

Page 1

LMI330_011403_F6
Online User’s Guide
Dual-Band Tri Mode PCS Phone
Model SPH-I330
Page 2

Important Information Regarding the Local Serial Connection
For the i330 to properly HotSync with another computer, it must be setup
to connect using the Local Serial option in the HotSync configuration
settings. If this option is not selected, the i330 will not connect to the
other computer. The cable that connects the two devices was designed to
connect to a USB connector, thus allowing easier installation. It does not
however use a USB connection to HotSync the two devices together. The
devices still use a Local Serial connection to transfer and receive data. To
properly configure this option, see "Perform a HotSync the First Time" on
page 150.
ii
Page 3

Welcome to Sprint
print built the largest all-PCS nationwide network with advanced
multimedia services and clear calls, reaching more than 230 million
S
people for clarity you can see and hear. We built our network to give you
what we believe you really want from a wireless phone, clear sound, private
conversations and time-saving features.
But with Sprint, you can do something even more far-reaching – simplify
your life. Our advanced technology is designed to grow with your
communications needs so that one day you'll be able to rely entirely on your
PCS Phone to stay connected.
This guide will familiarize you with our technology and with your new
PCS Phone through simple, easy-to-follow instructions. If you have already
reviewed the Start Here Guide, which was packaged with your new phone,
then you're ready to explore the advanced features outlined in this guide.
If you have not read your Start Here Guide, go to Section One - Getting
Started. This section provides all the information you need to quickly
activate your phone, set up your voicemail and much more. It also contains
information on how to contact Sprint should you have questions about
service, want to purchase additional products or services, or just to check
your account balance.
Thank you for choosing Sprint.
iii
Page 4

Introduction to this
T
Online User’s Guide
his Online User’s Guide introduces you to PCS Service and all the
features of your new phone. It’s divided into four sections:
䊳 Section 1: Getting Started
䊳 Section 2: Understanding Your Phone
䊳 Section 3: Using PCS Service Features
䊳 Section 4: Safety and Warranty Information
Throughout the guide, you'll find tips that highlight special shortcuts
and timely reminders to help you make the most of your new phone and
service. The Table of Contents and Index will help you locate specific
information quickly.
You'll get the most out of your phone if you read each section. However, if you'd
like to get right to a specific feature, simply turn to that page. Follow the
instructions in that section and you'll be ready to use your phone in no time.
Tip: You can print out this guide to keep on hand or view it online. If you're
viewing it online, simply click on a topic in the Table of Contents or on any
page reference within a section to go directly to that topic.
iv
Page 5

Table of Contents
SECTION 1: Getting Started ................. 9
Setting Up Service 10
Getting Started With PCS Service ..................................11
Setting Up Your Voicemail ............................................. 12
Getting Help ....................................................................12
SECTION 2: Understanding Your
Phone ....................................................14
Your PCS Phone: The Basics 15
Front View of Phone .......................................................16
Viewing the Display Screen ............................................ 19
Features of Your I330 .....................................................21
Turning Your Phone ON and OFF ................................22
Software Version ......................................................... 24
Using the Battery ............................................................24
Connecting the Cradle ................................................26
Displaying Your Phone Number ................................... 28
Making and Answering Calls .........................................28
Making Calls ............................................................... 28
One-Handed Dialing .................................................. 29
Answering Calls ........................................................... 29
Missed Call Notification ............................................. 30
Calling Emergency Numbers ..................................... 30
Using One/Two Touch Speed Dialing ....................... 30
Dialing Options ........................................................... 31
In-Call Options ........................................................... 31
End-of-Call Options .................................................... 33
Controlling Your Phone’s Settings 34
LMI330_103002_F3
Page 6

Adjusting the Phone’s Volume Settings ........................ 35
Ringer Types ................................................................... 35
Selecting Ringer Types for Voice Calls ...................... 35
Selecting Ringer Types for Messages ......................... 36
Selecting a Roam Ringer ........................................... 36
Selecting a Tone Length ................................................ 36
Alert Notification ............................................................37
Silent Mode ..................................................................... 37
Changing the Greeting .................................................. 37
Changing the Backlight Time Length .......................... 38
Changing the Display Screen ........................................ 38
Wake Up Feature ......................................................... 39
Setting Your Phone’s Security 40
Accessing the Security Menu .......................................... 41
Locking Your Phone ....................................................... 41
Unlocking Your Phone .................................................. 42
Changing the Lock Code ................................................42
Calling in Lock Mode ..................................................... 42
Using Special Numbers ..................................................43
Resetting Your Phone .....................................................43
Controlling Your Roaming Experience 44
Understanding Roaming ...............................................45
Setting Your Phone’s Roam Mode ................................46
Controlling Roaming Charges Using
Call Guard ....................................................................... 47
Application Menus and Entering Text 48
Application Launcher ................................................. 49
Application Categories ................................................49
Applications Display ...................................................51
Elements of the Application Screen ........................... 51
LMI330_103002_F3
Page 7

Menus ..........................................................................53
Online Help .................................................................53
Finding Records ..........................................................54
Sorting Records ........................................................... 54
Private Records ........................................................... 54
Attaching Notes ........................................................... 55
Choosing Fonts ........................................................... 56
Getting Application Information ............................... 57
Beaming Information ................................................ 57
Managing Call History 58
Viewing History ...............................................................59
Making a Call From Call History ...................................59
Saving a Phone Number From Call History ................. 60
Prepending a Phone Number From
Call History .....................................................................60
Erasing Call History ........................................................ 61
Using the Address Book..................................... 62
Creating an Address Book Entry ................................63
Address Details ............................................................65
Speed Dial ................................................................... 67
Voice Dial .................................................................... 68
Making Calls from the Address Book .........................69
Viewing Address Book Entries .................................... 70
Editing an Address Book Entry ..................................70
Looking up an Address Book Entry ........................... 71
Sorting the Address Book ............................................ 72
Beaming Address Book Entries .................................. 72
Address Book Menu Options ....................................... 73
Date Book 75
LMI330_103002_F3
Page 8

Scheduling Events ......................................................76
Scheduling Untimed Events ......................................78
Rescheduling an Event .............................................. 79
Setting an Alarm for an Event ................................... 80
Marking an Event As Private ......................................80
Changing the Date Book View ................................... 81
Scheduling Repeating Events .................................... 84
Date Book Menus ........................................................86
Using Your Phone’s Voice Services 88
Using Voice-Activated Dialing ....................................... 89
Recording Memos .......................................................... 91
Getting to Know the Handheld Computer ........93
What is a Handheld Computer ..................................94
Tapping and Typing ................................................... 95
Opening an Application ............................................. 96
Customizing your Handheld Computer .................... 97
Troubleshooting ......................................................... 99
Resetting Your Handheld ...........................................99
Entering Information into the Handheld
Computer 101
Using the On-Screen keyboard ................................102
®
Graffiti
Writing ......................................................103
Importing Data .........................................................110
Expense Manager 112
Creating Expense Items ........................................... 113
Changing the Expense Date ..................................... 114
Entering Receipt Details ...........................................115
Entering the Expense Type Automatically .............. 116
Expense List Display Options ................................... 117
LMI330_103002_F3
Page 9

Changing Currency and Symbol Display ................ 118
Importing Data into Microsoft Excel ...................... 119
Using Expense Report Templates ............................ 121
Expense Menus ......................................................... 123
Memo Pad........................................................... 124
Creating a New Memo .............................................. 125
Choosing a Memo Category ..................................... 126
Making a Memo Private ...........................................126
Reviewing or Editing Memos ................................... 127
Sorting Memos ..........................................................127
Deleting a Memo ......................................................128
Beaming a Memo .....................................................128
Memo Pad Menus .....................................................129
To Do List 130
Creating a To Do List Item ....................................... 131
Setting Priorities .......................................................132
Checking OFF To Do List Items ...............................133
Changing Priorities and Due Dates .........................133
Deleting a To Do List Item .......................................135
Displaying Completed and Due Items ..................... 135
To Do Menus .............................................................136
Calculator 137
Opening the Calculator ............................................ 138
Using the Calculator Buttons ................................... 138
Displaying Recent Calculations ...............................139
Managing Handheld Computer Software 141
Applications Launcher ............................................. 142
Installing Palm Applications ................................... 144
Deleting Handheld Computer Applications ............145
LMI330_103002_F3
Page 10

Checking Memory Usage ......................................... 146
Beaming Capabilities ...............................................146
HotSync
®
Operations ....................................... 149
HotSync Manager and Technology ......................... 150
Performing Your First HotSync Operation .............. 150
Creating a User Profile .............................................152
Performing a Local HotSync Operation .................. 153
Selecting HotSync Setup Options ............................. 153
Customizing the HotSync Operation .......................155
Performing a HotSync Operation via a Network .... 156
Using File Link .......................................................... 157
IR HotSync Operations ............................................. 158
Performing an IR HotSync operation ..................... 159
Changing the Phone Off Screen .............................. 160
Adding Custom Keypad Skins .................................. 161
SECTION 3: Using PCS Service
Features .............................................. 162
PCS Service Features: The Basics 163
Using Voicemail ...........................................................164
Setting Up Voicemail ................................................164
Knowing When You Have Messages ........................ 164
Message Types ...........................................................164
New Voicemail Message Alerts ................................. 165
Retrieving Your Voicemail Messages ....................... 165
Clearing the Voicemail Message Icon ..................... 166
Using Caller ID ............................................................. 166
Responding to Call Waiting ......................................... 167
Three-Way Calling ....................................................167
Forwarding Your Calls ..............................................168
LMI330_103002_F3
Page 11

PCS VisionSM....................................................... 169
Browsing the Web on Your Phone ............................... 170
Launching the Web ..................................................170
Your User Name ........................................................170
Net Guard ..................................................................171
Browsing the Web .....................................................171
PCS Business Connection
SM
Personal Edition ...........................................................174
PCS Vision FAQs ............................................................ 175
SM
PCS Voice Command
177
Getting Started With PCS Voice Command ................178
Creating Your Own Address Book ................................ 178
Making a Call With PCS Voice Command ..................179
Accessing Information Using
PCS Voice Command ...................................................179
SECTION 4: Safety Guidelines and
Warranty Information ....................... 180
Safety 181
Getting the Most Out of Your Reception ..................... 182
Maintaining Safe Use of and Access to
Your Phone ................................................................... 183
Caring for the Battery ................................................... 186
Acknowledging Special Precautions and the
FCC Notice .....................................................................187
Owner’s Record .............................................................189
User Guide Proprietary Notice .....................................189
Manufacturer’s Warranty ................................ 190
Manufacturer’s Warranty .............................................191
LMI330_103002_F3
Page 12

LMI330_103002_F3
Page 13

Section 1
Getting Started
Section 1
Getting Started 9
Page 14

1A
T
Setting Up Service
In This Section
䊳 Getting Started With PCS Service
䊳 Setting Up Voicemail
䊳 Getting Help
his section walks you through the basics of setting up service for
your PCS Phone, including unlocking and activating your phone,
setting up your voicemail and how to contact Sprint for assistance with
your PCS Service.
Section 1: Getting Started
1A: Setting Up Service 10
Page 15

Getting Started With PCS Service
Determine If Your Phone Is Already Activated
If you received your phone in the mail or purchased it at a Sprint Store, it
probably has been activated. All you need to do is unlock your phone.
If your phone is not activated, please refer to the Start Here Guide
included with your phone.
Unlocking Your Phone
Follow these steps to unlock your phone:
1. Press and hold to turn the phone on.
2. The System Lockout screen is displayed.
3. Enter your four-digit lock code using the on screen keyboard or
Graffiti writing area.
Tip: If you can’t recall your lock code, try using the last four digits of either
your Social Security number or PCS Phone Number or try 0000. If none of
these work, call PCS Customer Solutions at 1-888-211-4PCS (4727).
Activating Your Phone
To activate your phone, follow the directions in the Start Here Guide that
was included with your phone. Or visit
activate your phone online.
http://activate.sprintpcs.com and
Section 1: Getting Started
1A: Setting Up Service 11
Page 16

Setting Up Your Voicemail
All unanswered calls to your PCS Phone are automatically transferred to
voicemail, even if your phone is in use or turned off. Therefore, you will
want to set up your voicemail and personal greeting as soon as your
PCS Phone is activated.
To set up voicemail:
1. From the Phone main menu, tap .
2. Select Messages and tap Voicemail.
3. The Voicemail screen is displayed.
4. Tap the Listen button.
5. Follow the message prompts to setup your voicemail.
Or:
1. Press and hold to connect to voicemail.
Note: The voicemail setup process may vary in certain Affilitate areas.
Getting Help
Visit Our Web Site
Stop by www.sprintpcs.com to get up-to-date information on PCS
Services, options and more.
You can also:
䊳 Review coverage maps
䊳 Learn how to use voicemail
䊳 Access your account information
䊳 Purchase accessories
䊳 Add additional options to your service plan
䊳 Check out frequently asked questions
䊳 And more
Section 1: Getting Started
1A: Setting Up Service 12
Page 17
PCS Customer Solutions
Claire, your virtual service representative is also available to assist you
24 hours a day, seven days a week. Visit her at www.sprintpcs.com by
logging on and clicking on Claire’s Directory for Service Solutions.
Receiving Automated Invoicing Information
For your convenience, your phone gives you free access to invoicing
information on your PCS Account. This information includes balance
due, payment received, invoicing cycle and the amount of minutes used
since your last invoicing cycle. Follow these steps to access this
information:
䊳 Press .
Note: This service may not be available in all Affiliate markets.
PCS Directory Assistance
PCS Directory Assistance provides a variety of services, including
residential, business and government listings; assistance with local or
long-distance calls; movie listings; hotel, restaurant and shopping
information and major local event information. There is a per call
charge and you will be billed for airtime.
䊳 Press .
PCS Operator Services
PCS Operator Services can provide assistance in placing collect calls or
calls billed to a local telephone calling card or a third party.
䊳 Press .
For more information or to see the latest in products and services, visit us
online at
Note: PCS Operator Services may not be available in all
Affiliate markets.
www.sprintpcs.com.
Section 1: Getting Started
1A: Setting Up Service 13
Page 18

Section 2
Understanding Your
Phone
Section 2
Understanding Your Phone 14
Page 19

Section 2A
Y
Your PCS Phone: The Basics
In This Section
䊳 Front View of Phone
䊳 Viewing the Display Screen
䊳 Features of Your Phone
䊳 Turning Your Phone On and Off
䊳 Using the Battery and Charger
䊳 Displaying Your Phone Number
䊳 Making and Answering Calls
our PCS Phone is packed with features that simplify your life and
expand your ability to stay connected to the people and information
that are important to you. This section will guide you through the basics of
your phone and you’ll be on your way to using it in no time.
Section 2: Understanding Your Phone
2A: Your PCS Phone - The Basics 15
Page 20
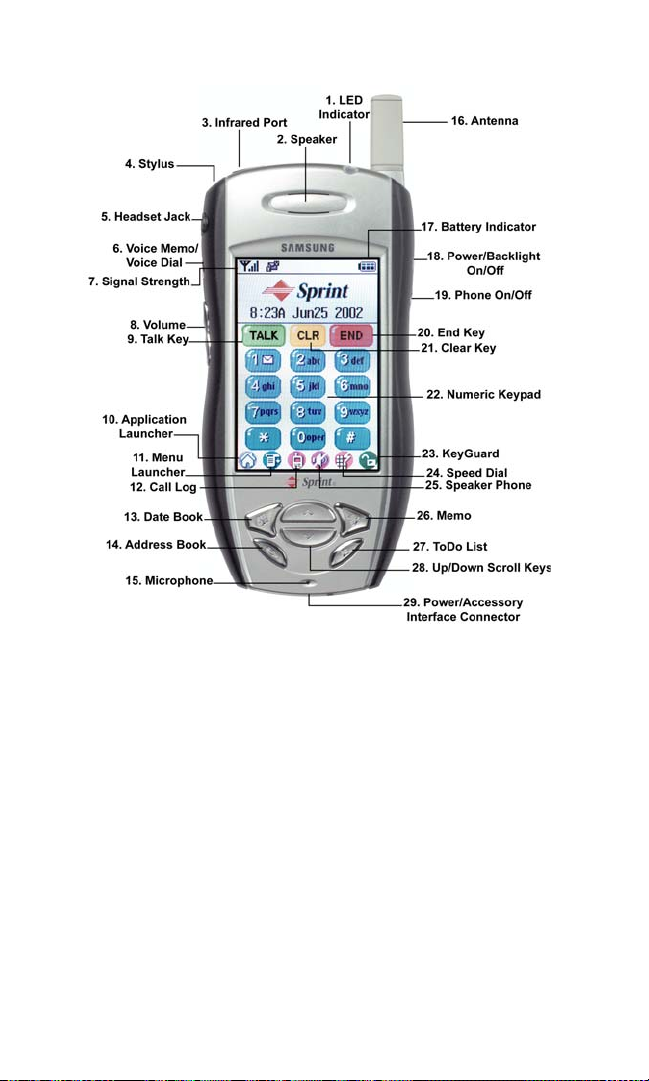
Front View of Phone
Section 2: Understanding Your Phone
2A: Your PCS Phone - The Basics 16
Page 21

1. LED Indicator: The LED is used while charging the battery. For more
information, see "Charging the Battery" on page 25.
2. Speaker: The speaker allows you to hear the other caller and the
different ring tones and sounds offered by your phone.
3. Infrared Port: This option allows the handheld computer to accept
information from another IR device through the use of beaming.
4. Stylus: The stylus acts like a mouse to navigate the PCS Phone. Use it
to touch the screen to select the desired function.
5. Headset Jack: (located in the upper left side of the phone above the
Voice Memo key.) Allows you to plug in an optional headset for safe,
convenient hands-free conversations.
6. Voice Memo: Record a personal memo on the PCS Phone. Up to 15
memos can be stored on the phone.
7. Signal Strength Indicator: This icon represents the signal strength by
displaying bars. The more bars displayed, the better the signal
strength.
8. Volume Up/Down Key: Adjust the ringer volume in standby mode.
Adjust the voice volume during a call. In a menu, scroll up or down to
navigate through the menu options. Volume Keys also mute the ringer
during an incoming call.
9. TALK Key: Place or receive a call. In standby mode, tap the key once to
display the Outgoing call log. If you tap and hold the key down you
will initiate Voice Dial.
10. Application Launcher: The Application Launcher displays the icons
of the applications loaded on your phone.
11. Menu Launcher: The Menu Launcher displays the menu options
associated with the screen that is displayed on the phone.
12. Call Log: Displays the last 20 entries of outgoing, incoming, and
missed calls.
13. Date Book: Automatically launches the Date Book and allows you to
schedule an event.
Section 2: Understanding Your Phone
2A: Your PCS Phone - The Basics 17
Page 22

14. Address Book: Automatically launches the Address Book and allows
you to save names, addresses, phone numbers, e-mail addresses, and
other information about your personal or business contacts.
15. Microphone: The Microphone allows the other caller to hear you
clearly when you are speaking to them.
16. Antenna: The antenna allows you to send and receive calls and
information while using your phone.
17. Battery Indicator: The battery indicator displays the amount of
remaining battery charge left in your phone. When the battery icon is
solid, the phone’s battery is fully charged. When it is clear, the phone’s
battery is completely discharged.
18. Power/Backlight On/Off: This option allows you to turn the screen
backlight Off. It will also turn off the screen if pressed once and then
released.
19. Phone On/Off: Press and hold the button for more than two seconds
to turn the phone On or Off. Press once and release to automatically
display the phone screen.
20. END Key: Tap this button to end a call.
21. CLR Key: Tap the clear key once to delete the last number or tap and
hold to delete all the numbers.
22. Numeric Keypad: Use these keys to enter numbers, letters, and
characters.
23. Keyguard: Activates or deactivates the keyguard option. This keeps
any keys from being pressed accidentally. During a call, this icon
changes to the Mute function.
24. Speed Dial: Tap this icon to gain instant access to the Speed Dial
screen.
25. Speaker Phone Key: This key allows you to turn the speaker phone
On or Off during a conversation.
26. Memo: Automatically launches the Memo Pad application to allow
you to create a quick note.
27. ToDo List: Automatically launches the ToDo List application and
allows you to enter or check off an item from the list.
Section 2: Understanding Your Phone
2A: Your PCS Phone - The Basics 18
Page 23

28. Up/Down Arrows: Allows you to scroll up or down or navigate
through different applications.
29. Power /Accessory Interface Connector: This connector is used to
connect power or any available accessory cable to your phone.
Viewing the Display Screen
Main LCD
This list identifies the symbols you’ll see on your main LCD screen.
Displays your current signal strength.The more lines you
have, the stronger your signal.
Means your phone cannot find a signal.
Tells you a call is in progress.
Indicates you are “roaming” off the PCS
Nationwide Network.
Indicates you have voicemail, text, numeric pages, or PCS
Web Alert messages waiting. Tap and select “Messages”
to view pending voicemail and text messages or tap and hold
to dial voicemail box.
Indicates that 3G functionality is active.
Indicates that 3G functionality is dormant or inactive.
Indicates that you are receiving information.
Indicates that you are sending information.
Indicates your phone is in vibrate mode.
Shows your current battery charge strength. (Icon shown
fully charged.)
Indicates that position location is active.
Indicates that position location is inactive.
Indicates that TTY option is On.
Launches the handheld computer application screen. Tap this
to exit any screen and return to the main screen.
Launches the menu bar associated with each screen being
displayed. Tap the Menu Launcher to display a drop down list
of the available options.
Section 2: Understanding Your Phone
2A: Your PCS Phone - The Basics 19
Page 24
Launches the call history application screen. You can see
missed, incoming, or outgoing call logs.
Activates the speaker phone option during a call. Cannot be
activated unless connected to another caller.
Tap this icon to gain instant access to the Speed Dial screen.
Activates or deactivates the key lock option. This keeps any keys
from being pressed accidentally.
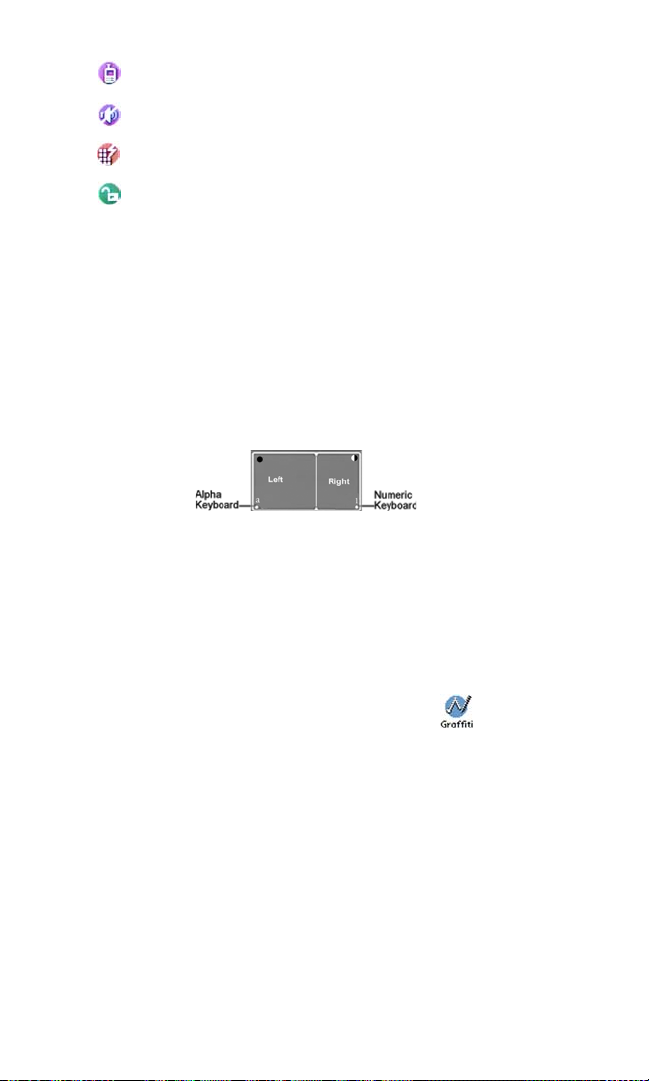
Entering Data in the Graffiti Writing Area of your Phone
Using the On-screen Keyboard:
1. Open an application that requires data entry.
2. Tap “a” for alpha, or “1” for a numeric keyboard in the graffiti area.
3. The on-screen keyboard is displayed. Use the stylus to tap the desired
keys.
4. Tap Done when finished.
Graffiti Writing
Graffiti is the method used to enter characters and symbols into the
handheld computer. Use the stylus in the Graffiti writing area to enter
characters on the display. To create letters, use the left side. For numbers,
use the right side.
To learn more about Graffiti, and practice entering characters:
1. From the applications screen, tap the Graffiti Icon .
2. Follow the instructions on the screen.
3. When finished, tap Done.
Section 2: Understanding Your Phone
2A: Your PCS Phone - The Basics 20
Page 25

Using the Applications Launcher
The Application Launcher displays the icons of the applications loaded
on your handheld computer. Any application can be started by going to
the Application Launcher. Simply tap the Application Launcher icon
and the main menu is displayed.
Features of Your I330
Congratulations on the purchase of your PCS Phone (SPH-I330). This
phone is lightweight, easy-to-use, reliable and offers many significant
features and service options:
䊳 Tri-Mode capability provides access to other PCS digital and analog
networks where Sprint has implemented roaming agreements (page
45).
䊳 A Complete Palm Powered™ color screen.
䊳 Software included in this package helps you stay organized and up-
to-date by synchronizing the Palm
List and Memo Pad with the Microsoft
Contacts, Tasks, and Notes folders.
䊳 Sprint Vision™.
䊳 160x240 pixel full color graphic LCD display.
䊳 Polyphonic ringers for enhanced more realistic and rich sounding
ringers.
䊳 GPS position location enabled.
䊳 The Blazer browser can access most internet sites in full HTML color.
䊳 PCS Vision
䊳 PCS Voice Command
SM
provides access to the wireless Internet in digital mode.
SM
lets you dial phone numbers by speaking
someone’s name.
䊳 The date book allows you schedule important events.
䊳 Each phone book entry can store up to five phone numbers.
TM
Date Book, Address Book, To Do
R
OutlookR default Calendar,
Section 2: Understanding Your Phone
2A: Your PCS Phone - The Basics 21
Page 26

Turning Your Phone ON and OFF
Turning Your Phone ON
Press for a few seconds. The phone will display “Powering On” until
it locates a signal, then it will automatically enter Standby mode — the
phone’s idle state. At this point, you’re ready to begin making and
receiving calls.
If your phone is unable to find a signal after 15 minutes of searching, a
Power Save feature is automatically activated. When a signal is found,
your phone automatically returns to Standby mode.
In Power Save mode, your phone searches for a signal periodically
without your intervention. You can also initiate a search for
PCS Service by pressing any key (when your phone is turned ON).
Tip : The Power Save feature helps to conserve your battery power when
you are in an area where there is no signal.
Turning Your Phone OFF
Press for a few seconds until you see the powering down animation
on the display screen.
Your screen remains blank while your phone is off (unless the battery
is charging).
Adjusting the Brightness & Contrast
To adjust the brightness from the PDA menu, tap the brightness icon
1.
located in the upper left corner of the alpha Graffiti writing
area.
2. Use the slider to adjust the desired brightness level. Tap Done to save
and exit.
22
Page 27
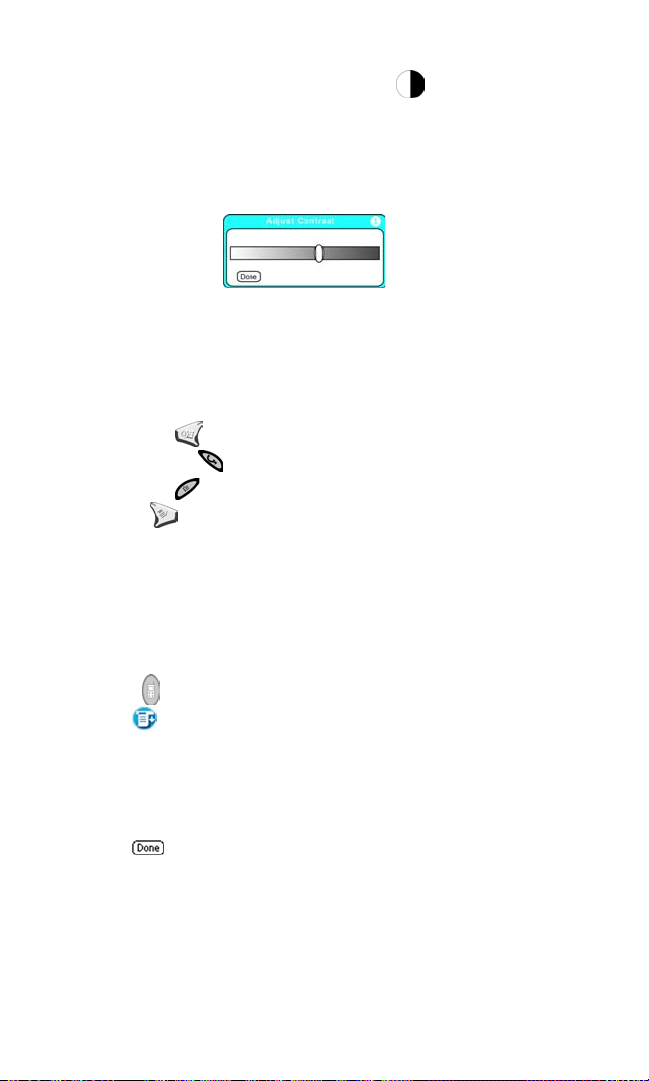
Adjusting the Contrast
To adjust the contrast, tap the contrast icon located in the
1.
upper right corner of the numeric Graffiti writing area.
2. Use the slider to adjust the desired contrast level. Tap Done to save
and exit.
Application Buttons
The four buttons located on the bottom of your phone under the LCD
screen are called Application Buttons. By default, the following
applications are launched when they are pressed:
䊳 Date Book .
䊳 Address Book .
䊳 To Do List .
䊳 Memo .
Phone Application Buttons
The four application buttons can also be programmed to launch special
phone related applications when you are in the phone main menu.
These buttons will act normally if you are in the application main menu.
To modify the applications associated with the buttons:
1. Press to view the phone main menu.
2. Tap and select Options and then Preferences.
3. Tap the drop down arrow in the upper right corner and select
Buttons.
4. Tap the drop down arrow next to each icon and select the desired
application to associate with each one.
5. Tap when finished to save and exit.
Scroll Buttons
The Up/Down buttons located between the application buttons allows
you to scroll up or down on the screen.
Section 2: Understanding Your Phone
2A: Your PCS Phone - The Basics 23
Page 28

Software Version
The hardware and software version of the phone can be accessed by
displaying the Version dialog box.
To Display the Version dialog box
1.
From the phone menu, tap the Menu Launcher icon.
2. Select the Options menu and tap Version.
Using the Battery
Battery Capacity
Your PCS Phone is equipped with a Lithium Ion (LiIon) battery. It allows
you to recharge your battery before it is fully drained. The battery
provides approximately 2.5 hours of continuous digital talk time
(1 hour in analog) or approximately 96 hours of continuous digital
standby time (14 hours in analog).
When the battery reaches 5% of its capacity, the battery icon blinks. When
there are approximately two minutes of talk time left, the phone sounds
an audible alert every 30 seconds and then powers down.
Note: Long backlight settings, searching for service, vibrate mode and
browser use affect the battery’s talk and standby times.
Tip: Be sure to charge your phone’s battery and watch your indicator to
ensure your levels are okay.
Installing the Battery
Your PCS Phone comes with a LiIon battery. Follow these steps to
install it:
1. Place the battery on the back of the phone, making sure that the
plastic tabs are aligned with the corresponding holes in the phone.
2. Gently push the battery down until it snaps into place.
Removing the Battery
To remove your battery for charging or for another reason, follow these
easy steps:
Section 2: Understanding Your Phone
2A: Your PCS Phone - The Basics 24
Page 29
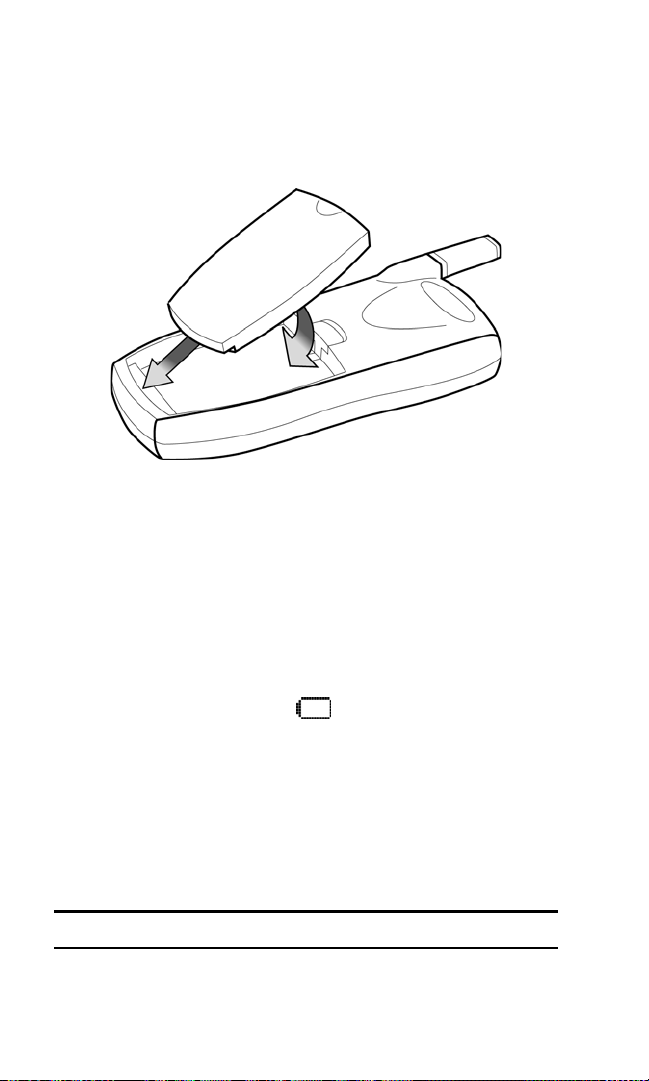
1. Make sure the power is off so that you don’t lose any stored numbers
or messages.
2. Push the battery release latch up and pull the battery away from the
phone at a 45 degree angle.
Charging the Battery
Your PCS Phone comes with a rechargeable battery. You should charge
the battery as soon as possible so you can begin using your phone.
Keeping track of your battery’s charge is important. If your battery level
becomes too low, your phone automatically turns off and you’ll lose
everything you were just working on. For a quick check of your phone’s
battery level, glance at the battery charge indicator located in the upperright corner of your phone’s display screen. If the battery charge is
getting too low, the battery icon ( ) blinks and t he phone sounds a
warning tone.
There is also an internal backup battery that saves all the settings in the
phone when the regular battery is discharged. An internal backup battery
needs to be charged initially for 24 hours. To make sure the internal
battery is charged, do not disconnect the main battery from the phone for
24 hours.
Note: The internal battery will maintain data for 15 hours.
Section 2: Understanding Your Phone
2A: Your PCS Phone - The Basics 25
Page 30

Always use a Sprint-approved desktop charger, travel adapter or vehicle
power adapter to charge your battery.
Warning! Using the wrong battery charger could cause damage to your
phone and void the warranty.
It is vital that you use only the PCS-approved desktop charger specifically
designed for your phone. Use of unauthorized accessories could damage
your phone and invalidate your warranty.
To use the desktop charger provided with your phone:
1. Plug the adapter in the wall and set the phone in the cradle.
䊳 A red light on the charger lets you know the battery is charging.
䊳 A green light lets you know that the battery is at least 90 percent
charged.
䊳 A yellow light indicates that the battery is operating at a
temperature that is too high or low, or that the charger is not
plugged in correctly. Please check the charger and the battery.
It takes about 4 hours to fully recharge a completely rundown battery.
Connecting the Cradle
Your package includes a cradle for charging the battery and
synchronizing the Sprint PCS Phone™ with a desktop or laptop
computer. If you do not plan to synchronize the Sprint PCS Phone™
with a desktop computer, the cradle can be used as a battery charger only.
When the cradle is plugged into a wall outlet, the battery charger is fully
functional.
Note: Before you connect the i330 to the desktop/laptop computer, make
sure you install the i330 software drivers from the installation CD.
Connecting the Cradle to a Desktop Computer
Turn OFF the desktop computer.
1.
2. Connect the USB cable to the desktop computer.
Section 2: Understanding Your Phone
2A: Your PCS Phone - The Basics 26
Page 31
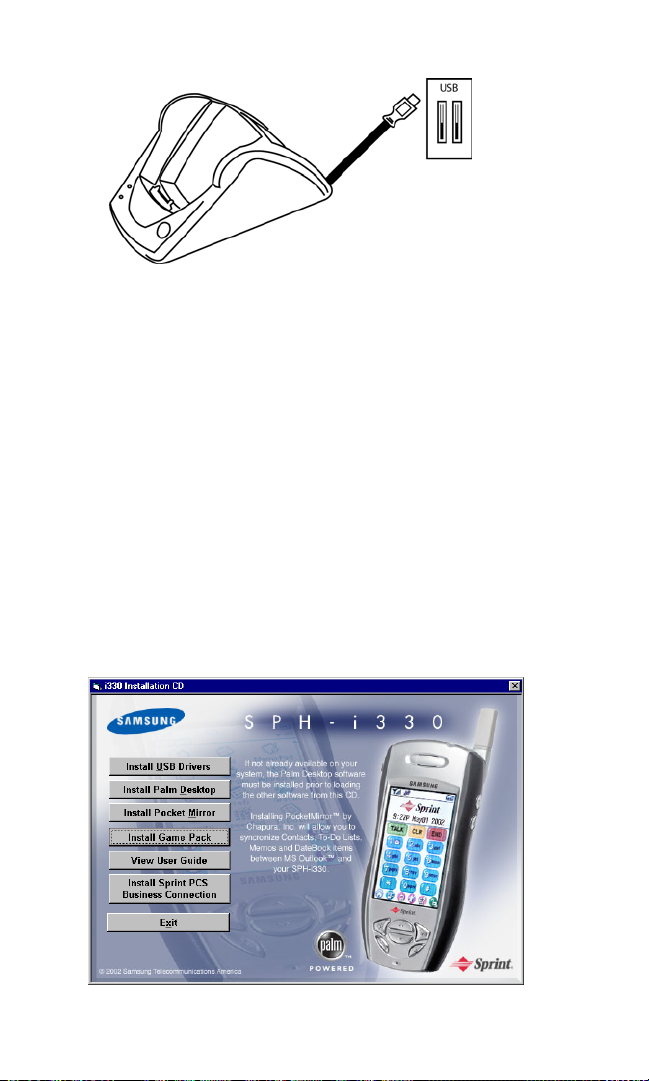
3. Turn the desktop computer back ON.
PC System Requirements for the Palm Desktop Software
To install and operate correctly, the Palm software must have the
following resources:
䊳 Windows® 95, 98, ME, NT, or XP
䊳 IBM-Compatible 486 or higher computer
䊳 8 MB of RAM minimum, 16 MB recommended
䊳 20 MB of disk space
䊳 VGA or better monitor
䊳 CD-ROM drive
䊳 Mouse
䊳 One available USB port
Installing the Palm Desktop Software
Insert the Palm Desktop CD into the desktop computer.
1.
Section 2: Understanding Your Phone
2A: Your PCS Phone - The Basics 27
Page 32

2. Click on the following buttons to install the software or to view the
User Guide:
䊳 Install USB Drivers
䊳 Install Palm Desktop
䊳 Install Pocket Mirror
䊳 Install Game Pack
䊳 View User Guide
䊳 Install Sprint PCS Business Connection
Note: If the Install application does not start, you can start it manually
through Windows Explorer.
3. Follow the instructions for each software installation.
Displaying Your Phone Number
Just in case you forget your phone number, your PCS Phone can
remind you.
To display your phone number:
1. From the phone main menu, tap and select Options.
2. Tap Preferences.
3. Tap the drop down arrow and select Display.
4. Tap My Phone Number to display.
Making and Answering Calls
Making Calls
Your PCS Phone offers many different ways to make calls, including
PCS Voice CommandSM (page 178), Speed Dialing (page 30) and using
Call History (page 58).
To make a call using your keypad:
1. Make sure your phone is on.
2. Enter a phone number. (If you make a mistake while dialing, tap
to erase one digit at a time. Tap and hold to erase the
entire number.)
Section 2: Understanding Your Phone
2A: Your PCS Phone - The Basics 28
Page 33

3. Tap . (To make calls when you are roaming and Call Guard is
enabled, tap to acknowledge roaming rates. (See "To Place
Roaming Calls With Call Guard On:" on page 47.)
4. When you’re finished, tap .
Tip: When making calls off the enhanced Sprint Nationwide PCS Network,
always dial using 11 digits (1 + area code + phone number).
One-Handed Dialing
One handed dialing allows you to make a call while using just one hand.
To make a call:
1. Press located on the side of the phone.
2. Press the Address book button .
3. Press the Up/Down Scroll keys to select the desired
address book entry.
4. Press to display the entry information and phone number.
5. Press the volume key up or down to highlight the desired
phone number.
6. Press to dial the number.
Answering Calls
1. Make sure your phone is on. If your phone is off, incoming calls go
to voicemail.
2. To answer an incoming call, tap . Depending on your settings,
your PCS Phone notifies you of incoming calls in the following ways:
䊳 The phone rings or vibrates.
䊳 The LED flashes.
䊳 The backlight illuminates.
䊳 The screen displays an incoming call message.
䊳 If available, the phone number of the caller is displayed.
䊳 If the phone number is in your Internal Phone Book, the Phone
Book entry’s name is displayed.
The following option is also displayed.
䊳 to Silence Ringer.
Section 2: Understanding Your Phone
2A: Your PCS Phone - The Basics 29
Page 34

Depending on your settings, you may also answer incoming calls simply
by opening the phone or by tapping any digit. (To answer a call when
you are roaming and Call Guard is enabled, you must tap to
answer the call. (See "To Place Roaming Calls With Call Guard On:" on
page 47.)
Note: If your phone is off, incoming calls go directly to voicemail.
3. To disconnect the call, tap .
Missed Call Notification
When an incoming call is not answered, the number of missed calls
along with the last caller’s phone number is displayed on the screen.
To display the Missed Call log to view the last 10 missed calls:
1. Tap the Call History icon on the phone main menu.
2. Tap the drop down arrow and select Missed.
Calling Emergency Numbers
You can place calls to 911 (dial and tap ), even
if your phone is locked or your account is restricted.
Using One/Two Touch Speed Dialing
With this feature, you can automatically call Speed Dial entries using
one key for locations 2-9 or two keys for locations 10-99.
To use One-Touch Dialing for Speed Dial locations 2-9:
䊳 Tap and hold the appropriate key for a few seconds. The display
confirms that the number has been dialed when it shows
“Connecting”.
Two-Touch Dialing for Speed Dial locations 10-99:
To use
1. Tap the first digit.
2. Tap and hold the second digit for a few seconds. The display confirms
that the number has been dialed when it shows “Connecting”.
Section 2: Understanding Your Phone
2A: Your PCS Phone - The Basics 30
Page 35

Dialing Options
Dialing options are displayed when you enter numbers using the keypad.
To select an option press
䊳 Ta lk is used to dial the phone number. (If you are roaming and have
the Call Guard feature activated, you must tap . See "To Place
Roaming Calls With Call Guard On:" on page 47.)
䊳 Hard Pause is used to insert a hard pause.
䊳 Time Pause to insert a 2-second pause.
䊳 DTMF (Dual Tone Multi Frequency) Tones: This option allows you
to transmit the DTMF tones of your phone. DTMF tones are used to
control electronic menus, such as voicemail or banking services.
䊳 Save to save the phone number in your Internal Phone Book.
Tip: To speed dial a phone number from the main menu, press and hold the
Internal Phone Book entry number. If the entry number is two digits, enter
the first digit, then press and hold the second digit.
In-Call Options
During a call, your phone can display other menu options in addition to
the main menu.
To select an option, tap during a call.
䊳 Record is used to record a caller. This is a good option for
remembering phone numbers, addresses, etc.
䊳 Mute or UnMute Select Mute to mute your phone’s microphone.
Unmute to reactivate the microphone.
Select
䊳 Deactivate Key Tones disables the keytones so they cannot be
heard by the other caller.
䊳 DTMF Tones transmits the tones to the electronic device requiring
the inputs.
䊳 Version displays the software & hardware version of the phone.
Record
The record option can be used to record a conversation. This is a good
option for remembering phone numbers, addresses, etc.
To record:
Section 2: Understanding Your Phone
2A: Your PCS Phone - The Basics 31
Page 36

1. Place a call to the desired party.
2. Tap to display the In Call menu.
3. Tap Record. You can record up to 60 seconds at a time. A total of 15
messages can be saved.
4. Press once to return to the phone main menu.
Note: Only press the button once, do not hold the button down or else
the phone will shut off.
Mute
Place a call to the desired party.
1.
2. Tap to display the In Call menu.
3. Tap Mute to mute your voice. Tap Un-Mute to un-mute your voice.
Tip: The keyguard icon changes to the mute icon during a call.
Deactivate Key Tones
This option disables the key tones when a key on the phone is tapped.
With the key tones on, the caller can hear you dial if you are performing
another function. An example would be if you wanted to save a phone
number while talking on the phone.
1. Place a call to the desired party.
2. Tap to display the In Call menu.
3. Tap Deactivate Key Tones.
DTMF Tone
This option allows you to transmit the DTMF tones of your phone. DTMF
tones are used to control electronic menus, such as voicemail or banking
services. To use the DTMF Tone option, you must already have some
DTMF Tones registered.
To register DTMF Numbers:
1. In the Phone main menu, tap .
2. Tap DTMF Tones from the Calls menu.
3. Tap the New button.
4. Enter the desired number and tap Done.
To use this option:
Section 2: Understanding Your Phone
2A: Your PCS Phone - The Basics 32
Page 37

1. Place a call to the desired party.
2. Tap to display the In Call menu.
3. Tap DTMF Tones.
4. Select the desired tone option from the list.
5. Tap one of the following:
䊳 Send - Sends the tones
䊳 Edit - Edits the tones
䊳 Delete - Deletes the tones from the list.
End-of-Call Options
After receiving or making a call the phone number and duration of the
call are displayed for 10 seconds. During that time you can save the
number to the address book.
To save the entry:
1. Before the duration screen stops flashing, tap .
The Address Book new entry screen is displayed. Enter all the desired
2.
information and tap Done.
Note: The End-of-Call options are not displayed for calls identified as
No ID or Restricted.
Section 2: Understanding Your Phone
2A: Your PCS Phone - The Basics 33
Page 38

Section 2B
Controlling Your Phone’s Settings
In This Section
䊳 Volume Settings
䊳 Ringer Types
䊳 Selecting Tone Length
䊳 Alert Notification
䊳 Silent Mode
䊳 Changing the Greeting
䊳 Changing the Backlight Settings
䊳 Changing the Display Screen
䊳 Screen Savers
䊳 Changing the Contrast
his section describes how you can change your phone’s settings to best
T
suit your requirements. Take a few moments to review these options and
add or adjust the settings that are right for you.
Section 2: Understanding Your Phone
2B: Controlling Your Phone’s Settings 34
Page 39

Adjusting the Phone’s Volume Settings
To adjust the ringer or key beep volume:
1. Tap from the phone main menu.
2. Select Options and tap Preferences.
3. Tap the drop down menu and select Sounds.
4. Tap the Vol ume button.
Tip: You can adjust the ringer volume in Standby mode or the earpiece
volume during a call by using the volume keys on the side of your phone.
Ringer Types
Ringer types help you identify incoming calls and messages. You can
assign ringer types to individual phone book entries, types of calls and
types of messages.
䊳 Ring Tones include a variety of standard ringer types.
䊳 Melodies includes a variety of standard musical melodies.
䊳 Vibrate alerts you to calls or messages without disturbing others.
Selecting Ringer Types for Voice Calls
Your PCS Phone provides a variety of ringer options which allow you to
customize your ring and volume settings.
Note: Ringers 1-3 are traditional type ringers
To select a ringer type for voice calls so you recognize when a certain type
of call is coming in by the ringer:
1. Tap from the phone main menu.
2. Select Options and tap Preferences.
3. Tap the drop down menu and select Sounds.
4. Tap the Ty p e box.
5. Tap the arrows to the left or right of the different ringer categories to
preview the ringers.
6. Tap Done when finished.
Section 2: Understanding Your Phone
2B: Controlling Your Phone’s Settings 35
Page 40

Selecting Ringer Types for Messages
To select a ringer type for messages:
1. Tap from the phone main menu.
2. Select Options and tap Preferences.
3. Tap the drop down menu and select Sounds.
4. Tap the Ty p e box.
5. Tap the arrows to the left or right of Voicemail, Page, or Tex t to
preview the ringers.
6. Tap Done when finished.
Selecting a Roam Ringer
To select a ringer type for incoming roaming calls:
1. Tap from the phone main menu.
2. Select Options and tap Preferences.
3. Tap the drop down menu and select Sounds.
4. Tap the Tone box.
5. Tap the down arrow next to Roam Ringer for the following choices:
䊳 Normal - If this option is selected, the ringer selected for “With
Caller Id” is played whenever a roaming call is received.
䊳 Distinctive - If this option is selected, a unique unassigned ringer is
played whenever a roaming call is received.
Selecting a Tone Length
Longer tone lengths may be better for tone recognitions when dialing
some voicemail or other automated systems.
To select a tone length:
1. Tap from the phone main menu.
2. Select Options and tap Preferences.
3. Tap the drop down menu and select Sounds.
4. Tap the Tone box.
5. Tap the drop down arrow next to Tone Length and select Short or
Long.
6. Tap Done when finished.
Section 2: Understanding Your Phone
2B: Controlling Your Phone’s Settings 36
Page 41

Alert Notification
To enable or disable alert sounds:
1. Tap from the phone main menu.
2. Select Options and tap Preferences.
3. Tap the drop down menu and select Sounds.
4. Tap the Tone box.
5. Tap the box next to each to enable or disable:
䊳 Minute Beep.
䊳 Service Area.
䊳 Connect Tone.
䊳 Disconnect Tone.
6. Tap Done when finished.
Silent Mode
There may be times when you need to silence your phone entirely. The
phone’s Silent Mode allows you to mute all sounds without turning your
phone off.
To change your phone’s Silent Mode:
1. Tap from the phone main menu.
2. Select Options and tap Preferences.
3. Tap the drop down menu and select Sounds.
4. Tap the Vol ume box.
5. Tap the OFF icon in the Ringer dialog box.
6. Tap Done when finished.
Note: To quickly set your phone to vibrate, use the volume buttons when in
idle mode on the phone main menu.
Changing the Greeting
The greeting can be up to 14 characters and is displayed on the first line
of your phone’s display screen in idle mode.
To change your greeting:
Section 2: Understanding Your Phone
2B: Controlling Your Phone’s Settings 37
Page 42

1. Tap from the phone main menu.
2. Select Options and tap Preferences.
3. Tap the drop down menu and select Display.
4. Tap Custom and enter the desired message.
5. Tap Done when finished.
Changing the Backlight Time Length
The backlight setting lets you select how long the display screen and
keypad are backlit after any key press is made. For more information
about setting additional preferences for the backlight, see "Setting other
Preferences" on page 98.
To change the backlight setting:
1. Tap to launch the applications menu.
2. Tap for Preferences.
3. Tap the drop down arrow and select General.
4. Tap the drop down arrow next to “Auto-off after” and select
30 seconds, 1 minute, 2 minutes, or 3 minutes.
Note: Long backlight settings affect the battery’s talk and standby times.
Changing the Display Screen
Your new PCS Phone has display screen options which gives your screen
a different look in standby mode. You can change the keypad and menu
display by accessing the display options in the phone preferences.
To display the available options:
1. Tap from the phone main menu.
2. Select Options and tap Preferences.
3. Tap the drop down menu and select Display.
4. For the Greeting, select one of the following:
䊳 Logo - This option allows you to display the Sprint logo on the idle
screen.
䊳 My Phone Number - This option allows you to display your phone
number on the idle screen.
Section 2: Understanding Your Phone
2B: Controlling Your Phone’s Settings 38
Page 43

䊳 User Name - This option allows you to display your NAI User Name.
䊳 Custom - This option allows you to enter up to 17 characters to
display on the idle screen.
5. For the Keypad, select Bubble, Mint Chocolate, Almond, or
Custom Skin.
Note: Custom skins can be added using the HotSync option. To add a
custom skin, see.
6. Tap Done when finished.
Wake Up Feature
The Wake Up feature allows you to designate the buttons that will wake
the phone up after it has been idle with the screen turned off. This setting
keeps you from accidentally turning the phone on and discharging the
battery.
1. Tap to launch the applications menu.
2. Tap for Preferences.
3. Tap the drop down arrow and select Buttons.
4. Tap the Wake up button.
5. Tap the drop down arrow to select the following options:
䊳 Power Buttons - Only wakes up the phone by pressing or .
䊳 Power and Volume Buttons - Only wakes up the phone when you
press or , and at the same time.
䊳 All Except Scroll Buttons - Wakes up when any button is pressed
except and .
6. Tap Done to exit and save your selection.
Section 2: Understanding Your Phone
2B: Controlling Your Phone’s Settings 39
Page 44

Section 2C
Setting Your Phone’s Security
In This Section
䊳 Accessing the Security Menu
䊳 Locking Your Phone
䊳 Unlocking Your Phone
䊳 Using Special Numbers
䊳 Security Features for PCS Vision
y using the security setting on your PCS Phone, you receive peace of
mind without sacrificing flexibility. With several options available, you
B
can customize your phone to meet your personal needs.
SM
Section 2: Understanding Your Phone
2C: Setting Your Phone’s Security 40
Page 45

Accessing the Security Menu
You must enter your lock code to view the Security menu.
To access the Security menu:
1. Tap for Main Menu.
2. Select Options and tap Security.
3. Tap the Details button.
4. Enter your lock code and tap .
Note: The lock code can be unassigned to allow certain palm applications
to operate correctly that do not require passwords to be assigned. Without
a lock code assigned, you are not able to modify any security functions.
5. The security menu is displayed.
Tip: If you can’t recall your lock code, try using the last four digits of either
your Social Security number or PCS Phone Number or try 0000. If none of
these work, call PCS Customer Solutions at 1-888-211-4PCS (4727).
Locking Your Phone
When your phone is locked, you can only receive incoming calls or make
calls to 911, PCS Customer Solutions or special numbers. If the phone is
powered Off when it is Locked, it will still be locked when it is powered
back On. To regain normal functionality, you must enter the lock code.
To lock your phone:
1. Tap for Main Menu.
2. Select Options and tap Security.
3. Tap the Details button.
4. Enter your lock code.
5. Tap the drop down arrow next to phone and select Lock.
Section 2: Understanding Your Phone
2C: Setting Your Phone’s Security 41
Page 46

Unlocking Your Phone
To unlock your phone:
1. Enter your lock code and tap .
Changing the Lock Code
To change your lock code:
1. From the Security menu, tap the Assigned/Unassigned button.
2. Enter your existing lock code and tap OK.
3. Enter the new lock code and tap OK.
4. Verify the new lock code by re-entering your new lock code and tap
OK.
Calling in Lock Mode
You can place calls to 911 and to your special numbers when in
lock mode.
To place an outgoing call in lock mode:
䊳 To call an emergency number, special number or PCS Customer
Solutions, tap the Special Numbers button. Enter the phone number
and tap .
䊳 To place normal outgoing calls, tap to display the lock code
screen. Enter your lock code. Enter the desired phone number and
Tap .
Section 2: Understanding Your Phone
2C: Setting Your Phone’s Security 42
Page 47

Using Special Numbers
You can save up to three special numbers in addition to your Internal
Phone Book entries. You can make and receive calls from special numbers
even when your phone is locked.
Note: Performing a soft reset will not affect the Palm data, Address Book,
Date Book, To Do List, or Contacts.
To add or replace a special number:
1. From the Security menu, tap any of the three boxes under Special
Numbers
2. Enter the number using graffiti or the keypad.
3. Tap OK to Save.
Note: There are no Speed Dial options associated with special numbers.
.
Resetting Your Phone
Resetting the phone restores all the factory defaults, including the ringer
types and display settings.
To reset your phone:
1. From the Security menu, tap and enter your Password.
2. Tap .
3. The Phone Reset dialog box is displayed. Tap OK.
Section 2: Understanding Your Phone
2C: Setting Your Phone’s Security 43
Page 48

Section 2D
Controlling Your Roaming
Experience
In This Section
䊳 Understanding Roaming
䊳 Setting Your Phone’s Roam Mode
䊳 Controlling Roaming Charges Using Call Guard
oaming is the ability to make or receive calls while you’re off the
Sprint Nationwide PCS Network. Your new [dual band/tri-mode] PCS
R
Phone works anywhere on the Sprint Nationwide PCS Network and allows
you to roam on
U.S. where compatible wireless service is available.
This section explains how roaming works as well as special features that let
you manage your roaming experience.
[analog and digital] networks virtually anywhere in the
Section 2: Understanding Your Phone
2D: Controlling Your Roaming Experience 44
Page 49

Understanding Roaming
Recognizing Icons on the Display Screen
Your phone’s display screen always lets you know when you’re off the
Sprint Nationwide PCS Network and roaming. The following chart
indicates what you’ll see depending on where you’re using your phone.
Roaming Indicator
Sprint Nationwide PCS Network
Other Digital Networks
Tip: Remember, when you are using your phone off the Sprint Nationwide
PCS Network, always dial numbers using 11 digits (1 + area code +
number).
Note: You will pay a higher per-minute rate for roaming calls.
Roaming on Other Digital Networks
When you’re roaming on other digital networks, your call quality and
security will be similar to the quality you receive when making calls
while on the Sprint Nationwide PCS Network. You may not be able to
access certain calling features, such as PCS Vision.
Roaming on Analog Networks
When you roam on analog networks, you will experience a similar
quality provided by other analog carriers today. Although some calling
features, such as PCS Vision, will be unavailable, you can still make and
receive calls and access voicemail. You will experience a few differences:
䊳 You are more likely to experience static, cross-talk, fade-out and
dropped calls.
䊳 Some calling features which are standard on the enhanced Sprint
Nationwide PCS Network, such as call waiting, PCS Vision Products
and Services and direct international dialing, are unavailable.
Section 2: Understanding Your Phone
2D: Controlling Your Roaming Experience 45
Page 50

䊳 Though callers can leave voicemail messages while you are
roaming, you will not receive notification until you return to the
Sprint Nationwide PCS Network. While roaming, you should
periodically check your voicemail box for new messages by dialing
1+area code+your PCS Phone Number. Press when you hear
your greeting and enter your pass code at the prompt.
䊳 There are security and privacy risks (eavesdropping and cloning)
that exist with conventional analog services today.
䊳 Your battery needs recharging sooner when you use your phone for
analog roaming.
Note: If you’re on a call when you leave the Sprint Nationwide PCS
Network and enter an area where roaming is available (whether digital or
analog), your call is dropped. If your call is dropped in an area where you
think PCS Service is available, turn your phone off and on again to
reconnect to the Sprint Nationwide PCS Network.
Note: When using your phone in analog mode, the handset may feel warm.
This behavior is normal for analog operation.
Setting Your Phone’s Roam Mode
Your PCS Phone allows you to control your ability to roam. By using the
Roaming menu option, you determine which signals your phone
accepts.
Set Mode
To set the mode
1. From the phone main menu, tap the Menu Launcher icon .
2. Select Options and tap Preferences.
3. Tap the drop down arrow and select Roaming.
4. The Roaming Preferences screen is displayed with the following
options:
Service Mode
䊳 Automatic: This setting seeks PCS Service. When PCS Service is
unavailable, it searches for an alternative system.
Section 2: Understanding Your Phone
2D: Controlling Your Roaming Experience 46
Page 51

䊳 Sprint: This setting allows you to select the Sprint Nationwide
PCS Network only and prevents roaming on other networks.
䊳 Analog: This setting forces the phone to seek an analog roaming
system. The previous setting is restored the next time the phone is
turned on.
Call Guard
䊳 No: Call Guard is OFF
䊳 Ye s: Call Guard is ON.
Controlling Roaming Charges Using Call Guard
In addition to the roaming icon, Call Guard alerts you when roaming
charges apply. This feature makes it easy to manage your roaming
charges by reminding you when you make or receive roaming calls. It
also requires you to take additional steps before placing or answering a
roaming call. These additional steps are not required when you make or
receive calls while on the Sprint Nationwide PCS Network.
Note: Voice Dialing and Speed Dialing are not available when you are
roaming with Call Guard enabled.
To Place Roaming Calls With Call Guard On:
1.
From the main menu, dial the eleven-digit number. (You can also
initiate a call from the Internal Phone Book, Call History or (Sprint
PCS Web Messages) and tap .
2. A message is displayed indicating that roaming rate applies. Tap
to place the call.
To Answer Incoming Roaming Calls With Call Guard On:
Remember if the Call Guard feature is set to On, you need to take extra
steps to make and receive roaming calls even if you have selected the
Analog setting.
Section 2: Understanding Your Phone
2D: Controlling Your Roaming Experience 47
Page 52

Section 2E
T
Application Menus and Entering
Text
In This Section
䊳 Menu Navigation
䊳 Shortcuts
䊳 Viewing the Menus
䊳 Entering Characters by Tapping the Keypad
䊳 Entering Characters Using T9 Text Input
䊳 Entering Symbols and Numbers
his section is a road map to using your PCS Phone. Every function and
feature can be accessed through a menu. Take a few moments to learn
your way around. You’ll find that it makes your phone easier to use.
Section 2: Understanding Your Phone
2E: Navigating Through Menus 48
Page 53

Application Launcher
The Application Launcher displays the icons of the applications loaded
on your phone. If in the phone mode, the application icon is located in
the lower left hand corner.
Opening an Application
1.
Tap from the phone main menu.
2. Find the desired application icon on the screen. Use the scroll bar on
the right if needed.
Tip: You can also use the up or down scroll keys on the front of the Sprint
PCS Phone™ to scroll.
3. Using the stylus, tap the icon.
4. The application is started.
Tip: All work is automatically saved before the application is exited.
Application Categories
The applications are stored in categories. Your phone is defaulted with
the following:
䊳 Games
䊳 Main
䊳 Palm.net
䊳 Phone
䊳 System
䊳 Utilities
䊳 Wireless Web
䊳 Unfiled
䊳 Edit Categories
You can also create 6 custom application categories. Categories are a
good way of finding your applications quickly. When a specific category is
selected, only the application icons associated with that category are
displayed.
Section 2: Understanding Your Phone
2E: Navigating Through Menus 49
Page 54

Creating a New Category
1.
Tap from the phone main menu.
2. Tap the drop down arrow in the upper right corner.
3. Tap Edit Categories.
4. Tap the New button.
Note: You can also rename an existing category by tapping the “Rename”
button.
5. An Edit Categories pop up screen is displayed. Enter a name in the
space provided.
6. Tap OK.
7. The new category is automatically displayed in the list.
8. Tap OK to exit.
Deleting a Category
1.
Tap from the phone main menu.
2. Tap the drop down arrow in the upper right corner.
3. Tap Edit Categories.
4. Select the category that you want to delete.
5. Tap the Delete button.
6. The category is deleted and the list is automatically updated.
7. Tap OK to exit.
All the categories can be deleted by highlighting the category and tapping
the delete button. Make sure that the correct category is selected before
deleting. If a category is deleted that contains applications, the
applications are automatically assigned to Unfiled.
Section 2: Understanding Your Phone
2E: Navigating Through Menus 50
Page 55

Applications Display
The applications are by default displayed as icons. They can also be
displayed as list of application names with small or large icons. This
allows many different applications to be displayed on the screen at one
time.
Changing the View
1.
Tap from the phone main menu.
2. Tap the Menu Launcher .
3. The Application Launcher menu options are displayed.
4. Select Options and tap Preferences.
5. The Preferences screen is displayed. Tap the drop down arrow and
select List, Small Icon, or Large Icon.
6. Tap OK to exit and save changes.
7. The display is automatically changed to reflect the new setting.
Elements of the Application Screen
Element Description
Menu Bar A set of menu options that are specific to the
application. Not all applications have a menu
bar.
Command Buttons Command buttons allow you to navigate a
screen. They are usually located at the bottom of
a screen or in dialog boxes.
Application Launcher. Tap this icon to display all
the applications loaded on the Sprint PCS
Phone™.
Section 2: Understanding Your Phone
2E: Navigating Through Menus 51
Page 56

Element Description
Menu Launcher. Tap this icon to display any
menu options associated with the screen
displayed on the Sprint PCS Phone™.
Calculator. Tap this icon to display a fully
functional calculator.
Find - Tap this icon to search for text located on
the Sprint PCS Phone™. Messages, Voicemail,
Addresses, Mail Messages, Memos, and To Do
Items are all searched.
Graffiti Writing Area Use this area to enter text using Graffiti writing.
Check Box When there is a check mark in a check box next to
an option, the option is turned ON. To turn the
option OFF, tap the check box. The check mark is
removed and the option is turned OFF.
Drop Down List An arrow pointing down designates a drop down
menu. Tap the arrow to display a list of options.
Scroll Bar Drag the slider up or down using the stylus. You
can also use the up or down buttons on the side of
the phone.
Section 2: Understanding Your Phone
2E: Navigating Through Menus 52
Page 57

Element Description
Next/Previous Arrows Tap the Up or Down arrows to display the previous
or next page. There may be left or right arrows.
They perform the same way. Tap the left for
previous and right for next page.
Command Bar The command bar displays a list of shortcuts that
can be used by activating the Command Bar.
Menus
The menus in the Sprint PCS Phone™ have been designed to help you
get the most from the applications installed. Menus and Menu
Commands vary depending on the application, but some items are
common throughout the phone. Menus are displayed using the Menu
Launcher.
Menu Launcher
Tip: For additional Menu Commands, open the application and tap the
Menu Launcher.
The Menu Launcher icon is responsible for launching any menus
associated with the application screen. When an application is started,
you cannot see the menu commands at the top of the screen like a
standard Windows application. To display the menu, you have to tap the
Menu Launcher.
Online Help
Throughout the menus, there is online help that explains what is
displayed on the screen. Help screens offer some guidance when the
screen is not familiar. Tap the “Help” button to display any helpful hints
about the specific screen being displayed.
53
Page 58

Finding Records
You can use the Find tool application to perform a text search of your
records. When the Find icon is tapped, a pop-up screen is displayed
that allows you to enter the text you want to find. The following
applications are searched:
䊳 Memos
䊳 Messages
䊳 Voice Memo
䊳 Addresses
䊳 Mail Messages
䊳 To Do Items
Sorting Records
You can sort records in several different ways. Sorting is available in
applications that display lists.
䊳 Address Book
䊳 To Do List
䊳 Memo Pad
䊳 Expense
Sorting preferences can usually be changed using the menu launcher in
each application.
Private Records
Records can be made private to avoid others from viewing them if your
phone is lost or stolen. Private records remain visible until you select the
hide option in the Security application. When this setting is turned ON,
all records marked private are either not visible or masked unless a
password is entered.
Marking a Record Private
1. In the application, do one of the following:
䊳 Create a new record and tap Edit, then tap Details.
䊳 Select an existing record, tap Edit and then tap Details.
2. Tap the Private check box.
3. Tap OK.
Section 2: Understanding Your Phone
2E: Navigating Through Menus 54
Page 59

Hiding Private Records
Once the record is marked as private, you can hide the record so that it is
not visible in the list. The record is replaced with a gray box designating
that a record exists, but is hidden. There are three different ways records
are used, they are:
䊳 Shown - These records are always displayed.
䊳 Hidden - Records marked private are hidden and require a password
to view. They are not displayed in the address book.
䊳 Masked - Records marked private are masked and require a
password to view. They are displayed in the address book as a shaded
entry.
To hide records:
1. Tap the Applications Launcher .
2. Tap the Security icon.
3. From the Current Privacy drop down list, select Hide Records. Tap
OK.
Displaying Private Records
1. Tap the Applications Launcher .
2. Tap the Security icon.
3. From the Current Privacy drop down list, tap Show Records. Tap
OK.
Tip: If you have assigned a password, you must enter the password before
the hidden records are displayed.
4. Enter your password and tap Show.
Attaching Notes
You can attach notes to records in most applications. A note can be
several characters.
Attaching a Note
1. Display the entry to which you want to attach a note.
Section 2: Understanding Your Phone
2E: Navigating Through Menus 55
Page 60

Note: In the address book, tap Edit.
2. Tap Details.
3. Tap Note.
4. Enter the desired text in the space provided.
5. Tap Done.
Reviewing a Note
1.
To review a note, tap the note icon.
Deleting a Note
1.
Tap the note icon.
2. Tap Delete.
3. Tap Yes to confirm the deletion of the note.
Choosing Fonts
You can change the font style in most applications. You can also choose a
different font style for each application. There are three different font
choices:
䊳 Small Font
䊳 Medium Font
䊳 Large Font
Changing the Font Style
1. Open the application.
2. Do one of the following depending on the application:
䊳 Tap the Menu Launcher icon. . Select Options and tap Font.
䊳 Tap the inverted tab at the top of the screen and select Options. Tap
Font.
䊳 In the text Graffiti area, drag a diagonal line from the lower left to
the upper right to display the command bar. In the text area, write an
“F”.
3. Tap the desired font style.
4. Tap OK.
Section 2: Understanding Your Phone
2E: Navigating Through Menus 56
Page 61

Getting Application Information
You can get information on any application by displaying the About box.
The about box displays the name and version number of the application.
To Display the About Box
1.
Tap the Menu Launcher icon.
2. Select the Options menu and tap About.
Note: The text that displays for the application is different depending on
the software manufacturer.
Beaming Information
Your phone is equipped with an IR (Infrared) port that is used to send
and receive information by beaming from one IR device to another. The
IR device is located at the top of the phone.
Section 2: Understanding Your Phone
2E: Navigating Through Menus 57
Page 62

Section 2F
T
Managing Call History
In This Section
䊳 Message Types
䊳 New Message Alerts
䊳 Message Options
he Call History helps you manage your time more effectively. It keeps
track of incoming calls, calls made from your PCS Phone and missed
calls. This section guides you through accessing and making the most of
your Call History.
Section 2: Understanding Your Phone
2F: Managing Call History 58
Page 63

Viewing History
You’ll find your Call History invaluable. It is a list of the last 20 phone
numbers or Internal Phone Book entries for calls you placed, accepted or
missed. Call History makes redialing a number fast and easy. It is
continually updated as new numbers are added to the beginning of the
list and the oldest entries are removed from the bottom of the list.
Each entry contains the phone number (if it is available) and Internal
Phone Book entry name (if the phone number is in your Internal Phone
Book). Duplicate calls (same number and type of call) may only appear
once on the list.
To view a Call History entry:
1. Tap from the phone main menu.
2. Tap the drop down arrow and select one of the following:
䊳 Outgoing Calls
䊳 Incoming Calls
䊳 Missed Calls
Making a Call From Call History
To place a call from Call History:
1. Tap from the phone main menu.
2. Tap the drop down arrow and select one of the following:
䊳 Outgoing Calls
䊳 Incoming Calls
䊳 Missed Calls
Select the desired entry from the list and tap Call.
3.
Note: You cannot make calls from Call History to entries identified as No
ID or Restricted.
Section 2: Understanding Your Phone
2F: Managing Call History 59
Page 64

Saving a Phone Number From Call History
The number of entries that can be saved in the phone depends on the
available memory. Your phone comes with 16Mb of memory. Phone
Book entries can store up to a total of five phone numbers and four
custom entries.
To save a phone number from Call History:
1. Tap from the phone main menu.
2. Tap the drop down arrow and select one of the following:
䊳 Outgoing Calls
䊳 Incoming Calls
䊳 Missed Calls
3.
Select the desired entry from the list and tap Save.
4. Tap Done when finished.
Note: You cannot save phone numbers already in your Internal Phone
Book or from calls identified as Private, Unknown, or Blocked ID.
Prepending a Phone Number From Call History
If you need to make a call from Call History and you happen to be
outside your local area code, you can add the appropriate prefix by
following these steps:
1. Tap from the phone main menu.
2. Tap the drop down arrow and select one of the following:
䊳 Outgoing Calls
䊳 Incoming Calls
䊳 Missed Calls
3.
Select the desired entry from the list and tap Prepend.
4. Enter the prefix if needed and tap Call.
Note: Prepending allows you to enter a series of numbers before the
actual phone number.
Section 2: Understanding Your Phone
2F: Managing Call History 60
Page 65

Erasing Call History
To erase Call History:
1. Tap from the phone main menu.
2. Tap the drop down arrow and select one of the following:
䊳 Outgoing Calls
䊳 Incoming Calls
䊳 Missed Calls
3.
Tap Delete All.
4. Tap Yes to confirm the deletion.
Section 2: Understanding Your Phone
2F: Managing Call History 61
Page 66

Section 2G
N
Using the Address Book
In This Section
䊳 Creating an Address Book Entry
䊳 Address Details
䊳 Speed Dial
䊳 Voice Dial
䊳 Making Calls from the Address Book
䊳 Editing and Viewing Address Book Entry
䊳 Beaming Address Book Entries
ow you know the basics that help make it easier to stay in touch with
people and information. This section helps you make the most of your
contacts and use your time more efficiently when you are trying to connect
with the important people in your life.
Section 2: Understanding Your Phone
2G: Using the Internal Phone Book 62
Page 67

The Address Book allows you to save names, addresses, phone numbers,
e-mail addresses, and other information about your personal or business
contacts.
You can store thousands of entries in the Address Book. Space is limited
only by the amount of available memory on the Sprint PCS Phone™.
You can use the Address Book to:
䊳 Make a phone call.
䊳 Enter up to five phone numbers, or e-mail addresses for each
contact. You can select which of these numbers is displayed in the
Address Book.
䊳 Attach a note to an Address Book entry.
䊳 Assign categories to the Address Book entries. This allows you to
quickly view or sort the entries.
䊳 Define the contacts to include in the Speed Dial and Voice Dial list.
Creating an Address Book Entry
An Address Book entry is the name, address, and phone information you
are keeping for a person or business. You can create these entries on your
phone, or you can use the Palm Desktop software to create entries on
your computer. These entries can then be downloaded into to your phone
during a HotSync operation. Palm Desktop software also has data import
capabilities that allows you load database files into the Address Book.
Creating a New Entry
1.
Choose one of the following options to launch the Address Book
application:
䊳 Press the button on the front of the phone to display the Address
Book.
Or:
䊳 Tap the Applications Launcher Icon . Tap the Address Book
icon.
2. Tap New.
3. Enter the Last name of the person in the space provided.
Section 2: Understanding Your Phone
2G: Using the Internal Phone Book 63
Page 68

Tip: You can enter the name with the stylus or on-screen keyboard. The
first letter is automatically capitalized.
4. Move to the next line by tapping on it.
5. Enter the first name of the person.
6. Enter the rest of the desired information in the spaces provided.
7. Use the drop down menus to select the proper label for the phone
numbers.
8. To attach a note to the entry, tap the Note button. Tap Done, when
finished.
9. Tap Done to save and exit.
Entering Pauses
If you are calling an automated system, you are required to enter a series
of numbers to gain access. These numbers can automatically be entered
as long as you allow the correct amount of time between the entries. To
solve this problem, you can add pauses to programmed numbers to
simulate your waiting and entering the numbers when they are required.
The pauses are entered into the Address Book entry and the number is
dialed just like any other.
There are two different types of pauses. They are:
䊳 Hard Pause (P) - When the number is called, the phone pauses and
waits at the hard pause. You must tap “Talk” when the next set of
programmed numbers is to be dialed. To enter a “P” for a hard
pause, tap and select Hard Pause.
䊳 Timed Pause (T) - When the number is called, the phone pauses for
two seconds before the next series of numbers are dialed. You can add
as many “T” pauses as necessary to get the correct length of pause.
To enter a “T” for a timed pause, tap and select Timed Pause.
Section 2: Understanding Your Phone
2G: Using the Internal Phone Book 64
Page 69

Address Details
When the Details button is tapped in an Address edit screen, a variety of
options is displayed. These options can be associated with the Address
Book entry.
The options available are:
䊳 Show in List
䊳 Category
䊳 Special Ringer
䊳 Private
To open the Address Entry screen:
1. From the Applications main menu, tap the Address Book icon. .
Tap the desired entry. The Address View screen is displayed.
2.
3. Tap the Edit button. The Edit screen is displayed.
4. Tap the Details button.
Show in List
You may have several different numbers, such as work, home, pager, fax,
e-mail, etc. To determine which one is displayed in the Address Book, you
use the “Show in List” feature. To display the correct number:
1. From the Applications main menu, tap the Address Book icon. .
Tap the desired entry. The Address View screen is displayed.
2.
3. Tap the Edit button. The Edit screen is displayed.
4. Tap the Details button.
5. Tap the drop down arrow from “Show in List” and select the desired
number. The choices are:
䊳 Work
䊳 Home
䊳 Fax
䊳 Other
䊳 E-mail
6. Tap OK to exit.
Section 2: Understanding Your Phone
2G: Using the Internal Phone Book 65
Page 70

Category
Categories can organize the Address Book entries into easy to find items.
By placing a name in a category, you can display addresses that are
similar without having to search through the rest of the files.
To assign a category:
1. From the Applications main menu, tap the Address Book icon. .
Tap the desired entry. The Address View screen is displayed.
2.
3. Tap the Edit button. The Edit screen is displayed.
4. Tap the Details button.
5. Tap the drop down arrow in Category and select the desired
category. If the desired category is not already created, use the Edit
Categories option.
6. Tap OK to exit.
Special Ringer
The special ringer option allows you to set a desired ringer for the
individual calling. When the person calls and is recognized in the
Address Book, your phone automatically identifies the caller and sounds
the special ringer instead of the normal ringer set for the phone.
To set the special ringer:
1. From the Applications main menu, tap the Address Book icon .
Tap the desired entry. The Address View screen is displayed.
2.
3. Tap the Edit button. The Edit screen is displayed.
4. Tap the Details button.
5. Tap the drop down arrow from Special Ringer and select the desired
ringer from the list. Each time a ringer is selected, the ringer plays.
Repeat this step until the desired ringer is found.
6. Tap OK to exit.
Private
You can mark an Address Book entry as private to avoid anyone seeing
the number. When the security features are turned ON, the entry is blank
or masked. You must enter a password to display them.
To make entries private:
Section 2: Understanding Your Phone
2G: Using the Internal Phone Book 66
Page 71

1. From the Applications main menu, tap the Address Book icon .
Tap the desired entry. The Address View screen is displayed.
2.
3. Tap the Edit button. The Edit screen is displayed.
4. Tap the Details button.
5. Tap the check box next to Private. A check mark is placed in the box.
This means that the option is activated.
6. Tap OK to exit.
Speed Dial
The Speed Dial option allows you to call people in the Address Book by
tapping one or two numbers. You can add up to 98 numbers to speed
dial. The Speed Dial feature is located in the Address details screen.
Note: Speed Dial numbers that are already assigned to other Address
Book entries are not displayed. They are automatically removed from the
list to avoid duplicate numbers.
To set Speed Dial:
1. From the Applications main menu, tap the Address Book icon. .
Tap the desired entry. The Address View screen is displayed.
2.
3. Tap the Edit button. The Edit screen is displayed.
4. Tap the Details button.
5. Tap the Set Speed Dial button.
6. The Set Speed Dial screen is displayed. Tap the drop down arrow and
select the desired number for Speed Dial.
7. Tap Done to exit.
Note: When you perform a HotSync operation, make sure you use the
default setting of “Handheld Overwrites Desktop” or else the Speed Dial
numbers will not be synchronized.
Section 2: Understanding Your Phone
2G: Using the Internal Phone Book 67
Page 72

Voice Dial
Voice dialing allows you to speak a name or other identifier into the
phone and have a number dialed from the Address Book. The recorded
name is associated with the Address Book entry. You can use the Voice
Dialing feature with 30 different Address Book entries.
To setup Voice Dialing:
1. From the Applications main menu, tap the Address Book icon .
Tap the desired entry. The Address View screen is displayed.
2.
3. Tap the Edit button. The Edit screen is displayed.
4. Tap the Details button.
5. Tap the Set Voice Dialing button.
6. The Set Voice Dialing screen is displayed. Tap the drop down menu
and select Record.
7. Speak the name or identifier into the phone after the prompt. Follow
the remaining instructions as they are given.
8. Tap Done to save. Notice that there is a Voice Dial icon next to the
drop down arrow. This indicates that the entry has Voice Dial
enabled.
9. Tap Done to exit.
Play or Erase Recorded Voice Names
1.
From the Applications main menu, tap the Address Book icon. .
Tap the desired entry. The Address View screen is displayed.
2.
3. Tap the Edit button. The Edit screen is displayed.
4. Tap the Details button.
5. Tap the Set Voice Dialing button.
6. To play the recorded name, tap the drop down arrow and select Play.
7. To erase the entry, tap the drop down arrow and select Erase.
8. Tap OK to confirm the deletion.
9. Tap Done to exit.
Tips on Recording Names
䊳 Avoid recording similar names. If the names are too similar, the
wrong name might be accessed.
Section 2: Understanding Your Phone
2G: Using the Internal Phone Book 68
Page 73

䊳 Avoid trying to record in a noisy area.
䊳 Speak clearly.
䊳 The person who uses the phone needs to record the name. The phone
will only recognize the voice of the person who recorded the entry
originally.
䊳 Avoid very long or short names. Names with two to five syllables are
recommended.
䊳 If there are problems with the voice dial entry connecting, the name
should be recorded again.
Making Calls from the Address Book
Once the Address Book entry is created, you can make a call from it
directly.
To make a call from the Address Book:
1. Choose one of the following options to open the Address Book:
䊳 Press on the front of the phone.
Or:
䊳 Tap the Applications Launcher on the display, then tap the
Address Book icon.
2. Locate the desired number in the Address Book and choose one of the
following:
䊳 Tap the number displayed in the right column. If more than one
number is displayed, tap the proper number, then tap the “Call”
button.
䊳 Tap the name in the left column, then tap the next to the
desired number.
Note: You can also use the volume buttons on the side of the phone to
scroll to the desired number. Press the Voice Memo button just above
the volume buttons to dial the selected number.
Section 2: Understanding Your Phone
2G: Using the Internal Phone Book 69
Page 74

Viewing Address Book Entries
1. Choose one of the following options to view Address Book entries:
䊳 Press on the front of the phone.
Or:
䊳 Tap the Applications Launcher on the display, then tap the
Address Book icon.
Or:
䊳 From the phone main menu, tap the Menu Launcher . Select
Calls, and tap Address.
2. If you have assigned categories to your address entries, you can view
the items by category. Tap the drop down arrow to display the
different categories.
3. Use the volume buttons on the side of the phone to scroll up or down
through the Address Book entries.
4. Once you find a desired entry, tap the desired name to view. The
Address View screen is displayed.
Note: Pressing the Address Book button on the front of your phone
repeatedly, cycles through the different assigned categories.
5. Tap Edit to change the information or Done to return to the Address
list.
Editing an Address Book Entry
At some point the information that is saved in your Address Book may
need to be changed. The information can be updated at anytime by
tapping the “Edit” button in the Address View screen. Information can
also be added using the “Edit” button.
To update or add new information:
1. Open the Address Book and tap on the desired entry.
2. The Address View screen is displayed for the entry.
3. Tap the Edit button. The Address Edit screen is displayed.
4. Using the stylus, tap the text in the line to add or change the
information. Using the Graffiti area or on-screen keyboard, change
the desired information.
Section 2: Understanding Your Phone
2G: Using the Internal Phone Book 70
Page 75

5. Tap the Details button to change the following options:
䊳 Show in List
䊳 Category
䊳 Special Ringer
䊳 Private
䊳 Set Speed Dial
䊳 Set Voice Dial
6. Tap Note to add a note to the entry.
7. Tap Done to exit.
Deleting an Entry
1. In the Address List, tap the desired entry to delete. (Tap the name, not
the number column).
2. Tap Edit to display the Address Edit screen.
3. Tap Details.
4. Tap Delete.
5. Tap OK to confirm deletion.
6. The entry is removed from the Address Book.
Looking up an Address Book Entry
You can locate addresses quickly by using the Look Up line in the Address
Book.
To Look Up an Address
Tip: Entries can be sorted by name or company. You must type the correct
info on the “Look Up” line based on the way you have chosen to sort the
entries.
1. In the Address List screen, enter the first letter of the name or
company you want on the
Look Up line using Graffiti text or the on-
screen keyboard.
2. The list automatically scrolls to the section of the Address Book that
begins with the letter entered.
3. Tap the Address Book entry to view the name.
Section 2: Understanding Your Phone
2G: Using the Internal Phone Book 71
Page 76

Sorting the Address Book
Entries can be sorted in the Address Book by company and last name,
instead of by last name and first name. These settings do not modify the
data stored in the Address Book, it just sorts the information differently.
Sorting the Address Book Entries
1.
In the Address List screen, tap the Menu Launcher
icon.
2. Select Options and tap Preferences.
3. In the List By field, tap the desired option.
4. Tap OK.
Beaming Address Book Entries
Using the Infrared (IR) port, you can exchange Address Book entries to
other mobile devices. Once the Beam Receive feature is activated, you can
beam any of the following:
䊳 Business Card - The business card is a specially designated entry
containing information you normally exchange with business
contacts. Your business card can be sent quickly using one-touch
beaming.
䊳 Address Entry -You can select any entry in the Address Book and
beam it to another IR mobile device.
䊳 Category of Address Entries - You can beam all entries in an
Address Book category to another IR mobile device.
Creating a Business Card
1. In the Address List, tap “New”
2. Enter all the necessary business information in the spaces provided.
3. Tap the Menu Launcher icon .
Select Record and tap Select Business Card to designate this entry
4.
as your business card.
5. Tap Yes to confirm.
6. Tap Done to exit. Notice that there is a new icon displayed next to the
entry that identifies this record as your business card.
Section 2: Understanding Your Phone
2G: Using the Internal Phone Book 72
Page 77

Beaming a Business Card
1.
In the Address List, tap the business card entry. The Address View
screen is displayed.
Note: You can also press and hold the Address Book button on the front of
your phone for about two seconds to beam your business card.
2. Tap the menu Launcher icon .
3. Select Record and tap Beam Business Card.
Beaming the Current Entry
1.
In the Address List, tap the desired entry.
2. Tap the menu Launcher icon .
3. Select Record and tap Beam Address.
Beaming the Current Category
1.
In the Address List, tap the drop down arrow and select the desired
category.
2. Tap the menu Launcher icon .
3. Select Record and tap “Beam Category”.
Address Book Menu Options
There are different menu options associated with the Address Book. These
menu choices may vary depending on which screen is open. To view the
options, tap the Menu Launcher
icon .
The menu choices available are:
䊳 Records Menu
䊳 Options Menu
Record Menu
The following choices are available in the Records menu.
䊳 Duplicate Address - Copies the current Address Book entry and
creates a new Address Book entry for speed when entering multiple
contacts with the same information.
䊳 Beam Category - Beams the entire Address Book category.
䊳 Beam Business Card - Beams the business card to another user.
Section 2: Understanding Your Phone
2G: Using the Internal Phone Book 73
Page 78

Options Menu
The following choices are available in the “Options” menu:
䊳 Font - Selects a different font size for the address book entries.
䊳 Preferences - Configures the way the Address Book displays
information. The sort can be designated one of two ways. Also
contains the “Remember Last Category” feature. This feature
displays the last category used when ever the Address Book is opened.
䊳 Rename Custom Fields - Create your own names for the four
custom fields. Your changes apply to the entire Address Book.
䊳 Security - Change the security options to show, hide, or mask private
records.
Section 2: Understanding Your Phone
2G: Using the Internal Phone Book 74
Page 79

Section 2H
Date Book
In This Section
䊳 Scheduling an Event
䊳 Setting an Alarm
䊳 Changing the Date Book View
䊳 Date Book Preferences
he Date Book lets you quickly and easily schedule appointments or any
activity associated with a date or date and time. When you open the
T
Date Book, the current date and a list of times for a standard business day
are displayed.
Section 2: Understanding Your Phone
2H: Personal Organizer 75
Page 80

Scheduling Events
An entry in the Date Book is called an event. When you schedule an
event, a description is displayed on the timeline, and the duration is set to
1 hour by default. You can easily change the start time and duration for
any event.
You can schedule the following types of events in the Date Book:
䊳 Timed events, such as meetings, that have a specific date and a
specific start and end time.
䊳 Untimed events, such as birthdays, holidays, and anniversaries.
These events occur on a particular date but have no specific start or
end times; they appear at the top of the list of times marked with a
diamond. You can schedule more than one untimed event on the
same date.
䊳 Repeating events, such as a weekly meeting that is held on the same
day at the same time each week.
䊳 Continuous events, such as a vacation or three-day conference.
䊳 All day events, which reflect the default length of the day as set by the
user.
Scheduling Timed Events
You can schedule timed events for the current date or for future dates.
To schedule a timed event for the current date:
1. Press the Date Book button on your phone to open the Date
Book to today’s schedule. The current date and a list of times for a
normal business day are displayed in “Day” view.
2. With the current day selected, tap the line next to the time that
corresponds to the start of the event.
Section 2: Understanding Your Phone
2H: Personal Organizer 76
Page 81

3. Enter a description of the event, up to 255 characters in length.
4. Set the event’s duration:
䊳 If the event is one hour long, skip to the end of this procedure.
䊳 If the event is longer or shorter than an hour, tap directly on the time
to open the Set Time dialog box.
Note: You can open the Set Time dialog box (to select a start time) by
making sure no event is selected, and then writing a number on the
number side of the Graffiti writing area.
5. Set the duration of the event in either of the following ways:
䊳 Tap the time columns in the Set Time dialog box to set the Start
Time; Tap End Time; then tap the time columns to set the End Time.
䊳 Tap All Day if the event lasts all day. The default hours of a standard
business day are set by the user, and may be changed using the
Preferences command in the Date Book application.
6. Tap OK to confirm your selection and exit.
Section 2: Understanding Your Phone
2H: Personal Organizer 77
Page 82

Scheduling a timed event for another date
1.
Choose one of the following options to select the Date:
䊳 Tap the desired day of the week in the date bar at the top of the
screen. If necessary, tap the Previous week or Next week scroll arrows
to move to another week.
Or:
䊳 Tap “Go To” at the bottom of the screen to open the “Go To Date”
dialog box. Select a date by tapping a day, month, and year in the
calendar.
2. After selecting the desired date, follow the steps for scheduling an
event for the current day.
Scheduling Untimed Events
You can schedule untimed events for any date. Untimed events are
displayed at the top of the list of times screen marked with a diamond.
Scheduling an untimed event
1. Select the desired event date, as described in the previous procedure,
“To schedule an untimed event for another date.”
2. Tap New.
3. In the Set Time dialog box, tap No Time.
Note: You can also tap “OK”, but make sure nothing is entered in the start
or end time.
Section 2: Understanding Your Phone
2H: Personal Organizer 78
Page 83
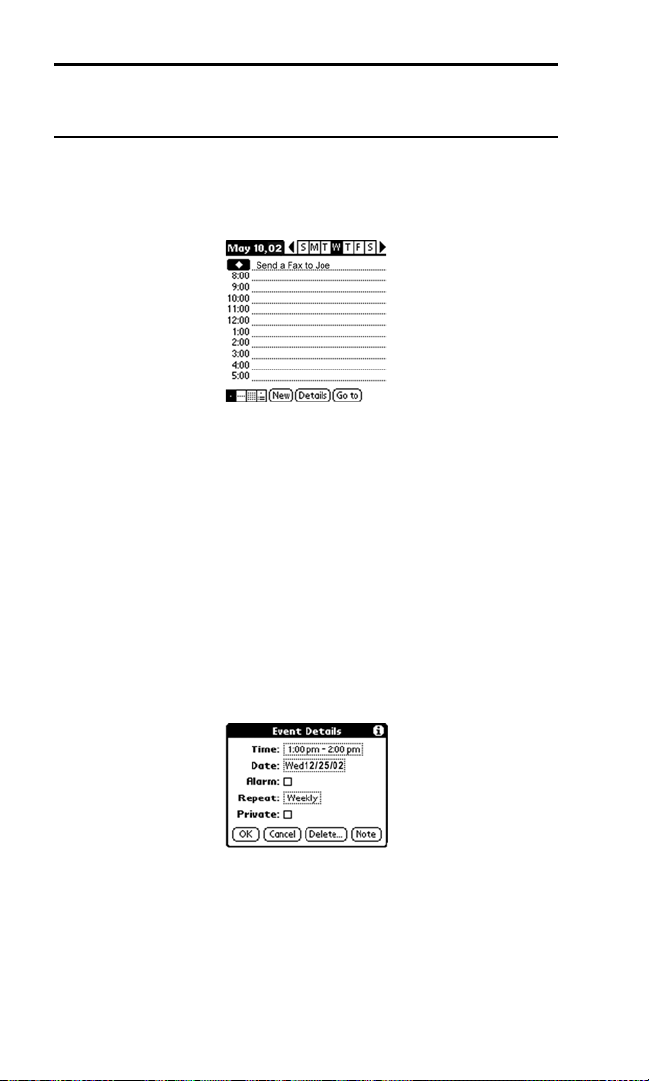
Note: You can create a new untimed event by making sure no event is
selected and then writing letters in the Graffiti writing area. When you
start writing, the untimed event is displayed at the top of the screen.
4. Enter a description of the event in the space provided.
5. Tap a blank area on the screen to deselect the untimed event.
Rescheduling an Event
You can easily change scheduled events in the Date Book.
Rescheduling
1.
From the Date Book screen, tap the event that you want to
reschedule.
2. Tap “Details” to open the Event Details dialog box for the event.
3. Tap the Time box. Select the new time.
4. Tap the Date box. Select the new date.
5. Tap OK to exit and return to the Date Book.
Section 2: Understanding Your Phone
2H: Personal Organizer 79
Page 84

Setting an Alarm for an Event
Tip: The battery powers both the phone and handheld computer. If the
battery has been depleted from placing calls on the phone, the handheld
computer will also have no power, and alarms will not sound.
You can set an alarm to remind yourself of upcoming events. The alarm
sounds even if the Sprint PCS Phone™ is turned OFF. The default setting
is five minutes before the scheduled event. The time can be changed to
any day, hour, or minute setting.
Setting an Alarm
1. Tap the desired event.
2. Tap Details.
3. Activate the alarm by tapping the Alarm check box.
4. Tap the drop down arrow to select minutes, hours, and days.
5. Enter a number from 0 - 98 as the numeric alarm setting.
6. Tap OK to exit and return to the Date Book.
Dismissing an Alarm
1.
When the alarm dialog box is displayed, tap one of the following
options:
䊳 OK - Clears the alarm.
䊳 Snooze - this delays the alarm for the preset amount of time.
Marking an Event As Private
Events can also be marked as Private when the security features are
configured. Your phone hides or masks (depending on your selection) all
private entries and requires a password if you want to view the entries.
Marking an Event Private
1. Tap the desired event.
2. Tap “Details” to open the Event Details screen.
3. Tap the “Private” check box.
Section 2: Understanding Your Phone
2H: Personal Organizer 80
Page 85

Note: If you do not have the security features setup, a popup dialog box is
displayed that tells you the security options are not configured.
4. Tap OK to exit.
Changing the Date Book View
There are four different views associated with the date book. They are:
䊳 Day View
䊳 Week View
䊳 Month View
䊳 Agenda View
Displaying Different Views
1. Choose one of the following options to change the view:
䊳 Press the Date Book application button repeatedly to cycle through
all the date book views.
䊳 Tap the view icons in the lower left area of the date book screen.
View Icons
Week View
The week view displays the calendar events for the entire week. This view
allows you to quickly see a listing of all the events for a the week. It can
help you see overlaps and event conflicts.
To change to week view:
1. Tap the Week View icon or press the “Date Book” application
button until the week view is displayed.
2. Tap the left and right navigation controls to move between different
weeks.
Section 2: Understanding Your Phone
2H: Personal Organizer 81
Page 86

Tip: To reschedule an event, tap and drag the event to a different time or
day.
Note: The Week View also shows untimed events and events before and
after the range of times displayed.
3. Tap an event to display the event description.
Event Conflicts
With the ability to define specific start and end times for any event, it is
possible to schedule events that overlap (an event that starts before a
previous event finishes).
An event conflict (time overlap) displays in the Week view as overlapping
time bars and in the Day view as overlapping brackets to the left of the
conflicting times.
Section 2: Understanding Your Phone
2H: Personal Organizer 82
Page 87

Month View
The Month View displays days that events are scheduled with dots and
lines throughout the Month. The dots and lines indicate events, repeating
events, and untimed events.
䊳 Dashed Line - Indicates a repeating event.
䊳 Dots on right side - Indicates a single event.
䊳 Dots below - Indicate untimed events.
Tips for Month View
䊳 Tap a desired day in the Month view to display the day in the Day
view screen.
䊳 Tap the scroll arrows in the upper right corner to move forward or
backward a month.
䊳 Tap Go To to open the date dialog box and select a different month.
䊳 Use the scroll buttons on your phone to move between months. Press
the top button to display the previous month, the bottom button to
display the next month.
Agenda View
The Agenda view allows you view appointments, untimed events, and To
Do List items in a single screen. Although it is primarily a viewing option,
you can also use the Agenda view to check off completed To Do List items.
To go to a Day View of any event on the Agenda view screen, simply tap
the desired event.
To display the Agenda view:
1. Tap the Agenda view icon or press the Date Book button until the
Agenda view appears.
Section 2: Understanding Your Phone
2H: Personal Organizer 83
Page 88

Tips for Agenda View
䊳 Tap any appointment while in Agenda view to display the Day View of
the appointment.
䊳 Check off completed To Do List items in the Agenda view, or click on
a description of an item to go directly into the To Do List application.
䊳 You can change the category of To Do items shown. Tap on the pick
list and select the new category. See the chapter on “Using the To Do
List” for more information on To Do items.
Scheduling Repeating Events
The repeat function allows you to schedule recurring events using a
single entry. Repeating events could be birthdays, anniversaries, or a
weekly meeting. These events can be scheduled daily, weekly, monthly, or
yearly according to the frequency of the event.
Scheduling A Repeating Event
1.
Tap the desired event (Be sure to tap the event and not the time next
to the event.).
Note: You must have an event before it can be repeated.
2. Tap the Details button.
3. Tap the Repeat box to open the Change Repeat dialog box.
4. Tap the desired day, week, month, or year box, and enter the repeat
information date information.
Section 2: Understanding Your Phone
2H: Personal Organizer 84
Page 89

5. Tap “OK” to exit.
Editing Repeating Events
When you edit a repeating function, you have the option of applying the
change to the current event, the current event and all future events, or all
occurrences of the event (past, present, and future.)
Deleting an Event
1.
Select the desired event.
2. Tap the Details button.
3. Tap the Delete button.
4. The Repeating Event screen is displayed. Tap one of the following
options:
䊳 Current - Deletes only the single event, no past or future events are
affected.
䊳 Future - Deletes the current event and all future occurrences of the
event.
䊳 All - Deletes all occurrences of the event. (Past, present and future.)
Tips for Scheduling Repeating Events
䊳 If you change the start date of a repeating event, your phone
calculates the number of days you moved the event. Your phone then
automatically changes the end date to maintain the duration of the
repeating event.
䊳 If you change the repeat interval (e.g., daily to weekly) of a repeating
event, past occurrences (prior to the day on which you change the
setting) are not changed, and your phone creates a new repeating
event.
Section 2: Understanding Your Phone
2H: Personal Organizer 85
Page 90

䊳 If you change the date of an occurrence of a repeating event (e.g.,
from January 14 to January 15) and apply the change to all
occurrences, the new date becomes the start date of the repeating
event. Your phone adjusts the end date to maintain the duration of
the event.
䊳 If you change other repeat settings (for example, time, alarm,
private) of a repeating event and apply the change to all occurrences,
your phone creates a new event. The start date of this new event is the
day on which the setting is changed. Past occurrences (prior to the
day of the change) are not changed.
䊳 If you apply a change to a single occurrence of a repeating event
(e.g., time), that occurrence no longer shows the Repeat icon.
Date Book Menus
There are menu commands that are specific to the Date Book. They are:
䊳 Record Menu
䊳 Edit Menu
䊳 Options Menu
Each menu item contains items that configure or adjust how the Date
Book application is used.
Record Menu
The following options are available in the Record menu:
䊳 New Event - Creates a new event in the date book. The “Set Time”
dialog box is displayed.
䊳 Delete Event - Deletes an event from the date book.
䊳 Attach Note - Creates a note for the selected event.
䊳 Delete Note - Delete the note from a selected event.
䊳 Purge - Deletes events based on time and date criteria.
䊳 Beam Event - Beams the selected event to another IR device.
Edit Menu
The following options are available in the Edit menu:
䊳 Undo - Automatically undo the last command.
䊳 Cut - Copy and remove text from the screen.
䊳 Copy - Copies the text on the screen.
Section 2: Understanding Your Phone
2H: Personal Organizer 86
Page 91

䊳 Paste - Paste text into a screen.
䊳 Select All - Selects all text on the screen.
䊳 Keyboard - Displays the onscreen keyboard.
䊳 Graffiti Help - displays the Graffiti help screen.
Options Menu
The following options are available in the Options menu:
䊳 Font - Allows you to select the desired font size for the date book.
Tip: When changing alert times & volumes, you will hear samples of the
options you choose unless you have turned OFF the volume for these
options in the main preferences.
䊳 Preferences - The preferences allows you to configure the times and
alarms for the date book. The following items are available:
䊳 Start/End Time
䊳 Alarm Preset
䊳 Alarm Sound
䊳 Remind Me
䊳 Play Every
䊳 Display Options - Change the date book appearance.
䊳 Phone Lookup - Activates the phone lookup feature.
䊳 Security - Hides or masks private records.
䊳 Dial - Allows you to highlight and then call a phone number located
in the Date Book entry.
䊳 About Date Book - Displays the version information for date book.
Section 2: Understanding Your Phone
2H: Personal Organizer 87
Page 92

Section 2I
T
Using Your Phone’s
Voice Services
In This Section
䊳 Using Voice-Activated Dialing
䊳 Recording Memos
his section explains the features associated with your phone’s
Voice Services. The easy-to-follow instructions explain how to make
calls and record memos.
Section 2: Understanding Your Phone
2I: Using Your Phone’s Voice Services 88
Page 93

Using Voice-Activated Dialing
To use Voice Dialing, you need to “train” the phone to recognize your
voice. You can put up to 30 names from your Address book into your
Voice Dial list. Once you have recorded these names, you can make calls
simply by speaking a name.
Note: This feature is only available in digital service areas.
Setting up Voice Dial
1.
From the Phone Menu, tap the Menu Launcher icon.
2. Select Calls and tap Voice Dial.
3. Tap the Add button.
4. The list of available names is displayed from the address book. Tap
the phone number next to the desired name.
5. The Set Voice Dial screen is displayed. Tap the down arrow next to
Select.
6. Tap Record.
Note: The Voice Dialing feature is different from the Sprint PCS Voice
Command.
7. Record a name or number to identify the entry.
8. The entry is saved and ready for voice dialing.
Placing Voice Dialing Calls with the Voice Dial Button
Note: The phone must be ON to make a Voice Dial call. If the phone is off
when a Voice Dial call is attempted, a warning message is displayed that
prompts you to turn the phone ON.
1. From the phone main menu, press once on the left side of the
phone.
2. The Voice Dial screen is displayed.
3. At the voice prompt, say the name into the phone.
Section 2: Understanding Your Phone
2I: Using Your Phone’s Voice Services 89
Page 94

䊳 If the name is recognized, the phone number associated with the
name is dialed.
䊳 If the name is not recognized, the name is asked for again.
䊳 If the name is not recognized after two attempts, a message is
displayed that says “Could not recognize name”. Try the call again
later, or record the entry name again.
Placing a Voice Dial Call from the List
1. From the Phone Menu, tap and select Calls.
2. Tap Voice Dial.
3. The list of available names is displayed from the address book. Scroll
through the list of available names and tap the phone number of the
desired name.
Tip: You can press the Voice Dial button when the number is highlighted in
the Voice Dial list to connect the call.
4. A Voice Dial popup menu is displayed with the following options:
䊳 Call - Calls the number.
䊳 Modify - Allows you to edit the entry.
Note: You can also access the Voice Dial screen from the Application
main menu by tapping on the Voice Dial icon. ( )
Managing the Voice Dial List
You can play the recorded name, re-record the name, or erase the
recording.
Play or Record:
1. From the Phone Menu, tap and select Calls.
2. Tap Voice Dial.
3. Select the name to edit and tap Modify.
4. The Set Voice Dial screen is displayed.
5. Tap the drop down arrow and select Play. Tap Re-Record to record
the name again.
Section 2: Understanding Your Phone
2I: Using Your Phone’s Voice Services 90
Page 95

Erasing an entry:
1. From the Phone Menu, tap and select Calls.
2. Tap Voice Dial.
3. elect the name to edit and tap Modify.
4. The Set Voice Dial screen is displayed.
5. Tap the drop down arrow and select Erase.
Recording Memos
Voice memos are digital recordings made by recording yourself or the
person calling you. You can store up to 15 recordings at a time. A single
recording can be up to 60 seconds long. Once you have made a
recording, you can review, name, save, or erase it.
There are two ways to record a voice memo:
䊳 Record yourself using the phone's built-in microphone
䊳 Record someone calling your phone
To record a memo using the phone's built-in microphone:
1. Press and hold on the left side of the phone.
2. A beep sounds and the Voice Memo Record screen is displayed.
3. Record your message.
4. Tap the pause button to pause while recording the message. Tap
pause again to continue recording.
5. Tap to stop recording.
6. Using the stylus, tap the title area to select. Enter a title for the
message and tap .
Playing a Memo
Tap from the phone main menu.
1.
2. Tap the Voice Memo icon.
3. The Voice Memo screen is displayed. Tap the desired message from
the list.
4. The Voice Memo Play screen is displayed. Tap the Play button.
91
Page 96

Note: You can also tap the speaker icon for speaker phone operation. The
voice memo is played at a higher volume that can be heard without having
to place the phone up to your ear. The volume can also be controlled using
the up and down volume buttons located on the side of the phone.
5. Tap the pause button to pause the message.
6. Tap Done when finished.
Deleting a Memo
Tap from the main menu.
1.
2. Tap the Voice Memo icon.
3. The Voice Memo screen is displayed. Tap the desired message from
the list.
4. Tap the Delete button.
5. Tap Yes to confirm.
Deleting all Memos
Tap from the phone main Menu.
1.
2. Tap the Voice Memo icon.
3. Tap to display the Voice Memo options.
4. Tap “Delete All” from the “Records” menu.
Section 2: Understanding Your Phone
2I: Using Your Phone’s Voice Services 92
Page 97

Section 2J
T
Getting to Know the Handheld
Computer
In This Section
䊳 What is a Handheld Computer
䊳 Tapping and Typing
䊳 Opening an Application
䊳 Customizing your Handheld Computer
䊳 Troubleshooting
䊳 Resetting Your Handheld
he handheld computer allows you to simplify your life by organizing
scheduled events and keeping important information easily accessible
in the palm of your hand. By using this phone, you get the best of both
worlds. You can communicate and have a personal assistant all in one unit.
Section 2: Understanding Your Phone
2J: Getting to Know the Handheld Computer 93
Page 98

What is a Handheld Computer
The handheld computer is a personal digital assistant that simplifies the
way you keep track of important events and information in your life. By
using the handheld computer, you can keep track and automatically
update information with a tap of the stylus. The stylus is the instrument
that is used to navigate inside the handheld computer. It has a special
point that serves to touch the screen to input information into the
handheld computer.
Front View of the Handheld Computer
Section 2: Understanding Your Phone
2J: Getting to Know the Handheld Computer 94
Page 99

Tapping and Typing
To navigate the handheld computer, you must use the stylus. The stylus
works similar to a mouse on a regular desktop machine, but instead of
clicking an icon, you tap it. The first time the handheld computer is
turned on, a setup screen is displayed with instructions. These
instructions include a calibration setup that aligns the internal circuitry
with the touch sensitive screen.
Note: Make sure you always use the stylus when touching the screen. If
you use another device, the screen may become scratched.
The stylus can also be used to drag and select text on the screen. Simply
press the stylus to the screen and drag it across the characters without
lifting from the surface. Highlighted text indicates it has been selected.
Typing
Included in the handheld computer is a fully functional on-screen
keyboard. To access the keyboard, tap either the alpha or numeric icons
listed on the bottom of the screen in the Graffiti text area. Once the
keyboard is displayed, use the stylus to select the letters or numbers
desired.
Section 2: Understanding Your Phone
2J: Getting to Know the Handheld Computer 95
Page 100

Opening an Application
Follow the steps listed below to use the stylus to open an application on
the handheld computer:
1. Remove the Stylus from your phone.
2. Find the Calculator icon on the handheld computer screen.
3. Tap the stylus lightly on the icon.
4. The Calculator screen is displayed.
5. Use the stylus to touch the number keys, enter values into the
calculator and perform calculations.
6. When you have completed calculations, tap the icon on the
bottom of the screen.
7. The main menu of the handheld computer is displayed.
96
 Loading...