


User Guide
www.sprint.com
© 2008 Sprint. Sprint and the logo are trademarks of Sprint. Other
marks are the property of their respective owners.
10/27/08

I325_MR_BG17_PS_102708_F18

Table of Contents
Introduction . . . . . . . . . . . . . . . . . . . . . . . . . . . . . . . i
Your Device’s Menu . . . . . . . . . . . . . . . . . . . . . . . ii
Section 1: Getting Started . . . . . . . . . . . . . . . . . 1
1A. Setting Up Service . . . . . . . . . . . . . . . . . . . . 2
Setting Up Your Device . . . . . . . . . . . . . . . . . . . . . . 2
Activating Your Device . . . . . . . . . . . . . . . . . . . . . . 5
Setting Up Your Voicemail . . . . . . . . . . . . . . . . . . . 7
Sprint Account Passwords . . . . . . . . . . . . . . . . . . . 7
Getting Help . . . . . . . . . . . . . . . . . . . . . . . . . . . . . . . 8
Section 2: Your Device . . . . . . . . . . . . . . . . . . . 11
2A. Device Basics . . . . . . . . . . . . . . . . . . . . . . . 12
Your Device Features . . . . . . . . . . . . . . . . . . . . . 12
Viewing the Display Screen . . . . . . . . . . . . . . . . . 17
Features of Your Device . . . . . . . . . . . . . . . . . . . . 22
Turning Your Device On and Off . . . . . . . . . . . . . 24
Using Your Device’s Battery and Charger . . . . . 25
Navigating Through Device Menus . . . . . . . . . . 28
Displaying Your Phone Number . . . . . . . . . . . . . 29
Making and Answering Calls . . . . . . . . . . . . . . . 29
Entering Text . . . . . . . . . . . . . . . . . . . . . . . . . . . . . . 38
2B. Your Device’s Settings . . . . . . . . . . . . . . . 42
Sound Settings . . . . . . . . . . . . . . . . . . . . . . . . . . . 42
Display Settings . . . . . . . . . . . . . . . . . . . . . . . . . . . 45
Power Management . . . . . . . . . . . . . . . . . . . . . . . 49
Location Settings . . . . . . . . . . . . . . . . . . . . . . . . . . 51
Call Options . . . . . . . . . . . . . . . . . . . . . . . . . . . . . . 52
Messaging Settings . . . . . . . . . . . . . . . . . . . . . . . 54
TTY Use With Sprint Service . . . . . . . . . . . . . . . . 58
Device Customization . . . . . . . . . . . . . . . . . . . . . . 59
Using Speed Dial . . . . . . . . . . . . . . . . . . . . . . . . . 61
2C. Your Device’s Security . . . . . . . . . . . . . . . 65
Accessing the Security Menu . . . . . . . . . . . . . . . 65
Using Your Device’s Device Lock Feature . . . . 65
Using Special Numbers . . . . . . . . . . . . . . . . . . . . 68
Using Encryption . . . . . . . . . . . . . . . . . . . . . . . . . . 69
Managing Certificates . . . . . . . . . . . . . . . . . . . . . 69
Resetting Your Device . . . . . . . . . . . . . . . . . . . . . 70
Security Features for Data Services . . . . . . . . . . 70

2D. Roaming . . . . . . . . . . . . . . . . . . . . . . . . . . . . 72
Understanding Roaming . . . . . . . . . . . . . . . . . . . 72
Setting Your Device’s Roam Mode . . . . . . . . . . 73
2E. Call History . . . . . . . . . . . . . . . . . . . . . . . . . 75
Viewing History . . . . . . . . . . . . . . . . . . . . . . . . . . 75
Call History Options . . . . . . . . . . . . . . . . . . . . . . . 76
Making a Call From the Call History . . . . . . . . . 78
Saving a Phone Number From Call History . . 78
Deleting Call History Entries . . . . . . . . . . . . . . . . 79
2F. Contacts . . . . . . . . . . . . . . . . . . . . . . . . . . . . 80
Adding a New Contacts Entry . . . . . . . . . . . . . . 80
Assigning Speed Dial Numbers . . . . . . . . . . . . 81
Finding Contacts Entries . . . . . . . . . . . . . . . . . . . 82
Contacts Entry Options . . . . . . . . . . . . . . . . . . . . 84
Adding a Phone Number to a Contacts Entry 85
Editing a Contacts Entry’s Phone Number . . . . 85
Editing a Contacts Entry . . . . . . . . . . . . . . . . . . . 85
Deleting Contacts . . . . . . . . . . . . . . . . . . . . . . . . 86
Beaming a Contacts Entry . . . . . . . . . . . . . . . . . 86
Selecting a Ringer Type for an Entry . . . . . . . . 87
Dialing Sprint Services . . . . . . . . . . . . . . . . . . . . 87
2G. Calendar and Tools . . . . . . . . . . . . . . . . . 88
Using Your Device’s Calendar . . . . . . . . . . . . . . . 88
Using Your Device’s Alarm Clock . . . . . . . . . . . . 92
Using Your Device’s Notepad . . . . . . . . . . . . . . . 93
Using Tasks . . . . . . . . . . . . . . . . . . . . . . . . . . . . . . . 95
Managing Voice Memos . . . . . . . . . . . . . . . . . . . 99
Using the Tip Calculator . . . . . . . . . . . . . . . . . . . 100
Using the Calculator . . . . . . . . . . . . . . . . . . . . . . 101
Using the Smart Converter . . . . . . . . . . . . . . . . . 101
Using the Stopwatch . . . . . . . . . . . . . . . . . . . . . . 102
Using the World Clock . . . . . . . . . . . . . . . . . . . . 102
Using the File Viewer . . . . . . . . . . . . . . . . . . . . . 103
2H. Using the microSD Card . . . . . . . . . . . . 104
Using Your Device’s microSD Card
and Adapter . . . . . . . . . . . . . . . . . . . . . . . . . . . . . 104
microSD Settings . . . . . . . . . . . . . . . . . . . . . . . . . 106
microSD Folders . . . . . . . . . . . . . . . . . . . . . . . . . 107
Connecting Your Device to Your Computer . . 108
General Precautions . . . . . . . . . . . . . . . . . . . . . . 110

2I. Camera . . . . . . . . . . . . . . . . . . . . . . . . . . . 111
Taking Pictures . . . . . . . . . . . . . . . . . . . . . . . . . . . 111
Adjusting Settings . . . . . . . . . . . . . . . . . . . . . . . . 115
Recording Videos . . . . . . . . . . . . . . . . . . . . . . . . 117
Working with Pictures and Videos . . . . . . . . . . 119
Sending Pictures and Videos by Email . . . . . . 123
Printing Pictures via Bluetooth . . . . . . . . . . . . . . 124
2J. Bluetooth . . . . . . . . . . . . . . . . . . . . . . . . . . 126
Turning Bluetooth On and Off . . . . . . . . . . . . . . 126
Using the Bluetooth Settings Menu . . . . . . . . . 127
Bluetooth Profiles . . . . . . . . . . . . . . . . . . . . . . . . . 128
Bluetooth Information Settings . . . . . . . . . . . . . 130
Pairing Bluetooth Devices . . . . . . . . . . . . . . . . . 131
Beaming Files . . . . . . . . . . . . . . . . . . . . . . . . . . . 133
Using Hands-Free Devices . . . . . . . . . . . . . . . . 135
Bluetooth OBEX FTP . . . . . . . . . . . . . . . . . . . . . . 135
Using a Bluetooth Virtual Serial Port . . . . . . . . 136
2K. Mobile Applications . . . . . . . . . . . . . . . . 137
Launching Internet Explorer . . . . . . . . . . . . . . . . 137
Using Live Search . . . . . . . . . . . . . . . . . . . . . . . . 140
Using the RSS Reader . . . . . . . . . . . . . . . . . . . . 141
Using Internet Sharing . . . . . . . . . . . . . . . . . . . . 143
2L. Synchronizing with ActiveSync . . . . . . 144
ActiveSync Requirements . . . . . . . . . . . . . . . . . 144
Synchronization Overview . . . . . . . . . . . . . . . . . 145
Setting Up and Configuring ActiveSync . . . . . 146
Connecting with Your Computer . . . . . . . . . . . 148
Setting up Windows Media Player
Sync Options . . . . . . . . . . . . . . . . . . . . . . . . . . . . 149
Synching Music via Windows Media Player . 150
Creating a Custom Ring Tone . . . . . . . . . . . . . 151
Section 3: Sprint Service. . . . . . . . . . . . . . . . 153
3A. Sprint Service Features: The Basics . 154
Using Voicemail . . . . . . . . . . . . . . . . . . . . . . . . . . 154
Using SMS Text Messaging . . . . . . . . . . . . . . . 160
Using Caller ID . . . . . . . . . . . . . . . . . . . . . . . . . . . 165
Responding to Call Waiting . . . . . . . . . . . . . . . 166
Making a Three-Way Call . . . . . . . . . . . . . . . . . 166
Using Call Forwarding . . . . . . . . . . . . . . . . . . . . 167

3B. Software Store and TV . . . . . . . . . . . . . . 168
Using the Sprint Software Store . . . . . . . . . . . . 168
Your Sprint TV Channel Options . . . . . . . . . . . 169
Playing a Video or Audio Clip . . . . . . . . . . . . . 169
Sprint TV FAQs . . . . . . . . . . . . . . . . . . . . . . . . . . 170
3C. Sprint Worldwide Wireless Service . . . 172
Your SIM Card . . . . . . . . . . . . . . . . . . . . . . . . . . . 172
Using Your Device in GSM Mode . . . . . . . . . . 174
Using Your SIM Card’s PhoneBook . . . . . . . . 178
Setting GSM Services Options . . . . . . . . . . . . 180
Contacting Sprint . . . . . . . . . . . . . . . . . . . . . . . . 181
Services . . . . . . . . . . . . . . . . . . . . . . . . . . . . . . . . 182
Selecting a Network . . . . . . . . . . . . . . . . . . . . . . 183
3D. GPS Navigation . . . . . . . . . . . . . . . . . . . . 185
Before You Begin . . . . . . . . . . . . . . . . . . . . . . . . 185
Using Sprint Navigation . . . . . . . . . . . . . . . . . . . 186
Getting Driving Directions . . . . . . . . . . . . . . . . . 187
Configuring Your Navigation Preferences . . . 193
Launching the Product Tour . . . . . . . . . . . . . . . 194
Section 4: Safety and Warranty
Information . . . . . . . . . . . . . . . . . . . . . . . . . . . . 195
4A. Important Safety Information . . . . . . . . 196
General Precautions . . . . . . . . . . . . . . . . . . . . . . 196
Maintaining Safe Use of and Access to
Your Phone . . . . . . . . . . . . . . . . . . . . . . . . . . . . . . 197
Using Your Phone With a Hearing
Aid Device . . . . . . . . . . . . . . . . . . . . . . . . . . . . . . . 198
Caring for the Battery . . . . . . . . . . . . . . . . . . . . . 200
Radio Frequency (RF) Energy . . . . . . . . . . . . . . 201
Owner’s Record . . . . . . . . . . . . . . . . . . . . . . . . . . 202
Phone Guide Proprietary Notice . . . . . . . . . . . . 202
4B. Manufacturer’s Warranty . . . . . . . . . . . . 203
Manufacturer’s Warranty . . . . . . . . . . . . . . . . . . . 203
Index . . . . . . . . . . . . . . . . . . . . . . . . . . . . . . . . . . 207

Introduction
This User Guide introduces you to Sprint® service and all
the features of your new device. It’s divided into four
sections:
⽧ Section 1: Getting Started
⽧ Section 2: Your Device
⽧ Section 3: Sprint Service
⽧ Section 4: Safety and Warranty Information
Throughout this guide, you'll find tips that highlight
special shortcuts and timely reminders to help you
make the most of your new device and service. The
Table of Contents and Index will also help you quickly
locate specific information.
You'll get the most out of your device if you read each
section. However, if you'd like to get right to a specific
feature, simply locate that section in the Table of
Contents and go directly to that page. Follow the
instructions in that section, and you'll be ready to use
your device in no time.
User Guide
Note
WARNING
Because of updates in your device’s software,
this printed guide may not be the most current
version for your phone. Visit www.sprint.com
and log on to
most recent version of the user guide.
Please refer to the Important Safety Information
section on page 196 to learn about information
that will help you safely use your device. Failure
to read and follow the Important Safety
Information in this user guide may result in
serious bodily injury, death, or property
damage.
My Sprint Wireless to access the
i
Your Device’s Menu
The following list outlines your device’s menu structure.
For more information about navigating through the
menus, please see “Navigating Through Device
Menus” on page 28.
Messaging
1: Text Messages
2: Setup E-mail
Calendar
Contacts
Settings
1: Phone
1: Auto Answer
1: 2 seconds 2: 4 seconds
3: 6 seconds 4: 8 seconds
5: 10 seconds 6: Never
ii
2: Call Options
1: Any key answer 2: Phone number
3: Voice mail number
4: International code
2: Display
1: Home Screen
1: Home screen layout
2: Show Recent Programs
3: Color scheme
4: Background image
5: Time out
2: Start Menu Style
1: Grid 2: List
3: Sounds
1: Ring Tone
1: Vibrate 2: None
3: Anticipation 4: Bug’s Song
5: Charming Intro Tone
6: City Light 7: Classic Bell
8: Color Lounge 9: Fast Tone
10: Floating Tone 11: Glitter Tone
12: Highway 101 13: Maze of City
14: Pause Tone 15: Rich Tone
16: Samsung Tune 17: Serene Tone
18: Serene Tone2 19: Spanish Guitar
20: Squash Tone 21: Sunny Day
22: Techno Dance 23: Tremolo Tone
24: Tumble Tone 25: Vivid Street
2: Notification
1: New e-mail
2: New text message
3: New voice message
4: New instant message
3: System Sound
1: Exclamation
2: Question
3: Warnings
4: Keypad Tone
1: Keypad control
5: Call Alert
1: Minute beep
2: Connect tone
3: Signal fade tone
6: R2VS
1: None 2: 3D Sound
3: M-Theater
4: Profiles
1: Normal
2: Silent
3: Vibrate
4: Outdoor
5: Automatic
5: Power Management
1: Main battery
iii
2: Backlight time out
1: 5 seconds 2: 10 seconds
3: 15 seconds 4: 30 seconds
5: 60 seconds 6: Never
3: Display time out on AC
1: 10 seconds 2: 15 seconds
3: 30 seconds 4: 1 minute
5: 2 minutes 6: 5 minutes
7: 10 minutes 8: Never
4: Display time out on Battery
1: 10 seconds 2: 15 seconds
3: 30 seconds 4: 1 minute
5: 2 minutes 6: 5 minutes
7: 10 minutes 8: Never
5: Display brightness
1: Level1 2: Level2
3: Level3 4: Level4
5: Level5
6: Keypad backlight time out
1: 1 second 2: 2 seconds
3: 3 seconds 4: 4 seconds
5: 5 seconds 6: 10 seconds
7: Keypad backlight on
1: Any time
2: Custom time
8: Start time/End time
6: Connections
1: Wireless Manager
1: All 2: Bluetooth
3: Phone
2: Bluetooth
3: Bluetooth Profiles
1: OBEX FTP Server Setting
2: BPP Setting 3: My Information Setting
4: Dial-up
1: New... 2: Phone as Modem
3: Sprint Data
5: Proxy
6: VPN
7: More...
1: USB to PC 2: Domain Enroll
iv
7: More...
1: Date and Time
2: Roaming
1: Roaming option 2: Data roam guard
3: Security
1: Device Lock
2: Certificates
3: Encryption
4: Emergency Numbers
5: Phone Reset
4: Memory Information
5: Text Input Settings
1: Input Language 2: Suggest words when typing
3: Suggest after 4: Suggest
5: Add a space after word
6: Enable auto-correct
6: Remove Programs
7: More...
1: Accessibility
2: Key Settings
3: Regional Settings
4: Other Settings
5: Phone Information
6: Owner Information
7: More...
1. About 2: Error Reporting
3: Customer Feedback
4: Windows Update 5: Managed Programs
6: Setup E-mail 7: More...
Call History
File Explorer
Internet Explorer
Windows Media
1: My Music
2: My Videos
3: My TV
4: My Playlists
5: Now Playing
v
Organizer
1: Alarms
2: Notepad
3: Tasks
4: Voice Notes
5: World Clock
Office Mobile
1: Excel Mobile
2: OneNote Mobile
3: PowerPoint Mobile
4: Word Mobile
File Viewer
Camera
1: Camera
Press Menu (right softkey), and then use the
navigation key to scroll through and display the
following options:
vi
1: Shooting Mode
1: Single shot 2: Multi shot
3: Mosaic shot 4: Frame shot
5: Night shot
2: Size
1: 1280x960 2: 640x480
3: 320x240
3: Timer
1: Off 2: 2 sec
3: 5 sec 4: 10 sec
4: White Balance
1: Auto 2: Daylight
3: Cloudy 4: Tungsten
5: Fluorescent
5: Effect
1: No effects 2: Sepia
3: B/W 4: Negative
6: Help
7: Settings
1: General
2: Camera
3: Camcorder
2: Camcorder
Press Menu (right softkey), and then use the
navigation key to scroll through and display the
following options:
1: Size
1: 320x240 2: 176x144
2: Timer
1: Off 2: 2 sec
3: 5 sec 4: 10 sec
3: White Balance
1: Auto 2: Daylight
3: Cloudy 4: Tungsten
5: Fluorescent
4: Audio
1: On 2: Off
5: Effect
1: No effects 2: Sepia
3: B/W 4: Negative
6: Help
7: Settings
1: General
2: Camera
3: Camcorder
Accessories
1: Calculator
2: Smart Converter
1: Currency 2: Length
3: Weight 4: Volume
5: Area 6: Temperature
3: Speed Dial
4: Stopwatch
5: Task Manager
6: Tip Calculator
7: Vision
ActiveSync
Games
1: Bubble Breaker
2: Solitaire
vii
Pictures & Videos
Get On Demand
Getting Started
1: Set date and time
2: Setup e-mail
3: Set up a device password
4: Set up a Bluetooth headset
5: Set background
6: Set ring tone
7: Transfer music
8: Add/remove Getting Started
International Usage
Internet Sharing
Live Search
Messenger
RSS Reader
viii
Service Mode
1: Sprint CDMA 2: Int’l GSM
Software Store
Sprint Navigation
Sprint TV
Voice Command
Windows Live
In Use Menu
Press Menu to display the following options:
1: Mute/Unmute 2: Speakerphone On/Off
3: Turn Hands-free On/Off
4: Contacts 5: Save to Contacts
6: View Calendar 7: Call History

Section 1
Getting Started

Section 1A
Setting Up Your Device
Setting Up Service
⽧ Setting Up Your Device
⽧ Activating Your Device
⽧ Setting Up Your Voicemail
⽧ Sprint Account Passwords
⽧ Getting Help
Setting up service on your new device is quick and easy. This
section walks you through the necessary steps to set
up, turn on, and unlock your device; set up your
voicemail; establish passwords; and contact Sprint for
assistance with your Sprint service.
2 Section 1A. Setting Up Service
1. Remove the battery cover.
䡲 Press down with thumbs as indicated below.
䡲 While applying pressure, slide cover away from
the camera lens (as shown below).
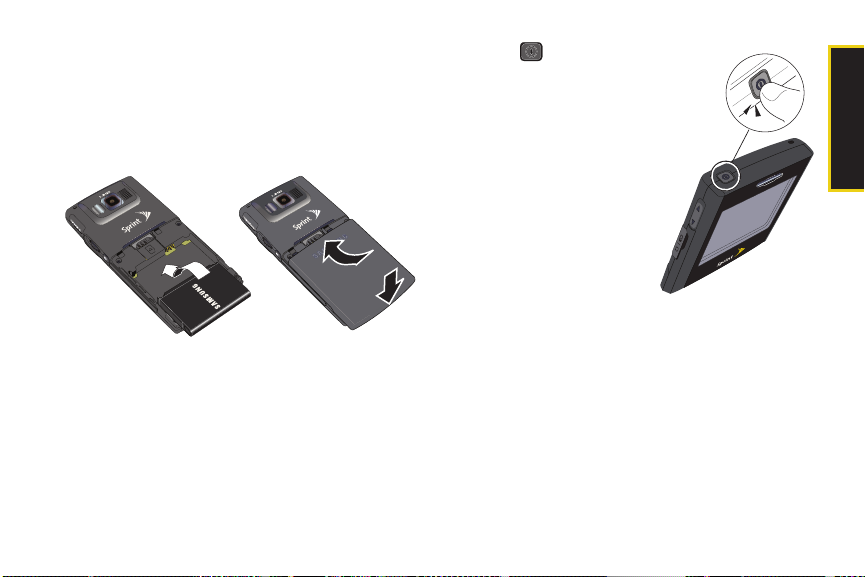
2. Install the battery.
䡲 Insert the battery into the opening on the back of
the device, making sure the connectors align.
Gently press down to secure the battery.
䡲 Position the battery cover and firmly slide it in until
you hear a click.
3. Press to turn the
device on.
䡲 Your device will turn on,
search for Sprint service,
and then enter standby
mode.
䡲 If your device is not yet
activated, or if it is
locked, see “Activating
Your Device” on page 5
for more information.
Initial Setup
After you have powered on
your device, you may wish to set some basic options.
After the initial power-up, your device will display the
Windows Mobile
through a series of setup procedures.
1. From initial screen, press Next (right softkey) to
begin the setup process.
®
screen where you will be guided
Section 1A. Setting Up Service 3
Setting Up Service

2.
Use both the navigation key and keypad to enter
new values within the date and time fields. See
“Configuring the Time and Date” on page 62..
● To toggle between AM and PM, highlight the
AM/PM field and then press either
or
P (PM) on the keypad.
A (for AM)
3. Press Next (right softkey) to continue on to the
password setup screen where you can create a
password which must be used to access your
device’s features and data. See “Locking Your
Device with a Password” on page 65.
– or –
Skip to step 7 if you do not wish to assign a
password at this time.
4. Select “Prompt if device unused for” and press
. (Enabling this option activates the remaining
fields.)
5. Select each field and enter the desired information:
䡲 Minutes: to select the amount of unused time (idle)
required before you are prompted for a password.
䡲 Password type: to choose from one of the following
PIN types:
4 Section 1A. Setting Up Service
● Simple PIN: must be at least four characters in
length and cannot contain a simple sequence
such as 000, 1111, or 1234.
● Strong alphanumeric: must be at least seven
characters in length and must contain at least
one character from each of the following
categories: uppercase/lowercase letters,
numerals, and symbols. Examples of strong
alphanumeric passwords are
%$VH5hW.
䡲 Password: use the keypad to enter the desired
sb?8A!3 and
password.
䡲 Confirm password: use the keypad to re-enter the
same password.
6. Press Done (left softkey) to store these settings.
7. From the E-mail screen, press Skip (left softkey) to
return to the email account setup process at a later
time, or press
Next (right softkey) to continue with
the setup process.
䡲 For more information, please see the Set UpYour
Email guide included with your device.

8. Press Next (right softkey) to choose whether you
would like to participate in the Windows®
Feedback program.
䡲 Select either Enable or Disable and press Done
(left softkey).
Some data connection charges may apply during
Note
the feedback update process.
Although your device’s battery should have enough
Note
charge (to power on the device, find a signal, set up
your voicemail, and make a call), it is recommended
that you fully charge your battery prior to its initial use.
See “Charging the Battery” on page 26 for details.
Activating Your Device
䢇 If you purchased your phone at a Sprint Store, your phone
should be activated and ready to use.
䢇 If you received your phone in the mail and it is for a new Spri nt
account or a new line of service, your phone is designed
to activate automatically when you first turn it on. To
confirm your activation, make a phone call.
䢇 If you received your phone in the mail and you are activating a
new phone for an existing number on your account, you will
need to contact Sprint Customer Service to activate
your new phone. There are two activation options:
䡲 From your computer’s Web browser, go to
www.sprint.com/activate and complete the onscreen
instructions to activate your phone.
䡲 Dial 1-888-211-4727 from another phone to contact
Sprint Customer Service to complete the phone
activation.
When you have finished, make a phone call to confirm
your activation.
Section 1A. Setting Up Service 5
Setting Up Service
Do not press while the phone is being activated.
Tip
Pressing cancels the activation process.
If you are having difficulty with activation, contact
Note
Sprint Customer Service by dialing
from any other phone.
Unlocking Your Device
1. Press to turn the device on.
2. Press Unlock (left softkey).
To select a softkey, press the softkey button directly
Note
below the softkey text that is displayed at the bottom
left and bottom right of your device’s display screen.
Softkey actions change according to the screen
you’re viewing and will not be displayed if there is no
corresponding action available.
3. Press to unlock the device.
6 Section 1A. Setting Up Service
1-888-211-4727
If you can’t recall your lock code, try using the last
Tip
four digits of your wireless phone number. If this
doesn’t work, call Sprint Customer Service at
1-888-211-4727.
Using your Device to Call
䊳 Make your first call.
䡲 Use your keypad to enter a phone number.
䡲 Press .
See “Making and Answering Calls” on page 29.

Setting Up Your Voicemail
All unanswered calls to your device are automatically
transferred to your voicemail, even if your device is in
use or turned off. Therefore, you will want to set up your
voicemail and personal greeting as soon as your
device is activated.
1. From standby mode, press and hold .
2. Follow the system prompts to:
䡲 Create your passcode.
䡲 Record your name announcement.
䡲 Record your greeting.
䡲 Choose whether to activate One-Touch Message
Access (a feature that lets you access messages
simply by pressing and holding , bypassing
the need for you to enter your passcode).
Voicemail Passcode
Note
If you are concerned about unauthorized access to
your voicemail account, Sprint recommends that you
enable your voicemail passcode (do not activate
One-Touch Message Access).
For more information about using your voicemail, see
“Using Voicemail” on page 154.
Sprint Account Passwords
As a Sprint customer, you enjoy unlimited access to
your personal account information, your voicemail
account, and your data services account. To ensure
that no one else has access to your information, you
will need to create passwords to protect your privacy.
Account Password
If you are the account owner, you'll have an account
password to sign on to
calling Sprint Customer Service. If you are not the
account owner (if someone else receives the bill for
your Sprint Service), you can get a sub-account
password at
www.sprint.com.
www.sprint.com and to use when
Section 1A. Setting Up Service 7
Setting Up Service

Voicemail Password
You'll create your voicemail password (or passcode)
when you set up your voicemail. See “Setting Up Your
Voicemail” on page 154 for more information on your
voicemail password.
Data Services Password
With your Sprint smart device, you may elect to set up
an optional data services password to control data
access and authorize Premium Services purchases.
For more information, or to change your passwords,
sign on to
8 Section 1A. Setting Up Service
www.sprint.com.
Getting Help
Visit www.sprint.com
You can go online to:
䢇 Access your account information.
䢇 Check your minutes used (depending on your Sprint
service plan).
䢇 View and pay your bill.
䢇 Enroll in Sprint online billing and automatic payment.
䢇 Purchase accessories.
䢇 Shop for the latest Sprint devices.
䢇 View available Sprint service plans and options.
䢇 Learn more about data services and other great
products like Sprint TV
savers, and more.
䢇 See “Dialing Sprint Services” on page 87.
SM
, games, ringers, screen
Reaching Sprint Customer Service
You can reach Sprint Customer Service in many
different ways:
䢇 Press on your device.
䢇 Sign on to your account at www.sprint.com.
䢇 Call us toll-free at 1-888-211-4727 (Consumer
customers) or
䢇 Write to us at Sprint Customer Service, P.O. Box 8077,
1-800-927-2199 (Business customers).
London, KY 40742.
Receiving Automated Billing Information
Your device lets you access billing information on your
Sprint account. This information includes balance due,
payment received, invoicing cycle, and an estimate of
the number of minutes used since your last invoicing
cycle.
To access automated billing information:
䊳 Press on your device.
This service may not be available in all Affiliate areas.
Note
Sprint 411
Sprint 411 gives you access to a variety of services and
information through your device, including residential,
business, and government listings; movie listings or
showtimes; driving directions, restaurant reservations,
and major local event information. You can get up to
three pieces of information per call, and the operator
can automatically connect your call at no additional
charge.
There is a per-call charge to use Sprint 411, and you
will be billed for airtime.
To call Sprint 411:
䊳 Press on your device.
Section 1A. Setting Up Service 9
Setting Up Service

Sprint Operator Services
Sprint Operator Services provides assistance when
placing collect calls or when placing calls billed to a
local telephone calling card or third party.
To access Sprint Operator Services:
䊳 Press on your device.
For more information or to see the latest in products
and services, visit us online at
10 Section 1A. Setting Up Service
www.sprint.com.

Section 2
Your Device
Section 2A
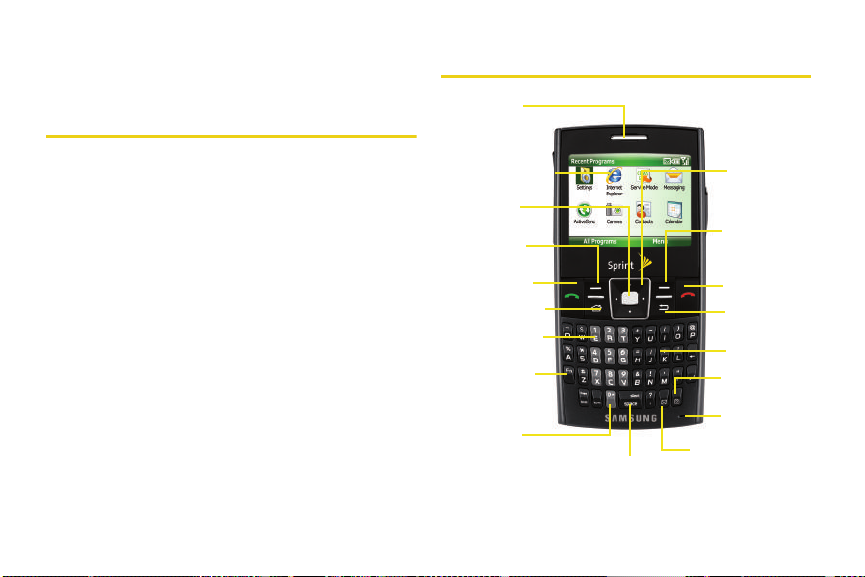
1. Earpiece
2. Display Screen
3. OK Key
4. Left Softkey
5. Talk Key
9. Plus Code
Dialing Key
6. Home/
7. Voicemail Key
Task Manager Key
8. Function Key
14. Keypad
12. Microphone
10. Space/Silent
16. End Key
17. Right Softkey
18. Navigation
13. Camera Key
11. Messaging Key
15. Back/Clear
Mode Key
Key
Key
Device Basics
⽧ Your Device Features
⽧ Viewing the Display Screen
⽧ Features of Your Device
⽧ Turning Your Device On and Off
⽧ Using Your Device’s Battery and Charger
⽧ Navigating Through Device Menus
⽧ Displaying Your Phone Number
⽧ Making and Answering Calls
⽧ Entering Text
Your device is packed with features that simplify your life
and expand your ability to stay connected to the people and
information that are important to you. This section will guide
you through the basic functions and calling features of
your device.
12 Section 2A. Device Basics
Your Device Features
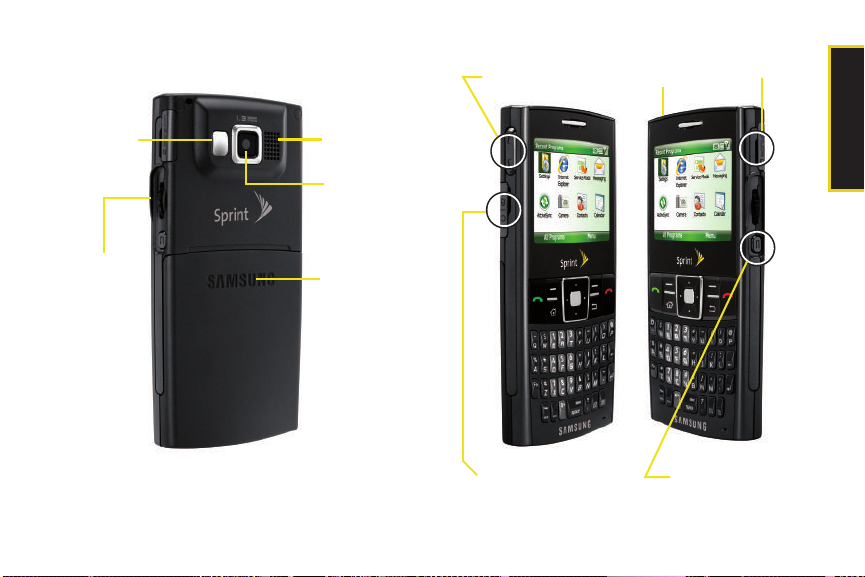
19. Mirror
21. Battery Cover
23. External
22. Camera Lens
Speaker
20. Thumbwheel
26. Power Button
25. Volume Key
24. Power/Accessory
27. microSD Slot
28. Back-Clear/
Interface Connector
Camera Access Key
Device Basics
Section 2A. Device Basics 13

Key Functions
1. Earpiece lets you hear the caller and automated
prompts.
2. Display Screen displays all the information needed
to operate your device, such as the call status, the
Contacts list, the date and time, and the signal and
battery strength.
3. OK Key lets you access the device’s menus and
selects the highlighted choice when navigating
through a menu.
4. Lef t Softkey lets you select softkey actions or menu
items corresponding to the bottom left line on the
display screen. For example, when you receive an
incoming call, you would press
to accept the call.
5. Ta lk K ey allows you to place or receive calls, answer
Call Waiting, or use Three-Way Calling.
䡲 In standby mode, press once to access your call
history (page 75).
䡲 Press twice to call the most recent phone number
from the call history list (page 75).
14 Section 2A. Device Basics
Answer (left softkey)
6. Home/Task Manager Key provides quick access back
to the Home (Idle) screen.
䡲 Press and release to exit the current screen or
application and launch the Home screen.
䡲 Press and hold to launch the Task Manager
screen.
7. Voicemail Key allows you to quickly access your
voicemail. Press and hold this key for two seconds
to automatically dial your voicemail’s phone
number.
8. Function Key allows you to quickly launch
predefined applications or activate specific
functionality. This feature is activated by pressing
and holding the key in conjunction with other
specified keys.
9. Plus Code Dialing Key automatically dials the
international access code for the country in which
you are located (for instance, 011 for international
calls placed from the United States).

10. Space/Silent Mode Key adds either a space to a text
entry or activates the device’s silent mode.
䡲 Press briefly to insert a blank character space into
a message.
䡲 Press and hold to put your device in silent mode.
11. Messaging Key allows you to either access either the
SMS Inbox or Message Composer.
䡲 Press briefly to access the SMS (Text) message
Inbox.
䡲 Press and hold to launch the Text Message
Composer (for new messages).
12. Microphone allows other callers to hear you clearly
when you are speaking to them.
13. Camera Key lets you access the Camera preview
where you can either take pictures or shoot videos.
14. Keypad allows you to enter numbers, letters, and
characters using a full keypad interface that has
the same layout as a computer keyboard. Press
and hold keys 2–99 for speed dialing.
15. Back/Clear Key deletes characters from the display
while in text entry mode. When in a menu, press
to return to the previous menu. This key also
allows you to return to the previous screen in a
data services session.
16. End Key lets you end a call, or return to standby
mode. While in the main menu, it returns the
device to standby mode and cancels your input.
When you receive an incoming call, press to enter
silent mode and mute the ringer.
17. Right Softkey lets you select softkey actions or menu
items corresponding to the bottom right line on the
display screen. For example, when you receive an
incoming call, you would press
Ignore
(right softkey) to reject the call and route it to your
voicemail.
18. Navigation Key scrolls through the device’s onscreen
menus and options.
19. Mirror displays your reflection while taking a picture
or shooting video.
Section 2A. Device Basics 15
Device Basics

20.
Thumbwheel lets you navigate through menu
options (for example, when using the Quick
Launcher [page 18] or within your Contacts list.)
䡲 Press briefly to either select an option or execute
the selected application.
䡲 Press and hold to display the Quick Launcher
screen (as shown on page 28).
21. Battery Cover covers and secures the internal
battery and the SIM card.
22. Camera Lens, as part of the built-in camera, lets you
take pictures and videos.
23. External Speaker allows you to hear the other caller
and the different ring tones or sounds offered by
your device.
16 Section 2A. Device Basics
24. Power/Accessory Interface Connector lets you connect
a power cable and optional accessories such as a
USB cable or wired headset for convenient handsfree conversations.
CAUTION! Inserting an accessory into the incorrect jack
may damage the device.
25. Volume Key allows you to adjust the audio volume
in standby mode or adjust the voice volume during
a call. The volume key can also be used to scroll
up or down to navigate through the different menu
options.
26. Power Button , located at the top of the device,
lets you both access a Quick List of functions and
power the device on and off (as shown on
page 24).
䡲 Press and release to access the Quick List screen
where you can access the device Ringer profiles
and the Wireless Manager, and lock the device or
turn it off.
䡲 Press and hold to shut down the device or turn
the device back on.

27. microSD Slot lets you use the microSD card to
expand the memory of your device. (See “Using
Your Device’s microSD Card and Adapter” on
page 104.)
28. Back-Clear/Camera Access Key lets you not only
clear an entry and return to a previous menu, but
also activate the camera and video mode to take
pictures and videos. This button is also userconfigurable. (See “Device Customization” on
page 59.)
䡲 Press briefly to either clear an entry or go back to
a previously active menu.
䡲 Press and hold to launch the camera mode and
access the Pictures menu and either take pictures
or shoot videos.
Viewing the Display Screen
Your device’s display screen provides information
about your device’s status and options. The display can
be divided into five main areas
䡲 Status Icons: indicate your device’s current status.
䡲 Home screen: shows items such as device
numbers, menu icons, and other listings.
(For more information see page 45.)
● Recently Used Apps.: provides an icon list of
recently accessed/used applications or
features. This list becomes updated with each
consecutive application or feature which is
accessed/used.
● Recently Used Apps.: displays the nearest
upcoming event in your calendar. Select it and
press to access your Today Calendar.
● Message Access: provides quick access to the
two different message types: SMS (text
messages) and Email.
● Taskbar/Softkey: provides access to Windows
Mobile features such as the Start menu and
Contacts.
Section 2A. Device Basics 17
:
Device Basics

Status Icons
Home
Tas kba r/ Sof tke y
Quick Launcher
Recently Used
(Task Manager, Calendar,
Alarm, and Edit Menu)
Screen
Upcoming Events
Message Access
Apps.
X
䡲 Quick Launcher: appears as a scrollable list at the
far right of the screen when the thumbwheel is
pressed and held for more than three seconds.
18 Section 2A. Device Basics
This list identifies the symbols you’ll see on your
device’s display screen:
shows your current signal strength. (The more
lines you have, the stronger your signal.)
indicates the wireless feature has been turned
off. Your device is in Flight mode and your
cellular radio is turned off.
indicates there is no service available and your
phone is searching for a network.
indicates your phone is in a roaming area.
indicates a data call is in progress and
provides its signal strength. (The icon is
animated while a data session is active.)
indicates there are no data sessions active.
X
indicates the 1xRTT high speed data transfer
protocol is currently in use.

indicates your device has high speed data
EvEv
X
X
OFF
AUTO
service (EV-DO protocol), which is required for
video streaming and downloads.
indicates a Voice call is in progress and
provides its signal strength.
indicates you missed a call.
indicates the speakerphone is enabled.
indicates you have new text messages.
indicates you have voicemail messages.
(Press and hold
indicates you have new email messages.
indicates your device’s location feature is on.
indicates your device’s location feature is off.
indicates the device has not detected an
internal GSM SIM card.
indicates ringer volume is set to vibrate.
to call your voicemail box.)
indicates Silence All mode is enabled. The
ringer for the selected profile is set to Off.
indicates your device is operating in TTY
mode.
indicates the camera is enabled.
indicates the camcorder is enabled.
indicates the self-timer function is enabled.
indicates the shooting mode.
indicates the white balance has been set to
automatic.
indicates the white balance has been set to
daylight.
indicates the white balance has been set to
cloudy.
indicates the white balance has been set to
tungsten.
Device Basics
Section 2A. Device Basics 19

indicates the white balance has been set to
x
HELP
fluorescent.
indicates the effects mode.
launches the shortcut key screen for both
camera and camcorder mode.
launches the options menu for both the
camera and camcorder.
indicates battery charge level (icon shown is
full).
indicates battery charge level (icon shown fully
discharged and device will power down.)
indicates battery is being charged.
indicates that Bluetooth
and enabled.
20 Section 2A. Device Basics
®
technology is active
Using Softkeys
Softkeys are special keys whose functions are
determined by the currently active dialog, menu, or
page. The current function for these keys is displayed
above them on the screen. Your device has a left ( )
and a right softkey ( ).

Using the End Key
The key can function differently depending on your
current task, location, and the length of the press.
䊳 In Idle mode, while in a menu or page:
䡲 A brief press takes you back to the Home Screen
䡲 A longer press locks the device.
While in a voice call:
䡲 A brief press hangs up the current call.
䡲 A longer press locks the device.
䊳 While in a data call:
䡲 A brief press puts the device into a dormant
mode. (A second press will end the data call.)
䡲 A longer press locks the device.
Completing a Hard Reset of the Device
WARNING
This reset will delete any installed applications
or personal information saved to the device.
Contacts stored on the SIM card will not be
deleted.
1. Remove the storage card from the device, if one is
present.
A hard reset will erase the cipher key used for
Note
encrypting data on the microSD card. Please ensure
that all personal data stored on this card is backed
up to a computer so that it can later be transferred
back to the memory card.
2. With phone powered off:
䡲 Press and hold both the left and right softkeys.
䡲 While both softkeys are held down, press and
hold until the unit powers on.
3. As the device begins to power on, release both
softkeys.
Once the phone powers on, you should see an
Note
onscreen alert message (a white screen with blue
text). If you do not see this screen, let the device
power up normally, turn it off again, and then repeat
steps 2 and 3.
Section 2A. Device Basics 21
Device Basics

4.
Immediately after the alert screen appears, press
the left softkey.
Important
You have only five seconds to press the left
softkey. Otherwise, the device will start up
normally and the reset will be unsuccessful.
5. If the reset was successful, the device displays a
pop-up message stating the device is currently
reformatting. This process can take several
minutes. Allow the process to finish without
interruption.
6. When the device has finished resetting, follow the
Windows Mobile setup instructions displayed on
the screen. See “Initial Setup” on page 3.
Features of Your Device
The Samsung ACETM is lightweight, easy-to-use, and
reliable, and it offers many features and service
options. This list previews some of those features and
provides page numbers where you can find out more:
22 Section 2A. Device Basics
䢇 Digital dual-band capability allows you to make and
receive calls while on the Sprint National Network
and to roam on other 1900 and 800 MHz digital
networks where Sprint has implemented roaming
agreements (page 72).
䢇 Windows Mobile 6.1 comes with a Getting Started
Center right on the phone. This application helps you
set features such as date and time and ring tones,
set up your email accounts, transfer music, and
much more.
䢇 The Recent Programs page gives you instant access
to your most recently used programs. These
programs are also displayed in a row of icons at the
top of the Home screen (page 17).
䢇 Task Manager lets you manage your device’s
memory, processor usage, and battery life more
effectively by letting your close or switch between
different programs (page 51).
䢇 Windows Mobile
®
6.1 offers support for many types
of Office 2007 files as well as the Adobe PDF 1.8 file
format (page 103).

䢇 Improved messaging capabilities such as Threaded
Text Messaging (page 163), Recipient
auto-completion (page 161), and multi-item
selections make texting and emailing easier and
quicker (page 164).
䢇 Live Search
®
for Windows Mobile uses GPS to find
what you want by direction or category and provides
you with real-time traffic updates and movie listings
for your area (page 140).
䢇 Sprint Navigation uses built-in GPS technology to
quickly locate nearby companies and services
(page 186).
䢇 Internet Explorer lets you copy text from any web
page and then paste it into other applications, such
as SMS text or email (page 137).
䢇 The preinstalled SIM card lets you use your device
when you are traveling outside of the U.S.
(page 174).
䢇 Windows Mobile
®
6.1 comes preinstalled and turns
your device into a portable computer that can use
mobile versions of Microsoft Office programs such as
Word, Excel, and PowerPoint. (For more information,
please see the Setting Up Email guide included with
your device.)
䢇 Your device gives you access to the Sprint Software
Store, where you can purchase not only Windowsbased applications, but also Games, Ringers, and
additional Screen Savers (page 168).
䢇 The Samsung ACE
TM
uses ActiveSync® 4.5 to keep
your computer and your device synchronized
(page 144).
䢇 Sprint TV (page 169) lets you enjoy live and
streaming video and audio on your device.
䢇 Data services (page 70) lets you get exciting On
Demand media content through your device.
䢇 SMS Text Messaging (page 160) provides quick and
convenient messaging capabilities.
䢇 Your Contacts list can be stored onto either your
Phone or internal SIM card (page 80).
Section 2A. Device Basics 23
Device Basics

䢇 The built-in Calendar offers several personal
information management features to help you
manage your busy lifestyle (page 88).
䢇 The Location feature works in connection with
available location-based services (page 51).
䢇 The keypad lets you quickly type messages with one
keypress per letter (page 38).
䢇 Speed dial lets you dial device numbers with one or
two keypresses (page 37).
䢇 The Internet Sharing feature lets you use your device
as a modem to connect your computer to the
Internet anywhere on the Sprint National Network
(page 143).
Your device and service provide access to the Sprint
Note
Mobile Broadband Network and its enhanced data
services, including Sprint TV, fast Web access,
downloadable games, ringers, and applications, and
more.
24 Section 2A. Device Basics
Turning Your Device On and Off
Turning Your Device On
1. Press , located at the
top of the device.
Once your device is on, it may
display “Searching for
Service.” When your device
finds a signal, it automatically
enters standby mode – the
device’s idle state. At this
point, you are ready to begin
making and receiving calls.
After five seconds of inactivity,
the Power Save mode is
activated.
In Power Save mode, your device searches for a signal
periodically without your intervention.
The Power Save feature conserves your battery
Note
power when you are in an area where there is no
signal.

Turning Your Device Off
䊳 Press and hold for two seconds until you see
the powering down animation on the display
screen.
Your screen remains blank while your device is off
(unless the battery is charging).
Using Your Device’s Battery and Charger
WARNING
These batteries and accessories can be found at Sprint
Stores or through Samsung
order. They’re also available at
Use only Sprint-approved or Samsungapproved batteries and chargers with your
device. Failure to use a Sprint-approved or
Samsung approved battery and charger may
increase the risk that your device will overheat,
catch fire, or explode, resulting in serious
bodily injury, death, or property damage.
®
; or call 1-866-343-1114 to
www.sprint.com.
Battery Capacity
Your device is equipped with a Lithium Ion (Li-Ion)
battery. It allows you to recharge your battery before it is
fully drained. A fully charged battery provides up to 4.3
hours of continuous digital talk time.
When the battery reaches 5% of its capacity, the battery
icon ( ) blinks. When there are approximately two
minutes of talk time left, the device sounds an audible
alert and then turns off.
Long backlight settings, searching for service, vibrate
Note
mode, browser use, and other variables may reduce
the battery’s talk and standby times.
Watch your device’s battery level indicator and
Tip
charge the battery before it runs out of power.
Installing the Battery
䊳 See “Setting Up Your Device” on page 2.
Section 2A. Device Basics 25
Device Basics

Removing the Battery
1. Make sure the power is off so that you don’t lose
any stored numbers or messages.
2. Press down on the upper end of the battery
compartment cover (just above the embossed
Samsung logo), slide the cover off, and remove the
battery from the device.
WARNING
26 Section 2A. Device Basics
Do not handle a damaged or leaking Li-Ion
battery as you can be burned.
Charging the Battery
Charge your battery as soon as possible so you can
begin using your device.
Keeping track of your battery’s charge is important. If
your battery level becomes too low, your device
automatically turns off, and you will lose any
information you were just working on.
For a quick check of your device’s battery level, glance
at the battery charge indicator located in the upperright corner of your device’s display screen. If the
battery charge is getting too low, the battery icon
( )blinks and the device sounds a warning tone.
Always use a Sprint-approved or Samsung-approved
desktop charger, travel charger, or vehicle power
adapter to charge your battery. Included in the
packaging is a non-charging USB cable used for data
transfer.
After setting up your phone, you should charge the
battery for at least four hours to ensure it is fully
charged.

Conserving Battery Power
Correct
+
Incorrect
Each unused background application both increases
the drain on your battery and decreases your device’s
performance. Close any unused applications via the
Tas k Ma nag er.
1. Press Start (left softkey) > All Programs (left softkey) >
Accessories > Task Manager.
2. Select an application from the list and press Stop
(left softkey).
See “Navigating Through Device Menus” on page 28
Note
for more detailed information about using your
device's menus.
Using the Charger
䊳 Plug the flat end of the charger into the device’s
power/accessory interface connector and the
other end into an electrical outlet.
Device Basics
With the Sprint-approved Li-Ion battery, you can
recharge the battery before it becomes completely run
down.
Section 2A. Device Basics 27

Navigating Through Device Menus
The navigation key on your device lets you scroll
through menus quickly and easily. The scroll bar at the
right of the menu keeps track of your position in the
menu at all times.
To navigate through a menu, one option is to press the
navigation key up or down. If you are in a first-level
menu, such as
menu by pressing or to the previous menu by
pressing .
A second navigation option
is to use the thumbwheel
located on the right side of
the device. While in a list, the
thumbwheel can be used to
quickly scroll through
available options.
For a diagram of your
device’s menu, please see
“Your Device’s Menu” on
page ii.
28 Section 2A. Device Basics
Settings, you may navigate to the next
Selecting Menu Items from the Main Menu
As you navigate through the main menu screen,
applications (programs) are highlighted. Select any
application by highlighting it and pressing . (If your
display is set to List view [page 48], you can select any
numbered option by pressing the corresponding
number on the keypad.)
For example, if you want to adjust a device setting:
1. Press Start (left softkey) > All Programs (left softkey) to
access the main menu.
2. Pressing Start displays the eight most Recent
Programs you have used. If the application you are
looking for is not present, press
(left softkey) to display all the programs on your
device.
3. Select Settings, and then select Sounds by pressing
(if your device is set to list view [page 48]) or
by highlighting it (using either the navigation key or
thumbwheel) and pressing
All Programs
.

For the purposes of this guide, these steps
Note
Important
condense into “Press
> Sounds.”
If your device is set to Grid view (default
setting), you can scroll through All Programs
simply by pressing the navigation key down.
However, in List view, you may need to press
More (left softkey) one or more times to find a
particular program. (See “Selecting the Start
Menu Style” on page 48.)
Start > All Programs > Settings
Backing Up Within a Menu
To go to the previous menu:
䊳 Press .
To return to standby mode:
䊳 Press .
Displaying Your Phone Number
䊳 Press Start > All Programs > Settings > Phone
Information. (Your phone number and other
information about your device will be displayed.)
Making and Answering Calls
Making Calls
Placing a call from your device is as easy as making a
call from any landline device. Enter the number, press
, and you’re on your way to clear calls.
1. Make sure your device is on.
2. Enter a phone number from standby mode. (If you
make a mistake while dialing, press to erase
the numbers.)
3. Press . (To make a call when you are roaming
and Call Guard is enabled, select
press . See “Setting Your Device’s Roam
Mode” on page 73.)
Section 2A. Device Basics 29
Roam Call and
Device Basics

4.
Press when you are finished.
To redial your last outgoing call, press TAL K ()
Tip
twice.
When making calls off the Sprint National Network,
always dial using 11 digits (1 + area code + phone
number).
You can also place calls from your device by using
speed dialing numbers from your Contacts (page 37)
and using your Call History listings (page 78).
Dialing Options
When you enter numbers in standby mode, you will
see a variety of dialing options displayed as softkeys on
the device’s display screen.
To initiate an option, press the corresponding softkey.
䢇 Save: Enter a seven-digit or ten-digit number (phone
number and area code) and press
save the phone number in your Contacts. (See
“Saving a Phone Number” on page 35.)
30 Section 2A. Device Basics
Save () to
䢇 Menu: Accessed by pressing Menu (), provides
you with the following options:
䡲 Open: Allows you to display information specific to
the current caller (if they have been previously
entered into the Contacts list).
䡲 Send Text Message: Allows you to send a text
message to the currently entered (or selected)
number.
䡲 View: Allows you to filter your onscreen list of
numbers by one of three criteria: Calls and
Contacts, All Calls, or Speed Dial.
● The Speed Dial filter allows you to enter a
number (1-99) and then display any speed
dial entries which match the specified speed
dial location. Press to dial the speed dial
number. (See “Assigning Speed Dial
Numbers” on page 81.)

To speed dial a phone number from standby mode,
Tip
press and hold the speed dial number. If the speed
dial number is two digits, enter the first digit, and then
press and hold the second digit. (For information on
setting up speed dial numbers, see “Assigning
Speed Dial Numbers” on page 81.) (This feature will
not work when you are roaming off the Sprint
National Network; when roaming you must dial using
eleven digits [1 + the area code + the seven-digit
phone number.])
Answering Calls
1. Make sure your device is on. (If your device is off,
incoming calls go to voicemail.)
2. Press to answer an incoming call.
– or –
Answer (left softkey). (Depending on your
Press
settings, you may also answer incoming calls by
pressing any number key. See “Call Options” on
page 52. for more information.)
Your device notifies you of incoming calls in the
following ways:
䢇 The device rings or vibrates.
䢇 The indicator light flashes.
䢇 The backlight illuminates.
䢇 The screen displays an incoming call message
screen.
If the incoming call is from a number stored in your
Contacts, the associated name is displayed. If the
incoming caller is not stored in your Contacts list, only
the phone number is displayed. The caller’s assigned
image may also be displayed, if available.
For all incoming calls, the
following options are
displayed. To select an
option, press the
corresponding softkey.
䢇 Answer to answer the
incoming call. (This is the
same as pressing .)
䢇 Ignore to send the call to your voicemail box. (This is
the same as pressing .)
Section 2A. Device Basics 31
Device Basics

When your device is off, calls go directly to voicemail.
Note
Ending a Call
䊳 Press .
Using Call History
When you place, accept, or miss a call, a record of the
call is saved in the Call History list. When you view the
numbers in this list, an icon to the left of the number
indicates the call type:
Dialed: Indicates all outgoing calls
made from your device.
Missed: Indicates any missed calls.
Received: Indicates any received
calls that were answered.
For more detailed information about the Call History,
see “Call History” on page 75.
32 Section 2A. Device Basics
Making Calls from Call History
1. Press Start > All Programs > Call History.
2. Use either the navigation key or thumbwheel to
scroll through the available list.
The previous two steps can be shortened by
Tip
pressing
from the Home screen to display a list of
recent calls.
3. Highlight the number and press .
Missed Call Notification
When an incoming call is not answered, the missed
call icon ( ) is displayed at the top of your screen.
To display a missed call entry from the ‘Frequently used’
menu:
1. Use the thumbwheel to scroll through the list of
frequently used applications.
2. With the missed call menu displayed, either press
or press and release the thumbwheel to
display the Call History list.

To display a missed call entry from standby mode:
1. Press Start > All Programs > Call History > Menu >
Filter > Missed Calls.
2. Select the missed call entry you wish to view. (To
call that number, press .)
Calling Emergency Numbers
You can place calls to 911 (dial ), even if
your device is locked or your account is restricted.
When you place an emergency call, your device
Note
automatically enters Emergency mode and remains
in this mode until you manually exit.
During an emergency call, press
display your options. Select an option and press .
䢇 Speakerphone On to activate speaker device mode. (If
you are in speaker device mode, the option is
displayed as
Tip
Speakerphone Off to deactivate.)
Press My Phone (left softkey) to display your phone
number during an emergency call.
Menu (right softkey) to
To exit Emergency mode:
1. Press to end a 911 call.
䡲 When calling a non-emergency number, you
must press
Yes (left softkey) to exit the Emergency
callback mode.
When you are in Emergency mode, you can exit only
Note
from the Alert menu.
To deactivate the Emergency callback mode:
1. Press to end a 911 call.
2. Call a non-emergency number.
3. Read the Alert notification screen.
4. Press Yes (left softkey) to exit the Emergency call
only mode and return to normal device operation
or
No (right softkey) to remain in this mode.
Section 2A. Device Basics 33
Device Basics

Enhanced 911 (E911) Information
This device features an embedded Global Positioning
System (GPS) chip necessary for utilizing E911
emergency location services where available.
When you place an emergency 911 call, the GPS
feature of your device seeks information to calculate
your approximate location. Depending on several
variables, including availability and access to satellite
signals, it may take up to 30 seconds or more to
determine and report your approximate location.
IMPORTANT
Always report your location to the 911
operator when placing an emergency call.
Some designated emergency call takers,
known as Public Safety Answering Points
(PSAPs) may not be equipped to receive GPS
location information from your device.
In-Call Options
Pressing Menu (right softkey) during a call displays a list
of available in-call features. To select an option, press
the corresponding keypad number or select the option
and press . The following options may be available
through the Options menu:
34 Section 2A. Device Basics
䢇 Mute/Unmute to toggle the onboard microphone’s
mute state (on/off).
䢇 Speakerphone On or Speakerphone Off to route the
device’s audio through the speaker or through the
earpiece.
䡲 Select Speakerphone On to route the device’s audio
through the speaker. (You can adjust the speaker
volume using the volume keys on the side of the
device.)
䡲 Select Speakerphone Off to use the device’s
earpiece.
WARNING
䢇 Turn Hands free On or Turn Hands free Off to toggle the
Because of higher volume levels, do not
place the device near your ear during
speakerphone use.
state of the Bluetooth hands free feature between on
or off.
䢇 Contacts to display your Contacts list.
䢇 Save to Contact to store the current phone number as
a new entry into your Contacts list.
䢇 View Contact to view details (if caller has already been
saved to Contacts).

䢇 View Calendar to display your calendar entries.
䢇 Call History to display Call History list.
During a call, the left softkey functions as the
Mute
button. Press it to mute the device’s microphone for
privacy. Press it again to
Unmute the device.
End-of-Call Options
After you receive a call from or make a call to a phone
number that is not in your Contacts, the phone number
and the duration of the call are displayed. Press
(left softkey) to add the new number to your Contacts.
(See “Saving a Phone Number” below.)
After you receive a call from or make a call to a phone
number that is already in your Contacts, the entry
name, phone number, and the duration of the call are
displayed.
䊳 Press Menu > View Contact to view the Contacts
information for the number.
The End-of-Call options are not displayed for calls
Note
identified as No ID or Restricted.
Save
Saving a Phone Number
Your device can store up to 12 phone numbers in each
of 10 Contacts entry types. Each entry’s name can
contain 255 characters. Your device automatically sorts
the Contacts entries alphabetically. (For more
information, see “Contacts” on page 80.)
To save a number from standby mode:
1. Enter a phone number and press Save (left
softkey).
2. Select <New Contact> and press .
3. Use the keypad to enter a first and last name for
the new contact name. (You can also choose to
update the number at this time.)
4. Use the navigation key to select a number type for
the new contact from one of the following entries:
䡲 Mobile
䡲 Work
䡲 Home
䡲 Work 2
䡲 Home 2
䡲 Company
Section 2A. Device Basics 35
Device Basics

䡲 Pager
䡲 Car
䡲 Assistant
䡲 Radio
5. Select Save.
Finding a Phone Number
You can search Contacts
entries for phone numbers
that contain a specific
string of numbers.
1. Enter one or more
digits in standby
mode. (Only numbers
matching your entry
are displayed. The more numbers you enter, the
more specific the search becomes.)
䡲 Although your current Contacts list is displayed in
alphabetical order, any recent numbers matching
the criteria are displayed.
2. To dial the number, press .
36 Section 2A. Device Basics
Plus (+) Code Dialing
When placing international calls, you can use Plus
Code Dialing to automatically enter the international
access code for your location (for example, 011 for
international calls made from the United States). This
key can also be assigned, not only an International
prefix such as 011, but also a Country code and City
code. See “Assigning an International Country Code”
on page 53.
1. Press and hold until a “+” is displayed on your
device’s display screen.
2. Dial the country code and phone number you’re
calling, and press . (The access code for
international dialing will automatically be dialed,
followed by the country code and phone number.)

Dialing From the Contacts List
1. Press Contacts (right softkey) to list the entries.
2. Use the thumbwheel to scroll through the list of
available contacts and select the entry you want to
call.
3. Press to dial the entry’s default phone number.
– or –
To dial another number assigned to the contact
entry, select the name and press , and then
select a number and press .
Using Speed Dialing
You can store up to 89 numbers in your device’s speed
dial memory to make contacting friends and family as
easy as pressing a button or two. With this feature, you
can dial speed dial entries using one keypress for
locations 2–9 or two keypresses for locations 11–99.
You can store a total of 89 numbers into speed dial
Note
locations. Numbers 0, 1, and all digits ending in 0 (10,
20, 30, etc.) are reserved and cannot be overwritten.
Speed dial 1 is reserved for quick access to
Voicemail.
To use One-Touch Dialing for speed dial locations 2–9:
䊳 Press and hold the appropriate key for
approximately two seconds.
䡲 If a number has been assigned to the current
number, the display confirms that the number has
been dialed when it shows “Calling...”.
䡲 If an application has been assigned to the
number, the corresponding application will
launch. Assigning an Application to a Speed Dial
Location.
To use Two-Touch Dialing for speed dial locations 11–99:
1. Press the first digit.
2. Press and hold the second digit for approximately
two seconds. The display confirms that the number
has been dialed when it shows “Calling...”.
Section 2A. Device Basics 37
Device Basics

Speed dialing is not available when you are roaming;
Note
when you are roaming off the Sprint National
Network, you must always dial using eleven digits
(1 + area code + number).
To manage all of your speed dial entries, press
All Programs > Accessories > Speed Dial
䡲 See “Using Speed Dial” on page 61.
.
Start >
Entering Text
Selecting Characters
Your device provides convenient ways to enter words,
letters, punctuation, and numbers whenever you are
prompted to enter text (for example, when adding a
Contacts entry or when using Microsoft
SMS Text Messaging).
The built-in keypad supports quick and easy text input,
just as you would when using a computer’s keyboard.
1. When you display a screen where you can enter
text, use the keypad to enter different character
types:
38 Section 2A. Device Basics
®
Outlook® and
The key can also be used to quickly launch up to
Note
four user-defined features or applications. See
“Customizing the Function Key” on page 60.
Function: Allows you to use characters
displayed at the top of the QWERTY
keys. Examples: $, @, #, ?
CAPS /SHIFT: Converts the alphabetic
character into uppercase. Changes the
text input mode to Upper/Lower case
mode.
Symbol: Launches the Symbols page
from where you choose from an
extensive list of symbols and other
character sets.
Enter: Moves the insertion point to the
next line in a message.
Delete Character: Deletes the previous
character, similar to the backspace key
on a computer keyboard.

2. Select one of the following character types:
B i l l
BILL
䡲 Letters to enter the alphabetic characters
associated with each key on the keypad. (See
page 39.)
䡲 Numbers to enter numbers by pressing the
numbers on the keypad. (See page 40.)
䡲 Symbols to enter symbols and “emoticons.” (See
page 40.)
䡲 My Text to enter preprogrammed messages.
(See page 40.)
The keypad provides dual-use keys labeled with
alphabetic characters on the lower half and numbers
and symbols on the upper half. Press the key
corresponding to the character you want to enter.
Entering Characters
Entering Uppercase and Lowercase Letters
1. Press to make the next character uppercase.
Characters revert back to lowercase after the next
character is typed.
2. Press the corresponding text keys.
䡲 For example, to enter the word “Bill,” type the
keypad sequence below. If you make a mistake,
press to erase a single character.
䡲 Press and hold to erase an entire word.)
Device Basics
䡲 To enter all uppercase characters, press
before each letter.
Section 2A. Device Basics 39

Entering Numbers
9:30
The keypad can be used to enter numbers, letters, and
symbols. Although these keys default to text (letters),
numbers can be input by using in conjunction with
the correct number key.
1. Press to input the character on the top row of
the next key pressed.
2. Press the corresponding keys. (For example, to
enter “9:30,” you would use the keypad sequence
below. If you make a mistake, press to erase a
single character. Press and hold to erase an
entire word.)
Entering Symbols and Preset Messages
Symbols can be entered from the keypad (using the
key) or from the Symbols page (accessed using
the key).
To enter symbols:
1. Position the cursor where you want the symbol to
appear within your message.
2. Press and use the navigation key to highlight a
symbol. Press to insert the symbol into your
message. There are multiple pages of available
symbols.
䡲 Press Next (right softkey) to open the next page of
symbols.
䡲 Press Previous (left softkey) to return to the
previous page of symbols.
– or –
1. Position the cursor where you want the symbol to
appear within your message.
40 Section 2A. Device Basics

2. Press and then press the key for the symbol
Ted @
you wish to insert.
To enter preset messages:
1. Position the cursor where you want to insert the
preset text into your message.
2. Press Menu > My Text.
3. Scroll to a preprogrammed message and
press
Note
.
Preset messages (My Text) make composing text
messages easier by allowing you to enter predefined
text, such as “Meet me at,” or a customized preset
message of your own. (For more information on
preset messages, please see “Using Preset
Messages” on page 165.)
Device Basics
Section 2A. Device Basics 41

Section 2B
Sound Settings
Your Device’s Settings
⽧ Sound Settings
⽧ Display Settings
⽧ Power Manage ment
⽧ Location Settings
⽧ Call Options
⽧ Messaging Settings
⽧ TTY Use With Sprint Service
⽧ Device Customization
⽧ Using Speed Dial
You can customize your device to sound, look, and operate just
the way you want it to. This section describes how to
change your device’s settings to best suit your needs.
Take a few moments to review these options and to
adjust or add settings that are right for you.
42 Section 2B. Your Device’s Settings
Ringer Types
Ringer types help you identify incoming calls and
messages. You can assign ringer types to individual
Contacts entries, types of calls, and types of messages.
There are five main sound categories available:
䢇 Ring Tone: assigns ring tones for incoming calls.
䢇 Notification: assigns ring tones for categories such as
new email, new text messages, new voice messages,
and new instant messages.
䢇 System Sound: assigns ring tones for system
categories such as Exclamations, Questions, and
Warnings.
䢇 Keypad Tone: assigns a tone for use with keypad
presses.
䢇 Call Alert: assigns ring tones for call-specific activities
such as minute warning, connection, and signal
fade.
䢇 R2VS: assigns a simulated audio effect to the sound
being routed through a connected headset.

Selecting Ringer Types for Voice Calls
Your device provides a variety of ringer options that
allow you to customize your ring and volume settings.
These options allow you to identify incoming calls by
the ring.
1. Press Start > All Programs > Settings > Sounds > Ring
Ton e.
2. Use your navigation key to scroll through the
available ringers. A sample ringer will sound as
you highlight each option.
3. Press Done (left softkey) to assign a ringer.
Selecting Ringer Types for Message Notifications
1. Press Start > All Programs > Settings > Sounds >
Notification.
2. Select New e -mail, New text message, New voice
message, or New instant message.
3. Use your navigation key to scroll through the
available ringers. A sample ringer will sound as
you highlight each option.
4. Press Done (left softkey) to assign a ringer.
Selecting Ringer Types for System Sounds
1. Press Start > All Programs > Settings > Sounds >
System Sound.
2. Select Exclamation, Question, or Warnings.
3. Use your navigation key to scroll through the
available ringers. A sample ringer will sound as
you highlight each option.
4. Press Done (left softkey) to assign a ringer.
Adding a Music File to Your Ring Tones
You can also add your own supported music file to the
Ring Tone list by using ActiveSync
the device’s Sounds folder. See “Creating a Custom
Ring Tone” on page 151.
®
to copy your file to
Selecting a Keypad Tone
Your device offers a number of options for selecting the
audible tones accompanying a keypress.
1. Press Start > All Programs > Settings > Sounds >
Keypad Tone.
Section 2B. Your Device’s Settings 43
Settings

2.
Use your navigation key to scroll through the
available tones (default is
sound as you highlight each option.
Click). A sample tone will
3. Press Done (left softkey) to assign a tone.
Call Alert Notification
Your device can alert you with an audible tone when
you change service areas, once a minute during a
voice call, or when a call has been connected.
1. Press Start > All Programs > Settings > Sounds > Call
Alert.
2. Select Minute beep, Connect tone, or Signal fade tone.
3. Select On or Off for each category and press Done
(left softkey).
Selecting an R2VS Setting
R2VS™ significantly enhances the quality of mono and
stereo audio by simulating stereo sound through a
connected headset, thereby creating improved
dynamics and bass performance. R2VS provides
panoramic three-dimensional audio that extends the
sound beyond the speakers or headphones
44 Section 2B. Your Device’s Settings
themselves. These enriching effects are especially
noticeable on digitally compressed audio formats such
as MP3 and WMA.
To utilize this feature, your device needs to be
connected to a headset via the Power/Accessory
Interface Connector.
1. Press Start > All Programs > Settings > Sounds > R2VS.
2. Use your navigation key to scroll through the
available stereo settings.
䡲 Choose None (Mono), 3D Sound, or M-Theater.
3. Press Done (left softkey) to assign a setting.
Assigning Sound Profiles
Using profiles, you can adjust and customize device
tones for different events or environments and then
apply the settings as a group. The currently selected
profile is displayed in the upper-right section of the
Home screen.
1. Press Start > All Programs > Settings > Profiles.
2. Select Normal, Silent, Vibrate, Outdoor, or Automatic
and press
Done (left softkey).

Device Icons
Tas kb ar/Soft key
Home
screen
Quick
Launcher
You can quickly change the profile by briefly pressing
Tip
and then releasing the
want from the Quick List and press .
You can quickly activate or deactivate the Silent
profile by pressing and holding
screen.
key. Select the profile you
Customizing Sound Profiles
1. Press Start > All Programs > Settings > Profiles.
2. Select the desired profile you want and press
Menu > Edit
3. Use the navigation key ( ) to change the
settings in each field. Available options may differ
depending on the selected profile.
.
4. When you have finished, press Done (left softkey).
Resetting a Sound Profile to Factory Default
1. Press Start > All Programs > Settings > Profiles.
2. Select the desired profile you want to revert and
press
Menu > Reset to default
3. Press Done (left softkey) complete the update.
.
from the Home
Display Settings
Configuring the Home Screen
The Home screen is displayed on your device while in
standby mode. From here, you can view important
information for the day or messages at a glance. You
can also quickly switch to programs you’ve recently
accessed.
Settings
Section 2B. Your Device’s Settings 45

The standby mode displays the Home screen from
where you can:
䢇 Access your Contacts List
䢇 Review upcoming appointments
䢇 Access unread SMS (text messages), email, and
voicemail messages.
䢇 Launch the most recently accessed programs or
change the sound profile option (top of screen)
䢇 Access the Quick Launcher using the thumbwheel to
provide access to some common features such as
the Task Manager, Alarms, Calendar, and Edit menu.
The Home screen can be quickly accessed from any
menu or screen by pressing . See “Viewing the
Display Screen” on page 17.
䊳 Update the Home screen settings by pressing
Start > All Programs > Settings > Display > Home Screen.
The following Home screen settings are available:
䡲 Home screen layout: Select the layout to be used for
the Home screen.
䡲 Color scheme: Select the color scheme to be used
for the Home screen.
46 Section 2B. Your Device’s Settings
䡲 Background image: Select an image to use as a
background image on the Home screen.
䡲 Time out: Specify the length of time the device
waits before returning the display to the Home
screen if the device is not used.
Setting the Home Screen Properties
Customize your Home screen’s display appearance by
selecting a new appearance and layout.
1. Press Start > All Programs > Settings > Display > Home
Screen > Home screen layout.
2. Use the navigation key to select an option.
3. Press Done (left softkey) to store the new selection
and return to the Home Screen.
Displaying the Recent Programs Screen
The Recent Programs screen displays up to eight of
the most recently accessed applications. These
applications are also displayed as a row of icons at the
top of the Home screen.
1. Press Start > All Programs > Settings > Display > Home
Screen.

2. Use the navigation key to highlight the “Show
Recent Programs” field and press to select the
check box.
䡲 Removing the check mark turns off the Recent
Programs screen.
䡲 When this box is checked, you will see a Recent
Programs screen after pressing
● In order to continue to your menu applications
Start.
from the Home page, you would need to press
All Programs (left softkey) to access the full Start
menu. (See “Selecting Menu Items from the
Main Menu” on page 28 for more details.)
The procedures in this guide are described with this
Note
feature turned on (active).
Changing the Color Scheme
Customize your device’s display appearance by
selecting a color scheme to reflect your personality.
1. Press Start > All Programs > Settings > Display > Home
Screen > Color scheme.
2. Use the navigation key to select an option.
3. Press Done (left softkey) to assign the color scheme
and return to the previous screen.
Changing the Display Screen Wallpaper
Choose what you see on the display screen while in
standby mode. This selected image is displayed as the
Home screen background image. The image can be
chosen from either the default set or from a My Pictures
folder.
1. Press Start > All Programs > Settings > Display > Home
Screen > Background image.
If you delete the default display image, the Home
Note
screen layout may not work properly.
2. Use the navigation key to select an image. The list
is sequential and includes a listing of any stored
images (both on the device and within the optional
memory card).
3. Press Done (left softkey) to assign the image and
return to the previous screen.
Section 2B. Your Device’s Settings 47
Settings

Setting the Time-out Properties
Start menu
Grid style List style
Choose the time delay before the Home screen turns
off.
1. From standby mode, press Start > All Programs >
Settings > Display > Home Screen > Time out.
2. Use the navigation key to select an option.
3. Press Done (left softkey) to assign the time-out
value and return to the previous screen.
Selecting the Start Menu Style
The Home screen provides access to the start menu
using the Windows taskbar’s
1. From standby mode, press Start > All Programs >
Settings > Display > Start Menu Style.
2. Select Grid or List and press Done (left softkey).
Start button.
Important
48 Section 2B. Your Device’s Settings
If your device is set to Grid view (default
setting), you can scroll through All Programs
simply by pressing the navigation key down.
However, in List view, you may need to press
More (left softkey) one or more times to find a
particular program.

Power Management
You can conserve battery power by adjusting the time
out settings for the display, keypad, display backlight or
adjusting the display brightness.
Another new feature is the use of the Task Manager
that allows to more effectively manage battery life by
determining memory and processor usage by
manually turning off any unused applications. This
section also provides you with an additional indication
of your current main battery charge level.
Reviewing the Battery Charge Level
䊳 From the standby mode, press Start > All Programs >
Settings > Power Management.
Changing the Backlight Time-Out
Select the length of time the display backlight stays on
when you do not use the device.
1. From the standby mode, press Start > All Programs >
Settings > Power Management > Backlight time out.
䡲 Choose Never, 5 seconds, 10 seconds, 15 seconds,
30 seconds, or 60 seconds.
2. Press the navigation key left or right to select a new
time out setting and press
Long backlight time-out settings reduce the battery’s
Note
talk and standby times.
Done (left softkey).
Changing the Display Time-Out
Select the length of time the display stays on while on
either a direct connection to a power supply or when
functioning off battery power.
1. From the standby mode, press Start > All Programs >
Settings > Power Management > Display time out on AC
or
Display time out on Battery.
䡲 During standby, the device goes into sleep mode
after a specified period of time to conserve power.
Choose
Never, 10 seconds, 15 seconds, 30 seconds,
1 minute, 2 minutes, 5 minutes, or 10 minutes.
2. Press the navigation key left or right to select a new
time-out setting and press
Section 2B. Your Device’s Settings 49
Done (left softkey).
Settings

Changing the Brightness
Adjust your screen’s brightness to suit your
surroundings.
1. From the standby mode, press Start > All Programs >
Settings > Power Management > Display brightness.
䡲 Adjust the brightness level for the display.
Choose
Level 1 - Level 5.
2. Press the navigation key left or right to select a new
level setting and press
Done (left softkey).
Changing the Keypad Backlight Time-Out
Select the length of time the keypad backlight stays on
when you do not use the keys.
1. From the standby mode, press Start > All Programs >
All Programs > Settings > Power Management > Keypad
backlight time out.
䡲 Choose 1 second, 2 seconds, 3 seconds, 4 seconds,
5 seconds, or 10 seconds.
2. Press the navigation key left or right to select a new
time-out setting and press
50 Section 2B. Your Device’s Settings
Done (left softkey).
Restricting the Keypad Backlight Time-Out
By default, the keypad backlight time-out is enabled all
the time. With this setting you can restrict the time of
day that the keypad backlight time-out will be enabled.
For example, if you were planning a day at the beach
(when you would not need the keypad backlight), you
could disable the backlight time-out for that period.
1. From the standby mode, press Start > All Programs >
Settings > Power Management > Keypad backlight on.
2. Choose Any time (default) or Custom time. If you wish
to set a custom time, enter new start and end times
using the 24-hour time format (0000 - 2400), and
press
Done (left softkey). The backlight will be
enabled only during the start and end time that
you have set.

Using the Task Manager
Free up memory by closing applications that you are
not using.
1. Press and hold .
– or –
Press
Manager, and press .
2.
Use the navigation key to highlight an application
from the list. (The Task Manager screen lists the
amount of memory in MBs and processor usage
as a percentage.)
3. Press End Task (left softkey) to end the application.
(This frees up both the available memory and
processing capability.)
Note
to access the Quick List, select Task
The more applications running on your device, the
faster your battery power is depleted.
Location Settings
Your device is equipped with a Location feature for use
in connection with location-based services.
The Location feature allows the network to detect your
position. Turning Location off will hide your location
from everyone except 911.
Turning Location on will allow the network to detect
Note
your position using GPS technology, making some
Sprint applications and services easier to use.
Turning Location off will disable the GPS location
function for all purposes except 911, but will not hide
your general location based on the cell site serving
your call. No application or service may use your
location without your request or permission. GPSenhanced 911 is not available in all areas.
To enable your device’s Location feature:
1. From the standby screen, press Start > All Programs
> Settings > More... > More... > Other Settings > Location.
(The Location disclaimer will be displayed.)
2. Read the disclaimer and press OK (left softkey).
Section 2B. Your Device’s Settings 51
Settings

3.
Select Location on or 911 calls only and press Done
(left softkey).
When the Location feature is on, your device’s standby
screen will display the icon. When Location is set to
911 calls only, the icon will be displayed. In this
instance, the location feature is only enabled while in a
911 call so that emergency personnel can locate you
during an emergency.
Call Options
You can customize settings related to call functions.
Although your current phone number is displayed, it
cannot be changed in this menu. Call options allow
you to change the following settings:
䢇 Auto answer to set how quickly incoming calls are
automatically answered by the optional hands-free
car kit or earphone.
䢇 Any key answer to set up how you answer incoming
calls.
䢇 Voice mail number to set up the call-in number for your
assigned voicemail server.
52 Section 2B. Your Device’s Settings
The voicemail number is automatically set when you
Note
receive your device. You should not need to change
it unless otherwise instructed by Sprint.
䢇 International code to set up a standard international
long distance prefix.
To access the Call Options menu:
䊳 From the standby screen, press Start > All Programs
> Settings > Phone > Call Options.
Setting Any Key Answer
Select how to answer incoming calls on your device:
whether you want to be required to press either or
any number key.
When this option is enabled, you can answer incoming
calls by pressing any key, except for the following:
.

To enable Any key answer:
1. From the standby screen, press Start > All Programs
> Settings > Phone > Call Options.
2. Use the navigation key to highlight the “Any key
answer” field and press to select the check
box.
Auto Answer Mode
You may set your device to automatically pick up
incoming calls when connected to an optional handsfree car kit or headset.
To enable or disable auto-answer mode:
1. From the standby screen, press Start > All Programs
> Settings > Phone > Call Options > Auto Answer.
䡲 Choose Never, 2 seconds, 4 seconds, 6 seconds,
8 seconds or 10 seconds.
䡲 Assigning a time causes all calls to be
automatically answered when the device is
connected to a hands-free car kit or a headset
(sold separately).
2. Press the navigation key left or right to select a new
time setting and press
Done (left softkey).
Reviewing Your Voicemail Number
During the initial system setup, the device automatically
detected and set your voicemail number. If this field is
blank, you can manually enter the number obtained
from Sprint Customer Service.
Although this field is editable, it is not recommended
Note
that this number be altered.
Assigning an International Country Code
You can enter a frequently used country code that will
be entered when plus code dialing is used. The Plus
Code Dialing Key ( ) automatically dials the
international access code for the country in which you
are located.
This field allows you to prepend multiple dialing codes
to a number. This can be useful for long distance
dialing where the international prefix, country code, and
city code are already stored on the device.
Section 2B. Your Device’s Settings 53
Settings

To enable the International Country Code:
1. From the standby screen, press Start > All Programs
> Settings > Phone > Call Options > International code.
2. Use the keypad to enter an international country
code and press
䡲 When using Plus Code Dialing, the international
code defaults to the code for the country you are
currently in, but when a value is entered in this
field, all international calls begin with this new
value. This new value supersedes the default
International code.
䡲 As an example, if this field contained: 01159399,
then whenever you pressed , these numbers
would appear onscreen and then you would
simply key in the local phone number.
Done (left softkey).
3. Press Done (left softkey).
54 Section 2B. Your Device’s Settings
Messaging Settings
Staying connected to your friends and family has never
been easier. With your device’s advanced messaging
capabilities, you can send and receive many different
kinds of text messages without placing a voice call.
(For more information, see “Using SMS Text
Messaging” on page 160.)
Messaging settings make text messaging easier by
letting you decide how you would like to be notified of
new messages, create a signature with each sent
message, and create your own preset messages.
Accessing SMS Message Settings
1. From the standby screen, press Start > All Programs
> Messaging.
2. Use your navigation key to select Text Messages and
press
Select (left softkey) to launch the Text
Messages menu.
3. Press Menu > Tools > Options
.

Configuring Message Display Settings
1. From the standby screen, press Start >
All Programs > Messaging > Text Messages.
2. Press Menu > Tools > Options > Display
3. Use your navigation key to make the appropriate
selections.
䡲 Show date and time in the message list places
additional date and time information into the
message display.
䡲 Sort messages by provides different sorting criteria
for those messages currently in the message list:
● Choose from either: Date received, Subject,
Sender or Message type.
● Choose from either: Descending or Ascending.
䡲 After deleting or moving a message lets you set one of
the following options: Show next message, Show
previous message, or Return to message list.
4. Press Done (left softkey) to update these display
settings.
.
Setting Message Sending Options
1. From the standby screen, press Start >
All Programs > Messaging > Text Messages.
2. Press Menu > Tools > Options > Sending
.
3. Use the navigation key to highlight a field:
䡲 Include copy of original message when replying to
e-mail
䡲 Save copies of sent items places a copy into the Sent
folder.
4. Press Done (left softkey) to check the box.
To access the Messaging Settings menu, you can
Tip
Start > All Programs > Messaging >
also press
Menu > Settings.
Adding a Customized Signature
Add a customized signature to each message you
send.
1. From the standby screen, press Start >
All Programs > Messaging > Text Messages.
2. Press Menu > Tools > Options > Signatures
Section 2B. Your Device’s Settings 55
.
Settings

3.
Select either Text Messages or Outlook E-mail to
assign which message category will use the
configured signature.
4. Highlight the “Use signature with this account” field
and press to check the box. (If you do not wish
to attach a signature to your outgoing messages,
do not check the “Use signature with this account”
field
.)
5. Highlight the “Include when replying and
forwarding” field and press to check the box.
(This adds the signature to your outgoing
messages.)
6. Enter a signature and press Done (left softkey).
(See “Entering Text” on page 38.)
Using Preset Messages
Preset messages make sending text messages to your
friends, family, and co-workers easier than ever.
messages lets you quickly insert commonly used
phrases into the body of a new message or a reply to a
message.
56 Section 2B. Your Device’s Settings
My Text
To add a preset message to a text message:
1. While the message is open, position the cursor to
where you would like the preset message to go.
2. Press Menu
(right softkey)
> My Text
.
3. Highlight a message to insert, and press Insert
(left softkey).
To edit a preset message:
䊳 Select an existing preset message and press Menu
> Edit My Text and use the keypad to edit or replace
the message and press . (See “Entering Text”
on page 38.)
To delete a preset message:
1. Select a preset message and press Menu (right
softkey)
> Edit My Text. (The entire message is
highlighted.)
2. Press and hold to delete the message.
3. Press Done (left softkey) to complete the deletion.
– or –
Cancel (right softkey) to cancel the deletion.
Press

Updating Account Settings
You can request that a notification message be sent
back to your device when a message has been
successfully delivered and also that your callback
number will be attached to the message.
1. From the standby screen, press Start > All Programs
> Messaging > Text Messages.
2. Press Menu > Tools > Options > Account Settings
3. Use the navigation key to highlight a field and then
press to check the box.
䡲 Request delivery notifications launches an onscreen
pop-up message to notify you if the last outgoing
message was successfully delivered.
䡲 Always send callback number provides additional
information to the outgoing message by attaching
the number used in the Callback number field.
4. Select the Callback number field, and if desired,
use the keypad to enter a new callback number.
Press and hold to delete the previous
numbers.
5. Press Done (left softkey).
.
Deleting Old Messages
Delete individual messages you have read whenever
you like, or delete all old messages.
To delete read messages:
1. From the standby screen, press Start > All Programs
> Messaging > Text Messages.
2. Select a message from the list and press Delete
(left softkey).
3. When prompted to confirm the deletion, press Ye s
(left softkey).
To empty previously deleted messages:
1. From the standby screen, press Start > All Programs
> Messaging > Text Messages.
2. Press Menu > Tools > Empty Deleted Items
3. When prompted to confirm the deletion, press Ye s
(left softkey).
Section 2B. Your Device’s Settings 57
.
Settings

TTY Use With Sprint Service
A TTY (teletypewriter, also known as a TDD or Text
Telephone) is a telecommunications device that allows
people who are deaf, hard of hearing, or who have
speech or language disabilities, to communicate by
telephone.
Your device is compatible with select TTY devices.
Please check with the manufacturer of your TTY device
to ensure that it supports digital wireless transmission.
Your device and TTY device will connect via a special
cable that plugs into your device's headset jack.
If this cable was not provided with your TTY device,
contact your TTY device manufacturer to purchase the
connector cable.
When establishing your Sprint service, please call
Sprint Customer Service via the state
Telecommunications Relay Service (TRS) by first
dialing . Then provide the state TRS with
this number:
58 Section 2B. Your Device’s Settings
866-727-4889.
To turn TTY Mode on or off:
1. From the standby screen, press Start > All Programs
> Settings > More... > More... > Other Settings > TTY
2.
Read the onscreen alert message and press OK
.
(left softkey).
3. Press the navigation key left or right to select a
setting and press
䡲 Choose from TTY + Hear (HCO), TTY FULL,
TTY + Talk (VCO), or TTY OFF.
Done ().
In TTY Mode, the device’s standby screen will display
Note
the TTY icon. If TTY mode is enabled, the audio
quality of non-TTY devices connected to the headset
jack may be impaired.

WARNING
911 Emergency Calling
Sprint recommends that TTY users make
emergency calls by other means, including
Telecommunications Relay Services (TRS),
analog cellular, and landline communications.
Wireless TTY calls to 911 may be corrupted
when received by public safety answering
points (PSAPs), rendering some
communications unintelligible. The problem
encountered appears related to TTY
equipment or software used by PSAPs. This
matter has been brought to the attention of
the FCC, and the wireless industry and the
PSAP community are currently working to
resolve this.
Device Customization
Customizing the Side Back-Clear Key Settings
You can change the program
assigned to the side
Back-Clear key ( ) when it
is pressed and held.
1. Press Start > All Programs >
Settings > More...> More... >
Key Settings > Side Key
Settings.
䡲 Pressing and releasing
either clears an entry or
takes you back to a previously active menu.
䡲 By default, pressing and holding launches the
camera mode.
2. Use your navigation key to assign a new
application and press
Section 2B. Your Device’s Settings 59
Done (left softkey).
Settings

Customizing the Message Key
You can change the Message application assigned
when you press and release or press and hold the
Messaging key ( ). By default:
䢇 Pressing and releasing (“short press”) lets you
access the Text Message Inbox.
䢇 Pressing and holding (“long press”) activates the Text
Message Composer (for new messages).
1. Press Start > All Programs > Settings > More... >
More... > Key Settings > Message Key Settings.
2. Use your navigation key to assign either Text
Messages Inbox or Outlook Email Inbox in the ‘(Short
press)’ field.
3. Use your navigation key to assign either Text
Messages Composer or Outlook Email Composer in the
‘(Long press)’ field.
4. Press Done (left softkey) to store these settings and
return to the previous menu.
60 Section 2B. Your Device’s Settings
Customizing the Function Key
While in the Home screen, pressing and holding the
key in conjunction with other specified keys can
launch predefined applications or activate specific
functions.
To show the list of customizable application hot keys:
1. Press Start > All Programs > Settings > More...>
More... > Key Settings > Fn Key Settings.
2. Press Show List to both display a list of four
predefined application buttons and their currently
associated application.
䡲 The W key is by default associated with the World
Clock application.
䡲 The B key by default, will launch the Bluetooth
Settings menu.
䡲 The S key is by default associated with Service
Mode.
䡲 The F key by default, will launch the Fn Key
Settings menu.

To use the Fn key:
1. From the Home screen,
press and hold for a
few seconds to activate
the onscreen Launch
Application window.
This pop-up indicates
the current application assignments of the four
available hot keys.
䡲 As an example, to quickly change the device’s
service mode from CDMA to GSM, press and
hold , and then press (in the default
setting).
To change the hot keys:
1. Press Start > All Programs > Settings > More...>
More... > Key Settings > Fn Key Settings > Show List.
2. Select one of the four buttons from the list and
press .
3. From the Select an Item screen, use your
navigation key to choose an item and press .
(This list is extensive and you should note that
there are many available options.)
4. Press Done (left softkey)
assigning hot keys.
when you have finished
Using Speed Dial
Settings
Assigning an Application to a Speed Dial Location
Start menu applications can be set to launch when
activated by a speed dial keypress in the same way
that phone numbers can be assigned to a speed dial
key.
You can also assign email addresses or Web pages
Tip
to the number keys as speed dial entries.
1. Press Start > All Programs.
2. Select a desired application from the Start menu
screen (or from available submenus), but don’t
press .
Section 2B. Your Device’s Settings 61

3.
Press Menu (right softkey) > Add Speed Dial.
4. Use the keypad to assign a descriptive name
within the Name field (or accept the default).
5. In the Keypad assignment field, select an available
speed dial location for the application.
Keypad numbers 0, 1, and all digits ending in 0 (10,
Note
20, 30, etc..) are reserved and cannot be overwritten.
Speed dial 1 is reserved for quick access to
Voicemail services.
6. Press Done (left softkey) to finish assigning the
speed dial.
62 Section 2B. Your Device’s Settings
To view the list of current Speed Dial assignments:
䊳 Press Start > All Programs > Accessories > Speed Dial
䡲 This list displays both phone numbers and
applications that have been assigned a speed
dial location (from 2 -99).
To delete a current Speed Dial assignment:
1. Press Start > All Programs > Accessories > Speed Dial
2. Select a speed dial entry and press Menu (right
softkey)
> Delete.
3. Confirm the deletion by pressing Yes (left softkey)
or cancel by pressing
No (right softkey).
Configuring the Time and Date
The Date and Time settings enable you to either
manually set the date, time, and time zone or to allow
the device to automatically update the information over
the Sprint network.
1. Press Start > All Programs > Settings > More... >
Date and Time.
2. Select your time zone and set the current date and
time.
.
.

3. Set the Time setting and Time zone setting fields to
either
Manual or Auto.
䡲 Manual requires the information to be updated by
the user.
䡲 Auto obtains the time and date information from
the network.
4. Press Done (left softkey) to complete the setup
process.
Configuring the Regional Settings
This menu allows you to change the way some data is
formatted and displayed on the device such as
language, locale, date styles, and currency and time
formats appropriate to your current location.
1. Press Start > All Programs > Settings > More... >
More... > Regional Settings.
2. Select the fields for any categories you wish to
change and then press the navigation key left or
right to change settings.
3. Press Done (left softkey) to complete the setup
process.
If you changed a language or locale setting, after
Note
Done you will need to turn the device off
pressing
and then back on again for your changes to take
effect.
To change from English to
Spanish:
1. Press Start > All Programs >
Settings > More... > More... >
Regional Settings.
2. In the ‘Language’ field,
select
Español and press
Done (left softkey).
3. Press OK (left softkey) to
acknowledge the change
in the language.
4. Press and hold for
two seconds until you see the powering down
animation on the display screen.
䡲 When the device restarts, Spanish menus will be
displayed.
Section 2B. Your Device’s Settings 63
Settings

To change from Spanish to English:
䊳 Repeat steps 1 – 4, this time selecting US English in
the ‘Language’ field.
64 Section 2B. Your Device’s Settings

Section 2C
Accessing the Security Menu
Your Device’s Security
⽧ Accessing the Security Menu ⽧ Using Your Device’s Device Lock Feature ⽧ Using Special Numbers ⽧ Using Encryption ⽧ Managing Certificates ⽧ Resetting Your Device ⽧ Security Features for Data Services
By using the security settings on your device, you receive peace
of mind without sacrificing flexibility. This section will
familiarize you with your device’s security settings. With
several options available, you can customize your
device to meet your personal needs.
All of your device’s security settings are available
through the Security menu.
䊳 Press Start > All Programs > Settings
Security
.
Using Your Device’s Device
More... >
>
Lock Feature
Locking Your Device with a Password
When your device is locked, you can only receive
incoming calls or make calls to 911, Sprint Customer
Service, or special numbers. (See “Using Special
Numbers” on page 68.)
When you lock your device, it requires a password to
return to normal operation. When a password is set up,
the device can be locked immediately or configured to
lock when the screen goes blank.
Section 2C. Your Device’s Security 65
Security

1.
Press Start > All Programs > Settings
Security.
More... >
>
2. Select Device Lock and press .
3. Select “Prompt if device unused for” and press
. (Enabling this option activates the remaining
fields.)
4. Select each field and enter the required
information:
䡲 Time: select the amount of unused time (idle)
required before you are prompted for a password.
䡲 Password type: to choose from one of the following
PIN types:
● Simple PIN: must be at least four characters in
length and cannot contain a simple sequence
such as 000, 1111, or 1234.
● Strong alphanumeric: must be at least seven
characters in length and must contain at least
one character from each of the following
categories: uppercase/lowercase letters,
numerals, symbols. Examples of strong
alphanumeric passwords are
%$VH5hW.
sb?8A!3 and
66 Section 2C. Your Device’s Security
䡲 Password: use the keypad to enter the desired
password.
䡲 Confirm password: use the keypad to re-enter the
same password.
5. Press Done (left softkey) > Yes (left softkey) to store
these settings.
Unlocking Your Device Using a Password
Once the preset time has expired, the display screen
will dim and the taskbar
Unlock.
Start option is replaced with
1. From standby mode, press Unlock.
2. Enter your password using the keypad.
3. Press Unlock.
Changing the Device Lock Code
1. Press Start > All Programs > Settings
Security.
2. Select Device Lock and press .
3. Enter your password using the keypad.
4. Press Unlock.
More... >
>

5. Navigate to the Password field and then to the
Confirm password field, pressing and holding
in each field to delete the current password
information.
6. Enter your new password within both fields and
when prompted, re-enter your new lock code.
7. Press Done (left softkey) to store the new password.
Removing the Device Lock
1. Press Start > All Programs > Settings
Security
.
2. Select Device Lock and press .
If you can’t recall your lock code, try using the last
Tip
four digits of your wireless phone number. If this
doesn’t work, call Sprint Customer Service at
211-4727.
3. Enter your password using the keypad.
4. Press Unlock.
More... >
>
1-888-
5. Select “Prompt if device unused for” and press
. (This action removes the check mark from this
option and disables the device lock feature.)
6. Press Done (left softkey) > Yes (left softkey) to store
the new settings.
Manually Locking Your Device
This manual process
temporarily locks the device
without the need to enter a
password.
You can still receive calls,
but you cannot make calls or
use the keypad.
1. Press to activate the
Quick List menu. (This
menu allows you to
quickly turn the device
off, access the Wireless
Manager, lock the device, or activate sound
profiles.)
Section 2C. Your Device’s Security 67
Security

2.
Select Lock and press . (The display screen
dims and the
taskbar.)
– or –
䊳 Press and hold .
Unlock option now appears in the
Manually Unlocking the Device
䊳 Press Unlock (left softkey) and then immediately
press . (This removes the manual lock and
allows you to fully utilize the device and all its
features.)
Calling in Lock Mode
You can place calls to 911 and to your special
numbers when in lock mode.
䊳 To call an emergency number, special number, or
Sprint Customer Service, enter the phone number
and press
68 Section 2C. Your Device’s Security
.
Using Special Numbers
Special numbers are important numbers that you have
designated as being “always available.” You can call
and receive calls from special numbers even if your
device is locked.
You can save up to three special numbers in addition
to your Contacts entries (the same number may be in
both directories).
To add or replace a special number:
1. Press Start > All Programs > Settings
Security.
2. Select Emergency Numbers and press .
3. Select a location for your entry.
4. Enter the number and press Done (left softkey).
5. Read the Alert message and press Yes (left softkey)
to activate a soft reset of your phone or
softkey) to cancel the operation.
There are no speed dial options associated with
Note
special numbers.
More... >
>
No (right

Using Encryption
The encryption feature is used with files stored on the
optional microSD™ card to make them readable only
on your device.
To encrypt files stored on a microSD card:
1. Press Start > All Programs > Settings
Security.
More... >
>
2. Select Encr yption and press .
3. Press to enable the encryption option and then
press
Done (left softkey).
Managing Certificates
You can add and delete public key certificates. Three
types of certificates can be created.
To access information about different certificate types:
1. Press Start > All Programs > Settings
Security.
More... >
>
2. Select Certificates and press . From this screen,
you can manage the following certificate types:
䡲 Perso nal: Used to identify yourself to others.
䡲 Intermediate: Used to identify intermediate
certification authorities. (Intermediate certificates
are issued by the trusted root certificate authority,
and any SSL [secure sockets layer] certificates
then issued by the intermediate certificate will
inherit the trust of the trusted root.
䡲 Root: Used to identify root certification authorities.
(A root certificate is the top-most certificate of the
certificate tree. All certificates below the root
certificate inherit the trustworthiness of the root
certificate.)
3. Select the encryption option and press to see
the certificate information.
To delete a certificate:
1. Press Start > All Programs > Settings
Security.
More... >
>
2. Select Certificates and press .
3. Select any of the three available certificates and
press to reveal a list of related certificates.
Section 2C. Your Device’s Security 69
Security

4.
Select an entry from the list and press Menu >
Delete.
䡲 After selecting Delete, the certificate is disabled by
default.
5. Read the disclaimer and press OK (left softkey).
Resetting Your Device
Resetting the device restores all the factory defaults,
including the ringer types and display settings. The
Contacts list, call history, scheduler, and messaging are
not affected.
1. Press Start > All Programs > Settings
Security.
2. Select Phone Reset and press .
3. Enter the lock code and press Done (left softkey).
4. Read the disclaimer and press OK (left softkey).
䡲 The device will restart and all current data stored
on the device will be deleted. This reset process
does not affect the data stored on the microSD
card.
70 Section 2C. Your Device’s Security
More... >
>
䡲 After the device restarts, you may have to press
Next (right softkey) and reconfigure basic settings
such as the time and date (page 62) and the
password (page 65).
Security Features for Data Services
Enabling and Disabling Data Services
You can disable data services without turning off your
device; however, you will not have access to all data
services, including Web and messaging. Disabling
data services will avoid any charges associated with
using those services. While signed out, you can still
place or receive device calls, check voicemail, and use
other voice services. You may enable data services
again at any time.

If you are unable to make an outgoing due to a
Note
current data call in session (indicated by an “
to Vision while a data call is in progress” message),
use the Wireless Manager to turn the phone off and
on again, and then press
refreshes the phone and enables data services.
Without data services enabled, you will be unable to
wirelessly sync your device to a remote email server
(page 144).
Done (left softkey). This
Unable
To enable data services:
1. Press Start > All Programs > Accessories
Menu (right softkey).
Vision >
>
2. Select Enable Vision and press .
3. Read the disclaimer and press Yes (left softkey) to
enable the service.
(A message indicating the
progress of the activation is displayed. The Status
field then displays “Vision Enabled.”)
To update your data services information:
1. Press Start > All Programs > Accessories
Menu (right softkey) > Update Profile.
Vision >
>
2. Read the confirmation screen and press Yes (left
softkey) to enable the service and begin the
update process using your remote vision
information.
Section 2C. Your Device’s Security 71
Security

Section 2D
Understanding Roaming
Roaming
⽧ Understanding Roaming
⽧ Setting Your Device’s Roam Mode
Roaming is the ability to make or receive calls when you’re off
the Sprint National Network. Your new Samsung ACE
works anywhere on the Sprint National Network and
allows you to roam on other 1900 and 800 MHz digital
networks where we’ve implemented roaming
agreements with other carriers.
This section explains how roaming works as well as
special features that let you manage your roaming
experience.
72 Section 2D. Roaming
TM
Recognizing the Roaming Icon on the Display Screen
Your device’s Home screen always lets you know when
you’re off the Sprint National Network. Anytime you are
roaming, the device displays the roaming icon ( )
and extra charges may apply when making or
receiving a call.
Remember, when you are using your device off the
Tip
Sprint National Network, always dial numbers using
11 digits (1 + area code + number).
Roaming on Other Digital Networks
When you’re roaming on digital networks, your call
quality and security will be similar to the quality you
receive when making calls on the Sprint National
Network. However, you may not be able to access
certain features, such as data services, depending on
the available network.

If you’re on a call when you leave the Sprint National
Note
Network, your call is dropped. If your call is dropped
in an area where you think Sprint service is available,
turn your device off and on again to reconnect to the
network.
Checking for Voicemail Messages While Roaming
When you are roaming off the Sprint National Network,
you may not receive automatic on-device notification of
new voicemail messages. Callers can still leave
messages, but you will need to periodically check your
voicemail for new messages if you are in a roaming
service area for an extended period of time.
1. Dial 1 + area code + your phone number.
2. When you hear your voicemail greeting, press
3. Enter your passcode at the prompt and follow the
voice prompts.
When you return to the Sprint National Network,
voicemail notification will resume as normal.
Setting Your Device’s Roam Mode
Your device allows you to control your roaming
capabilities. Your device has a way of alerting you
when you are roaming off the Sprint National Network:
the onscreen roaming icon. By using the
menu option, you can determine which signals your
device accepts, and which network you will use.
Enabling the Roaming Option
Choose from three different settings on your device to
control your roaming experience.
1. Press Start > All Programs > Settings > More... >
Roaming.
2. Use the navigation key to select an option in the
‘Roaming option’ field and press
.
䡲 Sprint Only to access the Nationwide Sprint PCS
Network only and prevent roaming on other
networks.
Section 2D. Roaming 73
Roaming
Done (left softkey).
Roaming

䡲 Roaming Only to seek a roaming system only. The
previous setting (Sprint Only or Automatic) is
restored the next time the device is turned on.
䡲 Automatic to seek service on the Sprint National
Network. When Sprint service is unavailable, the
device searches for an alternate system.
Enabling the Data Roam Guard
Depending on service availability and roaming
agreements, your phone may be able to access data
services while roaming on certain digital systems. You
can set your phone to alert you when you are roaming
off the Sprint National Network and try to use data
services such as messaging.
Data Roam Guard is turned off by default on your
Note
device.
74 Section 2D. Roaming
To set your Data Roam Guard notification:
1. Press Start > All Programs > Settings > More... >
Roaming > Data roam guard.
2. Use the navigation key to select an option in the
‘Data roam guard’ field and press
Done (left
softkey).
䡲 Always Ask sets your phone’s Data Roam Guard
feature on. You will see a prompt and will be
required to respond anytime you access data
services while roaming.
䡲 Never Ask turns your phone’s Data Roam Guard
feature off. You will not be notified of your roaming
status when accessing data services.
To use data services when Data Roam Guard is active:
䊳 When a pop-up notification appears informing you
that data roam charges may apply, select
Roam
(left softkey) to connect.

Section 2E
Call History
⽧ Viewing History
⽧ Call History Options
⽧ Making a Call From the Call History
⽧ Saving a Phone Number From Call History
⽧ Deleting Call History Entries
The Call History keeps track of incoming calls, outgoing calls,
and missed calls. This section guides you through
accessing and making the most of your Call History.
Viewing History
Call History is a list of recent phone numbers (or
Contacts entries) for calls you placed, accepted, or
missed. Call History makes redialing a number fast and
easy.
It is continually updated as new numbers are added to
the beginning of the list and the oldest entries are
removed from the bottom of the list. When you view the
numbers in this list, an icon to the left of the number
indicates the call type:
Dialed: I n d i c a t e s a l l o u t g o i n g c a l l s
made from your device.
Received: Indicates any received
calls that were answered.
Missed: Indicates any missed
calls. These are routed to your
voicemail.
Each entry contains the phone number (if it is
available) and the Contacts entry name (if the phone
number is in your Contacts).
Accessing Call History
1. Press Start > All Programs > Call History.
2. Use either the navigation key or thumbwheel to
scroll through the available list.
Section 2E. Call History 75
Call History

The previous two steps can be shortened by
Tip
from the Home screen to display a list of
pressing
recent calls.
3. Highlight the number and press .
Call History records only those calls that occur while
Note
the device is turned on. If a call is received while your
device is turned off, it will not be included in the
device’s Incoming or Missed call logs.
If you return a call from the voicemail menu, it will not
be included in your device’s Outgoing call log.
Call History Options
Select a Call History entry
and press to display
the date and time of the
call, the phone number (if
available), and the caller’s
name (if the number is
already in your Contacts).
76 Section 2E. Call History
1. Access the Call History list.
2. Press Menu (right softkey) to display the following
options:
䡲 Find Contact to find a contact entry matching the
selected phone number.
䡲 Send Text Message to activate the Text Message
Composer (for a new message).
䡲 E-mail to activate the Microsoft Outlook
®
Composer (for a new email message).
䡲 View Timers displays the recorded time for the
following categories.
● Last call: call length for last outgoing call.
● All calls: length of all incoming and outgoing
calls since the last reset of the timers
(page 77).
● Incoming calls: total time used for all incoming
calls.
● Outgoing calls: total time used for all outgoing
calls.
● Roaming calls: total time used for all roaming
calls.

● Data calls: total time used for all data
transmissions (calls).
● Last reset: shows most recent reset time.
● Lifetime calls: total combined time used for all
of the above call types.
䡲 Delete to delete the currently selected entry.
䡲 Delete List to delete all Call History entries.
䡲 Save to Contacts to save the number into your
Contacts list if it is not already stored. (See
“Saving a Phone Number From Call History” on
page 88.)
䡲 Filter to restrict the list of entries that appear.
You can also view the next Call History entry by
Tip
pressing the navigation key down or view the
previous entry by pressing the navigation key up.
Filtering Calls in Call History
1. Press Start > All Programs > Call History > Menu (right
softkey)
> Filter. (This option filters the list to display
only those calls meeting your selected criteria.)
2. Select an option and press .
䡲 No Filter: all calls are displayed.
䡲 Missed Calls: only calls which were not answered
are displayed.
䡲 Incoming Calls: only calls that were answered are
displayed.
䡲 Outgoing Calls: only calls that were placed are
displayed.
Resetting Timers from the Call History
1. Press Start > All Programs > Call History > Menu (right
softkey)
> View Timers.
2. Press Menu > Reset Timers.
3. Read the disclaimer and press Yes (left softkey).
Section 2E. Call History 77
Call History

Making a Call From the Call History
1. Press Start > All Programs > Call History.
2. Select an entry (number or Contacts name) and
press .
You cannot make calls from Call History to entries
Note
identified as
Saving a Phone Number From
No ID or Restricted.
Call History
The number of Contacts that can be stored on the
device is determined by the storage capacity. Each
Contacts entry can store up to a total of 10 phone
numbers, and each entry’s name can contain 255
characters.
1. Select a Call History entry and press Save (left
softkey).
2. Select <New Contact> and press .
78 Section 2E. Call History
3. Use the keypad to type in the new entry's first and
last name. The device’s word prediction feature
may try to identify the word being typed.
4. Select a Number type from one of the following
categories (groups):
䡲 Mobile
䡲 Work
䡲 Home
䡲 Work 2
䡲 Home 2
䡲 Company
䡲 Pager
䡲 Car
䡲 Assistant
䡲 Radio
After you have saved the number, the new Contacts
entry is displayed in the alphabetical listing. (See
“Contacts Entry Options” on page 84.)

You cannot save phone numbers already in your
Note
Contacts or from calls identified as
Restricted.
Unknown ID or
Deleting Call History Entries
You can delete individual entries from Call History, or
you can delete all entries.
Deleting individual entries in Call History:
1. Press Start > All Programs > Call History.
2. Select an entry and press Menu (right softkey) >
Delete.
3. Read the disclaimer and if you are certain you
want to permanently delete the entry, press
softkey).
– or –
No (right softkey) to return to the previous
Press
menu.
Yes (left
Deleting all entries in Call History:
1. Press Start > All Programs > Call History.
2. Press Menu (right softkey) > Delete List.
3. Read the disclaimer and if you are certain you
want to permanently delete the list of entries, press
Yes (left softkey).
– or –
No (right softkey) to return to the previous
Press
menu.
Section 2E. Call History 79
Call History

Section 2F
Adding a New Contacts Entry
Contacts
⽧ Adding a New Contacts Entry
⽧ Assigning Speed Dial Numbers
⽧ Finding Contacts Entries
⽧ Contacts Entry Options
⽧ Adding a Phone Number to a Contacts Entry
⽧ Editing a Contacts Entry’s Phone Number
⽧ Editing a Contacts Entry
⽧ Deleting Contacts
⽧ Beaming a Contacts Entry
⽧ Selecting a Ringer Type for an Entry
⽧ Dialing Sprint Services
Your device’s Contacts list helps you stay in touch with family,
friends, and colleagues by keeping track of all their contact
information. This section explains how to use your
device’s Contacts list.
80 Section 2F. Contacts
The number of Contacts entries that can be stored on
the device is determined by the storage capacity of the
device. Each Contacts entry can store up to a total of
10 phone numbers, and each entry’s name can
contain 255 characters.
1. Press Start > All Programs > Contacts
2. Enter a name for the new entry
New
>
.
(See “Entering
.
Text” on page 38.)
3. Enter the phone number(s) for the entry
.
4. Press Done (left softkey) to store the new entry into
the Contacts list.
After you have saved the number, the new Contacts
entry is displayed. (See “Contacts Entry Options” on
page 84.)

ICE – In Case of Emergency
Tip
To make it easier for emergency personnel to identify
important contacts, you can list your local
emergency contacts using the word “ICE” at the
beginning of the entry’s name within your device’s
Contacts list. For example, if your mother is your
primary emergency contact, list her as “
your Contacts list. To list more than one emergency
contact, use “ICE1–___,” “ICE2–___,” etc.
ICE–Mom” in
Assigning Speed Dial Numbers
Your device can store up to 89 phone numbers in
speed dial locations. (For details on how to make calls
using speed dial numbers, see “Using Speed Dialing”
on page 37.) You can assign speed dial numbers
when you add a new Contacts entry, when you add a
new phone number to an existing entry, or when you
edit an existing number.
Numbers 0, 1, and all digits ending in 0 (10, 20, 30,
Note
etc.) are reserved and cannot be overwritten. Speed
dial 1 is reserved for quick access to Voicemail.
To assign a speed dial number to a new phone number:
1. Add a phone number to a new or to an existing
Contacts entry. (See “Adding a New Contacts
Entry” on page 80
or “Adding a Phone Number to a Contacts Entry”
on page 85.)
2. Select the new entry from the Contacts list and
press . (This opens a details screen for the
selected entry.)
3. Press Menu (right softkey) > Add to Speed Dial and
press .
4. Edit the name using the keypad (if desired).
5. Select an available speed dial location (2 - 99) and
press
Done (left softkey) to complete the speed dial
assignment. (A confirmation will be displayed.)
To assign a speed dial number to an existing phone
number:
1. From the Home screen, press Contacts
(right softkey).
2. Select an entry and press .
Section 2F. Contacts 81
Contacts

3.
Select a number to assign to a speed dial location.
4. Press Menu (right softkey) > Add to Speed Dial and
press .
5. Select an available speed dial location (2 - 99) and
press
Done (left softkey) to return to the details
page. (A confirmation will be displayed.)
6. Press Done (left softkey) to return to the Contacts
menu.
If you attempt to assign an already in-use speed dial
Note
location to a new phone number, a message will
appear asking if you wish to replace the existing
speed dial assignment. Press
assign the location to the new phone number and
delete the previous speed dial assignment.
Yes (left softkey) to
To review a list of previously assigned speed dial numbers:
䊳 Press Start > All Programs > Accessories > Speed Dial.
82 Section 2F. Contacts
Finding Contacts Entries
There are several ways to display your Contacts entries:
by name, by speed dial number, by group, and by
voice dial tags. Follow the steps outlined in the sections
below to display entries from the Contacts menu.
Finding Contacts by Name
1. Press Start > All Programs > Contacts
– or –
From the Home screen, press Contacts
(right softkey).
2. Scroll through all the entries.
– or –
Enter the first letter of a name or part of a name
(such as “Dav” for “Dave”). (The more letters you
enter, the more your search narrows.)
3. To display the details for an entry, select it and
press .
.

4. To dial the entry’s default phone number, press
– or –
To display additional Contacts entries, press the
navigation key up or down.
Finding Speed Dial Numbers
1. Press Start > All Programs > Accessories
2. Scroll through speed dial entries. Speed dial
numbers are displayed in numeric order.
– or –
Enter the number of a speed dial location using
your numeric keypad.
3. To display the details of an entry, highlight it and
press .
4. To dial the entry’s default phone number, highlight
the entry from the list and press
>
.
Speed Dial
.
Finding Entries by Category
To make the search process easier and quicker,
Contacts entries can be assigned to any or all of these
categories: Business, Holiday, Personal, and Seasonal.
1. Press Start > All Programs > Contacts
2. Select one of the available category types from the
.
pop-up menu and press to filter the current list
> Menu > Filter.
of Contacts. (If your category does not appear in
the list, select
䡲 All Contacts does not filter the Contacts list.
䡲 Recent displays only the most recently added
More... to display additional entries.)
contacts.
䡲 No Categories displays only entries that
assigned to a category.
䡲 Business displays only entries that are assigned to
the Business category
䡲 Holiday displays only entries that are assigned to
the Holiday category
䡲 Perso nal displays only entries that are assigned to
the Personal category
.
.
.
Section 2F. Contacts 83
Contacts
are not

䡲 Seasonal displays only entries that are assigned to
the Seasonal category
䡲 More.. allows you to select multiple category types
.
and display only those entries that match.
3. To display an entry within the category, select it
and press .
4. To dial the entry’s default phone number, press
– or –
To dial another listed number:
䡲 Select the entry and press .
䡲 Select the phone number and press Call (left
softkey).
Contacts Entry Options
To access a Contacts entry’s options, display the entry
and press
䢇 Edit to add to or change a Contacts entry. (See
84 Section 2F. Contacts
Menu. Select an option and press .
“Adding a New Contacts Entry” on page 80 or
“Adding a Phone Number to a Contacts Entry” on
page 85.)
䢇 Send Contact [Beam] to send and receive information
wirelessly between your device and one or more
other Bluetooth-enabled devices.
䢇 Copy Contact to create a duplicate of a Contacts entry.
䢇 Delete Contact to permanently delete an entry.
䢇 Copy All to transfer a copy of all current contacts to
either the phone or to the SIM card, depending on
.
the original storage location of the selected entry.
䢇 View By to filter how entries are displayed (either by
Name [alphabetical] or by Company [user-defined]).
䢇 Delete All to permanently delete all Contacts entries
from either the device or the SIM card.
䢇 Filter to display only entries matching a selected filter
category. See “Finding Entries by Category”
page 83.
You can view the next entry by pressing the
Tip
navigation key right or view the previous entry by
pressing the navigation key left.

Adding a Phone Number to a Contacts Entry
1. Display a Contacts entry. (See “Finding Contacts
Entries” on page 82.)
2. Press Menu > Edit.
3. Select a phone number field, use the keypad to
enter the new number, and press
softkey).
Done (left
Editing a Contacts Entry’s Phone Number
1. Display a Contacts entry. (See “Finding Contacts
Entries” on page 82.)
2. Press Menu > Edit.
3. Select a number to change, and use to clear
one digit at a time, or press and hold
the entire number.
to erase
4. Re-enter or edit the number and press Done (left
softkey).
Editing a Contacts Entry
1. Display a Contacts entry.
2. Press Menu > Edit.
3. Select the information you wish to edit (Name,
Group, Ringer, etc.), and use to clear one
character at a time, or press and hold
the entire entry.
4. Add or edit the information using the keypad and
press
Done (left softkey) to save the changes.
Section 2F. Contacts 85
to erase
Contacts

Deleting Contacts
Beaming a Contacts Entry
You can quickly delete either individual entries or all
entries from your Contacts list. Contacts can be deleted
from either the device or from the SIM card.
To delete a single contact:
1. Press Start > All Programs > Contacts.
2. Select a contact from the list and press Menu >
Delete Contact.
3. Read the disclaimer and press Yes (left softkey).
To delete all contacts:
1. Press Start > All Programs > Contacts > Menu >
Delete All.
2. Select either Phone or SIM and press .
3. Read the disclaimer and press Yes (left softkey).
86 Section 2F. Contacts
You can send and receive information wirelessly
between your phone and up to two Bluetooth-enabled
devices. The following example shows how to transmit
Contacts entry information to another phone.
1. Display a Contacts entry.
2. Press Menu > Send Contact > Beam. (The device will
search for other Bluetooth-enabled devices in
range.)
3. Select a Bluetooth device from the list and press
Beam. (The recipient will then be given the option
to agree to save the contact to their own device.)
Receiving a Beamed Contact:
When receiving a Contacts entry from another device,
you will be prompted to accept the beamed
information.
䊳 Read the confirmation screen and press Done (left
softkey).
 Loading...