

Page 1

*
Depending on the software installed or your service provider or country,
some of the descriptions in this guide may not match your phone exactly.
* Depending on your country, your phone and accessories may appear
different from the illustrations in this guide.
World Wide Web
http://www.samsungmobile.com
Printed in Korea
Code No.:GH68-14666A
English . 07/2007. Rev. 1.0
Page 2

SPH-A420
User’s Guide
Page 3
Important
safety
precautions
Failure to comply with the following
precautions may be dangerous or illegal.
Drive safely at all times
Do not use a hand-held phone while driving. Park
the vehicle first.
Switch off the phone when refuelling
Do not use the phone at a refuelling point (service
station) or near fuels or chemicals.
Switch off in an aircraft
Wireless phones can cause interference. Using them
in an aircraft is both illegal and dangerous.
Switch off the phone near all medical
equipment
Hospitals or health care facilities may be using
equipment that could be sensitive to external radio
frequency energy. Follow any regulations or rules in
force.
Interference
All wireless phones may be subject to interference,
which could affect their performance.
Page 4
Be aware of special regulations
Meet any special regulations in force in any area and
always switch off your phone whenever it is forbidden
to use it, or when it may cause interference or danger.
Water resistance
Your phone is not water-resistant. Keep it dry.
Sensible use
Use only in the normal position (held to the ear). Avoid
unnecessary contact with the antenna when the phone
is switched on.
Emergency calls
Key in the emergency number for your present
location, then press .
Keep your phone away from small children
Keep the phone and all its parts, including accessories,
out of the reach of small children.
Accessories and batteries
Use only Samsung-approved batteries and
accessories, such as headsets and PC data cables. Use
of any unauthorised accessories could damage you or
your phone and may be dangerous.
• The phone could explode if the battery is replaced
with an incorrect type.
• Dispose of used batteries according to the
manufacturer’s instructions.
At very high volumes, prolonged listening to a
headset can damage your hearing.
Qualified service
Only qualified service personnel may repair your
phone.
For more detailed safety information, see "Health and
safety information" on page 75.
Important safety precautions
1
Page 5
About this Guide
This User’s Guide provides you with condensed
information about how to use your phone. To quickly
learn the basics for your phone, please refer to “Get
started” and “Step outside the phone.”
In this guide, the following instruction icons appear:
Indicates that you need to pay careful attention
to the subsequent information regarding safety
or phone features.
[ ]
< >
2
Indicates that you can get more information on
the referenced page.
Indicates that you need to press the Navigation
→
keys to scroll to the specified option and then
select it.
Indicates a key on the phone. For example,
[
TALK
]
Indicates a soft key, whose function is displayed
on the phone screen. For example,
Favourites
<
>
• Camera and camcorder
Special
•Media player
•Web browser
Use the camera module on your
phone to take a photo or record a
video.
features of your phone
Play media files on your phone. You
can enjoy high quality music and
videos.
Access the wireless web to get upto-the-minute information and a
wide variety of media content.
Page 6
• Photo printing
Print your photos to preserve your
best moments forever.
• Picture Mail service
Send and receive picture mail with a combination
of text, images, video, and audio.
• Get personal with photo caller
ID
See who’s calling you when the
phone displays their very own
photo displays.
• Name card
Create name cards with your
number and profile. Whenever
introducing yourself to others, use
this convenient electronic name
card.
•Memory disk
Connect your phone to a computer to copy files
directly to and from it.
•Alarm
Use your phone as an alarm clock
to wake you up in the morning or
notify you of an impending event.
•Scheduler
Keep track of your daily, weekly,
and monthly schedule.
• Voice recorder
Record memos or sounds.
Special features of your phone
3
Page 7
Contents
Unpack 6
Make sure you have each item
Your phone 6
Keys, features, and locations
Get started 7
First steps to operating your phone
Install and charge the phone ..................................... 7
Power on or off........................................................ 8
Keys and display ..................................................... 9
Access menu functions ............................................ 11
Customise your phone............................................. 12
Make/Answer calls .................................................. 16
Step outside the phone 16
Begin with your camera, the web, and other special features
Use the camera ...................................................... 16
Browse the web...................................................... 18
4
Use Contacts.......................................................... 18
Send messages ...................................................... 19
View messages....................................................... 21
Enter text 24
T9(English), Alpha, Symbol, and Number modes
Call functions 26
Advanced calling features
Menu functions 30
All menu options listed
Solve problems 74
Help and personal needs
Health and safety information 75
Page 8
Overview of menu functions
To access Menu mode, press [
1 Web
2 Call History
1 Outgoing Calls
2 Incoming Calls
3 Missed Calls
4 Recent Calls
3 Media Player
4 Voice Services
1 Voice Memo
2 Services
5 Missed Alerts
MENU OK
p.30
p.31
p.31
p.32
p.32
p.32
p.32
p.35
p.35
p.36
p.36
] in Idle mode. The order of menus may differ depending on the menu style you select.
6 Music
7 My Content
Games
Ringers
Screen Savers
Applications
Caller Tunes
8 Messaging
1 Send Message
2 Picture Mail
3 Text Message
4 Go to Email
5 Voice Mail
6 Premium Msg
7 Settings
p.36
9 Tools
1 Mass Storage
p.37
p.37
p.37
p.38
p.38
p.39
p.39
p.39
p.41
p.43
p.44
p.45
p.45
p.45
2 Planner
3 Memo Pad
4 World Time
5 Alarm Clock
6 Calculator
* Pictures
1 Camera
2 Camcorder
3 Picture Mail
4 My Albums
5 Order Prints
6 PictBridge Print
7 Settings and Info
p.46
0 Contacts
p.46
p.50
p.54
p.54
p.55
p.55
p.56
p.56
p.58
p.60
p.60
p.61
p.62
p.62
1 Find
2 Add New Entry
3 Speed Dial #’s
4 Group
5 My Name Card
# Settings
1 Display
2 Sounds
3 Internet
4 Security
5 Launch Pad
6 Others
7 Phone Info
p.63
p.63
p.63
p.64
p.64
p.65
p.66
p.66
p.67
p.69
p.69
p.70
p.71
p.73
5
Page 9
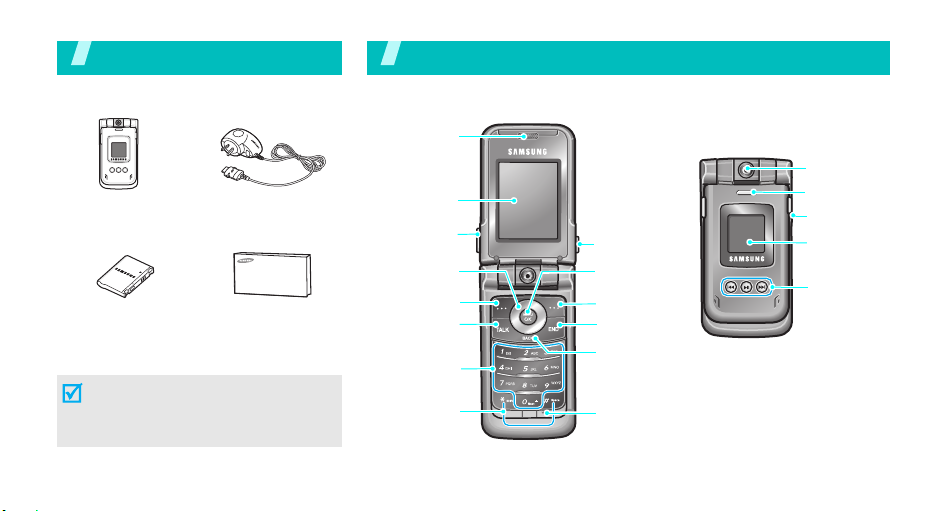
Unpack
Make sure you have each item
Phone Travel Adapter
Battery
You can obtain various accessories from
your local Samsung dealer.
The items supplied with your phone
and the accessories at your Samsung
dealer may vary, depending on your
country or service provider.
6
User’s Guide
You r phon e
Keys, features, and locations
Earpiece
Main display
Volume keys
Navigation keys
(Up/Down/Left/
Right)
Left soft key
Dial key
Alphanumeric
keys
Special
function keys
Camera key
Menu access/
Confirm key
Right soft key
Power on/off/
Menu exit key
Delete/
Cancel key
Microphone
Camera lens
Service light
Headset jack
External
display
Media
player
control keys
Page 10
Get started
First steps to operating your phone
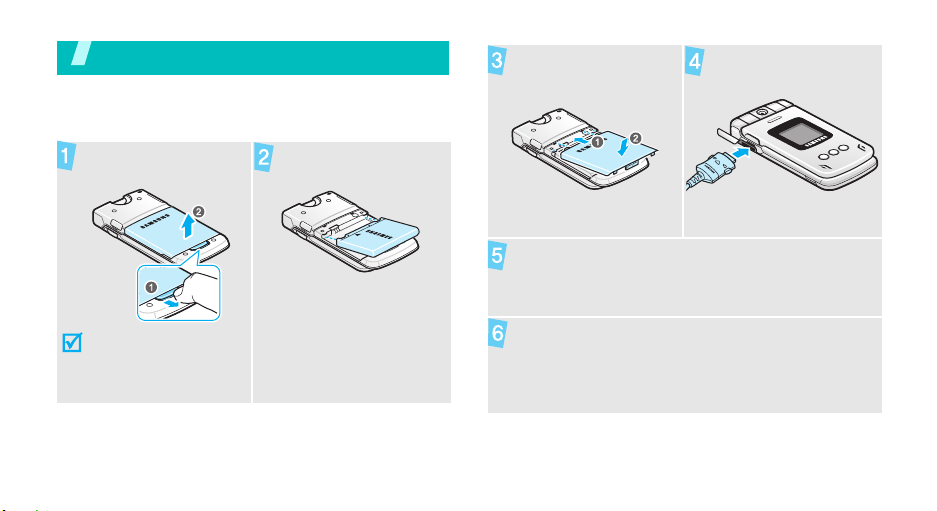
Install and charge the phone
Remove the battery
cover.
If the phone is already
on, first turn it off by
pressing and holding
[
END
].
Install the battery.
Reattach the battery
cover.
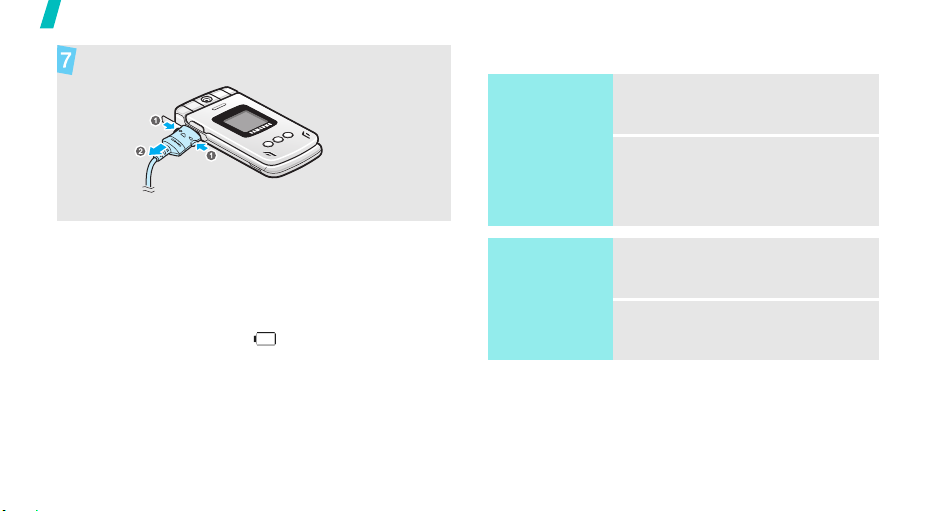
Plug the adapter into a standard AC wall outlet.
When the phone is completely charged (the
Plug the travel adapter
into the phone.
battery icon becomes still), unplug the adapter
from the power outlet.
7
Page 11
Get started
Remove the adapter from the phone.
Power on or off
Switch on
1. Open the phone.
Low battery indicator
When the battery is low:
• a warning tone sounds,
• the battery low message displays, and
• the empty battery icon blinks.
If the battery level becomes too low, the phone
automatically turns off. Recharge your battery.
8
Do not turn on the
phone when
mobile phone use
is prohibited.
Switch off
2. Press and hold [
1. Open the phone.
2. Press and hold [
END
END
].
].
Page 12
Keys and display
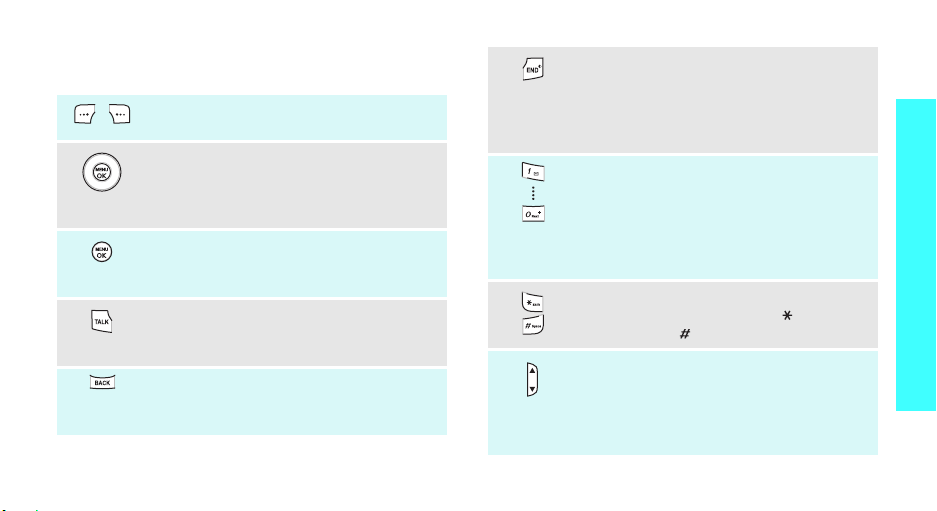
Keys
Perform the function indicated on the
bottom line of the display.
In Idle mode, access your favourite
menus directly.p. 70
In Menu mode, scroll through menu
options.
In Idle mode, access Menu mode.
In Menu mode, select the highlighted
menu option or confirm input.
Make or answer a call.
In Idle mode, retrieve numbers recently
dialled, missed, or received.
Delete characters from the display.
In Menu mode, return to the previous
menu level.
Press and hold to switch the phone on
and off.
End a call.
In Menu mode, cancel input and return
the phone to Idle mode.
Enter numbers, letters, and some
special characters.
In Idle mode, press and hold
access your voicemail server. Press and
hold [0] to enter an international call
prefix.
Enter special characters.
In a text input filed, press [ ] to change
case. Press [ ] to insert a space.
Adjust the phone volume.
In Idle mode, with the phone open,
adjust the ringer volume. With the
phone closed, press to turn on the
backlight.
[1]
to
Get started
9
Page 13
Get started
10
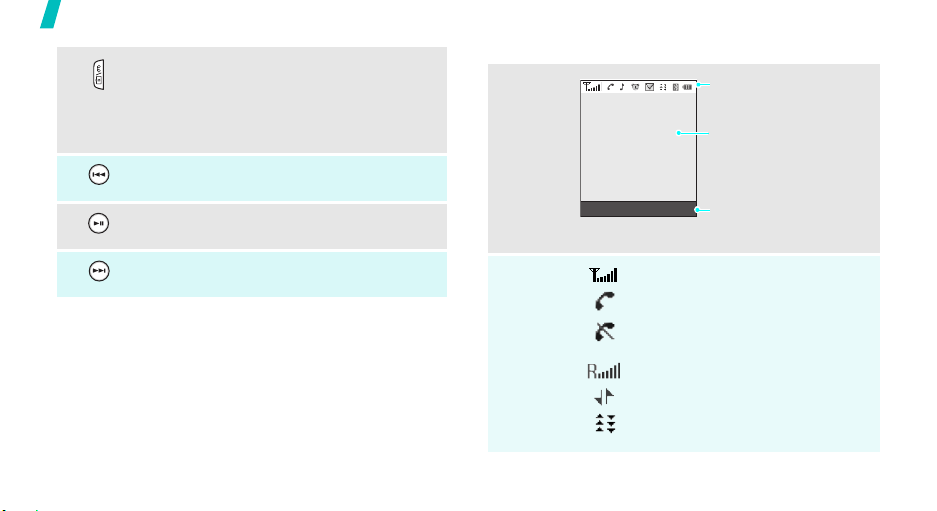
In Idle mode, press and hold to turn on
the camera.
In Camera mode or Camcorder mode,
take a photo or record a video.
During a call, record your conversation.
Return to the previous file during muisc
playback on Music Store.
In Idle mode, press to access Music
Store and start playback.
Skip to the next file during music
playback on Music Store.
Display
Layout
Icons
Icons
display various icons.
Text and graphics
display messages,
instructions, and
information you enter.
Favourites Contacts
Soft key function
indicators
show the current functions
assigned to the soft keys.
Received signal strength
Call in progress
Out of your service area; you
cannot make or receive calls
Roaming network
1x mode active
EVDO mode active
Page 14
New message
PhoneOff
Airplane modep. 71
Location service active p. 73
TTY modep. 72
Alarm set p. 55
Call ringer settings p. 67
• : Level 1~8 or 1-Beep
• : Level 1~8 or 1-Beep
with vibration
• : Ringer Off
• : Ringer Off with vibration
Silent mode
Vibration mode
Battery power level
Access menu functions
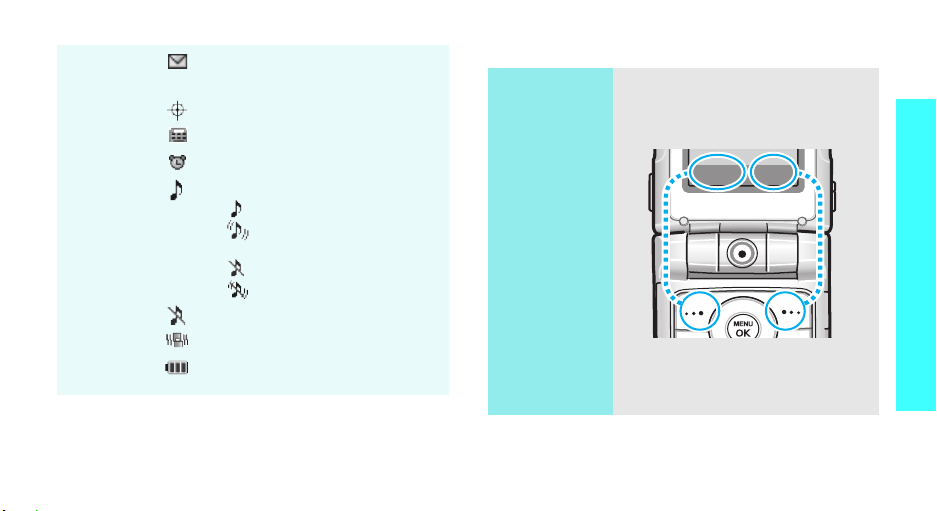
Use the soft
keys
The roles of the soft keys vary
depending on the function you are
using. The bottom line of the
display indicates their current role.
Favourites Contacts
Press the left soft
key to access
your Favourites
menus.
Press the right
soft key to access
the
Find
menu in
Contacts
.
Get started
11
Page 15
Get started
Select an
option
Use shortcuts
12
1. Press [
2. Press the Navigation keys to
3. Press [
4. To exit, choose either of the
Press the number key
corresponding to the option you
want.
MENU OK
soft key.
move to the next or previous
option.
MENU OK
the function displayed or option
highlighted.
following methods:
• Press [
one level.
• Press [
Idle mode.
] or a desired
] to confirm
BACK
] to move up
END
] to return to
Customise your phone
Call ringer
melody
Idle mode
wallpaper
1. In Idle mode, press [
OK
] and select
Sounds → Ringer Type →
Voice Calls
2. Select
3. Select a ringtone category.
4. Select a ringtone.
You can set wallpaper for the idle
screen.
1. In Idle mode, press [
2. Select an image category.
3. Scroll to an image or a video
With Caller ID
Caller ID
OK
] and select
Display → Screen Saver
Main LCD
clip and press <
.
.
.
MENU
Settings →
or
MENU
Settings →
Assign
>.
No
→
Page 16

Menu mode
options
You can customise the menu
display in Menu mode.
To set a menu style:
1. In Idle mode, press [
OK
].
2. Press <
3. Select a menu style.
Options
Menu Style
.
MENU
> and select
To set a theme:
1. In Idle mode, press [
OK
].
2. Press <
3. Press [Left] or [Right] to select
4. Press <
To set a background image:
1. In Idle mode, press [
2. Press <
3. Select an image category.
4. Scroll to an image and press
Options
Theme
.
a theme.
Assign
OK
].
Options
Background
<
Assign
>.
MENU
> and select
>.
MENU
> and select
.
Get started
13
Page 17

Get started
Menu
shortcuts
14
You can set the Navigation keys to
function as shortcuts to access
your favourite menus.
1. In Idle mode, press [
OK
] and select
Launch Pad
2. Select a key.
3. Select a menu to be assigned to
the key.
Settings →
.
MENU
Favourites
menus
You can set up a list of your own
favourite menus.
To add a Favourites menu:
1. In Idle mode, press
<
Favourites
2. Select an empty location.
3. Select the menu you want.
To access a Favourites menu:
1. In Idle mode, press
<
Favourites
2. Select the menu you want.
>.
>.
Page 18

Silent mode/
Vibration mode
You can switch the phone to Silent
mode or Vibration mode to avoid
disturbing other people.
To activate Silent mode:
1. In Idle mode, press [ / ] until
Silence All
2. Press <
To activate Vibration mode:
1. In Idle mode, press [ / ] until
Vibrate All
2. Press <
Done
Done
displays.
>.
displays.
>.
Phone lock
You can protect the phone against
unauthorised use with a phone
password.
1. In Idle mode, press [
OK
] and select
Security
2. Enter the default password, the
last 4-digit of your phone
number.
3. Select
4. Enter a new 4-digit password
and press <
5. Enter the new password again
and press <
6. Select
7. Select
Power-Up
.
Change Lock
Next
Done
Lock Phone
Lock Now
.
MENU
Settings →
.
>.
>.
.
or
On
Get started
15
Page 19
Make/Answer calls
Make a call
Answer a call
Adjust the
volume during
a call
16
1. In Idle mode, enter an area
2. Press [
3. To end the call, press [
1. When the phone rings, press
2. To end the call, press [
Press [ / ].
code and phone number.
TALK
].
[
TALK
].
END
END
Step outside the phone
Begin with your camera, the web, and other special
features
Use the camera
].
Take a photo
].
1. Open the phone.
2. In Idle mode, press and hold
[
]
to turn on the camera.
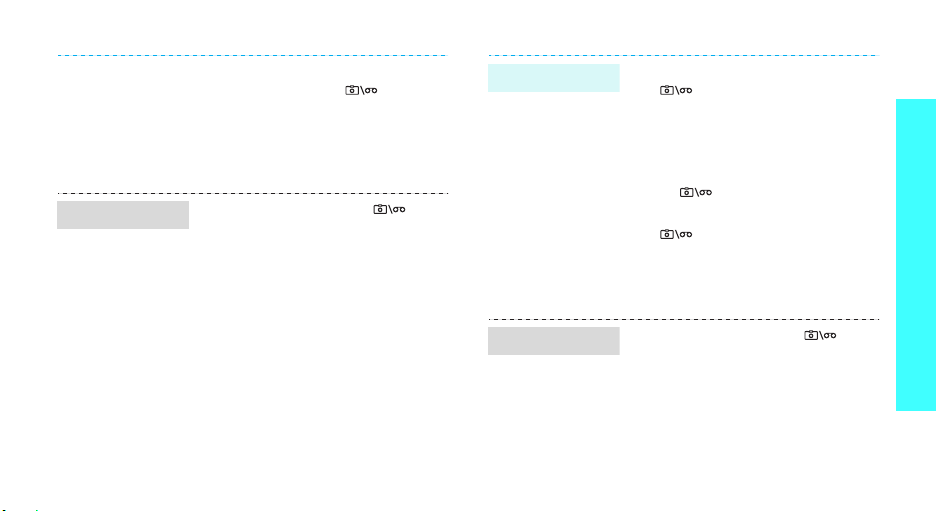
3. Aim the lens at the subject by
rotating the camera lens and
make any desired adjustments.
Page 20
View a photo
4. Press [
5.
1. In Idle mode, press [
2. Select an album.
3. Scroll to the photo you want
MENU OK
<
Capture
a photo. The photo is saved
automatically.
Pres
s [
MENU OK
take another photo.
select
My Albums
and press <
],
>, or [ ] to take
] or [
BACK
]
.
Expand
>.
and
] to
Record a video
1. In Idle mode, press and hold
[
]
to turn on the camera.
2. Press <
3. Press [
4. Press [
5. Press [
Options
Camcorder → Video Mail
Long Video
MENU OK
or [ ] to start recording.
MENU OK
[ ] to stop recording. The
video is saved automatically.
MENU OK
record another video.
> and select
.
], <
], <
] or [
Record
Done
BACK
or
>, or
Step outside the phone
>,
] to
Play a video
1. In Idle mode, press [
select
My Albums
2. Select an album.
3. Scroll to the video you want.
4. Press <
Play
Options
.
> and select
]
.
and
17
Page 21

Step outside the phone
Browse the web
Using a built-in web browser, you can easily access the
wireless web to get a variety of up-to-date services
and information and to download web content.
Launch the
web browser
Navigate the
web
18
In Idle mode, press [
and select
• To scroll line by line, press [Up]
• To scroll page by page, press
• To select a browser item, press
• To return to the previous page,
• To access options, press
Web
or [Down].
[/].
<Go> or [
press [
BACK
<
Menu
>.
MENU OK
.
MENU OK
].
].
Use Contacts
Add a contact
]
1. In Idle mode, enter a phone
number and press [
2. For the first saved number,
select a number type.
For the additional saved
number, select
number type.
3. Specify contact information:
Name, Phone number, E-mail,
URL, Nickname, Memo, Group,
Ringer, and Photo.
4. Press <
Done
contact.
MENU OK
New Entry →
> to save the
].
a
Page 22

Find a contact
Create a name
card
1. In Idle mode, press
<
Contacts
>.
2. Enter the first few letters of the
name you want.
3. Select a contact.
4. Scroll to a number and press
[
TALK
] to dial.
1. In Idle mode, press [
OK
] and select
Name Card
2. Press <
Edit
.
>.
MENU
Contacts →
My
3. Enter your contact information.
4. Press <
Done
> to save the
name card.
Send messages
Send a text
message (SMS)
1. In Idle mode, press [
2. Enter a phone number or
3. Press <
4. Enter your message and press
5. Press <
OK
] and select
Send Message →
Messaging →
Text
.
e-mail address or select it from
Contacts or recent message
log.
MENU
Next
>.
<
Next
>.
Send
> to send the
message.
Step outside the phone
19
Page 23

Step outside the phone
Send picture
mail
20
1. In Idle mode, press [
OK
] and select
Send Message →
Mail
.
2. Enter a phone number or
e-mail address or select it from
Contacts or recent message
log.
3. Press <
4. Select a photo or video clip
5. Press <
6. Scroll to
7. Enter the message subject and
Next
from your phone’s memory or
online album.
Next
Add
Subj
>.
Next
<
press <
MENU
Messaging →
Picture
>.
>.
and press
>.
8. Scroll to
<
9. Enter the message text and
press <
10. Scroll to the box next to
and press <
11. Press <
voice memo, and save it.
12. Select a priority level of the
message.
13. Press <
message.
Add
Text
>.
Next
Record
Send
and press
>.
Record
>.
> to record a
> to send the
Audio
Page 24

View messages
View a text
message
When a notification appears:
The message opens.
When you have any missed alerts:
The message appears on the
missed alert list.
Scroll to the message and press
<
From the Inbox:
1. In Idle mode, press [
2. Select a text message.
View
>. The message opens.
OK
] and select
Text Message →
MENU
Messaging →
Inbox
.
View picture
mail
When a notification appears:
The message opens.
When you have any missed alerts:
The received message appears on
the missed alert list.
Scroll to the message and press
<
View
>. The message opens.
From the Inbox:
1. In Idle mode, press [
OK
] and select
Picture Mail →
2. Select picture mail.
MENU
Messaging →
Inbox
.
Step outside the phone
21
Page 25

Enter text
T9(English), Alpha, Symbol, and Number modes
You can enter text for some features such as
messaging, Contacts, or Calendar, using T9(English)
mode, Alpha mode, Symbol mode, and Number mode.
Changing the text input mode
1. In a text input field, press <
2. Select the input mode you want.
Using T9(English) mode
T9 is a predictive text input mode that allows you to
key in any character using single keystrokes.
Entering a word in T9(English) mode
1. Press [2] to [9] to start entering a word. Press
each key once for each letter.
For example, press [4], [3], [5], [5], and [6] to
enter Hello in T9(English) mode.
22
Options
>.
T9 predicts the word that you are typing, and it
may change with each key that you press.
2. Enter the whole word before editing or deleting
characters.
3. When the word displays correctly, go to step 4.
Otherwise, press [0] to display alternative word
choices for the keys that you have pressed.
For example, Of and Me use [6] and [3].
4. Press [ ] to insert a space and enter the next
word.
Other T9(English) mode operations
• Press [1] to enter periods or apostrophes
automatically.
• Press [ ] to change case. Lower case (
Initial capital (
(
T9WORD
• Press [ ] to insert a space.
• Press the Navigation keys to move the cursor.
• Press [
Press and hold [
T9Word
) are available.
BACK
] to delete characters one by one.
), and Capital lock
BACK
] to clear the entire display.
T9word
),
Page 26
Using Alpha mode
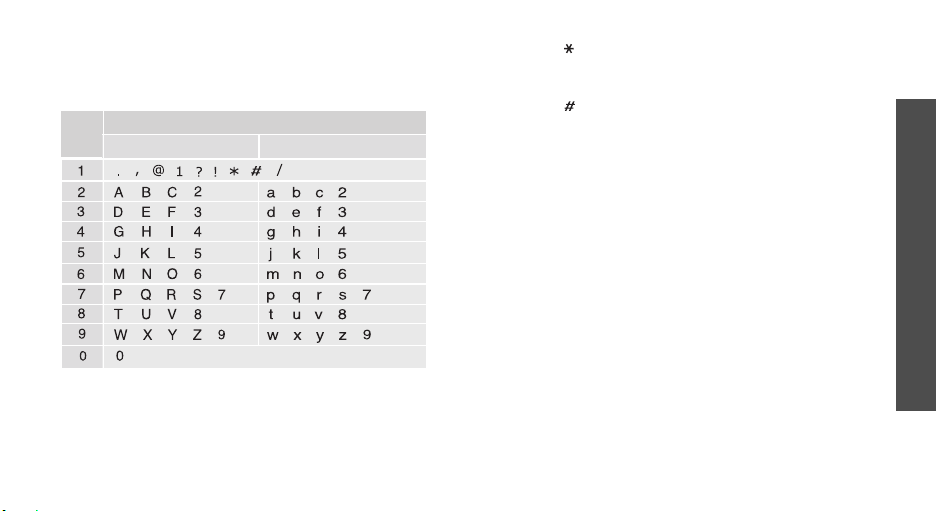
Press the appropriate key until the character you want
appears on the screen.
Key
Other Alpha mode operations
• To enter the same letter twice or to enter a
different letter on the same key, wait for the cursor
to move to the right automatically or press [Right].
Then, enter the next letter.
Characters in order displayed
Upper case
Lower case
• Press [ ] to change case. Lower case (
capital (
available.
• Press [ ] to insert a space.
• Press the Navigation keys to move the cursor.
• Press [
Press and hold [
Abc
), and Capital lock (
BACK
] to delete characters one by one.
BACK
] to clear the entire display.
ABC
abc
) are
), Initial
Using Symbol mode
Symbol mode enables you to insert symbols.
• To display more symbols, press [Left] or [Right].
• To select a symbol, press the corresponding
number key.
Using Number mode
Number mode enables you to enter numbers.
Press the keys corresponding to the digits you want.
Enter text
23
Page 27
Call functions
Advanced calling features
Making a call
1. In Idle mode, enter the area code and phone
number.
Press [
BACK
and hold [
2. Press [
3. When you want to end the call, press [
TALK
Making an international call
1. In Idle mode, press and hold [0]. The + character
appears.
2. Enter the country code, area code, and phone
number, then press [
Redialling recent numbers
1. In Idle mode, press [
recent numbers.
24
] to clear the last digit or press
BACK
] to clear the entire display.
].
TALK
].
TALK
] to display the list of
END
].
2. Scroll to the number you want and press [
TALK
].
Making a call from Contacts
Once you have stored a number in Contacts, you can
dial the number by selecting it from Contacts.p. 59
You can also use the speed dial feature to assign
number keys to your most frequently dialled
numbers.p. 60
Pause dialling
When you call an automated system, like a banking
service, you are required to enter a password or
account number. Instead of manually entering the
numbers each time, you can enter the necessary
DTMF tones separated by pauses before dialling.
DTMF tones are the tones you hear when you
press the number keys. DTMF tones allow you to
communicate with computerised telephone
systems, for example, voicemail servers or
telebanking systems.
Page 28

1. In Idle mode, enter the phone number you want to
dial, such as a bank’s teleservice number.
2. Press <
3. Enter a number to be sent after the pause, such as
4. Repeat steps 2 and 3 to add more pauses and
5. Press [
6. After connecting, wait for a prompt from the
Options
Pause
to insert a pause.
•
Hard Pause
after the “P” pause will be sent when you press
[
TALK
•
2sec Pause
Numbers after the “T” pause will be sent
automatically.
your account number, PIN, etc.
numbers, if necessary.
TALK
system, and then press [
applicable.
The DTMF tones are sent.
> and select
: insert a hard pause. Numbers
].
: insert a 2-second pause.
] to make a call.
Hard Pause
TALK
] at each prompt, if
or
2sec
Answering a call
When you receive an incoming call, the phone rings
and displays the incoming call image.
Press <
Answer
> or [
TALK
] to answer the call.
Tips for answering a call
• When
• When
• Press <
• Press [ / ], [
Any Key
except for <
phone.p. 68
a call.
ringer.
Ignore
Flip Open
Ignore
is active, you can press any key,
>, [
END
], and [ / ].p. 68
is active, you can simply open the
>, or press and hold [ / ] to reject
BACK
], or [
END
] to mute the call
Viewing missed calls
If you have missed calls, the screen displays how
many calls you have missed.
1. Press [
2. If necessary, scroll through the missed calls.
MENU OK
].
Call functions
25
Page 29

Call functions
3. Press [
When the missed call record appears on the missed
alert list, scroll to the missed call and press <
[
TALK
TALK
] to dial the number you want.
] to dial the number.
Using the headset
Use the headset to make or answer calls without
holding the phone.
Connect the headset to the jack on the right side of
the phone. The button on the headset works as
follows:
To Press
redial the last call and hold the button.
answer a call and hold the button.
end a call and hold the button.
Options during a call
You can access a number of functions during a call.
26
Call
> or
Adjusting the volume during a call
Use [ / ] to adjust the earpiece volume during a call.
Press [ ] to increase the volume level and press [ ]
to decrease the volume level.
Answering a second call
You can answer an incoming call while already on the
phone, if your network supports this function and you
have activated the call waiting feature.
1. Press <
2. Press [
3. To end the current call, press [
Answer
> or [
TALK
The first call is automatically put on hold.
TALK
] to switch between the calls.
] to answer the call.
END
].
Making a three-way call
If you have activated three-way calling service, you
can have a conversation with two people
simultaneously.
1. During a call, make another call. The first caller is
placed on hold.
Page 30
2. When you are connected to the third participant,
press [3] and then [
call.
You can press [1] and then [
disconnect the third participant’s call and
switch back to the first call, or press [2] and
then [
TALK
TALK
] to begin the three-way
TALK
] to
] to switch between the calls.
Switching your microphone off or on
You can temporarily switch off your phone’s
microphone so that the person on the phone cannot
hear you.
Press <
Mute
<
UnMute
>. To switch the microphone on, press
>.
Using In-call options
Press <
Options
during a call:
•
Speaker On/Speaker Off
speakerphone feature or switch back to Normal
mode.
> to access the following options
: turn on the
•
Key Mute/Key Unmute
that the person you are talking to cannot hear any
keypresses, or unmute them to allow the person to
hear the key tones.
To communicate with answering machines or
computerised telephone systems,
Unmute
•
Contacts
•
Messaging
•
3-Way Call
simultaneously.
•
Call History
•
Voice Memo
•
Tools
•
Phone Info
must be selected.
: access the
: access the
: converse with two people
: access the
: record your conversation.
: access the
: view your phone information.
: mute the key tones so
Contacts
Tools
menu.
Messaging
Call History
menu.
Key
menu.
menu.
Call functions
27
Page 31
Menu functions
All menu options listed
Web
(Menu 1)
The Wireless Application Protocol (WAP) browser on
your phone allows you to access the wireless web.
From the wireless web, you can access up-to-date
information and a wide variety of media content, such
as games, wallpapers, ringtones, and music files.
To access this menu, press [
and select
Web
.
Launching the web browser
Selecting this menu launches the web browser and
accesses the homepage of your service provider.
28
MENU OK
] in Idle mode
Navigating the web browser
To Press
scroll line by line [Up] or [Down].
scroll page by page [ / ].
select a browser item <Go> or [
return to the previous page [
BACK
MENU OK
].
Using browser options
From any web page, press <
following options:
•
Home
: return to the homepage.
•
Forward
•
Mark this Page
•
View Bookmarks
•
Search
•
Send page to...
via SMS.
: move forward through pages in history.
: bookmark the current page.
: launch a Google search.
: send the URL of the current page
Menu
> to access the
: access the bookmark list.
].
Page 32

•
Go to URL
•
History
accessed.
•
Refresh this page
updated information.
•
More
Show URL
web page.
Restart Browser
exiting it.
About Browser
information about the browser.
Preferences
sound settings.
: enter a URL address manually.
: access the list of web pages you have
: reload the current page with
: change the various settings for the browser.
: display the URL address of the current
: restart the browser without
: access version and copyright
: change the browser display and
Exiting the browser
Press [
END
the browser.
] to end the network connection and exit
Call History
Use this menu to view the calls you have dialled,
received, or missed.
To access this menu, press [
and select
Outgoing Calls
This menu displays the most recent calls you have
dialled.
(Menu 2)
Call History
(Menu 2.1)
.
MENU OK
] in Idle mode
Accessing a call record
1. Press [Left] or [Right] to move to another call
type.
2. Press [Up] or [Down] to scroll through the call list.
3. Press [
press <
MENU OK
Call
> or [
] to view the details of a call, or
TALK
] to dial a number.
Using call record options
While viewing call details, press <
the following options:
•
Send Msg
number.
: send a message to the selected
Options
> to access
Menu functions
Call History
(Menu 2)
29
Page 33

Menu functions
•
Show Contacts
the caller is saved in Contacts.
•
Save
: save the number in Contacts, if the caller is
not saved.
•
Prepend
before dialling the selected number.
•
Erase
: delete the call record.
Incoming Calls
This menu displays the most recent calls you have
received.
Missed Calls
This menu displays the most recent calls you did not
answer.
Recent Calls
This menu displays the most recent calls dialled,
received, or missed.
30
: access the contact information, if
: add an area code or service number
(Menu 2.2)
(Menu 2.3)
(Menu 2.4)
Media Player
The Media Player enables you to play audio clips or
video clips on the multimedia channel list or in your
phone’s memory.
To access this menu, press [
and select
Media Player
(Menu 3)
.
MENU OK
] in Idle mode
Accessing your multimedia channels
You can access audio clips and video clips on the
multimedia channel list.
From the Media Player window, select
Listing
.
The preview channels supplied by your service
provider or any multimedia channels you have
purchased will be displayed.
Channel
Page 34
Accessing media files in your phone’s
memory
You can access audio clips and video clips stored in
your phone’s memory.
From the Media Player window, select
The media files you have imported from a PC will be
displayed.
Mass Storage
Playing media files from your play list
You can play audio clips or video clips from a play list
you have created.
Creating a play list
1. From the Media Player window, select
2. Press <
3. Enter a name for the play list and press <
4. Select the play list you have created and select
5. Select the files to be added to the play list.
Yes
.
Options
> and select
New Play List
Play List
.
Done
.
>.
Playing a media file
1. From the Media Player window, select
2. Select a play list and then a file. The media player
opens.
.
During playback, use the following keys to control the
media player:
Key Function
MENU OK
Left Returns to the previous file. Moves
Right Skips to the next file. Moves forward
Up Accesses the current play list.
Down Changes the repeat mode.
/ Adjusts the volume level.
Pauses or resumes playback.
backward in a file when held down.
in a file when held down.
Play List
.
Menu functions
Media Player
(Menu 3)
31
Page 35
Menu functions
Using Media player options
During playback, press <
following options:
•
Media Listing
your phone’s memory.
•
Channel Listing
on your multimedia channels.
•
Visual Effect
•
Original View/Enlarged View
mode.
•
Info
: access the file properties.
•
Exit
: exit the
Accessing a play list
From the play list, press <
following options:
•
Channel Listing
on your multimedia channels.
32
Options
: access audio clips or video clips in
: access audio clips or video clips
: change the playback animation.
Media Player
: access audio clips or video clips
menu.
Options
> to access the
: change the view
> to access the
•
Media Listing
your phone’s memory.
•
Add New
•
Move
: move the file to another play list.
•
Copy
: copy the file to another play list.
•
Erase
: delete the file.
•
Info
: access the file properties.
•
Memory Storage Info
information for the media player.
•
Exit
: exit the
: access audio clips or video clips in
: add files to the play list.
: access memory
Media Player
menu.
Playing a file with the phone closed
Press and hold [ ] to open Music Store and start
playback.
If Key Guard mode is activated, press and hold
[ / ] and [ ] to temporarily unlock the
exposed keys. p. 68
Page 36
Use the following keys to control the media player:
Key Function
Pauses or resumes playback.
Returns to the previous file.
Skips to the next file.
Accesses the play list. This key function
is available only when you play a file
from the
close the phone.
/ Adjusts the volume.
Media Player
menu and then
Voice Services
Use this menu to access voice-related features.
To access this menu, press [
and select
Voice Memo
Use this menu to record voice memos. A voice memo
can be up to one minute long.
Record
Use this menu to record voice memos and save them
in the phone’s memory.
1. Speak into the microphone.
2. When you have finished, press <
Voice Services
(Menu 4.1.1)
•Press <
•Press <
[
MENU OK
automatically.
(Menu 4)
MENU OK
.
(Menu 4.1)
Pause
> to pause recording.
Resume
]. The voice memo is saved
> to resume recording.
] in Idle mode
Finish
> or
Menu functions
Voice Services
(Menu 4)
33
Page 37

Menu functions
Review
Use this menu to access the voice memos you have
recorded. Select the voice memo you want.
From the file list, press <
following options:
•
•
•
Erase All
Use this menu to delete all of voice memos in the
phone’s memory.
Services
Your phone is pre-programmed with contact numbers
for various services. Use this menu to dial your
customer service centre or service representative for
direct assistance.
34
(Menu 4.1.2)
Erase
: delete the selected file.
Edit Caption
Info
: access the file properties.
: change the file name.
(Menu 4.1.3)
(Menu 4.2)
Options
> to access the
Missed Alerts
When you are unable to acknowledge an alarm for
scheduled items or when you have missed a call, or an
alert for a message, the phone stores the alarm, the
call record, or the message until you confirm it.
To access this menu, press [
and select
Music
Use this menu to access Music Store, an online music
distribution site that lets you purchase and download
music files to play on your phone.
To access this menu, press [
and select
Missed Alerts
(Menu 6)
Music
.
(Menu 5)
.
MENU OK
MENU OK
] in Idle mode
] in Idle mode
Page 38

My Content
The
My Content
ringtones, sound clips, screensavers, and various
applications stored in your phone’s memory.
To access this menu, press [
and select
(Menu 7)
menu allows you to access games,
My Content
MENU OK
.
] in Idle mode
Games
Use this menu to access games you have downloaded
from the wireless web.
Accessing a game
Select a game from the game list and follow the
onscreen instructions. The procedure may differ from
game to game.
Using game options
From the game list, press <
following options:
•
Run
: launch the selected application.
•
Erase
: delete the selected application.
Options
> to access the
•
Erase All
•
Settings
charging you additional costs, such as network
access and GPS service.
•
Properties
: delete all applications.
: set permission settings for services
: access the application properties.
Downloading games
1. Select
2. Search for the game you want and follow the
Get New Games
website preset by your service provider.
onscreen instructions to download it.
. You are connected to the
Ringers
Use this menu to access ringtones and sound clips you
have downloaded from the wireless web.
Using ringtone options
From the file list, press <
following options:
•
Listen
: play the ringtone.
•
Set As..
: set the ringtone as your call ringer.
Options
> to access the
Menu functions
My Content
(Menu 7)
35
Page 39

Menu functions
•
Erase
: delete the selected file.
•
Erase All
•
Properties
: delete all files.
: access the file properties.
Downloading ringtones
1. Select
2. Search for the file you want and follow the
Get New Ringers
the website preset by your service provider.
onscreen instructions to download it.
. You are connected to
Screen Savers
Use this menu to access screensavers you have
downloaded from the wireless web.
Using screensaver options
From the file list, press <
following options:
•
View
: open the screensaver file.
•
Set As..
: set the screensaver file as wallpaper for
the idle screen.
•
Erase
: delete the selected file.
36
Options
> to access the
•
Erase All
•
Properties
: delete all files.
: access the file properties.
Downloading screensavers
1. Select
2. Search for the file you want and follow the
Get New Screen Savers
connected to the website preset by your service
provider.
onscreen instructions to download it.
. You are
Applications
Use this menu to access various applications you have
downloaded from the wireless web.
Using application options
From the application list, press <
the following options:
•
Run
: launch the selected application.
•
Erase
: delete the selected application.
•
Erase All
: delete all applications.
Options
> to access
Page 40

•
Settings
charging you additional costs, such as network
access and GPS service.
•
Properties
: set permission settings for services
: access the application properties.
Downloading various applications
1. Select
2. Search for the application you want and follow the
Get New Applications
to the website preset by your service provider.
onscreen instructions to download it.
. You are connected
Caller Tunes
Use this menu to connect to the website preset by
your service provider, and access ringtones to use on
your phone for ringback tone service.
Messaging
Use the
messages, picture mail, and hand written messages.
To access this menu, press [
and select
Send Message
Use this menu to create and send messages.
(Menu 8)
Messaging
Messaging
(Menu 8.1)
menu to send and receive text
MENU OK
.
] in Idle mode
Creating and sending a text message
Short Message Service (SMS) allows you to send or
receive text messages.
1. Select
2. Enter a destination phone number or e-mail
Text
.
address manually in the
and press <OK>.
You can also select
number or e-mail address from Contacts, or press
<
Recent List
destinations to which you have sent messages.
> to retrieve it from the list of
Mobile #
Contacts
or
Email
box
to retrieve a phone
Menu functions
Messaging
(Menu 8)
37
Page 41

Menu functions
3. Press <
4. Enter your message and press <
5. Press <
Creating and sending picture mail
Picture Mail Service delivers picture mail containing a
combination of text, image, video, and audio, from
phone to phone or from phone to e-mail. To use the
Picture Mail service, you need to register for the
picture message server.
1. Select
2. Enter a destination phone number or e-mail
38
Next
>.
Next
>.
The maximum number of characters allowed
in a message varies by service provider. If a
received message exceeds the maximum
number of characters, the phone will split the
message.
Send
> to send the message.
Picture Mail
address manually in the
and press <OK>.
.
Mobile #
or
Email
box
You can also select
number or e-mail address from Contacts, or press
<
Recent List
destinations to which you have sent messages.
3. Press <
4. Select one of the following options:
5. Press <
6. Scroll to
7. Enter the message subject and press <
8. Scroll to
Next
•
In Phone
memory.
•
Online Albums
online album.
•
Take New Picture
•
Take New Video
•
Text Only
attaching a photo to the message.
Next
Subj
Text
Contacts
> to retrieve it from the list of
>.
: select a photo from your phone’s
: select a photo from your
: enter the message text without
>.
and press <
and press <
to retrieve a phone
: take a new photo.
: record a new video clip.
Add
>.
Next
Add
>.
>.
Page 42

9. Enter the message text and press <
10. Scroll to the box next to
<
Record
>.
11. Press <
12. Select a priority level of the message.
13. Press <
save it.
Record
> to record a voice memo, and
Send
> to send the message.
Audio
Next
and press
>.
Creating and sending a hand written message
1. Select
2. Enter a destination phone number or e-mail
3. Press <
4. Take a photo of your handwriting. The handwriting
Hand.Msg
address manually in the
and press <OK>.
You can also select
number or e-mail address from Contacts, or press
<
Recent List
destinations to which you have sent messages.
Next
text photo will be added on the white background.
.
Mobile #
Contacts
> to retrieve it from the list of
>.
or
Email
to retrieve a phone
box
5. Press <
6. Follow the instructions from the step 6 in “Creating
Picture Mail
Use this menu to access picture mail you have
received, sent, or saved.
Send
>.
and sending picture mail.”
(Menu 8.2)
Inbox
This folder stores picture mail you have received.
While viewing a message, press <
the following options:
•
Reply all
•
Reply Via
Picture Mail service, or hand written message.
•
Call
•
Launch URL
message.
•
Forward
: reply to the sender and all recipients.
: reply to the sender via a text message,
: dial the selected number.
: connect to the URL specified in the
: forward a message to other people.
Options
> to access
Menu functions
Messaging
(Menu 8)
39
Page 43

Menu functions
•
Save..
: extract URLs, e-mail addresses, or phone
numbers from the message and save it in
Contacts. You can also save the message in the
Saved Mail
•
Print Media
and send it to a destination preset by your service
provider, or a photo printing shop via Picture Mail
service. This service will be available in late 2006.
•
Erase
•
Assign Media
for a Contacts entry or an incoming call, or set an
image or video clip as wallpaper for the idle
screen.
•
Message Info
Sent Mail
This folder stores picture mail you have sent.
While viewing a message, press <
the following options:
•
Forward
•
Call
40
folder.
: extract an image from the message
: delete the message.
: set an image as a caller ID image
: access the message properties.
Options
: forward the message to other people.
: dial the selected number.
> to access
•
Launch URL
message.
•
Save..
numbers from the message and save it in
Contacts. You can also save the message in the
Saved Mail
•
Print Media
and send it to a destination preset by your service
provider, or a photo printing shop via Picture Mail
service. This service will be available in late 2006.
•
Erase
•
Assign Media
for a Contacts entry or an incoming call, or set an
image or video clip as wallpaper for the idle
screen.
•
Message Info
: connect to the URL specified in the
: extract URLs, e-mail addresses, or phone
folder.
: extract an image from the message
: delete the message.
: set an image as a caller ID image
: access the message properties.
Saved Mail
This folder stores picture mail you have saved to send
at a later time.
Page 44

While viewing a message, press <
Options
> to access
the following options:
•
Call
: dial the selected number.
•
Launch URL
: connect to the URL specified in the
message.
•
•
Forward
Save..
: forward the message to other people.
: extract URLs, e-mail addresses, or phone
numbers from the message and save it in
Contacts.
•
Print Media
: extract an image from the message
and send it to a destination preset by your service
provider, or a photo printing shop via Picture Mail
service. This service will be available in late 2006.
•
Erase
: delete the message.
•
Assign Media
: set an image as a caller ID image
for a Contacts entry or an incoming call, or set an
image or video clip as wallpaper for the idle
screen.
•
Message Info
: access the message properties.
Pending
This folder stores messages the phone is attempting to
send or has failed to send.
Text Message
(Menu 8.3)
Use this menu to access messages you have received,
sent, or which have failed in sending.
Inbox
(Menu 8.3.1)
This folder stores all of the text messages you have
received.
Using message options
While viewing a message, press <
Options
> to access
the following options:
•Go: connect to the URL specified in the message.
•
Call
: extract phone numbers from the message
and dial a number.
•
Reply Via
•
Forward
: reply to the sender.
: forward the message to other people.
Menu functions
Messaging
(Menu 8)
41
Page 45

Menu functions
•
Lock/Unlock
deleted, or unlock the message.
•
Save..
from the message and save it in Contacts.
•
Erase
•
Erase Multiple
Outbox
This folder stores messages that the phone is
attempting to send or has failed to send.
While viewing a message, press <
the following options:
•
Forward
•
Resend
•
Lock/Unlock
deleted, or unlock the message.
•
Compose New
•
Erase
•
Erase Multiple
42
: lock the message from being
: extract a phone number or e-mail address
: delete the message.
: delete the messages you select.
(Menu 8.3.2)
Options
: forward the message to other people.
: resend the message.
: lock the message from being
: create a new text message.
: delete the message.
: delete the messages you select.
> to access
Drafts
(Menu 8.3.3)
This folder stores messages you have saved to send at
a later time.
While viewing a message, press <
the following options:
•Go: connect to the URL specified in the message.
•
Call
: extract phone numbers from the message
and dial a number.
•
Send
: send the message.
•
Compose New
•
Erase
: delete the message.
•
Erase Multiple
Send Text
Use this menu to create and send text messages.
p. 37
Go to Email
Use this menu to access the website for the e-mail
service supplied by your service provider.
: create a new text message.
: delete the messages you select.
(Menu 8.3.4)
(Menu 8.4)
Options
> to access
Page 46
Voice Mail
Use this menu to connect to the voicemail server and
access your voicemail.
Your service provider can give the voicemail
server number.
•
Call Voicemail
listen to your voicemail.
•
Clear Envelope
the screen.
Premium Msg
Use this menu to access premium messages including
images, videos, and audio received from your service
provider, or a third party provider. For further details
on receiving premium messages, contact your service
provider.
(Menu 8.5)
: access your voicemail server and
: remove the voicemail icon from
(Menu 8.6)
Settings
Use this menu to set up various options for using the
messaging services.
General
You can set up the options for sending and receiving
messages.
•
•
•
•
(Menu 8.7)
(Menu 8.7.1)
Notification
new messages.
Preset Messages
frequently use.
Edit Signature
the end of messages. You can enter your
signature.
Message Alert
settings.
Volume
Type
Reminder
of new messages.
: set how the phone informs you of
: edit preset messages you
: set your signature to be added to
: change the message alert
: select a volume for a message alert.
: select a message alert type.
: set how often the phone reminds you
Menu functions
Messaging
(Menu 8)
43
Page 47

Menu functions
•
Auto-Erase
messages arrive when the Inbox is full.
Yes
in order to receive new messages
No
: the phone alerts you that new messages are
being rejected because the Inbox is full.
Text Message
You can set up the options for sending text messages.
•
Save in Outbox
after sending.
•
Priority
•
Call Back #
to outgoing text messages.
44
: set what will happen if new
: the phone automatically erases old messages
(Menu 8.7.2)
: set to save messages in Outbox
: select a priority level of messages.
: set the callback number to be added
Tools
To access this menu, press [
and select
Mass Storage
Use this menu to connect your phone to a PC and copy
media files from/to a PC, as you would use an external
memory disk.
Connect to PC
Use this menu to connect the phone to a PC via a PC
data cable.
1. Connect a PC data cable to the jack on the left side
2. Access the
(Menu 9)
Tools
.
(Menu 9.1)
(Menu 9.1.1)
of the phone and the USB port of a PC.
switches to Memory Disk mode and the removable
disk automatically opens.
If the removable disk does not automatically open,
open
the corresponding removable disk to open the
phone’s file directory.
Connect to PC
My computer
MENU OK
menu. Your phone
on your PC and double-click
] in Idle mode
Page 48
3. Copy files from the phone to the PC, or vice versa.
4. When you have finished, press <
5. Select
Yes
to exit Memory Disk mode.
Done
>.
• When the phone is in Memory Disk mode, all
calls and messages are blocked.
• Use the Safely Remove Hardware programme
from the Windows task bar for removing the
PC data cable from the computer; otherwise,
the files may be corrupted and, thus, may not
be played properly.
• If you change a folder name, all data in the
folder may be deleted or the corresponding
feature may not work properly.
File Manager
(Menu 9.1.2)
Use this menu to access media files you have imported
from a PC.
Viewing a file
You can view various document files and images files
stored in the phone’s memory.
The following file formats are available:
• Documents: Microsoft Word, Microsoft Excel,
Microsoft PowerPoint, Adobe PDF, Plain text, HTML
•Images: GIF, JPEG
Select an image or document file. File Viewer runs to
open the file.
• Depending on the file size or memory capacity
of File Viewer, some files may not open
properly.
• If a document file contains languages
unsupported by File Viewer, the content of the
document will not display correctly.
Menu functions
Tools
(Menu 9)
45
Page 49

Menu functions
Use the following keys to view the image or
document:
Key Function
Up/Down/
Left/Right
1/3
2
4
5
6
Using file options
While viewing an image or document, press
<
Options
•
Fit to Screen
screen height.
46
Pans around the image or page in the
document.
Zooms in or out.
Rotates the image or document.
Returns to the previous page in the
document.
Fits the document to the page size.
Returns to the next page in the
document.
> to access the following options:
: fit the file to the screen width or
•
Rotate
: rotate the image or document.
•
Hide Icons/Show Icons
icons on the screen.
•
Help
: access the help information.
Memory Info.
Use this menu to view memory information for media
items in the phone’s memory.
Planner
Use this menu to keep track of your schedule, create a
list of takes you need to complete, or set your phone
as a countdown timer.
Today
(Menu 9.3.1)
Use this menu to access Planner items stored for the
current day.
Press [Left] or [Right] to display your schedule items,
tasks, or countdown timers.
For further details about storing items, see the
following menus.
(Menu 9.1.3)
(Menu 9.3)
: hide or display the tool
Page 50

Scheduler
(Menu 9.3.2)
Use this menu to manage your monthly, weekly, or
daily schedule.
When you enter the
Scheduler
menu, the calendar in
Month view appears with today’s date indicated by a
pink box.
Selecting a day on the calendar
• Press [Left] or [Right] to move by day.
• Press [Up] or [Down] to move by week.
• Press [ / ] to move by month.
Creating an item
1. Select a date on the calendar.
2. Press <
3. Enter the item information and press <
Options
> and select
Add New
.
Next
>.
4. Press [Left] or [Right] to select the item type and
press [Down].
5. Press [Left] or [Right] to set how long before the
item the alarm is to alert you and press [Down].
6. Press [Left] or [Right] to select a repeat option and
press [Down].
7. Select the Melody line and select an alarm tone
and press [Down].
8. Enter the starting date and time for the item and
press [Down].
Menu functions
Tools
(Menu 9)
47
Page 51

Menu functions
9. Enter the ending date and time for the item and
press [Down].
10. Select the Contact line and select a phone number
to be displayed when the alarm alerts you to the
item.
11. Press <
Viewing an item
Once you have scheduled items, the following icons
and the number of items for a specific day appear at
the bottom of the calendar.
• Personal • Business
• Appointment • Birthday
• Vacation
1. Select a date on the calendar to display the items
2. Select an item to view its details.
48
Done
for the day.
> to save the item.
From the item list, press <
following options:
•
Jump to date
access.
•
Assign
to be displayed in Idle mode.
•
Erase
•
Erase All
Using calendar options
On the calendar, press <
following options:
•
Add New
•
View Type
calendar.
•
Jump to date
access.
•
Assign
Idle mode.
•
Erase All
: enter the specific date you want to
: set the Planner items for the current day
: delete the selected item.
: delete all items on the calendar.
Options
: add a new Planner item.
: change the view mode of the
: enter the specific date you want to
: set the current calendar to be displayed in
: delete all items on the calendar.
Options
> to access the
> to access the
Page 52

Task List
(Menu 9.3.3)
Use this menu to create a list of tasks that you need to
complete.
Entering a task
1. Enter the task information. If there is any task
already stored, press <
2. Press <
Next
>.
Add New
>.
3. Press [Left] or [Right] to select a priority and then
press [Down].
4. Enter the ending time and press [Down].
5. Enter the ending date.
6. Press <
Done
> to save the task.
Viewing a task
When you access the
Task List
menu, a list of tasks
you have created displays.
From the task list, select the task you want.
Using task options
While viewing task details, press <
Options
> to access
the following options:
•
Add New
: add a new task.
•
Erase
: delete the selected task.
From the task list, press <
Options
> to access the
following options:
•
Add New
•
Set State
To Do
In Process
Completed
•
Assign
•
Erase
•
Erase All
: add a new task.
: change the task status.
: the task is not complete.
: the task is in process.
: the task is complete.
: set the task to be displayed in Idle mode.
: erase the selected task.
: delete all of the completed tasks or all
tasks from the list.
Countdown
(Menu 9.3.4)
Use this menu to set a time and date for a future
event and then check to see how many days, hours,
and minutes remain before that event. You can also
check how much time has passed since an event has
passed.
Menu functions
Tools
(Menu 9)
49
Page 53

Menu functions
Creating a countdown timer
1. Enter the details for the countdown timer. If there
is already an existing timer, press <
2. Enter text and Press <
3. Enter the time to/from which you want to count
down.
4. Press [Down].
5. Enter the date to/from which you want to count
down.
6. Press <
Using timer options
While viewing timer details, press <
access the following options:
•
•
From the timer list, press <
following options:
•
50
Done
> to save the timer.
Add New
Erase
Assign
mode.
: add a new timer.
: delete the selected timer.
: set the timer to be displayed in Idle
Next
Options
Add New
>.
Options
> to access the
> to
>.
•
Erase
: delete the selected timer.
•
Erase All
Memo Pad
Use this menu to make memos of important things
you need to remember.
Creating a memo
1. Enter a memo. If there is any memo already
stored, press <
2. Press <OK> to save the memo.
Viewing a memo
When you access the
memos you have created displays.
From the memo list, select a memo.
Using memo options
While viewing a memo, press <
the following options:
•
Set Skin
memo text. Press [Left] or [Right] to select an
image and press <
: delete all timers.
(Menu 9.4)
Add New
: change the background image for the
>.
Memo Pad
Assign
>.
menu, a list of
Options
> to access
Page 54

•
Add New
•
Erase
From the memo list, press <
following options:
•
Erase
•
Erase All
World Time
Use this menu to find out the current time in another
part of the world.
: add a new memo.
: delete the selected memo.
Options
: delete the selected memo.
: delete all memos.
(Menu 9.5)
> to access the
Viewing world time
From the world map, press [Left] or [Right] to scroll to
the city you want. As the time line moves, the time
and date of the given zone display.
Applying daylight saving time
From the world map, press <
On
.
DST Setting
> and select
Alarm Clock
Use this menu to set alarms to sound at specific times.
(Menu 9.6)
Setting an alarm
1. Select an alarm.
2. Set each alarm option:
•
Alarm
•
•
•
•
3. Press <
: activate the alarm.
Time
: enter the time for the alarm to sound.
Alarm tone
Repeat
Snooze Interval
again after the specified length of time has
elapsed.
: select an alarm tone.
: select a repeat option.
Done
: set the alarm to sound
>.
Stopping an alarm
• Press any key.
• Press <
Snooze
sound again after a specified length of time has
elapsed. To stop the snoozing alarm, press
<
Dismiss
> to stop the alarm and have it
>.
Menu functions
Tools
(Menu 9)
51
Page 55
Menu functions
Deactivating an alarm
1. On the Alarm screen, scroll to the alarm you want
to deactivate.
2. Press <
Calculator
Use this menu to perform basic arithmetic functions,
such as addition, subtraction, multiplication, and
division.
1. Enter the first number.
2. Press one of the Navigation keys to access the
3. Enter the second number.
4. Press [
5. If necessary, repeat from step 2 to continue the
52
Reset
>.
(Menu 9.7)
• Press [ ] or the left soft key to insert a decimal
point.
•
Press
[] t
sign (-) or positive sign (+).
math function you want.
calculation.
o change the number to a negative
MENU OK
] to view the result.
Pictures
You can use the camera module embedded in your
phone to take photos and record videos.
To access this menu, press [
and select
• Do not take photos of people without their
• Do not take photos in a place where cameras
• Do not take photos in a place where you may
Camera
You can take photos in various modes. The camera
produces JPEG photos.
When you take a photo in direct sunlight or in
bright conditions, shadows may appear on the
photo.
(Menu *)
Pictures
permission.
are not allowed.
interfere with another person’s privacy.
(Menu *.1)
MENU OK
, or press [ ].
] in Idle mode
Page 56

Taking a photo
1. Access the
and switch the display to Camera mode. You can
also press and hold [
2. Make any desired adjustments.
•Press <
• Press [ / ] to flip the image vertically.
• Press [Up] or [Down] to zoom in or out. This
3. Press [
a photo. The photo is automatically saved in the
My Albums
4.
To Press
access photo options <
move around the photo [Left] or [Right].
return to Capture mode [
Camera
menu to turn on the camera
]
in Idle mode.
Options
next section
feature is not available for the maximum image
resolution.
MENU OK
> to access camera options.
], <
Capture
folder.
>, or [ ] to take
Options>.
MENU OK
] or [
p. 54
BACK
Using camera options in Camera mode
In Camera mode, press <
following options:
•
Flash
•
Self-Timer
takes a photo.
•
Fun Tools..
the colour tone.
•
Controls..
balance.
•
Settings..
a photo.
Resolution
Quality
Shutter Sound
when you press the shutter release.
View Mode
].
Status Bar
the screen.
: determine the use of the flash.
: set a time delay before the camera
: apply a decorative frame or change
: adjust the brightness or white
: change the default settings for taking
: select an image resolution.
: select an image quality setting.
: select the preview mode.
: hide or display the camera icons on
Options
: select the sound that you hear
> to access the
Menu functions
Pictures
(Menu *)
53
Page 57

Menu functions
•
Review Pictures
•
Camcorder
Taking a postcard photo
Use this menu to take photos for postcards. You can
take a photo for a background image and another of
your handwriting text and create a postcard using
them. The photo of your text will be added in the
foreground.
1. In Camera mode, take a photo.
2. Press <
3. Take a photo of your message. The second photo is
4. Press <
54
Options
preview screen appears.
superimposed on the first one and displayed.
Options
options:
•
Ink Color
of your message.
•
Shadow
your message.
•
Rotate
: access the
: switch to Camcorder mode.
> and select
> to access the following editing
: change the colour tone of the photo
: apply a shadow effect to the photo of
: rotate the photo of your message.
My Albums
Postcard
folder.
. The
•
Zoom
: zoom in or out.
•
Move
: move the photo of your message.
5. When you have finished, press <
6. Press <
Options
photo in the
> and select
My Albums
Save
folder.
Done
>.
to save the
Using photo options
After taking a photo, press <
following options:
•
Send Msg
•
Camera Mode
•
Upload
•
Assign
entry, as wallpaper for the idle screen, or as an
image to be displayed when a call comes in.
•
Erase
•
Order Prints
preset by your service provider, or a photo printing
shop via Picture Mail service. This service will be
available in late 2006.
: send the photo via Picture Mail service.
: return to Camera mode.
: upload the photo to your online album.
: set the photo as a caller ID for a Contacts
: delete the photo.
: send the photo to a destination
Options
> to access the
Page 58

•
Post to Service
third party service. This service will be available in
late 2006.
•
Review Pictures
•
Postcard
superimposed on the first taken photo for a
postcard. p. 54
Camcorder
You can record a video of what is displayed on the
camera screen and save it.
: post your photo to an online
: access the
: take the second photo to be
(Menu *.2)
My Albums
folder.
Recording a video
You can record a video of what is displayed on the
camera screen and save it.
1. Access the
2. Select
messaging.
Select
limit of the currently available memory.
Camcorder
Video Mail
Long Video
menu.
to record a video suitable for
to record a video within the
The camcorder turns on and the display switches
to Camcorder mode.
3. Make any desired adjustments.
•Press <
• Press [ / ] to flip the image vertically.
• Press [Up] or [Down] to zoom in or out.
4. Press [
recording.
5. Press [
recording. The video is automatically saved in the
My Albums
next section
MENU OK
MENU OK
Options
], <
], <
folder.
> to access camcorder options.
Record
>, or [ ] to start
Done
>, or [ ] to end
Using camcorder options in Camcorder mode
In Camcorder mode, press <
following options:
•
Movie Light
•
Self-Timer
starts recording a video.
•
Color Tones
: determine the use of the flash.
: set a time delay before the camcorder
: change the colour tone.
Options
> to access the
Menu functions
Pictures
(Menu *)
55
Page 59

Menu functions
•
Controls..
balance.
•
Settings..
recording a video
Quality
View Mode
•
Video Length
Video Mail
for a picture mail.
•
Review Album
•
Camera Mode
Using video options
After saving a video clip, press <
following options:
•
Send Msg
service.
•
Play
•
Upload
album.
56
: adjust the brightness or white
: change the default settings for
: select an image quality setting.
: select the preview mode.
: select a recording mode. Selecting
allows you to record a video suitable
: access the
: switch to Camera mode.
: send the video clip via Picture Mail
: play the video clip.
: upload the video clip to your online
My Albums
Next
> to access the
folder.
•
Assign
: set the video clip as wallpaper for the idle
screen or as your ringtone for voice calls. You can
also set the video clip as a caller ID image and
ringtone for a Contacts entry.
•
Erase
: delete the video clip.
•
Camcorder
•
Review Album
Picture Mail
Use this menu to access picture mail you have
received, sent, or saved. p. 39
My Albums
Use this menu to access the photos or video clips in
your phone’s memory. You can also access your online
album.
: return to Camcorder mode.
: access the
(Menu *.3)
(Menu *.4)
My Albums
folder.
Viewing a photo
1. Select an album.
2. Scroll to a photo ( ) and press <
Expand
>.
Page 60

Using photo options
While viewing a photo, press <
following options:
•
Send
: send the photo via Picture Mail service.
•
Upload
: upload the file to your online album.
•
Post to Service
third party service. This service will be available in
late 2006.
•
Print..
: print the photo via a PictBridge-compatible
printer. You can also send the photo to a printing
service shop via Mail service or Print retails
service.
•
Assign
: set the photo as a caller ID for a Contacts
entry, as wallpaper for the idle screen, or as an
image to be displayed when a call comes in.
•
Erase
: delete the file.
•
Detail/Edit
properties.
: post your photo to an online
: change the file name or access file
Options
> to access the
•
Album list
•
Media Filter
video clips, or both.
•
Camera Mode
: return to the album list.
: select a filter to display photos or
: switch to Camera mode.
Playing a video clip
1. Select an album.
2. Scroll to a video clip ( ).
3. Press <
Options
> and select
Play
.
Using video options
When a video clip is selected, press <
access the following options:
•
Play
: play the video clip.
•
Send
: send the video clip via Picture Mail service.
•
Upload
: upload the file to your online album.
•
Post to Service
third party service. This service will be available in
late 2006.
: post the video clip to an online
Options
Menu functions
Pictures
> to
(Menu *)
57
Page 61

Menu functions
•
Assign
: set the video clip as wallpaper for the idle
screen or as your ringtone for voice calls. You can
also set the video clip as a caller ID image and
ringtone for a Contacts entry.
•
Erase
: delete the file.
•
Detail/Edit
properties.
•
Album list
•
Media Filter
video clips, or both.
•
Camcorder
Order Prints
Use this menu to send photos to a destination preset
by your service provider, or a photo printing shop via
Picture Mail service. This service will be available in
late 2006.
58
: change the file name or access file
: return to the album list.
: select a filter to display photos or
: switch to Camcorder mode.
(Menu *.5)
PictBridge Print
Use this menu to print images via a PictBridgecompatible printer.
1. In Idle mode, press [
Pictures →
2. Connect your phone to a printer via a PC data
cable.
3. Press [
4. Specify the following printing options:
5. Press <
6. Select
MENU OK
and press <
•
Copies
printed.
•
Type
Index
•
Size
: select a page size.
•
Date Print
•
Border On/Off
printed.
Print
Yes
(Menu *.6)
PictBridge Print
Next
: select the number of copies to be
: select a printing type,
.
> to print the image.
to confirm printing.
MENU OK
] to select the images you want
>.
: set the current date to be printed.
: set a page border to be
] and select
.
Standard
or
Page 62
Settings and Info
Use this menu to change the default settings for using
the camera or camcorder. You can also access your
Picture Mail account information or memory
information.
•
Status Bar
the screen.
•
Account Info
and memory information for picture mail or media
items.
•
View Mode
turn on the camera or camcorder, the selected
preview screen appears.
(Menu *.7)
: hide or display the camera icons on
: access your account information
: select a preview screen. When you
Contacts
You can store phone numbers with associated names
in your phone’s memory called Contacts to make it
easy for you to make a call without having to
remember the phone number.
To access this menu, press [
and select
Find
Use this menu to search for contact information in
Contacts.
You can quickly access this menu by pressing
<
Contacts
(Menu 0.1)
Contacts
(Menu 0)
.
> in Idle mode.
MENU OK
] in Idle mode
Finding a contact
1. Enter the first few letters of the name that you
want to find.
2. Select the contact from the list.
3. Scroll to a number and press [
TALK
] to dial.
Menu functions
Contacts
(Menu 0)
59
Page 63

Menu functions
Using Contacts options
While viewing contact details, scroll to a number and
press <
Options
•
Edit
•
Prepend
before dialling the selected number.
•
Erase #
•
Send Contact
Add New Entry
Use this menu to add a new contact to Contacts.
1. Change the settings or enter information about the
contact.
•
Name
•
Phone number
number type.
•
E-mail
•
URL
•
Nickname
•
Memo
60
> to access the following options:
: edit contact information.
: add an area code or service number
: delete the contact.
: send the contact.
(Menu 0.2)
: assign a name.
: enter a number and select a
: assign an e-mail address.
: enter a homepage address.
: assign a nickname.
: add a memo about the person.
•
Group
: assign the contact to a caller group.
•
Ringer
: assign a ringtone to alert you to a call
from the person.
•
Photo
: assign an image to alert you to a call
from the person.
2. Press <
Speed Dial #’s
Once you have stored phone numbers in Contacts, you
can set up to 99 speed-dial entries and then dial them
easily by pressing the associated one or two number
keys.
Done
> to save the contact.
(Menu 0.3)
Assigning speed dial numbers
1. Enter the location number you want or scroll to the
number. Key 1 is reserved for your voicemail
server.
2. Press <
3. Enter the first few letters of the name you want.
4. Select a contact from the list.
Assign
>.
Page 64

5. Select a number, if the contact has more than one
number.
Managing speed dial entries
From the Speed dial list, scroll to an entry and press
<
Options
•
•
> to access the following options:
Erase
: clear the selected speed dial setting for a
key.
Erase All
: clear all speed dial settings.
Dialling speed dial numbers
• For 1-digit locations, press and hold the
corresponding number key in Idle mode.
• For other locations, press the first number key and
press and hold the last number key in Idle mode.
Group
(Menu 0.4)
Use this menu to organise your contacts in caller
groups.
Creating a new caller group
1. Scroll to an empty location.
2. Press <
3. Enter a name for the group and press <
Rename
>.
Adding members to a caller group
1. Select a group.
2. Press <
3. Press [
4. Press <
Options
MENU OK
Done
>.
> and select
] to select the contacts you want.
Add member
Managing caller groups
While viewing the group list, press <
access the following options:
•
Add Member
group.
•
Rename group
•
Erase group
members, however, will not be deleted from
Contacts.
•
Set Ringer
from the group members.
: add members to the selected
: change the group name.
: delete the selected group. Group
: assign a ringtone to alert you to a call
Options
Done
.
> to
>.
Menu functions
Contacts
(Menu 0)
61
Page 65

Menu functions
My Name Card
Use this menu to create a name card and send it to
other people.
Saving your name card
1. Press <
2. Enter your contact information.
3. Press <
Sending your name card
You can send your name card to other people.
From the My Name Card screen, press <
Contact
Contact
62
>, or press <
.
(Menu 0.5)
Edit
>.
Done
> to save the name card.
Options
> and select
Send
Send
Settings
The
Settings
options to customise the phone to your preferences
and needs. You can also reset the settings to their
default status.
To access this menu, press [
and select
Display
Use this menu to change settings for the display and
light.
Screen Saver
You can set up the idle screen on both displays.
•
Main LCD
displayed on the main display.
•
Sub LCD
external display.
(Menu #)
menu provides you with various setting
Settings
(Menu #.1)
(Menu #.1.1)
: select an image or a video clip to be
: select an image to be displayed on the
MENU OK
.
] in Idle mode
Page 66

Set Foreground
(Menu #.1.2)
Use this menu to set the phone to display a function
screen in the idle screen.
•
Digital Clock
: display the current date and time
with a digital clock. You can change the item
placement by pressing the Navigation keys.
•
Analog Clock
: display the current date and time
with an analog clock.
•
Calendar
: display the current calendar. You can
change the item placement by pressing the
Navigation keys.
•
Others
: display your schedule items for the
current date or all items on the calendar, tasks, or
countdown timers.
Dialing Font
(Menu #.1.3)
Use this menu to select a font type for the numbers
entered while dialling. If you select
Basic
, select the
font colour and size you want.
Incoming Call
(Menu #.1.4)
Use this menu to select an image that will be displayed
on the screen when you have incoming calls. You can
identify incoming calls with the caller ID service by the
image.
Greeting
(Menu #.1.5)
Use this menu to set a greeting message to be
displayed at the bottom of the display in Idle mode.
Backlight
(Menu #.1.6)
You can change the backlight settings.
•
Main Display
: select the length of time the main
display backlight stays on.
•
Keypad
: select the length of time the keypad
backlight stays on.
•
Pwr Save Mode
: set whether or not the phone
switches to Save mode when not use.
•
Brightness
: adjust the brightness of the main
display for varying lighting conditions.
Menu functions
Settings
(Menu #)
63
Page 67

Menu functions
Service Light
Use this menu to activate or deactivate the use of the
service light on the front of the phone. The service
light blinks at regular intervals when your network is
available.
Sounds
Use this menu to customise various sound settings.
Volume
Use this menu to select a ringer volume for incoming
calls, message alert, alarms, or application alerts. You
can also set the phone to vibrate the sound effect
while playing a game.
•
Use Ringer Volume
volume used in
•
Separate Volume
ringer volume:
Ringer Off
1-Beep
64
(Menu #.1.7)
(Menu #.2)
(Menu #.2.1)
: select this option to use a
Ringer
.
: select this option to change a
: the phone does not ring.
: the phone sounds a beep.
Level 1~8
more bars, the louder the volume.
•
Always Vibrate
phone to vibrate.
Ringer Type
Use this menu to select a ringtone for incoming calls,
message alert, scheduler alarm, or roaming alert.
Alerts
Use this menu to have the phone alert (beep) you to
inform you that certain things have happened.
•
Minute Beep
during an outgoing call to keep you informed of the
length of your call.
•
Service
service area or return to a service area.
•
Connect
call is connected to the system.
•
Sig. Fade Tone
dropped call occurs during conversation in
response to fading signal strength.
: select a volume for the call ringer. The
: select this option to set the
(Menu #.2.2)
(Menu #.2.3)
: set the phone to beep every minute
: set the phone to beep when you exit a
: set the phone to beep when an outgoing
: set the phone to beep when a
Page 68

•
Power On
: set the phone to beep when you turn it
on.
•
Power Off
: set the phone to beep when you turn
it off.
Key Tone
(Menu #.2.4)
Use this menu to select the type and volume of tones
that the keypad sounds each time you press a key.
•
Tone Type
•
key Tone Level
: select a key tone.
: select the volume level of the
key tones.
•
Tone Length
: set short or long DTMF (dual-tone
multi-frequency) tones to be sent to access
teleservices, such as a bank account. If the service
is digital, as most are, short DTMF tones will
almost always work.
Internet
(Menu #.3)
You can enable Internet service, activate the Net
guard feature, or update a profile.
Enable Internet
(Menu #.3.1)
The first time you access this menu, your phone will
be automatically customised by the network so that
you are allowed to access the network services.
Disabling Internet service will avoid any charges
associated with network services. While signed out,
you can still place or receive phone calls, check
voicemails, and use other voice services.
Net Guard
(Menu #.3.2)
Use this menu to alert you each time the phone is
connected to the wireless web. This helps you avoid
connecting accidentally to the web.
Update Profile
(Menu #.3.3)
Use this menu to update your connection profile to the
latest profile.
Menu functions
Settings
(Menu #)
65
Page 69

Menu functions
Security
Use this menu to protect the phone against
unauthorised use.
To access the
phone password. The password is preset to the last 4digit of your phone number.
Lock Phone
Use this menu to lock your phone.
•
•
•
In Lock mode, you can only make calls to numbers on
your Special # list or emergency calls. All other calls
or use of the phone’s menu functions are prohibited.
66
(Menu #.4)
Security
(Menu #.4.1)
Unlocked
On Power-Up
on the phone, you need to enter the password to
use the phone.
Lock Now
password is entered, the phone unlocks.
: deactivate Lock mode.
: lock the phone just one time. Once the
menu, you must enter the
: lock the phone. Each time turning
Lock Pic/Video
Use this menu to lock access to the
Change Lock
Use this menu to change your phone password.
Special #
Use this menu to set up the list of phone numbers to
which you can make calls when outgoing calls are
restricted to the Special # list or when your phone is in
Lock mode.
Erase Contacts
Use this menu to delete all entries in Contacts.
Erase My Content
Use this menu to delete all files and applications in the
My Content
Erase Pic/Video
Use this menu to delete all of the photos and video
clips in the
(Menu #.4.2)
(Menu #.4.3)
(Menu #.4.4)
(Menu #.4.5)
menu.
(Menu #.4.7)
My Albums
(Menu #.4.6)
menu.
Pictures
menu.
Page 70

Reset Phone
Use this menu to reset the phone to its default
settings.
1. Select
2. Select
itself off and then back on.
Lock Services
Use this menu to lock voice call functions or Internet
access.
Launch Pad
You can use the Navigation keys as shortcuts to access
specific menus directly from Idle mode. Use this menu
to assign a shortcut to a key.
1. Select a key to be used as a shortcut key.
2. Select a menu to be assigned to the key.
(Menu #.4.8)
Yes
.
Yes
again. The phone automatically turns
(Menu #.4.9)
(Menu #.5)
Others
You can customise various phone settings.
Call Setup
Use this menu to set up the call options.
•
•
(Menu #.6)
(Menu #.6.1)
Abbrev. Dial
phone number when dialling. You just need to
enter the last 4 or 5 digits of any phone number
and the phone adds the entered prefix to dial the
number.
Restriction
Allow all
Contacts Only
those phone number saved in Contacts.
Special# Only
phone numbers specified in the Special # list.
p. 66
: set a 5- or 6-digit prefix to the
: restrict outgoing calls.
: the phone restricts all outgoing calls.
: the phone make a call to only
: the phone make a call to only the
Menu functions
Settings
(Menu #)
67
Page 71

Menu functions
•
Call Answer
Any Key
any key, except for <
Talk Key
<
Answer
Flip Open
open the phone. If the phone is already is open,
press <
•
Auto Answer
answer calls after a specified time when you use
the headset or an optional hands-free car kit.
Airplane Mode
Use this menu to switch the phone to Airplane mode,
in which the phone functions requiring network
connections are deactivated. You can use non-wireless
functions, such as, scheduler, games, contacts, and
voice recorder on an airplane during flight.
If you select
automatically switch to Airplane mode each time you
turn it on.
68
: set how to answer incoming calls.
: the phone answers calls when you press
: the phone answers calls when you press
> or [
: the phone answers calls when you
Answer
On Power Up
Ignore
>, [
END
], and [ / ].
TALK
].
> or [
TALK
].
: set the phone to automatically
(Menu #.6.2)
, the phone will
Key Guard
You can prevent accidental key presses by using Key
Guard mode.
To activate Key Guard mode, select the period of time
your phone waits for before locking the keypad.
When you have an incoming call or the time for an
alarm comes in Key Guard mode, the mode is
automatically deactivated and the phone goes to Idle
mode. It will be automatically activated after the
specified amount of time when you end the call or stop
the alarm.
Once Key Guard mode is activated, you can
temporarily unlock the exposed keys by pressing and
holding [ / ] and [
Audio Routing
Use this menu to change the sound output on the
phone. If you select
the headset into your headset jack to make or receive
calls.
(Menu #.6.3)
(Menu #.6.4)
Headset Only
]
at the same time.
, you need to plug
Page 72
TTY Options
(Menu #.6.5)
A TTY (also known as a TDD or Text Telephone) is a
telecommunications device that allows people who are
deaf, hearing impaired, or who have speech or
language disabilities, to communicate by telephone.
Your phone is compatible with TTY devices. Please
check with the manufacturer of your TTY device to
ensure that it supports digital wireless transmission.
Your phone and TTY device will connect via a special
cable that plugs into your phone's headset jack. If this
cable was not provided with your TTY device, contact
your TTY device manufacturer to purchase the
connector cable.
If TTY mode is enabled, the audio quality of nonTTY devices connected to the headset jack may
be impaired.
The following options are available:
•
TTY Full
: you can type what you want to say and
receive printed messages of what the person on
the phone is saying.
•
TTY+Hear
: you can receive printed messages of
what the person on the phone is saying.
•
TTY+Talk
•
TTY Off
Location
: you can type what you want to say.
: deactivate TTY mode.
(Menu #.6.6)
The Location service allows the network to determine
your current location. Use this menu to activate or
deactivate the service.
Phone Info
(Menu #.7)
Use this menu to access your phone information.
•
Phone Number
•
Icon Glossary
: check your phone number.
: view the icon information to be
displayed on the screen when you use the phone.
•
Version
: view the software version on your
phone.
•
Advanced
: access the advanced information of
your phone.
Menu functions
Settings
(Menu #)
69
Page 73

Solve problems
70
Solve problems
Help and personal needs
To save the time and expense of an unnecessary service
call, perform the simple checks in this section before
contacting a service professional.
“No Service,” “Network Failure,” or “Not Done”
displays
• The network connection has been lost. You may be
in a weak signal area. Move and try again.
• You are trying to access an option for which you
have no subscription with your service provider.
Contact the service provider for further details.
You have entered a number but it was not dialled
• Be sure that you have pressed [
• Be sure that you have accessed the right cellular
network.
• Be sure that you have not set an outgoing call
barring option.
TALK
].
Page 74

Your correspondent cannot reach you
• Be sure that your phone is switched on. ([
END
]
pressed for more than one second.)
• Be sure that you are accessing the correct cellular
network.
• Be sure that you have not set an incoming call
barring option.
Your correspondent cannot hear you speaking
• Be sure that you have switched on the
microphone.
• Be sure that you are holding the phone close
enough to your mouth. The microphone is located
at the bottom of the phone.
The phone starts beeping and “Low Battery
Recharge Soon” flashes on the display
• Your battery is insufficiently charged. Recharge the
battery.
The audio quality of the call is poor
• Check the signal strength indicator on the display
( ). The number of bars indicates the signal
strength from strong ( ) to weak ( ).
• Try moving the phone slightly or moving closer to a
window if you are in a building.
No number is dialled when you re-call a Contacts
entry
•Use the
Find
menu to ensure the number has been
stored correctly.
• Re-store the number, if necessary.
The battery does not charge properly or the
phone sometimes turns itself off
• Wipe the charging contacts both on the phone and
on the battery with a clean soft cloth.
If the above guidelines do not help you to solve
the problem, take note of:
• The model and serial numbers of your phone
•Your warranty details
• A clear description of the problem
Solve problems
Settings
(Menu #)
71
Page 75

Then contact your local dealer or Samsung after-sales
service.
72
Health and safety information
SAR certification information
Your wireless phone is a radio transmitter and receiver.
It is designed and manufactured not to exceed the
emission limits for exposure to radio frequency (RF)
energy set by the Federal Communications
Commission (FCC) of the U.S. government. These FCC
exposure limits are derived from the
recommendations of two expert organizations, the
National Counsel on Radiation Protection and
Measurement (NCRP) and the Institute of Electrical
and Electronics Engineers (IEEE). In both cases, the
recommendations were developed by scientific and
engineering experts drawn from industry, government,
and academia after extensive reviews of the scientific
literature related to the biological effects of RF energy.
The exposure limit set by the FCC for wireless mobile
phones employs a unit of measurement known as the
Specific Absorption Rate (SAR). The SAR is a measure
of the rate of absorption of RF energy by the human
body expressed in units of watts per kilogram (W/kg).
Page 76

The FCC requires wireless phones to comply with a
safety limit of 1.6 watts per kilogram (1.6 W/kg). The
FCC exposure limit incorporates a substantial margin
of safety to give additional protection to the public and
to account for any variations in measurements.
SAR tests are conducted using standard operating
positions accepted by the FCC with the phone
transmitting at its highest certified power level in all
tested frequency bands.
Although the SAR is determined at the highest
certified power level, the actual SAR level of the phone
while operating can be well below the maximum value.
This is because the phone is designed to operate at
multiple power levels so as to use only the power
required to reach the network. In general, the closer
you are to a wireless base station antenna, the lower
the power output.
Before a new model phone is available for sale to the
public, it must be tested and certified to the FCC that
it does not exceed the exposure limit established by
the FCC. Tests for each model phone are performed in
positions and locations (e.g. at the ear and worn on
the body) as required by the FCC.
The highest SAR values for this model phone as
reported to the FCC are
Head : 1.42 W/Kg, Body-worn: 0.541 W/Kg.
For body worn operation, this model phone has been
tested and meets the FCC RF exposure guidelines
when used with a Samsung accessory designated for
this product or when used with an accessory that
contains no metal and that positions the handset a
minimum of 1.5 cm from the body. Non-compliance
with the above restrictions may result in violation of
FCC exposure guidelines.
The FCC has granted an Equipment Authorization for
this mobile phone with all reported SAR levels
evaluated as in compliance with the FCC RF exposure
guidelines.
The FCC has granted an Equipment Authorization for
this model phone with all reported SAR levels
evaluated as in compliance with the FCC RF exposure
guidelines. SAR information on this model phone is on
73
Page 77

Health and safety information
file with the FCC and can be found under the Display
Grant section of http://www.fcc.gov/oet/fccid after
searching on FCC ID A3LSPHA420A.
Consumer Information on Wireless Phones
The U.S. Food and Drug Administration (FDA) has
published a series of Questions and Answers for
consumers relating to radio frequency (RF) exposure
from wireless phones. The FDA publication includes
the following information:
What kinds of phones are the subject of this
update?
The term wireless phone refers here to hand-held
wireless phones with built-in antennas, often called
“cell,” “mobile,” or “PCS” phones. These types of
wireless phones can expose the user to measurable
radio frequency energy (RF) because of the short
distance between the phone and the user's head.
These RF exposures are limited by Federal
Communications Commission safety guidelines that
were developed with the advice of FDA and other
federal health and safety agencies. When the phone is
74
located at greater distances from the user, the
exposure to RF is drastically lower because a person's
RF exposure decreases rapidly with increasing
distance from the source. The so-called “cordless
phones,” which have a base unit connected to the
telephone wiring in a house, typically operate at far
lower power levels, and thus produce RF exposures
well within the FCC's compliance limits.
Do wireless phones pose a health hazard?
The available scientific evidence does not show that
any health problems are associated with using
wireless phones. There is no proof, however, that
wireless phones are absolutely safe. Wireless phones
emit low levels of radio frequency energy (RF) in the
microwave range while being used. They also emit
very low levels of RF when in the stand-by mode.
Whereas high levels of RF can produce health effects
(by heating tissue), exposure to low level RF that does
not produce heating effects causes no known adverse
health effects. Many studies of low level RF exposures
have not found any biological effects. Some studies
have suggested that some biological effects may
Page 78

occur, but such findings have not been confirmed by
additional research. In some cases, other researchers
have had difficulty in reproducing those studies, or in
determining the reasons for inconsistent results.
What is FDA's role concerning the safety of
wireless phones?
Under the law, FDA does not review the safety of
radiation-emitting consumer products such as wireless
phones before they can be sold, as it does with new
drugs or medical devices. However, the agency has
authority to take action if wireless phones are shown
to emit radio frequency energy (RF) at a level that is
hazardous to the user. In such a case, FDA could
require the manufacturers of wireless phones to notify
users of the health hazard and to repair, replace or
recall the phones so that the hazard no longer exists.
Although the existing scientific data do not justify FDA
regulatory actions, FDA has urged the wireless phone
industry to take a number of steps, including the
following:
• “Support needed research into possible biological
effects of RF of the type emitted by wireless
phones;
• “Design wireless phones in a way that minimizes
any RF exposure to the user that is not necessary
for device function; and“Cooperate in providing
users of wireless phones with the best possible
information on possible effects of wireless phone
use on human health.
FDA belongs to an interagency working group of
the federal agencies that have responsibility for
different aspects of RF safety to ensure
coordinated efforts at the federal level. The
following agencies belong to this working group:
• “National Institute for Occupational Safety and
Health
• “Environmental Protection Agency
• “Federal Communications Commission
• “Occupational Safety and Health Administration
• “National Telecommunications and Information
Administration
Health and safety information
75
Page 79

Health and safety information
The National Institutes of Health participates in some
interagency working group activities, as well.
FDA shares regulatory responsibilities for wireless
phones with the Federal Communications Commission
(FCC). All phones that are sold in the United States
must comply with FCC safety guidelines that limit RF
exposure. FCC relies on FDA and other health agencies
for safety questions about wireless phones.
FCC also regulates the base stations that the wireless
phone networks rely upon. While these base stations
operate at higher power than do the wireless phones
themselves, the RF exposures that people get from
these base stations are typically thousands of times
lower than those they can get from wireless phones.
Base stations are thus not the primary subject of the
safety questions discussed in this document.
What are the results of the research done
already?
The research done thus far has produced conflicting
results, and many studies have suffered from flaws in
their research methods. Animal experiments
investigating the effects of radio frequency energy
76
(RF) exposures characteristic of wireless phones have
yielded conflicting results that often cannot be
repeated in other laboratories. A few animal studies,
however, have suggested that low levels of RF could
accelerate the development of cancer in laboratory
animals. However, many of the studies that showed
increased tumor development used animals that had
been genetically engineered or treated with cancercausing chemicals so as to be pre-disposed to develop
cancer in absence of RF exposure. Other studies
exposed the animals to RF for up to 22 hours per day.
These conditions are not similar to the conditions
under which people use wireless phones, so we don't
know with certainty what the results of such studies
mean for human health.
Three large epidemiology studies have been published
since December 2000. Between them, the studies
investigated any possible association between the use
of wireless phones and primary brain cancer, glioma,
meningioma, or acoustic neuroma, tumors of the brain
or salivary gland, leukemia, or other cancers. None of
the studies demonstrated the existence of any harmful
health effects from wireless phones RF exposures.
Page 80

However, none of the studies can answer questions
about long-term exposures, since the average period
of phone use in these studies was around three years.
What research is needed to decide whether RF
exposure from wireless phones poses a health
risk?
• A combination of laboratory studies and
epidemiological studies of people actually using
wireless phones would provide some of the data
that are needed. Lifetime animal exposure studies
could be completed in a few years. However, very
large numbers of animals would be needed to
provide reliable proof of a cancer promoting effect
if one exists. Epidemiological studies can provide
data that is directly applicable to human
populations, but ten or more years' follow-up may
be needed to provide answers about some health
effects, such as cancer. This is because the interval
between the time of exposure to a cancer-causing
agent and the time tumors develop - if they do may be many, many years. The interpretation of
epidemiological studies is hampered by difficulties
in measuring actual RF exposure during day-to-day
use of wireless phones. Many factors affect this
measurement, such as the angle at which the
phone is held, or which model of phone is used.
What is FDA doing to find out more about the
possible health effects of wireless phone RF?
FDA is working with the U.S. National Toxicology
Program and with groups of investigators around the
world to ensure that high priority animal studies are
conducted to address important questions about the
effects of exposure to radio frequency energy (RF).
FDA has been a leading participant in the World Health
Organization international Electromagnetic Fields
(EMF) Project since its inception in 1996. An influential
result of this work has been the development of a
detailed agenda of research needs that has driven the
establishment of new research programs around the
world. The Project has also helped develop a series of
public information documents on EMF issues.
FDA and Cellular Telecommunications & Internet
Association (CTIA) have a formal Cooperative
Research and Development Agreement (CRADA) to do
Health and safety information
77
Page 81

Health and safety information
research on wireless phone safety. FDA provides the
scientific oversight, obtaining input from experts in
government, industry, and academic organizations.
CTIA-funded research is conducted through contracts
to independent investigators. The initial research will
include both laboratory studies and studies of wireless
phone users. The CRADA will also include a broad
assessment of additional research needs in the
context of the latest research developments around
the world.
What steps can I take to reduce my exposure to
radio frequency energy from my wireless phone?
If there is a risk from these products - and at this
point we do not know that there is - it is probably very
small. But if you are concerned about avoiding even
potential risks, you can take a few simple steps to
minimize your exposure to radio frequency energy
(RF). Since time is a key factor in how much exposure
a person receives, reducing the amount of time spent
using a wireless phone will reduce RF exposure.
“If you must conduct extended conversations by
wireless phone every day, you could place more
78
distance between your body and the source of the RF,
since the exposure level drops off dramatically with
distance. For example, you could use a headset and
carry the wireless phone away from your body or use a
wireless phone connected to a remote antenna.
Again, the scientific data do not demonstrate that
wireless phones are harmful. But if you are concerned
about the RF exposure from these products, you can
use measures like those described above to reduce
your RF exposure from wireless phone use.
What about children using wireless phones?
The scientific evidence does not show a danger to
users of wireless phones, including children and
teenagers. If you want to take steps to lower exposure
to radio frequency energy (RF), the measures
described above would apply to children and
teenagers using wireless phones. Reducing the time of
wireless phone use and increasing the distance
between the user and the RF source will reduce RF
exposure.
Page 82

Some groups sponsored by other national
governments have advised that children be
discouraged from using wireless phones at all. For
example, the government in the United Kingdom
distributed leaflets containing such a recommendation
in December 2000. They noted that no evidence exists
that using a wireless phone causes brain tumors or
other ill effects. Their recommendation to limit
wireless phone use by children was strictly
precautionary; it was not based on scientific evidence
that any health hazard exists.
Do hands-free kits for wireless phones reduce
risks from exposure to RF emissions?
Since there are no known risks from exposure to RF
emissions from wireless phones, there is no reason to
believe that hands-free kits reduce risks. Hands-free
kits can be used with wireless phones for convenience
and comfort. These systems reduce the absorption of
RF energy in the head because the phone, which is the
source of the RF emissions, will not be placed against
the head. On the other hand, if the phone is mounted
against the waist or other part of the body during use,
then that part of the body will absorb more RF energy.
Wireless phones marketed in the U.S. are required to
meet safety requirements regardless of whether they
are used against the head or against the body. Either
configuration should result in compliance with the
safety limit.
Do wireless phone accessories that claim to
shield the head from RF radiation work?
Since there are no known risks from exposure to RF
emissions from wireless phones, there is no reason to
believe that accessories that claim to shield the head
from those emissions reduce risks. Some products
that claim to shield the user from RF absorption use
special phone cases, while others involve nothing
more than a metallic accessory attached to the phone.
Studies have shown that these products generally do
not work as advertised. Unlike “hand-free” kits, these
so-called “shields” may interfere with proper operation
Health and safety information
79
Page 83

Health and safety information
of the phone. The phone may be forced to boost its
power to compensate, leading to an increase in RF
absorption. In February 2002, the Federal trade
Commission (FTC) charged two companies that sold
devices that claimed to protect wireless phone users
from radiation with making false and unsubstantiated
claims. According to FTC, these defendants lacked a
reasonable basis to substantiate their claim.
What about wireless phone interference with
medical equipment?
Radio frequency energy (RF) from wireless phones can
interact with some electronic devices. For this reason,
FDA helped develop a detailed test method to measure
electromagnetic interference (EMI) of implanted
cardiac pacemakers and defibrillators from wireless
telephones. This test method is now part of a standard
sponsored by the Association for the Advancement of
Medical instrumentation (AAMI). The final draft, a joint
effort by FDA, medical device manufacturers, and
many other groups, was completed in late 2000. This
standard will allow manufacturers to ensure that
cardiac pacemakers and defibrillators are safe from
wireless phone EMI. FDA has tested wireless phones
80
and helped develop a voluntary standard sponsored by
the Institute of Electrical and Electronic Engineers
(IEEE). This standard specifies test methods and
performance requirements for hearing aids and
wireless phones so that no interference occurs when a
person uses a compatible phone and a compatible
hearing aid at the same time. This standard was
approved by the IEEE in 2000.
FDA continues to monitor the use of wireless phones
for possible interactions with other medical devices.
Should harmful interference be found to occur, FDA
will conduct testing to assess the interference and
work to resolve the problem.
Additional information on the safety of RF exposures
from various sources can be obtained from the
following organizations:
• FCC RF Safety Program:
• http://www.fcc.gov/oet/rfsafety/
• Environmental Protection Agency (EPA):
• http://www.epa.gov/radiation/
• Occupational Safety and Health Administration's
(OSHA):
Page 84

• http://www.osha.gov/SLTC/
radiofrequencyradiation/index.html
• National institute for Occupational Safety and
Health (NIOSH):
• http://www.cdc.gov/niosh/emfpg.html
• World health Organization (WHO):
• http://www.who.int/peh-emf/
• International Commission on Non-Ionizing
Radiation Protection:
• http://www.icnirp.de
• National Radiation Protection Board (UK):
• http://www.nrpb.org.uk
• Updated 4/3/2002: US food and Drug
Administration
• http://www.fda.gov/cellphones
Road Safety
Your wireless phone gives you the powerful ability to
communicate by voice, almost anywhere, anytime.
But an important responsibility accompanies the
benefits of wireless phones, one that every user must
uphold.
When driving a car, driving is your first responsibility.
When using your wireless phone behind the wheel of a
car, practice good common sense and remember the
following tips:
1. Get to know your wireless phone and its features,
such as speed dial and redial. If available, these
features help you to place your call without taking
your attention off the road.
2. When available, use a hands-free device. If
possible, add an additional layer of convenience
and safety to your wireless phone with one of the
many hands free accessories available today.
3. Position your wireless phone within easy reach. Be
able to access your wireless phone without
removing your eyes from the road. If you get an
incoming call at an inconvenient time, let your
voice mail answer it for you.
4. Let the person you are speaking with know you are
driving; if necessary, suspend the call in heavy
Health and safety information
Settings
81
Page 85

Health and safety information
traffic or hazardous weather conditions. Rain,
sleet, snow, ice and even heavy traffic can be
hazardous.
5. Do not take notes or look up phone numbers while
driving. Jotting down a “to do” list or flipping
through your address book takes attention away
from your primary responsibility, driving safely.
6. Dial sensibly and assess the traffic; if possible,
place calls when you are not moving or before
pulling into traffic. Try to plan calls when your car
will be stationary. If you need to make a call while
moving, dial only a few numbers, check the road
and your mirrors, then continue.
7. Do not engage in stressful or emotional
conversations that may be distracting. Make
people you are talking with aware you are driving
and suspend conversations that have the potential
to divert your attention from the road.
8. Use your wireless phone to call for help. Dial 9-1-1
or other local emergency number in the case of
fire, traffic accident or medical emergencies.
Remember, it is a free call on your wireless phone!
82
9. Use your wireless phone to help others in
emergencies. If you see an auto accident, crime in
progress or other serious emergency where lives
are in danger, call 9-1-1 or other local emergency
number, as you would want others to do for you.
10. Call roadside assistance or a special nonemergency wireless assistance number when
necessary. If you see a broken-down vehicle
posing no serious hazard, a broken traffic signal, a
minor traffic accident where no one appears
injured, or a vehicle you know to be stolen, call
roadside assistance or other special nonemergency number.
“The wireless industry reminds you to use your
phone safely when driving.”
For more information, please call 1-888-901-SAFE, or
visit our web-site www.wow-com.com
Provided by the Cellular Telecommunications &
Internet Association
Operating Environment
Page 86

Remember to follow any special regulations in force in
any area and always switch your phone off whenever it
is forbidden to use it, or when it may cause
interference or danger. When connecting the phone or
any accessory to another device, read its user's guide
for detailed safety instructions. Do not connect
incompatible products.
As with other mobile radio transmitting equipment,
users are advised that for the satisfactory operation of
the equipment and for the safety of personnel, it is
recommended that the equipment should only be used
in the normal operating position (held to your ear with
the antenna pointing over your shoulder).
Using Your Phone Near Other Electronic Devices
Most modern electronic equipment is shielded from
radio frequency (RF) signals. However, certain
electronic equipment may not be shielded against the
RF signals from your wireless phone. Consult the
manufacturer to discuss alternatives.
Pacemakers
Pacemaker manufacturers recommend that a
minimum distance of 15 cm (6 inches) be maintained
between a wireless phone and a pacemaker to avoid
potential interference with the pacemaker.
These recommendations are consistent with the
independent research and recommendations of
Wireless Technology Research.
Persons with pacemakers:
• should always keep the phone more than 15 cm
(6 inches) from their pacemaker when the phone is
switched on.
• should not carry the phone in a breast pocket.
• should use the ear opposite the pacemaker to
minimize potential interference.
If you have any reason to suspect that interference is
taking place, switch your phone off immediately.
Hearing Aids
Some digital wireless phones may interfere with some
hearing aids. In the event of such interference, you
Health and safety information
Settings
83
Page 87

Health and safety information
may wish to consult your hearing aid manufacturer to
discuss alternatives.
Other Medical Devices
If you use any other personal medical devices, consult
the manufacturer of your device to determine if it is
adequately shielded from external RF energy. Your
physician may be able to assist you in obtaining this
information. Switch your phone off in health care
facilities when any regulations posted in these areas
instruct you to do so. Hospitals or health care facilities
may be using equipment that could be sensitive to
external RF energy.
Vehicles
RF signals may affect improperly installed or
inadequately shielded electronic systems in motor
vehicles. Check with the manufacturer or its
representative regarding your vehicle. You should also
consult the manufacturer of any equipment that has
been added to your vehicle.
Posted Facilities
84
Switch your phone off in any facility where posted
notices require you to do so.
Potentially Explosive Environments
Switch your phone off when in any area with a
potentially explosive atmosphere and obey all signs
and instructions. Sparks in such areas could cause an
explosion or fire resulting in bodily injury or even
death.
Users are advised to switch the phone off while at a
refueling point (service station). Users are reminded of
the need to observe restrictions on the use of radio
equipment in fuel depots (fuel storage and distribution
areas), chemical plants or where blasting operations
are in progress.
Areas with a potentially explosive atmosphere are
often but not always clearly marked. They include
below deck on boats, chemical transfer or storage
facilities, vehicles using liquefied petroleum gas (such
as propane or butane), areas where the air contains
chemicals or particles, such as grain, dust or metal
Page 88

powders, and any other area where you would
normally be advised to turn off your vehicle engine.
Emergency Calls
This phone, like any wireless phone, operates using
radio signals, wireless and landline networks as well as
user programmed functions, which cannot guarantee
connection in all conditions. Therefore, you should
never rely solely on any wireless phone for essential
communications (medical emergencies, for example).
Remember, to make or receive any calls the phone
must be switched on and in a service area with
adequate signal strength. Emergency calls may not be
possible on all wireless phone networks or when
certain network services and/or phone features are in
use. Check with local service providers.
To make an emergency call:
If the phone is not on, switch it on.
Key in the emergency number for your present
location (for example, 911 or other official emergency
number). Emergency numbers vary by location.
If certain features are in use (call barring, for
example), you may first need to deactivate those
features before you can make an emergency call.
Consult this document and your local cellular service
provider.
When making an emergency call, remember to give all
the necessary information as accurately as possible.
Remember that your phone may be the only means of
communication at the scene of an accident; do not cut
off the call until given permission to do so.
Restricting Children's access to your Phone
Your phone is not a toy. Children should not be allowed
to play with it because they could hurt themselves and
others, damage the phone or make calls that increase
your phone bill.
FCC Notice and Cautions
Health and safety information
Settings
85
Page 89

Health and safety information
FCC Notice
• This device complies with Part 15 of the FCC Rules. Operation is subject to the following two conditions: (1) this device
may not cause harmful interference, and (2) this device must accept any interference received, including interference
that may cause undesired operation.
• This equipment has been tested and found to comply with the limits for a Class B digital device, pursusant to part 15 of
the FCC Rules. These limits are designed to provide reasonable protection against harmful interference in a residential
installation. This equipment generates, uses and can radiate radio frequency energy and, if not installed and used in
accordance with the instructions, may cause harmful interference to radio communications. Howerver, there is no
guarantee that interference will not occur in a particular installation. If this equipment does cause harmful interference
to radio or television reception, which can be determined by turning the equipment off and on, the user is encouraged
to try to correct the interference by one or more of the following measures:
• - Reorient or relocate the receiving antenna.
• - Increase the separation between the equipment and receiver.
• - Connect the equipment into an outlet on a circuit different from that to which the receiver is connected.
• - Consult the dealer or an experienced radio/TV technician for help.
The phone may cause TV or radio interference if used
in close proximity to receiving equipment. The FCC
can require you to stop using the phone if such
interference cannot be eliminated.
Vehicles using liquefied petroleum gas (such as
propane or butane) must comply with the National Fire
Protection Standard (NFPA-58). For a copy of this
86
standard, contact the National Fire Protection
Association, One Battery march Park, Quincy, MA
02269, Attn: Publication Sales Division.
Cautions
Changes or modifications made in the radio phone, not
expressly approved by Samsung, will void the user’s
authority to operate the equipment.
Page 90

Only use approved batteries, antennas and chargers.
The use of any unauthorized accessories may be
dangerous and void the phone warranty if said
accessories cause damage or a defect to the phone.
Although your phone is quite sturdy, it is a complex
piece of equipment and can be broken. Avoid
dropping, hitting, bending or sitting on it.
Other Important Safety Information
• Only qualified personnel should service the phone
or install the phone in a vehicle. Faulty installation
or service may be dangerous and may invalidate
any warranty applicable to the device.
• Check regularly that all wireless phone equipment
in your vehicle is mounted and operating properly.
• Do not store or carry flammable liquids, gases or
explosive materials in the same compartment as
the phone, its parts or accessories.
• For vehicles equipped with an air bag, remember
that an air bag inflates with great force. Do not
place objects, including both installed or portable
wireless equipment in the area over the air bag or
in the air bag deployment area. If wireless
equipment is improperly installed and the air bag
inflates, serious injury could result.
• Switch your phone off before boarding an aircraft.
The use of wireless phone in aircraft is illegal and
may be dangerous to the aircraft's operation.
• Failure to observe these instructions may lead to
the suspension or denial of telephone services to
the offender, or legal action, or both.
Product Performance
Getting the Most Out of Your Signal Reception
The quality of each call you make or receive depends
on the signal strength in your area. Your phone
informs you of the current signal strength by
displaying a number of bars next to the signal strength
icon. The more bars displayed, the stronger the signal.
If you're inside a building, being near a window may
give you better reception.
Understanding the Power Save Feature
Health and safety information
Settings
87
Page 91

Health and safety information
If your phone is unable to find a signal after 15
minutes of searching, a Power Save feature is
automatically activated. If your phone is active, it
periodically rechecks service availability or you can
check it yourself by pressing any key.
Anytime the Power Save feature is activated, a
message displays on the screen. When a signal is
found, your phone returns to standby mode.
Maintaining Your Phone's Peak Performance
For the best care of your phone, only authorized
personnel should service your phone and accessories.
Faulty service may void the warranty.
There are several simple guidelines to operating your
phone properly and maintaining safe, satisfactory
service.
• Hold the phone with the antenna raised, fullyextended and over your shoulder.
• Try not to hold, bend or twist the phone's antenna.
• Don't use the phone if the antenna is damaged.
• Speak directly into the phone's receiver.
88
• Avoid exposing your phone and accessories to rain
or liquid spills. If your phone does get wet,
immediately turn the power off and remove the
battery. If it is inoperable, call Customer Care for
service.
Availability of Various Features/Ring Tones
Many services and features are network dependent
and may require additional subscription and/or usage
charges. Not all features are available for purchase or
use in all areas. Downloadable Ring Tones may be
available at an additional cost. Other conditions and
restrictions may apply. See your service provider for
additional information.
Battery Standby and Talk Time
Standby and talk times will vary depending on phone
usage patterns and conditions. Battery power
consumption depends on factors such as network
configuration, signal strength, operating temperature,
features selected, frequency of calls, and voice, data,
and other application usage patterns.
Battery Precautions
Page 92

• Never use any charger or battery that is damaged
in any way.
• Use the battery only for its intended purpose.
• If you use the phone near the network's base
station, it uses less power; talk and standby time
are greatly affected by the signal strength on the
cellular network and the parameters set by the
network operator.
• Battery charging time depends on the remaining
battery charge and the type of battery and charger
used. The battery can be charged and discharged
hundreds of times, but it will gradually wear out.
When the operation time (talk time and standby
time) is noticeably shorter than normal, it is time
to buy a new battery.
• If left unused, a fully charged battery will
discharge itself over time.
• Use only Samsung-approved batteries and
recharge your battery only with Samsungapproved chargers. When a charger is not in use,
disconnect it from the power source. Do not leave
the battery connected to a charger for more than a
week, since overcharging may shorten its life.
• Extreme temperatures will affect the charging
capacity of your battery: it may require cooling or
warming first.
• Do not leave the battery in hot or cold places, such
as in a car in summer or winter conditions, as you
will reduce the capacity and lifetime of the battery.
Always try to keep the battery at room
temperature. A phone with a hot or cold battery
may temporarily not work, even when the battery
is fully charged. Li-ion batteries are particularly
affected by temperatures below 0 °C (32 °F).
• Do not short-circuit the battery. Accidental shortcircuiting can occur when a metallic object (coin,
clip or pen) causes a direct connection between the
+ and - terminals of the battery (metal strips on
the battery), for example when you carry a spare
battery in a pocket or bag. Short-circuiting the
terminals may damage the battery or the object
causing the short-circuiting.
Health and safety information
Settings
89
Page 93

Health and safety information
• Dispose of used batteries in accordance with local
regulations. In some areas, the disposal of
batteries in household or business trash may be
prohibited. For safe disposal options for Li-Ion
batteries, contact your nearest Samsung
authorized service center. Always recycle. Do not
dispose of batteries in a fire.
90
Care and maintenance
Your phone is a product of superior design and craftsmanship and
should be treated with care. The suggestions below will help you
fulfill any warranty obligations and allow you to enjoy this product
for many years.
• Keep your phone and all its parts and accessories out of the
reach of small children and pets. They may accidentally damage
these things or choke on small parts.
• Keep the phone dry. Precipitation, humidity, and liquids contain
minerals that corrode electronic circuits.
• Do not use the phone with a wet hand. Doing so may cause an
electric shock to you or damage to the phone.
• Do not use or store the phone in dusty, dirty areas, as its moving
parts may be damaged.
Page 94

• Do not store the phone in hot areas. High temperatures can
shorten the life of electronic devices, damage batteries, and
warp or melt certain plastics.
• Do not store the phone in cold areas. When the phone warms up
to its normal operating temperature, moisture can form inside
the phone, which may damage the phone’s electronic circuit
boards.
• Do not drop, knock, or shake the phone. Rough handling can
break internal circuit boards.
• Do not use harsh chemicals, cleaning solvents, or strong
detergents to clean the phone. Wipe it with a soft cloth.
• Do not paint the phone. Paint can clog the device’s moving parts
and prevent proper operation.
• Do not put the phone in or on heating devices, such as a
microwave oven, stove, or radiator. The phone may explode
when overheated.
• When the phone or battery gets wet, the label indicating water
damage inside the phone changes colour. In this case, phone
repairs are no longer guaranteed by the manufacturer's
warranty, even if the warranty for your phone has not expired.
• If your phone has a flash or light, do not use it too close to the
eyes of people or animals. This may cause damage to their eyes.
• Use only the supplied or an approved replacement antenna.
Unauthorised antennas or modified accessories may damage the
phone and violate regulations governing radio devices.
• If the phone, battery, charger, or any accessory is not working
properly, take it to your nearest qualified service facility. The
personnel there will assist you, and if necessary, arrange for
service.
Health and safety information
Settings
91
 Loading...