

Page 1

Sprint PCS
The clear alternative to cellular.
®
SM
Document Number - 010505D5
Page 2

Copyright 2001 Sprint Spectrum L.P. All rights reserved. No reproduction in whole or in part
without prior written approval. Sprint, Sprint PCS, Sprint PCS Phone, Sprint PCS Wireless
Web, and the diamond logo are trademarks of Sprint Communications Company L.P. Palm
OS, Graffiti, HotSync, iMessenger and Palm.Net are registered trademarks of Palm, Inc. Palm,
the Palm logo, MyPalm, the HotSync Logo, Palm Powered and the Palm Powered logo are
trademarks of Palm, Inc. All other trademarks are property of their respective owners.
Page 3

Page 4

Welcome to Sprint PCS
Sprint PCS built the only all-digital, all-PCS nationwide network from the
ground up for clearer calls, serving more than 300 major metropolitan
areas and all major airports. We built our network to give you what we
believe you really want from a wireless phone: clear sound, private
conversations and time-saving features.
And Sprint Personal Communications Services® can do something even
more far-reaching – simplify your life. Our advanced technology is designed
to grow with your communications needs so that one day, you’ll be able to
rely entirely on your phone to stay connected.
This guide will introduce you to our technology and your new
Sprint PCS Phone through simple, easy-to-follow instructions. Since you’re
probably anxious to start using your phone, we encourage you to
immediately flip to Section One – Getting Started With Sprint PCS Service.
This section provides all the information you need to quickly set up your
voicemail and much more. It also contains information on how to contact
Sprint PCS should you have questions about service, want to purchase
additional products or services, or just check your account balance.
Thank you for choosing Sprint PCS.
Understanding
Roaming
Getting Started Understanding
Roaming
Getting Started Getting Started
1
Page 5

Understanding
Roaming
Getting Started Understanding
Roaming
Getting Started Getting Started
2
Page 6

Table of Contents
1. Getting to Know Your Sprint PCS Phone ..........................................9
䊳 Getting Started.............................................................................................. 10
䊳 Understanding This User Guide................................................................... 11
䊳 Front View of Phone.....................................................................................12
䊳 Connecting the Cradle.................................................................................. 14
䊳 Installing and Charging the Battery............................................................ 16
䊳 Turning Your Phone ON and OFF............................................................... 20
䊳 Calibration/Initial Setup Screens................................................................ 21
䊳 Adjusting Screen Contrast............................................................................22
䊳 Icons on the Phone Screen ..........................................................................23
2. Getting to Know the Handheld Computer.......................................27
䊳 What is a Handheld Computer..................................................................... 28
䊳 Tapping and Typing..................................................................................... 29
䊳 Opening an Application............................................................................... 30
䊳 Customizing your Handheld Computer.......................................................31
䊳 Troubleshooting........................................................................................... 33
䊳 Resetting Your Handheld............................................................................. 34
3. Getting Started With Sprint PCS Service .......................................37
䊳 Getting Started With Sprint PCS Service...................................................... 38
䊳 Setting Up Your Voicemail...........................................................................38
䊳 Getting Help.................................................................................................. 39
4. Entering Information into the Handheld Computer....................... 41
䊳 Using the On-Screen keyboard..................................................................... 42
䊳 Graffiti® Writing......................................................................................... 43
䊳 Importing Data............................................................................................. 53
5. Understanding Roaming ....................................................................55
䊳 Understanding How Roaming Works.......................................................... 56
䊳 Setting Your Phone’s Roam Mode............................................................... 57
䊳 Setting an Alert When Roam Charges Apply (Call Guard) .......................58
6. Making and Answering Calls...........................................................59
䊳 Making Calls................................................................................................. 60
䊳 Answering Calls............................................................................................ 61
䊳 Missed Call Notification............................................................................... 62
䊳 Adjusting the Ringer Volume....................................................................... 63
䊳 In-Call Options............................................................................................. 63
䊳 Voice Dialing................................................................................................ 66
䊳 Speed Dialing ...............................................................................................68
䊳 Redialing the Last Number.......................................................................... 71
䊳 Four Digit Dialing........................................................................................71
䊳 Making an Emergency Call .........................................................................72
Page 7

䊳 Viewing Missed Calls ....................................................................................72
䊳 Key Guard..................................................................................................... 73
䊳 Voice Memo.................................................................................................. 73
䊳 Setting Phone Preferences............................................................................ 75
䊳 Network Connections ...................................................................................87
7. Using Sprint PCS Service Features .................................................93
䊳 Sprint PCS Voice Command......................................................................... 94
䊳 Using Caller ID............................................................................................. 95
䊳 Responding to Call Waiting......................................................................... 96
䊳 Three-Way Calling .......................................................................................96
䊳 Forwarding Your Calls.................................................................................. 97
8. Application Menus and Entering Text ............................................99
䊳 Application Launcher................................................................................. 100
䊳 Application Categories................................................................................ 100
䊳 Applications Display...................................................................................102
䊳 Elements of the Application Screen........................................................... 103
䊳 Menus......................................................................................................... 105
䊳 Online Help................................................................................................. 105
䊳 Finding Records .........................................................................................105
䊳 Sorting Records.......................................................................................... 106
䊳 Private Records........................................................................................... 106
䊳 Attaching Notes........................................................................................... 107
䊳 Choosing Fonts........................................................................................... 108
䊳 Getting Application Information............................................................... 109
䊳 Software Version.........................................................................................109
䊳 Beaming Information................................................................................ 109
9. Adjusting Volume..............................................................................111
䊳 Changing Ringer Volume.......................................................................... 112
䊳 Adjusting Volume During a Conversation................................................. 112
䊳 Speakerphone............................................................................................. 113
䊳 Muting a Call.............................................................................................. 113
10. Managing Messaging ......................................................................115
䊳 Setting Up Voicemail.................................................................................. 116
䊳 Knowing When You Have Messages........................................................... 116
䊳 Message Types............................................................................................. 116
䊳 New Voicemail Message Alerts.................................................................... 117
䊳 Retrieving Your Voicemail Messages......................................................... 117
䊳 Clearing the Voicemail Message Icon........................................................ 118
䊳 Sprint PCS Wireless Web Messaging.......................................................... 119
䊳 New Sprint PCS Wireless Web Messages..................................................... 120
䊳 Sorting the Message List............................................................................. 121
䊳 Deleting Messages....................................................................................... 121
Page 8

䊳 Creating a Message Filter...........................................................................122
䊳 Message Menu Options............................................................................... 123
11. Address Book ....................................................................................125
䊳 Creating an Address Book Entry................................................................. 126
䊳 Address Details............................................................................................ 128
䊳 Speed Dial................................................................................................... 131
䊳 Voice Dial.................................................................................................... 131
䊳 Making Calls from the Address Book......................................................... 133
䊳 Viewing Address Book Entries..................................................................... 133
䊳 Editing an Address Book Entry................................................................... 134
䊳 Looking up an Address Book Entry............................................................ 135
䊳 Sorting the Address Book............................................................................ 135
䊳 Beaming Address Book Entries................................................................... 136
䊳 Address Book Menu Options....................................................................... 137
12. Date Book...........................................................................................139
䊳 Scheduling Events...................................................................................... 140
䊳 Scheduling Untimed Events....................................................................... 143
䊳 Rescheduling an Event ..............................................................................144
䊳 Setting an Alarm for an Event ...................................................................145
䊳 Marking an Event As Private...................................................................... 146
䊳 Changing the Date Book View.................................................................... 146
䊳 Scheduling Repeating Events.................................................................... 150
䊳 Date Book Menus........................................................................................ 152
13. Managing Mail..................................................................................155
䊳 Managing Desktop E-mail......................................................................... 156
䊳 Setting up the Desktop Mail....................................................................... 157
䊳 Synchronizing Mail with your E-mail Application................................... 159
䊳 Creating, Viewing, and Replying to Messages........................................... 160
䊳 Looking Up an Address............................................................................... 163
䊳 Adding Details to E-mail Messages............................................................ 164
䊳 Adding a Signature..................................................................................... 165
䊳 Sending Messages....................................................................................... 166
䊳 Editing an Un-sent Message....................................................................... 166
䊳 Working with Drafts................................................................................... 167
䊳 Purging Deleted Messages.......................................................................... 168
䊳 Managing the Message List........................................................................ 169
䊳 Sorting the Message List............................................................................. 170
䊳 HotSync Options.........................................................................................171
䊳 Working with Filters................................................................................... 173
䊳 Ignoring or Receiving Messages................................................................ 174
䊳 Filter Strings...............................................................................................175
䊳 High Priority Messages............................................................................... 176
Page 9

䊳 Truncating Messages.................................................................................. 177
䊳 Mail Menus................................................................................................. 177
14. Expense Manager.............................................................................179
䊳 Creating Expense Items.............................................................................. 180
䊳 Changing the Expense Date....................................................................... 181
䊳 Entering Receipt Details............................................................................. 182
䊳 Entering the Expense Type Automatically................................................. 183
䊳 Expense List Display Options .....................................................................184
䊳 Changing Currency and Symbol Display ..................................................185
䊳 Importing Data into Microsoft Excel......................................................... 186
䊳 Using Expense Report Templates............................................................... 188
䊳 Expense Menus........................................................................................... 190
15. Memo Pad ..........................................................................................191
䊳 Creating a New Memo................................................................................ 192
䊳 Choosing a Memo Category....................................................................... 193
䊳 Making a Memo Private............................................................................. 193
䊳 Reviewing or Editing Memos..................................................................... 194
䊳 Sorting Memos ...........................................................................................194
䊳 Deleting a Memo........................................................................................195
䊳 Beaming a Memo....................................................................................... 196
䊳 Memo Pad Menus....................................................................................... 196
16. To Do List............................................................................................199
䊳 Creating a To Do List Item......................................................................... 200
䊳 Setting Priorities......................................................................................... 201
䊳 Checking OFF To Do List Items .................................................................202
䊳 Changing Priorities and Due Dates........................................................... 202
䊳 Deleting a To Do List Item......................................................................... 204
䊳 Displaying Completed and Due Items....................................................... 205
䊳 To Do Menus ..............................................................................................206
17. Calculator...........................................................................................207
䊳 Opening the Calculator.............................................................................. 208
䊳 Using the Calculator Buttons..................................................................... 209
䊳 Displaying Recent Calculations................................................................. 210
18. Security...............................................................................................213
䊳 Assigning a Password................................................................................. 214
䊳 Changing or Deleting a Password..............................................................215
䊳 Recovering a Lost Password....................................................................... 215
䊳 Showing or Hiding Private Records........................................................... 216
䊳 Locking your phone................................................................................... 217
䊳 Allowing Calls............................................................................................. 218
䊳 Resetting the Preferences........................................................................... 219
Page 10

19. Experiencing Sprint PCS Wireless Web ......................................221
䊳 The Sprint PCS Wireless Web..................................................................... 222
䊳 The Sprint PCS Wireless Web Browser .......................................................223
䊳 Launching the Browser..............................................................................224
䊳 Navigating the Sprint PCS Wireless Web................................................... 225
䊳 Connecting to the Internet......................................................................... 229
䊳 Bookmarks.................................................................................................. 230
䊳 Web Alerts ...................................................................................................231
䊳 Browser Menus ...........................................................................................232
20. Web Clipping Applications.............................................................235
䊳 Web Clipping Applications......................................................................... 236
䊳 Web Clipping vs. Web Browsing................................................................. 236
䊳 Using Web Clipping Applications............................................................... 237
21. Managing Handheld Computer Software.....................................241
䊳 Applications Launcher ...............................................................................242
䊳 Installing Your Phone Software................................................................. 244
䊳 Deleting Handheld Computer Applications............................................... 245
䊳 Checking Memory Usage............................................................................ 246
䊳 Beaming Capabilities.................................................................................246
22. HotSync® Operations......................................................................249
䊳 HotSync Manager and Technology............................................................ 250
䊳 Performing Your First HotSync Operation................................................. 251
䊳 Creating a User Profile............................................................................... 252
䊳 Performing a Local HotSync Operation..................................................... 253
䊳 Selecting HotSync Setup Options............................................................... 254
䊳 Customizing the HotSync Operation......................................................... 256
䊳 Performing a HotSync Operation via a Network.......................................258
䊳 Using File Link........................................................................................... 259
䊳 IR HotSync Operations............................................................................... 260
䊳 Performing an IR HotSync operation........................................................ 262
23. Selecting Your Accessories ...........................................................263
䊳 Accessory Options .......................................................................................264
䊳 How to Order............................................................................................... 266
24. Knowing Performance and Safety Guidelines ............................267
䊳 Getting the Most Out of Your Reception.................................................... 268
䊳 Maintaining Safe Use of and Access to Your Phone.................................. 270
䊳 Caring for the Battery................................................................................. 273
䊳 Acknowledging Special Precautions and the FCC Notice.......................... 274
䊳 Owner’s Record........................................................................................... 276
䊳 User Guide Proprietary Notice.................................................................... 276
Page 11

25. Terms and Conditions, & Warranty Information .........................277
䊳 Terms and Conditions of Services.............................................................. 278
䊳 Intellectual Property................................................................................... 300
䊳 Manufacturer’s Warranty........................................................................... 301
Page 12

1
Y
Getting to Know Your Sprint PCS Phone
In this Section
䊳 Getting Started
䊳 Front View of Phone
䊳 Connecting the Cradle
䊳 Installing and Charging the Battery
䊳 Turning Your Phone ON and OFF
䊳 Calibrating the Display Screen
™
Ge
Getting to Know
Your Sprint PCS
1
䊳 Adjusting Screen Contrast
our phone is packed with features that simplify your life and expand your
ability to stay connected to the people and information that are important to
you. We know that you’re anxious to start using it, so this section will give you a
quick introduction to your new phone. The easy-to-follow instructions will guide
you through the basics of the most common features of your phone and you’ll be on
your way to using it in no time.
Don’t forget the other chapters in this guide. They’re filled with information about
the capabilities and benefits of your new Sprint PCS Phone. They include detailed
step-by-step instructions that familiarize you with all the features and explain how
to customize your phone to meet your specific needs.
Getting to Know Your Sprint PCS Phone 9
Ge
Getting to Know Your
Sprint PCS Phone
1
Sprint PCS
Wireless Web
Ge
Page 13

Getting Started
Congratulations on the purchase of your phone (Model SPHI300). Your phone combines two leading technologies, to give
you the convenience of a digital phone and a personal digital
assistant (PDA). Although the products have been effectively
combined, they can be used together or completely
independent of one another. The Sprint PCS Phone™ uses the
popular Palm® Operating System, thus allowing you to
install and run over 10,000 Palm Computing applications.
Custom e-mail and web applications have been included and
especially designed to work with the Sprint PCS Phone™. The
HotSync® application can be used to synchronize a desktop
machine with the Sprint PCS Phone™. This phone is
lightweight, easy-to-use, reliable and offers many significant
features:
䊳 A Complete Palm Powered™ color screen.
䊳 Software included in this package helps you stay organized
and up-to-date by synchronizing the Palm(tm) Date
Book, Address Book, To Do List and Memo Pad with the
Microsoft(R) Outlook(R) default Calendar, Contacts,
Tasks, and Notes folders.
䊳 Voice Dialing allows you to use speech recognition to call
someone saved in your address book.
䊳 Dual-band capability provides access to other PCS CDMA
and analog cellular networks where Sprint PCS has
implemented roaming agreements.
䊳 Sprint PCS Wireless Web Browser provides access to the
wireless Internet in digital mode.
䊳 Sprint PCS Wireless Web Mail and Sprint PCS Wireless Web
Short Mail provide quick and convenient text messaging
capabilities.
䊳 Sprint PCS Voice Command lets you dial phone numbers
by speaking someone’s name or the digits in their phone
number.
Section 1
10 Getting to Know Your Sprint PCS Phone
Page 14

䊳 Voice Memo allows you to record personal memos to
remind yourself of important events.
䊳 Voice activated dialing with 20 locations.
Understanding This User Guide
This user guide introduces you to our technology and all the
advantages of your new Sprint PCS Phone – through easy-tofollow instructions.
䊳 Sections break down categories of information to
progressively take you all the way from learning the basics
to using the most advanced phone features.
䊳 Tips highlight special shortcuts and timely reminders to
help you make the most of your new phone.
䊳 The Index helps you find specific information quickly.
We know your time is valuable, that’s why we’ve designed this
guide to be used in a building block format or in stand-alone
sections. You’ll get the most out of your new Sprint PCS phone
if you read each section. However, if you’d like to learn about a
specific feature, you can locate the specific section using the
colored tabs.
Ge
Getting to Know
Your Sprint PCS
1
Ge 1
Getting to Know Your
Sprint PCS Phone
Getting to Know Your Sprint PCS Phone 11
Sprint PCS
Wireless Web
Ge
Page 15
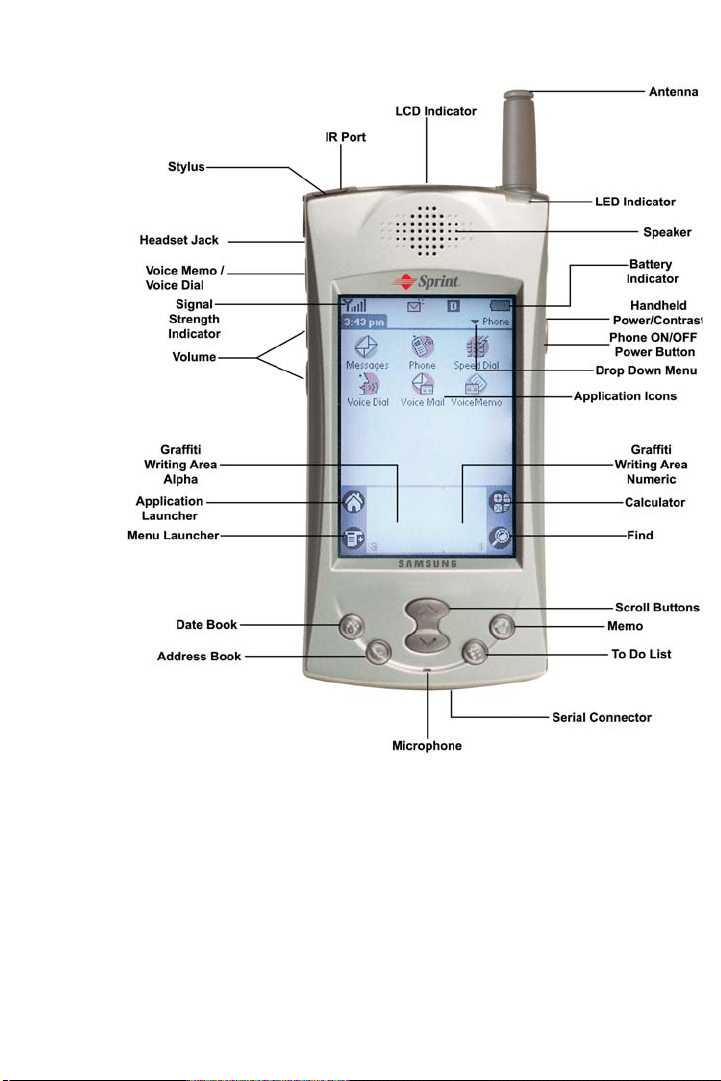
Front View of Phone
Getting to Know Your Sprint PCS Phone 12
Page 16

䊳 Stylus: The stylus acts like a mouse to navigate the Sprint
PCS Phone. Use it to touch the screen to select the desired
function.
䊳 IR (Infrared) Port: The Infrared port allows you to beam
information between two Sprint PCS I300 Phone devices.
Each device must have IR capabilities.
䊳 LED Indicator: Displays when the phone is turned on.
䊳 LCD Indicator: Displays the Time, Signal, Date, and
Battery strength. Flashes to indicate an incoming call or
message. Also lights up when the phone is turned On.
䊳 Phone Power Button: Turns the Phone ON or OFF.
䊳 Handheld Computer Power Button: Turns the power
ON or OFF if pressed once. Also acts as the contrast
adjustment on the Sprint PCS Phone when pressed and
held.
䊳 Voice Memo: Record a personal memo on the Sprint PCS
Phone. Up to ten memos can be stored on the phone.
䊳 Sprint PCS Phone Screen: This is a touch sensitive
screen designed to be used with the provided stylus. Use
only the stylus, since other objects may scratch the screen.
䊳 Scroll Buttons: Allows you to move up or down on the
Sprint PCS Phone screen to display all of the icons or
information available.
䊳 Application Buttons: These buttons automatically
activate the Date Book, Address Book, To Do List, and
Calculator when pressed.
䊳 Volume Keys: Adjust the ringer volume in Standby mode
and the voice volume during a call. Can also be used to
scroll up/down in the Address Book.
䊳 Ear-Microphone Jack: Provides connection for an
optional hands free headset.
䊳 Reset Button: The reset button should not be used under
normal conditions. If the device stops responding or locks
up, it can be reset by pressing this button. The top of the
stylus un-screws to reveal a reset tool that is used to push
into the tiny opening on the back of the phone.
Ge
Getting to Know
Your Sprint PCS
1
Ge 1
Getting to Know Your
Sprint PCS Phone
Sprint PCS
Wireless Web
Getting to Know Your Sprint PCS Phone 13
Ge
Page 17

䊳 Serial Connector: Connects the Sprint PCS Phone™ to
the desktop cradle/charger allowing the information
between the desktop computer and Sprint PCS Phone to
synchronize.
Connecting the Cradle
Your package includes a cradle for charging the battery and
synchronizing the Sprint PCS Phone™ with a desktop or
laptop computer. If you do not plan to synchronize the Sprint
PCS Phone™ with a desktop computer, the cradle can be used
as a battery charger only. When the cradle is plugged into a
wall outlet, the battery charger is fully functional.
Connecting the Cradle to a Desktop Computer
1. Turn OFF the desktop computer.
2. Connect the serial cable to com 1 or com 2 on the desktop
computer.
3. Turn the desktop computer back ON.
PC System Requirements for the Palm Desktop Software
To install and operate correctly, the Palm software must have
the following resources:
䊳 Windows® 95, 98, ME, NT, or XP
䊳 IBM-Compatible 486 or higher computer
䊳 8 MB of RAM minimum, 16 MB recommended
䊳 20 MB of disk space
䊳 VGA or better monitor
䊳 CD-ROM drive
Section 1
14 Getting to Know Your Sprint PCS Phone
Page 18

䊳 Mouse
䊳 One available serial port
Macintosh System Requirements for the Palm Desktop Software
䊳 Any Palm™ handheld and HotSync® cradle
䊳 Apple Macintosh or compatible with a Power PC processor
䊳 Mac OS 7.5.3 or later
䊳 One open serial (printer/modem) port (USB-equipped
computers, such as the Apple iMac, require the Palm
Connect USB adapter.)
䊳 Macintosh Serial Adapter (included with original Palm
MacPac kit, or available for purchase)
䊳 20 MB free hard drive space
䊳 6 MB free RAM
Installing the Palm Desktop Software
1. Insert the Palm Desktop CD into the desktop computer.
2. Follow the instructions on the screen when the Install
application starts.
Note: If the Install application does not start, you can start it
manually through Windows Explorer.
3. Select Yes or No to install the Mail application. If you
select Yes, the application configures the mail program on
the desktop to synchronize with the Sprint PCS Phone
mail application.
Macintosh
System
Ge
Your Sprint PCS
Note:
You can connect your
phone to a Macintosh
using the PalmConnect®
Serial Kit or PalmConnect
USB kit (sold separately).
1
System
Ge 1
Getting to Know
Macintosh
Getting to Know Your
Sprint PCS Phone
Getting to Know Your Sprint PCS Phone 15
Sprint PCS
Wireless Web
Ge
Page 19

4. Select com1 or com 2, depending on which port the cradle
is connected.
5. When the application is finished installing, restart your
machine.
Installing and Charging the Battery
Battery Capacity
Your phone is equipped with a Lithium Ion (LiIon) battery. It
allows you to recharge your battery before it is fully drained.
The battery provides approximately four hours of continuous
digital talk time (90 minutes in analog) or approximately 100
hours of continuous digital standby time (20 hours in
analog).
When the battery reaches 5% of its capacity, the battery icon
blinks. When there are approximately two minutes of talk time
left, the phone sounds an audible alert every 30 seconds and
then powers down.
Section 1
16 Getting to Know Your Sprint PCS Phone
Page 20

Installing the Battery
Your phone comes with a LiIon battery. To install the battery:
1. Hold the Sprint PCS Phone™ so that the back portion is
exposed.
2. Line up the battery in the slot and slide upwards until it
locks into place.
Removing the Battery
To remove your battery for charging or for another reason,
follow these easy steps:
Installing the
Battery
Ge
Getting to Know
Your Sprint PCS
1
Installing the
Battery
Ge 1
Getting to Know Your
Sprint PCS Phone
1. Make sure the power is off so you don’t lose any stored
numbers or messages.
2. Press the release button on the back of the phone.
3. Slide the battery downward to release from the phone.
Getting to Know Your Sprint PCS Phone 17
Sprint PCS
Wireless Web
Ge
Page 21

WARNING:
Using the wrong battery
charger could cause
damage to your phone
and void the warranty.
Charging the Battery
Your phone comes with a rechargeable battery. You should
charge the battery upon opening the package. Being aware of
your battery’s charge is important. If your battery level
becomes too low, your phone automatically shuts off and you
may lose information. For a quick check of your phone’s
battery level, glance at the battery charge indicator located on
the top display screen.
There is also an internal backup battery that saves all the
settings in the phone when the regular battery is discharged.
An internal backup battery needs to be charged initially for 24
hours. To make sure the internal battery is charged, do not
disconnect the main battery from the phone for 24 hours.
Section 1
18 Getting to Know Your Sprint PCS Phone
Page 22

Remaining Battery Power
The remaining battery power is indicated on the screen using
a battery icon in the upper right corner of the display.
Remaining
Battery Power
Note: A battery indicator also exists on the LCD screen. Both
indicators are a correct measurement of battery power.
If the battery charge gets too low, the battery icon blinks
and the phone sounds a warning tone. The phone may power
down to conserve battery power to maintain the phone’s data.
Note: Always use the Sprint PCS-approved desktop charger,
travel charger or cigarette lighter adapter to charge your
battery.
Using the Desktop Charger
To use the desktop charger provided with your phone:
1. Plug the AC adapter into the electrical outlet.
2. Remove the serial connector rubber plug from the bottom
of your phone.
3. Insert the phone (with the battery installed) into the slot.
䊳 A red light on the charger lets you know the battery is
charging.
䊳 A green light lets you know that the battery is at least 90
percent charged.
䊳 A yellow light indicates that the battery is operating at a
temperature that is too high or low, or that the charger is
not plugged in correctly. Please check the charger and the
battery.
It generally takes about three hours to fully recharge a
completely discharged battery. With the Sprint PCS-approved
Lilon battery, it is okay to recharge the battery before it
becomes completely run down.
Note:
If your battery drains and
you have the unit in an
uncharged state for an
extended period of time,
you can lose all of the
stored data.
Ge
Your Sprint PCS
1
Battery Power
Wireless Web
Ge
Getting to Know
Remaining
Ge 1
Getting to Know Your
Sprint PCS Phone
Sprint PCS
Getting to Know Your Sprint PCS Phone 19
Page 23

Turning Your Phone ON and OFF
Turning your Phone ON
Choose from the following options:
Tip:
The Power Save feature
helps to conserve your
battery power when you
are in an area where there
is no signal.
1. To turn your phone on, press for approximately two
seconds.
䊳 Once your phone is ON, it displays “No Service Area” while
your phone looks for a signal. When your phone finds a
signal, it automatically enters Standby mode – the
phone’s idle state. At this point, you're ready to begin
making and receiving calls.
䊳 If your phone is unable to find a signal after 15 minutes of
searching, a Power Save feature is automatically activated.
When a signal is found, your phone returns to Standby
mode.
䊳 Your phone searches for a signal periodically without
your intervention. You can also initiate a search for
Sprint PCS Service by pressing any key (when your phone
is turned ON).
Or:
1. From the Applications menu, tap .
2. Tap Yes to turn the phone ON.
Or:
1. From the Phone OFF screen, tap the car.
2. Tap Yes to turn the phone ON.
Section 1
20 Getting to Know Your Sprint PCS Phone
Page 24

Turning your Phone OFF
Choose from the following options:
1. Press for two seconds.
䊳 Your screen displays the Phone OFF screen. The handheld
computer portion of the phone can still be used when the
phone is OFF.
Turning your
Phone OFF
Ge
Or:
1. On the phone main screen, tap .
2. Select Options and tap “Phone Off”.
Calibration/Initial Setup Screens
When the phone is first turned ON, the calibration screen is
displayed. By calibrating the unit, the internal circuitry is
synchronized with the touch screen. Remove the stylus and
follow the directions displayed on the screen to calibrate.
Note: You can calibrate the screen at anytime by launching
the Preferences program and selecting Digitizer under the
options menu.
Setup
When the handheld computer is initially turned ON, the Setup
screens are displayed. Follow the steps listed below to complete
the initial setup:
1. The Calibration Setup screen is displayed automatically.
2. Remove the stylus and tap the screen anywhere to begin.
Getting to Know
Your Sprint PCS
1
Turning your
Phone OFF
Ge 1
Getting to Know Your
Sprint PCS Phone
Sprint PCS
Wireless Web
Getting to Know Your Sprint PCS Phone 21
Ge
Page 25

Note: To prevent scratches, always use the stylus. Other
devices may cause scratches to the surface of your phone.
3. A cross hatch is displayed on the screen. Tap the
center of the cross hatch.
4. A new cross hatch is displayed in the upper left corner. Tap
the center.
5. Repeat these steps until there are no more cross hatch
marks displayed.
6. The Time Setup screen is displayed once the device has
been calibrated.
7. Set the desired time by tapping on the box. Tap OK to close
the Time screen.
8. Tap the Date box to set the correct day, month, and year.
Tap Today to close the Date screen.
9. Tap Done to exit the Setup screens.
Note: For more information on date and time setup, see
“General” on page 79.
Adjusting Screen Contrast
The contrast allows the screen to display better in different
lighting conditions. To display the setting to adjust the
contrast:
1. Press and hold the button.
2. The contrast adjustment screen is displayed. Move the
slider back and forth to the desired setting.
3. Tap to exit.
Section 1
22 Getting to Know Your Sprint PCS Phone
Page 26

Icons on the Phone Screen
Signal Strength Indicator - The more bars that are
displayed, the better the signal strength. The maximum
number of bars is five.
Setup
No Service - No service means that the phone cannot
receive a signal from the system. You cannot make or
receive calls with the no service indicator on.
InUse indicator - This icon is displayed when a call is
connected.
Data Call Indicator - This icon is displayed when a
data call is connected.
Roaming Indicator - If the phone is outside of the
Sprint PCS Service area, the roaming icon is displayed.
Analog Indicator - The phone is operating in analog
mode. No digital service is available or being used.
New Message Indicator - When you have a new
Sprint PCS Wireless Web message, page, or voicemail
messages, tap the message icon to listen or view the new
messages.
Web Alert Indicator - When you have a new web alert
message, tap the web alert icon to view the new message
through the Sprint PCS Wireless Web.
Ge
Getting to Know
Your Sprint PCS
1
Setup
Ge 1
Getting to Know Your
Sprint PCS Phone
Battery Level Indicator - The power level of the
battery is displayed
Getting to Know Your Sprint PCS Phone 23
Sprint PCS
Wireless Web
Ge
Page 27
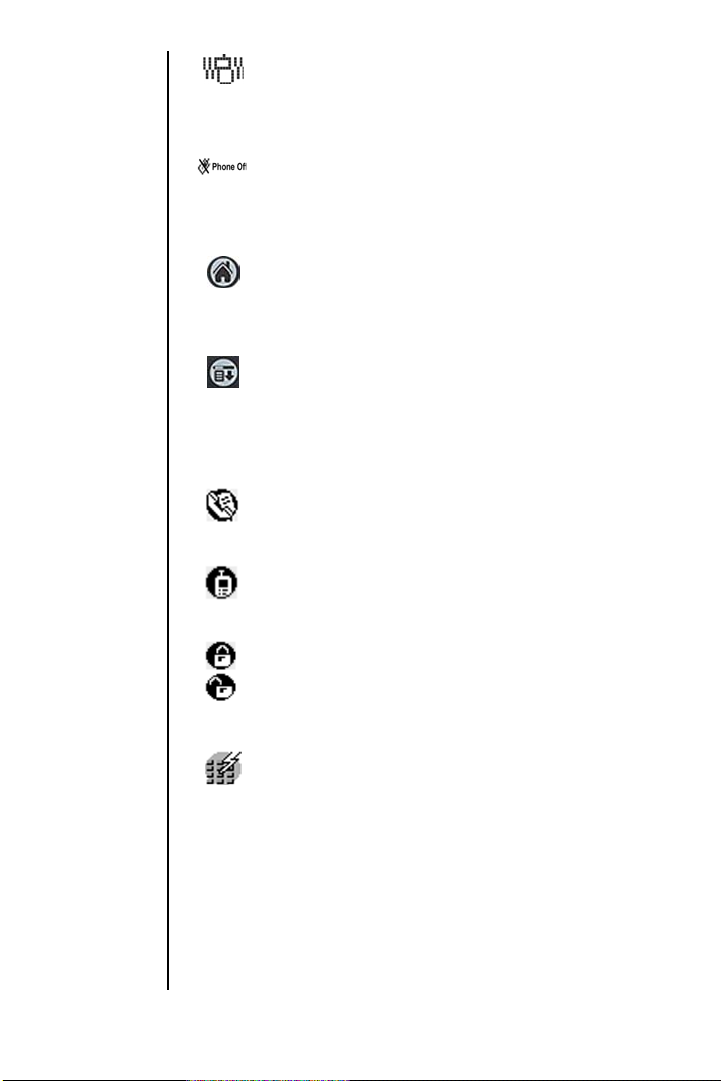
Vibrate Indicator - The phone is set to vibrate
mode. The ringer does not sound for incoming calls
or message alerts, instead the phone vibrates.
Phone OFF Indicator - This means that the phone’s
power is OFF. If you tap the icon, the Power ON
prompt is displayed. Tap
Applications Launcher - Launches the handheld
Yes to turn the phone ON.
computer application screen. Tap this to exit any
screen and return to the main screen.
Menu Launcher - Launches the menu bar
associated with each screen being displayed. Tap the
Menu Launcher to display a drop down list of the
available options.
Address Book - Tap this icon to gain instant access
to the Address Book.
Outgoing Call History - Displays the last 20 entries
of outgoing calls.
Key Lock/Unlock - Activates or deactivates the key
lock option. This keeps any keys from being pressed
accidentally.
Speed Dial - Tap this icon to gain instant access to
the Speed Dial screen.
Section 1
24 Getting to Know Your Sprint PCS Phone
Page 28

Icons on the Phone LCD
There is also a LCD display located on the top of the phone. It
is a small LCD panel that displays:
Icons on the
Phone LCD
䊳 Caller ID
䊳 Time & Date
䊳 Signal Strength
䊳 Battery Level
䊳 Call in Progress
䊳 Roaming
䊳 Sprint PCS Wireless Web Message, Page, or
Voicemail Alert
䊳 Web Alert
䊳 Vibrate Mode
Ge
Getting to Know
Your Sprint PCS
1
Icons on the
Phone LCD
Ge 1
Getting to Know Your
Sprint PCS Phone
Getting to Know Your Sprint PCS Phone 25
Sprint PCS
Wireless Web
Ge
Page 29

Section 1
26 Getting to Know Your Sprint PCS Phone
Page 30

2
T
Getting to Know the Handheld Computer
In this Section
䊳 What is a Handheld Computer
䊳 Tapping and Typing
䊳 Opening an Application
䊳 Customizing your Handheld Computer
䊳 Troubleshooting
䊳 Resetting Your Handheld
he handheld computer allows you to simplify your life by organizing scheduled
events and keeping important information easily accessible in the palm of your
hand. By using this phone, you get the best of both worlds. You can communicate
and have a personal assistant all in one unit.
Ge
Getting to Know
the Handheld
2
Ge
Getting to Know the
Handheld Computer
Getting to Know the Handheld Computer 27
2
Sprint PCS
Wireless Web
Ge
Page 31

What is a Handheld Computer
The handheld computer is a personal digital assistant that
simplifies the way you keep track of important events and
information in your life. By using the handheld computer, you
can keep track and automatically update information with a
tap of the stylus. The stylus is the instrument that is used to
navigate inside the handheld computer. It has a special point
that serves to touch the screen to input information into the
handheld computer.
Front View of the Handheld Computer
Section 2
28 Getting to Know the Handheld Computer
Page 32

Tapping and Typing
To navigate the handheld computer, you must use the stylus.
The stylus works similar to a mouse on a regular desktop
machine, but instead of clicking an icon, you tap it. The first
time the handheld computer is turned on, a setup screen is
displayed with instructions. These instructions include a
calibration setup that aligns the internal circuitry with the
touch sensitive screen.
The stylus can also be used to drag and select text on the
screen. Simply press the stylus to the screen and drag it across
the characters without lifting from the surface. Highlighted
text indicates it has been selected.
Typing
Typing
Ge
the Handheld
Note:
Make sure you always
use the stylus when
touching the screen. If you
use another device, the
screen may become
scratched.
2
Getting to Know
Included in the handheld computer is a fully functional onscreen keyboard. To access the keyboard, tap either the alpha
or numeric icons listed on the bottom of the screen in the
Graffiti text area. Once the keyboard is displayed, use the stylus
to select the letters or numbers desired.
Getting to Know the Handheld Computer 29
Typing
Ge 2
Getting to Know the
Handheld Computer
Sprint PCS
Wireless Web
Ge
Page 33

Opening an Application
Follow the steps listed below to use the stylus to open an
application on the handheld computer:
1. Remove the Stylus from your phone.
2. Find the Calculator icon on the handheld computer
screen.
3. Tap the stylus lightly on the icon.
4. The Calculator screen is displayed.
5. Use the stylus to touch the number keys, enter values into
the calculator and perform calculations.
6. When you have completed calculations, tap the icon
on the bottom of the screen.
7. The main menu of the handheld computer is displayed.
Section 2
30 Getting to Know the Handheld Computer
Page 34

Customizing your Handheld Computer
Now that you are getting more familiar with the handheld
computer, it is time to personalize it by adding some
information. The type of information you can enter to
personalize is:
䊳 Name and Address
䊳 Correct Time
䊳 Set the desired view for time and date
䊳 Configure alert sounds
Information is entered through the Preferences menu.
Setting the Time
and Date
Ge
Getting to Know
the Handheld
Setting the Time and Date
To set the time and date:
1. From the Applications main screen, tap the icon.
2. The Preferences screen is displayed.
3. Using the stylus, tap “Manual”.
2
Setting the Time
and Date
Ge 2
Getting to Know the
Handheld Computer
Sprint PCS
Wireless Web
Ge
Getting to Know the Handheld Computer 31
Page 35

Note:
The Automatic setting
retrieves the date and
time from the Sprint PCS
network
4. Using the stylus, tap inside the Set Time box.
5. Enter the correct time.
6. Tap inside the Set Date box.
7. Enter the correct date.
Setting other Preferences
There are other items located in the preferences menu that
setup how the handheld computer functions. These
preferences are:
Note:
The Auto-off after setting
is also used to determine
when the display will shut
off during phone calls.
䊳 Auto-off after: - This determines the amount of time the
handheld computer remains ON when there is no activity.
Setting this preference to a lower value conserves battery
power. The available settings are 30 seconds, 1 minute, 2
minutes, or 3 minutes.
䊳 System Sound: - This is the default sound level of the
system. The available settings are OFF, Low, Medium, or
High.
䊳 Alarm Sound: - This is the default sound level for alarms
that are configured on the handheld computer. The
available settings are OFF, Low, Medium, or High.
䊳 Game Sound: - This is the default sound level for games
installed on the handheld computer. The available settings
are OFF, Low, Medium, or High.
䊳 Beam Receive: - This option allows the handheld
computer to accept information from another IR device
through the use of beaming. An infrared beam is sent
between the two devices and information is exchanged.
This option must be set to
ON to work correctly.
Section 2
32 Getting to Know the Handheld Computer
Page 36

Troubleshooting
Before contacting Sprint PCS Customer Service Solutions, try
the following:
Setting other
Preferences
䊳 Make sure that the battery is properly attached to your
phone.
䊳 Make sure that the battery is fully charged.
䊳 Make sure that there is no visible physical damage to your
phone or battery.
䊳 Make sure that the cradle/charger is plugged in to a
working receptacle.
䊳 Perform a soft or hard reset of the Sprint PCS Phone by un-
screwing the top of the stylus and using the small pin to
press the reset button located on the back of your phone.
For more information, see "Resetting Your Handheld" on
page 34.
Ge
Getting to Know
the Handheld
2
Setting other
Preferences
Ge 2
Getting to Know the
Handheld Computer
Getting to Know the Handheld Computer 33
Sprint PCS
Wireless Web
Ge
Page 37

Tip:
The stylus that comes
with your handheld has a
reset tip inside. To use it,
unscrew the top of the
stylus.
Resetting Your Handheld
Under normal circumstances, you will not have to use the
reset button. On rare occasions, however your handheld may
no longer respond to buttons or the screen. In this case, you
need to perform a reset to get your handheld running again.
Performing a Soft Reset
A soft reset tells your handheld to stop what it is doing and
start over again. All records and entries stored in your
handheld computer are retained with a soft reset. After a soft
reset, the main phone screen is displayed.
To perform a Soft Reset:
䊳 Use the reset tip tool, or the tip of an unfolded paper clip
(or similar object without a sharp tip), to gently press the
reset button inside the hole on the back panel of your
handheld.
Section 2
34 Getting to Know the Handheld Computer
Page 38

Performing a Hard Reset
A hard reset erases all records and entries stored in your
handheld. Never perform a hard reset unless a soft reset does
not solve the problem. To restore your data after a hard reset,
you must perform a HotSync operation. For more information
on performing a HotSync operation, see "Performing a Local
HotSync Operation" on page 253.
Performing a
Hard Reset
Ge
To perform a Hard Reset:
䊳 To perform a hard reset, unscrew the top of the stylus. Press
and hold the Handheld Power button then use the pin to
press the reset button. Remove the pin from the rest hole,
then release the handheld power button. An “Erase all
data” screen is displayed confirming the hard reset. Press
the up arrow to hard reset the phone.
Note:
You can restore any data
previously synchronized
with your computer during
the next HotSync
operation.
the Handheld
2
Note:
With a hard reset, the
current date and time are
retained. Formats,
Preferences, and other
settings are restored to
their factory default
settings.
Hard Reset
Ge 2
Handheld Computer
Wireless Web
Getting to Know
Performing a
Getting to Know the
Sprint PCS
Getting to Know the Handheld Computer 35
Ge
Page 39

Section 2
36 Getting to Know the Handheld Computer
Page 40

3
T
Getting Started With Sprint PCS Service
In this Section
䊳 Setting Up Your Voicemail
䊳 Getting Help
䊳 Understanding This User Guide
his section walks you through the step-by-step basics of setting up service for
your phone, including unlocking your phone, selecting your Sprint PCS Service
Plan, receiving your new Sprint PCS Phone Number and setting up your voicemail.
Once you have completed this section, you’re ready to explore the advanced features
of your new phone.
Ge
Getting Started
With Sprint PCS
3
Ge
Getting Started With
Sprint PCS Service
Getting Started With Sprint PCS Service 37
3
Sprint PCS
Wireless Web
Ge
Page 41

Getting Started With Sprint PCS Service
Determine If Your Phone Is Already Activated
Tip:
If you do not remember
your lock code, try using
the last four digits of your
Social Security number,
Sprint PCS Phone
Number, or try 0000. If
none of these work, call
Sprint PCS Customer Care
at 1-888-211-4PCS (4727).
Note:
The voicemail setup
process may vary in
certain affiliate areas.
If you received your phone in the mail or purchased it at a
Sprint PCS Center, it probably is already activated. All you need
to do is unlock your phone.
Unlocking Your Phone
Follow these steps to unlock your phone:
1. Press and hold to turn the phone on.
2. The System Lockout screen is displayed.
3. Enter your four-digit lock code using the on screen
keyboard or Graffiti writing area. (For more information
on entering data using Graffiti writing, see "Graffiti®
Writing" on page 43.)
Setting Up Your Voicemail
All unanswered calls to your phone are automatically
transferred to voicemail, even if your phone is in use or turned
off. To avoid missing any important messages, you can set up
your Sprint PCS voicemail box and personal greeting when
your phone is activated.
To set up voicemail:
Note:
The phone actually dials
the Sprint PCS voicemail
automatically. To see the
number, view the
outgoing call log.
1. From the Phone main menu, tap .
2. Select Messages and tap voicemail.
3. The Voicemail screen is displayed.
4. Tap the Call button.
5. Follow the message prompts to setup your voicemail.
Or:
1. Press and hold to connect to voicemail.
Section 3
38 Getting Started With Sprint PCS Service
Page 42

Getting Help
Visit Our Web Site
Stop by www.sprintpcs.com to get up-to-date information on
Sprint PCS. You can also:
䊳 Review coverage maps
䊳 Learn how to use voicemail
䊳 Access your customer account
䊳 Purchase accessories
䊳 Add additional options to your service plan
䊳 Check our FAQ (frequently asked questions)
䊳 And much more
Visit Our Web
Site
Ge
Getting Started
With Sprint PCS
Sprint PCS Customer Care
Sprint PCS Customer Advocates are available to assist you 24
hours a day, seven days a week. Simply dial
1-888-211-4PCS (4727) from any phone or
press
from your phone while on the Sprint
PCS Nationwide Network.
Once you dial Sprint PCS Customer Care, you can access a
number of helpful account services through our automated
Customer Care line. Follow the voice prompts to learn more
about Sprint PCS Products and Services, Sprint PCS coverage
by zip code, or request a copy of your invoice.
Tip:
If you need to
reach Sprint
PCS Customer
Care while you
are off the
Sprint PCS
Network, dial
1-888-2114PCS (4727)
3
Visit Our Web
Site
Ge 3
Getting Started With
Sprint PCS Service
Sprint PCS
Wireless Web
Ge
Getting Started With Sprint PCS Service 39
Page 43

Tip:
If you have a question
regarding the operation of
your phone, dial 1-888211-4PCS (4727) from
another phone so you can
use your
Sprint PCS Phone while
speaking with Customer
Care.
Receiving Automated Billing Information
For your convenience, you can receive free access to billing
information on your Sprint PCS account by simply dialing
your phone number. This information includes balance due,
payment received, billing cycle and the amount of minutes
used since your last billing cycle. Follow these steps to access
this information:
Tip:
This service may not be
available in all affiliate
markets.
Note:
Sprint PCS Operator
Services may not be
available in all affiliate
markets.
1. Press
2. Follow the voice prompts to receive the information you
want.
Sprint PCS Directory Assistance
Sprint PCS Directory Assistance provides a variety of services,
including: residential, business and government listings;
assistance with local or long-distance calls; movie listings;
hotel, restaurant and shopping information and major local
event information. There is a per call charge and you will be
billed for airtime.
䊳 Tap
Sprint PCS Operator Services
Sprint PCS Operator Services can provide assistance in placing
collect calls or calls billed to a local telephone calling card or
a third party.
䊳 Tap
Section 3
40 Getting Started With Sprint PCS Service
Page 44

4
T
Entering Information into the Handheld Computer
In this Section
䊳 Graffiti® Writing
䊳 Using the On Screen Keyboard
䊳 Importing Data
his section introduces you to the Graffiti application, on-screen keyboard, and
how to import large quantities of data into the handheld computer. You’ll find
one of the benefits of having an handheld computer, is having important
information close at hand.
En
Entering
Information into
4
En
Entering Information
into the Handheld
Entering Information into the Handheld Computer41
4
Sprint PCS
Wireless Web
En
Page 45

Using the On-Screen keyboard
There is an on-screen keyboard available to type using the
stylus. This option is useful if you are not yet familiar with
Graffiti writing, or you are writing special characters. To
access the on screen keyboard:
Note: This option is only available when you need to enter
text into an application.
1. Using the stylus, tap the alpha or numeric icon located on
the bottom of the screen.
2. This displays the on screen keyboard.
3. Using the stylus, tap any of the letters on the screen. The
results are displayed in the space above the keyboard.
4. When finished, tap .
Section 4
42 Entering Information into the Handheld Comput-
Page 46

Graffiti® Writing
The stylus can also be used to enter information by writing in
the Graffiti writing area. Graffiti is an application that
introduces you to the handwriting style the handheld
computer understands. Characters are entered by writing in
the Graffiti area using the stylus. The letters are then displayed
on the handheld computer screen.
To start using Graffiti:
1. Remove the stylus from your phone.
2. From the phone main menu, tap the Application
Launcher icon.
3. Tap the Graffiti Icon.
4. Follow the instructions on the screen.
5. When finished, tap .
En
Entering
Information into
4
En 4
The Graffiti area is divided into two different areas. The left
side is used to create letters, alpha characters and symbols.
The right side is used to create numbers or numeric
characters. Small marks in the middle of the screen designate
the divide between alpha and numeric areas.
Entering Information into the Handheld Computer 43
Entering Information
into the Handheld
Sprint PCS
Wireless Web
En
Page 47

The Graffiti letters have a starting point that is designated by a
small black square. Using the stylus, trace the letter in the
Graffiti writing area just as it’s displayed above. If you’re
successful, the letter is displayed on the dotted line below the
characters.
Note:
Some characters have
similar shapes, but
different starting points.
Make sure that you begin
drawing from the correct
point to make the desired
character.
Here is the Graffiti alphabet:
Section 4
44 Entering Information into the Handheld Comput-
Page 48

Capital Letters
To make capital letters, you can use the shift stroke. The shift
stroke is made exactly like the other letters in the alphabet.
The shift stroke is a single line from the bottom to top starting
the stroke from the bottom.
To make the shift stroke:
Tip:
For greater accuracy, draw
letters with large strokes
that take up nearly all the
available area.
Tip:
Write at a natural speed.
Writing too slow can
cause errors.
Capital Letters
En
1. Using the stylus, make a line starting from the bottom and
drawing upwards.
2. Notice that the display changes to reflect the shift
command by placing an arrow in the lower right corner of
the screen. The next alpha character entered will be
capitalized.
Tip:
Press firmly on the stylus
at a right angle. Avoid
writing at a slant.
Information into
4
Entering
Capital Letters
En 4
Entering Information
into the Handheld
Entering Information into the Handheld Computer 45
Sprint PCS
Wireless Web
En
Page 49

Cap Lock
Capital letters can be set to always on just like using a
standard Caps Lock key on a keyboard. To accomplish this
function, use the stylus to make two cap shift marks in a row.
Numbers
Writing numbers is done the exact same way as letters. Simply
use the numeric or right side of the Graffiti writing area.
Numbers also have a starting point, similar to the letters.
Here is a chart of how to write Graffiti numbers:
Section 4
46 Entering Information into the Handheld Comput-
Page 50

Writing Punctuation Marks
Any standard punctuation mark available on a keyboard can
be created using Graffiti writing.
Writing
Punctuation
All punctuation marks begin with a single tap in the Graffiti
alpha writing area. This tap activates the punctuation shift,
indicated by a dot on the display screen. The next stroke is
designed to create a punctuation mark. When the punctuation
stroke is active, the character can be written on either side of
the Graffiti area.
Here is a chart of how to write punctuation marks:
En
Entering
Information into
4
Writing
Punctuation
En 4
Entering Information
into the Handheld
Entering Information into the Handheld Computer 47
Sprint PCS
Wireless Web
En
Page 51

Writing Symbols and Extended Characters
To write symbols and characters, you simply activate the
Symbol shift. When the symbol shift is activated, a slash mark
is displayed in the bottom right hand corner of the screen, just
above the Graffiti area. The next stroke after the symbol shift is
the desired symbol character. The symbol shift is done by
tapping and dragging the stylus from the top left to the lower
right corner of the Graffiti alpha area.
Here is a chart of how to write Graffiti symbols:
Section 4
48 Entering Information into the Handheld Comput-
Page 52

Writing Accented Characters
To write accented characters, you have to write the letter and
then perform the accent stroke. Accents are added to letters or
alpha characters.
Writing
Accented
For example, the following displays an accented “E”:
Here is a chart of accented characters:
En
Entering
Information into
4
Writing
Accented
En 4
Entering Information
into the Handheld
Entering Information into the Handheld Computer 49
Sprint PCS
Wireless Web
En
Page 53

Command Bar
The Command Bar allows you to display a list of shortcuts by
making a stroke on the Graffiti writing area. If you are on the
Applications Launcher main menu, the Command Bar
displays:
䊳 Info - Displays the Info screen that displays all the
applications and their memory usage.
䊳 Beam - Displays the Beam screen. This allows you to
beam applications to another user.
䊳 Delete - Displays the Delete screen. This allows you to
delete applications.
To make the command bar display:
1. On the left side of the Graffiti screen, make the following
stroke.
Section 4
50 Entering Information into the Handheld Comput-
Page 54

Graffiti Shortcuts
There are also shortcuts built into the Palm OS® software.
These shortcuts allow you to quickly and easily enter
information with fewer strokes. Usually shortcuts are
commonly used phrases or words. You can also create your
own shortcuts with up to 45 characters. (For more
information, see "Shortcuts (Main Preferences)" on page 85.)
The following shortcuts are included with the Palm OS®:
䊳 ds - Date Stamp
䊳 ts - Time Stamp
䊳 dts - Date/Time Stamp
䊳 me - Meeting
䊳 br - Breakfast
䊳 lu - Lunch
䊳 di - Dinner
Graffiti
Shortcuts
En
Entering
Information into
4
Graffiti
Shortcuts
En 4
Entering Information into the Handheld Computer 51
Entering Information
into the Handheld
Sprint PCS
Wireless Web
En
Page 55

Using a Shortcut
To use a shortcut, you need to make the shortcut stroke
followed by the proper characters. The shortcut stroke is a curl
that starts from the bottom left and goes to the bottom right.
Using a Shortcut
To use the shortcut, simply write the shortcut stroke and then
the alpha characters that are defined in the preferences. You
know that you have created the correct stroke when the
shortcut symbol is displayed on the screen.
To write a shortcut:
1. Open a program into which you can enter text using
Graffiti. (Memo Pad, Address Book, etc.)
2. With the application open and a blinking cursor on the
first line, write the shortcut symbol as displayed above.
3. The shortcut symbol is displayed on the screen.
4. Write the letters “b” & “r”.
5. The word Breakfast is displayed.
Note: To create custom shortcuts, see "Shortcuts (Main
Preferences)" on page 85.
Section 4
52 Entering Information into the Handheld Comput-
Page 56

Importing Data
If you have data stored on a desktop computer in applications
such as spreadsheets and databases, or if you want to import
data from another device, you can transfer the data to your
handheld computer without having to enter it manually. Save
the data in one of the file formats listed below, import it into
the Palm Desktop software, and then perform a HotSync
operation to transfer the data to your handheld computer.
Palm Desktop software can import data in the following file
formats:
䊳 Comma delimited (.csv, .txt): Address Book and Memo Pad
only.
䊳 Tab delimited (.tab, .tsv, .txt): Address Book and Memo Pad
only.
䊳 CSV (Lotus Organizer 2.x/97 Mapping): Address Book only.
䊳 Date Book archive (.dba).
䊳 Address Book archive (.aba).
䊳 To Do List archive (.tda).
䊳 Memo Pad archive (.mpa)
Archive formats (.csv, .txt, .tab, .tsv, .dba, .aba, .tda, .mpa) can
only be used with Palm Desktop software. Use the archive file
formats to share information with other people who use Palm
Powered handheld’s or to create a copy of your important
Palm Desktop information. (For more information about
archiving, see "Using File Link" on page 259.)
Using a Shortcut
En
Entering
Information into
4
Using a Shortcut
En 4
Entering Information
into the Handheld
Entering Information into the Handheld Computer 53
Sprint PCS
Wireless Web
En
Page 57

Importing Data
Data must be stored on the desktop or laptop machine before
any it can be imported. Importing the data allows you to keep
the information created on the desktop or laptop available to
you.
1. Launch the Palm Desktop software on your desktop or
laptop computer.
2. Select one of the following buttons:
䊳 Date
䊳 Address
䊳 To Do
䊳 Memo
Note: Import file extensions or choices depend on which
button is selected.
3. From the menu, click “File/Import”.
4. The Import screen is displayed. Click the “Files of Type”
drop down arrow and select the proper file format.
5. Click the “Browse” button and navigate to the desired file
location.
6. Click “Import”.
7. Perform a HotSync function to add the new data to your
phone.
Note: See the Palm Desktop help file for more information on
Importing.
Section 4
54 Entering Information into the Handheld Comput-
Page 58

5
R
Understanding Roaming
In this Section
䊳 Understanding Roaming
䊳 Understanding the Difference Between Roaming and Sprint PCS Network
Calls
Un
Understanding
Roaming
䊳 Setting Your Phone’s Roam Mode
䊳 Setting and Using Call Guard
oaming is the ability to make or receive calls while you’re off the Sprint PCS
Nationwide Network. Your new dual-band Sprint PCS Phone
on the Sprint PCS Nationwide Network and allows you to roam on analog cellular
and digital networks virtually anywhere in the U.S. where competitive wireless
service is available.
This section explains how roaming works as well as special features that let you
manage your roaming experience.
™
works anywhere
5
Un
Understanding
Roaming
5
Sprint PCS
Wireless Web
Un
Understanding Roaming 55
Page 59

Understanding How Roaming Works
Recognizing Icons on the Display Screen
Your phone’s display screen lets you know when you’re off the
Sprint PCS Network and whether your phone is operating in
analog cellular or digital mode. The following chart indicates
what you’ll see depending on where you’re using your phone.
Note: You may pay a higher per-minute rate for roaming
calls.
Tip:
If you’re on a call when
you leave the Sprint PCS
Network and enter an
area where roaming is
available (whether CDMA
or analog cellular), your
call is dropped. If your call
is dropped in an area
where you think
Sprint PCS Service is
available, turn your phone
off and on again to
reconnect to the Sprint
PCS Nationwide Network.
Roaming
Indicator
Analog
Indicator
Sprint PCS Nationwide Network
Other CDMA Networks
Analog Cellular Networks
Roaming on Other PCS CDMA Networks
When you’re roaming on other PCS CDMA networks, your call
quality will be similar to the quality you receive when making
calls while on the Sprint PCS Network. You may not be able to
access certain calling features, such as the Sprint PCS Wireless
Web; however, all of your calls are still private and secure.
Roaming on Analog Cellular Networks
When you roam on analog cellular networks, you will
experience the same quality provided by analog cellular
carriers today. Although some features, such as
Sprint PCS Wireless Web, may be unavailable, you can still
make and receive calls. You will experience a few differences
including:
Section 5
56 Understanding Roaming
Page 60

䊳 You are more likely to experience static, cross-talk, fade-
out and dropped calls.
䊳 Some calling features that are standard on the Sprint PCS
Network are unavailable.
䊳 There are security and privacy risks (eavesdropping and
cloning) that exist with conventional analog cellular
services today.
䊳 Your battery needs recharging sooner when you use your
phone for analog cellular roaming.
Setting Your Phone’s Roam Mode
Your phone allows you to control your ability to roam. By
using the
Roaming menu option, you determine which
services your phone will use.
Set Mode
Set Mode
Un
Understanding
Roaming
5
Choose from three different settings on your dual-band phone
to control your roaming experience:
1. From the phone main menu, tap the Menu Launcher
.
icon
2. Select “Options” and tap “Preferences”.
3. Tap the drop down arrow and select “Roaming”.
4. The Roaming Preferences screen is displayed with the
following options:
䊳 Service Mode
䊳 Automatic: This setting seeks Sprint PCS Service.
When Sprint PCS Service is unavailable, it searches for
an alternative system.
䊳 Sprint PCS: This setting allows you to select the
Sprint PCS Nationwide Network only and prevents
roaming on other networks.
䊳 Analog: This setting forces the phone to seek an
analog roaming system. The previous setting is restored
the next time the phone is turned on.
䊳 Call Guard
䊳 No: Call Guard is OFF
䊳 Yes: Call Guard is ON
Understanding Roaming 57
Set Mode
Un 5
Understanding
Roaming
Sprint PCS
Wireless Web
Un
Page 61

Setting an Alert When Roam Charges Apply
(Call Guard)
In addition to the roaming icon, the Call Guard alerts you
when roaming charges may apply. This feature makes it easy
to manage your roaming charges by reminding you when you
make or receive roaming calls. It also requires you to take
additional steps before placing or answering a roaming call.
These additional steps are not required when you make or
receive calls while on the Sprint PCS Nationwide Network.
To Turn the Call Guard Feature ON or OFF:
1. From the phone main menu, tap the Menu Launcher
.
icon
2. Select “Options” and tap “Preferences”.
3. Tap the drop down arrow and select “Roaming”.
4. Tap the drop down arrow under Call Guard.
5. Select “No” or “Yes”.
To Place Roaming Calls With Call Guard ON:
1. From the main menu, dial the area code + the seven-digit
number. (You can also initiate a call from the Internal
Phone Book, Call History or Sprint PCS Web Messages.)
2. Press . A “Roaming Rate Applies” message is
displayed on the screen.
3. Press to accept the roaming rates and complete the
call.
To Answer Incoming Roaming Calls With Call Guard ON:
1. From the phone main menu, tap .
2. A “Roaming Rate Applies” message is displayed on the
screen.
3. Press to accept the roaming rates and answer the
incoming call.
Section 5
58 Understanding Roaming
Page 62

6
Y
Making and Answering Calls
In this Section
䊳 Making Calls
䊳 Answering Calls
䊳 Missed Call Notification
䊳 In-Call Options
䊳 Dialing Options
䊳 Speed Dialing
䊳 Setting Phone Preferences
our Sprint PCS Phone™ gives you different options for making calls so you
can use the method that works best for you. Once you learn the basics, there are
several possibilities.
M
Making and
Answering Calls
6
M
Making and
Answering Calls
Making and Answering Calls 59
6
Sprint PCS
Wireless Web
M
Page 63

Making Calls
Your phone offers many different ways to make calls,
including Sprint PCS Voice Command (page 94),
Speed Dialing (page 68) and using Missed Calls(page 72).
To make a call using the dialer on the screen:
1. Press and hold for 2-3 seconds to turn the Sprint PCS
Phone™ ON.
2. Remove the stylus from the back of the phone.
3. Enter a phone number by tapping the desired numbers.
4. Tap . (To make calls when you are roaming and
Call Guard is enabled, dial the number and tap
Press
to accept the roaming rates and complete the
.
call.)
5. When you’re finished, tap .
Tip:
To redial your last
outgoing phone number,
tap
twice.
Correcting the number
If you type a number incorrectly, you can erase the number
one digit at a time, or simply just erase the whole number and
start over. To erase the number one digit at a time:
1. If you tap when dialing a number, the last digit
entered is erased.
To erase the entire number:
2. If you tap and hold when dialing a number, the
phone will beep and the entire number is erased.
Note: You can also tap .
Section 6
60 Making and Answering Calls
Page 64

Making a single handed Call
To make a single handed call, you can use the address book in
conjunction with the buttons located on the phone. Follow the
steps listed below to make the call:
Making a single
handed Call
1. Open the address book by pressing the Address Book
button on the front of the phone.
2. Use the volume buttons located on the side of the phone to
scroll to the desired address.
3. Press the voice memo/voice dial button to select the
entry.
4. Use the volume keys to scroll to the desired number and
press the voice memo/voice dial key again to place the
call.
5. When you are finished with the call, press the phone
power button
Note: You can also press the phone power button once to
once to disconnect.
return to the phone application from any other application.
To turn the phone off, press and hold the phone power button
from any application.
Answering Calls
When someone calls you, the phone rings or vibrates. If the
caller can be identified, the number is displayed on the screen.
If the number is unidentified, a message is displayed that says
“U”.
M
Making and
Answering Calls
6
Making a single
handed Call
M 6
Making and
Answering Calls
To answer the call:
1. Make sure your phone is on. If your phone is off,
incoming calls go to voicemail.
2. When your phone rings, tap .
3. To disconnect the call, tap .
Making and Answering Calls 61
Sprint PCS
Wireless Web
M
Page 65

Missed Call Notification
When an incoming call is not answered, the number of calls
missed and the caller ID information of the last caller is
displayed on your screen.
To display the Missed Call entry:
1. From the Phone main menu, tap .
2. Select Calls and tap Missed.
3. The Missed Calls screen is displayed.
4. Tap the desired missed call for the following options:
䊳 Call - The Sprint PCS Phone™ dials the number of the
missed call.
䊳 Save - This opens the Address Book and automatically
populates the phone number field with the missed
caller phone number.
䊳 Details - Displays the Name/Number, Date/Time, and
Status of the missed call.
䊳 Delete - Deletes the call from the missed call log.
䊳 Prepend - This option allows you to add numbers to
the beginning of the missed call. The new number can
be dialed and saved in the Address Book.
Section 6
62 Making and Answering Calls
Page 66

Adjusting the Ringer Volume
You can set the Sprint PCS Phone™ to several different
ringers and volume settings using the volume buttons located
on the side of the phone. (See "Front View of Phone" on page
12 for the exact location.)
To adjust the ringer volume:
1. With the phone in standby mode, press the Volume
buttons up or down to display the Ringer Volume setting
screen.
2. If vibrate is selected, the phone will vibrate to confirm the
selection.
Note: If the phone is set to vibrate, the vibrate icon
(Page 24)(
)is displayed on the Top LCD Display and
main screen of the phone.
To adjust the ringer type, see "Sounds" on page 82.
Making a single
handed Call
M
Making and
Answering Calls
6
Making a single
handed Call
In-Call Options
During a call, your phone displays menu options in addition
to the main menu.
To display the InCall menu, tap while connected to a
call. The following options are displayed:
䊳 Record: Records the conversation of the caller.
䊳 (Un)Mute: Select (Un)Mute to mute your phone’s
microphone. Select (
Un)Mute again to reactivate the
microphone.
䊳 Deactivate Key Tones: This option allows you to tap
keys without the caller hearing any tones during a call.
Making and Answering Calls 63
M 6
Making and
Answering Calls
Sprint PCS
Wireless Web
M
Page 67

䊳 DTMF (Dual Tone Multi Frequency) Tones: This
option allows you to transmit the DTMF tones of your
phone. DTMF tones are used to control electronic menus,
such as voicemail or banking services.
䊳 Version: Displays the software and hardware version
information of your phone.
Record
The record option is used to record a caller. This is a good
option for remembering phone numbers, addresses, etc.
To record:
1. Place a call to the desired party.
2. Tap to display the InCall menu.
3. Tap Record. You can record up to 60 seconds at a time. A
total of 10 messages can be saved.
4. Press once to return to the Sprint PCS Phone™ main
menu.
Note: Only press the button once, do not hold the button
down or else the phone will shut off.
(Un)Mute
1. Place a call to the desired party.
2. Tap to display the InCall menu.
3. Tap (Un)Mute to mute your voice. Tap (Un)Mute again to
un-mute your voice.
Section 6
64 Making and Answering Calls
Page 68

Deactivate Key Tones
This option disables the key tones when a key on the phone is
tapped. With the key tones on, the caller can hear you dial if
you are performing another function.
Deactivate Key
Tones
1. Place a call to the desired party.
2. Tap to display the InCall menu.
3. Tap Deactivate Key Tones.
DTMF Tone
To use the DTMF Tone option, you must already have some
DTMF Tones registered.
To register DTMF Numbers:
1. In the Phone main menu, tap .
2. Tap Tone List from the Calls menu.
3. Tap the New button.
4. Enter the desired number and tap OK.
To use this option:
1. Place a call to the desired party.
2. Tap to display the InCall menu.
3. Tap DTMF Tones.
4. Select the desired tone option from the list.
5. Tap one of the following:
䊳 Send - Sends the tones
䊳 Edit - Edits the tones
䊳 Delete - Deletes the tones from the list.
M
Making and
Answering Calls
6
Deactivate Key
Tones
M 6
Making and
Answering Calls
Sprint PCS
Wireless Web
Making and Answering Calls 65
M
Page 69

Note:
The Voice Dialing feature
is different from the Sprint
PCS Voice Command. For
more information
regarding Sprint PCS
Voice Command, see
"Sprint PCS Voice
Command" on page 94.
Voice Dialing
To use Voice Dialing, you need to “train” the phone to
recognize your voice. You can put up to 20 names from your
Address book into your Voice Dial list. Once you have recorded
these names, you can make calls simply by speaking a name.
Note: This feature is only available in digital service areas.
Setting up Voice Dial
1. From the Phone Menu, tap the Menu Launcher icon.
2. Select “Calls” and tap “Voice Dial List”.
3. Tap the “Add” button.
4. The list of available names is displayed from the address
book. Tap the phone number next to the desired name.
5. The Set Voice Dial screen is displayed. Tap the down arrow
next to Select.
6. Tap “Record”.
7. Record a name or number to identify the entry.
8. The entry is saved and ready for voice dialing.
Placing Voice Dialing Calls with the Voice Dial Button
Note: The phone must be ON to make a Voice Dial call. If the
phone is off when a Voice Dial call is attempted, a warning
message is displayed that prompts you to turn the phone ON.
1. From the phone main menu, press once on the left
side of the phone.
2. The Voice Dial screen is displayed.
3. At the voice prompt, say the name into the phone.
䊳 If the name is recognized, the phone number associated
with the name is dialed.
䊳 If the name is not recognized, the name is asked for again.
䊳 If the name is not recognized after two attempts, a message
is displayed that says “Could not recognize name”. Try the
call again later, or record the entry name again.
Section 6
66 Making and Answering Calls
Page 70

Placing a Voice Dial Call from the List
1. From the Phone Menu, tap and select Calls.
2. Tap “Voice Dial List”.
3. The list of available names is displayed from the address
book. Scroll through the list of available names and tap
the phone number of the desired name.
4. A Voice Dial popup menu is displayed with the following
options:
䊳 Call - Calls the number.
䊳 Modify - Allows you to edit the entry.
Note: You can also access the Voice Dial screen from the
Application main menu by tapping on the Voice Dial icon.
)
(
Managing the Voice Dial List
You can play the recorded name, re-record the name, or erase
the recording.
Play or Record:
1. From the Phone Menu, tap and select Calls.
2. Tap “Voice Dial List”.
3. Select the name to edit and tap “Modify”.
4. The Set Voice Dial screen is displayed.
5. Tap the drop down arrow and select “Play”. Tap
Re-Record to record the name again.
Dial Call from
Tip:
You can press the Voice
Dial button when the
number is highlighted in
the Voice Dial list to
connect the call.
M
Answering Calls
Dial Call from
Placing a Voice
Making and
6
Placing a Voice
M 6
Making and
Answering Calls
Erasing an entry:
1. From the Phone Menu, tap and select Calls.
2. Tap “Voice Dial List”.
3. Select the name to edit and tap “Modify”.
4. The Set Voice Dial screen is displayed.
5. Tap the drop down arrow and select “Erase”.
Making and Answering Calls 67
Sprint PCS
Wireless Web
M
Page 71

Speed Dialing
You can designate up to 98 numbers in your address book for
speed dialing. The speed dial numbers are associated with the
numbers 02-99. Since the numbers are associated with an
Address Book entry, any updates made are automatically saved
in the speed dial list.
Adding Phone Numbers to the Speed Dial List
To avoid entering phone numbers in multiple places, the
numbers in the Speed Dial list are taken from your Address
Book. If you think of a number you want to add while you are
using the Speed Dial list, there is a quick way to jump from the
Speed Dial list to the Address Book.
1. Tap to open the Application launcher, then tap to
open the Speed Dial application. The Speed Dial List
screen shows the currently registered speed dial entries.
You can also access the Speed Dial List from the phone menu.
In the Phone screen, tap
, then tap Speed Dial List from
the Calls menu.
2. Tap the “Add” button in the Speed Dial List screen. A list
of all the entries in your Address book is displayed.
3. Select the desired entry by tapping on the phone number.
4. The Set Speed Dial screen is displayed. Tap the drop down
arrow.
5. Select the desired Speed Dial number from 02 - 98.
6. Tap “Done”.
Making a Speed Dial Call
1. In the Phone main screen, tap and hold the speed dial
number associated with the desired entry.
Section 6
68 Making and Answering Calls
Page 72

Note: If the number is more than one digit, tap the first
number and hold down the last number until you see the
number being dialed on the screen.
2. When finished, tap the END button.
Searching a
Number to
Searching a Number to Speed Dial
1. In the phone main menu, tap .
2. Tap Speed Dial List from the Calls menu.
Note: You can also tap the Speed Dial icon ( )from the
Applications main menu to display the Speed Dial List.
3. The Speed Dial List screen is displayed. notice the number
next to the address book entry of the names. This is the
designated speed dial number.
4. Tap .
5. Tap and hold the Speed Dial number to complete the call.
Using One-Touch/Two-Touch Speed Dialing
With this feature, you can dial Speed Dial entries using one
key tap for locations 2-9 or two key taps for locations 10-99.
To use One-Touch Dialing for Speed Dial locations 2-9:
䊳 Tap and hold the appropriate key for approximately two
seconds. The display confirms that the number has been
dialed when it shows “Connecting.”
To use Two-Touch Dialing for Speed Dial locations 10-99:
Note:
Speed Dialing is not
active when you are
roaming.
M
Making and
Answering Calls
6
Searching a
Number to
M 6
Making and
Answering Calls
1. Tap the first digit.
2. Tap and hold the second digit for approximately two
seconds. The display confirms that the number has been
dialed when it shows “Connecting.”
Making and Answering Calls 69
Sprint PCS
Wireless Web
M
Page 73

Modifying the Speed Dial List
You can delete or update the numbers listed in the Speed Dial
list at anytime. To modify the numbers:
1. From the Phone main menu, tap .
2. The Speed Dial List screen is displayed. Tap the desired
entry in the speed dial list.
3. Select “Modify” from the pop-up menu.
4. Tap the drop down arrow and select the desired number.
5. Tap “Done”.
Deleting a Number
To delete the number:
1. From the Phone main menu, tap .
2. Tap the desired entry in the Speed Dial List.
3. Tap “Modify” from the pop-up menu.
4. Select “None”.
5. Tap “Done”.
Deleting All Numbers
To delete all numbers:
1. From the Applications menu, tap .
2. Tap
3. Select “Erase All”.
Section 6
70 Making and Answering Calls
Page 74

Redialing the Last Number
The phone stores the last 20 numbers called.
To Call the Last Number
1. To redial the last number called, tap the button.
2. The screen displays the last number called. Tap the
button again to automatically call the number.
To Call the Last
Number
M
Four Digit Dialing
The phone has the ability to remember the last four digits of
any phone number stored in the address book or to simply dial
the four digits entered. This option allows you to enter the last
four digits of a phone number stored in the address book to
call the selected entry.
To access four digit dialing:
1. On the Phone main menu, tap the last four digits of any
phone number stored in the address book.
2. Tap the button.
3. The name is displayed on the screen. If the name is
correct, tap the
button to place the call.
Or:
1. On the Phone main menu, tap four digits.
2. Tap the Menu Launcher icon and select “4 Digit Dial”.
Note: If more than one number is found with the same last
four digits, use the volume buttons to scroll to the desired
number. Tap
to connect.
Making and
Answering Calls
6
To Call the Last
Number
M 6
Making and
Answering Calls
Sprint PCS
Wireless Web
Making and Answering Calls 71
M
Page 75

Making an Emergency Call
You can dial 911 or any of the three emergency numbers
specified even if the phone is locked. The special numbers can
be set through the Security menu. (For more information on
dialing special numbers, see "Special Numbers" on page 218.)
To make an Emergency Call when the Phone is Locked:
1. Tap the Special Numbers button in the System Lockout
screen.
2. The Phone screen is displayed. Tap the desired emergency
number.
3. Tap the button.
Note: If any number other than the specified emergency
numbers are entered, the Sprint PCS Phone™ returns to the
system lock out screen.
Viewing Missed Calls
If you are unable to answer a call, the caller information is
automatically saved and displayed on the screen. The
information is displayed when the display is turned on after
the call has been missed. The callers name and number is
displayed if they are already in your phone book. If they are
not in the phone book, only the number is displayed.
If you tap the button, the last missed call is connected. If
any other keys are tapped, the missed call notification screen
disappears.
Section 6
72 Making and Answering Calls
Page 76

Key Guard
The Key Guard feature is used to prevent the accidental
tapping of keys on the phone. When the Key Guard is enabled,
the keys on the phone do not work when tapped. The Key
Guard remains active until it is turned off or an incoming call
is received.
Turning Key Guard ON or OFF
1. In the phone main screen, tap and hold until the icon
changes to lock or unlock.
Receiving a Call when Key Guard is ON
Turning Key
Guard ON or OFF
M
Making and
Answering Calls
You can receive a call with the Key Guard option ON simply by
tapping the
button. Key Guard is automatically turned
OFF for the duration of the call, then automatically
reactivated.
Voice Memo
The Voice Memo option allows you to record telephone
conversations and personal memos. The maximum length of
a recording is one minute. You can store up to ten different
memos.
Recording a Memo
1. Press and hold on the left side of the phone.
2. A beep sounds and the Voice Memo Record screen is
displayed.
3. Record your message.
4. Tap the pause button to pause while recording the
message. Tap pause again to continue recording.
5. Tap to stop recording.
6. Using the stylus, tap the title area to select. Enter a title for
the message and tap
.
6
Turning Key
Guard ON or OFF
M 6
Making and
Answering Calls
Sprint PCS
Wireless Web
M
Making and Answering Calls 73
Page 77

Playing a Memo
1. Tap from the phone main menu.
2. Tap the Voice Memo icon.
3. The Voice Memo screen is displayed. Tap the desired
message from the list.
4. The Voice Memo Play screen is displayed. Tap the Play
button.
Note: You can also tap the speaker icon for speaker phone
operation. The voice memo is played at a higher volume that
can be heard without having to place the phone up to your
ear. The volume can also be controlled using the up and down
volume buttons located on the side of the phone.
5. Tap the pause button to pause the message.
6. Tap Done when finished.
Deleting a Memo
1. Tap from the main menu.
2. Tap the Voice Memo icon.
3. The Voice Memo screen is displayed. Tap the desired
message from the list.
4. Tap the “Delete” button.
5. Tap “Yes” to confirm.
Deleting all Memos
1. Tap from the phone main Menu.
2. Tap the Voice Memo icon.
3. Tap to display the Voice Memo options.
4. Tap “Delete All” from the “Records” menu.
Section 6
74 Making and Answering Calls
Page 78

Setting Phone Preferences
The phone preferences allow you to customize the look and
feel of your phone.
Changing the Preferences
The following preferences are available for the handheld
computer:
䊳 Buttons - Allows you to change the icons for the different
applications displayed on the screen.
䊳 Connection - Displays the available configurations for
the connection. Select the proper connection based on
your location.
䊳 Digitizer - Calibrates the digitizer to allow the stylus to
touch the screen in the proper area. Without calibration,
the stylus might not work correctly.
䊳 Formats - Allows you to set the Time, Date, Week, and
Numbers display format.
䊳 General - Displays the general preferences for the
handheld computer. Time Setting, Set Time, Set Date,
Auto OFF after, System volume, Alarm volume, Game
volume, and Beam Receive.
䊳 Network - Displays the settings for the wireless data.
䊳 Owner - Displays the owner information.
䊳 Phone Prefs - This is a different set of preferences that are
related to the phone portion of the device.
䊳 Shortcuts - Allows you to display, create, or edit shortcuts.
䊳 Wireless - Proxy connection settings.
Changing the
Preferences
M
Making and
Answering Calls
6
Changing the
Preferences
M 6
Making and
Answering Calls
Buttons
1. From the Application main menu, tap .
2. “All” should be selected, tap the Prefs icon.
3. Tap the drop down list located in the upper right corner.
Select “Buttons”.
Making and Answering Calls 75
Sprint PCS
Wireless Web
M
Page 79

The buttons preference allows you to designate any icon with
an application loaded on your phone. For example, if you
would like the memo pad icon assigned to voicemail, you
would access the buttons preference and make the change.
Note: To reset all the icons back to their original
applications, simply tap the Default button on the buttons
preference screen.
There is also a section for the pen or stylus in the button
preferences. This option allows you to designate what action
occurs when you drag the stylus from the bottom of the
writing screen to the middle of the handheld computer screen
using one continuous motion. The options are:
䊳 Contrast
䊳 Keyboard
䊳 Graffiti Help (Default Setting)
䊳 Beam Data
In addition to the buttons and pen settings, there is also a
HotSync Setting. The HotSync setting allows you to designate
what the HotSync button on the cradle or modem does when it
is pressed. The available options are listed on a drop down
menu next to each.
Wake up
A wake up button allows you to program which buttons turn
on the display. The two choices are:
䊳 Power Buttons
䊳 All Except Scroll Buttons
Connection
1. From the Application main menu, tap .
2. “All” should be selected, tap the Prefs icon.
Section 6
76 Making and Answering Calls
Page 80

3. Tap the drop down list located in the upper right corner.
Select “Connection”.
The connection preference allows you to set the desired
connection method for accessing the web. You can add, edit,
or delete a configuration from the connection preferences. The
following fields are available if “Edit” is selected:
Connection
M
䊳 Name - The name that describes the connection.
䊳 Connection Method - How you are going to connect.
The choices are:
䊳 To PC
䊳 To Modem
䊳 Data on Air to Modem
䊳 Ircomm to PC
䊳 Ircomm to modem
䊳 Dialing - Select the type of dialing you can perform. The
choices are:
䊳 TouchTone
䊳 Rotary
䊳 Volume - Sets the volume of the connection to OFF, Low,
Medium, or High.
There is also a details button that displays specific options for
the device being used. The following information may be seen
on the details screen:
䊳 Speed - The speed of the modem or device connected. If
the device is a modem, the speed range is
1200 - 57,600bps.
䊳 Flow Ctl - Flow Control. The available options are
Automatic, ON, or OFF.
䊳 Init String - Initialization string. These are a set of
commands that can be entered to allow the modem or
device to perform a specific function when initialized. See
the modem user guide for more information.
Making and
Answering Calls
6
Connection
M 6
Making and
Answering Calls
Sprint PCS
Wireless Web
Making and Answering Calls 77
M
Page 81

Digitizer
1. From the Application main menu, tap .
2. “All” should be selected, tap the Prefs icon.
3. Tap the drop down list located in the upper right corner.
Select “Digitizer”.
4. Follow the instructions on the screen.
The digitizer aligns the internal circuitry with the touch
sensitive screen. The calibration allows you to touch the screen
and have the proper item selected.
When the digitizer application is launched, a series of
symbols are displayed on the screen. Use the stylus to tap the
center of each cross hatch. When all the cross hatches have
been tapped, the previous screen is displayed.
Note: The Digitizer cannot run when the phone is ON.
Formats
1. From the Application main menu, tap .
2. “All” should be selected, tap the Prefs icon.
3. Tap the drop down list located in the upper right corner.
Select “Formats”.
The formats preference screen displays the different options for
the display of numbers, dates, and other common items. The
options listed are:
䊳 Preset To - This allows you to specify the country where
the Sprint PCS Phone™ is being used. United States is set
as the default.
䊳 Time - This allows you to specify the desired time display
format. The available options are:
䊳 HH:MM am/pm
䊳 HH:MM
䊳 HH.MM am/pm
䊳 HH.MM
Section 6
78 Making and Answering Calls
Page 82

䊳 HH,MM
䊳 Date - This allows you to specify the desired date format.
The available options are:
䊳 M/D/Y
䊳 D/M/Y
䊳 D.M.Y
䊳 D-M-Y
䊳 Y/M/D
䊳 Y.M.D
䊳 Y-M-D
䊳 Week starts - This allows you to specify the starts day of
the week. The available options are:
䊳 Sunday
䊳 Monday
䊳 Numbers - This allows you to specify the desired number
display format. The available options are:
䊳 1,000.00
䊳 1.000,00
䊳 1 000,00
䊳 1’000.00
䊳 1’000,00
General
1. From the Application main menu, tap .
2. “All” should be selected, tap the Prefs icon.
3. Tap the drop down list located in the upper right corner.
Select “General”.
General
M
Making and
Answering Calls
6
General
M 6
Making and
Answering Calls
The general preferences displays the options that are common
to the handheld computer and phone. The available options
are:
䊳 Time Setting - This setting is used to configure how the
device gets the correct time. The available options are:
䊳 Automatic
䊳 Manual
䊳 Set Time - If the above option is set to Manual, you can
tap on the Set Time box and enter the correct time.
䊳 Set Date - If the date is incorrect, you can tap on the Set
Date box and select the proper month and day.
Making and Answering Calls 79
Sprint PCS
Wireless Web
M
Page 83

䊳 Sync Network Time button - This button allows you to
synchronize your phone with the Sprint PCS Network time.
䊳 Auto-off after - This setting determines the amount of
time the Sprint PCS Phone™ stays on when there is no
activity. The available settings are:
䊳 30 Seconds
䊳 1 minute
䊳 2 minutes
䊳 3 minutes
䊳 System Sound - This setting determines the sound level
of the system prompts. The available settings are:
䊳 OFF
䊳 Low
䊳 Medium
䊳 High
䊳 Alarm Sound - This setting determines the sound level of
the alarms. The available settings are:
䊳 OFF
䊳 Low
䊳 Medium
䊳 High
䊳 Game Sound - This setting determines the sound level of
games. The available settings are:
䊳 OFF
䊳 Low
䊳 Medium
䊳 High
䊳 Beam Receive - This setting turns beaming capabilities
ON or OFF on your phone. When the setting is ON, you can
receive information from another Sprint PCS Phone™ or
device using beaming technology. The two devices are
faced toward each other and the information is sent or
received. (See "Beaming Capabilities" on page 246.)
Network
1. From the Application main menu, tap .
2. “All” should be selected, tap the Prefs icon.
3. Tap the drop down list located in the upper right corner.
Select “Network”.
Section 6
80 Making and Answering Calls
Page 84

The network settings allow you to configure your phone to
connect to an online network. The available settings are:
䊳 Service - This setting allows to select your service
provider. Using the stylus, tap the drop down menu and
select the desired service provider.
䊳 User Name - Tap the box and enter your User Name.
䊳 Password - Tap the box and enter your password.
䊳 Connection - If there is a different connection other than
the one set in the connection preferences, tap the drop
down menu to select.
䊳 Details button - This displays the details about the
network setting selected. The available details may
change, depending on the connection type. The default
details are:
䊳 Connection Type - You can select PPP, SLIP, or
CSLIP.
䊳 Idle Timeout - If the system times out for no activity,
the system can be set to one of the following options.
Immediate, 1 minute, 2 minutes, 3 minutes, or Power
OFF.
䊳 Query DNS - This option is either set to ON or OFF. A
check mark in the check box indicates that the option is
ON.
䊳 IP Address - This option is set to Automatic when
there is a check mark in the check box.
䊳 Script button - This option allows you to create a login
script. Preset values are available by tapping the drop
down menu.
Owner
M
Making and
Answering Calls
6
Owner
M 6
Making and
Answering Calls
Owner
This option displays the owner of the Sprint PCS Phone™. To
change the setting, tap the “Unlock” button and enter your
password. Enter the desired information and tap OK.
1. From the Application main menu, tap .
2. “All” should be selected, tap the Prefs icon.
Making and Answering Calls 81
Sprint PCS
Wireless Web
M
Page 85

3. Tap the drop down list located in the upper right corner.
Select “Owner”.
Phone Prefs
1. From the Application main menu, tap .
2. “All” should be selected, tap the Prefs icon.
3. Tap the drop down list located in the upper right corner.
Select “Phone Prefs”.
The following preferences are available in Phone Prefs:
䊳 Sounds - Displays the sound settings for the ringer of the
phone.
䊳 Display - This setting affects what is displayed on the
phone main screen.
䊳 Setup - Miscellaneous phone options.
䊳 DataSvc - Sets the incoming call mode and ringer sound.
䊳 Roaming - Configures the roaming options of the phone.
䊳 Main Prefs - Returns the drop down list to the handheld
computer preferences.
Sounds
1. From the Application main menu, tap .
2. “All” should be selected, tap the Prefs icon.
3. Tap the drop down menu located in the upper right corner
and select “Phone Prefs”
4. Tap the drop down menu again and select Sounds.
This option allows you to configure the Volume, Type, and
Tone preferences of your phone. The available options are:
䊳 Volume - This option sets the volume for the Ringer,
Voice, and Key Tone.
䊳 Type - This option allows you to attach a specific ringer to
different types of incoming calls and messages. The
available choices are:
䊳 With Caller ID
䊳 No Caller ID
Section 6
82 Making and Answering Calls
Page 86

䊳 Voicemail
䊳 Page
䊳 Text
䊳 Web alerts
䊳 Tone - This option sets the Roam Ringer, Tone Length,
Minute Beep and Service Area are also listed on this screen.
Display
The minute beep sounds a beep for every minute that you are
connected. If the Service Area option is checked, a tone is
heard whenever you leave or enter your local coverage area.
Display
This screen allows you to configure the look of the phone
mode while the phone is in standby. The available options are:
䊳 Logo - Displays the Sprint logo.
䊳 My Phone Number - Displays the phone number of the
phone.
䊳 Custom - Displays custom text, like your name.
Setup
This screen displays the following setup options:
䊳 Auto Answer - Allows you automatically answer
incoming calls. This option only works with the car kit
accessory.
䊳 Auto Hyphen - Automatically places the hyphen between
numbers when dialing or caller ID when incoming calls
are received.
䊳 AnyKey Answer - Allows you to answer an incoming call
by tapping or pressing any key (except END & Volume
keys) on the Sprint PCS Phone™.
䊳 Message Popup - Enables the popup display messages
when an error or alert is received.
䊳 Enable Auto-Off of Display During Call - Configures the
LCD screen to stay ON or power OFF according to your “Auto-OFF
After” setting during a call.
M
Making and
Answering Calls
6
Display
M 6
Making and
Answering Calls
Sprint PCS
Wireless Web
M
Making and Answering Calls 83
Page 87

DataSvc
1. From the Phone main menu, tap .
2. “All” should be selected, tap the Prefs icon.
3. Tap the drop down list located in the upper right corner
and select
DataSvc (Data Services.)
This screen displays the Fax/Data settings for your phone.
These settings determine how the phone responds to incoming
data calls. The available settings are:
䊳 Incoming Call Mode - This setting configures the phone to
accept incoming calls. The available choices are:
䊳 Voice Only
䊳 Fax Only
䊳 Data Only
Note: The Warning message displays specific information
concerning the Incoming Call Mode setting.
䊳 Set Ringer Sound - This setting allows you to set a specific
ringer to Identify the type of call being received. Tap the
drop down arrow to select the desired ringer.
Roaming
1. From the Application main menu, tap .
2. “All” should be selected, tap the Prefs icon.
3. Tap the drop down list located in the upper right corner
and select
Roaming.
This screen allows you to configure roaming options for the
phone. By setting the roaming options, you can better monitor
how the phone reacts when you go outside your coverage area.
The available options are:
䊳 Service Mode - The service mode configures the phones
option for roaming. There is three settings available:
䊳 Automatic - Chooses whatever service is available.
Can be analog or digital.
Section 6
84 Making and Answering Calls
Page 88

䊳 Sprint PCS - The phone will only work when located
within a Sprint PCS coverage area.
䊳 Analog - The phone uses analog service only.
Roaming rates apply when the phone is used.
䊳 Call Guard - Call Guard warns you before making a call
outside of the Sprint PCS network. When the Call Guard
option is enabled, a warning screen is displayed and a key
must be tapped before the call can be made.
Shortcuts (Main
Preferences)
M
Note: The warning messages display information about the
current settings in the phone.
Shortcuts (Main Preferences)
1. From the Application main menu, tap .
2. “All” should be selected, tap the Prefs icon.
3. Tap the drop down list located in the upper right corner.
Shortcuts.
Select
Shortcuts let you quickly and easily enter commonly used
words or phrases. Shortcuts are similar to the Glossary or Autotext features of some word processors. Graffiti writing comes
with several predefined Shortcuts. You can also create your
own, for any words, letters, or numbers.
You can create Shortcuts, with up to 45 characters, using the
Shortcut preferences. For example, you could create a Shortcut
for your name or for the header of a memo. All Shortcuts you
create appear on the list in the Shortcut Preferences screen, are
available in any of your (device type, lower case) applications,
and are backed up on your computer when you perform a
HotSync operation. Your (device type, lower case) includes the
following predefined Graffiti Shortcuts for common entries:
䊳 br - Breakfast
䊳 di - Dinner
䊳 ds -[Date Stamp]
䊳 dts - [Date and Time Stamp]
Making and
Answering Calls
6
Shortcuts (Main
Preferences)
M 6
Making and
Answering Calls
Sprint PCS
Wireless Web
M
Making and Answering Calls 85
Page 89

䊳 lu - Lunch
䊳 me - Meeting
䊳 ts - [Time Stamp]
Wireless Preferences (Main Preferences)
1. From the Application main menu, tap .
2. “All” should be selected, tap the Prefs icon.
3. Tap the drop down list located in the upper right corner.
Wireless.
Select
The Wireless preferences configures a proxy server address if
needed. To enter the proxy address:
1. Tap the Proxy box.
2. Enter the correct numbers in the space provided.
There is also a check box for “Warn when sending ID”. If this
option is ON, a warning message is displayed prior to sending
your ID.
Section 6
86 Making and Answering Calls
Page 90

Network Connections
Your phone can connect wirelessly to network services from
email and wireless web internet service. Network preferences
identify your ISP’s (Internet Service Providers). You can
establish the following connections:
䊳 PPP (Point to Point Protocol)
䊳 SLIP (Serial Line Internet Protocol)
䊳 CSLIP (Compressed Serial Line Internet Protocol)
The proper network settings must be configured before the
Wireless Web or email services can be used.
Entering
Network
M
Making and
Answering Calls
Entering Network Settings
1. From the phone main menu, tap .
2. “All” should be selected, tap the Prefs icon.
3. Tap the drop down list located in the upper right corner.
Select
Network.
Selecting a Service
Use the Service field to select the desired ISP or to set up access
to a dial in server.
1. Tap the “Service” drop down list to display a list of
available service providers.
6
Entering
Network
M 6
Making and
Answering Calls
Sprint PCS
Wireless Web
M
Making and Answering Calls 87
Page 91

2. If the desired ISP is not listed, tap the menu launcher icon
located in the Graffiti area. Select Service and tap
.
New
3. The Service field defaults to “Untitled”.
Setting Up Your New Entry
Now that you have created a new entry, you need to enter all
the necessary information for the service to connect to the ISP.
1. Enter a new Service name.
2. Tap the “User Name” field
3. Enter your user name without spaces.
4. Tap the “Password” field and enter the password used to
log in to the ISP server.
5. Tap OK to close the password dialog box.
Section 6
88 Making and Answering Calls
Page 92

6. Tap the drop down arrow next to the “Connection” field.
Select “Wireless CDMA Modem” from the list.
7. Tap the “Details” button to display the advanced settings
for the connection protocol.
Setting Up Your
New Entry
M
Making and
Answering Calls
8. Tap the “Connection Type” drop down list and select PPP,
SLIP, or CSLIP.
9. Tap the “Idle Timeout” drop down menu and select
Immediate, 1, 2, or 3 minutes, or Power Off.
10. Check the “Query DNS” box to verify the DNS (Domain
Naming System) numbers of a computer prior to
attempting a network connection.
11. Tap OK to exit the “Details” dialog box.
12. Tap the “Phone” field. Enter the telephone number that
connects to the ISP server or dial in.
6
Note:
The first choice for
“Connection Type” should
be set to the default of
“PPP” for almost all ISP’s.
New Entry
M 6
Tip:
If you need
help deciding
which protocol
to use, contact
your ISP for
more
information.
Answering Calls
Wireless Web
M
Setting Up Your
Making and
Sprint PCS
Making and Answering Calls 89
Page 93

Note: You can enter a dialing prefix if needed by checking the
box and entering it in the space provided.
13. Tap OK to close the “Phone Setup” dialog box.
14. Tap Connect to connect to the Wireless Web.
Disabling Call Waiting
Call Waiting can cause your session to terminate if you receive
an incoming call while connected. If you have call waiting,
you can disable the feature by tapping the check box located
next to “Disable call waiting” in the Phone Setup dialog box.
Using a Calling Card
The “Use calling card” field enables you to use your calling
card when dialing your ISP or Intranet server. Keep in mind,
that a delay is needed between the time you enter your calling
card number, and the time the ISP numbers are dialed. To
achieve the necessary amount of delay, commas are entered in
the dialing sequence. Each comma pauses the dialing two
seconds.
Using Primary and Secondary DNS Entries
DNS is used to translate the names of host computers into IP
addresses. When you enter a DNS number, you are identifying
Section 6
90 Making and Answering Calls
Page 94

the specific server handling the translation services. Each IP
address or DNS entry has four sections separated by periods.
Each section is a number between 0-255. In the Details dialog
box, you can manually enter the desired values. Contact your
ISP to get the correct primary and secondary IP numbers.
Many systems do not require that you enter a DNS.
Using Primary
and Secondary
M
Making and
Answering Calls
6
Using Primary
and Secondary
M 6
Making and Answering Calls 91
Making and
Answering Calls
Sprint PCS
Wireless Web
M
Page 95

Selecting an IP Address Dynamically
Everyone who logs into the Wireless Web needs to have a
unique identifier (IP Address). Some networks assign a
temporary IP address when clients log in. Use the IP address
field to select automatic or temporary IP addressing. If your IP
address is permanently assigned, ask your system
administrator for the permanent address. If your provider
supports dynamic IP addressing, make sure IP Address is
checked in the Details dialog box.
Section 6
92 Making and Answering Calls
Page 96

7
N
Using Sprint PCS Service Features
In this Section
䊳 Sprint PCS Voice Command
䊳 Using Caller ID
䊳 Responding to Call Waiting
䊳 Three-Way Calling
䊳 Forwarding Your Calls
ow that you’ve mastered the basics, you can begin to focus on where you want
to go. This section guides you step-by-step through the calling features that
enhance your Sprint PCS Service. From Caller ID to Call Forwarding, using these
features will help you make the most of your Sprint PCS Service.
Us
Using Sprint
PCS Service
7
Us
Using Sprint PCS
Service Features
Using Sprint PCS Service Features 93
7
Sprint PCS
Wireless Web
Us
Page 97

Sprint PCS Voice Command
With Sprint PCS, the first wireless provider to offer innovative
Voice Command technology, reaching your friends, family,
coworkers and teammates has never been easier – especially
when you’re on the go.
With Sprint’s PCS Voice Command:
䊳 You store all your contact numbers in your phone’s
memory.
䊳 There’s no need to enter numbers, memorize voicemail
passwords, or try to dial while driving.
䊳 You can call anyone at any time – even if you don’t
remember their phone number.
Activating Your Service
You can choose Sprint PCS Voice Command as your free
option when you sign up for the Sprint PCS Advantage
Agreement SM or you can add on Sprint PCS Voice Command
for $10 per month in addition to your normal monthly service
plan rate. Contact Sprint at (888)211-4727.
Section 7
94 Using Sprint PCS Service Features
Page 98

Using Caller ID
Caller ID lets you know who’s calling by displaying the
number of the person calling when the phone rings. If the
caller’s name and number are already saved in your Internal
Address Book, the corresponding name appears with the
number. In the same way, if you call someone who has this
feature your phone number displays on their phone.
If the phone number is not recognized, a “U” is displayed. The
“U” means the number is unavailable.
If the caller has marked their number private, a “P” is
displayed on the screen.
To block your phone number from being displayed for a
specific outgoing call:
1. Tap
2. Dial the number you want to call.
3. Tap .
Note: To permanently block your ID, call Sprint PCS
Customer Care at (888) 211-4PCS(4727)
Activating Your
Service
Us
Using Sprint
PCS Service
7
Activating Your
Service
Us 7
Using Sprint PCS
Service Features
Using Sprint PCS Service Features 95
Sprint PCS
Wireless Web
Us
Page 99

Tip:
For those calls where you
don’t want to be
interrupted, you can
temporarily disable call
waiting by pressing
before placing your call.
Call Waiting is
automatically reactivated
once you end the call.
Tip:
You don’t have to worry
about being interrupted
during a Sprint PCS
Wireless Web call
because Call Waiting and
Three-Way Calling are
automatically disabled.
Responding to Call Waiting
You can answer an incoming call while on an existing call. If
you are on an existing call and another call is received, a tone
is heard and a call waiting message is displayed on the screen.
If the caller is stored in the address book, their name is also
displayed.
Answering a Waiting Call
1. Tap the button. The phone connects to the other call
while placing the existing caller on hold.
2. Tap the button again to switch back over to the
original caller.
Three-Way Calling
Three way calling allows you to talk to two different people at
the same time. When using this feature, normal airtime rates
apply for each of the two calls.
1. Enter the number you wish to call and tap .
2. During the conversation, tap .
3. Dial the second person.
4. Tap . When the person answers, tap again to
connect all three parties.
If one of the people you called hangs up, you and the
remaining caller stay connected. If you initiated the call and
are the first one to hang up, all three calls are disconnected.
Section 7
96 Using Sprint PCS Service Features
Page 100

Forwarding Your Calls
Call Forwarding lets you to forward all your incoming calls to
another phone number - even when your phone is turned off.
You can still make calls from your phone with Call
Forwarding activated.
To Activate Call Forwarding:
1. Tap
2. Enter the area code and phone number where the
incoming calls are forwarded.
3. Tap . A confirmation tone is heard that confirms the
activation of Call Forwarding.
To Activate Call
Forwarding:
Us
Note:
You are charged a higher
rate for calls you have
forwarded. Contact your
service provider for more
information.
PCS Service
Using Sprint
To Deactivate Call Forwarding:
1. Press
2. Press . A confirmation tone is heard that confirms the
deactivation of Call Forwarding.
7
To Activate Call
Forwarding:
Us 7
Using Sprint PCS
Service Features
Sprint PCS
Wireless Web
Us
Using Sprint PCS Service Features 97
 Loading...