

Page 1
©2012 Samsung. All rights reserved. BOOST and BOOSTMOBILE and Logo are
trademarks of Boost. Other marks are the property of their respective owners.
3/25/13
Online User Guide
www.boostmobile.com
Page 2

Consejo: Para encontrar esta guía para usuarios en Español,
Important Privacy Message – Boost Mobile’s policies often do
not apply to third-party applications. Third-party applications
may access your personal information or require Boost to
disclose your customer information to the third-party
application provider. To find out how a third-party application
will collect, access, use, or disclose your personal information,
check the application provider’s policies, which can usually be
found on their website. If you aren’t comfortable with the thirdparty application’s policies, don’t use the application.
por favor visita a
haz clic en
To find this user guide in English, please visit
www.boostmobile.com/user_guides
www.boostmobile.com/espanol y
ASISTENCIA.
Intellectual Property
All Intellectual Property, as defined below, owned by or
which is otherwise the property of Samsung or its
respective suppliers relating to the SAMSUNG Phone,
including but not limited to, accessories, parts, or
software relating there to (the “Phone System”), is
proprietary to Samsung and protected under federal
laws, state laws, and international treaty provisions.
Intellectual Property includes, but is not limited to,
Boost_SPH-D710_MR2_JB_UG_GC01_TN_032213_F3
inventions (patentable or unpatentable), patents, trade
secrets, copyrights, software, computer programs, and
related documentation and other works of authorship.
You may not infringe or otherwise violate the rights
secured by the Intellectual Property. Moreover, you
agree that you will not (and will not attempt to) modify,
prepare derivative works of, reverse engineer,
decompile, disassemble, or otherwise attempt to create
source code from the software. No title to or ownership
in the Intellectual Property is transferred to you. All
applicable rights of the Intellectual Property shall
remain with SAMSUNG and its suppliers.
Open Source Software
Some software components of this product incorporate
source code covered under GNU General Public
License (GPL), GNU Lesser General Public License
(LGPL), OpenSSL License, BSD License and other
open source licenses. To obtain the source code
covered under the open source licenses, please visit
opensource.samsung.com
:
Page 3

Disclaimer of Warranties; Exclusion of
Liability
EXCEPT AS SET FORTH IN THE EXPRESS
WARRANTY CONTAINED ON THE WARRANTY PAGE
ENCLOSED WITH THE PRODUCT, THE PURCHASER
TAKES THE PRODUCT "AS IS", AND SAMSUNG
MAKES NO EXPRESS OR IMPLIED WARRANTY OF
ANY KIND WHATSOEVER WITH RESPECT TO THE
PRODUCT, INCLUDING BUT NOT LIMITED TO THE
MERCHANTABILITY OF THE PRODUCT OR ITS
FITNESS FOR ANY PARTICULAR PURPOSE OR USE;
THE DESIGN, CONDITION OR QUALITY OF THE
PRODUCT; THE PERFORMANCE OF THE PRODUCT;
THE WORKMANSHIP OF THE PRODUCT OR THE
COMPONENTS CONTAINED THEREIN; OR
COMPLIANCE OF THE PRODUCT WITH THE
REQUIREMENTS OF ANY LAW, RULE, SPECIFICATION
OR CONTRACT PERTAINING THERETO. NOTHING
CONTAINED IN THE INSTRUCTION MANUAL SHALL
BE CONSTRUED TO CREATE AN EXPRESS OR
IMPLIED WARRANTY OF ANY KIND WHATSOEVER
WITH RESPECT TO THE PRODUCT. IN ADDITION,
SAMSUNG SHALL NOT BE LIABLE FOR ANY
DAMAGES OF ANY KIND RESULTING FROM THE
PURCHASE OR USE OF THE PRODUCT OR ARISING
FROM THE BREACH OF THE EXPRESS WARRANTY,
INCLUDING INCIDENTAL, SPECIAL OR
CONSEQUENTIAL DAMAGES, OR LOSS OF
ANTICIPATED PROFITS OR BENEFITS.
Modification of Software
SAMSUNG IS NOT LIABLE FOR PERFORMANCE
ISSUES OR INCOMPATIBILITIES CAUSED BY YOUR
EDITING OF REGISTRY SETTINGS, OR YOUR
MODIFICATION OF OPERATING SYSTEM SOFTWARE.
USING CUSTOM OPERATING SYSTEM SOFTWARE
MAY CAUSE YOUR DEVICE AND APPLICATIONS TO
WORK IMPROPERLY. YOUR CARRIER MAY NOT
PERMIT USERS TO DOWNLOAD CERTAIN
SOFTWARE, SUCH AS CUSTOM OS.
master_sample
c
Page 4

Samsung Telecommunications America
(STA), LLC
Headquarters:
1301 E. Lookout Drive
Richardson, TX 75082
Customer Care Center:
1000 Klein Rd.
Plano, TX 75074
Toll Free Tel: 1.888.987.HELP (4357)
Internet Address:
http://www.samsung.com
Nuance®, VSuite™, T9® Text Input, and the Nuance
logo are trademarks or registered trademarks of
Nuance Communications, Inc., or its affiliates in the
United States and/or other countries.
The Bluetooth® word mark, figure mark (stylized “B
Design”), and combination mark (Bluetooth word mark
and “B Design”) are registered trademarks and are
wholly owned by the Bluetooth SIG.
d
microSD™ and the microSD logo are Trademarks of the
SD Card Association.
Google, the Google logo, Android, the Android logo,
Google Play, Gmail, Google Mail, Google Maps,
Google Music, Google Talk, Picasa, YouTube and other
marks are trademarks of Google Inc.
Wi-Fi is a registered trademark of the Wireless Fidelity
Alliance, Inc.
Swype and the Swype logos are trademarks of Swype,
Inc. ©.
©2012 Samsung Telecommunications America, LLC.
Samsung is a registered trademark of Samsung
Electronics Co., Ltd. All product and brand names are
trademarks or registered trademarks of their respective
companies. Screen images simulated. Appearance of
the device may vary.
Page 5
Table of Contents
Tip: Looking for something? If you don’t see it in the headings
listed here, try the Index on page 229.
Introduction . . . . . . . . . . . . . . . . . . . . . . . . . . . . . . . . . i
Your Phone’s Menu . . . . . . . . . . . . . . . . . . . . . . . . . . i
1A. Setting Up Service . . . . . . . . . . . . . . . . . . . 2
Setting Up Your Device . . . . . . . . . . . . . . . . . . . . . . 2
Activating Your Device . . . . . . . . . . . . . . . . . . . . . . 3
Making Calls . . . . . . . . . . . . . . . . . . . . . . . . . . . . . . . 4
Setting Up Your Voicemail . . . . . . . . . . . . . . . . . . . 5
Account Passwords . . . . . . . . . . . . . . . . . . . . . . . . . 5
Getting Help . . . . . . . . . . . . . . . . . . . . . . . . . . . . . . . 6
2A. Device Basics . . . . . . . . . . . . . . . . . . . . . . . 8
Your Device . . . . . . . . . . . . . . . . . . . . . . . . . . . . . . . . 8
Turning Your Phone On and Off . . . . . . . . . . . . . 11
Viewing the Display Screen . . . . . . . . . . . . . . . . . 12
Battery and Charger . . . . . . . . . . . . . . . . . . . . . . . 13
Navigation and Customization . . . . . . . . . . . . . . 14
Displaying Your Phone Number . . . . . . . . . . . . . 22
Entering Text Using the Samsung Keyboard . . 23
Creating a Google Account . . . . . . . . . . . . . . . . 24
2B. Making and Answering
Calls 25
Making Calls . . . . . . . . . . . . . . . . . . . . . . . . . . . . . 25
Receive Phone Calls . . . . . . . . . . . . . . . . . . . . . . 29
Phone Call Options . . . . . . . . . . . . . . . . . . . . . . . . 30
Voicemail . . . . . . . . . . . . . . . . . . . . . . . . . . . . . . . . 33
Call Settings . . . . . . . . . . . . . . . . . . . . . . . . . . . . . . 39
2C. Settings . . . . . . . . . . . . . . . . . . . . . . . . . . . . 43
Accessing Settings . . . . . . . . . . . . . . . . . . . . . . . 43
Wireless and Network Settings . . . . . . . . . . . . . . 44
Device Settings . . . . . . . . . . . . . . . . . . . . . . . . . . . 52
Personal Settings . . . . . . . . . . . . . . . . . . . . . . . . . 62
Accounts Settings . . . . . . . . . . . . . . . . . . . . . . . . . 75
System Settings . . . . . . . . . . . . . . . . . . . . . . . . . . . 76
2D. Logs . . . . . . . . . . . . . . . . . . . . . . . . . . . . . . . 87
Logs . . . . . . . . . . . . . . . . . . . . . . . . . . . . . . . . . . . . . 87
2E. Contacts . . . . . . . . . . . . . . . . . . . . . . . . . . . . 90
Get Started with Contacts . . . . . . . . . . . . . . . . . . 90
2F. Calendar & Tools . . . . . . . . . . . . . . . . . . 100
Calendar . . . . . . . . . . . . . . . . . . . . . . . . . . . . . . . . 100
Page 6

Clock . . . . . . . . . . . . . . . . . . . . . . . . . . . . . . . . . . . 103
Calculator . . . . . . . . . . . . . . . . . . . . . . . . . . . . . . . 104
My Files . . . . . . . . . . . . . . . . . . . . . . . . . . . . . . . . 104
microSD Card . . . . . . . . . . . . . . . . . . . . . . . . . . . 105
Update Your Phone . . . . . . . . . . . . . . . . . . . . . . . 107
2G. Voice Services . . . . . . . . . . . . . . . . . . . . . 109
Voice Services . . . . . . . . . . . . . . . . . . . . . . . . . . 109
2H. Camera . . . . . . . . . . . . . . . . . . . . . . . . . . . 112
Take Pictures . . . . . . . . . . . . . . . . . . . . . . . . . . . . . 112
Camera Settings . . . . . . . . . . . . . . . . . . . . . . . . . . 115
Record Videos . . . . . . . . . . . . . . . . . . . . . . . . . . . 117
View Pictures and Videos using Gallery . . . . . 118
Working with Photos . . . . . . . . . . . . . . . . . . . . . 120
Photo Editor . . . . . . . . . . . . . . . . . . . . . . . . . . . . . . 121
Share Photos and Videos . . . . . . . . . . . . . . . . . 123
2I. Bluetooth . . . . . . . . . . . . . . . . . . . . . . . . . . 125
Turning Bluetooth On and Off . . . . . . . . . . . . . . 125
2J. Wi-Fi and Wi-Fi Direct . . . . . . . . . . . . . . 131
About Wi-Fi . . . . . . . . . . . . . . . . . . . . . . . . . . . . . . 131
Turning Wi-Fi On or Off . . . . . . . . . . . . . . . . . . . . 131
Scanning and Connecting to Wi-Fi . . . . . . . . . 132
Adding a Wi-Fi Network Manually . . . . . . . . . . 132
Wi-Fi Direct . . . . . . . . . . . . . . . . . . . . . . . . . . . . . . 133
3A. Service: The Basics . . . . . . . . . . . . . . . 135
Service: The Basics . . . . . . . . . . . . . . . . . . . . . . . 135
3B. Web & Data Services . . . . . . . . . . . . . . . 141
Wi-Fi . . . . . . . . . . . . . . . . . . . . . . . . . . . . . . . . . . . . 145
Wi-Fi Direct . . . . . . . . . . . . . . . . . . . . . . . . . . . . . . 147
Kies Via Wi-Fi . . . . . . . . . . . . . . . . . . . . . . . . . . . . 149
AllShare Play . . . . . . . . . . . . . . . . . . . . . . . . . . . . . 149
Email . . . . . . . . . . . . . . . . . . . . . . . . . . . . . . . . . . . 150
Play Books . . . . . . . . . . . . . . . . . . . . . . . . . . . . . . 160
Play Movies & TV . . . . . . . . . . . . . . . . . . . . . . . . . 160
Music . . . . . . . . . . . . . . . . . . . . . . . . . . . . . . . . . . . 161
Using Play Store . . . . . . . . . . . . . . . . . . . . . . . . . . 165
Google Navigation . . . . . . . . . . . . . . . . . . . . . . . . 166
Applications . . . . . . . . . . . . . . . . . . . . . . . . . . . . . 168
4A. Important Safety Information . . . . . . . . 170
4B. Manufacturer’s Warranty . . . . . . . . . . . 195
Standard Limited Warranty . . . . . . . . . . . . . . . . . 195
End User License Agreement for Software . . . 201
Social Hub . . . . . . . . . . . . . . . . . . . . . . . . . . . . . . 208
Page 7
Introduction
This User Guide introduces you to Boost Mobile service
and all the features of your new phone. It’s divided into
four sections:
⽧ Section 1: Getting Started
⽧ Section 2: Your Phone
⽧ Section 3: Service Features
⽧ Section 4: Safety and Warranty Information
WARNING: Please refer to the Important Safety Information
section on page 170 to learn about information
that will help you safely use your phone. Failure to
read and follow the Important Safety Information
in this phone guide may result in serious bodily
injury, death or property damage.
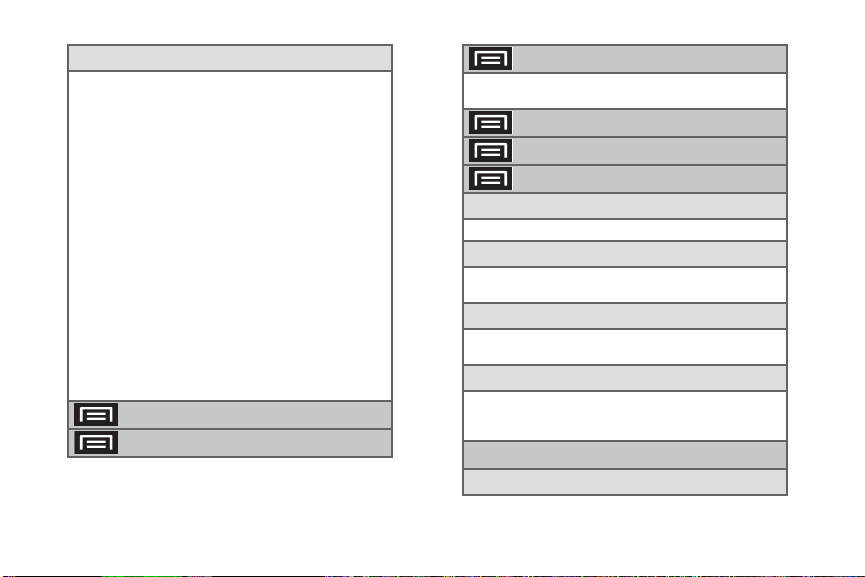
Your Phone’s Menu
The following table outlines your phone’s main menu
structure. For more information about using your
phone’s menus, see “Navigation and Customization”
on page 14.
Home screen
Home screen
Apps and Widgets
Apps
AllShare Play Boost Hotspot
Boost Zone Calculator
Calendar Camera
Clock Contacts
Downloads Email
Gallery Gmail
Google Google Settngs
Google+ Internet
Local Maps
Messaging Messenger
Mobile ID Music Player
My Files Navigation
Phone Photo Editor
Play Books Play Magazines
Play Movies & TV Play Music
Play Store Polaris Office 4.0
Settings Talk
Video Editor Video Player
Voice command Voice Recorder
Voice Search Voice talk
Voicemail YouTube
i
Page 8
Widgets
Active applications Alarm
Book Calendar
Calendar (mini today) Calendar (month)
Clock (digital) Clock (funky)
Clock (modern) Contact
Direct Dial Direct Message
Directions & Navigation Dual Clock (analog)
Dual Clock (digital) Email
Favorite apps Favorite Contacts (4x2)
Favorite Contacts (4x4) Favorite Settings
Gmail Gmail label
Google Play Books Google Play Music
Google Search Google+ posts
Keypad Messaging
Music Player Music playlist
Picture Frame Play - My Library
Play Recommendations Play Store
S Bookmarks Settings Shortcut
Simple Alarm Clock Simple Picture Frame
Traffic Video Player
Voice Voicemail
Weather Yahoo! Finance
Yahoo! News YouTube
> Add apps and widgets
> Create folder
> Set wallpaper
Home screen Lock screen
Home and lock screens
> Edit page
> Search
> Settings
Wi-Fi (On/Off)
Scan Wi-Fi Direct
4G settings (On/Off)
Network notification (On/Off)
Scan now
Bluetooth (On/Off)
Bluetooth (On/Off) My device
Available devices Scan
Data usage
Mobile data
Alert me about data usage (On/Off)
Data usage cycle
More settings
Limit mobile data usage (On/Off)
Airplane mode (On/Off)
ii
Page 9
Mobile networks
Mobile data (On/Off) Connections optimizer
VPN
Add VPN network
Nearby devices
File sharing Shared contents
Device name Allowed devices list
Not-allowed devices list
Download to
Upload from other devices
Kies via Wi-Fi
Home screen mode
Basic mode Easy mode
Blocking mode (On/Off)
Featu res
Disable incoming calls
Disable notifications
Disable alarm and timer
Disable LED indicator
Set time
Always From/To
Allowed contacts
Allowed contacts Allowed contact list
Sound
Vol ume
Music, video, games, and other media
Ringtone
Notifications System
Vibration intensity
Incoming call Notification
Haptic feedback
Device ringtone
Device vibration
Default notifications
Vibrate when ringing (On/Off)
Keytones (On/Off)
Touch sounds (On/Off)
Screen lock sound (On/Off)
Haptic feedback (On/Off)
Display
iii
Page 10
Wallpaper
Home screen Lock screen
Home and lock screens
LED indicator
Charging (On/Off) Low battery (On/Off)
Notifications (On/Off) Voice recording (On/Off)
Screen mode
Dynamic Standard
Natural Movie
Brightness
Auto-rotate screen (On/Off)
Screen timeout
15 seconds 30 seconds
1 minute 2 minutes
5 minutes 10 minutes
Font style
Default font Choco cooky
Helvetica S
Font size
Tiny Small
Normal Large
Huge
iv
Touch key light duration
1.5 seconds 6 seconds
Always off Always on
Display battery percentage (On/Off)
Auto adjust screen tone (On/Off)
Storage
Device memory
USB storage
SD card
Power saving mode
Power saving mode settings
CPU power saving Screen power saving
Background color Turn off haptic feedback
Power saving tips
Learn about Power saving mode
Battery
Application manager
Downloaded
Page 11
On SD card
Running
All
Location services
Use wireless networks (On/Off)
Use GPS satellites (On/Off)
Location and Google search (On/Off)
Lock screen
Screen lock Lock screen options
Owner information
Security
Encrypt device
Encrypt external SD card
Make passwords visible (On/Off)
Device administrators
Unknown sources (On/Off)
Trusted credentials
System User
Install from device storage
Clear credentials
Language and input
Language
English Español
Default
Samsung keyboard Swype
Google voice typing
Samsung keyboard
Swype
Voice recognizer
Google
Samsung powered by Vlingo
Voice search
Language Speech output
Block offensive words (On/Off)
Hotword detection (On/Off)
Download offline speech recognition
Personalized recognition (On/Off)
Google Account dashboard
v
Page 12
Text-to-speech output
Google Text-to-speech Samsung TTS
Speech rate Listen to an example
Driving mode (ON/Off)
Pointer speed
Backup and reset
Back up my data
Backup account
Automatic restore
Factory data reset
Add account
Motion (On/Off)
Direct call (On/Off)
Double tap to top (On/Off)
Tilt to zoom (On/Off)
Pan to move icon (On/Off)
Pan to browse images (On/Off)
Shake to update (On/Off)
vi
Turn over to mute/pause (On/Off)
Sensitivity settings
Learn about motions
Accessory
Dock sound (On/Off)
Audio output mode(On/Off)
Desk home screen display (On/Off)
Audio output
Stereo Surround
Audio applications (On/Off)
Date and time
Automatic date and time (On/Off)
Set date
Set time
Automatic time zone (On/Off)
Select time zone
Use 24-hour format (On/Off)
Page 13
Select date format
12/ 31/2 013 31 /12/ 2013
2013/12/31
Accessibility
Auto-rotate screen (On/Off)
Screen timeout
15 seconds 30 seconds
1 minute 2 minutes
5 minutes 10 minutes
Speak passwords (On/Off)
Answering/ending calls
Accessibility shortcut (On/Off)
TalkBack (On/Off)
Font size
Negative colors (On/Off)
Text-to-speech output
Enhance web accessibility
Mono audio (On/Off)
Turn off all sounds (On/Off)
Tap and hold delay
Short Medium
Long
Developer options
Desktop backup password
Stay awake (On/Off)
Protect SD card (On/Off)
USB debugging (On/Off)
Allow mock locations (On/Off)
Select app to be debugged
Wait for debugger (On/Off)
Show touches (On/Off)
Show pointer location (On/Off)
Show layout boundaries (On/Off)
Show GPU view updates (On/Off)
Show screen updates (On/Off)
vii
Page 14
Window animation scale
Animation is off Animation scale 0.5x
Animation scale 1x Animation scale 1.5x
Animation scale 2x Animation scale 5x
Animation scale 10x
Transition animation scale
Animation is off Animation scale 0.5x
Animation scale 1x Animation scale 1.5x
Animation scale 2x Animation scale 5x
Animation scale 10x
Animator duration scale
Animation is off Animation scale 0.5x
Animation scale 1x Animation scale 1.5x
Animation scale 2x Animation scale 5x
Animation scale 10x
Disable hardware overlay (On/Off)
Force GPU rendering (On/Off)
Strict mode (On/Off)
GPU rendering profile (On/Off)
viii
Enable traces
Graphics Input
View WebView
Window Manager Activity Manager
Sync Manager Audio
Video
Do not keep activities (On/Off)
Limit background processes
Standard limit
No background processes
1 process at most 2 processes at most
3 processes at most 4 processes at most
Show all ANRs (On/Off)
System Update
Update PRL
Update Profile
Update Samsung Software
Update Firmware
About device
Status
Page 15

Legal information
Open source licenses Google Legal
License settings Privacy Alert
Model number
Android version
Baseband version
Kernel version
Build number
Hardware version
Software version
In Use Menu
Add call/Merge Keypad
End call Speaker
Mute Bluetooth
ix
Page 16

Section 1
Getting Started
Page 17

1A. Setting Up Service
⽧ Setting Up Your Device (page 2)
⽧ Activating Your Device (page 3)
⽧ Making Calls (page 4)
⽧ Setting Up Your Voicemail (page 5)
⽧ Account Passwords (page 5)
⽧ Getting Help (page 6)
Setting Up Your Device
Install the battery:
1. Grasp the device firmly and locate the cover
release latch.
2. Place your finger nail in the opening and firmly
“pop” the cover off the device.
1A. Setting Up Service 2
Page 18
Caution!: Do not bend or twist the back cover excessively.
3.
Insert the battery into the opening in the back of
the device, making sure the connectors align and
gently press down to secure the battery.
Doing so may damage the cover.
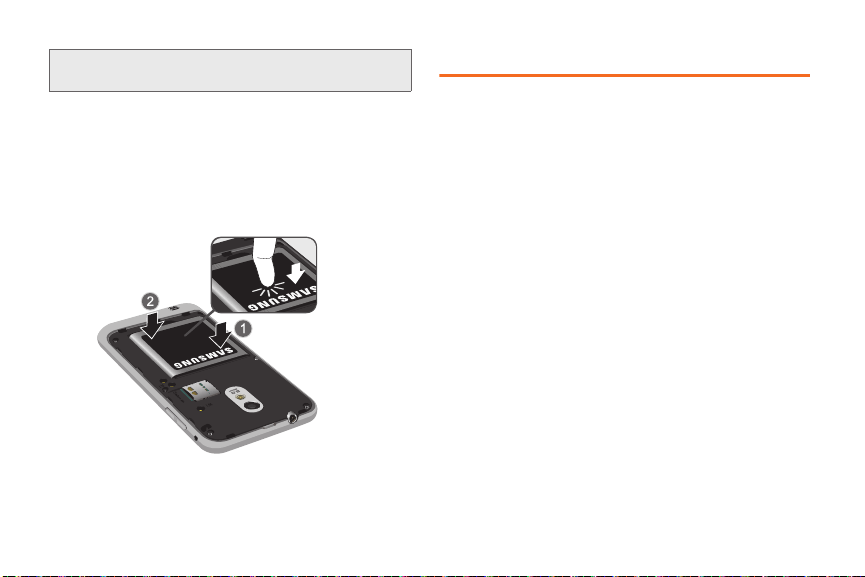
4. Place the battery cover over the battery
compartment and press down until you hear a
click.
3 1A. Setting Up Service
Activating Your Device
To activate your new phone, please refer to the
Activation Instructions included within the Getting
Started Guide.
For additional support information visit us at:
www.boostmobile.com
– or –
Call Boost Customer Care at
(
1-888-266-7848).
Mobile ID
An exclusive service from Boost Mobile, Mobile ID is
loaded with a variety of “ID packs” for Android powered
phones. Each pack is a customized experience of the
best applications, widgets, shortcuts, wallpapers and
ringers.
You can install as many as many as six ID packs
including MyID at any one time, and you can easily
switch from one ID Pack to another without losing any
applications already installed.
1-888-BOOST-4U
Page 19
Installing Your First ID Pack
End call
1. Press and tap > Mobile ID.
Note: Your device must be activated, your battery should be
fully charged, and you should be in a network coverage
area before you install an ID Pack.
2. On the Choose Your ID screen, tap Get New ID
Packs.
3. Touch an ID Pack on the Mobile ID > Get New ID
Packs screen. Read the information screen for a
description of the ID Pack and touch
4. Touch Agree to accept the Terms & Conditions.
5. If prompted, touch Continue on any following
screens until you see the progress icon in the
upper-left corner of your screen.
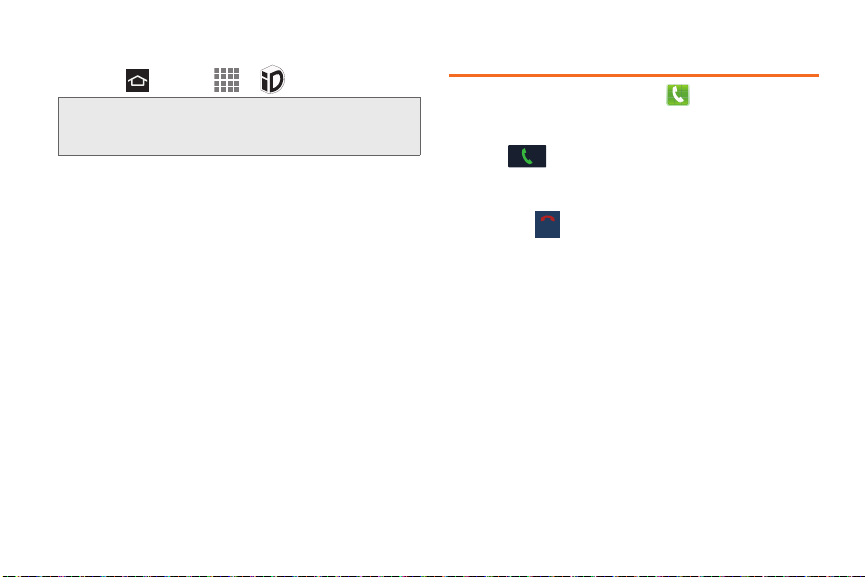
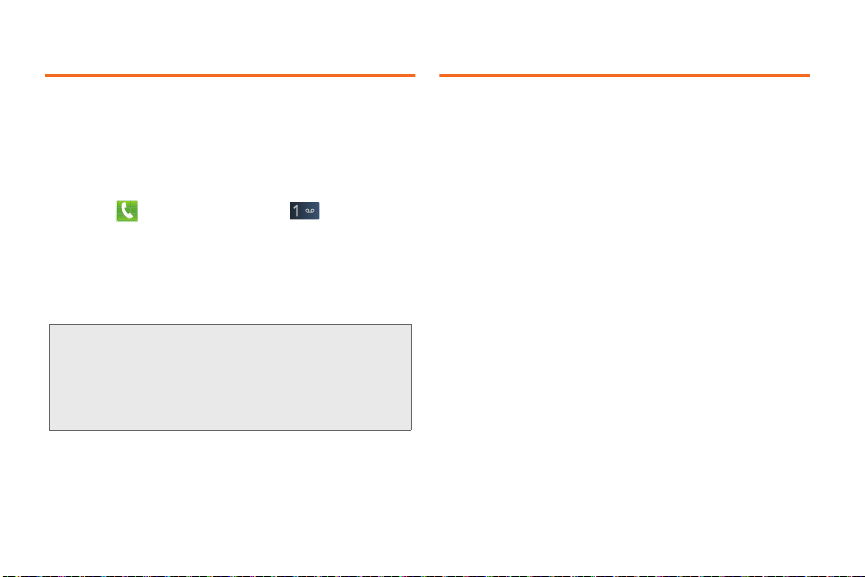
Making Calls
1. From the Home screen, tap and use the
on-screen keypad to enter the number you wish to
dial.
2. Ta p to make the call.
Ending a Call
䊳 Tap the key.
Install.
1A. Setting Up Service 4
Page 20
Setting Up Your Voicemail
Account Passwords
Your device automatically transfers all unanswered
calls to your voicemail, even if your device is in use or
turned off. You should set up your Voicemail and
personal greeting as soon as your device is activated.
Always use a password to protect against unauthorized
access.
1. Press then press and hold .
2.
Follow the system prompts to:
䡲 Create your password.
䡲 Record your name announcement.
䡲 Record your greeting.
Note: Voicemail Password
Boost Mobile strongly recommends that you create a
password when setting up your voicemail to protect
against unauthorized access. Without a password,
anyone who has access to your device is able to
access your voicemail messages.
5 1A. Setting Up Service
As a Boost Mobile customer, you enjoy unlimited
access to your personal account information, your
voicemail account, and your data services account. To
ensure that no one else has access to your information,
you will need to create passwords to protect your
privacy.
Voicemail Password
You will create your voicemail password (or passcode)
when you set up your voicemail. See “Setting Up Your
Voicemail” on page 5.
Page 21
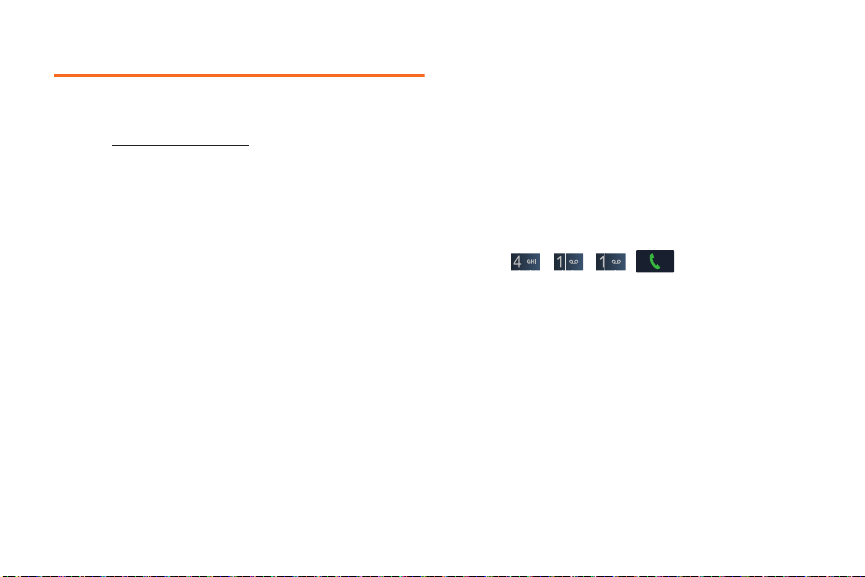
Getting Help
Managing Your Account
Online: www.boostmobile.com
䢇 Access your account information.
䢇 Check your minutes used (depending on your
Boost Mobile service plan).
䢇 View and add money to your account.
䢇 Enroll in Auto Re-Boost to make automatic
payments.
䢇 Purchase accessories.
䢇 Shop for the latest Boost Mobile phones.
䢇 View available Boost Mobile service plans and
options.
䢇 Learn more about data services and other products
like games, ringtones, wallpapers, and more.
From Any Other Phone
䢇 1-888-BOOST-4U (1-888-266-7848).
411
411 gives you access to a variety of services and
information, including residential, business and
government listings, movie listings or showtimes,
driving directions, restaurant reservations and major
local event information. You can get up to three pieces
of information per call, and the operator can
automatically connect your call at no additional charge.
A per call charge and standard airtime fee may apply
depending on your plan.
䊳 Tap .
1A. Setting Up Service 6
Page 22

Section 2
Your Phone
Page 23
⽧ Your Device (page 8)
2A. Device Basics
⽧ Turning Your Phone On and Off (page 11)
⽧ Viewing the Display Screen (page 12)
⽧ Battery and Charger (page 13)
⽧ Navigation and Customization (page 14)
⽧ Displaying Your Phone Number (page 22)
⽧ Entering Text Using the Samsung Keyboard (page 23)
⽧ Creating a Google Account (page 24)
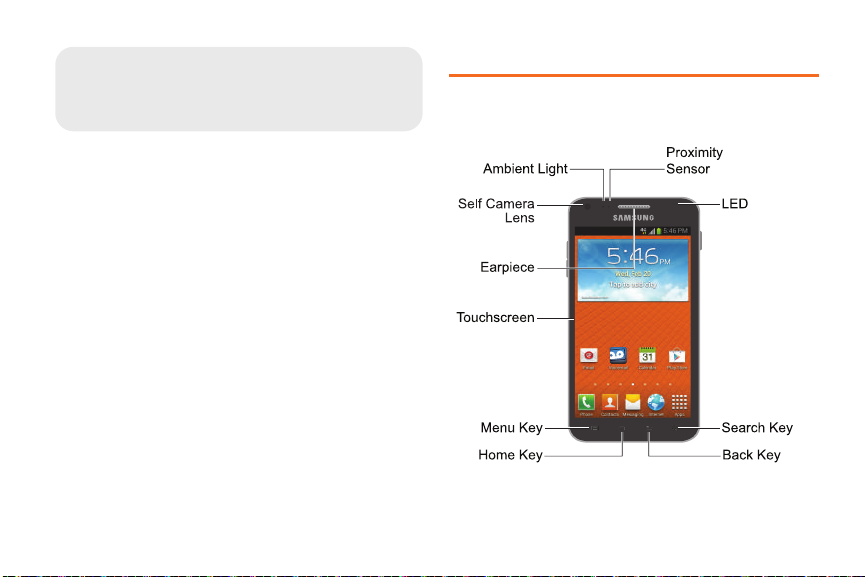
Your Device
Phone Front View
2A. Device Basics 8
Page 24

Key Functions
䢇 Ambient Light and Proximity Sensor uses the ambient
light level to adjust keypad access. If the light path is
blocked, for example, when holding the phone close
to your ear, the touch screen will turn off.
䢇 Self Camera Lens allows you to take pictures and
videos of yourself when you set the camera shooting
mode to Front portrait.
䢇 Earpiece lets you hear the caller and automated
prompts.
䢇 Touchscreen displays all the information needed to
operate your device, such as the call status, the
Contacts list, and the date and time. Also provides
one-touch access to all of your features and
applications.
䢇 Menu Key allows you to access your device’s main
functions menu. From most screens, press to open a
list of options for the current screen or feature. Press
and hold to access Google Search.
9 2A. Device Basics
䢇 Home Key returns you to the Home Screen. Press and
hold to access Recent apps, Task manager and
Google Now.
䢇 Back Key when in a menu, pressing the Back key
returns you to the previous menu, closes a dialog
box, or exits an onscreen menu/option.
䢇 Search Key launches the Google search option.
䢇 Status Bar Icons provide information about your
device’s status and options, such as signal strength,
wireless technology, ringer setting, messaging, and
battery charge.
䢇 LED Indicator lights when charging, you have missed
events, or incoming notifications. The light turns on
by default unless you turn it off.
Page 25
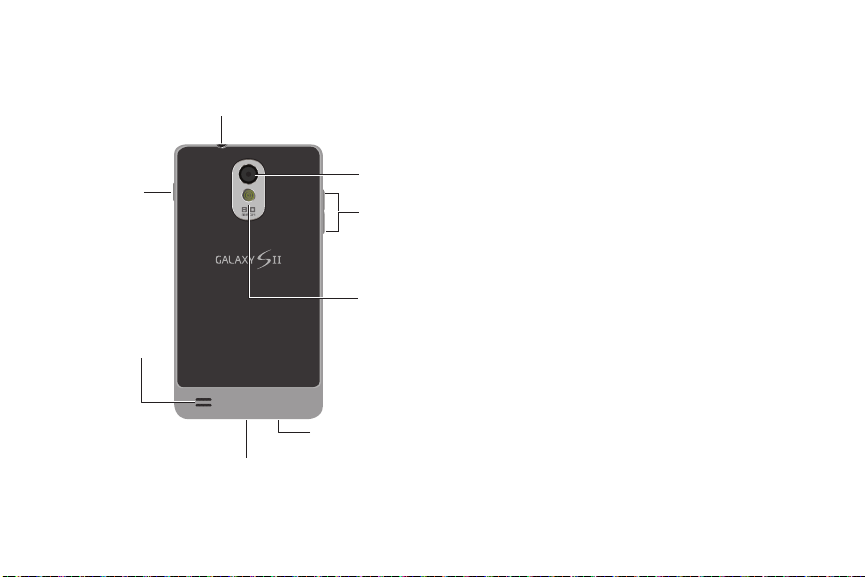
Phone Back View
Power/Lock
Button
External
Speaker
3.5mm
Headset Jack
Charger/
Accessory Jack
Camera
Volume
Buttons
Flash
Microphone
䢇 3.5 mm Headset Jack allows you to plug in an
optional headset for convenient, hands-free
conversations.
CAUTION! Inserting an accessory into
the incorrect jack may damage the device.
䢇 Power/Lock Button lets you turn the device on or off,
or turn off the touchscreen display.
䡲 When the screen is turned off, press once to
return to Screen lock mode.
䡲 While the device is unlocked and not on an active
call, press and hold to display the Phone options
menu (Power off, Data network mode, Airplane
mode, Restart and Sound modes).
䢇 External Speaker lets you hear the different ringers
and sounds. You can mute the ringer when receiving
incoming calls by pressing the volume button. The
speaker also lets you hear the caller’s voice in
speakerphone mode.
䢇 Charger/Accessory Jack allows you to connect the
phone charger or a USB cable (included).
CAUTION!
Inserting an accessory into the incorrect jack may
damage the device.
䢇 Microphone allows other callers to hear you clearly
when you are speaking to them.
2A. Device Basics 10
Page 26

䢇 Camera flash helps illuminate subjects in low-light
environments when the camera is focusing and
capturing a photo or video.
䢇 Volume Buttons allows you to adjust the ringer
volume in standby mode, the voice volume during a
call, and media playback volume.
䢇 Camera Lens as part of the built-in 3.0 megapixel
camera, this lens lets you take pictures and videos
11 2A. Device Basics
Turning Your Phone On and Off
1. Press and hold until the phone
switches on.
2. Sweep your finger across the screen to unlock
the phone.
Turning Your Phone Off
1. To switch off the phone, press and hold ,
until the
Device options
2. Tap Power
off
3. At the Power off prompt, tap OK.
screen displays.
to switch off the phone.
Page 27
Viewing the Display Screen
4
4
Your device’s display screen provides information
about your device’s status and options. This list
identifies the symbols you’ll see on your device’s
display screen:
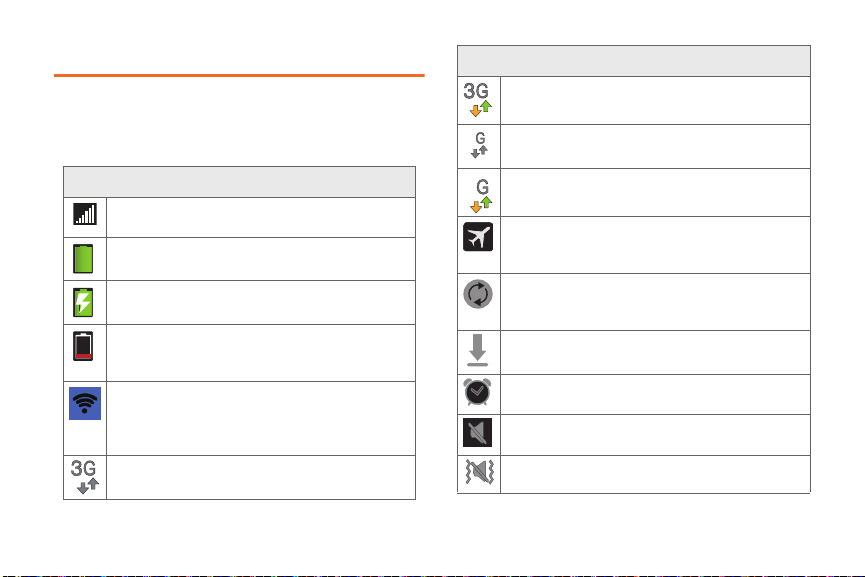
Status Bar – Status Icons
Signal Strength – Shows your current signal
strength. (More bars = stronger signal.)
Battery Strength – Shows your current battery
charge level. (Icon shown is fully charged.)
Battery Charging – Shows your current battery
charge level and indicates it is charging.
Battery Critical – Shows your current battery
charge level requires attention and your device
will soon shut off.
Wi-Fi Direct Connected – Displays when
Wi-Fi Direct is active and configured for a direct
connection to another compatible device in the
same direct communication mode.
3G Available – Boost 3G data service is
available.
Status Bar – Status Icons
3G Communicating – Boost 3G data service is
active and communicating.
4G Available – Boost 4G data service is
available.
4G Communicating – Boost 4G data service is
active and communicating.
Airplane Mode On – Your device will not make
or receive calls or provide data access. Local
applications are still available.
Data Synchronization – Application sync is
active and synchronization is in progress for
Gmail, Calendar and Contacts.
Mobile ID – Mobile ID is available for installation.
Alarm Event – Shows you have an upcoming
alarm event.
Mute – All sounds are turned off.
Vibrate – The ringer is set to vibrate only.
2A. Device Basics 12
Page 28
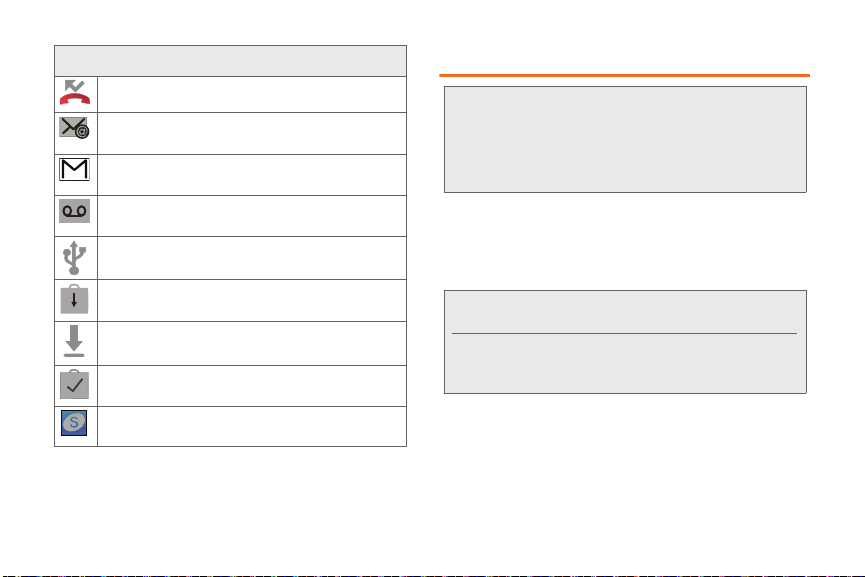
Status Bar – Notification Icons
Missed Call – You missed an incoming call.
New Email – You received a new email or text
message.
New Gmail – You received a new Gmail
message.
New Voicemail – You received a voicemail
message.
USB Connection – The device has detected an
active USB connection.
System Updates Available – A new system
update is available for download.
Downloading – The phone is currently
downloading an application.
Download Successful – A recent software
download was successfully downloaded.
Samsung Notification – Samsung Account
requires activation.
13 2A. Device Basics
Battery and Charger
WARNING: Use only Samsung-approved batteries and
Battery Capacity
Your device is equipped with a Lithium Ion (Li-Ion)
battery. It allows you to recharge your battery before it is
fully drained.
Note: Watch your device’s battery level indicator and charge
Installing the Battery
䊳 See “Setting Up Your Device” on page 2.
chargers with your device. The failure to use a
Samsung-approved battery and charger may
increase the risk that your device will overheat,
catch fire or explode, resulting in serious bodily
injury, death or property damage.
the battery before it runs out of power.
Long backlight settings, searching for service, vibrate
mode, browser use and other variables may reduce the
battery’s talk and standby times.
Page 29
Removing the Battery
1. Make sure the power is off so that you don’t lose
any stored numbers or messages.
2. Grasp the device firmly, locate the cover release
latch, and then place your fingernail in the opening
and firmly “pop” the cover off the device.
3. Carefully remove the battery from the device.
WARNING: Do not handle a damaged or leaking Li-Ion
battery as you can be burned.
Charging the Battery
Keeping track of your battery’s charge is important. If
your battery level becomes too low, your device
automatically turns off and you will lose any information
you were just working on.
Always use a Samsung-approved charger to charge
your phone’s battery.
䊳 Plug the USB end of the charger into the phone’s
Charger/Accessory Jack and the other end into an
electrical outlet.
Navigation and Customization
Your new phone is a touch-sensitive device which
allows you to operate many features by touching the
screen.
Tip: Some menu options are also accessed by pressing and
holding an onscreen item, such as a Contact entry from
the Contacts tab.
Home Screen Overview
The Home Screen is the starting point for using your
phone. You can add app shortcuts, widgets, and
folders, for instant access to information and
applications.
Press from any screen to return to the main Home
screen.
The Home screen includes extended screens that
extend beyond the current visible screen to provide
more space for adding icons, widgets, and more.
2A. Device Basics 14
Page 30
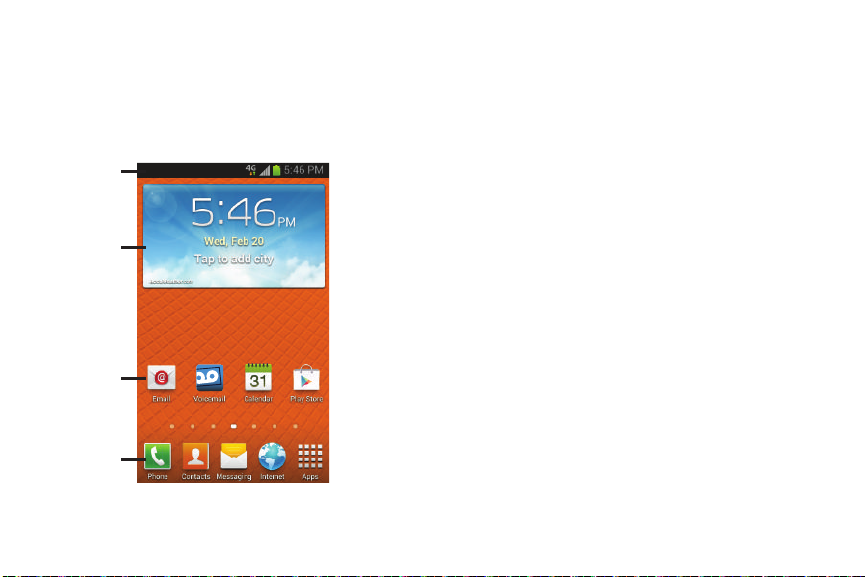
There are seven available screens. You can customize
Status bar
Shortcuts
Widget
Primary
Shortcuts
the number of home screens, up to the maximum of
seven. Dots in the lower part of the screen indicate the
current home screen, and its position to other home
screens.
15 2A. Device Basics
䢇 Status bar, located at the top of all Home screens,
displays icons for notifications, such as email
messages, calls (missed, call in progress), new
voicemail, upcoming events, USB connection, and
text/MMS, plus status icons for signal strength and
battery level.
䢇 Primary Shortcuts are the bottom row of application
shortcuts that remain static on all home screens (by
default Phone, Contacts, Messaging, Internet and
Apps).
䢇 Shortcuts are icons that launch available device
applications such as the preloaded shortcuts Email
and Voicemail.
䢇 Widgets are self-contained apps that run on the
Home screen (not shortcuts). These can be placed
onto any of the available screens (Home or
Extended).
Page 31

Apps
The Apps screen holds all the apps installed on your
phone, including pre-loaded apps, and those you
download and install on your phone.
Using the Apps Tab
Application icons display on the Apps tab, for easy
access.
1. Press and tap to open the tab.
2. Scroll through the list and tap an icon to launch the
associated application.
Application Icons
AllShare Play - allows your phone to stream
photos, music and videos from its memory to
other Digital Living Network Alliance (DLNA)
devices. Your phone can also play digital
content streamed from other DLNA certified
devices..
Boost Hotspot – Allows you to turn your phone
into a Wi-Fi hotspot. The feature works best
when used in conjunction with 4G data services
(although 3G service can also be used).
NOTE: Hotspot feature available for select plans
at additional cost.
Boost Zone - Lets you stay connected to all the
latest news and information from Boost Mobile.
Features include news, feedback, featured
applications and tips and tricks for your device
(page 135).
Calculator – Launches the onscreen calculator
application (page 104).
Calendar – Launches the Calendar applications
that syncs itself to either your Google or
Outlook® calendar (page 100). Events can only
be synced to a managed account.
2A. Device Basics 16
Page 32

Application Icons
Camera – Launches the built-in camera
(page 112).
Clock – Accesses the alarm and media
application screen (page 103).
Contacts – Displays the Contacts tab listing
current contacts, synced from a managed
account.
Downloads – Allows you to view files you
download to your phone.
Email – Provides access to both your Outlook
(Exchange Server-based) email and Internet
email accounts (such as Google, MSN Live, etc.,
page 150).
Gallery – Displays a Gallery of photos and
videos stored on the microSD card (page 118).
Gmail – Provides access to your Gmail account
(page 151).
Google – Provides an onscreen Internet search
engine powered by Google™.
17 2A. Device Basics
Application Icons
Google + - Google+ makes messaging and
sharing with your friends a lot easier. You can
set up Circles of friends, visit the Stream to get
updates from your Circles, use Messenger for
fast messaging with everyone in your Circles, or
use Instant Upload to automatically upload
videos and photos to your own private album on
Google+.
Internet – Launches the Web browser
(page 142). The browser is fully optimized and
comes with advanced features to enhance
Internet browsing on your device.
Local – Allows others to find your business on
local search results using either Google Search
or Google Maps (page 167).
Maps – Launches Google Maps for mobile that
helps you find local businesses, locate friends,
view maps and get driving directions
(page 167).
Messaging – Provides access to your text
messaging application (SMS) (page 136).
Page 33

Application Icons
Messenger - Messenger allows you to bring
groups of friends together into a simple group
conversation. When you get a new conversation
in Messenger, Google+ sends an update to your
phone.
Mobile ID – An exclusive service from Boost
Mobile, Mobile ID is loaded with a variety of “ID
packs” for Android powered phones. Each pack
is a customized experience of the best
applications, widgets, shortcuts, wallpapers and
ringers (page 3).
Music Player – Launches the built-in Music
Player (page 161).
My Files – Lets you view supported image files
and text files on your microSD card (page 104).
Navigation – Launches a built-in GPS feature,
giving you access to a number of locationbased services (page 166).
Phone – Access the phone keypad (page 26).
Application Icons
Photo Editor – provides basic editing functions
for pictures that you take on your phone. Along
with basic image tuning like brightness, contrast,
and color it also provides a wide variety of
effects used for editing the picture.
Play Books – Allows you to purchase and
download ebooks from the Google ebooks
Website (page 160).
Play Magazines – Allows you to purchase and
download magazines to view on your phone.
Play Movies & TV – Allows you to rent movies
and watch tv on your phone (page 160).
Play Music – While online, you can play music
added to your music file as well as any music
copied from your PC. While offline, listen to
music you have copied from the PC (page 161).
Play Store – Google Play Store provides access
to downloadable applications and games to
install on your phone (page 165).
Polaris Office 4.0 – Polaris Office Mobile for
Android is a Microsoft Office compatible office
suite. This application provides a central place
for managing your documents online or offline.
2A. Device Basics 18
Page 34

Application Icons
Settings – Access the device’s built-in Settings
menu (page 43).
Tal k – Launches Google Talk application that
lets you chat with family and friends over the
Internet.
Video Editor – Video Editor allows you to edit
your own videos. You can add themes, music,
pictures, and more.
Video player – Launches the video player and
plays video files stored on your microSD card
(page 120).
Voice command – With the Voice command
application you can use your voice to perform
operations that you would normally have to do
by hand such as dialing a phone number,
texting a message, playing music, etc.
Voice Recorder – The Voice recorder allows
you to record an audio file up to one minute
long and then immediately send it as a
message.
Voice Search – Speak criteria to search the
Web.
19 2A. Device Basics
Application Icons
Voice Talk – With the Voice talk application you
can use your voice to perform operations that
you would normally have to do by hand such as
dialing a phone number, texting a message,
playing music, etc.
Voicemail – Dials the voicemail service for
activation. After initial use, dials the voice
mailbox to access messages (page 5).
YouTu be – Launches YouTube to watch videos
(page 124).
Page 35

Customizing Your Home Screen
Learn how to add, move, or remove items from the
home screen. You can customize your Home Screen
by doing the following:
䢇 Adding apps
䢇 Adding widgets
䢇 Adding folders
䢇 Changing the Wallpaper
Adding Shortcuts
1. Press .
2. Navigate to the desired Home Page and tap
to display your current applications.
3. Touch and hold an application icon. This creates a
shortcut and closes the Apps tab.
4. While still holding the shortcut, position it on the
current page, and then release it to lock the new
shortcut on the current screen.
Adding Shortcuts from the Home Screen
1. Press .
2. Navigate to the desired Home Page, and then
touch and hold an empty area of the Home screen.
3. Ta p Apps and widgets.
4. Touch and hold an application icon. This creates a
shortcut and closes the Apps tab.
5. While still holding the shortcut, position it on the
current page, and then release it to lock the new
shortcut on the current screen.
Deleting a Shortcut
1. Press .
2. Touch and hold the desired shortcut. This unlocks
it from its location on the current screen.
3. Drag the shortcut to the Remove icon and release
it. As you place the shortcut into the Trash, both
items turn red.
Note: This action does not delete the application, it simply
removes the shortcut from the current screen.
2A. Device Basics 20
Page 36

Adding and Removing Primary Shortcuts
The primary shortcuts are the bottom row of application
shortcuts that remain static on all home screens (by
default Phone, Contacts, Messaging, Internet, and
Apps). You can change any of your primary shortcuts
with the exception of the Apps shortcut.
Note: Before replacing a primary shortcut, add the
replacement shortcut to the Home Screen.
1. Press .
2. Touch and hold the primary shortcut you want to
replace and then drag it to an empty space on any
Home screen.
3. Touch and hold the new shortcut and then drag it
to the empty space in the row of primary shortcuts.
The new primary shortcut displays on all Home
screens.
21 2A. Device Basics
Adding and Removing Widgets
Widgets are self-contained applications that reside
either in your Widgets tab or on the main or extended
Home screens. Widgets can include Contacts
shortcuts, bookmarks, Gmail and email accounts, and
many other types of applications.
Adding a Widget
1. Press .
2. Navigate to the desired Home Page, and then
touch and hold an empty area of the Home screen.
3. Tap Apps and widgets, and then tap the Widgets
tab.
4. Touch and hold an available Widget to position it
on the current screen.
Page 37

Removing a Widget
1. Press .
2. Touch and hold the desired widget. This unlocks it
from its location on the current screen.
3. Drag the widget to the Remove icon and release it.
As you place the Widget into the Trash, both items
turn red.
Adding Folders
1. Press .
2. Navigate to the desired Home Page, and then
touch and hold an empty area of the Home screen.
3. Tap Folder to add a new folder to the Home
screen. Tap the folder to give it a name and tap
Changing the Background Wallpaper
You can customize the screen’s wallpaper image on
the Home screen, Lock screen, or you can place the
same image on both the Home and lock screens.
1. Press .
2. Touch and hold an empty area of the Home
screen.
3. Ta p Set wallpaper, and then select the screen(s) to
change. Selections:
Home and lock screens.
Home screen, Lock screen, or
4. Select a location in which to search for wallpaper,
then select a wallpaper image. Selections are:
Gallery, ID wallpapers (Home screen only), Live
OK.
wallpapers (Home screen only), or Wallpapers.
Displaying Your Phone Number
䊳 Press and tap > Settings > About device >
Status. (Your phone number and other phone
information displays.)
2A. Device Basics 22
Page 38

Entering Text Using the Samsung
Keyboard
The Samsung Keyboard is an onscreen QWERTY
keyboard.
1. Press and tap > Settings > Language and
input.
2. Tap to the right of Samsung keyboard to
access these options:
䡲 Portrait keyboard types: Select text input method.
Choose from
䡲 Input language: Select the text input language.
Choose from either
䡲 Predictive text: Enable the predictive text entry
mode. This must be enabled to gain access to
the advanced settings. Tap Predictive text to
access the advanced settings.
● Word completion: to enable the word
completion.
● Word completion point: to set how many letters
should be entered before a prediction is
made.
23 2A. Device Basics
Qwerty or 3x4 keyboard.
English, or Español.
● Spell correction: to correct typographical errors
by selecting from a list of possible words that
reflect the characters of the keys you tapped
as well as the characters of nearby keys.
● Next word prediction: to enable word
prediction for the next word.
● Auto-append: to automatically add predictions
to the word you are typing.
● Auto-substitution: to automatically replace
words that you are typing. This option will help
for accidental misspellings.
● Regional correction: to set the device to
automatically correct mistyped words
according to normal spelling for your region.
● Recapture: to set the device to re-display the
word suggestion list when you select the
wrong word from the list.
● My word list: to add the new word in the
Register to XT9 my words.
● Auto substitution list: to add words to substitute
(for example youve becomes you’ve).
䡲 Continuous input: Enter text by sliding your finger
across the keyboard without lifting your finger.
Page 39

䡲 Handwriting: The phone recognizes onscreen
handwriting and converts it to text.
䡲 Advanced
● Auto capitalization: automatically capitalizes
the first letter of the first word in each sentence
(standard English style).
● Auto-punctuate: automatically inserts a period
at the end of a sentence when you tap the
space bar twice while using the onscreen
QWERTY keyboard.
● Character preview: provides an automatic
preview of the current character selection
within the text string. This is helpful when
multiple characters are available within one
key.
● Key-tap vibration: key-tap vibration enables
vibration when you tap an onscreen key.
● Key-tap sound: enables auditory feedback
when you tap an onscreen key.
䡲 Tutorial: Launches a brief onscreen tutorial
covering the main concepts related to the
Samsung keyboard.
䡲 Reset settings: Reverts the Samsung Keyboard
settings you applied back to their defaults.
Creating a Google Account
You will need a Google account to access several
device features such as Gmail, Google Maps, Google
Talk, and the Google Play Store applications. Before
you are able to access Google applications, you must
enter your account information. These applications
sync between your device and your online Google
account.
1. From a computer, launch a Web browser and
navigate to
2. On the main page, click create an account for free.
3. Follow the onscreen prompts to create your free
account.
www.google.com.
2A. Device Basics 24
Page 40

⽧ Making Calls (page 25)
2B. Making and Answering
Calls
⽧ Receive Phone Calls (page 29)
⽧ Phone Call Options (page 30)
⽧ Voicemail (page 33)
⽧ Call Settings (page 39)
25 2B. Making and Answering Calls
Making Calls
There are several convenient ways to place calls from
your phone.
䢇 Using the Keypad
䢇 From Logs
䢇 From Favorites
䢇 From Contacts
䢇 Call a Number in a Text Message
䢇 Email Message
䢇 Call Emergency Numbers
Page 41

Call Using the Keypad
The most “traditional” way to place a call is by using
the phone’s dialer screen.
1. Press and tap .
2. Tap the number keys on the dialpad to enter the
phone number.
Tip: As you enter digits, Smart Dial searches for contacts that
match. If you see the number you want to dial, tap it to
place the call immediately without entering the rest of the
number.
3. Tap to place the call.
4. Tap to end the call.
End call
Call From Logs
All incoming, outgoing and missed calls are recorded
in the Call log. You can place a call to numbers or
contacts that display in this area.
1. Press and tap .
2. Ta p the Logs tab. A list of recent calls displays.
3. Tap the contact to call, then tap to place a
call.
Tip: Swipe the entry left to right to place a call or from right to
left to send a message.
2B. Making and Answering Calls 26
Page 42

Call from Contacts
You can place calls directly from your Contacts list
using either of the following procedures.
1. Press and tap .
2. Tap the contact you want to call and then tap
to place a call.
– or –
1. Press and tap .
2. Tap the Contacts tab. A list of contacts
displays.
3. Tap the contact to call and then tap to place
a call.
27 2B. Making and Answering Calls
Call a Number in a Text Message
While viewing a text message, you can place a call to a
number that is in the body of the message. For more
information, see “Text Messaging (SMS)” on page 136.
1. Press and tap .
2. Open the message then tap the phone number.
Tip: You can also call the number from which you received a
text or MMS message. Tap the name at the top of the
conversation and then tap a phone number.
3. Tap to dial the number.
Page 43

Call a Number in an Email Message
While viewing an email you can place a call to a
number that is in the body of the message.
1. Press and tap .
2. Open the message with the phone number and
then tap the phone number.
The Phone screen opens, with the phone number
automatically filled in and ready to dial.
3. Tap to place the call.
Call Emergency Numbers
You can place calls to 911 even if the phone’s screen is
locked or your account is restricted.
To call the 911 emergency number when the phone’s
screen is locked with a screen lock:
1. Press and tap .
2. Dial 911 and press .
To call the 911 emergency number normally or when your
account is restricted:
1. Press and tap .
2. Dial 911 and press .
2B. Making and Answering Calls 28
Page 44

Receive Phone Calls
When you receive a phone call from a contact, the
Incoming call screen display the caller ID icon, name,
and phone number of the calling party. When you
receive a phone call from someone not stored in
Contacts, only the default caller ID icon and phone
number display on the Incoming call screen.
Note: If your phone is turned off, all calls are automatically
sent to voicemail.
Answer an Incoming Call
The following procedure shows you how to answer an
incoming call.
䊳 When the call comes in, touch and slide to
the right to answer the call.
29 2B. Making and Answering Calls
Mute the Ringing Sound
You can mute the ringtone without rejecting the call by
press the volume button down.
Reject an Incoming Call
䊳 When you receive an incoming call, touch and
slide to the left.
Reject a Call with a Text Message
You can automatically reject an incoming call and
send a text message to the caller.
1. Touch and slide up Reject call with message.
2. Select an existing message and tap Send.
– or –
Create new message to compose a new text
Tap
message.
Page 45

Phone Call Options
Dialing Options
1. Press while dialing a phone number.
2. Tap one of the following options:
䡲 Send message: Sends a text message to this number.
䡲 Add to Contacts: Adds this number to the
Contacts list. For more information, see “Add a
Contact” on page 92.
䡲 Speed dial setting: Displays the contacts assigned
to numbers 2 through 100. The number 1 is
reserved for Voicemail.
䡲 Add 2-sec pause: Adds a 2-second pause to this
number.
䡲 Add wait: Adds a pause to the calling sequence
until you tap a key to continue.
䡲 Call Settings: Displays the Call settings menu. see
“Device Settings” on page 52.
Caller ID
Caller ID identifies a caller by displaying the phone
number of the incoming caller.
To hide your number when making a call, follow these
steps.
1. Press and tap .
2. Tap the Keypad tab.
3. Tap .
4. Enter a phone number, then tap .
Call Waiting
When you are on a call, Call Waiting alerts you to
incoming calls by sounding a tone. Your phone’s
screen informs you that another call is waiting and
displays the caller’s phone number (if it is available).
To respond to an incoming call while you’re on a call:
1. Slide to the right to place the first caller on
hold and answer the second call.
2. Ta p Swap to switch back to the first caller.
2B. Making and Answering Calls 30
Page 46

3-way Calling
Note: With 3-Way calling, you can talk to two people at the
same time. When using this feature, the normal airtime
rates will be charged for each of the two calls
depending on your service plan.
1. Press and tap .
2. Tap the Keypad tab.
3. Enter a number and tap .
4. When the number connects, tap the Add call
menu and dial the second number.
The first caller is placed on hold while dialing the
second number.
5. Tap Merge to merge the calls into a three-way all.
Note: If one person hangs up during the call, you and the
remaining person stay connected. If you are first to
hang up, all callers are disconnected.
31 2B. Making and Answering Calls
Call Forwarding
Call Forwarding lets you forward all your incoming calls
to another phone number – even when your phone is
turned off. You can continue to make calls from your
phone when you have activated Call Forwarding.
Important: You are charged a higher rate for forwarded calls.
To activate Call Forwarding:
1. Press and tap .
2. Tap .
3. Enter the area code and number in which to
forward calls.
4. Tap . A tone confirms Call Forwarding
activation.
To deactivate Call Forwarding:
1. Press and tap .
2. Tap .
3. Tap . A message displays and a tone plays
to confirm deactivation.
Page 47

In-call Options
While on a call, a number of onscreen options display.
Tap an option to select it.
䢇 Add call: Displays the keypad so you can dial another
number.
䢇 Keypad: Displays the keypad.
䢇 End call: Terminates the call.
䢇 Speaker: To hear audio through the speaker.
䢇 Mute/Unmute: Mutes the microphone. Tap again to
unmute.
䢇 Headset: Connects to a Bluetooth headset. Tap again
to disconnect.
Press for more options:
䢇 Contacts: Displays the Contact list.
䢇 Message: Create a text message during a call.
Speed Dialing
You can assign a shortcut to dial a phone number in
your Contacts List for speed dialing. There are one
hundred available numbered spaces. The number 1 is
reserved for Voicemail.
Assign a Speed Dial Number
1. Press and tap .
– or –
Press and tap .
2. Press > Speed dial setting.
3. Tap a Not assigned slot, then tap a contact to
assign to this number.
The selected number displays in the speed dial
number area.
2B. Making and Answering Calls 32
Page 48

Remove a Speed Dial Number
1. Press and tap .
2. Press > Speed dial setting.
3. Press > Remove.
4. Tap the next to the speed dial entry to remove
and select
Done.
Edit a Speed Dial Number Location
1. Press and tap .
2. Press > Speed dial setting.
3. Press > Change order.
4. Tap the entry to move. The entry highlights.
5. Tap a Not assigned space to move the entry to this
location.
6. Tap Done.
33 2B. Making and Answering Calls
Voicemail
The phone automatically transfers all unanswered calls
to voicemail, even when the phone is in use or turned
off. You should set up your voicemail and personal
greeting as soon as your phone is activated. Always
use a password to protect against unauthorized
access.
Important: Voicemail Password - Boost strongly
recommends that you create a password when
setting up your voicemail to protect against
unauthorized access. Without a password,
anyone who has access to your phone is able to
access your voicemail messages
Page 49

Set Up Voicemail from the Phone App
The following steps will guide you through setting up
your voicemail using the Phone application.
Your phone automatically transfers all unanswered
calls to your voicemail, even if your phone is in use or
turned off.
1. Press and tap .
2. Touch and hold to dial voicemail.
3. Follow the prompts to:
䡲 Create a password.
䡲 Record a name announcement.
䡲 Record a greeting.
Retrieve Voicemail Messages
1. Press and tap .
2. Touch and hold to dial voicemail.
3. When connected, follow the voice prompts from
the voicemail center.
Note: If you previously set up Visual Voicemail, that
application launches and directs you to visual
voicemail. For more information, see “Visual Voicemail”
on page 35.
Voicemail Notification
There are several ways the phone alerts you to a new
message.
䢇 Playing the assigned ringtone type.
䢇 Displaying within the Notifications area of the Status
bar when a single new unheard voicemail message
is received.
2B. Making and Answering Calls 34
Page 50

Visual Voicemail
Visual Voicemail provides a quick and easy way to
access voicemail. You can locate one message without
listening to every voicemail message. This new feature
periodically retrieves caller information from all of the
current voicemails and populates a list with the caller
name and number, along with the length of time and
priority level of the voicemail message.
Set Up Visual Voicemail
Your phone automatically transfers all unanswered
calls to your voicemail, even if your phone is in use or
turned off.
1. Press and tap Voicemail.
The first time you access the Voicemail application
the Personalize your voicemail prompt displays.
2. Tap Personalize now to access the voicemail setup
program.
3. Follow the system prompts to:
䡲 Create a password.
䡲 Record a name announcement.
䡲 Record a greeting.
35 2B. Making and Answering Calls
Review Visual Voicemail
Visual Voicemail lets you easily access and select
which messages you want to review.
1. Press and tap .
2. Touch a message to review it.
3. While reviewing a voicemail message these
options are available:
䡲 Delete to delete the current voicemail
message. The message is moved to the Trash
folder.
䡲 Call to call the person who left the voicemail
message.
䡲 Share to send the message via Bluetooth,
Wi-Fi Direct, Messaging, Gmail, Email, or
Google+.
Page 51

䡲 Reply to reply to the message. You can then
reply to the sender or forward it to anyone with
either an email or phone number. This allows you
to send this voicemail message to several
recipients at the same time. You can tag the reply
message for both Urgency and Privacy.
䡲 Speaker On / Speaker Off to turn the
speakerphone on or off during playback. If the
speakerphone feature is enabled in Voicemail
Settings, the speakerphone will automatically be
enabled during voicemail playback.
Listen to Multiple Voicemail messages
When you are done listening to a voicemail message
you can easily access other voicemail messages
without returning to the main voicemail screen.
1. Press and tap .
2. Listen to the first voicemail message, then swipe
your finger left or right to display the next or
previous message. The message automatically
begins playing.
Visual Voicemail Settings
The Visual Voicemail settings menu lets you access
settings for notifications, pictures, greetings, and more.
1. Press and tap .
2. Touch > Settings. From this menu, you can:
䡲 Touch Manage Subscription to subscribe to
monthly transcriptions. If you are using the free
trial, the number of days remaining on your free
trail are shown.
䡲 Touch Auto forward to email to automatically send
a copy of each voicemail to your email address.
(This option is only available if you subscribe to
the Voicemail-to-Text service.)
䡲 Touch Personalize voicemail to change your
voicemail greeting for incoming calls and update
your password.
䡲 Touch Notifications to determine how you are
notified of new voicemails. Choose from: Select
ringtone and Vibrate.
2B. Making and Answering Calls 36
Page 52

䡲 Touch Delete messages to select the number of
days for the system to wait before deleting your
messages from the Trash folder. Choose from:
Empty trash after 30 days, Empty trash after
10 days, Empty trash immediately, or Never
automatically empty trash.
䡲 Touch Display name to enter a name or number
that is attached to your outgoing voicemails as
part of an identification string.
䡲 Touch Speakerphone to check to turn on,
uncheck to turn off.
䡲 Touch Themes to access options.
䡲 Touch View quick tips tutorial for a visual overview
of five high-level tips.
䡲 Touch Help to access Boost Visual Voicemail
Help.
䡲 Touch Send feedback to compose and send an
email to
voicemail-feedback@smithmicro.com.
䡲 Touch Updates to search for an upgrade to your
Visual message software.
䡲 Touch About Voicemail to view build information
about the current visual voicemail application.
37 2B. Making and Answering Calls
Automatically Enable the Speakerphone
Every time you access a selected message from your
Visual Voicemail list, you can configure the phone to
automatically launch the built-in speakerphone so that
you can clearly hear the message.
1. Press and tap .
2. Touch > Settings > Speakerphone to make
your alterations.
3. Touch to activate the feature.
4. Touch again to deactivate the speakerphone.
Page 53

Change Your Main Greeting via the Voicemail
Menu
Your main greeting can be changed directly via the
Visual Voicemail system. This direct access saves you
from having to navigate within the voicemail menu.
1. Press and tap .
2. Touch > Settings > Personalize voicemail.
3. Touch OK to connect to the voicemail system.
Follow the prompts to change your current
greeting and update password.
Edit the From Name via the Voicemail Menu
From your Visual Voicemail menu, you can quickly
change the name or number attached to your voice
messages.
1. Press and tap .
2. Touch > Settings > Display name.
3. Touch the existing identification field and enter a
new identifying name or number (used to identify
you to recipients of your voice messages).
4. Touch OK to save your information.
Record a Visual Voicemail Message
You can record and share a visual voicemail recording.
1. Press and tap .
2. Touch to access the recording screen and
then touch to begin recording.
3. Touch to end the recording.
4. Touch to preview the recorded message or
touch to record a new one. The new one will
override the most recent iteration of the message.
5. Touch to share the new message. Choose
from Bluetooth share, Wi-Fi Direct, Messaging,
Gmail, or Email.
2B. Making and Answering Calls 38
Page 54

Call Settings
1. Press and tap .
2. Tap > Call Settings.
3. Configure the following call settings:
䡲 Set reject messages: manages both existing
rejection messages and creates new ones.
䡲 Ringtones and keypad tones: allows you to choose
tones and/or vibration to play for incoming calls
and keypad taps.
䡲 Call alert: allows you to choose how your phone
alerts you to call status and alerts that occur
during a call.
䡲 Answering/ending calls: allows you to choose
whether to allow answering calls by pressing the
Home key, or ending calls by pressing the power
key.
䡲 Turn off screen during calls: allows you to choose
whether the screen automatically turns off during
calls, to prevent unintentional entries. When
turned On, the phone will use the proximity
sensor on the front of the phone to detect when
the phone is moved or brought close to another
39 2B. Making and Answering Calls
surface, such as when you move the phone to
your ear.
䡲 Call accessories: allows you to set options for using
optional accessories (not included) with calls.
䡲 Increase volume in pocket:
allows you to have the
phone increase ringtone volume when the
proximity sensor detects the phone is in a pocket or
other close-fitting location, such as a purse or bag.
䡲 US dialing: replaces + with International dialing
code.
䡲 International dialing: allows you to set then
international dialing code.
䡲 TTY mode: allows you to TTY on or off.
䡲 DTMF tones: allows you to set the length of Dual-
tone Multi-frequency tones, which play when you
use the keypad during a call, such as when
navigating automated menus.
䡲 DDTM: sends voice calls to voicemail during an
active data connection.
䡲 Voicemail settings: allows you to set options for
your voicemail.
䡲 Voice privacy: allows you to activate an enhanced
privacy mode.
Page 55

Voicemail Settings
Configure your voicemail settings so you can listen to
and manage your voicemail.
1. Press and tap .
2. Ta p > Call Settings > Voicemail settings.
3. The following are the voicemail settings:
䡲 Manage subscription: Manage subscription
services for transcribing new messages to text.
䡲 Auto forward to email: Send a copy of new
messages to an email address of your choice.
䡲 Personalize voicemail: Change your voicemail
greeting for incoming calls and update password.
䡲 Notifications: Set your notification sound and
vibrate settings
䡲 Delete messages: Permanently delete fom the
Trash folder after 30 days.
䡲 Display name: Allows you to enter the name of the
person calling.
䡲 Speakerphone
䡲 Themes
䡲 View quick tips tutorial
䡲 Help
䡲 Send feedback
䡲 Updates
䡲 About Voicemail
Activating Plus Code Dialing
Plus Code dialing configures the phone to
automatically dial the international access code for
your location when you touch and hold .
1. Press and tap .
2. Ta p > Call settings.
3. Ta p US dialing to activate the international dialing
code feature. A green checkmark indicates
activation.
Important: This feature does not work for 1+ dialing.
2B. Making and Answering Calls 40
Page 56

Changing the International Dialing Code
By default, the international dialing prefix (code) is set
to 011. This code can not be changed until the feature
is temporarily disabled. Once disabled, the field
becomes accessible and can be altered.
1. Press and tap .
2. Tap > Call Settings.
3. Tap US dialing to deactivate it. This enables the
International dialing field.
4. Tap International dialing then press to erase
the previous number.
5. Enter a new number, then tap OK.
6. Tap US dialing to reactivate it. This disables the
International dialing field.
41 2B. Making and Answering Calls
TTY Use
A TTY (also known as a TDD or Text Telephone) is a
telecommunications device that allows people who are
deaf, hard of hearing, or who have speech or language
disabilities, to communicate by telephone.
Your device is compatible with select TTY devices.
Please check with the manufacturer of your TTY device
to ensure that it is compatible with digital cell phones.
Your device and TTY device will connect via a special
cable that plugs into your phone’s headset jack.
Contact your TTY device manufacturer to purchase the
connector cable if one was not provided with the
device.
1. Press and tap .
2. Tap > Call Settings.
3. Tap TTY mode then tap TTY Off, TTY Full, TTY HCO,
or
TTY VCO.
Page 57

WARNING: 911 Emergency Calling
Boost Mobile recommends that TTY users make
emergency calls by other means, including
Telecommunications Relay Services (TRS),
analog cellular, and landline communications.
Wireless TTY calls to 911 may be corrupted
when received by public safety answering points
(PSAPs), rendering some communications
unintelligible. The problem encountered appears
related to software used by PSAPs. This matter
has been brought to the attention of the FCC,
and the wireless industry and the PSAP
community are currently working to resolve this.
2B. Making and Answering Calls 42
Page 58

⽧ Accessing Settings (page 43)
2C. Settings
⽧ Wireless and Network Settings (page 44)
⽧ Device Settings (page 52)
⽧ Personal Settings (page 62)
⽧ Accounts Settings (page 75)
⽧ System Settings (page 76)
43 2C. Settings
Accessing Settings
To a ccess Set t i ngs:
䊳 Press and tap > Settings.
– or –
Press and tap
> Settings.
Page 59

Wireless and Network Settings
Wi-Fi
Turning Wi-Fi On or Off
1. Press and tap > Settings.
2. Ta p the Wi-Fi OFF/ON slider to turn Wi-Fi
On or Off.
Wi-Fi Direct
Wi-Fi Direct allows device-to-device connections so
you can transfer data over a Wi-Fi connection.
1. Press and tap > Settings > Wi-Fi.
2. Ta p the Wi-Fi OFF/ON slider to turn on
Wi-Fi.
3. Tap Wi-Fi Direct.
For more information about Wi-Fi Direct, see
“About Wi-Fi Direct” on page 147.
Advanced Wi-Fi Settings
Set up and manage wireless access points.
1. Press and tap > Settings > Wi-Fi , then tap
> Advanced.
2. Select one of the following:
䡲 Network Notification: alerts you when a new WAP
is available.
䡲 Keep Wi-Fi on during sleep: allows you to specify
when to disconnect from Wi-Fi. Options are:
Always, Only when plugged in, or Never
(increases data usage).
䡲 Check for Internet service: allows you to have the
phone check if Internet service is available when
connected to a Wi-Fi network.
䡲 Wi-Fi timer: allows you to enable or disable
automatic connections or disconnections from
Wi-Fi networks. When enabled, touch Wi-Fi timer
to set a starting and/or ending time.
䡲 MAC address: view your phone’s MAC address,
required when connecting to some secured
networks (not configurable).
䡲 IP address: view your phone’s IP address.
2C. Settings 44
Page 60

4G Settings
Configure options for connecting to the Sprint 4G
WiMAX network.
Note: The availability and range of the Sprint 4G WiMAX
network depends on a number of factors, including if
you're within a 4G WiMAX coverage area, the distance
to the Sprint 4G WiMAX base station and infrastructure,
and other objects through which the signal passes.
Turning 4G On or Off
1. Press and tap > Settings.
2. Tap the 4G settings OFF/ON slider to turn
access to the Sprint 4G WiMAX network On or Off.
45 2C. Settings
Configuring 4G Settings
1. Press and tap > Settings.
2. Tap the 4G settings OFF/ON slider to turn
access to the Sprint 4G WiMAX network On. 4G
must be turned on to configure settings.
3. Choose settings:
䡲 Network notification: When enabled, your phone
notifies you when an open 4G WiMAX network is
available.
䡲 4G Networks: View information about available 4G
networks. Tap a network for more information.
䡲 Scan now: Tap to search for available 4G
networks.
Page 61

Bluetooth
Bluetooth is a short-range communications technology
that allows you to connect wirelessly to other Bluetooth
devices, such as headsets and hands-free car kits, and
Bluetooth-enabled computers, printers, and wireless
devices. The Bluetooth communication range is
approximately 30 feet.
For more information, using Bluetooth see “Bluetooth
Settings” on page 126.
Turning Bluetooth On and Off
By default, Bluetooth is set to Off. Turning Bluetooth on
activates the Bluetooth antenna, so you can search and
pair with other Bluetooth devices.
Note: Activating Bluetooth can drain your battery faster and
reduce your available usage times. It is recommended
that if you do not need it active, turn it off.
It is also recommended to turn off your Bluetooth within
locations that prohibit its use.
1. Press and tap > Settings > Bluetooth.
2. Tap the Bluetooth OFF/ON slider to turn
Bluetooth On or Off.
Bluetooth Settings
Pair with other Bluetooth devices, manage your
Bluetooth connections, and control your device’s
visibility to other devices.
Note: Bluetooth must be turned on to access Bluetooth
settings.
1. Press and tap > Settings > Bluetooth.
2. Tap the Bluetooth OFF/ON slider to turn
Bluetooth On.
3. Ta p Bluetooth to configure settings:
䡲 Touch your device’s name to control its visibility to
other devices’ Bluetooth searches. Available when
Bluetooth is turned On.
䡲 Touch a paired device to connect to it, or touch
beside the device to change its settings.
䡲 Touch Scan to search for visible Bluetooth
devices. After searching, touch a device to pair
with it. For more information, see “Pairing with a
Bluetooth Device” on page 113.
2C. Settings 46
Page 62

Change My Device Name
The device name identifies your phone to other
Bluetooth devices.
1. Press and tap > Settings > Bluetooth.
2. If Bluetooth is not on, tap the Bluetooth OFF/ON
slider to turn it on.
3. Tap > Rename device.
4. Enter the name for your phone in the dialog box,
then tap
47 2C. Settings
OK.
Control your Phone’s Visibility
When your phone is visible, other Bluetooth devices
can find it during a scan.
1. Press and tap > Settings > Bluetooth.
2. If Bluetooth is not on, tap the Bluetooth OFF/ON
slider to turn it on.
3. Tap > Visibility timeout.
4. Choose a period of time to make your phone
visible to Bluetooth scans.
Page 63

Data Usage
Use this feature to turn Mobile data capability On or Off,
view Mobile data usage, and set a mobile data limit.
1. Press and tap > Settings > Data usage.
2. Configure options:
䡲 Ta p Mobile data to enable access to the mobile
data network.
䡲 Ta p Limit mobile data usage to automatically
disable the mobile data connection when it
reaches the configured limit. Drag the red
horizontal line on the graph to adjust the mobile
data limit.
䡲 Ta p Alert me about data usage to have your phone
warn you when mobile data usage reaches the
warning limit you set. Drag the orange horizontal
line on the graph to to set the Warning limit.
䡲 Touch and drag the gray vertical lines to adjust
the time frame for data usage statistics.
䡲 Tap the Data usage cycle menu and select a date,
to choose a period to display data usage, as well
as a list of applications and how many Megabytes
each application used.
WARNING: Data usage displayed/measured by your phone
may differ from your carrier's measured data
usage and is not guaranteed as the actual usage
measured by your carrier. Please check with your
carrier for actual data usage.
2C. Settings 48
Page 64

More settings
Use these settings to configure additional wireless and
network information such as Airplane mode,
Kies via Wi-Fi, VPN, and Mobile networks.
Airplane Mode
When airplane mode is enabled, all your device’s
wireless connections are disabled, and you cannot
make or receive calls or messages or connect to
networks. While in airplane mode, you can use other
features of your device, such as playing music,
watching videos, or other applications.
䊳 Press and tap > Settings > More settings
> Airplane mode.
– or –
Press and hold the Power button until the Device
options menu displays, then tap
49 2C. Settings
Airplane mode.
Mobile Networks
Set options for network selection and data service.
Your phone uses mobile data networks for apps that
use data, such as Google Maps, Internet, or Email.
Mobile data
1. Press and tap > Settings > More settings
> Mobile networks.
2. Tap Mobile data to activate this feature.
Connections optimizer
Connections optimizer helps you manage and
enhance your data experience by finding and
connecting to remembered Wi-Fi networks on your
device, and if applicable, the Sprint 4G WiMAX
network.
1. Press and tap > Settings > More settings
> Mobile networks.
2. Tap Connections optimizer to activate this feature.
Page 65

Virtual Private Network (VPN) Settings
Using this menu you can set up and manage Virtual
Private Networks (VPNs).
Important: Before you can use a VPN you must establish
Important: You will need to set a screen unlock pattern, PIN
1. Press and tap > Settings > More settings
2. Ta p Add VPN network.
3. Enter a name for this VPN network, select a VPN
and configure one.
or password before you can use credential
storage. See “Lock screen” on page 63 for
instructions.
> VPN.
type, enter the configuration information for this
connection type, then tap
Save.
Connecting to a VPN
1. Press and tap > Settings > More settings
> VPN.
2. Tap the VPN in which to connect.
3. Enter the requested information at the prompt.
4. Ta p Connect.
Deleting a VPN
1. Press and tap > Settings > More settings
> VPN.
2. Touch and hold the VPN to delete.
3. Ta p Delete network at the prompt.
2C. Settings 50
Page 66

Nearby devices
Share files with nearby devices using DLNA (Digital
Living Network Alliance) standards, over Wi-Fi.
To share with nearby devices, you must connect to a
Wi-Fi network. The devices you wish to share files with
must also be connected to the same Wi-Fi network and
must support DLNA.
Important: Use care when enabling file sharing for nearby
Turning File sharing On or Off
1. Press and tap > Settings > More settings
2. Tap the File sharing check box to turn sharing On
51 2 C. Settings
devices. When enabled, other devices can
access data on your device.
> Nearby devices.
or Off.
Configuring sharing options
1. Press and tap > Settings > More settings
> Nearby devices.
2. Touch the File sharing check box to turn sharing
On.
3. Under Advanced, touch options to control how
content is shared from your device:
䡲 Shared contents: allows you to choose the type of
content to share, from Videos, Photos, or Music.
䡲 Device name: allows you to view or modify your
device’s name.
䡲 Allowed devices list: allows you to view and
manage devices allowed to connect to your
device.
䡲 Not-allowed devices list: view and manage
devices restricted from connecting to your device.
䡲 Download to: allows you to choose a location to
save downloaded content, from USB storage
(phone memory) or SD card.
䡲 Upload from other devices: allows you to choose
how to handle incoming files from other devices,
from Always accept, Always ask, or Always reject.
Page 67

Kies Via Wi-Fi
Samsung Kies via Wi-Fi is software that enables you to
update your phone firmware, synchronize files, and
transfer data to and from your phone directly by
connecting to your PC, Mac OS®, or Linux® OS.
Note: If you use Windows XP, ensure that you have Windows
XP Service Pack 3 or higher, and Samsung Kies 2.0 or
Windows Media Player 10 or higher installed on your
computer.
Access Kies via Wi-Fi
1. Press and tap > Settings > More settings
> Kies via Wi-Fi.
2. Read the information about using unsecured Wi-Fi
networks, then tap
3. From your phone, connect to the same Wi-Fi
network that your PC is connected to if you have
not already done so.
OK.
Device Settings
Home screen mode
Your phone offers two Home screen modes:
䢇 Basic mode provides a conventional layout for apps
and widgets on the Home screen.
䢇 Easy mode provides an easier experience for the
first-time smartphone user.
1. Press and tap > Settings > Home screen
mode.
2. Choose a mode from the pulldown menu and tap
Apply.
2C. Settings 52
Page 68

Blocking mode
When Blocking mode is turned On, notifications for
selected features are disabled, and you will only
receive notifications of incoming calls from numbers on
your allowed list.
1. Press and tap > Settings > Blocking
mode.
2. Tap the Blocking mode OFF/ON slider to
turn on blocking mode.
3. Choose features to disable during blocking mode:
䡲 Disable incoming calls
䡲 Disable notifications
䡲 Disable alarm and timer
䡲 Disable LED indicator
53 2C. Settings
4. Set a time for blocking mode:
䡲 Choose Always to disable all the blocking mode
features.
䡲 Set a time period for blocking mode by entering
From and To times.
5. Tap Allowed contacts to choose to allow
notifications for calls and messages from
contacts, Favorites, or tap Custom to choose
All
specific contacts. To block calls from all callers, tap
None. After choosing allowed contacts, you can tap
Allowed contact list to manage the list.
Page 69

Sound
Vol ume
Set the system volume level, and set default volume for
call ringtones, notifications, and media playback.
1. Press and tap > Settings > Sound >
Volu me.
2. Touch and drag the sliders for:
䡲 Music, video, games, and other media: to set the
default volume level for audio playback. You can
also adjust volume inside the apps.
䡲 Ringtone: to set the volume for incoming calls.
䡲 Notifications: to set the volume for notifications,
such as new messages and event reminders.
䡲 System: to set the volume for all other system
sounds, such as keytones played for screen
touches. You can control whether tones play for
screen touches with other sound settings.
3. Touch OK to save your settings.
Vibration intensity
Set the level for vibration to accompany ringtones and
notifications.
1. Press and tap > Settings > Sound >
Vibration intensity.
2. Touch and drag the sliders for:
䡲 Incoming call: to set the vibration level for
incoming call ringtones.
䡲 Notification: to set the vibration level for
notifications, such as new messages and event
reminders.
䡲 Haptic feedback: to set the vibration level
vibrations to accompany screen touches.
3. Touch
OK to save your settings.
2C. Settings 54
Page 70

Ringtone and notifications
1. Press and tap > Settings > Sound.
2. Tap options, then choose ringtones:
䡲 Device ringtone: to set the default ringtone for
incoming calls. Or tap
Choose music track or Music Player, then choose
Always or Just once for the selection.
䡲 Device vibration: to set the default vibration pattern
for incoming calls. Or tap
own custom device vibration ringtone.
䡲 Default notifications: to set the default ringtone for
notifications.
䡲 Vibrate when ringing: to turn vibration On or Off for
notifications.
3. Touch
OK to save your settings.
55 2C. Settings
Add and select from
Create and create your
System
1. Press and tap > Settings > Sound.
2. Tap options to turn the option On or Off:
䡲 Key tones: to play tones for keypad touches.
䡲 Touch sounds: to play sound when touching the
screen for selections.
䡲 Screen lock sound: to play sounds when locking
and unlocking the screen.
䡲 Haptic feedback: to vibrate when softkeys are
pressed, and on certain screen touches.
Page 71

Display Settings
Wallpaper
You can customize the image displayed on the Home
screen and Lock screen, or you can place the same
image on both the Home and lock screens.
1. Press and tap > Settings > Display >
Wallpaper.
2. Ta p Home screen, Lock screen, or Home and lock
screens.
3. Select a source for wallpaper, from Gallery, ID
Wallpapers (Home screen only), Live wallpapers
(Home screen only), or Wallpapers.
4. Follow the prompts to set the picture or wallpaper.
LED Indicator
The LED indicator on the front of the phone displays
when the phone is locked, to notify you of status
changes and events. Use LED indicator settings to
configure how the LED functions.
1. Press and tap > Settings > Display > LED
Indicator.
2. Tap options to turn the indicator On or Off. Choose:
䡲 Charging: When enabled, the LED glows red
when the phone is connected to a charger and
charging, and blinks red when the phone is
connected to a charger and there is a problem
with charging. When enabled, the LED glows
green when the phone is connected to a charger
and the battery is fully charged.
䡲 Low battery: When enabled, the LED blinks red
when battery power is low and the phone is not
connected to charger.
䡲 Notifications: When enabled, the LED blinks blue
for missed call, messages or other notifications.
䡲 Voice recording: When enabled, the LED glows
blue when recording while the screen is off.
2C. Settings 56
Page 72

Screen mode
Choose a screen mode to match the type of content
displayed.
1. Press and tap > Settings > Display >
Screen mode.
2. Tap a selection from Dynamic, Standard, Natural, or
Movie.
Brightness
Adjust the screen’s brightness to suit your
surroundings.
1. Press and tap > Settings > Display >
Brightness.
2. Tap Automatic brightness to allow the phone to
automatically adjust the brightness levels.
– or –
Touch and drag the
decrease brightness) or right to (increase
brightness), then tap
57 2C. Settings
Brightness slider left (to
OK.
Auto-rotate screen
By default, most screens change orientation
automatically if you rotate the phone. You can choose
to have the screen not change orientation on rotation.
1. Press and tap > Settings > Display.
2. Tap Auto-rotate screen. A checkmark indicates
activation.
Screen timeout
Choose how long the display screen remains lit after
you press a key.
1. Press and tap > Settings > Display.
2. Tap Screen timeout, then tap a time setting
(
15 seconds through 10 minutes).
Note: Long screen timeout settings reduce the battery’s talk
and standby times.
Page 73

Font style
Choose the font style used on the phone’s screen.
1. Press and tap > Settings > Display.
2. Ta p Font style, and then select a font style from the
list, or tap
Get fonts online to download fonts.
Font size
Choose the font size used on the phone’s screen.
1. Press and tap > Settings > Display.
2. Ta p Font size, and then select a font size from the
list.
Touch Key Light Duration
This feature allows you to set the delay time before the
lighted touch keys (the Menu, Home, Back, and Search
keys located at the bottom of the screen) automatically
turn off.
1. Press and tap > Settings > Display.
2. Ta p Touch key light duration and touch a duration.
Choose
1.5 seconds, 6 seconds, Always off, or
Always on.
Display Battery Percentage
Use these settings to configure additional Display
settings.
1. Press and tap > Settings > Display.
2. Ta p Display battery percentage to display the
percentage of available battery power on the
screen.
Auto adjust screen tone
When enabled, your phone automatically analyzes the
screen and adjusts the brightness to conserve battery
power.
1. Press and tap > Settings > Display.
2. Ta p Auto adjust screen tone to enable or disable the
setting.
2C. Settings 58
Page 74

Storage Settings
View the memory allocation for the device memory, or
USB storage, or optional installed memory card (not
included).
䊳 Press and tap > Settings > Storage.
Device memory and SD card memory details
display.
Mounting and unmounting a memory card
1. Press and tap > Settings > Storage.
2. Tap Mount SD card to mount the card so you can
use it to store data.
3. Tap Unmount SD card to unmount the card so you
can safely remove it from the phone, then tap
Note: Optional microSD cards not included. Must be
purchased separately.
59 2C. Settings
Formatting a memory card
1. Press and tap > Settings > Storage.
2. Tap Format SD card to format the card. This deletes
all the data on the SD including music, videos, and
photos.
3. Tap Format SD card again. Tap Delete all to
continue.
OK.
Page 75

Power Saving Mode
Use Power Saving Mode to manage your phone in
order to save power.
1. Press and tap > Settings > Power saving
mode.
2. Ta p the Power saving mode OFF/ON slider
to activate the feature.
3. Tap Power saving mode to choose options:
䡲 CPU power saving: to limit the maximum
performance of the CPU (Central Processing
Unit).
䡲 Screen power saving: to use low power for the
screen.
䡲 Background color: to allow the phone to change
the background color when using the Internet
app.
䡲 Turn off haptic feedback: to extend battery life by
not vibrating for notifications and screen touches.
䡲 Learn about power saving mode: to view
information about practices that can conserve
battery power.
Battery
View the amount of battery power used for phone
activities from this menu.
1. Press and tap > Settings > Battery.
2. Ta p Screen, Android System, or one of the listed
items to view the battery usage for that item.
2C. Settings 60
Page 76

Application Manager
You can download and install applications from the
Play Store or other sources, or create applications
using the Android SDK and install them on your phone.
Use Applications manager to view memory or
resources, as well as view memory and resources used
for applications and processes. You can also clear the
data, cache, or defaults.
1. Press and tap > Settings > Application
manager.
2. Tap the Downloaded, On SD card, Running, or All
tab to display applications. The graph at the
bottom of the screen displays resource usage for
the apps on the tab.
3. Tap an application to view information including
memory usage, default settings, and permissions.
While viewing an app, you can use other options:
䡲 Tap an application to clear the cache or data then
tap
Force stop, Clear data, or Clear cache.
䡲 Press MENU > Sort by size or Sort by name to
switch the order of the lists displayed.
61 2C. Settings
Uninstalling Downloaded Applications
You can uninstall apps you downloaded and installed.
Pre-loaded apps cannot be uninstalled.
1. Press and tap > Settings > Application
manager.
2. Tap the Downloaded tab and select the application
to uninstall.
3. Tap Uninstall.
4. Tap OK at the prompt to uninstall the application.
Page 77

Running Services
From this menu you can view and control services
running on the phone.
1. Press and tap > Settings > Application
manager.
2. Ta p the Running tab. All the running applications
display.
3. Tap Show cached processes to display all the
cached processes running.
4. Tap Show services in use to switch back.
5. Tap one of the applications to view application
information.
6. Tap one of the following options:
䡲 Stop: Stops the application from running on the
phone. This is usually done prior to uninstalling
an application.
WARNING: Stopping services may have undesirable
䡲 Report: Report failure and other application
consequences for the application or Android
system. You cannot stop all services.
information.
Personal Settings
Location Services
Use Location Services to configure how the phone
determines your location.
Use Wireless Networks
Before using applications such as Google Maps to find
your location or search for places of interest, you must
enable the Use wireless networks option or enable the
GPS satellites.
1. Press and tap > Settings > Location
Services.
2. Ta p Use wireless networks to enable location
information using the wireless network.
2C. Settings 62
Page 78

Use GPS satellites
This option allows you to locate locations accurately to
street level. To conserve power, deselect this option
when not in use.
1. Press and tap > Settings > Location
Services.
2. Tap Use GPS satellites to enable the GPS satellite.
Location and Google search
This option allows Google to use your location data for
improved search results and other services.
1. Press and tap > Settings > Location
Services.
2. Tap Location and Google search to activate the
feature.
63 2C. Settings
Lock screen
Screen Lock
Choose settings for unlocking your screen.
1. Press and tap > Settings > Lock screen >
Screen lock.
2. Select a screen lock option:
䡲 Swipe: to unlock the screen by swiping your
finger across the screen. This is the default screen
lock, and offers no security.
䡲 Motion: to unlock the screen by touching and
holding on the screen and tilting the phone
forward. Touch the option for more information
and a demonstration of the motion. This screen
lock offers no security, but you can set special
lock screen options; see “Lock screen options” on
page 64.
䡲 Face unlock: allows you to unlock the screen by
looking at it. This option offers low security,
because someone who looks similar to you could
unlock your phone. Touch the option for more
information, and to set up Face unlock.
Page 79

䡲 Pattern: allows you to unlock the screen by
drawing a pattern, which you create, on the
screen. Touch the option; then follow the prompts
to create or change your screen unlock pattern.
䡲 PIN: allows you to unlock the screen by entering a
numeric PIN (Personal Identification Number),
which you create.
䡲 Password: allows you to unlock the screen by
entering a password, which you create.
䡲 None: disables all custom screen lock settings, to
use the default Swipe screen lock.
Lock screen options
When the Screen lock is set to Swipe or Motion, or you
have the With swipe lock option enabled, set options
for unlocking the screen.
1. Press and tap > Settings > Lock screen >
Lock screen options.
2. Choose from these options:
䡲 Shortcuts: to display app shortcuts at the bottom
of the lock screen. Tap the OFF/ON slider
to choose shortcuts to display: touch and drag a
shortcut to a new position, or to the trash can to
remove it, and touch + to select a new shortcut.
䡲 Information ticker: to display a scrolling ticker on
the lock screen. Tap the OFF/ON slider
turn the option ON, then touch
to choose content to display.
䡲 Clock: to display a clock on the lock screen.
turn the option on, then touch
Information ticker
2C. Settings 64
Shortcuts
Page 80

䡲 Dual clock: to display the time in two zones on the
lock screen. Touch to control display of a dual
clock to show the time in two zones when you¡¯re
traveling. Tap the OFF/ON slider turn the
option ON, then touch
Dual clock to set a home
city. When you have location services turned on
while traveling, the dual clock will display the time
in your home city and current location.
䡲 Wea ther: to display of current local weather
conditions on the lock screen. Tap the OFF/ON
slider turn the option ON, then touch
Weather to configure options.
䡲 Help text: to display tips on the lock screen.
䡲 Camera quick access: to allow quick access to the
camera from the lock screen by touching and
holding on the lock screen, then rotating the
device to landscape orientation. Tap the OFF/ON
slider turn the option ON, then touch
Camera quick access to learn about this gesture.
Note: Lock screen options vary depending on Screen lock
you selected.
65 2C. Settings
Owner Information
This option displays owner information on the lock
screen. You can also enter text to the display screen.
1. Press and tap > Settings > Lock screen >
Owner information.
2. Enter the text to display on the screen in the Owner
information field.
3. Tap the Show owner info on lock screen checkbox if
you want to display the Owner information.
4. Tap OK.
Page 81

Security Settings
Configure security for your phone.
Encryption
To require a numeric PIN or password in order to
decrypt your phone each time it is turned on or encrypt
the data on the SD card each time it is connected:
1. Press and tap > Settings > Security >
Encrypt device. Read the screen for more
information about encryption.
2. Ta p Encrypt device.
3. Tap Encrypt external SD card to enable encryption
for SD card data that requires a password when
the memory card is connected.
Important: The battery should be more than 80 percent
charged because encryption could take an hour
or more to complete.
Make passwords visible
When enabled, password characters display briefly as
you enter them.
1. Press and tap > Settings > Security >
Passwords.
2. Ta p Make passwords visible to enable or disable
the display of password characters.
2C. Settings 66
Page 82

Device Administration
Use Device administration settings to control device
administrators and installation of apps from unknown
sources.
Select one or more device administration options to
control your device for security purposes (for example,
if your phone is lost or stolen). These applications
enforce remote or local device security policies.
Some features a device administrator might control are:
䡲 Setting the number of failed password attempts
before the device is restored to factory settings.
䡲 Automatically locking the device.
䡲 Restoring factory settings.
Note: If you have multiple device administrators enabled, the
strictest policy is enforced.
67 2C. Settings
1. Press and tap > Settings > Security.
2. Configure options:
䡲 Device administrators: allows you to select device
administrators. Select a device administrator and
follow the prompts. Available device
administrators depend on the applications
installed, or accounts set up on the phone.
䡲 Unknown sources: allows you to choose whether
to allow installation of apps from sources other
than the Play Store.
WARNING: Enabling this option makes your phone and
personal data more vulnerable to applications
from unknown sources.
Page 83

Credential Storage
View and manage usage of trusted credentials, and
install certificates from device storage, or clear
credentials.
If a certificate authority (CA) certificate is compromised
or for some other reason becomes unstable, you can
disable or remove it.
1. Press and tap > Settings > Security
2. Configure options:
䡲 Trusted credentials: allows you to view and
manage usage of trusted credentials. Tap the
System tab to display certificates pre-installed on
your device. Tap the User tab to view certificates
installed by you. Tap a CA certificate to examine
its details, or tap the checkbox to enable or
disable the certificate.
Caution!: When you disable a system CA certificate, it is still
available to enable again, if necessary. When you
remove a user-installed CA certificate, it is
permanently deleted and must be re-installed if
needed.
䡲 Install from device storage: allows you to install
encrypted certificates from an installed memory
card. Select a certificate and follow the prompts to
install.
Note: The phone must have an installed memory card
containing encrypted certificates to use this feature.
䡲 Clear credentials: allows you to delete all installed
certificates.
2C. Settings 68
Page 84

Language and Input Settings
Configure the language for your phone’s operation,
and set options for entering text.
Language
Change the language used by your device by following
these steps:
1. Press and tap > Settings > Language and
input > Language.
2. Select a language from the list.
Default Input Method
Change the keyboard used by your device by following
these steps:
1. Press and tap > Settings > Language and
input > Default.
2. Choose the default input method.
3. Tap Set up input methods to configure text entry
options.
69 2C. Settings
Google Voice Typing
Use Google voice typing to enter text by speaking it.
Note: You must enable Google voice typing before
managing its settings.
1. Press and tap > Settings > Language and
input.
2. Tap the icon next to Google voice typing to
access the following options:
䡲 Choose input languages: allows you to select
language(s) for input. Select Automatic to use the
same language set as the default language for
your device, or select language(s) from the list.
䡲 Block offensive words: blocks recognized
offensive words.
䡲 Download offline speech recognition: allows you to
use voice input when not connected to the
network.
Page 85

Samsung keyboard
The Samsung keyboard is an onscreen Qwerty
keyboard.
1. Press and tap > Settings > Language and
input.
2. Tap the icon next to Samsung keyboard to
access the options. See “Entering Text Using the
Samsung Keyboard” on page 23 for list of options.
Swype
Swype is a text input method that allows you to enter a
word by sliding your finger from letter to letter, lifting
your finger between words.
1. Press and tap > Settings > Language and
input.
2. Tap the icon next to Swype to access these
options:
䡲 How to Swype: to view an on-screen manual for
Swype.
䡲 Gestures: to view a list of shortcuts on the
keyboard to quickly accomplish common tasks.
䡲 Preferences: to alter these settings:
● Vibrate on keypress: vibrates as you enter text
using the keypad.
● Sound on keypress: turns on sounds
generated by the Swype application.
● Show helpful tips: turns on a flashing
indicator for quick help.
● Auto-spacing: automatically inserts a space
between words. When you finish entering a
word, lift your finger and start the next word.
● Auto-capitalization: automatically capitalizes
the first letter of a sentence.
● Show complete trace: determines whether or
not to display the complete Swype path.
● Pop-up on keypress: displays a character
above an on-screen key while typing.
● Next word prediction: predicts the next word
in the text string based on your current text
entries.
● Reset Swype’s dictionary: deletes any words
added to Swype’s dictionary.
2C. Settings 70
Page 86

● Versi on: displays the software version
information.
䡲 Language Options: To activate and select the
current text input language. Default language is
US English.
● Language: English is the only option.
● Living language: automatically updates
Swype with popular new words.
● Download languages: displays a selectable
list of other languages to download.
䡲 Swype Connect: Enable personalization from
your accounts, and choose whether to contribute
your usage data to improve predictions.
● Contribute usage data: allows Nuance to
collect usage data to provide better
predictions.
● Cellular data: enables cellular data to allow
Swype updates, language downloads and
other Swype Connect features over your
cellular data connection.
䡲 Personalization: Sync dictionary with social
media accounts.
71 2C. Settings
● Edit dictionary: to add words to a custom
dictionary.
● Facebook: to add contact names from your
Facebook account to your personal dictionary.
● Twitter: to add user names and new words
from your public twitter feeds to your personal
dictionary.
● Gmail: to add names you have sent email to
from your Gmail account to your personal
dictionary.
䡲 Updates: To update the application if new
software is available.
Voice recognizer
Built-in voice recognizer software that allows you to
hear your voice and transcript it directly into text .
1. Press and tap > Settings > Language and
input.
2. Tap Voice recognizer and tap the voice recognition
format you want. Choose from
powered by Vlingo.
Google or Samsung
Page 87

Voice Search
Voice Search allows you to speak criteria for searching
the Web.
1. Press and tap > Settings > Language and
input > Voice search.
2. Select one of the following options:
䡲 Language: sets the language used for voice input
and output.
䡲 Speech output: allows you to choose whether
speech output is used all the time, or only when
using an optional hands-free accessory.
䡲 Block offensive words: blocks recognized
offensive words.
䡲 Hotword detection
䡲 Download offline speech recognition: to enable
speech recognition via locally stored files so that
even if you are not connected to a network you
can still use the service.
䡲 Personalized recognition: improves speech
recognition and accuracy by allowing Google to
associate your recordings with your Google
Account.
䡲 Google Account dashboard: manages collected
data using your Google account.
Text-to-Speech Output
The Text-to-speech output feature allows the phone to
provide a verbal readout of onscreen data such as
messages and incoming caller information (based on
Caller ID).
1. Press and tap > Settings > Language and
input > Text-to-speech output.
2. Select from the following options:
Preferred TTS engine
䡲 Google text-to-speech Engine: allows you to use
and modify Google Text-to-speech settings. Tap
the icon next to Google text-to-speech for
additional settings.
䡲 Samsung TTS: configures the Samsung TTS
settings for various languages.
2C. Settings 72
Page 88

General
䡲 Speech rate: Adjusts the rate at which onscreen
text is spoken by the phone. Choose from:
slow, Slow, Normal, Fast, and Very fast.
䡲 Listen to an example: Plays a short example of
what the text-to-speech feature sounds like on the
phone when activated.
䡲 Driving mode: Tap the Driving mode OFF/ON slider
to turn the Driving mode On or Off.
When turned on the following options are
available for hands free driving:
● Incoming call
● Message
● New emails
● New voicemail
● Alarm
● Schedule
● Unlock screen
73 2C. Settings
Very
Pointer Speed
This feature allows you to adjust the speed of the
Mouse/trackpad.
1. Press and tap > Settings > Language and
Input > Pointer speed.
2. Use the slider to adjust the Pointer speed and tap
OK.
Page 89

Backup and Reset Settings
Choose options for backing up data from your phone
to Google servers, or reset your phone to the original
factory settings, which erases all data from the phone’s
memory.
Backup and Restore
1. Press and tap > Settings > Backup and
reset.
2. Configure options:
䡲 Ta p Back up my data to create a backup of the
current phone settings and applications on the
Google servers.
䡲 When Back up my data is enabled, tap Backup
account to assign the Google account to use for
back ups.
䡲 When Back up my data is enabled, tap Automatic
restore to restore backed-up settings and data
automatically when you re-install an application.
Factory Data Reset
From this menu reset the phone and sound settings to
the factory default settings.
1. Press and tap > Settings > Backup and
reset > Factory data reset.
2. Read the onscreen reset information then tap
Reset device.
3. If necessary, enter your password and tap Delete
all. The phone resets to the factor default settings.
2C. Settings 74
Page 90

Accounts Settings
Set up, manage, and synchronize accounts, including
your Google, Email, and social networking accounts.
Adding an Account
1. Press and tap > Settings.
2. Tap Add account, then tap an account type.
3. Follow the prompts and enter your credentials to
set up the account.
Removing an Account
1. Press and tap > Settings.
2. Tap an account to remove then tap Remove
account.
75 2C. Setting s
Synchronization Settings
Once an account is added you can synchronize
features such as the calendar, contacts, Gmail, and
more.
1. Press and tap > Settings.
2. Tap an account to configure synchronization.
3. Tap each category that you want to synchronize.
Available options depend on the type of account.
Page 91

System Settings
Configure options for motion gestures, accessories,
accessibility, and other system features.
Motion Settings
Your phone recognizes motion, to allow you to
navigate and access features by moving the phone in
specific gestures. You can configure motion options.
1. Press and tap > Settings > Motion.
2. Ta p the Motion OFF/ON slider to turn on
Motion settings.
䡲 Direct call: When enabled, you can lift the phone
to your ear while viewing a contact to dial the
contact’s phone number.
䡲 Double tap to top: When enabled, a double tap on
the top of the phone takes you to the top of the
list.
䡲 Tilt to zoom: When enabled, tilting the phone while
in Gallery or Internet causes the screen to zoom
in or out.
䡲 Pan to move icon: When enabled, moving the
phone in a panning motion (side-to-side) moves
a highlighted icon to a new location on the Home
screen.
䡲 Pan to browse images: When On, moving the
phone in a panning motion while viewing an
image moves focus around in the image.
䡲 Shake to update: When On, shaking the phone
starts a new scan for available devices.
䡲 Turn over to mute/pause: When On, turning the
phone screen-down automatically mutes
incoming call ringtones and alert sounds.
䡲 Sensitivity settings: Configure settings to control
how sensitive your device is to movements and
gestures.
䡲 Learn about motions: Get help with understanding
motion gestures.
2C. Settings 76
Page 92

Accessory Settings
Configure your phone’s behavior when it is connected
to an optional dock (not included).
1. Press and tap > Settings > Accessory.
2. Configure settings:
䡲 Dock sound: Allows you to choose whether a
sound plays when you insert and remove the
phone from the dock.
䡲 Audio output mode: Allows you to choose whether
audio plays through the dock speakers when the
phone is docked.
䡲 Desk home screen display: Allows you to choose
whether the phone displays a special screen
when it is docked.
䡲 Audio output: Allows you to choose an audio
output mode (stereo or surround).
䡲 Audio applications: Allows you to choose enable
or disable automatic display of audio applications
in Notifications when you connect earphones or a
headset to the Headset Jack.
77 2C. Settings
Date and Time Settings
By default, your phone receives date and time
information from the wireless network. When you are
outside network coverage, you may want to set date
and time information manually using the Date and time
settings.
1. Press and tap > Settings > Date and time.
2. Configure settings:
䡲 Tap Automatic date and time to enable or disable
the feature. When enabled, the phone receives
date and time information from the wireless
network.
䡲 When Automatic date and time is disabled, tap
Set date to adjust the date, month, and year. Tap
Set when finished.
䡲 When Automatic date and time is disabled, tap
Set time to adjust the time. Tap the am or pm icon
to change the value. Tap
䡲 Tap Automatic time zone to enable or disable the
feature. When enabled, the phone receives date
and time information from the wireless network.
Set when finished.
Page 93

䡲 When Automatic time zone is disabled, tap Select
time zone to select a time zone. Scroll down the
list to view additional time zones.
䡲 Ta p Use 24-hour format to toggle between using a
12-hour or a 24-hour format.
䡲 Ta p Select date format to select how the date
information is displayed on your phone. The
selected date format is used for time displays in
your phone’s features, including Clock.
Accessibility Settings
The Accessibility settings allow you to set options to
simplify phone use and improve accessibility for users
with certain physical disabilities.
This service is able to collect all the text you type,
including personal data credit card numbers except
passwords. It may also log your user interface
interactions. Using TalkBack, every interaction and
keypress is explained in audio. The Accessibility menu
also allows you to set various vision, hearing, and
access options.
System
1. Press and tap > Settings > Accessibility.
2. Select settings from the following options:
䡲 Auto-rotate screen: Allows you to choose whether
the screen automatically updates when you rotate
the phone.
䡲 Screen timeout: Allows you to set the length of
delay between the last key press or screen tap
and the automatic screen timeout (dim and lock).
䡲 Speak passwords: Allows you to choose whether
to speak passwords for log-ins.
䡲 Answering/ending calls: Allows you to manage
options for answering and ending calls. Enable
The home key answers calls to answer incoming
calls by pressing the Home key. Enable The
power key ends calls to end calls by pressing the
Power key.
䡲 Accessibility shortcut: Allows you to enable or
disable a link to the Accessibility settings from the
Device options menu. The Device options menu
is available when you press and hold the Power/
Lock button.
2C. Settings 78
Page 94

Services
This feature provides synthesized speech feedback to
describe the results of actions. The following
procedures enhance TalkBack capabilities.
1. Press and tap > Settings > Accessibility >
TalkBack.
2. Tap the TalkBack OFF/ON slider to turn
on TalkBack.
3. Tap Settings and configure the following:
䡲 Speech volume: Allows you to match speech
volume to media volume, or to a percentage of
media volume.
䡲 Ringer volume: Allows you to choose whether
readout is used, based on the phone’s volume
setting. When Speak at all ringer volumes is
enabled, feedback occurs all the time, regardless
of the volume setting. When No speech in Silent
Mode is enabled, feedback does not occur when
volume is set to silent. When No speech in Vibrate
and Silent mode is enabled, feedback does not
occur when all volume is set to silent and vibrate
is on.
79 2C. Settings
䡲 Use pitch changes: Allows you to choose whether
feedback for keyboard entries are spoken in a
lower-pitched voice.
䡲 Keyboard echo: Allows you to choose how
feedback for keyboard entries is treated. Choose
Always speak typed keys, Only for on-screen
keyboard, or Never speak typed keys.
䡲 Speak when screen is off: Allows you to enable or
disable voice feedback when the screen is off.
䡲 Use proximity sensor: Allows you to enable or
disable voice feedback when the proximity sensor
is engaged, such as when the phone is near your
ear.
䡲 Speak caller ID: Allows you to enable or disable
voice feedback for caller ID.
䡲 Vibration feedback: Allows you to enable or
disable vibration feedback for key presses.
䡲 Sound feedback: Allows you to enable or disable
sound feedback for screen touches.
䡲 Sound volume: Allows you to match sound
feedback volume to media volume, or to a
percentage of media volume.
Page 95

䡲 Explore by touch: Allows you to enable or disable
speech feedback for shortcut gestures
(configured in the Manage shortcut gestures
option below) or screen touches.
䡲 Launch “Explore by touch” tutorial: Provides
information about using the Explore by touch
option. Explore by touch must be enabled to
launch the tutorial.
䡲 Manage shortcut gestures: Allows you to assign
touch actions to open features or perform
common tasks.
䡲 Developer settings: Allows you to enable or
disable options for debugging accessibility
features.
Vision
Configure options for to customize the visibility of your
phone’s display.
1. Press and tap > Settings > Accessibility.
2. Configure options:
䡲 Font size: Allows you to choose a font size for
screen.
䡲 Negative colors: Allows you to enable or disable
reverse colors on the screen.
䡲 Text-to-speech output: Allows you to configure
options for audible read-out of text, for example
for the contents of text messages.
䡲 Enhance web accessibility: Allows you to choose
whether apps may install scripts from Google to
make their Web content more accessible.
2C. Settings 80
Page 96

Hearing
Configure options to customize your phone’s sounds.
1. Press and tap > Settings > Accessibility.
2. Configure options:
䡲 Mono audio: allows you switch from stereo to
mono output, for example when you are .
䡲 Turn off all sounds: allows you to enable or disable
all your phone’s sounds, including receiver voice
(other caller’s voice).
Mobility
Configure options to customize your phone’s touch
responses.
1. Press and tap > Settings > Accessibility.
2. Tap Tap and hold delay to set the length of time the
phone considers a screen touch before
interpreting a touch as touch-and-hold.
81 2C. Settings
Developer Options
Use the Developer Options to set options for
application development.
Important: These features are used for development
Turning Developer Options On or Off
1. Press and tap > Settings > Developer
2. Tap the Developer options OFF/ON slider
Desktop Backup Password
This protects the desktop with a backup password ID.
1. Press and tap > Settings > Developer
2. In the Settings screen, enter the current full backup
3. Tap Set backup password to save.
purposes only.
options.
to turn the setting On or Off.
options > Desktop backup password.
password, the new password for the full backups,
then enter the new password again.
Page 97

Stay awake
When this option is enabled, the screen will never
sleep while charging.
1. Press and tap > Settings > Developer
options.
2. Ta p Stay awake to enable or disable the setting.
Protect SD card
When this option is enabled, apps must request
permission to read an installed optional SD card (not
included).
1. Press and tap > Settings > Developer
options.
2. Touch Protect SD card to enable or disable the
setting.
Debugging
When enabled, this allows debugging when the phone
is attached to a PC by a USB cable.
1. Press and tap > Settings > Developer
options.
2. Configure options:
䡲 USB debugging: When enabled, connecting your
device to a computer with a USB data cable
launches debugging mode.
䡲 Allow mock locations: When enabled, mock
locations are allowed during debugging.
䡲 Select app to be debugged: Choose an app to be
debugged when device is in debugging mode.
䡲 Wait for debugger: When enabled, the app
selected above opens when the debugger is
attached.
2C. Settings 82
Page 98

Input
Configure options for input.
1. Press and tap > Settings > Developer
options.
2. Configure options:
䡲 Show touches: When enabled, screen touches
cause the screen to display visual feedback.
䡲 Show pointer location: When enabled, the current
pointer location shows on a screen overlay.
Drawing
Configure options for drawing screens.
1. Press and tap > Settings > Developer
options.
83 2C. Settings
2. Configure options:
䡲 Show layout boundaries: When enabled, clip
boundaries, margins, and other layout details
display.
䡲 Show GPU view updates: When enabled, views are
flashed inside windows when they are drawn with
the GPU.
䡲 Show screen updates: When enabled, areas of the
screen flash as they update.
䡲 Window animation scale: Choose a scale for
window animations.
䡲 Transition animation scale: Choose a scale for
screen transitions.
䡲 Animator duration scale: Choose a scale for
animators.
䡲 Disable hardware overlays: When enabled, the
GPU is always used for screen compositing.
䡲 Force GPU rendering: When enabled, 2D
hardware acceleration is used in applications.
Page 99

Monitoring
Configure options for monitoring apps.
1. Press and tap > Settings > Developer
options.
2. Configure options:
䡲 Strict mode: When enabled, the screen flashes
while apps perform long operations.
䡲 Show CPU usage: When enabled CPU usage
displays on a screen overlay.
䡲 GPU rendering profile: When enabled, rendering
time is measured in adb shell dumpsys gfxinfo.
䡲 Enable traces: Choose traces.
Apps
Set options for application behavior.
1. Press and tap > Settings > Developer
options.
2. Configure options:
䡲 Do not keep activities: When enabled, activities are
destroyed as soon as the user leaves them.
䡲 Limit background processes: Choose options for
processes running in the background.
䡲 Show all ANRs: When enabled, an App Not
Responding dialog displays for apps running in
the background.
2C. Settings 84
Page 100

System Update Settings
Use System Update to update your phone to the latest
PRL, Profile, Samsung Software, and Firmware. You
can access this menu on a regular basis to ensure that
your phone maintains the most recent system
enhancements and security features.
Update PRL
This option allows you to download and automatically
update the preferred roaming list (PRL).
1. Press and tap > Settings > System
Update > Update PRL.
2. Follow the onscreen instructions.
Update Profile
This option automatically updates your online user
profile information. If you choose to change your user
name and select a new one online, you must update
the user name on your phone.
1. Press and tap > Settings > System
Update > Update profile.
2. Follow the onscreen instructions.
85 2C. Settings
Note: If your data services or account syncing unexpectedly
stops working, use this feature to reconnect with the
network.
Update Samsung Software
Use this feature to upgrade your phone to the latest
version of software for your phone.
1. Press and tap > Settings > System Update
> Update Samsung Software.
2. Follow the onscreen instructions.
Update Firmware
Once all the data is backed up on the phone, use the
Update Firmware option to update the phone firmware.
䊳 Press and tap > Settings > System
Update > Update Firmware.
The phone automatically downloads and installs
any available updates. You may be required to
power the phone off and back on to complete the
software upgrade.
 Loading...