

Page 1

SPH-a740 Series
PORTABLE Tri-Mode
TELEPHONE
User Guide
Please read this manual before operating your phone, and keep it for
future reference.
BMC_UG_A740_061105_F11
Page 2

Intellectual Property
All Intellectual Property, as defined below, owned by or which is
otherwise the property of Samsung or its respective suppliers
relating to the SAMSUNG Phone, including but not limited to,
accessories, parts, or software relating thereto (the “Phone
System”), is proprietary to Samsung and protected under federal
laws, state laws, and international treaty provisions. Intellectual
Property includes, but is not limited to, inventions (patentable or
unpatentable), patents, trade secrets, copyrights, software, computer
programs, and related documentation and other works of authorship.
You may not infringe or otherwise violate the rights secured by the
Intellectual Property. Moreover, you agree that you will not (and will
not attempt to) modify, prepare derivative works of, reverse engineer,
decompile, disassemble, or otherwise attempt to create source code
from the software. No title to or ownership in the Intellectual Property
is transferred to you. All applicable rights of the Intellectual Property
shall remain with SAMSUNG and its suppliers.
© 2004, 2005 Samsung Electronics Canada, Inc.. SAMSUNG is a
registered trademark of Samsung Electronics Co., Ltd. and its related
entities.
Licensed by Qualcomm Incorporated under one or more of the
following patents: U.S. Patent No. 4, 901, 307; 5, 056, 109; 5, 099,
204; 5, 101, 501; 5, 103, 459; 5, 107, 225; 5, 109, 390.
Printed in South Korea
®
Openwave
is a registered Trademark of Openwave, Inc.
RSA® is a registered Trademark RSA Security, Inc.
Page 3

Disclaimer of Warranties; Exclusion of Liability
EXCEPT AS SET FORTH IN THE EXPRESS WARRANTY CONTAINED ON THE
WARRANTY PAGE ENCLOSED WITH THE PRODUCT, THE PURCHASER TAKES
THE PRODUCT "AS IS", AND SAMSUNG MAKES NO EXPRESS OR IMPLIED
WARRANTY OF ANY KIND WHATSOEVER WITH RESPECT TO THE PRODUCT,
INCLUDING BUT NOT LIMITED TO THE MERCHANTABILITY OF THE PRODUCT OR
ITS FITNESS FOR ANY PARTICULAR PURPOSE OR USE; THE DESIGN,
CONDITION OR QUALITY OF THE PRODUCT; THE PERFORMANCE OF THE
PRODUCT; THE WORKMANSHIP OF THE PRODUCT OR THE COMPONENTS
CONTAINED THEREIN; OR COMPLIANCE OF THE PRODUCT WITH THE
REQUIREMENTS OF ANY LAW, RULE, SPECIFICATION OR CONTRACT
PERTAINING THERETO. NOTHING CONTAINED IN THE INSTRUCTION MANUAL
SHALL BE CONSTRUED TO CREATE AN EXPRESS OR IMPLIED WARRANTY OF
ANY KIND WHATSOEVER WITH RESPECT TO THE PRODUCT. IN ADDITION,
SAMSUNG SHALL NOT BE LIABLE FOR ANY DAMAGES OF ANY KIND RESULTING
FROM THE PURCHASE OR USE OF THE PRODUCT OR ARISING FROM THE
BREACH OF THE EXPRESS WARRANTY, INCLUDING INCIDENTAL, SPECIAL OR
CONSEQUENTIAL DAMAGES, OR LOSS OF ANTICIPATED PROFITS OR BENEFITS.
Page 4

Table of Contents
Getting Started..............................................................................1
Closed View of Phone . . . . . . . . . . . . . . . . . . . . . . . . . . . . . . . . . . . . . . 1
Front View of Your Phone . . . . . . . . . . . . . . . . . . . . . . . . . . . . . . . . . . . 2
Key Functions. . . . . . . . . . . . . . . . . . . . . . . . . . . . . . . . . . . . . . . . . . . 3
Viewing the Display Screen. . . . . . . . . . . . . . . . . . . . . . . . . . . . . . . . . . 6
Features of Your Phone. . . . . . . . . . . . . . . . . . . . . . . . . . . . . . . . . . . . . 9
Turning Your Phone On and Off . . . . . . . . . . . . . . . . . . . . . . . . . . . . . 10
Using Your Phone’s Battery and Charger . . . . . . . . . . . . . . . . . . . . . . 11
Phone Basics..............................................................................15
Displaying Your Phone Number . . . . . . . . . . . . . . . . . . . . . . . . . . . . . 15
Making and Answering Calls . . . . . . . . . . . . . . . . . . . . . . . . . . . . . . . . 15
Making Calls. . . . . . . . . . . . . . . . . . . . . . . . . . . . . . . . . . . . . . . . . . . 15
Answering Calls . . . . . . . . . . . . . . . . . . . . . . . . . . . . . . . . . . . . . . . . 16
Missed Call Notification . . . . . . . . . . . . . . . . . . . . . . . . . . . . . . . . . . 17
Calling Emergency Numbers . . . . . . . . . . . . . . . . . . . . . . . . . . . . . . 17
In-Call Options . . . . . . . . . . . . . . . . . . . . . . . . . . . . . . . . . . . . . . . . . 18
End-of-Call Options . . . . . . . . . . . . . . . . . . . . . . . . . . . . . . . . . . . . . 18
Saving a Phone Number . . . . . . . . . . . . . . . . . . . . . . . . . . . . . . . . . 19
Finding a Phone Number . . . . . . . . . . . . . . . . . . . . . . . . . . . . . . . . . 20
Dialing and Saving Phone Numbers With Pauses . . . . . . . . . . . . . . 20
Abbreviated Dialing . . . . . . . . . . . . . . . . . . . . . . . . . . . . . . . . . . . . . 21
Dialing From Contacts . . . . . . . . . . . . . . . . . . . . . . . . . . . . . . . . . . . 22
Using One-Touch/Two-Touch/Three-Touch
Speed Dialing . . . . . . . . . . . . . . . . . . . . . . . . . . . . . . . . . . . . . . . . . . 22
Entering Text . . . . . . . . . . . . . . . . . . . . . . . . . . . . . . . . . . . . . . . . . . . . 23
Selecting a Character Input Mode . . . . . . . . . . . . . . . . . . . . . . . . . . 23
Entering Characters Using T9 Text Input . . . . . . . . . . . . . . . . . . . . . 24
Entering Characters by Tapping the Keypad . . . . . . . . . . . . . . . . . . 25
Entering Numbers and Symbols . . . . . . . . . . . . . . . . . . . . . . . . . . . 26
Using Voicemail . . . . . . . . . . . . . . . . . . . . . . . . . . . . . . . . . . . . . . . . . 26
Setting Up Your Voicemail. . . . . . . . . . . . . . . . . . . . . . . . . . . . . . . . 26
Voicemail Notification . . . . . . . . . . . . . . . . . . . . . . . . . . . . . . . . . . . 26
New Voicemail Message Alerts . . . . . . . . . . . . . . . . . . . . . . . . . . . . 27
Page 5

Retrieving Your Voicemail Messages . . . . . . . . . . . . . . . . . . . . . . . 27
Clearing the Message Icon. . . . . . . . . . . . . . . . . . . . . . . . . . . . . . . . 28
UsingCaller ID . . . . . . . . . . . . . . . . . . . . . . . . . . . . . . . . . . . . . . . . . . . 28
Responding to Call Waiting. . . . . . . . . . . . . . . . . . . . . . . . . . . . . . . . . 29
Making a Three-Way Call . . . . . . . . . . . . . . . . . . . . . . . . . . . . . . . . . . 30
TTY Use With Handset . . . . . . . . . . . . . . . . . . . . . . . . . . . . . . . . . . . . 31
Roaming .....................................................................................32
Understanding Roaming . . . . . . . . . . . . . . . . . . . . . . . . . . . . . . . . . . . 32
Setting Your Phone’s System . . . . . . . . . . . . . . . . . . . . . . . . . . . . . . . 33
Set NAM . . . . . . . . . . . . . . . . . . . . . . . . . . . . . . . . . . . . . . . . . . . . . . . 34
Navigating Through Menus.........................................................35
Menu Styles. . . . . . . . . . . . . . . . . . . . . . . . . . . . . . . . . . . . . . . . . . . . . 35
Changing the Phone’s Menu Style . . . . . . . . . . . . . . . . . . . . . . . . . . 36
Viewing the Menus . . . . . . . . . . . . . . . . . . . . . . . . . . . . . . . . . . . . . . . 37
Call History .................................................................................44
Viewing History . . . . . . . . . . . . . . . . . . . . . . . . . . . . . . . . . . . . . . . . . . 44
Call History Options. . . . . . . . . . . . . . . . . . . . . . . . . . . . . . . . . . . . . . . 44
Making a Call From Call History . . . . . . . . . . . . . . . . . . . . . . . . . . . . . 45
Saving a Phone Number From Call History. . . . . . . . . . . . . . . . . . . . . 46
Prepending a Phone Number From
Call History . . . . . . . . . . . . . . . . . . . . . . . . . . . . . . . . . . . . . . . . . . . . . 46
Erasing Call History . . . . . . . . . . . . . . . . . . . . . . . . . . . . . . . . . . . . . . . 47
Air Time. . . . . . . . . . . . . . . . . . . . . . . . . . . . . . . . . . . . . . . . . . . . . . . . 47
Using Contacts ...........................................................................48
Adding a New Contact. . . . . . . . . . . . . . . . . . . . . . . . . . . . . . . . . . . . . 48
Finding Contacts . . . . . . . . . . . . . . . . . . . . . . . . . . . . . . . . . . . . . . . . . 48
Adding a Phone Number to an Existing Contact Entry . . . . . . . . . . . . 49
Editing a Contacts Entry’s Phone Number . . . . . . . . . . . . . . . . . . . . . 49
Selecting a Ringer Type for an Entry. . . . . . . . . . . . . . . . . . . . . . . . . . 50
Secret Contacts Entries . . . . . . . . . . . . . . . . . . . . . . . . . . . . . . . . . . . . 51
Changing the Group Name. . . . . . . . . . . . . . . . . . . . . . . . . . . . . . . . 52
Messaging ..................................................................................53
Erasing Text Messages . . . . . . . . . . . . . . . . . . . . . . . . . . . . . . . . . . 53
Text Messaging . . . . . . . . . . . . . . . . . . . . . . . . . . . . . . . . . . . . . . . . . . 54
Page 6

Using Text Messaging . . . . . . . . . . . . . . . . . . . . . . . . . . . . . . . . . . . 54
Message Setup Options . . . . . . . . . . . . . . . . . . . . . . . . . . . . . . . . . . . 56
Notifications. . . . . . . . . . . . . . . . . . . . . . . . . . . . . . . . . . . . . . . . . . . 57
Sending Options . . . . . . . . . . . . . . . . . . . . . . . . . . . . . . . . . . . . . . . 57
Preset Messages . . . . . . . . . . . . . . . . . . . . . . . . . . . . . . . . . . . . . . . 58
Edit Signature. . . . . . . . . . . . . . . . . . . . . . . . . . . . . . . . . . . . . . . . . . 59
Message Alerts. . . . . . . . . . . . . . . . . . . . . . . . . . . . . . . . . . . . . . . . . 59
Save in Outbox. . . . . . . . . . . . . . . . . . . . . . . . . . . . . . . . . . . . . . . . . 61
Auto Delete. . . . . . . . . . . . . . . . . . . . . . . . . . . . . . . . . . . . . . . . . . . . 61
Alert Setup . . . . . . . . . . . . . . . . . . . . . . . . . . . . . . . . . . . . . . . . . . . . 62
Voice Mail Number. . . . . . . . . . . . . . . . . . . . . . . . . . . . . . . . . . . . . . 62
Picture Mail . . . . . . . . . . . . . . . . . . . . . . . . . . . . . . . . . . . . . . . . . . . . . 62
Sending Picture Messages from your Phone . . . . . . . . . . . . . . . . . 62
Phone Camera ............................................................................64
Taking Pictures . . . . . . . . . . . . . . . . . . . . . . . . . . . . . . . . . . . . . . . . . . 64
Camera Options: . . . . . . . . . . . . . . . . . . . . . . . . . . . . . . . . . . . . . . . . . 66
Picture Messaging. . . . . . . . . . . . . . . . . . . . . . . . . . . . . . . . . . . . . . . . 69
Storing Pictures. . . . . . . . . . . . . . . . . . . . . . . . . . . . . . . . . . . . . . . . . . 69
In Camera. . . . . . . . . . . . . . . . . . . . . . . . . . . . . . . . . . . . . . . . . . . . . 70
Saved to Phone . . . . . . . . . . . . . . . . . . . . . . . . . . . . . . . . . . . . . . . . 71
Online Albums. . . . . . . . . . . . . . . . . . . . . . . . . . . . . . . . . . . . . . . . . . . 71
Creating an Online Album . . . . . . . . . . . . . . . . . . . . . . . . . . . . . . . . 71
Uploading a picture to the Picture Messaging Web Site . . . . . . . . . 72
To view Online Albums . . . . . . . . . . . . . . . . . . . . . . . . . . . . . . . . . . 73
Sharing Online Pictures . . . . . . . . . . . . . . . . . . . . . . . . . . . . . . . . . . 73
Accessing Online Pictures Message Options From Your Phone . . . 73
Account Info . . . . . . . . . . . . . . . . . . . . . . . . . . . . . . . . . . . . . . . . . . . . 74
Camera Key Guard . . . . . . . . . . . . . . . . . . . . . . . . . . . . . . . . . . . . . . . 74
Web Services..............................................................................75
The Wireless Web . . . . . . . . . . . . . . . . . . . . . . . . . . . . . . . . . . . . . . . . 75
Launching the Browser . . . . . . . . . . . . . . . . . . . . . . . . . . . . . . . . . . 75
Web Guard. . . . . . . . . . . . . . . . . . . . . . . . . . . . . . . . . . . . . . . . . . . . 76
Web Connection Status and Indicators . . . . . . . . . . . . . . . . . . . . . . 77
Navigating the Wireless Web . . . . . . . . . . . . . . . . . . . . . . . . . . . . . . 77
Downloading Games, Ringers, Screen Savers and Applications . . . . 80
Page 7

Games . . . . . . . . . . . . . . . . . . . . . . . . . . . . . . . . . . . . . . . . . . . . . . . 80
Ringers. . . . . . . . . . . . . . . . . . . . . . . . . . . . . . . . . . . . . . . . . . . . . . . 81
Screen Savers . . . . . . . . . . . . . . . . . . . . . . . . . . . . . . . . . . . . . . . . . 83
Applications . . . . . . . . . . . . . . . . . . . . . . . . . . . . . . . . . . . . . . . . . . . 84
Voice Services ............................................................................85
Activating Voice Recognition. . . . . . . . . . . . . . . . . . . . . . . . . . . . . . . . 85
Using Voice Dial . . . . . . . . . . . . . . . . . . . . . . . . . . . . . . . . . . . . . . . . . 86
Enabling/Disabling Choice Lists. . . . . . . . . . . . . . . . . . . . . . . . . . . . 87
Using Name Lookup . . . . . . . . . . . . . . . . . . . . . . . . . . . . . . . . . . . . . . 88
Phone Status Information . . . . . . . . . . . . . . . . . . . . . . . . . . . . . . . . . . 88
Customizing Voice Dial . . . . . . . . . . . . . . . . . . . . . . . . . . . . . . . . . . . . 89
Adapting Voice Dial . . . . . . . . . . . . . . . . . . . . . . . . . . . . . . . . . . . . . 89
Changing Voice Dial Sensitivity . . . . . . . . . . . . . . . . . . . . . . . . . . . . 91
Changing Voice Dial Prompts . . . . . . . . . . . . . . . . . . . . . . . . . . . . . 92
Changing Voice Launch . . . . . . . . . . . . . . . . . . . . . . . . . . . . . . . . . . 92
Managing Voice Memos . . . . . . . . . . . . . . . . . . . . . . . . . . . . . . . . . . . 93
Recording Voice Memos . . . . . . . . . . . . . . . . . . . . . . . . . . . . . . . . . 93
Reviewing and Erasing Memos . . . . . . . . . . . . . . . . . . . . . . . . . . . . 94
Tools...........................................................................................96
Scheduler . . . . . . . . . . . . . . . . . . . . . . . . . . . . . . . . . . . . . . . . . . . . . . 96
Adding an Event to the Scheduler . . . . . . . . . . . . . . . . . . . . . . . . . . 96
Event Alerts . . . . . . . . . . . . . . . . . . . . . . . . . . . . . . . . . . . . . . . . . . . 98
Viewing Events. . . . . . . . . . . . . . . . . . . . . . . . . . . . . . . . . . . . . . . . . 98
Erasing a Single Event for a Day . . . . . . . . . . . . . . . . . . . . . . . . . . . 99
Erasing All Events for a Day. . . . . . . . . . . . . . . . . . . . . . . . . . . . . . . 99
Erasing All Events in your Scheduler . . . . . . . . . . . . . . . . . . . . . . . . 99
World Time . . . . . . . . . . . . . . . . . . . . . . . . . . . . . . . . . . . . . . . . . . . . 100
Using the Alarm Clock. . . . . . . . . . . . . . . . . . . . . . . . . . . . . . . . . . . . 100
Task List . . . . . . . . . . . . . . . . . . . . . . . . . . . . . . . . . . . . . . . . . . . . . . 101
Memo Pad. . . . . . . . . . . . . . . . . . . . . . . . . . . . . . . . . . . . . . . . . . . . . 102
Calculator . . . . . . . . . . . . . . . . . . . . . . . . . . . . . . . . . . . . . . . . . . . . . 104
Countdown . . . . . . . . . . . . . . . . . . . . . . . . . . . . . . . . . . . . . . . . . . . . 104
Phone Settings .........................................................................106
Display Settings. . . . . . . . . . . . . . . . . . . . . . . . . . . . . . . . . . . . . . . . . 106
Page 8

Changing the Screen Saver . . . . . . . . . . . . . . . . . . . . . . . . . . . . . . 106
Creating a Slide Show . . . . . . . . . . . . . . . . . . . . . . . . . . . . . . . . . . 106
Changing the Phone’s Menu Style . . . . . . . . . . . . . . . . . . . . . . . . . 107
Changing the Incoming Call display. . . . . . . . . . . . . . . . . . . . . . . . 107
Changing the Text Greeting . . . . . . . . . . . . . . . . . . . . . . . . . . . . . . 108
Changing the Backlight Time Length . . . . . . . . . . . . . . . . . . . . . . . 109
Changing the LCD Contrast . . . . . . . . . . . . . . . . . . . . . . . . . . . . . . 109
Turning the Service Light On or Off . . . . . . . . . . . . . . . . . . . . . . . . 110
Changing the Size of your Dialing Font . . . . . . . . . . . . . . . . . . . . . 110
Changing the Color of your Dialing Font . . . . . . . . . . . . . . . . . . . . 111
Sound Settings . . . . . . . . . . . . . . . . . . . . . . . . . . . . . . . . . . . . . . . . . 111
Adjusting the Phone’s Volume Settings. . . . . . . . . . . . . . . . . . . . . 111
Ringer Types . . . . . . . . . . . . . . . . . . . . . . . . . . . . . . . . . . . . . . . . . 112
Selecting a Key Tone . . . . . . . . . . . . . . . . . . . . . . . . . . . . . . . . . . . 115
Selecting Tone Length . . . . . . . . . . . . . . . . . . . . . . . . . . . . . . . . . . 116
Alert Notification . . . . . . . . . . . . . . . . . . . . . . . . . . . . . . . . . . . . . . 116
Application Volume . . . . . . . . . . . . . . . . . . . . . . . . . . . . . . . . . . . . 118
Silence All. . . . . . . . . . . . . . . . . . . . . . . . . . . . . . . . . . . . . . . . . . . . 118
Location Settings . . . . . . . . . . . . . . . . . . . . . . . . . . . . . . . . . . . . . . . 119
Airplane Mode . . . . . . . . . . . . . . . . . . . . . . . . . . . . . . . . . . . . . . . . . . 119
Phone Setup Options . . . . . . . . . . . . . . . . . . . . . . . . . . . . . . . . . . . . 120
Shortcut . . . . . . . . . . . . . . . . . . . . . . . . . . . . . . . . . . . . . . . . . . . . . 120
Call Answer Mode . . . . . . . . . . . . . . . . . . . . . . . . . . . . . . . . . . . . . 121
Auto-Answer Mode . . . . . . . . . . . . . . . . . . . . . . . . . . . . . . . . . . . . 121
Display Language. . . . . . . . . . . . . . . . . . . . . . . . . . . . . . . . . . . . . . 122
Phone Security .........................................................................123
Accessing the Security Menu . . . . . . . . . . . . . . . . . . . . . . . . . . . . . . 123
Using Your Phone’s Lock Feature. . . . . . . . . . . . . . . . . . . . . . . . . . . 123
Locking Your Phone . . . . . . . . . . . . . . . . . . . . . . . . . . . . . . . . . . . 123
Unlocking Your Phone . . . . . . . . . . . . . . . . . . . . . . . . . . . . . . . . . . 124
Changing the Lock Code . . . . . . . . . . . . . . . . . . . . . . . . . . . . . . . . 124
Calling in Lock Mode . . . . . . . . . . . . . . . . . . . . . . . . . . . . . . . . . . . 124
Restricting Calls. . . . . . . . . . . . . . . . . . . . . . . . . . . . . . . . . . . . . . . 124
Using Special Numbers. . . . . . . . . . . . . . . . . . . . . . . . . . . . . . . . . . . 125
Erasing the Contacts . . . . . . . . . . . . . . . . . . . . . . . . . . . . . . . . . . . . . 126
Page 9

Erasing Downloads . . . . . . . . . . . . . . . . . . . . . . . . . . . . . . . . . . . . . . 126
Erasing Pictures . . . . . . . . . . . . . . . . . . . . . . . . . . . . . . . . . . . . . . . . 126
Resetting Your Phone . . . . . . . . . . . . . . . . . . . . . . . . . . . . . . . . . . . . 127
Safety .......................................................................................128
Getting the Most Out of Your Reception . . . . . . . . . . . . . . . . . . . . . . 128
Maintaining Safe Use of and Access to Your Phone . . . . . . . . . . . . . 129
Caring for the Battery . . . . . . . . . . . . . . . . . . . . . . . . . . . . . . . . . . . . 132
Acknowledging Special Precautions and
Industry Canada Notice . . . . . . . . . . . . . . . . . . . . . . . . . . . . . . . . . 134
Information to User . . . . . . . . . . . . . . . . . . . . . . . . . . . . . . . . . . . . 134
Owner’s Record. . . . . . . . . . . . . . . . . . . . . . . . . . . . . . . . . . . . . . . . . 136
User Guide Proprietary Notice. . . . . . . . . . . . . . . . . . . . . . . . . . . . . . 136
Manufacturer’s Warranty ..........................................................137
Index.........................................................................................140
Page 10
Getting Started
Closed View of Phone
1 Getting Started
Page 11

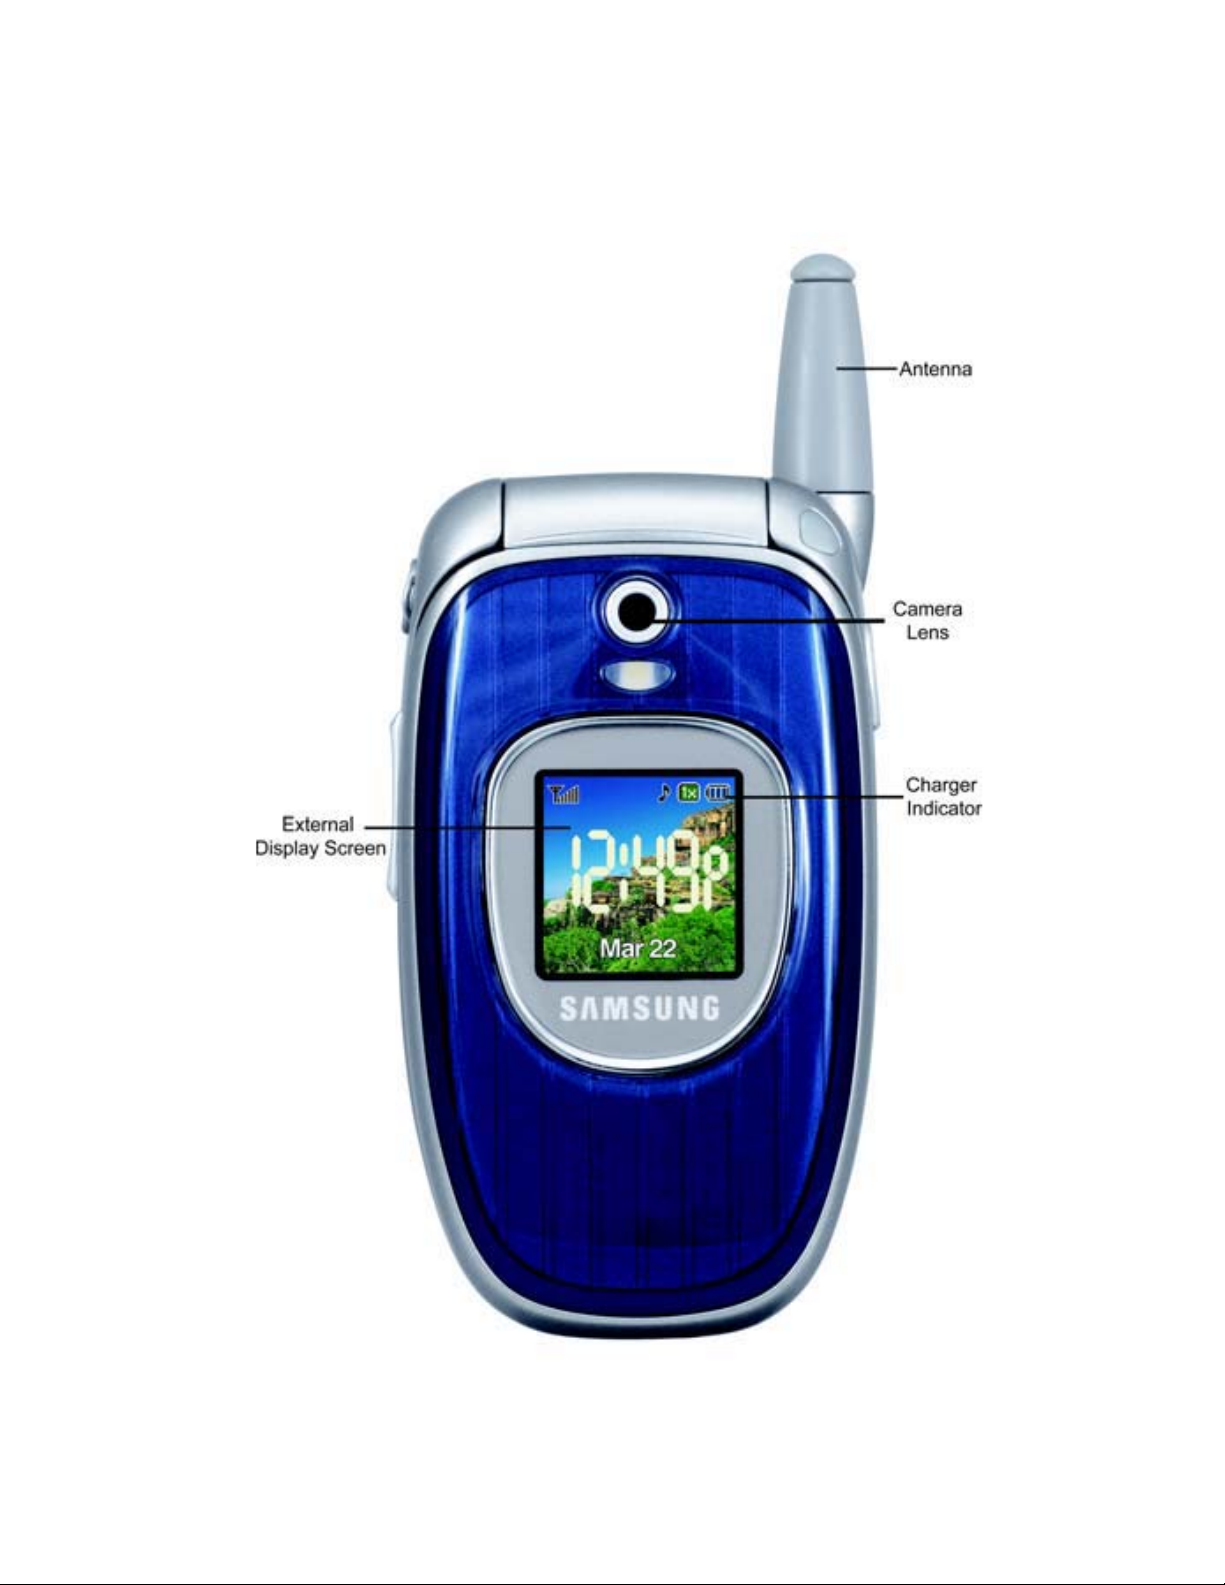
Front View of Your Phone
Getting Started
Getting Started 2
Page 12

Key Functions
1. Speaker: The speaker allows you to hear the other caller
and the different ring tones and sounds offered by your
phone.
2. Signal Strength Indicator: This icon represents the signal
strength by displaying bars. The more bars displayed, the
better the signal strength.
3. Display Screen: This screen displays all the information
needed to operate your phone.
4. Headset Jack: Allows you to plug in an optional headset for
safe, convenient hands-free conversations.
5. OK Key: This key can be used in several different ways.
• In idle mode, press and hold to start the camera.
• Press when navigating through a menu accepts the
highlighted choice in the menu.
6. Left Softkey: This key can be used in several different ways.
• In idle mode, press to access the Menu.
• When using other features, such as the Web Browser, the
left softkey performs a context-sensitive action. This action
is shown in the bottom left corner of the Display Screen.
7. Right Softkey: This key can be used in several different
ways.
• In idle mode, press to access your Contacts.
• In text entry mode, press to change the character input type.
• When using other features, such as the Web Browse, the
right softkey performs a context-sensitive action. This
action is shown in the bottom right corner of the Display
Screen.
3 Getting Started
Page 13

8. Volume Key: Allows you to adjust the ringer volume in
standby mode (with the flip open) or adjust the voice
volume during a call. The volume key can also be used to
scroll up or down to navigate through the different menu
options. To mute the ringer during an incoming call, press
the volume key up or down.
9. TALK Key: This key can be used in several different ways.
• Allows you to place or receive a call.
• In standby mode, press the key once to access the Recent
calls log.
• If you press and hold the key down, you will initiate the
Voice Recognition feature.
10. Voicemail Key: From standby mode, press and hold to
Getting Started
access your voicemail.
11. Numeric Keypad: Use these keys to enter numbers, letters,
and characters.
12. Shift/Asterisk Key: Enters the asterisk [*] character for
calling features. In text entry mode, press to change the
character input type (ABC, Abc, abc).
13. Power Interface Connector: The power interface connector
is used to plug in the charging accessories.
14. Accessory Interface Connector: This connector is used to
connect any available accessory cables to your phone.
15. Microphone: The microphone allows the other caller to hear
you clearly when you are speaking to them.
16. Space/Pound Key: Enters the pound [#] character for
calling features. In text entry mode, press to enter a space.
Getting Started 4
Page 14

17. BACK Key: Deletes characters from the display when you
are in text entry mode. When in a menu, press to return to
the previous menu.
18. END Key: This key can be used in several different ways.
• During a call, press to end the call.
• When you receive an incoming call, press to enter silent
mode and mute the ringer. Alternatively, press and hold to
send the call directly to voice mail.
• When the phone is off or in standby mode, press and hold
this key for a few seconds to turn your phone On or Off.
• When in the main menu, press to return the phone to
standby mode and cancel your input.
19. Navigation Key: This key allows you to scroll through the
phone menu options and provides a shortcut to phone
functions from standby mode.
20. Camera Key: This key is used to launch the integrated
digital camera, both when the phone is open or closed.
21. LED Indicator: The LED Indicator flashes when you have an
incoming call or other event (such as receiving voicemail).
Additionally, the LED indicator indicates when the phone is
recharging (red) or is fully charged (green).
22. Ringer Indicator: This icon indicates that a ringer is set.
23. Signal Type Indicator: This icon indicates whether you are
receiving 3G digital service, digital service or analog
service.
24. Battery Indicator: The battery indicator displays the
amount of remaining battery charge currently available in
your phone. When all bars are displayed in the battery icon,
5 Getting Started
Page 15

the phone’s battery is fully charged. When no bars are
displayed, the phone’s battery is completely discharged or
empty.
25. Position Location: This icon indicates that the position
location feature is active.
Viewing the Display Screen
Your phone’s interior and exterior display screens provides a wealth
of information about your phone’s status and options. This list
identifies the symbols you’ll see on your phone’s display screens:
tells you a call is in progress.
means there is no service, as your phone cannot find a
signal.
Getting Started
displays your current signal strength. When you are
receiving maximum signal strength, six bars are shown.
displays your current battery strength at full.
displays your current battery strength at empty.
indicates that your phone is receiving 3G digital service.
indicates that your phone is receiving digital (non 3G)
service.
indicates that your phone is receiving analog service.
indicates that position location is active.
indicates that position location is inactive.
indicates that your phone is in security mode.
indicates that your phone is roaming.
indicates that you have new text messages waiting.
Getting Started 6
Page 16

indicates that you have new picture messages waiting.
indicates that you have new voicemail messages
waiting. Press and hold to dial your voicemail box.
indicates that there is an unread message in your
inbox.
indicates that the message has been read.
indicates that there is an unread urgent message in
your inbox.
indicates that you have read the urgent message.
indicates that the message was sent.
indicates that the message is marked urgent.
indicates that the message failed to send.
indicates that you have a pending message.
indicates that the message is a draft.
indicates that there is URL text contained in the text
message.
indicates that the phone is locked. A passcode must be
entered before your phone can be used.
indicates that your phone is in vibrate mode.
indicates that the TTY option is On.
indicates that your web connection is active and data is
being transferred. Incoming voice calls go directly to
voicemail; outgoing voice calls can be made, but the
web connection will terminate.
indicates that a file (ringer, game, java app, etc.) has
been downloaded to your phone.
7 Getting Started
Page 17

indicates that the ringer is set at a level between 1-8 or
that 1-Beep is selected.
indicates that the ringer is turned Off.
indicates that your phone is set to high ringer plus
vibrate mode.
indicates that an alarm is set on your phone.
indicates that the handset is in Camera mode.
indicates that the self-timer function is enabled. With
the self timer enabled, a set amount of time is required
prior to taking a picture.
indicates that the white balance has been set to Auto.
This is used for taking pictures indoors or outdoors
under normal conditions.
Getting Started
indicates that the white balance has been set to Sunny.
This is used for taking pictures outdoors on bright
sunny days.
indicates that the white balance has been set to Cloudy.
This is used for taking pictures outdoors under cloudy
conditions.
indicates that the white balance has been set to
Tungsten. This is used for taking pictures indoors under
normal lighting conditions.
indicates that the white balance has been set to
Fluorescent. This is used for taking pictures indoors
under fluorescent lighting conditions.
indicates that the white balance has been set to
Manual. This is used for taking pictures indoors or
outdoors using your own custom settings.
Getting Started 8
Page 18

indicates that a picture has been assigned a function.
An example may be Picture ID, Screensaver, or
Incoming Call.
indicates that a picture has been uploaded to an online
album or folder.
indicates that a picture Has been downloaded from the
web.
Tip: Display indicators let you know when you’re off the network.
Features of Your Phone
Congratulations on the purchase of your Samsung SPH-a740 phone.
This phone is lightweight, easy-to-use, reliable, and it also offers
many significant features and service options:
• Dual-band/Tri-Mode capability provides access to other Digital
Networks where roaming agreements are established. See
"Roaming" on page 32.
• Mobile Browser
digital mode. See "Launching the Browser" on page 75.
TM
provides access to the wireless Internet in
• Messaging provides quick and convenient text messaging
capabilities. See "Using Text Messaging" on page 54.
• Downloadable games, ringers, screen savers, and applications
allow you to turn down time into fun time and to personalize
your phone. See "Downloading Games, Ringers, Screen Savers
and Applications" on page 80.
• The built-in organizer lets you schedule alerts to remind you of
important events. See "Scheduler" on page 96.
• Five hundred Contacts entries store up to six phone numbers
each. See "Using Contacts" on page 48.
9 Getting Started
Page 19

• Voice Signal/Voice Command.
• English or French Language Menus.
Turning Your Phone On and Off
To turn your phone on:
• Press to turn your phone on.
Once your phone is On, it displays “Looking for Service” which
indicates that your phone is searching for a signal. When your phone
finds a signal, it automatically enters standby mode – the phone’s idle
state. At this point, you are ready to begin making and receiving calls.
If your phone is unable to find a signal after 15 minutes of searching,
a Power Save feature is automatically activated. When a signal is
found, your phone automatically returns to standby mode.
Getting Started
In Power Save mode, your phone searches for a signal periodically
without your intervention. You can also initiate a search for service by
pressing any key (when your phone is turned On).
Tip: The Power Save feature helps to conserve your battery power when
you are in an area where there is no signal.
To turn your phone off:
• Press and hold for two seconds until you see the pow-
ering down animation on the display screen.
Your screen remains blank while your phone is off (unless the battery
is charging).
Getting Started 10
Page 20

Using Your Phone’s Battery and Charger
Battery Capacity
Your phone is equipped with a Lithium Ion (LiIon) battery. It allows
you to recharge your battery before it is fully drained. The battery
provides approximately 3 hours of continuous digital talk time or
approximately 8 days of continuous digital standby time.
When the battery reaches 5% of its capacity, the battery icon blinks.
When there are approximately two minutes of talk time left, the
phone sounds an audible alert and then powers down.
Note: Long backlight settings, searching for service, vibrate mode,
playing games, or browser use affect the battery’s talk and standby
times.
Tip: Be sure to watch your phone’s battery level indicator and charge the
battery before it runs out of power.
Installing the Battery
To install the LiIon battery:
1. Insert the battery into the opening on the back of the phone
at an angle, making sure the plastic tab on the bottom of the
battery is inserted into the matching slot in the phone.
2. Press down until the battery snaps into place.
11 Getting Started
Page 21

Getting Started
Removing the Battery
To remove your battery:
1. Make sure the power is off so that you don’t lose any stored
numbers or messages.
2. Push the battery release latch up completely.
3. Using the side tabs, pull the top of the battery away from the
phone and remove.
Getting Started 12
Page 22

Charging the Battery
Your phone’s LiIon battery is rechargeable and should be charged as
soon as possible so you can begin using your phone.
Keeping track of your battery’s charge is important. If your battery
level becomes too low, your phone automatically turns off and you
will lose all the information you were just working on. For a quick
check of your phone’s battery level, glance at the battery charge
indicator located in the upper-right corner of either of your phone’s
display screens. indicates that the battery is full. If the battery
charge is getting too low, the battery icon blinks and the phone
sounds a warning tone.
Always use a Samsung-approved desktop charger, travel adapter, or
vehicle power adapter to charge your battery.
Warning! Using the wrong battery charger could cause damage to your
phone and void the warranty.
13 Getting Started
Page 23

Using the Desktop Charger
To use the desktop charger with your phone:
• Plug the outlet from the desktop charger in the wall. Place
your phone into the desktop charger, making sure that it fits
securely. If properly connected, you should see the charging
lights turn on.
• A red light on the desktop charger and an animated battery
icon on the phone indicates that the battery is charging.
• A green light on the desktop charger indicates that the
battery is at least 90 percent charged.
• A yellow light on the desktop charger indicates that there is
a problem charging the phone.
It takes approximately 4 hours to fully recharge a completely drained
Getting Started
standard battery. With the Samsung approved LiIon battery, you can
recharge the battery before it drains completely.
An animated battery icon is displayed on both the external LCD
screen and the main screen. The icon provides an indication of
whether the battery is being charged or is fully charged.
Getting Started 14
Page 24

Phone Basics
Displaying Your Phone Number
Just in case you forget your phone number, your phone can remind
you.
To display your phone number:
• Press the left softkey for Menu, followed by to
display your phone number.
Note: To access the phone’s main Menu, press the left softkey from
standby mode. Menu items may be selected by highlighting them with
the navigation key and pressing , or you can press the number
corresponding to the menu item on your keypad.
Note: Your phone can display the various features and options in one
of two different menu styles, 3x3 and List style. By default, your
phone is set to List. This user guide also corresponds to the List
menu style. The 3x3 menu style uses a different menu numbering
scheme for the top-level menus. For more information, see "Menu
Styles" on page 35.
Making and Answering Calls
Making Calls
Placing a call from your phone is as easy as making a call from any
land-line phone. Just enter the number and press and you’re on
your way to clear calls.
To make a call using your keypad:
15 Phone Basics
Page 25

1. Make sure your phone is on.
2. Enter a phone number. (If you make a mistake while dialing,
press to erase one digit at a time. Press and hold
to erase the entire number.)
3. Press to call.
4. Press or close the phone when you are finished.
Tip: To redial your last recent call, press twice.
You can also place calls from your phone by using Voice Command
(page 86), Speed Dialing numbers from your Contacts (page 22), and
using your Call History listings (page 45).
Answering Calls
To answer an incoming call:
1. Make sure your phone is on. (If your phone is off, incoming
calls go to voicemail.)
Phone Basics
2. Press to answer an incoming call. (Depending on your
phone’s settings, you may also answer incoming calls by
opening the phone or by pressing any number key. See “Call
Answer Mode” on page 121 for more information.)
Your phone notifies you of incoming calls in the following ways:
• The phone rings or vibrates (unless set to Silence All).
• The LED flashes.
• The backlight illuminates.
• The screen displays an incoming call message.
Phone Basics 16
Page 26

If the incoming call is from a number stored in your Contacts, the
Contacts entry’s name is displayed. The caller’s phone number may
also be displayed, if available.
The following options are also available to handle an incoming call:
• Press or the volume key to quiet the ringer.
• Press and hold or the volume key to send the incoming
call to your voicemail box.
Note: When your phone is off, incoming calls go to voicemail.
Ending a Call
To disconnect a call when you are finished:
• Close the phone or press .
Missed Call Notification
When an incoming call is not answered, a Missed Call message is
displayed on your screen.
To dial a missed call back press .
Calling Emergency Numbers
You can place calls to 911 (dial and press ),
even if your phone is locked or your account is restricted.
Warning: After initiating a 911 call, you must end the call by pressing
. This notifies the phone that the 911 call was terminated
intentionally by the user. No other calls can be made prior to terminating
the 911 call.
Warning: You can not make 911 calls when the phone is in airplane
mode and the icon " phone off " is displayed. Turn the phone back on, by
17 Phone Basics
Page 27

disabling airplane mode. For more details, see ‘Airplane Mode” on page
119.
In-Call Options
Select actions by pressing the right softkey for Options during a
call. A list of options is displayed that allows you to perform
different actions during the course of a call. The following options
are available: (To select an option, press the corresponding keypad
number or highlight the option and press .)
• (1) Mute or UnMute allows you to mute or reactivate your
phone’s microphone.
• (2) Call History checks your call log for Missed, Outgoing, and
Incoming calls. You can also erase the logs from this menu.
• (3) Contacts accesses the Contacts menu options.
• (4) 3-Way Call allows you to talk to two different people at the
same time. (For more information, see "Making a Three-Way
Call" on page 30.)
Phone Basics
• (5) Messaging allows you to check for voicemail and
notifications.
• (6) Voice Memo allows you to record the current conversation.
(For more information, see "Reviewing and Erasing Memos" on
page 94.)
• (7) Tools accesses the Tools menu options.
• (8) Phone Info displays the phone number, icon glossary, the
hardware/software version, Preferred Roaming List (PRL), the
system and the technology being used.
End-of-Call Options
After receiving a call from or making a call to a phone number that is
not in your Contacts, the phone number and the duration of the call
Phone Basics 18
Page 28

are displayed. Press the left softkey to Save the new number in
your Contacts. (See “Saving a Phone Number” below for more
information.)
Note: The End-of-Call options are not displayed for calls identified as
Unknown ID or Restricted number.
Saving a Phone Number
Your phone can store up to 500 Contacts numbers. Contacts entries
can store up to a total of six phone numbers, and each entry’s name
can contain up to 20 characters. (For more information, see "Adding
a New Contact" on page 48.)
To save a number from standby mode:
1. Enter a phone number.
2. Press the right softkey for Options
3. Press for Save.
4. Press to Add a New Entry.
5. Select the Type using the navigation key and press
• Home • Mobile • Fax
• Work • Pager • No Label
6. Enter the name using the keypad and press the left softkey
for Next.
7. Press the left softkey for Done.
After you have saved the number, the new Contacts entry is
displayed.
19 Phone Basics
Page 29

Finding a Phone Number
This feature allows you to search for phone numbers saved in your
address book by entering 1-4 digits of the last four digits saved.
When searching, you must enter the digits in sequential order
starting from the last digit. For example; if you have a number saved
with “1234” as the last four digits, you can enter “34” and a match
will be found. If you enter “12”, no match will be found since the
digits do not match the last two digits.
To find a phone number:
1. Enter one to four digits of the last four digits of a phone
number and press the right softkey for Options and
select Find. (A list of possible matches is displayed.)
2. Use your navigation key to display the desired entry.
3. To dial the number, highlight it and press .
Dialing and Saving Phone Numbers With Pauses
You can dial or save phone numbers with pauses for use with
automated systems, such as voicemail or credit card billing
Phone Basics
numbers.
There are two types of pauses available on your phone:
• Hard Pause sends the next set of numbers when you press
.
• 2-Second Pause automatically sends the next set of numbers
after two seconds.
Note: You can have multiple pauses in a phone number and combine
2-second and hard pauses.
To dial or save phone numbers with pauses:
1. Enter a phone number from standby mode.
Phone Basics 20
Page 30

2. Press the right softkey for Options and select Hard
pause or 2-sec pause. Hard pauses are displayed as a “P”
and 2-second pauses as a “T”.
3. Enter additional numbers.
4. Press to dial the number.
— or—
Press the right softkey for Options and select Save to
save the number in your Contacts.
When dialing a number with a hard pause, press to send the
next set of numbers.
Abbreviated Dialing
Abbreviated dialing allows you to set a five or six-digit prefix for
commonly used phone numbers. When abbreviated dialing is On,
you can enter the last four or five digits of any phone number that
matches the five or six digit prefix only. The number is dialed using
the prefix numbers plus the last four or five digits entered.
To set up abbreviated dialing:
1. Press the left softkey for Menu.
2. Press for Settings.
3. Press for Others.
4. Press for Abbrev. Dial.
5. Press the navigation key up or down to select On and
press .
6. Input the five or six digit prefix and press to Save.
Making an Abbreviated Dial Call
To make a call:
1. Enter the last four or five digits of the prefix phone number.
21 Phone Basics
Page 31

2. Press the right softkey for Options, followed by
for Abbrev. Dial.
Dialing From Contacts
To dial directly from a Contacts entry:
1. Press the right softkey for Contacts.
2. Scroll left or right to search by Name, Entry, or Group.
3. Highlight the desired option and press the navigation key
down.
4. Name: Enter the first few letters of the entry’s name to
locate the desired entry.
— or —
Entry: Enter the entry number using the keypad.
Phone Basics
— or —
Group: Press the navigation key up or down to select the
desired group.
5. Scroll to highlight the desired entry and press to make
the call.
Tip: If the desired entry contains more than one phone number, scroll
left or right to display the number you wish to call and press to
make the call.
Using One-Touch/Two-Touch/Three-Touch
Speed Dialing
You can store up to 500 numbers in your phone’s speed dial memory
to make contacting friends and family as easy as pressing a few
buttons. With this feature, you can dial Speed Dial entries using one
key press for locations 1-9, two key presses for locations 10-99, and
three key presses for 100-500.
Phone Basics 22
Page 32

To use One-Touch Dialing for Speed Dial locations 1-9:
• Press and hold the appropriate key for approximately two
seconds. (The display confirms that the number has been
dialed when it shows “Calling...”.)
To use Two-Touch Dialing for Speed Dial locations 10-99:
1. Press the first digit.
2. Press and hold the second digit for approximately two
seconds. (The display confirms that the number has been
dialed when it shows “Calling...”.)
To use Three-Touch Dialing for Speed Dial locations 100-500:
1. Press the first digit.
2. Press the second digit.
3. Press and hold the third digit for approximately two
seconds. (The display confirms that the number has been
dialed when it shows “Calling...”.)
Note: Your phone also supports 1- 4 digit dialing. If you enter a number
using the keypad without holding the last number and then press ,
your phone will dial those digits. (For example, if you enter
and press , it dials 211, not the number stored in memory
location 211.
Entering Text
Selecting a Character Input Mode
Your phone provides convenient ways to enter words, letters,
punctuation, symbols, and numbers whenever you are prompted to
23 Phone Basics
Page 33

enter text (for example, when adding a Contacts entry or when
sending text messages).
To change the character input mode:
1. When you display a screen where you can enter text,
Press the right softkey for Options.
2. Select a character input mode:
• T9 (English) to enter characters using predictive
T9 Text Input (see page 24).
• Alpha to enter characters by tapping the keypad
(see page 25).
• Symbol to enter symbols (see page 26).
• Number to enter numbers (see page 26).
Entering Characters Using T9 Text Input
T9 Text Input lets you enter text in your phone by pressing keys just
once per letter. (To select the T9 (English) mode when entering text,
see “Selecting a Character Input Mode” above.)
Phone Basics
T9 Text Input analyzes the letters you enter using an intuitive word
database and creates a suitable word. (The word may change as you
type.) If the word you want does not display after you have entered all
the letters, press to scroll through additional word selections.
To accept a word and insert a space, press .
If you make a mistake, press to erase a single character.
Press and hold to delete an entire entry.
To enter text using T9:
1. From the text entry screen (for example, a new event in
scheduler), press the right softkey for Options and
select T9 (English).
2. Use your keypad to enter the new event. (For example, to
enter “Meeting”, press once, twice, once,
once, once, and once.)
Phone Basics 24
Page 34

Entering Characters by Tapping the Keypad
To enter characters by tapping the keypad, select the Alpha mode
(see “Selecting a Character Input Mode” on page 23). Press the
corresponding key repeatedly until the desired character appears.
When the icon is shown, the first letter of the first word is
capitalized and following letters are lowercase. The key can be
used to select the case desired.
To enter text using Alpha:
1. From a text entry screen (for example, a Contacts entry),
press the right softkey for Options and select Alpha.
2. Use your keypad to enter the contact's name. (For example,
to enter "Bill", press twice, three times,
three times, and then after a brief pause three times
again.)
Characters scroll in the following order:
• . , - ? ! ’ @ : / 1
• A B C 2
• D E F 3
• G H I 4
• J K L 5
• M N O 6
After a character is entered, the cursor automatically advances to the
P Q R S 7
T U V 8
W X Y Z 9
0
Space
Change case
next space after two seconds or when you enter a character on a
different key.
25 Phone Basics
Page 35

Entering Numbers and Symbols
To enter numbers:
• Select the Number mode and press the appropriate key.
(See “Selecting a Character Input Mode” on page 23.)
To enter symbols:
Select the Symbol mode. (See “Selecting a Character Input Mode”
on page 23.) To enter a symbol, press the appropriate key indicated
on the display. Use the navigation keys to scroll up or down to see
additional symbols.
Using Voicemail
Setting Up Your Voicemail
All unanswered calls to your phone are automatically transferred to
Phone Basics
your voicemail, even if your phone is in use or turned off. Therefore,
you will want to set up your Voicemail and personal greeting as soon
as your phone is activated.
To set up your voicemail:
1. Press and hold .
2. Follow the system prompts to create your passcode, record
your greeting, and record your name announcement.
Note: You must request this feature from your service provider for it to
work correctly.
Note: The voicemail setup process may vary in certain Affiliate areas.
Voicemail Notification
There are several ways your phone alerts you of a new message:
• By displaying a message on the screen.
Phone Basics 26
Page 36

• By sounding the assigned ringer type.
• By the LED blinking red.
• By displaying at the top of your screen.
New Voicemail Message Alerts
When you receive a new voice message, your phone alerts you and
prompts you to call your voicemail.
To call your voicemail:
• Press and hold .
To display your Missed Calls:
• Press the left softkey , followed by .
Important: When you are roaming off the network, you may not receive
notification of new voicemail messages. It is recommended that you
periodically check your voicemail by dialing 1 + area code + your Phone
Number. When your voicemail answers, press and enter your
passcode. You will be charged roaming rates when accessing voicemail
while roaming off the network.
Note: Your phone accepts messages even when it is turned off. However,
you are only notified of new messages when your phone is turned on and
you are in a Service Area.
Retrieving Your Voicemail Messages
You can review your messages directly from your phone or from any
other touch-tone phone. To dial from your phone, you can either speed
dial your voicemail or use the menu keys.
Using One-Touch Message Access
27 Phone Basics
Page 37

• Press and hold . Follow the system prompts.
Using the Menu Keys on Your Phone to Access Your Messages
1. Press the left softkey for Menu.
2. Press for Messaging.
3. Press for Voicemail.
4. Press to call the voicemail server.
Note: You may be charged for airtime minutes when you are accessing
your voicemail from your phone.
Clearing the Message Icon
Your phone may temporarily continue to display the message icon
after you have checked your voice and text messages.
To clear the icon from the display screen:
1. Press the left softkey for Menu.
Phone Basics
2. Press for Messaging.
3. Press for Voicemail.
4. Press for Clear Envelope.
5. Press the navigation key up to select Yes and press .
Using Caller ID
Caller ID allows people to identify a caller before answering the
phone by displaying the number of the incoming call. If you do not
want your number displayed when you make a call, just follow these
easy steps.
To block your phone number from being displayed for a specific
outgoing call:
Phone Basics 28
Page 38

1. Press .
2. Enter the number you want to call.
3. Press .
To permanently block your number, call the Customer Service
department of your network service provider.
Note
turn off after a period of time, pressing will switch the back light
back on. Either press and hold or press twice to answer the
second call when the LCD is turned off. To avoid this problem, set the
back light to "flip open". For more inforamtion, see "Changing the
Backlight Time Length" on page 109.
: If you have not subscribed to Caller ID, and the back light is set to
Responding to Call Waiting
When you’re on a call, Call Waiting alerts you of incoming calls by
sounding two beeps. Your phone’s screen informs you that another
call is coming in and displays the caller’s phone number (if it is
available and you are in digital mode).
To respond to an incoming call while you’re on a call:
• Press . (This puts the first caller on hold and answers
the second call.)
To switch back to the first caller:
• Press again.
: For those calls where you don’t want to be interrupted, you can
Tip
temporarily disable Call Waiting by pressing
29 Phone Basics
Page 39

before placing your call. Call Waiting is automatically reactivated
once you end the call.
Making a Three-Way Call
With Three-Way Calling, you can talk to two people at the same time.
When using this feature, the normal airtime rates will be charged for
each of the two calls.
To make a Three-Way Call:
1. Enter a number you wish to call and press .
2. Once you have established the connection, press the right
softkey for Menu, followed by for 3-Way Call.
3. Dial the second number and press .
Phone Basics
4. When you’re connected to the second party, press
again to begin your three-way call.
If one of the people you called hangs up during your call, you and the
remaining caller stay connected. If you initiated the call and are the
first to hang up, all three callers are disconnected.
Tip: You can also begin a Three-Way Call by displaying a phone number
stored in your Contacts, Call History, or Messaging. To call the third
party, press .
Note: Call Waiting and Three-Way Calling are not available while roaming
off the network.
Phone Basics 30
Page 40

TTY Use With Handset
A TTY (also known as a TDD or Text Telephone), is a telecommunications
device that allows people who are deaf or hard of hearing, or who have
speech or language disabilities, to communicate by telephone.
Your phone is compatible with select TTY devices. Please check with
the manufacturer of your TTY device to ensure that it supports digital
wireless transmission. Your phone and TTY device will connect via a
special cable that plugs into your phone's headset jack. If this cable
was not provided with your TTY device, contact your TTY device
manufacturer to purchase the connector cable.
To turn TTY Mode on or off:
1. Press followed by the left
softkey . (A brief explanation of TTY Mode will display.)
2. Press the left softkey again to continue.
3. Press the navigation key up or down to select Enable TTY
or Disable TTY and press to save and exit.
Note: In TTY Mode when your headset is plugged in, your phone will
display the TTY access icon. If TTY mode is enabled, the headset cannot
be used.
IMPORTANT 911 Emergency Calling: We recommend that TTY users
make emergency calls by other means, including Telecommunications
Relay Services (TRS), analog cellular, and land line communications.
Wireless TTY calls to 911 may be corrupted when received by public
safety answering points (PSAPs) rendering some communications
unintelligible. The problem encountered appears related to TTY
equipment or software used by PSAPs. This matter has been brought to
the attention of the FCC, and the wireless industry and PSAP community
are currently working to resolve this.
31 Phone Basics
Page 41

Roaming
Understanding Roaming
Recognizing Icons on the Display Screen
Your phone’s display screen always lets you know when you’re off the
network. The following chart indicates what you’ll see depending on
where you’re using your phone.
Roaming Indicator Analog Indicator
Network
Other Digital Networks
Roaming
Note: You will pay a higher per-minute rate for roaming calls.
Roaming on Other Digital Networks
When you’re roaming, your call quality and security will be similar to
the quality you receive when making calls on your home network. You
may not be able to access certain features, such as web services.
Roaming on Analog Networks
When you roam on analog networks, you will experience a similar
quality provided by other analog carriers today. Although some
features, such as Mobile Browser and Voice Command, will be
unavailable, you can still make and receive calls and access voicemail.
You will experience a few differences:
• You are more likely to experience static, cross-talk, fade-out,
and dropped calls.
Roaming 32
Page 42

• Some features which are standard on the network, such as call
waiting, web browser, and direct international dialing, are
unavailable.
• Though callers can leave voicemail messages while you are
roaming, you will not receive notification until you return to the
network. While roaming, you can periodically check your
voicemail for new messages by dialing 1+area code+your
Phone Number. Press when you hear your greeting and
enter your passcode at the prompt.
• There are security and privacy risks (eavesdropping and
cloning) that exist with conventional analog services today.
• Your battery needs recharging sooner when you use your
phone in analog mode, whether in network or roaming.
Note: If you’re on a call when you leave the network and enter an area
where roaming is available, your call is dropped. If your call is dropped in
an area where you think service is available, turn your phone Off and On
again to reconnect to the network.
Setting Your Phone’s System
Your phone allows you to control your ability to roam. By using the
Roaming menu option, you can determine which signals your phone
accepts. Choose from three different settings on your phone to
control your roaming experience:
1. Press the left softkey for Menu.
2. Press for Settings.
3. Press for Others.
4. Press for Set System.
5. To select an option, highlight it and press .
33 Roaming
Page 43

• Automatic: This setting seeks service. When service is
unavailable, the phone searches for an alternate system.
• Home Only: This setting allows you to access the home
network only and prevents roaming on other networks.
• Digital Only: This setting allows you to access digital
service only, preventing access on analog networks.
• Analog: This setting allows you to access analog service
only, preventing access on digital networks.
• AMPS Home: This setting allows you to use your carrier’s
analog service only, preventing access on digital or other
analog networks.
Set NAM
This setting allows you to associate your mobile identification
number (MIN) to your phone’s electronic serial number (ESN).
1. From the standby screen, press
followed by for Set NAM.
2. Enter the service code provided to you by your service
provider.
Roaming
Roaming 34
Page 44

Navigating Through Menus
Menu Styles
Your phone can display the various features and options in one of
two different menu styles, 3x3 and List. By default, your handset is
set to the List menu style.
Note: Key commands for the first menu level in the 3x3 style differ
from those in this guide. For more information on changing the menu
style between 3x3 and List, see "Changing the Phone’s Menu Style"
on page 36.
List Style
List style displays all the various menu choices in a vertical list. As
you navigate through the menu, menu options are highlighted. You
can use your navigation keys to scroll through menus quickly and
easily. The scroll bar at the right of the menu keeps track of your
position in the menu at all times.
• To navigate through a menu, simply press the navigation key
up or down. If you are in a first-level menu, such as Settings,
you may also navigate to the next menu by pressing the
navigation key left or right.
• You can also press the number corresponding to the menu
choice. For example, if you want to view your last incoming
call:
1. Press the left softkey for Menu.
2. Press for Call History.
3. Press for Incoming Calls.
35 Navigating Through Menus
Page 45

3x3 Style
3x3 style displays the first level menu choices with graphical icons
arranged in a grid pattern. In other menu levels, choices are arranged
in a vertical list, similar to List style.
• To navigate through a first level menu, simply press the
navigation key in the direction towards your desired menu
choice. The currently-highlighted menu choice is enlarged and
has a text label beneath it. Once the desired menu option is
highlighted, press
.
• You can also press the number corresponding to the menu
choice. For example, if you want to view your last incoming
call:
1. Press the left softkey for Menu.
2. Press for Call History.
3. Press for Incoming Calls.
Changing the Phone’s Menu Style
Your phone allows you to choose how the menu appears on your
display screen.
To select the display’s menu style:
1. Press the left softkey for Menu.
Navigating
2. Press for Settings.
3. Press for Display.
4. Press for Menu Style.
5. Press the navigation key up or down to select 3x3 Style or
List Style and press to save and exit.
Backing Up Within a Menu
To go to the previous menu:
• Press .
Navigating Through Menus 36
Page 46

To return to standby mode:
• Press .
1: Send Message
2: Text Message
1: Inbox
2: Outbox
Viewing the Menus
Menu Diagram
The following list outlines your
phone’s menu structure in List
mode:
1: Call History
1: Missed Calls
2: Outgoing Calls
3: Incoming Calls
4: All Recent
5: Erase History
1: Missed Calls
2: Outgoing Calls
3: Incoming Calls
4: All Recent
6: Air Time
1: Last Call
2: Total Calls
2: Contacts
1: Find
2: Add New Entry
3: My Phone #
4: Group Setting
1: Family
2: Friends
3: Colleague
4: VIPs
5: Unassigned
5: Memory
3: Messaging
3: Drafts
4: Send Text
3: Picture Mail
1: Inbox
2: Send Picture
4: Web Alert
5: Voicemail
1: Call Voicemail
2: Details
3: Clear Envelope
6: Settings
1: Notifications
1: Message and Icon
2: Icon only
2: Sending Options
1: Priority
1: Normal
2: Urgent
2: Call Back #
1: None
2: Phone Number
(xxx-xxx-xxxx)
3: Other
3: Preset Messages
1: Can’t talk right now.
Send me a message.
2: Call me
3: Where are you?
4: Can you pick up
5: Meet me at
6: Let’s get lunch.
7: The meeting has been
cancelled.
37 Navigating Through Menus
Page 47

8: I’ll be there at
3: Online Albums
9: What time does it
start?
10: I love you!
11 - 20: [Empty]
4: Edit Signature
1: On
2: Off
5: Message Alerts
1: Alert Volume
2: Alert Type
3: Reminder
4: Alert on Call
6: Save in Outbox
1: Yes
2: No
7: Auto Delete
1: Yes
2: No
8: Alert Setup
1: Yes
2: No
9: Voice Mail #
4: Pictures
1: Camera
2: My Pictures
1: In Camera
2: Saved to Phone
1: Voicemail
2: Text Message
3: Picture Mail
4: Web Alert
1: Off
2: Once
3: Every 2 min
1: Off
2: On
1: View Albums
2: Upload Picture
4: Account Info
5: Cam. Key Guard
1: On
2: Off
5: Downloads
1: Games
1: Get New
2: Ringers
1: Get New
3: Screen Savers
1: Get New
Navigating
4: Applications
1: Get New
6: Web
1: Start Browser
2: Web Guard
1: None
2: To Start
3: To End
4: Both
7: Voice Service
1: Voice Dial
2: Voice Memo
1: Record
2: Review
8: Tools
1: Today
2: Scheduler
3: World Time
4: Alarm Clock
1: Alarm #1
2: Alarm #2
3: Alarm #3
5: Task List
Navigating Through Menus 38
Page 48

6: Memo Pad
1: 3x3 Style
7: Calculator
8: Countdown
9: Settings
1: Display
1: Screen Saver
1: Main LCD
1: Preset Image
1: Tea Time
2: Parrots
3: Patterns
4: Dog
5: Cliff
6: Calendar
7: World Time
8: Analog 1
9: Analog 2
2: List Style
4: Incoming Call
1: With Caller ID
1: No Image
2: Downloads
3: My Pictures
2: No Caller ID
1: No Image
2: Downloads
3: My Pictures
5: Greeting
1: 1X Ready
2: Custom
6: Backlight
1: Main Display
1: Flip Open
10: Digital
11: Kitty
12: Snowboard
2: Downloads
3: My Pictures
1: In Camera
2: Saved To
Phone
2: External LCD
1: Digital 1
2: Digital 2
3: Analog 1
4: Analog 2
5: Analog 3
6: Analog 4
7: My Pictures
2: 15 seconds
3: 30 seconds
4: 1 minute
5: 3 minutes
2: Keypad
1: Off
2: 15 seconds
3: 30 seconds
4: 1 minute
5: 3 minutes
6: 10 minutes
3: Pwr Save Mode
1: On
2: Off
7: LCD Contrast
1: Main LCD
2: Slide Show
1: In Camera
2: Saved To Phone
3: Menu Style
39 Navigating Through Menus
2: External LCD
8: Service Light
1: On
2: Off
Page 49

9: Dialing Font
2: Off
1: Color
1: Basic
2: Rainbow
3: Monochrome
4: Hyphenate
2: Size
1: Large
2: Normal
2: Sounds
1: Ringer Volume
1: Calls
2: Messages
3: Alarms
2: Ringer Type
1: Voice Calls
1: With Caller ID
4: Disconnect
1: On
2: Off
5: Fade
1: On
2: Off
6: Roam
1: On
2: Off
7: Power On/Off
1: On
2: Off
8: Flip Sound
Navigating
1: On
2: Off
4: Key Tone
2: No Caller ID
2: Messages
1: Voicemail
2: Page
3: Text Message
4: Picture Mail
5: Web Alerts
3: Schedule
4: Roam Ringer
1: Normal
2: Distinctive
3: Alerts
1: Minute Beep
1: On
2: Off
2: Service
1: Tone Type
1: Normal
2: Piano
3: Beep
2: Tone Level
5: Tone Length
1: Short
2: Long
6: App. Volume
1: Sound
2: Vibrate
1: On
2: Off
3: Security
1: Lock Phone
1: Unlocked
1: On
2: Off
3: Connect
1: On
2: On Power-Up
3: Lock Now
2: Lock Pictures
1: On
Navigating Through Menus 40
Page 50

2: Off
3: Reject Less
3: Change Lock
4: Restriction
1: Allow All
2: Contacts Only
3: Special # Only
5: Special #
1: 911
2: *911
3: #911
6: Erase
1: Erase Contacts
1: Yes
2: No
2: Erase Downloads
1: Yes
2: No
2: Names
1: Reject More
2: Recommended
3: Reject Less
3: Choice Lists
1: Name Dialing
1: Automatic
2: Always On
3: Always Off
2: Digit Dialing
1: Automatic
2: Always On
3: Always Off
3: Contacts
1: Automatic
2: Always On
3: Erase Pictures
1: Yes
2: No
7: Reset Phone
1: Yes
2: No
8: Reset Picture Account
1: Yes
2: No
4: Voice Service
1: Settings
1: Digit Dialing
1: Adapt Digits
2: Reset Digits
1: Yes
2: No
3: Always Off
4: Sound
1: Prompts
1: On
2: Off
2: Digits
1: On
2: Off
3: Names
1: On
2: Off
4: Name Settings
1: Speed
1: Faster
2: Recom-
mended
2: Sensitivity
1: Commands
1: Reject More
2: Recommended
41 Navigating Through Menus
3: Slower
2: Volume
1: Louder
Page 51

2: Recom-
1: Any Key
5: Voice Launch
1: Talk Only
2: Talk and Flip
6: About
5: Airplane Mode
1: On
2: Off
6: Launch Pad
1: Up Key
1: Contacts
2: Voice Memo
3: Scheduler
4: Messaging
5: Voice Dial
mended
3: Softer
2: Talk Key
3: Flip Open
3: Auto Answer
1: Yes
2: No
4: Language
1: English
2: French
5: Set System
1: Automatic
2: Home Only
3: Digital Only
4: Analog
Navigating
5: AMPS Home
6: Location
1: On
6: Ringer Type
7: Downloads
8: Display
9: Alarms
10: Calculator
11: Web
12: Inbox
13: Send Text
14: Tools
2: Down Key (Options same
as Up key)
3: Left Key (Options same
as Up key)
4: Right Key (Options same
as Up key)
7: Others
2: Off
8: Phone Info
1: Phone Number
2: Icon Glossary
3: Version
4: Advanced
In Use Menu
1: Mute/Unmute
2: Call History
3: Contacts
4: 3-Way Call
5: Messaging
6: Voice Memo
7: Tools
8: Phone Info
1: Abbrev. Dial
1: On
2: Off
2: Call Answer
Navigating Through Menus 42
Page 52

Camera Menu
6: Manual
1: Flash
1: Off
2: On this Shot
3: Always On
2: Self Timer
1: Off
2: 5 Sec
3: 10 Sec
3: Fun Frames
1: Off
2: Dollar
3: Love
4: Memories
5: Merry Christmas
6: Movie Star
7: Rainy Day
2: Brightness
6: Settings
1: Resolution
1: High:640*480
2: Med:320*240
3: Low:160*120
2: Quality
1: Fine
2: Normal
3: Economy
3: Shutter Sound
1: Shutter 1
2: Shutter 2
3: Shutter 3
4: Shutter 4
5: Shutter 5
8: Roses for Love
9: Stars
10: Top Secret
11: Beans
4: Color Tones
1: Auto
2: Monochrome
3: Sepia
4: Warm
5: Cool
6: Fog
7: Antique
8: Negative
5: Controls
1: White Balance
1: Auto
6: Shutter 6
7: Say Cheese
4: Auto Erase
1: On
2: Off
7: Review Pictures
2: Sunny
3: Cloudy
4: Tungsten
5: Fluorescent
43 Navigating Through Menus
Page 53

Call History
Viewing History
You’ll find the Call History feature very helpful. It is a list of the last 20
phone numbers (or Contacts entries) for calls you missed, made, or
accepted. Call History makes redialing a number fast and easy. It is
continually updated as new numbers are added to the beginning of
the list and the oldest entries are removed from the bottom of the list.
Each entry contains the phone number (if it is available) and Contacts
entry name (if the phone number is in your Contacts). Duplicate calls
(same number and type of call) may only appear once on the list.
To view a Call History entry:
1. Press the left softkey for Menu.
2. Press for Call History.
• Press for Missed Calls.
• Press for Outgoing Calls.
• Press for Incoming Calls.
• Press for All Recent.
Tip: You can also access your list of recent calls from the idle screen
by pressing the key.
Call History Options
For additional information on a particular call, highlight a Call History
entry and press . The time and date of the call is displayed.
Call History
Tip: You can also scroll between Call History entries by pressing the
navigation key left or right.
Call History 44
Page 54

Press the right softkey for Options to select one of the following
options for this entry:
• Send Msg to send a text or picture message to this phone
number.
• Save to create a new Contact for this phone number.
• Prepend to add a prefix before dialing this phone number.
• Erase to erase this number from your Call History.
Making a Call From Call History
To place a call from Call History:
1. Press the left softkey for Menu.
2. Press for Call History.
3. Select Missed Calls , Outgoing Calls ,
Incoming Calls , or All Recent .
4. Highlight the entry you want to call and press to dial
the number.
Tip: For recent calls, you can also press the key to show your
recent calls. Highlight the entry you want to call and press to
dial the number.
Note: You cannot make calls from Call History to entries identified as
Unknown or Restricted.
45 Call History
Page 55

Saving a Phone Number From Call History
Your phone can store up to 500 Contacts entries. Each contact entry
can store up to a total of six phone numbers, and each entry’s name
can contain up to 20 characters.
To save a phone number from Call History:
1. Press the left softkey for Menu.
2. Press for Call History.
3. Select Missed Calls , Outgoing Calls ,
Incoming Calls , or All Recent .
4. Highlight the entry you want to save and press .
5. Press the left softkey to Save the number.
Follow the onscreen prompts to complete the entry. (See
"Saving a Phone Number" on page 19.)
After you have saved the number, the new Contacts entry is
displayed.
Note: You cannot save phone numbers already in your Contacts or from
calls identified as Unknown ID or Restricted.
Prepending a Phone Number From
Call History
If you need to make a call from Call History and you happen to be
outside your local area code, you can add the appropriate prefix by
prepending the number.
To prepend a phone number from Call History:
Call History
1. Press the left softkey for Menu.
2. Press for Call History.
Call History 46
Page 56

3. Select Missed Calls , Outgoing Calls ,
Incoming Calls , or All Recent .
4. Highlight the entry you want to prepend and press .
5. Press the right softkey for Options, and select Prepend.
6. Use the keypad to enter the desired numbers.
7. Press or the left softkey to Call.
Erasing Call History
To erase an individual Call History entry, see “Call History Options”
on page 44.
To erase Call History:
1. Press the left softkey for Menu.
2. Press for Call History.
3. Press for Erase History.
4. Select Missed Calls , Outgoing Calls ,
Incoming Calls , or All Recent .
5. Using the navigation key, highlight Yes, and press .
Air Time
Air time allows you to check the time of the last call or the total air
time since your phone was activated on the network. These times
are not meant for billing purposes. To view the air time:
1. Press the left softkey for Menu.
2. Press for Call History.
3. Press for Air Time.
4. Press for Last Call or for Total Calls.
47 Call History
Page 57

Using Contacts
Adding a New Contact
Your phone can store up to 500 Contact numbers. Each contact entry
can store up to a total of six phone numbers, and each entry’s name
can contain up to 20 characters.
To add a new entry:
1. Enter a new phone number and press the right softkey
for Options.
2. Press for Save. Press to Add a New Entry.
3. Select the Type using the navigation key and press
• Home • Mobile • Fax
• Work • Pager • No Label
4. Enter the name using the keypad and press the left softkey
for Next.
5. Press the left softkey for Done.
After you have saved the number, the new Contacts entry is
displayed.
Finding Contacts
There are several ways to display your Contacts entries: by name, by
speed dial number, by group, and by voice dial recognition. To find an
entry from the Contacts menu:
1. Press the left softkey for Menu.
Using Contacts
2. Press for Contacts.
3. Press for Find.
Using Contacts 48
Page 58

4. Press the navigation key left or right to search by Name,
Entry, or Group.
5. Once the desired option is highlighted, press the navigation
key down.
6. Enter the first few letters, entry # or scroll down to select
the group to locate the desired entry.
7. Scroll to highlight the name and press to make the
call.
Adding a Phone Number to an Existing
Contact Entry
To add a phone number to an Existing Contact entry:
1. Press the left softkey for Menu.
2. Press for Contacts.
3. Press for Find.
4. Select the desired entry and press .
5. Press the right softkey , followed by for Edit.
6. Press the navigation key down until the desired label is
selected and press the right softkey for Edit.
7. Enter the phone number using the keypad and press .
8. Press the left softkey for Done.
Editing a Contacts Entry’s Phone Number
To edit an entry’s phone number:
1. Press the left softkey for Menu.
2. Press for Contacts.
49 Using Contacts
Page 59

3. Press for Find.
4. Select the desired entry and press .
5. Press the right softkey , followed by to Edit the
entry.
6. Select the phone number (home, work, etc.) to be edited,
and press the right softkey to Edit the entry.
7. Press and hold to erase the entire number or press
once to erase just the last digit.
8. Enter the phone number using the keypad and press .
9. Press the left softkey for Done.
Selecting a Ringer Type for an Entry
You can assign a ringer type to a Contacts entry so you can identify
the caller by the ringer type. (See “Ringer Types” on
page 112.)
To select a ringer type for an entry:
1. Press the left softkey for Menu.
2. Press for Contacts.
3. Press for Find.
4. Select the desired entry and press .
5. Press the right softkey , followed by to Edit the
entry.
6. Press the navigation key down until Default Ringer is
selected and press the right softkey for Edit.
Using Contacts
7. Press the navigation key to the left or right and highlight the
desired Ringer Category.
8. Press the navigation key down.
Using Contacts 50
Page 60

9. Press the navigation key to the left or right to highlight and
listen to the desired Ringer and press to save.
10. Press the left softkey for Done.
Secret Contacts Entries
You can hide an entry’s phone number(s) and require your lock code
to edit the entry by making it secret. The entry name is still displayed,
but the entry’s phone numbers are replaced with “(SECRET).”
To make an entry secret:
1. Press the left softkey for Menu.
2. Press for Contacts.
3. Press for Find.
4. Select the desired entry and press .
5. Press the right softkey , followed by to Edit the
entry.
6. Press the navigation key down until Secret is selected.
7. Press the navigation key left or right until Secret-ON is
displayed in the Secret field.
8. Press the left softkey for Done.
To make an entry public:
1. Display a Contacts entry that is marked secret.
2. Press the right softkey , followed by to edit the
entry.
3. Enter your lock code.
4. Press the navigation key down until Secret is selected.
5. Press the navigation key left or right until Secret-OFF is
displayed in the Secret field.
51 Using Contacts
Page 61

6. Press the left softkey for Done.
Tip: If you can’t recall your lock code, try using the last four digits of
your Phone Number, your year of birth, or try 0000. If none of these
work, call Customer Service at the number listed on the back of the User
Guide cover.
Changing the Group Name
You can associate a preset group name to your entries to help you
sort them easier in the Contacts. The preset group names already
programmed into your phone are:
• Family • VIPs
• Friends • Unassigned
• Colleague
To associate an existing number located in your Contacts:
1. Press the left softkey for Menu.
2. Press for Contacts.
3. Press for Find.
4. Select the desired entry and press .
5. Press the right softkey , followed by to edit the
entry.
6. Press the navigation key down until the Group is selected.
7. Press the navigation key left or right until the desired group
name is displayed.
8. Press the left softkey for Done.
Using Contacts
Using Contacts 52
Page 62

Messaging
Now you can exchange text and multimedia messages right from
your phone and stay connected without saying a word. Within the
Messaging menu you can also view the number of voicemail
messages you have waiting for you. For more information on using
your phone’s voicemail feature, see “Using Voicemail” on page 26.
The following folders are available in the Messaging menu:
• Send Message - allows you to send text messages.
• Text Message - allows you to create and send new text
messages, as well as check your Text Message Inbox
• Picture Mail - allows you to create and send new
picture messages, as well as check your Picture Mail
Inbox.
• Web Alert - allows you to receive an alert that a new web
message is available.
• Voicemail - allows you to view or listen to any voice
messages saved in the phone.
• Settings - allows you to configure the messaging options.
Erasing Text Messages
To erase messages:
1. Press the left softkey for Menu.
2. Press for Messaging.
3. Select for Text Message.
4. Press for Inbox.
5. Press the right softkey , followed by:
• for Erase. Using the navigation keys select Erase
53 Messaging
This to delete the currently highlighted message, Erase
Page 63

Old to delete all read messages, or Erase All to delete all
messages in your Inbox and press .
• for Erase Multiple. Scroll through your list of
messages and press
want to erase. When you are finished, press the left softkey
for
Erase.
to check or uncheck messages you
Text Messaging
Using Text Messaging
With Text Messaging, you can use a person’s wireless phone number
to send instant text messages from your web enabled phone to their
messaging-ready phone – and they can send messages to you. When
you receive a new message, you’ll automatically be notified with a
one-way text message.
In addition, messaging includes a variety of pre-set messages, such as
“I’m running late, I’m on my way,” that make composing messages
fast and easy.
To send a text message:
1. Press the left softkey for Menu.
2. Press for Messaging.
3. Press for Send Message.
4. Using the navigation keys, select Text and press .
5. Enter the phone number or email address of the person to
whom you’re sending a message and press .
Tip: If you wish to send your text message to multiple numbers or
addresses, repeat step 5. You can send a text message to a
maximum of 10 numbers.
Messaging
Messaging 54
Page 64

6. Press the left softkey for Next.
7. Enter your message using the keypad.
8. Press the left softkey for Next when finished.
9. Press the left softkey to Send. If you wish to change
your text message options, press the right softkey for
Options and select one of the following:
• Edit allows you to reenter the message recipients and the
message.
• Priority allows you to set the priority level between Normal
and Urgent.
• Call Back # allows you to enter or omit a call back number
in your message.
• Save to Drafts stores a copy of the text message in your
Drafts folder.
To read and Reply to a Text Message:
When you receive a text message, you will see “New Text Message”
on your display screen. To reply to the text message:
1. While the message is open, select the left softkey for
Reply.
2. Compose your reply or use a pre-composed messages.
• Use your keypad to type a message. Use the right softkey
to select a character input mode.
• To use pre-written messages press the right softkey
for Options, followed by for Preset Msg. Press the
corresponding number on the keypad to enter the preset
3. Press .
4. Press the left softkey to Send.
55 Messaging
message response.
Page 65

Note: The last preset message used automatically moves to the top of
the list when you send a new message.
Message Setup Options
There are several options associated with text messaging. The
Message Setup menu allows you to customize the options to fit your
preferences. The message options are divided into the following
categories:
• Notifications: Allows you to configure whether new
messages will appear with a pop-up message or with an
icon.
• Sending Options: Allows you to configure the default
Priority level and Call Back number for messages.
• Preset Messages: Allows you to edit or change the default
pre-written messages.
• Edit Signature: If the option is On, your signature will be
appended to each message you send.
• Message Alerts: Allows you to configure the Volume level,
Type, Message Reminder and Alert on Call settings for
Message Alerts.
• Save In Outbox: If this option is On, a copy of the
message is automatically saved in the Outbox after being
sent.
• Auto Delete: If this option is On, old messages are
automatically deleted from the mail boxes when they
become full. This allows the new messages to be added to
a full mail box without having to manually delete old
Messaging
messages to free up space first.
• Alert Setup: Allows you to configure to auto-connect web
alerts when possible.
Messaging 56
Page 66

• Voice Mail #: Allows you to configure the voicemail
number.
To access the Settings menu:
1. Press the left softkey for Menu.
2. Press for Messaging.
3. Press for Settings.
Notifications
The Notifications options allow you to select whether a message in a
popup window appears to alert you that new messages are waiting.
To turn On the Display Popup option:
1. In the Settings menu, press for Notifications.
2. Select Message and Icon using the navigation key and
press to select.
Sending Options
The Sending Options allow you to configure the Priority and Call Back
number for outgoing messages. Once configured, these options are
the default settings for any new messages that are created.
Priority
There are two priority levels associated with text messaging. They
are:
• Normal: this option sends the message as normal with
regular delivery.
• Urgent: this option sends the message at the highest level
and alerts the recipient that it is urgent.
This setting allows you to select the default priority level when
creating new messages. To select the priority level:
1. In the Settings menu, press for Sending Options.
57 Messaging
Page 67

2. Press for Priority.
3. Select Normal or Urgent using the navigation key and press
to select.
Call Back Number
This option allows you to enter a call back number that is
automatically attached to your outgoing messages. To access the call
back number option:
1. In the Settings menu, press for Sending Options.
2. Press for Call Back #.
3. Use the navigation key to highlight either your phone # or a
custom # and press .
4. For the custom call back #, press and hold to erase
the existing number. Enter the number using the keypad and
press to save.
Preset Messages
Preset messages are used to enter common responses to questions
often received in text messages. A preset message can be selected
and automatically entered into the message. Preset messages can
also be changed to whatever you want by editing the 20 pre-set
entries already stored in your phone. To edit a preset message:
1. In the Settings menu, press for Preset Messages.
2. Press the navigation key up or down to highlight the
desired message or available entry and press to edit.
3. Press and hold to erase the message. Enter your
new message or edit the existing one using the keypad and
Messaging
press to save.
Messaging 58
Page 68

Note: When you send a message using Preset Messages, the last
message selected automatically displays as the first choice when sending
a new message.
Edit Signature
The Edit Signature menu allows you to create a signature of up to 32
characters that is automatically appended to all your text messages.
To edit your signature, or to turn signatures on or off:
1. In the Settings menu, press for Edit Signature.
2. Press the navigation key up or down to highlight On or Off
and press .
3. If signatures are on, your current signature is now
displayed. Press and hold to erase the signature.
Enter your new signature or edit the existing one using the
keypad and press the left softkey or to save.
Message Alerts
The Message Alerts menu allows you to configure the volume and
message reminder default settings for voicemail, text messages, and
web alerts.
Alert Volume
This allows you to select the volume level for message alerts for
voicemail, text messaging, and web alerts. The level can be set to
Silence All, Vibrate, 1-Beep, or a volume level between 1-8. To set the
volume:
1. In the Settings menu, press for Message Alerts.
2. Press for Alert Volume.
3. Press the navigation key left or right to select the desired
volume level and press to save.
59 Messaging
Page 69

Alert Type
This allows you to select the ringer type for voicemail, text
messaging, and web alerts. Any ringer saved in the phone can be
used as the default ringer. Ringers that are downloaded can also be
assigned. To set the ringer type:
1. In the Settings menu, press for Message Alerts.
2. Press for Alert Type.
3. Press:
• for Voicemail
• for Text Message
• for Picture Mail
• for Web Alert
4. Press the navigation key left or right to select between Ring
Tones, Melodies, Downloaded, or Single Tones.
5. Press the navigation key down to preview the first ringer.
Press left or right to preview the other ringers associated
with the ringer group selected. When finished, press to
Save the desired ringer.
Reminder
This allows you to configure how often the reminder for new
messages is sounded or displayed on the phone. The available
options are:
• Off: No reminder is sounded or heard on the phone.
• Once: A reminder is sounded or displayed once to alert you
of new messages.
Messaging
• Every 2 min: A reminder is sounded or displayed every
two minutes until the new message is read.
Messaging 60
Page 70

To set the message reminder option:
1. In the Settings menu, press for Message Alerts.
2. Press for Reminder.
3. Press the navigation key up or down to select the desired
duration and press to select.
Alert on Call
This allows you to configure whether your phone displays an alert if a
message is received while you are on call.
To set the Alert on Call option:
1. In the Settings menu, press for Message Alerts.
2. Press for Alert on Call.
3. Press the navigation key up or down to select Off or On and
press .
Save in Outbox
This allows you to save a copy of the outgoing text message in the
outbox. To turn this option On or Off:
1. In the Settings menu, press for Save In Outbox.
2. Press the navigation key up or down to select Yes or No and
press to select.
Auto Delete
This option allows you to automatically delete old messages when
the memory becomes full. This prevents new messages from being
rejected due to the Inbox being full. To turn this option On or Off:
1. In the Settings menu, press for Auto Delete.
2. Press the navigation key up or down to select Yes or No and
press to select.
61 Messaging
Page 71

Alert Setup
This option allows you to automatically connect to the web when new
web alerts are received. If this option is turned Off, you are required
to connect before the message can be viewed. To turn this option On
or Off:
1. In the Settings menu, press for Alert Setup.
2. Press the navigation key up or down to select Yes or No and
press to select.
Voice Mail Number
This option allows you to enter a return voice mail number that is
automatically attached to your outgoing messages. To access the
voice mail number option:
1. In the Settings menu, press for Voice Mail #.
2. Enter the number using the keypad and press to Save.
Picture Mail
Your phone gives you the ability to take pictures, view them using the
phone's display, and instantly send them to your friends and family.
In addition to sending your pictures to friends and family, you can
also send them to a Picture Messages Web site for storage. Cameras
can take and store pictures and the image quality is similar to what
you see on your computer screen.
Sending Picture Messages from your Phone
1. Press the left softkey for Menu.
2. Press for Messaging.
Messaging
3. Press for Picture Mail.
4. Press for Send Picture.
Messaging 62
Page 72

5. Using the navigation keys select either Camera Review to
send a picture already stored in your phone or New Picture
to take a new picture prior to sending your message.
• For more information on taking a picture, see "Taking
Pictures" on page 64.
• If you selected Camera Review, use the navigation keys to
highlight a picture and press . A checkmark appears
beside the picture. You can select more than one picture.
6. Once you have finished selecting all the pictures you wish to
send press the left softkey for Next.
7. Using the navigation keys, select the destination you wish to
send the picture(s) to and press .
8. Enter your destination and press the left softkey for OK.
You can send each message to up to 10 destinations.
9. When you have finished entering all the desired
destinations, press the left softkey for Next.
• If you wish to add text to your picture message, highlight
Message and press the right softkey for Add. Enter
your text and press the left softkey for Next.
• If you wish to add an audio clip, highlight Audio and press
the right softkey for Record. From the Add Voice Memo
screen, press the left softkey for Record to record your
message. When finished, press the left softkey for
Done.
10. Press the left softkey for Send.
63 Messaging
Page 73

Phone Camera
Taking Pictures
Taking pictures with your phone’s built-in camera is as simple as
choosing a subject, pointing the lens, and pressing a button. You can
activate camera mode and take pictures whether the phone is open or
closed.
To take a picture with the phone open:
1. Press the left softkey for Menu.
2. Press for Pictures.
3. Press for Camera.
Shortcut
illustration on page 2).
: To activate camera mode, you can also press and hold the
button twice or just press the side camera button (see
4. Using the phone’s main LCD as a viewfinder, aim the
camera lens at your subject.
5. Press either the left softkey for Capture, or the side
camera button ( ) until the shutter sounds. (Make sure
the camera is steady.)
6. After the picture is taken, press the right softkey for
Next.
7. The picture is saved in your My Pictures folder. Choose one
of the following options:
Phone Camera
• Send Msg - to send your picture to someone using Picture
Mail. For more information, see "Picture Mail" on page 62.
Phone Camera 64
Page 74

• Upload - to upload the picture to your online folder, see
"Uploading a picture to the Picture Messaging Web Site" on
page 72.
• Assign - to assign the picture to Picture ID, Screen Saver or
incoming call, see "Display Settings" on page 106.
• Erase - to erase this picture.
• Camera Mode - to take another picture.
• Review Pictures - to review the images stored in your
camera.
• To exit camera mode, press .
To take a picture with the phone closed:
1. Press and hold the side camera button located on the
side of the handset to activate the camera.
2. Point the camera lens at your subject. (You can check the
picture framing through the external display screen.)
Note
appears in reverse on the external display. The captured image will
not be saved in reverse.
: When taking a picture with the phone closed, the subject image
3. Press side camera button to take the picture. The
picture taken appears on the external LCD.
• Open the flip lid to review your image,
• Press the Side Camera button again to return to the camera
mode.
65 Phone Camera
Page 75

Camera Options:
There are several settings associated with the full-color digital
camera. These settings allow you to customize how the camera
operates when taking pictures.
To set a camera option:
1. Start the camera. For more information, see "Taking
Pictures" on page 64.
2. Press the right softkey for Options.
3. Press the number key corresponding to the desired option.
• Flash: Allows you to set the flash to Off, On This Shot, or
Always On. To get the best picture quality, do not move the
phone when the flash is on.
• Self Timer: Allows you to configure a timer for Off, 5 Sec. or
10 Sec.
• Fun Frames: Allows you to select a frame around the image
before the picture is taken. Press the navigation key left or
right to select the desired frame. Press to select and return
to the camera mode.
• Color Tones: Allows you to select between several different
color tones including Monochrome (black & white), Sepia,
Warm, Cool, Fog, Antique, Negative, and Auto by pressing the
navigation key left or right. When you find the desired tone,
press .
• Controls: Allows you to set the White Balance and
Brightness for your pictures.
Phone Camera
White Balance: Allows you to set up the white balance of
the camera automatically or manually using the different
preset modes. The modes available are:
Phone Camera 66
Page 76

• Auto: Automatically adjusts the lighting.
• Sunny: Decreases the light sensitivity for taking pictures in
full or mostly sunny conditions.
• Cloudy: Increases light sensitivity for taking pictures under
cloudy conditions.
• Tungsten: Adjusts the white balance to match inside
lighting conditions displayed using common household
light bulbs.
• Fluorescent: Adjusts the white balance to match inside
lighting conditions displayed using common fluorescent
lighting.
• Manual: Allows you to adjust the white balance settings
manually.
Brightness: Allows you to set the brightness level. Press the
navigation key left or right to increase or decrease the
desired brightness.
• Settings: Allows you to change the following camera settings:
Resolution: Your full-color digital camera can take pictures
in three different modes. Each of the modes allow you to
increase the zoom multiple levels, depending on the picture
quality setting. This allows you to get a closer view of the
subject or scenery being photographed. The available sizes
are:
• High (640*480): This is the highest resolution setting
available for this camera, thus allowing you the most image
detail. Images taken at the high setting require more
memory to save than the other two modes.
• Medium (320*240): The medium setting allows you to take
good quality images without using too much memory.
67 Phone Camera
Page 77

• Low (160*120): The low setting allows you to take average
quality images. You can save the most images in memory
using this setting.
Tip: While in Capture mode, the zoom feature is available using the
navigation keys.
Quality: The quality allows you to select between Fine,
Normal,and Economy. These settings reflect the image
quality settings for the pictures.
Shutter Sound: The shutter sound allows you to select
between 7 different shutter sounds. The shutter sound is
heard when you take a picture.
Auto-Erase: If the auto erase function is On, the pictures
stored in your phone’s memory are automatically deleted
after they are uploaded to an online album.
• Review Pictures Allows you to review pictures currently
stored in your camera’s memory.
Setting the Self-timer
To activate the Self-timer and get yourself in on the picture:
1. With the phone open and in Camera mode, press the right
softkey for Options.
2. Press for Self Timer.
3. Using the navigation key, highlight the length of delay you
want the timer to use (5 or 10 seconds) and press .
4. Press the left softkey to Start the timer. (A timer is
Phone Camera
displayed in the lower left portion of the main LCD during
the Self Timer countdown and the phone starts beeping.)
Phone Camera 68
Page 78

5. Get ready for the picture. When the timer is down to 5
seconds, beep sounds are made. At 3 seconds, the timer
icon turns red.
To cancel the Self Timer after it has started:
• Press the right softkey to Cancel.
Note
right softkey and .
: While the Self-timer is active, all keys are disabled except the
Picture Messaging
Once you’ve taken a picture, it is automatically saved in the camera.
You can share the picture instantly with family and friends. With
Picture Messaging, a picture can be sent to up to ten people at a time
using their email addresses or phone numbers (if their phones are
equipped to receive picture messages).
For more details, see "Picture Mail" on page 62.
Storing Pictures
Your phone can store pictures in three ways:
• In Camera - a folder that keeps photos taken through the
camera.
• Saved to Phone - a folder that keeps photos downloaded or
received from other users.
• Online Albums - an online folder provided by your service
provider.
69 Phone Camera
Page 79

Images located in In Camera and Saved to Phone can be assigned to
address book entries, uploaded to online albums, sent to other users,
or saved for future use.
Note
modified to fit the screen.
When you access either location, the following options are available
when you press the right softkey :
: When pictures are assigned as your screen saver, they are
• Upload: Allows you to upload the image to an online album on
the web. (Only available in In Camera.)
• Assign: Allows you to assign an image to an address book
entry.
• Saved to Phone/In Camera: Allows you to switch between In
Camera and In Phone locations.
• Edit Caption: Allows you to edit the default name given to the
image when the picture was taken.
• Erase: Allows you to erase a single or all of the stored images.
• Picture Info: Displays detailed information about the image.
• Camera Mode: Launches the Camera function.
• Expand/Thumbnail: Allows you to change the aspect of the
image between full screen and thumbnail size.
In Camera
Your phone displays a picture immediately after it is taken and
stores the image in the In Camera folder. Pictures stored in your
phone can be viewed at any time without connecting to the web.
To access the images:
1. Press the left softkey for Menu.
Phone Camera
Phone Camera 70
Page 80

2. Press for Pictures.
3. Press for My Pictures.
4. Using the navigation keys, select In Camera and press .
Saved to Phone
When pictures are downloaded from the web or sent from another
user, they are stored in the Saved to Phone folder. Web access is not
required to view these images.
To view Saved to Phone images:
1. Press the left softkey for Menu.
2. Press for Pictures.
3. Press for My Pictures.
4. Using the navigation keys, select Saved to Phone and press
.
Online Albums
Online Albums are remote storage space that can be accessed using
your phone. The locations can be used to save pictures from your
phone.
Creating an Online Album
The first time you use any of the Picture Messaging management
options involving the Picture Messaging Web site you will need to
establish a Picture Messaging password through your phone. This
password will also allow you to log in to the Picture Messaging Web
site. Please contact your service provider for the web site details to
access and manage your uploaded pictures and albums.
To create your Picture Messaging password:
1. Press the left softkey for Menu.
2. Press for Pictures.
71 Phone Camera
Page 81

3. Press for Online Albums.
4. Using the navigation keys, select Upload Picture and press
.
5. Please wait while the system creates your account.
Tip: Write down your Picture Messaging password in a secure place.
Once you have received confirmation that your account has been
successfully registered, you may upload and share pictures and
access the Picture Messaging Web site.
To access the Picture Messaging Web site:
1. From your computer’s web browser, go to the Picture
messaging webbsite provided by your service provider.
2. Enter your Phone Number and Picture Messaging password
to log in.
Uploading a picture to the Picture Messaging Web Site
1. Press the left softkey for Menu.
2. Press for Pictures.
3. Press for Online Albums.
4. Using the navigation keys, select Upload Picture and press
.
5. Highlight the desired image using the navigation key and
press to select the image. A checkmark appears in the
top left corner of the image.
6. Repeat step 5 for each image that you want to upload.
Phone Camera
7. When you have selected all the images you wish to upload,
press the left softkey to Upload.
Phone Camera 72
Page 82

8. Using the navigation keys, select either Upload Selection or
Upload All and press .
9. Using the navigation keys, select either My Uploads or
Other Album as your picture destination and press .
To view Online Albums
1. Press the left softkey for Menu.
2. Press for Pictures.
3. Press for Online Albums.
4. Select View Albums and press .
5. Use the navigation keys to select the desired album and
press .
Sharing Online Pictures
To share an album or picture:
1. Press the left softkey for Menu.
2. Press for Pictures.
3. Press for Online Albums.
4. Select View Albums and press .
5. Press the right softkey for Options, followed by for
Select Album.
Accessing Online Pictures Message Options From Your
Phone
1. Select a picture from your online Picture account.
2. Press the right softkey for Options.
3. To select an option, highlight it and press .
73 Phone Camera
Page 83

To access your Online Albums options from your phone:
1. Display the album list in the Online Picture/Video account.
2. Use your navigation key to select an album (or Inbox).
3. Press the right softkey for Options.
4. To select an option, highlight it and press .
• Select Album: Allows you to select the highlighted album.
• New Album: Allows you to create a new album.
• Album Info: Displays the detailed information associated
with the album.
• Next: Displays the next 20 albums (if applicable).
• Previous: Displays the previous 20 albums (if applicable).
Account Info
The Account Info screen allows you to check the details of your
online album(s), such as your account number, the number of
pictures you have loaded, and comments. Contact your service
provider for more details.
Camera Key Guard
The Camera key guard prevents you from taking unwanted pictures
by accidentally pressing the side camera button while the flip
lid is closed.
To turn the camera key guard on or off:
1. Press the left softkey for Menu.
2. Press for Pictures.
Phone Camera
3. Press for Cam. Key Guard.
4. Using the navigation keys, select On or Off and press
Phone Camera 74
.
Page 84

Web Services
The Wireless Web
Your phone comes equipped with Wireless Web access through your
browser. You can view specially designed version of popular sites
which includes sports, weather, news, stock quotes etc. ... as well as
downloadable ringtones, screen savers and games. When you launch
the browser, the phone will connect to the Internet and the service
indicator icon will display. Any time the service indicator icon is
visible on the display, you are connected to the Internet and will be
invoiced accordingly.
Note: Rates and pricing vary according to your service plan. Please
contact your service provider for additional information.
Launching the Browser
Note: The first time you use the Browser, you will be prompted to go
through a setup process that takes approximately three minutes.
To launch a web connection:
1. Press the left softkey for Menu.
2. Press for Web.
3. Press for Start Browser.
4. Your connected to the Mobile Web Home page.
Note: If Web Guard is enabled and displayed (see below), select Yes and
press to continue and launch the Web.
75 Web Services
Page 85

If you had a previous web connection, the last page you visited will
be displayed when you launch your browser. When this occurs, you
may not see the "Connecting as..." message when you launch the
session. Though the browser is open, you are not currently in an
active data session - that is, no data is being sent or received. As
soon as you navigate to another page, the active session will launch
and you will see the "Connecting" message.
Web Guard
When you first connect to the Internet, the Web Guard will appear to
confirm that you want to connect. This feature helps you avoid
accidental connections. You can disable the Web Guard in the future
by selecting Always Auto-Connect when the Web Guard is displayed.
To change your Web Guard settings:
1. Press the left softkey for Menu.
Web Services
2. Press for Web.
3. Press for Web Guard
4. Press the navigation key up or down to select:
• None • To End
• To Start • Both
5. Press to select.
Note: When enabled, the Web Guard appears only once per session.
The Web Guard does not appear if the phone is merely re-connecting due
to a time-out.
Web Services 76
Page 86

Web Connection Status and Indicators
Your phone's display lets you know the current status of your web
connection through indicators which appear at the top of the screen.
The following symbols are used:
Your web connection is active (data is being transferred).
Incoming voice calls go directly to voicemail; outgoing voice
calls can be made, but the web connection will terminate.
When your web connection is dormant (no data is being sent or
received). Though not currently active, when dormant the
phone can restart an active connection quickly; voice calls can
be made and received.
Navigating the Wireless Web
Navigating through menus and Web sites during a web session is
easy once you've learned a few basics. Here are some tips for getting
around:
Softkeys
When browsing the Web, the bottom line of your phone's display
contains one or more softkeys. These keys are shortcut controls for
navigating around the Web, and they correspond to the softkey
buttons directly below the phone’s display screen. Depending on
which Web sites you visit, the labels on the softkeys may change to
indicate their function.
To use softkeys, simply press the desired softkey button. If an
additional pop-up menu appears when you press the softkey button,
select the menu items using your keypad (if they’re numbered) or by
highlighting the option and pressing .
Scrolling
As with other parts of your phone's menu, you'll have to scroll up
and down to see everything on some Web sites.
• Press the navigation key up and down to scroll line by line or
77 Web Services
Page 87

press the volume buttons on the side of the phone to scroll
one page at a time.
Navigating Between Web Pages
Once you've learned how to use softkeys and scroll, you can start
navigating Web sites.
• Select on-screen items by using the navigation key to
highlight the desired item, then press the desired softkey
button (or press ).
You'll find that the left softkey is used primarily for selecting
items. This softkey is often labeled OK.
• If the items on a page are numbered, you can use your keypad
(number keys) to select an item.
Links, which appear as underlined text
, allow you to jump to different
Web Services
Web pages, select special functions, or even place phone calls.
• Select links by highlighting the link and then selecting the
appropriate softkey.
Tip: The tenth item in a numbered list may be selected by pressing
the key on your phone’s keypad, even though the number 0
doesn’t appear on the screen.
• To go back one page, press on your phone. (Note that
is also used like a BACKSPACE key to delete text.)
Web Services 78
Page 88

Using the Menu to Navigate
By pressing the Menu softkey, you can navigate between web pages.
• Press the Menu softkey and select one of the following
options:
1. Home to return to the Bell home page
2. Forward one web page (if you have not returned back from
a previous web page, this option is greyed out)
3. Mark this page to create a Bookmark
4. View Bookmarks to see your list of Bookmarks
5. History to see a list of web pages you have browsed this
session
6. Go to URL to directly jump to a specific web page
7. Show URL to view the URL of your current webpage
8. Reload this page
9. About Browser to view information about your Mobile
Browser
0. Restart your Mobile Browser
• Preferences to change your Mobile Browser preferences.
Note: Scroll down the list to select Preferences.
79 Web Services
Page 89

Downloading Games, Ringers, Screen
Savers and Applications
With your new web enabled phone, you have access to a variety of
services such as downloadable Games, Ringers, and Screen Savers.
While each type of download involves a different file type, the basic
method for accessing and downloading files is the same.
Games
You can play a variety of entertaining and graphically-rich games on
your phone. New games are easy to download and play.
Downloading Games
1. Press the left softkey for Menu.
2. Press for Downloads.
Web Services
3. Highlight Games and press .
4. Highlight Get New and press . The browser will launch
and take you to the Games download menu.
5. Use your navigation key to highlight and select a game you
wish to download. (For more information on navigating the
Web, see “Navigating the Wireless Web” on page 77.)
6. Follow the web page instructions to complete your
purchase.
Note: You may store a limited number of downloaded games on your
phone, depending on the file sizes.
Playing Games
To play a downloaded game on your phone:
1. Press the left softkey for Menu.
Web Services 80
Page 90

2. Press for Downloads.
3. Highlight Games and press .
4. Select the game you wish to play.
5. Follow the on-screen instructions to play the game. When
you are finished, select Exit (or Quit) or press .
Ringers
Downloading Ringers
To download an available ringer to your phone:
1. Press the left softkey for Menu.
2. Press for Downloads.
3. Highlight Ringers and press .
4. Highlight Get New and press . The browser will launch
and take you to the Ringers download menu.
5. Use your navigation key to highlight and select a
ringer you wish to download. (For more information on
navigating the Web, see “Navigating the Wireless Web” on
page 77.)
6. Follow the web page instructions to complete your
purchase.
Note: You may store a limited number of downloaded ringers on your
phone, depending on the file sizes.
81 Web Services
Page 91

Assigning Downloaded Ringers
Downloaded ringers may be assigned directly from the Downloads
menu and are also available through the Settings menu. To assign a
downloaded ringer through the Settings menu, see "Selecting Ringer
Types for Voice Calls" on page 113 or "Selecting Ringer Types for
Voice Calls" on page 113.
To assign a downloaded ringer through the Downloads menu:
1. Press the left softkey for Menu.
2. Press for Downloads.
3. Highlight Ringers and press .
• If you wish to hear the ringer, highlight the desired ringer
and press to play it. When you are finished, press
to return to the Ringers menu.
Web Services
4. Press the right softkey, followed by for Set as.
5. Press for Voice Calls.
6. Press for With Caller ID or for No Caller ID.
7. Press to exit.
Note: You may assign a ringer to more than one type of call.
Web Services 82
Page 92

Screen Savers
Downloading Screen Savers
To download an available Screen Saver to your phone:
1. Press the left softkey for Menu.
2. Press for Downloads.
3. Highlight Screen Savers and press .
4. Highlight Get New and press . The browser will launch
and take you to the Screen Savers download menu.
5. Use your navigation key to highlight and select a Screen
Saver you wish to download. (For more information on
navigating the Web, see “Navigating the Wireless Web” on
page 77.)
6. Follow the web page instructions to complete your
purchase.
Note: You may store a limited number of downloaded Screen Savers on
your phone, depending on the file sizes.
Assigning Downloaded Screen Savers
Downloaded Screen Savers may be assigned directly from the
Downloads menu and are also available through the Settings menu.
To assign a downloaded Screen Saver through the Settings menu,
see "Changing the Screen Saver" on page 106.
To assign a downloaded Screen Saver from the Downloads menu:
1. Press the left softkey for Menu.
2. Press for Downloads.
3. Highlight Screen Savers and press .
83 Web Services
Page 93

• If you wish to see the screen saver, highlight the desired
screen saver and press to view. When you are
finished, press to return to the Screen Savers
menu.
4. Press the right softkey, followed by for Set as.
5. Press for Screen Saver.
6. Press to exit.
Note: You may assign a Screen Saver to more than one task.
Applications
Downloading Applications
To download an application to your phone:
Web Services
1. Press the left softkey for Menu.
2. Press for Downloads.
3. Highlight Applications and press .
4. Highlight Get New and press . The browser will launch
and take you to the application download menu.
5. Use your navigation key to highlight and select an
application you wish to download. (For more information on
navigating the Web, see “Navigating the Wireless Web” on
page 77.)
6. Follow the web page instructions to complete your
purchase.
Note: You may store a limited number of downloaded applications on
your phone, depending on the file sizes.
Web Services 84
Page 94

Voice Services
Activating Voice Recognition
Voice recognition allows you to say commands to perform common
functions supported by your phone. There is no voice training
required to use the voice recognition feature. You simply say the predesignated command displayed on your screen in a normal tone of
voice to perform the desired function.
To activate voice recognition:
1. Press the navigation key left or press and hold . (The
phone prompts you to say a voice command.)
2. Wait for the beep and then say one of the following
commands:
• Voice Dial • Voice Memo • My Phone #
• Contacts • Status
When it recognizes one of these commands, the phone launches the
associated application. If the phone does not hear a command within
approximately eight seconds, it de-activates voice recognition
without taking any action.
Note: If you want to use another button to activate voice recognition, in
addition to , press the
Launch Pad. Though this menu, you can change button
for
assignments, including the button used to launch "Voice Dial", which is
the voice recognition application.
left softkey for Menu, followed by
85 Voice Services
Page 95

Using Voice Dial
Voice Dial allows you to dial any valid 7, 10 or 11 digit North
American phone number by speaking the number naturally, without
pausing between the digits. It also allows you to dial by pronouncing
a name stored in your Contacts.
Tips for using Voice Dial:
• Voice Dial works best in quieter environments.
• When saying a number, speak at a normal speed and say each
digit clearly. There is no need to pause between digits.
• The phone recognizes the digits one, two, three, four, five, six,
seven, eight, nine, zero, and oh. The phone does not recognize
numbers such as "one eight hundred" for "1-800." Instead, say
"one-eight-zero-zero."
Voice Services
• The phone recognizes only valid 7, 10 or 11 digit North
American phone numbers.
• If your phone does not usually recognize you correctly when
you are using Voice Dial, try adapting Voice Dial to your voice,
which can significantly improve accuracy for some speakers.
(See "Changing Voice Dial Sensitivity" on page 91 for details.)
To place a call using Voice Dial:
1. Activate voice recognition by pressing and holding .
(The phone prompts you for a command.)
2. Say Voice Dial. (The phone prompts you to say the number
or Contact name.)
3. Say either a name stored in your Contacts or a valid 7, 10 or
11 digit North American phone number naturally and
clearly.
Voice Services 86
Page 96

4. If the phone asks you, "Did You Say," followed by the correct
number, say Yes. (You can also select the correct number
from those displayed on the screen by pressing on the
correct number. The phone will then dial the number.)
5. If the phone asks you, "Did You Say," followed by an
incorrect number, say No. (If there are other alternatives,
the phone will prompt you with the next one. You can also
press the navigation key up or down to select the correct
number from the Choice List, and then press to dial.)
6. Alternatively, you can call a person in your Contacts by
saying the full name of the person you want to call, exactly
as it is entered in your Contacts. (The phone plays the name
through the earpiece and displays it on the screen.)
• If you said a name listed in your Contacts that has more
than one number associated with it, the phone displays the
different locations (Home, Work, Mobile, Pager, Fax) and
asks you which one to dial. Say one of the location names
and the phone will dial the number for the location you
specified.
Note: In some cases, the phone might ask you to repeat a name or
number. Make sure that the number is a valid 7, 10 or 11 digit North
American phone number, and then say the number again. If the number
isn't valid, or if the phone still doesn't understand the number on the
second try, it will not place a call.
Enabling/Disabling Choice Lists
You can customize whether the Voice Dial feature displays the list of
top voice recognition choices or automatically dials the first number,
without displaying a choice list.
To enable or disable choice lists for Voice Dial:
1. Press the left softkey for Menu.
87 Voice Services
Page 97

2. Press for Settings.
3. Press for Voice Service.
4. Press for Settings.
5. Press for Choice Lists.
6. Press for Name Dialing,
for Contacts.
7. Press the navigation key up or down to select Automatic,
Always On or Always Off and press .
for Digit Dialing or
Using Name Lookup
Name Lookup lets you retrieve contact information for any person in
your Contacts by saying the full name of the person.
To retrieve information using Name Lookup:
1. Activate voice recognition by pressing and holding .
(The phone will prompt you for a command.)
2. Say Contacts. (The phone will prompt you to say the
Voice Services
name.)
3. Say the full name of the person, exactly as it is entered in
your Contacts. (The phone will play the name it recognized
through the speaker, and then open the contact information
for that name.)
• If the phone says, "Did You Say," followed by an incorrect
name, say No. The phone then prompts you with the next
name, if there is one. If there are no more names, the phone
will say "Sorry, No Match Found."
Phone Status Information
The voice recognition Status option gives you an update on your
phone's service, signal strength, and battery level.
Voice Services 88
Page 98

To retrieve your phone's status information:
1. Press and hold to activate voice recognition. (The
phone prompts you to say a voice command.)
2. Wait for the beep and say Status. Your phone’s current
status information is displayed.
Customizing Voice Dial
Adapting Voice Dial
Voice Dialing is speaker independent, which means that no initial
training or adaptation is required. Some users with heavy accents or
unusual voice characteristics may encounter difficulty in achieving
high accuracy with speaker independent Voice Dialing. The Adapt
Digits feature allows users to dramatically improve the digit accuracy
through adaptation. Users who get acceptable digit recognition
accuracy will gain no additional benefit performing the Adapt Digit
adaptation.
After you adapt Voice Dial, your phone will be customized to your
voice. Other people may not be able to use Voice Dial on your phone
accurately unless they reset the phone to factory defaults.
Note
recognizing your speech. You can always restore the system to its
original factory setting.
Adaptation involves recording several digit sequences to teach the
system your voice. The adaptation process takes about 3 minutes.
Tips for adapting Voice Dial:
: ONLY adapt Voice Dial if the system is frequently mis-
• Perform the adaptation in a quiet place.
• Make sure you wait for the beep before starting to speak.
89 Voice Services
Page 99

• Speak clearly, but say each digit sequence naturally.
• If you make a mistake while recording a sequence of digits, or
if there is an unexpected noise that spoils the recording, you
can say or select No when the prompt asks, “Did the
recording sound OK?” You will then be prompted to re-record
the sequence.
To adapt Voice Dial to your voice:
1. Press the left softkey for Menu, followed by for
Settings.
2. Press for Voice Service.
3. Press for Settings.
4. Press for Digit Dialing.
Voice Services
5. Press for Adapt Digits. (The phone displays the first
digit sequence.)
6. When you are ready to start recording, press . (The
phone prompts you to say the first sequence of digits.)
7. Wait for the beep, and then repeat the digits using a normal
tone of voice. (The phone plays back your recording and
asks you if the recording sounds "OK.")
• If the recording sounds OK (no mistakes and no
background noises), say Yes.
• If you need to re-record the digits to fix any problems, say
No. (The phone then prompts you to say the digits again.)
8. After confirming that the recording sounds OK, repeat the
recording process with the next set of digits. In total, there
are 10 sets of numbers. When you are finished with a full
session, you will reach a screen that reads, “Adaptation
Complete.”
Voice Services 90
Page 100

Note: It is recommended that you perform the complete adaptation of
Voice Dial at least once to achieve the maximum benefit of this feature. If
a partial adaptation is performed, you can always return later and resume
the process from the half way point.
Resetting Voice Dial Adaptation
To erase any adaptation and reset Voice Dial to its original state:
1. Press the left softkey for Menu, followed by for
Settings.
2. Press for Voice Service.
3. Press for Settings.
4. Press for Digit Dialing.
5. Press for Reset Digits.
6. Press the navigation key up or down to select Yes and press
the left softkey
for OK.
Changing Voice Dial Sensitivity
You can adjust your phone’s sensitivity to sounds when listening for
voice commands or names, making it require a more exact or less
exact sound match before responding to your command.
To adjust your phone’s voice dial sensitivity:
1. Press the left softkey for Menu, followed by for
Settings.
2. Press for Voice Service.
3. Press for Settings.
4. Press for Sensitivity.
5. Press for Commands or for Names.
91 Voice Services
 Loading...