

Page 1

SPH-A420 by Samsung®
© 2007 Samsung Mobile.
Printed in Korea.
Page 2

Page 3

Table of Contents
Introduction . . . . . . . . . . . . . . . . . . . . . . . . . . . . . . . . . . . . . . .i
Your Phone’s Menu . . . . . . . . . . . . . . . . . . . . . . . . . . . . . . . . ii
Section 1: Getting Started . . . . . . . . . . . . . . . . . . . . . . . . . . 1
1A. Setting Up Service . . . . . . . . . . . . . . . . . . . . . . . . . . . . . . . 3
Getting Started With Your Service....................................................... 4
Setting Up Your Voicemail ..................................................................... 5
Getting Help ............................................................................................... 6
Section 2: Your Phone . . . . . . . . . . . . . . . . . . . . . . . . . . . . . 9
2A. Your Phone: The Basics . . . . . . . . . . . . . . . . . . . . . . . . . . 11
Front View of Your Phone.....................................................................12
Viewing the Display Screen.................................................................. 16
Features of Your Phone .........................................................................17
Turning Your Phone On and Off ......................................................... 18
Using Your Phone’s Battery and Charger......................................... 19
Navigating Through Phone Menus....................................................23
Displaying Your Phone Number .........................................................25
Making and Answering Calls ............................................................... 25
Entering Text ............................................................................................36
2B. Controlling Your Phone’s Settings . . . . . . . . . . . . . . . . 41
Sound Settings......................................................................................... 42
Display Settings .......................................................................................47
Location Settings.....................................................................................51
Messaging Settings ................................................................................52
Airplane Mode.......................................................................................... 55
TTY Use With Trumpet Mobile Service ............................................. 56
Phone Setup Options .............................................................................58
Call Setup Options ..................................................................................59
2C. Setting Your Phone’s Security . . . . . . . . . . . . . . . . . . . . 63
Accessing the Security Menu............................................................... 64
Using Your Phone’s Lock Feature........................................................64
Using Special Numbers .........................................................................66
Erasing Contacts......................................................................................66
Resetting Your Phone.............................................................................67
Page 4

2D. Managing Call History . . . . . . . . . . . . . . . . . . . . . . . . . . . 69
Viewing History .......................................................................................70
Call History Options................................................................................ 71
Making a Call From Call History..........................................................72
Saving a Phone Number From Call History .....................................73
Prepending a Phone Number From Call History ............................74
Erasing Call History.................................................................................74
2E. Using Contacts . . . . . . . . . . . . . . . . . . . . . . . . . . . . . . . . . 75
Adding a New Contacts Entry..............................................................76
Finding Contacts Entries .......................................................................77
Contacts Entry Options .........................................................................79
Adding a Phone Number to a Contacts Entry................................. 80
Editing a Contacts Entry’s Phone Number.......................................80
Assigning Speed Dial Numbers...........................................................81
Editing a Contacts Entry........................................................................82
Selecting a Ringer Type for an Entry.................................................. 82
Dialing Trumpet Mobile Services .......................................................83
2F. Using the Phone’s Scheduler and Tools . . . . . . . . . . . . 85
Using Your Phone’s Scheduler.............................................................86
Using Your Phone’s Alarm Clock......................................................... 89
Using Your Phone’s Memo Pad...........................................................90
Using Your Phone’s Tools......................................................................91
Section 3: Trumpet Mobile Service Features . . . . . . . . . 95
3A. Trumpet Mobile Service Features: The Basics . . . . . . 97
Using Voicemail.......................................................................................98
Using SMS Text Messaging............................................................... 107
Using Caller ID....................................................................................... 110
Responding to Call Waiting .............................................................. 111
3B. Trumpet Mobile Voice Kit . . . . . . . . . . . . . . . . . . . . . .113
Getting Started With Trumpet Mobile Voice Kit ........................ 114
Programming the Phone for Voice Dialing................................... 116
Setting Up Voice Dial .......................................................................... 117
Placing a Call Using Voice Dial ......................................................... 118
Reviewing Voice Dial Entries ............................................................ 118
Erasing Voice Dial Entries .................................................................. 119
Managing Voice Memos .................................................................... 119
Page 5

Section 4: Safety and Warranty Information . . . . . . .123
4A. Important Safety Information . . . . . . . . . . . . . . . . . . . 125
General Precautions ............................................................................ 126
Maintaining Safe Use of and Access to Your Phone .................. 127
Using Your Phone With a Hearing Aid Device ............................. 129
Caring for the Battery ......................................................................... 131
Radiofrequency (RF) Energy .............................................................. 132
Owner’s Record..................................................................................... 133
Phone Guide Proprietary Notice ...................................................... 134
4B. Manufacturer’s Warranty . . . . . . . . . . . . . . . . . . . . . . .135
Manufacturer’s Warranty.................................................................. 136
Index . . . . . . . . . . . . . . . . . . . . . . . . . . . . . . . . . . . . . . . . . . .141
Page 6

Page 7

Introduction
This Phone Guide introduces you to a ll the features of your
new phone. It’s divided into four sections:
⽧ Section 1: Getting Started
⽧ Section 2: Your Phone
⽧ Section 3: Trumpet Mobile Service Features
⽧ Section 4: Safety and Warranty Information
Throughout this guide, you'll find tips that highlight special
shortcuts and timely reminders to help you ma ke the mos t of
your new phone and service. The Table of Contents and
Index will also help you quickly locate specific information.
You'll get the most out of your phone if you read each
section. However , if you'd like to get right to a specific
feature, simply locate that section in the Table of Contents
and go directly to that page. Follow the instructions in that
section, and you'll be ready to use your phone in no time.
Phone
Guide
Note:
WARNING
Due to updates in phone software, this printed guide
may not be the most current version for your phone. Visit
www.samsungmobileusa .com to access the most
recent version of the phone guide.
Please refer to the Important Safety Information section
on page 125 to learn about information that will help you
safely use your phone. Failure to read and follow the
Important Safety Information in this phone guide may
result in serious bodily injury, death, or property damage.
i
Page 8

Your Phone’s Menu
The following list outlines your phone’s menu structure. For
more information about navigating through the menus,
please see “Navigating Through Phone Menus” on page 23.
CONTACTS (RIGHT SOFTKEY)
VOICE KIT (LEFT SOFTKEY)
PRESS MENU TO DISPLAY THE FOLLOWING:
1: VOICE KIT
1: Voice Dial
1: Record 2: Review 3: Set Active
2: Voice Memo
1: Record 2: Review
2: MESSAGING
1: Send Message
2: Inbox
3: Outbox
4: Drafts
5: Voicemail
1: Call Voicemail 2: Details
3: Clear Envelope
6: Settings
1: Notification
Message and Icon Icon only
ii
Page 9
2: Preset Messages
1: Can’t talk right now. Send me a message.2: Call me
3: Where are you? 4: Can you pick up 5: Meet me at
6: Let’s get lunch. 7: The meeting has been cancelled.
8: I’ll be there at 9: What time does it start?
10: I love you! 11: [Empty] 12: [Empty]
13: [Empty] 14: [Empty] 15: [Empty]
16: [Empty] 17: [Empty] 18: [Empty]
19: [Empty] 20: [Empty]
3: Edit Signature
On Off
4: Message Alerts
1: Alert Volume
1: Voicemail 2: Text Message
2: Alert Type
1: Voicemail 2: Text Message
3: Reminder
Off Once Every 2 min
5: Save in Outbox
Yes N o
6: Auto Erase
Yes N o
3: TOOLS
1: Today
2: Scheduler
3: Task List
4: Countdown
5: Memo Pad
6: World Time
Options
iii
Page 10
1: DST Setting
On Off
7: Alarm Clock
1: Alarm #1
2: Alarm #2
3: Alarm #3
8: Calculator
9: Set Time (displayed when there is no time information)
4: SETTINGS
1: Display
1: Screen Saver
Trumpet Mobile Launch Pad Digital Clock
Worl d Time Calenda r Dual Clock
Analog Clock Apple Flower
Road SnowBoa rding
2: Menu Style
Grid Style List Style
3: Dialing Font
1: Color
Basic Rainbow Monochrome
Hyphenate
2: Size
Large Normal Small
4: Greeting
5: Backlight
1: Main Display
Flip Open 30 seconds 15 seconds
8 seconds
2: Keypad
iv
Page 11

Flip Open 30 seconds 15 seconds
8 seconds Off
3: Pwr Save Mode
On Off
4: Brightness
Lowest Low Med
High Highest
6: Service Light
On Off
2: Sounds
1: Ringer Type
1: Voice Calls
1: With Caller ID
Melodies Single Tones Ring Tones
2: No Caller ID
Single Tones Ring Tones Melodies
2: Messages
1: Voicemail
Single Tones Ring Tones Melodies
2: Text Message
Ring Tones Melodies Single Tones
3: Schedule
Ring Tones Melodies Single Tones
2: Volume
1: Ringer
Ringer Off 1-Beep Level 1 – 8
Vibrate
2: Messages
Use Ringer Vol.
v
Page 12

Separate Vol.
Ringer Off 1-Beep Level 1 – 8
Vibrate
3: Voicemail
Use Ringer Vol.
Separate Vol.
Ringer Off 1-Beep Level 1 – 8
Vibrate
4: Alarms
Use Ringer Vol.
Separate Vol.
Ringer Off Level 1 – 8
Vibrate
3: Alerts
1: Minute Beep
On Off
2: Service
On Off
3: Connect
On Off
4: Sig. Fade Tone
On Off
5: Power On/Off
On Off
4: Key Tone
1: Tone Type
Xylophone DTMF Simple
2: Tone Level
vi
Page 13

Tone Off Level 1 – 8
3: Tone Length
Short Long
3: Security
1: Lock Phone
Unlocked On Power-up Lock Now
2: Change Lock
3: Special #
1: Empty
2: Empty
3: Empty
4: Erase Contacts
Yes N o
5: Reset Phone
Yes N o
4: Roaming
1: Set Mode
Automatic Home Only
2: Call Guard
On Off
5: Launch Pad
1: Up Key
Ringer Type Call History Voice Dial
Missed Alerts Contacts Messaging
Text Inbox Send Message Scheduler
Alarms Calculator Display
2: Down Key
vii
Page 14

Ringer Type Call History Voice Dial
Missed Alerts Contacts Messaging
Text Inbox Send Message Scheduler
Alarms Calculator Display
3: Left Key
Ringer Type Call History Voice Dial
Missed Alerts Contacts Messaging
Text Inbox Send Message Scheduler
Alarms Calculator Display
4: Right Key
Ringer Type Call History Voice Dial
Missed Alerts Contacts Messaging
Text Inbox Send Message Scheduler
Alarms Calculator Display
6: Others
1: Call Setup
1: Abbrev. Dial
On Off
2: Contact Match
On Off
3: Restriction
1: Outgoing Call
Allow all Contacts Only Special# Only
4: Call Answer
Any Key Talk Key F lip Op en
5: Auto Answer
Yes No
2: Language
English Español
3: Airplane Mode
On Off
viii
Page 15
4: Location
On Off
5: Audio Routing
Normal Headset Only
6: TTY Mode
TTY Off TTY + Hear TTY + Talk
TTY Full
7: Phone Info
1: Phone Number
2: Icon Glossary
3: Version
4: Advanced
5: CALL HISTORY
1: Outgoing Calls
2: Incoming Calls
3: Missed Calls
4: All Recent
6: CONTACTS
1: Find
2: Add New Entry
3: Speed Dial #s
2 – 99
4: Group
1: Unassigned
2: Family
3: Friends
4: Colleague
ix
Page 16

5: VIPs
6: Empty
5: Services
1: Customer Care
611
2: Air Time Top-Up
222
3: Dir Assist
411
6: My Phone #
IN USE MENU
Press Options (right softkey) to display the following options:
1: Call History
2: Contacts
3: 3-Way Call
4: Messaging
5: Voice Memo
6: Tools
7: Phone Info
x
Page 17

Section 1
Getting Started
Page 18

2
Page 19

Section 1A
Setting Up Service
In This Section
⽧ Getting Started With Your Service
⽧ Setting Up Your Voicemail
⽧ Getting Help
Setting up service on your new Samsung a420 phone is
quick and easy. This section walks you through the
necessary steps to unlock your phone, set up your
voicemail, establish passwords, and contact Customer
Care.
Setting Up Service
Section 1A: Setting Up Service 3
Page 20

Getting Started W ith Your Service
Determining if Y our Phone is Already Activated
If you purchased y our phone at a p artner store, it is probab ly
activated, unloc ked, and ready to use. If you received your
phone in the mail, you will need to call Customer Care in
order to activate your phone. By activating the phone you
are agreeing to all of Trumpet Mobile's terms and conditions
of service. These terms and conditions are available at
trumpetmobile.com. Customer Care will w alk y ou through the
one time subsidy lock code process.
Unlocking Y our Phone
To unl ock your phone, follow these easy step s:
1. Press to turn the phone on.
2. From standby mode, press , Left/Right softkey ,
Volume key, or .
3. Enter your fo ur-digit loc k co de. (For security purposes,
the code is not visible as you type.)
Tip:
END
MENU
OK
If you can’t recall your lock code , try usin g the last four digit s
of your wireless phone number or try 0000. If neither of these
works, call Trumpet Mobile Customer Car e at 1-877TRUMPET .
TALK
4 Section 1A: Setting Up Service
Page 21

Setting Up Y our Voicemail
All unanswered calls to your phone are automatically
transferred to your voicemail, even if your p hone is i n u se or
turned off. Therefore, you will want to set up your voicemail
and personal greeting as soon as your phone is act ivated.
To set up your voi cemail:
1. From standby mode, press and hold .
2. Follow the system prompts to:
䡲 Create your passcode
䡲 Record your name announcement
䡲 Record your greeting
䡲 Choose whether or not to activate One-Touch
Message Access (a feature that lets you access
messages simply by pressing and holding ,
bypassing the need for you to enter your
passcode)
Voicemail P asscode
Note:
If you are concerned about unauthorized access to your
voicemail account, Trumpet Mobile recommends you enable
your voicemail passcode.
For more information about using your voic email, see “Using
Voicemail” on page 98.
Setting Up Service
Section 1A: Setting Up Service 5
Page 22

Getting Help
Visit www.trumpetmobi le.com
You can go online to:
䢇 Access your account information
䢇 Check your minutes used (depending on your
Trumpet Mobile Service Plan)
䢇 View available Trumpet Mobile Service Plans and
options
Reaching Trumpet Mobile Customer Care
You can reach Trumpet Mobile Customer Care many
different ways:
䢇 Dial on your phone
䢇 Sign on to your account at www.trumpetmobile.com
䢇 Call us toll-free at 1-877-TRUMPET
䢇 Write to us at Trumpet Mobile
Trumpet Mobile 41 1
You have access to a variety of services and information
through Trumpet Mobile 411, including residential, business ,
and government listings; movie listings or showtimes;
driving directions, restaurant reservations, and major local
event information. You can get up to three pieces of
information per call, and the operator can auto matically
connect your call at no additional charge.
There is a per-call charge to use Trumpet Mobile 411 and
you will be billed for airtime.
MNOMNO
TALK
Customer Care
P.O. Box 2067
Manhattan Beach, CA 90267
6 Section 1A: Setting Up Service
Page 23

To call T rumpet Mobile 411:
䊳 Press .
GHIGHI
Setting Up Service
TALK
Section 1A: Setting Up Service 7
Page 24

8 Section 1A: Setting Up Service
Page 25

Section 2
Your Phone
Page 26

10
Page 27

Y our Phone: The Basics
In This Section
Section 2A
⽧ Front View of Your Phone
⽧ Viewing the Display Screen
⽧ Features of Your Phone
⽧ Turning Your Phone On and Off
⽧ Using Your Phone’ s Battery and Charger
⽧ Navigating Through Phone Menus
⽧ Displaying Your Phone Number
⽧ Making and Answering Calls
⽧ Entering Text
Your phone is p acked with features that simplify your life
and expand your ability to stay connected to the people and
information that are important to you. This section will guide
you through the basic functions and calling features of your
phone.
Section 2A: Your Phone: The Basics 11
Phone Basics
Page 28
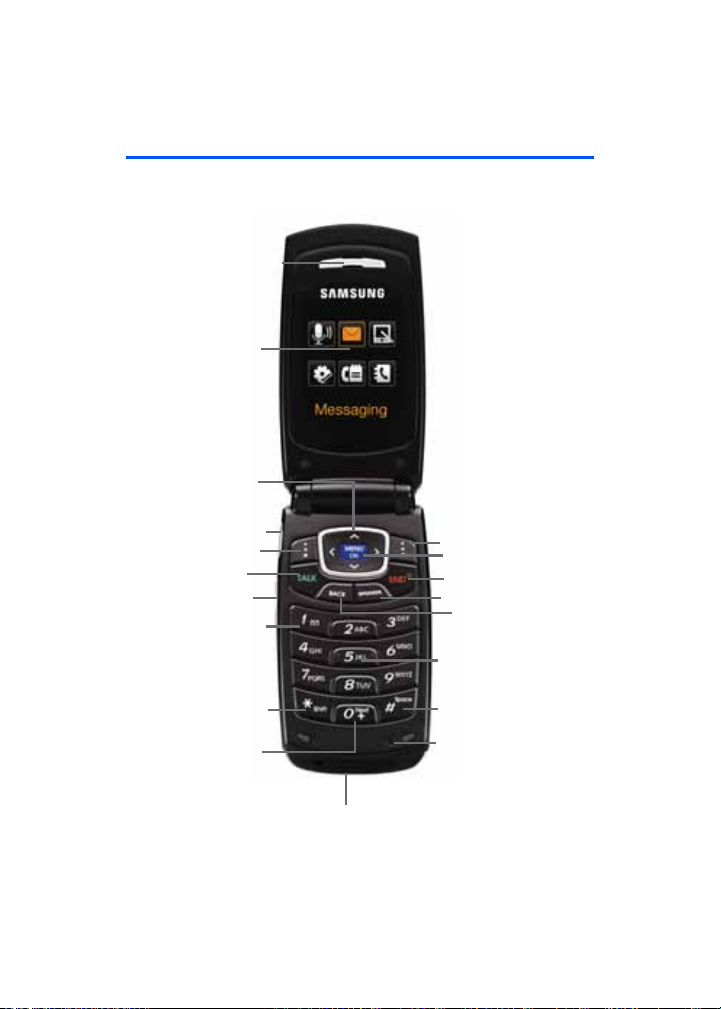
Front View of Your Phone
1. Speaker
2. Display Screen
3. Navigation Key
4. Headset Jack
5. Left Softkey
6. TALK Key
7. Volume Key
8. Voicemail Key
9. Shift/Asterisk Key
10. Plus Code
Dialing Key
11. Power/Accessory
Interface Connector
19. Right Softkey
18. OK/Menu Key
17. END Key
16. Speaker Key
15. BACK Key
14. Numeric Keypad
13. Space/Pound Key
12. Microphone
12 Section 2A: Your Phone: The Basics
Page 29

Key Functions
1. Speaker allows you to hear the other caller and the
different ring tones or sounds offered by your phone.
2. Display Screen displays all the information needed to
operate your phone, such as t he call status, the
contacts, the date and time and the signal and battery
strength.
3. Navigation Key scrolls through the phone’s menu
options and acts as a shortcut key from standby mode.
䡲 Press Up to access Missed Alerts.
䡲 Press Down to access Scheduler.
䡲 Press Right to launch Text Inbox.
䡲 Press Left to access the Send Message.
(Keys can be reassigned to create customized
shortcuts.)
4. Headset Jack allows you to plug in an optional headset
for convenient, hands-free conversations.
5. Left Softkey allows you to select softkey actions or
menu items corresponding to the bo tt om le ft line on
the display screen.
T o select a softkey, press the softkey directly below the
Note:
softkey text that appears at the bottom left and bottom right
of your phone’ s display screen. Softkey actions change
according to the screen you’re viewing and will not appear if
there is no corresponding action available.
Phone Basics
6. TALK Key allows you to place or receive calls, answer
Call Waiting, or activate Voice Dial.
7. V olume Key allows you to adjust the ringer volume in
standby mode (with the flip open) or adjust the voice
volume during a call. The v olume k ey can also be used
to scroll up or down to navigate through the different
Section 2A: Your Phone: The Basics 13
Page 30

menu options. To mute the ringer duri n g a n in c o m ing
call, press the volume key up or down.
8. V oicemail Key allows you to press and hold to
automatically dial your voicemail.
9. Shift/Asterisk Key enters the asterisk [*] character for
calling features. In text entry mode, press to change
the capitalization mode.
10. Plus Code Dialing Key automatically dials the
international access code for the country in which you
are located (for instance, 011 for international calls
placed from the United States).
11. Power/Accessory Interface Connector allows you to
connect charging accessories and optional accessory
cables to your phone.
12. Microphone allows other callers to hear you clearly
when you are speaking to them.
13. Space/Pound Key enters the pound [#] character for
calling features. In text entry mode, press to enter a
space.
14. Numeric Keypad allows you to enter numbers, letters,
and characters.
15. BACK Key (Clear) deletes characters from the display
in text entry mode. When in a menu, press the Back
key to return to the previous menu.
16. Speaker Key turns on or off the speaker phone.
17. END Key (Power) ends a call. Press and hold this key
for two seconds to turn your phone on or off. While in
the main menu, it returns the phone to standby mode
and cancels your input. When yo u receiv e an incoming
call, press to enter silent mode and mute the ringer.
14 Section 2A: Your Phone: The Basics
Page 31

18. OK/MENU Key allows you to access the menu screen.
It also allows you to accept choices when navigating
through a menu.
19. Right Softkey allows you to sel ect softkey actions or
menu items corresponding to the bo ttom right line on
the display screen.
T o select a softkey, press the softkey directly below the
Note:
softkey text that appears at the bottom left and bottom right
of your phone’ s display screen. Softkey actions change
according to the screen you’re viewing and will not appear if
there is no corresponding action available.
Phone Basics
Section 2A: Your Phone: The Basics 15
Page 32

Viewing the Display Screen
Your phone’s display screen pro vides
a wealth of information about your
phone’s status and options.
To view a list of your phone’s icons
and descriptions:
䊳 Select MENU > Settings > Phone Info > Icon
Glossary.
16 Section 2A: Your Phone: The Basics
Page 33

Features of Y our Phone
Congratulations on the purchase of your phone. The A420
by Samsung is lightweight, easy-to-use, and reliable, and it
also offers many significant features and service options.
The following list previews some of those features and
provides page numbers where you can find out more:
䢇 SMS Text Messaging (page 107), provide quick and
convenient messagin g c apabilities.
䢇 The Contacts list allows you to store up to 299 entries,
with up to five phone numbers per entry (page 75).
䢇 The built-in Scheduler offers several personal
information management fe atures to help you manage
your busy lifestyle (page 85).
䢇 You r phone is equipped with a Location f eature f or use in
connection with location -b a s ed se rvices that may be
available in the future (page 51).
䢇 T9 Text Input lets you quickly type messages with one
keypress per letter (page 37).
䢇 Speed dial lets you dial phone numbers with one or two
keypresses (page 35).
Phone Basics
Section 2A: Your Phone: The Basics 17
Page 34

T urning Your Phone On and Off
Turning Your Phone On
To turn your phone on:
䊳 Press and release .
Once your phone is on, it may display “Searching for
Service,” which indicates that your phone is searching for a
signal. When your phone finds a signal, it automatically
enters standby mode – the phone’s idle state. At this point,
you are ready to begin making and receiving calls.
If your phone is unable to find a signal after 15 minutes of
searching, a Power Save feature is automatically activated.
When a signal is found, your phon e automat ica lly returns to
standby mode.
In Pow er Save mode, your phone searches for a signal
periodically without your intervent io n. You can also ini tiat e a
search for Trumpet Mobile Service by pressing any key
(when your phone is turned on).
The Power Save feature helps to conserve your battery power
Note:
when you are in an area where there is no signal.
Turning Your Phone Off
To turn your phone off :
䊳 Press and hold for two seconds until you see the
powering down animation on the display screen.
Your screen remains blank while your phone is off (unless
the battery is charging).
END
END
18 Section 2A: Your Phone: The Basics
Page 35

Using Y our Phone’ s Battery and Charger
Warning!
Use only Trumpet Mobile-approved or manufacturerapproved batteries and chargers with your phone. The
failure to use a T rumpet Mobile-approved or
manufacturer-approved battery and charger may increase
the risk that your phone will overheat, catch fire, or
explode, resulting in serious bodily injury, death, or
property damage.
Trumpet Mobile- or manufacturer-approved batteries and
accessories can be found at Partner Stores or through your
phone’s manufacturer, or call 1-866-343-1114 to order.
They’re also available at
www.trumpetmobile.com – click the
Wireless link under “Personal,” and then click Accessories
under “Shop Trumpet Mobile Online.”
Battery Capacity
Your phone is equipped with a Lithium Ion (Li-Ion) battery. It
allows you to recharge your battery before it is fully drained.
The battery provides up to 3.5 hours of continuous digit al
talk time.
When the battery reaches 5% of its capacity, the battery
icon blinks. When there are approximately two minutes of
talk time left, the phone sounds an audible alert and then
powers down.
Long backlight settings, searchin g for service and vibrate
Note:
mode affect the battery ’s talk and standby times.
Be sure to watch your phone’s battery level indicator an d
Tip:
charge the battery before it runs out of power.
Phone Basics
Section 2A: Your Phone: The Basics 19
Page 36

Installing the Battery
To inst all the Li-Ion battery:
1. Insert the battery into the opening on the back of the
phone at a 45-degree angle, making s ure to line up the
gold contacts. Gently press down until it snaps into
place.
2. Install the protective cover by lining up the tabs at a
and gently press up until the cover snaps into place.
Removing the Battery
To remove your batt ery:
1. Remove the protective cover by pressing down on the
back of the cover.
2. Grip the battery at the bottom and pull up and out at a
45-degree angle.
20 Section 2A: Your Phone: The Basics
Page 37

Charging the Battery
Your phone’s Li-Ion battery is rechargeable and should be
charged as soon as possible so you can begin using your
phone.
Keeping track of your battery’s charge is important. If your
battery level becomes too lo w, your phone automatically
turns off and you will lose all the inf ormation you were just
working on. For a quick check of your phone’s battery level,
glance at the battery charge indicator located in the upperright corner of your phone’s display screen. If the battery
charge is getting too low, the battery icon ( ) blinks and
the phone sounds a warning tone.
Always use a Trumpet Mobile-approved desktop charger,
travel charger, or vehicle power adapter to charge your
battery.
Phone Basics
Warning!
Using the wrong battery charger could cause damage to
your phone and void the warranty.
Using the Travel C harger
To use the travel charger provided with your phone:
䊳 Plug the end of the AC adapter into the phone’s power
interface connector and the ot her end into an elect rical
outlet.
䡲 A red indicator light on the phone lets you know
the battery is charging.
䡲 A green indicator light on the phone indicates that
the battery is fully charged.
䡲 An onscreen indicator lets you know that the
battery is charged.
It takes about three hours to fully recharge a completely
rundown battery.
Section 2A: Your Phone: The Basics 21
Page 38

UL Certified Travel Adapter
The Travel Adapter for this phone has met UL 1310 safety
requirements. Please adhere to the following safety
instructions per UL guidelines.
FAILURE TO FOLLOW THE INSTRUCTIONS OUTLINED MAY
LEAD TO SERIOUS PERSONAL INJURY AND POSSIBLE
PROPERTY DAMAGE.
IMPORTANT SAFETY INSTRUCTIONS - SAVE THESE
INSTRUCTIONS.
DANGER - TO REDUCE THE RISK OF FIRE OR ELECTRIC SHOCK,
CAREFULLY FOLLOW THESE INSTRUCTIONS. FOR CONNECTION
TO A SUPPLY NOT IN THE U.S.A., USE AN ATTACHMENT PLUG
ADAPTOR OF THE PROPER CONFIGURATION FOR THE POWER
OUTLET. THIS POWER UNIT IS INTENDED TO BE CORRECTLY
ORIENTATED IN A VERTICAL OR HORIZONTAL OR FLOOR
MOUNT POSITION
22 Section 2A: Your Phone: The Basics
Page 39

Navigating Through Phone Menus
The navigation key on your phone allows you to scroll
through menus quickly and easily. The scroll bar at the right
of the menu keeps track of your position in the menu at all
times.
To navigate through a menu, simply press the navigation
key up or down. If you are in a first-level menu, such as
Settings, you may also navigate to the next or previous firstlevel menu by pressing the navigation key right or left.
For a diagram of your phone’s menu, please see “Your
Phone’s Menu” on page iii.
Selecting Menu Items
As you navigate through the menu, menu options are
highlighted. Select any numbe red o ption by simply pressing
the corresponding number on the phone’ s keypad. You may
also select any item by highlighting it and pressing
For example, if you want to view your last incoming call:
MENU
OK
MENU
OK
JKLJKL
.
MENU
OK
ABCABC
. (If you have received
1. Select MENU ( ) to access the main menu.
2. Select Call Histor y by pressing or by highlighting it
and pressing
3. Select Incoming Calls by pressing or by
highlighting it and pressing
any calls, they are displayed on the screen.)
MENU
OK
Phone Basics
.
For the purposes of this guide, the above steps condense into
Note:
“Select MENU > Call History > Incoming Calls.”
Section 2A: Your Phone: The Basics 23
Page 40

Backing Up Within a Menu
BACK
BACK
To go to the previous menu:
BACK
䊳 Press .
To r eturn to st andby mode:
䊳 Press .
BACK
END
24 Section 2A: Your Phone: The Basics
Page 41

Displaying Y our Phone Number
Just in case you forget your phone number, your phone can
remind you.
To di splay your phone number:
䊳 Select MENU > Settings > Phone Info > Phone
Number. (Your phone number and other information
about your phone and account will be displayed.)
To select Menu, press the menu key. To select menu options
Note:
(such as Settings, above), highlight the option and pr ess OK .
(If the menu options are numbered, you may also select an
option simply by pressing the corres ponding num ber key.)
Making and Answering Calls
Holding Y our Phone
Since the antenna has been integr ated into the d esign of the
phone, it is important not to block the recepti on path
accidentally to ensure the strongest signal possible is
achieved. The orbital internal antenna is located near the
hinge of your handset.
ATTENTION
Phone Basics
Correct
Obstructing the internal
antenna could inhibit
call performance.
Section 2A: Your Phone: The Basics 25
Incorrect
Page 42

Making Calls
BACK
BACK
BACK
BACK
Placing a call from your phone is as easy as making a call
from any landline phone. Just enter the number , press ,
and you’re on your way to clear calls.
To make a call using your keyp ad:
1. Make sure your phone is on.
2. Enter a phone number from standby mode. (If you
make a mistake while dialing, press to erase one
digit at a time. Press and hold to erase the entire
number.)
3. Press .
4. Press or close the phone when you are finished.
Tip:
TALK
END
To redial your previous call, press TALK twice.
You can also place calls from your phone by using the
Contacts menu (page 77), Voice Dial (page 118), speed
dialing numbers from your Contacts (page 35), and using
your Call History listings (page 72).
BACK
BACK
BACK
BACK
TALK
26 Section 2A: Your Phone: The Basics
Page 43

Dialing Options
When you enter numbers in standby mode, select
Options ( ) to see the following dialing options.
To initiate an option, press the corresponding softkey.
䢇 Speed Dial (appears for the first three digits only)
launches the Speed Dial funtion and dials the number
assigned to the entered digits.
䢇 4-Digit Dial (appears after you enter only four digits)
dials the number or digits displayed. (See “Abbreviated
Dialing” on page 59 for more information.)
䢇 Dial dials the number or digits displayed.
䢇 Send Msg (appears only after you enter four or more
digits) allows you to send text messages to the number
being dialed.
䢇 Save allows you to enter a seven- or ten-digit number
(phone number and area code) and press Options (right
softkey) > Save to save the phone number in your
Contacts. (See “Saving a Phone Number” on page 31.)
䢇 Find allows you to enter a digit or string of digits, press
Options (right softkey), and then press Se arch to displa y
Contacts entries that contain the entered numbers. (See
“Finding a Phone Number” on page 32.)
䢇 Hard Pause allows you to enter a hard pause. To
continue dialing, you m ust press a ke y. (See “Dialing and
Saving Phone Numbers With Pauses” on page 33.)
䢇 2sec Pause allows you to enter a two-second pause.
The phone will pause and then continue dialing without
any additional keys being pressed. (See “Dialing and
Saving Phone Numbers With Pauses” on page 33.)
Phone Basics
Section 2A: Your Phone: The Basics 27
Page 44

Answering Calls
To answer an incoming call:
1. Make sure your phone is on. (If your phone is off,
incoming calls go to voicemail.)
2. Press to answer an incoming call. (Depending on
Your phone notifies you of incoming calls in the following
ways:
䢇 The phone rings and/or vibrates.
䢇 The indicator light flashes.
䢇 The backlight illuminates.
䢇 The screen displays an incoming call message.
If the incoming call is from a number stored in your
Contacts, the entry’s name is displayed. The caller’s phone
number may also be displayed, if available.
If Call Answer is set to Talk Key, the following options are
also displayed. To select an option, press the corresponding
softkey.
䢇 Answer to answer the call.
䢇 Ignore to send the call to your voicemail box.
Tip:
TALK
your phone’s settings, you may also answer incoming
calls by opening the phone or by pressing any number
key. See “Call Answer Mode” on page 62 for more
information.)
To quiet the ringer , press the back, end, or volume key.
Ending a Call
To di sconnect a call when you are finished:
䊳 Close the phone or press .
28 Section 2A: Your Phone: The Basics
END
Page 45

Missed Call Notification
BACK
BACK
When an incoming call is not answ e re d, the Misse d Call log
is displayed on your screen.
To di splay the Missed Call entry from the notification screen:
䊳 Highlight the entry and press . (To dial the phone
number, press .)
TALK
MENU
OK
To di splay a Missed Call entry from standby mode:
1. Select MENU > Call History > Missed Calls.
2. Highlight the entry you wish to view and press .
MENU
OK
Calling Emergency Numbers
You can place calls to 911 (dial and press
TALK
), even if your phone is locked or your account is
restricted.
When you place an emergency call, your phone automatically
Note:
enters Emergency mode.
During an emergency call, press Options (right softkey) to
display your options. To select an option, highlight it and
MENU
press
䢇 Unlock Phone to unlock your phone (appears only if the
.
OK
phone is locked).
䢇 To close the pop-up menu (appears only if the phone is
unlocked), press the key.
WXYZWXYZ
BACK
BACK
Phone Basics
Press Options (right softkey) and then Phone Info & Phone
Tip:
Number
to display your phone number during an emergency
call.
Section 2A: Your Phone: The Basics 29
Page 46

To exit Emerg ency mode:
1. Press to end a 911 call.
2. Press until Emergency mode is exited.
END
SpaceSpace
ShiftShift
In-Call Options
Pressing Options (right softkey) during a call displays a list
of features you may use during the course of a call. To
select an option, press the corresponding ke ypad number or
highlight the option and press . The following options
are available through the Options menu:
MENU
OK
Warning!
䢇 Call History checks your call log for Outgoing, Incoming,
Due to higher volume levels, do not place the phone
near your ear during monitor use.
Missed, and Recent calls. You can also erase the logs
from this menu.
䢇 Contacts accesses the Contacts menu.
䢇 3-Way Call places the other phone on hold and displays
the 3-way Call screen, allowing you to dial a second
number and join the new phone into a 3-way call.
䢇 Messaging accesses the Messaging menu options.
䢇 Voice Memo allows you to record incoming audio from
your conversation. (For more information, see
“Managing Voice Memos” on page 119.)
䢇 Tools accesses the Tool s menu options.
䢇 Phone Info displays the following menu options:
䡲 Phone Number
䡲 Icon Glossary
䡲 Version
䡲 Advanced
30 Section 2A: Your Phone: The Basics
Page 47

During a call, the left softkey funct ions as the Mute button.
Press it to mute the phone’s microphone for privacy. Press it
again to Unmute the phone.
End-of-Call Options
After receiving a call from or making a call to a phone
number that is not in your Contacts, the phone number and
the duration of the call are displayed. The left softkey
displays the Save option. Select this option if you wish to
add the new number to you r Contacts. (See “Saving a
Phone Number” below.)
After receiving a call from or making a call to a phone
number that is already in y our Contacts , the entry name and
phone number and the duration of the call are displayed.
The left softkey dis plays the Call option. Select this option if
you wish to re-call the Contact.
Saving a Phone Number
Your phone can store up to five phone numbers in each
Contact entry up to a total of 299 phone numbers. Each
entry’s name can contain up to 20 characters. Your phone
automatically sorts the Contacts entries alphabetically. (For
more information, see Section 2F: Using Contacts on page
75.)
To save a nu mber from standby mode:
1. Enter a phone number and press .
2. Select New Entry or Existing Entry and press .
MENU
OK
MENU
OK
Phone Basics
The New Entry screen does not display for the first entry
Note:
saved in the contacts. Skip to step 3 if you are entering the
first number in the contacts.
Section 2A: Your Phone: The Basics 31
Page 48

If Existing Entry was selected, press OK to launch the Find
Note:
screen. Locate the desired contact and add the additional
number to the selected entry.
3. Use your navigation key to select a label (Mobile,
Home, Work, Pager, or Others) and press .
MENU
OK
4. Enter a name for the entry using the numeric keys.
Press to select the desired entry method
T9(English), Alpha, Symbol, or Number. (See
“Entering Text” on page 36.)
5. When you hav e finished ent ering the name, press
to return to the contact entry.
6. Press for Done to save the entry.
Finding a Phone Number
You can search Contacts entries for phone numbers that
contain a specific string of numbers.
To find a phone number:
1. While in standby mode, enter three or more of the last
digits of the phone number. (The more numbers you
enter, the more specif ic the search becomes.)
2. Press Options ( ) and select Find. (All Contacts
entries matching the entered numbers will be
displayed.)
3. To display the Contacts entry that contains the phone
number you entered, highlight the entry and press
MENU
. To dial the number, press .
OK
TALK
MENU
OK
32 Section 2A: Your Phone: The Basics
Page 49

Dialing and Saving Phone Numbers With Pauses
You can dial or save phone numbers with pauses f or use
with automated systems, such as voicemail or credit card
billing numbers.
There are two types of pauses available on your phone:
䢇 Hard Pause sends the next set of numbers when you
press the left softkey.
䢇 2-Second Pause automatically sends the next set of
numbers after two seconds.
Y ou can have mult iple pause s in a phone num ber and
Note:
combine two-second and hard pauses.
To di al or save phone numbers with p auses:
1. Enter the phone number.
2. Press Options ( ) and select either Hard Pause or
2sec Pause.
3. Enter additional numbers.
4. Press .
Note
TALK
— or —
Press Options () > Save to save the number in y our
Contacts.
When dialing a number with a hard pause, press the Talk to
send the next set of numbers.
Phone Basics
Section 2A: Your Phone: The Basics 33
Page 50

Plus (+) Code Dialing
When placing international calls, you can use Plus Code
Dialing to automatically enter the international access code
for your location (for example, 011 for international calls
placed from the United States).
To make a call using Plus Code Dialing:
1. Press and hold until a “+” appears on your phone
NextNext
display.
2. Dial the country code and phone number y ou’re calling
and press . (The access code for international
TALK
dialing will automatically be dialed , followed by the
country code and phone number.)
Dialing From the Contacts List
To di al directly from a Contact s entry:
1. Select MENU > Contacts > Find.
Shortcut:
Press Contacts (right softkey) to list entries.
2. Highlight the entry you want to call and press .
TALK
— or —
To dial another number from the entry, highlight the
name and press , highlight the number you wish
to call, and press .
34 Section 2A: Your Phone: The Basics
MENU
OK
TALK
Page 51

Using Speed Dialing
You can store up to 98 numbers in your phone’s speed dial
memory to make contacting friends and family as easy as
pressing a button or two. With this feature, you can dial
speed dial entries using one keypress for locations 2 – 9 or
two key presses for locations 10 – 99.
To use One-Touch Dialing for speed dial locations 2 – 9:
䊳 Press and hold the appropriate key for approximately
two seconds. The display confirms that the number
has been dialed when it shows the name and number
of the speed dial.
To use Two-Touch Dialing for speed dial locations 10 – 99:
1. Press the first digit.
2. Press and hold the second digit for approximately two
seconds. The display conf irms that the number has
been dialed when it shows the name and number of
the speed dial.
Phone Basics
Section 2A: Your Phone: The Basics 35
Page 52

Entering T ext
Selecting a Character Input Mode
Your phone provides convenient ways to enter words,
letters, punctuation, and numbers whenever you are
prompted to enter text (for example, when adding a
Contacts entry or SMS Text Messaging).
To change the character input mode:
1. When you display a screen where you can enter te xt,
press the right softkey to change the character input
mode.
2. Select one of the following options:
䡲 T9(English) to enter text using a predictive text
entering system that reduces the number of keys
that need to be pressed while entering a word
(see page 37).
䡲 Alpha to cycle through the alpha characters
associated with the letters on the keypad
(see page 38).
䡲 Symbol to enter symbols (see page 39).
䡲 Number to enter numbers by pressing the numbers
on the keypad (see page 39).
䡲 Preset Msg to enter preprogrammed messages
(see page 39).
䡲 Recent Msg to enter a message from a list of
previous messages.
䡲 Emoticons to enter “emoticons” (see page 39).
When entering text, press the * (S hift) key t o chan ge letter
Tip:
capitalization (Abc > ABC > abc).
36 Section 2A: Your Phone: The Basics
Page 53

Entering Characters Using T9 Text Input
BACK
BACK
BACK
BACK
T9 Text Input lets you enter text in your phone by pressing
keys just once per letter. (To select the T9 Word mode when
entering text, see “Selecting a Characte r Input Mode” on
page 36.)
T9 T e xt Input analyz es the letters y ou enter using an intuitiv e
word database and creates a suitable word. (The word may
change as you type.)
To ent er a word using T9(English) Text Input:
1. Select the T9(English) character input mode. (See
“Selecting a Character Input Mode” on page 36.)
2. Press the corresponding ke ys once per lette r to enter a
word. (For example, to enter the word “Bill,” press
ABCABC
to erase a single character. Press and hold to
delete an entire entry.)
If the word you want is not displayed after you have entered
all the letters, press to scroll through additional word
selections. To accept a word and insert a space, press .
JKLJKL JKLJKL
GHIGHI
.) (If you make a mistake, press
BACK
BACK
NextNext
Phone Basics
BACK
BACK
SpaceSpace
Section 2A: Your Phone: The Basics 37
Page 54

Entering Characters by Tapping the Keyp ad
BACK
BACK
BACK
BACK
To enter characters by t apping the keypad:
1. Select the Alpha mode. (See “Selecting a Character
Input Mode” on page 36.)
2. Press the corresponding ke ys repeatedly until the
desired letter appears. (F or examp le, to ent er the word
“Bill,” press twice, three times, three
times, and three times again.) (If you make a
mistake, press to erase a single character. Press
and hold to delete an entire entry
ABCABC
JKLJKL
BACK
BACK
BACK
BACK
GHIGHI
By default, the first letter of an entry is capitalized and the
following letters are lower cased. After a character is
entered, the cursor automatically advances to the next
space after two seconds or when y ou enter a char acter on a
different key.
Characters scroll in the following order:
JKLJKL
.)
. ,@ 1 ?! * # / P Q R S 7
ABCABC
A B C 2 T U V 8
DEFDEF
D E F 3 W X Y Z 9
GHIGHI
G H I 4 0
JKLJKL
J K L 5 Space
MNOMNO
M N O 6 Shift
PQRSPQRS
TUVTUV
WXYZWXYZ
NextNext
SpaceSpace
ShiftShift
38 Section 2A: Your Phone: The Basics
Page 55

Entering Numbers, Symbols, Smileys, and Preset Messages
To enter n umbers:
䊳 Select the Number mode and press the appropriate
key .
(See “Selecting a Character Input Mode” on page 36.)
To enter symbol s:
䊳 Select the Symbols mode. (See “Selecting a
Character Input Mode” on page 36.) To enter a symbol,
press the appropriate key indicated on t he display.
To enter “emoticons” (smil eys):
䊳 Select the Emoticons mode and press the
appropriate key. (See “Selecting a Character Input
Mode” on page 36.)
To enter p reset messages:
1. Select the Preset Msg mode. (See “Selecting a
Character Input Mode” on page 36.)
2. Scroll to the desired preprogrammed message and
Note:
MENU
press
Preset messages make composing text messages even
easier by allowing you to enter preset messages, such as
“Meet me at,” “Let’s get lunch,” or a customized preset
message of your own. (For more information on preset
messages, please see “Managing Preset Messages” on page
53.)
.
OK
Phone Basics
Section 2A: Your Phone: The Basics 39
Page 56

40
Page 57

Section 2B
Controlling Your Phone’s Settings
In This Section
⽧ Sound Settings
⽧ Display Settings
⽧ Location Settings
⽧ Messaging Settings
⽧ Airplane Mode
⽧ TTY Use With Trumpet Mobile Service
⽧ Phone Setup Options
⽧ Call Setup Options
Using the menu options available on your phone, you can
customize your phone to sound, look, and operate just the
way you want it to. This section describes how you can
change your phone’ s settings t o best suit y our needs. Take a
few moments to review these options and to adjust or add
settings that are right for you.
Section 2B: Controlling Your Phone’s Settings 41
Phone Basics
Page 58

Sound Settings
Ringer T ypes
Ringer types help you identify incoming call s and
messages. You can assign ringer types to individual
Contacts entries, types of calls, and types of messages.
䢇 Preprogrammed Ringers include a variety of standard
ringer types and familiar music.
䢇 Vibrating Ringer alerts you to calls or messages without
disturbing others.
Selecting Ringer T ypes for Voice Calls
Your phone provides a variety of ringer options that allow
you to customize your ring and volume settings. These
options allow you to identify incoming calls by the ring.
To select a ringer type for voice calls:
1. Select MENU > Settings > Sounds > Ringer Type >
Voice Calls.
2. Select With Caller ID or No Caller ID.
3. Select Melodies, Single Tones, or Ring Tones and
4. Use your navigation key to scroll through the availab le
5. Press .
MENU
press . (The list of ringers is displayed.)
OK
ringers. A sample ringer will sound as you highlight
each option.
MENU
OK
42 Section 2B: Controlling Your Phone’s Settings
Page 59

Selecting Ringer T ypes for Messages
To select a ringer type for messages:
1. Select MENU > Settings > Sounds > Ringer Type >
Messages.
2. Select Voicemail or Text Message.
3. Select Single T ones, Ring Tones or Melodies and
MENU
press . (The list of pr ep rogrammed ringers is
OK
displayed.)
4. Use your navigation key to scroll through the availab le
ringers. A sample ringer will sound as you highlight
each option.
5. Press to assign the desired ringer.
MENU
OK
Selecting Ringer T ypes for Schedule
To select a ringer type for schedule:
1. Select MENU > Settings > Sounds > Ringer Type >
Schedule.
2. Select Melodies, Ring Tones or Single Tones and
MENU
press . (The list of pr ep rogrammed ringers is
OK
displayed.)
3. Use your navigation key to scroll through the availab le
ringers. A sample ringer will sound as you highlight
each option.
4. Press to assign the desired ringer.
MENU
OK
Phone Basics
Section 2B: Controlling Your Phone’s Settings 43
Page 60

Selecting a Key Tone
Your phone offers a number of options for selecting the
audible tones accompanying a keypress. (Longer tone
lengths may be better for tone recognition when dialing
voicemail or other automated systems.)
To select a key tone:
1. Select MENU > Settings > Sounds > Key Tone .
2. Select T one Type and press
3. Select Xylophone, DTMF, or Simple and press .
MENU
OK
.
MENU
OK
T one Le vel
Your phone allows you to set the desired volume level of the
key tones.
To set the key tone level:
1. Select MENU > Settings > Sounds > Key To ne > Tone
Level
.
MENU
2. Press left or right until you hear the desired tone
level and press
OK
MENU
.
OK
Key T one Le ngth
The key tone length allows you to choose between short or
long tones when pressing a key. Longer tone lengths may
be better for tone recognition when dialing voicemail or
other automated systems.
To set the key tone length:
1. Select MENU > Settings > Sounds > Key Tone >
Tone Length.
2. Select Short or Long and press
MENU
OK
.
44 Section 2B: Controlling Your Phone’s Settings
Page 61

Adjusting the Phone’s Ringer V olume
You can adjust your phone’s ringer volume to suit your
needs and your environment.
To adj ust your phone’ s ringer volume:
1. Select MENU > Settings > Sounds > Volume.
2. Select Ringer.
3. Use the navigation key to choose a volume level and
select
Done (). (
Select Vibrate to make the ringer
vibrate at any volume level.)
Y ou can adjust the ri nger volum e in standby m ode (or the
Tip:
earpiece volume during a call) by using the volume key on the
left side of your phone.
Adjusting the Phone’s V olume Settings
You can adjust your phone’s volume settings to suit your
needs and your environment.
To adj ust your phone’ s volume settings:
1. Select MENU > Settings > Sounds > Volume.
2. Select Messages, Voic email or Alarms, and press
MENU
.
OK
3. Select Use Ringer V olume to use t he ringer settings or
select Separate Volume .
4. Use the navigation key to choose a volume level and
select
Done (). (
vibrate at any volume level.)
Select Vibrate to make the ringer
Phone Basics
Section 2B: Controlling Your Phone’s Settings 45
Page 62

Alert Notification
Your phone can alert you with an audible tone when you
change service areas, once a minute during a voice call,
when the signal fades, when powering yo ur phone on o r of f,
or when a call has been connected.
To enabl e or disable alert sounds:
1. Select MENU > Settings > Sounds > Alerts.
2. Select Minute Beep, Service , Connect, Sig. Fade
Tone, or Power On/Off and press .
If Power On/Off is sele cted, c hoose On or Off and press OK.
Note:
MENU
OK
3. Select On or Off and press .
MENU
OK
Silence All
There may be times when you need to silence your phone
entirely. The phone’s Silence All option allows you to mute
all sounds without turning your phone off.
To activate Si lence All:
䊳 With the phone open, press and hold the volume
key down in standby mode. (The screen will display
“Silence All.”)
To deactivate Si lence All:
䊳 Press the volume k ey u p repeatedly to sel ect a desired
volume level.
46 Section 2B: Controlling Your Phone’s Settings
Page 63

Display Settings
BACK
BACK
BACK
BACK
Changing the Text Greeting
The text greeting can be up to 14 characters and is
displayed on y our phone’ s screen in standb y mode. You may
choose to keep the phone’s default greeti ng (“Trumpet
Mobile”), or you may enter your own custom greeting.
To di splay or change your greeting:
1. Select MENU > Settings > Display > Greeting.
2. Enter a custom greeting using your keypad and press
MENU
. (See “Entering Text” on page 36.) (To erase the
OK
existing greetin g one char acter a t a time , press . To
erase the entire greeting, press and hold .)
Changing the Backlight Time Length
The backlight setting lets you select how long the display
screen and keypad are backlit after any keypress is made.
To change the backlight setting:
1. Select MENU > Settings > Display > Backlight > Main
Display .
2. Select a time setting and press .
To change the keypad setti ng:
1. Select MENU > Settings > Display > Backlight >
Keypad.
2. Select a time setting and press .
MENU
OK
MENU
OK
BACK
BACK
Phone Basics
BACK
BACK
Long backlight settings affect the battery’s talk and standby
Note:
times.
Section 2B: Controlling Your Phone’s Settings 47
Page 64

Changing the Display Screen
Your new phone offers options for what you see on the
display screen and when in standby mode.
To change the display images on main LCD:
1. Select MENU > Settings > Display > Screen Saver.
2. Choose the desired image and press to assign it
MENU
OK
as a screen saver.
Changing the Brightness
You can adjust your screen’s brightness to suit your
surroundings.
To adj ust the display’s contrast:
1. Select MENU > Settings > Display > Backlight >
Brightness.
2. Press your navigati on key up or down to adjust the
brightness and select Done ()
.
Changing the Phone’s Menu Style
Your phone allows you to choose how the men u appears on
your display screen.
To select th e display’ s menu style:
1. Select MENU > Settings > Display >
2. Select Grid Style to vie w each main menu item as an
animated, single screen icon or List Style to view the
main menu as a list and press .
MENU
OK
Menu Style.
48 Section 2B: Controlling Your Phone’s Settings
Page 65

Changing the Font Color
You can customize your phone’s display font by selecting a
color scheme or style to reflect your personality.
To change the display’ s theme color:
1. Select MENU > Settings > Display > Dialing Font
Color.
2. Select Basic, Rainbow , Monochrome, or Hyphenate
and press .
MENU
OK
Changing the Dialing Font
This setting allows you to adjust the display appearance
when dialing phone numbers.
To change the dialing font:
1. Select MENU > Settings > Display > Dialing Font
Size
.
2. Select Large, Normal, or Small and press
MENU
OK
.
Changing the Power Save Mode
The Power Save feature helps to conserve your battery
power by turning off the keypad backlight and dimming the
display backlight.
To change the Power Save Mode:
1. Select MENU > Settings > Display > Backlight
Save Mode
2. Select On or Off and press
.
MENU
.
OK
>
>
Phone Basics
>
Pwr
Changing the Service Light
The Service Light feature alerts you visually to your phone ’s
status (indicating incoming calls and messages , alarms, and
battery charging) when the flip is closed.
Section 2B: Controlling Your Phone’s Settings 49
Page 66

To change the Service Light:
1. Select MENU > Settings > Display > Service Light
2. Select On or Off and press
MENU
OK
.
.
50 Section 2B: Controlling Your Phone’s Settings
Page 67

Location Settings
Your phone is equipped with a Location feature for use in
connection with location-based services that may be
available in the future.
The Location feature allows the network Trumpet Mobile
makes available to you to detect your position. Turning
Location off will hide your location from everyone except
911.
T urning Location on will all ow the netw ork Trumpet Mobile
Note:
makes available to you to detect your position using GPS
technology , ma king some Trumpet Mobile applications and
services easier to use. Turning Location off will disable the
GPS location function for all purposes except 911, but will not
hide your general location based on the cell site serv ing your
call. No application or service may use y our loc ation without
your request or permission. GPS-enhanced 911 is not
available in all areas.
To enable your phone’ s Location feature:
1. Select MENU > Settings
> Others >
Location disclaimer is displayed.)
2. Read the disclaimer and press .
3. Select On or Off press
MENU
OK
.
When the Location feature is on, your phone’s standby
screen will display th e icon. When Location is turned
off, the icon will be displayed.
MENU
OK
Location
. (The
Phone Basics
Section 2B: Controlling Your Phone’s Settings 51
Page 68

Messaging Settings
Staying connected to your friends and family has never
been easier. With your phone’s advanced messaging
capabilities, you can send and receive many diff erent kinds
of text messages without placing a voice call.
Your phone’s messaging settings mak e text messaging ev en
faster and easier b y lettin g y ou decide ho w y ou w ould lik e t o
be notified of new messages, create a signature with each
sent message, and create your own canned messages, to
name just a few.
Setting Message Alerts
When new messages arrive, you can choose to have your
phone notify you by playing an audible alert.
To hear an alert when you receive a new message:
1. Select MENU > Messaging
> Settings >
Alerts.
2. Select Alert Volume, Alert Type, or Reminder and
MENU
press .
OK
3. Select the desired options and press .
Deleting Old Messages
You can delete messages that you’ve already read
whenever yo u like, or you can have your phone delete them
automatically for you when your phone's message memory
becomes full.
To automatically delete read messages:
1. Select MENU > Messaging
2. Select Yes or No and press .
> Settings >
MENU
OK
Message
MENU
OK
Auto Erase.
52 Section 2B: Controlling Your Phone’s Settings
Page 69

Adding a Customized Signature
Each message you send can have a customized signature
to reflect your personality.
To add a customized signature to each sent message:
1. Select MENU > Messaging
Signature
.
2. Select On and press . (If you do n ot wish t o attach
a signature to your outgoing messages, select Of f and
MENU
press
.)
OK
> Settings > Edit
MENU
OK
3. Enter your signature and press Done ( ). (See
“Entering Text” on page 36.)
Managing Preset Messages
Your phone is programmed with 10 preset messages to help
make sending text messages faster and easier. These
messages, such as “Where are you?,” “Let’s get lunch,” and
“Meet me at,” can be customized or deleted to suit your
needs. You can even add you r own preset messages to the
list (up to 20 messages total).
To edi t or delete a preset message:
1. Select MENU > Messaging
> Settings >
Messages. (The list of preset messages is displayed.)
2. To edit or delete a preset message, highlight it and
press Edit ( ). (See “Entering Text” on page 36.)
— or —
Select Options (), and then select Erase to delete
the selected message. Select Yes to confirm. (Select
No to cancel the deletion.)
Preset
Phone Basics
Section 2B: Controlling Your Phone’s Settings 53
Page 70

To add a new preset message:
1. Select MENU > Messaging
> Settings >
Preset
Messages. (The list of preset messages is displayed.)
2. To add a new message, select the desired message
location, press Options ( ) and select Add New.
3. Enter your message (see “Entering Text” on page 36),
and press . (Your new message will be added to
MENU
OK
the beginning of the list.)
54 Section 2B: Controlling Your Phone’s Settings
Page 71

Airplane Mode
Airplane Mode allows you to use many of you r phone’s
features, such as Memo Pad and Voice Memos when you
are in an airplane or in any other area where making or
receiving calls or data is prohibited. When your phone is in
Airplane Mode, it cannot send or receive any calls o r access
online information.
To set your phone to Airplane Mode:
1. Select MENU > Settings
> Others >
2. Read the disclaimer and press .
3. Select On or Off and press
While in Airplane Mode, your phone’s standby screen will
display “Phone off.”
MENU
OK
MENU
OK
.
Airplane Mode
Phone Basics
.
Section 2B: Controlling Your Phone’s Settings 55
Page 72

TTY Use With T rumpet Mobile
Service
A TTY (also known as a TDD or Text Telephone) is a
telecommunications device that allows people who are
deaf, hard of hearing, or who have speech or language
disabilities, to communicate by telephone.
Your phone is compatible with select TTY devices. Please
check with the manufacturer of your TTY device to ensure
that it supports digital wireless transmission. Your phone
and TTY device will connect via a special cable that plugs
into your phone's headset jack. If this cable was not
provided with your TTY device, contact your TTY device
manufacturer to purchase the connector cable.
When establishing your Trumpet Mobile Service, please call
Trumpet Mobile Customer Care via the state
Telecommunications Relay Service (TRS) by first dialing
PQRSPQRS
number: 888-774-2000.
To t urn TTY Options on or off:
1. Press
standby mode. (An informational message is
displayed.)
2. Press .
3. Select TTY Off, TTY + Hear, TTY+ Talk or TTY Full and
press .
TALK
. Then provide the state TRS with this
MENU > Settings > Others > TTY Mode from
MENU
OK
MENU
OK
56 Section 2B: Controlling Your Phone’s Settings
Page 73

In TTY Mode, your phone will display the TTY access icon
Note:
when a headset or TTY device is plugged in.
If TTY mode is enabled, the audio quality of non-TTY
devices connected to the headset jack may be
impaired.
WARNING
911 Emergency Calling
T rumpet Mobile re commends th at TTY users ma ke
emergency calls by other means, incl uding
T elecommunications Relay Services (TRS), analog
cellular, and landline communications. Wireless TTY
calls to 911 may be corrupted when received by
public safety answering points (PSAPs), rendering
some communications unintelligible. Th e problem
encountered appears related to TTY equipment or
software used by PSAPs. This matter has been
brought to the attention of the FCC, and the wir eless
industry and PSAP community are currently working
to resolve this.
Phone Basics
Section 2B: Controlling Your Phone’s Settings 57
Page 74

Phone Setup Options
Display Language
You can choose to display your phone’s onscreen menus in
English or in Spanish.
To assign a language for the phone’ s display:
1. Select MENU > Settings > Others > Language.
2. Select English or Español and press .
MENU
OK
58 Section 2B: Controlling Your Phone’s Settings
Page 75

Call Setup Options
Call Setup options allow you to set up the following options:
䢇 Abbreviated Dial allows you to program a five- or six-
digit prefix for commonly used phone numbers
(page 59).
䢇 Contacts Match allows you to turn on or off the contacts
matching feature (page 60).
䢇 Restriction allows you to restrict outgoing calls
(page 61).
䢇 Call Answer allows you to set up how you answer
incoming calls (page 62).
䢇 Auto Answer allows you to answer incoming calls
automatically with the optional hands-free car kit
(page 62).
Abbreviated Dialing
Abbreviated dialing all o ws you to program a five- or six-di gi t
prefix for commonly used phone numbers. When
abbreviated dialing is on, you can enter the last four or five
digits of any phone number that mat ches the five - or six-digit
prefix, and the number is dialed.
To set up abbreviated dialing:
1. Select MENU > Settings > Others > Call Setup >
Abbrev . Dial.
2. Select On or Off and press .
3. If you select On, input the five- or six-digit prefix (for
example, area code and prefix) and press .
MENU
OK
MENU
OK
Phone Basics
Section 2B: Controlling Your Phone’s Settings 59
Page 76

Making an Abbreviated Dial Call
To make a call :
1. Enter the last four or five digits of the prefix phone
number.
2. Abbrev. Dial is displayed in the lower left corner with
the prefix digits displayed.
If there is more than one C ontact entry that matches the last
Note:
four or five digits, a list is displayed which allows you to select
the desired number to call.
3. Press to make the call.
TALK
Contact Match
With the Contact Match feature, your phone displays the
contact’s name and phone number if the incoming call or
outgoing call is in your Contacts list.
To access Con tact Match:
1. Select MENU > Settings > Others > Call Setup >
Contact Match.
2. Select On or Off and press .
60 Section 2B: Controlling Your Phone’s Settings
MENU
OK
Page 77

Restriction
Allows you to restrict outgoing call options by selecting one
of the following options:
䢇 Allow all to allow outgoing calls to be made (no
restrictions).
䢇 Contacts Only to allow outgoing calls to only those
numbers saved in the Contact s list.
䢇 Special# Only to allow outgoing calls to only the
numbers set up in the special numbers list. (See “Using
Special Numbers” on page 66.)
To access call restriction:
1. Select MENU > Settings > Others > Call Setup >
Restriction.
2. Enter your lock code.
3. Select Outgoing Call and press .
4. Select Allow all, Contacts Only, or Special# Only and
MENU
press .
OK
MENU
OK
Phone Basics
Section 2B: Controlling Your Phone’s Settings 61
Page 78

Call Answer Mode
You can determine how to answer incoming calls on your
phone, whether by pressing , by pressing any number
key, or simply by opening the phone.
To set call answer mode:
1. Select MENU > Settings
Answer.
2. To select an option, highlight it and press
䡲 Any Key to allow an incoming call to be answered
by opening the phone or pressing any key.
䡲 Talk Key to require
incoming calls
䡲 Flip Open to answer the call when the phone is
opened.
TALK
Others > Call Setup > Call
>
MENU
.
OK
TALK
to be pressed to answer all
.
Auto Answer Mode
You may set your phone to automatically pick up incoming
calls when connected to an optional hands-free car ki t.
To set Auto Answer mode:
1. Select MENU > Settings > Others > Call Setup >
Auto Answer.
2. To select an option, highlight it and press
䡲 CarKit/Headset select Yes to answer calls
automatically when the phone is connected to a
hands-free car kit or a headset (sold separately).
Remember, your phone will answer calls in Auto
Answer mode even if you are not present.
MENU
OK
.
62 Section 2B: Controlling Your Phone’s Settings
Page 79

Section 2C
Setting Your Phone’s Security
In This Section
⽧ Accessing the Security Menu
⽧ Using Your Phone’ s Lock Feature
⽧ Using Special Numbers
⽧ Erasing Contacts
⽧ Resetting Your Phone
By using the security settings on your ph one, you recei ve
peace of mind without sacrificing flexibility. This section will
familiarize you with your phone’s security settings. With
several options available, you can customize your phone to
meet your personal needs.
Section 2C: Setting Your Phone’s Security 63
Phone Basics
Page 80

Accessing the Security Menu
All of your phone’s security settings are available through
the Security menu. You must enter your lock code to view
the Security menu.
To access th e Security menu:
1. Select MENU > Settings
Security
>
.
2. Enter your lock code to display the Security menu.
If you can’t recall your lock code , try usin g the last four digit s
Tip:
of your wireless phone number or try 0000. If neither of these
works, call Trumpet Mobile Customer Car e at 1-877TRUMPET .
Using Y our Phone’ s Lock Feature
Locking Your Phone
When your phone is lock ed, you can only receive incoming
calls or make calls to 911, Trumpet Mobile Customer Care,
or special numbers. (See “Using Speci al Numbers” on page
66.)
To lock your phone:
1. From the Security menu, select Lock Phone.
2. Highlight Lock Now and press . (To set your
phone to lock the next time it is turned on, select On
Power-up and press
MENU
OK
MENU
OK
.)
64 Section 2C: Setting Your Phone’s Security
Page 81

Unlocking Your Phone
To unl ock your phone:
1. From standby mode, press Talk, Left/Right softkey ,
Volume key, or OK key.
2. Enter your lock code.
Calling in Lock Mode
You can place calls to 911 and to your special numbers
when in lock mode. (For information on special numbers,
see “Using Special Numbers” on page 66.)
To pl ace an outgoing call in lock mode:
䊳 To call an emergency number, special number, or Trumpet
Mobile Customer Care, ent er the phone number and pres s
TALK
.
Changing the Lock Code
To change your lock code:
1. Select MENU > Settings > Security
2. Enter your lock code. (The Security menu is
displayed.)
3. Select Change Lock.
4. Enter your new lock code and press Next ().
5. Re-enter your new lock code and press Done ().
.
Phone Basics
Section 2C: Setting Your Phone’s Security 65
Page 82

Using Special Numbers
Special numbers are important numbers that you have
designated as being “always available.” You can call and
receive calls from special numbers even if your phone is
locked.
You can save up to three special numbers in addition to
your Contacts entries. (The same number may be in both
directories.)
To add or replace a special number:
1. Select MENU > Settings > Security
.
2. Enter your lock code. (The Security menu is
displayed.)
3. Select Special #.
4. Select a location for your entry and press .
5. Enter the number and press
There are no speed dial options associated with special
Note:
numbers.
MENU
OK
.
MENU
OK
Erasing Contact s
You can quickly and easily erase all the contents of your
Contacts list.
To erase all the names and n umbers in your Contact s:
1. Select MENU > Settings
2. Enter your lock code. (The Security menu is
displayed.)
3. Select Erase Contacts
Security
>
and press .
.
MENU
OK
66 Section 2C: Setting Your Phone’s Security
Page 83

4. If you are certain you would like to erase all of your
Contacts entries, select Yes and press .
MENU
OK
Resetting Y our Phone
Resetting the phone restores all the factory defaults,
including the ringer types and display settings. (Contacts
are not affected when resetting your phone.)
To r eset your phone:
1. Select MENU > Settings > Security .
2. Enter your lock code. (The Security menu is
displayed.)
3. Select Reset Phone
and press .
4. If you are certain that you would like to restore all the
factory settings, select Yes and press .
MENU
OK
MENU
OK
Phone Basics
Section 2C: Setting Your Phone’s Security 67
Page 84

68
Page 85

Managing Call History
In This Section
Section 2D
⽧ Viewing History
⽧ Call History Options
⽧ Making a Call From Call History
⽧ Saving a Phone Number From Call History
⽧ Prepending a Phone Number From Call History
⽧ Erasing Call History
The Call History keeps tra ck of incomin g calls, calls made
from your phone, and missed calls. This section guides you
through accessing and making the most of your Call History.
Section 2D: Managing Call History 69
Phone Basics
Page 86

Viewing History
You’ll find the Call History feature very helpful. It is a list of
the last 20 phone numbers (or Contacts entries) for cal ls you
placed, accepted, or missed. Call History makes redialing a
number fast and easy. It is continually updated as new
numbers are added to the beginning of the list and the
oldest entries are removed from the bottom of the list.
Each entry contains the phone number (if it is av ailab le) and
Contacts entry name (if the phone number is in your
Contacts). Duplicate calls (same number and type of call)
may only appear once on the list.
To view a Call Histo ry entry:
1. Select MENU > Call History .
2. Select Outgoing Calls, Incoming Calls, Missed Calls,
or All Recent and press .
3. Highlight the entry you wish to view and press
MENU
OK
MENU
.
OK
70 Section 2D: Managing Call History
Page 87

Call History Options
For additional information and options on a particular call,
highlight a Call History entry and press
MENU
. This feature
OK
displays the date and time of the call, the phone number (if
availab le), and the cal ler’s name (if the number is already in
your Contacts). By pressing Options ( ), you can select
from the following options:
䢇 Send Msg to send a text message to the number
displayed on screen (“Using SMS Text Messaging” on
page 107.)
䢇 Save to save the number if it is not already in your
Contacts. (See “Saving a Phone Number From Call
History” on page 73.)
䢇 Prepend to add numbers to the beginning of the
selected number. (See “Prepending a Phone Number
From Call History” on page 74.)
䢇 Erase to delete the entry (page 74).
You can also view the next Call History entry by pressing the
Tip:
navigation key right or view the previous entry by pressing the
navigation key left.
Phone Basics
Section 2D: Managing Call History 71
Page 88

Making a Call From Call History
To pl ace a call from Call History:
1. Select MENU > Call History
2. Select Outgoing Calls, Incoming Calls, Missed Calls,
or All Recent and press .
3. Use your navigation key to select a Call History entry
and press
Y ou cannot make calls fr om Call History to entries ide ntified as
Note:
No Caller ID, Unknown, or Restricted.
MENU
OK
.
4. Select Call ( ) to call the selected number.
MENU
OK
.
72 Section 2D: Managing Call History
Page 89

Saving a Phone Number From Call History
Contacts entries can store up to a total of five phone
numbers, and each entry’ s name ca n contain 20 char acters .
To save a ph one number from Call History:
1. Select MENU > Call History > Outgoing Calls,
Incoming Calls, Missed Calls, or All Recent and press
MENU
.
OK
2. Use your naviga tion ke y to select the d esired entry and
select Options ().
3. Select Save
and press .
4. Select New Entry and press .
5. Select a label and press .
6. Enter a name for the entry using the keypad and
MENU
press .
OK
7. Select Done ( ) to save and exit.
After you have saved the number, the Find screen is
displayed. (See “Finding Contacts Entries” on page 77.)
Y ou can not save phon e numbers alr ea dy in your Co ntacts or
Note:
from calls identified as No Caller ID, Unknown, or Restricted.
MENU
OK
MENU
OK
MENU
OK
Phone Basics
Section 2D: Managing Call History 73
Page 90

Prepending a Phone Number From Call History
If you need to make a call from Ca ll History and you happen
to be outside your local area code, you can add the
appropriate prefix by prepending the number.
To pr epend a phone number from Call History:
1. Select MENU > Call History
2. Select Outgoing Calls, Incoming Calls, Missed Calls,
or All Recent and press .
3. Select a Call History entry, select the number or the
name and press .
MENU
OK
4. Press Options ( ) and select Prepend
5. Enter the prefix and press
MENU
OK
.
.
TALK
.
Erasing Call History
To erase individual Call History entries, see “Call History
Options” on page 71.
To erase Call History:
1. Select MENU > Call History
2. Select Outgoing Calls, Incoming Calls, Missed Calls,
or All Recent and press .
3. Press Options ( ) and select Erase for the
highlighted entry or Erase All for all entries and press
MENU
.
OK
MENU
OK
.
74 Section 2D: Managing Call History
Page 91

Using Contact s
In This Section
Section 2E
⽧ Adding a New Contacts Entry
⽧ Finding Contacts Entries
⽧ Contacts Ent ry Options
⽧ Adding a Phone Number to a Contacts Entry
⽧ Editing a Contact s Entr y’ s Phone Num ber
⽧ Assigning Speed Dial Numbers
⽧ Editing a Contact s Entry
⽧ Selecting a Ringer Type for an Entry
⽧ Dialing Trumpet Mobile Services
Now that you know the basics that make it easie r to st ay in
touch with people and information, you’re ready to explore
your phone’s more advanced features. This section
explains how to use your phone’s Contacts and helps you
make the most of your contacts and time when you are
trying to connect with the important people in your life.
Section 2E: Using Contacts 75
Phone Basics
Page 92

Adding a New Contact s Entry
Your phone's Contacts list can store up to 299 entries and
each entry’s name can contain 20 characters.
To add a new entry:
1. Select MENU > Contacts
Add New Entry
>
.
Shortcut:
Tip:
Press Contacts and press Add New. Pr oceed with
steps 2 – 5.
Yo u can also enter the phone number in standby mode, press
OK, select New Entry , and press OK. Pr oceed with steps
2 – 5.
2. Enter a name for the new entry and press the
navigation key down. (See “Entering Text” on page 36.)
3. Highlight the desired label entry (Mobile, Home, Work,
Pager, or Others) and enter the phone number.
4. Select OK ().
5. Select Done ().
After you have saved the number, the Find entry screen is
displayed. (See “Finding Contacts Entries” on page 77.)
76 Section 2E: Using Contacts
Page 93

Finding Contact s Entries
There are several ways to display your Contacts entries: by
name, by speed dial number, and by group. F ollo w the steps
outlined in the sections below to display entries from the
Contacts menu.
Finding Names
To f ind Cont acts entries by name:
1. Select MENU > Contacts
> Find.
Phone Basics
Shortcut:
From standby mode, press Contacts (right softkey) to
display the Contacts menu.
2. Scroll through all the entries using your navigation key.
— or —
Enter the first letter of a name or part of a name (such
as “ave” for “Dave”). (The more letters you enter, the
more your search narrows.)
3. To display an entry, highlight it and press .
4. To dial the entry’s default phone number, press
MENU
OK
TALK
.
— or —
To display additional Contacts entries, press the
navigation key left or right.
Section 2E: Using Contacts 77
Page 94

Finding Speed Dial Numbers
To find phone numbers you have stored in speed dial
locations:
1. Select MENU > Contacts
Speed Dial #s
>
.
2. Scroll through speed dial entries using your navigation
key. Speed dial numbers are displayed in numeric
order.
— or —
Enter the number of a speed dial location using your
keypad.
3. To display an entry, highlight it and press .
MENU
OK
4. To dial the entry’s default phone number, press
Finding Group Entries
To f ind entries designated as p art of a group :
1. Select MENU > Contacts
>
Group
.
2. Scroll through the group titles using your navigation
key. To display entries belonging to a group, highlight
the group and press .
MENU
OK
3. Navigate through the gr oup to find the desired c ontact.
4. To dial the entry’s default phone number, press
TALK
.
TALK
.
78 Section 2E: Using Contacts
Page 95

Contact s Entry Options
To access a Contacts entry’s options, highlight the entry and
MENU
press . Press Options () > Edit. Highlight one of the
OK
options listed below and press .
䢇 [Contact Name] to edit the contact entry name.
䢇 [Mobile/Home/Work/Pager/Others] to add a phone
number to the entry. (See “Adding a Phone Number to a
Contacts Entry” on page 80.)
䢇 [E-mail] to add an email address to the entry.
䢇 [Memo] to add a short text description about the contact.
䢇 [Group] to assign the entry to a group.
䢇 [Ring] to assign a preprogrammed ringer.
䢇 [Image] to assign a preset image to the contact entry.
Yo u can view the next entry by pressing the navigation key
Tip:
right or view the previous entry by pressing the navigation key
left.
MENU
OK
Phone Basics
Section 2E: Using Contacts 79
Page 96

Adding a Phone Number to a Contact s
BACK
BACK
BACK
BACK
Entry
To add a phone number to an entry:
1. Highlight a Contacts entry (see “Finding Contacts
Entries” on page 77) and press to display a
MENU
OK
Contacts entry.
2. Press Options () > Edit.
3. Highlight the desired label, enter the new phone
number, and press OK ().
4. Press Done ( ) to save the new number.
Editing a Contact s Entry’ s Phone Number
To edi t an entry’ s phone number:
1. Highlight a Contacts entry (see page 77) and press
MENU
to display a Contacts entry.
OK
2. Press Options () > Edit.
3. Highlight the number you wish to edit and press
BACK
hold
BACK
BACK
BACK
to erase the whole number.
MENU
OK
4. Press to clear one digit at a time, or press and
5. Re-enter or edit the number and press
6. Press Done ( ) to save the number.
MENU
OK
.
.
80 Section 2E: Using Contacts
Page 97

Assigning Speed Dial Numbers
Your phone can store up to 98 phone numbers in speed dial
locations. For deta ils on how to make calls using speed dial
numbers, see “Using Speed Dialing” on page 35.
Speed dial numbers can be assigned when you add a new
Contacts entry, when you add a new phone number to an
existing entry, or when you edit an existing number.
To assign a speed dial number to a new or existin g phone
number:
1. Add a phone number to a new or existing Contacts
entry . (See “Adding a Ne w Contacts Entry” on page 76
or “Adding a Phone Number to a Contacts Entry” on
page 80.)
2. Highlight the number and press Options ().
If you select a location that a lr eady has a sp eed di al entry
Note:
associated, you can pr ess Edi t to overwrite the location.
Phone Basics
3. Select Speed Dial and press .
4. Select an avail ab le speed dia l location and press
MENU
OK
MENU
OK
.
5. Press Done ( ) to return to the Contacts menu.
If you attempt to assign an already in-use speed dial location
Note:
to a new phone number, a dialog will appear asking if you
wish to replace the existing speed dial assignment. Select Yes
to assign the location to the new phone number and delete
the previous speed dial assignment.
Section 2E: Using Contacts 81
Page 98

Editing a Contact s Entry
To make changes to an entry:
1. Display a Contact s entry and highlight the name of the
person you wish to edit.
2. Press Options () > Edit.
3. Highlight the part of the entry you wish to edit (Name,
Group, Ringer , etc.) and press
4. Add and/or edit the desired information and press
MENU
.
OK
MENU
OK
.
5. Press Done ( ) to save your changes.
Selecting a Ringer T ype for an Entry
You can assign a ringer type to a Contacts entry so you can
identify the caller by the ringer type . (See “Rin ger Types” on
page 42.)
To select a ringer type for an entry:
1. Display a Contact s entry and highlight the name of the
person you wish to edit.
2. Press Options () > Edit.
MENU
OK
MENU
OK
MENU
OK
3. Highlight the current ringer type and press .
4. Select the desired ringer category and press .
5. Use your navigation key to scroll through available
ringers. (When you highlight a ringer type, a sample
ringer will sound.)
6. Highlight your desired ringer and press .
7. Press Done ( ) to save the new ringer type.
82 Section 2E: Using Contacts
Page 99

Dialing T rumpet Mobile Services
Your Contacts list is preprogrammed with contact numbers
for various Trumpet Mobile Services.
To di al a service from your Contact s:
1. Select MENU > Contacts
2. Select Customer Care, Airtime T op-Up,
3. Press to place the call.
TALK
To di al a service from standby mode using your keypad:
1. Dial the appropriate service number:
䡲 Customer Care –
䡲 Airtime Top-Up –
䡲 Dir Assist –
2. Press to place the call.
TALK
GHIGHI
>
MNOMNO
ABCABC ABCABC ABCABC
Services.
Dir Assist
or
.
Phone Basics
Section 2E: Using Contacts 83
Page 100

84
 Loading...