

Samsung SNC-550 User Manual


Preface
i
Preface
Thanks for purchasing of SNC-550 camera.
This is a user instruction manual for high resolution D&N network
camera and the product mentioned here designates the high
resolution D&N network camera.
The user who installs and operates the product shall be aware of this
manual and other manuals referenced by this manual before the
installation and operation and use properly.
This manual and the software and hardware explained here are
protected by copyright law.
So the copy, reprint and translation to other languages of a part of or
all contents of this user manual without permission of
SamsungTechwin Co., LTD are not allowed except for the copy for
general use within the scope of copyright law.
A brand that is integrated into Samsung's network products,
stands for a convenient world (Polis) made safe
(Police) through Samsung's superior network performance(Internet
protocol). With
products' clear digital images
transmitted over the internet, real-time monitoring is possible
anywhere with an internet connection. Easy remote control
functions and the use of existing networks minimize installation
costs. With
, experience a world of convenience
connected anytime, anywhere.


Contents
1
Contents
Preface .............................................................................. i
Contents ...........................................................................1
Note to User .....................................................................4
Product Warranty and Limitations ....................................6
Warning Symbols .............................................................7
Warning ............................................................................7
Caution .............................................................................9
Ch1. Overview.......................................................................11
1.1. SNC-550 Network Camera Introduction..................12
1.2. Features ..................................................................12
Ch2. Production Description ...............................................16
2.1. Components and Accessories.................................17
2.2. Section names and functions .................................. 18
2.2.1. Front ......................................................................18
2.2.2. Side........................................................................ 19
2.2.3. Bottom ...................................................................20
2.2.4. Back....................................................................... 21
2.3. Recommended PC specifications ...........................23
Ch3. Installation and Network Setup...................................24
3.1. Lens Installation.......................................................25
3.2. Connecting to Monitor .............................................29
3.3. Connecting to Power ...............................................30

SNC-550 Network Camera
2
3.4. Connection to External Control Connector.............. 32
3.5. Network configuration and connection method ....... 36
3.5.1. Configuration/connection using Web page ............. 36
3.5.2. Configuration/connection using Network Manger ... 38
Ch4. How to Use Web Viewer ..............................................49
4.1. How to Use Web Viewer..........................................50
4.1.1. Login ...................................................................... 50
4.1.2. Web Viewer screen ................................................ 51
4.2. Using Administration page....................................... 56
4.2.1. Live ........................................................................ 56
4.2.2. Basic...................................................................... 57
4.2.3. Network.................................................................. 59
4.2.4. User ....................................................................... 60
4.2.5. Motion Detection .................................................... 63
4.2.6. Alarm/Sensor .........................................................64
4.2.7. Time....................................................................... 67
4.2.8. LOG ....................................................................... 68
4.2.9. Upgrade ................................................................. 69
4.2.10. System Reboot.....................................................70
4.2.11. SLiM Player.......................................................... 71
Ch5. How to Use Network Manager ....................................73
5.1. What is Network Manager? .....................................74
5.2. Composition and Function of Network Manager .....75
5.2.1. Video display part................................................... 76
5.2.2. Page control part.................................................... 78

Contents
3
5.2.3. Equipment Status Display Part............................... 82
5.2.4. Main Button Part .................................................... 83
5.2.5. List Display Part ..................................................... 89
5.2.6. Channel Setup Part................................................ 90
Ch6. How to Operate Camera ..............................................94
6.1. Setup MENU ...........................................................95
6.2. How to Set Up Functions.........................................96
6.2.1. Lens selection (LENS)............................................ 98
6.2.2. SHUTTER (condition and speed control) ............. 100
6.2.3. WHITE BAL. (WHITE BALANCE control)............. 101
6.2.4. BACKLIGHT (Backlight Compensation) ............... 103
6.2.5. AGC (Auto Gain Control)...................................... 104
6.2.6. SSNR (Samsung Super Noise reduction)............. 105
6.2.7. SENS-UP (Low Illuminance) ................................ 106
6.2.8. SPECIAL.............................................................. 108
6.2.9. EXIT..................................................................... 114
Ch7. Troubleshooting.........................................................115
Specifications ........................................................................120
Network Manager Specifications...........................................122
Dimension .............................................................................123

SNC-550 Network Camera
4
Note to User
This machine’s electromagnetic waves have been
registered as suitable for business purposes; the retailer
and consumer should be aware of this registration. If in
the case of wrongful purchases, please exchange the
product for a home use product.
Correct Disposal of This Product
(Waste Electrical & Electronic Equipment)
(Applicable in the European Union and other
European countries with separate collection
systems)
This marking shown on the product or its literature, indicates that it
should not be disposed with other household wastes at the end of its
working life. To prevent possible harm to the environment or human
health from uncontrolled waste disposal, please separate this from
other types of wastes and recycle it responsibly to promote the
sustainable reuse of material resources. Household users should
contact either the retailer where they purchased this product, or their
local government office, for details of where and how they can take
this item for environmentally safe recycling. Business users should
contact their supplier and check the terms and conditions of the
purchase contract. This product should not be mixed with other
commercial wastes for disposal.
Note to User
5
Samsung Techwin cares for the environment at all
product manufacturing stages to preserve the
environment, and is taking a number of steps to
provide customers with more environment-friendly
products.The Eco mark represents Samsung
Techwin s will to create environment-friendly
products, and indicates that the product satisfies
the EU RoHS Directive.

SNC-550 Network Camera
6
Product Warranty and Limitations
The manufacturers of this product do not take any responsibility for
this product; therefore, the manufacturer does not authorize the
third-party, but allows that retailer is responsible.
The product warranty does not extend to cover accidents, negligence,
abuse, or wrongful use for the whole or any part of the product.
Additionally, the manufacturer does not provide warranty for any
additional parts or affiliations.
The warranty is for one year from the purchase date. During the
period, warranty does not extend to malfunction in these areas.
y Malfunction due to user’s negligence
y Dismantlement or replacement by the user
y Connection to alternate power source
y Malfunction due to natural disasters (fire, flood, tsunami, etc.)
y Replacement due to wear and tear
y Instability of network
Warning Symbols
7
Warning Symbols
Before attempting to connect or operate this product,
please read these instructions carefully and save this manual for
future use.
Danger :
Misuse or wrongful operation of the product may
result in death, injury or bring about other fatal
results. It indicates absolute caution when operating.
Caution :
Misuse or wrongful operation of the product may
result in slight injury or damage to the product. It
indicates caution when operating.
Note :
Indication that the user needs to be aware of certain
matters, or will find matters helpful in operating the
product.
Warning
Before Setup
y Please set up the proper voltage before connecting to power
source.
y Please be sure the power is turned off before setup.

SNC-550 Network Camera
8
y There is risk of shock or fire; be sure to avoid setup in places
with high humidity.
y To prevent shocks, please connect the ground wire.
y Do not install the camera on a surface that can not support it.
y Unless the surface is suitable, it could cause falling or other
hazards.
During Use
y When opening the product cover, there is a risk of electric
shock. Only a professional should open the cover.
y Please use only in an environment with standard temperature
and humidity.
y Please do not plug in multiple products to a power source; it is
often the cause of fires.
y Please do not place water or heavy objects on the product; it is
often a cause of malfunction.
y Please do not use in a location with propane gas, gasoline or
other flammable substances to avoid risk of explosion or fire.
y Please do not touch the power plug with wet hands to avoid
electric shock.
y Do not pull on the power plug with too much force; a damaged
plug may cause electric shock or fires.
y Don’t connect the RJ-45 cable to a terminal by constraint.
y Stop using your camera when you find a malfunction.
If you use your camera around smoke or unusual heat for a

Caution
9
long time,
Fire may be caused.
y Random replacement of built-in battery by other types of
batteries may cause explosion. The battery shall be replaced by
the same battery. The used batteries shall be disposed carefully
because they can cause environment pollutions.
y The battery shall be replaced by the same battery.
y The used batteries shall be disposed carefully because they can
cause environment pollutions.
Disassembly and Cleaning
y There is a risk of malfunction, shock or other dangers. Please
do not disassemble or attempt to fix the product.
y To prevent malfunction or shock, please do not use a wet cloth
or oil-based cleaning product to clean the product exterior.
Clean the exterior of the product with a dry cloth.
Caution
y Do not install under extreme temperature conditions
Use only under temperature conditions between -0°C and

SNC-550 Network Camera
10
+40°C. Provide good ventilation when using in high
temperature conditions.
y Do not install under unstable lighting conditions.
Severe lighting changes or flickering may hinder normal
camera operation.
y Do not drop the camera or subject it to physical shock.
May cause a product malfunction.
y Never keep the camera face to strong light directly.
May damage the CCD.
y Avoid touching the camera lens.
The lens is the most important component of the camera. Be
careful not to smear it with fingerprints.
y Do not expose the camera to rain or other types of liquids
Wipe dry any liquids. Liquids may contain minerals that are
corrosive to Electronic components.
y Do not expose the camera to radioactivity.
Radioactivity exposure may damage the CCD.
y Do not disassemble the camera.
If you disassemble the product as you please, a Repair Center
doesn’t repair it for free.
y Please check the created network place first, before trying to
connect to a network.
y Please use only the power adapter that is provided with the
product.
y Please check national laws to be sure that using the product for
monitoring purposes is not illegal.

CChh11..
OOvveerrvviieeww

SNC-550 Network Camera
12
1.1. SNC-550 Network Camera Introduction
The SNC-550 is a high-tech network camera that uses MPEG-4
codec technology to allow high compression rates and clear picture
quality by allowing for high frame rates to be transmitted through
the network.
By using the network, remote connection, monitoring, and control is
possible from any location for simple use; additionally, set-up
requires only a network.
The SNC-550 Network Camera utilizes embedded software
solutions (Embedded Web Server, Embedded Streaming Server,
Network Protocol) developed by SamsungTechwin, and guarantees
performance and safety while offering various solutions through
Internet integration.
1.2. Features
High Resolution
By adopting SUPER HAD CCD, this camera provides
530TV line on vertical resolution color, 570TV line on BW
(on the basis of VIDEO OUT output)
DAY & NIGHT
This camera has a function that automatically selects the
mode that is appropriate for daytime or night-time
conditions.

1.2. Features
13
The COLOR mode operates in daytime conditions to
provide optimum colors, and BW mode operates in night-
time conditions to enhance the definition of the image.
Electronic IRIS
The electronic IRIS function enables continuous
automatic control of the shutter between
1/60(1/50)~1/120,000 seconds.
PRIVACY Function
The PRIVACY function conceals the areas you do not
wish to appear on the screen.
VIDEO/DC Drive Lens
The video drive lens and the DC drive lens can be
selected by the touch of a switch.
High Sensitivity
The built-in high sensitivity COLOR CCD enables a clear
image even in 0.002Lux(Sens-up) or lower illumination.
SSNR (Samsung Super Noise Reduction)
By using built-in SSNR function manufactured by
SAMSUNG TECHWIN, the amount of low illuminance
noise has been significantly reduced, and the signal-to-
noise ratio (S/N) as well as horizontal resolution have
been improved, resulting in a clear and sharp image
display even in the dark.

SNC-550 Network Camera
14
SPOTLIGHT Function
The SPOTLIGHT function is setting when you want
subject in the center of the image exposed correctly,
regardless of the back lighting.
Controlled by OSD Menu
The camera can be controlled by selecting text displayed
on the monitor screen.
Motion Detection
Once motion is detected, the camera sends an alert
signal to the processing unit, which, if used in conjunction
with an optional alarm, can provide effective surveillance
of your property.
Alarm and interoperation
Motion Detection function is interoperated with Alarm, still
picture can be transmitted via e-mail or FTP.
High data compression ratio
With high data compression ratio based on MPEG-4,
transmission speed is fast and relatively large number of
frame can be transmitted on the same network bandwidth.
Adopt PoE(Power Over Ethernet)
PoE is the function that supplies power in addition to data
sending and receiving using LAN cable without separate
power connection and it provides convenience for users
at installation.

1.2. Features
15
Bi-directional audio and video transmission
Video and bi-directional audio can be transmitted in real
time and recording and playing are possible through
exclusive viewer installed on user’s PC.
Additional function
SENS-UP, Horizontal reversal, SHARPNESS, SYNC
selection(INT/LL), MPEG-4/JPEG selection function.

16
CChh22..
PPrroodduuccttiioonn DDeessccrriippttiioonn
2.1. Components and Accessories
17
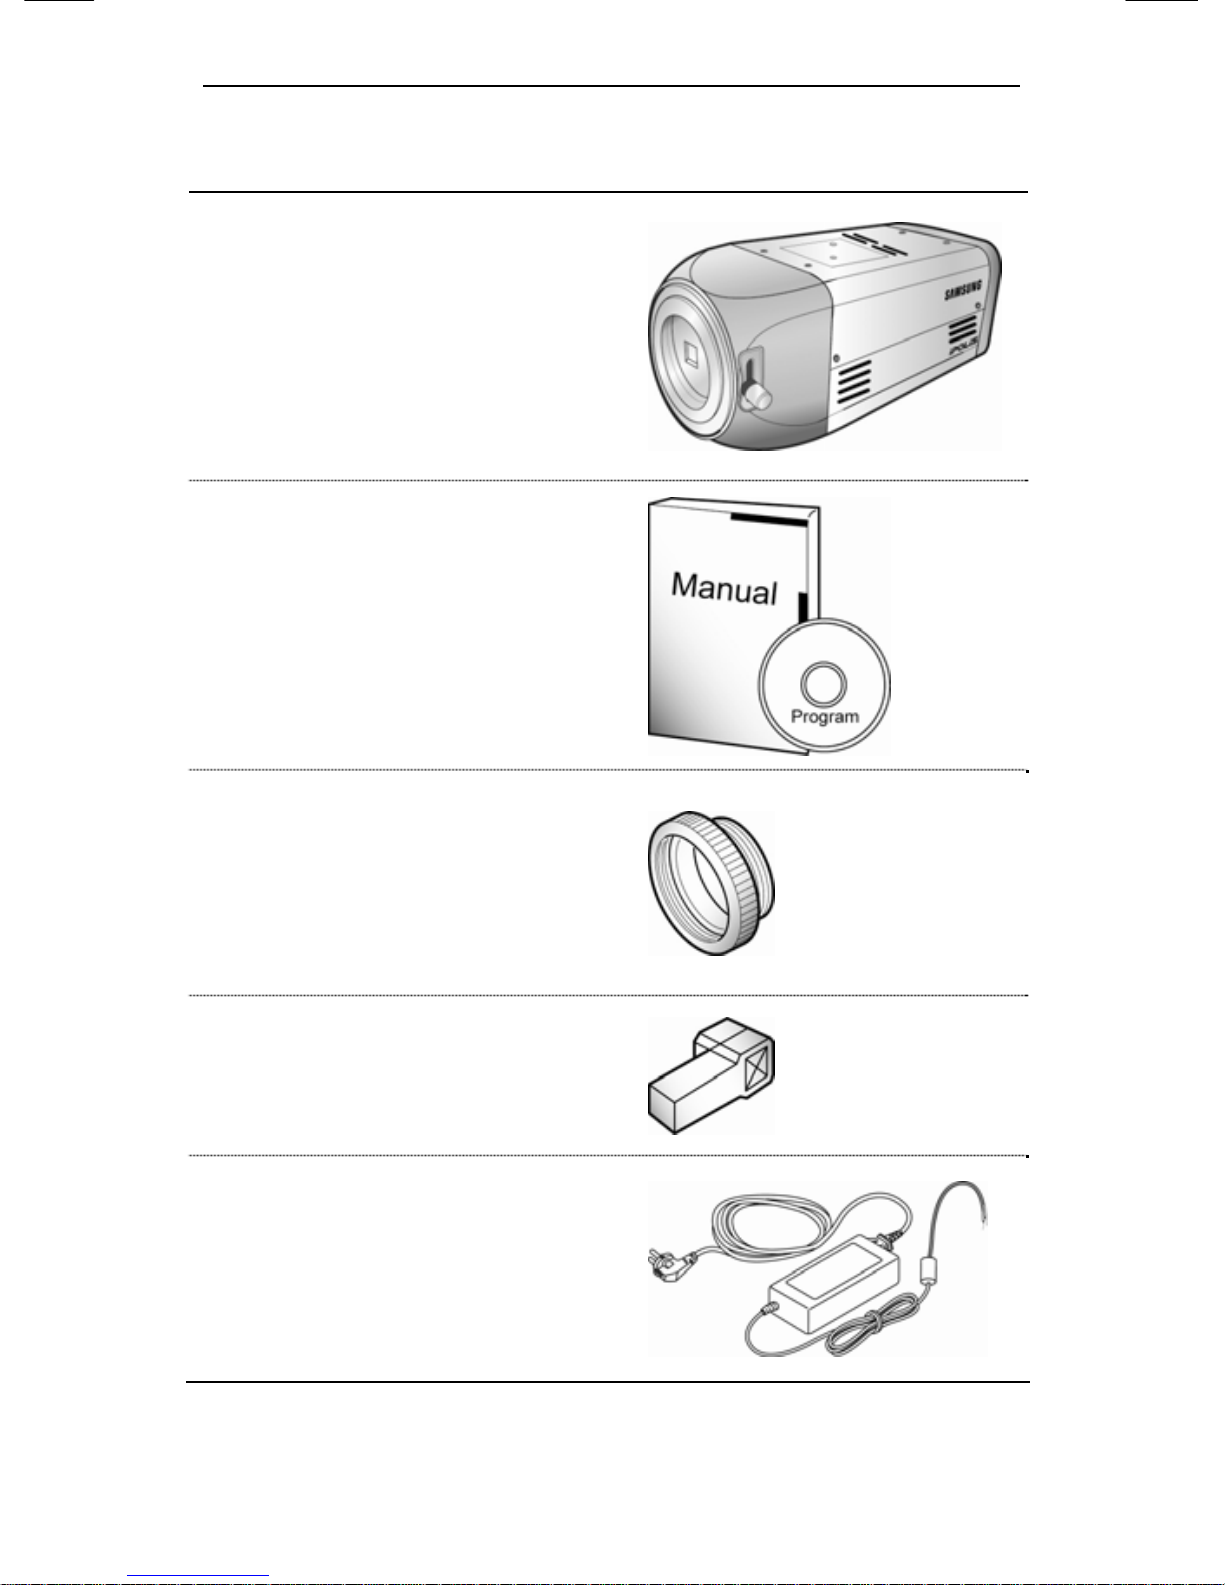
2.1. Components and Accessories
High Resolution,
Day&Night Network
Camera
User’s Manual/CD
C-Mount adaptor
Auto iris lens
connection plug
DC 12V adaptor
SNC-550 Network Camera
18
2.2. Section names and functions
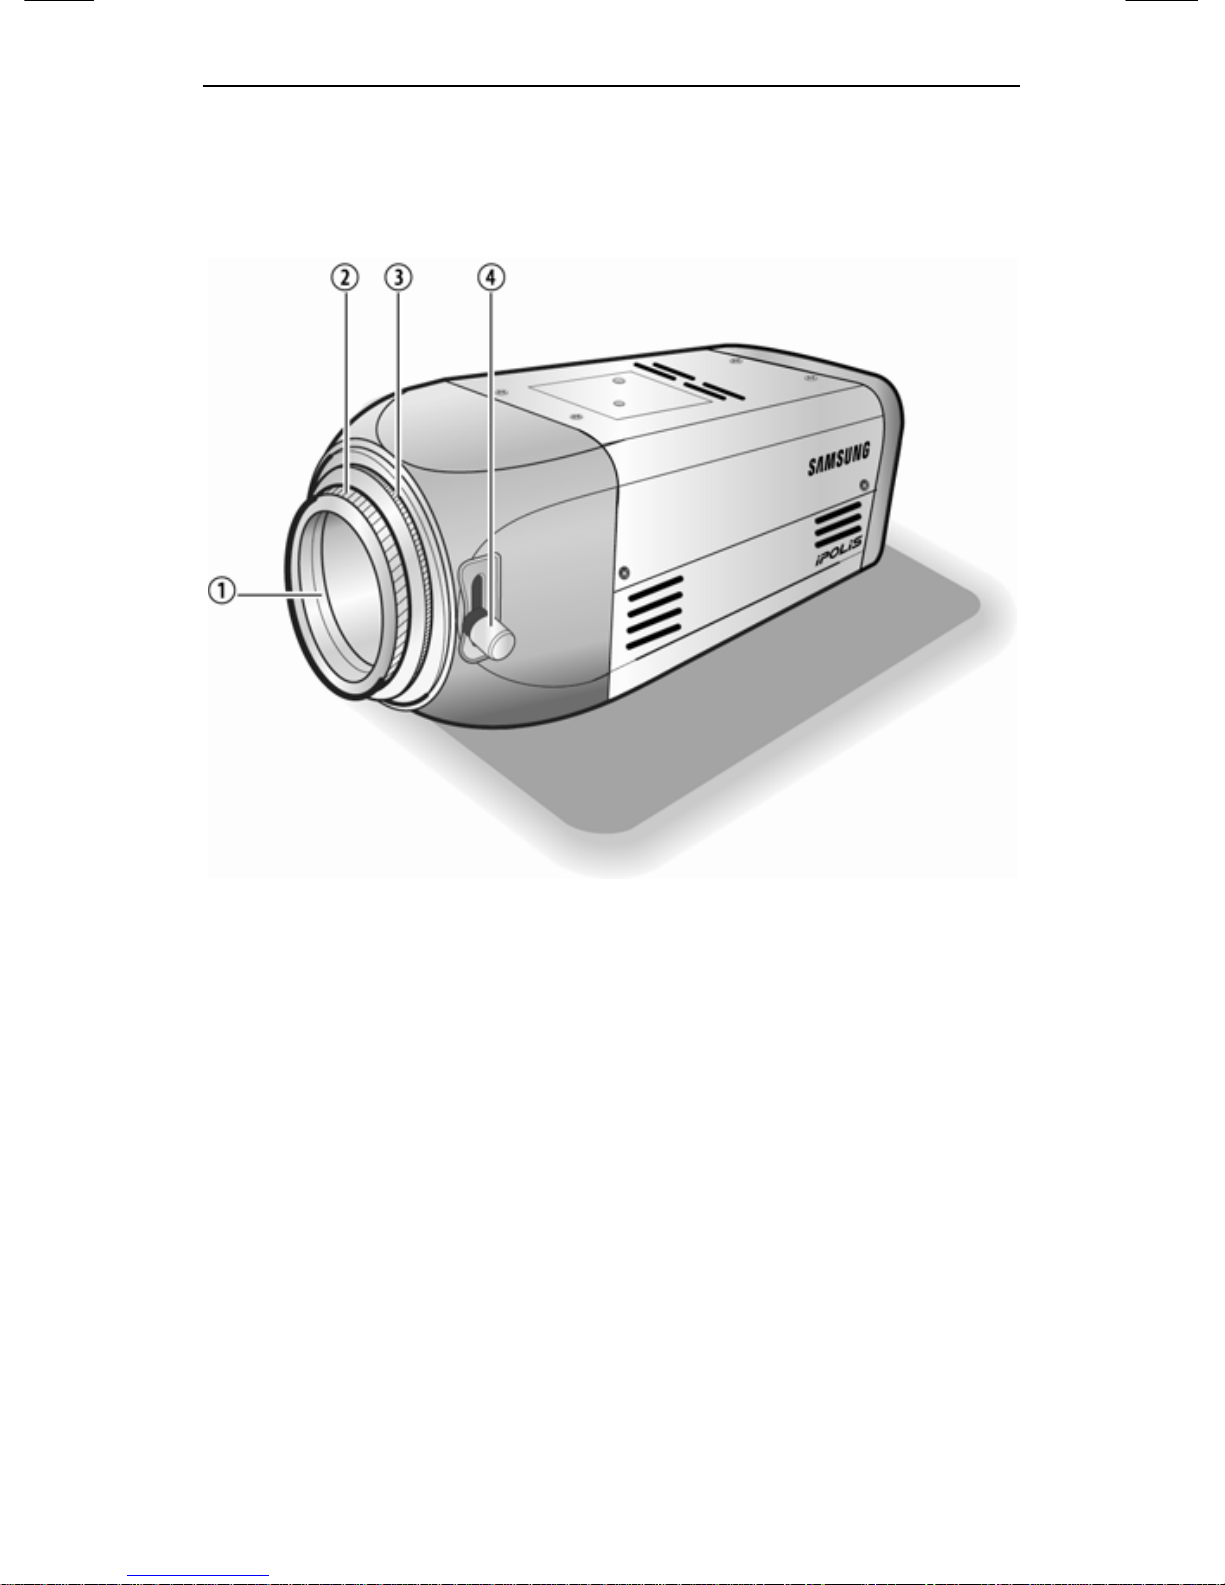
2.2.1. Front
① CCD protection cap
Please cover the CCD SENSOR when not using it.
② C-Mount lens adaptor
Please attach the C-Mount lens here.
③ CS-Mount lens adaptor
Please remove the C-MOUNT lens adaptor and then
attach it.
④ Back Focus adjustment lever
Please used to adjust back focal length.
2.2. Section names and functions
19
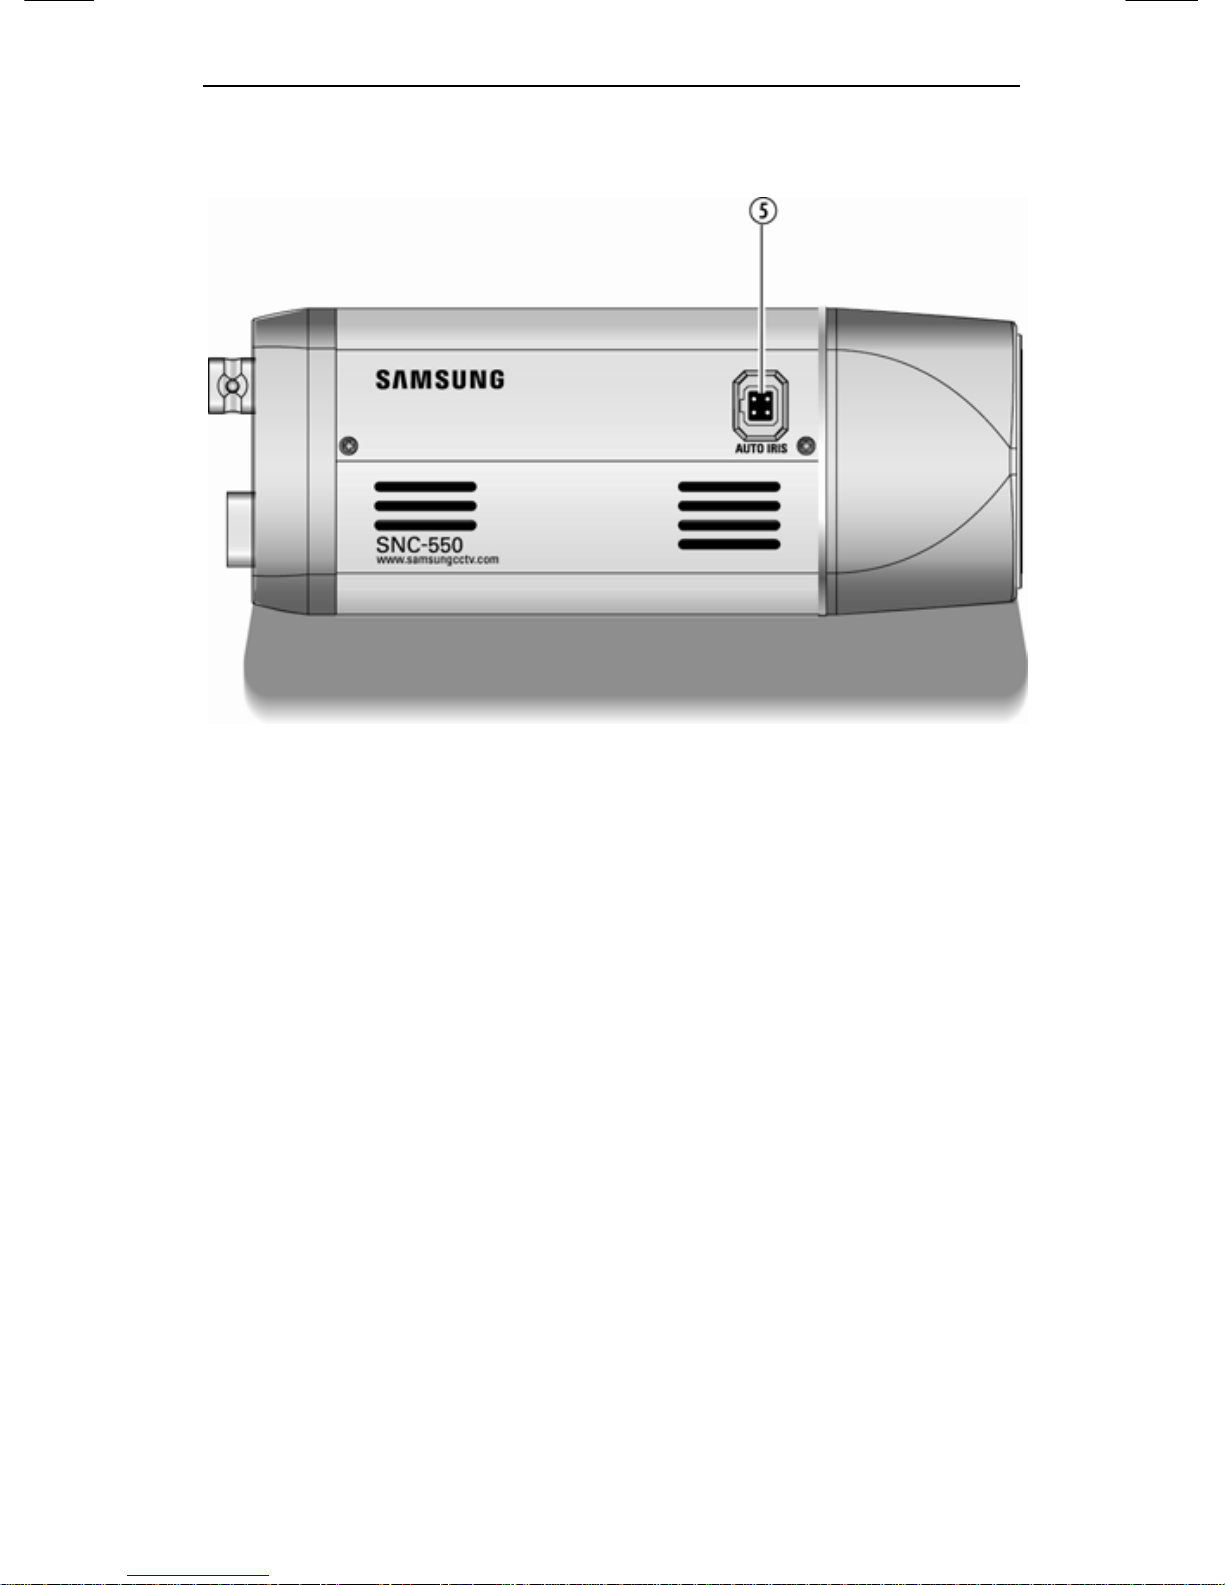
2.2.2. Side
⑤ Auto iris lens connector
This is the connection terminal for the auto iris lens.
SNC-550 Network Camera
20
L
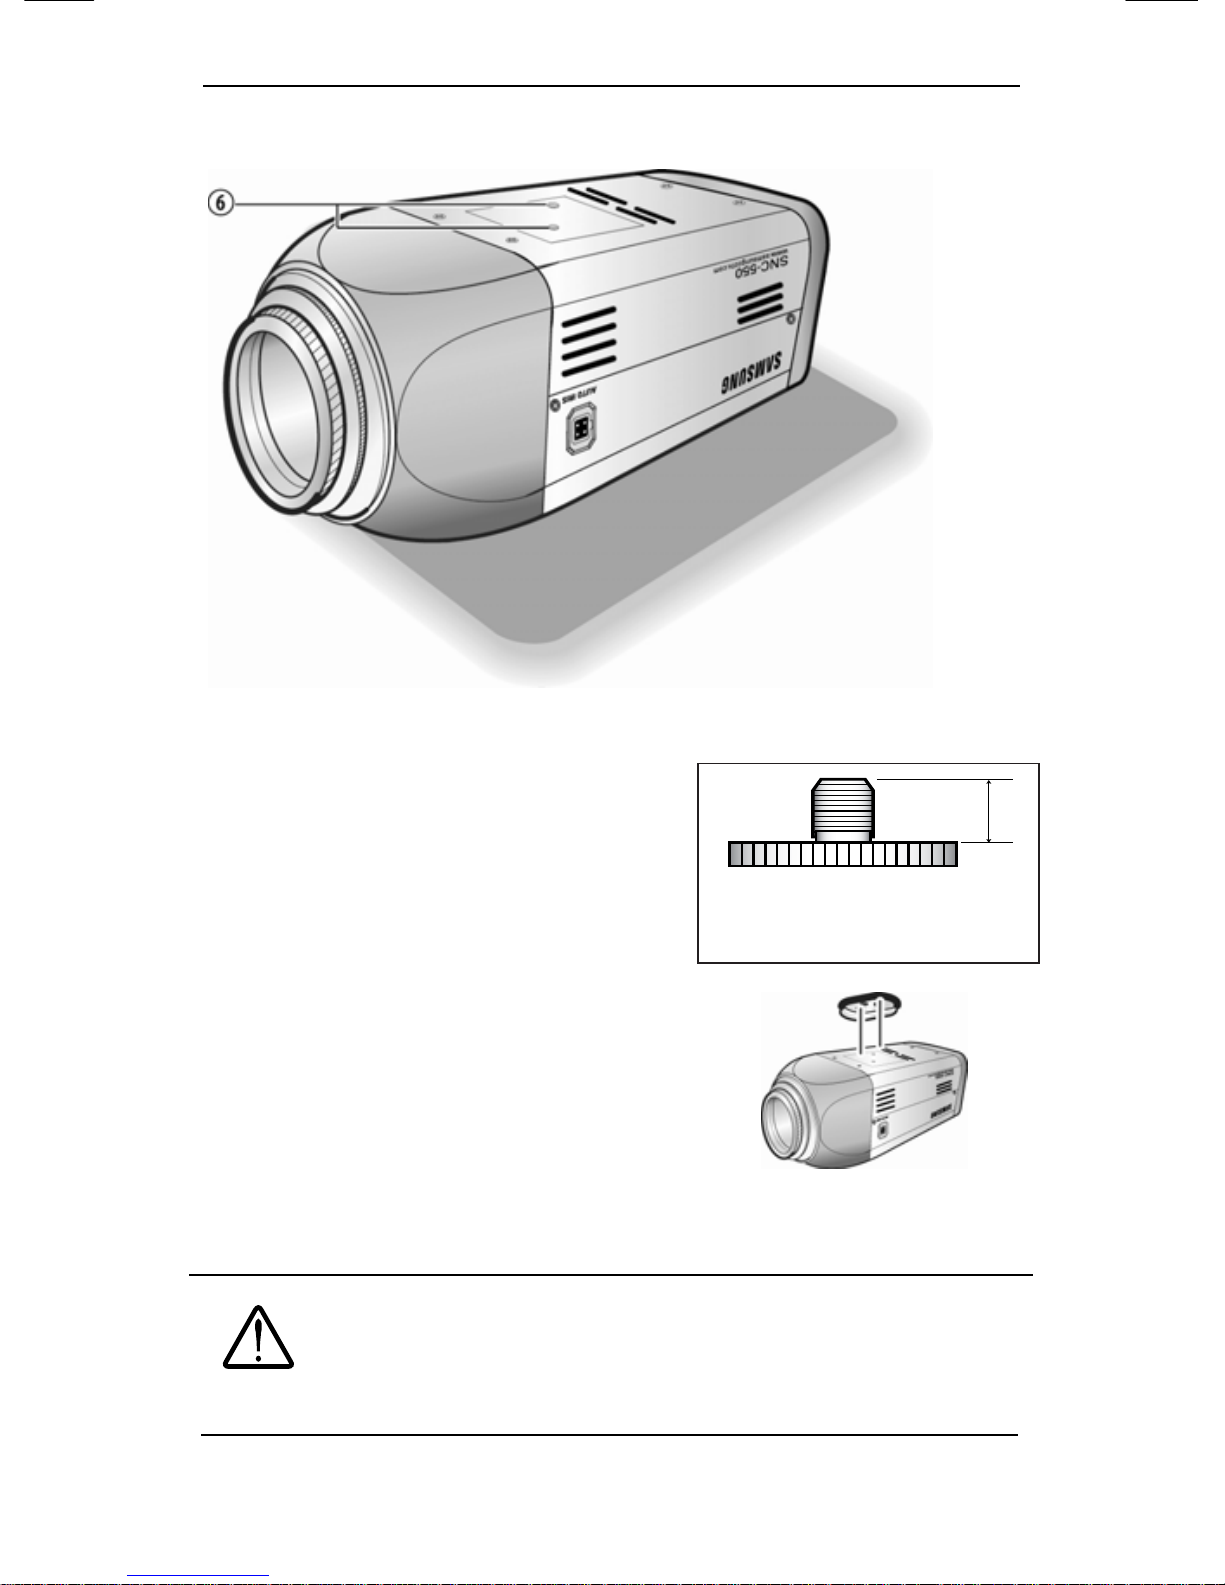
2.2.3. Bottom
⑥ Mounting bracket screw hole
Please use the screw hole
when fixing the camera onto
the mounting bracket. Please
use the clamp screw as
specified below.
※ The mounting bracket can be
separated and attached to the top of
the camera.
In this instance please do not
tighten the screw to a depth of more
than 4mm, otherwise serious
damage can occur to the inside of
the camera.
Caution
This camera package does not include the
mounting bracket. Please refer to the user's
manual for installation of the mounting bracket.
1/4”-20UNC(20THREAD)
L:4.5 ㎜±0.2 ㎜(ISO Standard), or
0.197’’(ASA Standard)
2.2. Section names and functions
21
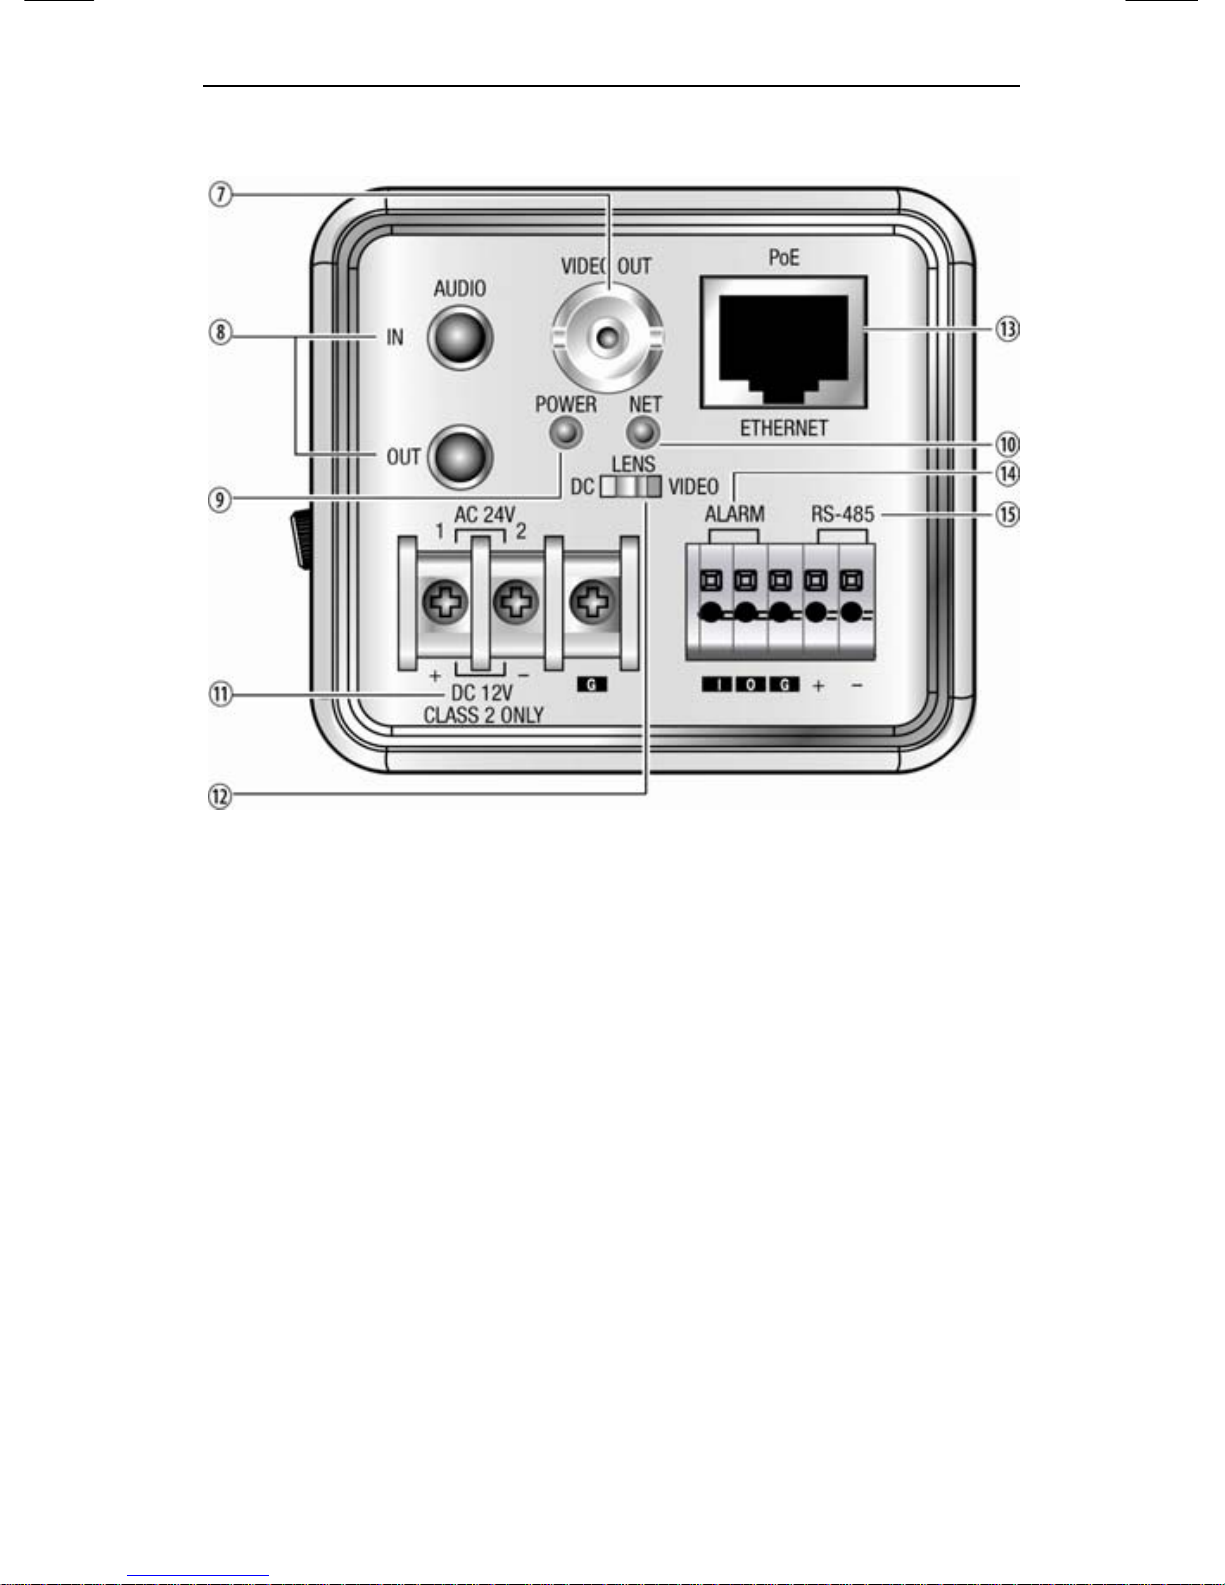
2.2.4. Back
⑦ VIDEO OUTPUT TERMINAL
Sends video signal and it can be used for setting
‘Incidence at image surface’ when you install a camera.
⑧ AUDIO IN/ OUT
IN : Input audio signal to the camera and connect to the
microphone.
OUT: Output audio signal to the camera and connect to
the speaker.
⑨ POWER LED
Lights up when the correct power is supplied to the
camera.
SNC-550 Network Camera
22
⑩ NETWORK LED
LED lights ( green ) flash when the camera sends and
receives data by the network.
⑪ POWER INPUT TERMINAL
Connects to the power appropriate to each model.
⑫ AUTO IRIS LENS SELECTION SWITCH
Please change the mode to DC or VIDEO depending on
the type of auto iris lens being used.
⑬ ETHERNET
Can connect to 10/100 Mbps internet using the standard
RJ-45 connector. Can be powered by using a PoE(IEEE
802.3af) equipment.
Caution
When you connect SNC-550 network camera to
a POE equipment, the voltage on the LAN cable
may be high. So make a request an installation
and separation to the agency.
⑭ ALARM
Alarm Input (I) : Connecting infrared sensors or other
external sensor equipment.
Alarm Output (O) : Connecting bright light, or other relay
equipment.
⑮ RS-485
Connecting serial cameras that perform Pan/ Tilt/ Zoom
functions.

2.3. Recommended PC specifications
23
2.3. Recommended PC specifications
Items Specifications
CPU Pentium IV 3.0GHz or higher processor
Main Memory 1GB or higher RAM
HDD More than 120GB when recording
VGA 128M or higher recommended
OS Window 2000, XP, 2003
Web Browser Internet explorer 5.5 or higher
Resolution 1024*768 or higher
Network 10/100 Base-T Ethernet
DirectX 9.0C or higher

24
CChh33..
IInnssttaallllaattiioonn aanndd NNeettwwoorrkk SSeettuupp

3.1. Lens Installation
25
3.1. Lens Installation
Lenses are sold separately. Lenses such as an auto iris lens, CS-
Mount lens and C-Mount lens can be used.
Caution
To effectively realize major performance of this
product, the use of DC format auto-iris lens is
recommended.
Any foreign objects and fingermarks on the lens
can cause inferior image quality in low light level
conditions. Please keep the lens clean.
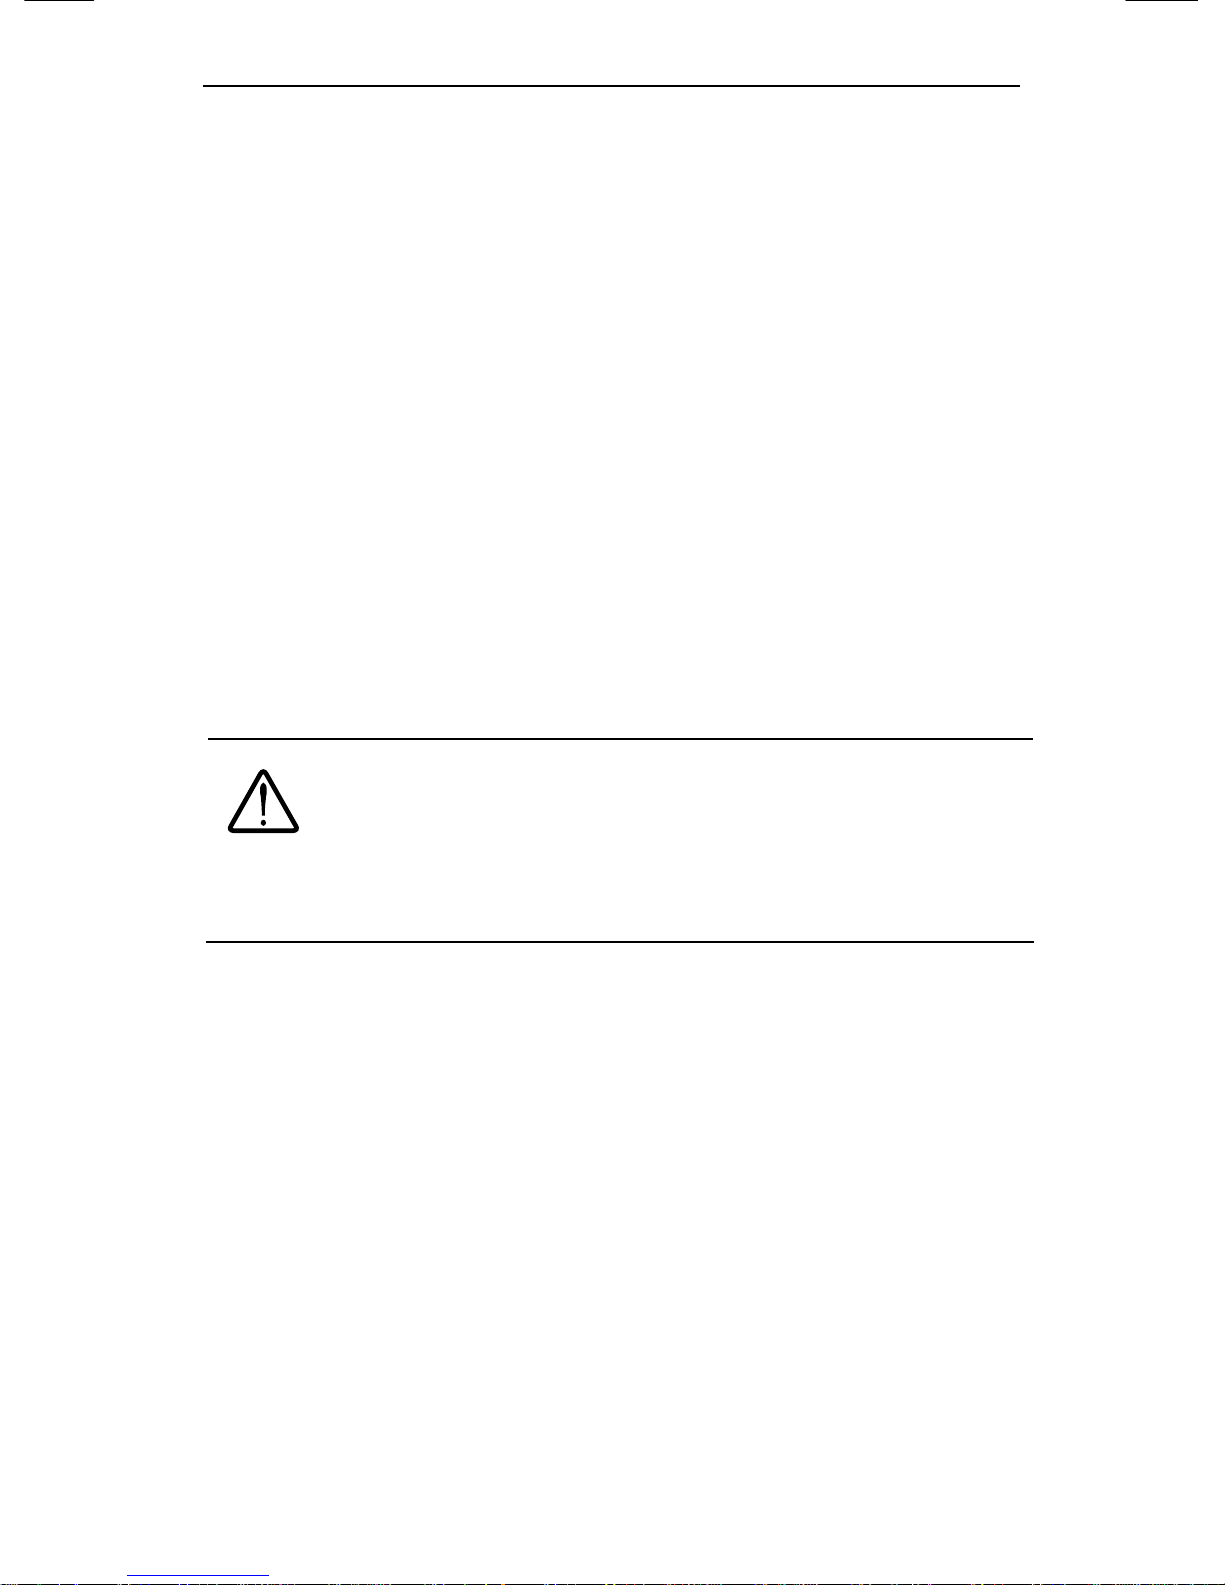
When using an auto iris lens
1. Please peel off about 8mm of the outer skin of the auto iris lens
cable.
2. Please peel off about 2mm of the outer skin of the insulated
conductor inside the lens cable.
A
pprox. 8 ㎜
SNC-550 Network Camera
26
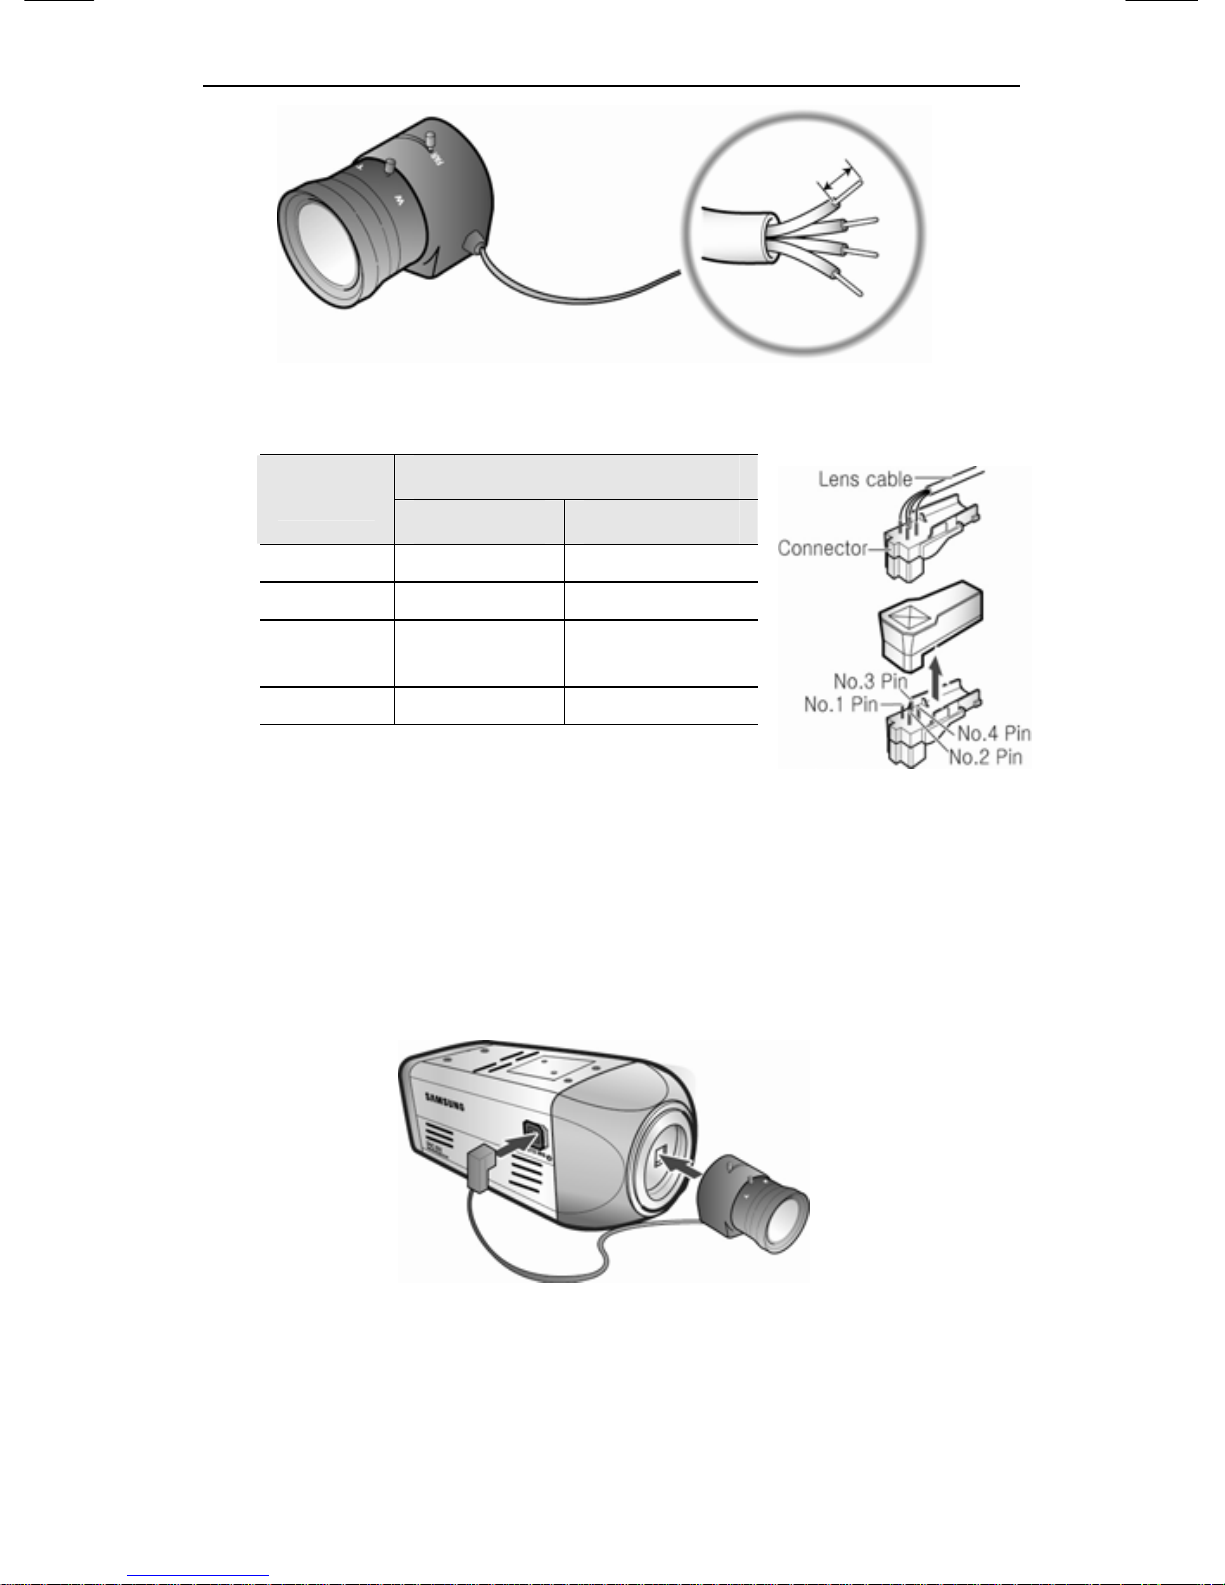
3. Please remove the cover of the auto iris lens connection plug
and solder the lens cable to the connector pin in the plug.
Lens
Pin No
DC VIDEO
No.1 Pin Damping - Red(power)
No.2Pin Damping + NC
No.3 Pin Drive +
White
(video signal)
No.4 Pin Drive - Black(GND)
4. Please replace the auto iris lens connection plug cover and take
off the CCD protection cap, and then attach the auto iris lens to
the camera by screwing it in clockwise.
5. Please insert the connection plug that is connected to the auto
iris lens cable into the auto lens connector, which is located on
the side of the camera.
6. Please set the lens selection switch, located on the side of the
camera, to DC or VIDEO depending on the type of auto iris
lens which is being used.
A
pprox. 2 ㎜
 Loading...