

Page 1

www.samsung.com
User Manual
English (EU). 06/2017. Rev.1.1
SM-W720
SM-W723
SM-W727
SM-W727Y
SM-W728
SM-W728Y
Page 2

2
Table of Contents
Basics
3 Read me first
4 Device overheating situations and
solutions
7 Package contents
8 Device layout
12 Battery
15 SIM or USIM card (mobile network-
enabled models)
17 Memory card (microSD card)
20 Turning the device on and off
21 Keyboard Cover
28 Controlling the touchscreen
31 Windows
39 Entering text
41 Screen capture
41 Device and data management
42 InstantGo (Modern standby)
42 Connecting to an external display
Applications
43 Installing or uninstalling apps
44 Air Command
47 Samsung Notes
51 Samsung Flow
53 Show Window
55 Camera
56 Book Settings
56 Samsung Recovery
Settings
60 Windows Settings
62 BIOS (Setup utility)
Appendix
66 Troubleshooting
71 Windows recovery function
71 Removing the battery
Page 3

3
Basics
Read me first
Please read this manual before using the device to ensure safe and proper use.
r
Descriptions are based on the device’s default settings.
r
Some content may differ from your device depending on the region, service provider,
model specifications, or device’s software.
r
Content (high quality content) that requires high CPU and RAM usage will affect the
overall performance of the device. Apps related to the content may not work properly
depending on the device’s specifications and the environment that it is used in.
r
Samsung is not liable for performance issues caused by apps supplied by providers other
than Samsung.
r
Samsung is not liable for performance issues or incompatibilities caused by edited
registry settings or modified operating system software. Attempting to customise the
operating system may cause the device or apps to work improperly.
r
Software, sound sources, wallpapers, images, and other media provided with this device
are licensed for limited use. Extracting and using these materials for commercial or other
purposes is an infringement of copyright laws. Users are entirely responsible for illegal
use of media.
r
You may incur additional charges for data services, such as uploading and downloading,
auto-syncing, or using location services depending on your data plan. For large data
transfers, it is recommended to use the Wi-Fi feature.
r
Default apps that come with the device are subject to updates and may no longer be
supported without prior notice. If you have questions about an app provided with
the device, contact a Samsung Service Centre. For user-installed apps, contact service
providers.
r
Modifying the device’s operating system or installing softwares from unofficial sources
may result in device malfunctions and data corruption or loss. These actions are violations
of your Samsung licence agreement and will void your warranty.
r
Depending on the region, you can view the regulatory information on the device. To
view the information, tap
ĺ
Book Settings
ĺ
Legal information
ĺ
Regulatory
information
.
Page 4

Basics
4
Instructional icons
Warning: situations that could cause injury to yourself or others
Caution: situations that could cause damage to your device or other equipment
Notice: notes, usage tips, or additional information
Device overheating situations and solutions
When the device heats up while charging the battery
While charging, the device and the charger may become hot. During wireless charging or fast
charging, the device may feel hotter to the touch. This does not affect the device’s lifespan
and is in the device’s normal range of operation. If the battery becomes too hot, the charger
may stop charging.
Do the following when the device heats up:
r
Disconnect the charger from the device and close any running apps. Wait for the
device to cool down and then begin charging the device again.
r
If the lower part of the device overheats, it could be because the connected USB
cable is damaged. Replace the damaged USB cable with a new Samsung-approved
one.
r
When using a wireless charger, do not place foreign materials, such as metal objects,
magnets, and magnetic stripe cards, between the device and the wireless charger.
The wireless charging or fast charging feature is only available on supported models.
Page 5

Basics
5
When the device heats up during use
When you use features or apps that require more power or use them for extended periods,
your device may temporarily heat up due to increased battery consumption. Close any
running apps and do not use the device for a while.
The following are examples of situations in which the device may overheat. Depending on
the functions and apps you use, these examples may not apply to your model.
r
During the initial setup after purchase or when restoring data
r
When downloading large files
r
When using apps that require more power or using apps for extended periods
–
When playing high-quality games for extended periods
–
When recording videos for extended periods
–
When streaming videos while using the maximum brightness setting
–
When connecting to a TV
r
While multitasking (or, when running many apps in the background)
–
When using Multi window
–
When updating or installing apps while recording videos
–
When downloading large files during a video call
–
When recording videos while using a navigation app
r
When using large amount of data for syncing with the cloud, email, or other accounts
r
When using a navigation app in a car while the device is placed in direct sunlight
r
When using the mobile hotspot and tethering feature
r
When using the device in areas with weak signals or no reception
r
When charging the battery with a damaged USB cable
r
When the device’s multipurpose jack is damaged or exposed to foreign materials, such as
liquid, dust, metal powder, and pencil lead
r
When you are roaming
Page 6

Basics
6
Do the following when the device heats up:
r
Keep the device updated with the latest software.
r
Conflicts between running apps may cause the device to heat up. Restart the device.
r
Deactivate the Wi-Fi, GPS, and Bluetooth features when not using them.
r
Close apps that increase battery consumption or that run in the background when
not in use.
r
Delete unnecessary files or unused apps.
r
Decrease the screen brightness.
r
If the device overheats or feels hot for a prolonged period, do not use it for a while. If
the device continues to overheat, contact a Samsung Service Centre.
Device limitations when the device overheats
When the device heats up, the features and performance may be limited or the device may
turn off to cool down. This feature is only available on supported models.
r
To lower the device’s temperature, the screen brightness and the performance speed will
be limited and battery charging will stop.
r
If the device overheats or feels hot for a prolonged period, turn off the device, and wait
until it cools down.
Precautions for operating environment
Your device may heat up due to the environment in the following conditions. Use caution to
avoid shortening the battery’s lifespan, damaging the device, or causing a fire.
r
Do not store your device in very cold or very hot temperatures.
r
Do not expose your device to direct sunlight for extended periods.
r
Do not use or store your device for extended periods in very hot areas, such as inside a
car in the summertime.
Page 7

Basics
7
r
Do not place the device in any areas that may overheat, such as on an electric heating
mat.
r
Do not store your device near or in heaters, microwaves, hot cooking equipment, or high
pressure containers.
r
Never use a damaged charger or battery.
Package contents
Check the product box for the following items:
r
Device
r
Keyboard Cover
r
S Pen
r
S Pen holder
r
Quick start guide
r
The items supplied with the device and any available accessories may vary
depending on the region or service provider.
r
The supplied items are designed only for this device and may not be compatible
with other devices.
r
Appearances and specifications are subject to change without prior notice.
r
You can purchase additional accessories from your local Samsung retailer. Make
sure they are compatible with the device before purchase.
r
Use only Samsung-approved accessories. Using unapproved accessories may cause
the performance problems and malfunctions that are not covered by the warranty.
r
Availability of all accessories is subject to change depending entirely on
manufacturing companies. For more information about available accessories, refer
to the Samsung website.
Page 8

Basics
8
Device layout
Device
Keyboard dock port
Tou ch sc re en
Microphone
Front camera
Light sensor
Speaker
Headset jack
Multipurpose jack (USB
Type-C)
Fan vents
Volume key
Power key
LED indicator
Speaker
GPS antenna
Main antenna (mobile
network-enabled models)
SIM card (mobile
network-enabled models) /
Memory card tray
Rear camera
Page 9

Basics
9
The device and the Keyboard Cover contain magnets. The American Heart Association
(US) and the Medicines and Healthcare Products Regulatory Agency (UK) both warn
that magnets can affect the operation of implanted pacemakers, cardioverters,
defibrillators, insulin pumps or other electro medical devices (collectively, “Medical
Device”) within the range of 15 cm (6 inches). If you are a user of any of these Medical
Devices, DO NOT USE THIS DEVICE AND THE KEYBOARD COVER UNLESS YOU HAVE
CONSULTED WITH YOUR PHYSICIAN.
Do not store your device and the Keyboard Cover near magnetic fields. Magnetic
stripe cards, including credit cards, phone cards, passbooks, and boarding passes,
may be damaged by magnetic fields.
r
Connectivity problems and battery drain may occur in the following situations:
–
If you attach metallic stickers on the antenna area of the device
–
If you attach a device cover made with metallic material to the device
–
If you cover the device’s antenna area with your hands or other objects while
using certain features, such as the mobile data connection
r
Using a Samsung-approved screen protector is recommended. Unapproved screen
protectors may cause the sensors to malfunction.
r
Do not allow water to contact the touchscreen. The touchscreen may malfunction
in humid conditions or when exposed to water.
Keys
Key Function
Power
r
Press and hold to turn the device on or off.
r
Press to turn on or lock the screen.
Volume
r
Press to adjust the device volume.
Page 10

Basics
10
S Pen
S Pen button
S Pen clip
S Pen nib
Tweezers
Name Functions
S Pen nib
r
Use the S Pen to write, draw, or perform touch actions on the
screen.
r
Hover the S Pen over items on the screen to access additional
S Pen features.
S Pen button
r
Hover the S Pen over the screen and press the S Pen button to
display the air command features.
Tweezers
r
Remove the S Pen nib with the tweezers when replacing the nib.
The supplied S Pen is already calibrated. Do not calibrate the screen for pen input
randomly. Doing so may cause performance degradation or malfunction.
Page 11

Basics
11
Replacing the S Pen nib
If the nib is dull, replace it with a new one.
1
Firmly hold the nib with the tweezers and remove it.
2
Insert a new nib into the S Pen.
Page 12

Basics
12
Be careful not to pinch your fingers with the tweezers.
r
Do not reuse old nibs. Doing so may cause the S Pen to malfunction.
r
Do not press the nib excessively when inserting the nib into the S Pen.
r
Do not insert the round end of the nib into the S Pen. Doing so may cause damage
to the S Pen or your device.
r
Do not bend or apply excessive pressure with the S Pen while using it. The S pen
may be damaged or the nib may be deformed.
r
The S Pen may not be attached firmly if you clip it on the objects that are too thick
or too thin.
r
If the S Pen is not working properly, take it to a Samsung Service Centre.
r
If you use the S Pen at sharp angles on the screen, the device may not recognise
the S Pen actions. Do not bend or apply excessive pressure with the S Pen while
using it.
r
For more information about the S Pen, visit the Samsung website.
Battery
Charging the battery
Charge the battery before using it for the first time or when it has been unused for extended
periods.
Use only Samsung-approved chargers supplied with the device, batteries, and cables.
Unapproved chargers or cables can cause the battery to explode or damage the
device.
Connecting the charger improperly may cause serious damage to the device. Any
damage caused by misuse is not covered by the warranty.
To save energy, unplug the charger when not in use. The charger does not have a
power switch, so you must unplug the charger from the electric socket when not in
use to avoid wasting power. The charger should remain close to the electric socket
and easily accessible while charging.
Page 13

Basics
13
1
Connect the USB cable to the USB power adaptor, and plug the USB cable into the
device’s multipurpose jack.
2
Plug the USB power adaptor into an electric socket.
3
After fully charging, disconnect the device from the charger. First unplug the charger
from the device, and then unplug it from the electric socket.
Viewing the remaining charging time
While charging, on the taskbar, tap ĺ ĺ
System
ĺ
Battery
.
The actual charging time may vary depending on the status of your device and the
charging conditions. The estimated charging time may not be displayed when you
charge the device in very cold or very hot conditions.
Reducing the battery consumption
You r d evi ce p ro vid es v ar io us o pt io ns t ha t he lp y ou c ons er ve b at te ry p owe r.
r
When you are not using the device, switch to sleep mode by pressing the Power key or
close the Keyboard Cover.
r
Activate battery saver.
r
Close unnecessary apps.
r
Deactivate the Bluetooth feature when not in use.
r
Deactivate the Wi-Fi feature when not in use.
r
Deactivate auto-syncing of apps that need to be synced, such as emails.
r
Decrease the backlight time.
r
Decrease the screen brightness.
Page 14

Basics
14
Battery charging tips and precautions
r
Use the charger supplied with the device. It may take longer to charge the battery if you
use other chargers.
r
When the battery power is low, the battery icon appears empty.
r
If the battery is completely discharged, the device cannot be turned on immediately
when the charger is connected. Allow a depleted battery to charge for a few minutes
before turning on the device.
r
If you use multiple apps at once, network apps, or apps that need a connection to
another device, the battery will drain quickly. To avoid losing power during a data
transfer, always use these apps after fully charging the battery.
r
Using a power source other than the charger, such as a computer, may result in a slower
charging speed due to a lower electric current.
r
The device can be used while it is charging, but it may take longer to fully charge the
battery.
r
If the device receives an unstable power supply while charging, the touchscreen may not
function. If this happens, unplug the charger from the device.
r
While charging, the device and the charger may heat up. This is normal and should not
affect the device’s lifespan or performance. If the battery gets hotter than usual, the
charger may stop charging.
r
If you charge the device while the multipurpose jack is wet, the device may be damaged.
Thoroughly dry the multipurpose jack before charging the device.
r
If the device is not charging properly, take the device and the charger to a Samsung
Service Centre.
Battery saver
Save the battery power by limiting the device’s activity running in the background and push
notifications.
On the taskbar, tap
ĺ ĺ
System
ĺ
Battery
, and then tap the
Battery saver status
until next charge
switch to activate it. Alternatively, on the taskbar, tap ĺ
Battery saver
to activate it.
To automatically activate battery saver mode when the remaining battery power reaches the
preset level, tap
Turn battery saver on automatically if my battery falls below:
and set the
battery level.
Page 15

Basics
15
SIM or USIM card (mobile network-enabled models)
Installing the SIM or USIM card
Insert the SIM or USIM card provided by the mobile telephone service provider.
r
Use only a nano-SIM card.
r
Use caution not to lose or let others use the SIM or USIM card. Samsung is not
responsible for any damages or inconveniences caused by lost or stolen cards.
r
It is only for data network. Calling and messaging features are not supported
except for receiving messages.
r
Some LTE services may not be available depending on the service provider. For
more information about service availability, contact your service provider.
Page 16

Basics
16
1
Place the device with the bottom facing upwards.
2
Insert the ejection pin into the hole on the tray to loosen the tray.
Ensure that the ejection pin is perpendicular to the hole. Otherwise, the device may
be damaged.
3
Pull out the tray gently from the tray slot.
4
Place the SIM or USIM card on the tray with the gold-coloured contacts facing upwards.
5
Gently press the SIM or USIM card into the tray to secure it.
If the card is not fixed firmly into the tray, the SIM card may leave or fall out of the tray.
6
Insert the tray back into the tray slot.
r
If you insert the tray into your device while the tray is wet, your device may be
damaged. Always make sure the tray is dry.
r
Fully insert the tray into the tray slot to prevent liquid from entering your device.
Removing the SIM or USIM card
1
Insert the ejection pin into the hole on the tray to loosen the tray.
2
Pull out the tray gently from the tray slot.
Page 17

Basics
17
3
Remove the SIM or USIM card.
4
Insert the tray back into the tray slot.
Memory card (microSD card)
Installing a memory card
Your device’s memory card capacity may vary from other models and some memory cards
may not be compatible with your device depending on the memory card manufacturer and
type. To view your device’s maximum memory card capacity, refer to the Samsung website.
r
Some memory cards may not be fully compatible with the device. Using an
incompatible card may damage the device or the memory card, or corrupt the data
stored in it.
r
Use caution to insert the memory card right-side up.
r
The device supports the FAT and the exFAT file systems for memory cards. When
inserting a card formatted in a different file system, the device will ask to reformat
the card or will not recognise the card. If the device does not recognise your
memory card, format it on your computer.
r
Frequent writing and erasing of data shortens the lifespan of memory cards.
r
When inserting a memory card into the device, the memory card’s file directory
appears in the
File Explorer
ĺ
Secure Digital storage device
folder.
Page 18

Basics
18
1
Insert the ejection pin into the hole on the tray to loosen the tray.
Ensure that the ejection pin is perpendicular to the hole. Otherwise, the device may
be damaged.
2
Pull out the tray gently from the tray slot.
When you remove the tray from the device, the mobile data connection will be
disabled.
3
Place a memory card on the tray with the gold-coloured contacts facing downwards.
4
Gently press the memory card into the tray to secure it.
Page 19

Basics
19
5
Insert the tray back into the tray slot.
r
If you insert the tray into your device while the tray is wet, your device may be
damaged. Always make sure the tray is dry.
r
Fully insert the tray into the tray slot to prevent liquid from entering your device.
Removing the memory card
Before removing the memory card, first unmount it for safe removal.
On the taskbar, tap
ĺ , and then select the ejection option.
1
Insert the ejection pin into the hole on the tray to loosen the tray.
2
Pull out the tray gently from the tray slot.
3
Remove the memory card.
4
Insert the tray back into the tray slot.
Do not remove the memory card while the device is transferring or accessing
information. Doing so can cause data to be lost or corrupted or damage to the
memory card or device. Samsung is not responsible for losses that result from the
misuse of damaged memory cards, including the loss of data.
Formatting the memory card
A memory card may not be compatible with the device, so format the memory card on the
device.
On the taskbar, tap
ĺ
Windows System
ĺ
File Explorer
ĺ
This PC
, tap and hold
Secure
Digital storage device
, and then tap
Format...
.
Before formatting the memory card, remember to make backup copies of all
important data stored in the memory card. The manufacturer’s warranty does not
cover loss of data resulting from user actions.
Page 20

Basics
20
Turning the device on and off
Press and hold the Power key for a few seconds to turn on the device.
Before turning on your device for the first time, you must connect the device to a
power supply.
When you turn on your device for the first time or after performing a data reset, follow the onscreen instructions to set up your device.
To tu rn of f th e d ev ic e, ta p
ĺ ĺ
Shut down
. In Tablet mode, tap ĺ
Shut down
.
Alternatively, press and hold the Power key until
Slide to shut down your PC
appears, and
then drag the screen downwards.
Follow all posted warnings and directions from authorised personnel in areas where
the use of wireless devices is restricted, such as aeroplanes and hospitals.
Restarting the device
If your device is frozen and unresponsive, press and hold the Power key for more than
10 seconds until the device turns off. Then, press and hold the Power key again to restart it.
Power key
Page 21

Basics
21
Keyboard Cover
Introduction
Connect the device to the Keyboard Cover. The bottom of the touchpad acts as the left and
right buttons of a mouse.
When you close the Keyboard Cover, your device will enter sleep mode. When you open
the cover, the touchscreen will turn on. To change the settings, tap
ĺ ĺ
System
ĺ
Power & sleep
ĺ
Additional power settings
ĺ
Choose what closing the lid does
, and then
configure the
When I close the lid:
settings.
Keyboard Cover
Connector
Keyboard
Tou ch pa d
NFC tag
Stand
Do not remove keycaps from the keyboard. Doing so may damage the keyboard and
the keycaps.
The function of the NFC tag may differ depending on the model and region.
Page 22

Basics
22
Connecting the Keyboard Cover
1
Connect the keyboard dock port at the bottom of the device to the connector on the
keyboard.
Make sure that the Keyboard Cover is securely attached to your device. If not, check
the location of the keyboard dock port and reconnect the Keyboard Cover to your
device.
2
Attach the device to the stand.
2
1
You ca n a tt ac h th e de vi ce t o th e st an d in v ar io us a ng le s.
Page 23

Basics
23
Attaching the S Pen holder
Attach the S Pen holder to the S Pen holder slot. You can insert the S Pen into the S Pen
holder.
r
Make sure that the S Pen holder is securely attached after 1 hour.
r
To avoid detaching the holder from the keyboard cover, do not apply excessive
force.
Hot keys
Use hot keys to easily use features and change settings, such as brightness and volume.
To us e hot k ey s, s imu lt an eou sl y pre ss a nd ho ld t he Fn key and press a hot key.
If you lock the Fn key, you can use hot keys without pressing the Fn key. To lock the Fn key,
tap the Fn Lock key.
The Fn Lock key will automatically unlock when you reconnect the device and the Keyboard
Cover.
Page 24

Basics
24
Hot key functions
Key/Icon Function
F1
r
Launch
Settings
.
F2
r
Adjust the brightness of the display.
F3
F4
r
Change the display mode when an external display is connected
to the device.
F5
r
Lock or unlock the touchpad.
F6
r
Mute or unmute the audio.
F7
r
Adjust the volume.
F8
F9
r
Turn the keyboard backlight on or off.
F10
r
Open the task view screen.
F11
r
Hide or show currently open windows.
F12
r
Activate or deactivate flight mode.
r
Perform the same function as the right buttons of a mouse.
Page 25

Basics
25
Touc hp ad
Use the touchpad to move the cursor or select items. The left and right buttons of the
touchpad function the same as the left and right buttons of a mouse.
Use only your fingers on the touchpad. The touchpad may not recognise the S Pen or
the other tools.
Basic touchpad functions
Moving
To mo ve t he cu rs or, mo ve y our f in ger o n the t ou ch pad.
Clicking
Tap t he tou chp ad or pre ss the le ft -c li ck but ton .
or
Page 26

Basics
26
Double-clicking
Double-tap the touchpad or press the left-click button twice.
or
Right-clicking
Press the right-click button to perform the right-click function. Alternatively, tap the touchpad
with two fingers.
or
Dragging
To mo ve a n ite m, s ele ct an d dr ag it t o the t ar ge t p os it ion w hi le pr es si ng an d hol di ng th e le ft-
click button.
Page 27

Basics
27
Additional functions
Swiping
To sc ro ll up, d ow n, le ft , o r ri ght t o a des ir ed l oca ti on , s wi pe wi th t wo fi ng ers o n the t ou ch pad.
or
Spreading and pinching
Spread two fingers apart on a webpage, map, or image to zoom in a part. Pinch to zoom out.
Configuring touchpad settings
Configure touchpad settings to use the touchpad more efficiently.
Tap
ĺ ĺ
Devices
ĺ
Mouse & touchpad
, and configure the settings under
To uc hp ad
.
Locking and unlocking the touchpad
Press and hold the Fn key and press the F5 key to lock or unlock the touchpad.
If the touchpad was locked when it was disconnected, it will still be locked when you
reconnect the Keyboard Cover. To use the touchpad again, unlock it manually.
Page 28

Basics
28
Controlling the touchscreen
r
Do not allow the touchscreen to come into contact with other electrical devices.
Electrostatic discharges can cause the touchscreen to malfunction.
r
To avoid damaging the touchscreen, do not tap it with anything sharp or apply
excessive pressure to it with your fingertips.
r
The device may not recognise touch inputs close to the edges of the screen, which
are outside of the touch input area.
r
Leaving the touchscreen idle for extended periods may result in afterimages
(screen burn-in) or ghosting. Turn off the touchscreen when you do not use the
device.
r
It is recommended to use fingers or the S Pen when you use the touchscreen.
Tappin g
To open an app, to select a menu item, to press an on-screen button, or to enter a character
using the keyboard on the screen, tap it with your finger or the S Pen.
Page 29

Basics
29
Tappin g and h ol ding
Tap a nd ho ld an ite m o r t he scre en for mo re t han 2 se cond s to a cces s avai lab le opt ion s.
Dragging
To mo ve a n ite m, t ap an d hol d it an d dr ag it t o the t ar ge t p os it ion .
Double-tapping
Double-tap on a webpage or image to zoom in. Double-tap again to return.
Page 30

Basics
30
Swiping
Swipe to the left or right on the screen to scroll left or right. Swipe upwards or downwards to
scroll through a webpage or a list of items.
Spreading and pinching
Spread two fingers apart on a webpage, map, or image to zoom in a part. Pinch to zoom out.
Page 31

Basics
31
Windows
Microsoft Windows is an operating system that is used to control a computer.
r
Images and available features may differ depending on the model and operating
system.
r
This manual is designed for Windows 10 and content may differ depending on the
OS version.
r
The image displayed on the desktop screen may differ between models and OS
versions.
Start screen
Start screen
The Start screen is the starting point for accessing all of the device’s features.
Task bar
Start menu
Task vie w
Search box
Notification icons
Shortcuts
Moving and removing an item
Drag an item on the Start screen to a new location.
To re mo ve a n ite m, t ap an d hol d th e i te m, a nd th en ta p
Delete
.
Taskbar
The bottom area of the screen is the taskbar. You can access the Start menu, launch the search
box, view notification icons, and more on the taskbar.
Page 32

Basics
32
Managing shortcuts
To ad d a s ho rtc ut , on th e tas kba r, tap , tap and hold an item, tap
More
or tap ĺ
More
,
and then tap
Pin to taskbar
.
To de le te a sh or tc ut , tap a nd ho ld a sh or tcu t, a nd th en ta p
Unpin from taskbar
.
To mo ve a s hor tcu t to a not he r loc at io n, dr ag it t o a new l oc ati on .
Managing notification icons
On the taskbar, tap ĺ ĺ
Personalisation
ĺ
Task ba r
ĺ
Select which icons appear
on the taskbar
, and then select items to display in the notification area.
Search box
Search for a wide variety of content on the device or web with a keyword.
Tap t he se arch box on th e t as kb ar an d e nter a key wo rd i n t he se arch fi eld.
Cortana
If
Cortana
is supported in your region, it will launch when you tap the search box.
Cortana
will help you find things on your device, manage your schedules, and more. Enter a keyword
or question into the search field to search for something, set a reminder, and more.
This feature may not be available depending on the region and language settings.
Page 33

Basics
33
Start menu
On the taskbar, tap to open the Start menu.
From the Start menu, you can access your frequently used apps, shortcuts to other locations
on your device, and more.
Settings
App tiles
Power
Yo ur a c co un t
Frequently used
apps
Apps list
Managing app tiles
You ca n p in y ou r fa vo ur ite a pp s on t he a pp t il e ar ea .
To add more apps, tap and hold an app from the apps list, and then drag it to the app tile
area.
To mo ve a t ile, t ap an d hol d a til e, a nd th en d ra g i t to a ne w loc at io n.
To ad ju st th e size o f a t il e, ta p an d h ol d a t il e, a nd th en ta p
ĺ
Resize
.
To de le te a ti le , tap a nd ho ld a ti le , an d t he n tap
.
Page 34

Basics
34
Switching to tablet mode
You can switch between PC mode and tablet mode. In Tablet mode, the full Start menu
screen will be the Start screen. Switching to tablet mode makes the device more touchfriendly.
To sw it ch to t ab let m od e, on t he ta sk bar, ta p
ĺ
Tabl et m od e
. Alternatively, Swipe from
the right edge of the screen towards the centre of the screen, then tap
Tabl et m od e
.
To re tu rn to P C mod e, t ap
Tabl et m od e
again.
Pc mode Tablet m ode
Lock screen
You can change the way that you lock the screen to prevent others from accessing your
personal information.
On the taskbar, tap
ĺ ĺ
Accounts
ĺ
Sign-in options
, and then select a screen lock
method. The device requires an unlock code whenever unlocking it.
r
If the unlock code is forgotten, take the device to a Samsung Service Centre to
reset it.
r
You must sign in to your Microsoft account or add a password before you can use
the other lock methods.
Page 35

Basics
35
Password
A password consists of characters or numbers. Enter a password, enter the password again to
verify it, and then enter a password hint.
If you have signed in to your Microsoft account, your account password will be set as the
password automatically.
PIN
A PIN consists of numbers only. Enter at least four numbers, and then enter the password
again to verify it.
Picture password
A password consists of circles, straight lines, and taps. Select an image and draw on the image
to create gestures.
Pattern Log-in
To un lo ck th e scre en us in g a p at te rn , o n th e t as kba r, t ap ĺ
Book Settings
ĺ
Pattern
Log-in
, and then tap the switch to activate it.
Draw a pattern by connecting four dots or more, and then draw the pattern again to verify it.
ACTION CENTRE
You can view new notifications from Windows and apps, and use quick action buttons. Quick
action buttons allow you to easily adjust frequently used settings, such as activating Wi-Fi.
To op en th e ac ti on c en tr e p an el , on th e tas kb ar, t ap
. Alternatively, swipe from the right
edge of the screen.
Page 36

Basics
36
You ca n u se t he f ol low ing fu nc t io ns o n th e ac ti on ce nt re pa nel .
Clear all
notifications.
Tap a no tific ation
and perform various
actions.
Quick action
buttons
Using quick action buttons
Tap quick action buttons to activate certain features. To view more detailed settings, tap and
hold a button, and then tap
Go to settings
.
You ca n c ha ng e th e to p fou r b utt on s. O n th e ta sk ba r, t ap
ĺ ĺ
System
ĺ
Notifications & actions
, and then change quick action buttons under
Quick actions
.
Multi desktop
Multi desktop allows you to work on various tasks at the same time via multiple desktops. You
can use different desktops for a variety of purposes.
Creating new desktops
1
On the taskbar, tap . Alternatively, swipe from the left edge of the screen.
2
Tap
New desktop
.
A new desktop will be added. You can select a desktop from the list displayed at the bottom
of the screen.
Page 37

Basics
37
Currently open
windows
Multi desktop list
Deleting desktops
1
On the taskbar, tap
.
2
On the multi desktop list, tap on the desktop to delete.
Moving windows to another desktop
1
On the taskbar, tap to view the current desktop’s open windows.
2
Tap a nd ho ld a w ind ow to m ove, and th en ta p
Move to
.
3
Select a desktop to move the window.
Split screen view
In Tablet mode, you can open two windows at the same time in the split screen view by
selecting windows from the task view screen.
Some apps may not support this feature.
1
On the taskbar, tap to view currently open windows. Alternatively, swipe from the
left edge of the screen.
Page 38

Basics
38
2
Tap a nd ho ld a w ind ow and se lec t
Snap left
or
Snap right
.
Adjusting the window size
Drag the handle between the windows left or right to adjust the size of the windows.
Help
To ac ce ss he lp i nfor ma ti on, t ap ĺ
Get Started
.
Page 39

Basics
39
Using the control panel
You ca n a dj us t ba si c sy st em s et ti ng s, su ch a s ha rd wa re, s of twa re , o r u ser a cc ou nt s et ti ng s.
Tap
ĺ
Windows System
ĺ
Control Panel
. Alternatively, press the right-click button on
and tap
Control Panel
. Then, select options you want to change.
Entering text
Using the on-screen keyboard
In Tablet mode, the on-screen keyboard appears automatically when you enter text to send
emails, create notes, and more. To use the on-screen keyboard in PC mode, on the taskbar, tap
.
Text entry is not supported in some languages. To enter text, you must change the
input language to one of the supported languages.
Break to the next
line.
Move the cursor.
Delete a preceding
character.
Enter numbers and
punctuation marks.
Enter uppercase. For
all caps, tap it twice.
Enter emoticons.
Switch to the
floating keyboard.
Enter a space.
Change the input
language or the
keyboard layout, or
add input
languages.
Hide the keyboard.
Changing the input language
Tap ĺ
Language preferences
ĺ
Add a language
, and then select a language to add.
When you add languages, you can select other input languages by tapping
.
Page 40

Basics
40
Additional keyboard functions
Tap to use various functions.
r
: Switch to the default keyboard.
r
: Switch to the floating split keyboard. You can move the keyboard to another
location by dragging the keyboard.
r
: Switch to handwriting mode.
This feature may not be available depending on the region or service provider.
r
: Switch to the standard keyboard. If this feature is not activated, on the taskbar, tap
ĺ ĺ
Devices
ĺ
Typing
and tap the
Add the standard keyboard layout as a
touch keyboard option
switch to activate it.
Copying and pasting
1
Drag your finger across text to select it.
2
Tap a nd ho ld the tex t to dis pl ay t he opt io ns.
3
Tap
Copy
or
Cut
.
The selected text is copied to the clipboard.
4
Tap a nd ho ld whe re t he tex t is to be ins er te d a nd ta p
Paste
.
Using the Keyboard Cover
When your device is connected to the Keyboard Cover, you can enter text using the
traditional keyboard. Refer to Keyboard Cover for more information.
Page 41

Basics
41
Screen capture
Capture a screenshot while using the device.
You ca n v ie w ca pt ur ed i ma ge s in t he
This PC
ĺ
Pictures
ĺ
Screenshots
folder.
It is not possible to capture a screenshot while using some apps and features.
Capturing screenshots with the S Pen
You ca n a ls o us e th e Ai r co mm an d fe at ur es t o ca pt ure s cr ee ns ho ts.
Screen write
allows you to write on captured screenshots.
To se le ct a nd c apt ur e a spe ci fi c a re a, us e
Smart select
.
Refer to Screen write and Smart select for more information.
Device and data management
Updating the device
Keep the device up to date by downloading and installing updates, such as service packs and
patches, for the operating system and other Microsoft apps.
The device is set to download and install updates automatically. To check for available
updates manually, on the taskbar, tap
ĺ ĺ
Update & security
ĺ
Windows Update
ĺ
Check for updates
.
Backing up and restoring data
Keep your personal information, app data, and settings safe on your device using
Samsung
Recovery
. Refer to Samsung Recovery for more information.
Performing a data reset
Delete all settings and data on the device. Before performing a factory data reset, ensure you
back up all important data stored on the device. Refer to Restoring to factory default and
Backing up the current system for more information.
Page 42

Basics
42
InstantGo (Modern standby)
InstantGo (Modern standby) is a low-power mode that allows the device to maintain network
connectivity. When the screen turns off, the device will enter modern standby mode.
While the device is in modern standby mode, the device can still sync content, such as
emails, from the cloud and run background apps. It also allows the device to wake from sleep
instantly, faster than the traditional sleep and hibernation states.
Modern standby consumes more battery power than the traditional sleep mode.
To se t thi s fe at ur e, t ap
ĺ ĺ
System
ĺ
Power & sleep
ĺ
Additional power
settings
ĺ
Choose what the power button does
, and then set the
When I press the
power button:
and the
When I close the lid:
settings to
Hibernate
.
Connecting to an external display
You can connect your device to an external display, such as a TV or monitor, and view
presentations or movies on the connected display. Connect your device to an external display
using an HDMI cable and display adapter.
r
HDMI cables and display adapters are sold separately.
r
Use only a Samsung-approved display adapter. Performance problems and
malfunctions caused by using unapproved accessories are not covered by the
warranty.
r
The method for connecting to an external display may differ depending on cable
or adapter types. The following actions are based on using an HDMI cable.
1
Connect the display adapter to the multipurpose jack of the device.
2
Connect the HDMI cable into the display adapter and to a HDMI port of the external
display.
3
Turn on the external display and change its display mode to one that supports an
external input.
4
Press and hold the Fn key and press the F4 key several times simultaneously.
5
Select a mode from the list.
Page 43

43
Applications
Installing or uninstalling apps
Store
Purchase and download apps.
On the taskbar, tap
. Alternatively, on the taskbar, tap ĺ
Store
.
For service requests for apps provided by third-party providers, contact the provider.
If you contact a Samsung Service Centre, troubleshooting actions in response to
service requests may have limitations depending on the app.
Installing apps
Browse apps by category or tap the search field to search for a keyword.
Select an app to view information about it. To download free apps, tap
Free
. To purchase and
download apps where charges apply, tap the price and follow the on-screen instructions.
To ch an ge th e aut o up da te se tt in gs, t ap ĺ
Settings
, and then tap the
Update
apps automatically when I’m on WiFi
switch to activate or deactivate it.
Uninstalling apps
Some apps cannot be uninstalled.
1
On the taskbar, tap .
2
Tap a nd ho ld an app, and th en ta p
Uninstall
.
Some apps will automatically move to the
Uninstall or change a program
screen. Tap
and hold an app, tap
Uninstall
, and then follow the on-screen instructions to uninstall
the app.
3
Tap
Uninstall
.
Page 44

Applications
44
Air Command
Introduction
Air command is a menu that provides S Pen features.
To open the Air command panel, hover the S Pen over the screen and press the S Pen button.
Alternatively, tap
ĺ
Samsung
ĺ
Air Command
.
Create note
Show Window
Smart select
Screen write
View all notes
r
Create note
: Launch
Samsung Notes
and create a new note. Refer to Samsung Notes for
more information.
r
View all notes
: Launch
Samsung Notes
and view all notes.
r
Smart select
: Collect content quickly. Refer to Smart select for more information.
r
Screen write
: Capture, edit, and write memos on screenshots, and then share them. Refer
to Screen write for more information.
r
Show Window
: Select an area on the screen and show it in full screen mode on an
external display. Refer to Show Window for more information.
Page 45
Applications
45
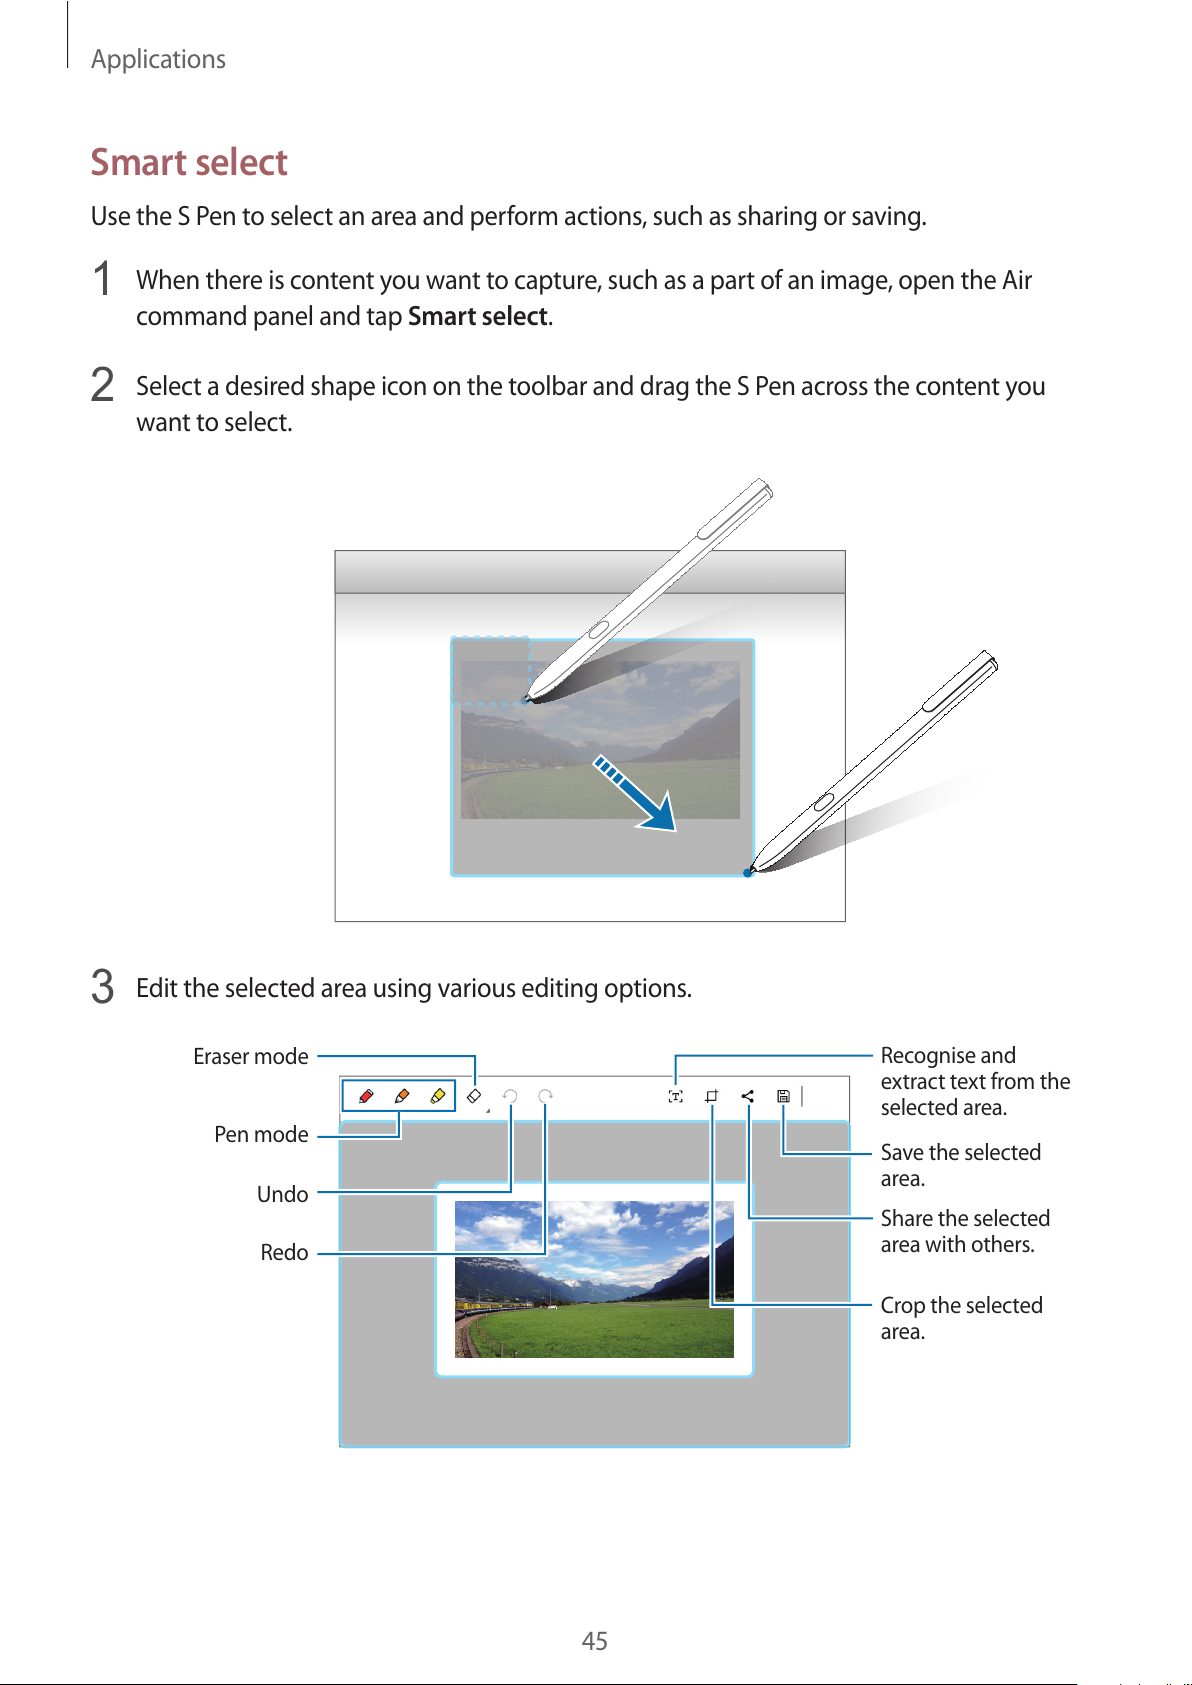
Smart select
Use the S Pen to select an area and perform actions, such as sharing or saving.
1
When there is content you want to capture, such as a part of an image, open the Air
command panel and tap
Smart select
.
2
Select a desired shape icon on the toolbar and drag the S Pen across the content you
want to select.
3
Edit the selected area using various editing options.
Pen mode
Eraser mode
Undo
Redo
Recognise and
extract text from the
selected area.
Save the selected
area.
Share the selected
area with others.
Crop the selected
area.
Page 46

Applications
46
Screen write
Capture screenshots to write or draw on them.
1
When there is content you want to capture, open the Air command panel and tap
Screen
write
.
The current screen is automatically captured and the editing toolbar appears on the
screen.
2
Write a memo on the screenshot.
3
Select an option to use with the screenshot.
r
: Recognise and extract text from the screenshot.
r
: Crop the screenshot.
r
: Share the screenshot with others.
r
: Save the screenshot.
It is not possible to capture a screenshot while using some apps.
Page 47

Applications
47
Samsung Notes
Introduction
Create notes by writing or drawing on the screen with the S Pen. You can also insert images
into your notes.
Creating notes
1
On the taskbar, tap ĺ
Samsung Notes
ĺ
All notes
ĺ .
You ca n a ls o op en t he A ir c om ma nd p an el a nd t ap t he
Create note
shortcut.
2
Select an input method from the toolbar at the top of the screen and compose a note.
Tap
Image
to insert an image by selecting from
File Explorer
.
Write or draw with
pens.
Paint with brushes.
Insert an image.
3
When you are finished composing the note, tap
Save
.
Page 48

Applications
48
Composing notes in handwriting mode
On the note composer screen, tap
Pen
to write or draw with the S Pen.
Undo
Redo
Eraser mode
Selection mode
Changing the pen settings
When writing or drawing on the screen, you can change the pen type, line thickness, or pen
colour.
Change the pen
colour.
Change the line
thickness.
Change the pen
type.
Select a new colour
using the colour
picker.
Using the line eraser
1
When you want to erase handwriting from a note, tap
Eraser
.
2
Tap a n a rea to era se.
The whole line on the area will be erased. The line eraser can erase your note line by line.
r
To on ly er as e th e a re a yo u to uc h w it h the S P en , tap
Eraser
once more and tap
Erase
touched area
. You can adjust the size of the eraser by dragging the size adjustment
bar.
r
To cl ea r t he n ote, t ap
ERASE ALL
.
Page 49

Applications
49
r
You can also erase an area in pen mode by tapping it while pressing and holding
the S Pen button.
r
Even with a smaller eraser, you may still not be able to precisely erase the intended
part.
Editing handwritten notes
Edit handwritten notes using various editing options, such as cutting, moving, or resizing.
1
When there is handwriting on the note, tap
Select
.
To ch an ge th e sha pe o f t he s ele ct ion , ta p
Select
once more.
2
Tap o r d raw a lin e a roun d the in put to se lec t.
To move the input to another location, select the input, and then drag it to a new
location.
To change the size of the selection, tap the input and drag a corner of the frame that
appears.
3
Edit the input using the available options.
r
Cut
: Cut out the input. To paste it to another location, tap and hold the location, and
then tap
Paste
.
r
Copy
: Copy the input. To paste it to another location, tap and hold the location, and
then tap
Paste
.
Page 50

Applications
50
r
Delete
: Delete the input.
r
To f ro nt
: Send the input to the front.
r
To b ac k
: Send the input to the back.
Painting with brushes
On the note composer screen, tap
Brush
to paint with various brushes.
When you are finished, tap
Done
to insert your painting into the note.
Undo
Redo
Insert the painting
into the note.
Select a new colour
using the colour
picker.
Eraser mode
Change the brush
colour.
Change the brush’s
radius or opacity.
Inserting images into a note
On the note composer screen, tap
Image
to select an image. The image will be inserted into
your note.
Deleting notes
1
On the taskbar, tap ĺ
Samsung Notes
ĺ
All notes
.
2
Tap
Select
and tick a note to delete.
To de le te mu lt ip le no te s, ti ck m ore no te s t o de lete .
3
Tap
Delete
.
Page 51

Applications
51
Samsung Flow
Introduction
Samsung Flow allows you to easily connect your tablet to your smartphone and use them
conveniently, such as unlocking your tablet screen or sharing contents.
Samsung Flow must be installed on your tablet and smartphone that you want to connect. If
Samsung Flow is not installed, download it from app stores.
r
This feature is only available on some Samsung Android smartphones.
r
To use this feature, you must register your fingerprint, and activate NFC and
Bluetooth feature on your smartphone.
Connecting your tablet and smartphone
1
On your smartphone, launch
Samsung Flow
, and then tap the switch to activate it.
If you have not registered your fingerprint, follow the on-screen instructions to register
your fingerprint.
2
On the taskbar of your tablet, tap ĺ
Samsung Flow
, and then tap
PAI R
.
The detected devices are listed.
3
Select your smartphone from the detected devices list, and then tap
PAI R
ĺ
Ye s
.
4
Accept the connection request on both devices.
5
On your tablet, tap
Register device
.
If you have not registered a PIN, tap
Register PIN
, and then follow the on-screen
instructions to register the PIN.
6
On your tablet, enter the PIN, and then follow the on-screen instructions to add the
registered fingerprint on your smartphone.
Both devices will connect via Samsung Flow.
Page 52

Applications
52
Unlocking your tablet screen with fingerprint
You ca n u nl oc k yo ur t ab le t sc re en wit h r eg is te re d fi ng er pr int o n yo ur s ma rt ph on e.
1
On the locked screen of your tablet, touch the NFC antenna area on the back of your
smartphone to the nfc tag of your keyboard cover.
Samsung Flow
will launch automatically on your smartphone.
2
When a fingerprint lock pop-up window appears, on your smartphone, scan your
registered fingerprint. You can unlock your tablet screen.
Sharing mobile data connection
Share your smartphone’s mobile data connection with your tablet using a mobile hotspot
when the Internet connection is not available on your tablet.
1
On your smartphone, activate the mobile hotspot feature.
2
On the locked screen of your tablet, unlock your tablet screen with fingerprint. Refer to
Unlocking your tablet screen with fingerprint for more information.
3
When the mobile hotspot window appears on your tablet, follow the on-screen
instructions to complete the connection.
You can access the Internet on your tablet using your smartphone’s mobile data
connection.
You ma y in cu r ad di ti on al c ha rg es o n you r sm ar t ph on e wh en u si ng t hi s fe at ure .
Page 53

Applications
53
Checking notifications on your tablet
When you receive new notifications on your smartphone, check notifications from the virtual
screen or in pop-up window on your tablet.
Sharing contents
You ca n s ha re y our sm ar tp ho ne ’s c on te nt s wi th y ou r ta bl et .
Show Window
Show Window allows you to select an area on the screen and show it in full screen mode on
an external display. You can draw on the screen using tools.
Showing a selected area on an external display
1
Connect the device to an external display.
You ca n c on ne ct an ex t er na l di sp lay us in g a ca bl e or w ir el es sl y. Ref er t o Connecting
to an external display for more information.
2
On the taskbar, tap ĺ
Samsung
ĺ
Show Window
.
3
Press and hold the Fn key and press the F4 key simultaneously, and then press the F4 key
again to select
Extend
.
4
Tap
Start
.
A white frame for selecting an area will appear.
Start
is activated only when the display mode is set to
Extend
.
Page 54

Applications
54
5
Drag to select an area to show in full screen mode on the external display, and then
tap
Done
.
The selected area will be shown on the external display.
To fi x the r at io of t he se le cte d ar ea to th e r at io o f t he e xte rn al sc re en , t ap
and tap the
Fixed
ratio
switch to activate it.
To st op d isp la yi ng th e scre en , tap
Stop
.
Using tools
While showing the screen on the connected display, you can use the following tools.
Cursor
Pen
Undo/Redo
Eraser
Highlighter
While using the pen or highlighter, tap the desired icon again to change the colour or line
thickness.
Setting the connection notification
You ca n s et t he d ev ic e to d is pl ay a n oti fi ca ti on w hi ch p ro mp ts yo u to u se
Show Window
when an external device is connected. Tap
and tap the
Auto launch
switch to activate it.
Page 55

Applications
55
Camera
Take pho tos an d r ecord v ide os usi ng var io us mod es and se tt ing s.
On the taskbar, tap
ĺ
Camera
.
When you launch
Camera
, the LED indicator turns on. The LED indicator will be
automatically turned off after the camera is turned off.
Tak in g ph otos or record in g video s
1
Tap t he im age on th e p rev iew sc reen wh ere th e c ame ra sho uld foc us.
This feature is only available when using the rear camera.
2
Tap to take a photo or tap to record a video.
r
Spread two fingers apart on the screen to zoom in, and pinch to zoom out.
r
To sw it ch be tw ee n t he f ro nt an d re ar ca me ras, t ap
.
Preview thumbnail
Take a p hoto.
Record a video.
Camera settings
Quick settings
Page 56

Applications
56
Book Settings
Samsung-integrated settings app offers various settings functions.
1
On the taskbar, tap ĺ
Book Settings
.
2
Select an option to configure the corresponding function.
r
Pen
: Select an app to launch when you press the S Pen button while hovering the
S Pen over the screen.
r
Battery Life Extender
: Set the maximum battery charge level to 85% to prolong the
battery lifetime.
r
AMOLED
: Change the screen mode and the screen brightness timer.
r
Pattern Log-in
: Set a pattern to use it as your screen lock method.
r
APN
(mobile network-enabled models): Set up access point names (APNs).
r
Legal information
: View the Samsung legal information, the open source licence
announcement, and the safety information.
r
User manual
: View help information to learn how to use the device and apps or
configure important settings.
r
About device
: Access device information.
Samsung Recovery
Introduction
Back up your data and settings, and restore your device to a previously backed up point or to
the factory default.
r
To use this app, you must sign in to the device with an administrator account, or
enter the administrator’s password.
r
When you restore your device, it will erase the data or apps saved after the selected
backup point. Ensure you back up important data regularly. If necessary, back up
important data to an external storage device before restoring the system.
r
When you launch the application for the first time, read and accept the Terms and
Conditions when they display on the screen.
Page 57

Applications
57
Restoring to factory default
Restore the device to its factory default settings. Before performing a factory data reset,
ensure you back up all important data stored on the device. Refer to Backing up the current
system for more information.
1
On the taskbar, tap ĺ
Samsung
ĺ
Samsung Recovery
.
If Windows does not start, turn on your device and press the
F4
key several times
immediately before the Samsung logo appears, to launch
Samsung Recovery
.
2
Tap
Backup management
ĺ
Factory image
ĺ
Recover
ĺ
Recover
ĺ OK.
3
Follow the on-screen instructions to complete the recovery.
Page 58

Applications
58
Backing up the current system
Back up important data to an external storage device regularly to prevent data loss.
1
Connect an external storage device.
2
On the taskbar, tap ĺ
Samsung
ĺ
Samsung Recovery
.
3
Tap
Backup management
ĺ
New backup
.
4
Enter backup information and select the external storage device.
5
Tap
Backup
.
6
When the backup start window appears, tap
Ye s
.
7
When the backup complete window appears, tap OK.
When the backup is finished, the backup image will appear on the backup management
screen.
Page 59

Applications
59
Restoring the system
Select a backup point saved on an external storage device to restore the device to that point.
1
Connect the external storage device to your device.
2
On the taskbar, tap ĺ
Samsung
ĺ
Samsung Recovery
.
3
Tap
Backup management
, select a backup image, and then tap
Recover
.
4
Tap
Recover
.
Page 60

60
Settings
Windows Settings
Customise settings for functions and apps. You can make your device more personalised by
configuring various setting options.
On the taskbar, tap
ĺ .
To se ar ch for s ett in gs by en te rin g ke ywo rd s, t ap th e se arc h fi el d a t th e t op o f t he s cree n.
The available options may vary depending on the region or service provider.
System
Change the system settings.
The actual available capacity of the internal memory is less than the specified
capacity because the operating system and default apps occupy part of the memory.
The available capacity may change when you update the device.
Devices
Change settings related to your connected devices.
Page 61

Settings
61
Network & Internet
Change the network and Internet settings.
r
Your device uses a non-harmonised frequency and is intended for use in all
European countries. The WLAN can be operated in the EU without restriction
indoors, but cannot be operated outdoors.
r
Turn off Wi-Fi to save the battery when not in use.
Personalisation
Change the display settings, such as a wallpaper, colour, and theme.
Accounts
Change the account settings.
Time & language
Change settings to control how the device displays the time and date, and select your
country or region. You can also select device languages and change settings, such as
keyboards and voice input types.
If the battery remains fully discharged or removed from the device, the time and date
is reset.
Ease of Access
Change settings to improve the device’s accessibility.
Privacy
Change the privacy settings.
Update & security
Change the Windows update, data backup, and device security settings.
Page 62
Settings
62
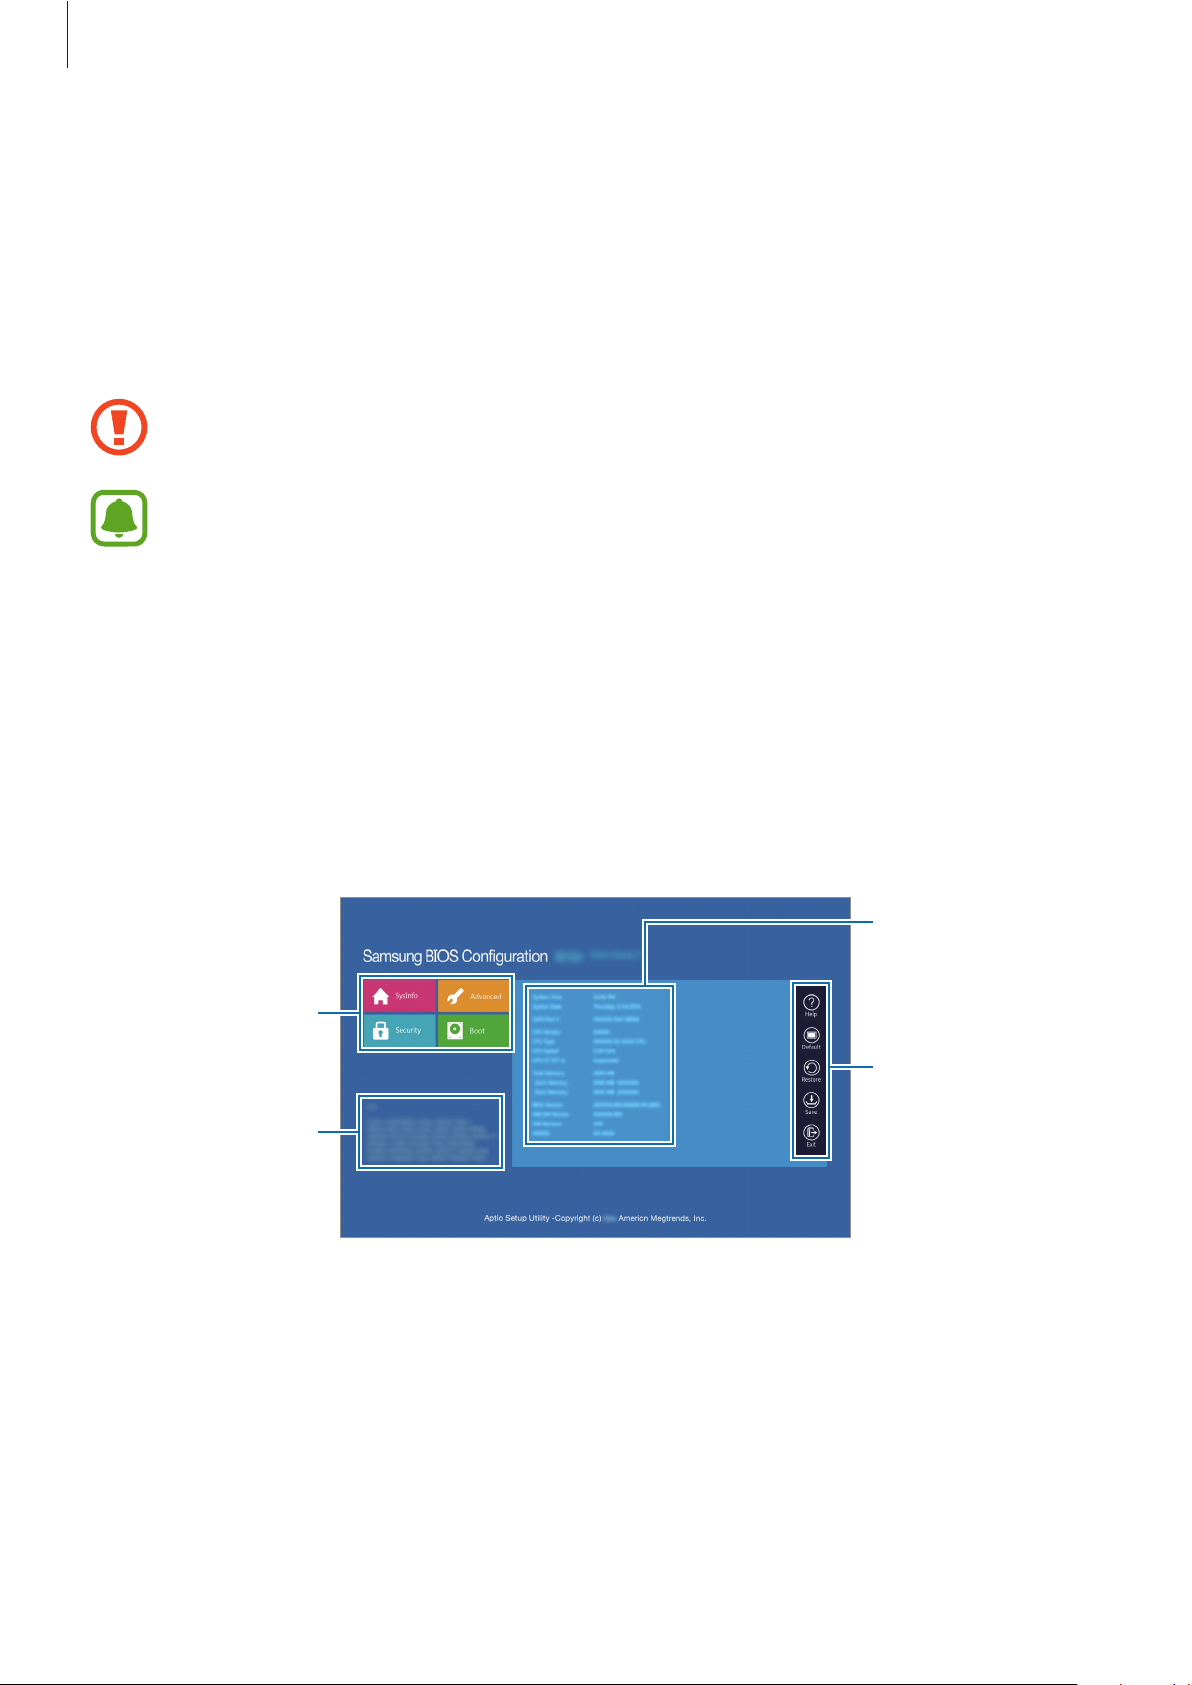
BIOS (Setup utility)
Introduction
BIOS is the program that starts the operating system when you turn on your device. Access
the BIOS setup screen to set a boot password, perform battery calibration, and more.
Be careful when changing BIOS settings. Incorrect changes may cause the system to
malfunction or crash.
The BIOS setup screens, menus, and items may appear differently depending on the
model and BIOS version.
Entering the BIOS screen
When your device is connected to the Keyboard Cover, press the F2 key several times
immediately after you turn on your device, before the Samsung logo appears.
Alternatively, press the Volume Up key several times when your device is not connected to
the Keyboard Cover.
If the locked screen or the Start screen appears, restart the device and try again.
Setup menus
Help information
Setup items
Setup tools
Setup tools
r
Help
: View the help information for the BIOS setup.
r
Default
: Restore the device to the default settings.
r
Restore
: Undo changes.
Page 63

Settings
63
r
Save
: Save the changes and restart the device.
r
Exit
: Restart the device without saving the changes.
Setup menus
r
SysInfo
: View the basic specifications of the device.
r
Advanced
: Configure the advanced settings and perform the battery calibration.
r
Security
: Configure security functions.
r
Boot
: Configure boot-related settings.
Setting the boot password
Setting a password with the BIOS enhances protection against viruses and hacking attacks.
On the BIOS screen, tap
Security
.
The following password settings are available:
r
Supervisor Password
: This password is required when turning on the device or entering
the BIOS screen. This password allows you to enter the BIOS screen as an administrator.
You ca n c ha ng e th e BI OS s et ti ng s.
r
User Password
: This password is required when turning on the device or entering the
BIOS screen. This password allows you to enter the BIOS screen as a user. You cannot
change the BIOS settings. The password will be deactivated automatically if the
supervisor password is removed.
r
HDD Password
: This password is required to access the hard disk drive (HDD) from the
device. This password may not be supported depending on the model.
Do not forget your password or expose it to others.
r
If you forget your supervisor password or HDD password, contact a Samsung
Service Centre.
r
If you forget your user password, you can remove it by removing the supervisor
password.
Page 64

Settings
64
Setting a boot password
To se t a u se r pas sw or d or HD D pa sswo rd , yo u mus t se t t he s upe rvi so r pas sw or d fir st .
1
Tap
Set Supervisor Password, Set User Password
, or
Set HDD Password
.
2
Enter a password and tap Ok.
The password can be up to 20 characters long.
3
Enter the password again and tap Ok.
4
Tap
Save
to save the password and restart the device.
Removing a password
1
Tap
Set Supervisor Password, Set User Password
, or
Set HDD Password
.
2
Enter the password and tap Ok.
3
Without entering any characters, tap Ok ĺ Ok.
The password will be removed.
Boot priority
Change the boot priority from the BIOS setup.
1
On the BIOS screen, tap
Boot
.
2
Tap
Boot Device Priority
.
3
Tap t he dro p- do wn me nu and se lec t an op tio n.
4
Tap
Save
to save the setting and restart the device.
Page 65

Settings
65
Smart Battery Calibration
If the battery is charged or discharged repeatedly over a short period, the actual battery
power and the detected remaining battery power may be different. Performing a battery
calibration will discharge the battery completely to ensure more accurate battery level
detection.
The battery calibration will take three to five hours. The time may differ depending on
the remaining battery level.
1
Fully charge the battery.
2
Disconnect the charger from the device.
3
On the BIOS screen, tap
Advanced
.
4
Tap
Smart Battery Calibration
.
The battery calibration will start and the battery will be discharged.
To st op t he ca li bra ti on , p re ss t he Esc key.
Page 66

66
Appendix
Troubleshooting
Before contacting a Samsung Service Centre, please attempt the following solutions. Some
situations may not apply to your device.
When you turn on your device or while you are using the device, it
prompts you to enter one of the following codes:
r
Password: When the device lock feature is enabled, you must enter the password you set
for the device.
r
PIN: When using the device for the first time or when the PIN requirement is enabled, you
must enter the PIN supplied with the SIM or USIM card. You can disable this feature by
using the Lock SIM card menu.
r
PUK: Your SIM or USIM card is blocked, usually as a result of entering your PIN incorrectly
several times. You must enter the PUK supplied by your service provider.
r
PIN2: When you access a menu requiring the PIN2, you must enter the PIN2 supplied with
the SIM or USIM card. For more information, contact your service provider.
Yo u r de v i c e d i s p l ay s n et w o r k o r s e r v i ce e r ro r m e s sa g e s
r
When you are in areas with weak signals or poor reception, you may lose reception. Move
to another area and try again. While moving, error messages may appear repeatedly.
r
You cannot access some options without a subscription. For more information, contact
your service provider.
Yo u r de v i c e d o e s no t t u r n o n
When the battery is completely discharged, your device will not turn on. Fully charge the
battery before turning on the device.
Page 67

Appendix
67
The touchscreen responds slowly or improperly
r
If you attach a screen protector or optional accessories to the touchscreen, the
touchscreen may not function properly.
r
If you are wearing gloves, if your hands are not clean while touching the touchscreen,
or if you tap the screen with sharp objects or your fingertips, the touchscreen may
malfunction.
r
The touchscreen may malfunction in humid conditions or when exposed to water.
r
Restart your device to clear any temporary software bugs.
r
Ensure that your device software is updated to the latest version.
r
If the touchscreen is scratched or damaged, visit a Samsung Service Centre.
The device responds slowly
If you use the device without connecting the Keyboard Cover, the device’s speed and
performance may be affected. Use the device with the Keyboard Cover connected.
Yo u r de v i c e f r e e ze s o r h a s f a ta l e r ro r s
Try the following solutions. If the problem is still not resolved, contact a Samsung Service
Centre.
Restarting the device
If your device freezes or hangs, you may need to close apps or turn off the device and turn it
on again.
Forcing restart
If your device is frozen and unresponsive, press and hold the Power key for more than
10 seconds until the device turns off. Then, press and hold the Power key for a few seconds to
restart it.
Page 68

Appendix
68
Resetting the device
If the methods above do not solve your problem, perform a factory data reset.
On the taskbar, tap
ĺ
Samsung
ĺ
Samsung Recovery
ĺ
Factory image
ĺ
Recover
ĺ
Recover
ĺ OK. Before performing the factory data reset, remember to make backup copies
of all important data stored in the device.
If Windows does not start, turn on your device and press the
F4
key several times immediately
before the Samsung logo appears, to launch
Samsung Recovery
.
The Internet is often disconnected
r
Ensure that you are not blocking the device’s internal antenna.
r
When you are in areas with weak signals or poor reception, you may lose reception. You
may have connectivity problems due to issues with the service provider’s base station.
Move to another area and try again.
r
When using the device while moving, wireless network services may be disabled due to
issues with the service provider’s network.
The battery icon is empty
You r b at te ry i s lo w. C ha rg e th e ba tte ry.
The battery does not charge properly (For Samsung-approved
chargers)
r
Ensure that the charger is connected properly.
r
Visit a Samsung Service Centre and have the battery replaced.
The battery depletes faster than when first purchased
r
When you expose the device or the battery to very cold or very hot temperatures, the
useful charge may be reduced.
r
Battery consumption increases when you use some apps, such as games or the Internet.
r
The battery is consumable and the useful charge will get shorter over time.
Page 69

Appendix
69
Yo u r de v i c e i s h o t t o t he t o u c h
When you use apps that require more power or use apps on your device for an extended
period of time, your device may feel hot to the touch. This is normal and should not affect
your device’s lifespan or performance.
If the device overheats or feels hot for a prolonged period, do not use it for a while. If the
device continues to overheat, contact a Samsung Service Centre.
Error messages appear when launching the camera
Your device must have sufficient available memory and battery power to operate the camera
app. If you receive error messages when launching the camera, try the following:
r
Charge the battery.
r
Free some memory by transferring files to an external storage device or deleting files
from your device.
r
Restart the device. If you are still having trouble with the camera app after trying these
tips, contact a Samsung Service Centre.
Photo quality is poorer than the preview
r
The quality of your photos may vary, depending on the surroundings and the
photography techniques you use.
r
If you take photos in dark areas, at night, or indoors, image noise may occur or images
may be out of focus.
Error messages appear when opening multimedia files
If you receive error messages or multimedia files do not play when you open them on your
device, try the following:
r
Free some memory by transferring files to an external storage device or deleting files
from your device.
r
Ensure that the music file is not Digital Rights Management (DRM)-protected. If the file is
DRM-protected, ensure that you have the appropriate licence or key to play the file.
r
Ensure that the file formats are supported by the device. If a file format is not supported,
such as DivX or AC3, install an app that supports it. To confirm the file formats that your
device supports, visit www.samsung.com.
Page 70

Appendix
70
r
Your device supports photos and videos captured with the device. Photos and videos
captured by other devices may not work properly.
r
Your device supports multimedia files that are authorised by your network service
provider or providers of additional services. Some content circulated on the Internet,
such as ringtones, videos, or wallpapers, may not work properly.
Another Bluetooth device is not located
r
Ensure that the Bluetooth wireless feature is activated on your device.
r
Ensure that the Bluetooth wireless feature is activated on the device you wish to connect
to.
r
Ensure that your device and the other Bluetooth device are within the maximum
Bluetooth range (10 m).
If the tips above do not solve the problem, contact a Samsung Service Centre.
Yo u r de v i c e c a n n o t f i n d yo u r c ur r e n t l o c a ti o n
GPS signals may be obstructed in some locations, such as indoors. Set the device to use Wi-Fi
to find your current location in these situations.
Data stored in the device has been lost
Always make backup copies of all important data stored in the device. Otherwise, you cannot
restore data if it is corrupted or lost. Samsung is not responsible for the loss of data stored in
the device.
The touchscreen does not turn on when you open the Keyboard Cover
Ensure that your device connects to the Keyboard Cover, and the device is in correct position
using the stand of the Keyboard Cover. Refer to Keyboard Cover for more information.
A small gap appears around the outside of the device case
r
This gap is a necessary manufacturing feature and some minor rocking or vibration of
parts may occur.
r
Over time, friction between parts may cause this gap to expand slightly.
Page 71

Appendix
71
Windows recovery function
If the
Samsung Recovery
app is not supported, reinstall Windows using the Windows
recovery function.
Reinstalling Windows will erase all apps and data on the device. Back up important
apps and data to an external storage device before reinstalling Windows.
After Windows is reinstalled, you can install the required Samsung apps.
1
On the taskbar, tap ĺ ĺ
Update & security
ĺ
Recovery
.
2
Tap
Get started
.
3
Tap
Keep my files
or
Remove everything
.
Removing the battery
r
To remove the battery, contact an authorised service centre. To obtain battery
removal instructions, please visit www.samsung.com/global/ecodesign_energy.
r
For your safety, you must not attempt to remove the battery. If the battery is not
properly removed, it may lead to damage to the battery and device, cause personal
injury, and/or result in the device being unsafe.
r
Samsung does not accept liability for any damage or loss (whether in contract or tort,
including negligence) which may arise from failure to precisely follow these warnings and
instructions, other than death or personal injury caused by Samsung’s negligence.
Page 72

Copyright
Copyright © 2017 Samsung Electronics
This manual is protected under international copyright laws.
No part of this manual may be reproduced, distributed, translated, or transmitted in any form
or by any means, electronic or mechanical, including photocopying, recording, or storing
in any information storage and retrieval system, without the prior written permission of
Samsung Electronics.
Trademarks
r
SAMSUNG and the SAMSUNG logo are registered trademarks of Samsung Electronics.
r
Microsoft, MS-DOS, and Windows are trademarks or registered trademarks of the
Microsoft Corporation.
r
Bluetooth® is a registered trademark of Bluetooth SIG, Inc. worldwide.
r
Wi-Fi®, Wi-Fi Protected Setup™, Wi-Fi CERTIFIED™, and the Wi-Fi logo are registered
trademarks of the Wi-Fi Alliance.
r
All other trademarks and copyrights are the property of their respective owners.
 Loading...