

Page 1
SM-W700
SM-W703
SM-W707
SM-W708Y
User Manual
SM-W708
English (EU). 04/2016. Rev.1.1
www.samsung.com
Page 2

Table of Contents
Basics
3 Read me first
4 Package contents
5 Device layout
8 Battery
11 SIM or USIM card (mobile network-
enabled models)
13 Turning the device on and off
13 Keyboard Cover
20 Touchscreen
23 Start screen
26 Lock screen
27 ACTION CENTRE
29 Search box
30 Entering text
Settings
42 Introduction
42 System
43 Devices
44 Network & Internet
45 Personalisation
45 Accounts
46 Time & language
46 Ease of Access
47 Privacy
48 Update & security
48 Extras
49 BIOS (Setup utility)
32 Screen capture
32 Opening apps
32 Split screen view
34 Device and data management
35 InstantGo (Connected standby)
Applications
36 Installing or uninstalling apps
37 Scrap Box
38 Samsung Update
38 Samsung Recovery
40 Online Support(S Service)
40 Show Window
Appendix
53 Troubleshooting
58 Windows recovery function
58 Removing the battery
2
Page 3

Basics
Read me first
Please read this manual before using the device to ensure safe and proper use.
•
Descriptions are based on the device’s default settings.
•
Some content may differ from your device depending on the region, service provider,
model specifications, or device’s software.
•
Content (high quality content) that requires high CPU and RAM usage will affect the
overall performance of the device. Apps related to the content may not work properly
depending on the device’s specifications and the environment that it is used in.
•
Samsung is not liable for performance issues caused by apps supplied by providers other
than Samsung.
•
Samsung is not liable for performance issues or incompatibilities caused by edited
registry settings or modified operating system software. Attempting to customise the
operating system may cause the device or apps to work improperly.
•
Software, sound sources, wallpapers, images, and other media provided with this device
are licensed for limited use. Extracting and using these materials for commercial or other
purposes is an infringement of copyright laws. Users are entirely responsible for illegal
use of media.
•
You may incur additional charges for data services, such as messaging, uploading and
downloading, auto-syncing, or using location services depending on your data plan. For
large data transfers, it is recommended to use the Wi-Fi feature.
•
Default apps that come with the device are subject to updates and may no longer be
supported without prior notice. If you have questions about an app provided with
the device, contact a Samsung Service Centre. For user-installed apps, contact service
providers.
•
Modifying the device’s operating system or installing softwares from unofficial sources
may result in device malfunctions and data corruption or loss. These actions are violations
of your Samsung licence agreement and will void your warranty.
•
Depending on the region, you can view the regulatory information on the device. To view
→
the information, tap
→
Regulatory information
Settings
.
→
Extras
3
→
Galaxy Settings
→
Legal information
Page 4
Basics
Instructional icons
Warning: situations that could cause injury to yourself or others
Caution: situations that could cause damage to your device or other equipment
Notice: notes, usage tips, or additional information
Package contents
Check the product box for the following items:
•
Device
•
Keyboard Cover
•
Quick start guide
•
The items supplied with the device and any available accessories may vary
depending on the region or service provider.
•
The supplied items are designed only for this device and may not be compatible
with other devices.
•
Appearances and specifications are subject to change without prior notice.
•
You can purchase additional accessories from your local Samsung retailer. Make
sure they are compatible with the device before purchase.
•
Use only Samsung-approved accessories. Using unapproved accessories may cause
the performance problems and malfunctions that are not covered by the warranty.
•
Availability of all accessories is subject to change depending entirely on
manufacturing companies. For more information about available accessories, refer
to the Samsung website.
4
Page 5

Basics
Microphone
Volume key
models)
Main antenna
Device layout
Device
Power key
Front camera
Camera indicator
light
Touchscreen
Keyboard dock port
(mobile
network-enabled
models)
Rear camera
Light sensor
Microphone
Loud speaker
Multipurpose jack
(USB Type-C
Headset jack
NFC antenna
Start key
™
)
The device and the Keyboard Cover contain magnets. The American Heart Association
(US) and the Medicines and Healthcare Products Regulatory Agency (UK) both warn
that magnets can affect the operation of implanted pacemakers, cardioverters,
defibrillators, insulin pumps or other electro medical devices (collectively, “Medical
Device”) within the range of 15 cm (6 inches). If you are a user of any of these Medical
Devices, DO NOT USE THIS DEVICE AND THE KEYBOARD COVER UNLESS YOU HAVE
CONSULTED WITH YOUR PHYSICIAN.
Loud speaker
SIM card tray (mobile
network-enabled
5
Page 6
Basics
Do not store your device and the Keyboard Cover near magnetic fields. Magnetic
stripe cards, including credit cards, phone cards, passbooks, and boarding passes,
may be damaged by magnetic fields.
•
Connectivity problems and battery drain may occur in the following situations:
–
If you attach metallic stickers on the antenna area of the device
–
If you attach a device cover made with metallic material to the device
–
If you cover the device’s antenna area with your hands or other objects while
using certain features, such as calls or the mobile data connection
•
Using a Samsung-approved screen protector is recommended. Unapproved screen
protectors may cause the sensors to malfunction.
•
Do not allow water to contact the touchscreen. The touchscreen may malfunction
in humid conditions or when exposed to water.
Keys
Key Function
•
Press and hold to turn the device on or off.
Power
•
Press to turn on or lock the screen.
Start
Volume
•
Press to open the Start menu.
•
Press to adjust the device volume.
6
Page 7
Basics
Keyboard Cover
Stand
Connector
Keyboard
Touchpad
NFC tag
Do not remove keycaps from the keyboard. Doing so may damage the keyboard and
the keycaps.
The function of the NFC tag may differ depending on the model and region.
7
Page 8
Basics
Battery
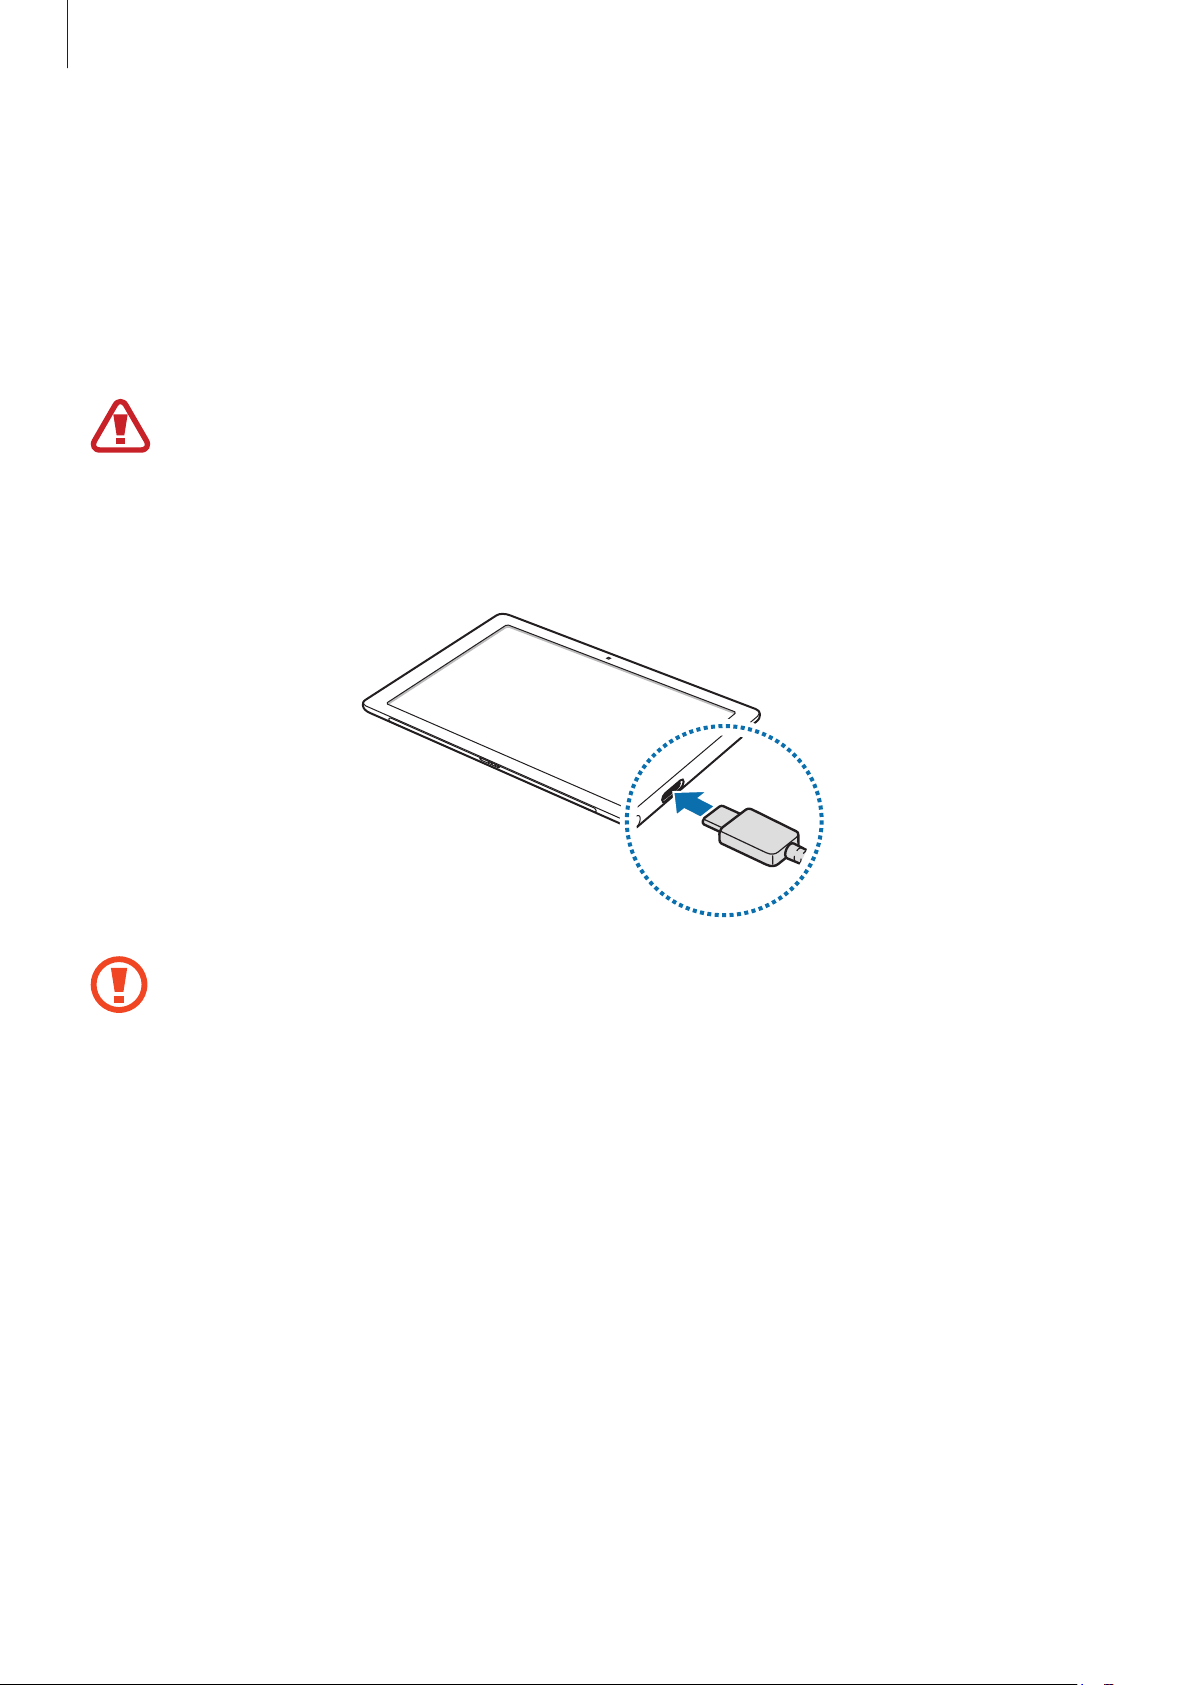
Charging the battery
Charge the battery before using it for the first time or when it has been unused for extended
periods.
Use only Samsung-approved chargers, batteries, and cables. Unapproved chargers or
cables can cause the battery to explode or damage the device.
Connect the USB cable to the USB power adaptor, and then plug the end of the USB cable
1
into the multipurpose jack.
Connecting the charger improperly may cause serious damage to the device. Any
damage caused by misuse is not covered by the warranty.
Plug the USB power adaptor into an electric socket.
2
8
Page 9

Basics
After fully charging, disconnect the device from the charger. First unplug the charger
3
from the device, and then unplug it from the electric socket.
To save energy, unplug the charger when not in use. The charger does not have a
power switch, so you must unplug the charger from the electric socket when not in
use to avoid wasting power. The charger should remain close to the electric socket
and easily accessible while charging.
Viewing the remaining charging time
→
While charging, on the taskbar, tap
The actual charging time may vary depending on the status of your device and the
charging conditions. The remaining charging time may not be displayed when you
charge the device in very cold or very hot conditions.
Settings
→
System
→
Battery saver
.
Reducing the battery consumption
Your device provides various options that help you conserve battery power.
•
When you are not using the device, switch to sleep mode by pressing the Power key.
•
Activate battery saver mode.
•
Close unnecessary apps.
•
Deactivate the Bluetooth feature when not in use.
•
Deactivate the Wi-Fi feature when not in use.
•
Deactivate auto-syncing of apps.
•
Decrease the backlight time.
•
Decrease the screen brightness.
9
Page 10

Basics
Battery charging tips and precautions
•
Use the charger supplied with the device. It may take longer to charge the battery if you
use other chargers.
•
When the battery power is low, the battery icon appears empty.
•
If the battery is completely discharged, the device cannot be turned on immediately
when the charger is connected. Allow a depleted battery to charge for a few minutes
before turning on the device.
•
If you use multiple apps at once, network apps, or apps that need a connection to
another device, the battery will drain quickly. To avoid losing power during a data
transfer, always use these apps after fully charging the battery.
•
Using a power source other than the USB power adaptor, such as a computer, may result
in a slower charging speed due to a lower electric current.
•
The device can be used while it is charging, but it may take longer to fully charge the
battery.
•
If the device receives an unstable power supply while charging, the touchscreen may not
function. If this happens, unplug the charger from the device.
•
While charging, the device and the charger may heat up. This is normal and should not
affect the device’s lifespan or performance. If the battery gets hotter than usual, the
charger may stop charging.
•
If the device is not charging properly, take the device and the charger to a Samsung
Service Centre.
Battery saver
Save the battery power by limiting the device’s functions.
On the taskbar, tap
saver is currently:
To automatically activate battery saver mode when the remaining battery power reaches the
→
Settings
switch to activate it.
→
System
→
Battery saver
, and then tap the
Battery
preset level, tap
Battery saver settings
and select an option.
10
Page 11
Basics
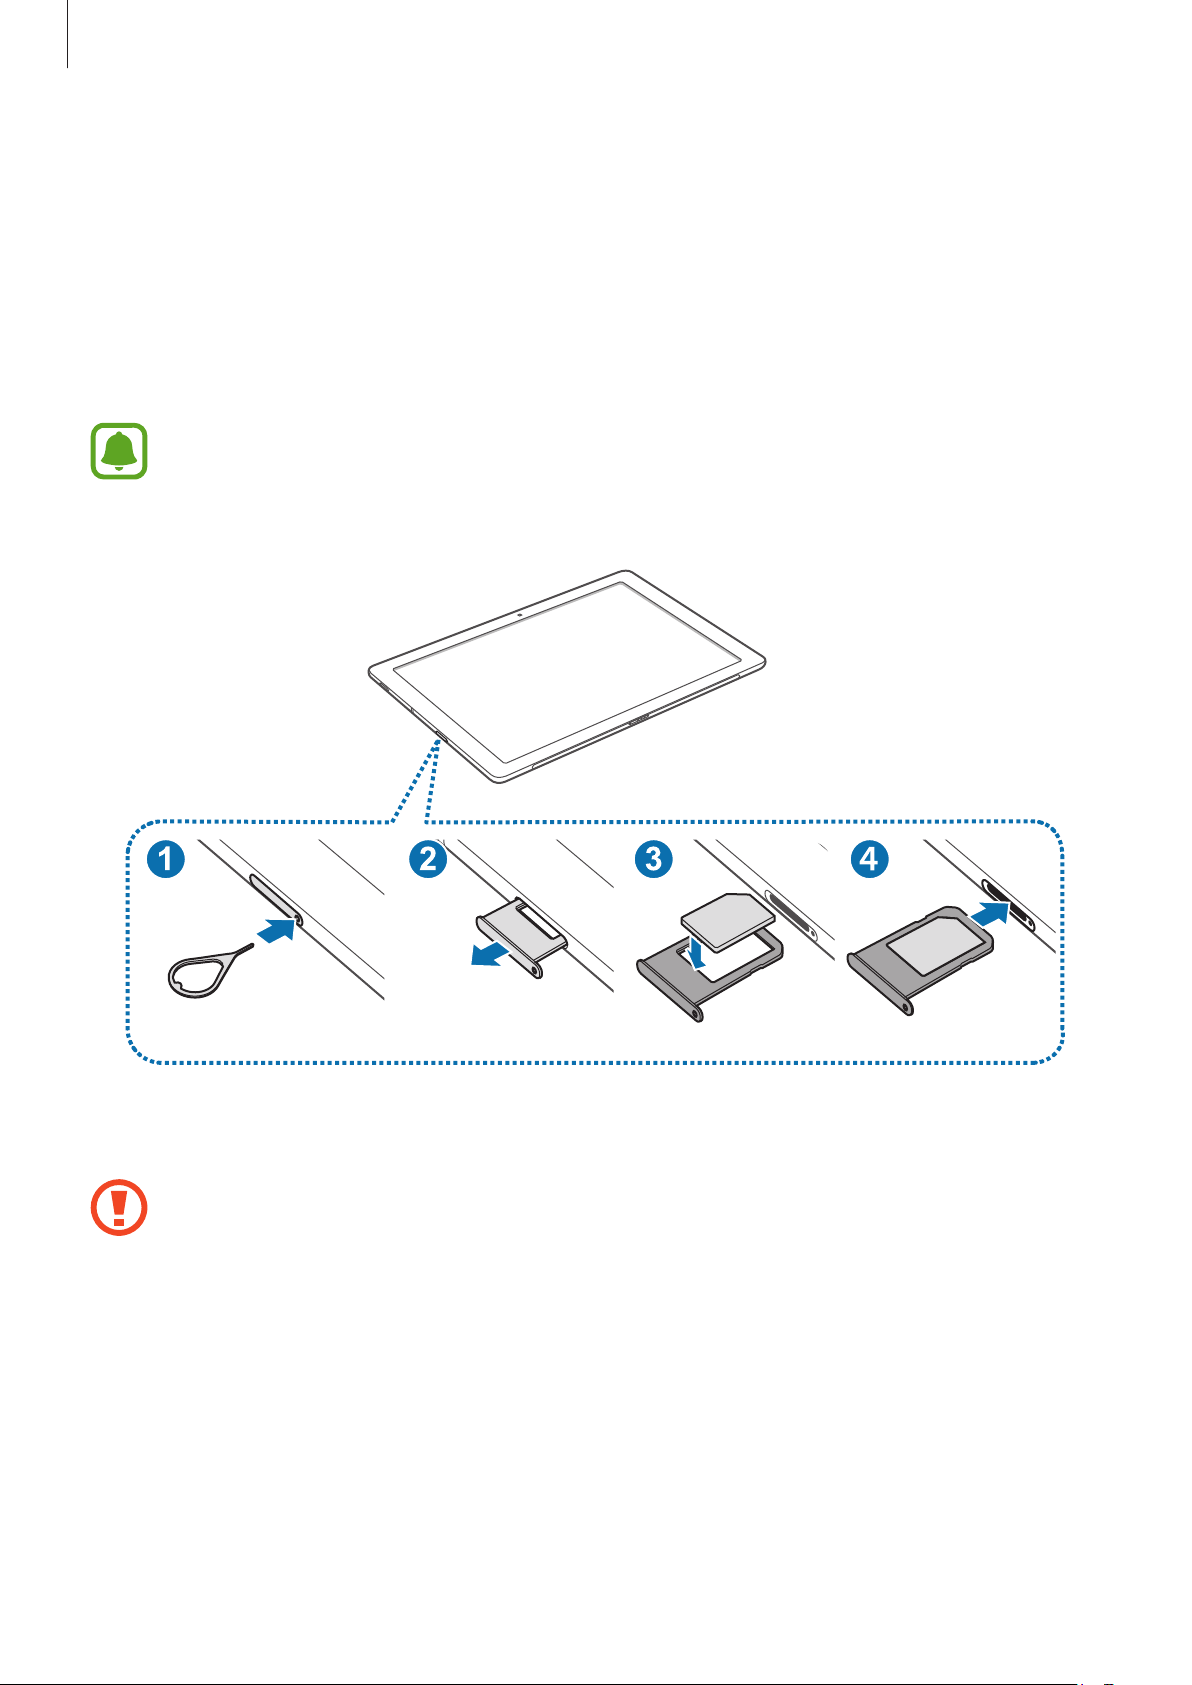
SIM or USIM card (mobile network-enabled models)
Installing the SIM or USIM card
Insert the SIM or USIM card provided by the mobile telephone service provider.
•
Only nano-SIM cards work with the device.
•
Some LTE services may not be available depending on the service provider. For
more information about service availability, contact your service provider.
Insert the ejection pin into the hole on the SIM card tray to loosen the tray.
1
Ensure that the ejection pin is perpendicular to the hole. Otherwise, the device may
be damaged.
11
Page 12
Basics
Pull out the SIM card tray gently from the SIM card tray slot.
2
Place the SIM or USIM card on the SIM card tray with the gold-coloured contacts facing
3
downwards.
Use caution not to lose or let others use the SIM or USIM card. Samsung is not
responsible for any damages or inconveniences caused by lost or stolen cards.
Insert the SIM card tray back into the SIM card tray slot.
4
Carefully insert the SIM card tray to prevent the SIM card from leaving or falling out of
the tray.
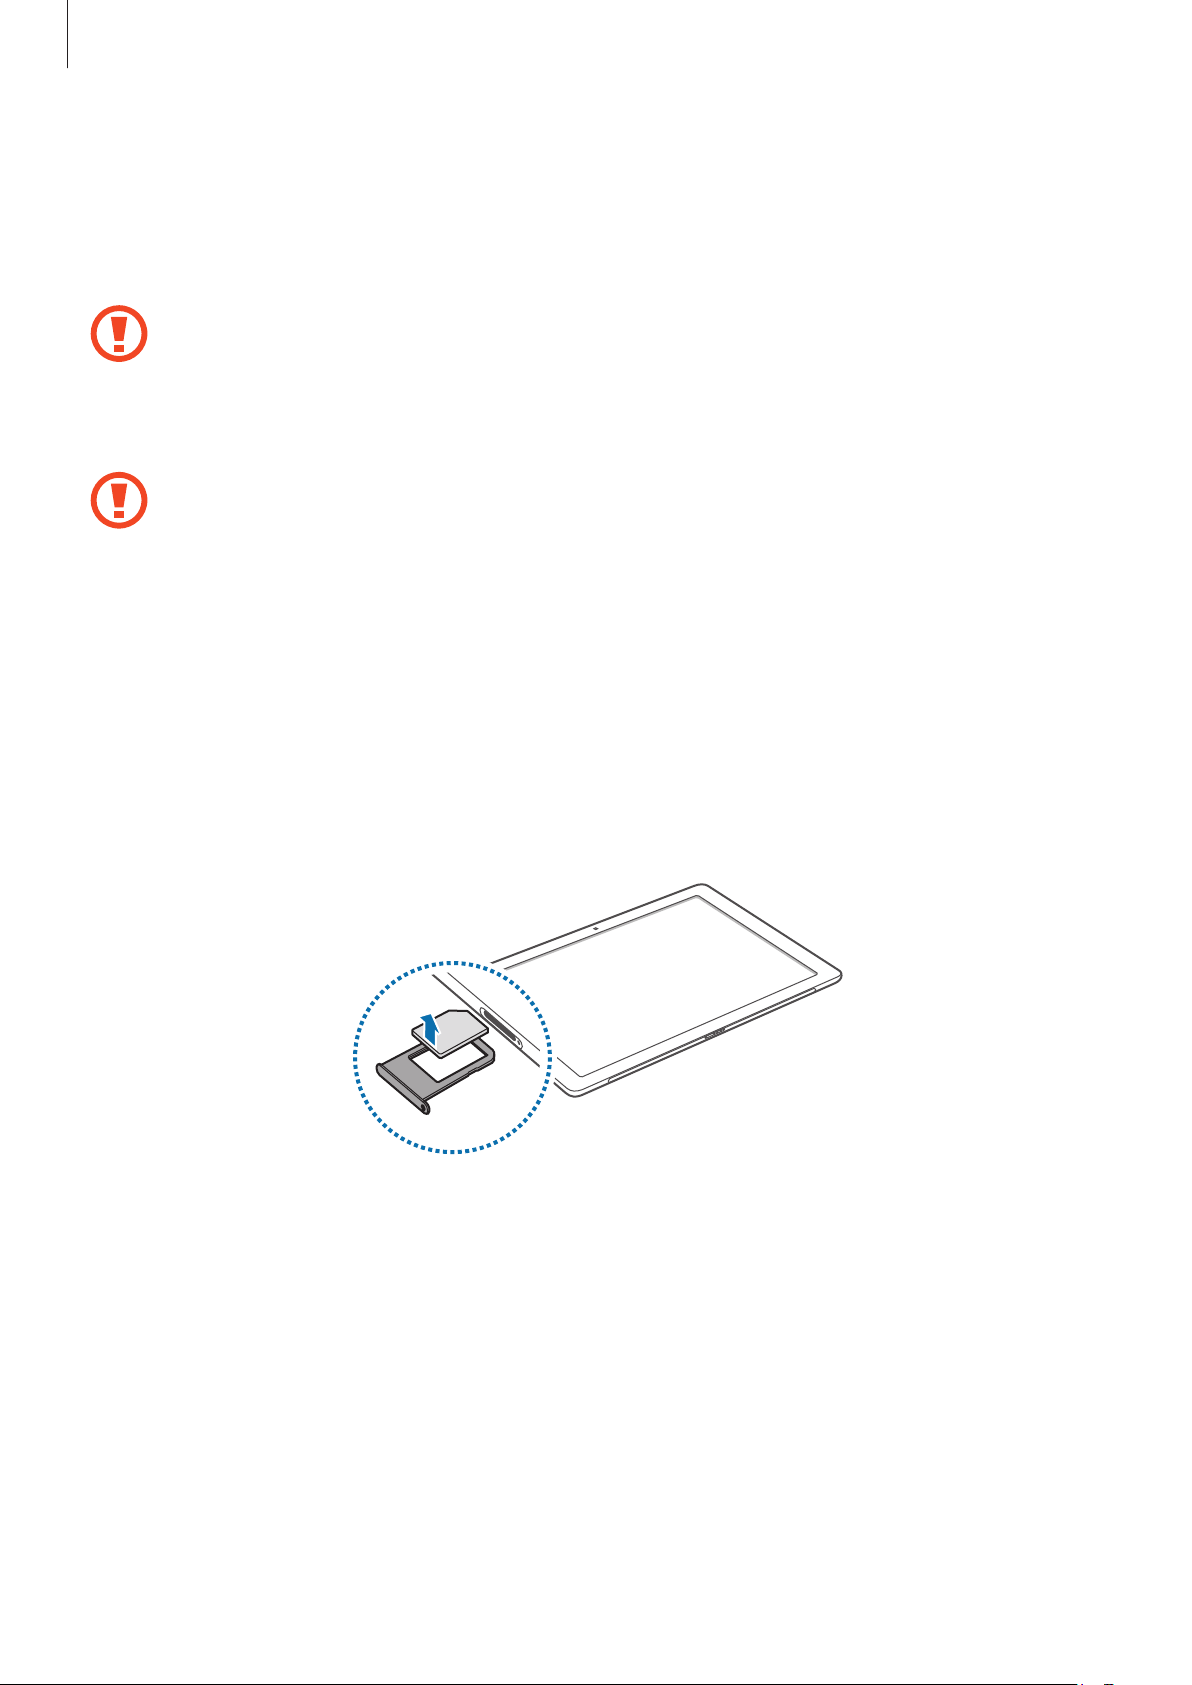
Removing the SIM or USIM card
Insert the ejection pin into the hole on the SIM card tray to loosen the tray.
1
Pull out the SIM card tray gently from the SIM card tray slot.
2
Remove the SIM or USIM card.
3
Insert the SIM card tray back into the SIM card tray slot.
4
12
Page 13
Basics
Turning the device on and off
Press and hold the Power key for a few seconds to turn on the device.
Before turning on your device for the first time, you must connect the device to a
power supply.
When you turn on your device for the first time or after performing a data reset, follow the onscreen instructions to set up your device.
To turn off the device, tap
Alternatively, press and hold the Power key until
then drag the screen downwards.
Follow all posted warnings and directions from authorised personnel in areas where
the use of wireless devices is restricted, such as aeroplanes and hospitals.
→
Power
→
Shut down
. In Tablet mode, tap →
Slide to shut down your PC
Shut down
appears, and
Restarting the device
If your device is frozen and unresponsive, press and hold the Power key for more than
10 seconds until the device turns off. Then, press and hold the Power key again to restart it.
Keyboard Cover
Introduction
.
Connecting the device to the Keyboard Cover allows you to use a traditional keyboard and
touchpad. The touchpad has two click buttons so you can use the touchpad like a mouse. You
can also stand your device upright using the stand on the Keyboard Cover.
When you close the Keyboard Cover, your device will enter sleep mode. When you open the
cover and set the device in position using the stand, the touchscreen will turn on. To change
→
the settings, tap
→
Choose what closing the lid does
Settings
→
System
→
Power & sleep
, and then configure the
→
Additional power settings
When I close the lid:
settings.
13
Page 14
Basics
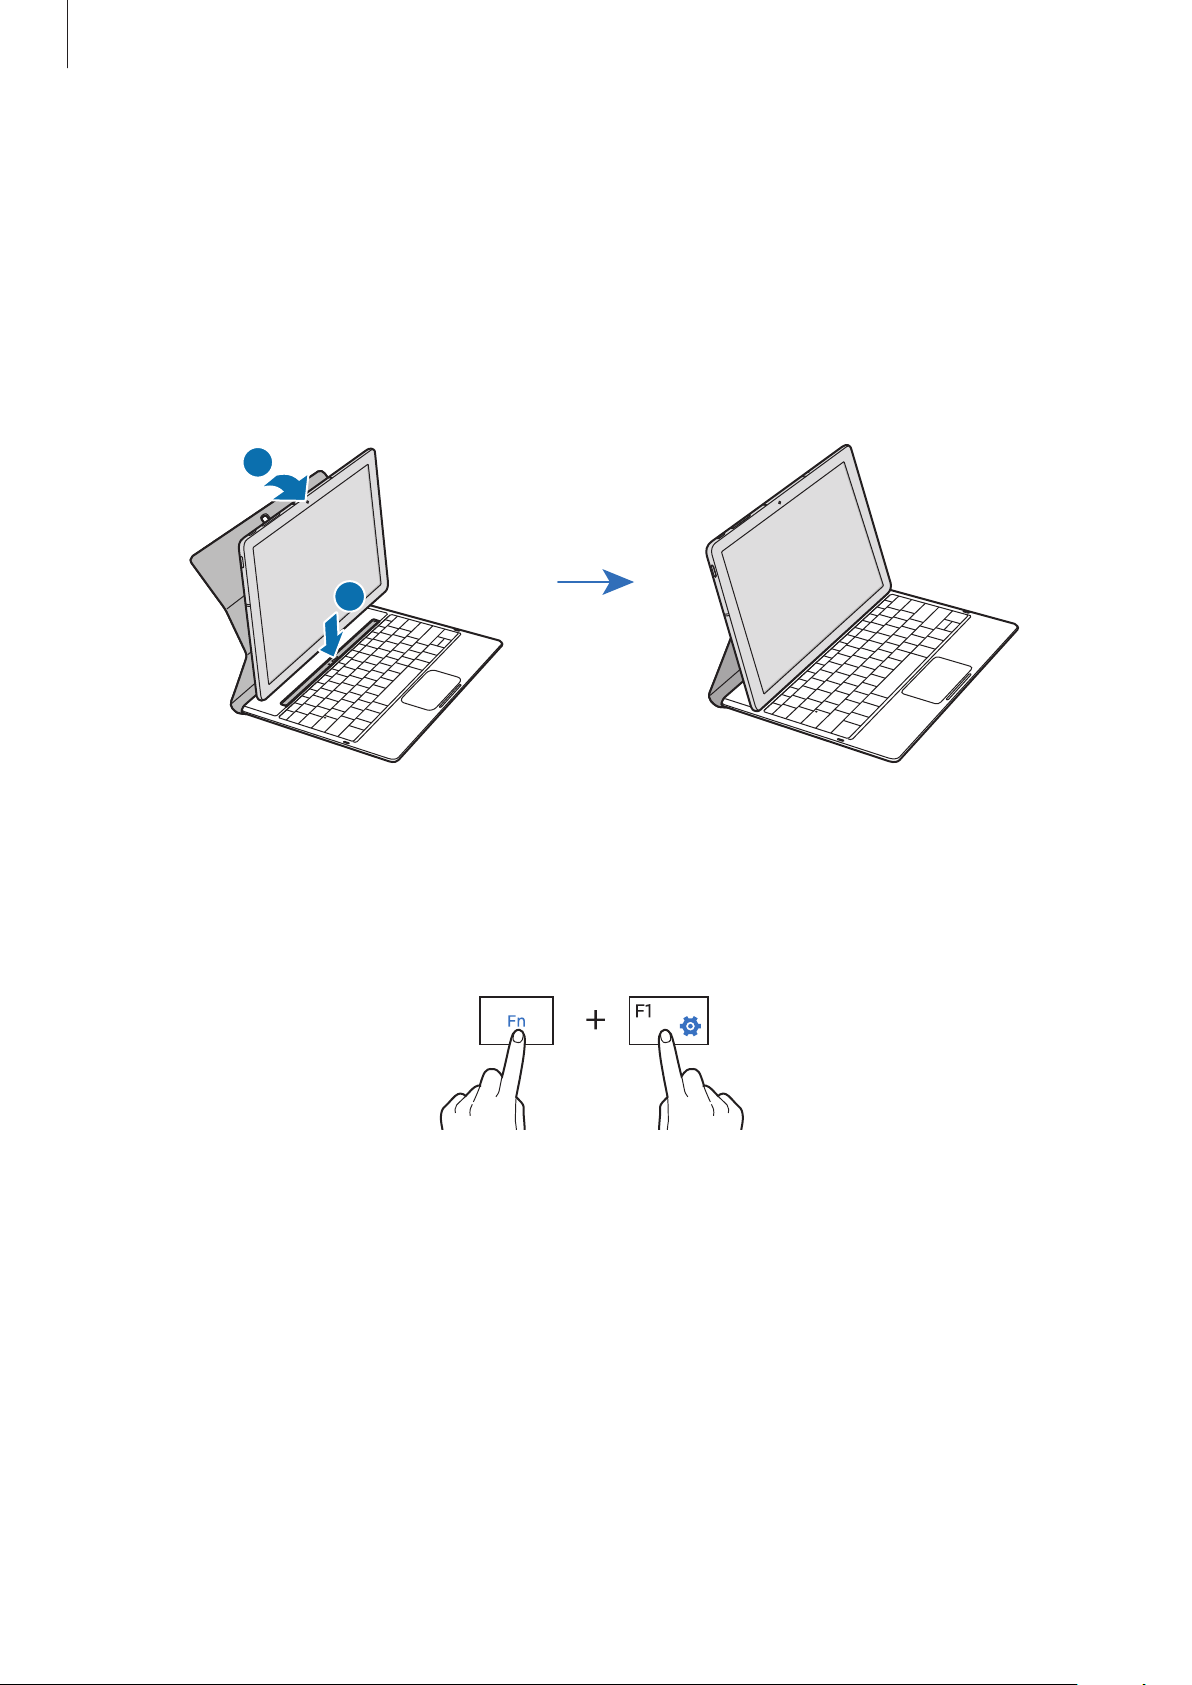
Connecting the Keyboard Cover
Attach the device to the stand.
1
Ensure that the rear camera is correctly aligned with the camera hole in the stand.
Connect the keyboard dock port at the bottom of the device to the connector on the
2
keyboard, and then set the device in position.
1
2
Hot keys
Use hot keys to easily use features and change settings, such as brightness and volume.
To use hot keys, simultaneously press and hold the Fn key and press a hot key.
If you lock the Fn key, you can use hot keys without pressing the Fn key. To lock the Fn key,
tap the Fn Lock key.
The Fn Lock key will automatically unlock when you reconnect the device and the Keyboard
Cover.
14
Page 15
Basics
Hot key functions
Key/Icon Function
•
F1
F2
F3
F4
Launch
•
Adjust the brightness of the display.
•
Change the display mode when an external display is connected
to the device.
Settings
.
F5
F6
F7
F8
F9
F10
F11
F12
•
Lock or unlock the touchpad.
•
Mute or unmute the audio.
•
Adjust the volume.
•
Open the search box.
•
Open the task view screen.
•
Hide or show currently open windows.
•
Activate or deactivate flight mode.
•
Perform the right-click function.
15
Page 16
Basics
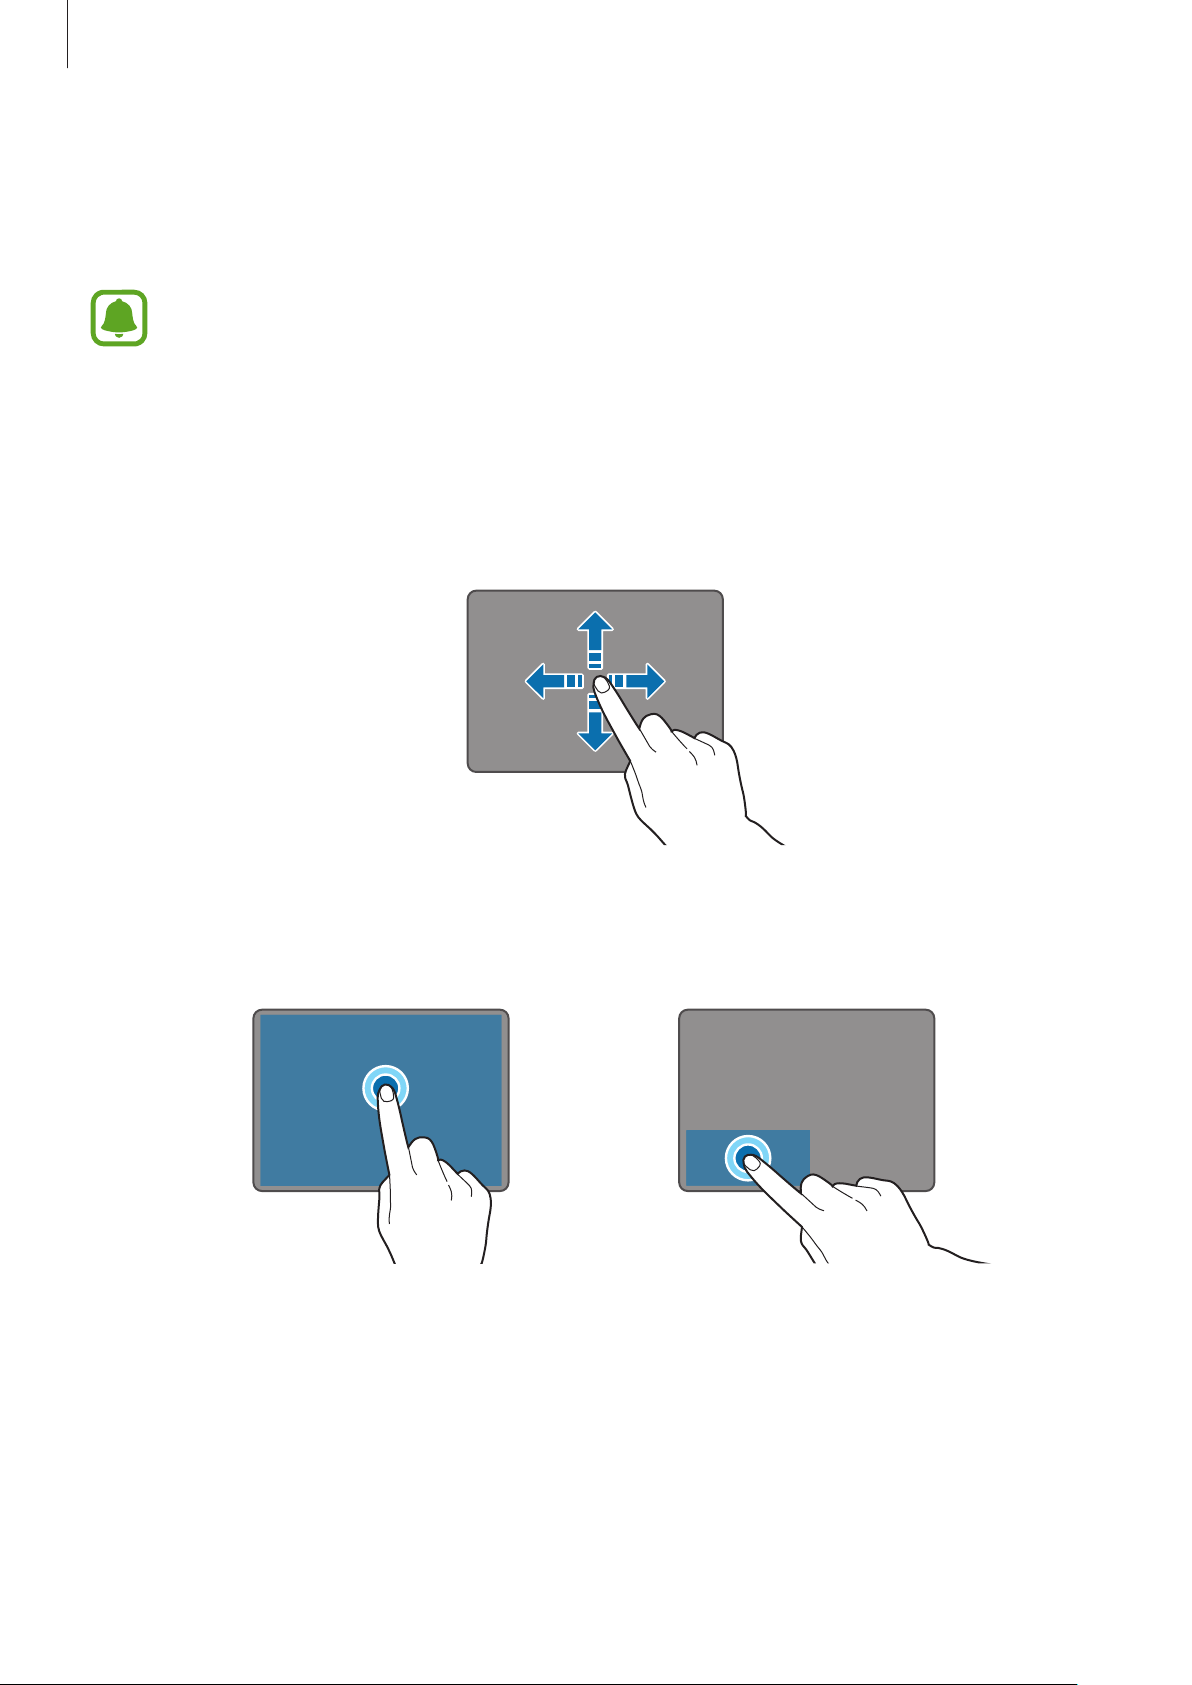
Touchpad
Use the touchpad to move the cursor or select items. The left and right buttons of the
touchpad function the same as the left and right buttons of a mouse.
Use only your fingers on the touchpad.
Basic touchpad functions
Moving
To move the cursor, move your finger on the touchpad.
Clicking
Tap the touchpad or press the left-click button.
or
16
Page 17
Basics
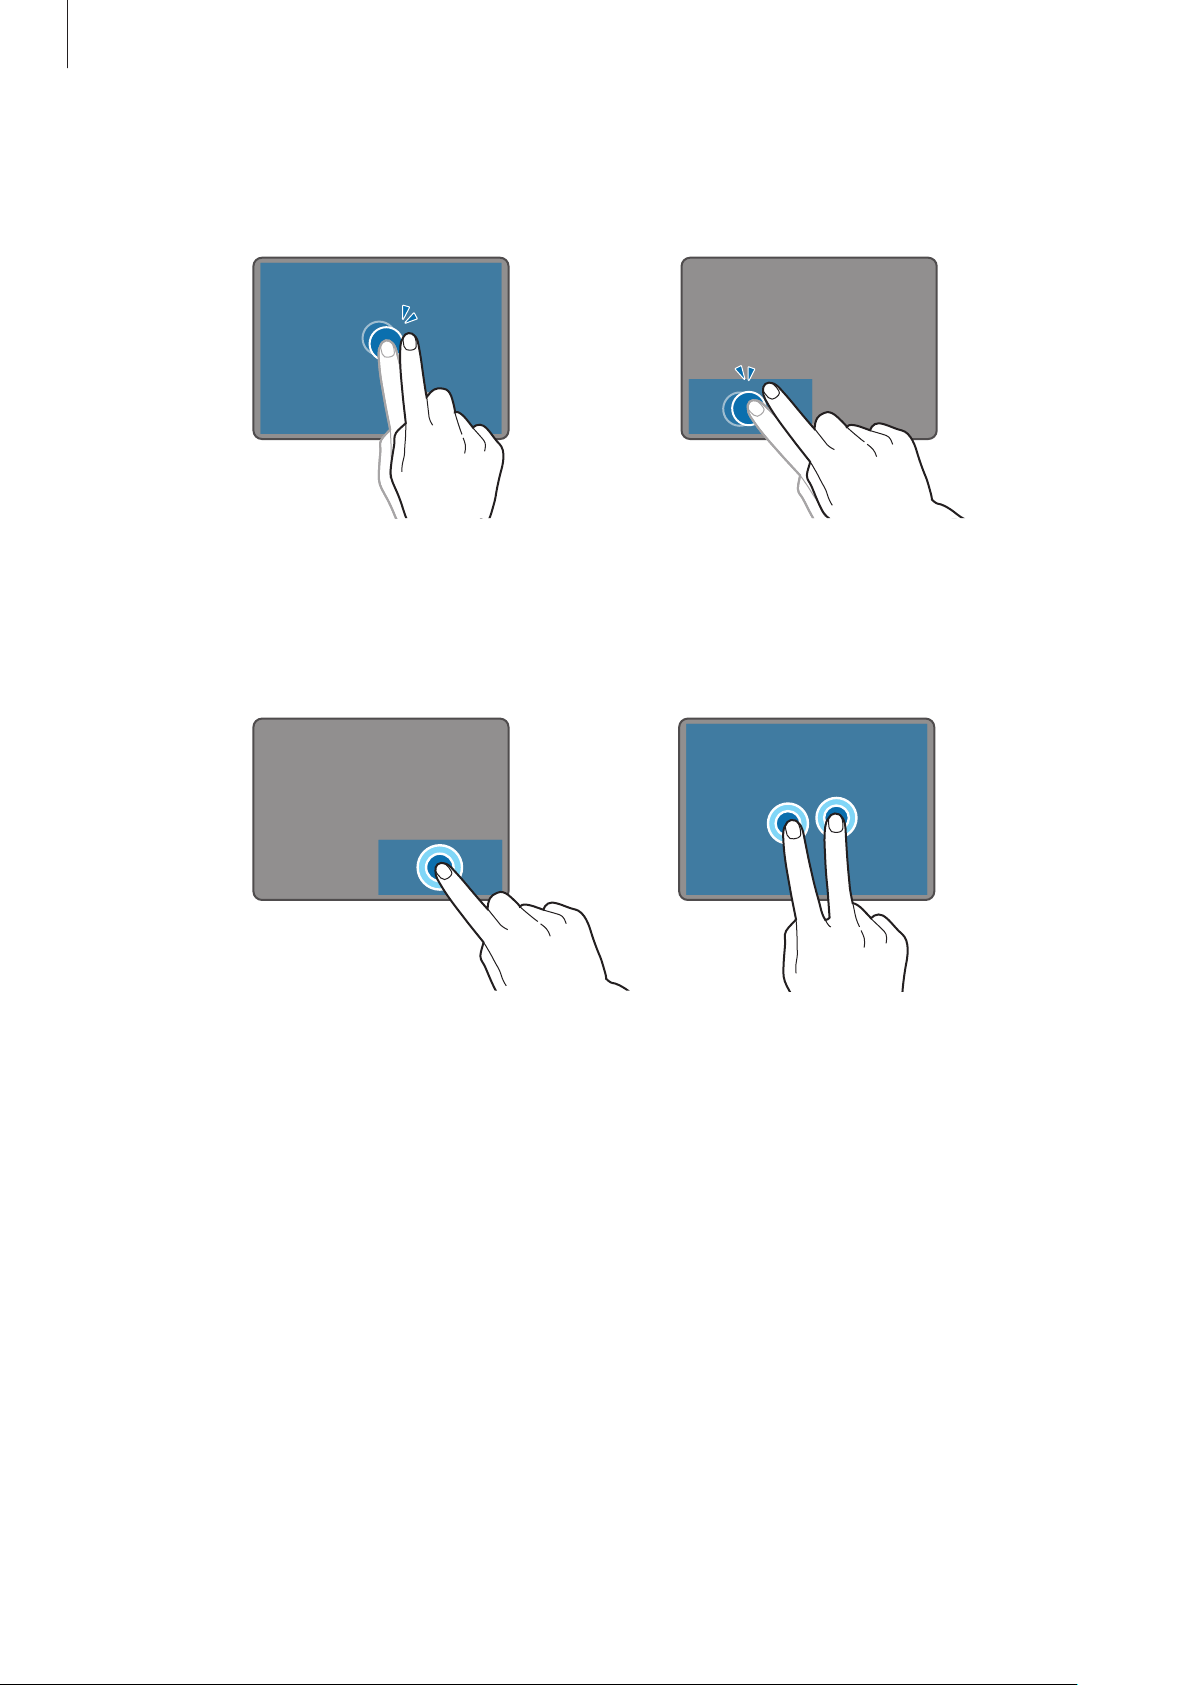
Double-clicking
Double-tap the touchpad or press the left-click button twice.
or
Right-clicking
Press the right-click button to perform the right-click function. Alternatively, tap the touchpad
with two fingers.
or
17
Page 18
Basics
Dragging
To move an item, select and drag it to the target position while pressing and holding the
left-click button. Alternatively, double-tap and hold the item, and then drag it to the target
position.
Additional functions
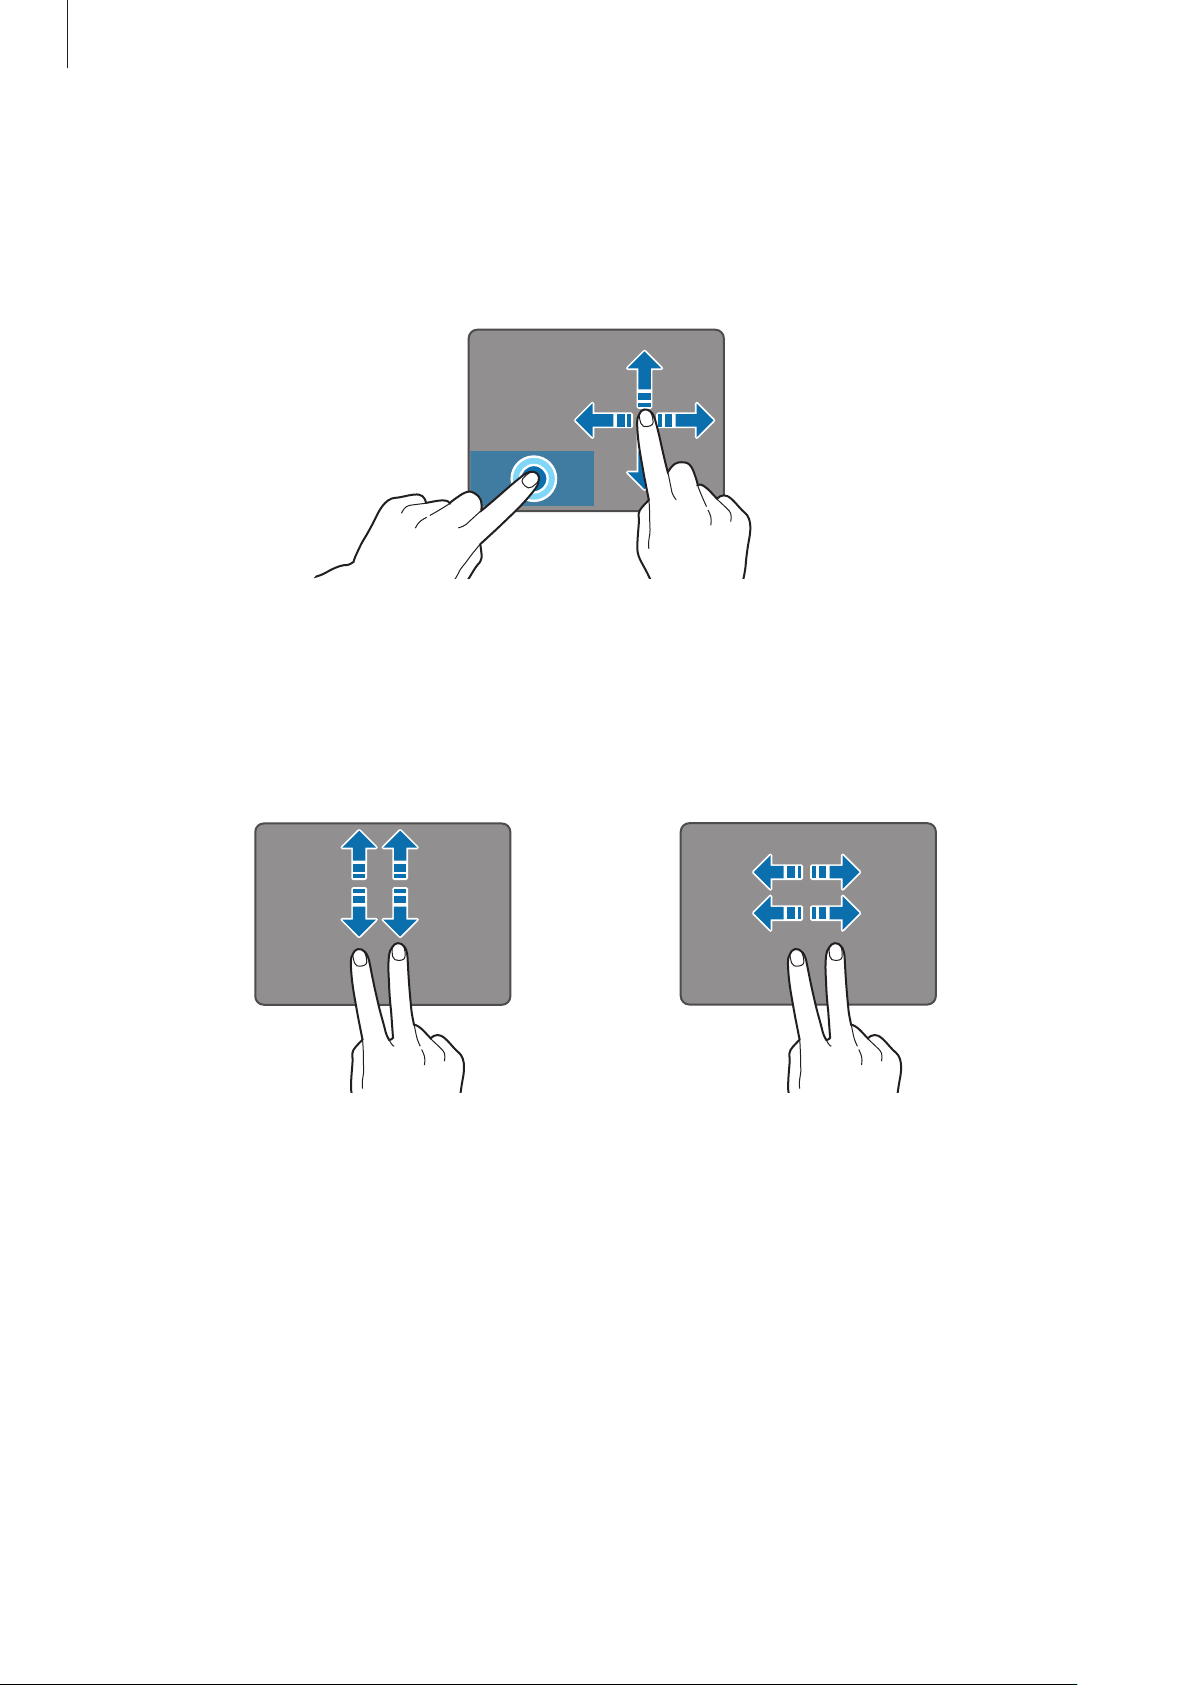
Swiping
To scroll up, down, left, or right to a desired location, swipe with two fingers on the touchpad.
or
18
Page 19

Basics
Spreading and pinching
Spread two fingers apart on a webpage, map, or image to zoom in a part. Pinch to zoom out.
Configuring touchpad settings
Configure touchpad settings to use the touchpad more efficiently.
Tap
Touchpad
→
Settings
.
→
Devices
→
Mouse & touchpad
, and configure the settings under
Locking and unlocking the touchpad
Press and hold the Fn key and press the F5 key to lock or unlock the touchpad.
If the touchpad was locked when it was disconnected, it will still be locked when you
reconnect the Keyboard Cover. To use the touchpad again, unlock it manually.
19
Page 20

Basics
Touchscreen
•
Do not allow the touchscreen to come into contact with other electrical devices.
Electrostatic discharges can cause the touchscreen to malfunction.
•
To avoid damaging the touchscreen, do not tap it with anything sharp or apply
excessive pressure to it with your fingertips.
•
The device may not recognise touch inputs close to the edges of the screen, which
are outside of the touch input area.
•
Leaving the touchscreen idle for extended periods may result in afterimages
(screen burn-in) or ghosting. Turn off the touchscreen when you do not use the
device.
•
It is recommended to use fingers when you use the touchscreen.
Tapping
To open an app, to select a menu item, to press an on-screen button, or to enter a character
using the keyboard on the screen, tap it with your finger.
20
Page 21

Basics
Tapping and holding
Tap and hold an item or the screen for more than 2 seconds to access available options.
Dragging
To move an item, tap and hold it and drag it to the target position.
Double-tapping
Double-tap on a webpage or image to zoom in. Double-tap again to return.
21
Page 22

Basics
Swiping
Swipe to the left or right on the screen to scroll left or right. Swipe upwards or downwards to
scroll through a webpage or a list of items.
Spreading and pinching
Spread two fingers apart on a webpage, map, or image to zoom in a part. Pinch to zoom out.
22
Page 23

Basics
Shortcuts
Task view
Start screen
Start screen
The Start screen is the starting point for accessing all of the device’s features.
Taskbar
Start menu
Moving and removing an item
Drag an item on the Start screen to a new location.
To remove an item, tap and hold the item, and then tap
Delete
.
Taskbar
The bottom area of the screen is the taskbar. You can access the Start menu, launch the search
box, view notification icons, and more on the taskbar.
Start menu
Search box
Notification icons
23
Page 24

Basics
Power
Managing shortcuts
To add a shortcut, on the taskbar, tap , tap and hold an item, tap
and then tap
Pin to taskbar
To delete a shortcut, tap and hold a shortcut, and then tap
.
Unpin from taskbar
More
or tap →
To move a shortcut to another location, drag it to a new location.
Managing notification icons
On the taskbar, tap →
icons appear on the taskbar
Settings
→
System
→
Notifications & actions
→
Select which
, and then select items to display in the notification area.
Start menu
On the taskbar, tap to open the Start menu. Alternatively, press the Start key.
From the Start menu, you can access your frequently used apps, the
other locations on your device, and more.
Your account
All apps
list, shortcuts to
More
,
.
Frequently used
apps
File Explorer
Settings
All apps
Managing app tiles
You can pin your favourite apps on the app tile area.
To add more apps, tap
To move a tile, tap and hold a tile, and then drag it to a new location.
To adjust the size of a tile, tap and hold a tile, and then tap
All apps
, tap and hold an app, and then drag it to the app tile area.
→
Resize
App tiles
.
To delete a tile, tap and hold a tile, and then tap
24
.
Page 25

Basics
Virtual desktop
Virtual desktop allows you to work on various tasks simultaneously from multiple desktops.
You can use different desktops for a variety of purposes.
On the taskbar, tap
If you have added desktops, the desktop thumbnails will appear at the lower part of the
screen. Select a thumbnail to activate the desktop.
Currently open
windows
Desktop thumbnails
. Alternatively, swipe from the left edge of the screen.
Adding desktops
On the desktop thumbnails list, tap
New desktop
.
Deleting desktops
On the desktop thumbnails list, tap on a desktop.
Moving windows to another desktop
Tap to view the current desktop’s open windows.
1
To view the open windows of other desktops, tap and hold a desktop thumbnail.
Tap and hold a window to move, and then tap
2
Select a desktop to move the window.
3
Move to
.
25
Page 26

Basics
Switching to tablet mode
You can switch between PC mode and tablet mode. In Tablet mode, the full Start menu
screen will be the Start screen. Switching to tablet mode makes the device more touchfriendly.
→
To switch to tablet mode, on the taskbar, tap
Tablet mode
. Alternatively, Swipe from
the right edge of the screen towards the centre of the screen, then tap
To return to PC mode, tap
Tablet mode
again.
Tablet mode
.
Lock screen
Pressing the Power key turns off the screen and locks it. Also, the screen turns off and
automatically locks if the device is not used for a specified period.
To unlock the screen, press the Power key and drag the locked screen upwards.
You can change the way that you lock the screen to prevent others from accessing your
personal information.
On the taskbar, tap
lock method. The device requires an unlock code whenever unlocking it.
•
If the unlock code is forgotten, take the device to a Samsung Service Centre to
reset it.
→
Settings
→
Accounts
→
Sign-in options
, and then select a screen
•
You must sign in to your Microsoft account or add a password before you can use
the other lock methods.
Password
A password consists of characters or numbers. Enter a password, enter the password again to
verify it, and then enter a password hint.
If you have signed in to your Microsoft account, your account password will be set as the
password automatically.
26
Page 27

Basics
PIN
A PIN consists of numbers only. Enter at least four numbers, and then enter the password
again to verify it.
Picture password
A password consists of circles, straight lines, and taps. Select an image and draw on the image
to create gestures.
Pattern Log-in
To unlock the screen using a pattern, on the taskbar, tap →
→
Settings
Draw a pattern by connecting four dots or more, and then draw the pattern again to verify it.
Pattern Log-in
, and then tap the switch to activate it.
Settings
→
Extras
→
Galaxy
ACTION CENTRE
Using the action centre
You can view new notifications from Windows and apps, and use quick action buttons. Quick
action buttons allow you to easily adjust frequently used settings, such as activating Wi-Fi.
To open the action centre panel, on the taskbar, tap
edge of the screen.
. Alternatively, swipe from the right
27
Page 28

Basics
Clear all
You can use the following functions on the action centre panel.
Using quick action buttons
notifications.
Tap a notification
and perform various
actions.
Quick action
buttons
Tap quick action buttons to activate certain features. To view more detailed settings, tap and
hold a button, and then tap
You can change the top four buttons. On the taskbar, tap
Notifications & actions
actions
.
Go to settings
, and then change quick action buttons under
.
→
Settings
→
System
Choose your quick
→
Screen mirroring
View your device’s displayed content on a larger screen via a wireless connection.
If a large screen, such as a TV, does not support the Screen mirroring feature, use compatible
accessories to enable the feature. Compatible accessories include HomeSync and an AllShare
Cast dongle.
On the TV, activate the screen mirroring feature.
1
On the action centre panel, tap
2
Connect
.
The detected devices are listed.
28
Page 29

Basics
Select a device to connect to.
3
Your device’s screen appears on the TV screen.
Open or play a file, and then control the display with the keys on your device.
4
•
This feature may not be available depending on the region or service provider.
•
For more information about connecting your device and the large screen, refer to
the user manual for the large screen or the Screen mirroring-enabled accessory.
•
Some files may be buffered during playback, depending on the network
connection.
•
If you specify a Wi-Fi frequency, AllShare Cast dongles or HomeSync may not be
detected or connected.
Search box
Search for a wide variety of content on the device or web with a keyword.
Tap the search box on the taskbar and enter a keyword in the search field.
To search for files, apps, settings, and more in your device and your
Cortana
If
Cortana
will help you find things on your device, manage your schedules, and more. Enter a keyword
or question into the search field to search for something, set a reminder, and more.
is supported in your region, it will launch when you tap the search box.
This feature may not be available depending on the region and language settings.
OneDrive
, tap
My stuff
Cortana
.
29
Page 30

Basics
Switch to the
Entering text
Using the on-screen keyboard
In tablet mode, the on-screen keyboard appears automatically when you enter text to send
emails, create notes, and more. To use the on-screen keyboard in PC mode, on the taskbar, tap
.
Text entry is not supported in some languages. To enter text, you must change the
input language to one of the supported languages.
floating keyboard.
Delete a preceding
character.
Hide the keyboard.
Enter uppercase. For
all caps, tap it twice.
Enter numbers and
punctuation marks.
Enter emoticons.
Enter a space.
Break to the next
line.
Change the input
language or the
keyboard layout, or
add input
languages.
Move the cursor.
Changing the input language
Tap →
When you add languages, you can select other input languages by tapping
Language preferences
→
Add a language
, and then select a language to add.
.
30
Page 31

Basics
Additional keyboard functions
Tap to use various functions.
•
•
•
: Switch to the default keyboard.
: Switch to the floating split keyboard. You can move the keyboard to another
location by dragging the keyboard.
: Switch to handwriting mode.
This feature may not be available depending on the region or service provider.
•
: Switch to the standard keyboard. If this feature is not activated, on the taskbar, tap
→
Settings
a touch keyboard option
→
Devices
→
Typing
switch to activate it.
and tap the
Copying and pasting
Drag your finger across text to select it.
1
Tap and hold the text to display the options.
2
Tap
Copy
or
Cut
3
The selected text is copied to the clipboard.
Tap and hold where the text is to be inserted and tap
4
.
Add the standard keyboard layout as
Paste
.
31
Page 32

Basics
Using the Keyboard Cover
When your device is connected to the Keyboard Cover, you can enter text using the
traditional keyboard. Refer to Keyboard Cover for more information.
Screen capture
Capture a screenshot while using the device.
Press and hold the Start key and the Volume Down key simultaneously. You can view
captured images in the
It is not possible to capture a screenshot while using some apps and features.
This PC
→
Pictures
→
Screenshots
folder.
Opening apps
On the taskbar, tap →
To open an app from the task view screen, on the taskbar, tap
Closing an app
Tap at the top of the app window to close it.
All apps
, and then select an app icon to open it.
Split screen view
, and then select a window.
In tablet mode, you can open two windows at the same time in the split screen view by
selecting windows from the task view screen.
Some apps may not support this feature.
On the taskbar, tap to view currently open windows. Alternatively, swipe from the
1
left edge of the screen.
32
Page 33

Basics
Tap and hold a window and select
2
Adjusting the window size
Snap left
or
Snap right
.
Drag the handle between the windows left or right to adjust the size of the windows.
33
Page 34

Basics
Device and data management
Updating the device
Keep the device up to date by downloading and installing updates, such as service packs and
patches, for the operating system and other Microsoft apps.
The device is set to download and install updates automatically. To check for available
→
updates manually, on the taskbar, tap
→
Update
Check for updates
.
Settings
Samsung Update
Update Samsung apps, drivers, and more on the device easily.
→
Update & security
→
Windows
On the taskbar, tap
Update for more information.
→
All apps
→
Samsung
→
Samsung Update
. Refer to Samsung
Backing up and restoring data
Keep your personal information, app data, and settings safe on your device using
Recovery
. Refer to Samsung Recovery for more information.
Samsung
Performing a data reset
Delete all settings and data on the device. Before performing a factory data reset, ensure you
back up all important data stored on the device. Refer to Backing up the current system and
Restoring to factory default for more information.
34
Page 35

Basics
InstantGo (Connected standby)
InstantGo (Connected standby) is a low-power mode that allows the device to maintain
network connectivity. When the screen turns off, the device will enter connected standby
mode.
While the device is in connected standby mode, the device can still sync content, such as
emails, from the cloud and run background apps. It also allows the device to wake from sleep
instantly, faster than the traditional sleep and hibernation states.
Connected standby consumes more battery power than the traditional sleep mode.
→
To disable this feature, tap
→
power settings
Choose what the power button does
Settings
→
System
→
Power & sleep
, and then set the
→
Additional
When I
press the power button:
and the
When I close the lid:
settings to
Hibernate
.
35
Page 36

Applications
Installing or uninstalling apps
Store
Purchase and download apps.
On the taskbar, tap
For service requests for apps provided by third-party providers, contact the provider.
If you contact a Samsung Service Centre, troubleshooting actions in response to
service requests may have limitations depending on the app.
. Alternatively, on the taskbar, tap →
All apps
→
Store
.
Installing apps
Browse apps by category or tap the search field to search for a keyword.
Select an app to view information about it. To download free apps, tap
download apps where charges apply, tap the price and follow the on-screen instructions.
To change the auto update settings, tap →
apps automatically when I’m on WiFi
activate or deactivate it.
or the
Settings
Update apps automatically
, and then tap the
Free
. To purchase and
Update
switch to
Uninstalling apps
Some apps cannot be uninstalled.
On the taskbar, tap →
1
Tap and hold an app, and then tap
2
Some apps will automatically move to the
and hold an app, tap
the app.
Tap
3
Uninstall
.
All apps
Uninstall
, and then follow the on-screen instructions to uninstall
.
Uninstall
36
.
Uninstall or change a program
screen. Tap
Page 37

Applications
Scrap Box
Capture a screenshot while using the device. You can share or edit captured images.
Capturing screenshots
When there is content you want to capture, on the taskbar, tap →
1
.
Box
Tap .
2
Drag to select the content you want, and then tap
3
To auto fit the frame around the content you want, tap
Use tools to edit the image and tap to save it.
4
Done
Auto-fit
Managing captured images
On the Scrap Box screen, you can share images, upload them to
Tap
•
•
, tick images, and then use the following options:
: Share the images with others.
: Upload the images to
OneDrive
.
.
.
OneDrive
All apps
, or delete them.
→
Scrap
•
: Delete the images.
To view an image, tap the image.
37
Page 38

Applications
Samsung Update
Install and update drivers and software.
On the taskbar, tap →
1
To check for available updates, tap
2
To check for available software, tap
Tick updates or software you want to install and tap OK.
3
To install all available updates and software, tap
To search for other software for your device, tap
To download software setup files, tap
All apps
→
Samsung
Update
Recommend
Save Setup Files
.
Install & Update
Find Model
Samsung Recovery
Introduction
→
Samsung Update
.
.
.
.
.
Back up your data and settings, and restore your device to a previously backed up point or to
the factory default.
•
To use this app, you must sign in to the device with an administrator account, or
enter the administrator’s password.
•
When you restore your device, it will erase the data or apps saved after the selected
backup point. Ensure you back up important data regularly.
Backing up the current system
Back up important data to an external storage device regularly to prevent restore.
Connect an external storage device.
1
On the taskbar, tap →
2
All apps
→
Samsung
→
Samsung Recovery
.
38
Page 39

Applications
Tap
3
4
5
Backup management
Enter backup information and select the external storage device.
Tap
Backup
.
→
New backup
.
When the backup start window appears, tap
6
When the backup complete window appears, tap OK.
7
When the backup is finished, the backup image will appear on the backup management
screen.
Yes
.
Restoring the system
Restoring to factory default
Restore the device to its factory default settings. Before performing a factory data reset,
ensure you back up all important data stored on the device. Refer to Backing up the current
system for more information.
→
On the taskbar, tap
Recover
→
Recover
All apps
→ OK.
→
Samsung
→
Samsung Recovery
→
Factory image
→
Restoring to a backup point
Select a backup point saved on an external storage device to restore the device to that point.
Connect the external storage device to your device.
1
On the taskbar, tap →
2
Tap
3
4
Backup management
Tap
Recover
.
All apps
, select a backup image, and then tap
→
Samsung
→
Samsung Recovery
.
Recover
.
39
Page 40

Applications
Online Support(S Service)
This service allows you to chat with a technical engineer via the Internet and resolve
problems on your device remotely.
•
This service may be limited after the expiration date.
•
This service may not be available depending on the region.
On the taskbar, tap →
1
Enter a question and tap
2
When you are connected with an engineer, start your consultation.
3
All apps
Request
→
Samsung
.
→
Online Support(S Service)
.
Show Window
Show Window allows you to select an area on the screen and show it in full screen mode on
an external display. You can draw or highlight items on the screen using tools.
Before you use this app, you must connect the device to an external display.
Showing a selected area on an external display
Connect the device to an external display.
1
•
You can connect an external display using a cable. Cables, such as HDMI cables, or
adaptors for connecting to an external display are sold separately.
•
You can also wirelessly connect the devices. Refer to Screen mirroring for more
information.
On the taskbar, tap →
2
All apps
→
Show Window
.
40
Page 41

Applications
Tap
Start
3
A white frame for selecting an area will appear.
.
Start
is activated only when the display mode is set to
F4
key and press the
key simultaneously, and then press the F4 key again to select
Extend
. Press and hold the Fn
Extend
Drag to select an area to show in full screen mode on the external display, and then
4
Done
tap
The selected area will be shown on the external display.
To fix the ratio of the selected area to the ratio of the external screen, tap
switch to activate it.
ratio
To stop displaying the screen, tap
.
.
and tap the
Stop
.
Using tools
While showing the screen on the connected display, you can use the following tools.
Fixed
Cursor
Pen
Highlighter
While using the pen or highlighter, tap the desired icon again to change the colour or line
thickness.
Clear all drawing
Undo/Redo
Eraser
Setting the connection notification
You can set the device to display a notification which prompts you to use
when an external device is connected. Tap
and tap the
Auto launch
Show Window
switch to activate it.
41
Page 42

Settings
Introduction
Customise settings for functions and apps. You can make your device more personalised by
configuring various setting options.
On the taskbar, tap
To search for settings by entering keywords, tap the search field at the top of the screen.
The available options may vary depending on the region or service provider.
→
Settings
.
System
Change the system settings.
On the Settings screen, tap
•
Display
display.
•
Notifications & actions
and change the notification settings.
•
Apps & features
: Change the display settings, such as the font size and the brightness of the
: View and manage apps and features on the device.
System
: Select quick action buttons to display on the action centre panel
.
•
Multi-tasking
•
Tablet mode
•
Battery saver
•
Power & sleep
when the device is in sleep mode.
•
Storage
are saved by default.
: View memory information for your device and select where new apps and data
The actual available capacity of the internal memory is less than the specified
capacity because the operating system and default apps occupy part of the memory.
The available capacity may change when you update the device.
: Change settings for multi-tasking.
: Switch to tablet mode and change the related settings.
: View battery power information and change the power saving options.
: Set the device’s backlight timer. You can also set the Wi-Fi settings for
42
Page 43

Settings
•
Offline maps
settings for offline maps.
•
Default apps
•
About
: Access device information and change the device name or other settings.
: Download maps to search for places and get directions offline and change
: Select a default setting for using apps.
Devices
Change settings related to your connected devices.
On the Settings screen, tap
•
Printers & scanners
•
Connected devices
•
Bluetooth
Bluetooth devices and pair with them.
•
•
•
•
: Activate or deactivate the Bluetooth feature. You can search for other
Samsung is not responsible for the loss, interception, or misuse of data sent or
received via Bluetooth.
Always ensure that you share and receive data with devices that are trusted
and properly secured. If there are obstacles between the devices, the operating
distance may be reduced.
Some devices, especially those that are not tested or approved by the Bluetooth
SIG, may be incompatible with your device.
Do not use the Bluetooth feature for illegal purposes (for example, pirating copies
of files or illegally tapping communications for commercial purposes).
Samsung is not responsible for the repercussion of illegal use of the Bluetooth
Devices
: Change setting to connect printers and scanners.
: Add devices and change settings for metered connections.
.
feature.
•
Mouse & touchpad
•
Typing
•
AutoPlay
•
USB
: Change the on-screen keyboard settings.
: Activate or deactivate the AutoPlay feature and change related settings.
: Set the device to notify you if there are issues when connecting to USB devices.
: Change the mouse and touchpad settings.
43
Page 44

Settings
Network & Internet
Change the network and Internet settings.
On the Settings screen, tap
•
WiFi
: Activate the Wi-Fi feature to connect to a Wi-Fi network and change the related
settings.
•
Your device uses a non-harmonised frequency and is intended for use in all
European countries. The WLAN can be operated in the EU without restriction
indoors, but cannot be operated outdoors.
•
Turn off Wi-Fi to save the battery when not in use.
•
Flight mode
your device. You can use only non-network services.
Make sure the device is turned off during takeoff and landing. After takeoff, you can
use the device in flight mode if allowed by aircraft personnel.
•
Mobile
•
When using the Wi-Fi feature, you should deactivate the mobile data connection.
If the mobile data connection is activated, you may incur additional charges, even
: Activate or deactivate flight mode. This disables all wireless functions on
(mobile network-enabled models): Configure your mobile network settings.
Network & Internet
.
when the Wi-Fi feature is activated.
•
To search for available mobile networks and manually connect to a network,
disconnect from your current network first.
•
Data usage
•
Data usage
and customise the settings for the limitation.
•
Mobile hotspot
share the device’s mobile data connection with other devices.
•
VPN
: Set up and connect to virtual private networks (VPNs).
•
Dial-up
•
Proxy
: Configure the proxy settings.
: Keep track of your data usage amount.
(mobile network-enabled models): Keep track of your data usage amount
(mobile network-enabled models): Use the device as a mobile hotspot to
: Configure the dial-up settings.
44
Page 45

Settings
Personalisation
Change the display settings, such as a wallpaper, colour, and theme.
On the Settings screen, tap
•
Background
•
Colours
•
Lock screen
screen.
•
Themes
•
Start
: Change the settings related to the Start menu.
: Change the wallpaper and related settings.
: Change the colours of the taskbar, items on the Start menu, and more.
: Change the locked screen wallpaper and select items to show on the locked
: Select a theme to apply and change related settings.
Personalisation
Accounts
Change the account settings.
On the Settings screen, tap
•
Your email and accounts
•
Sign-in options
: Change the device sign-in options. You can select a screen lock method
Accounts
.
.
: Add your Microsoft account and manage your other accounts.
to prevent others from accessing your personal information.
•
Work access
such as apps and network.
•
Family & other users
use the device with their own personalised settings.
•
Sync your settings
Microsoft account.
: Add a work or school account to access to your organisation’s resources,
: Add additional accounts for your family members or other users to
: Change settings to sync your settings with other devices using your
45
Page 46

Settings
Time & language
Change settings to control how the device displays the time and date, and select your
country or region.
On the Settings screen, tap
If the battery remains fully discharged or removed from the device, the time and date
is reset.
•
Date & time
•
Region & language
To change the display language, tap the language you want and tap
restart the device to apply the change.
If the language you want is not on the languages list, tap
language to add. If the required language pack is not installed, you must download it
before you can change the display language. Tap the language, tap
Download
tap
You may not be able to change the display language depending on the device’s
software.
•
Speech
: Change the time and date settings.
under
: Change the settings for the text-to-speech feature.
Time & language
: Set your country or region, and add your languages.
Download language pack
.
Set as default
Add a language
Options
.
and select a
. Then,
, and then
Ease of Access
Change settings to improve the device’s accessibility.
On the Settings screen, tap
•
Narrator
this feature, the device reads aloud all the elements on the screen, such as text and
buttons.
•
Magnifier
feature you can zoom in on the screen to view a larger version of the content.
•
High contrast
•
Closed captions
•
Keyboard
•
Mouse
•
Other options
: Activate the screen reader and change the related settings. When you activate
: Activate a magnifier and change the related settings. When you activate this
: Apply high contrast themes to the display to improve screen visibility.
: Change the caption settings.
: Change the on-screen keyboard settings.
: Change the pointer and mouse settings.
: Change the additional accessibility settings.
Ease of Access
.
46
Page 47

Settings
Privacy
Change the privacy settings.
On the Settings screen, tap
•
General
•
Location
•
Camera
camera feature.
•
Microphone
the microphones.
•
Speech, inking & typing
and recent calendar events. You can also manage your cloud settings.
•
Account info
use your account information.
•
Contacts
•
Calendar
the calendar app.
: Change the general privacy settings.
: Change settings for location information permissions.
: Activate or deactivate the camera feature. Select apps to allow them to use the
: Activate or deactivate the microphones. Select apps to allow them to use
: Set apps to access your account information. Select apps to allow them to
: Select apps to allow them to access your contacts.
: Activate or deactivate the calendar app. Select apps to allow them to access
Privacy
: Set the device to collect personal information, such as contacts
.
•
Call history
•
Email
app and send emails.
•
Messaging
access the messaging app and send messages.
•
Radios
receive data. Select apps to allow them to control radio wave technologies.
•
Other devices
hardware.
•
Feedback & diagnostics
send the device’s diagnostic and usage data to Microsoft.
•
Background apps
information, send notifications, and stay up to date, even when you are not using them.
: Activate or deactivate the email app. Select apps to allow them to access the email
: Select apps to allow them to access your call logs.
: Activate or deactivate the messaging app. Select apps to allow them to
: Allow apps to control radio wave technologies, such as Bluetooth, to send or
: Change the settings for external devices, such as wireless devices or
: Set the frequency of Windows feedback and select an option to
: Select apps to run in the background and allow them to receive
47
Page 48

Settings
Update & security
Change the Windows update, data backup, and device security settings.
On the Settings screen, tap
•
Windows Update
•
Windows Defender
also set the device to send security problems to Microsoft automatically.
•
Backup
•
Recovery
•
Activation
product key.
•
Find My Device
webpage to track and control your lost or stolen device.
•
For developers
: Backup your files using the File History feature.
: Reset the device or recover it using the advanced start-up feature.
: View the Windows activation information. You can change your Windows
: Activate or deactivate the Find My Device feature. Access the Microsoft
: Change the development settings.
Update & security
: Check for available updates and update Windows to the latest version.
: Activate the Windows Defender feature to scan for malware. You can
.
Extras
Change additional settings provided by Samsung.
On the Settings screen, tap
•
Battery Life Extender
•
AMOLED
•
Pattern Log-in
•
Legal information
announcement, and the safety information.
•
Network mode
•
User manual
configure important settings.
•
About device
: Change the screen mode and the screen brightness timer.
: Set a pattern to use it as your screen lock method.
(mobile network-enabled models): Select a network type.
: View help information to learn how to use the device and apps or
: Access device information.
Extras
: Set the maximum battery charge level to extend the battery life.
: View the Samsung legal information, the open source licence
→
Galaxy Settings
.
48
Page 49

Settings
BIOS (Setup utility)
Introduction
BIOS is the program that starts the operating system when you turn on your device. Access
the BIOS setup screen to set a boot password, perform battery calibration, and more.
Be careful when changing BIOS settings. Incorrect changes may cause the system to
malfunction or crash.
•
The BIOS setup screens, menus, and items may appear differently depending on
the model and BIOS version.
•
To enter the BIOS screen, the device must be connected to the Keyboard Cover.
Entering the BIOS screen
Press the F2 key several times immediately after you turn on your device, before the Samsung
logo appears.
If the locked screen or the Start screen appears, restart the device and try again.
Setup items
Setup menus
Setup tools
Help information
49
Page 50

Settings
Setup tools
•
Help
: View the help information for the BIOS setup.
•
Default
•
Restore
•
Save
•
Exit
: Restore the device to the default settings.
: Undo changes.
: Save the changes and restart the device.
: Restart the device without saving the changes.
Setup menus
•
SysInfo
•
Advanced
•
Security
: View the basic specifications of the device.
: Configure the advanced settings and perform the battery calibration.
: Configure security functions.
•
Boot
: Configure boot-related settings.
Setting the boot password
Setting a password with the BIOS enhances protection against viruses and hacking attacks.
On the BIOS screen, tap
The following password settings are available:
•
Supervisor Password
the BIOS screen. This password allows you to enter the BIOS screen as an administrator.
You can change the BIOS settings.
•
User Password
BIOS screen. This password allows you to enter the BIOS screen as a user. You cannot
change the BIOS settings. The password will be deactivated automatically if the
supervisor password is removed.
•
HDD Password
another computer. This password may not be supported depending on the model.
Security
: This password is required when turning on the device or entering
: This password is required when turning on the device or entering the
: This password is required to access the hard disk drive (HDD) from
.
Do not forget your password or expose it to others.
•
If you forget your supervisor password or HDD password, contact a Samsung
Service Centre.
•
If you forget your user password, you can remove it by removing the supervisor
password.
50
Page 51

Settings
Setting a boot password
To set a user password or an HDD password, you must set the supervisor password first.
Tap
1
2
3
4
Set Supervisor Password, Set User Password
Enter a password and tap Ok.
The password can be up to 20 characters long.
Enter the password again and tap Ok.
Tap
Save
to save the password and restart the device.
, or
Set HDD Password
.
Removing a password
Tap
1
2
3
Set Supervisor Password, Set User Password
Enter the password and tap Ok.
Without entering any characters, tap Ok → Ok.
The password will be removed.
Boot priority
Change the boot priority from the BIOS setup.
On the BIOS screen, tap
1
Tap the drop-down menu and select an option.
2
Tap
Save
3
to save the setting and restart the device.
Boot
.
, or
Set HDD Password
.
51
Page 52

Settings
Smart Battery Calibration
If the battery is charged or discharged repeatedly over a short period, the actual battery
power and the detected remaining battery power may be different. Performing a battery
calibration will discharge the battery completely to ensure more accurate battery level
detection.
The battery calculation will take three to five hours. The time may differ depending on
the remaining battery level.
Fully charge the battery.
1
Disconnect the charger from the device.
2
On the BIOS screen, tap
3
Tap
4
Smart Battery Calibration
The battery calibration will start and the battery will be discharged.
To stop the calibration, press the Esc key.
Advanced
.
.
52
Page 53

Appendix
Troubleshooting
Before contacting a Samsung Service Centre, please attempt the following solutions. Some
situations may not apply to your device.
When you turn on your device or while you are using the device, it
prompts you to enter one of the following codes:
•
Password: When the device lock feature is enabled, you must enter the password you set
for the device.
•
PIN: When using the device for the first time or when the PIN requirement is enabled, you
must enter the PIN supplied with the SIM or USIM card. You can disable this feature by
using the Lock SIM card menu.
•
PUK: Your SIM or USIM card is blocked, usually as a result of entering your PIN incorrectly
several times. You must enter the PUK supplied by your service provider.
•
PIN2: When you access a menu requiring the PIN2, you must enter the PIN2 supplied with
the SIM or USIM card. For more information, contact your service provider.
Your device displays network or service error messages
•
When you are in areas with weak signals or poor reception, you may lose reception. Move
to another area and try again. While moving, error messages may appear repeatedly.
•
You cannot access some options without a subscription. For more information, contact
your service provider.
Your device does not turn on
When the battery is completely discharged, your device will not turn on. Fully charge the
battery before turning on the device.
53
Page 54

Appendix
The touchscreen responds slowly or improperly
•
If you attach a screen protector or optional accessories to the touchscreen, the
touchscreen may not function properly.
•
If you are wearing gloves, if your hands are not clean while touching the touchscreen,
or if you tap the screen with sharp objects or your fingertips, the touchscreen may
malfunction.
•
The touchscreen may malfunction in humid conditions or when exposed to water.
•
Restart your device to clear any temporary software bugs.
•
Ensure that your device software is updated to the latest version.
•
If the touchscreen is scratched or damaged, visit a Samsung Service Centre.
The device responds slowly
If you use the device without connecting the Keyboard Cover, the device’s speed and
performance may be affected. Use the device with the Keyboard Cover connected.
Your device freezes or has fatal errors
Try the following solutions. If the problem is still not resolved, contact a Samsung Service
Centre.
Restarting the device
If your device freezes or hangs, you may need to close apps or turn off the device and turn it
on again.
Forcing restart
If your device is frozen and unresponsive, press and hold the Power key for more than
10 seconds until the device turns off. Then, press and hold the Power key again to restart it.
Resetting the device
If the methods above do not solve your problem, perform a factory data reset.
On the taskbar, tap
→
Recover
backup copies of all important data stored in the device.
If Windows does not start, press the F4 key several times immediately after you turn on your
device, to launch
→
Recover
→
All apps
→ OK. Before performing the factory data reset, remember to make
Samsung Recovery
→
Samsung
.
54
→
Samsung Recovery
→
Factory image
Page 55

Appendix
The Internet is often disconnected
•
Ensure that you are not blocking the device’s internal antenna.
•
When you are in areas with weak signals or poor reception, you may lose reception. You
may have connectivity problems due to issues with the service provider’s base station.
Move to another area and try again.
•
When using the device while moving, wireless network services may be disabled due to
issues with the service provider’s network.
The battery icon is empty
Your battery is low. Charge the battery.
The battery does not charge properly (For Samsung-approved
chargers)
•
Ensure that the charger is connected properly.
•
Visit a Samsung Service Centre and have the battery replaced.
The battery depletes faster than when first purchased
•
When you expose the device or the battery to very cold or very hot temperatures, the
useful charge may be reduced.
•
Battery consumption increases when you use messaging features or some apps, such as
games or the Internet.
•
The battery is consumable and the useful charge will get shorter over time.
Your device is hot to the touch
When you use apps that require more power or use apps on your device for an extended
period of time, your device may feel hot to the touch. This is normal and should not affect
your device’s lifespan or performance.
If the device overheats or feels hot for a prolonged period, do not use it for a while. If the
device continues to overheat, contact a Samsung Service Centre.
55
Page 56

Appendix
Photo quality is poorer than the preview
•
The quality of your photos may vary, depending on the surroundings and the
photography techniques you use.
•
If you take photos in dark areas, at night, or indoors, image noise may occur or images
may be out of focus.
Error messages appear when opening multimedia files
If you receive error messages or multimedia files do not play when you open them on your
device, try the following:
•
Free some memory by transferring files to an external storage device or deleting files
from your device.
•
Ensure that the music file is not Digital Rights Management (DRM)-protected. If the file is
DRM-protected, ensure that you have the appropriate licence or key to play the file.
•
Ensure that the file formats are supported by the device. If a file format is not supported,
such as DivX or AC3, install an app that supports it. To confirm the file formats that your
device supports, visit www.samsung.com.
•
Your device supports photos and videos captured with the device. Photos and videos
captured by other devices may not work properly.
•
Your device supports multimedia files that are authorised by your network service
provider or providers of additional services. Some content circulated on the Internet,
such as ringtones, videos, or wallpapers, may not work properly.
Another Bluetooth device is not located
•
Ensure that the Bluetooth wireless feature is activated on your device.
•
Ensure that the Bluetooth wireless feature is activated on the device you wish to connect
to.
•
Ensure that your device and the other Bluetooth device are within the maximum
Bluetooth range (10 m).
If the tips above do not solve the problem, contact a Samsung Service Centre.
56
Page 57

Appendix
Your device cannot find your current location
GPS signals may be obstructed in some locations, such as indoors. Set the device to use Wi-Fi
to find your current location in these situations.
Data stored in the device has been lost
Always make backup copies of all important data stored in the device. Otherwise, you cannot
restore data if it is corrupted or lost. Samsung is not responsible for the loss of data stored in
the device.
The touchscreen does not turn on when you open the Keyboard Cover
Ensure that your device connects to the Keyboard Cover, and the device is in correct position
using the stand of the Keyboard Cover. Refer to Keyboard Cover for more information.
A small gap appears around the outside of the device case
•
This gap is a necessary manufacturing feature and some minor rocking or vibration of
parts may occur.
•
Over time, friction between parts may cause this gap to expand slightly.
57
Page 58

Appendix
Windows recovery function
If the
recovery function.
1
2
3
Samsung Recovery
Reinstalling Windows will erase all apps and data on the device. Back up important
apps and data to an external storage device before reinstalling Windows.
After Windows is reinstalled, you can install the required Samsung apps. On the
taskbar, tap
On the taskbar, tap →
Tap
Get started
Tap
Keep my files
app is not supported, reinstall Windows using the Windows
→
All apps
.
or
Remove everything
→
Settings
Samsung
→
Removing the battery
→
Samsung Update
Update & security
.
→
Recovery
.
.
•
To remove the battery, you must visit an authorised service centre with the provided
instructions.
•
For your safety, you must not attempt to remove the battery. If the battery is not
properly removed, it may lead to damage to the battery and device, cause personal
injury, and/or result in the device being unsafe.
•
Samsung does not accept liability for any damage or loss (whether in contract or tort,
including negligence) which may arise from failure to precisely follow these warnings and
instructions, other than death or personal injury caused by Samsung’s negligence.
To soften the adhesive that holds the front panel to the main device, the device must be
1
warmed to a controlled level using a dedicated temperature controlled chamber.
Attach a suction pad removal tool to the lower end of the front panel and while holding
the device firmly, pull the front panel away from the bottom upwards.
Loosen and remove the screws at the location points and remove the chassis.
2
Disconnect the connectors.
3
Loosen and remove the screws from the battery and remove the battery.
4
58
Page 59

Copyright
Copyright © 2016 Samsung Electronics
This manual is protected under international copyright laws.
No part of this manual may be reproduced, distributed, translated, or transmitted in any form
or by any means, electronic or mechanical, including photocopying, recording, or storing
in any information storage and retrieval system, without the prior written permission of
Samsung Electronics.
Trademarks
•
SAMSUNG and the SAMSUNG logo are registered trademarks of Samsung Electronics.
•
Microsoft, MS-DOS, and Windows are trademarks or registered trademarks of the
Microsoft Corporation.
•
Bluetooth® is a registered trademark of Bluetooth SIG, Inc. worldwide.
•
Wi-Fi®, Wi-Fi Protected Setup™, Wi-Fi CERTIFIED™, and the Wi-Fi logo are registered
trademarks of the Wi-Fi Alliance.
•
All other trademarks and copyrights are the property of their respective owners.
 Loading...