

LTE MOBILE HOTSPOT
Samsung LTE Mobile HotSpot PRO
User Manual
Please read this manual before operating your
device and keep it for future reference.

Warning!
This product contains chemicals known to the State of California to cause cancer and reproductive toxicity.
Intellectual Property
All Intellectual Property, as defined below, owned by or which is otherwise the property of Samsung or its respective suppliers
relating to the SAMSUNG Phone, including but not limited to, accessories, parts, or software relating there to (the “Phone
System”), is proprietary to Samsung and protected under federal laws, state laws, and international treaty provisions. Intellectual
Property includes, but is not limited to, inventions (patentable or unpatentable), patents, trade secrets, copyrights, software,
computer programs, and related documentation and other works of authorship. You may not infringe or otherwise violate the
rights secured by the Intellectual Property. Moreover, you agree that you will not (and will not attempt to) modify, prepare
derivative works of, reverse engineer, decompile, disassemble, or otherwise attempt to create source code from the software. No
title to or ownership in the Intellectual Property is transferred to you. All applicable rights of the Intellectual Property shall remain
with SAMSUNG and its suppliers.
Open Source Software
Some software components of this product incorporate source code covered under GNU General Public License (GPL), GNU Lesser
General Public License (LGPL), OpenSSL License, BSD License and other open source licenses. To obtain the source code covered
under the open source licenses, please visit:
http://opensource.samsung.com
.
Disclaimer of Warranties; Exclusion of Liability
EXCEPT AS SET FORTH IN THE EXPRESS WARRANTY CONTAINED ON THE WARRANTY PAGE ENCLOSED WITH THE PRODUCT, THE
PURCHASER TAKES THE PRODUCT "AS IS", AND SAMSUNG MAKES NO EXPRESS OR IMPLIED WARRANTY OF ANY KIND
WHATSOEVER WITH RESPECT TO THE PRODUCT, INCLUDING BUT NOT LIMITED TO THE MERCHANTABILITY OF THE PRODUCT OR
SM-V100T_UM_English_MI1_PS_121813_F6

ITS FITNESS FOR ANY PARTICULAR PURPOSE OR USE; THE DESIGN, CONDITION OR QUALITY OF THE PRODUCT; THE
PERFORMANCE OF THE PRODUCT; THE WORKMANSHIP OF THE PRODUCT OR THE COMPONENTS CONTAINED THEREIN; OR
COMPLIANCE OF THE PRODUCT WITH THE REQUIREMENTS OF ANY LAW, RULE, SPECIFICATION OR CONTRACT PERTAINING
THERETO. NOTHING CONTAINED IN THE INSTRUCTION MANUAL SHALL BE CONSTRUED TO CREATE AN EXPRESS OR IMPLIED
WARRANTY OF ANY KIND WHATSOEVER WITH RESPECT TO THE PRODUCT. IN ADDITION, SAMSUNG SHALL NOT BE LIABLE FOR
ANY DAMAGES OF ANY KIND RESULTING FROM THE PURCHASE OR USE OF THE PRODUCT OR ARISING FROM THE BREACH OF
THE EXPRESS WARRANTY, INCLUDING INCIDENTAL, SPECIAL OR CONSEQUENTIAL DAMAGES, OR LOSS OF ANTICIPATED PROFITS
OR BENEFITS.
Modification of Software
SAMSUNG IS NOT LIABLE FOR PERFORMANCE ISSUES OR INCOMPATIBILITIES CAUSED BY YOUR EDITING OF REGISTRY SETTINGS,
OR YOUR MODIFICATION OF OPERATING SYSTEM SOFTWARE.
USING CUSTOM OPERATING SYSTEM SOFTWARE MAY CAUSE YOUR DEVICE AND APPLICATIONS TO WORK IMPROPERLY. YOUR
CARRIER MAY NOT PERMIT USERS TO DOWNLOAD CERTAIN SOFTWARE, SUCH AS CUSTOM OS.
Samsung Telecommunications America (STA), LLC
Headquarters:
1301 E. Lookout Drive
Richardson, TX 75082

Customer Care Center:
1000 Klein Rd.
Plano, TX 75074
Toll Free Tel: 1.888.987.HELP (4357)
Internet Address:
http://www.samsung.com
©
2013 Samsung Telecommunications America, LLC. Samsung is a registered trademark of Samsung Electronics Co., Ltd.
Do you have questions about your Samsung Mobile Device?
For 24 hour information and assistance, we offer a new FAQ/ARS System (Automated Response System) at:
www.samsung.com/us/support
The actual available capacity of the internal memory is less than the specified capacity because the operating system and default
applications occupy part of the memory. The available capacity may change when you upgrade the device.
microSD™ and the microSD logo are Trademarks of the SD Card Association.
Wi-Fi is a registered trademark of the Wireless Fidelity Alliance, Inc.
LTE is a trademark of ETSI

Table of Contents
Section 1: Getting Started .......................... 3
Understanding this User Manual . . . . . . . . . . . . 3
Setting Up Your Device . . . . . . . . . . . . . . . . . . . 4
Installing the Optional microSD Memory Card . . 9
Turning Your Device On and Off . . . . . . . . . . . 11
Factory Reset of Your Device . . . . . . . . . . . . . 12
Section 2: Understanding Your Device .... 13
Features of Your Device . . . . . . . . . . . . . . . . . 13
Front View . . . . . . . . . . . . . . . . . . . . . . . . . . . 13
Side Views . . . . . . . . . . . . . . . . . . . . . . . . . . . 14
On-Screen Indicators . . . . . . . . . . . . . . . . . . . 15
Section 3: Connecting Your Device .......... 16
System Requirements . . . . . . . . . . . . . . . . . . 16
Before You Begin a Connection . . . . . . . . . . . 16
Initial Connection to Your Device . . . . . . . . . . 17
Accessing Your HotSpot via a Browser . . . . . . 17
Configuring Your HotSpot . . . . . . . . . . . . . . . . 18
Preparing your HotSpot for File Access . . . . . . 19
Installing the USB drivers for various
OS types . . . . . . . . . . . . . . . . . . . . . . . . . . . 20
Connecting your Computer to the HotSpot
via USB . . . . . . . . . . . . . . . . . . . . . . . . . . . . 21
Factory Reset via the Web Portal . . . . . . . . . . 22
Using the Battery Pack Feature . . . . . . . . . . . . 23
Section 4: Home Page ...............................24
Mobile HotSpot Home Page . . . . . . . . . . . . . . 24
Section 5: Network Page ...........................27
Mobile HotSpot Network Page . . . . . . . . . . . . 27
Wi-Fi Configuration . . . . . . . . . . . . . . . . . . . . 29
Section 6: Securing Your Device ..............30
Mobile HotSpot Security Page . . . . . . . . . . . . . 30
SIM PIN Tab . . . . . . . . . . . . . . . . . . . . . . . . . . 30
MAC Filtering Tab . . . . . . . . . . . . . . . . . . . . . . 31
Port Filtering Tab . . . . . . . . . . . . . . . . . . . . . . 32
Port Forwarding Panel . . . . . . . . . . . . . . . . . . 35
1

Section 7: Configuring Your Device ..........37
Mobile HotSpot Configuration Page . . . . . . . . . 37
Settings Tab . . . . . . . . . . . . . . . . . . . . . . . . . .37
Software Update Tab . . . . . . . . . . . . . . . . . . . . 38
DLNA Tab . . . . . . . . . . . . . . . . . . . . . . . . . . . . 39
Tools Tab . . . . . . . . . . . . . . . . . . . . . . . . . . . . 39
Factory Reset via Web Portal . . . . . . . . . . . . . . 41
Section 8: Messaging on Your Device ......42
Mobile HotSpot Messaging Page . . . . . . . . . . .42
Section 9: Troubleshooting .......................44
Technical Support . . . . . . . . . . . . . . . . . . . . . .44
Connection Tips and Tricks . . . . . . . . . . . . . . .44
Section 10: Health and Safety
Information .................................................46
Exposure to Radio Frequency (RF) Signals . . . .46
Specific Absorption Rate (SAR) Certification
Information . . . . . . . . . . . . . . . . . . . . . . . . . 46
FCC Part 15 Information to User . . . . . . . . . . .48
Radio Frequency (RF) Energy . . . . . . . . . . . . . . 48
Knowing Radio Frequency Safety . . . . . . . . . . 48
FCC Radio Frequency Emission . . . . . . . . . . . .49
2
Samsung Mobile Products and Recycling . . . . .49
UL Certified Travel Charger . . . . . . . . . . . . . . .50
Display / Touch-Screen . . . . . . . . . . . . . . . . . .51
Battery Use and Safety . . . . . . . . . . . . . . . . . .51
Care and Maintenance . . . . . . . . . . . . . . . . . . .53
Operating Environment . . . . . . . . . . . . . . . . . .54
Restricting Children's Access to Your
Wireless Mobile Device . . . . . . . . . . . . . . . .56
FCC Notice and Cautions . . . . . . . . . . . . . . . . .56
Other Important Safety Information . . . . . . . . .57
Section 11: Warranty Information ............58
Standard Limited Warranty . . . . . . . . . . . . . . .58
End User License Agreement for Software . . . .63
Index ...........................................................71

Section 1: Getting Started
Understanding this User Manual
The sections of this manual is laid out to assist your with
setup and follow the UI features of your device.
A robust index for features begins on page 71.
Also included is important safety information, beginning on
page 46, that you should know before using your device.
This manual gives navigation instructions according to the
default display settings.
Before using your device for the first time, you’ll need to
install and charge the battery and install the micro SIM card.
The micro SIM card is loaded with your subscription details,
such as your PIN, available optional services, and many other
features.
Unless otherwise specified, all instructions in this manual
assume you are starting from the Home screen.
Note:
Instructions in this manual are based on default settings,
and may vary from your device, depending on the
software version on your device, and any changes to the
device’s Settings.
Unless stated otherwise, instructions in this User Manual
start with the device at the Home screen.
All screen images in this manual are simulated. Actual
displays may vary, depending on the software version of
your device and any changes to the device’s firmware.
Getting Started 3

Special Text
Throughout this manual, you’ll find text that is set apart from
the rest. These are intended to point out important
information, share quick methods for activating features, to
define terms, and more. The definitions for these methods
are as follows:
•
Notes
: Presents alternative options for the current feature, menu,
or sub-menu.
•
Tips
: Provides quick or innovative methods, or useful shortcuts.
•
Important
: Points out important information about the current
feature that could affect performance.
•
Warning
: Brings to your attention important information to
prevent loss of data or functionality, or even prevent damage to
your phone.
4
Text Conventions
This manual provides condensed information about how to
use your device. To make this possible, the following text
conventions are used to represent often-used steps:
➔
Note:
Arrows are used to represent the sequence of
selecting successive options in longer, or
repetitive, procedures.
From the Web portal home screen, select ➔ Messaging
tab.
Setting Up Your Device
These steps take you through an out-of-the-box setup
process. These procedures are intended to help you get your
device setup, activated, and assist you with your initial
connection.
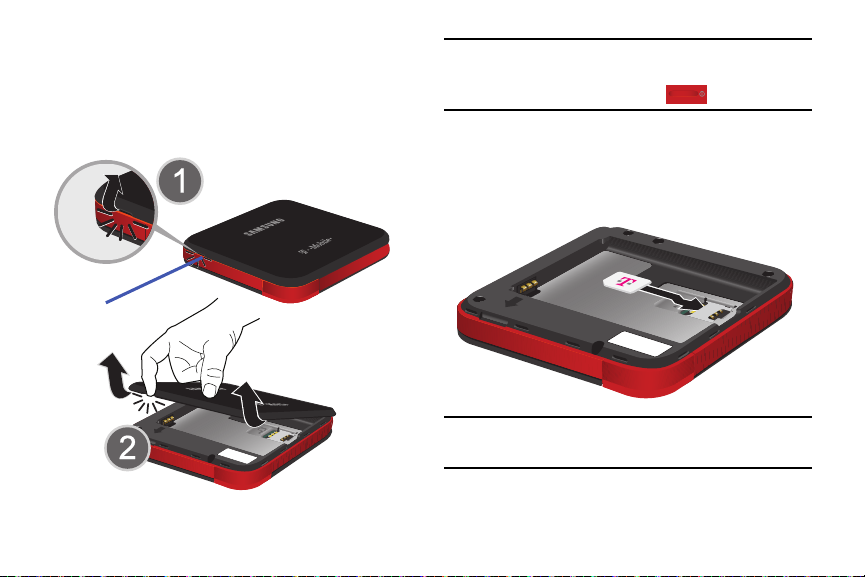
Removing the Back Cover
Release Latch
1. Hold the device firmly and locate the cover release
latch (1).
2. Place your fingernail in the groove and firmly “pop” the
cover off the device (2).
Important!
Before removing or replacing the battery cover,
make sure the device is switched off. To turn the
device off, hold down the key.
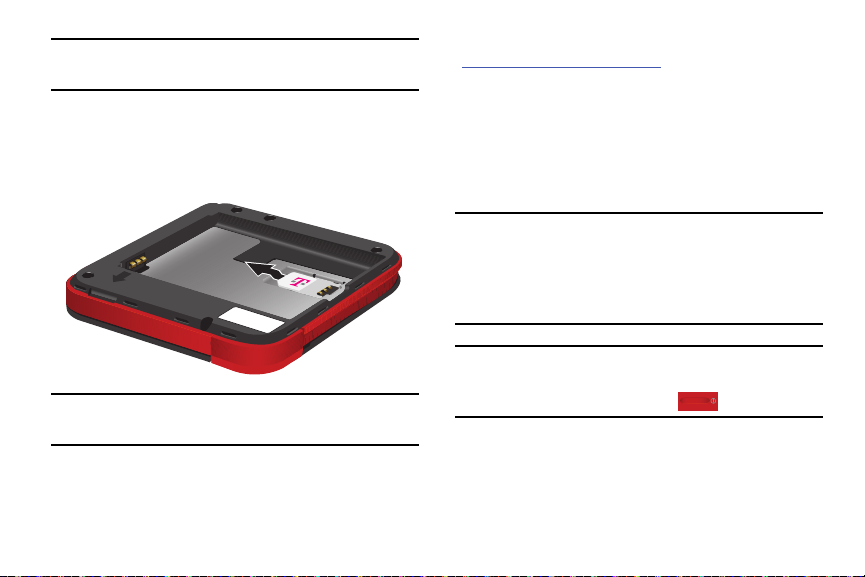
Installing the 4G LTE microSIM Card
With the battery removed, carefully slide the microSIM
card into the SIM card slot until it “clicks” into place
with the label side facing up.
Ne
t
w
o
T-
r
k
M
N
o
a
bi
P
me
a
l
e
s
swor
/
Br
SSI
o
a
D
d
d: 12345
:
b
a
nd
##
67
8
N
e
t
w
o
T
rk
M
N
o
a
b
Pas
m
ile
e
s
/
B
SS
w
r
o
o
I
a
D
r
d
d
:
b
:
1
a
2
n
3
d
4
#
5
#
6
7
8
Important!
The 4G LTE microSIM Card MUST remain in the
device when in use.
Getting Started 5
Caution!
N
e
t
w
o
r
k
N
ame/
S
S
ID:
T
-
M
o
b
il
e
B
roadb
a
n
d
##
Pa
s
s
w
or
d
:
1
2
3
4
5
67
8
Do not bend or scratch your microSIM Card. Avoid
exposing it to static electricity, water, or dirt.
Removing the 4G LTE microSIM Card
1. Remove the battery and cover (page 7).
2. Carefully slide the 4G LTE SIM card out of the SIM card
socket.
If you experience any issues with your device, visit us at:
http://support.t-mobile.com/welcome
Service at
T-Mobile
1-877-453-1304
®
retail location.
or contact Customer
or visit your nearest U.S.
Installing the Battery
Your device is powered by a rechargeable, standard Li-Ion
battery. A Wall/USB Charger (Charging Head and USB cable)
are included with the device, for charging the battery.
Note:
The battery comes partially charged. You must fully
charge the battery before using your device for the first
time.
After the first charge, you can use the device while
charging.
Important!
6
If your SIM card is ever separated from the device
or damaged, your device will not function.
Important!
Before removing or replacing the battery cover,
make sure the device is switched off. To turn the
device off, hold down the key.
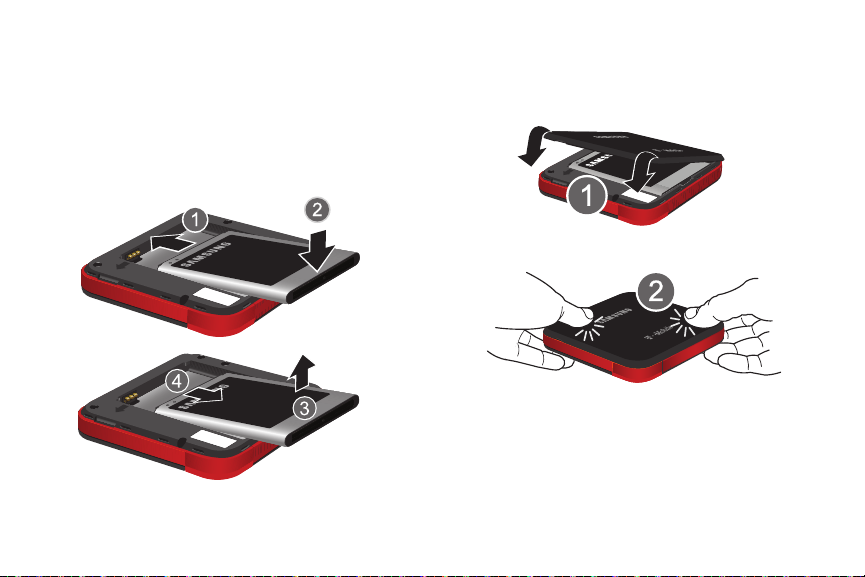
1. Insert the battery as shown, making sure to align the
N
e
t
w
or
k
Na
m
e
/
SSID:
T-
M
ob
i
le
B
roadba
nd #
#
P
as
sw
or
d
:
12
3
4
5
6
7
8
Net
wo
rk
Name
/
SSID
:
T-Mo
bi
le
Bro
a
d
b
a
n
d
#
#
P
a
sswo
rd
:
1
2
3
45
6
7
8
Installing Battery
Removing Battery
gold contacts (1).
2. Press down gently to secure the battery (2).
Removing the Battery
Grip the battery at the top end (3) and lift it up and out
of the battery compartment (4).
Replacing the Back Cover
1. Position the battery cover over the battery
compartment (1).
2. Press down firmly along the edges of the cover (2).
N
e
tw
o
T-
rk
Mo
Nam
b
Pa
i
l
e
e
s
s
/
B
S
w
r
S
o
o
ID:
ad
r
d
b
:
1
an
2
3
d
4
#
5
#
6
7
8
Getting Started 7

Charging the Battery
Charging Head
USB Cable
Your device is powered by a rechargeable Li-ion battery. A
wall charger, which is used for charging the battery, is
included with your device. Use only approved batteries and
chargers. Ask your local Samsung dealer for further details.
Before using your device for the first time, you must fully
charge the battery.
Note:
Verify that the battery is installed prior to connecting the
wall charger. If both the wall charger is connected and
the battery is not installed, the device can power cycle
continuously and prevent proper operation. Failure to
unplug the wall charger before you remove the battery,
can cause the device to become damaged.
Important!
8
It is recommended you fully charge the battery
before using your device for the first time.
1. Connect the USB cable to the charging head.
2. Locate the Charging port.
3. Insert the USB cable into the device’s Charger/
Accessory jack.
4. Plug the charging head into a standard AC power
outlet. The device turns on and indicates both its
charge state and percent of charge.
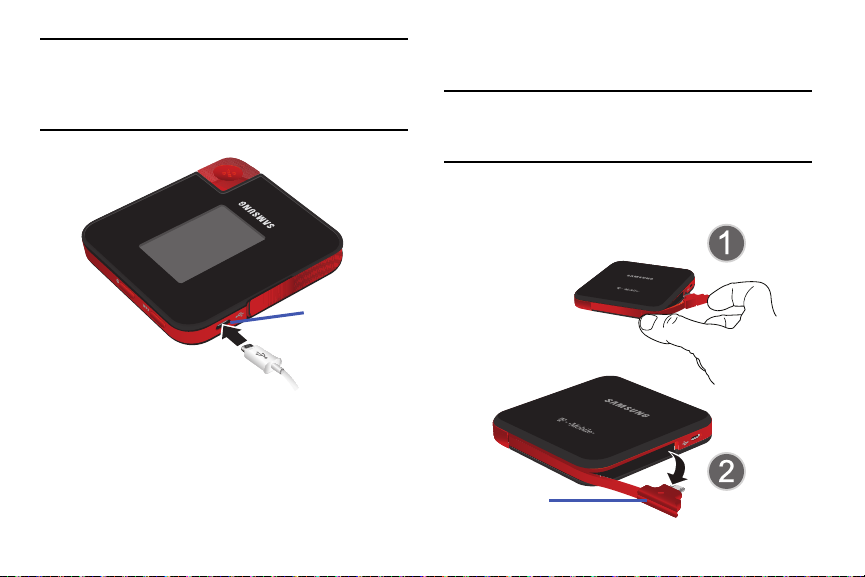
Warning!
Charging port
mini USB Cable
While the device is charging, if the screen does not
function due to an unstable power supply unplug the
USB power adapter from the power outlet or unplug
the USB cable from the device.
5. When charging is finished, first unplug the charger’s
power plug from the AC wall outlet, then disconnect
the charger’s connector from the device.
Installing the Optional microSD Memory Card
Note:
The installation of an optional microSD card can provide
additional storage and access to additional files such as
document, image, and other multimedia content.
1. Using your fingertip (1), slide the mini USB connector
out from its current location (2).
Getting Started 9
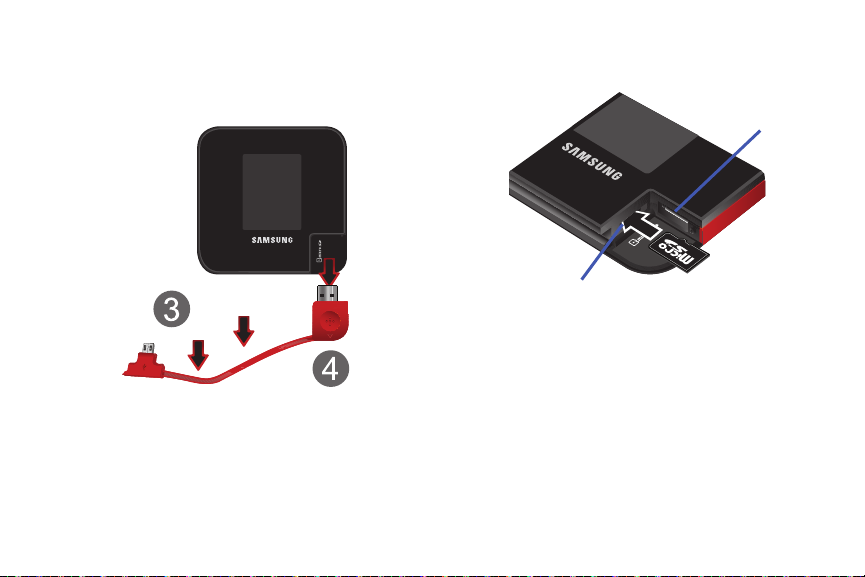
2. Pull the cable all the way round the unit (3) and then
USB slot
microSD card slot
carefully remove the other USB connector from its
slot (4). This action exposes the internal microSD card
slot.
10
3. Slide the memory card into the card slot until it “clicks”
into place.

4. Replace the USB cable firmly into its corresponding slot
USB
mini USB connector
connector
(1).
Turning Your Device On and Off
Turning Your Device On
Press and hold (
Power
) to turn the device on.
5. Pull the cable around the side of the device (2) and
carefully re-insert the mini USB connector back into its
corresponding slot (3).
Turning Your Device Off
With the device on, press and hold (
turn the device off.
Power
Getting Started 11
) to
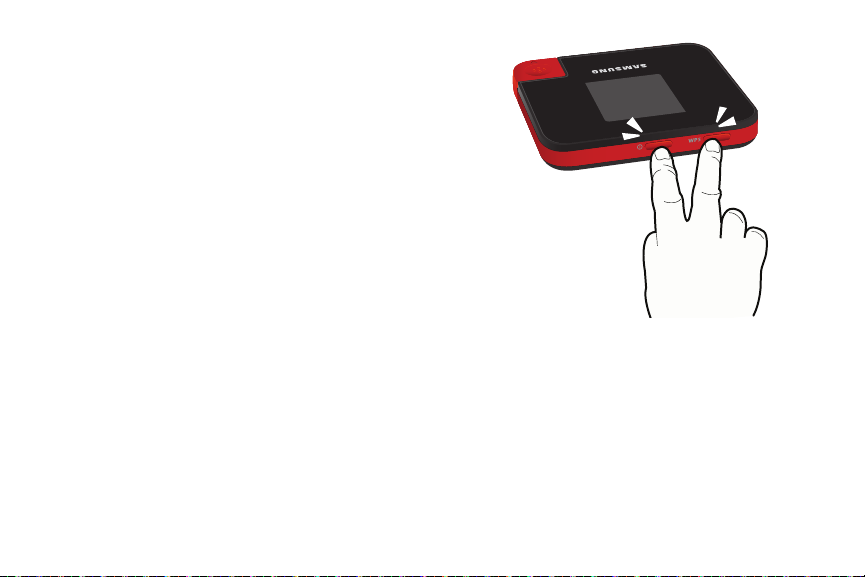
Factory Reset of Your Device
Resetting your device restores all factory defaults. You may
need to reset your device if you cannot connect device(s) to
your Wi-Fi HotSpot or can not regain access to the Web
portal.
1. Locate the
device.
2. Press and hold these two keys for 5 seconds to display
an on-screen Factory Reset message.
3. Press the
completed, the power should recycle and the main
screen will re-appear.
– or –
Press the
12
Power
and
WPS
keys along the top of the
Power
key to reset the device. Once
WPS
key to cancel the reset operation.
Section 2: Understanding Your Device
3
2
1
This section outlines key features of your device. It also
describes the device’s keys, screen and the icons that
display when the device is in use.
Features of Your Device
Your device is lightweight, easy-to-use and offers many
significant features. The following list outlines a few of the
features included in your device.
•
Delivers data speeds faster than the current 3G network
technology by using 4G LTE
•
Wi-Fi ® Capability
•
Able to receive and send text messages via Web Portal
•
Expandable memory slot - supports up to 64GB microSD
•
Portable Wi-Fi HotSpot and USB Tethering-capability
Front View
The following illustrations show the main elements of your
device. The following list correlates to the illustrations.
1.
Notification bar
connection status, signal strength, battery level, and
time, and displays notifications about incoming
messages, and other action
shows information about the
Understanding Your Device 13
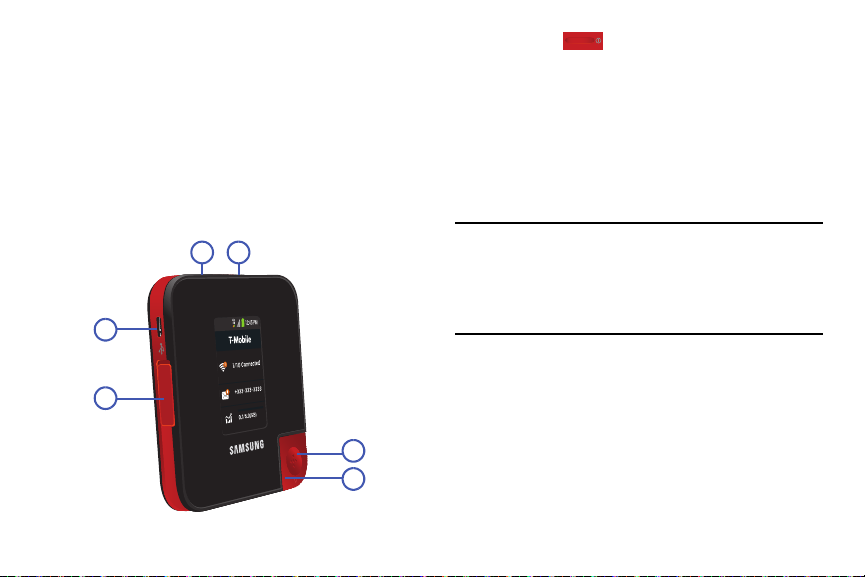
Display
5
3
12
4
6
2.
3.
shows all the information needed to operate
your device, such as the number of wirelessly
connected devices, number of received messages
(along with date, time and phone number), and data
usage.
USB Connector
USB-capable devices using this connector type.
provides a direct connection for
Side Views
The following illustration shows the side elements:
Power key
1.
WPS key
2.
a WPS connection. The WPS (Wi-Fi Protected Setup)
feature allows you to pair your Wi-Fi-capable device
without the need for entering a passcode. This process
is similar to Wi-Fi Direct pairing.
Charging Port
3.
power cable.
Caution!
Please use only an approved charging accessory to
charge your device. Improper handling of the
charging port, as well as the use of an incompatible
charger, may cause damage to your device and void
the warranty.
ends switches the phone off and on.
allows you to pair with devices currently using
allows you to connect a compatible
Mini USB Connector
4.
14
to devices using this type of connector.
microSD Card Slot
5.
card to expand the memory of your device.
USB Connector
6.
devices using this type of connector. This provides your
target device with wired Internet access.
provides a mini USB for connection
(internal) allows you use a microSD
provides a USB plug for connection to
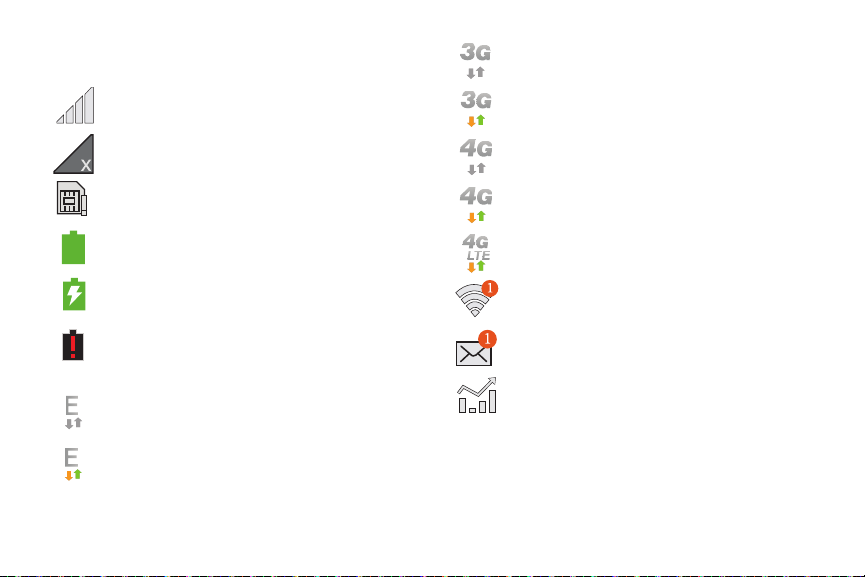
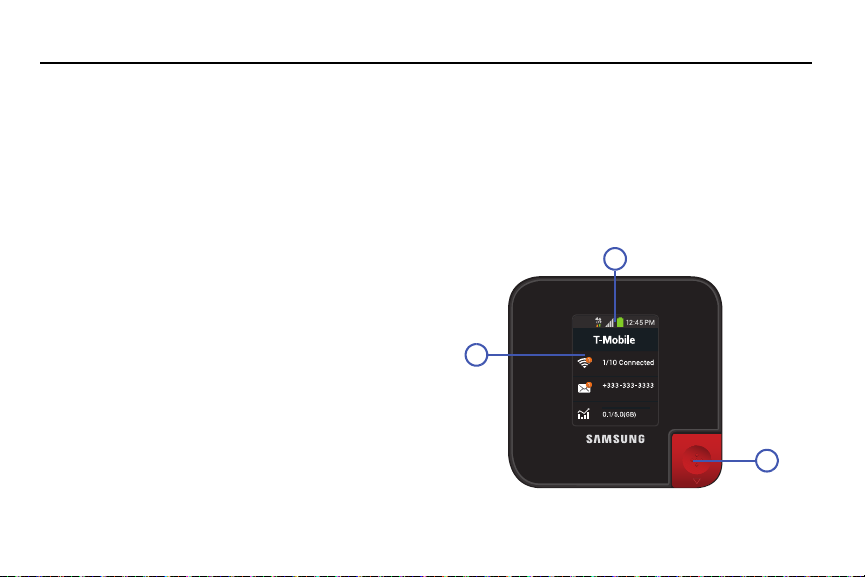
On-Screen Indicators
Displays when connected to the 3G network.
Displays your current signal strength. The greater
the number of bars, the stronger the signal.
Indicates there is no signal available.
Displays when there is no microSIM card in the
device.
Displays your current battery charge level. Icon
shown is fully charged.
Displays your battery is currently charging.
Shows your current battery only has a few
minutes of power remaining and will soon
shutdown.
Displays when connected to the EDGE network.
Displays when your phone is communicating with
the EDGE network.
Displays when your device is connected to and
communicating with the 3G network.
Displays when connected to the HSPA+ network.
Displays when connected to and communicating
with the HSPA+ network.
Displays when your device is communicating
with the 4G LTE network.
Displays when Wi-Fi is active and indicates the
number of externally connected devices.
Displays when there is a new text message.
Displays your current data usage.
Understanding Your Device 15

Section 3: Connecting Your Device
With your new Wi-Fi HotSpot and your computer, a wireless
Internet connection can always be at your fingertips.
System Requirements
If you choose to connect with an external device via a direct
USB cable connection, your target device will need the meet
the following minimum system requirements:
•
One open Type-A USB Port (ex: Laptops, Desktops, etc..)
•
One open mini USB Port (ex: portable devices, mobile phones,
etc..)
Note:
Up to 10 simultaneous devices can be connected to the
HostSpot.
Note:
It is recommended the battery be fully charged in order
to use your device via Wi-Fi for the first time, or connect
your device to the AC wall charger for power.
16
Before You Begin a Connection
Press and hold (
The following should occur once your device turns on:
•
The battery indicator shows a solid green color (if there is more
than a 15% charge.)
•
Once your device has been activated, it automatically connects
to the Internet provided that your cellular network broadband
service is available.
•
Confirm a network indicator icon, such as , appears in
the Notification area at the top of the display. This indicates the
device is in service and ready to connect.
Power
) to turn the device on.

Initial Connection to Your Device
N
e
tw
o
rk
Na
m
e
/
SS
ID
:
T-
M
o
bi
l
e B
ro
a
d
b
a
n
d
##
P
a
ssw
o
r
d
:
123
456
78
Network Name/SSID:
T-Mobile Broadband ##
Password: 12345678
1. Locate the internal sticker that provides both the SSID
and Password information for access to the device’s
portal.
Note:
The default password is also the last 8-digits of the
device 15-digit IMEI.
For example: If the IMEI number is “1234567
89012345
”,
the password is “89012345”.
Accessing Your HotSpot via a Browser
1. With your device now connected to the HotSpot, launch
an available Browser on your target device.
2. Within the Browser’s Address field, enter:
• http://mobile.hotspot
Note:
If there are any issues accessing the HotSpot using the
above url, use 192.168.43.1.
2. Enable the Wi-Fi connection on your target device and
begin to scan for available Wi-Fi networks.
3. The SM-V100T HotSpot appears as a secured device
T-Mobile Broadband ##
named: “
”.
4. Enter the default password located on the sticker to
establish your initial connection.
3. From the HotSpot’s main Web portal, locate the
Password
field.
4. Enter the HotSpot’s Administrator (Web portal)
Apply
password information and click
Note:
The default Administrator password is “
.
admin
Connecting Your Device 17
”.

Note:
The default connection state for the HotSpot is secured.
Use the Web portal to configure the various settings.
Configuring Your HotSpot
Changing your Web Portal Administrator
Password
Changing this password prevents other users from entering
the default “admin” password and gaining access to your
Web portal and changing the device’s settings.
1. Access the Web portal and select the
Too ls
tab.
2. Select the
password information.
3. Re-enter your new password within the
Password
Caution!
4. Click
18
New Password
field.
Write down this new administrator password. If you
loose or forget it, you will need to do a Factory Reset
on the device to regain access. For more information,
refer to “Factory Reset of Your Device” on page 12.
Apply
.
field and enter your updated
Configuration
Verify New
➔
Changing your Wi-Fi Access Password
This password is different from the administrator password
that provides access to the Web portal. The Wi-Fi password
is used by external devices to gain a connection to the
HotSpot.
1. Access the Web portal and select
2. From the bottom of the screen, tap the
and enter your new password.
Apply
3. Click
to update their connection passwords.
. Any currently connected devices will need
Network
Password
.
field,
Changing your SSID Name
1. Access the Web portal and select
2. Select the
3. Delete the current information and enter a new name.
4. Click
to forget their previous connections and reconnect to
the newly named HotSpot.
Network Name (SSID)
Apply
. Any currently connected devices will need
Network
field.
.

Assigning Data Limits
1. Access the Web portal and select
2. Tap t he
3. Tap the adjacent field, enter a numeric value, and
4. Click
Data Limits
select either GB (Gigabytes) or MB (Megabytes).
Apply
an on-screen notification will appear.
checkbox to enable the feature.
. Once you reach your assigned data limit,
Network
Hiding Your HotSpot
1. Access the Web portal and select
2. From the bottom of the screen, tap the
enable
checkbox. Removing the checkmark stops
broadcasting your SSID.
3. Tap the checkbox field again to re-enable SSID
broadcast.
Network
Broadcast SSID
Preparing your HotSpot for File Access
.
.
Note:
You can select MTP or USB Tethering only when USB is
connecting to the computer.
Home
1. Access the Web portal and select (
2. Scroll down the page and enable the
device(MTP)
3. Click
4. Follow the USB connection procedures described on
page 21.
Files can also be accessed from the internal microSD
memory card by enabling the DLNA functionality. For more
information, refer to “DLNA Tab” on page 39.
OK
option.
.
Connecting Your Device 19
).
Media
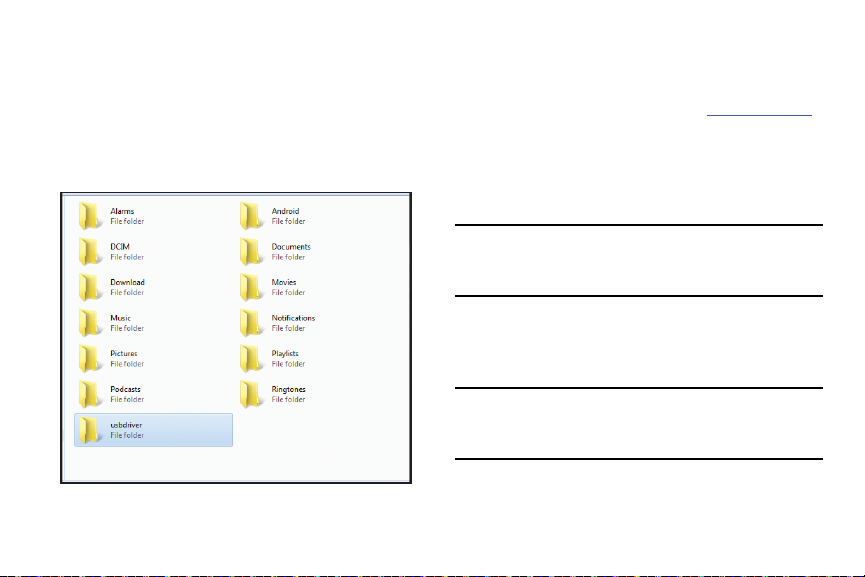
Installing the USB drivers for various OS types
There two separate types of drivers required for connection
to the device. These drivers can be found within the usb
driver folder on the HotSpot shown below.
•
Mac OS (requires the Escape drive)
•
Windows OS - (XP and Windows8 need RNDIS driver)
Installation of the Escape Driver
1. With the HotSpot not yet connected, locate the Mac®
version of the Samsung USB Driver for Mobile Phones
(Escape) found on product page @
2. Run the installation package for the file named:
ssud_v1.4.10_mac_for_rndis.dmg.zip
3. Select the disk where you would like the software to be
installed and click
Continue
www.samsung.com
.
.
.
Important!
Important!
20
It is important that you select the disk running the
OSX operating system. Choosing a different disk
can result in an installation failure.
4. If prompted, enter your username and password
information into the User Authentication window and
OK
.
click
If an installation failure occurs, unplug the device,
reboot the machine, and rerun the installation
procedures above.
5. Connect the HotSpot to the computer using the USB
connector (page 21).

Installation of the RNDIS windows USB Driver
mini USB Cable
1. With the HotSpot not yet connected, locate the
2. Run the installation package for the file named:
3. Follow the on-screen instructions.
®
WIndows
Mobile Phones (RNDIS) found on product page @
www.samsung.com
SAMSUNG_USB_Driver_for_Mobile_Phones_v1.5.25.o.
exe
version of the Samsung USB Driver for
.
.
Connecting your Computer to the HotSpot via USB
This method can be used to provide USB Tethering to your
computer.
1. Using your fingertip (1), slide the mini USB connector
out from its current location (2).
Important!
Important!
It is important that you select the disk running the
Windows operating system. Choosing a different
disk can result in an installation failure.
If an installation failure occurs, unplug the device,
reboot the machine, and rerun the installation
procedures above.
4. Connect the HotSpot to the computer using the USB
connector (page 21).
Connecting Your Device 21

2. Pull the cable all the way round the unit (3) and then
carefully remove the other USB connector from its
slot (4).
3. Re-insert the mini USB cable back into its
corresponding port along the side of the device.
22
4. Locate the USB port on your target device and firmly
insert the HotSpot’s USB plug.
5. Open your computer’s local file browsing application
and locate the connected HotSpot that appears
connected as an external drive.
Factory Reset via the Web Portal
1. Access the Web portal and select the
Too ls
tab.
2. Follow the on-screen instructions to complete the
process. For more information, refer to “Factory Reset
via Web Portal” on page 41.
Configuration
➔

Using the Battery Pack Feature
mini USB Cable
Open USB port
The HotSpot can also be used to charge external devices via
either the mini USB connector or via the USB port.
Charging a external device by using the mini USB connector:
1. Carefully remove the mini USB connector from the side
of the device.
2. Carefully insert the mini USB connector into the
available travel adapter/Power jack on a compatible
device.
3. Confirm the external device is charging.
Charging an external device via the USB port:
1. Remove the USB connector from the side of the device
(1). Make sure to leave the mini usb connector plugged
in (2).
2. Insert an external USB cable into the open USB port on
the HotSpot
3. Plug the other end of the USB cable into the external
device’s power port.
4. Confirm the external device is charging.
Connecting Your Device 23

Section 4: Home Page
After accessing the Web portal, the default screen in the
Home page. This page provides overall system information.
Mobile HotSpot Home Page
1. Access the Web portal and select (
2. Scroll down the page to review the available
Home
information. The
following basic status information and options:
page Web portal lists the
Data Usage
•
Network Name
•
Data Received
of data received from your Wireless Provider’s network.
•
Data Used
data received through the HotSpot and used by the connected
devices.
24
: The name of the current cellular provider.
: For the current Internet connection, the amount
: For the current Internet connection, the amount of
Home
).
•
Data Sent
: For the current Internet connection, the amount of
data sent to your Wireless Provider’s network.
•
Data Remaining
values is set by either your current carrier data plan, or via the
Data Limit field.
•
Days Remaining
monthly period of usage.
•
Connected Time
of time which has elapsed since the connection was established.
Data Usage Buttons
•
Mobile HotSpot off
functionality off (this does not turn the device off). Press the
external
: The amount of data usage remaining. This
: The amount of days remaining in your current
: For the current Internet connection, the period
: This button allows you to turn of the HotSpot
WPS
key to re-enable the HotSpot functionality.
System Information
This section provides the information for both the HotSpot
and any currently connected devices such as: Device Name,
Mobile Number, SIM ID, Manufacturer, IMEI, and SW Version.

Visit My T-Mobile
•
My T-Mobile
account information via the current Browser.
•
Community
T-Mobile Community website.
•
Device Support
T-Mobile Tech Support website.
•
Coverage Map
Web page from where you can check your current coverage
areas.
•
Contact Us
page.
: This button allows you to quickly access your
: This button provides ready-access to the online
: This button provides ready-access to the online
: This button provides to the online coverage area
: This button displays the T-Mobile Contact Us Web
T-Mobile Network
•
IP Address
your Mobile HotSpot.
•
Gateway
above.
•
Subnet Mask
provided IP Address.
•
DNS
HotSpot.
: The externally accessible IP address assigned to
: The gateway IP address associated with the IP address
: The network mask associated with the network
: The Domain Name Server currently used by your Mobile
My HotSpot Connection
•
IP Address
HotSpot.
•
Security
•
Subnet Mask
Address.
: Internet Protocol address assigned to your Mobile
: The current Wi-Fi security protocol used by the HotSpot.
: The network mask associated with the current IP
USB Connection
Note:
You can select MTP or USB Tethering only when USB is
connecting to the computer.
The USB connection to the HotSpot (via either the USB or
mini USB connectors) can used to either:
•
Access files stored within the internal microSD card
•
Provide a directly connected device with Internet access via the
USB Tethering functionality
1. Select either the
option.
OK
2. Click
Follow the USB connection procedures described on
page 21.
Media device (MTP)
.
or
USB tethering
Home Page 25

Connected Devices
This area provides information about those connected
devices. This section offers access to devices via either a
Connected
•
•
•
•
or
Blocked (#)
Device Name
information to something user-defined (ex: Pat’s GS4).
•
Tap
Save
•
Tap
Block
device.
•
Tap
Pause
device.
Connection Information
currently connected device such as: IP Address, MAC Address,
Connected at and for information.
Set Time Limit
usage by the external device. This action limits how long it can be
connected. Enable the
amount of hrs and min, then tap
Data Usage
device’s data usage during a period of time. Choose from
month
26
: Displays information about the current wireless
or
Last 3 days
tab.
: Allows you to rename the current MAC ID
to store the new name association.
to stop connection to the externally connected
to temporarily halt connection by the external
: Displays information about the
: Allows you to set a time limit for connection and
Set Time Limit
.
checkbox, enter the
Save
.
This
•
Set Data Limit
usage by the external device. This action limits how much data
can be used by the external device. Enable the
checkbox, enter the amount of data in GB and/or MB, then tap
Save
: Allows you to set a data limit for connection and
Set Data Limit
.

Section 5: Network Page
Your HotSpot provides a wireless Local Area Network (LAN)
that can share access to the 4G or 3G data network. You can
use your Wi-Fi HotSpot’s
wireless LAN.
Network
pages to configure your
Mobile HotSpot Network Page
1. Access the Web portal and select
2. Scroll down the page to review the available
information. The
following basic status information and options:
Network
Network
.
page Web portal lists the
Network
Your Wi-Fi HotSpot is preconfigured to use private IP
addresses on the WAN side, and to act as a DHCP server.
The router's default WAN IP configuration is:
•
IP address
: 192.168.43.1 (default)
This is the LAN WAN IP address of the router.
•
Subnet mask
This is the LAN WAN Subnet Mask of the Mobile HotSpot router.
Combined with the IP address, the IP Subnet Mask allows a
device to know which other addresses are local to it, and which
must be reached through a gateway or other router.
Note:
•
MAC Address
: 255.255.255.0
These addresses are part of a private address range for
use in private networks, and should be suitable in most
applications. If your network has a requirement to use a
different IP addressing scheme, you can make those
changes in this menu.
(display only): Displays the device MAC address.
Network Page 27

DHCP Server
When enabled, the DHCP (Dynamic Host Configuration
Protocol) server allows your Mobile HotSpot to acquire
network configuration settings from your Wireless Provider’s
network automatically.
Important!
Note:
If you make any changes to the DHCP server
settings, you will need to reboot the HotSpot or
re-start the device and then re-connect.
•
DHCP Server enable
•
DHCP Address Range
use by the HotSpot’s DHCP server table. If a device with a static IP
address wants to connect to Mobile HotSpot’s network, the static
IP should be outside of the DHCP address range. Most devices do
not have a static IP.
The DHCP Adddress range is available only when the
DHCP Address is shown on the Web UI (by default).
When you are located out of the coverage are, you will
have see the following pop-up message "DHCP Address
Range is invalid”.
28
: Click or touch to enable.
: The range of IP addresses reserved for
•
DHCP Lease Time (in hour)
amount of time (in hours) for which the DHCP server will retain
the IP Address that will be allocated to a particular device.
DHCP Server Buttons
•
Apply
: Select to update the settings and apply them.
•
Reset
: Select to revert the settings to their previous values.
: Enter a value to assign a minimum
Data Limit
•
Data Limit
on your current network. This action limits how much data can be
used by the external device. Enable the
enter the amount of data in GB and/or MB, then tap
Data Limit Buttons
•
Apply
•
Reset
: Allows you to set a data limit for connected devices
Data Limits
: Select to update the settings and apply them.
: Select to revert the settings to their previous values.
checkbox,
Apply
.

Wi-Fi Configuration
Wi-Fi is a branded standard for wireless connecting
electronic devices. A Wi-Fi device, such as a personal
computer, video game console, smartphone, or digital audio
player can connect to the Internet via a wireless network
access point. The Wi-Fi HotSpot has a range of about
45 meters (150 feet) indoors and a greater range outdoors.
Multiple overlapping access points can cover large areas.
•
Network Name (SSID)
touch the field to enter a network ID.
•
Security
: Security provides different types of security protocols.
The protocols encrypt the data that is going between two points.
Click or touch the drop down menu to select a protocol. Protocols
are listed from least secure to most secure.
•
Password
: Displays the current network password. Click or touch
the field and enter a new password to password-protect access
to your network. WPA2 provides the highest level of Wi-Fi
security, but older Wi-Fi-enabled devices may not support WPA
security. WEP security is supported by virtually all Wi-Fi-enabled
devices.
: Displays the network name. Click or
•
Broadcast Channel
automatically choose the best available channel. Click or touch
the drop down menu to select a specific channel. Make this
selection for either the 2.4 GHz or 5GHz bands.
•
Broadcast SSID enable
prompted, select
–
When enabled, other devices will see the Wi-Fi network access
point name in the list of available wireless networks.
–
When disabled, other devices will not see the Wi-Fi network
access point name in the list of available wireless networks.
Wi-Fi Configuration Buttons
•
Apply
: Select to update the settings and apply them.
•
Reset
: Select to revert the settings to their previous values.
: Click or touch
: Click or touch to enable. When
OK
to complete the section.
Auto
Network Page 29
for the HotSpot to

Section 6: Securing Your Device
Security Tabs
This section outlines how to enable security features for your
Wi-Fi HotSpot. You can use your Wi-Fi HotSpot’s
to configure your device’s security options.
Security
Mobile HotSpot Security Page
1. Access the Web portal and select
2. Select any of the available tabs and scroll down the
page to review the available information. The
page Web portal lists the following basic status
information and options:
30
Security
.
Security
tabs
SIM PIN Tab
Prevent another user from using your microSIM card to make
unauthorized use of your data plan or access information
stored on your card by protecting the information with a PIN
code. If the microSIM card is locked, you will need to enter
the PIN code before you can use it.
To lock your SIM card:
1. Access the Web portal and select
2. Enable the
3. From the
To unlock your SIM card:
1. Access the Web portal and select
2. Once accepted, uncheck the
3. Enter your existing PIN code.
tab.
select
tab.
Lock SIM Card
Enter SIM PIN
OK
.
field, enter a PIN number then
Security ➔ SIM PIN
checkbox.
Security ➔ SIM PIN
Lock SIM Card
checkbox.

To change your PIN code:
1. Access the Web portal and select
tab.
Change
2. Ta p
3. Enter the old SIM PIN code and tap
4. Enter the new SIM PIN code and tap
5. Re-type the new SIM PIN code and tap
.
Security ➔ SIM PIN
OK
.
OK
.
OK
.
MAC Filtering Tab
MAC Filtering prevents unknown Wi-Fi clients from using
your access point. A MAC address is a low-level network ID
which is unique to a device. Access is allowed only for
trusted clients.
Access the Web portal and select
Filtering
tab.
Enable MAC Filtering
Caution!
Before enabling this feature, ensure that the MAC
address of your own PC or tablet is included in the
Trusted Client list. Otherwise, the connected device
will not be able to use any data services.
Security ➔ MAC
•
Enable MAC Filtering
MAC Address Filtering.
When the featured is enabled only Trusted Clients can connect.
If the MAC address is in the
access is allowed. Otherwise, access is blocked.
•
When this feature is disabled the MAC Address of each Wi-Fi
client is not checked. All clients will be allowed to connect to the
HotSpot as long as they have a valid password.
Note:
Whether enabled or disabled, clients must have the
correct Wi-Fi Security settings to connect.
: Click or touch the checkbox to enable
Trusted Client MAC Address List
Trusted Client List
MAC addresses of trusted clients are listed here. If you have
not entered any MAC addresses, this field will be empty.
To add a client to the Trusted Client List:
1. Enter the MAC Address of the trusted device.
Add Client
2. Select the
button.
Securing Your Device 31
,

Caution!
Before enabling MAC Filtering, add the MAC address
of your own PC or tablet to the Trusted Client list.
Otherwise, the HotSpot will disconnect from your
Wi-Fi device, and you won’t be able to reconnect.
To remove a client from the Trusted Client List:
1. Click or tap the drop down menu to select a device.
2. Select the
Note:
On wireless devices, the "MAC address" is called the
"Physical Address". You can check the properties or
status of the wireless device to find the MAC address.
Trusted Client Buttons
•
Add Client
Trusted Client MAC Address
•
Delete Client
List.
•
Apply
•
Reset
32
Delete Client
: Select to add the MAC address typed in the
: Select to remove a device from the Trusted Client
: Select to save changes made to the list.
: Select to discard changes made to the list.
button.
field to the Trusted Client List.
Add
Port Filtering Tab
Port Filtering blocks outgoing Internet traffic. When enabled,
only traffic from selected applications can access the
Internet. Traffic type is identified by port number.
Note: DNS (Domain Name Server)
when using Port Filtering. Without DNS, it is not possible
to convert a Domain name (for example, www.msn.com)
to an IP address. DNS is used by E-mail, FTP, and many
other protocols as well as by Web browsers.
Access the Web portal and select
FIltering
tab.
Enable Port Filtering
•
Enable Port Filtering
Filtering.
When the featured is enabled only traffic from selected
applications from the
access to the internet.
When the featured is disabled all traffic is allowed to access to the
internet.
should always be enabled
Security ➔ Port
: Select the checkbox to enable Port
Allowed Applications
list are allowed

Allowed Applications
Enable those applications you wish to give access to the
Internet while the Port Filtering feature is enabled. All other
applications will be blocked.
These allowed application rules are used to open single or
multiple ports on your HotSpot when it senses data sent to
the Internet via these applications.
Select All Applications
be allowed to pass through and access the Internet.
The following is a list of the allowed applications:
•DNS (Domain Name Server)
managing the names of Web sites and other Internet domains.
DNS technology allows you to type names into your Web
browser like samsung.com and have your computer
automatically find that IP address on the Internet.
Note: DNS (Domain Name Server)
when using Port Filtering. Without DNS, it is not possible
to convert a Domain name (for example, www.msn.com)
to an IP address. DNS is used by E-mail, FTP, and many
other protocols as well as by Web browsers.
: selects all applications listed below to
: is a technology used for
should always be enabled
• HTTP
(Hypertext Transfer Protocol): is the data transfer protocol
used on the Web.
• HTTPS
(Hypertext Transfer Protocol over TLS/SSL): is a secured
data transfer protocol (using TCP). This transfers hypertext
requests between both servers and your browser.
•FTP
(File Transfer Protocol): is a network protocol used to copy
files from one location on the Web to another.
• E-mail(POP3)
standard protocol used by local e-mail applications/clients to
retrieve email from a remote server.
• E-mail (IMAP)
Protocol, is used for retrieving remote email messages.
•VPN
extended externally and allows you to securely communicate
over a public network.
•Telnet
computer on the same local network.
•RTP
for transferring both audio and video data.
: also known as Post Office Protocol, is a
: also known as Internet Message Access
(Virtual Private Network): is a private network that is
: is a network protocol that is used to log onto another
(Realtime Transport Protocol): is an Internet protocol used
Securing Your Device 33

Custom Applications
Define your own
additional applications.
•
Application Name
defining.
•
Port Range
refer to outgoing traffic.
–
For a single port, enter the port number in both the
and
–
For a port range, enter the beginning of the range in the
Port
–
Up to 5 ports or port ranges can be defined. Use as many rows
as necessary; unused rows can be left blank.
•
Port Type
(TCP, UDP, or both) used by that port range.
34
Allowed Applications
: Enter a name for the application you are
: Define the ports used by the application. These ports
End Port
fields.
field and the end of the range in the
: For each port range (each row), select the protocol
. Define and enable
End Port
Start Port
Start
field.
Port Filtering Buttons
•
Apply
: When this button is activated, all settings (enabled, name,
port settings) for all applications are saved to this device.
•
Reset
: Select to discard changes made to the allowed
applications.
•
Delete
: Select this button to erase a Custom Application
definition.
•
Revert
: Select this button to discard all changes made since the
Apply
last
•
Add
: Select this button to add another row for defining a Custom
Application.
operation.

Port Forwarding Panel
Port Forwarding allows incoming traffic (from the Internet) to
be forwarded to a particular PC or device on your local
WLAN. Normally, incoming traffic from the Internet is blocked
by the Firewall.
You need to use Port Forwarding to allow Internet users to
access running services such as a Web server, FTP server,
E-mail server, etc...
For some online applications (such as games), Port
Forwarding must be used in order for the game to function
correctly.
Note:
Port Forwarding creates a security risk and should be
disabled when not required.
Note:
Some 3G Mobile Wireless Networks do not provide you
with an Internet IP address, but an IP address on their
own network. In this case, Port Forwarding can not be
used because Internet users cannot reach your IP
address.
Access the Web portal and select
Forwarding
tab.
Security ➔ Port
Port Forwarding Applications
A number of common server applications are listed. To use
any of these applications, follow this procedure:
1. Install the application on a personal computer or other
device on your local WLAN.
2. Ensure the device is connected to this HotSpot, and
record the device's IP address for the Wi-Fi interface.
3. On this screen, enter the device's IP Address in the
IP Address on WLAN
4. Enable this application on this screen by checking its
checkbox. Available applications can include: DNS
(Domain Name Server), FTP Server, HTTP (Web Server),
etc..
5. Save your changes with the
6. On the Home screen, make a note of the Internet IP
Address of this HotSpot.
7. Ask users on the Internet to connect to the Internet IP
address of this device. These connection requests will
be forwarded to the IP address specified in step 3.
field beside the application.
Apply
button.
Securing Your Device 35

8. When no longer needed, the application should be
disabled on this screen by unchecking its checkbox,
Apply
and saving this change with the
applications enabled unnecessarily creates a security
risk.
Note:
Some wireless networks do not provide you with an
Internet IP address, but an IP address on their own
network. In this case, Port Forwarding can not be used
because Internet users cannot reach your IP address.
button. Leaving
IP Address on WLAN
This is the IP Address of the PC, server, or device on the local
WLAN which is running this application.
If an application is enabled, an IP Address is required.
Otherwise, this field may be blank.
36

Section 7: Configuring Your Device
Configuration Tabs
Your HotSpot provides access to support and configuration
options. You can use your Wi-Fi HotSpot’s
to configure your device.
Configuration
Mobile HotSpot Configuration Page
1. Access the Web portal and select
2. Select any of the available tabs and scroll down the
page to review the available information. The
Configuration
status information and options:
page Web portal lists the following basic
Configuration
.
tabs
Settings Tab
LTE N e twor k
Caution!
Unchecking this Mobile data feature will prevent
wirelessly connected devices from receiving any data
access to the Web. They will still remain connected
from the HotSpot, but not be getting any data.
•
Mobile data
features of your plan to provide Internet access to connected
devices. Select from a list of available data networks. Choose
from and available option:
: If enabled, allows the device to use the mobile data
• LTE/GSM/WCDMA
option. This selection allows the device to choose the fastest
connection from among the available connection speeds,
including LTE.
•GSM/WCDMA
• LTE only
• WCDMA only
•GSM only
(default) is the default network mode
provides access to either the 2G or 3G network.
restricts your connection only to the LTE network.
restricts your connection to only the 3G network.
restricts your connection to only the 2G network.
Configuring Your Device 37

•
Data roaming
service provider’s partner networks and access data services
when you are out of your service providers area of coverage.
LTE Network Buttons
•
Apply
•
Reset
: If enabled, allows your device to connect to your
: Select to save changes made to the list.
: Select to discard changes made to the list.
APN
This feature allows your HotSpot to act as the Access Point
within a WWAN (Wireless Wide Area Network). You can
create APN (Access Point Name) profiles via your HotSpot
and then allow devices to join the network.
•
Profile Name
•
APN
Name.
•
IP Version
•
Authentication
Choose from either: None, PAP, or CHAP.
•
User name
•
Password
•
Action
38
: Allows you to assign a profile name to the WWAN.
: Allows you to assign a resolveable URL as the Access Point
: Displays the selected IP version information.
: Allows you to select the authorization type.
: Allows you to assign a username.
: Allows you to assign a password.
: Allows you to use an available action button (see below).
APN Buttons
•
Edit
: Select to edit a current entry.
•
Delete
: Select to delete an existing entry.
•
Save
: Select to store a new entry or apply an update to an
existing entry.
Software Update Tab
This tab allows you to remotely check to see if there are any
available software updates for your device.
1. Read the on-screen disclaimer information.
2. Select
3. If new software is detected, follow the on-screen
Check
software.
instructions.
to begin the process of checking for new

DLNA Tab
This tab provides you with the ability to designate your
HotSpot or a DLNA-compliant device that can share stored
information with other compliant devices.
This feature works by sharing data stored within an internally
installed microSD memory card. For more information, refer
to “Installing the Optional microSD Memory Card” on page
9.
To set up the DLNA settings:
1. Access the Web portal and select
tab.
DLNA
2. Select the
your DLNA device, and tap
will display on external DLNA-compliant devices.
3. From the
alongside those file types (located on your microSD
card) you wish to share with external devices. Choose
from: Music, Pictures, and Videos.
4. Select either
Device Name
Select media
filed, enter a unique name for
section, place a checkmark
Apply
or
Reset
Configuration ➔
Apply
. This is the name that
.
DLNA Buttons
•
Apply
: Select to save changes made to the list.
•
Reset
: Select to discard changes made to the list.
Tools Tab
This tab provides access to Web portal features such as
Administrator password reset, Power Management, System
Log files, and Device Factory Reset.
Change Administration Password
This password protects the configuration settings on this
device. You must provide the password to access the
HotSpot’s Web-based administration interface.
•
New Password
to access the administration interface.
Enter the new password, using only letters, numbers, and
standard punctuation symbols. The password must be at least
four characters long. The maximum length is 64 characters.
•
Verify New Password
select
: Enter the new password you would like to used
: Re-enter the new password to verify and
Apply
.
Configuring Your Device 39

Admin Password Buttons
•
Apply
: Select to save changes.
•
Reset
: Select to discard changes made.
Power Management
Once enabled, the HotSpot will disconnect from the data
network after a designated amount of time is reached.
To save on battery life, the built-in wireless radio is turned off
if the HotSpot is idle for the time duration specified in the
Hibernate field.
When the LCD is on and the device is in Hibernate
mode, press the
– or –
If the LCD is off and the device is in Hibernate mode,
then pressing (
turn Hibernate mode off and enable the radios.
•
Hibernate
: Enables/disables the Standby feature. Select the
adjacent filed to determine the amount of time that must be met
before standby time is activated. Choose from: 15 minutes,
30 minutes, 1 hour, 3 hours, or 6 hours.
•
If the device does go into Hibernte mode, confirm the
On
icon ( ) appears and press the WPS key to exit the mode.
40
WPS
key to exit the Hibernate mode.
Power
) will turn the LCD on and
Hibernate
Power Management Buttons
•
Apply
: Select to update the settings and apply them.
•
Reset
: Select to revert the settings to their previous values.
Umounting SD Card
This process allows you to safely remove the card without
damaging any of the contents. A card must be properly
Unmounted before removal.
Caution!
If a card is pulled out of its internal slot without being
first properly unmounted, it can corrupt or damage
the card’s data.
•
Unmount
: Properly disconnects the card from the device and
allows you to safely remove it.
Format SD Card
This process allows you to quickly erase all data found within
an optional microSD card.
•
Format
: Quickly formats and erases all data currently on the SD
card.

System
The System log feature is used for troubleshooting purposes
and allows you to download the log as a single file.
The location of the log file is provided.
Note:
To access the log file, you must first turn off the USB
tethering feature from the Home page so that the device
can then act as an external storage medium.
•
Download
: Begins the process of downloading the Log file to the
described location.
Factory Reset via Web Portal
Use Factory reset function to return your device to its factory
defaults. This setting erases all data, configuration, and
passwords from the device.
To reset the device:
1. Access the Web portal and select
tab.
2. Scroll to the bottom of the page and select the
Factory Reset
3. Follow the on-screen instructions to complete the
process.
button.
Configuring Your Device 41
Configuration ➔ Too ls

Section 8: Messaging on Your Device
This page provides access to your current text message
Inbox. These messages (SMS text only) can be selected,
updated, and replied to.
Mobile HotSpot Messaging Page
1. Access the Web portal and select (
2. The left pane displays your Inbox.
Note:
Messages can be stored on either the Device or the
internal SIM card. The default is the Device option.
42
Messaging
Replying to an existing Message
1. Select a message from the left Inbox list.
2. Select the bottom
available text entry method to create your new reply
text.
3. Once you have updated the message contents, select
Send
.
).
Type message here
. field and use the

Create and Send a Message
Important!
Message notifications are displayed on the main
screen and can only be viewed and replied to via a
connected device.
4. Access the Web portal and select (
5. Select
6. Select the
7. Add more recipients by tapping the recipient field and
8. Select the
9. Select
Create Messages
To
field and enter a target phone number.
separating each number by a colon (:).
Type message here
available text entry method to create your new text.
Send
to deliver your new text message.
– or –
Cancel
Select
.
. field and use the
to exit this process.
Messaging
Deleting an Existing Message
1. Select a message from the left Inbox list and select
Delete
.
2. Place a checkmark alongside the desired message(s),
and select
).
exit.
3. If prompted, click
deletion.
Note:
You can also enable the
checkmark alongside all current Inbox messages.
Messages can be stored on either the Device or the internal
SIM card.
Delete
to complete the process or
OK
to acknowledge a successful
Select All
option to place a
Messaging on Your Device 43
Cancel
to

Section 9: Troubleshooting
This section covers common technical support questions and
solutions.
Technical Support
If you experience any issues with your device, visit us at the
HotSpot website
Customer Service at 1-877-453-1304.
http://support.t-mobile.com/welcome
or contact
Connection Tips and Tricks
The following are a few common troubleshooting issues and
possible solutions.
I can’t get any network signal appearing on the main screen.
•
Your microSIM card may be improperly installed. These cards are
commonly inserted in the wrong orientation. Remove the card and
re-attempt a proper insertion.
•
If your microSIM card is properly inserted and you still can’t get a
network connection, call customer support and confirm your
account is active and there are no issues.
44
I can’t connect to the Wireless HotSpot using the provided
password.
•
Underneath the back cover is the device’s default SSID (wireless
network name) and the default password. This password is used
to connect your Wi-Fi enabled device to the HotSpot.
•
If the sticker information is not accepted make sure your CAPS
Lock is not on and you enable the “Show password” feature on
your target device.
•
The HotSpot’s default password is the last 8 digits of the IMEI.
How do I reset the device back to Factory Default via the Web
Portal?
•
Access the Web portal and select Configuration g Tools tab.
•
Scroll to the bottom of the page and select the Factory Reset
button.
•
Follow the on-screen instructions to complete the process.

How do I reset the device back to Factory Default via the
Hardware?
•
Press and hold Power and WPS keys for 5 seconds to display an
on-screen Factory Reset message.
•
Press the Power key to reset the device. Once completed, the
power should recycle and the main screen will re-appear.
What is the password for the Web Portal?
•
The default password is “admin” (all lowercase letters).
•
After changing this password in the Web portal you will need to
reset the device before regaining access.
I can’t see my HotSpot in my list of available wireless devices.
How do I make it visible again?
•
Access the Web portal and select Network.
•
Tap the Broadcast SSID checkbox and place a checkmark in the
adjacent field.
•
Select
Apply ➔ OK
•
On your target device, refresh your list of available WAPs and
connect.
.
The device is on but I have no Internet connectivity?
The Hibernate mode is used for power management and by
default is turned on. The default is inactivity for 30 minutes.
When Hibernate mode is activated - All radios are turned off
(Wi-Fi and Cellular Network).
Note:
LCD turns off after 30 seconds (standby default).
•
If you believe your are in Hibernate mode or you have had not
Internet activity for a while:
•
Press
Power
key , the LCD and both radios will turn on
and all network communication icons will re-appear.
I think I see the Hibernate icon on the screen, what do I do?
•
If you see the Hibernate icon ( ) on the screen you must:
•
Confirm the on-screen message indicates you are in Hibernate
mode.
•
Press the
WPS
key to then disable the Hibernate mode and
reactivate all radios.
Troubleshooting 45

Section 10: Health and Safety Information
This device is capable of operating in Wi-Fi™ mode in the
2.4 and 5 GHz bands. The FCC requires that devices
operating within 5.15-5.25 GHz may only be used indoors,
not outside, in order to avoid interference with Mobile
Satellite Services (MSS). Therefore, this device is restricted
from being used outdoors when operating in frequencies
between 5.15-5.25 GHz.
This section outlines the safety precautions associated with
using your mobile hotspot. Your Samsung Mobile Hotspot
device may also be referred to as “wireless device” or
“wireless mobile device” or “device”.
before using your device
.
Read this information
Exposure to Radio Frequency (RF) Signals
The U.S. Food and Drug Administration (FDA) has published
information for consumers relating to Radio Frequency (RF)
exposure from wireless devices. The FDA publication
includes the following information:
46
Specific Absorption Rate (SAR) Certification Information
Your wireless device is a radio transmitter and receiver. It is
designed and manufactured not to exceed the exposure
limits for Radio Frequency (RF) energy set by the Federal
Communications Commission (FCC) of the U.S. Government.
These FCC RF exposure limits are derived from the
recommendations of two expert organizations: the National
Council on Radiation Protection and Measurement (NCRP)
and the Institute of Electrical and Electronics Engineers
(IEEE). In both cases, the recommendations were developed
by scientific and engineering experts drawn from industry,
government, and academia after extensive reviews of the
scientific literature related to the biological effects of RF
energy.
The RF exposure limit set by the FCC for wireless mobile
devices employs a unit of measurement known as the
Specific Absorption Rate (SAR). The SAR is a measure of the
rate of absorption of RF energy by the human body

expressed in units of watts per kilogram (W/kg). The FCC
requires wireless devices to comply with a safety limit of 1.6
watts per kilogram (1.6 W/kg).
The FCC SAR limit incorporates a substantial margin of safety
to give additional protection to the public and to account for
any variations in measurements.
SAR tests are conducted using standard operating positions
accepted by the FCC with the device transmitting at its
highest certified power level in all tested frequency bands.
Although the SAR is determined at the highest certified
power level, the actual SAR level of the device while
operating can be well below the maximum reported value.
This is because the device is designed to operate at multiple
power levels so as to use only the power required to reach
the network. In general, the closer you are to a wireless base
station antenna, the lower the power output of the device.
Before a new model device is available for sale to the public,
it must be tested and certified to the FCC that it does not
exceed the SAR limit established by the FCC. Tests for each
model wireless mobile device are performed in positions and
locations (e.g. at the ear and worn on the body) as required
by the FCC. For body-worn operation, this device has been
tested and meets FCC RF exposure guidelines when used
with an accessory that contains no metal and that positions
the wireless mobile device a minimum of 1.0 cm from the
body.
Use of other accessories may not ensure compliance with
FCC RF exposure guidelines. The FCC has granted an
Equipment Authorization for this mobile device with all
reported SAR levels evaluated as in compliance with the FCC
RF exposure guidelines. This device has a FCC ID number:
A3LSMV100T [Model Number: SM-V100T] and the specific
SAR levels for this device can be found at the following FCC
website:
http://www.fcc.gov/oet/ea/
The SAR information for this device can also be found on
Samsung’s website:
http://www.samsung.com/sar
SAR information on this and other model devices can be
accessed online on the FCC's website through
transition.fcc.gov/oet/rfsafety/sar.html
pertains to a particular model device, this site uses the
device FCC ID number which is usually printed somewhere
on the case of the device. Sometimes it may be necessary to
remove the battery pack to find the number. Once you have
the FCC ID number for a particular device, follow the
.
.
http://
. To find information that
Health and Safety Information 47

instructions on the website and it should provide values for
typical or maximum SAR for a particular device. Additional
SAR information can also be obtained at
http://www.fcc.gov/encyclopedia/specific-absorption-rate-sarcellular-telephones
.
FCC Part 15 Information to User
Pursuant to part 15.21 of the FCC Rules, you are cautioned
that changes or modifications not expressly approved by
Samsung could void your authority to operate the device.
This device complies with part 15 of the FCC Rules.
Operation is subject to the following two conditions: (1) This
device may not cause harmful interference, and (2) this
device must accept any interference received, including
interference that may cause undesired operation.
Note: This equipment has been tested and found to comply
with the limits for a Class B digital device, pursuant to part
15 of the FCC Rules. These limits are designed to provide
reasonable protection against harmful interference in a
residential installation. This equipment generates, uses and
can radiate radio frequency energy and, if not installed and
used in accordance with the instructions, may cause harmful
interference to radio communications.
48
However, there is no guarantee that interference will not
occur in a particular installation. If this equipment does
cause harmful interference to radio or television reception,
which can be determined by turning the equipment off and
on, the user is encouraged to try to correct the interference
by one or more of the following measures:
•
Reorient or relocate the receiving antenna.
•
Increase the separation between the equipment and receiver.
•
Connect the equipment into an outlet on a circuit different from
that to which the receiver is connected.
•
Consult the dealer or an experienced radio/TV technician for help.
Radio Frequency (RF) Energy
Understanding How Your Samsung Mobile
Hotspot Operates
Your device functions as a radio transmitter and receiver.
When it is turned on, it receives and transmits radio
frequency (RF) signals.
Knowing Radio Frequency Safety
The design of your device complies with updated NCRP
standards described below:

In 1991-92, the Institute of Electrical and Electronics
Engineers (IEEE) and the American National Standards
Institute (ANSI) joined in updating ANSI’s 1982 standard for
safety levels with respect to human exposure to RF signals.
More than 120 scientists, engineers and physicians from
universities, government health agencies and industries
developed this updated standard after reviewing the
available body of research.
In 1993, the Federal Communications Commission (FCC)
adopted this updated standard in a regulation. In August
1996, the FCC adopted a hybrid standard consisting of the
existing ANSI/IEEE standard and the guidelines published by
the National Council of Radiation Protection and
Measurements (NCRP).
For more information about RF exposure, visit the FCC Web
site at
www.fcc.gov
.
FCC Radio Frequency Emission
This device meets the FCC Radio Frequency Emission
Guidelines.FCC ID number: A3LSMV100T.
Samsung Mobile Products and Recycling
Samsung cares for the environment and encourages its
customers to recycle Samsung wireless mobile devices and
genuine Samsung accessories.
Proper disposal of your wireless mobile device and its battery
is not only important for safety, it benefits the environment.
Batteries must be recycled or disposed of properly.
Recycling programs for your wireless mobile device,
batteries, and accessories may not be available in your area.
We've made it easy for you to recycle your old Samsung
wireless mobile device by working with respected take-back
companies in every state in the country.
Drop It Off
You can drop off your Samsung-branded wireless mobile
device and batteries for recycling at one of our numerous
Samsung Recycling Direct (SM) locations. A list of these
locations may be found at:
http://pages.samsung.com/us/recyclingdirect/
usactivities_environment_samsungrecyclingdirect_locations.jsp
.
Health and Safety Information 49

Samsung-branded wireless mobile devices and batteries
will be accepted at these locations for no fee.
Consumers may also recycle their used wireless mobile
device or batteries at many retail or carrier-provided
locations where wireless mobile devices and batteries
are sold. Additional information regarding specific
locations may be found at:
http://www.epa.gov/epawaste/partnerships/plugin/cellphone/
index.htm
or at
http://www.call2recycle.org/
Mail It In
The Samsung Mobile Take-Back Program will provide
Samsung customers with a free recycling mailing label.
Just go to
http://fun.samsungmobileusa.com/recycling/index.jsp
follow the instructions to print out a free pre-paid postage
label and then send your old mobile device or battery to
the address listed, via U.S. Mail, for recycling.
Dispose of unwanted electronics through an approved
recycler.
To find the nearest recycling location, go to our website:
www.samsung.com/recyclingdirect
Or call, (877) 278-0799.
50
.
and
Follow local regulations regarding disposal of
wireless mobile devices and batteries
Dispose of your wireless mobile device and batteries in
accordance with local regulations. In some areas, the
disposal of these items in household or business trash may
be prohibited. Help us protect the environment - recycle!
Warning!
Never dispose of batteries in a fire because they may
explode.
UL Certified Travel Charger
The Travel Charger for this wireless mobile device has met
applicable UL safety requirements. Please adhere to the
following safety instructions per UL guidelines:
FAILURE TO FOLLOW THE INSTRUCTIONS OUTLINED MAY
LEAD TO SERIOUS PERSONAL INJURY AND POSSIBLE
PROPERTY DAMAGE.
IMPORTANT SAFETY INSTRUCTIONS - SAVE THESE
INSTRUCTIONS.
DANGER - TO REDUCE THE RISK OF FIRE OR
ELECTRIC SHOCK, CAREFULLY FOLLOW THESE
INSTRUCTIONS.

FOR CONNECTION TO A SUPPLY NOT IN NORTH
AMERICA, USE AN ATTACHMENT PLUG ADAPTOR
OF THE PROPER CONFIGURATION FOR THE
POWER OUTLET.
THIS POWER UNIT IS INTENDED TO BE
CORRECTLY ORIENTED IN A VERTICAL OR
HORIZONTAL OR FLOOR MOUNT POSITION.
Display / Touch-Screen
Please note the following information when using your
mobile device:
WARNING REGARDING DISPLAY
The display on your mobile device is made of glass or
acrylic and could break if your mobile device is
dropped or if it receives significant impact. Do not use
if screen is broken or cracked as this could cause
injury to you.
WARRANTY DISCLAIMER: PROPER USE OF A
TOUCH-SCREEN MOBILE DEVICE
If your mobile device has a touch-screen display,
please note that a touch-screen responds best to
a light touch from the pad of your finger or a
non-metallic stylus. Using excessive force or a
metallic object when pressing on the
touch-screen may damage the tempered glass
surface and void the warranty. For more
information, please refer to the “Standard
Limited Warranty”.
Battery Use and Safety
Important! Handle and store batteries properly to avoid injury or
damage
. Most battery issues arise from improper
handling of batteries and, particularly, from the
continued use of damaged batteries.
•
Do not disassemble, crush, puncture, shred, or otherwise
attempt to change the form of your battery
degree of pressure on the battery. This can cause leakage or an
internal short-circuit, resulting in overheating.
Health and Safety Information 51
. Do not put a high

•
Do not let the wireless mobile device or battery come in
contact with liquids.
device’s circuits, leading to corrosion. Even when the mobile
wireless device appears to be dry and appears to operate
normally, the circuitry could slowly corrode and pose a safety
hazard. If the mobile wireless device and/or battery get wet, have
them checked by your service provider or contact Samsung, even
if they appear to be working properly.
•
Do not place your battery in or near a heat source
heating can damage the phone or the battery and could cause the
wireless mobile device or the battery to explode. Do not dry a wet
or damp battery with an appliance or heat source such as a
microwave oven, hair dryer, iron, or radiator. Avoid leaving your
wireless mobile device in your car in high temperatures.
•
Do not dispose of the wireless mobile device or the battery in
. The wireless mobile device or the battery may explode
a fire
when overheated.
•
Do not handle a damaged or leaking battery
battery fluid come in contact with your eyes, skin or clothing. For
safe disposal options, contact your nearest Samsung-authorized
service center.
52
Liquids can get into the wireless mobile
. Excessive
. Do not let leaking
•
Avoid dropping the wireless mobile device
wireless mobile device or the battery, especially on a hard
surface, can potentially cause damage to the wireless mobile
device and battery. If you suspect damage to the wireless mobile
device or battery, take it to a service center for inspection.
•
Never use any charger or battery that is damaged in any way
•
Do not allow the battery to touch metal objects
short-circuiting can occur when a metallic object (coin, key,
jewelry, clip, or pen) causes a direct connection between the +
and - terminals of the battery (metal strips on the battery), for
example when you carry a spare battery in a pocket or bag.
Short-circuiting the terminals may damage the battery or the
object causing the short-circuiting.
Important!
Use only Samsung-approved batteries, and
recharge your battery only with
Samsung-approved chargers which are
specifically designed for your wireless mobile
device.
. Dropping the
. Accidental
.

WARNING!
Use of a non-Samsung-approved battery or charger may
present a risk of fire, explosion, leakage, or other hazard
Samsung's warranty does not cover damage to the wireless
mobile device caused by non-Samsung-approved batteries
and/or chargers.
•
Do not use incompatible wireless mobile device batteries and
. Some websites and second-hand dealers not
chargers
associated with reputable manufacturers and carriers, might be
selling incompatible or even counterfeit batteries and chargers.
Consumers should purchase manufacturer or
carrier-recommended products and accessories. If unsure about
whether a replacement battery or charger is compatible, contact
the manufacturer of the battery or charger.
•
Misuse or use of incompatible mobile wireless device,
batteries, and charging devices could result in damage to the
equipment and a possible risk of fire, explosion, or leakage,
leading to serious injuries, damages to your wireless mobile
device, or other serious hazard
.
.
Care and Maintenance
Your device is a product of superior design and
craftsmanship and should be treated with care. The
suggestions below will help you fulfill any warranty
obligations and allow you to enjoy this product for many
years:
Keep your Samsung Device away from:
Liquids of any kind
Keep the wireless mobile device dry. Precipitation,
humidity, and liquids contain minerals that will corrode
electronic circuits. If the wireless mobile device does get
wet, do not accelerate drying with the use of an oven,
microwave, or dryer, because this may damage the
device and could cause a fire or explosion.
Do not use the wireless mobile device with a wet hand.
Doing so may cause an electric shock to you or damage
to the wireless mobile device.
Extreme heat or cold
Avoid temperatures below 0°C / 32°F or above 45°C /
113°F.
Health and Safety Information 53

Microwaves
Do not try to dry your wireless mobile device in a
microwave oven. Doing so may cause a fire or explosion.
Dust and dirt
Do not expose your wireless mobile device to dust, dirt,
or sand.
Cleaning solutions
Do not use harsh chemicals, cleaning solvents, or strong
detergents to clean the wireless mobile device. Wipe it
with a soft cloth slightly dampened in a mild
soap-and-water solution.
Shock or vibration
Do not drop, knock, or shake the wireless mobile device.
Rough handling can break internal circuit boards.
Paint
Do not paint the wireless mobile device. Paint can clog
the device’s moving parts or ventilation openings and
prevent proper operation.
Operating Environment
Remember to follow any special regulations in force in any
area, and always switch your wireless mobile device off
whenever it is forbidden to use it, or when it may cause
54
interference or danger. When connecting the wireless mobile
device or any accessory to another device, read its user's
guide for detailed safety instructions. Do not connect
incompatible products.
Using Your Mobile Hotspot Near Other Electronic
Devices
Most modern electronic equipment is shielded from Radio
Frequency (RF) signals. However, certain electronic
equipment may not be shielded against the RF signals from
your wireless mobile device. Consult the manufacturer to
discuss alternatives.
Conversely, ensure the unit is placed at least 2 feet away
from products which generate electromagnetic radiation,
such as a computer monitor or microwave oven.
Note:
For the best care of your device, ensure that only
authorized personnel service your wireless mobile
device. Failure to do so may be dangerous and void your
warranty. Consult the manufacturer of any personal
medical devices, such as pacemakers and hearing aids,
to determine if they are adequately shielded from
external RF signals.

Implantable Medical Devices
A minimum separation of six (6) inches should be maintained
between a handheld wireless mobile device and an
implantable medical device, such as a pacemaker or
implantable cardioverter defibrillator, to avoid potential
interference with the device.
Persons who have such devices:
•
Should ALWAYS keep the mobile device more than six (6) inches
from their implantable medical device when the mobile device is
turned ON;
•
Should not carry the mobile device in a breast pocket;
•
Should use the ear opposite the implantable medical device to
minimize the potential for interference;
•
Should turn the mobile device OFF immediately if there is any
reason to suspect that interference is taking place;
•
Should read and follow the directions from the manufacturer of
your implantable medical device. If you have any questions about
using your wireless mobile device with an implantable medical
device, consult your health care provider.
For more information see:
http://www.fcc.gov/oet/rfsafety/rf-faqs.html#
.
Other Medical Devices
If you use any other personal medical devices, consult the
manufacturer of your device to determine if it is adequately
shielded from external RF energy. Your physician may be able
to assist you in obtaining this information. Switch your
mobile device off in health care facilities when any
regulations posted in these areas instruct you to do so.
Hospitals or health care facilities may be using equipment
that could be sensitive to external RF energy.
Vehicles
RF signals may affect improperly installed or inadequately
shielded electronic systems in motor vehicles. Check with
the manufacturer or its representative regarding your vehicle
before using your mobile device in a motor vehicle. You
should also consult the manufacturer of any equipment that
has been added to your vehicle.
Posted Facilities
Switch your mobile device off in any facility where posted
notices require you to do so.
Potentially Explosive Environments
Switch your mobile device off when in any area with a
potentially explosive atmosphere and obey all signs and
instructions. Sparks in such areas could cause an explosion
Health and Safety Information 55

or fire resulting in bodily injury or even death. Users are
advised to switch the mobile device off while at a refueling
point (service station).
Users are reminded of the need to observe restrictions on the
use of radio equipment in fuel depots (fuel storage and
distribution areas), chemical plants, or where blasting
operations are in progress. Areas with a potentially explosive
atmosphere are often, but not always, clearly marked. They
include below deck on boats, chemical transfer or storage
facilities, vehicles using liquefied petroleum gas (such as
propane or butane), areas where the air contains chemicals
or particles, such as grain, dust, or metal powders, and any
other area where you would normally be advised to turn off
your vehicle engine. Vehicles using liquefied petroleum gas
(such as propane or butane) must comply with the National
Fire Protection Standard (NFPA-58). For a copy of this
standard, contact the National Fire Protection Association.
When your Device is Wet
Do not turn on your device if it is wet. If your device is
already on, turn it off and remove the battery immediately (if
the device will not turn off or you cannot remove the battery,
leave it as-is). Then, dry the device with a towel and take it
to a service center.
56
Restricting Children's Access to Your Wireless Mobile Device
Your wireless mobile device is not a toy. Do not allow
children to play with it because they could hurt themselves
and others or damage the wireless mobile device.
Keep the wireless mobile device and all its parts and
accessories out of the reach of small children.
FCC Notice and Cautions
FCC Notice
The device may cause TV or radio interference if used in
close proximity to receiving equipment. The FCC can require
you to stop using the device if such interference cannot be
eliminated.
Cautions
Any changes or modifications to your device not expressly
approved by Samsung could void your warranty for this
equipment and void your authority to operate this equipment.
Only use approved batteries, antennas, and chargers. The
use of any unauthorized accessories may be dangerous and
void the device warranty if said accessories cause damage
or a defect to the device.

Although your device is quite sturdy, it is a complex piece of
equipment and can be broken. Avoid dropping, hitting,
bending, or sitting on it.
Other Important Safety Information
•
Only qualified personnel should service the device or install the
wireless mobile device in a vehicle. Faulty installation or service
may be dangerous and may invalidate any warranty applicable to
the device.
•
Ensure that any devices or related equipment installed in your
vehicle are securely mounted.
•
Check regularly that all wireless device equipment in your vehicle
is mounted and operating properly.
•
Do not store or carry flammable liquids, gases, or explosive
materials in the same compartment as the device, its parts, or
accessories.
•
For vehicles equipped with an air bag, remember that an air bag
inflates with great force. Do not place objects, including installed
or portable wireless equipment near or in the area over the air
bag or in the air bag deployment area. If wireless equipment is
improperly installed and the air bag inflates, serious injury could
result.
•
Switch your device off before boarding an aircraft. The use of
wireless devices in aircraft is illegal and may be dangerous to the
aircraft's operation. Check with appropriate authorities before
using any function of a device while on an aircraft.
•
Failure to observe these instructions may lead to the suspension
or denial of services to the offender, or legal action, or both.
•
While using your device, leave some lights on in the room and do
not hold the screen too close to your eyes.
•
Seizures or blackouts can occur when you are exposed to flashing
lights while watching videos or playing games for extended
periods. If you feel any discomfort, stop using the device
immediately.
•
Reduce risk of repetitive motion injuries. When you repetitively
perform actions, such as pressing keys, drawing characters on a
touch screen with your fingers, or playing games, you may
experience occasional discomfort in your hands, neck, shoulders,
or other parts of your body. When using your device for extended
periods, hold the device with a relaxed grip, press the keys lightly,
and take frequent breaks. If you continue to have discomfort
during or after such use, stop use and see a physician.[122011]
Health and Safety Information 57

Section 11: Warranty Information
Standard Limited Warranty
What is covered and for how long?
SAMSUNG TELECOMMUNICATIONS AMERICA, LLC
(“SAMSUNG”) warrants that SAMSUNG’s Mobile Hotspot
device and accessories (“Products”) are free from defects in
material and workmanship under normal use and service for
the period commencing upon the date of purchase by the
first consumer purchaser and continuing for the following
specified period of time after that date:
Mobile Hotspot Device 1 Year
Batteries 1 Year
Case/Pouch/Holster 90 Days
Other Accessories 1 Year
What is not covered?
This Limited Warranty is conditioned upon proper use of the
Product.
58
This Limited Warranty does not cover: (a) defects or damage
resulting from accident, misuse, abnormal use, abnormal
conditions, improper storage, exposure to liquid, moisture,
dampness, sand or dirt, neglect, or unusual physical,
electrical or electromechanical stress; (b) scratches, dents
and cosmetic damage, unless caused by SAMSUNG;
(c) defects or damage resulting from excessive force or use
of a metallic object when pressing on a touch screen;
(d) equipment that has the serial number or the
enhancement data code removed, defaced, damaged,
altered or made illegible; (e) ordinary wear and tear;
(f) defects or damage resulting from the use of Product in
conjunction or connection with accessories, products, or
ancillary/peripheral equipment not furnished or approved by
SAMSUNG; (g) defects or damage resulting from improper
testing, operation, maintenance, installation, service, or
adjustment not furnished or approved by SAMSUNG;
(h) defects or damage resulting from external causes such as
collision with an object, fire, flooding, dirt, windstorm,
lightning, earthquake, exposure to weather conditions, theft,
blown fuse, or improper use of any electrical source;
(i) defects or damage resulting from cellular signal reception

or transmission, or viruses or other software problems
introduced into the Product; or (j) Product used or purchased
outside the United States. This Limited Warranty covers
batteries only if battery capacity falls below 80% of rated
capacity or the battery leaks, and this Limited Warranty does
not cover any battery if (i) the battery has been charged by a
battery charger not specified or approved by SAMSUNG for
charging the battery; (ii) any of the seals on the battery are
broken or show evidence of tampering; or (iii) the battery has
been used in equipment other than the SAMSUNG mobile
wireless device for which it is specified.
What are SAMSUNG’s obligations?
During the applicable warranty period, provided the Product
is returned in accordance with the terms of this Limited
Warranty, SAMSUNG will repair or replace the Product, at
SAMSUNG’s sole option, without charge. SAMSUNG may, at
SAMSUNG’s sole option, use rebuilt, reconditioned, or new
parts or components when repairing any Product, or may
replace the Product with a rebuilt, reconditioned or new
Product.
Repaired/replaced cases, pouches and holsters will be
warranted for a period of ninety (90) days. All other repaired/
replaced Products will be warranted for a period equal to the
remainder of the original Limited Warranty on the original
Product or for ninety (90) days, whichever is longer. All
replaced Products, parts, components, boards and
equipment shall become the property of SAMSUNG. Except to
any extent expressly allowed by applicable law, transfer or
assignment of this Limited Warranty is prohibited.
What must you do to obtain warranty service?
To obtain service under this Limited Warranty, you must
return the Product to an authorized mobile wireless device
service facility in an adequate container for shipping,
accompanied by the sales receipt or comparable proof of
sale showing the original date of purchase, the serial number
of the Product and the seller’s name and address.
To obtain assistance on where to deliver the Product, please
call SAMSUNG Customer Care at 1-888-987-4357. If
SAMSUNG determines that any Product is not covered by this
Limited Warranty, you must pay all parts, shipping, and labor
charges for the repair or return of such Product.
You should keep a separate backup copy of any contents of
the Product before delivering the Product to SAMSUNG for
warranty service, as some or all of the contents may be
deleted or reformatted during the course of warranty service.
Warranty Information 59

What are the limits on SAMSUNG’s liability?
THIS LIMITED WARRANTY SETS OUT THE FULL EXTENT OF
SAMSUNG’S RESPONSIBILITIES, AND THE EXCLUSIVE
REMEDY REGARDING THE PRODUCTS.
ALL IMPLIED WARRANTIES, INCLUDING WITHOUT
LIMITATION, IMPLIED WARRANTIES OF MERCHANTABILITY
AND FITNESS FOR A PARTICULAR PURPOSE, ARE LIMITED TO
THE DURATION OF THIS LIMITED WARRANTY. IN NO EVENT
SHALL SAMSUNG BE LIABLE FOR DAMAGES IN EXCESS OF
THE PURCHASE PRICE OF THE PRODUCT OR FOR, WITHOUT
LIMITATION, COMMERCIAL LOSS OF ANY SORT; LOSS OF
USE, TIME, DATA, REPUTATION, OPPORTUNITY, GOODWILL,
PROFITS OR SAVINGS; INCONVENIENCE; INCIDENTAL,
SPECIAL, CONSEQUENTIAL OR PUNITIVE DAMAGES; OR
DAMAGES ARISING FROM THE USE OR INABILITY TO USE THE
PRODUCT. SOME STATES AND JURISDICTIONS DO NOT
ALLOW LIMITATIONS ON HOW LONG AN IMPLIED WARRANTY
LASTS, OR THE DISCLAIMER OR LIMITATION OF INCIDENTAL
OR CONSEQUENTIAL DAMAGES, SO THE ABOVE LIMITATIONS
AND DISCLAIMERS MAY NOT APPLY TO YOU.
SAMSUNG MAKES NO WARRANTIES OR REPRESENTATIONS,
EXPRESS OR IMPLIED, STATUTORY OR OTHERWISE, AS TO
THE QUALITY, CAPABILITIES, OPERATIONS, PERFORMANCE
60
OR SUITABILITY OF ANY THIRD-PARTY SOFTWARE OR
EQUIPMENT USED IN CONJUNCTION WITH THE PRODUCT, OR
THE ABILITY TO INTEGRATE ANY SUCH SOFTWARE OR
EQUIPMENT WITH THE PRODUCT, WHETHER SUCH
THIRD-PARTY SOFTWARE OR EQUIPMENT IS INCLUDED WITH
THE PRODUCT DISTRIBUTED BY SAMSUNG OR OTHERWISE.
RESPONSIBILITY FOR THE QUALITY, CAPABILITIES,
OPERATIONS, PERFORMANCE AND SUITABILITY OF ANY
SUCH THIRD-PARTY SOFTWARE OR EQUIPMENT RESTS
SOLELY WITH THE USER AND THE DIRECT VENDOR, OWNER
OR SUPPLIER OF SUCH THIRD-PARTY SOFTWARE OR
EQUIPMENT.
Nothing in the Product instructions or information shall be
construed to create an express warranty of any kind with
respect to the Products. No agent, employee, dealer,
representative or reseller is authorized to modify or extend
this Limited Warranty or to make binding representations or
claims, whether in advertising, presentations or otherwise,
on behalf of SAMSUNG regarding the Products or this Limited
Warranty.
This Limited Warranty gives you specific legal rights, and you
may also have other rights that vary from state to state.

What is the procedure for resolving disputes?
ALL DISPUTES WITH SAMSUNG ARISING IN ANY WAY FROM
THIS LIMITED WARRANTY OR THE SALE, CONDITION OR
PERFORMANCE OF THE PRODUCTS SHALL BE RESOLVED
EXCLUSIVELY THROUGH FINAL AND BINDING ARBITRATION,
AND NOT BY A COURT OR JURY.
Any such dispute shall not be combined or consolidated with
a dispute involving any other person’s or entity’s Product or
claim, and specifically, without limitation of the foregoing,
shall not under any circumstances proceed as part of a class
action. The arbitration shall be conducted before a single
arbitrator, whose award may not exceed, in form or amount,
the relief allowed by the applicable law. The arbitration shall
be conducted according to the American Arbitration
Association (AAA) Commercial Arbitration Rules applicable to
consumer disputes. This arbitration provision is entered
pursuant to the Federal Arbitration Act. The laws of the State
of Texas, without reference to its choice of laws principles,
shall govern the interpretation of the Limited Warranty and all
disputes that are subject to this arbitration provision. The
arbitrator shall decide all issues of interpretation and
application of this arbitration provision and the Limited
Warranty.
For any arbitration in which your total damage claims,
exclusive of attorney fees and expert witness fees, are
$5,000.00 or less (“Small Claim”), the arbitrator may, if you
prevail, award your reasonable attorney fees, expert witness
fees and costs as part of any award, but may not grant
SAMSUNG its attorney fees, expert witness fees or costs
unless it is determined that the claim was brought in bad
faith. In a Small Claim case, you shall be required to pay no
more than half of the total administrative, facility and
arbitrator fees, or $50.00 of such fees, whichever is less, and
SAMSUNG shall pay the remainder of such fees.
Administrative, facility and arbitrator fees for arbitrations in
which your total damage claims, exclusive of attorney fees
and expert witness fees, exceed $5,000.00 (“Large Claim”)
shall be determined according to AAA rules. In a Large Claim
case, the arbitrator may grant to the prevailing party, or
apportion among the parties, reasonable attorney fees,
expert witness fees and costs. Judgment may be entered on
the arbitrator’s award in any court of competent jurisdiction.
This arbitration provision also applies to claims against
SAMSUNG’s employees, representatives and affiliates if any
such claim arises from the Product’s sale, condition or
performance.
Warranty Information 61

You may opt out of this dispute resolution procedure by
providing notice to SAMSUNG no later than 30 calendar days
from the date of the first consumer purchaser’s purchase of the
Product. To opt out, you must send notice by e-mail to
optout@sta.samsung.com, with the subject line: “Arbitration
Opt Out.” You must include in the opt out e-mail (a) your name
and address; (b) the date on which the Product was purchased;
(c) the Product model name or model number; and (d) the IMEI
or MEID or Serial Number, as applicable, if you have it (the IMEI
or MEID or Serial Number can be found (i) on the Product box;
(ii) on the Product information screen, which can be found
under “Home;” (iii) on a label on the back of the Product
beneath the battery, if the battery is removable; and (iv) on the
outside of the Product if the battery is not removable).
Alternatively, you may opt out by calling 1-888-987-4357 no
later than 30 calendar days from the date of the first consumer
purchaser’s purchase of the Product and providing the same
information. These are the only two forms of notice that will be
effective to opt out of this dispute resolution procedure. Opting
out of this dispute resolution procedure will not affect the
coverage of the Limited Warranty in any way, and you will
continue to enjoy the benefits of the Limited Warranty.
62
Severability
If any portion of this Limited Warranty is held to be illegal or
unenforceable, such partial illegality or unenforceability shall
not affect the enforceability of the remainder of the Limited
Warranty.
Precautions for Transfer and Disposal
If data stored on this device is deleted or reformatted using
the standard methods, the data only appears to be removed
on a superficial level, and it may be possible for someone to
retrieve and reuse the data by means of special software.
To avoid unintended information leaks and other problems of
this sort, it is recommended that the device be returned to
Samsung’s Customer Care Center for an Extended File
System (EFS) Clear which will eliminate all user memory and
return all settings to default settings. Please contact the
Samsung Customer Care Center
Important!
Please provide warranty information (proof of
purchase) to Samsung’s Customer Care Center in
order to provide this service at no charge. If the
warranty has expired on the device, charges may
apply.
for details.

Samsung Telecommunications America, LLC
1301 E. Lookout Drive
Richardson, Texas 75082
Phone: 1-800-SAMSUNG
Phone: 1-888-987-HELP (4357)
No reproduction in whole or in part allowed without prior
written approval. Specifications and availability subject to
change without notice. [111611]
End User License Agreement for Software
IMPORTANT. READ CAREFULLY: This End User License
Agreement ("EULA") is a legal agreement between you
(either an individual or a single entity) and Samsung
Electronics Co., Ltd. ("Samsung") for software, owned by
Samsung and its affiliated companies and its third party
suppliers and licensors, that accompanies this EULA, which
includes computer software and may include associated
media, printed materials, "online" or electronic
documentation in connection with your use of this device
("Software").
This device requires the use of preloaded software in its
normal operation. BY USING THE DEVICE OR ITS PRELOADED
SOFTWARE, YOU ACCEPT THE TERMS OF THIS EULA. IF YOU
DO NOT ACCEPT THESE TERMS, DO NOT USE THE DEVICE OR
THE SOFTWARE.
1.
GRANT OF LICENSE
rights provided that you comply with all terms and conditions
of this EULA: You may install, use, access, display and run
one copy of the Software on the local hard disk(s) or other
permanent storage media of one computer and use the
Software on a single computer or a mobile device at a time,
and you may not make the Software available over a network
where it could be used by multiple computers at the same
time. You may make one copy of the Software in machine
readable form for backup purposes only; provided that the
backup copy must include all copyright or other proprietary
notices contained on the original.
Certain items of the Software may be subject to open source
licenses. The open source license provisions may override
some of the terms of this EULA. We make the applicable
open source licenses available to you on the Legal Notices
section of the Settings menu of your device.
. Samsung grants you the following
Warranty Information 63

RESERVATION OF RIGHTS AND OWNERSHIP
2.
reserves all rights not expressly granted to you in this EULA.
The Software is protected by copyright and other intellectual
property laws and treaties. Samsung or its suppliers own the
title, copyright and other intellectual property rights in the
Software. The Software is licensed, not sold.
3.
LIMITATIONS ON END USER RIGHTS
engineer, decompile, disassemble, or otherwise attempt to
discover the source code or algorithms of, the Software
(except and only to the extent that such activity is expressly
permitted by applicable law not withstanding this limitation),
or modify, or disable any features of, the Software, or create
derivative works based on the Software. You may not rent,
lease, lend, sublicense or provide commercial hosting
services with the Software.
4.
CONSENT TO USE OF DATA
affiliates may collect and use technical information gathered
as part of the product support services related to the
Software provided to you, if any, such as IMEI (your device’s
unique identification number), device number, model name,
customer code, access recording, your device’s current SW
version, MCC (Mobile Country Code), MNC (Mobile Network
Code). Samsung and its affiliates may use this information
solely to improve their products or to provide customized
64
. You agree that Samsung and its
. Samsung
. You may not reverse
services or technologies to you and will not disclose this
information in a form that personally identifies you. At all
times your information will be treated in accordance with
Samsung’s Privacy Policy, which can be viewed at:
http://account.samsung.com/membership/pp
SOFTWARE UPDATES
5.
make available to you updates, upgrades, supplements and
add-on components (if any) of the Software, including bug
fixes, service upgrades (parts or whole), products or devices,
and updates and enhancements to any software previously
installed (including entirely new versions), (collectively
“Update”) after the date you obtain your initial copy of the
Software to improve the Software and ultimately enhance
your user experience with your device. This EULA applies to
all and any component of the Update that Samsung may
provide to you or make available to you after the date you
obtain your initial copy of the Software, unless we provide
other terms along with such Update. To use Software
provided through Update, you must first be licensed for the
Software identified by Samsung as eligible for the Update.
After the Update, you may no longer use the Software that
formed the basis for your Update eligibility. The updated
Software version may add new functions and, in some
limited cases, may delete existing functions.
. Samsung may provide to you or
.

While the Update will be generally available, in some limited
circumstances, the Software updates will only be offered by
your network carrier, and such Software updates will be
governed by your contractual relationship with your network
carrier.
With the “Automatic Update” function enabled (as in the
default setting in the System Update menu in the Setting),
your device downloads some Updates automatically from
time to time. Your device will, however, ask for your consent
before installing any Update If you choose to disable the
“Automatic Update” function, then you can check the
availability of new Updates by clicking on the “Check
Update” menu in the Setting. We recommend that you check
availability of any new Updates periodically for optimal use of
your device. If you want to avoid any use of network data for
the Update downloads, then you should choose the “Wi-Fi
Only” option in the Setting. (Regardless of the option you
choose, the “Automatic Update” function downloads Updates
only through Wi-Fi connection.)
6. Some features of the Software may require your device to
have access to the internet and may be subject to
restrictions imposed by your network or internet provider.
Unless your device is connected to the internet through Wi-Fi
connection, the Software will access through your mobile
network, which may result in additional charges depending
on your payment plan. In addition, your enjoyment of some
features of the Software may be affected by the suitability
and performance of your device hardware or data access.
7.
SOFTWARE TRANSFER
the rights to the Software granted herein to any third party
unless it is in connection with the sale of the mobile device
which the Software accompanied. In such event, the transfer
must include all of the Software (including all component
parts, the media and printed materials, any upgrades, this
EULA) and you may not retain any copies of the Software.
The transfer may not be an indirect transfer, such as a
consignment. Prior to the transfer, the end user receiving the
Software must agree to all the EULA terms.
8.
EXPORT RESTRICTIONS
Software is subject to export restrictions of various countries.
You agree to comply with all applicable international and
national laws that apply to the Software, including all the
applicable export restriction laws and regulations.
9.
TERMINATION
rights under this License will terminate automatically without
notice from Samsung if you fail to comply with any of the
. You may not transfer this EULA or
. You acknowledge that the
. This EULA is effective until terminated. Your
Warranty Information 65

terms and conditions of this EULA. Upon termination of this
EULA, you must cease all use of the Software and destroy all
copies, full or partial, of the Software.
10.
DISCLAIMER OF WARRANTY
IN A WRITTEN EXPRESS LIMITED WARRANTY
ACCOMPANYING YOUR DEVICE, ALL SOFTWARE PROVIDED
BY SAMSUNG WITH THIS MOBILE DEVICE (WHETHER
INCLUDED WITH THE DEVICE, DOWNLOADED, OR
OTHERWISE OBTAINED) IS PROVIDED "AS IS" AND ON AN
"AS AVAILABLE" BASIS, WITHOUT WARRANTIES OF ANY KIND
FROM SAMSUNG, EITHER EXPRESS OR IMPLIED. TO THE
FULLEST EXTENT POSSIBLE PURSUANT TO APPLICABLE
LAW, SAMSUNG DISCLAIMS ALL WARRANTIES EXPRESS,
IMPLIED, OR STATUTORY, INCLUDING, BUT NOT LIMITED TO,
IMPLIED WARRANTIES OF MERCHANTABILITY, SATISFACTORY
QUALITY OR WORKMANLIKE EFFORT, FITNESS FOR A
PARTICULAR PURPOSE, RELIABILITY OR AVAILABILITY,
ACCURACY, LACK OF VIRUSES, QUIET ENJOYMENT, NON
INFRINGEMENT OF THIRD PARTY RIGHTS OR OTHER
VIOLATION OF RIGHTS. SOME JURISDICTIONS DO NOT
ALLOW EXCLUSIONS OR LIMITATIONS OF IMPLIED
WARRANTIES, SO THE ABOVE EXCLUSIONS OR LIMITATIONS
MAY NOT APPLY TO YOU. NO ADVICE OR INFORMATION,
WHETHER ORAL OR WRITTEN, OBTAINED BY YOU FROM
66
. UNLESS SEPARATELY STATED
SAMSUNG OR ITS AFFILIATES SHALL BE DEEMED TO ALTER
THIS DISCLAIMER BY SAMSUNG OF WARRANTY REGARDING
THE SOFTWARE, OR TO CREATE ANY WARRANTY OF ANY
SORT FROM SAMSUNG.
11.
THIRD-PARTY APPLICATIONS
applications may be included with, or downloaded to this
mobile device. Samsung makes no representations
whatsoever about any of these applications. Since Samsung
has no control over such applications, you acknowledge and
agree that Samsung is not responsible for the availability of
such applications and is not responsible or liable for any
content, advertising, products, services, or other materials
on or available from such applications. You expressly
acknowledge and agree that use of third party applications is
at your sole risk and that the entire risk of unsatisfactory
quality, performance, accuracy and effort is with you. It is up
to you to take precautions to ensure that whatever you select
to use is free of such items as viruses, worms, Trojan horses,
and other items of a destructive nature. References on this
mobile device to any names, marks, products, or services of
any third-parties are provided solely as a convenience to you,
and do not constitute or imply an endorsement, sponsorship,
or recommendation of, or affiliation with the third party or its
products and services. You agree that Samsung shall not be
. Certain third party

responsible or liable, directly or indirectly, for any damage or
loss, including but not limited to any damage to the mobile
device or loss of data, caused or alleged to be caused by, or
in connection with, use of or reliance on any such third party
content, products, or services available on or through any
such application. You acknowledge and agree that the use of
any third-party application is governed by such third party
application provider's Terms of Use, License Agreement,
Privacy Policy, or other such agreement and that any
information or personal data you provide, whether knowingly
or unknowingly, to such third-party application provider, will
be subject to such third party application provider's privacy
policy, if such a policy exists. SAMSUNG DISCLAIMS ANY
RESPONSIBILITY FOR ANY DISCLOSURE OF INFORMATION OR
ANY OTHER PRACTICES OF ANY THIRD PARTY APPLICATION
PROVIDER. SAMSUNG EXPRESSLY DISCLAIMS ANY
WARRANTY REGARDING WHETHER YOUR PERSONAL
INFORMATION IS CAPTURED BY ANY THIRD PARTY
APPLICATION PROVIDER OR THE USE TO WHICH SUCH
PERSONAL INFORMATION MAY BE PUT BY SUCH THIRD
PARTY APPLICATION PROVIDER.
12.
SAMSUNG APPLICATIONS
and services may be included with, or downloaded to, this
mobile device. Many of them require Samsung Services
. Certain Samsung applications
membership registration (“Samsung Account”), and your
rights and obligations will be set forth in separate Samsung
Account terms and conditions and privacy policies. There are
non-Samsung Account applications and services that require
your consent to their separate terms and conditions and
privacy policies. You expressly acknowledge and agree that
your use of such applications and services will be subject to
the applicable terms and conditions and privacy policies.
13.
LIMITATION OF LIABILITY
FOR ANY DAMAGES OF ANY KIND ARISING OUT OF OR
RELATING TO THE USE OR THE INABILITY TO USE THE
SOFTWARE OR ANY THIRD PARTY APPLICATION, ITS
CONTENT OR FUNCTIONALITY, INCLUDING BUT NOT LIMITED
TO DAMAGES CAUSED BY OR RELATED TO ERRORS,
OMISSIONS, INTERRUPTIONS, DEFECTS, DELAY IN
OPERATION OR TRANSMISSION, COMPUTER VIRUS, FAILURE
TO CONNECT, NETWORK CHARGES, IN-APP PURCHASES,
AND ALL OTHER DIRECT, INDIRECT, SPECIAL, INCIDENTAL,
EXEMPLARY, OR CONSEQUENTIAL DAMAGES EVEN IF
SAMSUNG HAS BEEN ADVISED OF THE POSSIBILITY OF SUCH
DAMAGES. SOME JURISDICTIONS DO NOT ALLOW THE
EXCLUSION OR LIMITATION OF INCIDENTAL OR
CONSEQUENTIAL DAMAGES, SO THE ABOVE EXCLUSIONS OR
LIMITATIONS MAY NOT APPLY TO YOU. NOTWITHSTANDING
. SAMSUNG WILL NOT BE LIABLE
Warranty Information 67

THE FOREGOING, SAMSUNG ELECTRONIC CO.'S TOTAL
LIABILITY TO YOU FOR ALL LOSSES, DAMAGES, CAUSES OF
ACTION, INCLUDING BUT NOT LIMITED TO THOSE BASED ON
CONTRACT, TORT, OR OTHERWISE, ARISING OUT OF YOUR
USE OF THE SOFTWARE OR THIRD PARTY APPLICATIONS ON
THIS MOBILE DEVICE, OR ANY OTHER PROVISION OF THIS
EULA, SHALL NOT EXCEED THE AMOUNT PURCHASER PAID
SPECIFICALLY FOR THIS MOBILE DEVICE OR ANY SUCH
THIRD PARTY APPLICATION THAT WAS INCLUDED WITH THIS
MOBILE DEVICE. THE FOREGOING LIMITATIONS,
EXCLUSIONS, AND DISCLAIMERS (INCLUDING SECTIONS 10,
11, 12 AND 13) SHALL APPLY TO THE MAXIMUM EXTENT
PERMITTED BY APPLICABLE LAW, EVEN IF ANY REMEDY
FAILS ITS ESSENTIAL PURPOSE.
14.
U.S. GOVERNMENT END USERS RESTRICTED RIGHTS
Software is licensed only with "restricted rights" and as
"commercial items" consisting of "commercial software"
and "commercial software documentation" with only those
rights as are granted to all other end users pursuant to the
terms and conditions herein. All Products are provided only
with "restricted rights" with only those rights as are granted
to all other end users pursuant to the terms and conditions
herein. All Software and Products are provided subject to
Federal Acquisition Regulation (FAR) 52.227.19.
68
. The
15.
APPLICABLE LAW
the jurisdiction where you are a resident or, if a resident of
the United States, by the laws of the state of Texas, without
regard to its conflict of law provisions. This EULA shall not be
governed by the UN Convention on Contracts for the
International Sale of Goods, the application of which is
expressly excluded.
16.
DISPUTE RESOLUTION
(a) Non-United States residents. If a dispute, controversy or
difference arising in any way from this EULA or your use of
the Software is not amicably settled, it shall be subject to the
non-exclusive jurisdiction of the courts of the jurisdiction
where you are a resident. Notwithstanding the foregoing,
Samsung may apply for injunctive remedies (or an equivalent
type of urgent legal relief) in any jurisdiction.
(b) United States residents. ALL DISPUTES WITH SAMSUNG
ARISING IN ANY WAY FROM THIS EULA OR YOUR USE OF THE
SOFTWARE SHALL BE RESOLVED EXCLUSIVELY THROUGH
FINAL AND BINDING ARBITRATION, AND NOT BY A COURT OR
JURY. Any such dispute shall not be combined or
consolidated with any other person’s or entity’s claim or
dispute, and specifically, without limitation of the foregoing,
shall not under any circumstances proceed as part of a class
. This EULA is governed by the laws of
.

action. The arbitration shall be conducted before a single
arbitrator, whose award may not exceed, in form or amount,
the relief allowed by the applicable law. The arbitration shall
be conducted according to the American Arbitration
Association (AAA) Commercial Arbitration Rules applicable to
consumer disputes. This arbitration provision is entered
pursuant to the Federal Arbitration Act. The laws of the State
of Texas, without reference to its choice of laws principles,
shall govern the interpretation of the EULA and all disputes
that are subject to this arbitration provision. The arbitrator
shall decide all issues of interpretation and application of this
arbitration provision and the EULA. For any arbitration in
which your total damage claims, exclusive of attorney fees
and expert witness fees, are $5,000.00 or less ("Small
Claim"), the arbitrator may, if you prevail, award your
reasonable attorney fees, expert witness fees and costs as
part of any award, but may not grant Samsung its attorney
fees, expert witness fees or costs unless it is determined that
the claim was brought in bad faith. In a Small Claim case,
you shall be required to pay no more than half of the total
administrative, facility and arbitrator fees, or $50.00 of such
fees, whichever is less, and Samsung shall pay the
remainder of such fees. Administrative, facility and arbitrator
fees for arbitrations in which your total damage claims,
exclusive of attorney fees and expert witness fees, exceed
$5,000.00 ("Large Claim") shall be determined according to
AAA rules. In a Large Claim case, the arbitrator may grant to
the prevailing party, or apportion among the parties,
reasonable attorney fees, expert witness fees and costs.
Judgment may be entered on the arbitrator's award in any
court of competent jurisdiction. This arbitration provision also
applies to claims against Samsung’s employees,
representatives and affiliates if any such claim arises from
the licensing or use of the Software. You may opt out of this
dispute resolution procedure by providing notice to Samsung
no later than 30 calendar days from the date of the first
consumer purchaser’s purchase of this device. To opt out,
you must send notice by e-mail to
optout@sta.samsung.com, with the subject line: "Arbitration
Opt Out." You must include in the opt out e-mail (a) your
name and address; (b) the date on which the device was
purchased; (c) the device model name or model number; and
(d) the IMEI or MEID or Serial Number, as applicable, if you
have it (the IMEI or MEID or Serial Number can be found (i) on
the device box; (ii) on the device information screen, which
can be found under "Settings;" (iii) on a label on the back of
the device beneath the battery, if the battery is removable;
and (iv) on the outside of the device if the battery is not
Warranty Information 69

removable). Alternatively, you may opt out by calling
1-888-987-4357 no later than 30 calendar days from the
date of the first consumer purchaser's purchase of the
device and providing the same information. These are the
only two forms of notice that will be effective to opt out of
this dispute resolution procedure. Opting out of this dispute
resolution procedure will not affect your use of the device or
its preloaded Software, and you will continue to enjoy the
benefits of this license.
17.
ENTIRE AGREEMENT; SEVERABILITY
entire agreement between you and Samsung relating to the
Software and supersedes all prior or contemporaneous oral
or written communications, proposals and representations
with respect to the Software or any other subject matter
covered by this EULA. If any provision of this EULA is held to
be void, invalid, unenforceable or illegal, the other provisions
shall continue in full force and effect. [050113]
70
. This EULA is the

Index
A
Administration Password
Changing
39
Administrator Password
Changing
18
APN
38
B
Back Cover
Removal
5
Replacing/Installing
Battery
Charging
8
Installation
Removal
7
Wall Charger
Battery Pack
Charging External Devices
Battery Use & Safety
7
6
8
51
23
C
Care and Maintenance 53
Charging battery
Configuration
Wi-Fi
Configuration Page
DLNA
LTE Network
Settings
Software Update
Tools
WWAN APN
Connected Devices
Customer Service
Number
8
29
37
39
37
37
38
39
38
26
6
D
Data Limit 28
Data Limits
Assigning
19
Data Roaming
Data Usage
Device
Factory Reset
On and Off
Set Up
DHCP Server
Display / Touch-Screen
DLNA
38
24
12, 22, 41
11
4
28
51
39
E
Exposure to Radio Frequency (RF)
Signals
46
F
Factrory Reset
Via the Hardware
Via the Web Portal
Via Web Portal
FCC Notice and Cautions
Filtering
Enable
32
MAC
31
Port
32
12
41
22
56
71

H
Health and Safety Information 46
Hibernate
Hibernation
Home Page
HotSpot
40
Troubleshooting
45
24
Connected Devices
Data Usage
My HotSpot Connection
System Information
T-Mobile Network
USB Connection
Visit My T-Mobile
Accessing via Browser
Assigning Data Limits
Changing SSID Name
Changing your Administrator
Password
Configuring
Hiding
19
72
26
24
25
24
25
25
25
17
19
18
18
18
I
Initial Connection 17
L
Log
System
LTE Network
41
37
M
MAC Drivers
Escape
MAC Filtering
mciroSIM
Message
Messaging Page
microSD Card
Mobile HotSpot
20
Enabling
31
Installing
5
Removing
Creating and Sending
Deleting
Replying To
6
43
42
42
Installing
9
Off
24
43
N
Network 27
Network Page
Data Limit
DHCP Server
Network
Wi-Fi Configuration
27
28
28
27
29
O
Operating Environment 54
Other Important Safety Information
57
P
Port Forwarding 35
Power Management
40
S
Samsung Mobile Products and
Recycling
SD Card
49
Format
40
see also microSD Card
Unmount
40
9

Security Page
Set Data Limit
Set Time Limit
Settings
Sharing Media
SIM
Micro
see also mciroSIM
Software Update
Specific Absorption Rate (SAR)
Certification Information
Standard Limited Warranty
System Information
System Log
System Requirements
30
26, 28
26
37
9, 39
3
5
38
46
58
24
41
16
T
Technical Support 44
Tips and Tricks
Connection
44
U
UL Certified Travel Charger 50
Understanding Your Device
Features
13
Front View
Side Views
USB Connection
USB Drivers
Escape
RNDIS WIndows
USB Port
Charging External Device
USB Tethering
13
14
25
20
21
21
W
Warranty Information 58
Website
Support
6
Wi-Fi
Configuration
Windows Drivers
USB
29
21
23
73
 Loading...