

Page 1

Internet Phone
User’s Manual
Page 2

Precautions for Safety
Conventions
Please review the User Manual carefully prior to using the product in order to ensure safe and proper
product operation.
This document provides the information to prevent bodily injury and property damage.
Please make s good use of product with its description below.
Symbols
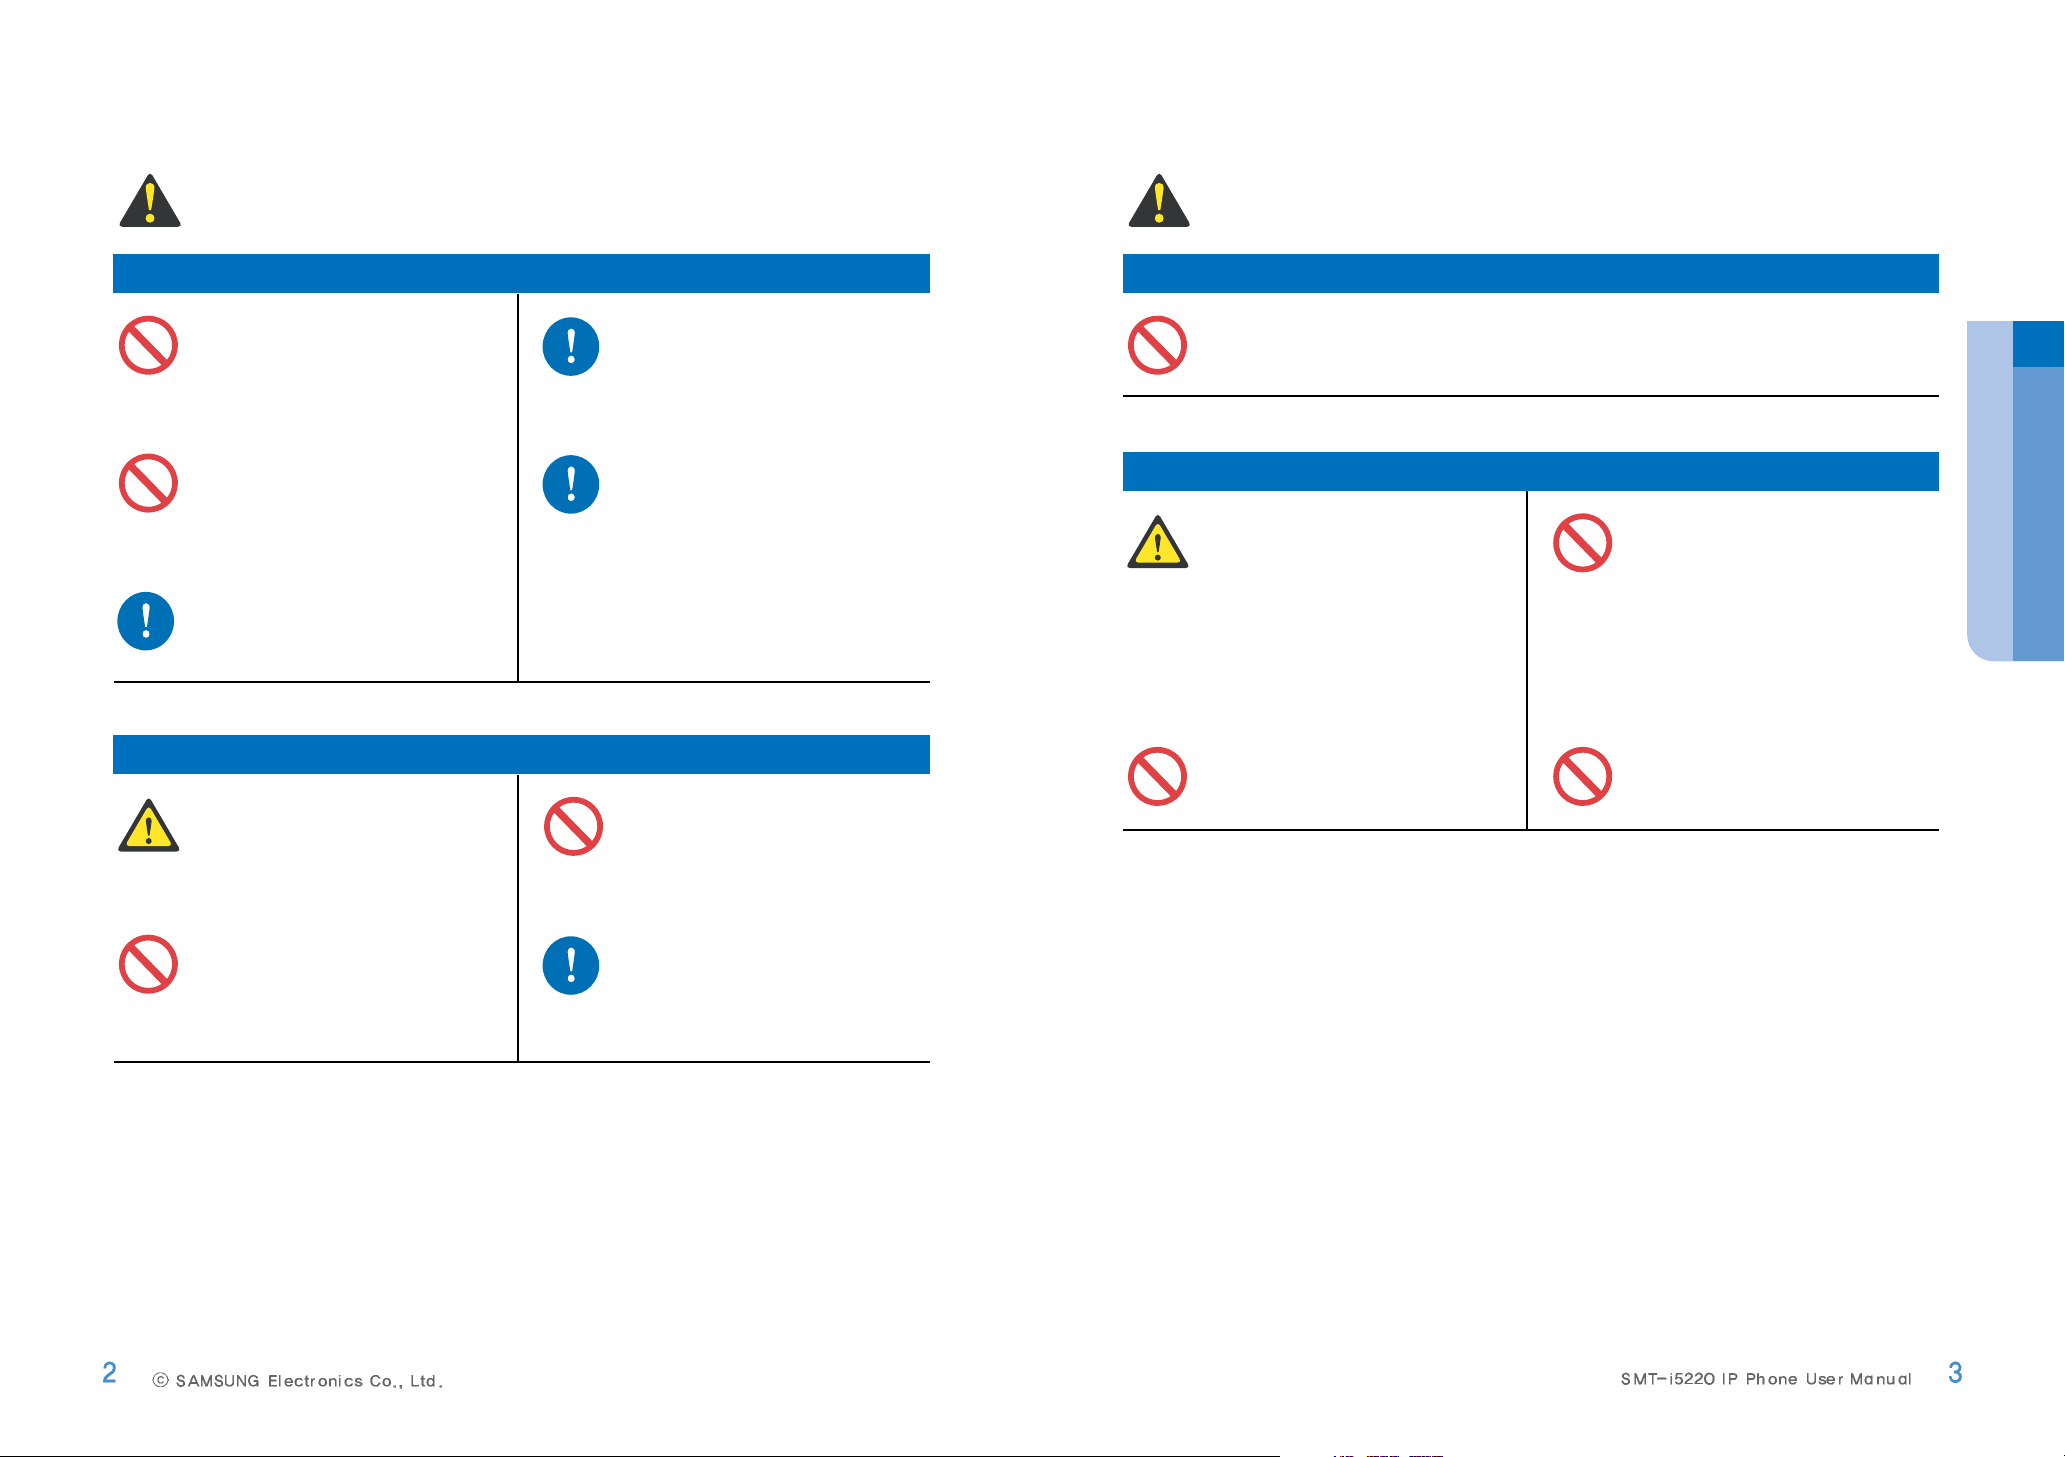
WARNING
Provides information or instructions that you should follow in order to avoid
personal injury or fatality.
WARNING
CAUTION
Provides information or instructions that you should follow in order to avoid
service failure or product damage.
CAUTION
NOTE
Indicates additional information for reference.
NOTE
CHECK IT
Provides information or instructions that you should follow in order to avoid
service failure or product damage.
CHECK
Caution
Indication of a general caution.
Restriction
Indication for prohibiting an action for a product.
Instruction
Indication for commanding s specifically required action.
This guide is proprietary to SAMSUNG Electronics Co., Ltd. and
is protected by copyright.
No Information contained herein may be copied, transcribed or
duplicated for any commercial purposes or disclosed to third
parties in any from without the prior written consent of SAMSUNG
Electronics Co., Ltd.
Product names mentioned in the document may be trademarks
and/or registered trademarks of their respective companies.
This guide may be changed for product improvement,
standardization or other technical reasons without prior notice.
For further information on the updated guide or the contents
contained in the guide, please contact the address or homepage
below.
http://www.samsung.com
Preparations
Page 3
WARNING
Power supply
Unplug the power plug when the
product is not used for a long
period of time.
Be sure to connect the power
connection port to the power
adapter(AC 220V) offered with the
product.
If there is dust or water on power
plug, wipe it off with a dry cloth.
Do not use the damaged power
line or loose plug.
Never pull out the power plug by
pulling the line or when your hands
are wet.
Installation/Maintenance
Do not use volatile liquids, such as
insect spray, near the product.
Unplug the power plug at once
and contact the service center if
unusual sound, smell, or smoke
comes out.
Do not leave the product in dusty
areas or in environments with
extreme thermal differences or
near a heating apparatus
(Cigarette or heater and so on).
Do not place vases shall, near the
product.
CAUTION
Power supply
Do not turn off the power while the product is saving the call log or upgrading its
software.
Installation/Maintenance
Do not repair or modify the product
without promission.
Do not put heavy things on the
product.
When you clean the product,
unplug the power cord and dry
with a soft cloth,
Do not clean the product with
chemical solvents such as wax,
benzene, alcohol, thinner,
mosquito spray, aerosol, lubricant
and detergent.
Do not install the product to direct
sunlight.
Preparations
Neglecting to do so may result in electrical shock, fire, bodily
injury to the user and/or damage to user’s property/assets.
Neglecting to do so may result in product malfunction and/or
product damage.
Page 4

Contents
Precautions for Safety 1
Conventions
...........................................................................
1
Symbols
..................................................................................
1
WARNING
...............................................................................
2
CAUTION
................................................................................
3
Preparations 4
Components
...........................................................................
8
Installation
...........................................................................
9
Initial Environment Settings for Activation
.......................
11
1 Easy Installation
.............................................................................................
11
2 Phone Information
.........................................................................................
14
3 Network
...............................................................................................................
15
4 Server
..................................................................................................................
17
5 Extension Login
.............................................................................................
18
6 S/WUpgrade
......................................................................................................
19
7Factory Reset
...................................................................................................
20
8 Phone Restart
..................................................................................................
21
Ip phone at a Glance
Features and functions
.......................................................
22
Part Names and buttons
.....................................................
24
Front view
..............................................................................................................
24
Buttons
...................................................................................................................
25
Status Indicator
....................................................................
27
LCD Screen Layout
.....................................................
27
Status Icon descriptions
.....................................................
28
Adjusting the Volume
..........................................................
29
Adjust the handset volume
..........................................................................
29
Adjust the speaker volume
.........................................................................
29
Adjust the incoming call ring tone volume
...........................................
29
Entering Text
........................................................................
30
Basic Functions 31
Making a call
........................................................................
31
Using the handset
..........................................................................
31
Using the speaker phone
..........................................................................
32
Using the Last Call
..........................................................................
33
Using the Phonebook
..........................................................................
34
Answering a call
..................................................................
35
Using the handset
..........................................................................
35
Using the speaker phone
..........................................................................
35
Functions available during a busy line
..............................
36
Call back
...............................................................................................................
36
Call Message
........................................................................................................
37
Functions available during a call
.......................................
38
Call Waiting
..........................................................................................................
38
Call Mute/Unmute
.............................................................................................
38
Call Forwarding
..........................................................................
39
Basic Menu usage 41
Function menu
.....................................................................
41
Settings menu
......................................................................
41
Phonebook
...........................................................................
42
Viewing a phone number
...............................................................................
42
New Number Registration
.............................................................................
42
Search the Phone number
............................................................................
43
Deleting a phone number or all phone number
..................................
43
Adding a group
...................................................................................................
44
Editing a group
...................................................................................................
44
Call Log
.................................................................................
45
Call Log
..................................................................................................................
45
Messages
..............................................................................
46
Creating a Message
..........................................................................................
46
Incoming Messages
.........................................................................................
47
Outgoing Message
............................................................................................
47
Draft Messages
...................................................................................................
48
Preparations
Page 5

Conference
...........................................................................
49
Group Conference Call
..........................................................................
49
Directory service
..................................................................
50
Directory service
................................................................................................
50
Scheduler
.............................................................................
51
Scheduler
..............................................................................................................
51
XML Browser
........................................................................
52
XML Browser
.......................................................................................................
52
Setup Menu usage
...............................................................
53
1Phone 1 Screen
.......................................................................................
54
1 Phone 2 Sound
.........................................................................................
55
1Phone 3 Language
.................................................................................
55
1 Phone 4 Security
.....................................................................................
56
1 Phone 5 Phone Information
...............................................................
56
2 Settings 1Application Set. 1 Call
............................................
57
2 Settings 1Application Set. 2Massages
...............................
57
2 Settings 1 Application Set. 3MyInformation
....................
58
2 Settings 1Application Set. 4 Extension Login
..................
58
2 Settings 2 Absent Messages
............................................................
59
2Settings 3 Call Forward
.......................................................................
60
2 Settings 4 Network Info.
.....................................................................
61
2 Settings 5 User Data Init.
....................................................................
62
Function Keys usage 74
Registration
..........................................................................
74
Troubleshooting 75
Appendix 76
Specifications
......................................................................
76
Product Warranty
Preparations
Conference Call
..................................................................................................
70
Group Listen
.........................................................................................................
71
Mute Calls
..............................................................................................................
71
OHVA Block
.........................................................................................................
72
Group Pickup
........................................................................................................
72
My Group Pickup
................................................................................................
73
Service Menu usage 63
Screen of Service Menu
......................................................
63
Redial
.......................................................................................................................
64
Message
.................................................................................................................
64
Call Pickup
............................................................................................................
65
DND(Do Not Disturb)
........................................................................................
66
Call back
................................................................................................................
66
Edit Mode
..........................................................................................................
67
Alarm/Morning Call
...........................................................................................
68
Save/Resend
........................................................................................................
68
News Select
........................................................................................................
69
Detail News
........................................................................................................
69
Barge Call
...............................................................................................................
70
Conference Call
..................................................................................................
70
Page 6
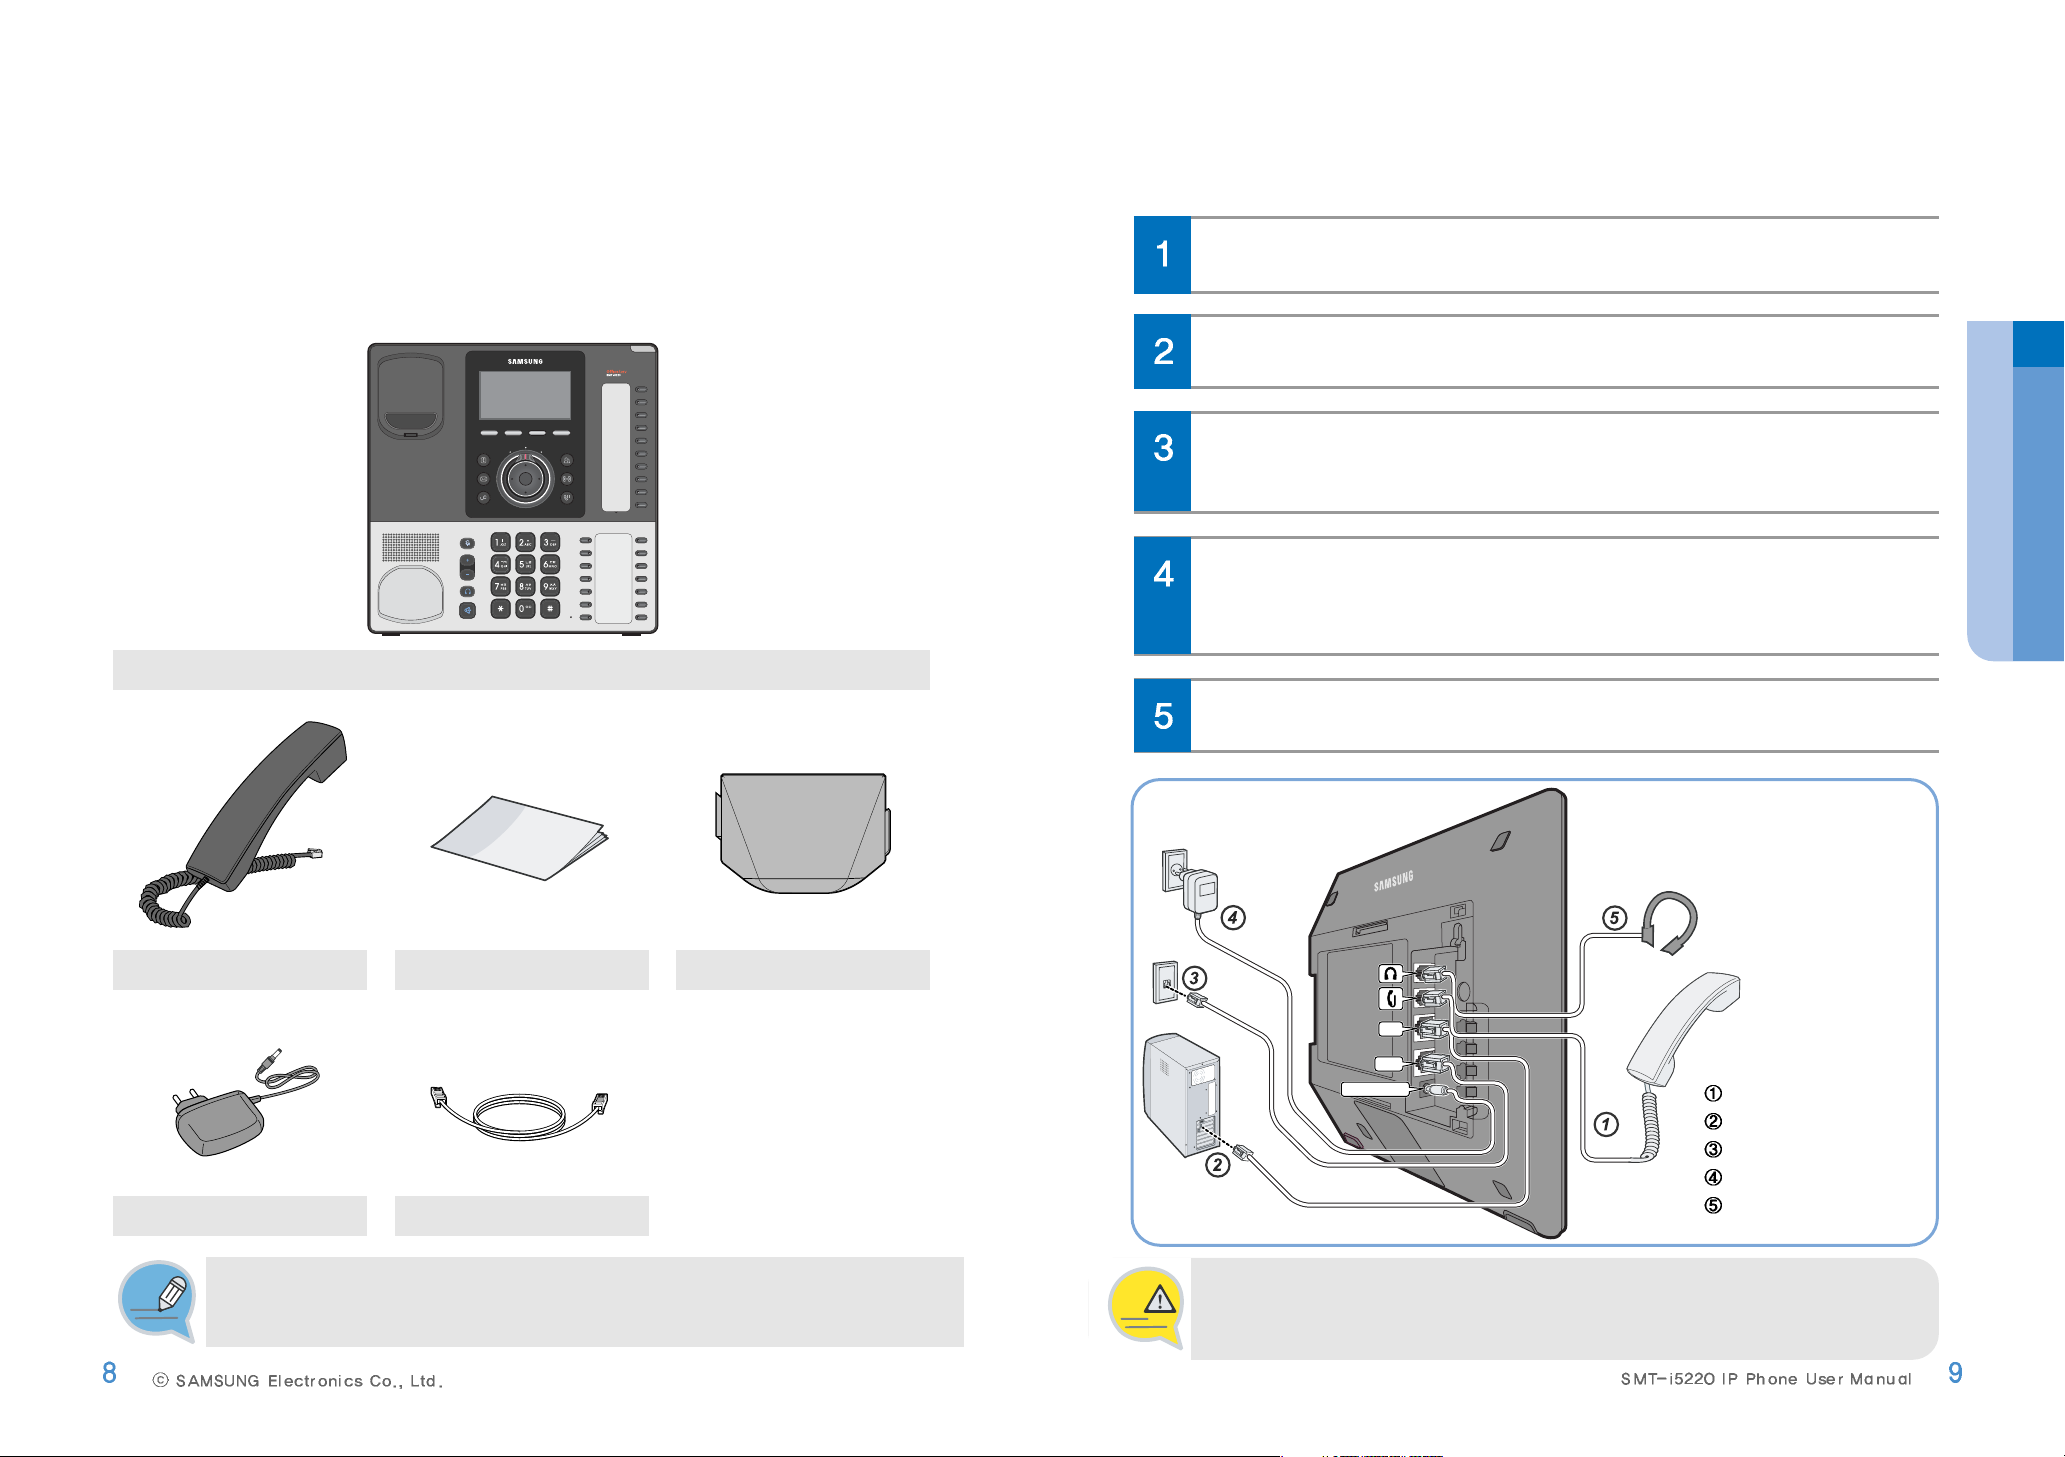
Connect the handset to the handset port on the back of your phone.
Connecting
Preparations
Components
This product consists of the following components.
Before using the phone, make sure that you have received all components.
If any items are missing, contact your dealer.
Mute
Vol
Headset
Speaker
Conference
Transfer
HoldUC
Phone book
Message
Main Unit
Handset Quick Manual Stand
Power Adapter UTP (LAN) Cable
The illustrations used in this manual are for you convenience only, and may be different
from actual objects.
NOTE
Connect the Ethernet port in your workspace to the LAN port on the back of
your phone, using the provided LAN (UTP) cable. Your IP Phone now shares a
network connection with your computer.
To use a headset, connect the headset to the headset port on the back of your
phone.
Power DC 5V
LAN
PC
Power DC 5V
LAN
PC
Handset connection
PC connection
Internet connection
Power connection
Headset connection
-Besure to connect to PC and Network(LAN) before connecting the AC Power adapter.
-During the power on, if network is disconnected be sure to replug the AC power adapter.
Otherwise, some problem can happen in the phone use.
CAUTION
Preparations
Connect a standard power outlet in your workspace to the power port using the
provided AC power adapter. The phone will subsequently boot.
(If your system administrator delivered your phone without a power supply, your
phone probably receives power through the Ethernet connection.)
Disconnect the Ethernet cable from the computer, and attach it to the PC port
on the back of your IP Phone.
Page 7
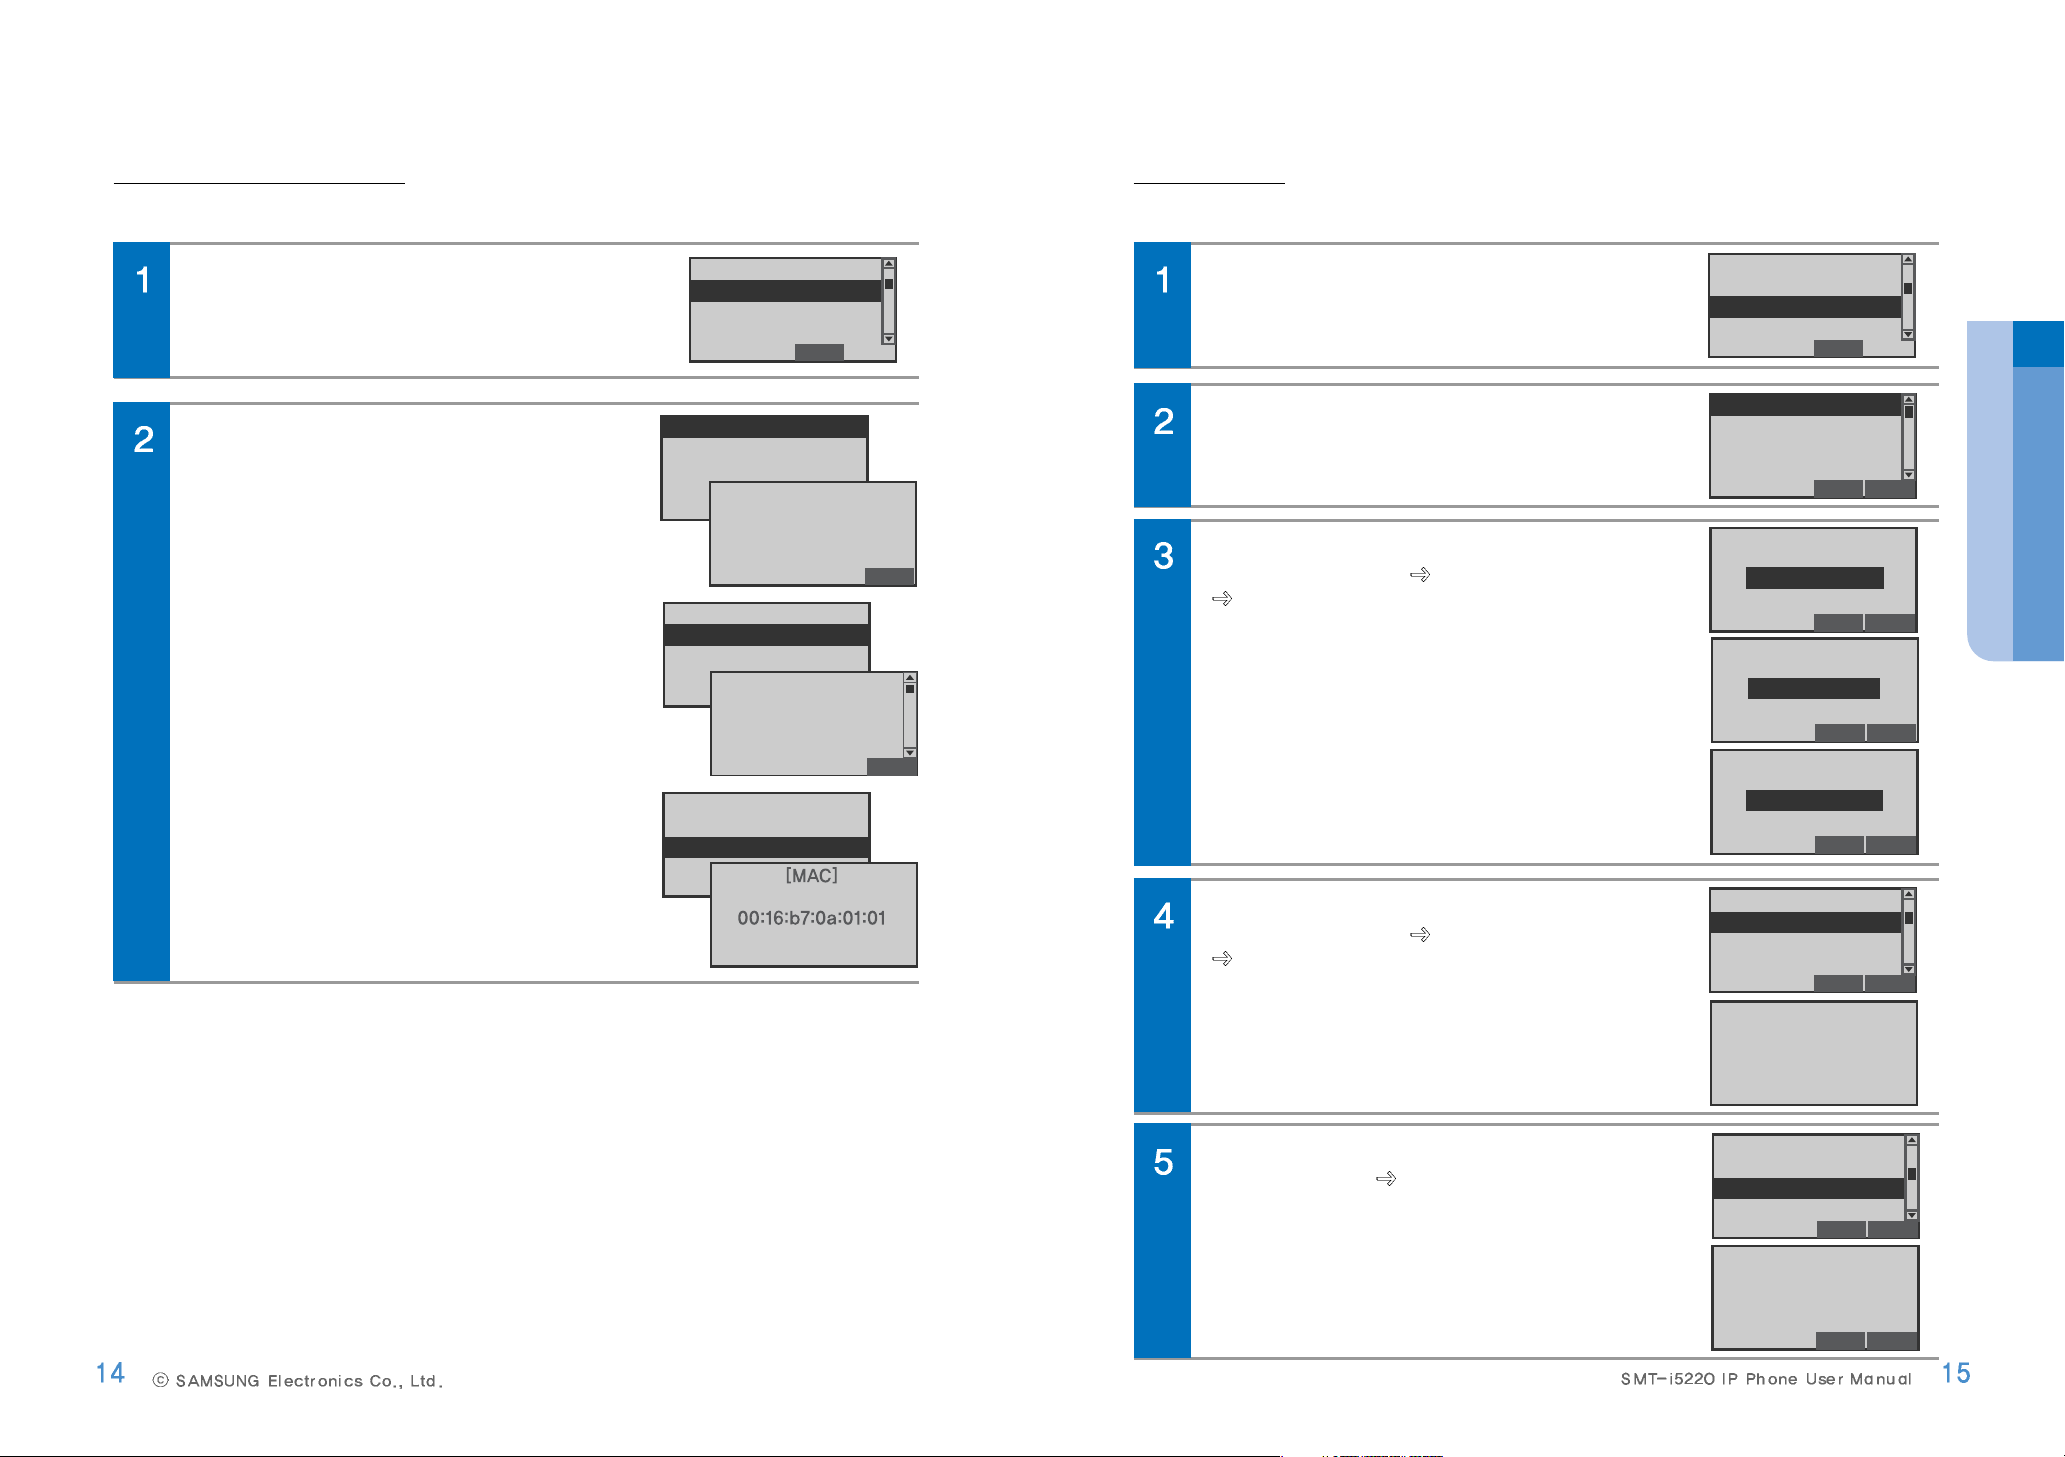
1EasyInstallation
You can set up the network, IP address and system server information settings for activation easily.
After connecting power to the product, the Activation
screen is displayed.
Select the 1 Easy Install, and press the Enter[OK]
button.
End
1 Easy Install
2 Phone Information
3 Network
4 Server
Initial Environment Settings for Activation
Once you connect the phone to its power source, a start-up process begins. After several minutes, the
phone’s LCD screen displays the Initial Environment Settings screen for Activation.
Or press and hold [
] button while in booting the phone to enter the Initial Environment Settings for
Activation screen.
NOTE
You can show the Network setting screen.
Select desired network mode, and press the
Enter[OK] button.
End Back
1 Static IP
2 Dynamic IP
3 PPPoE
If the 1 Static IP.....
Enter the IP Address Subnet Mask Gateway
address, and press the Enter[OK] button.
-The Network information inquires to administrator.
Del. Back
123.123.123.123
Enter IP Address
Preparations
Enter Subnet Mask
255.255.255.0
Del. Back
Enter Gateway
234.234.234.234
Del. Back
Page 8
In case of 2 Dynamic IP.....
Enter the System IP System ID (Phone
number) Password, and press the Enter[OK]
button.
-The System information inquires to administrator.
End Back
1 Static IP
2 Dynamic IP
3 PPPoE
Enter the System IP System ID (Phone
number) Password, and press the Enter[OK]
button.
-The System information inquires to administrator.
Del. Back
123.234.123.123
Enter System IP
In case of 3 PPPoE.....
Enter the User ID Password System IP
System ID (Phone number) Password, and
press the Enter[OK] button.
-Tochange the text input mode press [ ] button repeatedly.
(Refer to 30 page)
-The System information inquires to administrator.
End Back
1 Static IP
2 Dynamic IP
3 PPPoE
The Unit is reboot automatically.
Wait for a minute.
[Reboot Phone]
Preparations
Enter System ID
7942
Enter User ID
Anonymous
Del. Back
Enter Passward
****
Del. Back
[Reboot Phone]
Wait for a minute.
[Network Setting]
Set DHCP Mode
Del. Back
Enter Passward
****
Del. Back
Enter System IP
123.234.123.123
Del. Back
Enter System ID
7942
Del. Back
Enter Passward
****
Del. Back
Page 9
3Network
You can set up the network for manually.
In Activation screen, select the 3 Network Setting,
and press the Enter[OK]button.
End
1 Easy Install
2 Phone Information
3 Network
4 Server
2PhoneInformation
You can confirm the your IP Phone’s S/W version, Network information and MAC address.
In Activation screen, select the 2 Phone Information,
and press the Enter[OK] button.
End
1 Easy Install
2 Phone Information
3 Network
4 Server
Select desired Information mode, and press the
Enter[OK]button.
You can show the each information screen.
You can show the Network setting screen.
Select desired network mode, and press the
Enter[OK] button.
End Back
1 Static IP
2 Dynamic IP
3 PPPoE
4 VLAN(LAN Port)
In case of 1 Static IP.....
Enter the IP Address Subnet Mask Address
Gateway Address, and press the Enter[OK]
button.
-The System information inquires to administrator.
Del. Back
123.123.123.123
Enter IP Address
In case of 2 Dynamic IP.....
Enter the IP Address Subnet Mask Address
Gateway Address, and press the Enter[OK]
button.
End Back
1 Static IP
2 Dynamic IP
3 PPPoE
4 VLAN(LAN Port)
Preparations
End Back
1 Version Info.
2 Network Info.
3 MAC Address
Back
SMT-i5220 V1.40
(09.07.16 13:00)
Copyright @
2009 SAMSUNG
End Back
1 Version Info.
2 Network Info.
3 MAC Address
Back
Mode : Static IP
IP : 123.123.123.123
SUBNETMASK :
[Network Information]
End Back
1 Version Info.
2 Network Info.
3 MAC Address
In case of 3 PPPoE.....
Enter the User ID Password,and press the
Enter[OK] button.
-ThePPPoE item is reserved for additional functions.
-The Network information inquires to administrator.
End Back
1 Static IP
2 Dynamic IP
3 PPPoE
4 VLAN(LAN Port)
Enter Subnet Mask
255.255.255.0
Del. Back
Enter Gateway
234.234.234.234
Del. Back
[Network Setting]
Set DHCP Mode
Enter User ID
Anonymous
Del. Back
Page 10
In case of 4 VLAN(LAN Port).....
Select the VLAN-HOST : Use/Not Use enter
VLAN ID Priority, and press the Enter[OK]
button.
-The Network information inquires to administrator.
End Back
1 Static IP
2 Dynamic IP
3 PPPoE
4 VLAN(LAN Port)
In case of 5 VLAN9PC Port).....
Select the VLAN-PC : Use/Not Use enter VLAN
ID Priority,and press the Enter[OK] button.
-The Network information inquires to administrator.
End Back
2 Dynamic IP
3 PPPoE
4 VLAN(LAN Port)
5 VLAN(PC Port)
Unit is reboot for new condition automatically.
Wait for a minute.
[Reboot Phone]
Preparations
In Activation screen, select the 4 Server, and press
the Enter[OK]button.
End
1 Easy Install
2 Phone Information
3 Network
4 Server
Select PNP select No or Yes, and press the
Enter[OK] button.
Select Main or Sub System
enter the System IP
enter the System ID enter the Password, and
press the Enter[OK] button.
-The Server information inquires to administrator.
End Back
1 PNP
2 Main System
3 Sub System1
4 Sub System2
4Server
You can set up the to connected the Main or Sub Server System.
In case of 6 802.1x.....
Select the 802.1x : Not Use or Use( enter ID
enter Password),and press the Enter[OK] button.
-The Network information inquires to administrator.
End Back
3 PPPoE
4 VLAN(LAN Port)
5 VLAN(PC Port)
6 802.1x
VLAN-HOST Not Use
VLAN ID 0
Priiorty 0
Del. Back
VLAN-HOST Not Use
VLAN ID 0
Priiorty 0
Del. Back
[802.1x]
802.1x Use
ID test
PW *
****
BackDel.
[PNP]
No
Yes
1 PNP
2 Main System
3 Sub System1
4 Sub System2
Enter System IP
End Back
123.234.123.123
Enter System ID
7942
Del. Back
Enter Passward
****
1 PNP
2 Main System
3 Sub System1
4 Sub System2
End Back
Enter System IP
123.123.123.234
Back
Del. Back
Del. Back
Del. Back
Page 11

5Extension Login
You can set the Extension Login function.
In Activation screen, select the 5 Extension Login,
and press the Enter[OK] button.
End
2 Phone Information
3 Network
4 Server
5 Extension Login
Select the No or Yes, and press the
Enter[OK]button.
Back
[Extension Login]
No
Yes
Preparations
6S/WUpgrade
You can upgrade the IP Phone’s S/W.
In Activation screen, select the 6 S/W Upgrade, and
press the Enter[OK] button.
End
3 Network
4 Server
5 Extension Login
6 S/W Upgrade
Select 1TFTP Server enter the Server IP
Address, and press the Enter[OK]button.
-The firmware upgrade information inquires to
administrator.
End Back
1 TFTP Server
2 User Upgrade
3 Recovery Upgrade
After setup the TFTP Server, select 2 User
Upgrade, and press the Enter[OK] button.
Press the Enter[OK] button to start upgrading
firmware and reboot automatically.
End Back
1 TFTP Sever
2 User Upgrade
3 Recovery Upgrade
After setup the TFTP Settings, select 3 Recovery
Upgrade, and press the Enter[OK] button.
Press the Enter[OK] button to start recovery
upgrading firmware and reboot automatically.
End Back
1 TFTP Sever
2 User Upgrade
3 Recovery Upgrade
[Extension Login]
Setting Completed
[TFTP Server]
Press ENTER Button.
165.213.110.59
Del. Back
[Upgrade Start]
Press ENTER Button.
Back
[Recovery OS UP]
Press ENTER Button.
Back
Page 12
ⓒ
SAMSUNG Electronics Co., Ltd.
20
SMT-i5220 IP Phone User Manual
21
7 Factory Default
You can initialize the phone to its original condition.
In Activation screen, select the 6 Factory Default,
and press the Enter[OK] button.
- Be sure to check the your data before formatting the IP Phone.
End
4 Server
5 Extension Login
6 S/W Upgrade
7 Factory Default
1
Press the Enter[OK] button to start resetting.
Back
It will Clear
even Network Info
[Factory Default]
2
8 Phone Restart
You can reboot the IP Phone.
In Activation screen, select the 7 Reboot, and press
the Enter[OK] button.
End
5 Extension Login
6 S/W Upgrade
7 Factory Reset
8 Phone Restart
1
Press the Enter[OK] button to start rebooting.
Back
Press ENTER Button.
[Phone Restart]
2
Preparations
Page 13

IP Phone at a Glance
Features and functions
Network interface
Chances are, your system administrator or a technician will connect
your new IP Phone to the corporate IP telephony network.
If that is not the case, connecting your phone is easy.
LCD Screen
Displays features such as the time, date, your phone number, caller ID,
line/call status, and soft button tabs.
Service
Menu Set
Calllog
1234:TEST
Mar. 03[Mon] 12:34AM
Easy Navigation with Enter(OK) buttons
Enables you to scroll through text and select features displayed on the
LCD screen.
UC-Dial button
Use to select or deselect the Call Forward/DND setting by using the
Direct UC Dial Control.
Text M essaging
Use to send/receive the Text Message to External persons via
messaging service.
Call Back
If you call an extension and the line is busy or the call goes answered,
you can use the Call Back feature to receive notification when the
extension is available to take a call.
Call Messaging
Places an active call on hold, resumes a held call, or switches between
an active call and a held call-depending on the line state.
Call Conference
Your IP Phone supports conference calls, enabling you to talk with
multiple parties at the same time.
Call Forwarding
Redirects your incoming calls to another number.
DND(Do Not Disturb)
You can set the Do Not Disturb function, automatically refusing/blocking
all incoming calls
Announcement
Activates the announcements function via speakerphone.
Call Pickup
Answer an incoming call that is ringing on another extension within your
group
Call Settings
Provides access to phone settings such as contrast and ring sound,
network configuration, and status information.
IP Phone at a Glance
Page 14

Buttons
Front view
Part Names and buttons
DescriptionButtons/Items
Status LED
Indicates the IP Phone status.
User-Defined Function keys
Provide access to phone lines, web-based services, and
phone features.
Navigation with Enter[OK]
Use to scroll through menus and highlight items.
Use to enter the selected menus or item.
Conference
To turn a two-party call into a conference call.
Transfer
To transfer a connected call to another extension.
Hold
Toggle the Call Hold feature on or off.
Speed dial keys
Provide access to speed-dial numbers.
Conference
Handset
The handset on your IP Phone functions in the same way
as a handset on a traditional phone:
LCD screen
Displays features such as the time, date, your phone
number, caller ID, line/call status and softkey tabs.
Soft button
Performs the functions indicated by the screen text on the
bottom of the display.
Transfer
Transfer
IP Phone at a Glance
Navigation/
Enter buttons
Soft buttons
Status LED
Conference
Transfer
Hold
Microphone
Speaker Phone
Phonebook
Message
Service
Speaker
Mute
Volume
Headset
Speed dial keys
User-Defined
Function keys
Handset
LCD Screen
Dial Keypad
Phone book
Message
Mute
Vol
Headset
Speaker
Conference
Transfer
HoldUC
Page 15

Status Indicator
DescriptionButtons/Items
Speaker
Toggle the Speaker phone feature on or off.
Dialpad
Use to dial phone numbers, enter letters.
Headset
Toggle the Headset feature on or off.
Volume +/-
Increases or decreases volume for the handset, headset,
speakerphone or ringer (depending upon which is currently
active).
Mute
Toggle the mute on or off.
Speaker
UC
Message
Provides access to a message system.
Phonebook
Enter the Phonebook menu.
Speaker
Headset
Vol
Mute
UC
Message
Phone book
The status indicator on the top of the unit give information about your phone:
The following icon list show the conditions of your phone:
LCDScreen Layout
The display has 3 areas:
Status
During an incoming internal call
During an incoming external call
When a new message has been
received
During a call
Connecting your call
Indication
Blinking
Lighting
Microphone
Allows other callers to hear you clearly when you are
speaking to them.
Area
Status icons
Text and call
Information area
Soft function
Descriptions
Displays mode and status icons,
Displays input number or text and current
call and includes detailed information such
as caller ID, call duration, and call state.
Activate a softkey by pressing the
corresponding softkey button.
Service
Menu Set
Calllog
1234:TEST
Mar. 03[Mon] 12:34AM
IP Phone at a Glance
Toggle the Speaker phone feature on or off.
Page 16

Adjusting the Handset
Adjust the volume of the handset.
Follow the instructions below when holding
the handset during a call.
To increase, press the + button.
To decrease, press the-button.
Adjusting the VolumeStatus Icon descriptions
The following icon list show the conditions of your phone:
You can adjust the volume of the caller for the handset, speakerphone, and ringer individually.
H
ello
Adjusting the speaker
Adjust the volume of the speaker.
Follow the instructions below when using
the speakerphone during a call.
To increase, press the + button.
To decrease, press the-button.
Adjusting the ringer volume
Adjust the volume of the ringer.
Follow the instructions below while the
phone is ringing
To increase, press the + button.
To decrease, press the
-
button.
Descriptions
Appears when the Call Forwarding feature
is active.
Appears when the DND(Do Not Disturb)
feature is active.
Appears when the Mute feature is active.
Appears when the SRTP is feature is active.
Appears when a new text message has
been received.
Appears when calls can be carried out
using the speaker and microphone
Appears when calls can be carried out
using a headset
Appears when PC port is connected to a
LAN cable.
Appears when the unit is connected to the
server and the connection is operational.
Appears when the unit is connected to the
server but the operation is unavailable.
Ion
IP Phone at a Glance
Vol
To increase
To decrease
Vol
To increase
To decrease
Vol
To increase
To decrease
1234:TEST
Mar. 03[Mon] 12:34AM
Menu Set
Calllog
Service
Speaker
Page 17

Basic Functions
Using the handset
To place calls with the handset.
In case of Overlap mode
Lift the handset to sounds tone.
Enter a phone number using the dial
keypad to make a call.
In case of Mobile phone mode
List the handset to display “Enter the
number”. Enter a phone number using
the dial keypad, and press the Call soft
button to make a call.
Making a call
Entering Characters
The unit provides convenient ways to enter letters, numbers, and symbols whenever you are prompted to enter
text (for example, when adding a Contacts entry or when using SMS Text Messaging).
Press the button repeatedly to change the text
input mode.
[Text input mode]
Korean
Capital English
Small English
Numbers
Symbols
Use the Dial keypad to enter Korean text, English text, and numbers, and use the
Directional buttons and Enter[OK] button to enter special characters.
If you make a mistake while entering, press Delete soft button to erase a letter.
-Korean Text: The Korean text input mode is set as the default, and the dial keypad can be used to
enter the desired characters.
-English Text: Press the
button and select the English text input mode, and use the dial keypad to
enter the desired characters.
-Numbers/Special Characters: Press the
button and select the number or special character input
mode, and input the desired numbers or special characters.
Dial keypad
- You can select to between the Overlap or Mobile phone type for dialling.
Refer to Settings
2Settings 1Application Set. 1Call Dial Mode.
NOTE
You can talk to the other party when the call is
connected.
H
ello
Directional buttons and Enter[OK]
move to
move to
move to
Enter[OK]
move to
To finish your call, place the handset in its normal
position.
Enter the number
Call
Basic Functions
Please read this manua
l before
a
Send Delete
Back
Page 18

Select the desired number and Enter[OK] button to
scroll through the recent call list.
To show the detail information, press the Enter[OK]
button.
To make a call, press the Send soft button.
Using the Last Call
In idle mode, press the Calllog soft button.
All incoming, outgoing and missed call are listed in
the Calllog screen.
Using the speaker phone
To place calls with the speakerphone.
In idle mode, press the Speaker button.
In case of Overlap mode
Enter a phone number using the dial
keypad to make a call.
In case of Mobile phone mode
“Enter the number” is display.
Enter a phone number using the dial
keypad, and press the Call soft button to
make a call.
You can talk to the other party when the call is
connected.
-During a call, lift the handset to route the phone’s audio
through the earpiece of handset.
H
ello
To finish your call, press the Speaker button.
If the handset is lift, place the handset in its
normal position.
You can talk to the other party when the
call is connected.
-During the phone rings or a call, hangup the
handset to route the device saudio through the
earpiece of handset.
H
ello
Call
Enter the number
BackSend Save
Option
3301 : Calling
Service
Basic Functions
Speaker
1234:TEST
Mar. 03[Mon] 12:34AM
Menu Set
Calllog
Service
Speaker
Page 19

Using the handset
To answer a call by using the handset.
Lift the handset to receive calls.
Answering a call
Using the Phonebook
To make a call by using the phonebook.
In idle mode, press the Phone book button.
Group List screen is display.
Use Directional buttons and Enter[OK] button to
show all list of desired group.
Family
Frend
Client
Busness
[15]
[12]
[17]
[26]
BackEdit
Search
New
Use Directional buttons and Enter[OK] button to
show all list of desired group.
Use Directional buttons to select desired number
and Send soft button for a call.
You can talk to the other party when the call is
connected.
-During the phone rings or a call, hangup the handset to route
the device’s audio through the earpiece of handset.
You can start the phone conversation.
To finish your call, place the handset in its normal
position.
H
ello
Using the speaker phone
To answer a call by using the speaker phone mode.
Press the Speaker phone button to receive calls.
You can start the phone conversation.
-During a call, hangup the handset to route the device’s audio through the earpiece of handset.
To finish your call, press the Speaker phone button.
Basic Functions
Service
Menu Set
Calllog
1234:TEST
Mar. 03[Mon] 12:34AM
Back
1 Phonebook
2 Message
3 Scheduler
Phone book
Adam
Eva
Smith
Send
: Opt :
Back
Speaker
Speaker
Page 20

Call Message
Call an extension.
While you hear the busy tone or ringing tone,
press the Service soft button.
Call back
Call an extension.
While you hear the busy tone or ringing tone, press
the Service soft button.
Functions available during a busy line
If you call an extension and the line is busy or the call goes unanswered, you can use the Call Back
feature to receive notification when the extension is available to take a call.
NOTE
Select the CALLBACK and press the Enter [OK]
button.
A Call back activation confirmation message
displays.
123 : Ring
ing
Service
To reactivate the call whenever you want, by pressing
the Hold button.
-Whenthe extension you called is available to receive a call, you
receive an audio and visual alert from your phone.
Basic Functions
Back
CALLBACK
MESSAGE
a call back is
set to 123
123 : Ring
ing
Service
Select the MESSAGE and press the Enter [OK]
button.
A Message activation confirmation message
displays.
CALLBACK
MESSAGE
Back
a message has
been set to 123
Page 21

Call Forwarding
During a call, press the Transfer button to forward to
other phone.
Call Waiting
You can place the current call on hold whenever you want.
Press the Hold button during a call to hold.
Functions available during a call
To enter the Service Menu screen, press the Service soft button.
NOTE
Hold
You can show the “The call is on hold” message.
0000
Call Wiating
Service
To reactivate the call whenever you want, by pressing
the Hold button.
Enter the phone number by using the dial pad.
Dial the number or office extension to which you
want to transfer the call.
Forward Number : 1234
Service
After confirmed connection sound, place the handset
in its normal position.
When it rings on the other end, press Transfer
again. Or, when the party answers, announce the
call and then press Transf. (This is a consult
transfer.) If you are using a handset, hang up.
If the party refuses the call, press the Resume
softkey to return to the original call.
Basic Functions
Call Mute/Unmute
To toggle the microphone’s mute state (on/off).
Press the Mute buttons during a call to mute the
microphone.
Press the Mute buttons to unmute the microphone.
0000
Call Wiating
Service
Hold
Transfer
Transfer
Hold
Page 22

Basic Menu usage
Basic Menus
Setting menu
Descriptions
1Phone Menu
The idle screen decoration, LCD power and screen saver can
be set, and LCD brightness can be adjusted.
1Screen
The type of ringing sound, key tone and message tone can be
selected, and their volumes can be adjusted.
2Sound
The user can set the language displayed on a screen.
3Language
The user can change the password, and lock the phone, so
that other people cannot use their phone.
4Security
This displays the phone model and software version information.
5Phone Information
Descriptions
2Settings Menu
The user can set the optional functions related to calls and
messages.
1Application Set.
The user can set the message to be displayed to the called
party when he is absent.
2Absent Message
The user can set the number used for call forwarding
when he cannot receive a call.
3Call Forward
This displays the network settings of the phone.
4Network Info.
This clears all the information settings saved in a phone and
resets them to their initial status.
5User Data Init.
Function menu
Descriptions
Menu Items
Provides the function to save, search andregister with the phonebook.
1Phonebook
Shows all information on inbound/outbound calls and missed calls.
2Call Log
Enables the creation/saving and sending/receiving of a message.
3Message
Supports a conference call.
4Conference
This allows a user to search through the users registered with the
LDAP (Lightweight Directory Access Protocol) server. (For specific
server information, contact the administrator.)
5Directory Service
6Scheduler
7XML Browser
The user can register and manage his schedule.
The user can search and use the information provided from the
XML browser server.
Page 23

Viewing a phone number
Show the all group on phonebook.
In idle mode, press the Menu button(or
press the Phonebook button)
select
the Phonebook press the Enter[OK]
to display the Phonebook.
Select a desired Group press the
Enter[OK]button.
Phonebook
Select a desired list Press the Enter[OK] button to
show the detailed information.
-Ifyoupress Call soft button, a call can be made to the given
number.
BackCall
: Opt :
Adam
Eve
David
Eric
Search the Phone number
You can search the number by inputting just the initial letter of the name to search.
Select the Menu Phonebook press the Search
soft button.
Client/Business [15]
Family [12]
Frends [17]
Unfiled [10]
BackNew
Search
Group
Enter the first few letters of name or phone number,
and press the Enter [OK].
Phone book entries are listed, starting with the first
entry matching your input.
-Pressing the Enter [OK] button displays detailed information.
-Ifyou press Call soft button, a call can be made to the given
number.
Back
Search
Del.
D
Dad
David
Debon
A
Deleting a phone numberorallphonenumber
You can delete the phone number.
Select the Menu Phonebook Search Phone
Number Detail View.
Press the Option soft button, and press the Delete
or All Del. soft button to delete a selected phone
number or all phone numbers.
BackCall
: Opt :
Adam
Eve
David
Eric
Enter the Password, and press the Enter[OK]or
Yes soft button to delete/delete all.
Basic Menus
Service
Menu Set
Calllog
T. 123
Wed 01 Jul 02:34PM
Menu Set
Calllog
Back
1 Phonebook
2 Call Log
3 Message
4 Conference
Menu Set
Calllog
Back
1 Phonebook
2 Call Log
3 Message
4 Conference
Client/Business [15]
Family [12]
Frends [17]
Unfiled [10]
BackNew
Search
Group
New Number Registration
You can save the new phone number.
Select the Menu Phonebook press the New
soft button.
Client/Business [15]
Family [12]
Frends [17]
Unfiled [10]
BackNew
Search
Group
Enter the Name and phone number.
-Phone numbers (e.g., of mobile phone, home, office, extension),
fax, e-mail, notes, group and ringing sound settings can all be
saved.
BackSave Del.
Name
:
Mobile :
Home
:
Office :
A
Press the Save soft button to save.
BackSave Del.
Name : David
Mobile : 01012345679
Home : 0212345678
Office : 0312345678
A
Phone book
Adam
Eve
David
Eric
Adam
Eve
David
Eric
[Number Delete]
Delete All ?
: Opt :
BackCall
BackDelete All Del.
NoYes
Page 24

Editing a group
You can edit a group.
Select the Menu Phonebook press the New
soft button.
Client/Business [15]
Family [12]
Frends [17]
Unfiled [10]
BackNew
Search
Group
Enter the modified information, and press the Save
soft.
In idle mode, press the Calllog soft button(or press
the Menu select the 2 Call Log press the
Enter[OK]) to enter the Call Log list.
Service
Menu Set.
Calllog
T. 123
Wed 01 Jul 02:34PM
Call Log
Shows the list of calls you’ve recently dialed,
received, or missed.
Select the desired phone number.
To make a call : press the Send soft button
To save to Phonebook : press the Save soft button
To delete : press the Option soft button and Delete
soft button
BackCall Save
: OPT :
234
212
233
154
Shows a list of recent outgoing, incoming or missed calls.
BackCall Save
: OPT :
234
212
233
154
BackDelete All
Del.
234
212
233
154
Service
Menu Set
Calllog
T. 123
Wed 01 Jul 02:34PM
Menu Set
Calllog
Back
1 Phonebook
2 Call Log
3 Message
4 Conference
Service
Menu Set
Calllog
T. 123
Wed 01 Jul 02:34PM
Adding a group
You can add a group.
Select the Menu Phonebook press the Group
soft button press the New soft button.
Client/Business [15]
Family [12]
Frends [17]
Unfiled [10]
BackNew
Search
Group
Enter a new group name, and press the Save soft.
-The ringing sound can also be set.
Basic Menus
VIP
A
[Edit Group]
Modify
[New Group]
BackDel.New
BackSave Del.
[Edit Group]
Modify
[Edit Group Name]
Client/Business
A
BackDel.New
BackSave Del.
Page 25

Creating a Message
You can create and save new text message to send.
In idle mode, press the Message button(or press
the Menu select the 3Message press the
Enter[OK]) to display the Message Menu screen
Press the New Msg. soft button.
Back
1 Phonebook
2 Call Log
3 Message
4 Conference
Messages
Create a new message, and press the Enter[OK].
-Refer to the input text method on page 28.
-BypressingSave soft button, you can save a created message
into the Draft Messages temporarily.
BackNew Msg.
Inbox [0/2]
Outbox [16]
Draft Messages [5]
Incoming Messages
You can view the incoming message and the reply, forward and delete.
Press the Message button(or press the Menu
select the 3 Message press the Enter[OK])
select the Inbox soft button press the Enter[OK].
BackNew Msg.
Inbox [0/2]
Outbox [16]
Draft Messages [5]
Select a desired list to show the message, and press
the Enter[OK]button.
-Todeleteamessage : press the Opt Del. soft button
-Todeleteall messages : press the Opt
Delete All soft button
-Toreply : press the Reply soft button
-Tore-sent to another person : press the Fwd. soft button
-Tomakeacall:presstheOpt
Call soft button
-Tosave a phone number : press the Opt
Save soft button
Basic Menus
Message
Service
Menu Set
Calllog
1234:TEST
Mar. 03[Mon] 12:34AM
Back
1 Phonebook
2 Call Log
3 Message
4 Conference
Enter or select the phone number.
-Bypressing Search soft button, a phone number from a
phonebook can be searched for.
Press the Enter[OK]orSend soft button to send a
message.
Outgoing Message
You can view the outgoing message and the resend.
Press the Message button(or press the Menu
select the 3 Message press the Enter[OK])
select the Outbox soft button press the Enter[OK].
Select a desired list to show the message, and press
the Enter[OK] button.
-Tosendagain:presstheResend soft button
-Tore-senttoanother person : press the Fwd. soft button
-Todelete a message : press the Opt
Del. soft button
-Todelete all messages : press the Opt
Delete All soft button
Please read this manua
l before
a
1 201
2 123
3
4
Search
Send
Sending Message
Del.
BackSave Del.
Back
Welcome
User Guide
Information of
Some features
Back
: Opt :
Welcome to my world
10/05 8 : 15 AM
TO : 1234
FROM : 4321
Reply
Fwd.
Welcome to my world
10/05 8 : 15 AM
TO : 1234
FROM : 4321
Inbox [0/2]
Outbox [16]
Draft Messages [5]
: Opt :
: Opt :
Back
BackCall Save
Welcome
User Guide
Information of
Some features
: Opt :
Welcome to my world
10/05 8 : 15 AM
TO : 1234
FROM : 4321
Resend
Fwd.
: Opt :
BackNew Msg.
Back
Back
Page 26

Draft Messages
You can save a created message temporarily.
Press the Message button(or press the Menu
select the 3 Message press the Enter[OK])
select the Draft Messages soft button press the
Enter[OK].
BackNew Msg.
Inbox [0/2]
Outbox [16]
Draft Messages [5]
Select the desired list to show the message, and
press the Enter[OK] button.
-Todeleteamessage : press the Opt Del. soft button
-Todeleteall messages : press the Opt
Delete All soft button
-Tosend:presstheSend soft button
Back
: Opt :
Welcome
Refer to
Thank you for
Information of
Group Conference Call
Aconference group can be selected to make a conference call between the users registered with the group.
In idle mode, press the Conference button(or press
the Menu select the 4 Conference press the
Enter[OK]) to display the Conference list.
Back
1 Phonebook
2 Call Log
3 Message
4 Conference
Conference
Select desired conference list, and then press the
Enter [OK]
Del. Back
New
Edit
Team Meeting
Conference 1
Press the Call soft button.
When a call is connected, press the [Conference]
button start the conversation.
-Duringthe conference call, a participant can be added in the
same way.
Back
Call
Edit
211
212
Basic Menus
Conference
1234:TEST
Mar. 03[Mon] 12:34AM
Menu Set
Calllog
Service
1 Phonebook
2 Call Log
3 Message
4 Conference
Back
Welcome to my world
10/05 8 : 15 AM
TO : 1234
FROM : 4321
Back
Del.Send
211 Ringing
212 Failed
BackDisc.
Page 27

Directory service
With the LDAP (Lightweight Directory Access Protocol), the user can search the registered users to view user
information or make a call. (For information on the specific server, contact the server administrator.)
In idle mode, press the Conference button(or press
the Menu select the 5Directory Service press
the Enter[OK]) to enter the Directory Service screen.
Back
2 Call Log
3 Message
4 Conference
5 Directory Service
Directory service
Enter name, phone number or department, and then
press the Save soft button.
a
BackSave Del.
Directory Service
Name Test
TEL 235
Depart Design
Basic Menus
New Schedule
This is the function used to register and manage schedules on a daily basis.
The user can set location, time, alarm and ringing sound according to schedule.
In idle mode, press the Menu select the 6
Scheduler press the Enter[OK] press the
New Schedule soft button.
Back
3 Message
4 Conference
5 Directory Service
6 Scheduler
Scheduler
Enter the text of memo, and then press the press the
Enter [OK]
Back
: Opt :New
090707 Meeting
Enter the Set Time and selecte the Alarm type, and
then press the Enter [OK]tosave.
1234:TEST
Mar. 03[Mon] 12:34AM
Menu Set
Calllog
Service
2 Call Log
3 Message
4 Conference
5 Directory Service
Back
1234:TEST
Mar. 03[Mon] 12:34AM
Menu Set
Calllog
Service
3 Message
4 Conference
5 Directory Service
6 Scheduler
Back
090318 Make a call
090325 Birthday
BackNew
: Opt :
Set Date 09Y 07M 08D
Set Time 17h 46m
Alarm On Time
Back
Page 28

Setup Menu usage
Screen of Setup Menu
-Service Menu correspond to the option tabs displayed along the bottom of your LCD screen. Service Menu change
depending on the status of your IP phone.
Back
1 Phone
2 Settings
Back
1 Phone
2 Settings
Service
Menu Set
Calllog
1234:TEST
Mar. 03[Mon] 12:34AM
-The Service Menu may be changed according to Call type, System version or system
admonistrator’s establishmemts.
-For more information of the Service Menu, inquires to administrator.
NOTE
Back
1 Screen
2 Sound
3 Language
4 Security
Back
1 Application Set.
2 Absent Messages
3 Call Forward
4 Network Info.
Basic Menus
XML Browser
In idle mode, press the Menu select the 7 XML
Browser press the Enter[OK].
Back
4 Conference
5 Directory Service
6 Scheduler
7 XML Browser
XML Browser
When a server is accessed, the home page is
displayed.
Not Supported
Using a navigation button, the user can move
among the items displayed on the screen.
-The user cannot use those functions when the icons are not active.
-Forexample, if there is no previous page, the previous page icon is disabled.
NOTE
The user can search and use the information provided from XML browser.
Available information and related services may differ per server construction.
-WhenanXMLbrowser server is not constructed, the XML browser service is not available.
To find out more about the server construction, contact the server administrator.
-The XML browser server differs with each server construction.
For information about separate services, contact the server administrator.
NOTE
4 Conference
5 Directory Service
6 Scheduler
7 XML Browser
1234:TEST
Mar. 03[Mon] 12:34AM
Menu Set
Calllog
Service
Back
Not Supported
Page 29

1Phone
Service
Menu Set
Calllog
1234:TEST
Mar. 03[Mon] 12:34AM
Back
1 Phone
2 Settings
Basic Menus
Phone 1Screen
You can set the displaying items.
In idle mode, press the Set. soft button.
Select the 1 Phone 1 Screen Press the
Enter[OK]button.
Back
1 Screen
2 Sound
3 Language
4 Security
To set the Clock type:
Select the 1 Clock Type 12 hour or 24
hour
To set the Contrast:
Select the 2 Contrast select the level
To set the Font:
Select the 3 Font select the Font type
Back
1 Clock Type
2 Contrast
3 Font
To save the your settings, press the Enter[OK]
button.
Phone 2Sound
You can set the ring sound and sound volume.
In idle mode, press the Set. soft button.
Select the Phone
2 Sound Press the
Enter[OK] button.
Back
1 Phone
2 Settings
To set the Ring sound:
Select the 1 Ring select the Ring sound
Press the Enter[OK]button.
To set the Volume:
Select the 2 Volume select the Item
select the volume level Press the
Enter[OK] button.
Back
1 Ring
2 Volumes
Phone 3Language
You can change the language displayed onscreen.
In idle mode, press the Set. soft button.
Select the Phone 3 Language Press
the Enter[OK] button.
Back
1 Phone
2 Settings
You can select to English, Korean or
Italy, press the Enter[OK] button.
The phone is reboot automatically.
[Select Language]
English
한국어
Italy
Back
1 Clock Type
2 Contrast
3 Font
1 Clock Type
2 Contrast
3 Font
[Clock Type]
12 Hour
24 Hour
Back
[Contrast]
Back
[Font]
Yoon Font
Mono Font
Back
[Clock Type]
Setting is completed
Back
Back
1 Ring
2 Volumes
1 Screen
2 Sound
3 Language
4 Security
[Select Ring]
Ring (1)
Handset
Speaker
Ring
Key Silence
Back
1 Screen
2 Sound
3 Language
4 Security
Back
Back
Back
Back
Page 30

SMT-i5220 IP Phone User Manual
57
ⓒ
SAMSUNG Electronics Co., Ltd.
56
1 Phone 4 Security
You can set a password which is then used to set the functions of the phone, and the lock function.
This prevents other people from using the phone.
In idle mode, press the Set. soft button.
Select the 1 Phone Setting 4 Security
Press the Enter[OK] button.
1
Enter the Current Password Enter the New
Passward Press the Enter[OK] button.
Select the item [Call/Phone/] Select the Lock
type or Unlock Press the Enter[OK] button.
The password should be 4-digits.
Default password is “1234”.
BackDel.
[Security]
Enter Password.
****
2
Back
Change Passward
Call Send Lock
Phone Unlock
Back
Change Passward
Call Send Lock
Phone Unlock
Basic Menus
Back
1 Phone
2 Settings
Back
1 Screen
2 Sound
3 Language
4 Security
1 Phone 5 Phone Information
This displays the phone model and software version information.
In idle mode, press the Set. soft button.
Select the Phone 5 Phone Information
Press the Enter[OK] button.
1
Shows the Phone’s information
Back
SMT-i5220 V1.05
(09.06.07 13:00)
Copyright @
2009 SAMSUNG
2
Back
1 Phone
2 Settings
Back
2 Sound
3 Language
4 Security
5 Phone Information
2 Settings
2 Settings 1 Application Set. 1 Call
You can set set the optional functions related to calls.
In idle mode, press the Set. soft button.
Select the 2 Settings 1 Application Set.
1 Call Press the Enter[OK] button.
Back
1 Application Set.
2 Absent Messages
3 Call Forward
4 Network Info.
1
Select the Item Select the Item Type Press the
Enter[OK] button.
- You can change settings for external CID display,
phone number, dial mode, answer mode and headset
mode.
Back
CID Disp. Name
Dial Mode Overlap
Anwser Ring
Headset Cancel
2
Back
1 Call
2 Messages
3 My Phone Info.
4 Extension Login
[Call]
Setting is completed
2 Settings 1 Application Set. 2 Massages
You can set the optional functions related to a message.
In idle mode, press the Set. soft button.
Select the 2 Settings 1 Application Set.
2 Messages Press the Enter[OK]
button.
1
Select the No or Yes Press the Enter[OK]
button.
- You can make settings for the display of
received message.
2
Back
1 Application Set.
2 Absent Messages
3 Call Forward
4 Network Info.
Back
1 Call
2 Messages
3 My Phone Info.
4 Extension Login
Back
[Msg Content View]
No
Yes
[Msg Content View]
Setting is completed
Page 31

Basic Menus
Settings 1Application Set. 3MyInformation
You can set the My Information.
In idle mode, press the Set. soft button.
Select the 2 Settings 1 Application Set.
3MyInformation Press the Enter[OK]
button.
Select the User Enter the Name Select
the My Extension Enter the Number
Press the Enter[OK] button.
Settings 1Application Set. 4Extension Login
You can set the My Information.
In idle mode, press the Set. soft button.
Select the 2 Settings 1 Application Set.
4 Extension Login Press the Enter
[OK] button.
Select the No or Yes Press the Enter[OK]
button.
Settings 2Absent Messages
You can select or cancel an automatic response message during absence.
In idle mode, press the Set. soft button.
Select the 2 Settings
2 Absent Message Press
the Enter[OK]button.
Back
1 Phone
2 Settings
Select the Absent Message Type Press
the Enter[OK]button.
BackDisa. Save
IN A MEETING
OUT ON A CALL
OUT TO LUNCH
LEAVE A MESSAGE
1 Application Set.
2 Absent Messages
3 Call Forward
4 Network Info.
My Name : SuperMan
My Extension : 123
1 Call
2 Messages
3 My Phone Info.
4 Extension Login
Back
[My Phone Info.]
Setting is completed
BackSaveaBack
Back
1 Application Set.
2 Absent Messages
3 Call Forward
4 Network Info.
Back
PAGE ME
OUT OF TOWN
IN TOMORROW
RETURN AFTERNOON
BackDisa. Save
[Absent Messages]
Setting is completed
1 Application Set.
2 Absent Messages
3 Call Forward
4 Network Info.
[Extension Login]
No
Yes
1 Call
2 Messages
3 My Phone Info.
4 Extension Login
[Extension Login]
Setting is completed
Back
Back
Back
Page 32

Settings 3CallForward
You can set set or cancel a call transfer method.
The user can enable call forwarding for all calls, during busy times, or in the event of no answer.
In idle mode, press the Set. soft button.
Select the 2 Settings 3 Call Forward
Press the Enter[OK]button.
Back
1 Phone
2 Settings
Select the Type of Call Forward Press the
Enter[OK]button.
Back
Disable
Forward All
Forward Busy
Forward No Answer
Enter the Forward Number Press the
Enter[OK]button
BackDel.Save
[Forward Number]
9876
Basic Menus
Back
1 Application Set.
2 Absent Messages
3 Call Forward
4 Network Info.
Settings 4Network Info.
Shows IP, MAC information and LAN connection status.
In idle mode, press the Set soft button.
Select the 2 Settings
4 Network Info.
Press the Enter[OK] button.
Back
1 Phone
2 Settings
Enter the Password Press the Enter[OK]
button.
The default password is “1234”.
You can show the Network Mode, IP, Subnet
Mask, Gateway, DNS1 and DNS information.
Settings 5UserDataInit.
Initializes the phone by entering a password.
In idle mode, press the Set. soft button.
Select the Phone Setting 5User Data Init.
Press the Enter[OK]button.
Enter the Password Press the Enter[OK] button.
The default password is “1234”.
Wait for a minute.
[Reboot Phone]
1 Application Set.
2 Absent Messages
3 Call Forward
4 Network Info.
[Network Info]
Enter Passward.
****
Delete
[Network Info.]
Mode:Static IP
IP: 23.30.156.121
SUBNETMASK:
Back
Back
Back
1 Phone
2 Settings
2 Absent Messages
3 Call Forward
4 Network Info.
5 User Data Init.
Back
Back
Page 33

Service Menu usage
Screen of Service Menu
-Service Menu correspond to the option tabs displayed along the bottom of your LCD screen. Service Menu change
depending on the status of your IP phone.
Redial
Message
Call Pickup
Do Not Disturb
back
Conference Call
Group Listen
Mute On
Back
[During idle]
[During a call]
Service
Menu Set
Calllog
1234:TEST
Mar. 03[Mon] 12:34AM
Service Menu
-The Service Menu may be changed according to Call type, System version or system
administrator’s establishmemts.
-For more information of the Service Menu, inquires to administrator.
NOTE
Page 34

Redial
This function allows you to redial the outside number that was last dialed.
In idle mode, press the Service soft button.
Select the Redial
press the Enter[OK] button.
Redial
Message
Call Pickup
Do Not Disturb
back
Recall to the last number(s) dialed.
1234 : #56789012
Service
Call Pickup
Rings another phone.
In idle mode, press the Service soft button.
Select the Re-Routing press the Enter[OK]
button.
Redial
Message
Call Pickup
Do Not Disturb
back
“Enter the internal number” is displayed.
Input Ext Number
Service
Enter the number of the phone from which calls
should be re-routed to the your phone.
H
ello
Message
You can show the received messages from another call during a call.
In Service Menu screen, select the Message and
press the Enter[OK] button.
Redial
Message
Call Pickup
Do Not Disturb
back
You can show the information of request call
number.
7890
Request the call
Service
You can use Service > Message Replay / Delete /
Next Message.
Message Reply
Delete
Next Message
End
back
Service Menus
NOTE
Page 35

DND(Do Not Disturb)
You can set the Do Not Disturb function, automatically refusing/blocking all incoming calls
In idle mode, press the Service soft button.
Select the Do Not Disturb
press the Enter[OK]
button.
-When the DND(Do Not Disturb) feature is active, appears the
icon in the screen.
Redial
Message
Call Pickup
Do Not Disturb
back
Call back
If you call an extension and the line is busy or the call goes unanswered, you can use the Call Back feature to
receive notification when the extension is available to take a call.
Call an extension. While you hear the busy tone or
ringing tone, press the Call Back soft button.
Message
Call Pickup
Do Not Disturb
Call Back
back
H
ello
A Call Back activation confirmation message displays.
Place the handset in its normal position.
Reservation Completed
Service
When the extension you called is available to
receive a call, you receive an audio and visual alert
from your phone.
Lift the handset to receive calls.
Edit Mode
In Service Menu screen, select the Edit Mode
press the Enter[OK] button.
Call Pickup
Do Not Disturb
Call Back
Edit Mode
back
Press the desired Function key.
Press the Funtion key
Service
Enter the Index number press the Enter[OK]
button.
Input the Index
Service
Press the Function key once more to finish.
Service Menus
Page 36

Save/Resend
During a external call, you can save the current call number, and then make a call from saved number.
During a external call, press the Service button
select the Save/Resend and press the Enter[OK]
button.
Call Back
Edit Mode
Alarm/Morning Call
Save/Resend
back
Current call number is saved.
7890 :
Number is Saved
Service
To make a call from the saved external number
In idle mode, press the Service soft button
select
the Save/Resend
and press the Enter[OK]
button.
Call Back
Edit Mode
Alarm/Morning Call
Save/Resend
back
Alarm/Morning Call
You can set the Alarm/Morning call function.
In Service Menu screen, select the Alarm/Morning
Call and press the Enter[OK] button.
Do Not Disturb
Call Back
Edit Mode
Alarm/Morning Call
back
Enter the Hour and minute press the Enter[OK]
button.
Time Set-1 :
Input the Time
Service
Enter the number of day press the Enter[OK]
button.
Time Set-1 10 : 35
Input the number of day
Service
News Select
This function is reserved from the news server.
In Service Menu screen, select the News Select
and press the Enter[OK]button.
Edit Mode
Alarm/Morning Call
8 Save/Resend
News Select
back
This function Allows you to link the News Server.
Detail News
This function is reserved from the news server.
In Service Menu screen, select the Detail News
and press the Enter[OK] button.
Alarm/Morning Call
Save/Resend
News Select
Detail News
back
This function Allows you to link the News Server.
Service Menus
Page 37

Barge Call
If you call an extension and the line is busy or the call
goes unanswered, press the Service button select
the Call Barge and press the Enter[OK]button.
Back
Call Back
Message
Call Barge
Displays the “000 : Intercom status” on the screen.
Service
3031 :
= Intercom status =
Group Listen
During a call, press the Service button select the
Group Listen and press the Enter[OK] button.
Conference Call
Group Listen
Mute On
Back
To cancel the Group Listen, press the Service
button select the Listen Off and press the
Enter[OK] button.
Conference Call
Listen Off
Mute On
Back
Conference Call
Your IP Phone supports conference calls, enabling you to talk with multiple parties at the same time.
During a call, press the Service button select the
Conference and press the Enter[OK] button.
Enter the Phone number and press the Enter[OK]
button.
Conference Call
Group Listen
Mute On
Back
Enter the Phone number and press the Enter[OK]
button.
Repeat these steps to add parties to the conference
call.
-You can connect up to 5 participants into one conference call.
Back
Conference :
1234 5678 9876
Mute Calls
During a call, press the Service button select the
Mute On and press the Enter[OK]button.
Conference Call
Group Listen
Mute On
Back
To toggle mute off, press the Service button
select the Mute Off and press the Enter[OK]
button.
Conference Call
Group Listen
Mute Off
Back
Service Menus
Page 38

OHVA Block
In idle mode, press the Service soft button.
Select the OHVP Block press the Enter[OK]
button.
Hold Pickup
Group Announcement
Meet Me Page
OHVP Block
Back
Select the Enable/Disable press the Enter[OK].
-The OHVA information inquires to administrator.
Enable
Disable
Back
My Group Pickup
Call pickup allows you to pick up incoming calls within your own group.
In idle mode, press the Service soft button.
Select the My Group Pickup
press the
Enter[OK] button.
Meet Me Page
OHVP Block
Group Pickup
My Group Pickup
Back
The call now rings on your phone.
Answer the incoming call.
Group Pickup
Call pickup allows you to pick up incoming calls within your own group or outside of Your Group,.
In idle mode, press the Service soft button.
Select the Group Pickup press the Enter[OK]
button.
Group Announcement
Meet Me Page
OHVP Block
Group Pickup
Back
Enter the Group number and press the
Enter[OK]button.
The call now rings on your phone.
Answer the incoming call.
Service
Enter the Group number
Service Menus
Page 39

Troubleshooting
The phone does not boot.
-Check if your phone is correctly connected.
-Checkifthe adapter is correctly installed. Refer to page 9.
-Unplug the adapter, and then replug the adapter after for more 10
seconds.
The phone does not work
after booting.
-Check if your phone sIPaddress is duplicated with other unit.
The Network information inquires to administrator.
-Check if your phone is correctly installed. Refer to page 9.
No sound dial ready tone.
-Check if the phone is correctly installed. Refer to page 9.
-Check if the phone
snetwork ssetting is correctly set.
No display on the screen.
-Check if the phone is correctly installed. Refer to page 9.
No sound ring tone.
-PresstheVolume + to increase the ringer volume.
Refer to page 27.
I hear many noises during a
call.
-Liftthe handset to change to handset mode during a call.
I hear many noises while
using speakerphone.
-Your IP Phone is too near from another phone.
-Relocate the your IP phone at 1 m cover from another phone.
Symptoms Remedies
Let’s think about the problems that can occur when using the IP Phone.
If there is any problem of IP Phone, check the below items first. If the problem is not solved with following
methods, please contact the service center.
Registration
In idle mode, press the Transfer
button
press the desired
Function Key.
Enter the Index number press the Enter
[OK] button.
Or, enter the “001” select the desired function
by using or buttons press the same
Function Key.
Previous Next
Enter the related Phone Number or
select the Value press the same
Function Key.
(For example : If you select the Auto send
function, enter the phone number for auto
sending
press the same Function Key)
-Upto10buttons can be programmed by repeating the
upper 1 ~ 3 steps.
In idle mode or lit and hold the handset, press the
assigned Function Key.
(For example : If you press the Function1 key, send to
“3301” automatically)
Function Keys usage
Appendix
Transfer
3301
Prees the Function Key
Service
Code
Auto Send
Service
003
Service
3301
Service
Page 40

The specifications of the IP Phone SMT-i5220 is as follow;
Specification
SMT-i5220
785
223(W) 223(H) 115.5(D)
AC 100 ~ 250 V / 50~60 Hz ; 0.5 A
DC5V/3A
DC 36~57 V(Standard 48 V) ; 400 mA
IEEE 802.3af PoE (the phone is a Class 2 device)
B/W Graphic LCD (128 x 64 pixels)
Category
Model
Weight
Dimensions (mm)
Adapter Input Power
Adapter Output Power
PoE Input Power
PoE Device
LCD
Specifications Product Warranty
Seoul Commtech products are supplied with a one (1) year warranty based from
the date of purchase, during which time any defective product will be repaired or
replaced with a new or factory rebuilt replacement at no charge.
Warranty Conditions
1. This warranty applies to the original purchase only.
2. The warranty will become invalid in full if unauthorized repair or modifications are
performed to the unit, or in any case of accident, misuse, damage caused by
improper installation and altered serial numbers.
3. If warranty service is required, the customer must send the product to the
customer service center or an authorized dealer. In all cases, the product must
be accompanied by the following items: customer name, address, telephone
number,product serial numbers, and a copy of the purchase receipt that shows
the purchase date and location.
The product model number is included on the package and the front of the manual.
The serial number is located on the product unit. Please record the product model
number and serial number in the spaces provided below . Refer to these numbers
for warranty service.
Model No. Serial No.
 Loading...