

Page 1
Gas Range
User manual
NX58M6850S*
NX7000K_VE_NX58M6850SS_AA_DG68-00909A-03_EN+MES+CFR.indb 1 1/30/2018 1:04:00 PM
Page 2
WARNING: If the information in this manual is not followed exactly,
a re or explosion may result causing property damage, personal
injury, or death.
• DO NOT store or use gasoline or other ammable vapors and
liquids in the vicinity of this or any other appliance.
• WHAT TO DO IF YOU SMELL GAS:
- DO NOT try to light any appliance.
- DO NOT touch any electrical switch.
- DO NOT use any phone in your building.
- Immediately call your gas supplier from a neighbor’s phone.
Follow the gas supplier’s instructions.
- If you cannot reach your gas supplier, call the re
department.
• Installation and service must be performed by a qualied
installer, service agency, or the gas supplier.
ANTITIP DEVICE
WARNING: To reduce the risk of tipping the range, the range
must be secured by a properly installed Anti-Tip device. AFTER
THE RANGE HAS BEEN INSTALLED, CONFIRM THAT THE ANTI-TIP
DEVICE HAS BEEN PROPERLY INSTALLED AND VERIFY THAT THE
ANTI-TIP DEVICE IS PROPERLY ENGAGED. Refer to the
installation manual for instructions.
a) If the anti-tip device is not installed, a child or adult can tip the
range and be killed.
b) Verify the anti-tip device has been properly installed and engaged
at the rear right (or rear left) of the range bottom.
c) If you move the range and then move it back into place, ensure
the anti-tip device is re-engaged at the right or left rear of the
range bottom.
d) Do not operate the range without the anti-tip device in place and
engaged.
e) Failure to do so can result in death or serious burns to children or
adults.
WARNING
Do not step, lean, or sit on the oven door of the range. You can cause
the range to tip, resulting in burns or serious injuries.
Conrm that the Anti-Tip device is installed properly. Then, to verify
that the Anti-Tip device is engaged, grasp the top rear edge of the
range and carefully attempt to tilt it forward. The Anti-Tip device
should prevent the range from tilting forward more than a few
inches.
If you pull the range out from the wall for any reason, make sure
the anti-tip device is properly engaged when you push the range
back against the wall. If it is not, there is a risk of the range tipping
over and causing injury if you or a child stand, sit or lean on an open
door.
Never completely remove the leveling legs. If you remove the
leveling legs, the range will not be secured to the anti-tip device
properly.
2 English
NX7000K_VE_NX58M6850SS_AA_DG68-00909A-03_EN+MES+CFR.indb 2 1/30/2018 1:04:00 PM
Page 3

Regulatory Notice
1. FCC Notice
CAUTION
FCC CAUTION: Any changes or modications not expressly approved
by the party responsible for compliance could void the user’s
authority to operate the equipment.
This device complies with Part 15 of FCC Rules. Operation is Subject
to following two conditions:
1) This device may not cause harmful interference, and
2) This device must accept any interference received including
interference that cause undesired operation.
For products available in the US/Canadian markets, only channels
1~11 are available. You cannot select any other channels.
FCC STATEMENT:
This equipment has been tested and found to comply within the
limits for a Class B digital device, pursuant to part 15 of the FCC
Rules. These limits are designed to provide reasonable protection
against harmful interference in a residential installation.
This equipment generates, uses, and can radiate radio
frequency energy and, if not installed and used in accordance
with the instructions, may cause harmful interference to radio
communications. However, there is no guarantee that interference
will not occur in a particular installation. If this equipment does
cause harmful interference to radio or television reception, which
can be determined by turning the equipment off and on, the user is
encouraged to try to correct the interference by one or more of the
following measures:
• Reorienting or relocating the receiving antenna
• Increasing the separation between the equipment and receiver
• Connecting the equipment to an outlet that is on a different
circuit than the radio or TV
• Consulting the dealer or an experienced radio/TV technician for
help.
FCC RADIATION EXPOSURE STATEMENT:
This equipment complies with FCC radiation exposure limits set
forth for an uncontrolled environment. This equipment should be
installed and operated so there is at least 8 inches (20 cm) between
the radiator and your body. This device and its antenna(s) must not
be co-located or operated in conjunction with any other antenna or
transmitter.
English 3
NX7000K_VE_NX58M6850SS_AA_DG68-00909A-03_EN+MES+CFR.indb 3 1/30/2018 1:04:00 PM
Page 4

2. IC Notice
The term "IC" before the radio certication number only signies
that Industry Canada technical specications were met. Operation
is subject to the following two conditions: (1) this device may not
cause interference, and (2) this device must accept any interference,
including interference that may cause undesired operation of the
device.
This Class B digital apparatus complies with Canadian ICES-003.
For products available in the US/Canadian markets, only channels
1~11 are available. You cannot select any other channels.
IC RADIATION EXPOSURE STATEMENT:
This equipment complies with IC RSS-102 radiation exposure limits
set forth for an uncontrolled environment. This equipment should be
installed and operated so there is at least 8 inches (20 cm) between
the radiator and your body. This device and its antenna(s) must not
be co-located or operated in conjunction with any other antenna or
transmitter.
General safety instructions
This unit has been tested and found to comply with the limits for
a class B digital device, pursuant to Part 18 of the FCC rules. These
limits are designed to provide reasonable protection against harmful
interference in a residential installation. This unit generates, uses and
can radiate radio frequency energy and, if not installed and used in
accordance with the instructions, may cause harmful interference to
radio communications.
However, there is no guarantee that interference will not occur in a
particular installation. If this unit does cause harmful interference to
radio or television reception, which can be determined by turning
the unit off and on, the user is encouraged to try to correct the
interference by one or more of the following measures:
• Reorienting or relocating the receiving antennae.
• Increasing the distance between the unit and receiver.
• Connecting the equipment to an outlet that is on a different
circuit than the radio or TV.
4 English
NX7000K_VE_NX58M6850SS_AA_DG68-00909A-03_EN+MES+CFR.indb 4 1/30/2018 1:04:00 PM
Page 5
Contents
Important safety information 6
Overview 13
Layout 13
What’s included 13
Dual Door™ 14
Control panel 15
Clock 16
Kitchen timer 16
Oven vent/Cooling vent 16
Gas range 17
Cookware 17
Gas burners 18
Ignition 18
Adjusting low ame settings on cooktop burners 19
Gas oven 20
Single mode 20
Twin mode 20
Cooking mode 21
Broiling 24
Recipe guide 25
Temperature setting guides 25
Using the oven racks 26
Cooking options 28
Slow cook, dehydrate, proong 33
Non-cooking functions 34
Smart Control - Controlling your oven remotely 36
Maintenance 37
Cleaning 37
Replacing the Oven Light 42
Oven Door: Remove and Re-Install 43
Storage drawer 44
Troubleshooting 44
Checkpoints 44
Information codes 49
Warranty 49
Open Source Announcement 51
Contents
English 5
NX7000K_VE_NX58M6850SS_AA_DG68-00909A-03_EN+MES+CFR.indb 5 1/30/2018 1:04:00 PM
Page 6
Important safety informationImportant safety information
Important safety information
Read all instructions before using this appliance
• All electrical and gas equipment with moving parts can be dangerous. Please
read the important safety instructions for this appliance in this manual. The
instructions must be followed to minimize the risk of injury, death, or property
damage.
• Save this manual. Please Do Not Discard.
Symbols used in this manual
WARNING
Hazards or unsafe practices that may result in severe personal injury or death.
CAUTION
Hazards or unsafe practices that may result in electric shock, personal injury, or
property damage.
NOTE
Useful tips and instructions.
These warning icons and symbols are here to prevent injury to you and others.
Please follow them explicitly. After reading this section, keep it in a safe place for
future reference.
State of California Proposition 65 warning (US only)
WARNING : This product contains chemicals known to the State of California to
cause cancer and birth defects or other reproductive harm.
Gas appliances can cause low-level exposure to Proposition 65 listed substances,
including but not limited to, benzene, carbon monoxide, formaldehyde and soot,
substances resulting from the incomplete combustion of natural gas or LP fuels.
Commonwealth of Massachusetts
• This product must be installed by a licensed plumber or gas tter qualied
or licensed by the State of Massachusetts. When using ball-type gas shut-off
valves, you must use the T-handle type. Multiple exible gas lines must not be
connected in series.
General safety
WARNING
To reduce the risk of re, electric shock, personal injuries, and/or death, observe
the following precautions.
• Do not touch any part of the range, including
but not limited to, oven burners, surface
burners, or interior surfaces during or
immediately after cooking.
• Know the location of the gas shut-off valve
and how to shut it off.
• Make sure the anti-tip device is properly installed on the range. See the
installation instructions for more information.
• Do not let children near the range. Do not let children go into the range or
onto the range. Do not let children play with the range or any part(s) of the
range. Do not leave children unattended in an area where the range is in use.
For children’s safety, we recommend utilizing the control/door lockout feature.
• Remove all packaging materials from the range before operating to prevent
ignition of these materials. Keep all packaging materials out of children’s
reach. Properly dispose the packaging materials after the range is unpacked.
6 English
NX7000K_VE_NX58M6850SS_AA_DG68-00909A-03_EN+MES+CFR.indb 6 1/30/2018 1:04:00 PM
Page 7
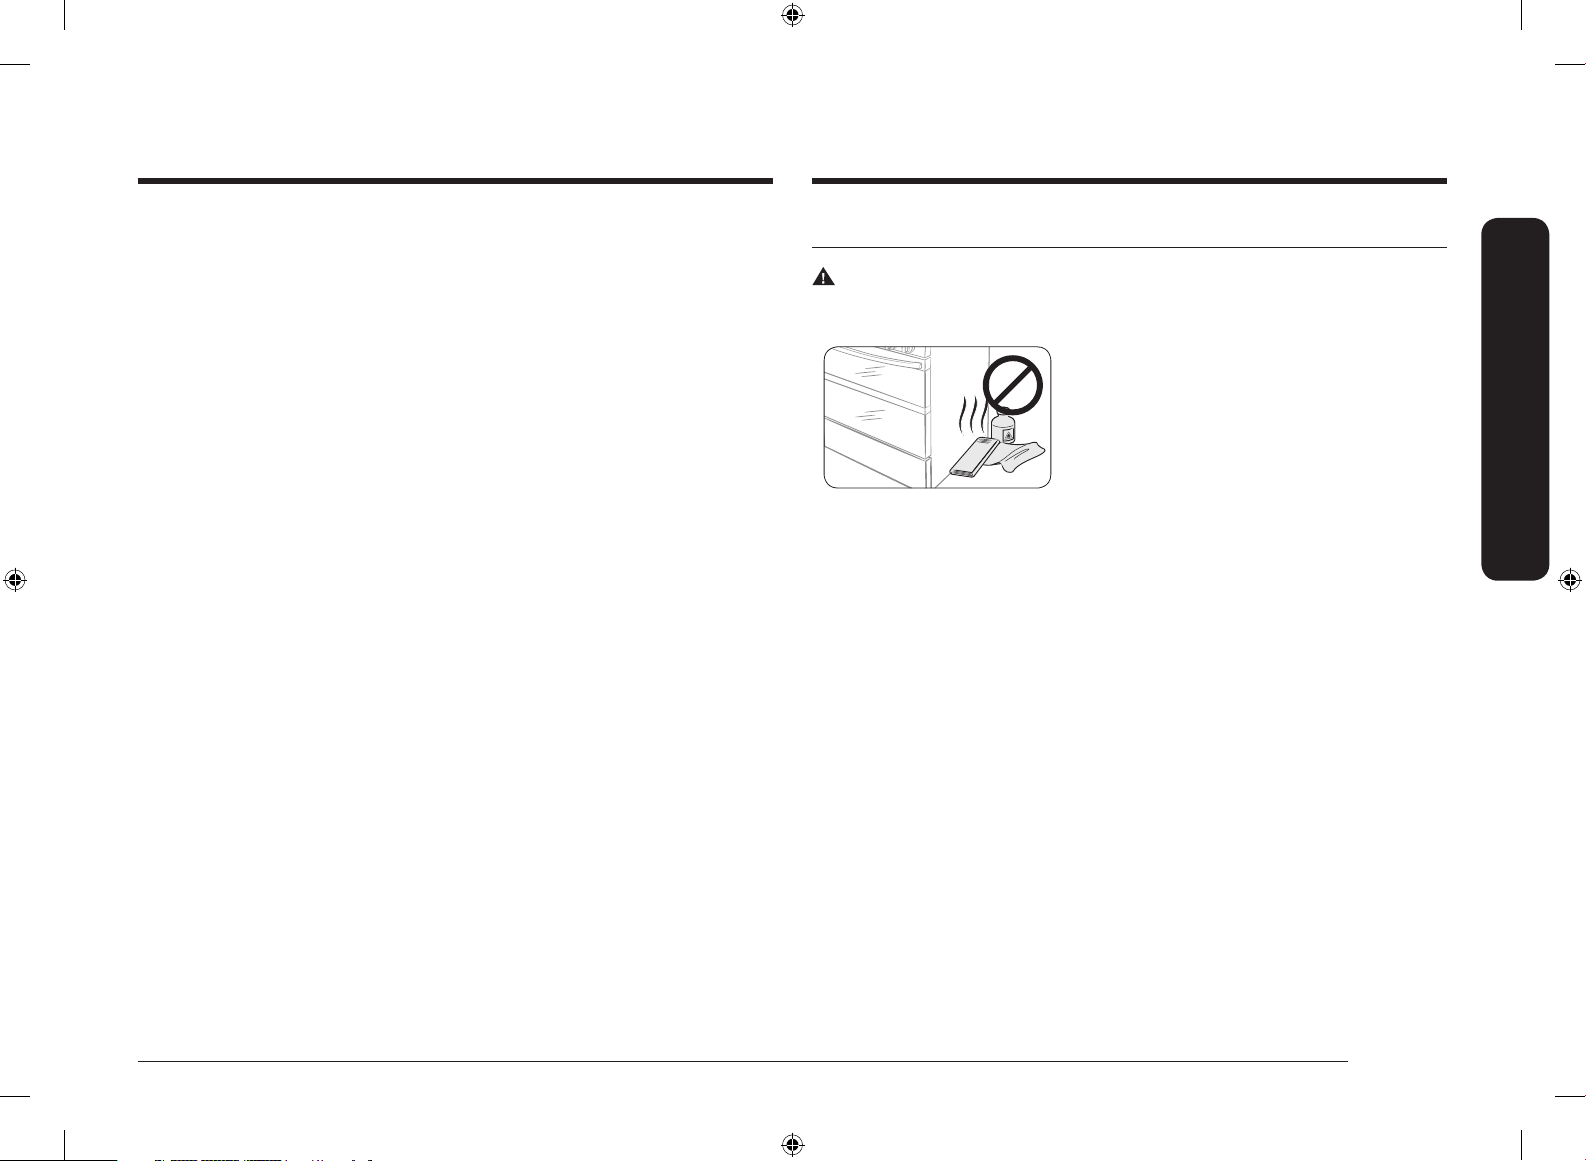
• Do not store any object of interest to children on the cooktop or backguard
of the range. Children climbing on the range to reach items could be killed or
seriously injured.
• Do not operate the range if the range or any part of the range is damaged,
malfunctioning, or missing parts.
• Do not use the range as a space heater. Use the range for cooking only.
• Do not use oven cleaners or oven liners in or around any part of the oven.
• Use only dry pot holders. Pot holders with moisture in them can release steam
and cause burns if they come in contact with hot surfaces. Keep pot holders
away from open ames when lifting cookware. Never use a towel or bulky
cloth in place of a pot holder.
• Do not use the range to heat unopened food containers.
• Do not strike the oven glass.
• When disposing of the range, cut off the power cord and remove the door to
prevent children and animals from getting trapped.
• Unplug or disconnect power before servicing.
• Make sure all meat and poultry is cooked thoroughly. Meat should always be
cooked to an internal temperature of 160 °F (71 °C). Poultry should always be
cooked to an internal temperature of 180 °F (82 °C).
• Do not make any attempt to operate the electric ignition oven during an
electrical power failure.
• Keep the appliance area clear and free of combustible materials, gasoline, and
other ammable vapors and liquids.
• Teach children not to touch or play with the controls or any part of the range.
We recommend you utilize the control / door lockout feature to reduce the risk
of misuse by children.
• Do not lean on the range as you may turn the control knobs inattentively.
• Do not stand on top of the appliance or place objects (such as laundry, an oven
cover, lighted candles, lighted cigarettes, dishes, chemicals, metal objects, etc.)
on the appliance.
- Items, such as a cloth, may get caught in the door.
- This may result in electric shock, re, problems with the product, or injury.
Fire safety
WARNING
To reduce the risk of re, electric shock, personal injuries, and/or death, observe
the following precautions.
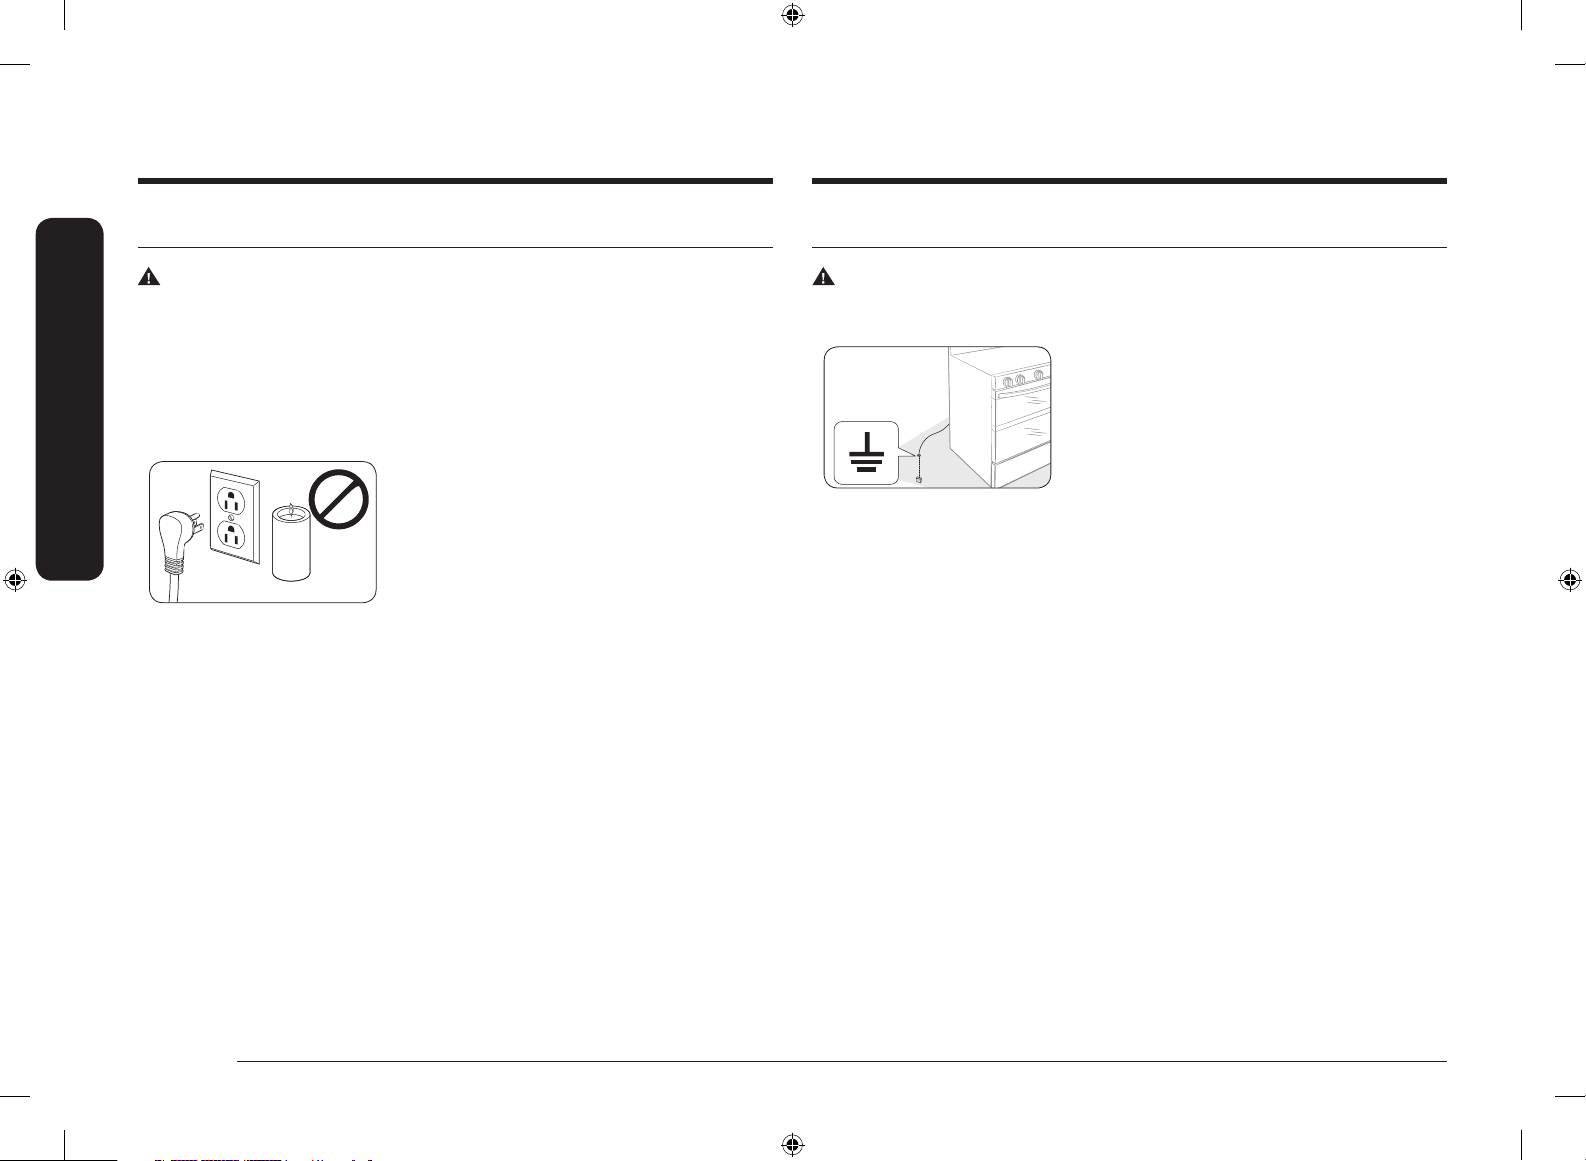
• Do not store, place, or use ammable or
combustible materials such as paper, plastic,
pot holders, linens, curtains, gasoline or other
ammable vapors or liquids near the range.
• Do not wear loose tting or hanging
garments while using the range.
• To avoid grease buildup, regularly clean the vents.
• Do not let pot holders or other ammable materials touch a heating element.
Do not use a towel or other bulky cloths in place of a pot holder.
• Do not use water on a grease re. To put out a grease re, turn off the heat
source and smother the re with a tight-tting lid or use a multipurpose dry
chemical or foam-type re extinguisher.
• If a grease re should occur in the oven, turn off the oven by pressing
the OFF/CLEAR pad. Keep the oven door closed until the re goes out. If
necessary, use a multipurpose dry chemical or foam-type re extinguisher.
• Do not heat unopened food containers. The buildup of pressure may cause the
containers to burst and result in injury.
• NEVER use this appliance as a space heater to heat or warm the room. Doing
so may result in carbon monoxide poisoning and overheating of the oven. Do
not use the oven for storage. Paper and other ammable items stored in the
oven can ignite.
• Do not leave items such as paper, cooking utensils or food in the oven when
not in use. Items stored in an oven can ignite.
• Do not put any combustible material or items around the range.
Important safety information
English 7
NX7000K_VE_NX58M6850SS_AA_DG68-00909A-03_EN+MES+CFR.indb 7 1/30/2018 1:04:01 PM
Page 8
Important safety information
Important safety information
Gas safety
WARNING
To reduce the risk of re, electric shock, personal injuries, and/or death, observe
the following precautions.
If you smell gas:
• Close the valve and do not use the range.
• Do not light a match, candle, or cigarette.
• Do not turn on any gas or electric appliances.
• Do not touch any electrical switches or plug a
power cord into an outlet.
• Do not use any phone in your building.
• Evacuate the room, building, or area of all
occupants.
• Immediately call your gas supplier from a
neighbor’s phone. Follow the gas supplier’s
instructions.
• If you cannot reach your gas supplier, call the
re department.
Checking for gas leaks
• Leak testing of the appliance must be conducted according to the
manufacturer’s instructions. Do not use a ame to check for gas leaks. Use a
brush to spread a soapy water mixture around the area you are checking. If
there is a gas leak, you will see small bubbles in the soapy water mixture at
the leak point.
Electrical and grounding safety
WARNING
To reduce the risk of re, electric shock, personal injuries, and/or death, observe
the following precautions.
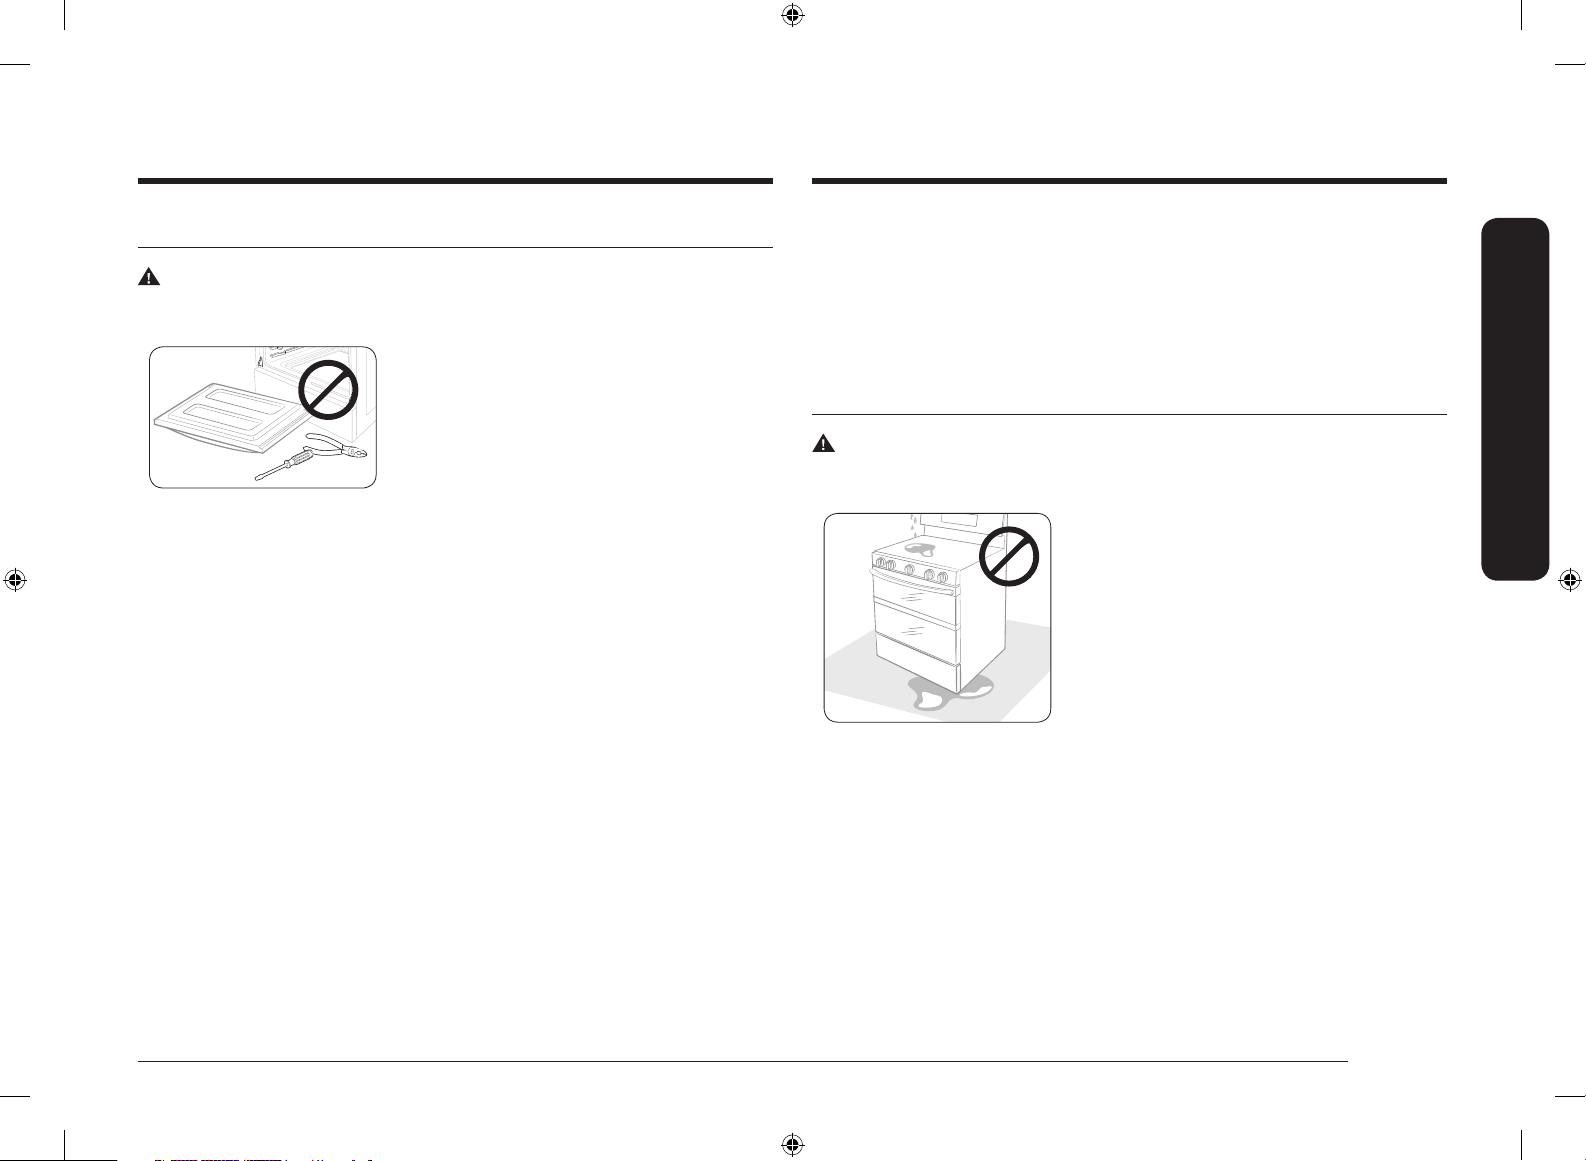
• Plug the range into a grounded 3-prong
outlet.
• Do not remove the ground prong.
• Do not use an adapter or an extension cord.
• Do not use a damaged power plug, power
cord, or loose power outlet.
• Do not modify the power plug, power cord, or
power outlet in any way.
• Do not put a fuse in a neutral or ground circuit.
• Use a dedicated 120-volt, 60-Hz, 20-amp, AC electrical circuit with a time-
delay fuse or circuit breaker for this range. Do not plug more than one
appliance into this circuit.
• Do not connect the ground wire to plastic plumbing lines, gas lines, or hot
water pipes.
• This range must be Earth grounded. In the event of a malfunction or
breakdown, grounding will reduce the risk of electrical shock by providing
a path for the electric current. This range is equipped with a cord having
a grounding plug. The plug must be rmly plugged into an outlet that is
properly installed and grounded in accordance with the local codes and
ordinances. If you are unsure whether your electrical outlet is properly
grounded, have it checked by a licensed electrician.
• The range is supplied with a 3-pronged grounded plug. This cord must be
plugged into a mating, grounded 3-prong outlet that meets all local codes and
ordinances. If codes permit the use of a separate ground wire, we recommend
that a qualied electrician determine the proper path for this ground wire.
• Electrical service to the range must conform to local codes. Barring local
codes, it should meet the latest ANSI/NFPA No. 70 – Latest Revision (for the
U.S.) or the Canadian Electrical Code CSA C22.1 – Latest Revisions.
• It is the personal responsibility of the range owner to provide the correct
electrical service for this range.
8 English
NX7000K_VE_NX58M6850SS_AA_DG68-00909A-03_EN+MES+CFR.indb 8 1/30/2018 1:04:01 PM
Page 9
Installation safety
WARNING
To reduce the risk of re, electric shock, personal injuries, and/or death, observe
the following precautions.
• Have your range installed and properly
grounded by a qualied installer, in
accordance with the installation instructions.
Any adjustment and service should be
performed only by qualied gas range
installers or service technicians.
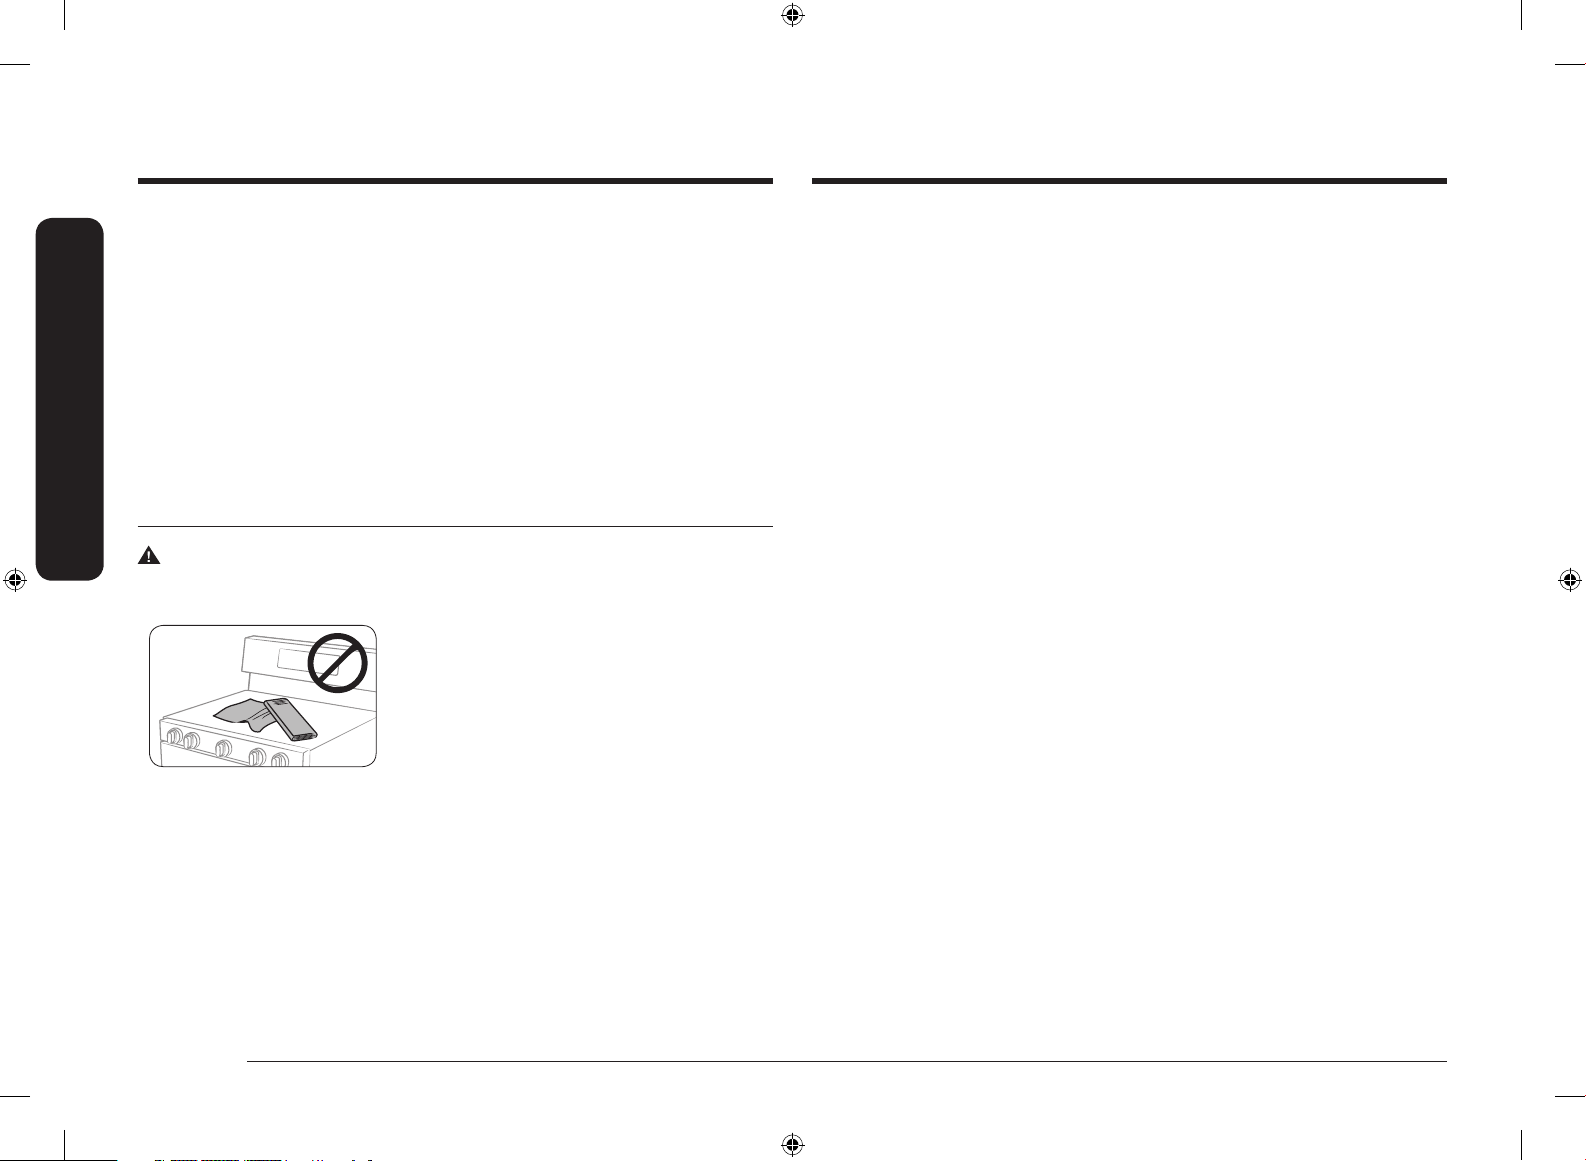
• Do not attempt to service, modify, or replace your range or any part of your
range unless it is specically recommended in this manual. All other service
should be referred to a qualied technician.
• Always use new exible connectors when installing a gas appliance. Do not
use old exible connectors.
• Make sure the anti-tip device is properly installed on the range. See the
installation instructions for more information.
• Due to the size and weight of the range, have two or more people move the
range.
• Remove all tape and packaging materials.
• Remove all accessories from the cooktop, oven, and/or lower drawer. Grates
and griddles are heavy. Use caution when handling them.
• Make sure no parts came loose during shipping. Do not install in an area
exposed to dripping water or outside weather conditions.
• Make sure your range is correctly installed and adjusted by a qualied service
technician or installer for the type of gas (natural or LP) you will use. For
your range to utilize LP gas, the installer must replace the 5 surface burner
orices and 2 oven orices with the provided LP orice set, and reverse
the GPR adapter. These adjustments must be made by a qualied service
technician in accordance with the manufacturer’s instructions and all codes
and requirements of the authority having jurisdiction. The qualied agency
performing this work assumes the gas conversion responsibility.
• Installation of this range must conform with local codes or, in the absence of
local codes, with the National Fuel Gas Code, ANSI Z223.1/NFPA.54, latest
edition. In Canada, installation must conform with the current Natural Gas
Installation Code, CAN/CGA-B149.1, or the current Propane Installation Code,
CAN/CGA-B149.2, and with local codes where applicable. This range has been
design-certied by ETL according to ANSI Z21.1, latest edition, and Canadian
Gas Association according to CAN/CGA-1.1, latest edition.
Location safety
WARNING
To reduce the risk of re, electric shock, personal injuries, and/or death, observe
the following precautions.
• This range is for indoor, household use only.
Do not install the range in areas exposed to
the weather and/or water.
• Do not install the range in a place which is
exposed to a strong draft.
• Select a level, well-constructed oor that
can support the range’s weight. Synthetic
ooring, such as linoleum, must withstand
180 °F (82 °C) temperatures without
shrinking, warping, or discoloring. Do not
install the range directly over interior kitchen
carpeting unless a sheet of ¼ inch plywood
or a similar insulator is placed between the
range and carpeting.
• Select a location where a grounded, 3-prong outlet is easily accessible.
• If the range is located near a window, do not hang long curtains or paper
blinds on that window.
• For the range to ventilate properly, make sure the range’s vents are not
blocked, and that there is enough clearance at the top, back, sides, and
underneath the range. The vents allow the necessary exhaust for the range to
operate properly with correct combustion.
Important safety information
English 9
NX7000K_VE_NX58M6850SS_AA_DG68-00909A-03_EN+MES+CFR.indb 9 1/30/2018 1:04:02 PM
Page 10
Important safety information
Important safety information
• Make sure the wall coverings around the range can withstand heat up to
200 °F (93 °C) generated by the range.
• Cabinet storage above the surface of the range should be avoided. If cabinet
storage above the range is necessary, allow a minimum clearance of 40 inches
(102 cm) between the cooking surface and the bottom of the cabinets or
install a range hood that projects horizontally a minimum of 5 inches (12.7
cm) beyond the bottom of the cabinets.
• Locate the range out of kitchen trafc paths and drafty locations to prevent
poor air circulation.
• If the range is located near a window, NEVER hang long curtains or paper
blinds on that window. They could blow over the surface burners and ignite,
causing a re hazard.
Cooktop safety
WARNING
To reduce the risk of re, electric shock, personal injuries, and/or death, observe
the following precautions.
• Make sure all burners are off when you are
not using the range.
• Do not use aluminium foil to line the grates
or any part of the cooktop. This can cause
carbon monoxide poisoning. Aluminum foil
linings may also trap heat, causing a re
hazard. Do not leave burners unattended on
medium or high heat settings.
• Before igniting the burners, make sure all burner caps are properly in place
and all burners are level.
• Always use the LITE position when igniting the burners and make sure the
burners have ignited. If ignition fails, turn the knob to OFF and wait until the
gas has dissipated.
• When you set a burner to simmer, do not turn the knob quickly. Make sure the
ame stays on.
• Do not place any objects other than cookware on the cooktop.
• This cooktop is designed for use with a wok or wok ring attachment.
• To ame food, you must have a ventilation hood. When you ame food, the
hood must be on.
• Before removing or changing cookware, turn off the burners.
• Remove food and cookware immediately after cooking.
• Before removing any parts of the burner for cleaning, make sure the range is
off and completely cool.
• After cleaning the burner spreader, make sure it is completely dry before reassembling.
• Make sure the spark mark on the dual burner spreader is placed beside the
electrode when it is assembled.
• To avoid carbon monoxide poisoning, do not pour water into the cooktop well
while cleaning.
• Select cookware that is designed for range top cooking. Use cookware that is
large enough to cover the burner grates. Adjust the burner ames so that the
ames do not extend beyond the bottom of the cookware.
• To avoid cookware discoloration, deformity, and/or carbon monoxide
poisoning, do not use cookware that is substantially larger than the grate.
• Make sure cookware handles are turned to the side or rear of the cooktop, but
not over other surface burners.
• Stand away from the range while frying.
• Always heat frying oils slowly, and watch as they heat. If you are frying foods
at high heat, carefully watch during the cooking process. If you are going
to use a combination of fats or oils when frying, mix them together before
heating.
• Use a deep-fryer thermometer whenever possible. This prevents overheating
the fryer beyond the smoking point.
• Use a minimum amount of oil when shallow pan-frying or deep-frying. Avoid
cooking unthawed food or food with excessive amounts of ice.
10 English
NX7000K_VE_NX58M6850SS_AA_DG68-00909A-03_EN+MES+CFR.indb 10 1/30/2018 1:04:02 PM
Page 11
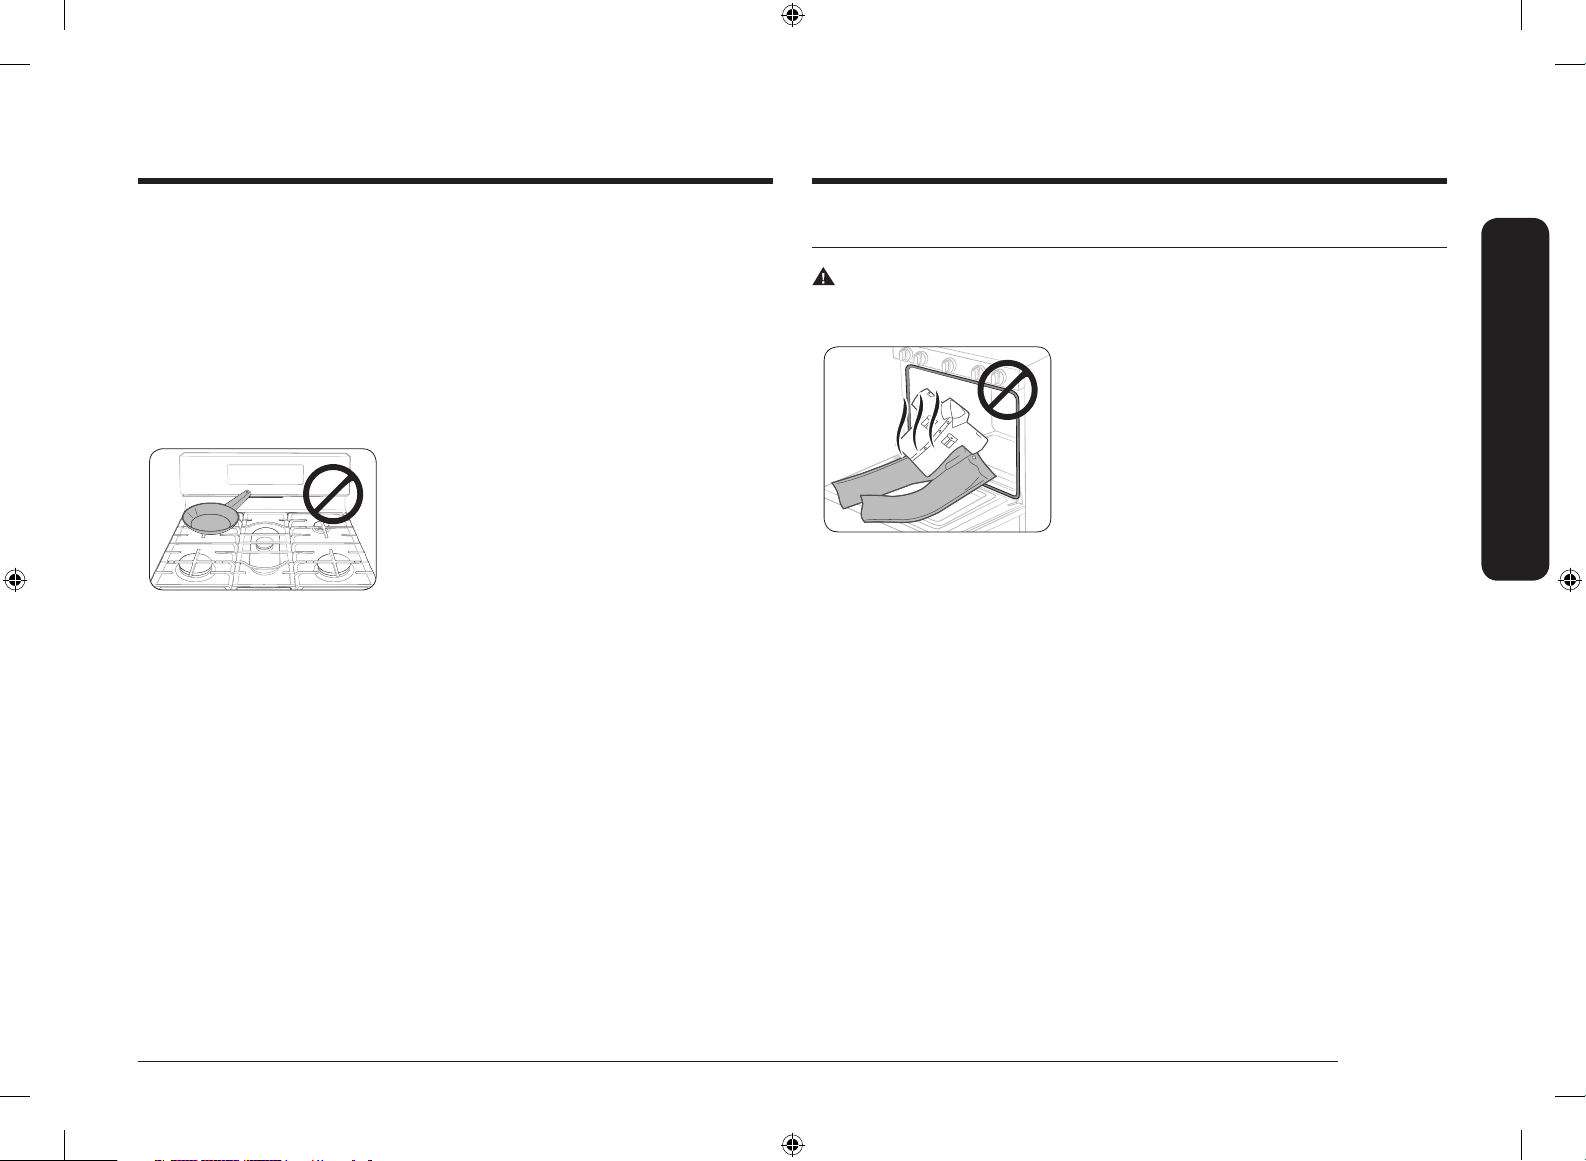
• Before moving cookware full of fats or oils, make sure it has completely
cooled.
• To prevent delayed eruptive boiling, always allow heated liquids to stand at
least 20 seconds after you have turned off the burner so that the temperature
in the liquid can stabilize. In the event of scalding, follow these rst aid
instructions:
1. Immerse the scalded area in cool or lukewarm water for at least 10
minutes.
2. Do not apply any creams, oils, or lotions.
3. Cover with a clean, dry cloth.
• Place pots in the center of the grate. Do not
place a pot larger than 9" in diameter on the
rear burners. If you place an oversized pot in
the wrong position, it might disrupt necessary
air circulation and make the ame on the
burner sputter and burn inefciently.
• Do not wear loose or hanging garments when using the range. They could
ignite and burn you if they touch a surface burner.
• Never leave plastic items on the cooktop. Hot air from the vent can melt or
ignite plastic items or cause a build up of dangerous pressure in closed plastic
containers.
• Do not place portable appliances, or any other object other than cookware on
the cooktop. Damage or re could occur if the cooktop is hot.
• Always make sure foods being fried are thawed and dry. Moisture of any kind
can cause hot fat to bubble up and over the sides of the pan.
• Always make sure the controls are OFF and the grates are cool before you
remove them to prevent any possibility of being burned.
• Do not put any combustible material or items around the range.
• Take care that your hands do not touch the burners when they are on. Turn off
the burners when you change a pan or pot.
• To warm liquid such as sauces, stir it while warming.
Oven safety
WARNING
To reduce the risk of re, electric shock, personal injuries, and/or death, observe
the following precautions.
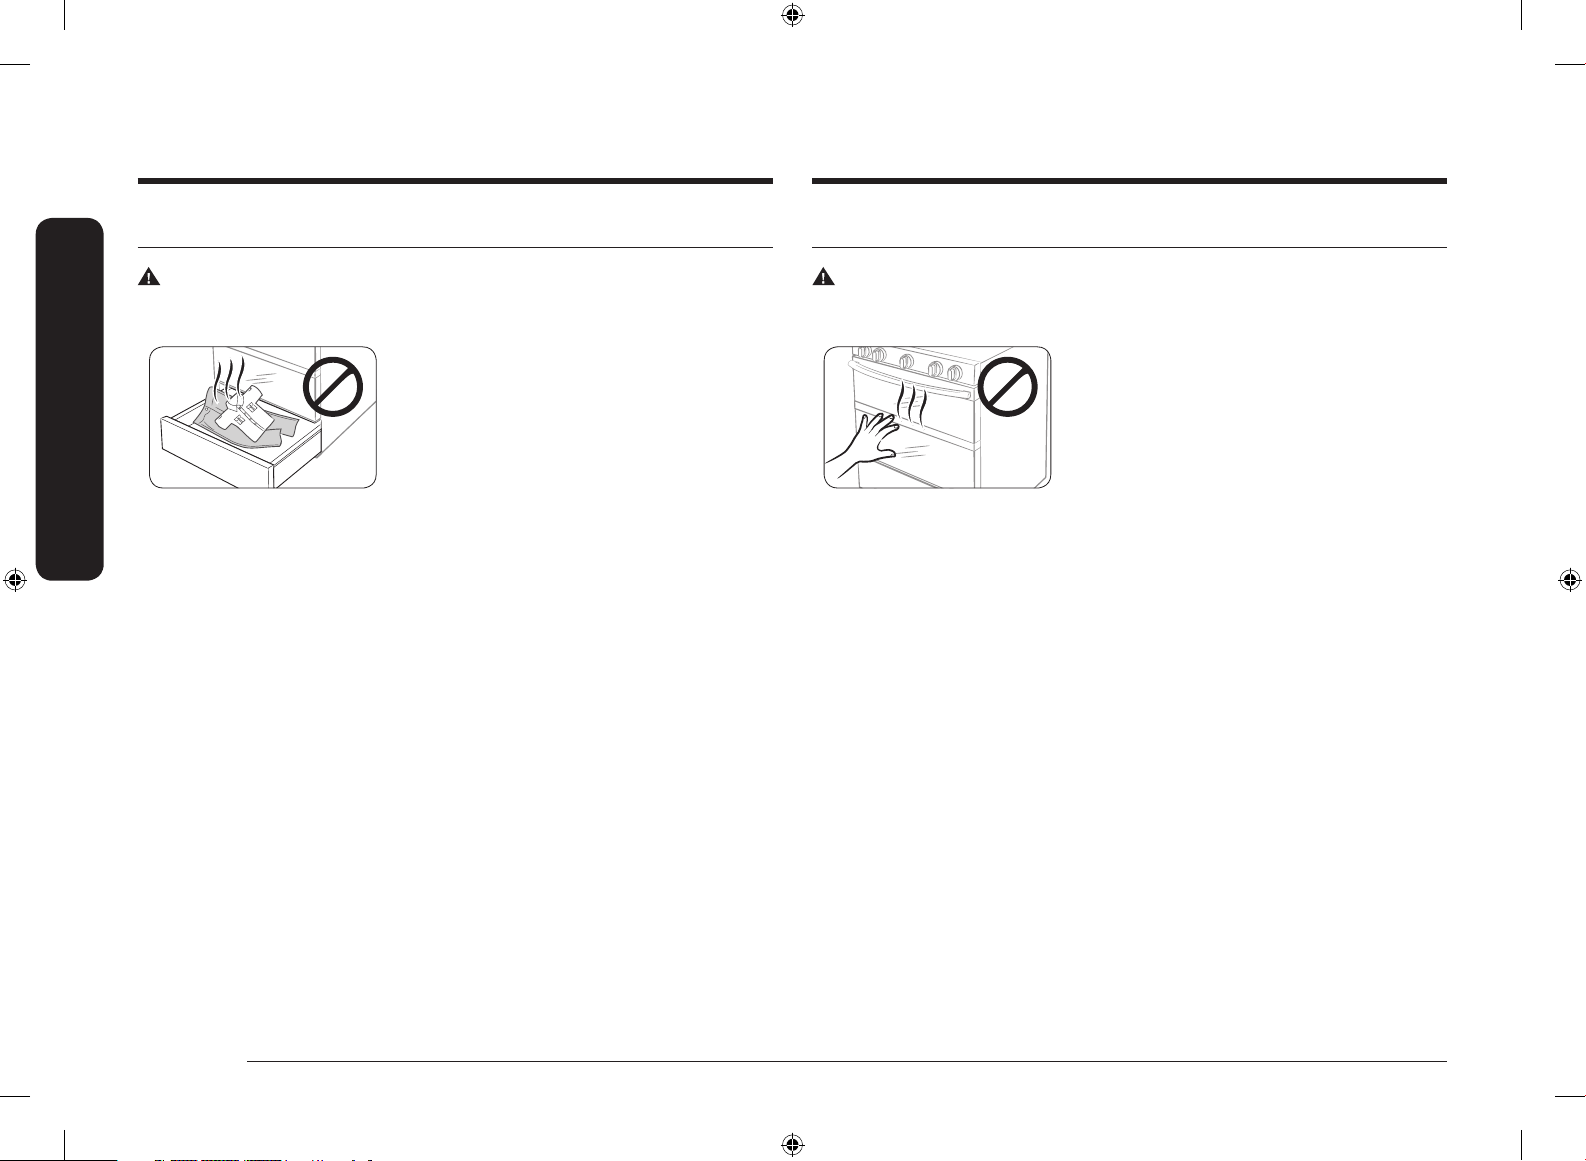
• Do not use the oven for non-cooking
purposes such as drying clothes or storage.
Use the oven for cooking only.
• Make sure the inner portion of the split ovenrack is in the proper position within the outer
rack.
• Make sure the oven racks are placed on the
same level on each side.
• Do not damage, move, or clean the door
gasket.
• Do not spray water on the oven glass while the oven is on or just after you
have turned it off.
• Do not use aluminium foil or foil liners anywhere in the oven. Do not use
aluminium foil or similar material to cover any holes or passages in the oven
bottom or to cover an oven rack. This can cause carbon monoxide poisoning.
Aluminum foil linings may also trap heat, causing a re hazard.
• Stand away from the oven when opening the oven door.
• Keep the oven free from grease buildup.
• When repositioning the oven racks, make sure the oven is completely cool.
• Only use cookware that is recommended for use in gas ovens.
• To avoid damaging the burner control knobs, always bake and/or broil with
the oven door closed.
• Do not broil meat too close to the burner ame. Trim excess fat from meat
before cooking.
• When using cooking or roasting bags in the oven, follow the manufacturer’s
directions.
• NEVER cover any slots, holes, or passages in the oven bottom or cover an
entire rack with material such as aluminum foil. Doing so blocks air ow
through the oven and may cause carbon monoxide poisoning. Aluminum foil
linings may also trap heat, causing a re hazard.
Important safety information
English 11
NX7000K_VE_NX58M6850SS_AA_DG68-00909A-03_EN+MES+CFR.indb 11 1/30/2018 1:04:03 PM
Page 12
Important safety information
Important safety information
Storage drawer safety
WARNING
To reduce the risk of re, electric shock, personal injuries, and/or death, observe
the following precautions.
• Do not use the drawer for non-cooking
purposes such as drying clothes or storage.
Use the drawer for cooking purposes only.
• Do not touch the interior drawer surface or
heating element. These surfaces may be hot
and could burn you.
• To avoid steam burns, use caution when opening the drawer.
• Do not use aluminium foil to line the drawer.
• Do not put the drawer in the oven. Do not put the drawer in the oven during a
self-cleaning cycle.
• Do not leave containers of fat drippings in or near the drawer.
Self-cleaning oven safety
WARNING
To reduce the risk of re, electric shock, personal injuries, and/or death, observe
the following precautions.
• The self-cleaning feature operates the oven at
temperatures high enough to burn away food
soils in the oven. The range is extremely hot
during a self-cleaning cycle. Do not touch any
surfaces of the range during a self-cleaning
cycle.
• Keep children away from the oven during a
self-cleaning cycle.
• Before starting a self-cleaning cycle, remove all racks, cookware, and utensils
from the oven. Only porcelain-coated oven racks may be left in the oven.
• Before starting a self-cleaning cycle, wipe grease and food soils from the
oven.
• Do not put the lower drawer into the oven cavity when you run a selfcleaning cycle.
• When opening the door after a self-cleaning cycle, stand away from the oven.
• If the self-cleaning cycle malfunctions, turn off the oven, disconnect the power
supply, and contact a qualied service technician.
12 English
NX7000K_VE_NX58M6850SS_AA_DG68-00909A-03_EN+MES+CFR.indb 12 1/30/2018 1:04:03 PM
Page 13
Overview
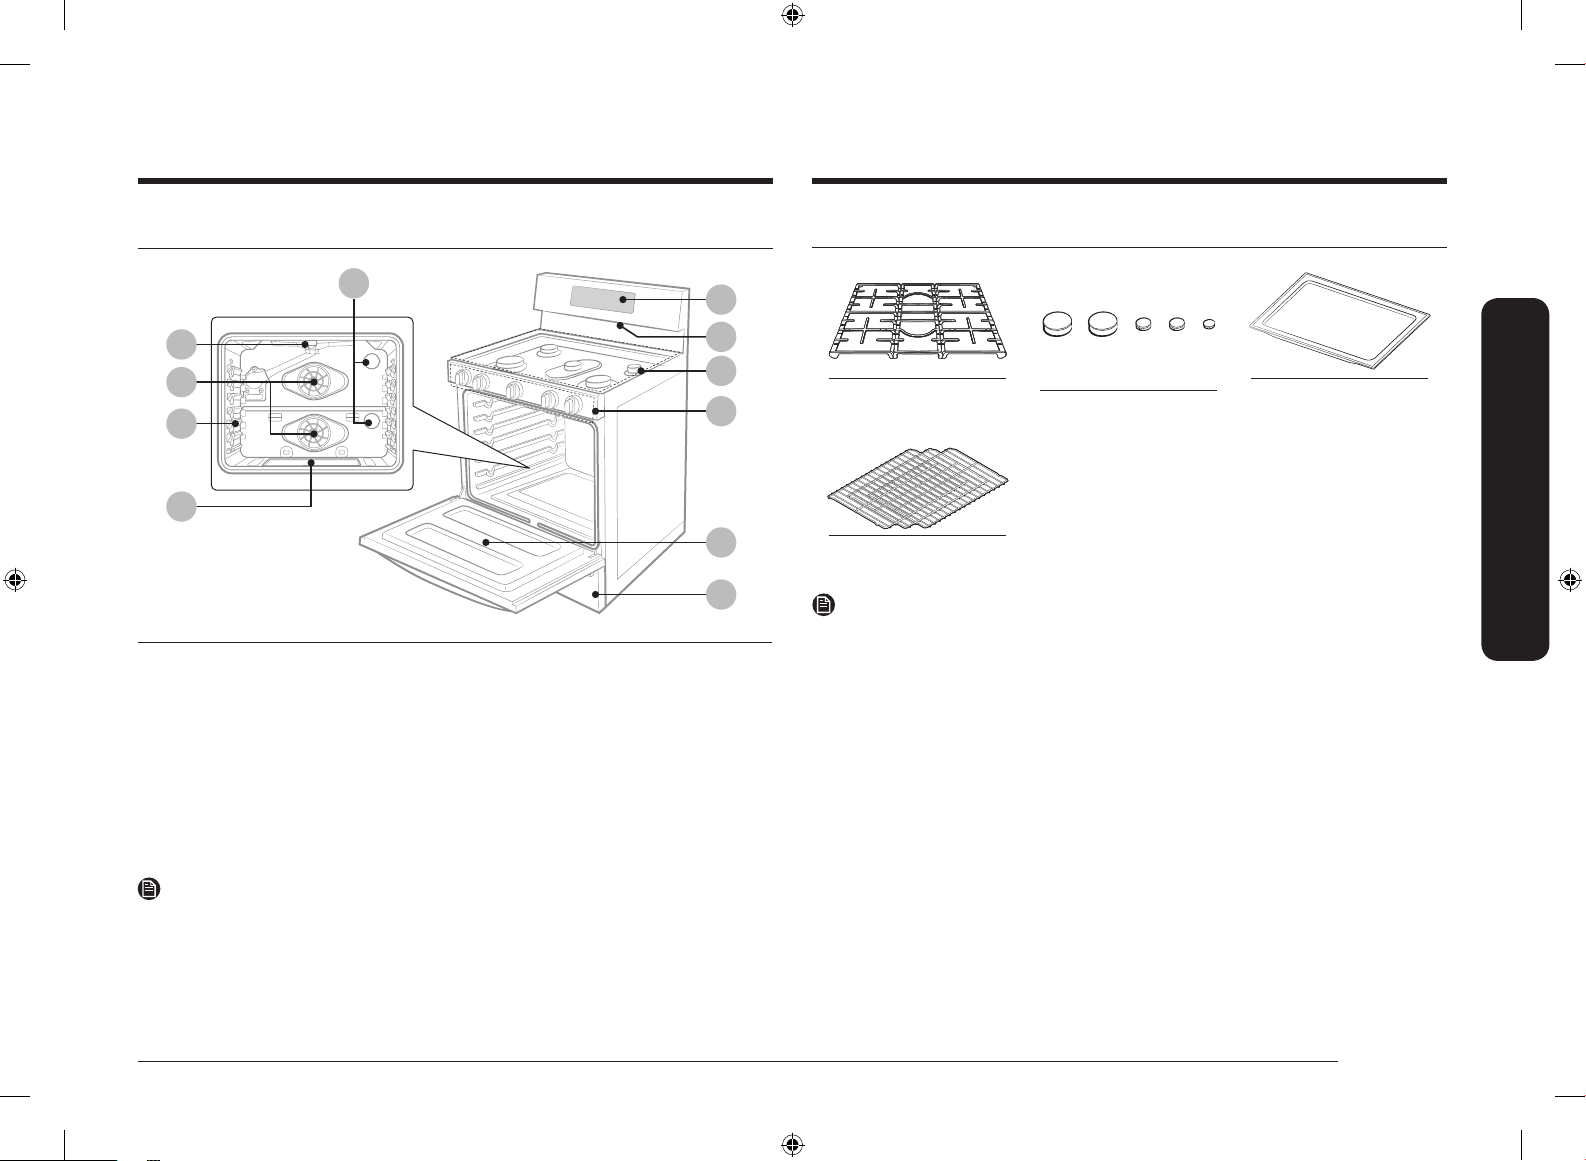
Layout
07
11
08
09
10
01 Display 02 Surface burner
knobs (5 pcs)
04 Oven vent 05 Removable oven
door
07 Oven lights *
(2 locations)
08 Convection fan/
Convection heater
01
04
03
02
05
06
03 Surface burners
06 Storage drawer
09 Oven rack system
What’s included
Surface burner grates (3) * Surface burners and caps
(5) *
Flat rack (3) *
NOTE
If you need an accessory marked with an * (asterisk), please contact the Samsung
Call Center at 1-800-726-7864 or visit our on-line parts web site at
www.samsungparts.com.
Smart divider (1) *
Overview
10 Bake oven burner 11 Broil oven burner
NOTE
If you need a part marked with a "*", you can buy it from the Samsung Contact
Center (1-800-726-7864).
English 13
NX7000K_VE_NX58M6850SS_AA_DG68-00909A-03_EN+MES+CFR.indb 13 1/30/2018 1:04:04 PM
Page 14
Overview
Dual Door™
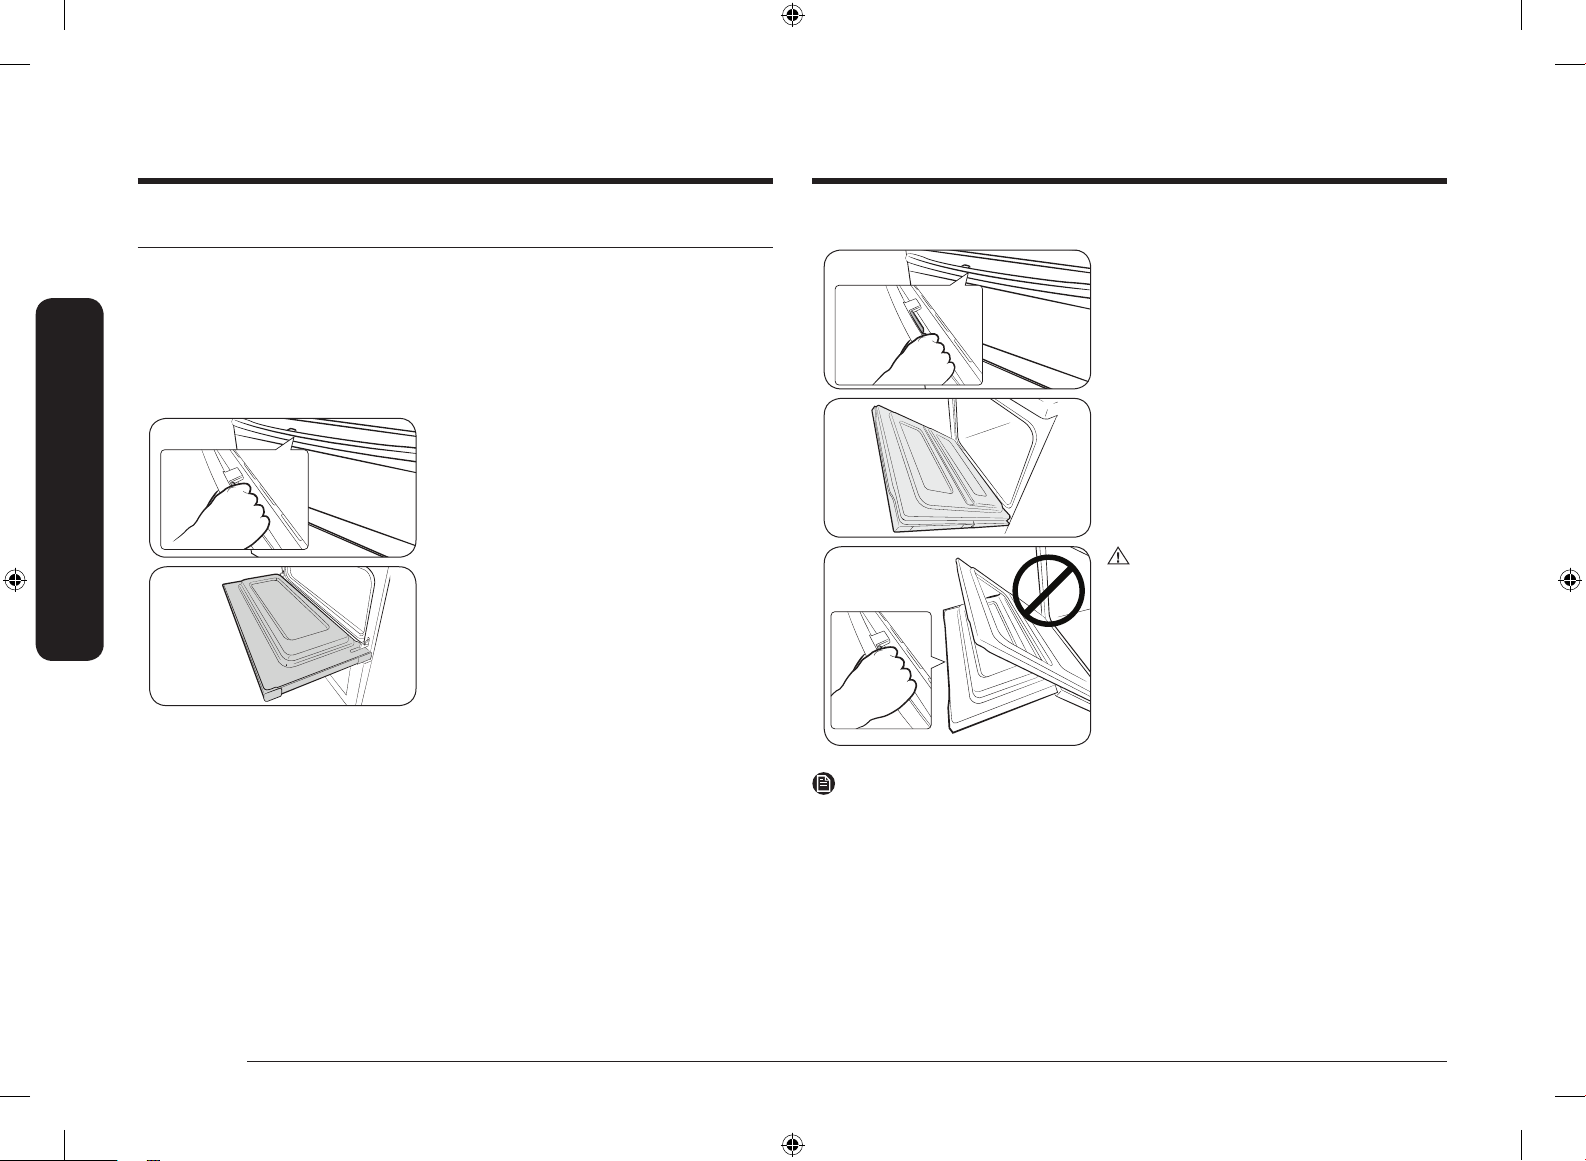
This oven has a unique Dual Door™ that is hinged in the middle. If you have
inserted the Smart Divider and divided the oven in two (so it is in Twin Mode),
you only need to open the top half to access the upper cavity. When you’re using
the Flex Duo™ capability, you can access the top oven space much more easily and
with greater energy efciency.
How to use the upper door
Overview
1. Hold the handle and the lever. Press the
lever to release the door latch, and then
pull the handle.
2. This will open only the upper door as
shown.
How to use the full door
1. Hold the lever-less area of the handle,
and then pull.
2. This will open the whole door as shown.
CAUTION
When opening the whole door, make sure to
grasp the handle by the lever-less portion.
If you press the lever halfway through
opening the whole door, the upper door
may open, causing physical injury.
NOTE
• Do not put heavy objects on, or apply excessive force, to the upper door.
• Do not let children play with or on the upper door.
• Do not use the Gliding Rack when using the upper door.
• Always use the full door when using the Gliding Rack.
14 English
NX7000K_VE_NX58M6850SS_AA_DG68-00909A-03_EN+MES+CFR.indb 14 1/30/2018 1:04:05 PM
Page 15
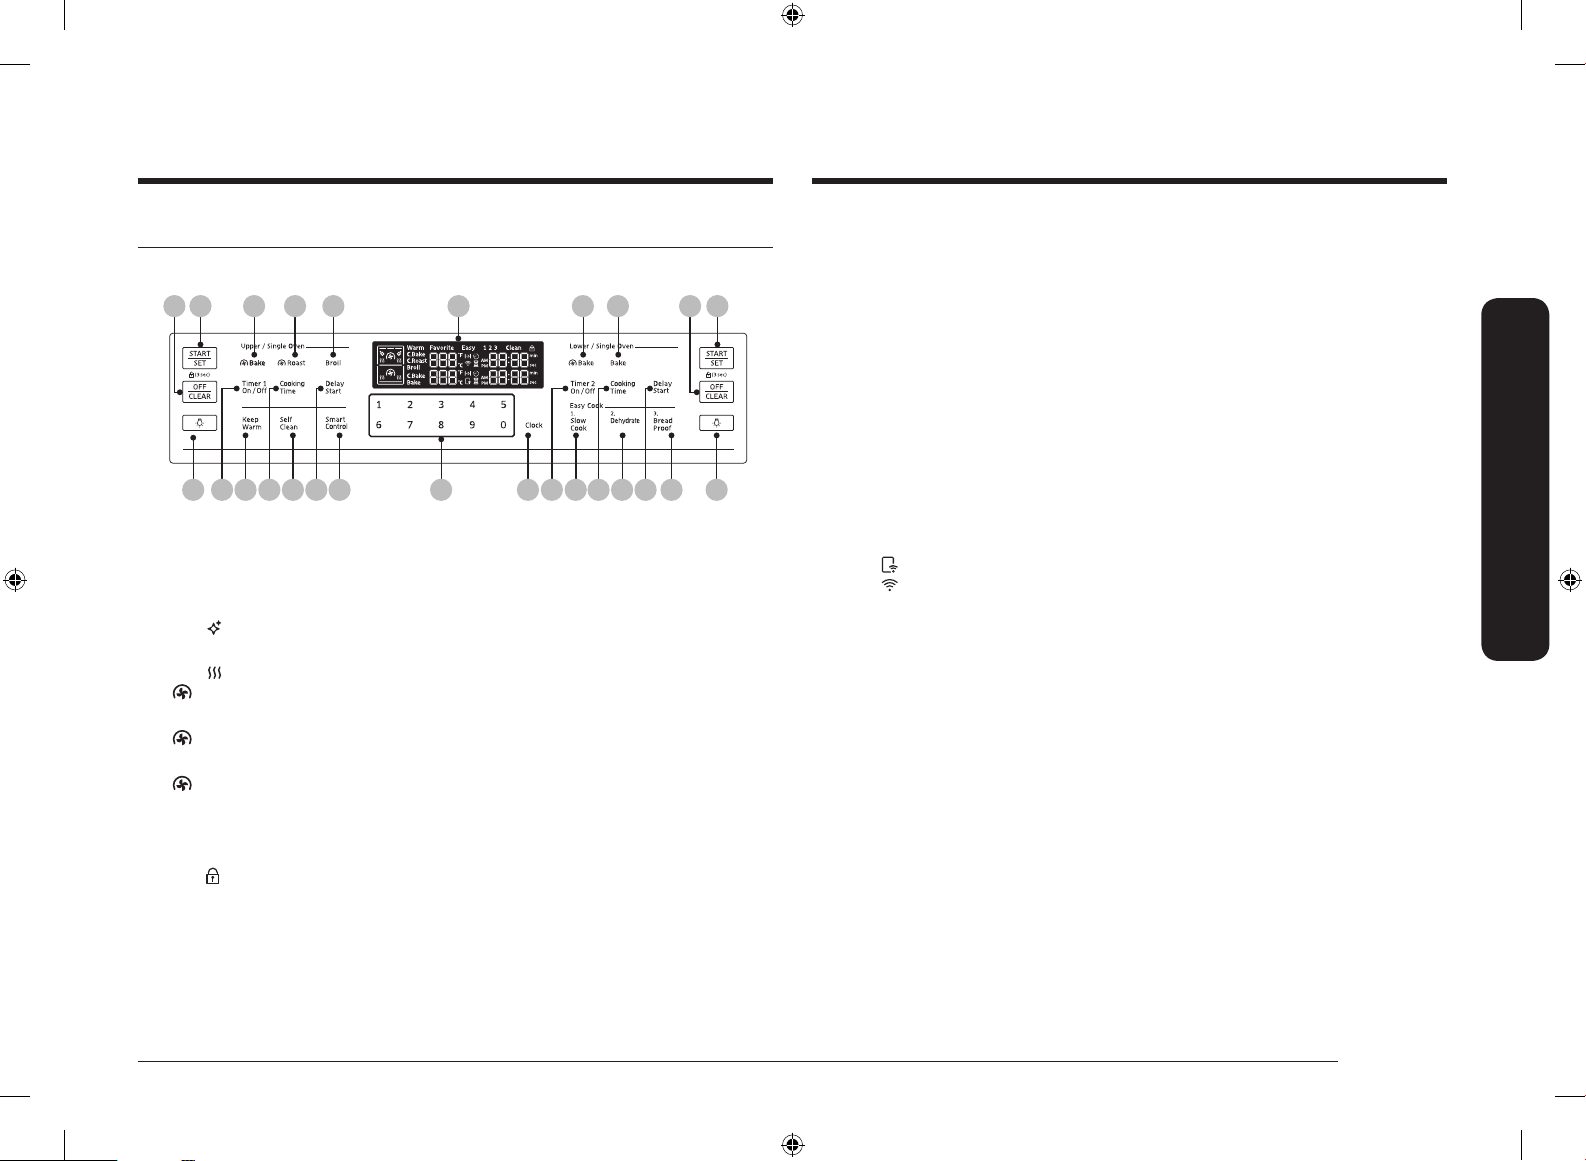
Control panel
08
07 02 03 04 01 05 06 08 07
12 09 13 10 14 11 24 1615 17 20 18 21 19 22 23
01 Display: Shows the time of day, oven temperature, whether the oven is in the
bake, broil or self-cleaning mode, and the time set for the timer or automatic
oven operations.
: When you use the self-cleaning feature, this icon appears in the
•
display.
•
: When the oven is pre-heating, this icon appears in the display.
Bake: Activate convection baking for the Upper Oven in Twin mode or the
02
entire oven in Single mode.
Roast: Activate convection roasting.
03
04 Broil: Broil food using the upper oven burner only.
05 Bake: Activate convection baking for the Lower Oven in Twin mode or the
entire oven in Single mode.
06 Bake: Bake food using the lower oven burner.
07 START/SET: Start a function or set the time.
• (3sec): Press and hold for 3 seconds to lock the control panel and the
door to prevent accidents.
08 OFF/CLEAR: Cancel the current operation but not the timer.
09 Timer1 On/Off: Activate or deactivate the timer. (Single/Upper in Twin mode)
10 Cooking Time: Set the cooking time. (Single/Upper in Twin mode)
11 Delay Start: Set the oven to start at a certain time. (Single/Upper in Twin
mode)
12 Oven Light: Turn on/Turn off the oven light. (Upper)
13 Keep Warm: Keep cooked food warm at lower temperatures.
14 Self Clean: Burn off food residues in the oven using very high temperatures.
15 Numbers: Use to set the times, temperature, or presets.
16 Clock: Set the clock time.
17 Timer2 On/Off: Activate or deactivate the timer. (Single/Lower in Twin mode)
18 Cooking Time: Set the cooking time. (Single/Lower in Twin mode)
19 Delay Start: Set the oven to start at a certain time. (Single/Lower in Twin
mode)
20 Slow Cook: Activates Slow Cook which cooks food slowly at lower
temperatures.
21 Dehydrate: Activates the Dehydrate function.
22 Bread Proof: Activates the Bread proof function.
23 Oven Light: Turn on/Turn off the oven light. (Lower)
24 Smart Control: Activates the Easy-connection.
: When you use the Easy connection, this icon appears in the display.
•
• : When the oven is connected to Wi, this icon appears in the display.
Overview
English 15
NX7000K_VE_NX58M6850SS_AA_DG68-00909A-03_EN+MES+CFR.indb 15 1/30/2018 1:04:06 PM
Page 16
Overview
01
02
03
01
03
02
02
01
03
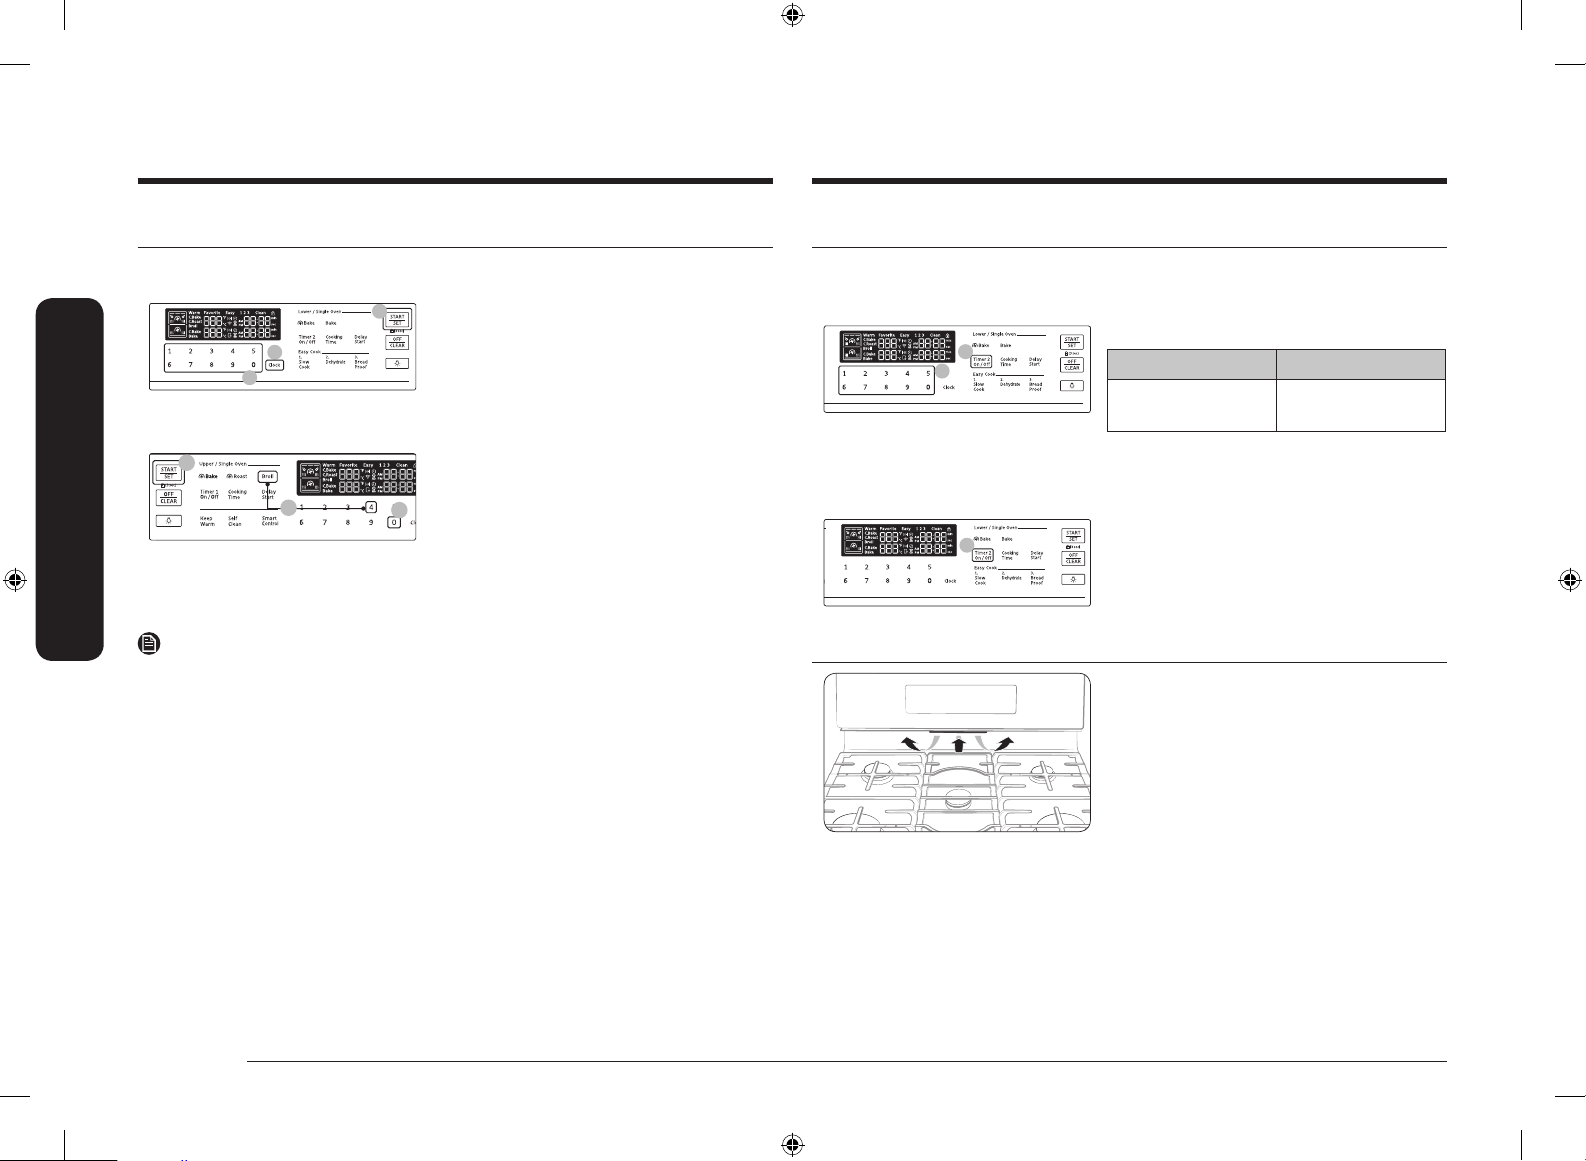
Clock
You must set the clock correctly to ensure the automatic features work properly.
This product supports two time formats: 12-hour (default) and 24-hour.
To set the clock time
1. Press the Clock pad.
2. Enter the current time using the
number pad.
3. Press the START/SET pad to conrm the
Overview
settings.
To change the time format(12hr/24hr)
1. Press and hold the Broil and 4 pads for
3 sec.
2. Press the 0 Pad to toggle between the
12-hour and 24-hour display setting
Kitchen timer
The kitchen timer gives you an extra timer you can use to time cooking tasks such
a boiling eggs. It does not, however, start or stop any cooking operation. You can
set the timer from 1 minute to 9 hours and 59 minutes.
1. Press the Timer On/Off pad.
Once Twice
Hours/Minutes Turn off or Cancel
the timer
2. Press the number pads to enter the
amount of time you want in minutes or
hours and minutes.
3. Press the Timer On/Off pad to start the
timer.
3. Press the START/SET pad to change the
clock display mode.
NOTE
You can set/change the clock or the kitchen timer before you start a cooking mode
or while most cooking modes are operating. However, you cannot set or change
the time if a time based function is operating (Time Bake, for example) or the
Sabbath option is enabled.
Oven vent/Cooling vent
The oven vent is located under the oven
Control panel. Proper air circulation
prevents oven burner combustion problems
and ensures good performance.
• Do not block the vent or the area
around the vent.
• Use caution when placing items near
the vent. Hot steam can cause them to
overheat or melt.
16 English
NX7000K_VE_NX58M6850SS_AA_DG68-00909A-03_EN+MES+CFR.indb 16 1/30/2018 1:04:07 PM
Page 17
Gas range
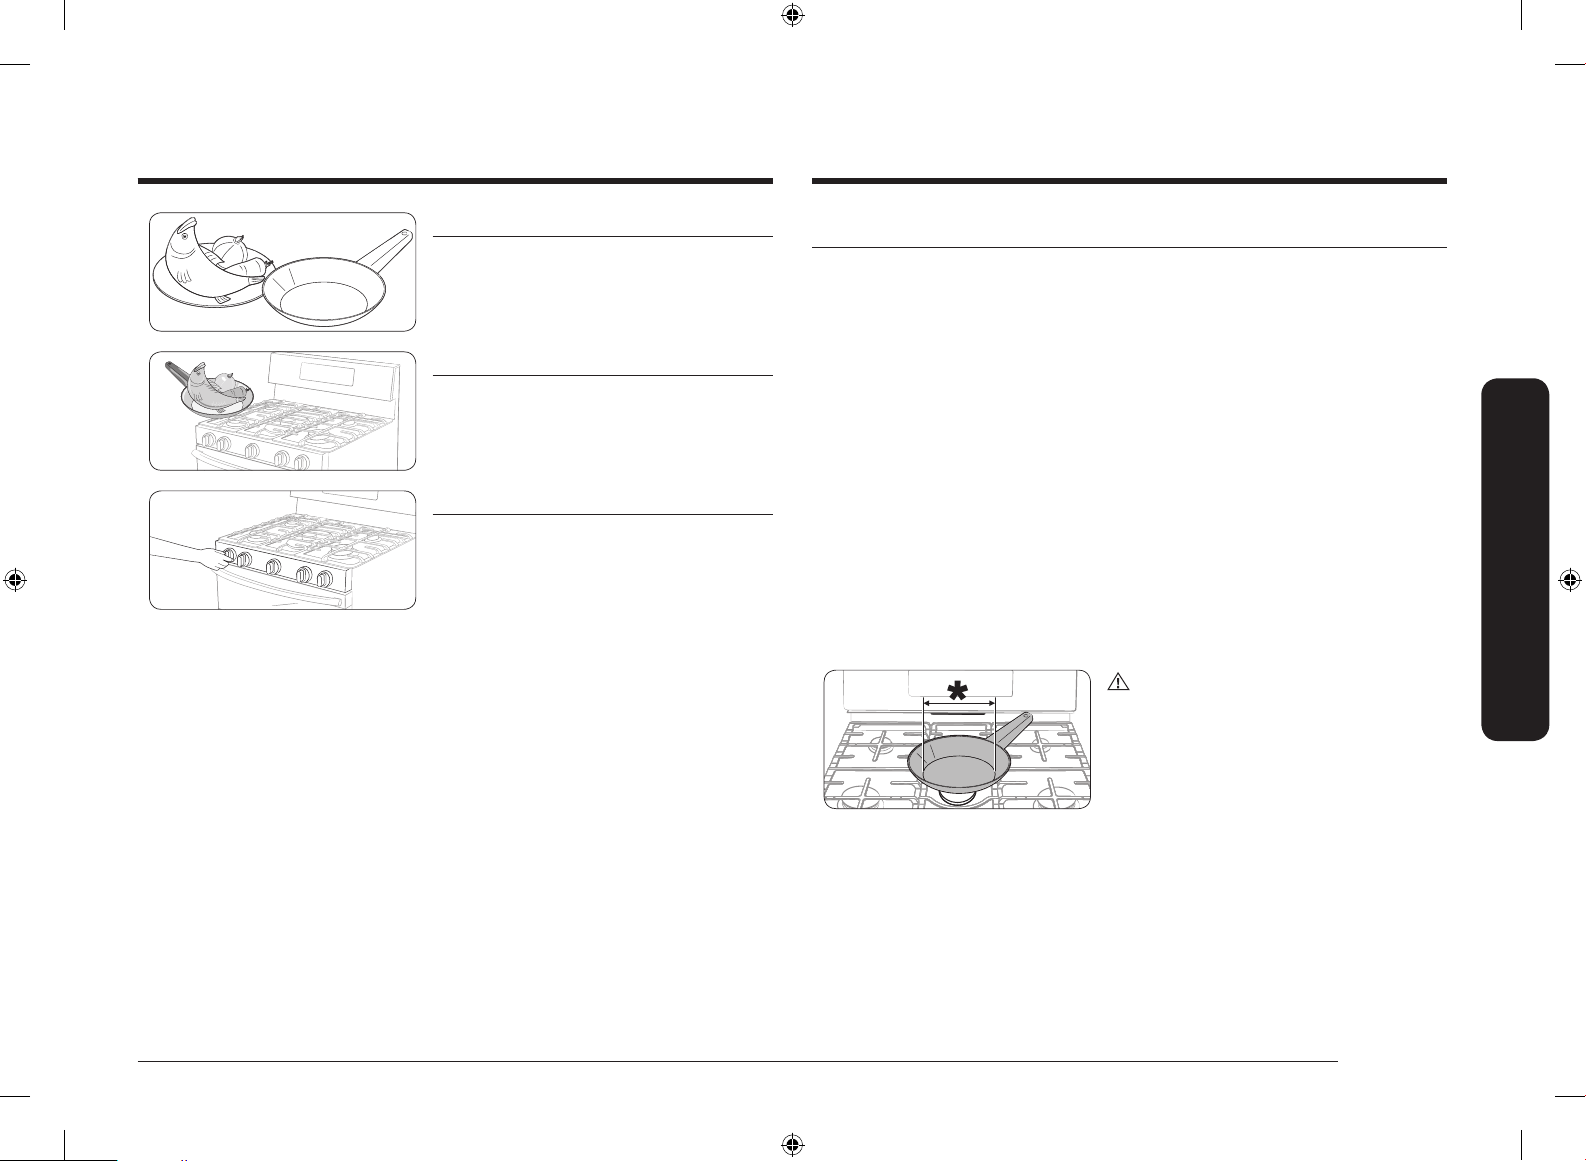
STEP 1
Put all ingredients into a cooking container
(pan, pot, etc).
STEP 2
Place the container on a surface burner.
STEP 3
Ignite the surface burner.
Cookware
Requirements
• Flat bottom and straight sides.
• Tight-tting lid.
• Well-balanced with the handle weighing less than the main portion of the pot or pan.
Material characteristics
• Aluminum: An excellent heat conductor. Some types of food may cause the aluminum
to darken. However, anodized aluminum cookware resists staining and pitting.
• Copper: An excellent heat conductor but discolors easily.
• Stainless steel: A slow heat conductor with uneven cooking performance but is
durable, easy to clean, and resists staining.
• Cast-Iron: A poor conductor but retains heat very well.
• Enamelware: Heating characteristics depend on the base material.
• Glass: A slow heat conductor. Use only glass cookware that is specied for range top
cooking or oven use.
Size limitations
CAUTION
Do not place a small pan or pot with a
bottom diameter of about 6 inches or less
on the center grate. This cookware may tip
over. Use the rear burners for this smallsized cookware.
* : 6 inches or less
• Always make sure cookware handles are turned to the side or rear of the
cooktop and not over other surface burners. This will minimize the chance of
burns, spillovers, and the ignition of ammable materials that can be caused if
pots or pans are bumped accidently.
• When using glass cookware, make sure it is designed for range top cooking.
• Never leave plastic items on the cooktop. Hot air from the vent can melt or ignite
plastic items or cause a building up of dangerous pressure in closed plastic containers.
• Make sure you hold the handle of a wok or a small one-handled pot while cooking.
Gas range
English 17
NX7000K_VE_NX58M6850SS_AA_DG68-00909A-03_EN+MES+CFR.indb 17 1/30/2018 1:04:09 PM
Page 18
Gas range
1
2
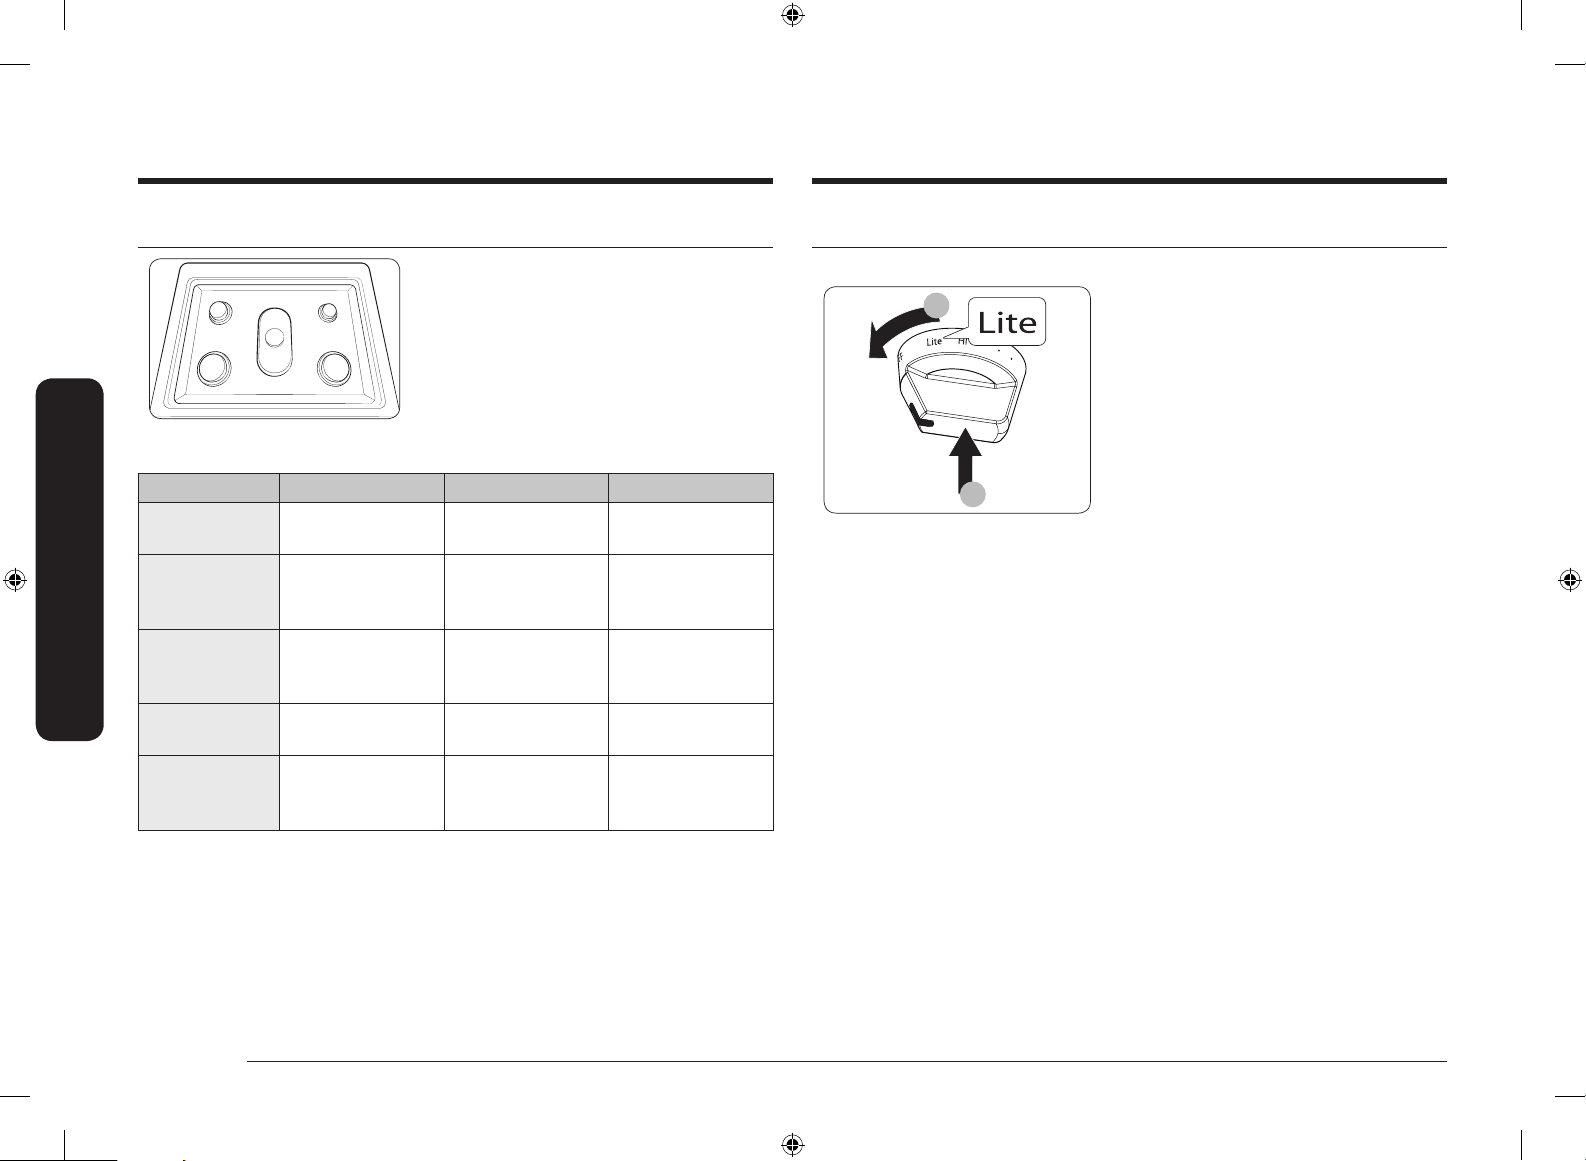
Gas burners
Each burner has a corresponding knob that
lets you to set the ame level from LO to
HI. In addition, each burner knob has a LITE
RRLR
C
LF RF
Position Purpose Food type Characteristics
Gas range
Right Front (RF)
16000 BTU
Right Rear (RR)
5000 BTU
Center (C)
9500 BTU
Left Front (LF)
15000 BTU
Left Rear (LR)
9500 BTU
Power heating Boiling food Maximum output
Low simmering Chocolate,
General heating/
Low simmering
Quick heating General General-purpose
General heating/
Low simmering
setting. Turning a knob to LITE ignites the
corresponding burner. The burner indicators
are located above each knob and show
which burner the knob controls. Each burner
is designed for specic cooking purposes.
See the table below.
Delicate food that
casseroles, sauces
General food,
casseroles, tomato
sauce*
General food,
casseroles, tomato
sauce*
requires low heat
for a long time
General-purpose
cooking
cooking
General-purpose
cooking
Ignition
Make sure all surface burners are properly installed. To light a burner:
1. Push in the control knob, and then turn
it to the LITE position. You will hear a
"clicking" sound indicating the electronic
ignition system is working properly.
2. After the surface burner lights, turn
the control knob to shift it out of the
LITE position and turn off the electronic
ignition system.
3. Turn the control knob to adjust the
ame level.
* Tomato sauce needs to be stirred while it is simmering.
18 English
NX7000K_VE_NX58M6850SS_AA_DG68-00909A-03_EN+MES+CFR.indb 18 1/30/2018 1:04:09 PM
Page 19
Manual ignition
If there is a power failure, you can ignite the burner manually. Use caution when doing this.
1. Hold a long gas grill lighter to the surface burner you want to light.
2. Push in the control knob for that burner, and then turn it to the LITE position.
Turn on the grill lighter to ignite the burner.
3. After the burner is lit, turn the control knob to adjust the ame level.
Flame level
The ames on the burners should always stay under the cookware, and should not
extend beyond the cookware bottom at any time.
WARNING
• Flames larger than the cookware bottom may result in a re or physical injury.
• When you set a burner to simmer, do not turn the burner knob quickly. Watch
the ame to make sure it stays on.
• After turning on a surface burner, check to make sure that the burner has
ignited. Adjust the level of the ame by turning the burner knob.
• Always turn off the surface burner controls before removing cookware. All
surface burner controls should be turned OFF when you are not cooking.
• Always turn the burners off before you go to sleep or go out.
• If you smell gas, turn off the gas to the range and call a qualied service
technician. NEVER use an open ame to locate a leak.
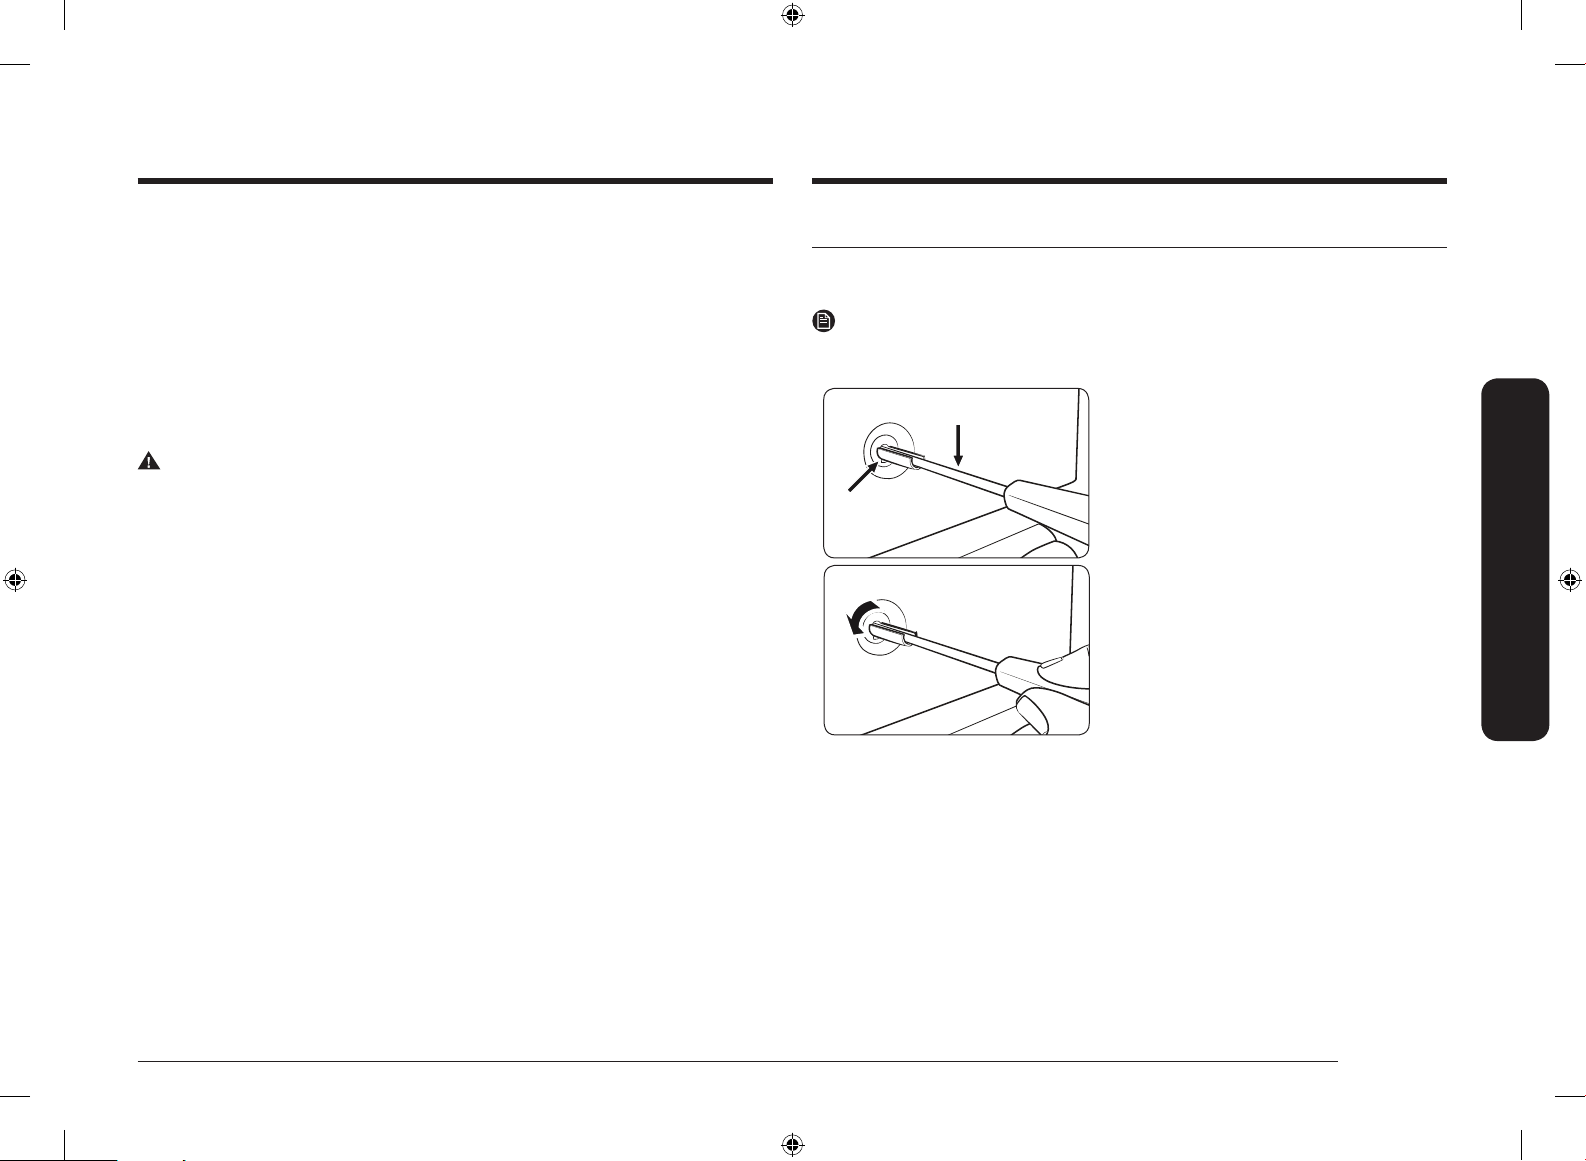
Adjusting low ame settings on cooktop burners
All Cooktop burner ames should be checked at their lowest setting. Use the
following steps to check and adjust the cooktop burner settings.
NOTE
Low setting adjustments should always be made with two or more burners
operating at the same time.
Flat-bladed screwdriver
Valve Stem
1. Turn on two or more surface burners and
set them between MED and HI.
2. Quickly turn one of the control knobs
counterclockwise to the lowest setting.
The ame should stay lit. if the ame
utter or goes out, adjust the bypass
valve on the control valve for that
burner.
3. Pull the control knob for that burner
straight off.
4. Using a small at-bladed screwdriver,
adjust the bypass valve screw in the base
of the valve stem. Turn the bypass valve
screw counter clockwise to increase the
ame size.
5. Replace control knob and recheck the
low ame setting.
6. Repeat step 1 thru 5 to check and adjust
the low ame settings on the remaining
surface burners.
Gas range
English 19
NX7000K_VE_NX58M6850SS_AA_DG68-00909A-03_EN+MES+CFR.indb 19 1/30/2018 1:04:10 PM
Page 20
Gas ovenGas oven
Gas oven
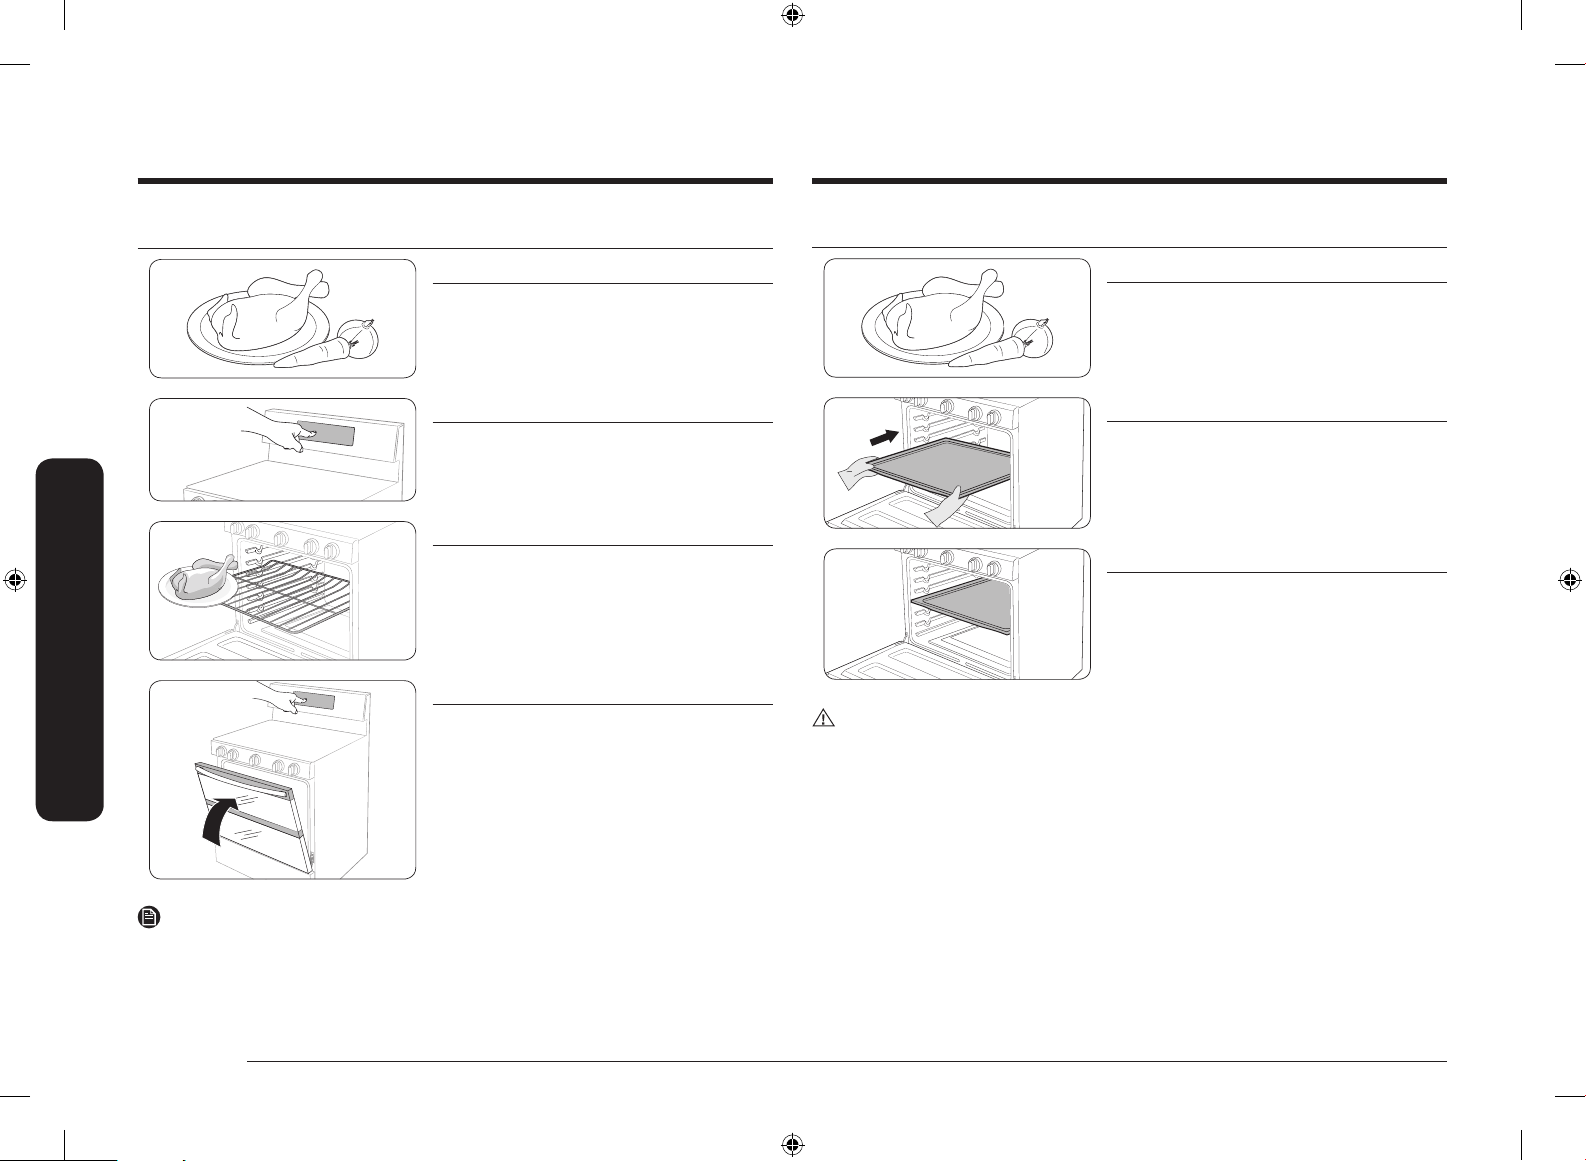
Single mode
STEP 1
Put all ingredients in a heat-safe container.
STEP 2
Select a cooking mode, and then start
preheating.
STEP 3
Place the container on a rack.
STEP 4
Close the door and start cooking.
Twin mode
STEP 1
Put all ingredients in a heat-safe container.
STEP 2
Insert the Smart Divider into 4th rack
position.
STEP 3
Push the Smart Divider in until the range
beeps.
CAUTION
When the Smart Divider is properly inserted, the "-" icon appears.
NOTE
The cooling fan automatically runs for a certain amount of time after cooking is
complete.
20 English
NX7000K_VE_NX58M6850SS_AA_DG68-00909A-03_EN+MES+CFR.indb 20 1/30/2018 1:04:11 PM
Page 21
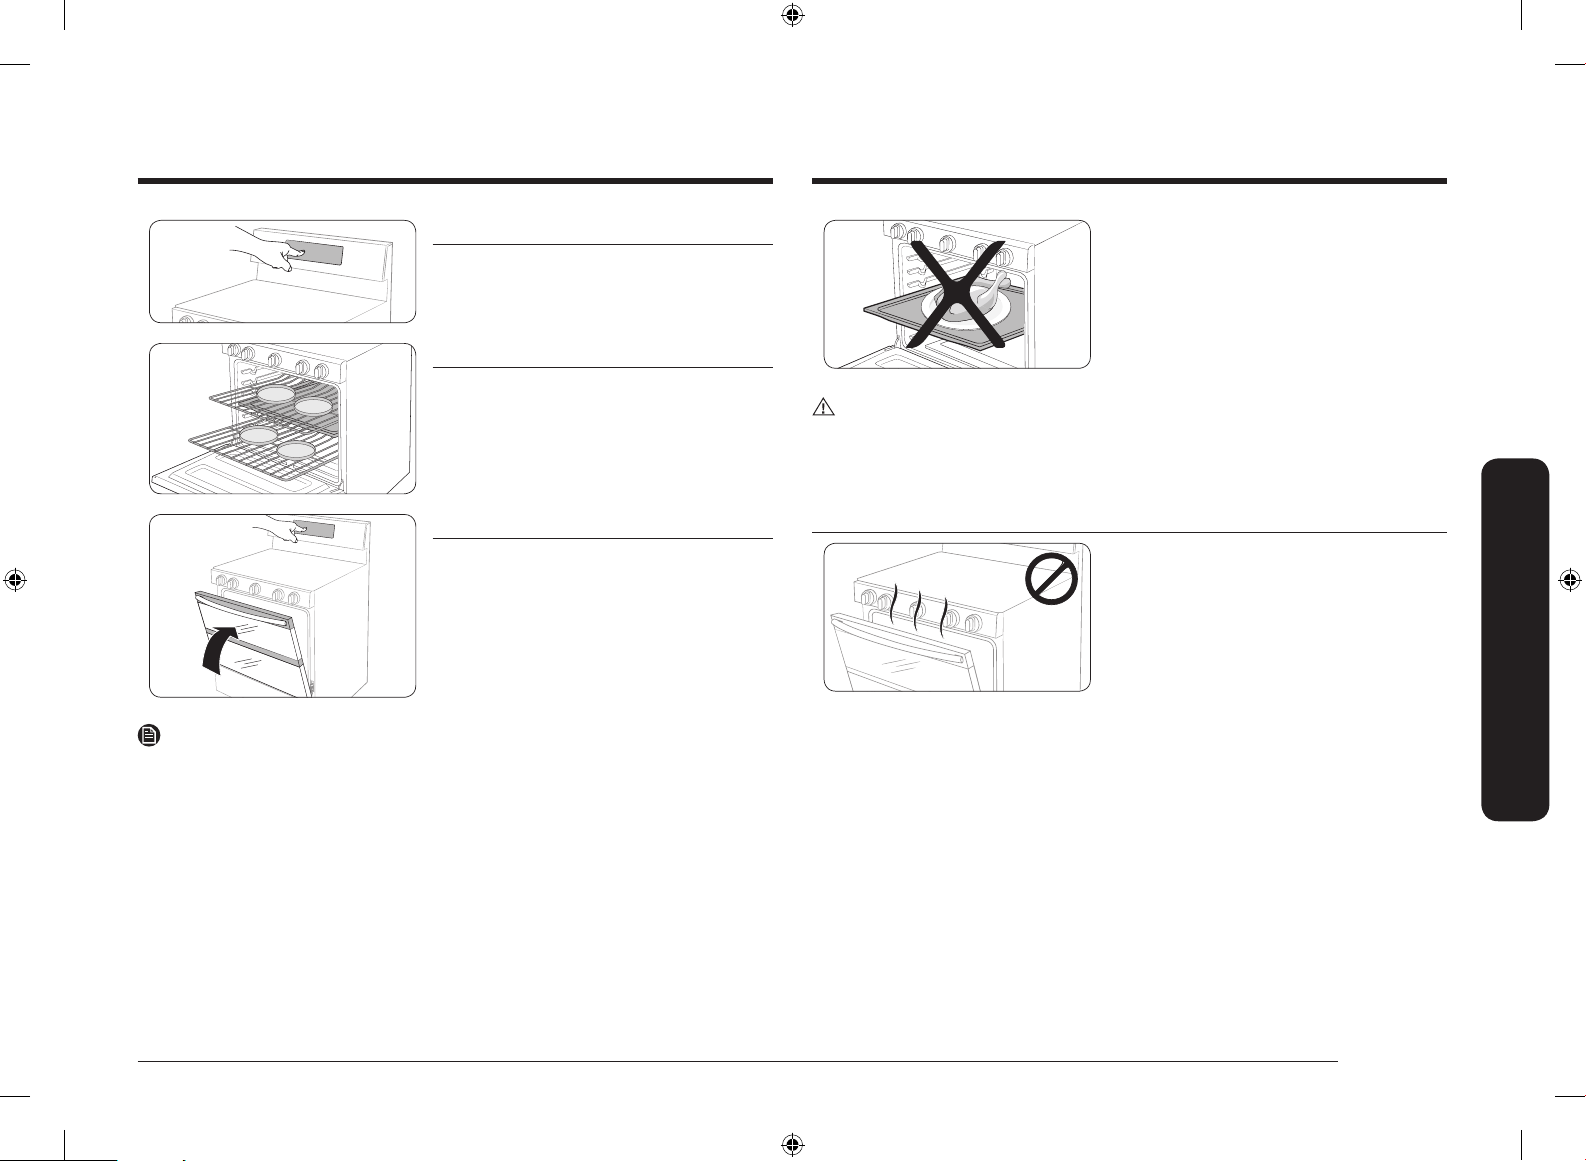
STEP 4
Select a cooking mode, and then start
preheating.
STEP 5
Arrange food containers on the racks.
CAUTION
Range displays "-dc-"
• Check the Smart Divider to see if it is installed correctly.
• Do not insert/remove the Smart Divider during cooking.
STEP 6
Close the door and start cooking.
NOTE
• To use Twin Mode operation, insert the Smart Divider.
• The cooling fan automatically runs for a certain amount of time after cooking
is complete.
• When you are not using the Smart Divider, store it at room temperature.
• Handle the Smart Divider with both hands.
• Use oven gloves when inserting or removing the Smart Divider.
• Do not put food containers directly on the Smart Divider for cooking purposes.
• Please note that the time for the upper and lower ovens to preheat is
different.
Cooking mode
• Make sure to close the oven door
before you start cooking.
• If you leave the door open for 20-30
seconds while the oven is in convection
baking/roasting, baking, or broiling
modes, the oven burner shuts off. To
restart the burner, close the door.
English 21
Gas oven
NX7000K_VE_NX58M6850SS_AA_DG68-00909A-03_EN+MES+CFR.indb 21 1/30/2018 1:04:12 PM
Page 22
Gas oven
Gas oven
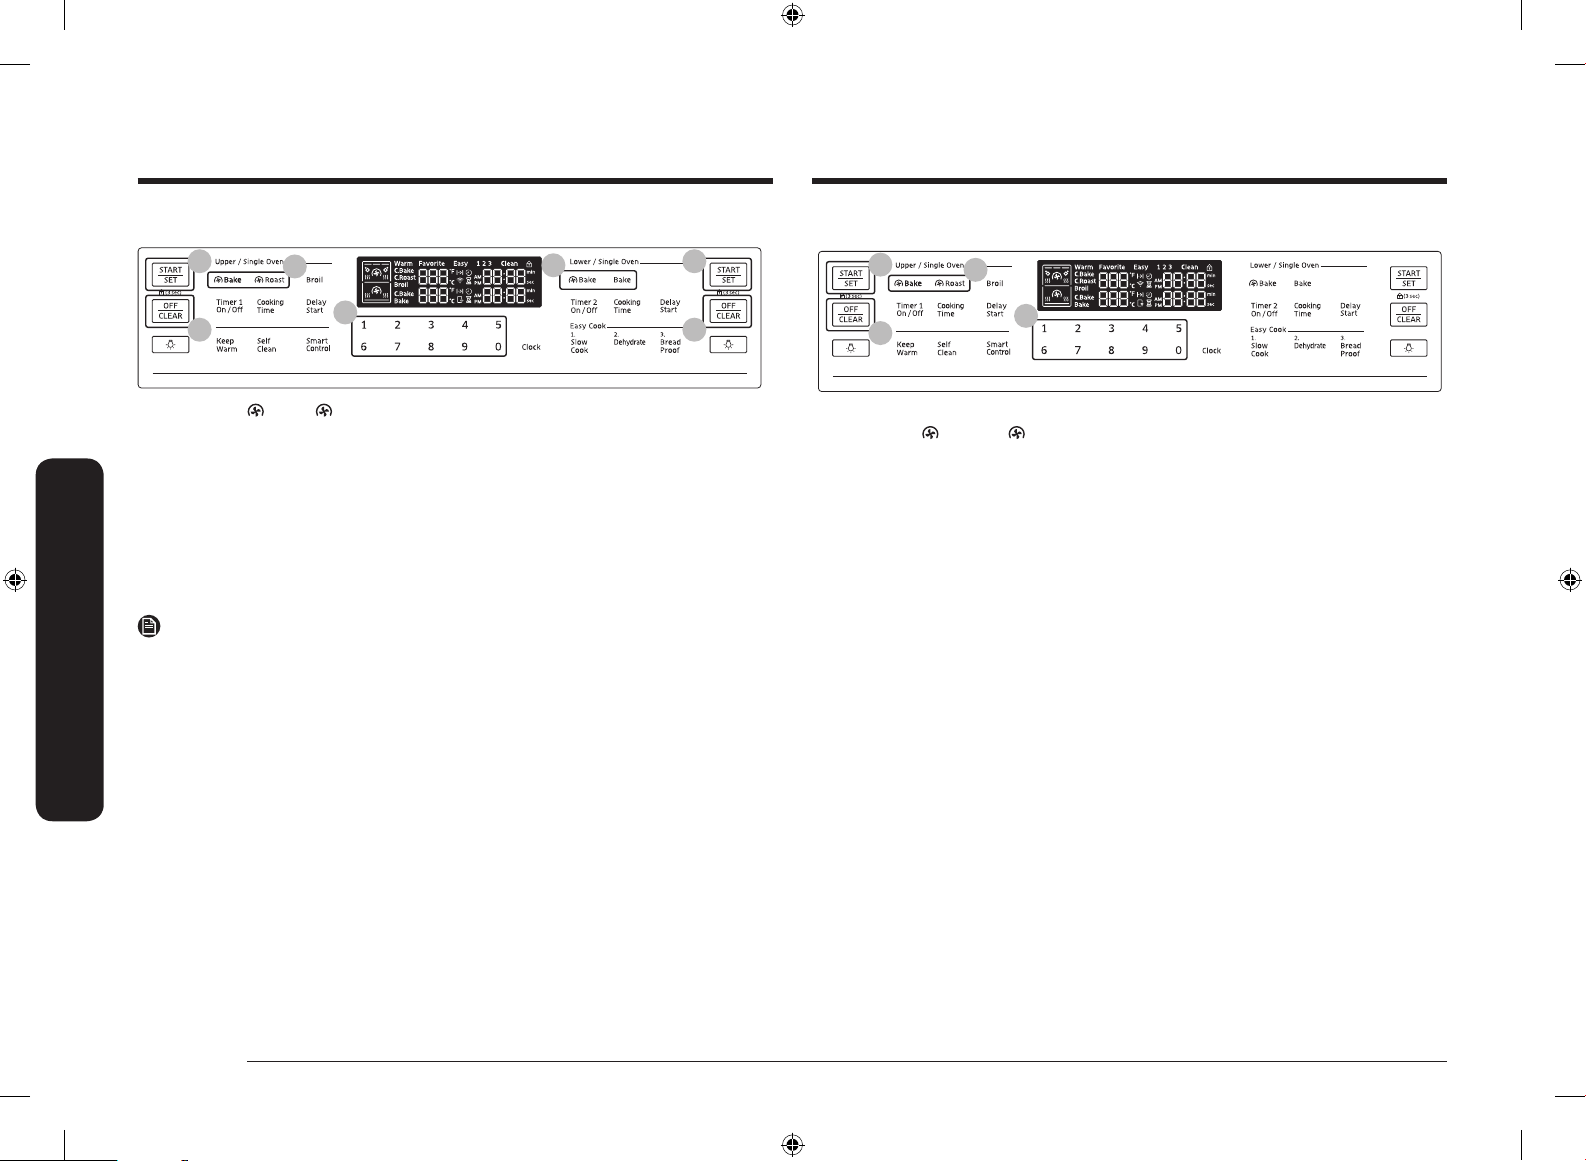
Baking and roasting (Single mode)
03
04
01
01
02
03
04
1. Press the Bake, Roast, or Bake pad.
2. If necessary, use the number pad to change the default temperature (350 °F).
You can set the oven to any temperature from 175 °F to 550 °F.
3. Press the START/SET pad.
• The oven preheats until it reaches the temperature you set.
• When preheating is complete, place the food in the oven, and then close
the door.
4. When cooking is complete, press the OFF/CLEAR pad, and then take out the
food
NOTE
To change the temperature during cooking, repeat steps 1 through 3 above.
Baking and Roasting (Twin mode upper)
04
05
02
03
1. Insert the Smart Divider into the cavity.
2. Press the Bake or Roast pad on the left side of the Control Panel.
3. If necessary, use the number pad to change the default temperature (350 °F).
You can set the oven to any temperature from 175 °F to 480 °F.
4. Press the START/SET pad.
• The oven preheats until it reaches the temperature you set.
• When preheating is complete, place the food in the upper cavity of the
oven, and then close the door.
5. When cooking is complete, press the OFF/CLEAR pad.
22 English
NX7000K_VE_NX58M6850SS_AA_DG68-00909A-03_EN+MES+CFR.indb 22 1/30/2018 1:04:13 PM
Page 23
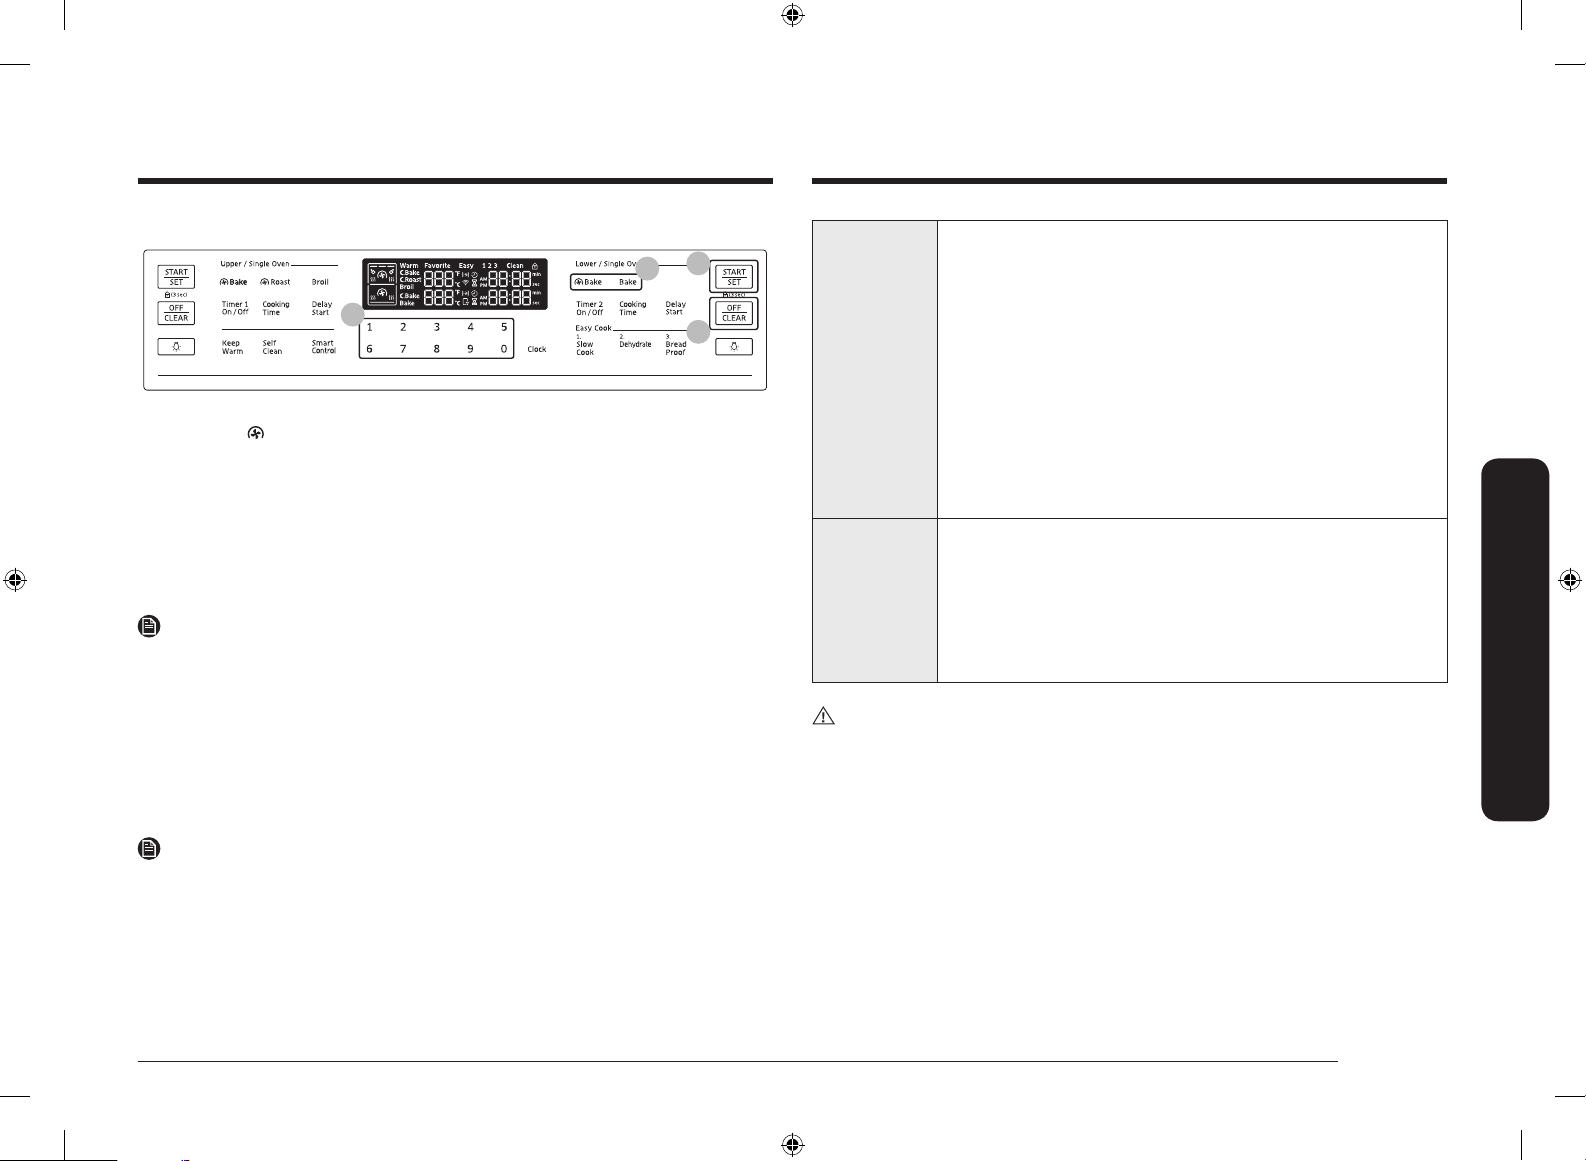
Baking and Roasting (Twin mode lower)
04
02
03
05
1. Insert the Smart divider into the cavity.
2. Press the Bake or Bake pad on the right side of the Control Panel.
3. If necessary, use the number pad to change the default temperature (350 °F).
You can set the oven to any temperature from 175 °F to 480 °F.
4. Press the START/SET pad.
• The oven preheats until it reaches the temperature you set.
• When preheating is complete, place the food in the lower cavity of the
oven, and then close the door.
5. When cooking is complete, press the OFF/CLEAR pad.
NOTE
Your oven has different temperature setting ranges when you use the upper oven
and lower oven simultaneously. See "Temperature setting guides" on page 25 for
details.
Convection cooking
The convection fan at the back of the oven circulates hot air evenly throughout the
oven cavities so that food is evenly cooked and browned in less time than with
regular heat.
NOTE
When using convection cooking, always pre-heat the oven for the best results.
Convection
baking
• Ideal for foods being cooked using multiple racks.
• Good for large quantities of food.
• Provides the best performance for cookies, biscuits,
brownies, cupcakes, cream puffs, sweet rolls, angel food
cake, and bread.
• Cookies bake best when cooked on at cookie sheets.
• When convection baking using a single rack, place the rack
in rack position 3 or 4. (In Twin mode, position A or 1)
• When convection baking using two racks, place the racks in
positions 3 and 5 (Cakes, Cookies). When convection baking
using three racks, place the racks in positons 2, 4, and 6.
• The oven automatically adjusts the temperature for
convection baking.
Convection
roasting
• Good for larger, tender cuts of meat, uncovered.
• For best performance, place a broiler pan and grid under
the meat or poultry. The pan catches grease spills and the
grid prevents grease spatters.
• Heated air circulates over, under, and around the food. Meat
and poultry are browned on all sides as if they were cooked
on a rotisserie.
CAUTION
Precautions for using only the upper oven:
• You must preheat the oven. If you do not, the food may be overcooked or
burnt on the surface and undercooked inside.
• To change the temperature during cooking, rst remove the food and change
the temperature. Then, put the food back inside the oven. Otherwise, the food
may be burnt by the broil burner while the upper oven is preheating.
• Do not bake food over 2 inches (50 mm) in height.
• The cooking time may be longer than with single-oven cooking.
Gas oven
English 23
NX7000K_VE_NX58M6850SS_AA_DG68-00909A-03_EN+MES+CFR.indb 23 1/30/2018 1:04:13 PM
Page 24
Gas oven
Gas oven
Broiling
Broiling uses the oven broil burner at the top of the oven to cook and brown food.
Meat or sh must be put on a broiling grid in a broiling pan. Preheating for 5
minutes before broiling is recommended.
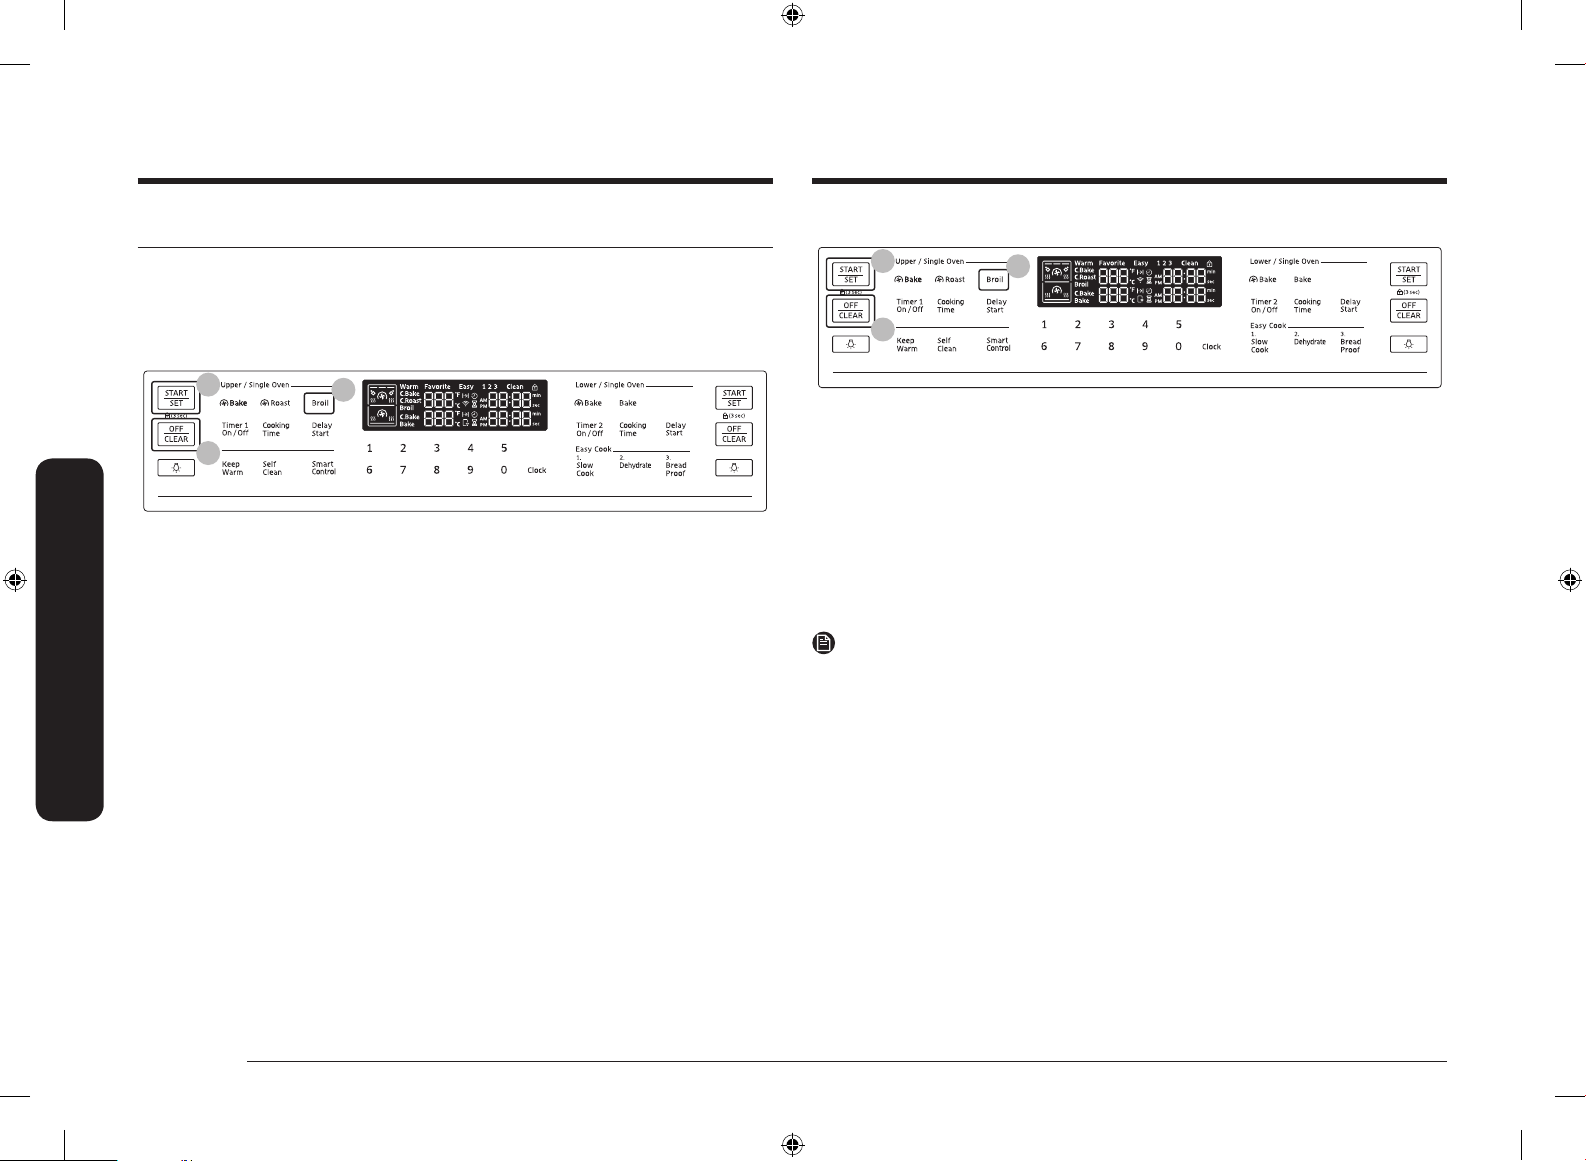
Broiling (Single mode)
03
07
1. Put food on a broiling grid in a broiling pan.
2. Press the Broil pad once for high temperature broiling or twice for low.
3. Press the START/SET pad to start the broiler.
4. Let the oven pre-heat for 5 minutes.
5. Place the pan on the desired rack, and then close the oven door.
6. When one side of the food is browned, turn it over, close the oven door, and
start cooking the other side.
7. When cooking is complete, press the OFF/CLEAR pad.
02
Broiling (Twin mode)
04
08
1. Insert the Smart Divider into the cavity.
2. Put food on a broiling grid in a broiling pan.
3. Press the Broil pad once for high temperature broiling or twice for low.
4. Press the START/SET pad to start the broiler.
5. Let the oven pre-heat for 5 minutes.
6. Place the pan on the desired rack in the upper cavity, and then close the oven
door.
7. When one side of the food is browned, turn it over, close the oven door, and
start cooking the other side.
8. When cooking is complete, press the OFF/CLEAR pad.
NOTE
• Use the low temperature setting for poultry or thick cuts of meat to prevent
overbroiling.
• In general, to prevent overbroiling, press the Broil pad to switch from High to
Low.
• Use caution when you open the oven door to turn over the food. The air
escaping from the oven will be very hot.
• Your oven has different temperature setting ranges when you use the upper
oven and lower oven simultaneously. See "Temperature setting guides" on
page 25 for details.
03
24 English
NX7000K_VE_NX58M6850SS_AA_DG68-00909A-03_EN+MES+CFR.indb 24 1/30/2018 1:04:14 PM
Page 25
Recipe guide
Temperature setting guides
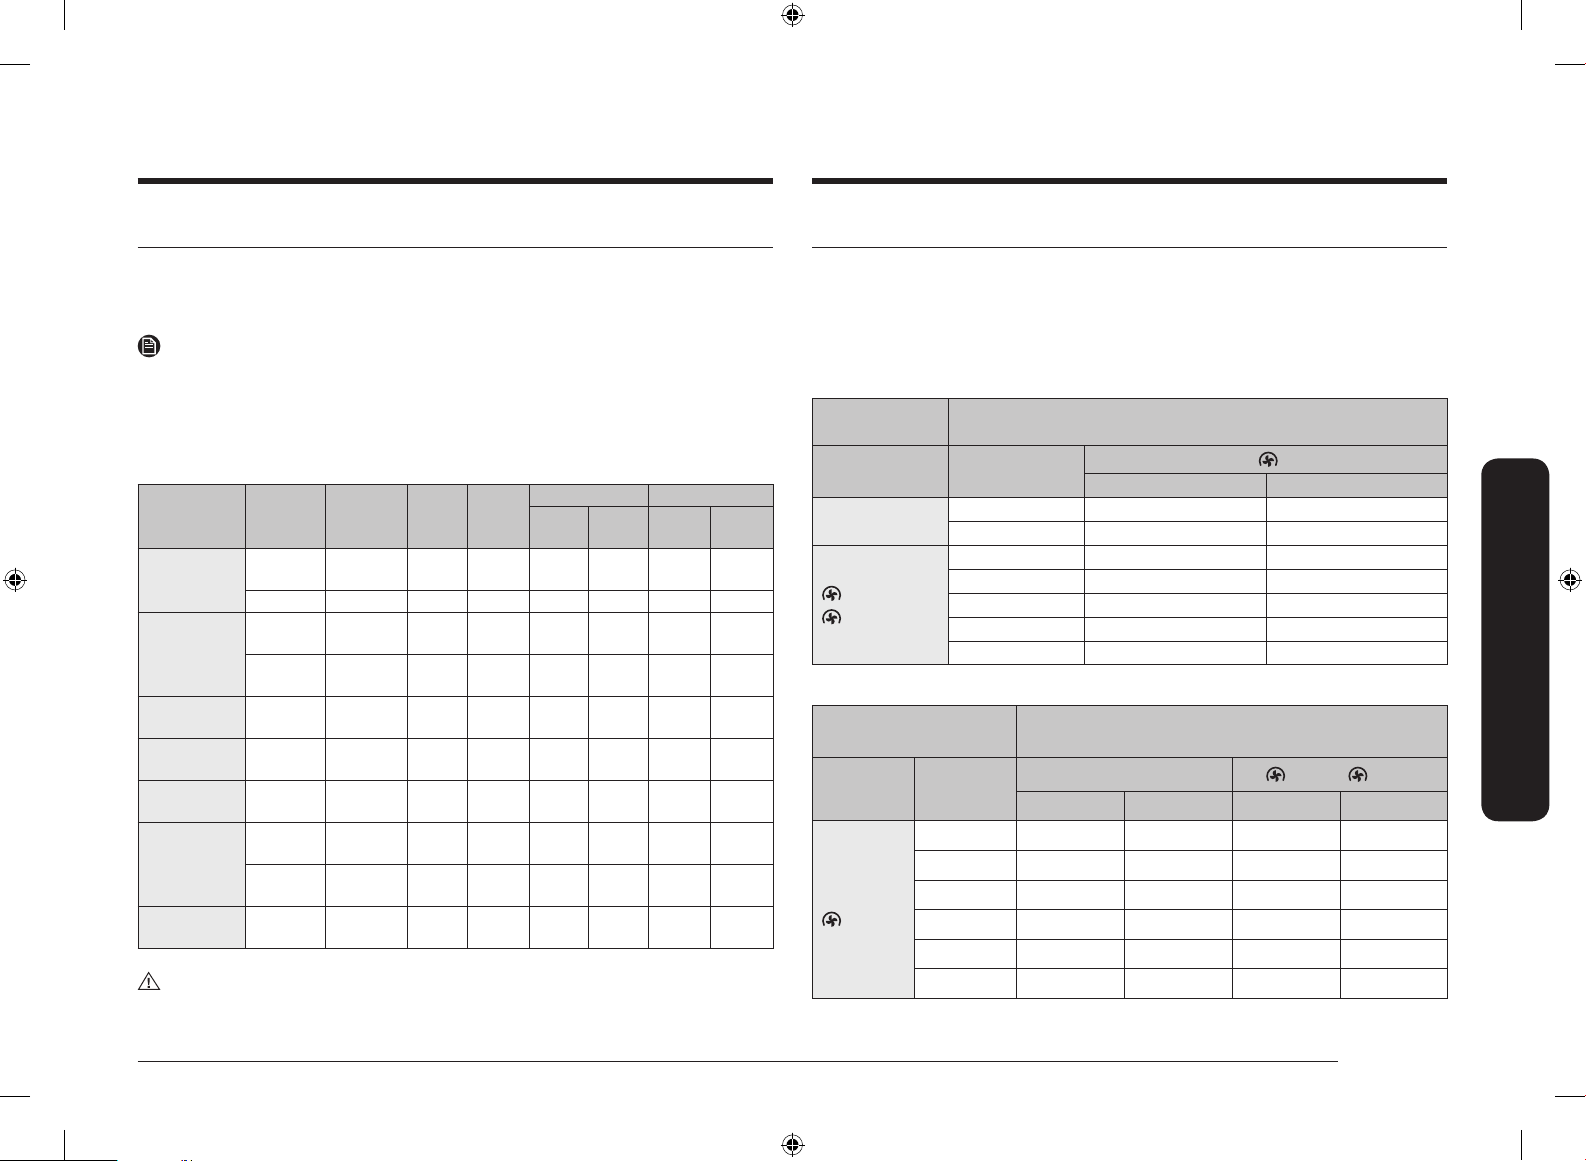
Broiling guide
For detailed instructions, see page 24.
NOTE
• This is for reference only.
• Preheating for 5 minutes before broiling is recommended.
• The size, weight, thickness, starting temperature, and your doneness
preference will affect broiling times.
• This guide is based on meats at refrigerator temperature.
Food Doneness Size
Hamburgers
Beef steak
Chicken
pieces
Chicken
breasts
Pork chops Well done 1 lb. ½" HI 5 A
Lamb chops
Fish llets Well done - ¼-½" HI 5 A
Medium 9 patties 1" HI 6 B
Medium 9 patties ¾" HI 6 B 5:00 4:00
Medium - 1" HI 6 B
Medium - 1½" HI 6 B
Well done 2-2½ lbs. ¾"-1" HI 5 A
Well done 2-3 pcs - HI 5 A
Medium 10 oz. 1" HI 4 A
Well done 1 lb. 1½" HI 4 A
Thick-
ness
Broil
setting
Rack position Cooking time
Single Upper
1st
side
5:00-
5:30
7:00-
6:00
9:00-
10:00
15:00-
17:00
15:00-
18:00
9:00-
11:00
8:00-
12:00
10:00-
15:00
5:00-
6:00
CAUTION
Make sure to close the door after turning over the food.
2nd
side
4:00-
4:30
6:00-
5:00
6:00-
7:00
13:00-
15:00
12:00-
15:00
6:00-
9:00
5:00-
8:00
7:00-
11:00
3:00-
4:00
Twin Mode Temperature setting ranges
Your oven has different temperature setting ranges when you use the upper oven
and lower oven simultaneously. The range for each oven changes, depending on
the function and temperature setting of the other oven. See the tables below and
on the next page for details.
Upper Oven
Mode Set Temp.
Broil
Available Functions and Temp.
Hi 350 ˚F 480 ˚F
Lo 300 ˚F 450 ˚F
Lower Oven
Bake,
Bake
Min Max
480 ˚F 400 ˚F 480 ˚F
Bake
Roast
450 ˚F 350 ˚F 480 ˚F
300 ˚F 250 ˚F 375 ˚F
250 ˚F 225 ˚F 300 ˚F
175 ˚F 175 ˚F 200 ˚F
(O - Available, X - Not Avilable)
Lower Oven
Mode Set Temp.
Available Functions and Temp.
Broil
Upper Oven
Bake & Roast
Lo Hi Min Max
480 ˚F X O 400 ˚F 480 ˚F
450 ˚F O O 350 ˚F 480 ˚F
Bake
Bake
350 ˚F O X 275 ˚F 450 ˚F
325 ˚F O X 275 ˚F 400 ˚F
250 ˚F X X 225 ˚F 300 ˚F
175 ˚F X X 175 ˚F 200 ˚F
Gas oven
English 25
NX7000K_VE_NX58M6850SS_AA_DG68-00909A-03_EN+MES+CFR.indb 25 1/30/2018 1:04:14 PM
Page 26
Gas oven
07
06
05
04
03
02
01
Gas oven
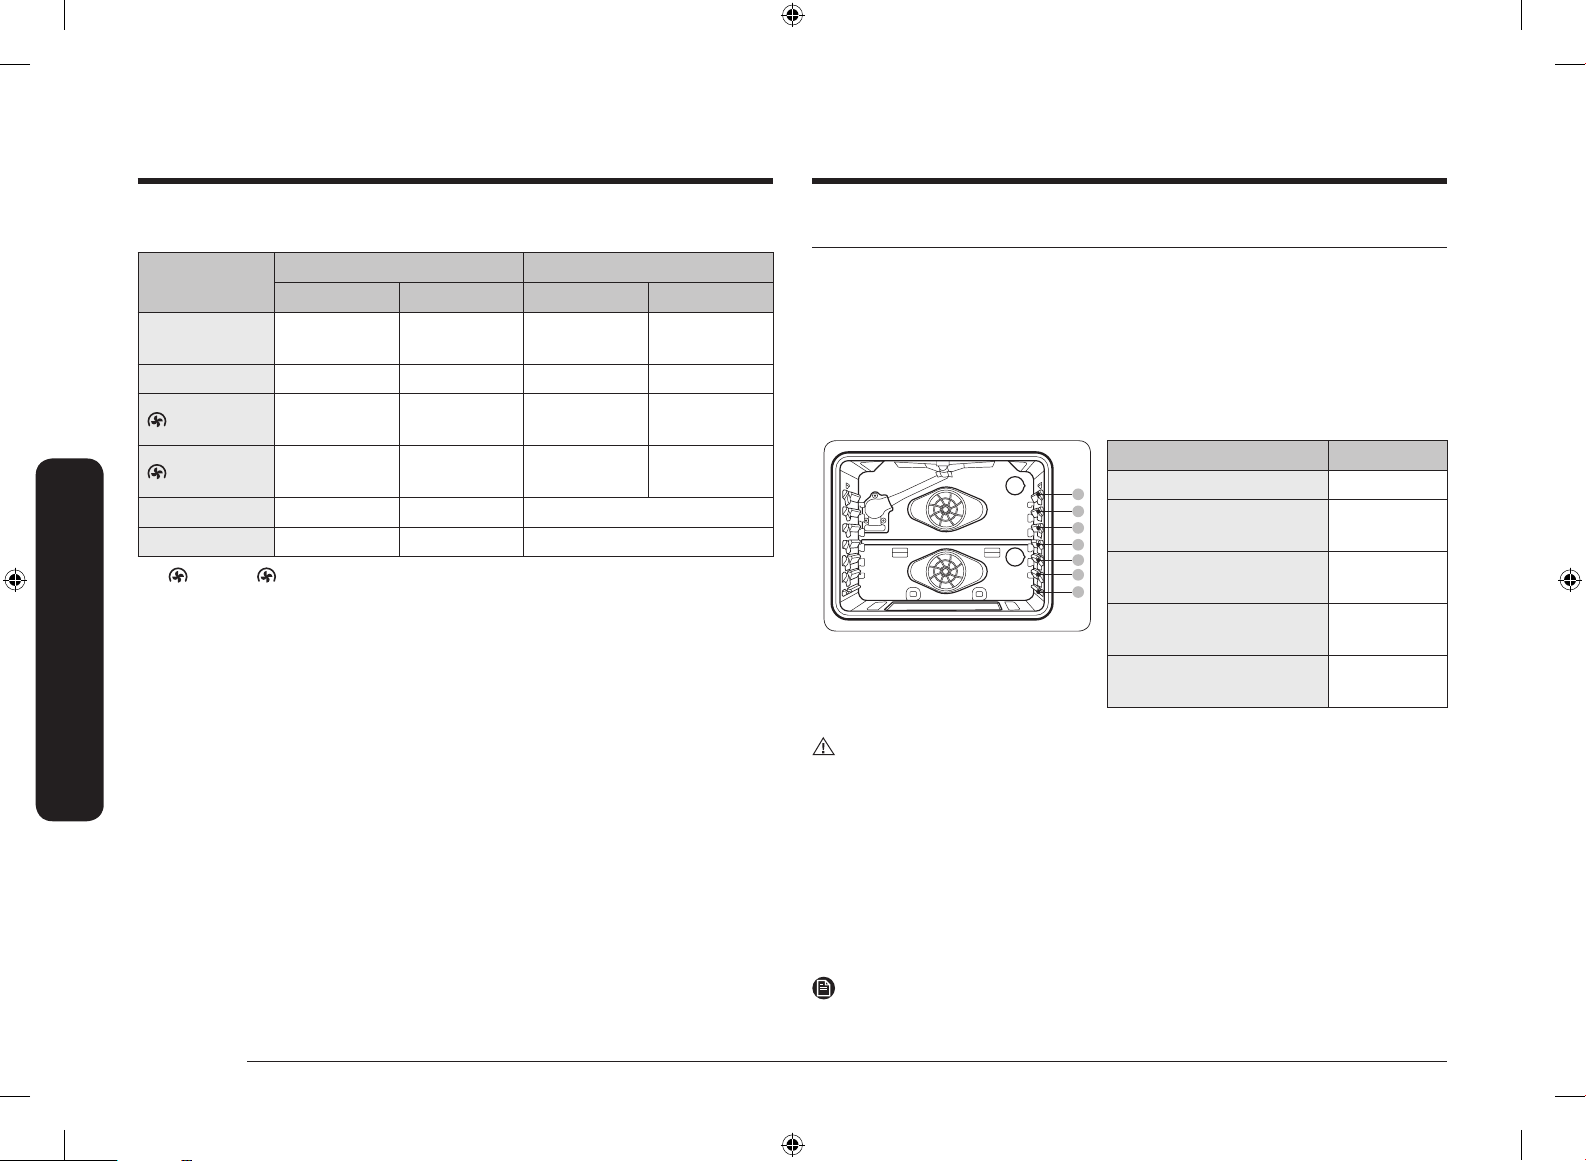
Temperature Limitations by Mode
Feature
Bake
Single Mode Twin Mode
Min Max Min Max
175 ˚F
(79 ˚C)
550 ˚F
(288 ˚C)
175 ˚F
(79 ˚C)
(249 ˚C)
Broil LO HI LO HI
Bake
Roast
175 ˚F
(79 ˚C)
175 ˚F
(79 ˚C)
550 ˚F
(288 ˚C)
550 ˚F
(288 ˚C)
175 ˚F
(79 ˚C)
175 ˚F
(79 ˚C)
(249 ˚C)
(249 ˚C)
Self-Clean 2 hours 5 hours -
Keep Warm - 3 hours -
Bake or Roast, use Auto Conversion to set the minimum temperature to
For
200 °F (93 °C) if necessary. See "Auto Conversion" on page 35 for details.
480 ˚F
480 ˚F
480 ˚F
Using the oven racks
Single Mode - One Oven Cavity
Your gas oven range comes with 3 racks and 7 rack positions. The rack positions
are delineated by rack guides which support the racks. Each rack guide has a stop
that prevents racks from loosening during the oven’s operation. Each rack has
stoppers that need to be placed correctly on the rack guides. The stoppers prevent
the racks from accidently coming out of the oven completely when you pull the
racks out.
Type of food Rack position
Broiling hamburgers 6
Broiling meats or small
cuts of poultry, sh
Bundt cakes, Pound cakes,
Frozen pies, casseroles
Fresh Pizza, Angel food
cakes, Small roasts
Turkey, Large roasts,
Hams
CAUTION
• Do not cover an oven rack with aluminum foil. This will hamper heat
circulation, resulting in poor baking.
• Do not place aluminum foil on the oven bottom. The aluminum can melt and
damage the oven.
• Arrange the oven racks only when the oven is cool.
• When placing an oven rack in the topmost rack position (position 7), make
sure the rack is situated stably on the embossed stop.
• When you use the gliding rack and a at rack, always place the gliding rack
below the at rack.
6-4
4 or 3
2
1
NOTE
26 English
NX7000K_VE_NX58M6850SS_AA_DG68-00909A-03_EN+MES+CFR.indb 26 1/30/2018 1:04:15 PM
This table is for reference only.
Page 27
5
3
5
2
Twin Mode - Two Oven Cavities
B
C
A
04
03
02
01
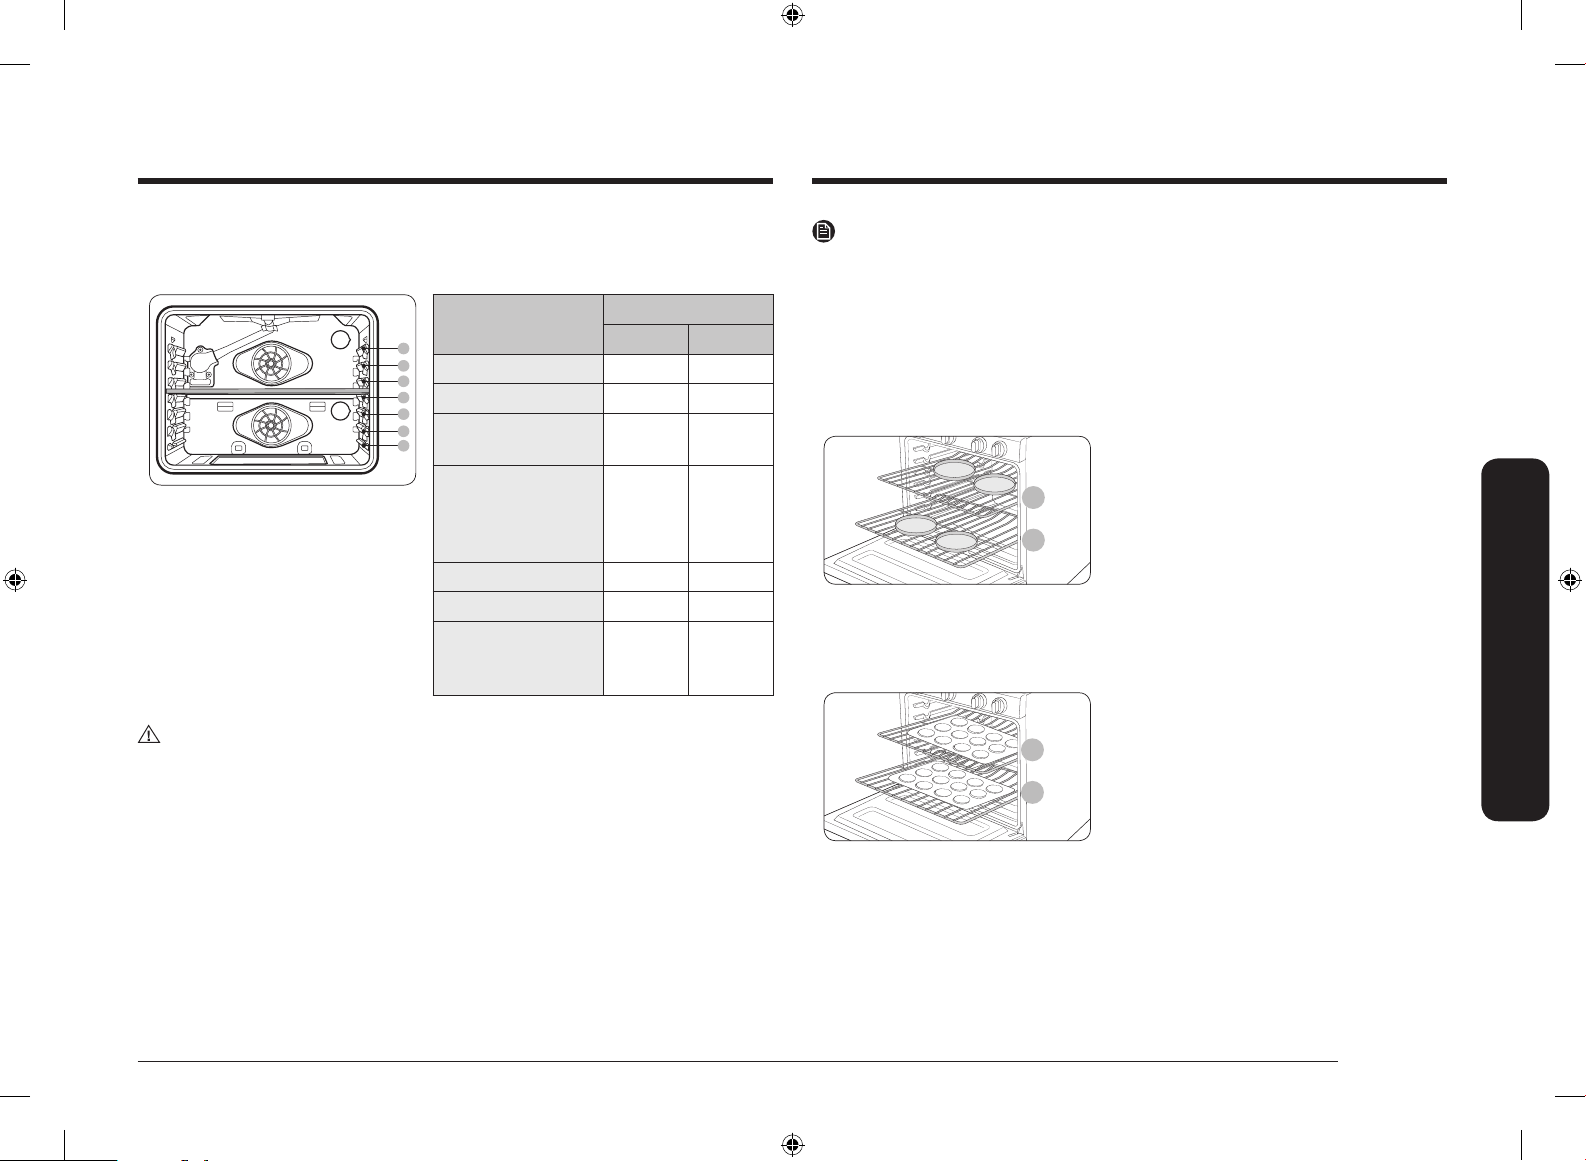
In Twin mode, the Smart Divider separates the oven into an upper oven and lower
oven. The upper oven and lower oven each has 3 rack positions.
Type of food
Rack position
Upper Lower
Frozen Pies - 1
Angle Food Cakes - 1
Bundt or pound
cakes
- 1
Mufns, Brownies,
• The upper oven has 3 rack
positions (A, B, C)
• The lower oven has 3 racks
positions (1, 2, 3)
Cookies, Cup cakes,
Layer cakes, Pies,
A 1
Biscuits
Casseroles - 1
Small roasts, Hams A 1
Small chickens,
Turkey pieces,
- 1
Meduim roasts
CAUTION
Precautions for using only the upper oven:
• You must preheat the oven. If not, the food may be overcooked or burnt on
the surface and undercooked inside.
• To change the temperature during cooking, rst remove the food and change
the temperature. Then, put the food back inside the oven. Otherwise, the food
may be burnt by the broil burner while the oven is preheating.
• In Convection baking mode, do not bake food over 2 inches (50 mm) in height.
• The cooking time may be longer than with single-oven cooking.
NOTE
• This table is for reference only.
• When using the upper oven mode, always pre-heat before cooking items such
as pizza.
• We recommend cooking pizza and pies using the 2nd rack position in Single
mode or the 2nd rack position of the lower oven in Twin mode for crispy
bottoms.
Multi-rack Baking
• When baking cakes on two racks
in Single mode, place the racks
in positions 3 and 5 for the best
performance.
• When using 4 pans on two racks, place
two pans in the rear of the upper rack,
and the other two in the front of the
Cake pan positions
lower rack.
• When baking multiple items on one
rack, maintain a 1" to 1.5" (2.5 cm to 3.8
cm) space between items.
• When baking cookies on two racks in
Single mode, place the oven racks in
positions 2 and 5.
Cookie sheet positions
Gas oven
NX7000K_VE_NX58M6850SS_AA_DG68-00909A-03_EN+MES+CFR.indb 27 1/30/2018 1:04:15 PM
English 27
Page 28
Gas oven
5
3
Gas oven
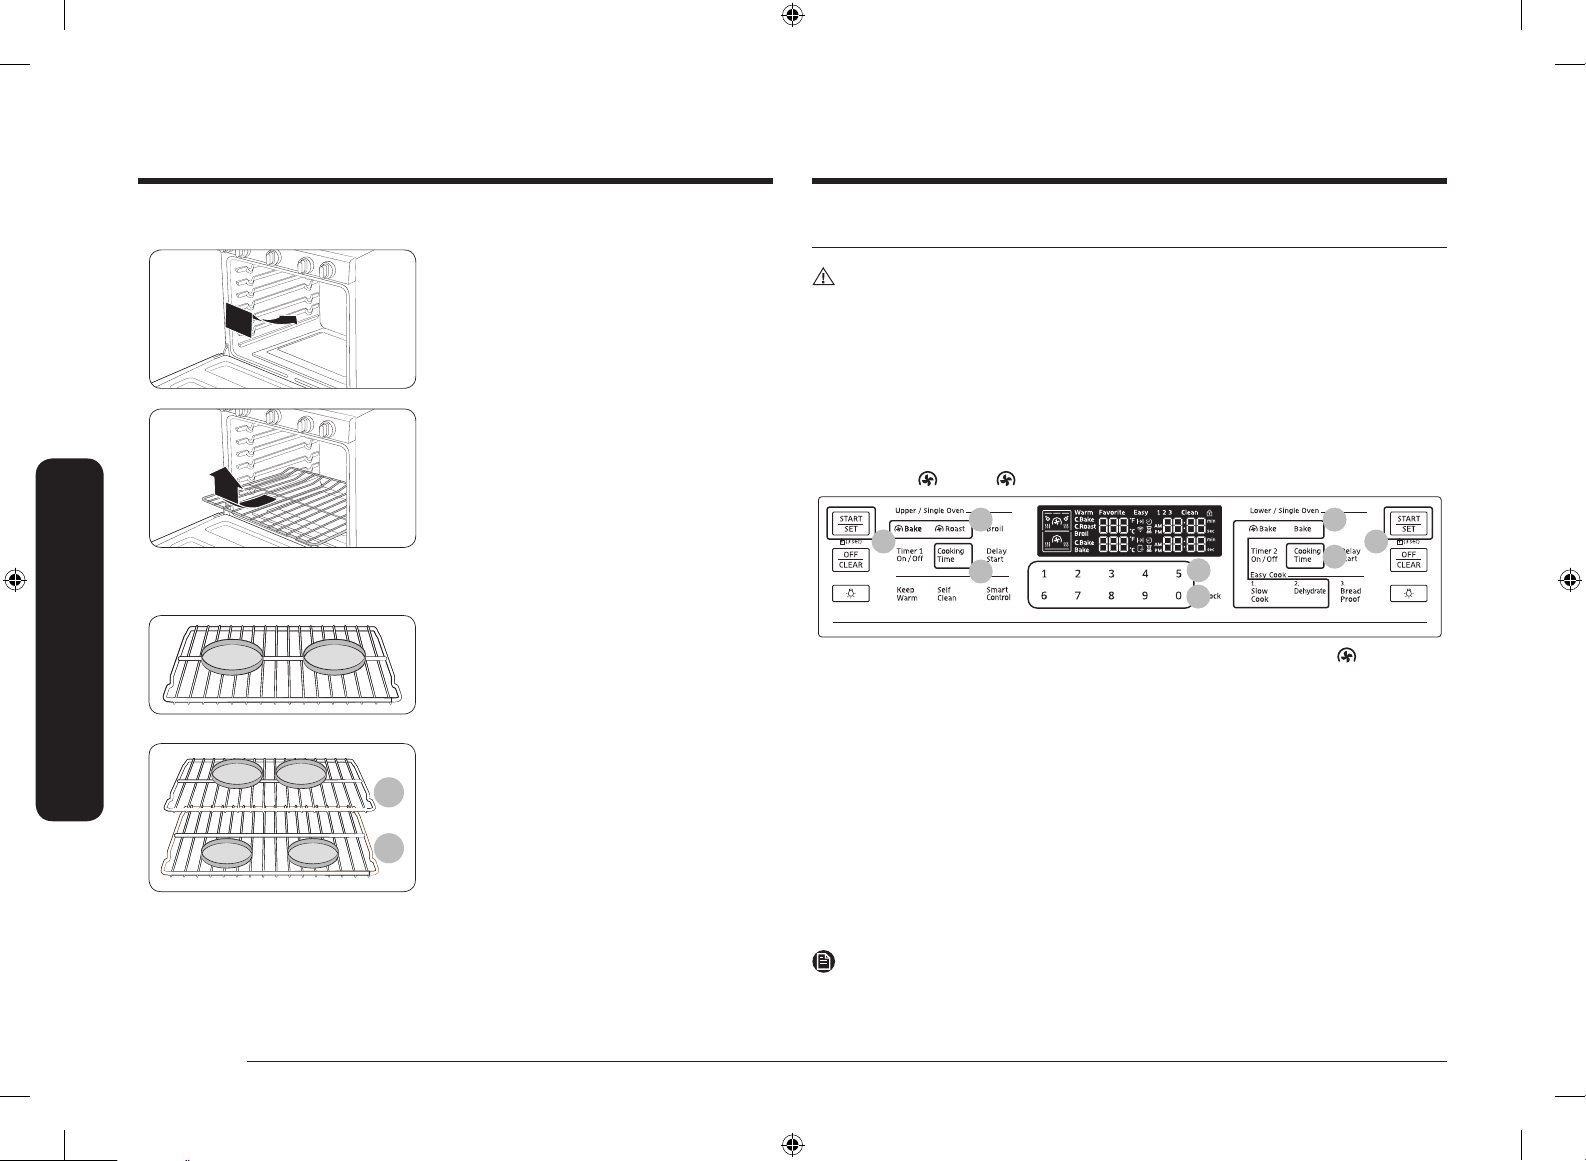
Inserting and removing an oven rack
Rack and Pan Placement
Single Oven Rack
Multiple Oven Rack
To insert an oven rack
1. Place the rear end of the rack on a rack
guide.
2. Slide the rack into the rack guide while
holding the front end of the rack.
To remove an oven rack
1. Pull out the rack until it stops.
2. Pull up the front end of the rack and
remove it from the rack guide.
Centering the baking pans in the oven as
much as possible will produce better results.
If baking with more than one pan, place the
pans so each has at least 1˝ to 1½˝ of air
space around it.
If baking on two racks in Single mode, place
the oven racks in positions 3 and 5 for the
best results.
When baking in Single mode on a single
oven rack, place the rack in position 3 or 4.
• When you use the Gliding Rack, place
the Gliding Rack below the at rack.
Cooking options
CAUTION
Food that can easily spoil, such as milk, eggs, sh, poultry, and meat, should be
chilled in a refrigerator before they are placed in the oven. Even when chilled,
they should not stand for more than 1 hour before cooking begins and should be
removed promptly when cooking is completed.
Timed Cook (Single mode)
Timed cooking sets the oven to cook foods at a set temperature for a set length of
time. The oven automatically turns off when it nishes.
Mode: Bake /
05 05
1. Press the pad corresponding to a desired cooking mode such as Bake on
the left or right side of the panel.
2. If necessary, change the temperature using the number pad.
3. Press the Cooking Time pad on the left or right side of the panel.
4. Set the cooking time between 1 minute and 9 hours and 59 minutes (9:59)
using the number pad.
5. Press the START/SET pad on the right or left side of the panel. The oven will
automatically light and start preheating. The temperature will increase until it
reaches the temperature you set.
6. When preheating is complete, put the container with the food on a rack, and
then close the door. The oven starts cooking for the amount of time you set.
7. When the cooking time has elapsed, the oven will automatically shut off and
then beep.
Bake / Roast / Slow Cook / Dehydrate
01
03
02
04
01
03
NOTE
To change the programmed cooking time, press the Cooking Time pad and enter a
different time. Then, press the START/SET pad.
28 English
NX7000K_VE_NX58M6850SS_AA_DG68-00909A-03_EN+MES+CFR.indb 28 1/30/2018 1:04:17 PM
Page 29
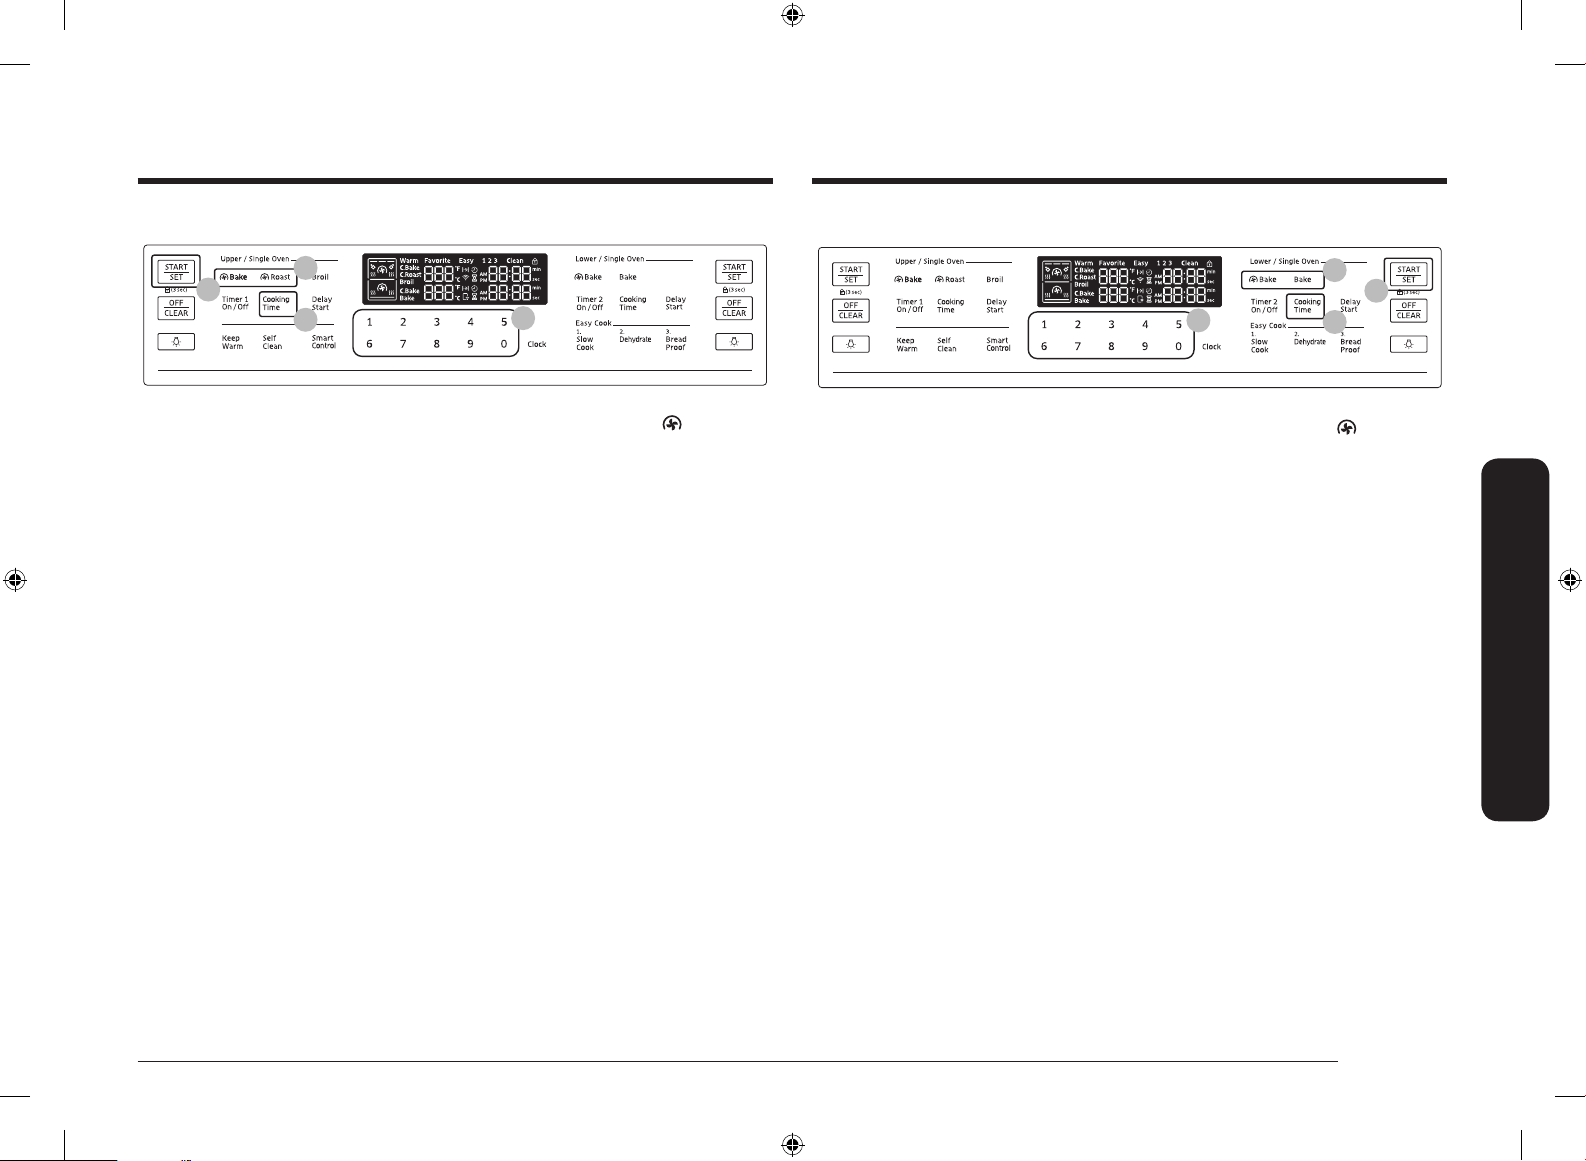
Timed Cook (Upper oven mode)
Timed Cook (Lower oven mode)
02
06
04
05
1. Insert the Smart Divider into the cavity.
2. Press the pad corresponding to a desired cooking mode such as
Bake on
the left side of the panel.
3. If necessary, change the temperature using the number pad.
4. Press the Cooking Time pad on the left side of the panel.
5. Set the cooking time between 1 minute and 9 hours and 59 minutes (9:59)
using the number pad.
6. Press the START/SET pad on the left side of the panel. The oven will
automatically light and start preheating. The temperature will increase until it
reaches the temperature you set.
7. When preheating is complete, put the container with the food on a rack in the
upper oven, and then close the door. The oven starts cooking for the amount
of time you set.
8. When the cooking time has elapsed, the oven will automatically shut off and
then beep.
02
06
05
04
1. Insert the Smart Divider into the cavity.
2. Press the pad corresponding to a desired cooking mode such as Bake on
the right side of the panel.
3. If necessary, change the temperature using the number pad.
4. Press the Cooking Time pad on the right side of the panel.
5. Set the cooking time between 1 minute and 9 hours and 59 minutes (9:59)
using the number pad.
6. Press the START/SET pad on the right side of the panel. The oven will
automatically light and start preheating. The temperature will increase until it
reaches the temperature you set.
7. When preheating is complete, put the container with the food on a rack in the
lower oven, and then close the door. The oven starts cooking for the amount
of time you set.
8. When the cooking time has elapsed, the oven will automatically shut off and
then beep.
Gas oven
English 29
NX7000K_VE_NX58M6850SS_AA_DG68-00909A-03_EN+MES+CFR.indb 29 1/30/2018 1:04:17 PM
Page 30
Gas oven
Gas oven
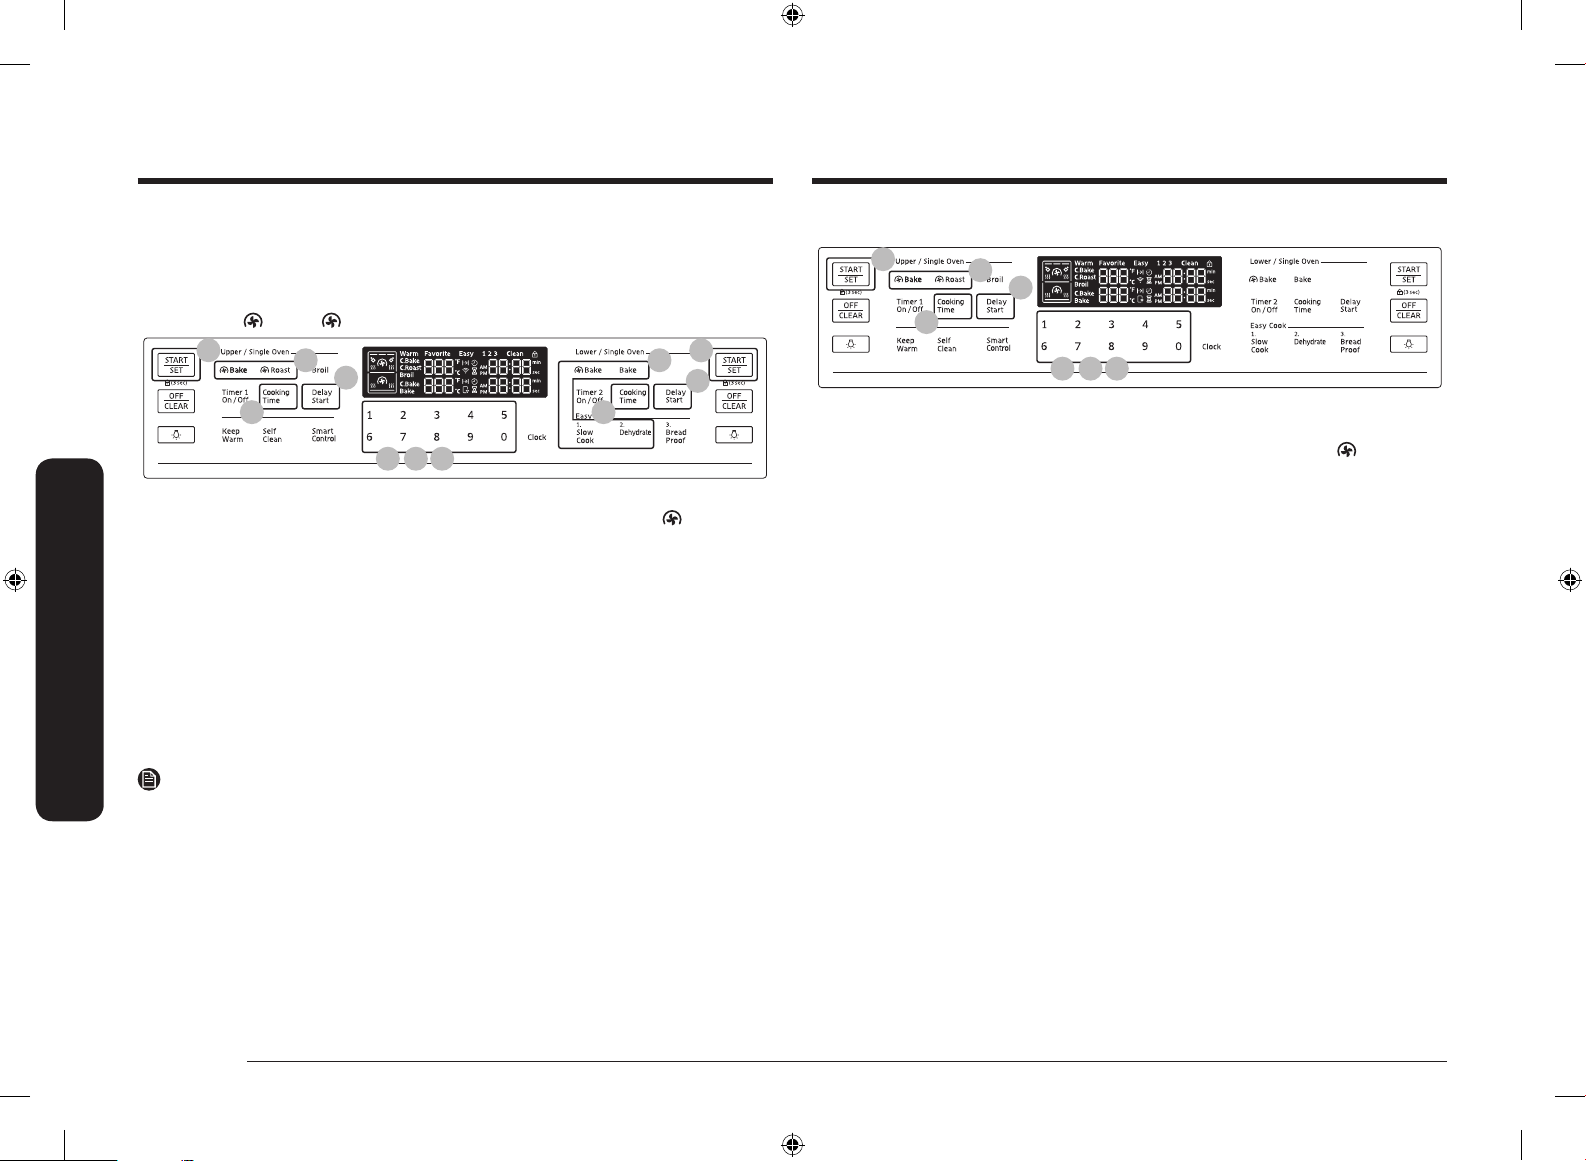
Delay Start (Single mode)
The Delay Start function lets you use the kitchen timer to automatically start
and stop another cooking program. Delay Start can be set before other cooking
operations for up to 12 hours.
Mode: Bake /
08
Bake / Roast / Slow Cook / Dehydrate / Self-clean
02
06
04
03 05 07
04
02
08
06
1. Place the container with the food on a rack, and then close the door.
2. Press the pad corresponding to a desired cooking mode such as
Bake on
the left or right side of the panel.
3. If necessary, change the temperature using the number pad.
4. Press the Cooking Time pad on the left or right side of the panel.
5. Set the cooking time between 1 minute and 9 hours and 59 minutes (9:59)
using the number pad.
6. Press the Delay Start pad on the left or right side of the panel.
7. Set the starting time using the number pad.
8. Press the START/SET pad on the left or right side of the panel.
9. The oven starts cooking at the set time, and turns off automatically when it
completes cooking.
NOTE
• To change the starting time, press the Delay Start pad, and enter a new
starting time. Then, press the START/SET pad.
• To change the programmed cooking time, press the Cooking Time pad and
enter a different time. Then, press the START/SET pad.
Delay Start (Upper mode)
08
02
06
04
03 05 07
1. Insert the Smart Divider into the cavity. Place the container with the food on a
rack in the upper oven, and then close the door.
2. Press the pad corresponding to a desired cooking mode such as Bake on
the left side of the panel.
3. If necessary, change the temperature using the number pad.
4. Press the Cooking Time pad on the left side of the panel.
5. Set the cooking time between 1 minute and 9 hours and 59 minutes (9:59)
using the number pad.
6. Press the Delay Start pad on the left side of the panel.
7. Set the starting time using the number pad.
8. Press the START/SET pad on the left side of the panel.
9. The oven starts cooking at the set time, and turns off automatically when it
completes cooking.
30 English
NX7000K_VE_NX58M6850SS_AA_DG68-00909A-03_EN+MES+CFR.indb 30 1/30/2018 1:04:18 PM
Page 31
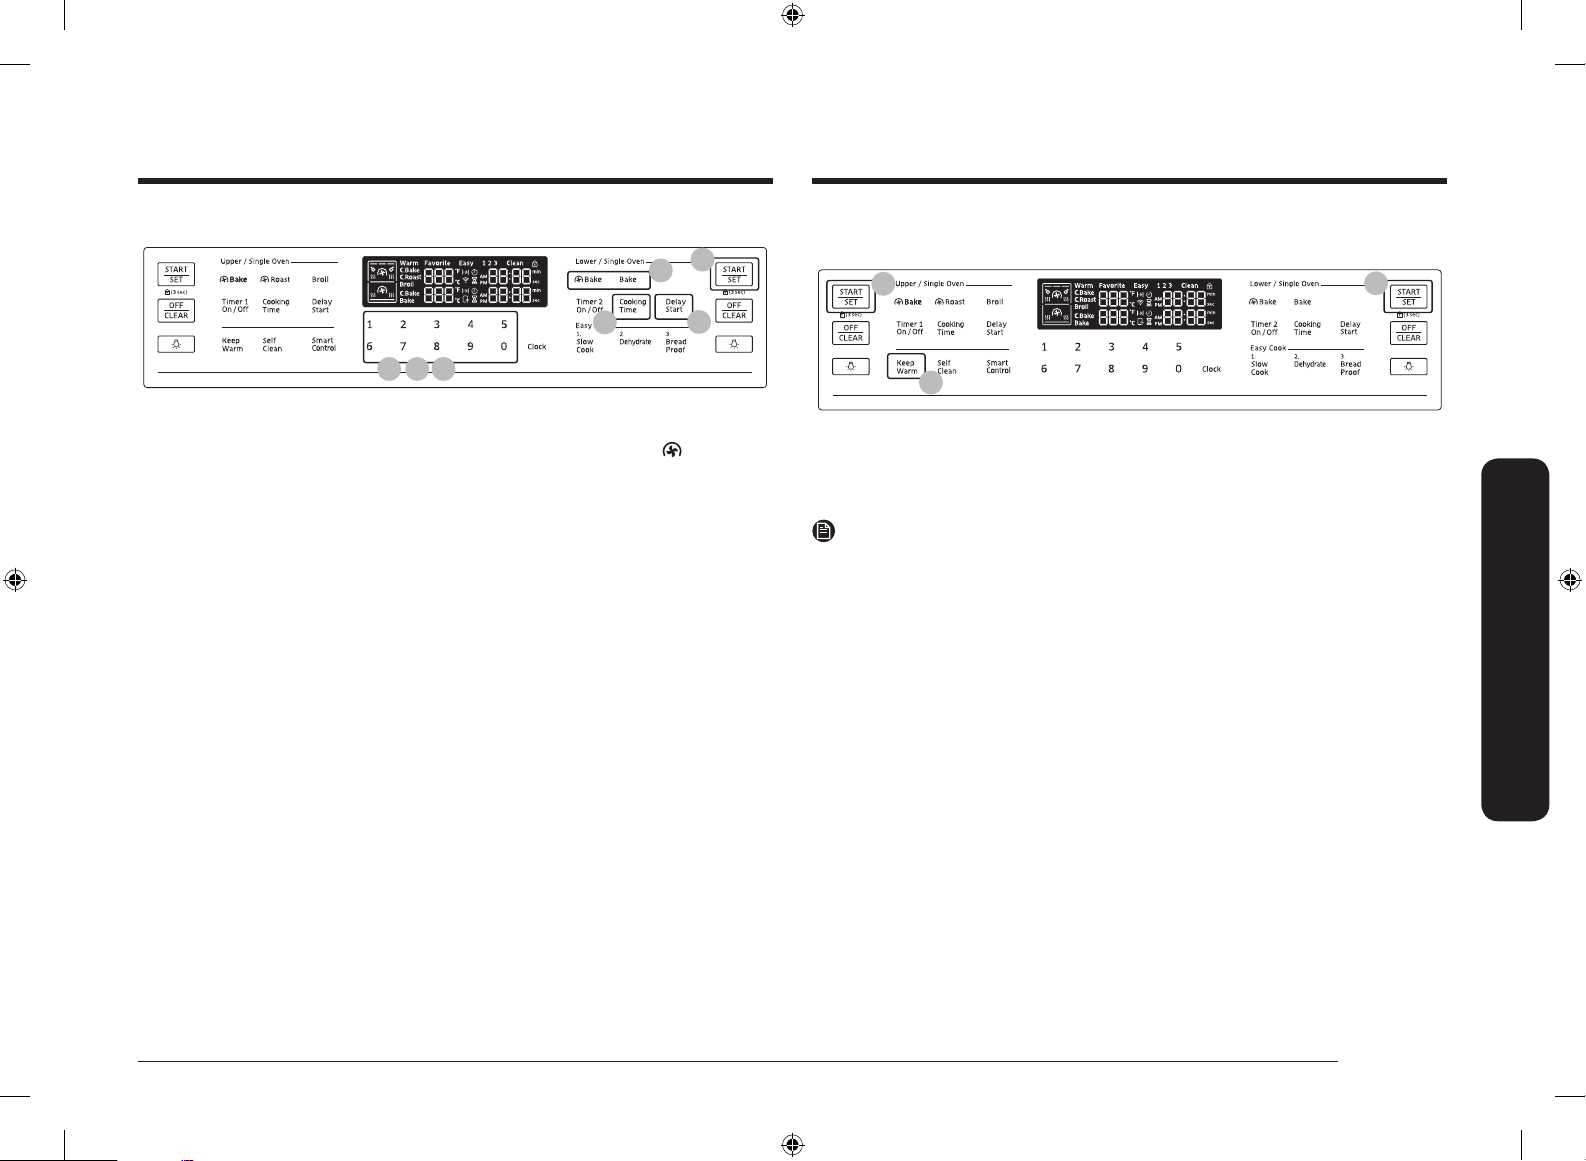
Delay Start (Lower mode)
02
08
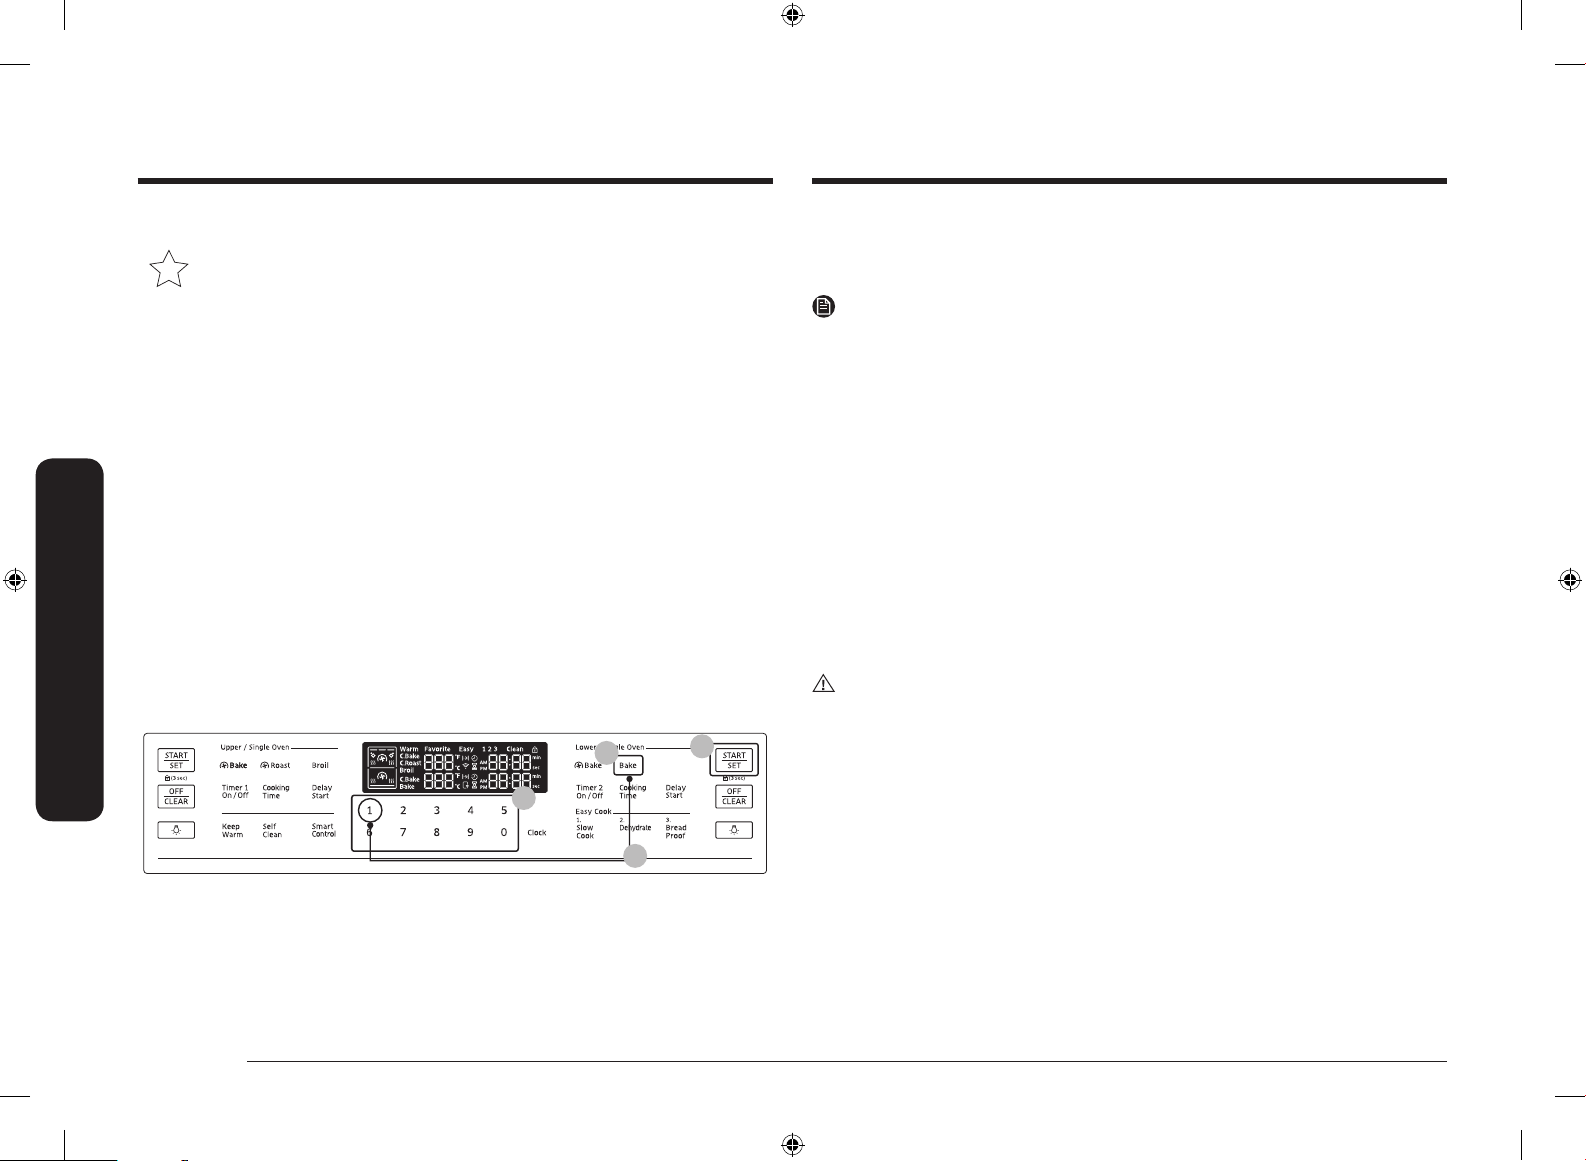
Keep Warm (Single mode only)
Keep cooked food warm at a low temperature up to 3 hours.
03
03
04
03 05 07
06
1. Insert the Smart Divider into the cavity. Place the container with the food on a
rack in the lower oven, and then close the door.
2. Press the pad corresponding to a desired cooking mode such as Bake on
the right side of the panel.
3. If necessary, change the temperature using the number pad.
4. Press the Cooking Time pad on the right side of the panel.
5. Set the cooking time between 1 minute and 9 hours and 59 minutes (9:59)
using the number pad.
6. Press the Delay Start pad on the right side of the panel.
7. Set the starting time using the number pad.
8. Press the START/SET pad on the right side of the panel.
9. The oven starts cooking at the set time, and turns off automatically when it
completes cooking.
02
1. Place the container with the food on a rack, and then close the door.
2. Press the Keep Warm pad.
3. Press the START/SET pad on the left or right side of the panel. The oven heats
up to 170 °F (77 °C).
NOTE
• You can cancel warming at any time by pressing the OFF/CLEAR pad.
• To set the warming function during a timed cooking, press the Keep Warm
pad in timed cooking mode. When the timed cooking is complete, the oven
will lower the temperature to the warming default, and keep that temperature
until warming nishes or is canceled.
• Use this function only in Single mode. Your oven cannot maintain the low
temperature this function requires during Twin mode cooking.
Gas oven
English 31
NX7000K_VE_NX58M6850SS_AA_DG68-00909A-03_EN+MES+CFR.indb 31 1/30/2018 1:04:19 PM
Page 32
Gas oven
Gas oven
The Sabbath Option (Single mode only)
(For use on the Jewish Sabbath & Holidays)
K
Use this option only for baking on the Jewish Sabbath and Holidays.
For more information, visit the website at http://www.star-k.org
With the Sabbath option
• The oven temperature can be set higher or lower after you have set this
option.
• The display doesn’t change and no beep sounds when you change the
temperature.
• Once the oven is properly set for baking with the Sabbath option active, the
oven will remain continuously on until the Sabbath feature is cancelled. This
will override the factory preset 12 hour energy saving feature.
• If the oven light is needed during the Sabbath, press OVEN LIGHT before
activating the Sabbath feature. Once the oven light is turned on and the
Sabbath option is active, the oven light will remain on until the Sabbath option
is turned off.
• If you want the oven light off, be sure to turn it off before activating the
Sabbath feature.
• Do not use the surface cooktop when the Sabbath option is on.
To enable the Sabbath option
01
02
04
03
4. Press the Bake and Number 1 pads simultaneously for 3 seconds to display
"SAb". Once "SAb" appears, the oven control no longer beeps or displays any
further changes.
NOTE
• You can change the oven temperature once baking starts, but the display
will not change or beep. After changing the temperature, it takes 15 seconds
before the oven recognizes the change.
• You can turn off the oven at any time by pressing OFF/CLEAR. However, this
doesn’t deactivate the Sabbath option.
• To deactivate the Sabbath option, hold down Bake and the Number 1
simultaneously for 3 seconds.
• You can set the cooking time before activating the Sabbath option.
• After a power failure, the oven will not resume operation automatically. "SAb"
will appear in the control panel, but the oven will not go back on. Food can be
safely removed from the oven, but you should not turn off the Sabbath option
and turn the oven back on until after the Sabbath/Holidays.
• After the Sabbath observance, turn off the Sabbath option by pressing and
holding Bake and the Number 1 simultaneously for at least 3 seconds.
•
CAUTION
• Do not attempt to activate any other functions except for Bake when the
Sabbath option is on. Only the following pads will function properly: Number
pads, Bake, Oven Start/Set, and Oven Off.
• Do not open the oven door or change the oven temperature for about
30 minutes after you have started the Sabbath option. Let the oven reach
the set temperature. The oven fan operates only when the oven temperature
increases.
1. Press the Bake pad.
2. Enter a desired temperature using the number pad. The default temperature is
350 °F.
3. Press the START/SET pad. The display temperature changes after the oven
temperature reaches 175 °F.
32 English
NX7000K_VE_NX58M6850SS_AA_DG68-00909A-03_EN+MES+CFR.indb 32 1/30/2018 1:04:19 PM
Page 33
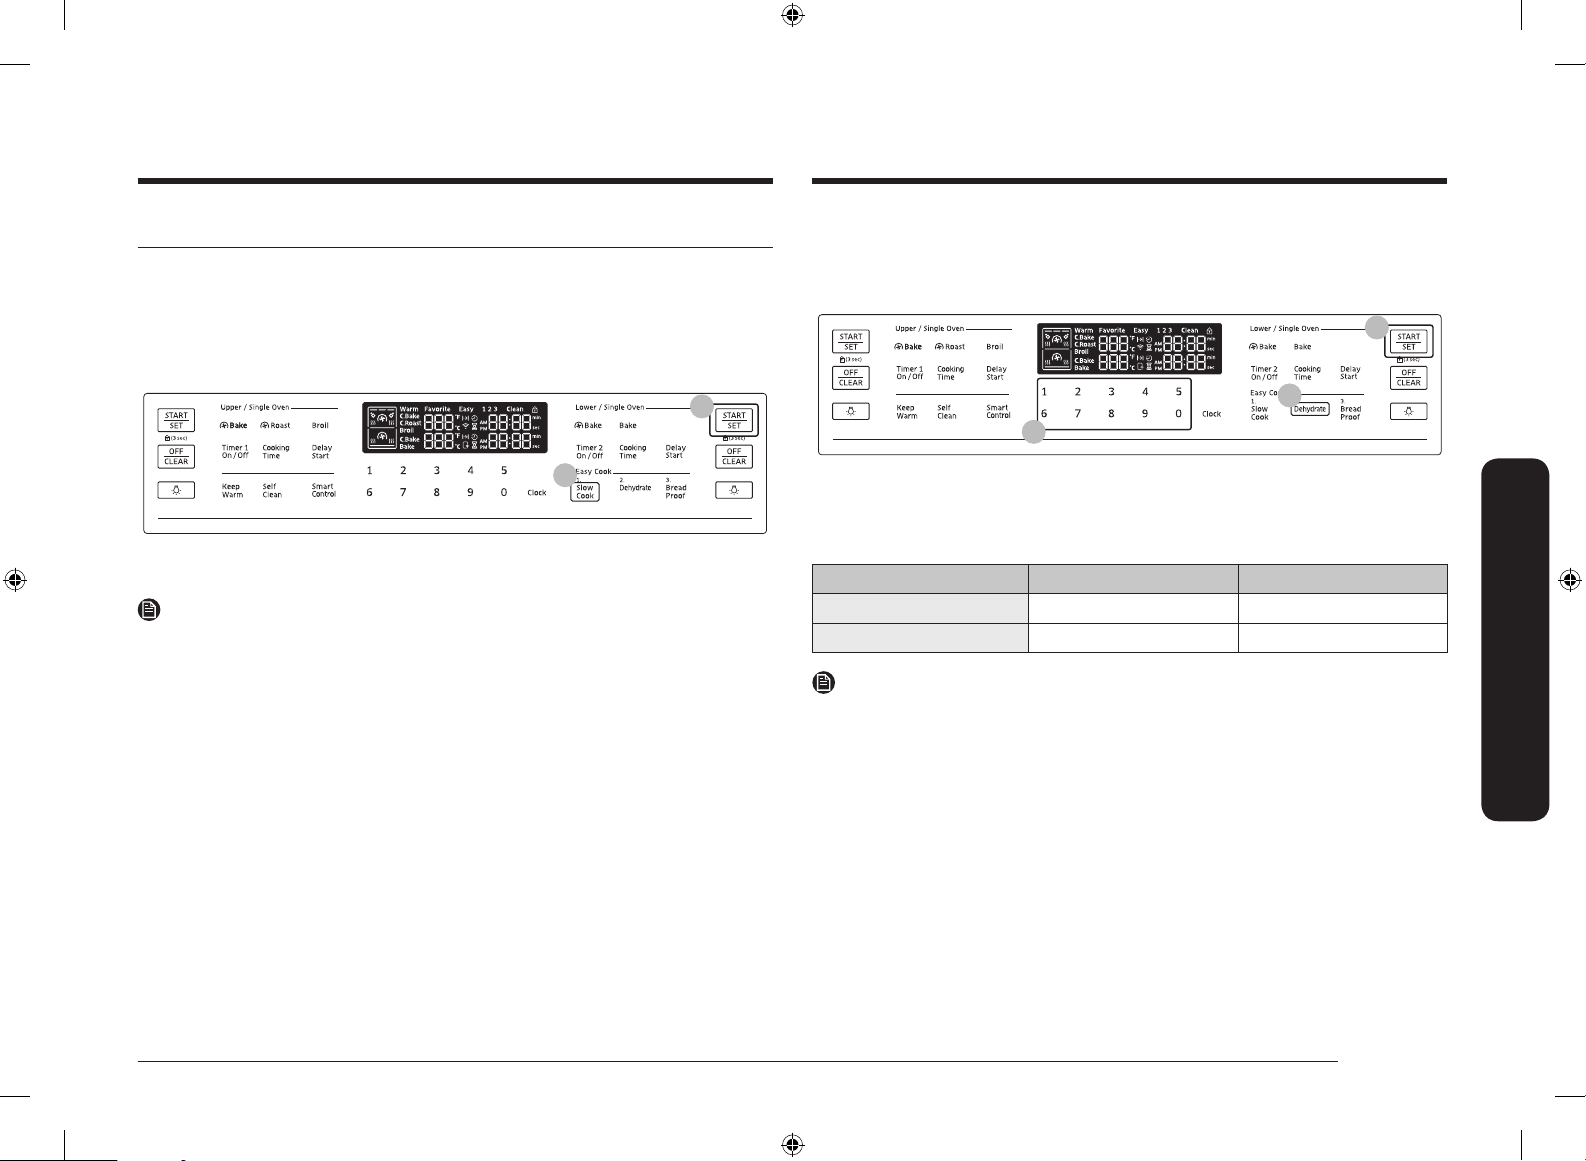
Slow cook, dehydrate, proong
Slow cook (Single mode only)
The Slow cook feature cooks food slowly at lower oven temperatures. The
extended cooking times allow better distribution of avors in many recipes. This
feature is ideal for roasting beef, pork, and poultry. Slow cooking meats may cause
the exterior of meats to become dark but not burnt. This is normal.
02
Dehydrate (Single mode only)
Dehydrate dries food or removes moisture from food via heat circulation. After
drying the food, keep it in a cool and dry place. For fruit, adding lemon or
pineapple juice or sprinkling sugar on the fruit helps the fruit retain sweetness.
03
01
02
01
1. Press Slow Cook once for HI or twice for LO.
2. Press START/SET.
NOTE
Use only 1 rack and place the rack in position 1 or 2 for the best results.
Preheating the oven is not necessary.
1. Press Dehydrate. The default temperature is 150 ˚F.
2. Enter the temperature you want on the number pad. (100 ˚F-175 ˚F)
3. Press START/SET.
Recommended Dehydration Temperatures
Category Rack position Temperature (˚F)
Vegetables or Fruit 3 or 4 100-150
Meat 3 or 4 145-175
NOTE
• Drying time depends on the amount of moisture inside of the food, the size of
the food, and the humidity in the air.
• Preheating the oven is not necessary.
Gas oven
English 33
NX7000K_VE_NX58M6850SS_AA_DG68-00909A-03_EN+MES+CFR.indb 33 1/30/2018 1:04:19 PM
Page 34
Gas oven
03
04
01
Gas oven
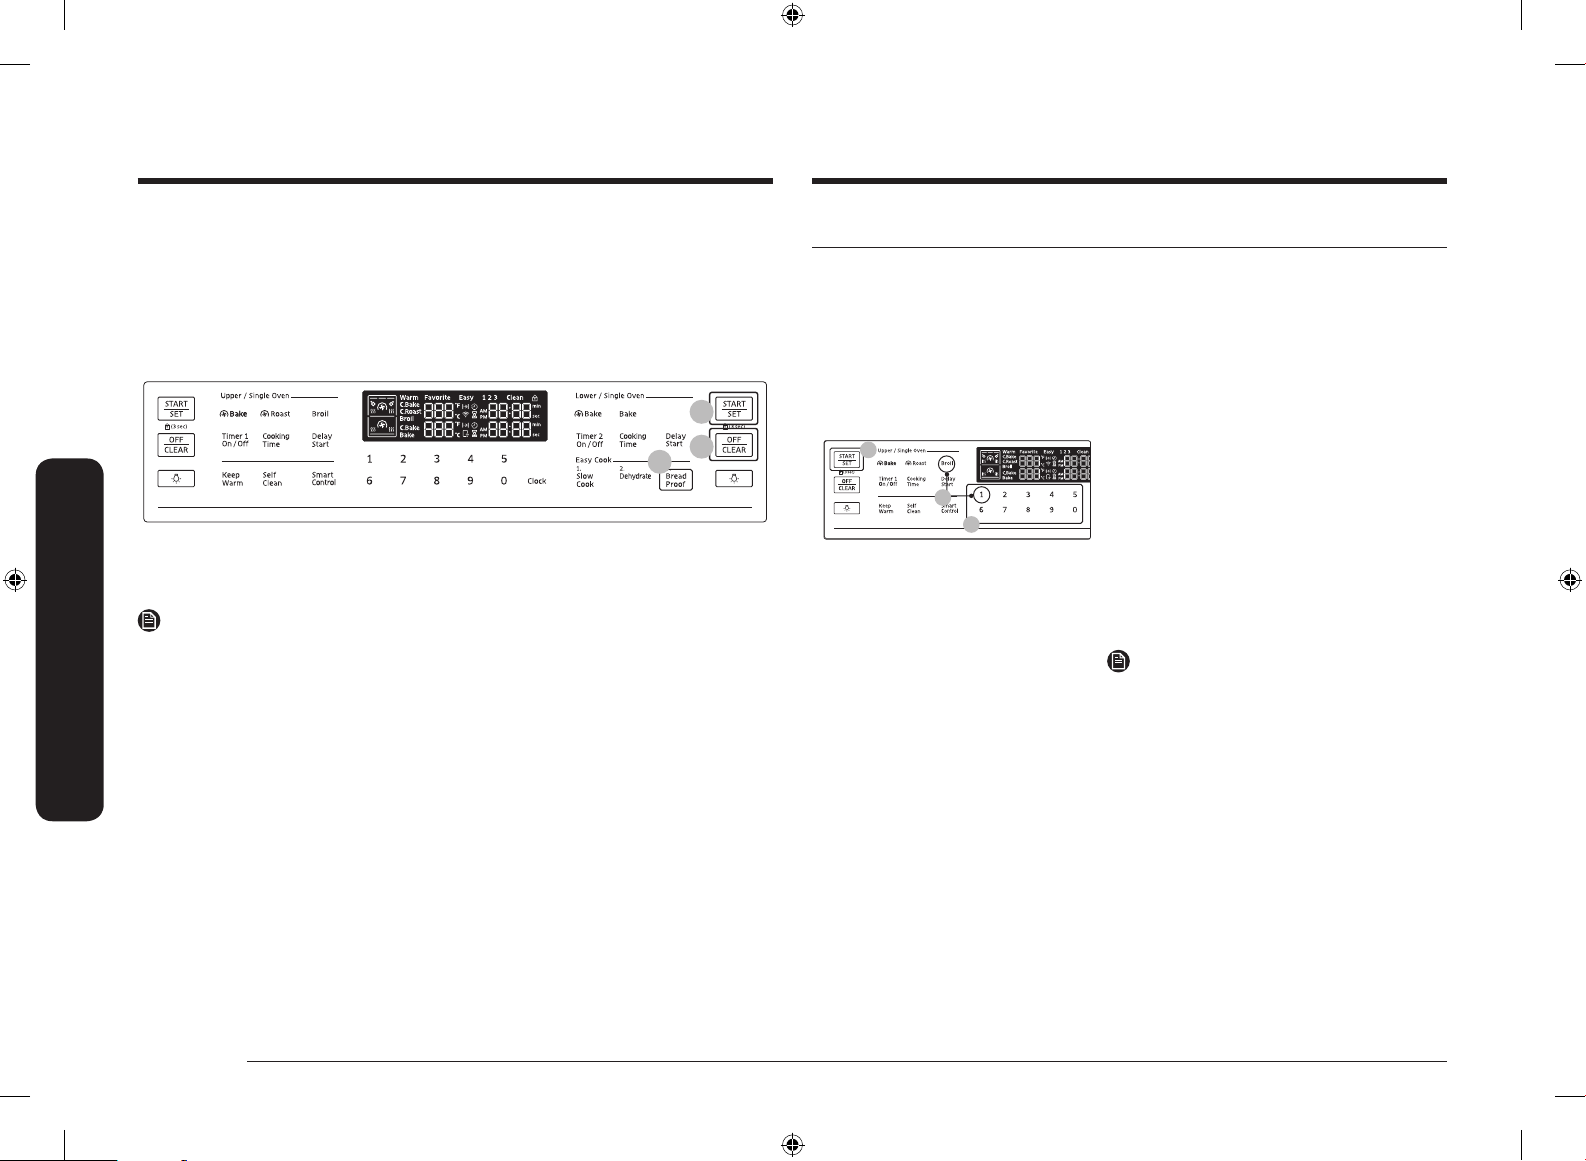
Bread Proof (Single mode only)
The Bread Proof function automatically provides the optimum temperature for the
bread proof process, and therefore does not have a temperature adjustment.
If you press Bread Proof when the oven temperature is above 100 ˚F, Hot will
appear in the display. Because this function produces the best results when started
while the oven is cool, we recommend that you wait until the oven has cooled
down and Hot disappears from the display.
02
03
01
1. Press Bread Proof.
2. Press START/SET.
3. Press OFF/CLEAR at any time to turn off the Bread Proof function.
NOTE
Use rack position 3 for bread proong.
Non-cooking functions
Temperature adjust
The oven temperature has been calibrated at the factory. When rst using the
oven, follow the recommended recipe times and temperatures. If it appears that
the oven is too hot or too cool, you can recalibrate the oven temperature. Before
recalibrating, test a recipe by using a temperature setting that is higher or lower
than recommended. The baking results should help you decide how much of an
adjustment is needed. The oven temperature can be adjusted by ±35 °F (±19 °C).
1. Press the Broil pad and 1 on the
number pad simultaneously for
3 seconds.
2. Press the Broil pad to select a higher(+)
or lower(-) temperature.
3. Enter an adjusting temperature value
(0-35) using the number pad.
4. Press the START/SET pad to save the
changes.
NOTE
This adjustment does not affect the broiling
or the self-cleaning temperature, and is
retained in memory after a power failure.
34 English
NX7000K_VE_NX58M6850SS_AA_DG68-00909A-03_EN+MES+CFR.indb 34 1/30/2018 1:04:20 PM
Page 35
03
01
02
03
01
02
03
01
02
Temp. Unit (°F / °C)
03
01
02
03
01
02
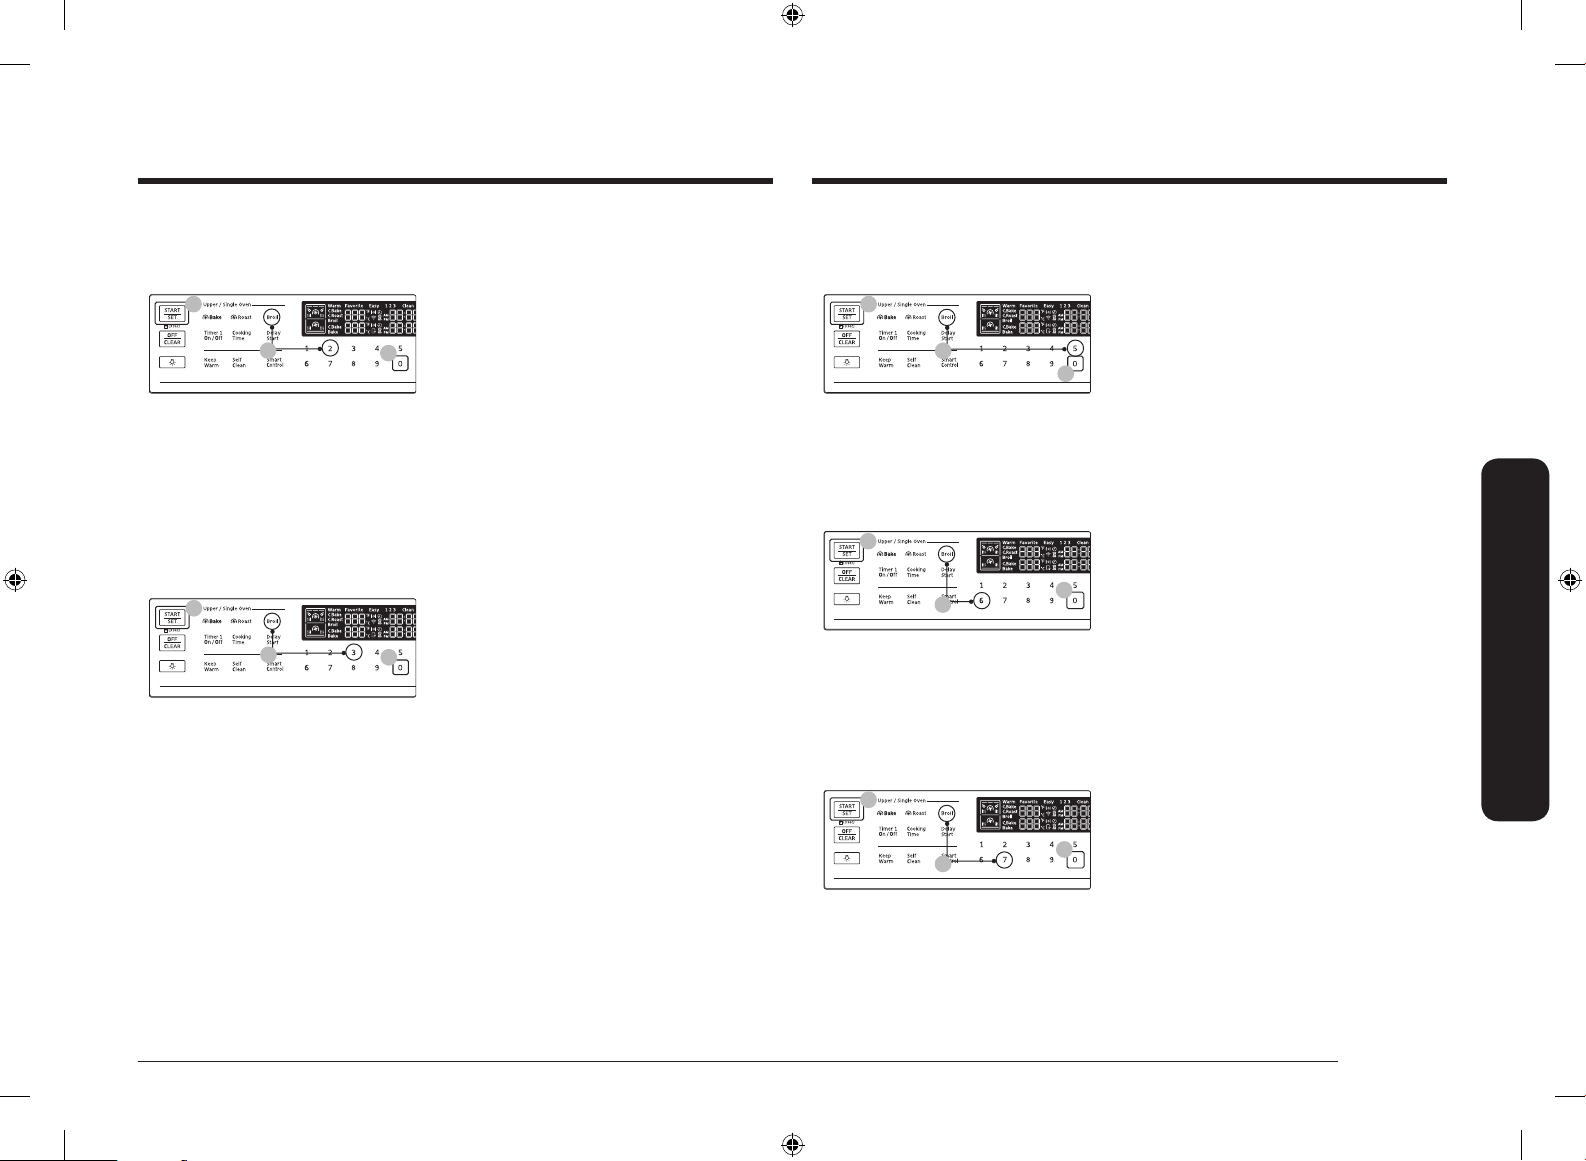
Change the temperature format of the oven to Fahrenheit or Centigrade. The
default is Fahrenheit.
1. Press the Broil pad and 2 on the
number pad simultaneously for
3 seconds.
2. Press 0 on the number pad to select
Fahrenheit or Centigrade.
3. Press the START/SET pad to save the
changes.
Energy saving
This will automatically turn off the oven 12 hours after baking starts or 3 hours
after broiling starts.
1. Press the Broil pad and 5 on the
number pad simultaneously for
3 seconds.
2. Press 0 on the number pad to select Off
or On.
3. Press the START/SET pad to save the
changes.
Auto Conversion
Auto Conversion automatically converts regular baking temperatures to convection
baking temperatures. For example, if you enter a regular recipe temperature of
350 °F and press START/SET, the oven displays the converted temperature of
325 °F.
1. Press the Broil pad and 3 on the
number pad simultaneously for 3
seconds.
2. Press 0 on the number pad to select Off
Sound
Mute/unmute the range.
1. Press the Broil pad and 6 on the
number pad simultaneously for
3 seconds.
2. Press 0 on the number pad to select
unmute or mute.
3. Press the START/SET pad to save the
changes.
Gas oven
or On. (Default setting is *OFF.)
3. Press the START/SET pad to save the
changes.
Demo mode
This is used by retailers for display purposes only. In this mode, the heating
element does not operate.
1. Press the Broil pad and 7 on the
number pad simultaneously for
3 seconds.
2. Press 0 on the number pad to select Off
or On.
3. Press the START/SET pad to save the
changes.
English 35
NX7000K_VE_NX58M6850SS_AA_DG68-00909A-03_EN+MES+CFR.indb 35 1/30/2018 1:04:21 PM
Page 36
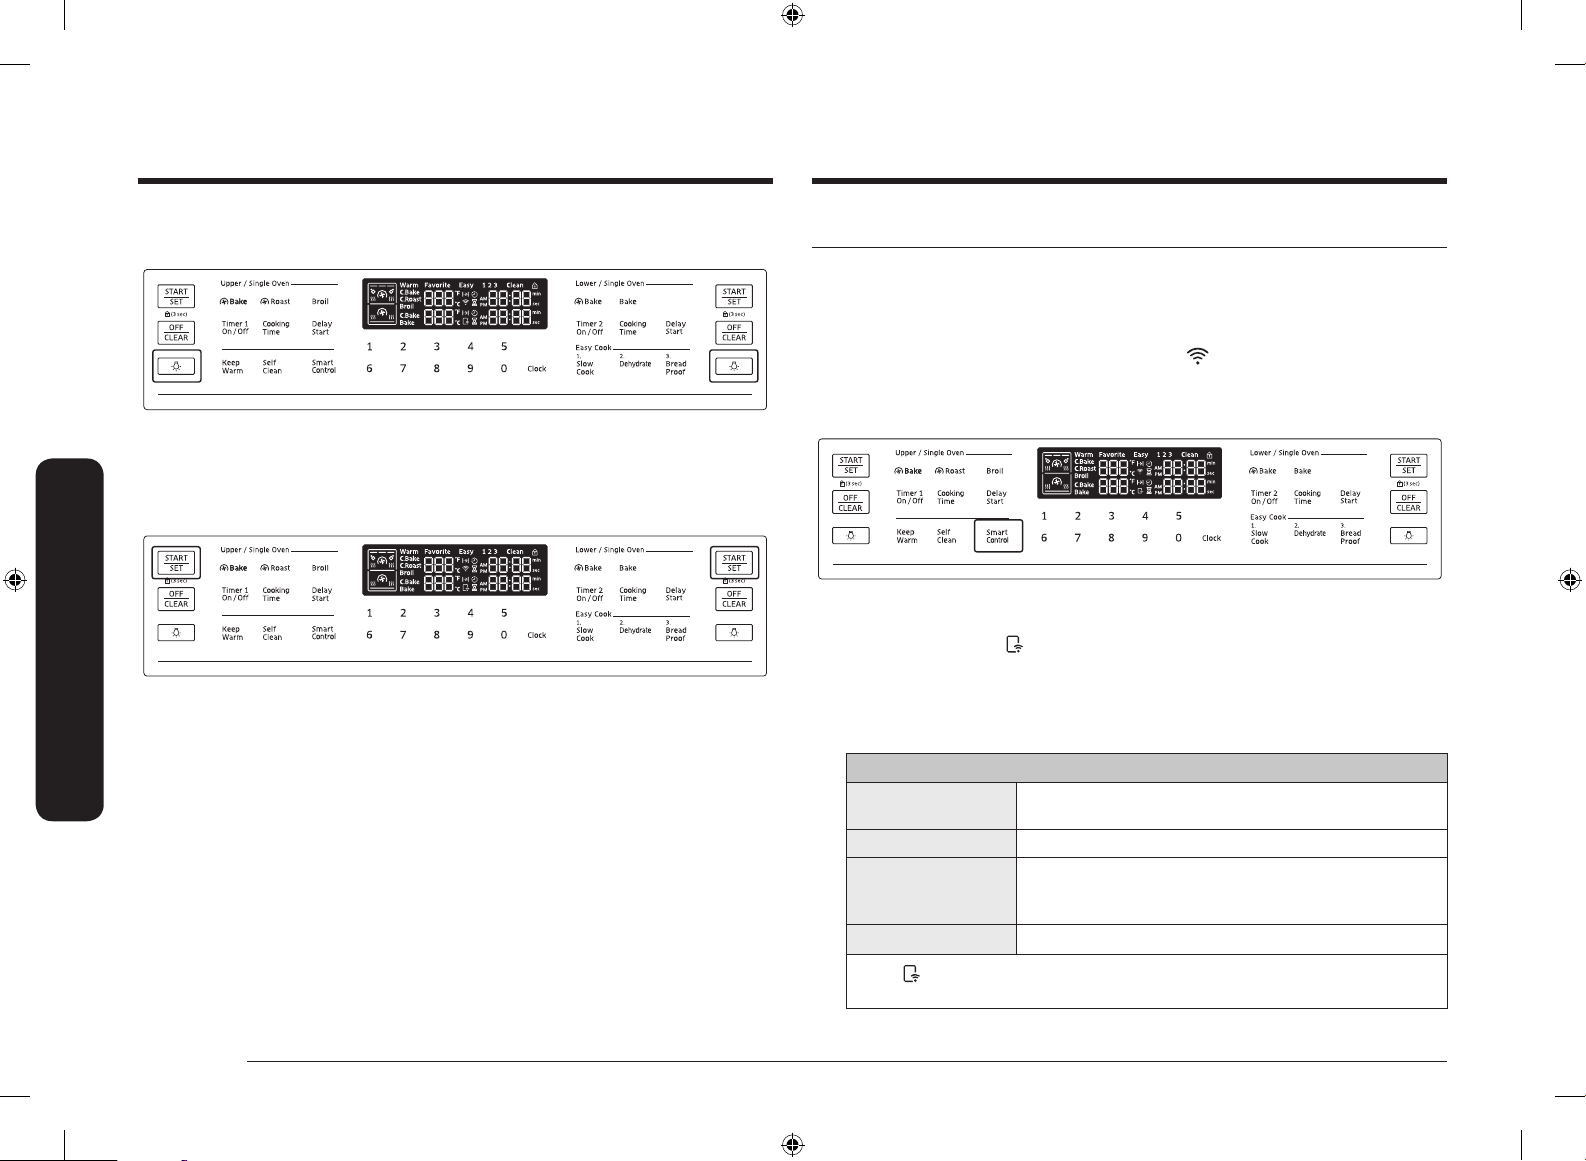
Gas oven
Gas oven
Oven light
Turns the oven light on and off.
Press the Oven Light pad to turn the oven light on and off.
Oven lock
Lock the control panel and the door to prevent accidental operations and/or
product tipping.
Press and hold the START/SET pad for 3 seconds to lock or unlock
both the control panel and the door. When the range lock is on, the range panel
does not operate and the range door is locked and cannot be opened.
Smart Control - Controlling your oven remotely
How to connect the oven
1. Download and open the SmartThings app on your smart device.
2. Follow the app’s on-screen instructions to connect your range.
3. Once the process is complete, the connected
displays and the app conrms you are connected.
4. If the connection icon does not turn on, follow the instruction in the app to
reconnect.
To control the oven remotely
1. Press Smart Control.
appears in the display. The oven can now be controlled
remotely using a connected remote device.
2. Select the oven icon in the SmartThings app to open the Oven Control app.
When the app is connected to the oven, you can perform the following
functions through the application:
Oven remote control using the SmartThings app
Oven/ Cooktop
Monitoring
Oven Remote Control • Set or adjust oven settings remotely.
My Cooking
Error Check • Automatically recognize errors.
• Check the status of the oven
• Monitor the on/off status of each cooktop burner.
• Turn the oven off remotely.
• Once cooking starts, change the set cooking time or
temperature remotely.
icon located on your range
• If
is not shown in the display, you are still able to monitor the oven and
cooktop status and turn the oven off.
36 English
NX7000K_VE_NX58M6850SS_AA_DG68-00909A-03_EN+MES+CFR.indb 36 1/30/2018 1:04:22 PM
Page 37
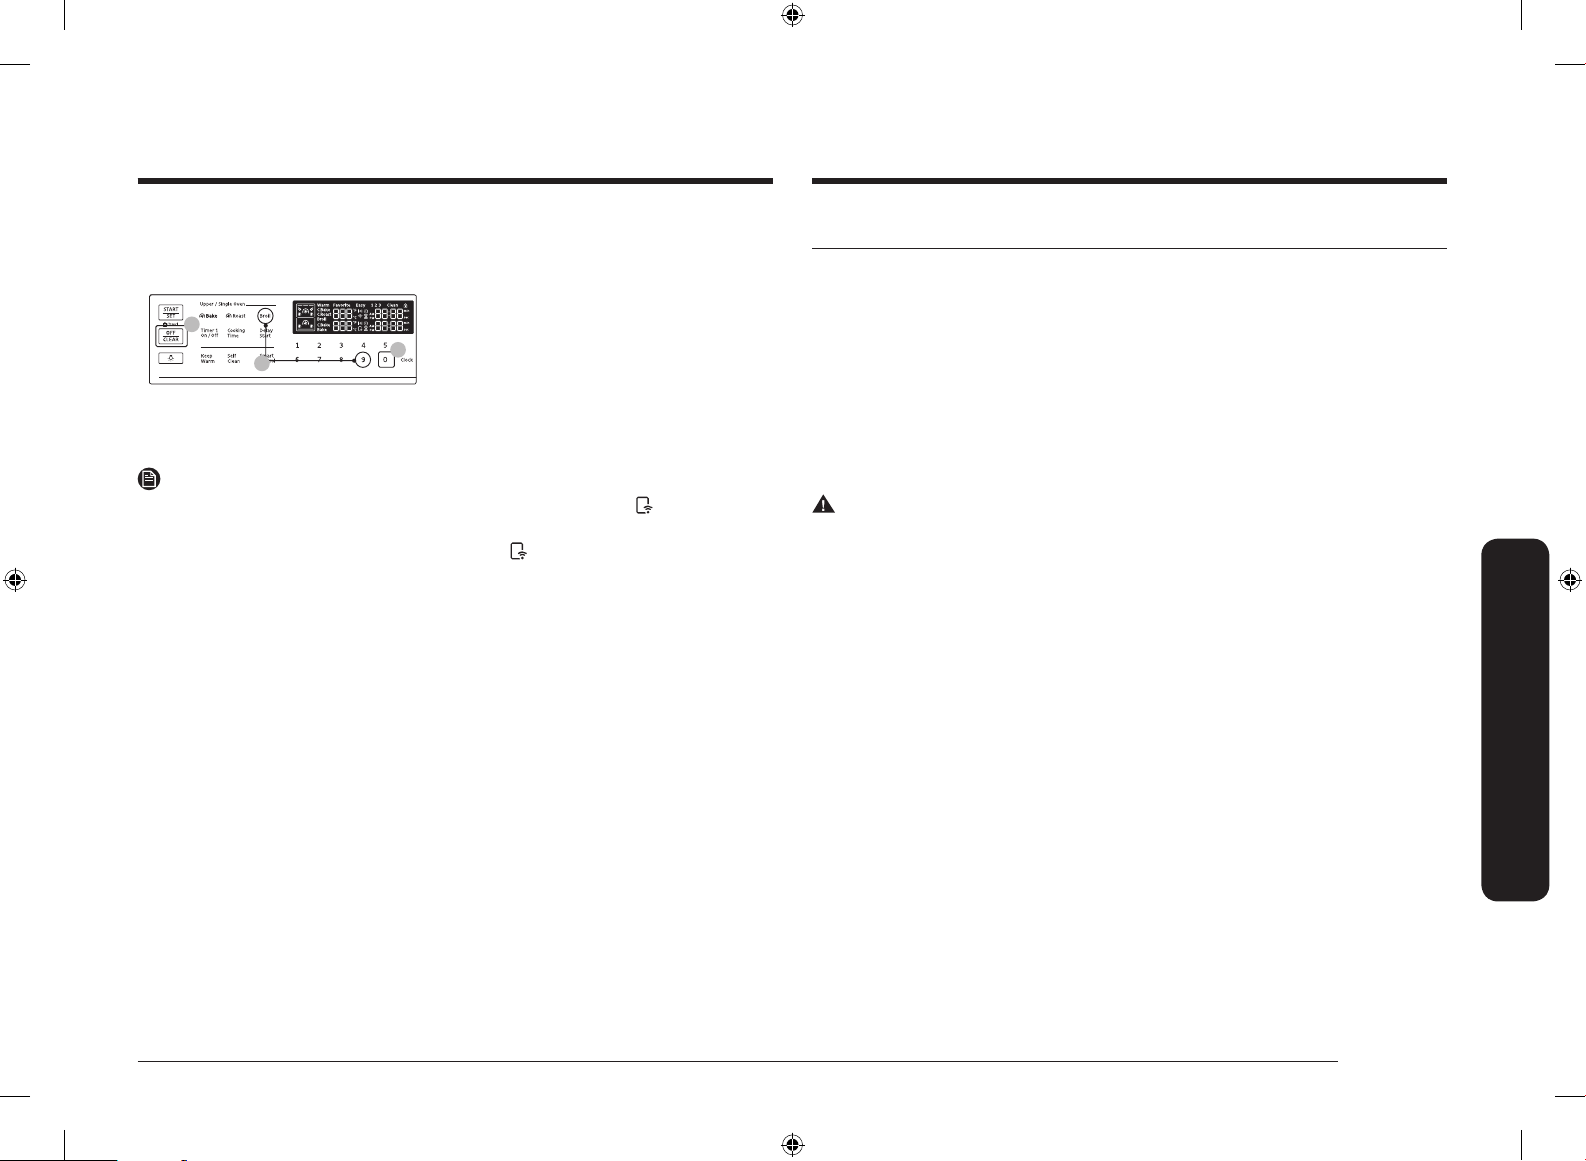
Gas oven Maintenance
03
01
02
WI-FI On/Off
If you activate the WI-FI Off mode, any mobile devices cannot connect to the
range.
1. Press the Broil pad and 9 on the
number pad simultaneously for 3
seconds.
2. Press 0 on the number pad to select Off
or On.
3. Press the START/SET pad to save the
changes.
NOTE
• Opening the oven door or pressing Smart Control will delete
from the
display and prevent most of the remote functions from operating.
• When oven cooking is nished or cancelled,
is removed from the display.
• For safety reasons, you cannot turn on the gas oven remotely.
• For safety reasons, you must specify the cooking time to enable remote
control.
• The oven continues operating even if the Wi-Fi connection is lost.
• Smart Control will not work properly if the Wi-Fi connection is unstable.
• See the SmartThings app manual for detailed information.
Cleaning
Control panel
First, lock the control panel and the door to prevent accidental operations and/or
product tipping.
1. Press and hold the START/SET pad for 3 seconds to lock both the control panel
and the door.
2. Clean the control panel using a soft cloth dampened with plain water, warm
soapy water, or glass cleaner. Do not spray cleansers directly onto the control
panel.
3. When done, press and hold the START/SET pad again for 3 seconds.
WARNING
• Make sure the control panel turns off and all surfaces of the range are cool
before cleaning. Otherwise, you can get burned.
• If the range has been moved away from the wall, make sure the anti-tip
device is reinstalled properly when the range has been put into place again.
Otherwise, the range may tip over, causing physical injuries.
• Do not use steel-wool or abrasive cleansers of any kind. These can scratch or
damage the surface.
Maintenance
English 37
NX7000K_VE_NX58M6850SS_AA_DG68-00909A-03_EN+MES+CFR.indb 37 1/30/2018 1:04:22 PM
Page 38
Maintenance
*
Stainless steel surface
1. Remove any spills, spots, and grease stains using a soft, wet cloth.
2. Apply an approved stainless steel cleanser to a cloth or paper towel.
3. Clean one small area at a time, rubbing with the grain of the stainless steel if
applicable.
4. When done, dry the surface using a soft, dry cloth.
5. Repeat steps 2 through 4 as many times as necessary.
CAUTION
• Do not use a steel-wool pad or abrasive cleanser on stainless steel surfaces.
They will scratch the surface.
• Do not spray any type of cleanser into the manifold holes. The ignition system
is located in those holes and must be kept free of moisture.
Racks
To keep the racks clean, remove them from the cavity, and soak them in lukewarm,
soapy water. Then, scour impurities off of the racks using a plastic scouring pad.
If the racks do not slide in and out smoothly after you have cleaned them, rub the
side rail guides with wax paper or a cloth containing a few drops of cooking oil.
Maintenance
This will help the racks glide more easily on their tracks.
Door
Do not remove the inner gasket of the oven door for cleaning.
Inner side
• Inner surface: Clean the inner side of the door manually using a soapy plastic
scouring pad, and then wipe with a dry cloth. Take care not to get the gasket
wet or allow moisture into the door.
• Inner glass: The inner glass is cleaned automatically during the self-cleaning
cycle.
Outer side
• Outer surface: Follow the cleaning instructions for stainless steel surfaces in
the previous section.
• Outer glass: Clean the outer glass using a glass cleanser or soapy water. Rinse
and dry thoroughly. Take care not to get the gasket wet or allow moisture into
the door.
CAUTION
• Do not let moisture enter the door or
contact the door gasket (*). Moisture
may reduce the gasket’s performance.
• Do not let moisture or water enter the
burners, electrical controls, or switches.
38 English
NX7000K_VE_NX58M6850SS_AA_DG68-00909A-03_EN+MES+CFR.indb 38 1/30/2018 1:04:23 PM
Page 39
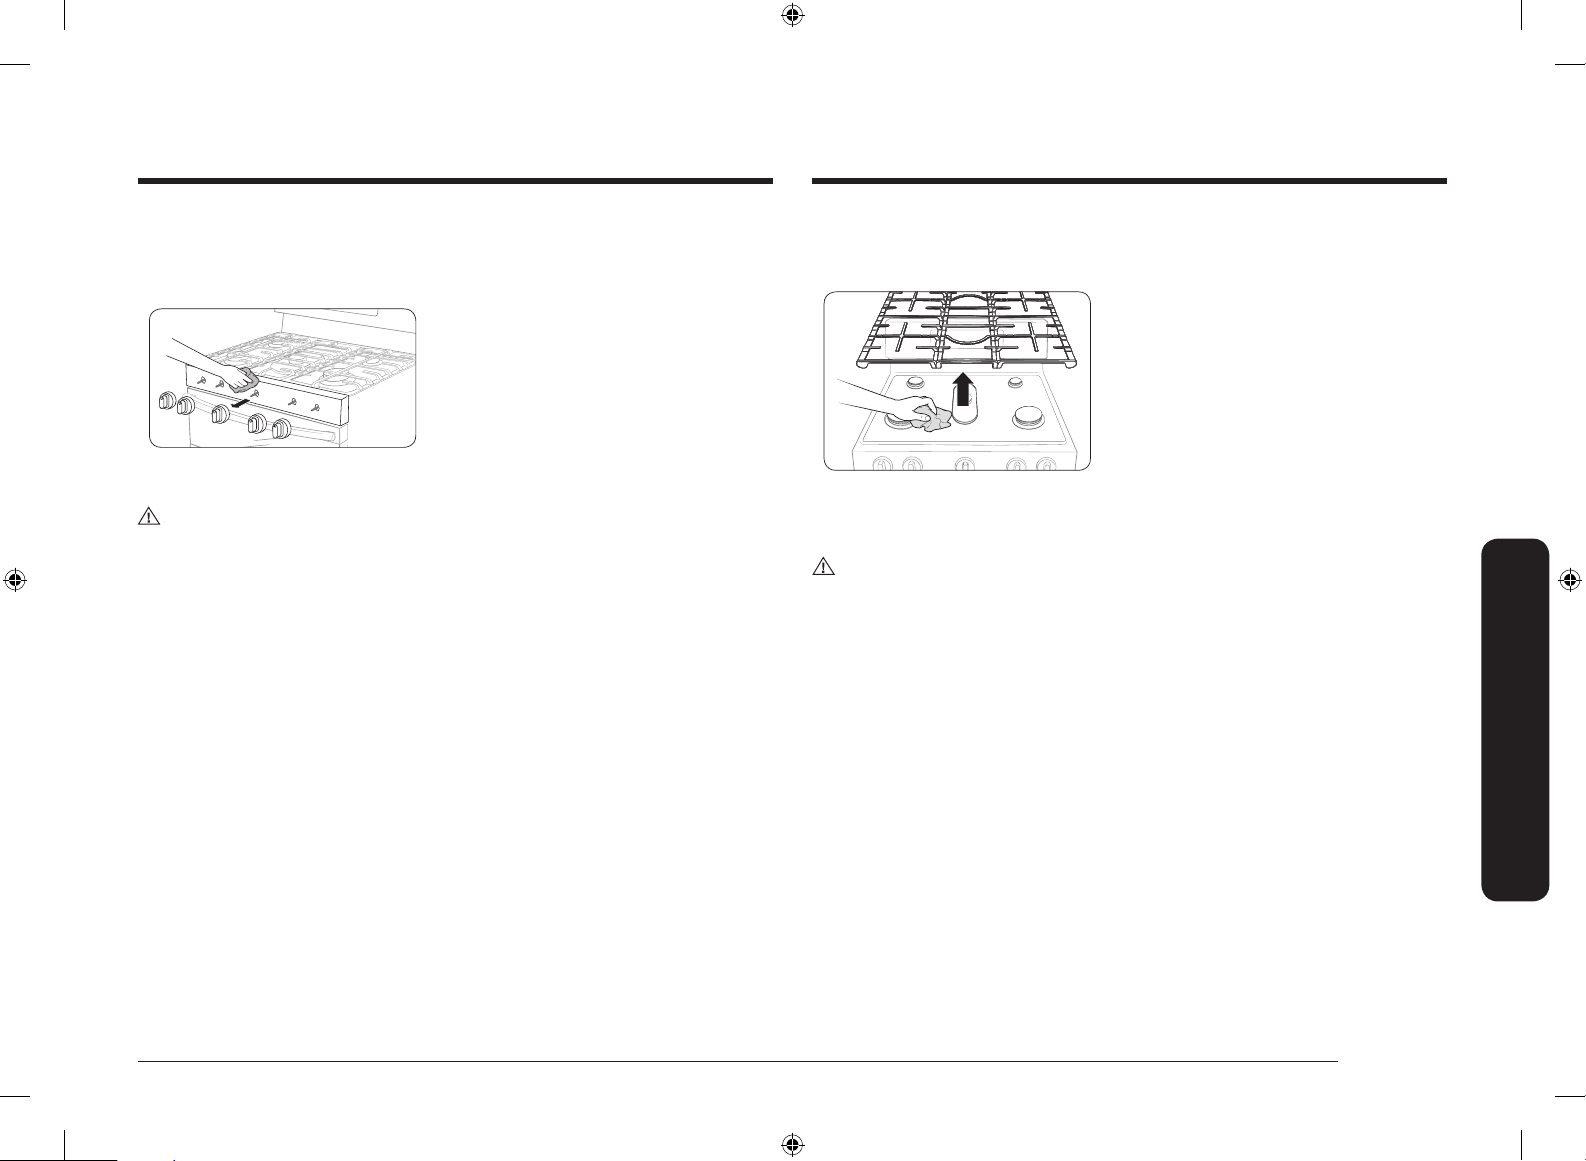
Surface burners
Burner controls
Make sure all surface burner knobs are in the OFF position.
1. Pull the knobs off the control valve
stems as shown.
2. Clean the knobs in warm, soapy water.
Then, rinse and dry them thoroughly.
3. Clean the stainless steel surfaces using
stainless steel cleaner.
4. Push the knobs back onto the control
valve stems.
CAUTION
• Do not clean the control knobs in a dish washer.
• Do not spray cleansers directly onto the control panel. Moisture entering the
electric circuits may cause electric shock or product damage.
Cooktop surface
The porcelain-enameled cooktop surface needs to be kept clean. We recommend
that you remove food spills immediately after they take place.
1. Turn off all surface burners.
2. Wait until all burner grates cool down,
and then remove them.
3. Clean the cooktop surface using a soft
cloth. If food spills run into the gaps
of the burner components, remove the
burner cap and the head, and then wipe
up the spills.
4. When cleaning is nished, re-install the
burner components, and then put the
burner grates into position.
CAUTION
• Do not use a steel-wool pad or abrasive cleaner, which can scratch or damage
the enamel surface.
• Do not remove the cooktop surface to clean it. The gas lines leading to the
burner manifolds can be damaged, resulting in a re or system failure.
Maintenance
English 39
NX7000K_VE_NX58M6850SS_AA_DG68-00909A-03_EN+MES+CFR.indb 39 1/30/2018 1:04:24 PM
Page 40
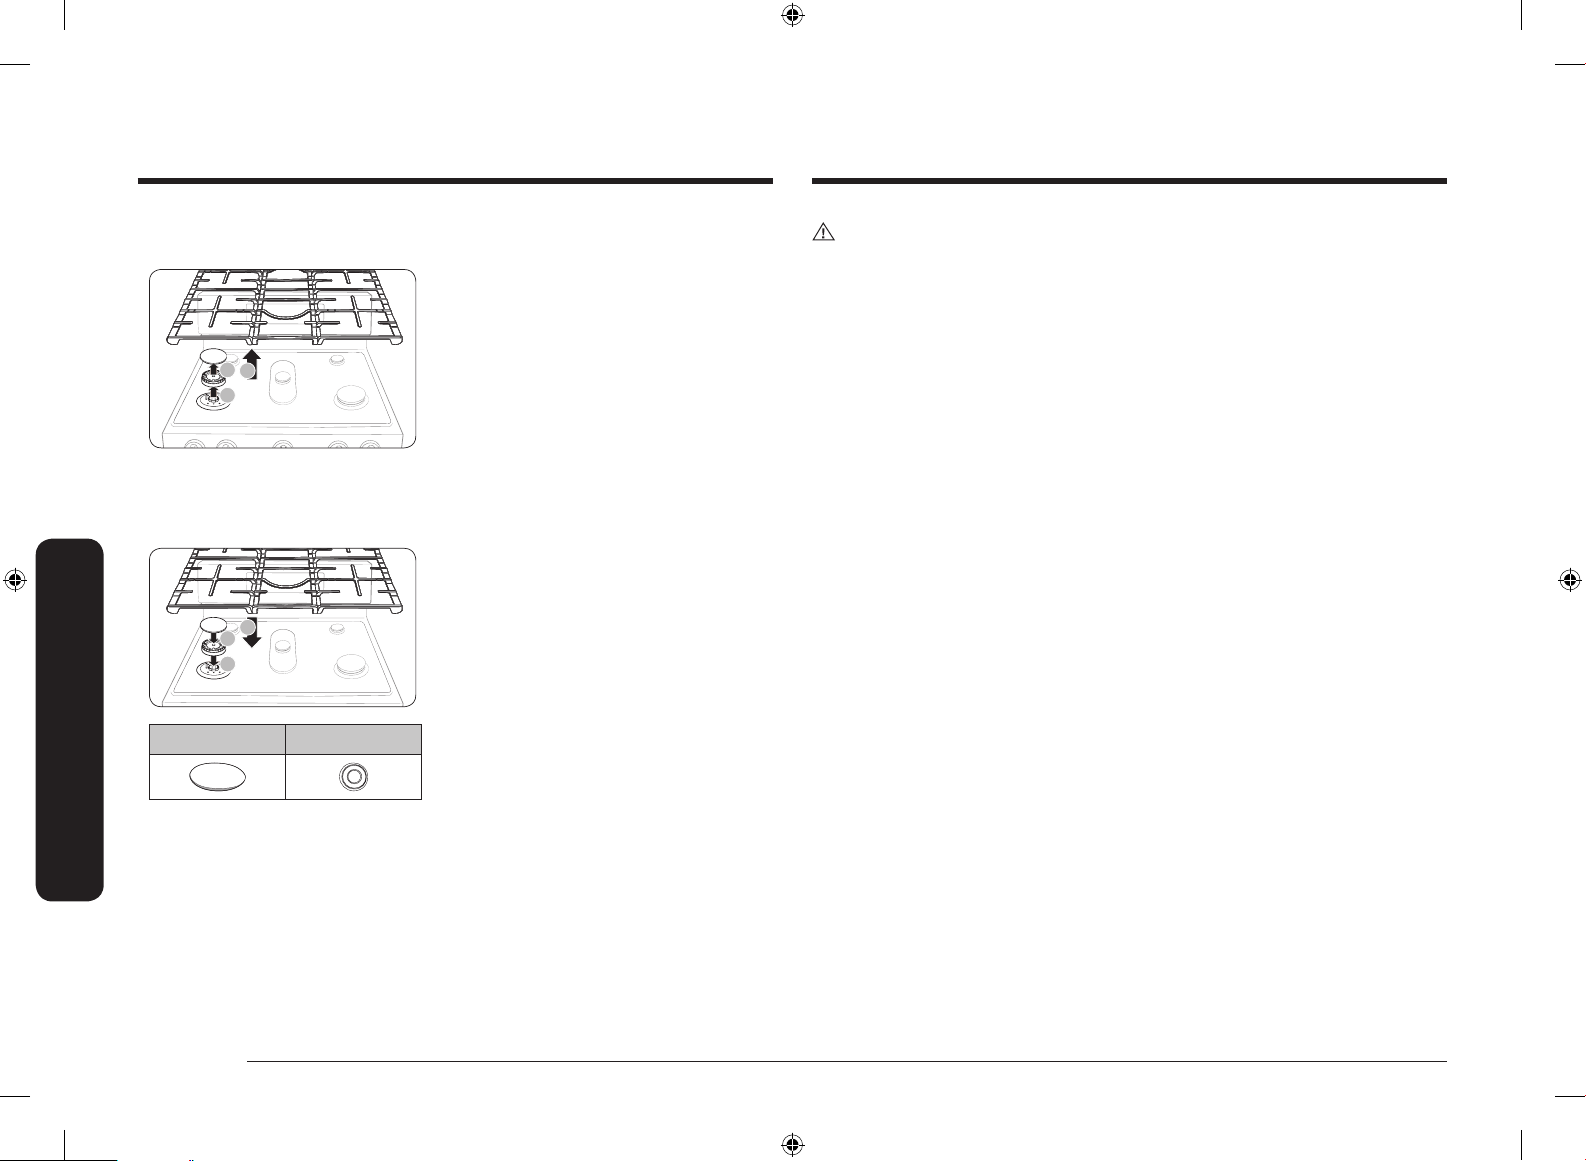
Maintenance
1
3
2
7
8
6
Burner grates and components
Turn off all surface burners, and make sure they have all cooled down.
1. Remove the burner grates.
2. Remove the burner caps from the
burner heads.
3. Remove the burner heads from the
valve manifolds to reveal the starter
CAUTION
• The starter electrodes are not removable. Do not attempt to remove them by
force.
• Make sure all burner components (heads and caps) are reinstalled properly.
When installed properly, they are stable and rest at.
• To avoid chipping, do not bang grates and caps against each other or hard
surfaces such as cast iron cookware.
electrodes.
4. Clean all removable grates and burner
components in warm, soapy water. Do
not use steel-wool pads or abrasive
cleaners.
5. Rinse and dry grates and burner
components thoroughly.
6. Return the burner heads to their
positions on top of the manifold
valves. Make sure a starter electrode
is inserted through the hole in each
burner head.
Maintenance
7. Return the burner caps to their
positions on top of burner heads. To
ensure proper and safe operation, make
Top Bottom
sure the burner caps lie at on top of
the burner heads.
8. Re-install the burner grates in their
respective positions.
9. Turn on each burner and check if it
operates properly. After verifying that
a burner operates normally, turn it off.
40 English
NX7000K_VE_NX58M6850SS_AA_DG68-00909A-03_EN+MES+CFR.indb 40 1/30/2018 1:04:25 PM
Page 41
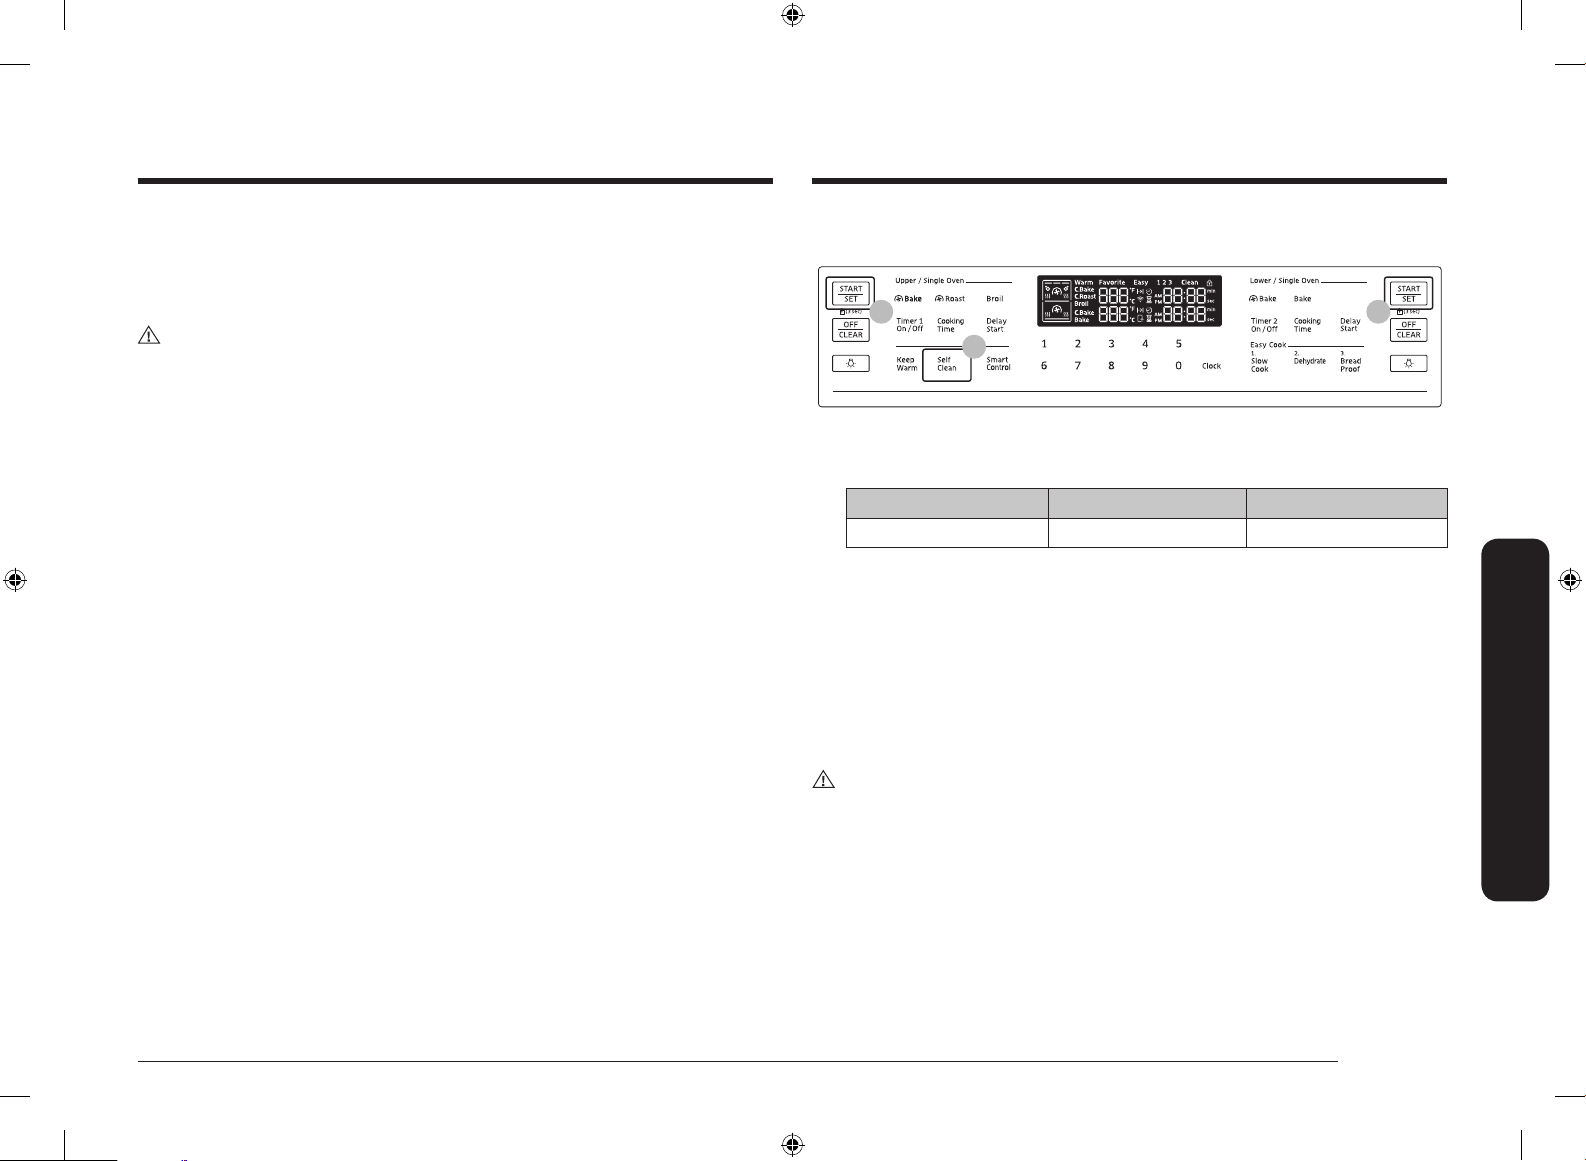
Self-cleaning (Single mode only)
This self-cleaning oven uses high temperatures (well above cooking temperatures)
to burn off leftover grease and residue completely or reduce them to a nely
powdered ash that you can wipe away with a damp cloth.
CAUTION
• Do not leave small children unattended near the range during the selfcleaning cycle. The outside surfaces of the range can get extremely hot.
• Some birds are extremely sensitive to fumes from a self-cleaning gas oven.
Relocate birds to a well-ventilated room away from the range.
• Do not line the oven, oven racks, or oven bottom with aluminum foil. Doing
so will result in poor heat distribution, produce poor baking results, and cause
permanent damage to the oven interior. The aluminum foil will melt onto and
adhere to the interior oven surfaces.
• Do not force the oven door open during the self-cleaning cycle. This will
damage the automatic door-locking system. The door automatically locks
when the self-cleaning cycle is started and stays locked until the cycle is
cancelled and the oven temperature is below 392 °F.
• Use caution when opening the oven door after the self-cleaning cycle. The
gas oven will still be VERY HOT and hot air and steam might escape when the
door is open.
• Wipe off any excess spillage before using the self-cleaning operation.
• Do not use oven cleaners. Commercial oven cleaners or oven liners should
NEVER be used in or around any part of the oven. Residue from oven cleaners
will damage the inside of the oven during a self-cleaning operation.
How to run a self-cleaning cycle
Make sure the door lock is released. Remove all racks from the oven cavity.
03 03
02
1. Make sure the oven door is unlocked and closed completely.
2. Press the Self Clean pad once. Then, select the cleaning time by pressing the
Self Clean pad one or more times in accordance with the table below.
Once Twice Three times
3 hour 5 hour 2 hour
3. Press the START/SET pad. The oven door is locked and the oven begins to heat
up.
4. When the cycle is complete, the oven beeps 6 times. The door will remain
locked and the Lock icon will blink until the oven temperature falls below
400 °F (204 °C).
5. When the Lock icon changes to an open lock, you can open the oven door. The
Lock icon changes to an open lock when the oven temperature drops below
400 °F (204 °C).
6. Press the OFF/CLEAR pad to display the time of the day.
CAUTION
Do not use the surface burners while the gas oven is performing a self-cleaning
cycle.
Maintenance
English 41
NX7000K_VE_NX58M6850SS_AA_DG68-00909A-03_EN+MES+CFR.indb 41 1/30/2018 1:04:26 PM
Page 42
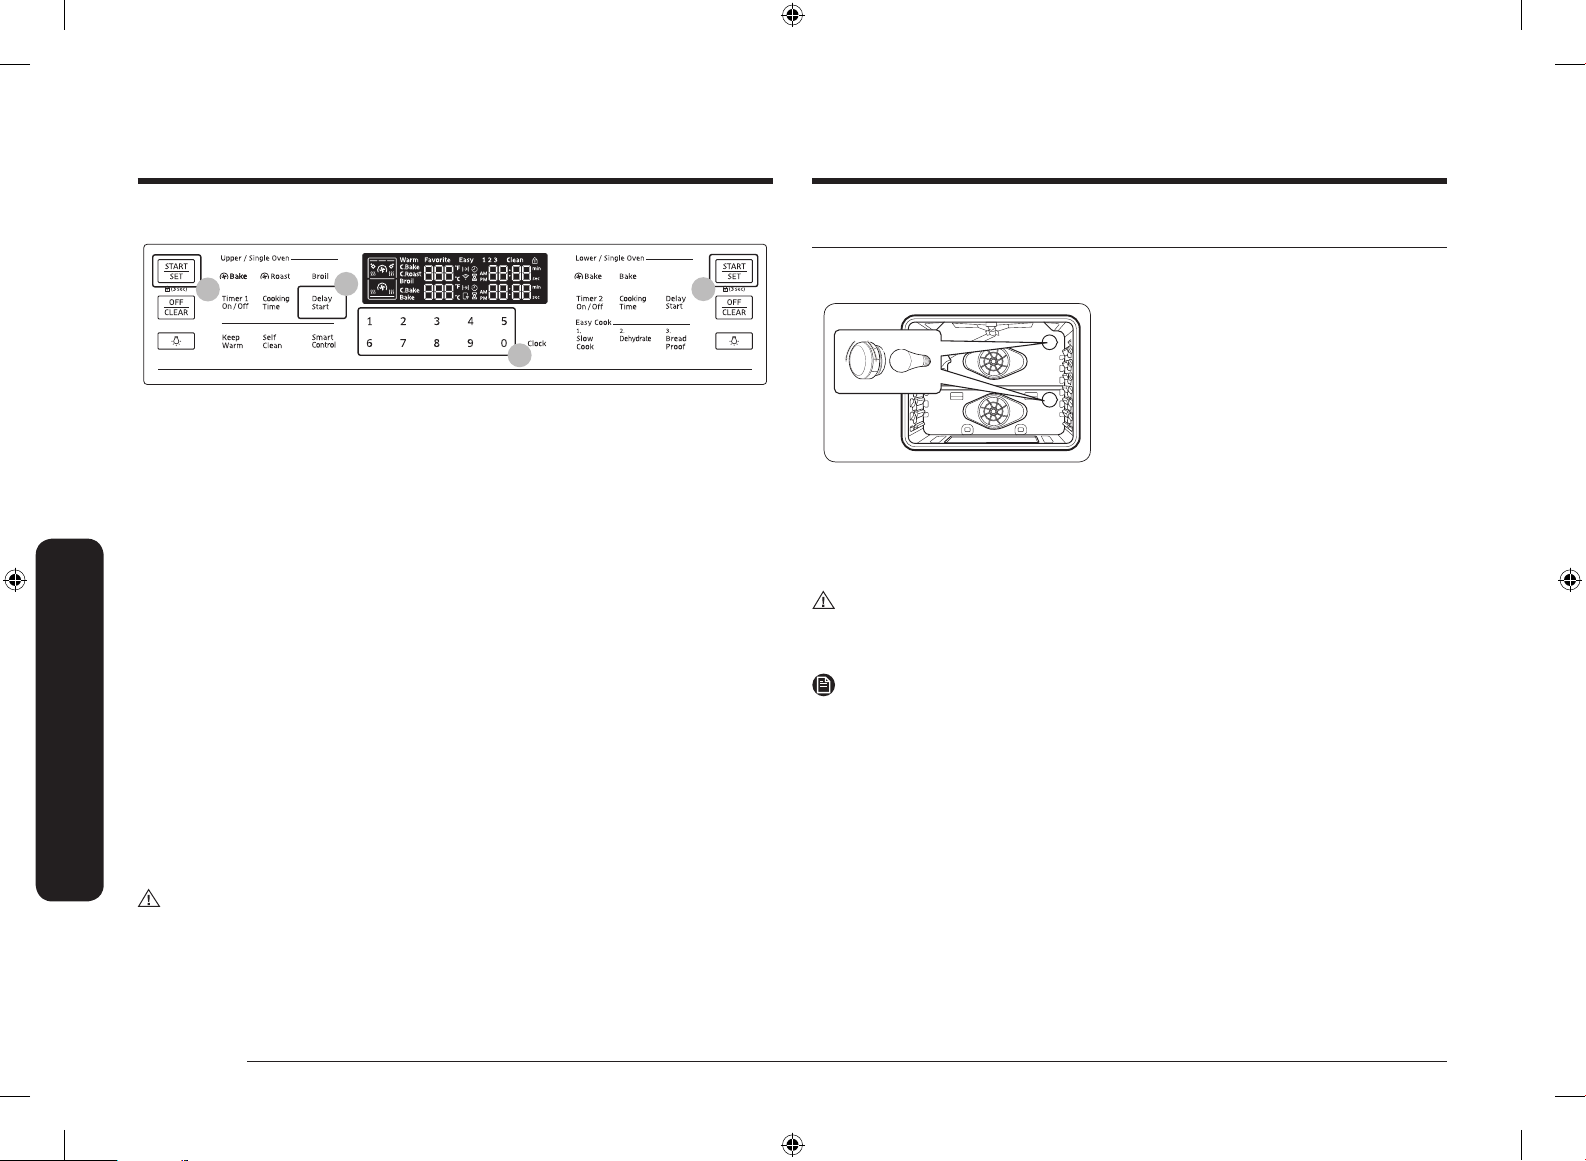
Maintenance
To delay starting the self-cleaning cycle
04
1. Repeat steps 1 and 2 on the previous page.
2. Press the Delay Start pad. The oven door locks.
3. Set the time you want the oven to start self-cleaning using the number pad.
4. Press the START/SET pad. The oven will start self-cleaning at your specied
time.
To cancel the self-cleaning cycle
You may nd it necessary to stop or interrupt a self-cleaning cycle due to smoke
in the oven. To turn off the self-cleaning cycle, press the OFF/CLEAR pad. The
cycle turns off, but the door remains locked and the Lock icon blinks until the oven
temperature falls below 400 °F (204 °C).
After self-cleaning
Maintenance
• The door stays locked until the internal oven temperature falls below 392 °F.
• When the oven has cooled down, wipe the oven surfaces with a cloth to remove
ash residue.
• Stubborn stains can be removed using a steel-wool pad. Lime deposits can be
removed using a vinegar-soaking cloth.
• If you are not satised with the cleaning results, repeat the cycle. "HOT" appears
on the display until the oven cools down. Wait until the message disappears, and
then start a new cycle.
• The cooling fan automatically runs for certain amount of time after self-cleaning.
• Self-cleaning does not operate within 2 hours after running the self-cleaning cycle.
02
03
04
Replacing the Oven Light
The oven light is a standard 40-watt appliance bulb. It comes on when you open
the oven door.
1. Turn off the oven.
2. Make sure the oven and oven light are
cool.
3. Open the door, and remove the glass
cover by turning it counterclockwise.
4. Remove the oven light from the socket
by turning it counterclockwise.
5. Insert a new 40-watt appliance bulb
into the socket, and then turn it
clockwise to tighten.
6. Reinsert the glass cover, and then turn
it clockwise to tighten.
CAUTION
To prevent electric shock, make sure the oven is turned off and cool before
replacing the oven light.
NOTE
• The oven light does not operate during the self-cleaning cycle.
• Remove the racks if they prevent you from accessing the oven light.
CAUTION
Do not attempt to open the oven door immediately after the self-cleaning cycle is
complete. The oven is still very hot when the door unlocks. Escaping hot air and/or
steam could burn you.
42 English
NX7000K_VE_NX58M6850SS_AA_DG68-00909A-03_EN+MES+CFR.indb 42 1/30/2018 1:04:26 PM
Page 43
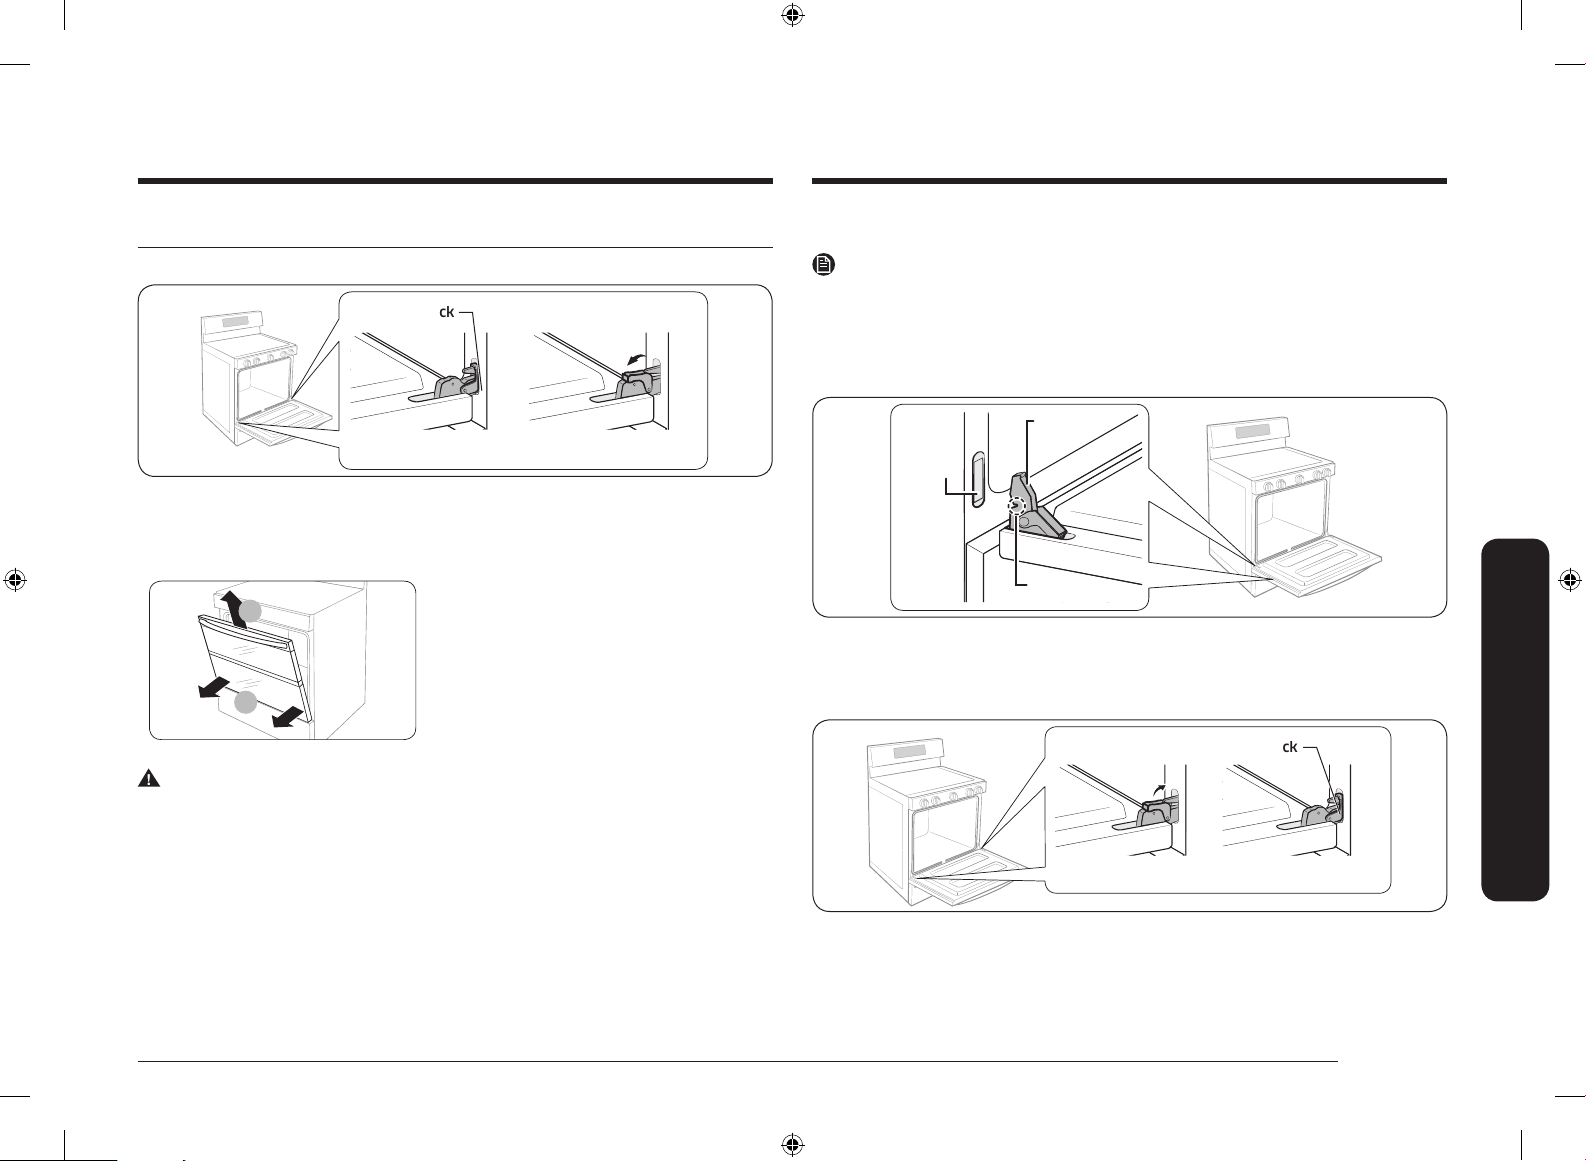
Oven Door: Remove and Re-Install
1
2
To re-install the oven door
To remove the oven door
Hinge lock
Locked position Unlocked position
1. Turn off the oven.
2. Fully open the oven door.
3. Pull the hinge locks away from the oven body and down toward the door
frame into the unlocked position.
4. Close the door to 5 degrees from
vertical. This is the removal position.
5. While holding both sides of the oven
door tightly, lift it up and out until the
hinge arms come clear of the slots at
the bottom of the oven door.
6. Place the door in a safe location.
WARNING
• The door is very heavy. Be careful when removing and lifting the door. Do not
lift the door by the handle.
• Take care when moving the oven door. Improper handling could result in
physical injury.
• To prevent electric shock, make sure the oven is turned off before removing
the oven door.
NOTE
You can re-install the upper door the same way you re-install the full door.
1. Firmly grasp both sides of the door at the top.
2. With the door at the same angle as the removal position, slide the indentation
of the hinge arm into the bottom edge of the hinge slot. The notch in the
hinge arm must be fully inserted into the bottom of the slot.
Bottom
edge of
slot
Hinge arm
Indentation
3. Open the door fully. If the door will not open fully, the indentation is not
inserted correctly in the bottom edge of the slot.
4. Push the hinge locks up against the front frame of the oven cavity into the
locked position.
Hinge lock
Locked positionUnlocked position
5. Close the oven door.
Maintenance
English 43
NX7000K_VE_NX58M6850SS_AA_DG68-00909A-03_EN+MES+CFR.indb 43 1/30/2018 1:04:27 PM
Page 44
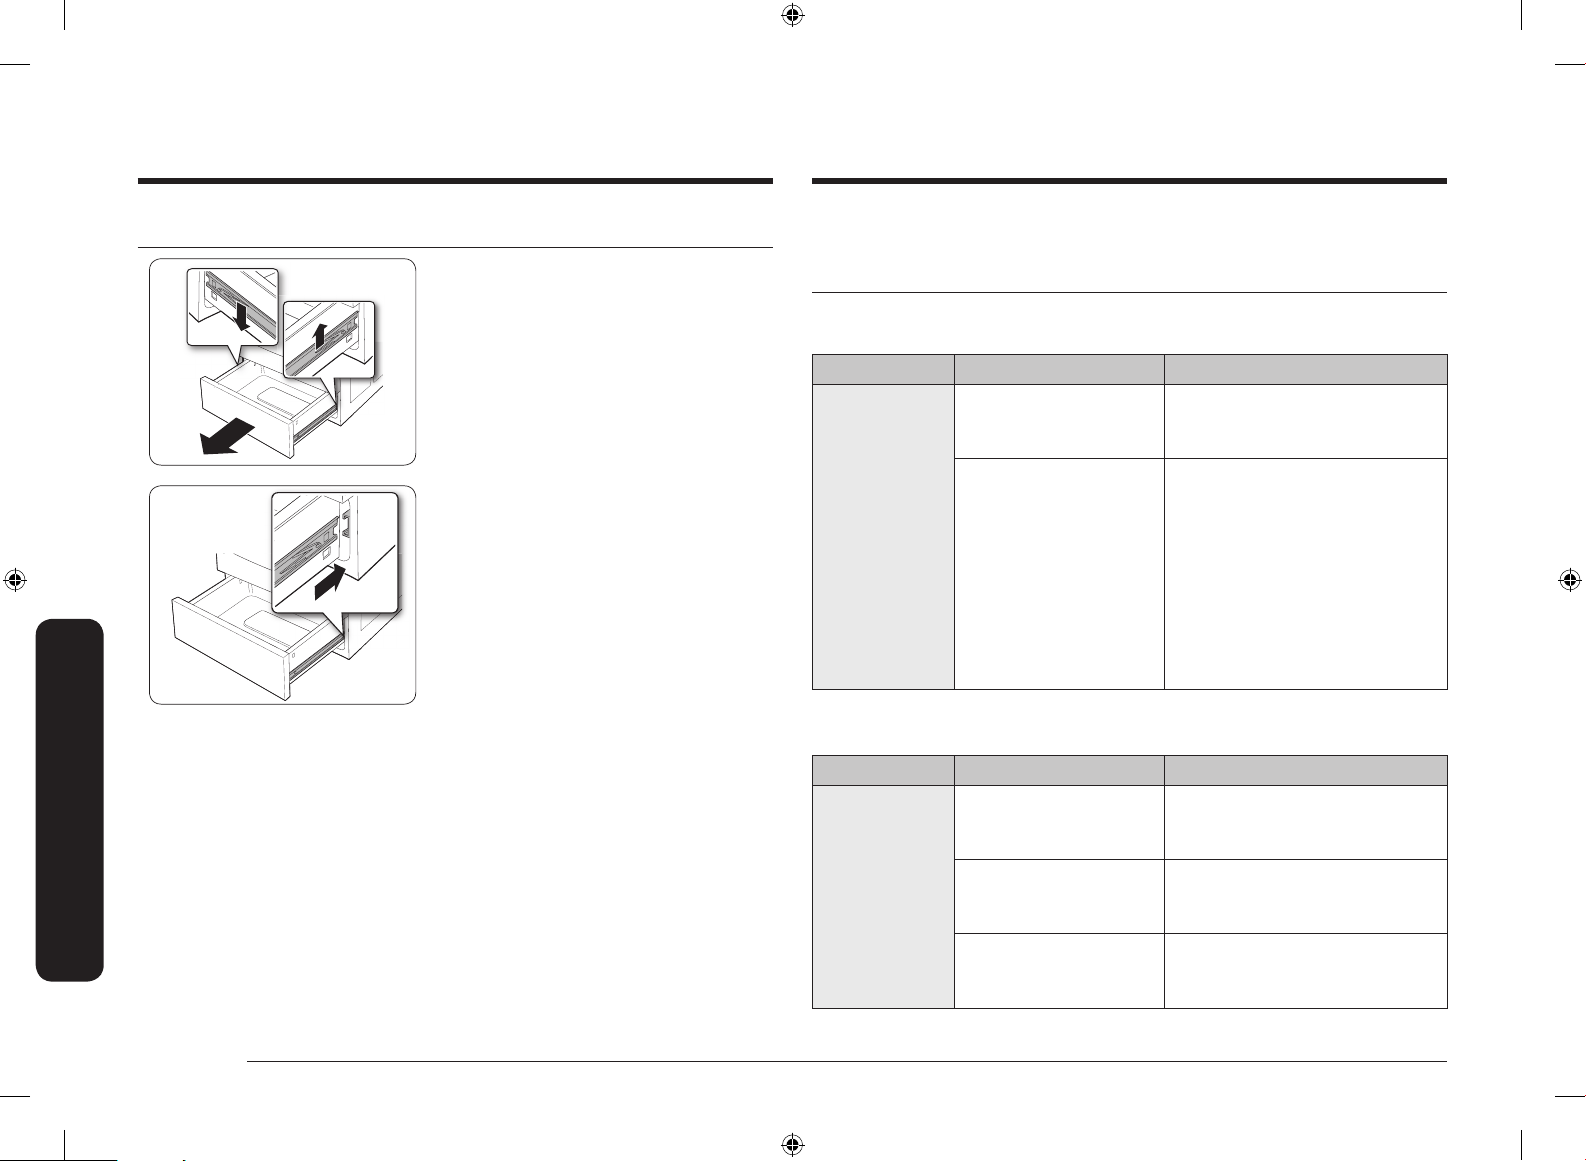
Maintenance Troubleshooting
Troubleshooting
Storage drawer
1. Slide open the drawer until it stops.
2. Locate the roller guide clips on either
side. Using both hands, pull down the
left clip while lifting the right clip, and
then remove the drawer.
3. Clean the drawer in warm, soapy water
using a cloth or soft brush. Then, rinse
and dry it thoroughly.
4. Put the drawer in the roller guides on
either side, and then snap the clips into
place.
If you encounter a problem with the range, check the tables starting below, and
then try the suggested actions.
Checkpoints
Gas safety
Problem Possible cause Action
You smell gas. The surface burner knob
is not in the OFF position
and the burner is not lit.
There is a gas leak. Clear the room, building, or area
Surface burner
Problem Possible cause Action
All burners do
not light.
The power cord is
not plugged into the
electrical outlet.
A fuse in your home may
be blown or the circuit
breaker tripped.
The gas supply is not
properly connected or
turned on.
Turn the burner knob to OFF.
of all occupants.
Immediately call your gas supplier
from a neighbor’s phone. Do
not call from your phone. It is
electrical and could cause a spark
that could ignite the gas. Follow
the gas supplier’s instructions.
If you cannot reach your gas
supplier, call the re department.
Make sure the electrical plug
is plugged into a live, properly
grounded outlet.
Replace the fuse or reset the
circuit breaker.
See the Installation Instructions
that came with your range.
44 English
NX7000K_VE_NX58M6850SS_AA_DG68-00909A-03_EN+MES+CFR.indb 44 1/30/2018 1:04:28 PM
Page 45
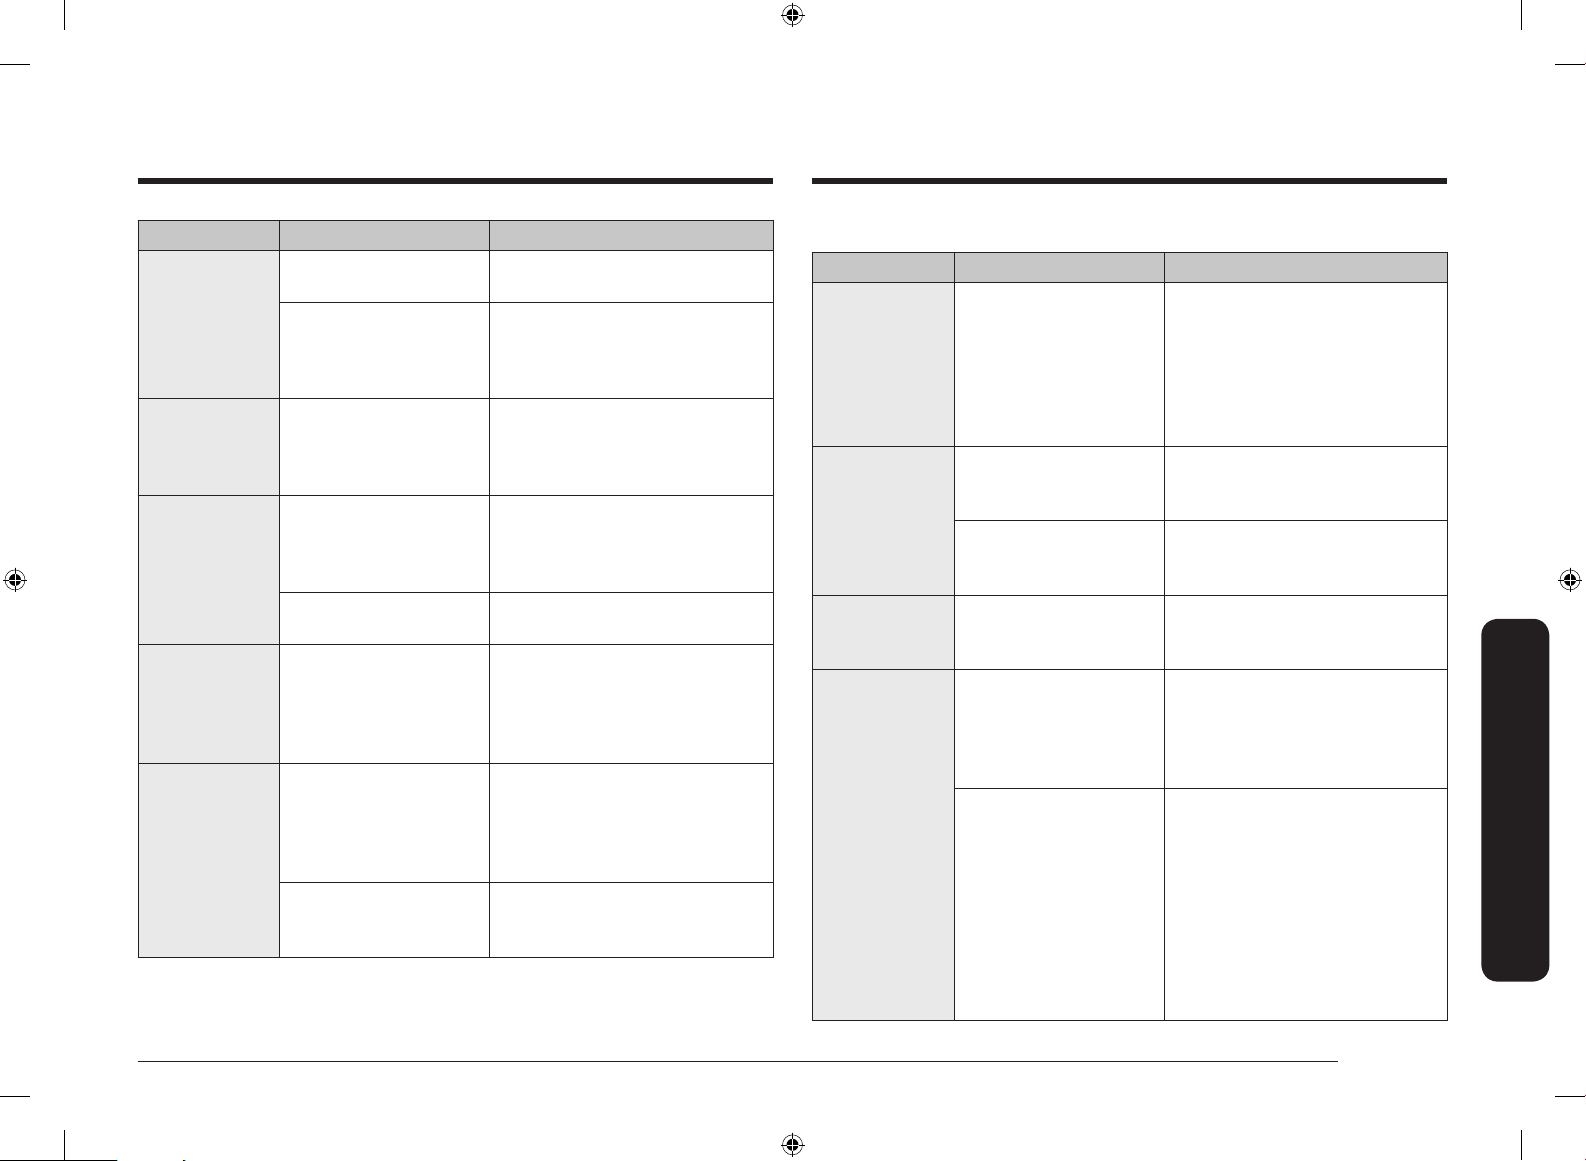
Problem Possible cause Action
The surface
burners do not
light.
A surface
burner
clicks during
operation.
The burners do
not burn evenly.
The control knob is not
set properly.
The burner caps are not
in place.
The burner base is
misaligned.
The control knob has
been left in the LITE
position.
The surface burner
components and caps
Push in the control knob and turn
it to the LITE position.
Clean the electrodes.
Put the burner cap on the burner
head.
Align the burner base.
After the burner lights, turn the
control knob to a desired setting.
If the burner still clicks, contact a
service technician.
See page 40.
are not assembled
correctly and level.
Very large or
yellow surface
burner ames.
The surface burners are
dirty.
The wrong burner orice
is installed.
Clean surface burner components.
(See page 39.)
Check the burner orice size.
Contact your installer if you have
the wrong orice (LP gas instead
of natural gas or natural gas
instead of LP gas).
The surface
burners light
but the oven
burners do not
light.
The oven door lock is
turned on.
The Gas Pressure
The display will show the Lock
icon. Hold the oven door open
and press the START/SET pad for
3 seconds. The oven will beep and
the Lock icon will turn off.
Call a qualied service technician.
Regulator shut off switch
is in the off position.
Oven
Problem Possible cause Action
The oven
control beeps
and displays
an information
code.
There may be a
malfunction. See the
"Information codes" chart
on page <OV>.
Press the OFF/CLEAR pad, and
then restart the oven.
If the problem persists, disconnect
all power to the range for at least
30 seconds and then reconnect
the power. If this does not solve
the problem, call for service.
Very large or
yellow oven
burner ames.
The oven burner air
adjustment shutters
need to be adjusted.
The gas supply is not
properly connected or
Call for a qualied service
technician.
See the Installation Instructions
that came with your range.
turned on.
The oven
temperature is
Oven thermostat needs
adjustment.
See page 34.
too hot or cold.
An oven burner
will not shut off.
The oven door lock is
turned on.
The display will show the Lock
icon. Hold the oven door open
and press the START/SET pad for
3 seconds. The oven will beep and
the Lock icon will turn off.
The Sabbath function
has been activated.
SAb and the time of day will show
in the display. All other controls
and signals will be deactivated. To
turn off the oven only, press the
OFF/CLEAR pad.
To cancel the Sabbath function and
reactivate the controls and signals,
press and hold the Bake and Touch
to Wake-Up pads simultaneously
for 3 seconds.
Troubleshooting
English 45
NX7000K_VE_NX58M6850SS_AA_DG68-00909A-03_EN+MES+CFR.indb 45 1/30/2018 1:04:29 PM
Page 46
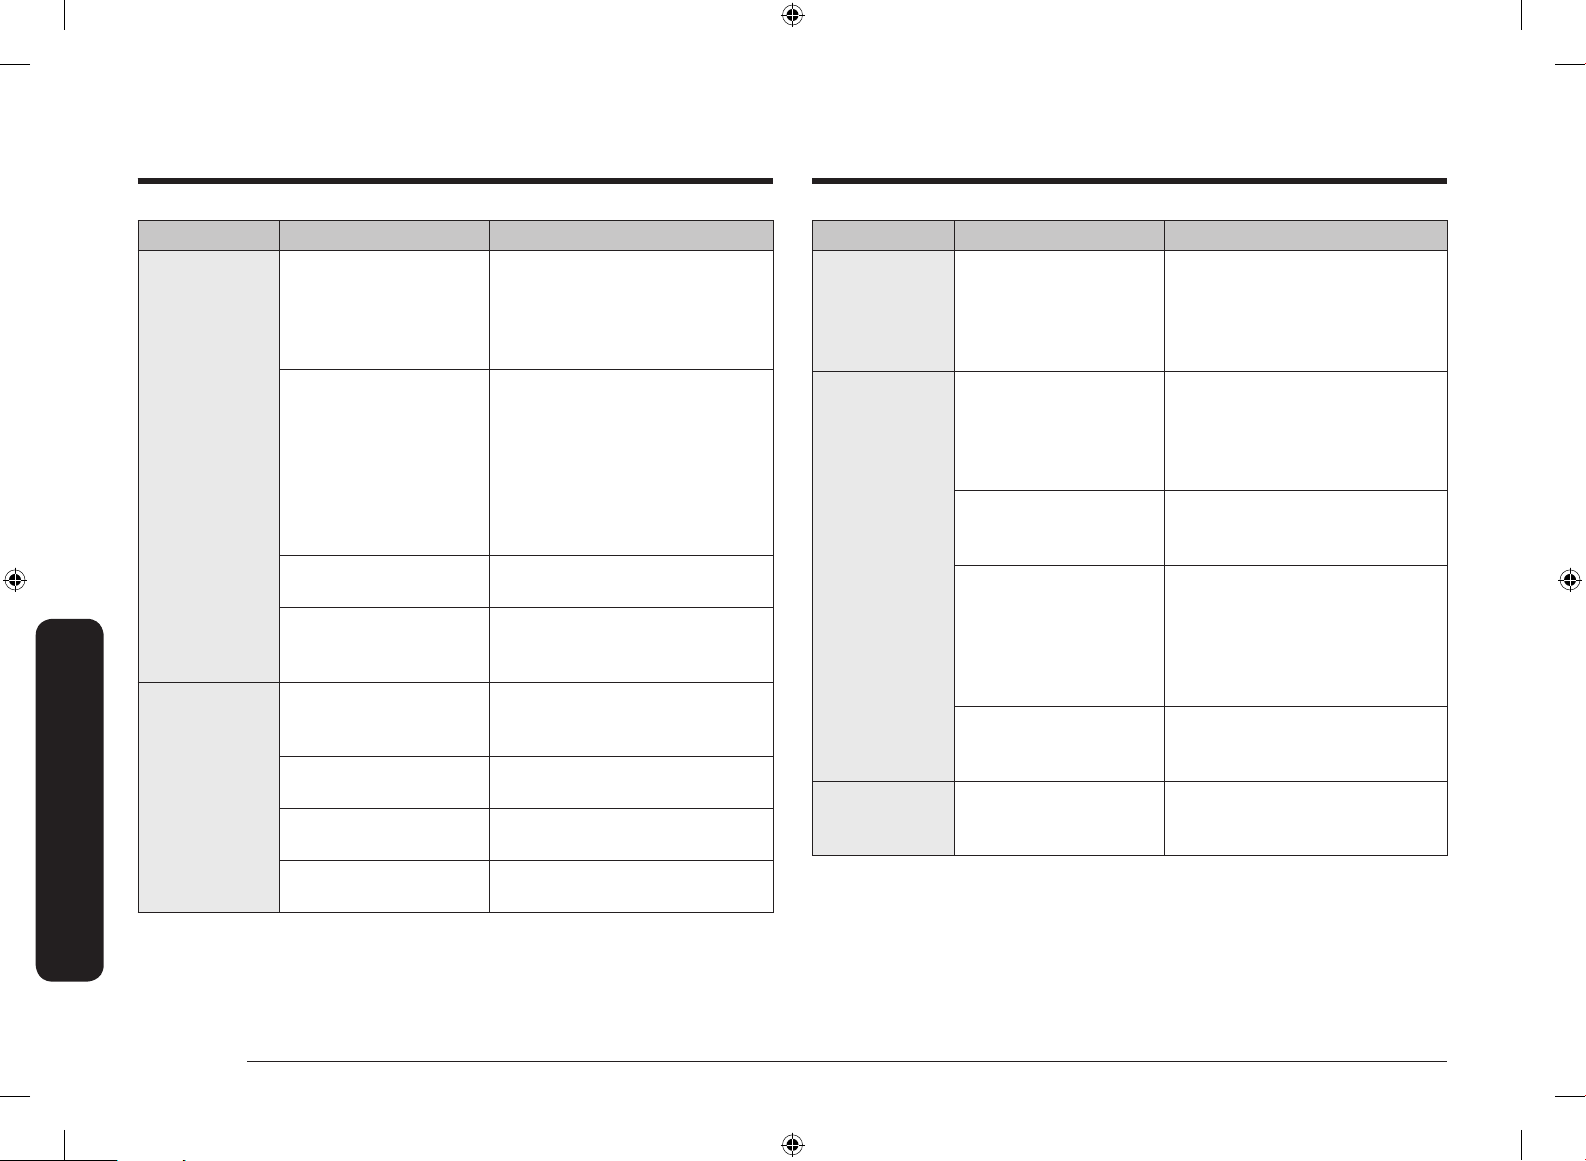
Troubleshooting
Troubleshooting
Problem Possible cause Action
The oven light
(lamp) will not
turn on.
Oven smokes
excessively
during broiling.
The oven door lock is
turned on.
The Sabbath function
has been activated.
A loose or burned-out
bulb.
The switch operating the
oven light needs to be
replaced.
Meat or food was not
properly prepared
before broiling.
An improperly
positioned top oven rack.
The controls are not
being set properly.
Greasy buildup on oven
surfaces.
The display will show the Lock
icon. Hold the oven door open
and press the START/SET pad for
3 seconds. The oven will beep and
the Lock icon will turn off.
SAb and the time of day will show
in the display. All other controls
and signals will be deactivated. To
cancel the Sabbath function and
reactivate the light switch and
other controls, press and hold the
Bake and Touch to Wake-Up pads
simultaneously for 3 seconds.
See page 42.
Call for a qualied service
technician.
Cut away excess fat and/or fatty
edges that may curl.
See broiling guide on page 25.
See page 24.
Regular cleaning is necessary
when broiling frequently.
Problem Possible cause Action
Cooking is
nished, but the
cooling fan is
still running.
Oven will not
self-clean.
Crackling or
popping sound.
the fan automatically
runs for a certain
amount of time to
ventilate inside the oven.
The oven door lock is
turned on.
The Smart Divider is
installed in the oven.
The oven is too hot. Let the oven cool down and reset
The self-cleaning oven
controls are not properly
set.
This is normal. This is the sound of the metal
This is not a product malfunction,
so there is no need to worry.
The display will show the Lock
icon. Hold the oven door open
and press the START/SET pad for
3 seconds. The oven will beep and
the Lock icon will turn off.
Self-clean will not operate with
the Smart Divider installed.
Remove it from the oven.
the controls. The self-clean cycle
will not lock the oven door if the
oven temperature is too hot. The
door must lock before the selfclean cycle can start.
Reset the self-cleaning oven
controls. (See page 41.)
heating and cooling during any
cooking or cleaning function.
46 English
NX7000K_VE_NX58M6850SS_AA_DG68-00909A-03_EN+MES+CFR.indb 46 1/30/2018 1:04:29 PM
Page 47
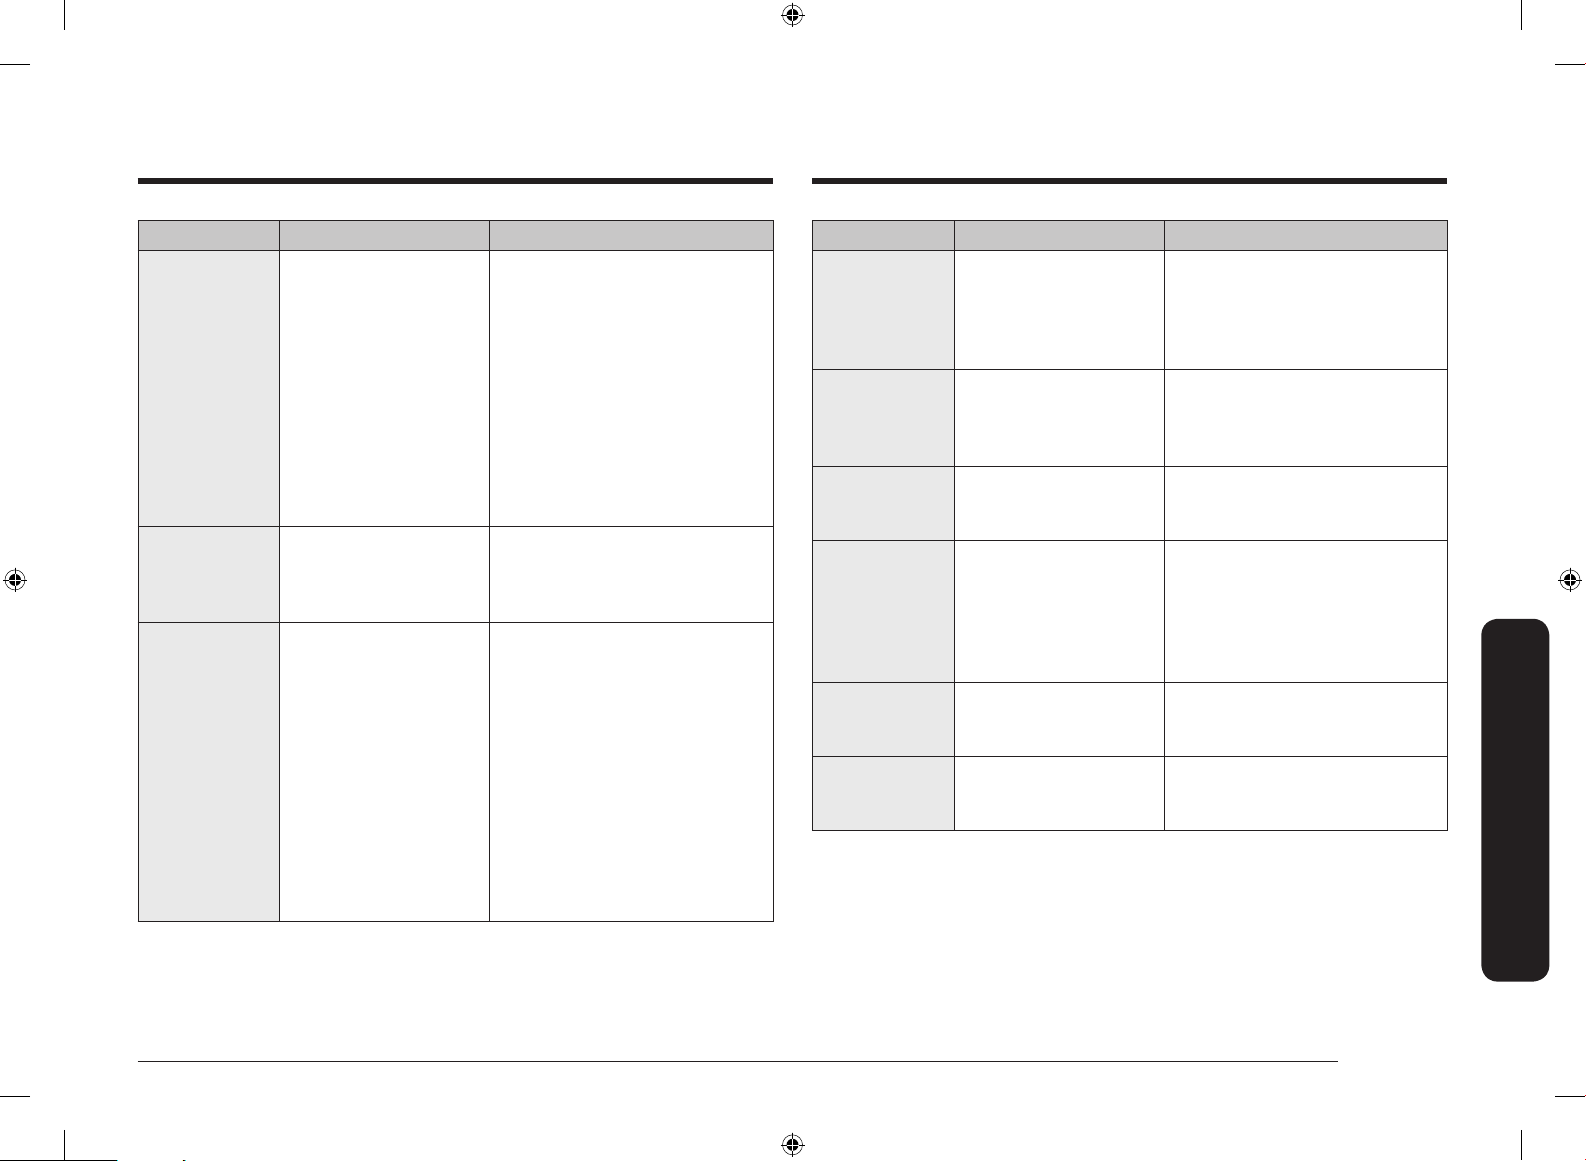
Problem Possible cause Action
Excessive
smoking during
a self-cleaning
cycle.
This is the rst time the
oven has been cleaned.
This is normal. The oven will
always smoke more the rst time
it is cleaned.
Wipe up all excessive soil before
starting the self-cleaning cycle.
If smoke persists, press the OFF/
CLEAR pad. Open the windows to
clear the smoke from the room.
After the oven has cooled and
unlocked, wipe up excessive soil
and reset the oven for self-
cleaning.
The oven door
will not open
after a self-
This is normal. The oven door will stay locked
until the oven temperature drops
below 392 °F.
cleaning cycle.
The oven is not
clean after a
self-cleaning
cycle.
A ne dust or ash is
normal.
This can be wiped clean with a
damp cloth.
Set the self-cleaning cycle for a
longer cleaning time.
The cycle was not long enough to
burn off the dirt buildup.
Extremely dirty ovens require
hand-cleaning of excessive
spillovers and food buildup before
you start a self-cleaning cycle.
Multiple self-cleaning cycles may
be necessary to completely clean
the oven.
Problem Possible cause Action
Steam or smoke
coming from
under the
control panel.
This is normal. The oven vent is located there.
More steam is visible when you
use the convection functions or
when baking or roasting multiple
items at the same time.
A burning
or oily odor
coming from
the vent.
This is normal for a new
oven and will disappear
within 1/2 hour of the
rst bake cycle.
To speed the process, set a selfcleaning cycle for a minimum of
3 hours. (See page 41.)
A strong odor. This is temporary. The insulation around the inside
of the oven emits an odor the rst
few times the oven is used.
Oven racks are
difcult to slide.
This is normal. Apply a small amount of vegetable
oil to a paper towel and wipe the
edges of the oven racks with the
paper towel. Racks become dull
and hard to slide if they are left in
the oven during a self-clean cycle.
Fan noise. This is normal. The convection fan runs until the
function is over or the door is
opened.
The convection
fan is not
working.
This is normal. The fan starts automatically when
the oven reaches the preheat
temperature.
Troubleshooting
English 47
NX7000K_VE_NX58M6850SS_AA_DG68-00909A-03_EN+MES+CFR.indb 47 1/30/2018 1:04:29 PM
Page 48
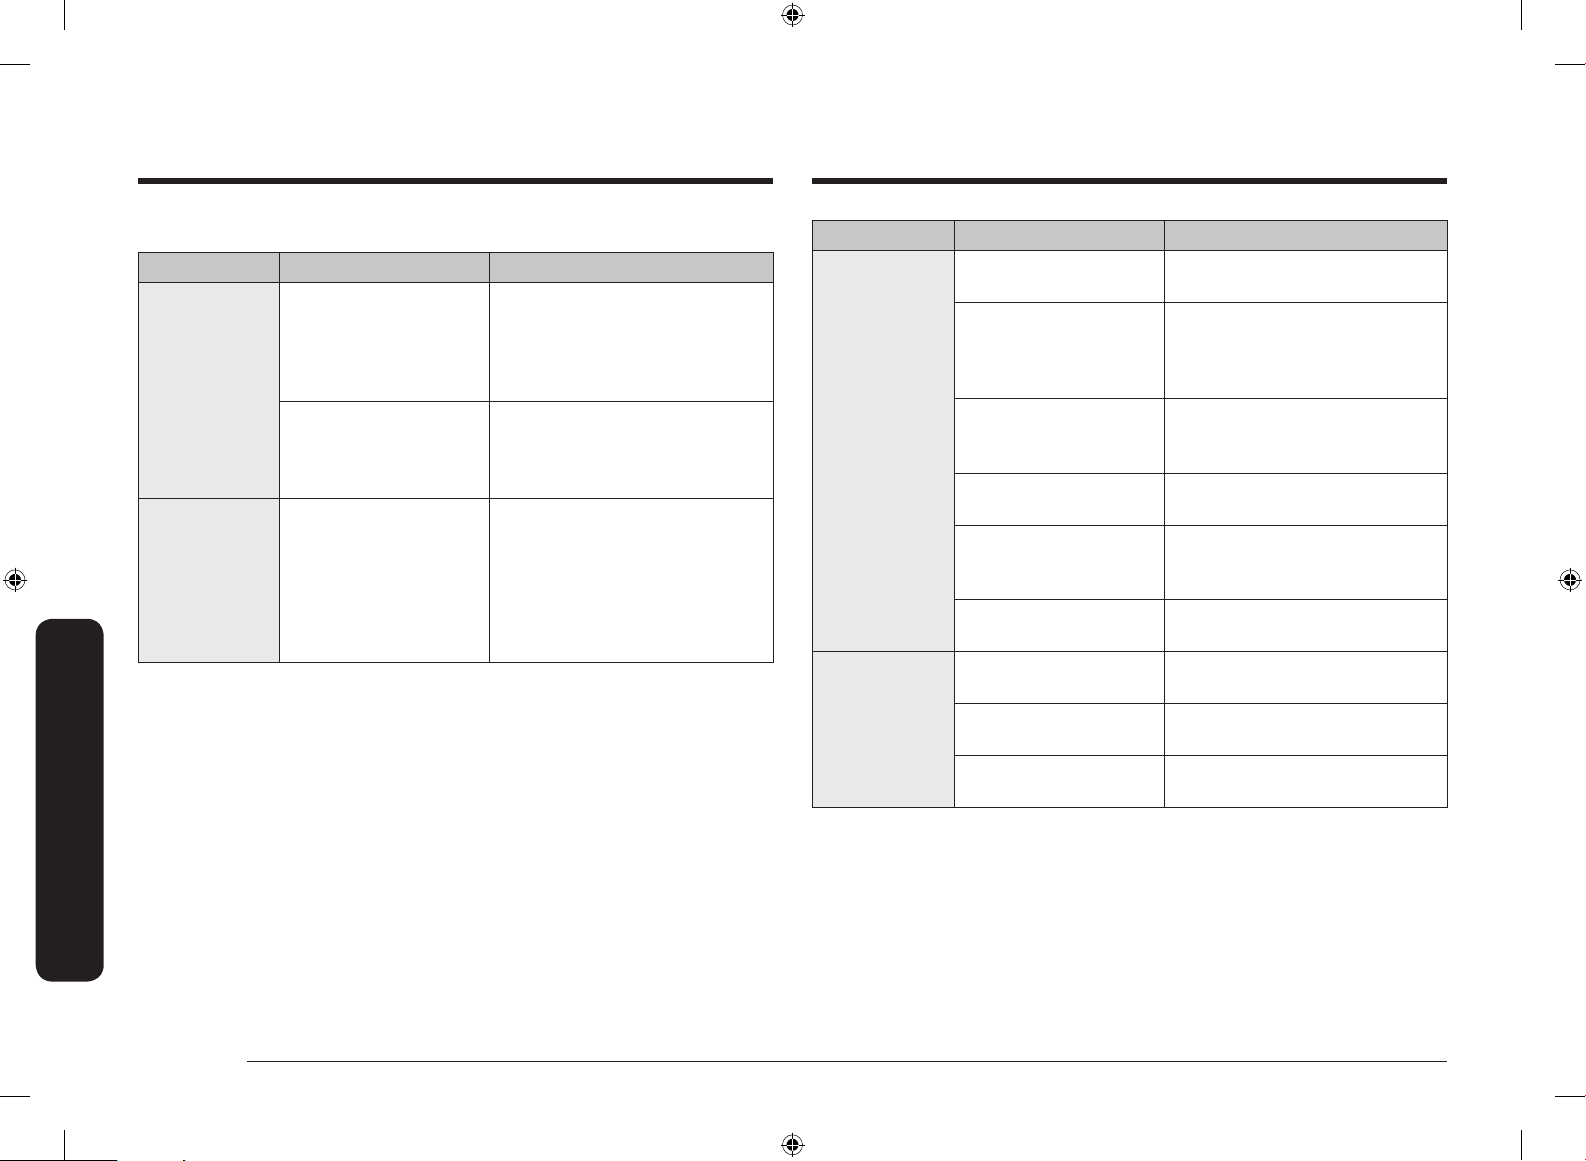
Troubleshooting
Troubleshooting
Others
Problem Possible cause Action
The product is
not level.
The display
goes blank.
The appliance has been
installed improperly.
The leveling leg(s)
is (are) damaged or
uneven.
The kitchen cabinets are
not properly aligned and
make the range appear
to be not level.
The electrical outlet
Ground Fault Interrupter
(GFI or GFCI) has been
tripped and needs to be
reset.
Your digital control has
been damaged.
Make sure the oor is level,
strong, and stable. If the oor sags
or slopes, contact a carpenter.
Check and level the range. (See the
Installation Instructions.)
Ensure that cabinets are square
and provide sufcient room for
installation.
Replace fuse or reset circuit
breaker.
Problem Possible cause Action
Food does not
bake or roast
properly in the
oven.
Food does not
broil properly in
the oven.
The wrong cooking
mode is selected.
The oven racks have not
been positioned properly
for the foods being
cooked.
Incorrect cookware or
cookware of improper
size is being used.
The oven thermostat
needs adjustment.
There is aluminum foil
on the racks and/or oven
bottom.
The clock or timers are
not set correctly.
The oven controls are
not set properly.
The oven door was not
closed during broiling.
The rack has not been
properly positioned.
See page 21.
See page 26.
See page 17.
See page 34.
Remove foil.
See page 16.
See page 24.
See page 21.
See the broiling guide on page 25.
48 English
NX7000K_VE_NX58M6850SS_AA_DG68-00909A-03_EN+MES+CFR.indb 48 1/30/2018 1:04:29 PM
Page 49
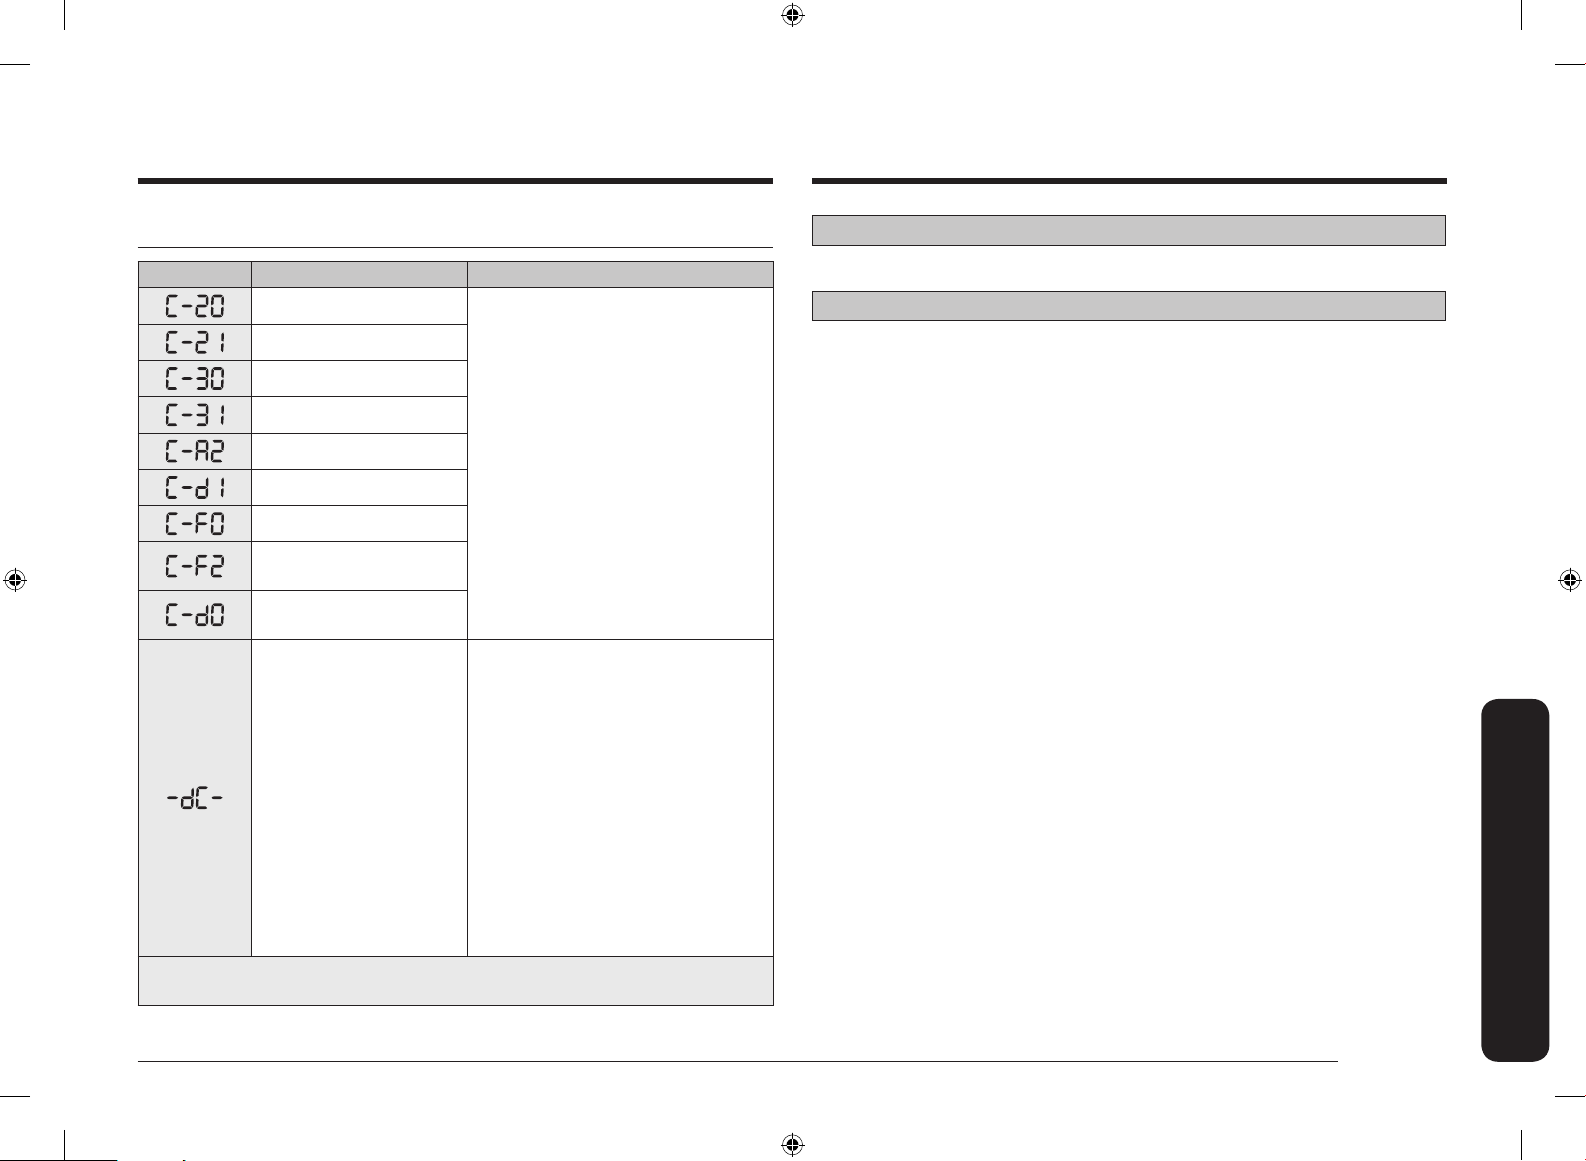
Troubleshooting Warranty
Information codes
Code symbol Meaning Solution
Check the oven sensor.
Oven overheating.
Check the PBA NTC Sensor
Check the PBA NTC Sensor
Check the cooling system.
Check the door lock.
Check the PCB signals.
Check the Touch PBA
signals.
Check the contol panel
pads
Check the divider switch.
** If these solutions do not solve the problem, contact a local Samsung service
center or call 1-800-SAMSUNG (1-800-726-7864).
1. Press the OFF/CLEAR pad, and
then restart the oven.
2. If the problem persists,
disconnect all power to the range
for at least 30 seconds, and then
reconnect the power.
1. If the Divider is in the oven, make
sure it is pushed in all the way.
2. If the Divider is not in the oven,
see if something is pressing
against the divider switch in the
back of the oven.
3. If the Divider is all the way in or
there is nothing pressing against
the Divider switch, press the OFF/
CLEAR pad, and then restart the
oven. If the problem persists,
disconnect all power to the oven
range for at least 30 seconds, and
then reconnect the power.
PLEASE DO NOT DISCARD.
SAMSUNG GAS RANGE
LIMITED WARRANTY TO ORIGINAL PURCHASER
This SAMSUNG brand product, as supplied and distributed by SAMSUNG ELECTRONICS
AMERICA or CANADA INC. (SAMSUNG) and delivered new, in the original carton to
the original consumer purchaser, is warranted by SAMSUNG against manufacturing
defects in materials and workmanship for a limited warranty period of:
One (1) Year Parts and Labor
This limited warranty begins on the original date of purchase, and is valid only on
products purchased and used in the United States or Canada. To receive warranty
service, the purchaser must contact SAMSUNG for problem determination and
service procedures. Warranty service can only be performed by a SAMSUNGauthorized service center, and any unauthorized service will void this warranty. The
original dated bill of sale must be presented upon request as proof of purchase to
SAMSUNG or SAMSUNG’s authorized service center. Samsung will provide in-home
service during the one (1) year warranty period at no charge subject to availability
within the contiguous United States or Canada. In-home service is not available in
all areas. To receive in-home service, product must be unobstructed and accessible
to the service agent. If service is not available, Samsung may elect to provide
transportation of the product to and from an authorized service center.
SAMSUNG will repair or replace this product, at our option and at no charge as
stipulated herein, with new or reconditioned parts or products if found to be
defective during the limited warranty period specied above. All replaced parts
and products become the property of SAMSUNG and must be returned to SAMSUNG.
Replacement parts and products assume the remaining original warranty, or ninety
(90) days, whichever is longer.
Warranty
English 49
NX7000K_VE_NX58M6850SS_AA_DG68-00909A-03_EN+MES+CFR.indb 49 1/30/2018 1:04:30 PM
Page 50
Warranty
Warranty
This limited warranty shall not cover cases of incorrect electric current, voltage or
supply, light bulbs, house fuses, house wiring, cost of a service call for instructions,
or xing installation errors. Furthermore, damage to the cooktop caused by the
use of cleaners other than the recommended cleaners and pads and damage to the
cooktop caused by hardened spills of sugary materials or melted plastic that are
not cleaned according to the directions in the use and care guide are not covered.
SAMSUNG does not warrant uninterrupted or error-free operation of the product.
EXCEPT AS SET FORTH HEREIN, THERE ARE NO WARRANTIES OR CONDITIONS
ON THIS PRODUCT EITHER EXPRESS OR IMPLIED AND SAMSUNG DISCLAIMS ALL
WARRANTIES AND CONDITIONS INCLUDING, BUT NOT LIMITED TO, ANY IMPLIED
WARRANTIES AND CONDITIONS OF MERCHANTABILITY, INFRINGEMENT, OR FITNESS
FOR A PARTICULAR PURPOSE.
NO WARRANTY OR GUARANTEE GIVEN BY ANY PERSON, FIRM, OR CORPORATION
WITH RESPECT TO THIS PRODUCT SHALL BE BINDING ON SAMSUNG.
SAMSUNG SHALL NOT BE LIABLE FOR LOSS OF REVENUE OR PROFITS, FAILURE
TO REALIZE SAVINGS OR OTHER BENEFITS, OR ANY OTHER GENERAL, INDIRECT,
SPECIAL, INCIDENTAL, OR CONSEQUENTIAL DAMAGES CAUSED BY THE USE, MISUSE,
OR INABILITY TO USE THIS PRODUCT, REGARDLESS OF THE LEGAL THEORY ON
WHICH THE CLAIM IS BASED, AND EVEN IF SAMSUNG HAS BEEN ADVISED OF THE
POSSIBILITY OF SUCH DAMAGES.
NOR SHALL RECOVERY OF ANY KIND AGAINST SAMSUNG BE GREATER IN AMOUNT
THAN THE PURCHASE PRICE OF THE PRODUCT SOLD BY SAMSUNG AND CAUSING
THE ALLEGED DAMAGE. WITHOUT LIMITING THE FOREGOING, PURCHASER ASSUMES
ALL RISK AND LIABILITY FOR LOSS, DAMAGE, OR INJURY TO PURCHASER AND
PURCHASER’S PROPERTY AND TO OTHERS AND THEIR PROPERTY ARISING OUT OF
THE USE, MISUSE, OR INABILITY TO USE THIS PRODUCT.
THIS LIMITED WARRANTY SHALL NOT EXTEND TO ANYONE OTHER THAN THE
ORIGINAL PURCHASER OF THIS PRODUCT, IS NONTRANSFERABLE, AND STATES
YOUR EXCLUSIVE REMEDY.
Some states or provinces do not allow limitations on how long an implied warranty
lasts, or the exclusion or limitation of incidental or consequential damages, so the
above limitations or exclusions may not apply to you.
This warranty gives you specic legal rights, and you may also have other rights
which vary from state to state or province to province.
To obtain warranty service, please contact SAMSUNG at:
Samsung Electronics America, Inc.
85 Challenger Road, Ridgeeld Park, NJ 07660
1-800-SAMSUNG (726-7864) and www.samsung.com/us/support
Samsung Electronics Canada Inc.
2050 Derry Road West, Mississauga, Ontario L5N 0B9 Canada
1-800-SAMSUNG (726-7864) and www.samsung.com/ca/support (English)
www.samsung.com/ca_fr/support (French)
Registration
Please register your product online at www.samsung.com/register.
Questions
For questions about features, operation/performance, parts, accessories, or service,
call 1-800-726-7864, or visit our Web site at www.samsung.com/us/support,
www.samsung.com/ca/support (English), or www.samsung.com/ca_fr/ support (French).
Model # Serial #
Please attach your receipt (or a copy) to this manual. You may need it, along with
your model and serial number, when calling for assistance.
50 English
NX7000K_VE_NX58M6850SS_AA_DG68-00909A-03_EN+MES+CFR.indb 50 1/30/2018 1:04:30 PM
Page 51

Open Source Announcement
The software included in this product contains open source software. You may
obtain the complete corresponding source code for a period of three years after
the last shipment of this product by sending an email to mailto:oss.request@
samsung.com.
It is also possible to obtain the complete corresponding source code in a physical
medium such as a CD-ROM; a minimal charge will be required.
The following URL http://opensource.samsung.com/opensource/SMART_AT_051/
seq/0 leads to the download page of the source code made available and open
source license information as related to this product. This offer is valid to anyone
in receipt of this information.
English 51
NX7000K_VE_NX58M6850SS_AA_DG68-00909A-03_EN+MES+CFR.indb 51 1/30/2018 1:04:30 PM
Warranty
Page 52
Scan the QR code* or visit
www.samsung.com/spsn
to view our helpful
How-to Videos and Live Shows
* Requires reader to be installed on your
smartphone
Please be advised that the Samsung warranty does NOT cover service calls to explain product operation, correct improper installation, or perform normal cleaning or
maintenance.
QUESTIONS OR COMMENTS?
COUNTRY CALL OR VISIT US ONLINE AT
U.S.A
Consumer Electronics
CANADA 1-800-SAMSUNG (726-7864)
1-800-SAMSUNG (726-7864) www.samsung.com/us/support
www.samsung.com/ca/support (English)
www.samsung.com/ca_fr/support (French)
DG68-00909A-03
NX7000K_VE_NX58M6850SS_AA_DG68-00909A-03_EN+MES+CFR.indb 52 1/30/2018 1:04:31 PM
Page 53
Estufa de gas
Manual del usuario
NX58M6850S*
NX7000K_VE_NX58M6850SS_AA_DG68-00909A-03_EN+MES+CFR.indb 1 1/30/2018 1:04:33 PM
Page 54
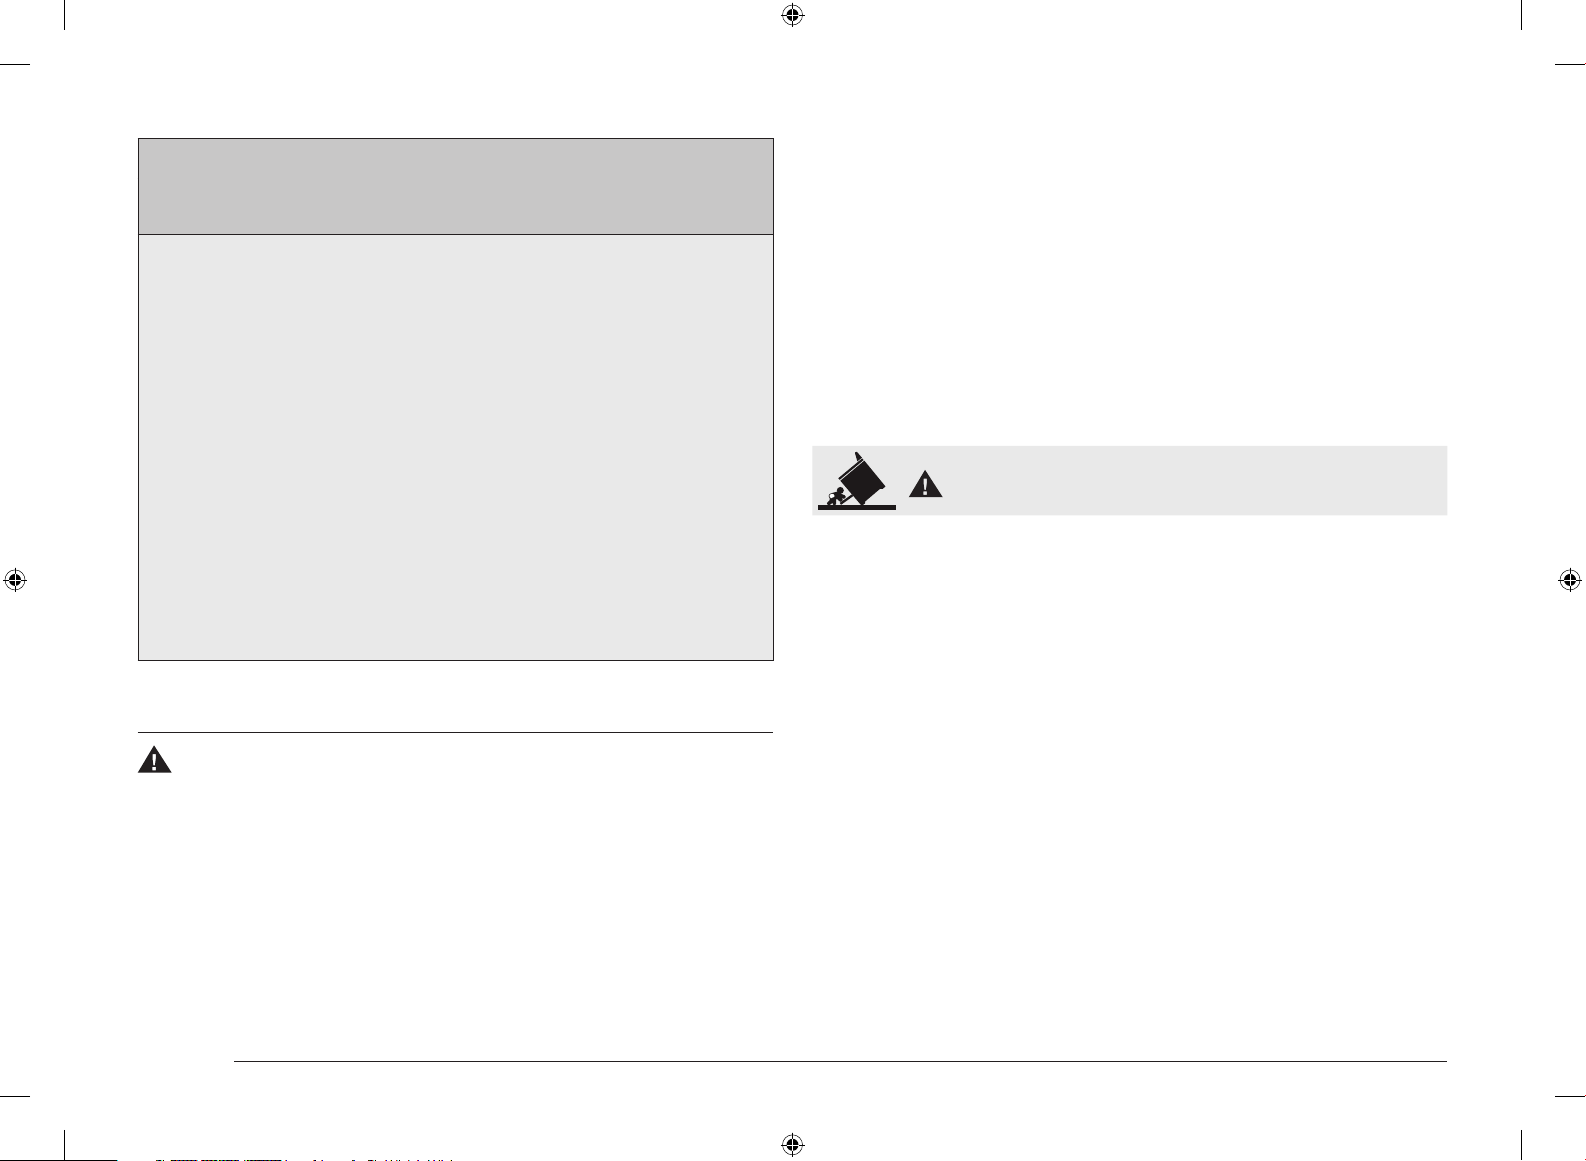
ADVERTENCIA: Si no se sigue la información de este manual con
exactitud, podrían producirse incendios o explosiones causantes
de daños a la propiedad, lesiones personales o muerte.
• No debe almacenarse ni utilizarse gasolina u otros líquidos y
vapores inamables cerca de este u otros artefactos.
• QUÉ HACER SI HAY OLOR A GAS:
- NO intente encender ningún artefacto.
- NO toque ningún interruptor eléctrico.
- NO utilice ningún teléfono dentro del edicio.
- Llame inmediatamente al proveedor de gas desde
el teléfono de un vecino. Siga las instrucciones del
proveedor de gas.
- Si no puede comunicarse con el proveedor de gas, llame
al departamento de bomberos.
• La instalación y el servicio técnico deben ser realizados por
un instalador calicado, agencias de servicio técnico o el
proveedor de gas.
DISPOSITIVO ANTI INCLINACIÓN
ADVERTENCIA: Para reducir el riesgo de inclinación o vuelco de
la estufa, ésta debe asegurarse mediante un dispositivo anti
inclinación correctamente instalado. DESPUÉS DE INSTALAR LA
ESTUFA, CONFIRME QUE EL DISPOSITIVO ANTI INCLINACIÓN
ESTÉ CORRECTAMENTE INSTALADO Y VERIFIQUE QUE ESTÉ
CORRECTAMENTE CONECTADO. Remítase al manual de
instalación donde se brindan las instrucciones correspondientes.
a) Si el dispositivo anti inclinación no está instalado, un niño o un
adulto podrían inclinar la estufa y morir.
2 Español
b) Verique que el dispositivo anti inclinación haya sido instalado
y conectado correctamente en la parte posterior derecha (o
posterior izquierda) de la base de la estufa.
c) Si mueve la estufa y luego la vuelve a colocar en su lugar,
asegúrese de volver a conectar el dispositivo anti inclinación en
la parte posterior derecha o izquierda de la base de la estufa.
d) No opere la estufa sin el dispositivo anti inclinación en su lugar
y conectado.
e) No hacerlo puede provocar la muerte o quemaduras serias a
niños o adultos.
ADVERTENCIA
No se pare sobre la puerta del horno de la estufa, ni se apoye o
siente sobre ella. Puede causar que la estufa se incline o vuelque,
produciendo quemaduras o lesiones severas.
Conrme que el dispositivo anti inclinación se encuentre instalado
correctamente. Luego, para vericar que dicho dispositivo
esté conectado, tome el borde superior trasero de la estufa y
cuidadosamente intente inclinarla hacia adelante. El dispositivo
anti inclinación debería prevenir que la estufa se incline hacia
adelante más de unas pocas pulgadas.
Si, por cualquier razón, hala la estufa alejándola de la pared,
asegúrese de que el dispositivo anti inclinación encaje
correctamente cuando empuje la estufa a su lugar contra la pared.
Si no se encuentra encajado, hay riesgo de que la estufa se incline
o vuelque y cause lesiones si usted o un niño se parasen, sentasen
o apoyasen sobre una puerta abierta.
Nunca retire completamente las patas niveladoras. Si las retira, la
estufa no quedará sujeta correctamente al dispositivo anti inclinación.
NX7000K_VE_NX58M6850SS_AA_DG68-00909A-03_EN+MES+CFR.indb 2 1/30/2018 1:04:33 PM
Page 55

Aviso sobre regulaciones
1. Aviso de la FCC
PRECAUCIÓN
PRECAUCIÓN DE LA FCC: Todos los cambios y modicaciones que
no cuenten con la aprobación expresa de la parte responsable del
cumplimiento invalidará la autoridad del usuario para operar el
equipo.
Este dispositivo cumple con la sección 15 de las Normas de la FCC.
El funcionamiento se encuentra sujeto a las siguientes dos condiciones:
1) Este aparato no puede causar interferencia dañina, y
2) Este aparato debe aceptar la recepción de cualquier
interferencia, incluidas aquellas que puedan causar un
funcionamiento indeseado.
En los productos disponibles en los mercados de Estados Unidos/
Canadá, solo están disponibles los canales 1~11. No se puede
seleccionar otros canales.
DECLARACIÓN DE LA FCC:
Este equipo ha sido sometido a pruebas y se ha determinado que
se encuentra dentro de los límites para los dispositivos digitales
clase B, de acuerdo con la sección 15 de las Normas de la FCC.
Estos límites están destinados a ofrecer una protección razonable
contra interferencias perjudiciales en una instalación residencial.
Este equipo genera, utiliza y puede irradiar energía de
radiofrecuencia y, si no se lo instala y utiliza de acuerdo con
las instrucciones, puede provocar interferencia perjudicial a las
comunicaciones de radio. Sin embargo, no se garantiza que no
habrá interferencia en alguna instalación determinada. Si este
equipo causa interferencia perjudicial con la recepción de radio o
televisión, lo que puede determinarse apagando y encendiendo
el equipo, se recomienda que el usuario intente corregir la
interferencia de una de las siguientes maneras:
• Reorientar o reubicar la antena receptora.
• Aumentar la separación entre el equipo y el receptor.
• Conectar el equipo a una toma de un circuito distinto de aquel
al que está conectada la radio o el televisor.
• Consultar al distribuidor o a un técnico de radio/TV
experimentado para obtener ayuda.
DECLARACIÓN DE LA FCC SOBRE LA EXPOSICIÓN A LA RADIACIÓN:
Este equipo cumple con los límites de exposición a la radiación
establecidos para un entorno no controlado. Este equipo debe ser
instalado y operado a una distancia mínima de 8 pulgadas
(20 cm) entre su cuerpo y el radiador. Este dispositivo y su antena
no deben ubicarse cerca ni utilizarse junto con ninguna otra antena
o transmisor.
Español 3
NX7000K_VE_NX58M6850SS_AA_DG68-00909A-03_EN+MES+CFR.indb 3 1/30/2018 1:04:33 PM
Page 56

2. Aviso de IC
El término “IC” antes del número de certicación de radio indica
que se cumplieron las especicaciones técnicas de Industry
Canada. El funcionamiento se encuentra sujeto a las siguientes dos
condiciones: (1) este dispositivo no puede causar interferencias, y
(2) este dispositivo debe aceptar cualquier interferencia, incluidas
las interferencias que puedan provocar un funcionamiento no
deseado.
Este aparato digital Clase B cumple con la norma ICES-003 de
Canadá.
En los productos disponibles en los mercados de Estados Unidos/
Canadá, solo están disponibles los canales 1~11. No se puede
seleccionar otros canales.
DECLARACIÓN DE IC SOBRE LA EXPOSICIÓN A LA RADIACIÓN:
Este equipo cumple con los límites de exposición a la radiación IC
RSS-102 establecidos para un entorno no controlado. Este equipo
debe ser instalado y operado a una distancia mínima de 8 pulgadas
(20 cm) entre su cuerpo y el radiador. Este dispositivo y su antena
no deben ubicarse cerca ni utilizarse junto con ninguna otra antena
Instrucciones de seguridad generales
Esta unidad ha sido sometida a pruebas y se ha determinado
que cumple con los límites para un dispositivo digital clase B, de
acuerdo con la Sección 18 de las normas de la FCC. Estos límites
están destinados a ofrecer una protección razonable contra
interferencias perjudiciales en una instalación residencial. Esta
unidad genera, utiliza y puede irradiar energía de radiofrecuencia
y, si no se instala y utiliza de acuerdo con las instrucciones, puede
provocar interferencias perjudiciales en las comunicaciones de
radio.
Sin embargo, no se garantiza que no habrá interferencia en alguna
instalación determinada. Si esta unidad causa interferencias
perjudiciales a la recepción de radio o televisión, lo que puede
determinarse apagando y encendiendo la unidad, se recomienda
que el usuario intente corregir la interferencia con una o más de
las siguientes medidas:
• Reorientar o reubicar la antena receptora.
• Aumentar la distancia entre la unidad y el receptor.
• Conectar el equipo a una toma de un circuito distinto de aquel
o transmisor.
al que está conectada la radio o el televisor.
4 Español
NX7000K_VE_NX58M6850SS_AA_DG68-00909A-03_EN+MES+CFR.indb 4 1/30/2018 1:04:33 PM
Page 57
Contenido
Información importante de seguridad 6
Descripción general 13
Esquema 13
Elementos incluidos 13
Dual Door™ 14
Panel de control 15
Reloj 16
Temporizador de cocina 16
Abertura de ventilación/Oricios de refrigeración 16
Estufa de gas 17
Utensilio de cocina 17
Quemadores de gas 18
Ignición 18
Ajuste de la conguración de llama baja en los quemadores de la estufa 19
Horno de gas 20
Modo simple 20
Modo doble 20
Modo de cocción 21
Asar a la parrilla 24
Guía de recetas 25
Guías de ajuste de temperatura 25
Uso de las parrillas del horno 26
Opciones de cocción 28
Cocción lenta, deshidratar, leudado 33
Funciones de no cocción 34
Smart Control - Control remoto del horno 36
Mantenimiento 37
Limpieza 37
Reemplazo de la luz del horno 42
Puerta del horno: Retirar y volver a instalar 43
Cajón de almacenamiento 44
Resolución de problemas 44
Puntos de vericación 44
Códigos de información 49
Garantía 49
Anuncio de código abierto 51
Contenido
Español 5
NX7000K_VE_NX58M6850SS_AA_DG68-00909A-03_EN+MES+CFR.indb 5 1/30/2018 1:04:33 PM
Page 58
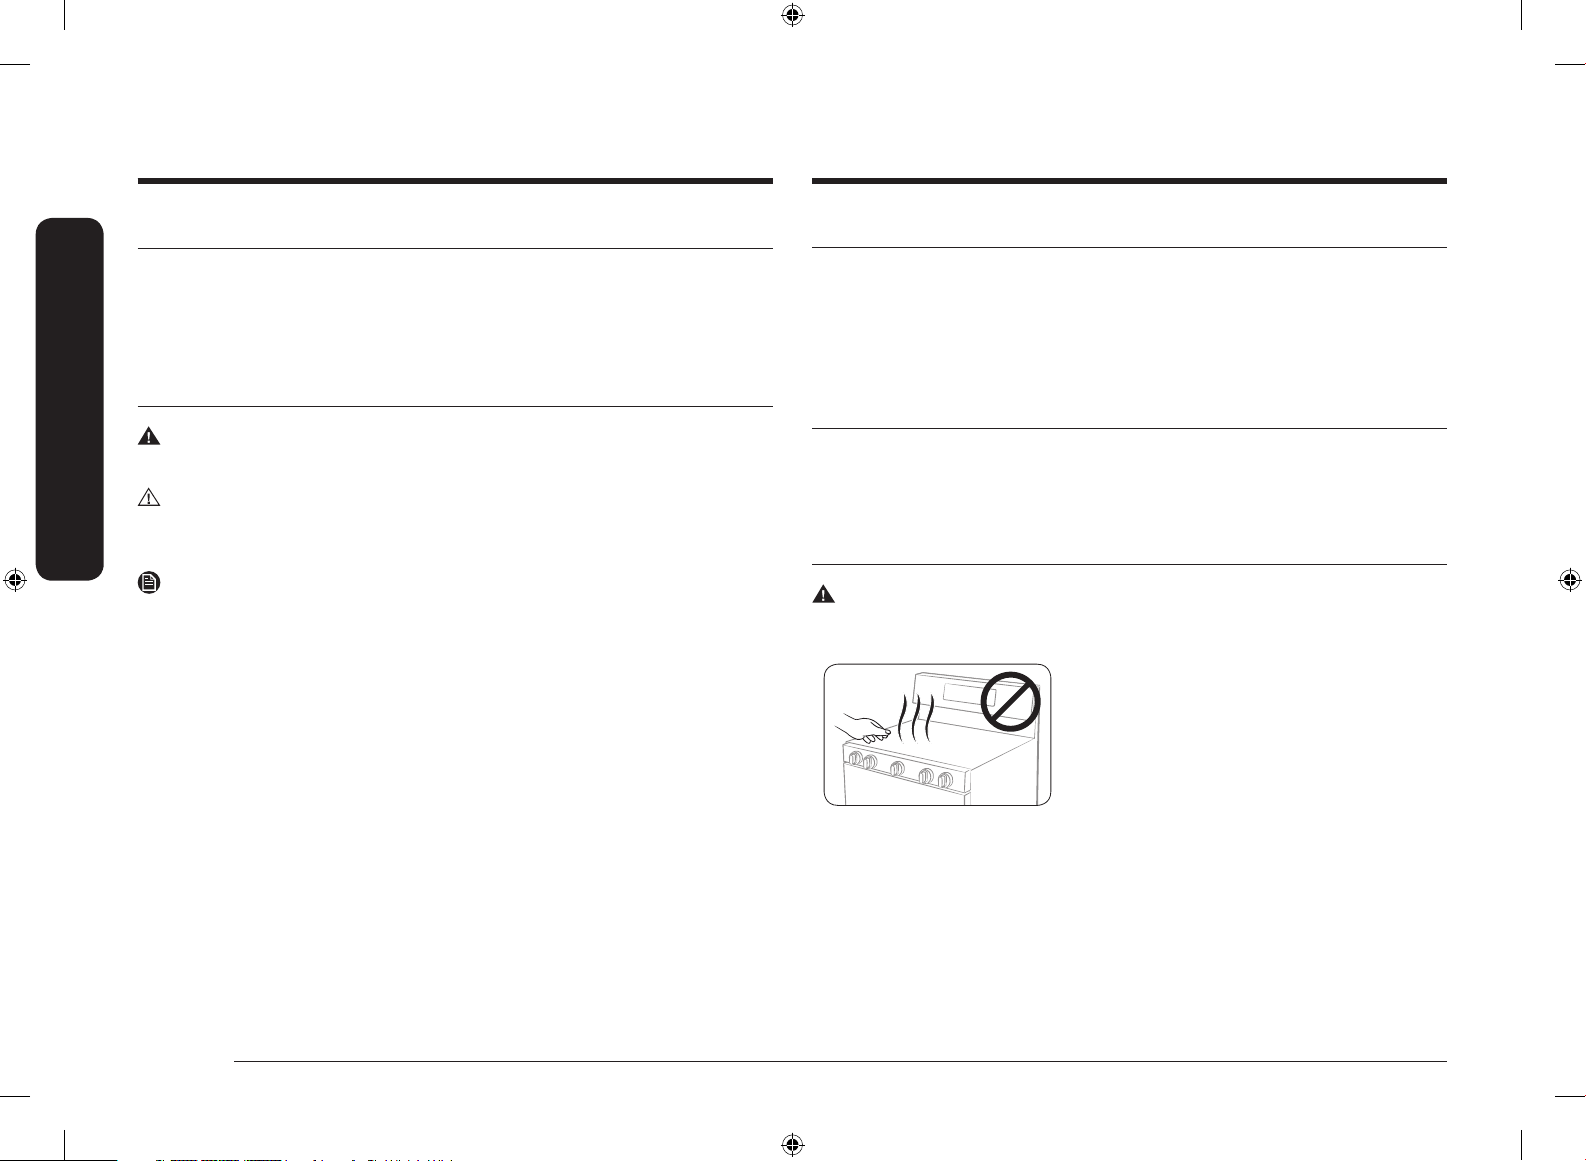
Información importante de seguridadInformación importante de seguridad
Información importante de seguridad
Lea todas las instrucciones antes de usar este artefacto
• Todos los equipos eléctricos y de gas con piezas móviles pueden ser peligrosos. Lea las
instrucciones de seguridad importantes para este artefacto incluidas en este manual.
Las instrucciones deben seguirse para minimizar el riesgo de lesión, muerte o daño a la
propiedad.
• Guarde este manual. No lo deseche.
Símbolos usados en este manual
ADVERTENCIA
Prácticas peligrosas o inseguras que pueden provocar lesiones graves o la muerte.
PRECAUCIÓN
Prácticas peligrosas o inseguras que pueden provocar descargas eléctricas, lesiones personales
o daños a la propiedad.
NOTA
Instrucciones y sugerencias útiles.
Estos iconos y símbolos de advertencia se incluyen para evitar que usted u otras personas
sufran lesiones. Sígalos explícitamente. Una vez que haya leído esta sección, consérvela en un
lugar seguro para consultas futuras.
Advertencia sobre la State of California Proposition 65 (solo EE.UU.)
ADVERTENCIA: Este producto contiene productos químicos reconocidos en el estado de
California como capaces de provocar cáncer y defectos de nacimiento u otras afecciones
reproductivas.
Los aparatos a gas pueden causar un bajo nivel de exposición a las sustancias indicadas en la
Proposición 65, incluyendo, entre otros, benceno, monóxido de carbono, formaldehído y hollín,
sustancias resultantes de una combustión incompleta del gas natural o del LP.
Mancomunidad de Massachusetts
• Este producto debe ser instalado por un plomero con licencia o un gasista matriculado
o con licencia del Estado de Massachusetts. Cuando se utilicen válvulas de bola para
el cierre del gas, se debe usar una manija en forma de "T". No deben conectarse varios
conductos exibles de gas en serie.
Seguridad general
ADVERTENCIA
Para reducir el riesgo de incendio, descarga eléctrica, lesiones personales y muerte, respete las
siguientes precauciones.
• No toque ninguna parte de la estufa, incluyendo,
entre otros, los quemadores del horno, los
quemadores superiores o las partes internas durante
la cocción o inmediatamente después de cocinar.
• Debe conocer la ubicación de la válvula de cierre
del gas y cómo cerrarla si es necesario.
• Asegúrese de que el dispositivo anti inclinación esté correctamente instalado en la estufa.
Consulte las instrucciones de instalación para obtener más información.
• No permita que los niños se acerquen a la estufa. No permita que los niños se metan en la
estufa ni trepen sobre ella. No permita que los niños jueguen con la estufa ni con ninguna
parte de la estufa. Los niños no deben quedar sin vigilancia en el lugar donde se utiliza
la estufa. Para la seguridad de los niños, recomendamos utilizar la función de control/
bloqueo de la puerta.
6 Español
NX7000K_VE_NX58M6850SS_AA_DG68-00909A-03_EN+MES+CFR.indb 6 1/30/2018 1:04:34 PM
Page 59
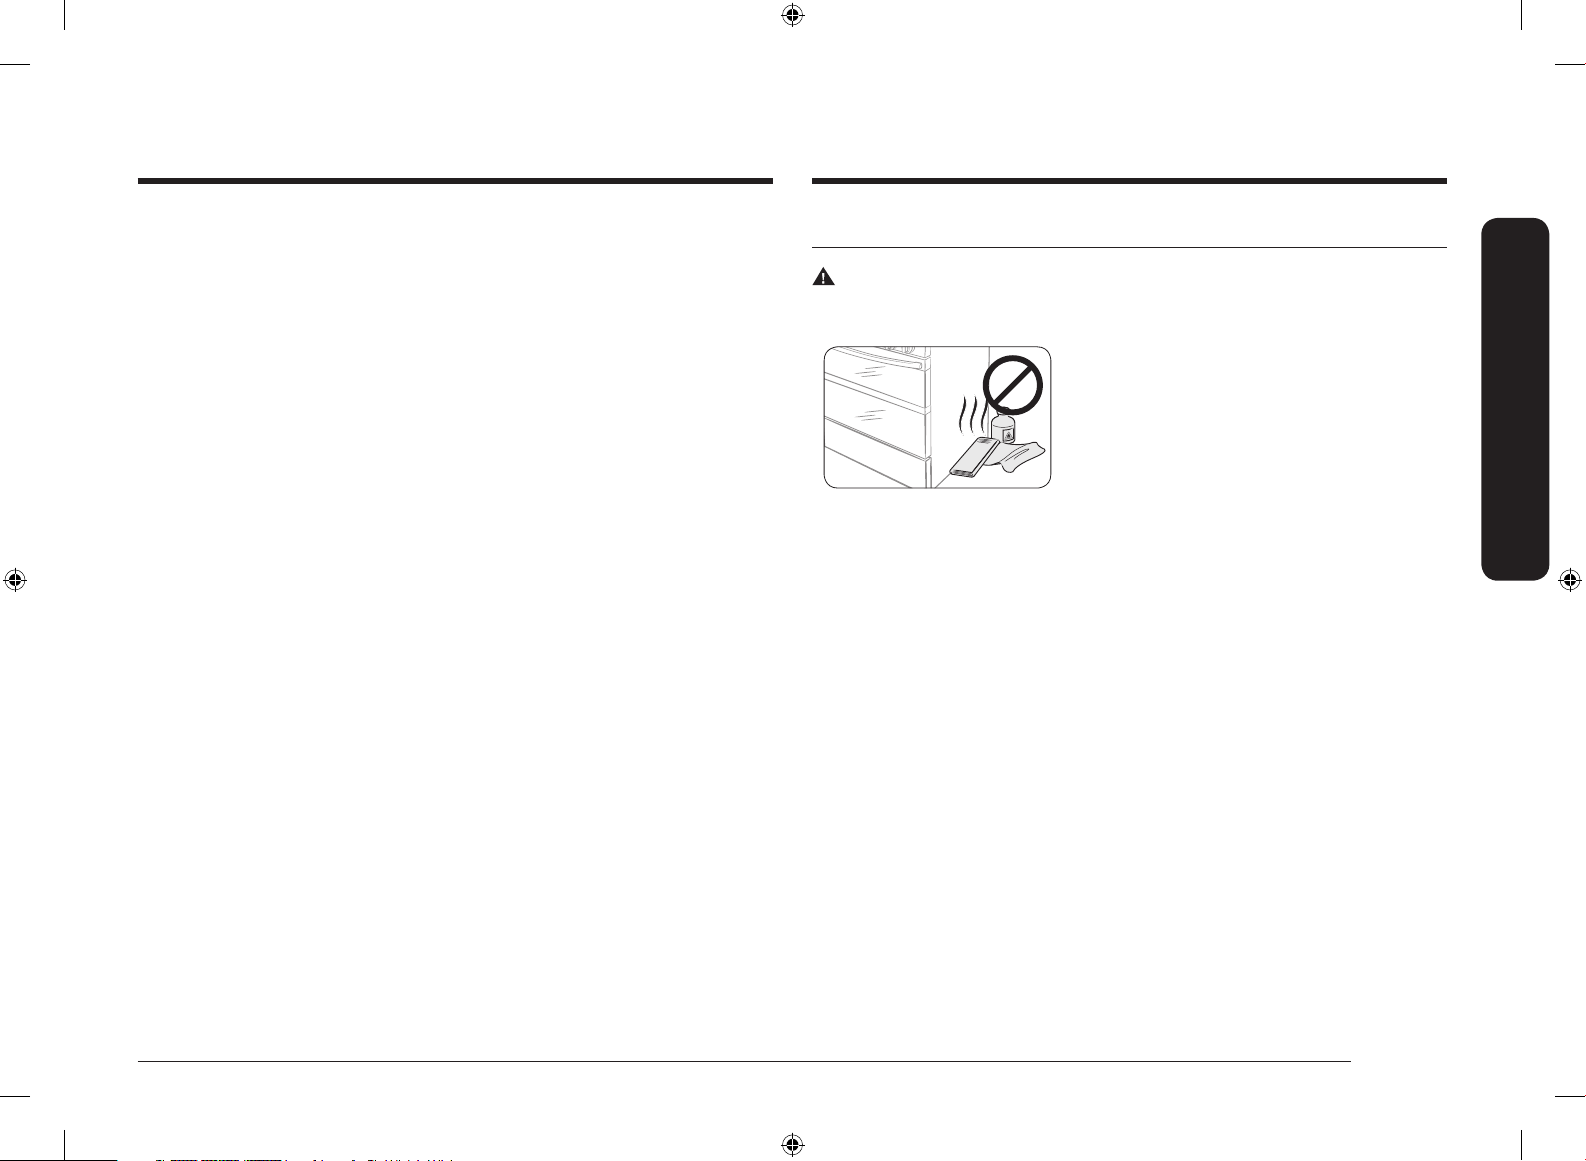
• Quite todos los materiales de empaque de la estufa antes de utilizarla para evitar que
se incendien. Mantenga todos los materiales de empaque fuera del alcance de los niños.
Deseche adecuadamente los materiales de empaque luego de desembalar la estufa.
• No guarde ningún objeto que resulte de interés para los niños sobre la cubierta o el
protector posterior de la estufa. Los niños que se trepen a la estufa para alcanzar un
objeto podrían morir o resultar seriamente lesionados.
• No opere la estufa si esta o alguna de sus partes se encuentra dañada, no funciona
correctamente o si falta alguna pieza.
• No utilice la estufa como calefactor del ambiente. Utilice la estufa solamente para cocinar.
• No utilice limpiadores para horno ni revestimientos de horno dentro o cerca de ninguna
parte del horno.
• Utilice únicamente agarradores aislantes secos. Los agarradores aislantes húmedos
pueden liberar vapor y causar quemaduras si entran en contacto con supercies calientes.
Mantenga todos los agarradores aislantes alejados de las llamas abiertas cuando levante
los recipientes. Jamás utilice una toalla o una tela voluminosa como agarrador aislante.
• No utilice la estufa para calentar recipientes cerrados con alimentos.
• No golpee el vidrio del horno.
• Al desechar la estufa, corte el cable de alimentación y quite la puerta para evitar que
niños y animales puedan quedar atrapados.
• Desenchufe o desconecte la alimentación antes de realizar tareas de mantenimiento o
reparación.
• Asegúrese de que todas las carnes de res y de ave se cocinen bien. La carne de res debe
cocinarse siempre a una temperatura interna de 160 °F (71 °C). La carne de ave debe
cocinarse siempre a una temperatura interna de 180 °F (82 °C).
• No intente operar el horno de ignición eléctrica durante un corte de energía eléctrica.
• Mantenga el área del artefacto desocupada y libre de materiales combustibles, gasolina y
otros vapores y líquidos inamables.
• Enseñe a los niños que no deben tocar ni jugar con los controles ni con ninguna parte de
la estufa. Recomendamos utilizar la función de bloqueo de los controles / la puerta para
reducir el riesgo de que los niños los usen incorrectamente.
• No se apoye sobre la estufa ya que podría girar las perillas de control sin darse cuenta.
• No se pare sobre el electrodoméstico ni coloque sobre él objetos (como ropa sucia, fundas para
hornos, velas encendidas, cigarrillos encendidos, platos, productos químicos, objetos metálicos, etc.).
- Artículos como trapos de cocina pueden quedar enganchados en la puerta.
- Se pueden producir descargas eléctricas, un incendio, problemas con el producto o lesiones.
Seguridad contra incendios
ADVERTENCIA
Para reducir el riesgo de incendio, descarga eléctrica, lesiones personales y muerte, respete las
siguientes precauciones.
• No guarde, coloque ni use materiales inamables
o combustibles como papel, plástico, agarradores
aislantes, ropa de cama, cortinas, gasolina u otros
vapores o líquidos inamables cerca de la estufa.
• No lleve prendas amplias o colgantes mientras se
utiliza la estufa.
• Para evitar la acumulación de grasa, limpie regularmente las ventilaciones.
• No permita que agarradores aislantes u otros materiales inamables entren en contacto
con el elemento calentador. No utilice una toalla u otras telas voluminosas como
agarrador aislante.
• No eche agua sobre la grasa prendida fuego. Para extinguir el fuego de la materia grasa,
apague la fuente de calor y extinga el fuego con una tapa que ajuste bien o utilice un
extinguidor de incendios de polvo químico seco o de espuma para usos diversos.
• Si la grasa llegara a encenderse, presione la tecla OFF/CLEAR (APAGAR/BORRAR) para
apagar el horno. Mantenga cerrada la puerta del horno hasta que se extinga el fuego.
De ser necesario, utilice un extinguidor de incendios de polvo químico seco o de espuma
para usos diversos.
• No caliente envases de alimentos que no hayan sido abiertos. La acumulación de presión
puede hacer que los envases exploten y causen lesiones.
• NUNCA UTILICE este artefacto como calefactor para calentar el ambiente. Hacerlo podría
tener como resultado el envenenamiento con monóxido de carbono y el recalentamiento
del horno. No utilice el horno como lugar de almacenamiento. El papel y otros materiales
inamables guardados en el horno pueden incendiarse.
• No deje productos como papel, utensilios de cocina o alimentos en el horno cuando no lo
utiliza. Los elementos almacenados en un horno pueden prenderse fuego.
• No coloque materiales combustibles ni otros productos alrededor de la estufa.
Información importante de seguridad
Español 7
NX7000K_VE_NX58M6850SS_AA_DG68-00909A-03_EN+MES+CFR.indb 7 1/30/2018 1:04:34 PM
Page 60
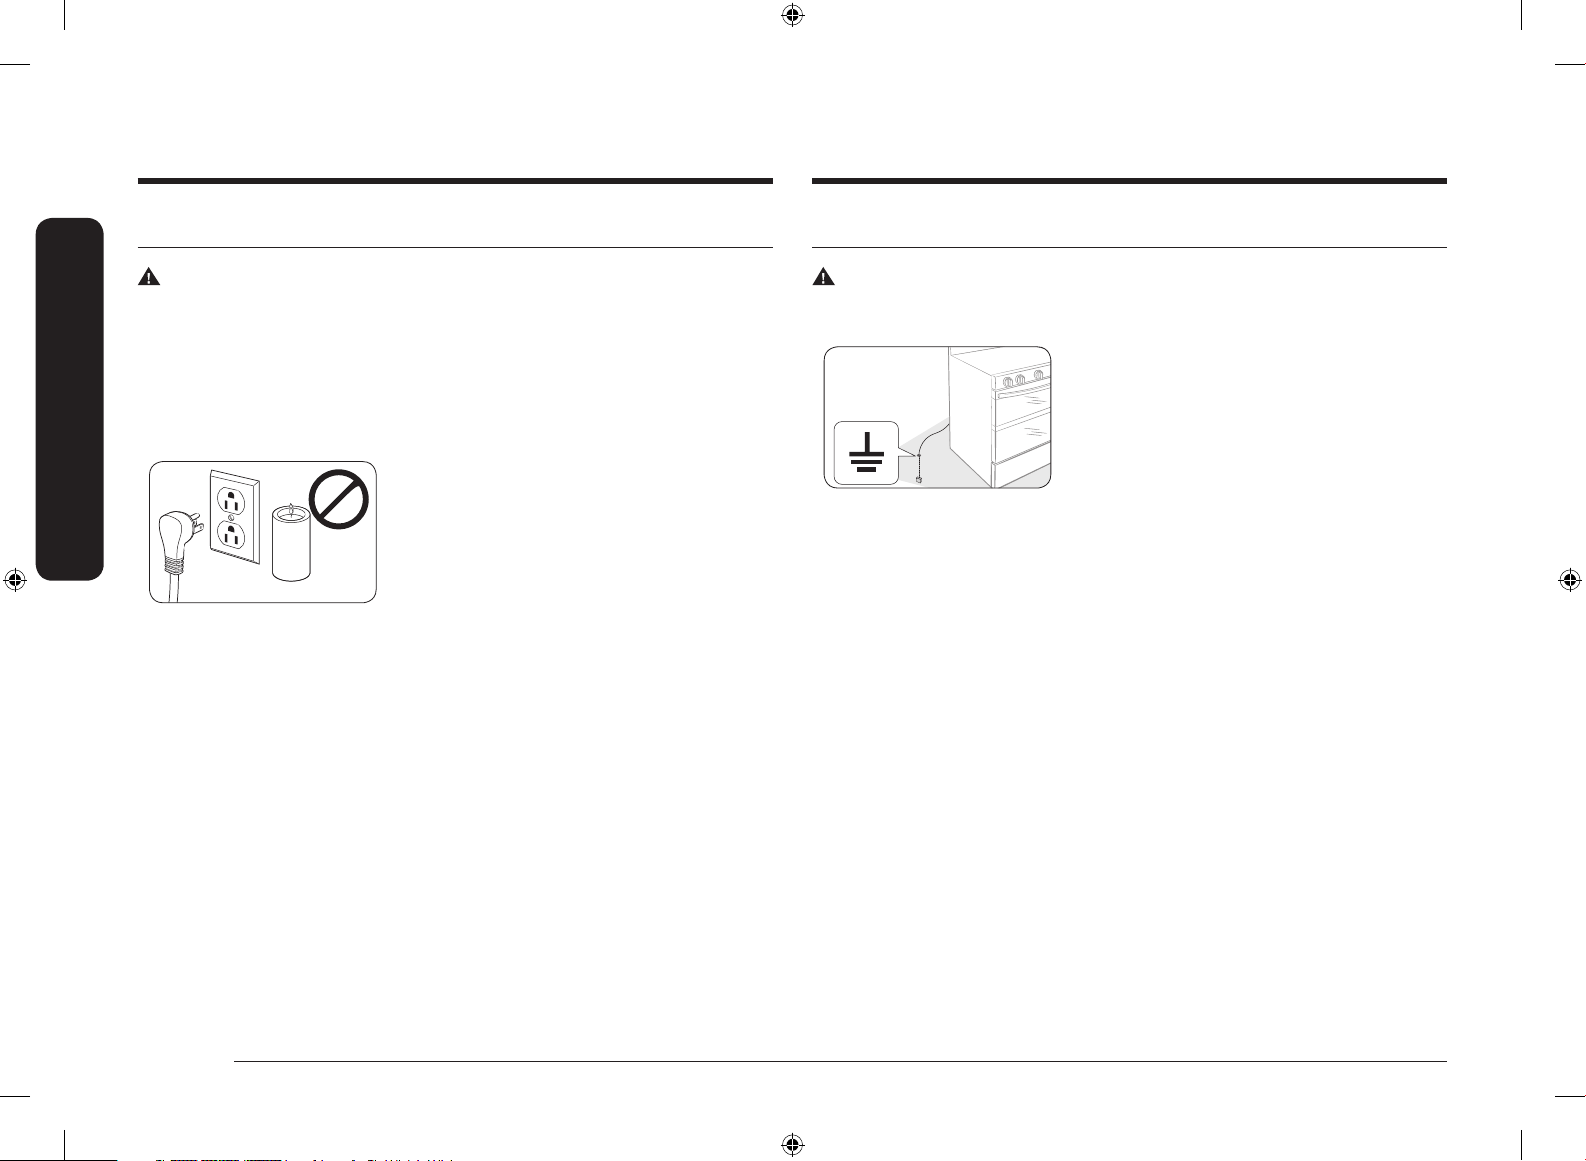
Información importante de seguridad
Información importante de seguridad
Seguridad del gas
ADVERTENCIA
Para reducir el riesgo de incendio, descarga eléctrica, lesiones personales y muerte, respete las
siguientes precauciones.
Si hay olor a gas:
• Cierre la válvula y no use la estufa.
• No encienda cerillos, velas ni cigarrillos.
• No encienda ningún artefacto eléctrico o a gas.
• No toque ningún interruptor eléctrico ni enchufe el
cable de alimentación en un tomacorriente.
• No utilice ningún teléfono dentro del edicio.
• Evacúe a todos los ocupantes del ambiente, edicio
o área.
• Llame inmediatamente al proveedor de gas desde
el teléfono de un vecino. Siga las instrucciones del
proveedor de gas.
• Si no puede comunicarse con el proveedor de gas,
llame al departamento de bomberos.
Vericación de pérdidas de gas
• La prueba de pérdidas del artefacto debe ser realizada de acuerdo con las instrucciones
del fabricante. No utilice una llama para vericar si hay pérdidas de gas. Utilice un cepillo
para esparcir una mezcla de agua jabonosa alrededor del área que está vericando. Si
hay una pérdida de gas, verá pequeñas burbujas en la mezcla de agua jabonosa en el
punto de la pérdida.
Seguridad de la electricidad y la conexión a tierra
ADVERTENCIA
Para reducir el riesgo de incendio, descarga eléctrica, lesiones personales y muerte, respete las
siguientes precauciones.
• Enchufe el artefacto a un tomacorriente de
3 clavijas conectado a tierra.
• No retire la clavija de conexión a tierra.
• No utilice un adaptador ni un cable prolongador.
• No utilice un enchufe o un cable de alimentación
dañado ni un tomacorriente ojo.
• No modique el enchufe, el cable de alimentación ni
el tomacorriente de ninguna manera.
• No coloque un fusible en el circuito neutral o de conexión a tierra.
• Utilice un circuito eléctrico exclusivo de CA, 120 voltios, 60 Hz, 20 A con un fusible de
retardo o un disyuntor para esta estufa. No conecte más de un artefacto a este circuito.
• No conecte el cable a tierra a cañerías de plomería de plástico, tuberías de gas o tuberías
de agua caliente.
• Esta estufa debe conectarse a tierra. En el caso de fallas o averías, la conexión a
tierra reducirá el riesgo de sufrir descargas eléctricas, ya que le ofrece una ruta a la
corriente eléctrica. Esta estufa está equipada con un cable que dispone de un enchufe
con conexión a tierra. El enchufe debe enchufarse rmemente en un tomacorriente que
esté correctamente instalado y que disponga de conexión a tierra, de acuerdo con los
códigos y ordenanzas locales. Si no está seguro de si el tomacorriente está conectado
correctamente a tierra, debe vericarlo un electricista matriculado.
• La estufa está equipada con un enchufe de 3 clavijas con conexión a tierra. Este cable
debe enchufarse a un tomacorriente adecuado de 3 clavijas con conexión a tierra, que
cumpla con todos los códigos y las ordenanzas locales. Si los códigos permiten el uso
de un conductor a tierra independiente, recomendamos que un electricista calicado
determine la vía adecuada para este conductor a tierra.
servicio eléctrico que alimentará a la estufa debe cumplir con los códigos locales.
• El
Además de los códigos locales, debe cumplir con la versión más reciente de ANSI/NFPA Nro.
70 (para EE.UU.) o con la versión más reciente del Código eléctrico de Canadá CSA C22.1.
• Es responsabilidad personal del propietario de la estufa brindar el servicio eléctrico
correcto para este equipo.
8 Español
NX7000K_VE_NX58M6850SS_AA_DG68-00909A-03_EN+MES+CFR.indb 8 1/30/2018 1:04:34 PM
Page 61
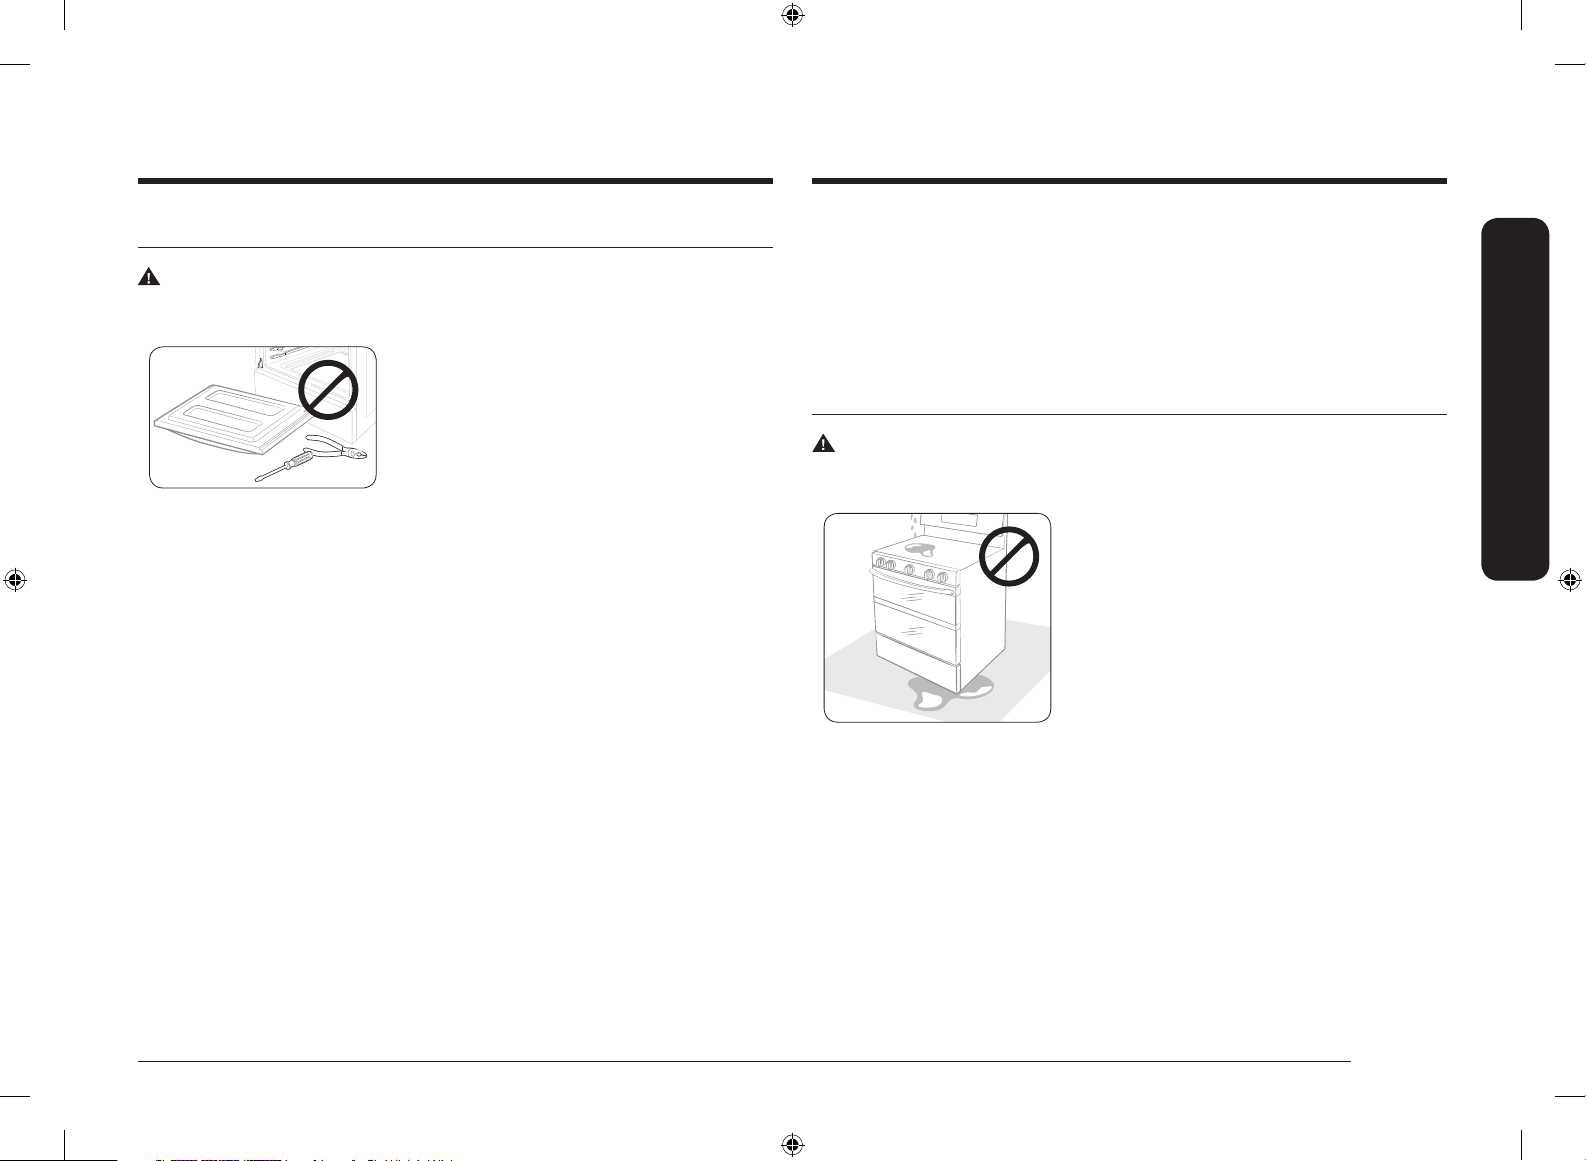
Seguridad de la instalación
ADVERTENCIA
Para reducir el riesgo de incendio, descarga eléctrica, lesiones personales y muerte, respete las
siguientes precauciones.
• Un instalador calicado debe realizar la instalación
y la conexión a tierra correcta, de acuerdo con las
instrucciones de instalación. Solo instaladores de
estufas de gas calicados o técnicos de servicio
deberían realizar los ajustes y el servicio técnico.
• No intente realizar el servicio, modicar ni reemplazar ninguna pieza de la estufa a
menos que este manual lo recomiende especícamente. Todas las demás tareas de
servicio técnico deben ser encomendadas a un técnico calicado.
• Utilice siempre conectores exibles nuevos cuando instale un artefacto a gas.
No utilice conectores exibles viejos.
• Asegúrese de que el dispositivo anti inclinación esté correctamente instalado en la estufa.
Consulte las instrucciones de instalación para obtener más información.
• Debido al tamaño y al peso de la estufa, se necesitan dos personas o más para moverla.
• Retire toda la cinta y el material de empaque.
• Retire todos los accesorios de la cubierta, del horno y del cajón inferior. Las rejillas y los
comales son pesados. Tenga cuidado al manipularlos.
• Asegúrese de que no se hayan aojado piezas durante el transporte. No debe instalarse
en un área expuesta al goteo de agua o al aire libre.
• Asegúrese de que un técnico de servicio o instalador calicado instale y ajuste
correctamente la estufa según el tipo de gas (natural o LP) que utilizará. Para utilizar
gas LP en su estufa, el instalador debe reemplazar los 5 oricios de los quemadores
superiores y los 2 oricios del horno con el juego de oricios para LP y también debe
invertir el adaptador GPR. Estos ajustes debe realizarlos un técnico de servicio calicado
de acuerdo con las instrucciones del fabricante y con todos los códigos y requisitos de
la autoridad pertinente. La agencia calicada que realice este trabajo asume toda la
responsabilidad de la conversión a gas.
• La instalación de esta estufa debe cumplir con los códigos locales o, a falta de ellos, con la
versión más reciente del Código nacional de gas combustible, ANSI Z223.1/NFPA.54.
En Canadá, la instalación debe cumplir con el Código de instalación para gas natural
CAN/CGA-B149.1 actual o con el Código de instalación para propano CAN/CGA-B149.2 actual
y con los códigos locales, cuando corresponda. El diseño de esta estufa ha sido certicado
por ETL según la versión más reciente de ANSI Z21.1, y por Canadian Gas Association
(Asociación de Gas de Canadá) según la versión más reciente de CAN/CGA-1.1.
Seguridad de la ubicación
ADVERTENCIA
Para reducir el riesgo de incendio, descarga eléctrica, lesiones personales y muerte, respete las
siguientes precauciones.
• Este horno ha sido diseñado para uso doméstico en
interiores solamente. No instale la estufa en áreas
expuestas al aire libre o el agua.
• No instale la estufa en un lugar que esté expuesto a
una corriente de aire fuerte.
• Seleccione un piso nivelado y sólido que pueda
soportar el peso de la estufa. Los pisos sintéticos,
como el linóleo, deben soportar temperaturas
de 180 °F (82 °C) sin encogerse, deformarse ni
decolorarse. No instale la estufa directamente sobre
alfombras interiores para cocinas a menos que se
coloque madera contrachapada de ¼ pulgadas o un
aislante semejante entre la estufa y la alfombra.
• Seleccione una ubicación en la que haya un fácil acceso a un tomacorriente de 3 clavijas
con conexión a tierra.
• Si se coloca la estufa cerca de una ventana, no cuelgue cortinas largas ni persianas de
papel en esa ventana.
• Para que la estufa pueda ventilarse correctamente, asegúrese de que las ventilaciones no
estén bloqueadas y de que haya suciente espacio libre arriba, atrás, a los lados y por
debajo de la estufa. Las ventilaciones permiten la salida de aire necesaria para que la
estufa funcione adecuadamente con la combustión correcta.
Información importante de seguridad
Español 9
NX7000K_VE_NX58M6850SS_AA_DG68-00909A-03_EN+MES+CFR.indb 9 1/30/2018 1:04:35 PM
Page 62
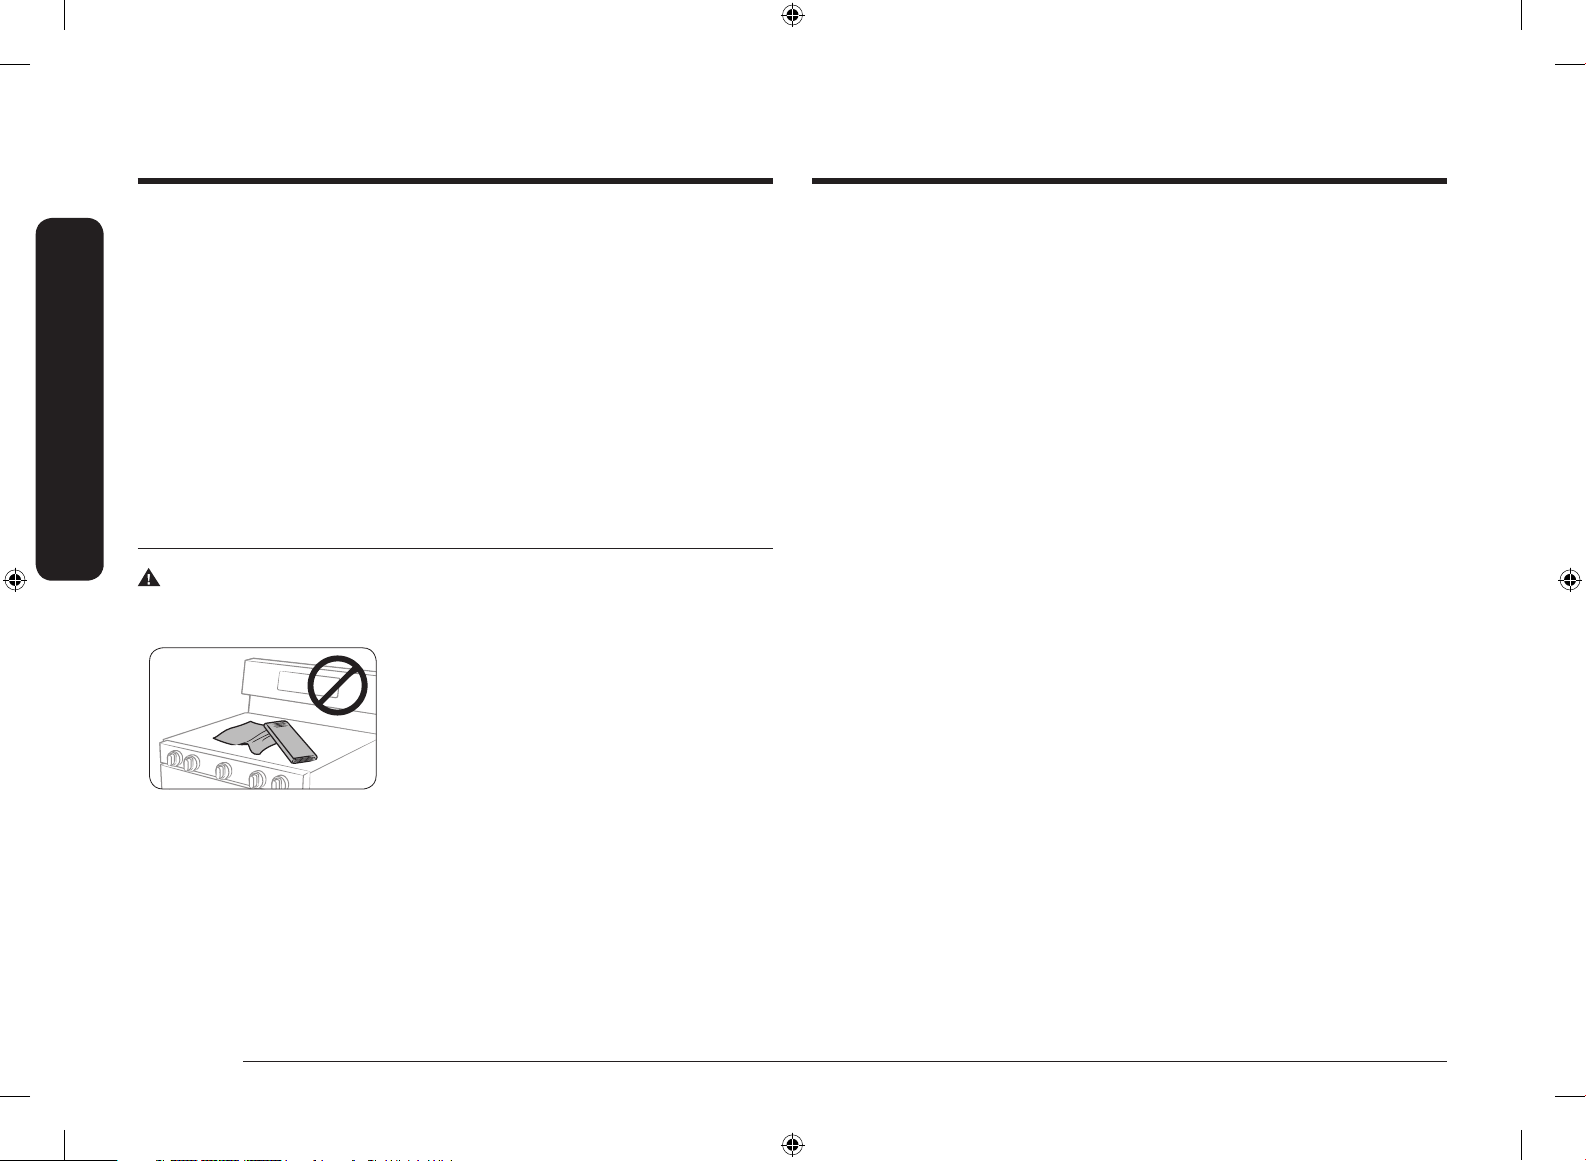
Información importante de seguridad
Información importante de seguridad
• Asegúrese de que los revestimientos de las paredes que rodean a la estufa puedan
soportar un calor de hasta 200 °F (93 °C), generado por la estufa.
• Se debe evitar colocar gabinetes de almacenamiento arriba de la supercie de la
estufa. Si resulta necesario colocar gabinetes de almacenamiento arriba de la estufa,
deje una separación mínima de 40 pulgadas (102 cm) entre la supercie de cocción y
la parte inferior de los gabinetes, o instale una campana para estufas que sobresalga
horizontalmente como mínimo 5 pulgadas (12.7 cm) con respecto al extremo inferior de
los gabinetes.
• Coloque la estufa alejada de los lugares de la cocina con tráco y corrientes de aire para
evitar una circulación de aire insuciente.
• Si se coloca la estufa cerca de una ventana, JAMÁS cuelgue cortinas largas ni persianas de
papel en esa ventana. Podrían volar sobre los quemadores superiores y prenderse fuego,
causando así un peligro de incendio.
Seguridad de la cubierta
ADVERTENCIA
Para reducir el riesgo de incendio, descarga eléctrica, lesiones personales y muerte, respete las
siguientes precauciones.
• Asegúrese de que todos los quemadores estén
apagados cuando no utilice la estufa.
• No utilice papel de aluminio para cubrir las rejillas
ni ninguna parte de la cubierta. Esto puede causar
un envenenamiento por monóxido de carbono.
Las envolturas de papel de aluminio también
pueden atrapar el calor, provocando un riesgo de
incendio. No deje los quemadores sin vigilancia en
conguraciones de calor medio o alto.
• Antes de encender los quemadores, asegúrese de que todas las tapas estén correctamente
instaladas en su lugar y que todos los quemadores estén nivelados.
• Siempre use la posición LITE (Encender) al encender los quemadores y asegúrese de que
todos los quemadores enciendan. Si falla el encendido, gire la perilla en OFF (Apagado) y
espere hasta que se disipe el gas.
• Cuando coloque un quemador a fuego lento, no gire la perilla rápidamente. Asegúrese de
que la llama permanezca encendida.
• No coloque objetos sobre la cubierta, excepto cuando se trate de recipientes y utensilios
de cocina.
• Esta cubierta está diseñada para usar con un wok o con el accesorio del aro para wok.
• Para ambear alimentos, debe tener una campana de ventilación. Durante el ambeado,
la campana debe estar encendida.
• Antes de retirar o cambiar recipientes de cocina, apague los quemadores.
• Retire los alimentos y los recipientes de inmediato después de la cocción.
• Antes de retirar alguna pieza del quemador para realizar la limpieza, asegúrese de que la
estufa esté apagada y completamente fría.
• Después de limpiar el distribuidor del quemador, asegúrese de que esté completamente
seco antes de volver a ensamblarlo.
• Asegúrese de que la marca de encendido en el distribuidor del quemador doble esté
colocada junto al electrodo al ensamblarlo.
• Para evitar el envenenamiento por monóxido de carbono, no vierta agua sobre el hueco
de la cubierta durante la limpieza.
• Seleccione recipientes de cocina diseñados para la cocción encima de la estufa. Seleccione
recipientes lo sucientemente grandes como para cubrir las rejillas de los quemadores.
Ajuste las llamas de los quemadores de modo que no se extiendan más allá de la base de
los recipientes.
• Para evitar que los recipientes se decoloren, se deformen o que se produzca un
envenenamiento por monóxido de carbono, no utilice recipientes que superen
considerablemente el tamaño de la rejilla.
• Asegúrese de que las manijas de los recipientes queden orientadas hacia un lado o hacia
la parte posterior de la cubierta, pero nunca sobre los demás quemadores superiores.
• Aléjese de la estufa durante la cocción mediante fritura.
• Caliente siempre los aceites para freír en forma lenta y vigílelos a medida que se
calientan. Si se fríen alimentos a alta temperatura, vigile cuidadosamente el proceso
de cocción. Si va a utilizar una combinación de grasas y aceites durante la fritura, debe
mezclarlos antes de calentarlos.
• Utilice un termómetro para freidoras de inmersión cuando sea posible. Esto evita el
recalentamiento de la freidora más allá del punto de generación de humo.
• Utilice una cantidad mínima de aceite durante las frituras de inmersión. Evite cocinar
alimentos no descongelados o con excesiva cantidad de hielo.
10 Español
NX7000K_VE_NX58M6850SS_AA_DG68-00909A-03_EN+MES+CFR.indb 10 1/30/2018 1:04:35 PM
Page 63
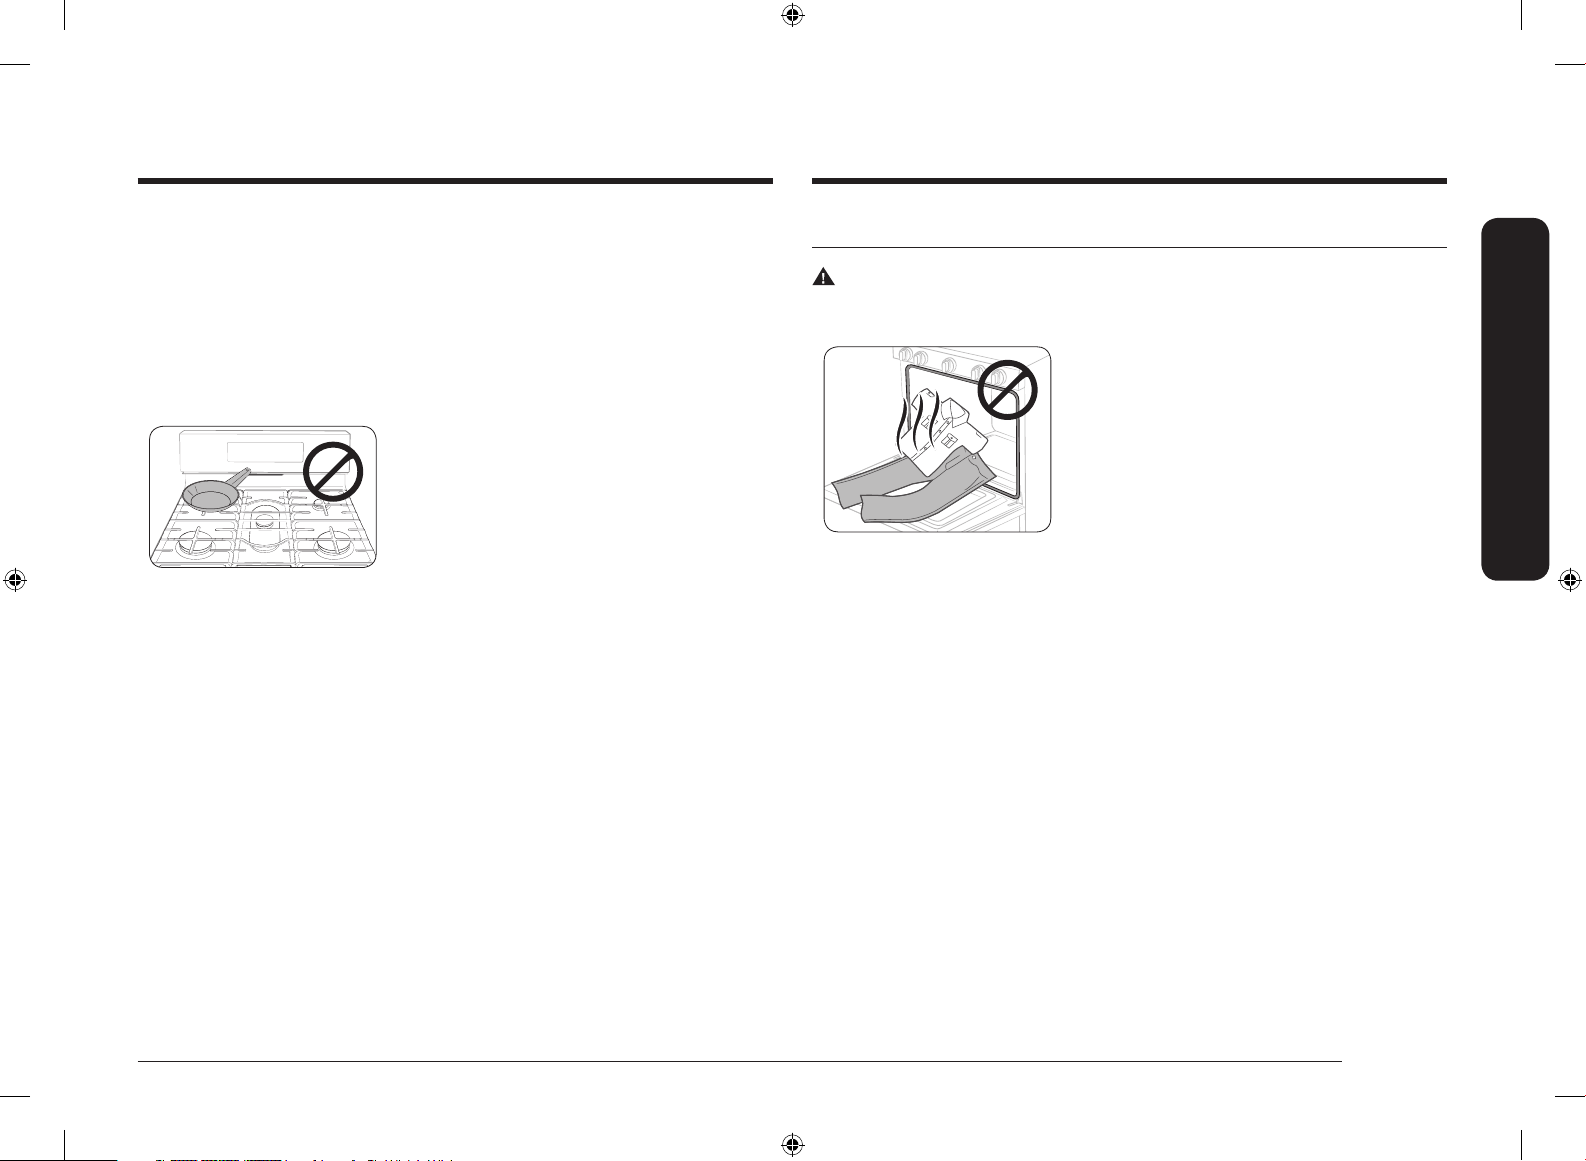
• Antes de transportar recipientes llenos de grasa o aceite, asegúrese de que se hayan
enfriado por completo.
• Para evitar el retraso en el punto de ebullición, siempre deje reposar los líquidos
calentados durante al menos 20 segundos después de apagar el quemador, para que
la temperatura del líquido pueda estabilizarse. En caso de escaldaduras, siga estas
instrucciones de primeros auxilios:
1. Sumerja el área escaldada en agua fría o tibia durante al menos 10 minutos.
2. No se aplique cremas, aceites ni lociones.
3. Cubra el área con un vendaje limpio y seco.
• Coloque los recipientes en el centro de la rejilla. No
coloque un recipiente con un diámetro superior a 9”
en los quemadores traseros. Si coloca un recipiente
de mayor tamaño en la posición incorrecta, podría
interrumpir la circulación de aire necesaria y hacer
que la llama del quemador chisporrotee y queme de
manera ineciente.
• No lleve prendas amplias o colgantes mientras utiliza la estufa. Pueden incendiarse y
producirle quemaduras si tocan el quemador superior.
• No deje elementos plásticos sobre la cubierta. El aire caliente del ventilador puede
derretir o encender los elementos de plástico o causar una acumulación de presión
peligrosa en recipientes de plástico cerrados.
• No coloque artefactos portátiles ni ningún otro objeto sobre la cubierta, excepto cuando
se trate de recipientes y utensilios de cocina. Es posible que se produzcan daños o
incendios si la supercie está caliente.
• Asegúrese siempre de que los alimentos que se frían estén descongelados y secos.
Cualquier tipo de humedad puede causar que la grasa caliente burbujee y se derrame del
recipiente.
• Asegúrese siempre de que los controles estén en OFF (Apagado) y de que las rejillas
estén frías antes de retirarlas para evitar cualquier posibilidad de sufrir quemaduras.
• No coloque materiales combustibles ni otros productos alrededor de la estufa.
• Tenga cuidado de que sus manos no toquen los quemadores cuando estén encendidos.
Apague los quemadores cuando cambie una sartén o una olla.
• Cuando caliente líquidos como salsas, remueva todo el tiempo.
Seguridad del horno
ADVERTENCIA
Para reducir el riesgo de incendio, descarga eléctrica, lesiones personales y muerte, respete las
siguientes precauciones.
• No utilice el horno para otros nes que no sean la
cocción, por ejemplo, para secar ropa o como lugar
de almacenamiento. Utilice el horno solamente para
cocinar.
• Asegúrese de que la parte interna de la parrilla
dividida esté en la posición adecuada dentro de la
parrilla externa.
• Asegúrese de que las parrillas del horno estén
colocadas al mismo nivel en cada lado.
• No dañe, mueva ni limpie la junta selladora de la
puerta.
• No rocíe agua en el vidrio del horno mientras el horno esté encendido o apenas después
de haberlo apagado.
• No utilice papel o cubiertas de aluminio en ninguna parte del horno. No utilice papel de
aluminio ni materiales similares para cubrir oricios o pasajes de la parte inferior del
horno ni para cubrir una parrilla del horno. Esto puede causar un envenenamiento por
monóxido de carbono. Las envolturas de papel de aluminio también pueden atrapar el
calor, provocando un riesgo de incendio.
• Guarde cierta distancia respecto del horno al abrir la puerta de horno.
• Mantenga el horno libre acumulaciones de grasa.
• Al volver a colocar las parrillas del horno, asegúrese de que el horno esté completamente
frío.
• Utilice solo recipientes recomendados para hornos de gas.
• Para evitar dañar las perillas de control de los quemadores, siempre hornee y/o ase a la
parrilla los alimentos con la puerta del horno cerrada.
• No ase carne demasiado cerca de la llama del quemador. Recorte el exceso de grasa de la
carne antes de la cocción.
• Al utilizar bolsas para cocinar o asar en el horno, siga las instrucciones del fabricante.
Información importante de seguridad
Español 11
NX7000K_VE_NX58M6850SS_AA_DG68-00909A-03_EN+MES+CFR.indb 11 1/30/2018 1:04:36 PM
Page 64
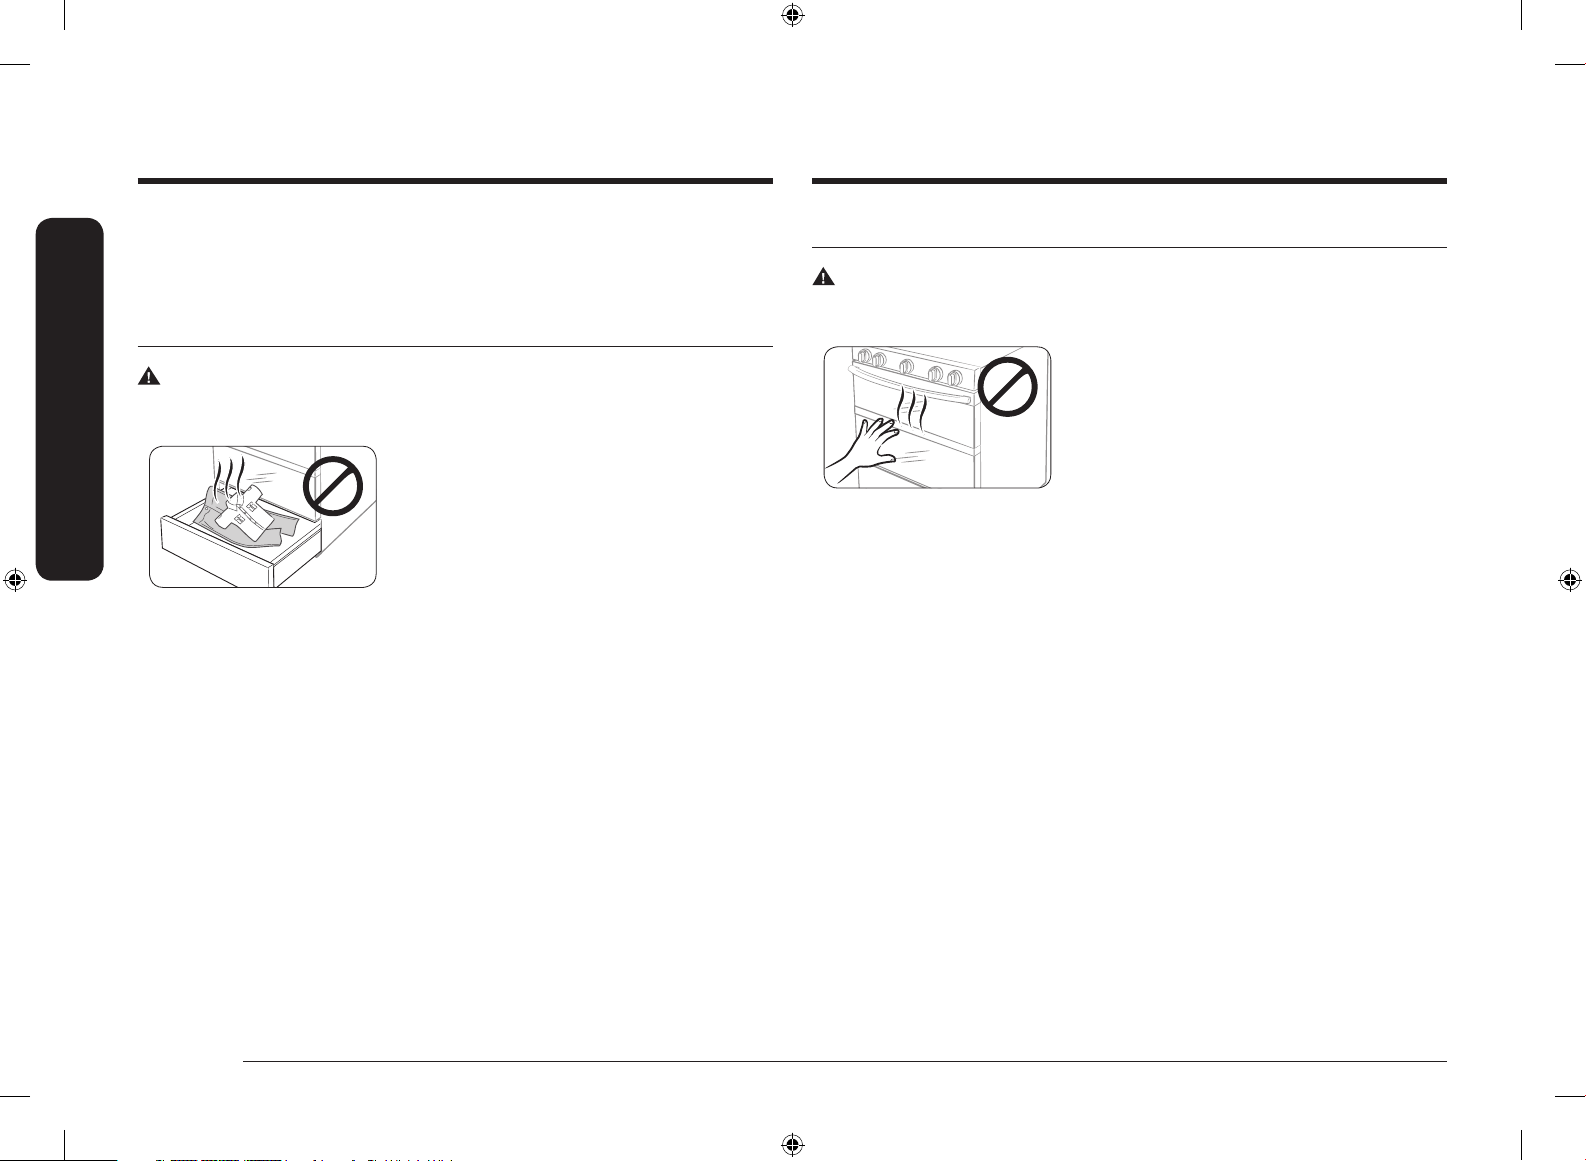
Información importante de seguridad
Información importante de seguridad
• No cubra ranuras, oricios o pasajes en la parte inferior del horno, ni cubra una parrilla
completa con materiales como papel de aluminio Esto evita que el aire circule a través
del horno y puede causar envenenamiento por monóxido de carbono. Las envolturas de
papel de aluminio también pueden atrapar el calor, provocando un riesgo de incendio.
Información de seguridad del cajón de almacenamiento
ADVERTENCIA
Para reducir el riesgo de incendio, descarga eléctrica, lesiones personales y muerte, respete las
siguientes precauciones.
• No utilice el cajón para otros nes que no sean la
cocción, por ejemplo, para secar ropa o como lugar
de almacenamiento. Utilice el cajón solamente para
cocinar.
• No toque la supercie interior del cajón ni el
elemento de calentamiento. Es posible que estas
supercies estén calientes y podrían ocasionarle
quemaduras.
• Para evitar las quemaduras producidas por el vapor, tenga cuidado al abrir el cajón.
• No utilice papel de aluminio para revestir el cajón.
• No coloque el cajón en el horno. No coloque el cajón en el horno durante un ciclo de auto-
limpieza.
• No deje recipientes de grasa derretida dentro o cerca del cajón.
Seguridad durante la auto-limpieza del horno
ADVERTENCIA
Para reducir el riesgo de incendio, descarga eléctrica, lesiones personales y muerte, respete las
siguientes precauciones.
• La función de auto-limpieza opera el horno a
temperaturas lo sucientemente altas como para
eliminar por incineración los restos de alimentos en
el horno. La estufa está extremadamente caliente
durante el ciclo de auto-limpieza. No toque ninguna
supercie de la estufa durante el ciclo de autolimpieza.
• Mantenga alejados a los niños durante el ciclo de
auto-limpieza.
• Antes de iniciar un ciclo de auto-limpieza, retire todas las parrillas, los recipientes y los
utensilios del horno. Solo pueden dejarse en el horno parrillas recubiertas de porcelana.
• Antes de iniciar un ciclo de auto-limpieza, limpie la grasa y los restos de comida del
horno.
• No coloque el cajón inferior en el interior del horno cuando ejecute un ciclo de autolimpieza.
• Al abrir la puerta después de un ciclo de auto-limpieza, aléjese del horno.
• Si el ciclo de auto-limpieza funciona mal, apague el horno, desconecte el suministro
eléctrico y comuníquese con un técnico de servicio calicado.
12 Español
NX7000K_VE_NX58M6850SS_AA_DG68-00909A-03_EN+MES+CFR.indb 12 1/30/2018 1:04:36 PM
Page 65
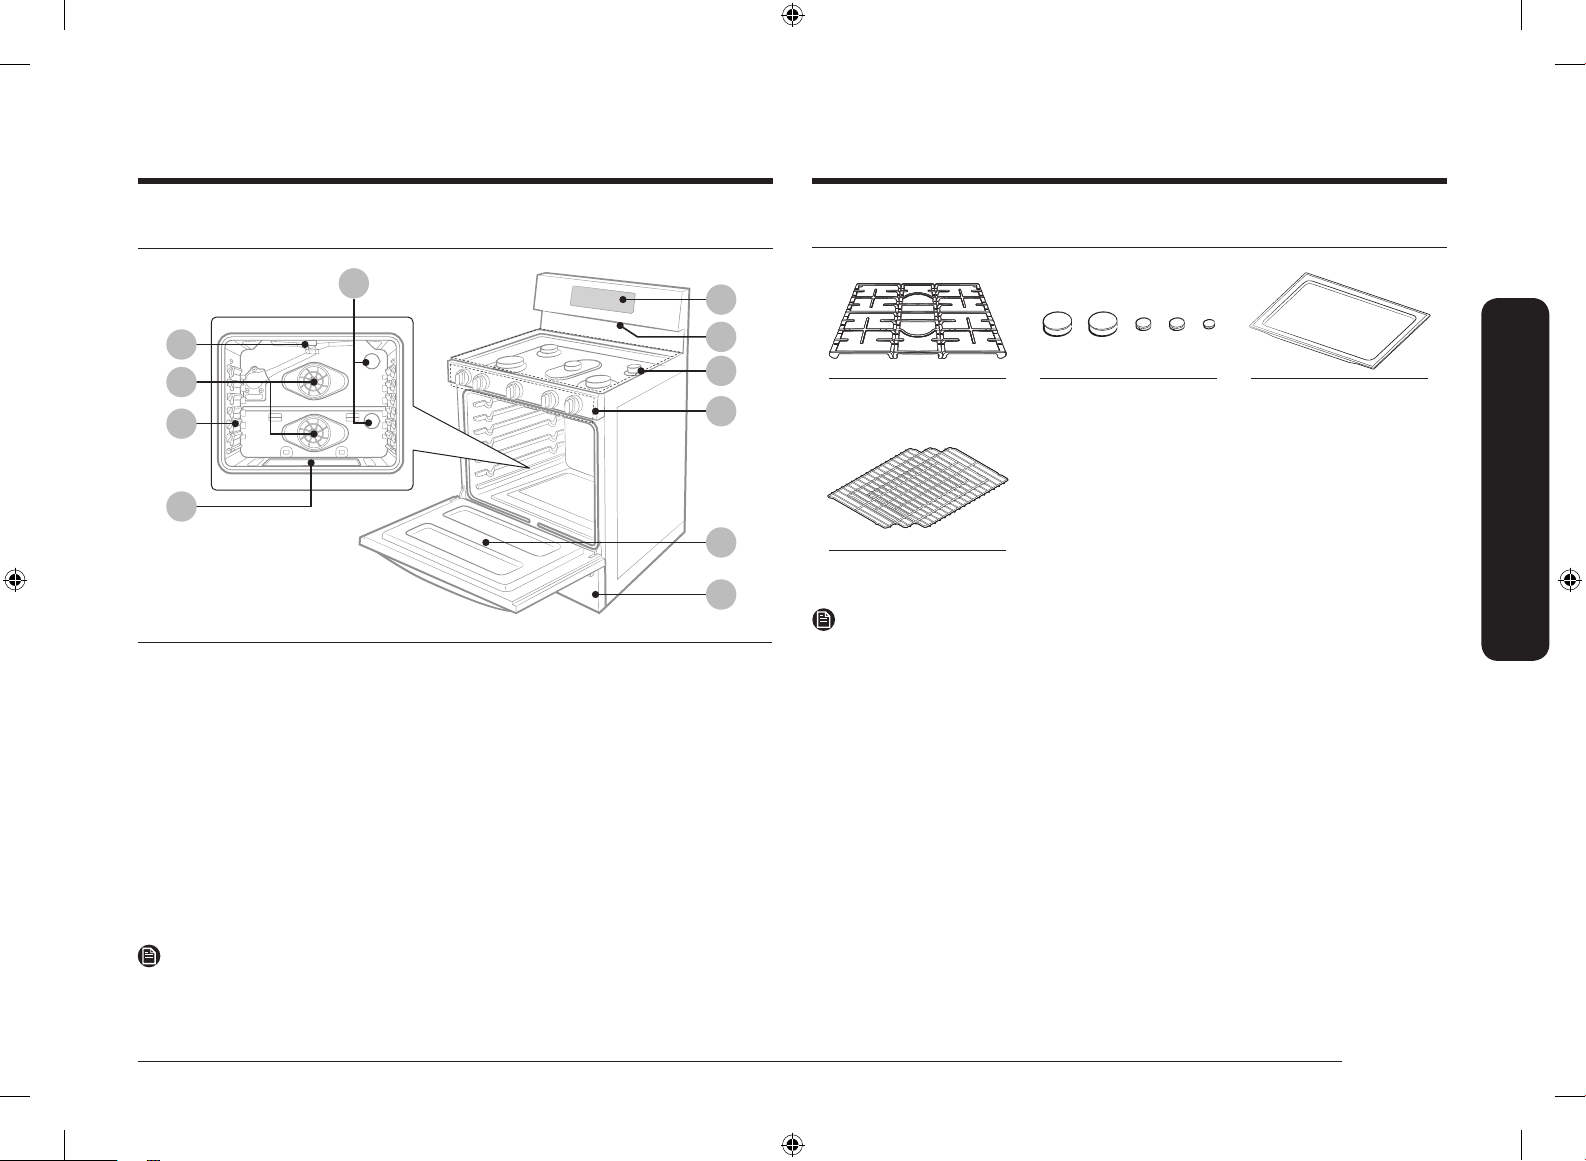
Descripción general
Esquema
07
11
08
09
10
01 Visor 02 Perillas para
los quemadores
superiores (5 piezas)
04 Ventilación del horno 05 Puerta del horno
desmontable
07 Luz del horno *
(2 ubicaciones)
08 Ventilador de
convección/Calentador
de convección
01
04
03
02
05
06
03 Quemadores
superiores
06 Cajón de
almacenamiento
09 Sistema de parrillas
del horno
Elementos incluidos
Rejillas para los quemadores
superiores (3) *
Parrilla plana (3) *
NOTA
Si necesita alguno de los accesorios identicados con un * (asterisco), comuníquese con el
Centro de llamadas de Samsung al 1-800-726-7864 o visite nuestro sitio en línea de repuestos
www.samsungparts.com.
Quemadores superiores
y tapas (5) *
Divisor inteligente (1) *
Descripción general
10 Quemador del horno
para hornear
NOTA
Si necesita una pieza identicada con un “*”, puede adquirirla en el Centro de contacto de
Samsung (1-800-726-7864).
NX7000K_VE_NX58M6850SS_AA_DG68-00909A-03_EN+MES+CFR.indb 13 1/30/2018 1:04:37 PM
11 Quemador del horno
para asar a la parrilla
Español 13
Page 66
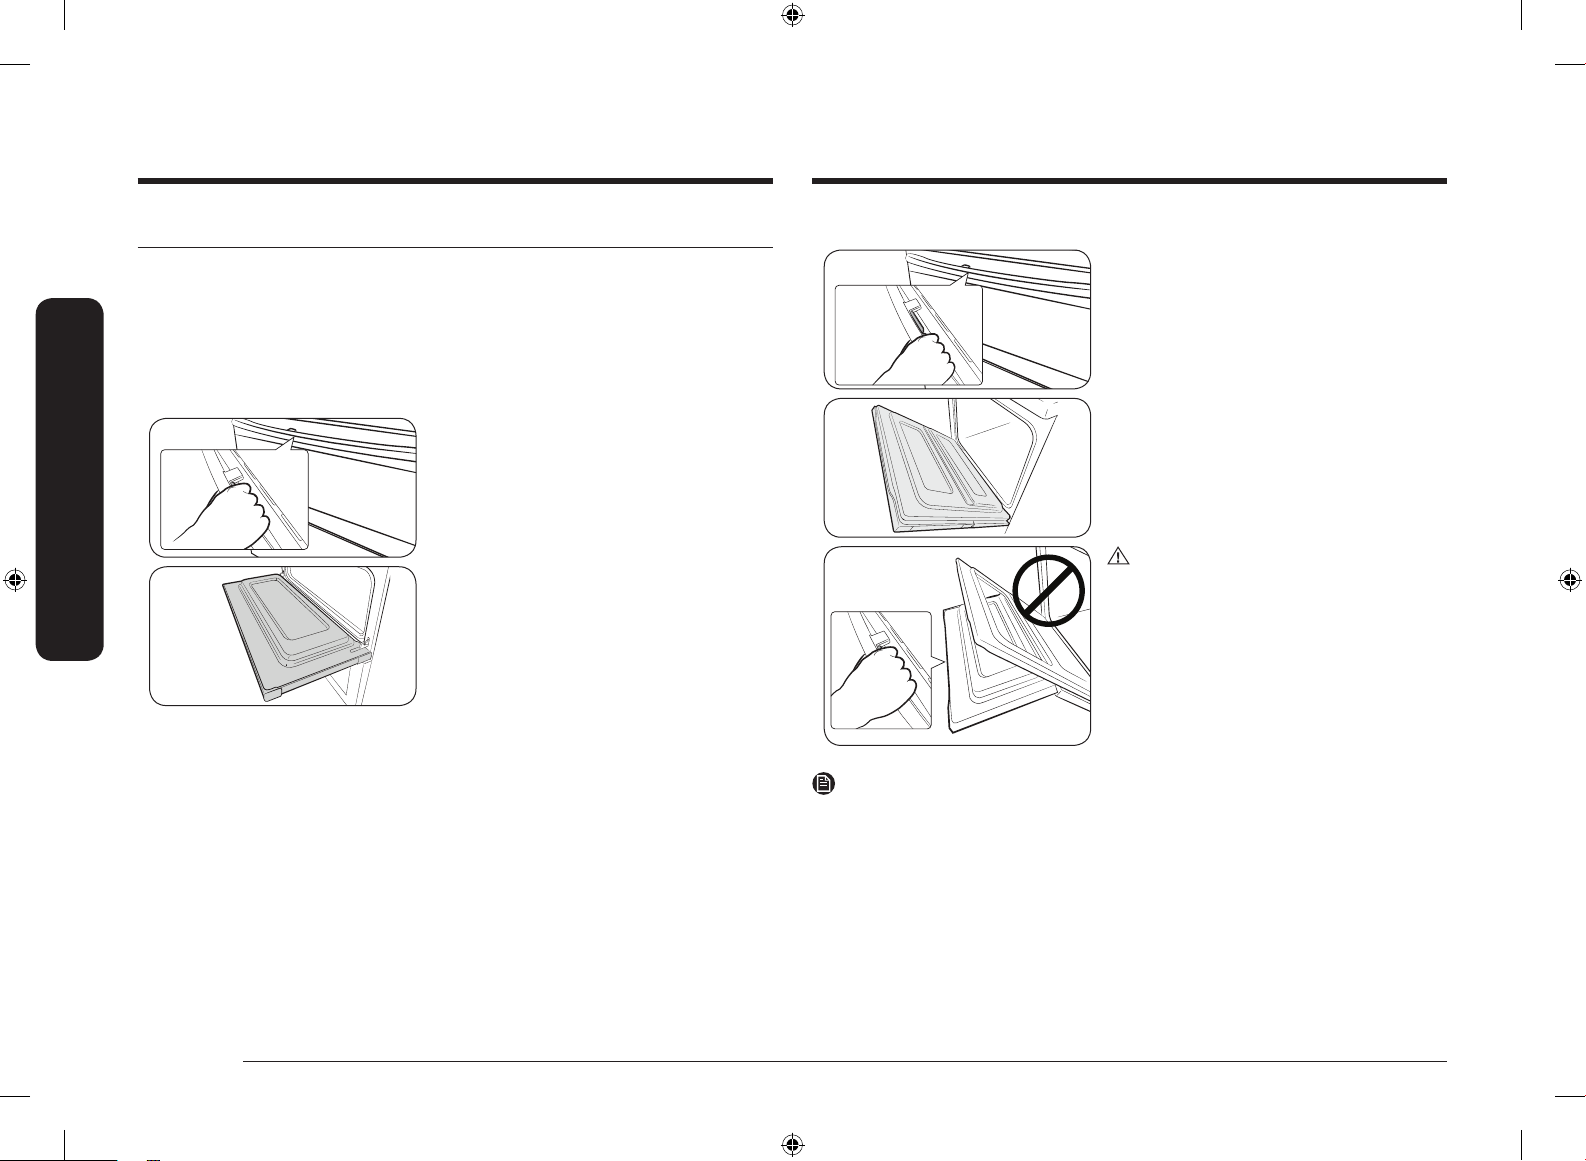
Descripción general
Dual Door™
Este horno tiene una única puerta Dual Door™ con bisagra en el centro. Si ha insertado el
Divisor inteligente y dividido el horno en dos (o sea en Modo doble), solo tiene que abrir la
mitad superior para acceder a la cavidad de arriba. Cuando utiliza la capacidad Flex Duo™,
puede acceder al espacio superior del horno mucho más fácilmente y con mayor eciencia
energética.
Descripción general
Cómo utilizar la puerta superior
1. Sujete la manija y la palanca. Presione la
palanca para liberar la traba de la puerta y
jale la manija.
2. Esto abrirá solo la puerta superior como se
muestra.
Cómo utilizar toda la puerta
1. Sujete la parte sin palanca de la manija y jale.
2. Esto abrirá toda la puerta como se muestra.
PRECAUCIÓN
Cuando abra toda la puerta, asegúrese de sujetar
la manija por la parte que no tiene palanca.
Si presiona la palanca mientras está abriendo
toda la puerta, la puerta superior puede abrirse y
causar daños físicos.
NOTA
• No coloque objetos pesados ni aplique una fuerza excesiva sobre la puerta superior.
• No permita que los niños jueguen con la puerta superior o se suban a ella.
• No utilice la parrilla deslizante cuando use la puerta superior.
• Use siempre toda la puerta cuando use la parrilla deslizante.
14 Español
NX7000K_VE_NX58M6850SS_AA_DG68-00909A-03_EN+MES+CFR.indb 14 1/30/2018 1:04:38 PM
Page 67
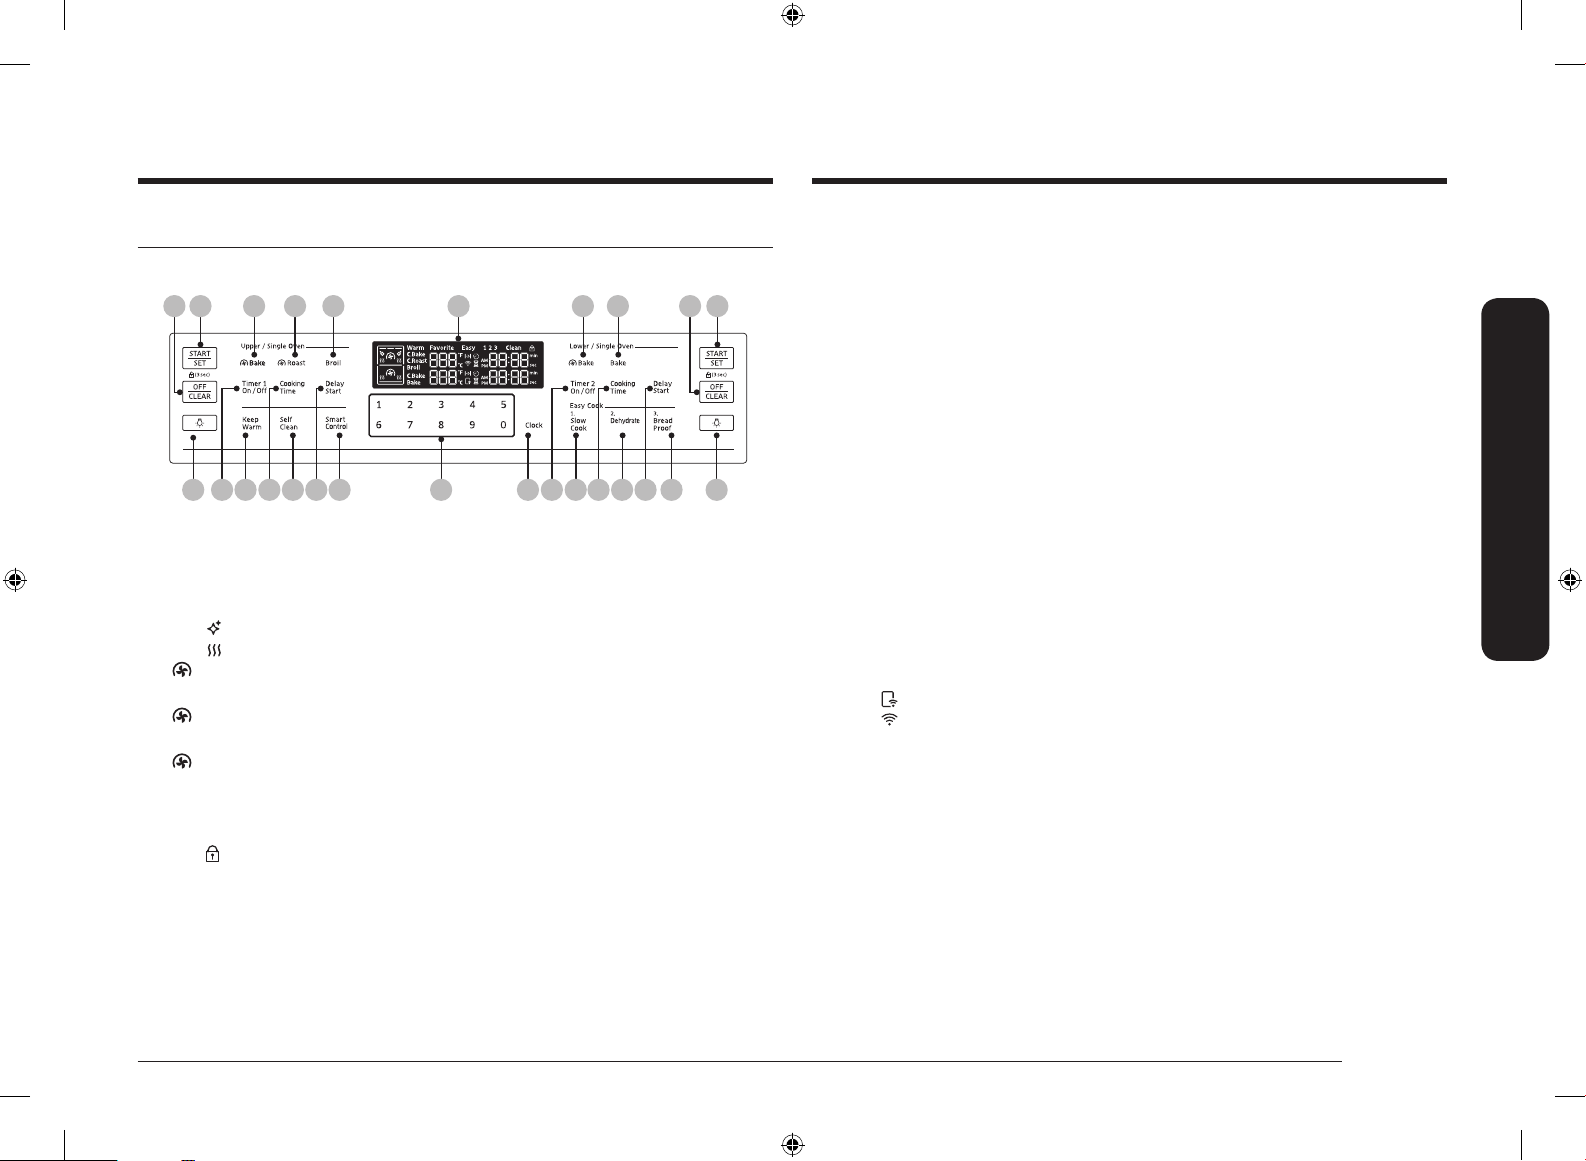
Panel de control
08
07 02 03 04 01 05 06 08 07
12 09 13 10 14 11 24 1615 17 20 18 21 19 22 23
01 Pantalla: Muestra la hora del día, la temperatura del horno, si el horno está en el modo de
hornear, asar a la parrilla o auto-limpieza y las horas jadas para el temporizador o las
operaciones automáticas del horno.
: Cuando usa la función de auto-limpieza, aparece este icono en la pantalla.
•
•
: Cuando el horno se está precalentando, aparece este icono en la pantalla.
Bake (Hornear por convección): Activar el horneado por convección para el horno
02
superior en el modo doble o para todo el horno en el modo simple.
Roast (Asar por convección): Activar el asado por convección.
03
04 Broil (Asar a la parrilla): Asar el alimento solamente con el quemador superior del horno.
05 Bake (Hornear por convección): Activar el horneado por convección para el horno
inferior en el modo doble o para todo el horno en el modo simple.
06 Bake (Hornear): Hornear los alimentos con el quemador inferior del horno.
07 START/SET (INICIO/CONFIGURAR): Iniciar una función o congurar el tiempo.
• (3sec) (3 s): Mantener presionado durante 3 segundos para bloquear el panel de
control y la puerta para evitar accidentes.
08 OFF/CLEAR (APAGAR/BORRAR): Cancelar la operación actual pero no el temporizador.
09 Timer1 On/Off (Activar/desactivar temporizador 1): Activar o desactivar el temporizador.
(Simple/Superior en modo doble)
10 Cooking Time (Tiempo de cocción): Establecer el tiempo de cocción. (Simple/Superior en
modo doble)
11 Delay Start (Inicio retardado): Programar el horno para que se inicie a una hora
determinada. (Simple/Superior en modo doble)
12 Oven Light (Luz del horno): Encender/apagar la luz del horno. (Superior)
13 Keep Warm (Mantener caliente): Mantener los alimentos cocinados calientes a baja
temperatura.
14 Self Clean (Auto-limpieza): Quemar residuos de alimentos en el horno usando
temperaturas muy elevadas.
15 Números: Se utilizan para jar la hora, la temperatura o los ajustes.
16 Clock (Reloj): Congurar la hora del reloj.
17 Timer2 On/Off (Activar/desactivar temporizador 2): Activar o desactivar el temporizador.
(Simple/Inferior en modo doble)
18 Cooking Time (Tiempo de cocción): Establecer el tiempo de cocción. (Simple/Inferior en
modo doble)
19 Delay Start (Inicio retardado): Programar el horno para que se inicie a una hora
determinada. (Simple/Inferior en modo doble)
20 Slow Cook (Cocción lenta): Activar la cocción lenta que cocina los alimentos lentamente a
más baja temperatura.
21 Dehydrate (Deshidratar): Activar la función de deshidratar.
22 Bread Proof (Entibiar pan para leudado): Activar la función de entibiar pan para leudado.
23 Oven Light (Luz del horno): Encender/apagar la luz del horno. (Inferior)
24 Smart Control: Activa la conexión fácil.
: Cuando usa la función de conexión fácil, aparece este icono en la pantalla.
•
• : Cuando el horno está conectado a Wi, aparece este icono en la pantalla.
Descripción general
Español 15
NX7000K_VE_NX58M6850SS_AA_DG68-00909A-03_EN+MES+CFR.indb 15 1/30/2018 1:04:39 PM
Page 68
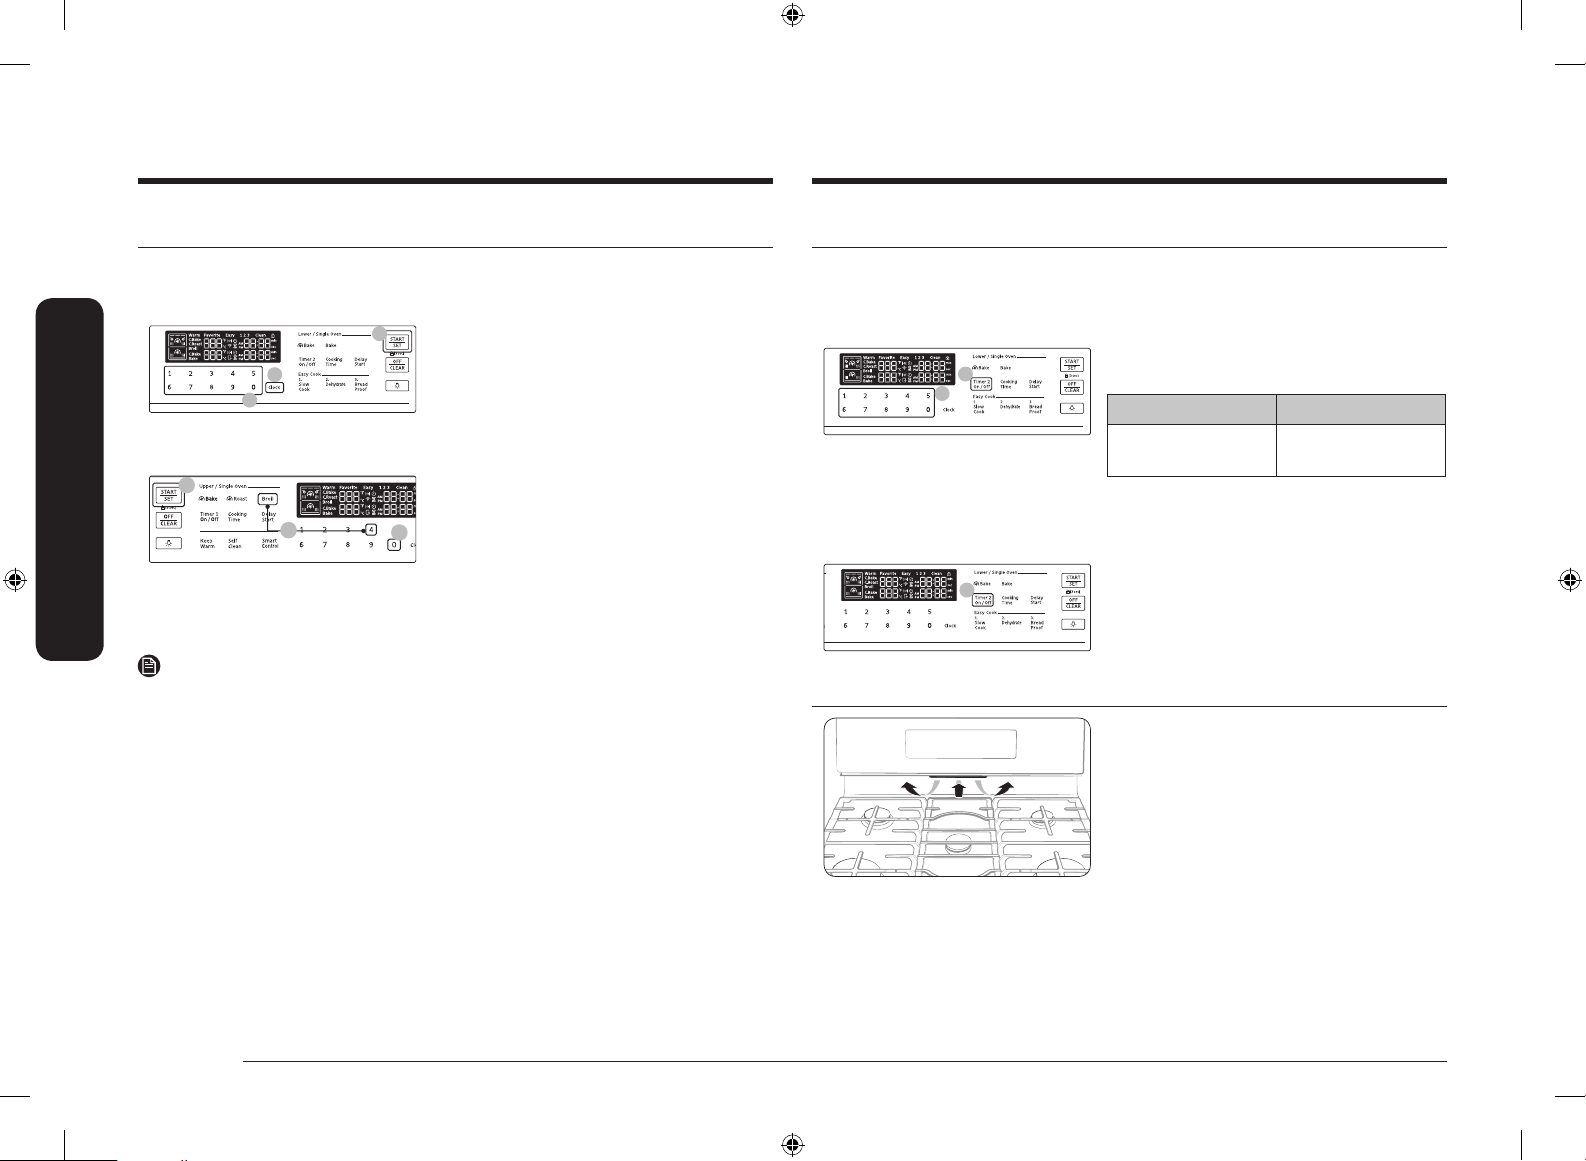
Descripción general
01
02
03
01
03
02
02
01
03
Reloj
Debe congurar correctamente el reloj para asegurar que las funciones automáticas funcionen
correctamente. Este producto admite dos formatos de hora: 12 horas (predeterminado) y
24 horas.
Para congurar la hora del reloj
1. Presione la tecla Clock (Reloj).
2. Ingrese la hora actual usando el teclado
Descripción general
numérico.
3. Presione la tecla START/SET (INICIO/CONFIGURAR)
para conrmar los ajustes.
Para cambiar el formato de hora (12 h/24 h)
1. Mantenga presionadas las teclas Broil
(Asar a la parrilla) y 4 durante 3 segundos.
2. Presione la tecla 0 para cambiar el ajuste de la
pantalla entre 12 horas y 24 horas.
3. Presione la tecla START/SET (INICIO/CONFIGURAR)
para cambiar el modo de visualización del reloj.
Temporizador de cocina
El temporizador de cocina le brinda un temporizador adicional que puede utilizar para
programar las tareas de cocción, como hervir huevos. Sin embargo, no inicia ni detiene
ninguna operación de cocción. El temporizador se puede jar desde 1 minuto hasta 9 horas y
59 minutos.
1. Presione la tecla Timer On/Off
(Activar/desactivar temporizador).
Una vez Dos veces
Horas/Minutos Apagar o cancelar el
proceso
2. Presione las teclas numéricas para ingresar la
cantidad de tiempo que desea en minutos o
en horas y minutos.
3. Presione la tecla Timer On/Off
(Activar/desactivar temporizador) para
iniciar el temporizador.
NOTA
Puede congurar/cambiar el reloj o el temporizador de cocina antes de iniciar un modo de
cocción o mientras la mayoría de los modos de cocción están funcionando. Sin embargo, no se
puede congurar o cambiar la hora si hay una función basada en el tiempo en funcionamiento
(horneado programado, por ejemplo) o si la opción Shabat está activada.
Abertura de ventilación/Oricios de refrigeración
La abertura de ventilación del horno está ubicada
debajo del panel de control del horno.
La adecuada circulación de aire evita los
problemas de combustión del quemador del horno
y asegura un buen desempeño.
• No bloquee la ventilación ni sus alrededores.
• Tenga cuidado al colocar elementos cerca de
la ventilación. El vapor caliente puede hacer
que se sobrecalienten o se derritan.
16 Español
NX7000K_VE_NX58M6850SS_AA_DG68-00909A-03_EN+MES+CFR.indb 16 1/30/2018 1:04:40 PM
Page 69
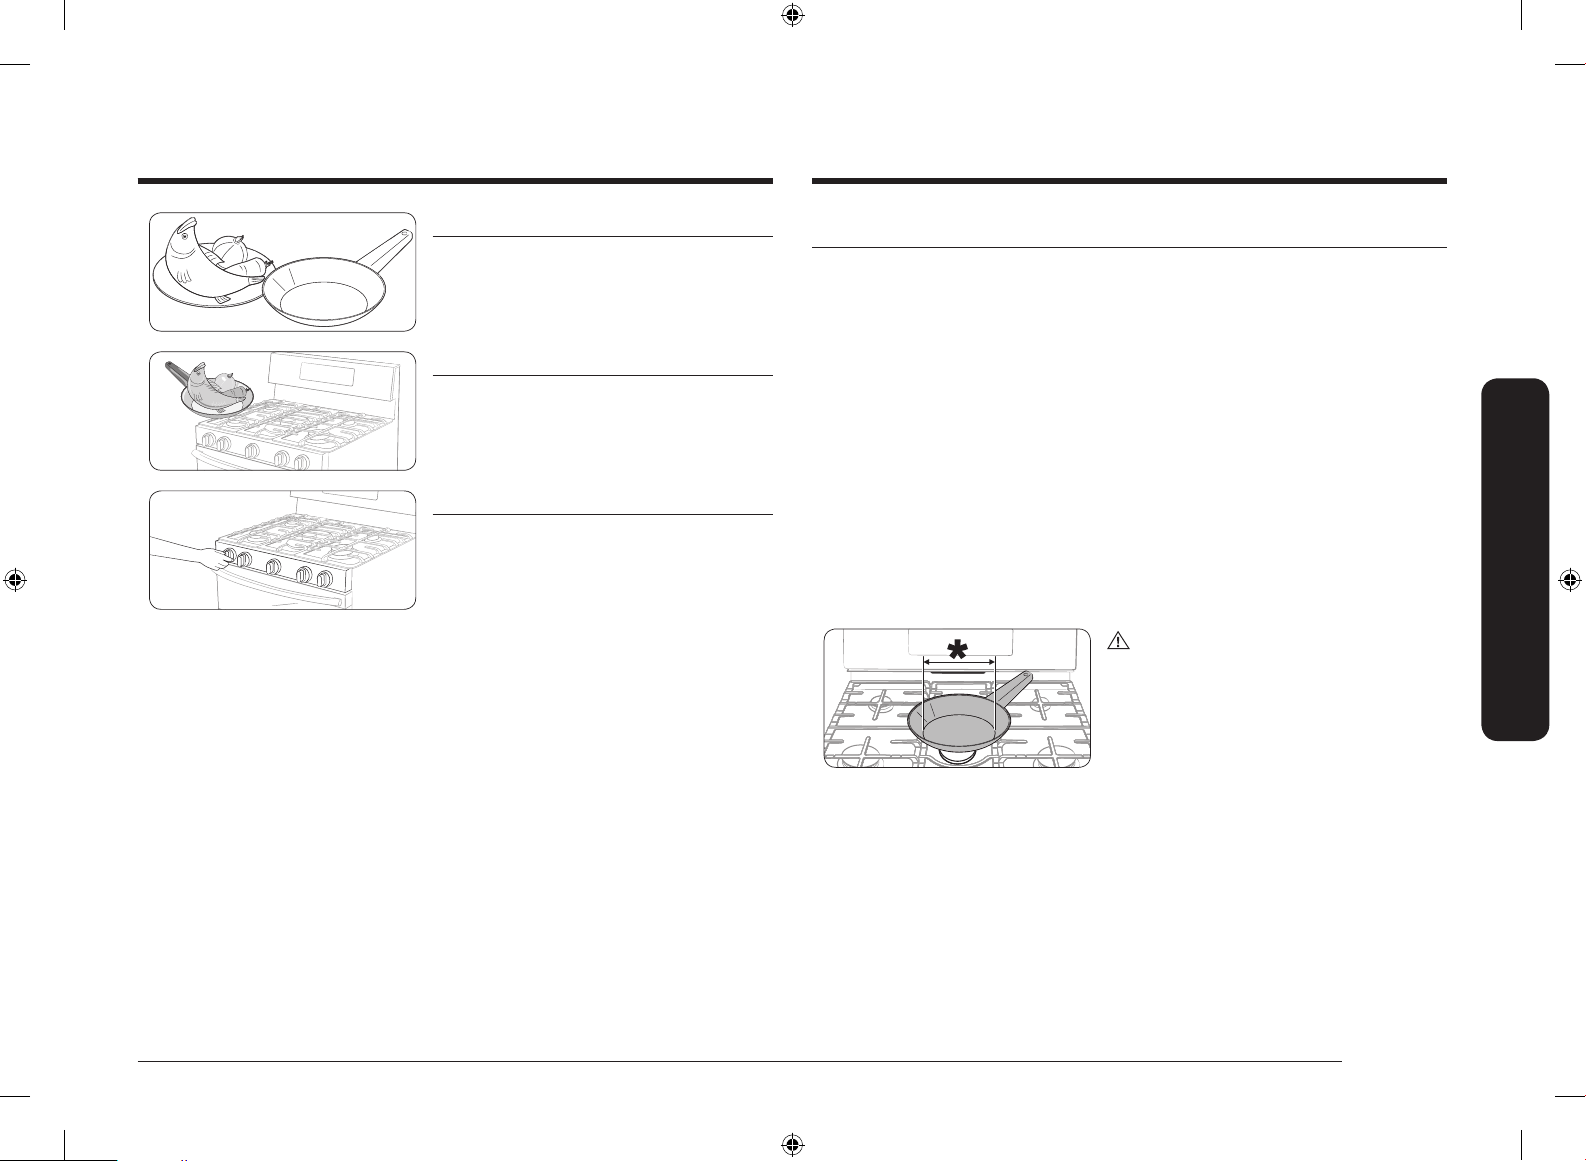
Estufa de gas
PASO 1
Ponga todos los ingredientes en un recipiente de
cocción (sartén, olla, etc.).
PASO 2
Coloque el recipiente sobre un quemador superior.
PASO 3
Encienda el quemador superior.
Utensilio de cocina
Requisitos
• Fondo plano y lados verticales.
• Tapa bien ajustada.
• Bien equilibrado con manijas que pesen menos que el cuerpo principal de la olla o sartén.
Características de los materiales
• Aluminio: Excelente conductor de calor. Algunos tipos de alimentos pueden causar el
oscurecimiento del aluminio. Sin embargo, los recipientes de aluminio anodizado son
resistentes a las manchas y a las picaduras.
• Cobre: Excelente conductor de calor pero su color se altera con facilidad.
• Acero inoxidable: Conductor de calor lento con resultados de cocción irregulares, pero es
duradero, fácil de limpiar y resistente a las manchas.
• Hierro fundido: Mal conductor de calor, pero retiene muy bien el calor.
• Utensilios esmaltados: Las características de conducción de calor dependen del material base.
• Vidrio: Conductor de calor lento. Utilice solo recipientes de vidrio con la especicación de
que son aptos para usar sobre quemadores superiores de estufas o en el horno.
Limitaciones de tamaño
PRECAUCIÓN
No coloque una olla o sartén pequeña con un
diámetro de fondo de alrededor de 6 pulgadas o
menos en la rejilla central. Este utensilio podría
volcarse. Utilice los quemadores traseros para
estos utensilios de tamaño pequeño.
* : 6 pulgadas o menos
• Asegúrese siempre de que las manijas de los recipientes queden orientadas hacia un lado
o hacia la parte posterior de la cubierta, y no sobre los demás quemadores superiores.
Esto minimizará las posibilidades de quemaduras y derrames y de que se enciendan los
materiales inamables que pueden causarse al golpear accidentalmente ollas o sartenes.
• Cuando utilice recipientes de vidrio, asegúrese de que estén diseñados para la cocción
sobre los quemadores superiores de las estufas.
• No deje elementos plásticos sobre la cubierta. El aire caliente del ventilador puede
derretir o encender los elementos de plástico o causar una acumulación de presión
peligrosa en recipientes de plástico cerrados.
• Asegúrese de sujetar la manija de un wok o una olla pequeña de una sola asa
mientras cocina.
Estufa de gas
Español 17
NX7000K_VE_NX58M6850SS_AA_DG68-00909A-03_EN+MES+CFR.indb 17 1/30/2018 1:04:41 PM
Page 70
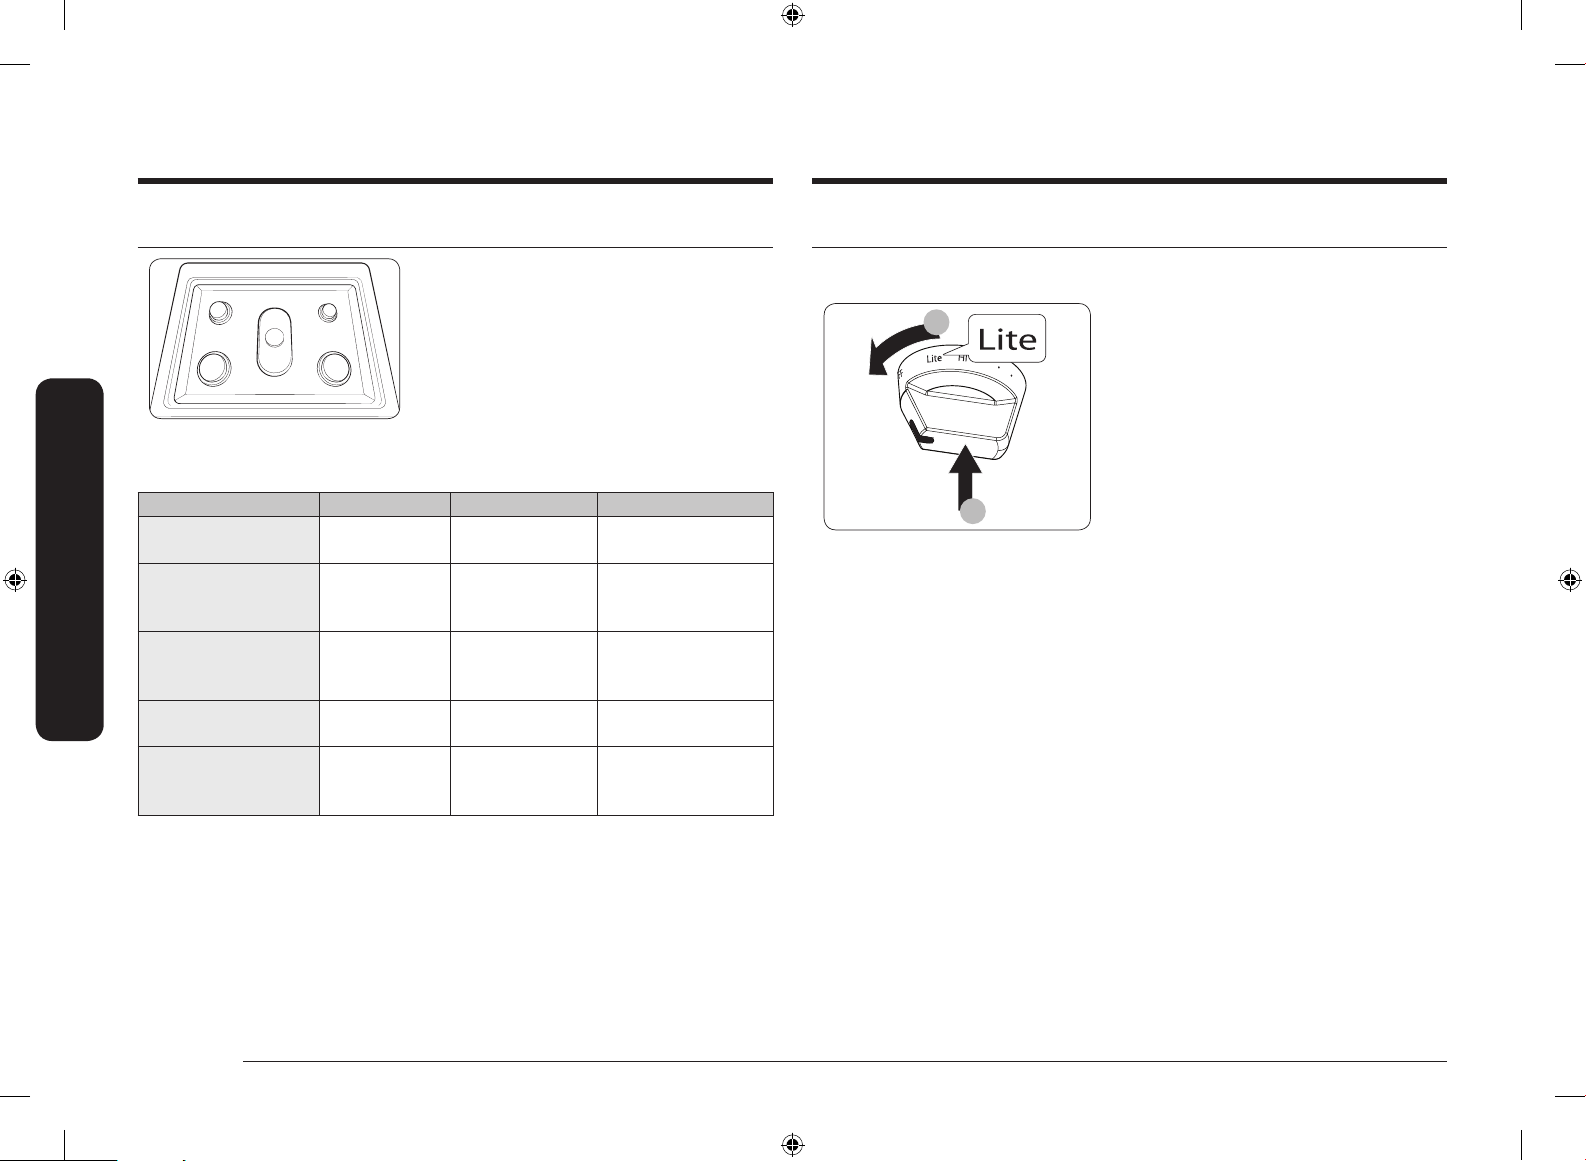
Estufa de gas
1
2
Estufa de gas
Quemadores de gas
Cada quemador tiene una perilla correspondiente
que le permite ajustar el nivel de la llama de
LO (Bajo) a HI (Alto). Además, cada perilla tiene
TI
DI DD
Posición Propósito Tipo de alimento Características
Delantero derecho (DD)
16000 BTU
Trasero derecho (TD)
5000 BTU
Centro (C)
9500 BTU
Delantero izquierdo (DI)
15000 BTU
Trasero izquierdo (TI)
9500 BTU
* La salsa de tomate debe revolverse durante la cocción a fuego lento.
TD
C
Calentamiento
potente
Cocción a fuego
lento baja
Calentamiento
general/Cocción a
fuego lento baja
Calentamiento
rápido
Calentamiento
general/Cocción a
fuego lento baja
un ajuste LITE (Encender). Al girar la perilla
hacia la posición LITE (Encender), se enciende el
quemador correspondiente. Los indicadores de
los quemadores están situados sobre cada perilla
y muestran qué quemador controla dicha perilla.
Cada quemador está diseñado para un propósito
de cocción especíco. Consulte la tabla siguiente.
Comida hervida Máxima potencia
Chocolate, guisos,
salsas
Alimentos en
general, guisos,
salsa de tomate*
General Cocción de uso general
Alimentos en
general, guisos,
salsa de tomate*
Alimentos delicados que
requieren fuego lento
para tiempo prolongado
Cocción de uso general
Cocción de uso general
Ignición
Asegúrese de que todos los quemadores superiores estén correctamente instalados. Para
encender un quemador:
1. Empuje la perilla de control y gírela a la
posición LITE (Encender). Oirá un "clic" que
indica que el sistema de ignición electrónico
funciona correctamente.
2. Una vez encendido el quemador superior,
gire la perilla de control para salir de la
posición LITE (Encender) y apagar el sistema
de ignición electrónico.
3. Gire la perilla de control para ajustar el nivel
de la llama.
Encendido manual
Si hay un corte de energía, puede encender el quemador manualmente. Tenga cuidado cuando lo haga.
1. Lleve un encendedor de la parrilla de gas largo al quemador superior que desea encender.
2. Empuje la perilla de control del quemador y gírela a la posición LITE (Encender).
Encienda el quemador con el encendedor de la parrilla.
3. Una vez encendido el quemador, gire la perilla de control para ajustar el nivel de la llama.
18 Español
NX7000K_VE_NX58M6850SS_AA_DG68-00909A-03_EN+MES+CFR.indb 18 1/30/2018 1:04:42 PM
Page 71
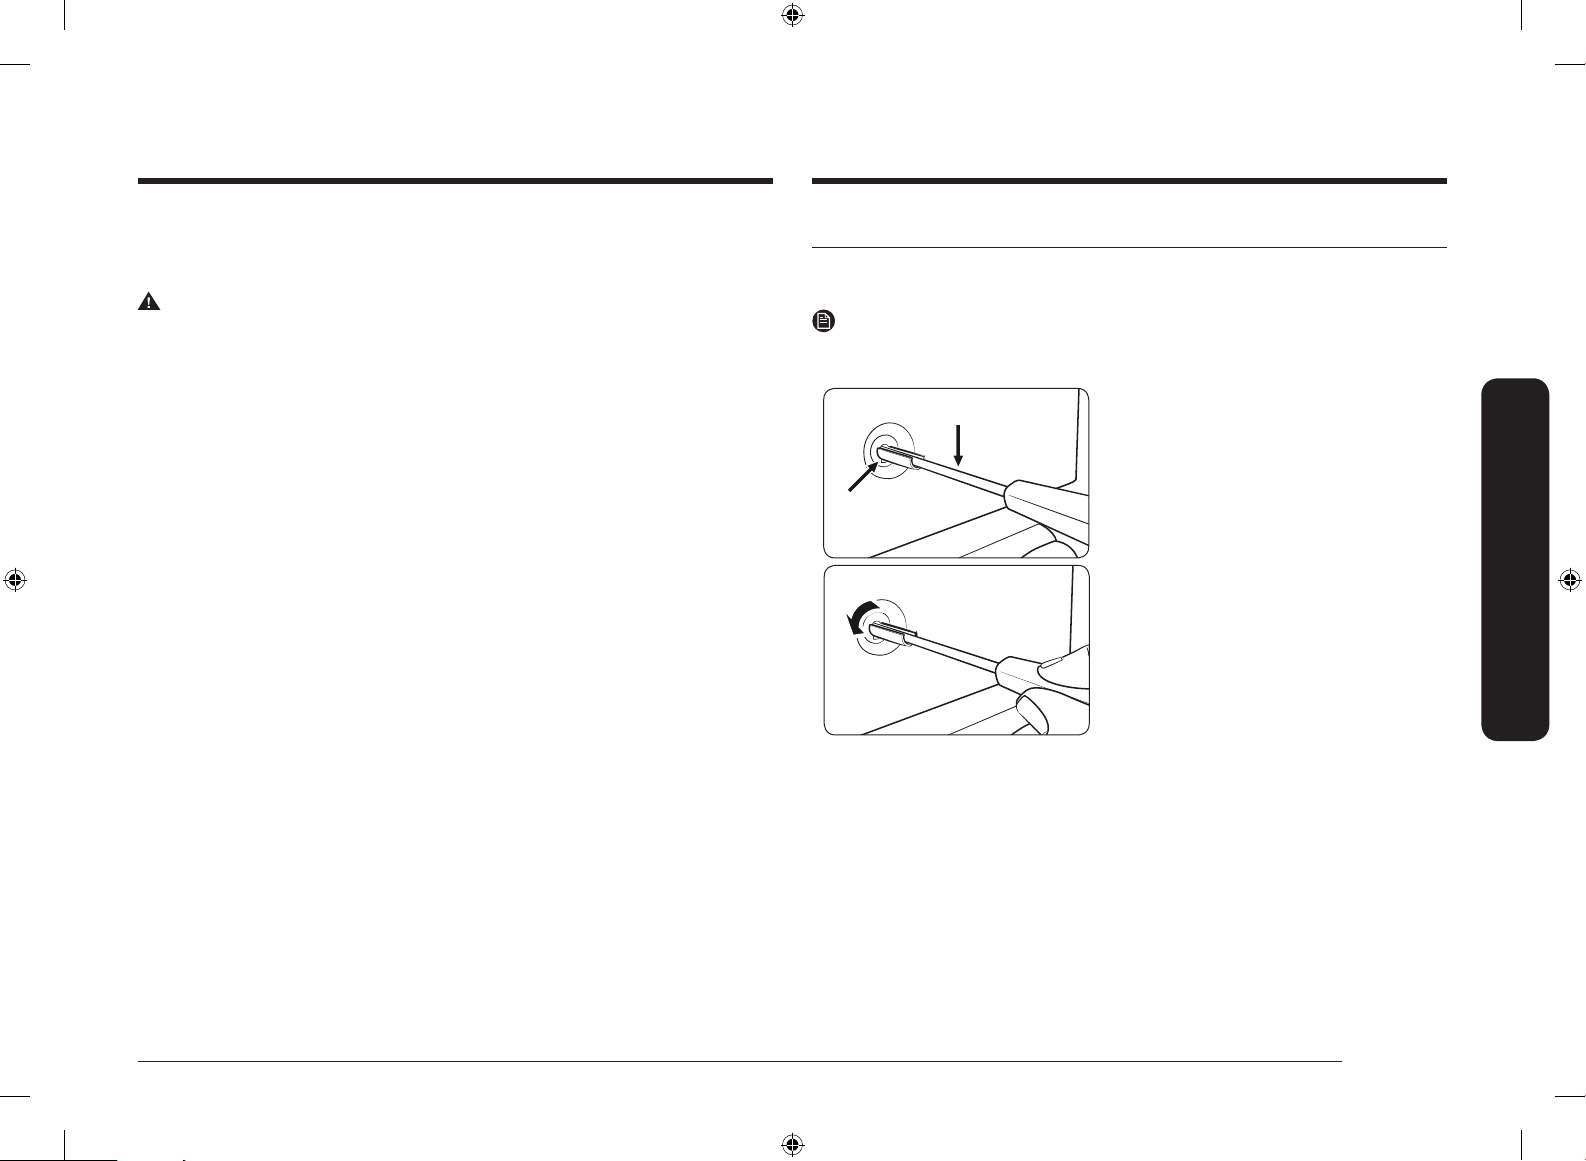
Nivel de la llama
Las llamas de los quemadores siempre deben permanecer debajo de los recipientes de cocción y no
deben extenderse más allá del fondo del utensilio en ningún momento.
ADVERTENCIA
• Si las llamas son mayores que el fondo del recipiente, pueden provocar un incendio o lesiones
físicas.
• Cuando coloca un quemador a fuego lento, no gire la perilla del quemador rápidamente.
Mire la llama para asegurarse de que se mantenga encendida.
• Después de encender un quemador superior, asegúrese de que el quemador se haya encendido.
Ajuste el nivel de la llama girando la perilla del quemador.
• Siempre apague los quemadores superiores antes de retirar los recipientes de cocción.
Los controles de todos los quemadores superiores deben estar en la posición OFF (Apagado)
cuando no se cocine.
• Siempre apague los quemadores antes de ir a dormir o salir.
• Si huele gas, corte el suministro de gas de la estufa y llame a un técnico de servicio calicado.
NUNCA utilice una llama para encontrar la pérdida.
Ajuste de la conguración de llama baja en los quemadores de la estufa
Las llamas de la quemadores de la estufa se deben comprobar en el ajuste más bajo. Siga los
pasos siguientes para comprobar y ajustar la conguración de los quemadores de la estufa.
NOTA
Los ajustes bajos se deben realizar siempre con dos o más quemadores encendidos al mismo
tiempo.
Desarmador de hoja plana
Vástago de la
válvula
1. Encienda dos o más quemadores exteriores y
ajústelos en MED (medio) y HI (alto).
2. Gire rápidamente una de las perillas de control
en sentido contrario a las agujas del reloj para
el ajuste más bajo. La llama debe permanecer
encendida. Si la llama oscila o se desvanece,
ajuste la válvula de derivación del quemador.
3. Hale la perilla de control de este quemador
para retirarla.
4. Con un desarmador de hoja plana pequeño,
ajuste el tornillo de la válvula de derivación
en la base del vástago de la válvula. Gire el
tornillo de la válvula de derivación en sentido
contrario a las agujas del reloj para aumentar
el tamaño de la llama.
5. Monte nuevamente la perilla de control y
compruebe el ajuste de la llama.
6. Repita los pasos 1 a 5 para vericar y
ajustar la llama baja en los otros quemadores
exteriores.
Estufa de gas
Español 19
NX7000K_VE_NX58M6850SS_AA_DG68-00909A-03_EN+MES+CFR.indb 19 1/30/2018 1:04:42 PM
Page 72
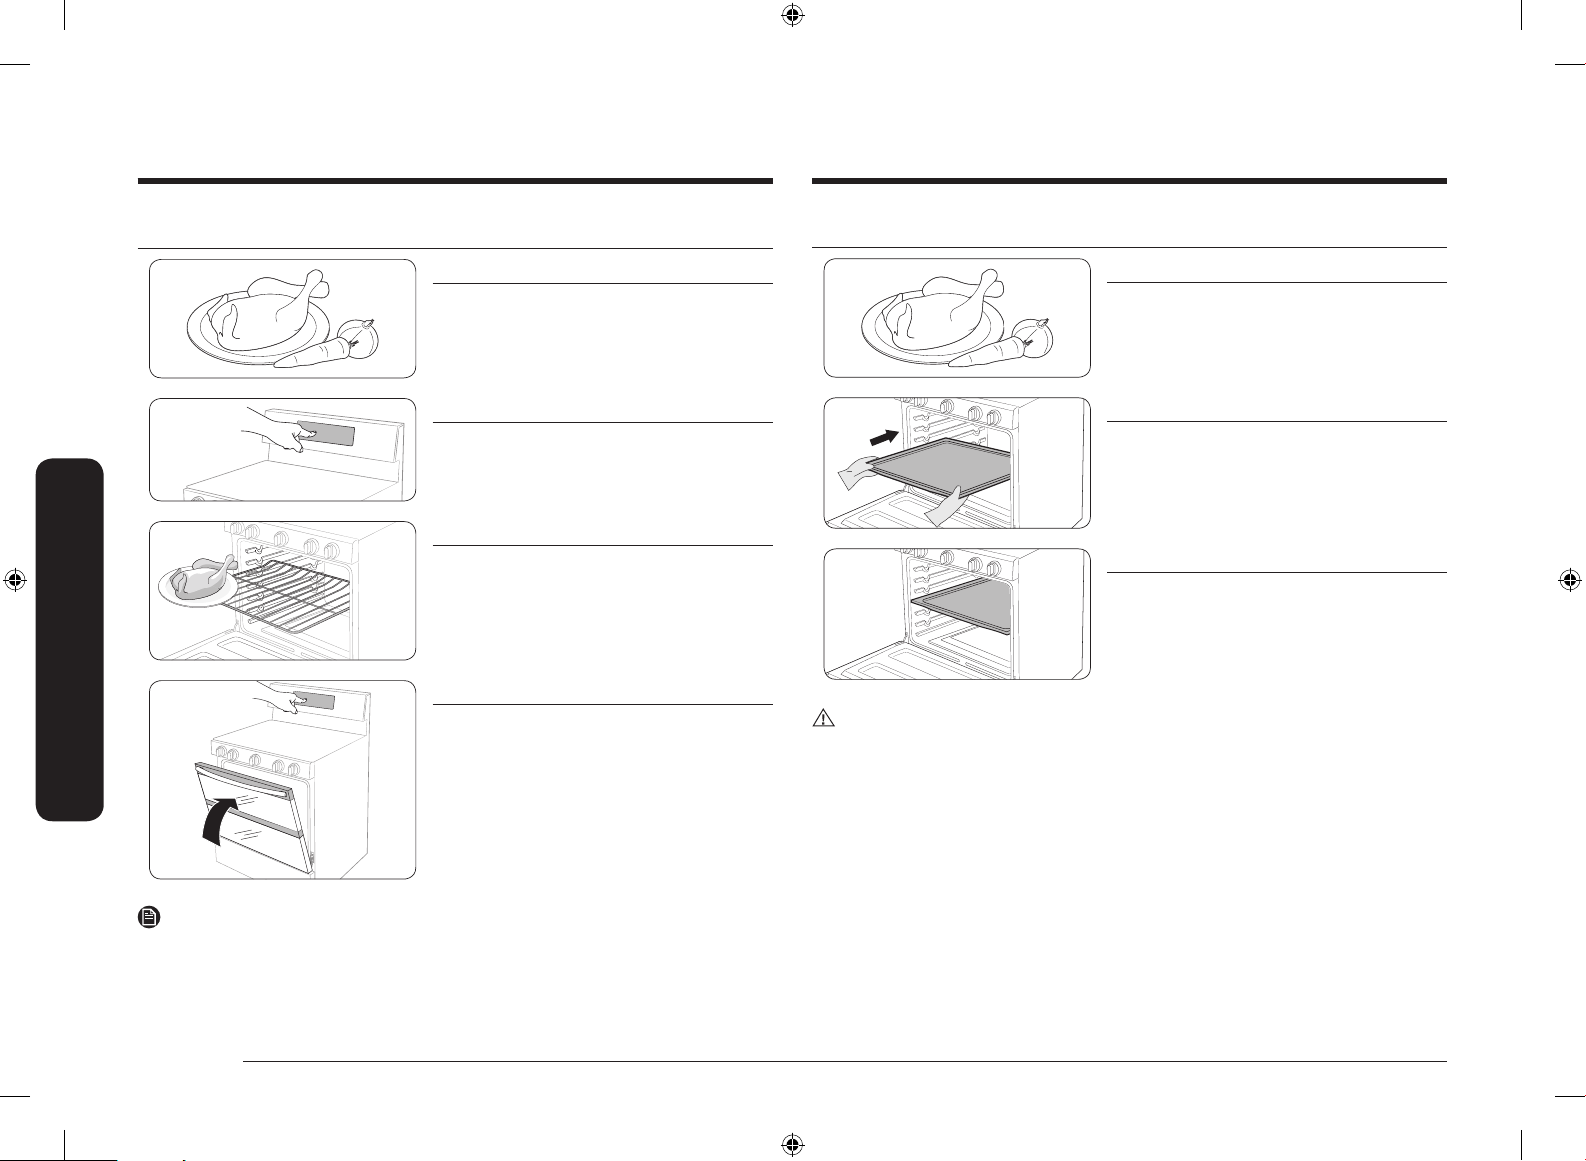
Horno de gasHorno de gas
Horno de gas
Modo simple
PASO 1
Ponga todos los ingredientes en un recipiente
resistente a la temperatura.
PASO 2
Seleccione un modo de cocción y luego comience
el precalentamiento.
PASO 3
Coloque el recipiente en una parrilla.
PASO 4
Cierre la puerta y comience la cocción.
Modo doble
PASO 1
Ponga todos los ingredientes en un recipiente
resistente a la temperatura.
PASO 2
Inserte el Divisor inteligente en la cuarta posición
de parrilla.
PASO 3
Empuje el Divisor inteligente hasta que la estufa
emita una señal sonora.
PRECAUCIÓN
Cuando el Divisor inteligente está correctamente insertado, aparece el icono “-”.
NOTA
El ventilador de enfriamiento comienza a funcionar automáticamente durante un tiempo
después de terminar la cocción.
20 Español
NX7000K_VE_NX58M6850SS_AA_DG68-00909A-03_EN+MES+CFR.indb 20 1/30/2018 1:04:44 PM
Page 73
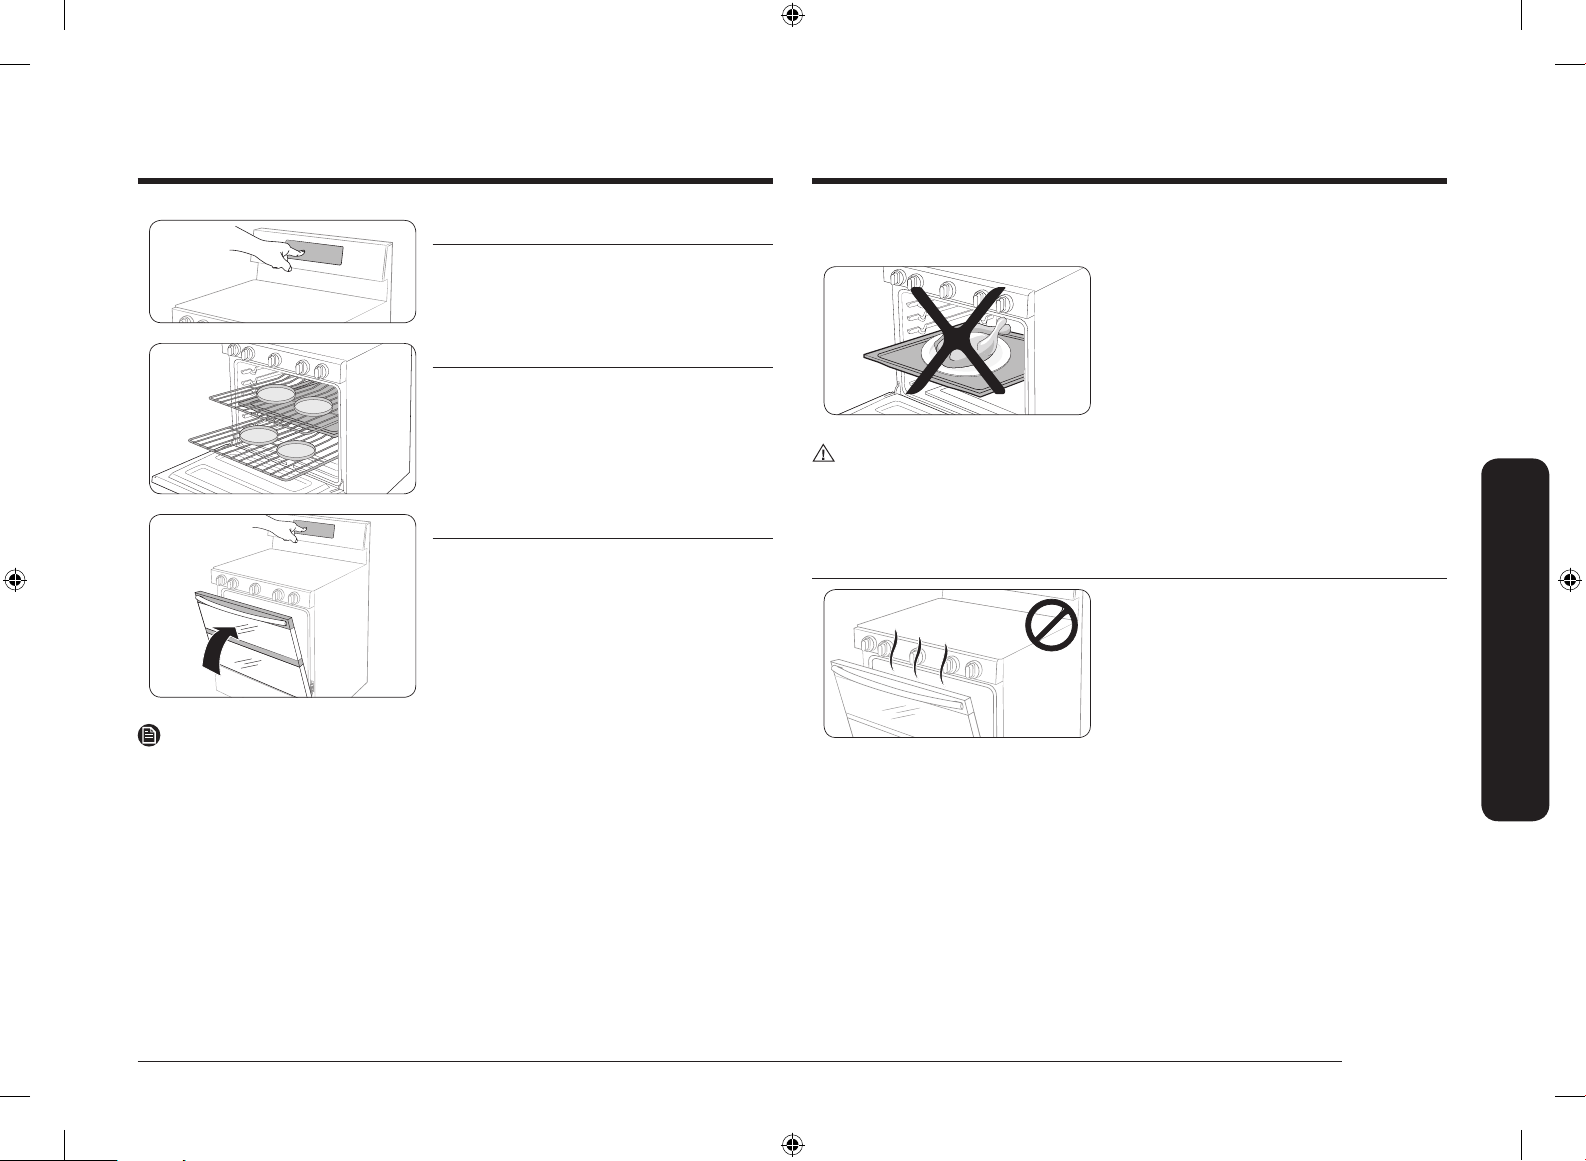
PASO 4
Seleccione un modo de cocción y luego comience
el precalentamiento.
PASO 5
Disponga los recipientes en las parrillas.
PASO 6
Cierre la puerta y comience la cocción.
NOTA
• Para utilizar el modo de funcionamiento doble, inserte el Divisor inteligente.
• El ventilador de enfriamiento comienza a funcionar automáticamente durante un tiempo
después de terminar la cocción.
• Cuando no utilice el Divisor inteligente, guárdelo a temperatura ambiente.
• Manipule el Divisor inteligente con ambas manos.
• Use guantes para hornos cuando inserte o retire el Divisor inteligente.
• No coloque recipientes con alimentos directamente sobre el Divisor inteligente para
cocinar.
• Tenga en cuenta que el tiempo de precalentamiento de los hornos superior e inferior es
diferente.
PRECAUCIÓN
La estufa muestra “-dc-”
• Revise el Divisor inteligente para ver si está instalado correctamente.
• No inserte ni retire el Divisor inteligente durante la cocción.
Modo de cocción
• Asegúrese de cerrar la puerta del horno antes
de empezar a cocinar.
• Si deja la puerta abierta durante
20-30 segundos mientras el horno está en
los modos de hornear/asar por convección,
hornear o asar a la parrilla, el quemador del
horno se apaga. Para reiniciar el quemador,
cierre la puerta.
Horno de gas
Español 21
NX7000K_VE_NX58M6850SS_AA_DG68-00909A-03_EN+MES+CFR.indb 21 1/30/2018 1:04:44 PM
Page 74
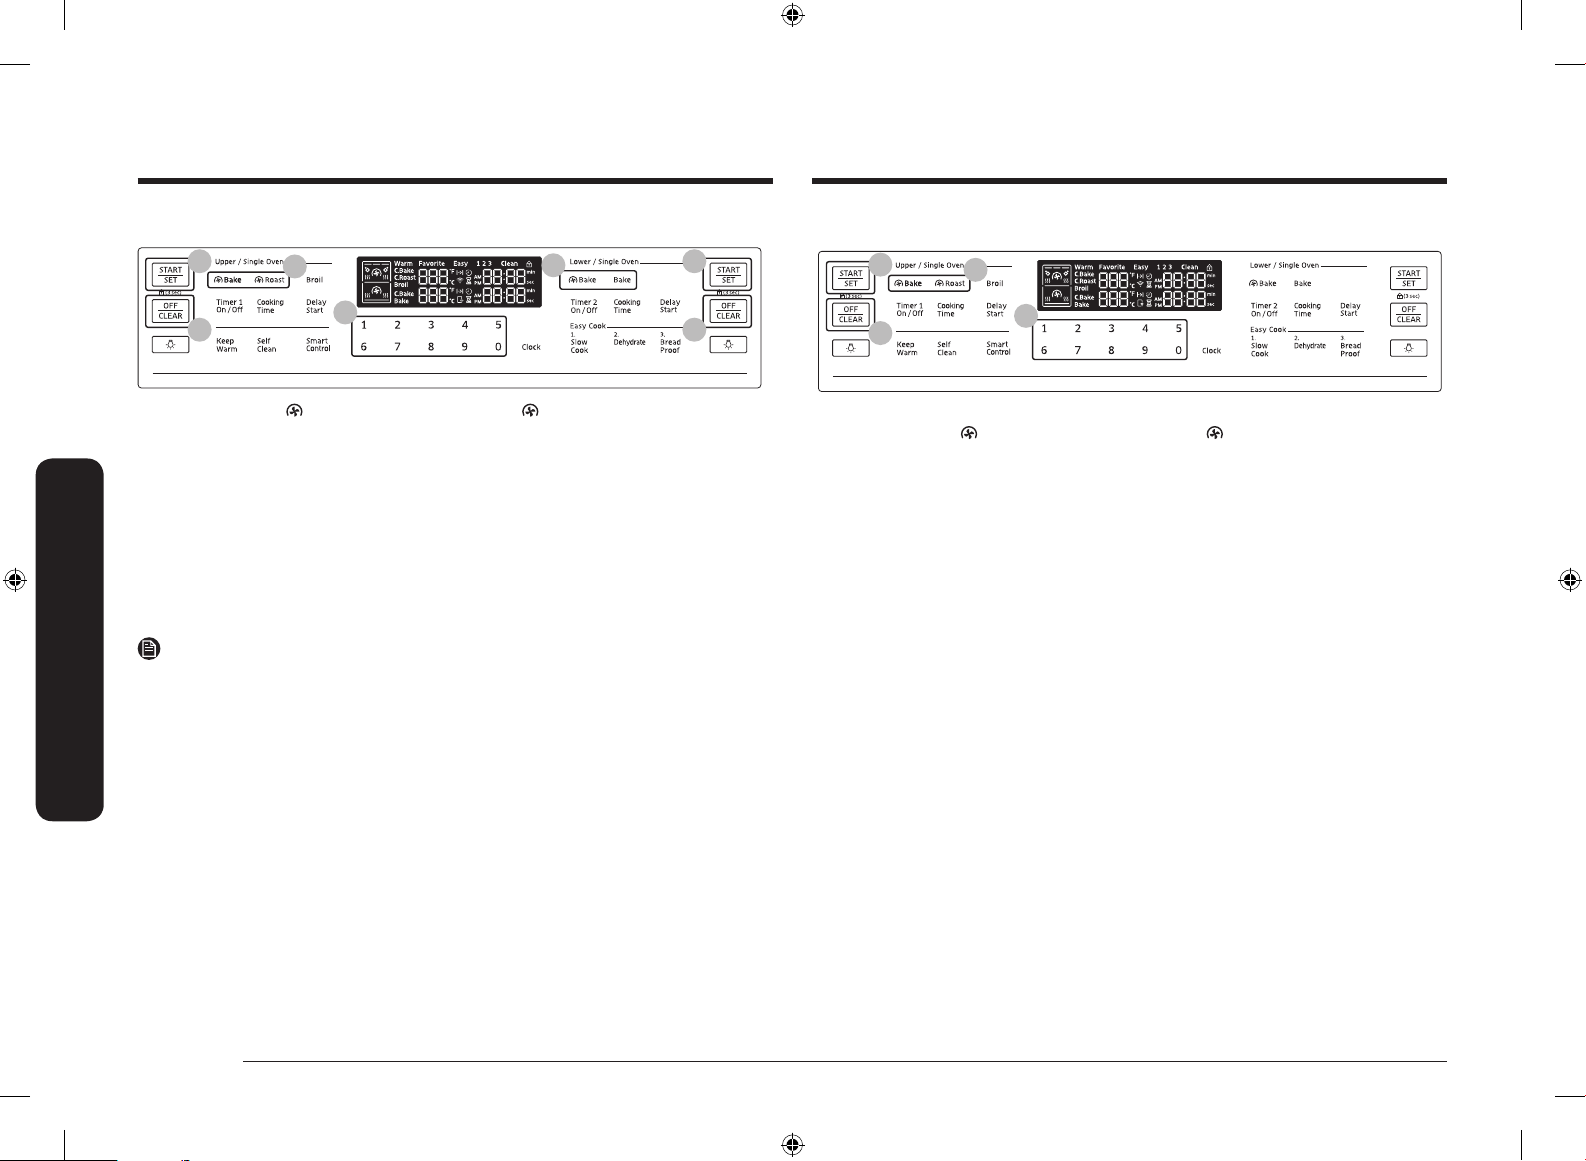
Horno de gas
Horno de gas
Hornear y asar (modo simple)
03
04
01
01
02
03
04
1. Presione la tecla Bake (Hornear por convección), Roast (Asar por convección) o
Bake (Hornear).
2. De ser necesario, utilice el teclado numérico para cambiar la temperatura predeterminada
(350 °F). Puede congurar el horno en cualquier temperatura desde 175 °F hasta 550 °F.
3. Presione la tecla START/SET (INICIO/CONFIGURAR).
• El horno se precalienta hasta que alcanza la temperatura que usted ha congurado.
• Al nalizar el precalentamiento, coloque los alimentos en el horno y, luego, cierre la
puerta.
4. Al nalizar la cocción, presione la tecla OFF/CLEAR (APAGAR/BORRAR) y, luego, retire los
alimentos.
NOTA
Para cambiar la temperatura durante la cocción, repita los pasos 1 a 3 anteriores.
Hornear y asar (superior modo doble)
04
05
02
03
1. Inserte el Divisor inteligente en la cavidad.
2. Presione la tecla Bake (Hornear por convección) o Roast (Asar por convección) en
la parte izquierda del panel de control.
3. De ser necesario, utilice el teclado numérico para cambiar la temperatura predeterminada
(350 °F). Puede congurar el horno en cualquier temperatura desde 175 °F hasta 480 °F.
4. Presione la tecla START/SET (INICIO/CONFIGURAR).
• El horno se precalienta hasta que alcanza la temperatura que usted ha congurado.
• Al nalizar el precalentamiento, coloque los alimentos en la cavidad superior del
horno y, luego, cierre la puerta.
5. Al nalizar la cocción, presione la tecla OFF/CLEAR (APAGAR/BORRAR).
22 Español
NX7000K_VE_NX58M6850SS_AA_DG68-00909A-03_EN+MES+CFR.indb 22 1/30/2018 1:04:45 PM
Page 75
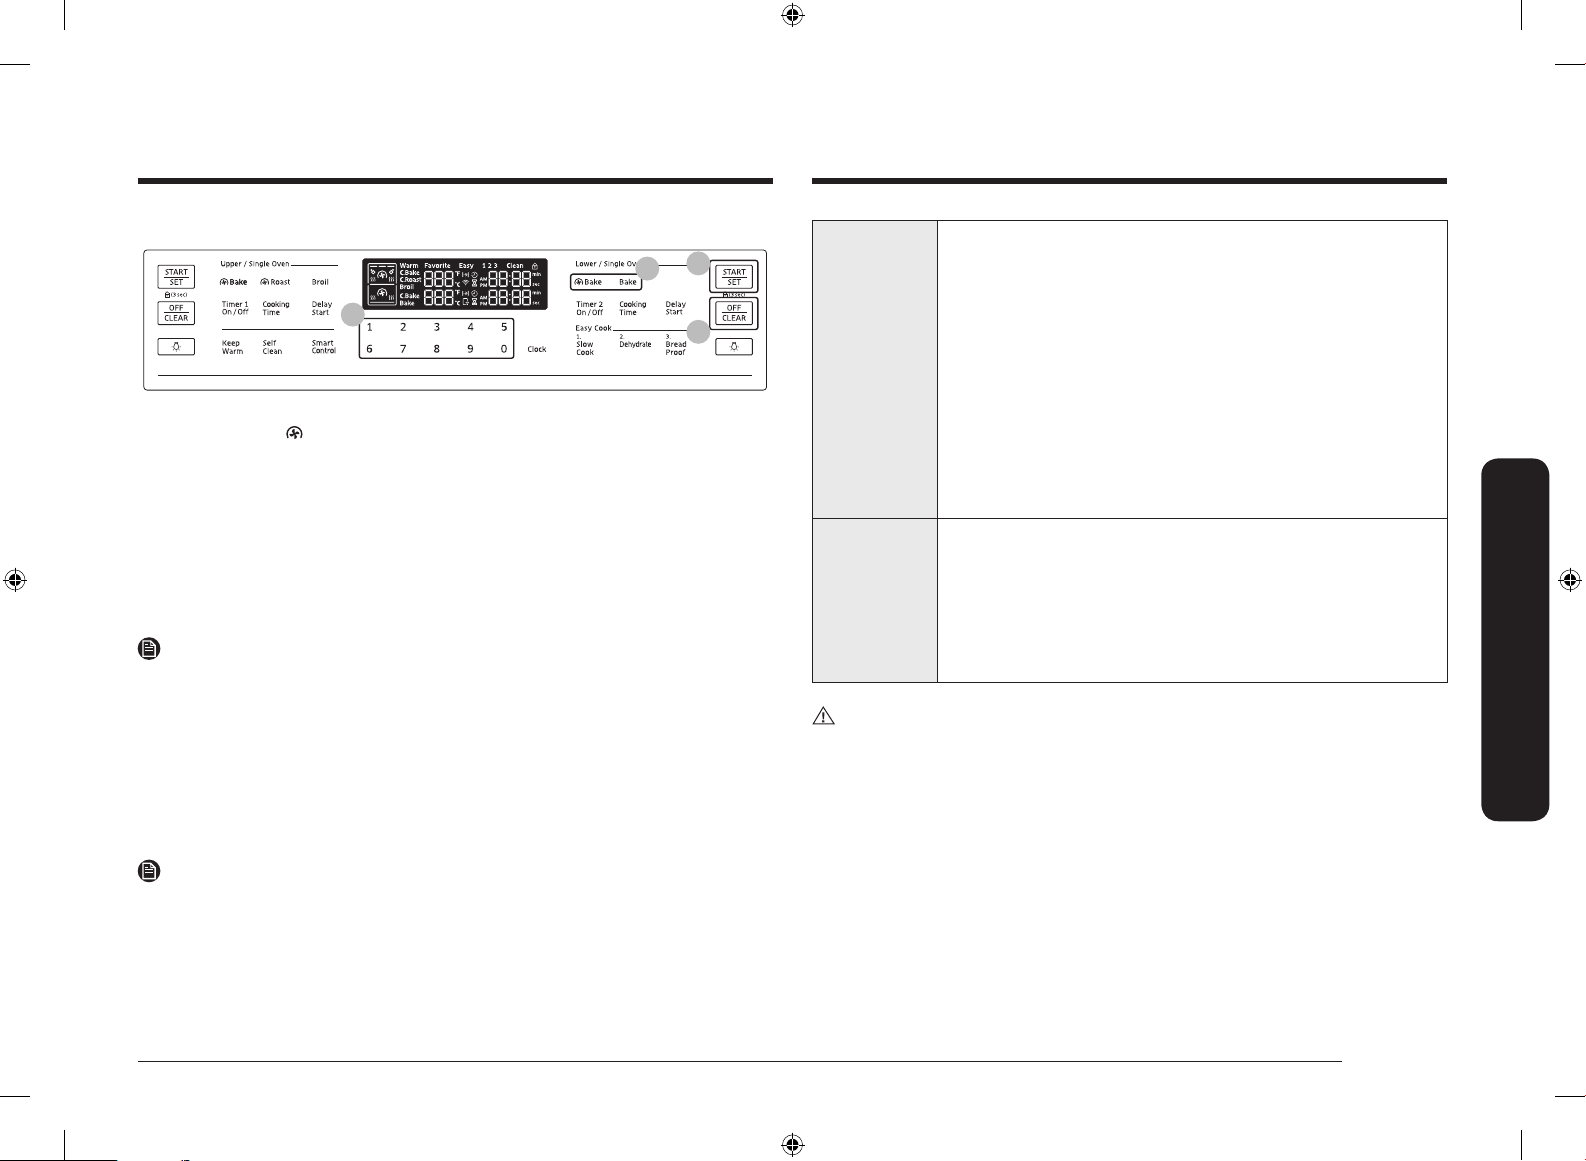
Hornear y asar (inferior modo doble)
04
02
03
05
1. Inserte el Divisor inteligente en la cavidad.
2. Presione la tecla Bake (Hornear por convección) o Bake (Hornear) en la parte derecha
del panel de control.
3. De ser necesario, utilice el teclado numérico para cambiar la temperatura predeterminada
(350 °F). Puede congurar el horno en cualquier temperatura desde 175 °F hasta 480 °F.
4. Presione la tecla START/SET (INICIO/CONFIGURAR).
• El horno se precalienta hasta que alcanza la temperatura que usted ha congurado.
• Al nalizar el precalentamiento, coloque los alimentos en la cavidad inferior del
horno y, luego, cierre la puerta.
5. Al nalizar la cocción, presione la tecla OFF/CLEAR (APAGAR/BORRAR).
NOTA
Su horno cuenta con diferentes rangos de ajuste de temperatura al usar el horno superior y el
horno inferior simultáneamente. Consulte “Guías de ajuste de temperatura” en la página
25 para obtener más detalles.
Cocción por convección
El ventilador de convección en la parte trasera del horno hace circular el aire caliente en forma
pareja por todas las cavidades del horno de manera que los alimentos se cocinen y se doren
uniformemente en menos tiempo que con el calor normal.
NOTA
Cuando utilice la cocción por convección, siempre precaliente el horno para obtener los
mejores resultados.
Hornear por
convección
• Ideal para los alimentos que se cocinan en varias parrillas.
• Adecuado para grandes cantidades de alimentos.
• Ofrece los mejores resultados con las galletas, brownies, pastelitos
individuales, mufns, bollos dulces, pastel de ángel y pan.
• Las galletas se hornean mejor en charolas planas para galletas.
• C
uando hornea por convección usando una única parrilla, coloque la
parrilla en la posición de parrilla 3 o 4. (En modo doble, posición A o 1)
• Cuando hornea por convección usando dos parrillas, coloque las
parrillas en las posiciones 3 y 5 (pasteles y galletas). Cuando hornea
por convección usando tres parrillas, coloque las parrillas en las
posiciones 2, 4 y 6.
• El horno ajusta automáticamente la temperatura para hornear por
convección.
Asar por
convección
• Adecuado para cortes de carne tiernos más grandes, destapados.
• Para obtener mejores resultados, coloque una asadera y una rejilla
debajo de la carne vacuna o la carne de ave. La asadera retiene los
derrames de grasa y la rejilla evita las salpicaduras de grasa.
• El aire caliente circula sobre, debajo y alrededor de la comida.
Las carnes, incluidas las aves, se doran por todos lados como si
hubiesen sido cocidas en un rosticero (asador giratorio).
PRECAUCIÓN
Precauciones para usar solamente el horno superior:
• Debe precalentar el horno. Si no lo hace, la comida puede estar demasiado cocida o
quemada en la supercie y poco cocida en el interior.
• Para cambiar la temperatura durante la cocción, primero retire los alimentos y, luego,
cambie la temperatura. A continuación, vuelva a colocar los alimentos dentro del horno.
De lo contrario, los alimentos podrían quemarse con el quemador para asar mientras se
precalienta el horno superior.
• No hornee alimentos con una altura superior a las 2 pulgadas (50 mm).
• El tiempo de cocción puede ser más prolongado que con la cocción en un solo horno.
Horno de gas
Español 23
NX7000K_VE_NX58M6850SS_AA_DG68-00909A-03_EN+MES+CFR.indb 23 1/30/2018 1:04:46 PM
Page 76
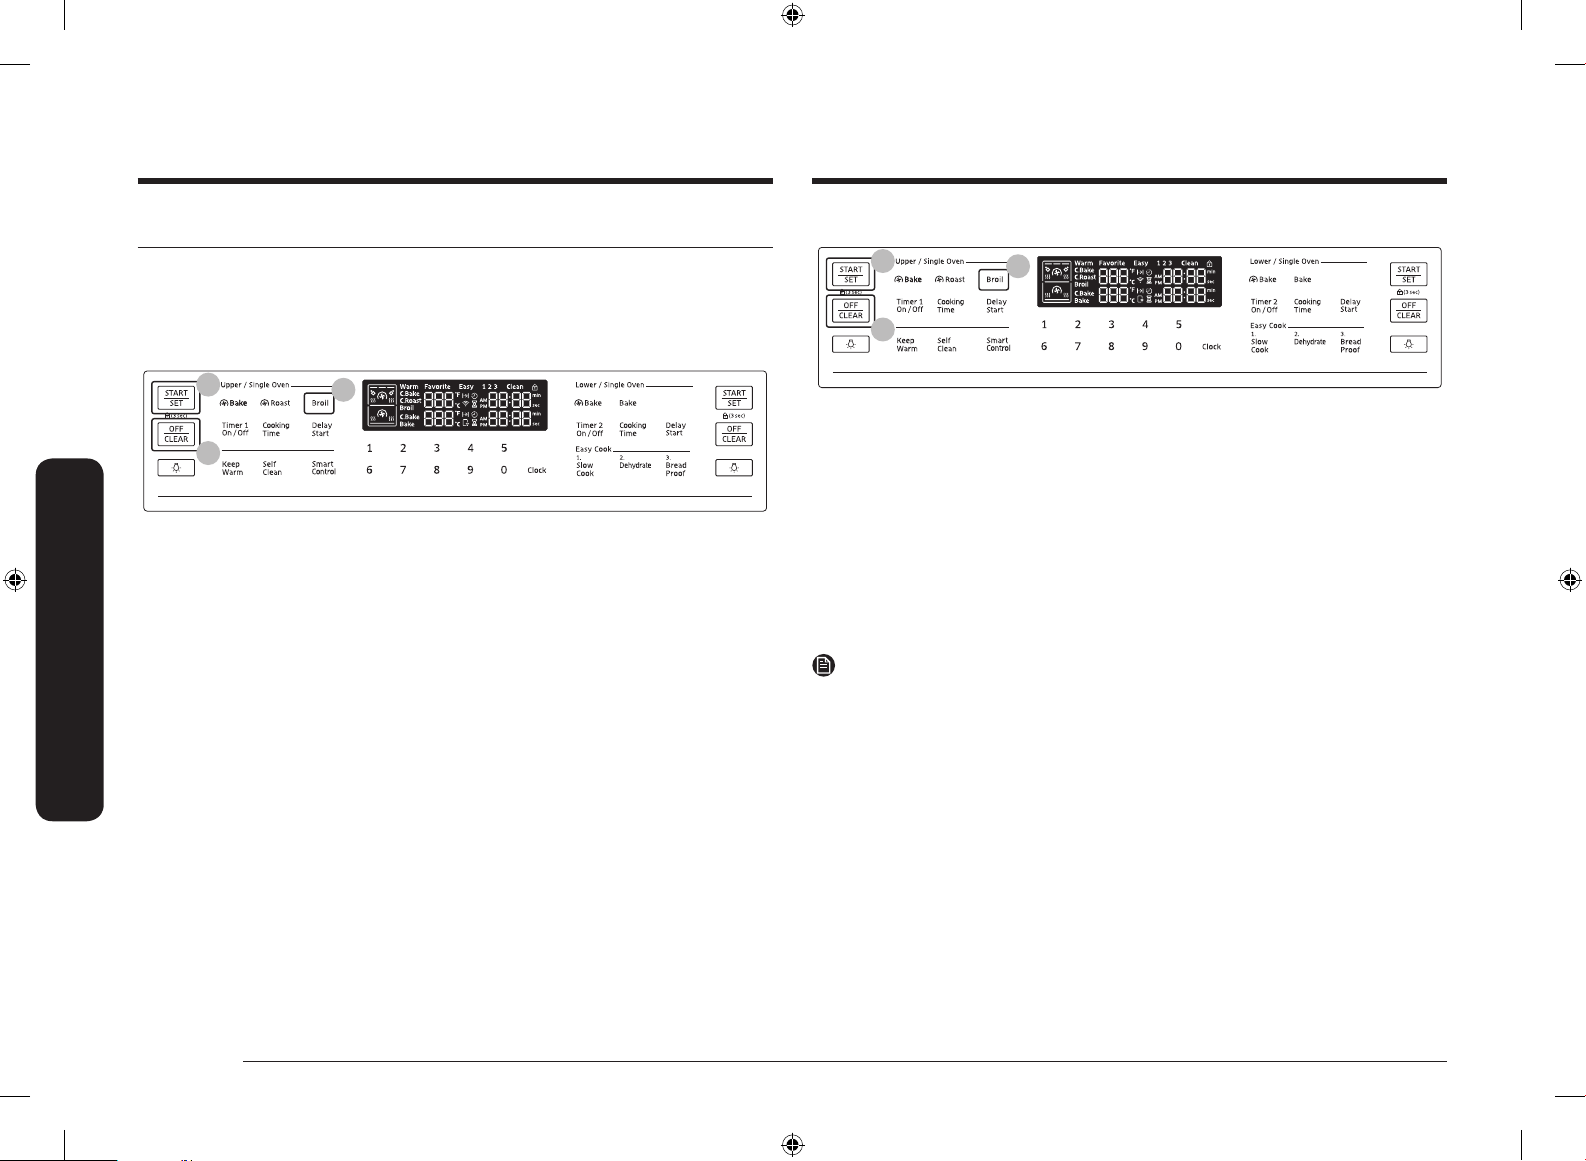
Horno de gas
Horno de gas
Asar a la parrilla
Al asar a la parrilla se utiliza el quemador en la parte superior del horno para cocinar y dorar
alimentos. La carne o el pescado deben colocarse siempre sobre una rejilla y una asadera.
Se recomienda precalentar 5 minutos antes de asar a la parrilla.
Asar a la parrilla (modo simple)
03
07
1. Coloque los alimentos sobre una rejilla y una asadera.
2. Presione la tecla Broil (Asar a la parrilla) una vez para una temperatura alta o dos veces
para una temperatura baja.
3. Presione la tecla START/SET (INICIO/CONFIGURAR) para comenzar a asar a la parrilla.
4. Deje que el horno se precaliente durante 5 minutos.
5. Coloque la asadera en la parrilla deseada y cierre la puerta del horno.
6. Cuando un lado de los alimentos esté dorado, debe darlos vuelta, cerrar la puerta del
horno y comenzar la cocción del otro lado.
7. Al nalizar la cocción, presione la tecla OFF/CLEAR (APAGAR/BORRAR).
02
Asar a la parrilla (modo doble)
04
08
1. Inserte el Divisor inteligente en la cavidad.
2. Coloque los alimentos sobre una rejilla y una asadera.
3. Presione la tecla Broil (Asar a la parrilla) una vez para una temperatura alta o dos veces
para una temperatura baja.
4. Presione la tecla START/SET (INICIO/CONFIGURAR) para comenzar a asar a la parrilla.
5. Deje que el horno se precaliente durante 5 minutos.
6. Coloque la asadera en la parrilla deseada de la cavidad superior y cierre la puerta del
horno.
7. Cuando un lado de los alimentos esté dorado, debe darlos vuelta, cerrar la puerta del
horno y comenzar la cocción del otro lado.
8. Al nalizar la cocción, presione la tecla OFF/CLEAR (APAGAR/BORRAR).
NOTA
• Utilice el ajuste de baja temperatura para la carne de ave o los cortes gruesos de carne
vacuna a n de evitar asarla demasiado.
• En general, para evitar el exceso de cocción, presione la tecla Broil (Asar a la parrilla)
para cambiar de Alta a Baja.
• Tenga cuidado al abrir la puerta del horno para dar vuelta los alimentos. El aire que
escapa del horno estará muy caliente.
• Su horno cuenta con diferentes rangos de ajuste de temperatura al usar el horno superior
y el horno inferior simultáneamente. Consulte “Guías de ajuste de temperatura” en la
página 25 para obtener más detalles.
03
24 Español
NX7000K_VE_NX58M6850SS_AA_DG68-00909A-03_EN+MES+CFR.indb 24 1/30/2018 1:04:46 PM
Page 77
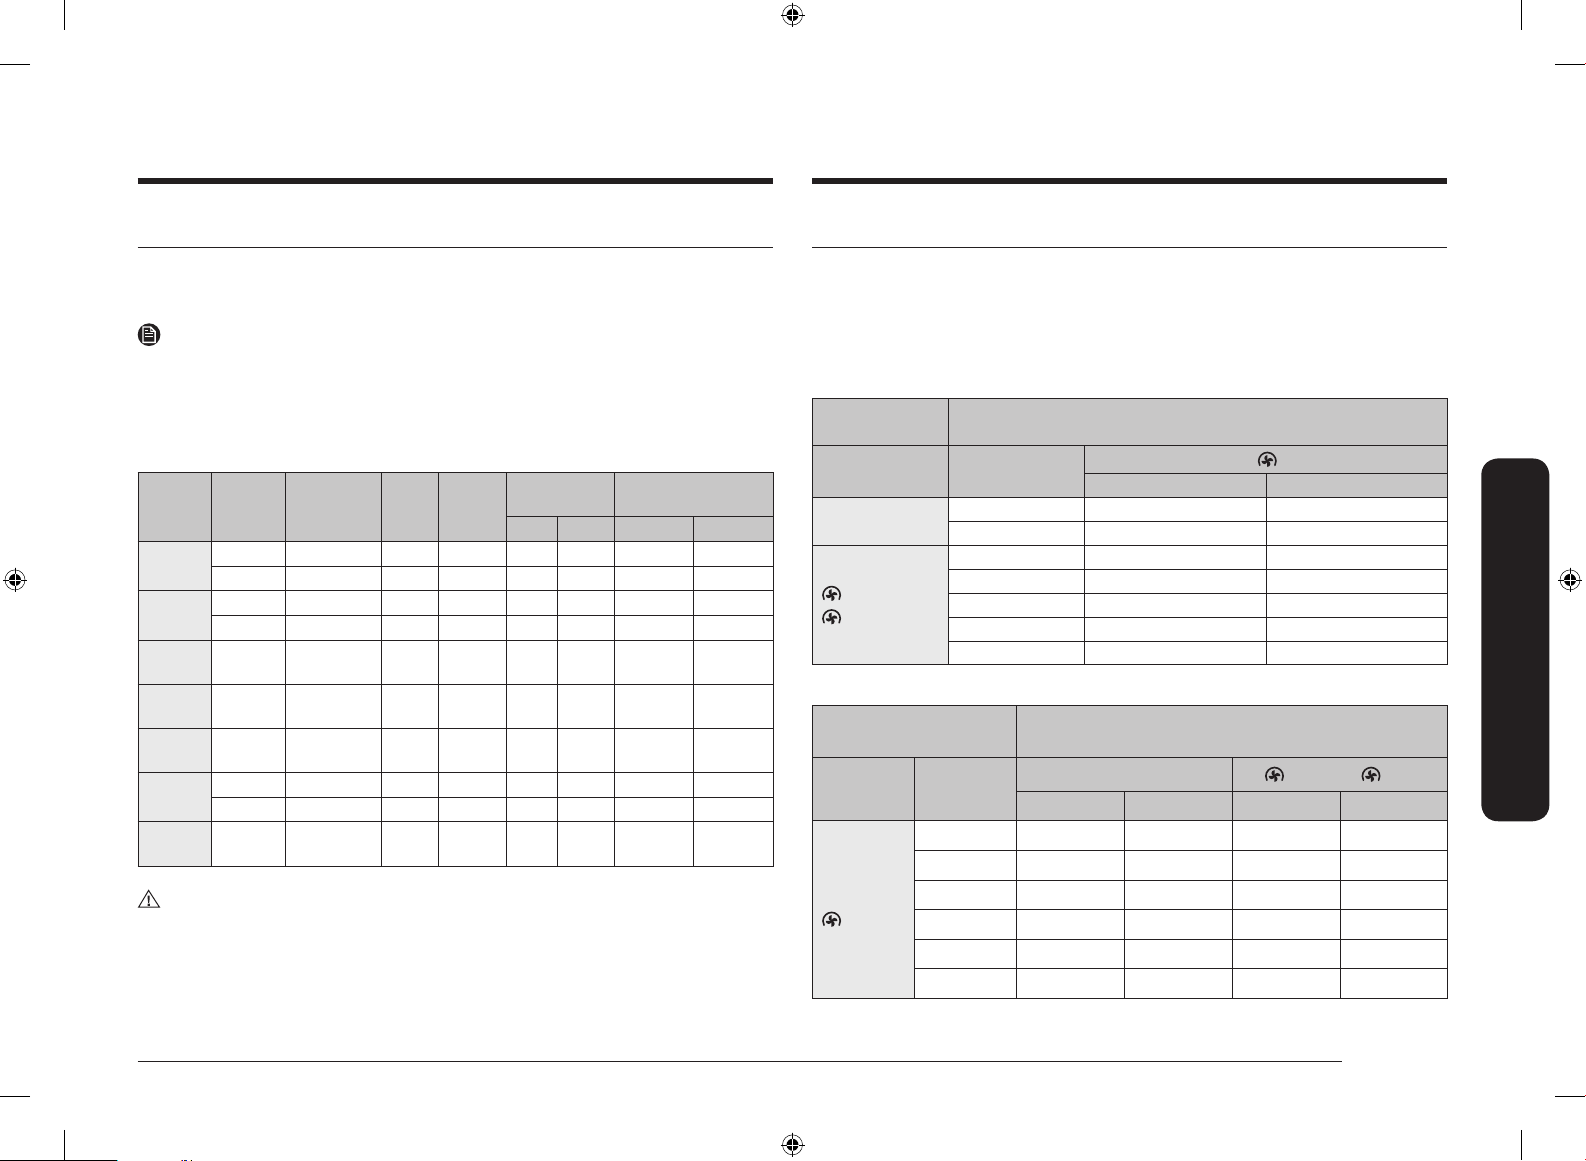
Guía de recetas
Guías de ajuste de temperatura
Guía para asar a la parrilla
Para obtener instrucciones detalladas, consulte la página 24.
NOTA
• Esto es para referencia solamente.
• Se recomienda precalentar 5 minutos antes de asar a la parrilla.
• Los tiempos necesarios para asar a la parrilla dependerán del tamaño, peso, espesor,
temperatura inicial y su preferencia en cuanto al grado de cocción.
• Esta guía esta basada en carnes a temperatura de refrigerador.
Posición de la
parrilla
Simple Superior 1er lado 2do lado
Tiempo de cocción
Alimento
-
Hambur
guesas
Bistec
Presas de
pollo
Pechugas
de pollo
Costillas de
cerdo
Chuletas de
cordero
Filetes de
pescado
Grado de
cocción
Al punto
Al punto
Al punto - 1" Alta 6 B 7:00-6:00 6:00-5:00
Al punto - 1½" Alta 6 B 9:00-10:00 6:00-7:00
Muy hecho 2-2½ lbs. ¾-1” Alta 5 A 15:00-17:00 13:00-15:00
Muy hecho 2-3 unidades - Alta 5 A 15:00-18:00 12:00-15:00
Muy hecho 1 lb. ½" Alta 5 A 9:00-11:00 6:00-9:00
Al punto 10 oz 1" Alta 4 A 8:00-12:00 5:00-8:00
Muy hecho 1 lb. 1½" Alta 4 A 10:00-15:00 7:00-11:00
Muy hecho - ¼-½" Alta 5 A 5:00-6:00 3:00-4:00
Tamaño Espesor
9 hamburguesas
9 hamburguesas
Ajuste de
asado a la
parrilla
1" Alta 6 B 5:00-5:30 4:00-4:30
¾" Alta 6 B 5:00 4:00
PRECAUCIÓN
Asegúrese de cerrar la puerta luego de dar vuelta el alimento.
Rangos de ajuste de temperatura del modo doble
Su horno cuenta con diferentes rangos de ajuste de temperatura al usar el horno superior y
el horno inferior simultáneamente. El rango de cada horno cambia dependiendo de la función
y el ajuste de temperatura del otro horno. Consulte las tablas a continuación y en la página
siguiente para obtener detalles.
Horno superior
Modo
Asar a la parrilla
Temperatura y funciones disponibles
Ajuste de
temperatura
Alta 350 °F 480 °F
Baja 300 °F 450 °F
Horno inferior
Hornear,
Hornear
Mín. Máx.
480 °F 400 °F 480 °F
Hornear
Asar
450 °F 350 °F 480 °F
300 °F 250 °F 375 °F
250 °F 225 °F 300 °F
175 °F 175 °F 200 °F
(O - disponible, X - no disponible)
Horno inferior
Modo
Ajuste de
temperatura
Temperatura y funciones disponibles
Asar a la parrilla
Baja Alta Mín. Máx.
Horno superior
Hornear y Asar
480 °F X O 400 °F 480 °F
450 °F O O 350 °F 480 °F
Hornear
Hornear
350 °F O X 275 °F 450 °F
325 °F O X 275 °F 400 °F
250 °F X X 225 °F 300 °F
175 °F X X 175 °F 200 °F
Horno de gas
Español 25
NX7000K_VE_NX58M6850SS_AA_DG68-00909A-03_EN+MES+CFR.indb 25 1/30/2018 1:04:47 PM
Page 78
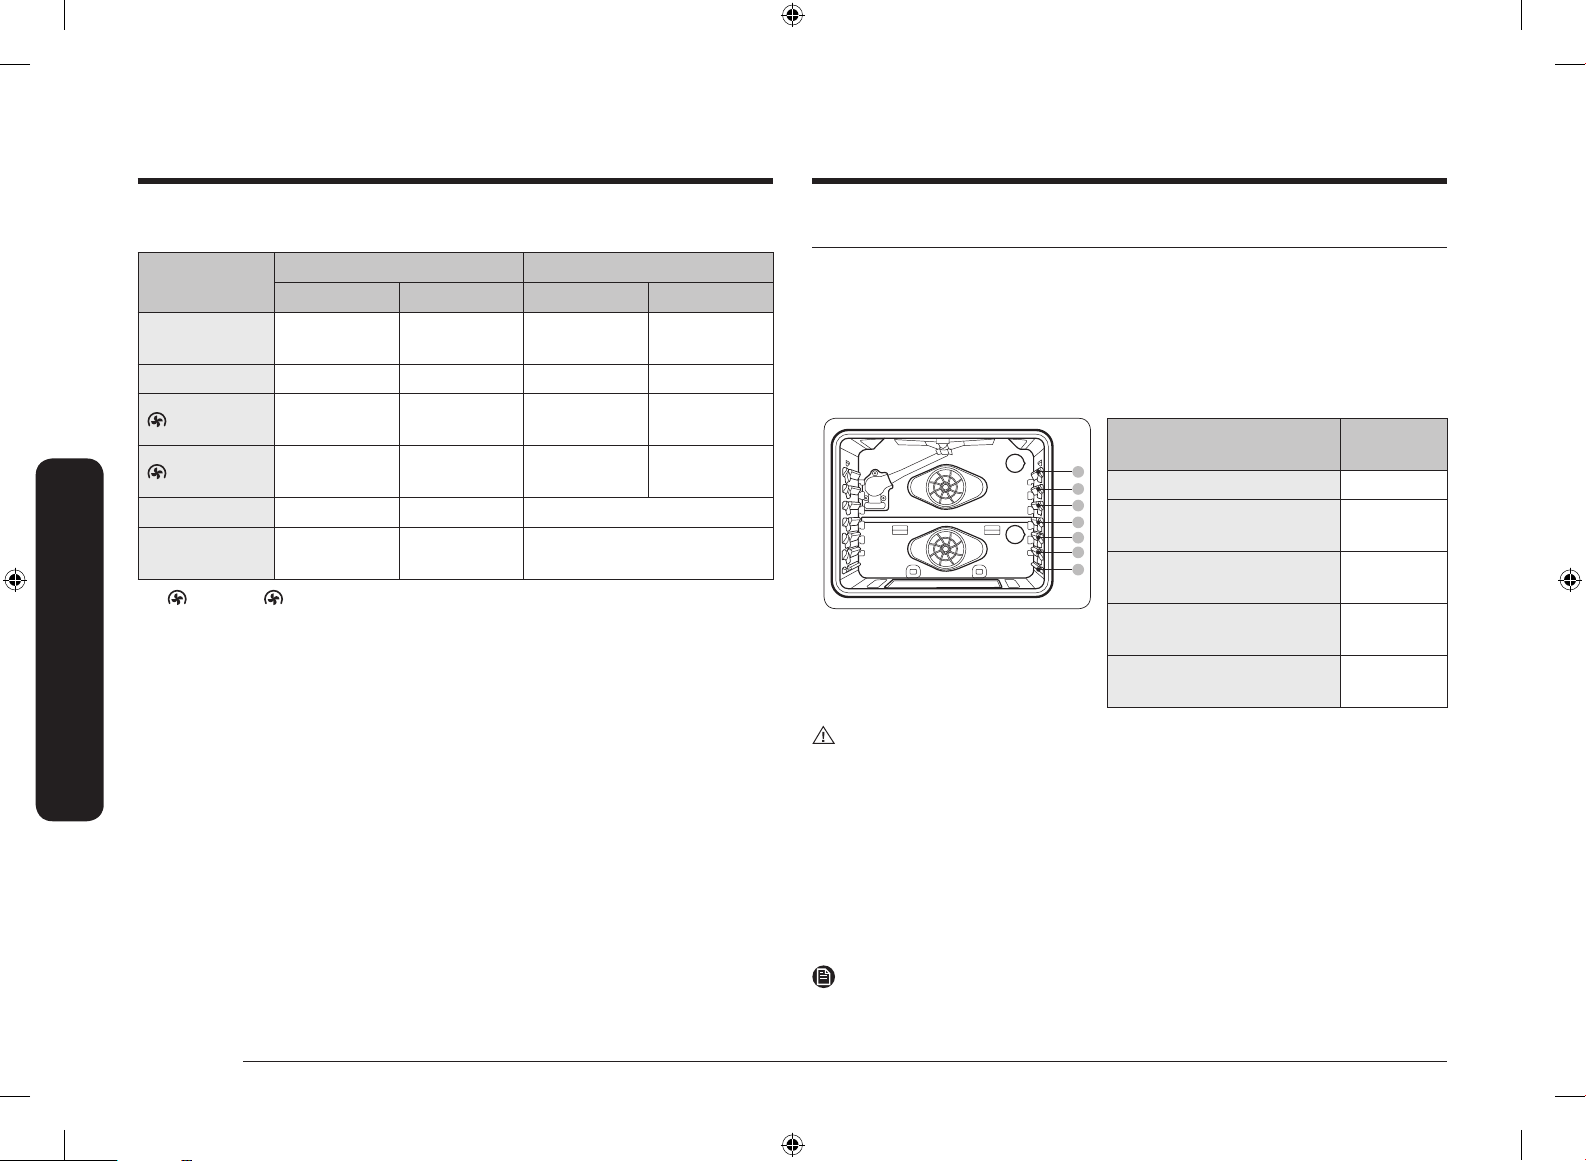
Horno de gas
07
06
05
04
03
02
01
Horno de gas
Limitaciones de temperatura según modo
Función
Hornear
Modo simple Modo doble
Mín. Máx. Mín. Máx.
175 ˚F
(79 ˚C)
550 ˚F
(288 ˚C)
175 ˚F
(79 ˚C)
480 ˚F
(249 ˚C)
Asar a la parrilla Baja Alta Baja Alta
Hornear
Asar
175 ˚F
(79 ˚C)
175 ˚F
(79 ˚C)
550 ˚F
(288 ˚C)
550 ˚F
(288 ˚C)
175 ˚F
(79 ˚C)
175 ˚F
(79 ˚C)
480 ˚F
(249 ˚C)
480 ˚F
(249 ˚C)
Auto-limpieza 2 horas 5 horas -
Mantener
caliente
Hornear o Asar, use Auto Conversion (Autoconversión) para congurar la
Con
- 3 horas -
temperatura mínima en 200 °F (93 °C) si es necesario. Consulte “Autoconversión” en la página
35 para obtener más detalles.
Uso de las parrillas del horno
Modo simple - una cavidad del horno
La estufa de gas viene con 3 parrillas y 7 posiciones. Las posiciones de las parrillas están
delineadas por las guías sobre las que se apoyan. Cada una de las guías de las parrillas tienen
un tope que evita que se aojen durante el funcionamiento del horno. Cada parrilla tiene topes
que requieren colocación correcta sobre las guías. Los topes evitan que las parrillas se salgan
accidentalmente del horno por completo al retirarlas.
Tipo de alimento
Hamburguesas a la parrilla 6
Carnes o cortes pequeños de
ave, pescado, a la parrilla
Panqués, pasteles molde savarin,
tartas congeladas, guisos
Pizza fresca, pasteles de ángel,
carnes asadas de pequeño tamaño
Pavo, carnes asadas de gran
tamaño, jamones
PRECAUCIÓN
• No cubra una parrilla del horno con papel de aluminio. Esto entorpecerá la circulación del
calor y creará problemas en el proceso de horneado.
• No coloque papel de aluminio sobre la parte inferior del horno. El aluminio puede
derretirse y causar daños en el horno.
• Coloque las parrillas en la distribución deseada solamente cuando el horno se encuentre frío.
• Cuando coloque una parrilla en la posición superior (posición 7), asegúrese de que la
parrilla se apoye en forma estable en el tope incorporado.
• Cuando use la parrilla deslizante y una parrilla plana, coloque siempre la parrilla
deslizante debajo de la parrilla plana.
Posición de
la parrilla
6-4
4 o 3
2
1
NOTA
26 Español
NX7000K_VE_NX58M6850SS_AA_DG68-00909A-03_EN+MES+CFR.indb 26 1/30/2018 1:04:47 PM
Esta tabla es para referencia solamente.
Page 79
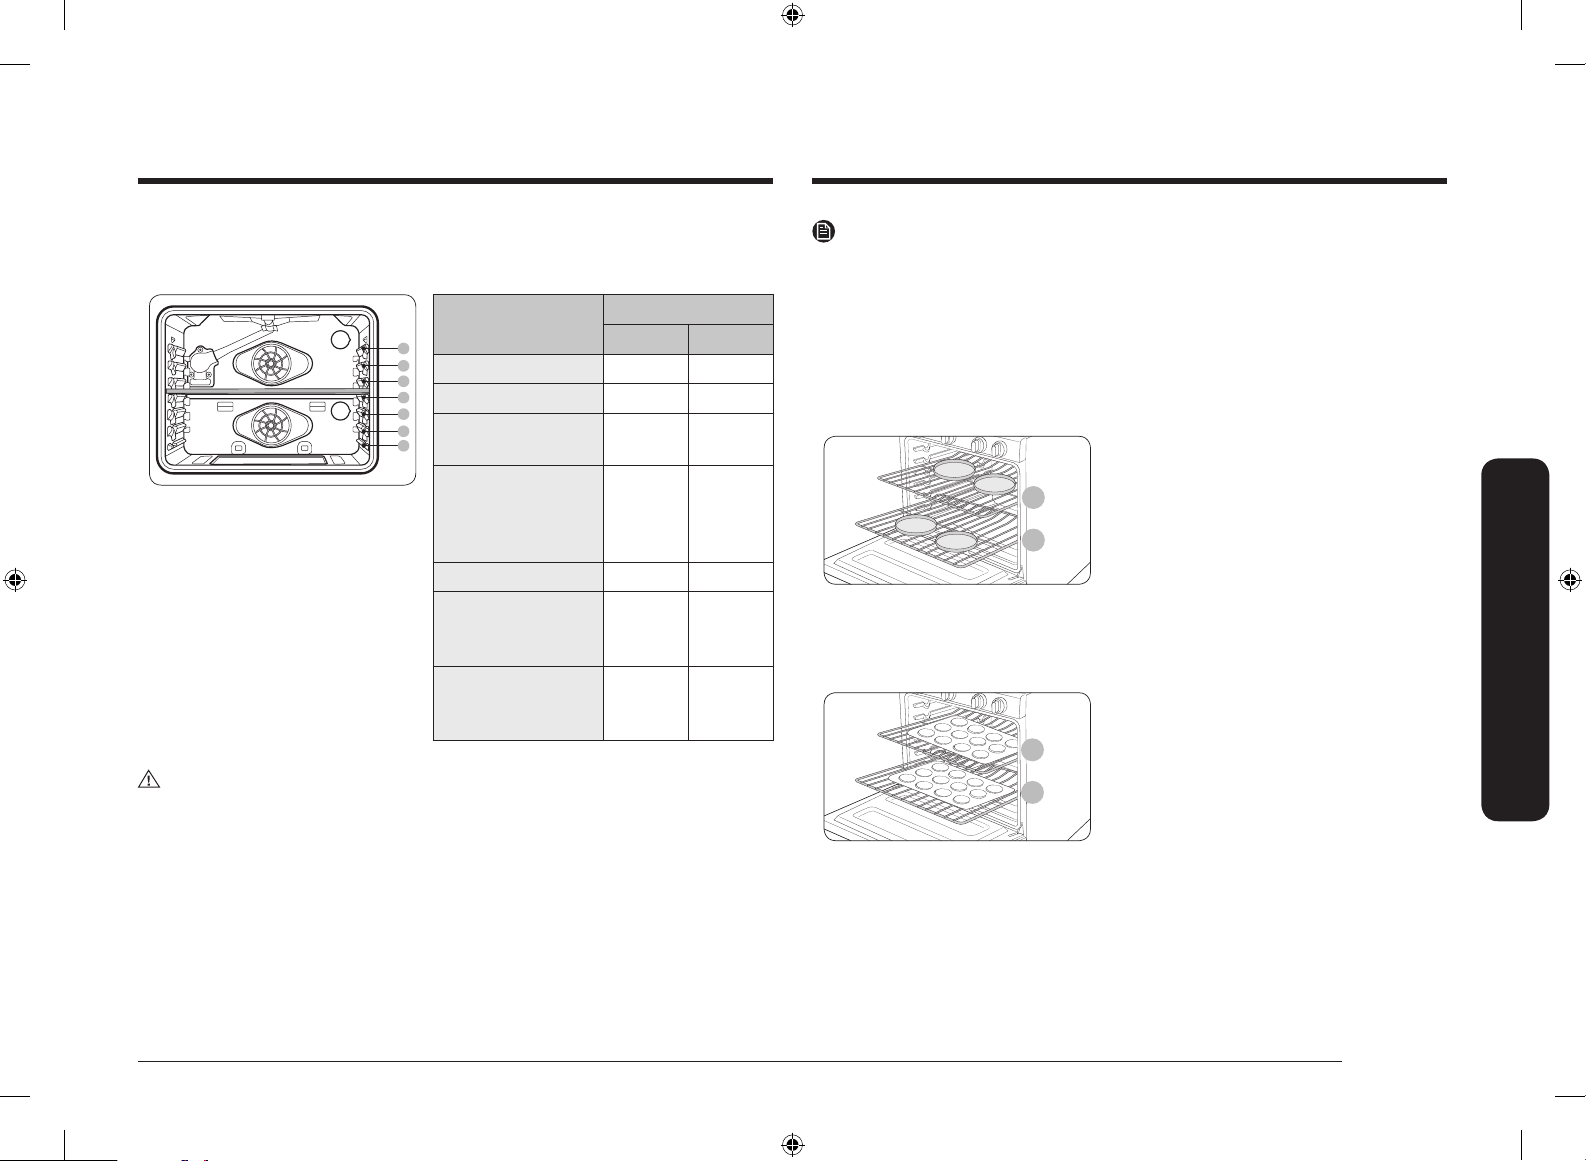
5
3
5
2
Modo doble - dos cavidades del horno
B
C
A
04
03
02
01
En el modo doble, el Divisor inteligente separa el horno en uno superior y uno inferior.
El horno superior y el horno inferior tienen cada uno 3 posiciones para las parrillas.
Tipo de alimento
Posición de la parrilla
Superior Inferior
Tartas congeladas - 1
Pasteles de ángel - 1
Panqués o pasteles en
molde savarin
- 1
Mufns, brownies,
• El horno superior tiene
3 posiciones para las parrillas
(A, B, C).
• El horno inferior tiene
3 posiciones para las parrillas
(1, 2, 3).
galletitas, magdalenas,
pasteles en capas,
A 1
tartas, galletas.
Guisos - 1
Jamones, carnes
asadas de pequeño
A 1
tamaño
Pollos pequeños,
trozos de pavo, asados
- 1
de tamaño mediano
NOTA
• Esta tabla es para referencia solamente.
• Al utilizar el modo de horno superior, siempre debe precalentarlo antes de cocinar
alimentos como pizzas.
• Recomendamos cocinar pizzas y pasteles usando la posición de la segunda parrilla en
modo simple o la posición de la segunda parrilla del horno inferior en modo doble para
obtener bases más crocantes.
Horneado en parrillas múltiples
• Cuando hornee tortas en dos parrillas en
el modo simple, coloque las parrillas en las
posiciones 3 y 5 para un mejor desempeño.
• Cuando utilice 4 recipientes en dos parrillas,
coloque dos recipientes en la parte trasera de
la parrilla superior y los otros dos en la parte
delantera de la parrilla inferior.
Posición de los recipientes para tortas
• Cuando hornee múltiples elementos en una
sola parrilla, mantenga un espacio de
1” a 1.5” (2.5 cm a 3.8 cm) entre los
elementos.
• Cuando hornee galletas en dos parrillas en
el modo simple, coloque las parrillas en las
posiciones 2 y 5.
PRECAUCIÓN
Precauciones para usar solamente el horno superior:
• Debe precalentar el horno. Si no lo hace, la comida puede estar demasiado cocida o
quemada en la supercie y poco cocida en el interior.
• Para cambiar la temperatura durante la cocción, primero retire los alimentos y, luego,
Posición de las bandejas para galletas
cambie la temperatura. A continuación, vuelva a colocar los alimentos dentro del horno.
De lo contrario, los alimentos podrían quemarse con el quemador para asar mientras se
precalienta el horno.
• En el modo de horneado por convección, no hornee alimentos con una altura superior a
las 2 pulgadas (50 mm).
• El tiempo de cocción puede ser más prolongado que con la cocción en un solo horno.
NX7000K_VE_NX58M6850SS_AA_DG68-00909A-03_EN+MES+CFR.indb 27 1/30/2018 1:04:48 PM
Español 27
Horno de gas
Page 80
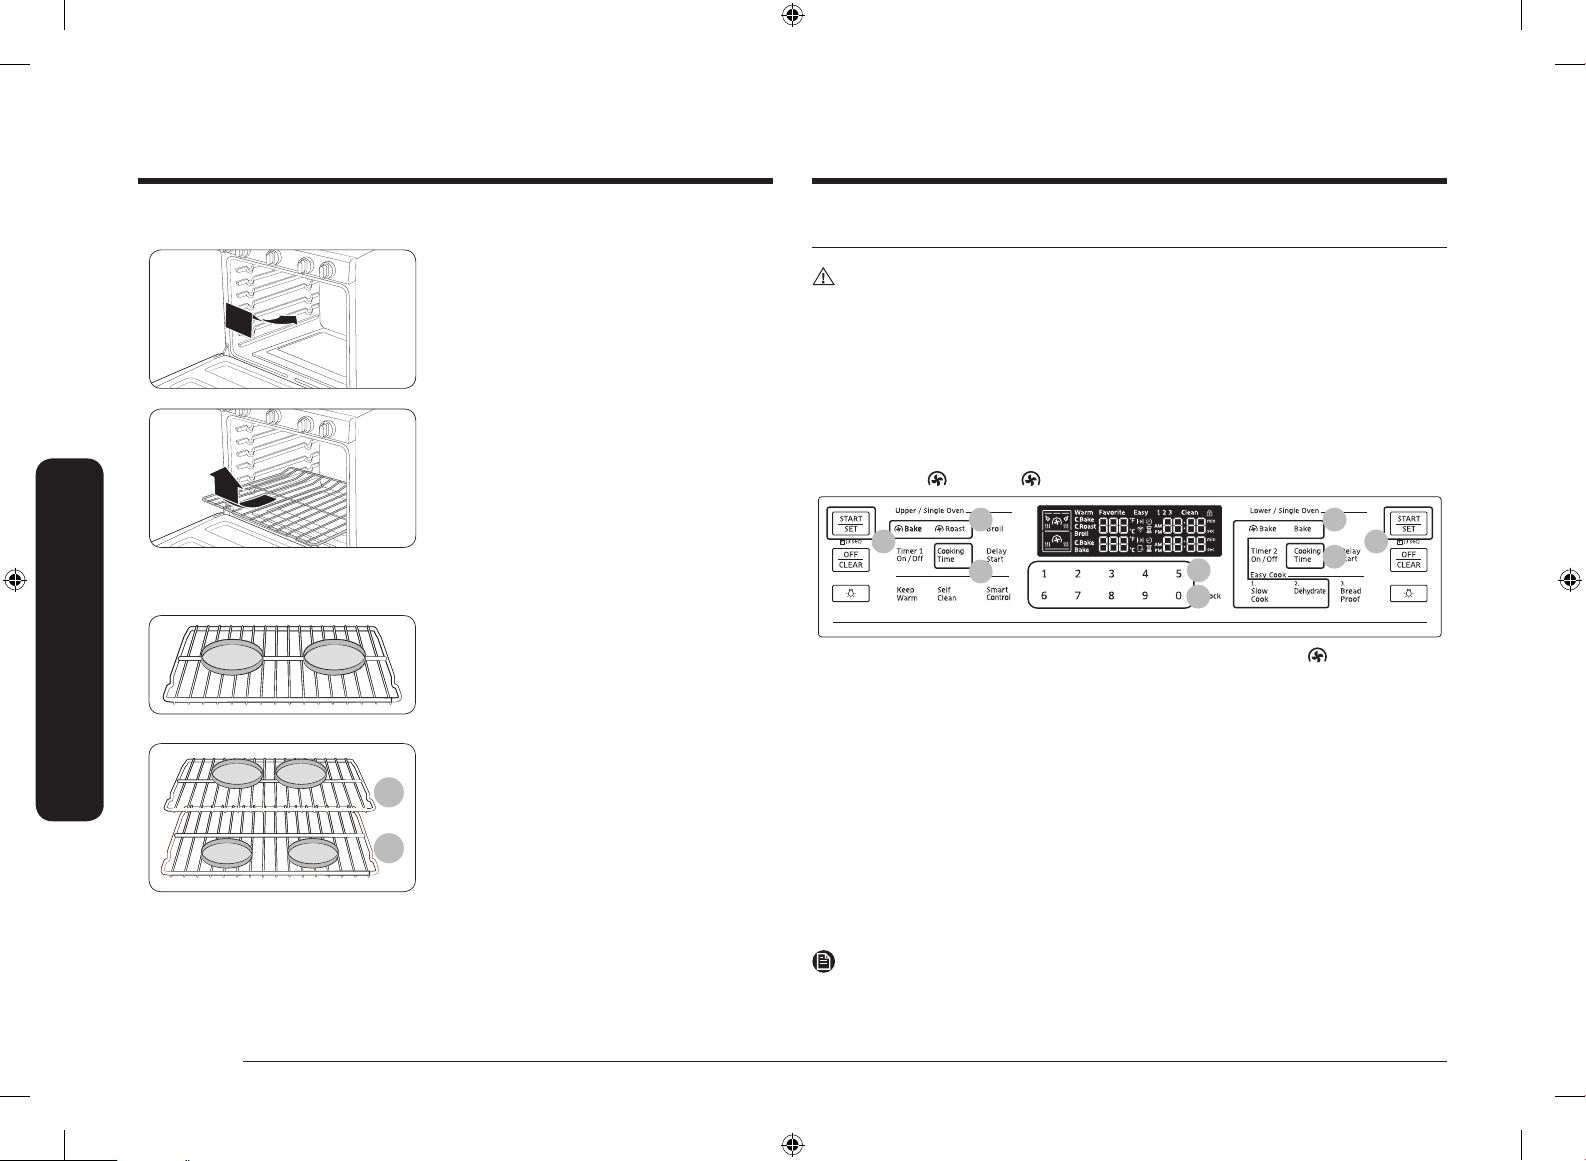
Horno de gas
5
3
Horno de gas
Inserción y retirada de una parrilla del horno
Para insertar una parrilla del horno
1. Coloque el extremo trasero de la parrilla
2. Deslice la parrilla sobre la guía mientras
Para retirar una parrilla del horno
1. Retire el cajón hacia afuera hasta que se
2. Levante el extremo delantero de la parrilla y
Colocación de parrillas y recipientes
Colocar los moldes o las charolas lo más cerca
posible del centro del horno producirá los mejores
resultados. Si hornea con más de un recipiente,
colóquelos de manera tal que cada uno tenga
Parrilla del horno simple
Parrilla del horno múltiple
1" a 1½" de espacio libre a su alrededor.
Si hornea en dos parrillas en el modo simple,
coloque las parrillas del horno en las posiciones
3 y 5 para un mejor desempeño.
Cuando hornea en el modo simple en una única
parrilla, coloque la parrilla del horno en la posición
3 o 4.
• Si usa la parrilla deslizante, colóquela debajo
sobre una guía.
sostiene el extremo delantero de la parrilla.
detenga.
retírela de la guía.
de la parrilla plana.
Opciones de cocción
PRECAUCIÓN
Los alimentos que pueden echarse a perder fácilmente como la leche, los huevos, el pescado,
las aves y las carnes, deben enfriarse en un refrigerador antes de colocarse en el horno.
Aún enfriados, no deben permanecer en el horno durante más de una hora antes de que se
inicie la cocción y una vez nalizada la cocción deben retirarse a la brevedad.
Cocción programada (modo simple)
La cocción programada congura el horno para cocinar los alimentos a una temperatura
establecida durante un tiempo determinado. El horno se apaga automáticamente cuando naliza.
Modo: Hornear / Hornear / Asar / Cocción lenta / Deshidratar
01
05 05
03
1. Presione la tecla correspondiente al modo de cocción deseado, como Bake (Hornear
por convección) en la parte izquierda o derecha del panel.
2. Si es necesario, cambie la temperatura usando el teclado numérico.
3. Presione la tecla Cooking Time (Tiempo de cocción) en la parte izquierda o derecha del panel.
4. Fije el tiempo de cocción entre 1 minuto y 9 horas y 59 minutos (9:59) usando el teclado
numérico.
5. Presione la tecla START/SET (INICIO/CONFIGURAR) en la parte derecha o izquierda del
panel. El horno se iniciará automáticamente y comenzará a precalentarse. La temperatura
aumenta hasta que alcanza la temperatura que usted ha congurado.
6. Al nalizar el precalentamiento, coloque el recipiente con el alimento sobre una parrilla y
cierre la puerta. El horno comienza la cocción para la cantidad de tiempo congurada.
7. Una vez transcurrido el tiempo de cocción, el horno se apagará automáticamente y, luego,
emitirá un sonido.
02
04
01
03
NOTA
Para cambiar el tiempo de cocción programado, presione la tecla Cooking Time (Tiempo de cocción)
e ingrese un tiempo distinto. Luego, presione la tecla START/SET (INICIO/CONFIGURAR).
28 Español
NX7000K_VE_NX58M6850SS_AA_DG68-00909A-03_EN+MES+CFR.indb 28 1/30/2018 1:04:49 PM
Page 81
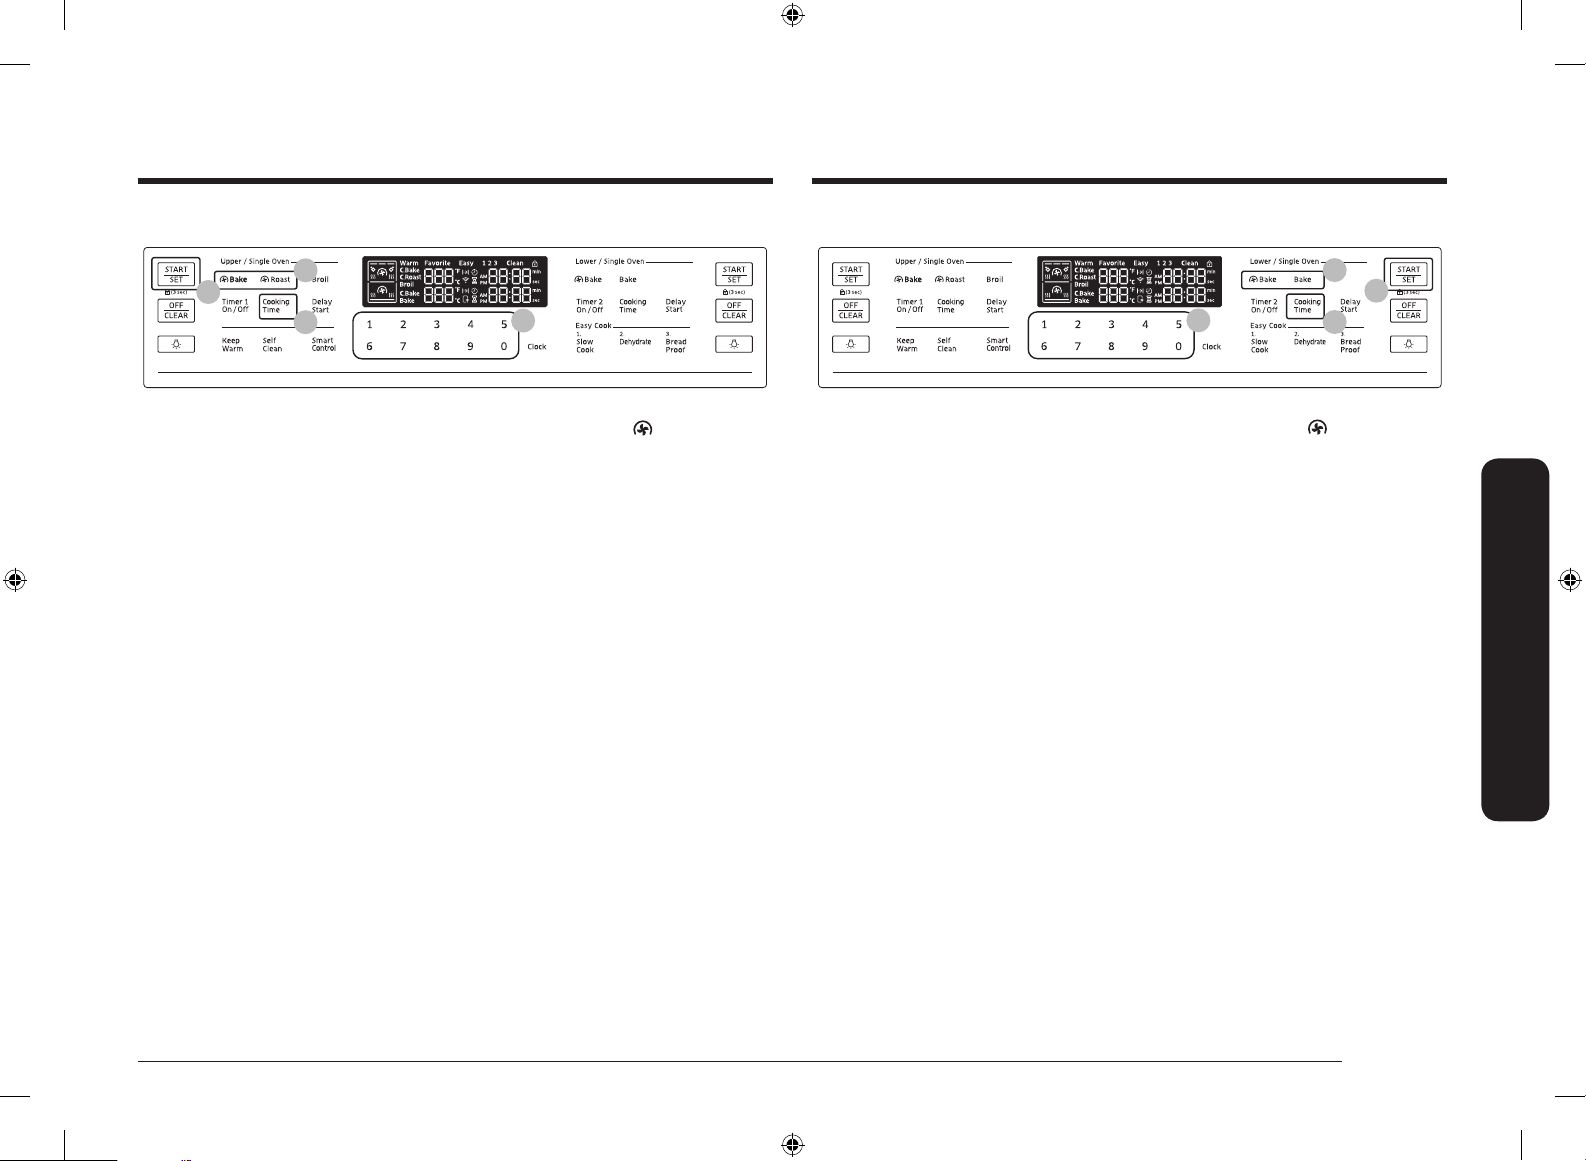
Cocción programada (modo de horno superior)
Cocción programada (modo de horno inferior)
02
06
04
05
1. Inserte el Divisor inteligente en la cavidad.
2. Presione la tecla correspondiente al modo de cocción deseado, como
Bake (Hornear
por convección) en la parte izquierda del panel.
3. Si es necesario, cambie la temperatura usando el teclado numérico.
4. Presione la tecla Cooking Time (Tiempo de cocción) en la parte izquierda del panel.
5. Fije el tiempo de cocción entre 1 minuto y 9 horas y 59 minutos (9:59) usando el teclado
numérico.
6. Presione la tecla START/SET (INICIO/CONFIGURAR) en la parte izquierda del panel.
El horno se iniciará automáticamente y comenzará a precalentarse. La temperatura
aumenta hasta que alcanza la temperatura que usted ha congurado.
7. Al nalizar el precalentamiento, coloque el recipiente con el alimento sobre una parrilla
en el horno superior y cierre la puerta. El horno comienza la cocción para la cantidad de
tiempo congurada.
8. Una vez transcurrido el tiempo de cocción, el horno se apagará automáticamente y, luego,
emitirá un sonido.
02
06
05
04
1. Inserte el Divisor inteligente en la cavidad.
2. Presione la tecla correspondiente al modo de cocción deseado, como Bake (Hornear
por convección) en la parte derecha del panel.
3. Si es necesario, cambie la temperatura usando el teclado numérico.
4. Presione la tecla Cooking Time (Tiempo de cocción) en la parte derecha del panel.
5. Fije el tiempo de cocción entre 1 minuto y 9 horas y 59 minutos (9:59) usando el teclado
numérico.
6. Presione la tecla START/SET (INICIO/CONFIGURAR) en la parte derecha del panel. El horno
se iniciará automáticamente y comenzará a precalentarse. La temperatura aumenta hasta
que alcanza la temperatura que usted ha congurado.
7. Al nalizar el precalentamiento, coloque el recipiente con el alimento sobre una parrilla
en el horno inferior y cierre la puerta. El horno comienza la cocción para la cantidad de
tiempo congurada.
8. Una vez transcurrido el tiempo de cocción, el horno se apagará automáticamente y, luego,
emitirá un sonido.
Horno de gas
Español 29
NX7000K_VE_NX58M6850SS_AA_DG68-00909A-03_EN+MES+CFR.indb 29 1/30/2018 1:04:50 PM
Page 82
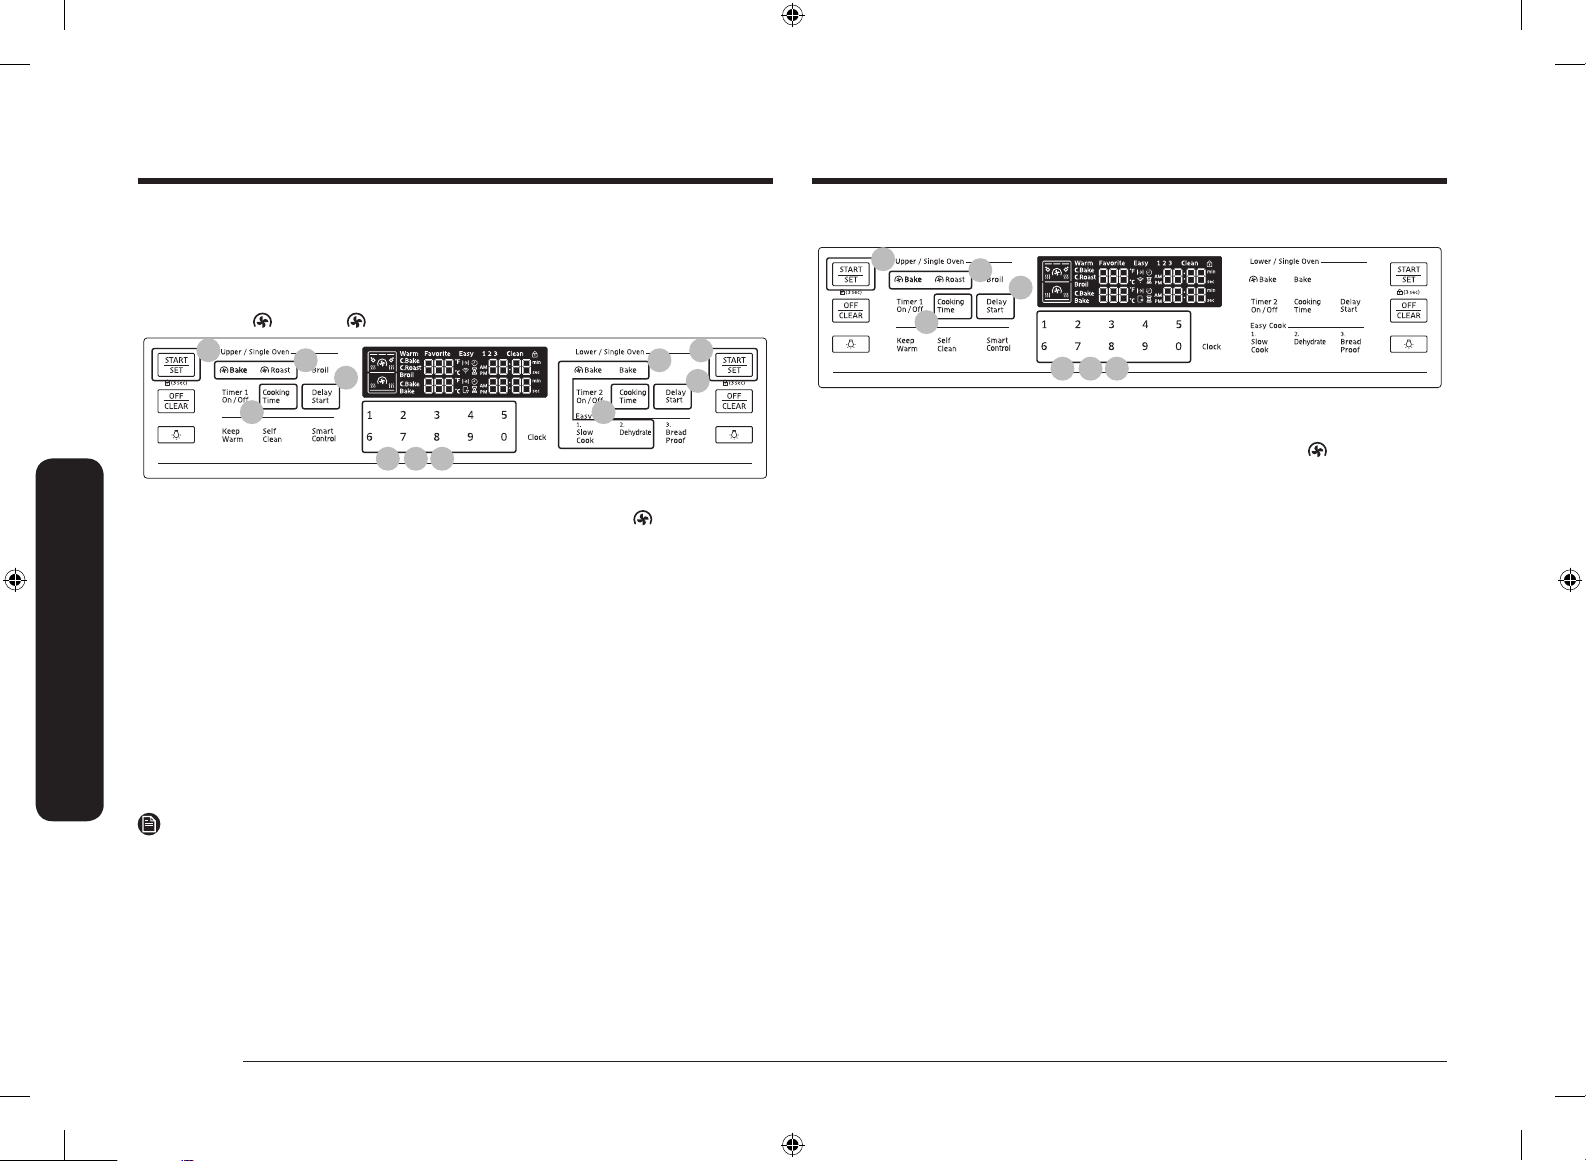
Horno de gas
Horno de gas
Inicio retardado (modo simple)
La función Inicio retardado le permite usar el temporizador de cocina para iniciar y detener
automáticamente otro programa de cocción. El Inicio retardado puede congurarse antes de
otras funciones de cocción hasta por 12 horas.
Modo: Hornear /
08
Hornear / Asar / Cocción lenta / Deshidratar / Auto-limpieza
02
06
04
03 05 07
04
02
08
06
1. Coloque el recipiente con el alimento sobre una parrilla y cierre la puerta.
2. Presione la tecla correspondiente al modo de cocción deseado, como
Bake (Hornear
por convección) en la parte izquierda o derecha del panel.
3. Si es necesario, cambie la temperatura usando el teclado numérico.
4. Presione la tecla Cooking Time (Tiempo de cocción) en la parte izquierda o derecha del
panel.
5. Fije el tiempo de cocción entre 1 minuto y 9 horas y 59 minutos (9:59) usando el teclado
numérico.
6. Presione la tecla Delay Start (Inicio retardado) en la parte izquierda o derecha del panel.
7. Fije la hora de inicio usando el teclado numérico.
8. Presione la tecla START/SET (INICIO/CONFIGURAR) en la parte izquierda o derecha del
panel.
9. El horno comienza a cocinar a la hora establecida y se apaga automáticamente cuando
naliza la cocción.
Inicio retardado (modo superior)
08
02
06
04
03 05 07
1. Inserte el Divisor inteligente en la cavidad. Coloque el recipiente con el alimento sobre
una parrilla en el horno superior y cierre la puerta.
2. Presione la tecla correspondiente al modo de cocción deseado, como Bake (Hornear
por convección) en la parte izquierda del panel.
3. Si es necesario, cambie la temperatura usando el teclado numérico.
4. Presione la tecla Cooking Time (Tiempo de cocción) en la parte izquierda del panel.
5. Fije el tiempo de cocción entre 1 minuto y 9 horas y 59 minutos (9:59) usando el teclado
numérico.
6. Presione la tecla Delay Start (Inicio retardado) en la parte izquierda del panel.
7. Fije la hora de inicio usando el teclado numérico.
8. Presione la tecla START/SET (INICIO/CONFIGURAR) en la parte izquierda del panel.
9. El horno comienza a cocinar a la hora establecida y se apaga automáticamente cuando
naliza la cocción.
NOTA
• Para cambiar la hora de inicio, presione la tecla Delay Start (Inicio retardado) e ingrese la
nueva hora de inicio. Luego, presione la tecla START/SET (INICIO/CONFIGURAR).
• Para cambiar el tiempo de cocción programado, presione la tecla Cooking Time
(Tiempo de cocción) e ingrese un tiempo distinto. Luego, presione la tecla START/SET
(INICIO/CONFIGURAR).
30 Español
NX7000K_VE_NX58M6850SS_AA_DG68-00909A-03_EN+MES+CFR.indb 30 1/30/2018 1:04:51 PM
Page 83
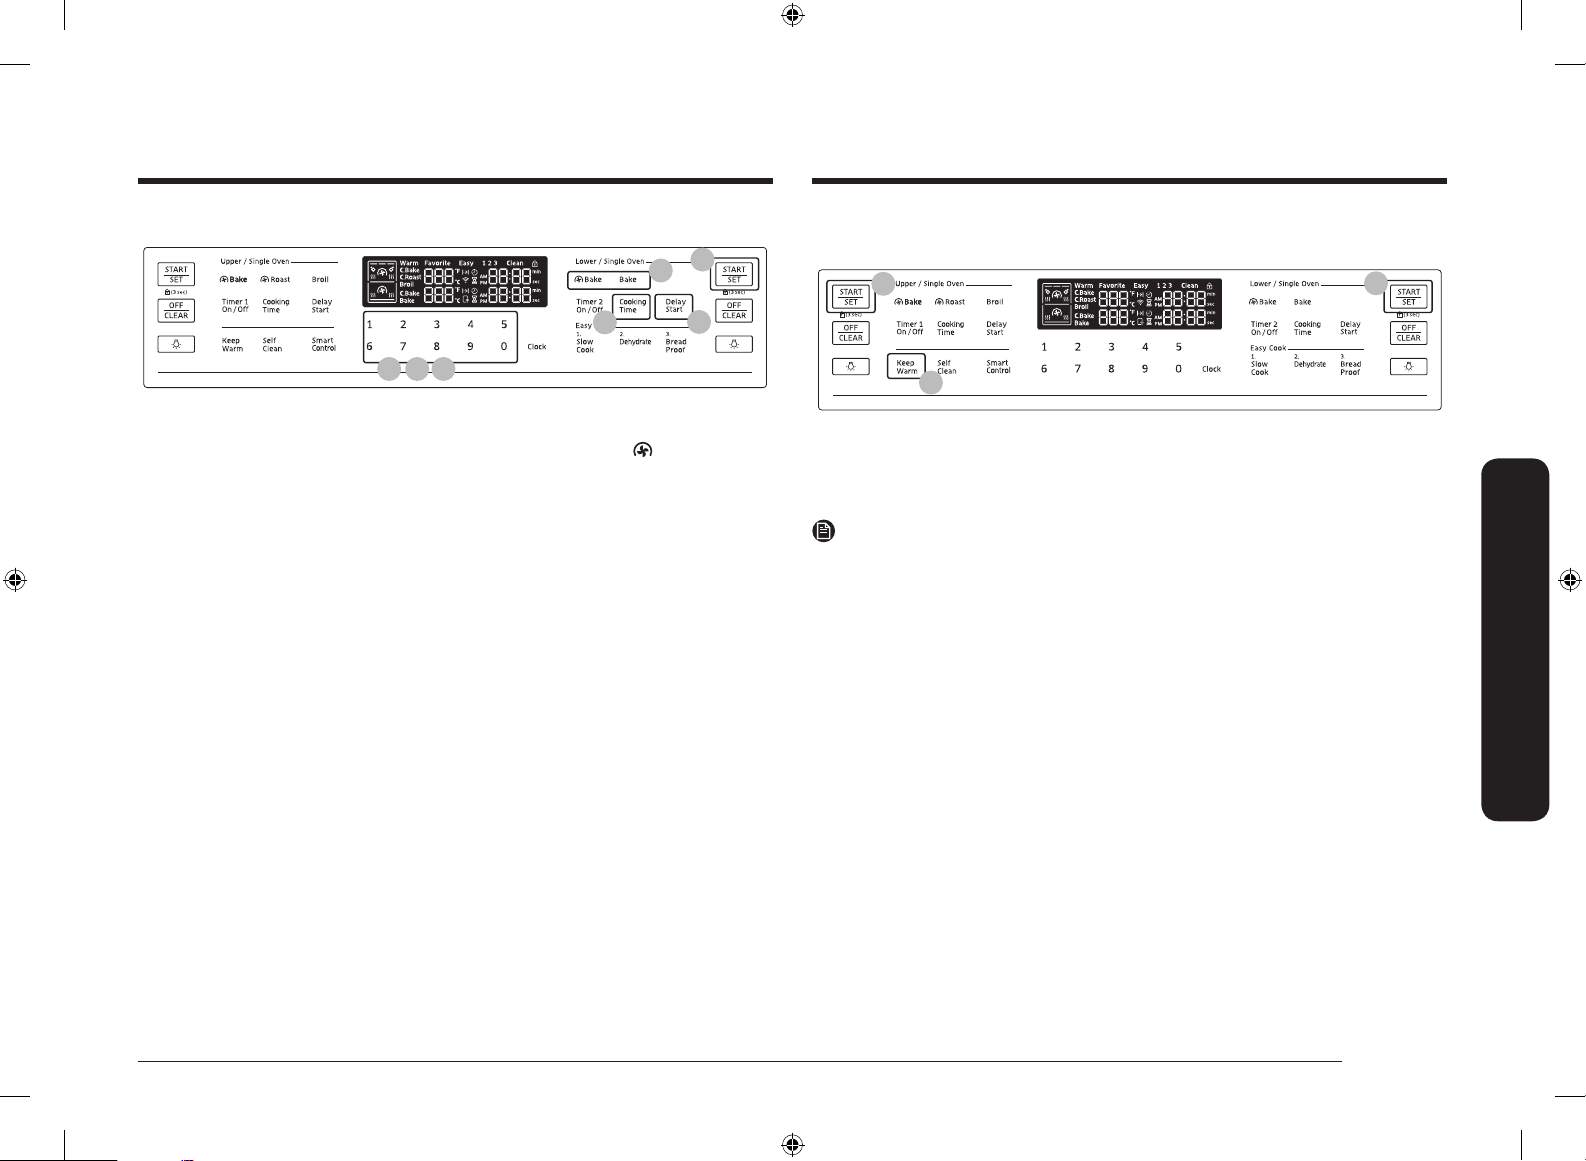
Inicio retardado (modo inferior)
02
08
Mantener caliente (solo modo simple)
Mantenga los alimentos cocinados calientes a una baja temperatura hasta tres horas.
03
03
04
03 05 07
06
1. Inserte el Divisor inteligente en la cavidad. Coloque el recipiente con el alimento sobre
una parrilla en el horno inferior y cierre la puerta.
2. Presione la tecla correspondiente al modo de cocción deseado, como Bake (Hornear
por convección) en la parte derecha del panel.
3. Si es necesario, cambie la temperatura usando el teclado numérico.
4. Presione la tecla Cooking Time (Tiempo de cocción) en la parte derecha del panel.
5. Fije el tiempo de cocción entre 1 minuto y 9 horas y 59 minutos (9:59) usando el teclado
numérico.
6. Presione la tecla Delay Start (Inicio retardado) en la parte derecha del panel.
7. Fije la hora de inicio usando el teclado numérico.
8. Presione la tecla START/SET (INICIO/CONFIGURAR) en la parte derecha del panel.
9. El horno comienza a cocinar a la hora establecida y se apaga automáticamente cuando
naliza la cocción.
02
1. Coloque el recipiente con el alimento sobre una parrilla y cierre la puerta.
2. Presione la tecla Keep Warm (Mantener caliente).
3. Presione la tecla START/SET (INICIO/CONFIGURAR) en la parte izquierda o derecha del
panel. El horno se calienta hasta 170 °F (77 °C).
NOTA
• Puede cancelar el calentamiento en cualquier momento presionando la tecla OFF/CLEAR
(APAGAR/BORRAR).
• Para congurar la función de calentamiento durante una cocción programada, presione
la tecla Keep Warm (Mantener caliente) en el modo de cocción regida por temporizador.
Al nalizar la cocción programada, el horno baja la temperatura al valor predeterminado
de calentamiento y mantiene esa temperatura hasta que el calentamiento termine o se
cancele.
• Utilice esta función solamente en el modo simple. El horno no puede mantener la
temperatura baja que esta función requiere durante la cocción en modo doble.
Horno de gas
Español 31
NX7000K_VE_NX58M6850SS_AA_DG68-00909A-03_EN+MES+CFR.indb 31 1/30/2018 1:04:51 PM
Page 84
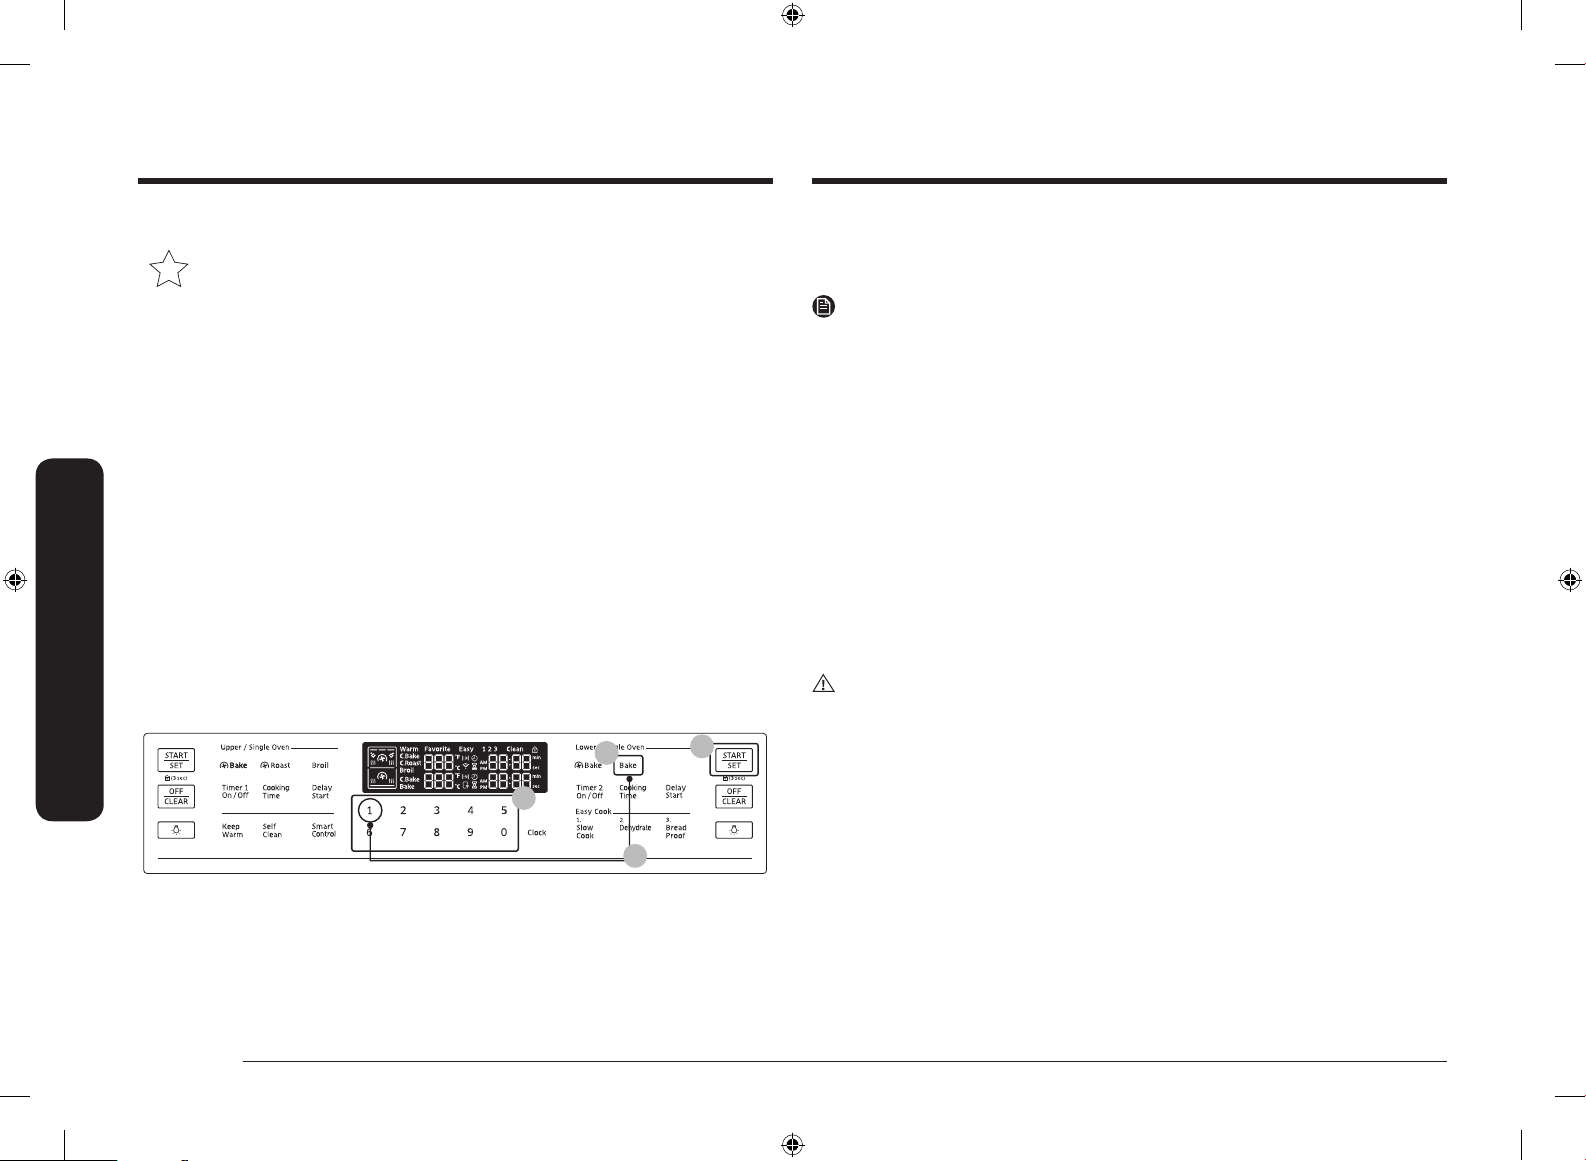
Horno de gas
Horno de gas
La opción Shabat (solo modo simple)
(Para uso en el Shabat y otras fechas sagradas judías)
K
Use esta opción solo para hornear en el Shabat y otras fechas sagradas judías.
Para obtener más información, visite el sitio web http://www.star-k.org
Con la opción Shabat
• La temperatura del horno se puede regular más alta o más baja después de haber
congurado esta opción.
• La pantalla no cambia y no suena ninguna señal sonora cuando cambia la temperatura.
• Una vez que el horno se encuentra correctamente congurado para hornear con la opción
Shabat activada, el horno permanecerá encendido continuamente hasta que se cancele
esa función. Esto anulará la función de ahorro de energía transcurridas 12 horas que
viene congurada de fábrica.
• Si la luz del horno es necesaria durante el Shabat, presione OVEN LIGHT (LUZ DEL HORNO)
antes de activar la función Shabat. Una vez que la luz del horno se encuentre encendida
y se encuentre activada la opción Shabat, la luz del horno permanecerá encendida hasta
que la opción Shabat sea desactivada.
• Si desea que la luz del horno se apague, asegúrese de apagarla antes de activar la
función Shabat.
• No utilice la supercie de la cubierta cuando la opción Shabat está activada.
Para activar la opción Shabat
01
02
04
03
4. Presione las teclas Bake (Hornear) y Número 1 simultáneamente durante 3 segundos para
mostrar “SAb”. Una vez que “SAb” aparece, el control del horno ya no emite sonidos ni
muestra ningún cambio.
NOTA
• Puede cambiar la temperatura del horno una vez comenzado el horneado, pero la
pantalla no cambiará ni emitirá sonidos. Luego de cambiar la temperatura, el horno tarda
15 segundos en reconocer el cambio.
• Puede apagar el horno en cualquier momento presionando OFF/CLEAR (APAGAR/BORRAR).
Sin embargo, esto no desactiva la opción Shabat.
• Para desactivar la opción Shabat, mantenga presionados Bake (Hornear) y el Número 1
simultáneamente por 3 segundos.
• Puede programar el tiempo de cocción antes de activar la opción Shabat.
• Después de un corte de energía, el horno no reanudará el funcionamiento
automáticamente. “SAb” aparecerá en el panel de control, pero el horno no se encenderá
nuevamente. Los alimentos se pueden retirar con seguridad del horno, pero no se debe
desactivar la opción Shabat y encender el horno de nuevo hasta que nalice el Shabat/
las estas.
• Después de la celebración del Shabat, apague la opción Shabat manteniendo presionados
Bake (Hornear) y el Número 1 simultáneamente por al menos 3 segundos.
PRECAUCIÓN
• No intente activar ninguna otra función excepto la de Hornear cuando la opción Shabat
está activa. Solo las siguientes teclas funcionarán correctamente: Teclados numéricos,
Hornear, Inicio/Congurar horno y Apagar horno.
• No abra la puerta del horno ni cambie la temperatura del horno durante alrededor de
30 minutos después de haber iniciado la opción Shabat. Deje que el horno alcance la
temperatura jada. El ventilador del horno funciona solamente cuando aumenta la
temperatura del horno.
1. Presione la tecla Bake (Hornear).
2. Ingrese la temperatura deseada usando el teclado numérico. La temperatura
predeterminada es 350 °F.
3. Presione la tecla START/SET (INICIO/CONFIGURAR). La temperatura en la pantalla cambia
luego de que la temperatura del horno alcanza los 175 °F.
32 Español
NX7000K_VE_NX58M6850SS_AA_DG68-00909A-03_EN+MES+CFR.indb 32 1/30/2018 1:04:52 PM
Page 85
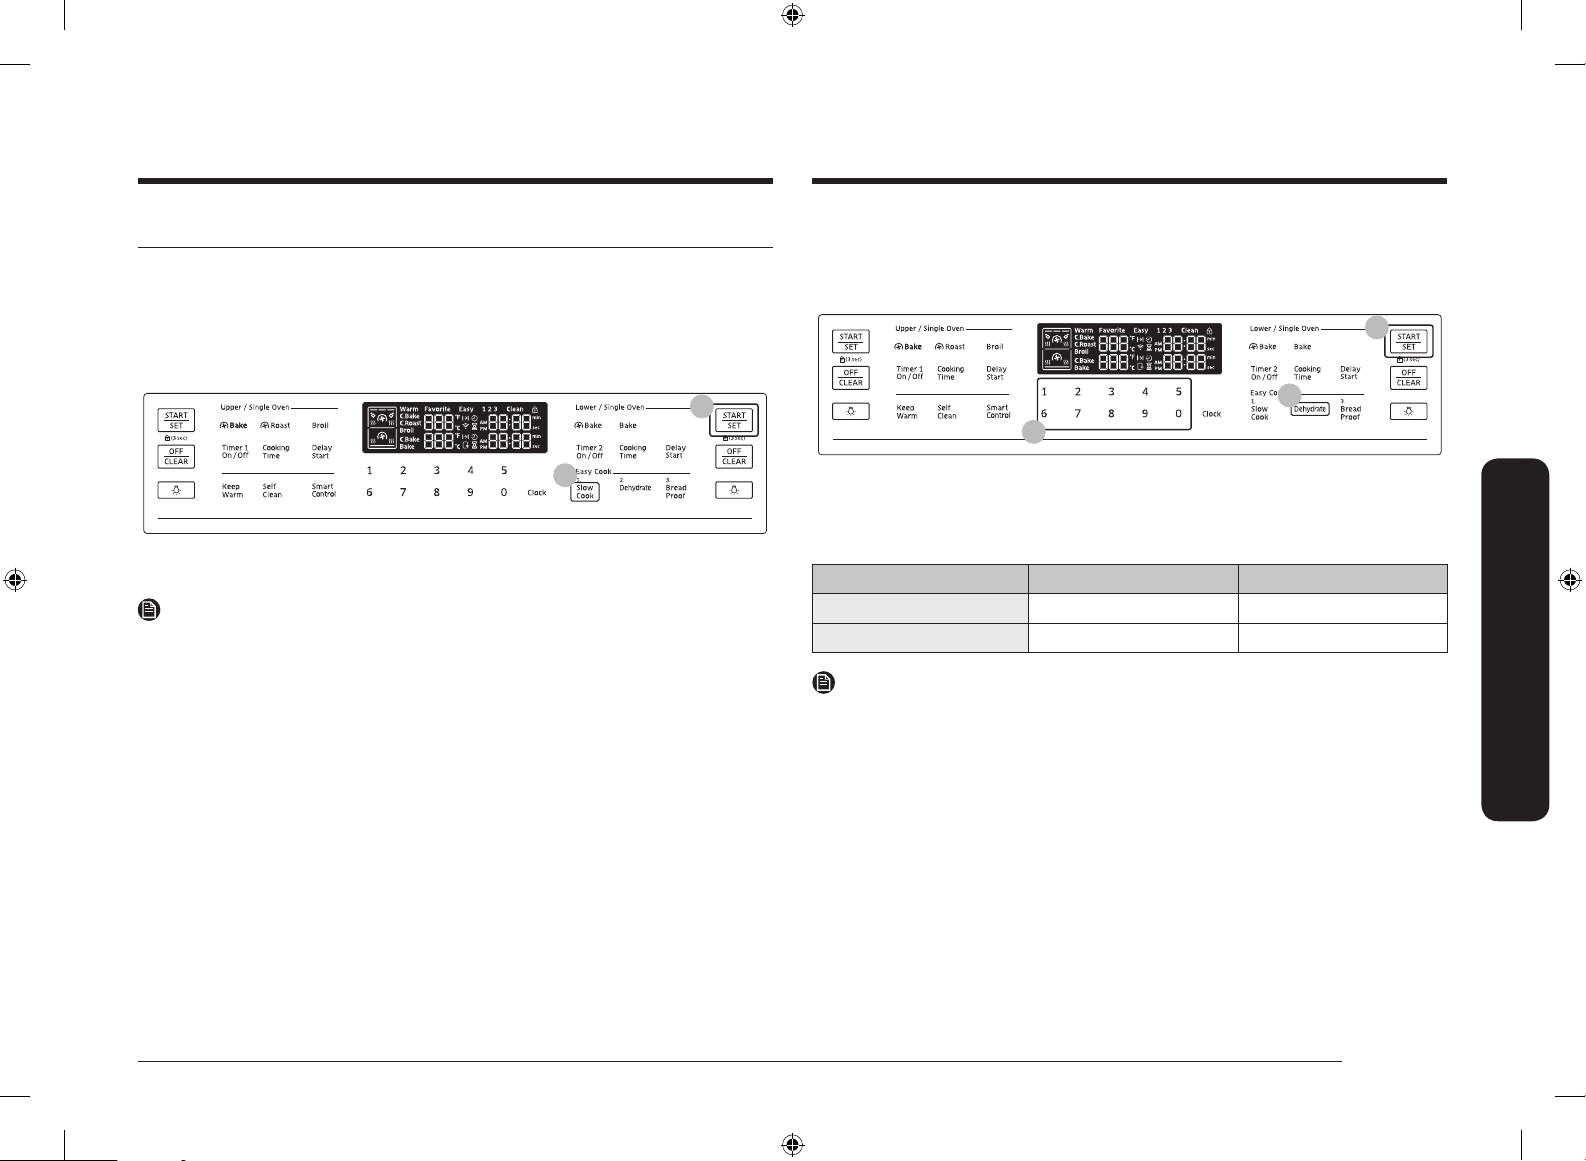
Cocción lenta, deshidratar, leudado
Cocción lenta (solo modo simple)
La función Cocción lenta cocina los alimentos lentamente a más baja temperatura del horno.
Los tiempos de cocción prolongados permiten una mejor distribución de sabores en muchas
recetas. Esta función es ideal para asar carne, cerdo y aves. Cocinar lentamente las carnes
puede provocar que la parte exterior se oscurezca pero no se queme. Esto es normal.
02
Deshidratar (solo modo simple)
Deshidratar seca los alimentos o elimina la humedad de los alimentos a través de la circulación
de calor. Después de secar los alimentos, guárdelos en un lugar fresco y seco. Agregar jugo de
limón o ananá o espolvorear azúcar sobre las frutas ayuda a conservar su dulzura.
03
01
02
01
1. Presione la tecla Slow Cook (Cocción lenta) una vez para HI (Alta) o dos veces para LO (Baja).
2. Presione START/SET (INICIO/CONFIGURAR).
NOTA
Use solo 1 parrilla y colóquela en la posición 1 o 2 para obtener los mejores resultados.
No es necesario precalentar el horno.
1. Presione Dehydrate (Deshidratar). La temperatura predeterminada es de 150 °F.
2. Ingrese la temperatura que desee en el teclado numérico. (100 °F-175 °F)
3. Presione START/SET (INICIO/CONFIGURAR).
Temperaturas de deshidratación recomendadas
Categoría Posición de la parrilla Temperatura (°F)
Verduras o fruta 3 o 4 100-150
Carne 3 o 4 145-175
NOTA
• El tiempo de secado depende de la cantidad de humedad en el interior de los alimentos,
el tamaño de los alimentos y la humedad en el aire.
• No es necesario precalentar el horno.
Horno de gas
Español 33
NX7000K_VE_NX58M6850SS_AA_DG68-00909A-03_EN+MES+CFR.indb 33 1/30/2018 1:04:53 PM
Page 86
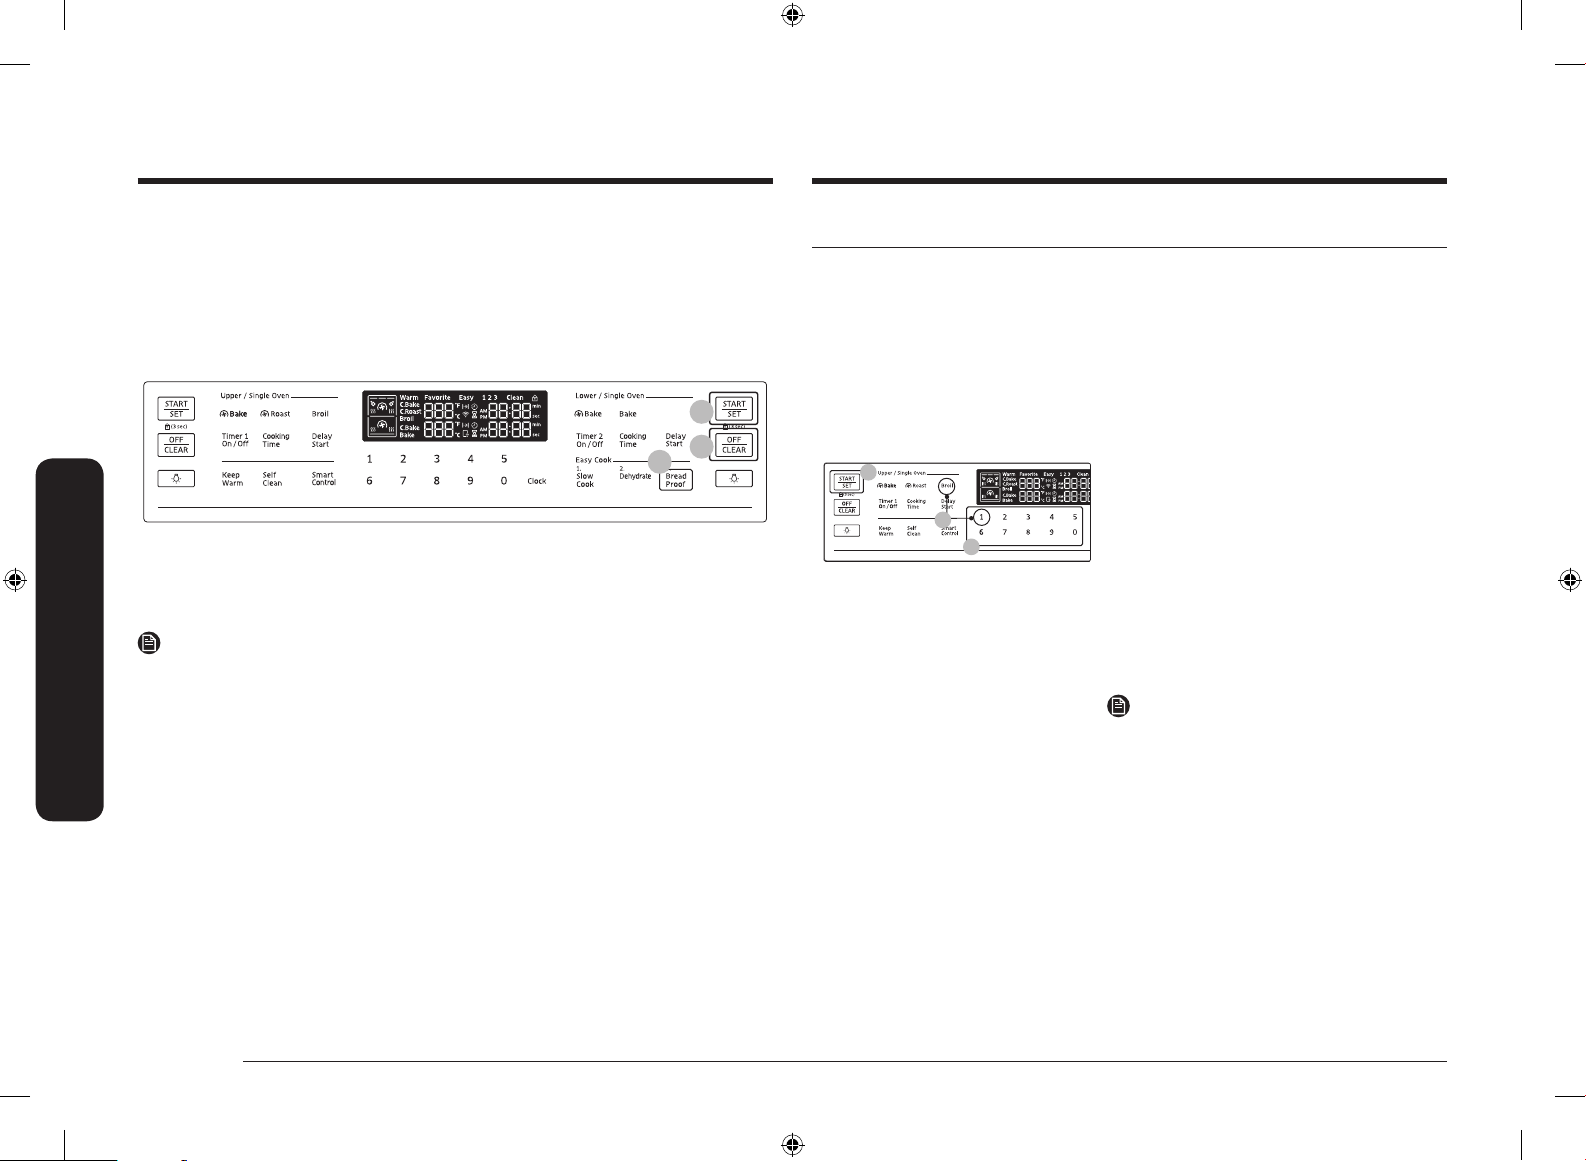
Horno de gas
03
04
01
Horno de gas
Entibiar pan para leudado (solo modo simple)
Esta función automáticamente genera la temperatura óptima para el proceso de leudado del
pan y, por ende, no le corresponde ningún ajuste de temperatura.
Si presiona Bread Proof (Entibiar pan para leudado) cuando la temperatura del horno es
superior a 100 °F, aparece Hot (Caliente) en la pantalla. Dado que esta función produce mejores
resultados si se inicia cuando el horno está frío, le recomendamos que aguarde hasta que el
horno se enfríe y Hot (Caliente) desaparezca de la pantalla.
02
03
01
1. Presione Bread Proof (Entibiar pan para leudado).
2. Presione START/SET (INICIO/CONFIGURAR).
3. Presione OFF/CLEAR (APAGAR/BORRAR) en cualquier momento para desactivar esta
función.
NOTA
Utilice la posición 3 de la parrilla para el leudado del pan.
Funciones de no cocción
Ajuste de temperatura
La temperatura del horno ya ha sido calibrada en la fábrica. Al principio, cuando utilice
el horno, siga las indicaciones de tiempo y temperatura recomendadas para las recetas.
Si considera que el horno está demasiado caliente o demasiado frío, puede recalibrar la
temperatura. Antes de recalibrarla, pruebe una receta utilizando un ajuste de temperatura
más alto o más bajo que el recomendado. Los resultados de horneado de esa manera
probablemente le sirvan de guía para decidir la magnitud del ajuste requerido. La temperatura
del horno puede ajustarse en ±35 °F (±19 °C ).
1. Presione la tecla Broil (Asar a la parrilla) y
1 en el teclado numérico simultáneamente
durante 3 segundos.
2. Presione la tecla Broil (Asar a la parrilla) para
seleccionar una temperatura más alta (+) o más
baja (-).
3. Ingrese un valor de temperatura de ajuste (0-35)
usando el teclado numérico.
4. Presione la tecla START/SET (INICIO/CONFIGURAR)
para guardar los cambios
NOTA
Este ajuste no afecta a la temperatura de asar a
la parrilla o auto-limpieza, y se conserva en la
memoria después de un corte de energía eléctrica.
.
34 Español
NX7000K_VE_NX58M6850SS_AA_DG68-00909A-03_EN+MES+CFR.indb 34 1/30/2018 1:04:53 PM
Page 87
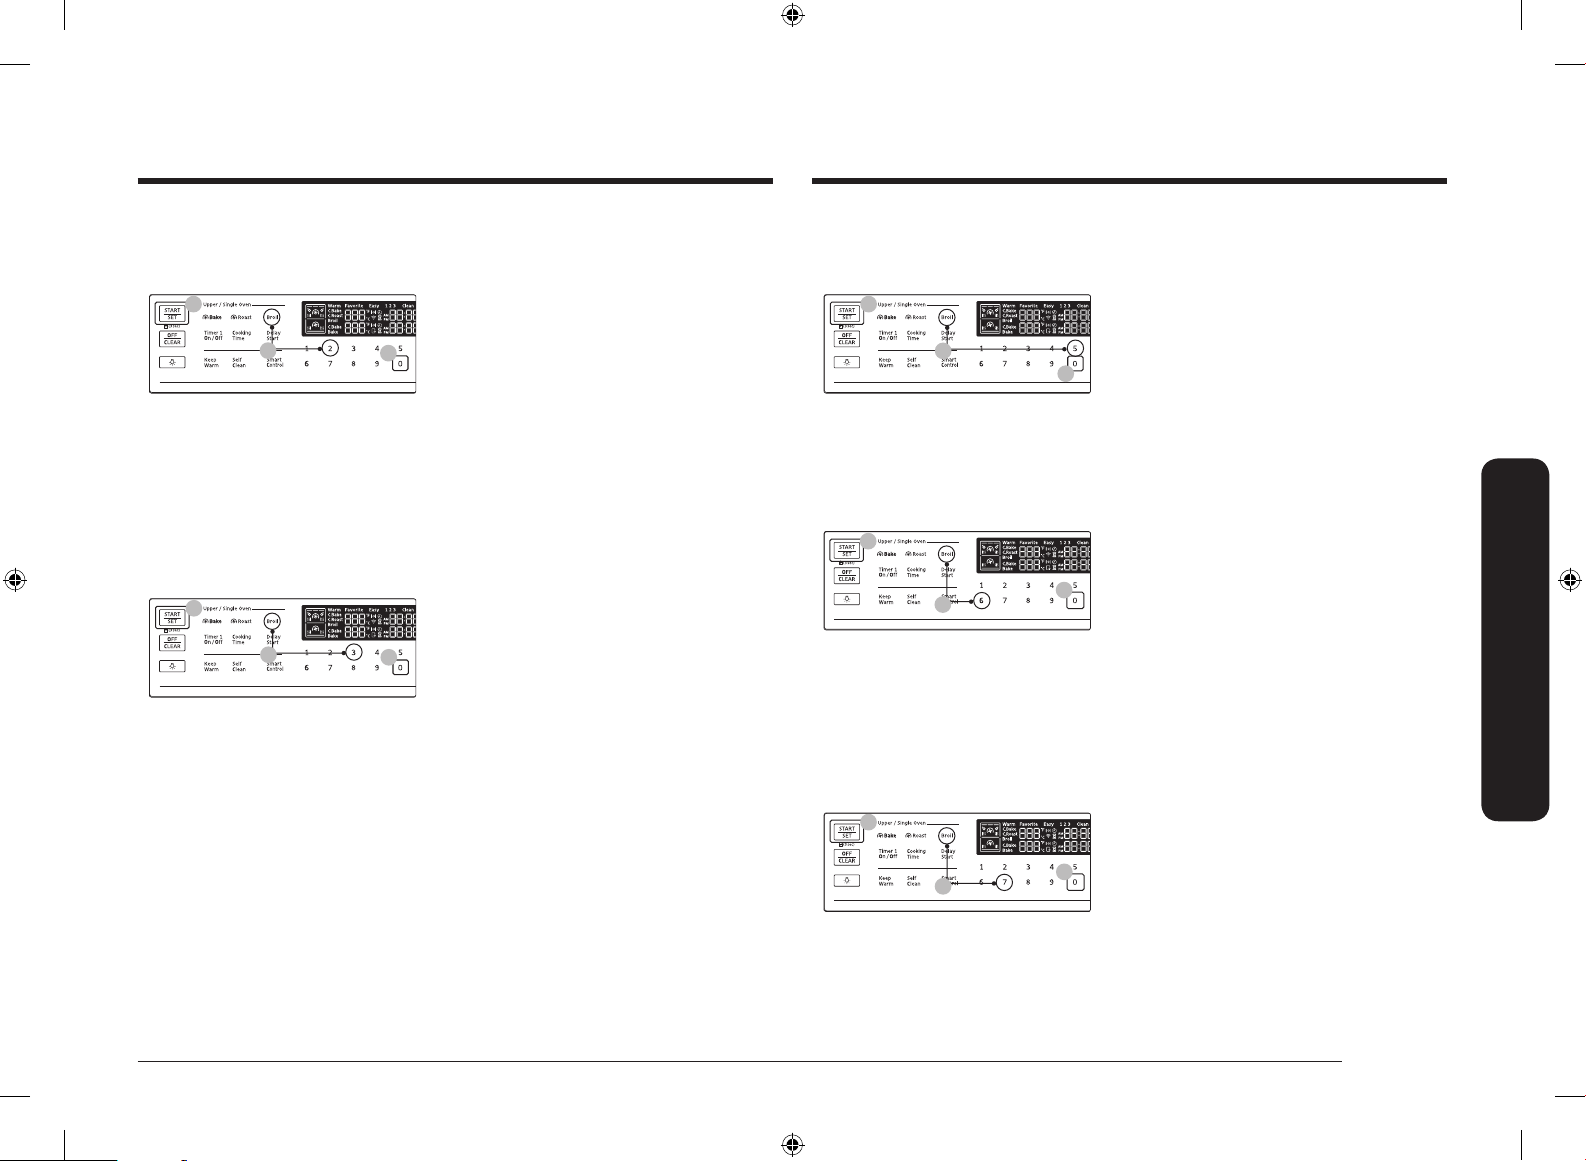
03
01
02
03
01
02
03
01
02
Temperatura Unidad (°F / °C)
03
01
02
03
01
02
Cambie el formato de la temperatura del horno a Fahrenheit o Centígrados. El ajuste
predeterminado es Fahrenheit.
1. Presione la tecla Broil (Asar a la parrilla) y
2 en el teclado numérico simultáneamente
durante 3 segundos.
2. Presione 0 en el teclado numérico para
seleccionar Fahrenheit o Centígrados.
3. Presione la tecla START/SET (INICIO/CONFIGURAR)
para guardar los cambios.
Ahorro de energía
Esto apagará automáticamente el horno 12 horas después del inicio del horneado o 3 horas
después del inicio del asado a la parrilla.
1. Presione la tecla Broil (Asar a la parrilla) y
5 en el teclado numérico simultáneamente
durante 3 segundos.
2. Presione 0 en el teclado numérico para
seleccionar OFF (Desactivado) o ON (Activado).
3. Presione la tecla START/SET (INICIO/CONFIGURAR)
para guardar los cambios.
Autoconversión
La autoconversión de convección convierte automáticamente temperaturas de horneado
normal a temperaturas de horneado por convección. Por ejemplo, si usted ingresa una
temperatura de receta normal de 350 °F y presiona START/SET (INICIO/ CONFIGURAR),
el horno muestra la temperatura convertida de 325 °F.
1. Presione la tecla Broil (Asar a la parrilla) y
3 en el teclado numérico simultáneamente
durante 3 segundos.
2. Presione 0 en el teclado numérico para
seleccionar OFF (Desactivado) o ON
Sonido
Desactivar/activar el sonido.
1. Presione la tecla Broil (Asar a la parrilla) y
6 en el teclado numérico simultáneamente
durante 3 segundos.
2. Presione 0 en el teclado numérico para
seleccionar la activación o desactivación del
sonido.
3. Presione la tecla START/SET (INICIO/CONFIGURAR)
para guardar los cambios.
Horno de gas
(Activado). (El ajuste predeterminado es “OFF”
(Desactivado).)
3. Presione la tecla START/SET (INICIO/CONFIGURAR)
para guardar los cambios.
Modo de demostración
Lo utilizan los minoristas para nes de exhibición únicamente. En este modo, el elemento
calentador no funciona.
1. Presione la tecla Broil (Asar a la parrilla) y
7 en el teclado numérico simultáneamente
durante 3 segundos.
2. Presione 0 en el teclado numérico para
seleccionar OFF (Desactivado) o ON (Activado).
3. Presione la tecla START/SET (INICIO/CONFIGURAR)
para guardar los cambios.
Español 35
NX7000K_VE_NX58M6850SS_AA_DG68-00909A-03_EN+MES+CFR.indb 35 1/30/2018 1:04:54 PM
Page 88
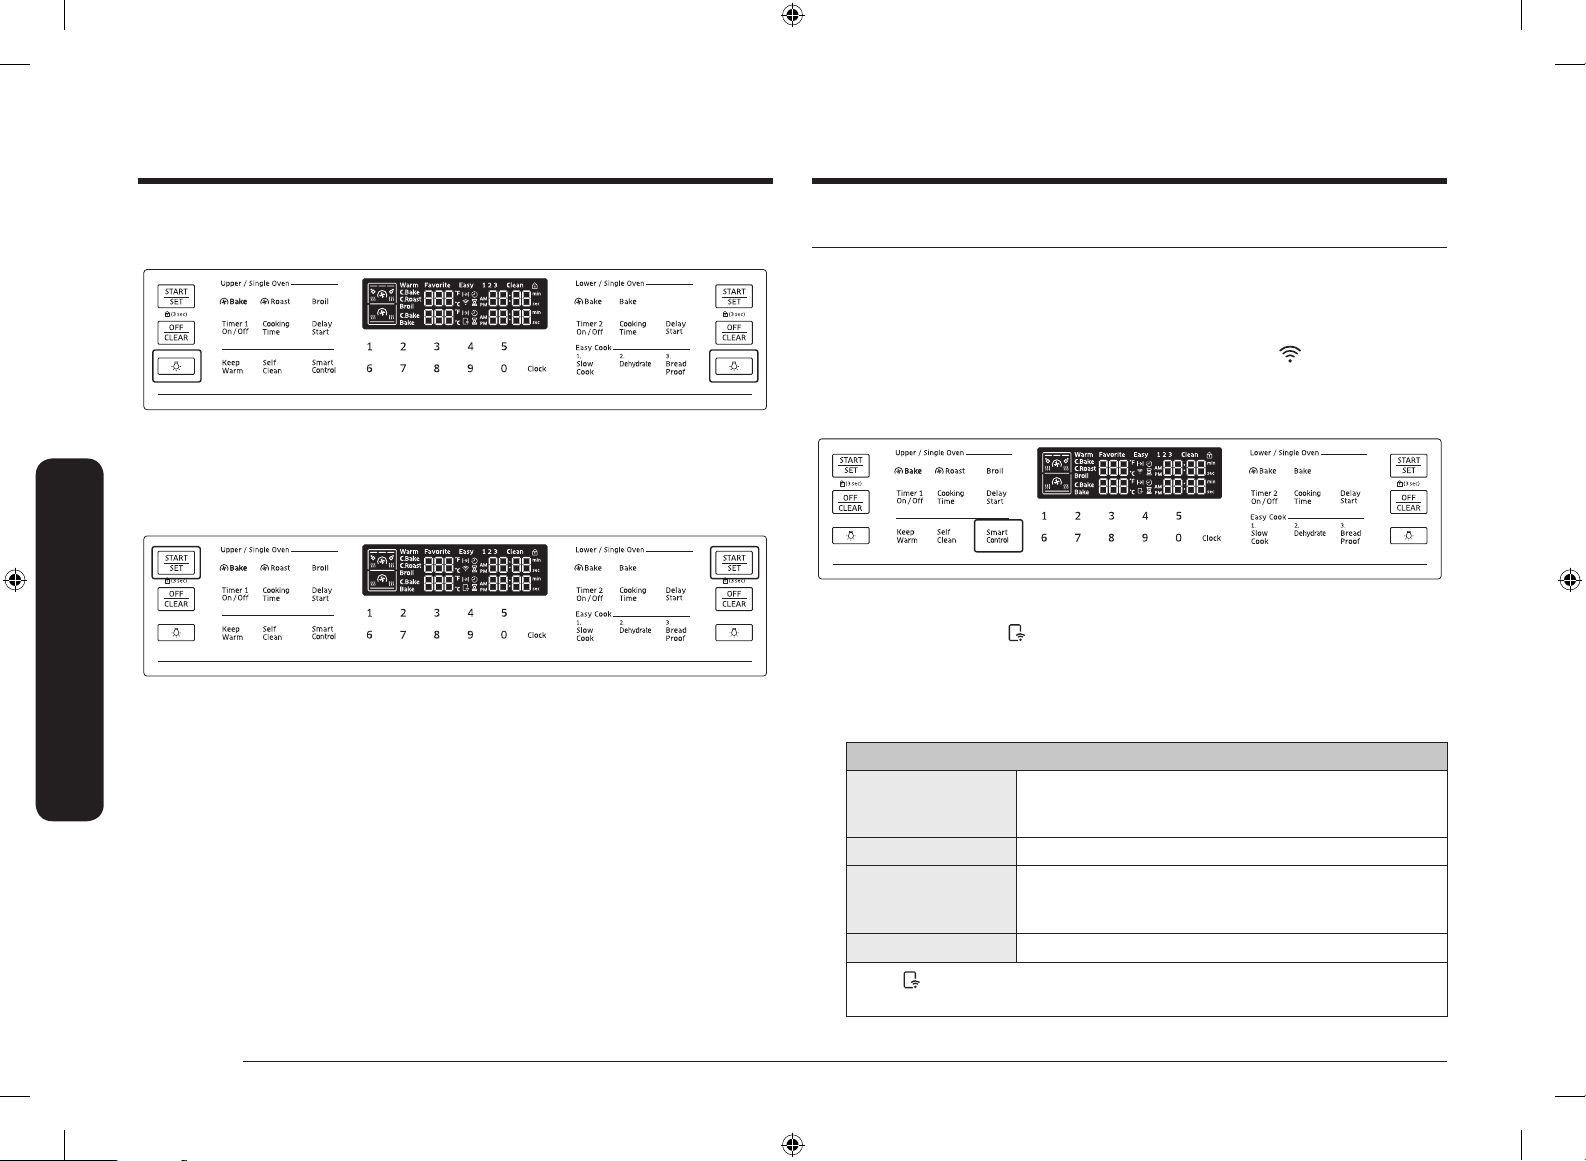
Horno de gas
Horno de gas
Luz del horno
Activa o desactiva la luz del horno
Presione la tecla Oven Light (Luz del horno) para activar o desactivar la luz del horno.
Bloqueo del horno
Bloquee el panel de control y la puerta para evitar operaciones accidentales y que el producto
se incline.
Mantenga presionada la tecla START/SET (INICIO/CONFIGURAR) durante 3 segundos para
desbloquear
el panel de control y la puerta. Cuando el bloqueo de la estufa está activado, el panel de la
estufa no funciona y la puerta del horno se bloquea y no puede abrirse.
Smart Control - Control remoto del horno
Cómo conectar el horno
1. Descargue y abra la aplicación SmartThings en su dispositivo inteligente.
2. Siga las instrucciones en pantalla de la aplicación para conectar la estufa.
3. Una vez completado el proceso, se muestra el icono de conexión
y la aplicación conrma que está conectado.
4. Si el icono de conexión no se enciende, siga la instrucción en la aplicación para volver a
conectarse.
Para controlar el horno remotamente
1. Presione Smart Control. aparecerá en la pantalla. El horno ahora puede controlarse de
manera remota mediante un dispositivo remoto conectado.
2. Seleccione el icono del horno en la aplicación SmartThings para abrir la aplicación Oven
Control. Si la aplicación está conectada al horno, puede ejecutar las siguientes funciones
mediante la aplicación:
Control remoto del horno usando la aplicación SmartThings
• Revisar el estado del horno.
Supervisión de
horno/cubierta
Control remoto del horno • Congurar o ajustar remotamente los ajustes del hornos
Mis platos
Detección de errores • Reconocer los errores automáticamente.
• Supervisar el estado de encendido/apagado de cada quemador
de la cubierta.
• Apagar el horno remotamente.
• Una vez iniciada la cocción, cambiar remotamente el tiempo de
cocción o la temperatura.
ubicado en la estufa
• Si
no aparece en la pantalla, aún puede supervisar el estado del horno y la cubierta y
apagar el horno.
36 Español
NX7000K_VE_NX58M6850SS_AA_DG68-00909A-03_EN+MES+CFR.indb 36 1/30/2018 1:04:55 PM
Page 89
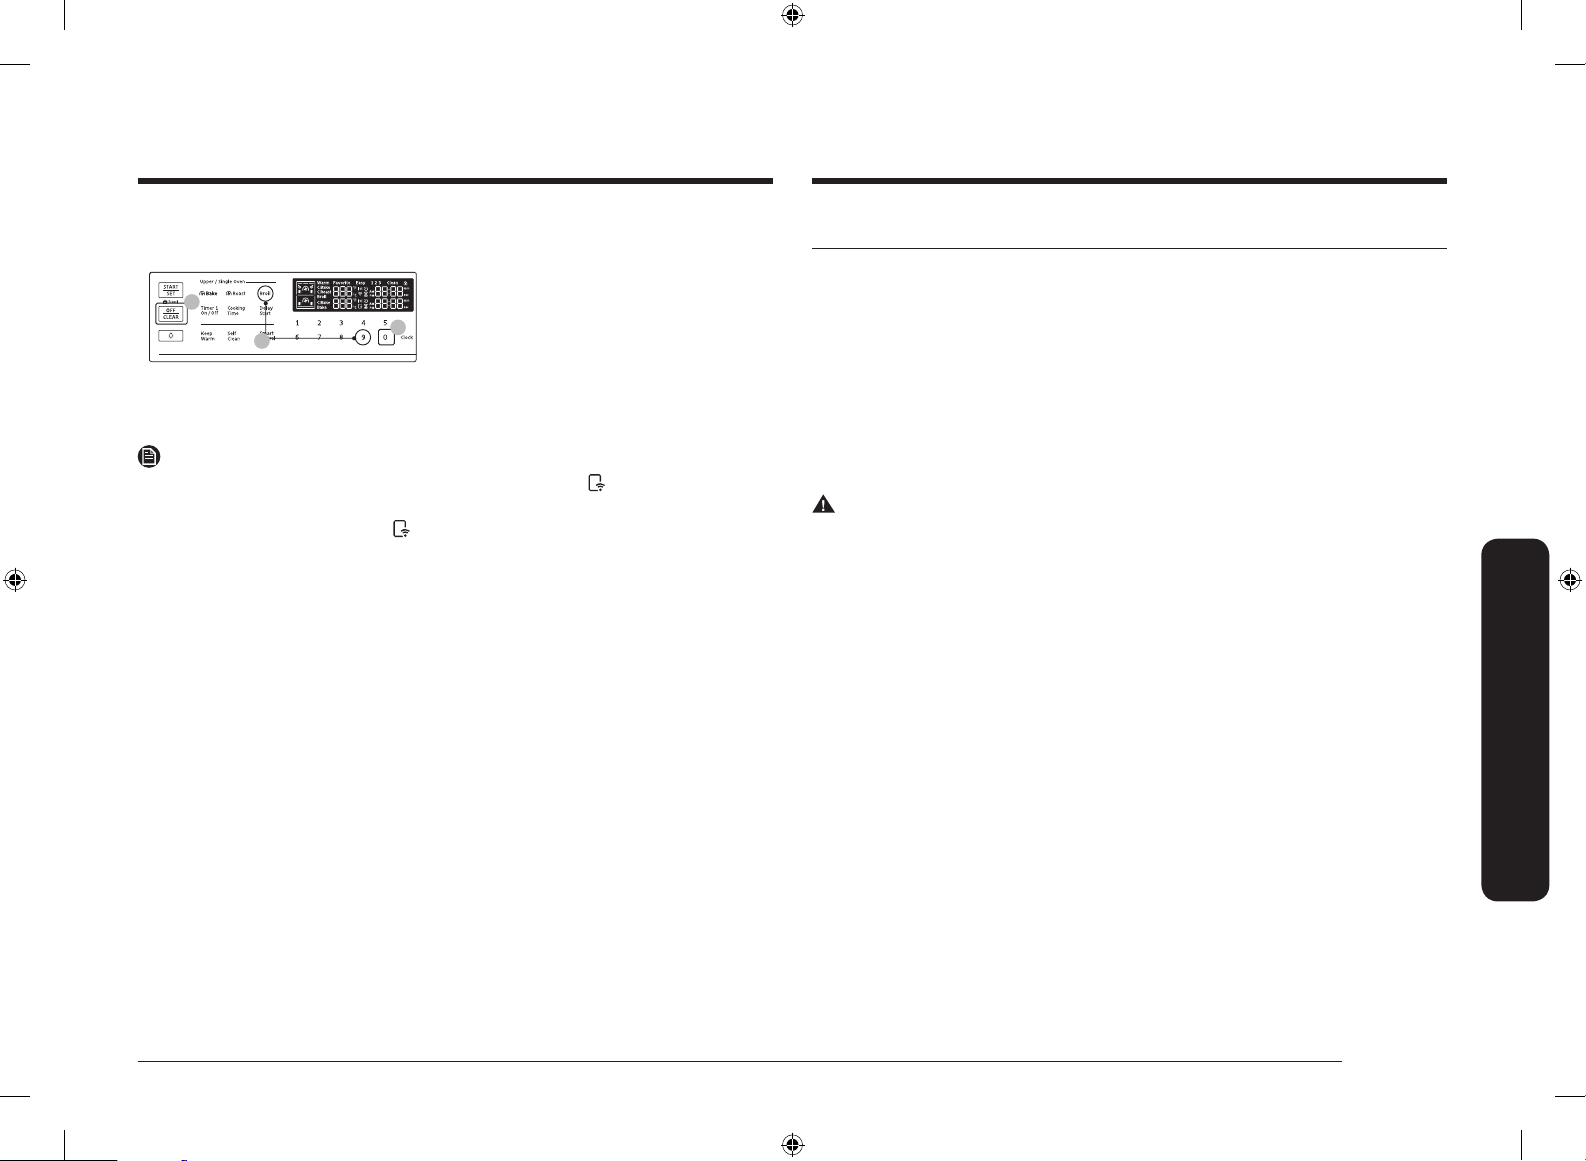
Horno de gas Mantenimiento
03
01
02
Activar/Desactivar WI-FI
Si activa el modo de WI-FI desactivado, ningún dispositivo móvil puede conectarse a la estufa.
1. Presione la tecla Broil (Asar a la parrilla) y
9 en el teclado numérico simultáneamente
durante 3 segundos.
2. Presione 0 en el teclado numérico para
seleccionar OFF (Desactivado) o ON (Activado).
3. Presione la tecla START/SET (INICIO/CONFIGURAR)
para guardar los cambios.
NOTA
• Abrir la puerta del horno o presionar el Smart Control borrará de la pantalla e
impedirá el funcionamiento de la mayoría de las funciones remotas.
• Al nalizar o cancelar la cocción,
se borra de la pantalla.
• Por cuestiones de seguridad, no puede encender el horno de gas de manera remota.
• Por cuestiones de seguridad, para activar el control remoto se debe especicar el tiempo
de cocción.
• El horno sigue funcionando aunque se pierda la conexión Wi-Fi.
• Smart Control no funciona adecuadamente si la conexión de Wi-Fi es inestable.
• Consulte el manual de la aplicación SmartThings para obtener información detallada.
Limpieza
Panel de control
Primero, bloquee el panel de control y la puerta para evitar operaciones accidentales y que el
producto se incline.
1. Mantenga presionada la tecla OFF/CLEAR (APAGAR/BORRAR) durante 3 segundos para
bloquear el panel de control y la puerta.
2. L
impie el panel de control con un paño suave humedecido con agua corriente, agua
jabonosa tibia o limpiavidrios. No rocíe limpiadores directamente sobre el panel de control.
3. Cuando nalice, mantenga presionada la tecla START/SET (INICIO/CONFIGURAR) de nuevo
durante 3 segundos.
ADVERTENCIA
• Asegúrese de que el panel de control se apague y todas las supercies de la estufa estén
frías antes de limpiar. De lo contrario, puede quemarse.
• Si la estufa se ha movido lejos de la pared, asegúrese de que el dispositivo anti
inclinación se vuelva a instalar correctamente cuando la estufa se haya colocado de
nuevo en su lugar. De lo contrario, la estufa podría caerse y causar lesiones físicas.
• No use limpiadores de lana de acero ni abrasivos de ningún tipo. Pueden rayar o dañar la
supercie.
Mantenimiento
Español 37
NX7000K_VE_NX58M6850SS_AA_DG68-00909A-03_EN+MES+CFR.indb 37 1/30/2018 1:04:56 PM
Page 90
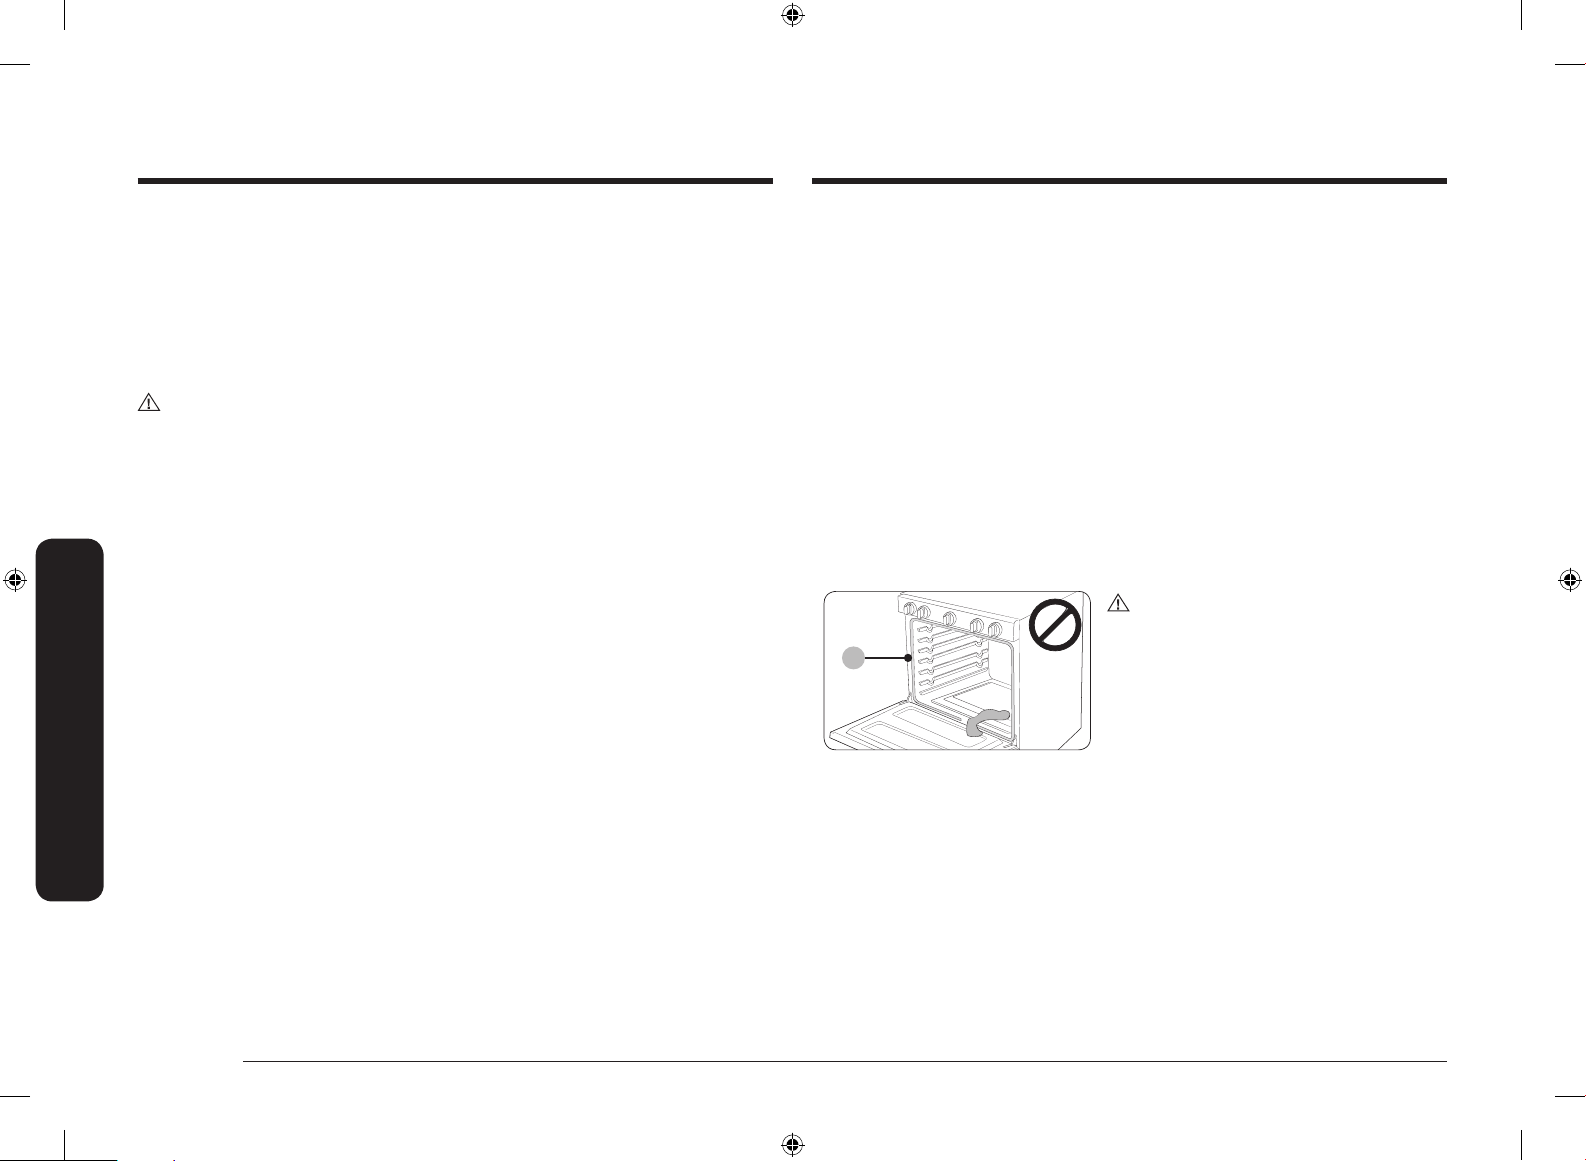
Mantenimiento
*
Supercie de acero inoxidable
1. Elimine derrames, manchas y grasa de la estufa con un paño suave humedecido.
2. A
plique un limpiador de acero inoxidable aprobado a un paño húmedo o una toalla de papel.
3. Limpie un área pequeña cada vez, frotando en la dirección del grano del acero inoxidable,
si fuese el caso.
4. Cuando nalice, seque la supercie con un paño suave seco.
5. Repita los pasos 2 a 4 tantas veces como sea necesario.
PRECAUCIÓN
• No use una esponja de lana de acero ni limpiadores abrasivos sobre supercies de acero
inoxidable. Rayarán la supercie.
• No rocíe ningún tipo de limpiador en los oricios de distribución. El sistema de ignición
está ubicado en estos oricios y debe mantenerse libre de humedad.
Parrillas
Para mantener las parrillas limpias, retírelas de la cavidad y remójelas en agua tibia jabonosa.
Luego, quite las impurezas de las parrillas con una esponja de pulir plástica. Si las parrillas no
se deslizan hacia adentro y hacia afuera sin problemas después de haberlas limpiado, frote las
guías de los rieles laterales con papel encerado o un paño que contenga unas gotas de aceite
Mantenimiento
de cocina. Esto permitirá que las parrillas se deslicen más fácilmente en sus carriles.
Puerta
No retire la junta interna de la puerta del horno para realizar la limpieza.
Parte interna
• Supercie interna: Limpie la supercie interna de la puerta manualmente con una esponja
de pulir plástica con jabón y luego séquela con un paño seco. Tenga cuidado de no
permitir que la junta se humedezca ni que ingrese humedad en la puerta.
• Vidrio interno: El vidrio interno se limpia automáticamente durante el ciclo de autolimpieza.
Parte externa
• Supercie externa: Siga las instrucciones de limpieza de la supercie de acero inoxidable
en la sección anterior.
• Vidrio externo: Limpie el vidrio externo con un limpiador de vidrio o agua jabonosa.
Enjuague y seque bien. Tenga cuidado de no permitir que la junta se humedezca ni que
ingrese humedad en la puerta.
PRECAUCIÓN
• No permita que ingrese humedad en la
puerta ni en la junta (*). La humedad puede
disminuir el rendimiento de la junta.
• No permita que ingrese humedad o agua
en los quemadores, controles eléctricos o
interruptores.
38 Español
NX7000K_VE_NX58M6850SS_AA_DG68-00909A-03_EN+MES+CFR.indb 38 1/30/2018 1:04:56 PM
Page 91
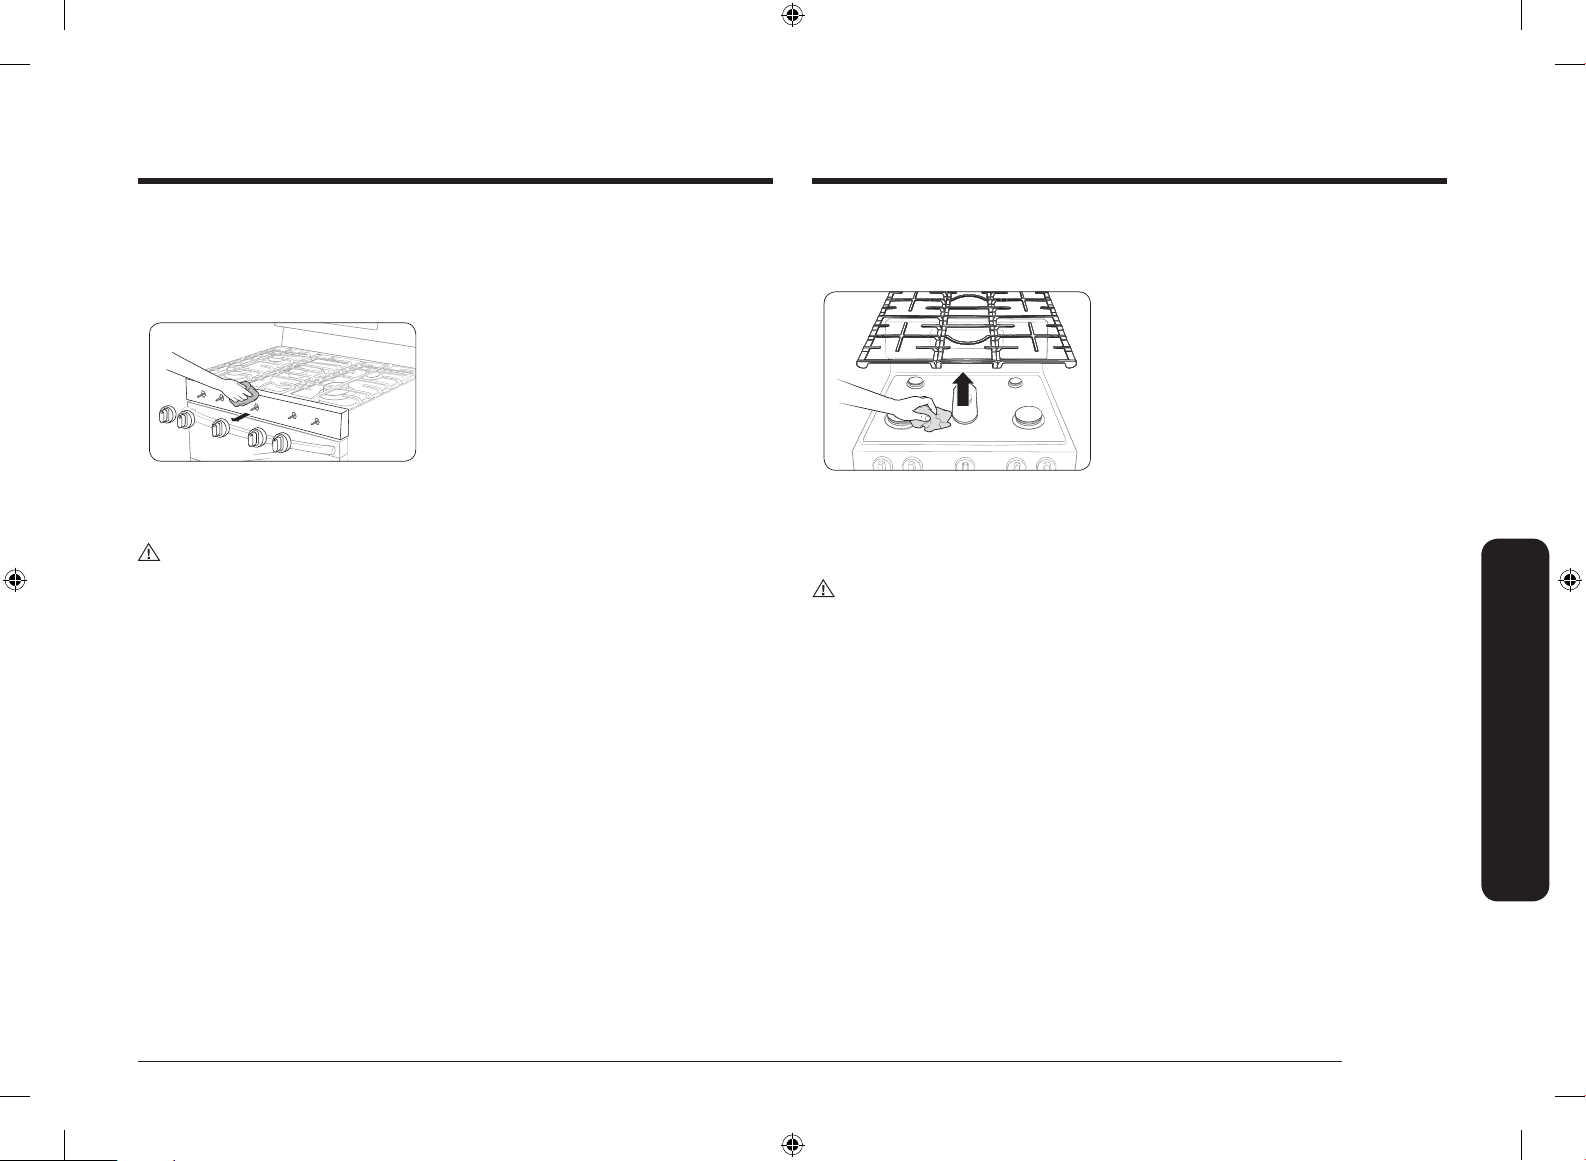
Quemadores superiores
Controles de los quemadores
Asegúrese de que todas las perillas de los quemadores superiores estén en la posición OFF
(apagado).
1. Retire las perillas de los vástagos de la
válvula de control como se muestra.
2. Limpie las perillas de control en agua
jabonosa tibia. Enjuáguelas y séquelas
completamente.
3. Limpie las supercies de acero inoxidable
con un limpiador para acero inoxidable.
4. Vuelva a empujar las perillas en los vástagos
de la válvula de control.
PRECAUCIÓN
• No limpie las perillas de control en un lavavajillas.
• No rocíe limpiadores directamente sobre el panel de control. Si ingresa humedad en los
circuitos eléctricos puede provocar descargas eléctricas o daños en el producto.
Supercie de la cubierta
La supercie de la cubierta de porcelana esmaltada debe mantenerse limpia. Recomendamos
retirar los alimentos derramados inmediatamente después de que se hayan derramado.
1. Apague todos los quemadores superiores.
2. Espere hasta que se enfríen las rejillas de los
quemadores y retírelas.
3. Limpie la supercie de la cubierta con un
paño suave. Si se derraman alimentos en los
huecos de los componentes del quemador,
retire la tapa del quemador y el cabezal y
limpie por completo los derrames.
4. Una vez nalizada la limpieza, vuelva a
instalar los componentes del quemador y,
luego, coloque las rejillas de los quemadores
en su posición.
PRECAUCIÓN
• No use una esponja de lana de acero ni limpiadores abrasivos ya que pueden rayar o
dañar la supercie esmaltada.
• No retire la supercie de la cubierta para limpiarla. Las líneas de gas que van a los
distribuidores de los quemadores se pueden dañar y provocar un incendio o una falla del
sistema.
Mantenimiento
Español 39
NX7000K_VE_NX58M6850SS_AA_DG68-00909A-03_EN+MES+CFR.indb 39 1/30/2018 1:04:57 PM
Page 92
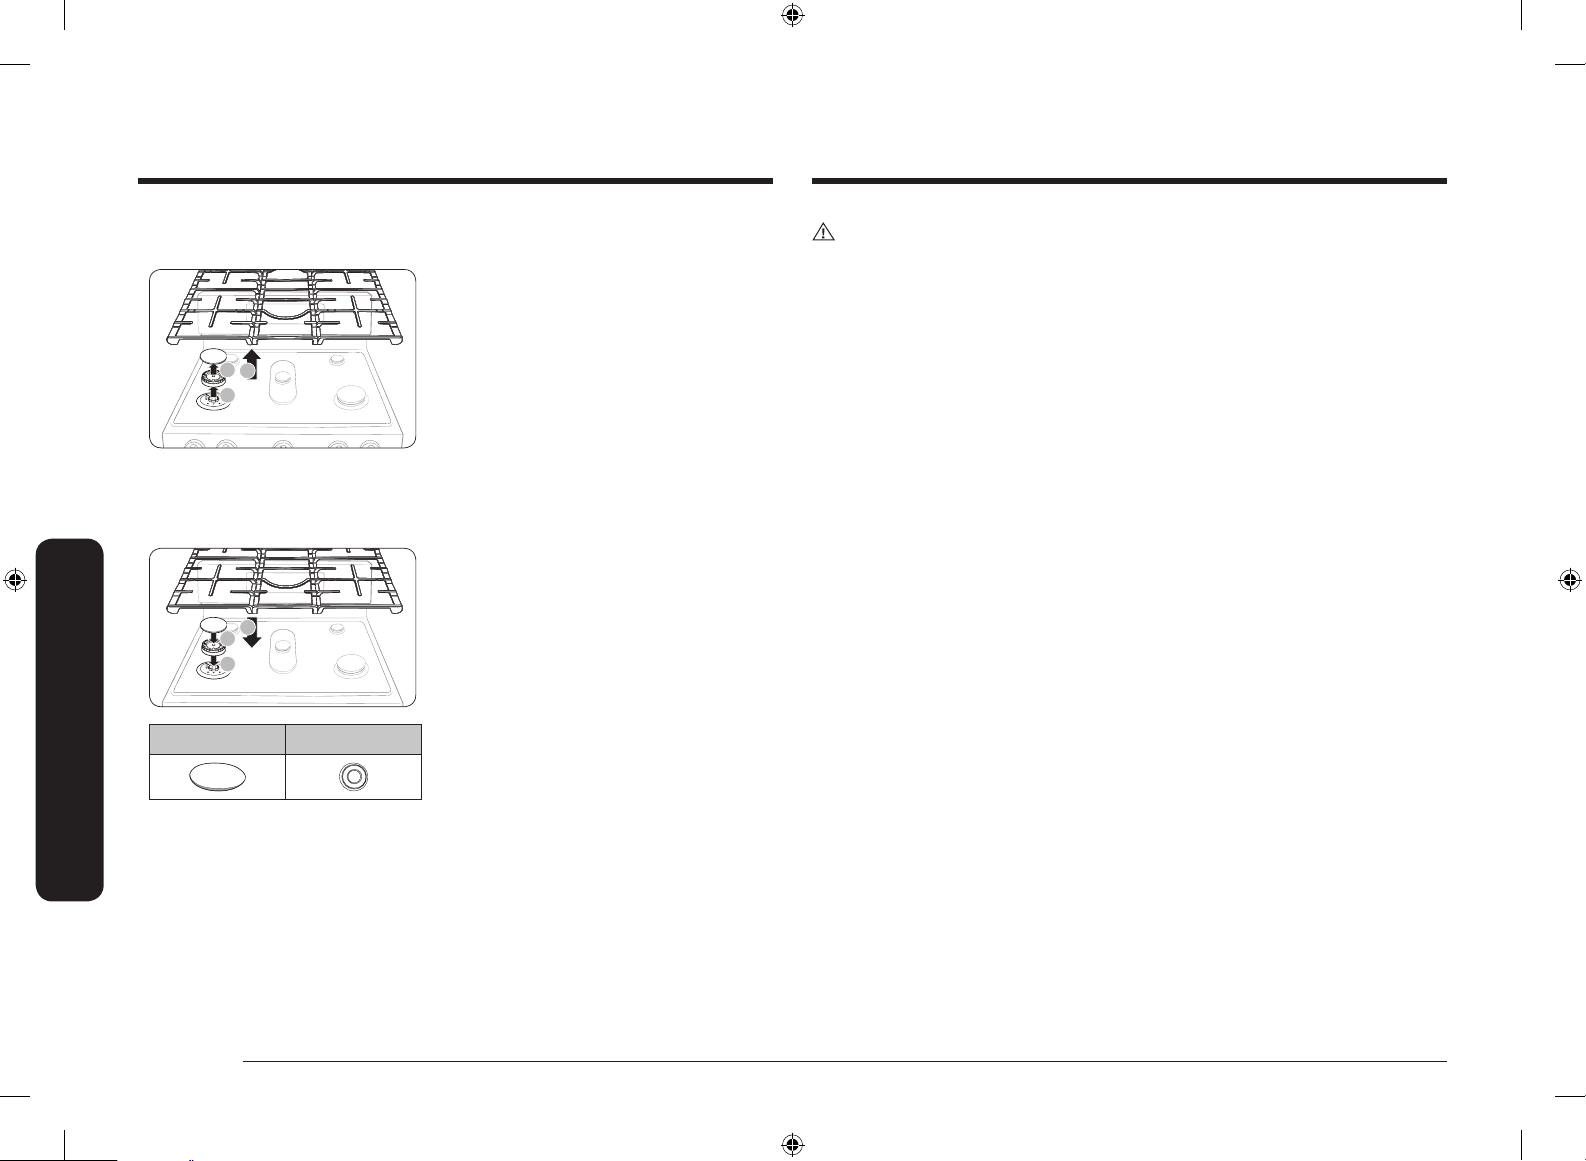
Mantenimiento
1
3
2
7
8
6
Rejillas de los quemadores y componentes
Apague todos los quemadores superiores y asegúrese de que se hayan enfriado.
1. Retire las rejillas de los quemadores.
2. Retire las tapas de los quemadores de los
cabezales de los quemadores.
3. Retire los cabezales de los quemadores de
las válvulas de distribución para revelar los
PRECAUCIÓN
• Los electrodos de encendido no son desmontables. No intente retirarlos por la fuerza.
• Asegúrese de que todos los componentes de los quemadores (cabezales y tapas) se
vuelvan a instalar correctamente. Cuando están bien instalados, son estables y quedan
planos.
• Para evitar el astillado, no golpee las rejillas y tapas entre sí, o contra supercies duras
tales como utensilios de hierro fundido.
electrodos de encendido.
4. Limpie todos los componentes desmontables
de las rejillas y los quemadores en agua
jabonosa tibia. No use esponjas de lana de
acero ni limpiadores abrasivos.
5. Enjuague y seque bien las rejillas y los
componentes de los quemadores.
6. Vuelva a colocar los cabezales de los
quemadores en sus posiciones arriba de las
válvulas de distribución. Asegúrese de que
haya un electrodo de encendido insertado
Mantenimiento
a través del oricio en cada cabezal de los
quemadores.
7. Vuelva a colocar las tapas de los quemadores
en sus posiciones arriba de los cabezales.
Superior Inferior
Para garantizar un funcionamiento correcto
y seguro, asegúrese de que las tapas de los
quemadores queden planas arriba de los
cabezales.
8. Vuelva a instalar las rejillas de los
quemadores en sus respectivas posiciones.
9. Encienda cada uno de los quemadores
y verique si funcionan correctamente.
Después de vericar que un quemador
funciona con normalidad, apáguelo.
40 Español
NX7000K_VE_NX58M6850SS_AA_DG68-00909A-03_EN+MES+CFR.indb 40 1/30/2018 1:04:59 PM
Page 93
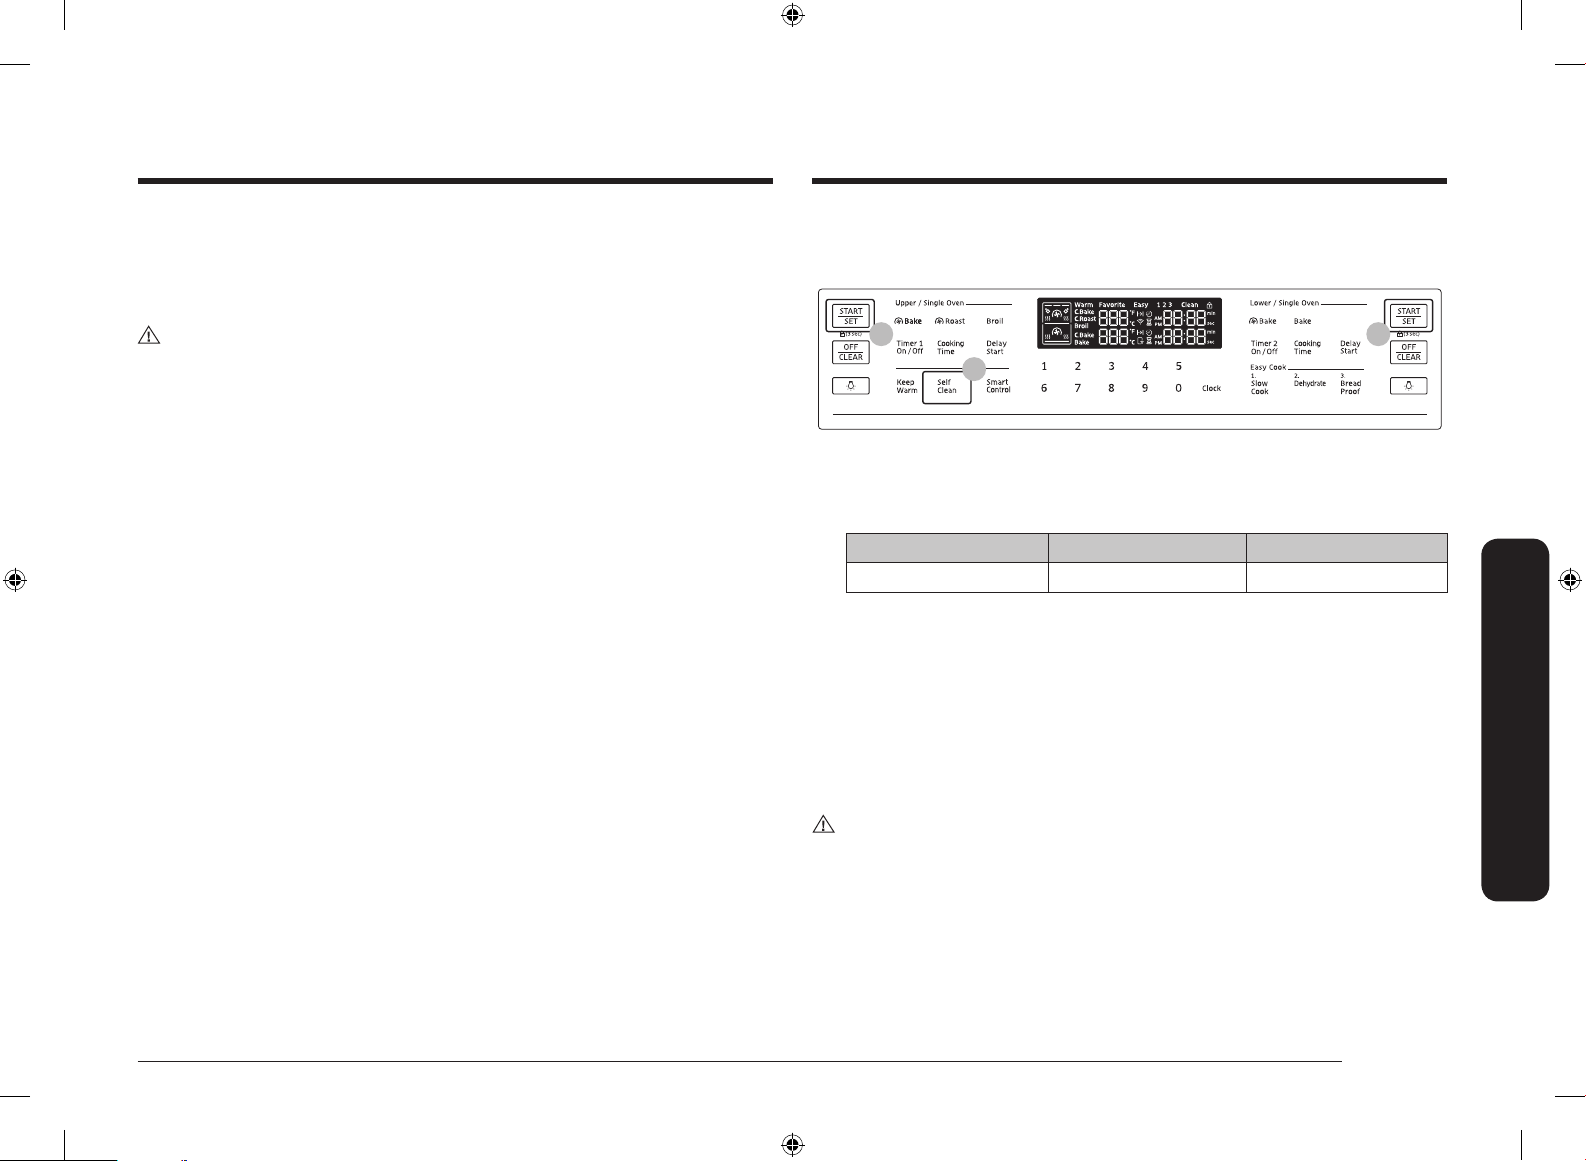
Auto-limpieza (solo modo simple)
Este horno auto-limpiante utiliza altas temperaturas (mucho más altas que las temperaturas de
cocción) para eliminar por incineración los restos de grasa y otros residuos o reducirlas a no
polvo de ceniza que se puede limpiar con un paño húmedo.
Cómo hacer funcionar un ciclo de auto-limpieza
Asegúrese de que el bloqueo de la puerta esté liberado. Retire todas las parrillas de la cavidad
del horno.
PRECAUCIÓN
• No deje niños pequeños sin vigilancia cerca de la estufa durante el ciclo de auto-limpieza.
Las supercies externas de la estufa pueden volverse muy calientes.
• Algunos pájaros son muy sensibles a los humos de un horno de gas auto-limpiante.
Lleve a los pájaros a una sala bien ventilada alejada de la estufa.
• No recubra el horno, las parrillas del horno ni la parte inferior del horno con papel
de aluminio. Hacerlo podría tener como consecuencia una mala distribución del calor,
producir malos resultados de horneado y causar daños permanentes al interior del horno.
El papel de aluminio se derretirá y se adherirá a las supercies interiores del horno.
• No fuerce la apertura de la puerta del horno durante el ciclo de auto-limpieza.
Esto dañará el sistema de traba automática de la puerta. La puerta se bloquea
automáticamente cuando se inicia el ciclo de auto-limpieza y se mantiene bloqueada
hasta que se cancela el ciclo y la temperatura del horno es inferior a 392 °F.
• Tenga precaución al abrir la puerta del horno después del ciclo de auto-limpieza. El horno
de gas estará aún MUY CALIENTE y podría salir aire caliente y vapor al abrir la puerta.
• Limpie los derrames excesivos antes de realizar la operación de auto-limpieza.
• No utilice limpiadores de hornos. Los limpiadores comerciales de hornos o los forros para
hornos no deben utilizarse JAMÁS en el horno ni alrededor de ninguna de sus partes.
Los residuos de los limpiadores de hornos dañarán el interior del horno durante la
operación de auto-limpieza.
03 03
02
1. Asegúrese de que la puerta del horno esté destrabada y completamente cerrada.
2. Presione la tecla Self Clean (Auto-limpieza) una vez. Luego, seleccione el tiempo de
limpieza al presionar la tecla Self Clean (Auto-limpieza) una o más veces de acuerdo con
la siguiente tabla.
Una vez Dos veces Tres veces
3 horas 5 horas 2 horas
3. Presione la tecla START/SET (INICIO/CONFIGURAR). La puerta del horno se bloquea y el
horno comienza a calentarse.
4. Cuando haya nalizado el ciclo, el horno emitirá una señal sonora 6 veces. La puerta
permanecerá bloqueada y el icono de bloqueo parpadeará hasta que la temperatura del
horno descienda por debajo de los 400 °F (204 °C).
5. Cuando el icono de bloqueo cambia a un candado abierto, puede abrir la puerta del
horno. El icono de bloqueo cambia a un candado abierto cuando la temperatura del horno
desciende por debajo de los 400 °F (204 °C).
6. Presione la tecla OFF/CLEAR (APAGAR/BORRAR) para mostrar la hora del día.
PRECAUCIÓN
No utilice los quemadores superiores cuando el horno de gas ejecute un ciclo de auto-limpieza.
Mantenimiento
Español 41
NX7000K_VE_NX58M6850SS_AA_DG68-00909A-03_EN+MES+CFR.indb 41 1/30/2018 1:05:00 PM
Page 94
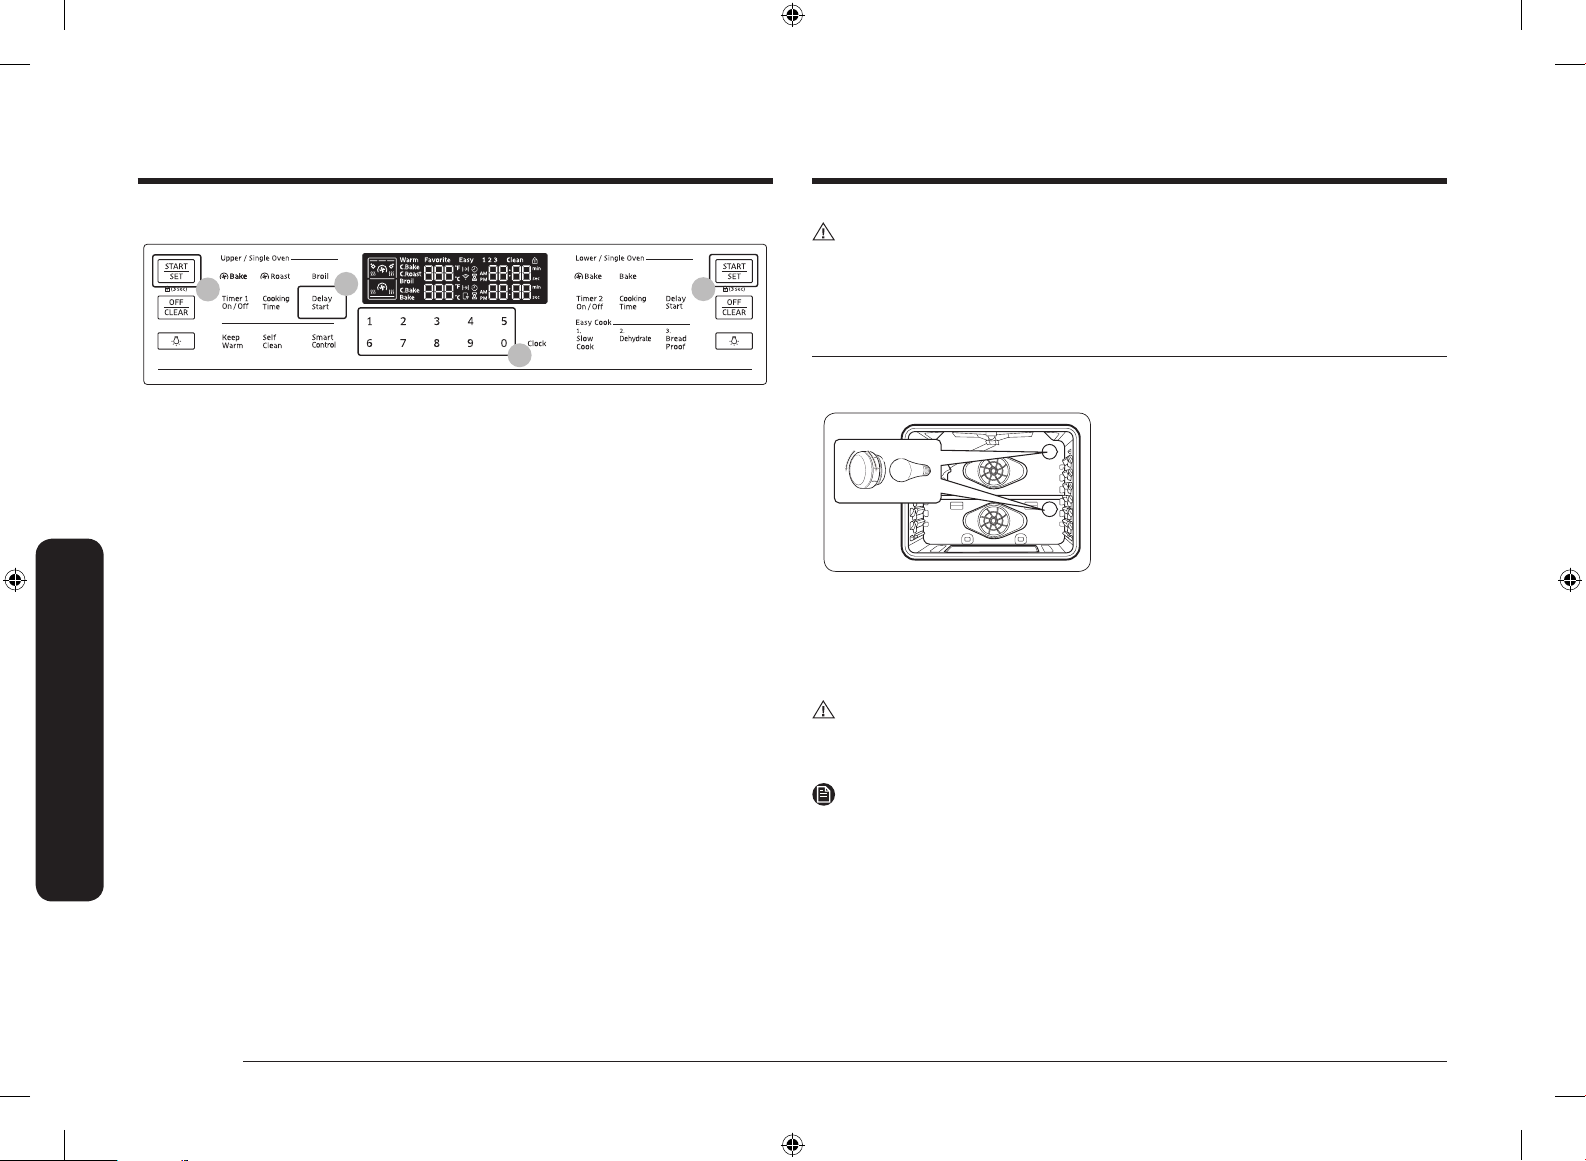
Mantenimiento
Para retardar el inicio del ciclo de auto-limpieza
04
1. Repita los pasos 1 y 2 en la página anterior.
2. Presione la tecla Delay Start (Inicio retardado). La puerta del horno se traba.
3. Ajuste la hora a la cual desea que el horno inicie la auto-limpieza utilizando el teclado
numérico.
4. Presione la tecla START/SET (INICIO/CONFIGURAR). El horno comenzará la auto-limpieza a
la hora especicada.
Para cancelar el ciclo de auto-limpieza
Es posible que se vea en la necesidad de detener o interrumpir un ciclo de auto-limpieza debido
a humo dentro del horno. Para apagar el ciclo de auto-limpieza, presione la tecla OFF/CLEAR
(APAGAR/BORRAR). El ciclo se apaga, pero la puerta permanece bloqueada y el icono de bloqueo
parpadea hasta que la temperatura del horno desciende por debajo de los 400 °F (204 °C).
Mantenimiento
Después de la auto-limpieza
• La puerta sigue bloqueada hasta que la temperatura interna del horno desciende por
debajo de los 392 °F.
• Una vez que se enfrió el horno, limpie las supercies del horno con un paño para retirar
residuos de cenizas.
• Las manchas rebeldes pueden quitarse con una esponja de lana de acero. Los depósitos
calcáreos pueden quitarse con un paño empapado en vinagre.
• Si no está satisfecho con los resultados de la limpieza, repita el ciclo. “HOT” aparece en la
pantalla hasta que el horno se enfría. Espere hasta que desaparezca el mensaje y, luego,
inicie un nuevo ciclo.
• El ventilador de enfriamiento comienza a funcionar automáticamente durante un tiempo
después de la auto-limpieza.
• La autolimpieza no opera durante las 2 horas siguientes a la ejecución del ciclo de
autolimpieza.
02
03
04
PRECAUCIÓN
No intente abrir la puerta del horno inmediatamente después de completarse el ciclo de autolimpieza. El horno sigue estando muy caliente cuando la puerta se desbloquea. El aire caliente
y el vapor que salen podrían quemarlo.
Reemplazo de la luz del horno
La luz del horno es una bombilla para electrodomésticos estándar de 40 watts. Se enciende
cuando se abre la puerta del horno.
1. Apague el horno.
2. Asegúrese de que el horno y la luz del horno
se encuentren fríos.
3. Abra la puerta y retire la tapa de vidrio
girándola hacia la izquierda.
4. Retire la luz del horno de la toma girándola
hacia la izquierda.
5. Inserte una bombilla para electrodomésticos
de 40 watts en la toma y, luego, gírela hacia
la derecha para ajustarla.
6. Vuelva a colocar la tapa de vidrio y, luego,
gírela hacia la derecha para ajustarla.
PRECAUCIÓN
Para evitar las descargas eléctricas, asegúrese de que el horno esté apagado y frío antes de
reemplazar la luz del horno.
NOTA
• La luz del horno no funciona durante el ciclo de auto-limpieza.
• Retire las parrillas si obstaculizan el acceso a la luz del horno.
42 Español
NX7000K_VE_NX58M6850SS_AA_DG68-00909A-03_EN+MES+CFR.indb 42 1/30/2018 1:05:01 PM
Page 95
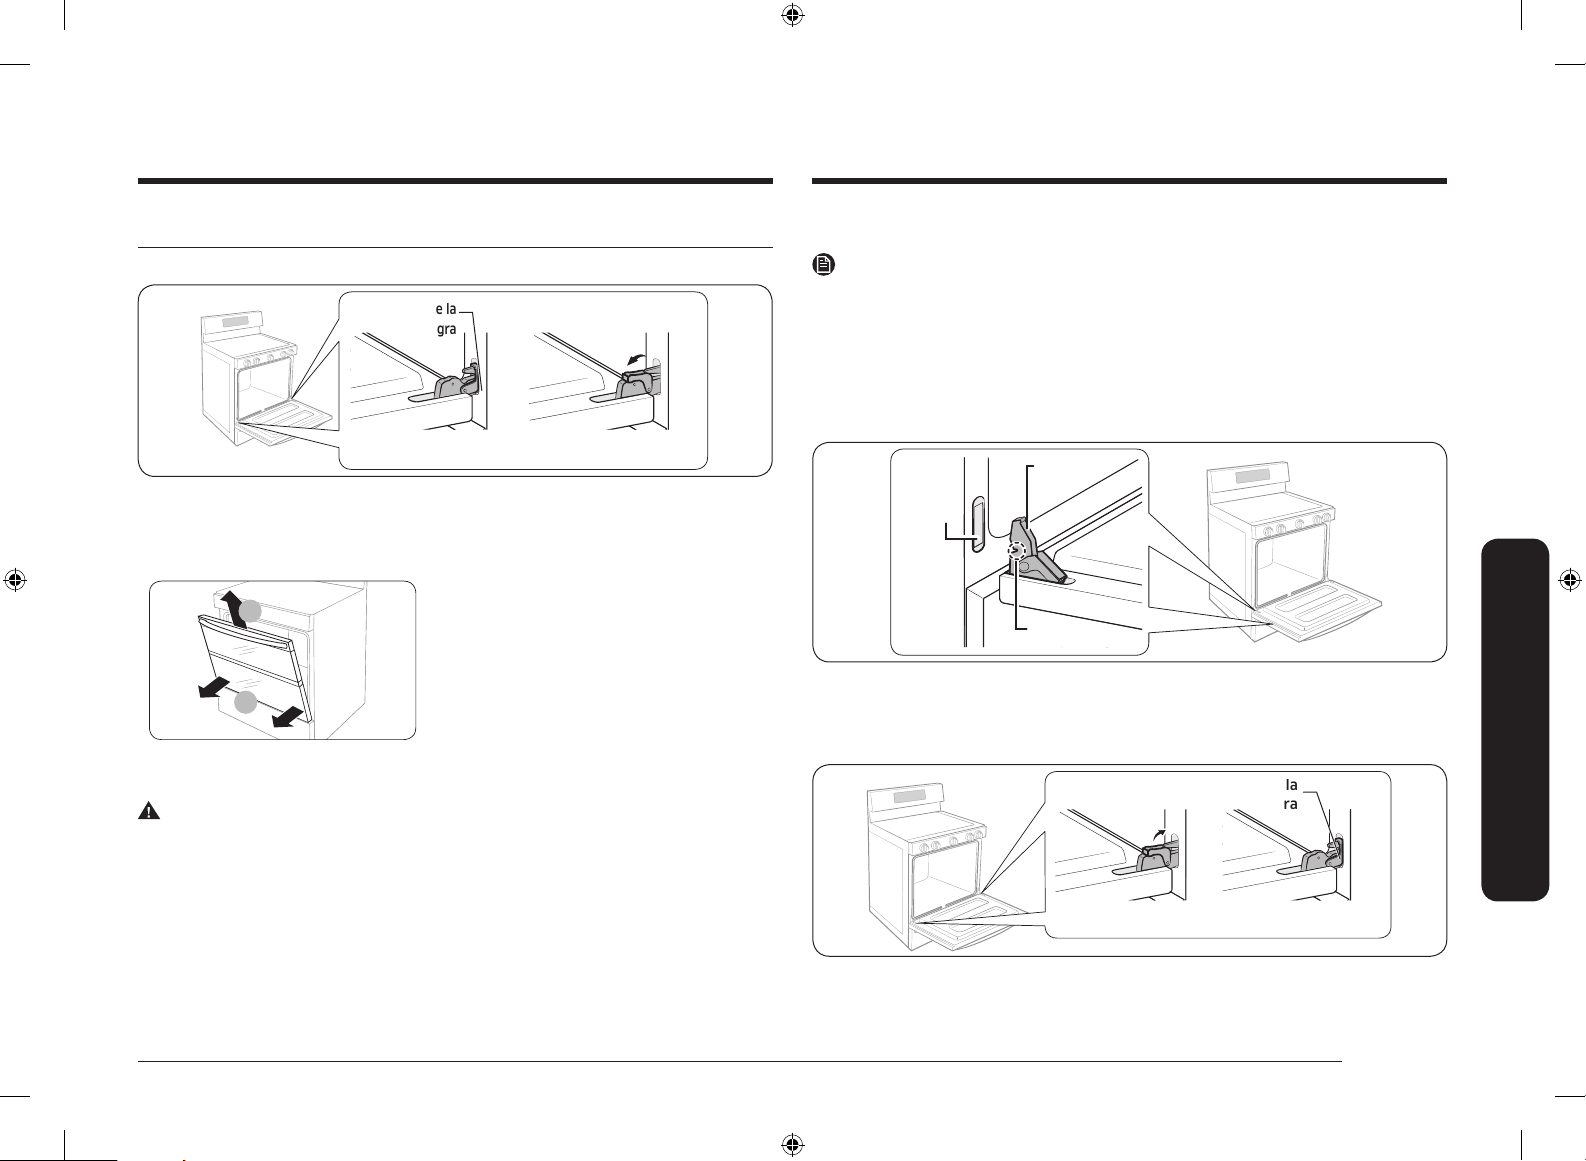
Puerta del horno: Retirar y volver a instalar
1
2
Para volver a instalar la puerta del horno
Para retirar la puerta del horno
Traba de la
bisagra
Posición trabada Posición destrabada
1. Apague el horno.
2. Abra completamente la puerta del horno.
3. Jale las trabas de la bisagra fuera del cuerpo del horno y hacia abajo, hacia el marco de
la puerta en la posición de desbloqueo.
4. Cierre la puerta a aproximadamente 5 grados
de la posición vertical. Esta es la posición de
remoción.
5. Mientras sujeta rmemente ambos lados de
la puerta del horno, empújela hacia arriba
y hacia afuera hasta que los brazos de la
bisagra salgan de las ranuras en la parte
inferior de la puerta del horno.
6. Coloque la puerta en un lugar seguro.
ADVERTENCIA
• La puerta es muy pesada. Tenga cuidado al retirarla y levantarla. No levante la puerta
halando de la manija.
• Sea precavido al mover la puerta del horno. El manejo inadecuado podría causar lesiones
físicas.
• Para evitar las descargas eléctricas, asegúrese de que el horno esté apagado antes de
retirar la puerta del horno.
NOTA
Puede volver a instalar la puerta superior de la misma manera que vuelve a instalar la puerta
completa.
1. Sujete rmemente ambos lados de la puerta en su extremo superior.
2. Con la puerta en el mismo ángulo que en la posición para retirar, deslice la muesca del
brazo de la bisagra hasta que encaje en el borde inferior de la ranura para la bisagra.
La muesca en el brazo de la bisagra debe quedar completamente inserta en la parte
inferior de la ranura.
Borde
inferior de
la ranura
Brazo de la
bisagra
Muesca
3. Abra la puerta por completo. Si la puerta no se abre completamente, la muesca no se
encuentra correctamente insertada en el borde inferior de la ranura.
4. Empuje las trabas de bisagra hacia arriba contra el marco frontal de la cavidad del horno
hasta que queden en la posición trabada.
Traba de la
bisagra
Posición trabadaPosición destrabada
5. Cierre la puerta del horno.
Mantenimiento
Español 43
NX7000K_VE_NX58M6850SS_AA_DG68-00909A-03_EN+MES+CFR.indb 43 1/30/2018 1:05:01 PM
Page 96
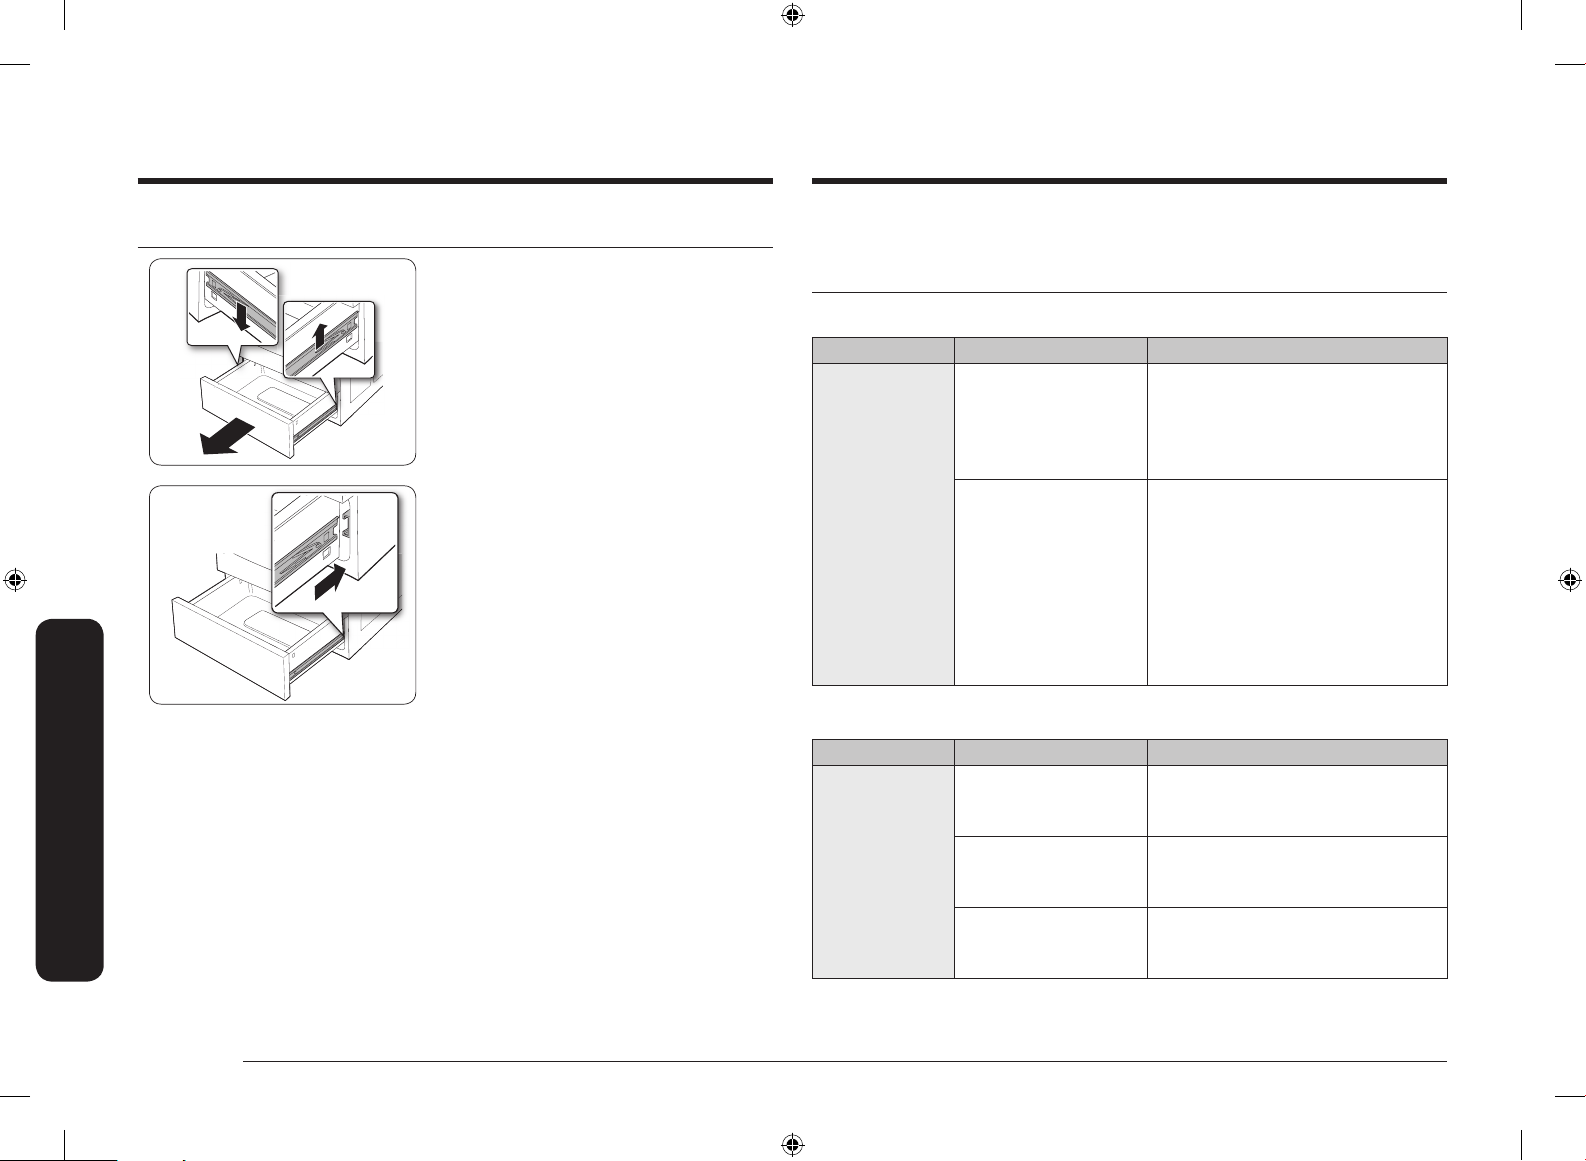
Mantenimiento Resolución de problemas
Resolución de problemas
Cajón de almacenamiento
1. Deslice el cajón hacia afuera hasta que se
detenga.
2. Localice los ganchos de los rieles a cada lado.
Con ambas manos, empuje hacia abajo el
gancho izquierdo mientras levanta el gancho
derecho y, luego, retire el cajón.
3. Limpie el cajón en agua jabonosa tibia con un
paño o un cepillo suave. Luego, enjuáguelo y
séquelo completamente.
4. Coloque el cajón en los rieles a cada lado y,
luego, presione los ganchos en su lugar.
Si encuentra algún problema con la estufa, verique primero las siguientes tablas e intente
poner en práctica las acciones sugeridas.
Puntos de vericación
Seguridad del gas
Problema Causa posible Acción
Hay olor a gas. La perilla del quemador
superior no está en
posición OFF (Apagado)
y el quemador no está
encendido.
Hay una fuga de gas. Libere el ambiente, el edicio o el área de
Quemadores superiores
Problema Causa posible Acción
No se enciende
ningún quemador.
El cable de alimentación
no está enchufado al
tomacorriente.
Puede haberse quemado un
fusible en su casa o haberse
disparado el disyuntor.
El suministro de gas no está
correctamente conectado o
encendido.
Gire la perilla del quemador a OFF (Apagado).
todos los ocupantes.
Llame inmediatamente al proveedor de gas
desde el teléfono de un vecino. No llame desde
su teléfono. El teléfono es eléctrico y podría
causar una chispa que podría prender fuego el
gas. Siga las instrucciones del proveedor de gas.
Si no puede comunicarse con el proveedor de
gas, llame al departamento de bomberos.
Asegúrese de que el enchufe se encuentre
insertado en un tomacorriente alimentado
con corriente y bien conectado a tierra.
Reemplace el fusible o reinicie el disyuntor.
Consulte las Instrucciones de instalación que
vinieron con su estufa.
44 Español
NX7000K_VE_NX58M6850SS_AA_DG68-00909A-03_EN+MES+CFR.indb 44 1/30/2018 1:05:03 PM
Page 97
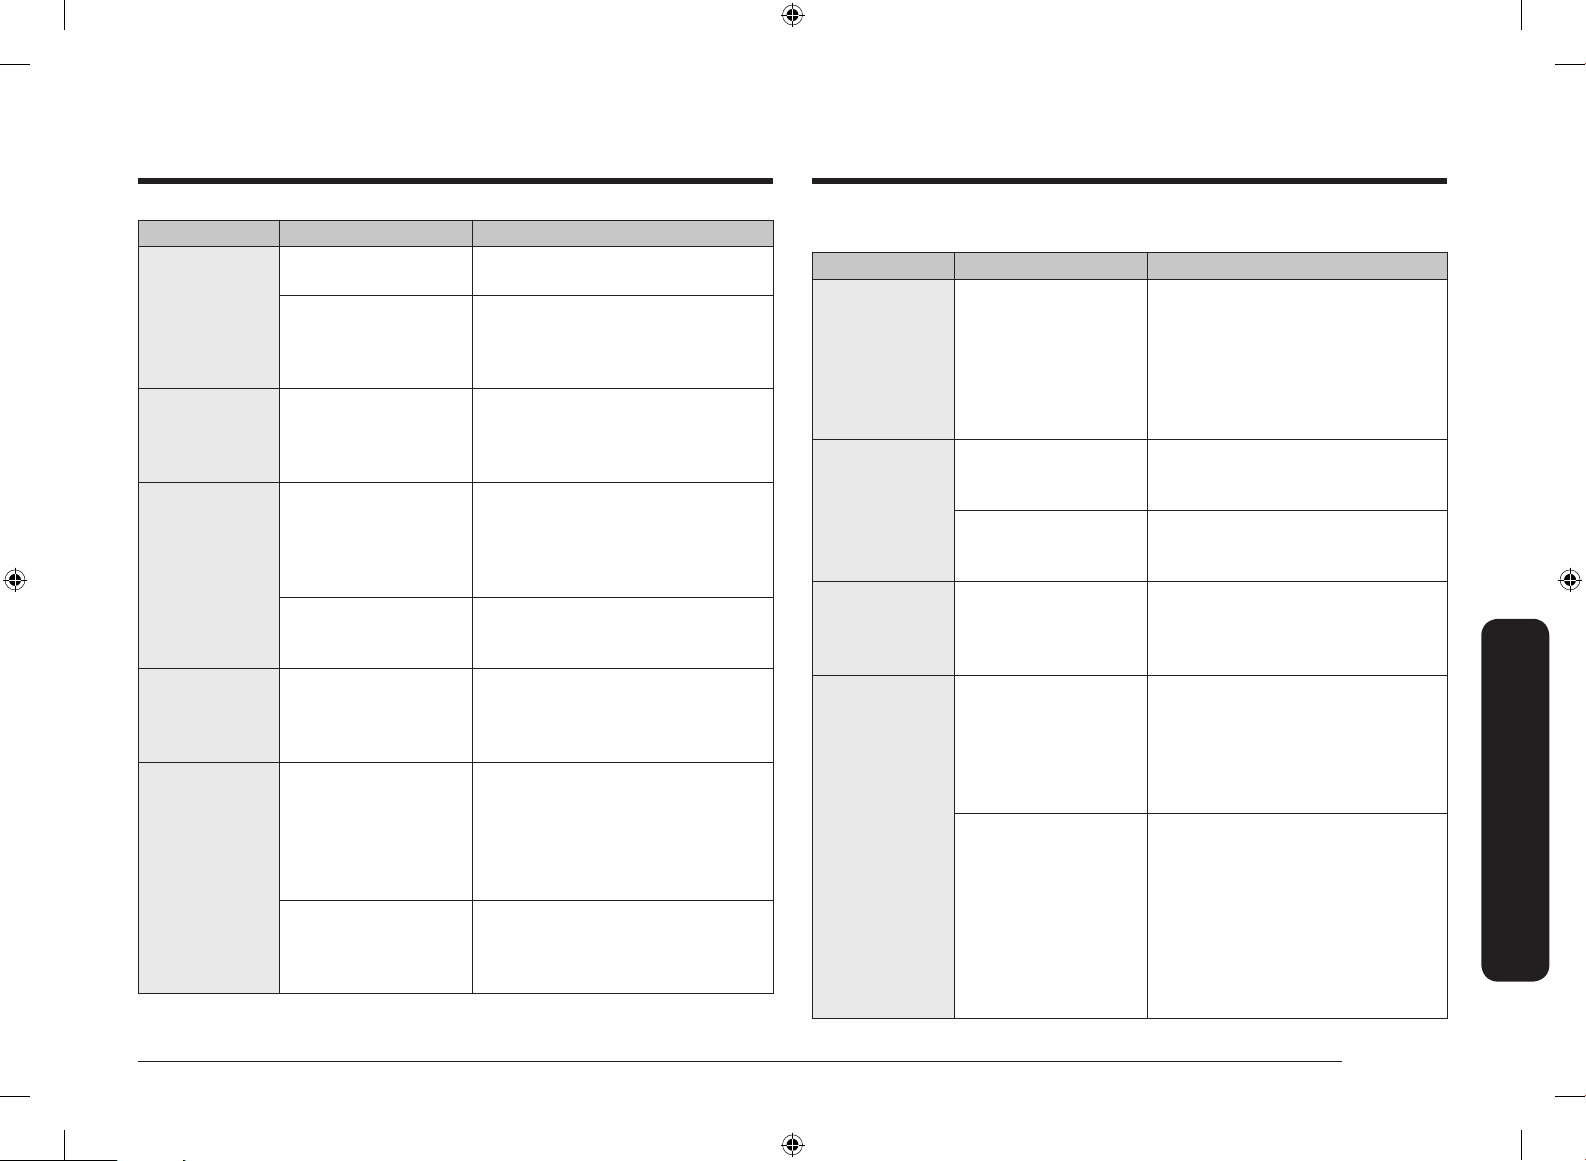
Problema Causa posible Acción
Los quemadores
superiores no se
encienden.
Un quemador
superior hace un
clic durante el
funcionamiento.
Los quemadores no
queman en forma
pareja.
La perilla de control no se
reguló correctamente.
Las tapas de los quemadores
no están en su lugar.
La base del quemador está
mal alineada.
La perilla de control se
dejó en la posición LITE
(Encender).
Los componentes y las
tapas de los quemadores
superiores no están
Empuje la perilla de control y gírela a la
posición LITE (Encender).
Limpie los electrodos.
Coloque la tapa del quemador sobre el
cabezal del quemador.
Alinee la base del quemador.
Una vez encendido el quemador, gire la
perilla de control hasta una posición deseada.
Si el quemador sigue haciendo clic, llame a un
técnico de servicio.
Consulte la página 40.
colocados correctamente y
a nivel.
Los quemadores superiores
están sucios.
Limpie los componentes de los quemadores
superiores.
(Consulte la página 39.)
Las llamas de
los quemadores
superiores son muy
grandes o amarillas.
Los quemadores
superiores se
encienden pero los
quemadores del
horno no.
Se instaló un oricio de
tamaño incorrecto.
El bloqueo de la puerta del
horno está activado.
Verique el tamaño del oricio del quemador.
Comuníquese con su instalador si tiene el
oricio incorrecto (gas LP en lugar de gas
natural o viceversa).
La pantalla mostrará el icono de Bloqueo.
Mantenga la puerta del horno abierta y
presione la tecla START/SET
(INICIO/CONFIGURAR) durante 3 segundos.
El horno emitirá una señal sonora y el icono
de Bloqueo se apagará.
El interruptor de cierre del
Llame a un técnico de servicio calicado.
Regulador de presión de
gas está en posición OFF
(Apagado).
Horno
Problema Causa posible Acción
El control del horno
emite una señal
sonora y muestra
un código de
información.
Es posible que haya una
falla. Consulte la tabla
“Códigos de información” en
la página <OV>.
Presione la tecla OFF/CLEAR (APAGAR/BORRAR)
y reinicie el horno.
Si el problema persiste, desconecte toda
alimentación eléctrica a la estufa durante por
lo menos 30 segundos y luego reconecte la
alimentación eléctrica. Si esto no soluciona el
problema, llame al servicio de reparaciones.
Las llamas de los
quemadores del
horno son muy
grandes o amarillas.
Los obturadores de ajuste
del aire de los quemadores
del horno deben ajustarse.
El suministro de gas no está
correctamente conectado o
Llame a un técnico de servicio calicado.
Consulte las Instrucciones de instalación que
vinieron con su estufa.
encendido.
El horno está
a temperatura
El termostato del horno
necesita ajustes.
Consulte la página 34.
demasiado alta o
demasiado baja.
Un quemador del
horno no se cierra.
El bloqueo de la puerta del
horno está activado.
La pantalla mostrará el icono de Bloqueo.
Mantenga la puerta del horno abierta y
Resolución de problemas
presione la tecla START/SET
(INICIO/CONFIGURAR) durante 3 segundos.
El horno emitirá una señal sonora y el icono
de Bloqueo se apagará.
Se ha activado la función
Shabat.
SAb y la hora del día aparecerán en la pantalla.
Todos los demás controles y señales se
desactivarán. Para apagar el horno solamente,
presione la tecla OFF/CLEAR (APAGAR/BORRAR).
Para cancelar la función Shabat y reactivar
los controles y señales, mantenga presionadas
las teclas Bake (Hornear) y Touch to Wake-Up
(Tocar para activar) al mismo tiempo durante
3 segundos.
Español 45
NX7000K_VE_NX58M6850SS_AA_DG68-00909A-03_EN+MES+CFR.indb 45 1/30/2018 1:05:03 PM
Page 98
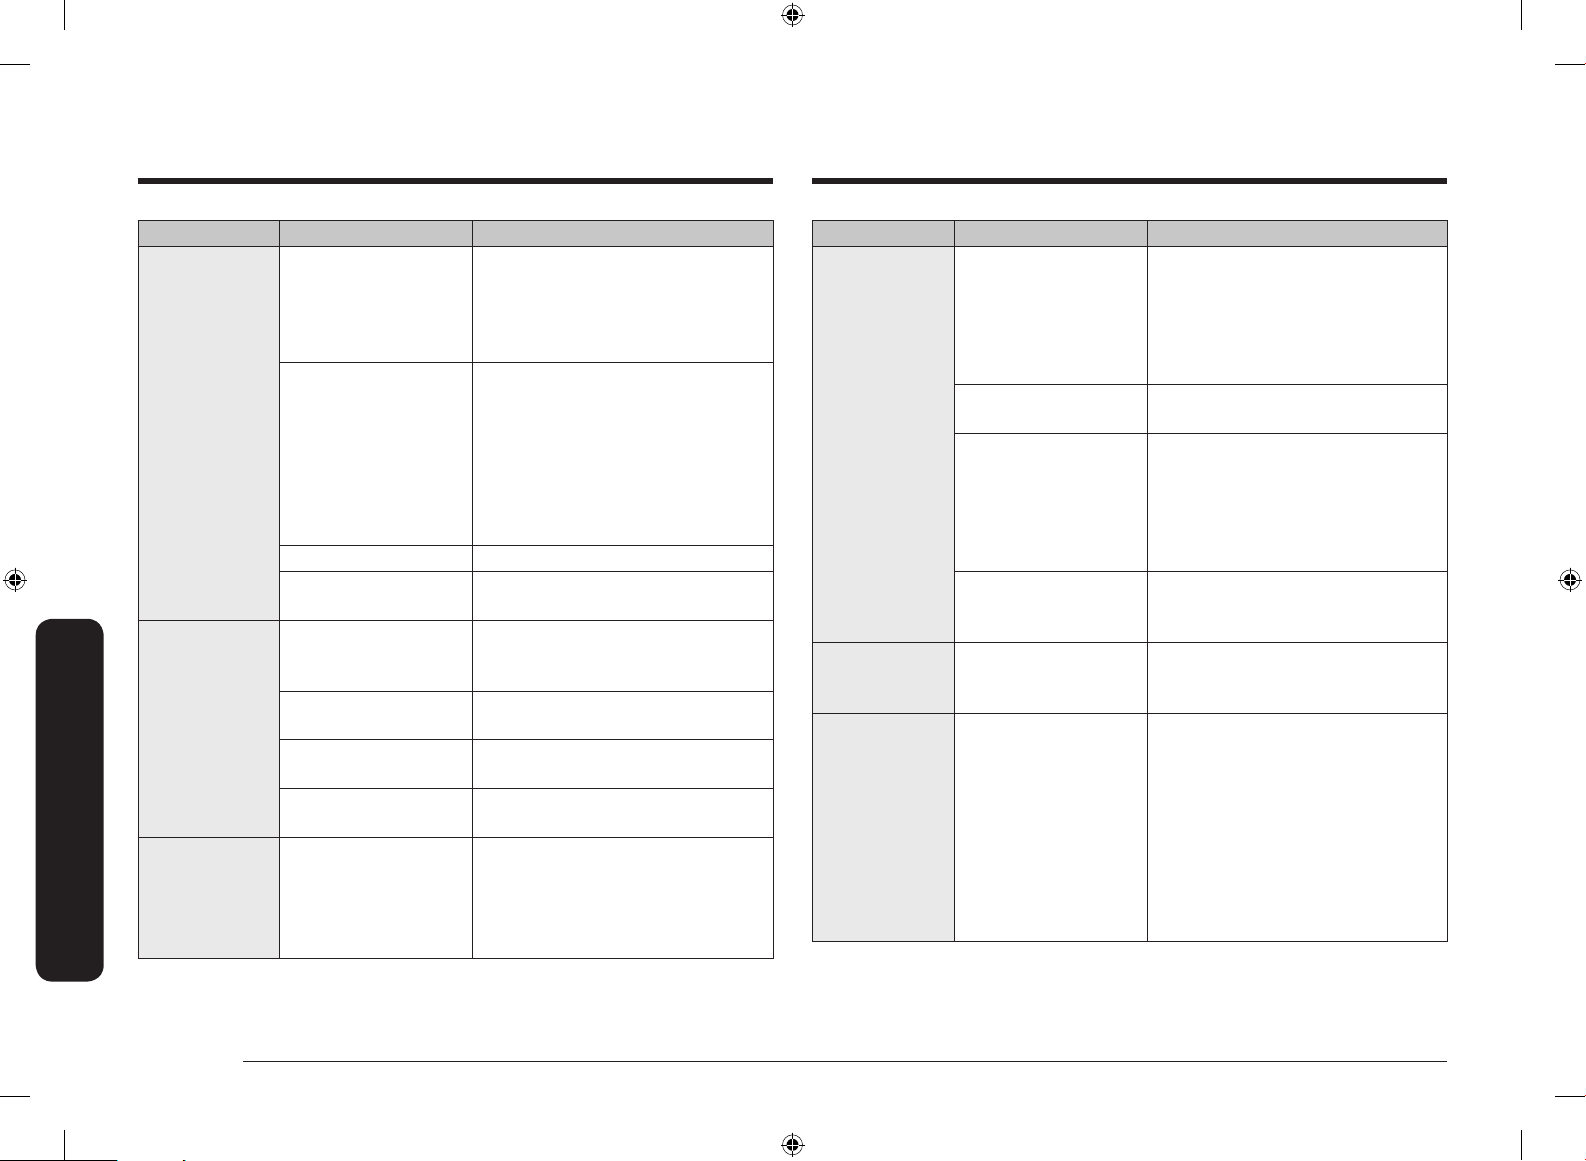
Resolución de problemas
Resolución de problemas
Problema Causa posible Acción
La luz del horno
(lámpara) no se
enciende.
El horno emite
demasiado humo
cuando se asa a la
parrilla.
Cuando termina
la cocción, el
ventilador de
enfriamiento sigue
funcionando.
El bloqueo de la puerta del
horno está activado.
Se ha activado la función
Shabat.
Bombilla suelta o quemada. Consulte la página 42.
El interruptor de la luz del
horno debe reemplazarse.
Carne o alimentos no fueron
preparados correctamente
antes de asar a la parrilla.
Parrilla del horno superior
colocada incorrectamente.
Los controles no se han
establecido adecuadamente.
Acumulación de grasa en las
supercies del horno.
El ventilador comienza a
funcionar automáticamente
durante un tiempo para
ventilar la parte interna del
horno.
La pantalla mostrará el icono de Bloqueo.
Mantenga la puerta del horno abierta y presione
la tecla START/SET (INICIO/CONFIGURAR)
durante 3 segundos. El horno emitirá una señal
sonora y el icono de Bloqueo se apagará.
SAb y la hora del día aparecerán en la
pantalla. Todos los demás controles y señales
se desactivarán. Para cancelar la función
Shabat y reactivar el interruptor de la luz y
otros controles, mantenga presionadas las
teclas Bake (Hornear) y Touch to Wake-Up
(Tocar para activar) al mismo tiempo durante
3 segundos.
Llame a un técnico de servicio calicado.
Corte el exceso de grasa o los bordes
grasosos que pueden doblarse.
Consulte la guía para asar a la parrilla en la
página 25.
Consulte la página 24.
Es necesario limpiar con regularidad si se asa
a la parrilla con frecuencia.
No debe preocuparse, no es un defecto del
producto.
Problema Causa posible Acción
El horno no ejecuta
el proceso de autolimpieza.
Se oyen ruidos como
de crujidos o ligeros
estallidos.
Humo excesivo
durante un ciclo de
auto-limpieza.
El bloqueo de la puerta del
horno está activado.
El Divisor inteligente está
instalado en el horno.
El horno está demasiado
caliente.
Los controles de autolimpieza del horno no están
congurados correctamente.
Esto es normal. Estos son los ruidos que emite el metal al
Esta es la primera vez que
se ha limpiado el horno.
La pantalla mostrará el icono de Bloqueo.
Mantenga la puerta del horno abierta
y presione la tecla START/SET (INICIO/
CONFIGURAR) durante 3 segundos. El horno
emitirá una señal sonora y el icono de
Bloqueo se apagará.
La auto-limpieza no funciona con el Divisor
inteligente instalado. Retírelo del horno.
Deje que el horno se enfríe y restablezca
los controles. El ciclo de auto-limpieza
no bloqueará la puerta del horno si la
temperatura del horno es demasiado alta. La
puerta debe bloquearse antes de que el ciclo
de auto-limpieza pueda comenzar.
Restablezca los controles de auto-limpieza del
horno. (Consulte la página 41.)
calentarse y enfriarse durante las funciones
de cocción y limpieza.
Esto es normal. El horno siempre emitirá más
humo la primera vez que se limpia.
Limpie toda la suciedad excesiva antes de
iniciar el ciclo de auto-limpieza.
Si el humo persiste, presione la tecla
OFF/CLEAR (APAGAR/BORRAR). Abra las
ventanas para sacar el humo del lugar. Una
vez que el horno se enfrió y desbloqueó,
limpie la suciedad excesiva y reinicie el horno
para la auto-limpieza.
46 Español
NX7000K_VE_NX58M6850SS_AA_DG68-00909A-03_EN+MES+CFR.indb 46 1/30/2018 1:05:04 PM
Page 99
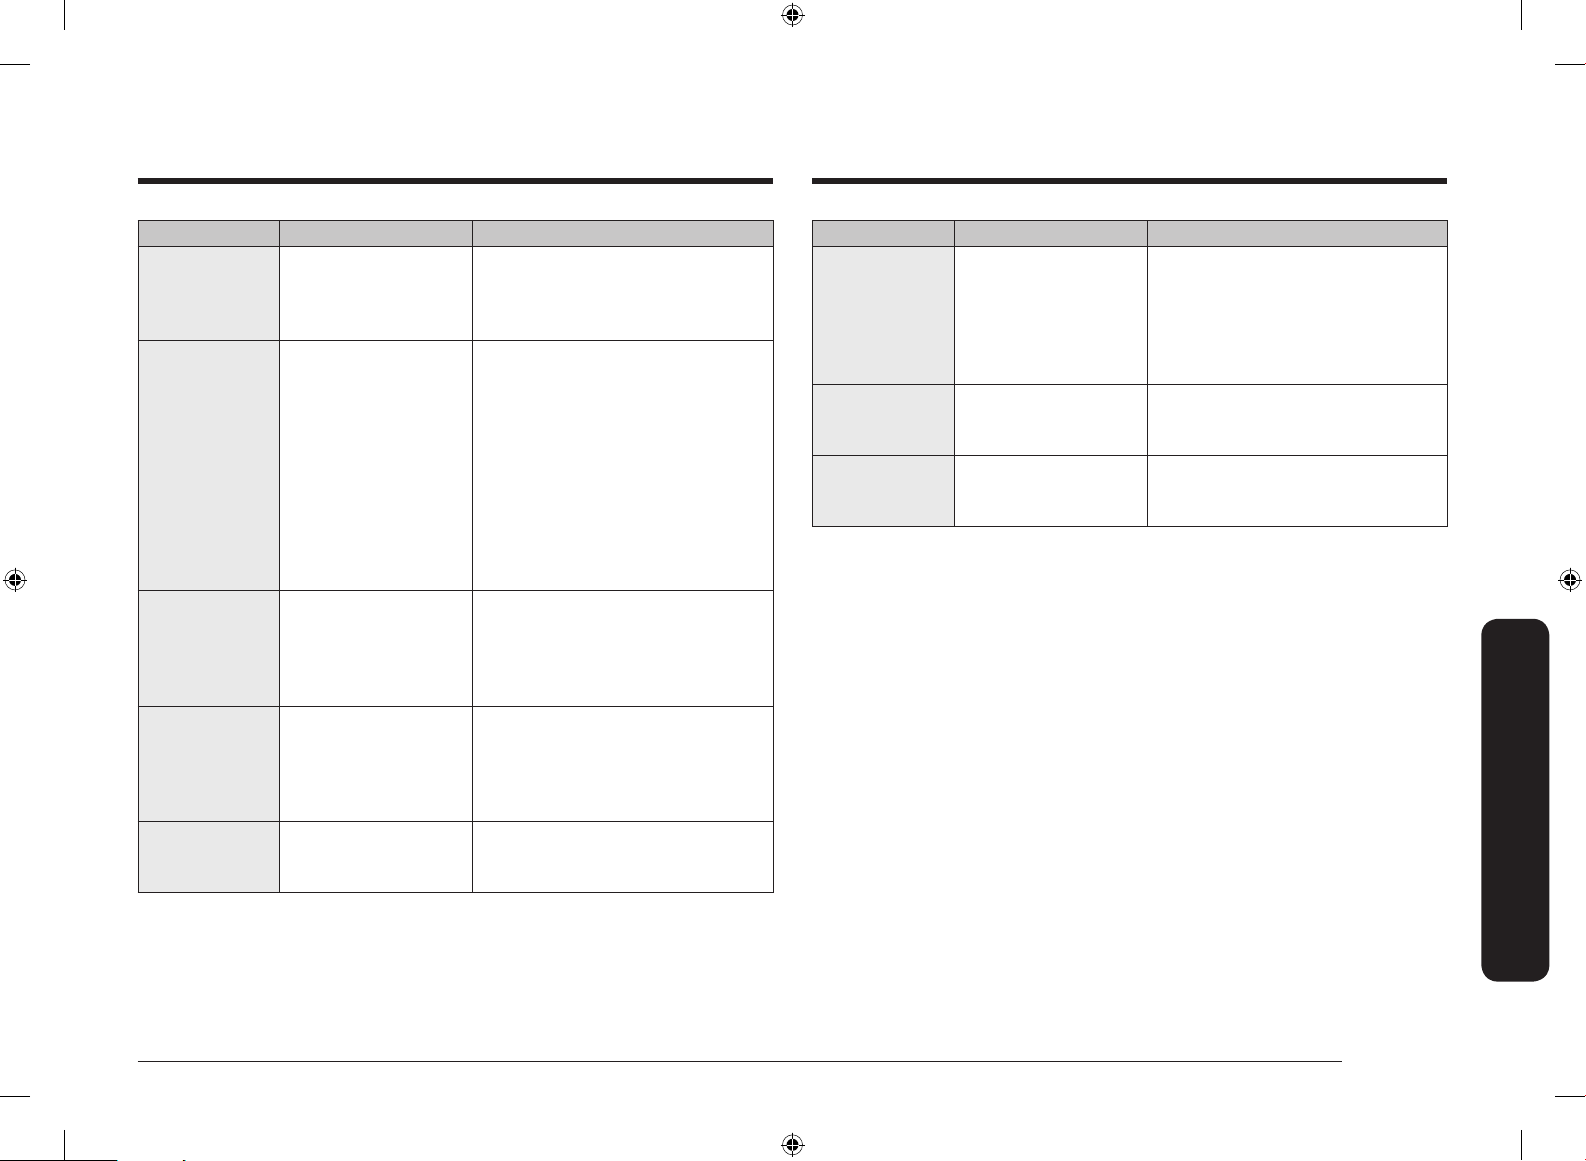
Problema Causa posible Acción
Después de un ciclo
de auto-limpieza la
puerta del horno, no
Esto es normal. La puerta del horno seguirá bloqueada hasta
que la temperatura del horno disminuya a
menos de 392 °F.
se abre.
Cumplido un ciclo
de auto-limpieza, el
horno aún no está
limpio.
Es normal encontrar un
polvo no o cenizas.
Esto puede limpiarse con un paño húmedo.
Establezca el ciclo de auto-limpieza para un
tiempo de limpieza superior.
El ciclo no fue lo sucientemente extenso
como para quemar la acumulación de grasa.
Los hornos extremadamente sucios requieren
la limpieza a mano de los excesivos derrames
y la acumulación de alimentos antes de
comenzar un ciclo de auto-limpieza. Pueden
necesitarse múltiples ciclos de auto-limpieza
para limpiar completamente el horno.
Sale vapor o humo
de abajo del panel
de control.
Esto es normal. La abertura de ventilación del horno está
ubicada allí. Se puede ver más vapor cuando
se utilizan las funciones de convección o
cuando se hornean o asan al horno múltiples
elementos a la vez.
Sale olor a quemado
o a aceite de
la abertura de
ventilación.
Esto es normal para un
nuevo horno y desaparecerá
en un plazo de 1/2 hora
Para acelerar este proceso, programe un ciclo
de auto-limpieza de por lo menos 3 horas.
(Consulte la página 41.)
después del primer ciclo de
horneado.
Hay un fuerte olor. Esto es transitorio. El aislamiento alrededor del interior del
horno emite un olor fuerte las primeras veces
que se usa el horno.
Problema Causa posible Acción
Resulta difícil
deslizar las parrillas
del horno.
Esto es normal. Aplique una pequeña cantidad de aceite
vegetal sobre una toalla de papel y frote
con él los lados de la parrilla. Las parrillas se
vuelven opacas y difíciles de deslizar si se
dejan en el horno durante un ciclo de autolimpieza.
Ruido del ventilador. Esto es normal. El ventilador de convección está encendido
hasta que la función termina y la puerta se
abre.
El ventilador de
convección no
funciona.
Esto es normal. El ventilador comienza automáticamente
cuando el horno llega a la temperatura de
precalentamiento.
Resolución de problemas
Español 47
NX7000K_VE_NX58M6850SS_AA_DG68-00909A-03_EN+MES+CFR.indb 47 1/30/2018 1:05:04 PM
Page 100
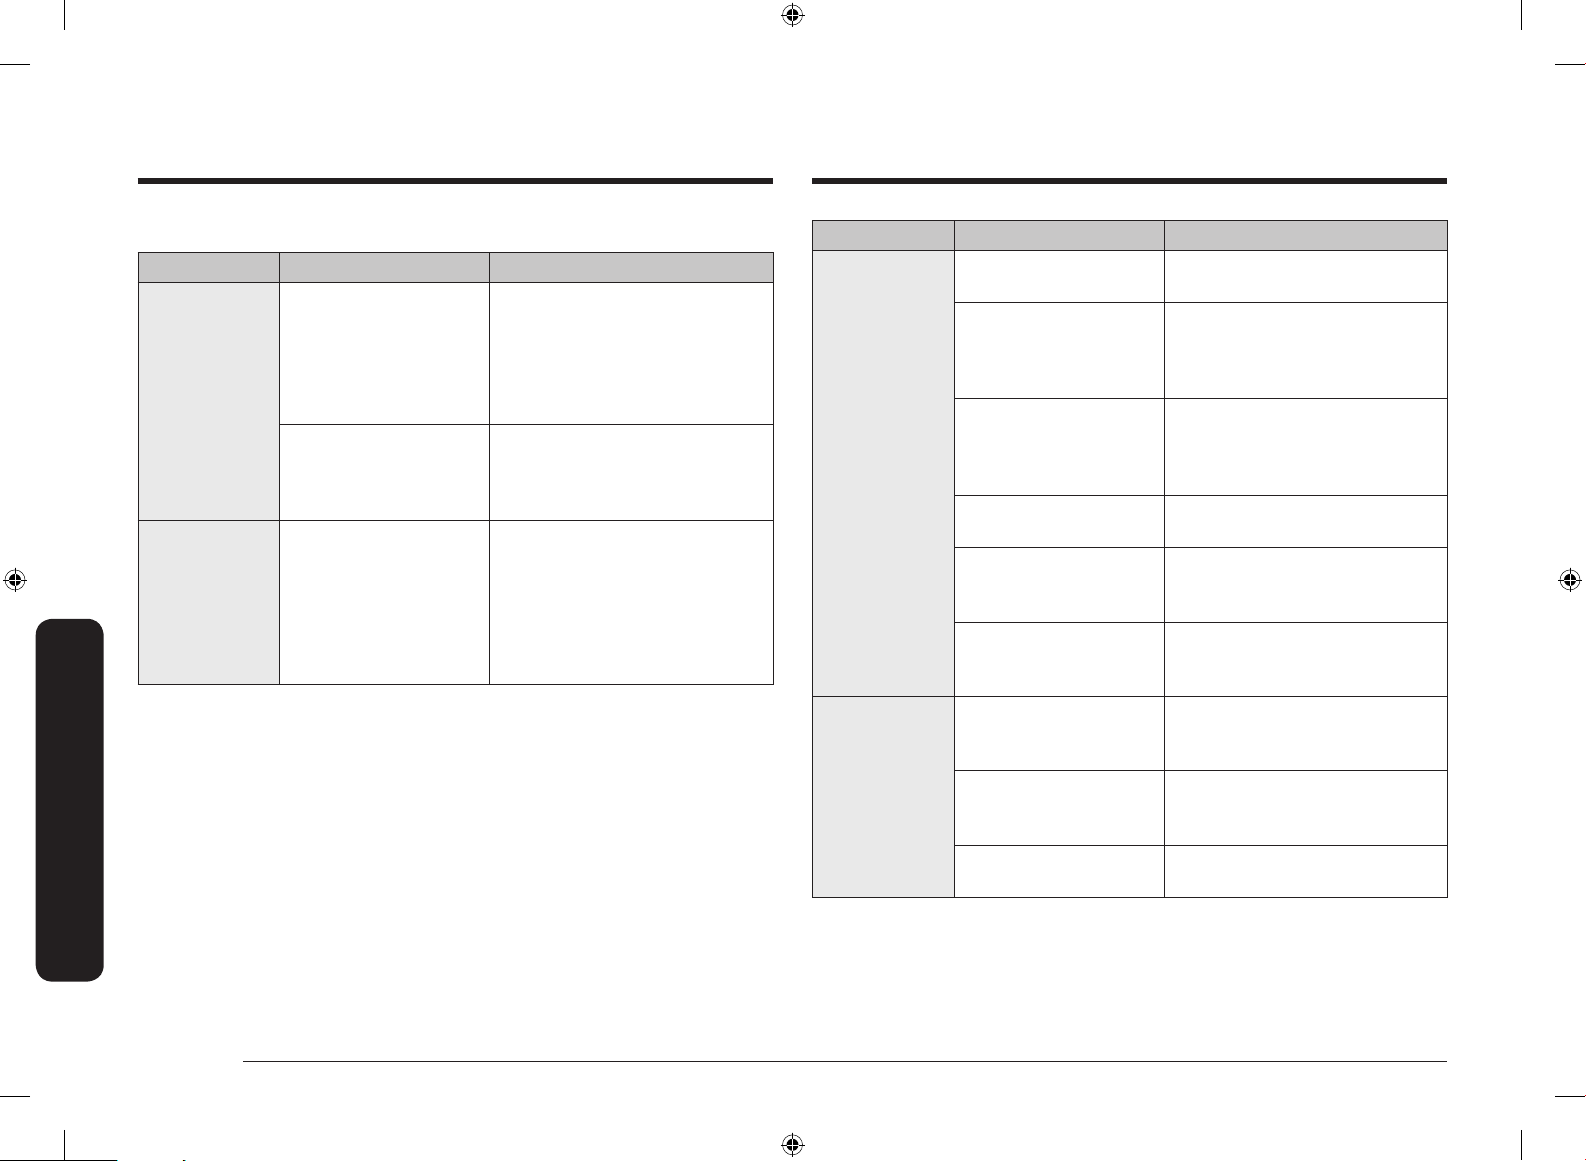
Resolución de problemas
Resolución de problemas
Otros
Problema Causa posible Acción
El producto no
está nivelado.
La pantalla queda
en blanco.
El electrodoméstico fue
instalado incorrectamente.
Las patas niveladoras están
dañadas o desparejas.
Son los gabinetes de cocina
los que están desalineados y
hacen que la estufa parezca
desnivelada.
El tomacorriente eléctrico
equipado con un interruptor
de falla a tierra (GFI o GFCI)
se ha disparado y debe
reiniciarse.
Su control digital se ha
dañado.
Asegúrese de que el piso esté nivelado,
y sea sólido y estable Si el piso está
combado o tiene una pendiente, llame a
un carpintero.
Controle y nivele la estufa. (Consulte las
instrucciones de instalación.)
Asegúrese de que los gabinetes se
encuentren en escuadra y dejan
suciente lugar para la instalación.
Reemplace el fusible o reinicie el
disyuntor.
Problema Causa posible Acción
Los alimentos no
se hornean o asan
como es debido
en el horno.
Los alimentos
no se asan
correctamente en
el horno.
Se seleccionó un modo de
cocción incorrecto.
Las parrillas del horno no se
han ubicado correctamente
para los alimentos que se
están cocinando.
Se están utilizando
recipientes de cocción no
adecuados o de tamaño
incorrecto.
El termostato del horno
necesita ajustes.
Hay papel de aluminio en las
parrillas o la parte inferior
del horno.
El reloj o los temporizadores
no están congurados
correctamente.
Los controles del horno
no se han establecido
adecuadamente.
La puerta del horno no se
cerró durante el asado a la
parrilla.
La parrilla fue colocada en
una posición incorrecta.
Consulte la página 21.
Consulte la página 26.
Consulte la página 17.
Consulte la página 34.
Retire el papel de aluminio.
Consulte la página 16.
Consulte la página 24.
Consulte la página 21.
Ver la guía para asar a la parrilla, en la
página 25.
48 Español
NX7000K_VE_NX58M6850SS_AA_DG68-00909A-03_EN+MES+CFR.indb 48 1/30/2018 1:05:04 PM
 Loading...