

Page 1

User Manual
SM-R760
SM-R765F
SM-R770
English. 01/2017. Rev.1.1
www.samsung.com
Page 2

Table of Contents
Getting Started
5 About the Gear S3
6 Read me first
7 Maintaining water and dust
resistance
8 Device layout
8 Package contents
9 Gear
11 Wireless charging dock
12 Battery
12 Charging the battery
14 Battery charging tips and
precautions
15 Power saving mode
23 eSIM (SM-R765F)
23 Introduction
23 Activating the eSIM
25 Managing the eSIM
25 Using the Gear without a mobile
device
Basics
26 Controlling the screen
26 Screen composition
27 Turning the screen on and off
27 Navigating the screen
29 Using the bezel
31 Touchscreen
16 Wearing the Gear
16 Putting on the Gear
16 Band tips and precautions
17 Replacing the band
19 Turning the Gear on and off
20 Connecting the Gear to a mobile
device
20 Installing the Samsung Gear app
20 Connecting the Gear to a mobile
device via Bluetooth
22 Remote connection
34 Status panel
36 Watch
36 Watch screen
36 Changing the watch face
37 Using the Watch always on feature
37 Power-off watch mode
37 Notifications
37 Notification panel
38 Viewing incoming notifications
39 Sending app notifications to the
Gear
2
Page 3

Table of Contents
39 Entering text
39 Introduction
40 Using the voice input
40 Using emoticons
41 Using handwriting input mode or
the keyboard
42 GPS
43 SOS messages
44 Finding my Gear
Applications
45 Messages
46 Phone
68 Music Player
68 Introduction
68 Playing music
68 Importing music
69 Playing music on the Gear
69 Playing music from your mobile
device
69 Standalone music
70 Reminders
71 Schedule
71 S Voice
71 Introduction
71 Setting a wake-up command
72 Using S Voice
73 Setting the language
46 Introduction
46 Setting an outgoing number
47 Receiving calls
49 Making calls
49 Options during calls
50 Forwarding calls to the Gear
52 Contacts
53 S Health
53 Introduction
55 24-hour Log
56 Steps
57 Floors
58 Exercise
60 Heart rate
62 Water
62 Caffeine
63 Together
64 Additional information
73 Weather
73 Alarm
74 World Clock
75 Gallery
75 Importing and exporting images
76 Viewing images
76 Deleting images
77 News Briefing
77 Find My Phone
78 Email
78 Get more apps
79 Settings
79 Introduction
79 Style
79 Sounds and vibration
80 Device
65 Alti-Barometer
81 Display
81 Call
3
Page 4

Table of Contents
82 Messages
82 Connections
87 Security
87 Accessibility
87 Input
87 Power saving
88 Gear info
88 Connect to new phone
88 Connect to phone
89 Updating the Gear
Samsung Gear app
90 Introduction
91 INFO
Appendix
99 Troubleshooting
103 Removing the battery
92 SETTINGS
92 Watch faces
92 Notifications
93 Apps
93 Send content to Gear
94 Send SOS requests
94 Find My Gear
95 Gear connection
95 Quick messages
95 Register Gear eSIM profile
96 Auto call forwarding
96 Social network sharing
96 S Health
97 Samsung Galaxy Apps
97 About Gear
98 About Samsung Gear app
4
Page 5
Getting Started
About the Gear S3
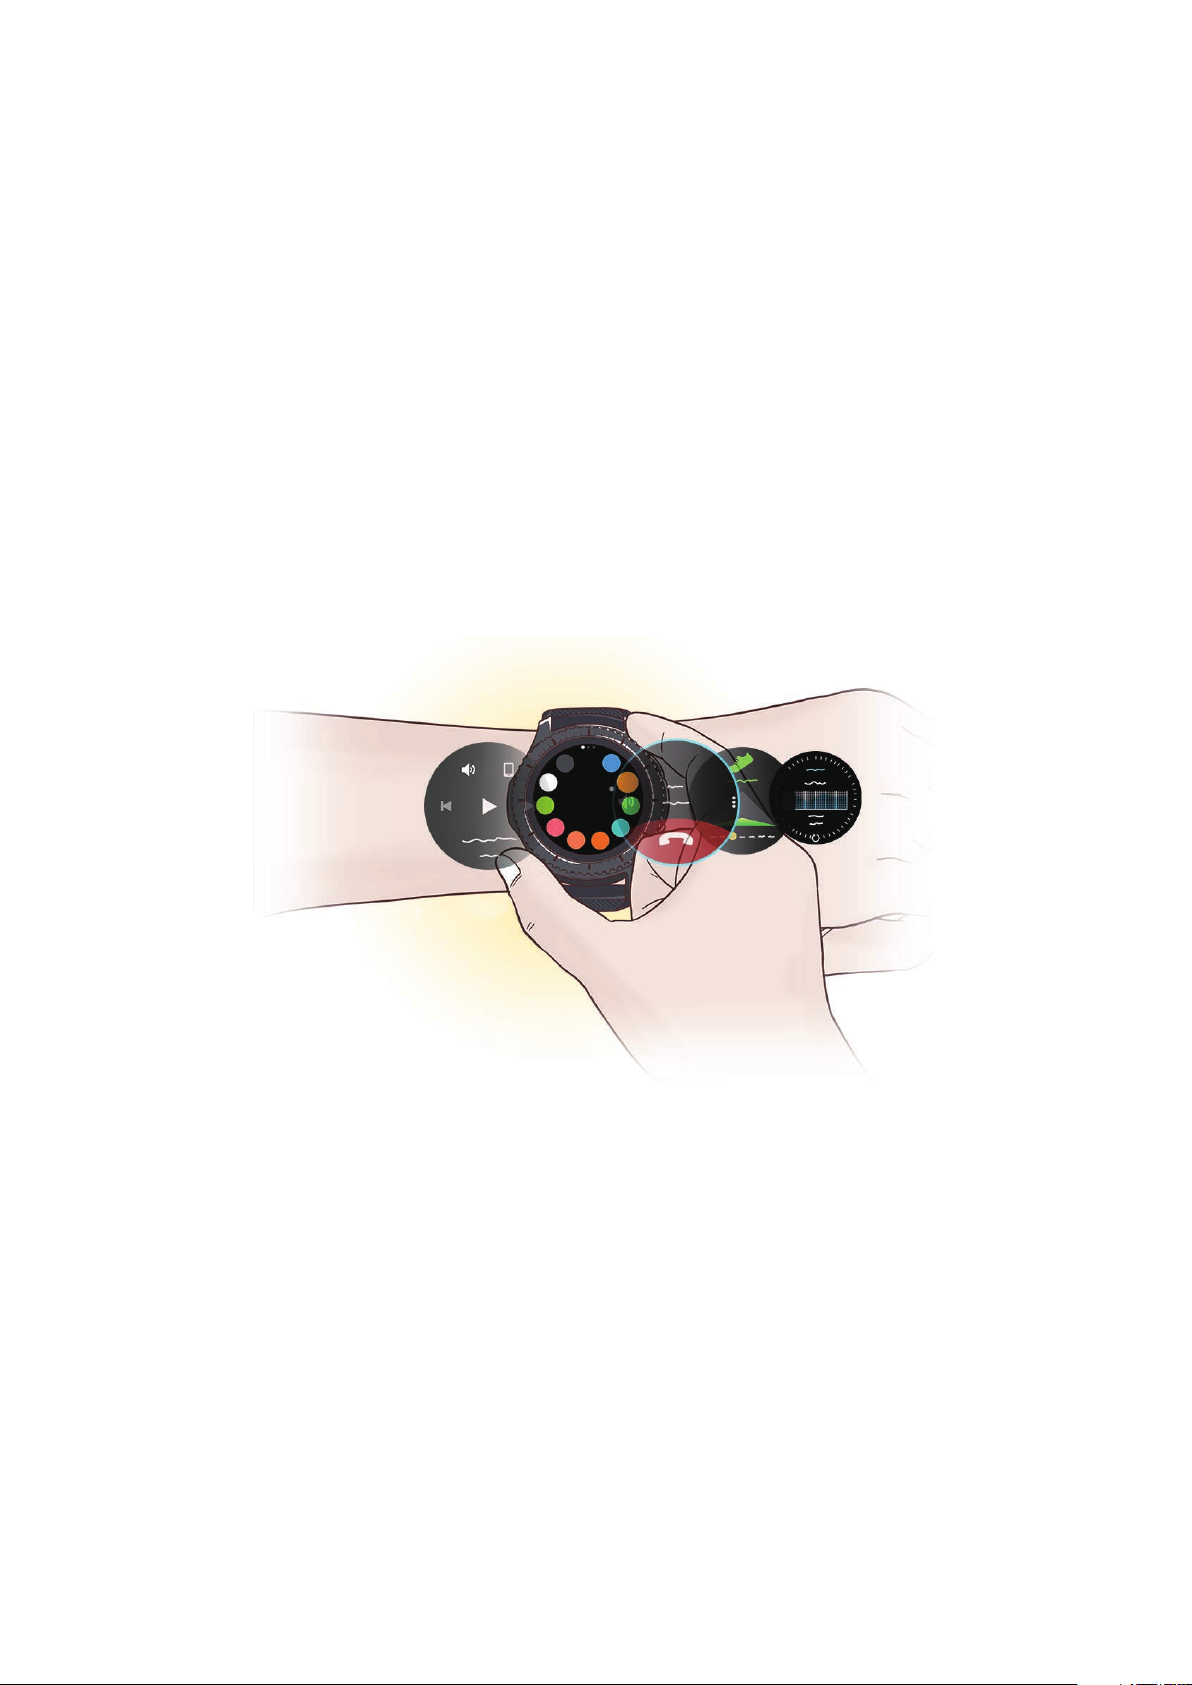
The Gear S3 is a smartwatch that works as a traditional watch and allows you to use a variety
of convenient apps for making phone calls, playing music, and managing your health. By
rotating the bezel, you can access convenient features quickly and easily. You can also change
the watch face and band to your taste.
Connect your Gear S3 to your mobile device to expand your mobile device experience, or use
the Gear S3 by itself, without connecting to a mobile device.
5
Page 6

Getting Started
Read me first
Please read this manual before using this device to ensure safe and proper use.
•
Descriptions are based on the device’s default settings.
•
Some content may differ from your device depending on the region, service provider,
model specifications, or device’s software.
•
Content (high quality content) that requires high CPU and RAM usage will affect the
overall performance of the device. Apps related to the content may not work properly
depending on the device’s specifications and the environment that it is used in.
•
Samsung is not liable for performance issues caused by apps supplied by providers other
than Samsung.
•
Samsung is not liable for performance issues or incompatibilities caused by edited
registry settings or modified operating system software. Attempting to customise the
operating system may cause the Gear or apps to work improperly.
•
Software, sound sources, wallpapers, images, and other media provided with this Gear
are licensed for limited use. Extracting and using these materials for commercial or other
purposes is an infringement of copyright laws. Users are entirely responsible for illegal
use of media.
•
You may incur additional charges for data services, such as messaging, uploading and
downloading, auto-syncing, or using location services depending on your data plan. For
large data transfers, it is recommended to use the Wi-Fi feature.
•
Default apps that come with the Gear are subject to updates and may no longer be
supported without prior notice. If you have questions about an app provided with
the Gear, contact a Samsung Service Centre. For user-installed apps, contact service
providers.
•
Modifying the Gear’s operating system or installing softwares from unofficial sources may
result in Gear malfunctions and data corruption or loss. These actions are violations of
your Samsung licence agreement and will void your warranty.
•
The images in this manual are based on the SM-R760 model.
•
Some functions may not work as described in this manual depending on the maker and
model of the mobile device you connect to the Gear.
6
Page 7

Getting Started
Instructional icons
Warning: situations that could cause injury to yourself or others
Caution: situations that could cause damage to your device or other equipment
Notice: notes, usage tips, or additional information
Maintaining water and dust resistance
Your device supports water- and dust-resistance. Follow these tips carefully to maintain the
water- and dust-resistance of your device. Failure to do so may result in damage to your
device.
•
Do not immerse the device in water deeper than 1.5 m or keep it submerged for more
than 30 minutes.
•
Do not expose the device to water moving with force.
•
When you are wearing the device, avoid taking a shower or going swimming.
•
If the device or your hands are wet, dry them thoroughly before handling the device.
•
If the device is exposed to clean water, dry it thoroughly with a clean, soft cloth. If
the device is exposed to other liquids, such as salt water, ionised water, or alcoholic
beverage, rinse it with clean water and dry it thoroughly with a clean, soft cloth. If you
do not follow these instructions, the device’s performance and appearance may be
affected.
•
If the device is dropped or receives an impact, the water- and dust-resistant features of
the device may be damaged.
•
If the device has been immersed in water or the microphone or speaker is wet,
sound may not be heard clearly during a call. Wipe the device with a dry cloth or dry it
thoroughly before using it.
7
Page 8

Getting Started
•
The touchscreen and other features may not work properly if the device is used in water.
•
Your device has been tested in a controlled environment and certified to be waterand dust-resistant in specific situations (meets requirements of classification IP68 as
described by the international standard IEC 60529 - Degrees of Protection provided
by Enclosures [IP Code]; test conditions: 15 - 35°C, 86 - 106 kPa, 1.5 metre, 30 minutes).
Despite this classification, it is still possible for your device to be damaged in certain
situations.
Device layout
Package contents
Check the product box for the following items:
•
Gear
•
Wireless charging dock
•
Band
•
Quick start guide
•
If the connected band is too large for your wrist, change it to a small one.
•
The items supplied with the Gear and any available accessories may vary
depending on the region or service provider.
•
The supplied items are designed only for this Gear and may not be compatible
with other devices.
•
Appearances and specifications are subject to change without prior notice.
•
You can purchase additional accessories from your local Samsung retailer. Make
sure they are compatible with the Gear before purchase.
•
Some accessories, such as docking devices, may not have the same water- and
dust-resistance certification.
•
Use only Samsung-approved accessories. Using unapproved accessories may cause
the performance problems and malfunctions that are not covered by the warranty.
•
Availability of all accessories is subject to change depending entirely on
manufacturing companies. For more information about available accessories, refer
to the Samsung website.
8
Page 9

Getting Started
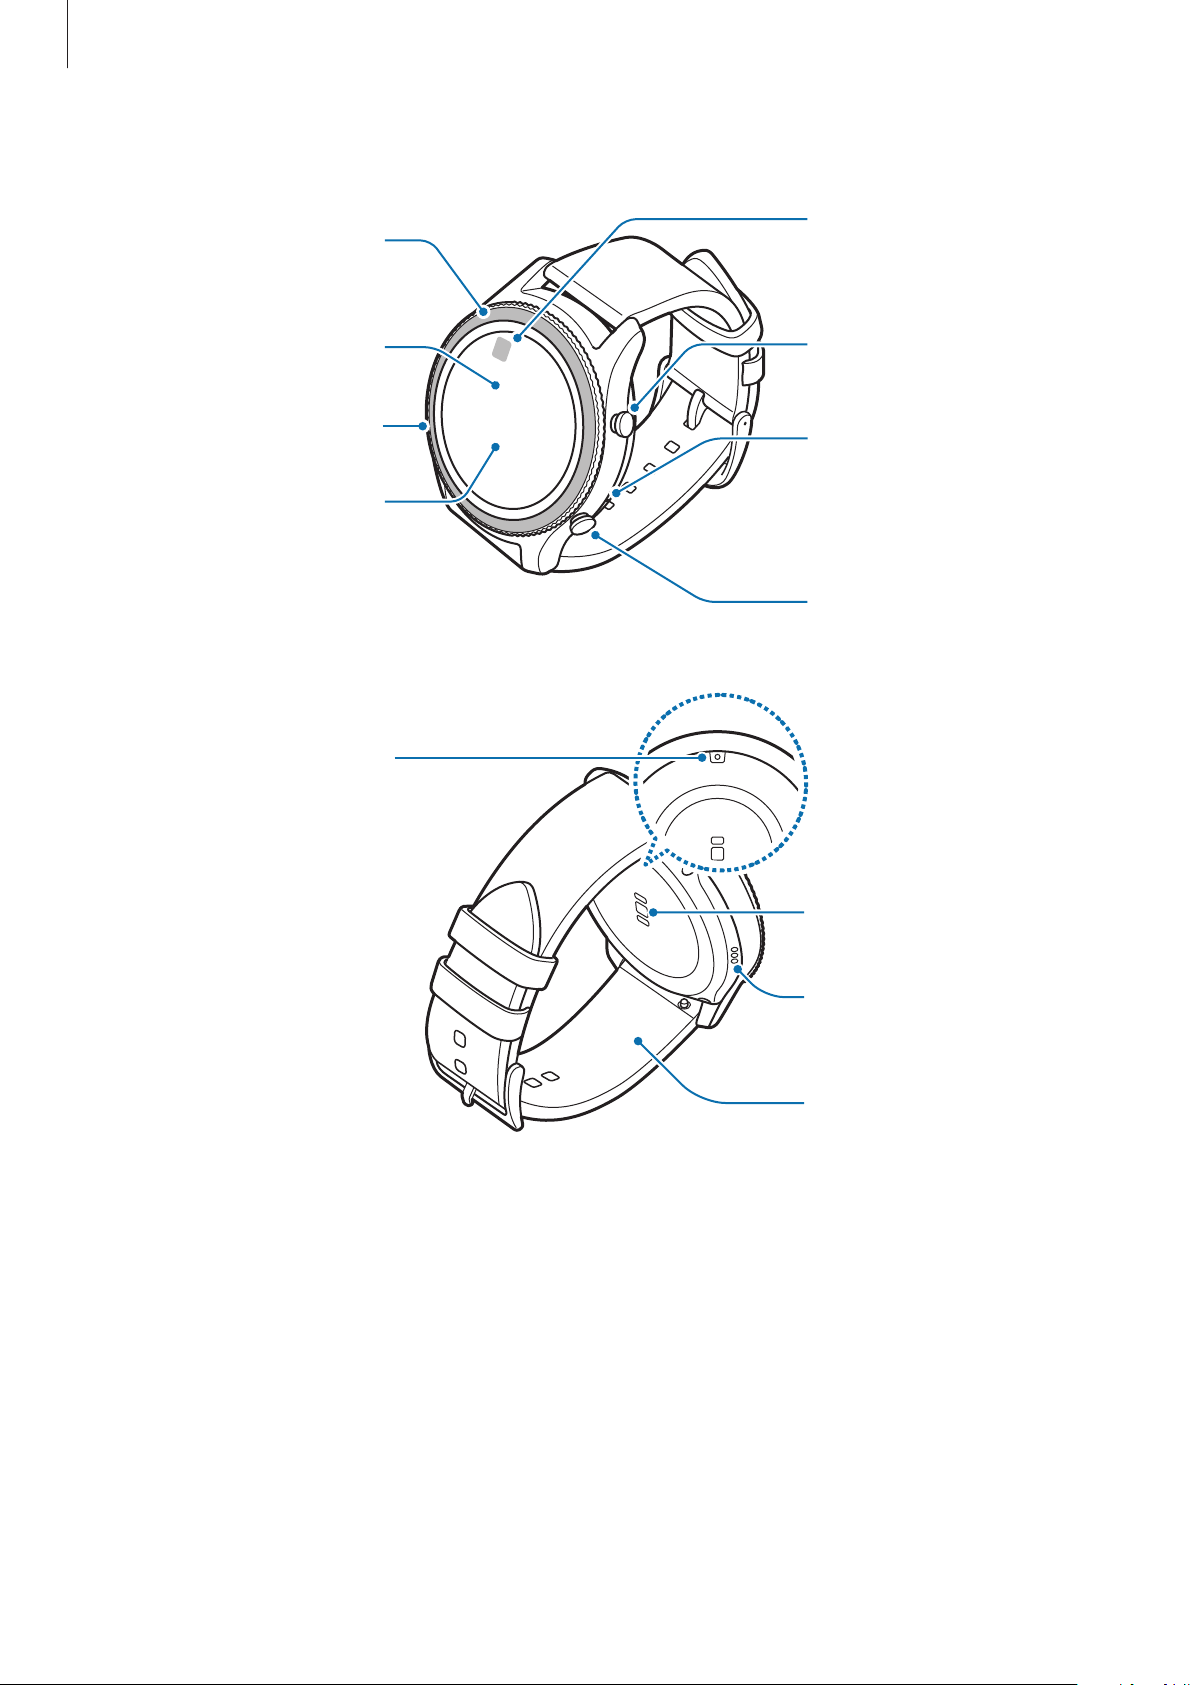
NFC antenna
Band
Gear
►
SM-R760, SM-R765F
GPS antenna
Touchscreen
Bezel
Light sensor
Pressure relief vent
(Atmospheric
pressure sensor)
Back key
Microphone
Home key (Power
key)
Heart rate sensor
9
Speaker
Page 10
Getting Started
NFC antenna
►
SM-R770
GPS antenna
Touchscreen
Bezel
Light sensor
Pressure relief vent
(Atmospheric
pressure sensor)
Back key
Microphone
Home key (Power
key)
Heart rate sensor
Speaker
Band
10
Page 11
Getting Started
Keys
Key Function
•
Press and hold to turn the Gear on or off.
•
Press to turn on the screen.
•
Press and hold for more than 7 seconds to restart the Gear.
/
/
Ensure that the band is kept clean. Contact with contaminants, such as dust and dye,
can cause stains on the band that may not be fully removed.
•
•
Home/Power
Back
If the loud speaker is wet, sound may be distorted. Ensure that the loud speaker is
dry.
Make sure the Gear’s microphone is not obstructed when you are speaking into it.
•
•
•
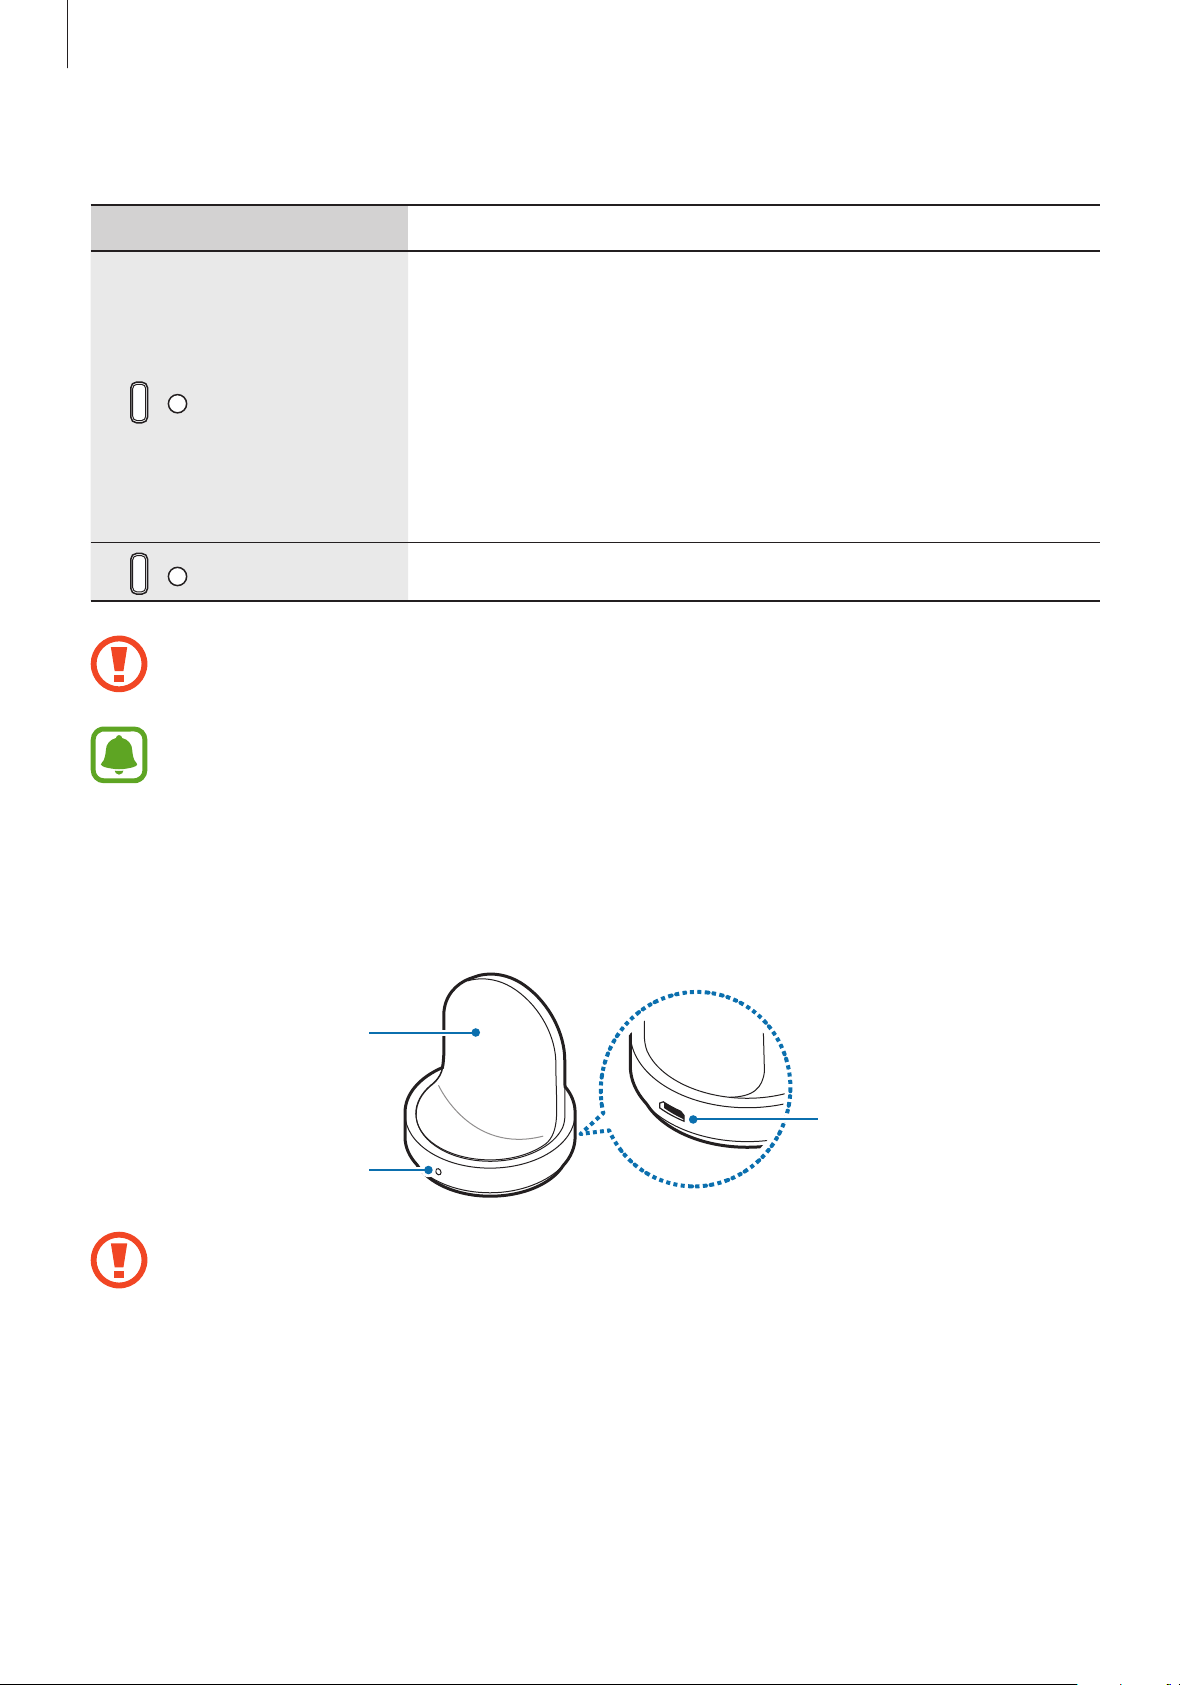
Wireless charging dock
Press to open the Apps screen when you are on the Watch
screen.
Press to open the Watch screen when you are on any
other screen.
Press to return to the previous screen.
Wireless
charging surface
LED indicator
Do not expose the wireless charging dock to water.
Charger port
11
Page 12
Getting Started
Battery
Charging the battery
Charge the battery before using it for the first time or when it has been unused for extended
periods.
Use only Samsung-approved chargers, batteries, and cables. Unapproved chargers or
cables can cause the battery to explode or damage the Gear.
•
Use the supplied wireless charging dock and charger. The Gear cannot be charged
properly with a third-party charger.
•
Connecting the charger improperly may cause serious damage to the device. Any
damage caused by misuse is not covered by the warranty.
To save energy, unplug the charger when not in use. The charger does not have a
power switch, so you must unplug the charger from the electric socket when not in
use to avoid wasting power. The charger should remain close to the electric socket
and be easily accessible while charging.
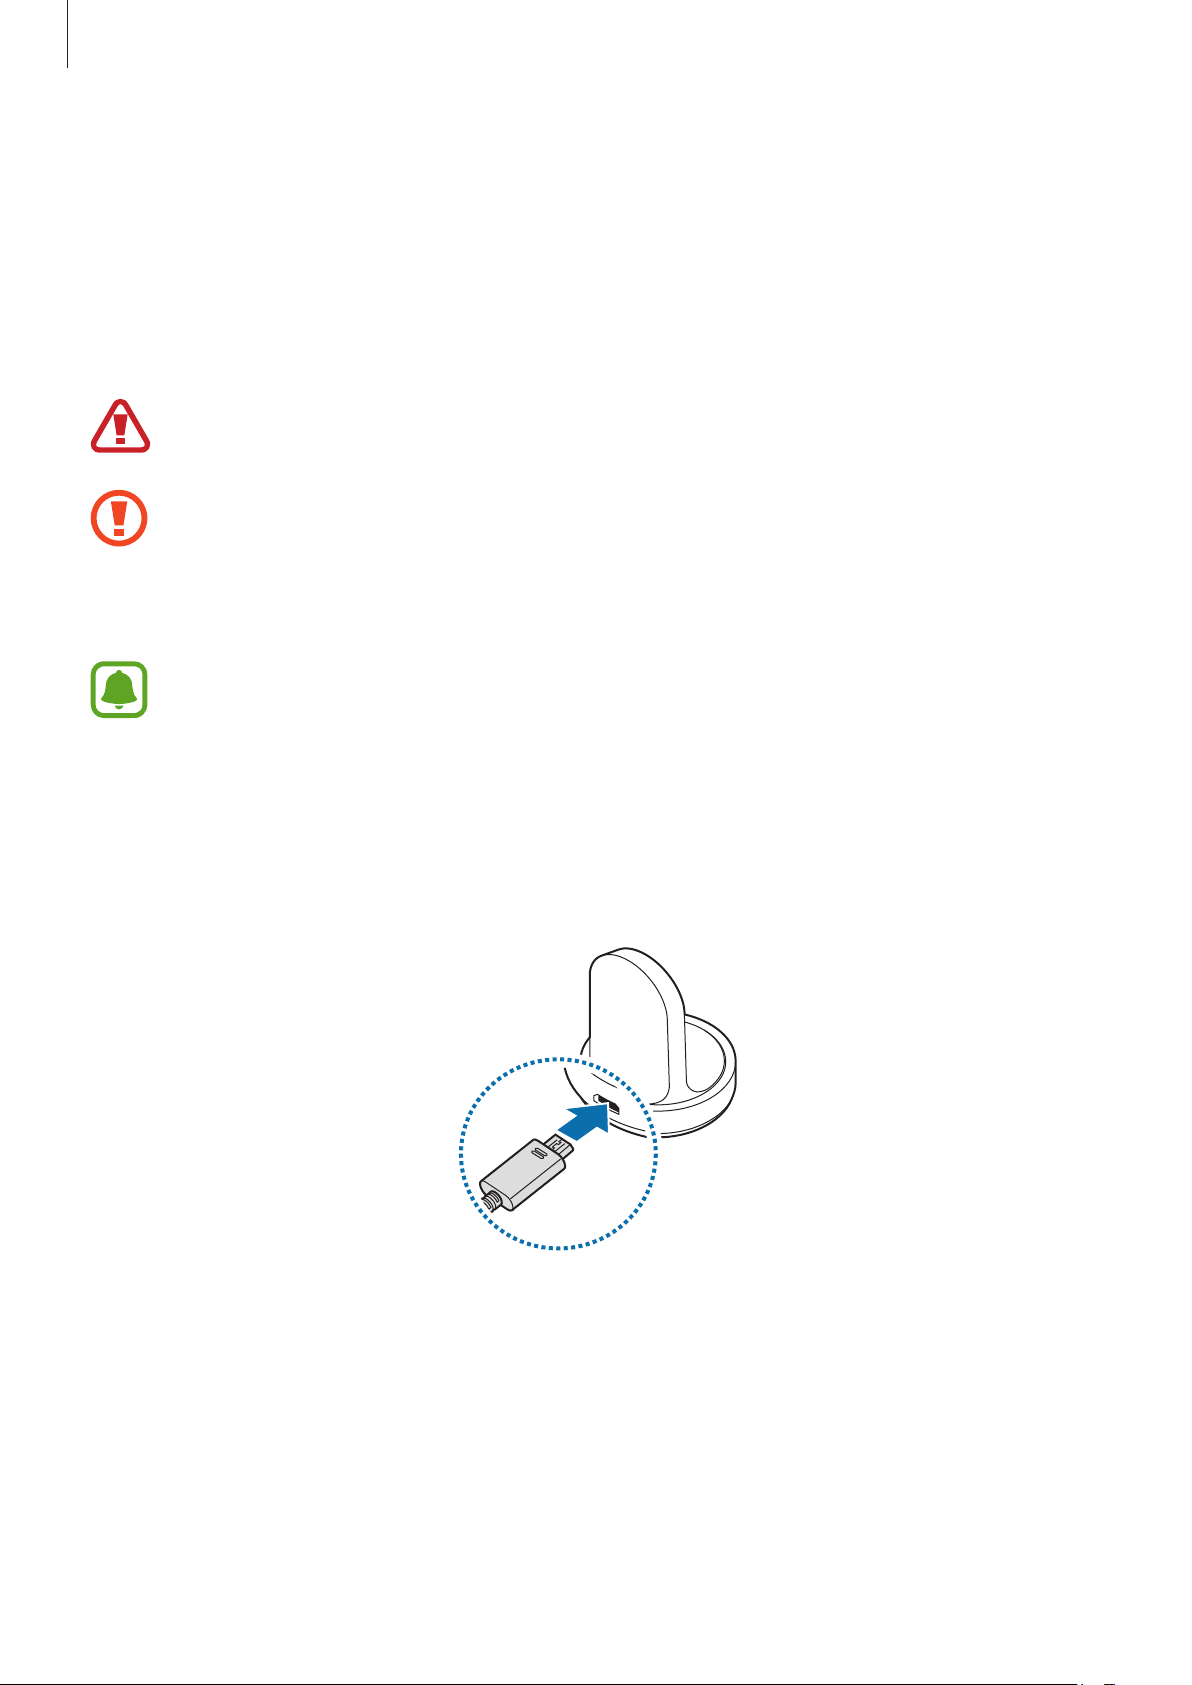
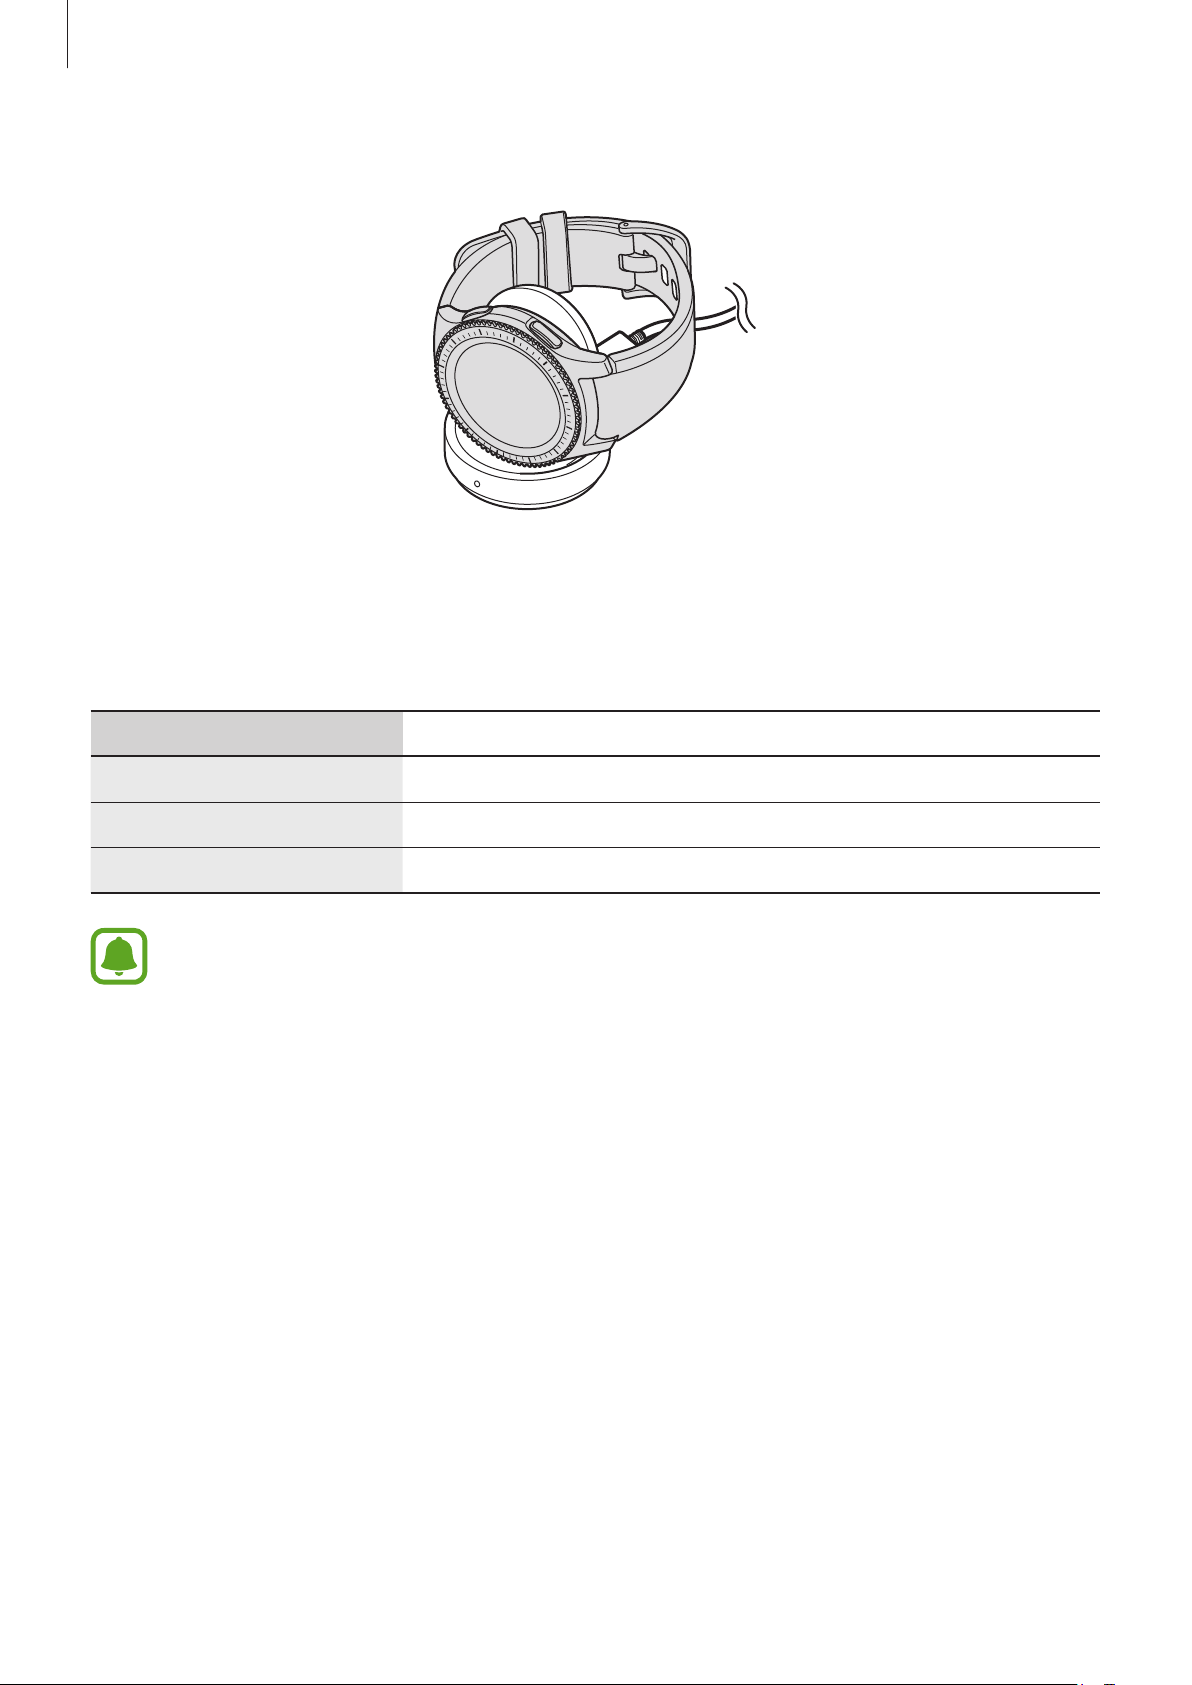
Plug the small end of the charger into the multipurpose jack of the wireless charging
1
dock and plug the large end of the charger into an electric socket.
12
Page 13
Getting Started
Place the Gear into the wireless charging dock.
2
Checking the charging status
When you connect the Gear and the wireless charging dock, the wireless charging dock’s LED
indicator flashes certain colours to indicate the battery level.
Colour Charging status
Red Charging
Green Fully charged
Orange Connected to a low-power adaptor
When a wireless charging dock error occurs, the LED indicator flashes red. Disconnect
the Gear from the wireless charging dock and reconnect them. If the error occurs
again, contact a Samsung Service Centre for service support.
13
Page 14

Getting Started
Reducing the battery consumption
Your Gear provides various options that help you conserve battery power.
•
When you are not using the Gear, turn off the screen by covering the screen with your
palm.
•
Activate power saving mode.
•
Close unnecessary apps.
•
Deactivate the Bluetooth feature when not in use.
•
Deactivate the Wi-Fi feature when not in use.
•
Decrease the screen brightness.
•
Deactivate the watch always on feature.
•
Deactivate the voice wake-up feature in
S Voice
.
•
Customise the notification settings in
Samsung Gear
on the mobile device.
Battery charging tips and precautions
•
If there are obstructions between the Gear and the wireless charging dock, the Gear may
not charge properly. Prevent the Gear and the wireless charger from coming into contact
with sweat, liquids, or dust.
•
When the battery power is low, the battery icon appears empty.
•
If the battery is completely discharged, the Gear cannot be turned on immediately when
the charger is connected. Allow a depleted battery to charge for a few minutes before
turning on the Gear.
•
If you use multiple apps at once, the battery will drain quickly. To avoid losing power
during a data transfer, always use these apps after fully charging the battery.
•
Using a power source other than the charger, such as a computer, may result in a slower
charging speed due to a lower electric current.
•
If the Gear is being charged with other devices via a multicharger, charging may take
longer.
14
Page 15
Getting Started
•
The Gear can be used while it is charging, but it may take longer to fully charge the
battery.
•
If the Gear receives an unstable power supply while charging, the touchscreen may not
function. If this happens, disconnect the Gear from the wireless charging dock.
•
While charging, the Gear may heat up. This is normal and should not affect the Gear’s
lifespan or performance. If the battery gets hotter than usual, the charger may stop
charging.
•
If the Gear is not charging properly, take the Gear to a Samsung Service Centre.
•
Avoid using a bent or damaged USB cable.
Power saving mode
Activate power saving mode to extend the battery’s usage time.
•
Displays colours on the screen as grey tones.
•
Deactivates features, excluding phone, messages, and notifications.
•
Deactivates the Wi-Fi feature.
•
Limits the performance of the Gear’s CPU.
On the Apps screen, tap
the Home key and tap
To deactivate this mode, tap
Power saving
→ .
(
Settings
Power saving
OFF
→ . Alternatively, press and hold the Home key and tap
) →
Power saving
→ .
→ . Alternatively, press and hold
15
Page 16
Getting Started
Wearing the Gear
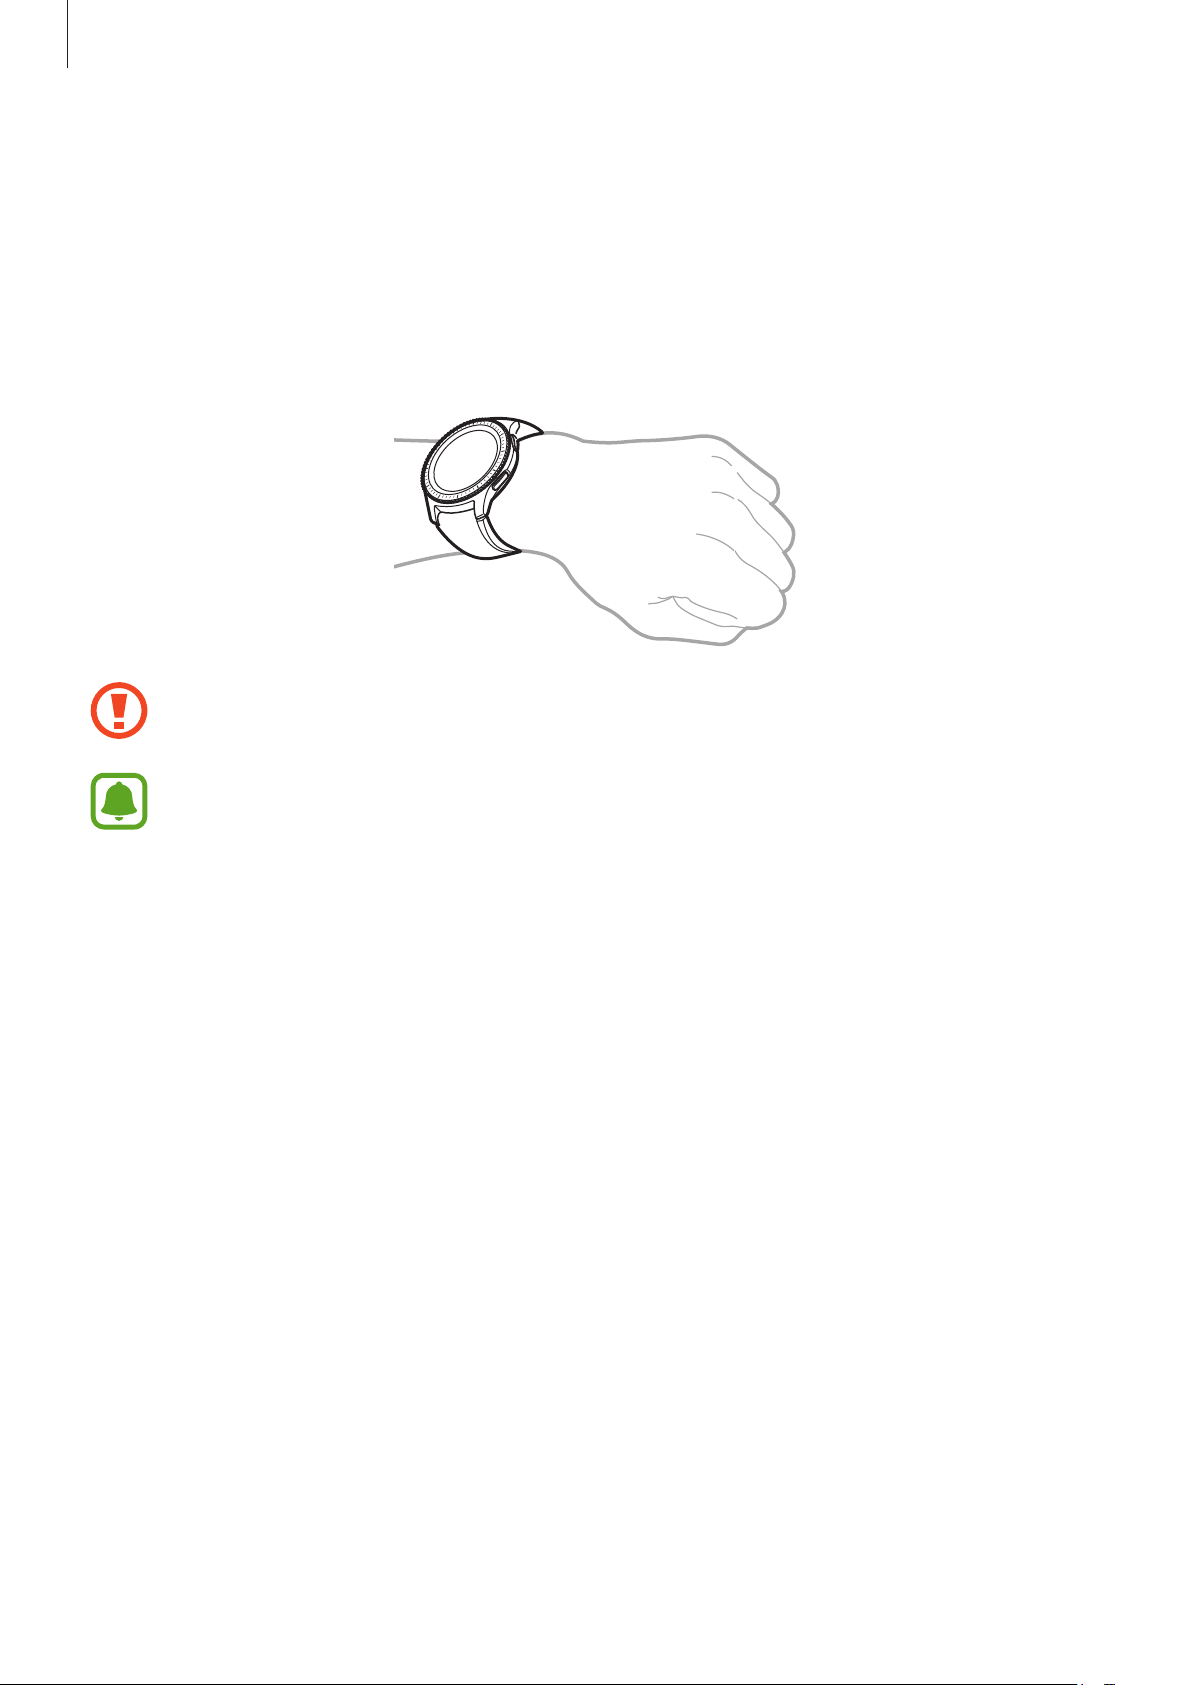
Putting on the Gear
Open the buckle and place the band around your wrist. Fit the band to your wrist, insert the
pin into an adjustment hole, and then secure the buckle to close it.
Do not bend the band excessively. Doing so may damage the Gear.
To measure your heart rate more accurately with the Gear, wear the Gear firmly
around your lower arm just above the wrist. Refer to Wearing the Gear correctly for
details.
Band tips and precautions
•
Be cautious when wearing the Gear. If you have sensitive skin or fasten the Gear too
tightly, you may feel some discomfort.
•
Some people may experience discomfort when wearing the Gear for prolonged periods.
•
Skin irritation may occur if the band is exposed to soap, sweat, allergens, or pollutants for
long periods.
•
Do not wear the device too tightly. Make sure to keep the device clean and dry. Though
this device has met international safety standards, some people may experience skin
irritation if they are allergic to certain substances.
16
Page 17
Getting Started
•
Keep in mind the followings to protect the leather band.
–
Avoid exposing the leather band to direct sunlight, water, and hot or humid
environments. The leather band can become discoloured or deformed.
–
The leather is permeable so it can be contaminated by oil and cosmetics. Avoid
exposing the leather band to these products.
•
Using a metal band is not recommended. Metal bands may cause connectivity problems
in areas with weak signals or poor reception.
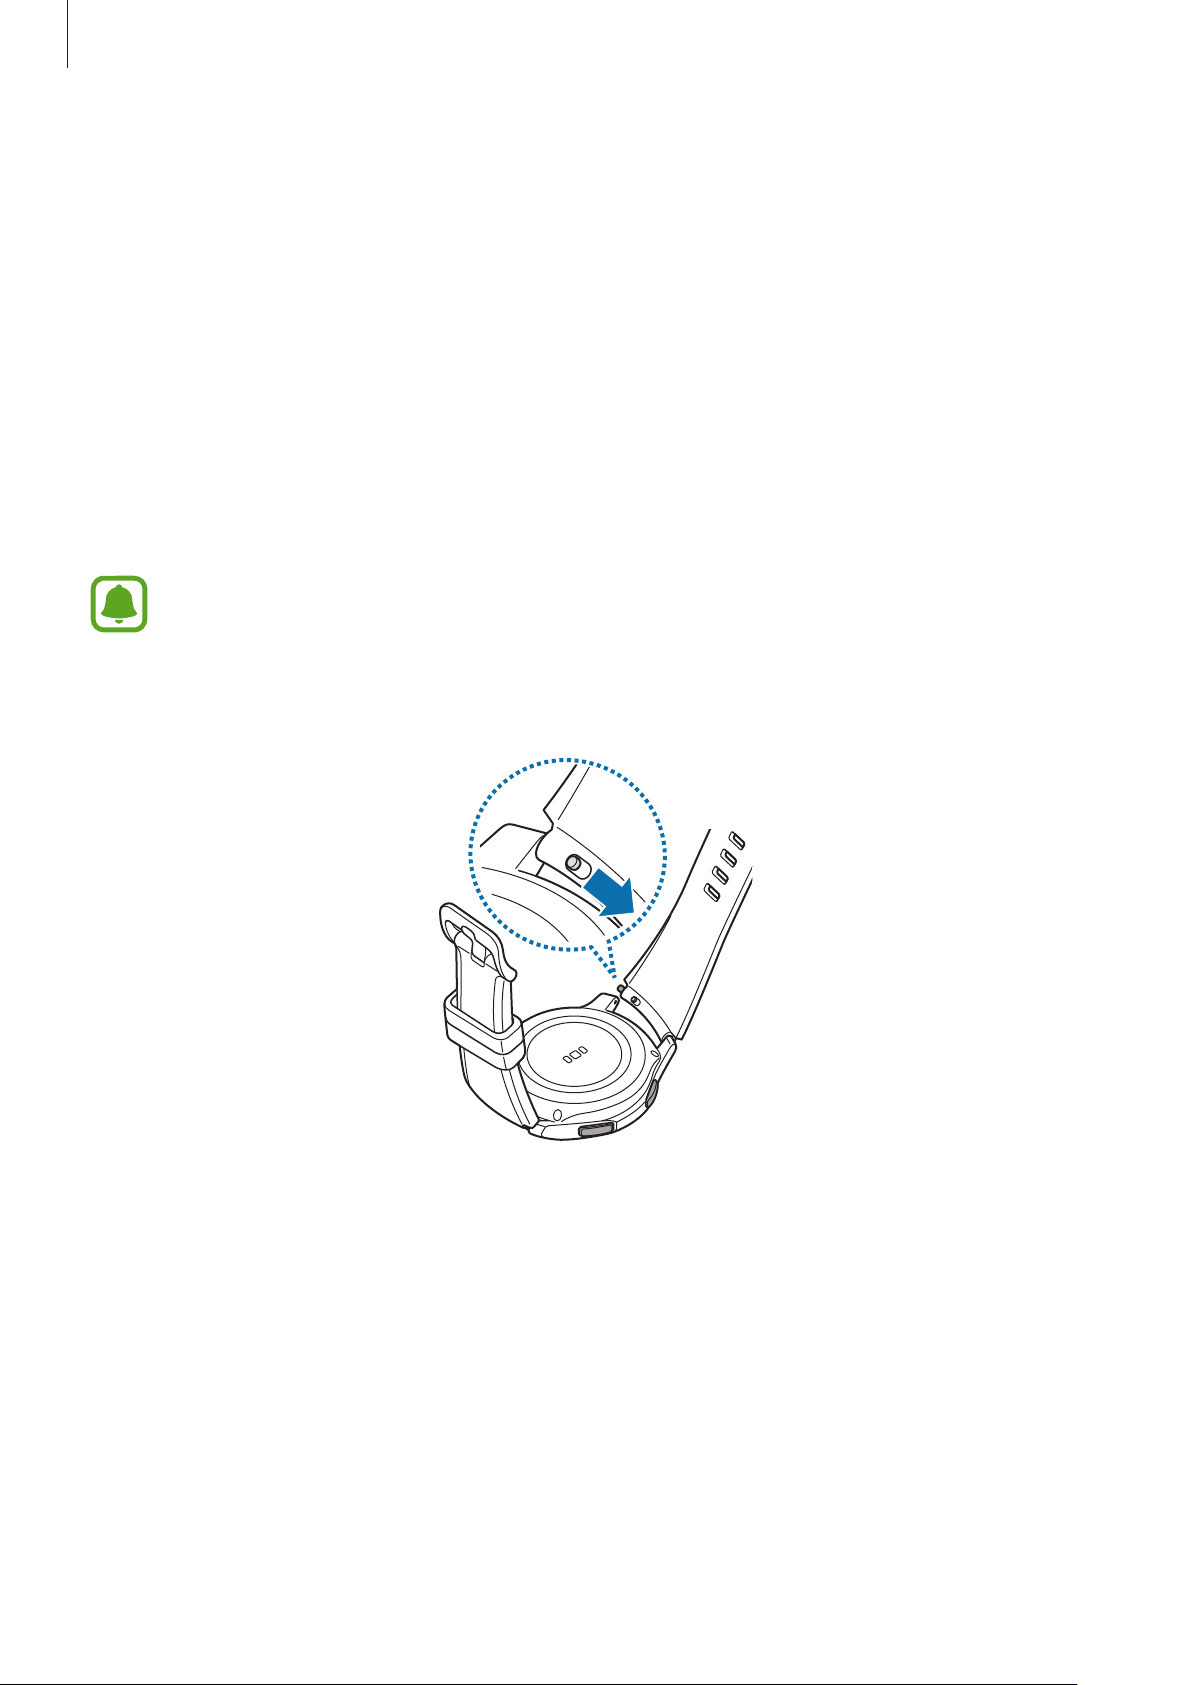
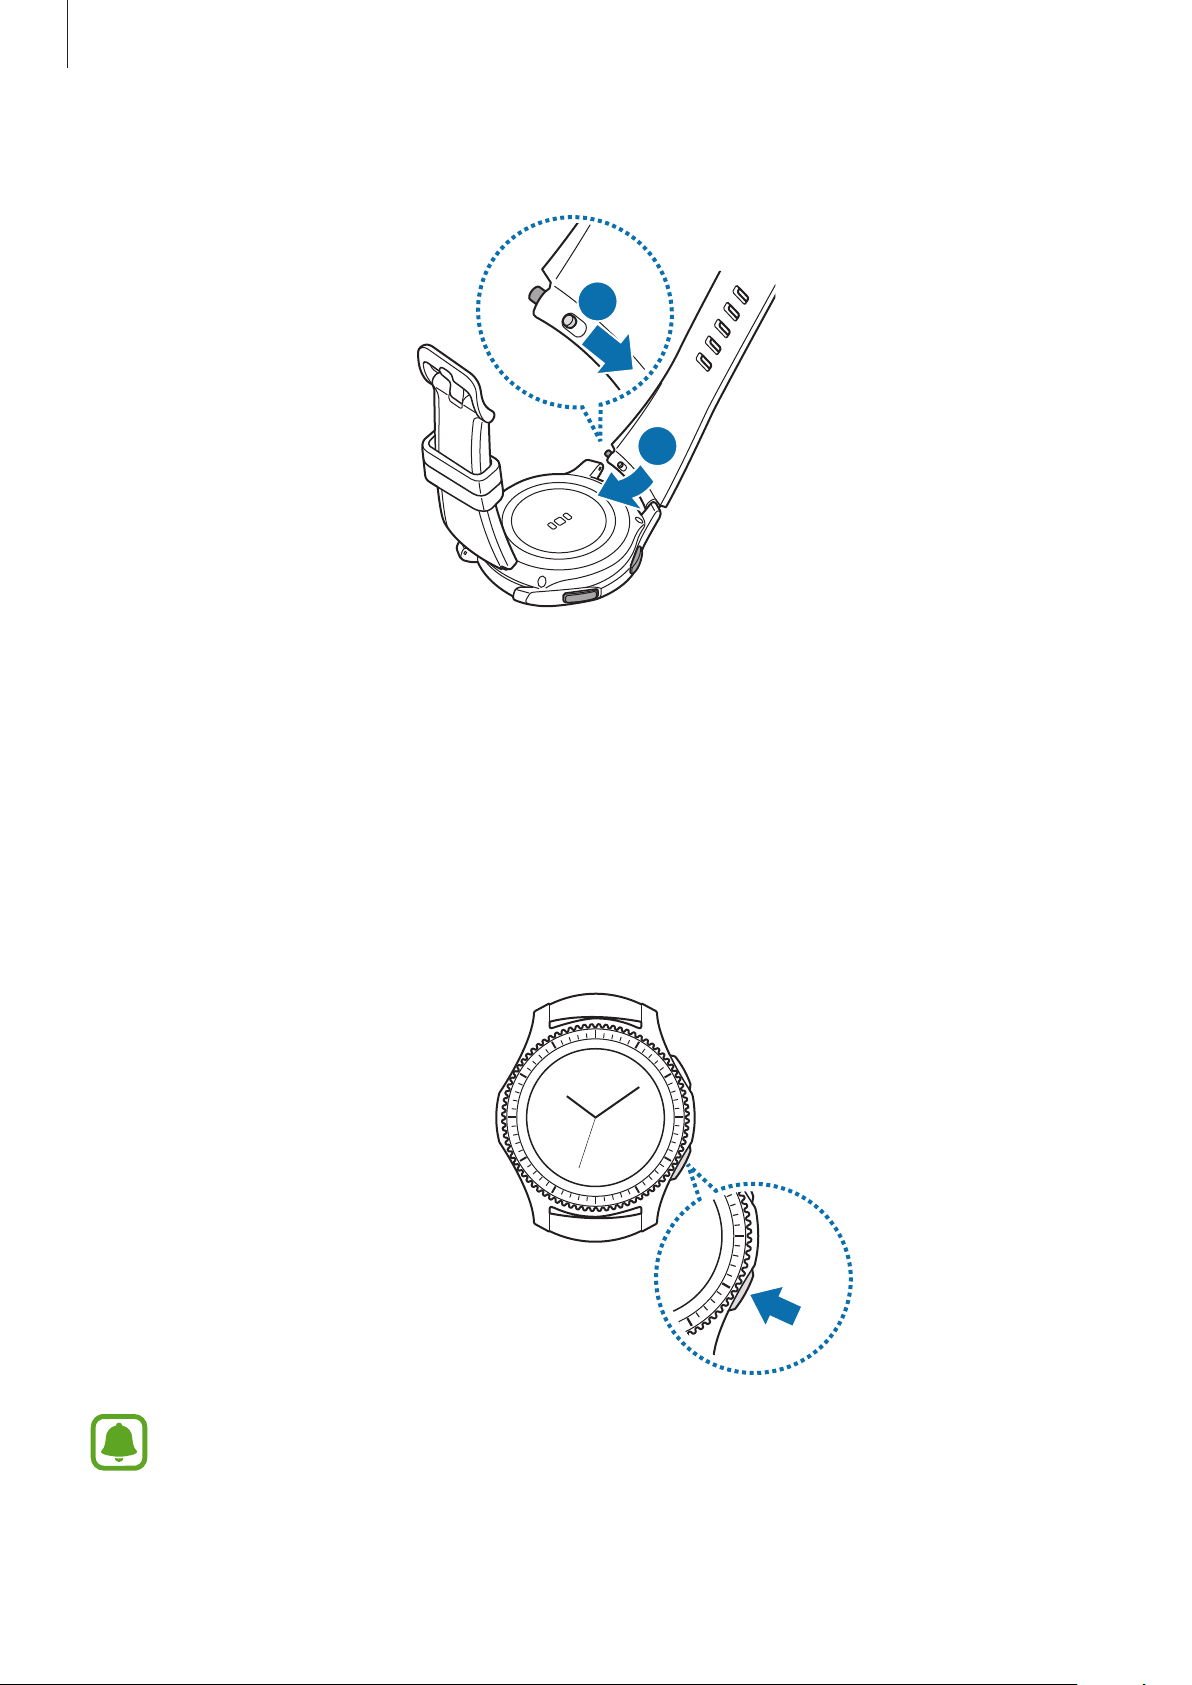
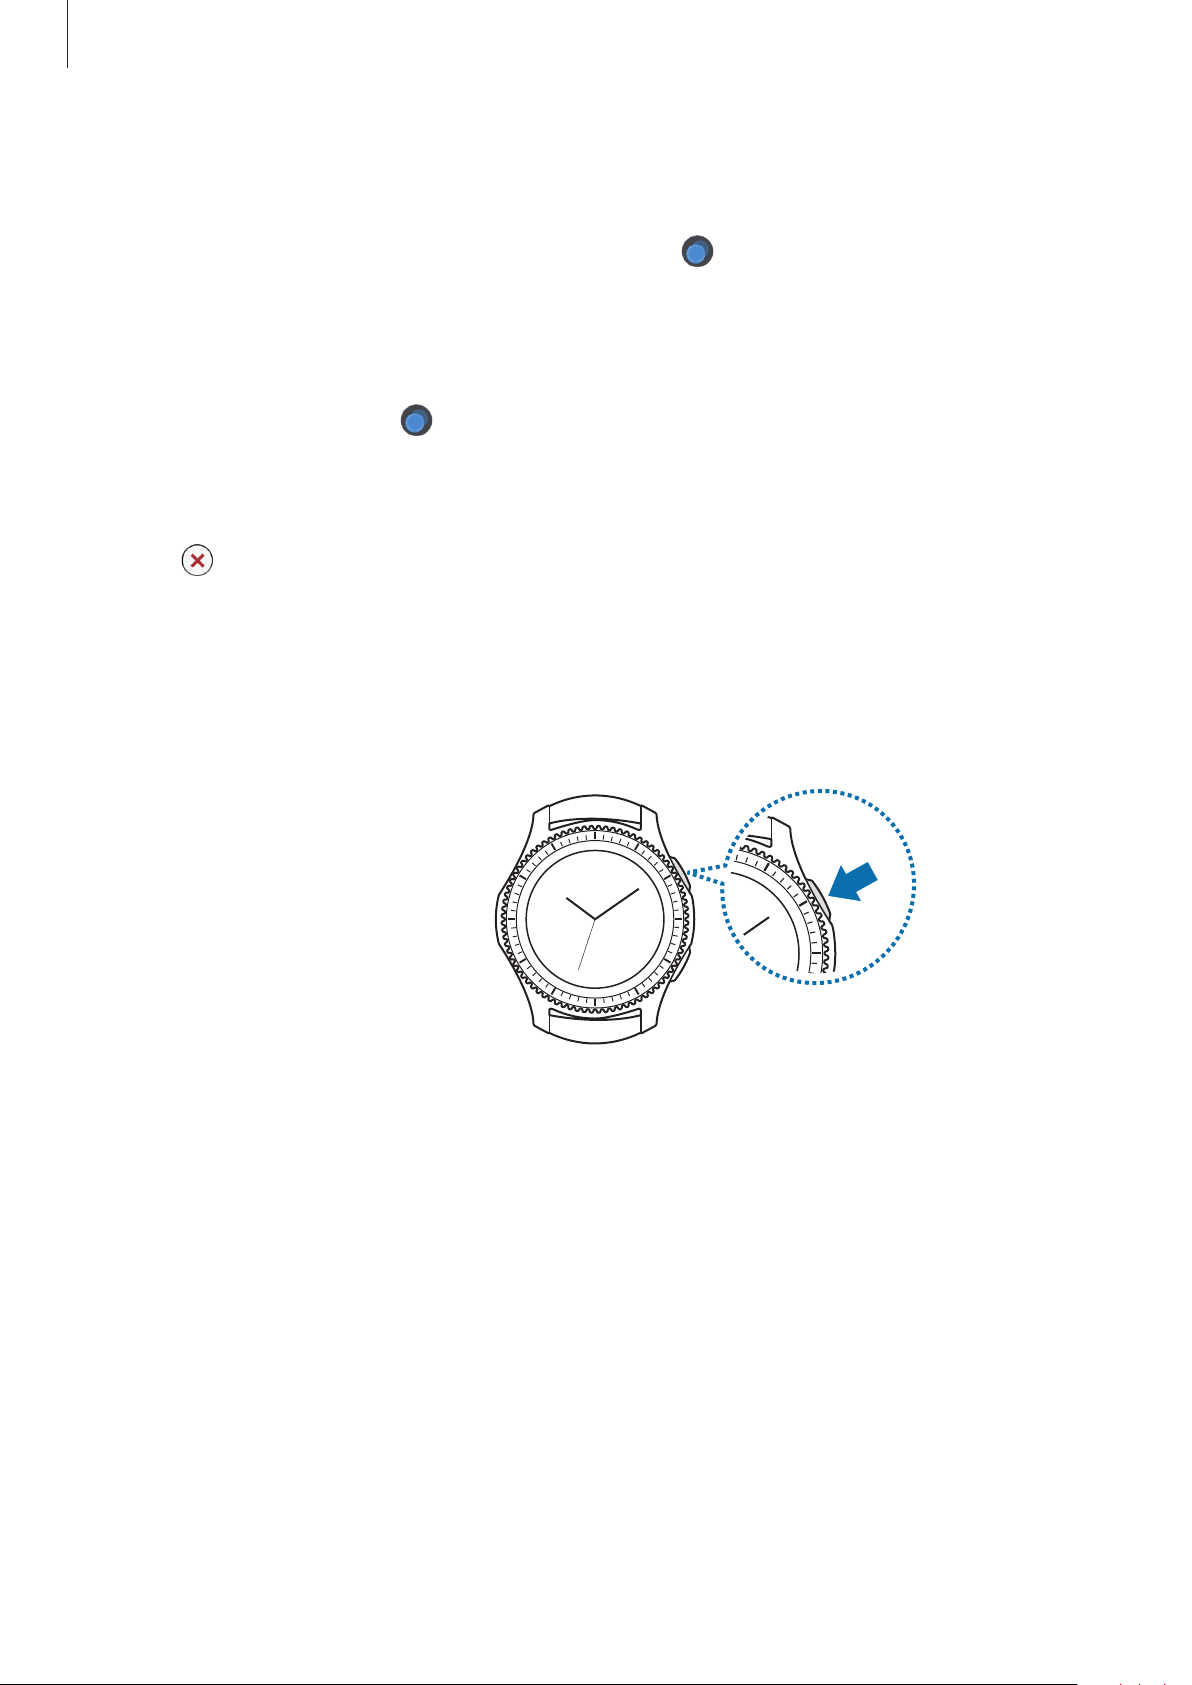
Replacing the band
Detach the band from the Gear to replace it with a new one.
The band’s appearance may vary depending on your model.
Slide the band’s spring bar inwards.
1
17
Page 18

Getting Started
Pull the band away from the Gear’s body.
2
Insert one end of the spring bar into the Gear’s lug.
3
18
Page 19
Getting Started
Slide the spring bar inwards and connect the band.
4
1
2
Turning the Gear on and off
Press and hold the Home key (Power key) for a few seconds to turn on the Gear. When you
turn on the Gear for the first time or reset it, a pop-up window will appear. Follow the onscreen instructions to download and install the Samsung Gear app on your mobile device.
Refer to Connecting the Gear to a mobile device for details.
To turn off the Gear, press and hold the Home key (Power key), and then tap
Power off
.
Follow all posted warnings and directions from authorised personnel in areas where
the use of wireless devices is restricted, such as aeroplanes and hospitals.
19
Page 20
Getting Started
Restarting the Gear
If your Gear is frozen and unresponsive, press and hold the Home key (Power key) for more
than 7 seconds to restart it.
Connecting the Gear to a mobile device
Installing the Samsung Gear app
To connect your Gear to a mobile device, install the Samsung Gear app on the mobile device.
Depending on your mobile device, you can download the Samsung Gear app from the
following places:
•
Samsung Android devices:
Galaxy Apps
, apps.samsung.com/gear
•
Other Android devices:
•
iOS devices:
You cannot install the Samsung Gear app on the mobile devices that do not support
Gear syncing. Ensure that your mobile device is compatible with a Gear.
App Store
Play Store
, apps.samsung.com/gear
Connecting the Gear to a mobile device via Bluetooth
Gear
Turn on the Gear.
1
When you turn on the Gear, a pop-up window will appear about downloading and
installing the Samsung Gear app on your mobile device.
Mobile device
On your mobile device, launch
2
Tap
3
4
CONNECT TO GEAR
Tap OK when the Bluetooth activation request window appears.
.
Samsung Gear
20
.
Page 21
Getting Started
Follow the on-screen instructions to complete the connection.
5
To make calls or send messages from the Gear, you should activate the eSIM. Refer to
eSIM (SM-R765F) for more information.
When the devices are connected, an on-screen tutorial will appear on the Gear’s screen.
Follow the on-screen instructions to learn the Gear’s basic controls.
•
Connection methods and screenshots may vary depending on your device and
software version.
•
The Gear is smaller than normal mobile devices so the network quality may be
lower, especially in areas with weak signals or poor reception. If a Bluetooth
connection is not available, your cellular network or Internet connection may be
poor or disconnected.
•
When connected, the Gear’s battery may drain more quickly while syncing data,
such as contacts.
•
Supported mobile devices and features may vary depending on your region,
service provider, and device manufacturer. Visit www.samsung.com to see a list of
compatible devices.
21
Page 22

Getting Started
Connecting the Gear to a new mobile device
When you connect the Gear to another mobile device, a pop-up window will ask you to
reset the Gear. Make sure you back up any important data stored in your Gear. For more
information about backing up your Gear, refer to Backing up and restoring data.
On your Gear, open the Apps screen, tap (
1
The connection between your Gear and your mobile device will end. After a light reset, it
will automatically enter Bluetooth pairing mode.
On another mobile device, launch
2
If the mobile device you want to connect to is already connected to another Gear,
your Gear cannot establish a connection. Disconnect your mobile device from the
previous Gear to connect to your current Gear.
Samsung Gear
Settings
) →
Connect to new phone
to connect to your Gear.
.
Remote connection
Your Gear and mobile device are connected via Bluetooth. When a Bluetooth connection
is not available, you can remotely connect the Gear to your mobile device by using your
Samsung account via Wi-Fi network. This allows you to continue receiving notifications from
your mobile device.
This feature is automatically activated when you connect to your mobile device via Bluetooth
for the first time.
If this feature is not turned on, launch
→
Gear connection
, and then tap the
Samsung Gear
Remote connection
on your mobile device, tap
switch.
SETTINGS
22
Page 23

Getting Started
eSIM (SM-R765F)
Introduction
Your Gear includes an eSIM, which functions as a SIM card so that you do not need a SIM card
to make calls, send messages, or use a mobile data connection with the Gear.
Install a profile and activate the eSIM. For more information, contact your service provider.
Activating the eSIM
To use the eSIM, you must download a profile and activate the eSIM. Ensure that the Gear is
able to connect to a network.
When you connect your Gear to your mobile device for the first time, follow the on-screen
instructions to activate the eSIM. If you skip the eSIM installation step, you can set it up later.
Gear
On the Watch screen, swipe downwards from the top edge of the screen to open the
1
status panel.
Tap .
2
Your mobile device will automatically launch the eSIM installation screen.
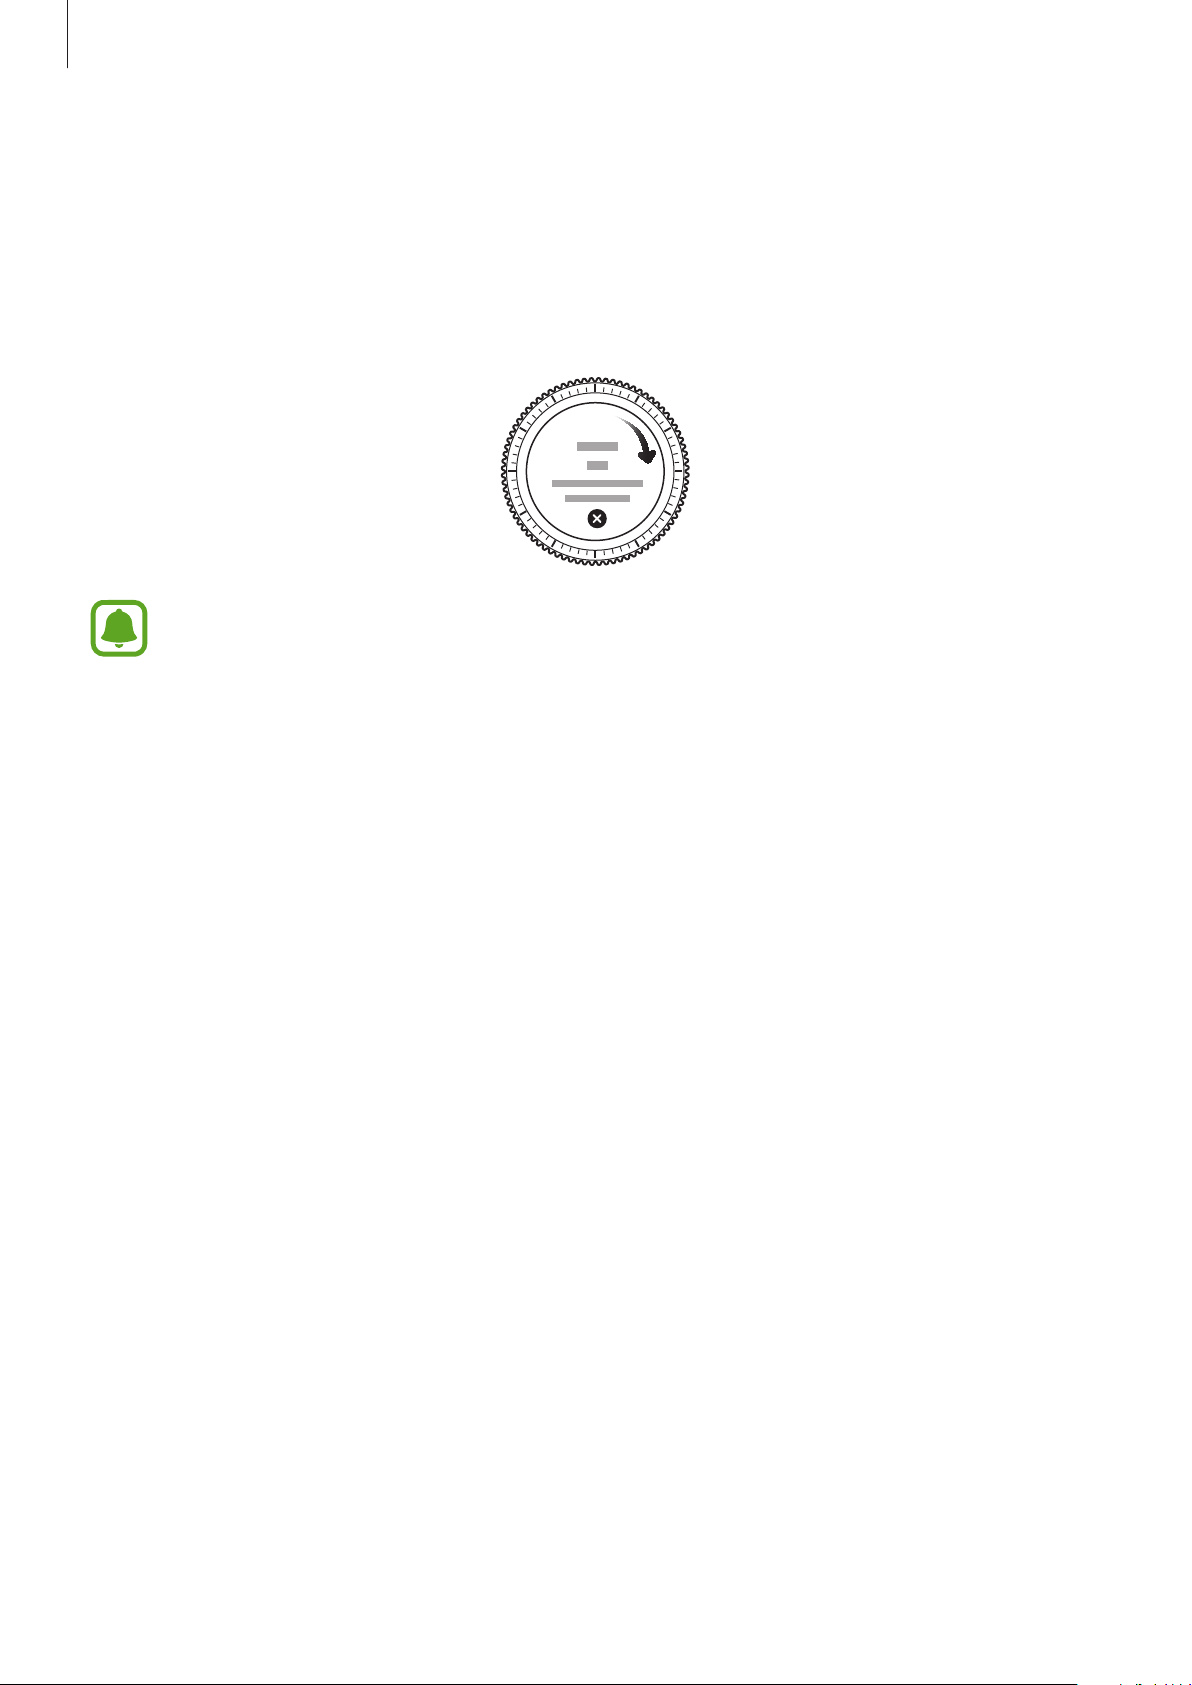
Tap
3
Mobile device
4
SCAN
Use your mobile device to scan the QR code on the eSIM voucher.
When the QR code is scanned, a profile is automatically downloaded on your device.
.
5
Tap
REGISTER
.
23
Page 24
Getting Started
Gear
Tap to activate the eSIM on your Gear.
6
You can use the mobile data connection sorely on the Gear.
Voucher card
This QR code is an example. It is not for actual use.
24
Page 25
Getting Started
Managing the eSIM
To activate or deactivate the eSIM, open the Apps screen and tap (
→
About device
To delete the eSIM, open the Apps screen and tap
→
device
profile. Before installing a new profile, you cannot use your Gear’s mobile data connection.
To add a new profile, launch
Register Gear eSIM profile
Gear eSIM profile
→
Gear eSIM profile
→
Samsung Gear
.
Delete
, and then tap .
(
Settings
. The Gear will be reset and you can download a new
on your mobile device, tap
) →
Settings
Gear info
SETTINGS
) →
→
Gear info
About
→
Using the Gear without a mobile device
You can use the Gear without connecting it to a mobile device. You can set to use the Gear
without a mobile device when you turn on the Gear for the first time or you reset it.
•
Some features are not available.
•
The setup method for using your Gear without a mobile device may vary
depending on your model.
Turn on the Gear.
1
Tap , scroll down the screen, and tap
2
Select a language.
3
Read the on-screen instructions and tap .
4
Read the terms and conditions, and then agree to them.
5
Follow the PIN setting instructions to protect your personal information.
6
Create a PIN to use when backing up and restoring data.
7
Set the date and time.
8
On the Gear, open the Apps screen, tap (
here
.
Settings
) →
Connect to phone
→ OK to
connect the Gear to a mobile device while using the Gear without a mobile device.
25
Page 26
Basics
Watch
Controlling the screen
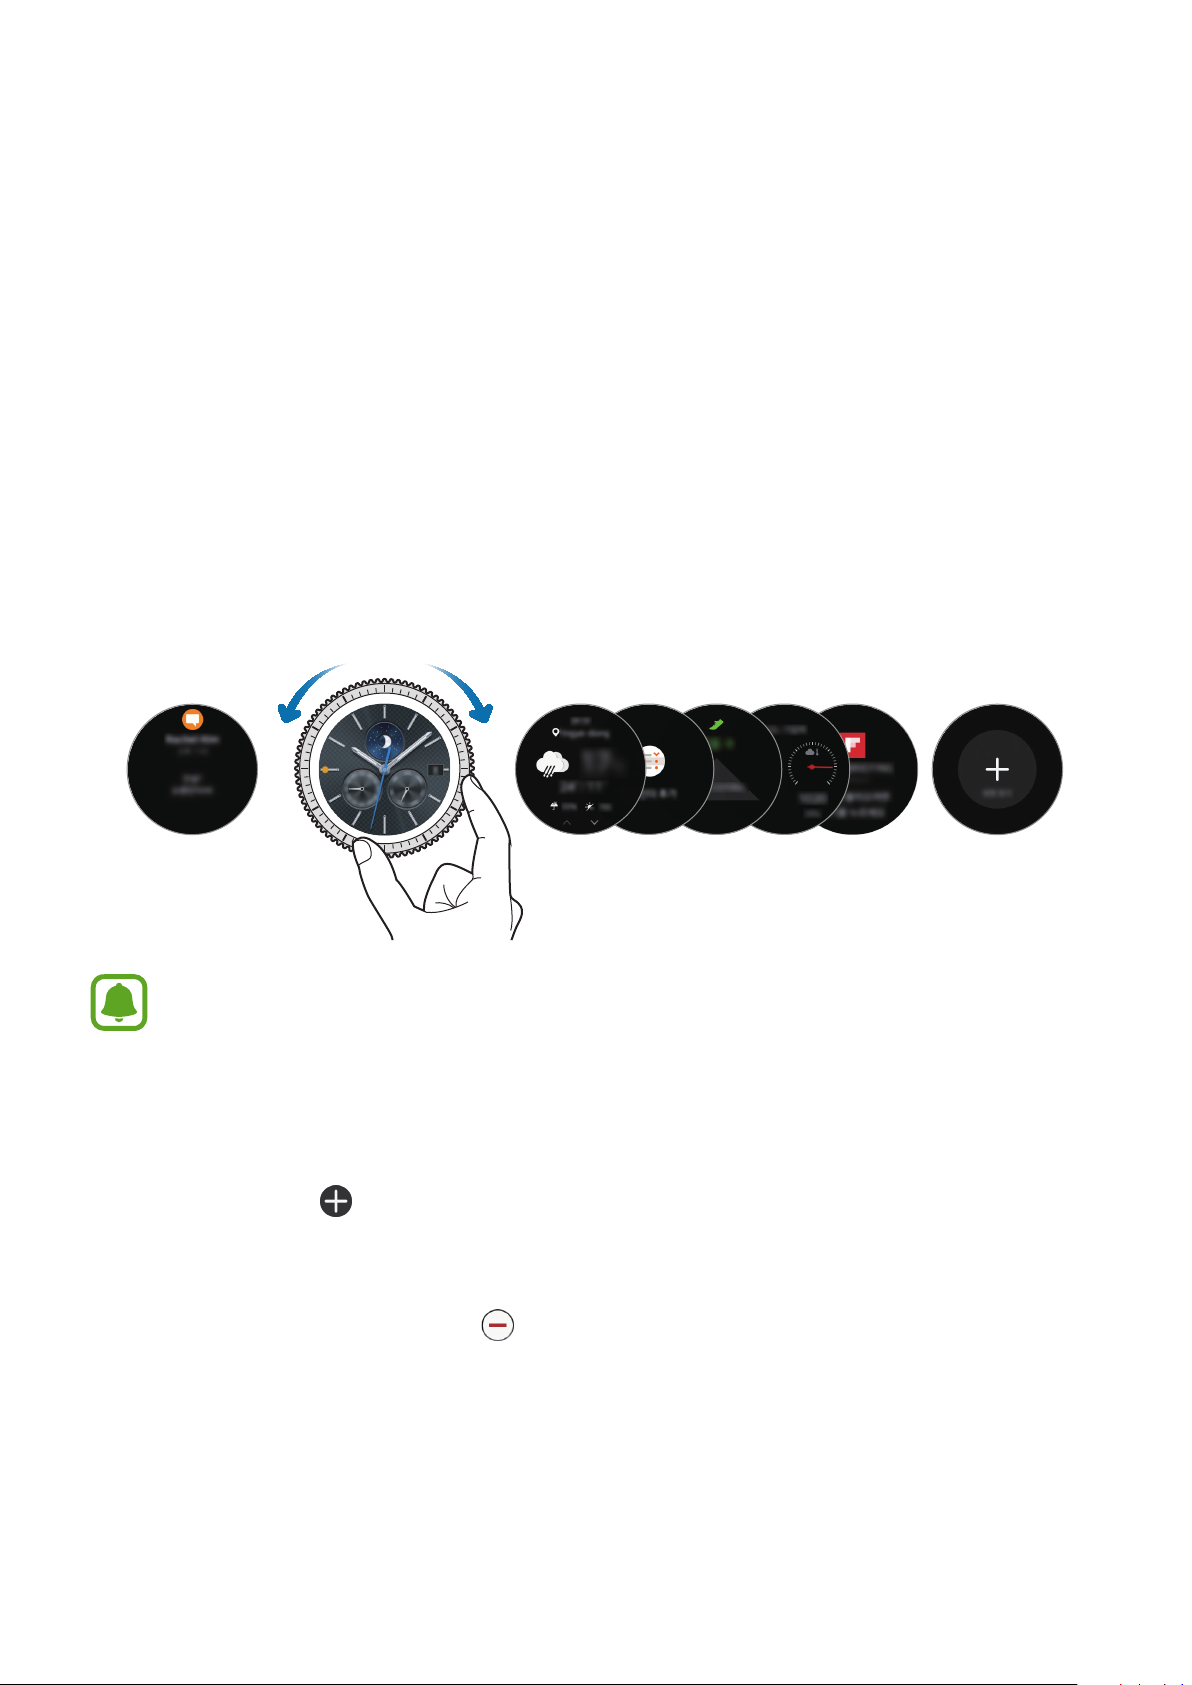
Screen composition
The Watch screen is the starting point for accessing all of the Gear’s many screens.
You can view other screens by pressing the button, rotating the bezel, or swiping your finger
on the screen.
Notifications
Available widgets, notifications, and their arrangement may vary depending on the
model and the software version.
Adding widgets
You can add more widgets on the Home screen.
Scroll the screen, tap
, and select a widget. The selected widget will appear in a new panel.
Removing widgets
Tap and hold a widget and then tap .
Widgets Add widgets.
26
Page 27
Basics
View recent apps.
Turning the screen on and off
To turn on the screen, rotate the bezel. Or, press the Home key or the Back key.
To turn off the screen, cover it with your palm. Also, the screen will turn off if the Gear is not
used for a specified period.
You can also turn on the screen using a gesture. On the Apps screen, tap
Device
→
Wake-up gesture
and then tap the
Wake-up gesture
switch to activate it.
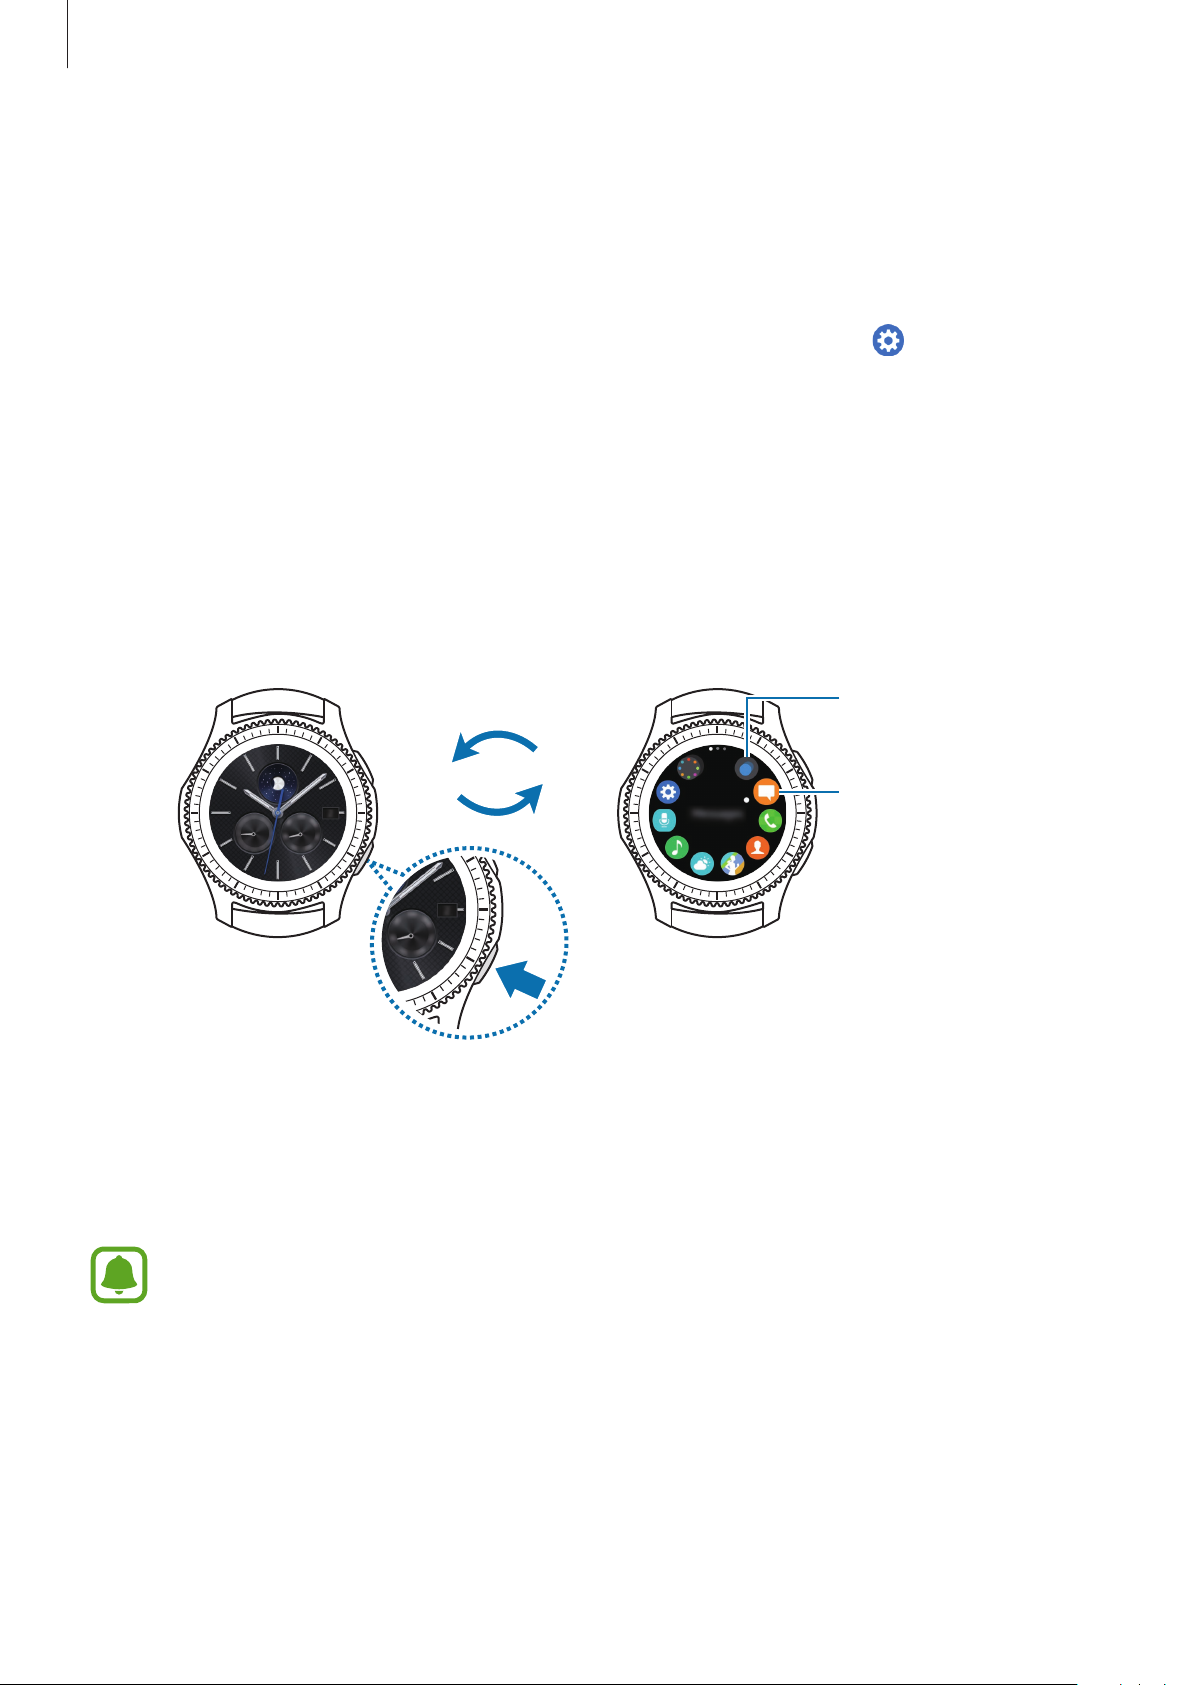
Navigating the screen
Switching between the Watch and Apps screen
To open the Apps screen, press the Home key on the Watch screen.
To return to the Watch screen, press the Home key.
An app
(
Settings
) →
Watch screen Apps screen
Apps screen
The Apps screen displays icons for all apps.
To view other panels, rotate the bezel. You can also tap or swipe the screen to the left or right.
The available apps may vary depending on the model and the software version.
27
Page 28
Basics
Opening apps
On the Apps screen, tap an app icon to open the app.
To open an app from the list of recently used apps, tap
and select the recent app window.
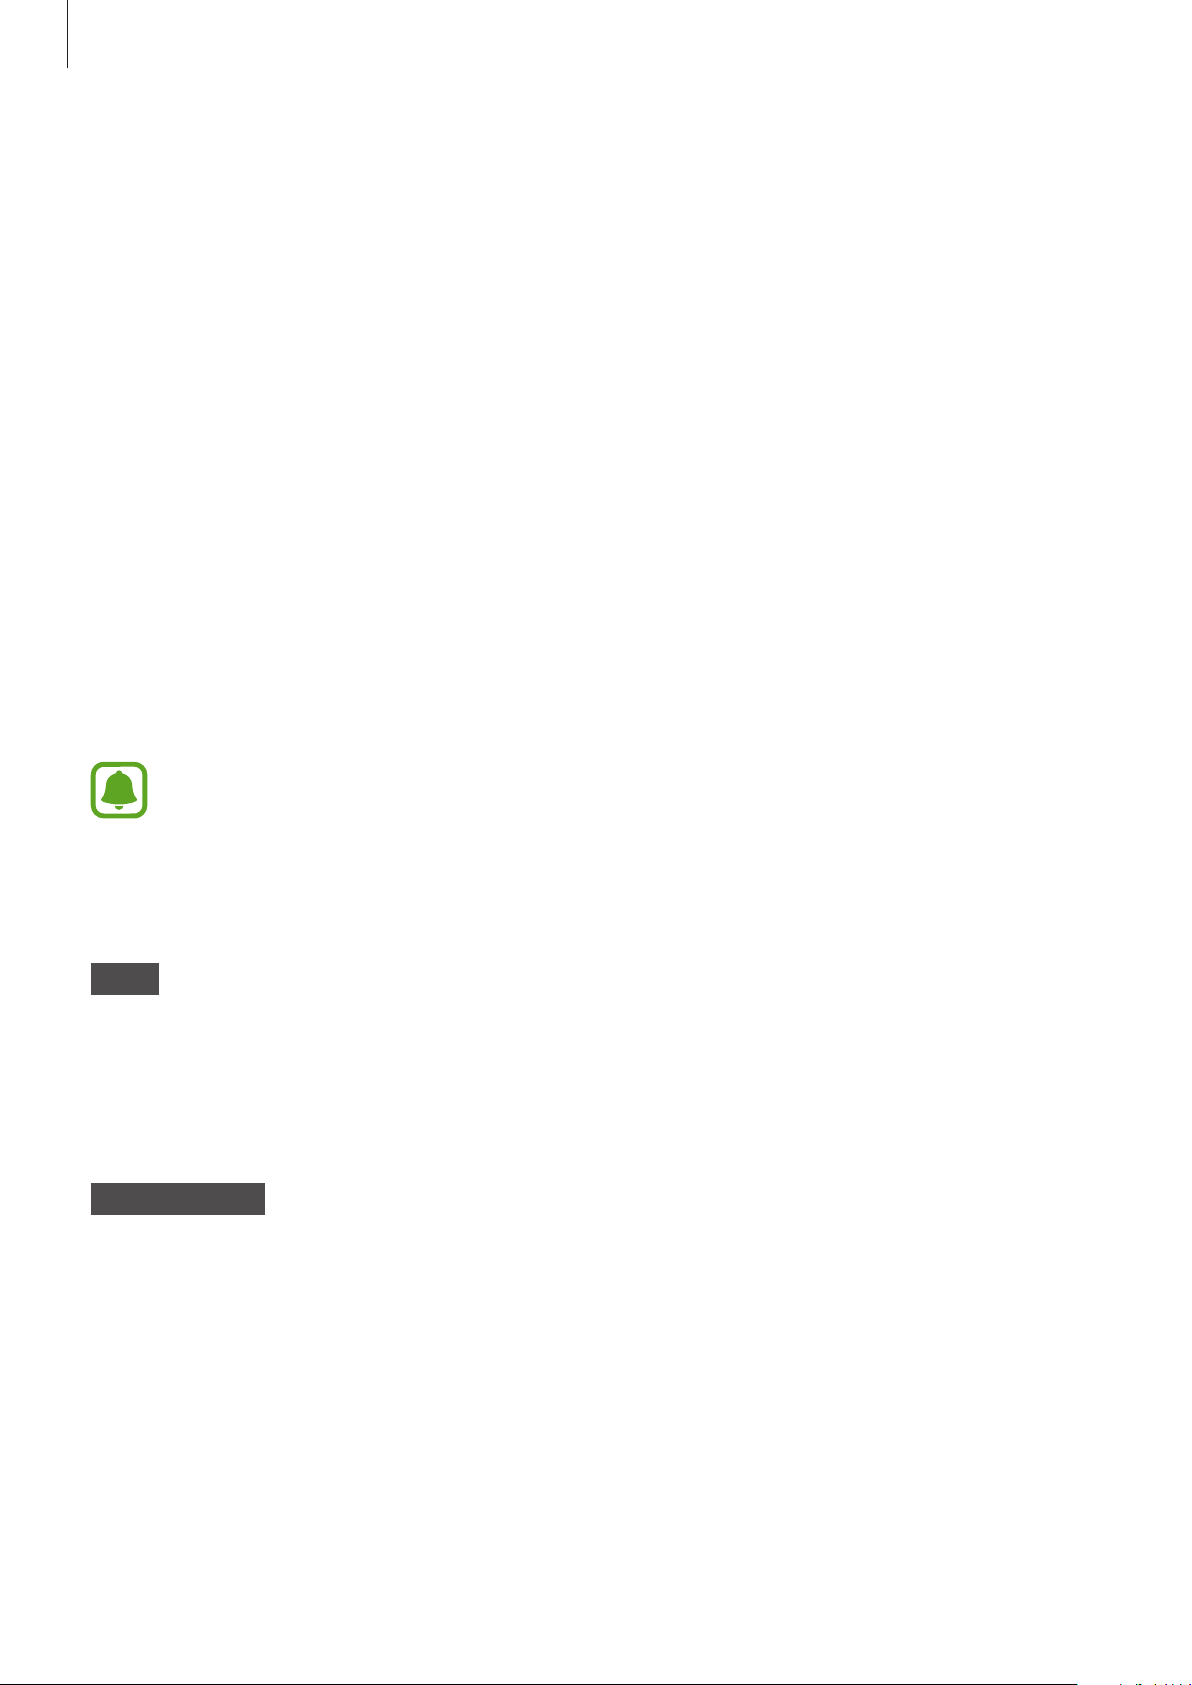
Closing apps
On the Apps screen, tap (
1
Rotate the bezel to highlight the app you want to close.
2
Tap .
3
To close all running apps, tap
Recent apps
CLOSE ALL
).
.
(
Recent apps
) on the Apps screen
Returning to the previous screen
Press the Back key. You can also swipe down from the top edge of the screen.
28
Page 29
Basics
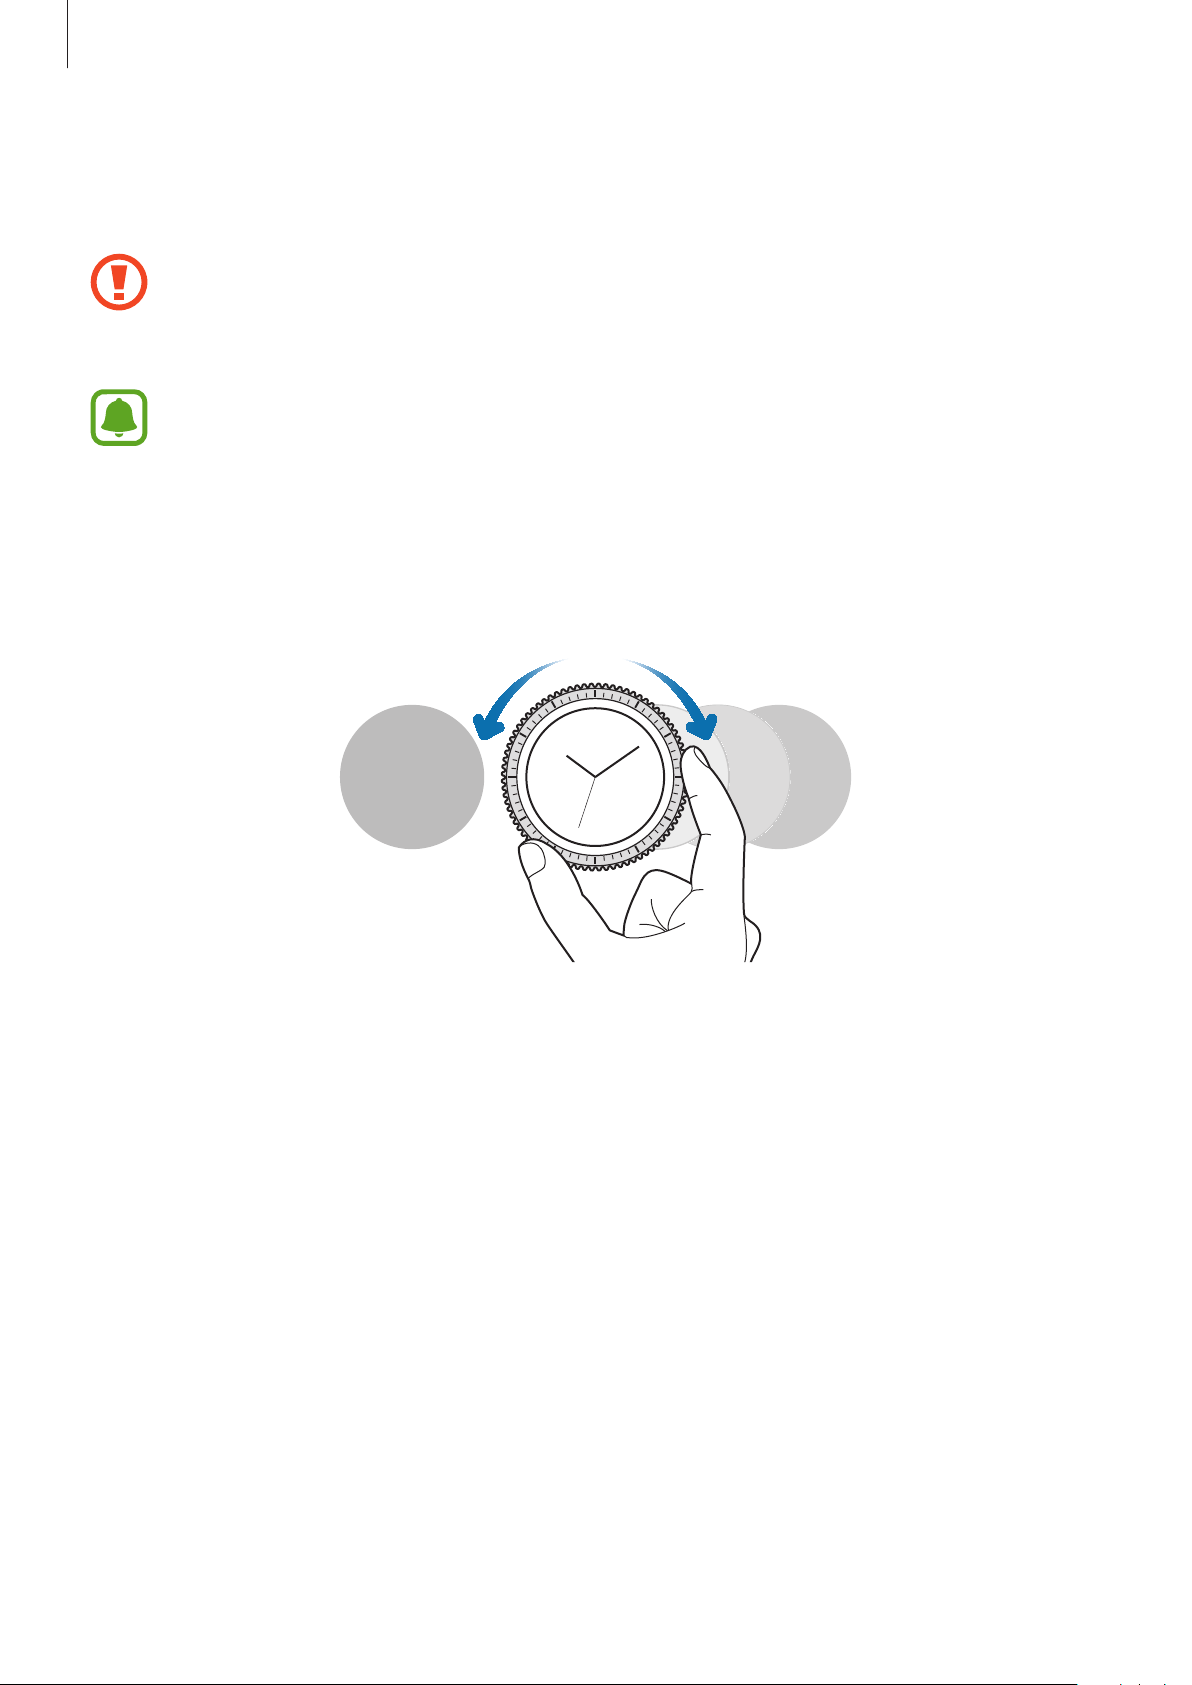
Using the bezel
Rotate the bezel to easily control the Gear’s various functions.
•
Make sure the bezel area is free from the foreign materials.
•
Do not use the bezel near magnetic fields as they may interfere with the bezel’s
internal magnets and cause it to malfunction.
If the bezel does not rotate, take it to a Samsung Service Centre. Do not disassemble
the Gear.
Scrolling through screens
Rotate the bezel to view other screens. On the Watch screen, rotate the bezel anticlockwise to
view notifications.
29
Page 30
Basics
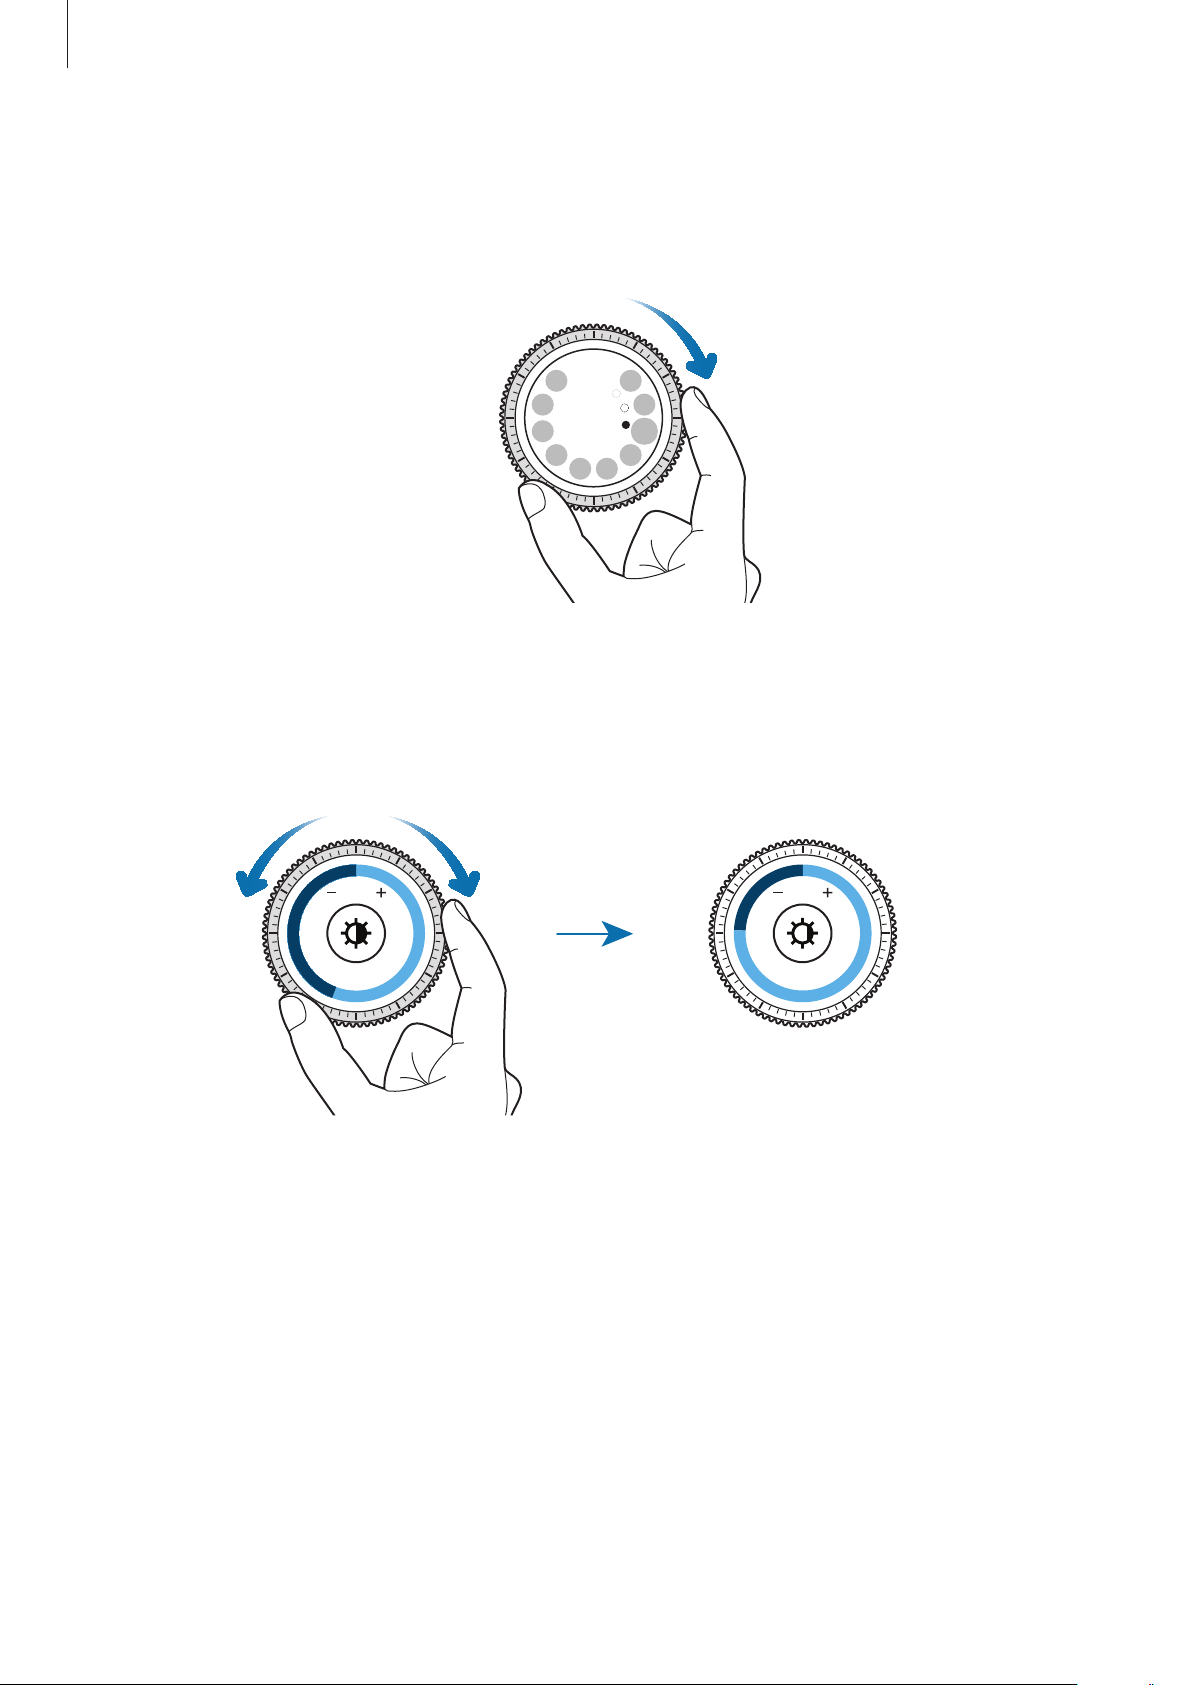
Selecting an item
Rotate the bezel to highlight the item you want to select and then tap the item. When you
rotate the bezel, the highlight indicator will move in the same direction.
Adjusting the input value
Rotate the bezel to adjust the volume or brightness. When adjusting the brightness, rotate
the bezel clockwise to make the screen brighter.
6
8
30
Page 31

Basics
Receiving or rejecting incoming calls
Rotate the bezel clockwise to receive an incoming call or to dismiss an alarm. Rotate the bezel
anticlockwise to reject an incoming call or to activate the snooze feature for an alarm.
Touchscreen
•
Do not allow the touchscreen to come into contact with other electrical devices.
Electrostatic discharges can cause the touchscreen to malfunction.
•
To avoid damaging the touchscreen, do not tap it with anything sharp or apply
excessive pressure to it with your fingertips.
The Gear may not recognise touch inputs close to the edges of the screen, which are
outside of the touch input area.
Tapping
To open an app, to select a menu item, or to press an on-screen button, tap it with your finger.
31
Page 32

Basics
Tapping and holding
Tap and hold the screen for two or more seconds to access the Edit mode or to view available
options.
Dragging
To move an item, tap and hold it and drag it to the target position.
32
Page 33

Basics
Double-tapping
Double-tap on an image or text to zoom in. Double-tap again to return.
Swiping
Swipe to the left or right to view other panels.
33
Page 34

Basics
Status panel
This panel allows you to view the current status and configure basic settings.
On the Watch screen, swipe downwards from the top edge of the screen.
Indicator icons
Gear's connection
status
Brightness
Volume
Do not disturb
Flight mode
Music Player
Indicator icons
Indicator icons appear at the top of the screen. The icons listed in the table below are most
common.
The indicator icons shown may vary depending on the region.
Icon Meaning
Bluetooth connected
Bluetooth disconnected
Signal strength
Bluetooth headset connected
HSDPA network connected
LTE network connected
Wi-Fi connected
34
Page 35

Basics
Icon Meaning
HD voice feature activated
Flight mode activated
Battery power level
Playing music
You can play music saved in the Gear or mobile device.
On the status panel, tap
.
Call forwarding
You can change the call forwarding settings.
On the status panel, tap
Refer to Forwarding calls to the Gear for more information.
.
Flight mode
You can activate or deactivate the flight mode.
On the status panel, tap
The
icon will appear at the top of the Watch screen.
.
Do not disturb mode
You can mute the Gear and set the screen not to turn on when a notification is received.
Alarms will still function normally.
On the status panel, tap
The
icon will appear at the top of the Watch screen.
.
Adjusting the volume
You can adjust the volume level for various sounds.
On the status panel, tap
and adjust the volume by rotating the bezel, or tap or .
Adjusting the brightness
You can adjust the Gear’s display brightness to suit the environment.
On the status panel, tap
and adjust the brightness by rotating the bezel, or tap or .
35
Page 36

Basics
Watch
Watch screen
View the current time. When you are not on the Watch screen, press the Home key to return
to the Watch screen.
Changing the watch face
Tap and hold the Watch screen, scroll through the list and select a watch face. You can also
customise the watch by tapping
Get more watch faces
tap
You can also change the Gear’s watch face from your mobile device. Launch
.
STYLISE
. To download more watch faces from
Samsung Gear
Galaxy Apps
,
on your mobile device and tap
Galaxy Apps
from
, tap
INFO
→
SETTINGS
VIEW MORE WATCH FACES
→
Watch faces
36
. To download more watch faces
.
Page 37

Basics
Using the Watch always on feature
You can set the Gear to display the time when the screen is turned off.
On the Apps screen, tap
activate it.
(
Settings
) →
Style
and tap the
Watch always on
switch to
Power-off watch mode
When the Gear’s battery is too low, it will ask you to activate Power-off watch mode to
conserve battery power and continue working as a watch.
In Power-off watch mode, all the functions of the Gear are turned off, and the watch will
display in power saving mode.
Notifications
Notification panel
Stay up to date with events, notifications, and messages from your mobile device and Gear.
On the Watch screen, rotate the bezel anticlockwise to open the notification panel. When
there are unchecked notifications, a yellow dot will be visible on the screen.
Notification indicator
37
Page 38

Basics
Viewing incoming notifications
When you receive a notification, information about the notification, such as its type, will
appear on the screen. Tap the notification to view details.
Access additional
options.
To view notifications received from other apps, rotate the bezel anticlockwise.
Deleting notifications
Delete a notification by swiping upwards from the bottom edge of the screen while viewing a
notification.
38
Page 39

Basics
Insert emoticons.
Sending app notifications to the Gear
Set your mobile device to send app notifications to the Gear.
Launch
1
tap the switch.
Tap
2
them on your Gear.
Samsung Gear
Manage notifications
on your mobile device and tap
SETTINGS
and tap the switch next to apps to receive notifications from
Entering text
Introduction
A text input screen will appear when you are able to enter text.
•
The screen layout may be different depending on the app you launch.
•
When the Gear is connected to a mobile device via Bluetooth, the language
settings applied on the mobile device are applied to the Gear.
→
Notifications
, and
Use speech-to-text.
Open handwriting input mode
or the keyboard.
Insert a text template.
39
Page 40

Basics
Using the voice input
Tap and speak to enter your message.
To change the language recognised, tap
•
This feature is not supported in some languages.
•
Tips for better voice recognition
–
Speak clearly.
–
Speak in quiet places.
–
Do not use offensive or slang words.
–
Avoid speaking in dialectal accents.
The Gear may not recognise your spoken message depending on your
surroundings or how you speak.
→
Input languages
.
Using emoticons
Tap and select the emoticon you want to send. To draw a picture, tap
the screen, and draw your message.
Doodle
at the top of
Rotate the bezel anticlockwise to delete the input stroke by stroke. To recover a stroke, rotate
the bezel clockwise.
40
Page 41

Basics
Using handwriting input mode or the keyboard
Tap and open handwriting mode and write on the screen.
This feature may not be available depending on the region or service provider.
Changing the input mode
Rotate the bezel to change the input mode. You can switch between handwriting mode,
character mode, number mode, punctuation mode, emoticon mode, and voice input mode.
Changing the input language
Slide the space key left or right.
To add more languages, switch to number mode, punctuation mode, or emoticon mode.
Then, tap
languages.
→
Select input languages
and select a language to add. You can use up to two
41
Page 42

Basics
Using the keyboard
Rotate the bezel to enter text using the keyboard.
•
Text entry is not supported in some languages. To enter text, you must change the
input language to one of the supported languages.
•
The keyboard layout may differ depending on the region.
Delete a preceding character.
Enter uppercase. For all caps, tap
it twice.
Enter a space.
GPS
The Gear has a GPS sensor so that you can check your real-time location information without
connecting to a mobile device. You can also use apps which require your location information
such as
in an emergency.
On the Apps screen, tap
switch to activate it.
To select a method to use for locating, scroll down the screen and select an option.
When your Gear and mobile device are connected, this feature uses your mobile device’s
location information. Activate the mobile device’s location feature to use the GPS sensor.
Alti-Barometer
GPS signal strength may decrease in locations where the signal is obstructed, such as
, and allow others to track your location by sending an SOS message
(
Settings
) →
Connections
→
Location
, and tap the
Location
between buildings or in low-lying areas, or in poor weather conditions.
42
Page 43

Basics
SOS messages
In an emergency situation, you can send an SOS message by quickly pressing the Gear’s
Home key three times. You can also set the Gear to automatically call your emergency
contacts.
Setting up SOS messages
Launch
1
and tap the switch to activate it.
Follow the on-screen instructions to add emergency contacts if you have not already
2
done so.
Samsung Gear
on your mobile device and tap
SETTINGS
→
Send SOS requests
Adding emergency contacts
Launch
Send SOS messages to
Tap
existing contact as an emergency contact.
Samsung Gear
Create contact
on your mobile device and tap
→
ADD
.
and enter the contact information or tap
SETTINGS
→
Send SOS requests
Select from Contacts
→
to add an
Activating SOS calls
Set the Gear to automatically call your emergency contact after sending an SOS message. You
can only call one of your emergency contacts.
Launch
Samsung Gear
on your mobile device and tap
SETTINGS
→
Send SOS requests
. Tap
,
Make SOS calls to
the
switch to activate it and select an emergency contact.
Setting the SOS message delay
Set the Gear to send an SOS message five seconds after you quickly press the Gear’s Home
key three times.
Launch
the
Samsung Gear
Count down before sending
on your mobile device and tap
switch to activate it.
SETTINGS
→
Send SOS requests
. Tap
43
Page 44

Basics
Sending SOS messages
In an emergency situation, quickly press the Gear’s Home key three times.
The Gear will send SOS messages to your emergency contacts. The messages will include
your current location information and a link to track your real-time location information for
60 minutes.
If the
emergency contact.
After sending an SOS message, the
right to view the result of your SOS request.
Make SOS calls to
feature is activated, the Gear will automatically call the selected
icon will display on the Watch screen. Swipe to the
Viewing my location
After sending an SOS message which includes your location information, you can view your
location on the notification panel. On the Watch screen, swipe to the right to the notification
panel and tap the screen to view your current location.
To finish sharing your location with your emergency contacts, scroll down the screen, and tap
→ .
Finding my Gear
If you misplace your Gear, use the Samsung Gear app on your mobile device to find it.
Launch
1
Tap .
2
The Gear will make a sound and the screen will turn on. Drag
on the Gear, or rotate the bezel clockwise, or tap
When your Gear is lost or stolen, you can control it remotely. Launch
your mobile device and tap
the switch to activate it.
Samsung Gear
on your mobile device and tap
on the mobile device.
SETTINGS
→
Find My Gear
SETTINGS
→
→
Find My Gear
outside the large circle
Samsung Gear
Control remotely
.
on
, and tap
44
Page 45

Applications
Messages
View messages and reply to using the Gear.
Viewing messages
You may incur additional charges for receiving messages when you are roaming.
Tap
1
Or, swipe to the right on the Watch screen when you receive a new message notification.
Scroll through the message list, and then select a contact to view your conversations.
2
To view a message on your mobile device, tap
To reply to a message, tap
(
Messages
) on the Apps screen.
and enter your message.
, rotate the bezel and tap
Show on phone
Sending messages
You may incur additional charges for receiving messages when you are roaming.
1
Tap (
Messages
Create a new message.
) on the Apps screen.
Contacts
.
Messages list
45
Page 46

Applications
Tap .
2
Or, you can choose a message recipient by tapping
contact on the messages list.
Add a recipient and tap
3
Enter text using one of available methods and tap an icon to send the message.
4
When you select a text template or an emoticon, the message will automatically be sent
to the recipients.
When you enter text by voice, you can select between text and audio for the message
format. If the message format selection screen does not appear, open the Apps screen,
(
tap
Settings
) →
NEXT
Messages
.
, and tap the
Send as audio
or selecting a contact from a
switch to activate it.
Phone
Introduction
On your Gear, directly make or receive calls. You can have phone conversations via the
internal microphone or a connected Bluetooth headset.
When your Gear is connected to a mobile network, you can make calls without being
connected to a mobile device.
Setting an outgoing number
Before making calls, you can select which device’s number to make calls from. By default,
outgoing calls are made from the mobile device’s SIM card.
On the Apps screen, tap (
1
→
networks
Always on
.
Settings
) →
Connections
→
Mobile networks
→
Mobile
46
Page 47

Applications
On the Settings screen, tap
2
•
If you set the Gear as the outgoing number for calls, the battery will drain more
quickly than normal.
•
If a Bluetooth connection between the two devices is not available, outgoing calls
will only be made from the Gear.
Receiving calls
Answering a call
When a call comes in, drag
Call
→
Outgoing number
outside the large circle. Alternatively, rotate the bezel clockwise.
→
Gear
or
Mobile device
.
If the voice control feature is activated, say “Answer” to answer the call. To activate the voice
(
control feature, open the Apps screen, tap
switch.
You can have phone conversations via the internal microphone or a connected Bluetooth
headset.
If you subscribe a call waiting, you can receive calls while you are on the phone. When you
answer the second call, you can place the current call on hold or end it.
Settings
) →
Call
and tap the
Voice answer
47
Page 48

Applications
Rejecting a call
Reject an incoming call and send a rejection message to the caller.
When a call comes in, drag
anticlockwise.
To send a message when rejecting an incoming call, swipe upwards from the bottom edge of
the screen.
If the voice control feature is activated, say “Reject” to reject the call. To activate the voice
control feature, open the Apps screen, tap
outside the large circle. Alternatively, rotate the bezel
(
Settings
) →
Call
and tap the
Voice answer
switch.
Missed calls
If a call is missed, a notification appears on the screen. On the Watch screen, rotate the bezel
(
anticlockwise to view missed call notifications. Alternatively, tap
screen to view missed calls.
Phone
) on the Apps
48
Page 49

Applications
End the current call.
Making calls
Tap (
Phone
) on the Apps screen.
Keypad
Log list
Use one of the followings methods:
•
Tap , enter a number using the keypad, and then tap .
•
Tap , search or select a contact, and then tap .
•
Scroll through the log list, select a log entry, and then tap .
Contacts
Options during calls
The following actions are available:
Adjust the volume.
Turn off the microphone so that
the other party cannot hear you.
Access additional options.
49
Page 50

Applications
Switching to a Bluetooth headset
Switch the Gear to a Bluetooth headset to continue the call on a Bluetooth headset.
Tap
→
Headset
.
Transferring calls to the mobile device
You can continue calls on the mobile device.
Tap
→
Phone
.
Opening the keypad
Tap →
Keypad
.
Forwarding calls to the Gear
When a Bluetooth connection between the two devices is not available, you cannot receive
incoming calls to your mobile device’s number on your Gear. Set the call forwarding feature
to answer the calls to the mobile device’s number on the Gear even when a Bluetooth
connection between the devices is not available.
•
This feature is only available when the Bluetooth connection between the two
devices is disconnected.
•
The method of activating this feature may differ depending on your service
provider.
•
A mobile device subscription may be required and you may incur additional
charges to access this feature depending on the service provider.
50
Page 51

Applications
<An incoming call diverted to the
Gear from the mobile device>
Tap (
1
Tap
2
Tap the
3
Enter your Gear’s phone number and tap .
4
Call
Settings
→
Enable
) on the Apps screen.
Auto call forwarding
switch to activate the feature.
.
Deactivating call forwarding
When the two devices are reconnected via Bluetooth, the call forwarding feature will be
automatically deactivated.
To manually deactivate the call forwarding feature, on the Apps screen, tap
Call
→
Auto call forwarding
→
Enable
.
(
Settings
Setting call forwarding on the mobile device
) →
When the two devices are connected remotely via your Samsung account, you can activate or
deactivate the call forwarding feature on your mobile device.
Launch
Samsung Gear
on your mobile device and tap
51
SETTINGS
→
Auto call forwarding
.
Page 52

Applications
Contacts
View your mobile device’s contacts list. You can make a call or send a message to the contact.
Tap
Use one of the following search methods:
Once a contact is selected, take one of the following actions:
(
Contacts
•
The favourites list contacts on the mobile device will display on the top of the
contacts list.
•
You can add contacts when your Gear is not connected to your mobile device.
•
Tap
Search
•
Scroll through the contacts list.
•
Rotate the bezel. When you rotate the bezel quickly, the list scrolls by the alphabet of the
first letter.
•
•
: Make a voice call.
: Compose a message.
) on the Apps screen.
and enter the search criteria.
Adding medical information to my profile
Add medical information to my profile for the rescuer to quickly see it in an emergency
situation.
On your mobile device, tap
To view your medical information, on the Apps screen tap
swipe upwards from the bottom edge of the screen.
In an emergency situation, press and hold the Gear’s Home key (Power key) and tap
Emergency medical info
You may not use this feature depending on the mobile device that you connect to the
Gear.
Contacts
.
, select your profile and enter your medical information.
(
Contacts
) → your profile and
52
Page 53

Applications
S Health
Introduction
S Health encourages you to have a healthy life by tracking your activity 24 hours a day and
letting you set goals.
When you exercise for more than 10 minutes while wearing the Gear, it will display an
encouraging message. When the Gear recognises inactivity for more than one hour, it will
notify you and show you some stretching motions to follow.
(
Tap
S Health
•
When running this app for the first time or after performing a data reset, tap
) on the Apps screen.
START
•
S Health features are intended only for leisure, well-being, and fitness purposes.
They are not intended for medical use. Before using these features, read the
instructions carefully.
•
Any information that is obtained from use of the Gear or the Fit Software or any
application preloaded within may not be suitable, accurate, complete or reliable.
.
Wearing the Gear correctly
When you activate the auto heart rate tracking feature, or when the Gear recognises your
exercise, the Gear will automatically track your heart rate. When measuring your heart rate,
wear the Gear snugly on your arm above your wrist as shown in the figure below. Do not
fasten the Gear too tightly.
<Rear>
Heart rate sensor
53
Page 54

Applications
•
The accuracy of the heart rate sensor may be diminished depending on
measurement conditions and surroundings.
•
Use the HR feature only for measuring your heart rate.
•
Do not look directly at the heart rate sensor’s lights. Doing so may impair your
vision. Make sure children do not look directly at the lights.
•
Cold ambient temperatures may affect your measurement; during winter or cold
weather, keep yourself warm when checking your heart rate.
•
Take heart rate measurements when you are seated and relaxed. Do not move your
body while taking heart rate measurements. Doing so may cause your heart rate to
be recorded inaccurately.
•
If you receive a reading that is very different from your expected heart rate, rest for
30 minutes and then measure again.
•
Smoking or consuming alcohol before taking measurements may cause your heart
rate to be different from your normal heart rate.
•
Do not talk, yawn, or breathe deeply while taking heart rate measurements. Doing
so may cause your heart rate to be recorded inaccurately.
•
Because the heart rate sensor uses light to approximate heart rate, its accuracy
may vary due to physical factors that affect light absorption and reflection, such as
blood circulation/blood pressure, skin condition and location and concentration of
blood vessels. In addition, if your heart rate is extremely high or low, measurements
may be inaccurate.
•
Users with thin wrists may receive inaccurate heart rate measurements when
the device is loose, causing the light to be reflected unevenly. If heart rate
measurement is not working properly, adjust the position of the device’s heart rate
sensor to the right, left, up, or down on your wrist, or turn the device so the heart
rate sensor sits firmly against the inside of your wrist.
•
If the heart rate sensor is dirty, wipe the sensor and try again. Obstructions
between the device’s band and your wrist, such as body hair, dirt, or other objects
may prevent the light from reflecting evenly. Please make sure you remove such
obstructions before use.
•
If your device becomes hot to the touch, remove it until it cools. Exposing skin to a
hot surface of the device for a long time may cause skin burn.
54
Page 55

Applications
24-hour Log
Based on your profile, you can view your basal metabolic rate (BMR) and activity for the day at
a glance. You can also view your activity level and calories burned.
On the widget panel, select
Tap the screen and rotate the bezel to view the details of your activity log.
24-hour Log
widget. Or, tap (
S Health
Basal metabolic rate
) on the Apps screen.
•
Healthy
than 100 steps per minute for at least 10 consecutive minutes, the Gear will encourage
you to keep going.
•
Light
inactivity.
•
Inactive
you stay active, the Gear will prompt you to move after 50 minutes of inactivity.
( ) : It indicates whether you are walking or running. If you have made more
( ) : This indicates the time spent doing light activity, but not hard exercise or
( ) : This indicates the time spent not moving for one hour or more. To help
55
Page 56

Applications
Steps
The Gear counts the number of steps you have taken and measures the distance travelled.
On the widget panel, select
the bezel clockwise, and open the steps tracker panel.
Current step total
Tap the screen to view a graph of your step count records. To view records by day, rotate the
bezel.
•
You may experience a brief delay while the steps tracker monitors your steps and
then displays your step count. You may also experience a brief delay before the
pop-up window indicates that your goal has been reached.
Steps
widget. Or, tap (
S Health
) on the Apps screen, rotate
Target
•
If you use the steps tracker while travelling by car or train, vibration may affect your
step count.
56
Page 57

Applications
Floors
Record and track how many floors you climb.
Tap (
1
Rotate the bezel clockwise and open the floors tracker panel.
2
Tap the screen to view a graph of your climbing records. To view records by day, rotate the
bezel.
S Health
Current floors total
•
One floor is calculated as approximately 3 metres. The floors measured may not
match the actual floors you climb.
) on the Apps screen.
Target
•
The floors measured may not be accurate depending on the environment, the
user’s movements, and the conditions of buildings.
•
The floors measured may not be accurate if water or foreign materials enter the
pressure relief vent (atmospheric pressure sensor). If there is any detergent, sweat,
or raindrops on the Gear, rinse it with clean water and dry the pressure relief vent
(atmospheric pressure sensor) thoroughly before use.
57
Page 58

Applications
Exercise
Record your exercise information and calories burned using S Health’s exercise feature.
•
Before using this feature, pregnant women, the elderly, and young children, users
suffering from conditions, such as chronic heart disease or high blood pressure, are
recommended to seek the advice of a licensed medical professional.
•
If you feel dizzy, experience pain, or have difficulty breathing during exercise, stop
using this feature and seek the advice of a licensed medical professional.
Be aware of following conditions before exercising in cold weather conditions:
•
Avoid using the device in cold weather. If possible, use the device indoors.
•
If you use the device outside in cold weather, cover the Gear with your sleeves before
using it.
•
If you have just purchased or have reset the Gear, read the on-screen information about
the app and create your profile.
Setting the exercise
Tap (
1
Rotate the bezel clockwise and open the exercise tracker screen.
2
Tap the screen and tap
3
Tap
4
Set the target.
5
S Health
Target
) on the Apps screen.
Activity type
to select a target type.
to select the type of exercise you want to monitor.
58
Page 59

Applications
Exercising with the Gear
Tap (
1
Rotate the bezel clockwise and open the exercise tracker screen.
2
Tap to start exercising.
3
You can view exercise information, such as calories burned and current speed, when you
rotate the bezel or tap the bottom of the screen.
To listen to music, rotate the bezel anticlockwise.
S Health
•
Tap to allow this app to use your location information while exercising. Your
location information sharing preference will be saved as the default.
•
To set your exercise again, tap the exercise tracker screen.
) on the Apps screen.
Exercise time
Heart rate
To finish exercising, press the Back key and tap
4
The music will continue to play even if you finish exercising. Stop playing music
before finish exercising. Or, launch
FINISH
(
Music Player
→ .
) to stop playing music.
Automatic exercise recognition
Once you have exercised for 10 minutes while wearing the Gear, it automatically recognises
that you are exercising and records the exercise type and duration.
When you stop exercising for more than one minute, the Gear automatically recognises that
you have stopped exercising and this feature is deactivated.
59
Page 60

Applications
•
Among the various exercise types, only walking, running, elliptical workouts,
rowing, and cycling can be measured.
•
The automatic exercise recognition feature measures the distance travelled and
calories burnt using the acceleration sensor. The measurements may not be
accurate depending on your walking and exercise routines.
Heart rate
Measure and record your heart rate.
•
The Gear’s heart rate tracker is intended for fitness and informational purposes
only and is not intended for use in the diagnosis of disease or other conditions, or
in the cure, mitigation, treatment, or prevention of disease.
•
To measure your heart rate more accurately with the Gear, wear the Gear firmly
around your lower arm just above the wrist. Refer to Wearing the Gear correctly for
details.
Be aware of following conditions before measuring your heart rate:
•
Rest for 5 minutes before taking measurements.
•
If the measurement is very different from the expected heart rate, rest for 30 minutes and
then measure it again.
•
During winter or in cold weather, keep yourself warm when measuring your heart rate.
•
Smoking or consuming alcohol before taking measurements may cause your heart rate
to be different from your normal heart rate.
•
Do not talk, yawn, or breathe deeply while taking heart rate measurements. Doing so
may cause your heart rate to be recorded inaccurately.
•
Heart rate measurements may vary depending on the measurement method and the
environment they are taken in.
•
If the heart rate sensor is not working, check the Gear’s position on your wrist and make
sure nothing is obstructing the sensor. If the heart rate sensor continues to have the same
problem, visit a Samsung Service Centre.
60
Page 61

Applications
Measuring your heart rate
Tap (
1
Rotate the bezel clockwise and open the heart rate tracker screen.
2
Tap to begin measuring your heart rate.
3
After a moment, your current heart rate will be displayed on the screen.
Tap the screen to view a graph of your records. To view records by hour, rotate the bezel.
S Health
) on the Apps screen.
Tracking your heart rate
The Gear can automatically measure and track your heart rate. Your Gear will measure your
heart rate at regular intervals. This feature may not function properly while you are moving.
Your heart rate is automatically measured when you are using the Exercise app.
To track your heart rate, rotate the bezel clockwise and open the settings screen. Then, tap
→
Auto HR
and tap the
Auto HR
switch to activate it.
61
Page 62

Applications
Water
Record and track how many glasses of water you drink.
Tap (
1
Rotate the bezel clockwise and open the water tracker screen.
2
Tap when you drink a glass of water.
3
If you accidentally added an incorrect value, you can fix it by tapping
Tap the screen to view a graph of your records. To view records by day, rotate the bezel.
S Health
) on the Apps screen.
.
Caffeine
Record and track how many cups of coffee you drink.
Tap (
1
Rotate the bezel clockwise and open the caffeine tracker screen.
2
S Health
) on the Apps screen.
62
Page 63

Applications
Tap when you drink a cup of coffee.
3
If you accidentally added an incorrect value, you can fix it by tapping
Tap the screen to view a graph of your records. To view records by day, rotate the bezel.
.
Together
Compare your step count records with other S Health users. You can set a goal, compete with
your friends, and view the challenge status.
Activate the together feature in the S Health app on your mobile device.
Tap (
1
Rotate the bezel clockwise and open the together screen.
2
S Health
) on the Apps screen.
Tap the screen to view the challenge status and the leaderboard.
63
Page 64

Applications
Additional information
•
The purpose for such data collection is limited to providing the service that you have
requested, including providing additional information to enhance your wellness, back
up/sync data, data analysis and statistics or to develop and provide better services.
(But if you sign in to your Samsung account from S Health, your data may be saved on
the server for data backup purposes.) Personal information may be stored until the
completion of such purposes. To delete any data you have shared with social networks or
transferred to storage devices, you must delete them separately.
•
You assume full responsibility for the inappropriate use of data shared on social networks
or transmitted to others. Use caution when sharing your personal data with others.
•
If the Gear is connected to a mobile device, verify the communication protocol to confirm
proper operation. If you use a wireless connection, such as Bluetooth, the Gear may be
affected by electronic interference from other devices. Avoid using the Gear near other
devices that transmit radio waves.
•
The content used in the S Health app may vary depending on the software version of
the app. The services provided with the app are subject to change or the cancellation of
support without prior notice.
•
Available S Health functions and services may vary depending on the local laws and
regulations in your region.
•
Some functions of S Health may not be provided depending on your region.
•
S Health functions are intended for fitness and informational purposes only and is not
intended for use in the diagnosis of disease or other conditions, or in the cure, mitigation,
treatment, or prevention of disease.
•
Measured distance may differ from the actual distance due to uneven strides,
walking in place, and pacing around.
•
Only records from the past thirty days are saved. You can view previous data on the
mobile device where the S Health app is installed.
64
Page 65

Applications
Calibrate
Alti-Barometer
Measure the altitude and atmospheric pressure of your current location using the internal
atmospheric sensor.
On the Apps screen, tap
(
Alti-Barometer
Altimeter Barometer
). To view the barometer, swipe to the left.
Measuring your altitude
Measure your current altitude and view a graph of changes over the last 6 hours.
On the Apps screen, tap
(
Alti-Barometer
).
•
If you have recently purchased or reset the Gear, tap GO to activate the Gear’s GPS
feature.
•
The altitude measured may not be accurate if water or foreign materials enter the
pressure relief vent (atmospheric pressure sensor). If there is any detergent, sweat,
or raindrops on the Gear, rinse it with clean water and dry the pressure relief vent
(atmospheric pressure sensor) thoroughly before use.
Current altitude
Change in altitude
Time of last calibration
65
Page 66

Applications
Manually calibrating the altitude
You can manually calibrate the measured altitude.
Swipe to the left to open the settings screen.
1
Tap
2
3
4
CHANGE >
Tap
Manual calibration
Tap
Altitude
The altitude is calibrated based on the entered reference value.
.
and tap the
and set the reference value.
Manual calibration
Measuring the atmospheric pressure
switch to activate it.
Measure the current atmospheric pressure and view a graph of changes over the last 6 hours.
You can anticipate any changes to the weather using the pressure prediction gauge.
On the Apps screen, tap (
1
Swipe to the left to open the barometer screen.
2
The atmospheric pressure measured may not be accurate if water or foreign materials
enter the pressure relief vent (atmospheric pressure sensor). If there is any detergent,
sweat, or raindrops on the Gear, rinse it with clean water and dry the pressure relief
vent (atmospheric pressure sensor) thoroughly before use.
Changes in atmospheric
pressure
Alti-Barometer
).
Current atmospheric pressure
66
Pressure prediction
Page 67

Applications
Manually calibrating the atmospheric pressure
You can manually calibrate the measured atmospheric pressure.
Swipe to the left to open the settings screen.
1
Tap
2
3
4
CHANGE >
Tap
Manual calibration
Tap
Sea level pressure
The atmospheric pressure is calibrated based on the entered reference value.
.
and tap the
and set the reference value.
Manual calibration
switch to activate it.
Configuring the alti-barometer
Scroll the screen to open the settings screen and tap
•
Manual calibration
entered reference value.
•
Pressure alerts
•
Distance unit
•
Pressure unit
•
Help
: View information about using the alti-barometer.
: Change the height unit.
: Change the pressure unit.
: Calibrate the altimeter and the atmospheric pressure based on the
: Set to notify you of rapid changes of atmospheric pressure.
CHANGE >
to use the following options.
67
Page 68

Applications
Pause and resume playback.
Music Player
Introduction
Listen to music saved in the Gear and in the mobile device.
Playing music
Tap (
To open the playlist, swipe upwards from the bottom edge of the screen.
Music Player
Adjust the volume.
Restart the currently playing file
or skip to the previous file. Tap
and hold to move backwards
) on the Apps screen.
quickly.
Change the device used to play
music.
Skip to the next file. Tap and
hold to move forwards quickly.
Importing music
Import music saved in your device to your Gear.
Launch
1
Tap
2
Tap
3
Select files and tap
4
To sync music in your mobile device with your Gear, tap the
The music in your mobile device will be synced with your Gear when it is charging and when
it has more than 15 % of remaining battery power.
Samsung Gear
SETTINGS
Select tracks
→
on your mobile device.
Send content to Gear
.
DONE
.
.
68
Auto sync
switch under
Music
.
Page 69

Applications
Playing music on the Gear
Play music saved in your Gear via the internal speaker. You can also play music via a
connected Bluetooth headset.
Tap (
1
Tap to play the music saved in your Gear.
2
The icon will be changed to
Tap .
3
Music Player
).
.
Playing music via a Bluetooth headset
You can listen to music saved in the Gear via a Bluetooth headset.
Tap
, rotate the bezel, and tap
Listen via BT
. Select a headset from the detected devices list.
Playing music from your mobile device
Play music saved on your mobile device and control it with your Gear.
1
Tap (
Music Player
).
Tap to play the music saved in your mobile device.
2
The icon will be changed to
Tap .
3
.
Standalone music
Listen to music or radio using the Gear by itself. You must download music or a radio
streaming app on the Gear.
On the Apps screen, tap
music or a radio streaming app in
(
Get more apps
Galaxy Apps
) →
Show on phone
.
. Browse and download
69
Page 70

Applications
Reminders
Add reminders for events such as buying tickets, going to the laundromat, or taking
medicine, without using your calendar app. You can set alarms to receive reminders at
specified times.
Creating a reminder
On the Apps screen, tap (
1
Tap
2
3
4
5
Create reminder
If you have a saved reminder, tap
Speak to create a reminder. When you are finished, tap
Or, tap
To set an alarm, tap
DONE
Tap
KEYBOARD >
.
SAVE
.
.
to enter text and tap
SET TIME >
Reminders
Create
, set the alarm time by rotating the bezel, and then tap
).
on the list.
Done
.
DONE
.
Viewing the reminder alarm
When an alarm sounds, tap the notification to view the reminder details.
You can also rotate the bezel anticlockwise on the Watch screen to view reminders.
•
To delete a reminder or to use the snooze function, tap .
•
You can view all your reminders, including deleted reminders, in the
app.
Reminders
Completing or deleting the reminder
When you have finished your task, you can set the reminder as completed or delete it.
On the reminder’s details, tap
To delete it, tap
, rotate the bezel, and tap
to complete it.
Delete
.
70
Page 71

Applications
Schedule
View the events scheduled on the mobile device.
Tap (
1
Tap anywhere on the monthly calendar.
2
The current day’s events list will be shown.
To view upcoming events, rotate the bezel to clockwise.
3
Schedule
) on the Apps screen.
S Voice
Introduction
Perform various tasks simply by speaking.
Make sure the Gear’s microphone is not obstructed when you are speaking into it.
Setting a wake-up command
You can launch (
feature when your Gear’s screen is turned on.
To change the wake-up command, tap
S Voice
) using your own wake-up command. You can only use this
, rotate the bezel and tap
Set wake-up command
.
71
Page 72

Applications
Using S Voice
Say the preset wake-up command. Alternatively, tap
1
(
When
This app may not be available depending on the region or service provider.
Say a voice command.
2
S Voice
View examples of voice
) is launched, the Gear begins voice recognition.
commands.
S Voice
S Voice settings
on the Apps screen.
If the Gear recognises the command, the Gear will perform the corresponding action.
To repeat a voice command or say a different command, tap
.
Tips for better voice recognition
•
Speak clearly.
•
Speak in quiet places.
•
Do not use offensive or slang words.
•
Avoid speaking in dialectal accents.
The Gear may not recognise your commands or may perform unwanted commands
depending on your surroundings or how you speak.
72
Page 73

Applications
Setting the language
On the Apps screen, tap (
language.
The selected language is applied to
the Gear.
S Voice
) → , rotate the bezel, tap
S Voice
only, not to the language displayed on
Language
, and then select a
Weather
View weather information on the Gear for locations set on the mobile device when the
devices are connected.
Tap
To view the current day’s weather information, tap the screen and rotate the bezel.
To add other cities’ weather information, rotate the bezel clockwise.
(
Weather
) on the Apps screen.
Alarm
Set alarms and manage them. When an alarm is set on your connected mobile device, your
Gear will also alert you.
Setting alarms
Tap (
1
Tap
2
If you have a saved alarm, tap
Set the alarm time by rotating the bezel and tap
3
Select the days for the alarm to repeat and tap
4
Alarm
Add alarm
) on the Apps screen.
.
Add
on the alarms list.
NEXT
NEXT
.
.
73
Page 74

Applications
Select an alarm notification type and tap
5
The saved alarm is added to the alarms list.
On the alarms list, tap
to activate the alarm or tap to deactivate the alarm.
SAVE
.
Stopping alarms
Drag outside the large circle to stop an alarm. Alternatively, rotate the bezel clockwise.
If you want to use the snooze function, drag
after 5 minutes. Alternatively, rotate the bezel anticlockwise.
outside the large circle to repeat the alarm
Deleting alarms
In the alarms list, tap and hold and alarm, and then tap
DELETE
.
World Clock
Creating clocks
Tap (
1
Tap
2
If you have a saved world clock, tap
Rotate the bezel to select a time zone on the globe.
3
You can also tap
Tap the city name representing the selected time zone.
4
Rotate the bezel to the city you want and tap it.
5
World Clock
Add city
.
ALL CITIES >
) on the Apps screen.
Add
on the clocks list.
and search for a city or select a city from the list.
Deleting clocks
On the clocks list, tap and hold a clock, and then tap
DELETE
.
74
Page 75

Applications
Gallery
Importing and exporting images
Importing images from your mobile device
Launch
1
Tap
2
Tap
3
Select files and tap
4
To sync images in your mobile device with your Gear, tap the
Albums to sync
tap
be synced with your Gear when it is charging and when it has more than 15 % of remaining
battery power.
Samsung Gear
SETTINGS
Select photos
→
, and then select albums to import to the Gear. The selected albums will
on your mobile device.
Send content to Gear
.
DONE
.
.
Auto sync
switch under
Photo
Exporting images to your mobile device
1
Tap (
Gallery
) on the Apps screen.
,
Tap an image.
2
Tap and hold the image to export.
3
Rotate the bezel and select any images to export.
4
Tap →
5
You can view the exported images in Gallery app on your mobile device.
Send to phone
.
75
Page 76

Applications
Viewing images
Tap (
1
Rotate the bezel to scroll through the image list and select an image.
2
Zooming in or out
While viewing an image, double-tap the image to zoom in or out.
When an image is magnified, you can view the rest of the image by scrolling around the
screen.
Gallery
) on the Apps screen.
Deleting images
Tap (
1
Tap an image.
2
Tap and hold an image to delete.
3
Gallery
) on the Apps screen.
Rotate the bezel and select any images you want to delete.
4
Tap
5
DELETE
→ .
76
Page 77

Applications
News Briefing
View the latest articles in various categories. You can catch up on news categories that
interest you.
Tap (
1
Rotate the bezel to select an article from a specific category.
2
To edit categories, tap
Tap an article to read it.
3
To read the full article, tap
News Briefing
) on the Apps screen.
, rotate the bezel, tap
and read it on your mobile device.
Select topic
, and then tick categories.
Find My Phone
If you misplace the mobile device, the Gear can help you find it.
1
2
Tap (
Tap .
Find My Phone
) on the Apps screen.
The mobile device emits sounds and turns on the screen.
Drag
outside the large circle on the mobile device, or tap on the Gear.
Viewing the location of your mobile device
Tap , rotate the bezel, and tap
The Gear will display your mobile device’s location.
Locate phone
.
77
Page 78

Applications
View emails received on the mobile device and reply to them.
Reading emails
On the Apps screen, tap (
1
Select an email to open the email screen.
2
To view an email on the mobile device, tap
To reply to a message, tap
You may not be able to reply emails depending on the mobile device that you
connect to the Gear.
Email
and enter your message.
).
, rotate the bezel, and tap
Show on phone
Get more apps
Download specialised apps on your Gear, not through the connected mobile device.
On the Apps screen, tap
download.
Tap
Show on phone
to launch
(
Get more apps
Galaxy Apps
). Scroll through the list and select an app to
on your mobile device. Then, browse and select
.
an app to download.
78
Page 79

Applications
Settings
Introduction
Customise settings for functions and apps. You can make your Gear more personalised by
configuring various setting options.
Tap
(
Settings
) on the Apps screen.
Style
Customise the watch face and the Apps screen.
On the Settings screen, tap
•
Watch faces
and download more watch faces from
•
Watch always on
This feature only works while you are wearing the Gear.
•
Notification indicator
you to notifications that you have not checked.
•
Background style
•
Font
: Change the font type and size.
: Select a watch type. You can also select items to display on the watch face
: Set the Gear to display a watch when the screen is turned off.
Style
.
Galaxy Apps
: Set the Gear to display a yellow dot on the Watch screen to alert
: Change the Apps screen’s wallpaper.
.
Sounds and vibration
Change settings for various sounds.
On the Settings screen, tap
•
Sound mode
•
Vibrate with sound
notifications.
•
Volume
•
Vibration intensity
: Set the Gear to use sound mode or silent mode.
: Adjust the volume level for various sounds.
Sounds and vibration
: Set the Gear to vibrate and play a ringtone for incoming calls and
: Adjust the force of the vibration notification.
.
79
Page 80

Applications
•
Long buzz
•
Ringtones
•
Ringtone vibration
•
Notification sound
•
Notification vibration
•
Touch sounds
touchscreen.
: Set the Gear to vibrate longer for incoming calls and notifications.
: Change the ringtone.
: Select a vibration pattern for incoming calls.
: Change the notification ringtone.
: Select a vibration pattern for notifications.
: Set the Gear to make a sound when apps or options are selected on the
Device
Change the Gear’s interaction settings.
On the Settings screen, tap
•
Double press Home key
key twice.
•
Wake-up gesture
wearing the Gear.
: Set the Gear to turn on the screen when you raise your wrist that is
Device
.
: Select an action to perform when you press the Gear’s Home
80
Page 81

Applications
•
Touch sensitivity
•
Do not disturb
•
Auto open apps
•
Date and time
device.
•
Language
The
connected to your mobile device.
: Select the Gear’s display language.
Date and time
: Set the Gear to allow use of the touch screen with gloves on.
: Set the device to mute incoming calls and notification sounds.
: Set the Gear to automatically open an app when it is highlighted.
: Set the Gear’s date and time when it is not connected to the mobile
Display
Change the display settings.
and
Language
options are available when your Gear is not
On the Settings screen, tap
•
Brightness
•
Auto low brightness
the ambient light conditions.
•
Screen timeout
backlight.
: Adjust the brightness for the display.
: Set the length of time the Gear waits before turning off the display’s
Display
: Set the Gear to automatically adjust the brightness depending on
Call
Change the call feature settings.
On the Settings screen, tap
•
Auto call forwarding
The activation method for this feature may differ depending on your service provider.
•
Outgoing number
Call
: Set to forward the mobile device’s incoming calls to the Gear.
: View the outgoing call resource.
.
.
•
Voice answer
•
Show my caller ID
calls.
: Set the Gear to answer or reject calls using voice commands.
: Set whether to display your caller ID to other parties for outgoing
81
Page 82

Applications
•
Voicemail
•
Block list
The
device.
: Access the voice mail service.
: Reject calls from specified phone numbers.
Outgoing number
option is available when the Gear is connected to a mobile
Messages
Change the message feature settings.
On the Settings screen, tap
•
Send as audio
•
Block list
: Set the Gear to send a voice message as an audio file.
: View blocked numbers or messages.
Messages
.
Connections
Bluetooth
Connect to a mobile device via Bluetooth. You can also connect a Bluetooth headset to your
Gear.
•
Samsung is not responsible for the loss, interception, or misuse of data sent or
received via Bluetooth.
•
Always ensure that you share and receive data with devices that are trusted
and properly secured. If there are obstacles between the devices, the operating
distance may be reduced.
•
Some devices, especially those that are not tested or approved by the Bluetooth
SIG, may be incompatible with your device.
•
Do not use the Bluetooth feature for illegal purposes (for example, pirating copies
of files or illegally tapping communications for commercial purposes).
Samsung is not responsible for the repercussion of illegal use of the Bluetooth
feature.
On the Settings screen, tap
•
Bluetooth
•
BT headset
: Turn the Bluetooth feature on or off.
: Search for Bluetooth headsets and connect them to the Gear.
Connections
→
Bluetooth
82
.
Page 83

Applications
Mobile networks
Customise settings to control networks.
On the Settings screen, tap
•
Mobile networks
–
Auto on/off
network depending on the Gear’s connection to the mobile device via Bluetooth.
•
When the Gear is connected to the mobile device via Bluetooth, the Gear’s mobile
network is turned off to save battery power. Then, the Gear will not receive
messages and calls made to the Gear’s phone number.
•
The Gear’s mobile network is automatically turned on after a moment when no
Bluetooth connection is detected. Then, you can receive messages and calls made
to the Gear’s phone number.
–
Always on
When this option enabled, you can receive incoming calls and messages to the Gear
and mobile devices’ phone numbers.
When you enable the
:
: Set the Gear to automatically connect to or disconnect from the mobile
: Set the Gear to connect to the mobile network.
Connections
Always on
→
Mobile networks
option, the Gear’s battery consumption may
.
increase.
–
Always off
When this option is enabled, you cannot receive incoming calls and messages to the
Gear’s phone number. If the Gear is connected to the mobile device via Bluetooth, you
can receive incoming calls or notifications from the mobile device.
•
Mobile data
•
Data roaming
•
Network mode
•
Network operators
•
Access Point Names
: Set the Gear not to connect to the mobile network.
: Set the Gear to use data connections on any mobile network.
: Set the Gear to use data connections when you are roaming.
: Select a network type.
: Search for available networks and manually register a network.
: Set up access point names (APNs).
83
Page 84

Applications
Wi-Fi
Activate the Wi-Fi feature to connect to a Wi-Fi network.
This feature is available when the Gear is not connected to the mobile device via Bluetooth.
On the Settings screen, tap
1
it.
Select a network from the Wi-Fi networks list.
2
Networks that require a password appear with a lock icon.
Tap
3
CONNECT
•
Once the Gear connects to a Wi-Fi network, the Gear will reconnect to that
network each time it is available without requiring a password. To prevent the Gear
connecting to the network automatically, select it from the list of networks and tap
FORGET
•
If you cannot connect to a Wi-Fi network properly, restart your device’s Wi-Fi feature
or the wireless router.
•
Turn off Wi-Fi to save the battery when not in use.
.
.
Connections
→
Wi-Fi
, and then tap
Wi-Fi
switch to activate
NFC
The Gear allows you to make payments and buy tickets for transportation or events after
downloading the required apps.
On the Settings screen, tap
The Gear contains a built-in NFC antenna. Handle the Gear carefully to avoid
damaging the NFC antenna.
•
NFC
: Activate the NFC feature to link your Gear to your credit or debit card.
•
Tap and pay
This feature may not be available depending on the region or service provider.
: Set the default payment app for mobile payments.
Connections
→
NFC
.
84
Page 85

Applications
Making payments with the NFC feature
Before you can use the NFC feature to make payments, you must register for the mobile
payment service. To register or get more information about the service, contact your service
provider.
On the Settings screen, tap
1
it.
Touch the NFC antenna area at the top of the Gear’s touchscreen to the NFC card reader.
2
To set the default payment app, open the settings screen and tap
Tap and pay
, and then select an app.
The payment services list may not include all available payment apps.
Connections
→
NFC
and then tap the
NFC
switch to activate
Connections
→
NFC
→
NFC antenna
85
Page 86

Applications
Alerts
Set the Gear to vibrate when it is disconnected from your mobile device.
On the Settings screen, tap
Connections
→
Alerts
.
Flight mode
This disables all wireless functions on your device. You can use only non-network services.
On the Settings screen, tap
Make sure the device is turned off during takeoff and landing. After takeoff, you can
use the device in flight mode if allowed by aircraft personnel.
Connections
→
Flight mode
.
Data usage
Keep track of your data usage amount and customise the settings for the limitation.
On the Settings screen, tap
•
Mobile data
•
Data usage limit
•
Data usage cycle
: Set the Gear to use data connections on any mobile network.
: Set a limit for mobile data usage.
Connections
: Set a data reset cycle to monitor data usage between usage periods.
→
Data usage
.
•
Start date
•
Usage details
: Set the start date of the data usage cycle.
: View your total data usage for the current cycle.
Location
Set the Gear to allow apps to use your current location information.
On the Settings screen, tap
Tap the
Location
switch to activate it and then select a method to collect your location data.
Connections
→
Location
.
86
Page 87

Applications
Security
Change the settings for securing the Gear.
On the Settings screen, tap
•
Screen lock
is activated, the Gear prevents others from accessing the personal information saved in
your Gear.
: Activate or deactivate the screen lock feature. When the screen lock feature
Security
.
Accessibility
Configure various settings to improve accessibility to the Gear.
On the Settings screen, tap
•
Vision
•
Hearing
impairment.
•
Direct access
three times with two fingers.
: Customise the settings to improve accessibility for visually impaired users.
: Customise the settings to improve accessibility for users with hearing
: Set the Gear to activate the screen reader feature when you tap the screen
Accessibility
.
Input
Change the text input settings.
On the Settings screen, tap
•
Default keyboard
•
Keyboard settings
Input
: Select a default keyboard type for text input.
: Change the Samsung keyboard settings.
.
Power saving
Activate power saving mode to save battery power by limiting the Gear’s functions.
On the Settings screen, tap
Power saving
.
87
Page 88

Applications
Gear info
View the Gear’s information.
On the Settings screen, tap
•
Update Gear software
•
Auto update apps
•
About device
•
Report diagnostic and usage info
diagnostic and usage information to Samsung.
•
Reset Gear
•
Debugging
The
Update Gear software
Gear is not connected to your mobile device.
: Access information about the Gear.
: Reset settings to the factory default values and delete all data.
: Activate or deactivate debugging mode when developing apps for the Gear.
Gear info
: Update your Gear to the latest software.
: Change the auto update settings for apps on your Gear.
.
: Set the Gear to automatically send the device’s
and
Auto update apps
options are available when your
Connect to new phone
Connect your Gear to a new mobile device. The Gear can connect to another mobile device
after performing a light reset to delete data except media files and personal data.
On the Settings screen, tap
This feature is available when the Gear is connected to a mobile device.
Connect to new phone
.
Connect to phone
Connect to a mobile device while you are using the Gear by itself. You can select whether to
restore the Gear’s data that is saved on the mobile device.
On the Settings screen, tap
•
•
: Connect your Gear to a mobile device and sync your health information, setting
values, and contacts information saved in the Gear.
: Connect your Gear to a mobile device after resetting all the data saved in the Gear.
This feature is available when your Gear is not connected to your mobile device.
Connect to phone
→ OK.
88
Page 89

Applications
Updating the Gear
The Gear can be updated to the latest software.
Updating via the Gear
The Gear can be updated without connecting it to your mobile device.
On your Gear, open the Apps screen, tap
software
.
This feature is available when your Gear is not connected to your mobile device.
(
Settings
) →
Gear info
→
Update Gear
Updating software via the Samsung Gear app
The Gear can be directly updated to the latest software by the firmware over-the-air (FOTA)
service.
Launch
1
Tap
2
manually
Read the on-screen information and tap
3
Samsung Gear
SETTINGS
.
→
About Gear
on your mobile device.
→
Update Gear software
DOWNLOAD
→
Download updates
.
The Gear will copy the updated software from your mobile device and restart.
To automatically check for available updates, tap the
automatically
device is connected to a Wi-Fi network.
switch to activate it. Updates will be downloaded only when the
Download updates
89
Page 90

Samsung Gear app
Access
INFO SETTINGS
Introduction
To connect your Gear to a mobile device, you must install the Samsung Gear app on your
mobile device. You can check the Gear’s status and download recommended watch faces and
apps. You can also customise your Gear’s various settings, such as your notification settings.
Launch
Samsung Gear
Some features may not be available depending on the type of connected mobile
device.
additional
options.
Gear's status
Recommended
watch faces
and apps
on your mobile device.
Customise your
Gear settings.
90
Page 91

Samsung Gear app
Tap to use the following options:
•
Disconnect
•
Connect new Gear
: Disconnect your Gear from the currently connected mobile device.
: Disconnect your Gear from the currently connected mobile device
and connect a new Gear. Tap
connected Gear, select one from the
•
Auto switch device
and automatically connect to it when you wear it.
•
Help
: Ask questions or view frequently asked questions.
•
User manual
•
Contact us: Samsung Members
problem diagnosis, and lets users submit questions and error reports. You can also share
information with others in the Galaxy users’ community or view the latest Galaxy news
and tips.
while using your device.
This feature may not be available depending on the region or service provider.
: View the user manual to learn how to use your Gear.
Samsung Members
: Set your mobile device to remember the previously connected Gear
SCAN
can help you solve any problems you might encounter
to find a new Gear. To reconnect to a previously
Paired devices
offers support services to customers, such as device
list.
INFO
View your Gear’s status, S Health data, and download recommended watch faces and apps.
Launch
About Gear
Provide a status overview of your Gear’s battery, storage, and RAM.
Select an item to view its details.
Suggested watch faces
You can download recommended watch faces from
Select a suggested watch face to download it. To view more watch faces, tap
WATCH FACES
Samsung Gear
.
on your mobile device and tap
Galaxy Apps
INFO
.
.
VIEW MORE
91
Page 92

Samsung Gear app
Suggested apps
You can download recommended apps from
Select a suggested app to download it. To view more apps, tap
Galaxy Apps
.
VIEW MORE APPS
.
Health
View S Health’s saved data.
Tap
OPEN S HEALTH
.
SETTINGS
Watch faces
You can change the type of watch to be displayed on the Watch screen.
Launch
desired watch type. The watch face you selected will be applied on the Watch screen.
Samsung Gear
on your mobile device, tap
SETTINGS
→
Watch faces
, and select a
Tap
STYLISE
to select background and items to display on the watch face.
Notifications
Change settings for the notification feature. Stay up to date with a variety of events, such as
new messages received on the mobile device.
Launch
to activate it, and then activate items.
•
•
•
Samsung Gear
Manage notifications
Show only while wearing Gear
wearing it.
Show while using phone
device.
on your mobile device, tap
: Select apps on the mobile device to send notifications to the Gear.
: Set the Gear to show notifications while using your mobile
SETTINGS
: Set the Gear to show notifications only while you are
→
Notifications
, tap the switch
92
Page 93

Samsung Gear app
•
Turn on screen
•
Auto show details
•
Notification indicator
you to notifications that you have not checked.
•
Smart relay
the Gear when you pick up the mobile device.
•
This feature is only available when the Gear’s screen is turned on.
•
Some mobile devices do not support this feature.
•
The mobile device must be unlocked first to view details when the screen is locked.
: Set the Gear to turn on the screen when the notification is received.
: Set the Gear to show details for notifications when they are received.
: Set the Gear to display a yellow dot on the Watch screen to alert
: Set the mobile device to display notification information that is displayed on
Apps
Customise the Gear’s Apps screen. You can select and rearrange apps.
Launch
Samsung Gear
on your mobile device and tap
SETTINGS
→
Apps
Uninstalling apps
Tap →
Uninstall
and tap next to the apps you want to remove from the Gear.
Reordering apps
Tap →
Reorder
and tap next to an app and drag it up or down to another position.
Send content to Gear
Transfer saved audio or image files from your mobile device to your Gear.
Launch
Samsung Gear
When the Gear does not have enough available memory, it deletes files that you have
not set as your favourites in order from oldest to newest.
on your mobile device and tap
SETTINGS
→
Send content to Gear
.
.
•
Select tracks
Gear.
: Select audio files and manually send them from the mobile device to the
93
Page 94

Samsung Gear app
•
Auto sync
•
Select photos
Gear.
•
Auto sync
•
Albums to sync
: Set the device to sync audio files with the Gear while the Gear is charging.
: Select images and manually send them from the mobile device to the
: Set the device to sync images with the Gear while the Gear is charging.
: Select an image folder to sync with the Gear.
Send SOS requests
Set the device to send help messages by pressing the Gear’s Home key three times. You can
also set it to automatically call your emergency contacts.
Launch
the switch to activate it. Refer to SOS messages for more information.
Samsung Gear
on your mobile device, tap
SETTINGS
→
Send SOS requests
Find My Gear
Remotely control your Gear when it is lost or misplaced.
Launch
•
•
Samsung Gear
Reactivation lock
device has been reset. This prevents others from reactivating your device if it is lost or
stolen.
Control remotely
–
Locate Gear
–
Lock Gear
activated when the Bluetooth connection between the Gear and mobile device ends
while a remote connection is activated.
on your mobile device and tap
: Set the Gear to require your Samsung account information after the
:
: View the location of your Gear.
: Remotely lock the Gear to prevent unauthorised access. This feature can be
SETTINGS
→
Find My Gear
, and tap
.
–
Reset Gear
Gear is reset, you cannot restore the information or use the Find My Gear feature.
: Remotely delete all personal information stored in the Gear. After the
94
Page 95

Samsung Gear app
Gear connection
Customise your Gear’s wireless connection settings.
Launch
the switch to activate it.
•
•
Samsung Gear
Remote connection
Bluetooth connection between the devices is not available.
Sync Wi-Fi profiles
on your mobile device, tap
: Set the Gear to remotely connect to the mobile device when a
: Set the device to sync the list of saved Wi-Fi networks with your Gear.
SETTINGS
Quick messages
Edit or add templates used for replying to messages.
Launch
1
Tap
2
Select a template to edit.
3
To create additional templates, tap
Samsung Gear
Quick responses
on your mobile device and tap
or
Call-decline messages
.
.
→
Gear connection
SETTINGS
→
Quick messages
, and tap
.
Edit the template and tap
4
SAVE
.
Register Gear eSIM profile
Install a profile and activate the eSIM by scanning the QR code on the eSIM voucher.
Launch
profile
Samsung Gear
.
on your mobile device and tap
SETTINGS
→
Register Gear eSIM
95
Page 96

Samsung Gear app
Auto call forwarding
Set to forward your mobile device’s incoming calls to the Gear on your mobile device. To use
this feature, your Gear and your mobile device should be remotely connected using your
Samsung account.
Launch
1
forwarding
Tap
2
Tap the switch to activate it.
3
Samsung Gear
.
Number setting
•
A mobile device subscription may be required and the activation method for this
feature may differ depending on your service provider.
•
The method of activating this feature may differ depending on your service
provider
on your mobile device and tap
and enter your Gear’s phone number.
SETTINGS
→
Auto call
Social network sharing
Share your exercise achievements in S Health with your friends on social media.
Launch
Select a social network service and sign in to it.
Samsung Gear
on your mobile device and tap
SETTINGS
→
Social network sharing
.
When you select the share option in S Health on your Gear or your mobile device, your
exercise information will be posted on your selected social network service.
S Health
View the data saved in the S Health app.
Launch
Samsung Gear
on your mobile device and tap
SETTINGS
→
S Health
.
96
Page 97

Samsung Gear app
Samsung Galaxy Apps
Purchase and download apps that are specialised for the Gear.
Launch
Browse by category and select an app to download.
Samsung Gear
on your mobile device and tap
SETTINGS
→
Samsung Galaxy Apps
About Gear
View your Gear’s status, back up or restore data, or update the Gear’s software.
Launch
•
•
Samsung Gear
Battery
Storage
tap
: Check the remaining battery power and time to use the Gear.
The usage time left shows the time remaining before the battery power runs
out. Usage time left may vary depending on your device settings and operating
conditions.
: Check the status of the used and available memory. To delete unnecessary files,
CLEAN NOW
The actual available capacity of the internal memory is less than the specified
capacity because the operating system and default apps occupy part of the memory.
on your mobile device and tap
.
SETTINGS
→
About Gear
.
.
The available capacity may change when you update the device.
•
RAM
: Check the status of the used and available RAM. To speed up your Gear by reducing
the amount of RAM you are using, tick apps from the apps list, and tap
•
Update Gear software
•
Back up and restore
backup data.
•
Legal information
•
Unknown sources
•
Samsung account
•
Device name
: Change the Gear’s name.
: Update the Gear to the latest software.
: Back up the Gear’s data on the Samsung Gear app or restore
: View the legal information for the Gear.
: Set the Gear to allow the installation of apps from unknown sources.
: View the Samsung account information.
CLEAN NOW
.
97
Page 98

Samsung Gear app
Backing up and restoring data
Keep the Gear’s settings data and other app settings and restore them later.
To back up data, launch
→
Gear
To restore, launch Samsung Gear on your mobile device and tap
Back up and restore
Back up and restore
•
Music and images saved on the Gear will not be backed up.
•
S Health app data will be automatically saved on the connected mobile device’s S
Health app.
Samsung Gear
→
→
Restore data
on your mobile device and tap
Back up data
. The latest backup data will be restored.
. The data will be saved in Samsung Cloud.
About Samsung Gear app
View version information of the Samsung Gear app.
Launch
app
Samsung Gear
.
on your mobile device and tap
SETTINGS
SETTINGS
SETTINGS
→
About Samsung Gear
→
→
About Gear
About
→
98
Page 99

Appendix
Troubleshooting
Before contacting a Samsung Service Centre, please attempt the following solutions. Some
situations may not apply to your Gear.
Your Gear does not turn on
When the battery is completely discharged, your Gear will not turn on. Charge the battery
completely before turning on the Gear.
Your Gear displays network or service error messages
•
When you are in areas with weak signals or poor reception, you may lose reception. Move
to another area and try again. While moving, error messages may appear repeatedly.
•
You cannot access some options without a subscription. For more information, contact
your service provider.
The touchscreen responds slowly or improperly
•
If you attach a screen protector or optional accessories to the touchscreen, the
touchscreen may not function properly.
•
If you are wearing gloves, if your hands are not clean while touching the touchscreen,
or if you tap the screen with sharp objects or your fingertips, the touchscreen may
malfunction.
•
The touchscreen may malfunction in humid conditions or when exposed to water.
•
Restart your Gear to clear any temporary software bugs.
•
Ensure that your Gear software is updated to the latest version.
•
If the touchscreen is scratched or damaged, visit a Samsung Service Centre.
99
Page 100

Appendix
Your Gear freezes or has fatal errors
Try the following solutions. If the problem is still not resolved, contact a Samsung Service
Centre.
Restarting the device
If your Gear freezes or hangs, you may need to close apps or turn off the device and turn it on
again.
Forcing restart
If your Gear is frozen and unresponsive, press and hold the Home key (Power key) for more
than 7 seconds to restart it.
Resetting the device
If the methods above do not solve your problem, perform a factory data reset.
On the Apps screen, tap
factory data reset, remember to make backup copies of all important data stored in the Gear.
(
Settings
) →
Gear info
→
Reset Gear
. Before performing the
Another Bluetooth device cannot locate your Gear
•
Ensure that the Bluetooth wireless feature is activated on your Gear.
•
Reset your Gear and try again.
•
Ensure that your Gear and the other Bluetooth device are within the Bluetooth
connection range (10 m). The distance may vary depending on the environment the
devices are used in.
If the tips above do not solve the problem, contact a Samsung Service Centre.
100
 Loading...