

Samsung SM-R750T (T-Mobile) User Manual
User Manual
Please read this manual before operating your device
and keep it for future reference.

Table of Contents
Read Me First ................................1
Maintaining Water and Dust Resistance
About the Gear S
Package Contents
..............................5
.............................5
.........3
Getting Started ...............................5
Optional Accessories
Device Layout
Using the SIM Card
Charging the Gear S
Replacing the Strap
Turning the Gear S On or Off
Connecting the Gear S to a Smartphone
Using the Touchscreen
...........................6
.................................6
............................7
...........................9
...........................14
..................16
.......16
........................20
Basics ........................................20
Basic Controls
................................24
Home Screen Layout
Notications
Moments Bar
Clock Screen
Customizing Your Gear S Style
Apps
Setting a Privacy Lock
Entering Text
Motions
Power Saving Features
Transferring Files Between the Gear S and a
Computer
Upgrading the Gear S
Connection Modes
..................................28
.........................................33
. . . . . . . . . . . . . . . . . . . . . . . . . . . . . . . . . . . . . . . 40
.....................................42
..........................26
.................................30
.................................31
................32
........................37
.................................37
.......................41
.........................43
............................44
Connections .................................44
Bluetooth
ii
.....................................45

Mobile Networks ..............................48
.........................................49
Wi-Fi
Remote Connection
........................................51
Phone
...........................50
Apps ..........................................51
Contacts
Messages
Email
S Health
Schedule
S Voice
Alarm
Find My Device
Gallery
Music Player
Milk Music
Navigator
News Brieng
Running
Weather
......................................58
....................................59
.........................................62
......................................63
.....................................79
.......................................79
........................................81
...............................82
.......................................83
..................................84
....................................86
.....................................86
.................................87
......................................88
......................................89
Style
.........................................90
Settings ......................................90
..........................................91
Call
........................................93
Sound
.......................................93
Display
Connections
Messages
Do not Disturb
Double Press
Privacy Lock
Accessibility
Motions
Language & Input
Power Saving
Reset Gear
Gear Info
Samsung Gear
..................................94
....................................98
................................98
.................................98
..................................98
..................................99
. . . . . . . . . . . . . . . . . . . . . . . . . . . . . . . . . . . . . . 100
............................100
................................102
..................................103
....................................103
..............................104
Samsung Gear App ........................104
Edit the Gear Home Screen
Transfer Files to Gear
iii
..................106
........................106

Apps and Settings ...........................107
Find My Gear
Settings
................................108
.....................................109
iv

Read Me First
Please read this manual before using the Gear S
to ensure safe and proper use.
Descriptions are based on the Gear S default
•
settings.
Some content may differ, depending on the
•
region, service provider, or device’s software.
Content that requires high CPU and RAM
•
usage will affect the overall performance of
the device. Apps related to the content may
not work properly depending on the device’s
specications and the environment that it is
used in.
Samsung is not liable for performance issues
•
caused by apps supplied by providers other
than Samsung.
Samsung is not liable for performance issues
•
or incompatibilities caused by edited registry
settings or modied operating system software.
Attempting to customize the operating system
may cause the Gear S or apps to work
improperly.
Software, sound sources, wallpapers, images,
•
and other media provided with this Gear S
are licensed for limited use. Extracting and
using these materials for commercial or other
purposes is an infringement of copyright laws.
Users are entirely responsible for illegal use of
media.
You may incur additional charges for data
•
services, such as messaging, uploading and
downloading, auto-syncing, or using location
1
services depending on your data plan. For
large data transfers, it is recommended to use
the Wi-Fi feature.
Default apps that come with the Gear S are
•
subject to updates and may no longer be
supported without prior notice. If you have
questions about an app provided with the
Gear S, contact a Samsung Service Center.
For user-installed apps, contact service
providers.
Modifying the Gear S operating system or
•
installing softwares from unofcial sources
may result in Gear S malfunctions and data
corruption or loss. These actions are violations
of your Samsung license agreement and will
void your warranty.
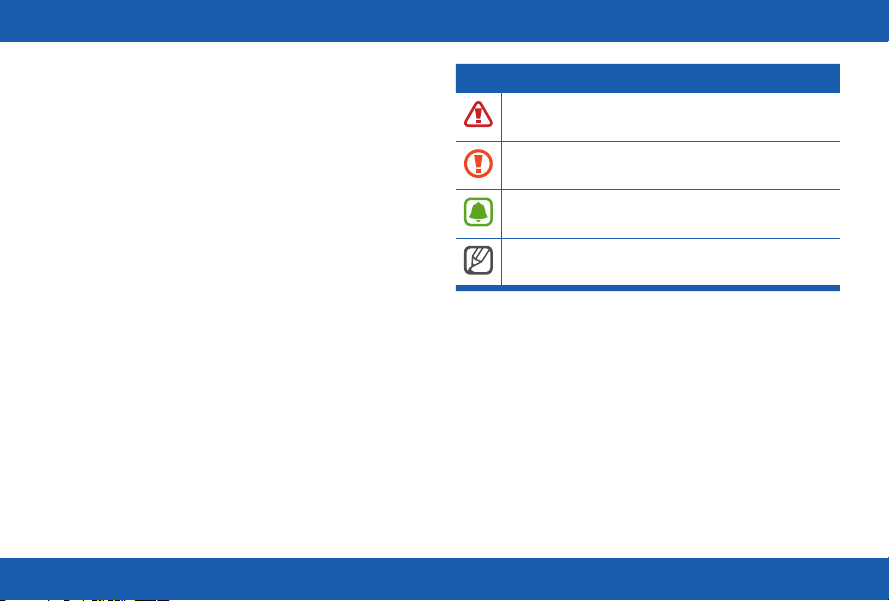
Instructional Icons
Warning: Situations that could cause injury to
yourself or others.
Caution: Situations that could cause damage
to your device or other equipment.
Note: Essential information for using the
device.
Tip: Additional information you may nd useful.
2

Maintaining Water and Dust
Resistance
The device may be damaged if water or dust
enters the device. Follow these tips carefully to
prevent damage to the device and to maintain
the water- and dust-resistant performance of the
device.
Do not immerse the device in water deeper
•
than 1 m and keep it submerged for more than
30 minutes.
Do not expose the device to water moving
•
with force, such as water running from a tap,
ocean waves, or waterfalls.
If the device or your hands are wet, dry them
•
thoroughly before handling the device.
If the device is exposed to freshwater, dry
•
it thoroughly with a clean, soft cloth. If the
device is exposed to any liquid other than
freshwater, rinse the device with freshwater
immediately and dry it thoroughly with a
clean, soft cloth. Failure to rinse the device
in freshwater and dry it as instructed may
cause the device to suffer from operability
or cosmetic issues.
If the device is dropped or receives an
•
impact, the water-and dust-resistant features
of the device may be damaged.
If the device has been immersed in water or
•
the microphone or the speaker is wet, sound
may not be heard clearly during a call. Ensure
that the microphone or the speaker is clean
and dry by wiping it with a dry cloth.
The touchscreen and other features may not
•
work properly if the device is used in water
or in other liquids.
Your device has been tested in a controlled
•
environment and shown to be water-and
dust-resistant in certain circumstances
(meets requirements of classication IP67
as described by the international standard
3

IEC 60529 - Degrees of Protection provided
by Enclosures [IP Code]; test conditions:
15 - 35°C, 86 - 106 kPa, 1 meter, for 30
minutes). Despite this classication, your
device is not impervious to water damage
in any situation.
4

Getting Started
About the Gear S
Your Gear S connects to your smartphone, to
allow you to check notications, answer or make
calls, view and send messages, and more.
After you pair the Gear S with your smartphone,
you can use it in Gear Only mode to make calls,
and send and receive messages, even if Gear S
is outside Bluetooth range of the smartphone.
For more information about Gear S connection
modes, see “Connections”.
Package Contents
Check the product box for the following items:
Gear S
•
Charging dock and cable
•
Quick start guide
•
The items supplied with the Gear S and any
available accessories may vary depending on the
region or service provider.
The supplied items are designed only for this
Gear S and may not be compatible with other
devices.
Appearances and specications are subject to
change without prior notice.
5
Optional Accessories
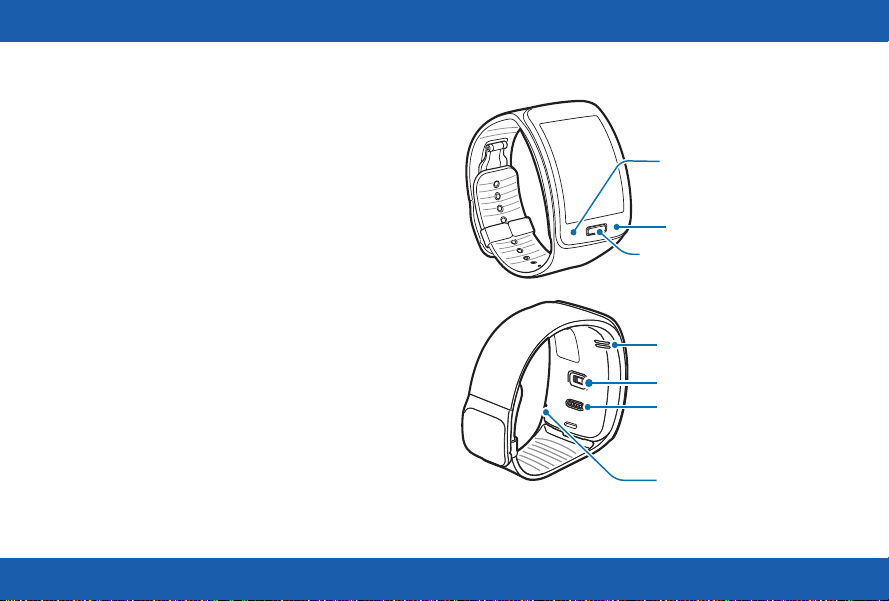
Power/Home key
Proximity
sensor
Charging
terminal
Speaker
Microphone
Heart rate sensor
UV Sensor
You can purchase additional accessories
•
from your local Samsung retailer. Make sure
they are compatible with the Gear S before
purchase.
Some accessories, such as docking devices,
•
may not have the same water- and dust-
resistance certication.
Use only Samsung-approved accessories.
•
Using unapproved accessories may cause the
performance problems and malfunctions that
are not covered by the warranty.
Availability of all accessories is subject to
•
change depending entirely on manufacturing
companies. For more information about
available accessories, refer to the Samsung
website.
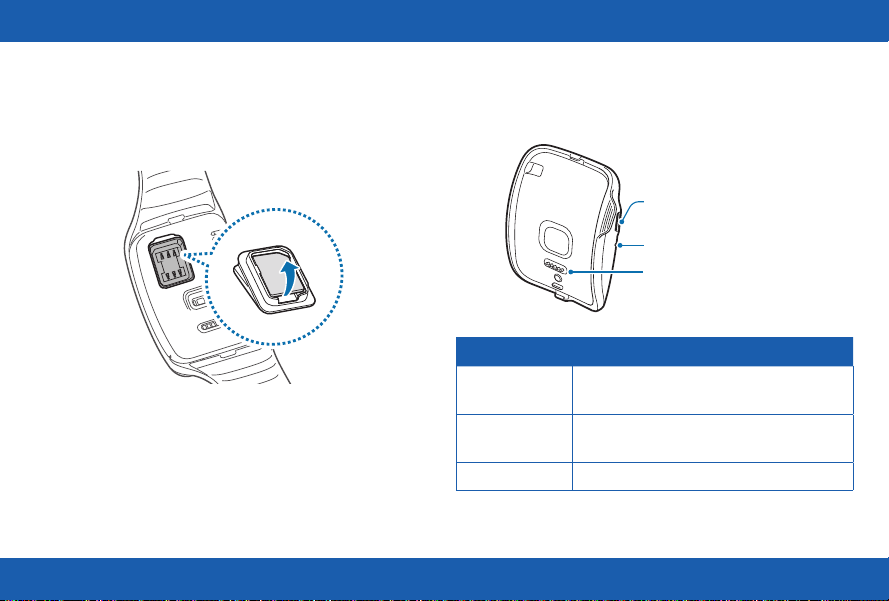
Device Layout
6

Feature Function
Power/Home Key • Press and hold to turn the
Gear S on or off.
• Press to move to the Clock
screen.
• Press to turn on the screen.
• Press and hold to restart the
Gear S.
Proximity Sensor
Speaker
Heart rate sensor
Charging terminal
Microphone
• Detects when the Gear S is
near other items.
• Plays sounds.
• Measures your heart rate, for
use with apps like S Health on
the smartphone.
• Connects to the terminal on
the charging dock, to charge
the battery.
• Picks up sounds.
Using the SIM Card
Installing the SIM Card
Insert the SIM card provided by the mobile
telephone service provider.
1. Using the SIM ejector tool, remove the SIM
card cover.
SIM ejector tool
7
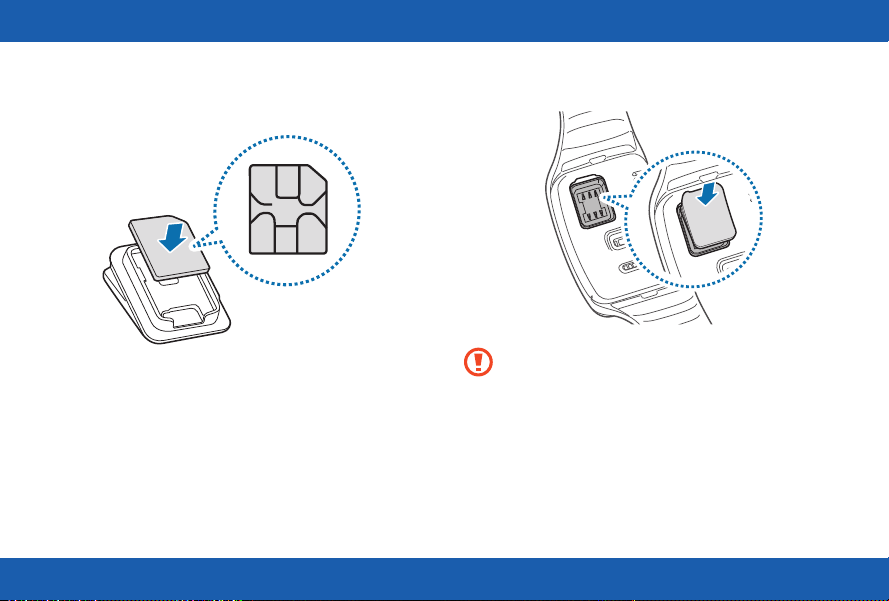
2. Insert the SIM card on the inside of the SIM
card cover with the gold-colored contacts
facing outwards.
3. Place the SIM card cover on the Gear S and
press the cover to close it.
Caution: Ensure that the SIM card
cover is closed tightly to prevent water
and dust entering the device. Open or
loose the cover may allow water and
dust to enter the device and cause
damage.
8
Removing the SIM Card
1. Using the SIM ejector tool, remove the SIM
card cover.
2. Pull out the SIM card.
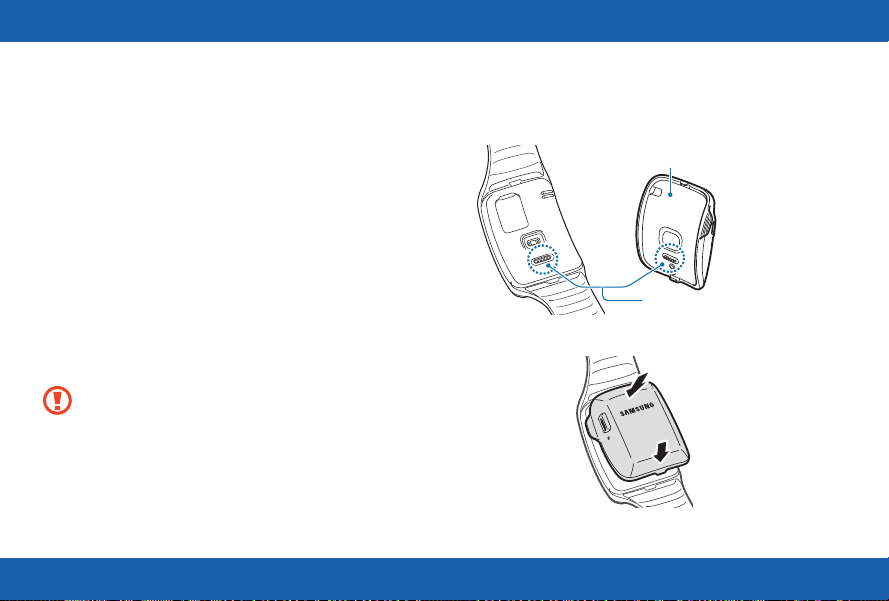
Charging the Gear S
Charging dock with battery
USB port
LED indicator
Charging terminal
Feature Function
Charging
terminal
USB port Connect a USB cable, to charge the
LED indicator Lights to indicate device status.
9
Connects to the terminal on the
Gear S to charge the battery.
battery, or to sync information.

About the Charging Dock
Use the charging dock to charge the battery in
your Gear S. The charging dock also contains a
battery. Take care not to lose the dock.
To charge the Gear S, connect it to the
•
charging dock.
The charging dock can be used as a backup
•
battery. Simply connect it to your Gear S (no
cable needed).
The charging dock automatically charges while
•
the Gear S is charging, or can be charged
independently without the Gear S.
About the Battery
Battery operating time is affected by device
•
usage patterns and the condition of the battery.
Battery life can be reduced when multiple apps
•
or features are running simultaneously.
Note: During charging, the
Gear S may heat up. This is normal
and should not affect the Gear S
lifespan or performance. If the battery
gets hotter than usual, the charger
may stop charging. If the Gear S is not
charging properly, contact a Samsung
Service Center.
10
Charging the Battery
Before using your Gear S for the rst time,
charge the battery. You can charge the Gear S by
connecting it to the charging dock and plugging
the USB charger into an outlet, or by connecting
it to a computer with an optional USB cable (not
included).
If the battery is completely depleted, you won’t
be able to turn the Gear S on immediately. Allow
a depleted battery to charge for a few minutes
before turning on the Gear S.
Using Gear S during charging may cause the
battery to charge more slowly.
Caution: Use only Samsung-approved
chargers, batteries, and cables.
Unapproved chargers or cables can
cause damage. Connecting the charger
improperly may cause serious damage
to the Gear S. Any damage caused by
misuse is not covered by the warranty.
1. Connect the Gear S to the Charging dock with
the charging terminals facing each other.
Charging dock with battery
Charging terminals
11

2. Connect the USB charger to the USB port on
the charging dock, and then plug the charger
into an electrical outlet.
3. After charging, disconnect the Gear S from the
Charging dock and unplug the USB charger
from the electrical outlet.
Note: To save energy, unplug the
charger when not in use. The charger
does not have a power switch, so you
must unplug it from the electrical outlet
when not in use to avoid wasting power.
12

Checking the Battery Level
When you connect the Gear S to the charging
dock, the LED indicator shows the battery level.
Battery level Indicator color
100--80% Blue
80--20% Green
20--5% Red
5--0% Red blinking
Note: If the charging dock LED indicator
ashes yellow, there is a problem with
charging. Contact a Samsung Service
Center for support.
Wearing the Gear S
1. Release the buckle.
13
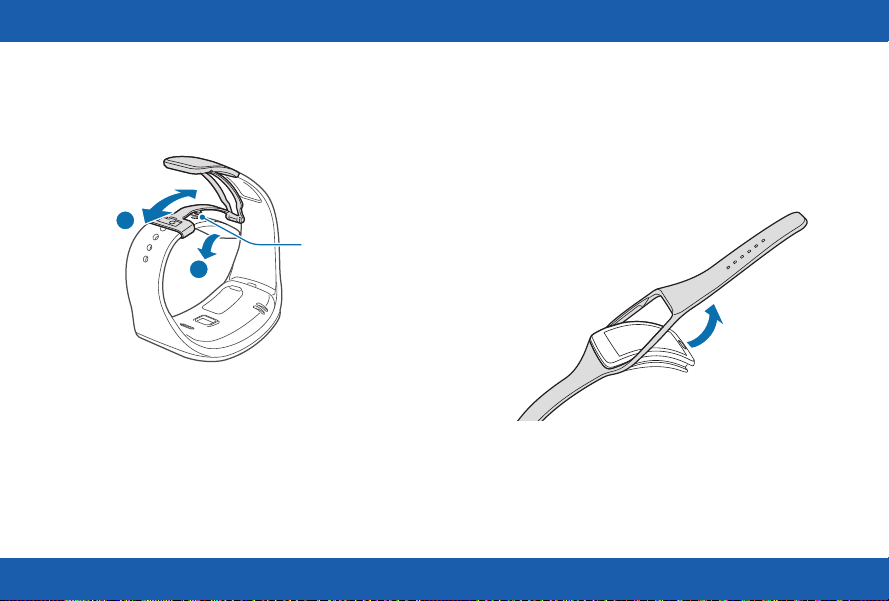
2. Open the clasp and place the strap around
your wrist. Adjust the length of the the strap by
moving the clasp, and then secure it with the
pin and press the buckle to close it.
2
Pin
1
Replacing the Strap
Detach the strap from the Gear S to replace it
with a new one.
1. Hold the Gear S and pull the strap upwards to
detach it.
14

2. Insert one end of the Gear S into the mounting
1
2
hole of a new strap. Then, insert the other end
of the Gear S into the hole and pull the strap
up at the same time.
3. Ensure that the Gear S is sitting securely in the
mounting hole and that it is properly aligned
with the strap.
3
15
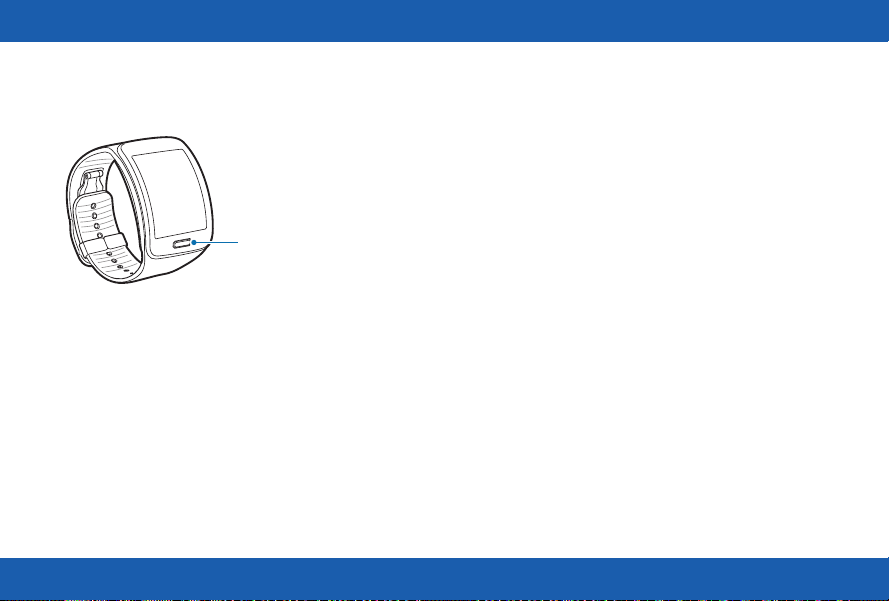
Turning the Gear S On or Off
Power/Home key
Connecting the Gear S to a
Smartphone
Connection Modes
There are several ways your Gear S can connect
to a smartphone. The Gear S functionality
depends on the connection mode.
When you congure Gear S connection settings,
they affect the way your Gear S works with the
connected smartphone.
To turn the Gear S on:
► Press and hold the Power/Home key.
To turn the Gear S off:
► Press and hold the Power/Home key, and
then tap Power off.
Connected via Bluetooth
In Bluetooth connection mode, the Gear S is
paired with the smartphone via Bluetooth.
While in Bluetooth connection mode, the
Gear S can receive notications and calls from
the connected smartphone, and you can use all
of the Gear S and Samsung Gear app functions.
16

You will not receive calls or SMS messages to
the Gear S number until you have set the Mobile
Data setting to Always On.
Connected Remotely
When connected remotely, the Gear S is not
connected to the smartphone via Bluetooth, but is
still connected to the smartphone via the mobile
network.
While connected remotely, the Gear S can
receive notications and calls from the
smartphone, calls and SMS messages to the
Gear S phone number, and have limited access
to Samsung Gear app functions. Calls which
are placed will be dialed from the Gear phone
number.
While in Gear Only mode, the Gear S will only
send and receive SMS messages and calls to the
Gear S phone number, and will have no access
to Samsung Gear app functions.
Pairing Your Gear S to a Smartphone
The rst time you turn on the Gear S, follow the
on-screen instructions to download and install
the Samsung Gear app on your smartphone.
Then, pair the Gear S with the smartphone via
Bluetooth to establish a connection between the
devices.
If you want to connect the Gear S to a different
smartphone, you will need to reset the
Gear S, to remove all data from the memory.
Refer to Reset Gear for more information.
Gear Only
In Gear Only mode, the Gear S is not connected
to the smartphone, and is operating as an
independent device.
Note: Connection methods and screens
may vary depending on the type of
smartphone and the software version.
17

1. On Smartphone: Download the Samsung
Gear app from Galaxy Apps.
2. On Smartphone: Make sure Bluetooth is on,
and then select the Gear S from the list of
scanned devices. Tap OK when the Bluetooth
pairing request window appears.
3. On Gear S: When the Bluetooth pairing
request appears, tap OK.
4. On Smartphone: Follow the onscreen
instructions to complete the set-up.
When the devices are connected, the Gear S
displays the Clock screen and a tutorial, and the
Samsung Gear Manager app launches on the
smartphone.
18

Signing in to Your Samsung Account
During the pairing process, the smartphone will
prompt you to sign in to your Samsung account.
Signing in to your Samsung account allows the
Gear S and the smartphone to remain connected
remotely when they are not connected via
Bluetooth.
The remote connection allows the Gear S
to receive notications and calls from your
smartphone, even when they are not within
Bluetooth range.
19

Basics
Using the Touchscreen
Caution: To avoid damaging the
touchscreen, do not tap it with anything
sharp or apply excessive pressure to it
with your ngertips.
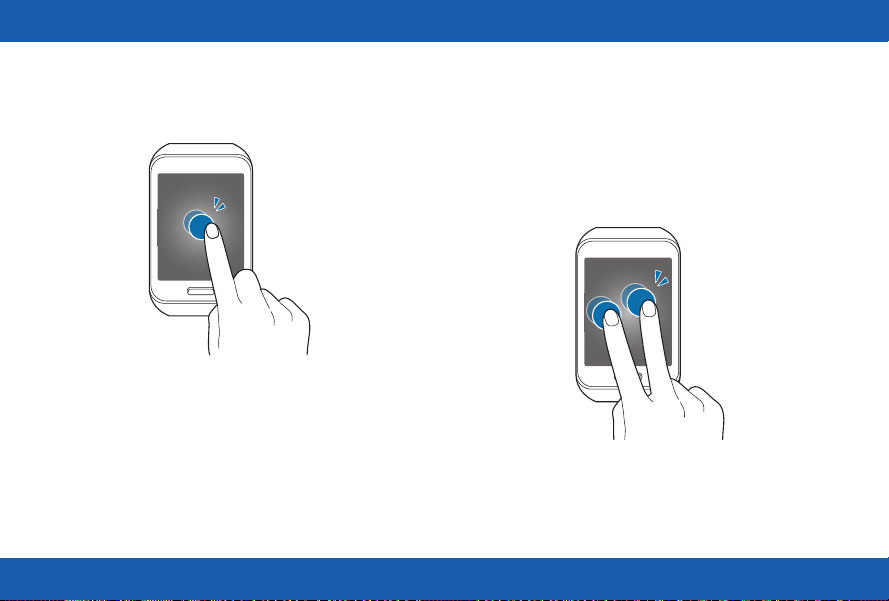
Tap
To open an app, to select a menu item, or to
press an on-screen button, tap it with a nger.
20

Touch and Hold
Touch and hold to access available options.
Touch and Hold with Two Fingers
Touch and hold with two ngers to open a list of
recently-used apps.
21
Double-tap
When viewing a picture, SMS message, or email,
double-tap to zoom in. Double-tap again to return.
Double-tap With Two Fingers
To check Gear S status, including Bluetooth,
the connection to the smartphone, sound mode,
mobile network status, and remaining battery
power, double-tap anywhere on the screen with
two ngers. You can also adjust the volume and
the brightness of the display.
22
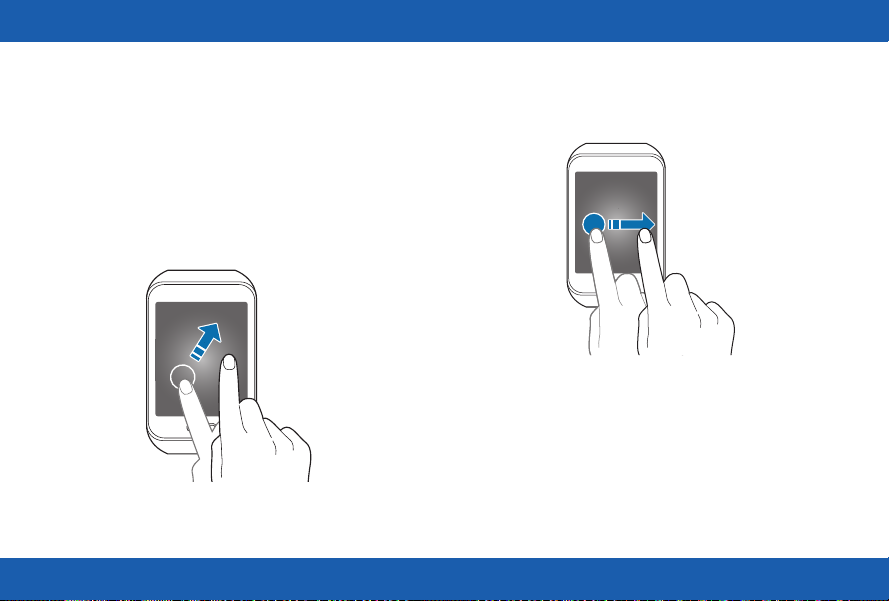
Swipe
Use your nger to swipe from the top, bottom, left
or right edges of the screen to perform actions.
When using an app, swipe left or right to perform
an action, such as scrolling through pictures in
Gallery, or moving to a new song in Music Player.
Swipe down from the top of the screen to return
to the previous screen.
Drag
To move an app on the Apps screen, touch and
hold it and drag it to a new position.
23
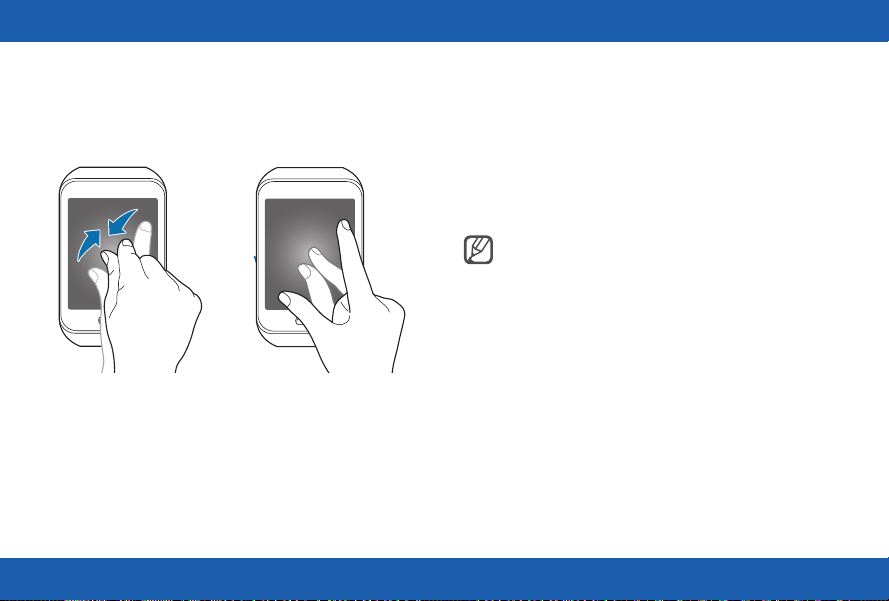
Spread and Pinch
When viewing a picture, SMS message, or email,
spread two ngers apart to zoom in. Pinch to
zoom out.
Basic Controls
Turning the Screen On or Off
To turn the screen on:
► Press the Power/Home key. The Gear S will
display the Clock screen.
Tip: The screen turns off if the Gear S
is not used for a period of time. You can
specify the screen timeout period in the
Gear Settings.
To turn the screen off:
► Press the Power/Home key.
24

Adjusting the Brightness of the Display
You can adjust the display’s brightness on the
Gear S to suit the environment.
► On the Clock screen, drag the screen upwards
from the bottom edge of the screen to display
the Apps screen, and then tap Settings >
Display > Brightness.
Adjusting the Volume
Adjust the volume of sound that Gear S plays.
► On the Clock screen, drag the screen upwards
from the bottom edge of the screen to display
the Apps screen, and then tap Settings >
Sound > Volume.
Caution: Do not hold the Gear S
speaker close to your ear. Excessive
exposure to loud sounds can cause
hearing damage.
Switching the Sound Mode
You can quickly switch between modes, to control
whether your Gear S plays sounds or vibrations.
To switch to sound mode:
Press and hold the Power/Home key, and then
•
tap Sound or Vibration.
On the Clock screen, drag the screen upwards
•
from the bottom edge of the screen, and then
tap Settings > Sound > Sound mode >
Vibrate or Mute.
25

Home Screen Layout
Moments Bar
Notifications Widgets
The Home screen has multiple panels. Swipe to
the left or right to view notications or widgets, or
swipe from the top to display the Moments bar,
and from the bottom to display the Apps screen.
Panel Widget or feature
Notications View events, such as missed calls
or new messages, received on the
Gear S and on the smartphone.
Moments Bar View current status. For more
information, see “Moments Bar”.
Clock (Home) View the time, plus other info,
depending on the clock style.
Apps Screen Launch apps.
Widgets Music Player, S Health, and News
brieng Widgets available by default,
or you can Add widgets.
Apps Screen
Note: Default panel conguration may
vary, depending on the device software.
26
 Loading...