

Page 1

User Manual
SM-R730A
Page 2

Legal
Warning: This product contains chemicals known to the State of California to cause cancer, birth defects, or other
reproductive harm. For more information, please call 1-800-SAMSUNG (726-7864).
Notice: Water-resistant and dustproof based on IP68 rating, which tests submersion up to 1.5 meters for up to
30 minutes.
Intellectual Property
All Intellectual Property, as defined below, owned by or which is otherwise the property of Samsung or its respective suppliers
relating to the SAMSUNG mobile device, including but not limited to, accessories, parts, or software relating thereto (the “mobile
device”), is proprietary to Samsung and protected under federal laws, state laws, and international treaty provisions. Intellectual
Property includes, but is not limited to, inventions (patentable or unpatentable), patents, trade secrets, copyrights, software,
computer programs, and related documentation and other works of authorship. You may not infringe or otherwise violate
the rights secured by the Intellectual Property. Moreover, you agree that you will not (and will not attempt to) modify, prepare
derivative works of, reverse engineer, decompile, disassemble, or otherwise attempt to create source code from the software. No
title to or ownership in the Intellectual Property is transferred to you. All applicable rights of the Intellectual Property shall remain
with SAMSUNG and its suppliers.
i
ATT_R730A_EN_UM_TN_OJ7_110315_FINAL
Page 3

Open Source Software
Some software components of this product incorporate source code covered under GNU General Public License (GPL), GNU Lesser
GeneralPublic License (LGPL), OpenSSL License, BSD License and other open source licenses. Toobtain the source code covered under
the opensource licenses, please visit: opensource.samsung.com
Disclaimer of Warranties; Exclusion of Liability
EXCEPT AS SET FORTH IN THE EXPRESS WARRANTY CONTAINED ON THE WARRANTY PAGE ENCLOSED WITH THE PRODUCT, THE
PURCHASER TAKES THE PRODUCT “AS IS”, AND SAMSUNG MAKES NO EXPRESS OR IMPLIED WARRANTY OF ANY KIND WHATSOEVER
WITH RESPECT TO THE PRODUCT, INCLUDING BUT NOT LIMITED TO THE MERCHANTABILITY OF THE PRODUCT OR ITS FITNESS FOR
ANY PARTICULAR PURPOSE OR USE; THE DESIGN, CONDITION OR QUALITY OF THE PRODUCT; THE PERFORMANCE OF THE PRODUCT;
THE WORKMANSHIP OF THE PRODUCT OR THE COMPONENTS CONTAINED THEREIN; OR COMPLIANCE OF THE PRODUCT WITH THE
REQUIREMENTS OF ANY LAW, RULE, SPECIFICATION OR CONTRACT PERTAINING THERETO. NOTHING CONTAINED IN THE INSTRUCTION
MANUAL SHALL BE CONSTRUED TO CREATE AN EXPRESS OR IMPLIED WARRANTY OF ANY KIND WHATSOEVER WITH RESPECT TO THE
PRODUCT. IN ADDITION, SAMSUNG SHALL NOT BE LIABLE FOR ANY DAMAGES OF ANY KIND RESULTING FROM THE PURCHASE OR USE
OF THE PRODUCT OR ARISING FROM THE BREACH OF THE EXPRESS WARRANTY, INCLUDING INCIDENTAL, SPECIAL OR CONSEQUENTIAL
DAMAGES, OR LOSS OF ANTICIPATED PROFITS OR BENEFITS.
ii
Page 4

Modification of Software
SAMSUNG IS NOT LIABLE FOR PERFORMANCE ISSUES OR INCOMPATIBILITIES CAUSED BY YOUR EDITING OF REGISTRY SETTINGS, OR
YOUR MODIFICATION OF OPERATING SYSTEM SOFTWARE.
USING CUSTOM OPERATING SYSTEM SOFTWARE MAY CAUSE YOUR DEVICE AND APPLICATIONS TO WORK IMPROPERLY. YOUR CARRIER
MAY NOT PERMIT USERS TO DOWNLOAD CERTAIN SOFTWARE, SUCH AS CUSTOM OS.
IF YOUR CARRIER PROHIBITS THIS, IF YOU ATTEMPT TO DOWNLOAD SOFTWARE ONTO THE DEVICE WITHOUT AUTHORIZATION, YOU
WILL BE NOTIFIED ON THE SCREEN THAT UNAUTHORIZED SOFTWARE HAS BEEN DETECTED. YOU SHOULD THEN POWER DOWN THE
DEVICE AND CONTACT YOUR CARRIER TO RESTORE THE DEVICE TO THE CARRIER AUTHORIZED SETTINGS.
Diagnostic Software
This device is equipped with diagnostic software reporting usage and performance information used solely to deliver improved
network quality and overall device experience to AT&T customers. Please refer to your AT&T Wireless Customer Agreement and/or the
AT&T Privacy Policy (att.com/privacy) for more information.
Samsung KNOX
Samsung KNOX™ is Samsung’s security platform and is a mark for a Samsung device tested for security with enterprise use in mind.
Additional licensing fee may be required. For more information about KNOX, please refer to: samsung.com/us/knox [030115]
iii
Page 5

Samsung Electronics America (SEA), Inc.
Address
:
85 Challenger Road
Ridgefield Park,
New Jersey 07660
Phone
:
1-800-SAMSUNG (726-7864)
Internet Address
samsung.com
©2015 Samsung Electronics America, Inc. Samsung, Samsung Galaxy, S Voice, and SHealth are all trademarks of
SamsungElectronics Co., Ltd.
:
Notice: Screen images are simulated. Appearance of device may vary.
iv
Page 6

Do you have questions about your Samsung Mobile Device?
For 24 hour information and assistance, we offer a new FAQ/ARS System (Automated Response System) at: samsung.com/us/support
The actual available capacity of the internal memory is less than the specified capacity because the operating system and default
applications occupy part of the memory. The available capacity may change when you upgrade the device.
The Bluetooth® word mark, figure mark (stylized “B Design”), and combination mark (Bluetooth word mark and “B Design”) are
registered trademarks and are wholly owned by the Bluetooth SIG.
Wi-Fi is a registered trademark of the WirelessFidelity Alliance, Inc.
Legal Information
READ THIS INFORMATION BEFORE USING YOUR MOBILE DEVICE.
Samsung Limited Warranty
resolution procedure.
The EULA for this device is found in the Gear Manager application, which is required for operation of your device.
You may also access this EULA at: samsung.com/us/Legal/SamsungLegal-EULAGEAR
- This product is covered under the applicable Samsung Limited Warranty
v
including its dispute
Page 7

Table of Contents
Basics
2 Device layout
6 Battery
11 Wearing the Gear
13 Replacing the strap
16 Turning the Gear on and off
17 Connecting the Gear to a Smartphone
20 Activating the device
21 Remote connection
21 Turning the screen on and off
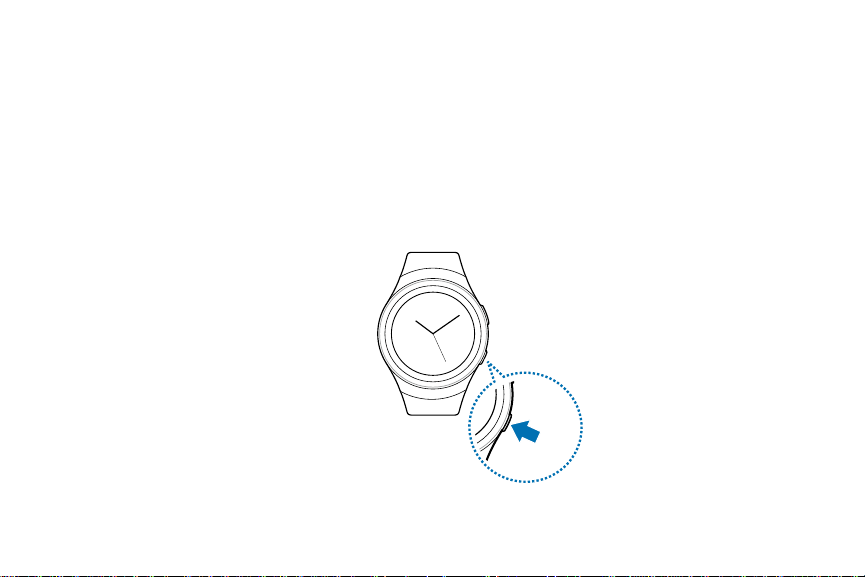
22 Using the bezel
25 Touchscreen
29 Navigating the screen
31 Home screen
41 Status panel
48 Setting the screen lock
49 Entering text
54 Screen capture
55 Updating the Gear
vi
Page 8

Applications
56 Messages
58 Phone
61 S Health
76 Nike+ Running
78 Schedule
79 S Voice
82 Weather
83 Alarm
84 Timer
85 Stopwatch
86 Bloomberg
86 CNN
87 Music Player
90 Samsung Milk Music
90 Gallery
94 Buddy
95 Email
96 Find My Phone
97 Maps
98 Voice Memo
vii
Page 9

Settings
101 Introduction
101 Display
102 Sound
104 Device
105 Call
106 Messages
107 Connections
113 Screen lock
114 Accessibility
115 Input
117 Power saving
118 Gear info
Samsung Gear App
119 Introduction
121 Watch faces
122 Notifications
123 Manage apps
124 Send media
viii
Page 10

125 App settings
125 Samsung Gear Apps
126 Settings
131 Find My Gear
ix
Page 11

Basics
Instructional icons
Warning: Situations that could cause injury to yourself or others.
Caution: Situations that could cause damage to your device or other equipment.
Notice: Notes, usage tips, or additional information.
1
Page 12

Basics
NFC antenna
Touchscreen
Microphone (behind)
Device layout
Gear S2
Front
Back button
Bezel
Light sensor
Home/Power button
2
Page 13
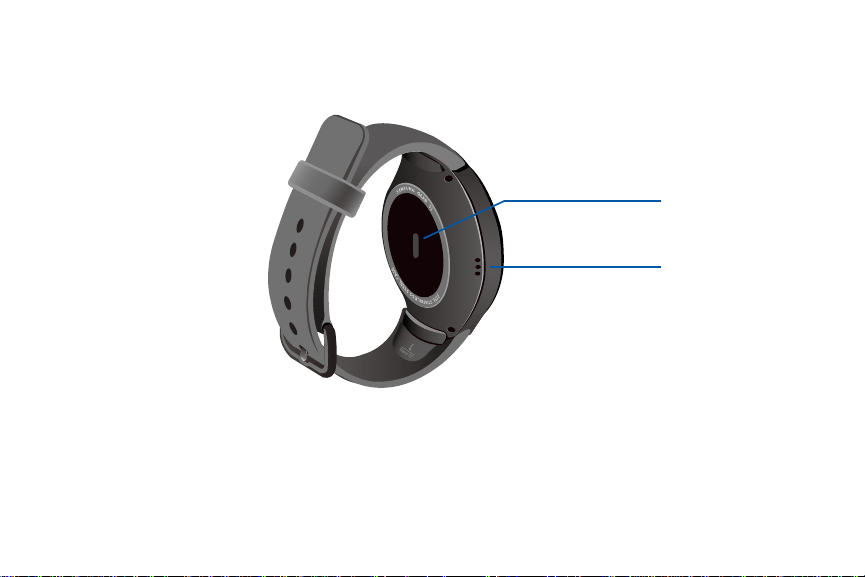
Basics
Heart rate sensor
Back
Speaker
3
Page 14
Basics
Buttons
Button Function
Home/Power
Back • Press to return to the previous screen.
Make sure the Gear’s microphone is not obstructed when you are speaking into it while charging.
Do not allow children or animals to chew or suck the device. Do not disassemble, modify, or repair your device. Magnetic
stripe cards, including credit cards, phone cards, passbooks, and boarding passes, may be damaged by magnetic fields.
• Press and hold to turn the Gear on or off.
• Press to turn on the screen.
• Press and hold for more than 7 seconds to restart the Gear.
• Press to open the Apps screen when you are on the Watch screen.
• Press to open the Watch screen when you are on any other screen.
4
Page 15

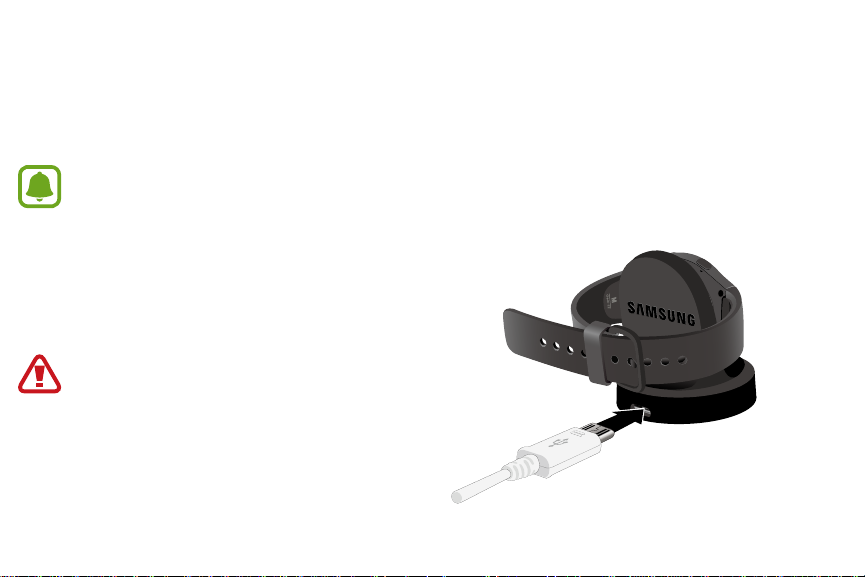
Basics
Wireless charger dock
Wireless
charging
surface
LED indicator
Make sure the Gear’s microphone is not obstructed when you are speaking into it while charging.
USB charger
port
5
Page 16
Basics
Battery
Charging the battery
Charge the battery before using it for the first time or when it sits unused for extended periods.
Use only Samsung-approved chargers and accessories which are specifically designed for your device.
1 Connect the USB cable to the USB power adaptor.
Then, connect the other end of the USB cable to the
wireless charger dock.
Prevent the USB charger port and the small
end of the charger from coming into contact
with conductive materials, such as liquids,
dust, metal powders, and pencil leads.
6
Page 17

Basics
2 Plug the USB power adaptor into an electric socket.
3 Place the Gear into the wireless charger dock.
4 After fully charging your Gear, disconnect it from the wireless charger dock. Unplug the charger from the wireless charger dock,
and then unplug the charger from the electric socket.
7
Page 18

Basics
Checking the charging status
When you connect the Gear and the wireless charger dock, the wireless charger dock’s LED indicator flashes certain colors to indicate
the battery level.
Color Charging status
Red > Green > Yellow Standby mode
Red Charging
Green Fully charged
Orange Connected to a low-power adaptor
When a wireless charger dock error occurs, the LED indicator flashes red. Disconnect the Gear from the wireless charger dock
and reconnect them. If the error occurs again, contact a Samsung Service Center for service support.
The LED indicator may work differently depending on the Gear.
8
Page 19

Basics
Reducing the battery consumption
Your Gear provides various options that help you conserve battery power.
• When you are not using the Gear, switch to sleep mode by covering the screen with yourpalm.
• Activate power saving mode.
• Close unnecessary apps.
• Deactivate the Bluetooth feature when not in use.
• Deactivate the Wi-Fi feature when not in use.
• Decrease the screen brightness.
• Deactivate the watch always on feature.
• Deactivate the voice wake-up feature in
• Customize the notification settings in the
S Voice
.
Samsung Gear
app on the connected smartphone.
9
Page 20

Basics
Battery charging tips and precautions
• If there are obstructions between the Gear and the wireless charger dock, the Gear may not charge properly.
• Prevent the Gear and the wireless charger from coming into contact with sweat, liquids, or dust.
• If the battery is completely discharged, the Gear cannot be turned on immediately after being connected to the charger.
Allow a depleted battery to charge for a few minutes before turning on the Gear.
• If you use multiple apps at once, the battery will drain quickly. To avoid losing power during a data transfer, always use these apps
after fully charging the battery.
• Using a power source other than the charger, such as a computer, may result in a slower charging speed due to a lower electric
current.
• If the Gear is being charged with other devices via a multi-charger, charging may takelonger.
• The Gear can be used while it is charging, but it may take longer to fully charge the battery.
• If the Gear receives an unstable power supply while charging, the touchscreen may not function. If this happens, immediately
disconnect the Gear from the wireless charger dock and leave the device aside until another power connection can be found.
• While charging, the Gear may heat up. This is normal and should not affect the Gear’s lifespan or performance. If the battery feels
hot to the touch during this charging process, remove the Gear from the charger and allow it to cool down before restarting the
charging process, or call 1-800-SAMSUNG (726-7864) to receive technical support.
• If the Gear is not charging properly, take the Gear to a Samsung Service Center.
• Avoid using a bent or damaged USB cable.
10
Page 21

Basics
Wearing the Gear
Putting on the Gear
1 Open the buckle and place the strap around your wrist.
2 Fit the strap to your wrist, insert the pin into an adjustment hole, and then secure the buckle to close it.
11
Page 22

Basics
This device, S Health, and related software is not intended for use in the diagnosis of disease or other conditions, or in the
cure, mitigation, treatment or prevention of disease.
If you feel discomfort while using the device, stop using it and remove it from your wrist. If your device becomes hot to the
touch, please remove it until it cools.
To measure your heart rate more accurately with the Gear, wear the Gear firmly around your lower arm just above the wrist.
Refer to Wearing the Gear fordetails.
Strap tips and precautions
• Be cautious when wearing the Gear. If you have sensitive skin or fasten the Gear too tightly, you may feel some discomfort.
• Some people may experience discomfort when wearing the Gear for prolonged periods.
• Do not expose the straps to very wet conditions. Wet straps can cause skin irritations. Dry the straps first. If you experience skin
irritation when wearing the device, stop wearing the device and consult a physician.
• The Gear and the strap have passed the hazardous materials test and meet international safety standards.
12
Page 23
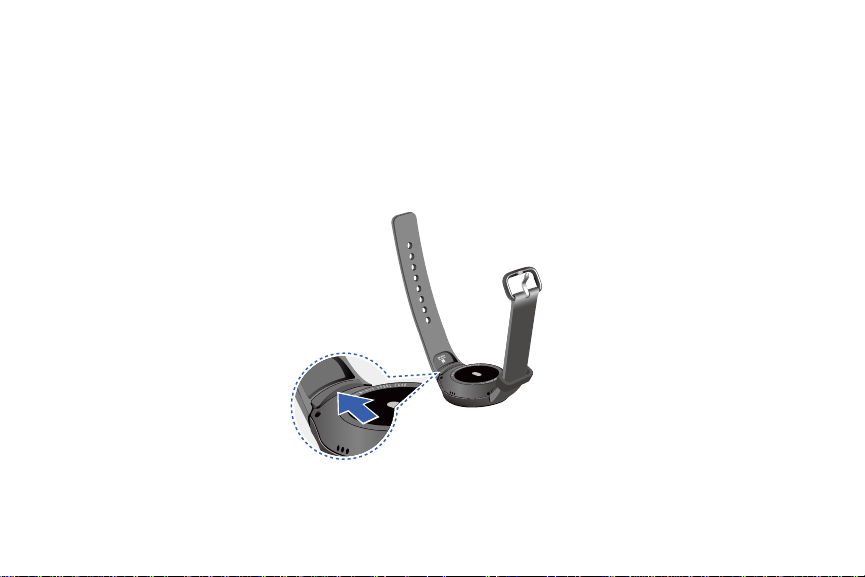
Basics
Replacing the strap
Detach the strap from the Gear to replace it with a new one.
1 Push the button where the Gear’s body and strap meet.
13
Page 24

Basics
2 While pushing the button, pull the strap upward and remove it.
14
Page 25

Basics
3 Insert the holder of new strap into the grooves on the Gear’s body.
4 Push the strap into the Gear’s body until it clicks into place.
15
Page 26
Basics
Turning the Gear on and off
1 Press and hold the
• When you turn on the Gear for the first time or reset it, a pop-up window displays. Follow the prompts to download and install
the Samsung Gear app on your smartphone.
2 To turn off the Gear, press and hold the
Power
button for a few seconds to turn on the Gear.
Power
button, and then tap
16
Power off
.
Page 27

Basics
Connecting the Gear to a Smartphone
You should connect your Gear to your smartphone once before using the Gear. To connect your Gear to a smartphone, install the
Samsung Gear app on the smartphone. Launch
For non-Samsung devices, download the Samsung Gear app from the Google Play store.
Compatible with Android 4.4 and later with 1.5GB RAM. Some features may not be available. For best compatibility, connect with
compatible Samsung Galaxy devices.
1 Turn on the Gear.
Galaxy Apps
or visit apps.samsung.com/gear from your smartphone to downloadit.
2 On the smartphone Apps screen, tap
• If necessary, update the Samsung Gear app to the latest version.
3 Tap
CONNECT TO GEAR
4 When the
then tap OK.
5 Follow the prompts to complete the connection.
Bluetooth pairing request
.
Samsung Gear
window displays, confirm the passkeys displayed on your Gear and smartphone match, and
.
17
Page 28
Basics
When the devices are connected, a tutorial displays on the Gear’s screen. Follow the prompts to learn the Gear’s basic controls.
• Connection methods and screenshots may vary depending on your device and software version.
• You cannot install the Samsung Gear app on smartphones that do not support Gear syncing. Ensure that your
smartphone is compatible with a Gear.
• Supported smartphones and features may vary depending on your region, service provider, and device manufacturer.
Visit samsung.com and search for your Gear device’s support page to view a list of compatible smartphones.
18
Page 29

Basics
Connecting the Gear to a new smartphone
When you connect the Gear to another smartphone, the Gear automatically resets and all data is removed from its memory.
Make sure you back up any important data stored on yourGear.
1 Back up your Gear’s data on your smartphone.
• On your smartphone, open the Apps screen and tap
2 End the connection between your Gear and smartphone. Refer to Disconnecting the Gear for more information.
3 Connect your Gear to another smartphone.
A new Gear device cannot connect to a target smartphone that is already paired with another Gear.
Samsung Gear
19
>
Settings
>
Back up and restore
>
Back up data
.
Page 30

Basics
Activating the device
Once you have connected your Gear to your smartphone, you will need to activate calling on your Gear.
X After pairing, your Gear will attempt to make a call, follow the prompts to activate your Gear.
If you experience any difficulty activating your device, contact your Service provider.
20
Page 31

Basics
Remote connection
You can remotely connect the Gear to your smartphone when a Bluetooth connection is not available. With this connection, you can
still receive notifications from your smartphone. This feature is automatically activated when you connect to your smartphone using
Bluetooth for the first time.
X If this feature is not turned on, on your smartphone, open the Apps screen, tap
and then tap the
Use Remote connection
switch.
Samsung Gear
>
Settings
>
Connection
Turning the screen on and off
• To turn on the screen, rotate the bezel, or press the
• To turn off the screen, cover it with your palm. Also, the screen will turn off if the Gear is not used for a specified period.
• You can also turn on the screen using a gesture.
Home
button or the
21
Back
button.
,
Page 32

Basics
Using the bezel
Rotate the bezel to easily control the Gear’s various functions.
Scrolling through screens
Rotate the bezel to view other screens. On the Watch screen, rotate the bezel left to view notifications.
22
Page 33

Basics
Selecting an item
Rotate the bezel to highlight the item you want to select and then tap the item. When you rotate the bezel, the highlight indicator
moves in the same direction.
23
Page 34

Basics
Adjusting the input value
Rotate the bezel to adjust the volume or brightness.
6 8
24
Page 35

Basics
Touchscreen
The Gear may not recognize touch inputs close to the edges of the screen, which are outside of the touch input area.
Tapping
Tap with your finger to open an app, select a menu item, press a displayed button, or enter a character using the keyboard.
Touch-screens respond best to a light touch from the pad of your finger or a capacitive stylus. Using excessive force or a
metallic object when pressing on the touch-screen may damage the tempered glass surface and void the warranty.
For more information, please refer to the “Standard Limited Warranty”.
25
Page 36

Basics
Press and hold
Press and hold the screen for two or more seconds to access the Edit mode or to view availableoptions.
26
Page 37

Basics
Dragging
To move an item, press and hold it and drag it to the target position.
27
Page 38

Basics
Swiping
Swipe to the left or right to view other panels.
28
Page 39

Basics
Navigating the screen
Switching between the Watch and Apps screen
1 On the Watch screen, press the
2 When you are not on the Watch screen, press the
Home
button to open the Apps screen.
Home
button to return to the Watch screen.
29
Page 40

Basics
Returning to the previous screen
X Press the
Back
button. You can also swipe down from the top edge of the screen.
30
Page 41

Basics
Watch
Home screen
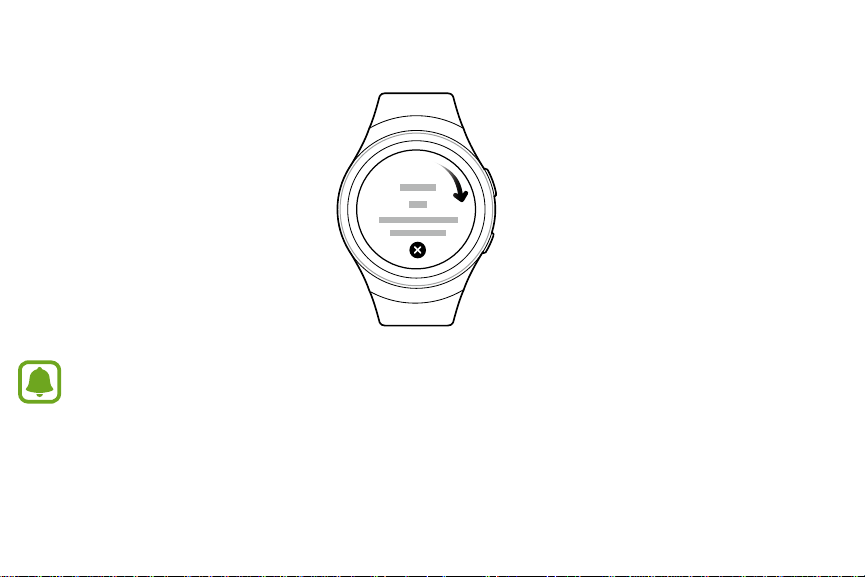
Introduction
The Home screen can have multiple panels. The Watch screen is the starting point for the Home screen. Rotate the bezel to view items
on the screen, such as notifications and widgets.
Notifications
Quick
access
Available widgets, notifications, and their arrangement may vary depending on the software version.
31
Widgets Add
widgets
Page 42

Basics
Notifications panel
Stay up to date with events, notifications, and messages from your smartphone.
When you receive a notification, it displays at the top of the screen and disappears after a few seconds and the Gear vibrates.
Viewing incoming notifications
X Tap the notification screen. You can view the notification’s detail.
Access additional
options
32
Page 43

Basics
Viewing other notifications
1 Tap the number at the bottom of the panel.
• You can view other notifications received from the same app.
2 Rotate the bezel left to view notifications received from otherapps.
Deleting notifications
Delete a notification by swiping upward from the bottom edge of the screen while viewinganotification.
33
Page 44

Basics
Blocking notifications
1 Select a notification from the app you want to block.
2 Tap the notification to view the details.
More options
3 Tap
• The Gear no longer receives notifications from the app.
You can block notifications from specific apps on the Gear. When you have not received any notifications on your Gear, block
notifications using your smartphone. On your smartphone, open the Apps screen, tap
Manage notifications
, rotate the bezel to
.
Block app
and tap
Block app
34
.
Samsung Gear
>
Notifications
>
Page 45

Basics
Watch screen
View the current time. You can also check the battery life, the date, your step count, and more.
X Press the
Home
button to open the Watch screen when you are not on the Watch screen.
35
Page 46

Basics
Changing the watch face
X Press and hold the Watch screen, then rotate the bezel to select a watch face.
STYLIZE
• You can also customize the watch by tapping
You can also change the Gear’s watch face on your smartphone.
X On the smartphone, open the Apps screen, tap
Samsung Gear
.
>
Watch faces
36
.
Page 47

Basics
Quick access panel
View and manage shortcuts to the Apps screen and other apps.
37
Page 48

Basics
Managing the quick access panel
You can create up to four shortcuts to your most frequently used apps.
X Press and hold anywhere on the screen, and tap
• Tap
• Tap
Delete
to delete a shortcut.
Add
to add a shortcut.
EDIT.
38
Page 49

Basics
tracker
Widgets
You can add widgets to the Home screen. Widgets are small apps that offer limited functionality to provide information and
convenient access. You can use the following widgets by default.
Step tracker Schedule Weather Music Player 24-hour
39
Heart rate
tracker
activity
Page 50

Basics
Adding widget
You can add more widgets on the Home screen.
Add
X Tap
and select a widget. The selected widget displays in a new panel.
Removing widgets
X Press and hold a widget and then tap
Delete
.
40
Page 51

Basics
Status panel
This panel allows you to view the current status and configure basic settings.
X On the Watch screen, swipe downward from the top edge of the screen.
41
Indicator icons
Gear's connection
status
Brightness
Sound
Do not disturb
Call forwarding
Music Player
Page 52

Basics
Indicator icons
Indicator icons display at the top of the screen. The icons listed in this table are most common.
Icon Meaning
The device is connected to a 4G wireless network
Signal strength
Bluetooth connected
Bluetooth disconnected
42
Page 53

Basics
Icon Meaning
Bluetooth headset connected
Wi-Fi connected
Battery power level
Playing music
You can play music saved on the Gear or smartphone.
X On the status panel, tap
Music Player
Call forwarding
You can forward your calls to your Gear.
X On the status panel, tap
Call forwarding
.
, and tap the check by
I agree
43
.
Page 54

Basics
Do not disturb mode
You can set the Gear not to vibrate and turn off the screen when a notification is received, except for alarms.
X On the status panel, tap
• The
Do not disturb
Do not disturb
icon displays at the top of the Watch screen.
.
Adjusting the brightness
You can adjust the Gear’s display brightness to suit the environment.
X On the status panel, tap
Brightness
and adjust the brightness by rotating the bezel.
44
Page 55

Basics
Apps screen
The Apps screen displays icons for all apps.
Home
1 On the Watch screen, press the
2 To view other panels, rotate the bezel. You can also tap
button to go to the Apps screen.
Apps screen
45
or swipe the screen to the left orright.
Page 56

Basics
Opening apps
On the Apps screen, tap an app icon to open the app.
X To open an app from the list of recently used apps, tap
Recent apps
Closing apps
1 On the Apps screen, tap
2 Rotate the bezel to highlight the app you want to close, and tap the
CLOSE ALL
3 Tap
Recent apps
to close all running apps.
.
46
on the Apps screen and select the recent app window.
X
.
Page 57

Basics
Moving items
X On the Apps screen, press and hold the screen, press and hold an app and then drag it to the desired location.
• You can also arrange the Gear’s apps on your smartphone. Refer to Manage apps in the Samsung Gear app for more
information.
Installing apps
You can purchase and download apps specially designed for the Gear. To use this feature, your Gear and smartphone must be
connected.
X On the Apps screen, tap
Samsung Gear Apps
• The
apps.
Get more apps
store automatically launches on your smartphone. From the store, you can browse and download
.
Uninstalling apps
You can only uninstall the downloaded Gear apps on your smartphone. Refer to Uninstalling apps in the Samsung Gear app for more
information.
47
Page 58

Basics
Setting the screen lock
Setting a screen lock code
Prevent others from accessing your Gear when you are not wearing it.
If you set the screen lock feature, the Gear requires an unlock code whenever unlocking it.
PIN
X On the Apps screen, tap
• A PIN consists of numbers only. Enter four numbers, and then enter the PIN again to verify it.
Unlocking the Gear
When you are not wearing the Gear, turn on the screen and enter the unlock code.
Settings
>
Screen lock
>
Screen lock
>
PIN
.
48
Page 59

Basics
Insert emoticons
Entering text
Introduction
A text input screen displays automatically when you are able to enter text. Select an emoticon or text template to enter a message.
You can also use voice input or the keyboard to type texts.
The screen layout may be different depending on the app you launch.
Use speech-to-text
Open the keyboard
Insert a text template
49
Page 60

Basics
by voice
Using the voice input
1 Tap
2 Tap
Microphone
More options > Language
and speak the message you want to enter. Tap when you are finished.
to change the language.
Send message
Access additional options
Start or pause entering text
50
Page 61

Basics
• This feature is not supported in some languages.
• When the Gear is connected to a smartphone using Bluetooth, the language settings applied on the smartphone are
applied to the Gear.
• Tips for better voice recognition
– Speak clearly.
– Speak in quiet places.
– Do not use offensive or slang words.
– Avoid speaking in dialectal accents.
– The Gear may not recognize your commands or may perform unwanted commands depending on your surroundings
or how you speak.
51
Page 62

Basics
Delete a character
Uppercase
Tap twice for all caps
Space
Using the keyboard
A key has three or four characters. To enter a character:
X Tap the corresponding key repeatedly until the desired character displays.
52
Page 63

Basics
Changing the input mode
X Rotate the bezel to change the input mode.
• You can switch between character mode, number mode, and punctuation mode.
Changing the input language
X Slide the space key left or right.
To add more languages:
1 Switch to number mode or punctuation mode.
2 Then, tap
• You can use up to two languages.
• You can also add more languages from the Settings screen. Refer to Using the keyboard for more information.
Settings > Select input languages
and select a language to add.
53
Page 64

Basics
Screen capture
Capture a screenshot while using the Gear.
Home
X Press and hold the
• You can view captured images in
It is not possible to capture a screenshot while using some apps and features.
button and swipe your finger to the right across the screen.
Gallery
.
54
Page 65

Basics
Updating the Gear
The Gear can be updated to the latest software.
Updating over the air
The Gear can be directly updated to the latest software by the firmware over-the-air (FOTA) service.
Samsung Gear
1 Tap
Settings
2 Tap
About Gear
3 Tap
4 Read the displayed information and tap
• The Gear copies the updated software from your smartphone and restarts.
To automatically check for available updates, tap the
Wi-Fi connection is activated, tap the
on the Apps screen of the smartphone.
.
>
Update Gear software
OK
>
.
Update now
Wi-Fi only
to install the latest software on your smartphone.
Auto update
switch to activate it.
55
switch to activate it. To download updates only when a
Page 66

Applications
Messages
Introduction
View messages and reply to or call the sender using the Gear.
Viewing messages
1 Tap
Messages
2 Scroll through the message list, and then select a contact to view your conversations.
• To view a message on your smartphone, tap
• To reply to a message, tap
on the Apps screen.
Reply
and enter your message.
More options > Show on phone
56
.
Page 67

Applications
Sending messages
1 Tap
Messages
2 Tap
3 Add recipients and tap
4 Enter text using one of available methods.
• Messages are automatically sent to the recipients.
• If you type texts using voice input or the keyboard, tap
on the Apps screen.
More options
, rotate the bezel to
NEXT
.
New message
, and then tap
Send
57
New message
to send the message.
.
Page 68

Applications
Phone
Introduction
Depending on your Call settings, you can use your Gear S2 to initiate outgoing calls, answer calls, and to complete conversations.
Receiving calls
Answering a call
X Drag
The call feature will automatically launch on your smartphone if you are connected to a smartphone. Use your smartphone to have a
conversation. If you are in standalone mode, you can answer the call on your Gear S2.
X If the voice control feature is activated, say “
Answer
to the right to answer a call.
Answer
” to answer the call.
58
Page 69

Applications
Rejecting a call
Reject an incoming call and send a rejection message to the caller.
Reject
X Drag
of the screen.
• If the voice control feature is activated, say “
to the left to reject a call. To send a message when rejecting an incoming call, swipe upward from the bottom edge
Reject
” to reject the call.
Missed calls
If a call is missed, a notification displays on the screen.
X On the Watch screen, rotate the bezel left to view missed call notifications, or tap
59
Phone
on the Apps screen to view missed calls.
Page 70

Applications
Making calls
X Tap
Phone
on the Apps screen.
Keypad
Log list
Use one of the following methods:
Keypad
• Tap
• Tap
• Scroll through the log list, select a log entry, and then tap
, enter a number using the keypad, and then tap Phone
Contacts
, select a contact, and then tap
Dial
.
or select a phone number.
Dial
.
60
Contacts
Page 71

Applications
S Health
Introduction
S Health helps you manage your wellness and fitness. Set fitness goals and regularly record and check your progress.
When the Gear is synced with a compatible S Health app, you can use additional features. The additional features include checking
your heart rate logs individually, and more.
The accuracy of the heart rate sensor may be diminished depending on skin condition, or measurement conditions and
surroundings. Take heart rate measurements when you are seated and relaxed.
X Tap
S Health
on the Apps screen. Tap
START w
hen running this app for the first time or after performing a data reset.
61
Page 72

Applications
Wearing the Gear correctly
When measuring your heart rate, wear the Gear snugly on your arm above your wrist as shown in the following figure. Do not fasten
the Gear too tightly.
<Rear>
Heart rate sensor
This device, S Health, and related software is not intended for use in the diagnosis of disease or other conditions, or in the
cure, mitigation, treatment or prevention of disease.
Do not look directly at the heart rate sensor’s lights. Doing so may impair your vision.
62
Page 73

Applications
24-hour activity tracker
Your Gear can monitor and record your activities during the day and encourage you to stay healthy.
S Health
1 Tap
•
•
•
on the Apps screen.
Healthy activity
10consecutive minutes, the Gear encourages you to keep going.
Light activity
Inactive time
prompts you to move more.
: Indicates whether you are walking or running. If you have made more than 100 steps per minute for at least
: Indicates the time you spend doing light activity, but not doing hard exercise.
: Indicates the time you spend not walking or moving at all. If you sat idle for 50 minutes or more, the Gear
63
Page 74

Applications
2 Tap the screen and rotate the bezel to view the details of your activity log.
64
Page 75

Applications
Steps tracker
The Gear counts the number of steps you have taken and measures the distance traveled.
S Health
1 Tap
2 Rotate the bezel right and open the steps tracker panel.
3 Tap the screen to view a graph of your step count records. Rotate the bezel to view records by day.
on the Apps screen.
Current step total
Target step number
65
Page 76

Applications
Exercise tracker
Record your exercise information and calories burned using S Health’s exercise feature.
When your Gear and smartphone are connected, this feature uses your smartphone’s location information.
Measured distance may differ from the actual distance due to uneven strides, walking in place, and pacing around.
66
Page 77

Applications
Exercising with the Gear
1 Tap
S Health
on the Apps screen.
2 Rotate the bezel right and open the exercise tracker screen.
Options
3 Tap
4 Tap
• Your location information sharing preference is saved as the default.
5 Rotate the bezel right to select a target type.
6 Tap the target value.
7 Rotate the bezel to set the target and tap
START
8 Tap
and select the type of exercise you want to monitor.
OK
to allow this app to use your current location while exercising.
SET
.
to start monitoring your exercise. Your heart rate measurement begins.
67
Page 78

Applications
Heart rate
9 Start exercising when the measurement is completed.
• When you rotate the bezel you can view exercise information, such as calories burned and current speed.
• Rotate the bezel left to listen to music using a Bluetooth headset.
Exercise time
Target duration of
exercise
10 Tap the screen and tap
PAUSE
> Stop
. Rotate the bezel to view your exercise information.
68
Page 79

Applications
Heart rate tracker
Measure and record your heart rate.
To measure your heart rate more accurately with the Gear, wear the Gear firmly around your lower arm just above the wrist.
This device, S Health, and related software is not intended for use in the diagnosis of disease or other conditions, or in the
cure, mitigation, treatment or prevention of disease.
69
Page 80

Applications
Measuring your heart rate
1 Tap
S Health
on the Apps screen.
2 Rotate the bezel right and open the heart rate tracker screen.
3 Tap
4 Select a status tag for your measured heart rate.
Heart rate
• After a moment, your current heart rate displays on the screen.
• The Gear displays information about your heart rate in relation to your selected tag.
to begin measuring your heart rate.
70
Page 81

Applications
5 Tap the screen to view a graph of your records. Rotate the bezel to view records by day.
71
Page 82

Applications
Tracking your heart rate
The Gear can automatically measure and track your heart rate. Your Gear measures your heart rate at regular intervals.
This feature may not function properly while you are moving.
X To activate or deactivate this feature, rotate the bezel right and open the settings screen, tap
frequency level.
72
Options > Auto HR
and select a
Page 83

Applications
Water tracker
Record and track how many glasses of water you drink.
S Health
1 Tap
2 Rotate the bezel right and open the water tracker screen.
on the Apps screen.
3 Tap
4 Tap the screen to view a graph of your records. Rotate the bezel to view records by day.
Add
when you drink a glass of water.
• If you accidentally added an incorrect value, you can fix it in the S Health app on your smartphone.
73
Page 84

Applications
Caffeine tracker
Record and track how many cups of coffee you drink.
S Health
1 Tap
2 Rotate the bezel right and open the caffeine tracker screen.
on the Apps screen.
74
Page 85

Applications
Add
3 Tap
• If you accidentally added an incorrect value, you can fix it in the S Health app on your smartphone.
4 Tap the screen to view a graph of your records. Rotate the bezel to view records by day.
when you drink a cup of coffee.
Additional information
Only your most recent activity records are stored. You can view previous data on the smartphone where the
SHealth app is installed.
75
Page 86

Applications
Nike+ Running
Nike+ Running records your exercising by tracking your distance, pace, and time. Check your monthly records and compare them with
yourfriends.
Starting Running
You must download and install
1 On the Gear Apps screen, tap
• The smartphone displays a screen that prompts you to download and install
Nike+ Running
Running
.
on the smartphone to use this app on the Gear.
Nike+ Running
.
2 On the smartphone follow the prompts to install
3 Launch
tap
LOG IN
Nike+ Running
>
DONE
.
, tap
GET STARTED
>
Nike+ Running
Running
76
.
, enter your email address and password, and then
Page 87

Applications
Starting to exercise
1 On the Apps screen, tap
Run
2 Tap
3 Set your music, heart rate measurement, and encouragement preferences for youractivity.
4 When you are finished, the Gear displays the Running main screen and starts to record your exercise.
• Rotate the bezel left to view music playback controls while exercising.
• Rotate the bezel right to view your current location on a map.
5 When you are finished exercising, tap the screen and tap
• Rotate the bezel left on the Running main screen to view your exercise records for this month.
• Rotate the bezel right on the Running main screen to compare your exercise records with friends. You can add your friends to
.
compete with them.
Running
.
Pause
>
Stop
> OK
77
.
Page 88

Applications
Schedule
View the events scheduled on the smartphone.
Schedule
1 Tap
2 Tap anywhere on the monthly calendar.
• The current day’s events list displays.
3 Rotate the bezel right to view upcoming events.
on the Apps screen.
78
Page 89

Applications
S Voice
Introduction
Perform various tasks simply by speaking.
Make sure the Gear’s microphone is not obstructed when you are speaking into it.
Setting a wake-up command
You can launch S Voice using your own wake-up command. You can only use this feature when your Gear’s screen is turned on.
X When launching S Voice for the first time, tap
• To change the wake-up command, tap
tap
START
and follow theprompts.
OK > START
More options
and set your own wake-up command.
, rotate the bezel to
79
Change wake-up command > OK
, and then
Page 90

Applications
Using S Voice
1 Say the preset wake-up command or tap
• When
S Voice
launches, the Gear begins voice recognition.
S Voice
on the Apps screen.
View examples of
voice commands
2 Say a voice command.
• If the Gear recognizes the command, the Gear performs the corresponding action.
• Tap Microphone
to repeat a voice command or say a different command.
80
S Voice settings
Page 91

Applications
Tips for better voice recognition
• Speak clearly.
• Speak in quiet places.
• Do not use offensive or slang words.
• Avoid speaking in dialectal accents.
The Gear may not recognize your commands or may perform unwanted commands depending on your surroundings or how
youspeak.
Setting the language
X On the Apps screen, tap
The selected language is applied to
S Voice
>
More options
>
Language
S Voice
only, not to the language displayed on the Gear.
, and then select a language.
81
Page 92

Applications
Weather
View weather information on the Gear for locations set on the smartphone when the devices are connected.
Weather
1 Tap
2 Tap the screen and rotate the bezel to view the current day’s weather information.
3 Rotate the bezel right to add other cities’ weather information.
on the Apps screen.
When your Gear and smartphone are connected, this feature uses your smartphone’s location information.
82
Page 93

Applications
Alarm
Setting alarms
1 Tap
Alarm
on the Apps screen.
Add alarm
2 Tap
• If you have a saved alarm, tap
3 Set the alarm time by tapping an option and rotating the bezel, and then tap
4 Select the days for the alarm to repeat and tap
• The saved alarm is added to the alarms list.
• From the alarms list, tap
.
ADD
on the alarm list.
SAVE
.
OFF
to activate the alarm or tap
ON
to deactivate the alarm.
83
NEXT
.
Page 94

Applications
Stopping alarms
X Drag
Stop
after 5 minutes.
to the right to stop an alarm. If you want to use the snooze function, drag
Deleting alarms
X In the alarms list, press and hold an alarm, and then tap
Delete
.
Timer
1 Tap
Timer
on the Apps screen.
2 Tap an increment of time, and rotate the bezel to set the duration, and then tap
Stop
3 Drag
to the right when the timer goes off.
84
START
.
Z
Z
Snooze
to the left to repeat the alarm
Page 95

Applications
Stopwatch
1 Tap
Stopwatch
START
2 Tap
• Tap
STOP
3 Tap
• Tap
• Tap
• Swipe upwards from the bottom edge of the screen to view the stopwatch log.
on the Apps screen.
to time an event.
LAP
to record lap times while timing an event.
to stop timing.
RESUME
to restart the timing.
RESET
to clear lap times.
85
Page 96

Applications
Bloomberg
View the latest articles, article summaries, and stock indexes from Bloomberg.
Bloomberg
1 Tap
2 Select a category and view the article summaries or stock indexes. Tap
view details for the index on your smartphone.
on the Apps screen.
CNN
Read the latest articles from CNN on your Gear.
CNN
1 Tap
2 Rotate the bezel to select a category.
3 Scroll up or down in the article list and tap an article to read it.
on the Apps screen.
• Tap
Download
to read the full article.
86
More options
>
Show on phone
to read the full article or
Page 97

Applications
Adjust the volume
Music Player
Introduction
Listen to music saved on the Gear and on the smartphone.
Playing music
X Tap
Music Player
on the Apps screen.
Skip to the previous file
Tap and hold to rewind
Pause and resume playback
Skip to the next file
Tap and hold to fast-forward
Access additional options
Open the playlist
87
Page 98

Applications
Playing music on your smartphone
When you select a smartphone to play music from, you can control playback of the music with your Gear. The music plays on your
smartphone.
Music Player
1 Tap
More options
2 Tap
• The music plays on your smartphone and the Gear displays the music controller screen.
.
, rotate the bezel to
Play music from
, and then tap
88
Play music from
.
Page 99

Applications
Importing music
Import music saved in your device to your Gear.
1 On the Apps screen of the smartphone, tap
Send media
2 Tap
Select tracks
3 Tap
4 Select files and tap
To sync music in your smartphone with your Gear:
1 Open the Apps screen of the smartphone and tap
2 Tap the
• The selected playlists synchronizes while the Gear is charging.
Auto sync
.
.
DONE
.
switch under
Music
Samsung Gear
, tap
Playlists to sync
Samsung Gear
.
>
Send media
, and then select playlists to export to the Gear.
89
.
Page 100

Applications
Samsung Milk Music
Samsung Milk Music is a streaming radio service that offers a simple way to find the music that is right for you. With a library of over
13 million songs and 200+ stations, the interactive dial makes it easy to skim through stations, to find the perfect soundtrack for the
moment.
Samsung Milk Music
X Tap
on the Apps screen to start listening to music.
Gallery
Introduction
View and manage images stored on the Gear.
Viewing images
1 Tap
Gallery
on the Apps screen.
2 Rotate the bezel to scroll through the image list and select an image.
90
 Loading...