

Samsung SM-R3820ZKNXAR, SM-R3820ZKAXAR, SM-R3820WRNXAR, SM-R3820WRAXAR User Manual

ANDROID SMARTWATCH
User Manual
Please read this manual before operating your
device and keep it for future reference.
GH68_3XXXXA Printed in KoreaXX

WARNING!
This product contains chemicals known to the State of California to cause cancer, birth defects, or other reproductive
harm. For more information, please call 1-800-SAMSUNG (726-7864).
Intellectual Property
All Intellectual Property, as defined below, owned by or which is otherwise the property of Samsung or its respective suppliers
relating to the SAMSUNG Phone, including but not limited to, accessories, parts, or software relating there to (the “Phone
System”), is proprietary to Samsung and protected under federal laws, state laws, and international treaty provisions. Intellectual
Property includes, but is not limited to, inventions (patentable or unpatentable), patents, trade secrets, copyrights, software,
computer programs, and related documentation and other works of authorship. You may not infringe or otherwise violate the
rights secured by the Intellectual Property. Moreover, you agree that you will not (and will not attempt to) modify, prepare
derivative works of, reverse engineer, decompile, disassemble, or otherwise attempt to create source code from the software. No
title to or ownership in the Intellectual Property is transferred to you. All applicable rights of the Intellectual Property shall remain
with SAMSUNG and its suppliers.
Open Source Software
Some software components of this product incorporate source code covered under GNU General Public License (GPL), GNU Lesser
General Public License (LGPL), OpenSSL License, BSD License and other open source licenses. To obtain the source code covered
under the open source licenses, please visit:
WEA_R382_EN_UM_TN_78T_082416_FINAL
opensource.samsung.com

Disclaimer of Warranties; Exclusion of Liability
EXCEPT AS SET FORTH IN THE EXPRESS WARRANTY CONTAINED ON THE WARRANTY PAGE ENCLOSED WITH THE PRODUCT, THE
PURCHASER TAKES THE PRODUCT “AS IS”, AND SAMSUNG MAKES NO EXPRESS OR IMPLIED WARRANTY OF ANY KIND
WHATSOEVER WITH RESPECT TO THE PRODUCT, INCLUDING BUT NOT LIMITED TO THE MERCHANTABILITY OF THE PRODUCT OR
ITS FITNESS FOR ANY PARTICULAR PURPOSE OR USE; THE DESIGN, CONDITION OR QUALITY OF THE PRODUCT; THE
PERFORMANCE OF THE PRODUCT; THE WORKMANSHIP OF THE PRODUCT OR THE COMPONENTS CONTAINED THEREIN; OR
COMPLIANCE OF THE PRODUCT WITH THE REQUIREMENTS OF ANY LAW, RULE, SPECIFICATION OR CONTRACT PERTAINING
THERETO. NOTHING CONTAINED IN THE INSTRUCTION MANUAL SHALL BE CONSTRUED TO CREATE AN EXPRESS OR IMPLIED
WARRANTY OF ANY KIND WHATSOEVER WITH RESPECT TO THE PRODUCT. IN ADDITION, SAMSUNG SHALL NOT BE LIABLE FOR
ANY DAMAGES OF ANY KIND RESULTING FROM THE PURCHASE OR USE OF THE PRODUCT OR ARISING FROM THE BREACH OF
THE EXPRESS WARRANTY, INCLUDING INCIDENTAL, SPECIAL OR CONSEQUENTIAL DAMAGES, OR LOSS OF ANTICIPATED PROFITS
OR BENEFITS.
Modification of Software
SAMSUNG IS NOT LIABLE FOR PERFORMANCE ISSUES OR INCOMPATIBILITIES CAUSED BY YOUR EDITING OF REGISTRY SETTINGS,
OR YOUR MODIFICATION OF OPERATING SYSTEM SOFTWARE.
USING CUSTOM OPERATING SYSTEM SOFTWARE MAY CAUSE YOUR DEVICE AND APPLICATIONS TO WORK IMPROPERLY. YOUR
CARRIER MAY NOT PERMIT USERS TO DOWNLOAD CERTAIN SOFTWARE, SUCH AS CUSTOM OS.

Samsung Electronics America (SEA), Inc.
Address:
85 Challenger Road
Ridgefield Park,
New Jersey 07660
Phone:
1-800-SAMSUNG (726-7864)
Internet Address:
samsung.com
©2016 Samsung Electronics America, Inc. Samsung, Samsung Galaxy, Gear, and S Voice are all registered trademarks of
Samsung Electronics Co., Ltd.
Other marks are the property of their respective owners.
Note:
Screen images are simulated. Appearance of device may vary.

Do you have questions about your Samsung Mobile Device?
For 24 hour information and assistance, we offer a new FAQ/ARS System (Automated Response System) at:
samsung.com/us/support
The actual available capacity of the internal memory is less than the specified capacity because the operating system and default
applications occupy part of the memory. The available capacity may change when you upgrade the device.
Legal Information
Important legal information can be accessed at
samsung.com
Samsung Limited Warranty
Samsung Limited Warranty - This product is covered under the applicable Samsung Limited Warranty INCLUDING ITS DISPUTE
RESOLUTION PROCEDURE and your right to opt out of arbitration within 30 calendar days of the first consumer purchase.
You may opt out by either sending an email to
calling 1-800-SAMSUNG (726-7864). For more detailed procedures, please refer to the “Dispute Resolution Procedures and
Arbitration and Opt-Out” section of the Limited Warranty.
The EULA for this device is found in the Gear Manager application, which is required for operation of your device.
You may also access this EULA at:
vice can be found at:
optout@sea.samsung.com
samsung.com/us/Legal/SamsungLegal-EULAGEAR
with the subject line “Arbitration Opt-Out” or by

Table of Contents
Section 1: Getting Started ...........................3
Charging the battery . . . . . . . . . . . . . . . . . . . . . 3
Turning the Gear Live on and off . . . . . . . . . . . . 7
Connecting the Gear Live to a mobile device . . .8
Section 2: Basics .......................................11
Gear Live features and controls . . . . . . . . . . . . 11
Maintaining Water and Dust Resistance . . . . . . 12
Wearing the Gear Live . . . . . . . . . . . . . . . . . . . 13
Using the Touch Screen . . . . . . . . . . . . . . . . . . 17
Features list . . . . . . . . . . . . . . . . . . . . . . . . . . 21
Start (apps) menu . . . . . . . . . . . . . . . . . . . . . . 22
Section 3: Using Features .........................24
Take a note . . . . . . . . . . . . . . . . . . . . . . . . . . . 24
Remind me . . . . . . . . . . . . . . . . . . . . . . . . . . . 24
Show me my steps . . . . . . . . . . . . . . . . . . . . . 25
Show me my heart rate . . . . . . . . . . . . . . . . . . 25
Send a text . . . . . . . . . . . . . . . . . . . . . . . . . . . 27
Email . . . . . . . . . . . . . . . . . . . . . . . . . . . . . . . . 28
Agenda . . . . . . . . . . . . . . . . . . . . . . . . . . . . . . 29
1
Navigate . . . . . . . . . . . . . . . . . . . . . . . . . . . . .29
Set a timer . . . . . . . . . . . . . . . . . . . . . . . . . . . .30
Start stopwatch . . . . . . . . . . . . . . . . . . . . . . . . 31
Set an alarm . . . . . . . . . . . . . . . . . . . . . . . . . . 31
Show alarms . . . . . . . . . . . . . . . . . . . . . . . . . .32
Settings . . . . . . . . . . . . . . . . . . . . . . . . . . . . . .32
Section 4: Using Applications ..................34
Accessing the Start menu . . . . . . . . . . . . . . . .34
Compass . . . . . . . . . . . . . . . . . . . . . . . . . . . . . 35
Fit . . . . . . . . . . . . . . . . . . . . . . . . . . . . . . . . . .35
Heart rate . . . . . . . . . . . . . . . . . . . . . . . . . . . .38
Keep . . . . . . . . . . . . . . . . . . . . . . . . . . . . . . . .38
Stopwatch . . . . . . . . . . . . . . . . . . . . . . . . . . . . 39
Section 5: Using Android Wear ................. 40
Installing Android Wear . . . . . . . . . . . . . . . . . .40
Launching Android Wear . . . . . . . . . . . . . . . . .40
Changing to your new Gear Live . . . . . . . . . . .40
Configuring Gear Settings . . . . . . . . . . . . . . . .41
Customizing your Gear Live . . . . . . . . . . . . . . .42

Getting to know your Gear Live . . . . . . . . . . . 43
Section 6: Customizing Your Gear Live ... 44
Launching the Settings menu . . . . . . . . . . . . . 44
Adjusting Display Brightness . . . . . . . . . . . . . 44
Always-on screen . . . . . . . . . . . . . . . . . . . . . 44
Airplane mode . . . . . . . . . . . . . . . . . . . . . . . . 45
Power off . . . . . . . . . . . . . . . . . . . . . . . . . . . . 45
Restart . . . . . . . . . . . . . . . . . . . . . . . . . . . . . . 45
Reset device . . . . . . . . . . . . . . . . . . . . . . . . . 46
Change watch face . . . . . . . . . . . . . . . . . . . . 46
About . . . . . . . . . . . . . . . . . . . . . . . . . . . . . . . 47
2

Section 1: Getting Started
With the Gear™ Live (also referred to as Gear Live or
Gear) connected to your mobile device, you can use
the Gear Live to do the following:
•
Save and review notes, and set reminders or alarms,
•
Send and receive text messages and email more
conveniently,
•
Navigate to a desired destination, and/or
•
Help monitor your health;
all this and more with a few spoken words or screen
taps.
Charging the batter y
Before using the Gear Live for the first time, you
should charge the battery.
Use the charging dock provided with the Gear Live to
charge the device’s battery.
3
You can also use a computer to charge the device’s
battery by connecting the computer to the charging
dock using the USB cable provided with the Gear.
Important!
Use only Samsung-approved chargers,
batteries, and cables. Unapproved
chargers or cables can cause damage to
the battery to the Gear Live.
Note:
When the battery power is low, the battery icon
displays as empty.
If the battery is completely discharged, you
cannot turn on the Gear Live as soon as the
charger is connected.
Allow a depleted battery to charge for a few
minutes before turning on the device.
While charging, some features are not available.
Note:
Make sure the Gear Live's microphone is not
obstructed when you are speaking into it while
charging.
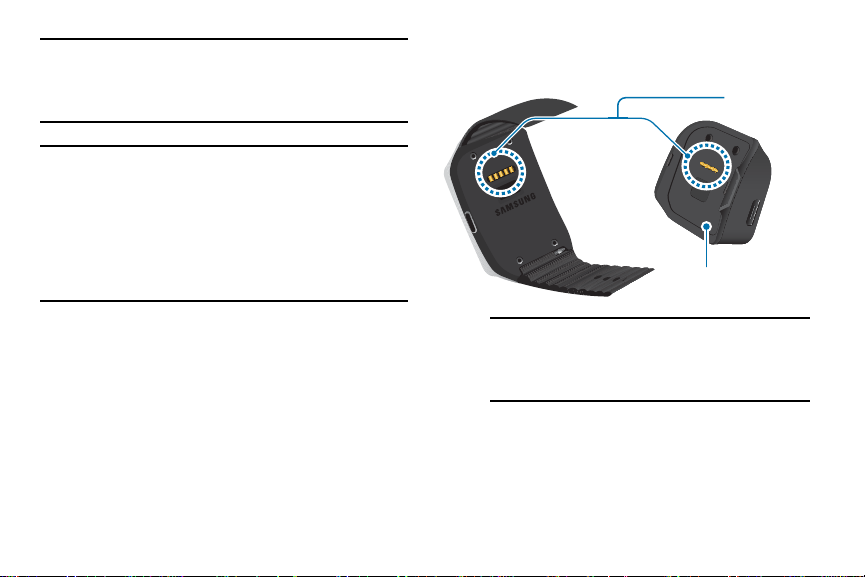
1. Locate the charging terminals on the
Gear™ Live and on the charging dock.
Charging
terminals
Warning!
Do not allow children or animals to chew or
suck the device. Do not disassemble, modify,
or repair your device. Magnetic stripe cards,
including credit cards, phone cards,
passbooks, and boarding passes, may be
damaged by magnetic fields.
Charging dock
Note:
The Charging dock is designed only for
use with the Gear Live and may not be
compatible with other devices.
Getting Started 4
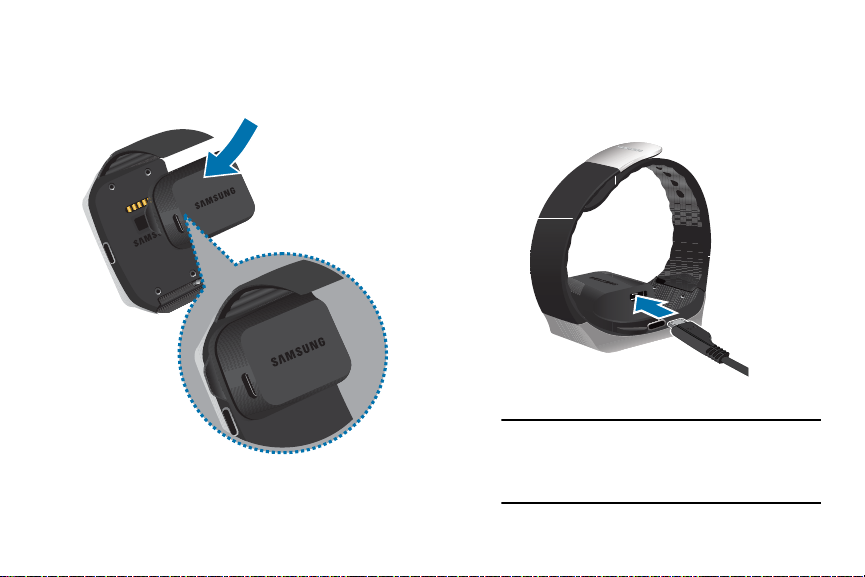
Place the charging dock on the Gear Live
2.
with the charging terminals facing each
other.
3. Plug the small end of the provided USB
cable into the USB port on the charging
dock, and then plug the large end of the
cable into the Charger head.
4. Plug the Charger head into a wall outlet.
Important!
If power to the Gear Live is unstable
while charging, the touch screen
may not function.
5

Important!
While charging, the Gear Live may
become warm. This is normal. If
the battery gets hotter than usual,
disconnect the charger.
After fully charging the Gear Live battery,
5.
open the retainer, and then separate the
device from the charging dock.
Caution!
Use only charging devices and
batteries approved by Samsung.
Samsung accessories are designed for
your device to maximize battery life.
Using other accessories may invalidate
your warranty and may cause damage.
Warning!
Prevent the USB charger port and the
small end of the charger from coming
into contact with conductive materials,
such as liquids, dust, metal powders,
and pencil leads.
Gear Live operating time
•
Device operating time is affected by your usage
patterns, the charge level, and the condition of the
battery.
•
Running multiple applications or features at the
same time can reduce device operating time.
Getting Started 6

•
Playing high-definition video reduces battery power.
Turning the Gear Live on and off
When you turn on the Gear Live for the first time, a
feature preview slide show plays on the screen.
Note:
To use the Gear Live, install the Android Wear on
your mobile device and connect it with the Gear
Live. (For details, see
Live to a mobile device”
7
“Connecting the Gear
on page 8.)
Turning the Gear Live on
To turn on the Gear Live, press and hold the
Power button (on the right hand side of the
device) for a few seconds. The screen lights
and displays
Samsung Gear Live
.

Turning the Gear Live off
1. To turn the Gear Live off, press and hold the
Power button, and then tap
2. When prompted
Power off: Are you sure?
Power off
.
,
tap .
Connecting the Gear Live to a mobile device
Install the Android Wear application on your mobile
device and connect your Gear Live to the device using
a Bluetooth
1. Using your mobile device, open Google Play
2. Install and open Android Wear on your
3. Turn on your Gear Live. The Gear Live model
®
connection.
Store and search for Android Wear, or visit
play.google.com
, to download it.
mobile device.
name displays on the Android Wear screen.
4. Place your Gear Live close to your mobile
device.
5. From the
Gear Live model name. The
pairing request
6. Tap
Android Wear
OK
. The
screen, select the
pop-up displays.
Confirm passkey
Bluetooth
pop-up
displays.
7. Tap
OK
. A
Paired with...
alert displays on
your mobile device.
Getting Started 8
When the devices connect, the
Gear Live
screen displays on the mobile device and
the clock screen displays on the Gear Live.
•
You can configure the Gear Live using the Android
Wear application.
9
•
Screens may vary depending on the type of mobile
device and its software version.
Connecting to another mobile device
To connect your Gear Live to another device, you must
reset the Gear Live to erase all your data from its
memory.
1. With your Gear Live on, press and hold the
Power button until the
displays.
2. Swipe upward until the
displays, and then tap it.
3. When the
Install Android Wear on your phone
prompt displays, tap it, and then follow
succeeding prompts to connect the new
mobile device to your Gear Live. (For more
information, refer to “Connecting the Gear
Live to a mobile device” on page 8.)
Settings
menu
Reset device
option

Tips for using Bluetooth
•
When connecting your Gear Live to your mobile
device, place both devices close to each other.
•
Bluetooth uses a relatively low power radio signal.
Some industrial, scientific, medical, and other low
power products can cause interference for Bluetooth
connections.
•
In an open space, the Bluetooth communication
range is usually up to approximately 30 feet.
•
Your Gear Live is not compatible with all Bluetoothcapable mobile devices. Some devices, especially
those not tested or approved by the Bluetooth SIG,
may not be compatible with your Gear Live.
Getting Started 10
Section 2: Basics
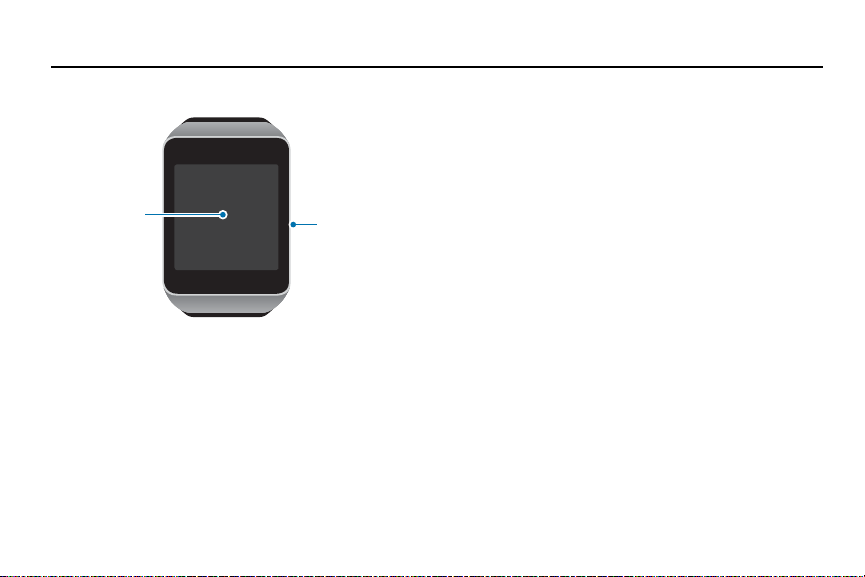
Screen
Power button
Gear Live f eatures and controls
Touch screen
The Gear Live’s touch screen displays device status
information, notifications, and application-related
information. By touching and swiping the screen, you
can access Gear Live’s features, settings, and apps.
(For more information, refer to
Screen”
11
on page 17.)
“Using the Touch
Power Button
The Power Button turns the Gear™ Live on or off,
Settings
displays the Watch screen or
the display.
•
Press and hold the Power button for several seconds
to turn the Gear Live on or to display the
menu.
•
Press the Power button once to hide or display the
Watch screen.
•
From the Watch screen, press the Power button
once to lock the Gear Live.
menu, blanks
Settings
 Loading...