

Samsung SMP907A Users Manual
Playing Videos
DRAFT For Internal Use Only
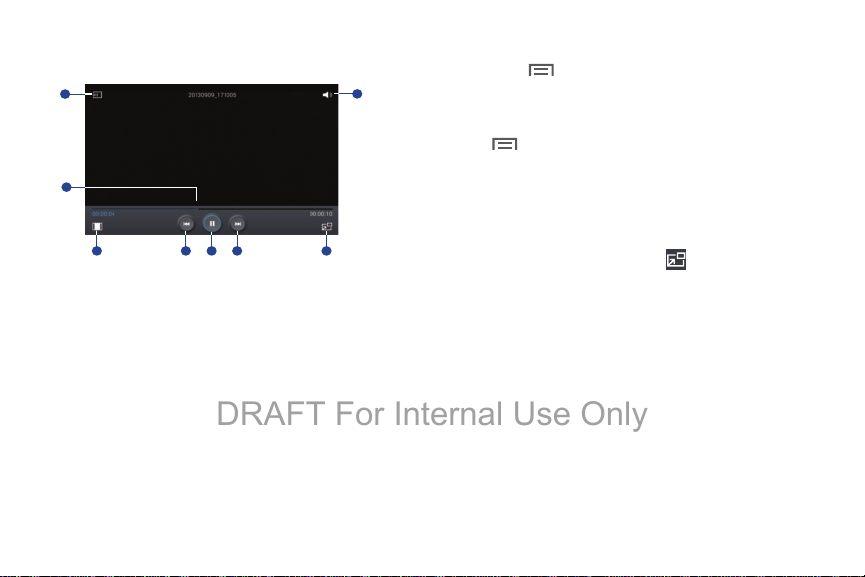
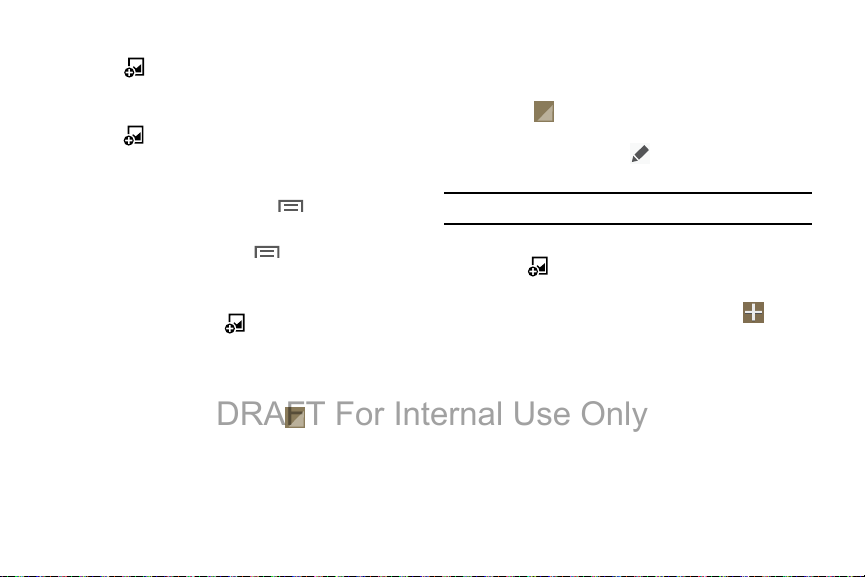
Select a video to play.
1
3
4 5 6 7 8
2
1. Scan DLNA-enabled devices.
2. Adjust the volume.
3. Move forwards or backwards by dragging the bar.
4. Change screen ratio.
5. Restart the current video or skip to the previous video.
Touch and hold to move backwards quickly.
6. Pause and resume playback.
7. Skip to the next video. Tap and hold to move forwards
quickly.
8. Switch to floating screen mode.
Deleting Videos
Tou ch
and then touch
Menu
➔
Delete
Delete
, select videos by ticking,
.
Sharing Videos
To uch
touch
Menu
➔
Share via
, select videos by ticking,
Done
, and then select a sharing method.
Using Popup Video Player
Use this feature to use other applications without closing the
video player.
While watching videos, touch to use the pop-up
player.
Spread two fingers apart on the screen to enlarge the
player or pinch to reduce it.
To move the player, drag the player to another location.
Purchasing Videos
Scroll the screen to the left or right, and then select a video.
Camera and Video 81
YouTube
DRAFT For Internal Use Only
Use this application to watch videos from the YouTube
website.
From a Home screen, touch
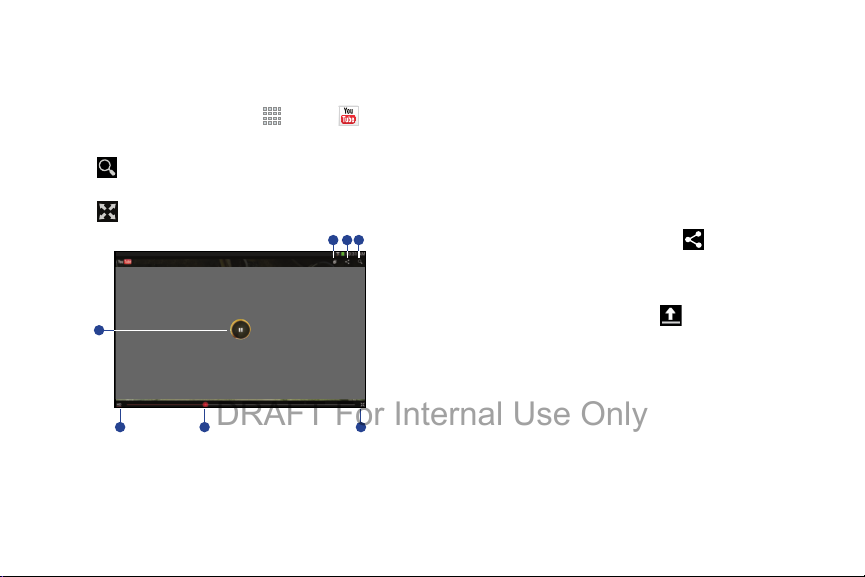
Watching Videos
Touch
the returned search results to watch a video.
Touch to display full screen.
4
Search
, and then enter a keyword. Select one of
Apps
➔
1
2
YouTube
3
1. Add the video to the playlist.
2. Send the URL to others.
3. Search for videos.
.
4. Pause or resume playback.
5. Change display quality.
6. Move forwards or backwards by dragging the bar.
7. Exit full screen.
Sharing Videos
Select the video to view, touch , and then select a
sharing method.
Uploading Videos
Select your account, touch , select a video, enter
information for the video, and then touch
UPLOAD
.
5 6
7
82
Section 7: Connections
DRAFT For Internal Use Only
Your device includes features to connect to the internet and
to other devices by using Wi-Fi, Bluetooth, or a USB cable.
Wi-Fi
Wi-Fi is a wireless networking technology that provides
access to local area networks. Use your device’s Wi-Fi
feature to:
•
Access the internet for browsing or to send and receive email.
•
Access your corporate network.
•
Use hotspots provided by hotels or airports while traveling.
Wi-Fi communication requires access to an existing Wireless
Access Point (WAP). WAPs can be open (unsecured, as with
most hotspots) or secured (requiring you to provide login
credentials). Your device supports Wi-Fi 802.11 a/b/g/n/ac.
Turn Wi-Fi On or Off
Turn your device’s Wi-Fi service on or off. When you turn
Wi-Fi service on, your device automatically searches for
available, in-range WAPs (Wireless Access Points).
From the Notification Panel
1. From any screen, touch the top of the screen and
swipe downward. The Notification Panel displays.
Wi-Fi
2. To uch
From Settings
1. From a Home screen, touch
➔
2. Touc h th e
OFF .
to turn Wi-Fi on (green) or off (grey).
Connections
.
OFF/ON
button to turn Wi-Fi ON or
Apps
➔
Settings
Connections 83
Scan and Connect to a Wi-Fi Network
DRAFT For Internal Use Only
When you turn on Wi-Fi, your device searches for and
displays available Wi-Fi connections.
1. From any screen, touch the top of the screen and
swipe downward. The Notification Panel displays.
Wi-Fi
2. Touch
scanning for available Wireless Access Points.
Note:
To begin a new scan for available WAPs, touch
3. When the scan is complete, touch a Wi-Fi network to
connect. If the Wi-Fi network is open (unsecured), your
device automatically connects. If the Wi-Fi network is
secured, enter the password at the prompt to connect.
Tip:
You can have your device automatically notify you of
available networks. See Network notification under
“Settings” on page 85.
Note:
When Wi-Fi is on, is displayed on the Status bar.
84
to turn Wi-Fi on (green). Your device begins
Scan
.
Add a Wi-Fi Network Manually
1. From a Home screen, touch
➔
Connections
2. Touch the
3. Tou ch
following:
• Network SSID
Point (WAP).
• Security
Note:
Depending on the security protocol used by the WAP,
additional network information may be required, such as
a password.
• Password
hex key.
4. Tou ch
tab.
OFF/ON
button to turn Wi-Fi ON .
Wi-Fi
➔
Add Wi-Fi network
: Enter the name of the Wi-Fi Wireless Access
: Select the type of security used by the WAP.
: If the WAP is secured, enter the password or
Connect
.
Apps
➔
and enter the
Settings
Settings
DRAFT For Internal Use Only
Configure your Wi-Fi connections.
Apps
➔
Settings
1. From a Home screen, touch
➔
Connections
2. Touch the
3. Tou ch
• Advanced
–
Network notification
Wireless Access Points (WAPs) are available.
–
Passpoint
automatically.
–
Sort by
signal strength indicator).
–
Keep Wi-Fi on during sleep
from Wi-Fi.
–
Always allow scanning
other apps to scan for networks, even when Wi-Fi is turned off.
tab.
OFF/ON
button to turn Wi-Fi ON .
Wi-Fi
➔
Menu
for options:
:
: Receive a notification when new
: Connect to passpoint-enabled Wi-Fi Access Points
: Sort Wi-Fi networks by alphabet or RSSI (received
: Specify when to disconnect
: Allow Google location service and
–
Wi-Fi timer
: Specify the
Starting time
time
for Wi-Fi to be automatically connected.
–
Install certificates
–
MAC address
required when connecting to some secured networks (not
configurable).
–
IP address
• WPS push button
Protected Setup) router or other equipment.
• WPS PIN entry
PIN-secured connection to a Wi-Fi router or other equipment
(not configurable).
•Help
: Learn about setting up and using Wi-Fi networks, and
other settings.
: Install authentication certificates.
: View your device’s MAC address, which is
: View your device’s IP address (not configurable).
: Set up a connection to a WPS (Wi-Fi
: View the PIN used by your phone to set up a
and the
Ending
Connections 85
Wi-Fi Direct
DRAFT For Internal Use Only
Wi-Fi Direct allows device-to-device connections so you
can transfer large amounts of data over a Wi-Fi connection.
These devices must be enabled for Wi-Fi Direct
communication. This connection is direct and not via a
hot spot or Wireless Access Point (WAP).
Apps
➔
Settings
Done
.
1. From a Home screen, touch
Connections
➔
2. Touch the
3. Tou ch
Your device begins scanning for other devices enabled
with Wi-Fi Direct.
4. Enable Wi-Fi Direct on the target device.
5. In the list of available devices, touch the target device.
– or –
If you want to connect to more than one device, touch
Multi-connect
Multi-connect) you want to connect to. Touch
86
tab.
OFF/ON
button to turn Wi-Fi ON .
Wi-Fi
➔
Wi-Fi Direct
and touch each device (that support
.
Accept
).
Samsung
(you have 30
folder ➔
Share, Share via,
6. On the target device, touch
seconds to touch
Once connected, the target device will show as
Connected
icon will display on the Status bar.
Share Information with Wi-Fi Direct
To share videos, photos, or other information with the
connected device, follow these steps:
1. View the information that you want to share. For
example, if you want to share a photo, find the photo in
your camera viewer or
My Files folder, then touch the
Send via
2. Touch the
The Wi-Fi Direct settings screen displays, Wi-Fi Direct
is turned on, and your device scans for other devices.
3. Touch a connected device name.
4. The other device displays a pop-up that indicates it is
receiving the file.
Accept
in your list of Wi-Fi Direct devices and the
option.
Wi-Fi Direct
option.
or
Bluetooth
DRAFT For Internal Use Only
Bluetooth is a short-range wireless communications
technology for exchanging information over a distance of
about 30 feet. You do not need to line up the devices to send
information with Bluetooth. If the devices are in range, you
can exchange information between them—even if they are
in different rooms.
Your device can use Bluetooth to share photos, contacts and
other content with other Bluetooth-enabled devices. Many of
the apps on your phone provide options for sharing via
Menu
Bluetooth under
.
Turning Bluetooth On or Off
From the Notification Panel
1. From any screen, touch the top of the screen and
swipe downward.
The Notification Panel displays.
2. Touch
Bluetooth
off (grey).
to turn Bluetooth on (green) or
From Settings
1. From a Home screen, touch
Connections
➔
2. Touc h th e
or OFF .
Note:
When Bluetooth is on, is displayed on the Status bar.
tab.
OFF/ON
button to turn Bluetooth ON
Apps
➔
Settings
Pair with a Bluetooth Device
To exchange information between your device and another
bluetooth-enabled device, you first must pair them.
Tip:
After pairing, your device and the target device recognize
each other and exchange information without having to
enter a passcode or PIN.
Apps
➔
1. From a Home screen, touch
Connections
➔
2. Touc h th e
Your device begins scanning for other
Bluethooth-enabled devices.
tab.
OFF/ON
button to turn Bluetooth ON .
Connections 87
Settings
Bluetooth
DRAFT For Internal Use Only
3. Touch
discoverable or visible mode. The target device will be
listed under Available devices. (If the target device is
not listed under Available devices, touch
4. Touch the target device to pair with it. Follow the
prompts to confirm the passkey, if required.
to enable the target device’s
Scan
.)
Share Data with a Bluetooth-Enabled Device
1. Select a file or item from within an app (such as a
photo in Gallery).
2. Touch the option for sharing, then select Bluetooth.
Note:
The method for selecting an option may vary by app and
data type.
3. Search for and pair with a Bluetooth device. For more
information, refer to “Pair with a Bluetooth Device” on
page 87.
88
Receive Data from a Bluetooth-Enabled Device
1. From a Home screen, touch
➔
Connections
2. To uch the
3. To uc h
device will be visible, touch
Visibility timeout
4. Pair with the Bluetooth device from which you want to
receive data. For more information, refer to “Pair with a
Bluetooth Device” on page 87.
A Bluetooth authorization request pop-up displays
when a Bluetooth-enabled device attempts to send
data to your device.
5. To uc h
receive data.
A File received message displays.
Received data is saved to the Bluetooth folder. If you receive
a contact, it is saved to your contacts automatically.
tab.
OFF/ON
button to turn Bluetooth ON .
Bluetooth
to select the length of time that your
.
Accept
to confirm that you are willing to
Apps
Menu
➔
➔
Settings
Additional Bluetooth Settings
DRAFT For Internal Use Only
When Bluetooth is on, additional settings are available.
1. From a Home screen, touch
Connections
➔
2. Touch
After searching, touch a device to pair with it. For more
information, refer to “Pair with a Bluetooth Device” on
page 87.
3. Touch
configure:
• Visibility timeout
automatically turn off the Discoverable option.
• Received files
Bluetooth.
•Help
Change Your Bluetooth Name
1. From a Home screen, touch
General
➔
2. Use the keyboard to modify your device name and
touch OK.
To uninstall an app from the Apps screen:
tab ➔ Bluetooth
Scan
to scan for nearby discoverable devices.
Menu
and select a Bluetooth setting to
: Use this setting to control when to
: Show the list of files received by using
: Display Bluetooth information.
tab ➔ About device ➔ Device name
Apps
.
Apps
➔
➔
Settings
Settings
.
Kies Via Wi-Fi
Samsung Kies is a software that enables you to update your
device firmware, synchronize files, and transfer data to and
from your device directly by connecting to the PC.
Note:
Some features will be supported through the System
Updates feature in the future. For more information,
refer to “Upgrading the Device” on page 59.
To learn more about Samsung Kies and Samsung
applications, browse featured applications and download
www.samsung.com/us/support/downloads
Kies at:
Note:
Samsung Kies works on both PC and Macintosh
computers.
.
Synchronizing with Windows Media
Player
Ensure that Windows Media Player is installed on your PC.
1. Attach your device to the computer with the USB cable.
Your computer recognizes the connection and displays
the AutoPlay screen.
Connections 89
2. Click the option to
DRAFT For Internal Use Only
to synchronize music files.
3. Select and drag the music files you want to the sync
list and begin synchronizing.
4. When finished, exit Windows Media Player and
disconnect the USB cable.
90
Sync digital media files to this device
Connecting as a Mass Storage Device
You can connect your device to a PC as a removable disk and
access the file directory. If you insert a memory card in the
device, you can also access the files directory from the
memory card by using the device as a memory card reader.
Note:
The file directory of the memory card displays as
separate from the internal memory, which is
1. Insert a memory card into the device to transfer files
from or to the memory card.
2. Attach your device to the computer with the USB cable.
Your computer recognizes the connection and displays
the AutoPlay screen.
3. Click the option to
You should see a Card and a Tablet folder.
4. Copy files from the PC to the memory card
(Card folder).
5. When finished, close the PC folder and disconnect the
USB cable.
Open device to view files
Tab le t
.
Card
.
,
Section 8: Applications
DRAFT For Internal Use Only
This section contains a description of each application that is
available on the Apps screen, its function, and how to
navigate through that particular application. If the application
is described in another section of this user manual, then a
cross reference to that description is provided.
Accessing Applications
The
Apps
screen displays all applications installed on your
wireless device. Applications that you download and install
from Google Play or from the web are also added to a Home
screen.
To access applications:
Apps
1. From a Home screen, touch
2. Locate the application’s icon and touch it to launch the
application.
Tip:
To open applications quickly, add the icons of frequentlyused applications to one of the Home screens, if it is not
there by default. For details, see “App Shortcuts” on
page 39.
.
Applications 91
Action Memo
1
2
DRAFT For Internal Use Only
Use Action Memo to jot down or draw a note, and then select
the memo to perform various actions, such as adding
contacts or sending a email.
To launch Action Memo:
With the S Pen button pressed, double-tap the screen.
For more information, refer to “Launching Action
Memo” on page 30.
– or –
Touch
then touch
92
Samsung
Create
folder ➔
.
Action Memo
, and
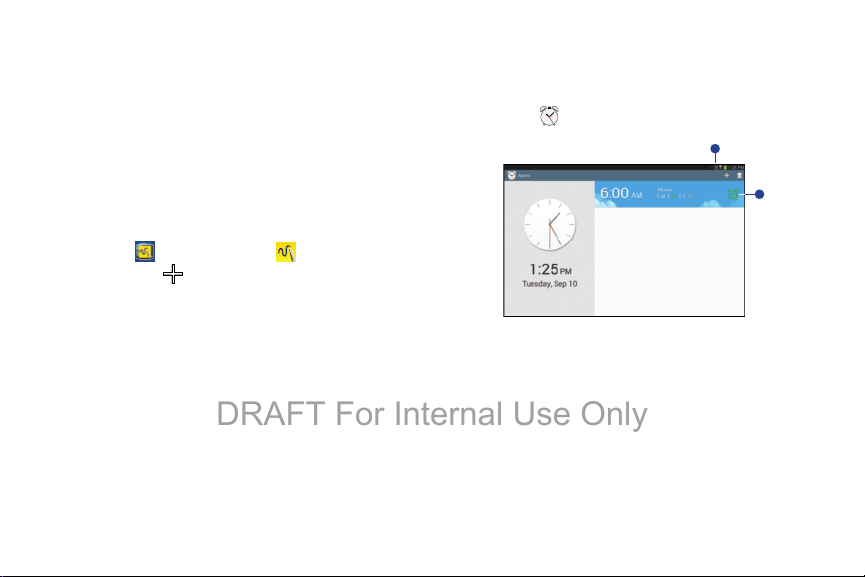
Alarm
Use this application to set wake-up calls and alarms for
important events.
Touch Alarm.
1. An alarm is set.
2. Turn this alarm on or off.
Setting Alarms
DRAFT For Internal Use Only
Tou ch
select days for the alarm to repeat, and then touch
Save
with the S Pen.
• Location alarm
• Snooze
• Smart alarm
Create
, set a time for the alarm to go off,
. You can also set an alarm by writing numbers
: Set a location. The alarm goes off only when
you are in the location.
: Set an interval and the number of times for the alarm
to repeat after the preset time.
: Set a time for the alarm to go off before the
preset time.
Stopping Alarms
Drag outside the large circle to stop an alarm.
Drag outside the large circle to repeat the alarm
after a specified length of time.
Deleting Alarms
Touch and hold the alarm, and then touch
Delete
.
Bloomberg Businessweek+
Read Bloomberg Businessweek+ weekly for all the content
of the print edition of the magazine along with exclusive
content and interactive features that enrich the reading
experience.
Tou ch
Businessweek+
.
Calculator
The Calculator provides the basic arithmetic functions to
solve simple arithmetic problems and advanced operators to
solve more complex problems.
Samsung
1. Touc h
2. Enter the first number using the numeric keys.
3. Enter the operation for your calculation by touching the
+
(add), - (subtract), × (multiply), or ÷ (divide) key.
4. Enter the next number.
5. To view the result, touch the
6. Repeat Steps 3 through 5 as many times as required.
7. Touch to clear the result.
folder ➔
Calculator
=
(equals) key.
Applications 93
.
8. For more advanced problems, rotate your device to
DRAFT For Internal Use Only
landscape mode and use the advanced operators
ln, cos, log, tan
pocket calculator.
9. Touch and hold entries in the Calculator's display field
to copy or cut the contents of the display.
The and display. Use the icons to select the
content to Cut or Copy. Touch either icon to display the
options pop-up. Touch
Clipboard.
, and so on, just as you would on a
Clipboard
to review the
sin
,
Calendar
Use this application to manage events and tasks.
Touc h
Calendar
.
Creating Events or Tasks
1. Touch , and then use one of the following methods:
• Add event
•Add task
– or –
To add an event or task more briefly, touch a date to
select it and touch it again.
94
: Enter an event with an optional repeat setting.
: Enter a task with an optional priority setting.
Enter a title and specify which calendar to use or sync
with. Then touch
add more details, such as how often the event repeats,
when it has an advance alert, or where it takes place.
2. Invite others to the event by sending an email. Enter
the email address to the
to open the contacts list.
3. Attach a map showing the location of the event. Enter
the location in the
field, and then pinpoint the precise location by touching
and holding on the map that appears.
Edit event details
Location
or
Edit task details
Participants
field, or touch
field, touch next to the
Syncing with Google Calendar
1. On a Home screen, touch
tab ➔
General
2. Touch a Google account ➔
To manually sync for updating:
Touch
To display synced events or tasks:
Touch
then tick the Google account.
Accounts ➔ Google
Calendar
Calendar
➔
➔
Apps
➔ Settings ➔
under
Sync Calendar
Menu
➔
Sync
Menu
➔
Calendars
My accounts
➔
Sync now
.
to
.
.
, and
Handwriting on Month View
DRAFT For Internal Use Only
On month view screen, touch to turn on
handwriting mode. This is only available in month view
in landscape mode.
Changing Calendar Type
Select one from among different types of calendars
including year, month, week, and others at the top side
of the screen.
Searching for Events
Tou ch
the search.
To view today’s events, touch Today at the top of the
screen.
Search
, and then enter a keyword to use for
Deleting Events
Tou ch
touch Delete.
Menu
➔ Delete, select events, and then
Sharing Events
Select an event or task, touch
and then select a sharing method.
Menu
➔ Share via,
Camera
Use this application to take photos or videos.
Tou ch
For more information, refer to “Camera” on page 66.
Camera
.
Applications 95
ChatON
DRAFT For Internal Use Only
Use ChatON to send and receive instant messages from any
device that has a mobile phone number.
To uch
For more information, refer to “ChatON” on page 58.
ChatON
.
Chrome
Use Chrome to browse the internet and bring your open tabs,
bookmarks and omnibox data from your computer to your
tablet.
Chrome
1. Touch
2. Follow the on-screen instructions.
.
Contacts
Store contact information for your friends, family, and
colleagues, to quickly access information or to send a
message.
Touc h
For more information, refer to “Contacts” on page 47.
96
Contacts
.
Downloads
Use this application to see what files are downloaded
through the applications.
1. To uch
2. Select a file to open it with an appropriate application.
•
•
Samsung
folder ➔
To sort the files by size, touch
To sort the files by date, touch
Downloads
Sort by size
Sort by date
.
.
.
Dropbox
Use this application to save and share files with others via
the Dropbox cloud storage. When you save files to Dropbox,
your device automatically syncs with the web server and any
other computers that have Dropbox installed.
1. To uch
When running Dropbox for the first time, touch Start to
activate it.
2. Follow the on-screen instructions to complete the
setup and begin using Dropbox.
Galaxy Plus
folder ➔
Dropbox
Email
DRAFT For Internal Use Only
Send and receive email using popular email services.
Tou ch
For more information, refer to “Email” on page 55.
Email
.
Evernote
Use this application to create, synchronize, and share
multimedia notes that you create. You can add tags to the
notes, or sort the notes into a notebook so that you can
manage your ideas efficiently.
Tou ch
Galaxy Plus
folder ➔ Evernote.
Flipboard
Use this application to access your personalized magazines.
Tou ch
For more information, refer to “Flipboard” on page 84.
Galaxy Plus
folder ➔
Flipboard
.
Gallery
Use Gallery to view, capture, and manage photos and videos.
For more information, refer to “Gallery” on page 74.
Tou ch
Gallery
.
Gmail
Send and receive email with Gmail, Google’s web-based
email.
Tou ch
For more information, refer to “Gmail” on page 54.
Google
folder ➔
Gmail
.
Google Search
Search the internet using the Google search engine.
1. From the main Home screen, touch .
– or –
Apps
From a Home screen, touch
Google
folder ➔
2. Use the keyboard to enter search criteria to display
matching searches.
– or –
Google
➔
.
Applications 97
Touch and speak the search criteria slowly and
DRAFT For Internal Use Only
clearly. Google searches for the information and
displays results.
Suggestions display below the text entry area.
98
3. Touch a suggestion to search for that term.
– or –
Touch on the keyboard to start the search.
A browser window displays the search results.
To use Voice Search directly:
1. From a Home screen, touch
Google
folder ➔
2. Speak the search criteria slowly and clearly. Google
searches for the information and displays results. If
criteria is not understood, it displays
to retry speaking the search words.
Apps
Voice Search
➔
.
Retry
. Touch the
Searching the Device
Touch the search field, and then enter a keyword.
Alternatively, touch , and then speak a keyword.
If no results are returned from the applications, the
web browser appears, displaying the search results.
Search Scope
To select which applications to search:
Tou ch
then touch the items to search for.
Menu
➔ Settings ➔ Tablet search, and
Google Now
DRAFT For Internal Use Only
Launch Google search to view Google Now cards that show
the current weather, public transit info, your next
appointment, and more when you are most likely to need it.
Join Google Now when opening Google search for the
first time.
To change Google Now settings:
Tou ch
Menu
➔ Settings ➔ Google Now.
Google Settings
Use this application to configure settings for some features
provided by Google.
Tou ch
Google
folder ➔
Google Settings
.
Google+
Share updates and see what is going on around you with
Google+ for mobile.
Tou ch
For more information, refer to “Google+” on page 58.
Google
folder ➔
Google+
.
Group Play
Group Play is an easy way to share files in real time with
others who are on the same Wi-Fi network. Group Play can
be used when you want to share documents, images, music,
and so on.
You can use Group Play for meetings, sales presentations,
conferences, and classes. All you need is a Wi-Fi network
that works with Group Play, and most do.
Note:
The Group Play app must be installed before you can
OK
use it. Touch
instructions.
Using Group Play from an Application
While using various applications, such as
you touch
option.
To share a file using Group Play:
1. Touc h
on the pop-up and follow the on-screen
Gallery
Share
to share a file, you see Group Play as an
Gallery
.
Applications 99
, when

2. Navigate to the file you want to share and touch
DRAFT For Internal Use Only
Share via
➔
Group Play
For more information, refer to “Gallery” on page 74.
Note:
After the initial Group Play request, touch
Group Play
3. Use the keyboard to enter a PIN code and touch
This process makes sure only desired recipients can
view your shared image.
The Group Play screen displays and the device waits
for other connected recipients to accept the connection
and enter the PIN on their screens.
You can now interact and draw with the on-screen
image, and users will instantaneously see the same
gestures and also be able to interact.
Note:
The newly altered image (with markups and comments)
cannot be saved, but you can take a screen shot of the
current image and save it to your Clipboard.
100
instead of
.
Share
.
Done
.
Using Group Play Directly
You can also access Group Play from the Applications screen.
Samsung
1. To uch
The Disclaimer screen displays the first time you
access Group Play.
2. Read the Group Play Terms and Conditions and
touch
Agree
The Group Play screen displays.
3. To uc h
4. To uc h
Join group
progress.
– or –
Create group
Tou ch
information.
folder ➔
.
to join a Group Play session in
to create a new group.
Menu
➔ Help for more Group Play
Group Play
.
Hangouts
DRAFT For Internal Use Only
Hangouts is an online place to meet friends and family, share
photos, and host video calls.
Tou ch
Google
folder ➔
Hangouts
.
Help
Access help information to learn how to use the device and
applications or configure important settings.
Tou ch
Help
.
Internet
Your device includes a full HTML Browser, to access the
internet.
Tou ch
Internet
.
KNOX
Use this application to secure the data on your device.
Tou ch
Samsung
folder ➔ KNOX.
Maps
Use Google Maps to find your current location, get directions,
and other location-based information.
Note:
You must enable location services to use Maps. For
more information, refer to “Location Services” on
page 118.
Tou ch
Maps
.
Messenger
With Google Messenger, you can bring groups of friends
together into a simple group conversation.
Tou ch
For more information, refer to “Messenger” on page 58.
Google
folder ➔
Messenger
.
Music
Play music and other audio files that you copy from your computer.
Tou ch
For more information, refer to “Music Player” on page 74.
Music
.
Applications 101
My Files
DRAFT For Internal Use Only
Use this application to access all kinds of files stored in the
device, including images, videos, songs, and sound clips.
Touc h
Samsung
folder ➔ My Files.
NYTimes
NYTimes allows you to read the latest web edition of The New
York Times newspaper.
1. Touch
The Latest News screen is displayed.
2. Touch on an article title to read it.
3. Touch
NYTimes
.
Menu
for
options, settings, and help.
Play Books
Use this application to read and download book files.
Touc h
Google
folder ➔
Play Books
.
Play Games
Use this application to download and play games.
Touc h
102
Google
folder ➔
Play Games
.
Play Magazines
Google Play Magazines helps you subscribe to your favorite
magazines so you can have them available to read on your
tablet at your leisure.
Play Magazines requires that you log on to your Google
account. For more information, refer to “Accounts” on
page 136.
Touch
Google
folder ➔
Play Magazines
.
Play Movies & TV
Use this application to watch, download, and rent movies or
TV shows.
Touch
Google
folder ➔
Play Movies & TV
Play Music
Use this application to listen to music from the device or
stream music from the Google cloud service.
Touch
For more information, refer to “Play Music” on page 74.
Google
folder ➔
Play Music
.
.
Play Store
DRAFT For Internal Use Only
Google Play Store provides access to downloadable
applications and games to install on your device. It also
allows you to provide feedback and comments about an
application, or flag an application that might be incompatible
with your device.
Play Store
1. Touch
2. The first time you open Play Store, read the Google Play
Terms of Service, the Google Music Terms of Service,
the Google Books Terms of Service, and the YouTube
Rentals Terms of Service, then touch
continue.
Menu ➔Help
3.
.
Accept
to
.
Installing Applications
Use this application to purchase and download applications
and games that are able to run on the device.
Play Store
1. Touch
2. Browse applications by category or touch
search with a keyword.
.
Search
to
3. Select an application to view information. To download
it, touch
INSTALL
. If there is a charge for the
application, touch the price, and follow on-screen
instructions to complete the purchase process.
Note:
When a new version is available for any installed
application, an update icon appears at the top of the
screen to alert you to the update. Open the notifications
panel and touch the icon to update the application.
Note:
To install applications that you downloaded from other
sources, on a Home screen, touch
Settings ➔ General
Unknown sources
tab ➔
.
Apps
Security ➔
➔
Uninstalling Applications
To uninstall applications purchased from Play Store:
Tou ch
select an application to delete in the list of installed
applications, and then touch
Play Store
and then touch
UNINSTALL
Applications 103
My apps
.
,
Updates to Downloaded Apps
DRAFT For Internal Use Only
You can check for new versions of applications by visiting the
Google Play Store. Items that have a new version available
Update
will say
You can also select apps that you would like to be updated
automatically. To do this:
1. Touch
2. Touch the
3. Touch an app and then touch
104
.
Play Store
and then touch
INSTALLED
installed on your device.
UPDATE is displayed if there is an update available for
the app.
➔
Auto-update apps
updating.
tab to list the Play Store apps
to enable or disable automatic
Menu
My apps
➔
Settings
.
4. To uc h
5. To uc h
device.
OPEN
to open the app on your device.
UPDATE
to immediately update the app on your
Polaris Office 5
Polaris Office Mobile for Android is a Microsoft Office
compatible office suite. This application provides a central
place for managing your documents online or offline.
The application can also open Adobe PDF (Portable
Document Format) files.
1. To uc h
2. Enter your Email information, if desired, and touch
Register
– or –
Tou ch
The main Polaris Office screen displays.
3. To get help for using Polaris Office, touch
➔
Polaris Office 5
to complete the process.
Later
to ignore this registration.
Help ➔ User Guide
.
Menu
.
S Finder
1
3
4
2
5
6
7 8 9 10
DRAFT For Internal Use Only
Use this application to search a wide variety of items on the
device, including email, documents, images, music,
applications, and more.
Menu
1. Touch and hold
to launch S Finder.
2. Touch the search field, and then enter search criteria.
Alternatively, touch , and then speak a keyword.
You can also use this feature to search the handwritten
content in the device.
S Note
Use this application to create a note using multimedia files or
voice recordings.
Tou ch
Creating Notes
When running S Note for the first time:
1. Touch
2. Follow the on-screen instruction to complete the setup.
Composing Notes
Create notes with enriched content by drawing sketches with
your finger or S Pen, or by adding multimedia files or voice
memos.
S Note
.
Start
to set the default covers and a template.
Touch to write or draw on the screen, or touch
to enter text with the keyboard.
1. Enter a note.
2. Erase the note.
3. Select the note.
4. Undo the last action.
5. Redo the last action.
6. Save the note.
7. Insert a multimedia file.
8. Append another page to the current note.
9. Switch to S Pen mode or finger mode.
10. Change page options.
Applications 105

When using the templates that have image frames:
1
2
3
4 5
DRAFT For Internal Use Only
Touch and hold an image frame, and then touch
Take picture
or
Images
to add an image.
To delete a frame:
Touch and hold the frame, and then touch
When jotting down a note:
Touch once more to change the pen type, line
thickness, or pen color.
.
Delete
1. Save the current setting as a pen profile.
2. Change the pen type.
3. Change the line thickness.
4. Change the pen color.
.
5. Add a new color based on the color picker.
When erasing the handwritten note:
Touch , and then touch to change the eraser
Clear all
size or touch
to clear the note
To zoom in or out:
On the screen, spread two fingers apart or pinch them.
To set page options, touch
Page options
. The following
options display:
•
Add page
: Add a new page.
•
Delete page
•
Add tag
•
Index page
•
Add template
•
Background
•
Show Grid
: To delete the page.
: To add a tag to the page.
: To add an index to the page.
: To change the page template.
: To change the background of the page.
: To display a grid on the page.
106
Inserting Multimedia Files
DRAFT For Internal Use Only
Touch to insert images, videos, voice memos,
and more.
Making a Table
1. Touch ➔
rows and columns for the table, and then touch
2. To enter data in the table, touch a table cell.
3. To add or delete columns, touch
Add dataset
4. To add or delete rows, touch
Delete item
Making a Chart
To make a chart, touch ➔
select a chart type. Then, draw bars, lines, or dividers
on the chart.
To make a chart from the data in the table, touch and
hold the table, touch
a chart.
Easy chart ➔ Tab le
or
Delete dataset
.
Edit chart
, set the number of
Done
Menu
➔
.
Menu
➔
Add item
Easy chart
, and then
➔ , and then select
.
or
Editing a Chart
To edit a chart, touch the chart or table ➔
and then use the following options:
•
Touch at the top left of the screen to change the
chart type.
•
Touch an item, and touch , and then write values, to
correct with your finger or the S Pen.
Note:
The available options may vary depending on the chart type.
Using Idea Sketch
Tou ch ➔
select category to search for images.
To add your own sketches to the list, touch
and then draw an image in the sketch panel.
Idea Sketch
, and then write a keyword or
Applications 107
Edit chart
Create
,
,
Viewing Note Pages
DRAFT For Internal Use Only
When viewing pages, touch
options:
•
Delete
: Delete the page.
•
Share via
: Send the page to others.
•
Export
: Save the page as an image file or a PDF file.
•
Edit pages
•
Add tag
•
Index page
•
Add shortcut to home
screen.
•
Print
may not be compatible with the device.
•
Save as
•
Set as
108
: Add or delete pages.
: Add a tag to the page.
: Add an index to the page.
: Add a shortcut to the page on the Home
: Print the page via a USB or Wi-Fi connection. Some printers
: Save the page with a different name.
: Set the note as wallpaper or assign it to a contact.
Menu
to use the following
Viewing Pages Preview
1. Drag down a note to preview the pages above the note.
2. Touch on the note cover to access the following
options:
•Delete
: Delete the note.
•Share via
: Share the note with others.
•Export
: Export the note as an image file or a PDF file.
•Rename
: Rename the note.
•Edit cover
•Add to Favorites
•Lock
• Add shortcut to home
: Change the note cover.
: Add the note to the favorites list.
: Lock the note so that others cannot view it.
: Add a shortcut to the note on the
Home screen.
Searching for Notes
DRAFT For Internal Use Only
Use this feature to search for a note by entering search
criteria, such as names, tags, text, or handwritten words.
Tou ch
the screen, and use the on-screen keyboard to enter
search criteria.
Search
, touch the Search field at the top of
S Translator
Use this application to translate text into other languages.
Note:
The S Translator app must be installed before you can
use it. Touch
instructions.
Tou ch
OK
on the pop-up and follow the on-screen
Samsung
folder ➔
S Translator
.
Using S Translator
Set the source and target languages, enter text in the
Tra n sl at e
input field, and then touch
To add a language pair to your favorites list, touch
Add to favorites
To send a language pair to others, touch
.
.
Share via
.
Starting a Conversation with the Translator
Touch the buttons at the bottom of the screen to
communicate with another person via spoken
translation.
Tou ch
Speak
for your language, and then speak into
the microphone. The device will translate what you
say. Touch in the target language field to let the
device read the translation out loud.
Then, touch
are talking with and let the person reply in their
language. The device will translate what they say.
Touch in the source language field to let the
device read it back to you.
Speak
for the language of the person you
Applications 109
S Voice
DRAFT For Internal Use Only
Use this application to command the device by voice to dial a
number, send a message, write a memo, and more.
Touc h
– or –
Press the
Here are several examples of spoken commands:
•
Open music
•
Launch calculator
•
Check schedule
Tips for better voice recognition:
•
Speak clearly.
•
Speak in quiet places.
•
Do not use offensive or slang words.
•
Avoid speaking in dialectal accents.
The device may not recognise your commands or may
perform unwanted commands depending on your
surroundings or how you speak.
110
Samsung
Home
button twice.
folder ➔ S Voice.
Using Wake-Up Commands on the
Locked Screen
On the locked screen, you can use various functions with
preset wake-up commands.
To activate this feature:
Apps
.
Apps
➔ Settings
➔
Settings
1. From a Home screen, touch
➔ Device tab
2. To uch the
screen ON .
To set a function and wake-up command:
1. From a Home screen, touch
➔ Device tab ➔ Lock screen.
2. To uc h Wake up in lock screen.
3. Select a number and function, and then touch to set
the wake-up command.
➔ Lock screen
OFF/ON
button to turn Wake up in lock
 Loading...