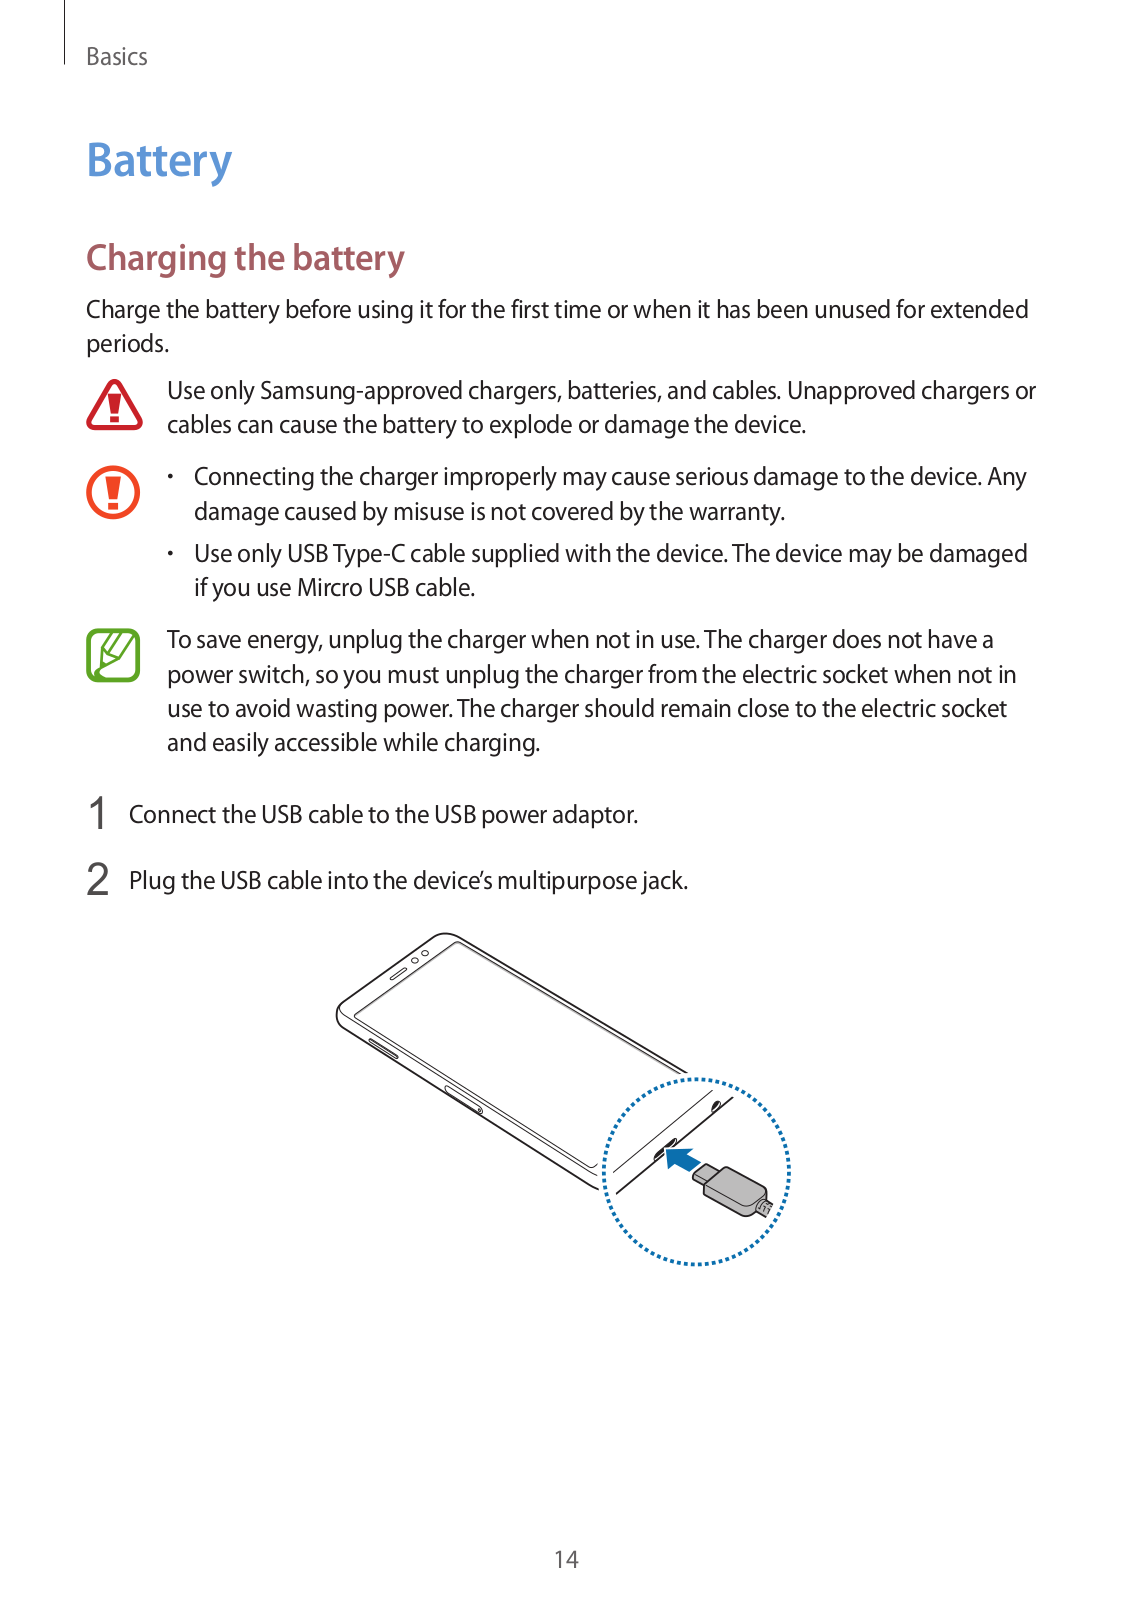
User Manual
SM-P205
English. 10/2017. Rev.1.0 |
www.samsung.com |
Table of Contents
Basics
4 Read me first
6Device overheating situations and solutions
10 Device layout and functions
14 Battery
18 SIM or USIM card (nano-SIM card)
24 Memory card (microSD card)
28Turning the device on and off
29Initial setup
31Samsung account
32Transferring data from your previous device
37 Understanding the screen
49 Notification panel
51 Entering text
Apps and features
54 Installing or uninstalling apps
56 Bixby
72 Phone
77 Contacts
81 Messages
84 Internet
86Email
87Camera
102Gallery
108Always On Display
110Multi window
115Samsung Pay
119Samsung Members
120Samsung Notes
121Calendar
122Samsung Health
126Voice Recorder
127My Files
128Clock
129Calculator
130Radio
131Game Launcher
134Dual Messenger
135Samsung Connect
139Sharing content
140Google apps
2
Table of Contents
Settings
142 Introduction
142Connections 143 Wi-Fi
146 Bluetooth
148 Data saver
151 Mobile Hotspot and Tethering
152SIM card manager (dual SIM models)
152 More connection settings
155Sounds and vibration
156Notifications
157Display
158 Blue light filter
158Changing the screen mode or adjusting the display colour
160 Screensaver
160Wallpapers and themes
161Advanced features
163Device maintenance
165Apps
166Lock screen and security 167 Face recognition
169 Fingerprint recognition
173 Smart Lock
173 Samsung Pass
177 Secure Folder
181Cloud and accounts 182 Backup and restore
182Google
183Accessibility
184General management
185Software update
186User manual
186 About phone
Appendix
187 Troubleshooting
193 Removing the battery
3
Please read this manual before using the device to ensure safe and proper use.
•Descriptions are based on the device’s default settings.
•Some content may differ from your device depending on the region, service provider, model specifications, or device’s software.
•Content (high quality content) that requires high CPU and RAM usage will affect the overall performance of the device. Apps related to the content may not work properly depending on the device’s specifications and the environment that it is used in.
•Samsung is not liable for performance issues caused by apps supplied by providers other than Samsung.
•Samsung is not liable for performance issues or incompatibilities caused by edited registry settings or modified operating system software. Attempting to customise the operating system may cause the device or apps to work improperly.
•Software, sound sources, wallpapers, images, and other media provided with this device are licensed for limited use. Extracting and using these materials for commercial or other purposes is an infringement of copyright laws. Users are entirely responsible for illegal use of media.
•You may incur additional charges for data services, such as messaging, uploading and downloading, auto-syncing, or using location services depending on your data plan. For large data transfers, it is recommended to use the Wi-Fi feature.
•Default apps that come with the device are subject to updates and may no longer be supported without prior notice. If you have questions about an app provided with the device, contact a Samsung Service Centre. For user-installed apps, contact service providers.
4
Basics
•Modifying the device’s operating system or installing softwares from unofficial sources may result in device malfunctions and data corruption or loss. These actions are violations of your Samsung licence agreement and will void your warranty.
•Depending on the region or model, some devices are required to receive approval from the Federal Communications Commission (FCC). If your device is approved by the FCC, you can view the FCC ID of the device. To view the FCC ID, launch the Settings app and tap About phone →Battery information.
•Depending on the region, you can view the regulatory information on the device. To view the information, launch the Settings app and tap About phone →Regulatory information.
Maintaining water and dust resistance
Your device supports waterand dust-resistance. Follow these tips carefully to maintain the waterand dust-resistance of your device. Failure to do so may result in damage to your device.
•Do not immerse the device in fresh water deeper than 1.5 m or keep it submerged for more than 30 minutes. If you immerse the device in any liquid other than fresh water, such as salt water, ionised water, or alcoholic beverage, liquid will enter the device faster.
•Do not expose the device to water moving with force.
•If the device is exposed to fresh water, dry it thoroughly with a clean, soft cloth. If the device is exposed to other liquids, such as salt water, ionised water, or alcoholic beverage, rinse it with fresh water and dry it thoroughly with a clean, soft cloth. If you do not follow these instructions, the device’s performance and appearance may be affected.
•If the device has been immersed in water or the microphone or speaker is wet, sound may not be heard clearly during a call. After wiping the device with a dry cloth, dry it thoroughly before using it.
•The touchscreen and other features may not work properly if the device is used in water.
•If the device is dropped or receives an impact, the waterand dust-resistant features of the device may be damaged.
•Your device has been tested in a controlled environment and certified to be waterand dust-resistant in specific situations (meets requirements of classification IP68 as described by the international standard IEC 60529-Degrees of Protection provided by Enclosures [IP Code]; test conditions: 15-35 °C, 86-106 kPa, fresh water, 1.5 metre, 30 minutes). Despite this classification, it is still possible for your device to be damaged in certain situations.
5
Basics
Instructional icons
Warning: situations that could cause injury to yourself or others
Caution: situations that could cause damage to your device or other equipment
Notice: notes, usage tips, or additional information
When the device heats up while charging the battery
While charging, the device and the charger may become hot. During wireless charging or fast charging, the device may feel hotter to the touch. This does not affect the device’s lifespan or performance and is in the device’s normal range of operation. If the battery becomes too hot, the charger may stop charging.
Do the following when the device heats up:
•Disconnect the charger from the device and close any running apps. Wait for the device to cool down and then begin charging the device again.
•If the lower part of the device overheats, it could be because the connected USB cable is damaged. Replace the damaged USB cable with a new Samsung-approved one.
•When using a wireless charger, do not place foreign materials, such as metal objects, magnets, and magnetic stripe cards, between the device and the wireless charger.
The wireless charging or fast charging feature is only available on supported models.
6
Basics
When the device heats up during use
When you use features or apps that require more power or use them for extended periods, your device may temporarily heat up due to increased battery consumption. Close any running apps and do not use the device for a while.
The following are examples of situations in which the device may overheat. Depending on the functions and apps you use, these examples may not apply to your model.
•During the initial setup after purchase or when restoring data
•When downloading large files
•When using apps that require more power or using apps for extended periods
––When playing high-quality games for extended periods
––When recording videos for extended periods
––When streaming videos while using the maximum brightness setting
––When connecting to a TV
•While multitasking (or, when running many apps in the background)
––When using Multi window
––When updating or installing apps while recording videos
––When downloading large files during a video call
––When recording videos while using a navigation app
•When using large amount of data for syncing with the cloud, email, or other accounts
•When using a navigation app in a car while the device is placed in direct sunlight
•When using the mobile hotspot and tethering feature
•When using the device in areas with weak signals or no reception
•When charging the battery with a damaged USB cable
•When the device’s multipurpose jack is damaged or exposed to foreign materials, such as liquid, dust, metal powder, and pencil lead
•When you are roaming
7
Basics
Do the following when the device heats up:
•Keep the device updated with the latest software.
•Conflicts between running apps may cause the device to heat up. Restart the device.
•Deactivate the Wi-Fi, GPS, and Bluetooth features when not using them.
•Close apps that increase battery consumption or that run in the background when not in use.
•Delete unnecessary files or unused apps.
•Decrease the screen brightness.
•If the device overheats or feels hot for a prolonged period, do not use it for a while. If the device continues to overheat, contact a Samsung Service Centre.
Device limitations when the device overheats
When the device heats up, the features and performance may be limited or the device may turn off to cool down. The feature is only available on supported models.
•If the device becomes hotter than usual, a device overheating message will appear. To lower the device’s temperature, the screen brightness and the performance speed will be limited and battery charging will stop. Running apps will be closed and you will only be able to make emergency calls until the device cools down.
•If the device overheats or feels hot for a prolonged period, a power off message will appear. Turn off the device, and wait until it cools down.
8
Basics
Precautions for operating environment
Your device may heat up due to the environment in the following conditions. Use caution to avoid shortening the battery’s lifespan, damaging the device, or causing a fire.
•Do not store your device in very cold or very hot temperatures.
•Do not expose your device to direct sunlight for extended periods.
•Do not use or store your device for extended periods in very hot areas, such as inside a car in the summertime.
•Do not place the device in any areas that may overheat, such as on an electric heating mat.
•Do not store your device near or in heaters, microwaves, hot cooking equipment, or high pressure containers.
•Never use a damaged charger or battery.
9
Basics
Package contents
Refer to the quick start guide for package contents.
•The items supplied with the device and any available accessories may vary depending on the region or service provider.
•The supplied items are designed only for this device and may not be compatible with other devices.
•Appearances and specifications are subject to change without prior notice.
•You can purchase additional accessories from your local Samsung retailer. Make sure they are compatible with the device before purchase.
•Use only Samsung-approved accessories. Using unapproved accessories may cause the performance problems and malfunctions that are not covered by the warranty.
•Availability of all accessories is subject to change depending entirely on manufacturing companies. For more information about available accessories, refer to the Samsung website.
10
Basics
Device layout
11
Basics
•Connectivity problems and battery drain may occur in the following situations:
––If you attach metallic stickers on the antenna area of the device
––If you attach a device cover made with metallic material to the device
––If you cover the device’s antenna area with your hands or other objects while using certain features, such as calls or the mobile data connection
•Using a Samsung-approved screen protector is recommended. Unapproved screen protectors may cause the sensors to malfunction.
•Do not cover the proximity/light sensor area with screen accessories, such as a screen protector or stickers. Doing so may cause the sensor to malfunction.
12
Basics
Hard keys
Volume key
|
|
|
|
Power key |
|
|
|
|
|
||
|
|
||||
Key |
Function |
||||
Power |
• |
Press and hold to turn the device on or off. |
|||
• |
Press to turn on or lock the screen. |
||||
|
|||||
|
|
|
|||
Volume |
• |
Press to adjust the device volume. |
|||
|
|
|
|
|
Soft buttons
Show and hide |
Back button |
button |
|
Recents button |
Home button |
When you turn on the device, the soft buttons will appear at the bottom of the screen. The soft buttons are set to the Recents button, Home button, and Back button by default. Refer to Navigation bar (soft buttons) for more information.
13
Basics
Charging the battery
Charge the battery before using it for the first time or when it has been unused for extended periods.
Use only Samsung-approved chargers, batteries, and cables. Unapproved chargers or cables can cause the battery to explode or damage the device.
1
2
•Connecting the charger improperly may cause serious damage to the device. Any damage caused by misuse is not covered by the warranty.
•Use only USB Type-C cable supplied with the device. The device may be damaged if you use Mircro USB cable.
To save energy, unplug the charger when not in use. The charger does not have a power switch, so you must unplug the charger from the electric socket when not in use to avoid wasting power. The charger should remain close to the electric socket and easily accessible while charging.
Connect the USB cable to the USB power adaptor.
Plug the USB cable into the device’s multipurpose jack.
14
Basics
3
4
Plug the USB power adaptor into an electric socket.
After fully charging, disconnect the charger from the device. Then, unplug the charger from the electric socket.
15
Basics
Reducing the battery consumption
Your device provides various options that help you conserve battery power.
•Optimise the device using the device maintenance feature.
•When you are not using the device, turn off the screen by pressing the Power key.
•Activate power saving mode.
•Close unnecessary apps.
•Deactivate the Bluetooth feature when not in use.
•Deactivate the Wi-Fi feature when not in use.
•Deactivate auto-syncing of apps that need to be synced, such as emails.
•Decrease the backlight time.
•Decrease the screen brightness.
Battery charging tips and precautions
•When the battery power is low, the battery icon appears empty.
•If the battery is completely discharged, the device cannot be turned on immediately when the charger is connected. Allow a depleted battery to charge for a few minutes before turning on the device.
•If you use multiple apps at once, network apps, or apps that need a connection to another device, the battery will drain quickly. To avoid losing power during a data transfer, always use these apps after fully charging the battery.
•Using a power source other than the charger, such as a computer, may result in a slower charging speed due to a lower electric current.
•The device can be used while it is charging, but it may take longer to fully charge the battery.
•If the device receives an unstable power supply while charging, the touchscreen may not function. If this happens, unplug the charger from the device.
16
Basics
•While charging, the device and the charger may heat up. This is normal and should not affect the device’s lifespan or performance. If the battery gets hotter than usual, the charger may stop charging.
•If you charge the device while the multipurpose jack is wet, the device may be damaged. Thoroughly dry the multipurpose jack before charging the device.
•If the device is not charging properly, take the device and the charger to a Samsung Service Centre.
Fast charging
The device has a built-in fast charging feature. You can charge the battery more quickly while the device or its screen is turned off.
About Fast charging
•Fast charging uses battery charging technology that charges the battery faster by increasing the charging power. The device supports Samsung’s Adaptive fast charging feature and Qualcomm Quick Charge 2.0.
•To use Fast charging on your device, connect it to a battery charger that supports Adaptive fast charging or Quick Charge 2.0.
Increasing the charging speed
To increase the charging speed, turn the device or its screen off when you charge the battery. While charging the battery when the device is turned off, the icon appears on the screen.
If the fast charging feature is not activated, launch the Settings app, tap Device maintenance
→Battery →→Advanced settings, and then tap the Fast cable charging switch to activate it.
•You cannot use the built-in fast charging feature when you charge the battery using a standard battery charger.
•If the device heats up or the ambient air temperature rises, the charging speed may decrease automatically. This is a normal operating condition to prevent damage to the device.
17
Basics
Installing the SIM or USIM card
Insert the SIM or USIM card provided by the mobile telephone service provider.
For dual SIM models, you can insert two SIM or USIM cards so you can have two phone numbers or service providers for a single device. In some areas, data transfer speeds may be slower if two SIM cards are inserted in the device than when one SIM card is inserted.
|
• |
Use only a nano-SIM card. |
|
• |
Use caution not to lose or let others use the SIM or USIM card. Samsung is not |
|
||
|
||
|
|
responsible for any damages or inconveniences caused by lost or stolen cards. |
Some LTE services may not be available depending on the service provider. For more information about service availability, contact your service provider.
18
Basics
19
Basics
20
Basics
21
Basics
1 Insert the ejection pin into the hole on the tray to loosen the tray.
Ensure that the ejection pin is perpendicular to the hole. Otherwise, the device may be damaged.
2
3
4
Pull out the tray gently from the tray slot.
►Single SIM models: Place the SIM or USIM card on the tray with the gold-coloured contacts facing downwards.
►Dual SIM models: Place the SIM or USIM card on the tray with the gold-coloured contacts facing downwards. Place the primary SIM or USIM card on the tray 1 and the secondary SIM or USIM card on the tray 2.
Gently press the SIM or USIM card into the tray to secure it.
If the card is not fixed firmly into the tray, the SIM card may leave or fall out of the tray.
5 Insert the tray back into the tray slot.
|
• |
If you insert the tray into your device while the tray is wet, your device may be |
|
• |
damaged. Always make sure the tray is dry. |
|
||
|
||
|
Fully insert the tray into the tray slot to prevent liquid from entering your device. |
Removing the SIM or USIM card
1
2
3
4
Insert the ejection pin into the hole on the tray to loosen the tray.
Pull out the tray gently from the tray slot.
Remove the SIM or USIM card.
Insert the tray back into the tray slot.
22
Basics
23
Basics
Installing a memory card
Your device’s memory card capacity may vary from other models and some memory cards may not be compatible with your device depending on the memory card manufacturer and type. To view your device’s maximum memory card capacity, refer to the Samsung website.
• Some memory cards may not be fully compatible with the device. Using an incompatible card may damage the device or the memory card, or corrupt the data stored in it.
•Use caution to insert the memory card right-side up.
•The device supports the FAT and the exFAT file systems for memory cards. When inserting a card formatted in a different file system, the device will ask to reformat the card or will not recognise the card. To use the memory card, you must format it. If your device cannot format or recognise the memory card, contact the memory card manufacturer or a Samsung Service Centre.
•Frequent writing and erasing of data shortens the lifespan of memory cards.
•When inserting a memory card into the device, the memory card’s file directory appears in the My Files →SD card folder.
24
Basics
1 |
2 |
3 |
4 |
5 |
1 Insert the ejection pin into the hole on the tray to loosen the tray.
Ensure that the ejection pin is perpendicular to the hole. Otherwise, the device may be damaged.
2 Pull out the tray gently from the tray slot.
For dual SIM models, when you remove the tray from the device, the mobile data connection will be disabled.
25
Basics
3 Place a memory card on the tray 2 with the gold-coloured contacts facing downwards.
Tray 1
Tray 2
4 Gently press the memory card into the tray to secure it.
If the card is not fixed firmly into the tray, the memory card may leave or fall out of the tray.
5 Insert the tray back into the tray slot.
|
• |
If you insert the tray into your device while the tray is wet, your device may be |
|
• |
damaged. Always make sure the tray is dry. |
|
||
|
||
|
Fully insert the tray into the tray slot to prevent liquid from entering your device. |
Removing the memory card
Before removing the memory card, first unmount it for safe removal.
Launch the Settings app and tap Device maintenance →Storage →→Storage settings →SD card →UNMOUNT.
1
2
Insert the ejection pin into the hole on the tray to loosen the tray.
Pull out the tray gently from the tray slot.
26
Basics
3
4
Remove the memory card.
Insert the tray back into the tray slot.
Do not remove external storage, such as a memory card or USB storage, while the device is transferring or accessing information, or right after transferring data. Doing so can cause data to be corrupted or lost or cause damage to the external storage or device. Samsung is not responsible for losses, including loss of data, resulting from the misuse of external storage devices.
Formatting the memory card
A memory card formatted on a computer may not be compatible with the device. Format the memory card on the device.
Launch the Settings app and tap Device maintenance →Storage →→Storage settings →SD card →Format.
Before formatting the memory card, remember to make backup copies of all important data stored in the memory card. The manufacturer’s warranty does not cover loss of data resulting from user actions.
27
Basics
Press and hold the Power key for a few seconds to turn on the device.
When you turn on your device for the first time or after performing a data reset, follow the onscreen instructions to set up your device.
To turn off the device, press and hold the Power key, and then tap Power off.
Follow all posted warnings and directions from authorised personnel in areas where the use of wireless devices is restricted, such as aeroplanes and hospitals.
Restarting the device
If your device is frozen and unresponsive, press and hold the Power key and the Volume Down key simultaneously for more than 7 seconds to restart it.
Volume Down key
Power key
Emergency mode
You can switch the device to emergency mode to reduce battery consumption. Some apps and functions will be restricted. In emergency mode, you can make an emergency call, send your current location information to others, sound an emergency alarm, and more.
Activating emergency mode
To activate emergency mode, press and hold the Power key, and then tap Emergency mode.
The usage time left shows the time remaining before the battery power runs out. Usage time left may vary depending on your device settings and operating conditions.
Deactivating emergency mode
To deactivate emergency mode, tap →Disable Emergency mode. Alternatively, press and hold the Power key, and then tap Emergency mode.
28
Basics
When you turn on your device for the first time or after performing a data reset, follow the onscreen instructions to set up your device.
1
2
The initial setup procedures may vary depending on the device’s software and your region.
Turn on the device.
Select your preferred device language and select START.
Select a language.
3 Select a Wi-Fi network and connect to it.
If you do not connect to a Wi-Fi network, you may not be able to set up some device features during the initial setup.
29
Basics
4
5
Follow the on-screen instructions to proceed the initial setup.
Set a screen lock method to protect your device. You can protect your personal information by preventing others from accessing your device. To set the screen lock method later, tap No, thank you.
6 Sign in to your Samsung account. You can enjoy Samsung services and keep your data up to date and secure across all of your devices. Refer to Samsung account for more information.
7 Select features you want to use and complete the initial setup. The Home screen will appear.
30