

Samsung SMH9187W/XAA, SMH9187ST/XAA, SMH9187B/XAA Owner’s Manual
user manual
the possibilities
Thank you for purchasing this Samsung
product, Please register your product at
www, samsu rig.com/g Iobal/reg ister
fo tuFo¢ of youFnow
I
Professionai Design
The new Stainless Steel Samsung Over The Range (OTR)oven has a clean, professional look
that matches your other kitchen appliances perfectly, providing a harmonious and complete
kitchen solution.
Turbo vent
With 400 CFM(Cubic Feet per Minute, FWmin) of ventilation power, your new Over The
Range (OTR) oven offers optimal cooking conditions by absorbing smoke and odor from the
cook-top. It is also as silent as other OTRs with much lower ventilation power.
Experience maximum power with no additional noise!
Large Interior capacity
With its 1.8 cu.ft capacity, your OTR oven delivers plenty of space for all your cooking needs.
A big capacity combined with 1,100 watts of output guarantees superior cooking results.
Sensor Cooking
Don't know how to cook? Samsung's new OTR sensor technology offers preset functions
resulting in perfectly cooked dishes every time. Simply select a cooking menu, and the
cooking results will astound you.
VFD display
With an informative VFD (Vacuum Fluorescent Display), your OTR lets you easily use all
available functions.
2 features of your new microwave oven
Throughout this manual, you'll see Warning and ©aution notes.
These warnings, cautions, and the important sCety instructions that follow do not
cover all possible conditions and situations that may occur.
It's your responsibility to use common sense, caution, and care when installing,
maintaining, and operation your microwave oven. Samsung is not liable for
damages resulting from improper use.
WHATTHEICONSANDSIGNSINTHISMANUALMEAN:
Z_ WARNING: Hazards or unsafe practices that may result in severe personal injury or death.
WARNING
CAOT,ONdamage.
] Do not repair.
I_ Follow directions explicity.
CAUTION: Hazards or unsafe practices that may result in minor personal injury or property
Do not attempt or use.
Do not touch.
Be careful
Unplug the power plug from the wall socket.
Make sure the machine is grounded to prevent electric shock.
Call the service center for help.
Note
PRECAUTIONSTOAVOIDPOSSIBLEEXPOSURETO
EXESSIVEMICROWAVEENERGY:
_Do not attempt to operate this microwave oven with the door open since open-
door operation can result in harmful exposure to microwave energy. It is important
not to defeat or tamper with the safety interlocks.
Do not place any object between the microwave oven front face and the door or
allow soil or cleaner residue to accumulate on sealing surfaces.
SAVETHESEINSTRUCTIONS
important safety instruction ....3
Do not operate the microwave oven if it is damaged. It is particularly important that
the microwave oven door close properly and that there is no damage to the
• Door (bent or dented),
Hinges and latches (broken or loosened),
Door seals and sealing surfaces.
The microwave oven should not be adjusted or repaired by anyone except
properly qualified service personnel.
IMPORTANTSAFETYINSTRUCTIONS
When using any electrical appliance, basic safety precautions should be followed,
including the following:
_o WARNING
[_} Always observe Safety Precautions when using your oven. Never try to repair the
oven on your own - there is dangerous voltage inside. If the oven needs to be
repaired, call 1-800-SAMSUNG (7267864) for the name of an authorized service
center near you.
TOREDUCERISKOFBURNS,ELECTRICSHOCK,FIRE,
PERSONALINJURYOREXPOSURETOEXCESSIVE
MICROWAVEENERGY:
Read allsafety instructions before using the appliance.
Read and follow the specific "PRECAUTIONS TO AVOID POSSIBLE EXPOSURE
TO EXCESSIVE MICROWAVE ENERGY" on page 3.
This appliance must be grounded. Connect only to properly grounded outlets. See
"IMPORTANT GROUNDING INSTRUCTIONS" on page 7 of this manual.
Install or place this appliance only in accordance with the installation instructions
provided.
Use this appliance only for its intended use as described in the manual. Do
not use corrosive chemicals or vapors inthis appliance. This type of oven is
specifically designed to heat, cook, or dry food. It is not designed for industrial or
laboratory use.
As with any appliance, close supervision is necessary when used by children.
Keep the inside of the oven clean. Food particles or spattered oils stuck to the
oven walls or floor can cause paint damage and reduce the efficiency of the oven.
Keep the power cord away from heated surfaces.
SAVETHESEINSTRUCTIONS
4....important safety instruct on
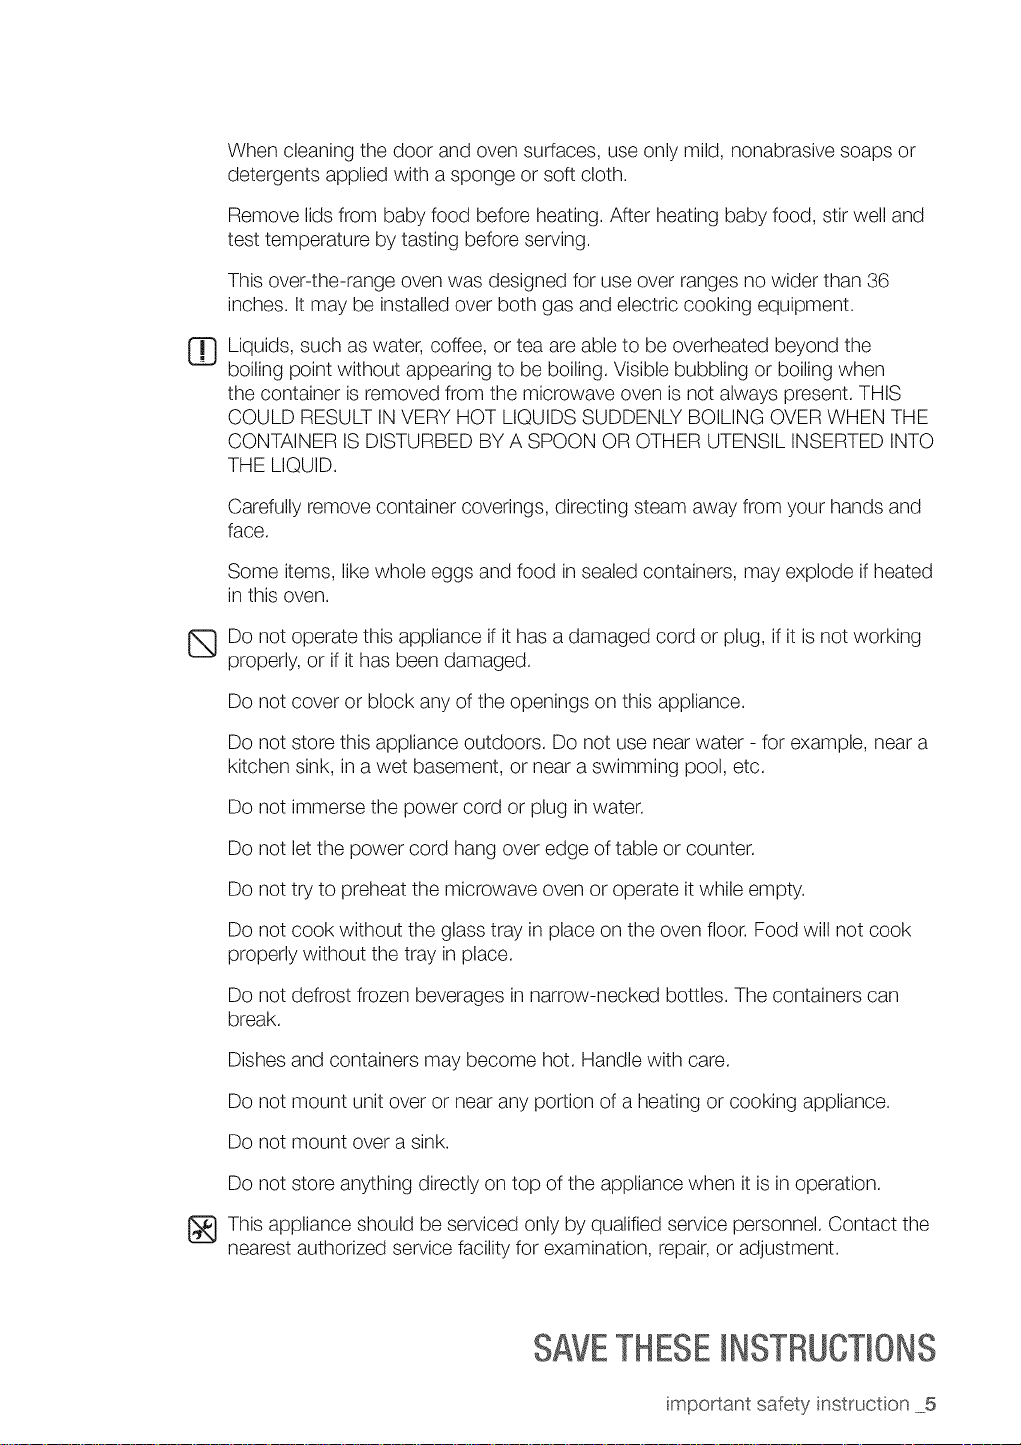
Whencleaningthedoorandovensurfaces,useonlymild,nonabrasivesoapsor
detergentsappliedwithaspongeorsoftcloth.
Removelidsfrombabyfoodbeforeheating.Afterheatingbabyfood,stirwelland
testtemperaturebytastingbeforeserving.
Thisover-the-rangeovenwasdesignedforuseoverrangesnowiderthan36
inches.Itmaybeinstalledoverbothgasandelectriccookingequipment.
[_ Liquids,suchaswater,coffee,orteaareabletobeoverheatedbeyondthe
boilingpointwithoutappearingto beboiling.Visiblebubblingorboilingwhen
thecontainerisremovedfromthemicrowaveovenisnotalwayspresent.THIS
COULDRESULTINVERYHOTLIQUIDSSUDDENLYBOILINGOVERWHENTHE
CONTAINERISDISTURBEDBYASPOONOROTHERUTENSILINSERTEDINTO
THELIQUID.
Carefullyremovecontainercoverings,directingsteamawayfromyourhandsand
face.
Someitems,likewholeeggsandfoodinsealedcontainers,mayexplodeifheated
inthisoven.
Donotoperatethisapplianceifithasadamagedcordorplug,ifitisnotworking
properly,orifithasbeendamaged.
Donotcoverorblockanyoftheopeningsonthisappliance.
Donotstorethisapplianceoutdoors.Donotusenearwater-forexample,neara
kitchensink,inawetbasement,ornearaswimmingpool,etc.
Donotimmersethepowercordorpluginwater.
Donotletthepowercordhangoveredgeoftableorcounter.
Donottrytopreheatthemicrowaveovenoroperateitwhileempty.
Donotcookwithouttheglasstrayinplaceontheovenfloor.Foodwillnotcook
properlywithoutthetrayinplace.
Donotdefrostfrozenbeveragesinnarrow-neckedbottles.Thecontainerscan
break.
Dishesandcontainersmaybecomehot.Handlewithcare.
Donotmountunitoverornearanyportionofaheatingorcookingappliance.
Donotmountoverasink.
Donotstoreanythingdirectlyontopoftheappliancewhenitisinoperation.
Thisapplianceshouldbeservicedonlybyqualifiedservicepersonnel.Contactthe
nearestauthorizedservicefacilityforexamination,repair,oradjustment.
SAVETHESEINSTRUCTIONS
important safety instruction ....5
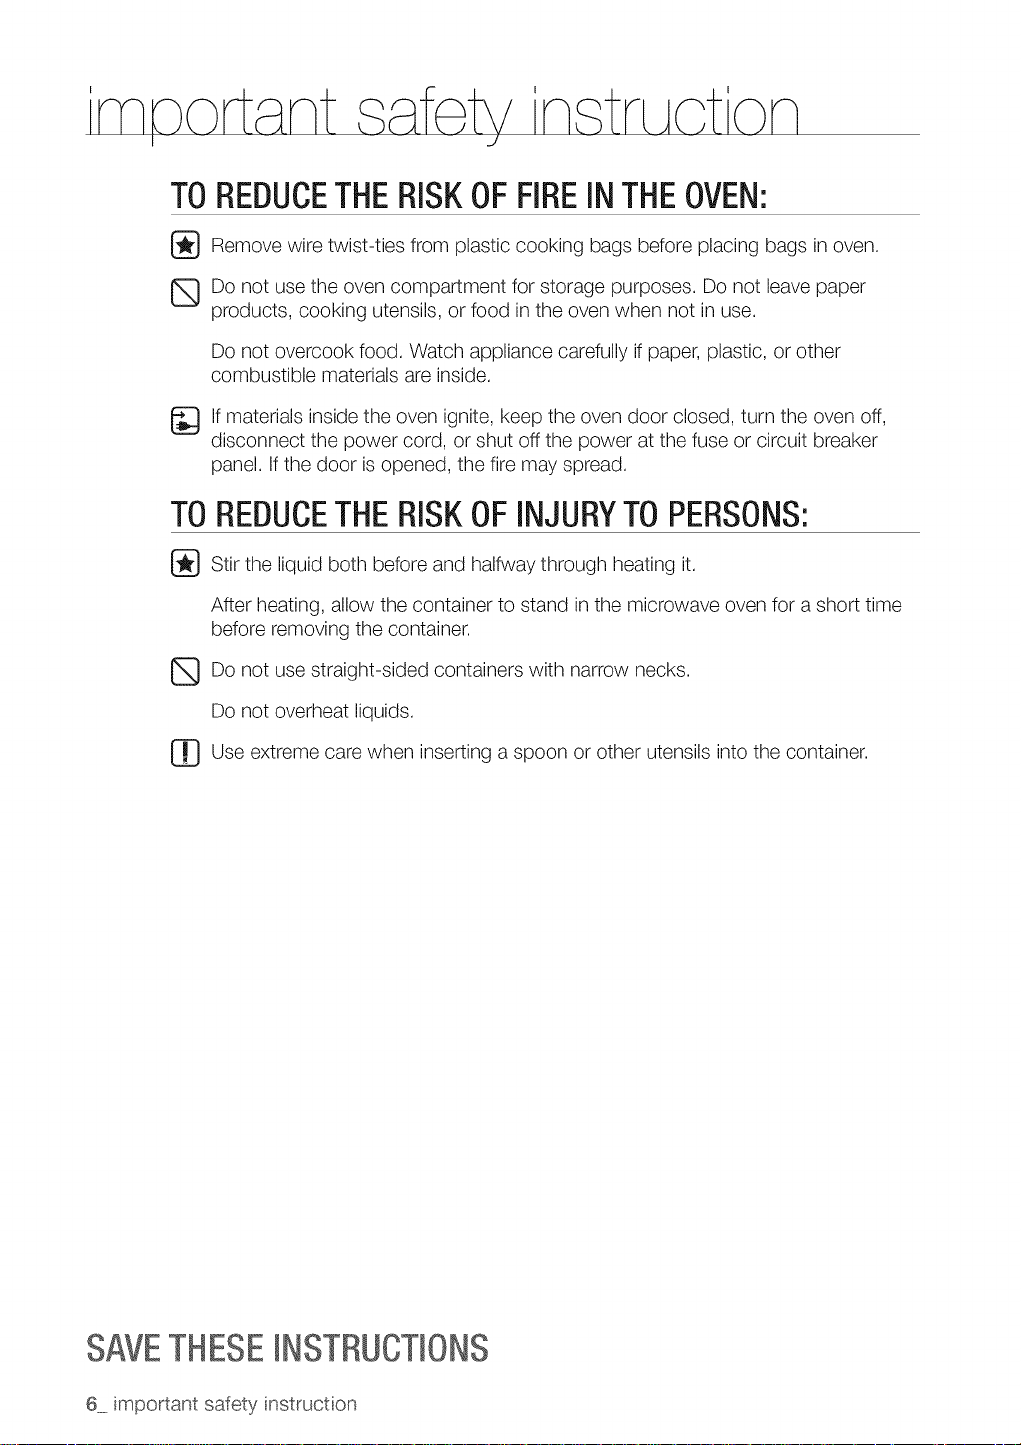
TOREDUCETHERISKOFFIREINTHEOVEN:
[_ Remove wire twist-ties from plastic cooking bags before placing bags in oven.
_Do not use the oven compartment for storage purposes. Do not leave paper
products, cooking utensils, or food in the oven when not in use.
Do not overcook food. Watch appliance carefully if paper, plastic, or other
combustible materials are inside.
_lf materials inside the oven ignite, keep the oven door closed, turn the oven off,
disconnect the power cord, or shut off the power at the fuse or circuit breaker
panel. If the door is opened, the fire may spread.
TOREDUCETHERISKOFINJURYTOPERSONS:
_]__.}Stir the liquid both before and halfway through heating it.
After heating, allow the container to stand in the microwave oven for a short time
before removing the container.
_Do not use straight-sided containers with narrow necks.
Do not overheat liquids.
_Use extreme when other utensils into the container.
care
insertingaspoon
or
SAVETHESEINSTRUCTIONS
6_.important safety instruct on
IMPORTANTGROUNDINGINSTRUCTIONS
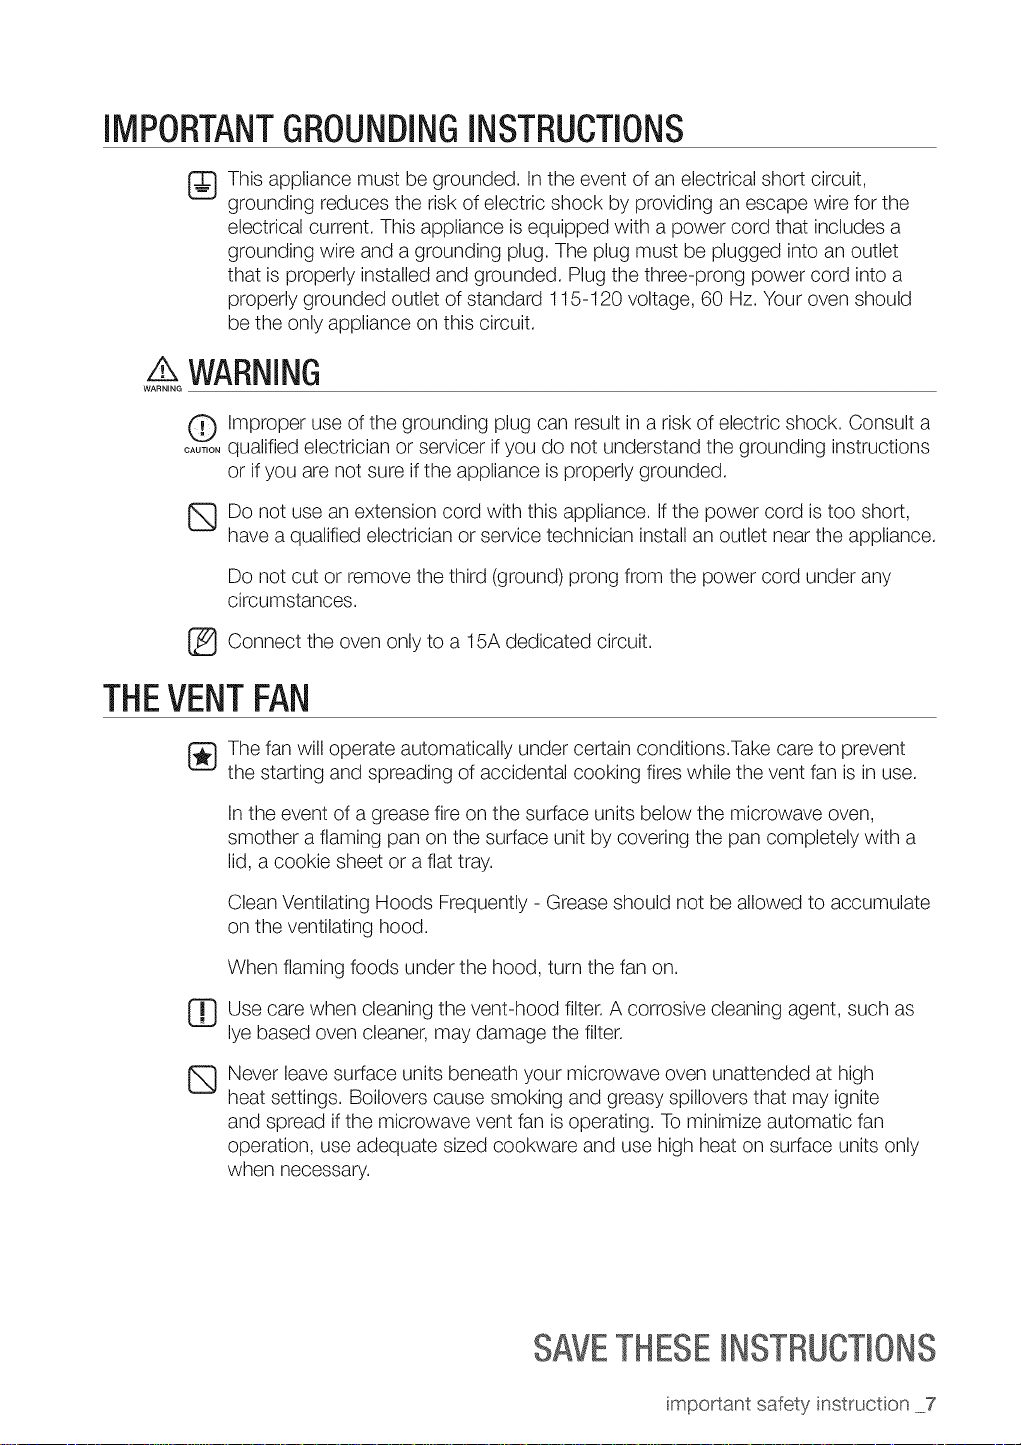
[_ This appliance must be grounded. Inthe event of an electrical short circuit,
grounding reduces the risk of electric shock by providing an escape wire for the
electrical current. This appliance is equipped with a power cord that includes a
grounding wire and a grounding plug. The plug must be plugged into an outlet
that is properly installed and grounded. Plug the three-prong power cord into a
properly grounded outlet of standard 115-120 voltage, 60 Hz. Your oven should
be the only appliance on this circuit.
A WARNING
WARNING
O Improper use of the grounding plug can result in a risk of electric shock. Consult a
....... qualified electrician or servicer if you do not understand the grounding instructions
or if you are not sure if the appliance is properly grounded.
_Do not use an extension cord with this appliance. If the power cord is too short,
have a qualified electrician or service technician install an outlet near the appliance.
Do not cut or remove the third (ground) prong from the power cord under any
circumstances.
[_ Connect the 15A dedicated circuit.
THEVENTFAN
_} The fan will operate automatically under certain conditions.Take care to prevent
the starting and spreading of accidental cooking fires while the vent fan is in use.
In the event of a grease fire on the surface units below the microwave oven,
smother aflaming pan on the surface unit by covering the pan completely with a
lid, a cookie sheet or a flat tray.
Clean Ventilating Hoods Frequently - Grease should not be allowed to accumulate
on the ventilating hood.
When flaming foods under the hood, turn the fan on.
Use care when cleaning the vent-hood filter. A corrosive cleaning agent, such as
lye based oven cleaner, may damage the filter.
Never leave surface units beneath your microwave oven unattended at high
heat settings. Boilovers cause smoking and greasy spillovers that may ignite
and spread if the microwave vent fan is operating. To minimize automatic fan
operation, use adequate sized cookware and use high heat on surface units only
when necessary.
oven
only
to
a
SAVETHESEINSTRUCTIONS
important safety instruction ....7
content
SETTING UP YOUR NEW
MICROWAVE OVEN
'i
USING YOUR MICROWAVE OVEN
10 Checking the parts
11 Warranty and service information
11 Setting up your microwave oven
12 Turning on the power for the first time
12 Setting the time
12 Child lock
13 My settings
14 Checking the control panel
16 Usin¢
16 Usin¢
17 Usin¢
17 Usin¢
17 Usin¢
17 Usin¢
17 Usin¢
18 Usin¢
18 Usin¢
19 Usin¢
21 Usin¢
22 Usin¢
22 Usin¢
23 Using
24 Using
25
26
27
the Kitchen Timer button
the add 30 sec. button
the More/Less buttons
the Vent buttons (5 speed & on/off)
the Vent delay off button
the Light hl/LO/off button
the Light timer button
the Turntable On/Off button
the metal shelf
the Sensor Cooking button
the Sensor Reheat button
the Auto Defrost button
the 1 pound Defrost button
the Soften/Melt button
the Kids Meals button
Using the Snacks button
Microwave Cooking Times & Power Levels
Using the Custom Cook buttons
8 contents
COOKWARE GUIDE
COOKING GUIDE
i
28 Microwave-safe utensils
30 General microwave tips
31 Cooking meat
32 Cooking poultry
32 Cooking seafood
33 Cooking eggs
33 Cooking vegetables
34 Recipes
CLEANING AND MAiNTAiNiNG YOUR
MICROWAVE OVEN
i
36 Cleaning the exterior
36 Cleaning the interior
36 Cleaning the turntable and roller rings
37 Storing and repairing your microwave oven
37 Replacing the cooktop/night light
37 Replacing the oven light
38 Cleaning the grease filter
39 Replacing the charcoal filter
TROUBLESHOOTING
i!
ii
APPENDIX 41 Specifications
WARRANTY
ii
40 Check these points if your microwave oven...
contents 9
sort ncj up
I
FnOW
Be sure to follow these instructions closely so that your new microwave oven works
properly,
CHECKING THE PARTS
Carefully unpack your microwave oven, and make sure you've received all the parts shown below. If your
microwave oven was damaged during shipping, or if you do not have all the parts, contact Samsung
Customer Service. (Refer to the "WARRANTY AND SERVICE INFORMATION" on page 11.)
Microwave oven (SMH9187}
Shelf Glass Tray Roller Guide Ring
DE75-00036B DE74-20002A DE97-00368A
Grease Filters (2ca)
DE63-00196A
Hardware kit (Screws &
Brackets)
DE92-90505E
Registration Card
6801-001581
Charcoal filter
DE63-00367D
Manuals
(User DE68-03640A &
installation DE68-00357S}
Exhaust adaptor
(Top DE68-03144B & Wall
DE92-90242D
Templates
DE68-03142B)
10 setting up your new microwave oven
WARRANTY AND SERVICE INFORMATION
Tohelp us to serve you better, please complete the enclosed registration card and promptly
return it by mail. Ifthe registration card is missing, you can call Samsung Electronics, Inc., at
1-8O0=SAMSUNG (726-7864} or register online at www.samsung.com/global/register.
When contacting Samsung, please provide the specific model and serial number information
which is usually located on the back or bottom of the product. Please record these numbers
below, along with the other requested information. Keep this information in a safe place as a
permanent record of your purchase to aid in identification in case of theft or loss, and a copy of
your sales receipt as a proof of purchase if warranty service is needed.
MODEL NUMBER
SERIAL NUMBER
DATE PURCHASED
PURCHASED FROM
Warranty service can only be performed by a Samsung Authorized Service Center. Ifyou should
require warranty service, provide the above information with a copy of your sales receipt to the
Samsung Authorized Service Center.
For service assistance and the location of the nearest service center, please call 1-800-
SAMSUNG (7267864).
SETTING UP YOUR MICROWAVE OVEN
1.
Open the door by pulling the handle on the right side of the door.
2.
Wipe the inside of the oven with a damp cloth.
3=
Install the pre-assembled ring into the indentation at the
center of the microwave oven.
4=
Place the glass tray securely in the center of the pre-
assembled roller ring.
Installing the metal shelf
When you need to use the Metal Shelf, place it on the plastic hooks inside your oven and make
sure it is positioned properly to avoid arcing and damaging your oven.
O Make sure the shelf is positioned properly inside the microwave to prevent damage to the
CAUTIONoven from arcing.
setting up your new m crowave oven 11
sett ng up
I
FnOW
TURNING ON THE POWER FOR THE FIRST TIME
The first time you plug the power cord into an outlet the display turns on after four seconds with:/_//½?E
7T?_/¢}//OZO¢}/4"A/_J??F7 77J_EO//XY
[]_ This occur a power interruption
will also after
SETTING THE TIME
Your microwave oven is equipped with a built-in clock. Set the clock when first installing your microwave
oven and after a power failure. The time is displayed whenever the microwave oven is not being used.
1. Press the Clock button.
2. The display will show £\/7X? T//W.,'cOi/?AY.
3, Use the number buttons to enter the current time. You need to press at least three numbers
to set the clock. For example, if the current time is 5:00, press 5, 0, 0. The display will show:
_'}00.
4, Press the Enter / Start button again.
5. The display will show AA_7bL/Oi/J/>A_ 7-Ot/O/P.
6. Use the number button to select AM / PM.
7. Press the Enter / Start button again.
8. A colon appears indicating that the time is set.
To check the time while cooking, press the Clock button.
CHILD LOCK
The Child Lock function allows you to lock the buttons so that the microwave oven cannot be operated
accidentally. The oven can be locked at any time.
Activating/Deactivating
Ifyou want to activate or deactivate the child lock function, press the Enter / Start button for 3 seconds.
The display will show O////D l OCX (10Nwhen the oven is locked and then returns to displaying the time.
12 setting up your new microwave oven
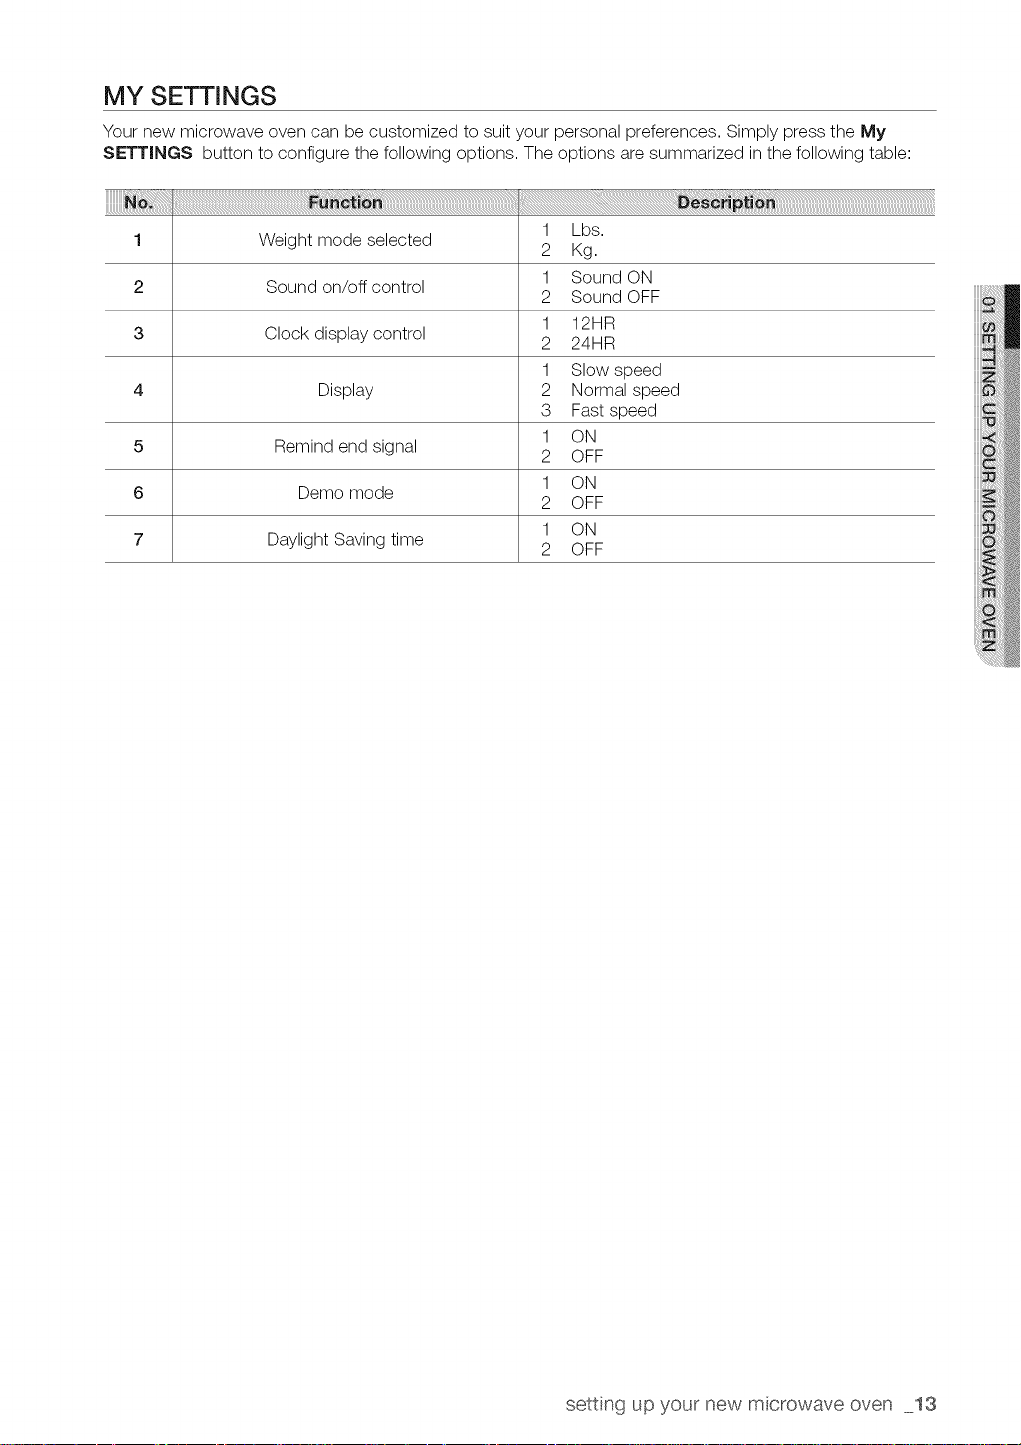
MY SETTINGS
Your new microwave oven can be customized to suit your personal preferences. Simply press the My
SETTINGS button to configure the following options. The options are summarized in the following table:
1 Weight mode selected
2 Sound on/off control
3 Clock display control
4 Display
5 Remind end signal
6 Demo mode
7 Daylight Saving time
1 Lbs.
2 Kg.
1 Sound ON
2 Sound OFF
1 12HR
2 24HR
1 Slow speed
2 Normal speed
3 Fast speed
1 ON
2 OFF
1 ON
2 OFF
1 ON
2 OFF
setting up your new m crowave oven 13
sett ng up
I
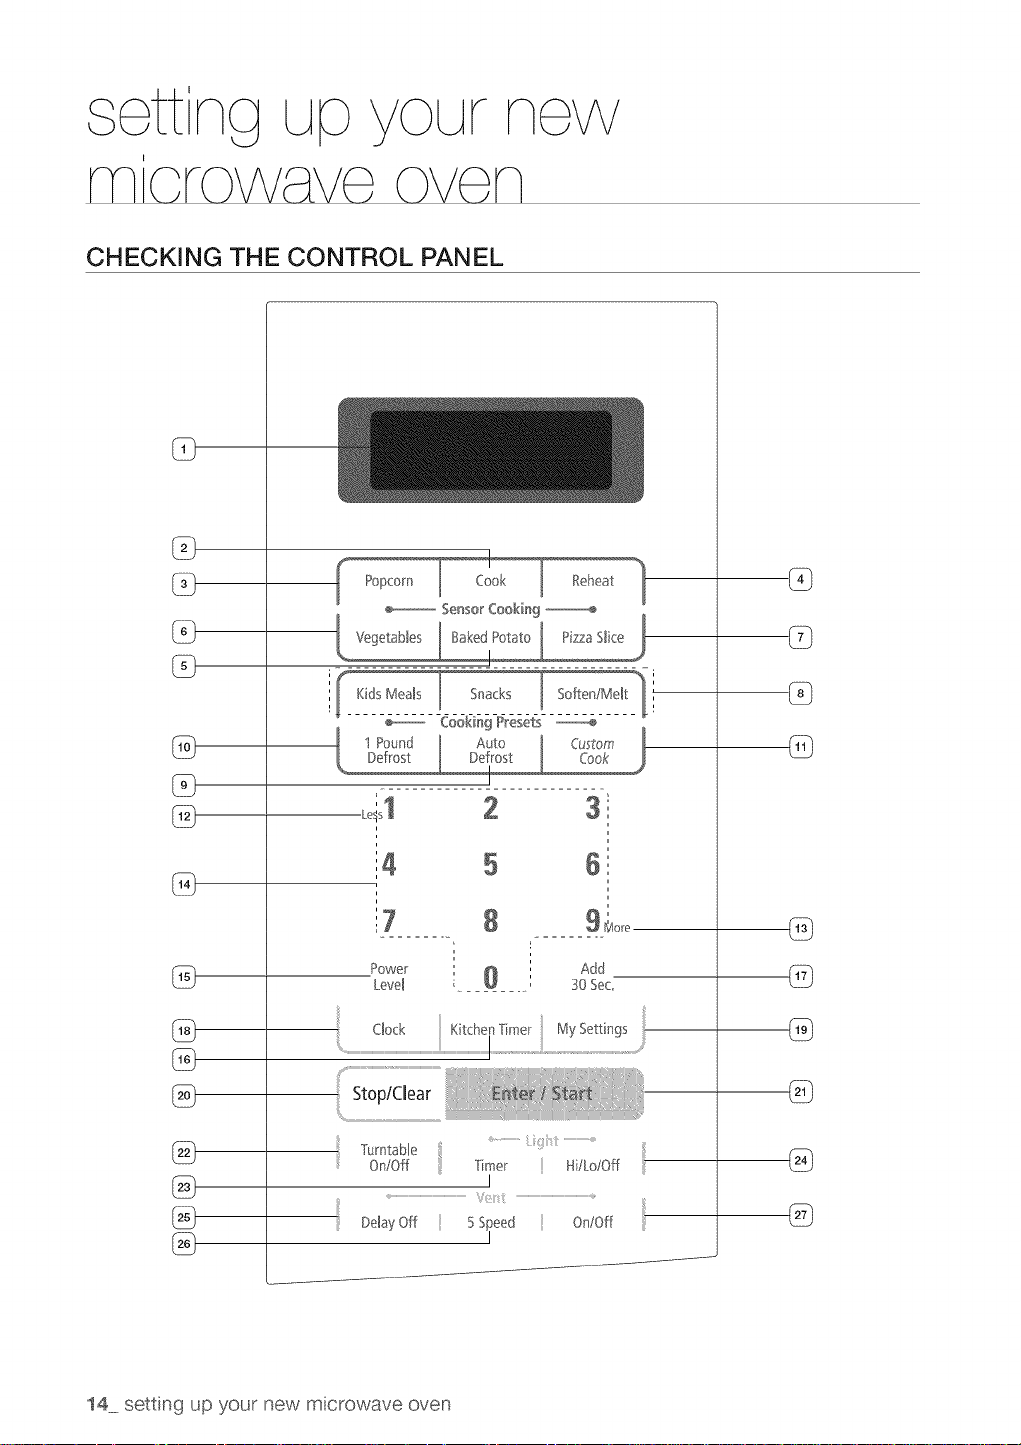
CHECKING THE CONTROL PANEL
Popcorn Reheat
÷ ........... Cooki_ 9 Presets ---_
@
@
41 2 31
FnOW
Se_sor Cooking
BakedPotato
Auto
Defrost
@
@
f
®
i
_7
i4
@
Power
Level
%
®
StoplClear
%
; Turntable ...........................: ............................
On/Off Timer H/Lo/Off :
@
%
DelayOff 5 Speed Or#Off
%
14 setting up your new m crowave oven
6_
i
8
0
Add
30 Sec,,
@
@
®
®
I
@
I
cooking time settings and cooking functions selected.
Press this button to cook a beverage, frozen dinner, frozen breakfast,
COOK chicken breast. The oven's sensor will tell the oven how long to cook
depending on the amount of humidity coming from the food.
ino,u o,oo i 0io to stote,,
LIJ POPOO The oven's sensor will tell the oven how long to cook depending on
(_ Press this button to reheat a dinner plate, casserole, and pasta. The
t_ POTATO oven how long to cook depending on the amount of humidity it
(_ ETABLES sensor will tell the oven how long to cook depending on the amount
(_ PIZZA SL|OE Press this button to reheat pizza. The oven's sensor will tell the oven
KIDS MEALSI
SOFTEN/MELT, Press these buttons to cook specific food.
SNACKS
/AUTO
k_zu DEFROST Press this button to defrost food by weight.
1POUND
DEFROST Press this button to defrost 1 pound of frozen food.
@ CUSTOM Press this button to recall one cooking instruction previously
PROGRAM programmed into memory.
@ LESS(1 Press this button to subtract the cooking time.
Press this button when popping popcorn in your microwave oven.
the amount of humidity it detects from the popcorn.
oven's sensor will tell the oven how long to cook depending on the
amount of humidity coming from the food.
Press this button to cook potatoes. The oven's sensor will tell the
detects from the potato.
Press this button to cook fresh or frozen vegetables. The oven's
of humidity it detects from the vegetables.
how long to cook depending on the amount of humidity it detects.
(_ MORE{9)Press this button to add more cooking time.
NUMBER Press number buttons to enter cooking time, power level, quantities,
@ POWER LEVEL Press this button to select a cooking power level.
I_ KITCHEN
TIMER Press this button to set the kitchen timer.
(_ ADD 30 SEC level. You can also use this button while cooking is in progress to add
@ CLOCK Press this button to enter the time of day.
@ MY SETT|NGS Press this button to change the oven's default settings.
_ STOP_CLEAR Press this button to stop the oven or to clear all entries.
or weights.
Press this button to set and start cooking quickly at 100% power
30 seconds to the cooking time.
setting up your new m crowave oven 15
Press this button to start a function. If you open the door after the
@ ENTER/START oven begins to cook, close the door and press the Enter/Start
button again.
Press this button to turn off the turntable. OFF will appear in the
@ TURNTABLE display.
ON/OFF • Turntable On/Off is not available in sensor cook and
LIGHT TIMER Press this button to set the light timer.
LIGHT HI/LO/OFF Press this button to turn on the cooktop light.
defrost modes.
VENT DELAY OFF minutes).
VENT 5 SPEED Press this button to choose one of 5 fan speeds.
Press this button when setting the ventilation time (1,3, 5, 10, 30
_VENT ON/OFF Press this button to turn the fan on/off.
[_ Refer to "Using microwave oven" below for detailed information on the buttons described in the
table above.
your
N
Cooking has never been easier than with your new Samsung microwave oven.
The following section describes everything you need to know about using your
microwave oven.
USING THE KITCHEN TIMER BUTTON
This microwave allows you to use your microwave oven as a timer. Use the Kitchen Timer for timing up to
99 minutes, 99 seconds.
1. Press the Kitchen Timer button.
2. Use the number buttons to set the length of time you want the timer to run.
3. Press Enter / Start button
4. The display counts down and beeps when the time has elapsed.
5. To cancel timer setting: Press Stop/Clear button once.
USING THE ADD 30 SEC. BUTTON
This simplified control saves you time, letting you quickly start cooking at 100% power without the need to
press the Start button.
1. Press the Add 30 sec. button for each 30 seconds you wish the food to be cooked for. For
example, press it twice to cook it for one minute. The time is displayed and the oven starts
automatically.
2. Add 30 sec. to a cooking program already in progress by pressing the Add 30 sec. button
for every additional 30 seconds you wish to add.
16 setting up your new microwave oven
USING THE MORE/LESS BUTTONS
The More (9)/Less (1) buttons allow you to adjust the pre-set cooking times. They only work for the
"Sensor Reheat", "Sensor Cooking(except Beverage)", "Add 30 sec.", "Custom Cook", "Kitchen Timer",
"Soften/Melt", "Kids Meals", "Snack Bar" and "Time Cook" modes. Use the More (9}/Less (1} buttons
only after you have already begun cooking with one of these modes.
1. Use the More (9) button to add time to increase the time of an automatic cooking
procedure.
2. Use the Less (1} button to decrease the time of an automatic cooking procedure.
• Each time you press the More (9) button while cooking manually, the current cooking time
increases by 10 seconds. Press the Less (1) button to decrease it by 10 seconds.
USING THE VENT BUTTONS (5 SPEED & ON/OFF)
The vent removes steam and other vapors from the cooking surface. You can manually select the vent
setting.
1. Press the Vent 5 Speed button for setting the speed level.
2. Press the Vent On/Off button to turn the vent on.
3. Press the Vent On/Off button again to turn the vent off.
Ifthe temperature becomes too hot around the microwave oven, the fan in the vent hood
will automatically turn on at the LEVEL 2 setting to cool the oven. The fan will automatically
[_ turn off when the oven has cooled down sufficiently. This is an automated process and
cannot be turned off. The fan may stay on for 30 minutes or more after the cooktop and
microwave controls are turned off. The Vent Fan will only operate in 1-4 levels modes while
the microwave is working.
USING
USING
The Light
THE VENT DELAY OFF BUTTON
1. Press the Delay Off button once to turn the fan off after 1 minute.
2. Press the Delay Off button twice to turn the fan off after 3 minutes.
3. Press the Delay Off button three times to turn the fan off after 5 minutes.
4. Press the Delay Off button flour times to turn the fan off after 10 minutes.
5. Press the Delay Off button five times to turn the fan off after 30 minutes.
THE LIGHT Hi/LO/OFF BUTTON
button allows you to select a light setting for your microwave.
1. Press the Light Hi/Lo/Off button once for high light.
2. Press the Light Hi/Lo/Off button twice for low light.
3. Press the Light Hi/Lo/Off button three times to turn the light off completely.
USING THE LIGHT TIMER BUTTON
The microwave can be set so the light turns on and off automatically at a preset time. The light comes on at
the same time every day until reset.
1. Press the Light Timer button.
2. Use the Number button to set the light on time.
3. Press the Enter / Start button.
4. Use the Number button to select AM or PM.
5. Press the Enter / Start button.
6. Use the Number button to set the off time.
7. Press the Enter / Start button.
8. Use the Number button to select AM or PM.
9. Press the Enter / Start button.
10. Press the Light Timer button and "0" button to cancel the light timer.
using your mcrowave oven 17
USING THE TURNTABLE ON/OFF BUTTON
For best cooking results, leave the turntable on. However, for large dishes it can be turned off.
Press the Turntable On/Off button to turn the turntable on or off.
The turntable may become too hot to touch. Use pot holders to touch the turntable during and after
oAoT,o,cooking.
USING THE METAL SHELF
Use the metal shelf to cook more than one item at the same time.
• Do not use a microwave browning dish on the shelf. The shelf could overheat.
....... • Do not use the oven with the shelf on the microwave floor. This could damage the microwave.
Use pot holders when handling the shelf as it may be hot.
Do not use the metal shelf when cooking popcorn.
Food cooks best on the turntable.
i
For best results Uneven results
The shelf gives you the option to reheat more than one dish at the same time.
Reheating food
To reheat food on 2 levels or to reheat food on the lower level:
Multiply the reheating time by 11/2.
Switch places halfway through the reheating process.
18 using your mcrowave oven
I I
USING THE SENSOR COOKING BUTTONS
The Sensor Cooking buttons consist of frequently used settings allowing you to select them quickly
and conveniently. Use the More (9)/Less (1) buttons to set your temperature preference. If the food is
not thoroughly cooked or reheated when using the auto cook feature, complete the cooking process by
selecting a power level and cooking time.
ADo not continuously use the Sensor Cooking buttons. The oven must cool for 5 minutes between
....... uses or the food will overcook.
Sensor cooking utensils & covers
Toobtain good cooking results using these functions, follow the directions for selecting the
appropriate containers and covers in the Cookware section on p26.
Always use microwave-safe containers and cover with a lid or plastic wrap. When using plastic
wrap, turn back one corner to allow steam to escape.
O Always use the proper lid for the container. If the utensil does not have its own lid, use
....... plastic wrap.
O Fillcontainers at least half full.
CAUTION
(_ oods that require stirring or rotating should be stirred or turned at the end of the Sensor
Cook cycle, when the time has started to count down on the display.
[_ Do not use the Auto Sensor cooking feature continuously. Wait 5 minutes before selecting
another sensor cooking operation.
To avoid poor results, do not use the Auto Sensor when the room ambient temperature is
too high or too low.
using your mcrowave oven 19
Sensor cooking table
Use only one microwave popcorn bag at a
Popcorn
Frozen
d nner
Cook
Frozen
breakfast
Chicken
breast
Fresh
Vegetable
Frozen
Baked Potatoes
The correct food temperature varies from person to person. Use the More (9)/Less (1} buttons
to select your personal temperature preference.
3.0 - 3.5 oz
1 package
8 OZ.
8 to 14 oz.
4 to 8 oz.
8 to 16 oz.
1 to 4 cups
1 to 4 servings
1 to 6 potatoes.
1 to 3 slices
time. Be careful when removing and opening
the heated bag from the oven. Let the oven
cool for at least 5 minutes before using it
again.
Use a measuring cup or mug and do not
cover. Place the beverage in the oven. After
heating, stir well. Let the oven cool for at least
5 minutes before using it again.
Remove the food from its wrapping and follow
the instructions on the box for covering and
standing instructions. Let the oven cool for at
least 5 minutes before using it again.
Follow the package instructions for covering
and standing. Use this button for frozen
sandwiches, breakfast entrees, pancakes,
waffles, etc. Let the oven cool for at least 5
minutes before using it again.
Place the chicken breasts on a microwave
safe plate and cover with plastic wrap. Cook
to an internal temperature of 170 °F. Let stand
for 5 minutes. Use the More (9) button to
increase the cooking time for larger or thicker
chicken breasts.
Place the fresh vegetables in a microwave-
safe ceramic, glass or plastic dish and add 2-
4 tbs. water. Cover with a lid or vented plastic
wrap while cooking and stir before standing.
Let the oven cool for at least 5 minutes before
using it again.
Place the frozen vegetables in a microwave-
safe ceramic, glass or plastic dish and add 2-
4 tbs. water. Cover with a lid or vented plastic
wrap while cooking and stir before standing
for 3-5 minutes. Let the oven cool for at least
5 minutes before using it again. Use the More
(9} button when cooking dense vegetables
such as carrots or broccoli spears.
Pierce each potato several times with a fork.
Place on the turntable in a spoke-like fashion.
After cooking, let the potatoes stand for
3-5 minutes. Let the oven cool for at least 5
minutes before using it again.
Place 1-3 pizza slices on a microwave-safe
plate with the wide ends of the slices towards
the outside edge of the plate. Do not let the
slices overlap. Do not cover. Let the oven cool
for at least 5 minutes before using it again.
Use the More (9} button to increase the
reheating time for pizzas with thick crusts.
20 using your mcrowave oven

I I
USING THE SENSOR REHEAT BUTTON
Heating leftovers and precooked foods is easy with your new microwave. By actually sensing the humidity
that escapes as the food is heated, the oven's heating time is automatically adjusted depending on the type
and amount of precooked food.
AII food must already be precooked. Plates of food and casseroles should be stored at refrigerator
temperature.
Press the Sensor Reheat button to begin reheating your precooked food. The display will show/_FJ_,c½7-
and the oven will start automatically. Use the More (9}/Less (0} buttons to adjust the heating time. If you
want to check the current time at any time while reheating, press the Clock button.
Sensor reheating table
Follow the instructions below when reheating different types of food.
Dinner plate
Casserole
1serving
(1 plate)
1to 4 servings
Use only precooked, refrigerated foods.
Cover the plate with vented plastic wrap or waxed
paper tucked under the plate. If the food is not as
hot as you would like after using the Sensor Reheat
function, continue heating using additional time and
power.
Contents:
3-4 oz. meat, poultry or fish (up to 6 oz. with bone)
1/2cup starch (potatoes, pasta, rice, etc.)
1/2cup vegetables (about 3 - 4 oz.)
Cover the plate with a lid or vented plastic wrap. If
the food is not as hot as you would like after using
the "Sensor Reheat" function, continue heating using
additional time and power.
Stir the food once before serving.
Contents:
Casserole, refrigerated foods.
Pasta: canned spaghetti and ravioli
using your mcrowave oven 21
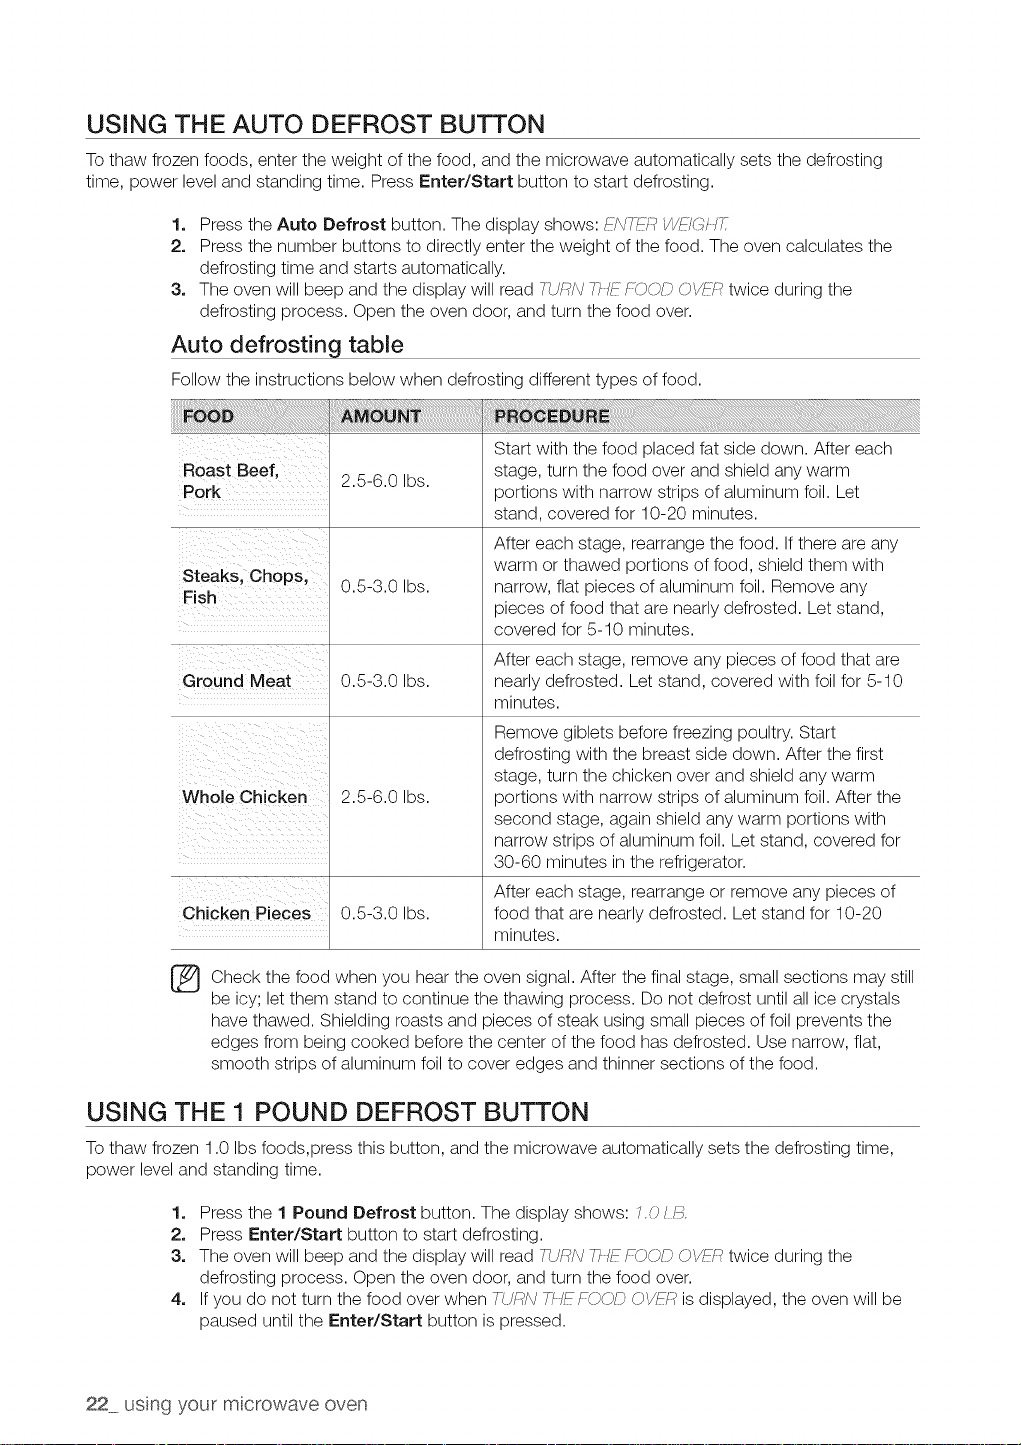
USING THE AUTO DEFROST BUTTON
To thaw frozen foods, enter the weight of the food, and the microwave automatically sets the defrosting
time, power level and standing time. Press Enter/Start button to start defrosting.
1. Press the Auto Defrost button. The display shows:/_7W7_c7_ V,/F7(_ft77
2. Press the number buttons to directly enter the weight of the food. The oven calculates the
defrosting time and starts automatically.
3. The oven will beep and the display will read 77,X_M/77/F/_JODOYFT7twice during the
defrosting process. Open the oven door, and turn the food over.
Auto defrosting table
Follow the instructions below when defrosting different types of food.
i!iiiiiiiiii 6 i! !iii!iiiii ii i i i i i i i i i i iiiii iiiiiiiii iiiiiiiiiiiiiiiiiiiiiiiiiiiiiiiiiiiiiiiiiii!i!iiiii!i
_iii!_i!i!_iii!_i!i!_iii!_i!i!_iii!_i!i!_iii!_i!i!_iii!_i!i!_ii_i_i!!_i_!!i_i_!!i_i_!!i_i_!!i_i_!!i_i_!!i_i_!!i_i_!!i_i_!!i_i_!!i_i_!!i_i_!!i_i_!!i_i_!!i_i_!!i_i_!i!!ili!ii!_i_iiiili_iiiiiiiii_i!!iiili!iiii!!iiiii!1111717_iiii_iiii_iiii_iiii_iiii_iiii_iiii_iiii_i!_!i!iii_!
Start with the food placed fat side down. After each
Roast Beef,
Pork
Steaks, Chops,
Fish
Ground Meat
Whole Chicken
Chicken Pieces
2.5-6.0 Ibs.
0.5-3.0 Ibs.
0.5-3.0 Ibs.
2.5-6.0 Ibs.
0.5-3.0 Ibs.
stage, turn the food over and shield any warm
portions with narrow strips of aluminum foil. Let
stand, covered for 10-20 minutes.
After each stage, rearrange the food. If there are any
warm or thawed portions of food, shield them with
narrow, flat pieces of aluminum foil. Remove any
pieces of food that are nearly defrosted. Let stand,
covered for 5-10 minutes.
After each stage, remove any pieces of food that are
nearly defrosted. Let stand, covered with foil for 5-10
minutes.
Remove giblets before freezing poultry. Start
defrosting with the breast side down. After the first
stage, turn the chicken over and shield any warm
portions with narrow strips of aluminum foil. After the
second stage, again shield any warm portions with
narrow strips of aluminum foil. Let stand, covered for
30-60 minutes in the refrigerator.
After each stage, rearrange or remove any pieces of
food that are nearly defrosted. Let stand for 10-20
minutes.
Check the food when you hear the oven signal. After the final stage, small sections may still
%
be icy; let them stand to continue the thawing process. Do not defrost until all ice crystals
have thawed. Shielding roasts and pieces of steak using small pieces of foil prevents the
edges from being cooked before the center of the food has defrosted. Use narrow, flat,
smooth strips of aluminum foil to cover edges and thinner sections of the food.
USING THE 1 POUND DEFROST BUTTON
To thaw frozen 1.0 Ibs foods,press this button, and the microwave automatically sets the defrosting time,
power level and standing time.
1. Press the 1 Pound Defrost button. The display shows: 7.0 L/_.
2. Press Enter/Start button to start defrosting.
3. The oven will beep and the display will read 77,X_M/77/_c/_JODOYFT7twice during the
defrosting process. Open the oven door, and turn the food over.
4. Ifyou do not turn the food over when 7:U/_N77/FLOOD OtX,_7-7is displayed, the oven will be
paused until the Enter/Start button is pressed.
22 using your morowave oven
I I
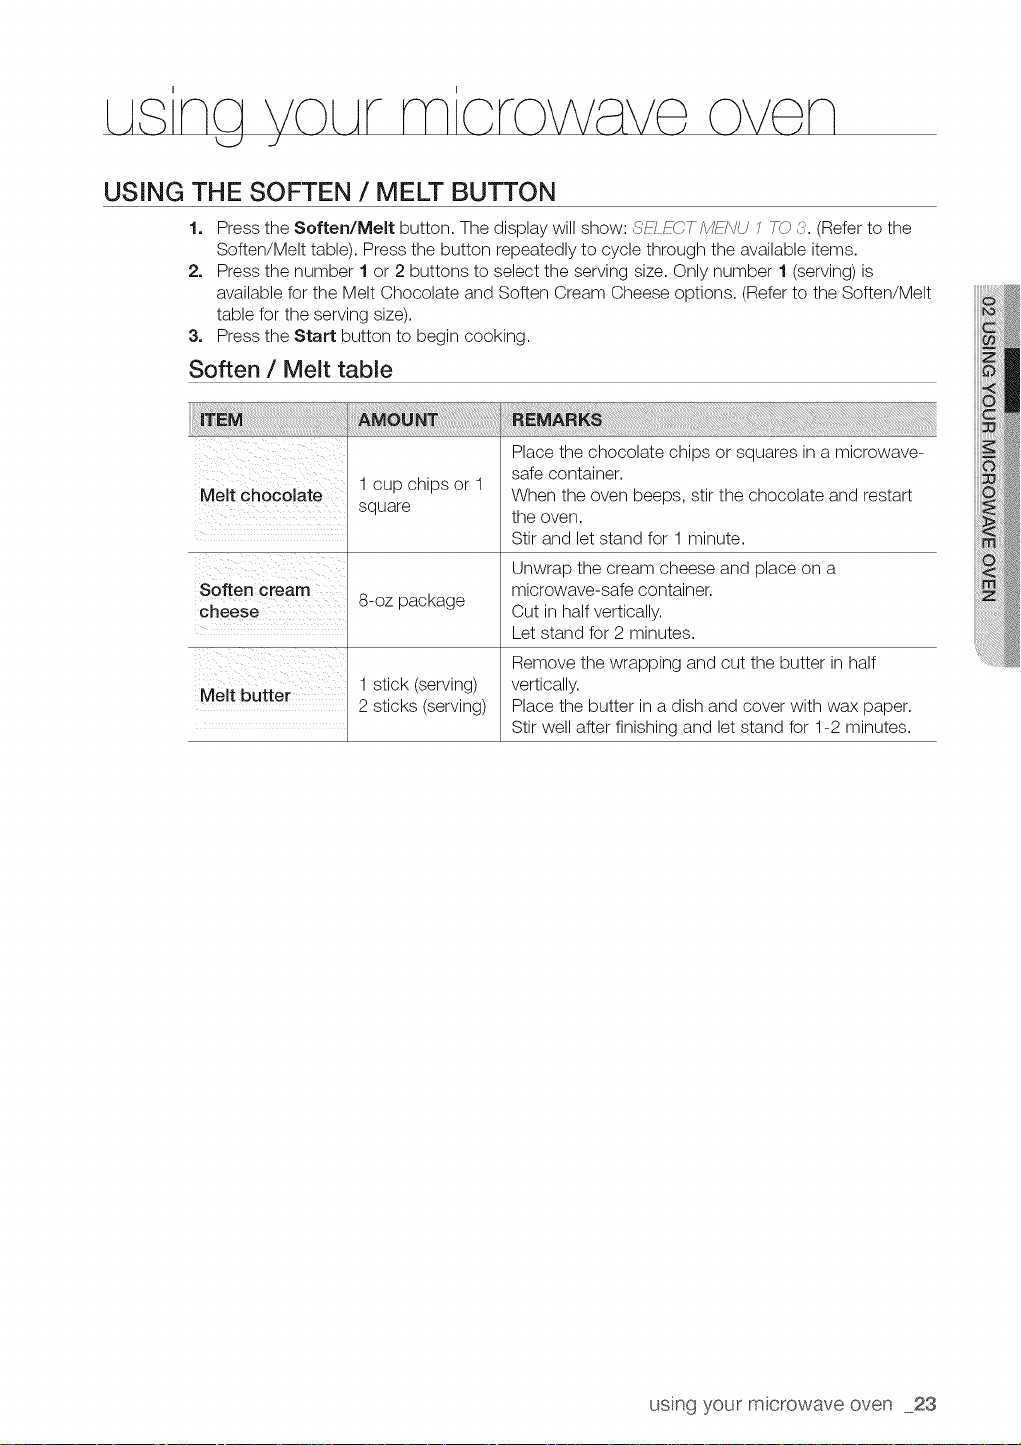
USING THE SOFTEN / MELT BUTTON
1. Press the Soften/Melt button. The display will show: _F/F_:_'T/_2_'ciX/UJ 7_?_¢.(Refer to the
Soften/Melt table). Press the button repeatedly to cycle through the available items.
2. Press the number 1or 2 buttons to select the serving size. Only number 1 (serving) is
available for the Melt Chocolate and Soften Cream Cheese options. (Refer to the Soften/Melt
table for the serving size).
3. Press the Start button to begin cooking.
Soften / Melt table
Place the chocolate chips or squares in a microwave-
safe container.
When the oven beeps, stir the chocolate and restart
the oven.
Stir and let stand for 1 minute.
Unwrap the cream cheese and place on a
microwave-safe container.
Cut in half vertically.
Let stand for 2 minutes.
Remove the wrapping and cut the butter in half
vertically.
Place the butter in a dish and cover with wax paper.
Stir well after finishing and let stand for 1-2 minutes.
Melt chocolate
Soften cream
cheese
Melt butter
1cup chips or 1
square
8-oz package
1stick (serving)
2 sticks (serving)
using your mcrowave oven 23
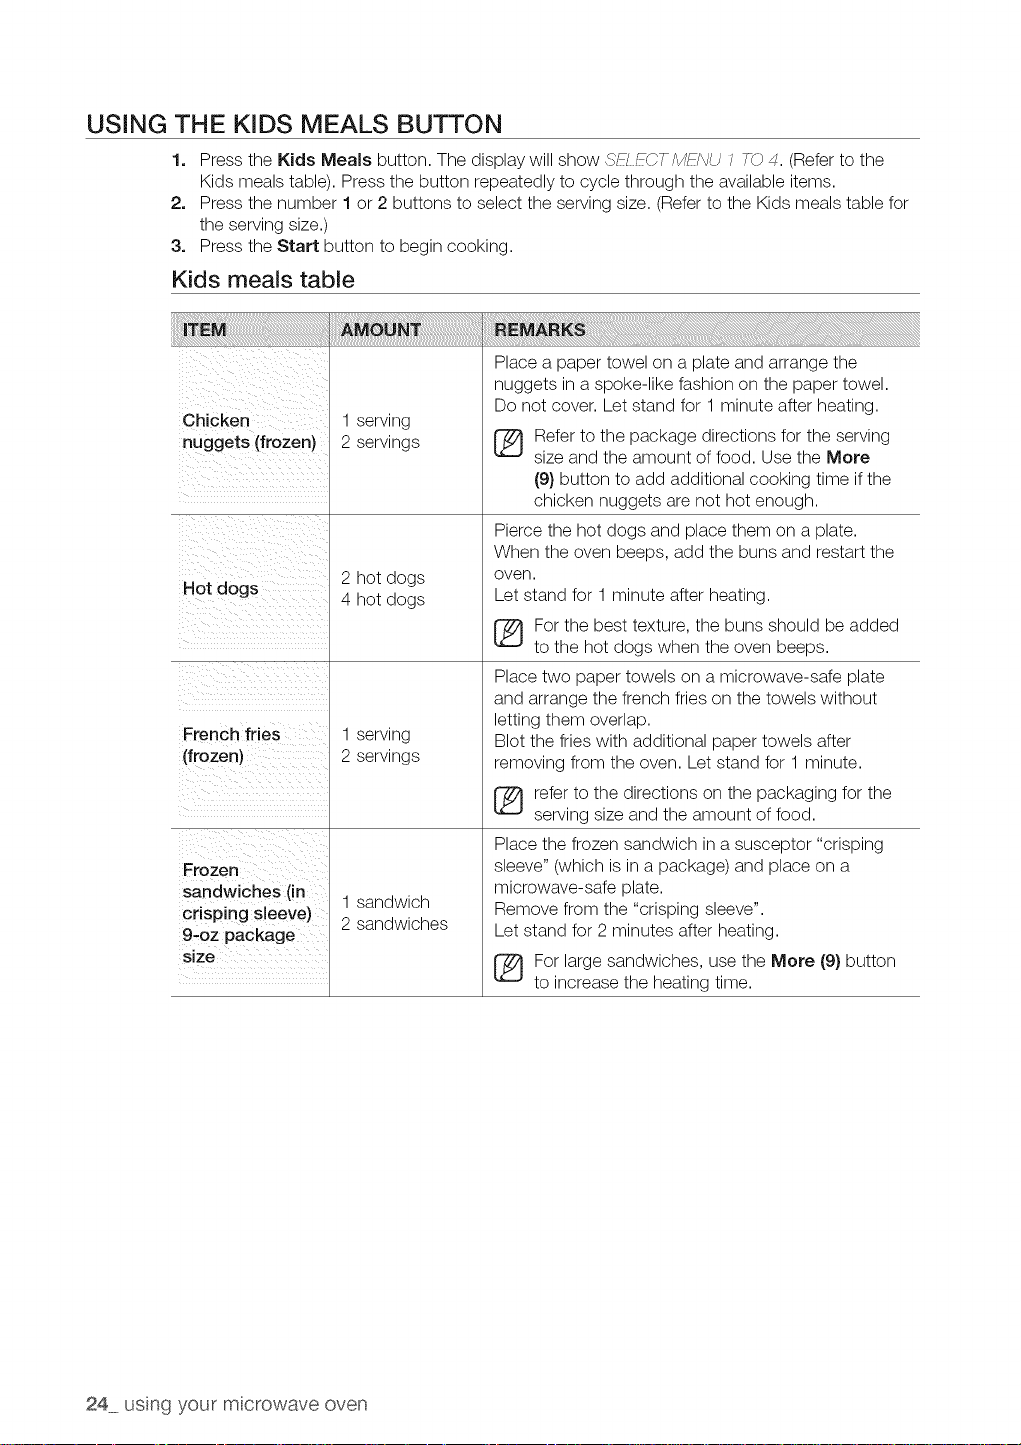
USING THE KIDS MEALS BUTTON
1. Press the Kids Meals button. The display will show _4Y-/i_'7-/',/i_i*/U1 7C_4. (Refer to the
Kids meals table). Press the button repeatedly to cycle through the available items.
2. Press the number 1 or 2 buttons to select the serving size. (Refer to the Kids meals table for
the serving size.)
3. Press the Start button to begin cooking.
Kids meals table
Chicken
nuggets (frozen)
Hot dogs
FrenCh fries
(frozen)
1 serving
2 servings
2 hot dogs
4 hot dogs
1 serving
2 servings
Place a paper towel on a plate and arrange the
nuggets in a spoke-like fashion on the paper towel.
Do not cover. Let stand for 1 minute after heating.
[_ Refer to the package directions for the serving
size and the amount of food. Use the More
(9) button to add additional cooking time if the
chicken nuggets are not hot enough.
Pierce the hot dogs and place them on a plate.
When the oven beeps, add the buns and restart the
oven.
Let stand for 1 minute after heating.
(_ or the best texture, the buns should be added
to the hot dogs when the oven beeps.
Place two paper towels on a microwave-safe plate
and arrange the french fries on the towels without
letting them overlap.
Blot the fries with additional paper towels after
removing from the oven. Let stand for 1 minute.
sandwiches (in
crisping sleeve)
9.oz package
1 sandwich
2 sandwiches
(_ efer to the directions on the packaging for the
serving size and the amount of food.
Place the frozen sandwich in a susceptor "crisping
sleeve" (which is in a package) and place on a
microwave-safe plate.
Remove from the "crisping sleeve".
Let stand for 2 minutes after heating.
For large sandwiches, use the Mere (9) button
to increase the heating time.
24 using your mcrowave oven
I I
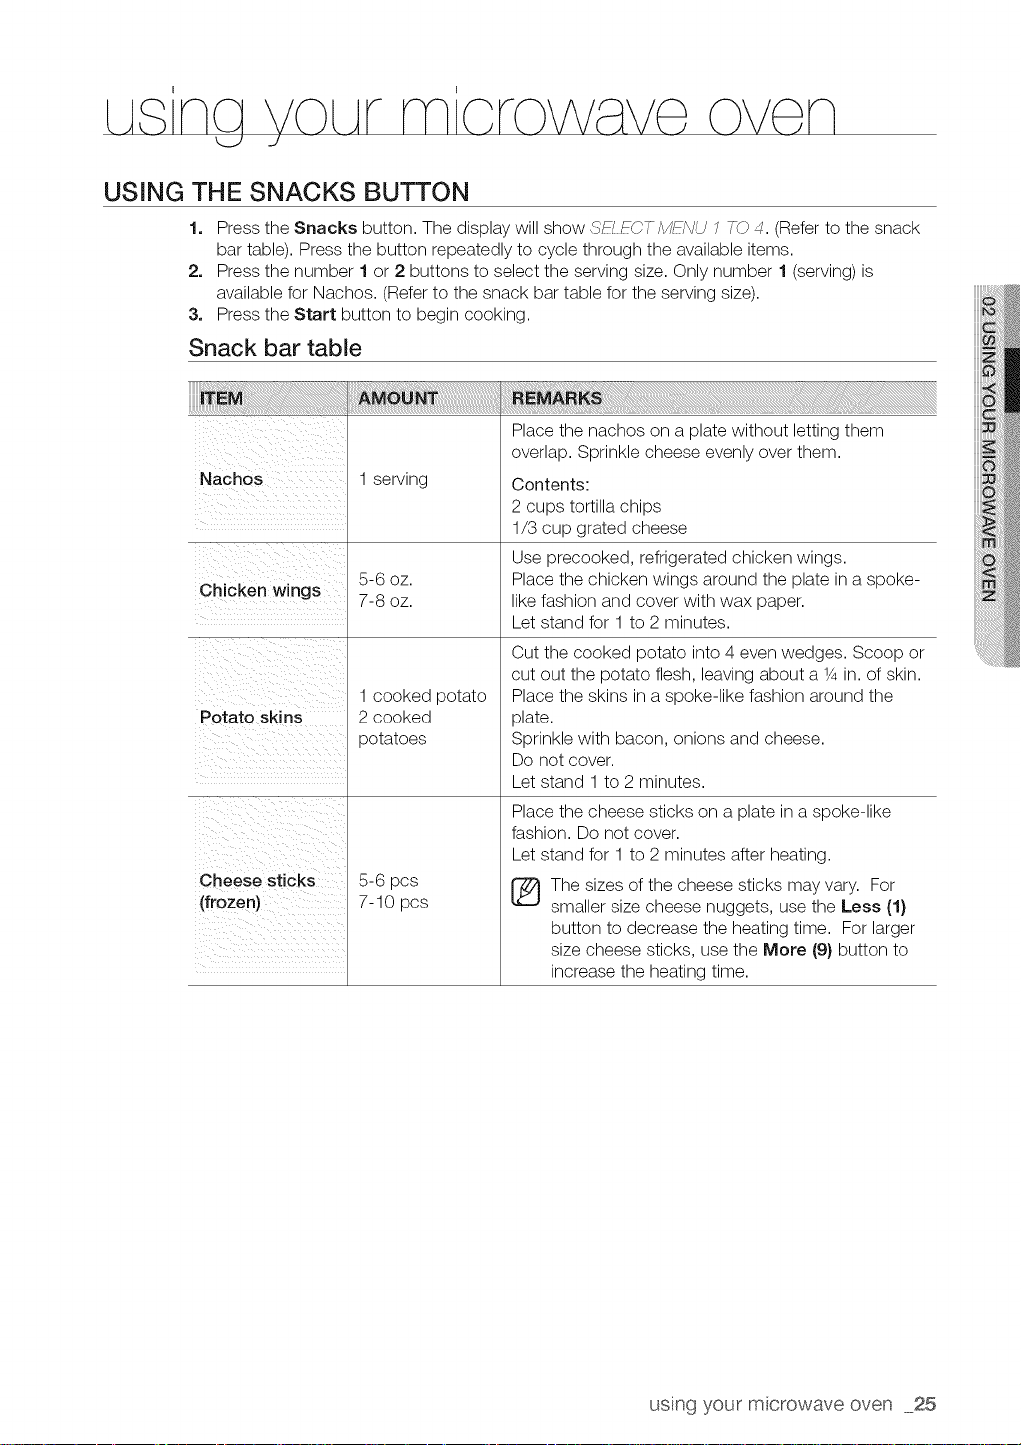
USING THE SNACKS BUTTON
1. Press the Snacks button. The display will show _4_F7_77 /_/_'_iX/U1 7-(?4. (Refer to the snack
bar table). Press the button repeatedly to cycle through the available items.
2. Press the number 1or 2 buttons to select the serving size. Only number 1 (serving) is
available for Nachos. (Refer to the snack bar table for the serving size).
3. Press the Start button to begin cooking.
Snack bar table
Nachos
Chicken wings
Potato skins
Cheese sticks
(frozen)
1serving
5-6 oz.
7-8 oz.
1cooked potato
2 cooked
potatoes
5-6 pcs
7-10 pcs
Place the nachos on a plate without letting them
overlap. Sprinkle cheese evenly over them.
Contents:
2 cups tortilla chips
1/3 cup grated cheese
Use precooked, refrigerated chicken wings.
Place the chicken wings around the plate in a spoke-
like fashion and cover with wax paper.
Let stand for 1 to 2 minutes.
Cut the cooked potato into 4 even wedges. Scoop or
cut out the potato flesh, leaving about a 1/4in. of skin.
Place the skins in a spoke-like fashion around the
plate.
Sprinkle with bacon, onions and cheese.
Do not cover.
Let stand 1 to 2 minutes.
Place the cheese sticks on a plate in a spoke-like
fashion. Do not cover.
Let stand for 1 to 2 minutes after heating.
The sizes of the cheese sticks may vary. For
smaller size cheese nuggets, use the Less (1}
button to decrease the heating time. For larger
size cheese sticks, use the More (9} button to
increase the heating time.
using your mcrowave oven 25
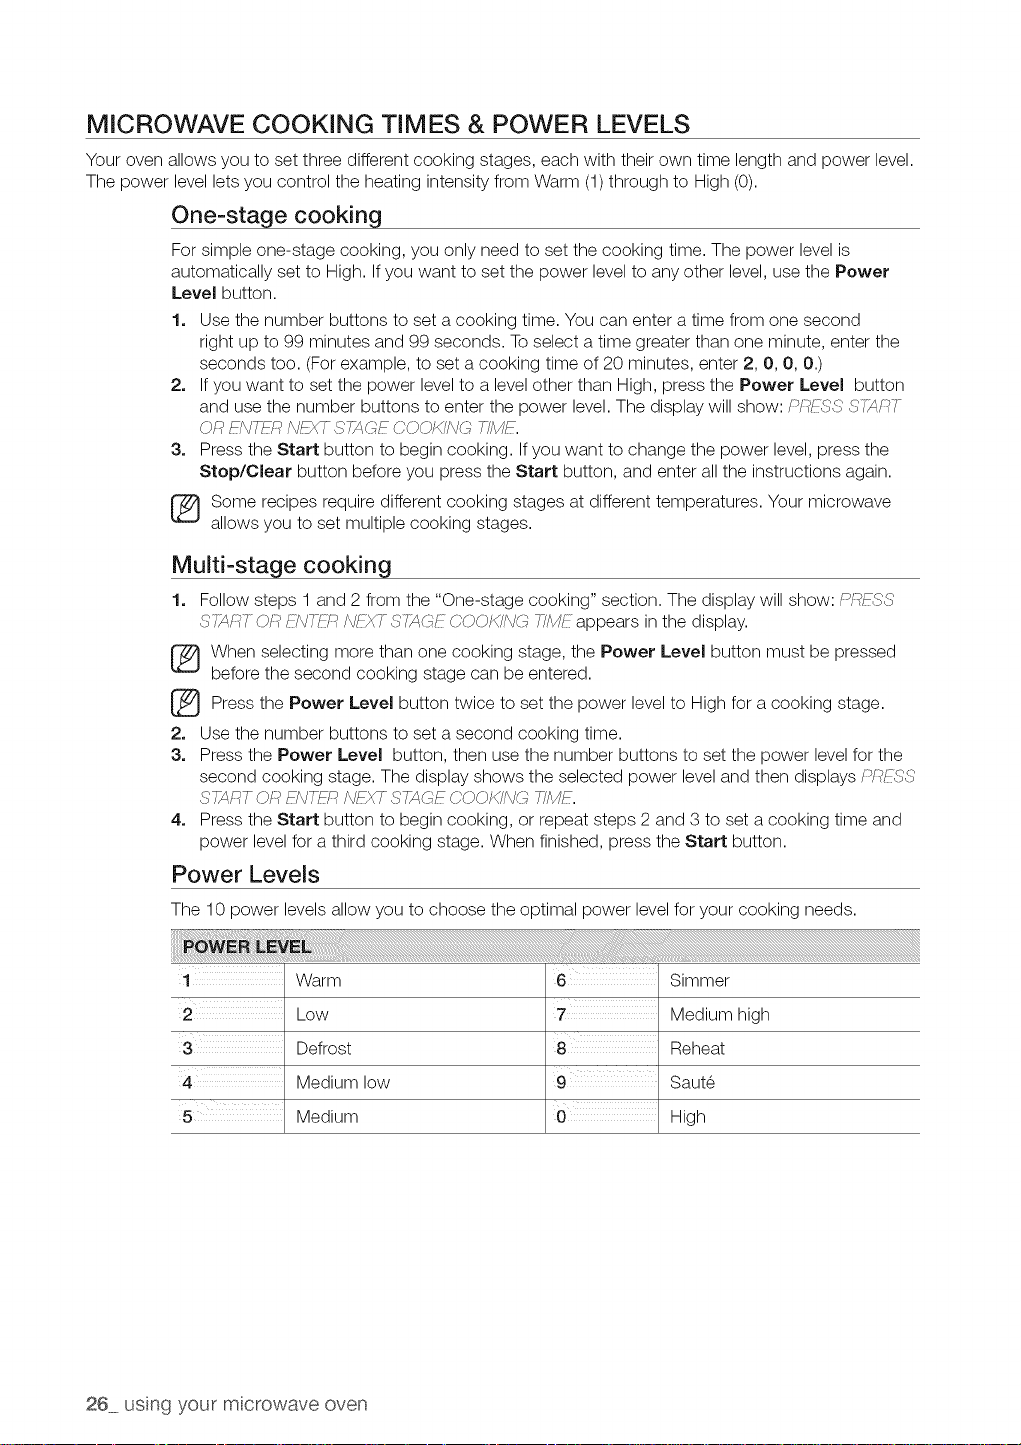
MICROWAVE COOKING TIMES & POWER LEVELS
Your oven allows you to set three different cooking stages, each with their own time length and power level.
The power level lets you control the heating intensity from Warm (1) through to High (0).
One-stage cooking
For simple one-stage cooking, you only need to set the cooking time. The power level is
automatically set to High. If you want to set the power level to any other level, use the Power
Level button.
1. Use the number buttons to set a cooking time. You can enter a time from one second
right up to 99 minutes and 99 seconds. Toselect a time greater than one minute, enter the
seconds too. (For example, to set a cooking time of 20 minutes, enter 2, O, O, 0.)
2. Ifyou want to set the power level to a level other than High, press the Power Level button
and use the number buttons to enter the power level. The display will show: _?F_S S7XR7-
OR F_/TF,oI\/F_7 STXC_EC00/47YC_T/IW?.
3. Press the Start button to begin cooking. Ifyou want to change the power level, press the
Stop/Clear button before you press the Start button, and enter all the instructions again.
[_ ome recipes require different cooking stages at different temperatures. Your microwave
allows you to set multiple cooking stages.
Multi-stage cooking
1. Follow steps 1 and 2 from the "One-stage cooking" section. The display will show: M?F_
STXR7 OR _i*q7_77NFXT ST_C_ECOOKiNC T/IWi_ appears in the display.
[_ hen selecting more than one cooking stage, the Power Level button must be pressed
before the second cooking stage can be entered.
[_ Press the Power Level button twice to set the level to forpower
2. Use the number buttons to set a second cooking time.
3. Press the Power Level button, then use the number buttons to set the power level for the
second cooking stage. The display shows the selected power level and then displays _::_S
S7XR7 ORFi\/7/h'_£/FX7 S7XOE C'OO_?'NG771W/_.
4. Press the Start button to begin cooking, or repeat steps 2 and 3 to set a cooking time and
power level for a third cooking stage. When finished, press the Start button.
High
Power Levels
a
cooking stage.
The 10 power levels allow you to choose the optimal power level for your cooking needs.
1¸¸¸¸¸¸ Warm
Low
Defrost
Medium low
Medium
26 using your mcrowave oven
Simmer
Medium high
8
Reheat
Saute
High
I I
USING THE CUSTOM COOK BUTTON
The Custom Cook button lets you store a customized set of cooking instructions, and recall this setting
later from memory to begin cooking quickly.
[_ Only one set of instructions can be stored at a time.
1. Press the Custom Cook button. The display shows 7-_JUC'it _4_77_R7(JR/WUT_7_/W_W 77/WF.
2. Use the number buttons to enter the cooking time. The display will show the set time.
3. Press the Power Level button and use the number buttons to enter the power level. The
display will show the selected power level. You can set the power level from 0 to 9.
4. Press the Enter/Start button again.
5. To retrieve a Custom Recipe, press the Custom Cook button, then press the Enter/Start
button.
• You can only recall one stored recipe at a time.
_You can check the power level anytime while cooking by pressing the Power Level button.
using your mcrowave oven 27
 Loading...