

Samsung SM-G920IZDEXSA, SM-G920IZDFXSA, SM-G920IZBFXSA, SM-G920IZDAXSA, SM-G920IZBEXSA User Manual
...
SM-G920F
SM-G920FQ
SM-G920I
User Manual
English. 04/2015. Rev.1.0
www.samsung.com

Table of Contents
Basics
4 Read me first
5 Package contents
6 Device layout
8 SIM or USIM card
10 Battery
15 Turning the device on and off
16 Touchscreen
19 Home screen
26 Lock screen
27 Notification panel
30 Entering text
33 Screen capture
33 Opening apps
57 Camera
73 Gallery
75 Smart Manager
77 S Planner
78 S Health
81 S Voice
83 Music
84 Video
85 Voice Recorder
87 My Files
88 Memo
88 Clock
90 Calculator
91 Google apps
34 Multi window
39 Device and data management
43 Connecting to a TV
45 Sharing files with contacts
46 Emergency mode
Applications
47 Installing or uninstalling apps
48 Phone
51 Contacts
53 Messages
55 Internet
56 Email
Settings
93 Introduction
93 Wi-Fi
95 Bluetooth
97 Flight mode
97 Mobile hotspot and tethering
98 Data usage
99 Mobile networks
99 NFC and payment
102 More connection settings
104 Sounds and notifications
105 Display
105 Motions and gestures
2

Table of Contents
106 Applications
106 Wallpaper
106 Themes
107 Lock screen and security
111 Privacy and safety
114 Easy mode
115 Accessibility
115 Accounts
116 Backup and reset
117 Language and input
117 Battery
118 Storage
118 Date and time
119 User manual
119 About device
Appendix
120 Accessibility
135 Troubleshooting
3

Basics
Read me first
Please read this manual before using the device to ensure safe and proper use.
•
Descriptions are based on the device’s default settings.
•
Some content may differ from your device depending on the region, service provider,
model specifications, or device’s software.
•
Content (high quality content) that requires high CPU and RAM usage will affect the
overall performance of the device. Apps related to the content may not work properly
depending on the device’s specifications and the environment that it is used in.
•
Samsung is not liable for performance issues caused by apps supplied by providers other
than Samsung.
•
Samsung is not liable for performance issues or incompatibilities caused by edited
registry settings or modified operating system software. Attempting to customise the
operating system may cause the device or apps to work improperly.
•
Software, sound sources, wallpapers, images, and other media provided with this device
are licensed for limited use. Extracting and using these materials for commercial or other
purposes is an infringement of copyright laws. Users are entirely responsible for illegal
use of media.
•
You may incur additional charges for data services, such as messaging, uploading and
downloading, auto-syncing, or using location services depending on your data plan. For
large data transfers, it is recommended to use the Wi-Fi feature.
•
Default apps that come with the device are subject to updates and may no longer be
supported without prior notice. If you have questions about an app provided with
the device, contact a Samsung Service Centre. For user-installed apps, contact service
providers.
•
Modifying the device’s operating system or installing softwares from unofficial sources
may result in device malfunctions and data corruption or loss. These actions are violations
of your Samsung licence agreement and will void your warranty.
4

Basics
•
Depending on the region or model, some devices are required to receive approval from
the Federal Communications Commission (FCC). If your device is approved by the FCC,
Apps
→
you can view the FCC ID of the device. To view the FCC ID, tap
Settings
→
About device
.
Instructional icons
Warning: situations that could cause injury to yourself or others
Caution: situations that could cause damage to your device or other equipment
Notice: notes, usage tips, or additional information
Package contents
Check the product box for the following items:
•
Device
•
Quick start guide
•
The items supplied with the device and any available accessories may vary
depending on the region or service provider.
•
The supplied items are designed only for this device and may not be compatible
with other devices.
•
Appearances and specifications are subject to change without prior notice.
•
You can purchase additional accessories from your local Samsung retailer. Make
sure they are compatible with the device before purchase.
•
Use only Samsung-approved accessories. Using unapproved accessories may cause
the performance problems and malfunctions that are not covered by the warranty.
•
Availability of all accessories is subject to change depending entirely on
manufacturing companies. For more information about available accessories, refer
to the Samsung website.
5

Basics
Speaker
Infrared port
Device layout
LED indicator
Proximity/Light sensor
Touchscreen
Front camera
Power key
Home key (Fingerprint
recognition sensor)
Recents key
Headset jack
Multipurpose jack
Microphone
Rear camera
SIM card tray
Back key
Loud speaker
Microphone
Flash
GPS antenna
Volume key
NFC antenna/Wireless
charging coil
Main antenna
6
Basics
•
Do not cover the antenna area with your hands or other objects. This may cause
connectivity problems or drain the battery.
•
Using a Samsung-approved screen protector is recommended. Unapproved screen
protectors may cause the sensors to malfunction.
•
Do not allow water to contact the touchscreen. The touchscreen may malfunction
in humid conditions or when exposed to water.
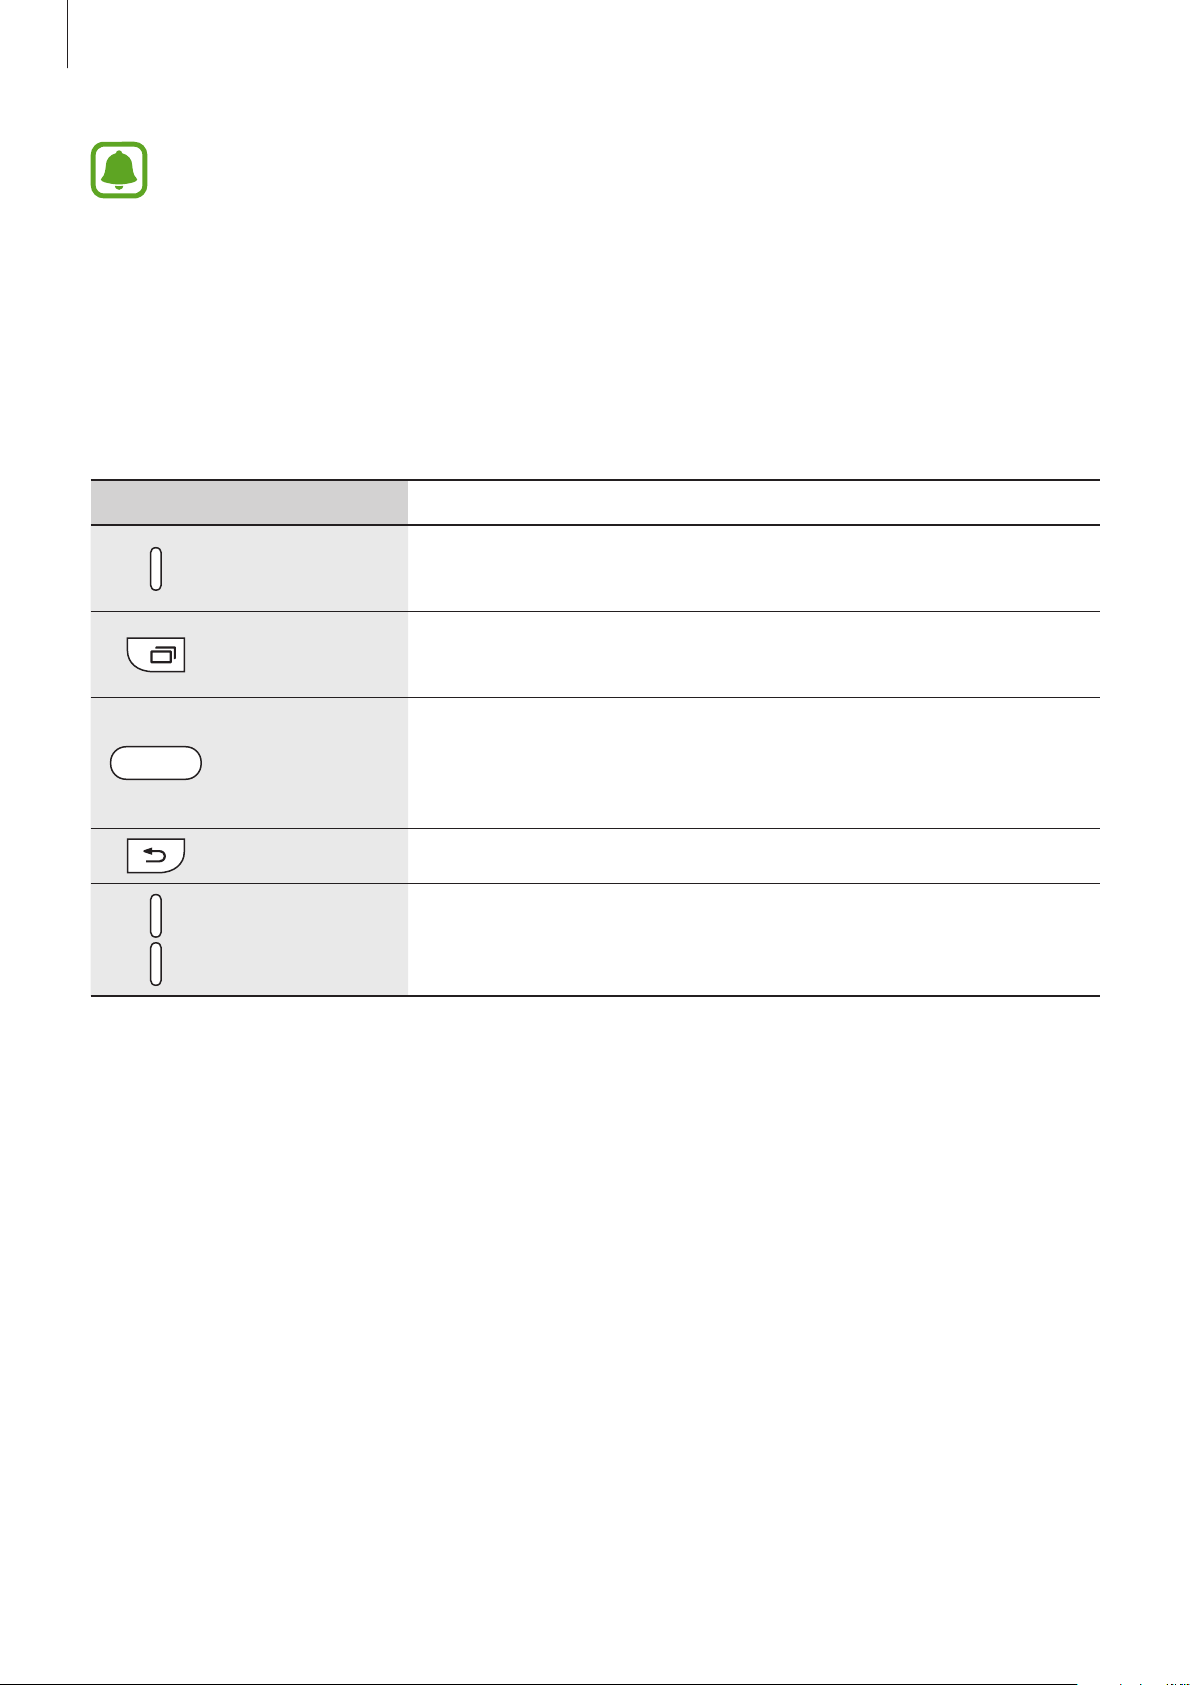
Keys
Key Function
•
Press and hold to turn the device on or off.
Power
•
Press to turn on or lock the screen.
•
Tap to open the list of recent apps.
Recents
•
Tap and hold to launch the split screen view.
Home
Back
Volume
•
Press to turn on the screen while the screen is locked.
•
Press to return to the Home screen.
•
Press and hold to launch
•
Tap to return to the previous screen.
•
Press to adjust the device volume.
Google
.
7
Basics
SIM or USIM card
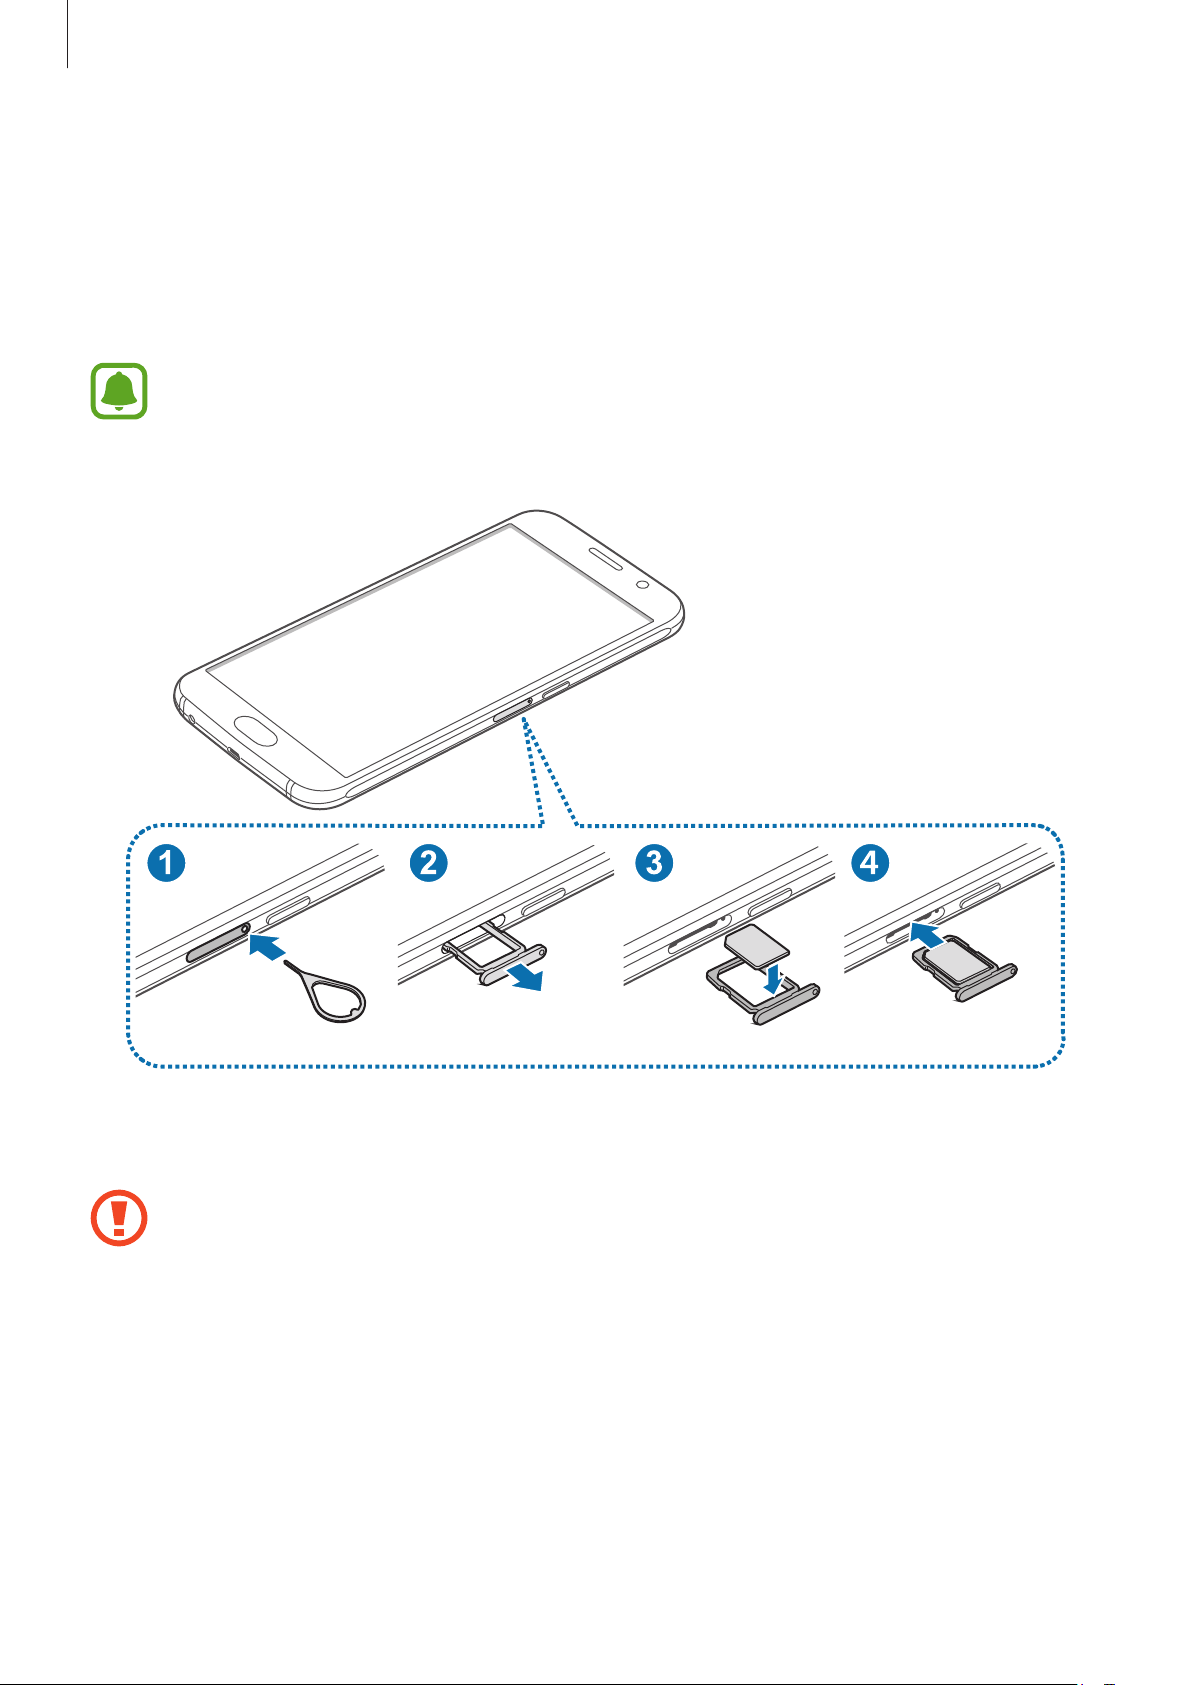
Installing the SIM or USIM card
Insert the SIM or USIM card provided by the mobile telephone service provider.
•
Only nano-SIM cards work with the device.
•
Some LTE services may not be available depending on the service provider. For
more information about service availability, contact your service provider.
Insert the ejection pin into the hole on the SIM card tray to loosen the tray.
1
Ensure that the ejection pin is perpendicular to the hole. Otherwise, the device may
be damaged.
8
Basics
Pull out the SIM card tray gently from the SIM card tray slot.
2
Place the SIM or USIM card on the SIM card tray with the gold-coloured contacts facing
3
downwards.
Use caution not to lose or let others use the SIM or USIM card. Samsung is not
responsible for any damages or inconveniences caused by lost or stolen cards.
Insert the SIM card tray back into the SIM card tray slot.
4
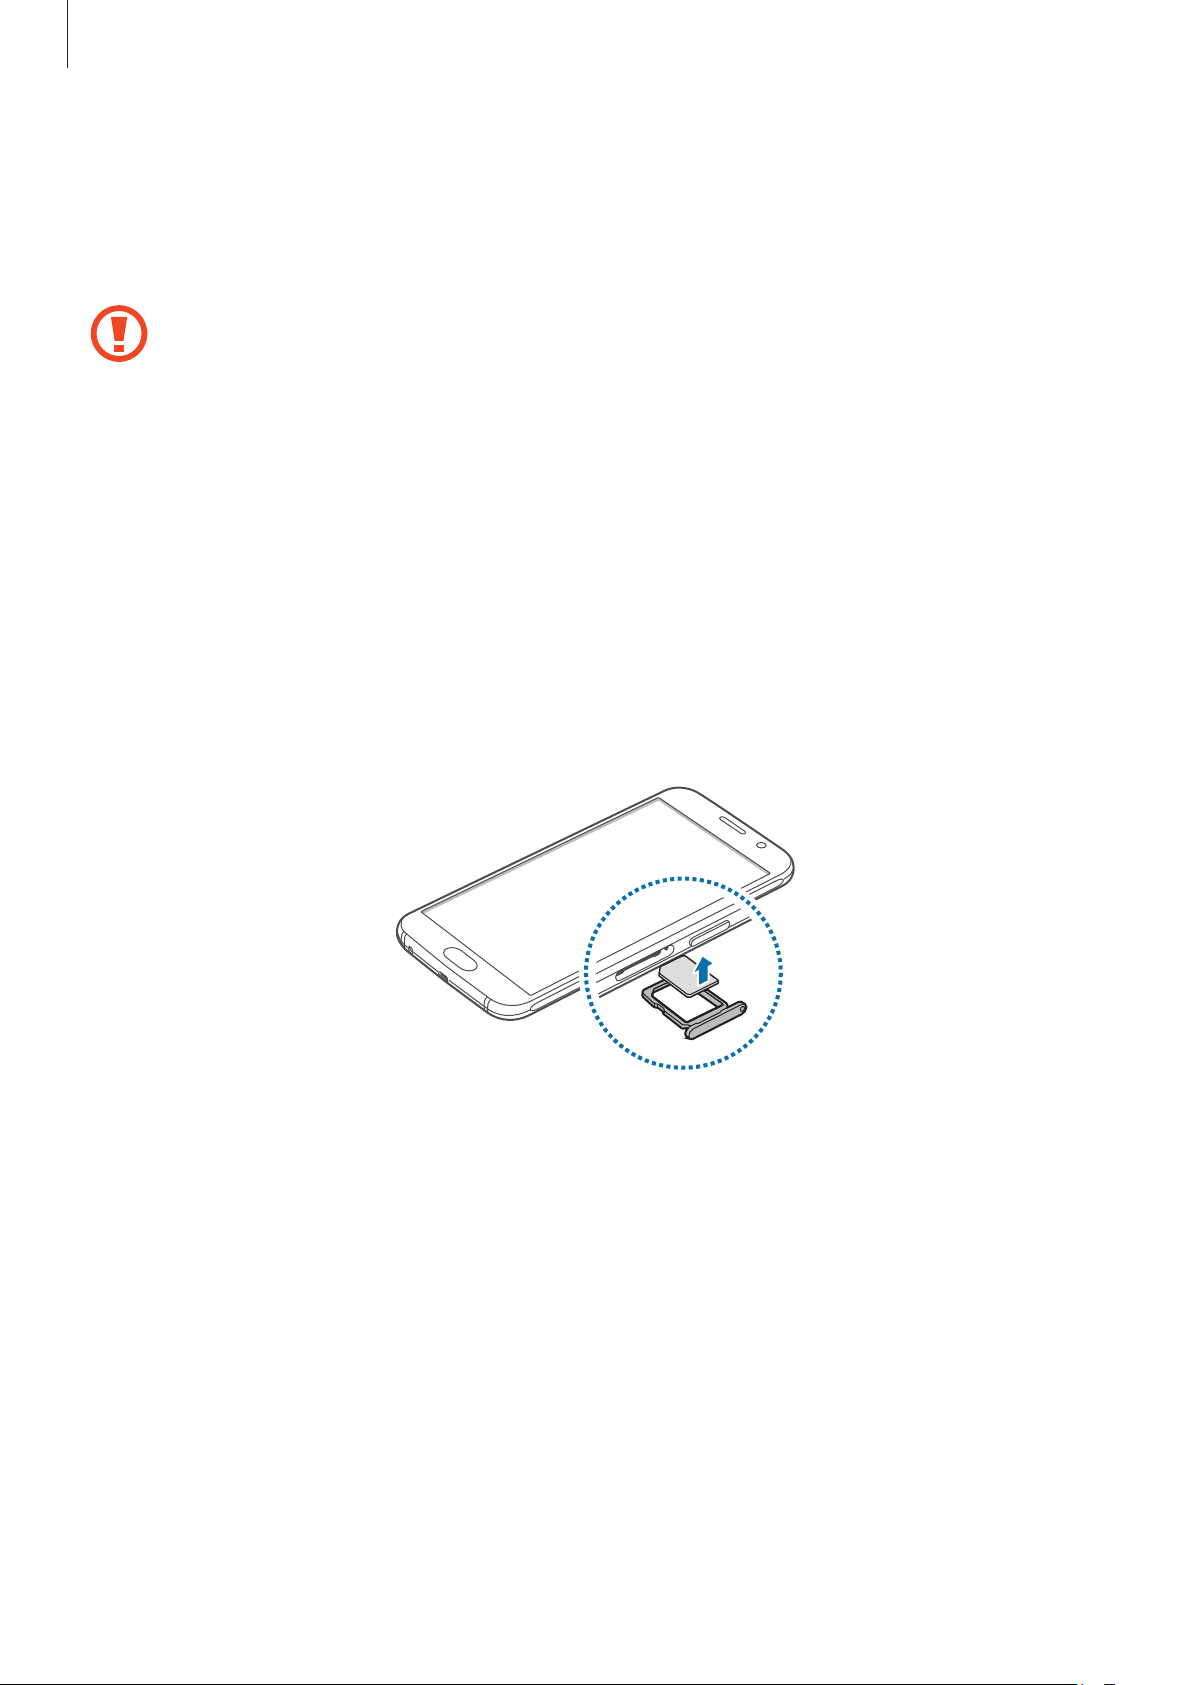
Removing the SIM or USIM card
Insert the ejection pin into the hole on the SIM card tray to loosen the tray.
1
Pull out the SIM card tray gently from the SIM card tray slot.
2
Remove the SIM or USIM card.
3
Insert the SIM card tray back into the SIM card tray slot.
4
9

Basics
Battery
Charging the battery
Charge the battery before using it for the first time or when it has been unused for extended
periods.
Use only Samsung-approved chargers, batteries, and cables. Unapproved chargers or
cables can cause the battery to explode or damage the device.
Connect the USB cable to the USB power adaptor, and then plug the end of the USB cable
1
into the multipurpose jack.
Connecting the charger improperly may cause serious damage to the device. Any
damage caused by misuse is not covered by the warranty.
Plug the USB power adaptor into an electric socket.
2
10

Basics
After fully charging, disconnect the device from the charger. First unplug the charger
3
from the device, and then unplug it from the electric socket.
To save energy, unplug the charger when not in use. The charger does not have a
power switch, so you must unplug the charger from the electric socket when not in
use to avoid wasting power. The charger should remain close to the electric socket
and easily accessible while charging.
Viewing the remaining charging time
While charging, open the Home screen and tap
The actual charging time may vary depending on the status of your device and the
charging conditions. The remaining charging time may not be displayed when you
charge the device in very cold or very hot conditions.
Apps
→
Settings
→
Battery
.
Reducing the battery consumption
Your device provides various options that help you conserve battery power.
•
Optimise the device using the Smart manager.
•
When you are not using the device, switch to sleep mode by pressing the Power key.
•
Activate power saving mode.
•
Close unnecessary apps.
•
Deactivate the Bluetooth feature when not in use.
•
Deactivate the Wi-Fi feature when not in use.
•
Deactivate auto-syncing of apps.
•
Decrease the backlight time.
•
Decrease the screen brightness.
11

Basics
Battery charging tips and precautions
•
When the battery power is low, the battery icon appears empty.
•
If the battery is completely discharged, the device cannot be turned on immediately
when the charger is connected. Allow a depleted battery to charge for a few minutes
before turning on the device.
•
If you use multiple apps at once, network apps, or apps that need a connection to
another device, the battery will drain quickly. To avoid disconnecting from the network
or losing power during a data transfer, always use these apps after fully charging the
battery.
•
Using a power source other than the USB power adaptor, such as a computer, may result
in a slower charging speed due to a lower electric current.
•
The device can be used while it is charging, but it may take longer to fully charge the
battery.
•
If the device receives an unstable power supply while charging, the touchscreen may not
function. If this happens, unplug the charger from the device.
•
While charging, the device and the charger may heat up. This is normal and should not
affect the device’s lifespan or performance. If the battery gets hotter than usual, the
charger may stop charging.
•
If the device is not charging properly, take the device and the charger to a Samsung
Service Centre.
12
Basics
Fast charging
The device has a built-in fast charging feature. You can use this feature to charge the battery
more quickly while the device or its screen is turned off.
About Fast charging
•
Fast charging uses battery charging technology that charges the battery faster by
increasing the charging power. The device supports Samsung’s Adaptive fast charging
feature and Qualcomm Quick Charge 2.0.
•
To use Fast charging on your device, connect it to a battery charger that supports
Adaptive fast charging or Quick Charge 2.0.
Increasing the charging speed
To increase the charging speed, turn the device or its screen off when you charge the battery.
•
While charging the battery when the device is turned off, the icon appears on the
screen.
•
You cannot use the fast charging feature when the screen is turned on. Turn off the
screen to increase the charging speed.
•
You cannot use the built-in fast charging feature when you charge the battery
using a standard battery charger.
•
If the device heats up or the ambient air temperature rises, the charging speed may
decrease automatically. This is a normal operating condition to prevent damage to
the device.
13

Basics
Wireless charging
The device has a built-in wireless charging coil. You can charge the battery using a wireless
charger (sold separately).
Place the centre of the device’s back on the centre of the wireless charger.
1
You can check the remaining charging time on the screen. The actual remaining time
may vary depending on the charging conditions.
After fully charging, disconnect the device from the wireless charger.
2
•
When there are foreign materials between the device and the wireless charger, the
device may not charge properly.
•
If you use the wireless charger in areas with weak network signals, you may lose
network reception.
•
Use Samsung-approved wireless chargers. If you use other wireless chargers, the
battery may not charge properly.
Power saving mode
Save the battery power by limiting the device’s functions.
On the Home screen, tap
the switch to activate it.
To automatically activate power saving mode when the remaining battery power reaches the
preset level, tap
Start power saving
Apps
→
Settings
and select an option.
→
Battery
→
Power saving mode
, and then tap
14

Basics
Ultra power saving mode
Use this mode to extend the device’s battery power. In ultra power saving mode, the device
performs the following:
•
Displays colours on the screen as grey tones.
•
Restricts the available apps to essential and selected apps only.
•
Deactivates the mobile data connection when the screen turns off.
•
Deactivates the Wi-Fi and Bluetooth features.
On the Home screen, tap
then tap the switch to activate it.
To deactivate ultra power saving mode, tap
The usage time left shows the time remaining before the battery power runs
out. Usage time left may vary depending on your device settings and operating
conditions.
Apps
→
Settings
→
Battery
MORE
→
Ultra power saving mode
→
Disable ultra power saving mode
, and
.
Turning the device on and off
Press and hold the Power key for a few seconds to turn on the device.
When you turn on your device for the first time or after performing a data reset, follow the onscreen instructions to set up your device.
To turn off the device, press and hold the Power key, and then tap
•
If your device is frozen and unresponsive, press and hold the Power key and the
Power off
.
Volume key down simultaneously for more than 7 seconds to restart it.
•
Follow all posted warnings and directions from authorised personnel in areas
where the use of wireless devices is restricted, such as aeroplanes and hospitals.
15
Basics
Touchscreen
•
Do not allow the touchscreen to come into contact with other electrical devices.
Electrostatic discharges can cause the touchscreen to malfunction.
•
To avoid damaging the touchscreen, do not tap it with anything sharp or apply
excessive pressure to it with your fingertips.
•
The device may not recognise touch inputs close to the edges of the screen, which
are outside of the touch input area.
•
Leaving the touchscreen idle for extended periods may result in afterimages
(screen burn-in) or ghosting. Turn off the touchscreen when you do not use the
device.
•
It is recommended to use fingers when you use the touchscreen.
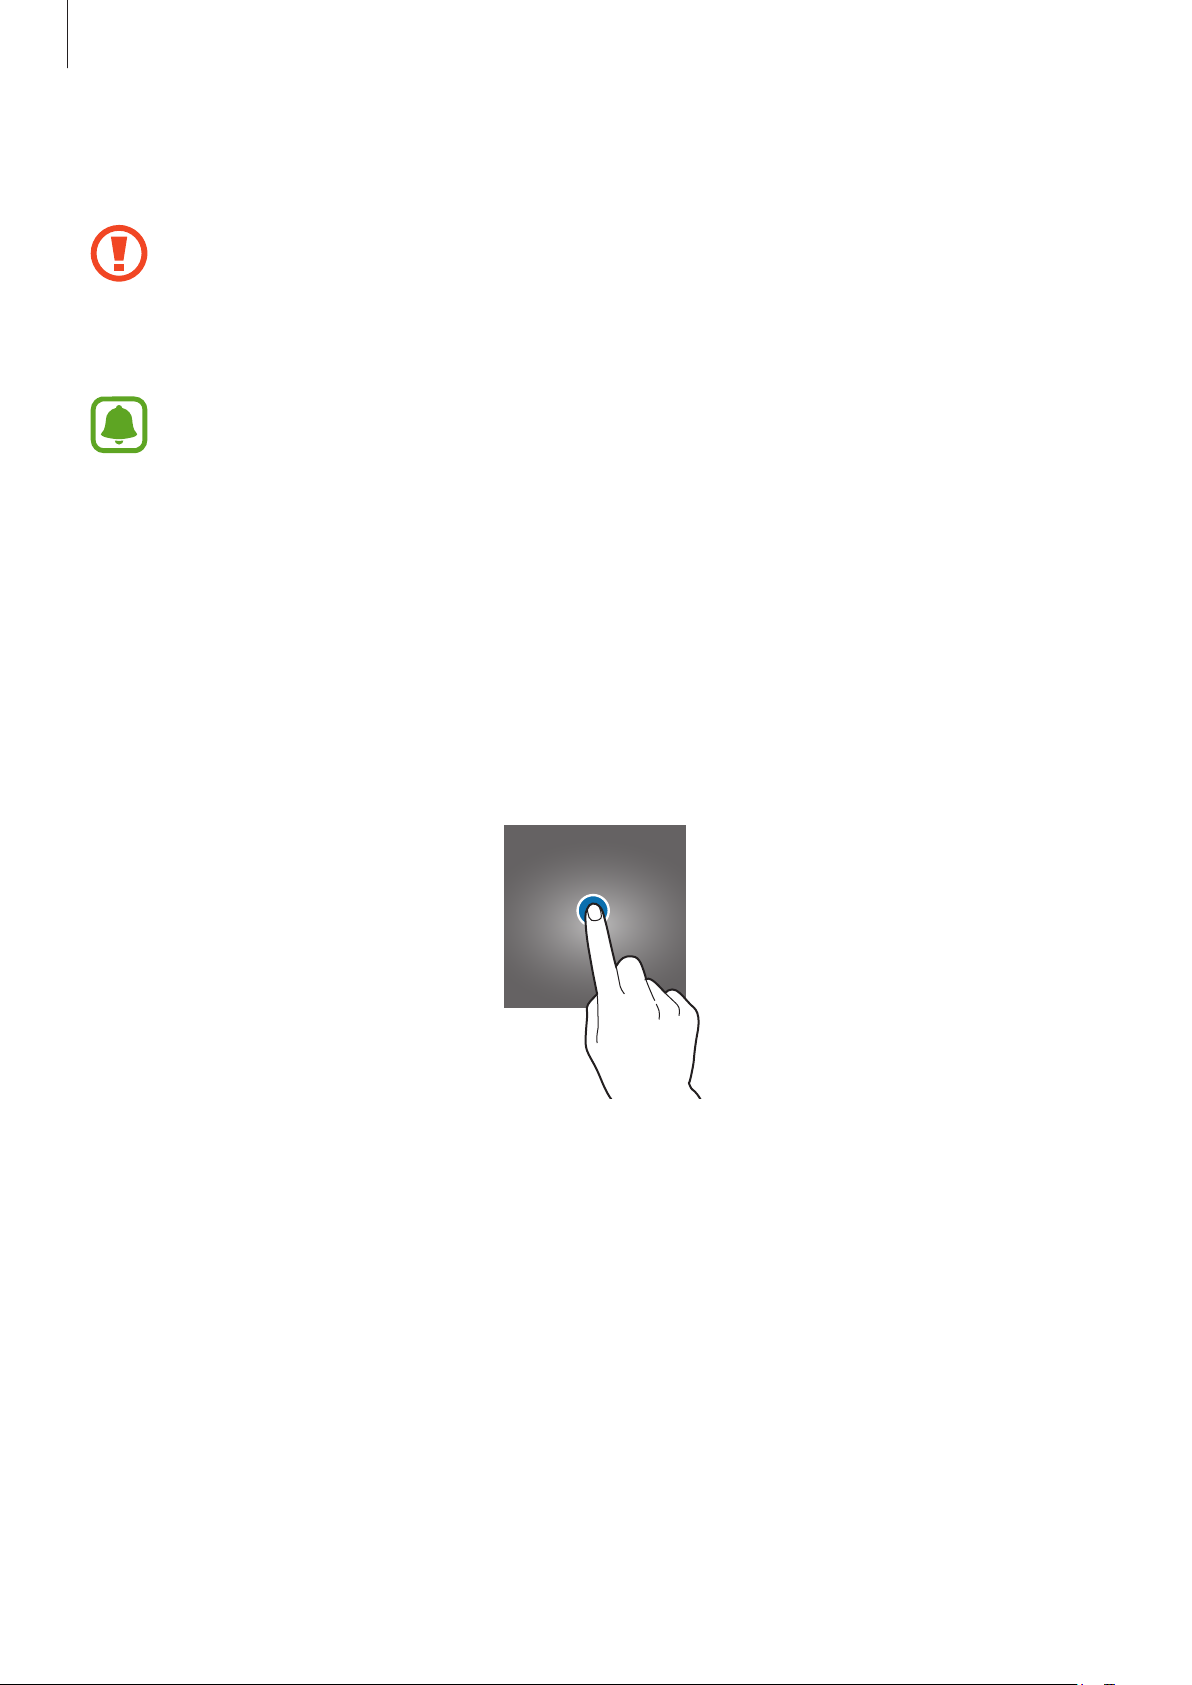
Tapping
To open an app, to select a menu item, to press an on-screen button, or to enter a character
using the keyboard on the screen, tap it with your finger.
16

Basics
Tapping and holding
Tap and hold an item or the screen for more than 2 seconds to access available options.
Dragging
To move an item, tap and hold it and drag it to the target position.
Double-tapping
Double-tap on a webpage or image to zoom in. Double-tap again to return.
17

Basics
Swiping
Swipe to the left or right on the Home screen or the Apps screen to view other panels. Swipe
upwards or downwards to scroll through a webpage or a list of items, such as contacts.
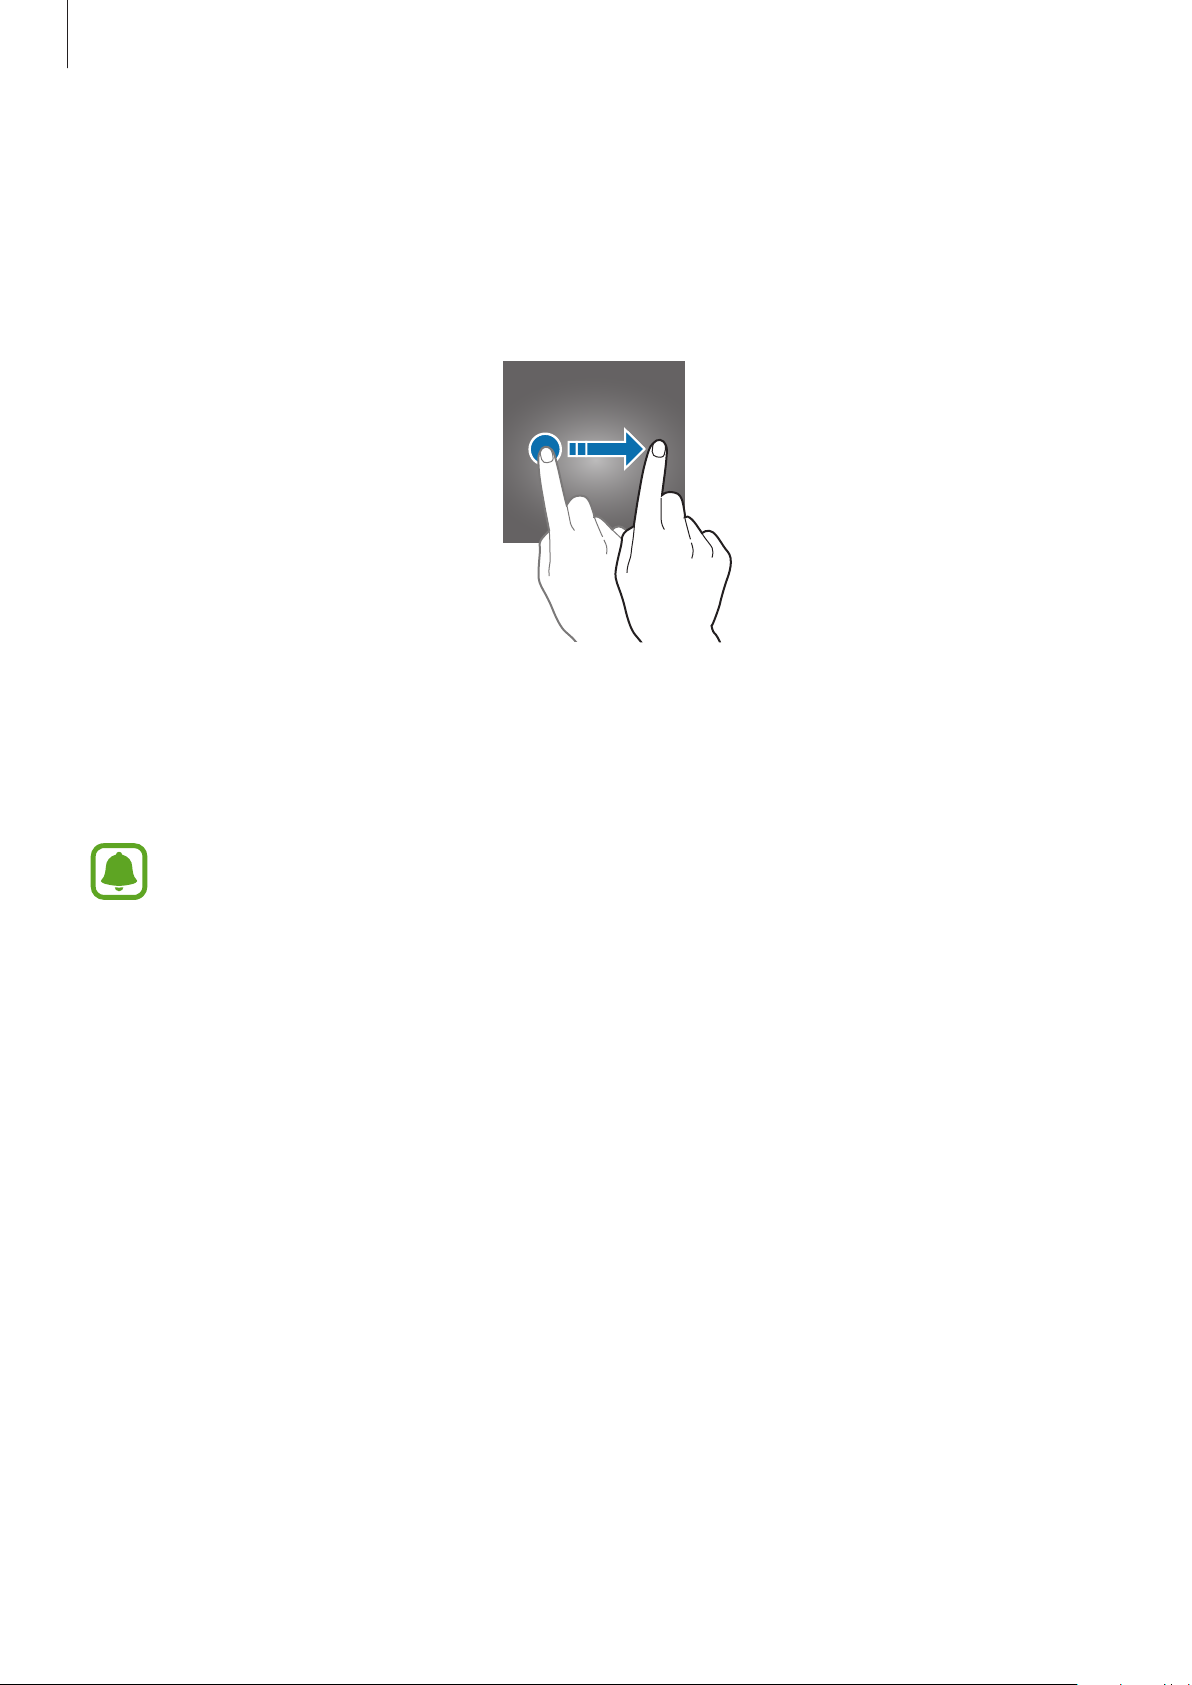
Spreading and pinching
Spread two fingers apart on a webpage, map, or image to zoom in a part. Pinch to zoom out.
18
Basics
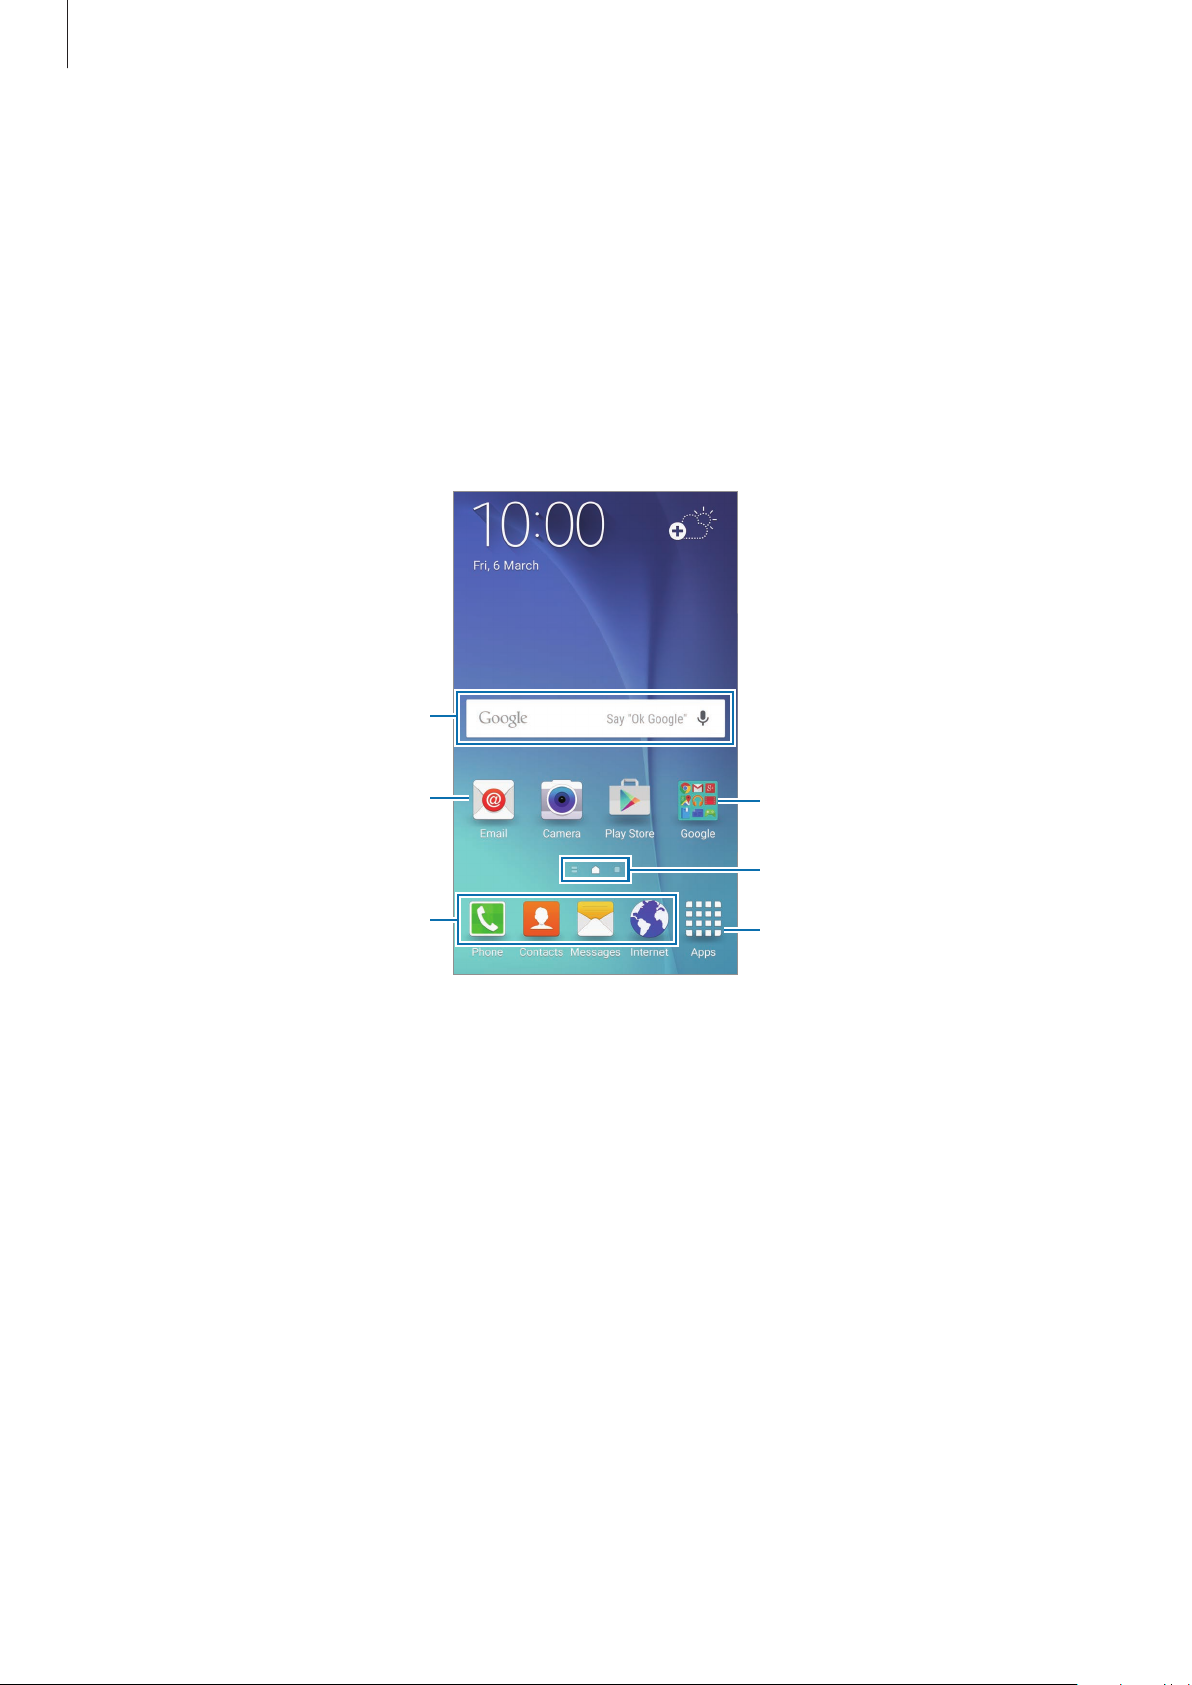
Home screen
Home screen
The Home screen is the starting point for accessing all of the device’s features. It displays
widgets, shortcuts to apps, and more.
To view other panels, swipe to the left or right, or tap one of the screen indicators at the
bottom of the screen.
A widget
An app
Favourite apps
A folder
Screen indicators
Apps screen icon
19
Basics
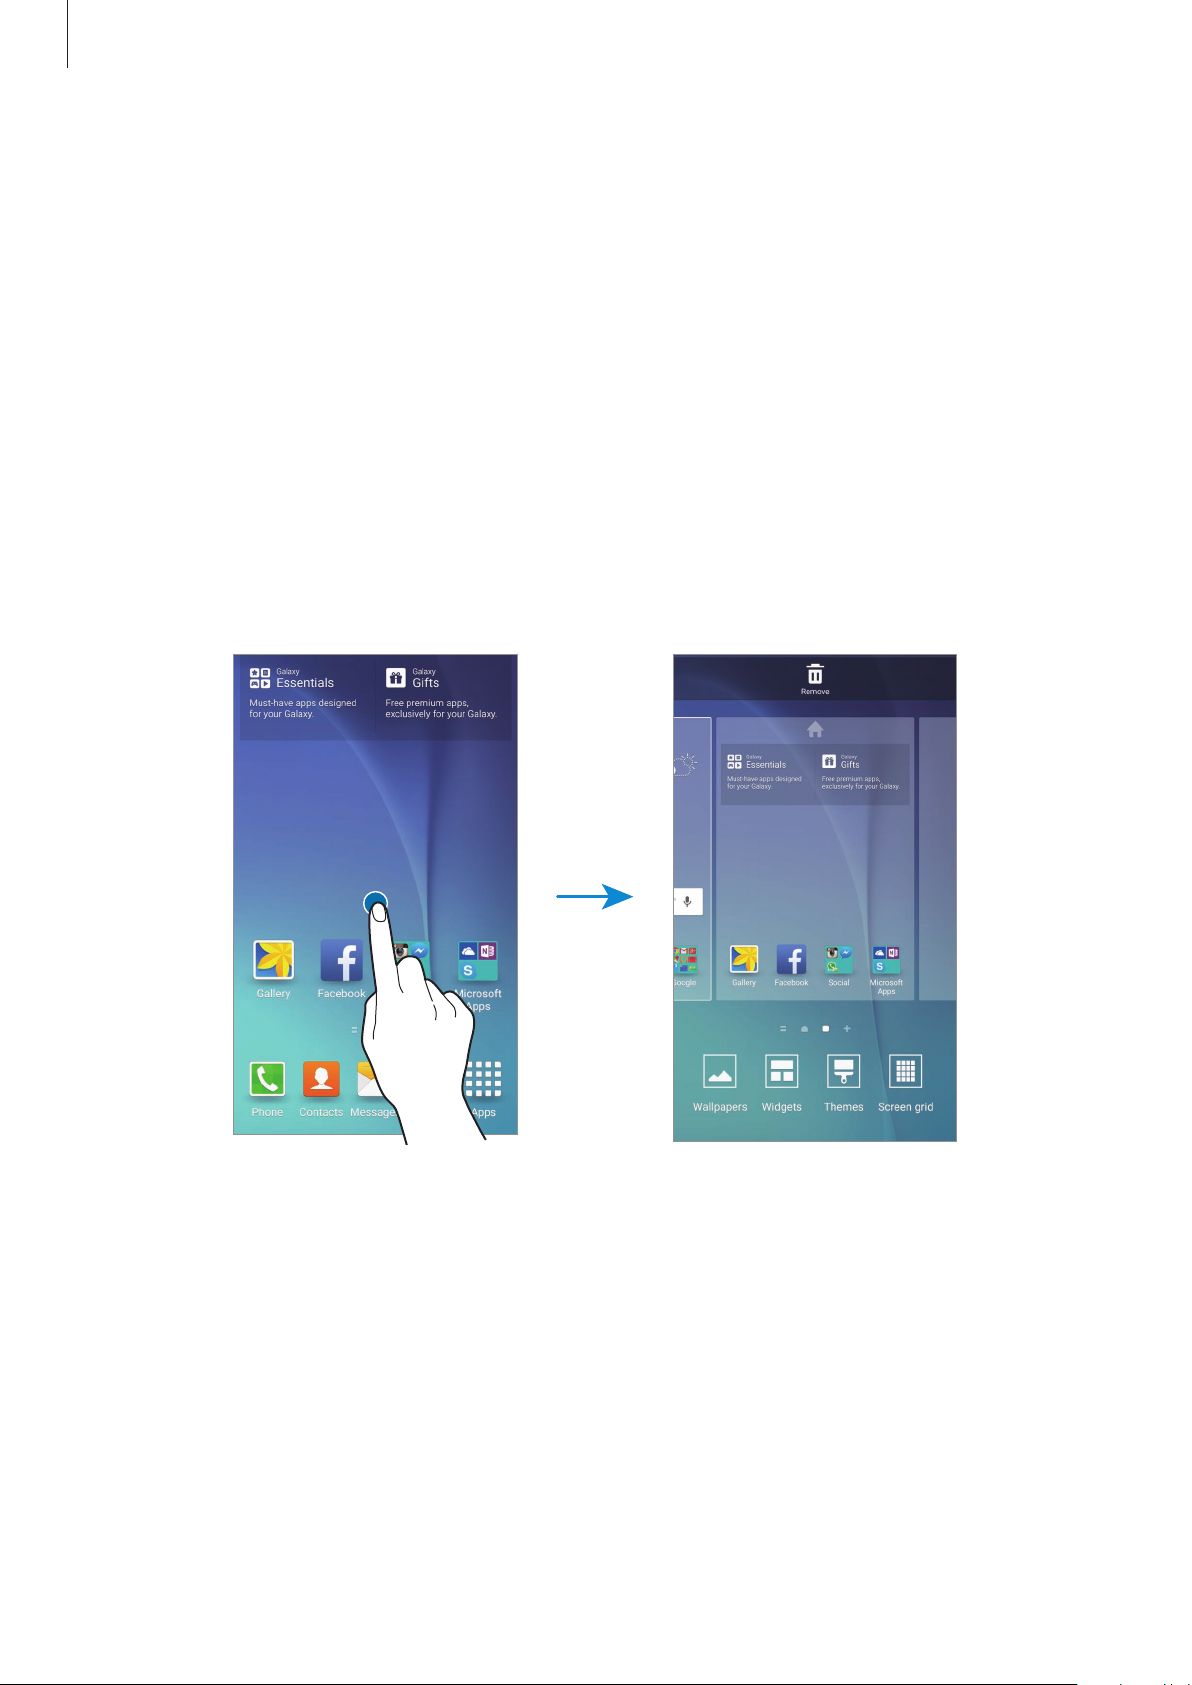
Home screen options
On the Home screen, tap and hold an empty area, or pinch your fingers together to access
the available options. Customise the Home screen by adding, deleting, or rearranging Home
screen panels. You can also set the Home screen wallpaper, add widgets to the Home screen,
and more.
•
Wallpapers
•
Widgets
app functions to provide information and convenient access on your Home screen.
•
Themes
and wallpapers, will change depending on the selected theme.
•
Screen grid
screen.
: Change the wallpaper settings for the Home screen and the locked screen.
: Add widgets to the Home screen. Widgets are small apps that launch specific
: Change the device’s theme. Visual elements of interface, such as colours, icons,
: Change the size of the grid to display more or less items on the Home
20
Basics
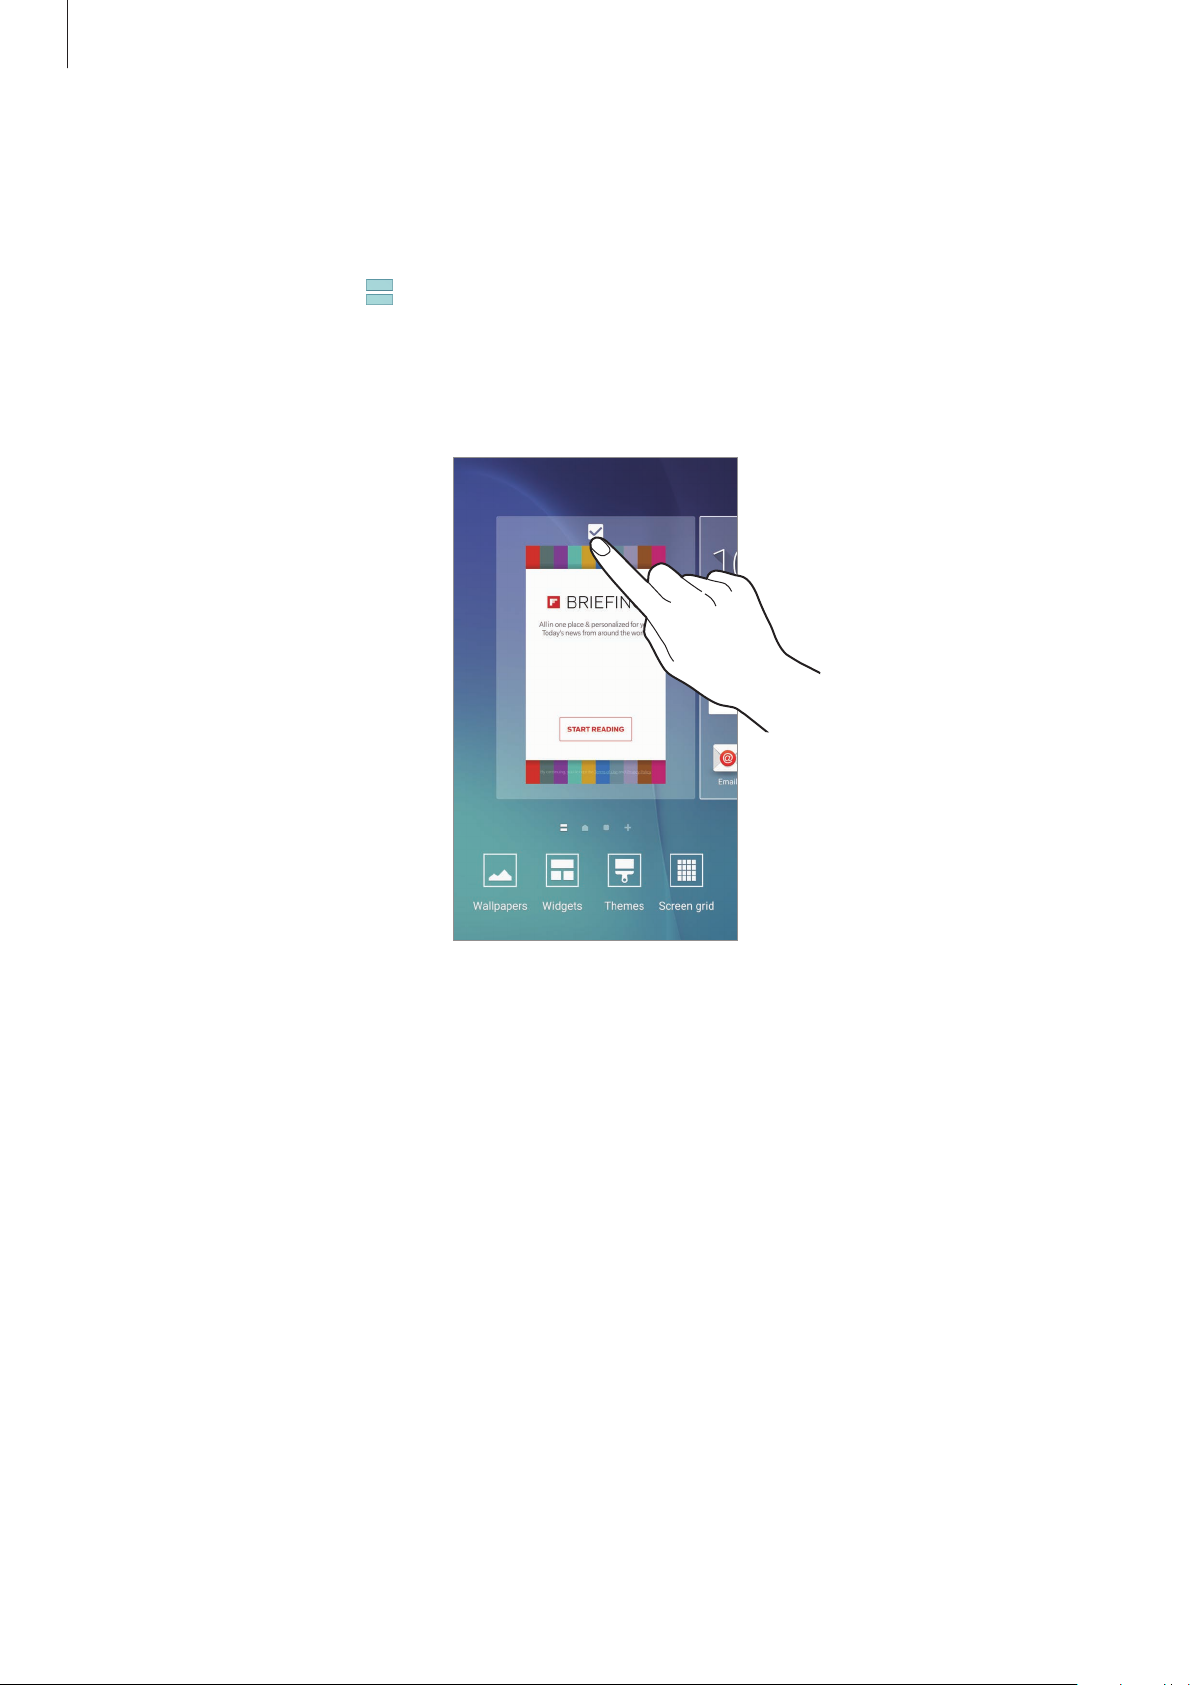
Flipboard Briefing
View the latest articles in various categories. You can get up to date on news that interests
you using this feature.
On the Home screen, tap
or downwards to browse articles in each news category.
To deactivate Flipboard Briefing, tap and hold an empty area on the Home screen. Then,
swipe to the right and deselect the tick box at the top of the Flipboard Briefing panel.
or swipe to the right to open Flipboard Briefing. Swipe upwards
Adding items
Tap and hold an app or a folder from the Apps screen, and then drag it to the Home screen.
To add widgets, tap and hold an empty area on the Home screen, tap
widget, and then drag it to the Home screen.
Widgets
, tap and hold a
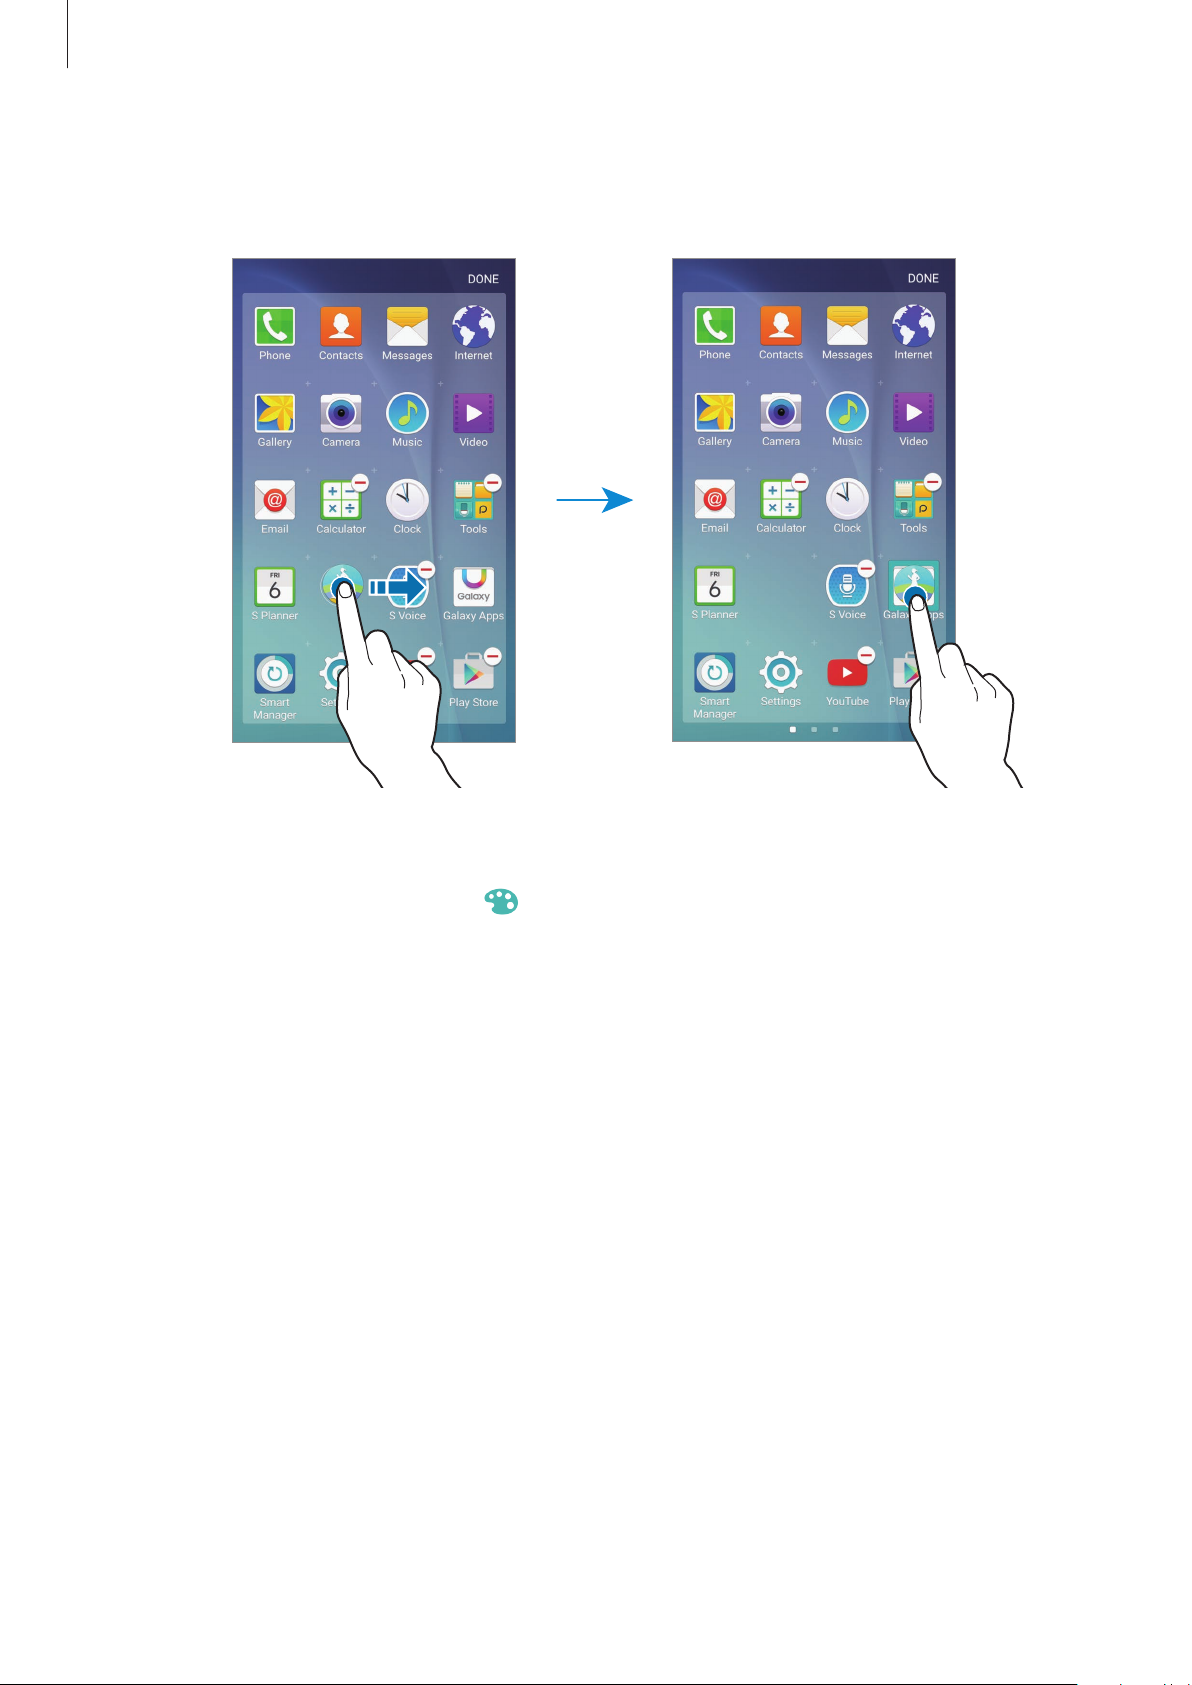
Moving and removing an item
Tap and hold an item on the Home screen, and then drag it to a new location.
To move the item to another panel, drag it to the side of the screen.
You can also move frequently used apps to the shortcuts area at the bottom of the Home
screen.
To remove an item, tap and hold the item. Then, drag it to
Remove
at the top of the screen.
21

Basics
Creating folders
On the Home screen, tap and hold an app, and then drag it over another app.
1
Drop the app when a folder frame appears around the apps.
2
A new folder containing the selected apps will be created.
Tap
3
To add more apps to the folder, tap and hold another app, and then drag it to the folder.
Enter folder name
To change the folder colour, tap
and enter a folder name.
.
Managing panels
On the Home screen, tap and hold an empty area to add, move, or remove a panel.
To add a panel, swipe to the left, and then tap
To move a panel, tap and hold a panel preview, and then drag it to a new location.
To remove a panel, tap and hold a panel preview, and then drag it to
the screen.
To set a panel as the main Home screen, tap
.
Remove
.
at the top of
22

Basics
Apps screen
The Apps screen displays icons for all apps, including newly installed apps.
On the Home screen, tap
left or right, or select a screen indicator at the bottom of the screen.
Apps
to open the Apps screen. To view other panels, swipe to the
Moving items
This feature may not be available depending on the region or service provider.
EDIT
On the Apps screen, tap
To move the item to another panel, drag it to the side of the screen.
. Tap and hold an item and drag it to a new location.
Creating folders
This feature may not be available depending on the region or service provider.
On the Apps screen, tap
1
EDIT
.
Tap and hold an app, and then drag it over another app.
2
23
Basics
Drop the app when a folder frame appears around the apps.
3
A new folder containing the selected apps will be created.
Tap
4
To add more apps to the folder, tap and hold another app, and then drag it to the folder.
Enter folder name
To change the folder colour, tap
and enter a folder name.
.
24

Basics
Indicator icons
Indicator icons appear on the status bar at the top of the screen. The icons listed in the table
below are most common.
The status bar may not appear at the top of the screen in some apps. To display the
status bar, drag down from the top of the screen.
Icon Meaning
No signal
Signal strength
Roaming (outside of normal service area)
GPRS network connected
/
EDGE network connected
UMTS network connected
HSDPA network connected
HSPA+ network connected
LTE network connected (LTE-enabled models)
Wi-Fi connected
Bluetooth feature activated
GPS activated
Call in progress
Missed call
New text or multimedia message
Alarm activated
Mute mode activated
Vibration mode activated
Flight mode activated
Error occurred or caution required
Battery power level
25
Basics
Lock screen
Pressing the Power key turns off the screen and locks it. Also, the screen turns off and
automatically locks if the device is not used for a specified period.
To unlock the screen, press the Power key or the Home key and swipe in any direction.
You can change the way that you lock the screen to prevent others from accessing your
personal information.
On the Apps screen, tap
select a screen lock method. The device requires an unlock code whenever unlocking it.
If the unlock code is forgotten, take the device to a Samsung Service Centre to reset it.
Settings
→
Lock screen and security
→
Screen lock type
, and then
Pattern
Draw a pattern by connecting four dots or more, and then draw the pattern again to verify it.
Set a backup PIN to unlock the screen when you forget the pattern.
PIN
A PIN consists of numbers only. Enter at least four numbers, and then enter the password
again to verify it.
26

Basics
Password
A password consists of characters and numbers. Enter at least four characters including
numbers and symbols, and then enter the password again to verify it.
Fingerprints
Register your fingerprints to unlock the screen. Refer to Fingerprint recognition for more
information.
Notification panel
Using the notification panel
When you receive new notifications, such as messages or missed calls, indicator icons appear
on the status bar. To see more information about the icons, open the notification panel and
view the details.
To open the notification panel, drag the status bar downwards. To close the notification panel,
swipe upwards on the screen.
27

Basics
Rearrange quick setting buttons.
You can use the following functions on the notification panel.
Quick setting buttons
Launch S Finder.
Tap a notification and perform
various actions.
Launch Settings.
Adjust the brightness.
Launch Quick Connect.
Clear all notifications.
Using quick setting buttons
Tap quick setting buttons to activate some features. Swipe to the left or right on the buttons
area to view more buttons. To view more detailed settings, tap and hold a button.
To rearrange buttons, tap
EDIT
, tap and hold a button, and then drag it to another location.
S Finder
Search for a wide variety of content with a keyword.
Searching for content on the device
Open the notification panel and tap
Enter a keyword in the search field or tap
To get more refined results, tap the filter buttons under the search field, and then select filter
S Finder
and say a keyword.
.
details.
28

Basics
Setting search categories
You can set search categories to search for content in specific search fields.
Tap
MORE
→
Select search locations
and select categories.
Quick Connect
Automatically search for nearby devices and quickly connect to them.
•
If the device you want to connect does not support the Quick connect feature,
activate its Wi-Fi Direct or Bluetooth feature before launching
your device.
•
Connection methods may vary depending on the type of connected devices or the
shared content.
Quick Connect
Connecting to other devices
Open the notification panel and tap
1
If you are using this feature for the first time, select a visibility option and tap
QUICK CONNECT
When the panel opens, the Wi-Fi and the Bluetooth features are activated automatically
and the device searches for nearby devices.
If you have installed Samsung Link on your device, the list of devices registered
with Samsung Link will appear at the top of the screen. For more information about
Samsung Link, visit link.samsung.com.
.
Quick Connect
.
ENABLE
on
Select a device from the list and connect to it by following the on-screen instructions.
2
The next steps may vary depending on the connected device.
To change your device’s visibility setting, tap
select an option.
SETTINGS
→
Device visibility
Re-searching for devices
If the desired device does not appear in the list, search for the device.
Tap
REFRESH
and select the device from the list of detected devices.
29
, and then
Basics
Sharing content
Share content with the connected devices.
Open the notification panel and tap
1
Select a device from the list of detected devices.
2
Tap
3
4
Share content
Follow the on-screen instructions to send content to the connected device.
The next steps may vary depending on the selected media category.
and select a media category.
Quick Connect
.
Entering text
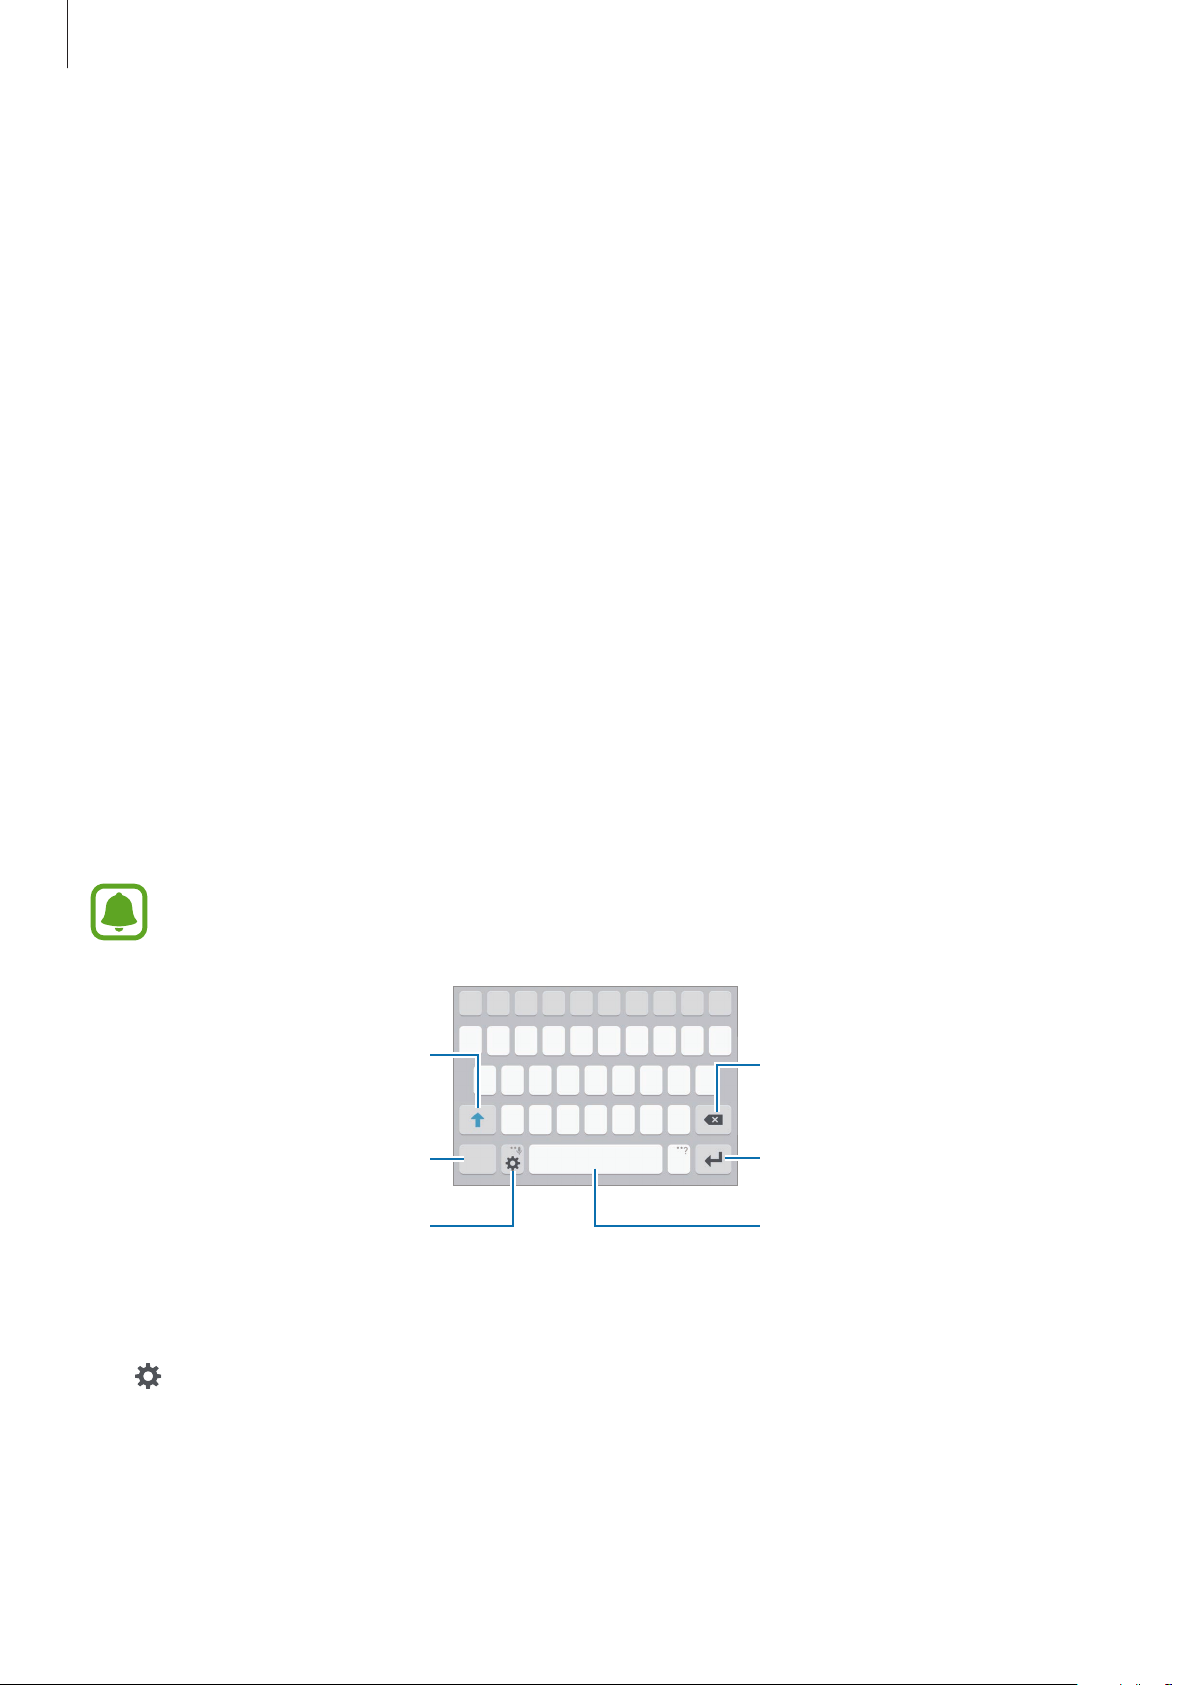
Keyboard layout
A keyboard appears automatically when you enter text to send messages, create memos, and
more.
Text entry is not supported in some languages. To enter text, you must change the
input language to one of the supported languages.
Enter uppercase. For all caps, tap
it twice.
Enter punctuation marks.
Change the keyboard settings.
Delete a preceding character.
Break to the next line.
Enter a space.
Changing the input language
Tap →
two or more languages, you can switch between the input languages by swiping to the left or
right on the space key.
Select input languages
, and then select the languages to use. When you select
30
 Loading...