

Page 1

E-MANUAL
Thank you for purchasing this Samsung product.
To receive more complete service, please register
your product at
www.samsung.com
Model__________________ Serial No.__________________
To directly go to the page that provides
instructions on how to use the manual for visually
impaired users, select the Learn the Menu Screen
link below.
“Learn the Menu Screen” Link
Page 2

Contents
Quick Guides
Connecting the Samsung Smart Remote to the TV
Using Smart Hub
Using the Ambient Mode
11 Screen states related to Ambient Mode
12 Changing the content and settings for Ambient Mode
Using Bixby
14 Running Bixby
15 Learning about My Bixby
16 Read Before Using Bixby
Updating the TV’s Software
17 Updating the TV’s software to the latest version
17 Updating the TV automatically
Getting Support
Troubleshooting Internet Connectivity Issues
24 Troubleshooting Internet connectivity issues
Connecting Video Devices
26 Connecting with an HDMI cable
27 Connecting with a component cable (Only for models with
COMPONENT IN / AV IN)
28 Connecting with a composite cable (Only for models with
COMPONENT IN / AV IN)
Audio Input and Output Connections
29 Connecting with an HDMI (ARC) cable
29 Connecting with a digital audio (optical) cable
29 Connecting through a wireless network
30 Connecting Bluetooth Devices
Connecting a Computer
30 Connecting through the HDMI port ― Screen sharing (HDMI)
Connecting Your Mobile Device
18 Getting support through Remote Management
19 Finding the contact information for service
19 Requesting service
Connections
Connection Guide
Connecting an Antenna
Connecting to the Internet
21 Connecting to your Internet network
23 Resetting Your Network
23 Turning on the TV with a mobile device
23 Connecting an IP control device to the TV
23 Setting up an Internet connection over IPv6
23 Changing the name of the TV on a network
31 Connecting to the TV via the SmartThings app
32 Bidirectionally mirroring your TV and mobile device using the
SmartThings app
33 Managing Mobile Devices
Switching between external devices connected to the TV
33 Changing the input signal
34 Editing the name and icon of an external device
35 Using additional functions
Connection Notes
35 Connection notes for HDMI
36 Connection notes for audio devices
37 Connection notes for computers
37 Connection notes for mobile devices
Page 3

Remote Control and Peripherals
About the Samsung Smart Remote (QLED TV)
About the Samsung Smart Remote (UHD TV)
Connecting to the Samsung Smart Remote
Using the Gallery App
Using the Universal Guide App
Using the SmartThings App
Using the e-Manual
68 Launching the e-Manual
Controlling External Devices with the Samsung Smart Remote
- Using the Universal Remote
Using Anynet+ (HDMI-CEC)
44 Connecting an external device through Anynet+ and using
their menus
Controlling the TV with a Keyboard or Mouse
45 Connecting a USB keyboard or mouse
45 Connecting a Bluetooth keyboard or mouse
45 Using the keyboard and mouse
46 Setting up the input devices
Entering Text using the On-Screen Virtual Keyboard
48 Entering Text using the remote control's microphone and the
on-screen virtual keyboard
Smart Features
Smart Hub
69 Using the buttons in the e-Manual
Using the Internet
Playing pictures/video/music
71 Playing media content
Using Bixby
72 Running Bixby
73 Learning about My Bixby
74 Read Before Using Bixby
TV Viewing
Viewing Broadcast Information at a Glance
75 Using the guide
Recording Programs
77 Recording programs
78 Managing the schedule recording list
50 Displaying the Home Screen
53 Launching Smart Hub automatically
53 Launching the last used app automatically
54 Testing Smart Hub connections
54 Resetting Smart Hub
Using a Samsung account
54 Creating and managing your Samsung account
55 Signing in to a Samsung account
Using the Ambient Mode
58 Screen states related to Ambient Mode
59 Changing the content and settings for Ambient Mode
Using the APPS Service
62 Installing and running an app
63 Managing purchased or installed apps
64 Rating apps
78 Viewing recorded programs
79 Setting up a schedule recording start
Setting Up a Schedule Viewing
79 Setting up a scheduled viewing for a channel
80 Editing a scheduled viewing
Using Timeshift
Buttons and functions available while recording a program or
Timeshift
Using the Channel List
Editing channels
84 Re-registering and deleting a channel
84 Changing a channel name
85 Using Program Rating Lock
Creating a Personal Favorites List
85 Registering channels as favorites
86 Viewing and selecting channels on Favorites lists only
Page 4

Editing a Favorites List
86 Adding channels to a favorites list
System and Support
86 Removing channels from a favorites list
86 Rearranging a favorites list
86 Renaming a favorites list
TV-Viewing Support Functions
87 Changing the broadcast signal
87 Scanning for available channels
87 Configuring advanced broadcasting audio settings
87 Checking digital channel signal info and strength
Picture and Sound
Adjusting the Picture Quality
88 Choosing a picture mode
88 Configuring advanced picture settings
Setting the Viewing Environment for External Devices
90 Playing games on an optimized screen
90 Configuring game mode details
91 Viewing UHD videos
91 Using HDMI black level
Using the Time Functions and the Timers
96 Setting the current time
97 Using the timers
Using the Screen Burn Protection and Energy Saving Functions
98 Preventing screen burn
98 Reducing the energy consumption of the TV
Updating the TV’s Software
99 Updating the TV’s software to the latest version
99 Updating the TV automatically
Protecting the TV from Hacking and Malicious Code
100 Scanning the TV and connected storage for malicious code
Using Other Functions
101 Running the accessibility functions
101 Running Accessibility Shortcuts
101 Enabling voice guides for the visually impaired
101 Enabling audio for the video description function
102 White text on black background (high contrast)
102 Setting the screen to black and white
102 Inverting the screen color
Changing the Picture Size and Position
92 Changing the picture size
92 Fitting the picture to the screen
92 Adjusting the picture size and/or position
Configuring a Sound Mode and Expert Settings
93 Choosing a sound mode
93 Configuring advanced sound settings
Using the Sound Support Functions
94 Selecting speakers
94 Listening to the TV through Bluetooth devices
95 Listening to the TV through a Samsung audio device that
supports the Wi-Fi function
102 Enlarging the font (for the visually impaired)
102 Learning about the remote control (for the visually impaired)
103 Learning about the TV menu
103 Showing captions
104 Listening to the TV through Bluetooth devices (for the hearing
impaired)
104 Configuring advanced system settings
105 Restoring the TV to the factory settings
Page 5

Troubleshooting
Read Before Playing Photo, Video, or Music Files
123 Limitations to the use of photo, video, and music files
Getting Support
106 Getting support through Remote Management
107 Finding the contact information for service
107 Requesting service
Diagnosing TV operational issues
There Is a Problem with the Picture
108 Testing the picture
I Can't Hear the Sound Clearly
111 Testing the sound
There Is a Problem with the Broadcast
My Computer Won't Connect
The TV Won't Connect to the Internet
The Schedule Recording/Timeshift Function Isn't Working
Anynet+ (HDMI-CEC) Isn't Working
124 Supported external subtitles
124 Supported internal subtitles
125 Supported image formats and resolutions
125 Supported music formats and codecs
126 Video codecs supported by NU7100 model series or higher
127 Video codecs supported by NU7090 model series or lower
Read After Installing the TV
129 Picture sizes and input signals
129 Installing an anti-theft lock
Supported Resolutions for UHD Input Signals
130 If HDMI UHD Color is set to Off
130 If HDMI UHD Color is set to On
Read Before Connecting a Computer (Supported Resolutions)
131 IBM
131 MAC
132 VESA DMT
I Have Trouble Launching/Using Apps
My File Won't Play
I Want to Reset the TV
Other Issues
Precautions and Notes
Before Using the Recording and Timeshift Functions
118 Before using the recording and schedule recording functions
119 Before using the timeshift function
Read Before Using APPS
Read Before Using the Internet Function
122 Read before setting up a wireless Internet connection
132 VESA CVT
133 CTA-861
Supported Resolutions for Video Signals
133 CTA-861
134 VESA CVT
Read Before Using Bluetooth Devices
135 Restrictions on using Bluetooth
Blocking programs based on their TV Rating
137 Blocking movies base on their Movie Rating (MPAA)
137 Blocking programs based on their Canadian English Rating
138 Blocking programs based on their Canadian French Rating
138 Blocking Programs based on their Downloadable U.S. Rating
Buttons and functions available while playing multimedia
content
License
Page 6

Accessibility Guidance
Learn the Menu Screen
Using the Remote control
142 Orientation of the Samsung Smart Remote
142 Description of the Samsung Smart Remote
Using the accessibility menu
144 Accessibility Shortcuts menu
145 Step by Step instructions to run the options
147 Setting accessibility settings using Bixby
Using the TV with Voice Guide on
148 Watching TV
Using the guide
Setting Up a Schedule Viewing
154 Cancelling a scheduled viewing
Using the Channel List
156 Creating a Personal Favorites List
Recording
158 Using the instant and schedule recording options from the
guide screen:
159 Using the Instant and Schedule Recording options from the
program info window
159 Changing the recording time
160 Viewing recorded programs
160 Deleting a recorded program
Using Smart Hub
161 Smart Hub
162 Using the Home Screen in Smart Hub
Launching the e-Manual
Using Bixby
165 Running Bixby
Page 7
Quick Guides
You can learn quickly how to run and use the frequently used functions, such as Bixby, Ambient Mode, and Smart
Hub.
Connecting the Samsung Smart Remote to the TV
Connect the Samsung Smart Remote to your TV to operate the TV.
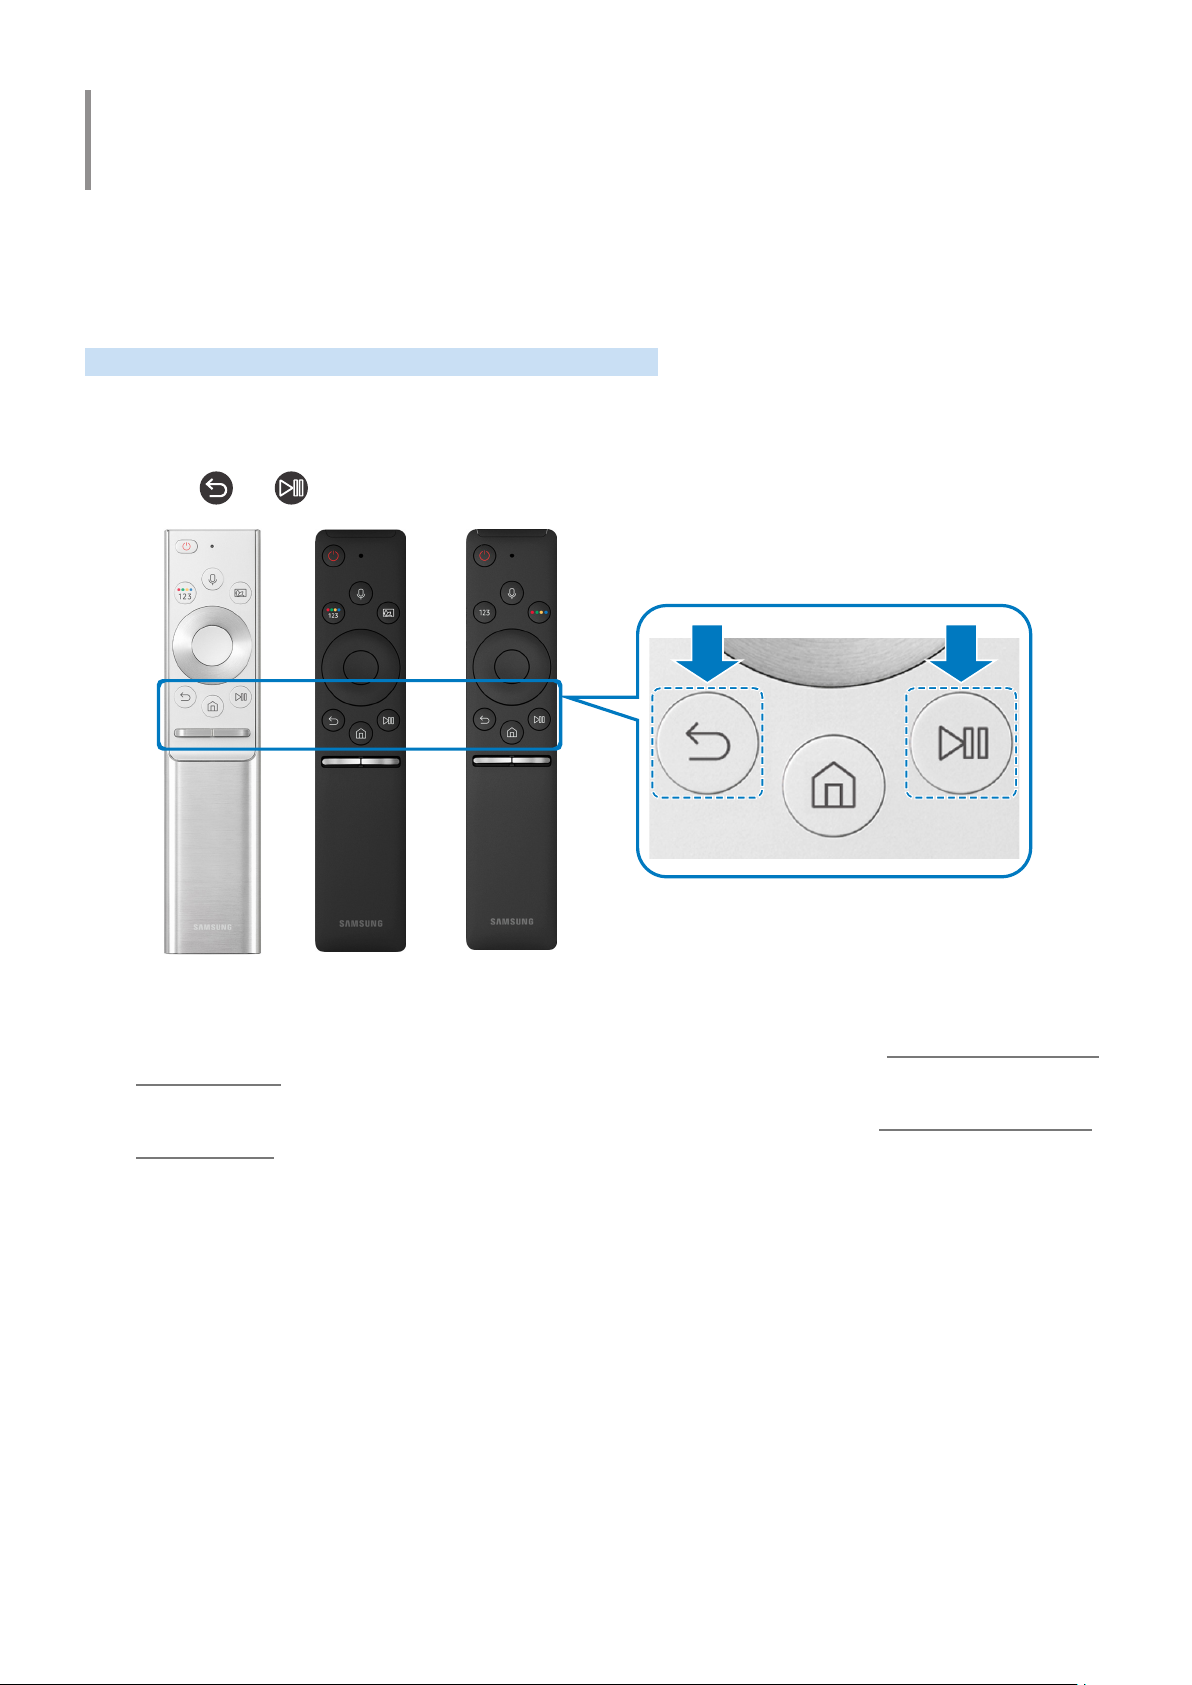
When you turn on the TV for the first time, the Samsung Smart Remote pairs to the TV automatically. If the Samsung
Smart Remote does not pair to the TV automatically, point it at the remote control sensor of the TV, and then press
and hold the and buttons simultaneously for 3 seconds or more.
" The images, buttons, and functions of the Samsung Smart Remote may differ depending on the model.
" For more information about the Samsung Smart Remote that comes with the QLED TV, refer to "About the Samsung Smart
Remote (QLED TV)."
" For more information about the Samsung Smart Remote that comes with the UHD TV, refer to "About the Samsung Smart
Remote (UHD TV)."
" The Samsung Smart Remote may not be supported depending on the model or geographical area.
- 7 -
Page 8
Using Smart Hub
Connect to Smart Hub for apps, games, movies, and more.
Enjoy the multiple functions provided by Smart Hub simultaneously on a single screen.
Sources
TV HDMI 1 HDMI 2 USB 1 USB 2
Source
Connection
Guide
Universal
Remote
" The image on your TV may differ from the image above depending on the model and geographical area.
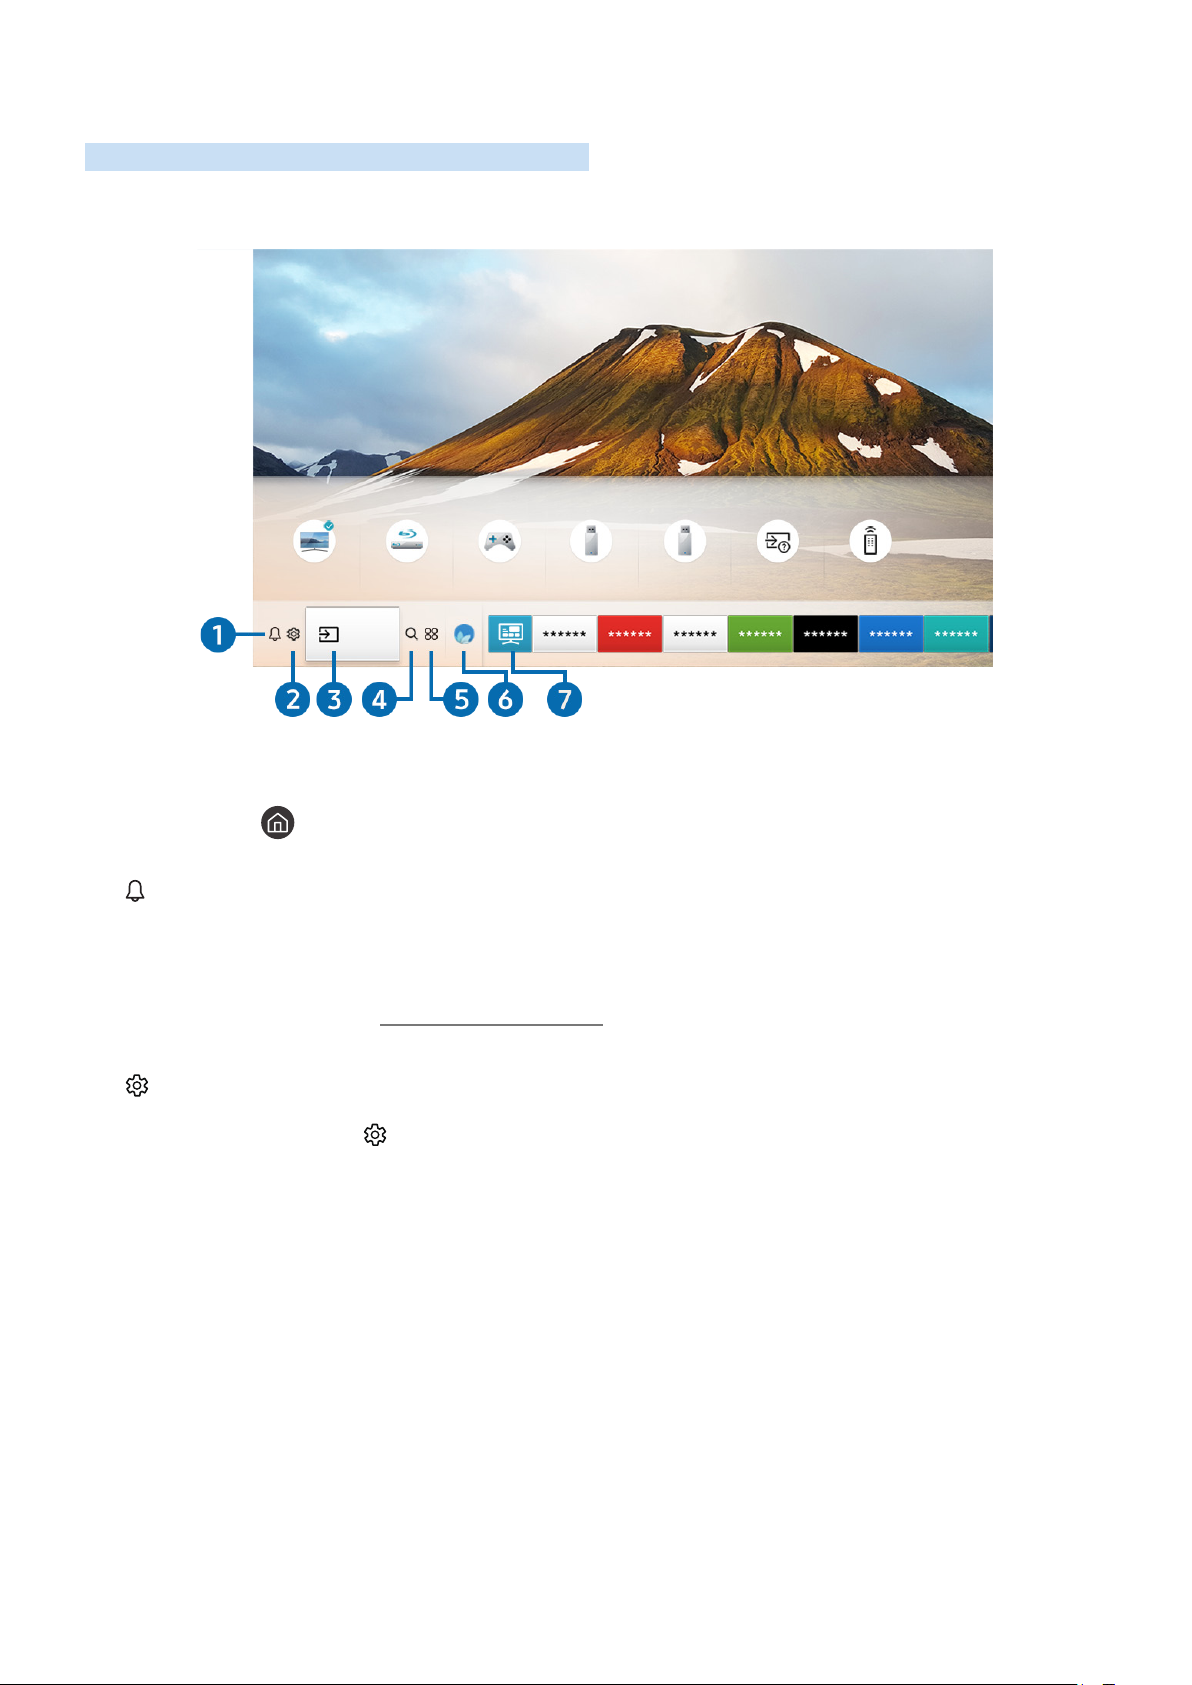
When you press the button on your remote control, you can use the following functions and features.
Notification
1
You can view a list of notifications for all events that occur on your TV. A notification appears on the screen when it is
time to broadcast a scheduled program or when an event occurs on a registered device.
" For more information, refer to "Displaying the Home Screen."
2
Settings
When the focus is moved to the icon, a list of quick settings icons appears above the top of the menu. You can
quickly set frequently used functions by clicking the icons.
- 8 -
Page 9

3
You can select an external device connected to the TV.
Source
" For more information, refer to "Switching between external devices connected to the TV."
4
You can search data for channels, programs, movie titles, and apps from Smart Hub.
5
You can enjoy a wide range of content including news, sports, weather, and games by installing the corresponding
apps on your TV.
6
In Ambient Mode, you can view beautiful screens, various visual information, and notifications.
To enter Ambient Mode, press the button. To return to the TV mode, press the or button. To shut off the
TV, press the button.
If you press the button when the TV is turned off, the TV turns on in Ambient Mode.
Search
" To use this feature, the TV must be connected to the Internet.
APPS
" To use this feature, the TV must be connected to the Internet.
" For more information, refer to "Using the APPS Service."
Ambient Mode
" If you use a remote control other than the Samsung TV remote control, there may be restrictions to entering Ambient
Mode.
" Because this function is a QLED TV-specific function, it may not be supported depending on the model.
" For more information about the Ambient Mode, refer to "Using the Ambient Mode."
7
Universal Guide is an app that allows you to search for and enjoy various content such as TV shows, dramas, movies,
and music in one place. Universal Guide can recommend content tailored to your preferences and notify you of new
drama series.
Universal Guide
" For more information about the Universal Guide, refer to "Using the Universal Guide App."
" Images may look blurry depending on the service provider's circumstances.
" This function may not be supported depending on the model or geographical area.
- 9 -
Page 10
Using the Ambient Mode
Learn about the functions available in Ambient Mode, which is a QLED TV-specific function.
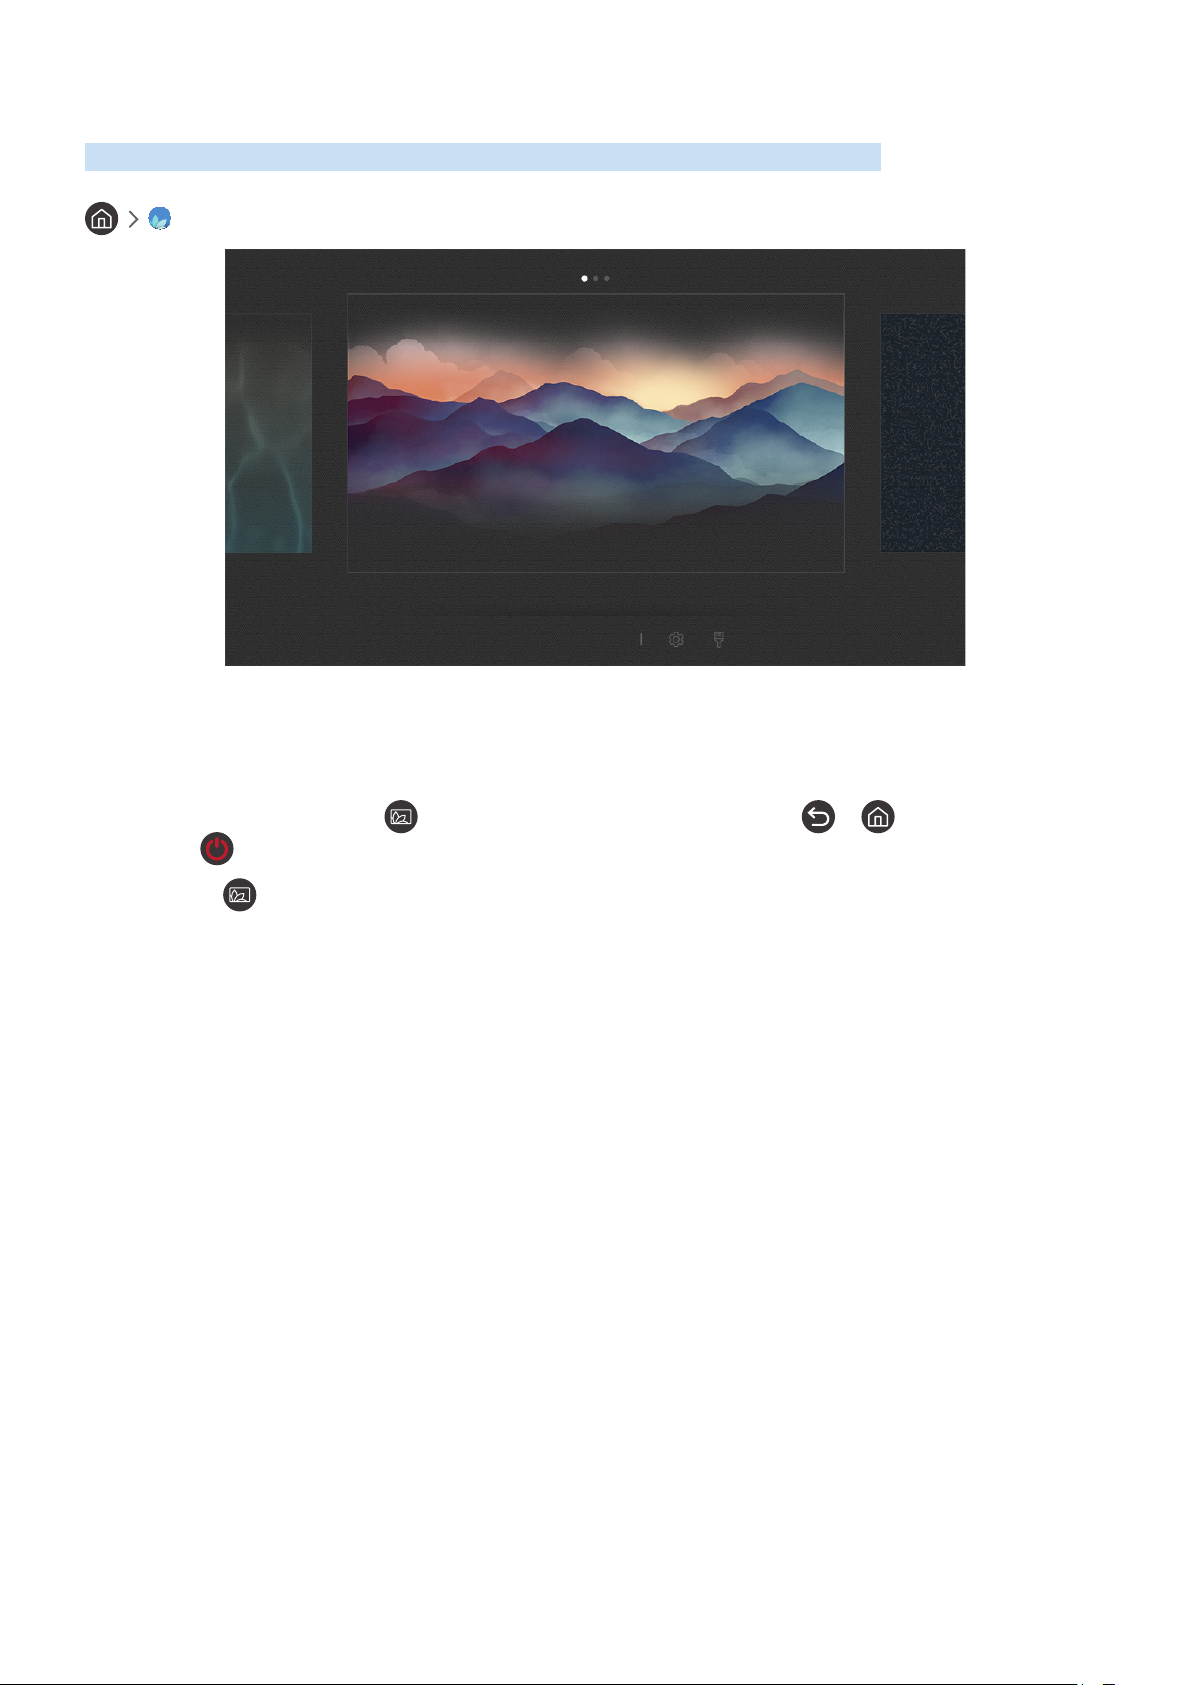
Ambient Mode
Décor Info Photo
" The image on your TV may differ from the image above depending on the model and geographical area.
In Ambient Mode, you can view beautiful screens, various visual information, and notifications.
To enter Ambient Mode, press the button. To return to the TV mode, press the or button. To shut off the
TV, press the button.
If you press the button when the TV is turned off, the TV turns on in Ambient Mode.
" If you use a remote control other than the Samsung TV remote control, there may be restrictions to entering Ambient
Mode.
" Because this function is a QLED TV-specific function, it may not be supported depending on the model.
- 10 -
Page 11

Screen states related to Ambient Mode
● Ambient Mode
In Ambient Mode, you can set up and enjoy visual information and design. In this state, less power is
consumed and brightness is automatically adjusted by the illuminance sensor.
● Getting dark state
In Ambient Mode, the TV screen changes automatically according to the surroundings. When the surroundings
get dark, the TV screen becomes darker. When the surroundings get bright before the TV screen turns
completely black or when the remote control or the Bixby function is operated, the TV screen returns to the
Ambient Mode.
" You can change the auto brightness setting for Ambient Mode. For more information, refer to "Setting up the Ambient
Mode details."
" In this state, the TV can activate voice guides and process voice commands.
● Black screen state
In Ambient Mode, if the surroundings get to a specific level of darkness or there is no external operation, the
TV turns soft-off. Then, when the surroundings get bright, the TV screen returns to the Ambient Mode.
" You can change the auto brightness setting for Ambient Mode. For more information, refer to "Setting up the Ambient
Mode details."
" In this state, the TV cannot activate voice guides and process voice commands.
● TV off state
To enter Ambient Mode when the TV is turned off, press the button on the remote control. To enter TV
mode when the TV is turned off, press the button. In TV mode, you can watch broadcasts or enjoy the
content on the external connected devices.
- 11 -
Page 12

Changing the content and settings for Ambient Mode
When you press the button in Ambient Mode, the Ambient Mode browser screen appears. In the Ambient Mode
browser screen, you can select content and change the Ambient Mode settings.
Setting up the content for Ambient Mode
The Ambient Mode browser screen displays content at the top and categories at the bottom. Use the left or right
directional buttons in the content list at the top to move the focus to content you want, and then press the Select
button. The selected content is played in Ambient Mode.
In the future, more content that you can set up in the Ambient Mode browser will be provided.
You can select the following categories and content:
● Décor: Allows you to select beautiful screens.
● Info: Provides information such as weather, news headlines, and more.
" This function may not be supported depending on the geographical area.
● Photo: Allows you to set a picture stored in your mobile device as the wallpaper of the Ambient Mode screen.
You can configure special layouts using your photos.
" To save photos from your mobile device to the TV and import them in Ambient Mode, use the SmartThings app on
your mobile device.
- 12 -
Page 13

Setting up the Ambient Mode details
In the Ambient Mode browser screen, move the focus to , and then press the Select button. You can change the
following settings:
● Brightness: Adjusts the screen brightness for Ambient Mode.
● Color Tone: Adjusts the colors of the screen for Ambient Mode.
● Auto Brightness: Changes the auto brightness setting for Ambient Mode.
" When this function is set to Off, the brightness level of the TV screen is not automatically adjusted according to the
ambient light level.
● Ambient Off Timer: Sets the time that the Ambient Mode screen turns off automatically.
" If there is no remote control input for the set time, the TV switches to the black screen state.
Changing the background color of Ambient Mode
To change the background color of Ambient Mode, move the focus to in the Ambient Mode browser screen, and
then press the Select button. You can change the background color or pattern. Move the focus to a color or pattern
you want, and then press the Select button.
" Take a picture of a wall using the SmartThings app on your mobile device to set it as the background of Ambient Mode.
This function may have a delay in image transmission and optimization depending on the network conditions.
- 13 -
Page 14

Using Bixby
Speak into the microphone on your Samsung Smart Remote to control your TV.
" This function may not be supported depending on the model or geographical area.
" The supported language may differ depending on the geographical area.
Running Bixby
Press and hold the button on your Samsung Smart Remote, say a command, and then release the button.
The TV recognizes the voice command.
To view the Bixby guide, press the button once:
● When you press the button for the first time, the Using Bixby button appears at the bottom of the screen.
Press the Select button. The Using Bixby popup window appears and a tutorial on using Bixby is shown.
● When you press the button after the first time, the Enter My Bixby button appears at the bottom of the
screen. Press the Select button to go to the My Bixby screen.
"Live TV" "HDMI1" "USB"
- 14 -
Page 15
Learning about My Bixby
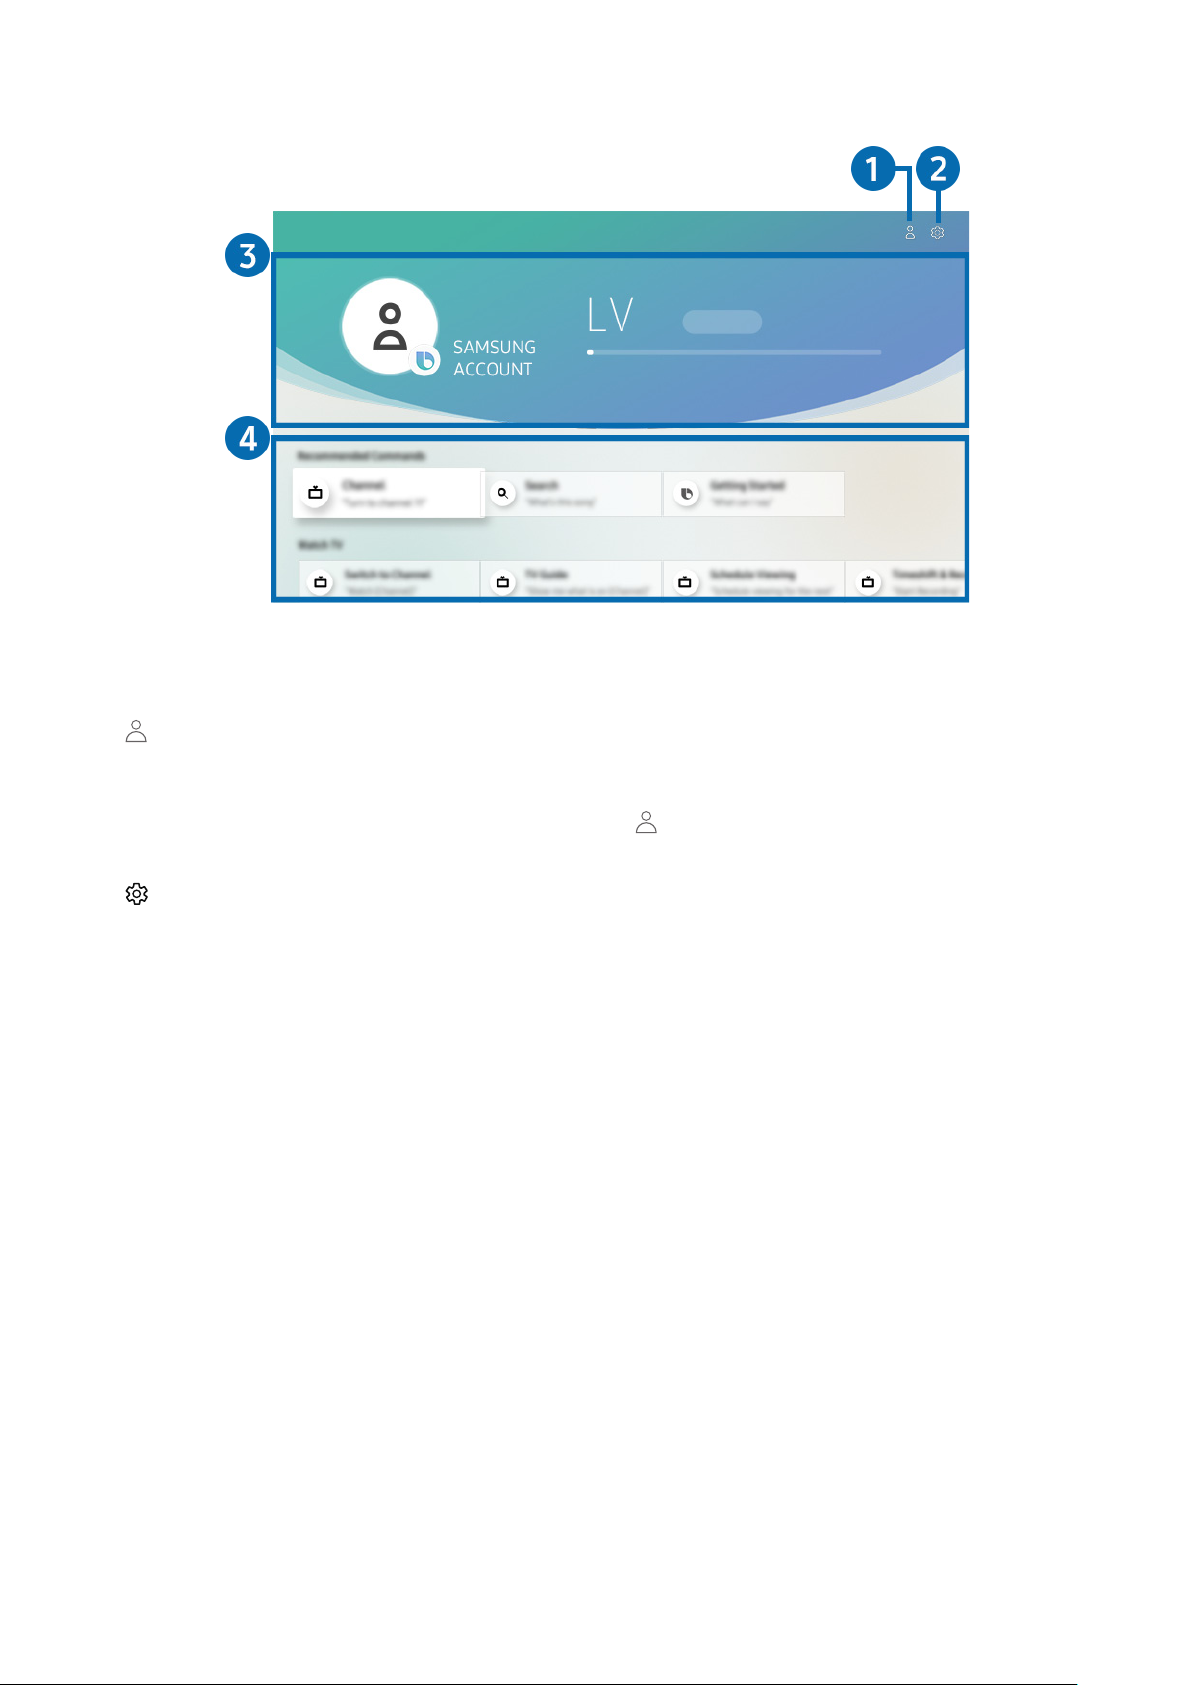
My Bixby
" The image on your TV may differ from the image above depending on the model and geographical area.
1
Go to the Samsung Account screen to create a new account or sign out of your account.
2
You can change the voice responses and the voice style of Bixby.
You can also select a music service provider in the Default music service provider tab.
3
You can see user information and the experience points (XP) that you can get from using Bixby.
4
Samsung Account
" If you are signed out of your Samsung account, select Sign In or to log in.
Settings
" The Default music service provider tab may not be supported depending on the model or geographical area.
User information and the experience points (XP) guide
" You must be signed in to your Samsung account to view the user information and the experience points (XP).
" This function may not be supported depending on the model or geographical area.
Bixby guide
You can learn the voice commands that let you use Bixby in various situations. Use the directional buttons to move
to the desired command, and then press the Select button. You can operate the TV with various voice commands.
" To view a tutorial on Bixby, use the directional buttons to move to the bottom, and then select the View Tutorial item.
- 15 -
Page 16

Read Before Using Bixby
Precautions for Bixby
● The supported voice interaction languages and features may differ depending on the geographical area.
● If the language set differs from the language of your country, some features are not available.
● Bixby is available only when the TV is connected to the Internet.
● Even if the TV is connected to the Internet, there may be no response due to a Bixby server error.
● The existing functional specifications may be changed if Bixby is updated.
● Bixby is available only on TVs that support it and come with remote controls that have a microphone.
● Symbols including "-" and special characters are not supported. Consequently, if a word or sentence contains
numeric values or symbols, the function may not operate properly.
● Searched results may not provide complete results.
● You may be required to pay for some apps. Consequently, you may encounter a service application or contract.
● To change the current channel by saying channel names as voice commands, you must finish Set Up Your
Service Provider. If Set Up Your Service Provider is not completed, you can complete it using the following
menu.
– Settings General Start Setup Try Now
● To use the voice text input function and Smart Search function, you must consent to provisions allowing third
parties to collect and use your voice data.
● To use the Bixby function, you must:
– Agree to Smart Hub's Terms of Use
– Agree to a guidance regarding the collection and use of personal information for the Smart Hub service.
– Consent to the collection and use of personal information for the voice interaction-based service.
Requirements for using Bixby
● The voice interaction rate differs with the volume/tone, pronunciation, and ambient sound environment (TV
sound and ambient noise).
● The optimal volume for voice commands is between 75 dB and 80 dB.
- 16 -
Page 17
Updating the TV’s Software
View your TV's software version and update it if necessary.
Settings Support Software Update Try Now
Updating the TV’s software to the latest version
[
DO NOT turn off the TV’s power until the update is complete. The TV will turn off and on automatically after
completing the software update. Video and audio settings will be reset to their defaults after a software
update.
Updating through the Internet
Settings Support Software Update Update Now Try Now
" Updating from the Internet requires an active Internet connection.
Updating through a USB device
Settings Support Software Update Update Now
After downloading the update file from the Samsung website and storing it on a USB device, connect the USB device
to the TV to update.
" To update using a USB flash drive, download the update package from Samsung.com to your computer. Then, save the
update package in the USB device's top-level folder. Otherwise, the TV will not be able to locate the update package.
Updating the TV automatically
Settings Support Software Update Auto Update Try Now
If the TV is connected to the Internet, you can have the TV's software update itself automatically while you are
watching the TV. When the background update is completed, it is applied the next time the TV is turned on.
If you agree to the Smart Hub terms and conditions, Auto Update is set to On automatically. If you want this function
disabled, use the Select button to turn it off.
" This function may take a longer time if another network function is running concurrently.
" This function requires an Internet connection.
- 17 -
Page 18

Getting Support
Get help directly from Samsung if you have a problem with your TV.
Getting support through Remote Management
Settings Support Remote Management Try Now
After consenting to our service agreement, you can use Remote Management to access Remote Support and have
a Samsung service technician diagnose your TV, correct problems, and update your TV's software, remotely, via the
web. You can also turn Remote Management on and off.
" You can also start this function by pressing and holding the button for 5 or more seconds.
" This function requires an Internet connection.
What is Remote Support?
Samsung Remote Support service offers you one-on-one support with a Samsung Technician who can remotely:
● Diagnose your TV
● Adjust the TV settings for you
● Perform a factory reset on your TV
● Install recommended firmware updates
How does Remote Support Work?
You can easily get Samsung Remote Support service for your TV:
Call the Samsung Contact Center and ask for remote support.
1.
Open the menu on your TV and go to the Support section. ( Settings Support)
2.
Select Remote Management, then read and agree to the service agreements. When the PIN screen appears,
3.
provide the PIN number to the agent.
The agent will then access your TV.
4.
- 18 -
Page 19

Finding the contact information for service
Settings Support About This TV Try Now
You can view the address of the Samsung website, the call center phone number, your TV's model number, your TV's
software version, Open Source License and other information you may need to get service support from a Samsung
call agent or the Samsung website.
" You can also view information by scanning the QR code of your TV.
" You can also start this function by pressing and holding the button for 5 or more seconds. For standard remote control,
press and hold the button for 5 or more seconds.
Requesting service
Settings Support Request Support Try Now
You can request service when you encounter a problem with the TV. Select the item matching the problem that
you encountered, and then select Request Now or Schedule Appointment Send. Your service request will be
registered. The Samsung Contact Center will contact you to set up or confirm your service appointment.
" You must agree to the terms and conditions for the service request.
" This function may not be supported depending on the geographical area.
" This function requires an Internet connection.
- 19 -
Page 20

Connections
You can watch live broadcasts by connecting an antenna and antenna cable to your TV and can get access to the
Internet by using a LAN cable or wireless router. Using various connectors, you can also connect external devices.
Connection Guide
You can view detailed information about external devices that can be connected to the TV.
Source Connection Guide
It shows you how to connect various external devices such as set-top boxes, game consoles, and PCs using pictures.
If you select the connection method and an external device, the connection details appear.
Connection Guide
Cable Box/Disc Player HDMI
Game Console
PC
Audio Device
Mobile Device
External Storage
Accessory
" The image on your TV may differ from the image above depending on the model and geographical area.
Connecting an Antenna
You can connect an antenna cable to your TV.
" An antenna connection is not necessary if you connect a cable box or satellite box.
ANT IN
- 20 -
Page 21
Connecting to the Internet
LAN
You can get access to the Internet through your TV.
Connecting to your Internet network
Settings General Network Open Network Settings Try Now
Connect to an available network.
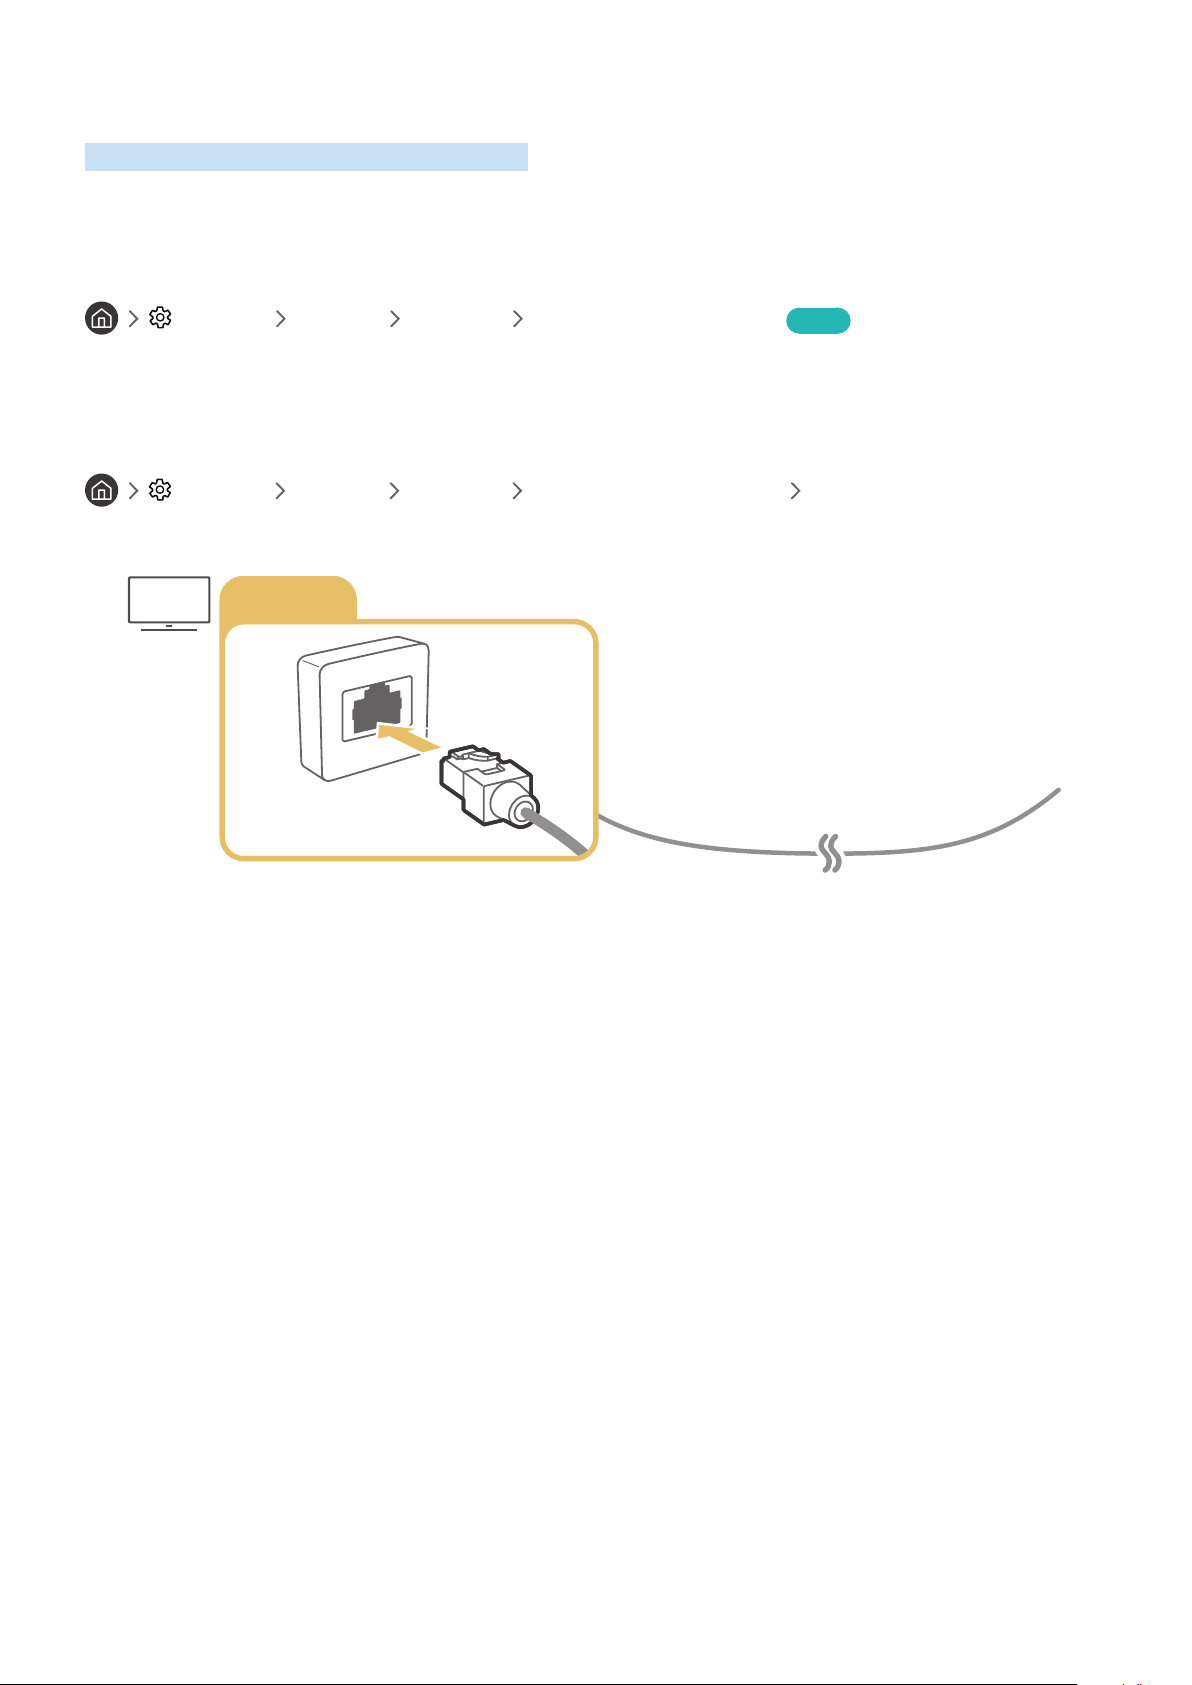
Establishing a wired Internet connection
Settings General Network Open Network Settings Wired
If you connect a LAN cable, the TV automatically accesses the Internet.
" Use a CAT 7 (*STP type) cable for the connection.
* Shielded Twist Pair
" The TV will not be able to connect to the Internet if your network speed is below 10 Mbps.
- 21 -
Page 22
Establishing a wireless Internet connection
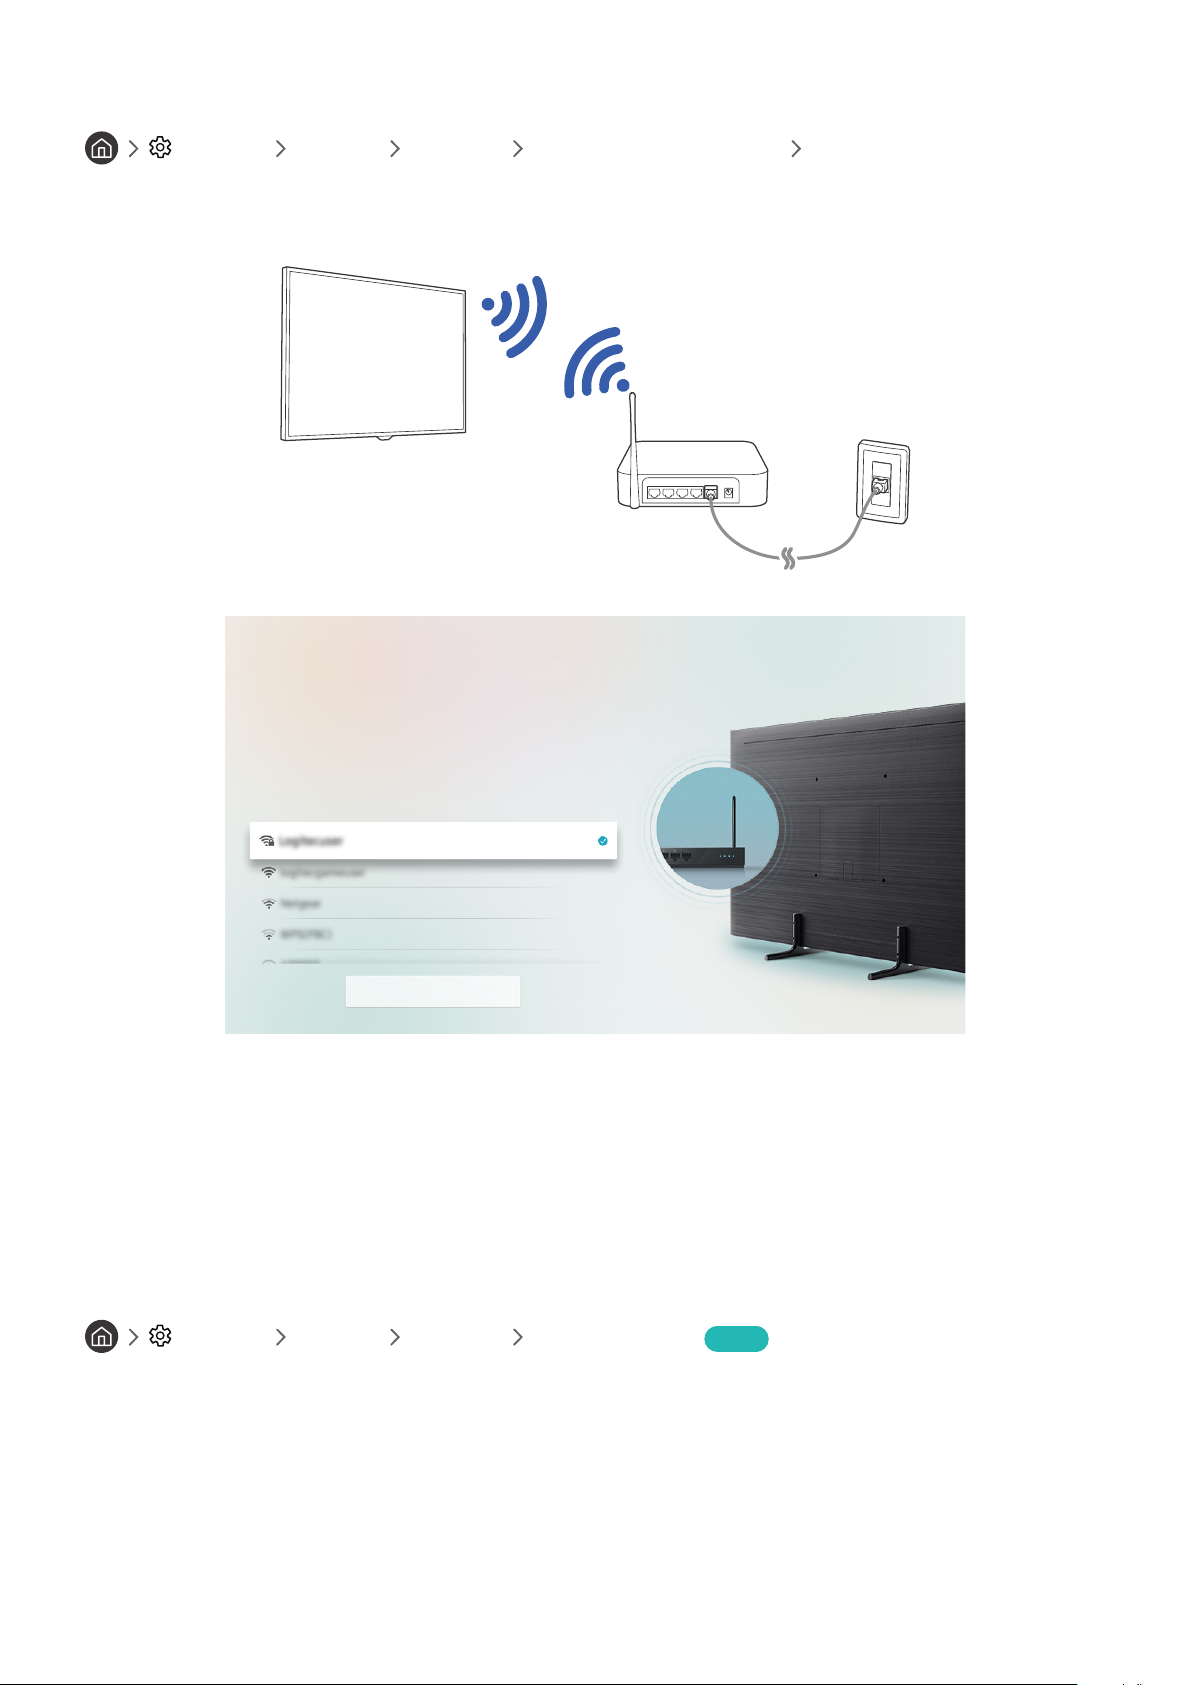
Settings General Network Open Network Settings Wireless
Make sure that you have the wireless router's SSID (name) and password settings before attempting to connect, and
then follow the directions on the screen.
Wireless Connection
Select your wireless network.
Refresh
" The image on your TV may differ from the image above depending on the model and geographical area.
" If no wireless router is found, select Add Network at the bottom of the list and enter the network name (SSID).
" If your wireless router has a WPS or PBC button, select Use WPS at the bottom of the list, and then push the WPS or PBC
button on your router within 2 minutes. The TV will connect automatically.
Checking the Internet connection status
Settings General Network Network Status Try Now
View the current network and Internet status.
- 22 -
Page 23
Resetting Your Network
Settings General Network Reset Network Try Now
Restore the network settings to the factory default.
Turning on the TV with a mobile device
Settings General Network Expert Settings Power On with Mobile
You can turn on the TV with your mobile device when both of them are connected to the same network.
Connecting an IP control device to the TV
Settings General Network Expert Settings IP Remote
You can connect an IP control device to the TV remotely to manage your IP device.
" To use this function, Power On with Mobile must be turned on.
" Turning this feature on may allow other IP control devices to control your TV. We recommend turning this feature on only
if an authorized third-party custom controller is installed and configured specifically for a Samsung TV and if your Wi-Fi
network is password protected.
" This function may not be supported depending on the model or geographical area.
Setting up an Internet connection over IPv6
Configuring the IPv6 connection settings
Settings General Network Expert Settings IPv6
" This function may not be supported depending on the model or geographical area.
Checking the Internet connection set up over IPv6
Settings General Network Expert Settings IPv6 Status
" This function may not be supported depending on the model or geographical area.
Changing the name of the TV on a network
Settings General System Manager Device Name Try Now
You can change the name of the TV on the network. Select User Input at the bottom of the list and change the name.
- 23 -
Page 24

Troubleshooting Internet Connectivity Issues
If your TV won't connect to the Internet, try the solutions below.
Troubleshooting Internet connectivity issues Try Now
After reading the following content, troubleshoot the Internet connection issue. If the problem persists, contact your
Internet Service Provider.
No network cable found
Make sure that the LAN cable is plugged in on both ends. If it is plugged in, make sure that the router is turned on. If
the router is on, try turning it off and then on.
Wireless network connection failed
If a selected wireless router is not found, go to Open Network Settings, and then select the correct router.
Settings General Network Open Network Settings
Unable to connect to a wireless router
Check if the router is turned on. If it is, turn it off and then on.
1.
Enter the correct password if required.
2.
- 24 -
Page 25

IP auto setting failed
Configure the settings in IP Settings.
1.
– Settings General Network Network Status IP Settings
Make sure that the DHCP server is enabled on the router, and then unplug the router and plug it back in.
2.
Reset the router if required.
3.
– For wireless connection, enter the correct password if required.
Unable to connect to the network
Check all IP Settings.
1.
– Settings General Network Network Status IP Settings
After checking the DHCP server status (must be active) on the router, remove the LAN cable, and then connect
2.
it again.
– For wireless connection, enter the correct password if required.
Connected to a local network, but not to the Internet
Make sure that the Internet LAN cable is connected to the router's external LAN port.
1.
Check the DNS values in IP Settings.
2.
– Settings General Network Network Status IP Settings
Network setup is complete, but unable to connect to the Internet
If the problem persists, contact your Internet Service Provider.
- 25 -
Page 26
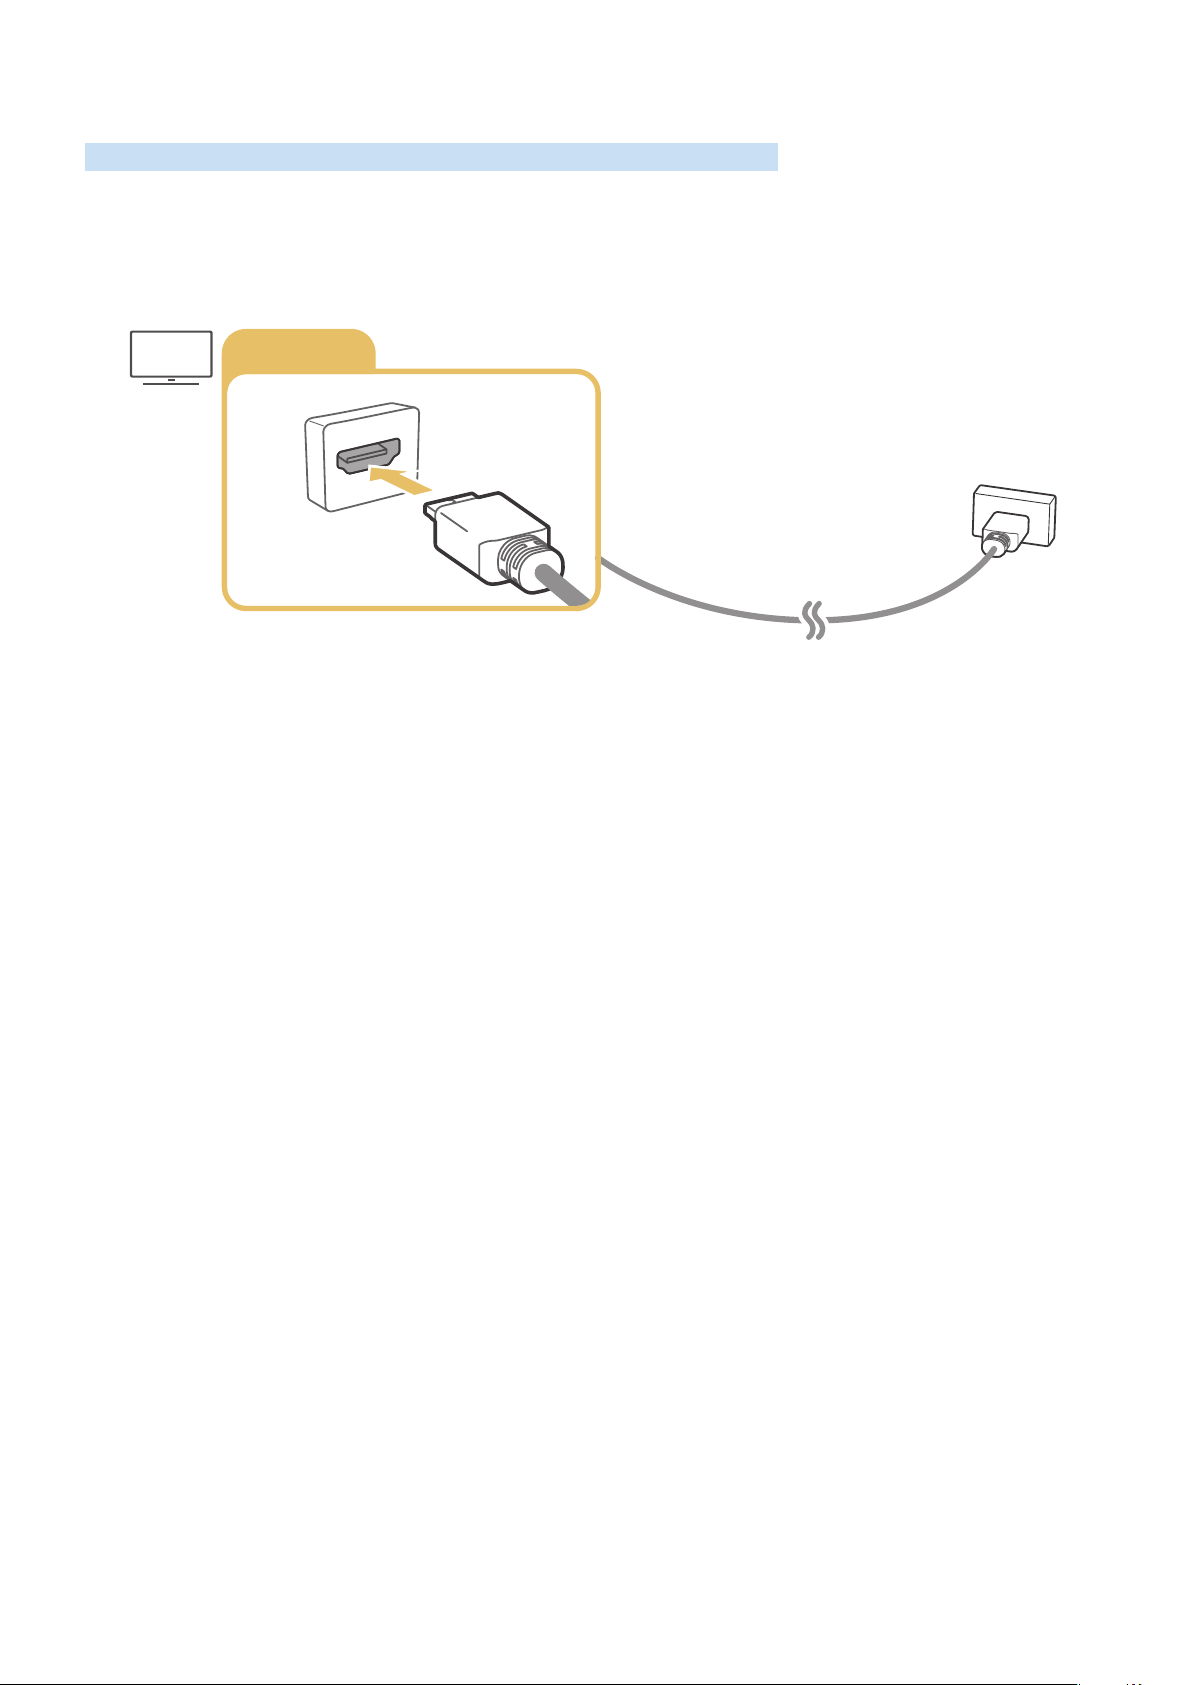
Connecting Video Devices
Make the correct video connections between your TV and your external devices.
Connecting with an HDMI cable
HDMI IN
- 26 -
Page 27
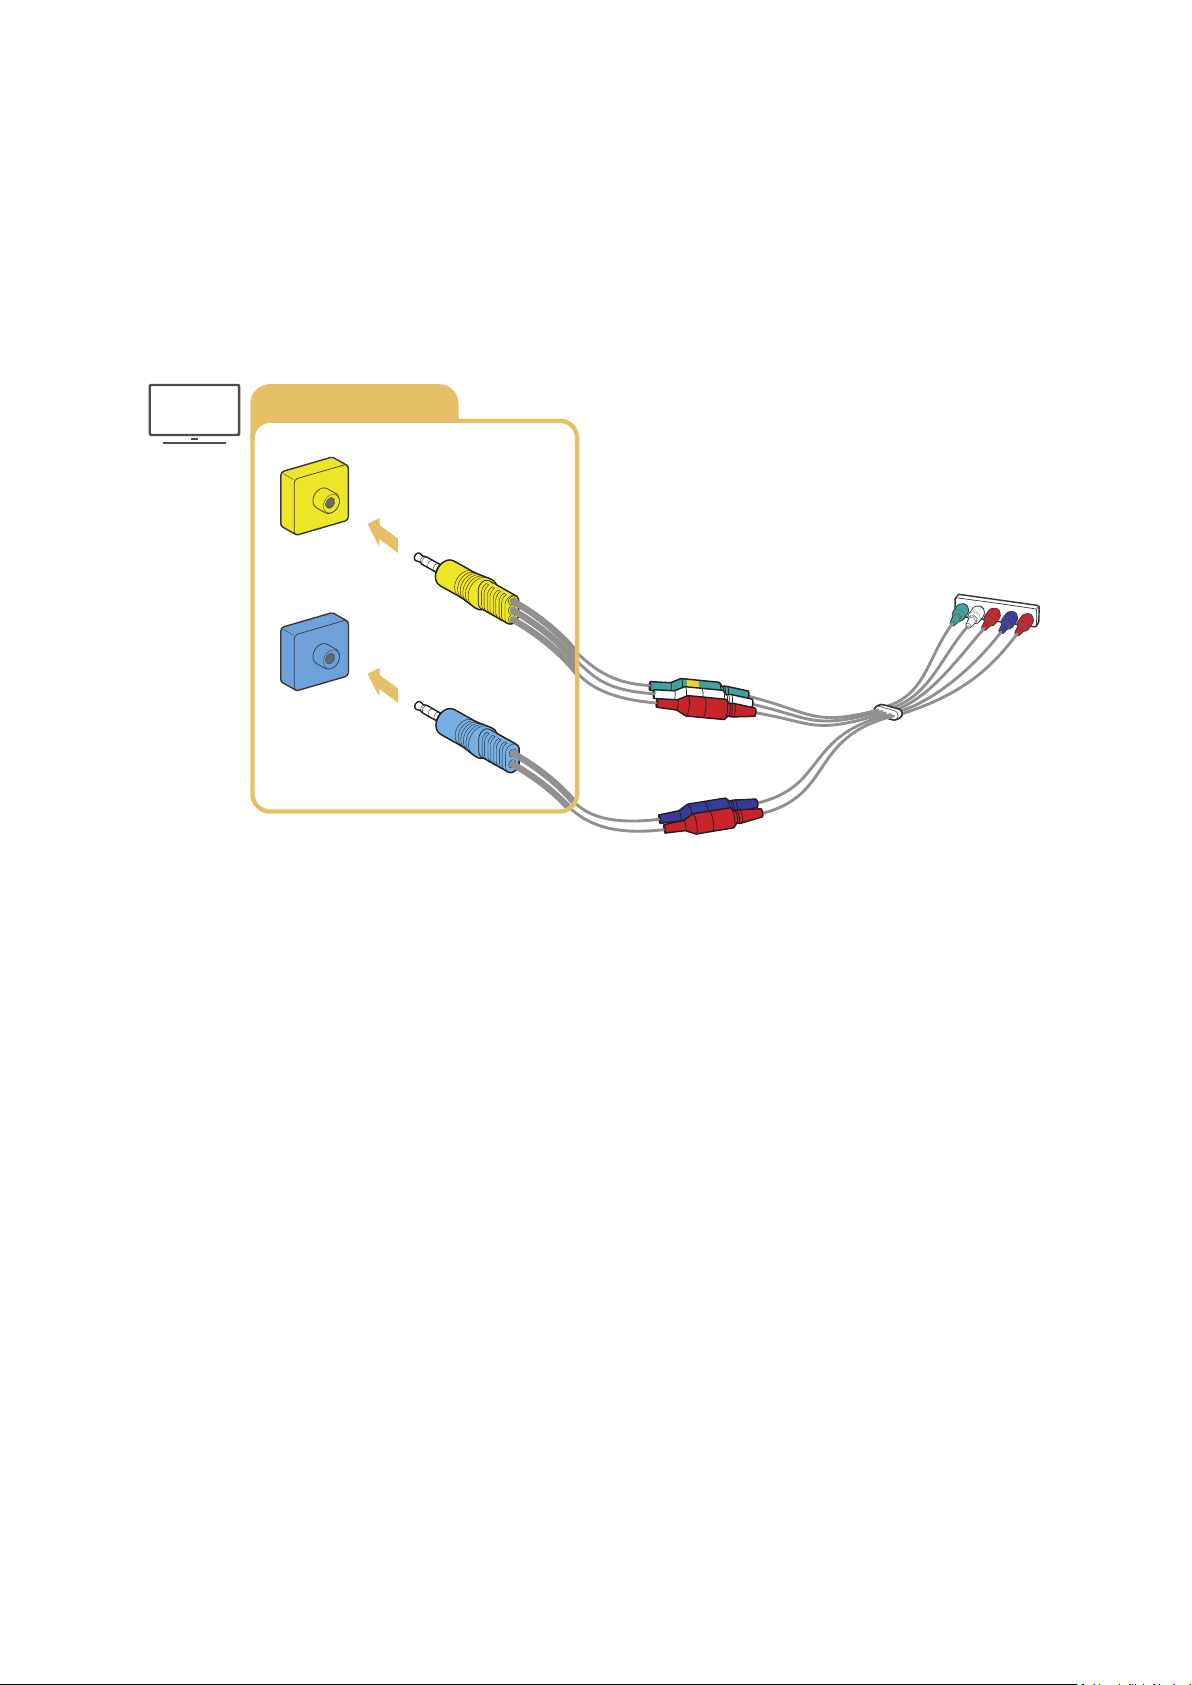
Connecting with a component cable (Only for models with COMPONENT IN / AV IN)
A Component connection lets you enjoy video resolutions up to 1080p. To watch video from most DVD and Blu-ray
players, use the Component connection.
Review the illustration below, and then connect Component IN and AV IN on the TV to Component OUT on the
external device by using the provided component and AV adaptors. Make sure to connect the same color connectors
together. (blue to blue, yellow to yellow, etc.)
COMPONENT IN / AV IN
AV IN
AV IN Adapter
COMPONENT IN
COMPONENT IN Adapter
" To use component equipment, connect both the component adapter (blue) and the AV adapter (yellow).
- 27 -
Page 28
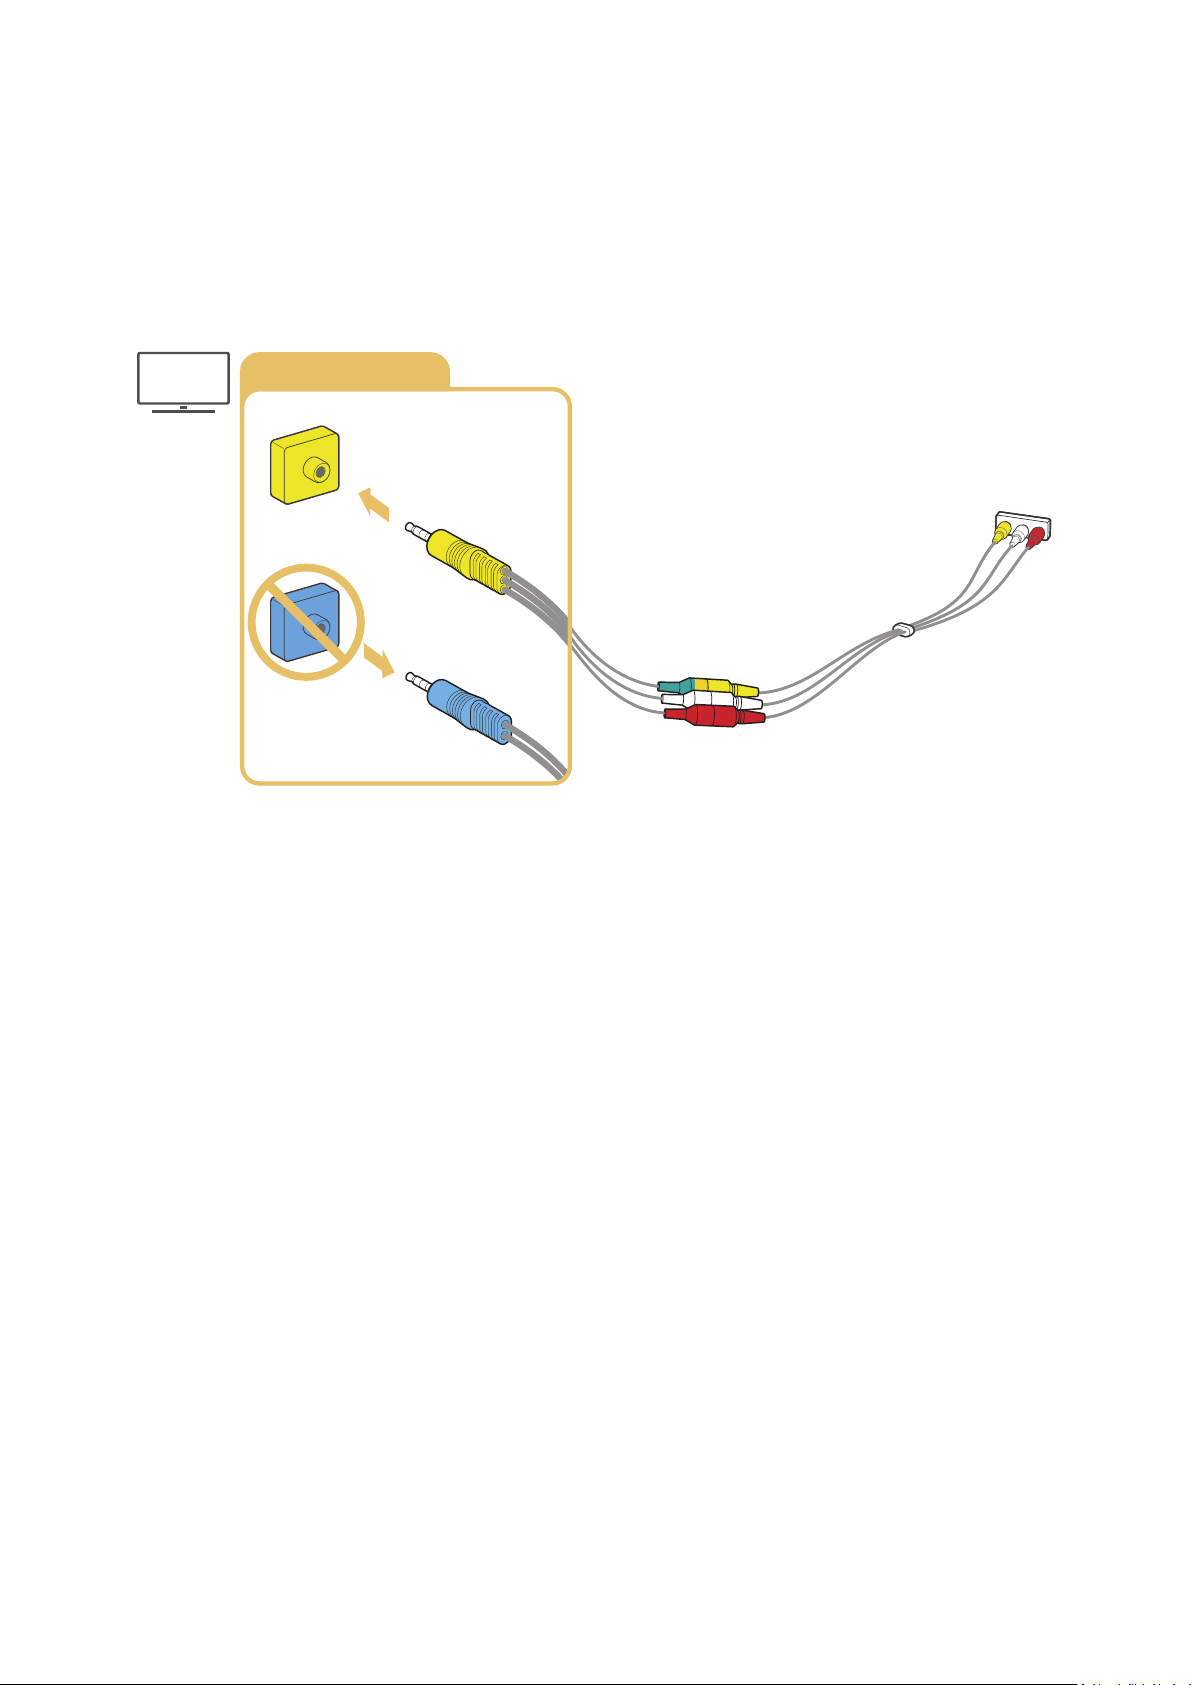
Connecting with a composite cable (Only for models with COMPONENT IN / AV IN)
Through the AV connection, you can enjoy video resolution up to 480i.
Review the illustration below, and then connect AV IN on the TV to AV OUT on the external device using the provided
AV adapter and composite cable. When connecting the cables, be sure to match the colors of the cables to the colors
of the ports.
COMPONENT IN / AV IN
AV IN
AV IN Adapter
COMPONENT IN
COMPONENT IN Adapter
" Connect AV (composite) equipment to AV In only. Do not connect to Component In.
- 28 -
Page 29
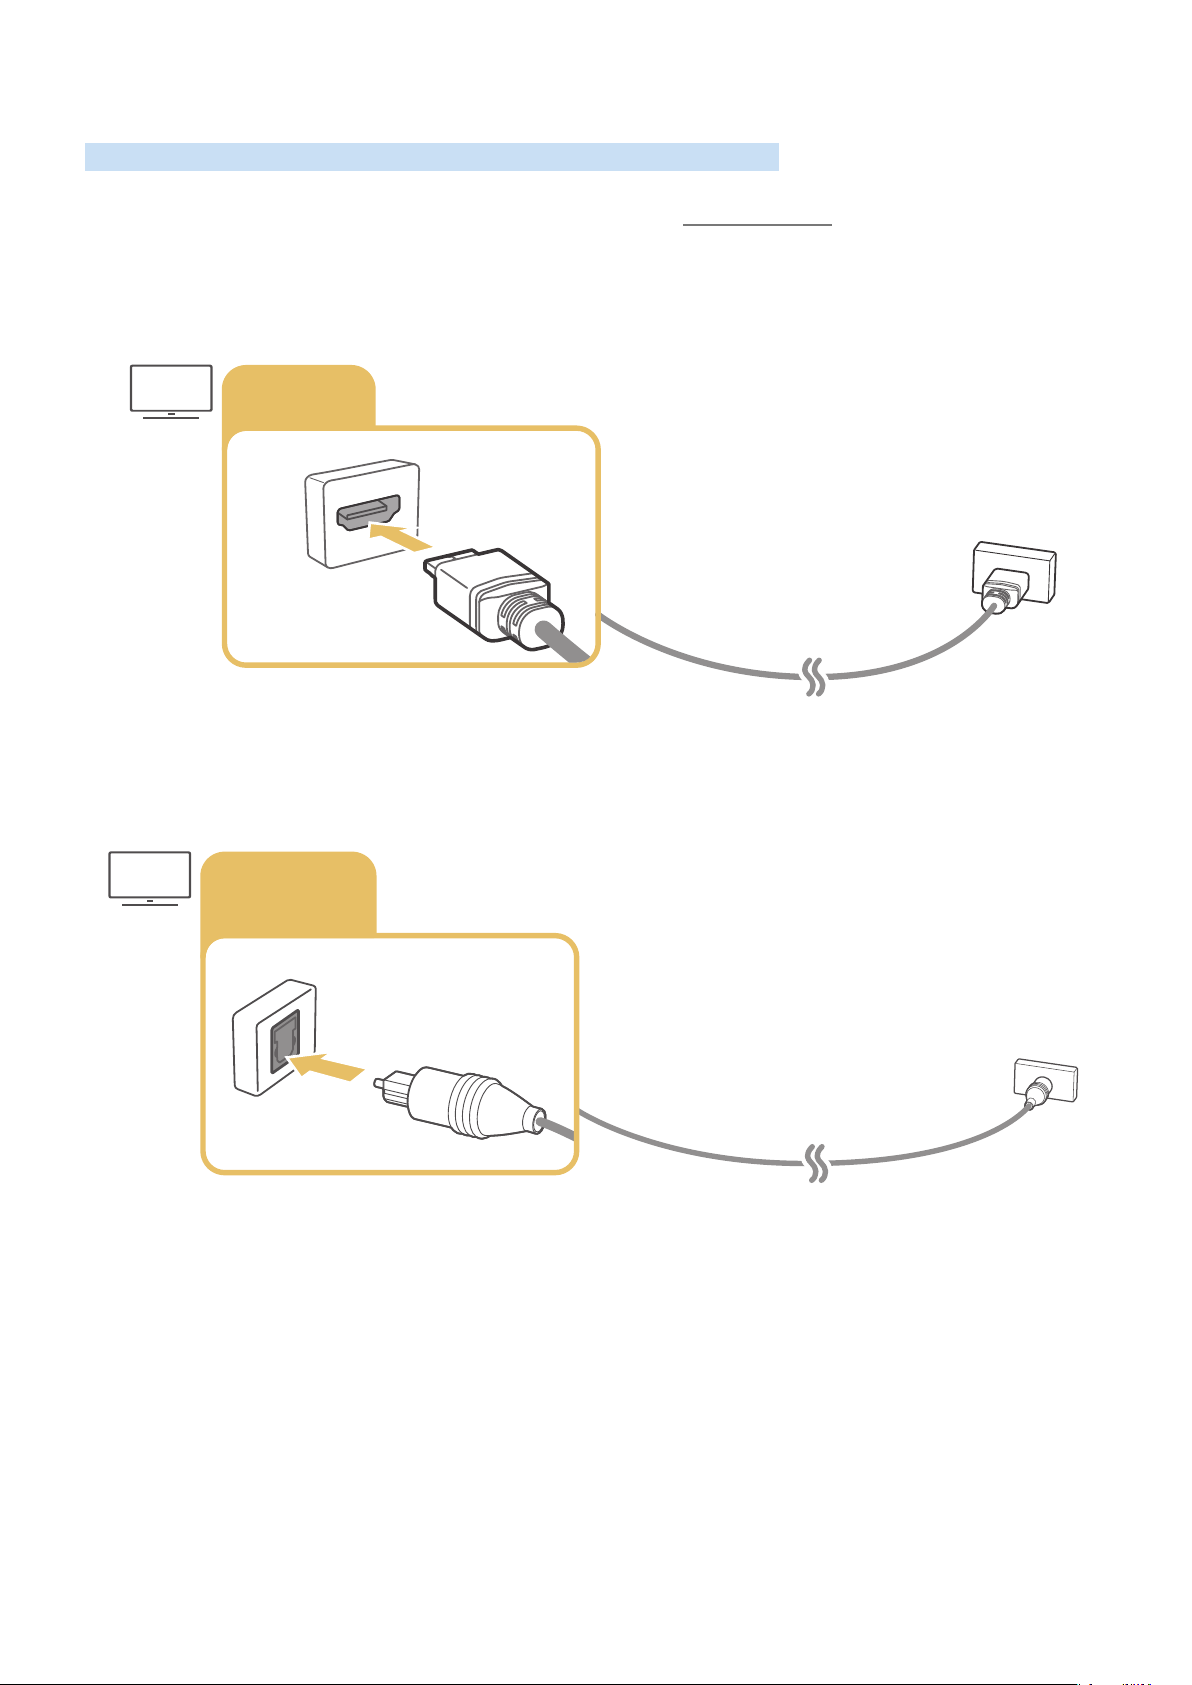
Audio Input and Output Connections
HDMI IN
DIGITAL
Make the correct audio connections between your TV and your external devices.
" For more information about how to select external speakers, refer to "Selecting speakers."
Connecting with an HDMI (ARC) cable
(ARC)
Connecting with a digital audio (optical) cable
AUDIO OUT
(OPTICAL)
Connecting through a wireless network
You can connect the TV to a Samsung audio device that supports the Wi-Fi function through your wireless network.
The two devices must be connected to the same network. For more information about how to connect and use a
Samsung audio device that supports the Wi-Fi function, refer to its user manual.
- 29 -
Page 30
Connecting Bluetooth Devices
For more information about how to connect and use external speakers, refer to the Connection Guide (
Source Connection Guide Audio Device Bluetooth) and to the speakers' user manuals.
" This function may not be supported depending on the model or geographical area.
Connecting a Computer
Use the TV as a computer monitor or connect the TV to a computer via your network and access the computer's
content.
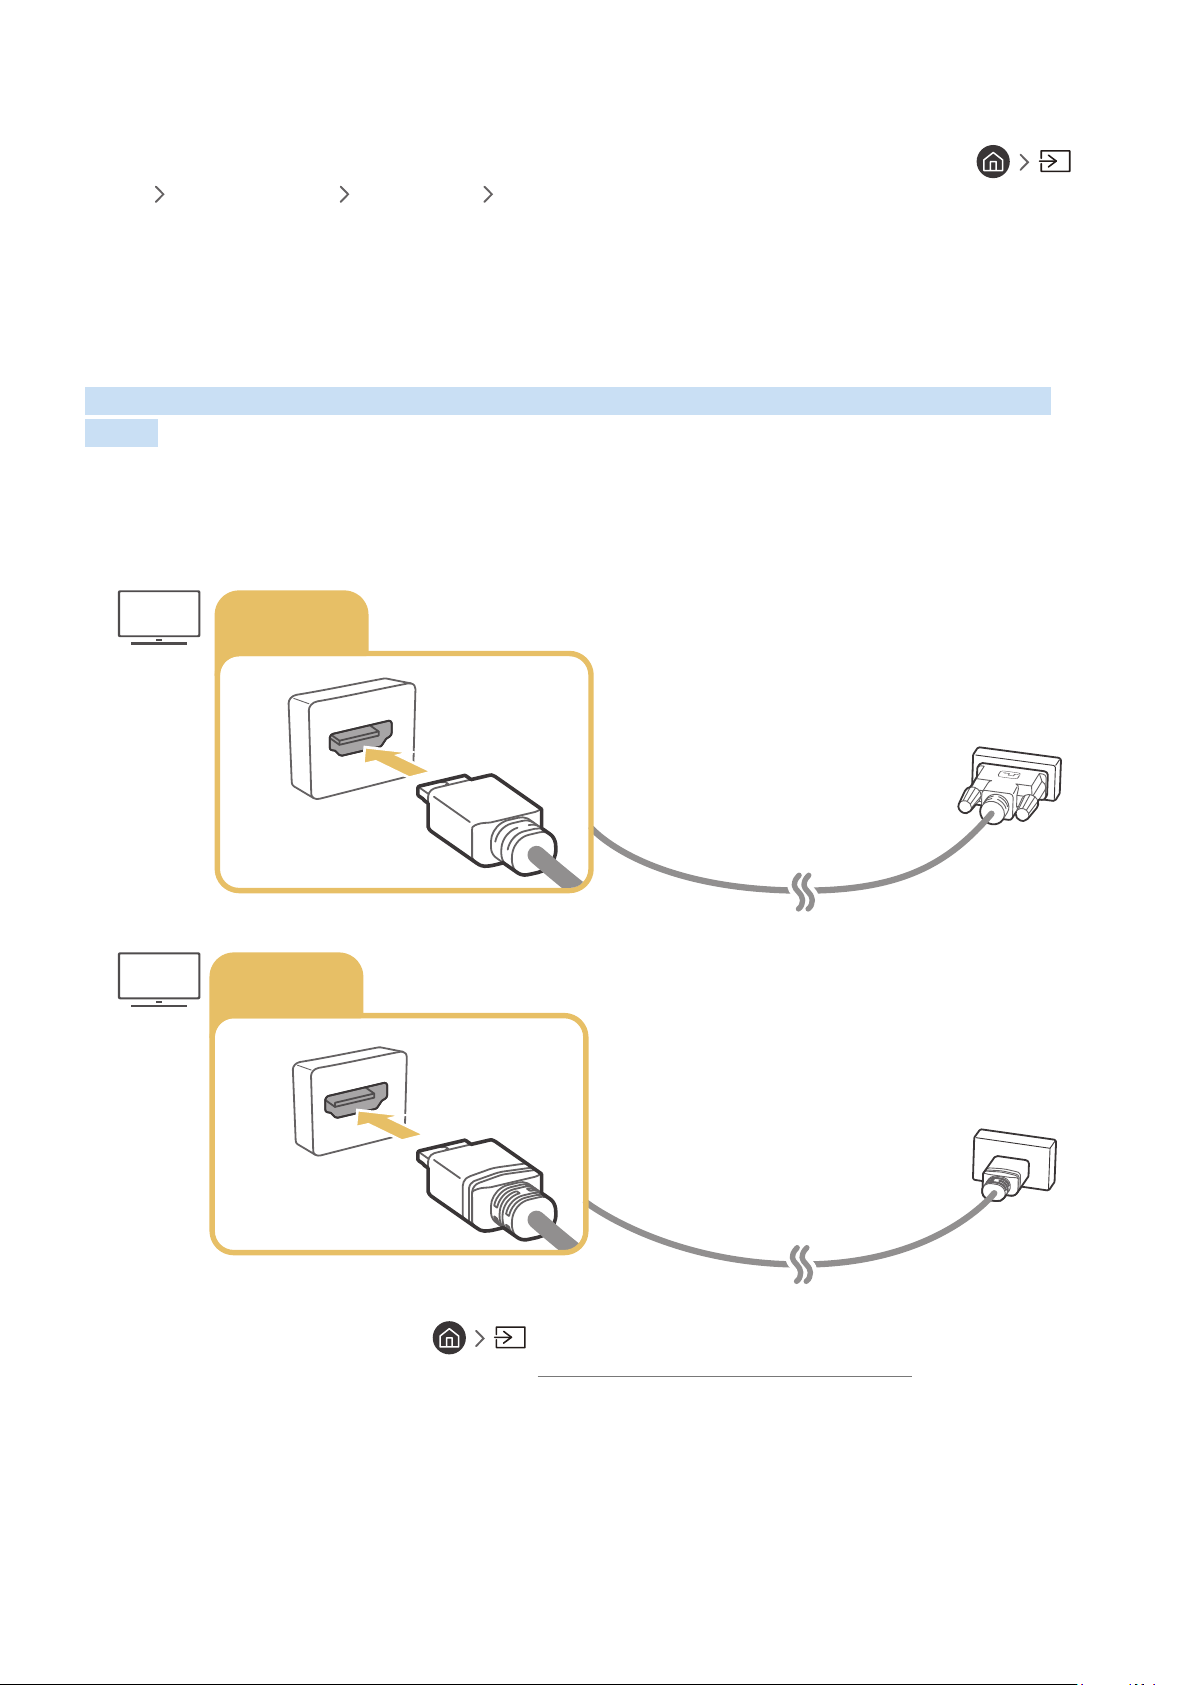
Connecting through the HDMI port ― Screen sharing (HDMI)
HDMI IN
HDMI IN
DVI
HDMI
" When you have connected a PC, go to Source, and then select the PC icon from the external device icon list. For
more information about the port settings, refer to "Editing the name and icon of an external device."
- 30 -
Page 31

Connecting Your Mobile Device
Connect your mobile device to the TV on the same network to control the TV with the mobile device or enjoy the
content of the mobile device on the TV.
Use the SmartThings app on your mobile device to quickly and easily connect to the TV and control its main settings.
In addition, you can remotely check and control the statuses of various devices such as Samsung smart devices,
home appliances, and speakers registered to the server.
" Make sure that your TV supports SmartThings. You can check this with the Supported Device menu in the SmartThings app.
" To use the SmartThings app, you must be signed in to your Samsung account on the TV.
" This function may not be supported depending on the TV model or mobile device.
" The supported functions may differ depending on the version of the SmartThings app.
You can install the SmartThings app from App Store or Google Play Store.
Connecting to the TV via the SmartThings app
Turn on the TV.
1.
Start the SmartThings app on your mobile device.
2.
Tap Add Device on the dashboard of the SmartThings app. Connectable TVs are searched for.
3.
From the search results, select the model of your TV.
4.
Enter the PIN number displayed on the TV screen.
5.
Once the TV is registered with your Samsung account, you can use the SmartThings app to control the TV.
" If your TV is not found on your mobile device, turn both of them off and on, and then try again.
" If you have more than one TV, you can easily select the TV you want by setting different TV names at Settings
General System Manager Device Name.
- 31 -
Page 32

Bidirectionally mirroring your TV and mobile device using the SmartThings app
Bidirectional mirroring refers to either outputting the screen and sound of a mobile device on a TV or outputting the
screen and sound of a TV on a mobile device. You can use the SmartThings app to enjoy the screen and sound of the
TV on your mobile device or to play the screen and sound of your mobile device on the TV.
Start the SmartThings app on your mobile device. Tap your TV from the dashboard or device. Tap (More Option) on
the screen of the mobile device. You can use the following functions:
● You can enjoy the screen of the mobile device on your TV.
" After you connect a mobile device that supports screen mirroring to your TV, you can use screen mirroring to view
the screen of the mobile device on your TV wirelessly and play the video, audio, or photo files currently playing on the
mobile device on your TV.
● You can enjoy TV screen and sound on your mobile device.
● You can only listen to the TV sound on your mobile device.
" This function may not be supported depending on the TV model or mobile device.
" The supported functions may differ depending on the version of the SmartThings app.
" If your TV is not found on your mobile device, turn both of them off and on, and then try again.
" If you have multiple TVs, assign a different name to each TV in Settings General System Manager
Device Name to make selection easy.
- 32 -
Page 33

Managing Mobile Devices
Settings General External Device Manager Device Connect Manager Try Now
● Access Notification
Set whether to display a notification when a mobile device attempts to connect to the TV.
● Device List
View, edit, or remove a list of mobile devices registered to the TV.
Switching between external devices connected to the TV
You can switch between TV programs and the content of external devices.
Changing the input signal
Source
When you select a connected external device on the Source screen, the output of the selected device is displayed on
the TV's screen.
" To control a device (Blu-ray player, game console, etc.) that supports universal remote control with the TV's remote,
connect the device to an HDMI port on the TV, and then turn on the device. You can switch to the output of the device
automatically or you can configure universal remote control for the device automatically. To configure the device for
universal remote control automatically, point the TV's remote control at the device.
" When a USB device is connected to the USB port, a pop-up message appears that lets you switch easily to the media
content listed on the device.
" This function may not be supported depending on the device and geographical area.
- 33 -
Page 34
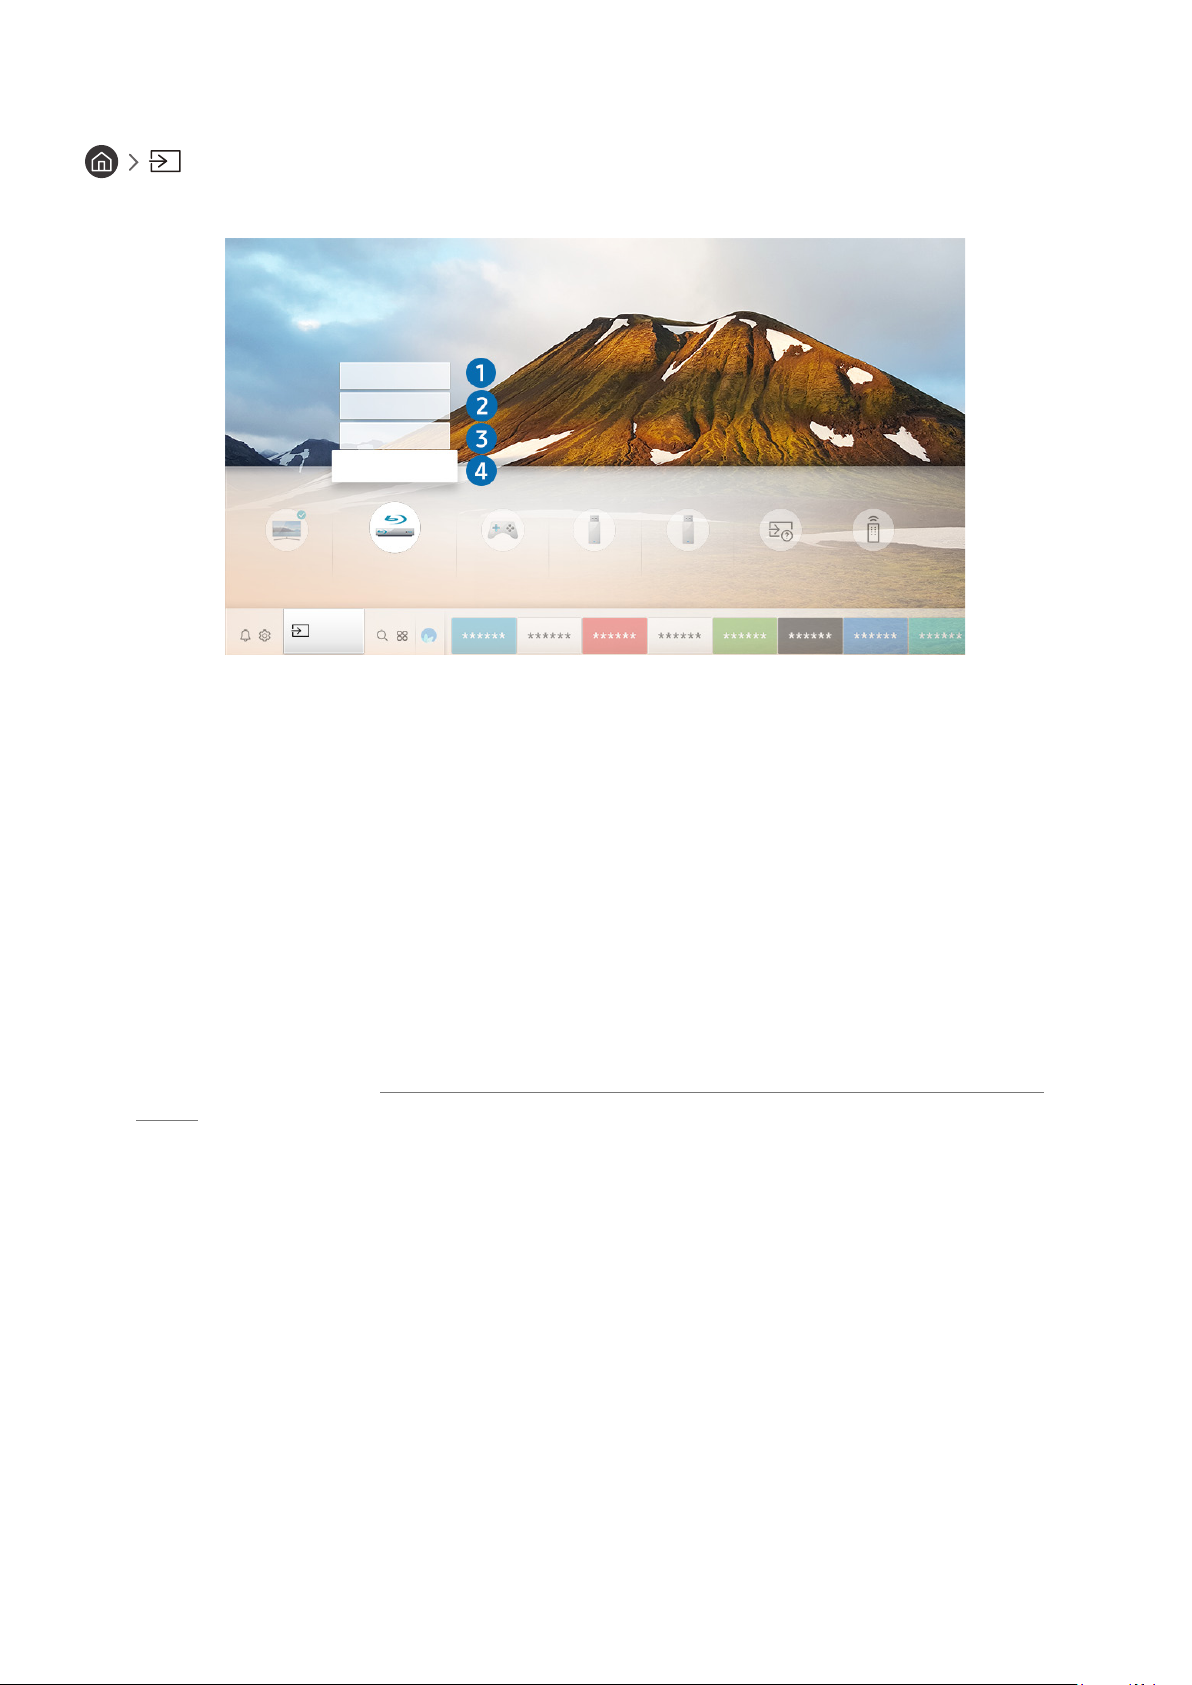
Editing the name and icon of an external device
Source
You can change the port name for a connected external device or add it to the Home Screen.
Universal Remote
Edit
Information
Sources
Add to Home
Source
" The image on your TV may differ from the image above depending on the model and geographical area.
Move the focus to a connected external device.
1.
Press the up directional button. The following functions become available.
2.
" Available functions may differ depending on the port type.
Universal Remote
1
You can control external devices connected to the TV using the remote control. To control external devices, register
them by following the instructions on the screen.
" This function may not be supported depending on the model or geographical area.
" For more information, refer to "Controlling External Devices with the Samsung Smart Remote - Using the Universal
Remote".
Edit
2
You can rename each port with the name of an input device or a desired name to make it easier to change the input
mode.
Information
3
You can view detailed information about an external device.
Add to Home
4
You can add the port of an external device to the Home Screen for quick switching.
- 34 -
Page 35

Using additional functions
You can use the following features on the Source screen.
● Connection Guide: Displays device connection instructions.
● Universal Remote: Lets you register external devices to your Samsung Smart Remote and control them using
the Remote.
" This function may not be supported depending on the model or geographical area.
" For more information, refer to "Controlling External Devices with the Samsung Smart Remote - Using the Universal
Remote."
Connection Notes
When connecting an external device, note the following.
" The number of connectors and their names and locations may differ with the model.
" Refer to the external device's operating manual when connecting it to the TV. The number of external device connectors
and their names and locations may differ with the manufacturer.
Connection notes for HDMI
● The following types of HDMI cables are recommended:
– High-Speed HDMI Cable
– High-Speed HDMI Cable with Ethernet
● Use an HDMI cable with a thickness of 0.66 inches (17 mm) or less.
● Using a non-certified HDMI cable may result in a blank screen or a connection error.
● Some HDMI cables and devices may not be compatible with the TV due to different HDMI specifications.
● This TV does not support HDMI Ethernet Channel. Ethernet is a Local Area Network (LAN) built with coaxial
cables standardized by the IEEE.
● Use a cable shorter than 10 feet (3 m) to get the best UHD viewing quality.
- 35 -
Page 36

● Many computer graphics adaptors do not have HDMI ports, but have DVI ports instead. If your PC does not
support HDMI video out, connect your PC with an HDMI-DVI cable.
" For more information, refer to "Connecting a Computer."
● For One Connect supported models, when the TV is connected to other equipment such as a DVD/BD player
or a set-top-box via HDMI, network standby mode will be automatically activated. In the network standby
mode, the TV continues to detect and connect HDMI devices. This function can be deactivated by pressing the
following buttons on the remote control:
– On the Samsung Smart Remote: Select VOL button. (up directional button) (left directional button)
(up directional button) (down directional button) Select VOL button. .
– On the standard remote control: Select button. (up directional button) (left directional button)
(up directional button) (down directional button) Select button. Select RETURN button.
" If the function is deactivated and TV is turned off, the function is automatically activated again when the TV is next
switched on.
Connection notes for audio devices
● For better audio quality, it is a good idea to use an AV receiver.
● If you connect an external audio device using an optical cable, the Sound Output setting is automatically
changed to the connected device. However, to make this happen, you must turn on the external audio device
before connecting the optical cable. To manually change the Sound Output setting, do one of the following:
– Use the Quick Settings screen to change to the connected device:
Use the Select button to select Audio Out/Optical on the Sound Output menu. ( Settings up
directional button Sound Output).
– Use the Settings screen to change to the connected device:
Select Audio Out/Optical on the Sound Output menu. ( Settings Sound Sound Output).
● An unusual noise coming from a connected audio device while you are using it may indicate a problem with
the audio device itself. If this occurs, ask for assistance from the audio device's manufacturer.
● Digital audio is only available with 5.1 channel broadcasts.
- 36 -
Page 37

Connection notes for computers
● For the resolutions supported by the TV, refer to "Read Before Connecting a Computer (Supported
Resolutions)."
● As long as file sharing is activated, unauthorized access may occur. When you do not need to access data,
disable file sharing.
● If you want to connect your PC and TV wirelessly, both of them must be connected to each other on the same
network.
● When sharing content with other network-based devices such as those in an IP (Internet Protocol) storage
system, sharing may not be supported due to the network’s configuration, quality, or functionality, for
example, if the network has an NAS (Network-Attached Storage) device.
Connection notes for mobile devices
● To use the Smart View function, the mobile device must support a mirroring function such as Screen Mirroring
or Smart View. To check whether your mobile device supports the mirroring function, please visit the mobile
device manufacturer's website.
● To use Wi-Fi Direct, the mobile device must support the Wi-Fi Direct function. Please check if your mobile
device supports Wi-Fi Direct.
● The mobile device and your Smart TV must be connected to each other on the same network.
● The video or audio may stop intermittently, depending on network conditions.
● When sharing content with other network-based devices such as those in an IP (Internet Protocol) storage
system, sharing may not be supported due to the network’s configuration, quality, or functionality, for
example, if the network has an NAS (Network-Attached Storage) device.
- 37 -
Page 38
Remote Control and Peripherals
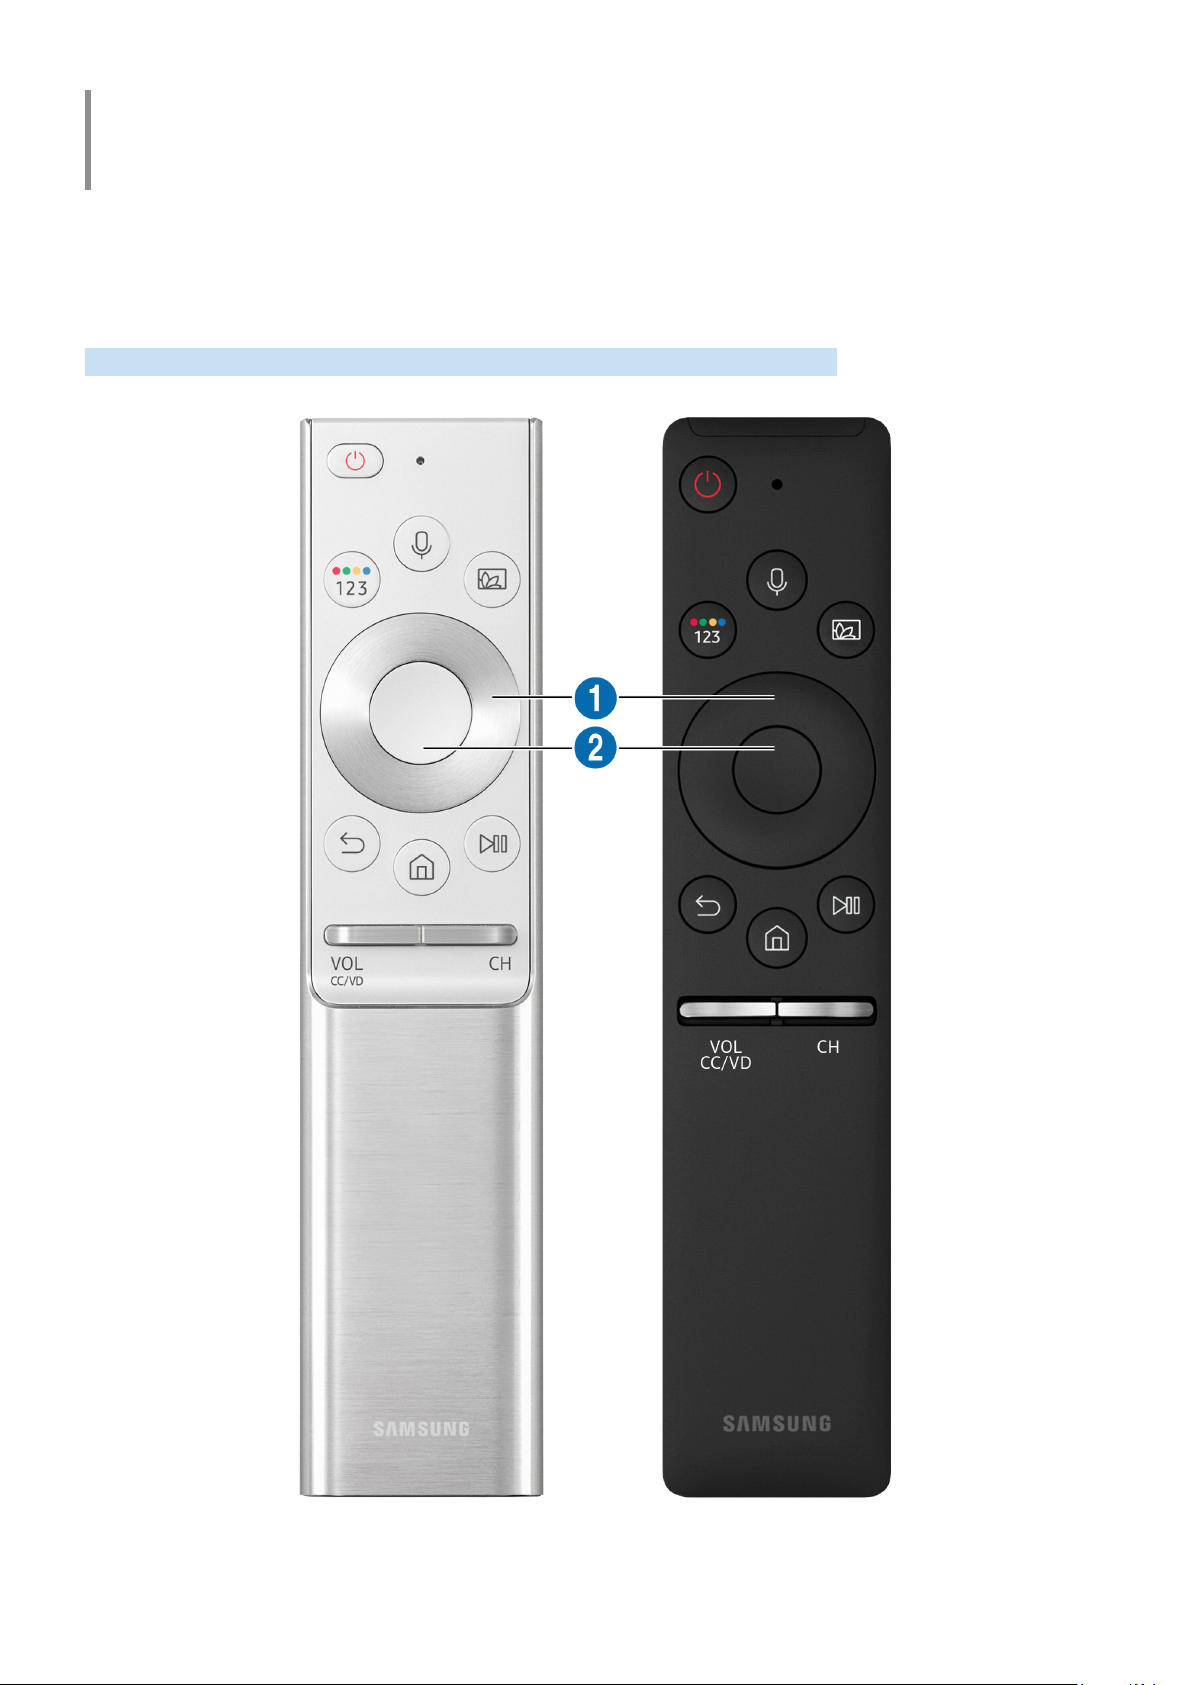
You can control TV operations with your Samsung Smart Remote. Pair external devices such as a keyboard for ease
of use.
About the Samsung Smart Remote (QLED TV)
Learn about the buttons on the Samsung Smart Remote that comes with the QLED TV.
- 38 -
Page 39
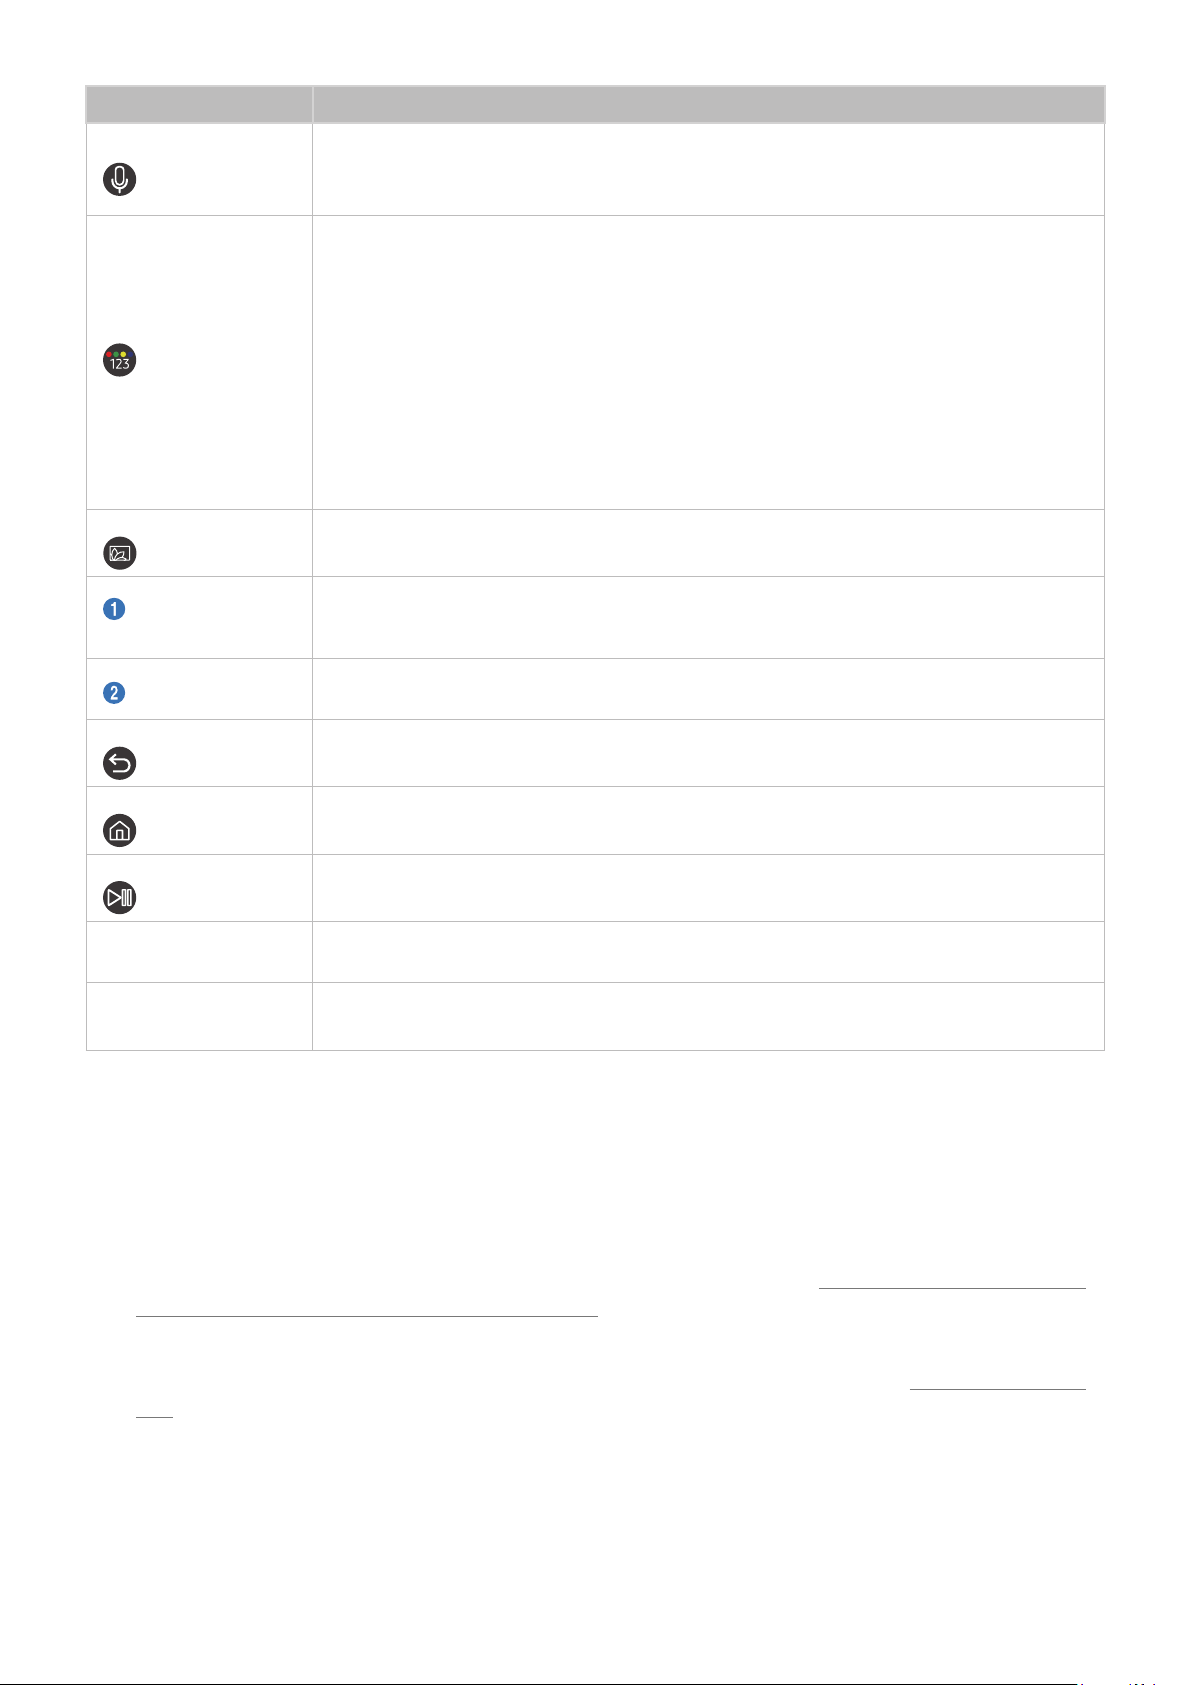
Button Description
(Bixby)
(Color / Number
button)
(Ambient Mode)
Runs Bixby. Press and hold the button, say a command, and then release the button to run
Bixby.
When you press the button, the Enter My Bixby menu appears at the bottom of the screen.
Each time you press this button, the colored buttons window and the virtual numeric pad are
displayed alternately.
● Use these colored buttons to access additional options that are specific to the feature in use.
" These buttons are not available in the U.S.A. and Canada.
● Press to bring up the virtual numeric pad on the screen. Use the numeric keypad to enter
numeric values. Select numbers and then select Done to enter a numeric value. Use to
change the channel, enter a PIN, enter a ZIP code, etc.
" If the Color Button appears with a number strip on the screen, select the Color Button and
then select a specific color by using the directional pad (up/down/left/right). Use this to
access additional options that are specific to the feature in use.
In TV mode, press the button to enter Ambient Mode.
If you press the button when the TV is turned off, the TV turns on in Ambient Mode.
Directional pad (up/
down/left/right)
Select
(Return)
(Smart Hub)
(Play/pause)
VOL (Volume)
CH (Channel)
Moves the focus.
Selects or runs a focused item. When pressed while you are watching content, detailed program
information appears.
Press to return to the previous menu. When pressed for 1 second or more, the running function is
terminated. When pressed while you are watching a program, the previous channel appears.
Press to return to the Home Screen.
When pressed, the playback controls appear. Using these controls, you can control the media
content that is playing.
Move the button up or down to adjust the volume. To mute the sound, press the button. When
pressed for 1 second or more, the Accessibility Shortcuts appear.
Move the button up or down to change the channel. To see the Guide screen, press the button.
Press and hold the button up or down to quickly change the channel.
" Use the Samsung Smart Remote less than 20 feet from the TV. The usable distance may vary with the wireless
environmental conditions.
" The images, buttons, and functions of the Samsung Smart Remote may differ with the model.
" The Samsung Smart Remote may not be supported depending on the model or geographical area.
" To use the Samsung Smart Remote to control a compatible external device that does not support HDMI-CEC (Anynet+), you
must configure universal remote control for the device. For more information, refer to "Controlling External Devices with
the Samsung Smart Remote - Using the Universal Remote."
" To use the Samsung Smart Remote to control a compatible external device that does support HDMI-CEC (Anynet+),
connect the device to an HDMI port on the TV using an HDMI cable. For more information, refer to "Using Anynet+ (HDMI-
CEC)."
- 39 -
Page 40
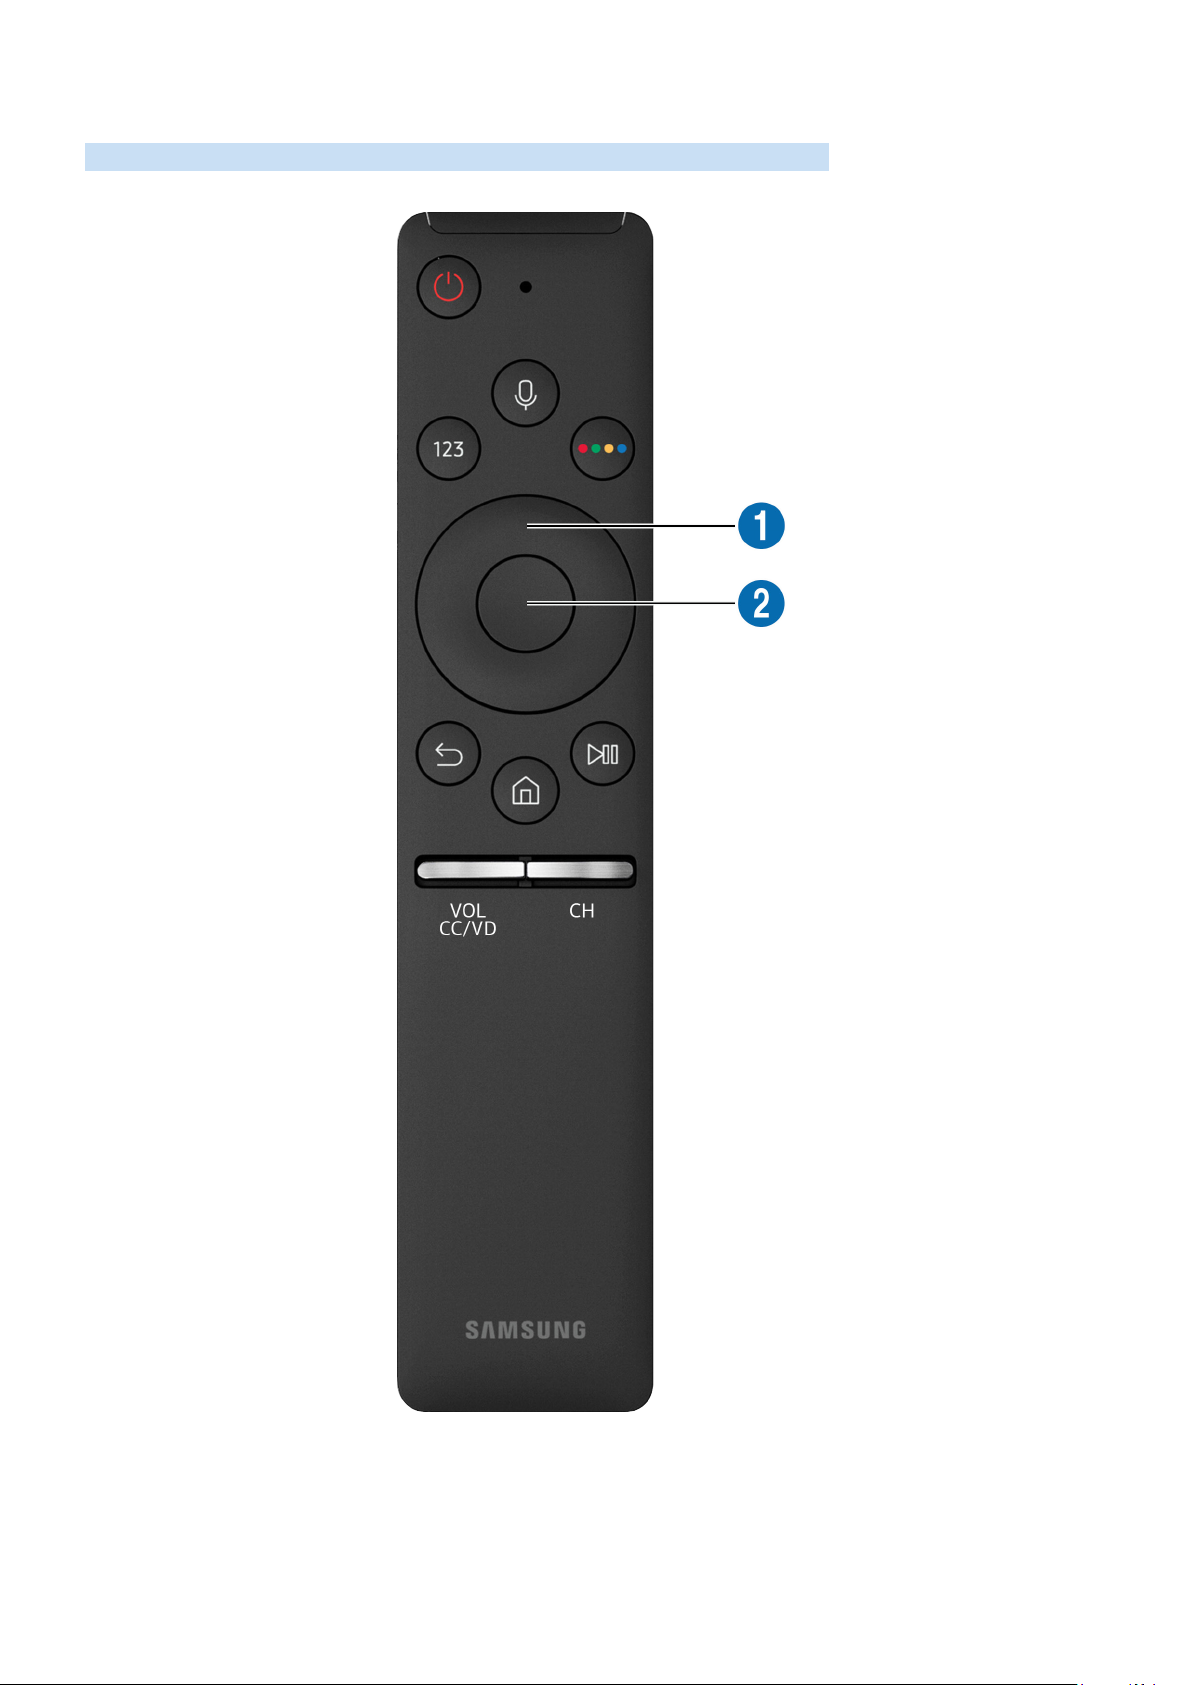
About the Samsung Smart Remote (UHD TV)
Learn about the buttons on the Samsung Smart Remote that comes with the UHD TV.
- 40 -
Page 41
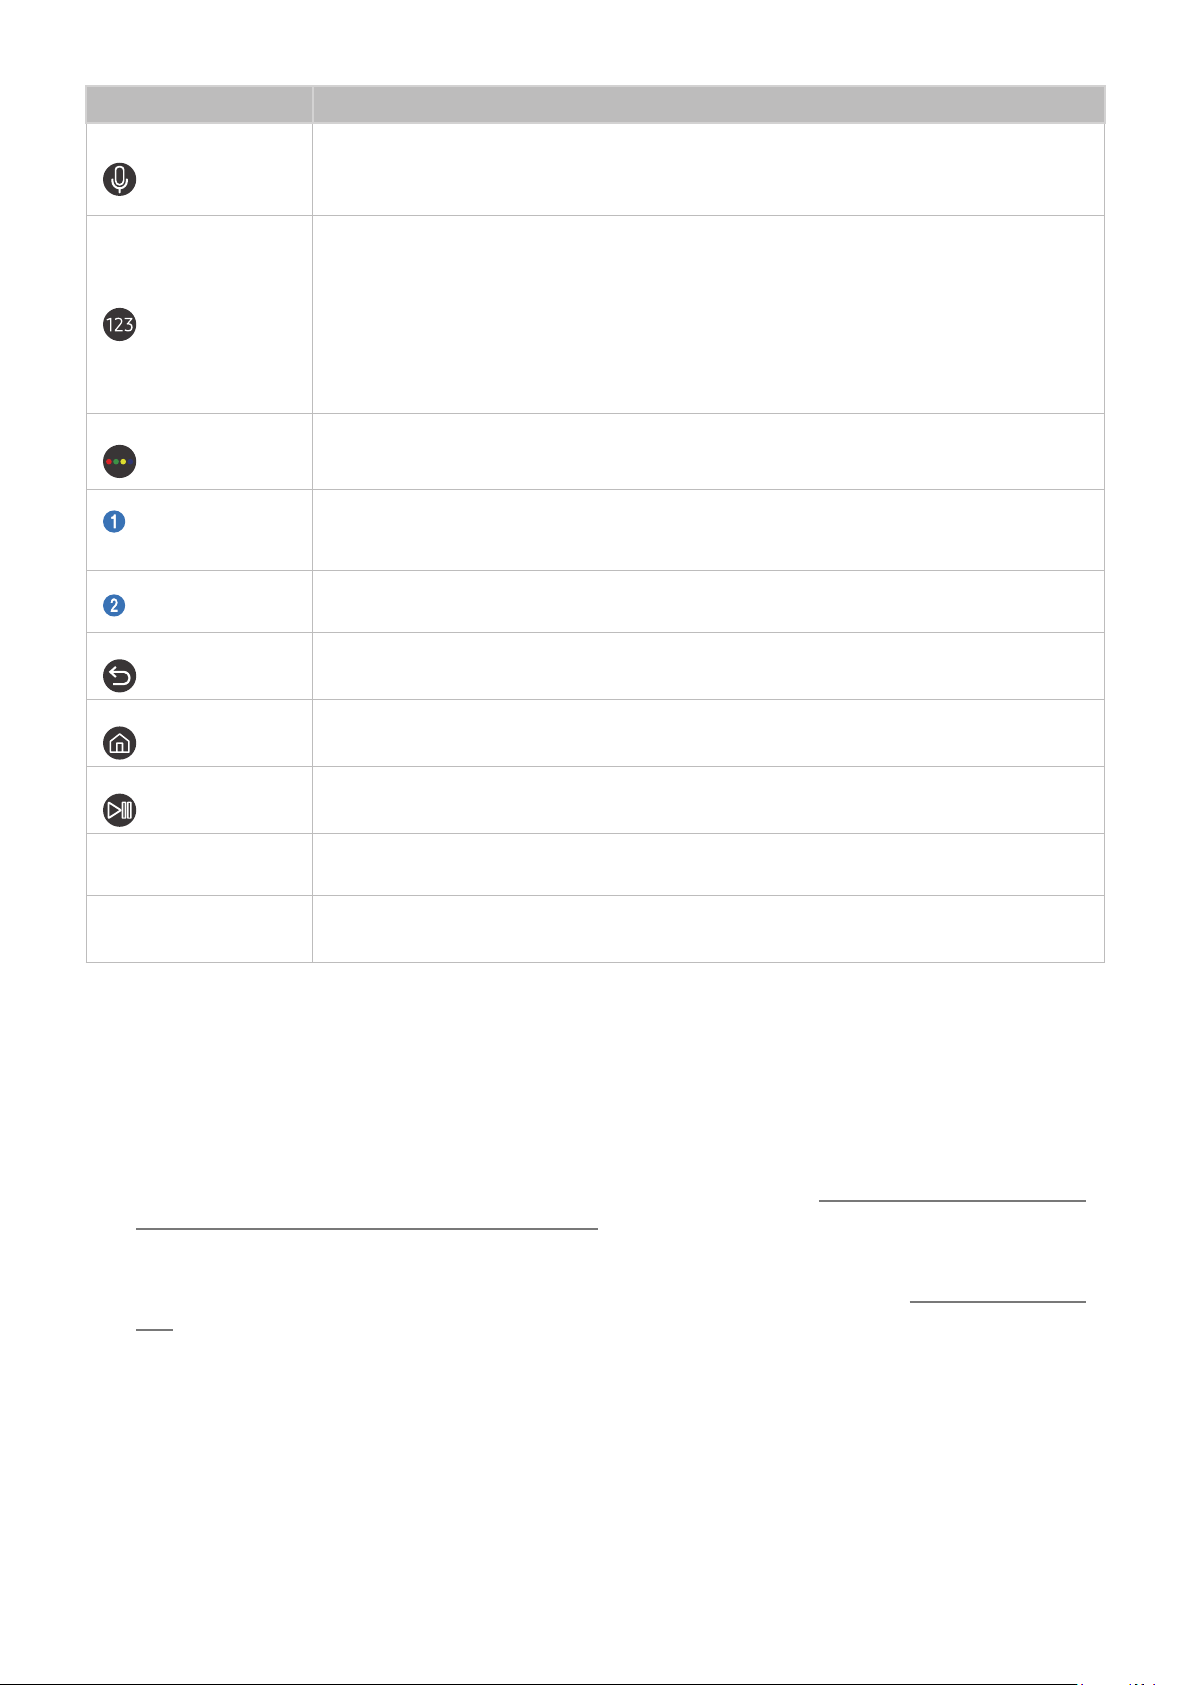
Button Description
Runs Bixby. Press and hold the button, say a command, and then release the button to run
(Bixby)
(Number button)
(Color button)
Bixby.
When you press the button, the Enter My Bixby menu appears at the bottom of the screen.
Press to bring up the virtual numeric pad on the screen. Use the numeric keypad to enter
numeric values.
Select numbers and then select Done to enter a numeric value. Use to change the channel, enter
a PIN, enter a ZIP code, etc.
If the Color Button appears with a number strip on the screen, select the Color Button and then
select a specific color by using the directional pad (up/down/left/right). Use this to access
additional options that are specific to the feature in use.
Use these colored buttons to access additional options that are specific to the feature in use.
" These buttons are not available in the U.S.A. and Canada.
Directional pad (up/
down/left/right)
Select
(Return)
(Smart Hub)
(Play/pause)
VOL (Volume)
CH (Channel)
Moves the focus.
Selects or runs a focused item. When pressed while you are watching content, detailed program
information appears.
Press to return to the previous menu. When pressed for 1 second or more, the running function is
terminated. When pressed while you are watching a program, the previous channel appears.
Press to return to the Home Screen.
When pressed, the playback controls appear. Using these controls, you can control the media
content that is playing.
Move the button up or down to adjust the volume. To mute the sound, press the button. When
pressed for 1 second or more, the Accessibility Shortcuts appear.
Move the button up or down to change the channel. To see the Guide screen, press the button.
Press and hold the button up or down to quickly change the channel.
" Use the Samsung Smart Remote less than 20 feet from the TV. The usable distance may vary with the wireless
environmental conditions.
" The images, buttons, and functions of the Samsung Smart Remote may differ with the model.
" The Samsung Smart Remote may not be supported depending on the model or geographical area.
" To use the Samsung Smart Remote to control a compatible external device that does not support HDMI-CEC (Anynet+), you
must configure universal remote control for the device. For more information, refer to "Controlling External Devices with
the Samsung Smart Remote - Using the Universal Remote."
" To use the Samsung Smart Remote to control a compatible external device that does support HDMI-CEC (Anynet+),
connect the device to an HDMI port on the TV using an HDMI cable. For more information, refer to "Using Anynet+ (HDMI-
CEC)."
- 41 -
Page 42
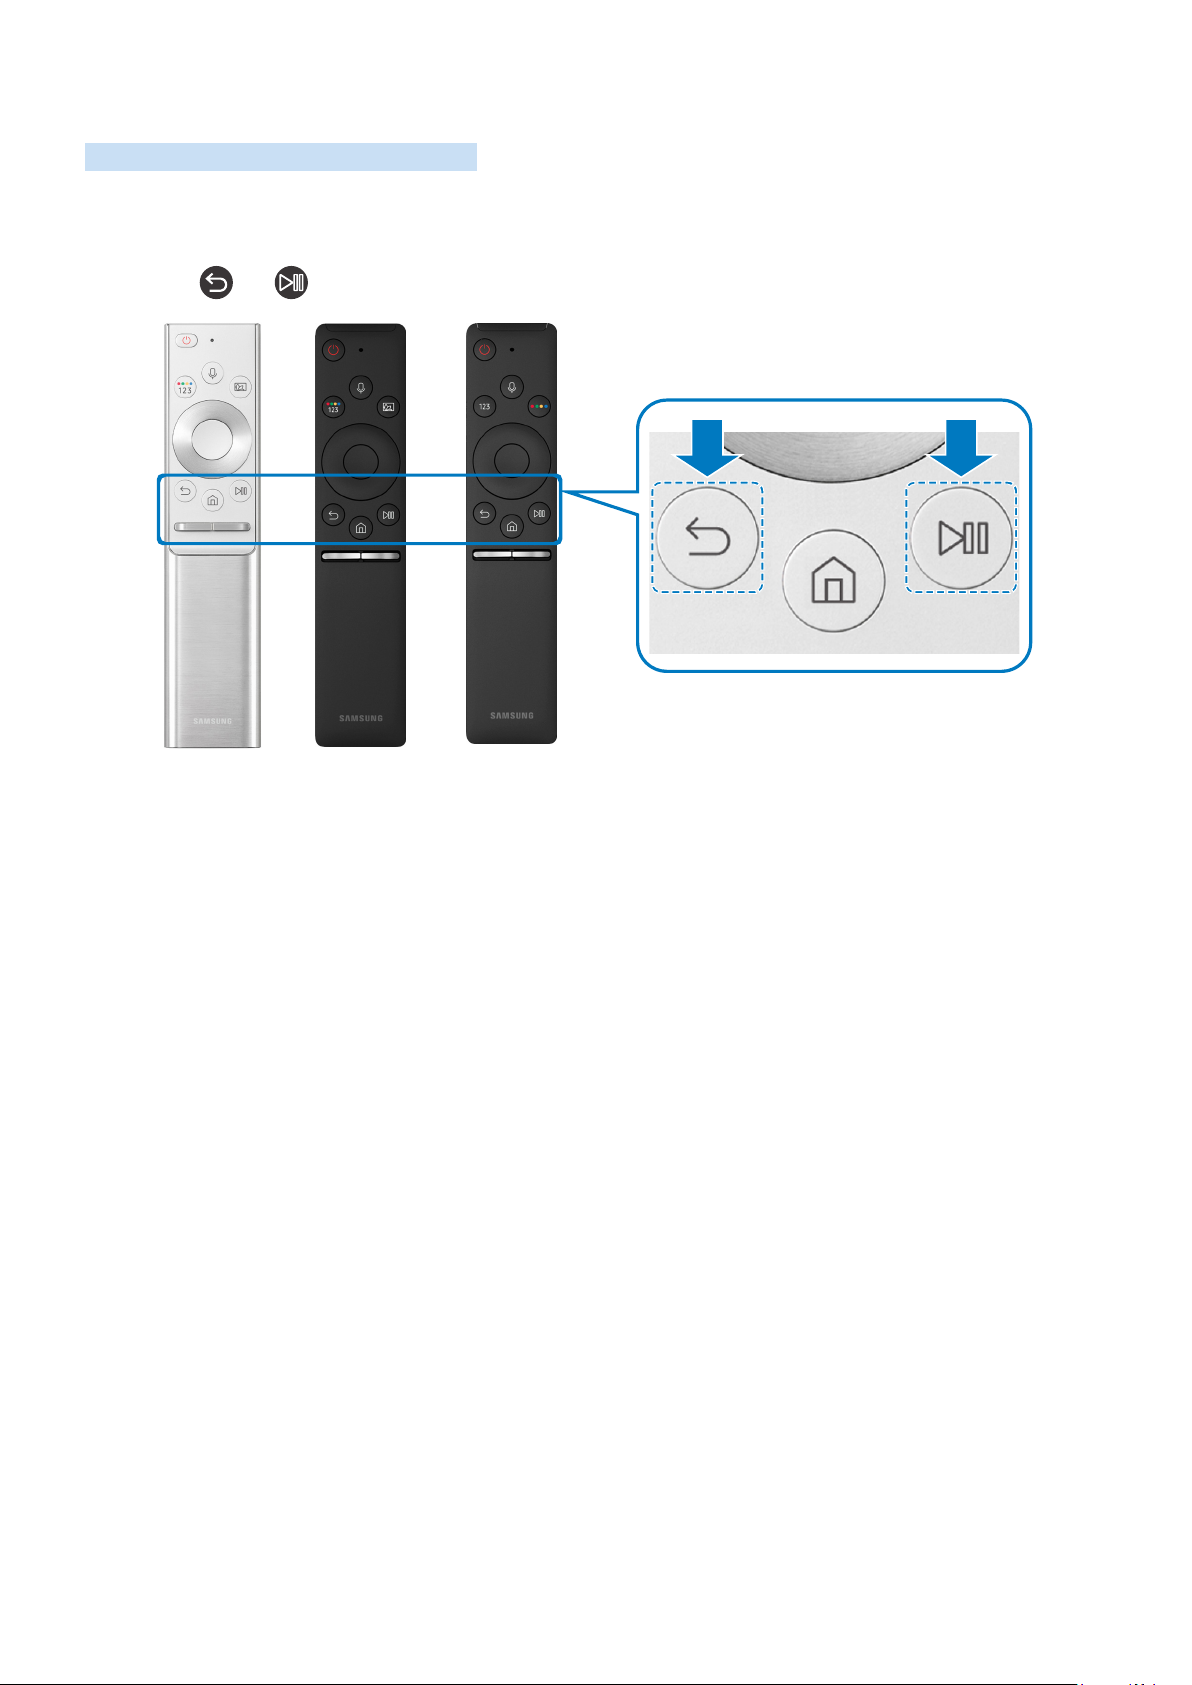
Connecting to the Samsung Smart Remote
Pair the TV with the Samsung Smart Remote.
When you turn on the TV for the first time, the Samsung Smart Remote pairs to the TV automatically. If the Samsung
Smart Remote does not pair to the TV automatically, point it at the remote control sensor of the TV, and then press
and hold the and buttons simultaneously for 3 seconds or more.
" The Samsung Smart Remote may not be supported depending on the model or geographical area.
- 42 -
Page 43

Controlling External Devices with the Samsung Smart Remote Using the Universal Remote
Control the TV and connected external devices with the Samsung Smart Remote.
Source Universal Remote
You can control external devices connected to the TV using the remote control. To control external devices, register
them by following the instructions on the screen.
" This function may not be supported depending on the model or geographical area.
" You can also use the Anynet+ (HDMI-CEC) function to operate external Samsung devices with your TV's remote control
without any additional setup. For more information, refer to "Using Anynet+ (HDMI-CEC)."
" Specific external devices connected to the TV may not support the universal remote feature.
" Do not place any obstacles in front of an external device. It may cause signals from the remote control to be transmitted
improperly.
" The TV memorizes both the external device and its connection port (HDMI 1, HDMI 2, etc.).
" For models that came with the One Connect, if you have difficulty controlling external devices with the Universal Remote,
try adjusting the positions of the One Connect and the external devices.
- 43 -
Page 44

Using Anynet+ (HDMI-CEC)
Control an external device connected via Anynet+ (HDMI-CEC) with the remote control.
You can use the TV's remote control to control external devices that are connected to the TV by an HDMI cable and
that support Anynet+ (HDMI-CEC). Note that you can only set up and operate Anynet+ (HDMI-CEC) with the remote
control.
Connecting an external device through Anynet+ and using their menus
Settings General External Device Manager Anynet+ (HDMI-CEC) Try Now
Set Anynet+ (HDMI-CEC) to On.
1.
Connect an HDMI-CEC-compliant device to the TV.
2.
Turn on the connected external device. The device is automatically connected to the TV. After the connection
3.
process is finished, you can access the menu of the connected device on your TV screen using your TV remote
and control the device.
" The connecting process can take up to 2 minutes to complete.
Read before connecting an Anynet+ (HDMI-CEC) device
" Anynet+ (HDMI-CEC)-enabled devices must be connected to the TV with an HDMI cable. Note that some HDMI cables may
not support Anynet+ (HDMI-CEC).
" You can configure the TV's Universal Remote to control third-party cable boxes, Blu-ray players, and home theaters that
do not support HDMI-CEC. For more information, refer to "Controlling External Devices with the Samsung Smart Remote -
Using the Universal Remote."
" Anynet+ cannot be used to control external devices that do not support HDMI-CEC.
" The TV remote control may not work under certain circumstances. If this occurs, set up the device as an Anynet+ (HDMI-
CEC)-enabled device again.
" Anynet+ (HDMI-CEC) works only with external devices that support HDMI-CEC and only when those devices are either in
standby mode or turned on.
" Anynet+ (HDMI-CEC) can control up to 12 compliant external devices (up to 3 of the same type) except for home theaters.
Anynet+ (HDMI-CEC) can control only one home theater system.
" To listen to 5.1 channel audio from an external device, connect the device to the TV via an HDMI cable and connect a 5.1
home theater system directly to the external device's digital audio output connector.
" If an external device has been set up for both Anynet+ and a universal remote control, the device can be controlled only
with the universal remote control.
- 44 -
Page 45
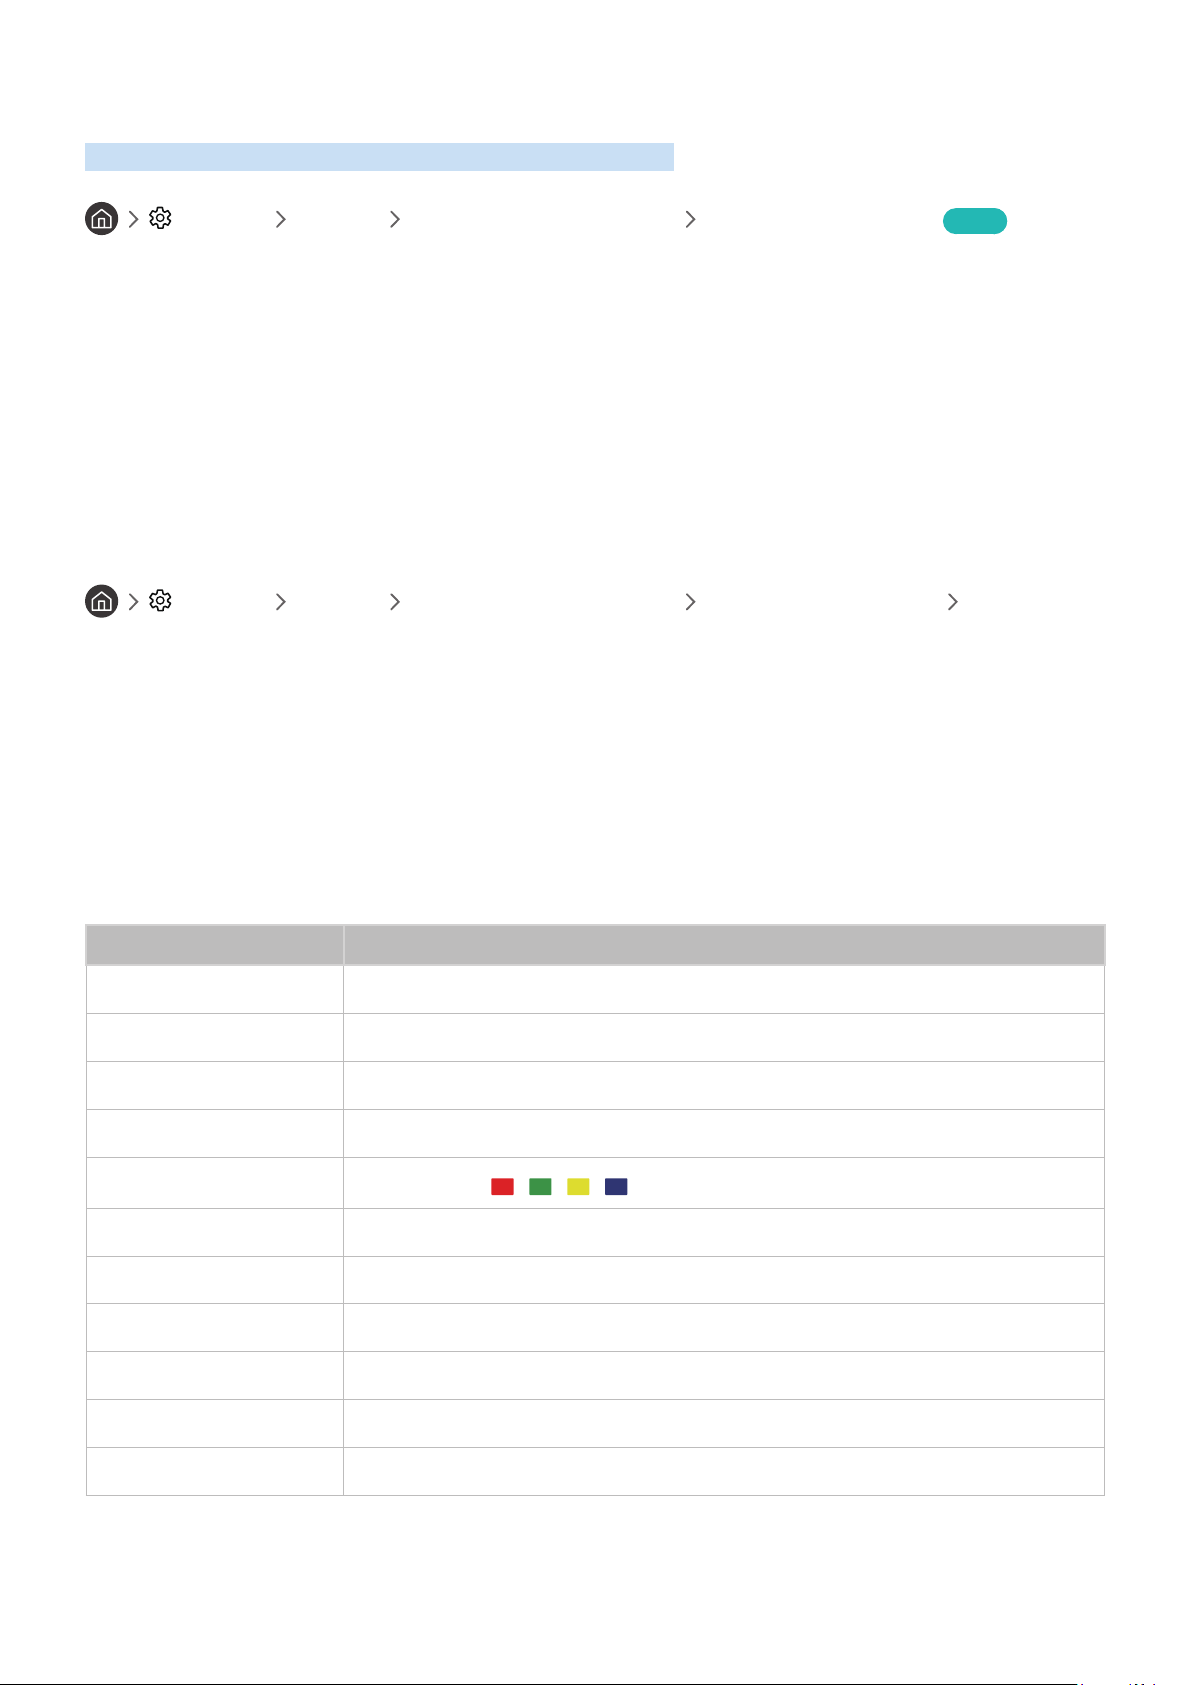
Controlling the TV with a Keyboard or Mouse
Connecting a keyboard or mouse to make it easier to control the TV.
Settings General External Device Manager Input Device Manager Try Now
You can connect a keyboard or mouse to make it easier to control the TV.
Connecting a USB keyboard or mouse
Plug the keyboard or mouse cable into the USB port.
" If you connect a mouse, it is available only in the Internet app.
Connecting a Bluetooth keyboard or mouse
Settings General External Device Manager Input Device Manager Bluetooth
Device List
" This function may not be supported depending on the model or geographical area.
" If your device was not detected, position the keyboard close to the TV, and then select Refresh. The TV scans for available
devices again.
" If you connect a mouse, it is available only in the Internet app.
Using the keyboard and mouse
Button Description
Directional keys Moves the focus
Windows key Displays the TV settings
Enter key Selects or runs a focused item
ESC key Returns to the previous screen
F1 / F2 / F3 / F4 key
F5 key Displays the Home Screen
F6 key Displays the Source screen
Color buttons ― / / /
F7 key Displays the Channel List
F8 key Mutes the sound
F9 / F10 key Adjusts the volume
F11 / F12 key Changes the channel
- 45 -
Page 46

Button Description
Page Up / Page Down Scrolls a web page displayed by the Internet app.
Left-click
Right-click
" The key operations may differ on some apps.
Available only in the Internet app. You can click a menu or link to start a function as you do
on a PC.
Available only in the Internet app. You can use the following functions:
" The options displayed in the menu may differ depending on the selected item.
● Open
● Open Link in New Tab
● Enable Scroll Mode
Setting up the input devices
Setting up the keyboard
Settings General External Device Manager Input Device Manager Keyboard
Settings
You can set up the keyboard with the following functions:
● Keyboard Language
● Keyboard Type
Setting up the mouse
Settings General External Device Manager Input Device Manager Mouse
Settings
You can set up the mouse with the following functions:
● Primary Button
● Pointer Speed
- 46 -
Page 47
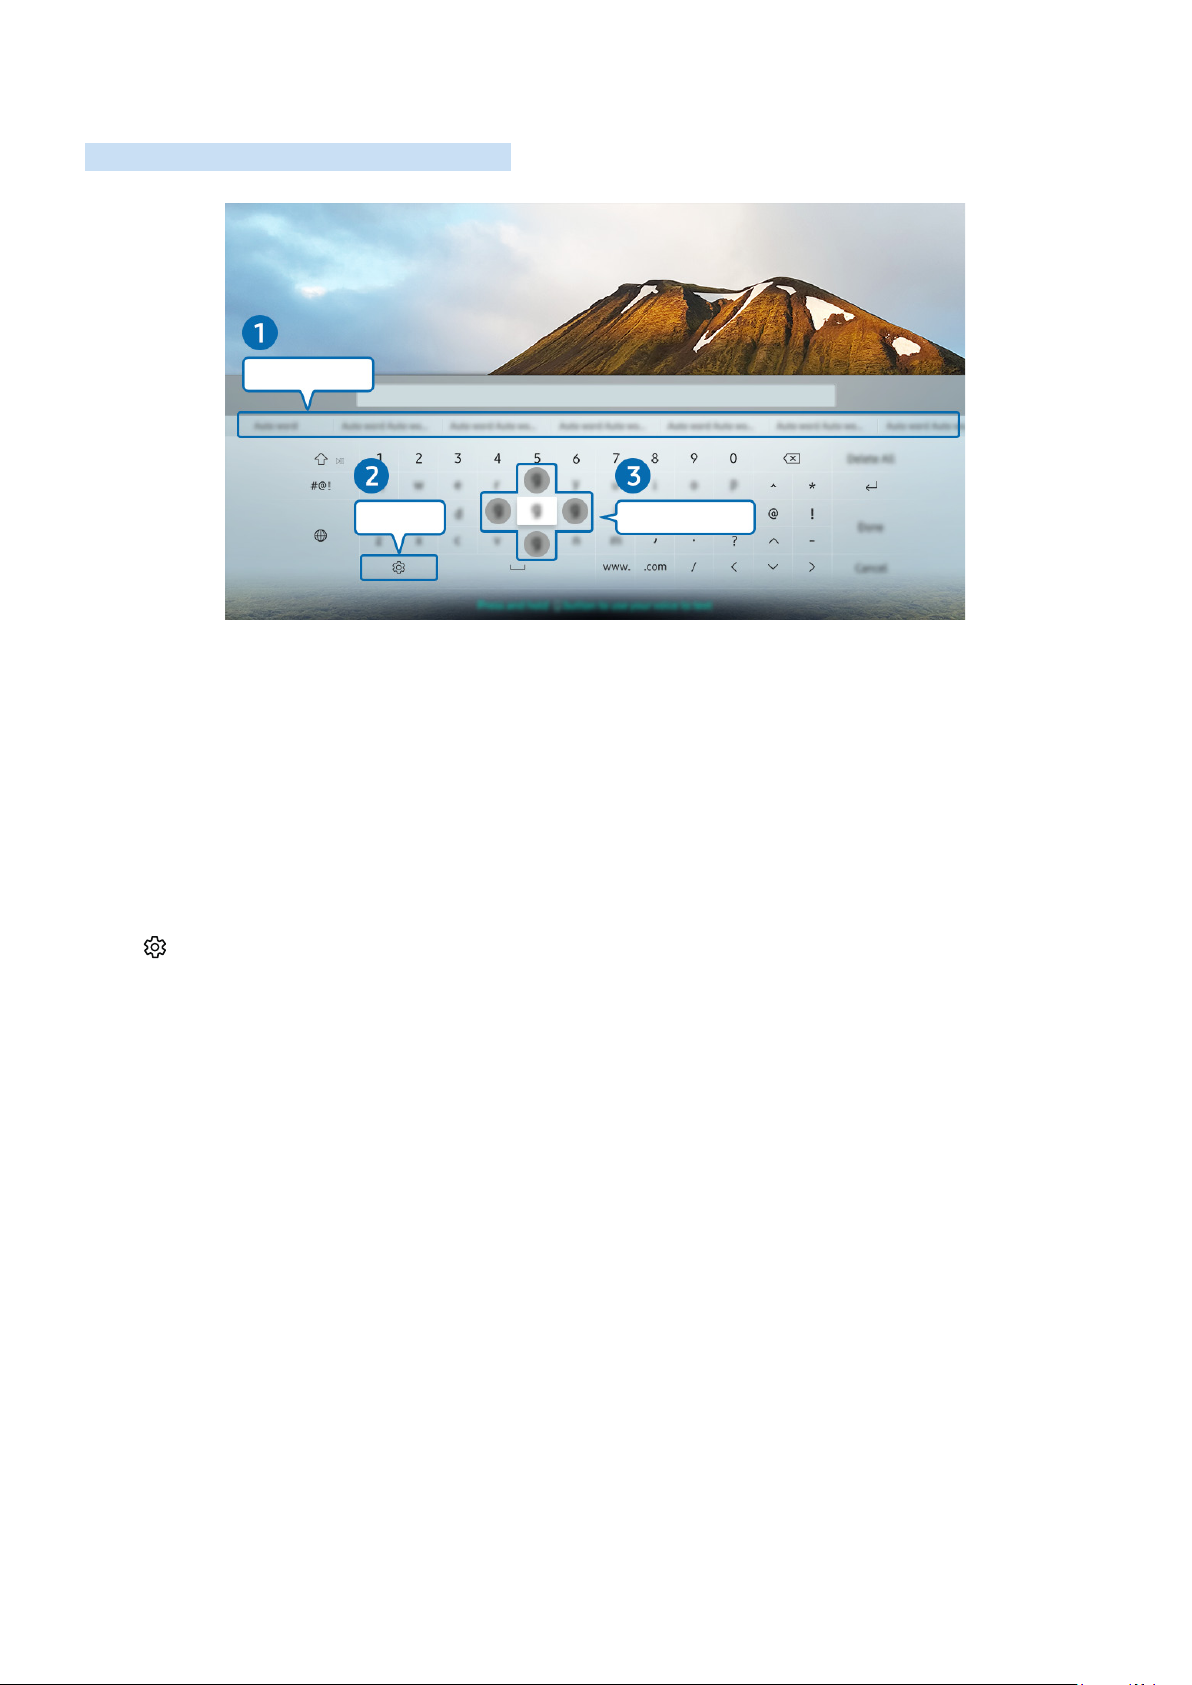
Entering Text using the On-Screen Virtual Keyboard
Use the virtual keyboard to enter text on your TV.
Recommended text
Options Predict Next Character
" The image on your TV may differ from the image above depending on the model and geographical area.
Recommended text
1
When you type a word you want to use as a search term, this function displays related suggestions from which you
can choose one.
Options
2
Select on the virtual keyboard screen. The following options are available:
" The options available may differ depending on the function running currently.
● Recommended text
● Reset Recommended Text Memory
● Predict Next Character (when using direction buttons)
● Language
Predict Next Character
3
Each time you type a character on the virtual keyboard, the next characters predicted to be typed are displayed. You
can use the directional buttons on the remote control to select one.
- 47 -
Page 48

Entering Text using the remote control's microphone and the on-screen virtual keyboard
When the virtual keyboard is on the screen, press and hold the button on the Samsung Smart Remote, speak
into the microphone on the Samsung Smart Remote, and then release the button. What you say appears on the
screen as text.
" This function may not be supported depending on the model or geographical area.
- 48 -
Page 49

Smart Features
You can enjoy various apps with Smart Hub.
Smart Hub
View descriptions of Smart Hub's basic functions.
From Smart Hub, you can use the Internet search function, install and use various apps, view photos and videos, or
listen to music stored on external storage devices, and perform more functions.
" Some Smart Hub services are paid services.
" To use Smart Hub, the TV must be connected to the Internet.
" Some Smart Hub features may not be supported depending on the service provider, language, or geographical area.
" Smart Hub service outages can be caused by disruptions in your Internet service.
" You can view the entire text of the Terms & Policy document by navigating to Settings Support Terms &
Policy. Try Now
" If you want to stop using Smart Hub, you can cancel the agreement. To cancel the Smart Hub service agreement, select
Reset Smart Hub ( Settings Support Self Diagnosis Reset Smart Hub). Note that accepting and
maintaining the Smart Hub service agreement is required if you want to use Smart Hub and other features and functions
on your TV.
- 49 -
Page 50
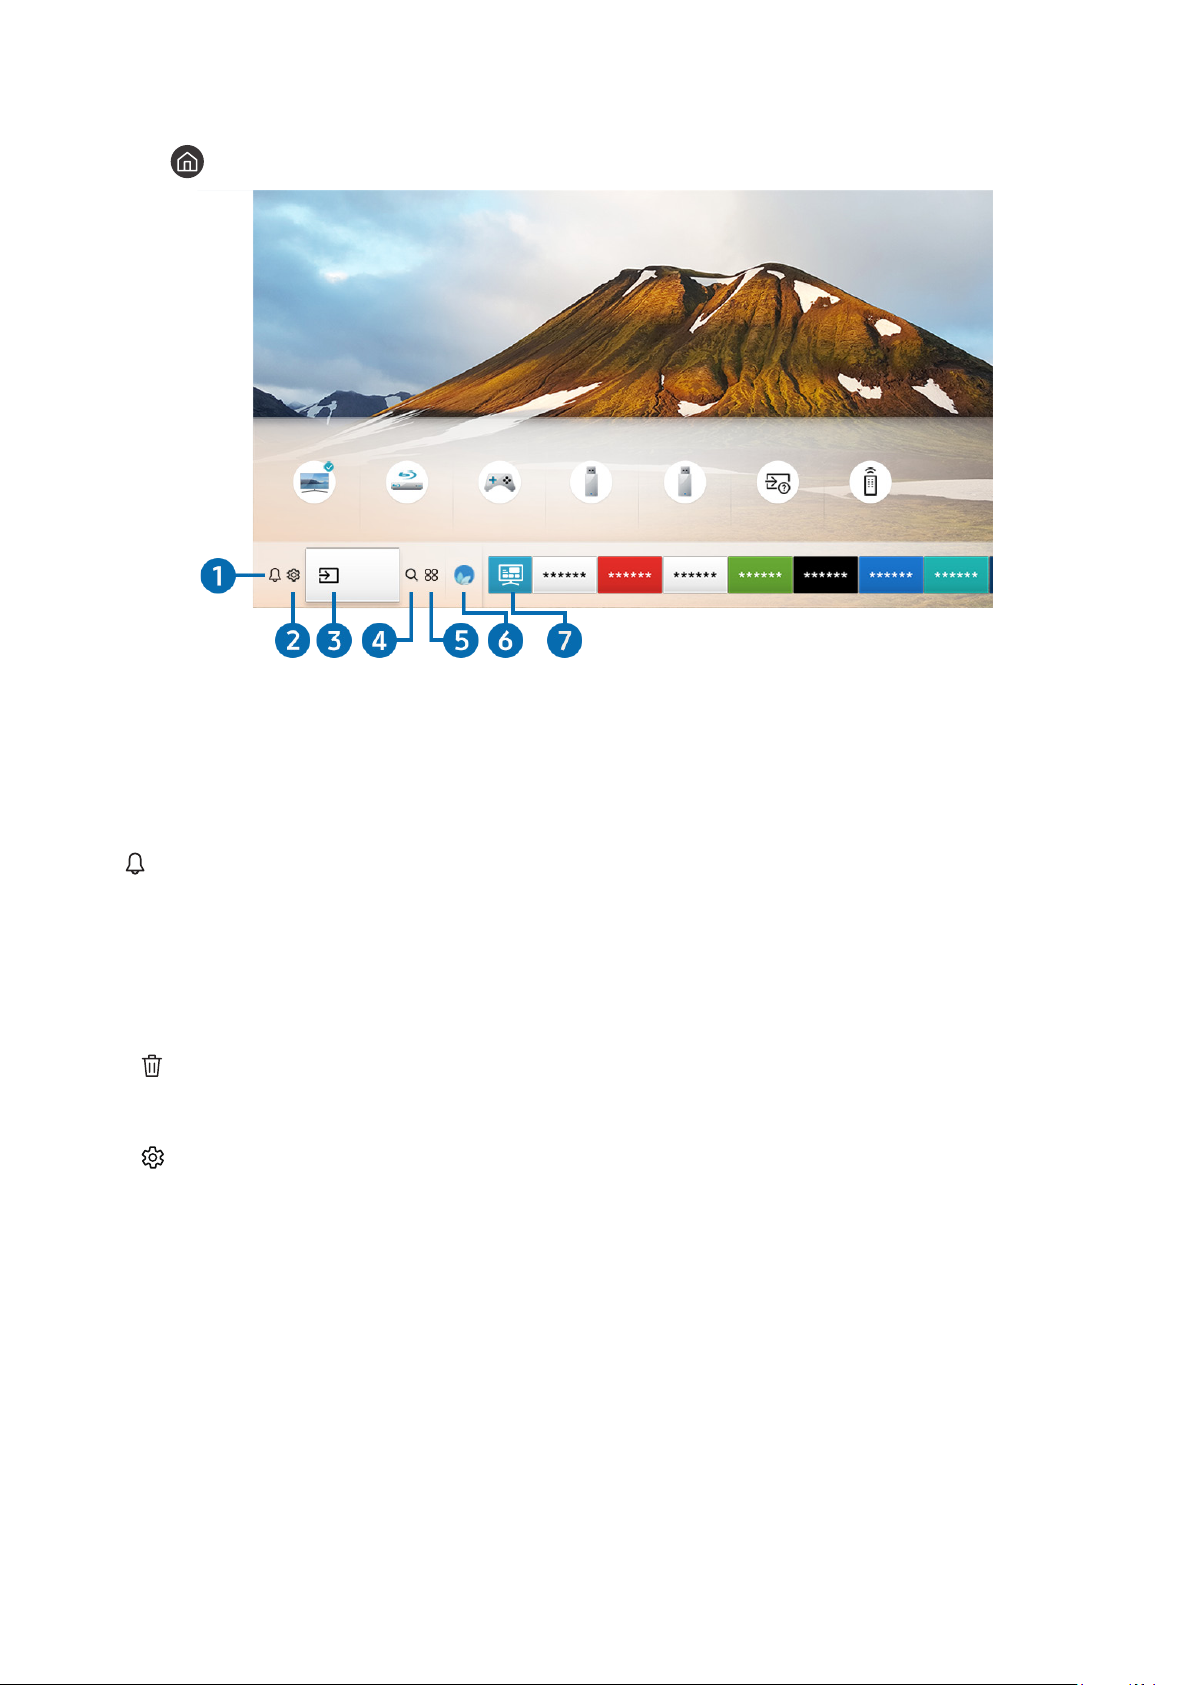
Displaying the Home Screen
Press the button.
Sources
TV HDMI 1 HDMI 2 USB 1 USB 2
Source
Connection
Guide
Universal
Remote
" The image on your TV may differ from the image above depending on the model and geographical area.
On the Home Screen, you can easily run the apps you have used previously or frequently. The apps can also be moved
or deleted from the screen.
Notification
1
You can view a list of notifications for all events that occur on your TV. A notification appears on the screen when it is
time to view a scheduled program or when an event occurs on a registered device.
If you move the focus to Notification, and then press the Select button, a notification window appears on the right
and the following functions are available:
● Delete All
You can delete all your notifications.
● Settings
– You can select services you want to be notified about.
– When you select Allow sound, notifications are displayed with a notification sound.
- 50 -
Page 51

2
Settings
When the focus is moved to the icon, a list of quick settings icons appears above the top of the menu. You can
quickly set frequently used functions by clicking the icons.
● Picture Mode
You can select the picture mode that provides the best viewing experience. To change the picture mode, press
the Select button. To make fine adjustments, press the up directional button, and then select Picture Setup.
● Sound Mode
You can select a sound mode to optimize your listening experience. To change the sound mode, press the
Select button. To make fine adjustments, press the up directional button, and then select Equalizer Setup.
● Sound Output
You can select which speakers the TV uses for audio output. To change the audio output, press the Select
button. To connect to a Bluetooth speaker, press the up directional button, and then select Speaker List.
" Connecting Bluetooth speaker may not be supported depending on the model or geographical area.
● Caption
You can watch TV broadcasts with captions. To activate/deactivate the Caption function, press the Select
button. To run Accessibility Shortcuts, press the up directional button, and then select Accessibility Shortcuts.
● Sleep Timer
You can have the TV automatically turn off at a specific time. To change the sleep time, press the Select
button. To set the specific time at which the TV turns off automatically, press the up directional button, and
then select Set Up Off Timer.
● Network
You can view the current network and Internet status. Press the up directional button, and then select
Network Status or Network Settings.
" Pressing Settings displays all setting menus available.
" This function may not be supported depending on the model or geographical area.
- 51 -
Page 52

3
You can select an external device connected to the TV.
Source
" For more information, refer to "Switching between external devices connected to the TV."
4
You can search the apps or games in Smart Hub services.
5
You can enjoy a wide range of content including news, sports, weather, and games by installing the corresponding
apps on your TV.
6
In Ambient Mode, you can view beautiful screens, various visual information, and notifications.
To enter Ambient Mode, press the button. To return to the TV mode, press the or button. To shut off the
TV, press the button.
If you press the button when the TV is turned off, the TV turns on in Ambient Mode.
Search
" To use this feature, the TV must be connected to the Internet.
APPS
" To use this feature, the TV must be connected to the Internet.
" For more information, refer to "Using the APPS Service."
Ambient Mode
" If you use a remote control other than the Samsung TV remote control, there may be restrictions to entering Ambient
Mode.
" Because this function is a QLED TV-specific function, it may not be supported depending on the model.
" For more information about the Ambient Mode, refer to "Using the Ambient Mode."
7
Universal Guide is an app that allows you to search for and enjoy various content such as TV shows, dramas, movies,
and music in one place. Universal Guide can recommend content tailored to your preferences and notify you of new
drama series.
Universal Guide
" For more information about the Universal Guide, refer to "Using the Universal Guide App."
" Images may look blurry depending on the service provider's circumstances.
" This function may not be supported depending on the model or geographical area.
- 52 -
Page 53
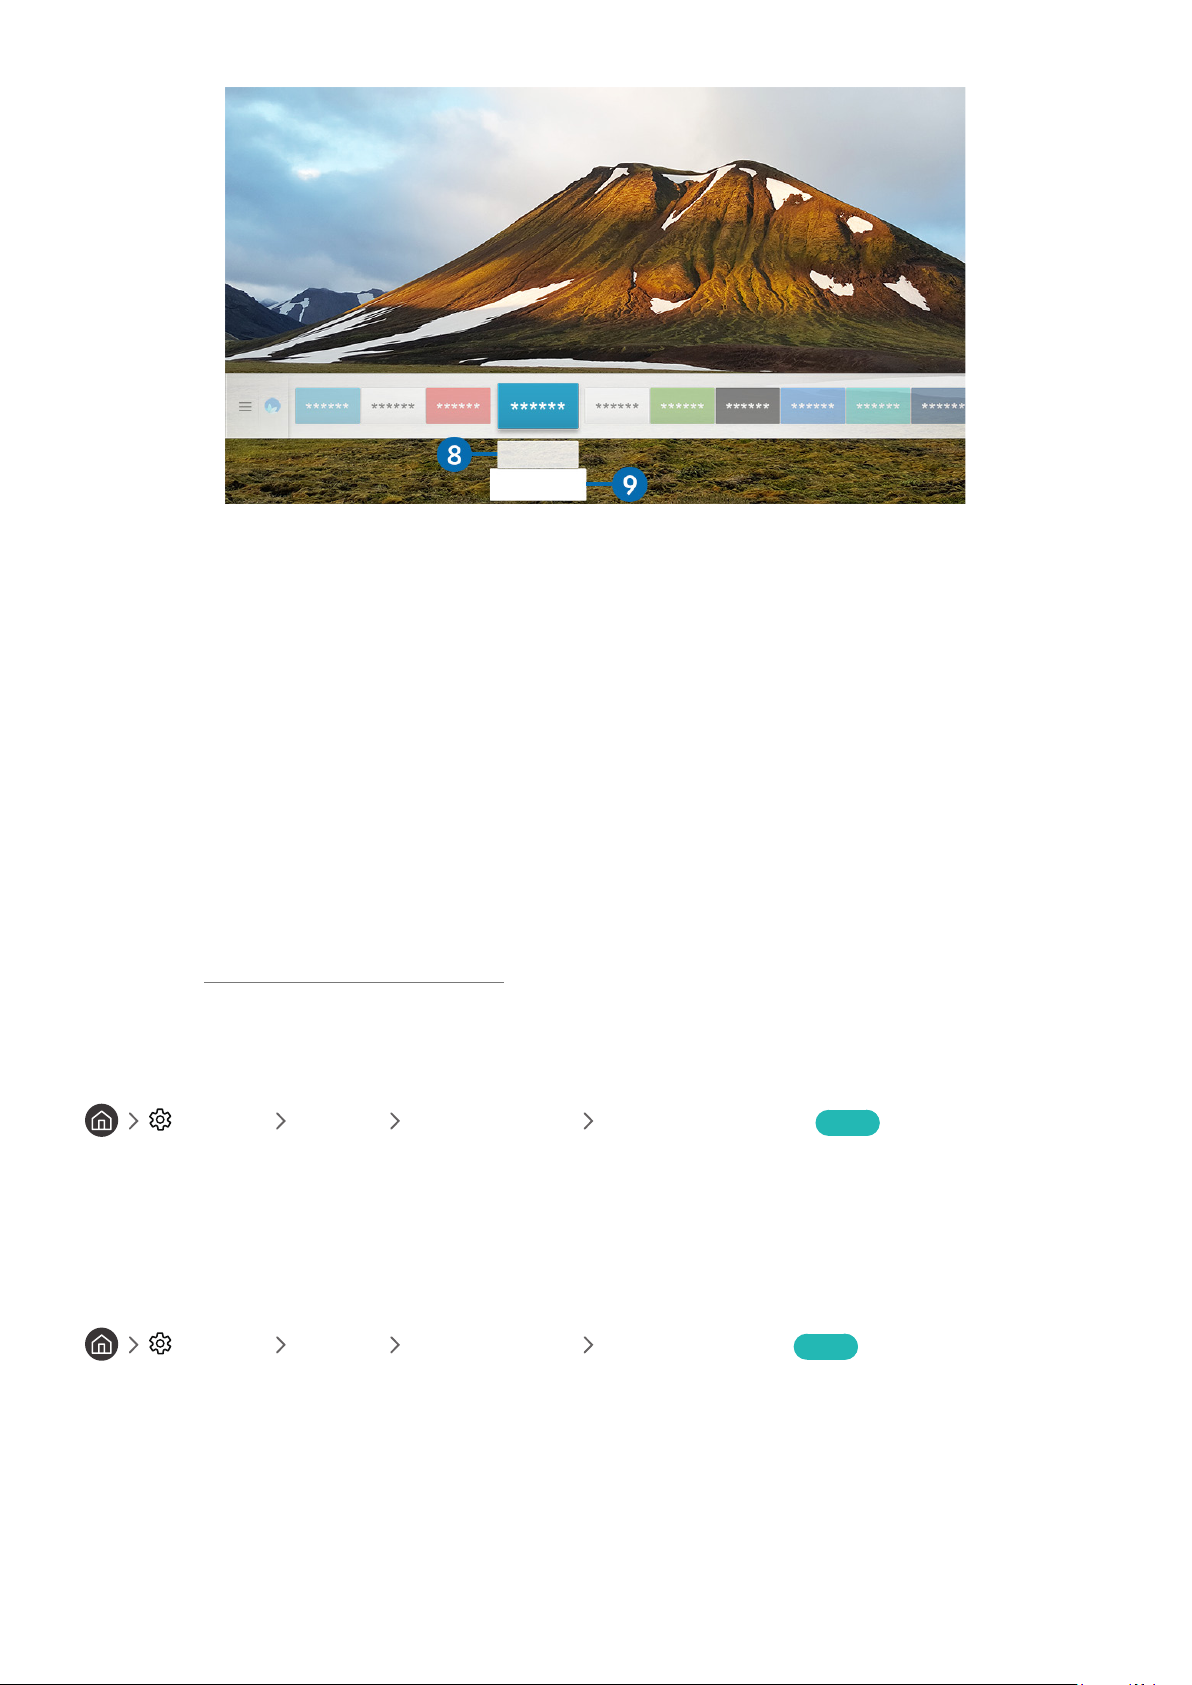
Move
Remove
" The image on your TV may differ from the image above depending on the model and geographical area.
Moving an item on the Home Screen
8
Move the focus to the app you want to move, press the down directional button on the remote control, and then
select Move. Move the app to the desired position by pressing the left or right directional button, and then press the
Select button. The selected app is moved on the Home screen.
Removing an item on the Home Screen
9
Move the focus to the app you want to delete, press the down directional button on the remote control, and then
select Remove. The selected app is deleted.
" You can add the apps you want to use often to the Home Screen using APPS. To add your favorite apps to the Home Screen,
refer to "Managing purchased or installed apps."
Launching Smart Hub automatically
Settings General Smart Features Autorun Smart Hub Try Now
When you set Autorun Smart Hub to On, the TV displays the Home Screen automatically when you turn the TV on.
You can also turn this function on or off: press the Select button at the current menu.
Launching the last used app automatically
Settings General Smart Features Autorun Last App Try Now
If Autorun Last App is set to On, the last used app is automatically run when you turn on the TV. You can also turn
this function on or off: press the Select button at the current menu.
" This function may not be supported depending on the app.
- 53 -
Page 54

Testing Smart Hub connections
Settings Support Self Diagnosis Start Smart Hub Connection Test Try Now
Resetting Smart Hub
Settings Support Self Diagnosis Reset Smart Hub Try Now
" You can reset the Smart Hub settings. To reset Smart Hub, enter the PIN. The default PIN is "0000." You can set the PIN in
Settings General System Manager Change PIN.
Using a Samsung account
Create and manage your own Samsung account.
Settings General System Manager Samsung Account Try Now
Creating and managing your Samsung account
" You can view the entire text of the Terms & Policy in Settings General System Manager Samsung
Account My Account Terms & Conditions, Privacy Policy after logging in to your Samsung account.
" You can also create a Samsung account at http://account.samsung.com. Once you have an account, you can use the same
ID on both the TV and the Samsung website.
" Add Account appears or not, depending on whether you are logged in to your Samsung account.
Creating a new account
Settings General System Manager Samsung Account (Add Account) Create
Account
To create a new Samsung account, follow the instructions on the screen.
" For more information about the terms, select View Details.
" To protect personal information, select Profile image selection and password entry (High security) in the field below the
password entry bar.
" If you want the TV to log you into your account automatically whenever you turn on the TV, click Sign me in automatically.
- 54 -
Page 55

Creating a Samsung account using a Facebook account
Settings General System Manager Samsung Account (Add Account) Create
with Facebook
Creating a Samsung account using a PayPal account
Settings General System Manager Samsung Account (Add Account) Create
with PayPal
Signing in to a Samsung account
Settings General System Manager Samsung Account Sign In
Changing and adding information to a Samsung account
Settings General System Manager Samsung Account My Account Edit
profile
" To change the account information, you must be logged in to your Samsung account.
Managing payment information saved on the TV
Settings General System Manager Samsung Account My Account Payment
Info
" To manage the payment information, you must be logged in to your Samsung account.
- 55 -
Page 56

Configure the sync Internet settings
Settings General System Manager Samsung Account My Account Sync
Samsung Internet
Once you sign in to your Samsung account and configure the sync Internet settings, you can share the favorites that
you registered on other devices.
" To configure the sync Internet settings, you must be logged in to your Samsung account.
Deleting a Samsung account from the TV
Settings General System Manager Samsung Account My Account Remove
Account
" To remove account information, you must be logged in to your Samsung account.
" Although you have deleted your Samsung account, you are not unsubscribed. To unsubscribe from your Samsung Account,
visit the Samsung Accounts website (http://account.samsung.com).
Signing out of your Samsung account
To sign out of your Samsung account, move the focus to your account at Settings General System
Manager Samsung Account, and then press the Select button. Or move to My Account ( Settings
General System Manager Samsung Account My Account), and then select Sign Out.
Viewing the user agreement and privacy policy
Settings General System Manager Samsung Account My Account Terms &
Conditions, Privacy Policy
" To view the user agreement and privacy policy, you must be logged in to your Samsung account.
- 56 -
Page 57
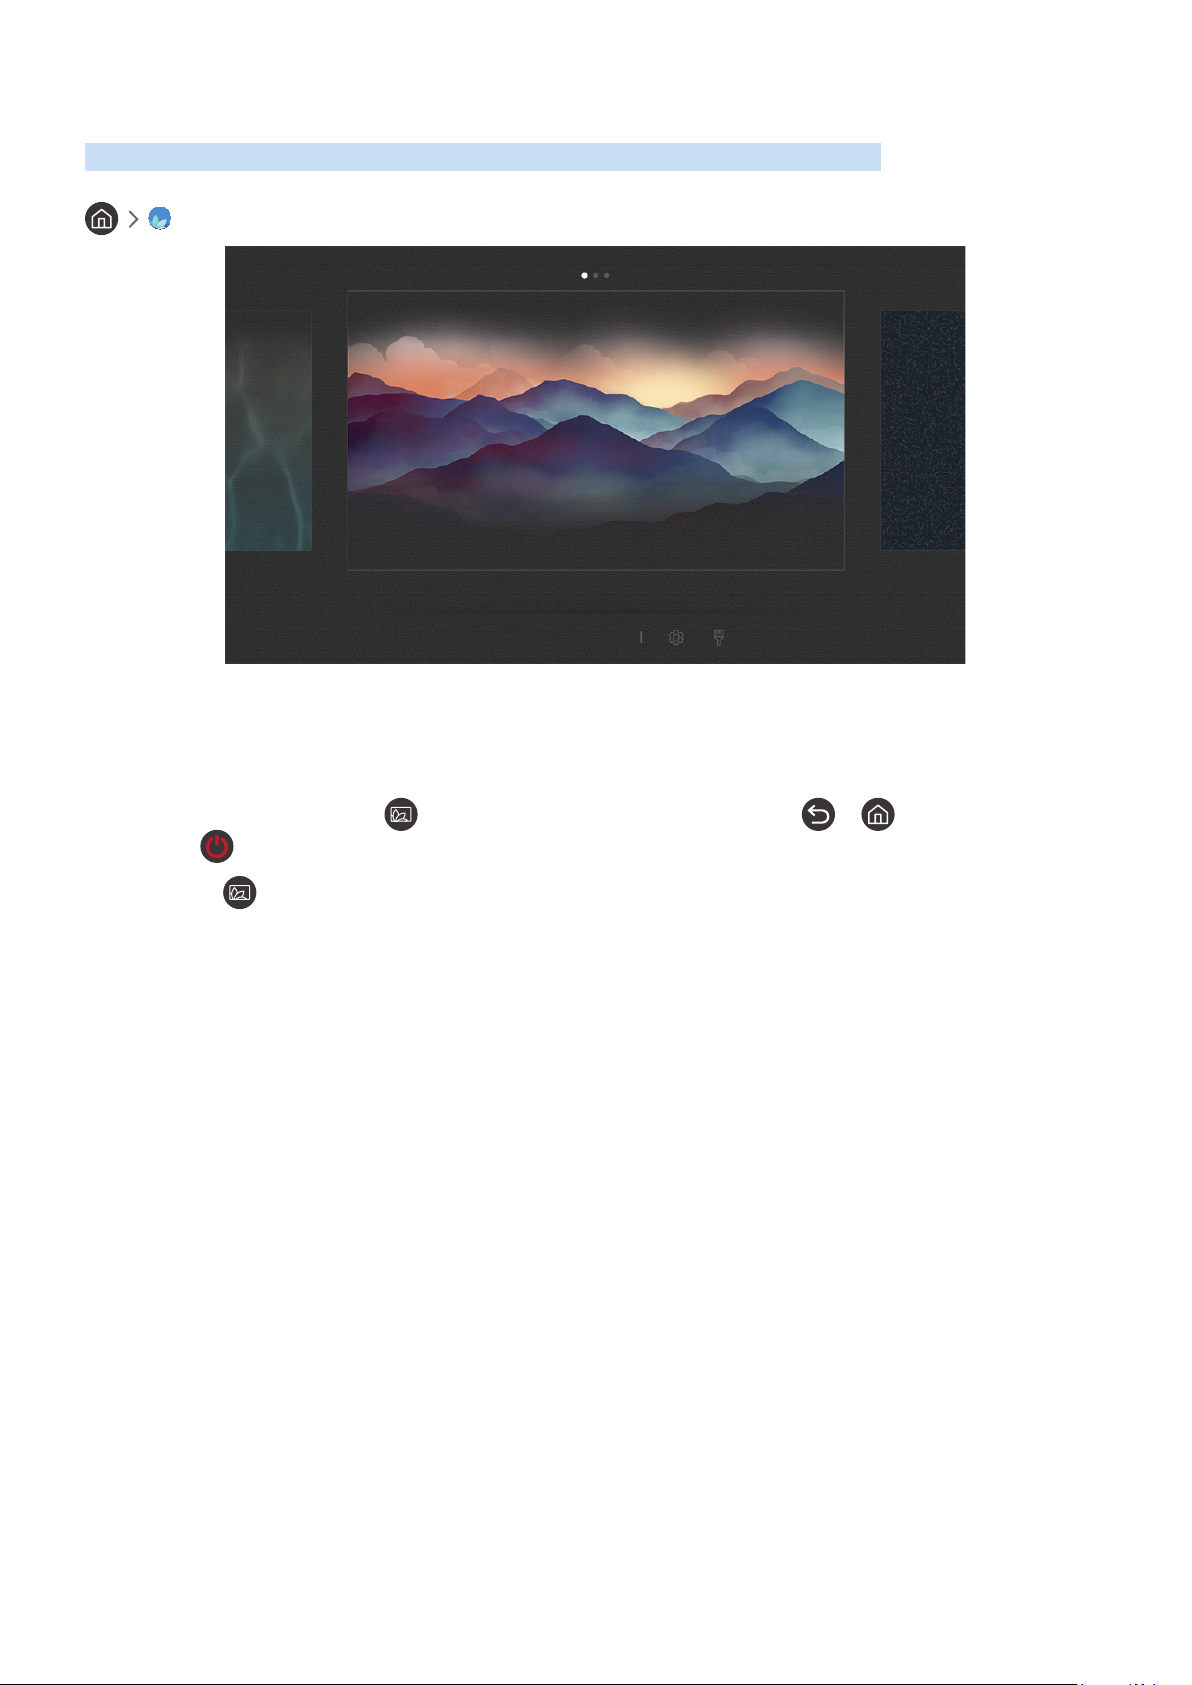
Using the Ambient Mode
Learn about the functions available in Ambient Mode, which is a QLED TV-specific function.
Ambient Mode
Décor Info Photo
" The image on your TV may differ from the image above depending on the model and geographical area.
In Ambient Mode, you can view beautiful screens, various visual information, and notifications.
To enter Ambient Mode, press the button. To return to the TV mode, press the or button. To shut off the
TV, press the button.
If you press the button when the TV is turned off, the TV turns on in Ambient Mode.
" If you use a remote control other than the Samsung TV remote control, there may be restrictions to entering Ambient
Mode.
" Because this function is a QLED TV-specific function, it may not be supported depending on the model.
- 57 -
Page 58

Screen states related to Ambient Mode
● Ambient Mode
In Ambient Mode, you can set up and enjoy visual information and design. In this state, less power is
consumed and brightness is automatically adjusted by the illuminance sensor.
● Getting dark state
In Ambient Mode, the TV screen changes automatically according to the surroundings. When the surroundings
get dark, the TV screen becomes darker. When the surroundings get bright before the TV screen turns
completely black or when the remote control or the Bixby function is operated, the TV screen returns to
Ambient Mode.
" You can change the auto brightness setting for Ambient Mode. For more information, refer to "Setting up the Ambient
Mode details."
" In this state, the TV can activate voice guides and process voice commands.
● Black screen state
In Ambient Mode, if the surroundings get to a specific level of darkness or there is no external operation, the
TV turns soft-off. Then, when the surroundings get bright, the TV screen returns to the Ambient Mode.
" You can change the auto brightness setting for Ambient Mode. For more information, refer to "Setting up the Ambient
Mode details."
" In this state, the TV cannot activate voice guides and process voice commands.
● TV off state
To enter Ambient Mode when the TV is turned off, press the button on the remote control. To enter TV
mode when the TV is turned off, press the button. In TV mode, you can watch broadcasts or enjoy the
content on the external connected devices.
- 58 -
Page 59

Changing the content and settings for Ambient Mode
When you press the button in Ambient Mode, the Ambient Mode browser screen appears. In the Ambient Mode
browser screen, you can select content and change the Ambient Mode settings.
Setting up the content for Ambient Mode
The Ambient Mode browser screen displays content at the top and categories at the bottom. Use the left or right
directional buttons in the content list at the top to move the focus to content you want, and then press the Select
button. The selected content is played in Ambient Mode.
In the future, more content that you can set up in the Ambient Mode browser will be provided.
You can select the following categories and content:
● Décor: Allows you to select beautiful screens.
● Info: Provides information such as weather, news headlines, and more.
" This function may not be supported depending on the geographical area.
● Photo: Allows you to set a picture stored in your mobile device as the wallpaper of the Ambient Mode screen.
You can configure special layouts using your photos.
" To save photos from your mobile device to the TV and import them in Ambient Mode, use the SmartThings app on
your mobile device.
- 59 -
Page 60

Setting up the Ambient Mode details
In the Ambient Mode browser screen, move the focus to , and then press the Select button. You can change the
following settings:
● Brightness: Adjusts the screen brightness for Ambient Mode.
● Color Tone: Adjusts the colors of the screen for Ambient Mode.
● Auto Brightness: Changes the auto brightness setting for Ambient Mode.
" When this function is set to Off, the brightness level of the TV screen is not automatically adjusted according to the
ambient light level.
● Ambient Off Timer: Sets the time that the Ambient Mode screen turns off automatically.
" If there is no remote control input for the set time, the TV switches to the black screen state.
Changing the background color of Ambient Mode
To change the background color of Ambient Mode, move the focus to in the Ambient Mode browser screen, and
then press the Select button. You can change the background color or pattern. Move the focus to a color or pattern
you want, and then press the Select button.
" Take a picture of a wall using the SmartThings app on your mobile device to set it as the background of Ambient Mode.
This function may have a delay in image transmission and optimization depending on the network conditions.
- 60 -
Page 61
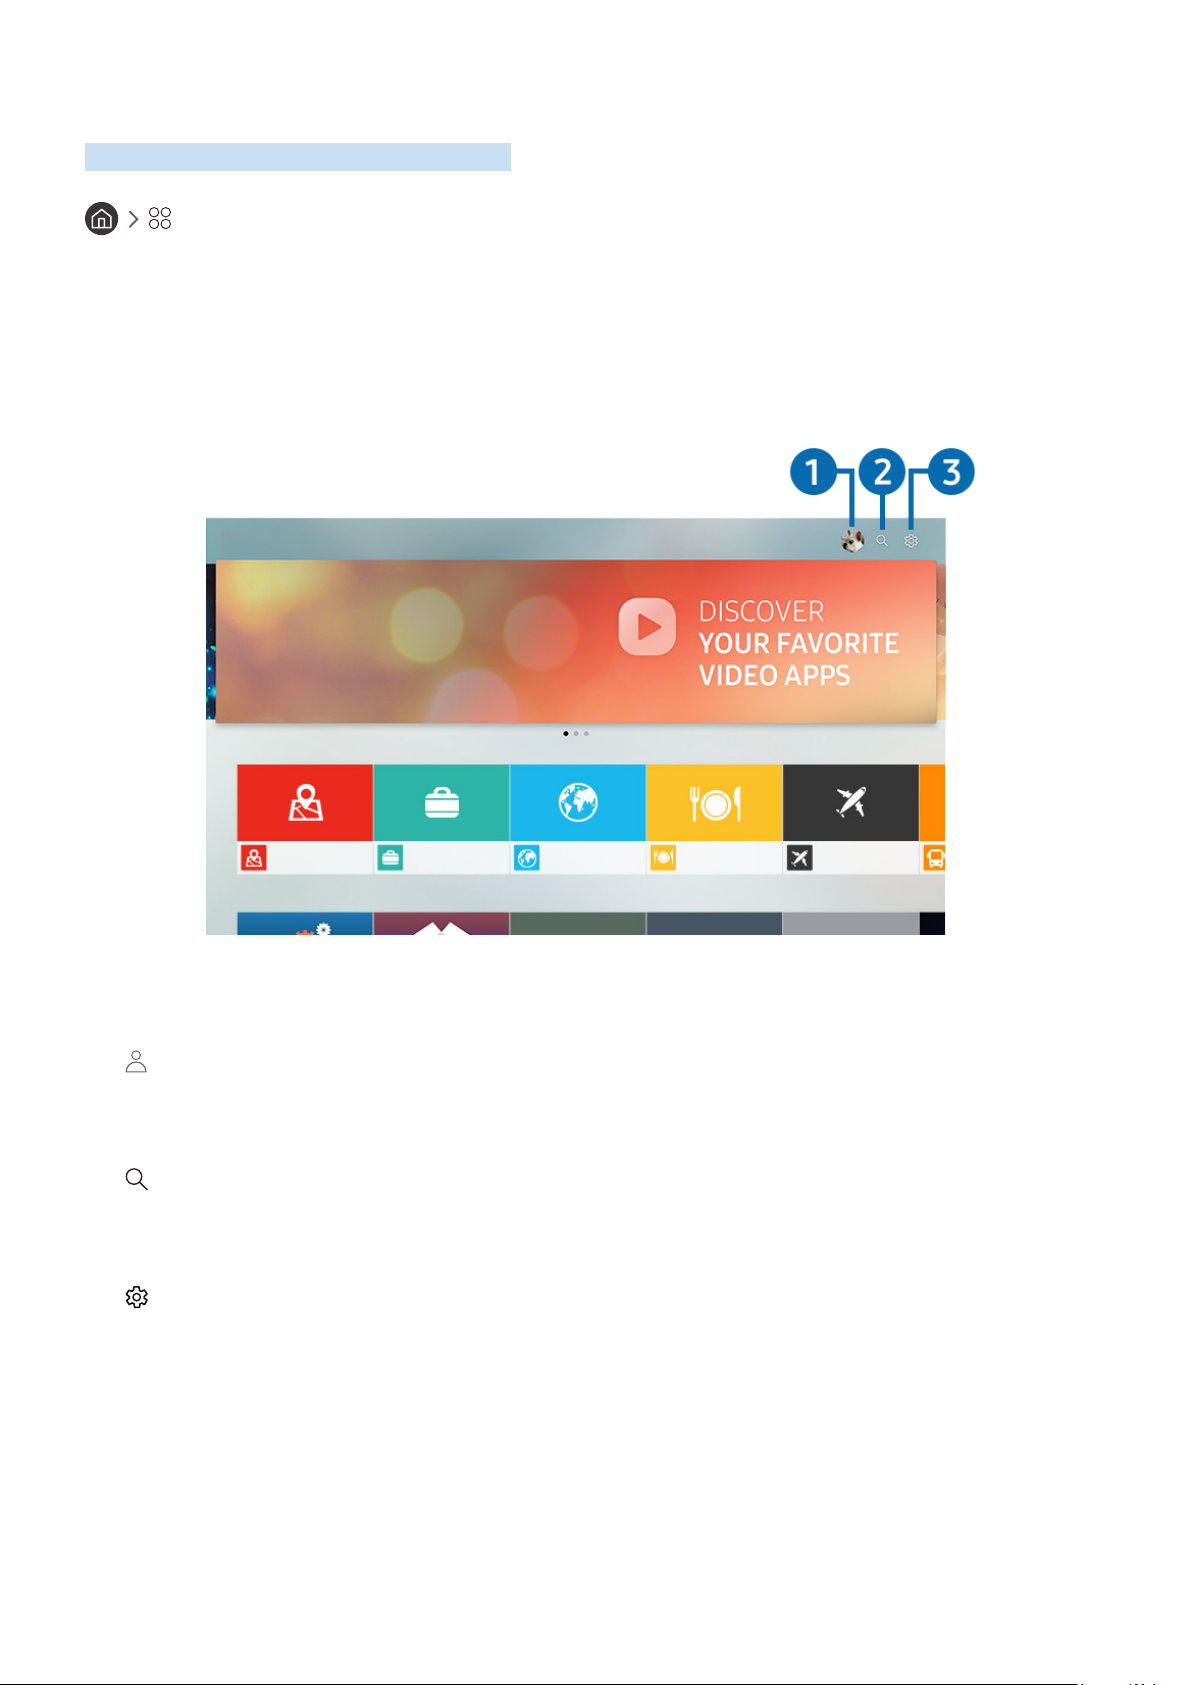
Using the APPS Service
Download and run various apps from Smart Hub.
APPS
You can enjoy a wide range of content including news, sports, weather, and games by installing the corresponding
apps on your TV.
" To use this feature, the TV must be connected to the Internet.
" When Smart Hub is launched for the first time, the default apps are automatically installed. The default apps may differ
depending on the geographical area.
APPS
Editor's Choice
Most Popular
" The image on your TV may differ from the image above depending on the model and geographical area.
1
Go to the Samsung Account screen to create a new account or sign in to your account.
2
You can search for available apps.
3
Sign In
App Search
Settings
You can manage the installed apps.
- 61 -
Page 62

Installing and running an app
Installing an app
Move to the app you want to install, and then press the Select button. The detailed information screen appears.
1.
Select Install. When the installation is complete, the Open menu appears.
2.
Select Open to run the app immediately.
3.
" You can view installed apps on the Settings screen.
" If the TV's internal memory is insufficient, you can install some specific apps on a USB device.
" You can run an app installed on a USB device only when the USB device is connected to the TV. If the USB device is
disconnected while an app is running, the app is terminated.
" You cannot run an app installed on a USB device on a PC or another TV.
Launching an app
You can run the app desired from Downloaded App.
The icons below appear within the selected app's icon and indicate the following:
● : The app is installed on a USB device.
● : The app has a password.
● : The app needs to be updated.
● : The app supports the mirroring function.
- 62 -
Page 63
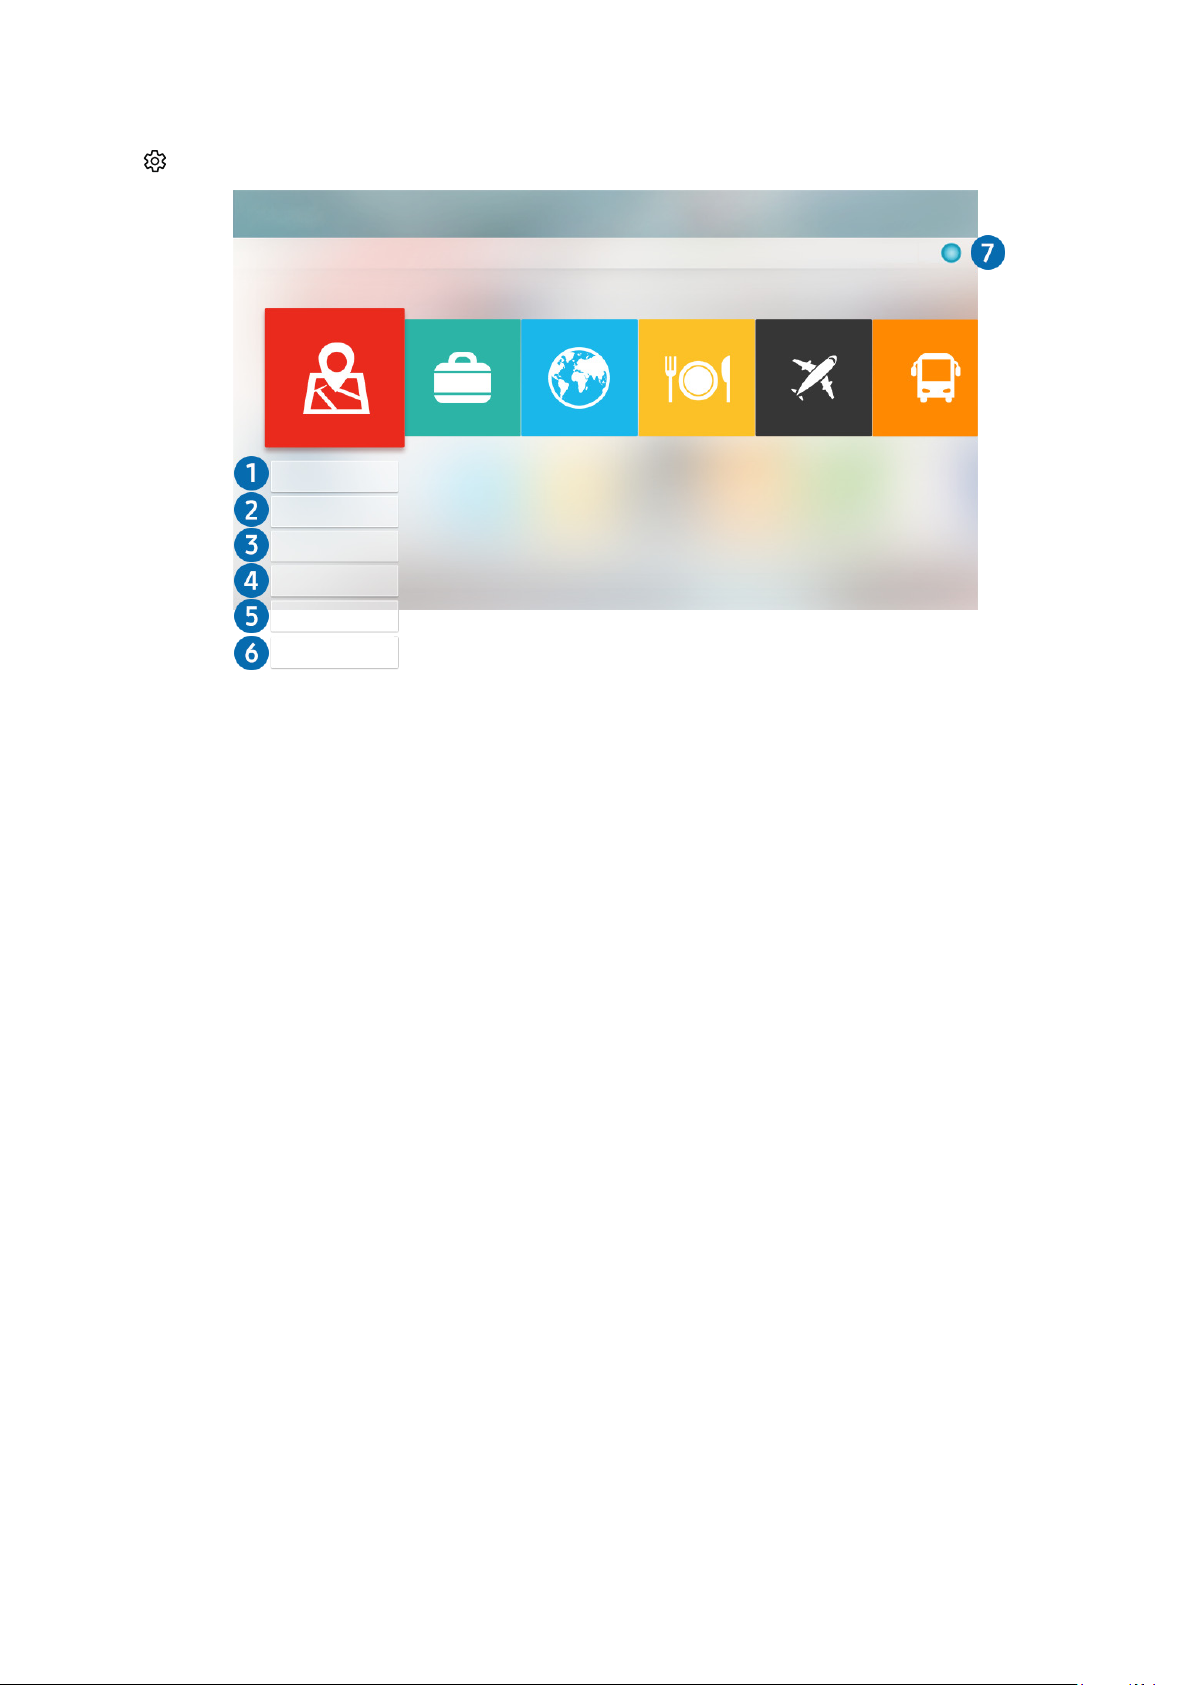
Managing purchased or installed apps
Select Settings on APPS. You can manage installed apps.
Settings
Delete
Add to Home
Lock/Unlock
Move
Reinstall
View Details
Auto Update : ON
" The image on your TV may differ from the image above depending on the model and geographical area.
Removing an app
1
Select an app to delete.
1.
Select Delete.
2.
The selected app is deleted.
" Ensure that the related app data is also removed when you remove an app.
Adding apps to the Home Screen
2
Select an app to add.
1.
Select Add to Home.
2.
After the Home screen appears, move the selected app to the desired location.
3.
Press the Select button.
4.
The selected app is added to the Home Screen.
- 63 -
Page 64

Locking and unlocking apps
3
Select an app to lock or unlock.
1.
Select Lock/Unlock.
2.
The selected app is locked or unlocked.
" To lock or unlock an app, enter the PIN. The default PIN is "0000." You can set the PIN in Settings General
System Manager Change PIN.
Moving apps
4
Select an app to move.
1.
Select Move.
2.
Move the app to the desired location.
3.
Press the Select button.
4.
The selected app is moved.
" This function may not be supported depending on the model or geographical area.
Reinstalling an app
5
Select the app to install again.
1.
Select Reinstall.
2.
Reinstallation starts.
Checking the app information details
6
Select the app to check.
1.
Select View Details.
2.
The app information screen appears.
Automatically updating apps
7
Installed apps can be automatically updated. If you do not want apps automatically updated, set Auto Update to OFF.
" Automatic update is enabled only when the TV is connected to the Internet.
Rating apps
You can rate an app on the detailed information screen using the left or right directional button on the remote.
- 64 -
Page 65

Using the Gallery App
View photos and videos synchronized with the Samsung Cloud.
Gallery
Gallery
" The image on your TV may differ from the image above depending on the model and geographical area.
You can enjoy various content synchronized with a mobile device that supports the Samsung cloud. The available
content types are photos, videos, stories, and other content shared through your groups.
If you have shared content from your groups, you can access them in notifications.
View: Daily
" To use the Gallery app, you must be signed in to your Samsung account.
1
Move to at the top left of the screen using the directional buttons on the remote control to view by category the
content synchronized with the Samsung Cloud.
2
Sort the content by day or month.
3
Go to the Samsung Account screen to create a new account or sign in to your account.
4
Restrict access to the Gallery app to protect your privacy, or view the user agreement and privacy policy.
Open category
View: Daily / View: Monthly
Sign In
Gallery Settings
- 65 -
Page 66
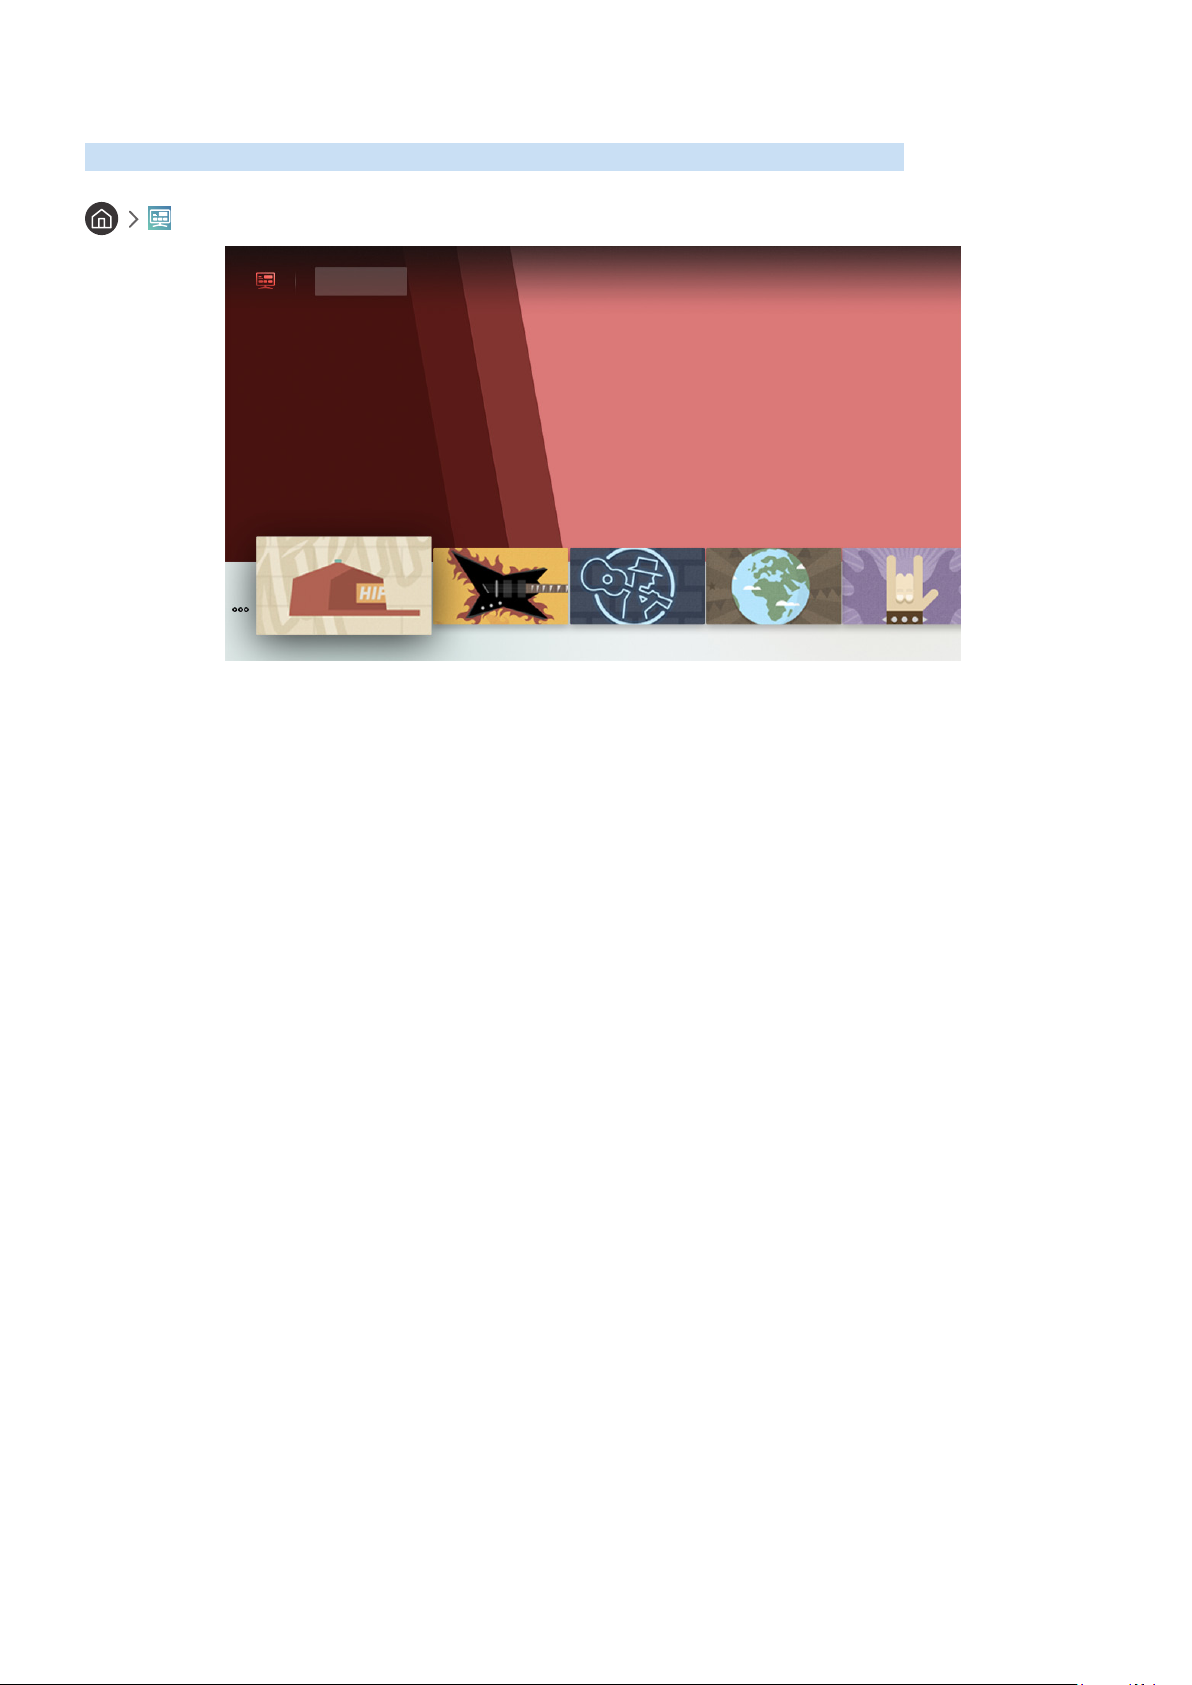
Using the Universal Guide App
Search for and enjoy content such as TV shows, dramas, movies, sports broadcasts, and music.
Universal Guide
For You TV Shows Movies Sports Music
On Now
" The image on your TV may differ from the image above depending on the model and geographical area.
Universal Guide is an app that allows you to search for and enjoy various content such as TV shows, dramas, movies,
and music in one place. Universal Guide can recommend content tailored to your preferences and notify you of new
drama series.
You can use this feature on your mobile with Samsung SmartThings app.
" To enjoy the content from these apps on your TV, they must be installed on the TV.
" When you watch some paid content, you may need to make a payment using their associated app.
" Images may look blurry depending on the service provider's circumstances.
" This function may not be supported depending on the model or geographical area.
- 66 -
Page 67
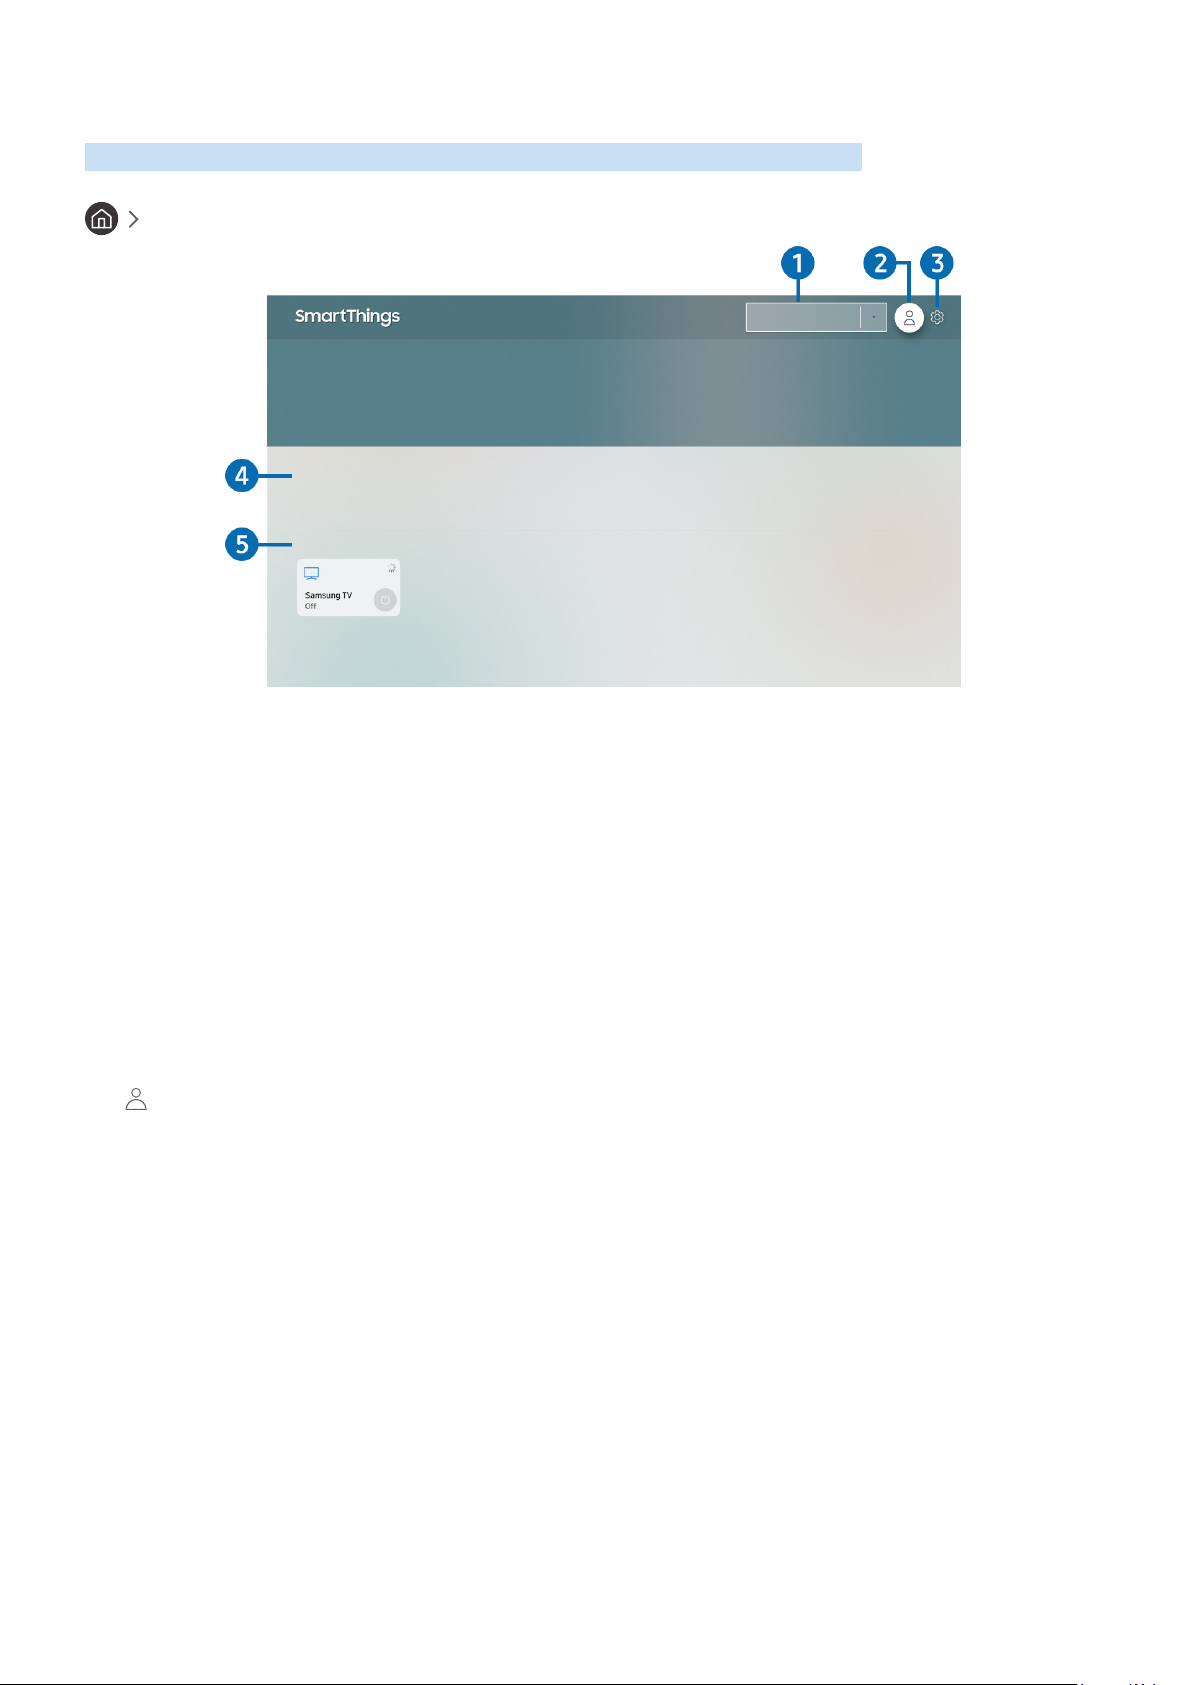
Using the SmartThings App
Monitor and configure the smart devices you have connected to the SmartThings service.
SmartThings
All Devices
Set Your Scene
Devices
" The image on your TV may differ from the image above depending on the model and geographical area.
From your TV, you can monitor and configure smart devices you connected to the SmartThings service via the
SmartThings app installed on them. You can receive notifications about the statuses of your smart devices.
" To use this function, you must be logged in to your Samsung account.
" This function may not be supported depending on the model or geographical area.
Location selection list
1
Press the Select button to identify all connected devices or the devices specific to a location.
2
Go to the Samsung Account screen to create a new account or sign in to your account.
Sign In
- 67 -
Page 68

3
Turn notifications on or off for the connected smart devices.
4
Create a custom mode to easily control multiple devices with a single command.
5
View a list of the connected smart devices and their statuses.
You can add a new device through the SmartThings app on your mobile phone. Please refer to the user guide of the
SmartThings app for more details.
Settings
Set Your Scene
Device list
Using the e-Manual
Control and read the manual embedded in your TV.
Launching the e-Manual
Settings Support Open e-Manual
You can view the embedded e-Manual that contains information about your TV's key features.
" Alternatively, you can download a copy of the e-Manual from Samsung's website.
" Words in blue (e.g., Picture Mode) indicate a menu item.
- 68 -
Page 69

Using the buttons in the e-Manual
● (Search): Select an item from the search results to load the corresponding page.
● (Index): Select a keyword to navigate to the relevant page.
● (Recently Viewed Topics): Select a topic from the list of recently viewed topics.
● (Try Now): Allows you to access the corresponding menu item and try out the feature right away.
● (Link): Access an underlined topic referred to on an e-Manual page immediately.
" Some menu screens cannot be accessed from the e-Manual.
Using the Internet
Surf the Internet on your TV.
Internet
When you run Internet, you can see recently viewed web sites or featured recommendations. When you select a
desired web site, you can get immediate access to it.
" You can use the Internet function more easily after connecting a keyboard and mouse.
" You can scroll web pages with the Directional Pad.
" The web pages may differ from those on a PC.
" For more information about the Internet function, refer to "Read Before Using the Internet Function."
- 69 -
Page 70
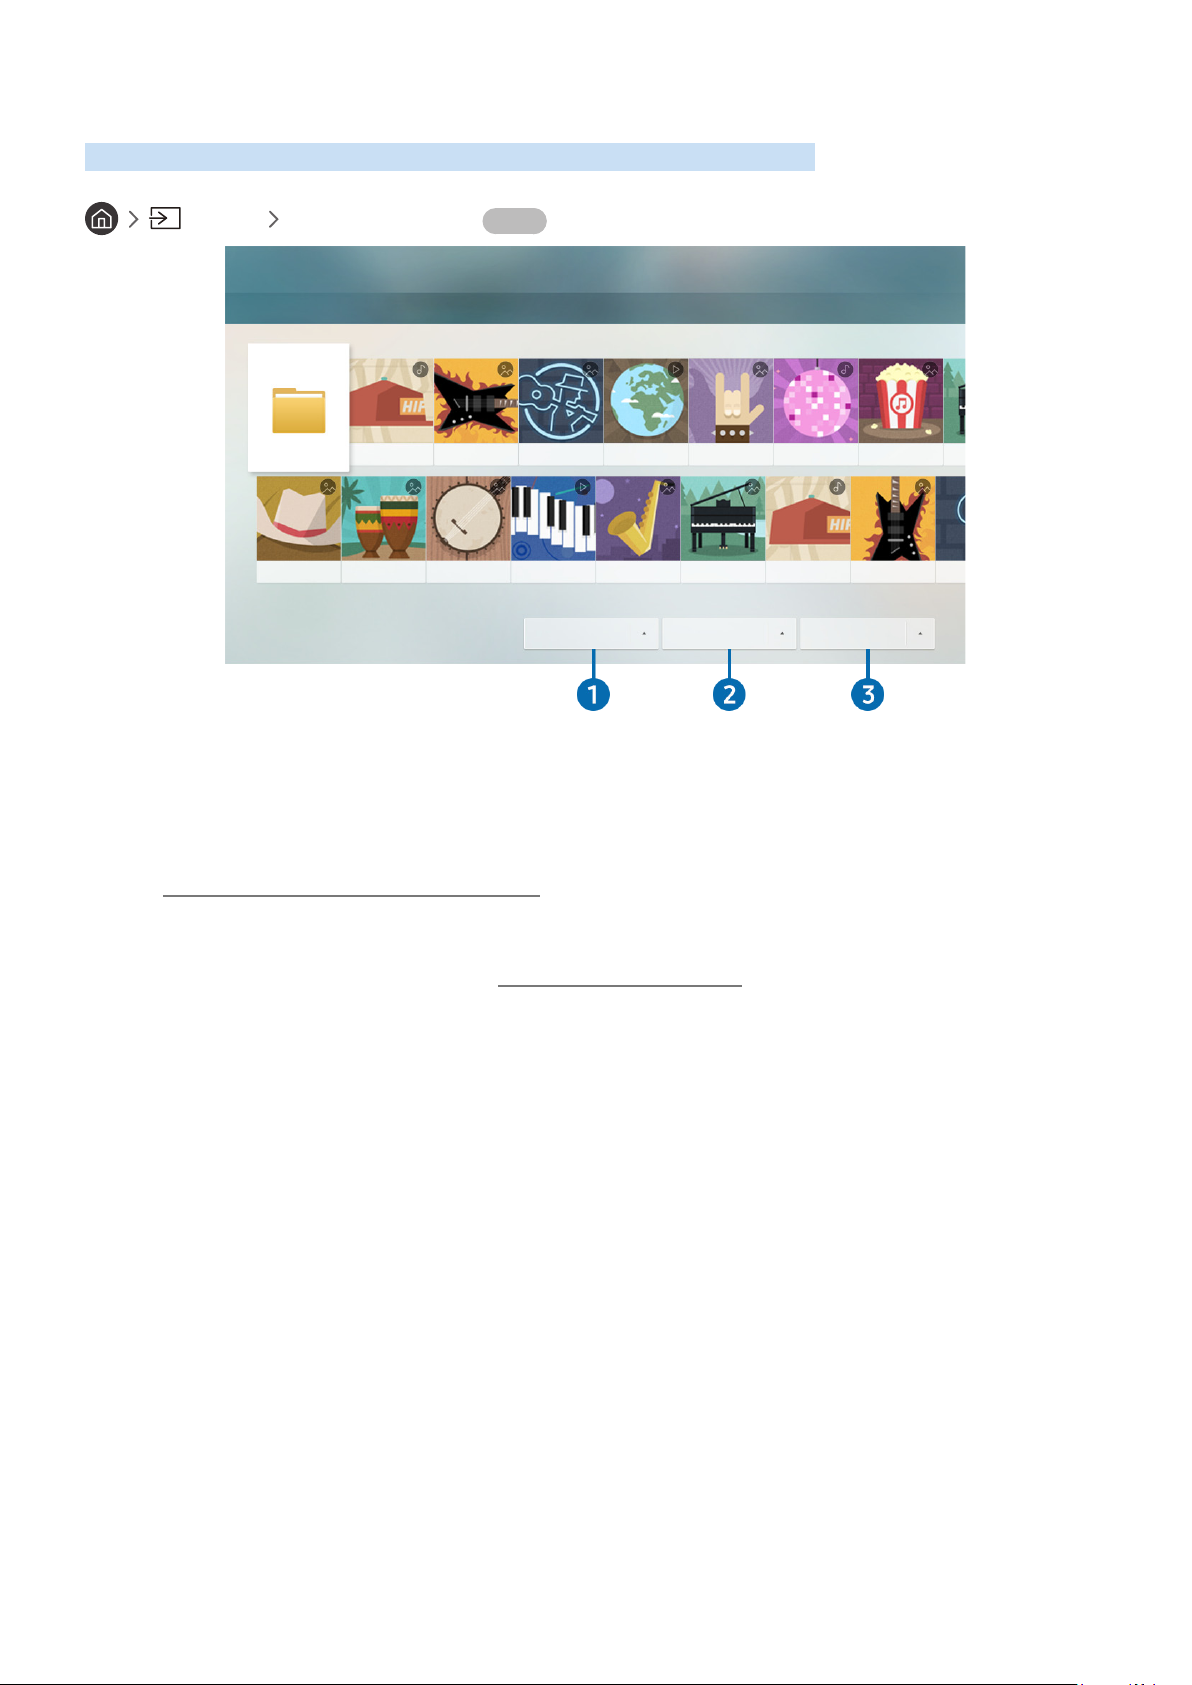
Playing pictures/video/music
Play media content stored on your TV, USB devices, smartphones, cameras, PCs, etc.
Source Connected Device Try Now
Samsung USB
Samsung USB
Filter By : All Sort By : Title Options
" The image on your TV may differ from the image above depending on the model and geographical area.
You can play media content saved on storage devices, such as USB devices, mobile devices, and cameras on the TV.
" You cannot play media content if the content or the storage device is not supported by the TV. For more information, refer
to "Read Before Playing Photo, Video, or Music Files."
" Backup important files before connecting a USB device. Samsung is not responsible for damaged or lost files.
" To connect the TV to a mobile device, refer to "Connecting Your Mobile Device."
You can use the following functions on the media content list screen of a storage device.
Filter By
1
Filters the media content by type of media. (music, photo, video, recorded contents, etc.)
- 70 -
Page 71

Sort By
2
Sorts the content list by title or date.
" This function may not be supported depending on the type of external device.
Options
3
Deletes or plays the selected media content in the media content list. When you select Refresh, the content list is
reloaded.
" You can delete only the recorded content. To delete content, change the Filter By option to Recorded.
Playing media content
Playing multimedia content on a PC or mobile device
Select a device with media content in Source. The media content list in the device appears.
1.
Select a media content item from the list.
2.
The content is played.
" For more information about buttons, refer to "Buttons and functions available while playing multimedia content."
" The content may not be played depending on the encoding method or file format. Furthermore, several functions may be
restricted.
" Content on devices connected to the TV via your network may not play smoothly due to network communication problems.
If this occurs, use a USB device.
" For more information about connecting to mobile devices, refer to "Connecting Your Mobile Device."
Playing multimedia content on a USB device
Connect a USB device to the USB port. When a pop up message appears on the screen, select Browse to easily
1.
move to the list of multimedia content stored on the device.
Select a content item to play from the list.
2.
The content is played.
- 71 -
Page 72
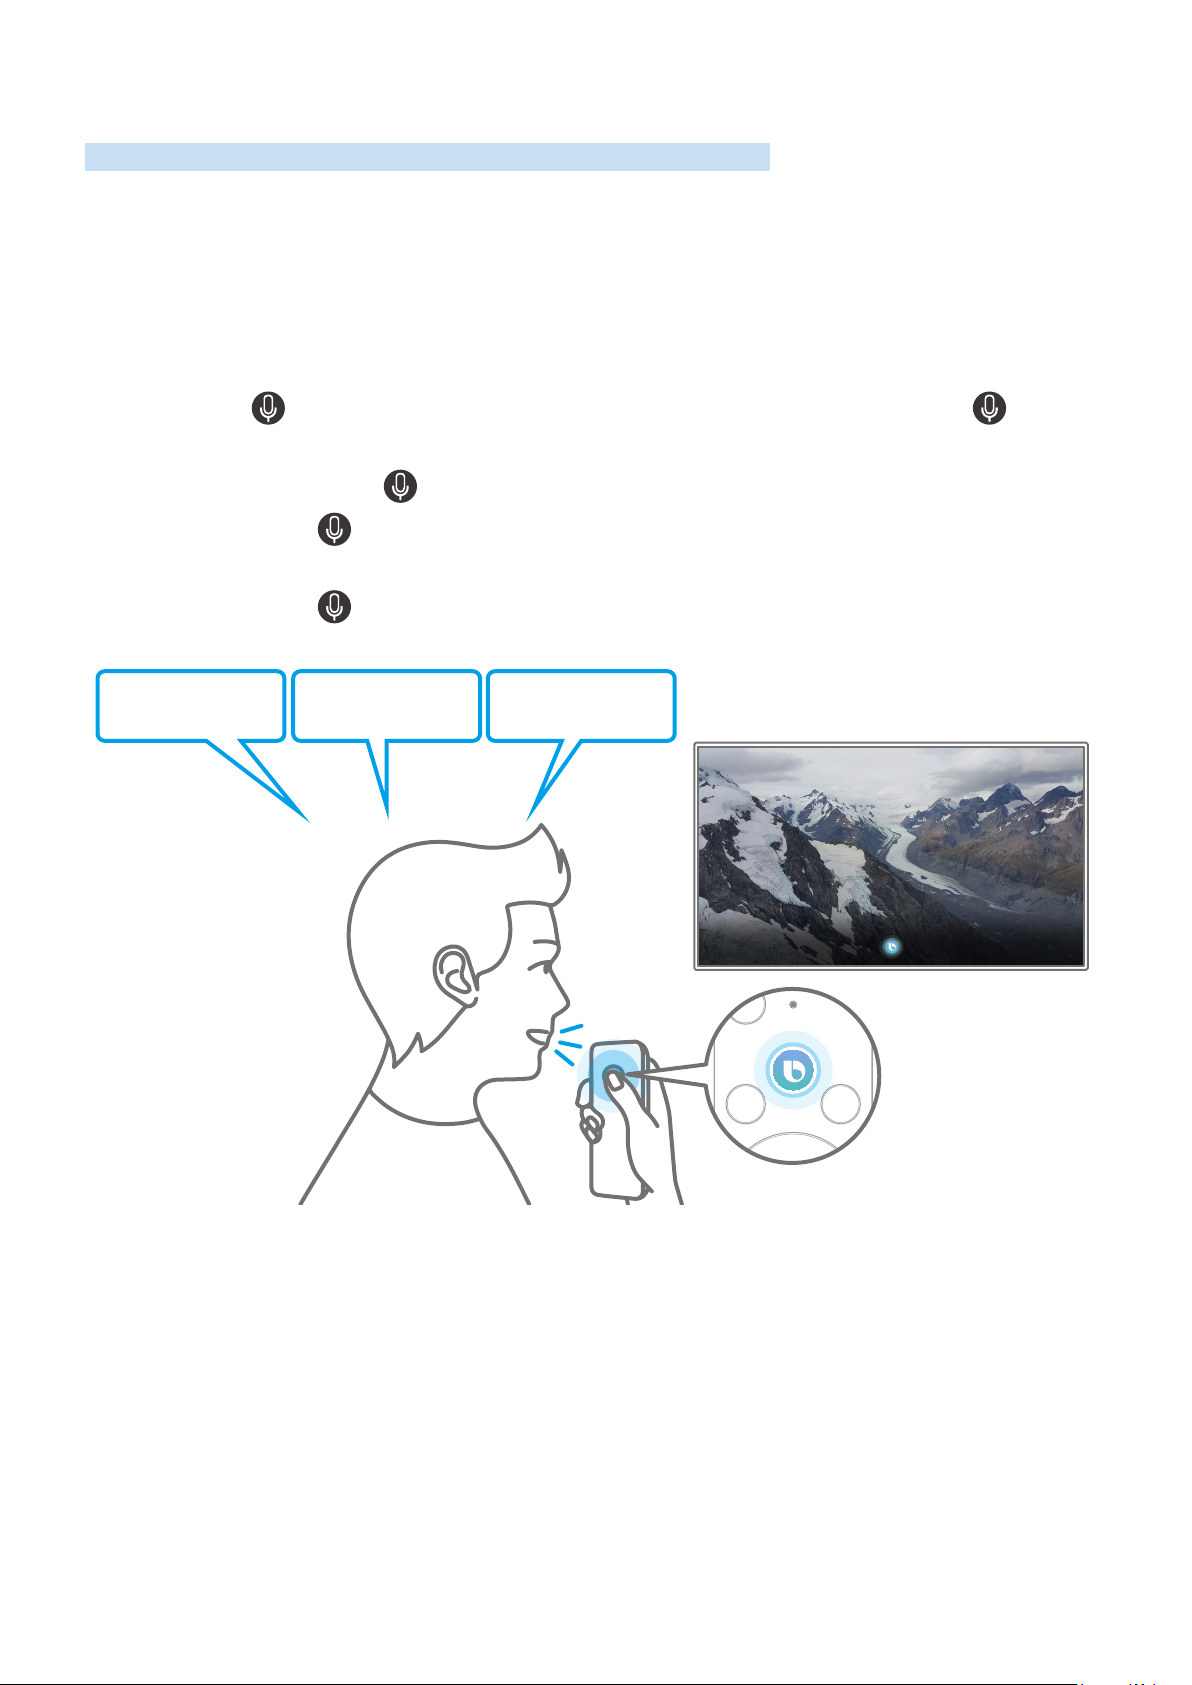
Using Bixby
Speak into the microphone on your Samsung Smart Remote to control your TV.
" This function may not be supported depending on the model or geographical area.
" The supported language may differ depending on the geographical area.
Running Bixby
Press and hold the button on your Samsung Smart Remote, say a command, and then release the button.
The TV recognizes the voice command.
To view the Bixby guide, press the button once:
● When you press the button for the first time, the Using Bixby button appears at the bottom of the screen.
Press the Select button. The Using Bixby popup window appears and a tutorial on using Bixby is shown.
● When you press the button after the first time, the Enter My Bixby button appears at the bottom of the
screen. Press the Select button to go to the My Bixby screen.
"Live TV" "HDMI1" "USB"
- 72 -
Page 73
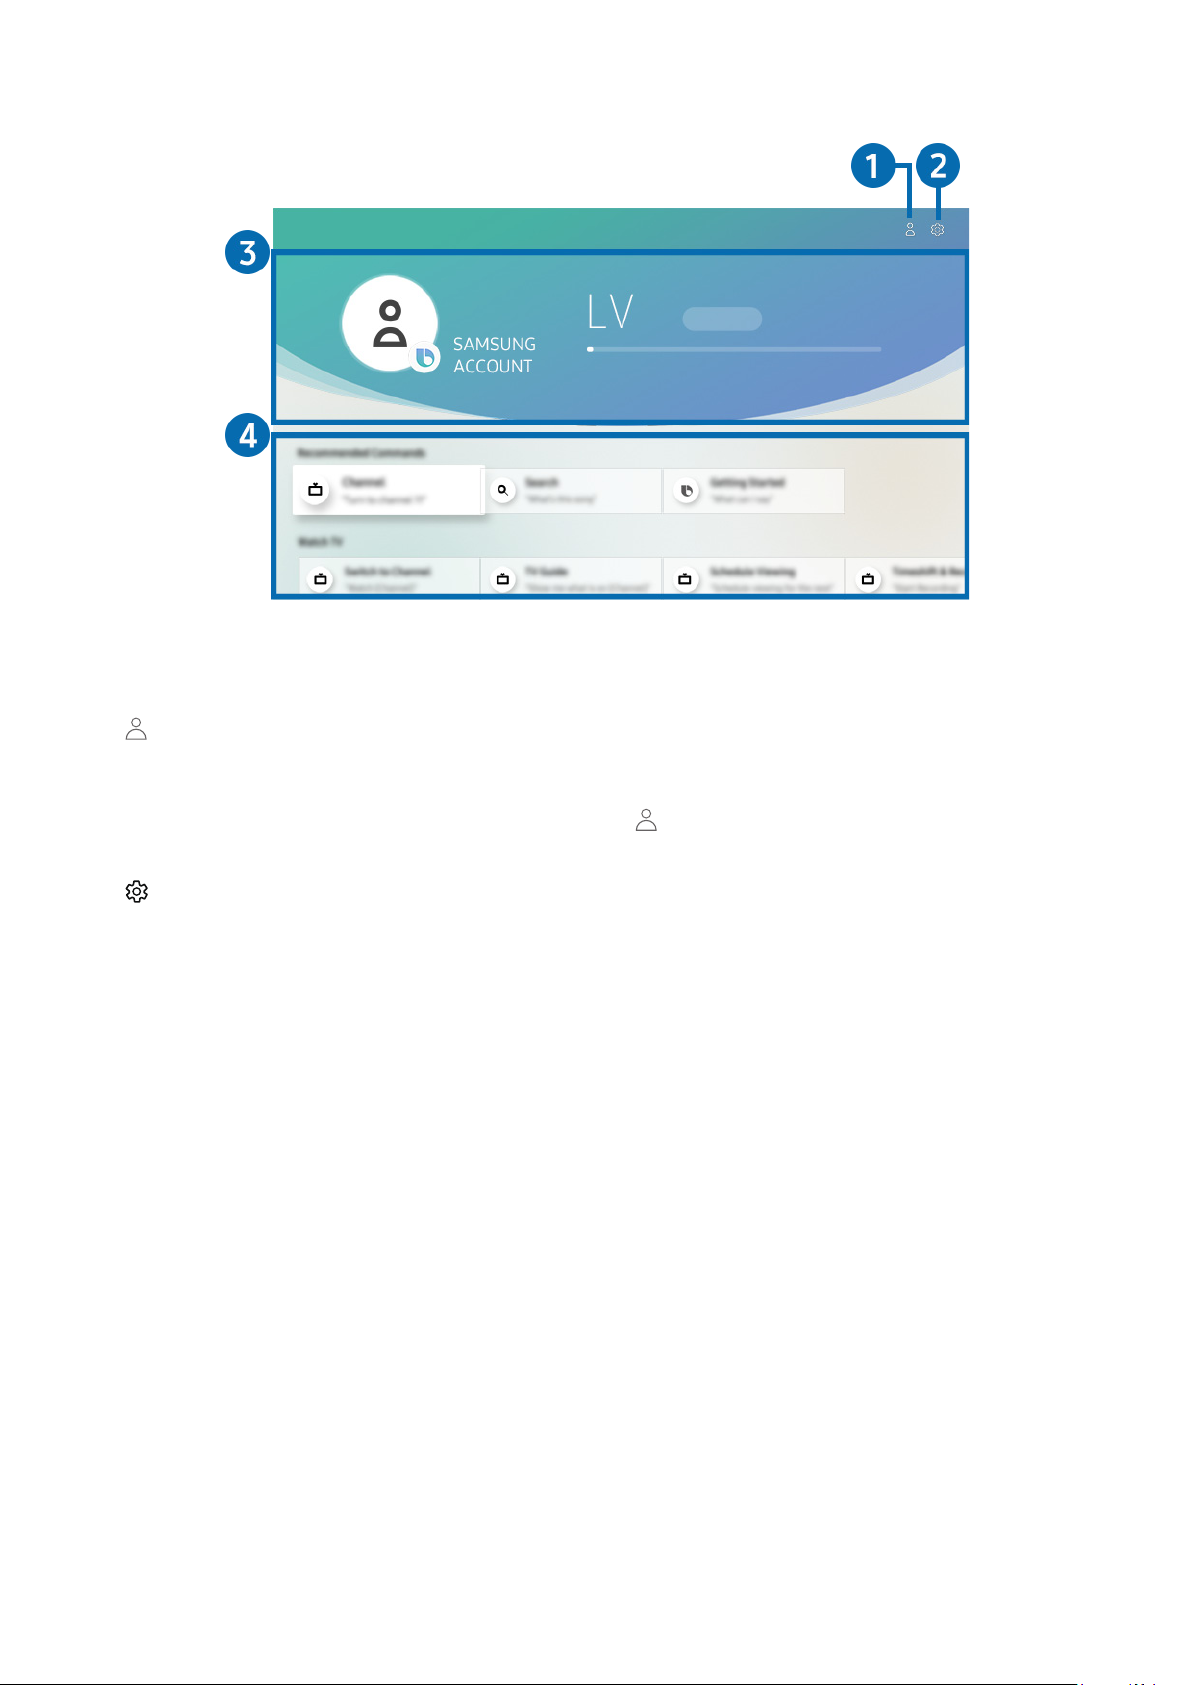
Learning about My Bixby
My Bixby
" The image on your TV may differ from the image above depending on the model and geographical area.
1
Go to the Samsung Account screen to create a new account or sign out of your account.
2
You can change the voice responses and the voice style of Bixby.
You can also select a music service provider in the Default music service provider tab.
3
You can see user information and the experience points (XP) that you can get from using Bixby.
4
Samsung Account
" If you are signed out of your Samsung account, select Sign In or to log in.
Settings
" The Default music service provider tab may not be supported depending on the model or geographical area.
User information and the experience points (XP) guide
" You must be signed in to your Samsung account to view the user information and the experience points (XP).
" This function may not be supported depending on the model or geographical area.
Bixby guide
You can learn the voice commands to use the Bixby in various situations. Use the directional buttons to move to the
desired command, and then press the Select button. You can operate the TV with various voice commands.
" To view a tutorial on Bixby, use the directional buttons to move to the bottom, and then select the View Tutorial item.
- 73 -
Page 74

Read Before Using Bixby
Precautions for Bixby
● The supported voice interaction languages and features may differ depending on the geographical area.
● If the language set differs from the language of your country, some features are not available.
● Bixby is available only when the TV is connected to the Internet.
● Even if the TV is connected to the Internet, there may be no response due to a Bixby server error.
● The existing functional specifications may be changed if Bixby is updated.
● Bixby is available only on TVs that support it and come with remote controls that have a microphone.
● Symbols including "-" and special characters are not supported. Consequently, if a word or sentence contains
numeric values or symbols, the function may not operate properly.
● Searched results may not provide complete results.
● You may be required to pay for some apps. Consequently, you may encounter a service application or contract.
● To change the current channel by saying channel names as voice commands, you must finish Set Up Your
Service Provider. If Set Up Your Service Provider is not completed, you can complete it using the following
menu.
– Settings General Start Setup Try Now
● To use the voice text input function and Smart Search function, you must consent to provisions allowing third
parties to collect and use your voice data.
● To use the Bixby function, you must:
– Agree to Smart Hub's Terms of Use
– Agree to a guidance regarding the collection and use of personal information for the Smart Hub service.
– Consent to the collection and use of personal information for the voice interaction-based service.
Requirements for using Bixby
● The voice interaction rate differs with the volume/tone, pronunciation, and ambient sound environment (TV
sound and ambient noise).
● The optimal volume for voice commands is between 75 dB and 80 dB.
- 74 -
Page 75
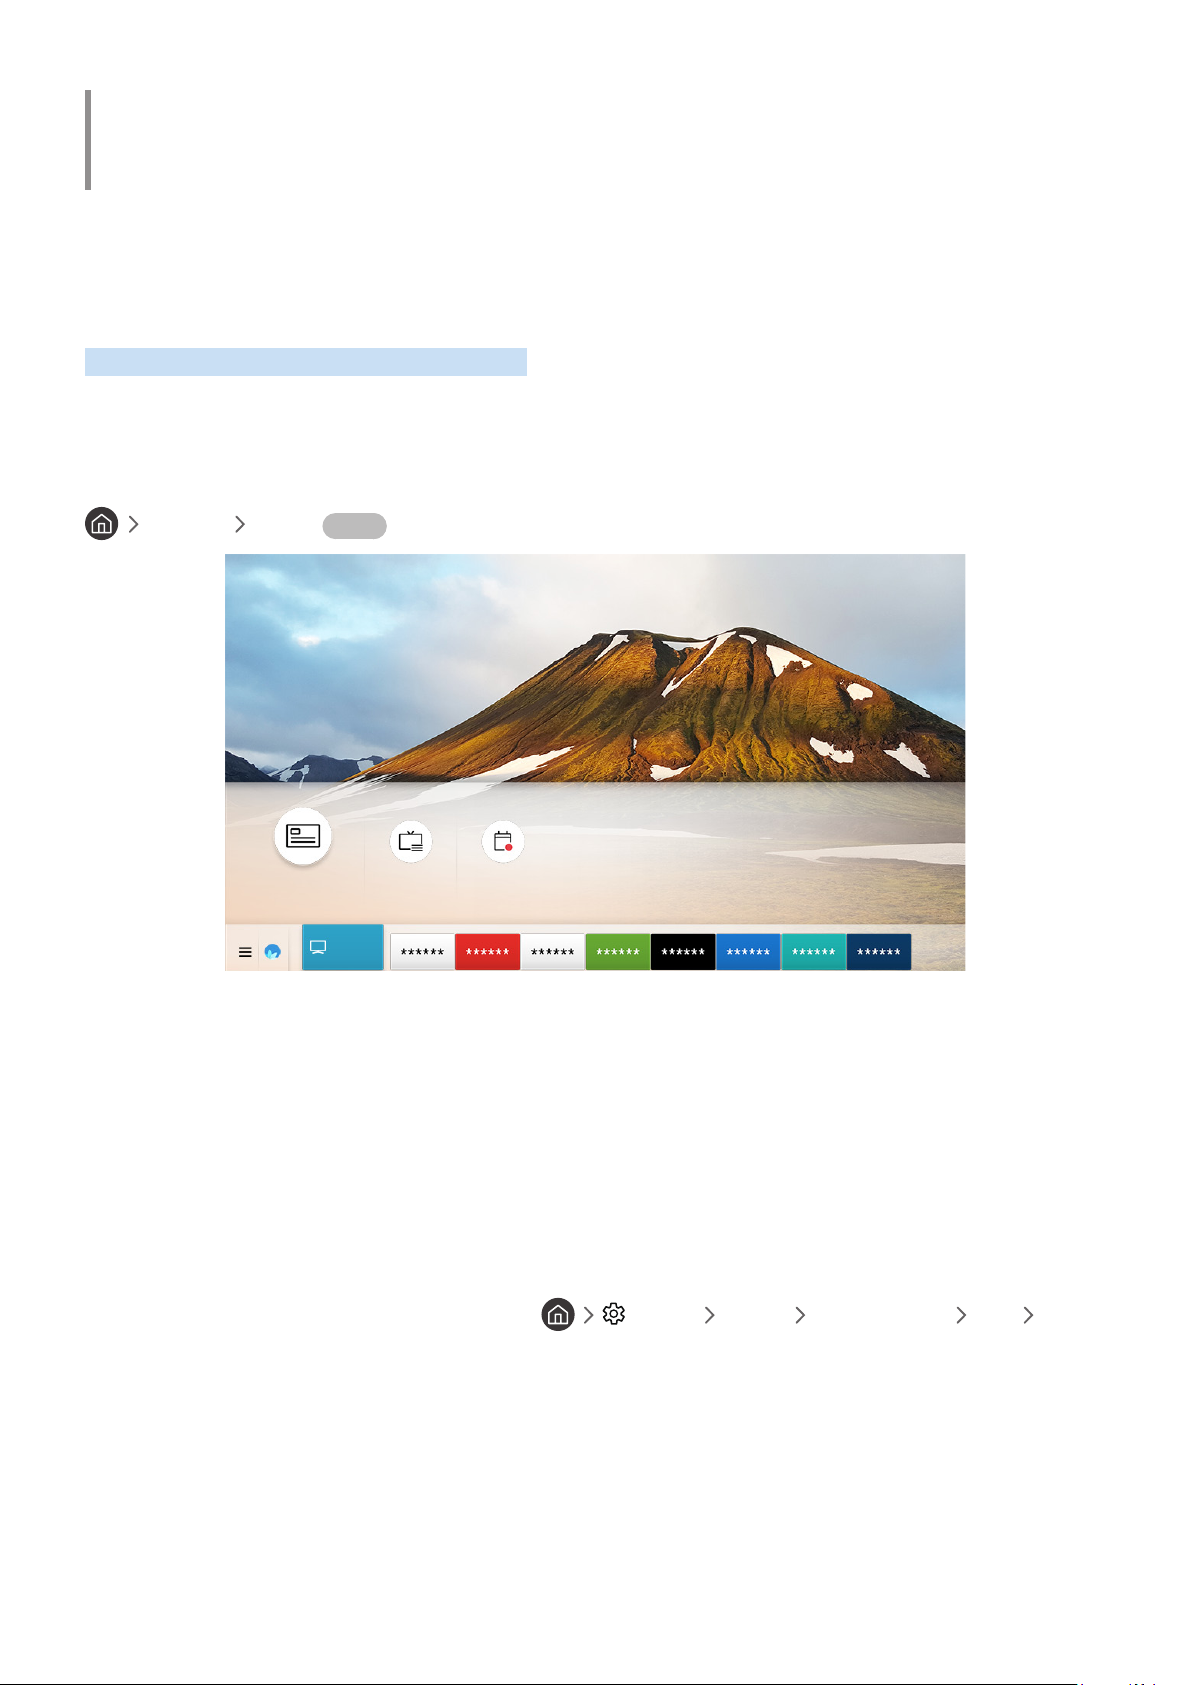
TV Viewing
You can use convenient features while watching TV. Additionally, you can edit the channel list or create favorite
channel lists.
Viewing Broadcast Information at a Glance
See an overview of each channel's program lineup.
Using the guide
Live TV Guide Try Now
Guide
" The image on your TV may differ from the image above depending on the model and geographical area.
In the Guide, you can see the daily program schedules for each broadcaster, see program information, choose a
program to watch, and set up a scheduled viewing or recording.
In the Guide, you can see only the TV programs scheduled after the current time.
" The Guide also appears when you press the CH button while watching TV.
" To see information about analog channels and use the analog channel functions of the Guide, you must finish the service
provider settings in initial setup.
" To view the Guide, you must first set the TV's clock ( Settings General System Manager Time Clock).
Channel List Recordings
Live TV
- 75 -
Page 76

To start Scheduled viewing, Scheduled recording, and other function for a program listed in the Guide, first move the
cursor to it and then press and hold Select button on the remote control to use follows functions:
● Record: You can make a recording of a current program.
" This function is not available in the U.S.A. and Canada.
" This function may not be supported depending on the model or geographical area.
● Schedule Viewing: You can schedule viewing of a broadcast scheduled program.
" For more information about watching or Schedule Viewing, refer to "Setting Up a Schedule Viewing."
● Schedule Recording: You can schedule recording of a broadcast scheduled program.
" This function is not available in the U.S.A. and Canada.
" This function may not be supported depending on the model or geographical area.
" For more information about recording or Schedule Recording, refer to "Recording Programs."
● Edit Recording Time: You can change the start and end times of scheduled program recordings.
" This function is not available in the U.S.A. and Canada.
" This function may not be supported depending on the model or geographical area.
● Stop: You can stop the recording function that is currently running.
● Cancel Scheduled Viewing / Cancel Scheduled Recording: You can cancel scheduled viewings or recordings.
" This function may not be supported depending on the model or geographical area.
● View Details: You can see detailed information about the selected program. The information may differ with
the broadcast signal. If information is not provided with the program, nothing appears.
To move to the Channel Filter or Antenna Type, Schedule Manager screen: Press the or button.
● Channel Filter: You can select a channel filter from a filter list to see a list of channels filtered accordingly.
● Antenna Type: You can change the type of broadcast signals to receive.
● Schedule Manager: You can see the Schedule Manager or Recording & Schedule Manager screen.
- 76 -
Page 77

Recording Programs
Record a current or upcoming program using a USB device instead of a video recorder.
" This function is not available in the U.S.A. and Canada.
" This function may not be supported depending on the model or geographical area.
" Read all precautions before using the recording feature. Refer to "Before Using the Recording and Timeshift Functions" for
more information.
" You can record only the programs that are received through an antenna.
" The appears next to the programs and channels scheduled for recording.
" If you go to Live TV while no USB device is connected, the Schedule Manager screen appears in place of the
Recordings screen.
Recording programs
Using the instant and schedule recording options from the guide screen
● Instant Recording
Select a live program from the Guide, press and hold the Select button, and then select Record from the popup menu to start recording immediately.
● Schedule Recording
Select a program scheduled to be broadcast, press the Select button, and then select Schedule Recording to
set up a scheduled recording of the scheduled program.
Using the instant and schedule recording options while watching a program
● Instant Recording
If you select Record after pressing the or button while watching a broadcast, recording starts.
● Schedule Recording
Press the Select button while watching a program to display the program info window. Use the left or right
directional button to select a scheduled program. Press the Select button, and then select Schedule Recording
to set up a scheduled recording of the scheduled program.
- 77 -
Page 78

Scheduling a video recording after entering the date and time
Live TV Recordings Schedules Add Recording
To schedule a recording, set the values for Antenna, Channel, Repeat, Date, Start Time, and End Time of the
broadcast program to record, and then select Save.
" Check the current time in Settings General System Manager Time Clock.
Managing the schedule recording list
Live TV Recordings Schedules
You can change scheduled recording information or cancel scheduled recordings.
" You can schedule up to 30 recordings or viewings at once using Schedule Recording and Schedule Viewing.
Setting the Schedule Recording Time
Live TV Recordings Schedules Edit
You can set the start and end times for a schedule recording. You can set the start time up to 10 minutes before the
program starts and the end time up to 10 minutes after the program ends.
Canceling a schedule recording
Live TV Recordings Schedules Delete
Checking scheduled recordings
Live TV Recordings Schedules View Details
Viewing recorded programs
Live TV Recordings Recordings
Select a file containing a recording from the list. The file is played back.
" Buttons that appear may differ depending on the file being played. For more information about control buttons, refer to
"Buttons and functions available while recording a program or Timeshift."
- 78 -
Page 79

Setting up a schedule recording start
Live TV Recordings Settings
● Start Recording Early: You can set the time to start the recording earlier than the broadcast start time in the
program guide.
● Continue Recording After: You can set the time to end the recording later than the broadcast end time in the
program guide.
Setting Up a Schedule Viewing
Configure the TV to show a specific channel or program at a specific time and date.
" The appears next to programs that have been configured for a scheduled viewing.
" To set up a scheduled viewing, you must first set the TV's clock ( Settings General System Manager
Time Clock).
Setting up a scheduled viewing for a channel
Using the schedule viewing options from the guide screen
On the Guide screen, select a program you would like to view, press and hold the Select button, and then select
Schedule Viewing in the pop-up menu that appears.
Using the schedule viewing options in the program info window
Press the Select button while watching TV. The Program Info window appears. Select a program that will be
broadcast using the left or right directional buttons. Press the Select button, and then select Schedule Viewing to
schedule viewing of that program.
Using schedule viewing to view programs at a specified time on a specified date
(U.S.A and Canada) Live TV Schedule Manager Add Viewing
(Other countries) Live TV Schedule Manager or Recordings Schedules Add Viewing
To schedule a viewing, set the values for Antenna, Channel, Repeat, Date and Start Time of the broadcast program to
view, and then select Save.
" Check the current time in Settings General System Manager Time Clock.
" This function may not be supported depending on the model or geographical area.
- 79 -
Page 80

Editing a scheduled viewing
(U.S.A and Canada) Live TV Schedule Manager
(Other countries) Live TV Schedule Manager or Recordings Schedules
" You can set up a maximum total of 30 Schedule Viewing and Schedule Recording entries.
Setting the Scheduled Viewing Time
(U.S.A and Canada) Live TV Schedule Manager Edit
(Other countries) Live TV Schedule Manager or Recordings Schedules Edit
You can set the start time of a scheduled viewing. If you choose a program from the Guide, the Start Time can be set
up to 10 minutes before the program.
Canceling a scheduled viewing
(U.S.A and Canada) Live TV Schedule Manager Delete
(Other countries) Live TV Schedule Manager or Recordings Schedules Delete
Checking scheduled viewings
(U.S.A and Canada) Live TV Schedule Manager View Details
(Other countries) Live TV Schedule Manager or Recordings Schedules View Details
- 80 -
Page 81

Using Timeshift
Play, pause, or rewind live TV.
You can pause and rewind live TV by using Timeshift. Activating this function disables the Broadcasting function.
Try Now
To activate the Timeshift function while watching TV, press the or button and then select Timeshift, or press
the button.
" This function is not available in the U.S.A. and Canada.
" This function may not be supported depending on the model or geographical area.
" When the Timeshift function is running, some functions are not available in Settings Broadcasting.
" To use Timeshift, you must connect a USB device for recording.
" Read all precautions before using the Timeshift function. For more information, refer to "Before Using the Recording and
Timeshift Functions."
Buttons and functions available while recording a program or Timeshift
Review available buttons and functions of how they are used while recording a program or Timeshift.
" This function is not available in the U.S.A. and Canada.
" This function may not be supported depending on the model or geographical area.
" The available buttons and functions may differ with the functions.
When you press the down directional button, the control bar appears and the following options are available:
● Edit Recording Time
You can set for what period of time the program will be recorded.
" This function is only available when a program is being recorded.
- 81 -
Page 82

● Record
You can switch from the Timeshift function to the recording function. When switching to the recording
function, you can include the content recorded by the Timeshift function in the new recording.
" This function is only available when the Timeshift function is running.
● Go to Live TV
Select to return to the current scenes of the program when the recording or Timeshift function is playing its
past scenes.
● Stop Recording / Stop Timeshift
Ends the recording or Timeshift function.
● Info
Displays the program info window of the program you are recording or time-shifting.
● Pause / Play
You can use the following functions when the video is paused. (Note that with the video paused, the TV does
not play audio.)
– Slow Rewind or Slow Forward: Allows you to play the video slowly (1/8, 1/4, 1/2) backward or forward by
selecting the or option. To increase the rewind or forward speed in slow mode up to 3 times, select
the option repeatedly. To return to normal speed, select the option.
" When the Slow Rewind function is activated, you can view the difference between the current recording time
and the current rewind time.
– Jump Backward / Jump Forward: Press the up directional button to move the focus to the playback control
bar, and then select the left or right directional button in the playback control bar to move backward or
forward by 10 seconds in the video.
" When the Jump Backward function is activated, you can view the difference between the current recording time
and the current rewind time.
● Rewind / Fast Forward
" This function is not available while you are watching a program that is currently being broadcast.
- 82 -
Page 83

Using the Channel List
Change the channel or check programs on other digital channels.
Live TV Channel List
Using the Channel List, you can change the channel or check programs on other digital channels while watching TV.
The Channel List screen contains the following icons:
● : A favorite channel
● : A locked channel.
If you press the right directional button when viewing the Channel List screen, you can use the following functions:
● All Channels
Displays the channels that the TV found during the Auto Program channel search.
● Favorites
Displays Favorites 1 to Favorites 5.
● Air or Cable
To allow you to select Air or Cable as the DTV mode, move the focus to Air or Cable, and then press the Select
button. Air is suitable for homes equipped with separate, over-the-air antennas. Cable is suitable for homes
that subscribe to a local cable-service. You do not need to use this function if your TV is connected to a cable
box or satellite box.
● TV PLUS
While the TV is connected to the Internet, you can watch popular programs or highlights for each theme
through a virtual channel at any time. As with regular channels, the TV provides the daily program schedules
for TV PLUS.
" This function may not be supported depending on the model or geographical area.
- 83 -
Page 84

Editing channels
Edit the channels stored on your TV.
Live TV Channel List All Channels Edit Channels
The Edit Channels screen contains the following icons:
● : A favorite channel
● : A locked channel.
Re-registering and deleting a channel
Removing registered channels
To remove a channel, select it from the Edit Channels screen, and then select Delete. Removed channels do not
appear in the Channel List.
Adding back removed channels
You can add back removed channels from the Edit Channels screen only. Removed channels are displayed in gray in
the Edit Channels screen. To add back a removed channel, select it, and then select Restore.
Changing a channel name
After selecting a channel to change in Edit Channels, select Rename Channel to change the channel name.
" This function is only available for selected channels.
" This function is available for analog channels only.
- 84 -
Page 85

Using Program Rating Lock
Settings Broadcasting Program Rating Lock Settings Try Now
This function is useful for controlling what children watch on TV. Program Rating Lock Settings does not, however,
block programs originating from external sources, such as Blu-ray players, DVD players, or USB files.
Every time you access Program Rating Lock Settings, you must enter the security PIN. You must also enter this PIN
to watch a blocked program. The default PIN is "0000." To change the PIN, go to Settings General
System Manager Change PIN.
" Program Rating Lock Settings may not be supported depending on your input signal.
" For more information about how to set your password, refer to "Setting up a password."
" For more information about the rating system of different countries, refer to "Blocking programs based on their TV Rating."
Watching blocked / restricted programs
To watch a blocked program, enter the PIN when requested.
When initially showing a restricted program or movie, the screen is blank because the Program Rating Lock Settings
blocks it. Enter the PIN to unblock the program when a message appears requesting the code.
Creating a Personal Favorites List
Designate frequently watched channels as favorite channels.
Favorite channels are highlighted in the Edit Channels and Channel List screens with the symbol. You can create
up to five favorites lists so that your family members can create their own personal favorites list.
Registering channels as favorites
Live TV Channel List
Press the right directional button on your remote control.
1.
Select Favorites.
2.
Select one of the five favorites lists.
3.
Move to Edit Favorites.
4.
Select a channel to add to the favorites list.
5.
Select icon.
6.
The selected channel is registered in the favorites list.
- 85 -
Page 86

Viewing and selecting channels on Favorites lists only
Live TV Channel List
Press the right directional button on your remote control.
1.
Select Favorites.
2.
Select the desired list among the five favorites lists on the screen.
3.
The channels in the selected favorites list appear.
" Only favorites lists that contain registered channels will display channels.
Editing a Favorites List
Edit a favorites channel list.
Live TV Channel List
After pressing the right directional button on your remote control, select Favorites Favorites 1 - Favorites 5 Edit
Favorites. The Edit Favorites screen appears.
Adding channels to a favorites list
Select channels to add, and then select the icon. The selected channels are added to the favorites list.
Removing channels from a favorites list
Select channels in a favorites list, and then select the icon.
Rearranging a favorites list
Select one or more channels, and then select Change order. The Change order highlight appears. Press the up/down
directional buttons to indicate the new location for the channels. Press the Select button to set the channels into
their new location.
Renaming a favorites list
Select the favorites list you want to rename, and then select Rename Favorites. Enter a new name using the on-
screen keyboard that appears, and then select Done.
- 86 -
Page 87
TV-Viewing Support Functions
Use the functions that are available while watching TV.
Changing the broadcast signal
Live TV Channel List
Press the right directional button on your remote control, move the focus to Air or Cable, and then press the Select
button.
" You do not need to use this function if your TV is connected to a cable box or satellite box.
Scanning for available channels
Settings Broadcasting Auto Program Try Now
" Do not use this function if your TV is connected to a cable box or satellite box.
" If the TV has saved channels, Auto Program deletes the existing list, and then saves the newly scanned channels.
Configuring advanced broadcasting audio settings
Settings Broadcasting Audio Options
Audio Options functions differently for analog and digital channels.
" This function may not be supported depending on the model or geographical area.
Selecting a Language
Settings Broadcasting Audio Options Preferred Language
This is the language you will hear while watching TV if the language is included in the broadcast signal.
Listening to Multi-Track Sound
Settings Broadcasting Audio Options Multi-Track Sound
Checking digital channel signal info and strength
Settings Support Self Diagnosis Signal Information Try Now
" If your TV is attached to a separate, over-the-air antenna, you can use the signal strength information to adjust the antenna
for increased signal strength and improved HD channel reception.
- 87 -
Page 88

Picture and Sound
You can change the settings for the picture and the sound according to your preference.
Adjusting the Picture Quality
Change the Picture Mode and adjust Expert Settings.
Choosing a picture mode
Settings Picture Picture Mode Try Now
You can select the Picture Mode that provides the best viewing experience.
● Dynamic
Makes the picture brighter and clearer in bright viewing environments.
● Standard
Is the default mode suitable for general viewing environments.
● Natural
Reduces eye strain for a comfortable viewing experience.
● Movie
Is suitable for watching TV or movies in a dark room.
" This function may not be supported depending on the model.
Configuring advanced picture settings
Settings Picture Expert Settings Try Now
Configure the screen settings to your taste by using the following functions:
● Backlight Try Now
● Brightness Try Now
● Contrast Try Now
● Sharpness Try Now
● Color Try Now
- 88 -
Page 89

● Tint (G/R) Try Now
● Apply Picture Settings Try Now
● Digital Clean View Try Now
● Auto Motion Plus Settings Try Now
" When LED Clear Motion is set to On, the screen appears darker than when it is Off.
● Local Dimming
" This function may not be supported depending on the model or geographical area.
● Contrast Enhancer Try Now
● HDR+ Mode Try Now
Automatically provide an optimal HDR effect based on the video source.
The HDR (High Dynamic Range) technology implements video images that are very similar to the images seen
through human eyes by finely adjusting the contrast of the source.
" This function may not be supported depending on the model or geographical area.
● Film Mode Try Now
" This function is only available when the input signal is TV, AV, Component (480i, 1080i), or HDMI (1080i).
● Color Tone Try Now
● White Balance Try Now
● Gamma Try Now
● RGB Only Mode Try Now
● Color Space Settings Try Now
● Reset Picture Try Now
- 89 -
Page 90

Setting the Viewing Environment for External Devices
You can optimize the TV for viewing specific video formats.
Playing games on an optimized screen
Settings General External Device Manager (Game Mode Settings) Game Mode
You can enable game mode to optimize the TV's settings for playing video games with a gaming console, such as a
PlayStation™ or Xbox™.
" The Game Mode Settings may not appear depending on the model.
" The game mode is not available for normal TV viewing.
" The screen may shake somewhat.
" When Game Mode is enabled, Picture Mode and Sound Mode are switched to Game automatically.
" To use a different external device on the same port, remove the game console connection, turn off Game Mode, and then
connect the external device to the port.
Configuring game mode details
Configuring Game Motion Plus
Settings General External Device Manager Game Mode Settings Game Motion
Plus Settings
You can configure the Game Motion Plus settings.
" This function may not be supported depending on the model or geographical area.
- 90 -
Page 91

Viewing UHD videos
Settings General External Device Manager HDMI UHD Color Try Now
If an external UHD player is connected to the TV, use the HDMI UHD Color function to convert the TV's HDMI
connector to a mode optimized for the UHD 50P/60P signals.
" When you select the HDMI connector you want to use for HDMI UHD Color, and then press the Select button to set the
HDMI UHD Color function to On, the TV screen flickers.
" The HDMI connection with HDMI UHD Color set to Off supports up to UHD 50P/60P 4:2:0 input signals, while the
HDMI connection with HDMI UHD Color set to On supports up to UHD 50P/60P 4:4:4 and 4:2:2 input signals. For more
information, refer to "Supported Resolutions for UHD Input Signals."
" When you connect the TV to an external device that supports only the UHD 24 or 30 Hz frequency or any FHD frequency, the
HDMI UHD Color function may not be available. In this case, set HDMI UHD Color to Off.
Using HDMI black level
Settings General External Device Manager HDMI Black Level Try Now
Use HDMI Black Level to adjust the black level to compensate for low black levels, low contrast, or dull colors
generated by external devices connected to the TV via an HDMI cable.
" This function is only available when the input signal connected to the TV via an HDMI connector is set to RGB444.
- 91 -
Page 92
Changing the Picture Size and Position
Change the picture size and position for your TV.
Changing the picture size
Settings Picture Picture Size Settings Picture Size Try Now
You can change the size of the picture displayed on the TV screen.
● 16:9 Standard
● Custom
● 4:3
[
Do not watch your TV in 4:3 mode for extended periods of time. This can cause the black bars, which appear
at the top, bottom, left, and right sides of the screen in 4:3 mode, to "burn in" and appear as temporary or
permanent after images on the screen. If the TV is used for commercial or non-normal consumer use, then
damage to the screen caused by screen "burn in" is not covered by your Warranty.
" Supported picture sizes differ with the input signal. For more information about supported picture sizes, refer to "Picture
sizes and input signals."
Fitting the picture to the screen
Settings Picture Picture Size Settings Fit to Screen Try Now
" This function may not be supported depending on the Picture Size setting.
" This function may not be supported depending on the broadcast signals.
Adjusting the picture size and/or position
Settings Picture Picture Size Settings Zoom and Position Try Now
" This function is available only if Picture Size is set to Custom.
" To change the picture position on analog channels, first enlarge the picture and then change the position.
- 92 -
Page 93

Configuring a Sound Mode and Expert Settings
Change the Sound Mode and adjust Expert Settings.
Choosing a sound mode
Settings Sound Sound Mode Try Now
You can select a favorite sound mode suitable for the content type or the listening environment.
● Standard
● Optimized
● Amplify
" This function may not be supported depending on the model.
Configuring advanced sound settings
Settings Sound Expert Settings Try Now
You can personalize the sound quality by adjusting the following settings.
● Balance Try Now
● Equalizer Try Now
● HDMI Input Audio Format Try Now
● Digital Output Audio Format Try Now
" If you use a receiver that does not support Dolby Digital Plus, you will hear no sound if you select Dolby Digital+.
" The Dolby Digital+ option is only available via ARC(HDMI) for external devices that support the format.
● Audio Delay Try Now
● Sound Mirroring
When the Sound Mirroring function is set to On, you can share your mobile device's sound using your TV
speakers.
" This function may not be supported depending on the TV model or mobile device.
● Auto Volume
● Sound Feedback Try Now
● Reset Sound Try Now
- 93 -
Page 94

Using the Sound Support Functions
Configure the sound settings for your TV.
Selecting speakers
Settings Sound Sound Output Try Now
You can select which speakers the TV uses for audio output.
" External speakers may not be controlled with the Samsung Smart Remote. When an external speaker is enabled, some
sound menus are not supported.
Listening to the TV through Bluetooth devices
Settings Sound Sound Output Speaker List
You can connect Bluetooth audio devices to the TV. They must be paired using the TV's Bluetooth function. For more
information on pairing, refer to the Bluetooth audio device's operating manual.
" This function may not be supported depending on the model or geographical area.
" If the TV fails to find a Bluetooth audio device, place the device closer to the TV, and then select Refresh.
" When you turn on a paired Bluetooth audio device, the TV detects it automatically, and then displays a pop-up window. Use
this pop-up window to activate/deactivate the Bluetooth audio device.
" The sound quality may be affected by the condition of the Bluetooth connection.
" Before using a Bluetooth audio device, refer to “Read Before Using Bluetooth Devices."
- 94 -
Page 95

Listening to the TV through a Samsung audio device that supports the Wi-Fi function
For more information about how to connect and use a Samsung audio device that supports the Wi-Fi function, refer
to its user manual.
" This function may not be supported depending on the model.
Using Samsung audio devices that support the Wi-Fi function to create a surround sound
configuration
Settings Sound Wi-Fi Speaker Surround Setup Try Now
If you've connected one or more Samsung wireless audio devices that support the Wi-Fi function to the TV, you can
create an optimal sound set up by configuring the surround effect settings. You can select any of the surround sound
configurations, with or without a sound bar.
A surround sound configuration can be used if all of the following conditions are met:
● Two or more Samsung wireless speakers of the same type must be connected to the same wireless network.
● The Samsung audio devices that support the Wi-Fi function must be connected to the same wireless network
as the TV.
" Surround sound configurations with a sound bar may not be supported depending on the product.
" If you activate the Screen Mirroring function while using Samsung audio devices that support the Wi-Fi function, the Wi-Fi
connection is disconnected.
" Mismatched video and audio lip-syncing may occur depending on the device type.
- 95 -
Page 96

System and Support
You can configure system and support settings such as time, screen burn protection, software update, etc.
Using the Time Functions and the Timers
Set the current time and use the timer function.
Setting the current time
Settings General System Manager Time Try Now
You can set the Clock manually or automatically. Once the Clock is set, you can view the current time on the TV
anytime.
You must reset the clock in the following cases:
● The power cable is disconnected and then connected.
● The Clock Mode is changed from Manual to Auto.
● The TV is not connected to the Internet.
● No broadcast signals are received.
Setting the clock automatically
Settings General System Manager Time Clock Clock Mode Auto
" This function works only when the TV is connected to the Internet or is receiving digital broadcasts through a connected
antenna.
" The accuracy of the time information received may differ with the channel and signal.
" If you get your TV signal from a cable broadcast receiver/set-top box or a satellite receiver/satellite set-top box connected
to an HDMI or Component port, you must set the current time manually.
- 96 -
Page 97

Adjusting the clock for DST and time zone
Settings General System Manager Time Clock
Sets the right time by setting Daylight Savings Time (DST) and your local time zone.
● Time Zone
Selects your time zone.
" This function is only available when the Clock Mode is set to Auto.
● DST
Automatically adjusts for Daylight Saving Time (DST).
" This function is only available when the Clock Mode is set to Auto.
Changing the current time
Settings General System Manager Time Clock Time Offset
" Time Offset adjusts the time through a network connection. This function is only available if Clock Mode is set to Auto and
the TV is connected to the Internet though a local area network.
" Time Offset adjusts the time if the TV fails to receive time information through normal digital broadcast signals.
Setting the clock manually
Settings General System Manager Time Clock Clock Mode Manual
When Clock Mode is set to Manual, you can directly enter the current time. Select the Date and Time by using the
directional buttons on the remote control.
Using the timers
Using the sleep timer
Settings General System Manager Time Sleep Timer
You can use this function to automatically shut off the TV after a pre-set period of time. You can set the sleep timer
for up to 180 minutes after which it will turn off the TV.
Turning off the TV using the off timer
Settings General System Manager Time Off Timer
You can set Off Timer to shut off the TV automatically at a specific time. Off Timer is only available if the Clock has
been set.
- 97 -
Page 98

Using the Screen Burn Protection and Energy Saving Functions
Protect the screen from screen burn-in and reduce the TV's energy consumption.
Preventing screen burn
Settings General System Manager Auto Protection Time Try Now
Still images can leave burned-in after-images if left on the screen for a long period of time. If a still image continues
for two hours, the screen burn protection function can be activated automatically to protect the screen from burned-
in after-images.
Reducing the energy consumption of the TV
Settings General Eco Solution Try Now
You can adjust the brightness level of the TV, reduce overall power consumption, and prevent overheating.
● Ambient Light Detection Try Now
Automatically adjusts the brightness level of the TV, according to the ambient light level, to reduce power
consumption. If Ambient Light Detection has adjusted the screen brightness to a too bright or dark level, you
can select Minimum Backlight to manually adjust the minimum screen brightness.
● Minimum Backlight Try Now
When Ambient Light Detection is turned on, you can manually adjust the minimum brightness of the TV
screen. This function acts only when the value is less than the setting in Settings Picture
Expert Settings Backlight.
● Power Saving Mode Try Now
Allows you to select a brightness setting from the list to reduce the TV's power consumption.
● Motion Lighting Try Now
Adjusts the brightness in response to on-screen movements to reduce power consumption.
● Auto Power Off Try Now
Automatically turns off the TV to reduce unnecessary power consumption if there is no operation for 4 hours.
- 98 -
Page 99
Updating the TV’s Software
View your TV's software version and update it if necessary.
Settings Support Software Update Try Now
Updating the TV’s software to the latest version
[
DO NOT turn off the TV’s power until the update is complete. The TV will turn off and on automatically after
completing the software update. Video and audio settings will be reset to their defaults after a software
update.
Updating through the Internet
Settings Support Software Update Update Now Try Now
" Updating from the Internet requires an active Internet connection.
Updating through a USB device
Settings Support Software Update Update Now
After downloading the update file from the Samsung website and storing it on a USB device, connect the USB device
to the TV to update.
" To update using a USB flash drive, download the update package from Samsung.com to your computer. Then, save the
update package in the USB device's top-level folder. Otherwise, the TV will not be able to locate the update package.
Updating the TV automatically
Settings Support Software Update Auto Update Try Now
If the TV is connected to the Internet, you can have the TV update its software automatically while you are watching
the TV. When the background update is completed, it is applied the next time the TV is turned on.
If you agree to the Smart Hub terms and conditions, Auto Update is set to On automatically. If you want this function
disabled, use the Select button to turn it off.
" This function may take a longer time if another network function is running concurrently.
" This function requires an Internet connection.
- 99 -
Page 100

Protecting the TV from Hacking and Malicious Code
Protect your TV from hacking attempts and malicious code.
Settings General System Manager Smart Security Try Now
You can use Smart Security to protect the TV from hacking and malicious code when it is connected to the Internet.
Scanning the TV and connected storage for malicious code
Settings General System Manager Smart Security Scan
If malicious code is found, the results of the scan will appear on the screen. This result window displays all malicious
code found. You can quarantine (isolate) the code. Quarantining prevents it from executing.
Select all the malicious code to quarantine.
1.
Select Isolate.
2.
The selected malicious code is relocated to the Isolated List.
" The Isolated List displays all quarantined malicious codes.
- 100 -
 Loading...