


1. Safety Precautions
1-1. Repair Precaution
Before attempting any repair or detailed tuning, shield the device from RF noise or static
electricity discharges.
Use only demagnetized tools that are specifically designed for small electronic repairs,
as most electronic parts are sensitive to electromagnetic forces.
Use only high quality screwdrivers when servicing products. Low quality screwdrivers can
easily damage the heads of screws.
Use only conductor wire of the properly gauge and insulation for low resistance, because of the low margin
of err or of most testing equipment.
We recommend 22-gauge twisted copper wire.
Hand-soldering is not recommended, because printed circuit boards (PCBs) can be easily
damaged, even with relatively low heat. Never use a soldering iron with a power rating of
more than 100 watts and use only lead-free solder with a melting point below 250°C (482°F).
Prior to disassembling the battery charger for repair, ensure that the AC power is disconnected.
Always use the replacement parts that are registered in the SEC system. Third-party replacement parts
may not function properly.
Confidential and pr oprietary-the c ontents in this ser vice guide subject to change wi thout prior noti ce
Distribution, transmission, or infringement of any content or data from this document without Samsung’s written authorization is strictly prohibited.

1. Safety Precautions
1-2. ESD(Electrostaticall y Sensitive Devices) Precaution
Many semiconductors and ESDs in electronic devices are particularly sensitive to static discharge and can
be easily damaged by it. We recommend protecting these components with conductive anti-stat i c bags
when you store or transport them.
Always use an anti-static strap or wristband and remove electrostatic buildup or dissipate
static electricity from your body before repairing ESDs.
Ensure that soldering irons have AC adapter with ground wires and that the ground wires are properly
connected.
Use only desoldering tools with plastic tips to prevent static discharge.
Properly shield the work environment from accidental electrostatic discharge before opening
packages containing ESDs.
The potential for static electricity discharge may be increased in low humidity environments,
such as air-conditioned rooms. Increase the airflow to the working area to decrease the
chance of accidental static electricity discharges.
Confidential and pr oprietary-the c ontents in this ser vice guide subject to change wi thout prior noti ce
Distribution, transmission, or infringement of any content or data from this document without Samsung’s written authorization is strictly prohibited.

2. Specification
Item
GSM 850
EGSM 900
DCS1800
PCS1900
Freq. Band[MHz]
Uplink/Downlink
824~849
869~894
880~915
925~960
1710~1785
1805~1880
1850~1910
1930~1990
ARFCN range
128~251
0~124 & 975~1023
512~885
512~810
Tx/Rx spacing
45MHz
45MHz
95MHz
80MHz
Mod. Bit rate/
Bit Period
270.833kbps
3.692us
270.833kbps
3.692us
270.833kbps
3.692us
270.833kbps
3.692us
Time Slot Period/
Frame Period
576.9us
4.615ms
576.9us
4.615ms
576.9us
4.615ms
576.9us
4.615ms
Modulation
GSM/
EGPRS
GMSK/
8PSK
GMSK/
8PSK
GMSK/
8PSK
GMSK/
8PSK
MS Power
33dBm~5dBm
33dBm~5dBm
30dBm~0dBm
30dBm~0dBm
Power Class
4(GMSK)
E2(8PSK)
4(GMSK)
E2(8PSK)
1(GMSK)
E2(8PSK)
1(GMSK)
E2(8PSK)
Sensitivity
-102dBm
-102dBm
-100dBm
-100dBm
TDMA Mux
8 8 8
8
2-1. GSM General Specification
Distribution, transmission, or infringement of any content or data from this document without Samsung’s written authorization is strictly prohibited.
Confidential and proprietary-the contents in this service guide subject to change without prior notice

2. Specification
TX Power
control level
GSM850
TX Power
control level
EGSM900
TX Power
control level
DCS1800
TX Power
control level
PCS1900
5
33±2 dBm
5
33±2 dBm
0
30±3 dBm
0
30±3 dBm
6
31±2 dBm
6
31±2 dBm
1
28±3 dBm
1
28±3 dBm
7
29±2 dBm
7
29±2 dBm
2
26±3 dBm
2
26±3 dBm
8
27±2 dBm
8
27±2 dBm
3
24±3 dBm
3
24±3 dBm
9
25±2 dBm
9
25±2 dBm
4
22±3 dBm
4
22±3 dBm
10
23±2 dBm
10
23±2 dBm
5
20±3 dBm
5
20±3 dBm
11
21±2 dBm
11
21±2 dBm
6
18±3 dBm
6
18±3 dBm
12
19±2 dBm
12
19±2 dBm
7
16±3 dBm
7
16±3 dBm
13
17±2 dBm
13
17±2 dBm
8
14±3 dBm
8
14±3 dBm
14
15±2 dBm
14
15±2 dBm
9
12±4 dBm
9
12±4 dBm
15
13±2 dBm
15
13±2 dBm
10
10±4 dBm
10
10±4 dBm
16
11±3 dBm
16
11±3 dBm
11
8±4 dBm
11
8±4 dBm
17
9±3 dBm
17
9±3 dBm
12
6±4 dBm
12
6±4 dBm
18
7±3 dBm
18
7±3 dBm
13
4±4 dBm
13
4±4 dBm
19
5±3 dBm
19
5±3 dBm
14
2±5 dBm
14
2±5 dBm
- - - - 15
0±5 dBm
15
0±5 dBm
2-2. GSM Tx Power Class
Confidential and proprietary-the contents in this service guide subject to change without prior notice
Distribution, transmission, or infringement of any content or data from this document without Samsung’s written authorization is strictly prohibited.

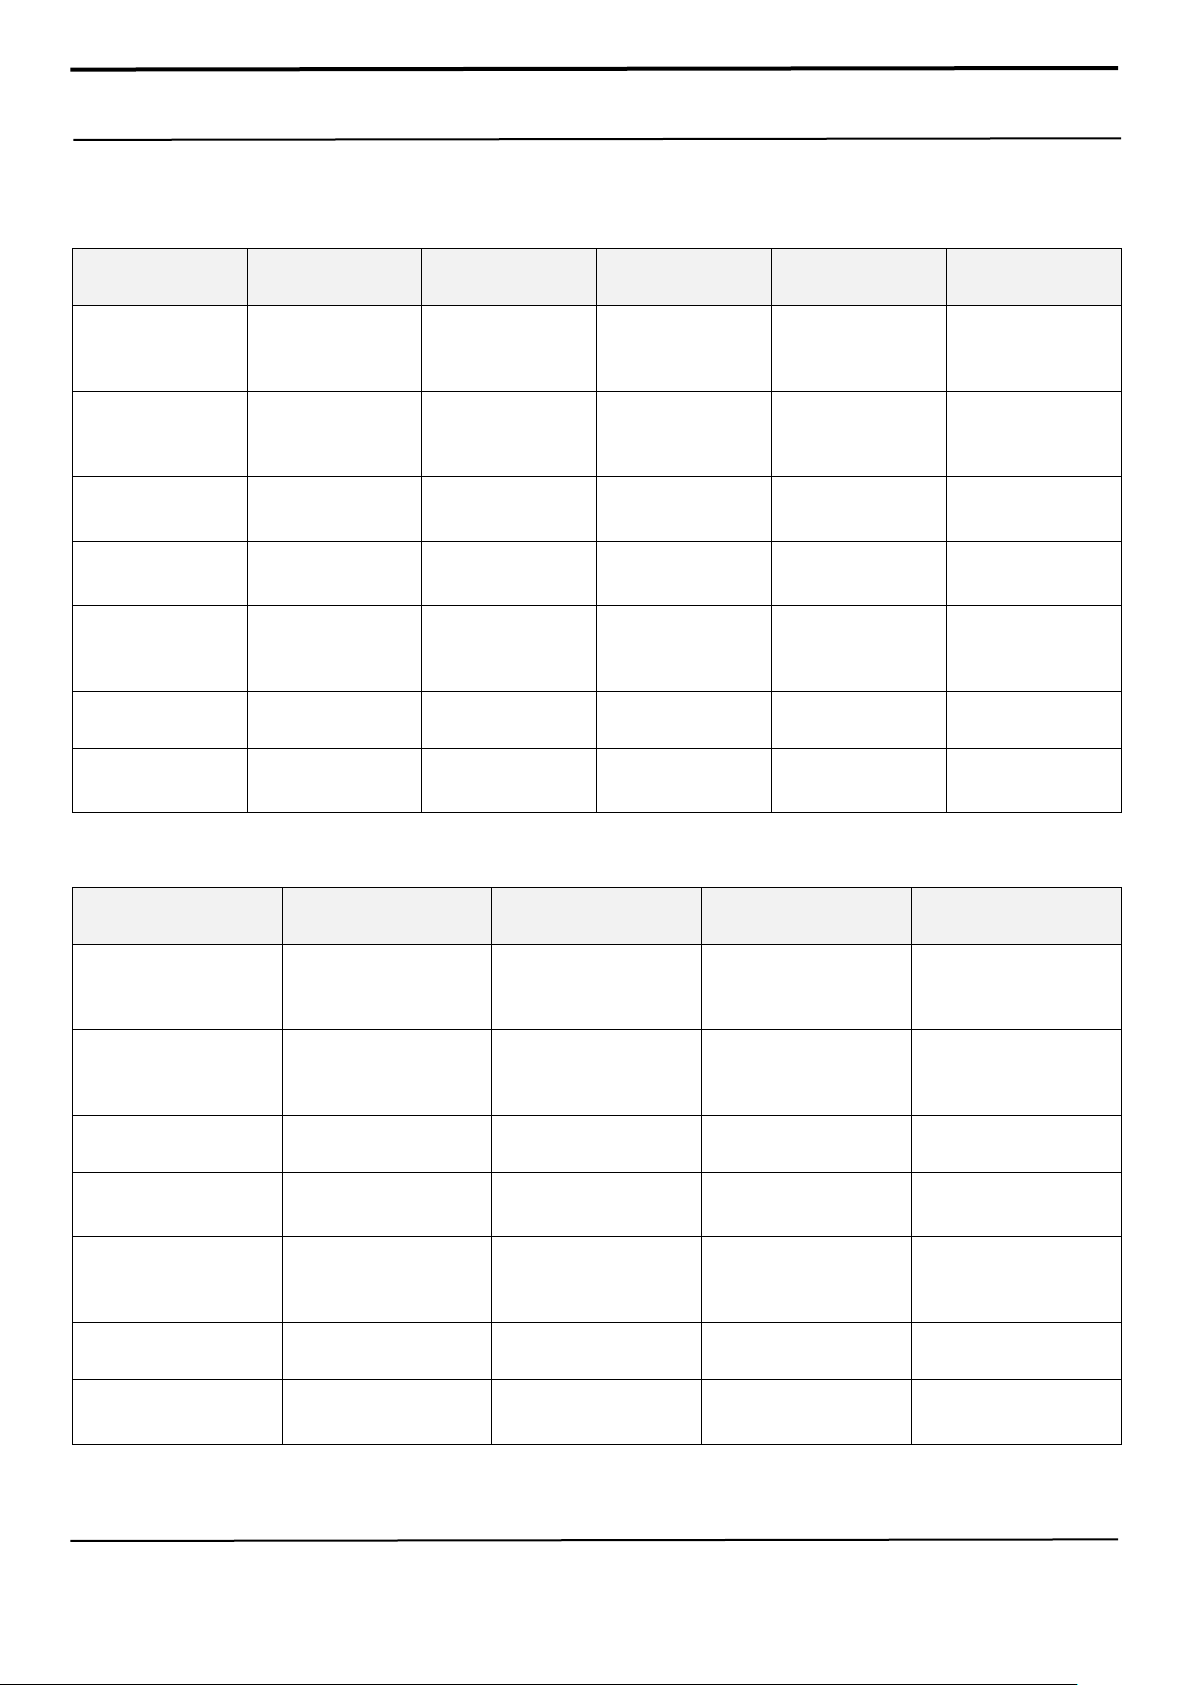
2. Specification
Item
WCDMA2100(B1)
WCDMA1900(B2)
WCDMA850(B5)
WCDMA900(B8)
Freq. Band[MHz]
Uplink/Downlink
1920~1980
2110~2170
1850~1910
1930~1990
824~849
869~894
880~915
925~960
ARFCN range
UL:9612~9888
DL:10562~10838
UL:9262~9538
DL:9662~9938
UL:4132~4233
DL:4357~4458
UL:2712~2868
DL:2937~3088
Tx/Rx spacing
190MHz
80MHz
45MHz
45MHz
Mod. Bit rate/
Bit Period
42.2Mbps(DL)
5.42Mbps(UL)
42.2Mbps(DL)
5.42Mbps(UL)
42.2Mbps(DL)
5.42Mbps(UL)
42.2Mbps(DL)
5.42Mbps(UL)
Time Slot Period/
Frame Period
WCDMA
10ms/0.667ms
HSPA
2ms/0.667ms
WCDMA
10ms/0.667ms
HSPA
2ms/0.667ms
WCDMA
10ms/0.667ms
HSPA
2ms/0.667ms
WCDMA
10ms/0.667ms
HSPA
2ms/0.667ms
Modulation
QPSK
16QAM
64QAM
QPSK
16QAM
64QAM
QPSK
16QAM
64QAM
QPSK
16QAM
64QAM
MS Power
(dBm)
25.7 ~ -49(↓)
25.7 ~ -49(↓)
25.7 ~ -49(↓)
25.7 ~ -49(↓)
Power Class
3(max+24dBm)
3(max+24dBm)
3(max+24dBm)
3(max+24dBm)
Sensitivity
-106dBm
-104dBm
-104dBm
-103dBm
2-3-1. WCDMA General Specification [SM-A705FN/F/GM]
Confidential and proprietary-the contents in this service guide subject to change without prior notice
Distribution, transmission, or infringement of any content or data from this document without Samsung’s written authorization is strictly prohibited.

2. Specification
Item
WCDMA2100(B1)
WCDMA1900(B2)
WCDMA AWS(B4)
WCDMA850(B5)
WCDMA900(B8)
Freq. Band[MHz]
Uplink/Downlink
1920~1980
2110~2170
1850~1910
1930~1990
1710~1755
2110~2155
824~849
869~894
880~915
925~960
ARFCN range
UL:9612~9888
DL:10562~10838
UL:9262~9538
DL:9662~9938
UL:1312~1513
DL:1537~1738
UL:4132~4233
DL:4357~4458
UL:2712~2868
DL:2937~3088
Tx/Rx spacing
190MHz
80MHz
400MHz
45MHz
45MHz
Mod. Bit rate/
Bit Period
42.2Mbps(DL)
5.42Mbps(UL)
42.2Mbps(DL)
5.42Mbps(UL)
42.2Mbps(DL)
5.42Mbps(UL)
42.2Mbps(DL)
5.42Mbps(UL)
42.2Mbps(DL)
5.42Mbps(UL)
Time Slot Period/
Frame Period
WCDMA
10ms/0.667ms
HSPA
2ms/0.667ms
WCDMA
10ms/0.667ms
HSPA
2ms/0.667ms
WCDMA
10ms/0.667ms
HSPA
2ms/0.667ms
WCDMA
10ms/0.667ms
HSPA
2ms/0.667ms
WCDMA
10ms/0.667ms
HSPA
2ms/0.667ms
Modulation
QPSK
16QAM
64QAM
QPSK
16QAM
64QAM
QPSK
16QAM
64QAM
QPSK
16QAM
64QAM
QPSK
16QAM
64QAM
MS Power
(dBm)
25.7 ~ -49(↓)
25.7 ~ -49(↓)
25.7 ~ -49(↓)
25.7 ~ -49(↓)
25.7 ~ -49(↓)
Power Class
3(max+24dBm)
3(max+24dBm)
3(max+24dBm)
3(max+24dBm)
3(max+24dBm)
Sensitivity
-106dBm
-104dBm
-106dBm
-104dBm
-103dBm
2-3-2. WCDMA General Specification [SM-A705MN]
Distribution, transmission, or infringement of any content or data from this document without Samsung’s written authorization is strictly prohibited.
Confidential and proprietary-the contents in this service guide subject to change without prior notice
2. Specification
Item
LTE Band1
LTE Band3
LTE Band5
LTE Band7
LTE Band8
Freq. Band[MHz]
Uplink/Downlink
1920~1980
2110~2170
1710~1785
1805~1880
824~849
869~894
2500~2570
2620~2690
880~915
925~960
ARFCN range
UL:18000~18599
DL:0~599
UL:19200~19949
DL:1200~1949
UL:20400~20649
DL:2400~2649
UL:20750~21449
DL:2750~3449
UL:21450-21799
DL:3450-3799
Tx/Rx spacing
(MHz)
190
95
45
120
45
Channel Bandwidth
(MHz)
5/10/15/20
1.4/3/5/10/15/20
1.4/3/5/10
5/10/15/20
1.4/3/5/10
Modulation
QPSK,16/64QAM
256QAM(DL only)
QPSK,16/64QAM
256QAM(DL only)
QPSK,16/64QAM
256QAM(DL only)
QPSK,16/64QAM
256QAM(DL only)
QPSK,16/64QAM
256QAM(DL only)
MS Power (dBm)
25.7~-39(↓)
25.7~-39(↓)
25.7~-39(↓)
25.7~-39(↓)
25.7~-39(↓)
Sensitivity(QPSK,
BW 10MHz) (dBm)
-96.3
-93.3
-94.3
-94.3
-93.3
Item
LTE Band20
LTE Band38
LTE Band40
LTE Band41
Freq. Band[MHz]
Uplink/Downlink
832~862
791~821
2570~2620
2300~2400
2496~2690
ARFCN range
UL:24150~24449
DL:6150~6449
UL/DL:37750 ~ 38249
UL/DL:38650 ~ 39649
UL/DL:39650 ~ 41589
Tx/Rx spacing (MHz)
-41 0 0
0
Channel Bandwidth
(MHz)
5/10/15/20
5/10/15/20
5/10/15/20
5/10/15/20
Modulation
QPSK,16/64QAM
256QAM(DL only)
QPSK,16/64QAM
256QAM(DL only)
QPSK,16/64QAM
256QAM(DL only)
QPSK,16/64QAM
256QAM(DL only)
MS Power (dBm)
25.7~-39(↓)
25.7~-39(↓)
25.7~-39(↓)
25.7~-39(↓)
Sensitivity(QPSK, BW
10MHz) (dBm)
-93.3
-96.3
-96.3
-94.3
2-4-1. LTE General Specification
[SM-A705FN/F/GM]
Distribution, transmission, or infringement of any content or data from this document without Samsung’s written authorization is strictly prohibited.
Confidential and proprietary-the contents in this service guide subject to change without prior notice

2. Specification
Item
LTE Band2
LTE Band4
LTE Band12
LTE Band13
LTE Band17
Freq. Band[MHz]
Uplink/Downlink
1850~1910
1930~1990
1710~1755
2110~2155
699~716
729~746
777~787
746~756
704~716
734~746
ARFCN range
UL:18600~19199
DL:600~1199
UL:19950~20399
DL:1950~2399
UL:23010~23179
DL:5010~5179
UL:23180~23279
DL:5180~5279
UL:23730~23849
DL:5730~5849
Tx/Rx spacing
(MHz)
80
400
30
-31
30
Channel Bandwidth
(MHz)
1.4/3/5/10/15/20
1.4/3/5/10/15/20
1.4/3/5/10
1.4/3/5/10
5/10
Modulation
QPSK,16/64QAM
256QAM(DL only)
QPSK,16/64QAM
256QAM(DL only)
QPSK,16/64QAM
256QAM(DL only)
QPSK,16/64QAM
256QAM(DL only)
QPSK,16/64QAM
256QAM(DL only)
MS Power (dBm)
25.7~-39(↓)
25.7~-39(↓)
25.7~-39(↓)
25.7~-39(↓)
25.7~-39(↓)
Sensitivity (QPSK,
BW 10MHz) (dBm)
-94.3
-96.3
-93.3
-93.3
-93.3
Item
LTE Band20
LTE Band28
LTE Band38
LTE Band40
LTE Band41
LTE Band66
Freq. Band[MHz]
Uplink/Downlink
832~862
791~821
703~748
758~803
2570~2620
2300~2400
2496~2690
1710~1780
2110~2200
ARFCN range
UL:24150~24449
DL:6150~6449
UL:27210~27659
DL:9210~9659
UL/DL:37750 ~
38249
UL/DL:38650 ~
39649
UL/DL:39650 ~
41589
UL:131972~13267
1
DL:66436~67335
Tx/Rx spacing
(MHz)
-41
55 0 0 0 400
Channel
Bandwidth
(MHz)
5/10/15/20
3/5/10/15/20
5/10/15/20
5/10/15/20
5/10/15/20
1.4/3/5/10/15/20
Modulation
QPSK,16/64QAM
256QAM(DL only)
QPSK,16/64QAM
256QAM(DL only)
QPSK,16/64QAM
256QAM(DL only)
QPSK,16/64QAM
256QAM(DL only)
QPSK,16/64QAM
256QAM(DL only)
QPSK,16/64QAM
256QAM(DL only)
MS Power (dBm)
25.7~-39(↓)
25.7~-39(↓)
25.7~-39(↓)
25.7~-39(↓)
25.7~-39(↓)
25.7~-39(↓)
Sensitivity (QPSK,
BW 10MHz) dBm)
-93.3
-94.8
-96.3
-96.3
-94.3
-95.8
2-4-2. LTE General Specification [SM-A705MN]
Distribution, transmission, or infringement of any content or data from this document without Samsung’s written authorization is strictly prohibited.
Confidential and proprietary-the contents in this service guide subject to change without prior notice

3. Product Function
Item
Description
OS
Android P OS V9.0
SM-A705F/FN/FM/GM
RF
GSM : 850, 900, 1800, 1900
WCDMA: B1, 2, 5, 8
LTE FDD B1, 3, 5, 7, 8, 20
LTE TDD 38, 40, 41
SM-A705MN
RF
GSM : 850, 900, 1800, 1900
WCDMA: B1, 2, 4, 5, 8
LTE FDD B1, 2, 3, 4, 5, 7, 8, 12, 13, 17, 20, 28, 66
LTE TDD 38, 40, 41
SM-A705W
RF
GSM : 850, 900, 1800, 1900
WCDMA: B1, 2, 4, 5, 8
LTE FDD B1, 2, 3, 4, 5, 7, 12, 13, 17, 20, 26, 29, 66
LTE TDD 38, 40, 41
Battery
4500mAh
Base Band
2.0Ghz 2x + 1.7GHz 6x
Other RF
GPS, Glonass, Beidou, Galileo / BT5.0 / USB 2.0 / WIFI 802.11 a/b/g/n/ac / NFC / MST
Camera
Triple Camera ( 32MP(F1.7) + 5MP(F2.2) + 8MP(F2.2)) with LED Flash / Front Camera 32MP(F2.0)
LCD
6.7", FHD+, 2400x1080
SM-A705FN/F/GM/MN
RAM+ROM
6+128GB
SM-A705F
RAM+ROM
8+128GB
Sensor
Accelerometer, Fingerprint Sensor, Gyro Sensor, Geomagnetic Sensor, Hall Sensor, Proximity
Sensor, RGB Light Sensor, Grip sensor
Accessory
Charger: 9V/2.77A and 5V/3.0A DC charging
Data cable: 3.05pi, 1.0m(USB-C2C)
Ear phone: 3.5pi, 4pin
Main Function
Confidential and proprietary-the contents in this service guide subject to change without prior notice
Distribution, transmission, or infringement of any content or data from this document without Samsung’s written authorization is strictly prohibited.
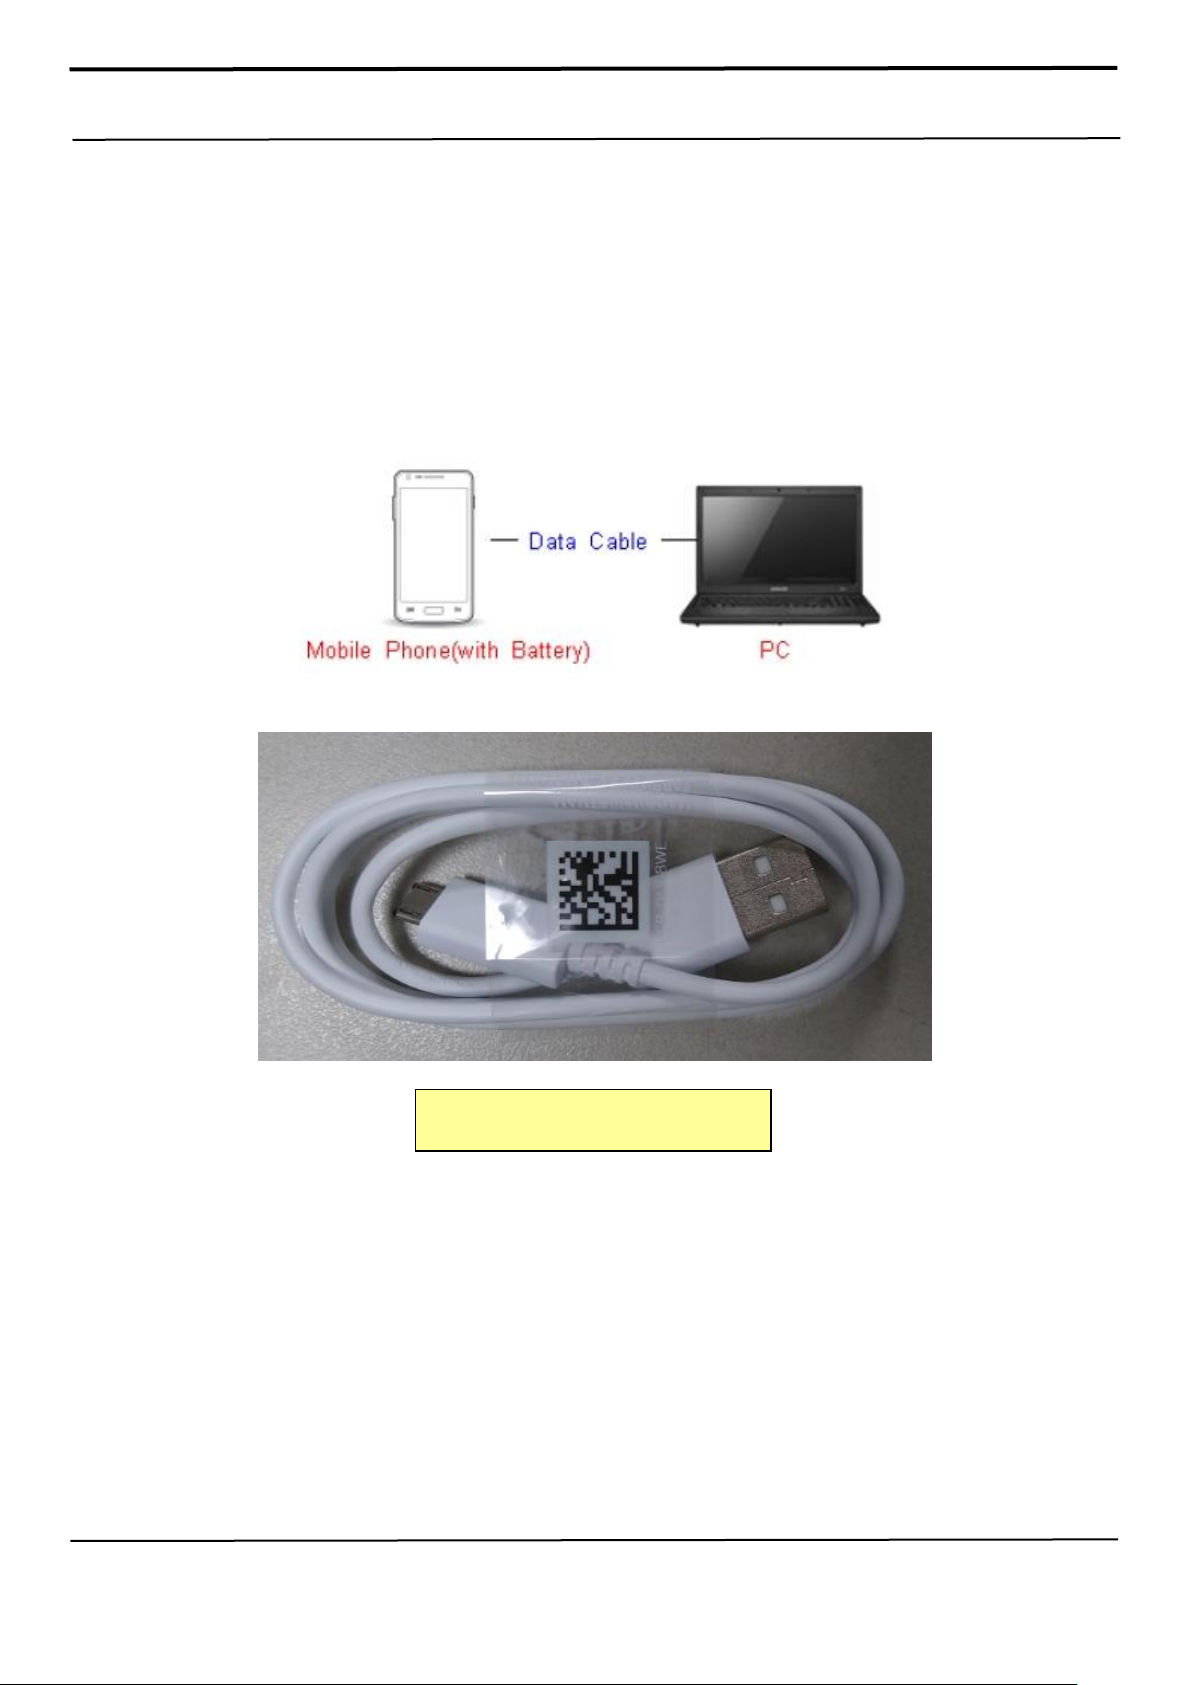
6. Level 1 Repair
Data Cable : GH39-02026A
6-1. S/W Update
6-1-1. Preparation
S/W Update program : Fenrir 5.17.xxxx
Mobile Phone
Data Cable
※ Settings
Confidential and proprietary-the contents in this service guide subject to change without prior notice
Distribution, transmission, or infringement of any content or data from this document without Samsung’s written authorization is strictly prohibited.

6. Level 1 Repair
6-1-2. How to use ‘Fenrir’ S/W update program.
1) Launch Fenrir by clicking on the icon on the desktop
- SVH (Fenrir_Home) : It uses Home binary which does not have user data area in the memory when
flashed to a device. (Keep user data)
- SVC (Fenrir_Factory) : It uses Factory binary which erases all user data in the memory when flashed to a
device. (Clear user data)
- SVA (Fenrir_All) : It uses Factory and Home binaries. you can download Home and Factory binary in a
PC(but requires double HDD storage and NW traffic)
2) Input ID & password
※You need to reset the ID information in case of PC change and format and repair, hard disk change
Confidential and proprietary-the contents in this service guide subject to change without prior notice
Distribution, transmission, or infringement of any content or data from this document without Samsung’s written authorization is strictly prohibited.

6. Level 1 Repair
3) Ensure device has sufficient charge (at least 20%) to start firmware update.
4) Connect the device to PC via data cable.
5) Upon USB connection, you will be presented with below screen.
Confidential and proprietary-the contents in this service guide subject to change without prior notice
Distribution, transmission, or infringement of any content or data from this document without Samsung’s written authorization is strictly prohibited.

6. Level 1 Repair
6) Once device is detected, you will be presented with below screen. To update S/W, select “S/W Update”
or to exit select “SVC Connection”. If you select “SVC Connection”, only Fenrir connection history (record)
will be stored in the FUS server to support warranty validation. (This is known as “Service Connection”
history)
7) Once Fenrir starts, application will display the below screen. And select the Start button & Agree button.
Confidential and proprietary-the contents in this service guide subject to change without prior notice
Distribution, transmission, or infringement of any content or data from this document without Samsung’s written authorization is strictly prohibited.

6. Level 1 Repair
8) The status circle increases as the update installs. The update process takes approximately 5-10 minutes
to complete. Do not disconnect the device from USB during processing.
9) Once complete, application will present the below screen indicating update complete.
Click Ok and detach device from USB.
Confidential and proprietary-the contents in this service guide subject to change without prior notice
Distribution, transmission, or infringement of any content or data from this document without Samsung’s written authorization is strictly prohibited.

6. Level 1 Repair
Data Cable : GH39-02026A
6-2. How to use ‘Odin’ program
※ S/W Update via Fenrir is mandatory.
Below is the method to use ‘Odin’ program in any specific case.
6-2-1. Preparation
Installation program : Odin3 v3.13.2.exe or above
Mobile Phone
Data Cable
S/W Binary files (downloaded from GSPN)
※ Settings
Confidential and proprietary-the contents in this service guide subject to change without prior notice
Distribution, transmission, or infringement of any content or data from this document without Samsung’s written authorization is strictly prohibited.

6. Level 1 Repair
6-2-2. S/W Installation Program (Downloader program)
Open up the S/W Installation Program by executing the "Odin3 v3.13.2.exe"
Confidential and proprietary-the contents in this service guide subject to change without prior notice
Distribution, transmission, or infringement of any content or data from this document without Samsung’s written authorization is strictly prohibited.

6. Level 1 Repair
1. Enable the check mark by click on the following options
- Check Auto Reboot, F. Reset Time, Nand Erase
- Check BL, AP, CP, CSC Files
* Note : "Odin v3.13.2 or above" checks MD5 checksum just after file selection.
Confidential and proprietary-the contents in this service guide subject to change without prior notice
Distribution, transmission, or infringement of any content or data from this document without Samsung’s written authorization is strictly prohibited.

6. Level 1 Repair
USB Cable Connect
2. Enter into Download Mode
- Enter into Download Mode by pressing Volume Down button, Intelligence button and ON/OFF Button
simultaneously followed by pressing Volume up button as a direction of the phone.
Confidential and proprietary-the contents in this service guide subject to change without prior notice
Distribution, transmission, or infringement of any content or data from this document without Samsung’s written authorization is strictly prohibited.

6. Level 1 Repair
3. Connect the device to PC via Data Cable.
Make sure that the one of communication ports [ID:COM] box is highlighted in sky blue.
The device is now connected with the PC and ready to download the binary files in it.
Confidential and proprietary-the contents in this service guide subject to change without prior notice
Distribution, transmission, or infringement of any content or data from this document without Samsung’s written authorization is strictly prohibited.

6. Level 1 Repair
4. Start downloading the binary files into the device by clicking Start button on the screen.
The green colored "PASS!" sign will appear on the upper-left box if the binary files have been successfully
downloaded into the device.
5. Disconnect the device from the Data cable.
6. Once the device boots up, you can check the version of the binary file or name by pressing the following
code in sequence; *#1234#
You can perform Factory data Reset by Settings → General Management → Reset
※ Caution. Never disconnect during the S/W downloading.
Confidential and proprietary-the contents in this service guide subject to change without prior notice
Distribution, transmission, or infringement of any content or data from this document without Samsung’s written authorization is strictly prohibited.

6. Level 1 Repair
① Library Install
To use Daseul, library files should be installed.
Refer to SVC Bulletin
“(11-82) Daseul (New IMEI writing Program) Library Install guide_rev1.0”
②Launcher
DASEUL_SVC_Launcher_v3.0.12 or higher
-Uploaded on HHPsvc Notice
③ Runtime File
1. DASEUL_IMEI_ALL_Runtime_3.1.348.0_r00519.CAB or higher
-Uploaded on HHPsvc Notice
2. Make ‘SM-A205F’ folder at the same position with
launcher & Runtime file.
④Model File
Copy Model File under the ‘SM-A205F’ folder
6-3. IMEI writing
6-3-1. Preparation
- New IMEI writing Program has been released.
- Supported Model : Models which CAB files are uploaded on HHPsvc INI File category, instead of ini file.
- Refer to below IMEI writing procedure.
- H/W
- S/W
Distribution, transmission, or infringement of any content or data from this document without Samsung’s written authorization is strictly prohibited.
Confidential and proprietary-the contents in this service guide subject to change without prior notice

6. Level 1 Repair
1. Run DASEUL_SVC_Launcher_v3.0.12.exe
2. Select Service Mode
3. Click and Select folder where the Launcher exists
Model Name
6-3-2. IMEI writing Process
Confidential and proprietary-the contents in this service guide subject to change without prior notice
Distribution, transmission, or infringement of any content or data from this document without Samsung’s written authorization is strictly prohibited.

6. Level 1 Repair
4. Select Model
5. Check IMEI and click System Setting
※Once you setup the setting, you don t have to do it again, unless there is change.
From second run of the IMEI program, check IMEI and click Extract & Run.
Model Name
Model Name
Confidential and proprietary-the contents in this service guide subject to change without prior notice
Distribution, transmission, or infringement of any content or data from this document without Samsung’s written authorization is strictly prohibited.

6. Level 1 Repair
6. Check IMEI Write / IMEI Check and click IMEI SVC & Repair Option.
7. Check ‘SVC , User Ticket No’ and click OK
Confidential and proprietary-the contents in this service guide subject to change without prior notice
Distribution, transmission, or infringement of any content or data from this document without Samsung’s written authorization is strictly prohibited.

6. Level 1 Repair
8. Click ‘Hardware Config’
9. Click ‘Port Setting’
Confidential and proprietary-the contents in this service guide subject to change without prior notice
Distribution, transmission, or infringement of any content or data from this document without Samsung’s written authorization is strictly prohibited.

6. Level 1 Repair
10. Select Port Number and SAVE
11.Click OK to proceed
Confidential and proprietary-the contents in this service guide subject to change without prior notice
Distribution, transmission, or infringement of any content or data from this document without Samsung’s written authorization is strictly prohibited.

6. Level 1 Repair
12. Click Model Info and OK when pop-up shows
13. Click OK
Confidential and proprietary-the contents in this service guide subject to change without prior notice
Distribution, transmission, or infringement of any content or data from this document without Samsung’s written authorization is strictly prohibited.

6. Level 1 Repair
14. Input SKU_CODE and BUYER, then click Save button.
※ Refer to HHPsvc→IMEI Review to check SKU Code and buyer
15. Input IMEI Number and click Apply
Confidential and proprietary-the contents in this service guide subject to change without prior notice
Distribution, transmission, or infringement of any content or data from this document without Samsung’s written authorization is strictly prohibited.

6. Level 1 Repair
16. ① Click Start → ②Input IMEI writing ID and Password & OTP → ③Input Ticket No
Model Name
Distribution, transmission, or infringement of any content or data from this document without Samsung’s written authorization is strictly prohibited.
Confidential and proprietary-the contents in this service guide subject to change without prior notice
6. Level 1 Repair
17. Connect the phone to Anyway JIG
※ When you connect the phone, the phone should be turned off.
After connecting the phone, the phone will be booted automatically.
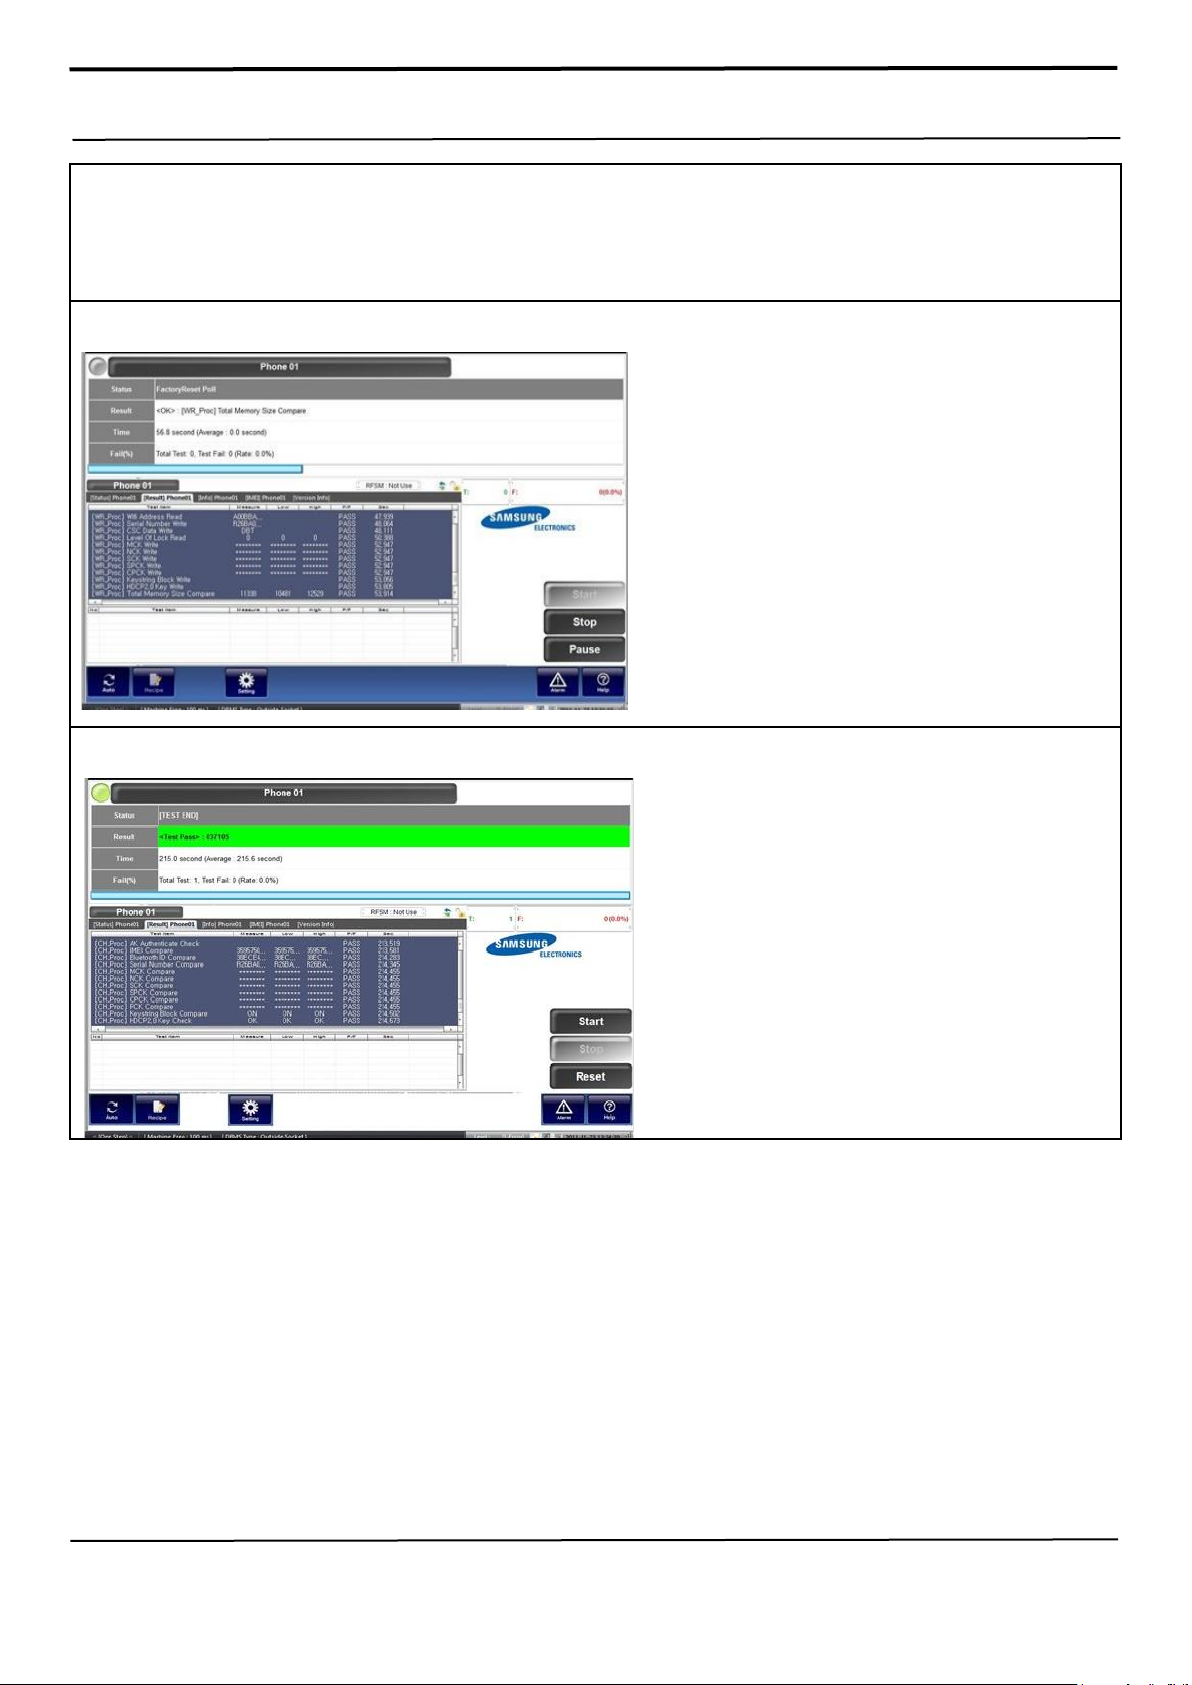
18. IMEI Writing Proceeding
19. IMEI Writing Success
Distribution, transmission, or infringement of any content or data from this document without Samsung’s written authorization is strictly prohibited.
Confidential and proprietary-the contents in this service guide subject to change without prior notice

9. Reference Abbreviation
Reference Abbreviation
― AAC: Advanced Audio Coding.
― AVC : Advanced Video Coding.
― BER : Bit Error Rate
― BPSK: Binary Phase Shift Keying
― CA : Conditional Access
― CDM : Code Division Multiplexing
― C/I : Carrier to Interference
― DMB : Digital Multimedia Broadcasting
― EN : European Standard
― ES : Elementary Stream
― ETSI: European Telecommunications Standards Institute
― MPEG: Moving Picture Experts Group
― PN : Pseudo-random Noise
― PS : Pilot Symbol
― QPSK: Quadrature Phase Shift Keying
― RS : Reed-Solomon
― SI : Service Information
― TDM : Time Division Multiplexing
― TS : Transport Stream
Confidential and proprietary-the contents in this service guide subject t o change w ithout prior notice
Distribution, transmission, or infringement of any content or data from this document without Samsung’s written authorization is strictly prohibited.
 Loading...