

Samsung SM-308 User Manual

BG68-00237A Rev:01
Easy CD C
Direct CD for Windows®95/98/2000 and N
●
ENGLISH
●
ESPAÑOL
●
DEUTSCH
●
FRANÇAIS
http://www.samsungelectronics.com
SM-308

User's Guide
COMBO DRIVE
SM-308
FCC Compliance
This equipment has been tested and found to comply with the limits for a
Class B digital device, pursuant to Part 15 of the FCC rules.
These limits are designed to provide reasonable protection against harmful
interference in a residential installation.
This equipment generates, uses, and can radiate radio frequency energy and,
if not installed and used in accordance with the instructions, may cause
harmful interference to radio communications. However, there is no guarantee
that interference will not occur in a particular installation. If this equipment
does cause harmful interference to radio or television reception, which can be
deter-mined by turning the equipment off and on, the user is encouraged to
try to correct the interference by one or more of the following measures:
• Re-orient or relocate the receiving antenna.
• Increase the separation between the equipment and receiver.
• Connect the equipment into an outlet on a circuit different from that to
which the receiver is connected.
• Consult the dealer or an experienced radio/TV technician for help.

Contents
3
Safety Precautions
2
The following diagrams illustrate the precautions to be taken when using
your COMBO drive.
You must not use the drive in any manner other than that specified in this guide.
Avoid exposing your eyes or skin to direct or scattered radiation.
CAUTION
Do not attempt to repair the COMBO drive yourself. Contact
your dealer or local SAMSUNG representative for all repairs.
If you make any adjustments or perform any operations other
than those specified in this guide, you run the risk of exposure to
hazardous radiation.
WARRANTY
Please refer to the Samsung limited warranty statements.
Precautions
1.To reduce the risk of fire or electric shock, do not expose
this appliance to rain or moisture.
2. Always check each disc for cracks before using it. If there are
cracks on the surfaces, especially around the border of the
center hole, we recommend that you make a copy of the disc
immediately and then stop using it. If you continue using the
disc, it will probably develop more cracks and eventually cause
irreparable damage.
3. Do not use poor quality discs:
● From unknown sources
● Without any copyright
● Scratched or damaged in any way
Safety Precautions . . . . . . . . . . . . . . . . . . . . . . . . . . . . . . . . . . . . . . . . . . . .2
Your COMBO Drive . . . . . . . . . . . . . . . . . . . . . . . . . . . . . . . . . . . . . . . . . .4
Upgrading the Firmware Flash Memory . . . . . . . . . . . . . . . . . . . . . . . . .5
System Requirements . . . . . . . . . . . . . . . . . . . . . . . . . . . . . . . . . . . . . . . . .5
Installing the COMBO Drive . . . . . . . . . . . . . . . . . . . . . . . . . . . . . . . . . . .5
Connecting the Cables . . . . . . . . . . . . . . . . . . . . . . . . . . . . . . . . . . . . . . . .6
Installing the CD Record Utility . . . . . . . . . . . . . . . . . . . . . . . . . . . . . . . .8
Installing the Device Driver . . . . . . . . . . . . . . . . . . . . . . . . . . . . . . . . . . . .8
Setting Up the Device Driver . . . . . . . . . . . . . . . . . . . . . . . . . . . . . . . . . . .9
Using the COMBO Drive . . . . . . . . . . . . . . . . . . . . . . . . . . . . . . . . . . . . .10
Storing and Cleaning Your Discs . . . . . . . . . . . . . . . . . . . . . . . . . . . . . .10
Solving Recording Problems . . . . . . . . . . . . . . . . . . . . . . . . . . . . . . . . . .11
Recommended Disc Types . . . . . . . . . . . . . . . . . . . . . . . . . . . . . . . . . . . .13
Solving Technical Problems . . . . . . . . . . . . . . . . . . . . . . . . . . . . . . . . . . .14
Technical Specifications . . . . . . . . . . . . . . . . . . . . . . . . . . . . . . . . . . . . . .15
* All product names mentioned in this document are trademarks or registered trademarks
of their respective owners.
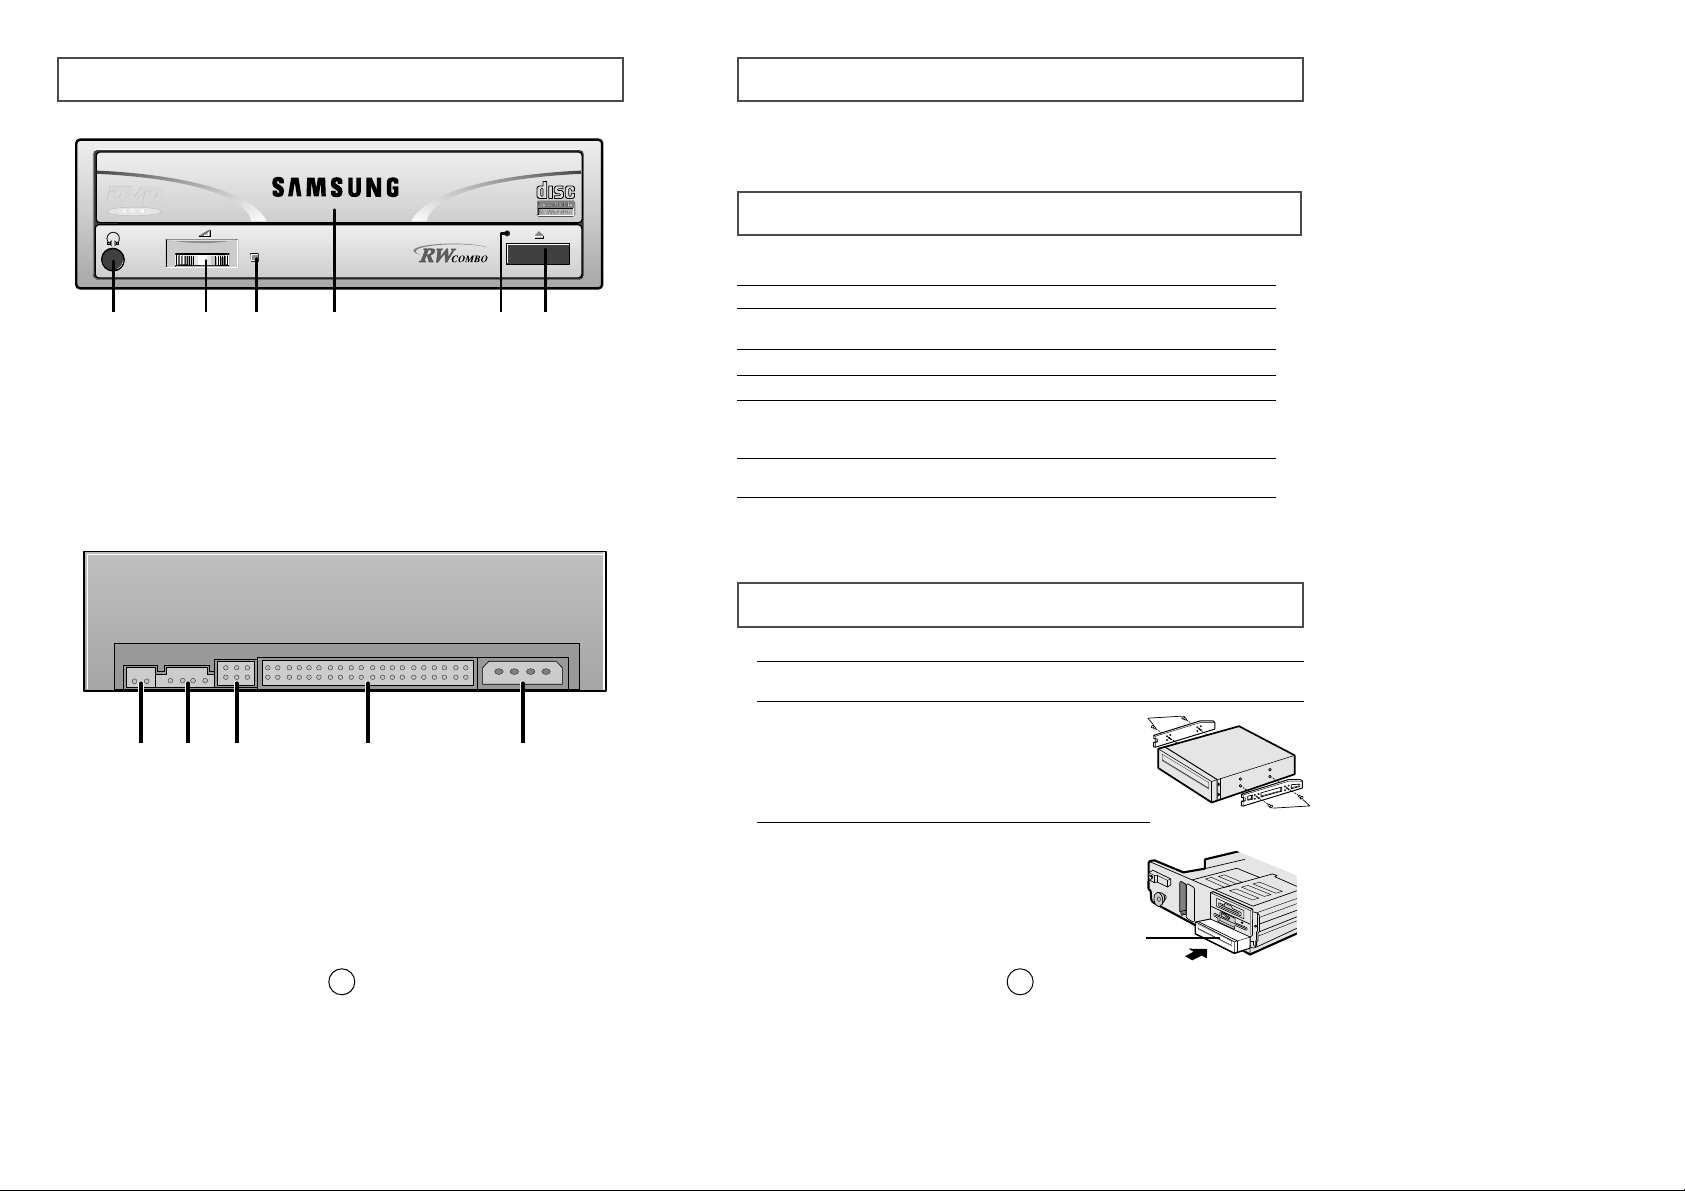
Installing the COMBO Drive
Upgrading the Firmware Flash Memory
5
The product firmware can be upgraded by downloading the updated file from the
following Web site:
http://www.samsungelectronics.com
To install your COMBO drive in the PC, proceed as follows.
1Make sure that the PC is powered off and disconnected from any power source.
2If necessary, attach a horizontal bracket to both sides of
the drive.
COMBO drive
● Use of the brackets depends on your computer
model; you can purchase these accessories
separately from your computer dealer.
3Remove the cover from a free expansion slot and install
the COMBO drive, as shown in the illustration.
● If you have no free expansion slot, install the drive in
place of the diskette drive.
Before you install the COMBO drive, we strongly recommend that you
check that your setup meets the system requirements listed below.
System Requirements
Item Description
Computer Intel Pentium II 300MHz/Celeron 333A(or higher),
32 MB of RAM (or higher) with an IDE interface
Free expansion unit 5.25 inch
Disk space 700 MB minimum
Windows version Windows 95/98/2000/ME/NT4.0 OSR2 (or higher)
(For Windows NT, we recommend Service Pack2,
and Version is over 4.00.1381)
MS-DOS 5.0 or higher (For MS-DOS, The CD-R/CD-RW driver
can only read a disc without premaster Software.)
DVD Video playback PC with Windows 95/98/2000/ME/NT4.0 OSR2
DVD-Video playback software and appropriate hardware
(the Power DVD MPEG software is included in the
COMBO drive package)
Your Combo Drive
4
1234 56
1
23 4
5
1. Earphone connection terminal
2. Volume control
3. Indicator light (when it is green, a disc is being read or recorded)
4. Disc compartment
5. Emergency eject hole (if the compartment does not open when
you press the Eject button, insert a pin or unfolded paper clip in the
hole and push firmly)
6. Eject button
1. Digital output terminal
2. Sound output terminal
3. Master/slave select terminal
4. Interface terminal
5. Power terminal
7
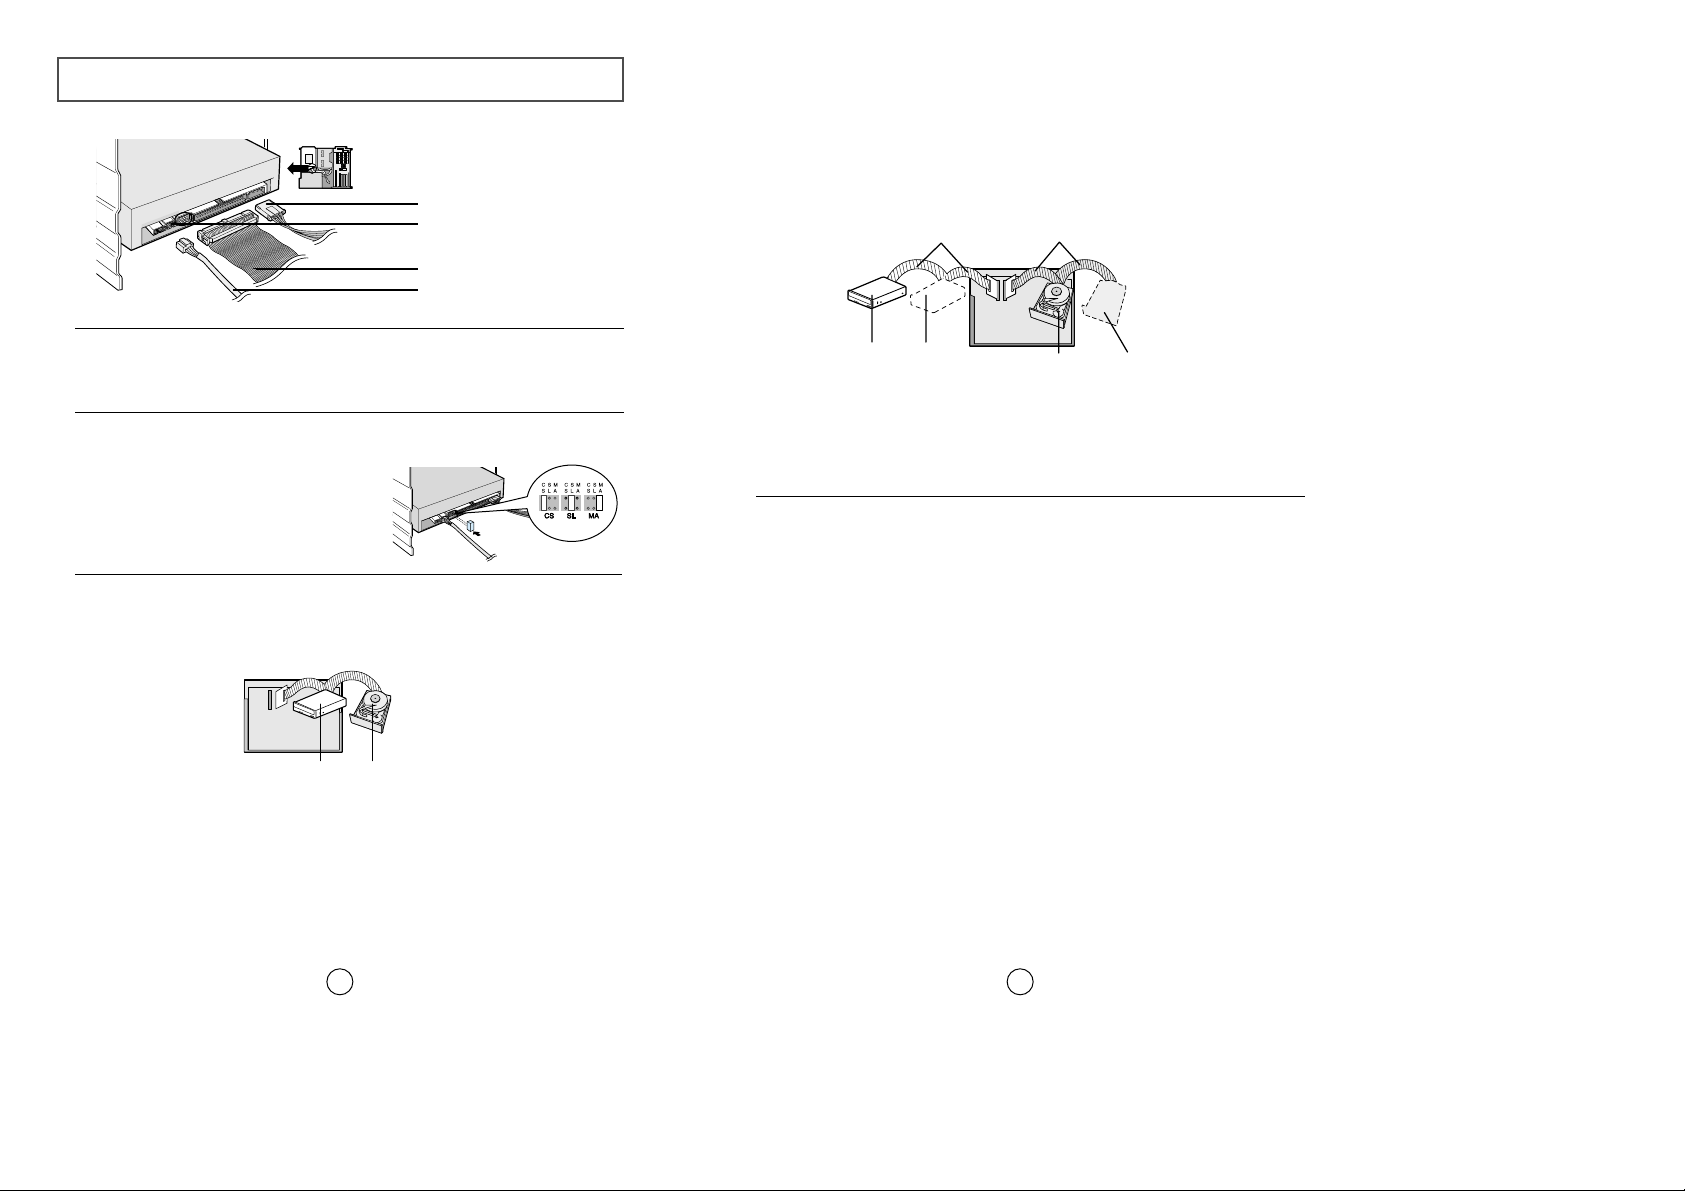
Connecting the Cables
6
1. Power cable
3. IDE cable
2. Master/slave select terminal
4. Audio cable
1Connecting the power cable
The 4-pin power cable from the internal power unit of your computer must be
connected to the power terminal on the rear of the COMBO drive.
3Connecting the IDE cable
Two configurations are possible.
● The COMBO drive is the only IDE device in addition to the hard disc.
4Connecting the audio cable from a sound card
Connect the 4-pin audio cable between the sound output terminal on the COMBO
drive and the audio input terminal on the sound card.
2Installing a jumper on the master/slave select terminal
Install the jumper in the correct position on the terminal:
MA to use the device in the master mode
SL to use the device in the slave mode
CS to control the device via a CSEL
host interface signal
See Step 3 for further details.
IDE port
Mother board
COMBO
(SL)
Hard disc
(MA)
Second IDE cable
COMBO
(MA)
CD-ROM
(SL)
Hard disc
(SL)
Hard disc
(MA)
First IDE cable
Mother
board
Install the jumper in the SL position (Slave).
Connect the 40-pin flat IDE cable from the IDE port on the mother board, first to
the COMBO drive and then to the ha
rd disc.
● You already have an additional IDE device installed in your computer.
Install the jumper in the MA position (Master).
Connect the 40-pin flat IDE cable from a second IDE port on the mother
board directly to the COMBO drive or first to another additional IDE drive and
then to the COMBO drive.

Setting Up the Device Driver
9
◆
Automatic Setup
1Insert the setup diskette in the diskette drive and change the directory to A:,
where A: is the diskette drive.
To do so, type A: after the C:\ prompt and press [Enter].
2Type CDSETUP and press [Enter].
3Reboot the computer.
◆
Manual Setup
LAST DRIVE = Z
- - - - - - - - - - - - - - - - - - - - - - - - - - - - - - - - - - - -
- - - - - - - - - - - - - - - - - - - - - - - - - - - - - - - - - - - DEVICE = C :\SAMSUNG\SSCDROM.SYS /D : SSCD000 /V
- - - - - - - - - - - - - - - - - - - - - - - - - - - - - - - - - - - -
- - - - - - - - - - - - - - - - - - - - - - - - - - - - - - - - - - - C :\SAMSUNG\MSCDEX /D:SSCD000
Installing the CD Record Utility
8
To record data on a CD-R or CD-RW disc in the COMBO drive, you must
first install the CD record utility. For compatibility reasons, you are
recommended to uninstall any existing software of the same type before
installing this utility.
1Insert the disc supplied with the COMBO drive in the drive.
2Follow the instructions displayed on the screen to install the utility.
Refer to the separate utility documentation for further details.
3Store the utility disc in a safe place.
The SAMSUNG device driver enables discs in the COMBO drive to be read but
not recorded in an MS-DOS environment; the driver is located in the D driver
folder on the CD record utility disc.
You do not need to install an additional device driver for
Windows 95/98/2000/ME, Windows NT4.0, as the default Windows device
driver is used.
Installing the Device Driver
1Make the C:\SAMSUNG directory.
2Copy the files from the diskette to the C:\SAMSUNG directory.
To do so, type COPY A:
*.*
C:\SAMSUNG after the C:\ prompt and press
[Enter].
3Edit the CONFIG.SYS file.
Add the DEVICE=C:\SAMSUNG\SSCDROM.SYS \D:SSCD000 /V entry.
4Edit the AUTOEXEC.BAT file.
Add the C:\SAMSUNG\MSCDEX /D:SSCD000 entry.
5Reboot the computer.
11
Using the COMBO Drive
10
To ensure a long service life for your discs and drive, follow the precautions below when storing and cleaning your discs.
1Push the power button and boot the computer.
2After booting the computer, open the disc
compartment by pressing the Eject button.
3Insert the disc (CD/DVD) and close the disc
compartment by pressing the Eject button.
The indicator light comes on.
4 Play the disc (CD/DVD).
1Do not place a disc in direct sunlight.
2Store a disc vertically in a well-ventilated and
stable location.
3Do not write or attach a label on a disc.
4Do not drop a disc or place heavy objects on it.
Playing Audio CDs
Run the CD player supplied with Windows or your sound card.
You can listen to the CD by connecting an earphone to the earphone
connection terminal.
Playing DVDs or Video CDs
Set up and run the SOFT MPEG program supplied as an accessory.
Storing and Cleaning Your Discs
5Do not touch the surface of a disc; hold it by the
edges.
6To clean a disc, polish lightly from the inside of the
disc to the outside with a soft cotton cloth.
1
Check whether the source file is corrupted.
2
Optimize the hard disc by using the Windows defragmenter feature:
START / PROGRAMS / ACCESSORIES / SYSTEM TOOLS / DISC DEFRAGMENTER
3
Decompress the hard disc if it is compressed.
4
Make sure that the space available on the hard disc is at least twice the size
of the largest file to be recorded on the disc.
5
If you wish to record more than 1 000 small files:
● First create an image file and copy the image file to the disc; refer to the
section entitled "CD Creation from CD Image" in the CD record utility
documentation
● Choose the low record speed
● Compress small files and then record them
Solving Recording Problems
If you have any problems recording via your COMBO drive, follow the
appropriate instructions below for the source that you are using.
To play audio or video CDs and/or DVDs in your COMBO drive, proceed as
follows.
◆
Hard Drive

Recommended Disc Types
13
DVD Region Protection Coding (RPC):
The RPC feature is supported on DVD players and is used with DVD-video
discs (such as movies). Currently, the motion picture industry has divided
the world into different regions or zones that correspond to the regional
markets into which the motion picture industry releases movies. Simply put,
RPC codes are placed on movies marketed throughout the world, based on
the region of the world in which they are being sold. These RPC codes help
control and prevent pirating of new movies into other motion picture regions
prior to their true release dates within those markets.
The SM-308 COMBO drive supports RPC phase II. In the RPC-2 mode,
the local code can be changed by users. RPC-2 is selected by default
for the SM-308 COMBO drive. You can change the region code up to
five times via an MPEG application.
Please contact your dealer or local SAMSUNG representative if you
wish to change the local code more than five times.
CD-R Fujifilm, Kodak, Maxell, Mitsubishi, Mitsui, Pioneer, Ricoh,
SKC, Sony, Taiyo Yuden, TDK, Yamaha
CD-RW Mitsubishi, Ricoh, SKC
12
1
Copy the network drive contents to the hard disc and then from the hard disk
to the COMBO drive.
1
Clean the source CD, if necessary.
2
Create an image file and then copy the image file to the COMBO drive.
3
Check the CD-ROM drive record speed.
There are two recording methods :
● Low-speed (file by file)
● High-speed (transfer of an image file from the hard disc)
4
If the transfer speed of the CD-ROM drive is slower than the record speed,
reduce the record speed.
1
Before starting to record, determine the audio and transfer speeds by using
the [Tool/System Test] option in Easy CD Creator. Then, choose an
appropriate record speed. If the audio speed is less than 2X, first create an
image file on the hard disc.
2
To perform a record test before copying to a CD, select the [Test/Copy]
option.
3
If the test fails, try recording on another disc.
4
The COMBO drive does not support high-speed recording to CD-RW discs
above 8X. Discs above CD-RW 8X use different rewriting methods and can
only be read via the COMBO drive.
◆
Network Drive
◆
CD-ROM Drive
◆
Others

Technical Specifications
15
SAMSUNG continually strives to improve its products. Both the design
specifications and these user instructions are thus subject to change without
notice.
CD-R: Max.1200 KB/sec (8X)
Max. 600 KB/sec (4X)
CD-RW: Max. 600 KB/sec (4X)
Sustained:
Max. 10800 KB/sec (8X)
Max. 4800 KB/sec (32X)
Disc
Error rate
Rear Panel
Front Panel
Operating
Environment
General
Reliability
Drive
Performance
Disc diameter
Disc types supported
Data transfer rate
Access time (1/3 stroke)
Data buffer capacity
Laser
Slide mechanism
Spindle motor
Load mechanism
Eject button
Indicator (LED)
Headphone output
Volume control
Dimensions
Net weight
Operations
Storage
Required power
Interface connector
Audio output
Jumper block
MTBF
DVD-ROM, DVD-VIDEO, CD-DA (Audio), CD-ROM, CD-ROM XA,
CD-Plus, CD-Extra, Photo-CD (Single, Multi-session), Video CD
ready, Enhanced CD, CD-I/FMV, CD-R, CD-RW, CD-TEXT
12 cm or 8 cm
Erasing disc types
CD-RW
PIO mode 4:16.6 MB/sec, DVD:
8X / CD, CD-R: 32X
Multiword DMA mode2: 16.6 MB/sec
120 ms
2 048 KB
Semiconductor laser
Stepping motor
Brushless motor
Tray. DC motor (Soft Eject). Horizontal/Vertical.
Mode 1:10
-12
, Mode 2:10
-9
Auto eject or Auto inject
BUSY
Stereo mini-jack (
Ø 3.6 mm)
0.60±20% (vrms) 33 Ω
Dial type
+5 VDC: 2.5 A (max.), +12 VDC: 1.5 A (max.)
ATAPI BUS (IDE)
Line out 0.70
± 20% (vrms): 47 KΩ
Device configuration jumper
Temperature: 5~45°C Humidity: 10~80%
149 (W)
x
42 (H) x 200 (D) mm (including bezel)
860 g (drive only)
125 000 POH (20% duty)
130 ms / 110 ms
Item
CD-RW DVD / CD
Temperature: -25~55°C Humidity: 10~90%
Solving Technical Problems
14
The COMBO drive is not
detected by the computer.
After installing the COMBO
drive, the PC gets slower.
◆ Check that the power, audio and IDE cables are
correctly connected to the computer.
◆ Change the IDE cable and reconnect it to the computer.
Preferably, connect a second IDE cable to the COMBO
drive in master mode; see page 7 for further details.
◆ Check the position of the jumper in the master/slave
select terminal.
Problem Meaning / Solution
The COMBO drive is not
recognized by MS-DOS.
◆ Reinstall the device driver or update it with the latest
version by downloading it from the Samsung Web site.
The COMBO drive is not
detected by Windows.
◆ This case may occur when there is a Windows
installation problem; reinstall Windows.
No sound is heard from an
audio CD.
◆ Check whether the audio cable is correctly connected
to the sound output terminal on the COMBO drive and
the sound card CD-IN terminal.
◆ Check that the sound card is operational.
◆ Adjust the volume control.
A CD is not read or is read too
slowly.
◆ Install the latest version of the device driver.
◆ Check whether the CD is of good quality and clean it,
if necessary.
When the MPEG software plays
a Video CD, the pictures are not
regular and the running speed is
too slow.
◆ Adjust the size of the replay screen.
◆ After checking the display resolution, adjust it, if
necessary.
The Disc is not in message is
displayed even though a disc
has been inserted.
◆ The computer may not recognize the disc if you start
playback too quickly after inserting the disc.
Open and close the disc compartment and try again.
◆ Clean the disc and try again.
The COMBO drive is not
detected after it is connected to
a sound card.
◆ The interface mode of the sound card is AT-BUS.
You must therefore connect the COMBO drive to the
IDE port on the PC mother board, rather than to the
sound card, or install an IDE-compatible sound card.
The disc compartment will not
open.
◆ Check that the power cable is correctly connected.
◆ Power off and disconnect the PC. Insert a pin or
unfolded paper clip in the emergency hole and push
firmly until the disc compartment opens.
 Loading...