

Samsung M262x, M282x, SLM2625D, SLM2825DW, SLM2625DXAC User Manual

User’s Guide
User’s Guide
BASIC
BASIC
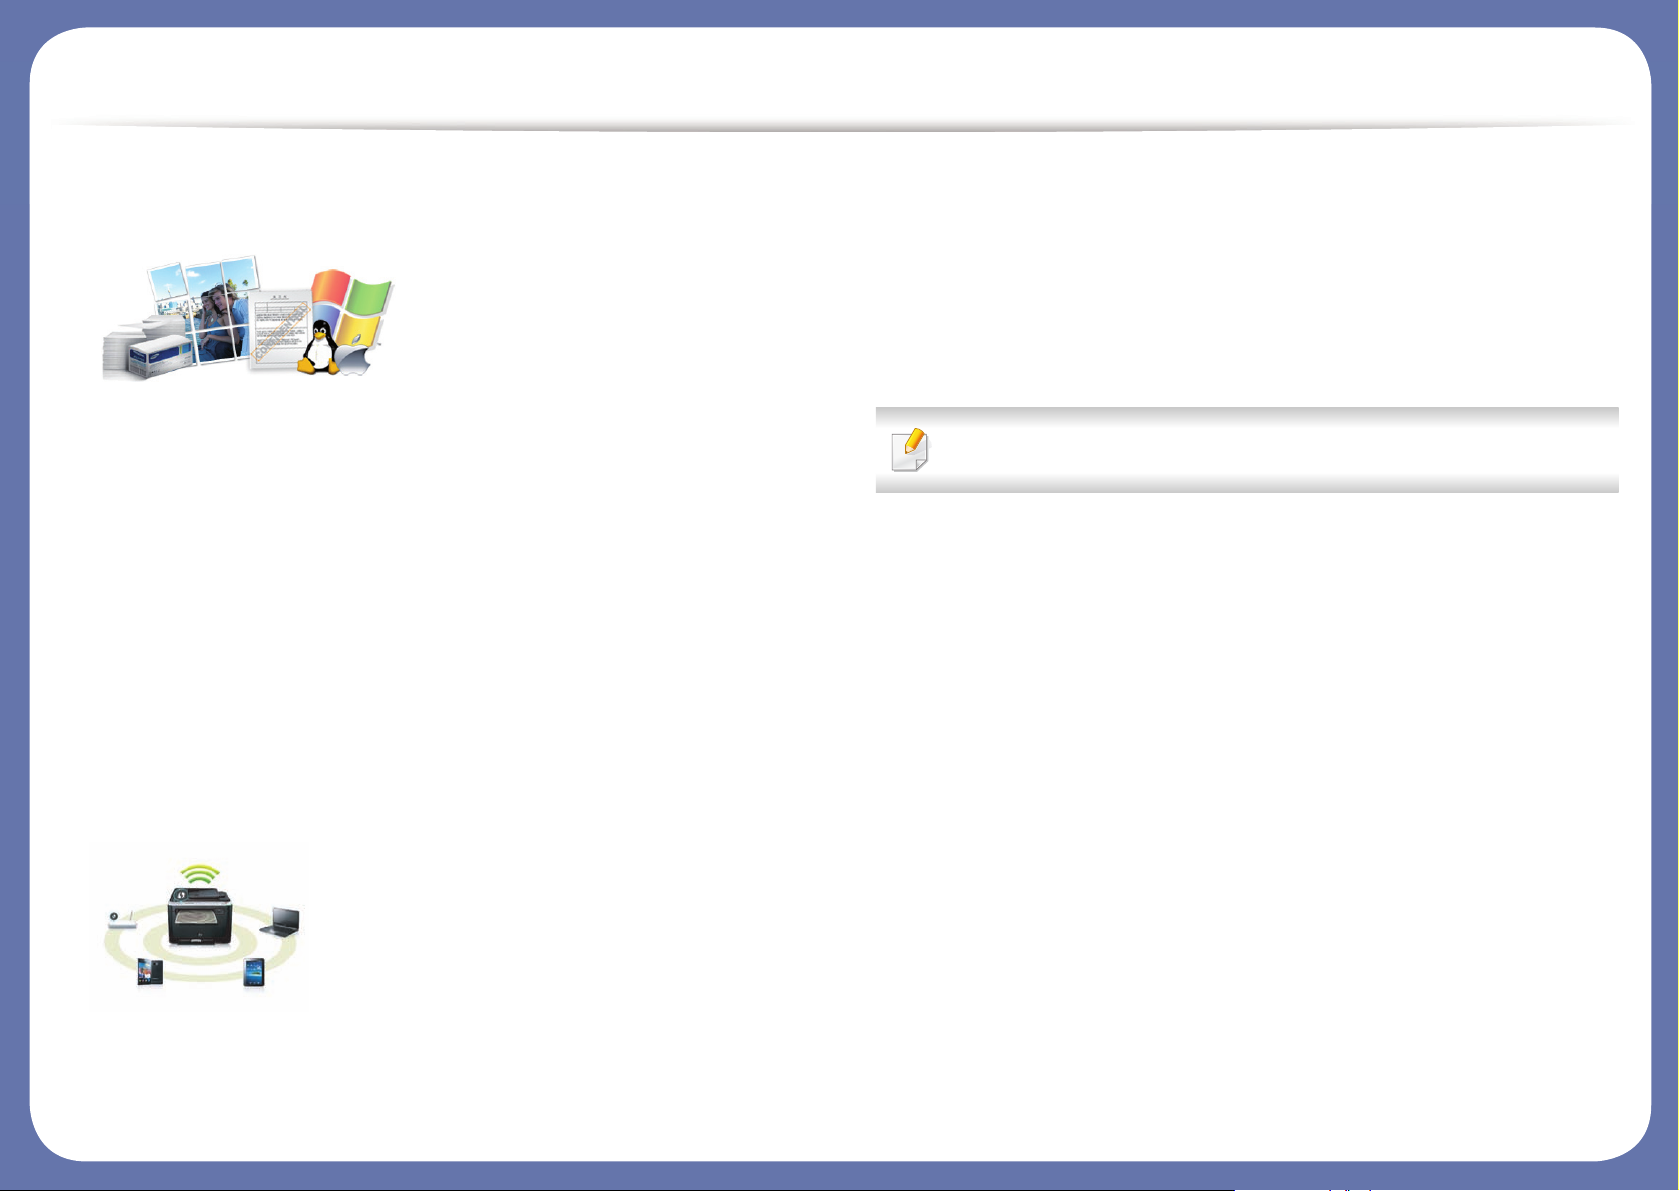
This guide provides information concerning the installation, basic operation
and troubleshooting on windows.
ADVANCED
This guide provides information about the installation, advanced configuration, operation
and troubleshooting on various OS environments.
Some features may not be available depending on models or countries.

Available consumables 43
1. Introduction
Key benefits 4
Features by models 6
Useful to know 8
About this user’s guide 9
Safety information 10
Machine overview 15
Control panel overview 17
Turning on the machine 19
Installing the driver locally 20
Reinstalling the driver 22
2. Basic setup
Available maintenance parts 44
Storing the toner cartridge 45
Redistributing toner 47
Replacing the toner cartridge 49
Replacing the imaging unit 52
Cleaning the machine 53
Tips for moving & storing your machine 57
4. Troubleshooting
Tips for avoiding paper jams 59
Clearing paper jams 60
Understanding the LED 68
Printing a demo page 24
Media and tray 25
Basic printing 36
3. Maintenance
Ordering consumables and option 42
5. Appendix
Specifications 71
Regulatory information 80
Copyright 91
2

1. Introduction
This chapter provides information you need to know before using the machine.
•Key benefits 4
• Features by models 6
• Useful to know 8
• About this user’s guide 9
• Safety information 10
• Machine overview 15
• Control panel overview 17
• Turning on the machine 19
• Installing the driver locally 20
• Reinstalling the driver 22

Key benefits
Environmentally friendly
• To save toner and paper, this machine supports the Eco feature.
• To save paper, you can print multiple pages on a single sheet of paper (see
"Using advanced print features" on page 158).
• To save paper, you can print on both sides of the paper (double-sided
printing) (see "Using advanced print features" on page 158).
• To save electricity, this machine automatically conserves electricity by
substantially reducing power consumption when not in use.
• We recommend using recycled paper for saving energy.
Print with excellent quality and speed
• You can print with a resolution of up to 4,800 x 600 dpi effective (600 x 600
x 3 bit) output.
• Fast, on-demand printing.
- M262x series
▪ For single-side printing, 26 ppm (A4) or 27 ppm (Letter).
- M282x Series
▪ For single-side printing, 28 ppm (A4) or 29 ppm (Letter).
Convenience
• You can print on the go from your smartphone or computer using Google
Cloud Print™ enabled apps (see "Google Cloud Print™" on page 149).
• Easy Capture Manager allows you to easily edit and print whatever you
captured using the Print Screen key on the keyboard (see "Easy Capture
Manager" on page 175).
• Samsung Easy Printer Manager and Samsung Printer Status are a program
that monitors and informs you of the machine’s status and allows you to
customize the machine’s settings (see "Using Samsung Easy Printer
Manager" on page 181 or "Using Samsung Printer Status" on page 184).
• AnyWeb Print helps you screen-capture, preview, scrap, and print the
screen more easily than when you use the ordinary program (see "Samsung
AnyWeb Print" on page 176).
• Smart Update allows you to check for the latest software and install the
latest version during the printer driver installation process. This is available
only for Windows OS users.
• If you have Internet access, you can get help, support application, machine
drivers, manuals, and order information from the Samsung website,
www.samsung.com > find your product > Support or Downloads.
Key benefits
Wide range of functionality and application support
• Supports various paper sizes (see "Print media specifications" on page 73).
• Print watermark: You can customize your documents with words, such as
“CONFIDENTIAL” (see "Using advanced print features" on page 158).
• Print posters: The text and pictures of each page of your document are
magnified and printed across the multiple sheets of paper and can then be
taped together to form a poster (see "Using advanced print features" on
page 158).
• You can print in various operating systems (see "System requirements" on
page 76).
• Your machine is equipped with a USB interface and/or a network interface.
Supports various wireless network setting method
• Using the WPS (Wi-Fi Protected Setup™) button
- You can easily connect to a wireless network using the WPS button on
the machine and the access point (a wireless router).
• Using the USB cable or a network cable
- You can connect and set various wireless network settings using a USB
cable or a network cable.
• Using the Wi-Fi Direct
- You can conveniently print from your mobile device using the Wi-Fi or
Wi-Fi Direct feature.
See "Introducing wireless set up methods" on page 117.

Features by models
Some features and optional goods may not be available depending on
model or country.
Operating System
(●: Included, Blank: Not available)
Software
Operating System M262x series M282x series
Windows ● ●
Mac ● ●
Linux ● ●
Unix ●
You can install the printer driver and software when you insert the
software CD into your CD-ROM drive.
For Windows, select the printer driver and software in the Select
Software to Install window.
Software M262x series M282x series
SPL printer driver
PCL printer driver
PS printer driver
XPS printer driver
a
(M262xND only)
b
● ●
●
● ●
●
Samsung
Easy Printer
Manager
Samsung Printer Status ● ●
Direct Printing Utility
Samsung AnyWeb Print
Device
Settings
● ●
b
b
● ●

Features by models
(●: Included, Blank: Not available)
Variety feature
(●: Included, Blank: Not available)
SyncThru™ Web Service ●
(M262xND only)
●
SyncThru Admin Web
Service
●
(M262xND only)
●
Easy Eco Driver ● ●
Easy Capture Manager ● ●
a. Depending on the operating system you use, the installed printer driver may differ.
b. Download the software from the Samsung website and install it: (http://
www.samsung.com > find your product > Support or Downloads). Before installing,
check whether your computer’s OS support the software.
Features M262x series M282x series
Hi-Speed USB 2.0 ● ●
Network Interface Ethernet
10/100 Base TX wired LAN
●
(M262xND only)
●
Network Interface 802.11b/
g/n wireless LAN
a
●
(M282xDW only)
Software M262x series M282x series
IPv6
●
(M262xND only)
●
(M282xND/M282xDW
only)
Eco printing ● ●
Wi-Fi Protected Setup™
(WPS)
●
(M282xDW only)
Double-sided printing
●
(M262xD/M262xND
only)
●
Double-sided printing
(Manual)
bc
●
(M2620/M2625/
M2626 only)
AirPrint
●
(M262xND only)
●
Google Cloud Print™
●
(M262xND only)
●
a. Depending on your country, wireless LAN card may not be available. For some countries,
only 802.11 b/g can be applied. Contact your local Samsung dealer or the retailer where
you bought your machine.
b. Available for Windows OS only.
c. Only tray 1 is supported.
Features M262x series M282x series

Useful to know
The machine does not print.
• Open the print queue list and remove the document from the
list (see "Canceling a print job" on page 37).
• Remove the driver and install it again (see "Installing the driver
locally" on page 20).
• Select your machine as your default machine in your Windows.
Where can I purchase option or consumables?
• Inquire at a Samsung distributor or your retailer.
• Visit www.samsung.com/supplies. Select your country/region
to view product service information.
The status LED flashes or remains constantly on.
A paper jam has occurred.
• Open and close the front door.
• Check the instructions on removing jammed paper in this
manual and troubleshoot accordingly (see "Clearing paper
jams" on page 60).
Printouts are blurry.
• The toner level might be low or uneven. Shake the toner
cartridge.
• Try a different print resolution setting.
• Replace the toner cartridge.
Where can I download the machine’s driver?
• Turn the product off and on again.
• Check the meanings of LED indications in this manual and
troubleshoot accordingly (see "Understanding the LED" on
page 68).
• Visit www.samsung.com to download the latest machine’s
driver, and install it on your system.
About this user’s guide
This user's guide provides information for your basic understanding of the
machine as well as detailed steps to explain machine usage.
• Read the safety information before using the machine.
• If you have a problem using the machine, refer to the troubleshooting
chapter.
• Terms used in this user’s guide are explained in the glossary chapter.
• All illustrations in this user’s guide may differ from your machine depending
on its options or model you purchased.
• The screenshots in this user's guide may differ from your machine
depending on the machine’s firmware/driver version.
• The procedures in this user’s guide are mainly based on Windows 7.
1
Conventions
2
General icons
Icon Text Description
Gives users information to protect the machine from
Caution
Note
possible mechanical damage or malfunction.
Provides additional information or detailed
specification of the machine function and feature.
Some terms in this guide are used interchangeably, as below:
• Document is synonymous with original.
• Paper is synonymous with media, or print media.
• Machine refers to printer or MFP.
1. Introduction
9

Safety information
These warnings and precautions are included to prevent injury to you and
others, and to prevent any potential damage to your machine. Be sure to read
and understand all of these instructions before using the machine. After reading
this section, keep it in a safe place for future reference.
3
Important safety symbols
Explanation of all icons and signs used in this chapter
Warning
Caution
Hazards or unsafe practices that may result in severe
personal injury or death.
Hazards or unsafe practices that may result in minor
personal injury or property damage.
4
Operating environment
Warning
Do not use if the power cord is damaged or if the electrical outlet is
not grounded.
This could result in electric shock or fire.
Do not place anything on top of the machine (water, small metal or
heavy objects, candles, lit cigarettes, etc.).
This could result in electric shock or fire.
• If the machine gets overheated, it releases smoke, makes
strange noises, or generates an odd odor, immediately turn off
the power switch and unplug the machine.
Do not attempt.
• The user should be able to access the power outlet in case of
emergencies that might require the user to pull the plug out.
This could result in electric shock or fire.
Do not bend, or place heavy objects on the power cord.
Stepping on or allowing the power cord to be crushed by a heavy
object could result in electric shock or fire.
Do not remove the plug by pulling on the cord; do not handle the
plug with wet hands.
This could result in electric shock or fire.
1. Introduction
10

Safety information
5
Caution
During an electrical storm or for a period of non-operation,
remove the power plug from the electrical outlet.
This could result in electric shock or fire.
Be careful, the paper output area is hot.
Burns could occur.
If the machine has been dropped, or if the cabinet appears
damaged, unplug the machine from all interface connections and
request assistance from qualified service personnel.
Otherwise, this could result in electric shock or fire.
If the machine does not operate properly after these instructions
have been followed, unplug the machine from all interface
connections and request assistance from qualified service
personnel.
Otherwise, this could result in electric shock or fire.
Operating method
Caution
Do not forcefully pull the paper out during printing.
It can cause damage to the machine.
Be careful not to put your hand between the machine and paper
tray.
You may get injured.
Be careful when replacing paper or removing jammed paper.
New paper has sharp edges and can cause painful cuts.
When printing large quantities, the bottom part of the paper
output area may get hot. Do not allow children to touch.
If the plug does not easily enter the electrical outlet, do not
attempt to force it in.
Call an electrician to change the electrical outlet, or this could
result in electric shock.
Do not allow pets to chew on the AC power, telephone or PC
interface cords.
This could result in electric shock or fire and/or injury to your pet.
Burns can occur.
When removing jammed paper, do not use tweezers or sharp metal
objects.
It can damage the machine.
Do not allow too many papers to stack up in the paper output tray.
It can damage the machine.
1. Introduction
11

Safety information
Do not block or push objects into the ventilation opening.
This could result in elevated component temperatures which can
cause damage or fire.
Use of controls or adjustments or performance of procedures other
than those specified herein may result in hazardous radiation
exposure.
This machine's power reception device is the power cord.
To switch off the power supply, remove the power cord from the
electrical outlet.
6
Installation / Moving
Warning
Do not place the machine in an area with dust, humidity, or water
leaks.
This could result in electric shock or fire.
Caution
Before moving the machine, turn the power off and disconnect all
cords. The information below are only suggestions based on the
units weight.
If you have a medical condition that prevents you from lifting, do
not lift the machine. Ask for help, and always use the appropriate
amount of people to lift the device safety.
Then lift the machine:
• If the machine weighs under 20 kg (44.09 lbs), lift with 1 person.
• If the machine weighs 20 kg (44.09 lbs) - 40kg (88.18 lbs), lift
with 2 people.
• If the machine weighs more than 40 kg (88.18 lbs), lift with 4 or
more people.
The machine could fall, causing injury or machine damage.
Choose a flat surface with enough space for ventilation to place
the machine. Also consider the space required to open the cover
and trays.
The place should be well-ventilated and be far from direct light,
heat, and humidity.
When using the machine for a long period of time or printing a
large number of pages in a non-ventilated space, it could pollute
the air and be harmful to your health. Place the machine in a wellventilated space or open a window to circulate the air periodically.
1. Introduction
12

Safety information
Do not place the machine on an unstable surface.
The machine could fall, causing injury or machine damage.
a
Use only No.26 AWG
or larger, telephone line cord, if necessary.
7
Maintenance / Checking
Otherwise, it can cause damage to the machine.
Make sure you plug the power cord into a grounded electrical
outlet.
Otherwise, this could result in electric shock or fire.
Use the power cord supplied with your machine for safe
operation. If you are using a cord which is longer than 2 meters (6
feet) with a 110V machine, then the gauge should be 16 AWG or
larger.
Otherwise, it can cause damage to the machine, and could result
in electric shock or fire.
Do not put a cover over the machine or place it in an airtight
location, such as a closet.
If the machine is not well-ventilated, this could result in fire.
Do not overload wall outlets and extension cords.
This can diminish performance, and could result in electric shock
or fire.
The machine should be connected to
the power level which is specified on the label.
If you are unsure and want to check the power level you are using,
contact the electrical utility company.
Caution
Unplug this product from the wall outlet before cleaning the
inside of the machine. Do not clean the machine with benzene,
paint thinner or alcohol; do not spray water directly into the
machine.
This could result in electric shock or fire.
When you are working inside the machine replacing
consumables or cleaning the inside, do not operate the machine.
You could get injured.
Keep cleaning consumables away from children.
Children could get hurt.
Do not disassemble, repair or rebuild the machine by yourself.
It can damage the machine. Call a certified technician when the
machine needs repairing.
To clean and operate the machine, strictly follow the user's guide
provided with the machine.
Otherwise, you could damage the machine.
a. AWG: American Wire Gauge
1. Introduction
13

Safety information
8
Supply usage
Caution
Keep the power cable and the contact surface of the plug clean
from dust or water.
Otherwise, this could result in electric shock or fire.
• Do not remove any covers or guards that are fastened with
screws.
• Fuser units should only be repaired by a certified service
technician. Repair by non-certified technicians could result in
fire or electric shock.
• The machine should only be repaired by a Samsung service
technician.
When storing consumables such as toner cartridges, keep them
away from children.
Toner dust can be dangerous if inhaled or ingested.
Using recycled consumables, such as toner, can cause damage to
the machine.
In case of damage due to the use of recycled consumables, a
service fee will be charged.
For consumables that contain toner dust (toner cartridge, waste
toner bottle, imaging unit, etc.) follow the instructions below.
• When disposing of the consumables, follow the instructions
for disposal. Refer to the reseller for disposal instructions.
• Do not wash the consumables.
For a waste toner bottle, do not reuse it after emptying the
•
bottle.
If you do not follow the instructions above, it may cause machine
malfunction and environmental pollution. The warranty does
not cover damages caused by a user's carelessness.
Do not disassemble the toner cartridge.
Toner dust can be dangerous if inhaled or ingested.
Do not burn any of the consumables such as toner cartridge or
fuser unit.
This could cause an explosion or uncontrollable fire.
When toner gets on your clothing, do not use hot water to wash
it.
Hot water sets toner into fabric. Use cold water.
When changing the toner cartridge or removing jammed paper,
be careful not to let toner dust touch your body or clothes.
Toner dust can be dangerous if inhaled or ingested.
1. Introduction
14

Machine overview
9
Accessories
Power cord
a. The software CD contains the printer drivers, user’s guide, and software applications.
b. Miscellaneous accessories included with your machine may vary by country of purchase and specific model.
Software CD
a
Misc. accessories
b
1. Introduction
15
Machine overview
10
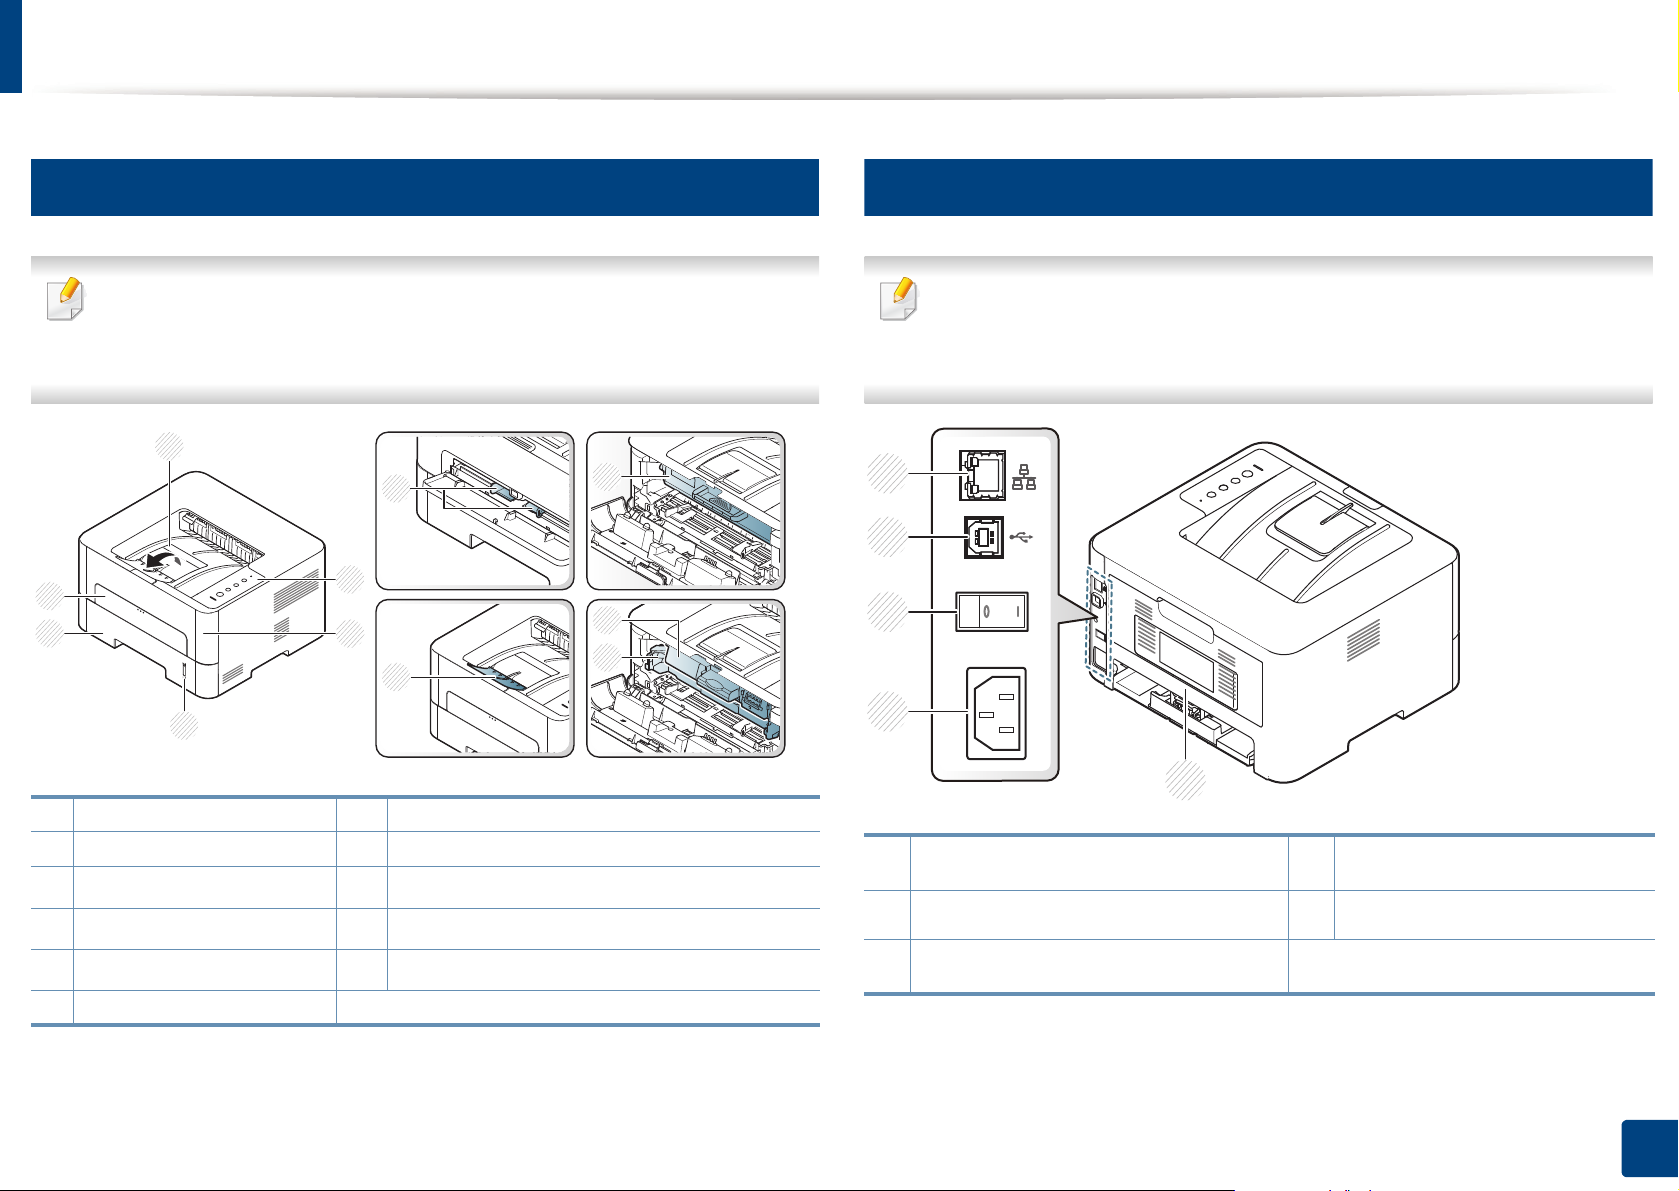
Front view
• This illustration may differ from your machine depending on its model.
• Some features and optional goods may not be available depending on
model or country.
6
5
11
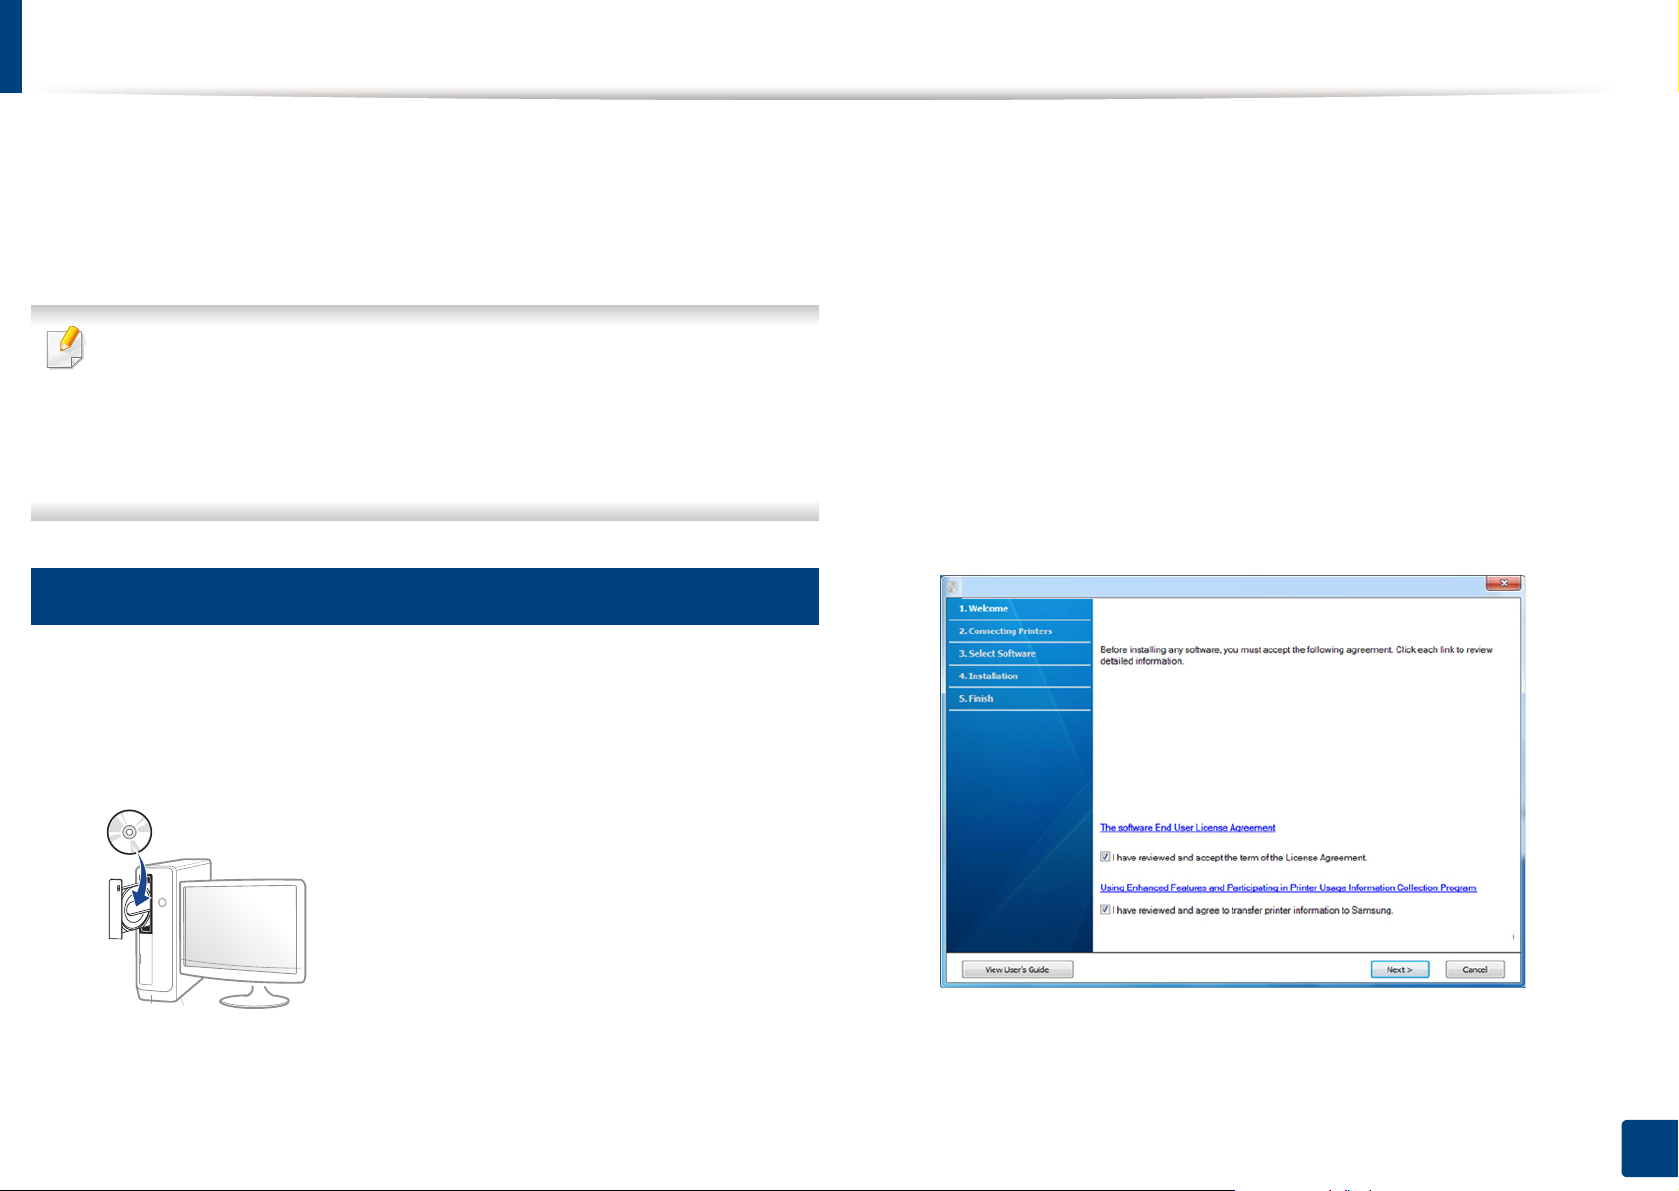
Rear view
• This illustration may differ from your machine depending on its model.
• Some features and optional goods may not be available depending on
model or country.
1
7
2
3
8
4
9
10
11
1
2
3
4
1 Output tray 7 Paper width guides on a manual feeder
2 Control panel 8 Output support
3
Front cover
4
Paper level indicator
5
Tray 1
9
Toner cartridge
10
Toner cartridge
11
Imaging unit
a
b
b
6 Manual feeder
a. M2620/ M2820 series only.
b. M2625/ M2626/ M2825/ M2826 series only.
5
1
Network port
2 USB port 5 Rear cover
3
Power-switch
a. Network and wireless models only (see "Features by models" on page 6).
b. Only if the machine has a power switch.
a
b
4
Power receptacle
1. Introduction
16

Control panel overview
This control panel may differ from your machine depending on its model.
There are various types of control panels.
3
Info sheet
a
Prints a demo page and network configuration
report (see "Printing a demo page" on page 24).
WPS
b
Configures the wireless network connection easily
without a computer (see "Wireless network setup"
on page 116).
c
Print screen
Press this button and the green LED will start
blinking. If you want to print only the active screen,
release the button when the green LED stops
blinking. If you want to print the whole screen,
release the button while it’s blinking.
• Print Screen can only be used in the
Windows and Mac operating systems.
• You can only use this function with USBconnected machine.
• When printing the active window/
whole monitor screen using the print
screen button, the machine may use
more toner depending on what is being
printed.
1
Toner
2
Eco
Shows the status of the toner (see "Toner LED/ WPS
LED/ Power LED/ Eco LED" on page 69).
Enters Eco mode to reduce toner consumption and
paper usage (see "Eco options" on page 40).
• You can only use this function if the
machine’s Easy Printer Manager
program is installed. If you are a Mac OS
user, you need to enable Screen Print
Settings from the Easy Printer Manager
to use the Print Screen feature.
1. Introduction
17

Control panel overview
4
5
6 Status LED Indicates the status of your machine (see
a. M262xND/M282xND only.
b. M282xDW only.
c. M262x/M262xD only.
d. Network and wireless models only (see "Features by models" on page 6).
Cancel Stops an operation at any time and there are more
Power You can turn the power on/off or wake the machine
functions.
• Cancels the current job.
• Prints demo page: Press and hold this button
for about 2 seconds until the status LED blinks
slowly, and release.
• Supplies Info & Usage Counter: Press and hold
this button for about 6 seconds and release.
• Prints configuration reports/network
d
configuration reports
button for about 4 seconds until the status LED
blinks fast, and release.
up from the power save mode with this button.
"Understanding the LED" on page 68).
: Press and hold this
1. Introduction
18

Turning on the machine
Connect the machine to the electricity supply first.
1
Press the power key or turn the switch on if the machine has a power switch.
1
Press (Power) on the control panel.
2
2
1. Introduction
19
Installing the driver locally
A locally connected machine is a machine directly attached to your computer
using the cable. If your machine is attached to a network, skip the following
steps below and go on to installing a network connected machine’s driver (see
"Installing driver over the network" on page 107).
• If you are a Mac, Linux, or Unix OS user, refer to the "Software installation"
on page 95.
• The installation window in this User’s Guide may differ depending on the
machine and interface in use.
• Only use a USB cable no longer than 3 meters (118 inches).
12
Windows
Make sure that the machine is connected to your computer and
1
powered on.
X:\Setup.exe replacing “X” with the letter, which represents your CDROM drive and click OK.
• For Windows 8,
If the installation window does not appear, from Charms, select
Search > Apps and search for Run. Type in X:\Setup.exe, replacing
“X” with the letter that represents your CD-ROM drive and click OK.
If “Tap to choose what happens with this disc.” pop-up window
appears, click the window and select Run Setup.exe.
Read and check The software End User License Agreement and Using
3
Enhanced Features and Participating in Printer Usage Information
Collection Program (optional). Then, click Next.
Insert the supplied software CD into your CD-ROM drive.
2
If the installation window does not appear, click Start > All programs >
Accessories > Run.
Follow the instructions in the installation window.
4
1. Introduction
20

Installing the driver locally
From the Windows 8 Start Screen
• Samsung Printer Experience app can only be used in the Start screen
when V4 driver is installed. The V4 driver is automatically downloaded
from the Windows Update if your computer is connected to the Internet.
If not, you can manually download the V4 driver from Samsung website,
www.samsung.com > find your product > Support or downloads.
• You can download Samsung Printer Experience app from the Windows
Store. You need have a Microsoft account to use the Windows Store.
1 From Charms, select Search.
2 Click Store.
3 Search and click Samsung Printer Experience.
4 Click Install.
• If you install the driver using the supplied software CD, V4 driver is not
installed. If you want to use the V4 driver in the Desktop screen, you can
download from the Samsung website, www.samsung.com >find your
product > Support or downloads.
• If you want to install Samsung’s printer management tools, you need to
install them using the supplied software CD .
Make sure that your computer is connected to the Internet and powered
1
on.
Make sure that the machine is powered on.
2
Connect the computer and the machine with a USB cable.
3
The driver is automatically installed from the Windows Update.
1. Introduction
21

Reinstalling the driver
If the printer driver does not work properly, follow the steps below to reinstall
the driver.
13
Windows
Make sure that the machine is connected to your computer and
1
powered on.
From the Start menu, select Programs or All Programs > Samsung
2
Printers > Uninstall Samsung Printer Software.
• For Windows 8,
1 From Charms, select Search > Apps.
2 Search and click Control Panel.
3 Click Programs and Features.
4 Right-click the driver you want to uninstall and select Uninstall.
Insert the software CD into your CD-ROM drive and install the driver
4
again (see "Installing the driver locally" on page 20).
From the Windows 8 Start Screen
Make sure that the machine is connected to your computer and
1
powered on.
Click on the Uninstall Samsung Printer Software tile in the Start
2
screen.
5 Follow the instructions in the window.
Follow the instructions in the installation window.
3
Follow the instructions in the window.
3
• If you cannot find a Samsung Printer Software tile, unintstall from the
desktop screen mode.
• If you want to uninstall Samsung’s printer management tools, from the
Start screen, right-click the app > Uninstall > right-click the program
you want to delete > Uninstall and follow the instruction in the window.
1. Introduction
22

2. Basic setup
After installation is complete, you may want to set the machine’s default settings. Refer to the next section if you would
like to set or change values.
• Printing a demo page 24
• Media and tray 25
• Basic printing 36
Printing a demo page
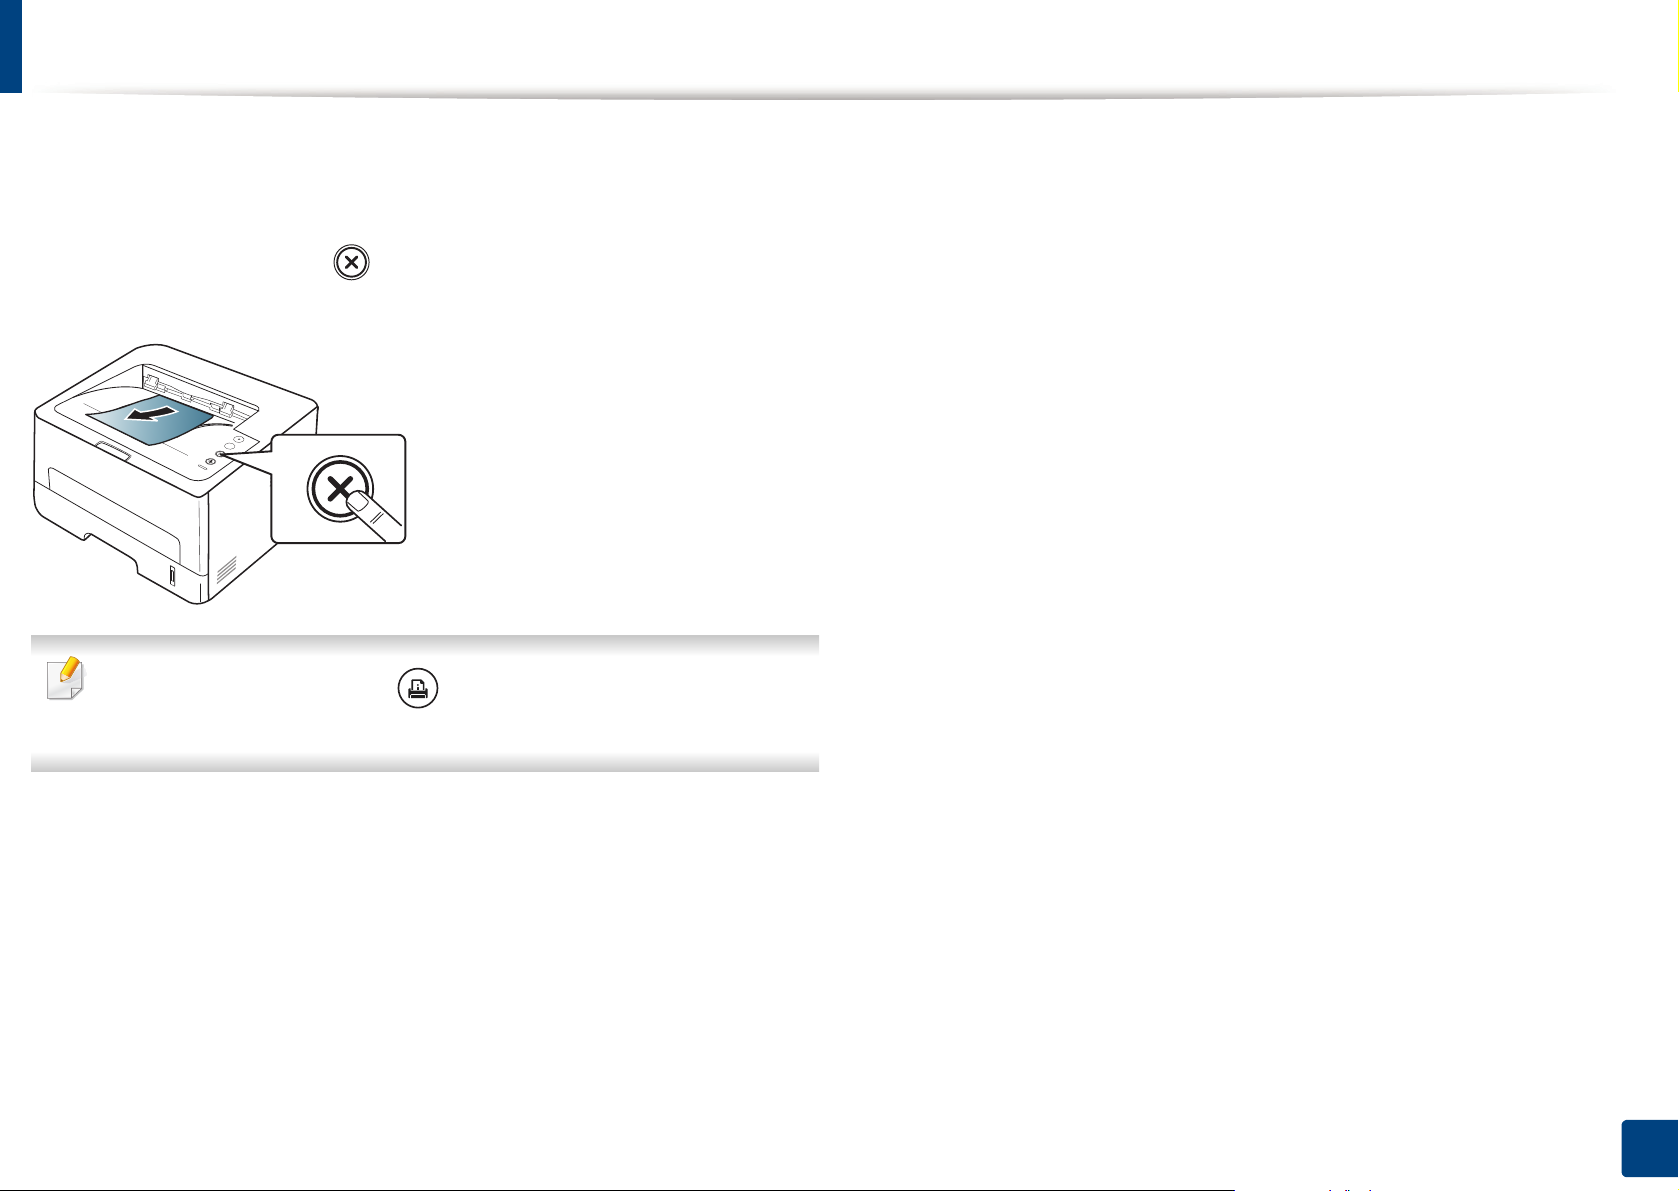
Print a demo page to make sure that the machine is operating correctly.
To print a demo page:
In ready mode, press and hold (Cancel) button for about 2 seconds until the
status LED blinks, and release.
For a model with a Info sheet ( ) button, press the button to print a
demo page.
2. Basic setup
24

Media and tray
This chapter provides information on how to load print media into your
machine.
• Using print media that does not meet these specifications may cause
problems or require repairs. Such repairs are not covered by Samsung’s
warranty or service agreements.
• Make sure not to use the inkjet photo paper with this machine. It could
cause damage to the machine.
• Using inflammable print media can cause a fire.
• Use designated print media (see "Print media specifications" on page
73).
The use of inflammable media or foreign materials left in the printer may
lead to overheating of the unit and, in rare cases may cause a fire.
1
Tray overview
To change the size, you need to adjust the paper guides.
2
1
3
If you do not adjust the guide, it may cause paper registration, image skew,
or jamming of the paper.
1 Tray extention guide
2 Paper length guide
3 Paper width guide
2. Basic setup
25

Media and tray
Paper quantity indicator shows the amount of paper in the tray.
Power voltage Available paper
110V Letter, Legal, US Folio, Oficio
220V A4
1
2
1 Full
2 Empty
Paper type available for duplex printing
Duplex printing might not be available for some models (see "Features by
models" on page 6).
Depending on the power voltage your machine uses, available paper types for
duplex printing differs. Refer to the below table.
2. Basic setup
26

Media and tray
1
2
2
1
2
2
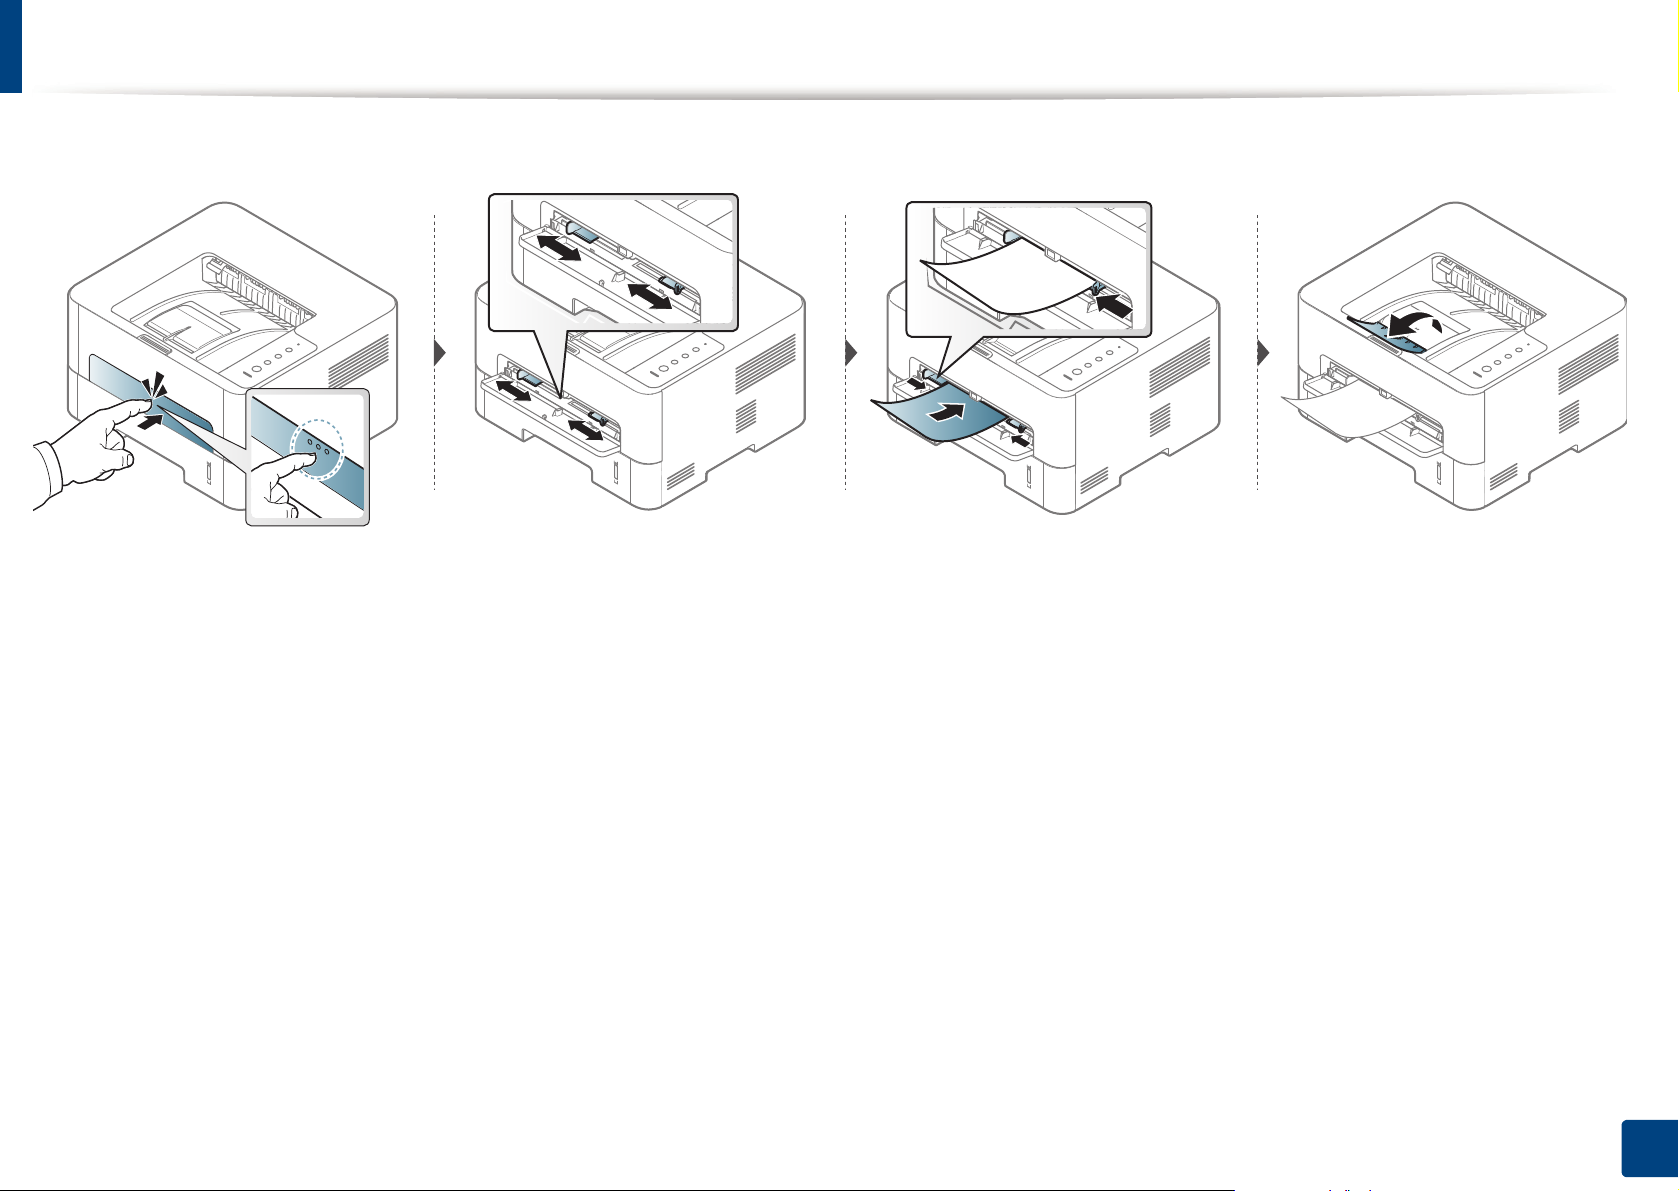
Loading paper in the tray
When printing using the tray, do not load paper on the manual feeder, it may cause a paper jam.
2. Basic setup
27

Media and tray
3
Loading in manual feeder
The manual feeder can hold special sizes and types of print material, such as postcards, note cards, and envelopes.
Tips on using the manual feeder
• Load only one type, size and weight of print media at time in the manual feeder.
•If you select Manual Feeder for the paper source in your software application, you need to press Print screen or Demo page, or WPS button each time you print
a page and load only one type, size and weight of print media at a time on the manual tray.
• To prevent paper jams, do not add paper while printing when there is still paper in the manual feeder.
• Print media should be loaded face up with the top edge going into the manual feeder first and be placed in the center of the tray.
• To ensure printing quality and to prevent paper jams, only load the available paper (see "Print media specifications" on page 73).
• Flatten any curl on postcards, envelopes, and labels before loading them into the manual feeder.
• When printing on special media, you must follow the loading guidelines (see "Printing on special media" on page 30).
• When papers overlap when printing using the manual feeder, open tray 1 and remove the overlapping papers then try printing again.
• When paper does not feed well while printing, push the paper in manually until it starts feeding automatically.
• When the machine is in a power save mode, the machine does not feed paper from the manual feeder. Wake up the machine by pressing the power button before
using the manual feeder.
2. Basic setup
28
Media and tray
2. Basic setup
29

Media and tray
4
Printing on special media
The table below shows the special media usable in each tray.
To change the paper setting set in the machine, from the Samsung Easy Printer
Manager select (Switch to advanced mode)> Device Settings.
Then, set the paper type from the Printing preferences window > Paper tab >
Paper Type (see "Opening printing preferences" on page 38).
For example, if you want to print on labels, select Labels for Paper Type.
• When using special media, we recommend you feed one sheet at a time
(see "Print media specifications" on page 73).
• Printing the special media (Face up)
If special media are printed out with curl, wrinkles, crease, or black bold
lines, open the rear cover and try printing again. Keep the rear cover
opened during printing.
To see for paper weights for each sheet, refer to "Print media specifications" on
page 73.
Types Tray Manual feeder
Plain ●●
Thick ●●
Thicker ●
Thin ●●
Bond ●●
Color ●
CardStock ●●
Labels ●
Transparency ●
Envelope ●
Thick Envelope ●
Preprinted ●
Cotton ●
Recycled ●●
Archive ●●
(●: Included, Blank: Not available)
2. Basic setup
30
 Loading...