

Samsung SGHZX20 Users Manual

* Depending on the software installed or your service provider, some of the
description in this manual may differ from your phone.
* Depending on your country, your phone and accessories may appear
different from the illustrations in this manual.
SAMSUNG ELECTRONICS
World Wide Web
http://www.samsungmobile.com
Printed in Korea
Code No.:GH68-0xxxxA
English. 12/2005. Draft02

SGH-ZX20
User’s Manual
Important
safety
precautions
Failure to comply with the following
precautions may be dangerous or illegal.
Use road safety at all times
Do not use a hand-held phone while driving. Park
the vehicle first.
Switch off the phone when refuelling
Do not use the phone at a refuelling point (service
station) or near fuels or chemicals.
Switch off in an aircraft
Wireless phones can cause interference. Using them
in an aircraft is both illegal and dangerous.
Switch off the phone near all medical
equipment
Hospitals or health care facilities may be using
equipment that could be sensitive to external radio
frequency energy. Follow any regulations or rules in
force.
Interference
All wireless phones may be subject to interference,
which could affect their performance.
Be aware of special regulations
Meet any special regulations in force in any area and
always switch off your phone whenever it is forbidden
to use it, or when it may cause interference or danger.
Water resistance
Your phone is not water-resistant. Keep it dry.
Sensible use
Use only in the normal position (held to the ear). Avoid
unnecessary contact with the antenna when the phone
is switched on.
Emergency calls
Key in the emergency number for your present
location, then press .
Keep your phone away from small children
Keep the phone and all its parts, including accessories,
out of the reach of small children.
Accessories and batteries
Use only Samsung-approved accessories and
batteries. Use of any unauthorised accessories could
damage your phone and may be dangerous.
• The phone could explode if the battery is
replaced with an incorrect type.
• Dispose of used batteries according to the
manufacturer’s instructions.
Qualified service
Only qualified service personnel may repair your
phone.
For more detailed safety information, see "Health and
safety information" on page 75.
Important safety precautions
1

About this Guide
This User’s Guide provides you with condensed
information about how to use your phone. To quickly
learn the basics for your phone, please refer to “Get
started”.
In this guide, the following instruction icons appear:
Indicates that you need to pay careful
attention to the subsequent information
regarding safety or phone features.
[ ] Indicates a key on the phone. For example,
< > Indicates a soft key, whose function is
2
Indicates that you can get more information
on the referenced page.
→
Indicates that you need to press the
Navigation keys to scroll to the specified
option and then select it.
[]
displayed on the phone screen. For example,
<
Menu
>

Important safety precautions
3
Contents
Unpack 6
Make sure you have each item
Your phone 6
Buttons, features, and locations
Get started 7
First steps to operating your phone
Install and charge the phone ................................... 7
Power on or off ...................................................... 8
Keys and display .................................................... 9
Access menu functions.......................................... 11
Customise your phone .......................................... 12
Make/Answer calls................................................ 14
Enter text 15
ABC, T9, Number, and Symbolic mode
4
Call functions 18
Advanced calling features
Menu functions 23
All menu options listed
Slove problems 73
Help and personal needs
Health and safety information 75

Overview of menu functions
To access Menu mode, press
<
Menu
> in Idle mode.
1 IM
2 Messaging
1 IM
2 Create New Message
3 Inbox
4 Sent
5 Outbox
6 Drafts
7 Email Inbox
8 Chat
9 Templates
10 Broadcast
11 Delete All
12 Settings
13 Memory Status
p.23
p.23
p.23
p.26
p.29
p.31
p.33
p.34
p.35
p.38
p.38
p.38
p.39
p.39
p.41
3 Recent Calls
1 Missed Calls
2 Calls Made
3 Calls Received
4 Voice Mail
5 Speed Dial List
6 Delete All
7 Call Time
8 Data Volume
9 Data Call Time
10 Address Book
4 MEdia Net
1 MEdia Net Home
2 Favorites
3 Enter URL
4 Browser Profiles
5 Clear Cache
p.42
p.42
p.42
p.42
p.42
p.42
p.42
p.42
p.42
p.43
p.43
p.43
p.43
p.43
p.43
p.43
p.43
5 Cingular Mall
1 Shop Tones
2 Shop Games
3 Shop Graphics
4 Shop Multimedia
5 Shop Applications
6 MEdia Net Home
6 Cingular Videos
7 My Stuff
1 My MEdia
2 Games
3 Applications
p.43
8 Address Book
p.43
1 Contact List
p.43
2 Add New Contact
p.43
3 Groups
p.43
4 Speed Dial
p.43
5 My Name Card
p.43
6 Copy All
7 Own Number
p.43
8 Settings
9 Memory Status
p.43
9 Settings
p.44
1 Time & Date
p.44
2 Profiles
p.44
3 Phone Settings
4 Display Settings
5 Call
6 Connectivity
7 Software Update
8 Application Settings
9 Security
10 Memory status
11 Reset settings
p.60
p.60
p.61
p.62
p.63
p.63
p.64
p.64
p.64
p.64
p.65
p.65
p.65
p.65
p.66
p.67
p.69
p.71
p.71
p.71
p.72
p.73
5
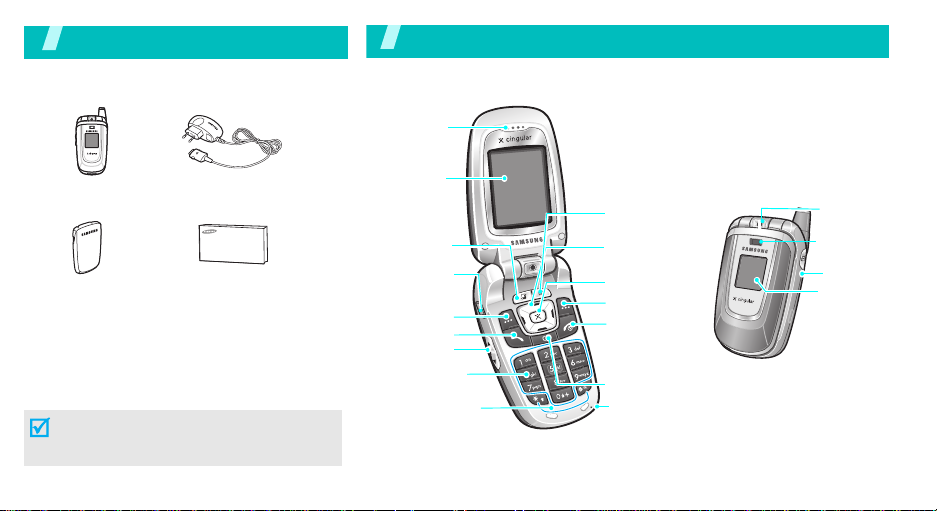
Unpack
Make sure you have each item
You r pho ne
Buttons, features, and locations
Earpiece/
Speaker
Phone
Battery
You can obtain the following accessories from
your local Samsung dealer:
Travel Adapter
User’s Manual
•Car Adapter
• Headset
• Data Link KIT
• Stylish Handfree Car Kit
The items supplied with your phone and the
accessories at your Samsung dealer may vary,
depending on your country or service provider.
6
Display
Application
switch key
Headset
jack
Soft key (left)
Dial key
Volume ke ys
Alphanumeric
function keys
keys
Special
Video call key
Navigation keys
(Up/Down/Left/
Right)
WAP access/
Confirm key
Soft key (right)
Power on/off/
Menu exit key
Cancel/Correct
key
Microphone
Camera
Flash
Camera key
External
display
Get started
First steps to operating your phone
SIM card information
When you subscribe to a cellular network, you receive
a plug-in SIM (Subscriber Identity Module) card
loaded with your subscription details, such as your
PIN, and available optional services.
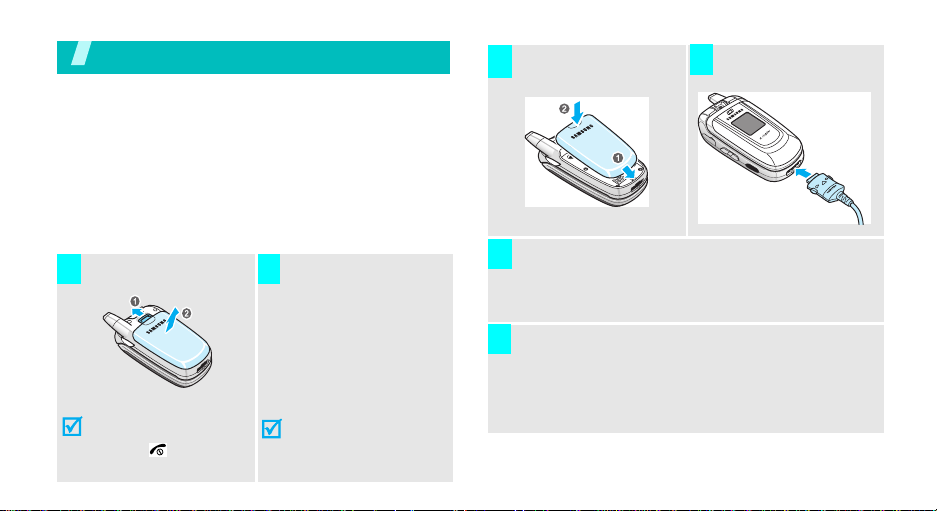
Install and charge the phone
Remove the battery.
1 2
If the
phone is already
on, first turn it off by
[]
holding
.
Insert the SIM card.
Make sure that the goldcoloured contacts on the
card face down into the
phone.
Install the battery.
3
Plug the adapter into a standard AC wall outlet.
5
When the phone is completely charged (the battery
6
icon stops blinking), unplug the adapter from the
power outlet.
Plug the travel adapter
4
into the phone.
7
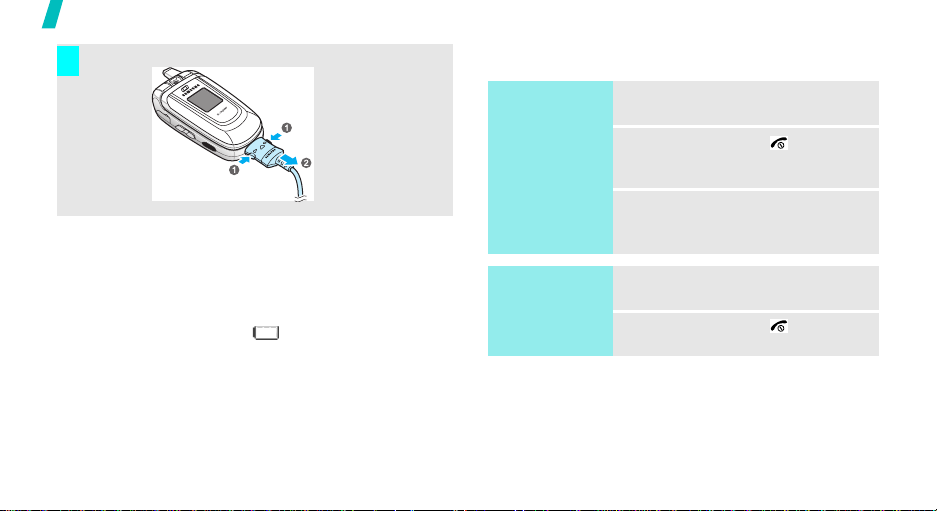
Get started
Remove the adapter from the phone.
7
Power on or off
Low battery indicator
When the battery is low:
• a warning tone sounds,
• the battery low message displays, and
• the empty battery icon blinks.
If the battery level becomes too low, the phone
automatically turns off. Recharge your battery.
8
Switch on
Do not turn on
the phone when
mobile phone
use is prohibited.
Switch off
1. Open the phone.
2. Press and hold [ ] to turn on
the phone.
3. If necessary, enter the PIN and
press <OK>.
1. Open the phone.
2. Press and hold [ ].
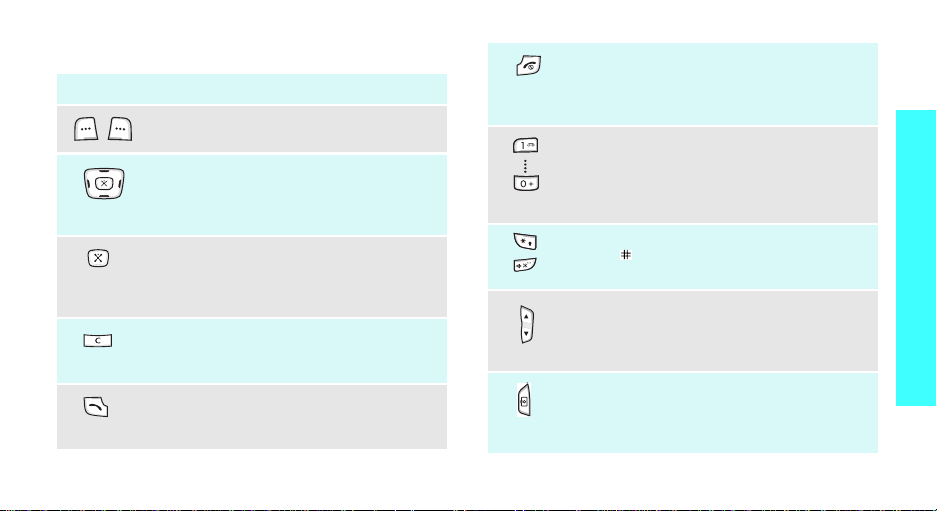
Keys and display
Key(s) Description
Perform the function indicated on the bottom
line of the display.
In Idle mode, access your favourite menus,
directly.
In Menu mode, scroll through the menu
options.
In Idle mode, launch the Wireless
Application Protocol (WAP) browser.
In Menu mode, select the highlighted menu
option.
Delete characters from the display.
In Menu mode, return to the previous menu
level.
Send or answer a call.
In Idle mode, retrieve the recent numbers
dialled, missed, or received.
p. 65
(on the left)
(on the right)
End a call.
Hold down to switch the phone on and off.
In Menu mode, cancel input and return the
phone to Idle mode.
Enter numbers, letters, and some special
characters.
In Idle mode, hold
voice mail server. Hold [
international call prefix.
Enter special characters.
Hold [
]
Quiet mode.
Adjust the phone volume.
In Idle mode, with the phone open, adjust
the keypad tone volume. With the phone
closed, hold down to turn on the backlight.
In Idle mode, hold down to turn on the
camera.
In Camera mode, take a photo or record a
video.
down to activate or deactivate
[1]
down to access your
0
] down to enter the
Get started
9
Get started
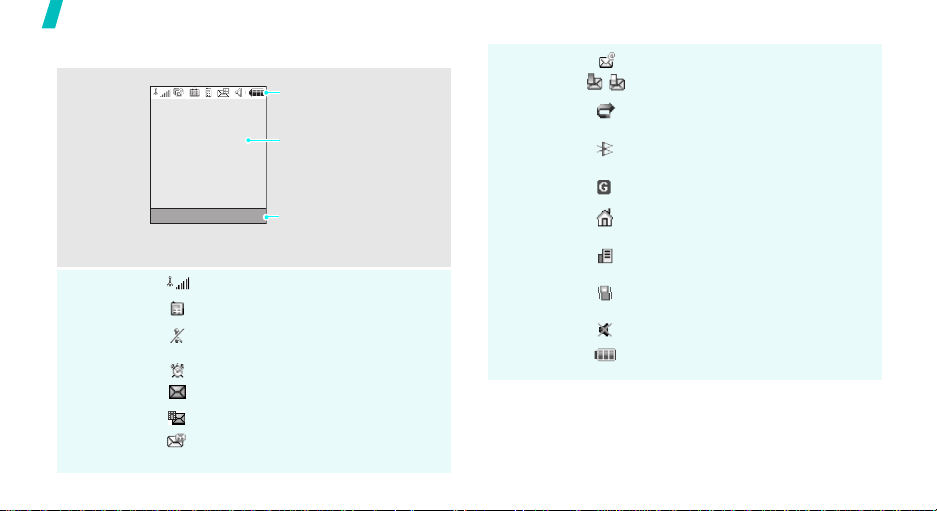
s
Display
Layout
*
Icons
Icons
display various icons.
Text and graphics
display messages,
instructions, and
information you enter.
Menu Addres
Soft key function indicators
show the current functions
assigned to the two soft
keys.
Received signal strength
Call in progress
Out of your service area; you cannot
send or receive calls
Alarm set
New text message
New multimedia message
New voicemail message
Icons
(continued)
New e-mail received or being sent
One of the message Inboxes is full
Call diverting feature is active
Bluetooth feature is active
GPRS network
Home Zone, if you have registered
for the appropriate service
Office Zone, if you have registered
for the appropriate service
Call ringer set to vibrate
Quiet mode is active
Battery power level
* The icons shown on the display may vary, depending
on your country or service provider.
10

Access menu functions
Use the soft
keys
The roles of the soft keys vary
depending on the function you are
using. The bottom line of the
display indicates their current role.
Menu Contacts
Press the left soft
key to access
Menu
mode.
Press the right soft
key to access
Options
.
Select an
option
Use shortcuts
1. Press the appropriate soft key.
2. Press the Navigation keys to
move to the next or previous
option.
3. Press <
Select
> or [ ] to
confirm the function displayed
or option highlighted.
4. To exit, choose either of the
following methods.
•Press <
Back
> or <C> to
move up one level.
• Press [ ] to return to
Idle mode.
Press the number key
corresponding to the option you
want.
Get started
11
Get started
Customise your phone
Display
language
Call ringer
melody
12
1. In Idle mode, press <
and select
settings → Language
2. Select a language.
1. In Idle mode, press <
and select
settings → Incoming call →
Ring tone
2. Press [Left] or [Right] to select
a ringer category.
3. Press [Up] or [Down] to scroll
through ringer melodies.
4. Select a ringer melody you
want.
5. Press <
Settings → Phone
Settings → Sound
.
Save
>.
Menu
Menu
Idle mode
>
.
>
wallpaper
You can set your wallpaper for the
main or external display.
1. In Idle mode, press <
and select
settings → Wallpaper → Main
display
2. Select an image category and
then an image.
For
select
to be displayed on the external
display.
3. Press [ ].
Settings → Display
or
Cover display
Cover display
Cover title
Menu
>
.
, you can
to enter text
Menu mode
skin colour
Quiet mode
You can change the colour for the
display components, such as title
bars and highlight bars.
1. In Idle mode, press <
and select
Settings → Display
settings → Skin
Menu
>
.
2. Select a colour pattern.
You can switch to Quiet mode to
avoid disturbing other people with
your phone sound.
Press and hold
[
]
in Idle mode.
Menu
shortcuts
You can use the Navigation keys as
shortcut keys to access specific
menus directly from Idle mode.
To assign a menu to a key:
1. In Idle mode, press <
and select
Settings → Phone
settings → Short cut
Menu
.
>
2. Select a key.
3. Press <
Change
Options
.
> and select
4. Scroll to a menu to be assigned
to the key.
5. Press <
Save
>.
Get started
13
Phone lock
14
You can protect the phone against
unauthorised use with a phone
password. The phone will require
the password on powerup.
1. In Idle mode, press <
and select
Security → Change
password
2. Enter the default password,
“00000000” and press <OK>.
3. Enter a new 4- to 8- digit
password and press <OK>.
4. Enter the new password again
and press <OK>.
5. Select
6. Select
7. Enter the password and press
<OK>.
Settings →
.
Phone lock
Enable
Menu
>
.
.
Make/Answer calls
Make a call
Answer a call
Adjust the
volume during
a call
1. In Idle mode, enter an area code
and phone number.
2. Press
3. To end the call, press
1. When the phone is ringing, press
[]
2. To end the call, press
Press [ / ].
[]
.
.
[]
.
[]
.
Enter text
ABC, T9, Number, and Symbolic mode
You can enter text for some features such as
messaging, Phonebook, or Calendar, using ABC mode,
T9 mode, Number mode, and Symbolic mode.
Changing the text input mode
The text input mode indicator appears when the cursor
is in a text field.
• Press the right soft key to change the text input
mode. ( : T9 mode, : ABC mode, :
Number mode, and : Symbolic mode)
• Press and hold [ ] to switch to Symbolic mode.
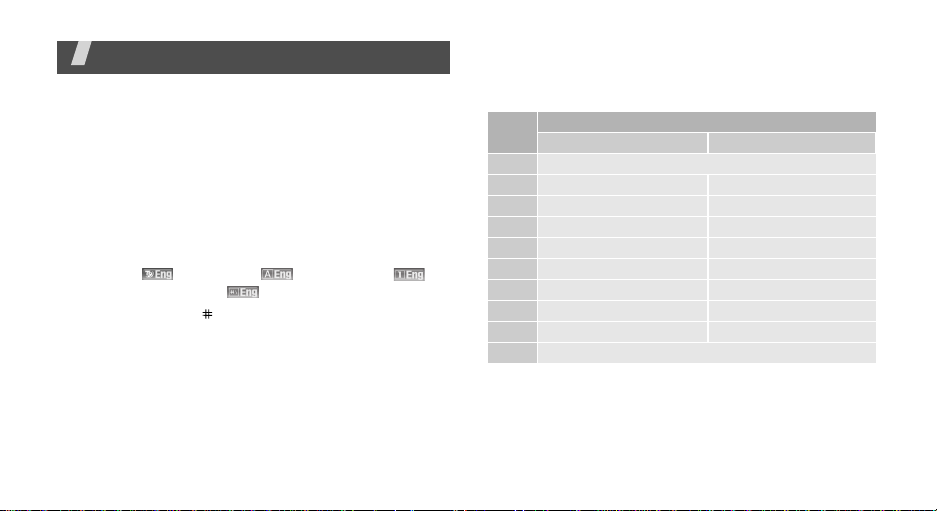
Using ABC mode
Press the appropriate key until the character you want
appears on the screen.
Key
1
. , - ? ! ’ @ : 1
2
A B C 2 a b c 2
3
D E F 3 d e f 3
4
G H I 4 g h i 4
5
J K L 5 j k l 5
6
M N O 6 m n o 6
7
P Q R S 7 p q r s 7
8
T U V 8 t u v 8
9
W X Y Z 9 w x y z 9
0
0
Tips for using ABC mode
• To enter the same letter twice or to enter a
different letter on the same key, wait for the cursor
to move to the right automatically or press [Right].
Then, enter the next letter.
Characters in order displayed
Upper case Lower case
15

Enter text
• Press [ ] to change case. Lower case (No
indicator), Initial capital ( ), and Capital lock ( )
are available.
• Press [ ] to insert a space.
• Press the Navigation keys to move the cursor.
•Press [C] to delete characters one by one. Press
and hold [C] to clear the display.
• Depending on your country, you may be able to
access an input mode for your specific language by
holding the [ ] key.
Using T9 mode
T9 is a predictive text input mode that allows you to
key in any character using single keystrokes.
Entering a word in T9 mode
1. Press [2] to [9] to start entering a word. Press
each key once for each letter.
For example, press [4], [3], [5], [5], and [6] to
enter HELLO in T9 mode.
16
T9 predicts the word that you are typing, and it
may change with each key that you press.
2. Enter the whole word before editing or deleting
characters.
3. When the word displays correctly, go to step 4.
Otherwise, press [0] to display alternative word
choices for the keys that you have pressed.
For example, OF and ME use [6] and [3].
4. Press [ ] to insert a space and enter the next
word.
Tips for using T9 mode
• Press [1] to enter periods or apostrophes
automatically.
• Press [ ] to change case. Lower case (No
indicator), Initial capital ( ), and Capital lock ( )
are available.
• Press [ ] to insert a space.
• Press the Navigation keys to move the cursor.
• Press [C] to delete characters one by one. Press
and hold [C] to clear the display.

Adding a new word to the T9 dictionary
This feature may not be available for some languages.
1. Enter the word that you want to add.
2. Press [0] to display alternative words for your key
presses. When there are no more alternative
words,
Spell
appears on the bottom line.
3. Press <
4. Enter the word you want using ABC mode and
Spell
press <OK>.
>.
Using Number mode
Number mode enables you to enter numbers.
Press the keys corresponding to the digits you want.
Using Symbolic mode
Symbolic mode enables you to insert symbols.
To Press
display more symbols [Up] or [Down].
To Press
select a symbol the corresponding
number key.
clear the entered symbol(s) [C].
insert the symbol(s) <OK>.
Enter text
17
Call functions
Advanced calling features
Making a call from Phonebook
Once you have stored a number in Phonebook, you
can dial the number by selecting it from Phonebook.
Making a call
1. In Idle mode, enter the area code and phone
number.
2. Press [ ].
Press [C] to clear the last digit or press and hold
[C]
to clear the whole display. You can move the
cursor to edit an incorrect digit.
Making an international call
1. In Idle mode, press and hold [0]. The + character
appears.
2. Enter the country code, area code, and phone
number, then press [ ].
Redialling recent numbers
1. In Idle mode, press [ ] to display the list of
recent numbers.
2. Scroll to the number you want and press [ ].
18
You can also use the speed dial feature to assign your
most frequently called numbers to specific number
keys.
Dialling a number from the SIM card
1. In Idle mode, enter the location number for the
phone number you want and press [ ].
2. Press [Left] or [Right] to scroll through other
numbers.
3. Press <
Dial
> or [ ] to dial the number you want.
Ending a call
Close the phone or press [ ].

Answering a call
When you receive an incoming call, the phone rings
and displays the incoming call image.
Press <
Accept
> or [ ] to answer the call.
Tips for answering a call
• When
• When
•Press <
• Depending on the setting in the
Anykey answer
menu is active, you can press any key, except for
<
Reject
>, [ ], or [ / ].p. 66
Active folder
is active, you can simply open the phone.p. 66
Reject
> or [ ] to reject a call.
press and hold [ / ] to mute a call ringer or
reject a call.
in the
in the
Extra settings
Extra settings
Side key
menu
menu,
Viewing missed calls
If you have missed calls, the screen displays how
many calls you have missed.
1. Press <
2. If necessary, scroll through the missed calls.
View
>.
3. Press [ ] to dial the number you want.
Using the headset
Use the headset to make or answer calls without
holding the phone.
Connect the headset to the jack on the left side of the
phone.
The buttons on the headset work as listed below:
To Press
redial the last call and hold the button twice.
answer a call the button.
end a call the button.
Options during a call
You can access a number of functions during a call.
Adjusting the volume during a call
Use [ / ] to adjust the earpiece volume during a call.
Call functions
19

Call functions
Press [ ] to increase the volume level and [ ] to
decrease the volume level.
Using the external speaker
Use the optional external speaker to talk and listen
with the phone a short distance away. First, you must
plug the speaker into the phone.
1. During a call, press [ ] to listen and talk to the
other person hands-free. The icon appears.
2. Press [ ] again to return to normal phone
mode. The icon appears.
Placing a call on hold/Retrieving
Press <
Hold
> or <
or retrieve the call.
Retrieve
> to place a call on hold
Making a second call
You can make another call if your network supports it.
1. Press <
2. Make the second call in the normal way.
3. Press <
20
Hold
> to put the call on hold.
Swap
> to switch between the calls.
4. Press <
5. To end the current call, press [ ].
Options
the call on hold.
> and select
End held call
to end
Answering a second call
You can answer an incoming call while already on the
phone, if your network supports it and you have
activated the call waiting feature.
1. Press [ ] to answer the call. The first call is
automatically put on hold.
2. Press <
3. Press <
4. To end the current call, press [ ].
Swap
> to switch between the calls.
Options
the call on hold.
> and select
End held call
to end
Transferring a call
You can transfer the currently active call to a caller on
hold, if your network supports it. With this option, the
two callers can talk to each other, but you are
disconnected from the call.
Press <
Options
> and select
Transfer
.

Using a Bluetooth headset
Use an optional Bluetooth headset to talk on the
phone without holding the phone to your ear. To use
this feature, you first need to register your headset
and connect it to the phone.
Press <
Options
Switch to phone
> and select
.
Switch to headset
or
Using the voice clarity feature
This feature increases the microphone’s sensitivity so
that the person with when you are speaking can hear
you clearly even though you may be whispering.
Press <
Options
Voice clarity off
Switching off the microphone
You can temporarily switch off your phone’s
microphone so that the person on the phone cannot
hear you.
Press <
Options
> and select
.
> and select
Voice clarity on
(Mute mode)
Mute
or
Unmute
or
.
Muting or sending key tones
You can turn the key tones off or on.
Press <
Options
keys
.
To communicate with answering machines or
computerised telephone systems,
be selected.
> and select
Mute keys
Send keys
or
Send
must
Sending a sequence of DTMF tones
Dual tone multi-frequency (DTMF) tones are the tones
used in phones for tone dialling.
You can send DTMF tones as a group after entering the
entire number you need to send or retrieving a
number from Phonebook. This feature is helpful for
entering a password or an account number when you
call an automated system, like a banking service.
1. When connected with a teleservice system, press
<
Options
2. Enter the number you need to send and press
<OK>.
> and select
Send DTMF
.
Call functions
21

Call functions
Using Phonebook
You can access the
store entries.
Press <
Options
Phonebook
> and select
menu to locate or
Phonebook
.
Using SIM services
The
SIM service
card in your phone. A SIM card provides services such
as news, weather, sports, entertainment, and location
services.
For details, see your SIM card instructions or contact
your service provider.
menu is available if you use a SIM
Making a multi-party call
Use this feature to allow as many as six people to join
a multi-party call, or conference call.
Your service provider must support multi-party calls
for you to use this feature.
Setting up a multi-party call
1. Call the first participant.
2. Call the second participant. The first call is
automatically put on hold.
22
3. Press <
4. If desired, call another person or answer an
5. Press <
6. Repeat steps 4 and 5 as desired.
Options
participant is added to the multi-party call.
incoming call.
Options
> and select
> and select
Join
Join
. The first
.
Having a private conversation with one
participant
1. Press <
2. Select a name or number from the participant list.
3. To return to the multi-party call, press <
Options
You can talk privately with that person, while the
other participants converse with each other.
and select
> and select
Join
.
Private
.
Options
>
Dropping one participant
1. Press <
2. Select a name or number from the participant list.
3. Close the phone or press [ ] to end the multi-
Options
The participant is dropped from the call, but the
call continues with the other parties.
party call.
> and select
Remove
.

Menu functions
All menu options listed
IM
(Menu 1)
Messaging
Use the
messages, multimedia messages, and e-mails. You
can also use WAP push message and cell broadcast
message features.
To access this menu, press <
select
Messaging
IM
(menu 2.1)
The Wireless Application Protocol (WAP) browser on
your phone allows you to access the wireless web.
Using the WAP browser, you can access up-to-date
information and a wide variety of media content, such
as wallpapers, ring tones, and music files.
To access this menu, press <
select
Browser
(Menu 2)
Messaging
.
menu to send and receive text
Menu
.
> in Idle mode and
Menu
> in Idle mode and
Home
Use this menu to connect your phone to the network
and load the home page of the wireless web service
provider. You can also press [ ] in Idle mode.
Navigating with the WAP browser
To Press
scroll through browser items [Up] or [Down].
select a browser item < >.
return to the previous page <
return to the home page and hold [C].
Back
> or [C].
Selecting and using the browser menu options
Press [ ] or select on the top of the screen.
•
Back
: go back to the previous page.
•
Home
: go back to the home page.
•
Exit
: exit the WAP browser.
•
Reload
: reload the current page.
23

Menu functions
•
Show URL
web page. You can also set the current page as the
home page for the WAP browser.
•
About
version information.
Using WAP page options
From any WAP page, press [ ] to access the following
options:
•
Go to URL
•
Bookmarks
•
Messages
box in the
create and send a new SMS message.
•
File manager
Exiting the WAP browser
Press [ ] to exit the browser.
Bookmarks
Use this menu to save URL addresses in order to
quickly access websites.
24
: display the URL address of the current
: view the WAP browser certificate and
: enter a URL address manually.
Menu 6.2
: switch to the
: check the
My messages
: switch to the
Bookmarks
Inbox, Outbox
menu. You can also
File manger
menu.
, and
menu.
Draft
Adding a bookmark
1. Select an empty location.
2. Enter a name for the bookmark.
3. Enter a URL address and press [ ].
Accessing a bookmarked page
Scroll to a bookmark item and press [ ].
Using bookmark options
Scroll to a bookmark and press <
the following options:
•Go: access the bookmarked website.
•
Edit
: edit the address and name of the bookmark.
•
Delete
: delete the selected bookmark.
Options
Go to URL
Use this menu to manually enter the URL address of a
website and access the website.
Clear cache
Use this menu to clear the cache, a temporary
memory that stores recently accessed web pages.
> to access

Profile settings
Use this menu to set up servers for the WAP browser.
Contact your service provider for details about your
setting options.
For each server, the following options are available:
•
Profile name
•
Home URL
•
Bearer
: assign a name to the server profile.
: set the address of your home page.
: select a bearer for each type of network
address accessed.
•
Proxy
: select whether or not the phone uses a
proxy server to launch the WAP browser. Your
service provider can tell you if your network
requires a proxy server, and they can give you the
appropriate settings.
•
GPRS settings
: customise the following GPRS
network settings:
When the proxy is set to
Proxy IP
Proxy port
APN
: enter the proxy IP address.
: enter the proxy port number.
: enter the access point name of the GPRS
Enable
:
network gateway.
Login ID
Password
When the proxy is set to
DNS 1
DNS 2
APN
: enter the user ID.
: enter the password.
Disable
: enter the primary address.
: enter the secondary address
: enter the access point name of the GPRS
network gateway.
Login ID
Password
•
GSM settings
: enter the user ID
.
: enter the password
: customise the following GSM
network settings:
When the proxy is set to
Proxy IP
Proxy port
Dial number
Login ID
Password
Data call type
: enter the proxy IP address.
: enter the proxy port number.
: enter the PPP server phone number.
: enter the user ID.
: enter the password.
: select a data call type.
When the proxy is set to
DNS 1
: enter the primary address.
Enable
Disable
:
Menu functions
.
.
:
:
Messaging
(Menu 2)
25
Menu functions
DNS 2
: enter the secondary address.
Dial number
Login ID
Password
Data call type
Current profile
Use this menu to select a connection profile for
accessing the WAP browser.
Create New Message
Use this menu to create and send SMS, MMS, or
e-mail messages.
Text Message
Short Message Service (SMS) allows you to send or
receive text messages that may include pictures,
animated images, and melodies.
The maximum number of characters allowed in a
text message varies by service provider. If your
message exceeds the maximum number of
characters, the phone will split the message.
26
: enter the PPP server phone number.
: enter the user ID.
: enter the password.
: select a data call type.
(Menu 2.2)
(Menu 2.2.1)
1. Enter your message.
2. Press <
3. When you have finished, press <
4. Enter a destination number.
5. Press [ ] to send the message.
Options
options:
•
Save and send
message and send the message.
•
Send only
•
Insert
bookmark.
•
Add picture/Add animation/Add melody
attach a picture, animated image, or melody.
•
Save to
folder
•
Language select
in the text input mode.
•
Text style
select
Save and send
To send the message to more than one recipient,
press [Down] and fill in additional destination
fields.
> to access one of the following
: both save a copy of the
: send the message.
: add a template, Phonebook entry, or
: save the message in the
box.
: change the language used
: change the text attributes.
or
Send only
Draft
Options
.
or
> and
:
My

Multimedia message
(Menu 2.2.2)
Multimedia Message Service (MMS) allows you to send
or receive multimedia messages containing a
combination of text, image, video, and audio, from
phone to phone or from phone to e-mail.
1. Select the
Subject
line.
2. Enter the message subject and press [ ].
3. Select the
4. Select
5. Select a photo and press <
Picture & Video
Picture
or
line.
Video
and select a category.
Add
>, or a video clip
and press the left soft key.
6. Select the
Sound
line.
7. Select a category and a sound file, and press
<
Add
>Select the
Message
line.
8. Enter the message text and press [ ].
9. While composing the message, press <
Options
>
to access the following options:
Depending on the field status or selected field,
available options vary.
•
Add
: add a message subject or text.
•
Edit
: edit the message subject or text.
•
Add image/Add video/Add sound
photo, video, or sound.
Depending on the file
: add a
type or DRM (Digital Rights Management) system,
some files may not be able to be forwarded
•
Preview
: display the message you have
created.
•
Send
•
: send the message.
Save to
: save the message in the
folder
box. You can also save the message as
Draft
an MMS template.
•
Add page
: add pages. Move to each page by
pressing [Left] or [Right] on the message
screen.
•
Delete page
•
Edit page
: delete an added page.
: change the duration of page display
or move the page forward.
•
Attach
: attach a name card or calender data.
•
Remove subject/Remove message
the subject or text.
•
Remove picture/Remove video/Remove
sound
: remove an added photo, video, or
sound.
.
or
: clear
Menu functions
My
Messaging
(Menu 2)
27
 Loading...