

Samsung SGH-T859 (T-Mobile) User Manual
ANDROID TABLET
User Manual
Please read this manual before operating your
device and keep it for future reference.

Intellectual Property
All Intellectual Property, as defined below, owned by or which is otherwise the property of Samsung or its respective suppliers relating to
the SAMSUNG Galaxy Tab, including but not limited to, accessories, parts, or software relating there to (the “Galaxy Tab System”), is
proprietary to Samsung and protected under federal laws, state laws, and international treaty provisions. Intellectual Property includes, but
is not limited to, inventions (patentable or unpatentable), patents, trade secrets, copyrights, software, computer programs, and related
documentation and other works of authorship. You may not infringe or otherwise violate the rights secured by the Intellectual Property.
Moreover, you agree that you will not (and will not attempt to) modify, prepare derivative works of, reverse engineer, decompile,
disassemble, or otherwise attempt to create source code from the software. No title to or ownership in the Intellectual Property is
transferred to you. All applicable rights of the Intellectual Property shall remain with SAMSUNG and its suppliers.
Samsung Telecommunications America (STA), LLC
Headquarters:
1301 E. Lookout Drive
Richardson, TX 75082
Toll Free Tel:
Customer Care Center:
1000 Klein Rd.
Plano, TX 75074
1.888.987.HELP (4357)
Internet Address:
©
2011 Samsung Telecommunications America, LLC. Samsung is a registered trademark of Samsung Electronics Co., Ltd.
Do you have questions about your Samsung Mobile Device?
For 24 hour information and assistance, we offer a new FAQ/ARS System (Automated Response System) at:
http://www.samsung.com/us/support
http://www.samsung.com
T859_English_UM_UVKJ2_PS_102611_F3

Nuance®, VSuite™, T9® Text Input, XT9® Smart Input, and the Nuance logo are trademarks or registered trademarks of Nuance
Communications, Inc., or its affiliates in the United States and/or other countries.
The Bluetooth® word mark, figure mark (stylized “B Design”), and combination mark (Bluetooth word mark and “B Design”) are registered
trademarks and are wholly owned by the Bluetooth SIG.
Google, the Google logo, Android, the Android logo, Android Market, Gmail, Google Mail, Google Maps, Google Talk, Picasa, and YouTube
are trademarks of Google Inc.
Wi-Fi is a registered trademark of the Wireless Fidelity Alliance, Inc.
Swype and the Swype logos are trademarks of Swype, Inc. © 2010 Swype, Inc. All rights reserved.
DivX®, DivX Certified® and associated logos are trademarks of Rovi Corporation or its subsidiaries and are used under license.
DivX Certified® to play DivX® video up to HD 720p, including premium content.
ABOUT DIVX VIDEO: DivX® is a digital video format created by DivX, LLC, a subsidiary of Rovi Corporation. This is an official DivX Certified
device that plays DivX video. Visit
ABOUT DIVX VIDEO-ON-DEMAND: This DivX Certified® device must be registered in order to play purchased DivX Video-on-Demand (VOD)
movies. To obtain your registration code, from the Home screen, tap
License settings > DivX® VOD > Register
www.divx.com
. Go to
for more information and software tools to convert your files into DivX videos.
Apps > Settings > About device > Legal Information >
vod.divx.com
for more information on how to complete your registration.
Open Source Software
Some software components of this product incorporate source code covered under GNU General Public License (GPL), GNU Lesser General
Public License (LGPL), OpenSSL License, BSD License and other open source licenses. To obtain the source code covered under the open
source licenses, please visit:
http://opensource.samsung.com
.
®

Disclaimer of Warranties; Exclusion of Liability
EXCEPT AS SET FORTH IN THE EXPRESS WARRANTY CONTAINED ON THE WARRANTY PAGE ENCLOSED WITH THE PRODUCT, THE
PURCHASER TAKES THE PRODUCT “AS IS”, AND SAMSUNG MAKES NO EXPRESS OR IMPLIED WARRANTY OF ANY KIND WHATSOEVER
WITH RESPECT TO THE PRODUCT, INCLUDING BUT NOT LIMITED TO THE MERCHANTABILITY OF THE PRODUCT OR ITS FITNESS FOR ANY
PARTICULAR PURPOSE OR USE; THE DESIGN, CONDITION OR QUALITY OF THE PRODUCT; THE PERFORMANCE OF THE PRODUCT; THE
WORKMANSHIP OF THE PRODUCT OR THE COMPONENTS CONTAINED THEREIN; OR COMPLIANCE OF THE PRODUCT WITH THE
REQUIREMENTS OF ANY LAW, RULE, SPECIFICATION OR CONTRACT PERTAINING THERETO. NOTHING CONTAINED IN THE INSTRUCTION
MANUAL SHALL BE CONSTRUED TO CREATE AN EXPRESS OR IMPLIED WARRANTY OF ANY KIND WHATSOEVER WITH RESPECT TO THE
PRODUCT. IN ADDITION, SAMSUNG SHALL NOT BE LIABLE FOR ANY DAMAGES OF ANY KIND RESULTING FROM THE PURCHASE OR USE OF
THE PRODUCT OR ARISING FROM THE BREACH OF THE EXPRESS WARRANTY, INCLUDING INCIDENTAL, SPECIAL OR CONSEQUENTIAL
DAMAGES, OR LOSS OF ANTICIPATED PROFITS OR BENEFITS.
SAMSUNG IS NOT LIABLE FOR PERFORMANCE ISSUES OR INCOMPATIBILITIES CAUSED BY YOUR EDITING OF REGISTRY SETTINGS, OR
YOUR MODIFICATION OF OPERATING SYSTEM SOFTWARE.
USING CUSTOM OPERATING SYSTEM SOFTWARE MAY CAUSE YOUR DEVICE AND APPLICATIONS TO WORK IMPROPERLY.

Table of Contents
Section 1: Getting Started ..............................................5
Understanding This User Manual . . . . . . . . . . . . . . . . . . . . . . . 5
SIM Card . . . . . . . . . . . . . . . . . . . . . . . . . . . . . . . . . . . . . . . . . 6
Battery . . . . . . . . . . . . . . . . . . . . . . . . . . . . . . . . . . . . . . . . . . . 7
Turning Your Device On and Off . . . . . . . . . . . . . . . . . . . . . . . . 9
Setting Up Your Device . . . . . . . . . . . . . . . . . . . . . . . . . . . . . . . 9
Retrieving Your Google Account Password . . . . . . . . . . . . . . . 10
Using Google Maps . . . . . . . . . . . . . . . . . . . . . . . . . . . . . . . . 11
Task Manager . . . . . . . . . . . . . . . . . . . . . . . . . . . . . . . . . . . . 11
Galaxy Tab Accessories . . . . . . . . . . . . . . . . . . . . . . . . . . . . . 12
Securing Your Device . . . . . . . . . . . . . . . . . . . . . . . . . . . . . . . 12
Troubleshooting . . . . . . . . . . . . . . . . . . . . . . . . . . . . . . . . . . . 12
Section 2: Understanding Your Device ........................13
Features . . . . . . . . . . . . . . . . . . . . . . . . . . . . . . . . . . . . . . . . 13
Front and Side Views . . . . . . . . . . . . . . . . . . . . . . . . . . . . . . . 14
Top and Bottom Views . . . . . . . . . . . . . . . . . . . . . . . . . . . . . . 15
Back View . . . . . . . . . . . . . . . . . . . . . . . . . . . . . . . . . . . . . . . 15
Home Screen . . . . . . . . . . . . . . . . . . . . . . . . . . . . . . . . . . . . . 16
Navigating Your Device . . . . . . . . . . . . . . . . . . . . . . . . . . . . . 18
Notifications . . . . . . . . . . . . . . . . . . . . . . . . . . . . . . . . . . . . . . 21
Status Details . . . . . . . . . . . . . . . . . . . . . . . . . . . . . . . . . . . . . 22
Quick Settings . . . . . . . . . . . . . . . . . . . . . . . . . . . . . . . . . . . . 22
Status Bar . . . . . . . . . . . . . . . . . . . . . . . . . . . . . . . . . . . . . . . 23
Primary Shortcuts . . . . . . . . . . . . . . . . . . . . . . . . . . . . . . . . . 26
Mini App Tray . . . . . . . . . . . . . . . . . . . . . . . . . . . . . . . . . . . . 27
Apps Screen . . . . . . . . . . . . . . . . . . . . . . . . . . . . . . . . . . . . . 28
Applications . . . . . . . . . . . . . . . . . . . . . . . . . . . . . . . . . . . . . . 28
Widgets . . . . . . . . . . . . . . . . . . . . . . . . . . . . . . . . . . . . . . . . . 34
App Shortcuts . . . . . . . . . . . . . . . . . . . . . . . . . . . . . . . . . . . . 38
Wallpapers . . . . . . . . . . . . . . . . . . . . . . . . . . . . . . . . . . . . . . 39
More . . . . . . . . . . . . . . . . . . . . . . . . . . . . . . . . . . . . . . . . . . . 39
Section 3: Entering Text ............................................... 41
Virtual QWERTY Keyboard . . . . . . . . . . . . . . . . . . . . . . . . . . . 41
Text Input Methods . . . . . . . . . . . . . . . . . . . . . . . . . . . . . . . . 41
Changing the Input Method . . . . . . . . . . . . . . . . . . . . . . . . . . 42
Entering Text Using Swype . . . . . . . . . . . . . . . . . . . . . . . . . . 43
Entering Text Using the Samsung Keypad . . . . . . . . . . . . . . . 46
Using XT9 Predictive Text . . . . . . . . . . . . . . . . . . . . . . . . . . . 49
Editing Text . . . . . . . . . . . . . . . . . . . . . . . . . . . . . . . . . . . . . . 51
Using Speech Recognition . . . . . . . . . . . . . . . . . . . . . . . . . . . 52
Section 4: Contacts and Accounts ..............................53
Accounts . . . . . . . . . . . . . . . . . . . . . . . . . . . . . . . . . . . . . . . . 53
Contacts . . . . . . . . . . . . . . . . . . . . . . . . . . . . . . . . . . . . . . . . 53
Joining Contact Information . . . . . . . . . . . . . . . . . . . . . . . . . . 58
Groups . . . . . . . . . . . . . . . . . . . . . . . . . . . . . . . . . . . . . . . . . 61
Favorites . . . . . . . . . . . . . . . . . . . . . . . . . . . . . . . . . . . . . . . . 63
Synchronizing Contacts . . . . . . . . . . . . . . . . . . . . . . . . . . . . . 64
1

Section 5: Messaging ...................................................65
Types of Messages . . . . . . . . . . . . . . . . . . . . . . . . . . . . . . . . . 65
Creating and Sending Messages . . . . . . . . . . . . . . . . . . . . . . . 65
Message Options . . . . . . . . . . . . . . . . . . . . . . . . . . . . . . . . . . 66
Viewing Newly Received Messages . . . . . . . . . . . . . . . . . . . . 67
Deleting Messages . . . . . . . . . . . . . . . . . . . . . . . . . . . . . . . . .69
Message Search . . . . . . . . . . . . . . . . . . . . . . . . . . . . . . . . . . . 69
Messaging Settings . . . . . . . . . . . . . . . . . . . . . . . . . . . . . . . .70
Gmail . . . . . . . . . . . . . . . . . . . . . . . . . . . . . . . . . . . . . . . . . . . 71
Email . . . . . . . . . . . . . . . . . . . . . . . . . . . . . . . . . . . . . . . . . . . 73
Google Talk . . . . . . . . . . . . . . . . . . . . . . . . . . . . . . . . . . . . . .80
Section 6: Multimedia ..................................................83
Using the Camera . . . . . . . . . . . . . . . . . . . . . . . . . . . . . . . . . . 83
Video Player . . . . . . . . . . . . . . . . . . . . . . . . . . . . . . . . . . . . . . 90
Gallery . . . . . . . . . . . . . . . . . . . . . . . . . . . . . . . . . . . . . . . . . . 94
Photo Editor . . . . . . . . . . . . . . . . . . . . . . . . . . . . . . . . . . . . . . 96
Media Hub . . . . . . . . . . . . . . . . . . . . . . . . . . . . . . . . . . . . . . . 98
T-Mobile TV . . . . . . . . . . . . . . . . . . . . . . . . . . . . . . . . . . . . . . 99
Music App . . . . . . . . . . . . . . . . . . . . . . . . . . . . . . . . . . . . . .100
Music Player . . . . . . . . . . . . . . . . . . . . . . . . . . . . . . . . . . . . . 105
Section 7: Connections ..............................................110
Browser . . . . . . . . . . . . . . . . . . . . . . . . . . . . . . . . . . . . . . . . 110
Bluetooth . . . . . . . . . . . . . . . . . . . . . . . . . . . . . . . . . . . . . . . 115
Enable Downloading for Web Applications . . . . . . . . . . . . . .118
Wi-Fi . . . . . . . . . . . . . . . . . . . . . . . . . . . . . . . . . . . . . . . . . .119
Connecting to Kies . . . . . . . . . . . . . . . . . . . . . . . . . . . . . . . . 121
2
Tethering . . . . . . . . . . . . . . . . . . . . . . . . . . . . . . . . . . . . . . . 123
Portable Wi-Fi Hotspot . . . . . . . . . . . . . . . . . . . . . . . . . . . . . 124
Managing Downloads . . . . . . . . . . . . . . . . . . . . . . . . . . . . . . 125
Section 8: Applications and Widgets ....................... 127
GPS Applications . . . . . . . . . . . . . . . . . . . . . . . . . . . . . . . . . 127
Alarm . . . . . . . . . . . . . . . . . . . . . . . . . . . . . . . . . . . . . . . . . . 128
Asphalt 6 . . . . . . . . . . . . . . . . . . . . . . . . . . . . . . . . . . . . . . . 130
Blio . . . . . . . . . . . . . . . . . . . . . . . . . . . . . . . . . . . . . . . . . . . 130
Books . . . . . . . . . . . . . . . . . . . . . . . . . . . . . . . . . . . . . . . . . 130
Browser . . . . . . . . . . . . . . . . . . . . . . . . . . . . . . . . . . . . . . . . 131
Calculator . . . . . . . . . . . . . . . . . . . . . . . . . . . . . . . . . . . . . . 131
Calendar . . . . . . . . . . . . . . . . . . . . . . . . . . . . . . . . . . . . . . . 132
Camera . . . . . . . . . . . . . . . . . . . . . . . . . . . . . . . . . . . . . . . . 134
Contacts . . . . . . . . . . . . . . . . . . . . . . . . . . . . . . . . . . . . . . . 134
Downloads . . . . . . . . . . . . . . . . . . . . . . . . . . . . . . . . . . . . . . 134
Dropbox . . . . . . . . . . . . . . . . . . . . . . . . . . . . . . . . . . . . . . . . 135
eBook . . . . . . . . . . . . . . . . . . . . . . . . . . . . . . . . . . . . . . . . . 136
Email . . . . . . . . . . . . . . . . . . . . . . . . . . . . . . . . . . . . . . . . . . 137
Files . . . . . . . . . . . . . . . . . . . . . . . . . . . . . . . . . . . . . . . . . . . 137
Gallery . . . . . . . . . . . . . . . . . . . . . . . . . . . . . . . . . . . . . . . . . 139
Get Web Now . . . . . . . . . . . . . . . . . . . . . . . . . . . . . . . . . . . . 139
Gmail . . . . . . . . . . . . . . . . . . . . . . . . . . . . . . . . . . . . . . . . . . 139
Google Search . . . . . . . . . . . . . . . . . . . . . . . . . . . . . . . . . . . 140
Latitude . . . . . . . . . . . . . . . . . . . . . . . . . . . . . . . . . . . . . . . . 140
Maps . . . . . . . . . . . . . . . . . . . . . . . . . . . . . . . . . . . . . . . . . . 142
Market . . . . . . . . . . . . . . . . . . . . . . . . . . . . . . . . . . . . . . . . . 144
Media Hub . . . . . . . . . . . . . . . . . . . . . . . . . . . . . . . . . . . . . . 145

Memo . . . . . . . . . . . . . . . . . . . . . . . . . . . . . . . . . . . . . . . . . 146
Messaging . . . . . . . . . . . . . . . . . . . . . . . . . . . . . . . . . . . . . . 147
MobileLife Organizer . . . . . . . . . . . . . . . . . . . . . . . . . . . . . . 147
Music . . . . . . . . . . . . . . . . . . . . . . . . . . . . . . . . . . . . . . . . . . 149
Music Player . . . . . . . . . . . . . . . . . . . . . . . . . . . . . . . . . . . . 149
My Account . . . . . . . . . . . . . . . . . . . . . . . . . . . . . . . . . . . . . 149
My Device . . . . . . . . . . . . . . . . . . . . . . . . . . . . . . . . . . . . . . 150
Navigation . . . . . . . . . . . . . . . . . . . . . . . . . . . . . . . . . . . . . . 151
Pen Memo . . . . . . . . . . . . . . . . . . . . . . . . . . . . . . . . . . . . . . 153
Photo Editor . . . . . . . . . . . . . . . . . . . . . . . . . . . . . . . . . . . . . 154
Places . . . . . . . . . . . . . . . . . . . . . . . . . . . . . . . . . . . . . . . . . 154
Pro Apps . . . . . . . . . . . . . . . . . . . . . . . . . . . . . . . . . . . . . . . 155
Pulse . . . . . . . . . . . . . . . . . . . . . . . . . . . . . . . . . . . . . . . . . . 155
Qello . . . . . . . . . . . . . . . . . . . . . . . . . . . . . . . . . . . . . . . . . . 156
Quickoffice HD . . . . . . . . . . . . . . . . . . . . . . . . . . . . . . . . . . . 156
Security . . . . . . . . . . . . . . . . . . . . . . . . . . . . . . . . . . . . . . . . 158
Settings . . . . . . . . . . . . . . . . . . . . . . . . . . . . . . . . . . . . . . . . 158
SimCity Deluxe HD . . . . . . . . . . . . . . . . . . . . . . . . . . . . . . . . 158
Slacker . . . . . . . . . . . . . . . . . . . . . . . . . . . . . . . . . . . . . . . . 159
Social Hub . . . . . . . . . . . . . . . . . . . . . . . . . . . . . . . . . . . . . . 159
T-Mobile TV . . . . . . . . . . . . . . . . . . . . . . . . . . . . . . . . . . . . . 160
Talk . . . . . . . . . . . . . . . . . . . . . . . . . . . . . . . . . . . . . . . . . . . 160
TegraZone Games . . . . . . . . . . . . . . . . . . . . . . . . . . . . . . . . 160
Video Chat . . . . . . . . . . . . . . . . . . . . . . . . . . . . . . . . . . . . . . 161
Video . . . . . . . . . . . . . . . . . . . . . . . . . . . . . . . . . . . . . . . . . . 162
Videos . . . . . . . . . . . . . . . . . . . . . . . . . . . . . . . . . . . . . . . . . 162
Voice Search . . . . . . . . . . . . . . . . . . . . . . . . . . . . . . . . . . . . 162
World Clock . . . . . . . . . . . . . . . . . . . . . . . . . . . . . . . . . . . . . 162
Yahoo Finance . . . . . . . . . . . . . . . . . . . . . . . . . . . . . . . . . . . 163
YouTube . . . . . . . . . . . . . . . . . . . . . . . . . . . . . . . . . . . . . . . 165
Zinio . . . . . . . . . . . . . . . . . . . . . . . . . . . . . . . . . . . . . . . . . . 166
Section 9: Settings ..................................................... 167
Accessing Settings . . . . . . . . . . . . . . . . . . . . . . . . . . . . . . . 167
Wireless and Networks . . . . . . . . . . . . . . . . . . . . . . . . . . . . 167
Tethering . . . . . . . . . . . . . . . . . . . . . . . . . . . . . . . . . . . . . . . 169
Sound Settings . . . . . . . . . . . . . . . . . . . . . . . . . . . . . . . . . . 174
Screen Settings . . . . . . . . . . . . . . . . . . . . . . . . . . . . . . . . . . 176
Power Saving Mode . . . . . . . . . . . . . . . . . . . . . . . . . . . . . . . 178
Location and Security . . . . . . . . . . . . . . . . . . . . . . . . . . . . . 179
Applications . . . . . . . . . . . . . . . . . . . . . . . . . . . . . . . . . . . . . 182
Accounts and Sync . . . . . . . . . . . . . . . . . . . . . . . . . . . . . . . 185
Motion Settings . . . . . . . . . . . . . . . . . . . . . . . . . . . . . . . . . . 189
Privacy . . . . . . . . . . . . . . . . . . . . . . . . . . . . . . . . . . . . . . . . 189
Storage . . . . . . . . . . . . . . . . . . . . . . . . . . . . . . . . . . . . . . . . 191
Language and Input . . . . . . . . . . . . . . . . . . . . . . . . . . . . . . . 191
Accessibility . . . . . . . . . . . . . . . . . . . . . . . . . . . . . . . . . . . . 195
Date and Time . . . . . . . . . . . . . . . . . . . . . . . . . . . . . . . . . . . 196
About Device . . . . . . . . . . . . . . . . . . . . . . . . . . . . . . . . . . . . 196
Section 10: Health and Safety Information ............... 199
Exposure to Radio Frequency (RF) Signals . . . . . . . . . . . . . . 199
Specific Absorption Rate (SAR) Certification Information . . . 203
Smart Practices While Driving . . . . . . . . . . . . . . . . . . . . . . . 205
Battery Use and Safety . . . . . . . . . . . . . . . . . . . . . . . . . . . . 205
Display / Touch-Screen . . . . . . . . . . . . . . . . . . . . . . . . . . . . 207
3

Section 11: Warranty Information .............................214
Standard Limited Warranty . . . . . . . . . . . . . . . . . . . . . . . . . . 214
End User License Agreement for Software . . . . . . . . . . . . . . 218
Index ............................................................................223
4

Section 1: Getting Started
This section helps you to quickly start using your device.
Understanding This User Manual
The sections of this manual generally follow the features of your
device. A robust index for features begins on page 223.
Also included is important safety information, beginning on
page 199, that you should know before using your device.
This manual gives navigation instructions according to the
default display settings. If you select other settings, navigation
steps may be different.
Unless otherwise specified, all instructions in this manual
assume that you are starting from a Home screen. To get to a
Home screen, you may need to unlock the device. For more
information, refer to “Securing Your Device” on page 12.
Note:
Instructions in this manual are based on default settings and may vary
from your device depending on the software version on your device
and any changes to the device’s settings.
Unless stated otherwise, instructions in this user manual start with the
device unlocked, at the Home screen.
All screen images in this manual are simulated. Actual displays may
vary depending on the software version of your device and any
changes to the device’s settings.
Special Text
In this manual, some text is set apart from the rest. This special
text is intended to point out important information, share quick
methods for activating features, define terms, and more. The
definitions for these methods are as follows:
•
Notes
: Presents alternative options for the current feature, menu, or
sub-menu.
•
Tips
: Provides quick or innovative methods or useful shortcuts.
•
Important
: Points out important information about the current feature
that could affect performance.
•
Warning
: Brings important information to your attention that can help
to prevent loss of data or functionality or damage to your device.
Text Conventions
This manual provides condensed information about how to use
your device. To make this possible, the following text conventions
are used to represent often-used steps:
➔
Arrows are used to represent the sequence of selecting
successive options in longer, or repetitive, procedures. For
example:
From a Home screen, tap (
Apps
)
➔
Getting Started 5
(
Settings
).
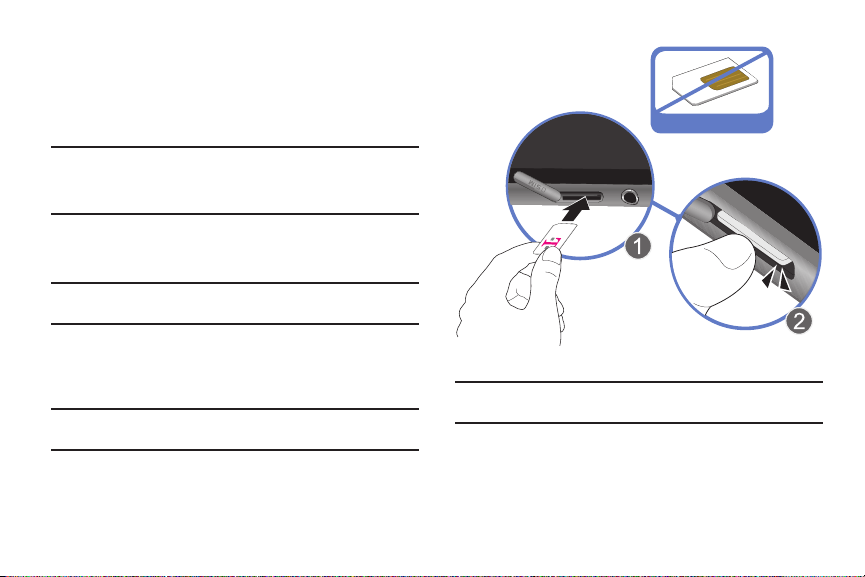
SIM Card
Incorrect
Your device uses a SIM (Subscriber Identity Module). The 4G LTE
SIM is a small, rectangular plastic card that stores your device
number, information about your wireless service, and other
information such as messages and contacts.
Caution!:
Do not bend or scratch the SIM card. Take care when handling,
installing, or removing the SIM card, and avoid exposing the SIM
card to static electricity, water, or dirt. Keep the SIM card out of
reach of small children.
Installing the SIM Card
The SIM card must remain in the device when in use.
Important!:
Turn the device off before installing or removing the SIM card. To
turn the device off, press and hold the Power/Lock Key.
1. Open the SIM card slot and carefully insert the SIM Card
into the slot, with the logo facing up.
2. Push the SIM card in gently until it clicks into place.
Warning!:
Do not insert a microSD or other memory card into the SIM card
slot.
6
Removing the SIM Card
Important!:
Turn the device off before installing or removing the SIM card. To
turn the device off, press and hold the Power/Lock Key.
1. Open the SIM card slot and gently push the SIM Card
inward to release it.
2. Carefully slide the SIM Card out of the slot.
3. Place the cover back over the open slot.

Note:
The battery comes partially charged. You must fully charge the battery
before using your device for the first time.
After the first charge, you can use the device while charging.
Warning!:
Use only approved charging devices. Approved accessories are
designed to maximize battery life. Using other accessories may
invalidate your warranty and may cause damage.
Battery Indicator
The Battery icon in the Status Bar shows the battery power
level. When battery power is 15% or less, your device prompts
you to charge the battery. If you continue to operate the device
without charging, the device powers off. For battery use
information, see “About Device” on page 196.
Tip:
Touch the Time field to display battery charge status.
Battery
Your device is powered by a rechargeable, standard Li-Ion
battery. A Wall/USB Charger (Charging Head and USB cable) are
included with the device for charging the battery.
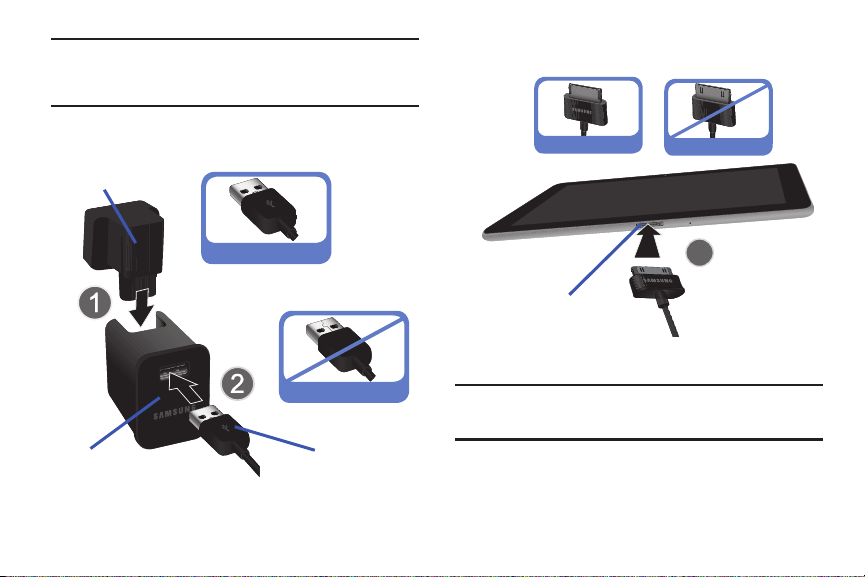
Charging the Battery
Your device comes with a Wall/USB Charger (Outlet Connector,
Charging Head, and USB cable) to charge your device from any
standard AC power outlet.
Getting Started 7
Note:
Charging Head
USB Cable
Outlet Connector
Charger/Accessory
Port
The battery comes partially charged. You must fully charge the battery
before using your device for the first time.
After the first charge, you can use the device while charging.
3. Insert the USB cable into the device’s Charger/Accessory
Port (3).
8
1. Carefully slide the Outlet Connector into the Charging Head
(1). Verify the connection is secure.
Correct
Incorrect
2. Insert the USB cable into the Charging Head (2).
Correct
Incorrect
4. Plug the Charging Head into a standard AC power outlet.
Warning!:
While the device is charging, if the touch screen does not function
due to an unstable power supply unplug the USB power adapter
from the power outlet or unplug the USB cable from the device.
5. When charging is complete, unplug the Charging Head
from the power outlet and remove the USB cable from the
device.
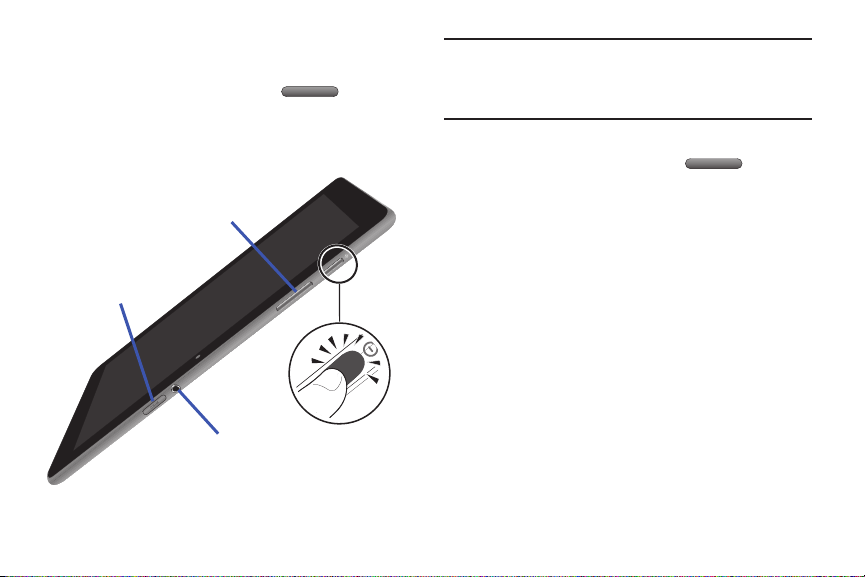
Turning Your Device On and Off
SIM Card Slot
Headphone Jack
Volume Keys
Turning Your Device On
䊳
Press and hold the
Power/Lock Key
.
For more information, refer to “Unlocking the Device” on
page 12.
Note:
Your device’s internal antenna is located along the top back of the
device. Do not block the antenna; doing so may affect signal quality
and may cause the device to operate at a higher power level than is
necessary. For more information, refer to “GPS Applications” on
page 127.
Turning Your Device Off
1. Press and hold the
2. At the prompt, tap
Power/Lock Key
Power off
.
.
Setting Up Your Device
When you first turn on your device, you are asked to set up a few
things.
1. At the
Welcome
screen, tap the language field, scroll
through the list and select the language you want your
device to use, such as, English (United States).
2. Ta p
Start
once you have made your language selection.
3. Read the
Use Google’s location service
screen information
and enable either or both of the Google location services.
Ta p
Next
to continue.
Getting Started 9

4.
If prompted with the
Set date and time
screen, tap
GMT+00:00, scroll through the list, and tap the time zone
for your location. If necessary, repeatedly tap above or
below the
Date
(month, day, year) and
Time
(hour, minute,
and AM/PM) fields to set the correct date and time. Tap
Next
to continue.
5. Your new device uses your Google account to fully utilize
its Android features, including Gmail, Maps, Navigation,
Google Talk, and the Android Market.
The
Sign in with your Google Account
screen, allows you to
create a new Google account or sign in, if you already have
a Google account.
•
Tap
Next
➔
password of your existing account then tap
Create account
or enter the email address and
Sign in
.
– or –
•
Tap
Skip
to perform this task later. For more information, refer to
“Setting Up Your Gmail Account”
Note:
If you try to sign in to your Google account and you skipped Wi-Fi
setup, the
Google Account sign-in failure
Tap
Connect to Wi-Fi
complete your Google account sign in.
10
, if you want to set up your Wi-Fi connection to
on page 71.
screen displays.
6. Read the
Backup and restore
screen information and
enable either or both options.
7. Tap
Done
. The main Home screen displays.
Retrieving Your Google Account Password
A Google account password is required for Google applications. If
you misplace or forget your Google Account password, follow
these instructions to retrieve it:
1. From your computer, use an Internet browser to navigate
to
http://google.com/accounts
2. Once the URL loads, click on the
account?
link and follow the on-screen instructions.
.
Can’t access your
Using Google Maps
In order to use some applications related to Google Maps, you
must first connect Wi-Fi. For more information, refer to “Wi-Fi
settings” on page 168.
You must also enable location services to use Google Maps.
Some features require Standalone or Google location services.
For more information, refer to “Location and Security” on
page 179.
Task Manager
Your device can run applications simultaneously and some
applications run in the background.
Use Task Manager to see which applications are running on your
device and to end running applications to extend battery life. You
can also uninstall applications from your device and see how
much memory is used by applications.
Task Manager provides information about
includes a
RAM manager
Note:
There are some functions that are accessible from almost any screen.
This Mini App Tray can be accessed by tapping the arrow at the bottom
of the screen .
.
Active applications
and
1. From a Home screen, tap (
(
Task manager
).
Mini App Tray
– or –
Add the Program monitor widget to a Home screen and
then touch the Program monitor widget. For more
information, refer to “Widgets” on page 34.
2. Tap t he
Active applications
tab to view applications
currently running on your device.
3. Tap t he
RAM manager
tab to display the amount of Random
Access Memory (RAM) currently in use.
4. Ta p
Clear memory
to clear inactive and background
processes.
5. Touch the
X
in the top right corner of the Task Manager
pop-up to close the application.
Shutting Down a Currently Active Application
1. From a Home screen, tap (
(
2. From the
application or
Task manager
Active applications
).
End all
to stop all running applications.
Mini App Tray
tab, tap to end an
Getting Started 11
) ➔
) ➔
Galaxy Tab Accessories
To find accessories for your Galaxy Tab:
1. Go to
http://www.samsung.com/us/mobile/galaxy-tab-
accessories
.
2. Use your model number to find compatible accessories.
Securing Your Device
By default, the device locks automatically when the screen times
out or you can lock it manually. You can unlock the device using
one of the default Unlock screens or, for increased security, use a
personal screen unlock pattern.
For more information about creating and enabling a Screen
unlock pattern, see “Configure Lock Screen” on page 179.
For other settings related to securing your device, see “Location
and Security” on page 179.
Note:
Unless stated otherwise, instructions in this User Manual start with the
device unlocked, at the Home screen.
Locking the device manually
䊳
Press the
Power/Lock Key
.
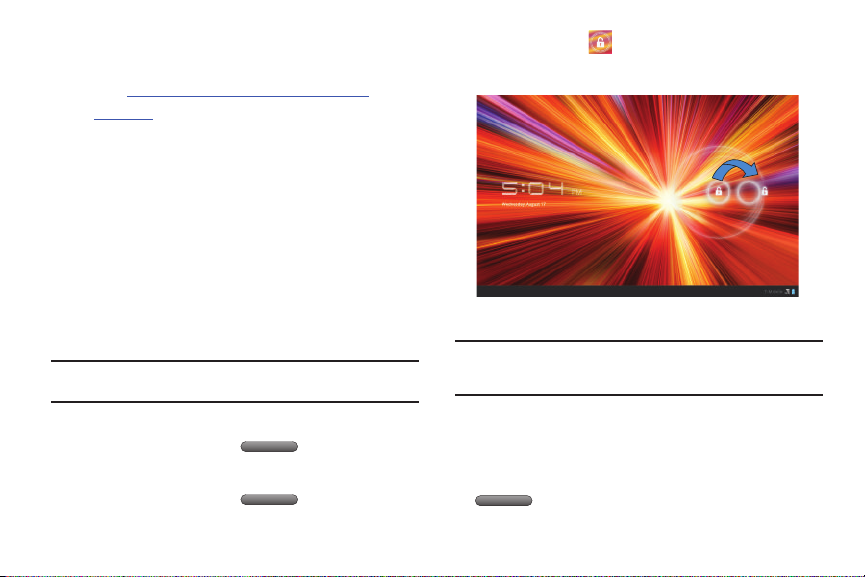
Unlocking the Device
1. Press the
12
Power/Lock Key
.
2. Touch and drag
(Unlock
) to the edge of the circle that
appears, as shown.
The last screen you accessed is displayed.
Note:
You can choose the type of Screen Unlock you want to use, from
Pattern, PIN or Password. For more information, refer to “Location and
Security” on page 179.
Troubleshooting
If your device has fatal errors, hangs up, or freezes, you may
need to reboot the device to regain functionality.
•
If your device is frozen and unresponsive, press and hold the
(
Power/Lock Key
) for at least 20 seconds.

Section 2: Understanding Your Device
This section outlines key features of your device and describes
the screen and the icons that appear when the device is in use. It
also shows how to navigate through the device.
Features
•
10.1-inch WXGA TFT (PLS) LCD touch screen
•
AndroidTM 3.2, Honeycomb
•
Android MarketTM for access to over 250,000 Apps
•
Full HTML Web Browser
•
Compatible with Adobe® Flash® technology
•
Bluetooth®
2.1
“Bluetooth Settings”
•
Built-in Wi-Fi technology (802.11 a/b/g/n)
•
High Speed packet Access Plus (HSPA+) delivering data speeds faster
Wireless technology. For more information, refer to
on page 169.
than the current 3G network technology
•
3 Megapixel Camera/Camcorder with flash
•
2 Megapixel forward-facing Camera for Video Chat
•
Full integration of Google applications (Gmail, YouTube, and Google
Maps)
•
Messaging Features:
–
Gmail
–
Email (corporate and personal)
Google Talk
TM
(Instant Messaging and Video Chat)
–
•
Photo Gallery that supports JPEG, PNG, GIF, WBMP, BMP, and AGIF
formats
•
HD Video Player (1080p)
–
Container types: MP4, 3GP, AVI (DivX), WMV (ASF), and FLV
–
Codecs: 3GPP, H.263, H.264, WMV, Streaming, and MPEG4 formats
•
DivX Certified to play DivX video up to HD 720p, including premium
content
•
Music Player supports MP3, ACC, ACC+, eACC+, WMA, MPEG4, WAV,
and MIDI formats
•
Ringtone supports MP3, HiFi (mp3, aac), Megatones (MIDI), AAC,
AAC+, eAAC+, MIDI, WMA, MPEG4 formats
•
1GB RAM system memory
•
16GB buit-in memory (on-board)
•
Pre-loaded e-reader applications such as: Blio®, Google BooksTM, and
TM
Zinio
•
QuickOffice® for easy document viewing and editing
•
•
•
TM
Social Hub
Slacker® Radio
T-M obi le® TV
Understanding Your Device 13
Warning!:
1
1
4
32
This device does not support some USB storage media devices.
For more information, refer to “Galaxy Tab Accessories” on
page 12.
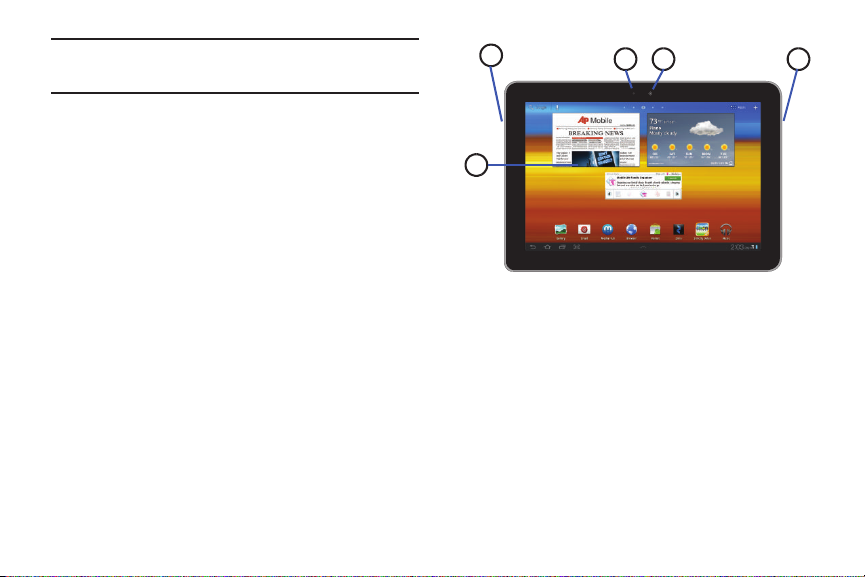
Front and Side Views
The following items can be found on the front and sides of your
device as illustrated.
1.
External Speakers
: Used in music or video playback,
notification tones, and for other sounds.
2.
Light Sensor
: Used to control screen brightness
automatically and when taking photos with the
Front-facing Camera.
3.
Front-facing Camera Lens
4.
Display Screen
rotates with the tablet as you turn it. You can turn this
: Used when taking photos.
: The orientation of the display screen
feature on and off. For more information, refer to
“Auto-Rotate Screen” on page 177.
14

Top and Bottom Views
1
3
2
5
4
6
1
2
1.
Power/Lock Key
off. Press to lock the device or to wake the screen for
unlocking. Press and hold to reveal the
2.
Volume Key
Home screen, press to
adjust Master Volume.
During music playback,
press to adjust volume.
3.
Charger/Accessory Port
Plug in a USB cable for
charging or to sync
music and files.
4.
Microphone
pick up your voice or
audio during recording.
5.
Headset Jack
3.5 mm headphones.
6.
SIM Card slot
: Press and hold to turn the device on or
Tablet options
: From a
:
: Used to
: Plug in for
: Insertion slot for SIM card.
list.
Back View
1.
Camera Lens
videos.
2.
Camera Flash
: Used when taking photos or recording
: Used when taking photos.
Understanding Your Device 15
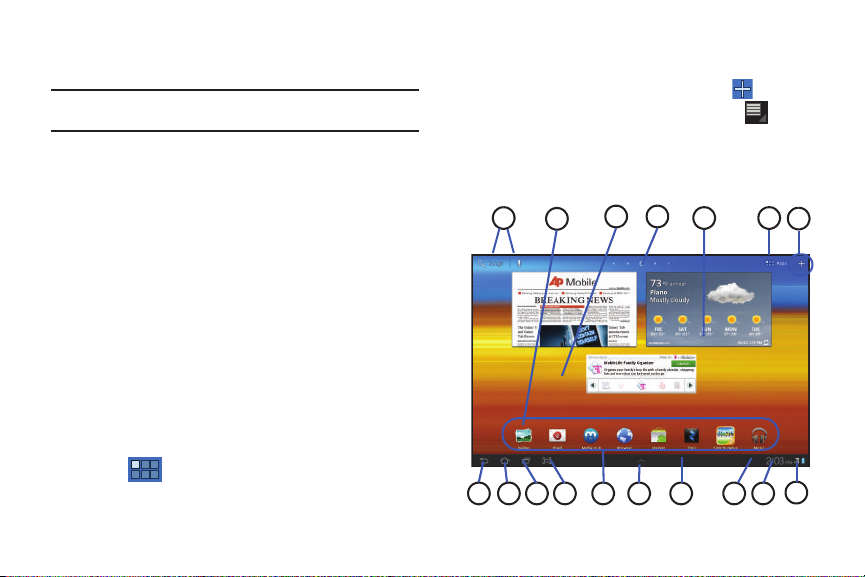
Home Screen
128
7
6
1
2
3
9 10 1514
5
16
17
11 13
4
The Home screen is the starting point for using your device.
Note:
Unless stated otherwise, instructions in this user manual start with the
device unlocked, at the Home screen.
1.
Google
and
typing or speaking.
Search”
2.
Shortcuts
Voice Search
on page 140.
: Shortcuts to common applications.These
: Search your tablet and the Web by
For more information, refer to “Google
shortcuts are found on the Home screen by default. For
more information, refer to “App Shortcuts” on page 38.
3.
Home screen
: The starting point for using your device.
Place shortcuts, widgets and other items to customize your
device to your needs.
4.
Screen Indicator
5.
Widgets
: Displays the current screen location.
: Applications that run on the Home screen. These
widgets are found on the Home screen by default. For
more information, refer to “Widgets” on page 34.
6.
Apps
16
: Display the Apps screen.
7.
Customize
or
Menu
: Display options for the current screen.
•
From a Home screen, you can add Widgets and App shortcuts, and
change the Home screen wallpaper by tapping (Customize).
•
From within an application screen (ex: Maps), tap (Menu) to
display options for the current screen. For more information, see
“Widgets”
on page 34,
“Wallpapers”
on page 39.
“App Shortcuts”
on page 38, and

Tip:
The area across the top of the screen is called the Application Bar.
Note:
The buttons along the bottom left of the screen are called Command
Buttons. They include Back, Home, Navigation, Screen Capture, and
Mini App Tray.
8.
Back
: Return to the previous screen or option.
9.
Home
: Display the central Home screen. Touch and
hold to reveal the Task manager.
10.
Navigation
: Opens a thumbnail list of applications you
have recently used. Tap a listed item to open it.
11.
Screen Capture
and saves it in the
information, refer to
12.
Primary Shortcuts
: Captures a picture of the current screen
/Root/ScreenCapture
“Files”
on page 137.
folder. For more
: Shortcuts to common features. For
more information, refer to “Primary Shortcuts” on
page 26.
13.
Mini App Tray
: Displays those applications that you
can access and use anytime, such as Task manager, your
Calendar, a Memo pad, and a Calculator. For more
information, refer to “Mini App Tray” on page 27.
14.
System Bar
: The area along the bottom of the Home screen
where you can find navigation buttons and icons that show
notifications, battery power, and connection details.
15.
Notification Icons
: Presents icons to show notifications
from the system or from an application. Tap a Notification
Icon to display more detail. For a list of icons, see “Status
Bar” on page 23.
16.
Time
: The current time. For more information, refer to
“Date and Time” on page 196.
17.
Status Icons
: Indicate the status of your tablet. Tap the
Time / Status Icons area to display the Status Details
panel. For more information, refer to “Status Bar” on
page 23.
Note:
Network status icons turn blue if you have a Google Account added to
your tablet and the tablet is connected to Google services for syncing
your Gmail, Calendar events, contacts, backing up your settings, and
so on.
If you do not have a Google Account or if, for example, you are
connected to a Wi-Fi network that is not connected to the Internet, the
network icons are gray.
Understanding Your Device 17

Extended Home Screen
The Home screen consists of the Home panel, plus four panels
that extend beyond the display width to provide more space for
adding shortcuts and widgets.
1. Touch and hold an area of the current screen. The
Home screen
2. Slide your finger horizontally across the screen to scroll to
options screen displays (shown above).
Add to
the left or right side panels.
Note:
The center panel (Home screen) displays when you tap
Home
Customizing a Screen
1. Navigate to the desired Home screen, then:
2. Tap (
Customize
).
– or –
Touch and hold on the screen. The
Add to Home screen
options screen displays.
18
3. Select one of these options:
• Widgets
• App shortcuts
• Wallpapers
•More
Screen Settings
You can customize display screen settings to your preferences.
For more information, refer to “Screen Settings” on page 176.
Navigating Your Device
Use command buttons and the touch screen to navigate.
Using Command Buttons
Back
.
䊳
Tap (
step.
Note:
When the on-screen keyboard is active,
Home
䊳
Tap (
: For more information, refer to
: For more information, refer to
on page 38.
: For more information, refer to
page 39.
: For more information, refer to
Back)
to return to the previous screen, option, or
Home)
to display the first center Home screen.
“Widgets”
“Wallpapers”
“More”
Close Keyboard
on page 34.
“App Shortcuts”
on
on page 39.
displays.
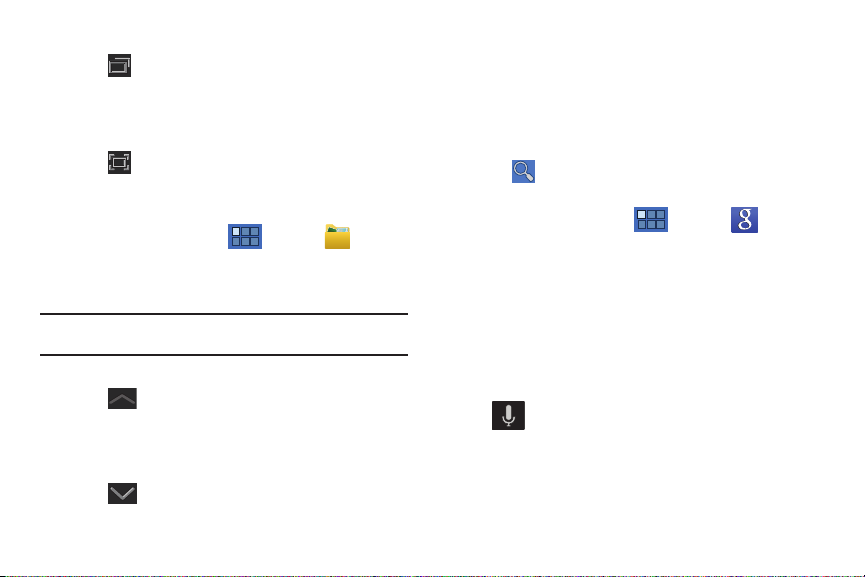
Navigation
䊳
Tap (
Navigation
) to open a thumbnail list of recently
used applications. Tap an application from the list to open
it.
Screen Capture
䊳
Tap (
Screen Capture
) to take a snapshot of the screen
currently displayed.
To view the screen shots:
1. From a Home screen, tap (
ScreenCapture
2. Tap a screen capture image file to display it.
Note:
This folder does not appear until you have taken your first screen
capture.
Mini App Tray
䊳
Tap (
.
Mini App Tray
Apps)
➔ (
) to display those applications that
can be accessed from almost any screen. Tap an
application to open it.
– or –
Tap to close the anytime list of applications.
Files
) ➔
Other Buttons
Google Search
Displays the Google Search box that can be used to search for
either a key term both on the device and online. In some
instances, this key opens a search box specific only to the
current application.
1. Tap (
Google)
to launch the Google Search box.
– or –
From a Home screen, tap (
Search
).
2. Enter a search term and tap a match from the list of
Apps)
➔ (
Google
suggestions, device search results, or previously chosen
search matches. Once touched, the item opens in the
appropriate application.
– or –
From the on-screen keyboard, tapping Voice Search
( ) lets you speak into your device's microphone to
enter a search term.
Understanding Your Device 19
Configuring Google Search Settings
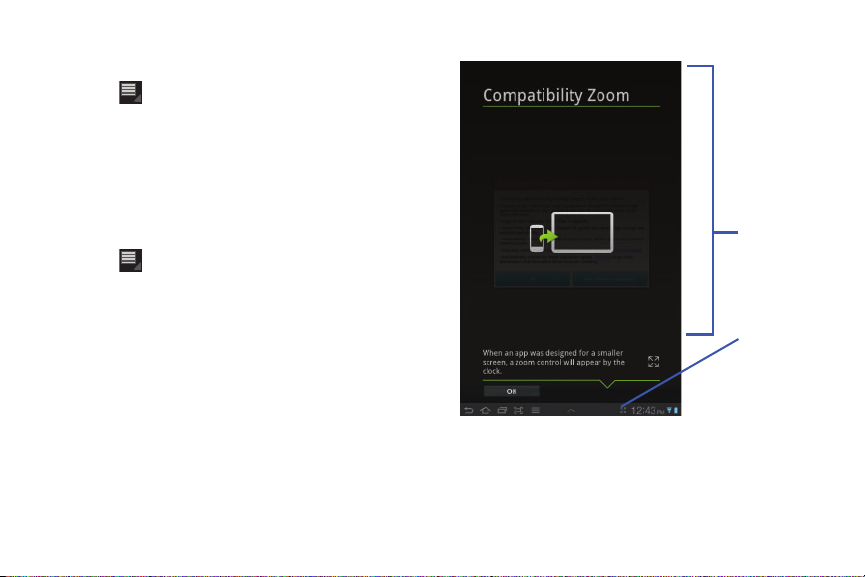
Compatability
Zooom
Control
Zoom
Overview
1. Launch Google Search.
2. Tap (
Menu
) ➔
Search settings
to access the Google
Search settings screen.
3. Enable searchable by placing a check mark alongside
those desired items.
Context-Sensitive Menus
Context-sensitive menus offer options for features or screens. To
access context-sensitive menus:
1. Tap (
2. Select an option in the list.
Menu)
to display a list of options.
Compatibility Zoom
When an application was designed for a smaller screen, a zoom
control appears next to the on-screen clock. An example of such
an application would be My Device.
1. Tap OK to adjust the view of the application to fit the
screen.
20
2. Tap the Zoom Control to adjust the view.

Screen Navigation
TimeNotification icons
Tap
Tap items to select or launch them. For example:
•
Tap the on-screen keyboard to enter characters or text.
•
Tap a menu item to select it.
•
Tap an application’s icon to launch the application.
Touch and Hold
Activate on-screen items. For example:
•
Touch and hold a widget on the home screen to move it.
•
Touch and hold on a field to display a pop-up menu of options.
Swipe, Flick, or Slide
Swipe, flick, or slide your finger vertically or horizontally across
the screen. For example:
•
Unlocking the screen
•
Scrolling the Home screens or a menu
Pinch
Use two fingers, such as your index finger and
thumb, to make an inward pinch motion on the
screen, as if you are picking something up, or
an outward motion by sweeping your fingers
out. For example:
•
Pinch a photo in Gallery to zoom in.
•
Pinch a webpage to zoom in or out.
Notifications
Notification icons appear in the System Bar, to the left of the Time
when you receive a notification. Notifications indicate the arrival
of Gmail, Email, alarms, calendar events, and so on.
Tap a Notification icon for more detail. For example, tap the
available Wi-Fi network icon to see available wireless
connections.
Tap the Time field to open the Notifications list to view all of your
current notifications. Tap a Notification in the list to display the
item. For example, tap a Gmail entry to open the Gmail
application and view the message.
Most apps that send notifications, such as Gmail and Google
Talk, have their own settings, which you can use to configure
whether and how they send notifications, whether they sound a
ringtone, and so on. See the documentation for those apps for
details.
Understanding Your Device 21

Status Details
Status Details
Quick Settings
Alerts or other
Messages
This area of the Status Bar displays the current date and time,
battery status, and Wi-Fi connectivity status information.
To open the Status Details:
1. Tap the Time area of the Status Bar. If you have any current
notifications, their summaries are listed below the Status
Details. Tap a notification summary to respond to it.
2. Close the Status Details by tapping any other part of the
screen.
Quick Settings
This area allows you to view and control the most common
settings for your tablet, and access the complete Settings
application.
1. Tap the Time area of the System bar to display the Quick
Settings pop-up.
22
Note:
IT might be necessary to scroll across the Quick Setting icons to view
all options (ex: Bluetooth).
The Quick Settings are:
•Wi-Fi
: Tap to enable or disable Wi-Fi. For more information, refer to
“Wi-Fi settings”
• Notifications
notifications. For more information, refer to
on page 168.
: Tap to enable or disable system and application
“Notifications”
page 21.
•GPS
: Tap to enable or disable the device’s GPS functions. For more
information, refer to
• Sound / Vibration
“Location and Security”
on page 179.
: Tap to enable or disable sound mode. When
sound is disabled, Vibration is enabled.
• Auto rotation
: Tap to enable or disable automatic rotation. When
disabled, the screen does not rotate when you turn the tablet. For
more information, refer to
• Bluetooth
• Flight mode
: Tap to enable or disable Bluetooth functionality.
: Tap to enable or disable flight mode. Flight mode
“Auto-Rotate Screen”
disables all wireless or cellular communication on the device while
still providing functionality of all built-in applications.
• (Brightness slider)
or tap
AUTO
: Touch and drag the slider to set the brightness
to allow the device to set brightness automatically
based on available light and battery charge status. For more
information, refer to
“Brightness”
on page 176.
on
on page 177.
• Settings
: Tap to open the Settings application. For more
information, refer to
2. Tap a notification entry to display the details or tap
“Settings”
on page 167.
to a notification of remove it.
3. Close the Quick Settings by either tapping
X
in the upper
right corner of the Quick Settings pop-up or any other part
of the screen.
Status Bar
The Status Bar displays icons to show network status, battery
power, and other details.
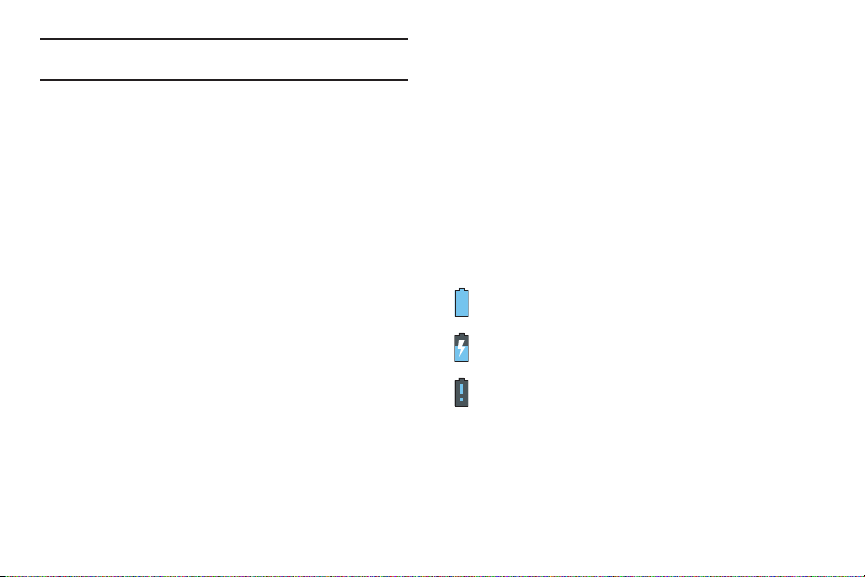
Battery Level
Charging Indicator
Device Power Critical
: Shown fully charged.
: Battery is charging.
: Battery has only three percent
power remaining. At about 15 percent power
remaining, a popup is displayed to remind you to
charge your device immediately.
Understanding Your Device 23
X
next

USB Charging Indicator
: The device is connected to a
computer using a USB cable, but it is not charging.
The battery is only charged while connected to a
computer, if the device is turned off. When the device
is off, press the Power/Lock key to see the battery
charging indicator.
USB Connected
: Device is connected to a computer
using a USB cable. Displayed in upper left corner of
screen.
USB Tethering Mode
: Displays when the USB Tethering
feature is active and communicating.
USB Debugging
: Device is connected to a computer in
debugging mode. For more information, refer to “USB
Debugging” on page 184.
Updates Available
: Updates to the applications you
have downloaded are available.
Download in progress
: An application is being
downloaded to the device.
Download Successful
: A recent application download or
update completed successfully.
24
Flight Mode
: Indicates that the Flight Mode is active,
which allows you to use many of your device’s features,
but it cannot access online information or applications.
New Text Message
: You have new text message. Tap the
icon for additional information.
New Email Message
: You have new email. Tap the icon
for additional information.
New Gmail Message
: You have new Gmail. Tap the icon
for additional information.
Google Talk Invitation
: Someone has invited you to chat
using Google Talk.
Configure input methods
: When the keyboard is being
displayed, tap this icon to display a menu of quick
keyboard settings.
Bluetooth Active
: Bluetooth is turned on. For more
information, refer to “Bluetooth” on page 115.
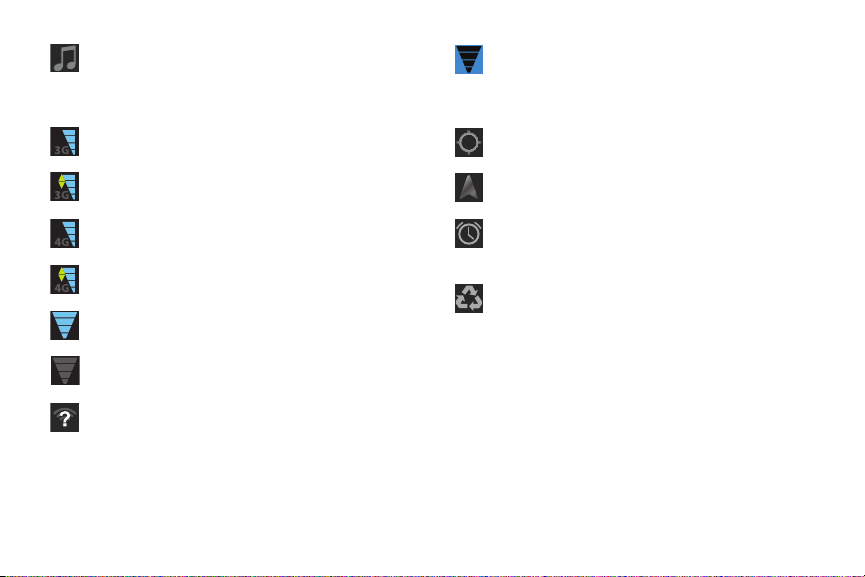
Music App
: A song is playing in the Music app. Tap
either the Music icon or the Status Details to see the
song title and music player controls. For more
information, refer to “Music App” on page 100.
Music Player
: A song is playing. Tap either the Music
icon or the Status Details to see the song title and
music player controls. For more information, refer to
“Music Player” on page 105.
3G Active
: Displays when connected to the 3G network.
Mobile AP Hotspot
: Displays when the Mobile AP
Hotspot feature is active and communicating. For more
information, refer to “Portable Wi-Fi Hotspot” on
page 124.
GPS Active
: Displays when GPS is active.
3G Communicating
: Displays when your device is
communicating with the 3G network.
4G Active
: Displays when connected to the HSPA+
network.
4G Communicating
: Displays when your device is
communicating with the HSPA+ network.
Wi-Fi Active
: Wi-Fi is connected, active, and
communicating with a Wireless Access Point (WAP).
Wi-Fi Action Needed
: Action needed to connect to
Wireless Access Point (WAP).
Wi-Fi In Range
: An open Wi-Fi network is in range.
Navigation Active
: The Navigation App is active. For
more information, refer to “Navigation” on page 151.
Alarm Set
: Displays when you set an alarm to ring at a
specified time. For more information, refer to “Alarm”
on page 128.
Power Saving Mode
: Indicates that your device is
automatically making adjustments to conserve battery
power. For more information, refer to “Power Saving
Mode” on page 178.
Understanding Your Device 25

Primary Shortcuts
Primary Shortcuts appear at the bottom of the main Home
screen.
Gallery
: View and manage photos stored on your
device. For more information, refer to “Gallery” on
page 94.
Email
: Provides access to both your Outlook
(Exchange Server-based) work email and Internet
email accounts. For more information, refer to
“Email” on page 73.
Media Hub
: Provides you with a one stop shop for the
hottest movie and TV content. For more information,
refer to “Media Hub” on page 98.
Browser
: Access the Internet. For more information,
refer to “Browser” on page 110.
Market
: Browse, download, and install Android
applications. For more information, refer to “Market”
on page 144.
Zinio
: Launches a digital magazine reader. For more
information, refer to “Zinio” on page 166.
26
SimCity Deluxe
: Provides an HD version of the popular
SimCity game. For more information, refer to “SimCity
Deluxe HD” on page 158.
Music: Play music and other audio files that you copy from
your computer.
For more information, refer to “Music
App” on page 100.
Also, when you first turn on your tablet, there are various widgets
on the center Home screen and the Home screens to the left and
right of the center Home screen. For more information, refer to
“Widgets” on page 34.
 Loading...