

Page 1

GT-S8600
user manual
Page 2

Using this manual
2
Using this manual
Thank you for purchasing this Samsung mobile device.
This device will provide you with high quality mobile
communication and entertainment based on Samsung’s
exceptional technology and high standards.
This user manual has been specially designed to guide you
through the functions and features of your device.
Read me first
●
Please read all safety precautions and this manual carefully
before using your device to ensure safe and proper use.
●
The descriptions in this manual are based on the default
settings of your device.
●
Images and screenshots used in this user manual may differ
in appearance from the actual product.
●
Content in this user manual may differ from the product, or
from software provided by service providers or carriers, and
is subject to change without prior notice. Refer to
www.samsung.com for the latest version of the user
manual.
●
Available features and additional services may vary by
device, software, or service provider.
●
Formatting and delivery of this user manual is based on
Bada operating systems and may vary depending on the
user’s operating system.
●
Applications and their functions may vary by country,
region, or hardware specifications. Samsung is not liable for
performance issues caused by third-party applications.
●
Samsung is not liable for performance issues or
incompatibilities caused by user editing of registry settings.
●
You may upgrade your mobile device’s software by
accessing www.samsung.com.
Page 3
Using this manual
3
●
Software, sound sources, wallpapers, images, and other
contents provided in this device are licenced for limited use
between Samsung and their respective owners. Extracting
and using these materials for commercial or other purposes
is an infringement of copyright laws. Samsung is not liable
for such copyright infringement by the user.
●
Please keep this manual for future reference.
Instructional icons
Before you start, familiarise yourself with the icons you will
see in this manual:
Warning—situations that could cause injury to
yourself or others
Caution—situations that could cause damage to
your device or other equipment
Note—notes, usage tips, or additional information
►
→
Refer to—pages with related information; for
example:
► p. 12 (represents “see page 12”)
Followed by—the order of options or menus you
must select to perform a step; for example: In Menu
→
mode, select Settings
Wi-Fi (represents Settings,
followed by Wi-Fi)
[ ] Square brackets—device keys; for example: [
(represents the End key)
]
Page 4

Using this manual
4
Copyright
Copyright © 2011 Samsung Electronics
This user manual is protected under international copyright
laws.
No part of this user manual may be reproduced, distributed,
translated, or transmitted in any form or by any means,
electronic or mechanical, including photocopying, recording,
or storing in any information storage and retrieval system,
without the prior written permission of Samsung Electronics.
Trademarks
●
SAMSUNG and the SAMSUNG logo are registered
trademarks of Samsung Electronics.
●
Headphone and WOW HD technologies are incorporated
under licence from SRS Labs, Inc.
●
Bluetooth
Inc. worldwide.
●
Oracle and Java are registered trademarks of Oracle and/
or its affiliates. Other names may be trademarks of their
respective owners.
●
Wi-Fi
registered trademarks of the Wi-Fi Alliance.
and are trademarks of SRS Labs, Inc. CS
is a registered trademark of the Bluetooth SIG,
®
, the Wi-Fi CERTIFIED logo, and the Wi-Fi logo are
®
Page 5

Using this manual
5
●
DivX
and associated logos
are trademarks of Rovi
Corporation or its
subsidiaries and are used
under licence.
●
All other trademarks and copyrights are the property of
their respective owners.
, DivX Certified®,
®
ABOUT DIVX VIDEO
DivX® is a digital video format created by DivX, LLC, a
subsidiary of Rovi Corporation. This is an official DivX
Certified
for more information and software tools to convert your files
into DivX videos.
DivX Certified
premium content
device that plays DivX video. Visit www.divx.com
®
to play DivX® video up to HD 720p, including
®
ABOUT DIVX VIDEO-ON-DEMAND
This DivX Certified® device must be registered in order to play
purchased DivX Video-on-Demand (VOD) movies. To obtain
your registration code, locate the DivX VOD section in your
device setup menu. Go to vod.divx.com for more information
on how to complete your registration.
Page 6

Contents
Assembling ............................................................. 10
Unpack .................................................................................... 10
Install the SIM or USIM card and battery ........................ 11
Charge the battery ............................................................... 13
Insert a memory card (optional) ....................................... 15
Getting started ....................................................... 18
Turn your device on and off ............................................... 18
Get to know your device ..................................................... 19
Use the touch screen ........................................................... 23
Lock or unlock the touch screen and keys ..................... 25
Access menus ........................................................................ 26
Launch and manage applications .................................... 28
Use widgets ............................................................................ 29
Customise your device ........................................................ 30
Enter text ................................................................................ 34
Communication ..................................................... 39
Calling ..................................................................................... 39
Logs .......................................................................................... 45
Messages ................................................................................ 45
Email ........................................................................................ 50
ChatON .................................................................................... 54
IM .............................................................................................. 54
Social Hub .............................................................................. 55
Contents
6
Page 7

Entertainment ........................................................ 56
Camera .................................................................................... 56
Videos ...................................................................................... 65
Gallery ..................................................................................... 66
Music ....................................................................................... 68
Music Hub .............................................................................. 72
FM radio .................................................................................. 73
Java .......................................................................................... 76
Personal information ............................................ 77
Contacts .................................................................................. 77
Calendar ................................................................................. 80
Task .......................................................................................... 82
Memo ...................................................................................... 83
Voice recorder ....................................................................... 83
Web .......................................................................... 86
Internet ................................................................................... 86
Navigation .............................................................................. 89
Samsung Apps ...................................................................... 90
Synchronise ........................................................................... 91
YouTube .................................................................................. 92
Google ..................................................................................... 92
Connectivity ........................................................... 93
Bluetooth ................................................................................ 93
Wi-Fi ......................................................................................... 95
AllShare ................................................................................... 98
Mobile network sharing ................................................... 100
GPS ......................................................................................... 101
Contents
7
Page 8

Contents
8
PC connections ................................................................... 103
VPN connections ................................................................ 105
Tools ....................................................................... 107
Calculator ............................................................................. 107
Caster ..................................................................................... 107
Clock ...................................................................................... 108
Desk clock ............................................................................. 110
My files .................................................................................. 110
Polaris Office ........................................................................ 113
Voice cmd ............................................................................. 114
Settings .................................................................. 115
Access the Settings menu ................................................ 115
Flight mode .......................................................................... 115
Wi-Fi ....................................................................................... 115
Network ................................................................................ 115
Bluetooth .............................................................................. 116
Location ................................................................................ 116
Connectivity ........................................................................ 116
Sound .................................................................................... 117
Display .................................................................................. 117
General .................................................................................. 118
Accounts ............................................................................... 123
Notification .......................................................................... 123
Call .......................................................................................... 123
Messages .............................................................................. 124
Email ...................................................................................... 125
Contacts ................................................................................ 127
Page 9

Contents
9
Calendar ............................................................................... 127
Task ........................................................................................ 128
Memo .................................................................................... 128
Internet ................................................................................. 128
Gallery ................................................................................... 129
Samsung Apps .................................................................... 129
AllShare ................................................................................. 129
Communities’ upload ........................................................ 129
Search .................................................................................... 130
Desk clock ............................................................................. 130
Troubleshooting .................................................. 131
Safety precautions ............................................... 137
Index ...................................................................... 148
Page 10

Assembling
10
Assembling
Unpack
Check your product box for the following items:
●
Mobile device
●
Battery
●
Quick start guide
Use only Samsung-approved software. Pirated or illegal
software may cause damage or malfunctions that are
not covered by your manufacturer's warranty.
●
The items supplied with your device and available
accessories may vary depending on your region or
service provider.
●
You can purchase additional accessories from your
local Samsung dealer.
●
The supplied accessories perform best for your device.
●
Accessories other than the supplied ones may not be
compatible with your device.
Page 11
Assembling
11
Install the SIM or USIM card and battery
When you subscribe to a cellular service, you will receive
a Subscriber Identity Module (SIM) card, with subscription
details, such as your personal identification number (PIN) and
optional services. To use UMTS or HSDPA services, you can
purchase a Universal Subscriber Identity Module (USIM) card.
To install the SIM or USIM card and battery,
If the device is on, press and hold the Power key and select
1
Ye s to turn it off.
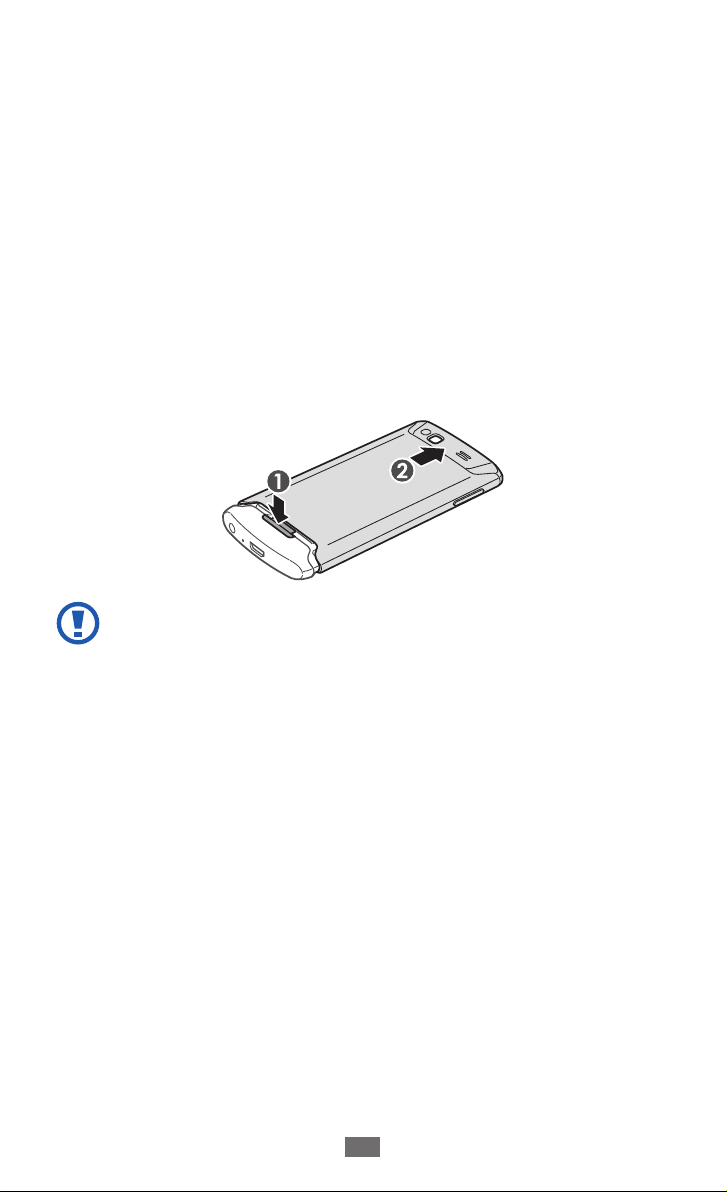
Press the button at the bottom of the back cover and slide
2
the back cover until it stops.
●
Do not slide the back cover too hard. Doing this may
separate the back cover from the device and cause
damage to the device.
●
Be careful not to damage your fingers when you slide
the back cover.
Page 12
Assembling
12
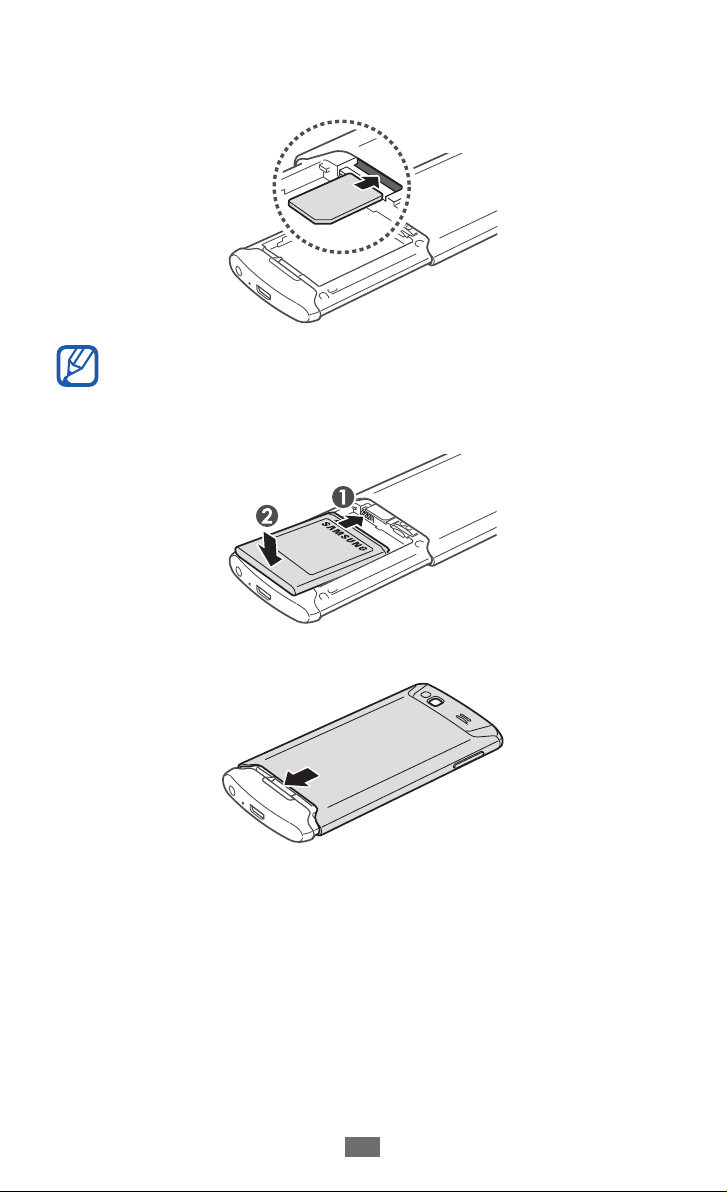
Insert the SIM or USIM card with the gold-coloured
3
contacts facing down.
If you do not insert a SIM or USIM card, you can only use
your device’s non-network services and some menus.
Insert the battery.
4
Slide the back cover to close.
5
Page 13
Assembling
13
Charge the battery
Before using the device for the first time, you must charge the
battery.
You can charge the device with a travel adapter or by
connecting the device to a PC with a USB cable.
Use only Samsung-approved chargers and cables.
Unauthorised chargers or cables can cause batteries to
explode or damage your device.
●
When your battery is low, the device will emit a
warning tone and display a low battery message. The
battery icon
becomes too low, the device will automatically power
off. Recharge your battery to continue using your
device.
●
If the battery is completely discharged, you cannot
turn on the device, even with the travel adapter
connected. Allow a depleted battery to charge for a
few minutes before you try to turn on the device.
will also be empty. If the battery level
Charge with a travel adapter
›
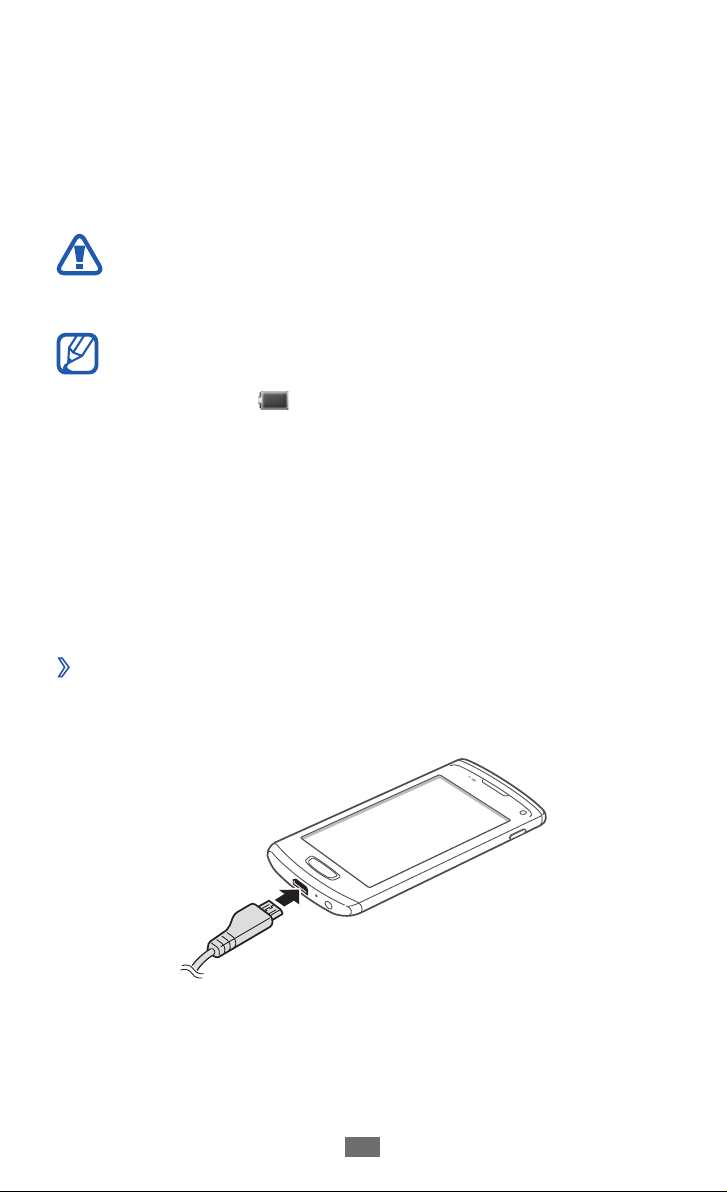
Plug the small end of the travel adapter into the
1
multifunction jack.
Page 14

Assembling
14
Connecting the travel adapter improperly may cause
serious damage to the device. Any damage caused by
misuse is not covered by the warranty.
Plug the large end of the travel adapter into a power
2
outlet.
●
You can use the device while it is charging, but it may
take longer to fully charge the battery.
●
While the device is charging, the touch screen may
not function due to an unstable power supply. If this
happens, unplug the travel adapter from the device.
●
While charging, the device may heat up. This is
normal and should not affect your device’s lifespan or
performance.
●
If your device is not charging properly, bring your
device and the charger to a Samsung Service Centre.
When the battery is fully charged, first unplug the travel
3
adapter from the device and then from the power outlet.
Do not remove the battery before removing the travel
adapter. Doing this may cause damage to the device.
To save energy, unplug the travel adapter when not in
use. The travel adapter does not have a power switch,
so you must unplug the travel adapter from the outlet
when not in use to avoid wasting power. The travel
adapter should remain close to the socket when in use.
Page 15
Assembling
15
Charge with a USB cable
›
Before charging, ensure that your PC is turned on.
Plug one end (micro-USB) of the USB cable into the
1
multifunction jack.
Plug the other end of the USB cable into a USB port on a
2
PC.
Depending on the type of USB cable you are using, it
may take some time before charging begins.
When the battery is fully charged, first unplug the USB
3
cable from the device and then from the PC.
Insert a memory card (optional)
To store additional multimedia files, you must insert
a memory card. Your device accepts microSD
microSDHC
32 GB (depending on memory card manufacturer and type).
Samsung uses approved industry standards for memory
cards, but some brands may not be fully compatible
with your device. Using an incompatible memory card
may damage your device or the memory card and can
corrupt data stored on the card.
memory cards with maximum capacities of
™
™
or
●
Your device supports only the FAT file structure for
memory cards. If you insert a card formatted with
a different file structure, your device will ask you to
reformat the memory card.
●
Frequent writing and erasing of data will shorten the
lifespan of memory cards.
Page 16
Assembling
16
Press the button at the bottom of the back cover and slide
1
the back cover until it stops.
Remove the battery.
2
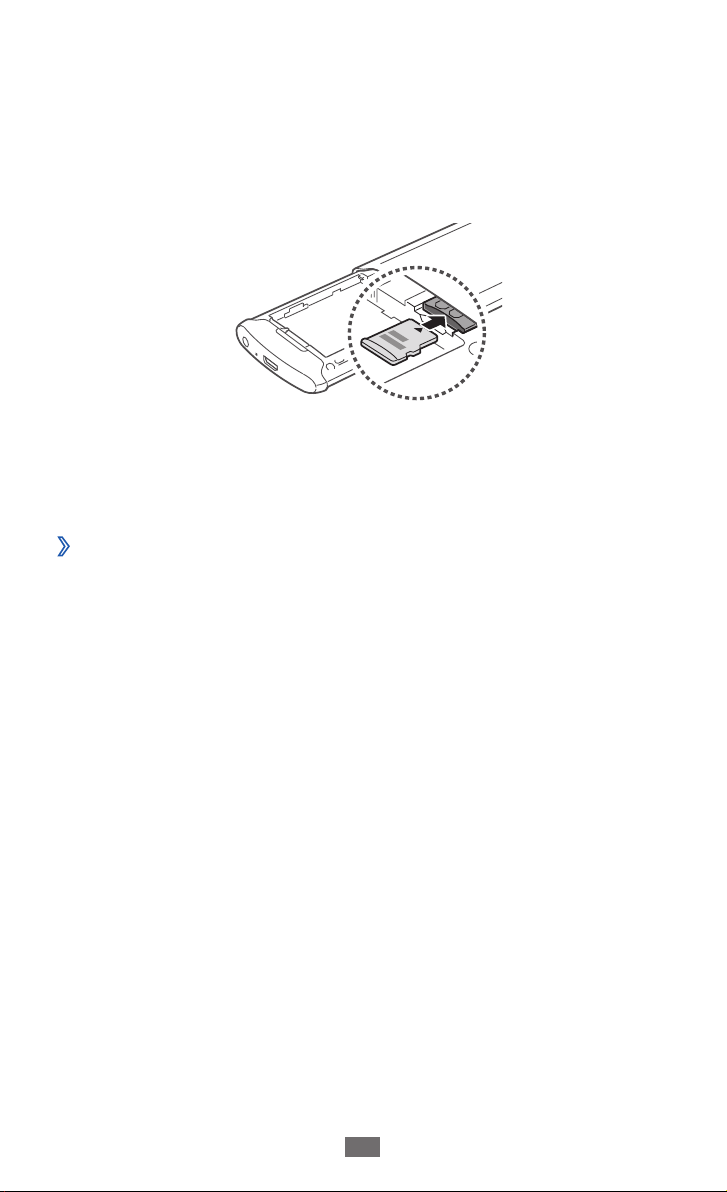
Insert a memory card with the gold-coloured contacts
3
facing down.
Insert the battery.
4
Slide the back cover to close.
5
Remove the memory card
›
Press and hold the Power key and select 1 Ye s to turn it off.
Press the button at the bottom of the back cover and slide
2
the back cover until it stops.
Remove the battery.
3
Push the memory card gently until it disengages from the
4
device.
Remove the memory card.
5
Insert the battery.
6
Slide the back cover to close.
7
Page 17

Assembling
17
Format the memory card
›
Formatting your memory card on a PC may cause
incompatibilities with your device. Format the memory card
only on the device.
→
In Menu mode, select Settings
→
Format memory card
Before formatting the memory card, remember to make
backup copies of all important data stored on your
device. The manufacturer’s warranty does not cover loss
of data resulting from user actions.
Ye s .
General → Memory →
Page 18

Getting started
18
Getting started
Turn your device on and off
To turn on your device, press and hold the Power key. If you
turn on your device for the first time, follow the on-screen
instructions to set up your device.
To turn off your device, press and hold the Power key and
select Ye s .
●
Follow all posted warnings and directions from
authorised personnel in areas where the use of
wireless devices is restricted, such as aeroplanes and
hospitals.
●
To use your device's non-network services only,
switch to Flight mode. In Menu mode, select Settings
and drag the slider next to Flight mode.
Page 19
Getting started
19
Get to know your device
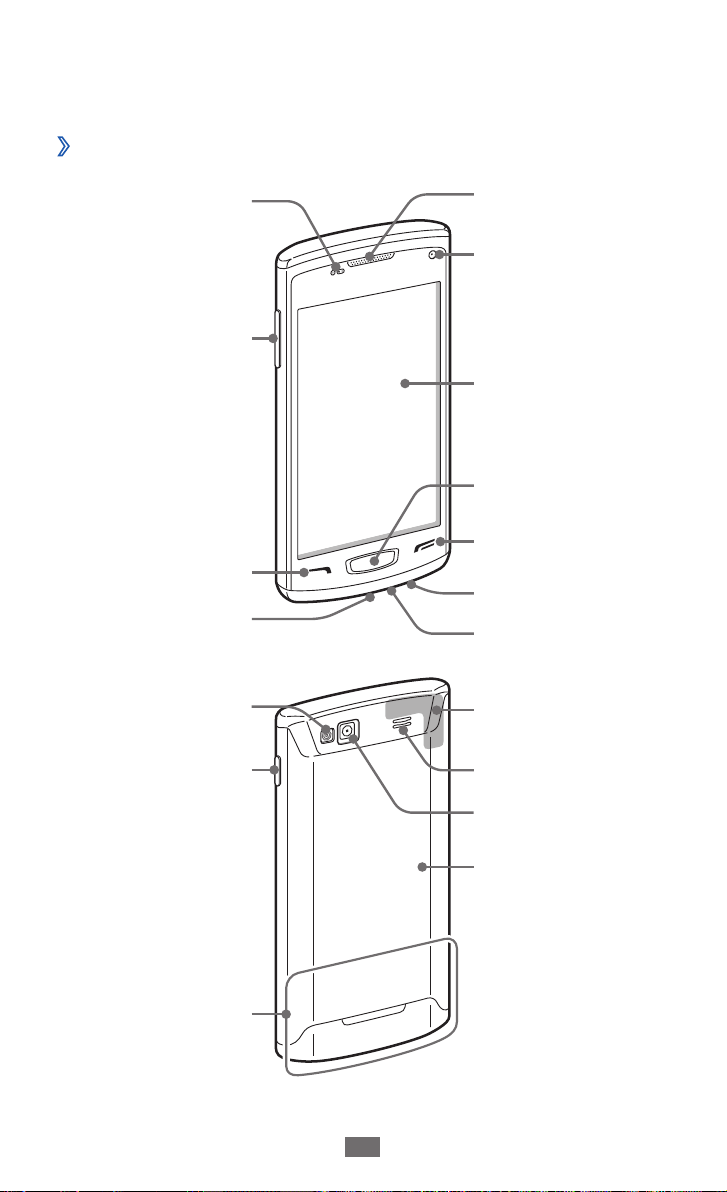
Device layout
›
Proximity sensor
Volume key
Dial key
Multifunction jack
Flashbulb
Power/Reset/Lock
key
Earpiece
Front camera lens
Touch screen
Home key
End key
Headset jack
Mouthpiece
GPS antenna
Speaker
Rear camera lens
Main antenna
Back cover
Page 20
Getting started
20
Keys
›
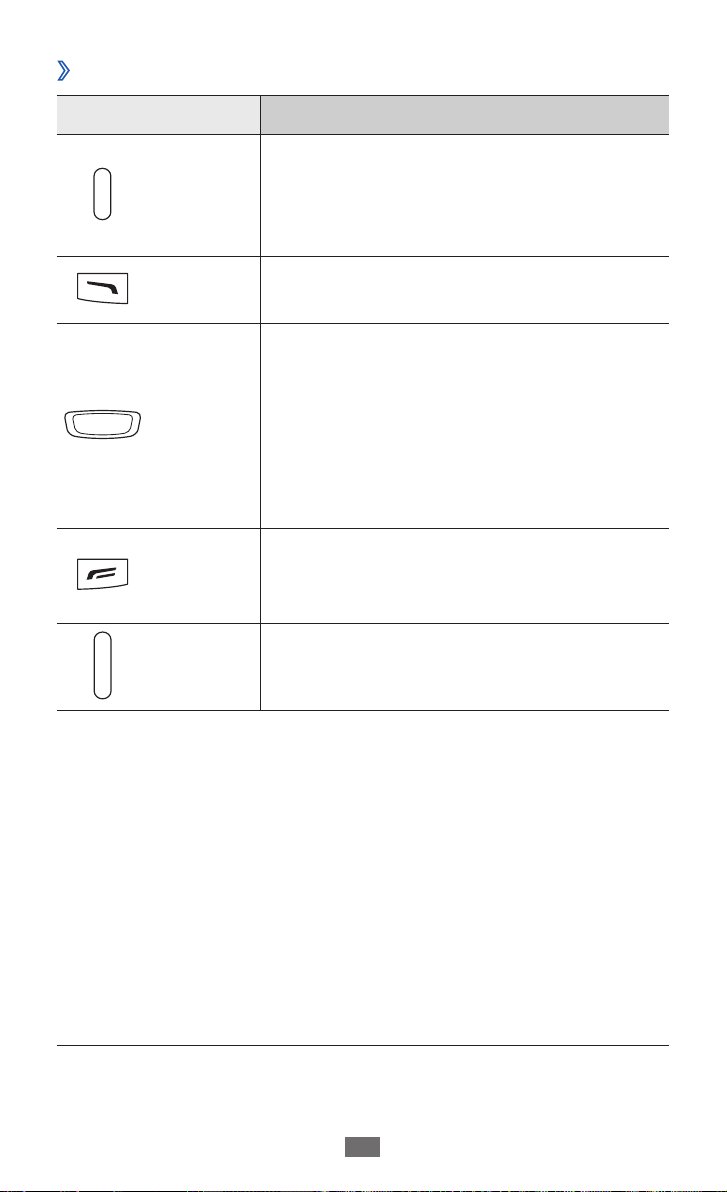
Key Function
Power/
1
Reset
Lock
Dial
Turn the device on (press and hold);
Reset the device (press and hold for
/
8-10 seconds and release); Lock the
touch screen.
Make or answer a call; In Idle mode,
retrieve logs of your calls.
In Idle mode, switch between the
widget panel and the idle screen;
Return to the idle screen; Launch
Home
the task manager to view all active
applications (press and hold); Launch
the voice command application (press
twice).
End a call; While using an application,
End
return to the idle screen or the main
menu.
Volume Adjust the device’s volume.
1. If your device has fatal errors or hang-ups, or freezes, you may
need to reset the device to regain functionality.
Page 21
Getting started
21
Idle screen
›
When the device is in Idle mode, you will see the idle screen.
From the idle screen, you can view your device’s status and
access applications.
The idle screen has multiple panels, and you can add new
panels to the idle screen.
Scroll left or right to a panel of the idle screen. You can also
select a dot on the top of the screen to move directly to the
corresponding screen.
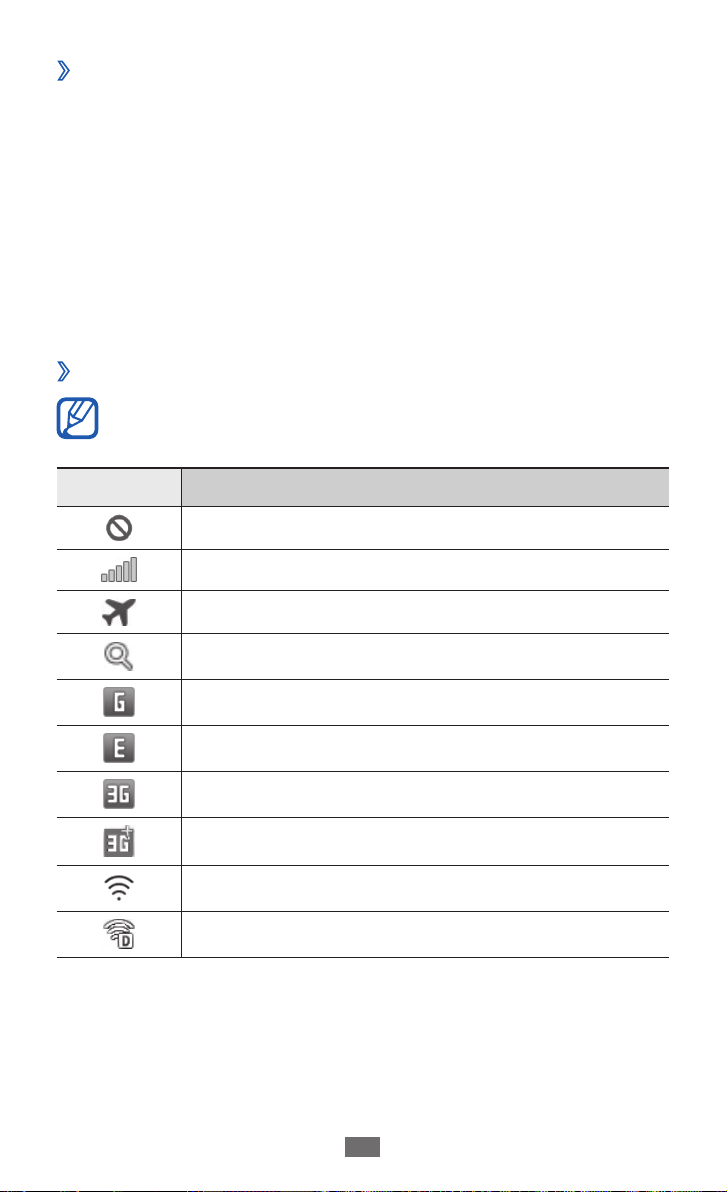
Indicator icons
›
Icons shown on the display may vary depending on
your region or service provider.
Icon Definition
No signal
Signal strength
Flight mode activated
► p. 30
Network searching
GPRS network connected
EDGE network connected
UMTS network connected
HSDPA network connected
Wi-Fi connected
WLAN Direct connected
Page 22
Getting started
22
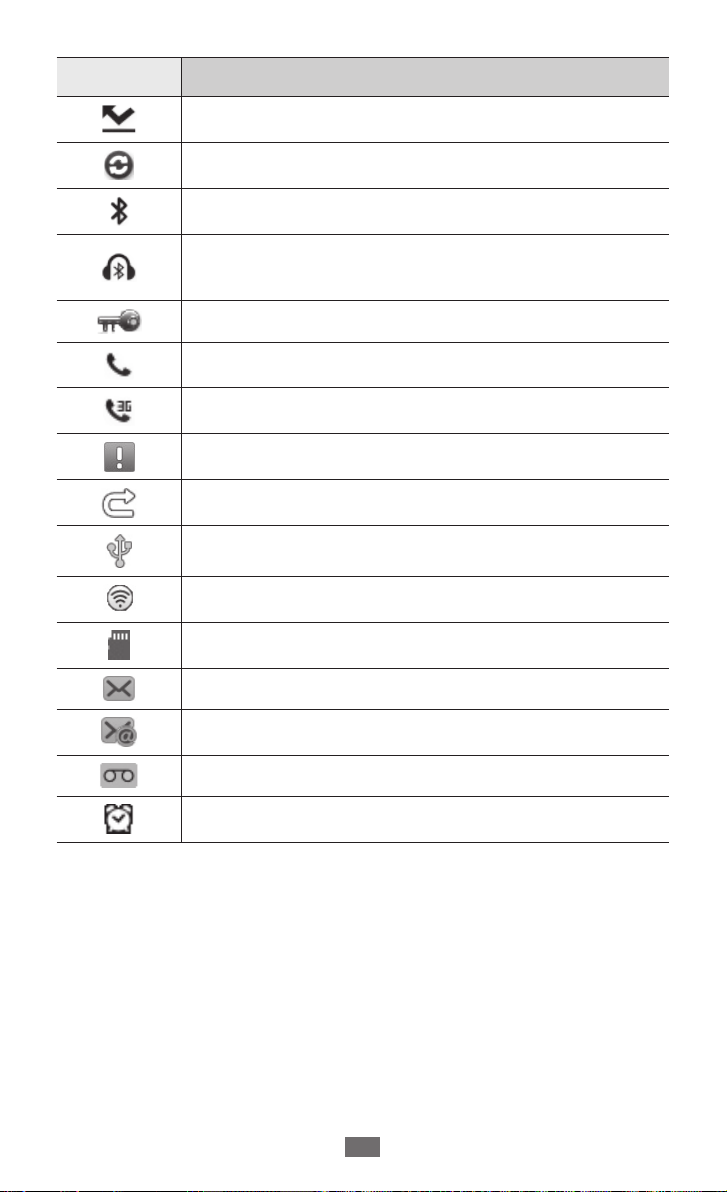
Icon Definition
Call missed
Synchronised with a web server
Bluetooth activated
Bluetooth hands-free car kit or headset
connected
Virtual Private Network (VPN) connected
Voice call in progress
Video call in progress
SOS message feature activated
Call diverting activated
Synchronising with PC
Wi-Fi tethering activated
Memory card inserted
New text or multimedia message
New email message
New voice mail message
Alarm activated
Page 23
Getting started
23
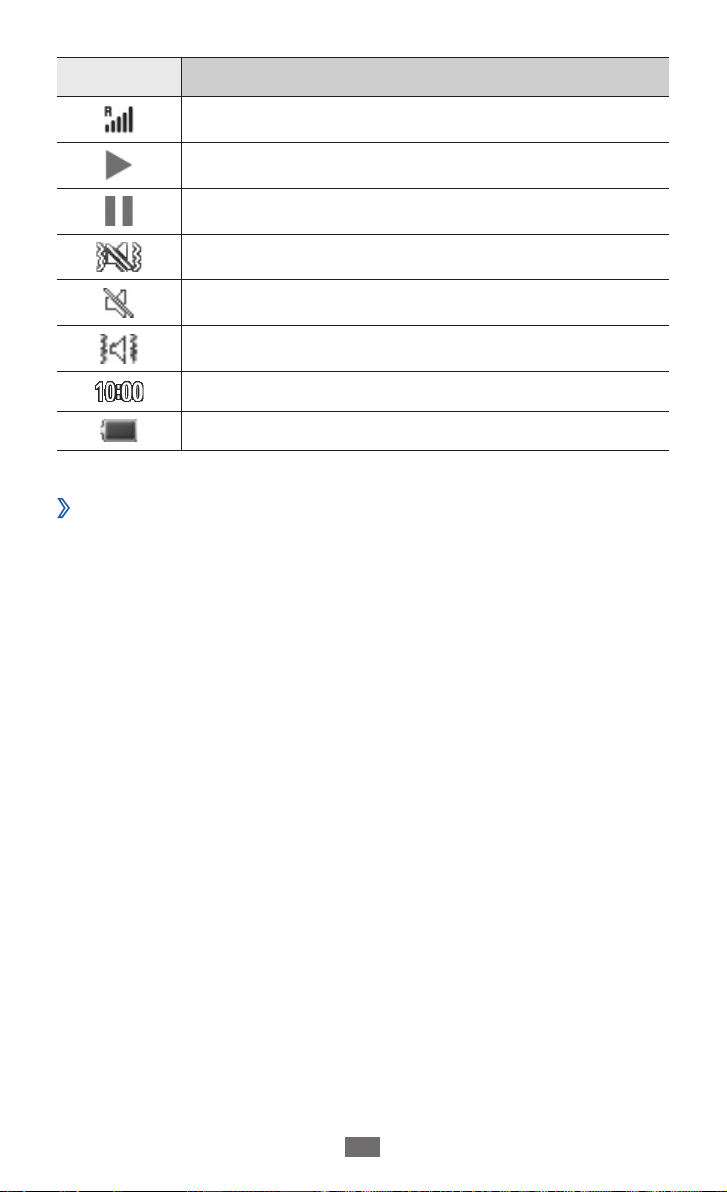
Icon Definition
Roaming (outside of normal service area)
Music playback in progress
Music playback paused
Silent & vibration mode activated
Silent mode activated
Vibration mode activated
Current time
Battery power level
Notifications panel
›
In Idle mode or while using an application, tap the indicator
icons area at the top of the screen and drag your finger down
to open the notifications panel.
Select icons to activate or deactivate the WLAN and Bluetooth
features. You can also turn on or off the device’s volume and
check new messages and alerts.
Use the touch screen
Your device’s touch screen lets you easily select items or
perform functions. Learn basic actions to use the touch
screen.
Page 24

Getting started
24
●
To avoid scratching the touch screen, do not use
sharp tools.
●
Do not allow the touch screen to come into contact
with other electrical devices. Electrostatic discharges
can cause the touch screen to malfunction.
●
Do not allow the touch screen to come into contact
with water. The touch screen may malfunction in
humid conditions or when exposed to water.
●
For optimal use of the touch screen, remove the
screen protection film before using your device.
●
Your touch screen has a layer that detects small
electrical charges emitted by the human body. For
best performance, tap the touch screen with your
fingertip. The touch screen will not react to touches of
sharp tools, such as a stylus or pen.
Control your touch screen with the following actions:
●
Tap: Tap once with your finger to select or launch a menu,
option, or application.
●
Tap and hold: Tap an item and hold it for more than
2 seconds to open a pop-up option list.
●
Drag: Tap and drag your finger up, down, left, or right to
move to items on lists.
●
Double-tap: Tap twice quickly with your finger to zoom in
or out while viewing photos or web pages.
●
Drag and drop: Tap and hold your finger on an item, and
then drag your finger to move the item.
Page 25

Getting started
25
●
Flick: Flick the screen quickly to activate an application.
●
Area zoom: Place two fingers on the screen and pull them
apart to zoom in or squeeze them together to zoom out.
●
Your device turns off the touch screen when you do
not use the device for a specified period. To turn on
the screen, press the Power key or the Home key.
●
You can also adjust the backlight time. In Menu mode,
select Settings → Display → Backlight time.
●
Some lists have an index along the right side. Tap a
letter to jump to items starting with that letter. Drag
your finger along the index to quickly scroll through
the list.
Lock or unlock the touch screen and keys
You can lock the touch screen and keys to prevent any
unwanted device operations.
To lock, press the Power key. To unlock, press the Power key or
the Home key and flick the window with your finger.
You can activate the device lock feature to prevent
others from using or accessing your personal data and
information saved in your device.
► p. 32
Page 26

Getting started
26
Access menus
To access your device’s menus,
In Idle mode, select
1
When the help screen for adding shortcuts to the idle
2
screen appears, select OK.
If you do not want to see the screen again, select the
check box next to Do not show again.
Scroll left or right to a screen.
3
You can also select a dot on the top of the screen to move
directly to the corresponding screen.
Select a menu or application.
4
Select 5 to return to the previous screen (if available);
press the Home key to return to idle screen.
When you return to the first idle screen, the help screen
for editing the idle screen panels appears. If you do not
want to see the screen again, select the check box next to
Do not show again.
●
Your device has a built-in motion sensor that detects
its orientation. If you rotate the device while using
some features, the interface will automatically switch
to landscape view. To set the interface to keep the
orientation when you rotate the device, open the
notifications panel and select Auto rotation.
●
While using the device, you can capture an image of a
screen by pressing the Home key and the Power key
simultaneously. The image will be saved in My files
Images → Screen capture.
Menu to access Menu mode.
→
Page 27

Getting started
27
Organise applications
›
You can reorganise the applications by changing their order
or grouping them into categories to suit your preferences and
needs.
To add a shortcut to the idle screen,
In Menu mode, tap and hold an application.
1
Drag the application icon to an idle screen panel at the
2
bottom of the screen.
To change the order of applications,
In Menu mode, tap and hold an application.
1
Drag an application icon to the location you want.
2
You can move an application icon to another screen.
To add a folder,
In Menu mode, tap and hold the screen.
1
Select 2 at the top left of the screen.
Drag an application icon to the folder.
3
Repeat this step to add more applications.
Select the new folder.
4
Select the name field, enter a name for the folder, and
5
select Save.
Before you delete a folder, you need to move the
applications in the folder to the screen. Then, select
.
Page 28

Getting started
28
To change the order of the screens,
In Menu mode, place your two fingers on the screen and
1
pinch.
Tap and hold the thumbnail of a screen and drag it to the
2
location you want.
Add new screens
›
In Menu mode, tap and hold an application.
1
Tap and hold an application icon.
2
Drag the application icon to an empty screen.
3
The new screen is added.
Launch and manage applications
Launch multiple applications
›
Your device allows you to multi-task by running multiple
applications at the same time.
To launch multiple applications, press the Home key while
using an application to return to Idle mode, and then select
an application to launch.
Use the task manager
›
You can manage multiple applications with the task manager.
To launch the task manager,
Press and hold the Home key. The icons of active
1
applications appear.
Page 29

Getting started
29
Control active applications as follows:
2
●
To switch between applications, select one from the
icons of active applications.
●
To close an application, select
●
To close all active applications, select
→
applications
Ye s .
.
End all
Use widgets
Widgets are small applications that provide convenient
functions and information.
●
Some of your widgets connect to web services. Using
a web-based widget may incur additional charges.
●
Available widgets may vary depending on your
region or service provider.
Open the widget panel
›
To open the widget toolbar and access widgets,
In Idle mode, press the Home key to open the widget
1
panel.
When the help screen for customising the widget panel,
2
select OK.
If you do not want to see the screen again, select the
check box next to Do not show again.
Scroll up or down on the widget panel to find the widget
3
you want to use.
Select the widget to launch.
4
Page 30
Getting started
30
Organise the widget panel
›
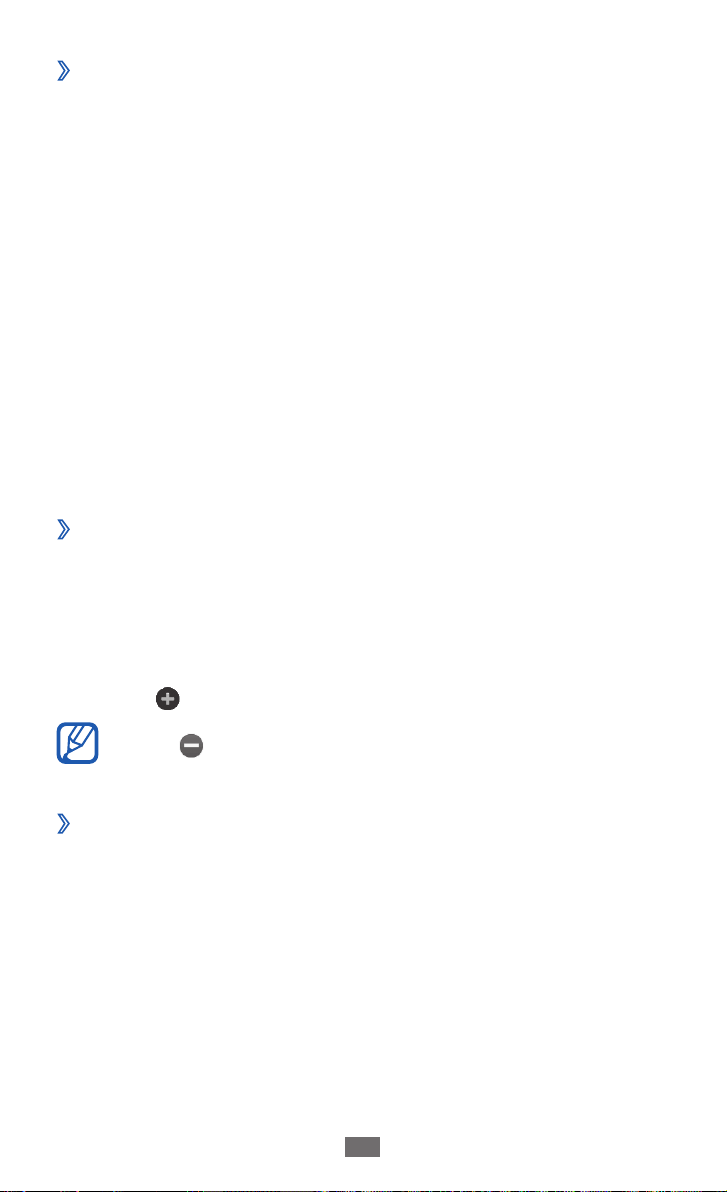
You can reorganise the widgets by changing their order and
activating or deactivating them.
In Idle mode, press the Home key to open the widget
1
panel and tap and hold the screen.
To activate or deactivate a widget, drag the slider next to
2
the widget.
To change the order of the widgets, tap and hold a widget
and drag it the location you want.
Customise your device
Get more from your device by customising it to match your
preferences.
Add new panels to the idle screen
›
You can add new panels to the idle screen to organise
widgets according to your preferences and needs.
In Idle mode, place your two fingers on the screen and
1
pinch.
Select
2
Select to remove a panel from the idle screen.
Set the current time and date
›
In Menu mode, select 1 Settings → General → Date and
time.
Drag the slider next to
2
auto time updates.
to add new panels to the idle screen.
Automatic update to deactivate
Page 31

Getting started
31
Select 3 Time zone → your time zone.
Enter the current time and date, and set the time and date
4
format.
Adjust the volume of the ringtones
›
Press the Volume key to adjust the ringtone volume.
Change your ringtone
›
In Menu mode, select 1 Settings → Sound → Ringtone.
Select a ringtone from the list.
2
Switch to Silent mode
›
To mute or unmute your device, do one of the following:
●
In Menu mode, select
●
Open the notifications panel from the top of the screen and
select Sound & vibration.
●
In Menu mode, select
slider next to Sound.
Keypad, and then tap and hold .
Settings → Sound and drag the
Select a wallpaper for the idle screen
›
In Menu mode, select 1 Settings → Display → Wallpaper.
→
Select an image folder
2
3
Select
Set.
Samsung is not responsible for any use of default
images or wallpapers provided on your device.
an image.
Page 32
Getting started
32
Adjust the brightness of the display
›
In Menu mode, select 1 Settings → Display.
Drag the slider next to
2
Drag the slider to adjust the level of brightness.
3
The brightness level of the display will affect how
quickly the device consumes battery power.
Lock your device
›
You can lock your device by activating the device password.
In Menu mode, select
1
Drag the slider next to
2
Enter a new 4- to 8-digit password and select
3
Enter the new password again and select
4
The first time you access a menu that requires a
password, you will be prompted to create and confirm a
password.
Once the device lock is enabled, you must enter the password
each time you turn on the device or unlock the touch screen
and keys.
Auto Brightness.
Settings → General → Security.
Phone lock.
OK.
OK.
●
If you forget your password, bring your device to a
Samsung Service Centre to reset it.
●
Samsung is not responsible for any loss of passwords
or private information or other damages caused by
illegal software.
Page 33

Getting started
33
Lock your SIM or USIM card
›
You can lock your device by activating the PIN supplied with
your SIM or USIM card.
In Menu mode, select
1
Drag the slider next to
2
Enter the PIN of your SIM or USIM card and select
3
Once the PIN lock is enabled, you must enter the PIN each
time you turn on the device.
●
If you enter an incorrect PIN too many times, your SIM
or USIM card will be blocked. You must enter a PIN
unlock key (PUK) to unblock the SIM or USIM card.
●
If you block your SIM or USIM card by entering an
incorrect PUK, bring the card to your service provider
to unblock it.
Activate the Find my mobile feature
›
When someone inserts a new SIM or USIM card in your
device, the Find my mobile feature will automatically send the
contact number to specified recipients to help you locate and
recover your device.
You need a Samsung account to track and control the device
remotely from the web.
Settings → General → Security.
PIN lock.
OK.
In Menu mode, select
1
Select
2
Enter your email address and password for your Samsung
3
account and select Sign in.
To create a Samsung account, select Sign up.
Find my mobile.
Settings → General → Security.
Page 34
Getting started
34
Drag the slider next to 4 SIM change alert.
Select
5
Enter a phone number including a country code (with +).
6
When you are finished setting the recipients, select 7 Done.
To add more recipients, repeat steps 5-7.
8
When you are finished, select 9 Save.
Select
10
Select
11
Add recipients to open the recipient list.
Sender and enter a sender’s name.
Done.
Enter text
You can enter text by selecting characters on the virtual
keypad or by inputting handwriting on the screen.
Change the text input method
›
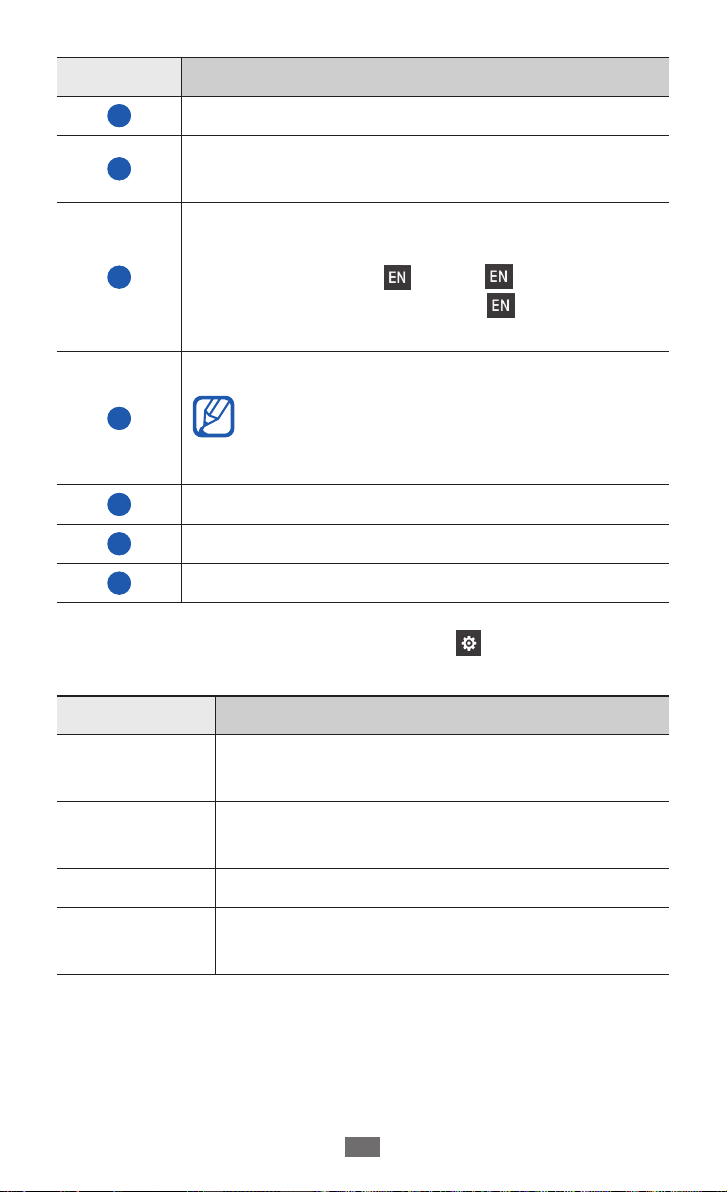
When you tap the text input field, the input panel with the
QWERTY keyboard appears by default.
1
2
3
4
5
6
7
Page 35
Getting started
35
Number Function
1
2
Change case.
Switch between Number/Symbol mode and
ABC mode.
Access the keyboard settings.
If you set two or more input languages, this
3
icon will change to
. Select to change the
input language. Tap and hold
keyboard settings.
Enter text by voice.
4
This feature may be unavailable
depending on the selected input
language.
5
6
7
Clear your input.
Start a new line.
Insert a space.
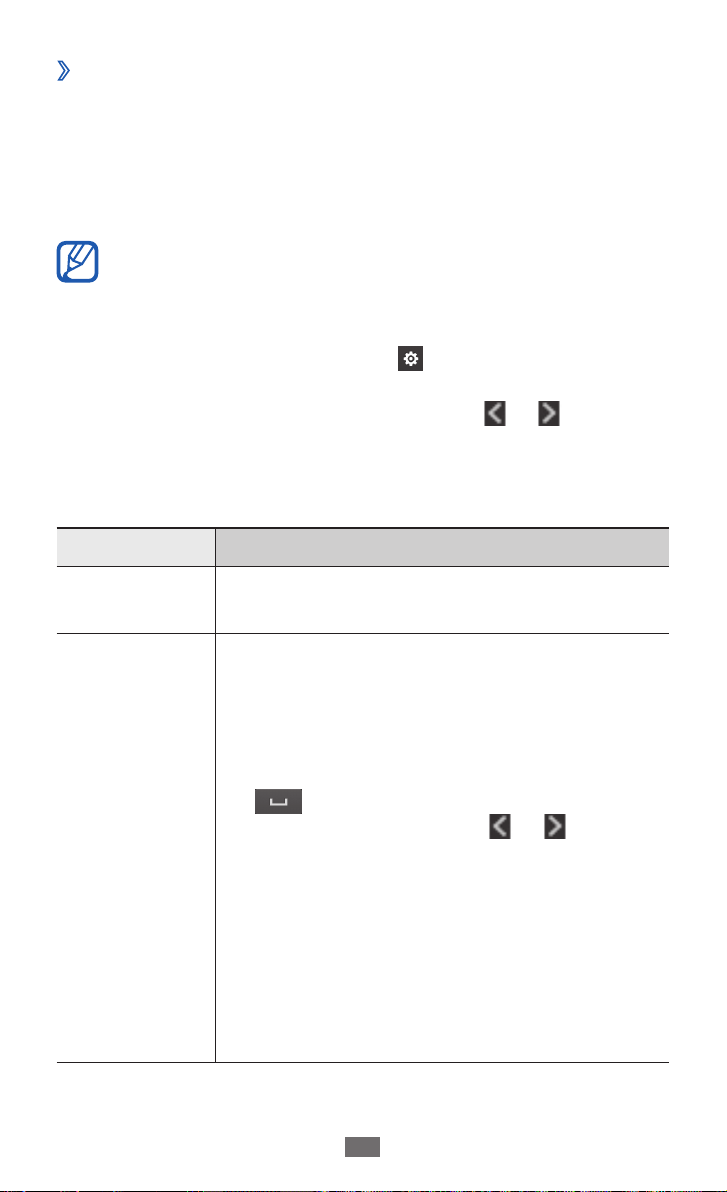
To change the text input method, select
→
Keyboard type
a text input method.
to access the
and select
Option Function
Qwerty
keyboard
3 X 4 keypad
Select characters on the QWERTY keyboard.
Select characters on the traditional
3x4 keypad.
Handwriting Write in the input box.
Handwriting
full screen
Write anywhere on the screen.
Page 36
Getting started
36
Enter text using input methods
›
Change the text input method.
1
Change the text input mode.
2
Select the appropriate virtual keys or write on the screen
3
to enter your text.
When entering text, rotate the device to display the
QWERTY keyboard on the wider screen. Select the
virtual keys as necessary to enter your text.
When entering English text, select
to Predictive text. Enter the first two letters of a word and
then the alternate word list appears. Select
alternate word from the list that appears.
When entering text with the 3x4 keypad, you can use the
following modes:
Mode Function
ABC
T9 (Predictive
text)
Select an appropriate virtual key until the
character you want appears on the display.
In ABC mode, select 1. T9 (The green dot
appears).
Select the appropriate virtual keys to 2.
enter an entire word.
When the word displays correctly, select 3.
to insert a space. If the correct word
does not display, select
an alternative word from the list that
appears.
and drag a slider next
or and an
or and
Adding words to the T9 dictionary
If you cannot find a word in the alternative
word list, you can add the word to the T9
dictionary. Select Add word at the right
end of the alternative word list.
Page 37
Getting started
37
Mode Function
Select 1. 123 to switch to Number mode.
Select an appropriate virtual key to enter 2.
Number
Symbol
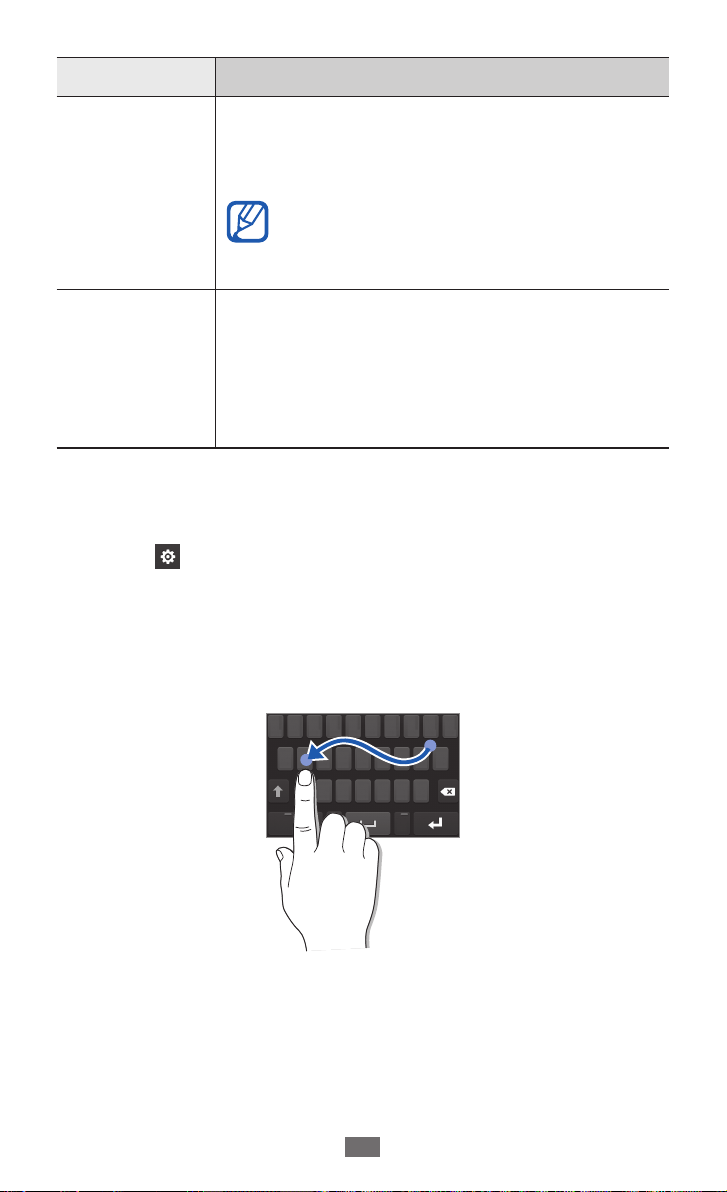
When Predictive text mode is activated, you can use
Continuous input mode.
a number or a symbol.
You can enter numbers by tapping
and holding a virtual key in ABC or
T9 mode.
Select 1. ?#+ to switch to Symbol mode.
Select 2. ◄ or ► to scroll to a symbol set
you want.
Select an appropriate virtual key to enter 3.
a symbol.
Select
1
Select the first character of a word and drag your finger
2
to the second character without releasing the finger from
the screen.
Continue until you have finished the word.
3
and drag the slider next to Continuous input.
Page 38

Release the finger on the last character.
4
When the word displays correctly, select
5
a space. If the correct word does not display, select an
alternative word from the list that appears.
Repeat steps 2-5 to complete your text.
6
Copy and paste text
›
While you are entering text, you can use the copy and paste
feature to use text in other applications.
Tap and hold the text input field until
1
Select
2
Drag
3
Select
4
text onto the clipboard.
In another application, tap and hold the text input field.
5
Select 6 Paste to insert the text from the clipboard into the
text input field.
Select from the option list.
or to select the text you want.
Copy or Cut to copy and paste, or cut and paste the
appears.
to insert
Getting started
38
Page 39
Communication
Calling
Learn to use calling functions, such as making and answering
calls, using options available during a call or customising and
using call-related features.
Make or answer a call
›
You can use the buttons or the touch screen when you make,
accept, end, or reject calls.
●
When you turn on the proximity sensor, your device
automatically turns off and locks the touch screen to
prevent accidental inputs when you hold the device
near your face.
●
Static electricity discharged from your body or
clothing may interfere with the proximity sensor
during a call.
Make a call
► p. 124
In Menu mode, select 1 Keypad and enter an area code and
a phone number.
Select
2
For a video call, select
To end the call, press [
3
●
Use the phonebook to save numbers you dial
frequently. ► p. 78
●
To quickly access the call log to redial numbers you
dialled recently, press [ ].
●
Use the voice command feature to dial by voice.
► p. 114
or press [ ] to dial the number.
.
].
Communication
39
Page 40
Communication
40
Answer a call
When a call comes in, press [1 ] or drag right.
When the device is ringing, press the Volume key to
mute the ringtone.
For a video call, press [
2
activated to show your image.
You can set whether to show your live image or preset
image. To change the setting, in Menu mode, select
→
Settings
To end the call, press [
3
Call → Own video in received call.
]. The front camera lens is
].
Reject a call
When a call comes in, press [ ] or drag left. The caller will
hear a busy tone.
●
You can set up a list of numbers to reject incoming
calls automatically. ► p. 43
●
You can send a message when you reject incoming
calls. To set messages, in Menu mode, select Settings
→
Call → Reject call with message.
Call an international number
In Menu mode, select 1 Keypad and tap and hold 0 to
insert the + character.
Enter the complete number you want to dial (country
2
code, area code and phone number), and then press [ ]
or select
to dial the number.
Page 41
Communication
41
Use a headset
›
By plugging a headset into the device, you can answer and
control calls hands-free:
●
To answer a call, press the headset button.
●
To reject a call, press and hold the headset button.
●
To place a call on hold or retrieve a held call during a call,
press and hold the headset button.
●
To end a call, press the headset button.
Use options during a voice call
›
You can use the following options while a voice call is in
progress:
●
To adjust the voice volume, press the Volume key up or
down.
●
To place a call on hold, select
select
●
To activate the speakerphone feature, select
.
. To retrieve a held call,
Speaker.
In noisy environments, you may have difficulty hearing
some calls while using the speakerphone feature. For
better audio performance, use the normal device mode.
●
To turn off the microphone so that the other party cannot
hear you, select Mute.
●
To listen and talk to the other party via a headset, first plug
a headset into the device and select Audio source.
●
To dial a second call, place the first call on hold and then
dial a new number.
Page 42

Communication
42
To answer a second call, select ●Accept + Hold Active call or
Accept + End Active call.
●
To switch between the two calls, select
●
To end the call on hold, select
●
To make a multiparty call (conference call), make or
Swap → End call.
Swap.
answer a second call and select Join when connected to
the second party. Repeat to add more parties. You must
subscribe to the multiparty call service to use this feature.
Use options during a video call
›
You can use the following options while a video call is in
progress:
●
To hide your image from the other party, select
●
To turn off the microphone so that the other party cannot
.
hear you, select .
●
To capture the other party’s image, select
●
To record a video call, select
●
To listen and talk to the other party via a headset, first
→ Record video.
→ Capture.
plug a headset into the device and select → Switch to
headset.
●
To switch between the front and rear camera lens, select
.
View and dial missed calls
›
Your device will display the missed call icon ( ) when you
have missed calls.
Open the notifications panel and select a missed call. Select
the call from the call log and press [
] to dial.
Page 43

Communication
43
Use additional features
›
You can use various other call-related features, such as auto
rejection, Fixed Dialling Number (FDN) mode, call diverting or
waiting.
Set auto rejection
Use auto rejection to reject calls from certain numbers
automatically. To activate auto rejection and set up the reject
list,
In Menu mode, select
1
Select
2
Select
3
Select the number input field, enter a number to reject,
4
and select Save.
To add more numbers, repeat steps 2-4.
5
Use Fixed Dialling Number (FDN) mode
In FDN mode, your device will restrict outgoing calls, except
for the numbers stored in the SIM or USIM card. To activate
FDN mode,
In Menu mode, select
1
Drag the slider next to
2
Enter the PIN2 supplied with your SIM or USIM card and
3
select OK.
Add.
Criteria → an option.
Settings → Call → Auto reject.
Settings → General → Security.
Fixed dialling mode.
Page 44

Communication
44
Set call diverting
Call diverting is a network feature to send incoming calls to
another number that you specify. You can set this feature
separately for several conditions when you are not able to
answer calls, such as when you are already on the phone or
when you are outside of the service area.
In Menu mode, select
1
forwarding.
Drag the slider next to a forwarding type you want.
2
Enter a number to which calls will be forwarded and select
3
Save.
Your setting will be sent to the network.
Settings → Call → Call
Set call waiting
Call waiting is a network feature to alert you of an incoming
call while you are on a previous call. This feature is available
only for voice calls.
In Menu mode, select
1
Drag the slider next to
2
Your setting will be sent to the network.
Settings → Call → Call waiting.
Call waiting.
Page 45
Communication
45
Logs
Learn to view and manage logs of calls you have dialled,
received, or missed.
View call logs
›
You can view logs of your calls filtered by their types.
In Menu mode, select
1
Select
2
Select a log to view its details.
3
All or Missed.
From the call logs, you can make a call or send a
message directly to a contact. Flick the contact to the
right or left and select an option.
From the detail view, you can dial the number, send
a message to the number, or add the number to the
phonebook or reject list.
Logs.
Messages
Learn to create and send text (SMS) or multimedia (MMS)
messages, and view or manage messages you have sent or
received.
You may incur additional charges for sending or
receiving messages while outside your home service
area. For details, contact your service provider.
Page 46
Communication
46
Send a text message
›
In Menu mode, select Messages
1
Add recipients for your message.
2
●
Enter phone numbers manually. Separate multiple
numbers by inserting a semicolon or comma or by
selecting Enter.
●
Select phone numbers from the lists by selecting the
options under the recipient input field.
Select the text input field and enter your message text.
3
Select 4 Send to send the message.
Set up an MMS profile
›
To send and receive multimedia messages, you must activate
a connection profile for connecting to the MMS server. In
addition to profiles that are preset by your service provider,
you can add your own connection profile.
In Menu mode, select
1
Connections
2
Select
New.
→
Settings → Network →
Ye s .
→
.
Customise the parameters for the connection profile.
3
Option Function
Set name Enter the name for the profile.
Access name Enter the access point name.
Auth type Select an authentication type.
User ID Enter your user name.
Password Enter your password.
Page 47
Communication
47
Option Function
Protocol Select a network protocol.
Home URL Enter the MMS server address.
Proxy address Enter the address of the proxy server.
Linger time
(sec)
Advanced
settings
When you are finished, select
4
In Menu mode, select
5
Application profiles → Multimedia messages.
Select a connection profile.
6
Send a multimedia message
›
In Menu mode, select Messages
1
Add recipients for your message.
2
●
Enter phone numbers or email addresses manually.
Separate multiple numbers or addresses by inserting a
semicolon or comma or by selecting Enter.
●
Select phone numbers or email addresses from the lists
by selecting the options under the recipient input field.
When you enter an email address, the device will
convert the message as a multimedia message.
Enter how long the device will wait for
responses from the network.
Customise IP and DNS addresses and
traffic class.
Save.
Settings → Network
→
→
.
Select the text input field and enter your message text.
3
Select 4 and attach a file.
You can select a file from the file list or capture a photo or
video.
5
Select
Send to send the message.
Page 48
Communication
48
View a text or multimedia message
›
In Menu mode, select Messages.
1
Your messages are grouped into message threads by
contact, like a messenger.
Select a contact.
2
For a multimedia message, select a message to view the
3
details.
Listen to voice mail messages
›
If you have set missed calls to be diverted to the voice mail
server, callers may leave voice messages when you do not
answer incoming calls. To access your voice mail inbox and
listen to voice mail messages,
In Menu mode, select
1
Follow the instructions from the voice mail server.
2
You must save the voice mail server number before
accessing the server. Your service provider can give you
the number.
Create a folder to manage messages
›
Learn to create folders to manage your messages according
to your preferences and needs.
In Menu mode, select
1
Select
2
Enter a new folder name and select
3
You can now move your important messages from the inbox
or sentbox to a custom folder for easier management or to
protect them from accidental deletion.
Advanced → Add folder.
Keypad, and then tap and hold 1.
Messages.
Save.
Page 49

Communication
49
Send an SOS message
›
In case of an emergency, you can ask for help by sending an
SOS message to specified recipients.
This feature may be unavailable depending on your
region or service provider.
In Menu mode, select
1
messages.
Drag the slider next to
2
messaging feature.
Select
3
Select
4
message and select Done.
When you are finished setting the recipients, select
5
→
Select
6
the SOS message.
To send an SOS message, the touch screen and keys must be
locked. Press the Volume key 4 times.
Recipients to open the recipient list.
Add recipients and add recipients for your
●
Enter phone numbers manually.
●
Select phone numbers from the lists by selecting the
options under the recipient input field.
Ye s .
Repeat and select the number of times to repeat
Once you send an SOS message, all device functions
will be suspended until you unlock the touch screen by
pressing and holding the Power key .
Settings → Messages → SOS
Activation to activate the SOS
Save
Page 50
Communication
50
Learn to create and send email messages, and view or
manage messages you have sent or received.
Set up an email account and profile
›
In addition to the email account predefined by your service
provider, you can add your personal email accounts. Also, you
can add your own connection profile for using email services.
Set up an email account
In Menu mode, select Email → Others.
1
To set up an account for a specific email service, select the
service name.
Customise the settings for the account by following the
2
screens:
Option Function
Account
name
Email address Enter your email address.
User name Enter your user name for the account.
Password Enter your password for the account.
SMTP server
SMTP port
Enter a name for the account. This
option is available only when setting up
a new email account.
Enter the address of the SMTP server
(outgoing server).
Enter the port number of the SMTP
server.
Page 51

Communication
51
Option Function
Secure
connection
Incoming
server type
POP3 server/
IMAP4 server
POP3 port/
IMAP4 port
Secure
connection
Select a security protocol for the SMTP
server.
Select the type of the incoming server
(POP3 or IMAP4).
Enter the address of the incoming
server.
Enter the port number of the incoming
server.
Select a security protocol for the
incoming server.
Select an email profile
In Menu mode, select Settings → Network
1
Connections → Ye s .
Select
2
Customise the network settings.
3
(p. 46)
In Menu mode, select
4
Application profiles
New.
► “Set up an MMS profile”
Settings → Network →
→
Email.
→
Select a connection profile.
5
Send an email message
›
In Menu mode, select Email → Compose.
1
You can select Accounts to view other accounts.
Page 52

Communication
52
Add recipients for your message.
2
●
Enter email addresses manually. Separate multiple
addresses by inserting a semicolon or comma or by
selecting Enter.
●
Select email addresses from the lists by selecting the
options under the recipient input field.
Select the Cc/Bcc field and add more recipients.
3
Select
4
You can select a file from the file list.
Select the subject field and enter a subject.
5
Select the text input field and enter your email text.
6
Select 7 Send to send the message.
View an email message
›
In Menu mode, select Email.
1
The inbox screen appears.
Select an email message.
2
Synchronise emails with the Exchange server
›
After configuring sync settings, you can synchronise your
emails with the Exchange server. To configure the Exchange
server,
In Menu mode, select
1
→
ActiveSync.
and attach a file.
Email accounts
Email → Accounts
→
Add account
→
→
Exchange
Settings
Page 53

Communication
53
Customise the settings for the Exchange server by
2
following screens:
Option Function
Email address
User name
Password
Domain Enter the domain of your email address.
Server URL Enter the URL of the Exchange server.
Use SSL
Select
3
After customising the server setting, select the dot next to
4
data types to synchronise.
For synchronising emails and calendar events, you can set
the sync interval.
To synchronise your emails,
In Menu mode, select
1
account.
Login.
Enter your email address for the
Exchange server.
Enter your user name for the Exchange
server.
Enter your password for the Exchange
server.
Set to use the SSL (Secure Sockets Layer)
protocol to increase security.
Email → the Exchange server
2
Select
.
Page 54

Communication
54
ChatON
Learn to chat with your friends and family in ChatON. This
is a global communication service based on mobile phone
numbers, regardless device type or operating system. While
having a conversation with your buddies, you can send
various multimedia files and data, such as photos, videos, and
contact numbers.
In Menu mode, select
1
If you are launching this application for the first time, read
2
the terms and conditions and select Agree.
Follow the on-screen instructions to complete the account
3
setup.
Chat with friends and family instantly.
4
ChatON.
IM
Learn to chat with friends and family from any of the universal
instant messengers.
In Menu mode, select
1
Select a messenger.
2
Enter your user name and password to sign in.
3
Chat with friends and family instantly.
4
IM.
Page 55

Communication
55
Social Hub
Learn to access Social Hub™, the integrated communication
application for email, messages, instant messages, contacts
or calendar information. Visit socialhub.samsungapps.com for
more details.
In Menu mode, select
1
If you are launching this application for the first time, add
2
an account or skip it for a later setup.
Select a category at the top of the screen.
3
Check and use contents delivered from Social Hub.
4
Social Hub.
Page 56
Entertainment
56
Entertainment
Camera
Learn how to capture and view photos and videos. You
can take photos at resolutions up to 2560 x 1920 pixels
(5 megapixels) and videos at resolutions up to
1280 x 720 pixels. Photos are saved in jpg format and videos
are saved in mp4 format.
●
The camera automatically turns off when you do not
use it for a specified period.
●
The memory capacity may differ depending on the
shooting scene or shooting conditions.
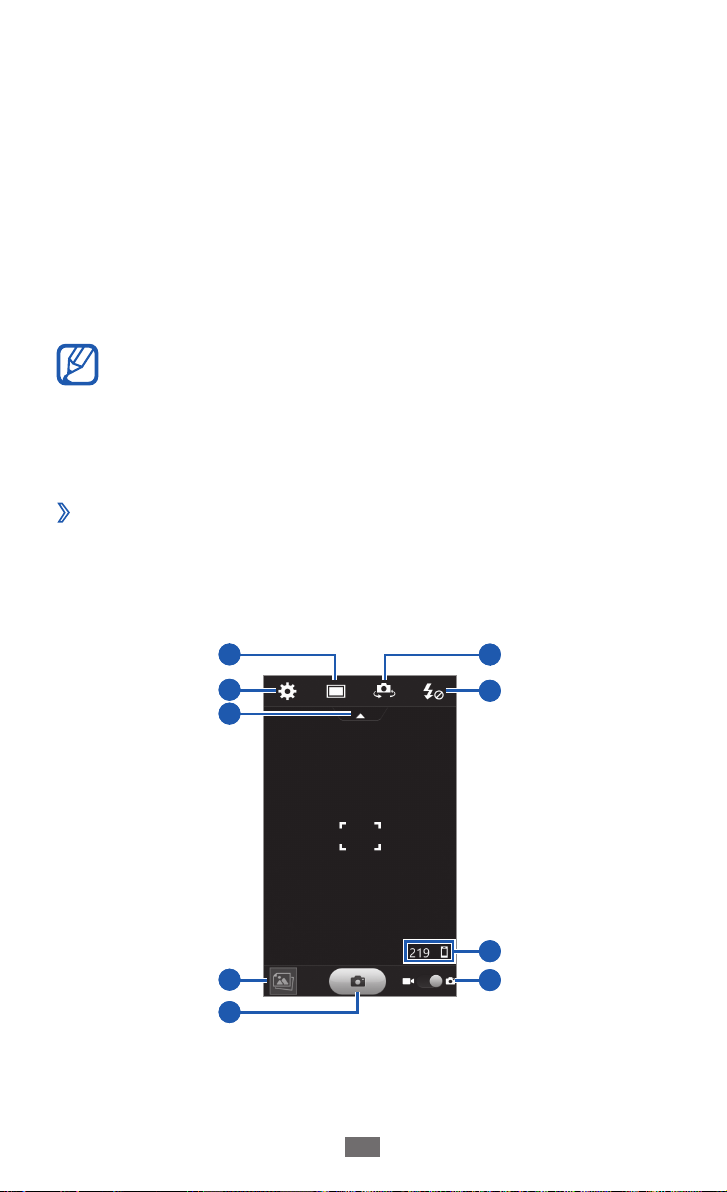
Capture a photo
›
In Menu mode, select Camera.
1
Aim the lens at the subject and make any necessary
2
adjustments.
1
2
3
4
5
6
7
8
9
Page 57
Entertainment
57
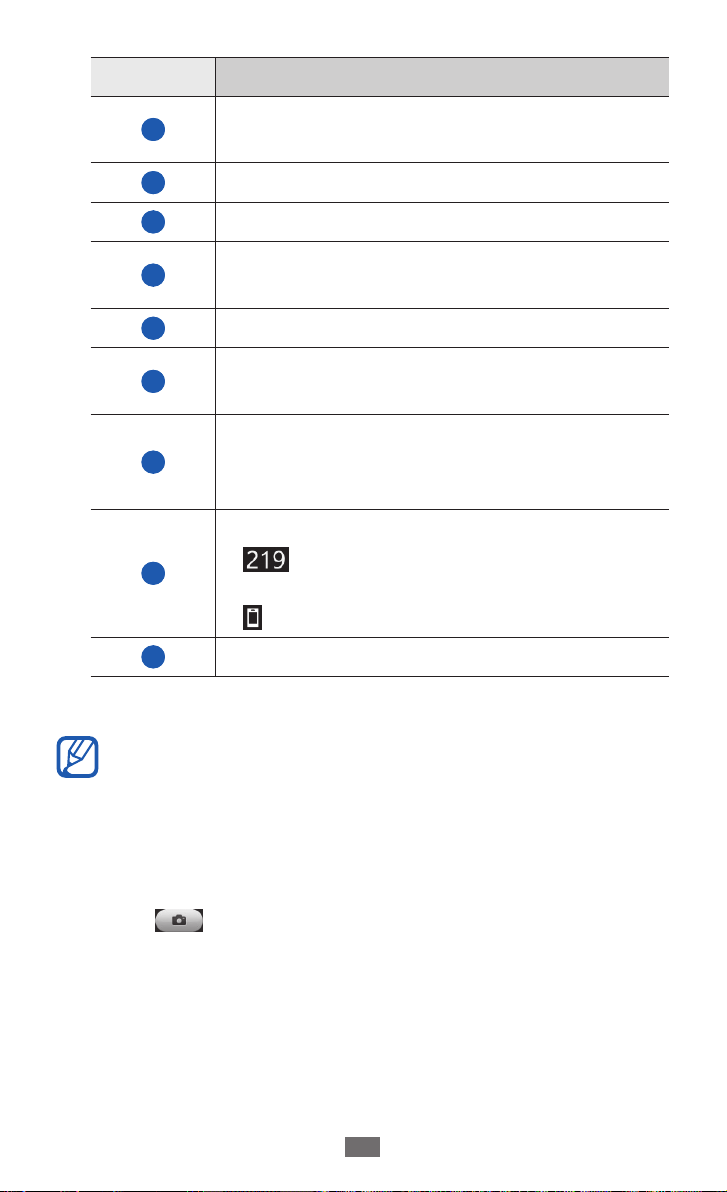
Number Function
1
2
3
4
5
6
7
8
9
Change the shooting mode and scene
mode.
Change the camera settings.
Hide or display the icons in the viewfinder.
View the photo or video you captured or
recorded last.
Capture a photo.
Switch between the front and rear camera
lenses.
Change the flash setting; You can manually
turn the flash on or off or set the camera to
automatically use the flash when needed.
Check the camera status and settings.
●
: Number of photos you can take
(according to available memory)
●
: Default storage location
Switch to the camcorder.
Press the Volume key to zoom in or out.
3
The zoom function may be unavailable when shooting
in the highest resolution.
Tap where you want to focus on the preview screen.
4
The focus frame moves to the place you tap and changes
to green when the subject is in focus.
5
Select
to take a photo.
The photo is saved automatically.
Page 58
Entertainment
58
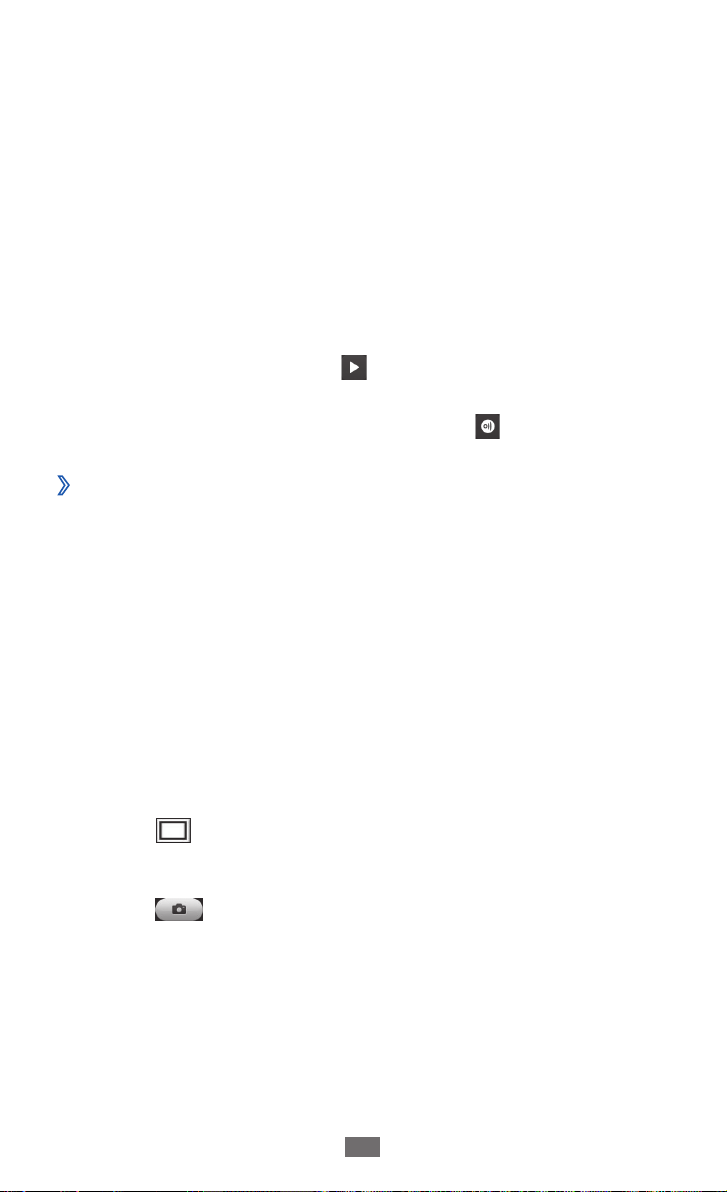
After taking photos, select the image viewer icon to view the
captured photos.
●
To view more photos, scroll left or right.
●
To zoom in, place two fingers on the screen and spread
them apart. To zoom out, move your fingers closer together.
You can also double-tap the screen.
●
To send a photo to others, select
●
To delete a photo, select
●
To set a photo as wallpaper or a caller ID image for a
Delete → Ye s .
Share.
contact, select Set as.
●
To start a slideshow, select
. Tap the screen to stop the
slideshow.
●
To view a photo on other devices, select
Capture a photo by using preset options for
›
.
various scenes
Your camera provides you with predefined settings for
various scenes. You can simply select the proper mode for
your shooting condition and subjects.
For example, when you take photos at night, select the
night mode that uses an extended exposure. When you take
photos of people with the light source behind them, select
the against light mode, which reduces the contrast between
light and dark areas.
In Menu mode, select
1
Select
2
Make any necessary adjustments.
3
Select
4
→ a scene under Panorama.
to take a photo.
Camera.
Page 59
Entertainment
59
Capture a photo in Self shot mode
›
You can take photos of yourself conveniently using the front
camera lens.
In Menu mode, select
1
Select
2
Make any necessary adjustments.
3
Select
4
Capture a photo in Smile shot mode
›
Your camera can recognise people’s faces and help you take
photos of their smiling faces.
In Menu mode, select
1
Select
2
Make any necessary adjustments.
3
Aim the camera lens at your subject and select
4
Your device recognises people in an image and detects
their smiles. When the subject smiles, the device
automatically takes a photo.
Capture a panoramic photo
›
You can take wide panoramic photos using Panorama
shooting mode. This mode is convenient for photographing
landscapes.
.
to take a photo.
→ Smile shot.
Camera.
Camera.
.
In Menu mode, select
1
Select
2
Select a direction.
3
→ Panorama.
Camera.
Page 60
Entertainment
60
Make any necessary adjustments.
4
Select
5
Slowly move the device in the direction you selected and
6
align the green frame with the viewfinder.
When you have aligned the green frame and viewfinder,
the camera will automatically take the next photo.
Repeat step 6 to complete the panoramic photo.
7
Select 8 to save the panoramic photo.
Customise camera settings
›
Before taking a photo, select to access the following
options:
Option Function
Exposure
value
Focus mode
Resolution Change the resolution option.
to take the first photo.
Adjust the exposure value.
Take close-up photos or set the camera to
focus on the subject.
Auto contrast
Timer
White
balance
ISO
Automatically adjust contrast between your
subject and background.
Select the length of the delay before the
camera takes a photo.
Adjust the colour balance according to
lighting conditions.
Adjust the sensitivity of the camera
imaging sensor.
Page 61
Entertainment
61
Option Function
Effects
Exposure
metering
Blink
detection
Apply a special effect, such as sepia or black
and white tones.
Select a type of exposure metre.
Set the camera to alert you when people
close their eyes.
Guidelines Display guidelines on the preview screen.
Review
Set the camera to display the captured
image.
Set the camera to include location
information for your photos.
To improve GPS signals, avoid
shooting in locations where the
GPS
signal may be obstructed, such as
between buildings or in low-lying
areas, or in poor weather conditions.
Alternately, customise the GPS
connection settings to improve GPS
reception.
► p. 102
Storage
Select a memory location for storing
captured photos.
Reset settings Reset menus and shooting options.
Page 62
Entertainment
62
Record a video
›
In Menu mode, select Camera.
1
Drag the slider to the camcorder to switch to the
2
camcorder.
Aim the lens at the subject and make any necessary
3
adjustments.
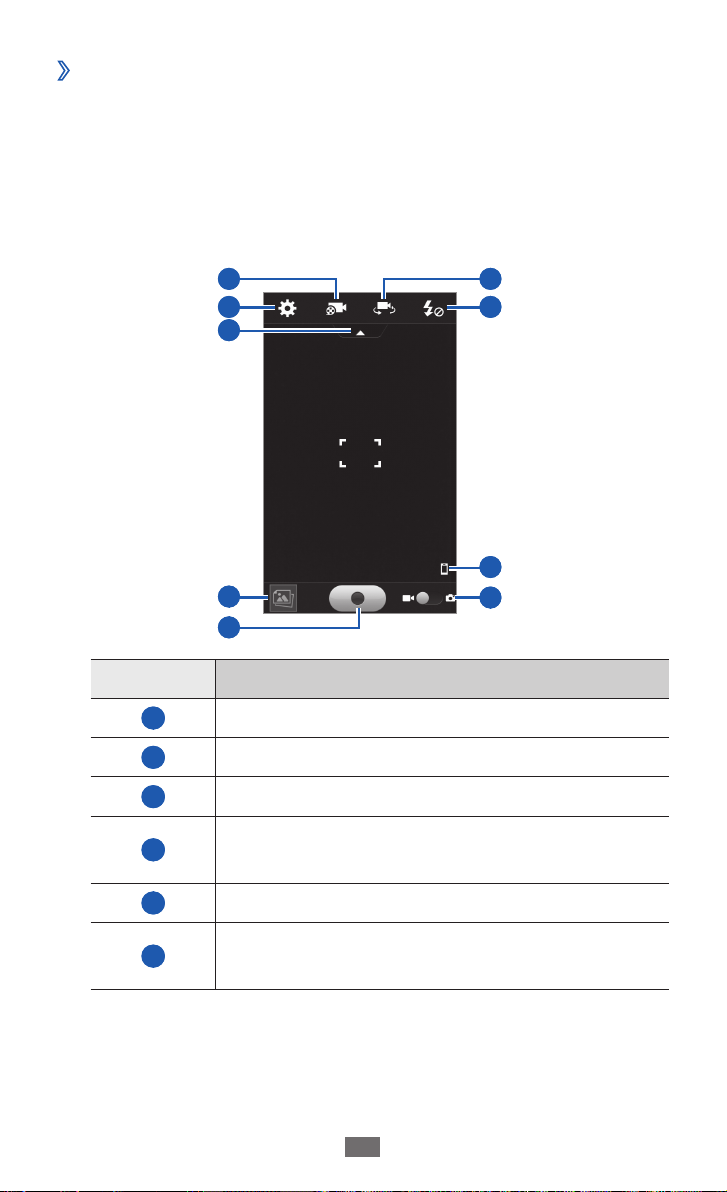
1
2
3
4
5
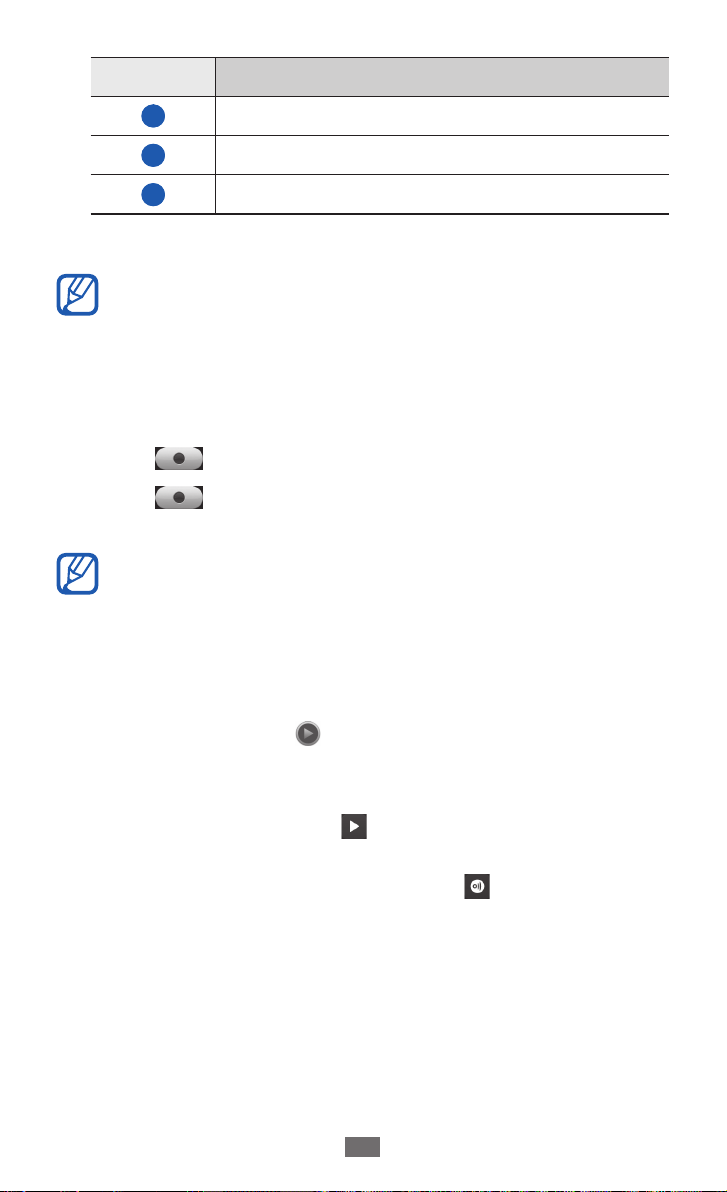
Number Function
1
2
3
4
Change the recording mode.
Change the camcorder settings.
Hide or display the icons in the viewfinder.
View the photo or video you captured or
recorded last.
6
7
8
9
5
6
Record a video.
Switch between the front and rear camera
lenses.
Page 63
Entertainment
63
Number Function
7
8
9
Press the Volume key to zoom in or out.
4
Change the flash setting.
View the default storage location.
Switch to the camera.
The zoom function may be unavailable when recording
in the highest resolution.
Tap where you want to focus on the preview screen.
5
The focus frame moves to the place you tap and changes
to green when the subject is in focus.
6
7
Select
Select
to start recording.
to stop recording.
The video is saved automatically.
The camcorder may not be able to properly record
videos to a memory card with a slow transfer speed.
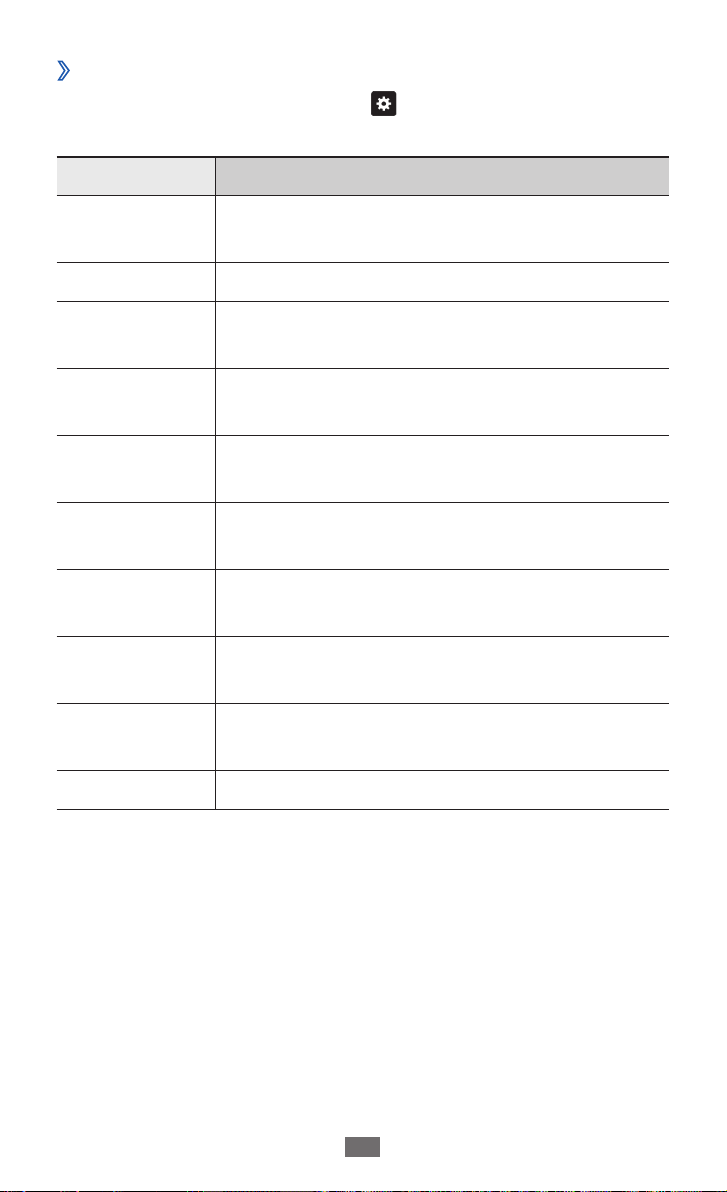
After recording videos, select the image viewer to view the
recorded videos.
●
To view more videos, scroll left or right.
To play a video, select ●.
●
To send a video to others, select
●
To delete a video, select
●
To start a slideshow, select
Delete → Ye s .
Share.
. Tap the screen to stop the
slideshow.
●
To play a video on other devices, select
.
Page 64
Entertainment
64
Customise camcorder settings
›
Before recording a video, select to access the following
options:
Option Function
Exposure
value
Resolution Change the resolution option.
Timer
White
balance
Effects
Anti-shake
Guidelines
Review
Storage
Reset settings Reset menus and recording options.
Adjust the exposure value.
Select the length of the delay before the
camcorder starts recording a video.
Adjust the colour balance according to
lighting conditions.
Apply a special effect, such as sepia or black
and white tones.
Reduce blur caused by the device’s
vibration or movement.
Display the guidelines on the preview
screen.
Set the camera to display the recorded
video.
Select a memory location for storing
recorded videos.
Page 65
Entertainment
65
Videos
Learn to use the video player to play various kinds of videos.
The video player supports the following file formats: 3gp,
mp4, avi, divx, mkv, wmv, asf.
Play a video
›
In Menu mode, select 1 Videos.
Select a video.
2
To play a video recorded on your device, select Recorded.
Rotate the device anti-clockwise to landscape view.
3
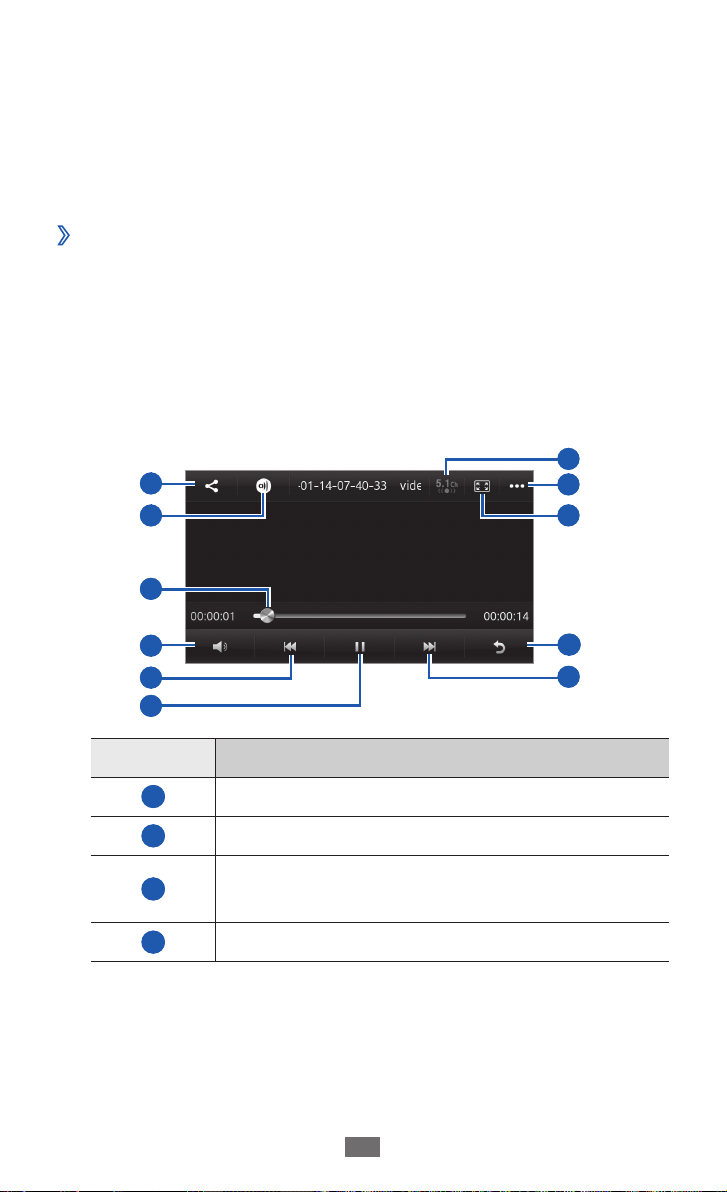
Control playback with the following keys:
4
7
1
2
3
8
9
4
5
6
Number Function
1
2
3
4
Send a video to others.
Play the video on other devices.
Move to a point of the file by dragging or
tapping the bar.
Adjust the volume.
10
1 1
Page 66
Entertainment
66
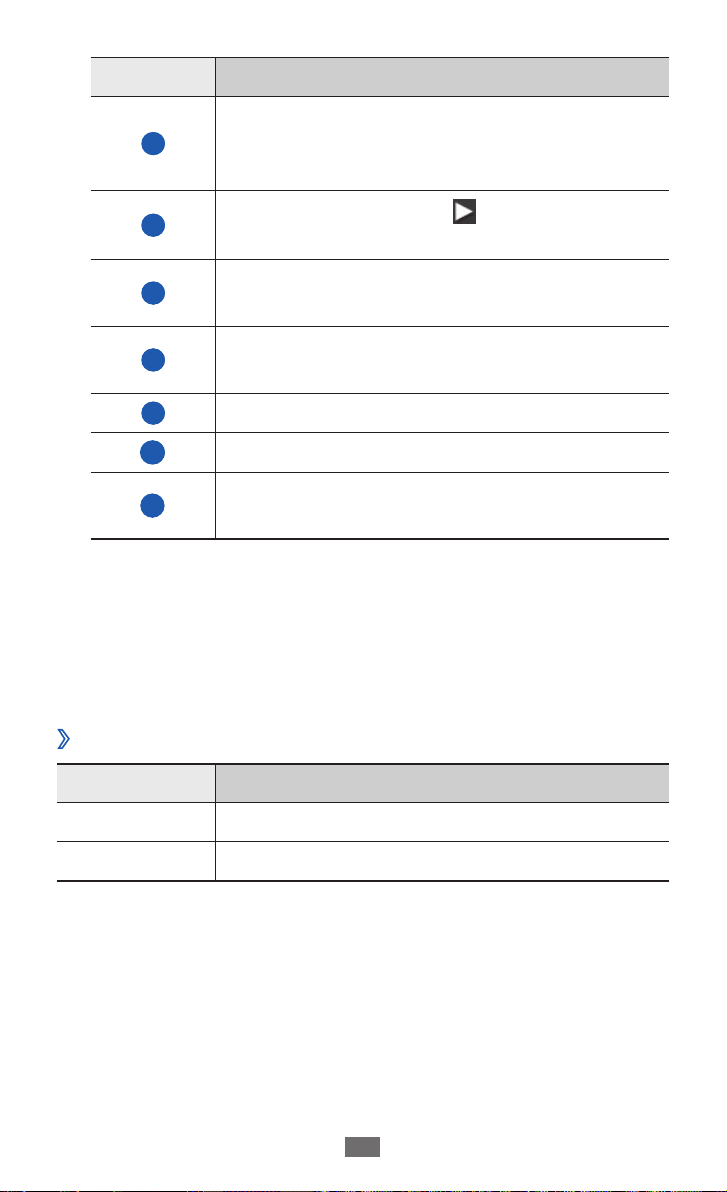
Number Function
Restart playback; Skip backward (tap within
5
3 seconds); Scan backward in a file (tap and
hold).
6
7
8
9
10
1 1
Pause playback; Select to resume
playback.
Activate the 5.1 channel surround sound
system when a headset is connected.
View the details of the video or customise
video player settings.
Change a ratio of the video screen.
Stop playback and return to the playlist.
Skip forward; Scan forward in a file (tap and
hold).
Gallery
Learn to view photos and play videos saved in your device’s
memory and memory card.
Supported file formats
›
Type Format
Image bmp, jpg, gif, png, tif, wbmp
Video 3gp, mp4, avi, divx, mkv, wmv, asf
Page 67

Entertainment
67
●
Avoid locking the device’s screen while playing a DivX
Video-On-Demand. Each time you lock the screen
while playing a DivX Video-On-Demand, one of your
available rental counts will be decremented.
●
Some file formats are not supported depending on
the software of the device.
●
If the file size exceeds the available memory, an error
can occur when you open files.
●
Playback quality may vary by content type.
●
Some files may not play properly depending on how
they are encoded.
View a photo
›
In Menu mode, select Gallery.
1
→
Select a folder
2
a photo (with no icon).
While viewing a photo, use the following options:
●
To view more photos, scroll left or right.
●
To zoom in, place two fingers on the screen and spread
them apart. To zoom out, move your fingers closer together.
You can also double-tap the screen.
●
To send a photo to others, select
●
To delete a photo, select
●
To use additional features with a photo, select
Delete.
Share.
More and
use the following options:
Set as - : Set a photo as wallpaper or a caller ID image for a
contact.
Rotate - : Rotate a photo.
Crop - : Crop an image from a photo.
Details - : View the details of the photo.
Page 68
Entertainment
68
To start a slideshow, select ●. Tap the screen to stop the
slideshow.
●
To view the photo on other devices, select
Play a video
›
In Menu mode, select Gallery.
1
→
Select a folder
2
a video (with the icon) to play.
.
Select
3
Control playback with the virtual keys.
4
Play a slideshow
›
In Menu mode, select Gallery.
1
Select
2
Tap the screen to end the slideshow.
3
to play.
► p. 65
.
Music
Learn to listen to your favourite music while on the go with
the music player. The music player supports the following file
formats: mp3, aac, wma, 3ga, m4a, flac, ogg (vorbis).
Add music files to your device
›
Start by transferring files to your device or memory card:
●
Download from the wireless web.
●
Download from a PC with Samsung Kies.
●
Receive via Bluetooth.
●
Copy to your memory card.
► p. 95
► p. 104
► p. 87
► p. 103
Samsung is not responsible for any use of default music
files provided on your device.
Page 69
Entertainment
69
Play music
›
After transferring music files to your device or memory card,
In Menu mode, select
1
Select a music category
2
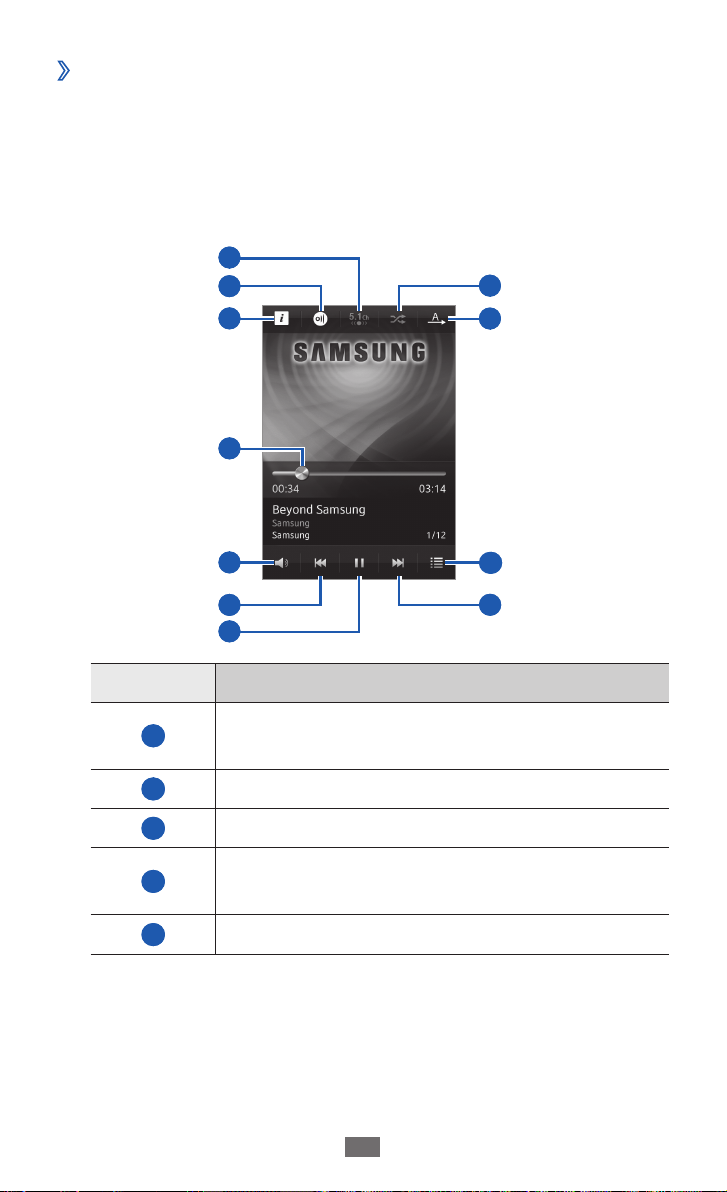
Control playback with the following keys:
3
1
2
3
4
5
6
7
Number Function
1
Activate the 5.1 channel surround sound
system when a headset is connected.
Music.
→
a music file.
8
9
10
1 1
2
3
4
5
Play the music on other devices.
View the details of the music file.
Move to a point of the file by dragging or
tapping the bar.
Adjust the volume.
Page 70
Entertainment
70
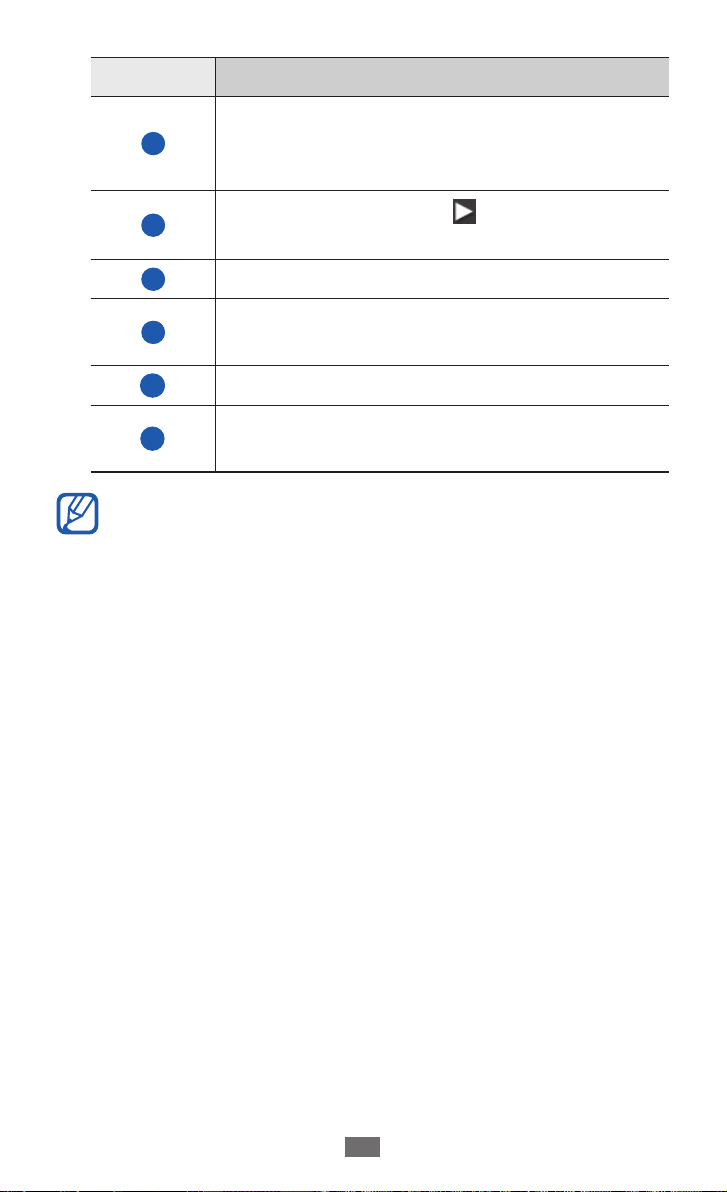
Number Function
Restart playback; Skip backward (tap within
6
3 seconds); Scan backward in a file (tap and
hold).
7
8
9
10
1 1
●
You can control the music player with a headset. In
Pause playback; Select to resume
playback.
Activate Shuffle mode.
Change the repeat mode (off, repeating
one file, or repeating all files).
Open the playlist.
Skip forward; Scan forward in a file (tap and
hold).
Idle mode, press and hold the headset button to
launch the music player. Press the headset button to
start or pause playback.
●
SRS CS Headphone
delivers a 5.1 surround sound
™
experience over standard headphones or earbuds
when listening to multichannel content, such as DVD
movies.
●
WOW HD
significantly improves the playback
™
quality of audio, delivering a dynamic 3D
entertainment experience with deep, rich bass and
high frequency clarity for crisp detail.
●
Playback quality may vary by content type.
●
Some files may not play properly depending on how
they are encoded.
Page 71

Entertainment
71
Access the disc view
›
During playback, rotate the device to landscape view.
1
The display switches to disc view.
Scroll left or right to an album and select the disc image.
2
Select a music file from the list next to the disc image to
3
play it.
Select
4
playback.
●
To switch to circle view, select
●
To switch back to album view, select
Create a playlist
›
In Menu mode, select 1 Music.
Select
2
Enter a title for your new playlist and select
3
Select the files you want to include and select
4
Customise music player settings
›
In Menu mode, select 1 Music.
Select a music category
2
or to pause or resume the current
.
Playlists → .
→
a music file.
.
Done.
Add.
Page 72

Entertainment
72
Select 3 More → Settings.
Adjust the following settings to customise your music
4
player:
Option Function
Equaliser Select a default equaliser type.
Effect Select a sound effect.
Visualisation
Lyric Set to display lyrics during playback.
Select an animated visualisation to
display during playback.
Music Hub
You can access the online music store, and search for and buy
your favourite songs. You can also add a music file to your
wish list and play downloaded music files.
This feature may be unavailable depending on your
region or service provider.
In Menu mode, select
1
If you are launching this application for the first time,
2
select Agree.
Search for songs, and preview or buy your favourite songs.
3
Music Hub.
Page 73
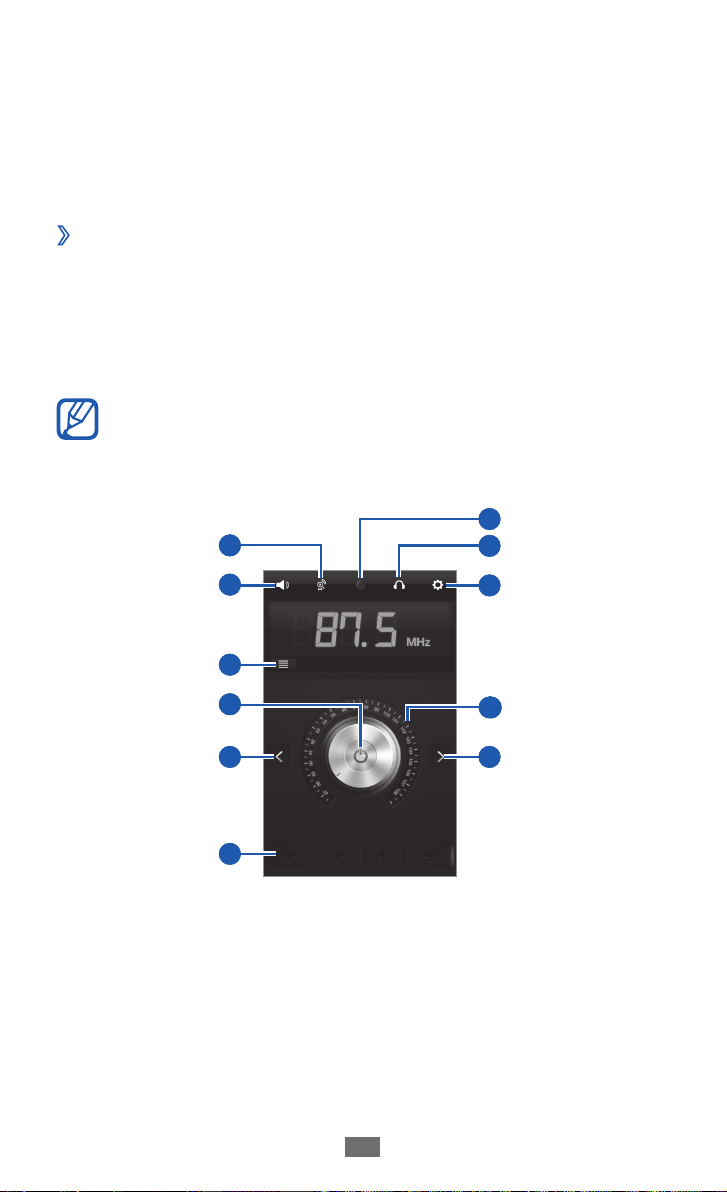
Entertainment
73
FM radio
Learn to listen to music and news on the FM radio. To listen
to the FM radio, you must connect a headset, which serves as
the radio antenna.
Listen to the FM radio
›
Plug a headset into the device.
1
In Menu mode, select 2 FM radio.
The FM radio scans and saves available stations
automatically.
The first time you turn on the FM radio, it will start
automatic tuning.
Control the FM radio with the following keys:
3
7
1
8
2
3
4
5
6
9
10
5
Page 74
Entertainment
74
Number Function
1
2
3
4
5
6
7
8
9
10
Record a song from the FM radio
›
Plug a headset into the device.
1
In Menu mode, select 2 FM radio.
Scans and saves available stations.
Adjust the volume.
Open the available radio stations list.
Turn the FM radio on or off.
Search for an available radio station.
Add the current radio station to the
favourites list.
Record a song from the FM radio.
Change the sound output (headset or
device’s speaker).
Customise the FM radio settings.
Fine-tune the frequency.
Select
3
Scroll to the radio station you want.
4
Select 5 to start recording.
When you are finished recording, select
6
The recorded file will be saved in Recorded files (in Menu
mode, select My files
to turn on the FM radio.
→
Sounds → Recorded files).
Stop.
Page 75
Entertainment
75
Save a radio station automatically
›
Plug a headset into the device.
1
In Menu mode, select 2 FM radio.
Select
3
The FM radio scans and saves available stations
automatically.
Add a radio station to the favourites list
›
Plug a headset into the device.
1
In Menu mode, select 2 FM radio.
Select
3
Scroll to the radio station you want.
4
Select 5 to add to the favourites list.
You can add a name for a radio station or remove
a radio station; Tap and hold a radio station on the
favourites list and select Rename or Remove.
Customise FM radio settings
›
In Menu mode, select 1 FM radio.
Select
2
.
to turn on the FM radio.
.
Adjust the following settings to customise your FM radio:
3
Option Function
Storage
Radio text
Set a memory location for storing
recorded FM radio clips.
Set whether or not to show the station
ID and programme information on the
FM radio screen. This information is
available only from radio stations that
provide it.
Page 76
Option Function
Alternative
frequency
Auto off
Set whether or not the FM radio
attempts to retune a radio station when
the signal is weak.
Set the FM radio to automatically turn
off after a specified length of time.
Java
Learn to use games and applications powered by awardwinning Java technology.
The download of Java games or applications may not
be supported depending on the software of the device.
Download games and applications
›
In Menu mode, select Java → More Games.
1
Your device connects to the website preset by your service
provider.
Search for a game or application and download it to the
2
device.
Play games or launch applications
›
In Menu mode, select 1 Java.
Select a game or application from the list and follow the
2
on-screen instructions.
●
Available games or applications may vary depending
on your region or service provider.
●
Controls and options of games or applications may
vary.
Entertainment
76
Page 77

Personal information
Contacts
Learn to create and manage a list of your personal or business
contacts stored on the device’s memory or a SIM or USIM
card. You can save names, mobile phone numbers, home
phone numbers, email addresses, birthdays and more for
your contacts.
Create a contact
›
In Menu mode, select 1 Contacts → .
Enter contact information.
2
Select 3 Save to add the contact to memory.
You can also create a contact from the dialling screen.
In Menu mode, select
1
Select
2
Enter contact information.
3
Select 4 Save to add the contact to memory.
Find a contact
›
In Menu mode, select Contacts.
1
Select
2
want.
You can also drag your finger along the index on the right
side to quickly scroll through the list.
Add to Contacts → Create contact.
Search and enter the first letters of the name you
From the contact list, you can make a call or send a
message directly to a contact by quickly flicking the
contact to the left or right and selecting an option.
Keypad and enter a phone number.
Personal information
77
Page 78
Personal information
78
Select the contact’s name from the contact list.
3
Once you find a contact, you use the following options:
●
To make a voice call, select
●
To make a video call, select
●
To send a text or multimedia message, select
●
To send an email message to the contact, select an email
.
.
.
address.
●
To set the contact as your favourites, select
●
To add a shortcut to the contact to the idle screen, select
.
Add to home screen.
●
To edit the contact information, select
●
To delete the contact, select
●
To send the contact to others, select
Set a favourite number
›
Delete → Ye s .
Edit.
Share.
In Menu mode, select 1 Contacts → Favourites
Select contacts and select
2
Add.
The contact is saved to the favourite contact list.
Create your namecard
›
In Menu mode, select 1 Settings → Contacts → My
profile.
Enter your own personal details.
2
Select 3 Save.
You can send your namecard by attaching it to a
message or email or transferring it via the Bluetooth
wireless feature.
→
.
Page 79

Personal information
79
Retrieve contacts from your community
›
accounts
You can view the list of community website accounts and
select an account to add a contact from the website to your
device contacts.
To set up an account,
In Menu mode, select
1
Select an account type.
2
Follow the on-screen instructions to complete the account
3
setup.
To access an account,
In Menu mode, select
1
The accounts list you added will appear.
Select one of the icons next to an account.
2
To retrieve all contacts, select ●.
●
To select contacts to retrieve, select
Create a group of contacts
›
By creating groups of contacts, you can manage multiple
contacts and send messages to an entire group. Start by
creating a group.
In Menu mode, select
1
Enter a name for the group.
2
Settings → Accounts.
Settings → Contacts → Accounts.
.
Contacts → Groups
→
.
Select a memory location to save the group.
3
Select 4 Save.
Page 80

Personal information
80
Copy contacts from or to the SIM or USIM card
›
In Menu mode, select 1 Settings → Contacts → Import
→
contacts or Export contacts
SIM.
Select contact files to copy and select
2
Import or export contacts
›
To import contact files (in vcf format) from a memory card,
In Menu mode, select
1
→
contacts
Select contact files to import and select
2
To export contact files (in vcf format) to a memory card, in
Menu mode, select Settings
→
Memory card.
Memory card.
Settings → Contacts → Import
→
Contacts → Export contacts
Import or Export.
Import.
Calendar
Learn to create and manage daily, weekly, or monthly events,
and set alarms to remind yourself of important events.
Create an event
›
In Menu mode, select 1 Calendar.
Select
2
Enter the details of the event as required.
3
Select 4 Save.
Create.
Page 81

Personal information
81
View events
›
To change the calendar view,
In Menu mode, select
1
Select a view mode from the top line of the calendar.
2
Month ●: A full month in one view; In month view, days
with scheduled events are indicated by a small triangle;
In month view, you can switch to year view by selecting
the month and year field or placing your two fingers on
the screen and pinch. To return to month view, select a
month you want.
●
●
●
To view events of a specific date,
In Menu mode, select
1
Select a date on the calendar.
2
To move to today’s date, select To d ay .
Select an event to view its details.
3
: Hourly blocks for the days in one full week
Week
Day
: Hourly blocks for one full day
List
: A list of scheduled events
●
You can send the event to others by selecting
→
an option.
●
You can synchronise your calendar with an Exchange
server after configuring sync settings. ► p. 52
Calendar.
Calendar.
Share
Stop an event alarm
›
If you set an alarm for a calendar event, the alarm will sound
at the specified time. To stop the alarm, drag
to the left.
Page 82

Personal information
82
Task
Learn to create a virtual task list and set alarms to remind
yourself of important tasks or set priority.
Create a task
›
In Menu mode, select 1 Task.
Select
2
Enter the details of the task.
3
Select 4 Save.
View tasks
›
In Menu mode, select 1 Task.
Select
2
Select a task to view its details.
3
For completed tasks with an expired deadline, you can set
their status to completed by selecting the check box next
to the task.
Create.
Sort by → a category to sort the tasks.
●
You can send the task to others by selecting
an option.
●
You can synchronise your tasks with an Exchange
server after configuring sync settings. ► p. 52
Share →
Page 83
Personal information
83
Memo
Learn to record important information to save and view at a
later date.
Create a memo
›
In Menu mode, select 1 Memo.
Select
2
Enter your memo text and select
3
View memos
›
In Menu mode, select 1 Memo.
Select a memo to view its details.
2
To delete the memo, select → Ye s .
Create.
Save.
●
You can send the memo to others by selecting
→
an option.
●
You can change the background colour by selecting
Skin.
Voice recorder
Learn to operate your device’s voice recorder.
Record a voice memo
›
In Menu mode, select 1 Voice recorder.
Share
2
Select
Record to start recording.
Page 84
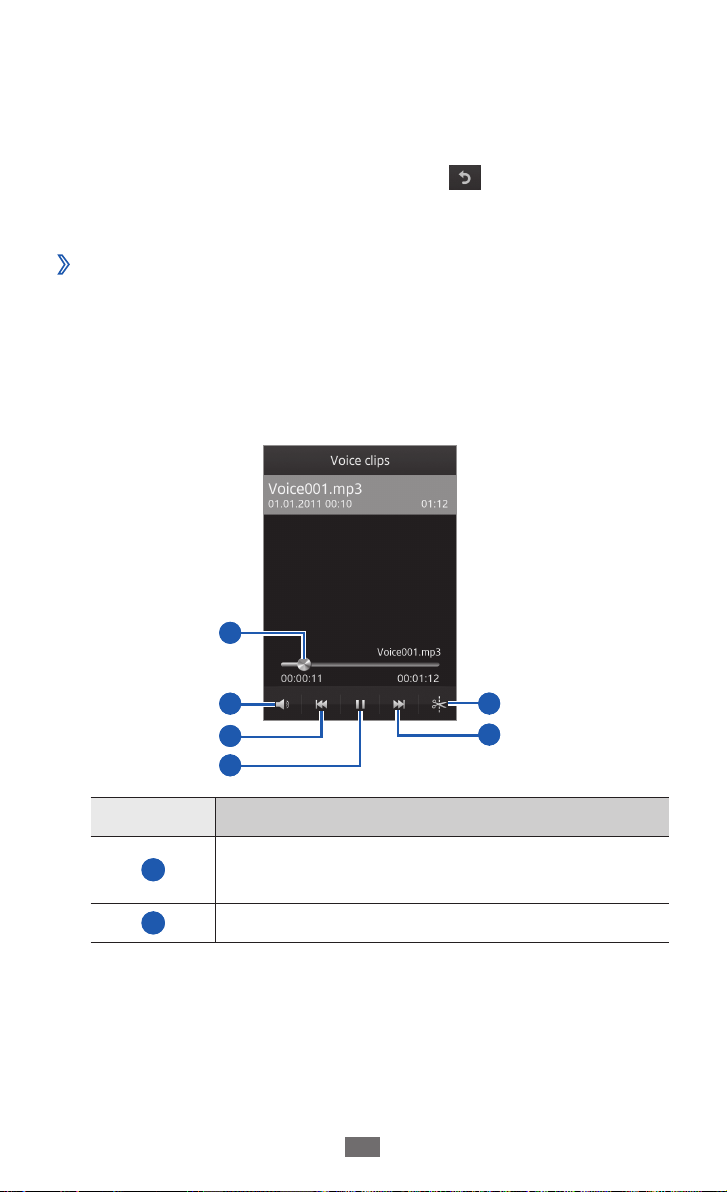
Personal information
84
Speak into the microphone.
3
When you are finished, select 4 Stop.
Your memo is saved automatically.
To record more voice memos, select
5
steps 2-4.
Play a voice memo
›
In Menu mode, select 1 Voice recorder.
Select
2
Select a voice memo to play.
3
Control playback with the following keys:
4
List to open the voice memo list.
1
2
3
4
and repeat
5
6
Number Function
1
2
Move to a point of the file by dragging or
tapping the bar.
Adjust the volume.
Page 85
Personal information
85
Number Function
3
4
5
6
You can send the voice memo to others by selecting
Share
Customise voice recorder settings
›
In Menu mode, select 1 Voice recorder.
Select
2
Adjust the following settings to customise your voice
3
recorder.
Settings.
Option Function
Storage
Skip backward; Scan backward in a file (tap
and hold).
Pause playback; Select to resume
playback.
Crop the file.
Skip forward; Scan forward in a file (tap and
hold)
→
an option.
Select a memory location for saving
voice memos.
Recording
type
Select a recording type. To record
a voice memo for attaching to a
multimedia message, select Limit for
MMS.
Page 86

Web
86
Web
Web services require a data connection. Contact your
operator to choose the best data plan.
Internet
Learn to access and bookmark your favourite web pages.
●
You may incur additional charges for accessing the
web and downloading media files. For details, contact
your service provider.
●
The web browser menu may be labelled differently
depending on your service provider.
●
Available icons may vary depending on your region or
service provider.
Set up an internet profile
›
To access the network and connect to the internet, you must
activate a connection profile. In addition to profiles that
are preset by your service provider, you can add your own
connection profile.
In Menu mode, select
1
Connections → Ye s .
Select
2
Customise the network settings.
3
(p. 46)
In Menu mode, select
4
Application profiles
Select a connection profile.
5
New.
Settings → Network
Settings → Network →
→
→
► “Set up an MMS profile”
Internet.
Page 87
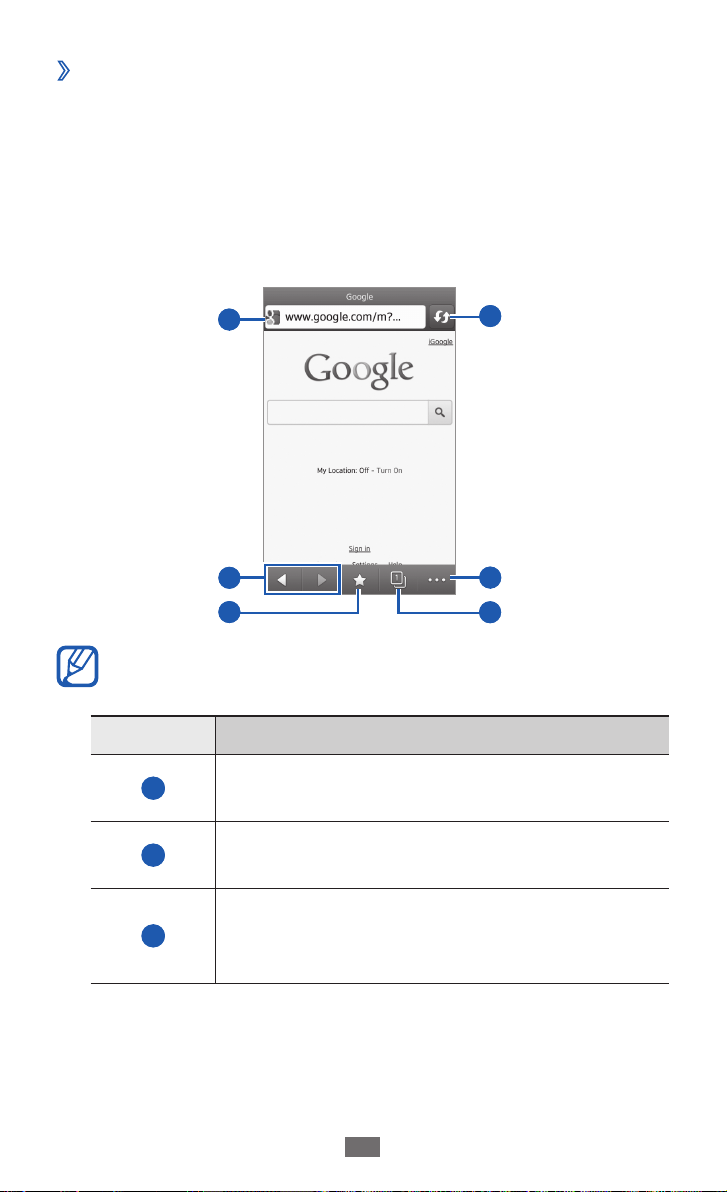
Web
87
Browse web pages
›
In Menu mode, select 1 Internet to launch a specified
homepage.
To access a specific web page, select the URL input field,
enter the web address (URL) of the web page, and select
Go.
Navigate web pages with the following keys:
2
1
2
3
The above screen may differ depending on your region
or service provider.
Number Function
1
2
Enter the web address of a web page to
access.
Move backward or forward to web pages in
history.
4
5
6
3
Open a list of saved bookmarks, recent
internet history, and frequently visited
pages.
Page 88

Web
88
Number Function
Refresh the current web page; While the
4
device is loading web pages, this icon
changes to
.
5
Access a list of web browser options.
Open a web page in a new window or
6
switch between the currently opened
windows.
While browsing the web page, use the following options:
●
To zoom in, place two fingers on the screen and spread
them apart. To zoom out, move your fingers closer together.
You can also double-tap the screen.
●
To use additional features, select
and select one of the
following options:
Add bookmark - : Bookmark the current web page.
Add to home screen - : Add a shortcut to the current web
page to the idle screen.
Send to Caster - : Send the address of the current webpage
or the selected item to others or transfer it to your PC.
► p. 108
Download manager - : View the download history.
Search text - : Search for text on the current web page.
Brightness - : Adjust the brightness of the screen. This
option is available only when you deactivate auto
brightness.
► p. 118
Word wrapping on - : Set the browser to adjust the text
flow to fit the screen.
Exit - : Close the web browser.
Page 89

Web
89
Bookmark your favourite web pages
›
You can bookmark web pages you frequently visit for quick
access. If you know the web address of the web page, you can
manually add a bookmark. To add a bookmark,
In Menu mode, select
1
Select
2
Enter a page title and a web address (URL).
3
Select 4 Save.
Access the recent history or the frequently
›
Add.
Internet → .
visited pages
In Menu mode, select 1 Internet → .
Select
2
Select a web page to access.
3
History or Most visited.
Navigation
Learn to use the GPS navigation system to find and show your
destination with voice guidance.
●
Navigation maps, your current location, and other
navigational data may differ from actual location
information. You should always pay attention to road
conditions, traffic, and any other factors that may
affect your driving and follow all safety warnings and
regulations while driving.
●
This feature may be unavailable depending on your
region or service provider.
Page 90

Web
90
In Menu mode, select 1 Navigation.
If you are launching this application for the first time, read
2
the disclaimer and select Accept.
Select
3
► p. 101
Select
4
Follow the on-screen instructions to start the mobile
5
navigator.
Ye s to activate location services (if necessary).
Ye s to update the latest the map information.
Samsung Apps
Samsung Apps allows you to simply and easily download an
abundance of useful applications to your device. Featuring a
wealth of games, news, reference, social networking, widgets,
health related applications and more, Samsung Apps gives
you instant access to a huge choice in mobile experience.
Your device gets smarter with fully optimised applications
from Samsung Apps. Explore amazing applications and make
your mobile life even better.
In Menu mode, select
1
If you are launching this application for the first time, read
2
the terms and conditions and select Accept.
Samsung Apps.
Search for and download applications or widgets as
3
desired.
●
You may incur additional charges for accessing the
internet and downloading applications.
●
For details, please visit www.samsungapps.com. Or,
refer to the Samsung Apps leaflet.
●
This service may be unavailable depending on your
region or service provider.
Page 91
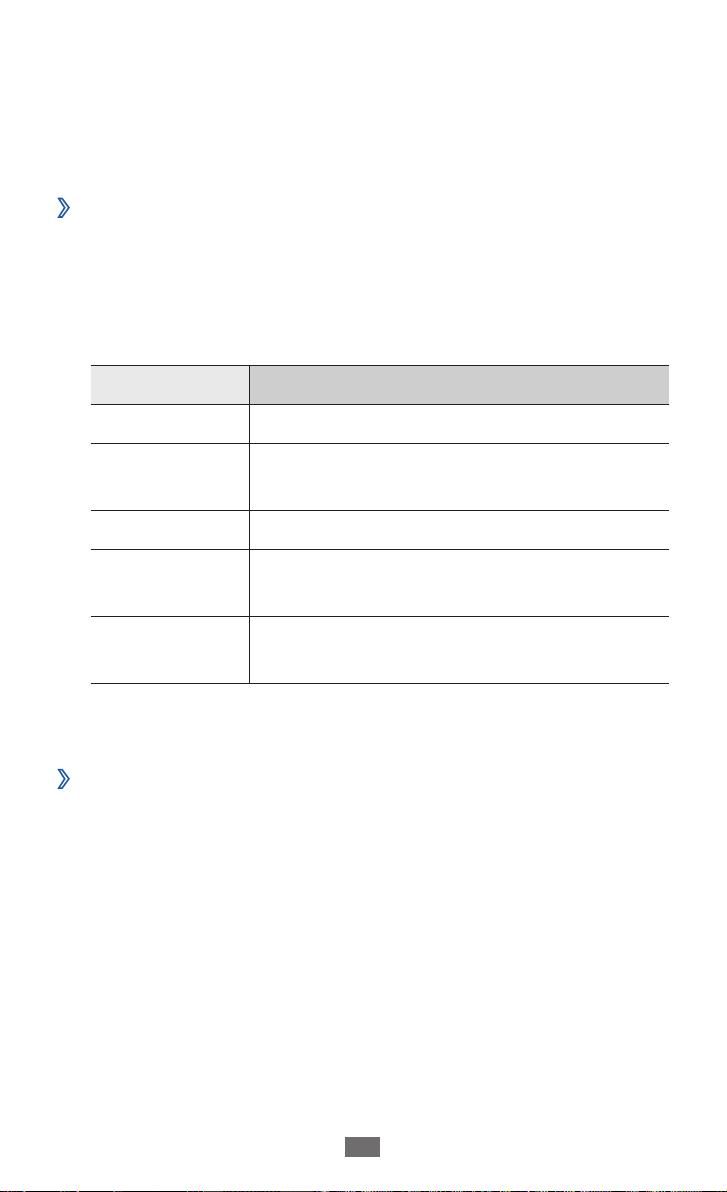
Web
91
Synchronise
Learn to synchronise contacts, calendar events, tasks and
memos with the web server you have specified.
Set up a synchronisation profile
›
In Menu mode, select 1 Settings → Connectivity
Synchronise.
Select
2
profile options:
When you are finished, select
3
Start synchronisation
›
In Menu mode, select 1 Settings → Connectivity
Synchronise.
Create sync profile and specify the following
Option Function
Profile name Enter a name for the profile.
Sync server
Sync category Select types of data to be synchronised.
Sync type
Network
profile
Enter the web address of the server to
be synchronised.
Set how to synchronise the device and
the server.
Select a connection profile to use for
synchronisation.
Save.
→
→
Select a synchronisation profile.
2
Select 3 Start sync to start synchronisation with the web
server you have specified.
Page 92

YouTube
Learn to view and share videos via YouTube.
This feature may be unavailable depending on your
region or service provider.
In Menu mode, select
1
Select a video from the list of the featured videos.
2
Control playback with the on-screen keys.
3
YouTube.
You can search for applications and data in your device and
specific data on the web. You can also use various Google
services.
To search for data,
In Menu mode, select
1
Enter a letter or a word of the data to search for.
2
Select the item’s name you want to access.
3
To use Google services,
In Menu mode, select
1
Select a service.
2
Google → Search.
Google → Apps.
Web
92
Page 93

Connectivity
Bluetooth
Bluetooth is a short-range wireless communications
technology capable of exchanging information over
a distance of about 10 m without requiring a physical
connection.
You do not need to line up the devices to beam information
with Bluetooth. If the devices are within range of one another,
you can exchange information between them even if they are
located in different rooms.
●
Samsung is not responsible for the loss, interception,
or misuse of data sent or received via the Bluetooth
wireless feature.
●
Always ensure that you share and receive data with
devices that are trusted and properly secured. If there
are obstacles between the devices, the operating
distance may be reduced.
●
Some devices, especially those that are not tested
or approved by Bluetooth SIG, may be incompatible
with your device.
Turn on the Bluetooth wireless feature
›
In Menu mode, select 1 Settings → Bluetooth.
Drag the slide next to
2
wireless feature.
To allow other devices to locate your device, select
3
→
Always on.
Activation to turn on the Bluetooth
Connectivity
93
Visible
Page 94
Connectivity
94
Find and pair with other Bluetooth-enabled
›
devices
In Menu mode, select 1 Settings → Bluetooth → Search
for devices.
Select a device.
2
Enter a PIN for the Bluetooth wireless feature or the other
3
device’s Bluetooth PIN, if it has one, and select Save.
Alternatively, select Ye s to match the PIN between your
device and the device.
When the owner of the other device enters the same
PIN or accepts the connection, pairing is complete. If the
pairing is successful, the device will automatically search
for available services.
Some devices, especially headsets or hands-free car
kits, may have a fixed Bluetooth PIN, such as 0000. If the
other device has a PIN, you must enter it.
Send data using the Bluetooth wireless feature
›
Select a file or item, such as a contact, calendar event,
1
memo, task, or media file, from an appropriate application
or My files.
Select an option for sending data via Bluetooth.
2
The method for selecting an option may vary by data
type.
Search for and pair with a Bluetooth-enabled device.
3
Page 95
Connectivity
95
Receive data using the Bluetooth wireless
›
feature
Enter the PIN for the Bluetooth wireless feature and select
1
OK (if necessary).
Select
2
from the device (if necessary).
Received data is saved to an appropriate application or folder
according to its type. For example, a music or sound clip is
saved to the sound folder and a contact to the phonebook.
Ye s to confirm that you are willing to receive data
Wi-Fi
Learn to use your device’s wireless networking capabilities
to activate and connect to any wireless local area network
(WLAN) compatible with the IEEE 802.11 b/g/n standards.
You can connect to the internet or other network devices
anywhere an access point or wireless hotspot is available.
Your device uses non-harmonised frequency and is
intended for use in all European countries. The WLAN
can be operated in the EU without restriction indoors,
but cannot be operated outdoors in France.
Activate the WLAN feature
›
In Menu mode, select Settings → Wi-Fi and drag the slider
next to Activation.
An active WLAN running in the background will
consume battery power. To preserve battery power,
activate the WLAN only when needed.
Page 96
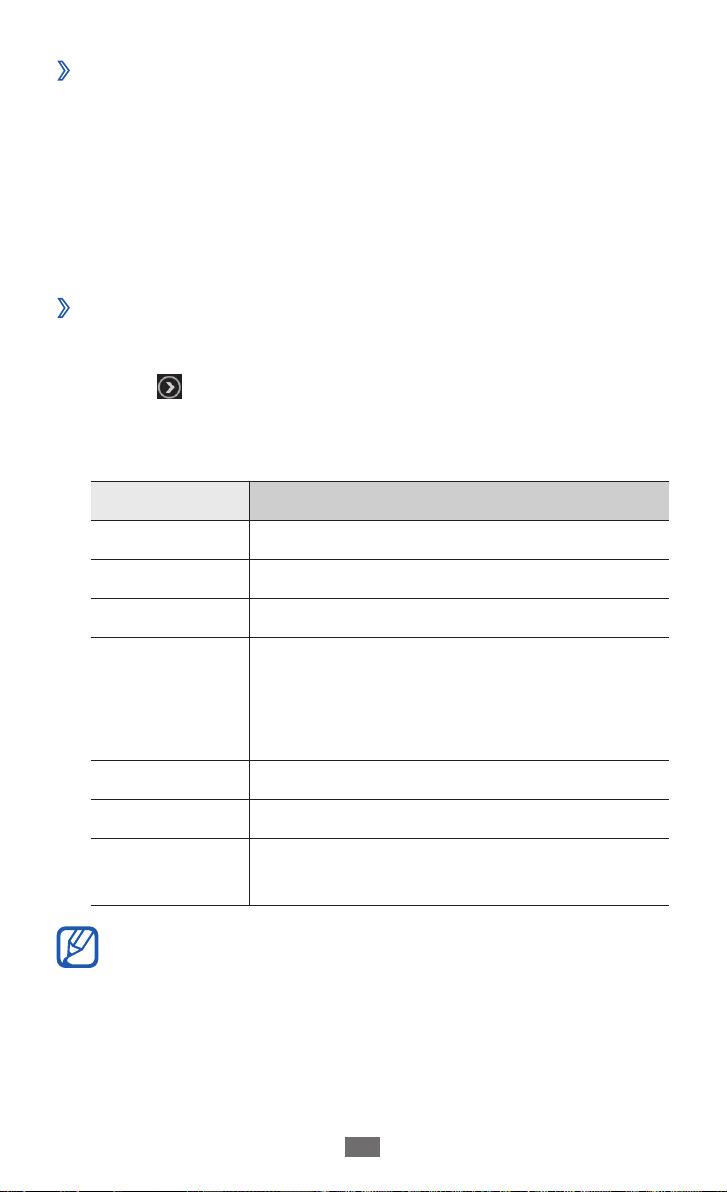
Connectivity
96
Find and connect to a WLAN
›
In Menu mode, select 1 Settings → Wi-Fi.
The device will automatically search for available WLANs.
Select a network.
2
Enter a password for the network and select 3 Connect (if
necessary).
Customise the connection profile
›
In Menu mode, select 1 Settings → Wi-Fi.
Select
2
The current connection profile for the network appears.
Customise the connection profile of the selected WLAN:
3
Option Function
Name View the name of the profile.
MAC address View the MAC address of the WLAN AP.
Security type View the security type of the WLAN AP.
Use static IP
IP address View your IP address of the WLAN AP.
Proxy address Enter the address of the proxy server.
Proxy port
To delete all details of the connection profile, select
Forget
next to the discovered WLAN AP.
Set up static network addresses for the
WLAN AP. You can manually set the IP
address, gateway, subnet mask, and
DNS addresses.
Enter the port number of the proxy
server.
→
Ye s .
Page 97

Connectivity
97
Connect to a WLAN using a Wi-Fi Protected
›
Setup (WPS)
In Menu mode, select 1 Settings → Wi-Fi.
Select
2
Press a WPS button on the AP device within 2 minutes.
3
Or, enter a PIN on the AP device and select Start within
2 minutes.
Connect to a WLAN device directly
›
Learn to use the WLAN Direct feature to connect two devices
via a WLAN without requiring an access point.
Connect your device to another WLAN device
In Menu mode, select 1 Settings → Wi-Fi → Wi-Fi Direct.
Select
2
Drag the slider next to
3
The device will automatically search for available devices.
Select a device.
4
When the owner of the other device accepts the
connection, the devices are connected.
Send data via a WLAN
WPS button depending on the AP device type.
Continue (if necessary).
Activation.
Select a file or item, such as a memo or media file, from an
1
appropriate application or My files.
Select an option for sending data via a Wi-Fi Direct.
2
The method for selecting an option may vary by data
type.
Search for and select a WLAN device.
3
Page 98
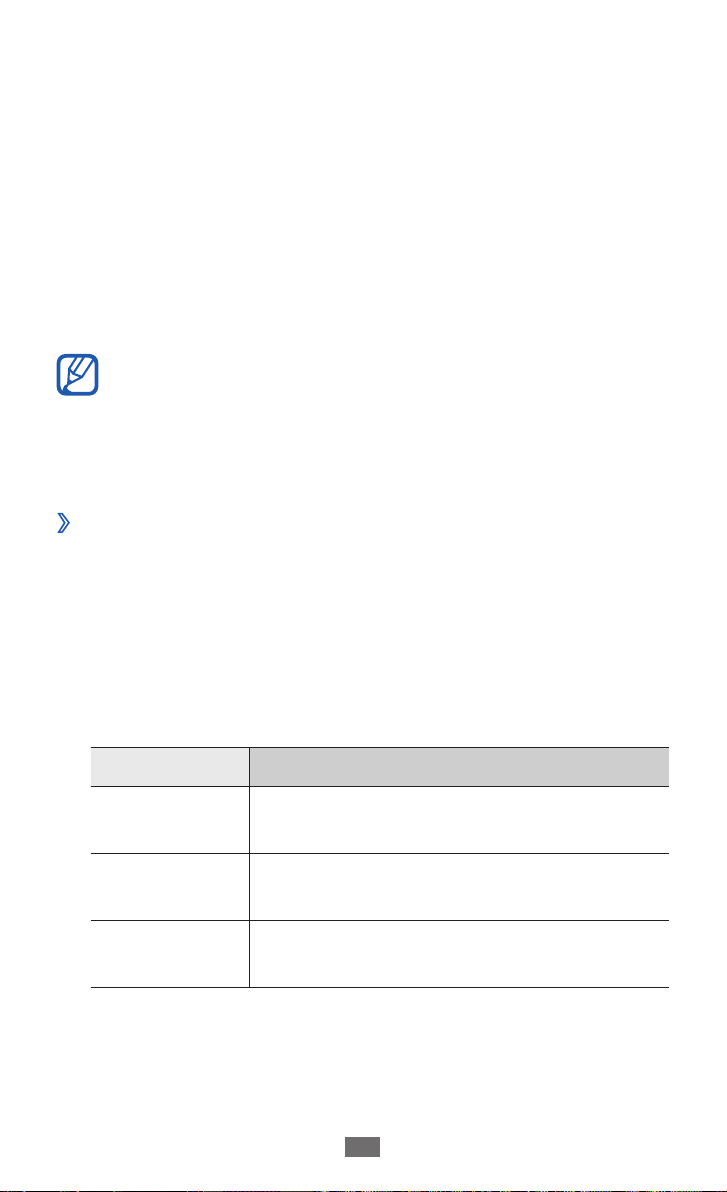
Connectivity
98
Receive data via a WLAN
When prompted, select OK to confirm that you are willing
to receive data. Received data is saved to an appropriate
application or folder according to its type.
AllShare
Learn to use the Digital Living Network Alliance (DLNA)
service that enables you to share media files between DLNAenabled devices in your home over a WLAN.
●
The supported file formats may vary depending on
the software of the device.
●
Some files may not play on the DLNA-enabled devices
depending on the devices.
Customise DLNA settings for sharing media
›
files
To allow other DLNA-enabled devices to access media files on
your device, you must activate media sharing.
In Menu mode, select
1
Adjust the following settings to customise the DLNA
2
feature:
Option Function
Share videos
Share photos
Share music
Settings → AllShare.
Turn on video sharing with other DLNAenabled devices.
Turn on image sharing with other
DLNA-enabled devices.
Turn on music sharing with other DLNAenabled devices.
Page 99
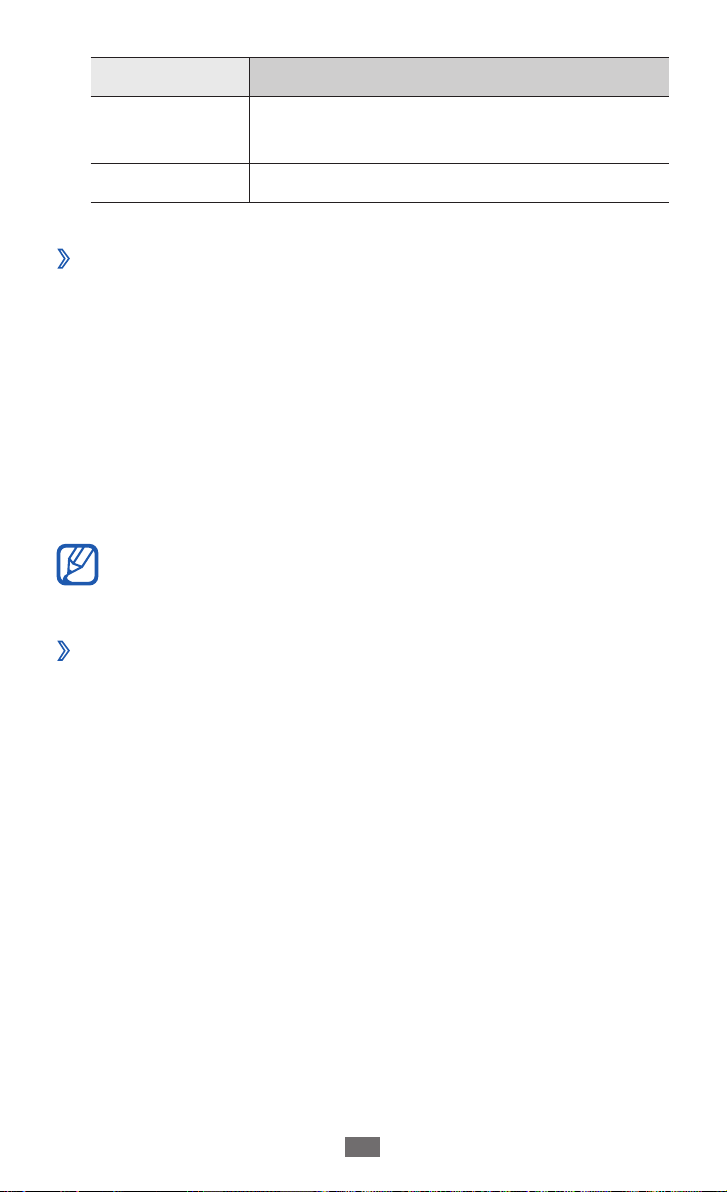
Connectivity
99
Option Function
Download to
Subtitles Set to display subtitles.
Play your files on another DLNA-enabled
›
Select the default memory location for
saving downloaded media files.
device
In Menu mode, select 1 AllShare.
Select
2
Select a media category
3
Select a player—the one that will play the media file.
4
Playback begins at the selected player.
Control playback using icons of your device.
5
Play files of one device on the other device
›
In Menu mode, select 1 AllShare.
My device.
→
a file.
Playback may be buffered, depending on the network
connection and the connected server.
Select
2
Your device automatically searches for DLNA-enabled
devices.
Select a device as the media server—the one that
3
contains media files.
Select a media category
4
Select a player—the one that will play the media file.
5
Playback begins at the selected player.
Control playback using icons of your device.
6
Remote device.
→
a file.
Page 100

Connectivity
100
Mobile network sharing
Learn to set your device as a wireless access point for PCs
or other devices, and share your device’s mobile network
connection.
In Menu mode, select
1
Mobile AP.
Drag the slider next to
2
tethering feature.
Select
3
Adjust the following settings to customise the Wi-Fi
4
tethering feature:
Ye s to confirm.
Option Function
Hide my
device
Tethering
Password
Settings → Connectivity
Activation to activate the Wi-Fi
Block other devices from locating your
device.
Activate the tethering function to use
your mobile device as a wireless modem
for another device.
Deactivate the tethering function to
preserve battery power and allow only
direct connections with other devices.
View or edit the network key to prevent
unauthorised access to the network.
→
When you are finished, select
5
From another device, locate your device’s name in the
6
available connection list and connect to the network by
entering the appropriate password in the WPA field.
.
 Loading...