

Samsung SGH-S5230, GT-S5230 Disassembly & Reassembly
11. Disassembly and Assembly Instructions
11-1. Disassembly
|
1 |
|
|
2 |
|
|
|
|
|
|
|
||
|
|
|
|
|
|
|
|
|
|
|
|
|
|
|
|
|
|
|
|
|
Release screws at 6 point.
DO NOT MAKE SCRATCH ON REAR. Torque Spec. : 1.0~1.2 kgf*cm
Unlock the right, left side and bottom of REAR by raising it.
(Refer to the picture.)
|
3 |
|
|
4 |
|
|
|
|
|
||
|
|
|
|
|
|
|
|
|
|
|
|
|
|
|
|
|
|
Disassemble antenna cable connector |
|
|
Disassembled the REAR and side key. |
|
|
|
|
|
|
|
|
|
|
|
|
|
|
|
|
|
|
|
from PBA. (Refer to above picture) |
|
|
|
|
|
|||||
|
|
|
|
|
|
|
|
|
|
|
|
|
|
|
|
|
|
|
|
|
Do |
Not touch the IC and Don't damage |
|
|
|
|
|
|
ON |
PBA. |
|
|
|
|
|
|
|
|
|
|
|
|
|
|
|
|
|
11-1
SAMSUNG Proprietary-Contents may change without notice
This Document can not be used without Samsung's authorization

Exploded View and Parts List
|
5 |
|
|
6 |
|
|
|
|
|
||
|
|
|
|
|
|
|
|
|
|
|
|
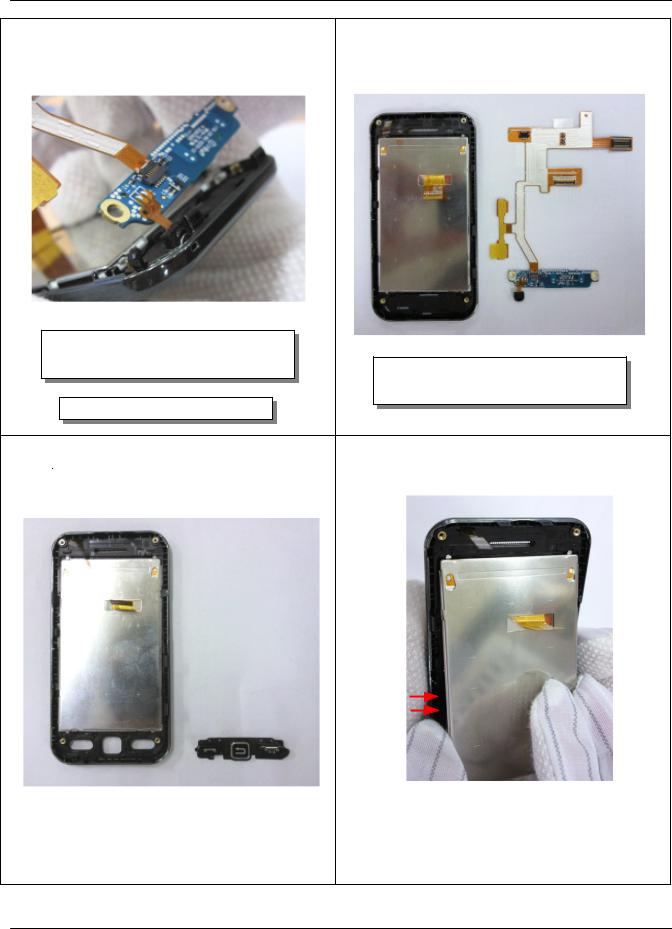
To separate PBA, first of all detach the volume key F_PCB (Refer to above picture)
Be careful not to tear a FPCB.
Disassemble a PBA from Front ass'y (Refer to the picture)
|
7 |
|
|
8 |
|
|
|
|
|
||
|
|
|
|
|
|
|
|
|
|
|
|
Disassemble Intenna from FRONT.
Disassembled Intenna and PBA.
11-2
SAMSUNG Proprietary-Contents may change without notice
This Document can not be used without Samsung's authorization

Exploded View and Parts List
9
To separate bracket, first of all detach the Camera & Holde key F_pcb
10
Take out connector through the bracket's hole carefully when separating Bracket and FRONT.
(Refer to the picture.)
Be careful to prevent tearing FPCB.
|
11 |
|
|
12 |
|
|
|
|
|
||
|
|
|
|
|
|
|
|
|
|
|
|
Disassembled bracket and Front. 
 Disassemble Lcd FPCB from Lcd.
(Refer to the picture.)
Be careful not to tear a FPCB.
11-3
SAMSUNG Proprietary-Contents may change without notice
This Document can not be used without Samsung's authorization
Exploded View and Parts List
|
13 |
|
|
14 |
|
|
|
|
|
||
|
|
|
|
|
|
|
|
|
|
|
|
Disassemble MIC from MIC hole.
(Refer to the picture.) Disassembled Lcd FPCB. (Refer to the picture.)
Be careful not to tear a MIC FPCB.
|
15 |
|
|
16 |
|
|
|
|
|
||
|
|
|
|
|
|
|
|
|
|
|
|
|
|
|
|
|
|
Disassemble a LCD from Front |
|
|
|
|
|
|
|
|
|
||
|
Disassembled SUB KEY. |
|
|
|
|
(Refer to the picture) |
|
|
|
|
|
|
|
|
|
|
|
|
|
|
|
|
|
|
|
|
|
|
|
|
|
|
|
|
|
|
|
|
|
|
|
Be careful to damage LCD. |
|
|
|
|
|
|
|
|
|
|
|
|
|
|
|
|
|
|
|
|
11-4
SAMSUNG Proprietary-Contents may change without notice
This Document can not be used without Samsung's authorization
 Loading...