

Samsung SGHI187 Users Manual
MOBILE PHONE
SGH-i187
FPO
DRAFT - For Internal Use Only
This document is watermarked because certain important information in the document has not yet been verified.
This document has been sent to you as a draft and for informational purposes only.
The document should only be used for internal purposes and may not be distributed outside of the company.
Distributing the document outside of the company could result in legal exposure to the company if the preliminary,
unverified information in the draft turns out to be inaccurate.
User Manual
Please read this manual before operating your
phone and keep it for future reference.

Intellectual Property
DRAFT - For Internal Use Only
All Intellectual Property, as defined below, owned by or which is otherwise the property of Samsung or its respective suppliers
relating to the SAMSUNG Phone, including but not limited to, accessories, parts, or software relating there to (the “Phone
System”), is proprietary to Samsung and protected under federal laws, state laws, and international treaty provisions. Intellectual
Property includes, but is not limited to, inventions (patentable or unpatentable), patents, trade secrets, copyrights, software,
computer programs, and related documentation and other works of authorship. You may not infringe or otherwise violate the
rights secured by the Intellectual Property. Moreover, you agree that you will not (and will not attempt to) modify, prepare
derivative works of, reverse engineer, decompile, disassemble, or otherwise attempt to create source code from the software. No
title to or ownership in the Intellectual Property is transferred to you. All applicable rights of the Intellectual Property shall remain
with SAMSUNG and its suppliers.
Open Source Software
Some software components of this product incorporate source code covered under GNU General Public License (GPL), GNU Lesser
General Public License (LGPL), OpenSSL License, BSD License and other open source licenses. To obtain the source code covered
under the open source licenses, please visit:
http://opensource.samsung.com
ATT_SGH-I187_UM_Eng_MH2_TN_082613_F1
.

Disclaimer of Warranties; Exclusion of Liability
DRAFT - For Internal Use Only
EXCEPT AS SET FORTH IN THE EXPRESS WARRANTY CONTAINED ON THE WARRANTY PAGE ENCLOSED WITH THE PRODUCT, THE
PURCHASER TAKES THE PRODUCT "AS IS", AND SAMSUNG MAKES NO EXPRESS OR IMPLIED WARRANTY OF ANY KIND
WHATSOEVER WITH RESPECT TO THE PRODUCT, INCLUDING BUT NOT LIMITED TO THE MERCHANTABILITY OF THE PRODUCT OR
ITS FITNESS FOR ANY PARTICULAR PURPOSE OR USE; THE DESIGN, CONDITION OR QUALITY OF THE PRODUCT; THE
PERFORMANCE OF THE PRODUCT; THE WORKMANSHIP OF THE PRODUCT OR THE COMPONENTS CONTAINED THEREIN; OR
COMPLIANCE OF THE PRODUCT WITH THE REQUIREMENTS OF ANY LAW, RULE, SPECIFICATION OR CONTRACT PERTAINING
THERETO. NOTHING CONTAINED IN THE INSTRUCTION MANUAL SHALL BE CONSTRUED TO CREATE AN EXPRESS OR IMPLIED
WARRANTY OF ANY KIND WHATSOEVER WITH RESPECT TO THE PRODUCT. IN ADDITION, SAMSUNG SHALL NOT BE LIABLE FOR
ANY DAMAGES OF ANY KIND RESULTING FROM THE PURCHASE OR USE OF THE PRODUCT OR ARISING FROM THE BREACH OF
THE EXPRESS WARRANTY, INCLUDING INCIDENTAL, SPECIAL OR CONSEQUENTIAL DAMAGES, OR LOSS OF ANTICIPATED PROFITS
OR BENEFITS.
Modification of Software
SAMSUNG IS NOT LIABLE FOR PERFORMANCE ISSUES OR INCOMPATIBILITIES CAUSED BY YOUR EDITING OF REGISTRY SETTINGS,
OR YOUR MODIFICATION OF OPERATING SYSTEM SOFTWARE.
USING CUSTOM OPERATING SYSTEM SOFTWARE MAY CAUSE YOUR DEVICE AND APPLICATIONS TO WORK IMPROPERLY. YOUR
CARRIER MAY NOT PERMIT USERS TO DOWNLOAD CERTAIN SOFTWARE, SUCH AS CUSTOM OS.

Samsung Telecommunications America (STA), LLC
DRAFT - For Internal Use Only
Headquarters:
1301 E. Lookout Drive
Richardson, TX 75082
Customer Care Center:
1000 Klein Rd.
Plano, TX 75074
Toll Free Tel: 1.888.987.HELP (4357)
Internet Address:
http://www.samsung.com
©
2013 Samsung Telecommunications America, LLC. Samsung is a registered trademark of Samsung Electronics Co., Ltd.
Do you have questions about your Samsung Mobile Phone?
For 24 hour information and assistance, we offer a new FAQ/ARS System (Automated Response System) at:
www.samsung.com/us/support

ACCESS® and NetFront™ are trademarks or registered trademarks of ACCESS Co., Ltd. in Japan and other countries.
DRAFT - For Internal Use Only
The Bluetooth
registered trademarks and are wholly owned by the Bluetooth SIG.
microSD
Openwave
Wi-Fi is a registered trademark of the Wireless Fidelity Alliance, Inc.
Microsoft
Devices purchased for use on AT&T's system are designed for use exclusively on AT&T's system. You agree that you won't make
any modifications to the Equipment or programming to enable the Equipment to operate on any other system. A voice plan is
required on all voice-capable devices, unless specifically noted otherwise in the terms governing your agreement. Some devices
or plans may require you to subscribe to a data plan.
Your phone is designed to make it easy for you to access a wide variety of content. For your protection, AT&T wants you to be
aware that some applications that you enable may involve the location of your phone being shared. For applications available
through AT&T, AT&T offers privacy controls that let you decide how an application may use the location of your phone and other
phones on your account. However, AT&T's privacy tools do not apply to applications available outside of AT&T. Please review the
terms and conditions and the associated privacy policy for each location-based service to learn how location information will be
used and protected.
Your phone may be used to access the Internet and to download, and/or purchase goods, applications, and services from AT&T or
elsewhere from third parties. AT&T provides tools for you to control access to the Internet and certain Internet content. These
controls may not be available for certain devices which bypass AT&T controls.
®
word mark, figure mark (stylized “B Design”), and combination mark (Bluetooth word mark and “B Design”) are
TM
, microSDHCTM, and the microSD logo are Trademarks of the SD Card Association.
®
is a registered Trademark of Openwave, Inc.
®
Office, Microsoft® Store, and Windows® Phone are trademarks of Microsoft Corporation.

AT&T may collect certain types of information from your device when you use AT&T services to provide customer support and to
DRAFT - For Internal Use Only
improve its services. For more information on AT&T's Privacy Policy, visit
www.att.com/privacy
.
Your phone features earSmart™, an intelligent voice processor that delivers a clear voice experience, allowing you to
™ in nearly any environment. earSmart technology uses the science of human hearing to distinguish sounds, identify your
heard
voice, and suppress surrounding noise for clear conversations just about anywhere.
How Does It Work?
•
The earSmart voice processor in your phone captures your voice and all the sounds around you.
•
Working like the human ear, it processes and distinguishes these sounds, isolates your voice conversation, and removes background noise –
from both ends of a call.
•
It also automatically equalizes and adjusts voice volume so you can hear and talk naturally, even in the noisiest places.
•
With earSmart technology, you can talk where you want, and have clear conversations for mobile calls, video chats, even speakerphone calls,
without worrying about surrounding noise.
hear and be

Table of Contents
DRAFT - For Internal Use Only
Section 1: Getting Started .......................... 6
Setting Up Your Phone . . . . . . . . . . . . . . . . . . . 6
Charging a Battery . . . . . . . . . . . . . . . . . . . . . 10
Switching the Phone On or Off . . . . . . . . . . . . 11
Locking and Unlocking the Touch Screen . . . . 12
Using the Start-up Wizard . . . . . . . . . . . . . . . 12
Setting Up Your Voice Mail . . . . . . . . . . . . . . . 14
Phone Updates . . . . . . . . . . . . . . . . . . . . . . . . 14
Troubleshooting . . . . . . . . . . . . . . . . . . . . . . . 16
Windows Phone 8 and microSD Cards . . . . . . 16
Formatting a Windows Phone 8 . . . . . . . . . . . 19
Section 2: Understanding Your Phone ..... 20
Features of Your Phone . . . . . . . . . . . . . . . . . 20
Front View of Your Phone . . . . . . . . . . . . . . . . 21
Top and Bottom Views of Your Phone . . . . . . . 22
Side Views of Your Phone . . . . . . . . . . . . . . . . 23
Back View of Your Phone . . . . . . . . . . . . . . . . 24
Display Layout . . . . . . . . . . . . . . . . . . . . . . . . 24
Menu Navigation . . . . . . . . . . . . . . . . . . . . . . 27
Customizing Your Home Screen . . . . . . . . . . . 29
Speech Engine . . . . . . . . . . . . . . . . . . . . . . . . 32
Entering Text . . . . . . . . . . . . . . . . . . . . . . . . . 32
Section 3: Call Functions ..........................38
Making a Call . . . . . . . . . . . . . . . . . . . . . . . . . 38
Making a Call from People . . . . . . . . . . . . . . . 39
Answering a Call . . . . . . . . . . . . . . . . . . . . . . 39
History . . . . . . . . . . . . . . . . . . . . . . . . . . . . . . 39
Options During a Call . . . . . . . . . . . . . . . . . . . 41
Section 4: Your People Hub ......................44
AT&T Address Book . . . . . . . . . . . . . . . . . . . . 44
Importing SIM Contacts to Your Phone . . . . . . 45
Deleting People Entries . . . . . . . . . . . . . . . . . 46
Adding a New Contact . . . . . . . . . . . . . . . . . . 46
Editing an Existing Contact . . . . . . . . . . . . . . . 47
Using Your People List . . . . . . . . . . . . . . . . . . 47
Linking People . . . . . . . . . . . . . . . . . . . . . . . . 49
Synchronizing Accounts . . . . . . . . . . . . . . . . . 50
People Options . . . . . . . . . . . . . . . . . . . . . . . . 51
1

Additional People Options . . . . . . . . . . . . . . . . 51
DRAFT - For Internal Use Only
What’s New . . . . . . . . . . . . . . . . . . . . . . . . . . . 52
Recent Activities . . . . . . . . . . . . . . . . . . . . . . . 52
Creating a New Room . . . . . . . . . . . . . . . . . . . 52
Room Options . . . . . . . . . . . . . . . . . . . . . . . . .53
Rooms Chat, Calendar, Photos, and Notes . . . . 54
Creating a New Group . . . . . . . . . . . . . . . . . . .54
Group Options . . . . . . . . . . . . . . . . . . . . . . . . . 55
Section 5: Messaging ................................56
Types of Messages . . . . . . . . . . . . . . . . . . . . .56
Creating and Sending Text Messages . . . . . . . 56
Voice to Text Messages . . . . . . . . . . . . . . . . . . 57
Creating and Sending Multimedia Messages . . 58
Messaging Threads . . . . . . . . . . . . . . . . . . . . . 58
Online Messaging . . . . . . . . . . . . . . . . . . . . . . 61
Messaging Settings . . . . . . . . . . . . . . . . . . . . . 62
Using Email . . . . . . . . . . . . . . . . . . . . . . . . . . . 62
Section 6: Multimedia ...............................72
Camera . . . . . . . . . . . . . . . . . . . . . . . . . . . . . . 72
Music and Videos . . . . . . . . . . . . . . . . . . . . . . 79
Photos . . . . . . . . . . . . . . . . . . . . . . . . . . . . . . . 85
Photo Editor . . . . . . . . . . . . . . . . . . . . . . . . . .89
2
Section 7: Connections .............................90
Internet Explorer . . . . . . . . . . . . . . . . . . . . . . .90
Wi-Fi . . . . . . . . . . . . . . . . . . . . . . . . . . . . . . . .95
Bluetooth . . . . . . . . . . . . . . . . . . . . . . . . . . . . .97
PC Connections . . . . . . . . . . . . . . . . . . . . . . . .99
Section 8: Applications ........................... 100
GPS Applications . . . . . . . . . . . . . . . . . . . . . .100
Accessing the App List . . . . . . . . . . . . . . . . . .101
Alarms . . . . . . . . . . . . . . . . . . . . . . . . . . . . . .101
AT&T Address Book . . . . . . . . . . . . . . . . . . . .102
AT&T FamilyMap . . . . . . . . . . . . . . . . . . . . . .102
AT&T Locker . . . . . . . . . . . . . . . . . . . . . . . . .103
AT&T Navigator . . . . . . . . . . . . . . . . . . . . . . .103
AT&T Radio . . . . . . . . . . . . . . . . . . . . . . . . . .103
ATIV Beam . . . . . . . . . . . . . . . . . . . . . . . . . . .104
Bing Finance, News, Sports, and Weather . . .104
Calculator . . . . . . . . . . . . . . . . . . . . . . . . . . .105
Calendar . . . . . . . . . . . . . . . . . . . . . . . . . . . .106
Camera . . . . . . . . . . . . . . . . . . . . . . . . . . . . .108
Games . . . . . . . . . . . . . . . . . . . . . . . . . . . . . .109
Help and Tips . . . . . . . . . . . . . . . . . . . . . . . .111
Internet Explorer . . . . . . . . . . . . . . . . . . . . . .111

Live Wallpaper . . . . . . . . . . . . . . . . . . . . . . . 111
DRAFT - For Internal Use Only
MangaCamera . . . . . . . . . . . . . . . . . . . . . . . 112
Maps . . . . . . . . . . . . . . . . . . . . . . . . . . . . . . 112
Messaging . . . . . . . . . . . . . . . . . . . . . . . . . . 114
MiniDiary . . . . . . . . . . . . . . . . . . . . . . . . . . . 115
Mobile TV . . . . . . . . . . . . . . . . . . . . . . . . . . . 116
Music and Videos . . . . . . . . . . . . . . . . . . . . . 116
myAT&T . . . . . . . . . . . . . . . . . . . . . . . . . . . . 116
Now . . . . . . . . . . . . . . . . . . . . . . . . . . . . . . . 117
Office . . . . . . . . . . . . . . . . . . . . . . . . . . . . . . 119
OneNote . . . . . . . . . . . . . . . . . . . . . . . . . . . . 120
People . . . . . . . . . . . . . . . . . . . . . . . . . . . . . 121
Phone . . . . . . . . . . . . . . . . . . . . . . . . . . . . . 121
Photo Editor . . . . . . . . . . . . . . . . . . . . . . . . . 121
Photos . . . . . . . . . . . . . . . . . . . . . . . . . . . . . 122
Samsung Link . . . . . . . . . . . . . . . . . . . . . . . 122
Settings . . . . . . . . . . . . . . . . . . . . . . . . . . . . 122
Shooting Modes . . . . . . . . . . . . . . . . . . . . . . 122
Store . . . . . . . . . . . . . . . . . . . . . . . . . . . . . . 123
Video Trimmer . . . . . . . . . . . . . . . . . . . . . . . 123
Wallet . . . . . . . . . . . . . . . . . . . . . . . . . . . . . 123
YPmobile . . . . . . . . . . . . . . . . . . . . . . . . . . . 124
Section 9: Changing Your Settings .........125
System Settings . . . . . . . . . . . . . . . . . . . . . . 125
Ringtones and Sounds . . . . . . . . . . . . . . . . . 125
Theme . . . . . . . . . . . . . . . . . . . . . . . . . . . . . 126
Email and Accounts . . . . . . . . . . . . . . . . . . . 126
Internet Sharing . . . . . . . . . . . . . . . . . . . . . . 126
Lock Screen . . . . . . . . . . . . . . . . . . . . . . . . . 127
Screen Rotation . . . . . . . . . . . . . . . . . . . . . . 128
Wi-Fi . . . . . . . . . . . . . . . . . . . . . . . . . . . . . . 128
Bluetooth . . . . . . . . . . . . . . . . . . . . . . . . . . . 128
Tap and Send . . . . . . . . . . . . . . . . . . . . . . . . 128
Airplane Mode . . . . . . . . . . . . . . . . . . . . . . . 129
Cellular . . . . . . . . . . . . . . . . . . . . . . . . . . . . 129
Location . . . . . . . . . . . . . . . . . . . . . . . . . . . . 130
Driving Mode . . . . . . . . . . . . . . . . . . . . . . . . 130
Kid’s Corner . . . . . . . . . . . . . . . . . . . . . . . . . 131
Battery Saver . . . . . . . . . . . . . . . . . . . . . . . . 131
Phone Storage . . . . . . . . . . . . . . . . . . . . . . . 132
Backup . . . . . . . . . . . . . . . . . . . . . . . . . . . . . 132
Date and Time . . . . . . . . . . . . . . . . . . . . . . . 133
Brightness . . . . . . . . . . . . . . . . . . . . . . . . . . 133
Keyboard . . . . . . . . . . . . . . . . . . . . . . . . . . . 133
3

Language and Region . . . . . . . . . . . . . . . . . . 134
DRAFT - For Internal Use Only
Ease of Access . . . . . . . . . . . . . . . . . . . . . . . 135
Speech . . . . . . . . . . . . . . . . . . . . . . . . . . . . . 135
Find My Phone . . . . . . . . . . . . . . . . . . . . . . .136
Phone Update . . . . . . . . . . . . . . . . . . . . . . . . 136
Company Apps . . . . . . . . . . . . . . . . . . . . . . . 137
About . . . . . . . . . . . . . . . . . . . . . . . . . . . . . .137
Feedback . . . . . . . . . . . . . . . . . . . . . . . . . . .137
Additional Call Settings . . . . . . . . . . . . . . . . . 137
Advanced Text Messages . . . . . . . . . . . . . . . 138
Call/SMS Blocker . . . . . . . . . . . . . . . . . . . . . .138
Contacts Import . . . . . . . . . . . . . . . . . . . . . . . 139
Extra Settings . . . . . . . . . . . . . . . . . . . . . . . . 139
SoundAlive . . . . . . . . . . . . . . . . . . . . . . . . . . 139
Applications Settings . . . . . . . . . . . . . . . . . . . 140
Background Tasks . . . . . . . . . . . . . . . . . . . . . 140
Games . . . . . . . . . . . . . . . . . . . . . . . . . . . . .140
Internet Explorer . . . . . . . . . . . . . . . . . . . . . . 141
Maps . . . . . . . . . . . . . . . . . . . . . . . . . . . . . . . 142
Messaging . . . . . . . . . . . . . . . . . . . . . . . . . .142
Music and Videos . . . . . . . . . . . . . . . . . . . . . 143
Office . . . . . . . . . . . . . . . . . . . . . . . . . . . . . . 144
4
People . . . . . . . . . . . . . . . . . . . . . . . . . . . . . .144
Phone . . . . . . . . . . . . . . . . . . . . . . . . . . . . . .145
Photos and Camera . . . . . . . . . . . . . . . . . . . .146
Search . . . . . . . . . . . . . . . . . . . . . . . . . . . . . .147
Store . . . . . . . . . . . . . . . . . . . . . . . . . . . . . . .148
Wallet . . . . . . . . . . . . . . . . . . . . . . . . . . . . . .148
Section 10: Health and Safety
Information ...........................................149
Exposure to Radio Frequency (RF) Signals . . .149
Specific Absorption Rate (SAR)
Certification Information . . . . . . . . . . . . . . .154
FCC Part 15 Information to User . . . . . . . . . . .156
Commercial Mobile Alerting System (CMAS) .156
Smart Practices While Driving . . . . . . . . . . . .156
Battery Use and Safety . . . . . . . . . . . . . . . . .158
Samsung Mobile Products and Recycling . . . .159
UL Certified Travel Charger . . . . . . . . . . . . . .161
Display / Touch-Screen . . . . . . . . . . . . . . . . .161
GPS & AGPS . . . . . . . . . . . . . . . . . . . . . . . . .162
Emergency Calls . . . . . . . . . . . . . . . . . . . . . .163
Care and Maintenance . . . . . . . . . . . . . . . . . .164
Responsible Listening . . . . . . . . . . . . . . . . . .165

Operating Environment . . . . . . . . . . . . . . . . 167
DRAFT - For Internal Use Only
FCC Hearing Aid Compatibility (HAC)
Regulations for Wireless Devices . . . . . . . 169
Restricting Children's Access to
Your Mobile Device . . . . . . . . . . . . . . . . . . 171
FCC Notice and Cautions . . . . . . . . . . . . . . . 171
Other Important Safety Information . . . . . . . 172
Section 11: Warranty Information ..........174
Standard Limited Warranty . . . . . . . . . . . . . . 174
End User License Agreement for Software . . 179
Section 12: Samsung Product
Registration ...........................................187
Index .........................................................188
5
Section 1: Getting Started
DRAFT - For Internal Use Only
This section explains how to start using your phone by first
configuring your hardware, activating your service, and then
setting up your voice mail.
Setting Up Your Phone
Prior to use it is necessary to install both the battery and SIM
into their corresponding internal compartments. The microSD
card slot is also located in this same internal area.
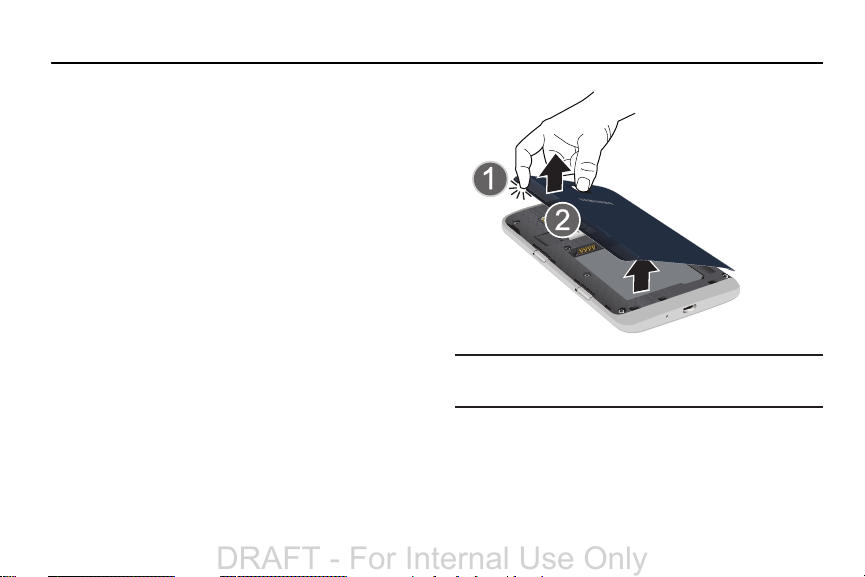
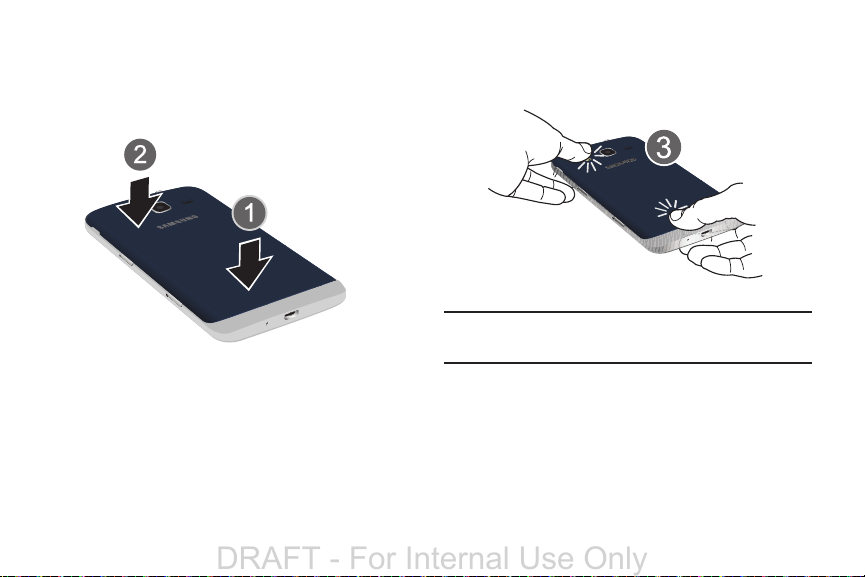
1. Remove the battery cover by placing your fingernail
into the slot in the side of the cover (1). If you have
fragile nails, use a pointed object.
2. Pull the cover up (2) and then lift up and away from the
phone (3).
6
Caution!
Do not bend or twist the back cover excessively.
Doing so may damage the cover.
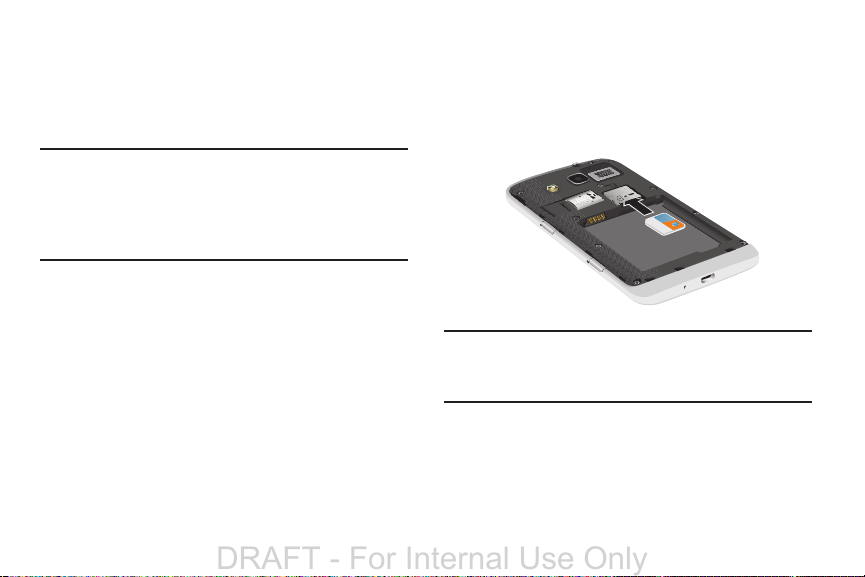
Installing the SIM Card
DRAFT - For Internal Use Only
When you subscribe to a cellular network, you are provided
with a plug-in SIM card loaded with your subscription details,
such as your PIN, available optional services, and many
others features.
Carefully slide the SIM card into the SIM card socket
(as shown) until the card locks into place.
•
Make sure that the card’s gold contacts face into the phone
and that the upper-left angled corner of the card is positioned
as shown.
Important!
The plug-in SIM card information and its contacts
can be easily damaged by scratching or bending,
so be careful when handling, inserting, or
removing the card. Keep all SIM cards out of reach
of small children.
Note:
If the card is not inserted correctly, the phone does not
detect the SIM card. Re-orient the card back into the slot
if the SIM is not detected.
Getting Started 7
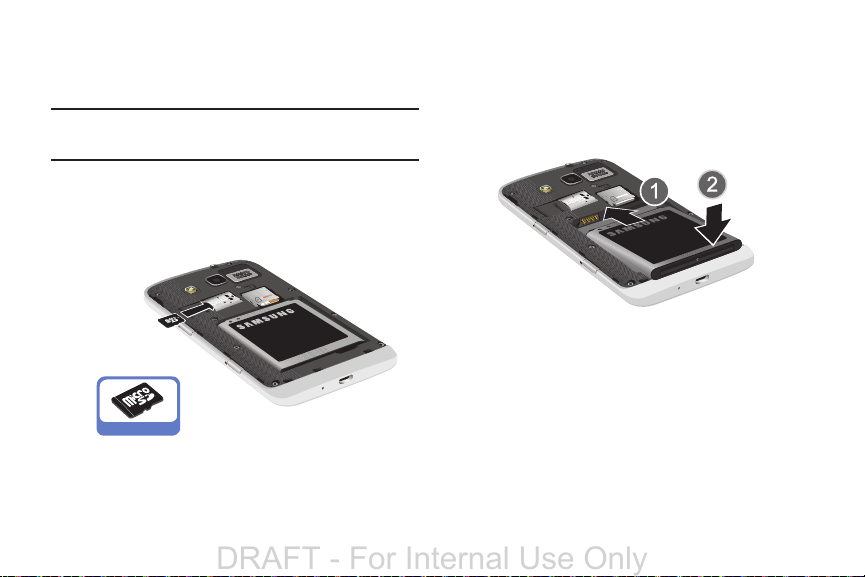
Installing the Memory Card
Correct
DRAFT - For Internal Use Only
Your device lets you use a microSD (SD) or microSDHC card
to expand available memory space.
Note:
Your phone has been tested to support up to a 64GB
memory card.
Push the microSD card into the slot until it clicks (as
shown). Make sure the microSD’s gold contact pins
face downward and the card is securely inserted.
For more information, refer to “Windows Phone 8 and
microSD Cards” on page 16.
8
Installing the Battery
1. Insert the battery into the opening on the back of
the phone, making sure the three metal connectors
align (1).
2. Gently press down to secure the battery (2).
Replacing the Battery Cover
DRAFT - For Internal Use Only
1. Replace the battery cover (the back of the phone) by
aligning the battery cover with the phone.
2. Press the cover down (1 and 2) into place.
3. Press down firmly along the edges of the cover to
ensure that the cover is flush with the phone (3). You
should hear a light click as the cover locks in place.
Note:
Make sure the battery is properly installed before
switching on the phone.
Getting Started 9
Charging a Battery
DRAFT - For Internal Use Only
Your phone is powered by a rechargeable Li-ion battery. The
Travel Charger, which is used to charge the battery, is
included with your phone. Use only Samsung-approved
batteries and chargers. Long backlight settings, searching
for service, vibrate mode, browser use, and other variables
may reduce the battery’s talk and standby times.
Although you can use the phone while the battery is
charging, doing so requires additional charging time.
Note:
You must fully charge the battery before using your
phone for the first time. A discharged battery recharges
fully in approximately 4 hours.
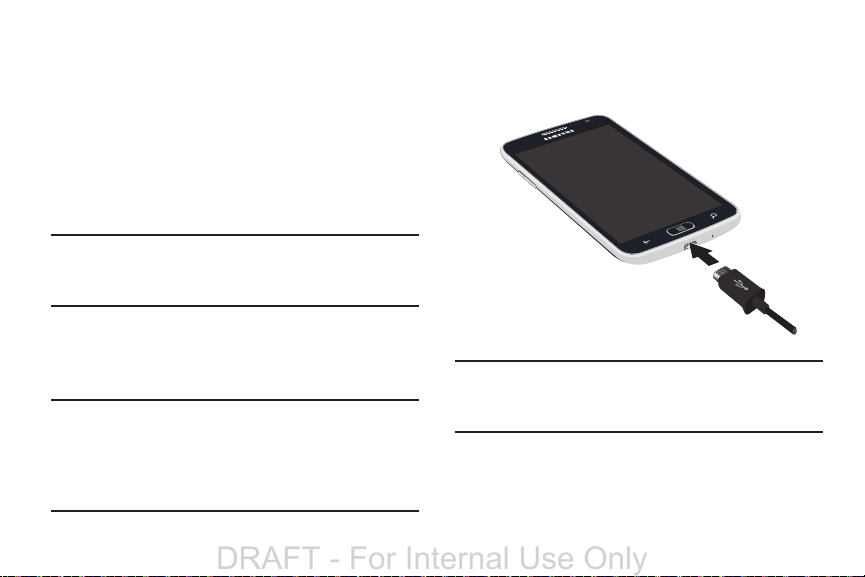
Using the Travel Charger
1. With the battery installed, locate the Power/Accessory
Interface connector at the bottom of the phone.
Important!
Verify that the handset battery is installed prior to
connection. If the battery is not properly installed
and the wall charger is connected, the handset
may power off and on continuously, preventing
proper operation.
10
2. Plug the flat end of the Travel Charger into the phone’s
interface connector jack and the other end into a
standard AC wall outlet.
Note:
When you connect the Travel Charger, your phone
powers on automatically. Your Windows phone stays
powered on whenever it is charging.
Warning!
DRAFT - For Internal Use Only
While the device is charging, if the touch screen
does not function due to an unstable power supply,
unplug the USB power adapter from the power outlet
or unplug the USB cable from the device.
3. When charging is finished, remove the flat end from
the interface connector jack on the phone.
Note:
Failure to unplug the wall charger before you remove the
battery can cause damage to the phone.
Low Battery Indicator
When the battery is weak and only a few minutes of talk time
remain, the “Battery critically low” warning appears and the
device sounds a warning tone at regular intervals. For a
quick check of your battery level, glance at the battery
charge indicator located in the upper-right corner of your
device’s display. Solid white ( ) indicates a full charge.
When the battery level becomes too low, the phone
automatically turns off.
Note:
If the phone automatically turns off because the battery
level is too low, you must charge the battery until the
phone turns on automatically.
Switching the Phone On or Off
1. Press and hold the
right side of the phone) until the phone switches on.
Note:
The display language is preset to English at the factory.
To change the language, use the Language menu. For
more information, refer to “Changing Your Settings” on
page 125.
2. To switch off the phone, press and hold the
Power key
with the message
3. Touch the screen and sweep downward.
goodbye
displays and the phone switches off.
slide down to power off
Power key
until the lock screen displays
Getting Started 11
(on the upper
.

Locking and Unlocking the
DRAFT - For Internal Use Only
Touch Screen
1. Press the
touch screen.
2. Press the
main screen then sweep your finger upwards across
the glass to unlock the touch screen.
Power key
Power key
to lock the
again to display the
Using the Start-up Wizard
The very first time you turn on your phone the Start-up
Wizard screen displays.
1. Touch
2. Touch the language you want to use and touch
12
get started
CHOOSE A LANGUAGE
The
language you choose determines how text displays on
your phone.
If you choose a language other than English, the Switch
your language screen displays. Touch
phone and change the language or touch
return to the Choose a Language screen.
The
WINDOWS PHONE TERMS OF USE
.
screen displays. The
next
ok
to restart the
cancel
to
screen displays.
.
3. Read the Windows Phone Terms of Use and the Privacy
Statement, and touch
SET UP YOUR PHONE
The
4. Tou ch
5. If necessary, touch the
recommended
configure your phone to the recommended settings.
– or –
Tou ch
custom
yourself. If you select
on-screen instructions.
SET UP YOUR PHONE
Another
field, scroll through the list of countries/
region?
regions, and touch your country/region.
If necessary, touch the
scroll through the list of time zones, and touch the time
zone of your choice to highlight it.
accept
.
screen displays.
to allow the Start-up Wizard to
to manually configure the phone
custom
, follow the
screen displays.
What’s your home country/
What time zone are you in?
field,
Note:
DRAFT - For Internal Use Only
The following date and time fields are displayed if no
SIM card is installed in your phone or if the
date+time automatically
If necessary, touch
month, day, and year and touch
set the current time.
Touch
next
.
CONNECT TO WI-FI
The
6. To connect to an available Wi-Fi connection, touch one
of the listed Wi-Fi networks, enter the password, and
touch
Done
.
– or –
To add a Wi-Fi network, touch
on-screen instructions.
– or –
To sign in to Wi-Fi later, touch
Keep your life in sync
The
option is
What’s the date today?
screen displays.
add
Skip
screen displays.
Set
Off
.
to set the
What time is it now?
and follow the
.
to
To keep your photos, contacts, music, documents, and
more in sync with your PC or Xbox, you need a
Microsoft account. If you already have an Xbox, Zune,
Hotmail, Live, or Messenger ID, you already have a
Microsoft account. For more information, refer to
“Setting Up a Microsoft Account” on page 68.
7. To sign into your existing account, touch
– or –
To create a new Microsoft account, touch
– or –
To create an account later, touch
Note:
If you choose
screen displays when you try to use a feature that
requires that you be signed in. You can sign in at
that time.
When you are finished, the
screen displays.
Sign in later
Sign in later
, a
Microsoft account required
SETTING UP YOUR PHONE
Getting Started 13
sign in
.
create one
.
.
next
DRAFT - For Internal Use Only
done
.
.
8. When all the apps have finished installing, touch
All done
The
9. When all the apps have finished installing, touch
The
a microSD card.
10. Touch
music, and videos on your SD card.
The
screen displays.
SD card found
yes
Home
screen displays, if you have installed
to set your phone to store new pictures,
screen displays.
Setting Up Your Voice Mail
1. From the
2. Follow the tutorial to create a password, record a
Note:
These steps may be different depending on
your network.
14
Home
screen, touch
Voicemail
.
When connected, you may be prompted to enter
a password.
greeting, and record your name.
Phone
, then touch
Accessing Your Voice Mail
1. From the
2. When connected, follow the voice prompts from the
Home
Voicemail
.
voice mail center.
screen, touch
Phone
, then touch
Accessing Your Voice Mail from Another Phone
1. Dial your wireless phone number.
2. When you hear your voicemail greeting, press the
asterisk key on the phone you are using.
3. Enter your passcode.
Phone Updates
Updating your phone can make it work better and add new
features. Updates can also make your phone more secure.
To check for a phone update:
Home
1. From the
the App List.
2. Tou ch
For more information, refer to “Phone Update” on page 136.
screen, sweep the screen left to display
Settings
➔
system ➔ phone update
.
When an update is available, a notification message from the
DRAFT - For Internal Use Only
server displays saying
To learn more and install the update:
1. From the
the App List.
2. Tou ch
3. To prepare for an update, give your phone a quick
Settings ➔system ➔about ➔ more info
Make a note of the
number
successful update.
charge before starting the update.
If you have limited storage space on your phone, make
some room for the update. If necessary, remove a few
unwanted apps or other large items.
If you would rather not use cellular data to download
updates, connect to Wi-Fi before you update
your phone.
An update is available
Home
screen, sweep the screen left to display
OS version
. These can be used to verify a
.
and
Firmware revision
.
4. When an update is available, you will get a notification
on your phone. After you see the notification, pick a
convenient time to install it because the update
process can take a while.
If you need to find an update after you have been
notified, from the
to display the App List. Touch
➔
phone update
download and install the update.
5. Once the update is complete, from the
sweep the screen left to display the App List. Touch
Settings ➔system ➔about ➔ more info
Check the
Compare these numbers to the numbers you noted
in Step 1 to further insure that the update
was successful.
Home
screen, sweep the screen left
Settings ➔system
, and then follow the prompts to
OS version
and
Firmware revision number
Getting Started 15
Home
screen,
.
.
Troubleshooting
DRAFT - For Internal Use Only
If your phone is frozen or unresponsive, try the following:
1. Restart your phone by pressing and holding the
Power key
press the
Power key
2. If restarting your phone does not solve the problem,
turn off the phone, remove and replace the battery, and
turn on the phone.
until the phone turns off and then
again to turn on the phone.
Windows Phone 8 and microSD Cards
If you need more storage on your Windows Phone 8 or you
want to share some media files using a memory card, you
can do both with a microSD memory card.
For more information see:
www.windowsphone.com/en-US/How-to/wp8/basics/use-an-sdcard-to-add-space
16
.
Inserting a microSD Card into a Windows
Phone 8
To insert a microSD card into your phone:
1. Insert the microSD card into the SD slot located on
device. For more information, refer to “Installing the
Battery” on page 8.
2. From the
3. Tou ch
Home
screen, sweep the screen left to display
the App List.
Settings ➔system ➔ phone storage
verify that the microSD is being used.
to
Formatting a microSD Card
DRAFT - For Internal Use Only
Once the microSD has been installed in your phone, you can
format the SD card.
Warning!
Formatting the SD card will erase all files (music,
videos, pictures, and so on) on the card.
To format a microSD card:
Home
1. From the
the App List.
2. Tou ch
➔
SD card ➔ format SD card
3. Touch
Note:
Formatting erases all user data stored on the device.
screen, sweep the screen left to display
Settings ➔system ➔ phone storage
.
yes
to confirm.
Changing Storage Settings
You can change the storage settings at any time to choose
between storing things, such as pictures, music, or videos,
on a microSD card or storing them on your phone.
1. From the
2. To uch
3. To uch
4. To uch
Home
screen, sweep the screen left to display
the App List.
Settings ➔system ➔ phone storage
Store new music + videos on
phone
or
SD card
.
Store new pictures on
SD card
.
and then touch
.
and then touch
phone
Checking Storage Space
To check the amount of used and total phone and SD card
space:
Home
1. From the
the App List.
2. To uch
Used and total space are displayed under phone and
SD card.
3. To uch
and how much free space is available.
screen, sweep the screen left to display
Settings ➔system ➔ phone storage
phone
or
SD card
to see how space is being used
Getting Started 17
.
or

Remove a microSD Card from a Windows Phone 8
DRAFT - For Internal Use Only
If you want to use the microSD card somewhere else, such
as on your computer or on another device, be sure to take
the card out of your phone properly.
To remove a microSD card from a Windows Phone 8 phone:
Press and hold the
1.
phone, if necessary.
– or –
From the
Home
screen, sweep the screen left to display
the App List.
Tou ch
Settings ➔system ➔ phone storage
SD card ➔ remove SD card
Touch
yes
to confirm.
2. Open the battery cover, remove the microSD card from
the SD slot, and replace the battery cover.
3. Press and hold the
the phone.
18
Power key
.
Power key
to power off the
➔
to power on
Managing Files on a microSD Card in your Phone
It is possible to move files to or from the microSD card in
your phone from or to your PC.
1. Connect your phone to a PC using a USB cable.
A Windows Phone pop-up screen displays on your PC.
Browse Files
2. Click
Windows Explorer (Windows 7, Windows Vista, or
Windows XP) or File Explorer (Windows 8) opens and
you should see SGH-I187 listed with your other drives.
3. Click
SGH-I187
To move files between your phone and your PC:
1. Right-click the file you want to copy and click
2. Right-click in the folder you want to move the file to
and click
and then click
Paste
.
.
SD card
.
Copy
.

Formatting a Windows Phone 8
DRAFT - For Internal Use Only
Normally, if you want to reset your phone to the factory
default settings:
1. From the
2. Tou ch
Home
screen, sweep the screen left to display
the App List.
Settings
reset your phone
A WARNING! screen displays.
➔
.
system ➔ about
➔
3. Follow the on-screen instructions.
For more information, refer to “About” on page 137.
After formatting is complete, the Start-up Wizard screen
displays. For more information, refer to “Using the Start-up
Wizard” on page 12.
Getting Started 19

Section 2: Understanding Your Phone
DRAFT - For Internal Use Only
This section outlines some key features of your phone and
describes the screen and the icons that appear when the
phone is in use. It also shows how to navigate through
the phone.
Features of Your Phone
Your phone is lightweight, easy-to-use, and offers many
useful features. The following list outlines a few of the
features included in your phone.
•
Band / Modes:
–
LTE Quad-band 4, 17, 2, and 5
–
HSPA+ Tri-band 21 Mbps
–
EDGE/GPRS Quad-band
•
Microsoft Windows 8.0 platform
•
Brilliant 4.77 inch full HD TFT display
•
Touch screen that provides quick response to a variety of
in-phone menus and options including applications and a
home screen
20
•
NFC (Near Field Communication) allows data exchange with
other devices
•
Ready access to the Internet
•
Built-in Bluetooth and advanced Wi-Fi technology
•
8 Megapixel camera and video recorder with Front Facing camera
•
AT&T GPS Navigation functionality provides real-time navigation
•
Up to 32 GB expandable memory slot
•
16 GB memory and 1 GB RAM
•
Support for microSD and microSDHC memory cards up to
64GB capacity
•
Corporate and Personal Email
•
Sync and update social network applications
•
Applications, music, and games available to download from the
Microsoft Store.
•
Virtual (on-screen) QWERTY keyboard
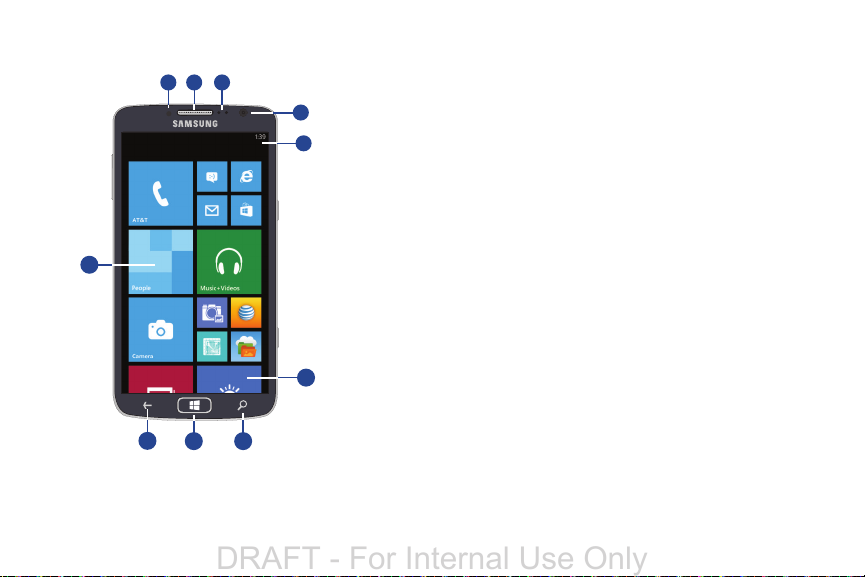
Front View of Your Phone
5
4
3
9
6
1
7
8
8
10
2
DRAFT - For Internal Use Only
The following items can be found on the front of your phone
as illustrated:
1.
Status light
: Displays red when charging, green when
fully charged, blue when powering up, and orange
when a notification has arrived.
2.
External speaker
Proximity and Light sensors
3.
: Used to hear the caller.
: The Proximity sensor
detects how close an object is to the surface of the
screen (for example, when your face is against the
phone during a call or the phone is in your pocket),
locks the keys to prevent accidental key presses, and
turns off the screen. Light sensors use the ambient
light level to adjust screen brightness and contrast.
4.
Front-facing Camera Lens
: Used when taking a photo
of yourself.
5. Indicator icons: Shows the information needed to
operate your phone, such as the received signal
strength, phone battery level, and time. If the icons are
not showing, touch the top of the display to show them.
Display
6.
: Shows the information needed to operate your
phone, such as the Application Tiles, icons, dialer,
messages, and so on.
Understanding Your Phone 21
7. Applications Menu key: Scroll to the bottom of the
DRAFT - For Internal Use Only
Home
screen and touch
applications menu.
You can also sweep your screen to the left to access
the Applications Menu.
8.
Back
: Used to step backwards when navigating a menu
or web page. Touch and hold the Back key to view the
current screen and up to six screens most
recently displayed.
9.
Start key / Window key
any screen. Touch and hold to activate the voice
search engine.
Bing search key
10.
allows you to search for items on the internet, scout,
music, vision, and voice. For more information, refer to
“Bing Search” on page 26.
Note:
Some applications, such as People and Store, display
a search button that allows you to search within
that application.
22
: Access the Bing search engine, which
Apps
: Access the
to access the
Home
screen from
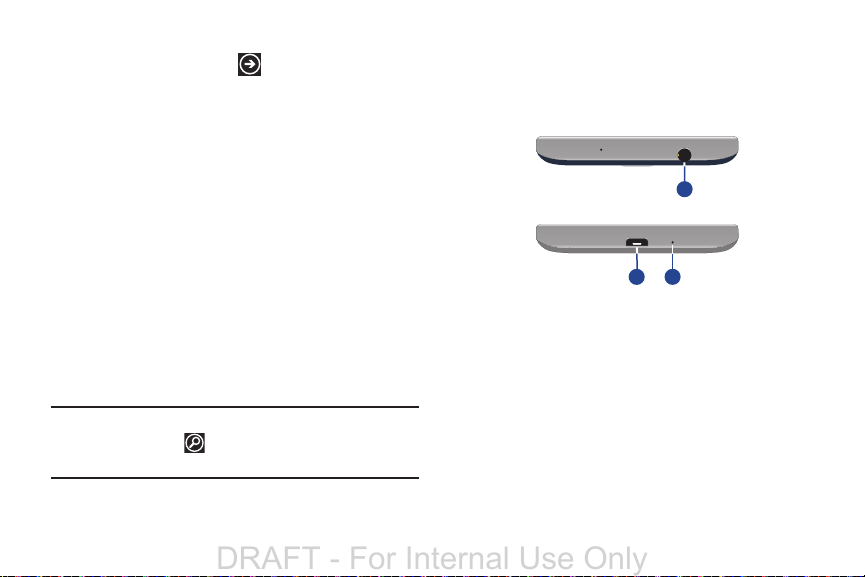
Top and Bottom Views of Your Phone
The following items can be found on the top and bottom of
your phone as illustrated below.
1
3
2
3.5mm Headset jack
1.
2. Power/Accessory Interface connector: Used to
connect a Travel Charger or other optional accessories
such as a USB/data cable.
External speaker
3.
Speakerphone is turned on.
: Plug in for headphones.
: Allows you to hear when the
Side Views of Your Phone
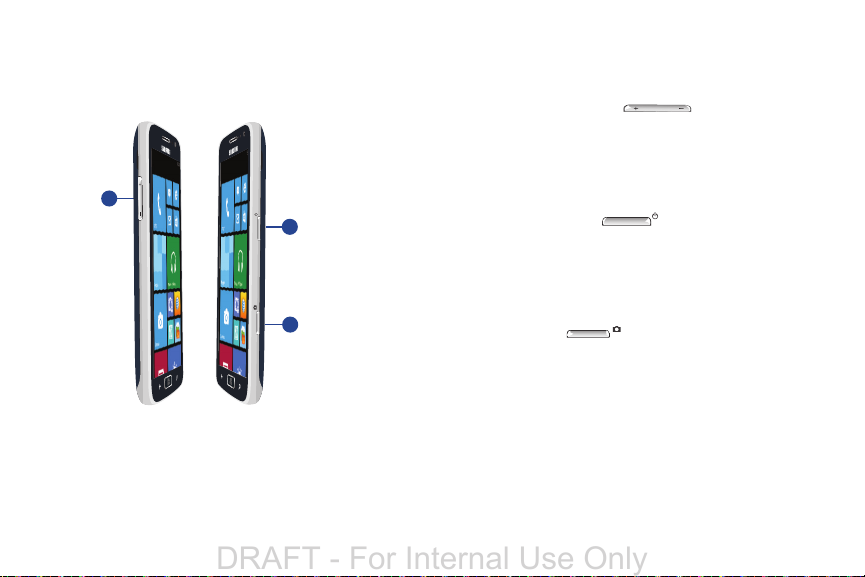
3
1
2
DRAFT - For Internal Use Only
The following items can be found on the sides of your phone
as illustrated below.
1.
Volume key
mode or adjusts the voice volume during a call. When
receiving an incoming call, briefly press down either
end of the volume key to mute the ring
tone. Also used to adjust the volume while playing
music or videos. While using the Radio, in Music &
Videos, press the volume key to display additional
tuning controls.
2. Power / Lock key : Press and hold until the
phone switches on. Press and release to lock or unlock
the touch screen. For more information on locking your
phone, see “Locking and Unlocking the Phone” on
page 27.
3. Camera key : Used to take pictures or record
videos. Press and hold to launch the Camera, even
when the display screen is off and locked.
: Adjusts the ringer volume while in standby
Understanding Your Phone 23
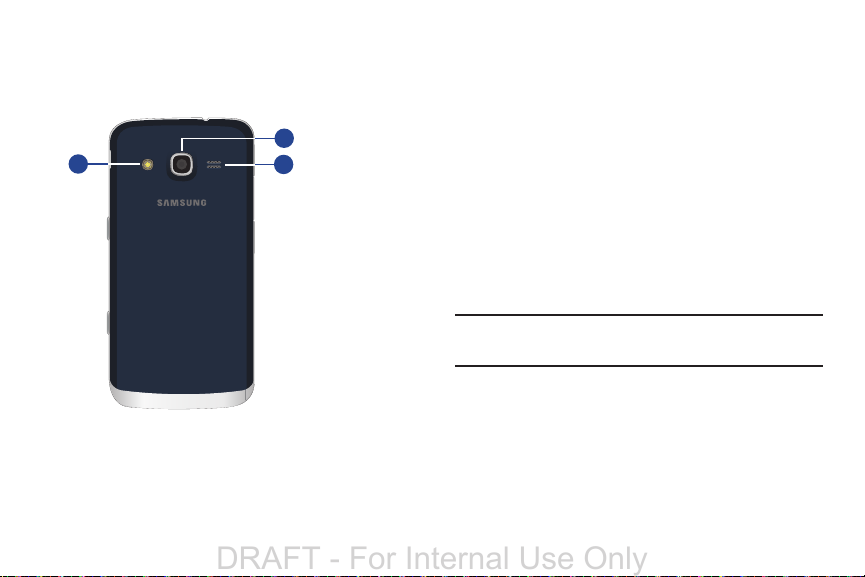
Back View of Your Phone
1
2
3
DRAFT - For Internal Use Only
The following items can be found on the back of your phone
as illustrated below.
24
1.
Flash
: Lets you take pictures when the lighting is poor.
Camera lens
2.
External speaker
3.
Speakerphone is turned on.
: Used to take pictures and shoot videos.
: Allows you to hear when the
Display Layout
Your display screen provides a wealth of information about
the phone’s status and options, as well as providing access
to application icons. For more information, refer to “Front
View of Your Phone” on page 21.
Indicator Icons
This list identifies the symbols that display on your phone’s
display and Indicator area:
Note:
If there are no icons displayed, touch the top of the
screen to display them.
 Loading...