

Page 1

SGH-G810
user manual
Page 2

Using this manual
This user manual has been specially
designed to guide you through the
functions and features of your device. To
get started quickly, refer to the Qu ick
Start Guide.
Instructional icons
Before you start, familiarise yourself with
the icons you will see in this manual:
Warning—situations that could
cause injury to yourself or
others
Caution—situations that could
cause damage to your device
or other equipment
Note—notes, usage tips, or
additional information
X
→
[ ]
< >
Refer to—pages with related
information; for example:
X
p.12 (represents "see page
12")
Followed by—the order of
options or menus you must
select to perform a step; for
example: Press [Menu]
Media
→
Music player
(represents [Menu], followed
by
Media
, followed by
)
player
Square brackets—device keys;
for example: [ ] (represents
the Power key)
Angled brackets—softkeys that
control different functions at
each screen; for example:
OK
> (represents the OK
<
softkey)
→
Music
Page 3

Copyrights and tradem ar ks
Rights to all technologies and products
that comprise this device are the
property of their respective own e rs:
• This product includes
software licensed from
Symbian Ltd.
© 1998-2008. Symbian
and Symbian OS are
trademarks of Symbian
Ltd.
• Java™ is a trademark of
Sun Microsystems, Inc.
•Bluetooth® is a registered trademark
of the Bluetooth SIG, Inc.
worldwide— Bluetooth QD ID:
B013532.
• Windows Media Player
®
is a registered
trademark of Microsoft Corporation.
Page 4

Contents
Safety and usage infor ma t ion ........... 4
1. Communication 11
Calls ........................................... 11
Messages..................................... 14
Log............................................. 30
2. Media 34
Music player................................. 34
Camera ....................................... 36
Gallery ........................................ 38
ShoZu......................................... 39
Video Editor .................... .... .... ... .. 41
Image Editor... .... .... ..................... 44
Radio .......................................... 46
Flash® Player . .... ......................... 47
RealPlayer®................................. 47
2
Recorder ......................................48
PC Studio .....................................49
3. Personal productivity 50
Contacts ......................................50
Calendar ......................................54
Quickoffice®.................................56
Adobe® Reader®............. .............57
Notes...........................................58
4. Web 59
Browse a web page... .... ................. 59
Change browser settings ................61
Add a bookmark............................61
Use a bookmark ...................... ......61
Save a web page and vie w it offline .62
Download files from the web ........... 63
Page 5

Contents
5. Connectivity 64
Use the Bluetooth wireless feature.. 64
Connect via USB........................... 67
Synchronise your device................ 69
6. Additional programs 71
Calculator .................................... 71
Clock .......................................... 71
Converter .................................... 73
GPS data ..................................... 75
Landmarks................................... 76
Oxford ........................................ 77
Navigation ................................... 77
XTRA .......................................... 78
7. Managers 80
File manager................................ 80
Application manager ......................81
Device manager ............... .... .........82
Activation key manage r..... .... .........84
Memory card manager ...................85
Connection manager......................86
8. Settings 89
General settings ............................89
Phone settings ..............................94
Connection settings .......................97
Applications settings....................100
9. Troubleshooting 103
Index 108
3
Page 6

Safety and usage information
Comply with the following prec au tions to
avoid dangerous or illegal situations and
ensure peak performance of your device.
Safety warnings
Keep your device away from small
children and pets
Keep your device and all accessories out
of the reach of small children or animals.
Small parts may cause cho king or serious
injury if swallowed.
Protect your hearing
Listening to a headset at high
volumes can damage your
hearing. Use only the minimum
volume setting necessary to hear
your conversation or music.
4
Install mobile devices and
equipment with caution
Ensure that any mobile devices or related
equipment installed in your vehicle are
securely mounted. Avoid placing your
device and accessories near or in an air
bag deployment area. Improperly
installed wireless equipment can cause
serious injury when air bags inflate
rapidly.
Handle and dispose of batteries and
chargers with care
• Use only Samsung-approve d ba tteries
and chargers specifically designed for
your device. Incompatible batteries
and chargers can cause serious injuries
or damage to y o u r de vic e.
• Never dispose of batteries in a fire.
Follow all local regulations when
disposing used batteries.
Page 7

Safety and usage information
• Never place batteries or phon es on o r
in heating devices, such as microwave
ovens, stoves, or r adiato rs. Batte ries
may explode when overheated.
Avoid interference with pacemakers
Maintain a minimum of 15 cm (6 inches)
between mobile devices and pacemak e rs
to avoid potential interference, a s
recommended by manufacturers and the
independent research group, Wireless
Technology Research. If you have any
reason to suspect that your device is
interfering with a pacemaker or other
medical equipment, turn off the device
immediately and contact the
manufacturer of the pacemaker or
medical equipme n t for gu id an ce.
Turn off the device in potentiall y
explosive environments
Do not use your device at refuelling
points (service stations) or near fuels or
chemicals. T urn off your device whene ver
directed by warning signs or instruct ions.
Your device could cause explosions or fire
in and around fuel or chemical storage
and transfer areas or blasting areas. Do
not store or carry flammable liquids,
gases, or explosive materials in the same
compartment as the device, its parts, or
accessories.
Reduce the risk of repetitive motion
injuries
When sending text messages or playing
games on your device, hold the device
with a relaxed grip, press the keys lightly,
use special features that reduce the
number of keys you have to press (such
as templates and pred ictive text), and
take frequent breaks.
5
Page 8

Safety and usage information
Safety precautions
Drive safely at al l tim es
Avoid using your device while driving and
obey all regulations that restrict the use
of mobile devices while driving. Use
hands-free accessories to increase your
safety when possible.
Follow all safety warnings and
regulations
Comply with any regulations that restrict
the use of a mobile device in a certain
area.
Use only Samsung-approved
accessories
Using incompatible accessories may
damage your device or cause injury.
6
Turn off the device near medical
equipment
Your device can interfere w ith m edical
equipment in hospitals or health care
facilities. Follow all regulations, posted
warnings, and directions from medical
personnel.
Turn off the device or disable the
wireless functions when in an
aircraft
Your device can cause interfere nce with
aircraft equipment. Follow all airline
regulations and turn off your device or
switch to a mode that disables the
wireless functions when directed by the
airline personnel.
Page 9

Safety and usage information
Protect batteries and chargers from
damage
• Avoid expos ing batteries to very cold or
very hot temper atu res (b elow 0° C/
32° F or above 45° C/113° F). Extreme
temperatures can reduce the charging
capacity and life of your batteries.
• Prevent batteries from contacting
metal objects, as this can create a
connection between the + and terminals of your batteries and lead to
temporary o r permanent battery
damage.
• Never use a damage d ch arg er or
battery.
• Risk of explosion if a battery is
replaced by an incorrect type. Dispose
of used batteries according to the
instructions.
Handle your device carefully and
sensibly
• Do not allow your device to get wet—
liquids can cause serious damage. Do
not handle your device with wet hands.
Water damage to your device can void
your manufacturer’s warranty.
• Avoid using or storing your device in
dusty, dirty areas to preven t damage
to moving parts.
• Your device is mad e of complex
electronics—protect it from impacts
and rough handling to avoid serious
damage.
• Do not paint your device, as paint can
clog moving parts and prevent proper
operation.
• Avoid using the device’s cam era flash
or light close to the eyes of children or
animals.
7
Page 10

Safety and usage information
• Your d evice and m emo ry cards ma y b e
damaged by exposure to magnetic
fields. Do not use carrying cases or
accessories with magnetic closures or
allow your device to come in contact
with magnetic fields for extended
periods of time.
Avoid interference with other
electronic equipment
Your device em its r adio frequency (RF )
signals that may interfere with
unshielded or impro p erl y shi elde d
electronic equipment, such as
pacemakers, hearing aids, and medical
equipment in homes or vehicles. Consult
the manufacturers of your electro nic
equipment to solve an y in terfere nce
problems you experience.
8
Important usage
information
Use your device in the normal
position
Avoid contact with your device’ s internal
antenna.
Allow only qualified personnel to
service your device
Allowing unqualified personnel to service
your device may result in damage to your
device and will void your warranty.
Ensure maximum battery and
charger life
• Avoid charging batteries fo r more than
a week, as overcharging may shorten
battery life.
Page 11

Safety and usage information
• Over time, unused batteries will
discharge and must be recharged
before use.
• Disconnect chargers from power
sources when not in use.
• Use batteries only for their intended
purpose.
Handle SIM cards and memory cards
with care
• Do not remove a card while the device
is transferring or accessing
information, as this could result in loss
of data and/or damage to the card or
device.
• Protect cards from strong shocks,
static electricity, and electrical noise
from other equipment.
• Frequent writing and erasing will
shorten the life span of memory cards.
• Do not touch gold-coloured contacts or
terminals with your fingers or metal
objects. If dirty , wip e the card with a
soft cloth.
Ensure access to emergency services
Emergency calls from your device may
not be possible in some areas or
circumstances. Before travelling in
remote or undeveloped areas, plan an
alternate method of contacting
emergency services personnel.
Specific Absorption Rate (SAR)
certification information
Your device conforms to European Union
(EU) standards that limit human
exposure to radio frequency (RF) energ y
emitted by radio and telecommunications
equipment. These standard s p rev en t the
sale of mobile devices that exceed a
maximum exposure level (known as the
9
Page 12

Safety and usage information
Specific Absorption Rate, or SAR) of
2.0 watts per kilogram of body tissue.
During testing, the maximum SAR
recorded for this model was 0.197 watts
per kilogram. In normal use, the actual
SAR is likely to be much lower, as the
device has been designed to emit only
the RF energy necessary to transmit a
signal to the nearest base station. By
automatically emitting lower levels when
possible, your device reduces your
overall exposure to RF energy.
The Declaration of Conformity at the back
of this user manual demonstrates your
device’s compliance with the European
Radio & Terminal Telecommunications
Equipment (R&TTE) directive. For mo re
information about the SAR and related
EU standards, visit the Samsung mobile
website.
10
Page 13
Communication
1
Your device allows you to send and
receive many types of calls and
messages over cellular networks and the
internet.
Calls
Learn to use your device's call functions.
For basic call functions, see the Quick
Start Guide.
Call an international number
1. Press [ ] twice to insert the +
character (this replaces the
international access code).
2. Enter the complete number you want
to dial (country code, area code, and
phone number), and then press [ ]
to dial.
3. To end the call, press [ ].
Make a call from the contact list
1. In Standby mode, press [Menu] →
Contacts
2. Scroll to a contact or search by
entering the first few letters of the
contact's name.
3. Press [ ] to call the default number
for the contact.
You can also press the
open the contact information and
select a different number or call type
(e.g., video).
to open your contact list.
Confirm
key to
11
Page 14

Communication
Insert a pause
When calling automated systems, you
can insert a pause between the device
number and another set of numbers.
T o insert a pause, press [ ] to select the
type of pause:
p
(automatic pause)-press [ ] three
•
times to insert an automatic pause.
The device will pause for two seconds,
then automatically transmit the
numbers after the pause.
w
(manual pause)-press [ ] four
•
times to insert a manual pause. After
the pause, you must press <
transmit the remaining numbers.
12
Send
> to
View and return missed calls
Your dev ice w ill show missed calls o n t he
display.
To return a missed call,
1. Press the Confirm key.
2. Scroll to a missed call.
3. Press [ ] to dial.
Call a recently dialled number
1. In Standby mode, press [ ] to
display a list of recent numbers.
2. Scroll to a number and press [ ].
Page 15

Communication
Divert calls
Your service provider or network may or
may not support this feat ure.
To divert your incoming calls to another
number,
1. In Standby mode, press [Menu]
Settings
→
Phone
→
Call diver t
2. Scroll to a call type and press
Confirm key.
3. Scroll to a diverting type and press
<
Options
> →
Activate
.
4. For voice calls, scroll to a diverting
location (mailbox or other number)
and press
the Confirm key.
5. Enter a phone number and press
OK
> (if necessary).
<
the
→
.
Bar (block) ca lls
To activate this function, you need a
barring password from your service
provider.
To bar incoming calls from a specific
number,
→
1. In Standby mode, press [Menu]
Settings
→
Phone
→
Call barring
2. Scroll to a barring type and press
Options
<
> →
Activate
.
3. Enter the barring password and press
OK
>.
<
If you ente r the incorrect barring
password t h ree times, the de vice will
lock. Contact your service provider.
.
13
Page 16

Communication
Messages
Learn to use messaging functions. For
instructions on entering text, see the
Quick Start Guide. For an explanation of
options, see "Change message options."
X
p.25
Message folders
When you open Messaging, you will see
New message
the
folders:
•
Inbox
: received messaging, except
email and cell broadcast messages
•
My folders
saved messages
•
Mailbox
when you create a mailbox, the name
you specify will appear here
14
: received email messages;
function and a list of
: message templates and
•
Drafts
: messages you have not yet
sent
•
Sent
: recent sent messages
Outbox
•
messages waiting to be sent
•
Reports
multimedia messages; you must
request a delivery report in the
message options before sending
: temporary storage for
: delivery reports of text and
• Messages sent via the Bluetooth
wireless feature are not saved in the
Drafts or Sent folder.
• You may not receive a delivery
report for a multimedia message if
you send it to an email address.
Page 17

Communication
Inbox icons
In the Inbox, you may see the following
icons next to your messages:
Icon Description
Unread text message
Multimedia message
notification
Unread multimedia message
Unread smart message
Unread service message
Data received via a Bluetooth
connection
Unknown mes s age type
Outbox sta t us
When you are outside your se rvice area
or have no connection to the network or
email server, y o ur messag es will remain
in the Outbox folder until you re-establish
a connection. The Outbox status explains
why a message is being held in t he
Outbox folder:
Sending
•
the message will be sent immediately
•
Waiting
another message and will be sent as
soon as possible
•
Resend at (time)
failed to send and will be sent at the
specified time
: the device is connecting and
: the message is in cue behind
: the message has
15
Page 18

Communication
•
Deferred
: the message has been
scheduled to send at a later time
•
Failed
: the device has attemp ted to
send the message multiple times, but
has failed
Text messages
Text messages longer than 160
characters will be sent as two or more
messages and may result in additional
charges.
Send a text message
1. In Standby mode, press [Menu] →
Messaging
message
2. Enter a phone number or press the
Confirm key to select a contact.
16
→
New message
.
→
Text
3. Scroll down and enter text.
→
Send
4. Press the Confirm key
to send
the message.
View a text message
1. In Standby mode, press [Menu] →
Messaging
→
Inbox
.
2. Scroll to a message and press the
Confirm key.
Retrieve messages from a SIM card
If you have text messages stored on a
SIM card, you must copy them to the
device before you can view them.
1. In Standby mode, press [Menu]
Messaging
messages
2. Press <
Mark
→ <
Options
.
Options
> →
Mark/Unmark
(to select one) or
Mark all
> →
→
SIM
(to
select all).
→
Page 19

Communication
3. Press <
Options> →
Copy
→
Inbox
or
a folder.
You can now view the me ssages from the
folder on your device.
Multimedia messages
Before you can send multimedia
messages, you must define an access
point.
Set an access point
Your service prov ider m a y s upply access
point settings via a smart message. To
automatically set an access point using a
smart message, see "Save sm art
message data or settings to your device."
X
p.24
To manually set an access point,
1. In Standby mode, press [Menu]
Settings
points
→
.
Connection
→
Access
→
2. Scroll down and press the Confirm key
to select an existing access point or
press <
point
Options
.
> →
New access
3. Set access point options according to
the instructions provided by your
service p rovider.
Send a multimedia me ss ag e
1. In Standby mode, press [Menu] →
Messaging
Multimedia message
→
New message
→
.
2. Enter a phone number or press the
Confirm key to select a contact.
17
Page 20

Communication
3. Scroll down and enter a subject.
4. Scroll down and enter text.
5. T o inser t a n existi ng mult imed ia
object, press <
→ an object type. T o create and
object
Options
> →
Insert
insert a new multimedia object, press
Options
<
> →
Insert new
→ an
object type.
6. Press the Confirm key
→
Send
to send
the message.
You can only add images with a
resolution of 176 x 144 or lower.
Edit a multimedia m e ss age
You can edit your multimedia message
before sending it:
• To add fields to the message header,
press <
Options
> →
Address fields
a field type
18
→
• To change the message layout, press
<
Options
> → a text position
• To preview the message, press
<
Options
• To remove an item, press <
→
Remove
> →
Preview
→ an item
Options
You can add images, sounds, or
videos to slides; however, you can
only add one type of media type per
slide.
View a multimedia m essage
1. In Standby mode, press [Menu] →
Messaging
→
Inbox
.
2. Scroll to a message and press the
Confirm key.
>
Page 21

Communication
Listen to voice mail
If your voice mail number is pres et by
your service provider, you can press and
1
] to access your voice mail.
hold [
If the voice mail number is not pre set or
if you need to change the voice mail
number,
1. In Standby mode, press [Menu]
Tools
→
Call mailbox
.
2. Enter the voice mail number provided
by your service provider.
3. Press <
OK
>.
You can now access your voice mail from
Standby mo de by pressing and holdi n g
1
].
[
→
Email messages
Before you can send or receive email
messages, you must create a mailbox .
Create a mailbox
1. In Standby mode, press [Menu] →
Messaging
→
E-mail
2. Press <
3. Press the Confirm key to start the
mailbox setup wizard and follow the
onscreen instructions.
The new mailbox will automatically
appear in Messaging. To change the
current mailbox, return to email settings
and switch the "Mailbox in use" to
another mailbox.
→ <
→
Mailboxes
Options
Options
.
> →
New mailbox
> →
Settings
.
19
Page 22

Communication
If you use the POP3 protocol, the
mailbox will not up date automatically
when you are online. You must
disconnect and then reconnect to view
new messages.
Send an email message
1. In Standby mode, press [Menu] →
Messaging
E-mail
→
New message
→
.
2. Enter an email address or press the
Confirm key to select a contact.
3. Scroll down and enter a subject.
4. Scroll down and enter text.
5. Press <
Options
> →
Insert
→ an
attachment type (optional).
→
Send
6. Press the Confirm key
20
.
If you are offline or outside your service
area, the message will be held in the
Outbox folder until you are online and in
your service area.
View an email message
When you open a mailbox, you can view
previously retrieved emails offline or
connect to the email server to view new
messages. After you retrieve email
messages, you can view them offline.
To view new messages online,
1. In Standby mode, press [Menu]
Messaging
2. Press <
3. Press <
→
New
→ your mailbox.
Options
Options
> →
> →
.
Connect
Retrieve e-mail
→
.
Page 23
Communication
To view new messages offline,
1. Repeat steps 1-3 above.
2. Press <
Options
> →
Disconnect
.
View or save email attachments
Email attachments ( ) may contain
viruses that can damage your
device. To protect your device, open
attachments only if you trust the
sender. For more information, see
X
"Certif. management."
p.93
To view an attachment,
1. From an open email message, press
<
Options
> →
Attachments
.
2. Scroll to the attachment and press the
Confirm key.
The attachment opens with the
corresponding application.
To save an attachment,
1. From an open email message, press
Options
<
> →
Attachments
.
2. Scroll to the attachment and press
Options
<
> →
Save
.
Delete an email message
You can delete email messag es from yo ur
device only or from both your device and
the mail server.
To delete a message from your dev ice
only,
→
1. In Standby mode, press [Menu]
Messaging
→ your mailbox.
2. Scroll to an email and press
Options
<
> →
Delete
→
Phone only
The email header will remain in your
mailbox until you delete the message
from the mail server.
.
21
Page 24

Communication
To delete a message from both your
device and the mail server,
1. In Standby mode, press [Menu]
Messaging
→ your mailbox.
→
2. Scroll to an email and press
Options
<
server
> →
Delete
→
Phone and
.
If you are offline, messages will be
deleted from the s erv er th e next time
you connect. If you are using the
POP3 protocol, deleted messages are
removed when you close the mailbox
connection.
Audio messages
You can send audio messages with voice
memos or sound clips. To record a voice
memo or sound clip, see "Recorder."
X
p.48
22
Send an audio message
1. In Standby mode, press [Menu] →
Messaging
Audio message
2. Press <
→
Options
New message
.
> →
Add recipient
→
.
3. Scroll to a recipient and press the
→
Confirm key
<OK> → a number (if
necessary).
4. To insert an existing sound clip:
a. Press <
clip
→
Options
> →
From Gallery
Insert sound
.
b. Scroll to a sound clip and press the
Confirm key (skip to step 6).
5. To record and insert a new sound clip:
a. Press <
Options
→
New sound clip
clip
> →
Insert sound
.
b. When you are finished reco rding ,
press <
Stop
> to automatically
attach the sound clip to the audio
message.
Page 25

Communication
6. Press <
Options
> →
Send
.
Cell broadcast messages
If your service provider supports this
function, you can subscribe to cell
broadcasts that provide a utomatic
notifications or news updates. To learn
about available cell broadcasts, contact
your service prov ider.
Add a cell broadcast topic
1. In Standby mode, press [Menu] →
Messaging
broadcast
2. Press <
manually
3. Enter the topic name and n um ber, and
then press <
→ <
.
Options
.
OK
Options
> →
Topic
>.
> →
→
Cell
Add
Subscribe to a cell bro a dca s t
1. In Standby mode, press [Menu] →
Messaging
broadcast
2. Scroll to a topic and press <
→
Subscribe
→ <
.
Options
.
> →
Options
Cell
Your device will now receive new
messages automatically.
3. To cancel a subscription, press
<
Options
> →
Cancel subscription
Some connection settings may block
cell broadcasts. Contact your service
provider for the appropriate
connection settings.
>
.
23
Page 26

Communication
View a cell broadcast topic
1. In Standby mode, press [Menu] →
Messaging
broadcast
→ <
.
Options
> →
Cell
2. Scroll to a topic folder and press the
Confirm key.
3. Scroll to a topic and press the Confirm
key.
Set automatic notification of new cell
broadcast messages
1. In Standby mode, press [Menu] →
Messaging
broadcast
2. Scroll to a topic and press <
→
Hotmark
→ <
.
.
Options
> →
Options
Cell
3. To stop automatic notifications, press
24
Options
<
> →
Remove hotmark
.
>
Smart messages
Your device can receive many kinds of
smart messages, including business
cards, ringtones, calendar events,
browser bookmarks, and settings. Your
service provider may send smart
messages that you can use to load
settings into your device.
Save smart message data or settings
to your device
1. In Standby mode, press [Menu] →
Messaging
2. Scroll to a message and press the
Confirm key.
3. Press <
settings according to the smart
message type:
• Business card: select
business card
→
Options
Inbox
.
> and save the data or
Save
Page 27

Communication
• Ringing tone: to save to
Save
select
• Calendar entry: select
Gallery
Save to
,
Calendar
• WAP message: select
bookmarks
or
• SMS service number: select
• Voice mail number: select
Add to
Save to Contacts
Save
Save to
Contacts
• Access point settings: select
• Email settings: select
Save
Save
You ma y also receive an email
notification, which tells you how many
new emails are in your remote mailbox.
Service messages
You ma y receiv e serv ice mess ages from
your service provider that are deleted
automatically when they expire. You can
view service messages from the Inbox
(you may have to download the message
from the service provider). Contact your
service provider for more information
about service messages.
Change message options
Change text message options
In Standby mode, press [Menu] →
Messaging → <
Text message
options:
•
Message centres
message centres or add a new centre
(press <
centre
Options
> →
to change the following
: view all defined
Options
> →
New message
)
Settings
→
25
Page 28

Communication
•
Message centre in use
: set a
message centre to use when sending
text messages
Character encoding
•
encoding type (
: set a character
Full support
Unicode reduces your maximum
message length by about one-half)
•
Receive report
: set to receive a
report when the message has been
delivered
Message validity
•
: set a duration for
the message to be valid; if the
message cannot be delivered within
the specified time, it will be removed
from the message centre
Message sent as
•
: set to convert text
messages to another format
•
Preferred connection
: set a network
connection type
26
for
Reply via same centre
•
: set to use
the same message centre when
receiving a reply message
Change multimedia message options
In Standby mode, press [Menu] →
Messaging
Multimedia message
→ <
Options
> →
Settings
to change the
→
following options:
•
Image size
: set a size for images
added to multimedia messages (when
sending a message to an email
address, the size is auto matically set to
Small
)
•
MMS creation mode
: set the mode
for creating multimedia messages
•
Access point in use
: set an access
point to use when sending multimedia
messages
Multimedia retrieval
•
: set an option
for receiving multimedia messages
Page 29

•
Allow anon. msgs.
: set to allow or
deny messages from anonymo us
senders
Receive adverts
•
: set to receive or
block advertisements
•
Receive report
: set to receive a
report when the message has been
delivered
Deny report sendi n g
•
: set to deny
delivery reports for multimedia
messages
•
Message validity
: set a duration for
the message to be valid; if the
message cannot be delivered within
the specified time, it will be removed
from the message centre
Communication
Change email options
In Standby mode, press [Menu] →
Messaging
E-mail
•
Mailboxes
→ <
Options
> →
Settings
to change the following options:
: view a list of defined
mailboxes; for each mailbox, you can
set the following options:
Connection settings
-
Incoming e-mail
: set options for
incoming email messages
-
Outgoing e-mail
: set options for
outgoing email messages
User settings
-
My name
-
Send message
: set your user name
: set email messages
to send immediately or the next time
you connect to the server
Send copy to self
-
: set to save
copies of outgoing email messages
→
27
Page 30

Communication
-
Include signatu re
: set to include a
signature in your email messages
-
New e-mail alerts
: set to show an
icon when you receive a new email
message
Retrieval settin g s
-
E-mail to retrieve
: set to retrieve
email headers or full messages with
attachments (you can specify a size
limit for full messages)
Retrieval amoun t
-
: set a maximum
number of headers to retrieve at one
time
-
IMAP4 folder path
(IMAP4): set a
path to the folder that will sync with
the server
Folder subscriptions
-
(IMAP4):
connect to mailbox and update
folders
28
Automatic retrieval
-
E-mail notifications
: set to be
notified when you receive a new
email message
-
E-mail retrieval
: set to
automatically retriev e email from t he
server
Mailbox in use
•
: set a mailbox for
messages
Change service message options
In Standby mode, press [Menu] →
Messaging
Service message
→ <
Options
> →
Settings
to change the
following options:
•
Service messages
: set to receive
service messages
•
Download messages
: set to
automatically or manually download
new service messages
→
Page 31

Communication
Change cell broadcast message
options
In Standby mode, press [Menu] →
Messaging
Cell broadcast
→ <
Options
> →
Settings
to change the following
options:
•
Reception
: set to receive cell
broadcast messages
•
Language
broadcast messages in
: set to receive cell
All
or
Selected
languages
•
Topic detection
: set to automatically
save the topic number when you
receive a cell broadcast message that
does not belong to an existing to pic
→
Change other message options
In Standby mode, press [Menu] →
Messaging
Other
•
Save sent messages
→ <
Options
to change the following options:
copies of sent messages
•
Number of save d ms g s.
maximum number of saved messages
to store in the Sent folder; as new
messages are saved, older messages
will be deleted
Memory in use
•
: set a memory
location to use for storing messages
> →
Settings
: set to save
: set a
→
29
Page 32

Communication
Log
Learn to view log information about calls,
packet data, and other communication
events.
Recent calls
You can view and erase logs of rece ntly
missed calls, received calls, or dialled
numbers.
View recent call logs
To view recently missed calls, received
calls, or dialled num bers,
1. In Standby mode, pres s [Menu]
→
Recent calls
.
2. Scroll to a call type and press the
Confirm key.
T o call a number from a call log, scroll
to the number and press [ ].
30
→
Log
Erase recent call logs
You can erase all recent call logs at onc e,
erase a single call log, or delete a single
number from a log.
To erase all recent call logs,
1. In Standby mode, press [M enu]
→
Recent calls
2. Press <
.
calls
3. Press <
Options
Yes
.
> →
Clear recen t
> to confirm.
To erase a single call log,
1. In Standby mode, press [M enu]
→
Recent calls →
2. Press <
3. Press <
Options
Yes
a call type.
> →
Clear list
> to confirm.
→
Log
→
Log
.
Page 33

Communication
To erase a single number from a log,
1. In Standby mode, pres s [Menu]
→
Recent calls →
a call type.
2. Scroll to a number and press [
press <
3. Press <
Options
Yes
> → Delete
> to confirm.
→
Log
C
], or
.
Call duration
To view the durations of your last call,
dialled number, received call, or all calls,
in Standby mode, press [Menu]
Call duration
.
To reset the call timers,
1. In Standby mode, pres s [Menu]
→
Call duration
2. Press <
Options
.
> →
Clear timers
→
Log
→
→
Log
.
3. Enter the lock code (the default lock
00000000
code is
OK
>.
<
), and then press
Packet data
To view the amount of sent or received
packet data, in Standby mode, press
→
Log
→
[Menu]
Packet data
To reset the packet data counters,
1. In Standby mode, press [M enu]
→
Packet data
2. Press <
Options
.
> →
Clear counters
3. Enter the lock code (the default lock
00000000
code is
OK
>.
<
), and then press
Communication log
You can view comm unication details and
filter logs with the communication log.
.
→
Log
.
31
Page 34

Communication
View the communication log
1. In Standby mode, press [Menu] →
Log
.
2. Scroll right to switch to the
communication log.
Some events, such as a text message
split into multiple parts, will appear as
one communication event.
Filter log events
1. In Standby mode, press [Menu] →
Log
.
2. Scroll right to switch to the
communication log.
3. Press <
Options
> →
Filter
.
4. Scroll to a filter type and press the
Confirm key.
32
Erase the communication log
To permanently erase all of the log
contents,
1. In Standby mode, press [Menu]
Log
.
→
2. Scroll right to switch to the
communication log.
3. Press <
4. Press <
Options
Yes
> →
Clear log
> to confirm.
.
Log duration
You can change the length of time that
communication events are stored in the
logs. After that time, events a re
automatically erased to free up memory.
To set a log duration,
1. In Standby mode, press [Menu]
Log
.
→
Page 35

Communication
2. Press <
3. Press <
Options
Options
> →
> →
Settings
Change
.
.
4. Scroll to a duration and press the
Confirm key.
If you select
No log
, no
communication ev ents w i ll be stor ed
in the log.
33
Page 36

2
Media
Learn to use the media applications on
your device: Music player, Camera,
Gallery, ShoZu, Video Editor, Image
Editor, Radio, Flash Player, RealPlayer,
and Recorder.
Music player
With Music player, you can play mp3,
aac, or wma music files.
Add files to your device
You can add music files to your d evice by
downloading them from the in terne t or
transferring them from a PC via PC
Studio (see PC Studio help), a microSD
memory card, or Windows Media Player.
34
Add files to the music library
To automatica lly ad d files to the music
library,
1. Add music files to your device.
2. In Standby mode, press [Menu]
Media
→
→
Music library
3. Press <
library
Music player
Options
.
→ <
.
> →
Update Music
→
Options
Play music files
1. In Standby mode, press [Menu] →
Media
→
→
2. Scroll to a playlist.
3. Press <
Music player
Music library
Options
.
> →
→ <
Play
Options
.
>
>
Page 37

Media
4. Use the following keys during
playback:
Key Function
Confirm Pause or resume
playback
Navigation
(Up)
Restart playbacks; Skip
backward (press within
3 seconds); scan
backward (press and
hold)
Navigation
(Down)
Skip forward; scan
forward (press and
hold)
Volume
Adjust the volume up or
down
0
Stop playback
You can also access the following
options:
• To play tracks in random, p ress
Options
<
> →
Random play
• To play a track or all tracks
repeatedly, press <
Loop
.
Options
> →
• To close the music player, leaving
music still in the background, press
<
Options
> →
Play in background
Create a playli st
To create a custom playlist,
1. In Standby mode, press [Menu]
Media
→
Music player
2. Press <
3. Press <
Options
Track lists
Options
.
a memory location (if necessary).
.
> →
Music library
> →
New track list
→ On.
→
→
.
→
35
Page 38

Media
4. Enter a name for the playlist and press
the Confirm k ey.
5. Scroll to a track and press the Confirm
key to add the tra ck to th e pla y list.
Camera
Your device allows you to tak e digital
photos (jpg format) or record videos
(mp4 format).
Capture a photo
1. Open the camera cover.
2. Rotate the device 90°
counterclockwise (to the left).
3. Aim the lens at the subject and make
any adjustments (see "U se the keyp ad
in Camera mode").
36
4. Press [Camera ] to capture the image.
Press <
Options
Settings
→ On and capture a photo.
Off/On
The photo saves current location
information and you can upload it to
Google Map.
. Select
> and scroll to
General
→
GPS
Use the keypad in Camera mode
Key Function
Navigation
(Left)
Navigation
(Right)
Navigation
(Down)
Navigation
(Up)
1
Open the Quickview
T u rn the flash on or off
Set the time delay b efor e
taking a photo
Hide or show the icons or
guidelines on the screen
Switch to Camcorder mode
Page 39
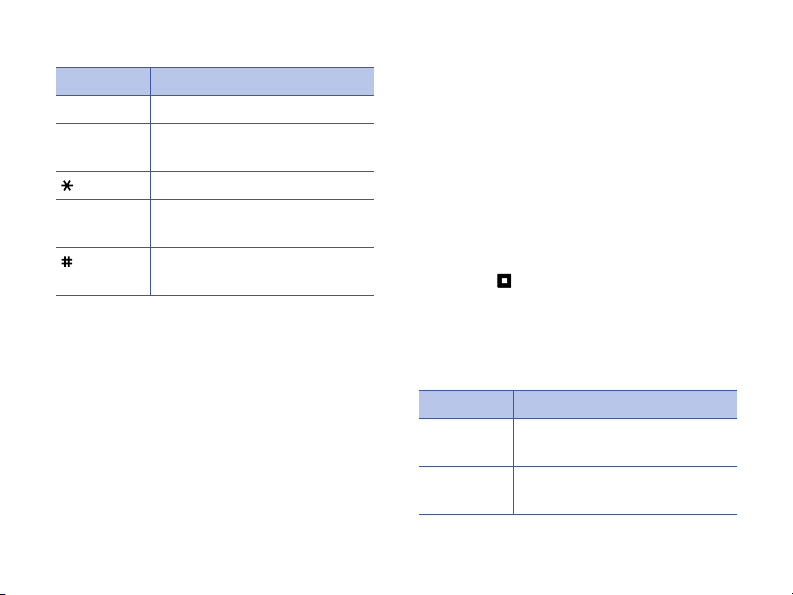
Media
Key Function
2
3
0
Change the shooting mod e
Set the time delay before
taking a photo
T u rn the flash on or off
T u rn the m a cro feature on
or off
Hide or show the icons or
guidelines on the screen
View a photo
1. In Standby mode, press [Menu] →
Media
→
Gallery
2. Scroll to an image and press the
Confirm key.
→
Images
.
Record a video
1. Open the camera cover.
2. Rotate the device 90°
counterclockwise (to the left).
1
3. Press [
camcorder.
4. Aim the lens at the subject and make
any adjustments (see "U se the key pad
in Camcorder mode").
5. Press [Camera] to begin recording.
6. Press < > or [Camera] to stop
recording.
] three times to launch the
Use the keypad in Camcorder
mode
Key Function
Navigation
(Left)
Navigation
(Right)
Open the Quickview
Mute or unmute the audio
37
Page 40
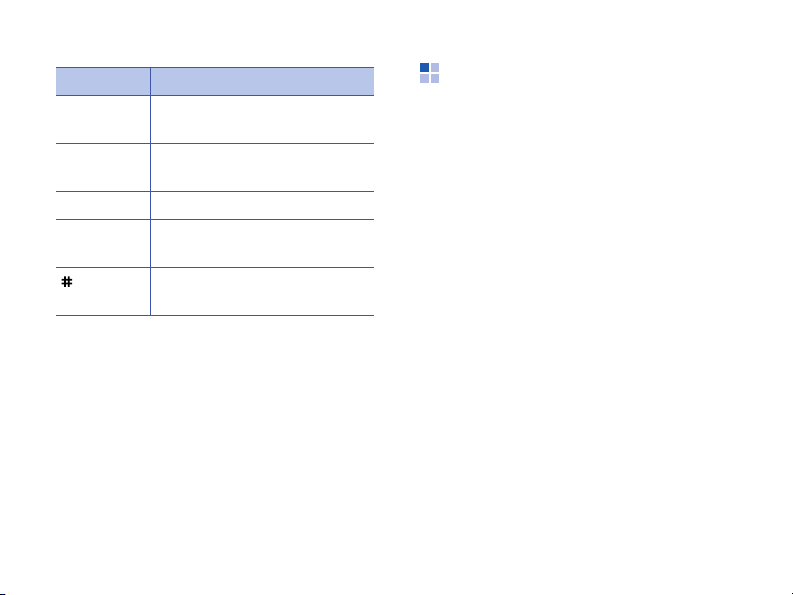
Media
Key Function
Navigation
(Down)
Navigation
(Up)
1
3
Set the time delay before
recording a video
Hide or show the icons on
the screen
Switch to Camera mode
Set the time delay before
recording a video
Hide or show the icons on
the screen
Play a video
1. In Standby mode, press [Menu] →
Media → Gallery
2. Scroll to a video and press the Confirm
key.
38
→
Video clips
.
Gallery
You can manage all your media files and
streaming internet links from Gallery .
Open a media file
1. In Standby mode, press [Menu] →
Media
→
Gallery
Your me dia files are automatically
organised by file type.
2. Scroll to a media folder and press the
Confirm key.
3. Scroll to a media file and press the
Confirm key.
.
Page 41

Media
Add a streaming internet link to
the Gallery
1. In Standby mode, press [Menu] →
Media
→
Gallery
→
Streaming links
2. Press <
3. Enter a name and web address and
Options
memory location (if necessary).
press the Confirm key.
> →
New link
→ a
Play streaming content from the
internet
1. In Standby mode, press [Menu] →
Media
→
Gallery
→
Streaming links
2. Scroll to a link and press the Confirm
key.
RealPlayer will launch and ask if you
want to connect to the wireless web.
Yes
3. Press <
>.
ShoZu
With ShoZu, you can upload photos and
videos to your favourite websites and
.
blogs, and get the latest updates from
them.
Activate ShoZu
1. In Standby mode, press [Menu] →
Installations
→
Activate
2. Enter your ShoZu ID and password
and press <
.
3. Scroll to an access point and press the
Confirm key (if necessary).
→ <
OK
→
Yes
>.
ShoZu
>.
→ <
Options
>
39
Page 42

Media
Create a new des t inat i on
1. In Standby mode, press [Menu] →
Installations
Destinations
new destination
2. Enter the name of the destination,
your email address, user name (if
necessary), and password.
3. Press <
new destination.
→ <
Options
→
> →
ShoZu
Options
→ <
Save
→
Yes
to add a
Share-It
> →
>.
Upload a file
1. In Standby mode, press [Menu] →
Installations
All files
2. Select a file and press <
Send
.
40
→
ShoZu
→
Share-It
.
Options
Add
> →
→
→
3. Select a destination.
Upload
4. Press <
You can upload photos which have
location information to Google Map
with ShoZu. When someone searches
for the loca tion in Google Map , your
photos may appear.
>.
Receive the latest updates
1. In Standby mode, press [Menu] →
Installations
Get ZuCasts
2. Follow the onscreen instructions to
download the latest upda te s of th e
website.
→
ShoZu
→ a websit.
→
ZuCasts
→
Page 43

Media
Video Editor
With Video Editor, you can edit or make
videos by combining photos or videos.
Crop a video
1. In Standby mode, press [Menu] →
Media
→ Video Editor
2. Select a video file.
3. Press the Confirm key to start
playback.
4. Mark the beginning and end of the new
video:
• Press <
• Press <
Start
you want the new video to begin.
want the new video to end.
> at the point where
End
> at the point whe re you
→ Edit video
5. Press <
6. When you are finished, press <
.
Options
change the properties for saving the
video file, such as image quality , name
prefix, and memory location.
→
<Options
After saving the new video, th e device
plays the video autom a tically.
> → Settings
> → Save
Add audio to a video
1. In Standby mode, press [Menu] →
Media
→ Video Editor
2. Select a video file.
3. Press the Confirm key to start
playback.
4. Press <
Options
one of the following options:
•
Audio dubbing
sounds you have saved.
> → Audio
and
Back
.
→ Edit video
and choose
: Add one of the
>
.
41
Page 44

Media
•
Live dubbing
: Add audio by
recording a new sound.
5. To add an existing sound, press
Options
<
> → Start dubbing
sound.
To add a new sound, press <
Record
and record a sound.
After adding the sound , the device
plays the video autom a tica lly.
Back
6. Press <
7. Press <
>.
Options
> → Settings
change the properties for saving the
video file, such as image quality, nam e
prefix, and storage location.
8. When you are finished, press <
→
<Options
> → Save
.
After saving the new video, the device
plays the video autom a tica lly.
42
→ a
and
Back
>
>
Make a sideshow
You can combine photos to make a
sideshow with your favourite photos.
1. In Standby mode, press [Menu]
Media
→ Video Editor
movie
.
→ Make photo
2. Select the photos you want and press
Done
>.
<
3. While viewing phot os, press
Options
<
> to use the following
options:
Option Description
Effect
Change the colour tone
or apply a special effect
Insert
→
Insert a photo or a text
Insert
photos
,
Insert text
clip
→
Page 45

Media
Option Description
Transition
Change how your
slideshow plays from
one video clip or photo
to the next
Narration
→
Insert
Duration
Add audio to your
slideshow
Set the duration of
photos
Move
Change the order of
photos
Settings
Change the properties
for saving the video file,
such as image quality,
default label, and
memory location
4. When you are finished, press
<
Options
> → Save
.
After saving the new video, the device
plays the video autom a tica lly.
Make a storyboard
You can combine photos and videos to
make a storyboard.
1. In Standby mode, press [Menu]
Media
→ Video Editor
Storyboard
.
→
2. Select the photos and videos you want
Done
and press <
>.
You can use the same options as when
making a slideshow. See the previous
section.
Additionally, you can use
crop a selected video or add audio to
the video.
3. When you are finished, press
<
Options
> → Save
.
After saving the new video, th e device
plays the video autom a tically.
→
Edit clip
to
43
Page 46

Media
Image Editor
With Image Editor, you can edit images
and apply fun effects.
Apply effects to images
1. In Standby mode, press [Menu] →
2. Press <
3. Select an image or take a new photo.
4. Press <
5. Select a variation of the effect to apply
6. When you are finished, press
7. Enter a new file name for the image
44
→
Media
Open
effect option.
and press <
<
Options
and press <
ImageEditor
Options
or
Capture image
Options
> →
Done
Save as
OK
>.
> →
New image
> →
Effects
>.
.
→
.
→
an
.
Adjust an image
1. In Standby mode, press [Menu] →
2. Press <
3. Select an image or take a new photo.
4. Press <
5. Using the navigation key, adjust the
6. When you are finished, press
7. Enter a new file name for the image
→
Options
or
Options
Options
ImageEditor
Capture image
> →
Save as
OK
>.
Media
Open
adjustment option (auto level,
brightness, contrast, or colour).
image as desired and press <
<
and press <
> →
New image
> →
Adjust
.
.
→ an
.
→
Done
>.
Page 47

Media
Transform an image
1. In Standby mode, press [Menu] →
2. Press <
3. Select an image or take a new photo.
4. Press <
5. Using the navigation key, rotate or flip
6. When you are finished, press
7. Enter a new file name for the image
→
Media
Open
Rotate
ImageEditor
Options
or
Capture image
Options
or
Flip
.
> →
New image
> →
Transform
.
.
the image as desired and press
<
Done
>.
Options
<
and press <
> →
OK
Save as
>.
.
→
→
Insert a visual feature
1. In Standby mode, press [Menu] →
2. Press <
3. Select an image or take a new photo.
4. Press <
5. Select a visual feature to add and
6. Press <
7. When you are finished, press
8. Enter a new file name for the image
→
Media
Open
ImageEditor
Options
or
Capture image
Options
> →
New image
> →
Insert
.
.
→
feature (frame, image, clip art,
emoticon, or text).
Select
Done
> →
>.
> or <
Save as
OK
>.
Options
.
> →
press <
Done
.
Options
<
and press <
→
a visual
45
Page 48

Media
Radio
You can listen to your favourite stations
with the FM radio.
Listen to the FM radio
1. Plug a headset into the headset jack.
2. In Standby mode, press [Menu]
Media
→
Radio
.
3. Select or to scan through
available radio stations.
4. Use the following options:
• T o access a radio station by manually
entering a frequency, press
Options
<
• To adjust the volume level, press
[Volume].
• To switch sound output to the
speaker, press <
Activate loudspeaker
46
> →
Manual tuning
Options
→
.
> →
.
• To access other functions while
listening to the radio, press
Options
<
> →
Play in background
.
Set up your favourite radio
statio n list
Once you have set up a station list, you
can access the stations by selecting
or from the radio screen.
Save radio stations by automatic
tuning
1. From the radio screen, press
Options
<
station list.
2. Press <
stations
3. Press <
replace any existing stations).
4. When you are finished, press <
> →
Stations
Options
Yes
> → Auto-save
.
> to confirm (this will
to access the
Back
>.
Page 49

Media
Save a radio station manually
1. From the radio screen, scroll to the
radio station you want.
2. Press <
3. Select an empty location.
4. Enter a station name and press <
Options
> →
Save station
OK
Flash® Player
Your device includes Flash Player for
viewing Flash (swf) files.
To view a Flash file,
1. In Standby mode, press [Menu]
Media
→
Flash Player
2. Scroll to a flash file and press the
Confirm key (scroll right to locate files
stored on a memory card).
.
→
RealPlayer
Your device includes RealPlayer for
viewing many types of media files and
.
>.
streaming content from the internet.
RealPlayer supports files with the
follow ing ex tens ions : 3gp , mp 4, rm , ram ,
ra, and rv.
®
Play a media file in R e alP la y er
1. In Standby mode, press [Menu] →
Media
→
RealPlayer
2. Press <
3. Locate a media file and press the
Options
recent clips
Confirm key.
or
.
> →
Open
Saved clip
→
Most
.
47
Page 50

Media
Play streaming web content with
RealPlayer
When you open a link to streaming web
content via your web browser, RealPlayer
will buffer and play the content (see
"Browse a web page."
then use the softkeys and volume key to
control options for the streaming content.
X
p.59). You can
Recorder
You can use Rec order to record and play
back voice memos and sound clips.
Record a voice clip
1. In Standby mode, press [Menu] →
Media
→
Recorder
2. Press the Confirm key to begin the
recording.
48
.
3. When you are finished recording, press
Stop
>.
<
The voice clip is automatically saved.
Play a voice clip
1. In Standby mode, press [Menu] →
Media
→
Recorder
2. Press <
3. Scroll to a voice clip and press the
4. Use the onscreen buttons to control
Options
Confirm key.
Playback begins automatically.
playback.
.
> →
Go to Gallery
.
Page 51

Media
PC Studio
PC Studio, which is included on the PC
Studio CD-ROM, is a Windows-based
program that allows you to manage your
personal information and sync files to
your device. For m ore information, install
the program a nd refer to th e PC Stu d io
help.
Install PC Studio
1. Insert the PC Studio CD into a
Windows-compatible PC.
2. Select a language for the setup
program.
3. Follow the onscreen instructions.
During installation, the setup program
will autom atically i nstall the necessary
USB drivers.
Use PC Studio
To connect your device to a PC with PC
Studio, you must change the device’s
USB mode (See "Use PC Studio."
X
p.68).
49
Page 52

Personal productivity
3
Learn to manage contacts, schedule
calendar events, create notes, and use
Quickoffice and Adobe Reader.
Contacts
Learn to use contact cards and groups to
store personal information, such as
names, phone numbers, and addresses.
Create a new contact card
You can store contact cards in your
device's memory or on a SIM card.
Create a new contact card in the
device's memory
1. In Standby mode, press [Menu] →
Contacts
50
.
2. Press <
3. Enter contact information.
4. When you are finished entering
Create a new contact card on a SIM
card
1. In Standby mode, press [Menu] →
2. Press <
Options
To insert additional information
fields, press <
detail
image to the contact card, pres s
Options
<
an image.
information, press <
the contact card.
Contacts
Options
SIM directory
> →
New contact
Options
→ a detail type. To assign an
> →
Add thumbnail
Done
.
> →
SIM contacts
(SIM card).
> →
Add
→
> to save
.
→
Page 53

Personal productivity
3. Press <
contact
Options
.
> →
New SIM
4. Enter contact information.
5. When you are finished entering
Done
information, press <
> to save
the contact card.
Search for a contact card
1. In Standby mode, press [Menu] →
Contacts
2. Enter the first few characters of the
contact name in the search box.
The contact cards are listed,
highlighting the name that most
closely matches your input.
3. Scroll to a contact and press the
Confirm key to open it.
.
Copy contact cards
To copy contact cards from one memory
location to another,
1. Open a contact list:
a. In Standby mode, press [Menu]
Contacts
(device’s memory).
b. In Standby mode, press [Menu]
Contacts
contacts
→ <
Options
→
SIM directory
> →
card).
2. Scroll to a contact and press
Options
<
Copy to SIM directory
> →
Copy to Contacts
.
If you have inserted a memory card,
you can also copy contacts to and
from the card: press <
Copy
→
To memory card
memory card
.
Options
or
→
→
SIM
(SIM
or
> →
From
51
Page 54

Personal productivity
Set a default number or address
Some contact cards may include more
than one number or address.
To assign a single number or address as
the default,
1. Open a contact list (see "Copy contact
cards."
X
p.51).
2. Scroll to a contact and press the
Confirm key.
3. Press <
4. Scroll to a default type and press the
5. Scroll to a number or address and
6. When you are finished, press <
52
Options
> →
Confirm key.
press the Confirm key.
Defaults
.
Back
>.
Assign a speed dial number to a
contact card
You can assign speed dial numbers to up
to eight contact cards ([
[
1
] is reserved as a speed dial number
for your voice mail.
To assign a speed dial number,
1. In Standby mode, press [Menu]
Contacts
.
2. Scroll to a contact and press the
Confirm key.
3. Scroll to a phone number and press
Options
<
> →
4. Scroll to a speed dial number and
press the Confirm key.
5. Press <
Yes
> (if necessary).
2
] through [9]);
Assign spee d dial
→
.
Page 55

Personal productivity
Assign a ringtone to a contact
card or group
You can assign a ringtone to any contact
card or group.
1. In Standby mode, press [Menu]
Contacts
2. Scroll to a contact or group and press
the Confirm k ey.
3. Press <
4. Scroll to a ringtone and press the
Confirm key.
.
Options
For an individual contact, your device
will use the ringtone that was
assigned last to the contact card. For
example, if you assign a ringtone to a
group and then assign another
ringtone to a contact ca rd within tha t
group, the de vice will us e the ringto ne
assigned to th e contact ca rd when
that contact calls.
> →
Ringing tone
→
.
Create a contact group
You can create groups of contacts and
send messages to the entire group.
1. In Standby mode, press [Menu]
Contacts
2. Scroll right to switch to the group list.
3. Press <
4. Enter a name and press the Confirm
key.
5. Scroll to your new group and press the
Confirm key to open it.
6. Press <
7. Scroll to each contact you want to add
and press the Confirm key.
8. When you are finished selecting
contacts, press <
the group.
.
Options
Options
> →
New group
> →
Add members
OK
> to save them to
→
.
.
53
Page 56

Personal productivity
Syncronise your contacts
To syncronise your contacts by using the
current sync profile,
1. In Standby mode, press [Menu]
Contacts
2. Scroll to a contact and press
Options
<
Start
3. Scroll to a sync profile or device and
press the Confirm key.
54
.
> →
.
To change sync profiles or settings,
see "Synchronise your device."
X
p.69
Synchronisation →
→
Calendar
Use the calendar to keep tr ack o f
appointments, birthd ays, or other e vents.
Create a calendar event
1. In Standby mode, press [Menu] →
Organiser
2. Scroll to a date and press <
→
New entry →
•
Meeting
date and time
•
Memo
Anniversary
•
a special date
•
To-do
task
3. Complete the fields and adjust the
settings for your event.
→
Calendar
: a reminder at a specific
: general text
: an annual reminder of
: a note about a particular
.
Options
an event type:
>
Page 57

Personal productivity
4. When you are finished, press <
to save your entry.
In the
Synchronisation
can specify whether an event is
Private
(seen only by you),
(seen by anyone with access to your
data after y ou sync), o r
synchronised).
Done
field, you
Public
None
(not
>
Change the calendar view
1. In Standby mode, press [Menu] →
Organiser
2. Press <
→
Calendar
Options
.
> → a view type.
Stop an event alarm
If you set an alarm for a calendar event,
the alarm will sound for one minute at
the specified time. To stop the alarm,
Stop
press <
>.
To set the alarm to sound again shortly,
Silence> → <Snooze
press <
>.
Change calendar options
From any calendar view, press
<
Options
following options:
•
•
•
•
•
> →
Settings
Calendar alarm tone
personalised alarm tone
Alarm snooze time
duration for calendar alarms
Default vi ew
shown when you open t he calendar
Week starts on
first in week view
Week view title
week view to a week num ber o r date
to change the
: set a
: set a snooze
: set the view that is
: set a day to show
: set the title of the
55
Page 58

Personal productivity
Quickoffice
With Quickoffice, you can open Word,
Excel, and PowerPoint files on your
device.
®
Open a Quickoffice document
1. In Standby mode, press [Menu] →
Organiser
2. Scroll right to switch applications
(Quickword, Quicksheet, and
Quickpoint).
3. Scroll to a document and press the
Confirm key.
56
→
Quickoffice
.
4. While viewing a doc ument, press
Options
<
options:
Option Description
Zoom
Worksheet
Go to
Search
options
Start autoscroll
Resize
> to use the following
Magnify part of a
document
Switch to another
worksheet
Jump to the top ,
bottom, or the specific
position of a document
Search for text
Automatically scroll
through a document
Resize a column or row,
or fit a column into the
widest column
Page 59

Personal productivity
Option Description
Pan
Full screen
Move right or left
Use the full display for
viewing
Update Quickoffice
With Quickmanager, you can download
program updates, new Quickoffice
products, or special offers.
1. In Standby mode, press [Menu]
Organiser
2. Scroll right to switch to
Quickmanager
3. Scroll to a Quickmanager item and
press the Confirm key.
→
Quickoffice
.
→
.
Adobe® Reader
With Adobe Reader, you can open and
view PDF documents.
1. In Standby mode, press [Menu]
Organiser
2. Press <
3. Scroll to a memory type and press the
Confirm key.
4. Scroll to a file type and press the
Confirm key.
5. Scroll to a file and press the Confirm
key.
→
Adobe PDF
Options
> →
®
→
.
Browse for file
.
57
Page 60

Personal productivity
6. While viewing a document, press
Options
<
options:
Option Description
Zoom
Find
View
Go to
> to use the following
Magnify part of a
document
Search for tex t
Use the full display for
viewing or rotating the
document
Skip to another page
Notes
With Notes, you can create text notes
and synchronise them with other devices.
58
Create a note
1. In Standby mode, press [Menu] →
Organiser
2. Press <
3. Enter text.
4. When you are finished entering text,
press <
→
Notes
Options
Done
> →
> to save the note.
.
New note
.
Synchronise notes with other
devices
1. In Standby mode, press [Menu] →
Organiser
2. Scroll to a note and press <
→
Synchronisation
3. Scroll to a sync profile or device and
press the Confirm key.
→
Notes
.
→
Start
Options
.
>
Page 61
4
Web
Your device allows yo u to connect to the
wireless web with the built-in web
browser. To connect to the web, you
must:
• Subscribe to a wireless network that
supports data calls
• Activate the data service for your SIM
card
• Obtain an internet access point from a
service provider
• Define your web settings
Your device is preset to access the
wireless web. If you cannot connect to
the web, contact y our service prov ider
to download new browser settings.
Browse a web page
1. In Standby mode, press [Menu] →
Web
.
The device shows the list of
bookmarks and folders.
2. Access a web page:
• Scroll to a bookmark or folder and
press the Confirm key
• Enter a web address and press the
Confirm key
3. While browsing a web pag e, pres s and
hold the Confirm key to display or hide
the toolbar:
Icon Description
Frequently used links
Page overview
59
Page 62
Web
Icon Description
Reload
Find
4. To close the web connection, press
Close
>.
<
• If your device shows "Not enough
memory," close other running
applications to free up the memory,
and then resta rt the browser.
• The device will show a security
indicator ( ) whenever you have
established an encrypted
connection.
While browsing, press <
Options
> to
access the following:
•
Go to web address
: move to the
entered web page
•
Bookmarks
60
: open the bookmark list
Save as bookmark
•
: create a new
bookmark for the current pag e
•
Rotate scre en
Navigation options
•
: switch to wide view
: view
screenshots of pages you have visited
recently or reload the current page
•
Zooming options
: zoom in or out on
a web page
•
Window
: block all pop-ups while
browsing the wireless web, or allow the
pop-ups to display on the browser
Clear privacy data
•
: delete data
transmitted while brow sing the
wireless web, such as cookies, data in
the cache, history, and form or
password data
Tools
•
: save pages for viewing offline,
send a web page, or view information
about a web page
Find
: search for text on a web page
•
•
Settings
: change the browser settings
Page 63

Web
Change browser settings
From the browser, press <
Settings
•
•
•
•
to access the following:
General
history, security, and Java options
Page
displaying web content
Privacy
options
Web feeds
automatically
: set access point, homepage,
: set options for loading and
: set bookmark and cookie
: set the page to update
Options
> →
Add a bookmark
1. In Standby mode, press [Menu] →
Web
.
2. Press <
3. Enter the bookmark name, address,
4. Press <
Options
manager
and access point, as well as a user
name and password if desired.
Options
> →
→
Add bookmark
Bookmark
> →
Save
.
.
Use a bookmark
While browsing, you can also access
bookmarks (see "Add a bookmark."
X
p.61). Press <
Bookmarks
Icon Description
Options
to access the following:
Start page of the access point
> →
61
Page 64
Web
Icon Description
Folder of automatic b ookmarks
Folder you have created
Default folder
Web feed folder
Bookmark
Save a web page and view it offline
When you save a web page, you can view
a copy of it offline without connec ting to
the web. The saved copy will not update
automatically , so yo u must re conne ct to
the web periodically to retriev e the
current version.
62
Save a web page
1. Use your browser to access the web
page (see "Browse a web page."
X
p.59).
2. Press <
Options
.
page
The web page is saved to your dev ice.
> →
Tools
→
Save
View a saved web page
1. In Standby mode, press [Menu] →
Web
.
Options
.
Saved pages
> →
Navigation op t i on s
2. Scroll to
Confirm key.
3. Scroll to a saved web page and press
the Confirm key.
4. To update the web page, press
<
Reload
and press the
→
Page 65

Download f ile s f ro m th e web
When you download files from the web,
your device stores them in a
corresponding folder in Gallery. For
example, your device will store
downloaded images in the Image s folde r.
Files you download from the web can
include viruses that will damage
your de vice. To lessen your r isk, o nly
download files from sources you
trust.
Some media files include D igi tal
Rights Mana gement to protect
copyrights. This protection may
prevent you from downloading,
copying, modifying, or transferring
some files.
Web
63
Page 66

Connectivity
5
Learn to transfer data to and from your
device via the Bluetooth wireless feature
or the PC data cable.
Use the Bluetooth wireless feature
You can connect with other Bluetoothenabled wireless devices over a distance
of 10 metres (30 feet). Wa lls or other
obstacles between devices may block or
impair the wireless connection.
Turn on the Bluetooth wireless
feature
1. In Standby mode, press [Menu] →
Connectivity
64
→
Bluetooth
.
2. Scroll to
Confirm key.
3. To make your device visible to others,
scroll to
press the Confirm key.
4. Select a visibility option and press the
Confirm key.
Bluetooth
My phone's visibility
and press the
and
Search for and pair with a
Bluetooth-enabled device
1. In Standby mode, press [Menu] →
Connectivity
2. Scroll right to open the paired device
list.
→
Bluetooth
.
Page 67
Connectivity
3. Press <
device
Options
.
> →
New paired
Your device se arches for and displays
the list of Bluetooth-enabled devices:
Icon Device type
Mobile phone
PC
Hands-free car kit
Headset or audio device
Unknown device
4. Scroll to a device and press the
Confirm key.
5. Enter a Bluetooth passcode and press
the Confirm key.
To pair with another Bluetoothenabled device, both devices must
use the same passcode. Headsets or
hands-free car kits may use a fixed
0000
passcode, such as
.
6. To allow the device to send and receiv e
data without confirmatio n, press
Yes
>. Otherwise, press <No> to
<
require confirmation.
Change paired device options
From the paired device list, press
Options
<
•
•
> to access the following:
New paired device
: search for
another Bluetooth-enabled device
Connect to audio device
: connect to
the paired audio device
65
Page 68
Connectivity
•
Assign shor t name
for a paired device
•
Set as authorised/Set as
unauthorised
device to connect automatically or
require permission
Delete
•
•
•
: remove a device from the list
Delete all
the list
Exit
: remove all devices from
: close the paired device list
: set a short name
: set to allow another
Send data via the Bluetooth
wireless feature
1. Select a file or item to send.
2. Press <
66
Options
Bluetooth
> →
Send
→
.
Via
3. Scroll to a paired device and press the
Confirm key.
OK
4. Enter a passcode and press <
(if necessary).
>
Receive data via the Bluetooth
wireless feature
1. When another device attempts to
access yours, press <
the connection.
Yes
2. Press <
are willing to receive data from the
device (if necessary).
Accepted items are placed in the
Inbox folder. The icon indicates
messages received via Bluetooth.
> again to confirm that you
Yes
> to permit
Page 69

Connectivity
Activate R emote S IM mode
T o use Remote SIM mode with a
compatible hands-free car kit,
1. Connect to your device from an
authorised hands-free car kit.
2. In Standby mode, press [Menu]
Connectivity
SIM mode
You can now make or answer calls only
with the connected hands-free car kit
via the SIM card on your device.
To deactivate it, press [ ]
remote SIM mode
→
Bluetooth →
→ On.
.
→
Remote
Exit
Connect via USB
Set a default action for your USB
connection
To set your device to perform a default
→
action when you connect the device to a
PC with the PC data cable,
→
1. In Standby mode, press [Menu]
Connectivity
2. Set the default USB mode (
player
transfer
You can also set your device to
on connection
default USB mode. If you use this
setting, your device will prompt you to
choose the USB mode every time you
connect to a PC.
,
PC Studio
).
→
USB
→
USB mode
, or
Data
, instead of using a
.
Media
Ask
67
Page 70

Connectivity
Use PC Studio
1. Change the USB connection to
2. Connect your device to a PC with the
3. Run PC Studio and manage personal
.
Studio
PC data cable.
data and media files.
Refer to the PC Studio help for more
information.
PC
Synchronise with Windows
Media Player
You can copy m usic files to the dev ice by
synchronising with Windows Media Player
11.
1. Change the USB connection to
2. Connect your device to a PC with the
68
.
player
PC data cable.
Media
3. Select
4. Enter the name of your device and
5. Select and drag the music files you
6. Click
7. When synchronisation is finished,
Sync digital media files to
this device
appears on your PC.
click
want to the sync list.
disconnect the device from the PC.
when a pop-up window
Finish
.
Start Sync
.
Copy files to a memory card
1. Insert a memory card into the device.
2. Change the USB connection to
transfer
3. Connect your device to a PC with the
PC data cable.
.
Data
Page 71

Connectivity
4. Select
5. Copy files from the PC to the memory
6. When you are finished, disconnect the
Open folder to view files
when a pop-up window appears on
your PC.
card.
device from the PC.
Synchronise your device
Learn to synchronise the data on your
device with data on a PC or other
wireless device.
Create a new sync profile
Your device includes a sync profile for PC
Studio.
To create a new sync profile,
1. In Standby mode, press [Menu]
Connectivity
2. Press <
profile
3. Press <
existing profile or <
settings.
4. Define the following:
•
Sync profile name
the profile
•
Applications
synchronise
•
Connection settings
for connecting to the network
5. Press <
profile.
→
Sync
.
Options
.
Yes
Back
> →
New sync
> to copy settings from an
No
> to define new
: set a name for
: set the applications to
: set options
> to save your new
→
69
Page 72

Connectivity
Synchronise data
1. Connect your device to another
Bluetooth-enabled wireless device (see
"Search for and pair with a Bluetoothenabled device."
2. In Standby mode, press [Menu]
Connectivity
3. Press <
Options
4. Scroll to a device and press the
Confirm key (if necessary).
Your device display s a progress me tre
at the bottom of the screen .
After synchronisation is complete, you
can press <
view a list of data that was changed.
70
X
p.64).
→
Sync
> →
Options
.
Synchronise
> →
View log
→
.
to
Page 73
Additional programs
6
Learn to use Calculator , Clock, Converter,
GPS data, and Landmarks.
Calculator
1. In Standby mode, press [Menu] →
Organiser
2. Use the alphanumeric keys and the
navigation key to perform basic
mathematical operations.
3. When performing calculations, press
<
Options
Last result
•
the last calculation
→
Calculator
Press [ ] to insert a decimal. Press
C
] to clear a result. Press [ ] to
[
switch functions.
> to access the following:
: insert the result from
.
•
Memory
calculator’s temporary memory
•
Clear screen
on the screen
: save, recall, or clear the
: clear all calculations
Clock
You can adjust clock settings, s et alarms,
and create a world clock.
Change clock settings
1. In Standby mode, press [Menu] →
Organiser
2. Press <
"Date and time."
→
Clock
Options
> →
X
.
Settings
p.91).
(see
71
Page 74

Additional pr o grams
Set a new alarm
1. In Standby mode, press [Menu] →
Organiser
2. Scroll right to the alarms view.
3. Press <
4. Set alarm details.
5. Press <
→
Clock
Options
Done
>.
.
> →
New alarm
.
Stop an alarm
When an alarm sounds, press <
end the alarm or <
the alarm after a specified time. You can
delay the alarm (snooze) up to five
times.
Your current profile setting will not
affect the volume of a clock alarm.
72
Snooze
Stop
> to repeat
> to
Create a world clock
With a world clock, you can monitor the
time in another city or country .
To create a world clock,
1. In Standby mode, press [Menu]
Organiser
2. Scroll right to the world clock view.
3. Press <
4. Scroll to a city and press the Confirm
key , or enter the first few lette rs of the
city name to search the list.
5. Repeat steps 3 and 4 to add more
cities (if necessary).
6. When you are finished adding cities,
press <
→
Clock
Options
Exit
>.
> →
.
Add city
→
.
Page 75

Additional pr o grams
Converter
With Converter, you can convert
measurements or currencies from one
unit to another. To convert currencies,
you must first set a base currency and
exchange rate.
Add currencies and exchange
rates
The value of the base cu rr enc y is
always 1. You must enter exc h ang e
rates for other curre ncies as the y
relate to on e u n it of the base
currency. Exchange rates change
often. To ensure an accurate
conversion, you must enter a current
exchange rate.
To set a base currency,
1. In Standby mode, press [Menu]
Organiser
2. Scroll right until the type shows
Currency
3. Press <
4. Scroll to a currency and press
<
Options
5. Enter the name of the base currency
and press the Confirm key.
6. Press <
currency
7. Press the Confirm key to confirm.
To add other currencies and exchange
rates,
1. Repeat steps 1-4 above.
→
Converter
.
Options
Options
> →
> →
Rename currency
> →
.
.
Currency ra te s
Set as base
→
.
.
73
Page 76

Additional pr o grams
2. Enter the name of a new currency and
press the Confirm key.
3. Scroll to the new currency and enter
the exchange rate.
4. Press <
Options
> →
Save
.
Convert currencies
1. In Standby mode, press [Menu] →
Organiser
2. Scroll right until the type shows
Currency
3. Scroll down to
select a currency to convert.
4. Scroll down to
amount to convert.
5. Scroll down to
select a currency to convert to.
The device displays the conversion
result.
74
→
Converter
.
.
Unit
and scroll right to
Amount
Unit
and enter the
and scroll right to
Convert measurements
1. In Standby mode, press [Menu] →
Organiser
2. Scroll right to change the type of
measurement.
3. Scroll down to
change the base unit (if necessary).
4. Scroll down to
base amount.
5. Scroll down to
change the conversion unit (i f
necessary).
The device displays the conversion
result.
→
Converter
Unit
Amount
Unit
.
and scroll right to
and enter the
and scroll right to
Page 77

Additional pr o grams
GPS data
You can view GPS data to help you
navigate, show your position, or monitor
trip details. Before you can use GPS data,
you must activa te a po sitionin g method
via a Bluetooth wireless connection or a
wireless network connection.
Activate a positioning method
1. In Standby mode, press [Menu]
Tools
→
GPS data
2. Press <
3. Scroll to a positioning method
Options
settings
Intergrated GPS, Bluetooth GPS
(
or
<
.
Network based
Options
> →
.
> →
) and press
Enable
Positioning
.
→
,
If you enable Bluetooth GPS, you
must pair with a Bluetooth-enabled
device (see "Search for and pair with
X
a Bluetooth-enabled device."
Once you activate a positioning
method, your device wi l l a ttempt to
open that connection when you launch
GPS data.
p.64).
Navigate with GPS data
1. In Standby mode, press [Menu] →
Tools
→
GPS data
2. Press <
3. Enter the latitude and longitude of
Options
→
Coordinates
your destination and press the Confirm
key.
Your dev ice will display the direction of
your destination, your current speed,
and the duration o f you r trip .
→
Navigation
> →
Set destination
.
.
75
Page 78

Additional pr o grams
4. To stop the GPS navig ation, p ress
Options
<
> →
Stop navigation
.
View your current position
In Standby mode, press [Menu] →
→
GPS data
→
Position
.
Tools
Monitor trip details
1. In Standby mode, press [Menu] →
Tools
→
GPS data
2. Press <
3. To stop monitoring trip details, press
76
Options
Your device will track trip details,
including distance, time, and speed.
Options
<
> →
> →
Stop
→
.
Trip distance
Start
.
Landmarks
With Landmarks, you can save your
current location or manually enter new
locations.
1. In Standby mode, press [Menu]
Tools
→
Landmarks
2. Press <
.
3. Enter details about the landmark (if
4. When you are finished entering
Options
Current position
To add your current location
automatically, your device must
have an active connection.
necessary).
landmark information, press <
.
> →
New landmark
or
Enter manually
→
Done
→
.
>.
Page 79

Additional pr o grams
Oxford
With Oxford, you can look up words of
various language and download a new
dictionary . The dictionary is av ailable
depending on your region.
Look up words
1. In Standby mode, press [Menu] →
Installations
2. Enter an English word and press the
Confirm key.
Change or download the
dictionary
1. In Standby mode, press [Menu] →
Installations
Options
<
2. Select a dictionary or
download a new dictionary .
> →
→
Oxford
→
Oxford
Direction
.
→
→ Choose
Download...
.
to
Change Oxford options
In Standby mode, press [Menu] →
Installations
Settings
•
Font size
the display
Full screen
•
viewing
•
Sound volume
speaker when the dictionary supports
the sound module
→
Oxford
→ <
to access the following:
: set the size of the text on
: use the full screen for
: set the volum e for the
Options
> →
Navigation
You can use the offline maps to search
for streets and cities.
Use the maps for a trial period and buy
them to use with your device.
77
Page 80

Additional pr o grams
For more details, refer to the we bsite
provided.
To open Navigation,
→
In Standby mode, press [Menu]
Installations
→
Navigation
.
XTRA
XTRA provides enhanced stand alone GPS
functionality to you by im pro vin g th e
speed and accuracy of positioning
capability. W ith XTRA, you can expand
your navigation to area where cellular
networks are not accessible. First,
download free XTRA data file to begin the
navigation much more quickly .
Download XTRA data file
1. In Standby mode, press [Menu] →
Installations
78
→
XTRA
.
2. Select
3. Select <
XTRA data download
Yes
server and download XTRA data file.
You will be additionally charged for
accessing the web and downloading
data.
> to connect to the XTRA
.
Navigate with XTRA data file
1. In Standby mode, press [Menu] →
Tools
→
2. Press <
settings
3. Scroll to
Options
<
4. Press <
5. Select
Navigation
navigation.
GPS data
Options
.
Integrated GPS
> →
Back
.
> →
Positioning
Enable
.
>.
to begin the GPS
and press
Page 81

Change XTRA settings
1. In Standby mode, press [Menu] →
Installations
2. Press <
Settings
•
Enable/Disable
data file. When enabled, you will be
charged for downloading the
information of valid time and current
time.
Auto download
•
automatically or manually download
XTRA data file
Download interva l
•
interval (in hours) for downloading
data
→
Options
.
XTRA
.
> and select
- set to use XTRA
- set to
- set the
Additional pr o grams
79
Page 82

Managers
7
Learn to manage files, applications,
device configurations, activation keys,
the installed memory card, and
connections.
File manager
With File manager, you can search for
and organise your files or folders.
Search for a file or folder
1. In Standby mode, press [Menu] →
Organiser
2. Press <
3. Scroll to a memory type and press the
Confirm key.
80
→
File mgr.
Options
> →
Find
.
4. Enter text in the search field and press
the Confirm key.
5. To open a file or folder from the search
results, scroll to the file or folder and
press the Confirm key.
Create a new folder
1. In Standby mode, press [Menu] →
Organiser
2. Press <
3. Enter a folder name and press the
Confirm key.
→
File mgr.
Options
> →
New folder
.
Move a file to a folder
1. In Standby mode, press [Menu] →
Organiser
→
File mgr.
Page 83

Managers
2. Scroll to a file or folder and press
Options
<
memory location (if necessary).
3. Scroll to a folder and press the Confirm
key.
4. Scroll to a subfolder and press the
Confirm key (if necessary).
5. Press the Confirm key.
> →
Move to folder
→ a
Application manager
Your device supports applications made
for the Symbian OS and the Java
platform, Micro Edition (J2ME™). Your
device will not support applications made
for other operating systems or Java
platforms (including PersonalJava™ ). To
download applications to your device, see
X
"Download files from the web."
p.63
Install a new application
1. In Standby mode, press [Menu] →
Installations
2. Scroll to an application and press
Options
<
3. Follow any onscreen instructions.
The application manager
automatically tries to verify an
application's digital signatures and
certificates during installation and will
show a warning if the application does
not meet normal security
requirements. To protect your device
and your data, do not install
applications that do not have valid
digital signatures or certificates.
> →
→
App. mgr
Install
.
.
81
Page 84

Managers
Change installation options
In Standby mode, press [Menu] →
Installations
Options
<
following:
•
Software installation
block installations
Online certificate check
•
check for online certificates when
installing applications
•
Default web address
web address for checking online
certificates
> →
→
App. mgr.
Settings
→
to access the
: set to allow or
: set to
: set a default
Remove an application
1. In Standby mode, press [Menu] →
Installations
2. Scroll to an application and press
<
Options
3. Press <
82
→
> →
Remove
Yes
> to confirm.
App. mgr.
.
Device manager
This feature is network-dependent and
may not be available from your se rvice
provider. If available, Device manager
allows your service provider to assist you
with device configurations. Before you
can start a configuration session, you
must define a server profile.
Define a server profile
1. In Standby mode, press [Menu] →
Tools
→
Device mgr.
2. Press <
3. Set the following server options
Options
profile
.
according to the instructions provided
by your service provider:
Server name
•
profile
> →
New server
: set a name for this
Page 85

•
Server ID
: set the ID of the remote
server
•
Server password
: set the password
that must be used by the device
manager to sync your device
Access point
•
•
Host address
: set an access point
: set the web address
of the host server
•
Port
: set a port to use for the dev ice
manager
•
User name
: set a user name for this
profile
•
Password
: set a user password for
this profile
•
Allow configuration
: set to allow
the server to configure your device
•
Auto-accept all requests
: set to
automatically accept new
configuration requests
Managers
Network authentication
•
: set to
require network authen ticatio n
4. When you are finished setting the
Back
options, press <
>.
Start a configuration session
1. In Standby mode, press [Menu] →
Tools
→
Device mgr.
2. Scroll to a server profile and press
Options
<
3. Press <
4. Scroll to an access point and press the
Confirm key (if necessary).
> →
Start configuration
Yes
> to confirm.
.
83
Page 86

Managers
Activation key manager
When you download digital content, you
may need to purchase an activation key
from the website that allows y o u to
access the file.
View activation keys
1. In Standby mode, press [Menu] →
Tools
→
Actv. keys
2. Scroll to a folder and press the Confirm
key:
Valid keys
•
•
Invalid keys
keys
•
Not in use
files that are no longer stored on the
device
3. Scroll to an activation key and press
the Confirm k ey.
84
.
: all valid activation keys
: expired activation
: activation keys of media
Restore an expired activation
key
When your activ ation k e y ex p ires, y ou
must purchase additional rights to use
the media file.
To restore an expired activation key,
1. In Standby mode, press [Menu]
Tools
→
Actv. keys
Options
Yes
Invalid keys
> →
> to confirm.
2. Scroll to
Confirm key.
3. Scroll to an activation key and press
<
4. Press <
5. Follow the onscreen instructions.
.
and press the
Get new key
→
.
Page 87

Managers
Memory card manager
With Memory card manager, you can
back up and restore data, protect a
memory card with a password, or view
memory details. Before you can use a
memory card for the first time, yo u must
format the card.
Format a memory card
Your device supports FAT16 or FAT32
file systems.
1. Insert a memory card (see the Quick
Start Guide).
→
2. In Standby mode, press [Menu]
Organiser
3. Press <
card
4. Press <
Options
.
Yes
→
Memory
> →
Format memory
> to confirm.
.
Back up data to a memory card
1. In Standby mode, press [Menu] →
Organiser
2. Press <
memory
3. Press <
→
Memory
Options
.
Yes
> to confirm.
.
> →
Back up phone
Restore data from a memory
card
1. In Standby mode, press [Menu] →
Organiser
2. Press <
card
3. Press <
Options
.
Yes
→
Memory
> →
Restore from
> to confirm.
.
85
Page 88

Managers
Protect a memory card with a
password
Devices that do not support this
feature, such as PCs, cannot read the
card while the pas sword protection is
active. Remove the password
protection from the card to use it with
those devices.
1. In Standby mode, press [Menu] →
Organiser
2. Press <
3. Enter and confirm a password (up to 8
characters).
4. To remove the p asswo rd, press
<
Options
5. Enter and confirm the password.
86
→
Memory
Options
> →
> →
Remove password
.
Set password
View memory details
You can view the used and available
memory on your memory card,
1. In Standby mode, press [Menu]
Organiser
2. Press <
→
Memory
Options
.
> →
Memory details
→
.
Connection manager
.
.
With Connection manager, you can view
the details of data connections and close
open connections.
View connection details
1. In Standby mode, press [Menu] →
Connectivity
data connections
→
Conn. mgr.
.
→
Active
Page 89

Managers
2. Scroll to a connection and press
Options
<
> →
Details
to access the
following:
•
Name
: the current access point or
modem (if using a dial-up
connection)
Bearer
•
•
•
: the type of data connection
Status
: the connection status
Total
: the total amount o f data
received and sent
•
Received
: the amount of data
received
•
Sent
: the amount of data sent
Duration
•
: the length of time the
connection has been open
•
Speed
: the current upload and
download speeds
•
Acc. pt.
: the name of the access
point in use
•
Shared
: the number of applications
using the same connection
Close an open connection
1. In Standby mode, press [Menu] →
Connectivity
.
data
→
Conn. mgr.
→
Active
2. Scroll to a connection and press
Options
<
3. Press <
> →
Yes
> to confirm.
Disconnect
.
View wireless connection details
1. In Standby mode, press [Menu] →
Connectivity
Available WLAN networks
→
Conn. mgr.
→
.
87
Page 90

Managers
2. Scroll to a connection and press
Options
<
> →
Details
to access the
following:
•
Network
: the name of the access
point in use
•
Signal
: the strength of the signal
•
Mode
: the current network mo de
Security
•
: the security state of the
access point in use
•
Coverage
: the number of access
points
•
Speed
: current upload and
download speeds
88
Page 91
Settings
8
Learn about your device settings. To
access your device settings,
1. In Standby mode, press [Menu]
Settings
2. Scroll to a category (
Connection
press the Confirm key.
.
Applications
.
General, Phone
) and
Options
, or
You can also access some settings
from other menus: press <
→
Settings
General settings
→
>
Personalisation
Control the appearance and behavior of
,
your display, Standby mode, tones, and
language (for
Quick Start Guide).
Display
•
Brightness
display
•
Font size
the display
•
Welcome note/logo
or image that shows when you turn on
the device
•
Backlight on time
before the backlight dims
Themes
: set the brightness of the
: set the size of the text on
settings, see the
: set the delay
: set a text note
89
Page 92

Settings
•
Dim time
: set the delay before the
dimmed backlight turns off
Standby mode
•
Active standby
: set to show
application shortcuts and calendar
events in Standby mode
Shortcuts
•
: set the softkey shortcuts
for Standby mode
•
Active standby apps.
: set the
application shortcuts to show in
Standby mode
Tones
•
Ringing tone
: set a ringtone for
incoming voice calls
•
Video call tone
: set a ringtone for
incoming video calls
•
Ringing type
90
: set a ring type
•
Ringing volume
: set the volume for
ringtones and message alerts
•
Message alert tone
: set a tone for
incoming text or multimedia messages
•
E-mail alert tone
: set a tone for
incoming email messages
Calendar alarm tone
•
: set a tone for
calendar events
•
Clock alarm tone
: set a tone for a
clock alarm
•
Vibrating alert
: set a vibrating alert
for incoming calls and messages
•
Keypad to nes
: set the volume for
keypad tones
•
Warning tones
: set the device to
sound a warning tone (e.g., when the
battery is low)
Page 93

Settings
Language
•
Phone language
: set a display
language (for all menus and
applications)
•
Writing language
: set a language for
writing messages (for all text editors
and dictionaries)
Predicti ve text
•
: turn Predictive text
on or off (for all text editors)
Date and ti me
Control the appearance and behavior of
the date, time, and alarms.
•
Time
: set the current time (press [C]
to switch between am and pm)
•
Time zone
•
Date
•
Date format
Date separator
•
: set the time zone
: set the current date
: set a date format
: set a date separator
Time format
•
Time separator
•
•
Clock typ e
: set a time format
: set a time separator
: set a clock type for the
display
•
Clock alarm tone
: set a tone for a
clock alarm
•
Alarm snooze time
: set the delay for
alarms to repeat
•
Workdays
: set the days of the week
to sound alarms
•
Network operator time
: set the
network to automatically update the
time and date
91
Page 94

Settings
Enhancement
Set the device to use the hea dse t,
headphone, hands-free car kit, or a TV as
the default enhancement: press
Options
<
> →
Set as default
. You can
change the following settings for each
enhancement:
Default profile
•
: set the default profile
for the enhancement
•
Automatic answer
: set the
enhancement to auto m atically a nsw e r
incoming calls (when connected to the
device)
•
TV screen size
: set a screen size of
your TV
•
TV system
: set a system of your TV
Security
Set security codes and manage security
certificates or security modules.
92
Phone and SIM card
•
PIN code request
: set the device to
request a PIN code each time you turn
it on
•
PIN code
: set a PIN code for the
device
•
PIN2 code
: set a PIN2 code (supplied
with some SIM cards)
•
Phone autolock period
: set the delay
before the device locks automatically
•
Lock code
: set a lock code for the
device
•
Auto key lock
: set to lock the k eypad
automatically after the display turns o ff
•
Lock if SI M ca rd changed
: set to
lock the device automatically wh en the
SIM card is changed
Closed user group
•
: set the device to
restrict calls to and from a selected
group of users
Page 95

•
Confirm SIM services
: set the device
to show a confirmation message when
you use a SIM service
Lock Keypad if sl ide clos...
•
: set to
lock the keypad auto matically when
the device is closed
Certif. management
Your device uses d igital certificates to
verify the identity and authenticity of
various online services and software.
These certificates help keep your
personal data secure and help you avoid
viruses and other dangerous softw are. In
Certificate management, you can view
certificate details, delete certificates, or
change the following trust settings:
Internet
•
: set the device to verify web
servers that use this certificate
Settings
Online certif. check
•
: set the device
to check the certificate against a list of
revoked certificates
VPN
: set the device to verify VPN
•
connections that use this certificate
Security module
Manage security modules on your device.
Factory settings
Reset settings to their factory defaults.
You m ust enter the lock code to reset the
device. After entering the code, th e
device will restart.
Positioning
Control the methods and serv ers y o ur
device uses to retrieve global positioning
information.
93
Page 96

Settings
Positioning methods
•
Integrated GPS
the internal GPS to retrieve glo bal
positioning information
•
Bluetooth GPS
the Bluetooth feat ure to retrie ve glob al
positioning information
Network based
•
the cellular network to retrieve global
positioning information
Positioning server
•
Access point
the global positioning server
•
Server address
for the global positioning server
•
Operation Mode
mode for the global positioning server
94
: set the device to use
: set the device to use
: set the device to use
: set an access point for
: set a web address
: set an operation
Phone settings
Call
Control how your device handles calls
with caller ID, call waiting, speed dial,
and other call settings.
Send my caller ID
•
caller ID based on your preferences or
network settings
Call waiti n g
•
incoming call while you are on a call
•
Reject call with SMS
text message to callers you reject
•
Message text
send to rejected callers
•
Image in video call
use during a video call
•
Automatic redial
automatically redial an unconnected
call
: set to send your
: set to alert you of an
: set to send a
: set the message to
: set an image to
: set to
Page 97

•
Show call duration
: set to show the
length of a call
•
Summary after call
: set to show a
summary after a call
•
Speed dialling
: set to allow speed
dialling
Anykey answer
•
: set to answer a call
when you press any key (except
[], and [Volume]).
•
Alert during call
: set to sound a tone
when you receive a message and an
alarm expires during a call
Side volume key
•
: set [Volu m e] to
mute the ringer or reject calls when
pressed during an incoming call
•
Slide up
: set to answer a call when
you open the dev ice
•
Slide down
: set to continue or stop an
operation when you close the device
Settings
Call divert
Divert incoming calls to another number.
When you divert calls, you must specify a
receiving numbe r or de l ay tim e for
diverted calls.
Voice calls
•
[
],
All voice calls
calls
•
If busy
are on another call
•
If not answered
you do not answer
•
If out of reach
when you are outside the service area
•
If not available
when your device is off
: set to divert all voice
: set to divert calls when you
: set to divert calls
: set to divert calls
: set to divert calls
95
Page 98

Settings
Data and video calls
•
All data a nd vide o calls
: set to divert
all data and video calls
•
If busy
: set to divert calls when you
are on another call
•
If not answered
: set to divert calls
you do not answer
If out of reach
•
: set to divert calls
when you are outside the service area
•
If not available
: set to divert calls
when your device is off
Call barring
•
Outgoing calls
outgoing calls
•
Internationa l c alls
calls to international numbers
96
: set to prevent all
: set to prevent
International calls except to home
•
country
: set to prevent international
calls to countries other than your home
country
Incoming calls
•
: set to prevent all
incoming calls
•
Incoming calls when abroad
: set to
prevent incoming calls when you are
outside your home service area
Network
Control network modes and selection
methods.
•
Network mode
UMTS or GSM netw o rk o r set to
operate on both (Du al m o d e)
: set to operate on a
Page 99

•
Operator selection
automatically or manually select a list
of cellular networks
To receive service on another
network, you must select one that
has a roaming agreement with your
home network.
Cell info display
•
the device is used in a Micro Cellular
Network
Operator Settings
•
service provider according to the SIM
card you are using
: set the device to
: set to indicate when
: check your
Settings
Connection settings
Bluetooth
Control the Bluetooth wireless feature.
Bluetooth
•
feature on or off
My phone's visibility
•
device visible to or hidden from other
Bluetooth-enabled devices and set how
long the device is visible to other
Bluetooth-enabled devices
My phone’s name
•
your device
•
Remote SIM mode
to the SIM card in your device so that
you can make a call from a Bluetooth
hands-free car kit or headset
connected to your device
: turn the Bluetoo th wireless
: make your
: set a name for
: activate access
97
Page 100

Settings
USB
Control how your device behaves when
you connect it to a PC.
•
USB mode
: set to
Media player
(when synchronising with Windows
Media Player to copy media files),
Studio
(when using PC Studio to sync
files), or
Data transfer
(when using a
memory card to transfer files)
•
Ask on connection
: set to ask which
mode to use when you connect to a PC
Access points
Control access point connections,
passwords, and homepages.
•
Connection name
access point connection
•
Data bearer
type
98
: set a name for the
: set a data transmission
PC
•
Access point name
: set the web
address for the access point
•
User name
Prompt password
•
: set a user name
: set to ask for a
password when you connect to the
access point
•
Password
: set a password for the
access point
•
Authentication
: set an authentication
mode
•
Homepage
: set a homepage for
access points that connect to web
services
You can also define advance d settings for
access points: press <
Advanced settings
Network type
•
.
: set a network type
Options
> →
(IPv6 or IPv4)
 Loading...