


D
(
2
Samsung
Smartphone
SGH-D710
n
o
i
s
r
e
v
t
f
a
r
)
?
?
.
10
.
04
0

This product includes software licensed from Symbian Ltd © 1998-2004. Symbian
and Symbian OS are trademarks of Symbian Ltd.
Java™ and all Java-based marks are trademarks or registered trademarks of Sun
Microsystems, Inc.

Contents
Important safety precautions . . . . . . . . . . . . . . . . . . 9
C
HAPTER 1: Getting started
What’s in the box? . . . . . . . . . . . . . . . . . . . . . . . . . 12
Getting to know your Smartphone . . . . . . . . . . . . . . 14
Installing the SIM card . . . . . . . . . . . . . . . . . . . . . . 17
Installing the battery . . . . . . . . . . . . . . . . . . . . . . . 19
Charging the battery . . . . . . . . . . . . . . . . . . . . . . . 21
Switching on or off the Smartphone . . . . . . . . . . . . . 22
Using an optional memory card . . . . . . . . . . . . . . . . 23
C
HAPTER 2: General information
Standby mode . . . . . . . . . . . . . . . . . . . . . . . . . . . . 26
Extend view . . . . . . . . . . . . . . . . . . . . . . . . . . . . . 30
Menu screen . . . . . . . . . . . . . . . . . . . . . . . . . . . . . 30
Online help . . . . . . . . . . . . . . . . . . . . . . . . . . . . . . 33
Navigation bar - moving horizontally . . . . . . . . . . . . 34
Actions common to all applications . . . . . . . . . . . . . 35
Volume control . . . . . . . . . . . . . . . . . . . . . . . . . . . 38
Keypad lock (Keyguard) . . . . . . . . . . . . . . . . . . . . . 39
Shared memory . . . . . . . . . . . . . . . . . . . . . . . . . . . 39
Entering text . . . . . . . . . . . . . . . . . . . . . . . . . . . . . 40
3

Contents
CHAPTER 3: Call functions
Making a call . . . . . . . . . . . . . . . . . . . . . . . . . . . . . 46
Answering a call . . . . . . . . . . . . . . . . . . . . . . . . . . 51
Using options during a call . . . . . . . . . . . . . . . . . . . 52
Viewing the Log . . . . . . . . . . . . . . . . . . . . . . . . . . . 53
C
HAPTER 4: Contacts
Creating contact cards . . . . . . . . . . . . . . . . . . . . . . 59
Copying contacts . . . . . . . . . . . . . . . . . . . . . . . . . . 61
Options when viewing contacts . . . . . . . . . . . . . . . . 61
Sending contact information . . . . . . . . . . . . . . . . . . 66
Subscribed contacts . . . . . . . . . . . . . . . . . . . . . . . . 66
Contact groups . . . . . . . . . . . . . . . . . . . . . . . . . . . 69
C
HAPTER 5: Entertainment
Camera . . . . . . . . . . . . . . . . . . . . . . . . . . . . . . . . 71
MP3 Player . . . . . . . . . . . . . . . . . . . . . . . . . . . . . . 79
RealPlayer . . . . . . . . . . . . . . . . . . . . . . . . . . . . . . 83
Gallery . . . . . . . . . . . . . . . . . . . . . . . . . . . . . . . . . 90
Games . . . . . . . . . . . . . . . . . . . . . . . . . . . . . . . . 101
C
HAPTER 6: Message services
Messaging . . . . . . . . . . . . . . . . . . . . . . . . . . . . . 106
Voice mail . . . . . . . . . . . . . . . . . . . . . . . . . . . . . . 142
Chat . . . . . . . . . . . . . . . . . . . . . . . . . . . . . . . . . 143
C
HAPTER 7: Scheduler
Calendar . . . . . . . . . . . . . . . . . . . . . . . . . . . . . . 155
To-do . . . . . . . . . . . . . . . . . . . . . . . . . . . . . . . . . 162
4

Contents
CHAPTER 8: Extras
Anyvoice . . . . . . . . . . . . . . . . . . . . . . . . . . . . . . 164
Notes . . . . . . . . . . . . . . . . . . . . . . . . . . . . . . . . . 169
Calculator . . . . . . . . . . . . . . . . . . . . . . . . . . . . . . 170
Converter . . . . . . . . . . . . . . . . . . . . . . . . . . . . . . 172
Recorder . . . . . . . . . . . . . . . . . . . . . . . . . . . . . . 174
Clock . . . . . . . . . . . . . . . . . . . . . . . . . . . . . . . . . 176
WorldMate . . . . . . . . . . . . . . . . . . . . . . . . . . . . . 179
Memory . . . . . . . . . . . . . . . . . . . . . . . . . . . . . . . 186
Wallet . . . . . . . . . . . . . . . . . . . . . . . . . . . . . . . . 189
Viewer . . . . . . . . . . . . . . . . . . . . . . . . . . . . . . . . 196
C
HAPTER 9: Internet
Web . . . . . . . . . . . . . . . . . . . . . . . . . . . . . . . . . . 202
Operator Menu . . . . . . . . . . . . . . . . . . . . . . . . . . 213
C
HAPTER 10: Personalisation
Profiles . . . . . . . . . . . . . . . . . . . . . . . . . . . . . . . . 214
Theme . . . . . . . . . . . . . . . . . . . . . . . . . . . . . . . . 218
Go to . . . . . . . . . . . . . . . . . . . . . . . . . . . . . . . . . 220
Mounut . . . . . . . . . . . . . . . . . . . . . . . . . . . . . . . 222
Presence . . . . . . . . . . . . . . . . . . . . . . . . . . . . . . 227
C
HAPTER 11: Settings
Changing the settings . . . . . . . . . . . . . . . . . . . . . 231
Phone settings . . . . . . . . . . . . . . . . . . . . . . . . . . 232
Call settings . . . . . . . . . . . . . . . . . . . . . . . . . . . . 236
Connection settings . . . . . . . . . . . . . . . . . . . . . . . 238
Date and time settings . . . . . . . . . . . . . . . . . . . . . 248
5

Contents
Security settings . . . . . . . . . . . . . . . . . . . . . . . . . 249
Call diverting settings . . . . . . . . . . . . . . . . . . . . . 255
Call barring settings . . . . . . . . . . . . . . . . . . . . . . . 257
Network settings . . . . . . . . . . . . . . . . . . . . . . . . . 259
Enhancement settings . . . . . . . . . . . . . . . . . . . . . 260
C
HAPTER 12: Managers
File manager . . . . . . . . . . . . . . . . . . . . . . . . . . . . 261
Application manager . . . . . . . . . . . . . . . . . . . . . . 263
Device manager . . . . . . . . . . . . . . . . . . . . . . . . . 267
C
HAPTER 13: Connectivity
Infrared connections . . . . . . . . . . . . . . . . . . . . . . 269
PC Suite . . . . . . . . . . . . . . . . . . . . . . . . . . . . . . . 272
Remote synchronisation . . . . . . . . . . . . . . . . . . . . 273
Connection manager . . . . . . . . . . . . . . . . . . . . . . 275
A
PPENDIX A: Troubleshooting
General problems . . . . . . . . . . . . . . . . . . . . . . . . 278
Call problems . . . . . . . . . . . . . . . . . . . . . . . . . . . 280
Power and charging problems . . . . . . . . . . . . . . . . 281
Application problems . . . . . . . . . . . . . . . . . . . . . . 283
A
PPENDIX B: Important safety information
SAR certification information . . . . . . . . . . . . . . . . . 286
Precautions when using batteries . . . . . . . . . . . . . 287
Road safety . . . . . . . . . . . . . . . . . . . . . . . . . . . . 289
Operating environment . . . . . . . . . . . . . . . . . . . . 289
Electronic devices . . . . . . . . . . . . . . . . . . . . . . . . 290
Potentially explosive environments . . . . . . . . . . . . 292
6

Contents
Emergency calls . . . . . . . . . . . . . . . . . . . . . . . . . 293
Other important safety information . . . . . . . . . . . . 294
A
PPENDIX C: Care and maintenance
7

Contents
8

Important safety precautions
Read these guidelines before using your wireless phone.
Failure to comply with them may be dangerous or
illegal.
Road safety at all times
Do not use a hand-held phone while driving; park the
vehicle first.
Switching off when refuelling
Do not use the phone at a refuelling point (service
station) or near fuels or chemicals.
Switching off in an aircraft
Wireless phones can cause interference. Using them in
an aircraft is both illegal and dangerous.
Switching off near all medical equipment
Switch your phone off near medical equipment.
Hospitals or health care facilities may be using
equipment that could be sensitive to external RF energy.
Follow any regulations or rules in force.
Interference
All wireless phones may be subject to interference,
which could affect their performance.
9

Special regulations
Meet any special regulations in force in any area and
always switch off your phone whenever it is forbidden to
use it, or when it may cause interference or danger (in a
hospital for example).
Water resistance
Your phone is not water-resistant. Keep it dry.
Sensible use
Use only in the normal position (held to the ear). Avoid
unnecessary contact with the antenna when the phone
is switched on.
Emergency call
Key in the emergency number for your present location,
then press the key. Give all the necessary
information as accurately as possible. Do not end the
call until given permission to do so.
Keeping small children away from your phone
Keep the phone and all its parts including accessories
out of the reach of small children.
10
Accessories and batteries
Use only Samsung-approved accessories and batteries.
Use of any unauthorised accessories could damage your
phone and may be dangerous.
Use only Samsung-approved batteries and recharge
your battery only with Samsung-approved chargers.

Qualified service
Only qualified service personnel may repair your phone.
For more detailed safety information, see page 286.
CAUTION
RISK OF EXPLOSION IF A BATTERY IS REPLACED
BY AN INCORRECT TYPE.
DISPOSE USED BATTERIES ACCORDING TO THE
INSTRUCTIONS.
11

1
Getting started
Congratulations on the purchase of your new
Smartphone! This chapter helps you set up your
Smartphone, charge the Smartphone’s batteries, and
familiarise yourself with its different components.
What’s in the box?
Your package contains the following items:
SGH-D710 Smartphone Batteries
12
Trav el c ha r ge r
Quick Reference Guide
* The PC Link CD contains PC Suite, Add-on software, and applications.
PC Link CD* + User Manual CD
PC data link cable

Getting started
In addition, you can obtain the following accessories for
your Smartphone from your local Samsung dealer:
• Standard Battery • Stylish Handsfree Car Kit
• Extended Battery • Travel Charger
• PC Data Link Cable • PC Link CD
• Straight Headset • Hand Strap
• Car Cradle • RS-MMC
• Car Charger/Adapter
Note
: The items supplied with your Smartphone and available
accessories may be different depending on your country
or service provider.
13
Getting started
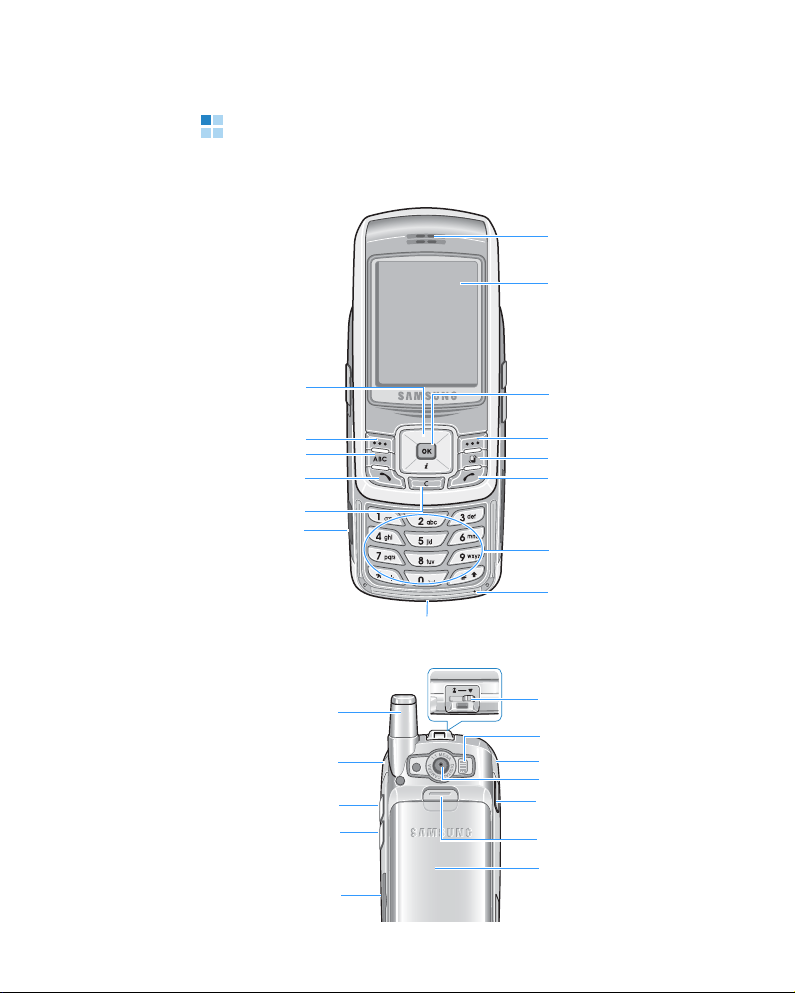
Getting to know your Smartphone
Earpiece
Display
14
Navigation keys
Soft key (left)
ABC key
Talk /Vo ice
command key
Clear key
Infrared port
Antenna
Speaker
Power key
Camera key
Memory card slot
OK key
Soft key (right)
Menu key
End key
Alphanumeric
keys
Microphone
Charging/Communication port
Macro lever
Camera flash
Speaker
Camera
Headset jack
Battery lock
Battery

Key Description
Power
key. Press and hold to turn on or off the
Smartphone.
In Standby mode, displays the list of the profiles.
Getting started
Camera
In
key. Press to open the
Camera
, press to take a picture or to record a video
Camera
application.
clip.
Soft
keys. Press either soft key to perform the command
shown on the screen immediately above the keys.
ABC
key. In Standby mode, press to switch between the
Standby screen and Extend view.
When entering text, press to change the text input
method.
Menu
key. Press to open the main menu screen, which
contains a list of available features and applications.
Navigation
keys. Press to scroll through items on a
screen. Press to move the cursor in a text input field.
In Standby mode, press the Down key to open the
application and the other keys to access your favourite
applications; you can assign applications to each key
according to your preferences.
OK
key. Press to confirm your selection. The
OK
similar to the "Enter" key on a keyboard.
In Standby mode, press to open the
Contacts
application.
Web
key is
15
Getting started
Key Description
Talk/Voice command
key.
Press to:
• dial a phone number on the screen.
• answer an incoming call.
• access call logs.
In Standby mode, press and hold to open the
Anyvoice
application.
Clear
key. Press to clear one or more characters when
you are in a text field.
Press to delete contents in any application or remove
add-on applications.
End
key. Press to end a call. Press to hide the currently
activated application.
Press to enter numbers and characters.
Press to enter an international prefix or pauses when
entering a phone number. Press to display a list of
symbols when you are in a text input field.
Press to change case in a text input field. Press and hold
to switch between text and number input modes.
16

Getting started
Installing the SIM card
When you subscribe to a cellular network, you are
provided with a plug-in SIM card loaded with your
subscription details, such as your PIN, any optional
services available, and much more.
• Keep all SIM cards out of the reach of small children.
• The SIM card and its contacts can easily be damaged
by scratches or bending, so be careful when handling,
inserting, or removing the card.
• When installing the SIM card, make sure that your
Smartphone is switched off before removing the
battery.
A PIN (Personal Identification Number) is supplied with
the SIM card from your network operator and must be
entered when you switch on your Smartphone for the
first time.
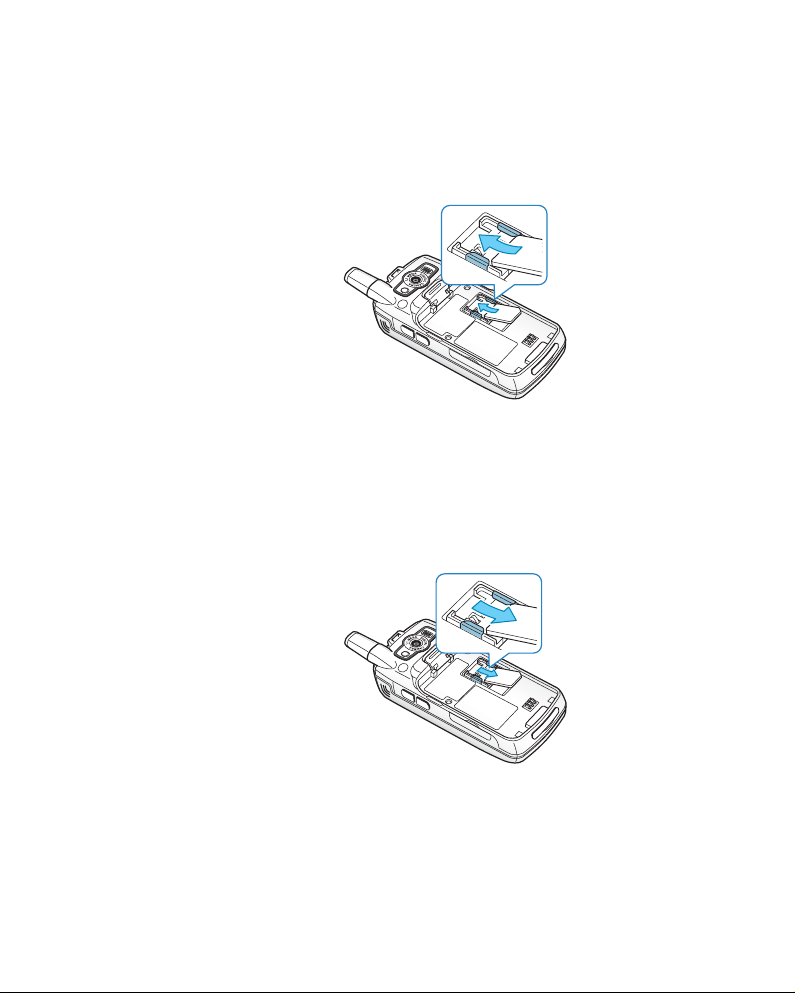
Inserting the SIM card
1. If necessary, remove the battery by referring to
page 20.
17
Getting started
2. Insert and slide the SIM card under the two tabs, as
shown, ensuring that the gold-coloured contacts of
the card face down into the Smartphone.
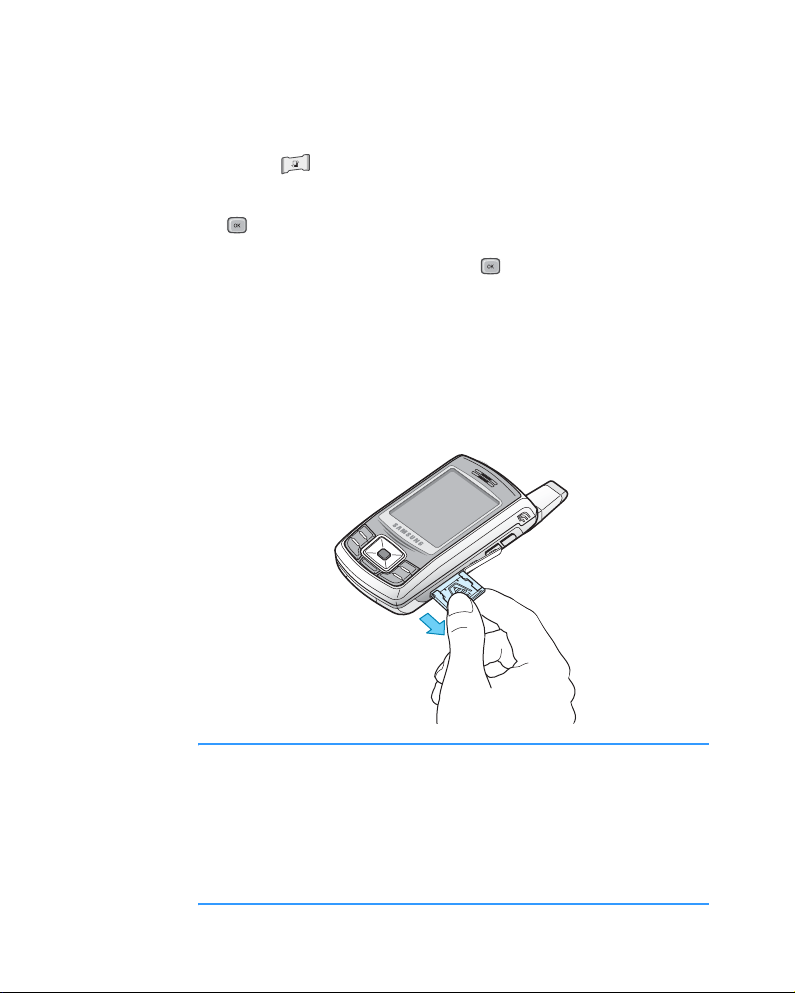
Removing the SIM card
To remove the SIM card, slide the card out of the holder,
as shown.
18

Getting started
Installing the battery
Your Smartphone is powered by a rechargeable Li-ion
battery. Use only approved batteries and chargers. Ask
your local Samsung dealer for further details.
Note
: You must fully charge the battery before using your
Smartphone for the first time. Fully recharging a
discharged standard battery takes approximately 90
minutes.
Installing the battery
1. Insert the tabs at the bottom edge of the battery into
the slots on your Smartphone.
19

Getting started
2. Press the top of the battery until it clicks into place.
Make sure that the battery is securely locked before
switching on the Smartphone.
Removing the battery
1. If necessary, switch off the Smartphone by pressing
and holding on the right side of the Smartphone
until the power-off image displays.
2. To remove the battery, with the back of the
Smartphone facing you, press the battery lock
upward and lift the battery away, as shown.
20
Battery lock

Getting started
Charging the battery
Note
: The Smartphone can be used while the battery is being
charged, but this causes the battery to charge more
slowly.
1. Plug the connector of the travel charger into the
bottom of the Smartphone. Check that the arrow on
the connector is facing up.
2. Plug the charger into a standard AC wall outlet.
3. When charging is finished, first unplug the charger
from the power outlet. Then remove the charger from
the Smartphone by pressing the buttons on both
sides of the connector and pulling the connector out.
21

Getting started
Switching on or off the Smartphone
1. Press and hold on the right side of the Smartphone
until the power-on image displays.
If you turn on the smartphone for the first time, you
need to set the current time and date.
22
2. Enter the current time and press the
3. Enter the current date and press the
OK soft key.
OK soft key.
4. If the Smartphone asks for a PIN, enter the PIN and
press the
OK soft key. For further details, see
page 249.
5. If the Smartphone asks for a lock code, enter the lock
code and press the
OK soft key. The defoult lock code
is “00000000.” For further details, see page 249.
The Smartphone searches for your network, and after
finding it, the Standby screen appears on the display.
Now, you can make or receive a call.
Note
: To change the display language, use the
language
option in the
Settings
menu. For further
Phone
details, see page 232.

Getting started
6. To switch off the Smartphone, press and hold until
the power-off image displays.
Note
: If your Smartphone is closed, you first need to open
it to activate the display and the keypad.
Using an optional memory card
Using a memory card (MMC), you can store your
multimedia files, such as video clips, sound files, photos,
and messaging data, and back up information from your
Smartphone’s memory.
Notes
:
• Use only compatible memory cards with your Smartphone.
Other memory cards, such as Secure Digital (SD) cards, do
not fit in the card slot and are not compatible with your
Smartphone. Using an incompatible memory card may
damage the card, as well as the Smartphone, and data
stored on the card.
• When you insert/remove a locked memory card (indicated as
“memory card locked” when you open the
Memory
application), you will not hear the system sound on insertion.
Also, you will not hear the system sound and see the note on
removal.
23
Getting started
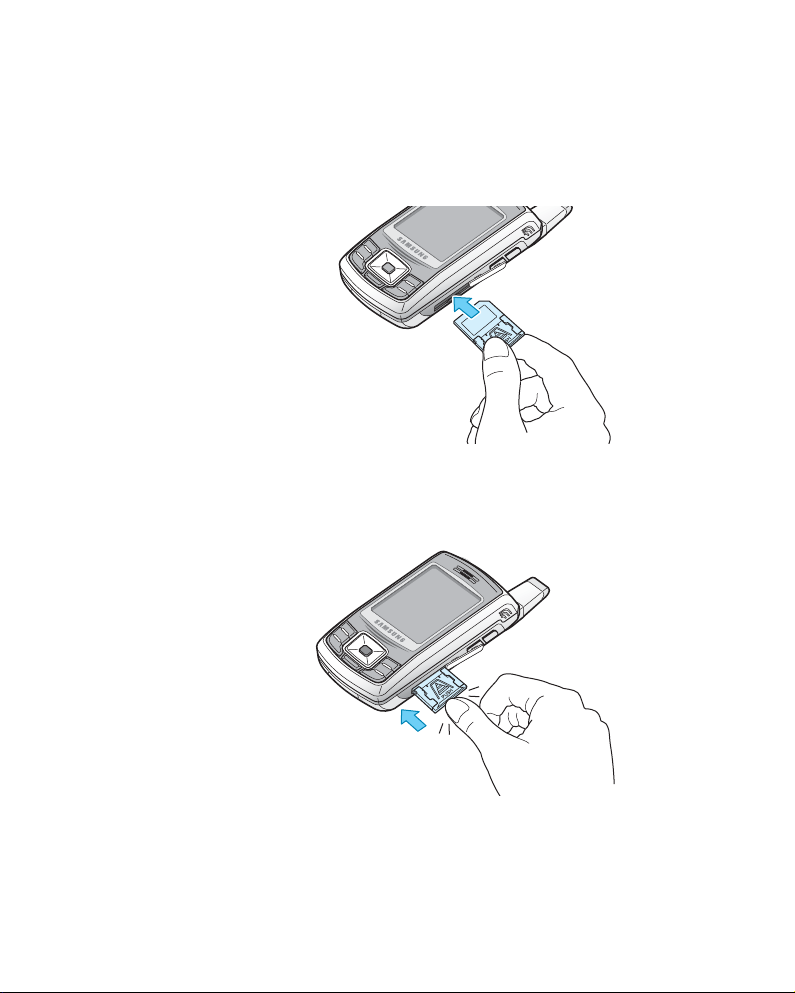
To insert a memory card:
1. Insert the card into the memory card slot with the
label facing up.
2. Push the card in with your thumb until it locks into
place. You will hear the system sound.
24
To remove the memory card:
1. Press to access the Menu.
Getting started
2. Scroll to
Extras using the Navigation keys and press
.
3. Scroll to
4. Press the
key when
5. Press the
Memory and press .
Options soft key and press the Select soft
Remove mem. card highlights.
Yes soft key.
6. Slide the card out of the card slot and then press the
OK soft key.
WARNING!
• Removing the memory card without following the procedure
above may cause damage to your data or the memory card.
• If you need to reboot the Smartphone while installing an
application on the memory card, do not remove the card
until the reboot is complete; otherwise the application files
may be lost.
25
2
General information
In addition to general phone functions, your Smartphone
provides various functions which are very handy for daily
use and for entertainment, such as
Messaging, Calculator, and Calendar.
This chapter provides some general information to help
you use the applications.
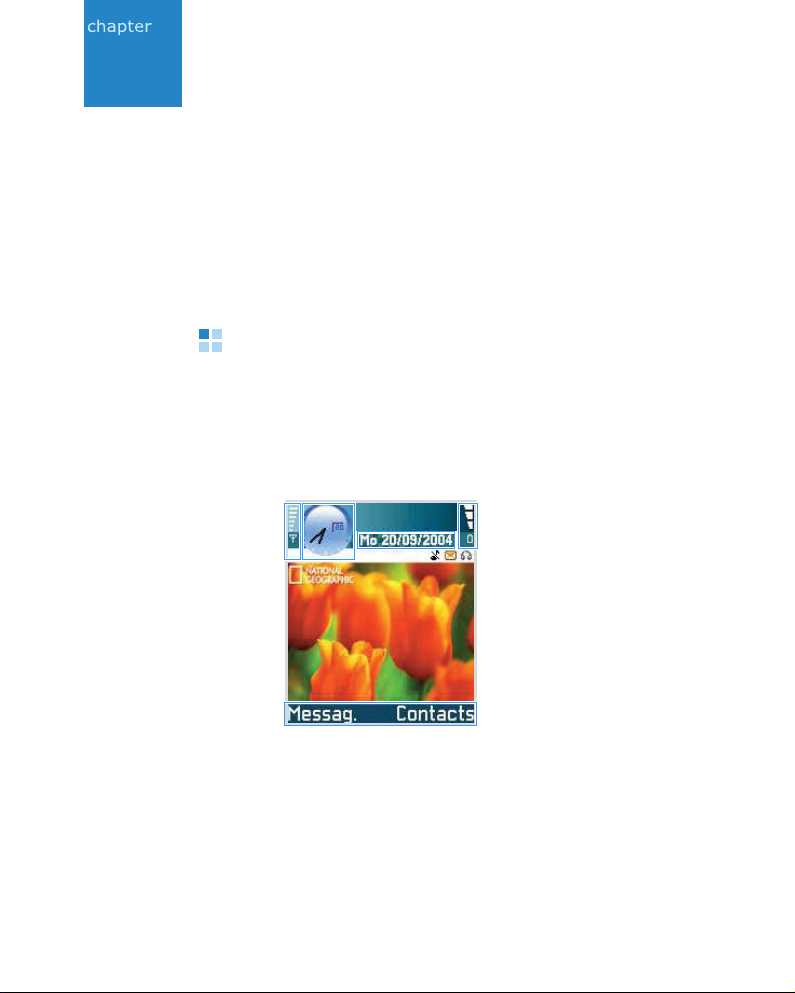
Standby mode
The components described below are shown when your
Smartphone is ready for use, with no characters keyed
in. In this state, the Smartphone is in Standby mode.
Camera, MP3 Player,
26
BC
A
D
E
G
F

General information
A
Shows the signal strength of the cellular network at
your current location. The more bars, the stronger
the signal. The symbol is replaced with the GPRS
symbol [ ] when the GPRS connection has been set
When available
to
and a connection is available on
the network or on the current cell. See “Packet data
(general packet radio service, GPRS)” on page 240
and “GPRS” on page 246.
B
Shows an analogue clock or a digital clock. See
“Date and time settings” on page 248.
C
Indicates in which cellular network the Smartphone
is currently being used.
D
Shows the battery charge level. The more bars, the
more power left in the battery.
E
Navigation bar: shows the currently active profile. If
the selected profile is
General
, the current date
displays instead of the profile name. For further
information, see “Navigation bar - moving
horizontally” on page 34 and “Profiles” on page 214.
F
Shows the current shortcuts assigned to the soft
keys. You can change soft key shortcuts. See
“Standby mode” on page 234.
G
Background image: You can select any image to be
used as a background image in Standby mode. See
page 218.
Note
: Your Smartphone has a screen saver. If no key is
pressed for 1 minute, the display is cleared and a
screen saver becomes visible. See page 235. To
deactivate the screen saver, press any key.
27
General information
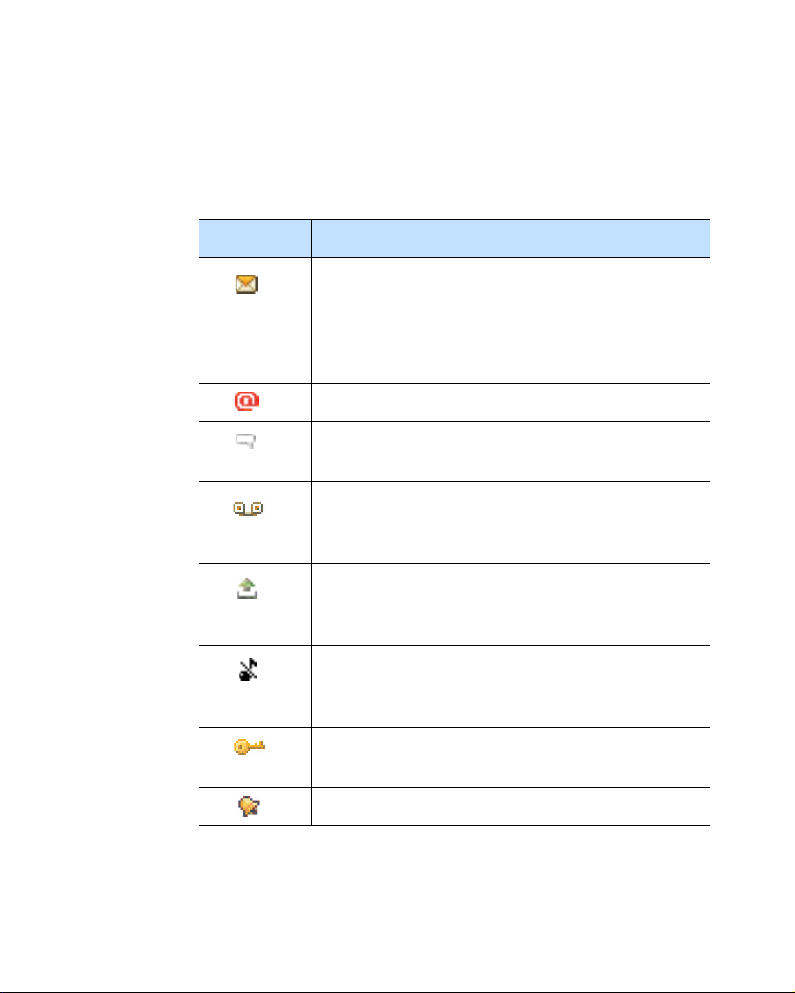
Indicators related to actions
One or more of the following icons may be shown when
the Smartphone is in Standby mode:
Indicator Meaning
Indicates that you have received new text or
multimedia messages. When this indicator is
blinking, the Smartphone’s memory capacity
is insufficient to store the message(s) and you
must delete some data.
Indicates that you have received new e-mails.
Indicates that you have received new chat
messages.
Indicates that you have received voice mail
messages. See “Calling your voice mailbox”
on page 48.
Indicates that there are messages waiting to
be sent in
Outbox
. See “Outbox” on
page 130.
28
Indicates that the
Silent
to
in the currently active profile. See
Ringing type
has been set
“Profiles” on page 214.
Indicates that the Smartphone’s keypad is
locked.
Indicates that you have an active alarm.
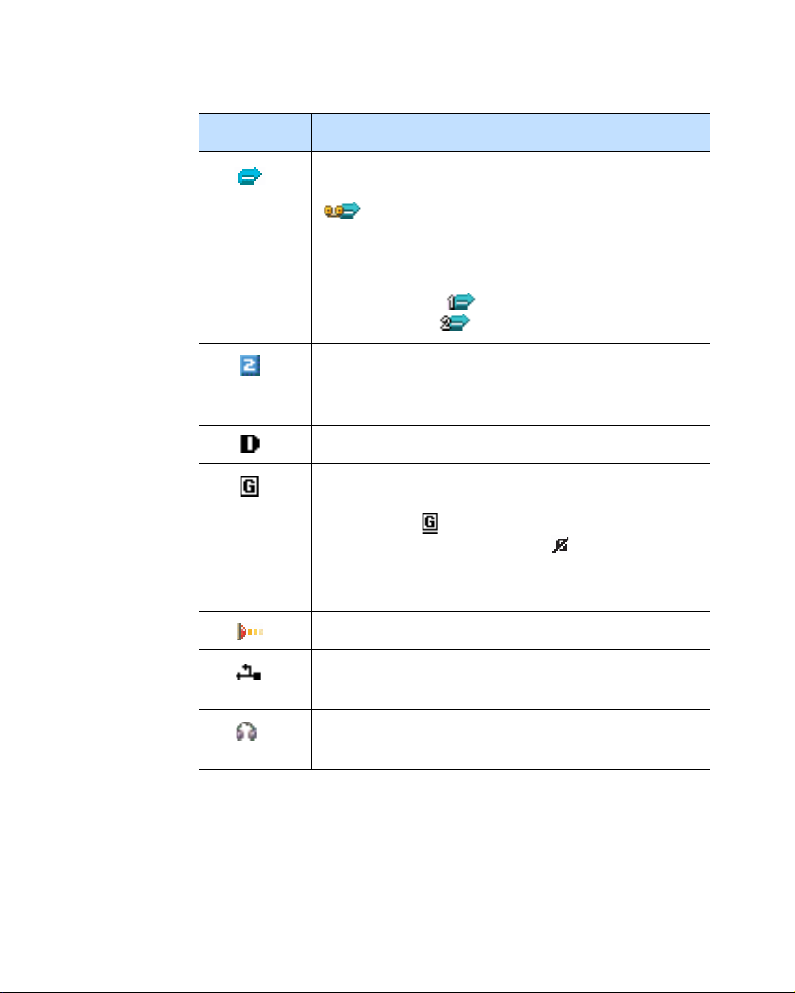
Indicator Meaning
Indicates that all calls to your Smartphone are
being diverted.
indicates that all calls to the Smartphone
are being diverted to a voice mailbox. See
“Call diverting settings” on page 255. If you
have two phone lines, the divert indicator for
the first line is and the indicator for the
second line is .
Indicates that you can make calls using phone
line 2 only (network service). See “Line in use
(network service)” on page 237.
Indicates a data call.
Appears instead of the signal strength
indicator when there is an active GPRS
connection.
indicates that there are
multiple GPRS connections.
the GPRS connection is put on hold during a
voice call.
Indicates that an infrared connection is active.
General information
indicates that
Indicates that a USB connection with a PC is
active.
Appears when a headset is connected to your
Smartphone.
29

General information
You will see the Extend view when you press in
Standby mode. On the Extend view, you can see
important information for the day, at a glance.
You can also quickly switch to applications you have
recently accessed.
Scroll to an item
and press to
In the Menu, you can access all of the applications for
your Smartphone. Press to open the Menu screen.
Extend view
Recently used
applications. Scroll
to an application
and press to
open it.
view details.
Menu screen
30
 Loading...