


PORTABLE Quad-BAND
MOBILE PHONE
User Manual
Please read this manual before operating your
phone, and keep it for future reference.

Intellectual Property
All Intellectual Property, as defined below, owned by or which is otherwise the property of Samsung or its respective suppliers relating to
the SAMSUNG Phone, including but not limited to, accessories, parts, or software relating there to (the “Phone System”), is proprietary to
Samsung and protected under federal laws, state laws, and international treaty provisions. Intellectual Property includes, but is not limited
to, inventions (patentable or unpatentable), patents, trade secrets, copyrights, software, computer programs, and related documentation
and other works of authorship. You may not infringe or otherwise violate the rights secured by the Intellectual Property. Moreover, you
agree that you will not (and will not attempt to) modify, prepare derivative works of, reverse engineer, decompile, disassemble, or
otherwise attempt to create source code from the software. No title to or ownership in the Intellectual Property is transferred to you. All
applicable rights of the Intellectual Property shall remain with SAMSUNG and its suppliers.
Samsung Telecommunications America (STA), LLC
Headquarters: Customer Care Center:
1301 E. Lookout Drive 1000 Klein Rd.
Richardson, TX 75082 Plano, TX 75074
Toll Free Tel: 1.888.987.HELP (4357)
Internet Address:
©
2010 Samsung Telecommunications America, LLC is a registered trademark of Samsung Electronics America, Inc. and its related
entities.
Do you have questions about your Samsung Mobile Phone?
For 24 hour information and assistance, we offer a new FAQ/ARS System (Automated Response System) at:
www.samsungtelecom.com/support
http://www.samsungusa.com
a847_UCJD6_WC_042910_F8

T9 Text Input is licensed by Tegic Communications and is covered by U.S. Pat. 5,818,437; U.S. Pat. 5,953,541; U.S. Pat. 6,011,554 and
other patents pending.
ACCESS® and NetFront™ are trademarks or registered trademarks of ACCESS Co., Ltd. in Japan and other countries.
The Bluetooth® word mark, figure mark (stylized “B Design”), and combination mark (Bluetooth word mark and “B Design”) are registered
trademarks and are wholly owned by the Bluetooth SIG.
microSD™ and the microSD logo are Trademarks of the SD Card Association.
Openwave® is a registered Trademark of Openwave, Inc.
Devices purchased for use on AT&T's system are designed for use exclusively on AT&T's system. You agree that you won't make any
modifications to the Equipment or programming to enable the Equipment to operate on any other system. A voice plan is required on all
voice-capable devices, unless specifically noted otherwise in the terms governing your agreement. Some devices or plans may require you
to subscribe to a data plan.
Your phone is designed to make it easy for you to access a wide variety of content. For your protection, AT&T wants you to be aware that
some applications that you enable may involve the location of your phone being shared. For applications available through AT&T, AT& T
offers privacy controls that let you decide how an application may use the location of your phone and other phones on your account.
However, AT&T's privacy tools do not apply to applications available outside of AT&T. Please review the terms and conditions and the
associated privacy policy for each location-based service to learn how location information will be used and protected.
Your phone may be used to access the Internet and to download, and/or purchase goods, applications, and services from AT&T or
elsewhere from third parties. AT&T provides tools for you to control access to the Internet and certain Internet content. These controls may
not be available for certain devices which bypass AT&T controls.
A&T may collect certain types of information from your device when you use AT&T services to provide customer support and to improve its
services. For more information on AT&T's Privacy Policy, visit
http://www.att.com/privacy
.

Dynamic Noise Suppression from Audience™
Your phone is equipped with an advanced voice processing chip that delivers clear mobile calls by suppressing background noise,
intermittent sounds (like a siren or nearby conversation), and echoes, allowing you to hear and be heard nearly anywhere.
How Does It Work?
Based on the intelligence of the human hearing system, the technology:
•
Captures, evaluates and distinguishes all the sound signals surrounding your phone, and the person you're speaking with.
•
Then isolates the primary voice in conversation and filters out the background noise - so the person you're calling hears only your voice, without
disturbing background noise.
•
Dynamically equalizes and adjusts voice volume to optimize your calling experience, so you can hear clearly and don't need to speak louder to overcome
surrounding noise.
The noise suppression technology is built-in and already enabled in your new mobile phone. So it's ready to provide unsurpassed voice
clarity with every call.
Open Source Software
Some software components of this product incorporate source code covered under GNU General Public License (GPL), GNU Lesser General
Public License (LGPL), OpenSSL License, BSD License and other open source licenses. To obtain the source code covered under the open
source licenses, please visit:
http://opensource.samsungmobile.com/index.jsp
.

Disclaimer of Warranties; Exclusion of Liability
EXCEPT AS SET FORTH IN THE EXPRESS WARRANTY CONTAINED ON THE WARRANTY PAGE ENCLOSED WITH THE PRODUCT, THE
PURCHASER TAKES THE PRODUCT "AS IS", AND SAMSUNG MAKES NO EXPRESS OR IMPLIED WARRANTY OF ANY KIND WHATSOEVER
WITH RESPECT TO THE PRODUCT, INCLUDING BUT NOT LIMITED TO THE MERCHANTABILITY OF THE PRODUCT OR ITS FITNESS FOR ANY
PARTICULAR PURPOSE OR USE; THE DESIGN, CONDITION OR QUALITY OF THE PRODUCT; THE PERFORMANCE OF THE PRODUCT; THE
WORKMANSHIP OF THE PRODUCT OR THE COMPONENTS CONTAINED THEREIN; OR COMPLIANCE OF THE PRODUCT WITH THE
REQUIREMENTS OF ANY LAW, RULE, SPECIFICATION OR CONTRACT PERTAINING THERETO. NOTHING CONTAINED IN THE INSTRUCTION
MANUAL SHALL BE CONSTRUED TO CREATE AN EXPRESS OR IMPLIED WARRANTY OF ANY KIND WHATSOEVER WITH RESPECT TO THE
PRODUCT. IN ADDITION, SAMSUNG SHALL NOT BE LIABLE FOR ANY DAMAGES OF ANY KIND RESULTING FROM THE PURCHASE OR USE OF
THE PRODUCT OR ARISING FROM THE BREACH OF THE EXPRESS WARRANTY, INCLUDING INCIDENTAL, SPECIAL OR CONSEQUENTIAL
DAMAGES, OR LOSS OF ANTICIPATED PROFITS OR BENEFITS.

Table of Contents
Section 1: Getting Started ..............................................5
SIM Card Information . . . . . . . . . . . . . . . . . . . . . . . . . . . . . . . . 5
Activating Your Phone . . . . . . . . . . . . . . . . . . . . . . . . . . . . . . . . 5
Installing the microSD™ Card . . . . . . . . . . . . . . . . . . . . . . . . . 7
Charging the Battery . . . . . . . . . . . . . . . . . . . . . . . . . . . . . . . . . 9
Turning the Phone On or Off . . . . . . . . . . . . . . . . . . . . . . . . . . 10
Setting Up Your Voice Mail . . . . . . . . . . . . . . . . . . . . . . . . . . . 10
Section 2: Understanding Your Phone ......................... 12
Features of Your Phone . . . . . . . . . . . . . . . . . . . . . . . . . . . . . . 12
Open View of Your Phone . . . . . . . . . . . . . . . . . . . . . . . . . . . . 12
Closed View of Your Phone . . . . . . . . . . . . . . . . . . . . . . . . . . .14
Main Display Layout . . . . . . . . . . . . . . . . . . . . . . . . . . . . . . . . 15
My Shortcuts . . . . . . . . . . . . . . . . . . . . . . . . . . . . . . . . . . . . . 18
Command Keys . . . . . . . . . . . . . . . . . . . . . . . . . . . . . . . . . . . 19
Section 3: Menu Navigation ......................................... 21
Menu Navigation . . . . . . . . . . . . . . . . . . . . . . . . . . . . . . . . . . . 21
Shortcuts . . . . . . . . . . . . . . . . . . . . . . . . . . . . . . . . . . . . . . . . 22
Section 4: Call Functions .............................................23
Making a Call . . . . . . . . . . . . . . . . . . . . . . . . . . . . . . . . . . . . . 23
Making a Call from the Address Book . . . . . . . . . . . . . . . . . . .24
Answering a Call . . . . . . . . . . . . . . . . . . . . . . . . . . . . . . . . . . . 25
Video Share . . . . . . . . . . . . . . . . . . . . . . . . . . . . . . . . . . . . . . 25
Recent Calls . . . . . . . . . . . . . . . . . . . . . . . . . . . . . . . . . . . . . .26
Call Details . . . . . . . . . . . . . . . . . . . . . . . . . . . . . . . . . . . . . . . 28
1
Options During a Call . . . . . . . . . . . . . . . . . . . . . . . . . . . . . . . 29
Silent Mode . . . . . . . . . . . . . . . . . . . . . . . . . . . . . . . . . . . . . . 33
Section 5: Entering Text ............................................... 34
Using the Text Input Methods . . . . . . . . . . . . . . . . . . . . . . . . . 34
Using the T9 Predictive Text Input Method . . . . . . . . . . . . . . . 35
Using the Alphabetic Input Method . . . . . . . . . . . . . . . . . . . . . 36
Using the Symbols Input Method . . . . . . . . . . . . . . . . . . . . . . 37
Using the 123 Numeric Input Method . . . . . . . . . . . . . . . . . . . 37
Section 6: Push to Talk ............................................... 38
Initializing Push to Talk Service . . . . . . . . . . . . . . . . . . . . . . . 38
PTT Icons . . . . . . . . . . . . . . . . . . . . . . . . . . . . . . . . . . . . . . . . 38
Add Group . . . . . . . . . . . . . . . . . . . . . . . . . . . . . . . . . . . . . . . 43
Making a PTT Call . . . . . . . . . . . . . . . . . . . . . . . . . . . . . . . . . 45
PTT Settings . . . . . . . . . . . . . . . . . . . . . . . . . . . . . . . . . . . . . . 46
Call Waiting . . . . . . . . . . . . . . . . . . . . . . . . . . . . . . . . . . . . . . 48
Help . . . . . . . . . . . . . . . . . . . . . . . . . . . . . . . . . . . . . . . . . . . . 48
Section 7: Understanding Your Address Book ............ 49
AT&T Address Book Activation . . . . . . . . . . . . . . . . . . . . . . . . 49
Address Book Settings . . . . . . . . . . . . . . . . . . . . . . . . . . . . . . 49
Adding a New Contact . . . . . . . . . . . . . . . . . . . . . . . . . . . . . . 50
Using Contacts . . . . . . . . . . . . . . . . . . . . . . . . . . . . . . . . . . . . 52
Address Book Entry Options . . . . . . . . . . . . . . . . . . . . . . . . . . 53
Synchronization of your AT&T Address Book . . . . . . . . . . . . . 53
Finding My Own Phone Number . . . . . . . . . . . . . . . . . . . . . . . 53

FDN Mode . . . . . . . . . . . . . . . . . . . . . . . . . . . . . . . . . . . . . . . 54
Group Settings . . . . . . . . . . . . . . . . . . . . . . . . . . . . . . . . . . . . 54
Adding Speed Dial Entries . . . . . . . . . . . . . . . . . . . . . . . . . . . 56
Using the Service Dialing Numbers . . . . . . . . . . . . . . . . . . . . 56
Managing Address Book Entries . . . . . . . . . . . . . . . . . . . . . . . 56
Yellow Pages Mobile . . . . . . . . . . . . . . . . . . . . . . . . . . . . . . . 58
Section 8: Messaging ................................................... 59
Types of Messages . . . . . . . . . . . . . . . . . . . . . . . . . . . . . . . . 59
Creating and Sending Text Messages . . . . . . . . . . . . . . . . . . . 59
Creating and Sending Multimedia Messages . . . . . . . . . . . . . 61
Attaching Business Card to a Message . . . . . . . . . . . . . . . . . . 63
Locating a Message . . . . . . . . . . . . . . . . . . . . . . . . . . . . . . . . 63
Inbox . . . . . . . . . . . . . . . . . . . . . . . . . . . . . . . . . . . . . . . . . . . 63
Using Message Options . . . . . . . . . . . . . . . . . . . . . . . . . . . . . 65
Outbox . . . . . . . . . . . . . . . . . . . . . . . . . . . . . . . . . . . . . . . . . . 66
Drafts . . . . . . . . . . . . . . . . . . . . . . . . . . . . . . . . . . . . . . . . . . . 66
Using Instant Messaging (IM) . . . . . . . . . . . . . . . . . . . . . . . . . 66
Signing into Your Mobile Email . . . . . . . . . . . . . . . . . . . . . . . . 67
Voicemail . . . . . . . . . . . . . . . . . . . . . . . . . . . . . . . . . . . . . . . . 67
Messaging Settings . . . . . . . . . . . . . . . . . . . . . . . . . . . . . . . . 67
Templates . . . . . . . . . . . . . . . . . . . . . . . . . . . . . . . . . . . . . . . 70
Delete by Folder . . . . . . . . . . . . . . . . . . . . . . . . . . . . . . . . . . . 71
Used Space . . . . . . . . . . . . . . . . . . . . . . . . . . . . . . . . . . . . . . 71
Section 9: AppCenter ....................................................72
Ringtones . . . . . . . . . . . . . . . . . . . . . . . . . . . . . . . . . . . . . . . 72
Games . . . . . . . . . . . . . . . . . . . . . . . . . . . . . . . . . . . . . . . . . . 72
Color Graphics . . . . . . . . . . . . . . . . . . . . . . . . . . . . . . . . . . . . 72
Answer Tones . . . . . . . . . . . . . . . . . . . . . . . . . . . . . . . . . . . . 72
MEdia Net Home . . . . . . . . . . . . . . . . . . . . . . . . . . . . . . . . . . 73
AppCenter Options . . . . . . . . . . . . . . . . . . . . . . . . . . . . . . . . . 73
Section 10: My Stuff ..................................................... 74
Applications . . . . . . . . . . . . . . . . . . . . . . . . . . . . . . . . . . . . . . 74
Audio . . . . . . . . . . . . . . . . . . . . . . . . . . . . . . . . . . . . . . . . . . . 74
Games . . . . . . . . . . . . . . . . . . . . . . . . . . . . . . . . . . . . . . . . . . 75
Online Locker . . . . . . . . . . . . . . . . . . . . . . . . . . . . . . . . . . . . 75
Pictures . . . . . . . . . . . . . . . . . . . . . . . . . . . . . . . . . . . . . . . . . 76
Tools . . . . . . . . . . . . . . . . . . . . . . . . . . . . . . . . . . . . . . . . . . . 77
Video . . . . . . . . . . . . . . . . . . . . . . . . . . . . . . . . . . . . . . . . . . . 97
Other Files . . . . . . . . . . . . . . . . . . . . . . . . . . . . . . . . . . . . . . . 97
Used Space . . . . . . . . . . . . . . . . . . . . . . . . . . . . . . . . . . . . . . 97
Section 11: Games & Applications ..............................99
Games . . . . . . . . . . . . . . . . . . . . . . . . . . . . . . . . . . . . . . . . . . 99
Applications . . . . . . . . . . . . . . . . . . . . . . . . . . . . . . . . . . . . . . 99
Section 12: AT&T Music ............................................. 102
Accessing AT&T Music . . . . . . . . . . . . . . . . . . . . . . . . . . . . 102
Using the Music Player . . . . . . . . . . . . . . . . . . . . . . . . . . . . 102
Using Playlists . . . . . . . . . . . . . . . . . . . . . . . . . . . . . . . . . . . 105
Shop Music/Tones . . . . . . . . . . . . . . . . . . . . . . . . . . . . . . . . 107
MusicID . . . . . . . . . . . . . . . . . . . . . . . . . . . . . . . . . . . . . . . . 110
Using AT&T Radio . . . . . . . . . . . . . . . . . . . . . . . . . . . . . . . . 110
Accessing Music Videos . . . . . . . . . . . . . . . . . . . . . . . . . . . 111
Community . . . . . . . . . . . . . . . . . . . . . . . . . . . . . . . . . . . . . 111
Music Applications . . . . . . . . . . . . . . . . . . . . . . . . . . . . . . . 111
2

Section 13: AT&T GPS ................................................113
Shop GPS Apps . . . . . . . . . . . . . . . . . . . . . . . . . . . . . . . . . . . 113
AT&T Navigator . . . . . . . . . . . . . . . . . . . . . . . . . . . . . . . . . . 113
AT&T Family Map . . . . . . . . . . . . . . . . . . . . . . . . . . . . . . . . .114
AllSport GPS . . . . . . . . . . . . . . . . . . . . . . . . . . . . . . . . . . . . . 114
Loopt . . . . . . . . . . . . . . . . . . . . . . . . . . . . . . . . . . . . . . . . . . 114
WHERE . . . . . . . . . . . . . . . . . . . . . . . . . . . . . . . . . . . . . . . . . 114
Trimble Outdoors . . . . . . . . . . . . . . . . . . . . . . . . . . . . . . . . . 115
TeleNavTrack . . . . . . . . . . . . . . . . . . . . . . . . . . . . . . . . . . . . 115
GPS TimeTrack . . . . . . . . . . . . . . . . . . . . . . . . . . . . . . . . . . . 116
Section 14: Mobile Web ..............................................117
Accessing the Mobile Web . . . . . . . . . . . . . . . . . . . . . . . . . . 117
Homepage - att.net . . . . . . . . . . . . . . . . . . . . . . . . . . . . . . . . 117
Navigating with the Mobile Web . . . . . . . . . . . . . . . . . . . . . . 118
Enter a URL . . . . . . . . . . . . . . . . . . . . . . . . . . . . . . . . . . . . .118
Search the Internet . . . . . . . . . . . . . . . . . . . . . . . . . . . . . . . . 119
My Shortcuts . . . . . . . . . . . . . . . . . . . . . . . . . . . . . . . . . . . . 119
My Account . . . . . . . . . . . . . . . . . . . . . . . . . . . . . . . . . . . . .119
Using Bookmarks . . . . . . . . . . . . . . . . . . . . . . . . . . . . . . . . . 119
Emptying the Cookies . . . . . . . . . . . . . . . . . . . . . . . . . . . . . . 120
Using your History . . . . . . . . . . . . . . . . . . . . . . . . . . . . . . . . 121
Changing the WAP Profiles . . . . . . . . . . . . . . . . . . . . . . . . . . 121
Section 15: Mobile Video ............................................123
Viewing a Video Clip . . . . . . . . . . . . . . . . . . . . . . . . . . . . . . .123
Using the Video Categories . . . . . . . . . . . . . . . . . . . . . . . . . . 123
Customizing Mobile Video . . . . . . . . . . . . . . . . . . . . . . . . . . . 124
3
Section 16: Changing Your Settings .......................... 125
Quick Tips . . . . . . . . . . . . . . . . . . . . . . . . . . . . . . . . . . . . . . 125
Sound Profile . . . . . . . . . . . . . . . . . . . . . . . . . . . . . . . . . . . . 125
Display . . . . . . . . . . . . . . . . . . . . . . . . . . . . . . . . . . . . . . . . . 127
Time & Date . . . . . . . . . . . . . . . . . . . . . . . . . . . . . . . . . . . . . 129
Phone . . . . . . . . . . . . . . . . . . . . . . . . . . . . . . . . . . . . . . . . . 130
Calls . . . . . . . . . . . . . . . . . . . . . . . . . . . . . . . . . . . . . . . . . . 135
Connectivity . . . . . . . . . . . . . . . . . . . . . . . . . . . . . . . . . . . . . 139
Applications Settings . . . . . . . . . . . . . . . . . . . . . . . . . . . . . . 144
Memory Management . . . . . . . . . . . . . . . . . . . . . . . . . . . . . 145
Software Update . . . . . . . . . . . . . . . . . . . . . . . . . . . . . . . . . 146
Phone Information . . . . . . . . . . . . . . . . . . . . . . . . . . . . . . . . 146
Section 17: Accessibility ............................................ 147
Section 18: Health and Safety Information ............... 148
Health and Safety Information . . . . . . . . . . . . . . . . . . . . . . . 148
Please Note the Following Information When Using
Your Handset . . . . . . . . . . . . . . . . . . . . . . . . . . . . . . . . . . 149
Samsung Mobile Products and Recycling . . . . . . . . . . . . . . . 150
UL Certified Travel Adapter . . . . . . . . . . . . . . . . . . . . . . . . . . 150
Consumer Information on Wireless Phones . . . . . . . . . . . . . . 150
Road Safety . . . . . . . . . . . . . . . . . . . . . . . . . . . . . . . . . . . . . 156
Responsible Listening . . . . . . . . . . . . . . . . . . . . . . . . . . . . . 158
Operating Environment . . . . . . . . . . . . . . . . . . . . . . . . . . . . . 159
Using Your Phone Near Other Electronic Devices . . . . . . . . . 160
FCC Hearing-Aid Compatibility (HAC) Regulations for
Wireless Devices . . . . . . . . . . . . . . . . . . . . . . . . . . . . . . . 160
Potentially Explosive Environments . . . . . . . . . . . . . . . . . . . . 162

Emergency Calls . . . . . . . . . . . . . . . . . . . . . . . . . . . . . . . . . 162
FCC Notice and Cautions . . . . . . . . . . . . . . . . . . . . . . . . . . . 163
Other Important Safety Information . . . . . . . . . . . . . . . . . . . 164
Product Performance . . . . . . . . . . . . . . . . . . . . . . . . . . . . . . 164
Availability of Various Features/Ring Tones . . . . . . . . . . . . . 165
Battery Standby and Talk Time . . . . . . . . . . . . . . . . . . . . . . 165
Battery Precautions . . . . . . . . . . . . . . . . . . . . . . . . . . . . . . . 165
Care and Maintenance . . . . . . . . . . . . . . . . . . . . . . . . . . . . . 167
Section 19: Warranty Information .............................168
Standard Limited Warranty . . . . . . . . . . . . . . . . . . . . . . . . . . 168
End User License Agreement for Software . . . . . . . . . . . . . . 171
Index ............................................................................176
4
Section 1: Getting Started
This section describes the first steps to operating your phone.
SIM Card Information
When you subscribe for 3G cellular network services, you receive
a plug-in SIM (Subscriber Identity Module) card loaded with your
subscription details, such as your PIN, and available optional
services.
Activating Your Phone
Activating your phone requires several things: inserting the SIM
card, charging the battery, and turning on the phone.
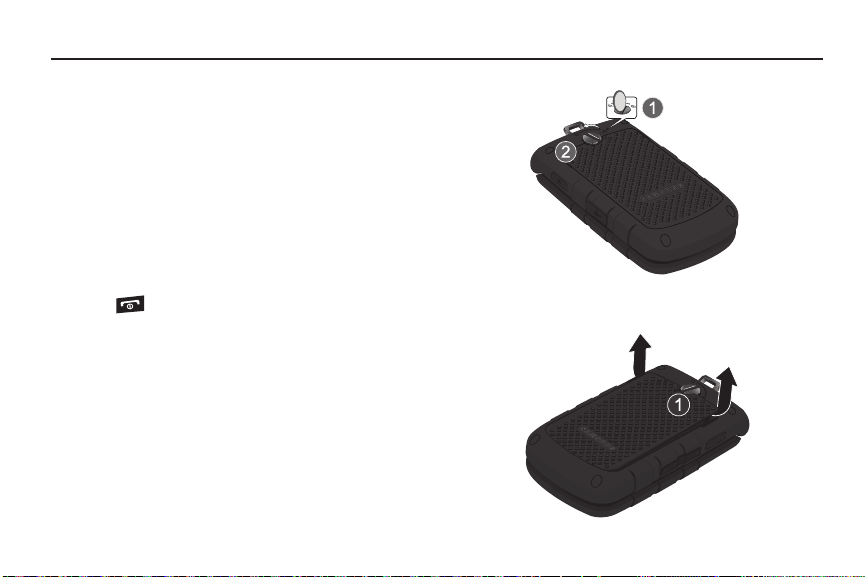
䊳
If necessary, power-off the phone by pressing and holding
the key until the power-off image displays.
Removing the Battery
1. Use a coin or other object inserted in the slot on the back
cover (1) and turn it counter-clockwise to open the battery
cover (2).
5
2. Use the grooves at the top of the cover to lift the cover up
and away from the back of the phone (1).
Lift the battery up (1) and away (2) from the phone, as
3.
shown.
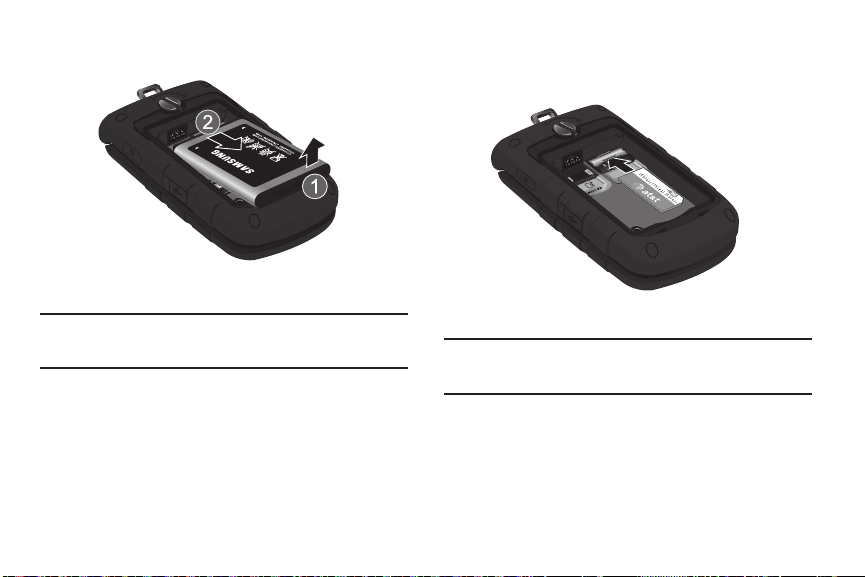
Installing and Removing the SIM Card
Important!:
The plug-in SIM card and its contacts can be easily damaged by
scratches or bending. Use caution when inserting or removing
the card, and keep all SIM cards out of reach of children.
1. Remove the back cover and battery.
2. Make sure to orient the SIM card with the gold contacts
facing down and the corner notch positioned as shown
below, then slide the SIM card completely into the socket.
3. To remove the SIM, gently slide it out of the socket.
Note:
The angled corner of the SIM should be inserted as shown in the
previous diagram. Improperly inserting the SIM can cause the phone to
not recognize the SIM.
Getting Started 6
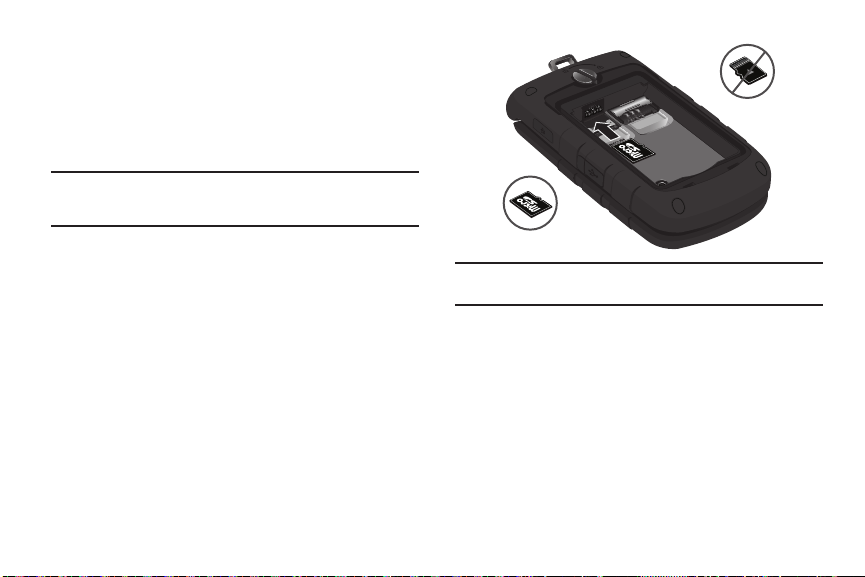
Installing the microSD™ Card
Correct
Incorrect
To add additional memory to your phone, you can insert a
microSD card into the memory card slot, located to the left of the
SIM card, inside the phone.
Use the following instructions and illustrations for proper
insertion and removal.
Note:
The a847 supports microSD cards to a maximum size of 16GB. The
handset was also verified to support SanDisk™ microSD cards of up
to 16GB and up to 5000 files.
1. Remove the back cover and battery.
2. Slide the microSD card into the slot as shown in the
diagram.
3. To remove the microSD card, press down on pull the card
out towards you.
7
Warning!:
Please note the printed circuit side faces down when inserting
the card.
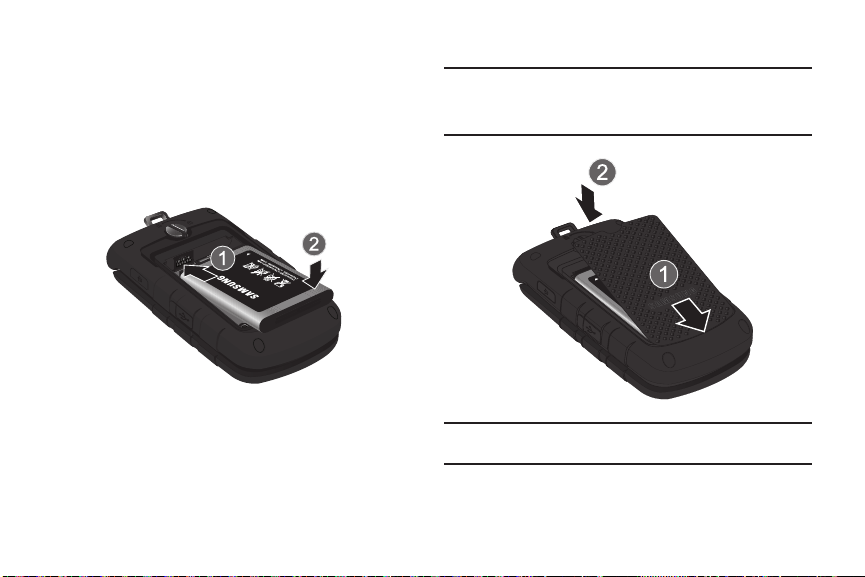
Replacing the Battery
1. To reinstall the battery, with the battery cover open, align
the battery tabs with the slots at the bottom of the phone
(1).
2. Press the battery down until it clicks into place (2). Make
sure the battery is properly installed and not obstructing
the SIM card before replacing the cover.
4. Turn the grooved dial clockwise until the cover locks.
Important!:
When placing the cover back on the phone, press down firmly
along the edges to ensure that the cover is flush with the phone.
This will ensure that the battery compartment is pressurized and
that the phone is waterproof.
3. With the battery in position on the phone, place the cover
back on the handset (1) then press down firmly (2). Press
down along the edges to make sure the cover is flush with
the phone and that there is a tight seal.
Note:
The battery must be properly installed before charging the battery or
switching on the phone.
Getting Started 8
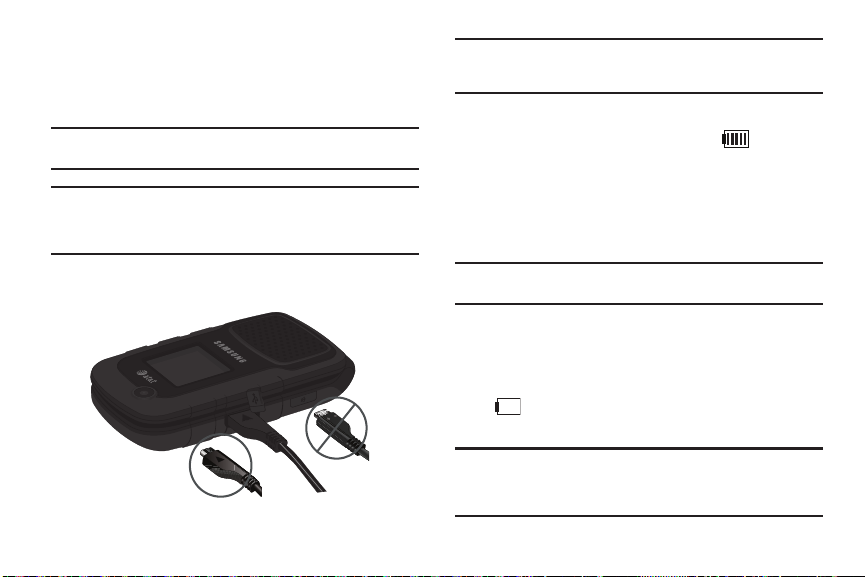
Charging the Battery
Correct
Incorrect
Your phone is powered by a rechargeable Li-ion battery. Use the
travel adapter to charge the battery, and use only Samsung
approved batteries and chargers.
Note:
You must fully charge the battery before using your phone for the first
time. A fully discharged battery requires up to 4 hours of charge time.
Caution!:
For connection to an electrical supply not located in the U.S., you
must use an adaptor of the proper configuration for the power
outlet. Use of the wrong adaptor could damage your phone and
void your warranty.
Note:
The previous illustration is the correct and incorrect method for
connecting the charger. If the incorrect method is attempted, damage
to the accessory port will occur therefore voiding the phone’s warranty.
2. Plug the adaptor into a standard AC wall outlet.
3. When the phone is completely charged ( ), unplug the
adapter from the power outlet.
4. Remove the adapter from the phone by gently pulling the
connector out and replace the plastic cover back over the
open jack.
1. Open the side slot and plug the connector of the travel
adapter jack into the jack on the side of the phone.
9
Note:
During charging, you must unplug the adapter before removing the
battery from the phone to avoid damage.
Low Battery Indicator
When the battery is weak and only a few minutes of talk time
remain, a warning tone sounds, the “Low Battery” message
repeats at regular intervals on the display, and the empty battery
icon ( ) blinks. The backlight turns off to conserve the
remaining battery power.
Note:
If your phone is in Silent Mode, the Low Battery Indicator defaults to
Vibration (see See “Sound Profile” on page 125.). If you change the
alert from Vibration to Mute, you will see a flashing message that
indicates a low battery.
If the battery level becomes too low, the phone automatically
turns off. Recharge your battery.
Turning the Phone On or Off
1. Open the phone.
2. Press and hold the key until the phone power-on
screen displays.
Note:
Do not turn on the phone when mobile phone use is prohibited.
3. If the phone asks, enter a password and press the Confirm
soft key or the key. For further details, see “Change
Phone Password” on page 133.
The Idle screen displays while the phone searches for your
network. After the phone finds your network and displays
adequate signal strength bars, you can make or receive
calls.
Note:
The display language is preset to Automatic at the factory. To change
the language, use the Language menu. For more information, refer to
“Phone” on page 130.
4. When you wish to switch off the phone, press and hold the
key until the power-off image displays.
Setting Up Your Voice Mail
Note:
If your service provider did not pre-configure your voicemail server
number, store the voicemail server number before accessing the
server. Your service provider can give you the number. For more
information, refer to “Changing the Voice Mail Name and Number” on
page 10.
Setting Up Your Personal Options
1. Open the phone to access your keypad.
2. In Idle mode, press and hold the key.
3. Follow the voice mail prompts. If you need additional help
setting up your voice mail, contact your service provider.
Changing the Voice Mail Name and Number
Your SIM card gives you the default service number of the voice
mail center. However, you may need to change the number. Use
the following procedures to change your voice mail number.
1. In Idle mode, press the Menu soft key to access
Menu mode.
2. Highlight Messaging and press the Select soft key or the
key.
3. Highlight Messaging Settings and press the Select soft
key or the key.
Getting Started 10

4.
Highlight Voicemail and press the Select soft key or the
key.
5. Press the Edit soft key .
6. To edit the Voice Server Name, highlight Name and press
to delete the current name and then use your
keypad to enter a replacement name.
– or –
To edit the Voice Mail Number, highlight Center Address
and press to delete the current number.
7. Enter your new Voice Server number and press the Save
soft key or the key to save this new number.
8. Press the key to return to Idle mode.
11
Section 2: Understanding Your Phone
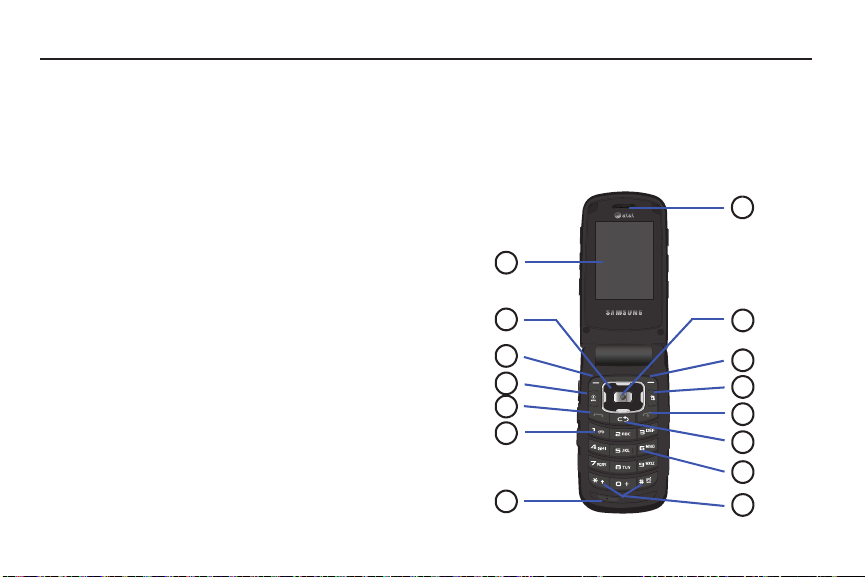
5
2
4
6
12
11
10
9
8
7
13
1
3
14
15
This section outlines some key features of your phone. It also
displays the screen and the icons that are displayed when the
phone is in use.
Features of Your Phone
Your phone is lightweight, easy-to-use and offers many
significant features. The following list outlines a few of the
features included in your phone:
•
Push to Talk (PTT)
•
Mobile Web
•
YPmobile (YELLOWPAGES.COM)
•
AT&T Navigator
•
Bluetooth wireless access
•
Camera and camcorder
•
Video Sharing
•
Instant Messaging capability
•
Mobile Share with Online Locker
•
E-mail
•
Featured applications provide alarms, calendar, calculator, record
audio, converter, timer, stopwatch, and world clock.
•
Multimedia Message Service (MMS)
•
Multimedia capability (with included Music Player)
•
Photo caller ID
•
Speakerphone capability
Open View of Your Phone
The following illustrations show the main elements of your
phone:
Understanding Your Phone 12

Keys
The following list correlates to the open and front view
illustrations.
1. Main Display: This screen displays useful information
needed to operate your phone.
2. Navigation keys: This key allows you to scroll through
phone menu options and provides a shortcut to phone
functions from standby mode.
3. Soft key (left): Performs the functions indicated by the
screen text on the bottom of the display.
4. AT&T Navigator key: Launches the AT&T Navigator
application.
5. Send key: Allows you to place or receive a call. In standby
mode, press the key once to access the Recent Call log. If
you press and hold the key down, you initiate the most
recent call from the Recent Call log. If the phone is off,
press and hold this key to turn the phone on.
6. Voice Mail key: Press and hold the key to
automatically dial your voicemail.
13
7. Microphone: Allows the other callers to hear you clearly
when you are speaking to them.
8. Special Function keys: Asterisk/Shift key-enters the
[*]
character for calling features. In text mode, press to
change the character input type.
[#] character for calling features. In text entry
the pound
Pound/Space key-enters
mode, press to enter a space between characters.
Press and hold to activate/deactivate the Silent
profile. Press and hold
to enter a pause between
numbers.
9. Alphanumeric keypad: Use these keys to enter numbers,
letters and some special characters. When in Idle mode,
press and hold the key to access your voicemail
server or press and hold to enter an International
call prefix.
10. Clear key: Deletes characters from the display when you
are in text entry mode. Deletes items when in an
application. When in a main menu, press to return to the
previous menu. In Idle mode, a quick press of the
key displays the Calendar in Month view.
Power On/Off/Menu Exit key: Ends a call. Press and hold
5
2
4
6
1
3
11.
this key for a few seconds to power your phone On or Off.
While in the main menu, it returns the phone to standby
mode and cancels your input. When you receive an
incoming call, press to reject call.
12. Multitasking key: Opens the application switch window
which allows you to select from a group of different
applications without having to exit from the currently
active application. These options include making a voice
call, messaging, Mobile Web launch, launching the music
player, accessing games, or end multitasking.
13. Soft key (right): Performs the functions indicated by the
screen text on the bottom of the display.
14. Menu access/Confirm key (Mobile Web): When
navigating through a menu accepts the highlighted choice
launches.
15. Earpiece/Speaker: Used to listen to audio and music from
your phone.
in the menu. If you press once in Idle mode, Mobile Web
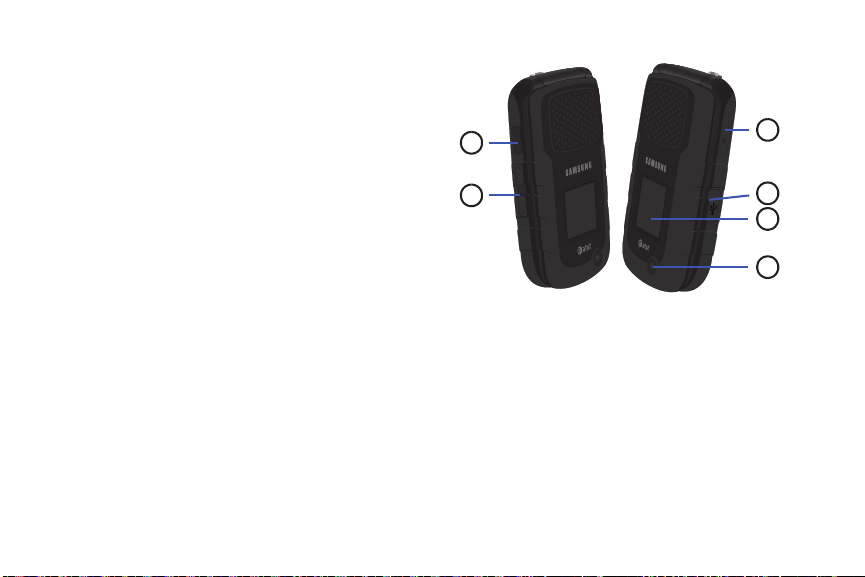
Closed View of Your Phone
Keys
The following list correlates to the side view illustrations.
1.
PTT key
: Press to display the PTT Contacts. Press and hold
to display the Recent calls list.
2. Volume keys/Menu Navigation: Allows you to adjust the
ringer volume in standby mode or adjust the voice volume
during a call. To mute the ringer during an incoming call,
press the up or down volume key.
The volume keys can also be used to scroll up or down to
Understanding Your Phone 14
navigate through the different menu options.
Icons
Date and Time
Text and graphic area
Soft key indicators
When the phone is closed, press and hold these keys to
toggle the display on or off. This key is also used when the
Music Player is active.
•
If you are playing music and the backlight goes out, press this key
to re-display the music player screen.
3. Camera/Camcorder: Allows you to take pictures and
videos with your phone.
4. Front Display: Allows you to view an incoming call or
message. It also displays date, time, network type, signal
strength, and battery power icons, and any icons
associated with alerts or alarms.
5. Headset jack/Adapter jack: Allows you to plug in the
travel adapter (power), optional PC connection cable (data
transfer), and optional headset for safe, convenient,
hands-free conversations.
6.
Speaker key
: During a call, press this key to turn the
speaker on. When the phone is turned on and closed, press
this key to access the Self Shot feature so you can
photograph yourself. For more information, refer to “Using
the Self Shot Feature” on page 77.
15
Back Light
A back light illuminates the display and the keypad when you
press any key or open the phone. It turns off when no keys are
pressed within a given period of time, and/or dims the light,
depending on the settings in the Backlight Time menu.
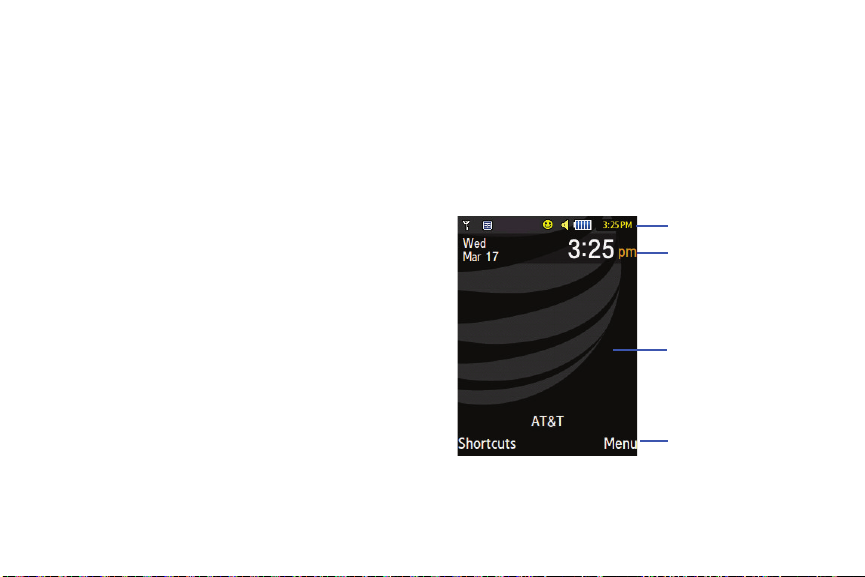
Main Display Layout
The display has 4 areas:
Icons
Shows the received signal strength. The greater the
number of bars, the stronger the signal.
Displays the level of your battery. The more bars you see,
the more power you have remaining.
Displays when the phone is accessing services in a GPRS
network. When data is being transferred, this icon
animates.
Displays when the phone is accessing services in an
EDGE network. When data is being transferred, this icon
animates.
Displays when the phone is accessing services in a 3G
(UMTS) network. When data is being transferred, this
icon animates.
Displays when a TTY adapter is plugged into the handset,
making it accessible via a keyboard for the hearing or
speech impaired.
Displays when a call is in progress.
Displays when there is no network coverage available.
When you are out of the service area, you cannot make
or receive voice calls.
Displays when an alarm is set on your phone.
Displays when your incoming phone calls are being
forwarded to another number.
Displays when you receive new voice mail message.
Displays when you receive an email message.
Displays when a new text message is received.
Displays when a new multimedia message is received.
Displays when a push-message is received from the
WAP server.
Displays when a new Over the Air (OTA) software update
file is received.
Displays when your memory card is inserted.
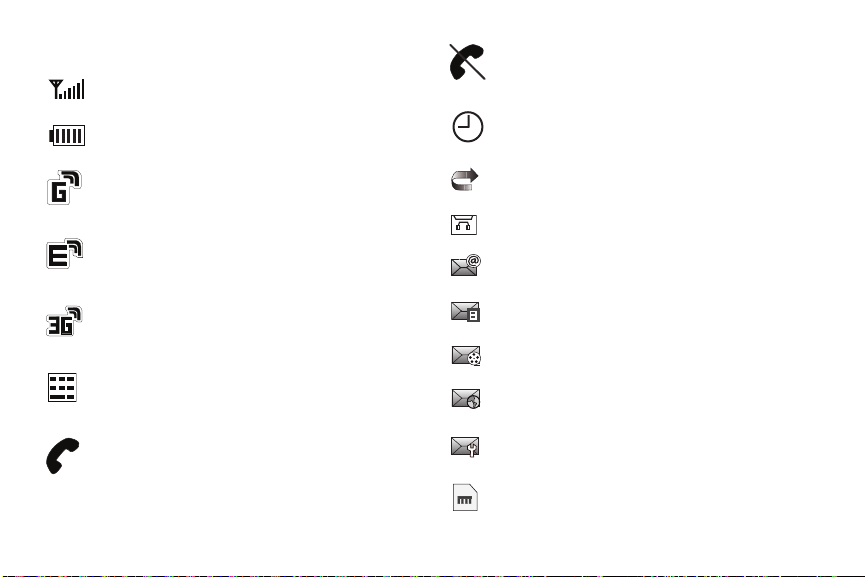
Understanding Your Phone 16
Displays when Bluetooth wireless technology is active.
When transferring data, this icon blinks red and blue.
Displays when Bluetooth wireless technology is
connecting with a device. It displays a solid red until the
connection is set, then changes to a solid blue.
Displays when a Bluetooth wireless headset is active and
in use.
Displays when you are using the phone’s Music Player.
Displays when the phone’s profile is set to Normal. For
more information, refer to “Sound Profile” on page 125.
Note:
The default phone profile is Normal. The profile is editable and the
displayed icons may vary according to the setting.
Displays when the phone’s profile is set to Silent. In this
case, the speaker is muted and the phone only vibrates
and displays information on its front panel LCD.
Displays when you are connected to a PC via a USB port.
Displays when your Address Book is synchronizing with
the AT&T Address Book, the network backup service. For
more information, refer to “Synchronization of your AT&T
Address Book” on page 53.
Displays when T-Coil is enabled. For more information,
refer to “T-Coil Mode” on page 135.
Displays when Airplane mode is enabled. For more
information, refer to “Airplane Mode” on page 134.
17
Displays when the phone’s profile is set to Driving. In this
case, the speaker is active and launches the currently
selected ringtone or melody when the associated
notification is activated. This icon is accompanied on
screen by the Audio icon.
Displays when the phone’s profile is set to Outdoor. In
this case, the speaker is active, the volume settings are
raised to their highest levels, any currently active
ringtones or melodies are activated, and the phone’s
vibrate feature is activated.

My Shortcuts
Your phone offers a set of functions that can be customized for
your ease and specific needs. These functions are arranged in
menus and sub-menus, accessed using the two soft keys. Each
menu and sub-menu allows you to view and alter the settings of
a particular function.
If you select the Shortcuts left soft key in Idle mode, the
following displays under the title of My Shortcuts:
•
Camera
: allows you to use the camera and camcorder functionality of
the handset.
•
Bluetooth
: allows you to use the Bluetooth functionality of the device.
•
Alarms
: allows you to set or alter alarm settings, including a Wake-up
Alarm.
•
Recent Calls
•
Games
: allows you to
view the recent call log.
: allows you to access games such as Big Range Hunting 2,
Tetris, and World Series of Poker HL. You can also buy new games
using the Shop Games option.
•
Applications
your phone. For more information, refer to
: allows you to access the many applications available on
“Applications”
on
page 99.
•
Tools: provides access to and allows you to use Camera, Voice
Recognition, Record Audio, Alarms, Calendar, Recent Calls,
Tasks, Notes, Calculator, Tip Calculator, Converter (for currency,
length, weight, volume, area, and temperature), World Clock,
Timer, and Stopwatch.
•
My Account
•
Empty
: allows you to view your account information on the web.
: (locations 9, 0, *, and #) allows you to program an additional
set of frequently used features.
–
Select an empty slot and press the key.
–
Use the Menu and Navigation keys to select a feature, then press the
Assign
soft key.
In some functions, you may be asked for a password or PIN.
Enter the code and press the Select soft key or the key.
Selecting Options
To view the various functions and options available and to select
the one you want:
•
Press the appropriate soft key.
•
To select the function displayed or the option highlighted, press the
Select
soft key or the key.
•
To view the next function or highlight the next option on a list, press the
Down
Navigation key or the down Volume key on the left side of the
phone.
•
To move back to the previous function or option on a list, press the
Navigation key or the up Volume key on the left side of the phone.
•
To move back up one level in the menu structure, press the
Back
key.
Understanding Your Phone 18
Up
soft
•
Right soft key
Right soft key
Left soft key
Left soft key
selection
selection
To exit the menu structure without changing the settings, press the
key.
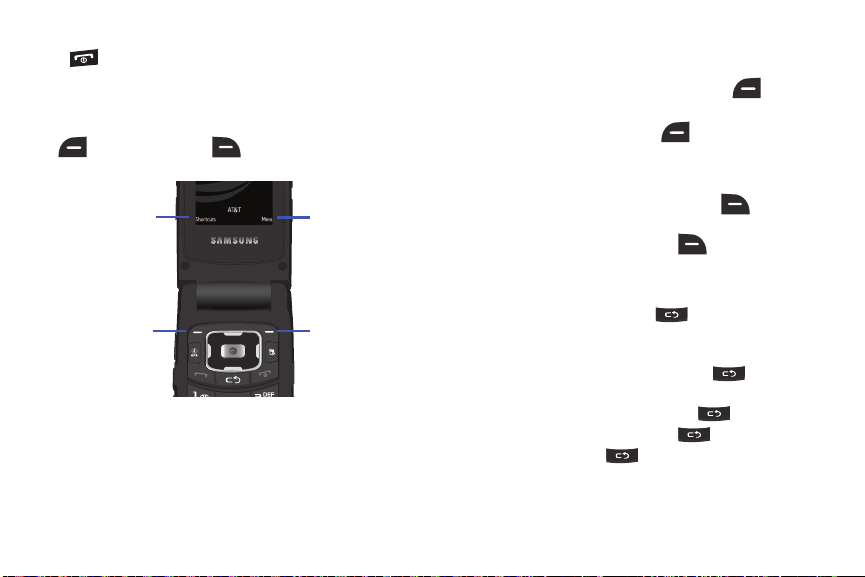
Command Keys
Functions for the soft keys are defined by what displays above
each in the display. There are two soft keys, the left soft key
and the right soft key .
Soft keys
The roles of the soft keys vary depending on the function you are
currently using; the labels on the bottom line of the display just
above each key indicate their current role.
Left Soft key
Some functions of the left soft key are as follows.
•
In the Idle screen, press the
My Shortcuts
screen. See
When in a menu mode, the left soft key function is
Shortcuts
(left) soft key to open the
“My Shortcuts”
on page 18.
Select
.
Right Soft Key
Some functions of the right soft key are as follows.
•
In the Idle screen, press the
Menu
screen.
•
When in a menu mode, the right soft key function is
Menu
(right) soft key to open the
Back
.
Clear Key
The Clear key is used to erase or clear numbers, text, or symbols
from the display. You can also use to return to a previous
menu or to return to standby mode from any menu. At the Idle
screen, a quick press displays the calendar in Month view.
•
If you enter an incorrect character, briefly press to backspace
(and delete) the character.
•
To erase the entire sentence, press and hold .
•
To back up one menu level, briefly press .
•
In Idle mode, briefly press to display the Month view of your
calendar.
19
End Key
Create Message
My Stuff
Contacts
IM (Instant Messaging)
Use the End key to turn on/off your phone, disconnect
calls, and return to the standby mode.
•
Press and hold the
•
Briefly press once to disconnect a call.
•
Press to return to standby mode from any menu.
End
key to turn on/off your phone.
Send Key
Use the Send key to answer calls, dial calls, and to recall
the last number(s) dialed, received, or missed.
•
Press once to answer calls.
•
Enter a number and briefly press to make a call.
•
Briefly press in standby mode to display a list of recent calls to
and from your phone.
•
Press twice in standby mode to call the most recent number.
•
Press to pick up a waiting call.
•
Press and hold to turn on your phone when the phone is off.
Navigation Key
Use the directional keys on the Navigation key to browse menus,
sub menus, and lists. Press the Up or Down Navigation keys
when jumping to highlighted links on the web.
Each key also acts as a shortcut to launch applications from the
Idle screen.
Understanding Your Phone 20
Section 3: Menu Navigation
This section explains the menu navigation for your phone. It also
includes an outline of all the available menus associated with
your phone. Some menu options are controlled by the SIM
provided by your service provider.
Menu Navigation
Menus and sub-menus can be accessed by scrolling through
them using the Navigation keys or by using the shortcut keys.
21
Accessing a Menu Function by Scrolling
1. In Idle mode, press the Menu soft key and scroll using the
Navigation keys to reach a main menu item, Settings for
example. Press the Select soft key or the key to
enter the menu.
2. If the menu contains sub-menus, Phone for example, you
can access them by first highlighting the option and then
by pressing the Select soft key or the key. If the
menu you selected contains further options, repeat this
step.
3. To scroll through these menus, press either the Up or
Down Navigation key or the Volume key (located on the
left side of your phone). Press the Select soft key or the
key to make your selection.
4. To return to the previous menu level, press the Back soft
key, the key.
5. To exit the menu without changing the settings, press the
key.

Using Shortcut Numbers
Numbered menu items, such as menus, sub-menus, and options
can be quickly accessed by using their shortcut numbers. In
Menu mode, Main Menus can be accessed by pressing the
number keys (1 to 0, * and #) corresponding to their location on
the screen.
Example:
Accessing the Music Player.
1. In Idle mode, press the Menu soft key.
2. Press the key for AT&T Music.
3. Press the key for Music Player.
The Music Player menu is displayed.
Shortcuts
The Shortcuts option is another way to access applications from
Idle mode without navigating through the main menu icons and
sub menus. There are twelve available shortcuts, eight
preassigned (Camera, Bluetooth, Alarms, Recent Calls, Games,
Applications, Tools, and My Account, and four empty shortcuts
(9, 0, *, #) you can assign.
To navigate to the shortcuts:
1. In Idle mode, press the Shortcuts soft key, and highlight a
shortcut application.
2. Press the key to access the selected option.
– or –
Press the
Options
soft key and select one of the following:
•Open
: open the selected shortcut and displays the submenus,
launches the selected application, or displays a screen.
• Change
: changes the currently selected shortcut and assigns
another shortcut to this field.
•Remove
: removes the selected shortcut from this field.
• Remove All
: removes all the shortcuts from the fields in this menu.
For more information, refer to “My Shortcuts” on page 18.
Menu Navigation 22
Section 4: Call Functions
This section describes how to make or answer a call. It also
includes the features and functionality associated with making or
answering a call.
Making a Call
When the Idle screen displays, enter the area code and phone
number, and press the key.
Note:
When you activate the
phone automatically redials up to 10 times when the person does not
answer the call or is already on the phone.
Auto Redial
option in the
Voice Call
menu, the
Making an International Call
1. Press and hold the key. The + character displays.
2. Enter the country code, area code, and phone number,
then press the key.
23
Correcting an Entered Number
Use the following steps to correct a mis-typed entry when
dialing.
1. After entering a number
•
To clear the last digit displayed, press the key.
•
To clear another digit in the number, press the
Left
or
Right
Navigation key until the cursor is immediately to the right of the digit
to clear. Press the key.
•
To enter a missing digit press the
Left
or
Right
Navigation key
until the cursor is in position and enter the digit.
•
To clear the whole display, press and hold the key.
2. Press the key to return to the Idle screen.
Ending a Call
When you want to finish your call, briefly press the key or
close the phone.

Manual Pause Dialing
When you call automated systems, you are often required to
enter a password or account number. Instead of manually
entering the numbers each time, you can dial the numbers along
with special characters called pauses. For more information, see
“Adding Pauses to Contact Numbers” on page 52.
To manually call a number with pause(s) without storing it in your
Contacts list:
1. In Idle mode, enter a phone number.
2. Press and hold the key to add a two-second pause.
The letter P will appear where the pause has been set.
3. Continue to enter numbers if desired.
Tip:
You can create pauses longer than two seconds by entering multiple P
pauses.
Redialing the Last Number
To display the last number dialed:
1. In Idle mode, press the key to view the Recent Calls
menu. The last number dialed displays as the first item in a
list of recent calls. If the caller is listed in your Address
Book, the name associated displays.
2. Press the key to call.
Dialing a Number From the Recent Calls Menu
All incoming, outgoing and missed calls are listed in the Recent
Calls Menu. If the caller is listed in your Address Book, the name
associated displays.
To access the Recent Calls menu:
1. In Idle mode, press the key.
2. Use the Right and Left Navigation keys to scroll through
the Recent Calls options. Choose from All Calls, Missed
Calls, Calls Made, Calls Received, or
3. Scroll to the number to call and highlight to select. Press
PTT Recent Calls
the key to call.
Making a Call from the Address Book
You can store phone numbers that you use regularly on the SIM
card or in the phone’s memory. These entries are collectively
called the Address Book.
Once a number is stored in the Address Book, you can dial it by
pressing a few keys using the Speed Dial feature.
For further details about the Address Book feature, see “Finding
an Address Book Entry” on page 52.
Call Functions 24
.
Answering a Call
When you receive a call the phone rings and displays the caller’s
phone number, or name if stored in the Address Book.
1. From the Idle Screen press the key.
If the Any Key option in the Menu ➔ Settings ➔ Calls ➔
General ➔ Call Answer menu is activated, you can press
any key to answer a call except for the key and the
Reject soft key.
If the Open Flip option in the Menu ➔ Settings ➔ Calls
➔ General ➔ Call Answer menu is activated, you can
answer the call by opening the phone.
Note:
To reject an incoming call, press and hold either Volume key on the left
side of the phone before opening the phone. A quick press of side
volume key silences the ringer on an incoming call.
2. Press the key or close the phone to end the call.
Note:
You can answer a call while using the Address Book or menu features.
After ending the call, the phone returns to the function screen you
were using.
25
Video Share
The Video Share features allow you to place a call and share live
or recorded video while on the call. You can initiate or receive
video by using the following steps.
Note:
In order to share video, both parties must be subscribed to Video
Share, both must have phones that support Video Share, and both
must be in a 3G coverage area.
Initiating and Receiving a Video Share Session
To initiate and receive a Video Share session:
1. From the Idle screen, use the key pad to enter the number
to dial and press .
2. Once the call is answered, if you're both capable of Video
Sharing, press Options ➔ Video Share to invite the other
party to see video shot from your phone. “Inviting ###-
###-####” displays. A message is sent to the recipient
“###-###-#### wants to Video Share with You!”.
Important!:
When establishing a Video Share session, only the sender of the
video clip can save the file.
 Loading...