

Samsung SMARTJET, SF-4300CI, SF-4300C User Manual
SmartJet Printer,
Scanner, Fax, Copier
User’s Guide
Setup and Operation
00-Cover 2/5/99 10:38 AM Page 1

Visit us at: http://samsungelectronics.com
If you have access to this online service, you can download the UserÕs
Guide and drivers from Samsung Electronics.
P/N: JG68-60792A Rev.3.00
00-Cover 2/5/99 10:38 AM Page 2
ELECTRONICS

Trademarks
¥ SmartJet is the trademark of Samsung Electronics Co., Ltd.
¥ Presto! PageManager is the trademarks of NewSoft, Inc.
¥ MyScan is the trademark of Samsung Electronics Co., Ltd.
¥ Windows is the trademark of Microsoft Corporation.
¥ Other names and trademarks mentioned in this manual are trademarks of their respective
holders.
Thank you for purchasing the SmartJetÑthe multifunction
office product for your home office and the whole family. We are
sure that your SmartJet will provide all you need in one
machine.
The SmartJet combines these office machine:
- Colour inkjet printer
- Scanner
- Plain paper fax
- PC fax
- Copier
Enjoy your new SmartJet!
01-Contents 2/5/99 10:36 AM Page 1

Contents
Set Up Your SmartJet 1.2
Unpacking 1.2
Control Locations and Functions 1.3
Front View 1.3
Rear View 1.3
Choosing a Location 1.4
Setting Up Your SmartJet 1.4
Installing Print Cartridge 1.7
Storing a Print Cartridge in the Storage Unit 1.10
Loading Paper 1.11
Running Printer Test 1.12
Installing Smart Soft 1.13
Installing Smart Soft 1.13
SmartJet Printer Driver 1.14
SmartJet Scanner Driver 1.14
Presto! PageManager 1.14
SmartFAX RCP Utility 1.15
SmartJet Fax Driver 1.15
System Requirement 1.16
Install Procedure 1.17
Printer Driver,Scanner Driver,Fax Driver
Fax RCP Driver in Windows 95/98 1.17
Printer Driver,Scanner Driver,Fax Driver
Fax RCP Driver in Windows 3.x 1.19
Presto ! PageManager 1.21
Changing SmartFAX RCP Port 1.22
Uninstalling 1.23
In Windows 95/98 1.23
In Windows 3.x 1.23
i
Chapter 1 Getting Started
01-Contents 2/5/99 10:36 AM Page 2

Using the Operator Panel 2.2
Printing 2.3
Printing a Document 2.3
Printer Settings 2.4
Accessing Print Settings 2.4
Using the Paper Tab 2.5
Using the Document/Quality Tab 2.5
Using the Advanced Tab 2.6
Specifying Your Printing Options 2.6
Paper Handling 2.7
Selecting Paper Types 2.7
Special Paper Guidelines 2.8
Loading Paper Manually 2.9
Using Banner Guide 2.10
Loading Envelopes 2.12
Printing Speed Versus Colour 2.14
For Quick Colour Printing 2.14
For High Quality Colour Printing 2.14
For Monochrome Printing 2.14
Setting Other Utilities Using the SmartJet Control Program 2.15
Starting the SmartJet Control Program 2.15
SmartJet Control Program Window 2.16
Using the Status Tab 2.17
Using the Options Tab 2.17
Using the Cartridge Tab 2.18
Scanning 2.19
Overview 2.19
Scanning a Document or Photograph 2.20
Faxing and Copying 2.25
SmartFAX 2.25
Starting the SmartFAX 2.26
Understanding the SmartFAX Window 2.27
Preparing Documents for Faxing or Copying 2.28
Using Carrier Sheet 2.28
Loading the Document 2.29
ii
1 Getting Started
2 Operation 3 Troubleshooting
Appendix
Chapter 2 Operation
01-Contents 2/5/99 10:36 AM Page 3

Specifications 4.2
Index 4.6
Important Notice 4.9
Replacing the Fitted Plug 4.11
Guarantee 4.12
iii
Troubleshooting 3.2
Printing Problems 3.2
Faxing Problems 3.8
Copying Problems 3.9
Scanning Problems 3.10
Error Lamp 3.13
Maintenance 3.14
Print Cartridge Maintenance 3.14
Print Cartridge Nozzle Test 3.15
Wiping the Print Cartridge Nozzles and Contacts 3.17
Cleaning Cartridge Carrier Contacts 3.18
Cartridge Alignment 3.19
Replacing the Print Cartridge 3.20
Cleaning a White Sheet 3.23
Chapter 3 Troubleshooting
Appendix
Making a Copy 2.30
On the SmartFAX 2.30
On the SmartJet Keypad 2.32
Sending a Fax 2.34
Sending from the SmartFAX 2.34
Dialling from a Telephone Connected to the SmartJet 2.36
Receiving a Fax 2.38
Receiving a Fax Automatically - FAX mode 2.38
Receiving a Fax Manually - TEL mode 2.39
Using Phonebook 2.40
Storing Numbers into and Deleting Numbers
from Phonebook 2.40
Dialling Phonebook Numbers 2.41
Setting User Options 2.42
Selectable Options 2.42
Setting Options 2.44
Printing Out Lists 2.45
Understanding Message Displayed on SmartFAX 2.46
01-Contents 2/5/99 10:36 AM Page 4
1.1
Getting Started
1
02-Setup 2/5/99 10:31 AM Page 1
1.2
Set Up Your SmartJet
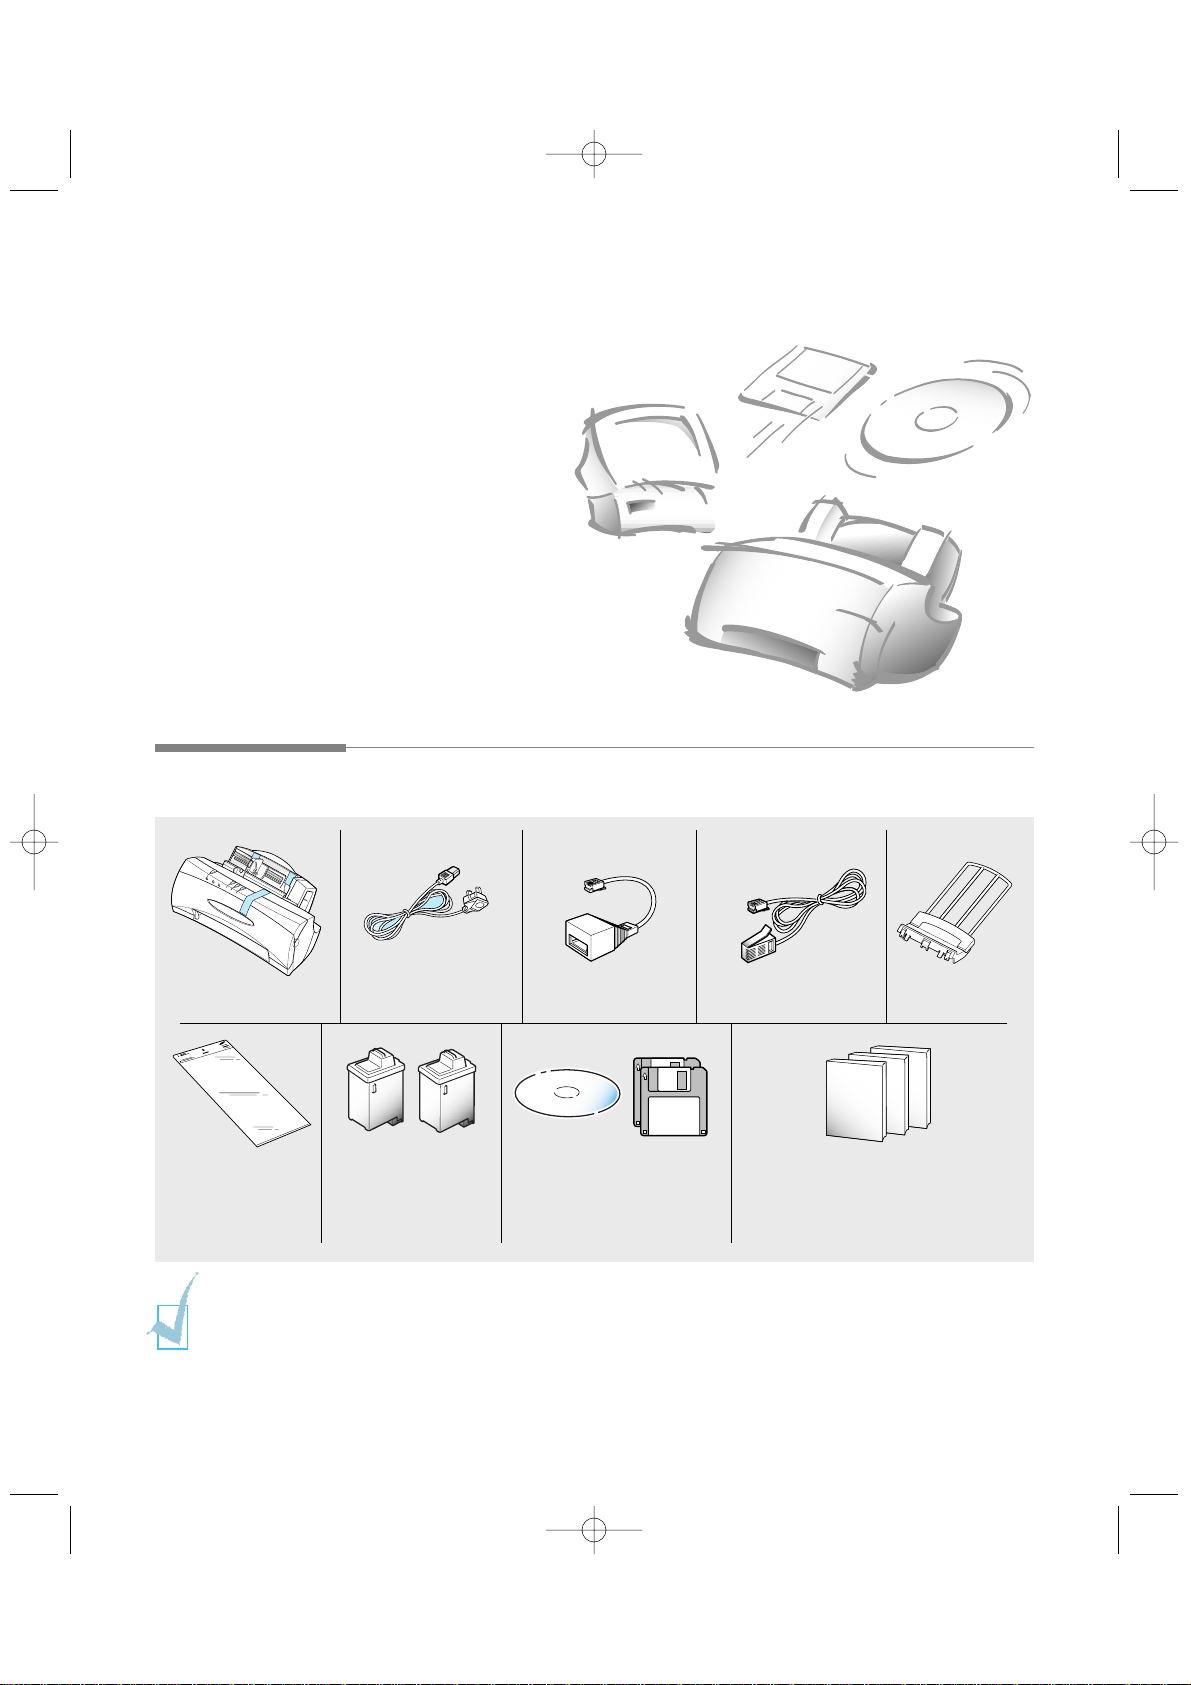
Machine Banner guide
Black, colour print
cartridge
Carrier sheet
¥Smart Soft CD-ROM
¥WinFax LITE diskettes
AC power cord TAM lead Telephone line cord
¥Setup and Operation UserÕs Guide
¥Presto! PageManager/MyScan
UserÕs Guide
¥WinFax LITE UserÕs Guide
Unpacking
Set Up Your
SmartJet
If you are experiencing problems with the SmartJet software contained on this CD-ROM or if you
donÕt have a CD-ROM drive and require the SmartJet software on 3.5Ó diskette, please call either
BITS Tel 01189 409500 or FLS (TEL) 01268 888895 or FLS (FAX) 01268 888899.
The shape of power and telephone line cord plugs may differ, depending on your country.
02-Setup 2/5/99 10:31 AM Page 2
1.3
Set Up Your SmartJet
Control Locations and Functions
Take a moment to familiarize yourself with the main components and
understand their functions.
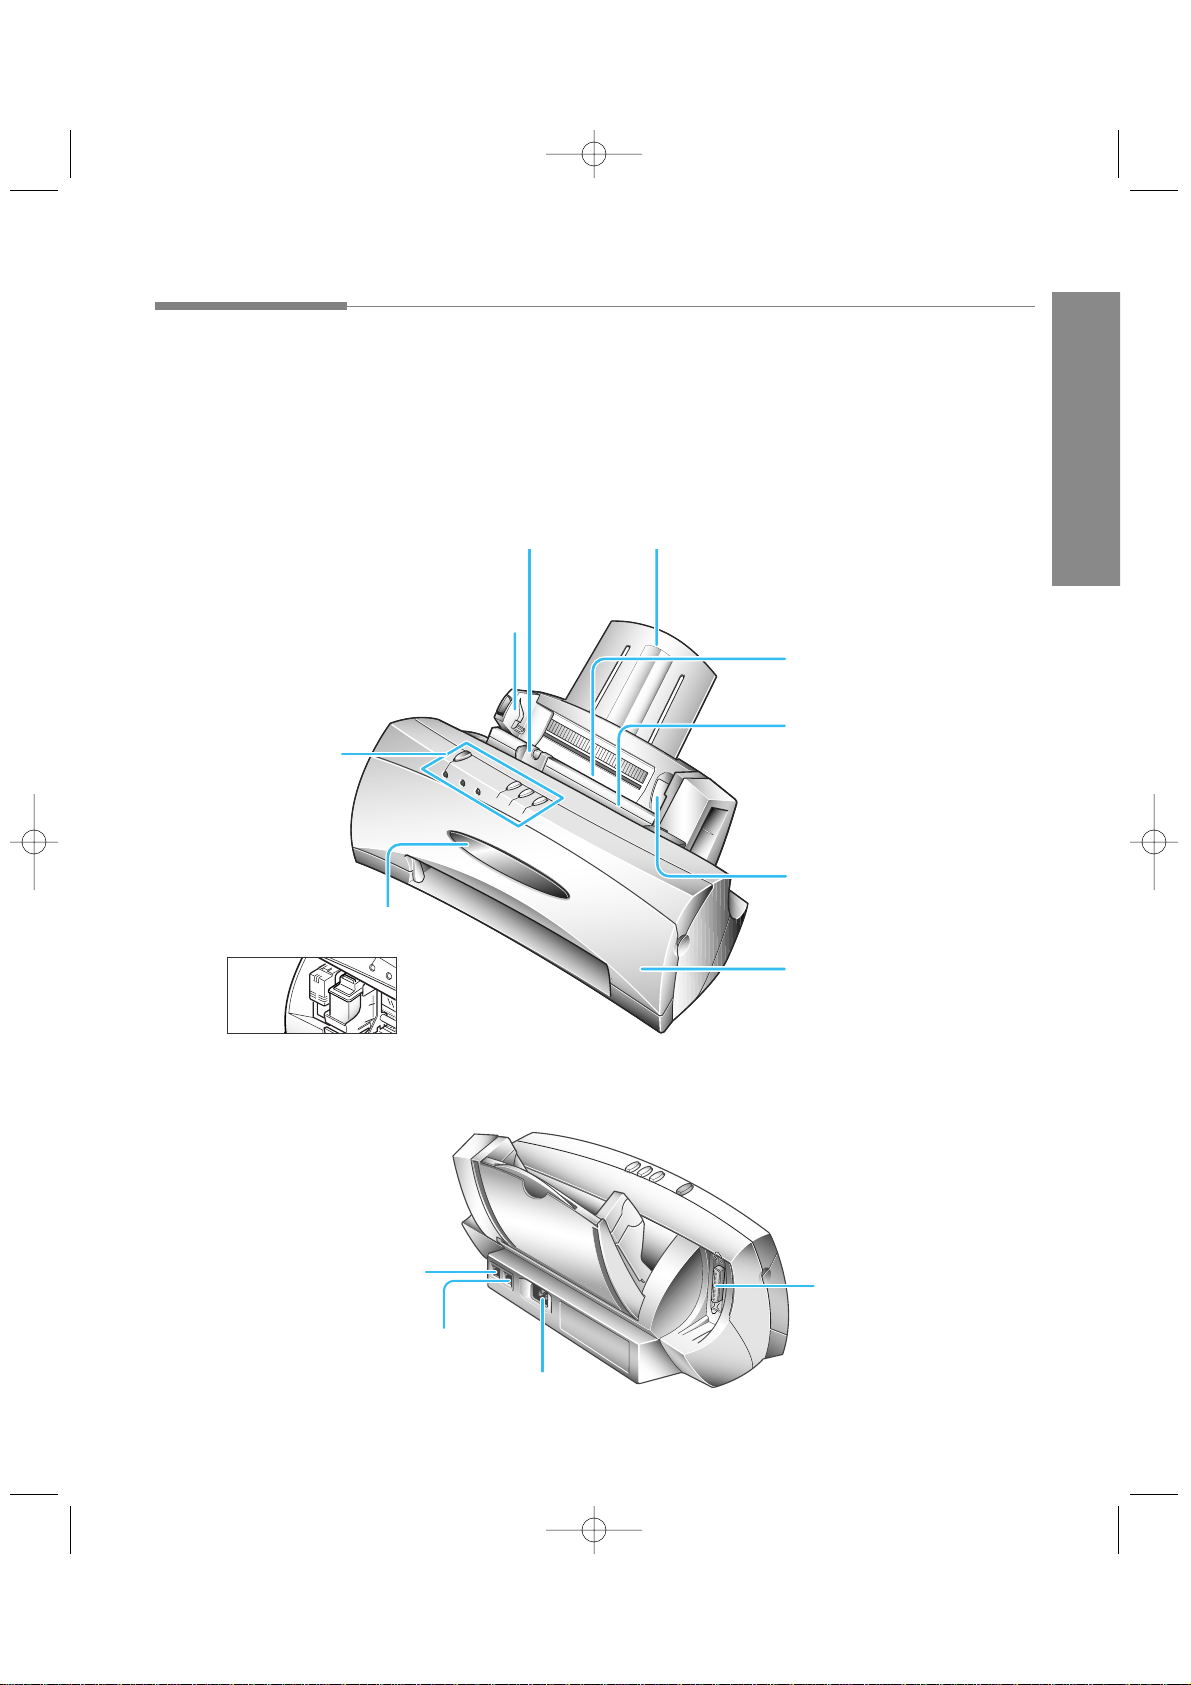
Front View
Rear View
Paper Extension
Supports the paper.
Paper Guide
Adjust this guide to the width.
Envelope Guide
Use to print an envelope.
Front Cover
Manual Tray
Allows you to load your
original document for scanning,
faxing and copying. Also, use to
feed paper manually one at a
time.
Document Guide
Adjust this guide to the paper width of the
document to be faxed, copied, or scanned.
Automatic Paper Feeder
Holds 100 sheets of plain paper.
Print cartridge and
carrier (inside)
Buttons and Lamps
See page 2.2.
Ext.Tel Jack
Printer Cable Connector
Line Jack
AC power Connector
1 Getting Started
02-Setup 2/5/99 10:31 AM Page 3

1.4
Set Up Your SmartJet
Choosing a Location
To help guarantee trouble-free operation of your machine, place it on a flat,
stable surface near your workstation. Leave enough space to allow for easy
paper loading, and front cover open.
Do not place your SmartJet:
- In direct sunlight.
- Near heat sources or air conditioners.
- In dusty or dirty environments.
Setting Up Your SmartJet
Remove the Shipping Tapes
1. Remove all pieces of shipping tape from the machine.
➡
➡
➡
02-Setup 2/5/99 10:31 AM Page 4

1.5
Set Up Your SmartJet
Telephone Line
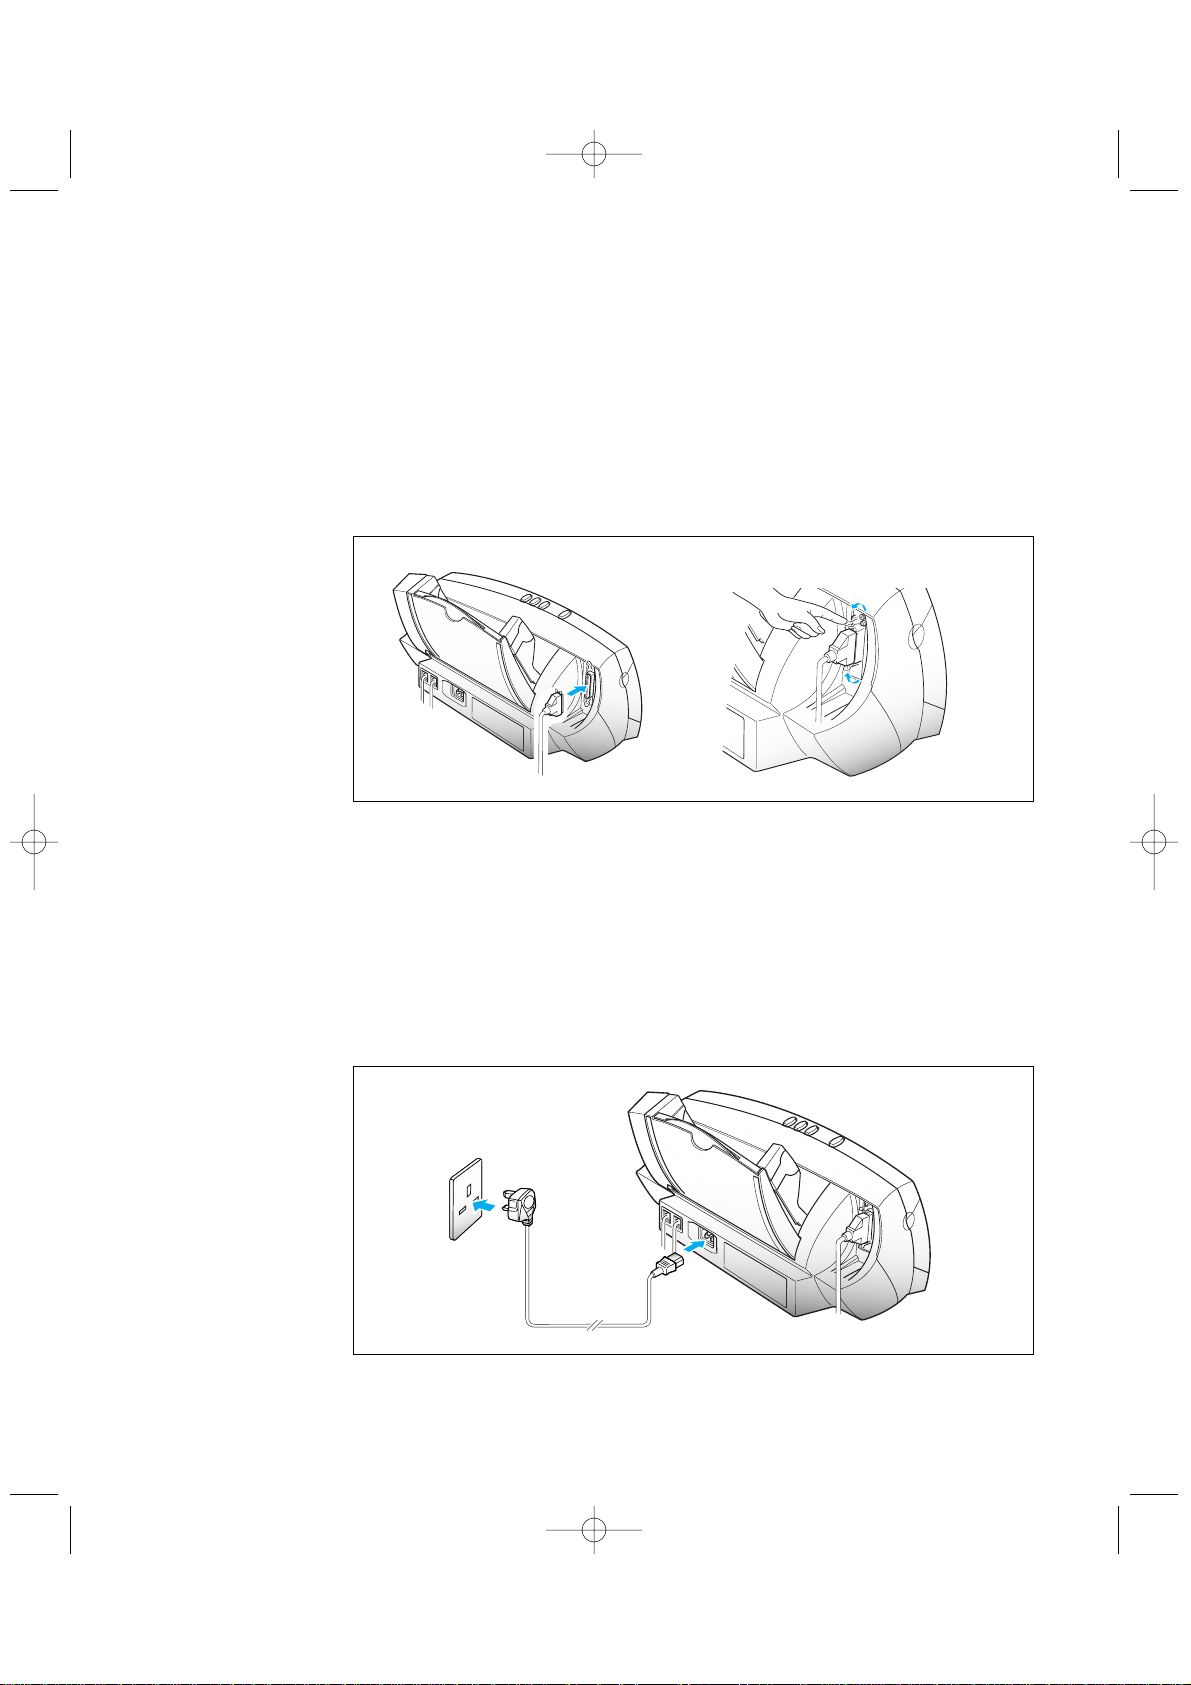
2. Plug one end of the telephone line cord into the Line jack on the back of
your machine and the other end into a standard phone wall jack.
Optional Telephone
3. Plug the cord of your extension phone into the TAM lead and plug the
other jack of TAM lead into the socket marked Ext. Tel jack on the back
of the machine.
You must connect an extension phone to send or receive a fax through this
machine when it is not connected to a PC.
TAM lead
1 Getting Started
02-Setup 2/5/99 10:31 AM Page 5
Ext. Tel
Line
Ext.Tel
Line
1.6
Set Up Your SmartJet
Printer Cable
4. Connect a parallel printer cable to the printer jack on your machine. You
need to purchase the cable.
You must use a parallel cable that supports IEEE-P1284 bidirectional
communications.
5. Fasten the metal clips to the parallel cable.
6. Connect the other end of the parallel cable to the appropriate parallel
port on your computer.
Refer to your computerÕs instruction manual for help.
AC Power Cord
7. Plug one end of the cord into the back of the machine and the other end
into a standard AC power outlet.
02-Setup 2/5/99 10:31 AM Page 6
1.7
Set Up Your SmartJet
Turning Power On and Off
8. Plug the power cord into the AC Power Outlet. The READY lamp comes
on to indicate that the system is ready for use. Note that in the event of a
power failure, when the power is restored the printer will revert to the
last mode selected.
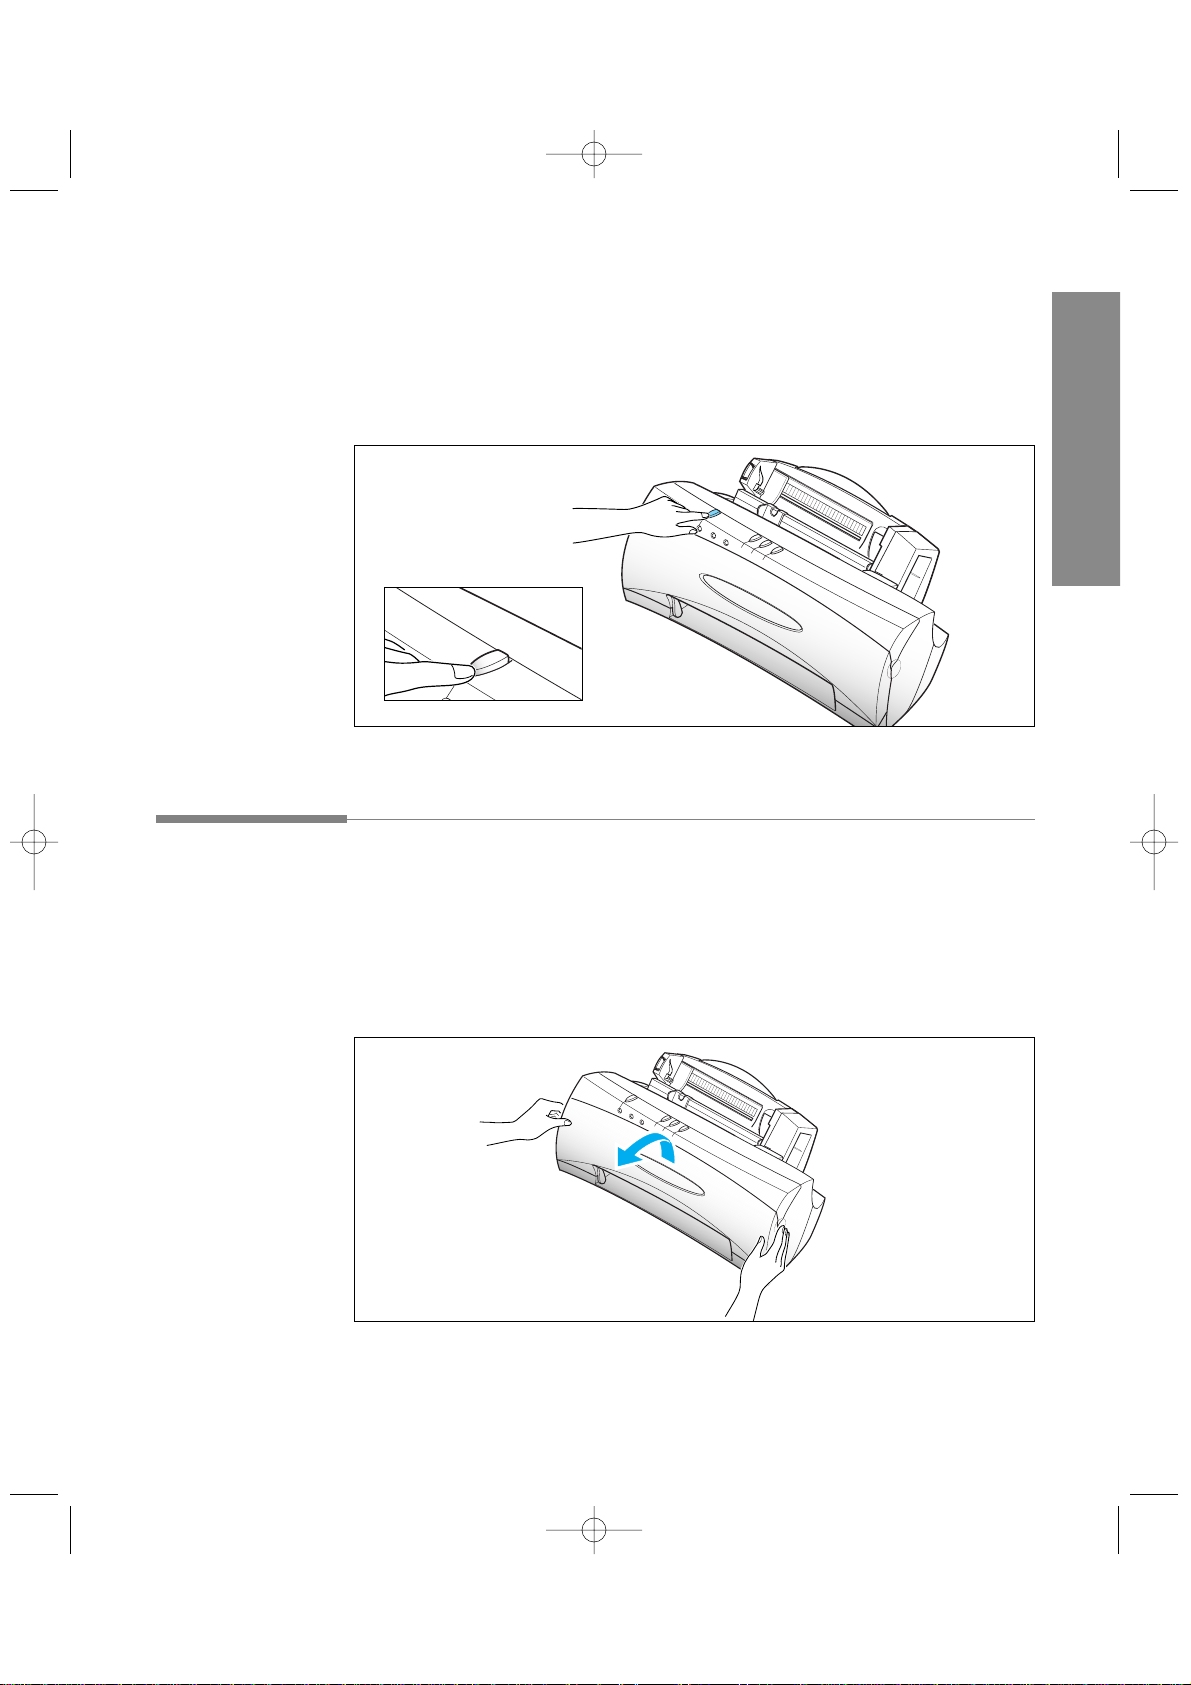
Installing Print Cartridge
When you plug the power cord in for the first time after you purchase this
machine, both the READY and BUSY lamp flicker to indicate that there is
no cartridge in the printer.
1. Open the front cover.
1 Getting Started
02-Setup 2/5/99 10:31 AM Page 7
READY
1.8
Set Up Your SmartJet
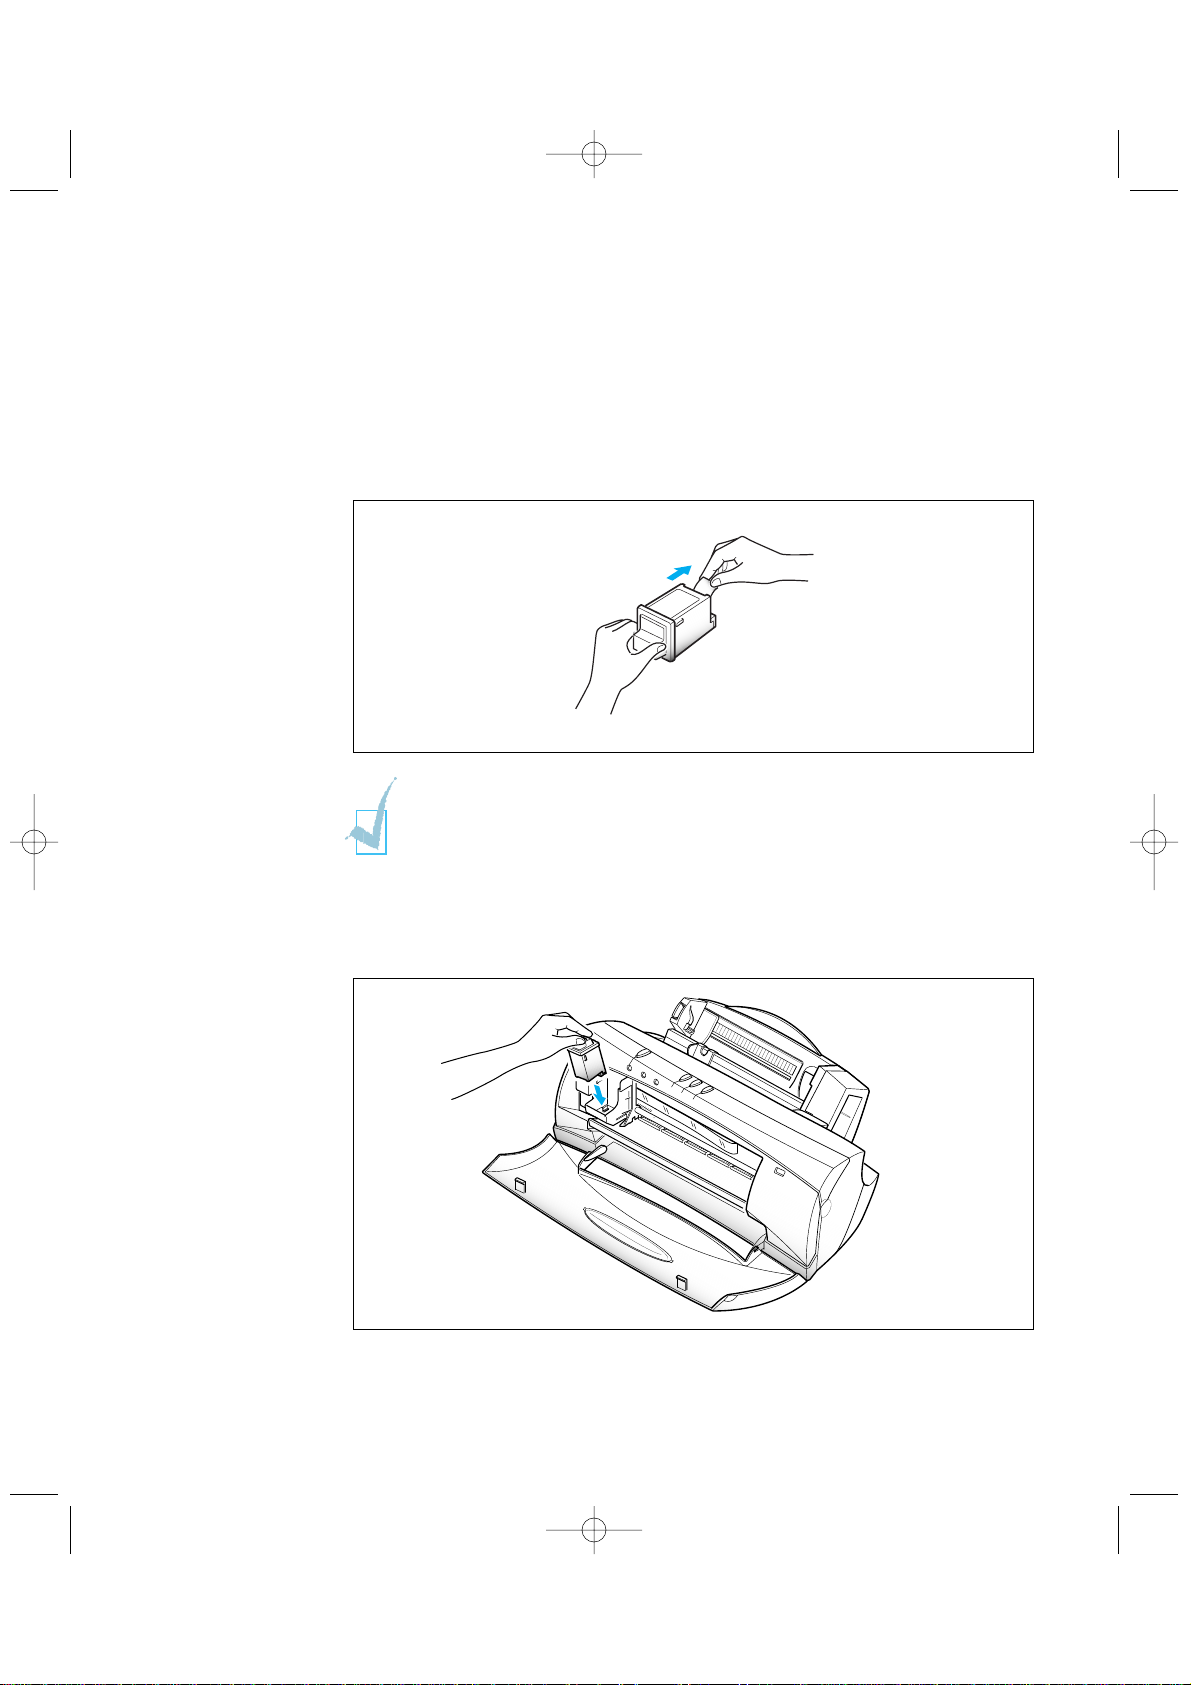
Do not touch the copper area.
4. Insert the print cartridge to the carrier.
2. Press the CARTRIDGE button to move the cartridge carrier to the install
position.
3. Remove the print cartridge from its packaging. Hold the print cartridge
by the black areas or coloured top only and carefully remove the tape
covering the printhead. Be sure to remove all the tapes.
02-Setup 2/5/99 10:31 AM Page 8
1.9
Set Up Your SmartJet
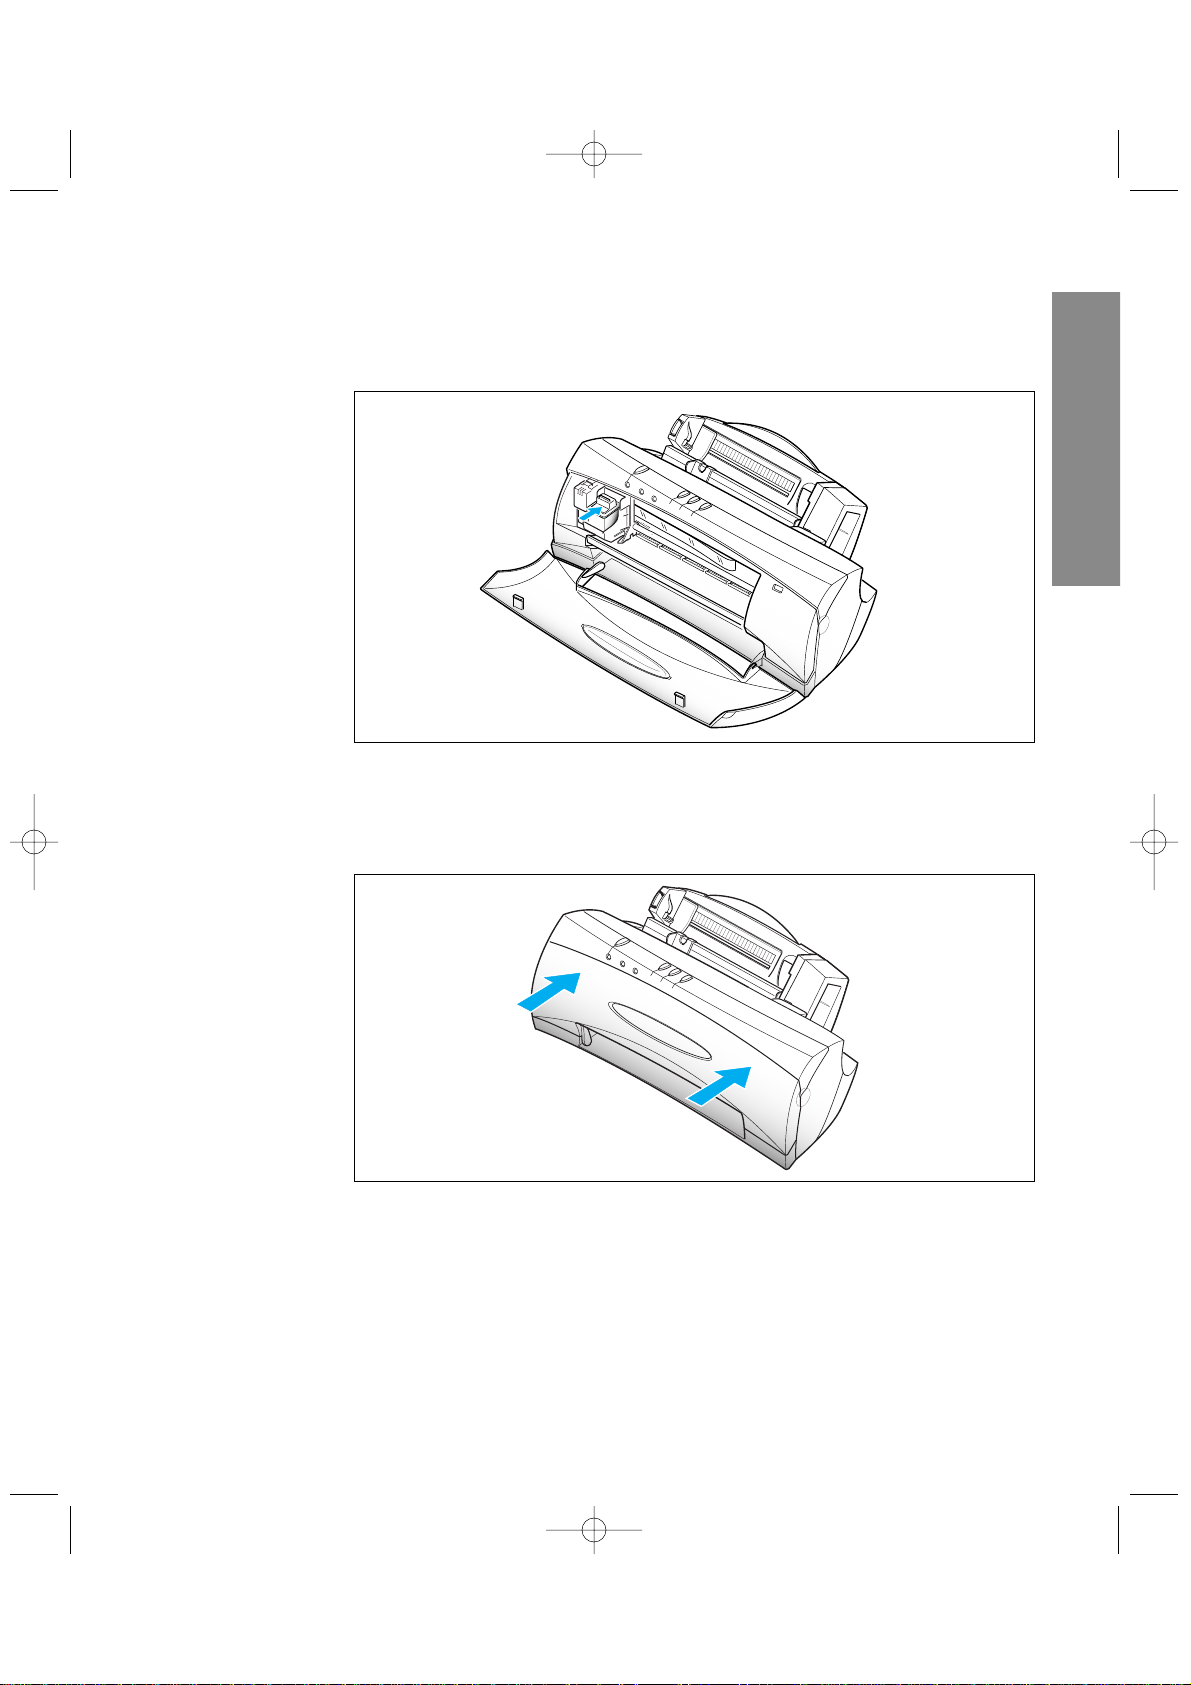
5. Push the cartridge firmly in the direction of the arrow until it clicks into
place.
6. After installing the print cartridge, close the front cover.
1 Getting Started
02-Setup 2/5/99 10:31 AM Page 9

1.10
Set Up Your SmartJet
7. Press and hold the CARTRIDGE button for approximately 3 seconds.
The cartridge carrier returns to its original position. The machine is now
ready for use.
OPY
¥ If the cartridge is not installed properly, both the READY and BUSY lamp
keep flickering.
¥ You can replace a print cartridge by temporarily suspending an activity such as
copying or printing. By pressing the CARTRIDGE button while your printer is
active, the machine will temporarily stop. Printing will resume after the print
cartridge has been replaced.
Storing a Print Cartridge in the Storage Unit
The print cartridge storage unit provides a convenient place to store an
extra print cartridge, and prevents an opened cartridge from drying out.
1. Holding the print cartridge, insert it into the storage unit.
2. Push firmly in the direction of the arrow until it clicks into place.
02-Setup 2/5/99 10:31 AM Page 10
CARTRIDGE
FF/STOP
START/C

1.11
Set Up Your SmartJet
2. Fan the paper and load it into the automatic paper feeder. Move the
paper to the far right, and push it slightly down until the machine pulls
the first sheet inward.
3. Squeeze the left paper guide and move it to the right to match the width
of the paper.
Loading Paper
When no paper is loaded, the BUSY lamp flickers and the SCAN/FAX lamp
glows red. You can load approximately 100 sheets of paper in the automatic
paper feeder.
1. Pull the paper extension on the automatic paper feeder all the way up.
If you fail to fan the paper or adjust the paper guide, it may cause multi-paper
feeding.
Paper extension
1 Getting Started
02-Setup 2/5/99 10:31 AM Page 11

1.12
Set Up Your SmartJet
3. The machine prints out a test pattern to show the status of the printer
mechanism.
Examine the test pattern and look for a break in the diagonal line. A
broken line shows any clogged nozzles. If the diagonal lines are not
broken and the bars are clear, the printer mechanism is functioning
properly. See the pattern sample below.
Sample of Test Pattern
Running Printer Test
Each time you install a new print cartridge, run the printer test to check if
the printer mechanism is functioning properly.
1. Press the READY button to turn the system off.
2. Press the CARTRIDGE button first, and the READY button next, then
hold down both of them for approximately 1 second.
FF/
Black cartridgeColour cartridge
02-Setup 2/5/99 10:31 AM Page 12
READY
CARTRIDGE

Installing Smart Soft
You must install the Smart Soft CD-ROM for printing, scanning, faxing, and
copying. If you do not install this software, the SmartJet will not work. The
Smart Soft includes drivers as follows:
¥ SmartJet Printer Driver
¥ SmartJet Scanner Driver
¥ Presto! PageManager
¥ SmartFAX RCP Utility
¥ SmartJet FAX Driver
For details on the drivers, refer to each driverÕs description.
If you are experiencing problems with the SmartJet software contained on this
CD-ROM or if you donÕt have a CD-ROM drive and require the SmartJet
software on 3.5Ó diskette, please call either BITS Tel 01189 409500 or FLS
(TEL) 01268 888895 or FLS (FAX) 01268 888899.
1.13
Installing Smart Soft
Installing
Smart Soft
1 Getting Started
03-Install 2/5/99 10:28 AM Page 1

1.14
Installing Smart Soft
SmartJet Printer Driver
Before you can use any type of printer with your computer, you must
install a printer driver. The printer driver tells the computer what kind of a
printer you are using. The printer driver also controls the various settings,
such as print quality and paper type. You define these settings within the
printer driver, and the printer driver then communicates the settings to
both the computer and the printer.
To use the SmartJet as your printer, you must install the SmartJet Printer
Driver in your computer. After installing the printer driver, make sure the
SmartJet is selected as a default printer to use SmartJet as your printer.
SmartJet Scanner Driver
Scanner driver allows you to scan images from any graphics or OCR
(optical character recognition) applications programme that supports the
TWAIN standard (e.g. Presto! PageManager, Adobe Photoshop). To use the
SmartJet as your scanner, you must install the SmartJet Scanner Driver in
your computer.
Presto! PageManager
With Presto! PageManager, you can easily scan documents and photographs
into your computer and maintain them as electronic documents. You can
also use Presto! PageManager to quickly transmit scanned documents by fax
or electronic mail, or to print a copy on your printer.
To use Presto! PageManager as your scanning application, you must install
the Presto! PageManager in your computer.
SmartFAX RCP Utility
The SmartFAX Remote Control Programme (RCP) utility enables you to
make a copy or send a fax through your SmartJet machine even when an
extension phone is not connected with your SmartJet. If you install the RCP
utility, the SmartFAX program is installed on your computer. The SmartFAX
allows you to dial a fax number and set up advanced fax options. The
display window on the SmartFAX shows the current status, and
information messages and prompts.
The SmartFAX is installed on LPT1. You can change the LPT port, if
necessary. See page 1.22.
03-Install 2/5/99 10:28 AM Page 2

1.15
Installing Smart Soft
SmartJet Fax Driver
The SmartJet Fax Driver allows you to use a Class-2 compatible PC-FAX
application like WinFax LITE 4.0. The SmartJet Fax Driver is a Windows
programme that silently runs in the background all the time. You can open
the SmartJet Fax Driver display by clicking on itÕs icon in the Control Panel
menu. You can also terminate the Fax Driver at any time, if necessary.
When you exit the Fax Driver, it will offer you two options. One option is to
terminate the SmartJet, and the other option is to keep the Fax Driver
running in the background. If you decide to terminate the Fax Driver then
all current and future SmartJet usage will be terminated until you restart
the SmartJet Fax Driver or restart Windows. You can also restart the
SmartJet Fax Driver from the Control Panel menu at any time.
You can change the Fax Driver COM port, which should be consistent with
the COM port used by PC-FAX application. Its default COM port is COM3.
1 Getting Started
¥Your SmartJet cannot perform more than one job at the same time. If you
try to use the SmartJet while it performs one job, it may malfunction.
¥It is recommended not to set automatic receiving mode through the PC-FAX
application like WinFax LITE, because it occupies the LPT port all the time and
you cannot use your SmartJet for printing, scanning, or any other job.
03-Install 2/5/99 10:28 AM Page 3

1.16
Installing Smart Soft
System Requirement
Before you start, make sure you have the following computer setup.
These are the minimum requirements.
SmartJet Printer Driver
¥ IBM or compatible with 486SX 33MHz or higher processor
¥ Free disk space of at least 3MB
¥ More than 8MB or higher RAM
¥ Windows 95/98, Windows 3.x
¥ CD-ROM drive
SmartJet Scanner Driver
¥ IBM or compatible with 486SX 33MHz or higher processor
¥ Free disk space of at least 3MB
¥ More than 8MB or higher RAM
¥ Windows 95/98, Windows 3.x
¥ CD-ROM drive
Presto! PageManager
¥ IBM or compatible with 486SX 33MHz or higher processor
¥ Free disk space of at least 28MB (Windows 95/98) or 8MB (Windows 3.x)
¥ More than 8MB or higher RAM
¥ Windows 95/98, Windows 3.x
¥ CD-ROM drive
SmartFAX RCP Utility
¥ IBM or compatible with 486SX 33MHz or higher processor
¥ Free disk space of at least 1MB
¥ More than 8MB or higher RAM
¥ Windows 95/98, Windows 3.x
¥ CD-ROM drive
03-Install 2/5/99 10:28 AM Page 4

1.17
Installing Smart Soft
SmartJet Fax Driver
¥ IBM or compatible with 486SX 33MHz or higher processor
¥ Free disk space of at least 4MB
¥ More than 8MB or higher RAM
¥ Windows 95/98, Windows 3.x
¥ CD-ROM drive
Install Procedure
Before you start, make sure your computer meets or exceeds the system
requirement for the driver and application programme you want to install.
See page 1.16.
Printer Driver, Scanner Driver, Fax Driver, Fax RCP Driver
in Windows 95/98
1. Make sure the SmartJet is plugged in and connected to your computer.
2. Turn on the SmartJet and the computer.
3. Start your Windows. You see a screen similar to this:
1 Getting Started
4. Select Cancel.
03-Install 2/5/99 10:28 AM Page 5
1.18
Installing Smart Soft
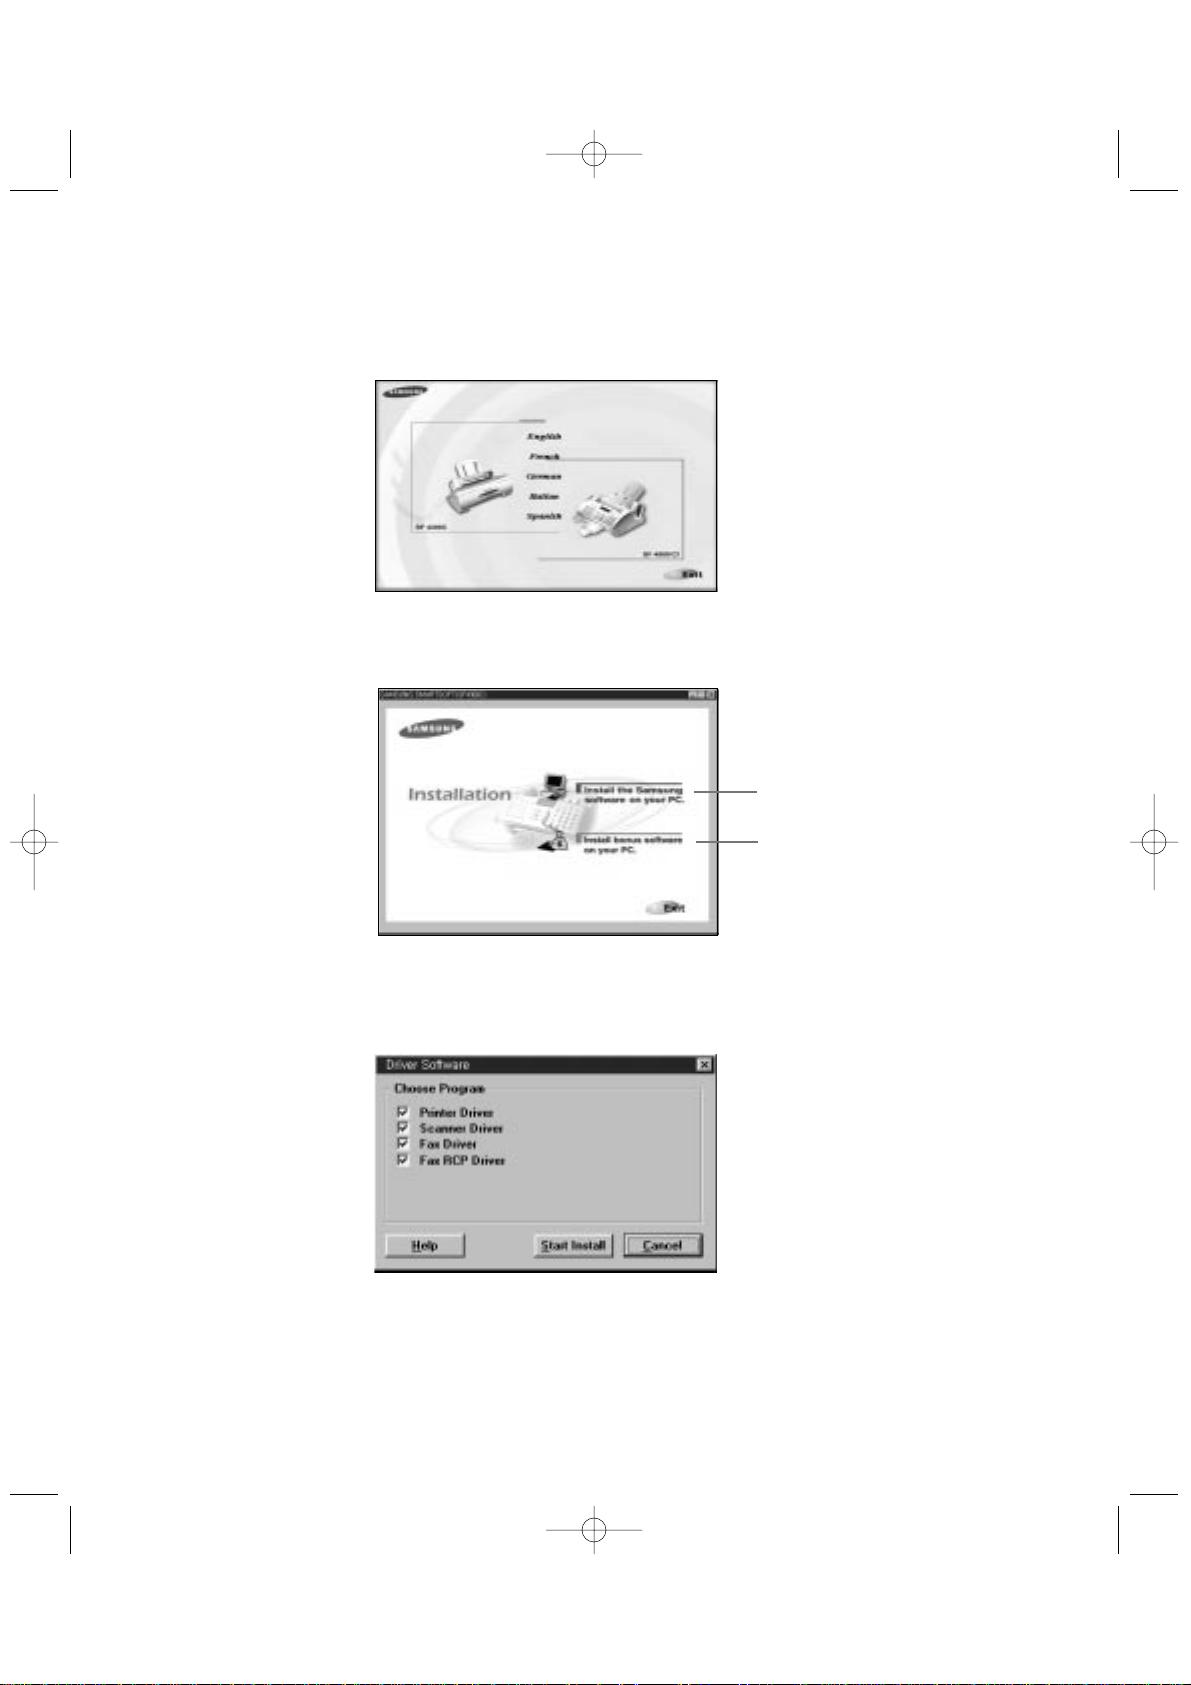
5. Inset Smart Soft CD-ROM into your CD-ROM drive. The CD-ROM starts
automatically and the initial screen appears.
6. From the initial screen, select the desired language on the screen.
7. From the Installation screen, select Install the Samsung software on
your PC. The Continue dialogue box appears.
8. Click Start Install and follow the instructions on the screen.
Printer Driver, Scanner Driver, Fax Driver,
Fax RCP Driver
Presto! PageManager
03-Install 2/5/99 10:28 AM Page 6
1.19
Installing Smart Soft
Printer Driver, Scanner Driver, Fax Driver, Fax RCP Driver
in Windows 3.x
1. Make sure the SmartJet is plugged in and connected to your computer.
2. Turn on the SmartJet and the computer.
3. Start your Windows.
4. Insert the Smart Soft CD-ROM into your CD-ROM drive.
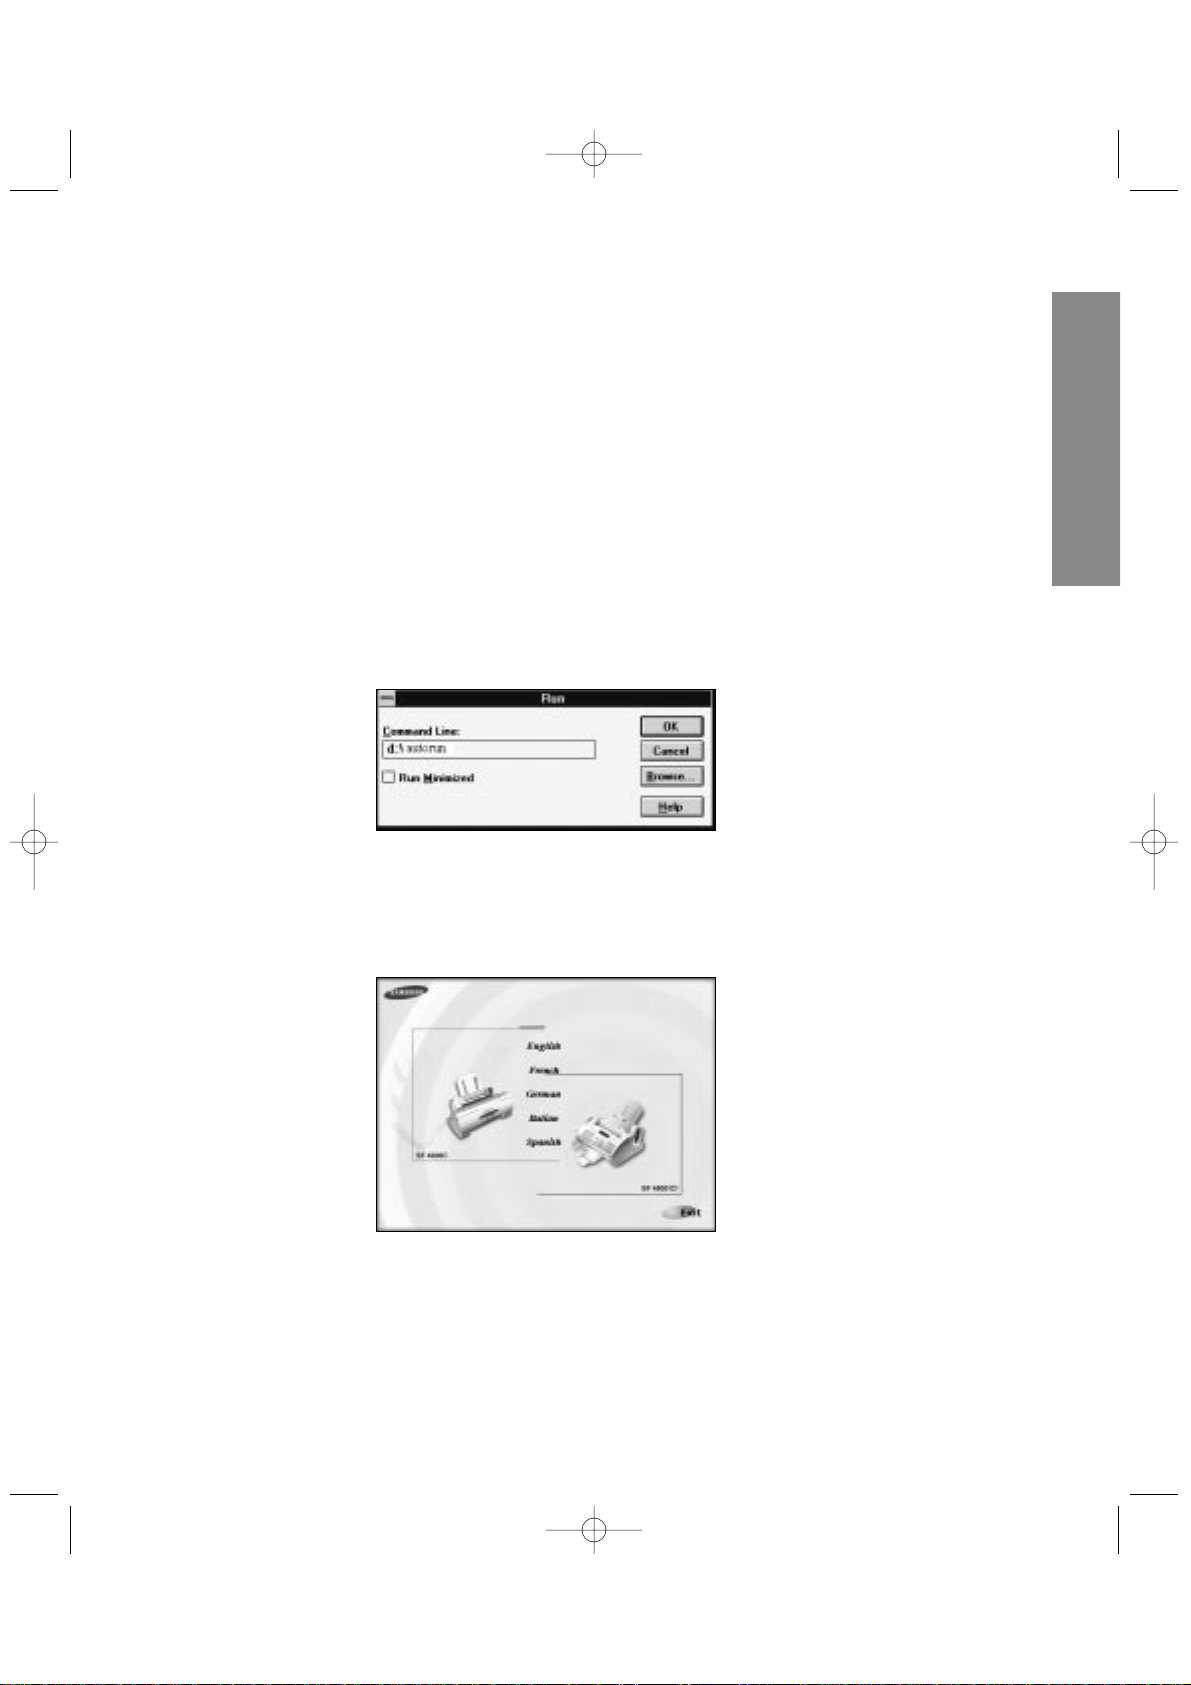
5. From the Program Manager, select Run from the File menu. The Run
dialogue box appears.
6. Type d:(or e:)\autorun on the command line, then click OK. The CDROM starts automatically and the initial screen appears.
1 Getting Started
03-Install 2/5/99 10:28 AM Page 7
7. From the initial screen, select the desired language on the screen.
8. From the Installation screen, select Install the Samsung software on
your PC. The Continue dialogue box appears.
9. Click Start Install and follow the instructions on the screen.
1.20
Installing Smart Soft
Printer Driver, Scanner Driver, Fax Driver,
Fax RCP Driver
Presto! PageManager
03-Install 2/5/99 10:28 AM Page 8

Presto! PageManager
1. Lets begin from the Smart Soft CD-ROM initial screen.
If not turned on, start Windows and insert the Smart Soft CD-ROM.
Windows 95/98 user will see the initial screen.
Windows 3.x user should select Run from the File menu under the
Program Manager. When the Run dialogue box appears, type d:(or
e:)\Autorun on the command line, then click OK. The CD-ROM starts
and the initial screen appears.
2. From the initial screen, select the desired language on the screen.
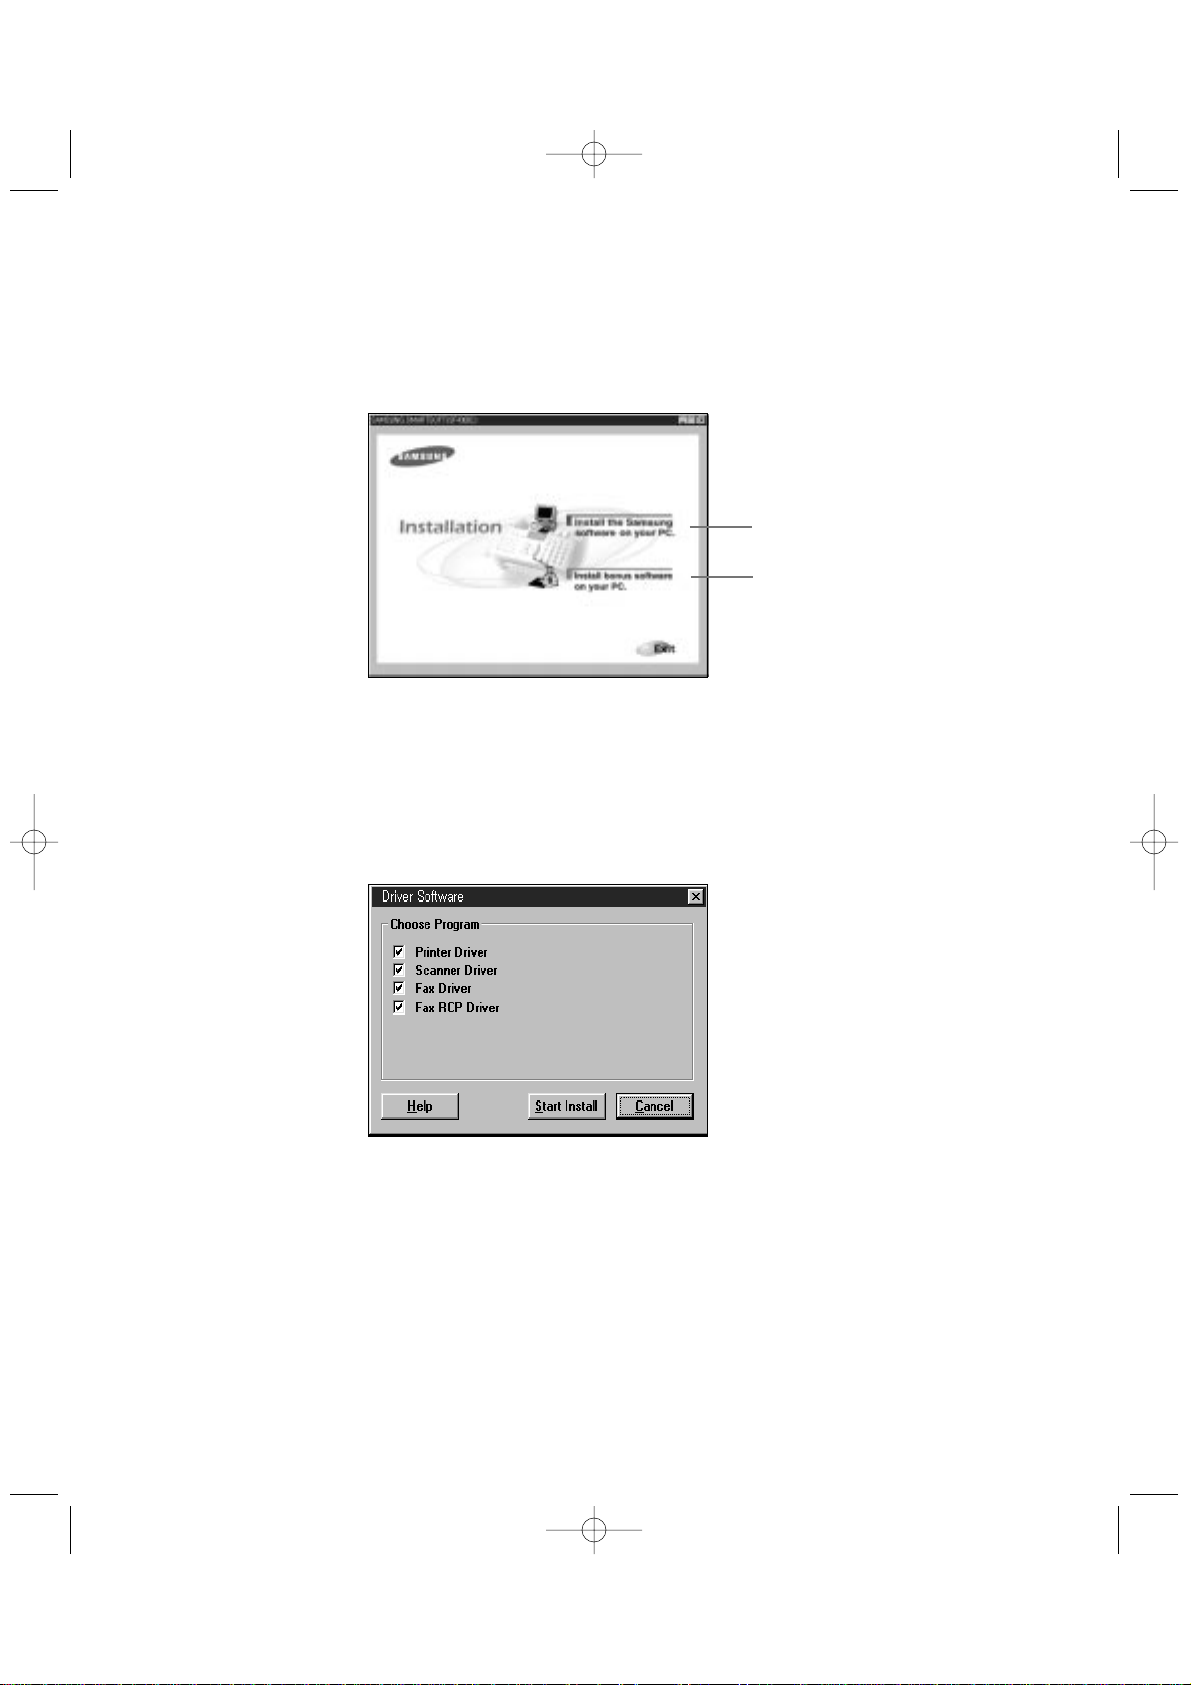
3. From the Installation screen, select Install bonus software on your PC.
The Continue dialogue box appears.
4. Click Start Install and follow the instructions on the screen.
1.21
Installing Smart Soft
1 Getting Started
Printer Driver, Scanner Driver, Fax Driver,
Fax RCP Driver
Presto! PageManager
03-Install 2/5/99 10:28 AM Page 9
1.22
Installing Smart Soft
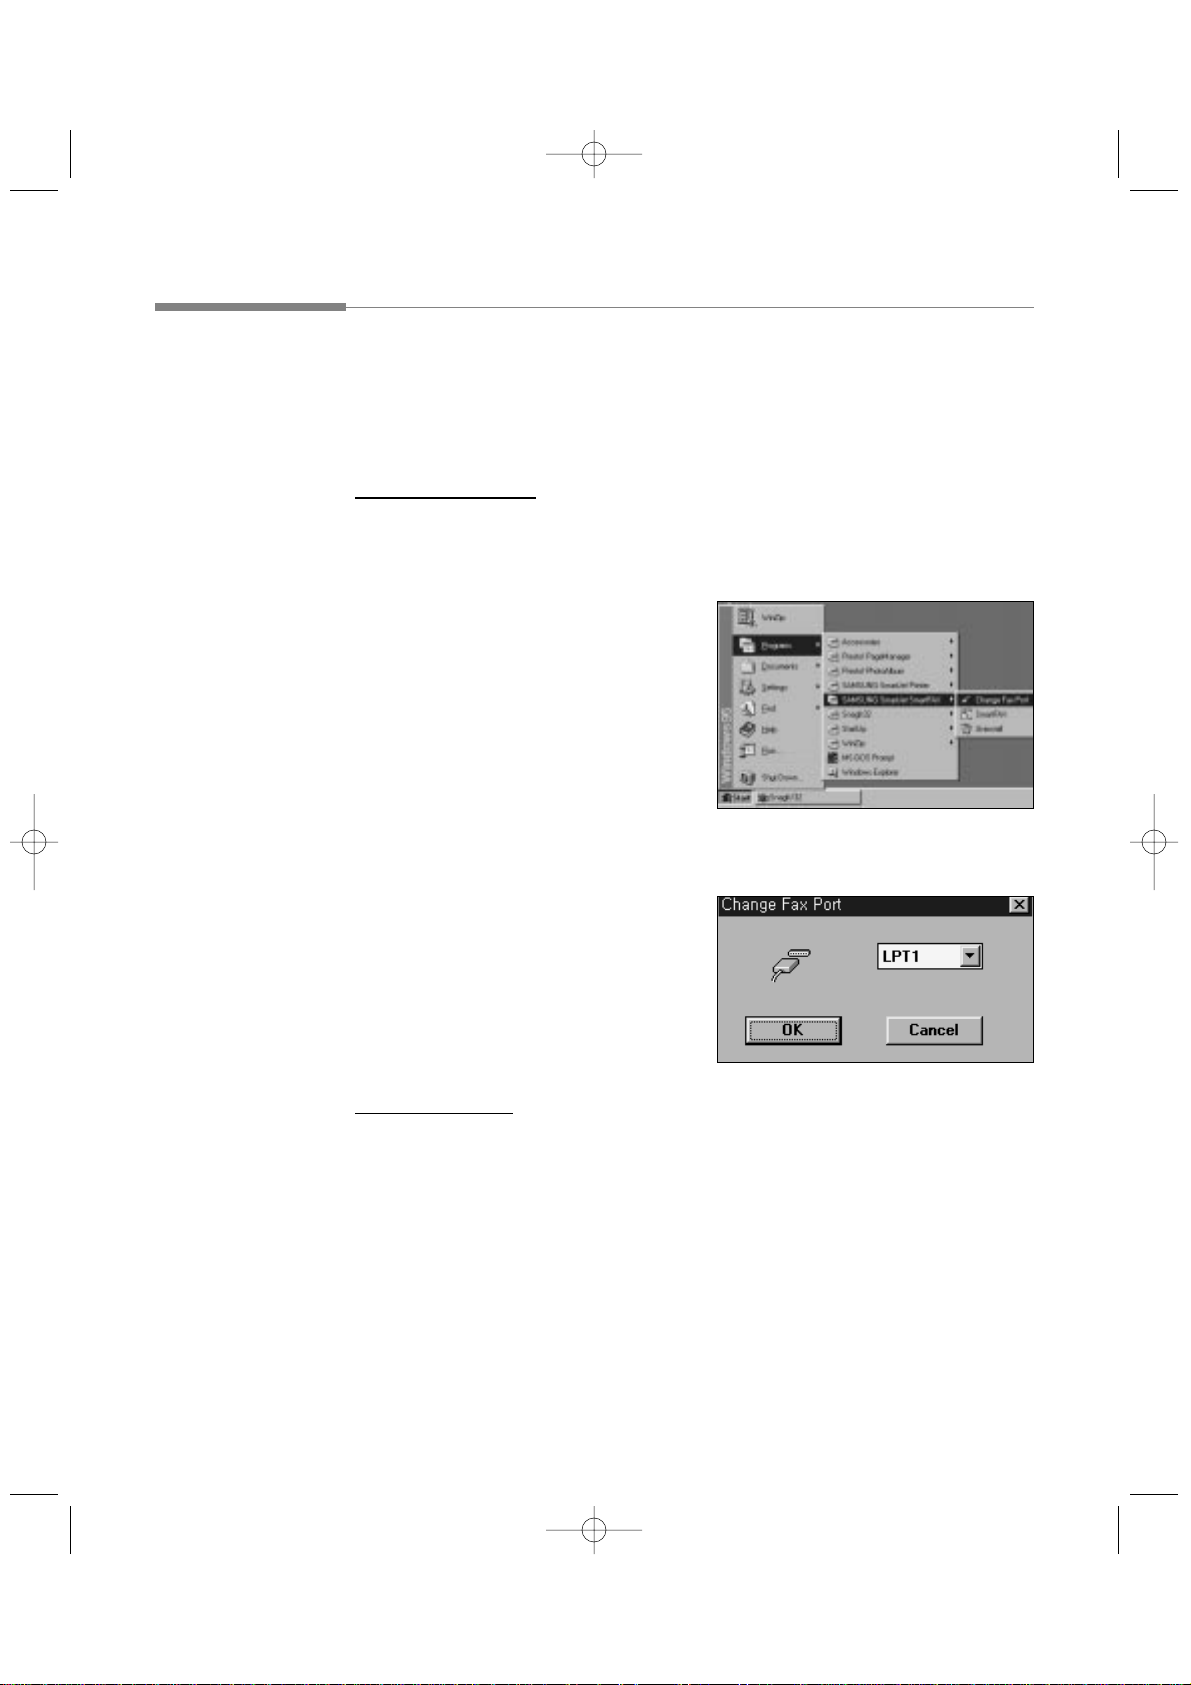
Changing SmartFAX RCP Port
If you install the SmartFAX Remote Control Program, SmartFAX is installed
on LPT 1. To change the port, do the following.
In Windows 95/98
1. Start Windows.
2. Click the Start button on the
taskbar, and select the Programs
from the Start menu.
3. Select SAMSUNG SmartJet
SmartFAX on the Programs menu,
and select Change Fax Port from
the SAMSUNG SmartJet
SmartFAX menu. The Change Fax
Port window appears.
4. Select the desired port, and click
OK.
In Windows 3.x
1. Start Windows.
2. From the Program Manager, double-click the SAMSUNG SmartJet
SmartFAX icon. The SAMSUNG SmartJet SmartFAX window appears.
3. Double-click the Change Fax Port icon. The Change Fax Port window
appears.
4. Select the desired port, and click OK.
03-Install 2/5/99 10:28 AM Page 10

1.23
Installing Smart Soft
Uninstalling
Uninstall is only required if you are upgrading from an older SmartJet
software or updating the software or if your installation fails.
In Windows 95/98
1. Start Windows if not already started.
2. Click the Start button and choose Programs.
3. Choose the driver or application you want to remove (SAMSUNG
SmartJet Printer, SAMSUNG SmartJet Scanner, SAMSUNG SmartJet
SmartFAX, SAMSUNG SmartJet FAX Driver, Presto! PageManager)
4. Choose the Uninstall. The Uninstall dialogue box appears. Follow the
instructions on the screen to complete uninstallation.
In Windows 3.x
1. Start Windows if not already started.
2. From the Program Manager, double click the driver or application icon
you want to remove (SAMSUNG SmartJet Printer, SAMSUNG SmartJet
Scanner, SAMSUNG SmartJet SmartFAX, SAMSUNG SmartJet FAX
Driver, Presto! PageManager)
3. In the selected software windows, double click the Uninstall icon. The
selected software Uninstall dialogue box appears.
4. Follow the instructions on the screen to complete uninstallation.
1 Getting Started
03-Install 2/5/99 10:28 AM Page 11

1.24
Installing Smart Soft
Memo
03-Install 2/5/99 10:28 AM Page 12
 Loading...