

Page 1
SE-S204S
User Manual
SE-S204S
BG68-01526A REV.00
For the correct use of product, read a user manual carefully.
- http://www.samsung-ODD.com
- http://www.samsung.com
Page 2

English
...........................................................
1~30
Deutsch
Français
Italiano
Português
Español
Svenska
Русский
Polski
Suomi
Magyar
Norsk
Dansk
...........................................................
...........................................................
...........................................................
...........................................................
...........................................................
...........................................................
...........................................................
...........................................................
...........................................................
...........................................................
...........................................................
...........................................................
31~60
61~90
91~120
121~150
151~180
181~210
211~240
241~270
271~300
301~330
331~360
361~390
Türkçe
Nederlands
简体中文
...........................................................
...........................................................
...........................................................
...........................................................
391~420
421~450
451~480
481~510
Page 3
Super-Writemaster
SE-S204S
Contents
User Manual - ENGLISH
FCC Compliance
This equipment has been tested and found to comply with the limits for a Class B digital
device, pursuant to Part 15 of the FCC rules.
These limits are designed to provide reasonable protection against harmful interference
in a residential installation.
This equipment generates, uses, and can radiate radio frequency energy and, if not
installed and used in accordance with the instructions, may cause harmful interference to
radio communications. However, there is no guarantee that interference will not occur in a
particular installation. If this equipment does cause harmful interference to radio or television
reception, which can be deter-mined by turning the equipment off and on, the user is
encouraged to try to correct the interference by one or more of the following measures:
• Re-orient or relocate the receiving antenna.
• Increase the separation between the equipment and receiver.
• Connect the equipment into an outlet on a circuit different from that to
which the receiver is connected.
• Consult the dealer or an experienced radio/TV technician for help.
CAUTION
Change or modifications not expressly approved by the manufacturer responsible for
compliance could void the user ’s authority to operate the equipment.
LASER STANDARD
IEC 60825-1 :1993 +A1 :1997 +A2 :2001
WEEE
Correct Disposal of This Product (Waste Electrical &Electronic Equipment)
(Applicable in the European Union and other European countries with separate collection systems)
This marking shown on the product or its literature,indicates that it should not be disposed with other
household wastes at the end of its working life.To prevent possible harm to the environment or
human health from uncontrolled waste disposal,please separate this from other types of wastes and
recycle it responsibly to promote the sustainable reuse of material resources.
Household users should contact either the retailer where they purchased this product,or their local
government office,for details of where and how they can take this item for environmentally
safe recycling.
Business users should contact their supplier and check the terms and conditions of the purchase
contract.This product should not be mixed with other commercial wastes for disposal.
• Samsung Eco-mark
The Samsung’s own Eco mark helps consumers to easily understand that
Samsung develops eco-friendly products. This mark represents Samsung’s
continuous effort to develop eco-friendly products.
• RoHS
(Restriction of the use of certain hazardous substances in electrical and electronic equipment)
The RoHS, the environment regulation announced by European Union, restricts the use of lead,
mercury, cadmium, hexavalent chromium, PBB, and PBDE in products put on the market in
The European Union after July 1, 2006.
1. User manual
Safety Precautions ........................................................................................................................................................................................ 3
Introduction .................................................................................................................................................................................................... 5
Installation method ........................................................................................................................................................................................ 6
How to connect and remove a drive ............................................................................................................................................................. 7
How to connect a device for the use of TruDirect program ......................................................................................................................... 8
How to operate/Disc care and keeping method .......................................................................................................................................... 10
Easy checks .................................................................................................................................................................................................. 11
Technical specifications ................................................................................................................................................................................ 13
Before the installation of TruDirect ............................................................................................................................................................... 14
1. Installing the TruDirect ............................................................................................................................................................................. 16
2. Starting the TruDirect ................................................................................................................................................................................ 18
3. Using the Express mode of TruDirect ..................................................................................................................................................... 20
4. Using the manual mode of TruDirect ....................................................................................................................................................... 24
5. Easy checks for TruDirect ......................................................................................................................................................................... 29
- http://www.samsung-ODD.com
- http://www.samsung.com
1 2
Page 4
Safety Precautions
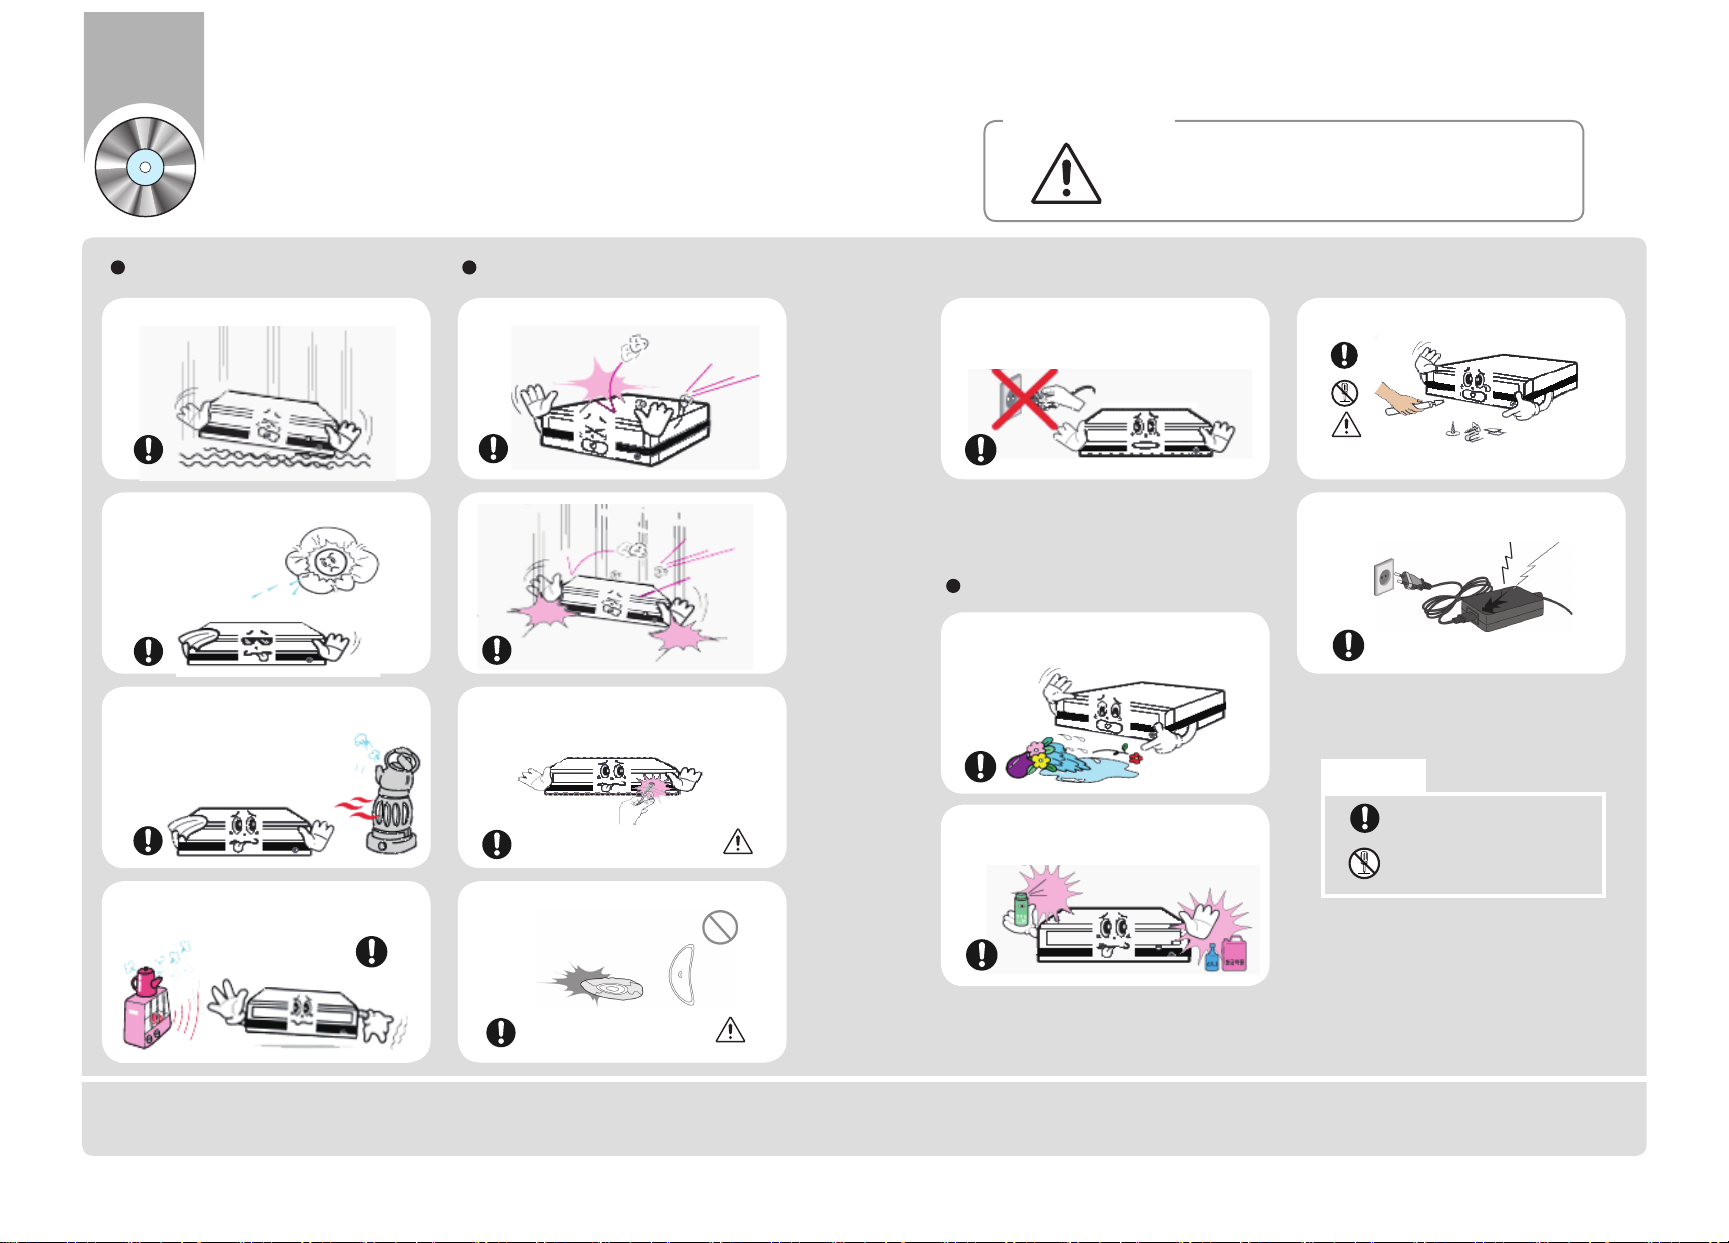
Ú These contents are for the safety of a user and prevention of property damage.
Read the following contents carefully and use a product correctly.
Installation Operation
●
Do not install the product at the
unstable place.
●
Do not install the product directly to
the sun.
● Do not impact on the product during the
operation.
● Do not drop the product.
Warning/Caution
Warning :
This is indicated when there is a possibility of death or fatal injury.
Caution :
This is indicated when there is a possibility of property damage.
●
Do not turn the power off or pull out
the power cord while the operation of
drive.
Others
●
Be careful not to insert a foreign material like
a food or water into the inside of product.
●
Do not disassemble, repair, remodel the product at your disposition.
-
There are dangers of breakdown, electric shock, and fire.
- Be sure to contact with a service center for a
repair.
●
Do not impact on the AC/DC adapter or disassemble it.
- There is a danger of breakdown or electric shock.
- Use only the adapter our company provides.
●
Do not install the product at the place
of high or low temperature.
Do not move the product or open the disc tray
unreasonably while operating. Use the Open/
Close button after the exit of acting program.
Marks
Do not insert a thin pin into the emergency
hole during the operation of drive.
●
Do not install the product at the moisture
place.
Ú If this product is changed or amended without the approval of a responsible person, the authority of a user for
product use may be cancelled.
● Do not use a disc being cracked, twisted, or
folded.
Specially, if there is a crack in the
inner circle of disc, it may cause the
breakdown of a disc while using it.
●
Do not drop alcohol or benzene due to
avoid a danger of fire.
1. Before use, always check if there is a crack on the disc. If there is a crack(specially, on the side of center hole), make a copy for use
immediately. If you use a cracked disc, the crack is extended and it gives a fatal damage to the disc.
2. Do not use a bad disc(illegal, scratched, damaged... ).
It indicates the application to be observed
absolutely.
It indicates the application to be observed
absolutely.
3 4
Page 5

Introduction
Ú
This product design can be changed according to the feature of product.
Ú
Because Record/ Play software CD is impossible to provide additionally when it is lost or damaged, keep it
carefully not to lose.
Disc tray Open/Close button
Installation method
System required
OS : Microsoft® Windows® 2000/XP/(Service pack 1 over)/Vista
CPU : Pentium® IV 4 2.8GHz
RAM : 512 MB or above
HDD : 10GB or above
Interface : USB 2.0 Interface connector
over IBM PC or compatible PC
Front
Emergency holeTruDirect Function button
Operation indicating light
Back
USB Interface port Power port
Accessories
USB cable, Product table, Software CD, Power adapter & Power cord,
User manual, Drive installation manual
- The accessory type can be different and some accessories are not provided
according to the product model.
- If you want a refund, you have to return the product and its accessories all.
Firmware upgrade method by the flash memory
Ú
If a problem is occurred by firmware upgrade, we don't take the responsibility for it. Contact
to the service center for a service.
X
It is possible to upgrade the function of this product by the download of firmware file at the
homepage of Samsung. Refer to the homepage of Samsung for more information.
Address :
Keep the power of a connected ODD drive turning on until the upgrade is finished.
X You can find out the model name(dealer) of ODD product and confirm its firmware
version.
Address :
www.samsung-ODD.com
http://www.samsung-ODD.com
[Firmware > Firmware download]
[Firmware l Firmware version check]
You can confirm the easy use way of software at our customer support site.
Address :
www.samsung-ODD.com
[Customer support > Download > User manual (PDF) > Easy use way of software]
5 6
Page 6

How to connect and remove a drive
How to connect the External DVD Writer
How to connect a device for the
use of TruDirect program
Switch off the PC power.
1
Connect a cable and switch on the drive
2
power.
●
Connect a USB cable with the USB port of drive.
●
Connect an AC power cord with an AC/DC adapter.
● After connecting an AC/DC adapter cord with the power port
of drive, connect the power plug of AC/DC adapter with an
AC power socket.
● Connect it to the drive port.
Connect the other end of USB cable with the
3
USB port of PC.
Connect Video/Audio device to the computer before the use of TruDirect program.
1
Camcoder, Digital Camera, Webcam...
IEEE 1394
USB
Composite
Press the TruDirect function button at the front of product(In the high speed mode), or click
2
the TruDirect shortcuts at the window background.
Make a DVD from the live video, photo file, and video file.
3
Checking the USB 2.0
If a PC which is not supported USB 2.0 uses this drive in the speed of USB2.0, it should install USB.20
adapter card. If not, this drive operates normally by USB 1.1 connection but it is limited in the speed of USB
1.1. You can check if USB 2.0 adapter card is recognized in the PC being installed USB 2.0 adapter card.
Windows 2000/XP/Vista
Select a property by clicking the right button of mouth attribute in my computer, and then click to confirm the
hardware tap and device manager in order. Contact with a card manufacturer or a manufacturer if there is a
yellow exclamation mark at the side of general purpose series bus controller.
7 8
Play a DVD which is made by TruDirect with a DVD player or a PC.
4
➡
Page 7
How to operate/Disc care and keeping method
The following instructions are for the user safety and the prevention of property damage.
Read instructions carefully and use a product correctly.
How to remove the USB cable
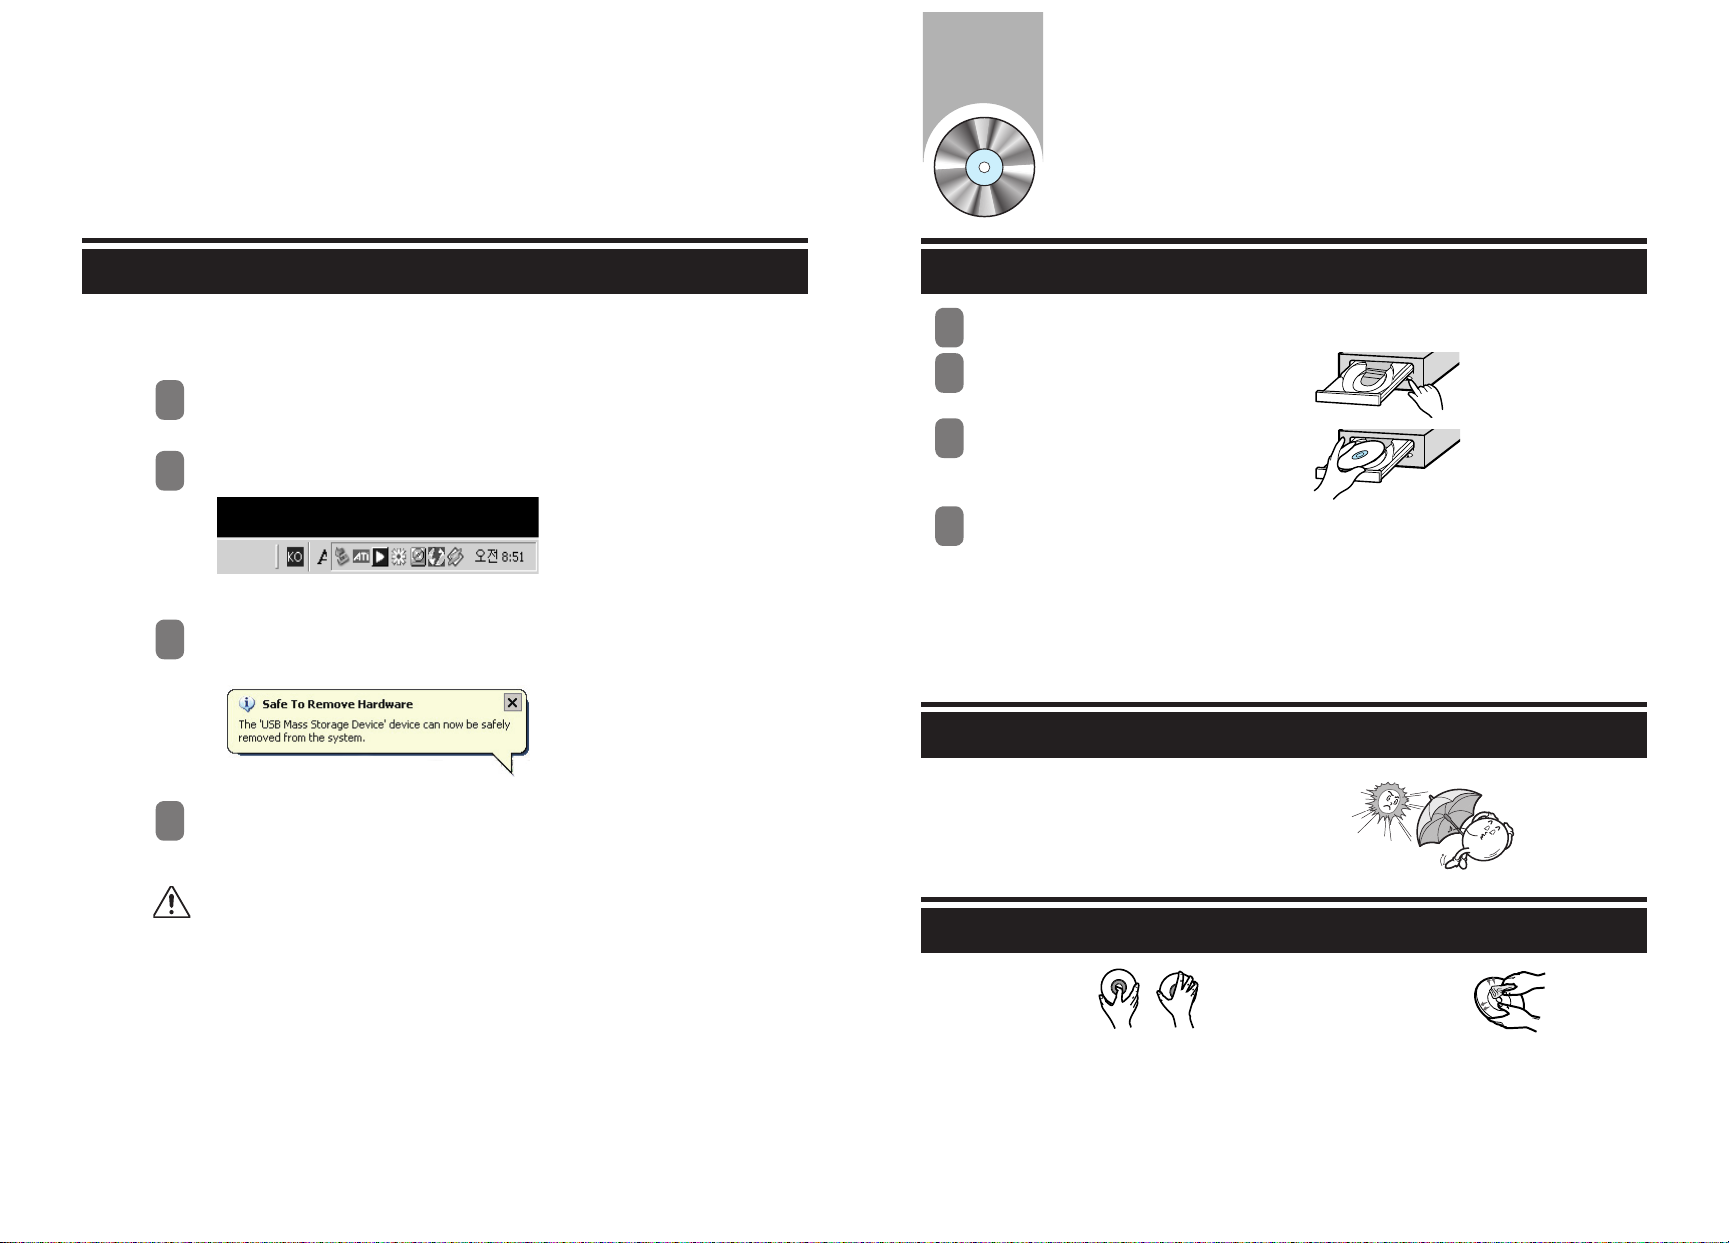
This drive adapts the Play&Play function for Windows, and it is possible to use by the following
method for the use of USB converter cable.
Exit all of software.
1
Click the icon of right bottom of screen as a below picture.
2
The following message is appeared if you click [Remove a drive].
3
(The message which is appeared by clicking the icon could be different according to the setting of computer.)
Remove the USB cable.
4
How to operate
Boot a computer by pressing the power button.
1
After booting, open the disc tray by
2
pressing the Open/Close button.
Insert a disc(CD/DVD), and close the disc tray
3
by pressing the Open/Close button.
●
The operation indicating light is turned on.
Play a disc(CD/DVD).
4
To play a DVD title/Video CD title
● Start to play after installing DVD software mpeg program which is provided with the accessories on the PC.
Ú If a drive is mounted vertically, it is impossible to use 8cm of mini disc because it is not fixed.
How to store a disc
● Do not store it directly to the sun.
● Store it vertically at the even place which is well ventilated.
● Do not scribble or put a label on a disc.
● Do not impact to a disc excessively or drop it.
Caution: Do not remove a converter cable when a drive is operating or a computer is
booting.
● Hold the edge of disc
instead of touching the
surface of disc.
Ú
If you touch the surface of disc or a foreign material or a dust is covered on the disc, it could not be operated well.
How to clear a disc
● Clear a disc lightly from the center
of disc to the outer side with the soft
cloth.
9 1 0
Page 8

Easy checks
PC does not recognize a drive.
A video file is not played.
A disc is not recognized and a
●
●
●
●
●
speed is slow.
●
A disc tray is not opened.
A screen is cut and a speed is
slow when playing a video with
●
●
●
S/W MPEG.
Check if the USB 2.0 converter cable is connected correctly.
Check if the power switch of back of drive is turned on.
Check it after installing the newest codec program.
Use the newest codec file to watch the movie file.
Select the codec program that supports the related compressing type and
install it.
Check a DISC condition and use it after cleaning.
Check the connection of a power cord or power cable.
If it is not opened at the state of power on, reboot the PC and open it by
pressing the Open/Close button. But still it is not opened, turn the power off
and open it pushing by inserting a thin pin(clip) into the emergency hole.
Reduce a play screen size.
Check the resolution of display and correct it to the proper resolution in
the control panel of windows.
The no disc message is
appeared in spite of inserting a
disc.
The function of pulling out the
disc being formatted with InCD is
included.
The CD is not created when
● If you press the play button so quickly after inserting a disc, a disc
●
●
● Select a drive that has a disc in the windows explorer and click the right
●
recording NERO and it is recorded
to a image file.
●
A recorder cannot recognize a
● Upgrade the firmware to the newest at www.samsung-ODD.com and
disc.
could not be recognized. Open and close the disc tray, and try again.
Use a disc after cleaning.
Click the right mouse on the tray icon(It is at the right of taskbar in
the bottom of monitor.) and select “Take Out” to take out the CD.
mouse, and select “Take Out” to take out the CD.
It is a symptom that SE-S204S is not selected but “Image
Recoder” is selected when selecting a record. Select a recorder
selection in the NERO top menu and record by selecting
SE-S204S in the recorder selection window.
When installing the recording software, pay attention that Image
Recorder is selected in the case that the software is installed first
and ROM drive is installed.
reinstall the recording software provided to bundle.
11 1 2
Page 9
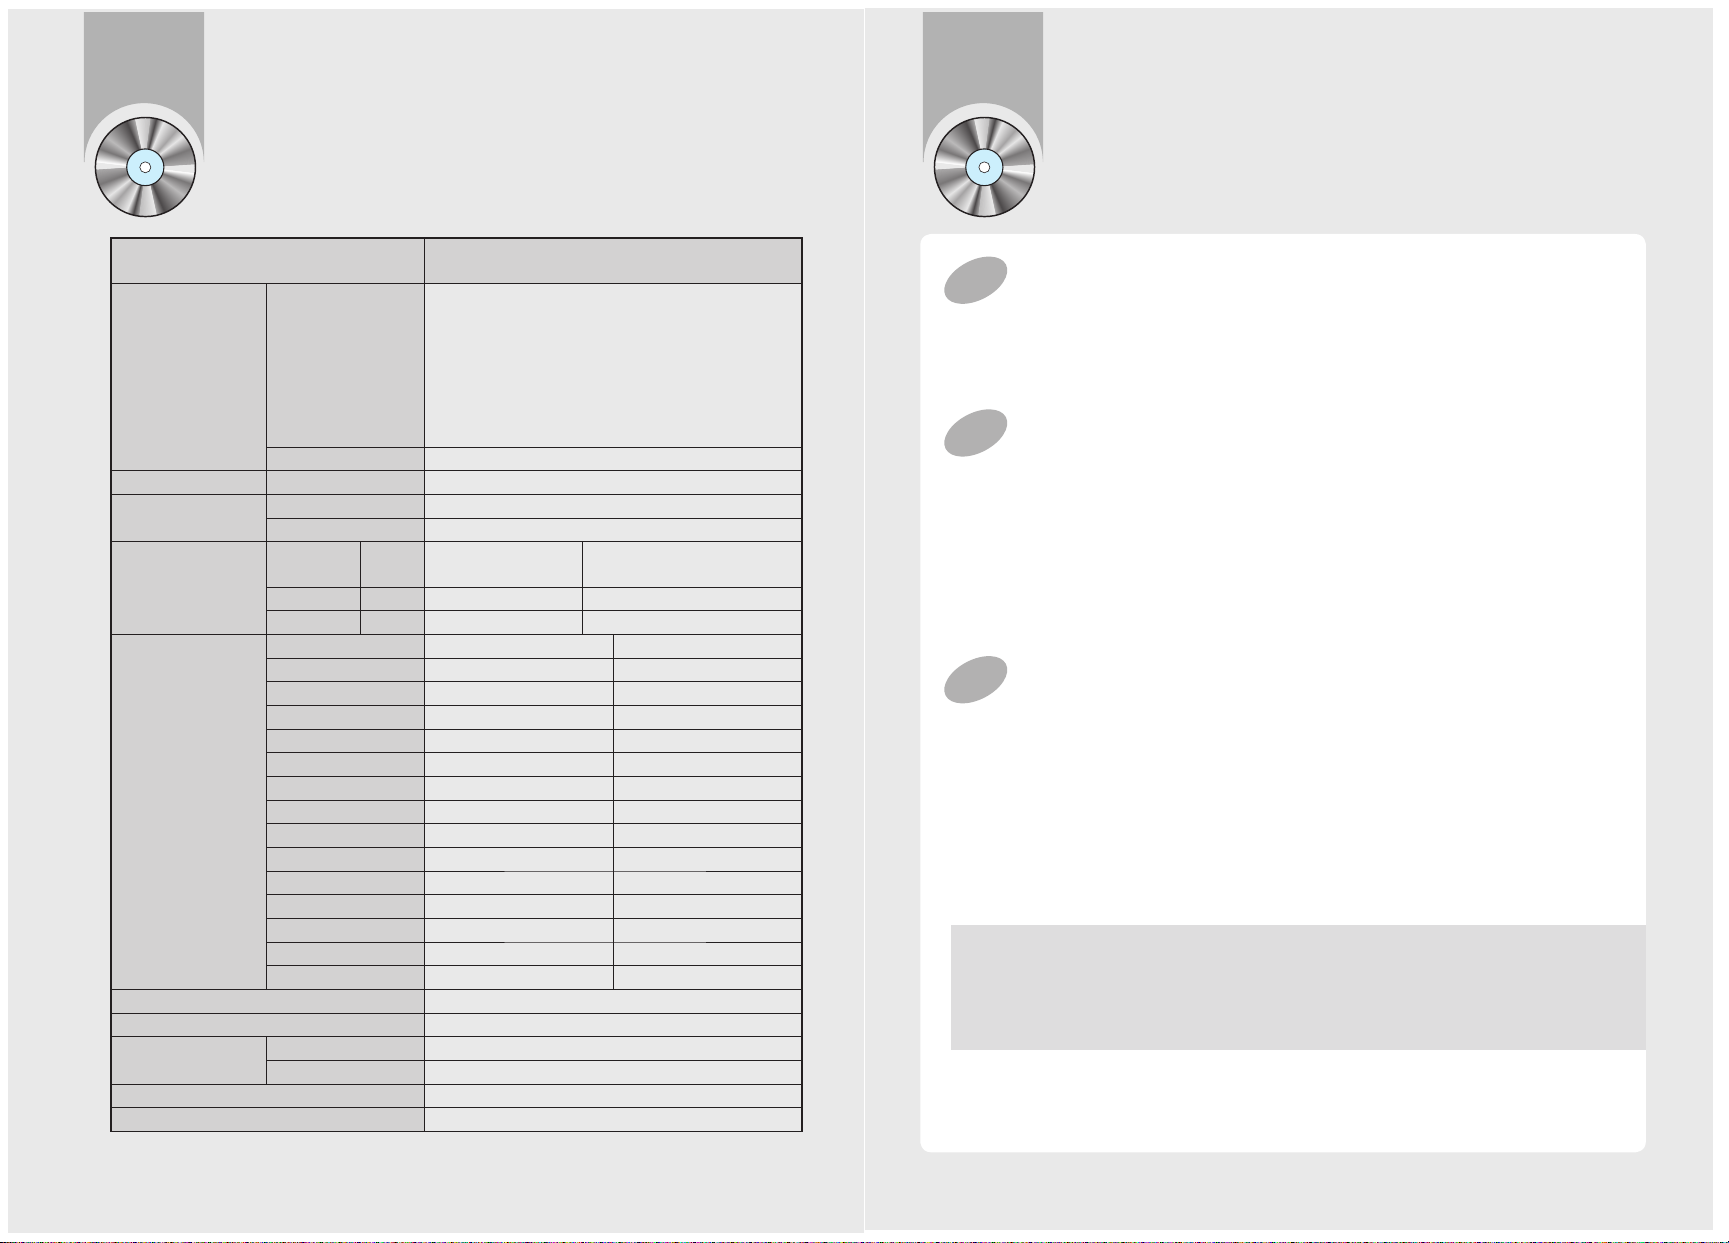
Technical specifications
Before the installation of TruDirect
Category
DVD : DVD-R, DVD-RW, DVD+R, DVD+RW, DVD-
ROM, DVD-Video, DVD+R(DUAL), DVDR(DUAL), LightScribe DVD±R, DVD-RAM
Disc
Interface Support Interface Port USB 2.0
Access Time
(Random)
Disc Labeling Time
Data Transfer
Speed(Max)
Buffer Memory 2MB
Drive Installation Horizontal / Vertical
Operating
Environment
Size (Width × Height × Length) 6.41 X 1.96 X 9.13 Inch(163 X 50 X 232 mm)
Weight 1,200g
Ú The above specification could be changed without a notice for the improvement of performance.
Usable Discs
Disc Diameter 4.72 Inch or 3.15 Inch(120mm or 80mm)
CD-ROM 110ms(Random)
DVD-ROM 130ms(Random)
Media Type Setting Titles only
CD Media Best Less than 3:30min Less than 28:00min
DVD Media Best Less than 3:30min Less than 30:00min
Media Type Write Read
DVD+R CAV 20X CAV 16X
DVD+RW ZCLV 8X CAV 12X
DVD+R Dual ZCLV 16X CAV 12X
DVD-R Dual ZCLV 12X CAV 12X
DVD-R CAV 20X CAV 16X
DVD-RW CLV 6X CAV 12X
DVD-ROM(single)
DVD-ROM(Dual)
DVD-RAM CAV 12X CAV 12X
CD-ROM
CD-R CAV 48X CAV 40X
US-RW ZCLV 32X CAV 40X
HS-RW CLV 10X CAV 40X
CD-RW CLV 4X CAV 40X
Temperature 5°C ~ 40°C (41°F ~ 104°F)
Humidity 5 ~ 80% (RH)
CD : CD-ROM, CD-R, CD-RW, CD-DA, CD+E(G),
CD-MlDI, CD-TEXT, CD-ROM XA, Mixed Mode
CD, CD-I, CD-I Bridge (Photo-CD, VideoCD), Multisession CD (Photo-CD, CD-Extra,
Portforio), LightScribe CD-R.
-
-
-
SE-S204S
External DVD Writer
Titles entire label
area(including GRAPHICS)
CAV 16X
CAV 12X
CAV 48X
PC software required
●
Windows
Windows Vista(Basic, Business, Premium, Enterprise & Ultimate)
●
Microsoft DirectX 9.0 over.
2000(Service pack 4),
Windows XP(Home, Professional & Professional MCE),
.
PC hardware required
●
CPU : Intel P-4 2.8 GHz over (Windows 2000/XP),
Intel Core2Duo 1.8GHz over (Windows Vista)
●
Memory : 512 MB over (Windows 2000/XP), 1 GB over (Windows Vista)
●
HDD : 60 MB over space for program installation, 9GB below space in maximum for DVD production
●
Video Card : Video card compatible with DirectX 9.0 (Windows Vista 128MB over)
●
ODD : SAMSUNG TruDirect™ Drive (In case of external type, USB 2.0 Interface)
●
AV PORT : IEEE 1394, USB 2.0 and Composite connection
PC Input Source supported
●
Video/Audio
PC Interface supported : IEEE 1394, USB2.0, Composite or Video Capture Card.
Devices supported : Camcoder, TV, Set Top Box(STB), VCR, Digital Camera, Webcam
●
Photo
PC Interface supported : USB 2.0
Devices supported : Digital Camera, Camcoder, Memory stick (Memory device of great capacity)
●
Video/Photo file
Video/Photo File that is made by the user or downloaded from the internet.
TruDirect is a DVD Recording Program which is based on the Windows OS of Microsoft.
So, it can record all of video files which are played in the PC (e.g. Windows Media Player).
(The normal play of a video file in the PC means that there is a correct codec for the play of video file.
Install the correct Software(CODEC) if it is impossible to play the video file.)
13 1 4
Page 10
1. Installing the TruDirect
Media format supported
●
DVD-R, -R DL, -RW, +R, +R DL, +RW and RAM media. (Including the 8cm disc)
File format supported
1. DVD-Video compatible video
2. DVD-Video compatible photo DVD
3. DVD-Video compatible multimedia file
4. Data file related to the video or photo file
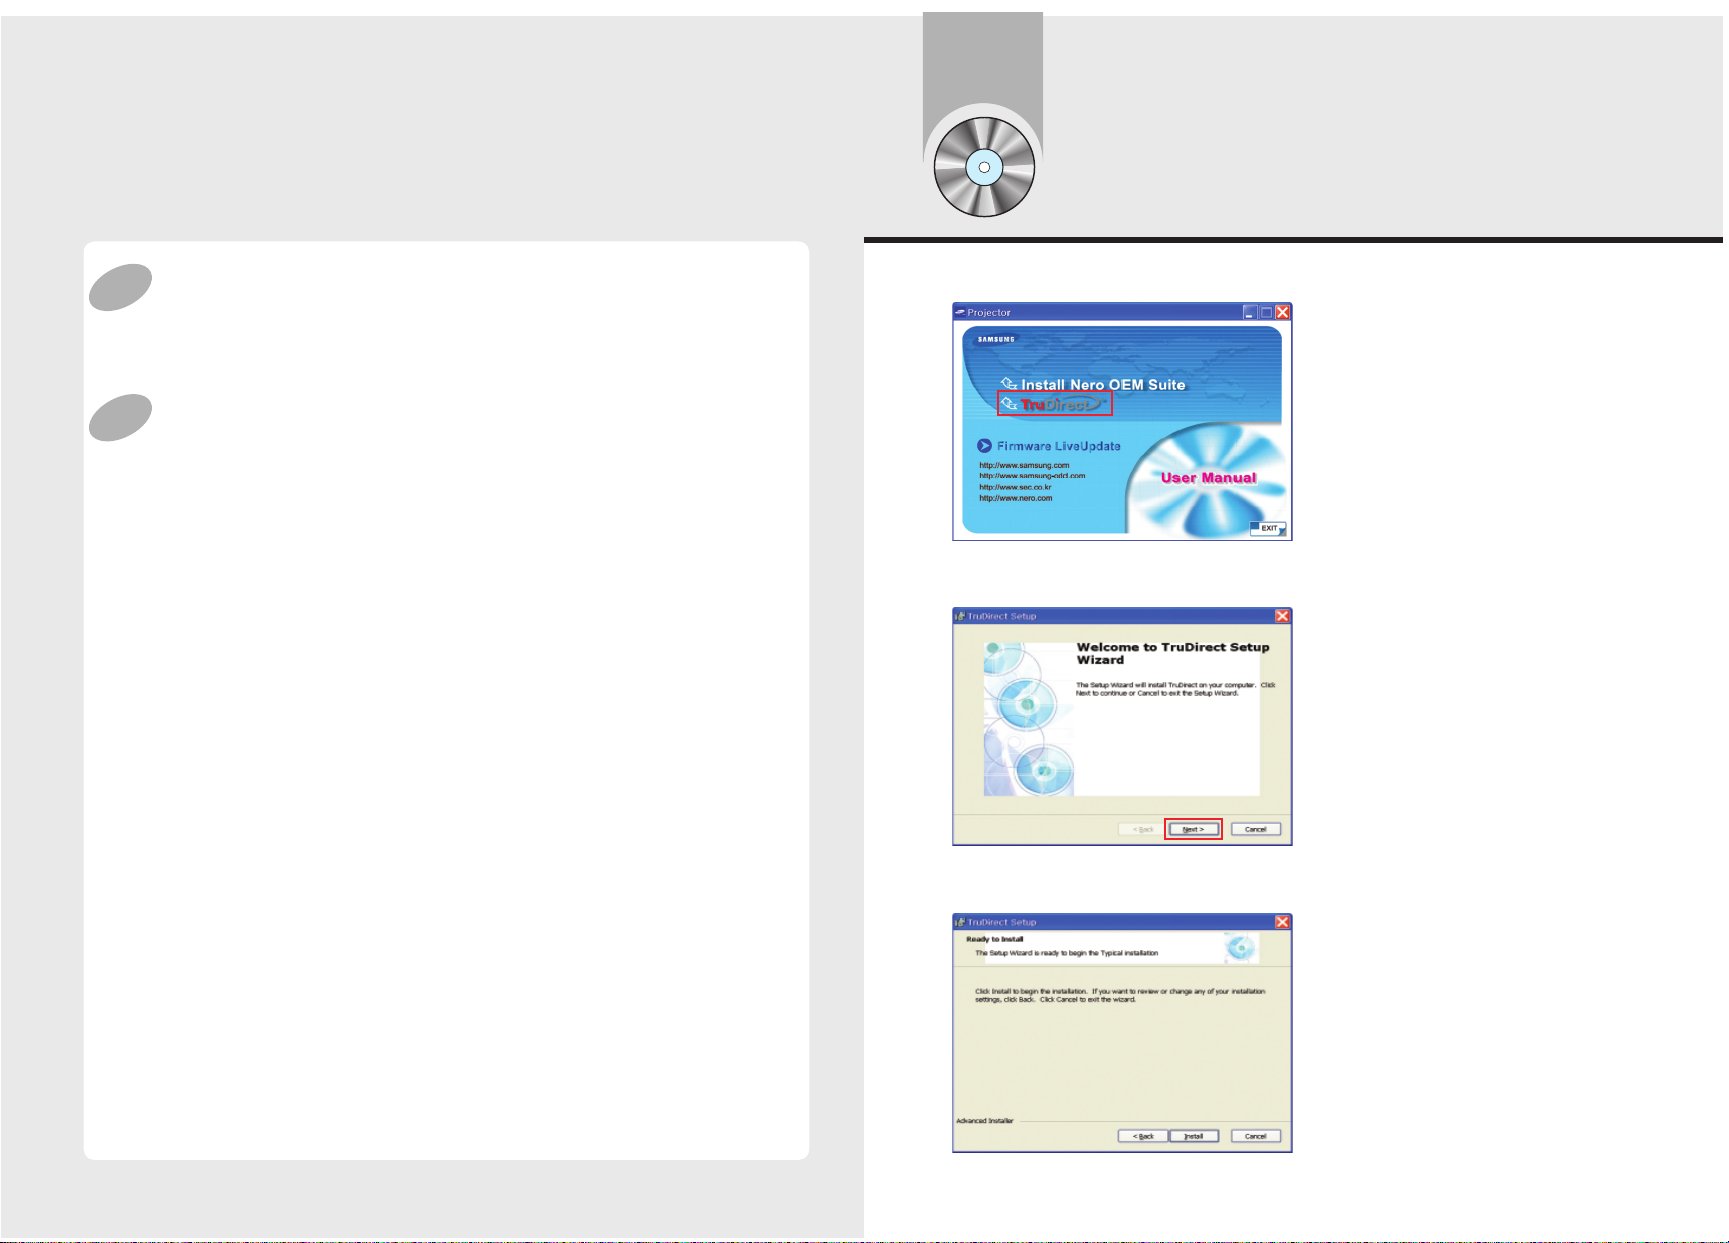
1. Select "Install TruDirect".
2. If the TruDirect installation wizard is appeared, press [Next] button.
3. If the installation preparation is completed, press [Install] button.
15 1 6
Page 11
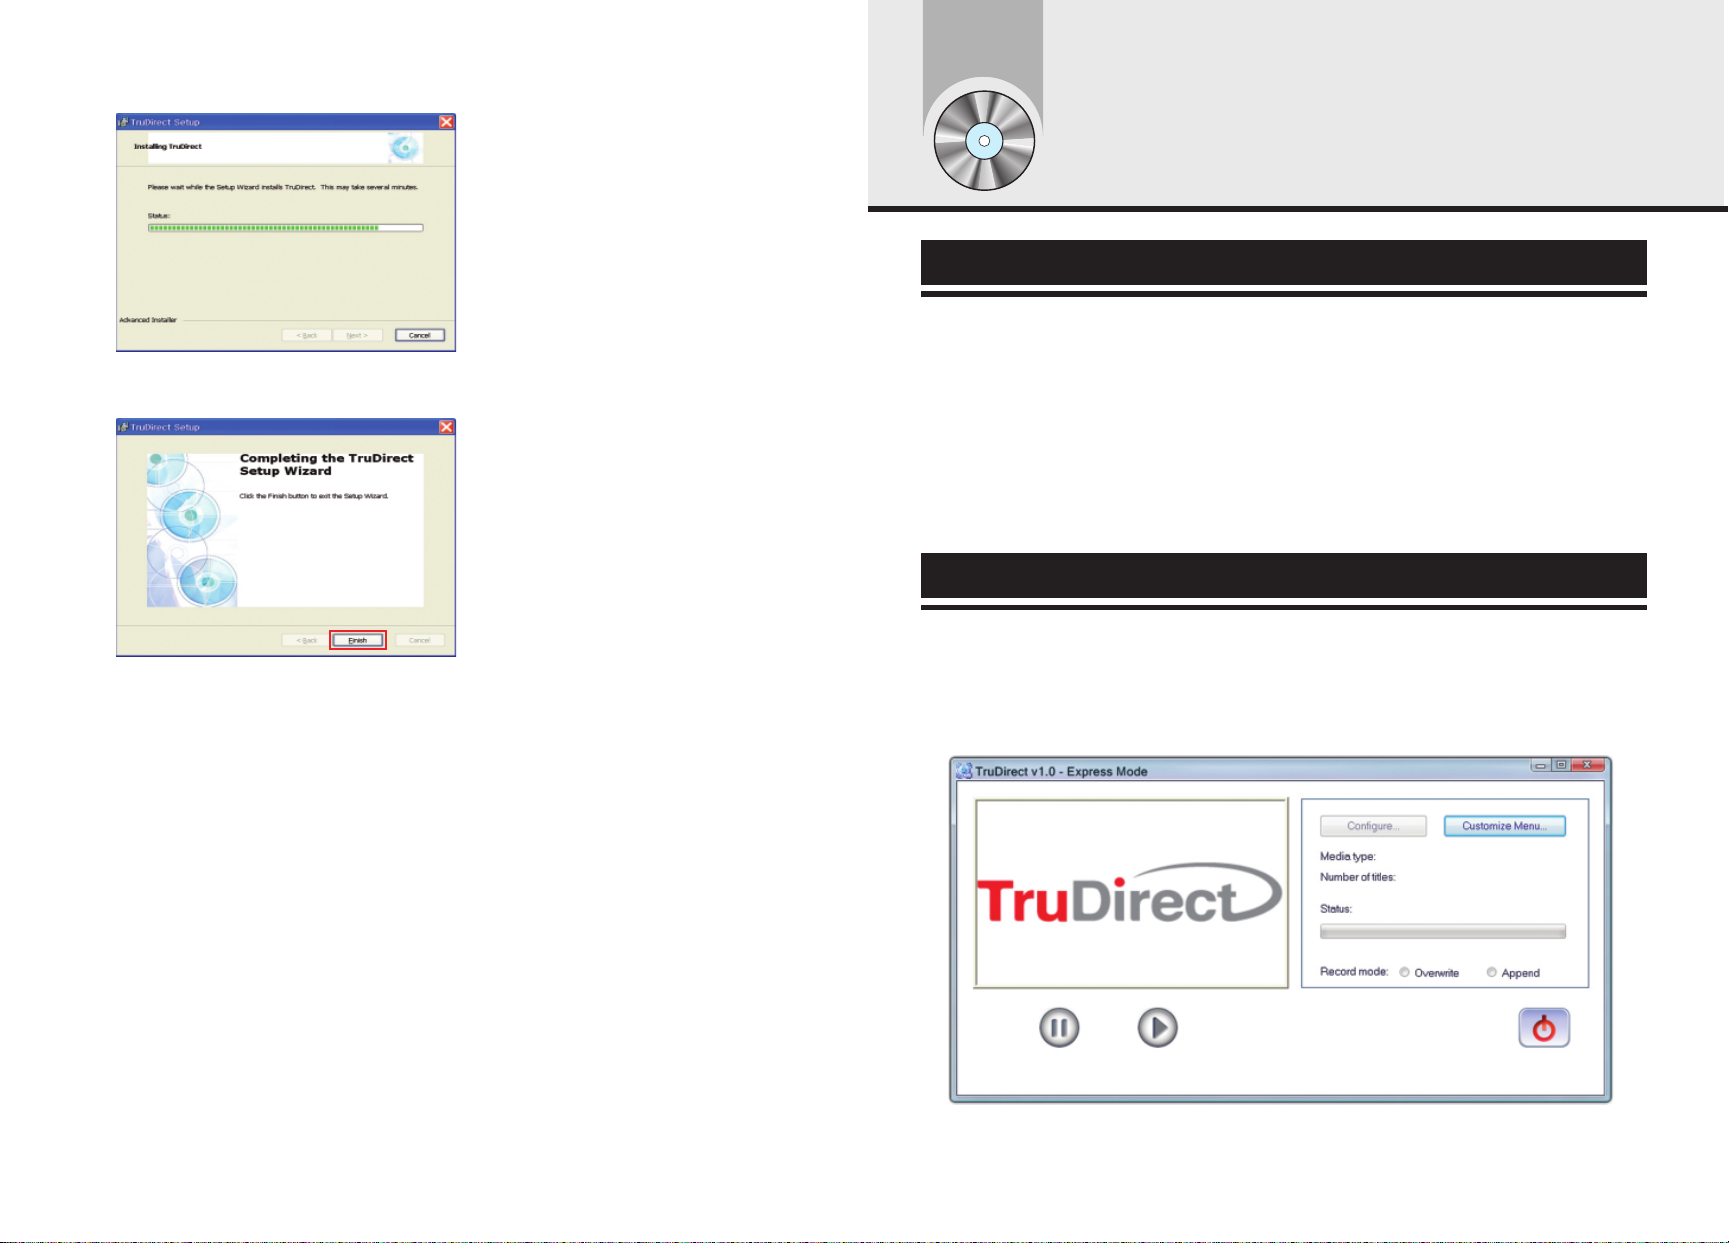
4. The installation of TruDirect is proceeding.
5. If the installation of TruDirect is completed, press [Finish] button to complete the installation.
2. Starting the TruDirect
Start of TruDirect
There are three methods in the start and use of TruDirect.
- Click the TruDirect shortcuts in the windows background or start menu.
- Select Trudirect in the application list of OS search popup window.
- Press the TruDirect function button in the front of drive.
Manual mode and Express mode
A user can operate TruDirect with a manual mode or a Express mode according to
the level of intervention that a user wants.
- Express Mode : It is possible to make a DVD in a short time by clicking many buttons of
For the installation of TruDirect application, the installation manager judges if a drive is
Ú
certificated.
If it is a certificated drive, the installation manager continues the installation of TruDirect.
If not, the installation manager indicates an error message and stops the installation.
17 1 8
popup screen or TruDirect function button of front of drive.
Page 12
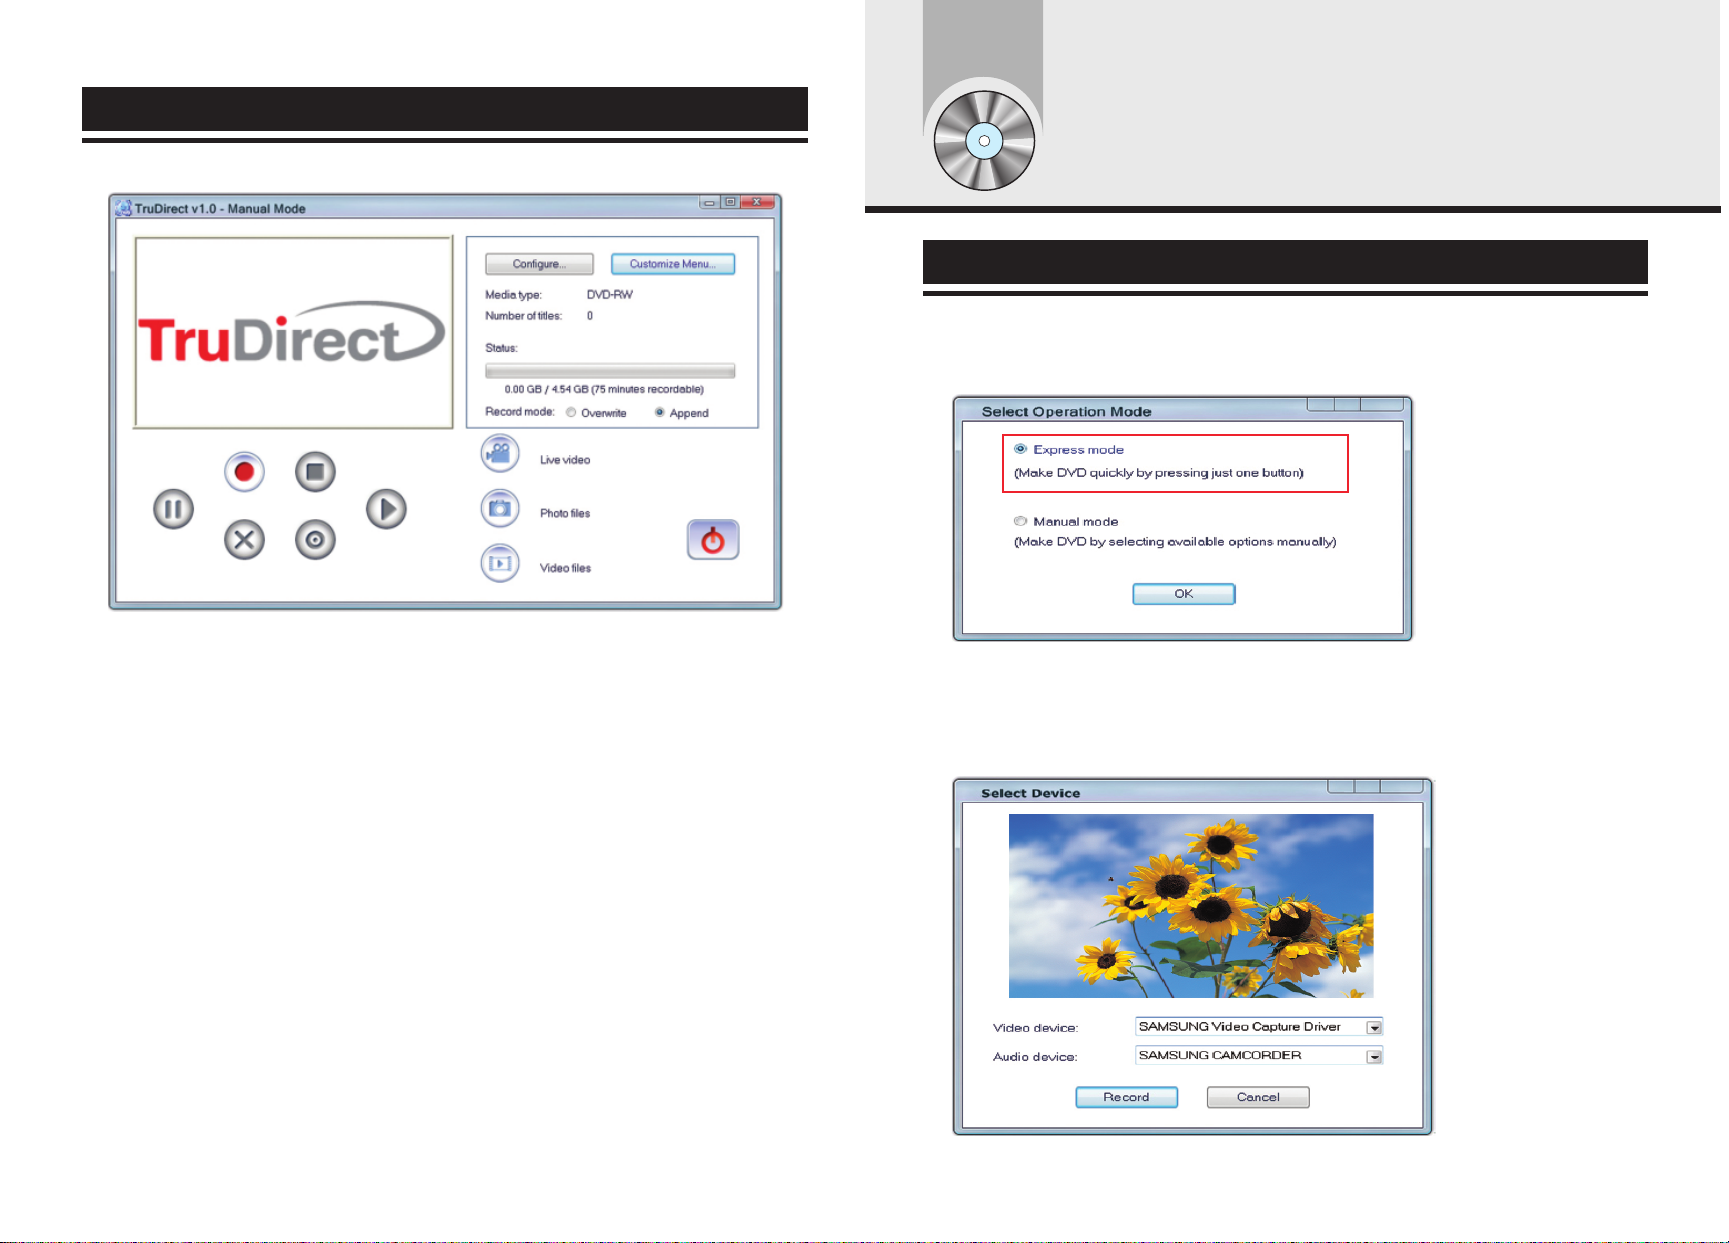
- Manual Mode : You can make a DVD by selecting the usable option directly.
3.
Using the Express mode of TruDirect
Express mode of TruDirect
Select the Express mode by clicking the TruDirect function button of the front of drive
after connecting a support device with a PC. You can also select the high speed mode by
clicking the Express mode button in the operation mode selection dialog box.
A. Making a DVD from the Live Video(Streaming image- DV camcorder,
Web camera, etc.)
1. If a live video device is detected, the video preview is displayed in the device selection dialog box
automatically.
19 2 0
Page 13
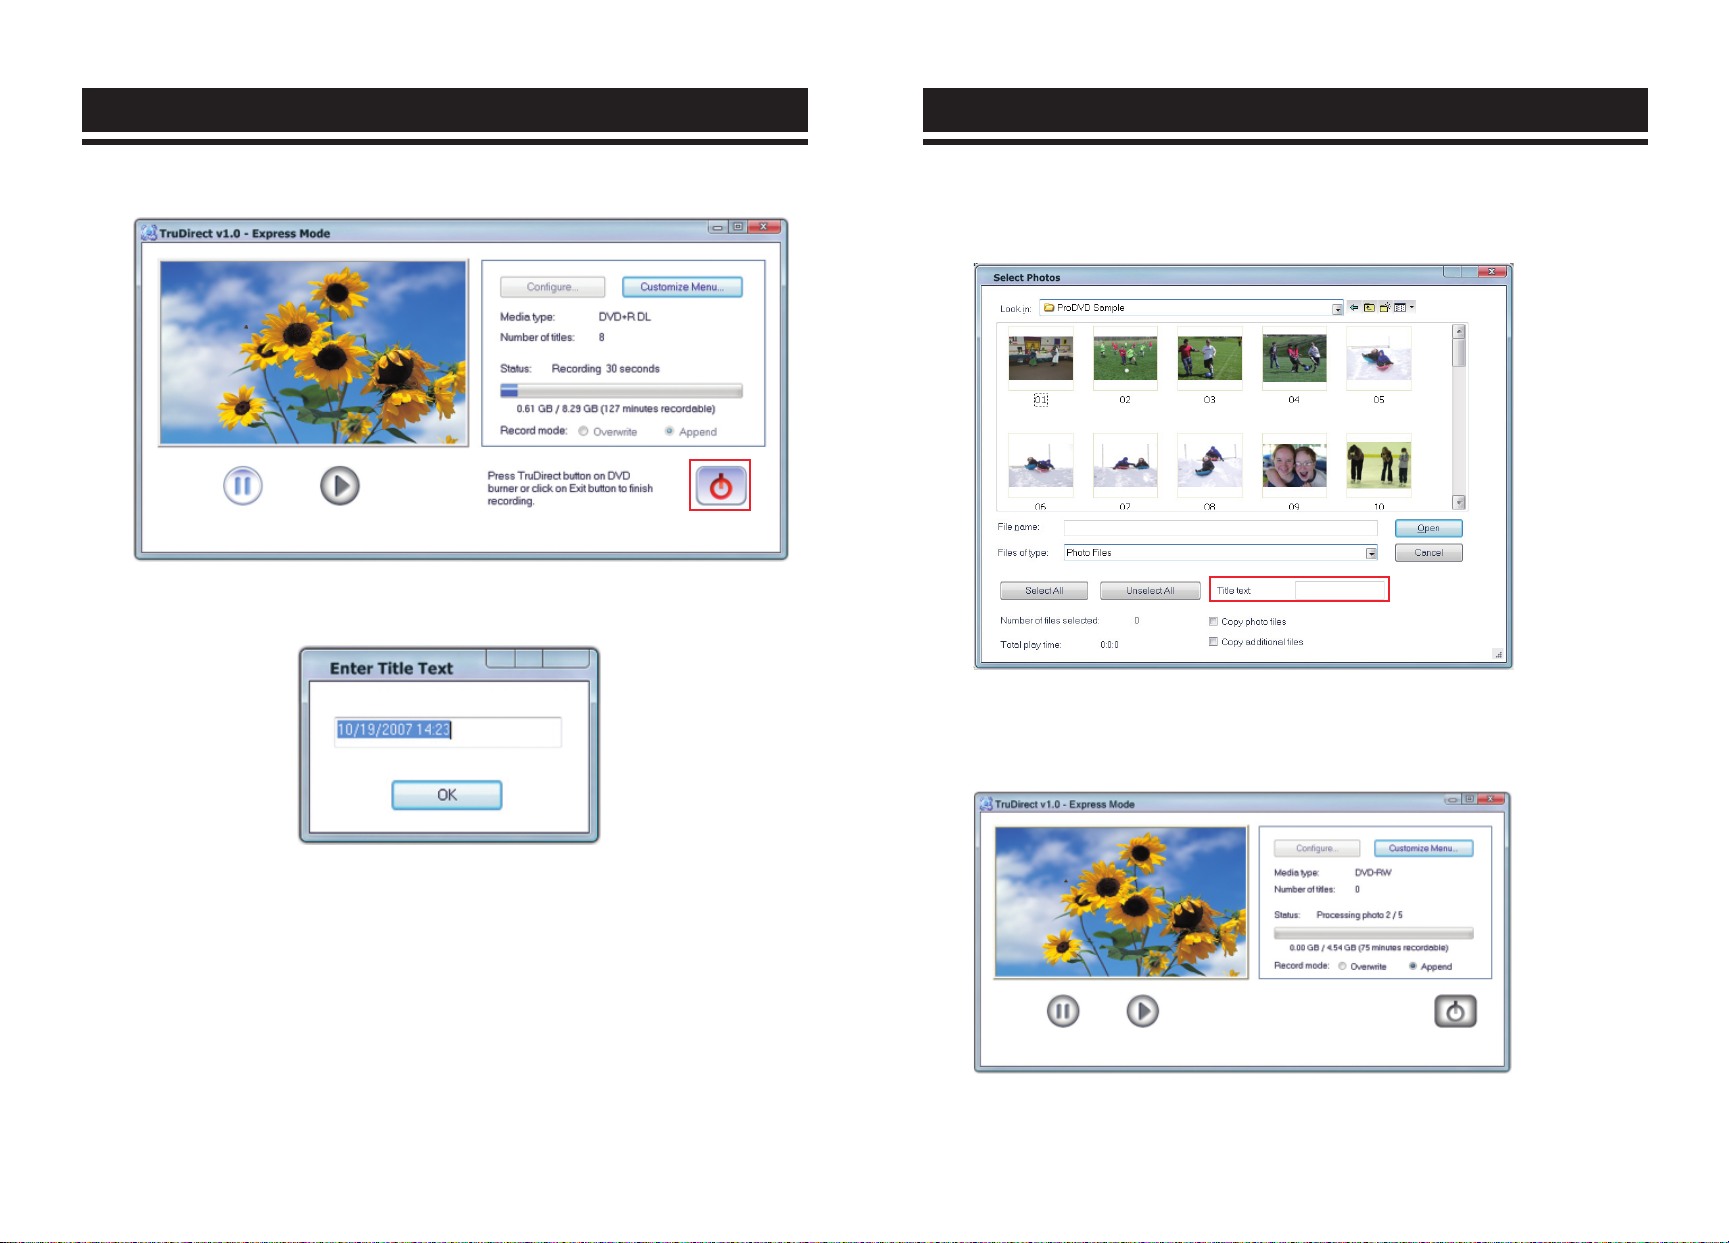
2. If you click the recording button, the recording starts and the video is displayed in the
main screen.
3. Clicking the recording stop displays the title input popup window.
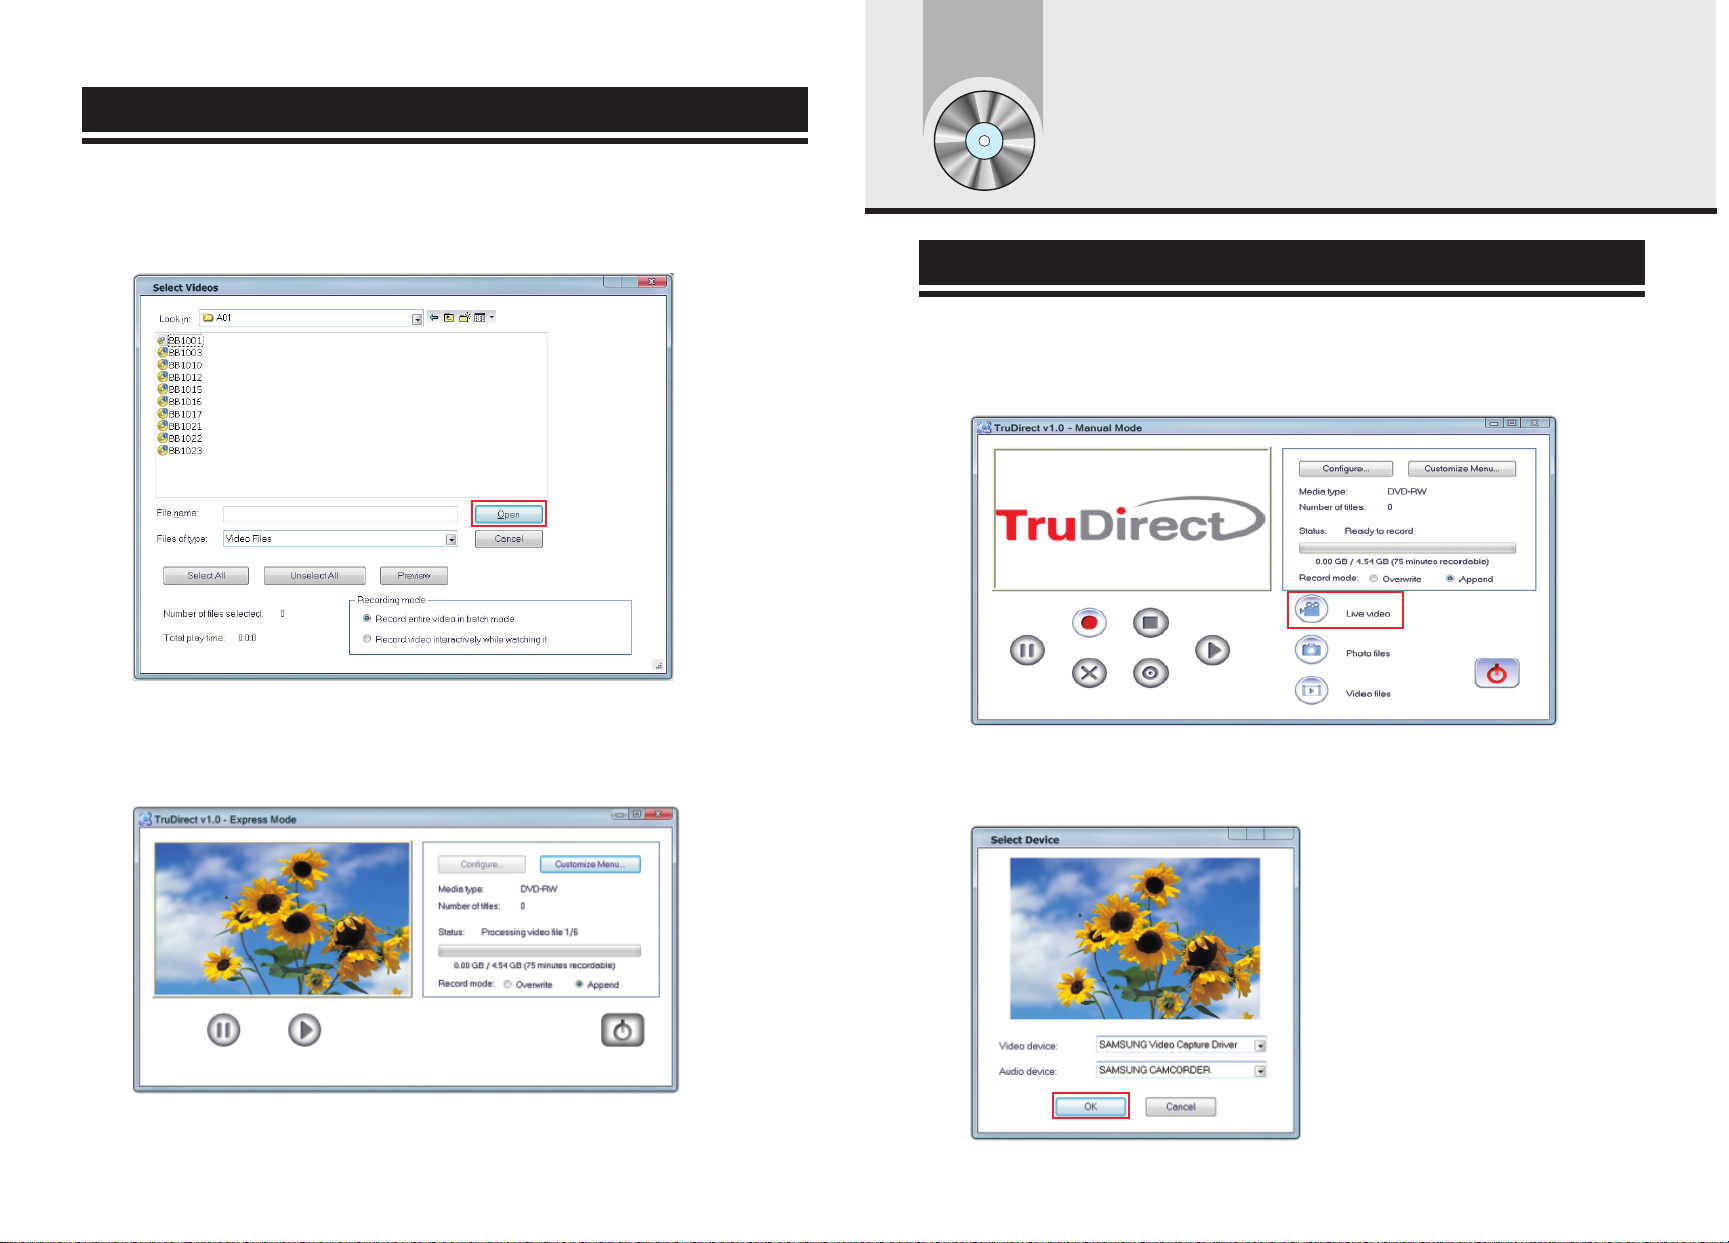
B. Making a DVD from the photo file
1. If photo files of portable memory device are detected, photo thumbnail preview is executed
in the photo selection dialog box.
2. Input a title after selecting the picture to record.
It is possible to record when photo files are five over.
3. Click the open button to start the recording of TruDirect drive.
4. Stop and complete the recording by clicking the confirmation after change of text.
After completion, TruDirect drive discharges a media.
4. After completion of recording, TruDirect drive discharge a media.
21 2 2
Page 14
C. Making a DVD from the video file
1. If the video file of portable big size storage device like a hard drive camcorder or a digital
camera is detected, the video file list is displayed at the video selection dialog box.
2. Select video files to record.
4. Using the manual mode of TruDirect
Manual mode of TruDirect
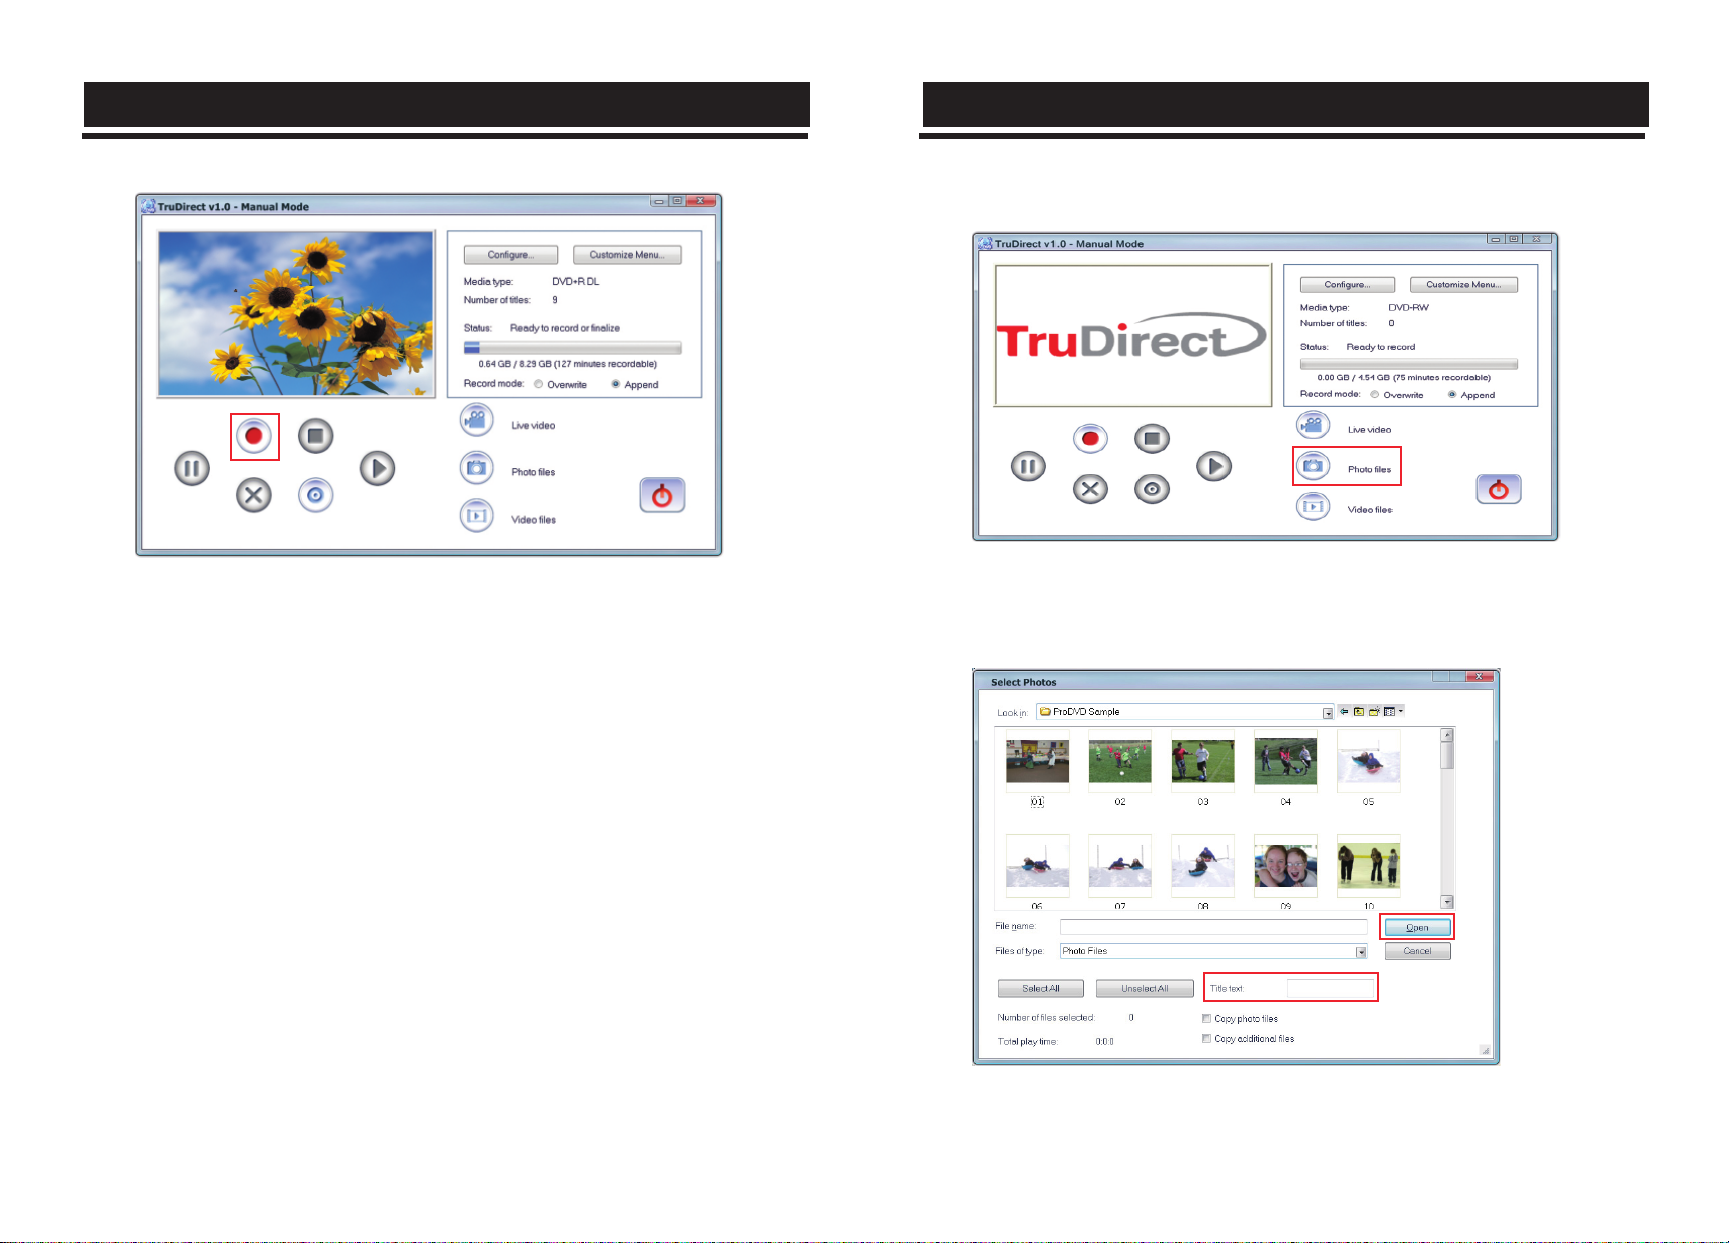
A. Making a DVD from the live video(Streaming image - DV camcorder,
Web camera, etc.)
1. The main screen is displayed if TruDirect starts.
3. Click the open button to play video files automatically in the main screen and a recording
starts.
4. After completion of recording, TruDirect drive discharge a media.
23 2 4
2. Connect a video device with a user’s PC.
3. Click the live picture of main screen.
4. Check the video and audio device to record, and click the confirmation.
Page 15
5. Click the start of recording to record a DVD.
6. Clicking the recording stop displays the title input popup window.
Input a title and click the confirmation.
7. Click the recording completion button if the recording completion button is usable and the
recording completion is prepared.
After completion of DVD recording, a DVD is discharged automatically.
B. Making a DVD from the photo file
1. The main screen is displayed if TruDirect starts.
2. Connect a photo file source with a user's PC. Or select a photo file from the hard drive of
PC.
3. Click photo files in the main screen to display the photo selection dialog box.
8. Click the finish to finish the TruDirect.
25 2 6
Page 16
4. Select a picture to record and input the tilte.
5. Click the open button to start a recording.
6. Click the recording completion button if the recording is completed and a DVD discharge is
prepared.
7. Click the finish to finish the TruDirect.
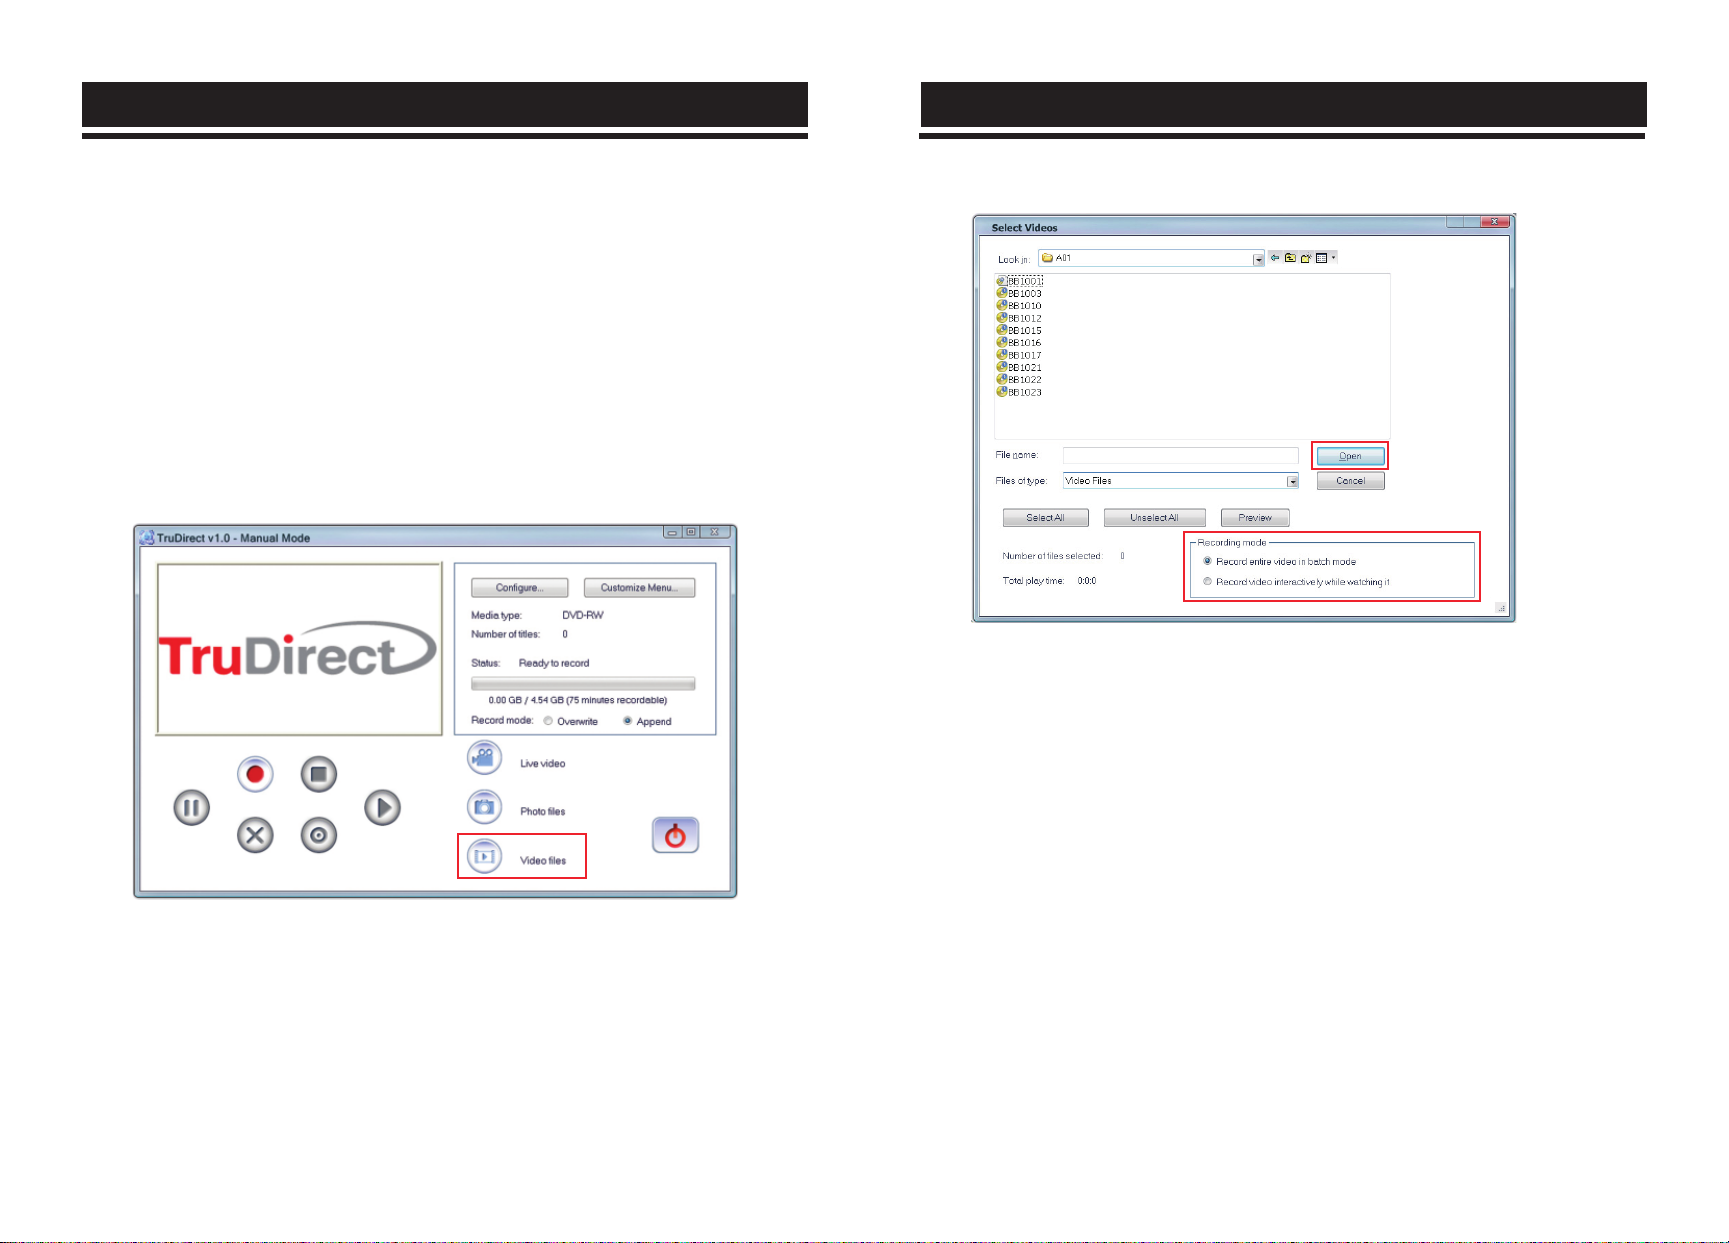
C. Making a DVD from the video file
1. The main screen is displayed if TruDirect starts.
2. Connect a video file source with a user's PC to display the selection dialog box. Or select a
video file from the hard drive of PC.
3. Select all video recording in the video selection dialog without watching or select a video
recording interactively with watching.
4. Select video files to record.
5. Click the open button to record by DVD burner. When a video is recorded interactively in
the state of watching, a video is played at the manual mode dialog box and DVD recording
starts by clicking the start of recording.
6. Clicking the recording stop displays the title input popup window.
Input a title and click the confirmation.
7.
Click the recording completion button if the recording is completed and a DVD discharge is
prepared.
8. Click the finish to finish the TruDirect.
27 2 8
Page 17

5. Easy checks for TruDirect
1.
TruDirect™ Software is not operated in the DVD Writer.
TruDirect™ Software operates by communicating with a TruDirect™ drive of
Samsung.
Check if a TruDirect™ drive is connected correctly.
2. Is it possible to record a video file that a computer cannot play with TruDirect™?
It is impossible to record a video file that a computer cannot play. Confirm the normal play
after Installing the correct codec or decoder and then record with TruDirect™.
3. It is impossible to record with TruDirect™ in spite that a video file is played with a PC
normally.
Some codec is operated in the special software. In this case, it could not be supported by
TruDirect™. Recommend the use of certified and stable codec.
Also, some united codec could make the all system unstable.
4. Why a part of video files supports 'Video recording with watching' mode?
And, what kinds of video file show the present screen during the 'recording the all
videos'?
In TruDirect™ 1.0, only the standard MPEG-2 video file supports 'Video recording with
watching
' mode. And it works quickly without showing the present screen in the case of
'recording the all videos'.
5. How to use the DV camcorder (Tape type) in TruDirect™?
To record pictures of DV camcorder, the camcorder should be connected with the IEEE 1394
(FireWire) port of PC. Execute TruDirect™ after connecting the camcorder with a PC. (If
there is no IEEE 1394 port in the PC, internal/external DV capture board is needed.)
Some camcoders support the USB connection and IEEE 1394 connection at the same time.
6. How to use the USB connection of camcorder, web camera, and digital camera in?
To record video/photo files with TruDirect™ from the above devices, connect a device with
a USB port of PC(1.1 or 2.0 : USB 2.0 connection provides the best data transmission rate.).
Some devices need a correct USB driver. In this case, install the provided driver with a device
or the newest version of driver at the homepage of manufacturer.
*** If a device is not recognized in the Microsoft Windows OS, it is impossible to use in
TruDirect™. If a device is not recognized in the OS, install the correct device driver.
7. There is no sound in DVD made with TruDirect™ by connecting the external device.
Check if the video/audio device is selected correctly at the selection window when connecting
the device. Otherwise check the original source of audio is saved correctly.
8. Photo slide show is not worked normally.
There is a case that some software that DVD timer logic is not realized dose not work
automatically the photo slide show made by TruDirect™. In this case, press button or click to
continue to the next picture.
'Write error' occurs when recording with TruDirect™.
9.
Check if a disc is scratched, broken, or dirtied.
An error could occur if another work is processed when recording a DVD.
10. A DVD that is made with TruDirect™ is not played in my DVD player.
Check if your DVD player supports the DVD media type(±R, ±RW, ±R Dual Layer, RAM ).
29 3 0
 Loading...