

Page 1

SCX-812x Series
CLX-92x1 Series
CLX-9301 Series
Color Multi-Functional Printer
User’s Guide
imagine the possibilities
Thank you for purchasing a Samsung product.
Page 2

Copyright_ 2
copyright
© 2012 Samsung Electronics Co., Ltd. All rights reserved.
This user’s guide is provided for informational purposes only. All information included herein is subject to change without notice.
Samsung Electronics is not responsible for any direct or indirect damages, arising from or related to use of this user’s guide.
• Samsung and Samsung logo are trademarks of Samsung Electronics Co., Ltd.
• PCL and PCL 6 are trademarks of Hewlett-Packard Company.
• Microsoft, Windows, Windows Vista, Windows 7 and Windows 2008 Server R2 are either registered trademarks or trademarks of Microsoft Corporation.
• PostScript 3 is a trademark of Adobe System, Inc.
• This product includes software developed at the University of California, Irvine for use in the DAV Explorer project (http://www.ics.uci.edu/~webdav/).
• ABBYY® FineReader® Engine for Embedded OS © 2009 ABBYY. ABBYY FineReader - the keenest eye in OCR. ABBYY, FINEREADER and ABBYY
FineReader are registered trademarks of ABBYY Software Ltd.
• All other brand or product names are trademarks of their respective companies or organizations.
Refer to the ‘LICENSE.txt’ file in the provided CD-ROM for the open source license information.
IF YOU USE THIS MACHINE TO PRODUCE AND THEN USE COUNTERFEIT CURRENCY, YOU WILL BE PUNISHED TO THE FULLEST EXTENT OF THE LAW.
REV. 1.00
Page 3

contents
Contents_ 3
COPYRIGHT
2
CONTENTS
3
11 Safety information
15 Regulatory information
25 About this user’s guide
27 Features of your new product
INTRODUCTION
29
29 Machine overview
29 Front view 1
30 Front view 2
31 Rear view
32 Inner view (CLX-92x1 Series, CLX-9301 Series)
33 Inner view (SCX-812x Series)
34 View with Standard finisher (optional)
35 View with Cabinet stand and High capacity feeder (optional)
36 Control panel overview
37 Understanding the status LED
38 Turning the machine on
39 Turning the machine off
39 Connecting a printer cable
39 Using a network cable
40 Introducing the display screen and useful buttons
40 Display screen
40 Counter button
41 Eco button
41 Job Status button
42 Interrupt button
42 Understanding the pop-up keyboard
43 Using the manual stapler
44 Viewing the animation for trouble shooting
MEDIA AND TRAY
45
45 Loading originals
45 On the scanner glass
45 In the duplex automatic document feeder (DADF)
46 Selecting print media
46 Guidelines to select the print media
46 Loading paper in the tray
46 Standard tray / optional dual cassette feeder
49 Multi-purpose tray
51 Media sizes automatically detected
52 Printing on special media
52 Envelope
53 Transparency
53 Labels
53 Card stock/ Custom-sized paper
54 Letterhead/Preprinted paper
54 Glossy
54 Tray setting
54 Setting the paper size
54 Setting the paper type
55 Auto tray switch
55 Auto continue
contents
Page 4

contents
Contents_ 4
55 Paper substitution
55 Tray priority setting
56 Setting the tray confirmation message
COPYING
57
57 Understanding the copy screen
57 Basic tab
58 Advanced tab
58 Image tab
59 Basic copy
60 Copying different sized originals
61 Changing the settings for each copy
61 Selecting the paper supply tray
62 Reducing or enlarging copies
62 Copying multiple sides
63 Selecting the color mode (CLX-9201 9301 Series only)
64 Deciding the form of copy output
65 Changing the darkness
65 Using special copy features
65 Selecting the size of originals
66 Selecting the orientation of originals
67 ID card copying
68 N-up copying
72 Booklet copying
73 Book copying
74 Watermark
74 Stamp
75 Selecting the type of originals
75 Erasing edges
76 Adjusting background
76 Erasing backside Images
77 Using a programs setting
77 Saving Programs
77 Using Programs
77 Managing Programs
78 Using previous settings
78 Saving documents
79 Using the Quick Copy menu
SCANNING
80
80 Basic scanning method
80 Understanding the scan methods
81 Scanning originals and sending through email (scan to email)
81 Understanding the Scan to Email screen
83 Sending a scanned image to several destinations as an email attachment
83 Entering email addresses
84 Resending the latest email address
84 Printing an email confirmation report
85 Scanning originals and sending via SMB/WEBDAV/FTP (scan to
server)
85 Understanding the Scan to Server screen
87 Scanning and sending to SMB/WEBDAV/FTP server
87 Entering server addresses
89 Resending the latest server address
90 An example of security configuration for anonymous user on SMB server.
92 Scanning originals and sending to a USB memory device (scan to
USB)
92 Understanding the Scan to USB screen
Page 5

contents
Contents_ 5
93 Scanning to a USB memory device
94 Attaching stored documents
94 Sending a stored document
94 Previewing image to be scanned
94 Using the Preview button
95 Changing the scan feature settings
95 Scanning from both sides of originals
95 Changing the resolution
95 Selecting the size of originals
96 Selecting the orientation of originals
96 Delaying a scanned image transmission
97 Book scanning
97 Build job
98 Setting job completion notification
98 Using bates numbering
99 Selecting the type of originals
99 Selecting the color mode
99 Changing Darkness
99 Changing Sharpness
100 Changing Contrast
100 Adjusting background
100 Erasing backside Images
100 Scan to Edge
101 Quality
101 Scan Preset
101 File Format
102 File Name
102 File Policy
102 Folder Creation
103 Using a programs setting
103 Saving Programs
103 Using Programs
103 Managing Programs
103 Using previous settings
104 Saving documents
105 Scanning originals and sending to your computer (scan to PC)
105 For a network connected machine
105 Using Samsung Scan and Fax Manager 2
106 Scan Assistant
107 Scanning with TWAIN-enabled software
107 Macintosh scanning
107 Scanning with network
108 Linux scanning
108 Scanning
108 Adding Job Type Settings
109 Using the Image Manager
FAXING (OPTIONAL)
110
110 Preparing to fax
110 Using a fax in your computer
110 Sending a fax (Windows)
111 Checking a sent fax list (Windows)
111 Sending a fax (Macintosh)
112 Understanding the fax screen
112 Basic tab
112 Advanced tab
113 Image tab
Page 6

contents
Contents_ 6
113 Sending a fax
113 Setting the fax header
113 Sending a fax
114 Sending a fax using speed dial numbers
114 Sending a fax manually using On Hook
114 Sending a fax manually using an extension telephone
114 Resending Automatically
115 Redialing the last number
115 Delaying a fax transmission
116 Sending a priority fax
116 Quick start fax
117 Receiving a fax
117 Changing the receive modes
117 Receiving manually in Telephone mode
117 Receiving automatically in Answering Machine/Fax mode
117 Receiving faxes manually using an extension telephone
118 Receiving in secure receiving mode
118 Selecting a received fax output tray
118 Printing received faxes on both sides of the paper
119 Printing received faxes to the right tray (face up)
119 Receiving faxes in memory
120 Adjusting the document settings
120 Selecting the size of originals
120 Faxing on both sides of originals
121 Selecting the orientation of originals
121 Changing the resolution
122 Selecting the type of originals
122 Selecting the color mode
122 Changing the darkness
122 Adjusting background
123 Erasing backside images
124 Forwarding a fax to another destination
124 Understanding the Fax Forward Settings options
124 Setting the fax forwarding
125 Using the polling option
125 Storing the originals for polling
125 Printing the polling document
125 Deleting the polling document
126 Polling a remote fax
126 Delaying polling a remote fax
126 Using mailbox
126 Creating Mailbox
127 Storing originals in Mailbox
127 Printing the data in Mailbox
127 Deleting the data in Mailbox
127 Faxing to a remote Mailbox
128 Polling a remote fax
128 Delaying polling a remote fax
128 Setting the junk fax
129 Printing a fax report
130 Using a programs setting
130 Saving Programs
130 Using Programs
131 Managing Programs
131 Using previous settings
132 Saving documents
Page 7

contents
Contents_ 7
SETTING UP AN ADDRESS BOOK
133
133 Setting up an address book using the control panel
133 Storing Individual address (Fax, E-Mail)
133 Storing Individual address (SMB, FTP, WebDAV)
134 Editing Individual address
134 Storing Group address
135 Editing Group address
135 Searching Address Book for an entry
136 Deleting an entry in an Address Book
136 Checking Address Book for an entry
137 Setting up an address book using SyncThru™ Web Service
137 Storing on your local machine
PRINTING
142
142 System requirements
142 Windows
142 Macintosh
142 Linux
143 UNIX
143 Introducing useful software programs
143 Samsung Anyweb Print
143 Printer driver features
143 PCL printer driver
143 XPS printer driver
144 PostScript printer driver
144 Basic printing
144 Canceling a print job
145 Opening printing preferences
145 Print Mode
146 Basic tab
147 Paper tab
148 Graphics tab
150 Finishing tab
151 Advanced tab
152 Eco tab
152 Samsung tab
153 Using a favorite setting
153 Using help
154 Setting Device Options
156 Using special print features
156 Printing multiple pages on one sheet of paper
156 Printing posters
156 Printing booklets
157 Printing on both sides of the paper
157 Change the size by percentage of your document
157 Fitting your document to a selected paper size
157 Using watermarks
158 Using overlay
159 Banner Printing
160 Using direct printing utility
160 What is Direct Printing Utility?
160 Printing
160 Using the right-click menu
160 Changing the default print settings
161 Setting your machine as a default machine
161 Printing to a file (PRN)
162 Macintosh printing
162 Printing a document
Page 8

contents
Contents_ 8
162 Activating optional devices or accessories
162 Changing printer settings
165 Printing multiple pages on one sheet of paper
165 Printing on both sides of paper
166 Linux printing
166 Printing from applications
166 Printing files
166 Configuring Printer Properties
167 UNIX Printing
167 Proceeding the print job
167 Changing the printer settings
USING A USB MEMORY DEVICE
169
169 Understanding the USB screen
169 About USB memory device
170 Printing from a USB memory device
171 Managing usb memory
171 Deleting an image file
171 Formatting a USB memory device
171 Viewing the USB memory capacity
DOCUMENT BOX
172
172 Understanding the document box screen
173 Box setting
173 New Box
173 Edit Box
174 Delete Box
174 Saving documents
175 Understanding details of the document box screen
176 Using document box features
176 Selecting the job type
176 Previewing the stored data
177 Adding scanned data
178 Viewing detail information
178 Editing stored data
178 Deleting stored data
179 Sending stored data
182 Printing stored data
182 Printing information of stored data
183 Combining stored data
183 Using the box with SyncThru™ Web Service
183 Box Setting
USEFUL TOOLS
187
187 Using the Smart Panel program
187 Understanding Smart Panel
188 Changing the Smart Panel Program Settings
188 Smarthru Office
188 Starting SmarThru Office
188 Using SmarThru Office
189 Using the Linux Unified Driver Configurator
189 Opening the Unified Driver Configurator
190 Printers configuration
190 Scanners configuration
191 Ports configuration
Page 9

contents
Contents_ 9
TROUBLESHOOTING
192
192 Redistributing toner
193 Replacing the toner cartridge
195 Cleaning paper dust stick and chargers of imaging units
198 Replacing the imaging unit
201 Replacing the waste toner container
203 Clearing original document jams
203 Original paper jam in front of scanner
204 Original paper jam inside of scanner
205 Original paper jam while reversing paper in scanner or exit area of
scanner
207 Original paper jam in front of scanner duplex path
209 Tips for avoiding paper jams
209 Clearing paper jams
209 Paper jam in tray 1
211 Paper jam in tray 2
212 Paper jam in tray 3
213 Paper jam in tray 4
214 Paper jam in the multi-purpose tray
214 Paper jam inside the machine (Jam feed 1)
215 Paper jam inside the machine (Jam feed 2)
215 Paper jam inside the machine (Jam feed 3)
216 Paper jam inside the machine (Jam feed 4)
216 Paper jam inside the machine (Jam Registration)
217 Paper jam inside of the machine (Jam at Fuser out)
217 Paper jam at the top of duplex path (Jam Duplex Return)
218 Paper jam at the top of duplex path (Jam Duplex 1)
218 Paper jam at the inside of duplex path (Jam Duplex 2)
219 Paper jam bottom of duplex path (Jam Duplex Regi.)
219 Paper jam in exit area (Jam Exit Face down)
220 Paper jam inside of finisher during ejecting to top bin
221 Paper jam at finisher’s exit during ejection to the top bin
221 Paper jam inside of finisher during ejecting to main bin
222 Paper jam at finisher’s exit during ejecting to main bin
223 Paper jam inside of finisher bridge
224 Paper jam at entrance of finisher
225 Paper jam around puncher of finisher
226 Understanding display messages
232 Solving other problems
232 Power and cable connecting problems
232 Display screen problem
233 Paper feeding problems
233 Printing problems
235 Printing quality problems
237 Copying problems
238 Scanning problems
238 Scan and Fax Manager 2 Problem
238 Fax problems (optional)
239 Common PostScript problems
239 Common Windows problems
240 Common Linux problems
241 Common Macintosh problems
SUPPLIES AND ACCESSORIES
242
242 How to purchase
242 Available supplies
242 CLX-9250 Series
242 CLX-9350 Series
244 Necessary precautions to take when installing accessories
Page 10

contents
Contents_ 10
244 Available accessories
246 Checking replaceable’s lifespan
SPECIFICATIONS
247
247 Hardware specifications
247 Environmental specifications
248 Electrical specifications
249 Print media specifications
CONTACT SAMSUNG WORLDWIDE
252
GLOSSARY
255
Page 11
Safety information_ 11
safety information
These warnings and precautions are included in order to prevent injury to you and others, as well as preventing any
potential damage to your machine. Be sure to read and understand all of these instructions before using the machine.
Use common sense for operating any electrical appliance and whenever using your machine. Also, follow all warnings and
instructions marked on the machine and in the accompanying literature. After reading this section, keep it in a safe place
for future reference.
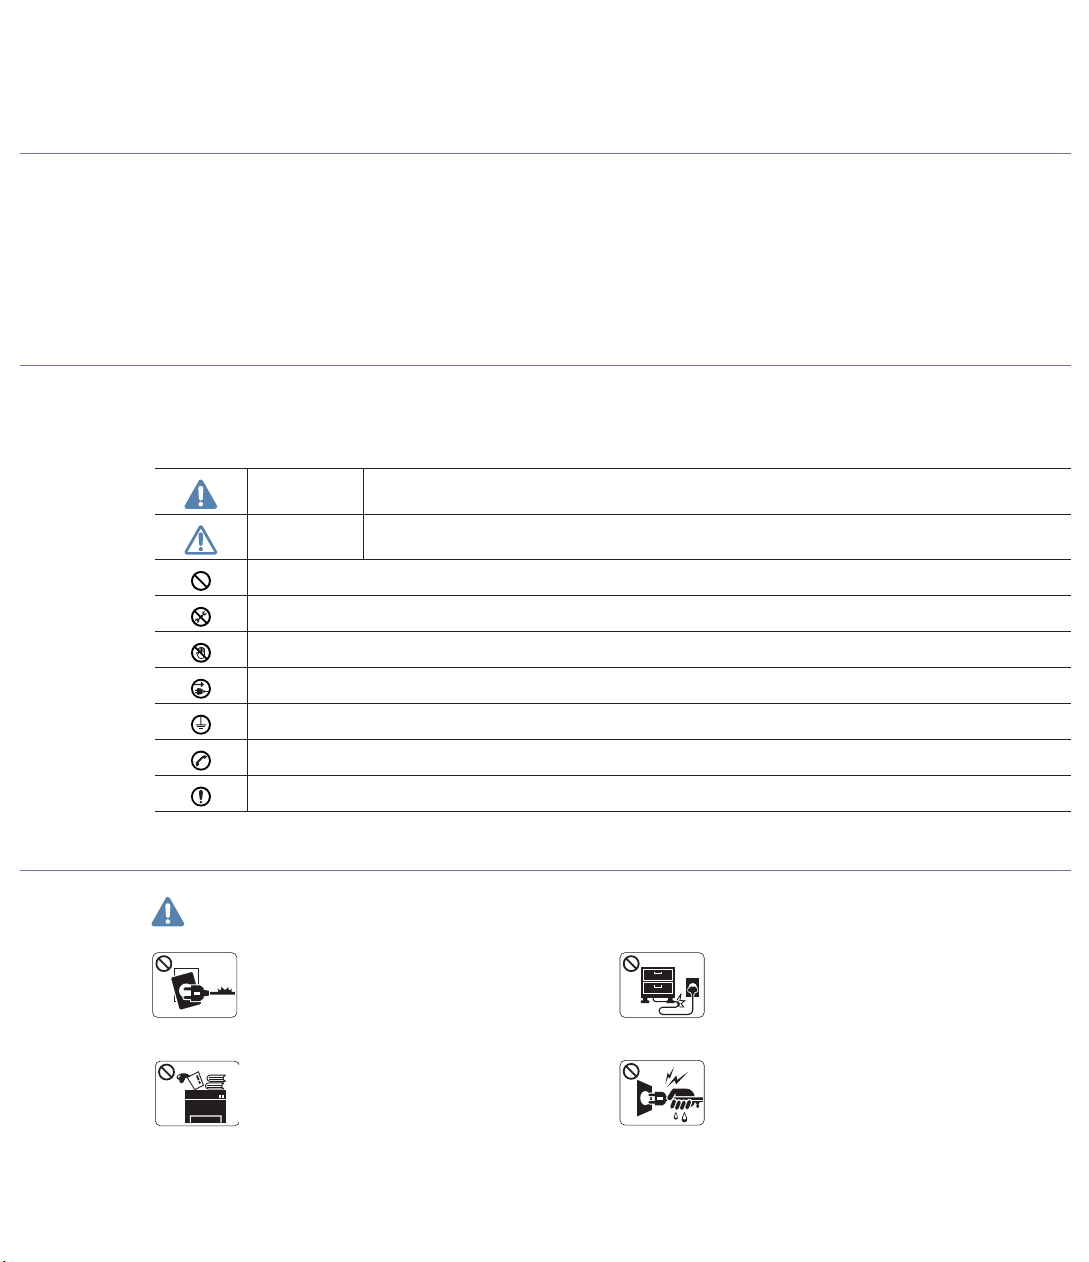
Important safety symbols
This section explains the meanings of all icons and signs in the user's guide. These safety symbols are in order, according to the degree of
danger.
Explanation of all icons and signs used in the user’s guide:
Operating environment
Warning
Warning Hazards or unsafe practices that may result in severe personal injury or death.
Caution Hazards or unsafe practices that may result in minor personal injury or property damage.
Do not attempt.
Do not disassemble.
Do not touch.
Unplug the power cord from the wall socket.
Make sure the machine is grounded to prevent electric shock.
Call the service center for help.
Follow directions explicitly.
Do not use if the power cord is damaged or if the
electrical outlet is not grounded.
! This could result in electric shock or fire.
Do not bend, or place heavy objects on the power
cord.
! Stepping on or allowing the power cord to be
crushed by a heavy object could result in electric
shock or fire.
Do not place anything on top of the machine (water,
small metal or heavy objects, candles, lit cigarrettes,
etc.).
! This could result in electric shock or fire.
Do not remove the plug by pulling on the cord; do not
handle the plug with wet hands.
! This could result in electric shock or fire.
Page 12
Safety information_ 12
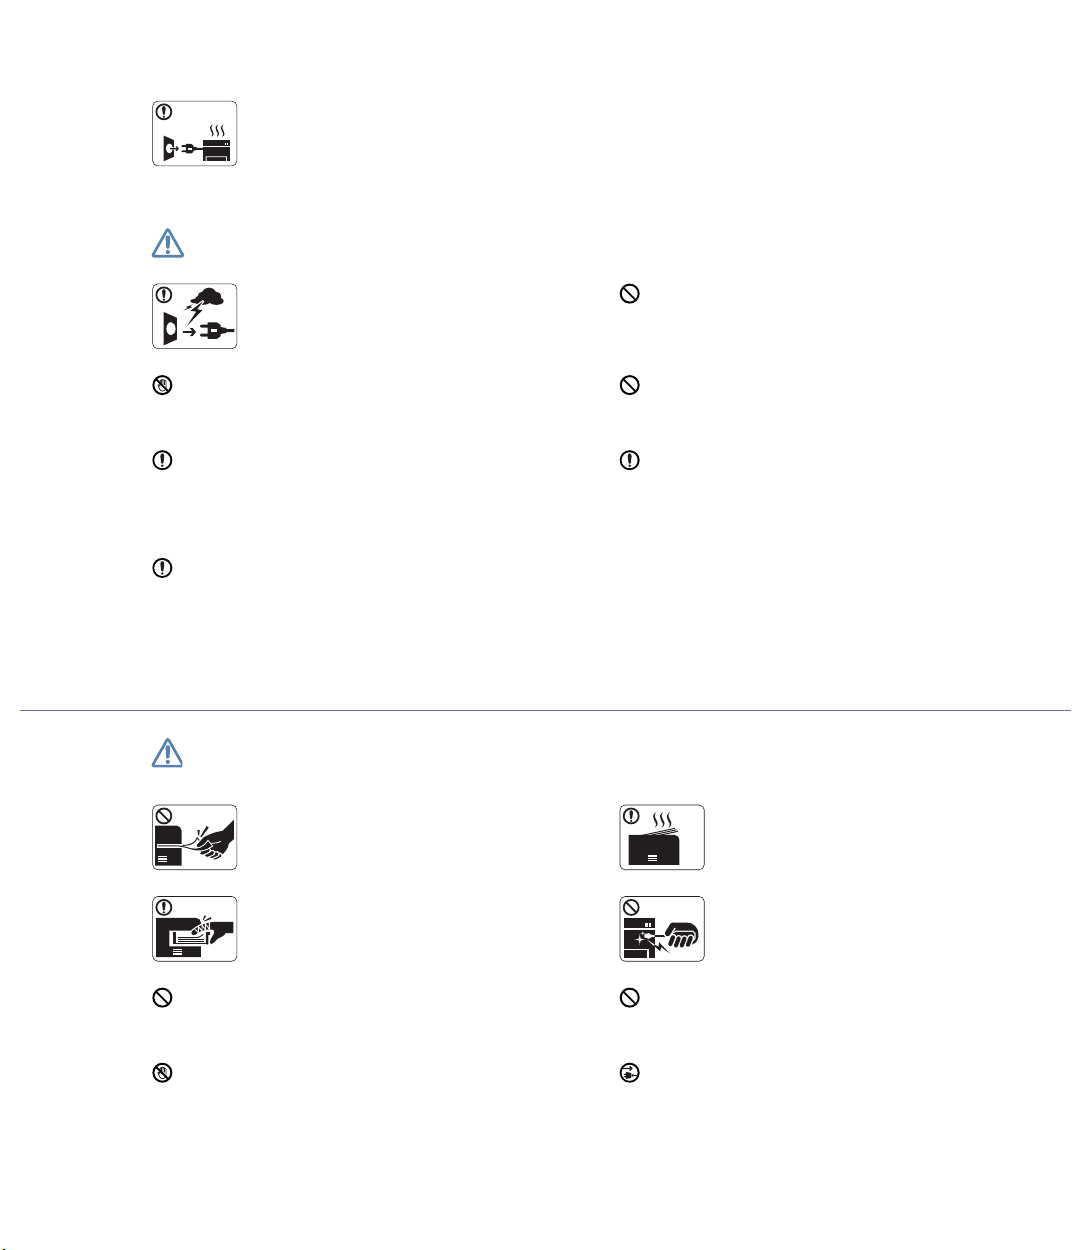
Caution
Operating method
Caution
If the machine gets overheated, it releases smoke,
makes strange noises, or generates an odd odor,
immediately turn off the power switch and unplug the
machine.
! This could result in electric shock or fire.
During an electrical storm or for a period of
non-operation,remove the power plug from the
electrical outlet.
! This could result in electric shock or fire.
If the plug does not easily enter the electrical outlet, do not
attempt to force it in.
! Call an electrician to change the electrical outlet, or this
could result in electric shock.
Be careful, the paper output area is hot.
! Burns could occur.
Do not allow pets to chew on the AC power, telephone or PC
interface cords.
! This could result in electric shock or fire.
If the machine has been dropped, or if the cabinet appears
damaged, unplug the machine from all interface connections
and request assistance from qualified service personnel.
! Otherwise, this could result in electric shock or fire..
If the machine does not operate properly after these
instructions have been followed, unplug the machine from all
interface connections and request assistance from qualified
service personnel.
! Otherwise, this could result in electric shock or fire.
If the machine exhibits a sudden and distinct change in
performance, unplug the machine from all interface
connections and request assistance from qualified service
personnel.
! Otherwise, this could result in electric shock or fire.
Do not forcefully pull the paper out during printing.
! It can cause damage to the machine.
When printing large quantities, the bottom part of the
paper output area may get hot. Do not allow children
to touch.
! You (children) may be burned.
Be careful not to put your hand between the machine
and paper tray.
! You may get injured.
When removing jammed paper, do not use tweezers
or sharp metal objects.
! It can cause damage to the machine.
Do not block or push objects into the ventilation opening.
! This could result in elevated component temperatures which
can cause damage or fire.
Do not allow too many papers to stack up in the paper output
tray.
! It could cause damage to the machine.
Use care to avoid paper cuts when replacing paper or removing
jammed paper.
! You may get hurt.
This machine's power interception device is the power cord.
! To switch off the power supply, remove the power cord from
the electrical outlet.
Page 13
Safety information_ 13
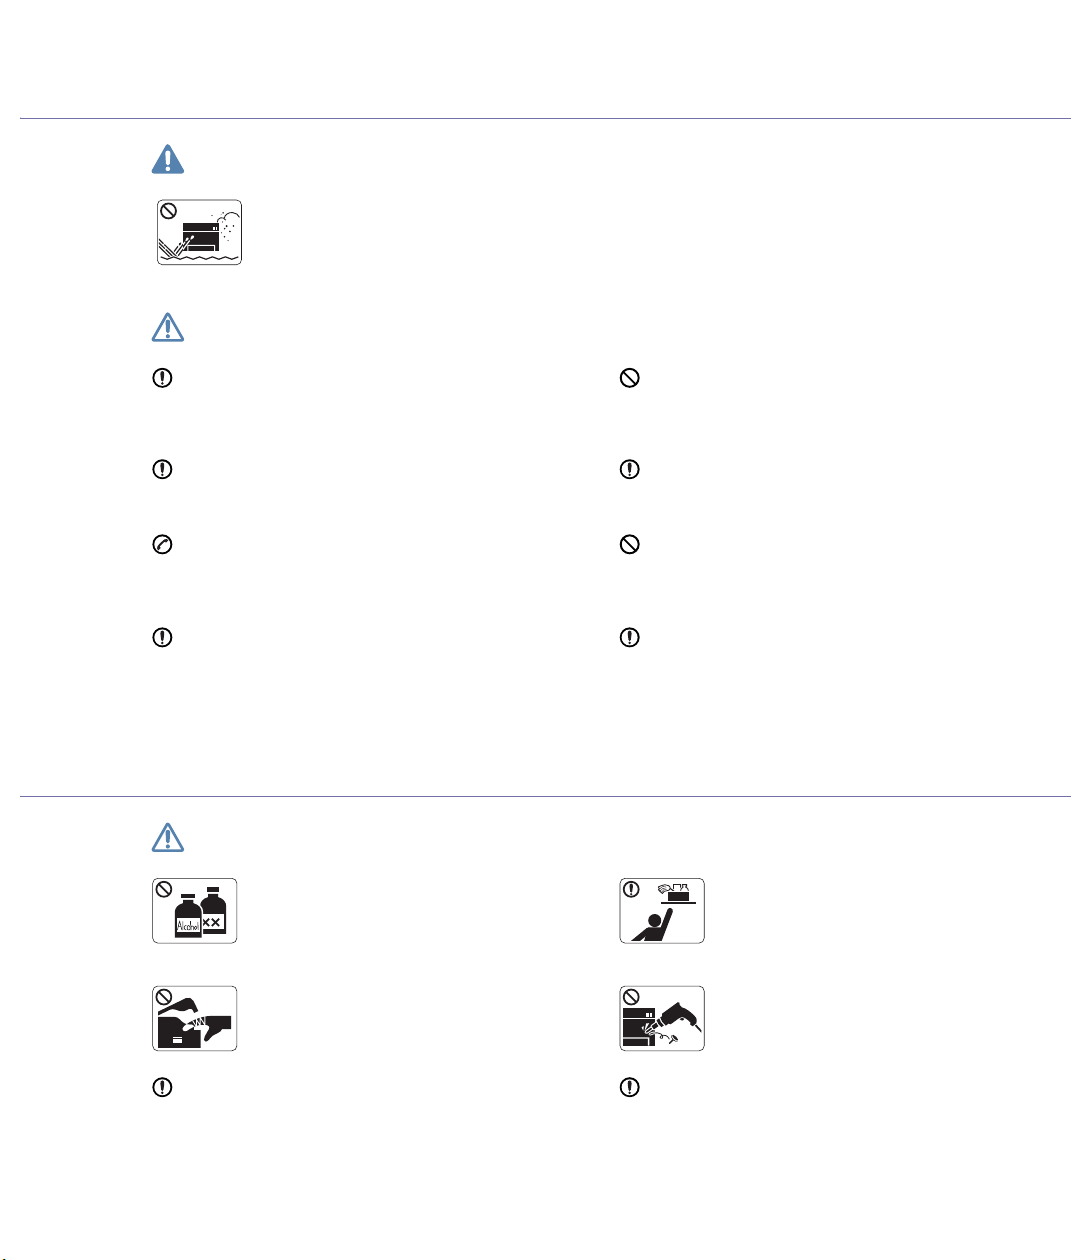
Installation / Moving
Warning
Caution
Maintenance / Checking
Caution
Do not place the machine in an area with dust,
humidity or water leaks.
! This could result in electric shock or fire.
When moving the machine, turn the power off and disconnect
all cords; then lift the machine with at least four people.
! The machine could fall, causing human injury or machine
damage.
Do not put a cover over the machine or place it in an airtight
location, such as a closet.
! If the machine is not well-ventilated, this could result in fire.
Do not place the machine on an unstable surface.
! The machine could fall, causing human injury or machine
damage.
Make sure you plug the power cord into a grounded electrical
outlet.
! Otherwise, this could result in electric shock or fire.
The machine should be connected to
the power level which is specified on the label.
! If you are unsure and want to check the power level you are
using, contact the electrical utility company.
Do not overload wall outlets and extension cords.
! This can diminish performance, and could result in electric
shock or fire.
Use only No.26 AWGa or larger, telephone line cord, if
necessary.
! Otherwise, it can cause damage to the machine.
a. AWG: American Wire Gauge
Use the power cord supplied with your machine for safe
operation.
! Otherwise, it can cause damage to the machine, and could
result in electric shock or fire.
Unplug this product from the wall outlet before
cleaning the inside of the machine. Do not clean the
machine with benzene, paint thinner or achol; do not
spray water directly into the machine.
! This could result in electric shock or fire.
Keep cleaning supplies away from children.
! Children (you) may get hurt.
When you are working inside the machine replacing
supplies or cleaning the inside, do not operate the
machine.
! You may get injured.
Do not disassemble, repair or rebuild the machine by
yourself.
! It can cause damage to the machine. Call a
certified technician when the machine needs repair.
Keep the power cable and the contact surface of the plug clean
from dust or water.
! This could result in electric shock or fire.
To clean and operate the machine, strictly follow the user's
guide provided with the machine.
! Otherwise, it can cause damage to the machine.
Page 14
Safety information_ 14
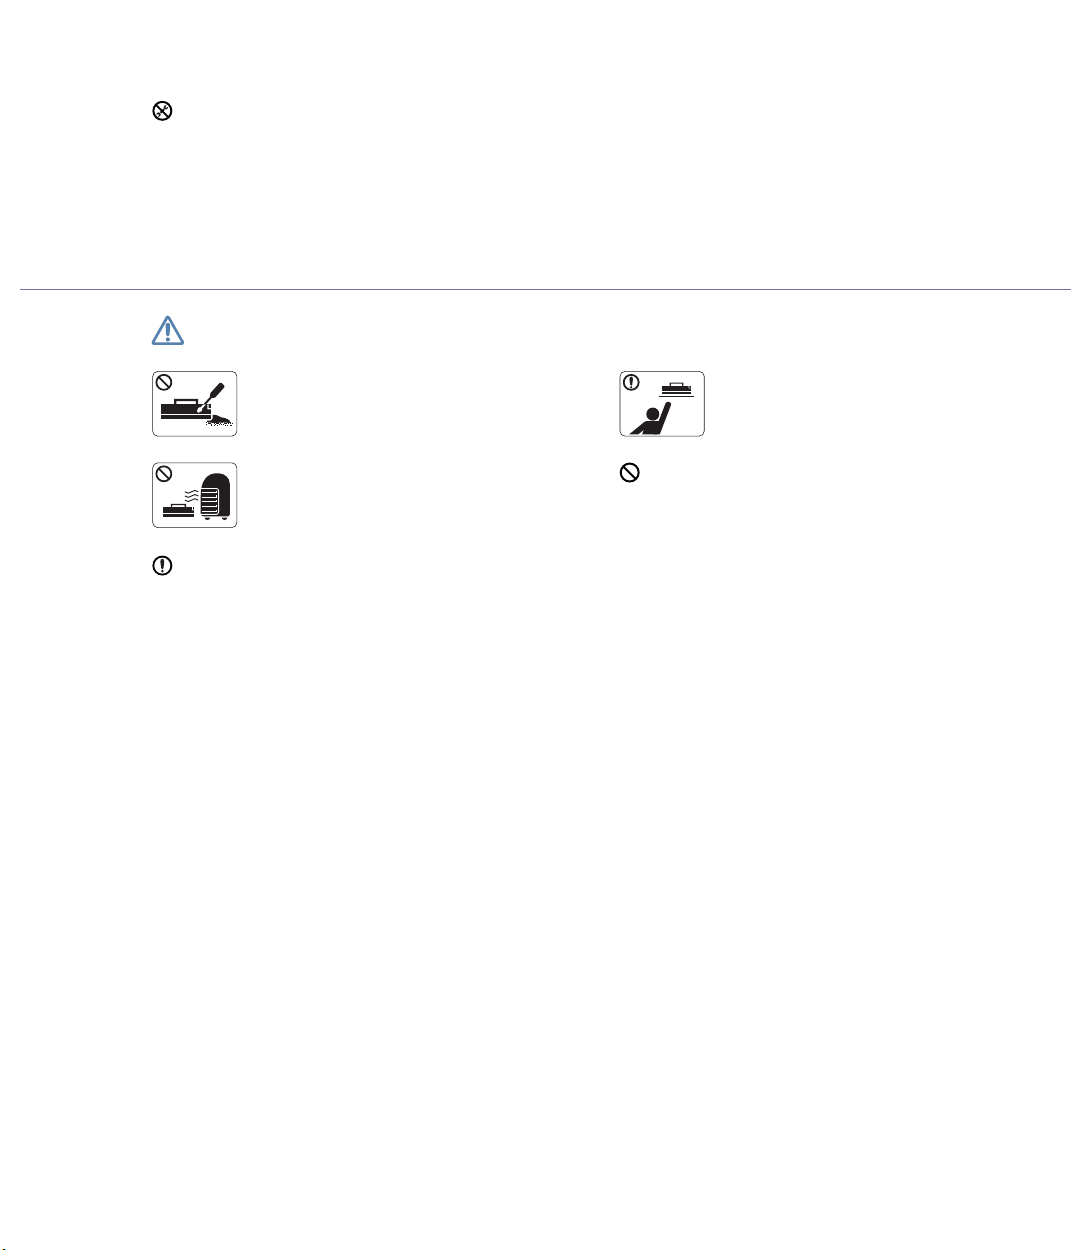
Supply usage
Caution
Do not remove any covers or guards that are fastened with
screws.
! The machine should only be repaired by Samsung service
technician.
! Fuser units should only be repaired by a certified service
technician. Repair by non-certified technicians could result in
fire or electric shock.
Do not disassemble the toner cartridge.
! Toner dust can be dangerous to humans.
When storing supplies such as toner cartridges, keep
them away from children.
! Toner dust can be dangerous to humans.
Do not burn any of the supplies such as toner
cartridge or fuser unit.
! It can cause an explosion or fire.
Using recycled supplies, such as toner, can cause damage to
the machine.
! In case of damage due to the use of recycled supplies, a
service fee will be charged.
When changing the toner cartridge or removing jammed paper,
be careful not to let toner dust touch your body or clothes.
! Toner dust can be dangerous to humans.
Page 15
Regulatory information_ 15
regulatory information
This machine is designed for our sound environment and certified with several regulatory statements.
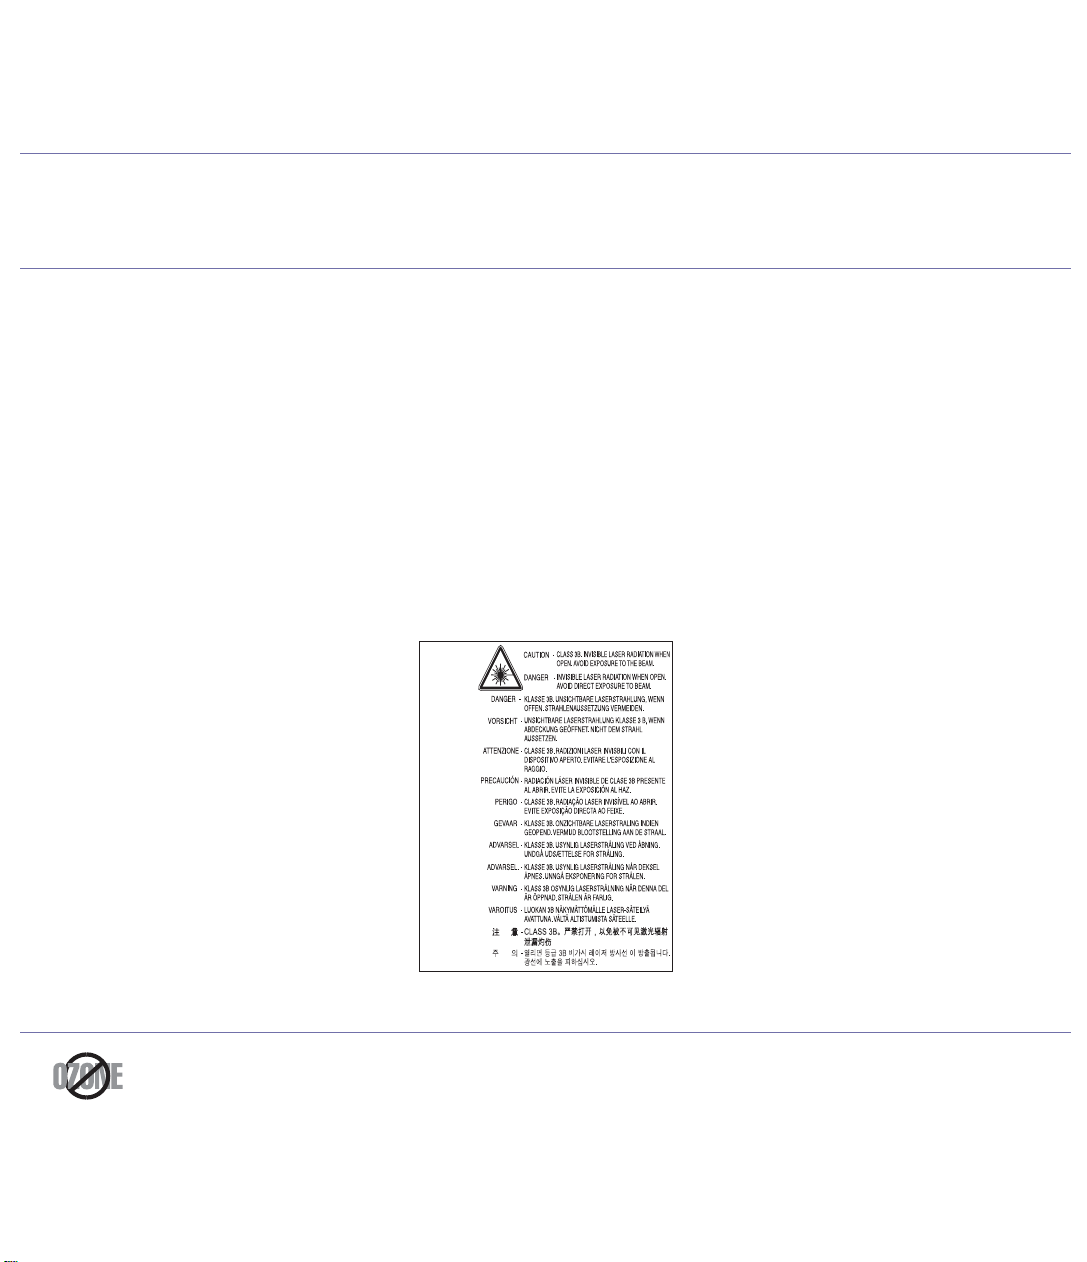
Laser Safety Statement
The printer is certified in the U.S. to conform to the requirements of DHHS 21 CFR, chapter 1 Subchapter J for Class I(1) laser products, and
elsewhere is certified as a Class I laser product conforming to the requirements of IEC 60825-1:1993 + A1:1997 + A2:2001.
Class I laser products are not considered to be hazardous. The laser system and printer are designed so there is never any human access to
laser radiation above a Class I level during normal operation, user maintenance or prescribed service condition.
• Wavelength
- CLX-9250 Series: 670 ~ 690 nm
- CLX-9350 Series: 648 ~ 665 nm
• Beam divergence
- CLX-9250 Series: Paraller: 7 ~ 13 degree, Prependicular: 14 ~ 22 degree
- CLX-9350 Series: Paraller: 7 ~ 11 degree, Prependicular: 14 ~ 22 degree
• Maximum power or energy output
- CLX-9250 Series: 15 mW
- CLX-9350 Series: 16 mW
WARNING
Never operate or service the printer with the protective cover removed from Laser/Scanner assembly. The reflected beam, although invisible,
can damage your eyes.
When using this product, these basic safety precautions should always be followed to reduce risk of fire, electric shock, and injury to persons:
Ozone Safety
During normal operation, this machine produces ozone. The ozone produced does not present a hazard to the operator. However, it is
advisable that the machine be operated in a well ventilated area.
If you need additional information about ozone, request your nearest Samsung dealer.
E n g lis h
G e rm a n
F re n c h
Ita lia n
S p a n is h
P o r tu g u es
D u tc h
D a n ish
N o rw e g ian
S w e d is h
F in n is h
Page 16
Regulatory information_ 16
PERCHLORATE WARNING
This Perchlorate warning applies only to primary CR (Manganese Dioxide) Lithium coin cells in the product sold or distributed ONLY in
California USA.
Perchlorate Material - special handling may apply.
See www.dtsc.ca.gov/hazardouswaste/perchlorate. (U.S.A. only)
Power Saver
Recycling
China only
Correct Disposal of This Product (Waste Electrical & Electronic Equipment)
(Applicable in the European Union and other European countries with separate collection systems)
This printer contains advanced energy conservation technology that reduces power consumption when it is not in active use.
When the printer does not receive data for an extended period of time, power consumption is automatically lowered.
ENERGY STAR and the ENERGY STAR mark are registered U.S. marks.
For more information on the ENERGY STAR program see http://www.energystar.gov
Recycle or dispose of the packaging material for this product in an environmentally responsible manner.
This marking on the product, accessories or literature indicates that the product and its electronic accessories (e.g. charger, headset, USB
cable) should not be disposed of with other household waste at the end of their working life. To prevent possible harm to the environment or
human health from uncontrolled waste disposal, please separate these items from other types of waste and recycle them responsibly to
promote the sustainable reuse of material resources.
Household users should contact either the retailer where they purchased this product, or their local government office, for details of where and
how they can take these items for environmentally safe recycling.
Business users should contact their supplier and check the terms and conditions of the purchase contract. This product and its electronic
accessories should not be mixed with other commercial wastes for disposal.
Page 17

Regulatory information_ 17
Correct disposal of batteries in this product
(Applicable in the European Union and other European countries with separate battery return systems.)
Radio Frequency Emissions
FCC Information to the User
This device complies with Part 15 of the FCC Rules. Operation is subject to the following two conditions:
• This device may not cause harmful interference, and
• This device must accept any interference received, including interference that may cause undesired operation.
This equipment has been tested and found to comply with the limits for a Class A digital device, pursuant to Part 15 of the FCC Rules. These
limits are designed to provide reasonable protection against harmful interference in a residential installation. This equipment generates, uses
and can radiate radio frequency energy and, if not installed and used in accordance with the instructions, may cause harmful interference to
radio communications. However, there is no guarantee that interference will not occur in a particular installation. If this equipment does cause
harmful interference to radio or television reception, which can be determined by turning the equipment off and on, the user is encouraged to
try to correct the interference by one or more of the following measures:
• Reorient or relocate the receiving antenna.
• Increase the separation between the equipment and receiver.
• Connect the equipment into an outlet on a circuit different from that to which the receiver is connected.
• Consult the dealer or experienced radio TV technician for help.
Change or modifications not expressly approved by the manufacturer responsible for compliance could void the user's authority to
operate the equipment.
Canadian Radio Interference Regulations
This digital apparatus does not exceed the Class A limits for radio noise emissions from digital apparatus as set out in the interference-causing
equipment standard entitled “Digital Apparatus”, ICES-003 of the Industry and Science Canada.
Cet appareil numérique respecte les limites de bruits radioélectriques applicables aux appareils numériques de Classe A prescrites dans la
norme sur le matériel brouilleur: “Appareils Numériques”, ICES-003 édictée par l’Industrie et Sciences Canada.
UNITED STATES OF AMERICA
Federal Communications Commission (FCC)
Intentional emitter per FCC Part 15
Low power, Radio LAN type devices (radio frequency (RF) wireless communication devices), operating in the 2.4 GHz/5 GHz Band, may be
present (embedded) in your printer system. This section is only applicable if these devices are present. Refer to the system label to verify the
presence of wireless devices.
Wireless devices that may be in your system are only qualified for use in the United States of America if an FCC ID number is on the system
label.
The FCC has set a general guideline of 20 cm (8 inches) separation between the device and the body, for use of a wireless device near the
body (this does not include extremities). This device should be used more than 20 cm (8 inches) from the body when wireless devices are on.
The power output of the wireless device (or devices), which may be embedded in your printer, is well below the RF exposure limits as set by
the FCC.
This transmitter must not be collocated or operation in conjunction with any other antenna or transmitter.
Operation of this device is subject to the following two conditions: (1) This device may not cause harmful interference, and (2) this device must
accept any interference received, including interference that may cause undesired operation of the device.
Wireless devices are not user serviceable. Do not modify them in any way. Modification to a wireless device will void the authorization to
use it. Contact manufacturer for service.
This marking on the battery, manual or packaging indicates that the batteries in this product should not be disposed with other household
waste at the end of their working life. Where marked, the chemical symbols Hg, Cd or Pb indicate that the battery contains mercury, cadmium
or lead above the reference levels in EC Directive 2006/66. If batteries are not properly disposed of, these substances can cause harm to
human health or the environment. To protect natural resources and to promote material reuse, please separate batteries from other types of
waste and recycle them through your local, free battery return system.
Page 18
Regulatory information_ 18
FCC Statement for Wireless LAN use:
While installing and operating this transmitter and antenna combination the radio frequency exposure limit of 1m W/cm2 may be
exceeded at distances close to the antenna installed. Therefore, the user must maintain a minimum distance of 20cm from the antenna at
all times. This device cannot be colocated with another transmitter and transmitting antenna.
RFID (RADIO FREQUENCY INTERFACE DEVICE)
RFID operation is subject to the following two conditions:(1) this device may not cause interference, and (2) this device must accept any
interference, including interference that may cause undesired operation of the device. (U.S.A., France, Taiwan only)
Russia only
Germany only
Fax Branding
The Telephone Consumer Protection Act of 1991 makes it unlawful for any person to use a computer or other electronic device to send any
message via a telephone facsimile machine unless such message clearly contains in a margin at the top or bottom of each transmitted page or
on the first page of the transmission the following information:
1. the date and time of transmission
2. identification of either business, business entity or individual sending the message; and
3. telephone number of either the sending machine, business, business entity or individual.
The Telephone Company may make changes in its communications facilities, equipment operations or procedures where such action is
reasonably required in the operation of its business and is not inconsistent with the rules and regulations in FCC Part 68. If such changes can
be reasonably expected to render any customer terminal equipment incompatible with telephone company communications facilities, or require
modification or alteration of such terminal equipment, or otherwise materially affect its use or performance, the customer shall be given
adequate notice in writing, to allow the customer an opportunity to maintain uninterrupted service
Page 19

Regulatory information_ 19
Ringer Equivalence Number
The Ringer Equivalence Number and FCC Registration Number for this machine may be found on the label located on the bottom or rear of the
machine. In some instances you may need to provide these numbers to the telephone company.
The Ringer Equivalence Number (REN) is a measure of the electrical load placed on the telephone line, and is useful for determining whether
you have “overloaded” the line. Installing several types of equipment on the same telephone line may result in problems making and receiving
telephone calls, especially ringing when your line is called. The sum of all Ringer Equivalence Numbers of the equipment on your telephone
line should be less than five in order to assure proper service from the telephone company. In some cases, a sum of five may not be usable on
your line. If any of your telephone equipment is not operating properly, you should immediately remove it from your telephone line, as it may
cause harm to the telephone network.
The equipment complies with Part 68 of the FCC rules and the requirements adopted by the ACTA. On the right lower side of this equipment is
a label that contains, among other information, a product identifier in the format US:AAAEQ##TXXXX. If requested, this number must be
provided to the telephone company.
FCC Regulations state that changes or modifications to this equipment not expressly approved by the manufacturer could void the user’s
authority to operate this equipment. In the event that terminal equipment causes harm to the telephone network, the telephone company
should notify the customer that service may be stopped. However, where prior notice is impractical, the company may temporarily cease
service, providing that they:
a) promptly notify the customer.
b) give the customer an opportunity to correct the equipment problem.
c) inform the customer of the right to bring a complaint to the Federal Communication Commission pursuant to procedures set out in
FCC Rules and Regulations Subpart E of Part 68.
You should also know that:
• Your machine is not designed to be connected to a digital PBX system.
• If you intend to use a computer modem or fax modem on the same phone line as your machine, you may experience transmission and
reception problems with all the equipment. It is recommended that no other equipment, except for a regular telephone, share the line with
your machine.
• If your area experiences a high incidence of lightning or power surges, we recommend that you install surge protectors for both the power
and the telephone lines. Surge protectors can be purchased from your dealer or telephone and electronic specialty stores.
• When programming emergency numbers and/or making test calls to emergency numbers, use a non-emergency number to advise the
emergency service dispatcher of your intentions. The dispatcher will give you further instructions on how to actually test the emergency
number.
• This machine may not be used on coin service or party lines.
• This machine provides magnetic coupling to hearing aids.
You may safely connect this equipment to the telephone network by means of a standard modular jack, USOC RJ-11C.
Replacing the Fitted Plug (for UK Only)
Important
The mains lead for this machine is fitted with a standard (BS 1363) 13 amp plug and has a 13 amp fuse. When you change or examine the
fuse, you must re-fit the correct 13 amp fuse. You then need to replace the fuse cover. If you have lost the fuse cover, do not use the plug until
you have another fuse cover.
Contact the people from you purchased the machine.
The 13 amp plug is the most widely used type in the UK and should be suitable. However, some buildings (mainly old ones) do not have normal
13 amp plug sockets. You need to buy a suitable plug adaptor. Do not remove the moulded plug.
If you cut off the moulded plug, get rid of it straight away.
You cannot rewire the plug and you may receive an electric shock if you plug it into a socket.
Page 20
Regulatory information_ 20
Important warning:
If the wires in the mains lead do not match the colors marked in your plug, do the following:
You must connect the green and yellow wire to the pin marked by the letter “E” or by the safety ‘Earth symbol’ or colored green and yellow or
green.
You must connect the blue wire to the pin which is marked with the letter “N” or colored black.
You must connect the brown wire to the pin which is marked with the letter “L” or colored red.
You must have a 13 amp fuse in the plug, adaptor, or at the distribution board.
Declaration of Conformity (European Countries)
Approvals and Certifications
Hereby, Samsung Electronics declare that this product is in compliance with the essential requirements and other relevant provisions of:
CLX-9201 9301 Series: R&TTE Directive (1999/5/EC)
The declaration of conformity may be consulted at www.samsung.com/printer, go to Support > Download center and enter your printer (MFP)
name to browse the EuDoC.
January 1, 1995: Council Directive 2006/95/EC Approximation of the laws of the member states related to low voltage equipment.
January 1, 1996: Council Directive 2004/108/EC (92/31/EEC), approximation of the laws of the Member States related to electromagnetic
compatibility.
March 9, 1999: Council Directive 1999/5/EC on radio equipment and telecommunications terminal equipment and the mutual recognition of
their conformity. A full declaration, defining the relevant Directives and referenced standards can be obtained from your Samsung Electronics
Co., Ltd. representative.
EC Certification
Certification to 1999/5/EC Radio Equipment & Telecommunications Terminal Equipment Directive (FAX)
This Samsung product has been self-certified by Samsung for pan-European single terminal connection to the analogue public switched
telephone network (PSTN) in accordance with Directive 1999/5/EC. The product has been designed to work with the national PSTNs and
compatible PBXs of the European countries:
In the event of problems, you should contact the Euro QA Lab of Samsung Electronics Co., Ltd. in the first instance.
The product has been tested against TBR21. To assist in the use and application of terminal equipment which complies with this standard, the
European Telecommunication Standards Institute (ETSI) has issued an advisory document (EG 201 121) which contains notes and additional
requirements to ensure network compatibility of TBR21 terminals. The product has been designed against, and is fully compliant with, all of the
relevant advisory notes contained in this document.
European Radio Approval Information (for products fitted with EU-approved radio devices)
Low power, Radio LAN type devices (radio frequency (RF) wireless communication devices), operating in the 2.4 GHz/5 GHz band, may be
present (embedded) in your printer system which is intended for home or office use. This section is only applicable if these devices are present.
Refer to the system label to verify the presence of wireless devices.
Wireless devices that may be in your system are only qualified for use in the European Union or associated areas if a CE mark !
with a Notified Body Registration Number and the Alert Symbol is on the system label.
The power output of the wireless device or devices that may be embedded in you printer is well below the RF exposure limits as set by the
European Commission through the R&TTE directive.
You must earth this machine.
The wires in the mains lead have the following color code:
• Green and Yellow: Earth
• Blue: Neutral
• Brown: Live
The CE marking applied to this product symbolizes Samsung Electronics Co., Ltd. Declaration of Conformity with the following applicable
93/68/EEC Directives of the European Union as of the dates indicated:
Page 21

Regulatory information_ 21
European States qualified under wireless approvals:
EU
Austria, Belgium, Cyprus, Czech Republic, Denmark, Estonia, Finland, France (with frequency restrictions), Germany, Greece, Hungary,
Ireland, Italy, Latvia, Lithuania, Luxembourg, Malta, The Netherlands, Poland, Portugal, Slovakia, Slovenia, Spain, Sweden and the U.K.
EEA/EFTA countries
Iceland, Liechtenstein, Norway and Switzerland
European States with restrictions on use:
EU
In France, the frequency range is restricted to 2446.5-2483.5 MHz for devices above 10 mW transmitting power such as wireless
EEA/EFTA countries
No limitations at this time
Page 22

Regulatory information_ 22
Regulatory Compliance Statements
Wireless Guidance
Low power, Radio LAN type devices (radio frequency (RF) wireless communication devices), operating in the 2.4 GHz/5 GHz Band, may be
present (embedded) in your printer system. The following section is a general overview of considerations while operating a wireless device.
Additional limitations, cautions, and concerns for specific countries are listed in the specific country sections (or country group sections). The
wireless devices in your system are only qualified for use in the countries identified by the Radio Approval Marks on the system rating label. If
the country you will be using the wireless device in, is not listed, contact your local Radio Approval agency for requirements. Wireless devices
are closely regulated and use may not be allowed.
The power output of the wireless device or devices that may be embedded in your printer is well below the RF exposure limits as known at this
time. Because the wireless devices (which may be embedded into your printer) emit less energy than is allowed in radio frequency safety
standards and recommendations, manufacturer believes these devices are safe for use. Regardless of the power levels, care should be taken
to minimize human contact during normal operation.
As a general guideline, a separation of 20 cm (8 inches) between the wireless device and the body, for use of a wireless device near the body
(this does not include extremities) is typical. This device should be used more than 20 cm (8 inches) from the body when wireless devices are
on and transmitting.
This transmitter must not be collocated or operation in conjunction with any other antenna or transmitter.
Some circumstances require restrictions on wireless devices. Examples of common restrictions are listed below:
Radio frequency wireless communication can interfere with equipment on commercial aircraft. Current aviation regulations require wireless
devices to be turned off while traveling in an airplane. IEEE 802.11 (also known as wireless Ethernet) and Bluetooth communication devices
are examples of devices that provide wireless communication.
In environments where the risk of interference to other devices or services is harmful or perceived as harmful, the option to use a wireless
device may be restricted or eliminated. Airports, Hospitals, and Oxygen or flammable gas laden atmospheres are limited examples where use
of wireless devices may be restricted or eliminated. When in environments where you are uncertain of the sanction to use wireless devices, ask
the applicable authority for authorization prior to use or turning on the wireless device.
Every country has different restrictions on the use of wireless devices. Since your system is equipped with a wireless device, when traveling
between countries with your system, check with the local Radio Approval authorities prior to any move or trip for any restrictions on the use of
a wireless device in the destination country.
If your system came equipped with an internal embedded wireless device, do not operate the wireless device unless all covers and shields are
in place and the system is fully assembled.
Wireless devices are not user serviceable. Do not modify them in any way. Modification to a wireless device will void the authorization to use it.
Contact manufacturer for service.
Only use drivers approved for the country in which the device will be used. See the manufacturer System Restoration Kit, or contact
manufacturer Technical Support for additional information.
OpenSSL License
Copyright (c) 1998-2001 The OpenSSL Project. All rights reserved.
Redistribution and use in source and binary forms, with or without modification, are permitted provided that the following conditions are met:
1. Redistributions of source code must retain the above copyright notice, this list of conditions and the following disclaimer.
2. Redistributions in binary form must reproduce the above copyright notice, this list of conditions and the following disclaimer in the
Page 23

Regulatory information_ 23
documentation and/or other materials provided with the distribution.
3. All advertising materials mentioning features or use of this software must display the following acknowledgment: "This product includes
software developed by the OpenSSL Project for use in the OpenSSL Toolkit. (http://www.openssl.org/)"
4. The names "OpenSSL Toolkit" and "OpenSSL Project" must not be used to endorse or promote products derived from this software without
5. Prior written permission. For written permission, please contact [email protected].
6. Products derived from this software may not be called "OpenSSL" nor may "OpenSSL" appear in their names without prior written
permission of the OpenSSL Project.
7. Redistributions of any form whatsoever must retain the following acknowledgment: "This product includes software developed by the
OpenSSL Project for use in the OpenSSL Toolkit (http://www.openssl.org/)"
THIS SOFTWARE IS PROVIDED BY THE OpenSSL PROJECT ``AS IS'' AND ANY EXPRESSED OR IMPLIED WARRANTIES, INCLUDING,
BUT NOT LIMITED TO, THE IMPLIED WARRANTIES OF MERCHANTABILITY AND FITNESS FOR A PARTICULAR PURPOSE ARE
DISCLAIMED. IN NO EVENT SHALL THE OpenSSL PROJECT OR ITS CONTRIBUTORS BE LIABLE FOR ANY DIRECT, INDIRECT,
INCIDENTAL, SPECIAL, EXEMPLARY, OR CONSEQUENTIAL DAMAGES (INCLUDING, BUT NOT LIMITED TO, PROCUREMENT OF
SUBSTITUTE GOODS OR SERVICES; LOSS OF USE, DATA, OR PROFITS; OR BUSINESS INTERRUPTION) HOWEVER CAUSED AND
ON ANY THEORY OF LIABILITY, WHETHER IN CONTRACT, STRICT LIABILITY, OR TORT (INCLUDING NEGLIGENCE OR OTHERWISE)
ARISING IN ANY WAY OUT OF THE USE OF THIS SOFTWARE, EVEN IF ADVISED OF THE POSSIBILITY OF SUCH DAMAGE.
This product includes cryptographic software written by Eric Young([email protected]). This product includes software written by Tim Hudson
([email protected]).
Original SSLeay License
Copyright (C) 1995-1998 Eric Young ([email protected]) All rights reserved.
This package is an SSL implementation written by Eric Young ([email protected]). The implementation was written so as to conform with
Netscapes SSL.
This library is free for commercial and non-commercial use as long as the following conditions are aheared to. The following conditions apply to
all code found in this distribution, be it the RC4, RSA, lhash, DES, etc., code; not just the SSL code. The SSL documentation included with this
distribution is covered by the same copyright terms except that the holder is Tim Hudson ([email protected]). Copyright remains Eric Young's,
and as such any Copyright notices in the code are not to be removed. If this package is used in a product, Eric Young should be given
attribution as the author of the parts of the library used. This can be in the form of a textual message at program startup or in documentation
(online or textual) provided with the package.
Redistribution and use in source and binary forms, with or without modification, are permitted provided that the following conditions are met:
1. Redistributions of source code must retain the copyright notice, this list of conditions and the following disclaimer.
2. Redistributions in binary form must reproduce the above copyright notice, this list of conditions and the following disclaimer in the
documentation and/or other materials provided with the distribution.
3. All advertising materials mentioning features or use of this software must display the following acknowledgement: "This product includes
cryptographic software written by Eric Young ([email protected])" The word 'cryptographic' can be left out if the rouines from the library
being used are not cryptographic related:-).
4. If you include any Windows specific code (or a derivative thereof) from the apps directory (application code) you must include an
acknowledgement: "This product includes software written by Tim Hudson ([email protected])"
THIS SOFTWARE IS PROVIDED BY ERIC YOUNG ``AS IS'' AND ANY EXPRESS OR IMPLIED WARRANTIES, INCLUDING, BUT NOT
LIMITED TO, THE IMPLIED WARRANTIES OF MERCHANTABILITY AND FITNESS FOR A PARTICULAR PURPOSE ARE DISCLAIMED.
IN NO EVENT SHALL THE AUTHOR OR CONTRIBUTORS BE LIABLE FOR ANY DIRECT, INDIRECT, INCIDENTAL, SPECIAL,
EXEMPLARY, OR CONSEQUENTIAL DAMAGES (INCLUDING, BUT NOT LIMITED TO, PROCUREMENT OF SUBSTITUTE GOODS OR
SERVICES; LOSS OF USE, DATA, OR PROFITS; OR BUSINESS INTERRUPTION) HOWEVER CAUSED AND ON ANY THEORY OF
LIABILITY, WHETHER IN CONTRACT, STRICT LIABILITY, OR TORT (INCLUDING NEGLIGENCE OR OTHERWISE) ARISING IN ANY
WAY OUT OF THE USE OF THIS SOFTWARE, EVEN IF ADVISED OF THE POSSIBILITY OF SUCH DAMAGE.
The licence and distribution terms for any publicly available version or derivative of this code cannot be changed. i.e. this code cannot simply
be copied and put under another distribution licence [including the GNU Public Licence.
Page 24
Regulatory information_ 24
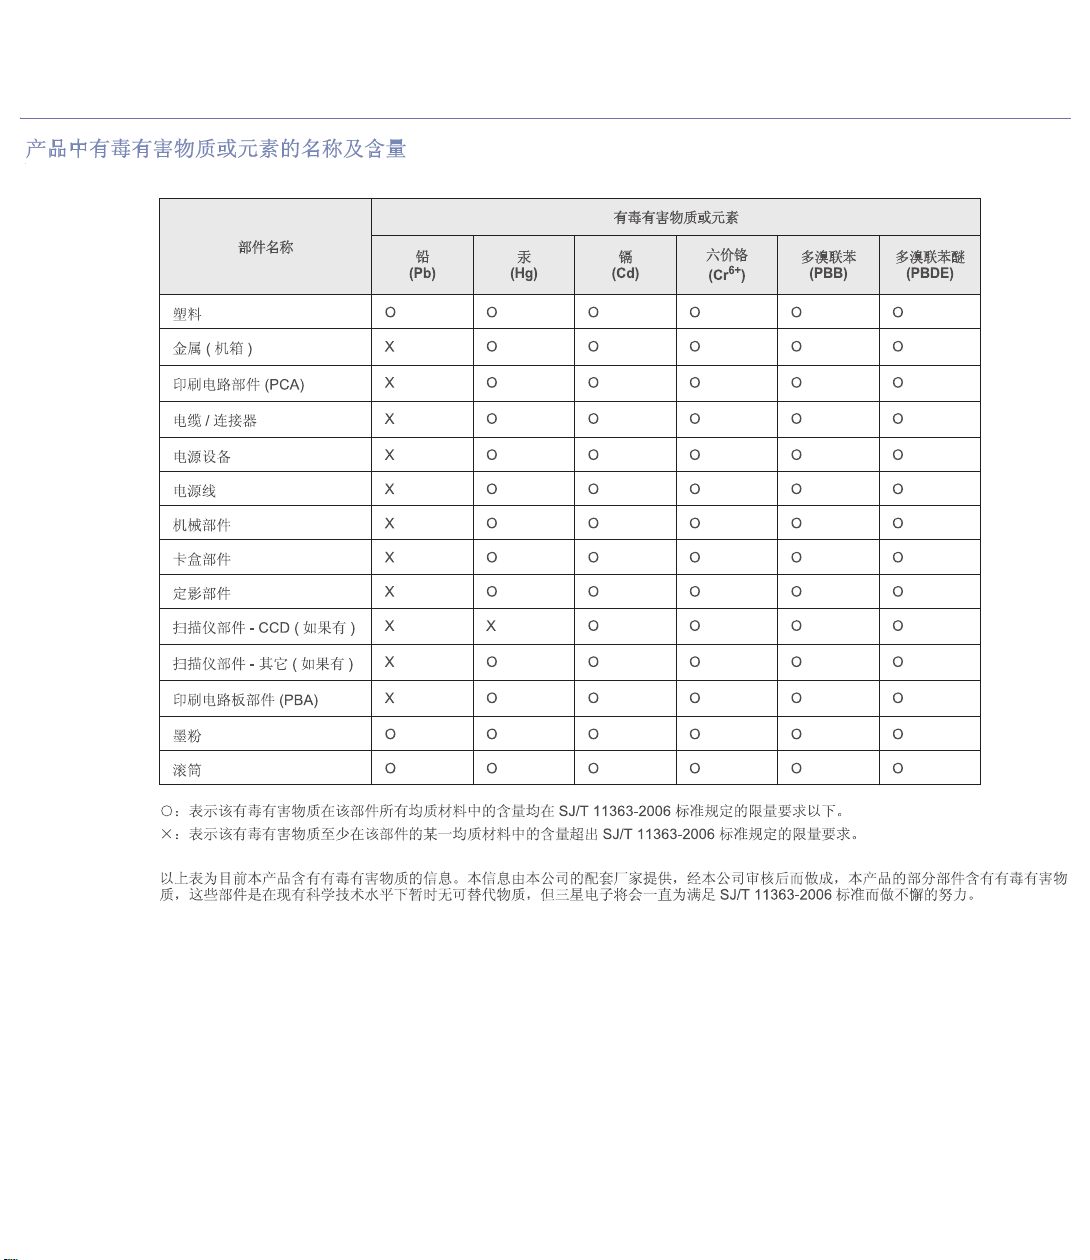
China only
Page 25
About this user’s guide_ 25
about this user’s guide
This user’s guide provides information to provide a basic understanding of the machine as well as detailed explanations on
each step during actual usage. Valuable for both novice and professional users, all users can refer to this guide for
installing and using the machine.
• Read the safety information before using the machine.
• If you have a problem using the machine, refer to the troubleshooting chapter (see "Troubleshooting" on page 192).
• Terms used in this user’s guide are explained in the glossary chapter (see "Glossary" on page 255).
• Use the Index to find information.
• All illustrations in this user’s guide may differ from your machine depending on its options or models.
• The display screen image in this user’s guide may differ from your machine depending on its options or models.
• The procedures in this user’s guide are mainly based on the operating system of Windows XP.
Conventions
Some terms in this guide are used interchangeably:
• Document is synonymous with original.
• Paper is synonymous with media, or print media.
• Machine refers to printer or MFP.
The following table offers the conventions of this guide:
Convention Description Example
Bold Used for texts on the display or button names on the machine. Start
Note Provides additional information or detailed specification of the machine function
and feature.
The date format may differ from country
to country.
Caution Gives users information to protect the machine from possible mechanical
damage.
Do not touch the green underside of the
toner cartridge.
Footnote Provides additional information on certain words or a phrase. a. pages per minute
(“Cross-reference”) Guides users to a reference page for additional detailed information. (see "Finding more information" on page 26).
Page 26
About this user’s guide_ 26
Finding more information
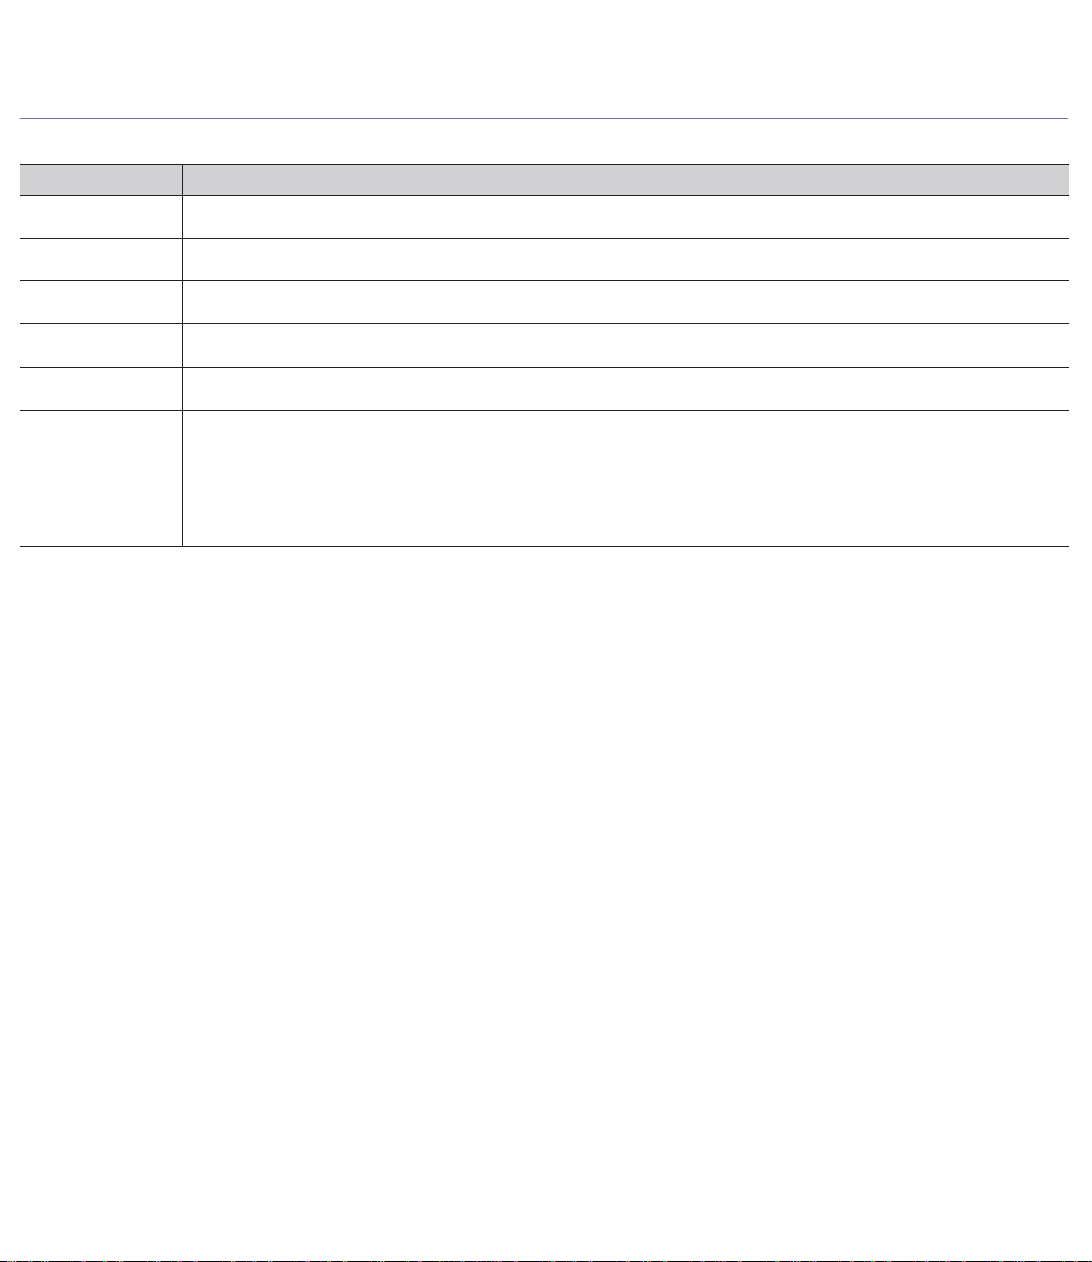
You can find information for setting up and using your machine from the following resources, either as a print-out or on screen.
Material name Description
Installation Guide This guide provides information on setting up your machine and requires that you follow the instructions in the guide to prepare the
machine.
Go Guide This guide provides operating procedures and descriptions of the most frequently used functions, allowing the machine to immediately
be used.
Online User’s Guide This guide provides you with step-by-step instructions for using your machine’s full features and contains information for maintaining
your machine, troubleshooting, and installing accessories.
Machine Driver Help
This help guide provides you with help information on the printer driver and instructions for setting up the printing optionsG(see the
User’s Guide).
Samsung website If you have Internet access, you can get help, support, machine drivers, manuals, and order information from the Samsung website.
(www.samsung.com)
Downloadable
softwares
You can download useful softwares from the Samsung website.
• SyncThruTM Web Admin Service: convenient for network administrators who need to manage many machines simultaneously. This
software is for network models only. (http://solution.samsungprinter.com)
• Samsung AnyWeb Print: helps personal users to screen-capture the website screen in Windows Internet Explorer easily.
(http://solution.samsungprinter.com/personal/anywebprint)
• XPS printer driver: used to print XPS file format. The XPS printer driver can be installed only on Windows Vista OS or higher.
(www.samsung.com)
Page 27
Features of your new product_ 27
features of your new product
Your new machine is equipped with a number of special features that improve the quality of your printed documents.
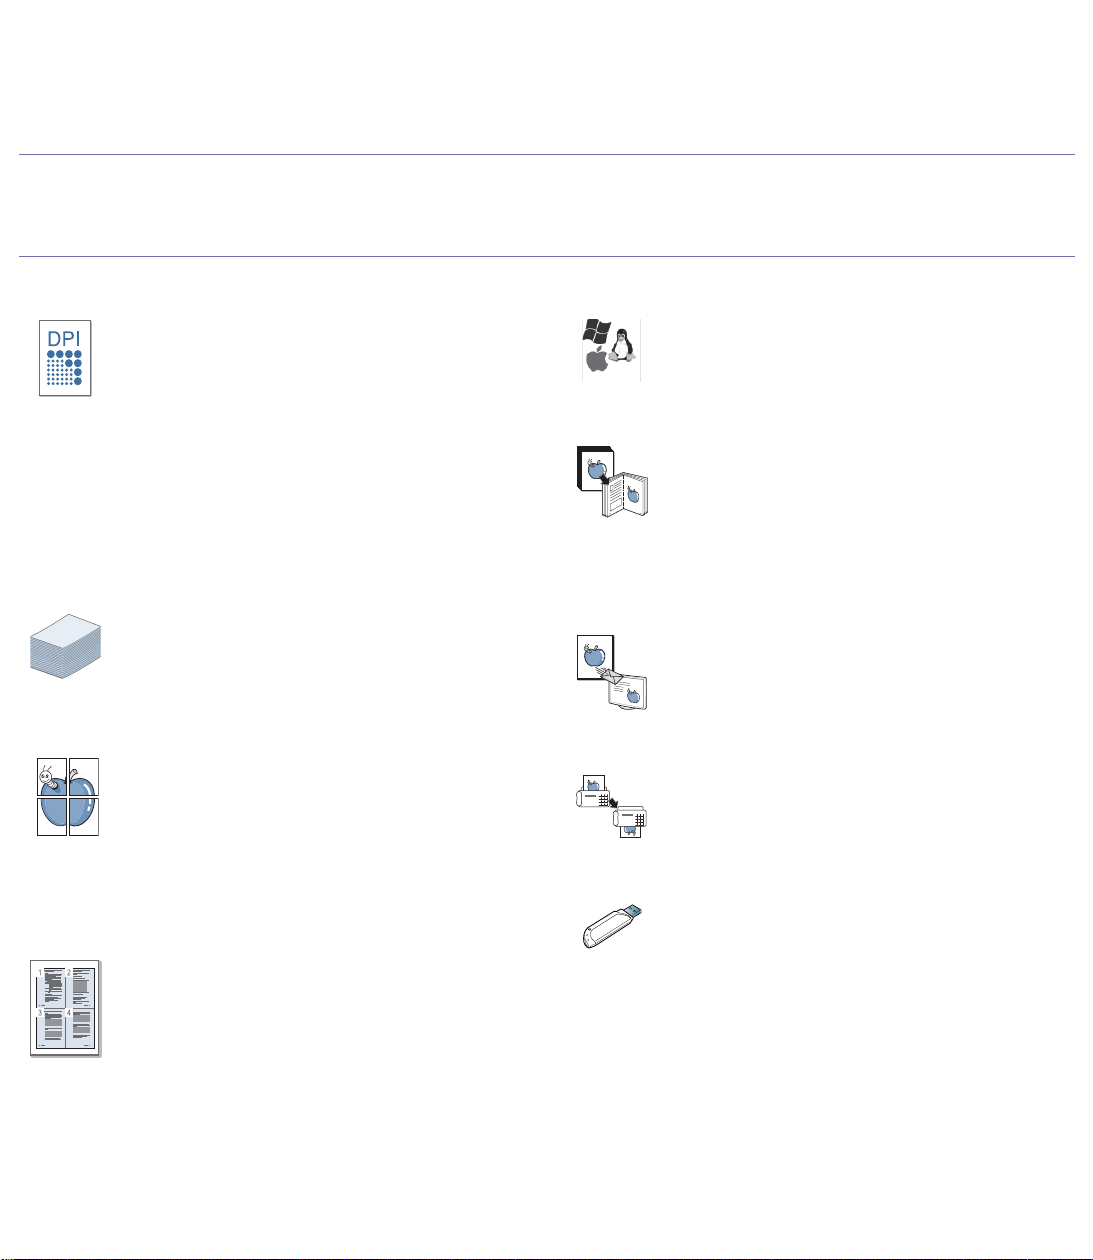
Special Features
Print with excellent quality and speed
Handle many different types of printable material
Create professional documents
Save time and money
• You can print with a resolution of up to 9S600 x 600 dpi
effective output (600 x 600 x 4 dpi).
• CLX-9301 Series prints A4-sized or letter-sized paper at up
to 30 ppm. CLX-9251 Series prints A4-sized or letter-sized
paper at up to 25 ppm. CLX-9201 Series prints A4-sized or
letter-sized paper at up to 20 ppm.
• CLX-9301 Series prints A3-sized paper at up to 15 ppm.
CLX-9251 Series prints A3-sized paper at up to 13 ppm.
CLX-9201 Series prints A3-sized paper at up to 10 ppm.
• SCX-8128 Series prints A4-sized or letter-sized paper at up
to 28 ppm. SCX-8123 Series prints A4-sized or letter-sized
paper at up to 23 ppm.
• SCX-8128 Series prints A3-sized paper at up to 14 ppm.
SCX-8123 Series prints A3-sized paper at up to 12 ppm.
• The multi-purpose tray supports various printable materials
(see"Print media specifications" on page 249).
• The multi-purpose tray holds up to 100 sheets of plain paper.
• The 1,040-sheet standard tray and 1,040-sheet optional dual
cassette feeder support plain paper in various sizes.
• Print Posters. The texts and pictures of each page of your
document are magnified and printed across the sheet of
paper and can then be taped together to form a poster (see
"Printing posters" on page 156).
• Print Watermarks. You can customize your documents with
words, such as “Confidential” (see "Using watermarks" on
page 157).
• You can use preprinted forms and letterhead with plain
paper (see"Using overlay" on page 158).
• To save paper, you can print multiple pages on one single
sheet of paper (see "Printing multiple pages on one sheet of
paper" on page 156).
• This machine automatically conserves electricity by
substantially reducing power consumption when not in use.
• To save paper, you can print on both sides of the paper
(double-sided printing) (see "Printing on both sides of the
paper" on page 157).
Print in various environments
Copy originals in several formats
Scan the originals and send it right away
Set a specific time to transmit a fax (optional)
Use USB flash memory devices
• You can print on various operating systems such as
Windows, Linux, and Macintosh systems.
• Your machine is equipped with a network interface.
• Your machine can copy multiple image copies from the
original documents on a single page (see "N-up copying" on
page 68).
• There are special functions to erase catalog and newspaper
background images (see "Adjusting background" on
page 76).
• The print quality and image size can be adjusted and
enhanced at the same time.
• Scan in color and use precise compressions of JPEG, TIFF,
and PDF formats.
• Quickly scan and send files to multiple destinations using
Networks scanning (see "Scanning" on page 80).
• You can specify a certain time to transmit a fax and also
send the fax to several stored addresses.
• After transmission, the machine may print out the fax reports
according to the setting.
If you have a USB memory device, you can use it various ways
for your machine.
• You can scan documents and save them to the device.
• You can directly print data stored in the device (see
"Printing from a USB memory device" on page 170).
Page 28

Features of your new product_ 28
Features by models
The machine is designed to support all of your document needs from printing and copying to more advanced networking solutions for your business. Some features
and optional goods may not be available depending on models or countries.
Features by models include:
( ": Included, o: Optional, Blank: Not available)
FEATURES CLX-9301 Series CLX-9251 Series CLX-9201 Series SCX-8128 Series SCX-8123 Series
USB Memory Interface " " " " "
Duplex Automatic Document Feeder " " " " "
Hard Disk " " " o
Network Interface Ethernet 10/100
Base TX wired LAN
" " " " "
Duplex (2-sided) printing " " " " "
500-sheet Standard Finisher o o o o o
Cabinet Stand o o o o o
Dual Cassette Feeder o o o o o
Working Table o o o o o
Fax Kit o o o o o
FDI Kit o o o o o
SmarThru Workflow x o o o o o
Page 29
Introduction_ 29
1.introduction
These are the main components of your machine:
This chapter includes:
• Machine overview
• Control panel overview
• Understanding the status LED
• Turning the machine on
• Connecting a printer cable
• Adjusting angle of the control panel
• Introducing the display screen and useful buttons
• Understanding the pop-up keyboard
• Using the manual stapler
• Using the pen and paper clip holder
• Using the USB keyboard
• Viewing the animation for trouble shooting
Machine overview
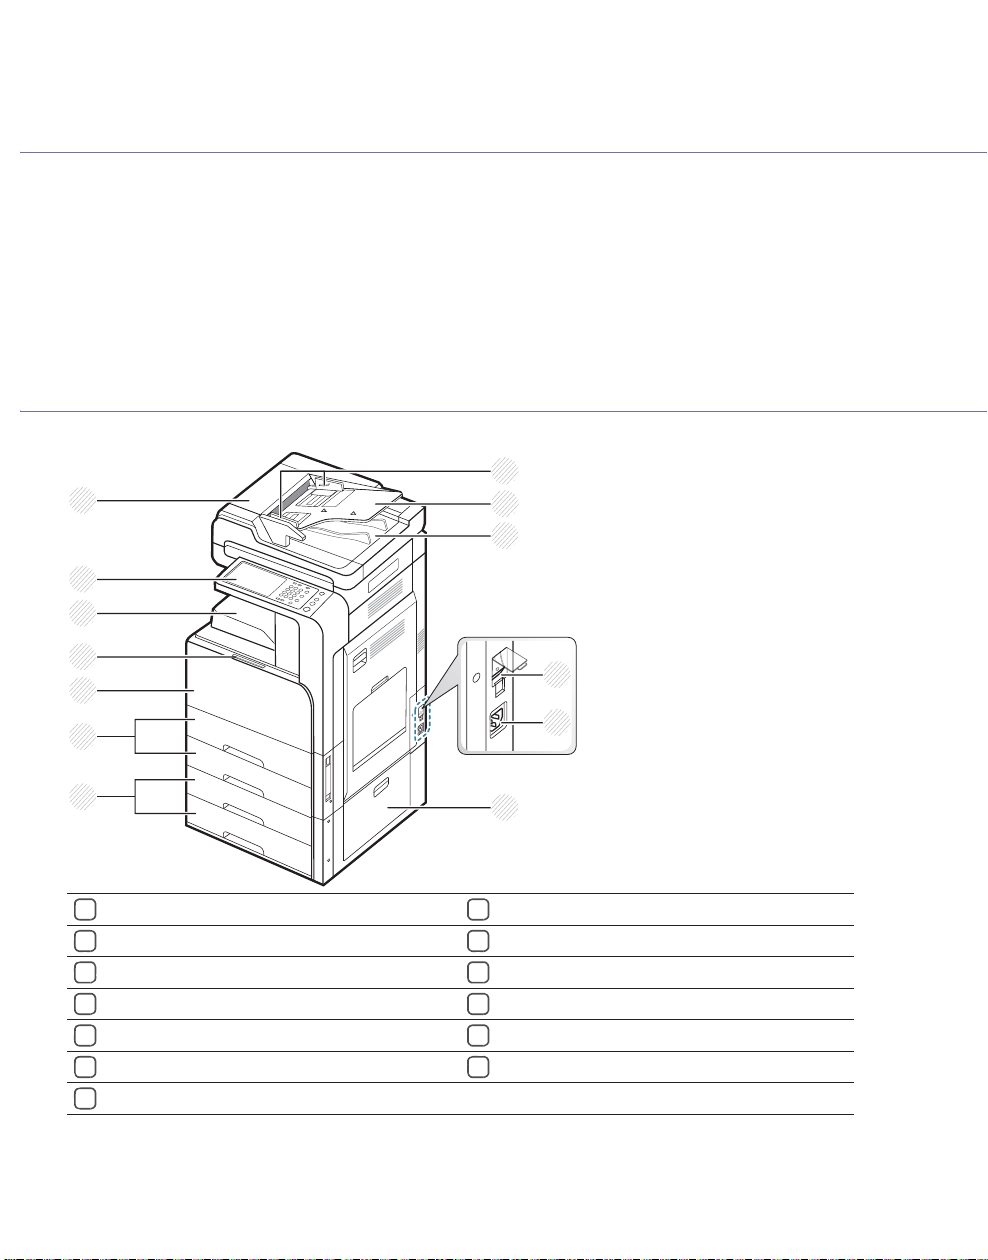
Front view 1
4
3
7
5
6
10
13
1
12
11
9
8
2
1
Duplex automatic document feeder cover
8
Optional dual cassette feeder (tray 3, tray 4)
a
2
Duplex automatic document feeder width guides
9
Standard tray (tray 1, tray 2)
3
Duplex automatic document feeder input tray
10
Front door
4
Duplex automatic document feeder output tray
11
Front door handle
5
Power-switch
12
Center tray
6
Power receptacle
13
Control panel
7
Optional dual cassette feeder right bottom door
a.Optional device.
Page 30
Introduction_ 30
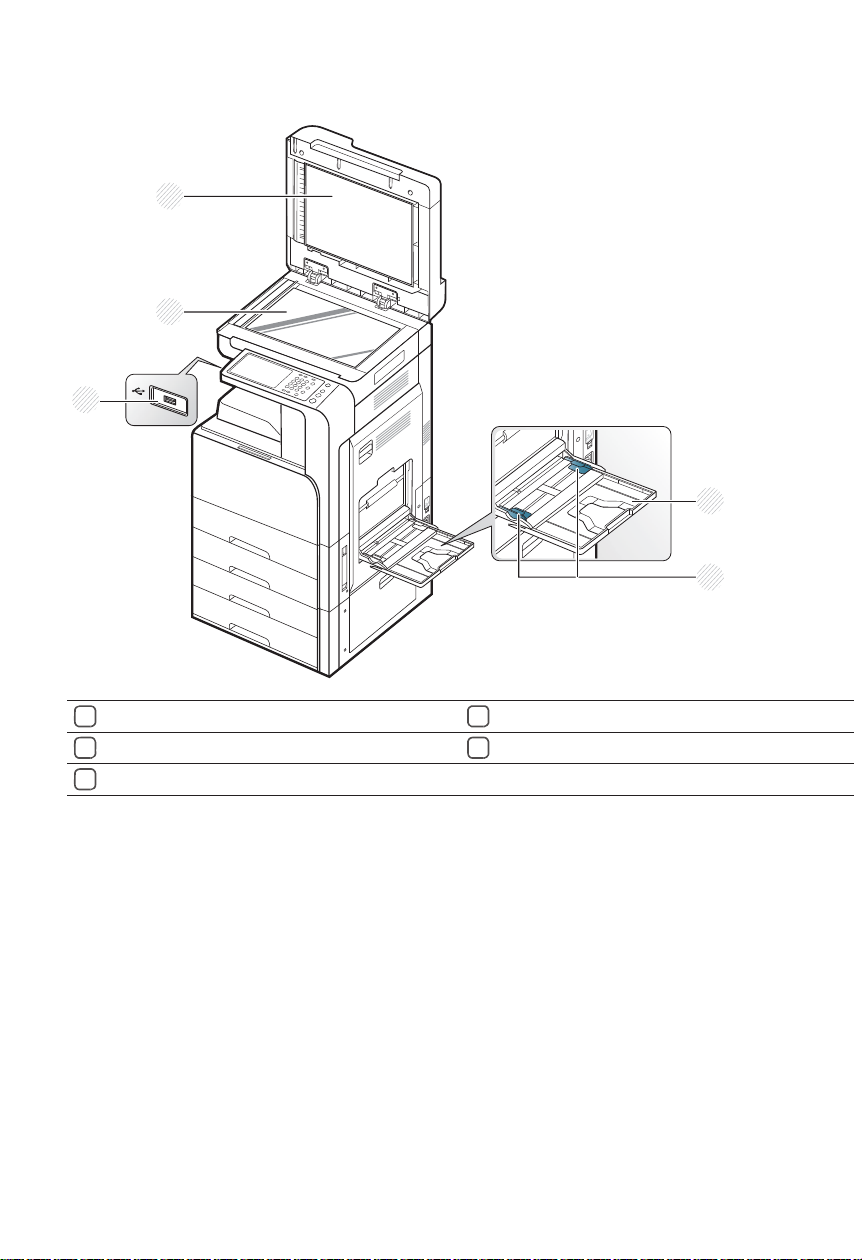
Front view 2
1
Scanner glass
4
Multi-purpose tray paper width guide
2
White sheet
5
USB port (2 EA)
3
Multi-purpose tray
1
2
3
4
5
Page 31
Introduction_ 31
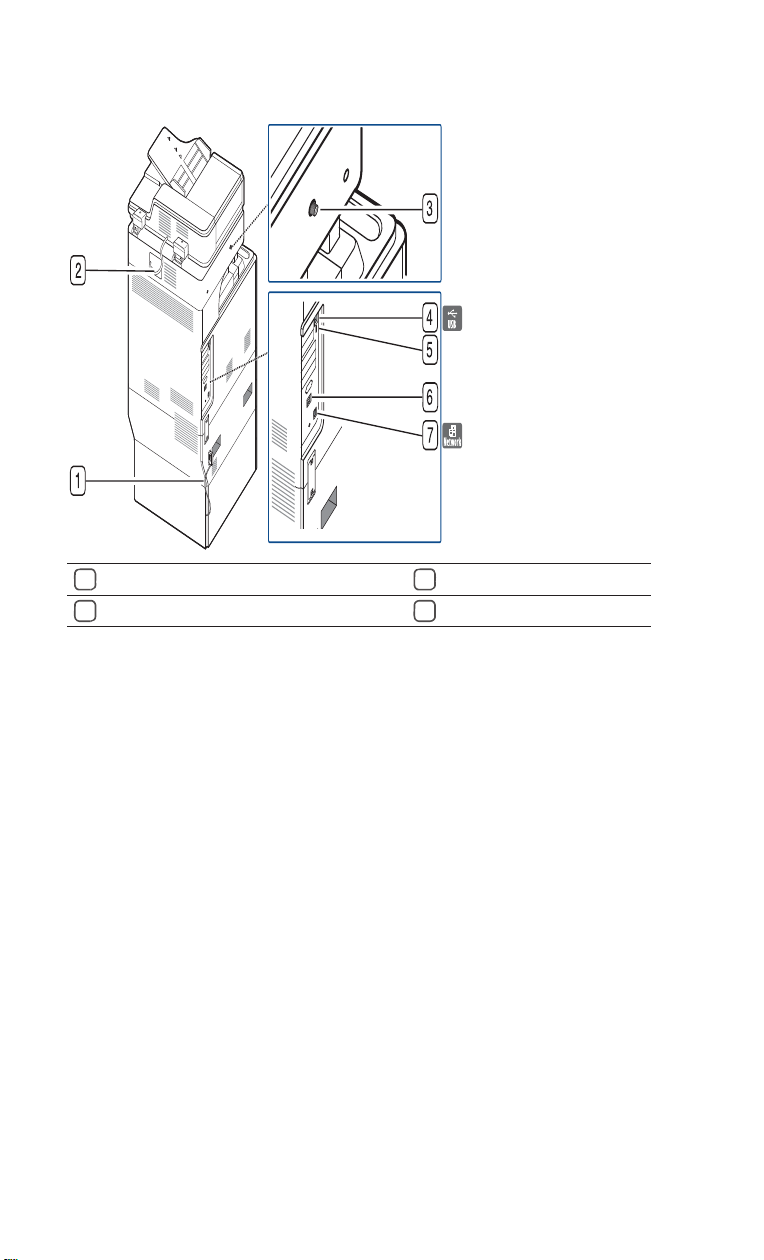
Rear view
1
Duplexing automatic document feeder cable
3
USB host port
2
Network port
4
USB port
Page 32
Introduction_ 32
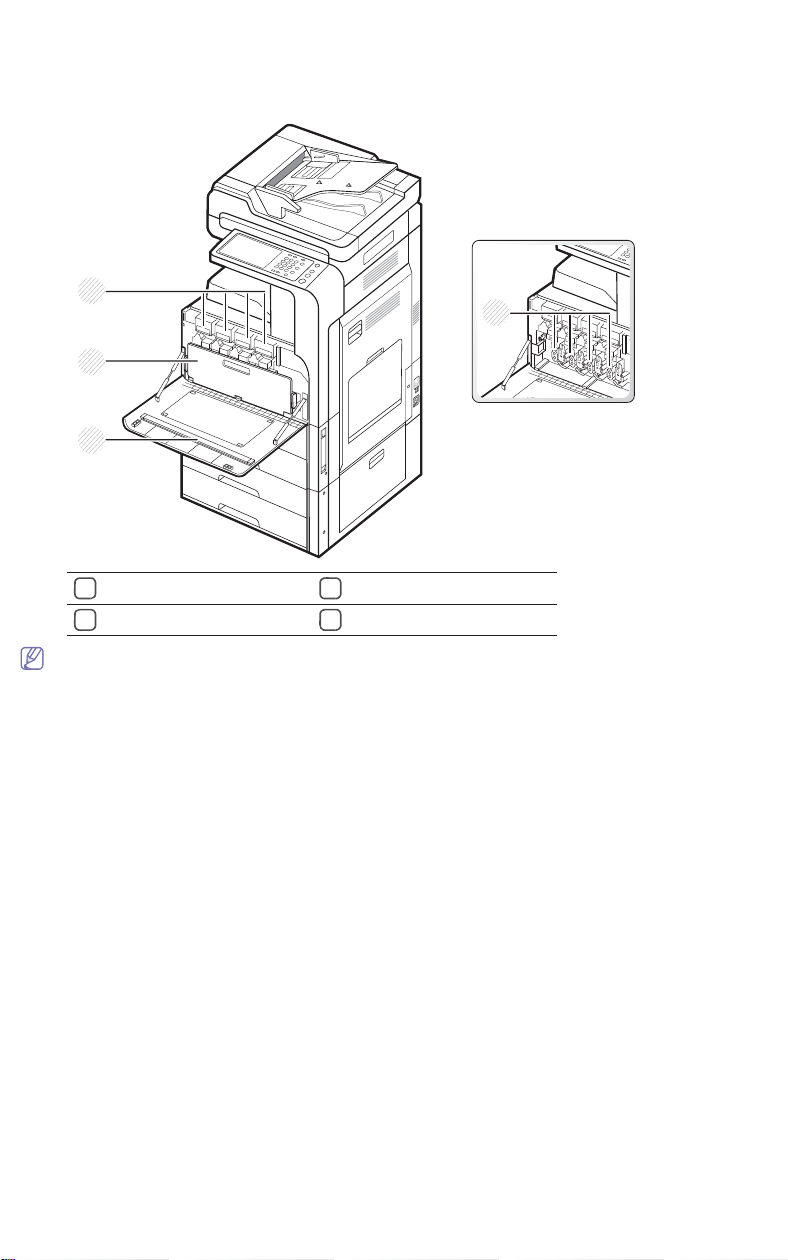
Inner view (CLX-92x1 Series, CLX-9301 Series)
If you want to see the imaging unit, you need to remove the waste toner container.
1
LSU window cleaning stick
3
Toner cartridges
2
Waste toner container
4
Imaging units
2
1
3
4
Page 33
Introduction_ 33
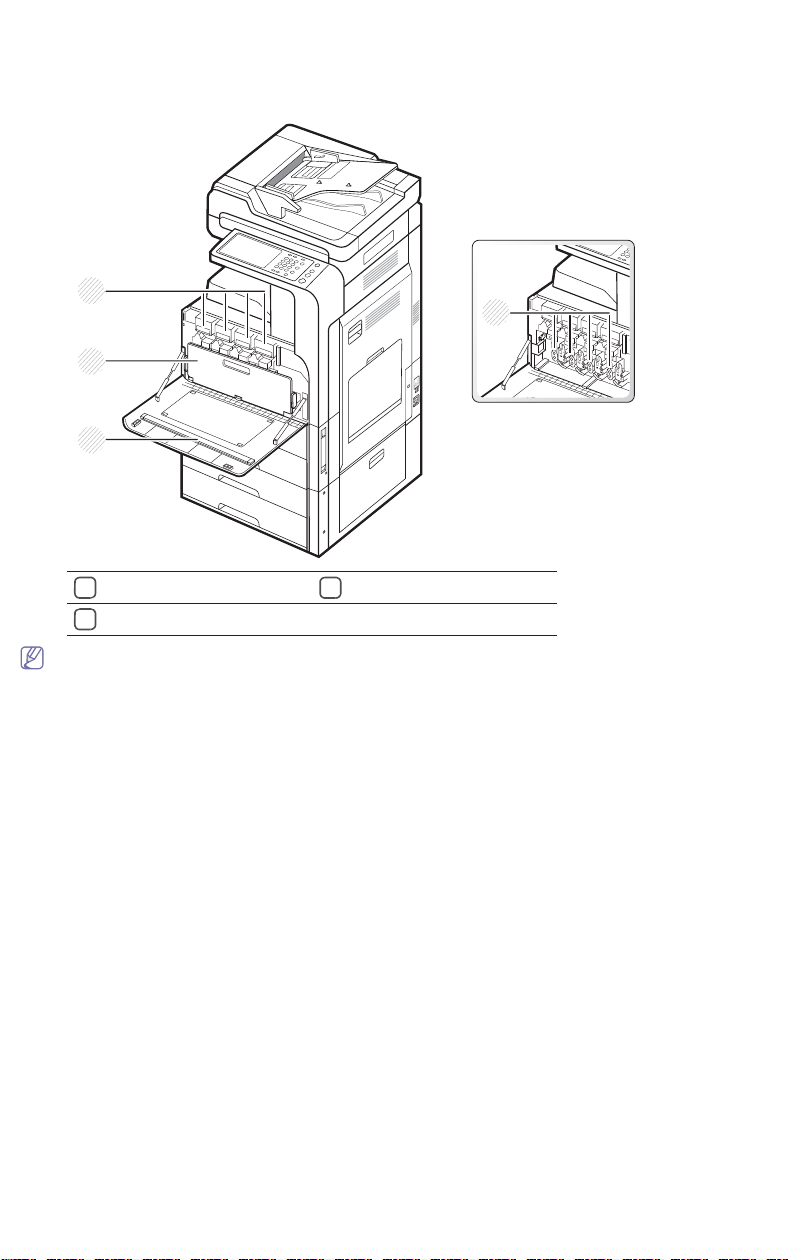
Inner view (SCX-812x Series)
If you want to see the imaging unit, you need to remove the waste toner container.
1
Toner cartridge
3
Imaging unit
2
Waste toner container
2
1
3
4
Page 34
Introduction_ 34
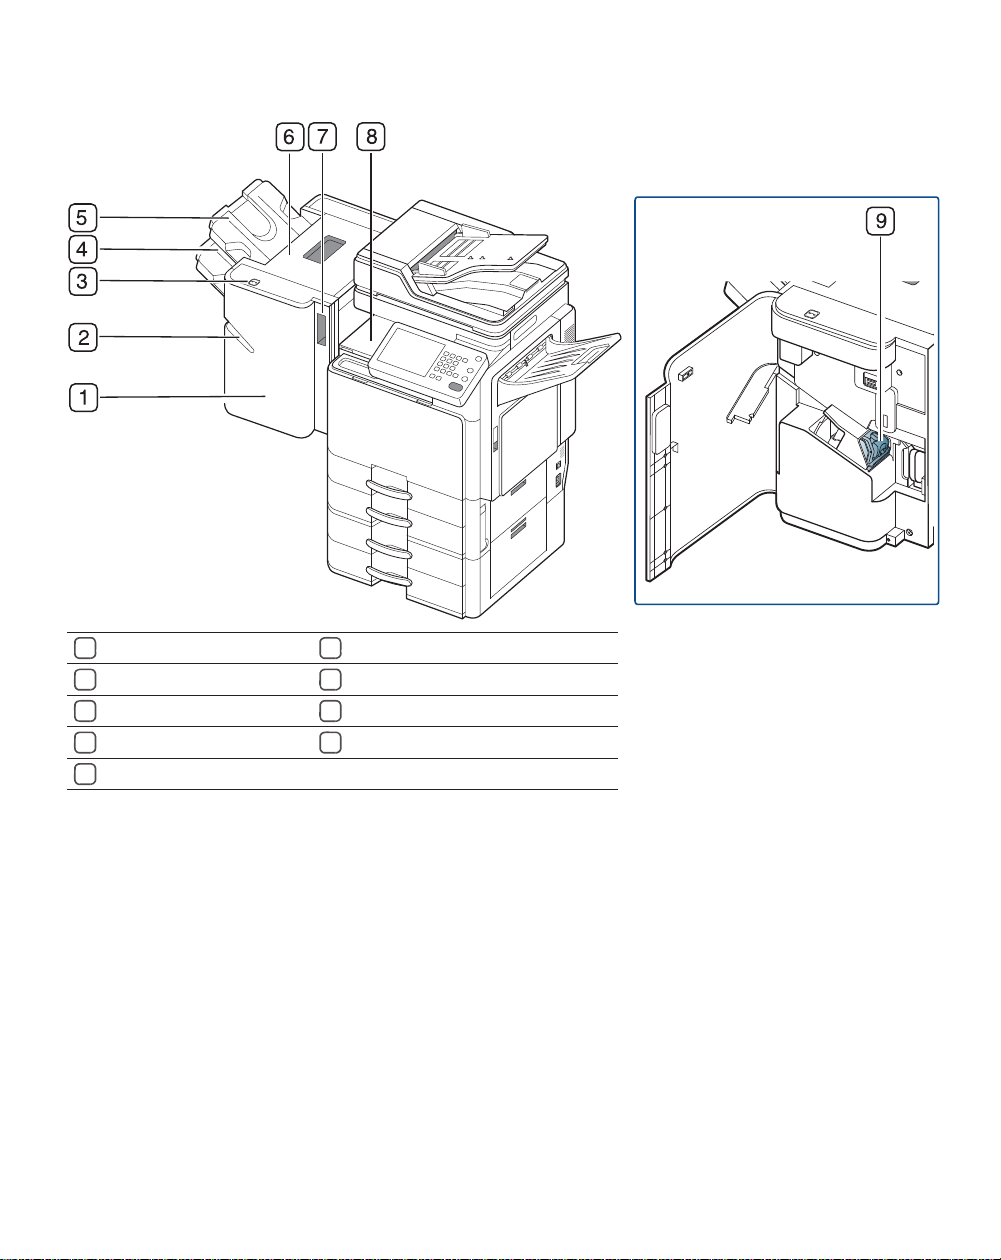
View with Standard finisher (optional)
1
Standard finisher front door
6
Top door
2
Manual stapler
7
Standard finisher Front door handle
3
Manual stapler button
8
Bridge unit
4
Finishing tray
9
Staple
5
Top tray
Page 35
Introduction_ 35
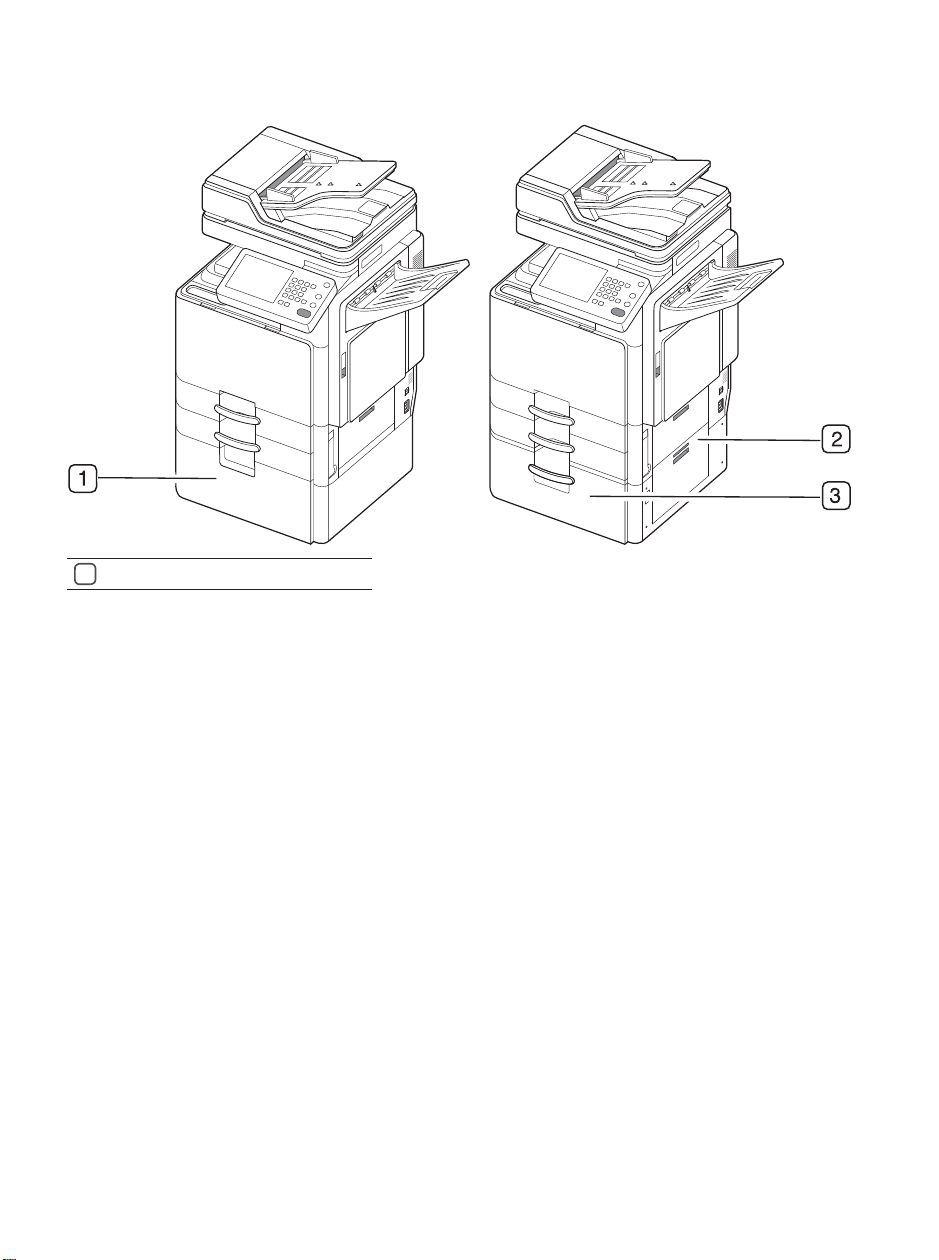
View with Cabinet stand and High capacity feeder (optional)
1
Cabinet Stand
Page 36
Introduction_ 36
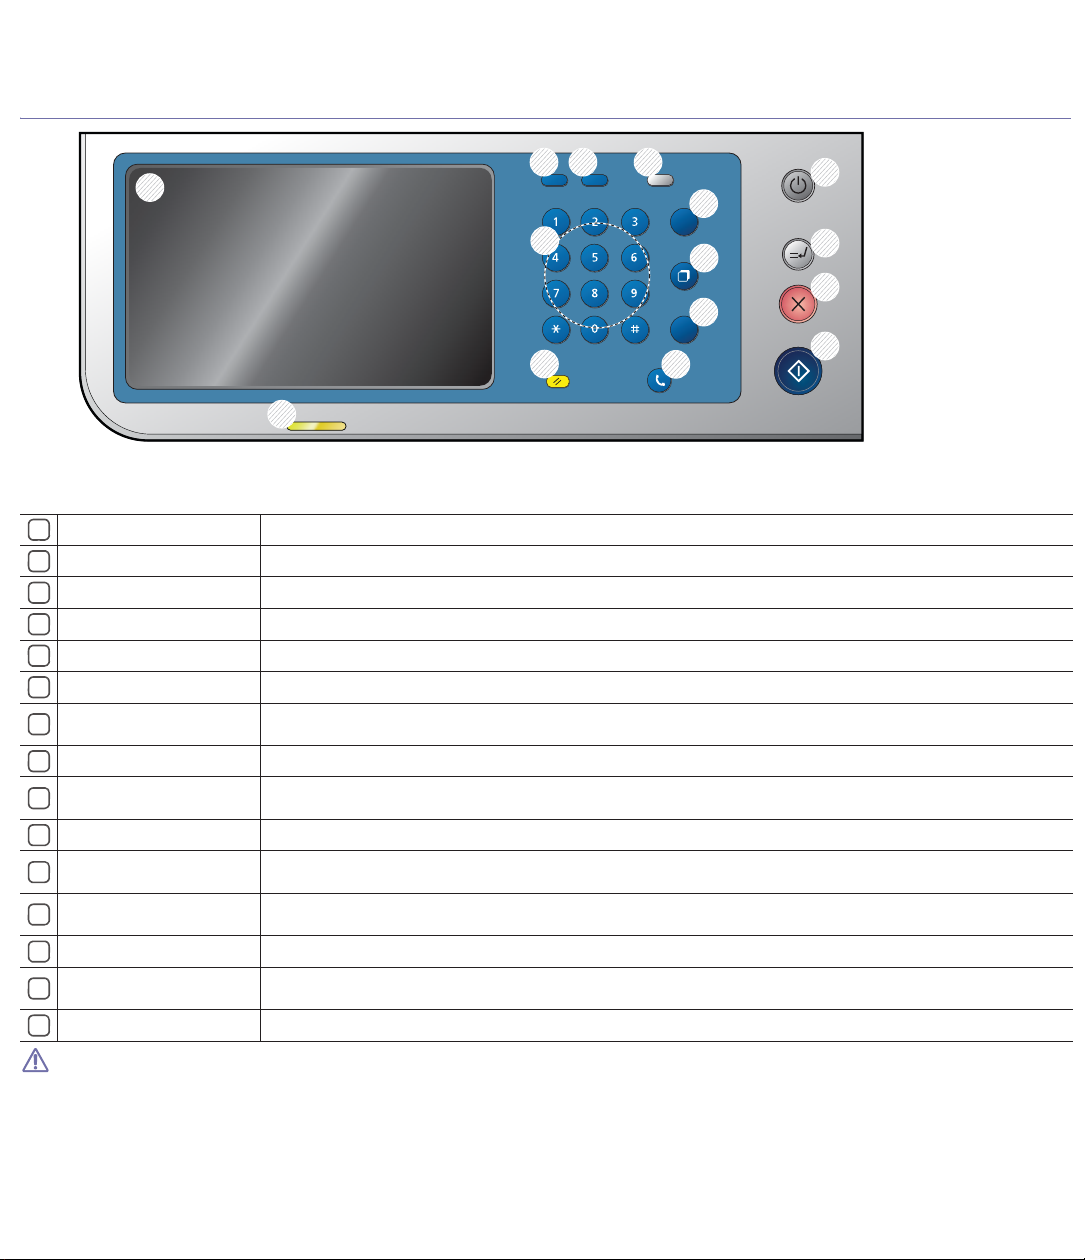
Control panel overview
When you use the display screen, use your finger only. The screen may be damaged with a sharpen pen or anything else.
1
Display screen
Shows the current machine status and prompts during an operation. You can set menus easily using the display screen.
2
Status LED
Shows the status of your machine (See "Understanding the status LED" on page 37).
3
Job Status
Shows the jobs currently running, queued jobs, completed jobs, current error code or secured jobs.
4
Counter
Shows the amount of paper used (See "Counter button" on page 40).
5
Eco
Turn into Eco mode (See "Eco button" on page 41).
6
Clear
Deletes characters in the edit area.
7
Numeric keypad
Dials numbers and enters alphanumeric characters. You can also enter the number value for document copies or other
options.
8
Reset
Resets the current machine’s setup.
9
Redial/Pause
Redials the recently sent fax number or received caller ID in ready mode, or inserts a pause(-) into a fax number in edit
mode.
10
Log in/Logout
Allows user to log in or log out.
11
On Hook Dial
When you press this button, you can hear a dial tone. Then enter a fax number. It is similar to making a call using speaker
phone.
12
Power
Turn the power on or off. When the blue LED is on, the machine is powered on and you can use it. If you turn the machine
off, press this button for more than three seconds. Press Yes when the confirmation window appears.
13
Interrupt
Stops a job in operation for urgent copying.
14
Stop
Stops an operation at any time. The pop-up window appears on the screen showing the current job that the user can stop or
resume.
15
Start
Starts a job.
C
ID
1
2
3 4 5
6
13
14
15
10
11
8
9
12
7
Page 37
Introduction_ 37
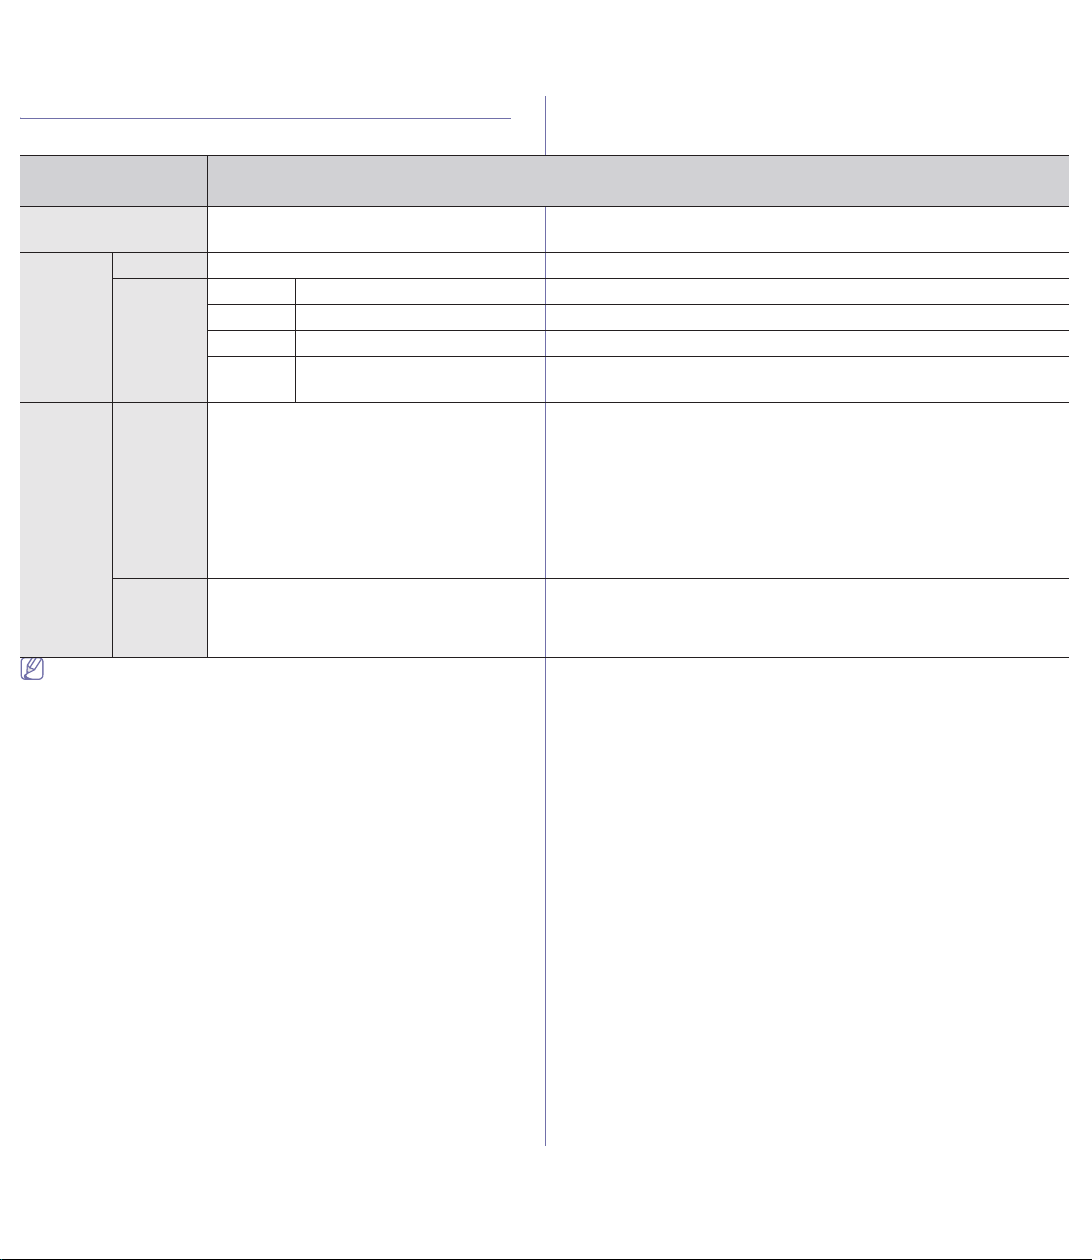
Understanding the status LED
The color of the status LED indicates the machine's current status.
Check the message on the display screen. Follow the instructions in
the message or refer to the troubleshooting chater (see
"Understanding display messages" on page 226). If the problem
persists, call for service.
Status
Description
Off • The machine is off-line.
• The machine is in power saver mode. When data is received, or any button is pressed, it switches to on-line automatically.
Green On The machine is on-line and can be used.
Blinking Fax The machine is sending or receiving faxes.
Copy The machine is copying documents.
Scan The machine is scanning documents.
Print
• When the status LEDslowly blinks, the machine is receiving data from the computer.
• When the status LED blinks rapidly, the machine is printing data.
Red On • The imaging unit is at the end of its lifespan. Remove the old imaging unit and install a new one.
• The toner cartridge is totally empty. Remove the old toner cartridge and install a new one.
• A paper jam has occurred (see "Clearing paper jams" on page 209).
• The door is open. Close the door.
• There is no paper in the tray. Load paper in the tray (see "Loading paper in the tray" on page 46).
• The machine has stopped due to a major error. Check the display message (see "Understanding display messages" on
page 226).
• The waste toner container is not installed in the machine, or full waste toner container (see "Replacing the waste toner container"
on page 201).
Blinking • A minor error has occurred and the machine is waiting for the error to be cleared. Check the display message
(see "Understanding display messages" on page 226). When the problem is cleared, the machine resumes its original task.
• The toner cartridge, imaging unit, or waste toner container is near the end of its life. Order a new toner cartridge, imaging unit, or
waste toner container. You can temporarily improve print quality by redistributing the toner.
Page 38
Introduction_ 38
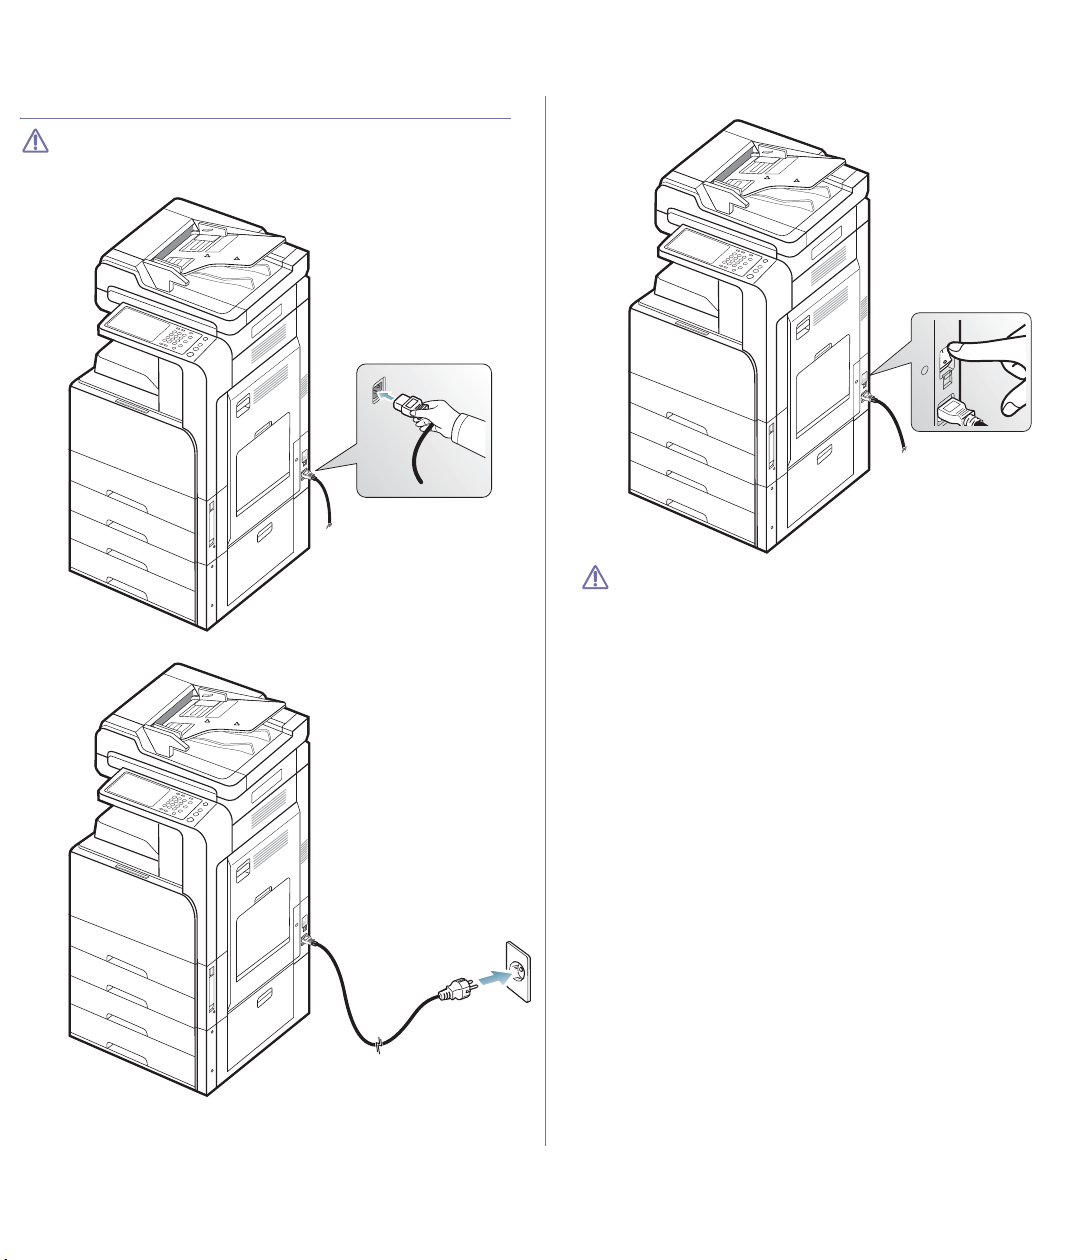
Turning the machine on
Keep in mind that you should use the power cord supplied with the
machine. Otherwise, it can cause damage or fire to the machine.
1. Plug the power cord into the power receptacle.
2. Plug the other end into a properly grounded AC outlet.
3. Turn on the main power switch.
• Some parts inside of the machine may be hot when power is on, or
after printing. Be careful not to burn yourself when working inside
the machine.
• Do not disassemble the machine when it is turned on or plugged
in. Doing so may give you an electric shock.
Page 39
Introduction_ 39
Turning the machine off
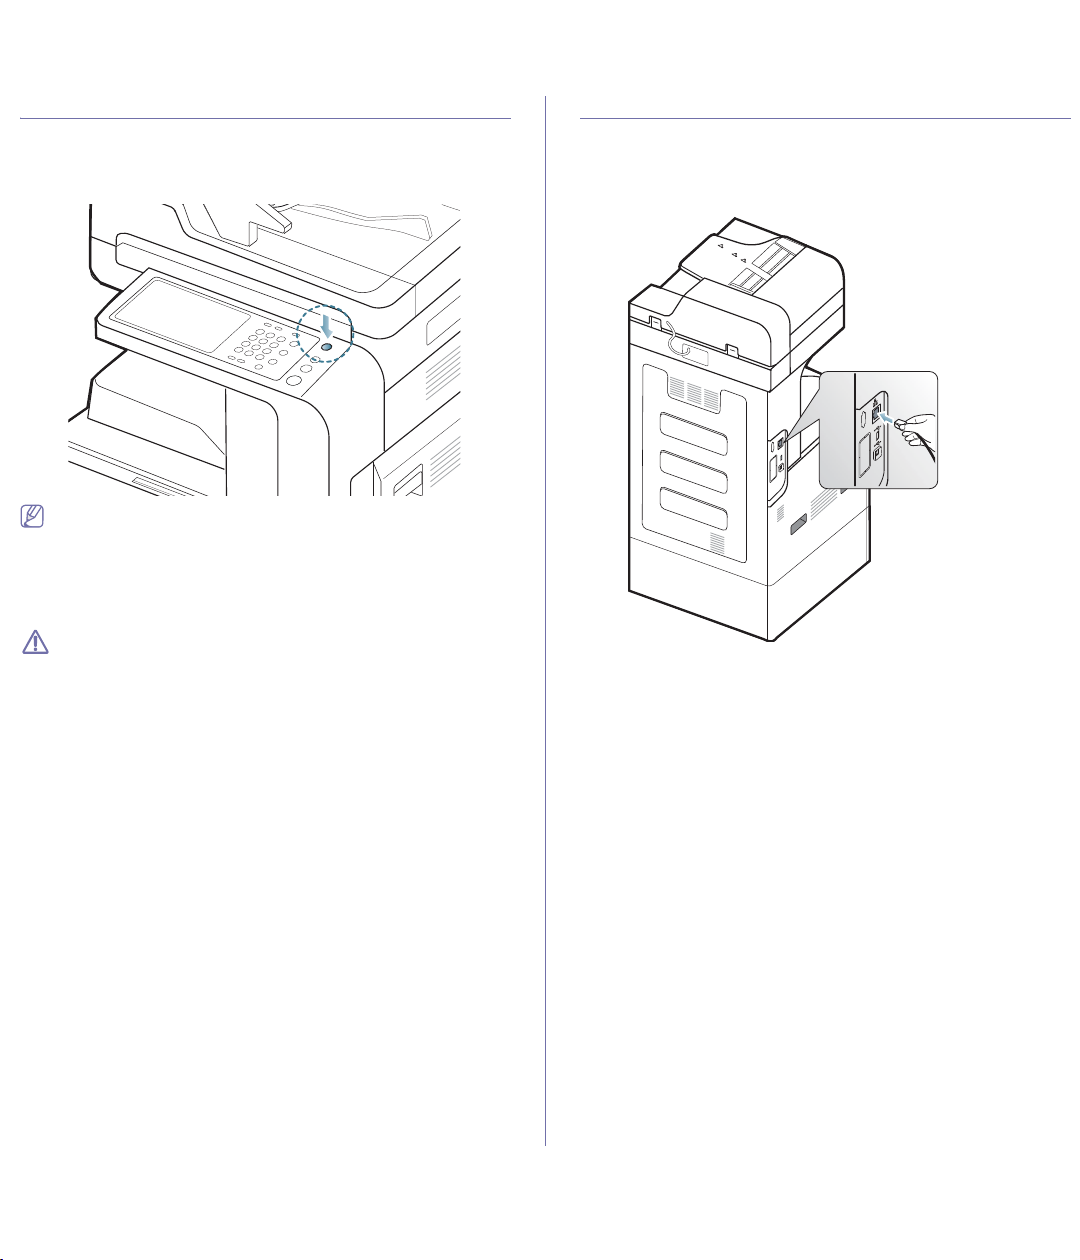
If you need to turn the machine off, press the Power button for more than
three seconds on the right side of the control panel. When the confirmation
window appears, press Yes from the display screen, then wait until power is
turned off automatically.
• The machine has three types of power off mode. Press the
Machine Setup > General Settings > Power Button Operation.
The Power Button Operation option can only be configured by an
authorized user who has registered an ID and a password on the
machine. For detailed information about the power off using the
Power button, refer to the Administrator’s Guide.
• You can also turn the machine on pressing the Power button.
If you turn the machine off directly using the main power switch above
the power receptacle, it could cause the hard disk problem in the
machine.
Connecting a printer cable
Using a network cable
This machine has a bulit-in network interface card. You can connect your
machine to a network using a network cable.
Connect your machine to the network with a network cable:
Page 40
Introduction_ 40
Introducing the display screen and useful
buttons
Display screen
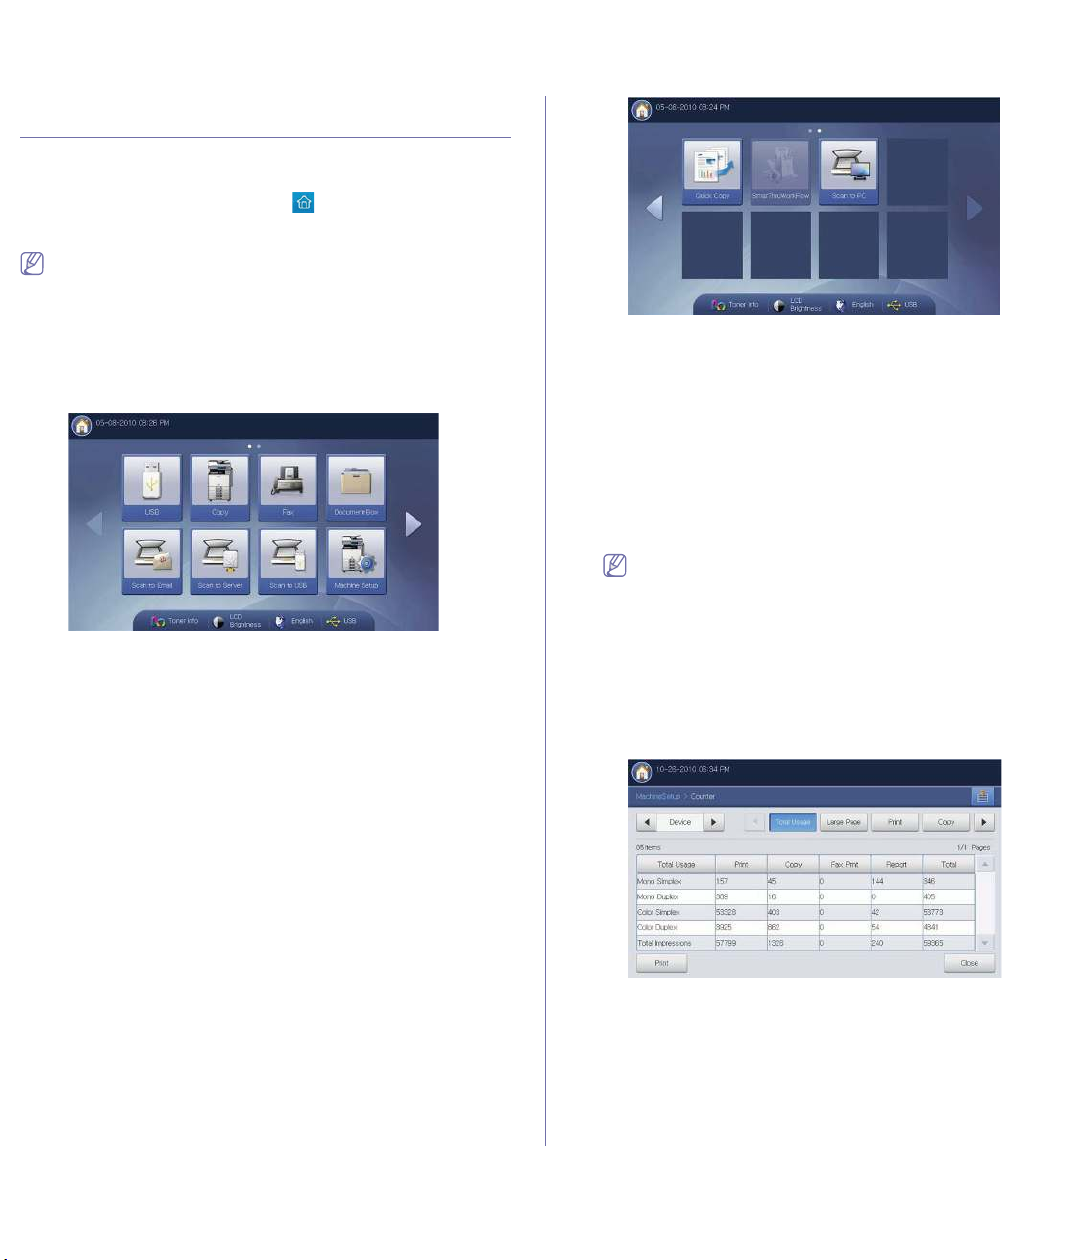
The display screen on the control panel allows user-friendly operation of the
machine. Once you press the home icon ( ) on the screen, it shows the
display screen. The display screen image in this user’s guide may differ
from your machine depending on its options or models.
• Icons shown on the display screen such as Fax may be grayed
out, depending on the optional kit or program installed in your
machine.
• To switch to the next display screen, press the right arrow on the
display screen.
• Depending on the authentication setting, the machine’s users have
to enter an ID and a password. In this case, the machine can only
be used by an authorized user who has registered an ID and a
password on the machine. Contact the machine’s administrator.
• Copy: Enters the Copy menu (see "Copying" on page 57).
• Fax: Enters the Fax menu. Fax is activated on the display screen by
installing optional fax kit (see "Faxing (optional)" on page 110).
• Stored Document: Enters the Stored Document menu (see
"Document box" on page 172).
• Shared Folder: Enters the Shared Folder menu (see "Document box"
on page 172).
• Scan to Email: Enters the Scan to Email menu (see "Scanning
originals and sending through email (scan to email)" on page 81).
• Scan to Server: Enters the Scan to Server menu (see "Scanning
originals and sending via SMB/WEBDAV/FTP (scan to server)" on
page 85).
• Scan to PC: Enters the Scan to PC menu (see "Scanning originals and
sending to your computer (scan to PC)" on page 105).
• Scan to Shared Folder: Enters the Scan to Shared Folder menu (see
"Scanning originals and sending to your computer (scan to PC)" on
page 105).
• Quick Copy: Enters the Quick Copy menu (see "Using the Quick Copy
menu" on page 79).
• ID Copy: Enters the ID Copy menu (see "Using the Quick Copy menu"
on page 79).
• USB: Enters the USB menu. When USB memory is inserted into the
USB memory port on your machine, USB is activated on the display
screen (see "Using a USB memory device" on page 169).
• Scan to USB: Enters the Scan to USB menu. When USB memory is
inserted into the USB memory port on your machine, Scan to USB is
activated on the display screen (see "Scanning originals and sending to
a USB memory device (scan to USB)" on page 92).
• Machine Setup: You can browse current machine settings or change
machine values.
Some menus are only configured by an administrator or an
authorized user who has registered ID and password on the
machine by administrator. When the machine requests, enter the
ID and password.
• SmarThru WorkFlow: In order to use this menu, SmarThru WorkFlow
should be installed. For more information, contact your local Samsung
dealer or the retailer where you purchased your machine.
Counter button
When you press the Counter button on the control panel, You can see the
number of impressions.
When you select Device, you can see the number of impressions by device.
Impression here means one side printing.
• Total Usage: Displays the total number of impressions.
• Large Page: Displays the total number of impressions with large size
paper.
• Send Usage: Displays the number of images sent via email, server,
etc.
Page 41
Introduction_ 41
• Fax Send Usage(PSTN): Displays the number of sent faxes.
When you select User, you can see the number of usage, limit, and
remaining usage by each user. For detailed information about Counter,
refer to the Administrator’s Guide.
Eco button
The eco feature allows you to save print resources and leads you to
eco-friendly printing. When you press the Eco button, the machine turns the
eco mode on or off. If the eco mode is on, you can see the eco image
( )on some features. Some options in the features are not available to
use in the eco mode. For detailed information about eco feature, refer to the
Administrator’s Guide.
• Only administrators have permission for Eco Setting in Machine
Setup.
• If the machine requests a password for eco mode, you need to
enter the password. Contact your administrator.
• The Eco button is activated only for Copy, Quick Copy and
Document Box menus.
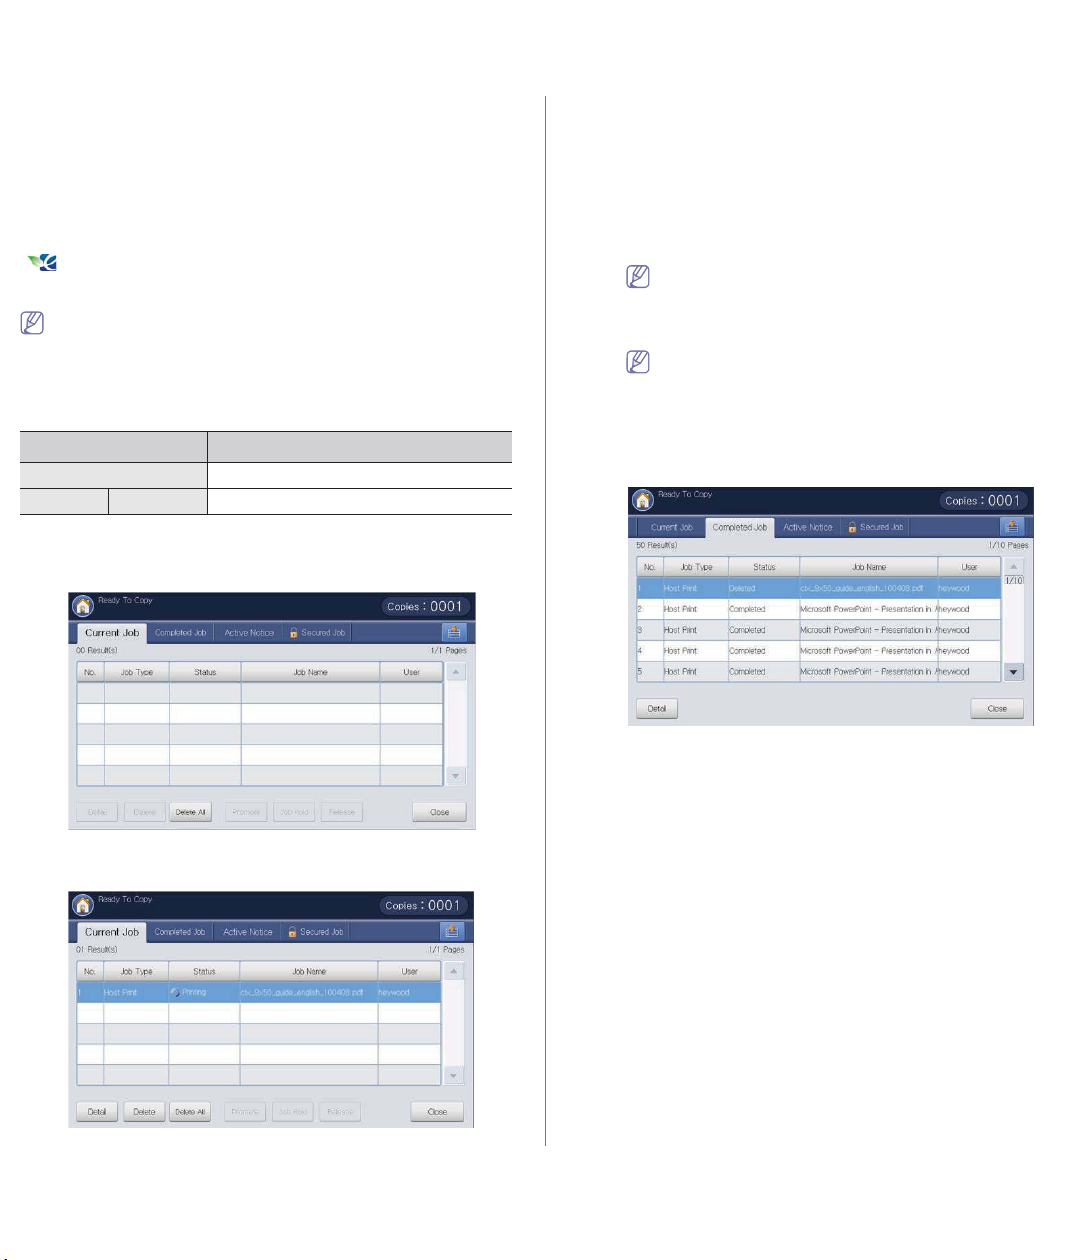
Job Status button
When you press the Job Status button, the screen lists the currently
running, queued, and completed jobs.
Current Job
Displays the list of jobs in progress and pending.
㧧㠛ⳛ㦚G㍶䌳䞮ⳊG㎎G㩫⽊⯒G⽊㡂㭣┞┺U
• No: Gives the order of jobs.
• Job Type: Displays type of the job, such as print, copy, fax, etc.
• Job Name: Displays the name of the job.
• User: Displays the name of the job owner.
• Status: Displays the current status of each job (see "Meaning of
status" on page 41).
• Promote: Promotes a selected job from the list when the many jobs
are queued. The selected job cannot be promoted in front of the
progressing job.
You cannot use the Promote button depending on the state of
the job. If the Promote button is inactivated when you select a
job, the job you selected is considerably progressed.
• Job Hold: Holds a selected job from the list.
You cannot use the Job Hold button depending on the state of
the job. If the Job Hold button is inactivated when you select a
job, the job you selected is considerably progressed.
• Delete: Removes a selected job from the list.
Completed Job
Displays the list of completed jobs.
㧧㠛ⳛ㦚G㍶䌳䞮ⳊG㎎G㩫⽊⯒G⽊㡂㭣┞┺U
• No: Gives the order of jobs.
• Job Type: Displays type of the job, such as print, copy, fax, etc.
• Job Name: Displays the name of the job.
• User: Displays the name of the job owner.
• Status: Displays the status of each completed job (see "Meaning of
status" on page 41).
Meaning of status
• Receiving: The machine is receiving data from network or fax line.
• Image Processing: The machine is processing the image
(decoding, encoding, converting data format).
• Formatting: The machine is generating the image for printing.
• Pending: The job on the queue is waiting for its turn.
• Transferring: The machine is transferring the data to email, server
or fax.
• Scanning: The machine is scanning.
• Dialing: In the fax mode, the machine is dialing to receiver’s fax
machine.
• Connecting: In the fax mode, the machine is waiting to connect to
destination.
• Printing: The machine is printing.
• Storing: The data is storing to a box or a USB.
Status Description
Off The machine is not in the Eco mode.
Green On The machine is in the Eco mode.
Page 42
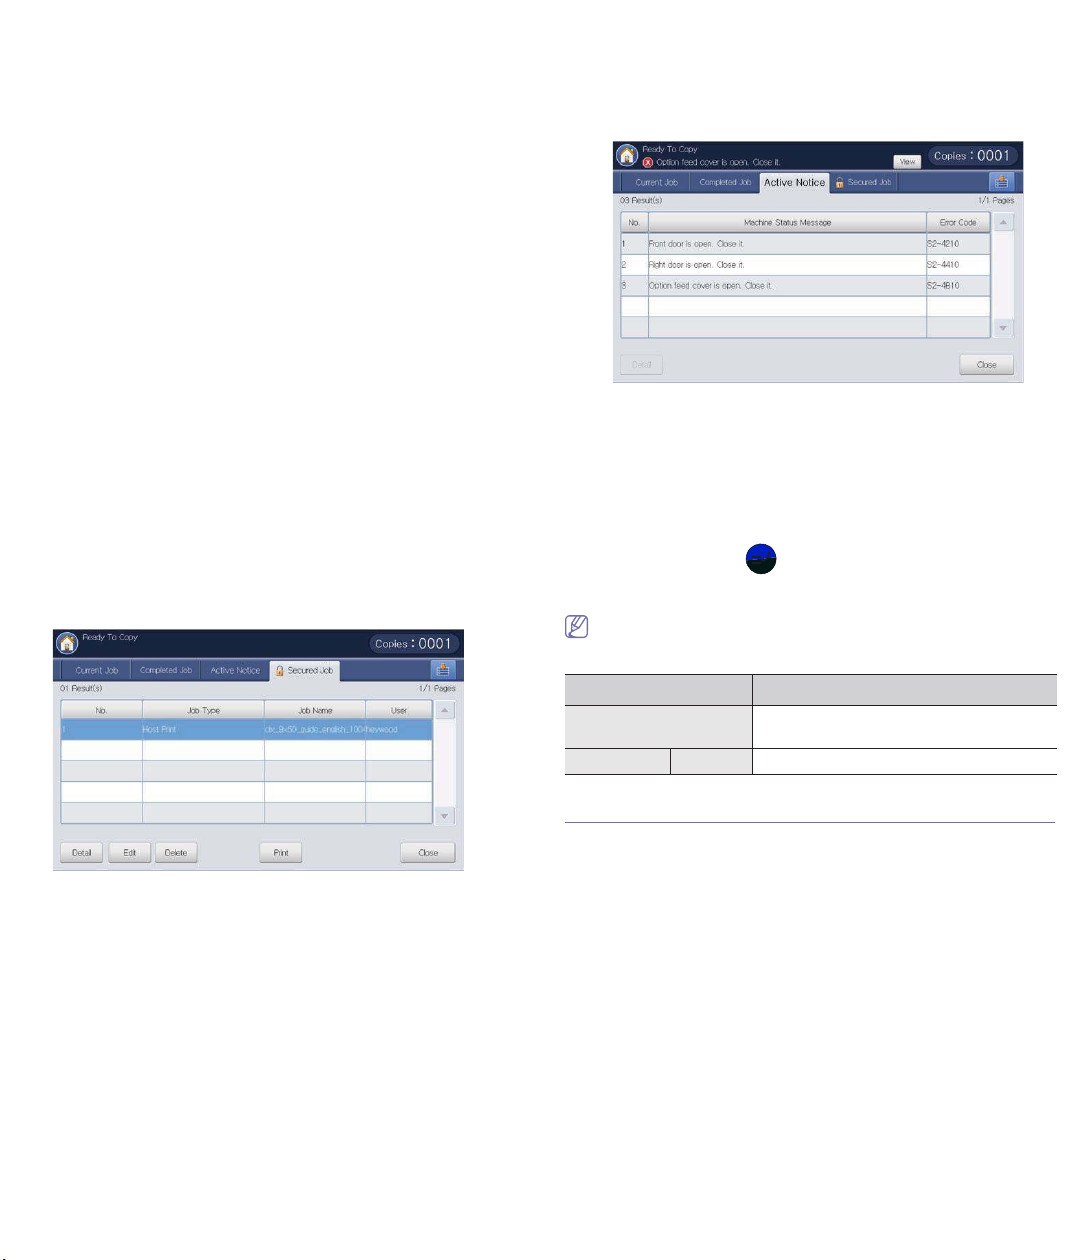
Introduction_ 42
• Delayed Job: The job is temporarily stopped until the time you set
for Delay Send (email, fax, server).
• Held: In the Secured Job tab, the job is temporarily stopped when
the secure print job is sent from a computer. You can release the job
pressing Print.
• Held: Proof Print: The job is temporarily stopped when the proof
print job is sent from a computer. You can release the job pressing
Release.
• Held: Proof Copy: In the copy mode, the job is temporarily stopped
when the proof copy was selected. You can release the job pressing
Release.
• Held: User Request: The job is temporarily stopped when Job
Hold was pressed. You can release the job pressing Release.
• Held: Delayed Print: The job is temporarily stopped until the time
you set for the delay print job which is sent from a computer.
• Held: Needs Resources: The job is temporarily stopped when the
machine has problem such as paper empty, paper mismatch, etc.
• Interrupted: The job is temporarily stopped when the Interrupt
button was pressed for an urgent copy job.
• Paused: The job is paused when the Stop button was pressed or
the machine fault.
• Completed: The job is completed.
• Completed with error: The job is completed with error.
• Deleted: If you select a job in the list and press Delete, the job is
deleted.
Secured Job
Displays the list of secured jobs the user has set in the printer driver (see
"Confidential" on page 145). You need to enter the User ID and
Password set in the printer driver (see "Confidential" on page 145).
• No: Gives the order of jobs.
• Job Type: Displays type of the job.
• Job Name: Displays the name of the job.
• User: Displays the name of the job owner.
• Detail: Displays detailed information of the selected job. You can
also change the number of copies pressing Change Settings.
• Edit: Changes the Job Name of the selected job.
• Delete: Removes the selected job from the list.
• Print: Prints the selected job from the list.
• Close: Closes the job status window.
Active Notice
Displays any error messages and codes that have occurred.
• No: Gives the order of messages.
• Machine Status Message: Displays the error message for the
current errors in the machine.
• Error Code: Displays the error message's code.
• Detail: Displays detailed information of the selected job.
• Close: Closes the job status window.
Interrupt button
When you press Interrupt ( ), the machine goes into interrupt mode,
which means it stops the current printing job for an urgent copy job. When
the urgent copy job completed, the previous printing job continues.
When you select the staple feature for a printing job, interrupt mode
works after a stapling completedGin the printing job.
Understanding the pop-up keyboard
You can enter alphabet characters, numbers, or special symbols using the
pop-up keyboard on the display screen. This keyboard is the same as a
normal keyboard for easy usability.
Status Description
Off The machine is not in interrupt printing
mode.
Green On The machine is in interrupt printing mode.
Page 43
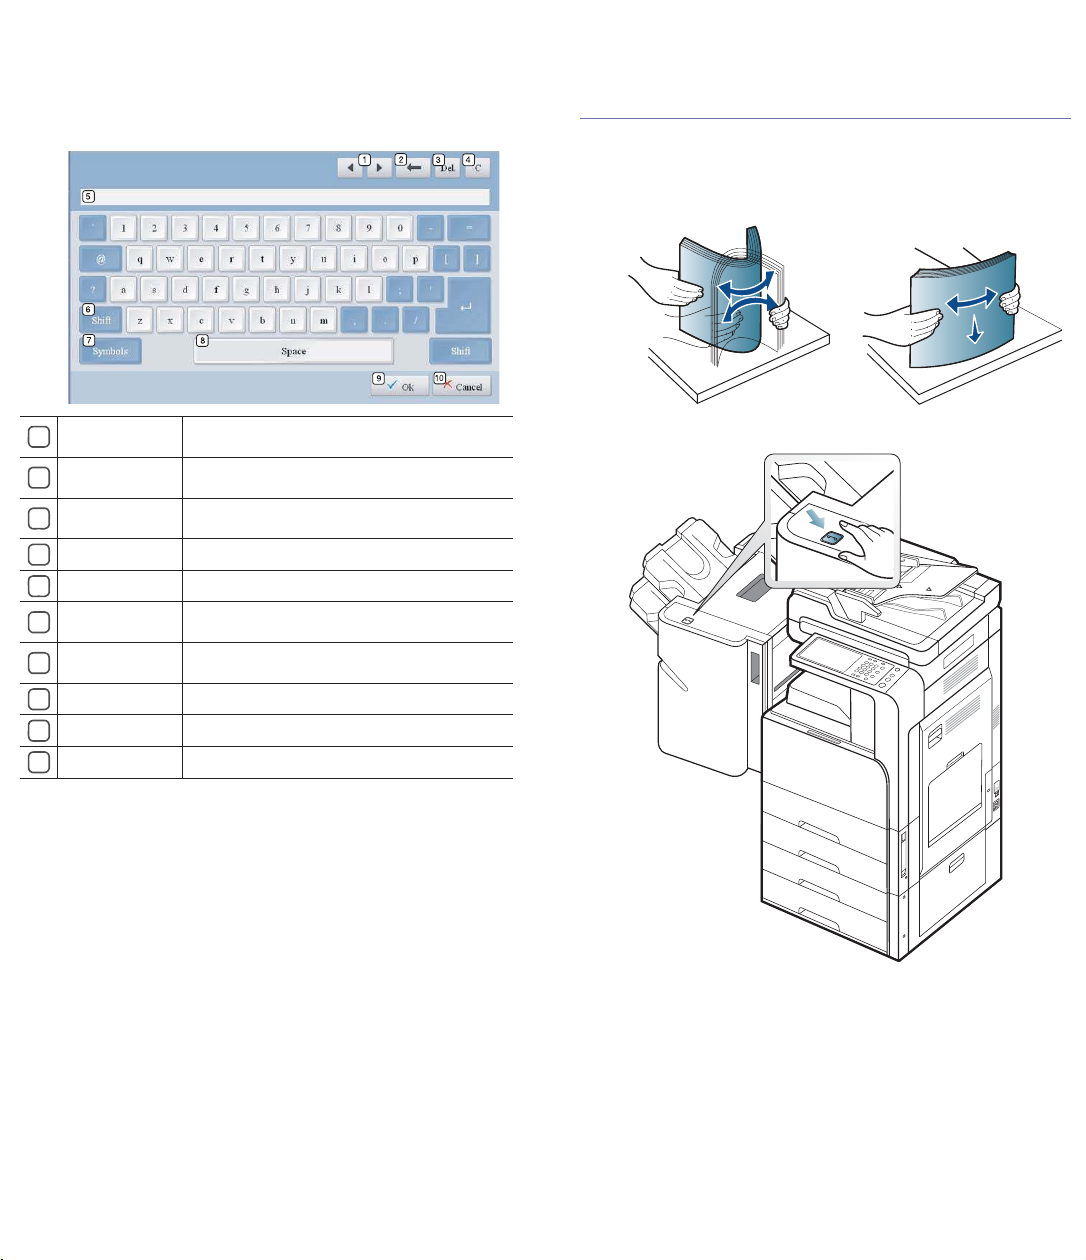
Introduction_ 43
Touch the input area where you need to enter characters, then the keyboard
pops up on the screen. The keyboard below is the default showing the
lowercase letters.
Using the manual stapler
You can use the manual stapler when the standard finisher or booklet
finisher is installed. It is useful to use the manual stapler in filing several
pages. The way to use the manual stapler is same as that of the standard
finisher and booklet finisher.
1. Arrange the documents before stapling.
2. Press the manual stapler button at the top of the finisher. When the
green light in on, the manual stapler is ready to stapling.
1
Arrow
Moves the cursor between characters in the input
area.
2
Backspace
Deletes the characters on the left side of the
cursor.
3
Del
Deletes the characters on the right side of the
cursor.
4
C
Deletes all characters in the input area.
5
Input area
Enters letters within this line.
6
Shift
Toggles between lowercase keys and uppercase
keys or vice versa.
7
Symbols
Switches from the alphanumeric keyboard to the
symbol keyboard.
8
Space
Enters a blank between characters.
9
OK
Saves and closes input result.
10
Cancel
Cancels and closes input result.
Page 44
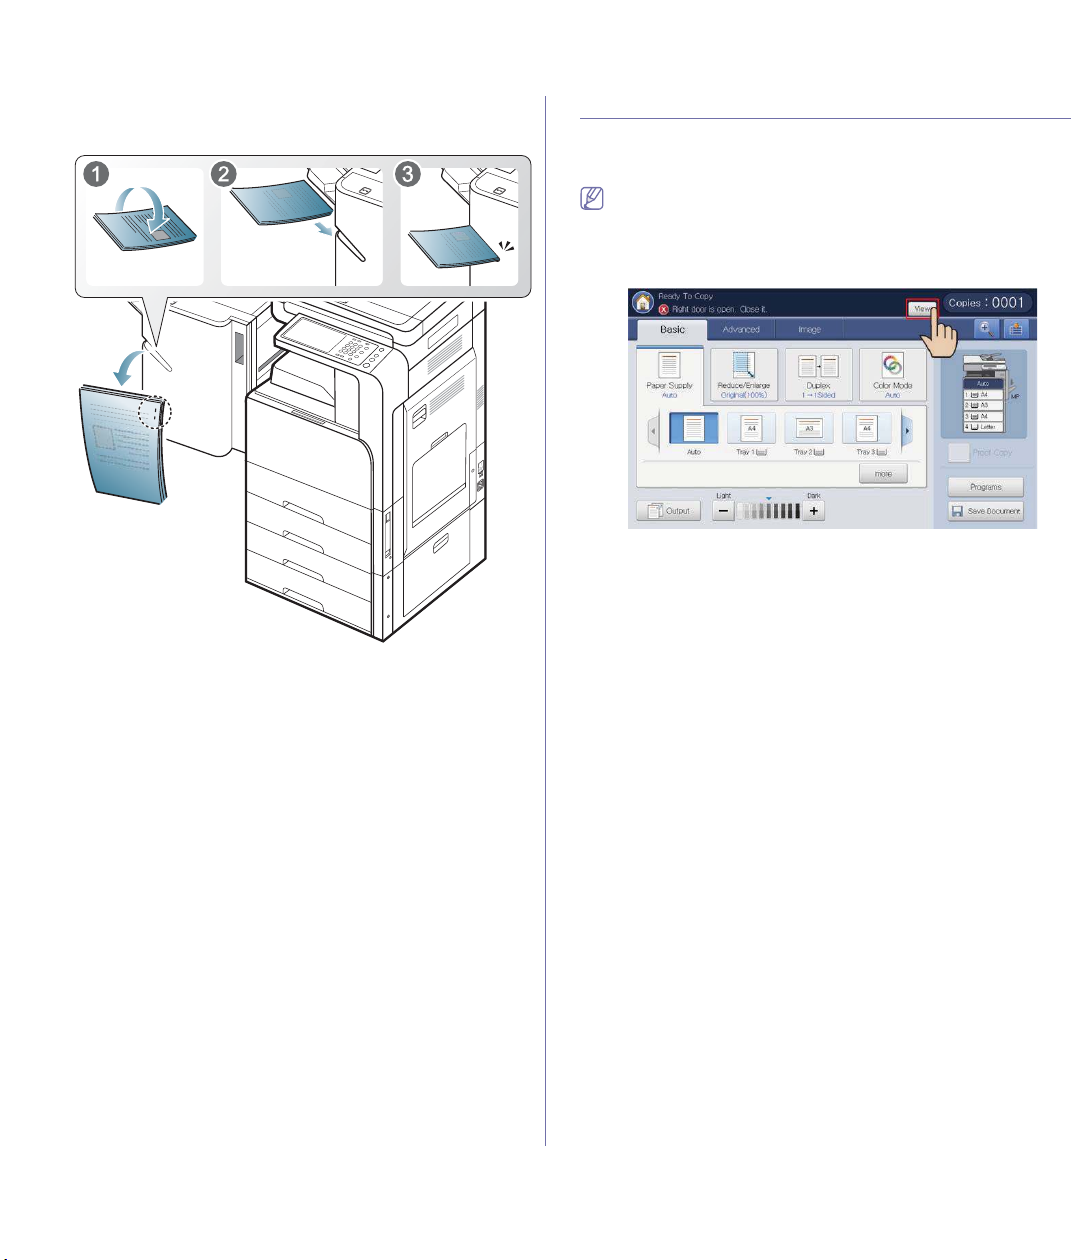
Introduction_ 44
3. The first page of the printed documents should face the bottom. Insert
the documents into the manual stapler so that the upper right part of the
documents will be stapled.
If the documents get inserted properly, the manual stapler button will
blink three or four times and then staple with flipping sound.
Viewing the animation for trouble shooting
When the problems in the machine occur, some error messages are shown
with animations to help you solve the problems. You can see the animation
to shoot the trouble pressing View.
This machine does not show the animations of all the problems. For
the errors of which messages are not shown with animation, refer to
the troubleshooting chapter (see "Understanding display messages"
on page 226).
The screens below show an example animation.
Follow the instructions on the screen to solve the concerned problem.
Page 45
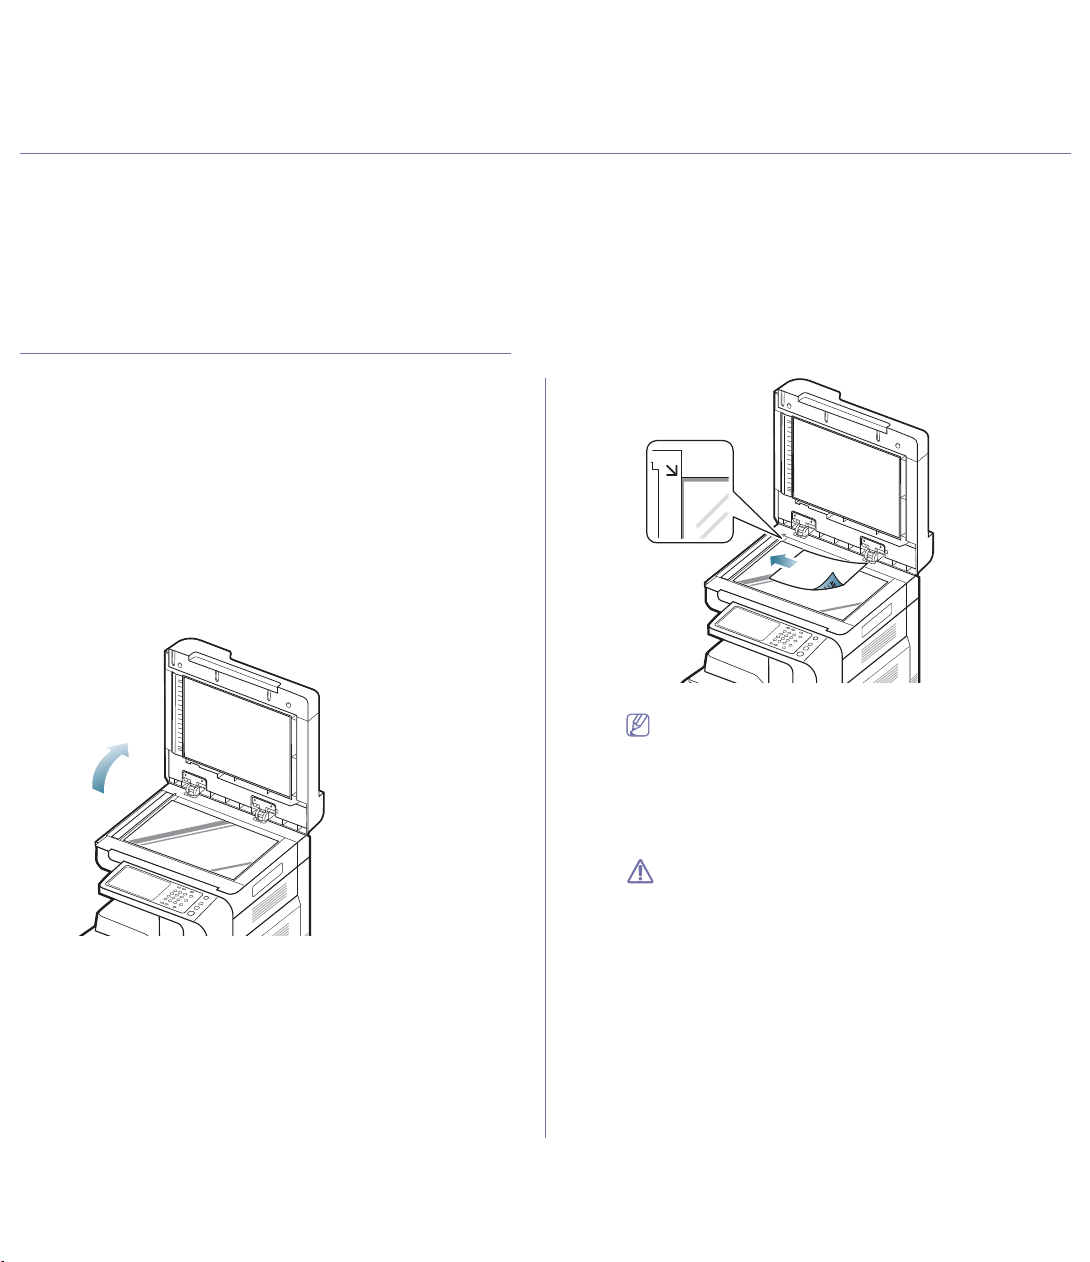
Media and tray_ 45
2.media and tray
This chapter provides information on how to load originals and print media into your machine.
This chapter includes:
• Loading originals
• Selecting print media
• Loading paper in the tray
• Printing on special media
• Tray setting
• Selecting an output location
Loading originals
You can use the scanner glass or the duplex automatic document feeder
(DADF) to load an original for copying, scanning, and sending a fax.
On the scanner glass
Make sure that no originals are in the DADF. If an original is detected in the
DADF, the machine gives it priority over the original on the scanner glass.
To get the best scan quality, especially for colored or gray-scaled images,
use the scanner glass.
Preparing originals
• Do not load paper smaller than 25 x 25 (1.0 x 1.0 inches) or larger
than 297 x 432 mm (11.7 x 17 inches).
• Make sure any glue, ink, or correction fluid on the paper is
completely dry before loading.
1. Open the DADF.
2. Place the original face down on the scanner glass and align it with
the registration guide at the top left corner of the glass.
3. Close the DADF.
• Leaving the DADF open while copying may affect copy
quality and toner consumption.
• Dust on the scanner glass may cause black spots on the
printout. Always keep it clean.
• If you are copying a page from a book or magazine, lift the
DADF until its hinges are caught by the stopper and then
close the lid. If the book or magazine is thicker than 30 mm
(1 inch), start copying with the lid open.
• Be careful not to break the scanner glass. You may get
hurt.
• Do not put hands on the scanner glass while closing the
DADF. The DADF may fall on your hands and cause injury.
• Do not look at the light inside of the scanner while copying
or scanning. It is harmful to eyes.
In the duplex automatic document feeder (DADF)
Preparing originals
• Do not load paper smaller than 140 x 140 mm (5.5 x 5.5 inches) or
larger than 297 x 432 mm (11.7 x 17 inches).
• The DADF can automatically detects Statement LEF, Statement
SEF, JIS B5 LEF, JIS B5 SEF, A5 LEF, A5 SEF, A4 LEF, A4 SEF,
Letter LEF, Letter SEF, B4, Ledger, Legal, and A3-sized originals.
• Do not attempt to load the following types of paper, in order to
Page 46
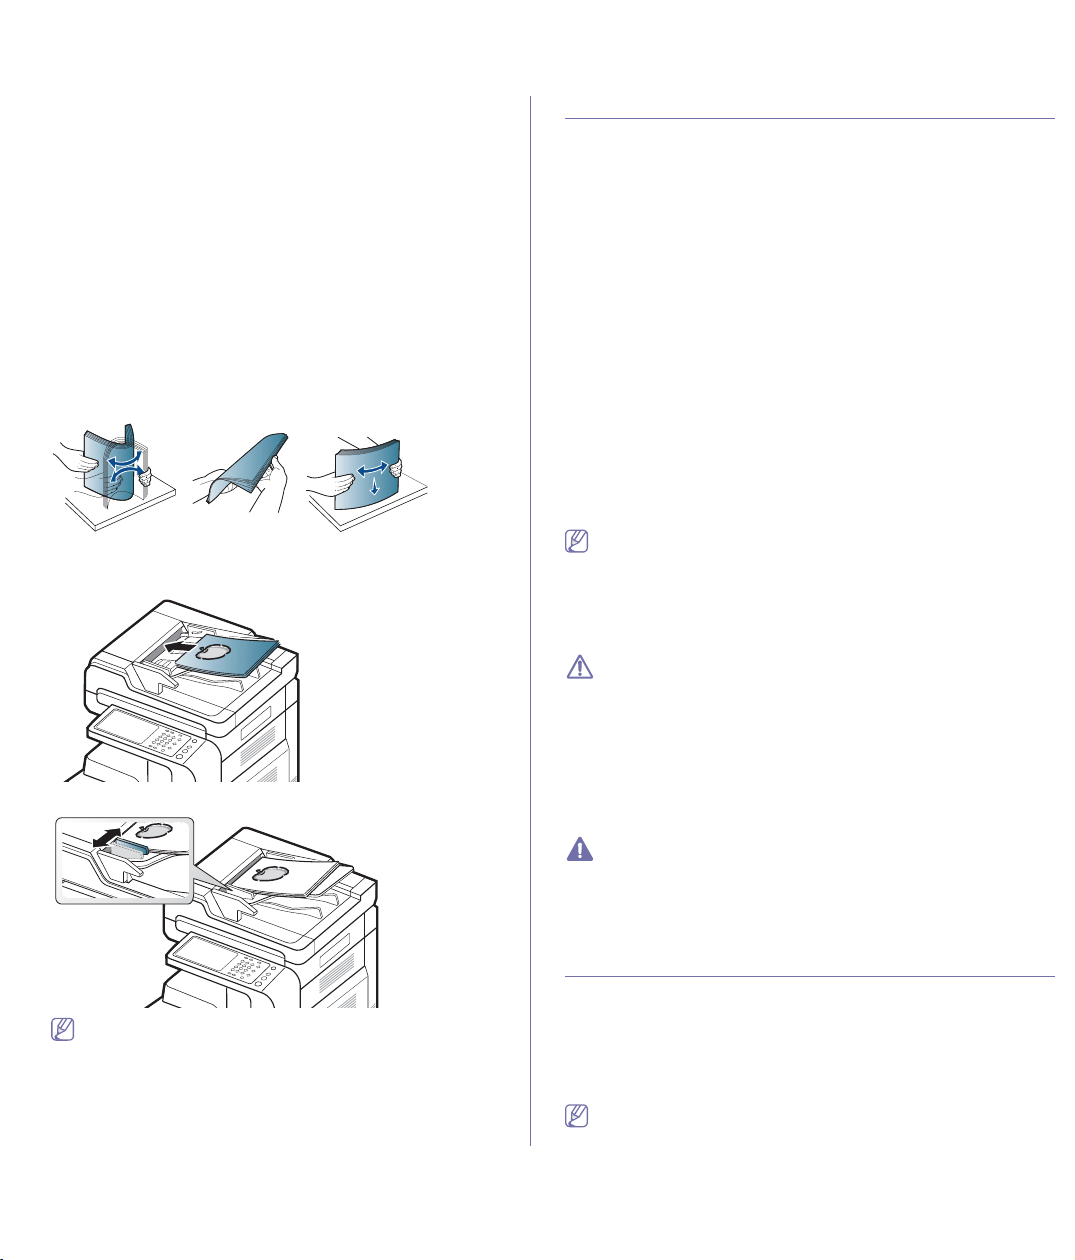
Media and tray_ 46
prevent paper jam, low print quality, and machine damage.
- Carbon-paper or carbon-backed paper
- Coated paper
- Onion skin or thin paper
- Wrinkled or creased paper
- Curled or rolled paper
- Torn paper
• Remove all staples and paper clips before loading.
• Make sure any glue, ink, or correction fluid on the paper is
completely dry before loading.
• Do not load originals that include different sizes or weights of paper.
• Do not load booklets, pamphlets, transparencies, or documents with
other unusual characteristics.
Using the DADF, you can load up to 100 sheets of paper (80 g/m2, 20 lb
bond) for one job.
1. Flex or fan the edge of the paper stack to separate the pages before
loading originals.
2. Load the originals face up into the DADF. Make sure that the bottom
of the original stack matches the paper size marked on the document
input tray.
3. Adjust the document width guides to the paper size.
Dust on the DADF glass may cause black lines on the printout.
Always keep the glass clean.
Selecting print media
You can print on a variety of print media, such as plain paper, envelopes,
labels, and transparencies. Always use print media that meet the guidelines
for use with your machine.
Guidelines to select the print media
Print media that does not meet the guidelines outlined in this user’s guide
may cause the following problems:
• Poor print quality
• Increased paper jams
• Premature wear on the machine.
Properties, such as weight, composition, grain, and moisture content, are
important factors that affect the machine’s performance and the output
quality. When you choose print materials, consider the following:
• The type, size, and weight of the print media for your machine are
described in print media specifications (see "Print media specifications"
on page 249).
• Desired outcome: The print media you choose should be appropriate for
your project.
• Brightness: Some print media are whiter than others and produce
sharper, more vibrant images.
• Surface smoothness: The smoothness of the print media affects how
crisp the printing looks on the paper.
• Some print media may meet all of the guidelines in this user’s
guide and still not produce satisfactory results. This may be the
result of the sheets characteristics, improper handling,
unacceptable temperature and humidity levels, or other variables
over which cannot be controlled.
• Before purchasing large quantities of print media, ensure that it
meets the requirements specified in this user’s guide.
• Using print media that does not meet these specifications may
cause problems or require repairs. Such repairs are not covered
by Samsung’s warranty or service agreements.
The amount of paper put into the tray may differ according to
media type used (see "Print media specifications" on page 249).
• Make sure not to use the inkjet photo paper with this machine. It
could cause damage to the machine.
• Using inflammable print media can cause a fire.
• Use designated print media!(see "Print media specifications" on
page 249).
The use of inflammable media or foreign materials left in the printer
may lead to overheating of the unit and" in rare cases may cause a
fire.
The amount of paper put into the tray may differ according to media type
used (see "Print media specifications" on page 249).
Loading paper in the tray
Standard tray / optional dual cassette feeder
Load the print media you use for the majority of your print jobs into the
standard tray. The standard tray can hold a maximum of 1,040 sheets of
plain paper.
You can purchase an optional dual cassette feeder and attach it below the
standard tray to load an additional 1,040 sheets of plain paper.
• Standard tray contains two trays. (Tray 1, Tray 2)
• Optional dual cassette feeder contains two trays. (Tray 3, Tray 4)
Page 47
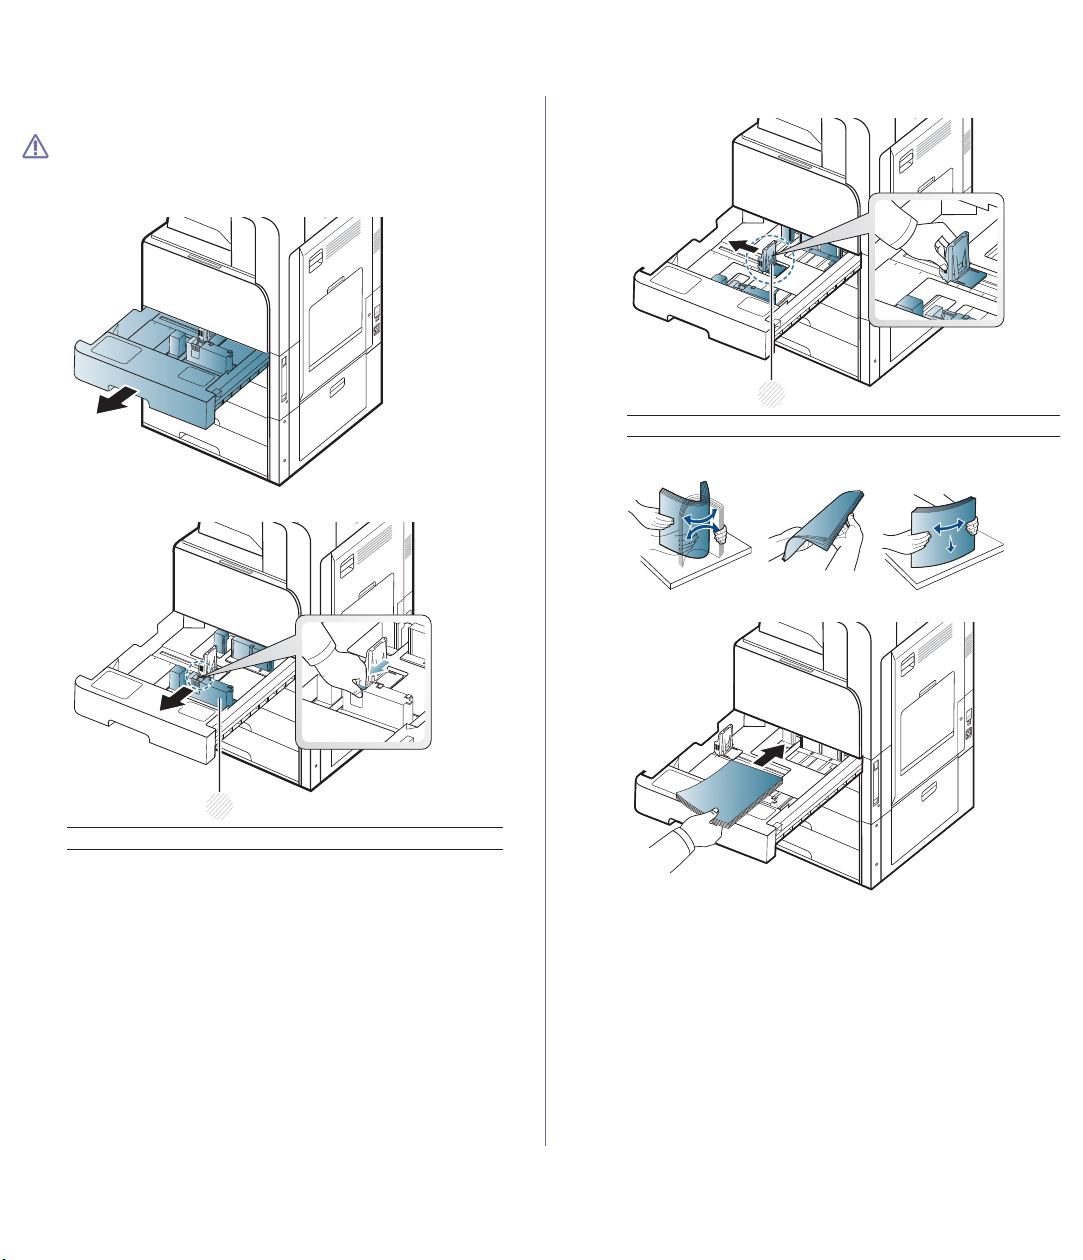
Media and tray_ 47
• The process to load paper in tray 1, tray 2, tray 3, and tray 4 is the
same.
Using photographic paper or coated paper may cause problems, that
require repairs. Such repairs are not covered by the warranty or
service agreements.
1. Squeeze the lock lever on the handle and pull out the tray.
2. Squeeze the paper length guide, and pull it to the end of the tray.
3. Squeeze the paper width guide, and pull it to the end of the tray.
4. Flex and fan the edge of the paper stack to separate the pages before
loading papers.
5. Load paper with the print side facing up.
1 Paper length guide
1
1 Paper width guide
1
Page 48
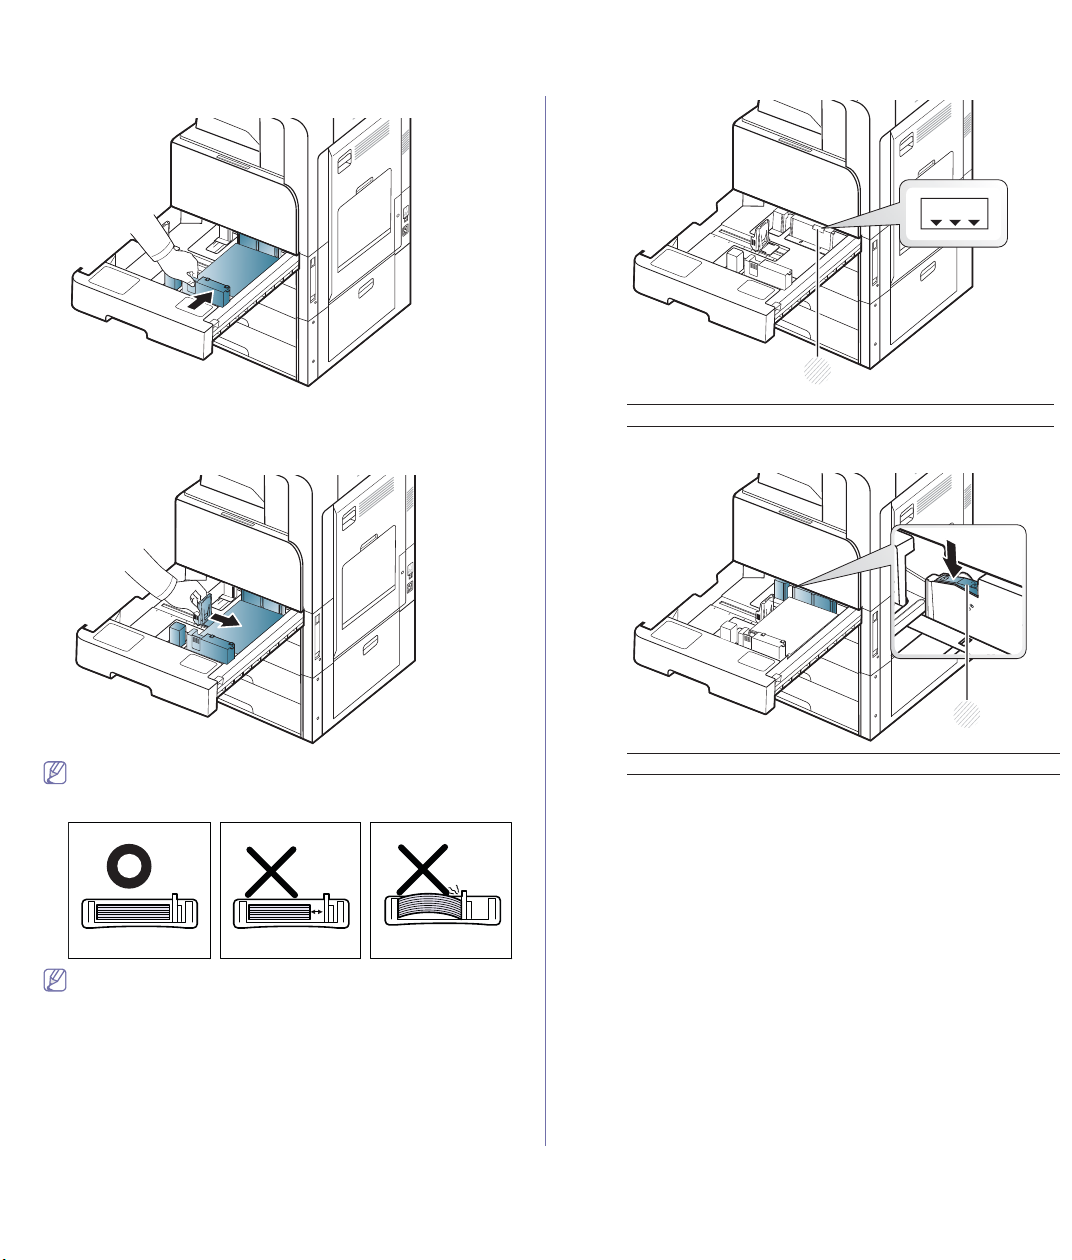
Media and tray_ 48
6. Adjust the paper length guide to the desired paper length.
7. After!loading paper into the tray, pinch the paper width guide and move it
toward the stack of paper until it lightly touches the side of the stack. Do
not press the guide too tightly to the edge of the paper, the guide may
bend the paper.
• Do not push the paper guide too far causing the media to wrap.
• If you do not adjust the paper width guide, it may cause paper
jams.
Do not overload the tray. Otherwise, it may cause paper jams.
Make sure that the paper is below the maximum paper capacity
guide inside the tray.
8. Fix the the paper length guide using the locking switch. Release the
locking switch to load a different sized paper.
1 Paper capacity guide
1 Locking switch
1
M A X
1
Page 49
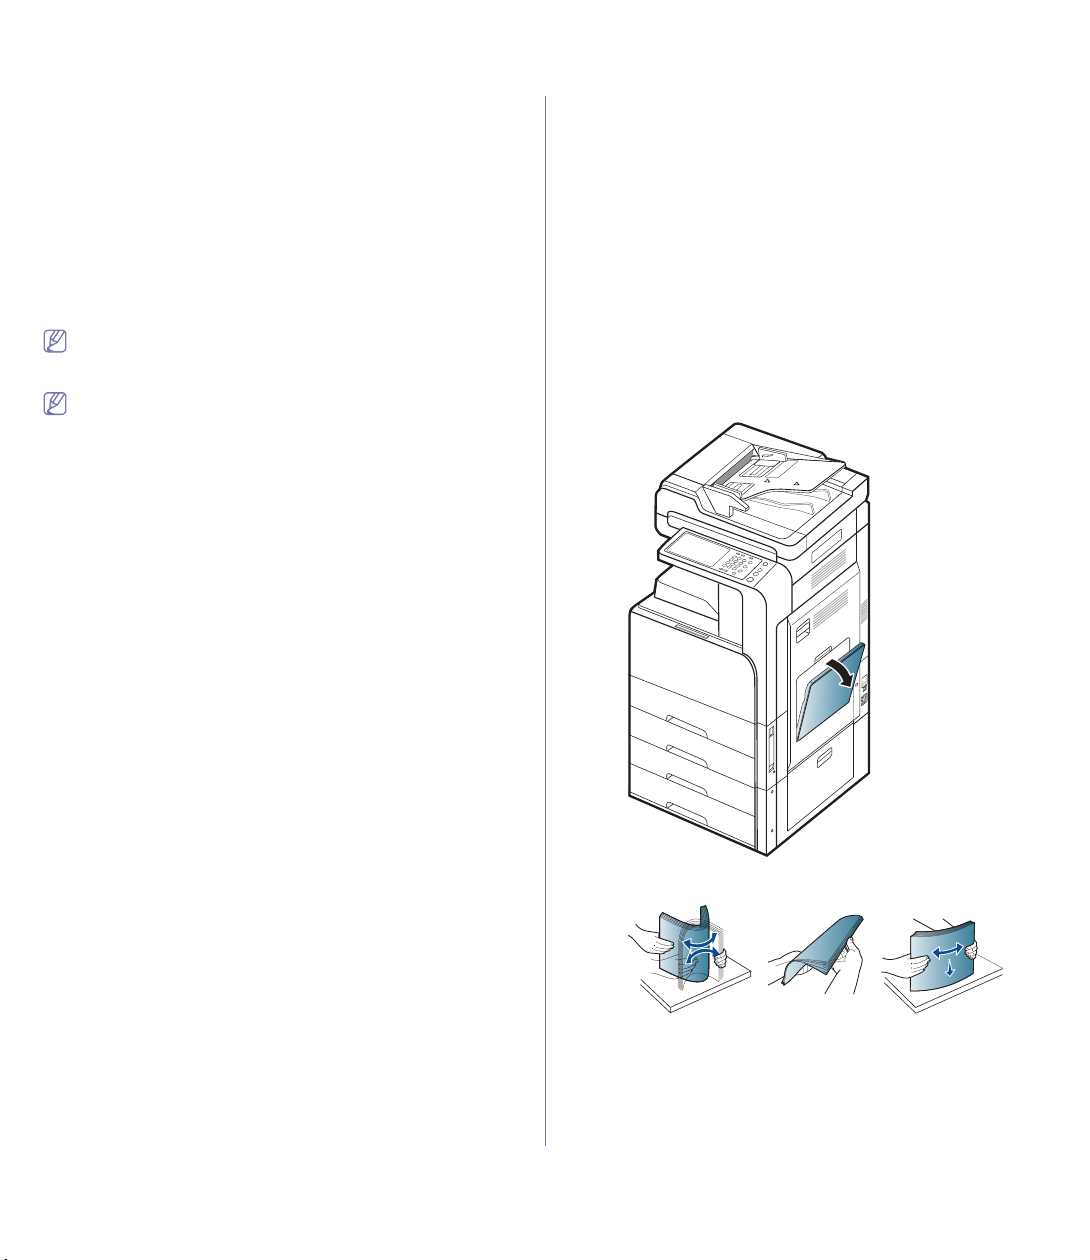
Media and tray_ 49
9. Insert the tray back into the machine.
When you print a document, set the paper type and size for the tray.
For information about setting the paper type and size on the control
panel (See "Tray setting" on page 54).
The standard tray and optional dual cassette feeder can automatically
detect various-sized paper (See "Media sizes automatically detected" on
page 51).
If you set the Tray Confirmation Message ON in Tray Settings, the
confirmation window appears automatically (See "Setting the tray
confirmation message" on page 56).
Check if the paper size and type in the tray are detected or not. If you
want to set the paper size and type or if the machine cannot detect them,
you can set the size and type directly in the confirmation window.
Some paper types are displayed with abbreviation. Tab Ext.
stands for Tabloid Extra, EXEC and STMT are Executive and
Statement each.
• If you experience problems with paper feeding, check whether
the paper meets the media specification (See "Print media
specifications" on page 246). Then, try placing one sheet at a
time in the multi-purpose tray (See "Multi-purpose tray" on
page 49).
• The settings made from the machine driver override the
settings on the control panel.
To print from an application:
a) Open an application and start the print menu.
b) Open Printing Preferences (See "Opening printing
preferences" on page 141).
c) Press the Paper tab in Printing Preferences, and select
an appropriate paper type, size, and source.
d) Press OK.
e) Start printing from an application.
Multi-purpose tray
The multi-purpose tray can hold special sizes and types of print material,
such as postcards, note cards, and envelopes. It is useful for single page
printing on colored paper.
Tips on using the multi-purpose tray
• Load only one type, size, and weight of print media at a time in the
multi-purpose tray.
• To prevent paper jams, do not add paper while printing when there is
still paper in the multi-purpose tray. This also applies to other types
of print media.
• Print media should be loaded face down with the top edge going into
the multi-purpose tray first and be placed in the center of the tray.
• Always load only the specified print media to avoid paper jams and
print quality problems (see "Print media specifications" on page 249).
• Flatten any curl on postcards, envelopes, and labels before loading
them into the multi-purpose tray.
1. Open the multi-purpose tray and pull out the extention if necessary.
2. Flex or fan the edge of the paper stack to separate the pages before
loading originals.
Page 50
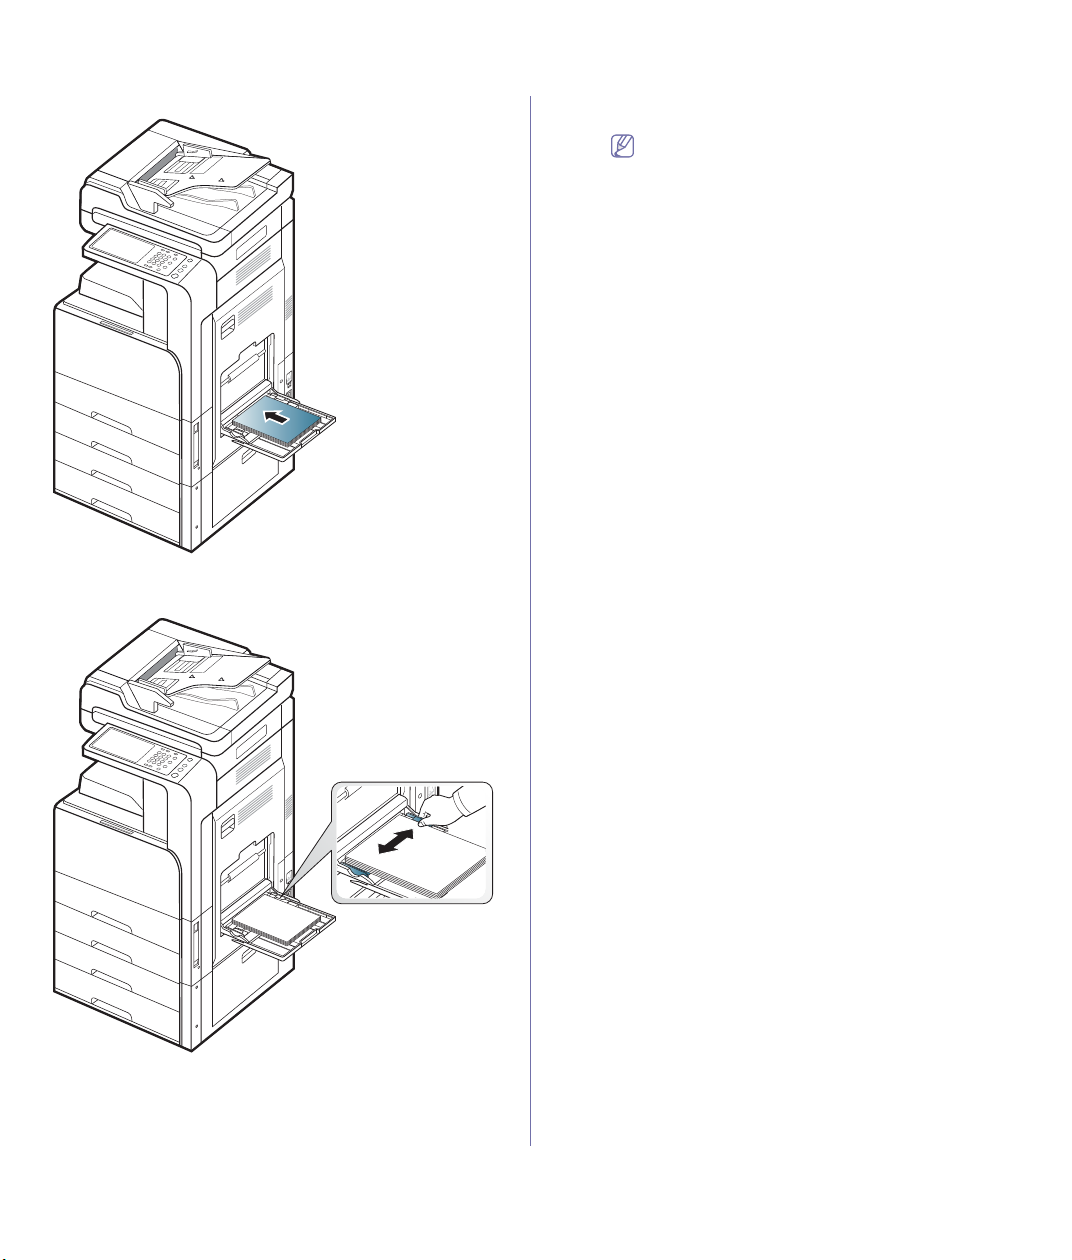
Media and tray_ 50
3. Load the paper with the side to be printed on facing down.
4. Squeeze the multi-purpose tray paper width guides and adjust them
to the width of the paper. Do not force too much, otherwise the paper
will bend resulting in a paper jam or skew.
5. When you print a document, set the paper type and size for the
multi-purpose tray.
The multi-purpose tray can automatically detect various-sized paper
(see "Media sizes automatically detected" on page 51).
For information about setting the paper type and size on the control
panel (see "Tray setting" on page 54).
The settings made from the machine driver override the
settings on the control panel.
To print from an application:
a) Open an application, and start the print menu.
b) Open Printing Preferences (see "Opening printing
preferences" on page 145).
c) Press the Paper tab in Printing Preferences, and select
an appropriate paper type, size, and source.
d) Press OK.
e) Start printing from an application.
 Loading...