

Page 1
Alignment & Adjustments
Service Manual
6-1
Samsung Electronics
6
6
6. Alignment and Adjustments
This chapter describes some of the main service procedures including:
Using the Tech Mode; Clearing paper jam and test patterns.
Much of this chapter is also included in the user's guide.
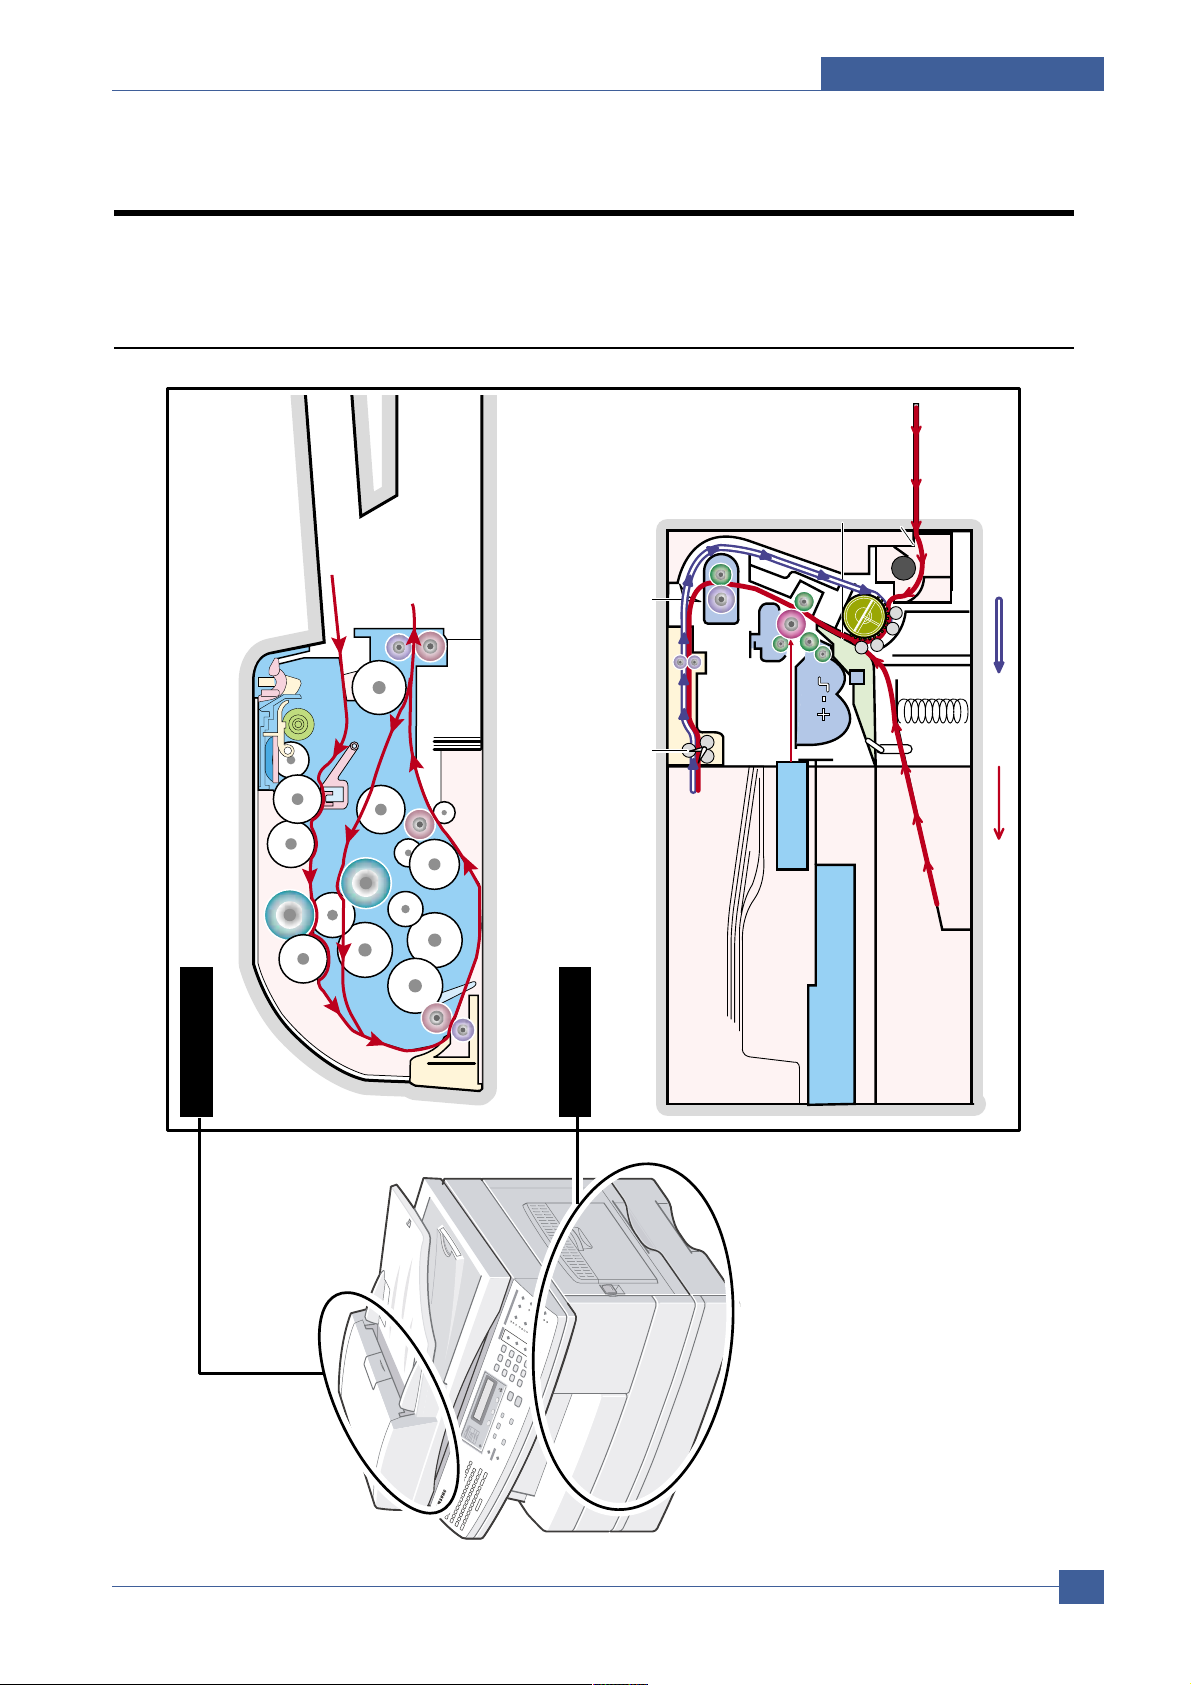
6.1 Paper path
Scanner Part
Engine Part
SCAN-ROLLERSCAN-ROLLER
SCAN-ROLLERSCAN-ROLLER
REGI-ROLLERREGI-ROLLER
DADF-ROLLERDADF-ROLLER
DUPLEX-ROLLERDUPLEX-ROLLER
DUPLEX_FEED-ROLLERDUPLEX_FEED-ROLLER
EXIT-ROLLEREXIT-ROLLER
SMPSSMPS
LIULIU
Main Board+Engine BoardMain Board+Engine Board
EMPTY SENSOR(MPF)EMPTY SENSOR(MPF)
FEED SENSORFEED SENSOR
EMPTY SENEMPTY SEN
TONER UNITTONER UNIT
FTLFTL
OPC UNITOPC UNIT
OPC UNITFUSER
MPF
EXIT SENSOREXIT SENSOREXIT SENSORBIN FULL SENSOR
EXIT UNITEXIT UNIT
TRTR
OPC
DRUM
OPC
DRUM
FEEDERFEEDER
PICKUP ROLLPICKUP ROLL
SIMPLEXDUPLEX
Page 2
Service Manual
Alignment & Adjustments
6-2
Samsung Electronics
6.2 Clearing Paper Jams
Occasionally, paper can be jammed during a print job. Some of the causes include:
• The tray is loaded improperly or overfilled.
• The tray has been pulled out during a print job.
• The front cover has been opened during a print job.
• Paper was used that does not meet paper specifications.
• Paper that is outside of the supported size range was used.
If a paper jam occurs an error message appears in the LCD display. Find and remove the jammed paper.
If you don't see the paper, open the covers.
Do not use a tweezers, pincers or other metal tools when clearing a paper jam.
This could damage the internal mechanism causing print quality problems or possibly electrical shock.
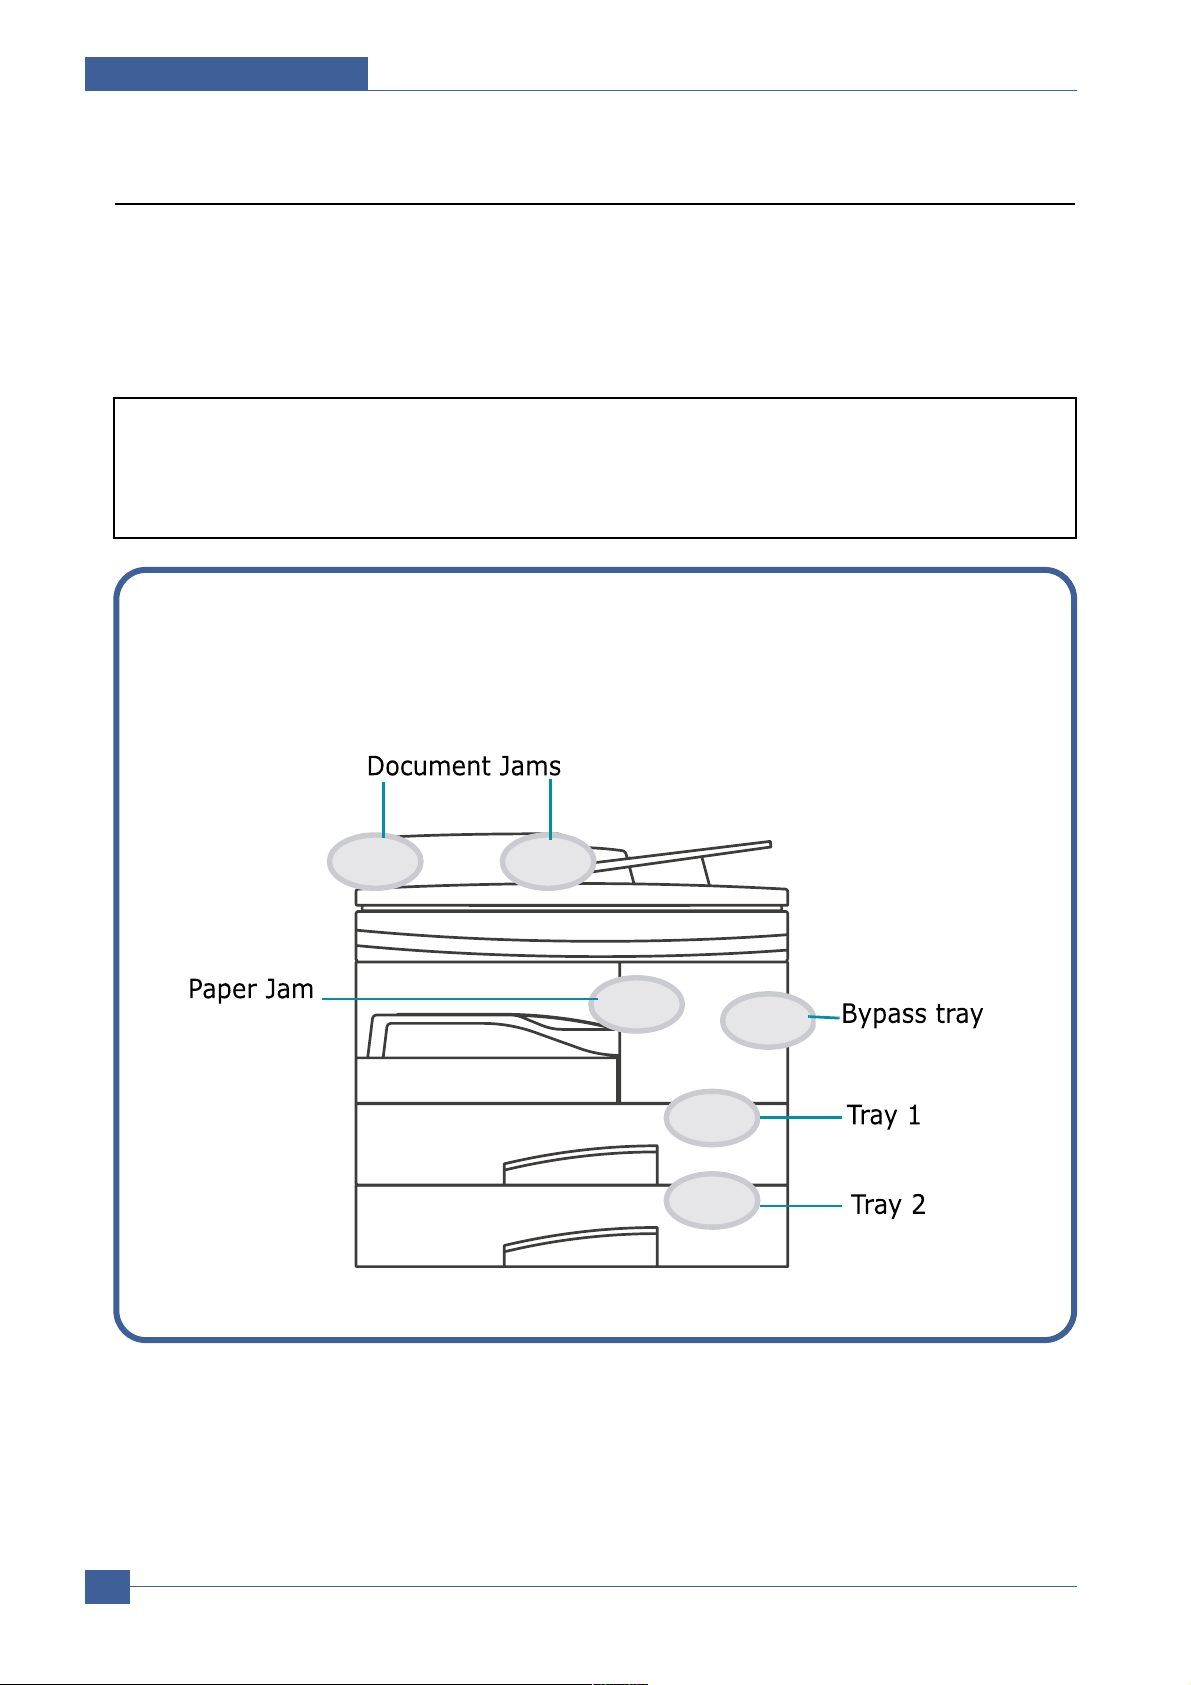
Fault Clearance
When a fault occurs, check the Status Map on the Control Panel. A green blanking LED identifies
the problem area:
Page 3

Alignment & Adjustments
Service Manual
6-3
Samsung Electronics
6.2.1 Clearing Document Jams
If a document jams while it is feeding through the DADF (Duplex Automatic Document Feeder),
“DOCUMENT JAM ” appears on the display.
6.2.1.1 DADF Input Misfeed
1) Open the DADF top cover.
2) Pull the document gently to the right and out of the
DADF .
3) Close the DADF top cover. Then place the documents back into the DADF.
NOTE : To prevent document jams, use the document
scanner glass for thick, thin or mixed documents.
Page 4
Service Manual
Alignment & Adjustments
6-4
Samsung Electronics
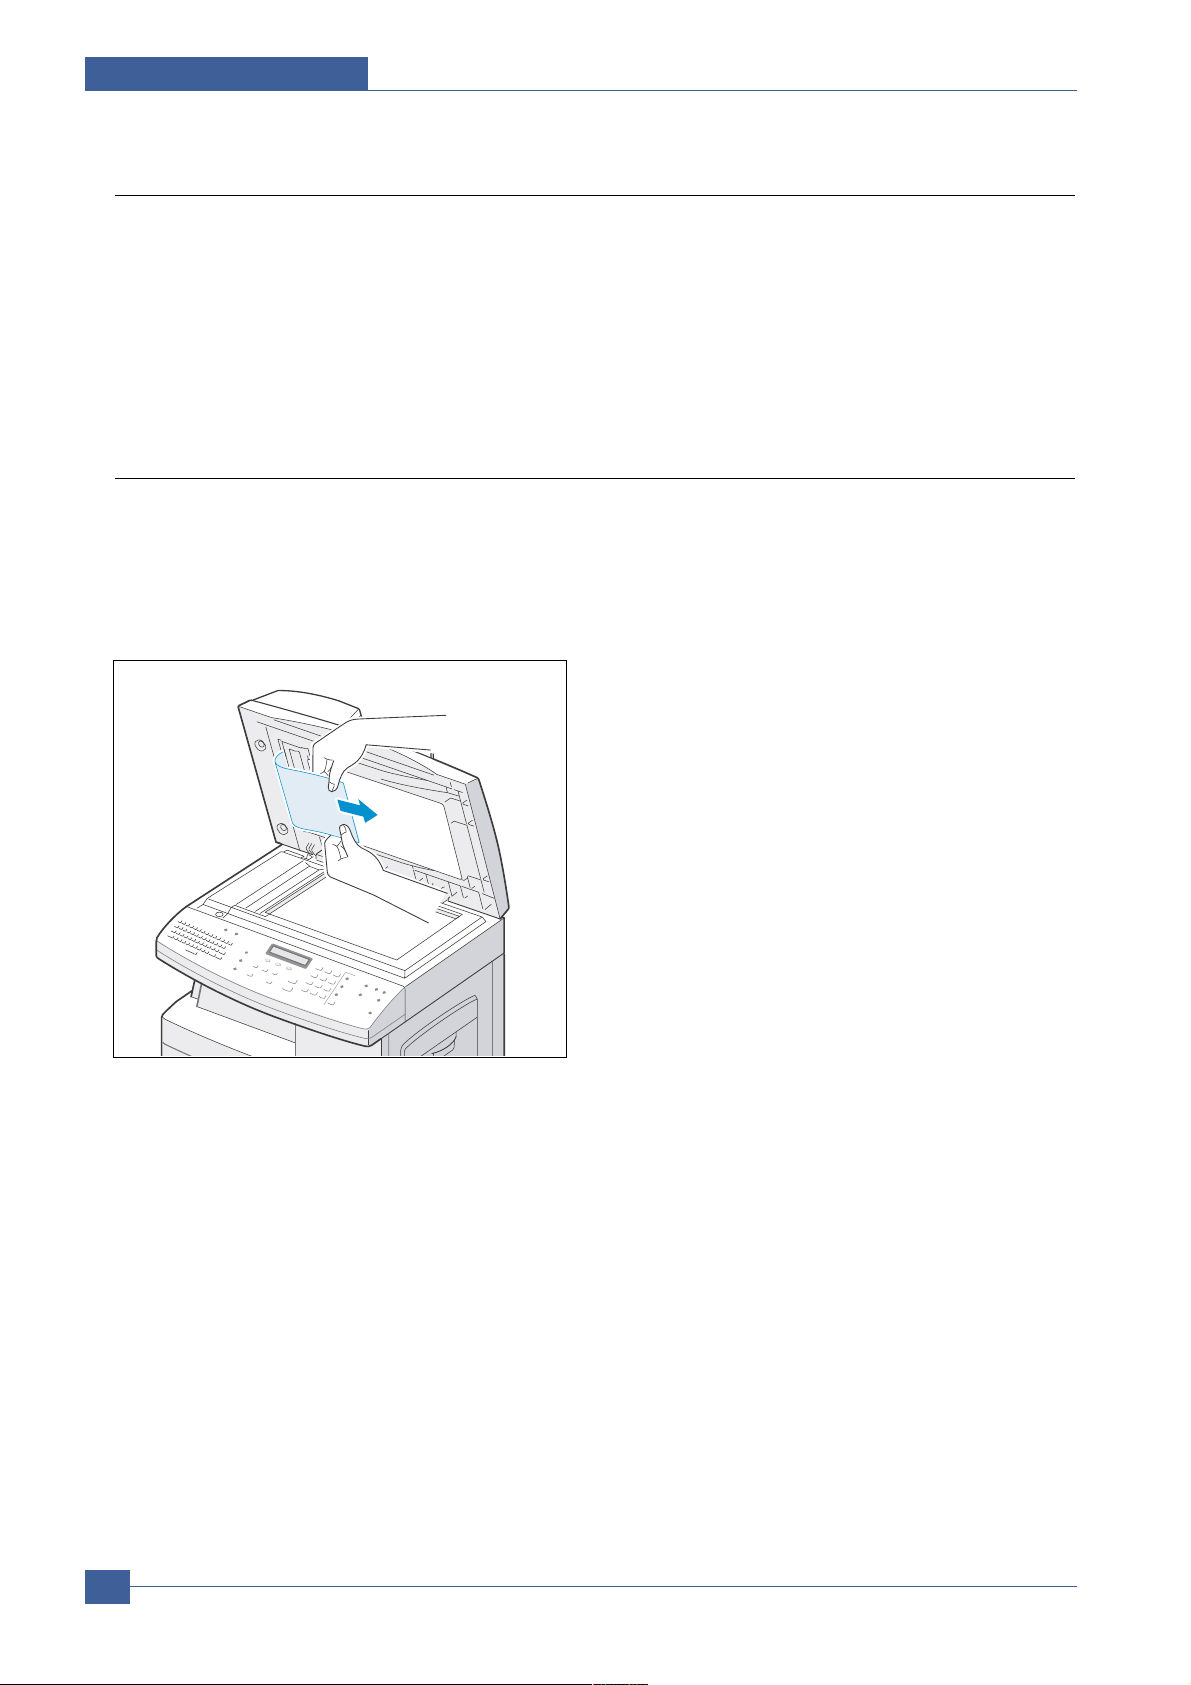
6.2.1.2 DADF Exit Misfeed
1) Remove the remaining documents from the
DADF.
2) Open the document input tray upward and Pull
the document gently out of the DADF.
3) Close the document input tray. Then place the
documents back into the DADF.
6.2.1.3 DADF Roller Misfeed
1) Open the document cover.
2) Seize the misfed document, and remove the
document from the DADF or the feed area by
carefully pulling it towards the right using both
hands.
3) Close the document cover. Then place the
documents back into the DADF.
Page 5
Alignment & Adjustments
Service Manual
6-5
Samsung Electronics
6.2.2 Paper Jams
If paper jams occur, “Paper Jam” appears on the display. Follow the steps below to clear the jam. To avoid tearing
the paper, pull the jammed paper out gently and slowly.
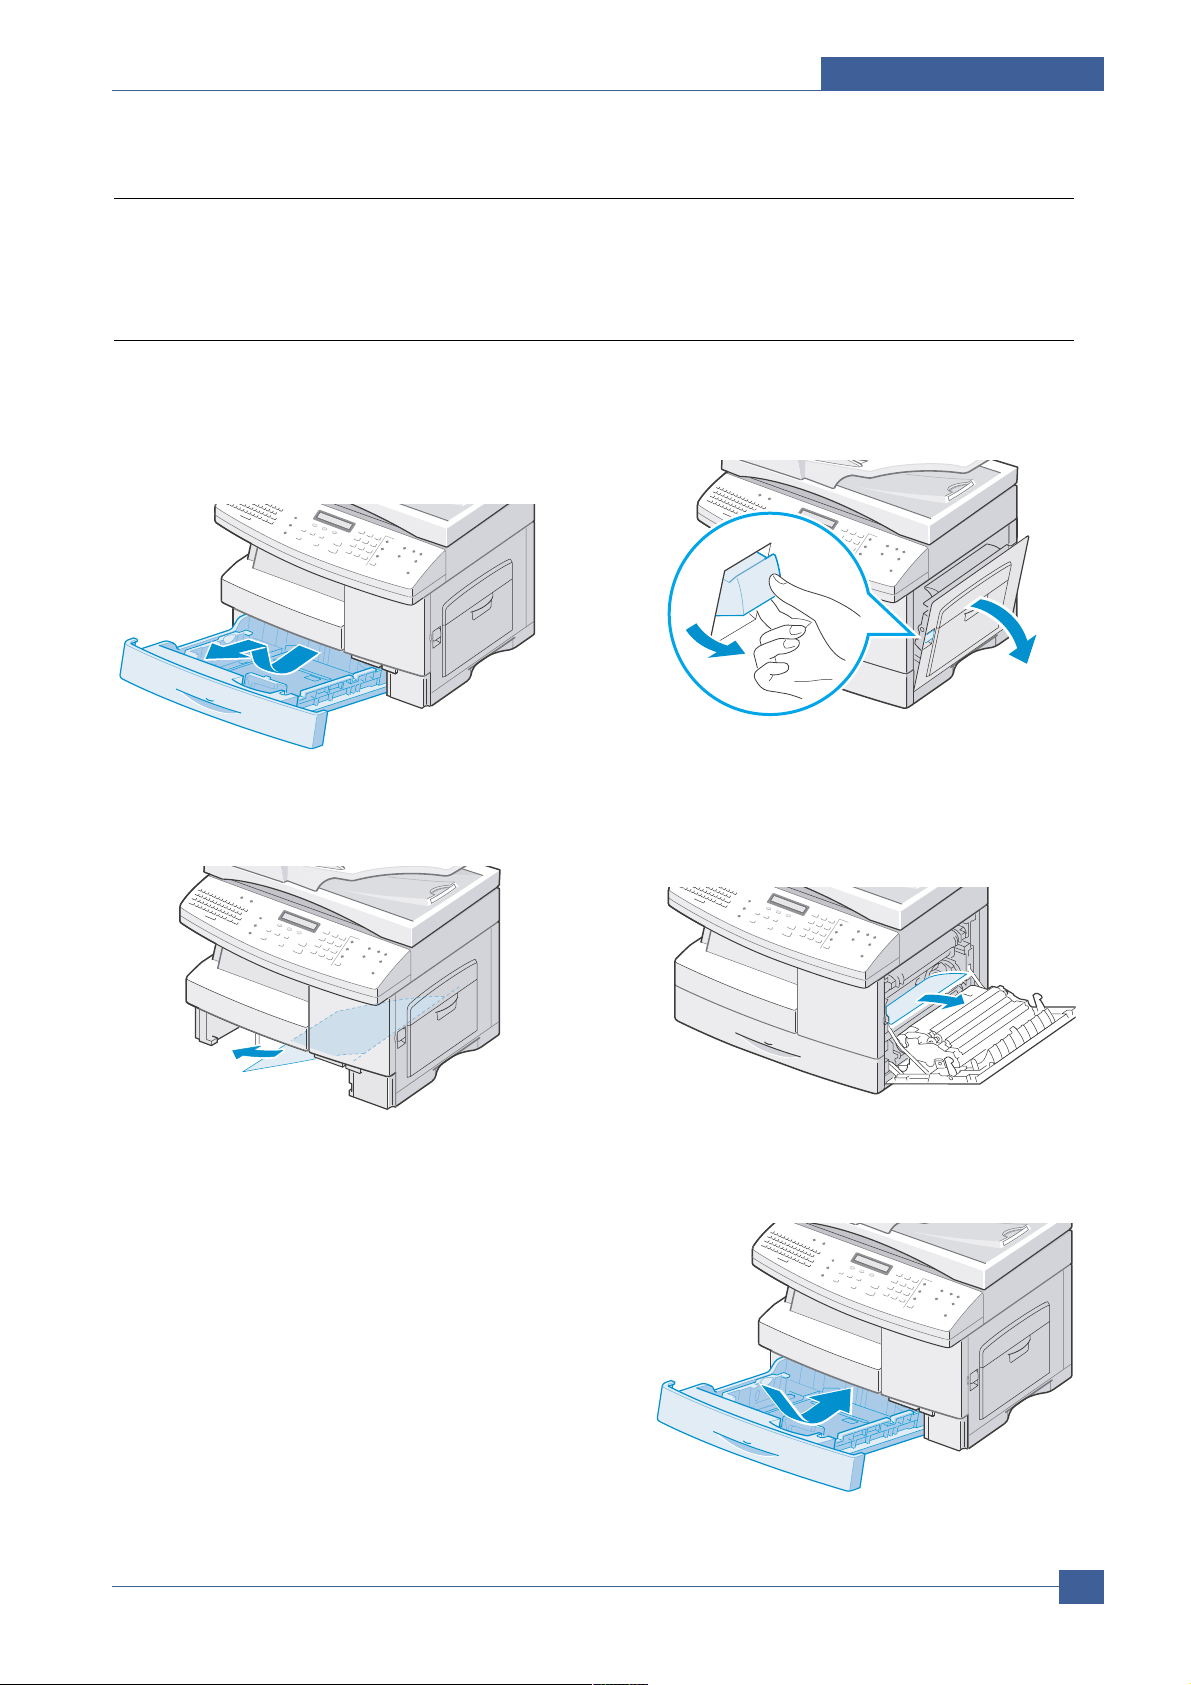
6.2.3 Paper Feed Area
If the paper jams in the feed area, “Paper Jam0” appears on the display.
1) Pull out the paper Tray to the fully open position.
Lift the front part of the Tray slightly up to release
the Tray from the machine.
2) Remove the jammed paper by gently pulling it
straight out.
Once you remove the jammed paper here, open
the side cover and then close it to clear the “Paper
Jam0” message on the display.
If there is any resistance, and the paper does not
move immediately when you pull, stop pulling. Then
continue to step3
3) Pull the release lever to open the side cover.
NOTE: Do not touch the shiny drum cartridge
surface. Scratches or smudges will result in
poor copy quality.
4) Carefully remove the misfed paper in the direction
shown.
5) Close the cover and insert the paper Tray. Lift the
front edge of the tray to engage the tray sliders
and fully insert the paper tray.
Page 6

Service Manual
Alignment & Adjustments
6-6
Samsung Electronics
6.2.4 Fuser Area
If the paper jams in the fuser area, "Paper Jam 1" appears on the display:
NOTE: The fuser area is hot. Take care when removing paper from the machine.
1) Lift the release lever to open the side cover.
2) Pull down on the fuser lever as shown below.
This will release pressure on the paper. If paper is
not seen in this area, skip to the Exit Area.
NOTE: Do not pull paper up through the fusing unit.
Unfused toner may adhere to the area, resulting in smudged copies.
3) Remove the jammed paper, in the direction shown.
4) Push the fuser lever up, and then close the side
cover.
Page 7
Alignment & Adjustments
Service Manual
6-7
Samsung Electronics
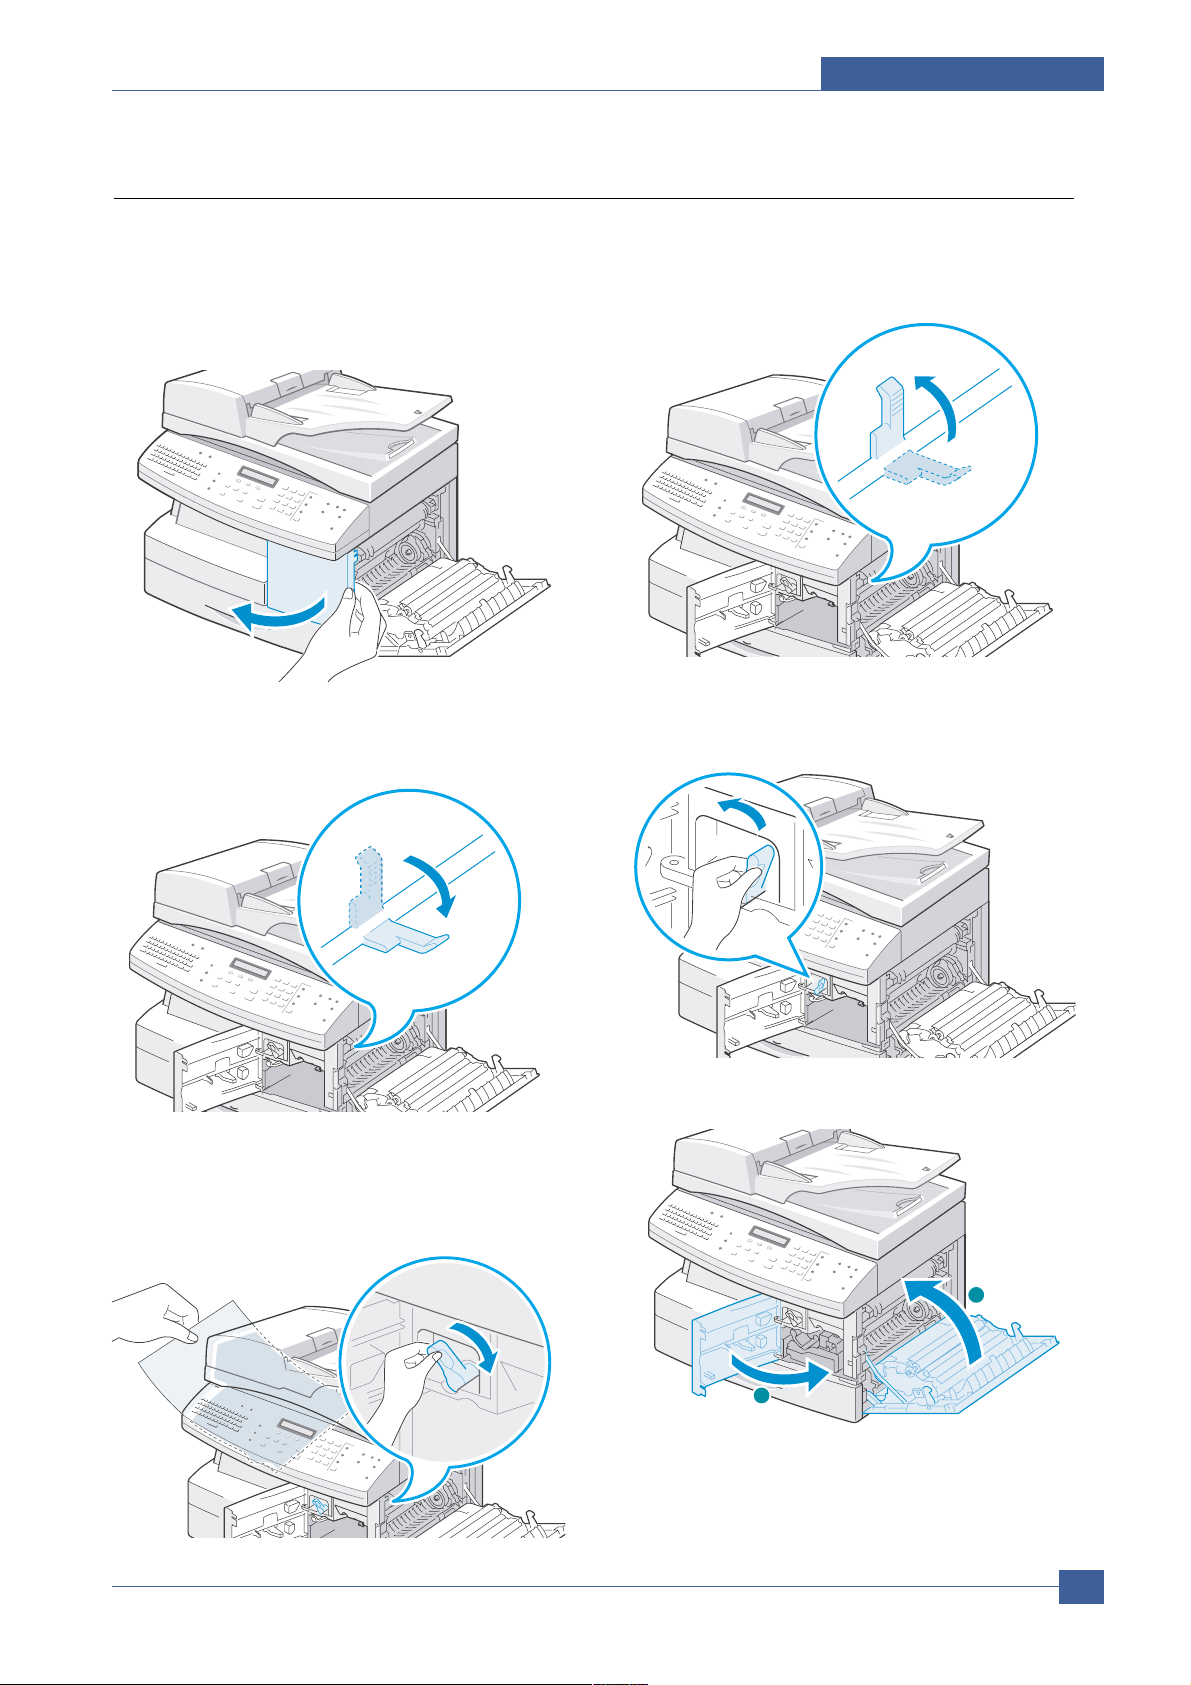
6.2.5 Paper Exit Area
If the paper jams in the exit area, "Paper Jam 2" appears on the display.
1) Press the release lever to open the side cover.
2) Open the front cover.
3) Pull down on the fuser lever. This will release pressure on the paper.
4) Turn the Jam Remove Lever in the direction of the
arrow to move the paper to the exit area, then gently pull the paper out through the exit area.
5) Push the fuser lever up.
6) Turn the Jam Remove Lever back to the original
position.
7) Close the front cover (1) and the side cover (2).
1
2
121
2
Page 8
Service Manual
Alignment & Adjustments
6-8
Samsung Electronics
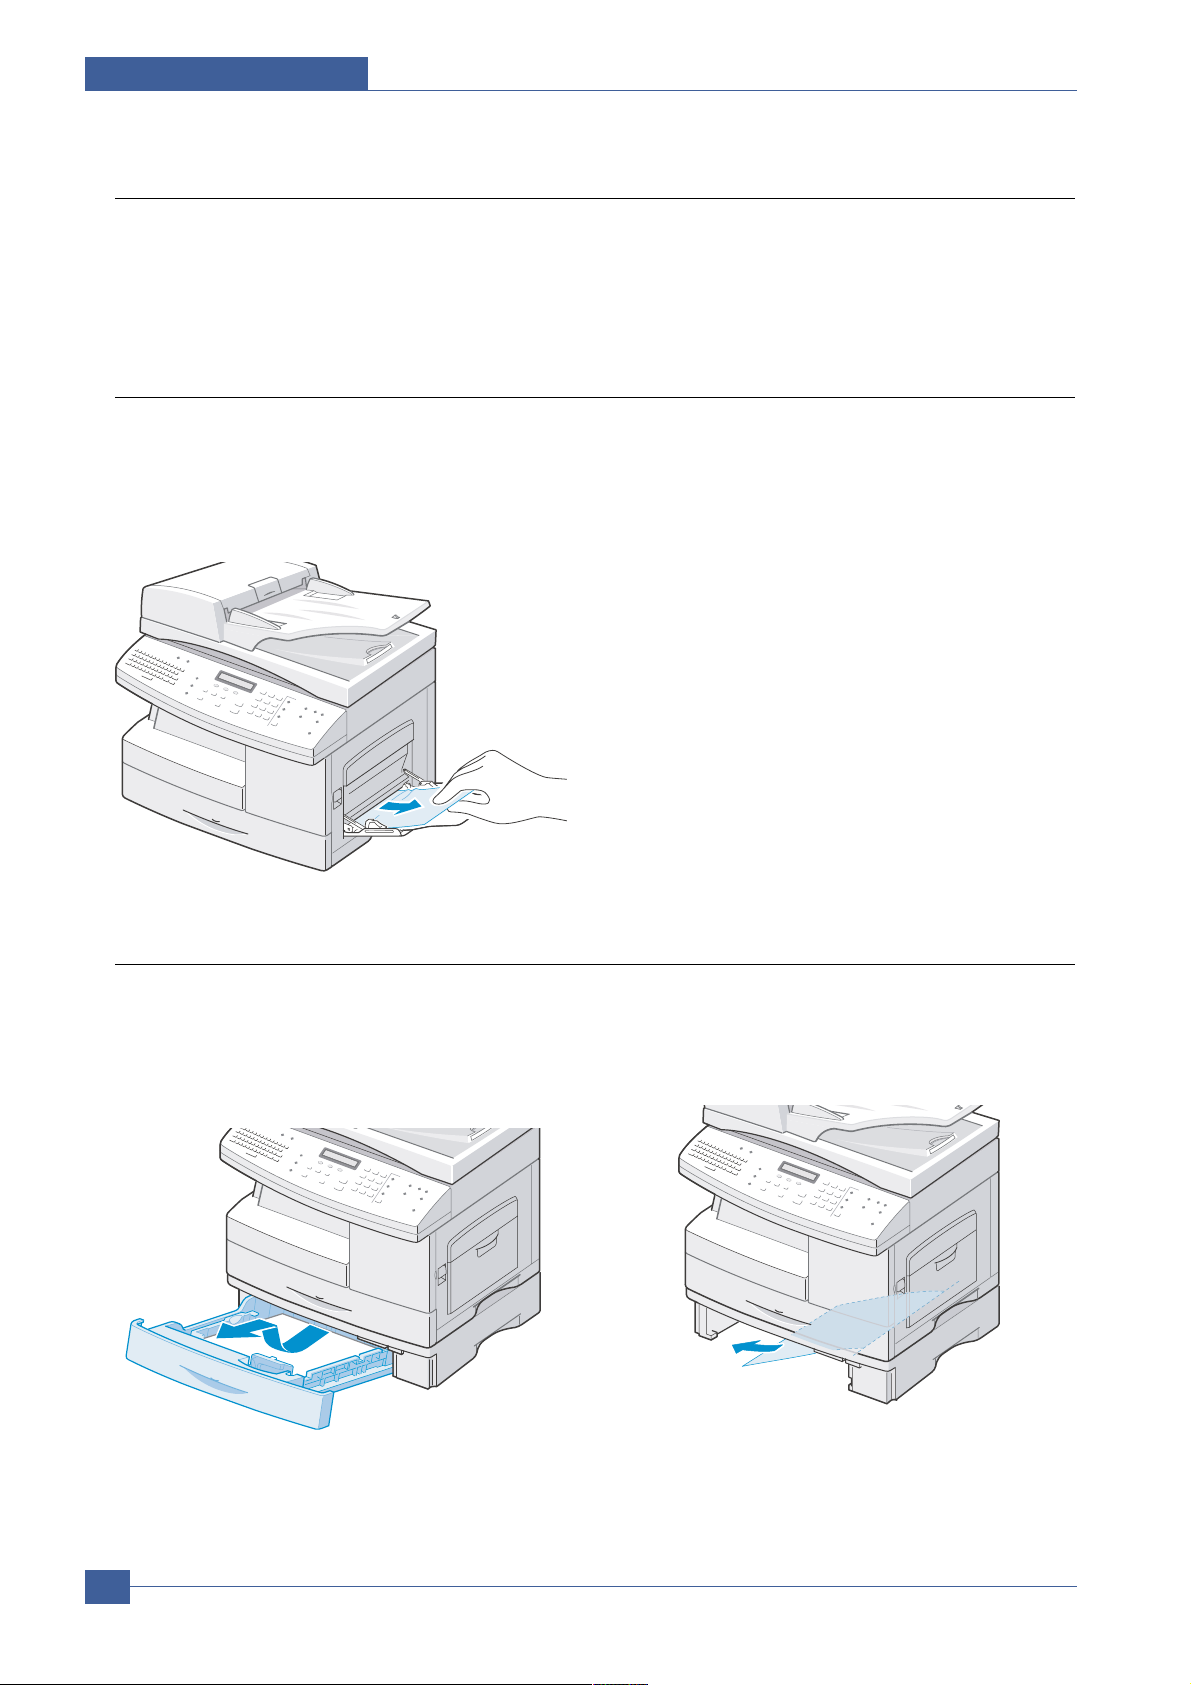
6.2.6 Duplex Jam
If paper jam occurs in the duplex mechanism, "Duplex Jam" appears on the display.
1) Press the release lever to open the side cover. 2) Remove the jammed paper. Then close the side
cover
6.2.8 Optional Tray2 Jam
If paper is jammed in the optional tray2, ‘Jam0 In Tray2’appears on the display.
1) Pull the paper Tray to open. After you pull it out
completely, lift the front part of the Tray slightly up
to release the Tray from the machine
2) Remove the paper in the direction shown. To
avoid the paper torn, pull it out gently and slowly.
6.2.7 Bypass Tray Jam
“Bypass Jam” appears on the display when you try to print using the Bypass Tray and the machine does not
detect paper due to no paper or improper paper loading.
“Bypass Jam” also may occur when the paper is not properly fed into the machine through the Bypass Tray. In that
case, pull the paper out of the machine.
Page 9
Alignment & Adjustments
Service Manual
6-9
Samsung Electronics
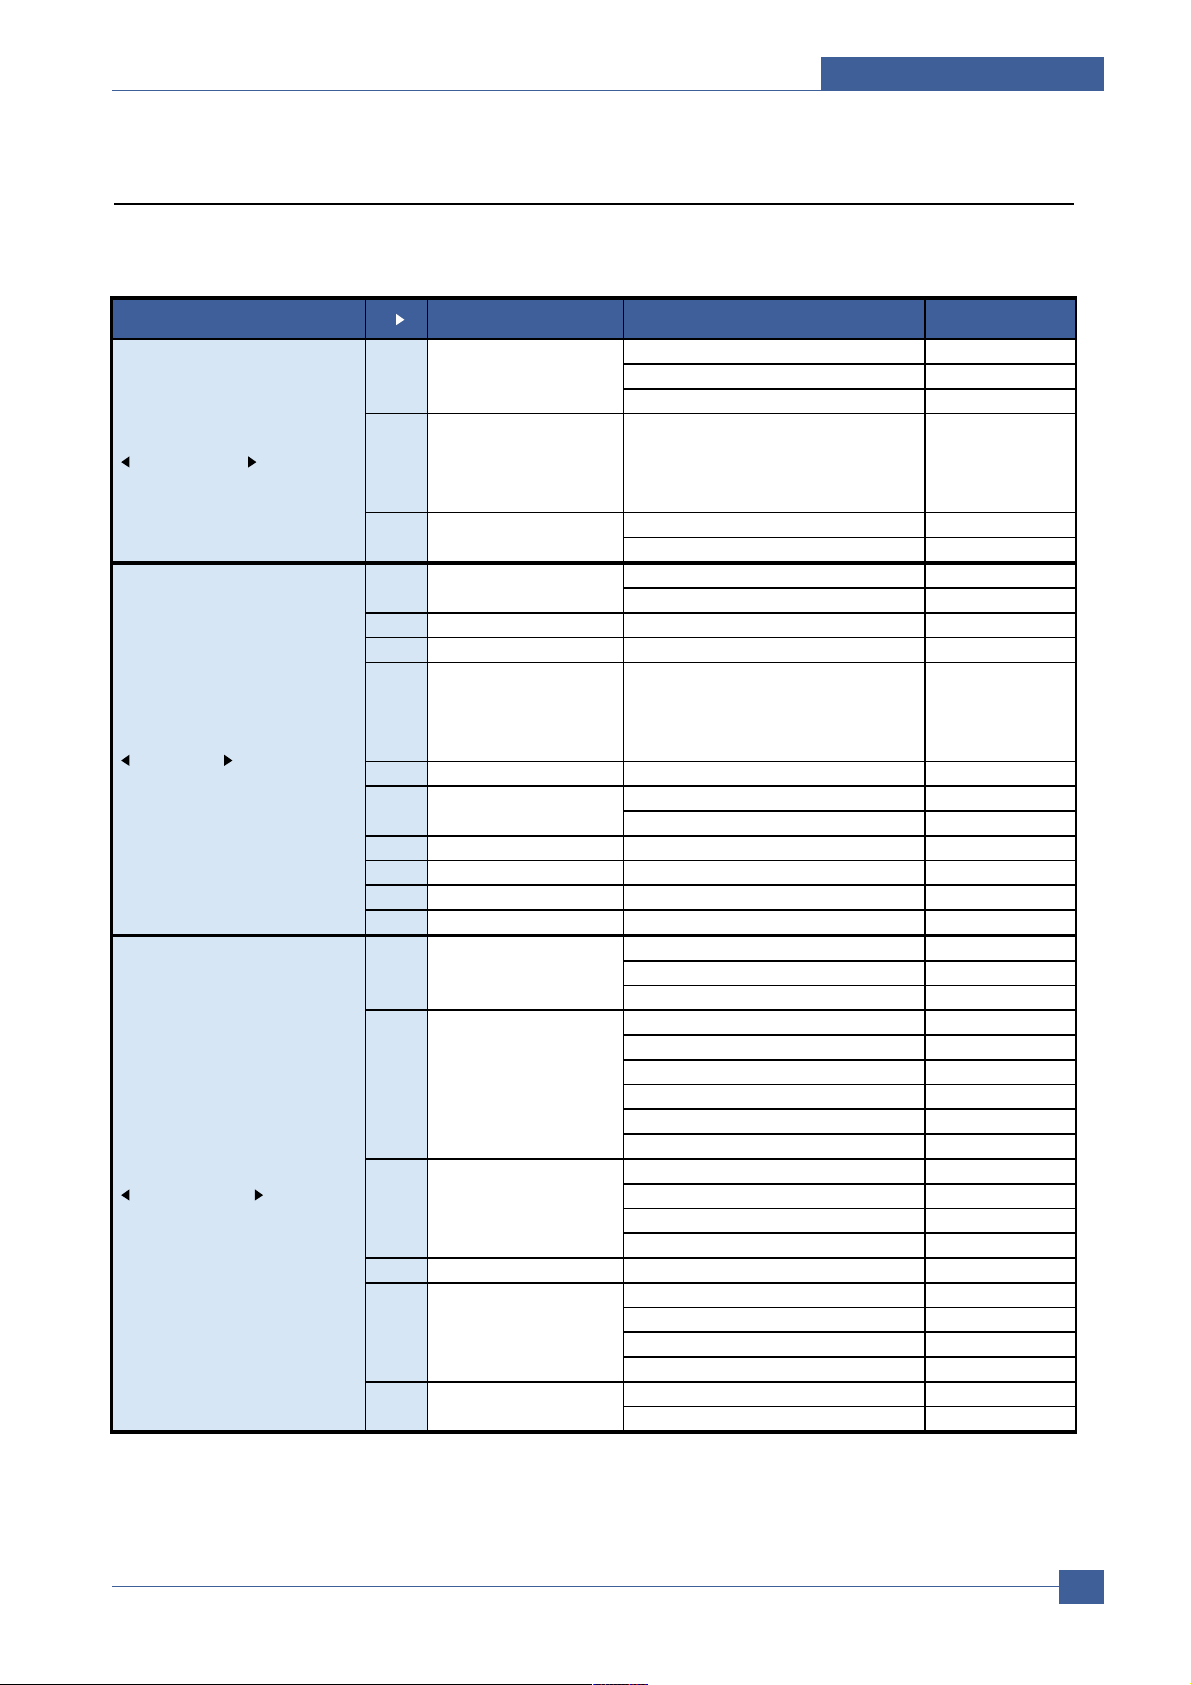
6.3 User Mode
The table below shows all of the possible user settings. Full details can be found in the User Guide.
Function
--
1’st LCD 2’st LCD Default
1.Paper Setting [Tray1] [Tray1]
[Tray2]
[All]
2 Paper Type
[Plain Paper/ Bond/
Transparency/ Card Stock
/Labels/Preprinted/
Colored/envelope]
[Plain Paper]
[Tray Paper] LTR
[MP Tray Paper] L TR
2.Machine Setup Fax:
ID:
2 Date & Time
3 Clock Mode [12, 24 hours] 12hours
4 Language
[English/FRANCAIS/Deutsch/Italia
no/Espa ol/Portugu
s/Nederlands/Dansk/Svenska/suomi
/Norsk
English
5 Localization [Inch, MM] Inch
[On] 5min
[Off]
7 CCD Power Save [1,4,8,12] 4Hour
8 USB Mode [Fast, Slow] Fast
9 Ignore Toner Empty [On, Off] off
10 Time out [Off, 15, 30, 60, 180] [30]
3.Copy Features [Darkness] [Normal]
[Original Type] [Text]
[Reduce/Enlarge] [Original(100%)]
[Off] [Off]
[Auto Center]
[Left Margin]
[Right Margin]
[Top Margin]
[Bottom Margin]
[Off] [Off]
[Left Page]
[Right Page]
[Both Pages]
4 Auto Suppress [Off, On] [Off]
[Off] [Off]
[Front] [Tray 1]
[Back] [Tray 1]
[Front&Back] [Tray 1]
[Off] [Off]
[ MP Tray] [Off]
Fax Paper Tray1
Paper Size3
Change Default1
Margin Shift2
Fax Paper Tray
Machine ID1
Power save6
Machine ID
Transparencies6
Change Default
Book Copy3
Covers5
Page 10

Service Manual
Alignment & Adjustments
6-10
Samsung Electronics
Function
--
1’st LCD 2’st LCD Default
4.Fax Setup [Darkness] [Normal]
[Resolution] [Standard]
2 Receive Mode [Fax, Tel, Ans/Fax] FAX
3 Ring to Answer [1~7] 1
4 Redial Term [1~15minutes] 3minutes
5 Redials [0~13times] 7times
6 MSG Confirm [On, Off, On-Err] On-Error
7 Auto Report [On, Off] On
8 Auto Reduction [On, Off] On
9 Discard Size [00~30mm] 20mm
10 Prefix Dial FAX: xxxxx (5 digits)
11 Receive Start Code
12 ECM Mode [On, Off] On
5.Fax Feature 1 Delay Fax
2 Priority Fax
[Tx Poll]
[Delay Rx Poll]
4 Broadcasting
5 Batch Tx
[On] Off
[Off]
[On] off
[Off]
[Off] off
[On]
[Print]
9 Stamp RCV Name [On, Off] Off
10 Fax Duplex [Off, Long Edge, Short Edge]
6.Reports 1 Fax Phone Book
2 Sent Report
3 RCV Report
4 System Data
5 Scheduled Jobs
6 MSG Confirm
7 Email Tx Report
8 Junk Fax List
9 Billing/Counters
10 Connect Page
1 1 User Auth List
12 Netscan Journal
13 Print All Reports
7.Sound/Volume 1 Speaker [On, Off, Com] Com
2 Ringer [Off, Low,Med,High] Med
3 Key Sound [On, Off] Off
4 Alarm Sound [On, Off] On
Default-Change1
Default-Change
Polling3
Toll Save6
Junk Fax Setup7
Secure Receive8
Delay Fax
Fax Phone Book
Speaker
Page 11

Alignment & Adjustments
Service Manual
6-11
Samsung Electronics
Function
--
1’st LCD 2’st LCD Default
8.Mail Box 1 Print
2 Store
3 Delete
4 Poll From
5 Send
9.Email Features
Print Address Book
10.Sys. Admin T ools [Off] Off
[On]
Set
Print
Management
3 [Off] Off
[On]
Reset NIC
Config Network
Netware
Factory Default
SMTP Server Setup
Auto Send to Self
Guest User Access
Default From
[On]
Default Subject
[Disable]
LDAP Server Setup
[On]
Email Body Text
[Off]
Default Change
File Format Prompt
6
Enter Passcode:
[System Data]
[Fax TX History]
[Fax RX History]
[Fax Phone Book]
[Email Address Book]
[Email TX History]
[Netscan Journal]
Billing Counters
[Serial Number]
[Adjust Shading]
[Clean Drum]
[New Drum]
[Notify Toner Low]
[Create]
[Delete]
10 Fax/Email Forward Setup Forward
1 1 Netscan Timeout Timeout Period
Local Address Book
Print
1
Group Mail
Passcode Protect?1
Passcode Protect
Email Features
Department Codes2
Auxiliary Access
Network Setup4
Email Setup5
Clear Memory7
Maintenance8
Mailbox Setup9
Page 12

Service Manual
Alignment & Adjustments
6-12
Samsung Electronics
6.4 Tech Mode
In service mode (tech) mode, the technician can check the machine and perform various test to isolate the cause
of a malfunction.
To enter the Tech mode, press MENU, #, 1, 9, 3, 4 in sequence, and the LCD briefly displays ‘T’, the machine has
entered service (tech) mode.
While in Tech mode, the machine still performs all normal operations.
To return to normal user mode, press MENU, #, 1, 9, 3, 4 in sequence again, or turn the power off, then on by
unplugging and plugging the power cord.
Options changed while in service mode do not remain changed unless you clear the machine’s memory.
6.4.1 Engine Test Mode
The Engine Test Mode supplies useful functions to check the condition of the print engine. It tests the condition of
each device and displays the result of the test on the LCD. It is divided into 7 functions (0~6), and these are shown
below.
6.4.1.1 Test No
<In Fax mode>
<In Copy mode>
<To Select Engine Test>
[ 0 ] : ALLMOTOR TEST
[ 1 ] : LSU MOTOR TEST
[ 2 ] : SENSOR TEST
[ 3 ] : SCF MOTOR TEST
[ 4 ] : OPC FUSE STATE
[ 5 ] : MHV SUPPLY 1350V
[ 6 ] : TEST START
JUN-25-2004 M:100%
03:09PM STD
LCD Display Step
JUN-25-2004 M:100%
03:09PM TECH MODE
Tech. Mode
Engine Test
Engine Test
[Diagnostic]
<normal>
<Diagnostic Display>
Key :
<MENU, #, 1, 9, 3, 4>
<Test Item>
<Engine T est Select>
Key : MENU, ->, #
ENGINE TEST
NO > 0 - 6
Ready To Copy
100% 001
Ready To Copy T
100% 001
LCD Display Step
<normal> <MENU, #, 1, 9, 3, 4>
Page 13

Alignment & Adjustments
Service Manual
6-13
Samsung Electronics
6.4.1.2 Test map
NEXT
NEXT
NEXT
NEXT
NEXT
NEXT
NEXT
NEXT
[2] SENSOR TEST CHECK
Monitor the status of Actuator(Sensor) with ’1’ or ’0’ .
- ’1’ :Active, ’0’:Inactive
(Legend)
CV / SIDE COVER SENSOR
FD / FEED SENSOR
EX / EXIT SENSOR
OB / OUT BIN SENSOR
FE / FC EMPTY SENSOR
ME / MP EMPTY SENSOR
Go to the top level of Engine test mode.
SCF MOTOR TEST ON Start the SCF Motor. OFF
OFF
Sopt the SCF Motor.
SCF SOLENOID TEST ON
Energize (Turn On) the Solenoid of the 2nd Cassette
Feeder (SCF).
- Automatically de-energized after 300ms.
De-energize (Turn Off) the Solenoid of the SCF
SCF EMP/INST CHECK CHECK
Display the status of the SCF (SCF Installed or not installed,
Paper Empty)
Go to the next test (go to SCF MOTOR TEST)
OPC FUSE STATE CHECK
Check thief there was a New OPC during the previous warm-up time.
Go to the next test (go to OPC FUSE CHECK)
OPC FUSE CHECK CHECK Display the current state of fuse in the OPC. Go to the next test (go to TONER STATE )
TONER STATE CHECK
Display Toner State
- This test does not check thecurrent toner state. It displays the
stored value in SDRAM at the previous Open/Close of the
Side-Cover or Power-on.
- Opening/closing the side-cover or POPO, will update the memory
with the current toner state.
Go to the next test (go to TONER LOW CHECK)
TONER LOW CHECK CHECK Check current toner state. Go to the next test (go to PAGE COUNTER INC)
PAGE COUNTER INC CHECK Increase PAGE COUNTER by 1 count Go to the next test (go to AIR TEMP CHECK)
AIR TEMP CHECK CHECK
Read and display the temperature of the current working environment.
- Display the ADC value
Go to the next test (go to OPC FUSE STATE)
[3]
[4]
OFF
OFF
OFF
OFF
FAN TEST ON Start the FAN motors (Cooler on the Rear side and LSU) Stop the FAN motors.
FUSER CONTROL TEST ON
Turns on the Fuser Heat lamp.
- only when the current fuser temp. is lower than the standby
fuser temp.
Turns off the Heating lamp of Fuser Unit.
FUSER TEMP CHECK CHECK Display FUSER ADC VALUE NEXT
NEXT
NEXT
Go to next test item (Go to ALL MOTOR TEST)
LSU MOTOR TEST ON Start the polygon mirror motor in the LSU.
Stop the polygon mirror motor in the LSU.
LASER DIODE TEST
LSU FAN TEST
ON Turns on LASER diode in the LSU.
ON
Check the time for the LSU motor to come to speed.
The time will be displayed. This includes 500ms for the speed to
stabilize (must be less than 10sec). The Motor will stop automatically.
Turns off LASER diode in the LSU.
OFF
Turns LSU Fan Off.
Turns LSU Fan On.
LSU READY TEST CHECK
Check the time for LSU HSYNC (Horizontal Synch. Signal)
to be detected. The time will be displayed.
(must be less than 10sec). The Motor will stop automatically.
Go to next test (go to LSU HSYNC TEST)
LSU HSYNC TEST CHECK
Monitor the status of the Actuators (Sensor).
- ’1’ :Active, ’0’:Inactive
Go to the next test (go to LSU MOTOR TEST)
[1]
Test No Test Items (Description)
ALL MOTOR TEST ON Start the Developer_Motor & Fuser_Motor OFF Stop the Developer_Motor & Fuser_Motor
FUSER MOTOR TEST (STEPPER) ON Start the Fuser_Motor only. OFF Stop the Fuser_Motor
Deve. MOTOR TEST (BLDC) ON Start the Developer_Motor only. OFF Stop the Developer_Motor.
FUSER MTR DIR TEST FWD Start the Fuser_Motor in the forward direction RVS Start the Fuser_Motor in the reverse direction
ALL MOTOR STOP STOP Stop the Developer_Motor & Fuser_Motor. NEXT Go to next test item (Go to FCF SOLENOID TEST).
FCF (1st Tray) SOLENOID TEST ON
Energize (Turn On) the Solenoid of the First Cassette
Feeder (FCF).
- Automatically de-energized after 200ms.
OFF De-energize (Turn off) the Solenoid of the FCF.
MPF (MP Tray) SOLENOID TEST ON
Energize (Turn Off) the Solenoid of the Multi-Purpose
Feeder (MPF).
- Automatically de-energized after 200ms.
OFF De-energize (Turn Off) the Solenoid of the MPF
PTL TEST ON Turns on the Pre-Transfer Lamp (PTL) OFF Turns off the PTL.
[2]
[0]
[1]
Control Code
Page 14

Service Manual
Alignment & Adjustments
6-14
Samsung Electronics
Test No Test Items (Description)
[2]
[1]
Control Code
NEXT
OFF
OFF
OFF
OFF
MHV SUPPLY 1350V ON Supply 1350V to the MHV Disconnect voltage from MHV
MHV ADC READ CHECK
Read and display the MHV ADC (Analog-To-Digital Conversion)
value.
Go to the next test (go to DEV SUPPLY 450V)
DEV SUPPLY 450V ON Supply 1450V to the DEV (Developer). Disconnect voltage from DEV
THV SUPPLY NEG VOLT ON Supply negative voltage to the THV Disconnect negative voltage from THV
THV SUPPLY 1301V ON Supply 1300V to the THV Disconnect voltage from THV
THV ADC READ CHECK Read and display the THV ADC value. NEXT Go to the next test (go to MHV SUPPLY 1350V)
1 ALL MOTOR CONTROL
2 FUSER MOTOR CONTROL
3 DEV MOTOR CONTROL
4 DUPLEX CONTROL
5 FCF PICKUP CONTROL
6 M P PICKUP CONTROL
7 PTL CONTROL
8 FAN CONTROL
9 FUSER CONTROL
10 LSU MOTOR CONTROL
11 LASER DIODE CONTROL
12 SENSOR DETECT
13 MHV CONTROL
14 DEV CONTROL
15 THV NEG CONTROL
16 THV CONTROL
17 MHV ADC READ
18 THV ADC READ
19 TEST END
Automatically start to test with 2 sec intervals.
[5]
Automatic Test Sequence
Auto TEST [6]
NEXT : RIGHT KEY
EXIT : STOP KEY Go to the top level of Engine test mode.
Page 15

Alignment & Adjustments
Service Manual
6-15
Samsung Electronics
6.4.1.3 Operation of Tech mode
Function
--
1’st LCD 2’st LCD 3’st LCD 4’st LCD 5’st LCD 6’st LCD Default
Tech Mode 1 Data Setup [Send Level] Send Level [-9~-15] -12
Data Setup
[Modem Speed] Modem Speed
[33.6,28.8,14.4,12,96,
48]
33.6
[Dial Mode] Dial Mode [Tone, Pulse]
[Error Rate] Error Rate [5%, 10%] 10%
[Notify Toner] Notify Toner [Customer No.]
[Customer Name]
[Service Number]
[Serial Number]
[Clear All Mem.] Clear All Mem.
[Clear Count] Clear Count [Total Page Count]
[CRU Print CNT]
[FLT Scan Count]
[ADF Scan Count]
[Used Toner CNT]
[Flash Upgrade] Flash Upgrade [Local]
[Remote]
2 Machine Test [Switch Test]
[Modem Test]
[DRAM Test]
[ROM Test]
[Pattern Test]
[Shading Test]
3 Engine Test [Diagnostic] Engine Test NO > 0 - 6 ALL MOTOR TEST 1:ON 2:OFF
FCF SOLENOID TEST 1:ON 2:OFF
M F SOLENOID TEST 1:ON 2:OFF
PTL TEST 1:ON 2:OFF
FAN TEST 1:ON 2:OFF
FUSER CONTROL TEST 1:ON 2:OFF
FUSER TEMP TEST 1:CHECK 2:NEXT
LSU MOTOR TEST 1:ON 2:OFF
LASER DIODE TEST 1:ON 2:OFF
LSU READY TEST 1:CHECK 2:NEXT
LSU HSYNC TEST 1:CHECK 2:NEXT
SENSOR TEST 1:CHECK 2:NEXT
SCF MOTOR TEST 1:ON 2:OFF
SCF SOLENOID TEST 1:ON 2:OFF
SCF EMP/INST TEST 1:CHECK 2:NEXT
OPC FUSE STATE 1:CHECK 2:NEXT
OPC FUSE CHECK 1:CHECK 2:NEXT
TONER STATE 1:CHECK 2:NEXT
TONER LOW CHECK 1:CHECK 2:NEXT
PAGE COUNTER INC 1:CHECK 2:NEXT
AIR TEMP CHECK 1:CHECK 2:NEXT
MHV SUPPLY 1350V 1:ON 2:OFF
MHV ADC READ 1:CHECK 2:NEXT
DEV SUPPLY 450V 1:ON 2:OFF
THV SUPPLY NEG VOLT 1:ON 2:OFF
THV SUPPLY 1301V 1:ON 2:OFF
THV ADC READ 1:CHECK 2:NEXT
TEST START NEXT : RIGHT KEY
[Status Print]
4 DADF Test DADF EDC
[DADF Diagnostic]
Clutch Test
Motor Test
Sensor Test
5 Report [Protocol]
[System Data]
Page 16

Service Manual
Alignment & Adjustments
6-16
Samsung Electronics
6.4.2 Data Setup
SEND LEVEL
You can set the level of the transmission signal. Typically, the Tx level should be under -12 dBm.
Caution : The Send Fax Level is set to the best condition during manufacture. Never change settings arbitrarily.
DIAL MODE
This function can choose the dialing method.
*Default : Dial (Dial/Pulse)
MODEM SPEED
You can set the maximum modem speed.
When the fax establishes communication with a remote set the value of the maximum modem speed is
checked for both transmitter and receiver. The lowest value is used. It is best set at 33.6Kbps, the default
setting.
ERROR RATE
When the error rate is about exceed the set value, the Baud rate automatically adjusts to 2400 bps.
This ensures that the error rate remains below the set value.
You can select the rate between 5% and 10%.
CLEAR ALL MEMORY
The function resets the system to factory default settings.
This function is used to reset the system to the initial value when the product is functioning abnormally.
All the values are returned to the default values, and all the information which was set by the user
will be erased.
< Method >
1. Select the [MEMORY CLEAR] in TECH MODE.
2. Push the ENTER button.
3. Select your country. (There are four country groups. Refer to the table below.)
4. Push the ENTER button then it will clear all memory.
NOTICE : Always perform a memory clear after replacing the main board, otherwise the system may
not operate properly.
Country Group USA/Canada UK Russia Southafrica
USA/Canada UK Russia South Africa
Mexico Germany India
Brazil France Oman
Italy Poland
Spain Bangladesh
Austria Kuwait
Netherlands Moroco
Belgium Algeria
Country Portugal Pakistan
Sweden UAE
Norway Bahrain
Denmark Srilanka
Finland Saudi Arabia
Switzerland Chile
Greece Peru
Ireland Argentina
Turkey Hungary
Romania
Bulgaria
Czech
Page 17

Alignment & Adjustments
Service Manual
6-17
Samsung Electronics
6.4.2.1 Clear Counters
The following counters can only be cleared in TECH MODE. They are
accessed through the Data Setup menu.
6.4.2.2 Flash Upgrade
FLASH memory is upgraded in the same way as Firmware. See Page 6-21.
6.4.3 Machine Test
SWITCH TEST
Use this feature to test all keys on the operation control panel. The result is displayed on the LCD window each
time you press a key.
MODEM TEST
Use this feature to hear various transmission signals to the telephone line from the modem and to
check the modem, amplifier and speaker. If no transmission signal sound is heard, it means the
modem part of the main board, amplifier, speaker or speaker harness is faulty.
DRAM TEST
Use this feature to test the machine's DRAM. The result appears in the LCD display.
If all memory is working normally, the LCD shows << O K >>
ROM TEST
Use this feature to test the machine's ROM. The result and the software version appear in the LCD display.
• FLASH VER : 1.00 V
• ENGINE VER :1.00V
PATTERN TEST
Using this pattern printout you can check that the printer mechanism is functioning properly.
This function is for factory manufacturing use only.
SHADING TEST
The function is used to set the optimum scan quality
determined by the specific characteristics of the CCD
(Charge Coupled Device). If copy image quality is poor
perform this function to check the condition of the CCD unit.
< Method >
1. Select the [Shading Test] in TECH MODE (Menu, #, 1934).
2. Push the ENTER button and an image will be scanned.
3. After scanning the CCD SHADING PROFILE will be print out.
4. If the printed image is different to the sample image shown
the CCD is defective.
NOTICE : When you test the CCD, make sure that the
cover is closed.
Total page Count : XXXXX
FLT Scan CNT : XXXXX
ADF SCAN CNT : XXXXX
Used Drum CNT : XXXXX
Used Toner CNT : XXXXX
Page 18

Service Manual
Alignment & Adjustments
6-18
Samsung Electronics
6.4.4 DADF Test
Test Item[DADF Diagnostic]
- Clutch Test: Pick up clutch, Regi clutch, Duplex clutch
- Motor Test: Scan Motor, Duplex CW, Duplex CCW
6.4.5 Report
6.4.5.1 Protocol Dump List
This list shows the sequence of the CCITT group 3
T.30 protocol during the most recent sending or
receiving operation. Use this list to check for send
and receive errors. If a communication error occurs
while the machine is in TECH mode, the protocol
list will print automatically.
6.4.5.2 System Data List
This list provides a list of the user system data
settings and tech mode settings.
Page 19

Alignment & Adjustments
Service Manual
6-19
Samsung Electronics
6.4.5.3 Billing / Counters List
This list provides the usage data (page count) of Drum Cartridge, Toner Cartridge, the page count of machine, and
DADF / Platen scan page count.
(See the chapter 4.2.8.3)
Billing/Counters List JAN-08-2004 01:39 AM THU
SCX-6320F
Machine ID :
Serial Number : PR-HV51........
Fax Number :
Total impressions : 1762
Total impression Count : 1762
Drum impression Count : 1762
DADF Scan Page Count : 1342
Platen Scan Page Count : 27
Replaced Toner Count : 1
Replaced Drum Count : 0
Equivalent Drum Revolution Rate : 126.10% (2237)
(Projected Page Counts)
CRUM Information
Vendor : SAMSUNG(China) [CHN]
Capacity : 8K
Product Date : 2004.06
Install Date : 2004.01.04
Serial : CRUM-04060934720
Total Pages : 1762(0)
Toner Status : 0
Page 20

Service Manual
Alignment & Adjustments
6-20
Samsung Electronics
6.5 Flash Upgrade
There are 2 methods to update the Flash Rom, Local and Remote.
(1) Local Machine
• RCP (Remote Control Panel) mode
This method is for Parallel Port or USB Port. Connect the PC and activate the RCP (Remote Control Panel) to
upgrade the Firmware.
< Method >
How to Update Firmware using RCP
1. Connect PC and Printer with a Parallel Cable or a USB Cable.
2. Run the RCP utility and select Firmware Update.
3. Search for the Firmware file to be used to update the set using the Browse Icon.
4. Click the Update icon. The firmware file is transmitted to the Printer automatically and the printer is
initialized when the download completes.
5. Click the Refresh icon and check that the updated version numbers are displayed.
• DOS Command mode
This method is ONLY for Parallel Port. Connect the PC to the set using a Parallel Cable and enter the DOS
Command to upgrade the firmware.
< Method >
1. First of all you need the following files : down.bat, down_com.bin, fprt.exe, and Rom File: (file name for
upgrade). Ensure you save ALLof these files in the same folder.
2. At the DOS prompt enter the correct command (as shown below) and push the enter key.
Then the upgrade will automatically take place..
3. There are two commands use the correct one depending on the condition of the set..
* When the product is in the idle condition
down "rom file"
* When the product is in Ready condition
(TECH MODE --> DATASETUP --> FLASH UPGRADE --> LOCAL)
fprt "rom file"
4. Do not turn off the power during the upgrade process.
(2) Remote FAX
It is possible to use a set that already has the latest firmware to upgrade a remote set remotely using the
telephone system.
< Method >
1. On the set that has the latest firmware set it toi transmit the upgrade:(TECH MODE •DATASETUP•••• FLASH UPGRADE•••• REMOTE)
2. Enter the telephone number of the set that needs to be upgraded.
(Several faxes can be upgrade at the same time. In this case, enter each fax number.)
3. When the enter button is pressed the set sends the firmware file by calling designated fax number.
(Around 10~15 minutes are needed to send the file.)
< Caution >
1. The Sending and Receiving fax machines MUST be the same model.
2. The sending fax must be set up in ECM mode and the Receiving fax memory must be 100%.
If not the function will not work.
Page 21

Alignment & Adjustments
Service Manual
6-21
Samsung Electronics
6.5.1 NIC Card F/W Upgrade
There're two methods for upgrading NIC f/w. You can not do it by using Printer RCP.
A. SyncThru :
SyncThru
->Menu
->Maintenance
->Upgrade Firmware
->Select the machine you want to upgrade.
-> Fill file path and name in File name field.
->Press Start.
Upgrading NIC F/W will take at least one minute.
B. SyncThru Web Service :
Open a browser(Internet explore)
-> type your machine ip address in address field.
-> Maintenance Tab
-> Firmware Upgrade
-> Fill file path and name in File name field.
-> Press "Upgrade" button
Upgrading NIC F/W will take at least one minute.
Page 22

Service Manual
Alignment & Adjustments
6-22
Samsung Electronics
6.6 Abnormal Image Printing and Defective Roller
If a mark or other printing defect occurs at regular intervals down the page it may be caused by a damaged or
contaminated roller. Measure the repetition interval and refer to the table below to identify the roller concerned.
No Roller Abnormal image period Kind of abnormal image
1 OPC Drum 94.30mm White spot, Block spot
2 Charge Roller 38.30mm Black spot
3 Supply Roller 43.80mm Horizontal density band
4 Develop Roller 54.30mm Horizontal density band
5 Transfer Roller 56.60mm Black side contamination/transfer fault
6 Heat Roller 83.60mm Black spot and fuser ghost
7 Pressure Roller 91.00mm Black side contamination
SMPSSMPS
LIULIU
Main Board+Engine BoardMain Board+Engine Board
EMPTY SENSOR(MPF)EMPTY SENSOR(MPF)
FEED SENSORFEED SENSOR
EMPTY SENEMPTY SEN
TONER UNITTONER UNIT
FTLFTL
OPC UNITOPC UNIT
OPC UNITFUSER
MPF
EXIT SENSOREXIT SENSOREXIT SENSORBIN FULL SENSOR
EXIT UNITEXIT UNIT
TRTR
OPC
DRUM
OPC
DRUM
FEEDERFEEDER
PICKUP ROLLPICKUP ROLL
1
2
4
3
5
76
1
OPC Drum
2
Charge Roller
3
Supply Roller
4
Developing Roller
5
Transfer Roller
6
Heat Roller
7
Pressure Roller
Page 23

Alignment & Adjustments
Service Manual
6-23
Samsung Electronics
DOCUMENT JAM
DOOR OPEN
BYPASS JAM
DUPLEX JAM
Drum Warning
Function Full
PAPER JAMØ
PAPER JAM1
Open/Close Door
PAPER JAM 2
Check Inside
NO PAPER ADD
P APER
LSU ERROR
LOW HEAT ERROR
OPEN HEAT ERROR
The loaded document has jammed in the
DADF
The side cover is not securely latched.
The machine detected a mis-feed from the
BYP ASS Tray.
The machine detected a duplex jam in the
middle of 2-sided printing.
The drum cartridge is near the end of its
life.
The memory is full.
Recording paper is jammed in the paper
feeding area.( Recording paper is jammed
in pick-up unit)
The machine has detected a paper jam in
fuser area. OPEN the side door and clear
the jam. CLOSE the door to continue.
The machine has detected a paper jam in
paper exit area. OPEN the side door and
clear the jam. CLOSE the door to continue.
The recording paper has run out. The
printer system stops.
The Laser Scanning Unit did not reach the
READY state within a defined time or a
problem has occurred in the LSU.
The Fuser temperature did not reach a
certain level, or the thermister has become
disconnected.
During operation the fuser temperature
fails to rise correctly, the Thermister is not
connected to the main board or contact
points are loose or dirty.
Clear the document jam.
Close the cover until it locks into place.
Open the side Cover and remove the
jammed paper.Load paper in the bypass tray.
Remove the jammed paper
You should ensure a replacement
cartridge is in stock.
Either delete unnecessary documents, or
retransmit after more memory becomes
available. The transmission can also be
split into more than one operation if it is a
large job.
Press STOP and remove the jammed
paper
Remove the jammed paper
Remove the jammed paper
Load the recording paper in the paper
feeder.
Try Power Off-Power On.
*Please test the LSU in engine test mode.
*If the problem still persists, replace the
LSU unit.
Try Power Off-Power On.
*Check thermister contact point & heat roller.
*If the problem still persists, replace fuser
unit.
*Check thermister contact point and cable
connection.
*Please test the fuser in engine test mode.
*If the problem still persists, replace fuser unit.
DADF
Feeder
Feeder
Feeder
Feeder
Feeder
Feeder
Feeder
LSU
Fuser
Fuser
Error Message Description Solution
6.7 Machine Error Codes (Service codes)
6.7.1 Machine Error Message
Page 24

Service Manual
Alignment & Adjustments
6-24
Samsung Electronics
OVER HEAT ERROR
NO CARTRIDGE
Invalid Cartridge
DRUM WARNING
REPLACE DRUM
TONER EMPTY or
REPLACE TONER
TONER LOW
Function Impossible
DIMM not installed
NETWORK IP Conflict
No Paper
RX Tray Full
The fuser temperature has risen too far. If the
temperature of heat roller abnormally increases
above the toner-fusing-temperature parts of
the fuser may be thermally degraded.
The toner cartridge is not installed or the
CRUM terminals in the cartridge are dirty
or loose.
The toner cartridge is not for the Samsung
machine.
The drum cartridge is near the end of life,
18,000 print pages.
The drum cartridge has reached the end of
its life, 20,000 print pages.
When the machine has encountered the
Toner Empty.
Toner is almost empty.
Toner may be low Toner may be unevenly
distributed.
Means that these modes do not work
together or are not supported in your
current machine configuration.
If the MODEM chip is installed on the main
PBA for SCX-6520FN but the DIMM for
Fax memory is not installed then this
message appears on the LCD.
Your MFP has been given the same IP
address as anther device on your network.
The paper in the paper Tray has run out.
The output bin is full.
The machine will automatically return to
standby mode when it cools down to the
normal operating temperature.
* Check DC control signal from Main PBA
to TRIAC and AC supply from SMPS to
fuser.
* Check the thermister on the fuser for
contamination by toner debris or dust
and clean the thermister surface.
* Please test the fuser in engine test
mode.
* If the problem still persists, replace fuser
unit.
Install a toner cartridge. If already installed
then check CRUM contact points. (Try
uninstalling and re-installing the cartridge)
Check that the toner cartridge is correct for
this model.
Ensure a replacement OPC Drum is in
stock. Continue to use this drum until
“REPLACE DRUM” appears
Replace the Drum Cartridge.
Replace with a new Toner Cartridge.
Take out the toner cartridge and gently
shake it. By doing this printing operations
can be temporarily resumed.
In case of copying, try again without function combination .For Scan-To-Email,
please check secured connection of the
DIMM and QWERTY keyboard
Check the DIMM in the expansion memory slot.
* Please test the RAM testing in engine
test mode.
* If the problem is in the DIMM, replace the
DIMM.
Correct the network settings.
Load the paper in the paper Tray.
Remove the paper.
Fuser
CRU
CRU
CRU
CRU
CRU
CRU
Inform
Main
PBA
NIC
Error Message Description Solution
Page 25

Alignment & Adjustments
Service Manual
6-25
Samsung Electronics
COMM. ERROR
GROUP NOT A VAILABLE
INCOMP ATIBLE
LINE BUSY
LINE ERROR
MEMORY FULL
NO ANSWER
NO. NOTASSIGNED
POWER FAILURE
RETRY REDIAL?
Poll Code Err.
Polling Error
Aproblem with the facsimile communications has
occurred.
- Machine displays this when transmitting.
- Machine displays this during fax handshaking
step when receiving.
You have tried to select a group location where
only a single location number can be used, such
as when adding locations for a multi-dial operation.
Remote party did not have the requested feature,
such as poling.
The remote FAX didn't answer
The machine has problem receiving data.
Your unit cannot connect with the remote
machine, or has lost contact because of a
problem on the phone line.
The memory has become full.
After completing the number of redials specified in
the System data and the remote machine was not
answered after all the redial attempts.
The speed dial location you tried to use has no
number assigned to it.
The power has been off and the backup power
time limit has been exceeded.
The machine is waiting for the programmed interval
to automatically redial.
You have used an incorrect poll code.
The remote fax machine you want to poll is not
ready to respond to your poll. Or, when setting up
to poll another fax machine, you have used an
incorrect poll code.
Try resending the fax.
Try again, check location for a group.
Try again.
Try again. If failure persists, wait an hour or
so for the line to clear then try again.
Either delete unnecessary documents, or
retransmit after more memory becomes available, or split the transmission into more than
one operation.
Try again. Make sure the remote machine is
OK.
Dial the number manually with the keypad, or
assign the number.
Check backup battery
You can press [START] to immediately redial,
or [STOP] to cancel the redial operation.
Use the correct poll code.
The remote operator should know in advance
that you are polling and have the fax
machine loaded with the original document.
Enter the correct poll code.
Error Message Description Solution
6.7.2 Fax Error Message (Only for SCX-6320F)
Page 26

Service Manual
Alignment & Adjustments
6-26
Samsung Electronics
Not Assigned
Send Error(SMTP)
Recipient Address
Failure
Send Error(SMTP)
Connection Failure
Authentication Failure
Authentication Required
SMTP Server CONN.
Failure
Invalid Server Or Port
No.
SMTP DNSCONN.
Failure
SMTP DNS
DomainError
Email AssociatedCannot
Delete
Mail Too Large
Empty Address Book
Address Book Full
Not Assigned. The Group Mail you tried to use has
no email assigned to it.
Your unit cannot connect with the server, or has lost
contactbecause of a problem on the network..
There was a problem with the address that you sent
the email to.
Send Error (SMTP) can be due to any of the following:
• Error returned due to abrupt disconnection of
SMTP server.
SMTP_SERVER_DISCONNECTION
• Error returned by NIC during SMTPencoding activity
SMTP_ENCODER_FAILURE
• Error returned by NIC due to memory failure during
SMTP operation.
SMTP_MEMORY_F AILURE
• Miscellaneous error return by NIC during SMTP
activities.
SMTP_MISC_ERROR
Any kind of communication or network failure during
SMTP / ESMTP operations.
Authentication failure is returned for Invalid ESMTP
A/C or Password entered by the user.
Authentication is disabled in MFP and the mail server
requires it.
SMTP server connection failure.
Wrong SMTP server or port no. is specified.
In case of DNS connection failure.
In case of SMTP DNS domain error.
This error is displayed, when a user tries to delete an
entry from the Address book which is associated with
group mail Solution:
This error is raised when the MFP is unable to split
the mail and send it. E.g. MFP configured to mail
size 1.0MB and the single scanned page size is
larger than the specified email size (e.g. 1.0)
Displayed when the Address book is empty while
trying to get address from Address book.
Display when the Address book is full when trying to
add a new entry .
Type the email manually with the QWERTY
Keyboard/ Numeric key pad, or assign the email.
Try again. If failure persists, waitan hour or so
for the network to clear.
Specified recipient email address should be a
valid email address.
Check the Network connection.
Specify the correct login name and password.
Enable the SMTP Sever authentication.
Check the Network connection.
Specify the correct SMTP server and port.
Specify the correct DNS.
Specify the correct DNS domain.
Try removing the group mail association and
then remove this entry
Try removing the group mail association and
then remove this entry
You must enter addresses into the Address
book before trying to use it.
If address book is full then you must delete
unused address before trying to add new
addresses.
Error Message Description Solution
6.7.3 Scan-To-Email Error Message (Network Option Only)
Page 27

Alignment & Adjustments
Service Manual
6-27
Samsung Electronics
Group Empty
Group Full
Entry Already Exists
Invalid Email ID
Enter Again
Configured Already
Invalid Login
Scanner Locked
Toner Empty
Replace Toner
Toner Low
Displayed when a Group is empty , while trying to
delete from the Group.
Displayed when a Group is full with maximum entries
while trying to add an entry to the group.
Displayed when trying to enter an entry which is
already existing in the Address book.
This message will be displayed when we enter an
email id:-
• with space in between, email addresses
• Starting with special characters e.g.: + - _ @
• Email Id with more than one @
This message will be displayed when you try to enter
an invalid GROUP number.
This message will be displayed when the user tries
to configure an already configured Group
Display when the user doesn’t enter proper login
name & corresponding password.
The scan module is locked.
The toner cartridge has run out. The machine stops.
The toner is almost empty .
You can only delete entries from a group if
entries exist.
If group is full, remove the unused entries in
the group.
Enter email address which do not exist in the
address book.
Enter valid email address.
Enter a valid group number.
Configure a group which is already not
configured.
Enter valid login name.
Unlock the scanner press Stop/ Clear.
Replace the old cartridge with new one.
Take out the toner cartridge and gently shake it.
By doing this, you can temporarily reestablish
printing operations.
Error Message Description Solution
 Loading...