

Samsung SCX-4321, SCX-4x21 Series User Manual

i
This manual is provided for information purposes only. All information included herein is subject to change without notice.
Samsung Electronics is not responsible for any changes, direct or indirect, arising from or related to use of this manual.
© 2005 Samsung Electronics
Co., Ltd
. All rights reserved.
• SCX-4321 and SC X-4521F are model names of Samsung Electronics Co., Ltd.
• SAMSUNG and Samsung logo are trademarks of Samsung Electronics Co., Ltd.
• Apple, AppleTalk, TrueType, Laser Writer, and Macintosh are trademarks of Apple Computer, Inc.
• Microsoft, Windows, Windows 98, Windows Me, Windows 2000, Windows NT 4.0, and Windows XP are registered trademarks of Microsoft
Corporation.
• All other brand or product names are trademarks of their respective companies or organization.
About the User’s Guide
This
User’s Guide
provides information you need for setting up your machine.
It also provides all of the detailed instructions for using your machine as a printer, a scanne r, a copier, and a facsimile,
and information for maintaining and troubleshooting the machine.
The
Software User’s Guide
which is the second section of this guide provides information you need for installing the supplied software and using its
features.

CONTACT SAMSUNG WORLDWIDE
If you have any comments or questions regarding Samsung products,
contact the Samsung customer care center.
Country Customer Care Center Web Site
ARGENTINE 0800-333-3733 www.samsung.com/ar
AUSTRALIA 1300 362 603 www.samsung.com/au
AUSTRIA
0800-SAMSUNG (726-7864)
www.samsung.com/at
BELGIUM 0032 (0)2 201 24 18 www.samsung.com/be
BRAZIL 0800-124-421
4004-0000
www.samsung.com/br
CANADA 1-800-SAMSUNG (7267864) www.samsung.com/ca
CHILE 800-726-7864 (SAMSUNG) www.samsung.com/cl
CHINA 800-810-5858
010- 6475 1880
www.samsung.com.cn
COLOMBIA 01-8000-112-112 www.samsung.com/co
COSTA RICA 0-800-507-7267 www.samsung.com/latin
CZECH
REPUBLIC
844 000 844 www.samsung.com/cz
Distributor pro Českou republiku : Samsung Zrt., česka
organizační složka Vyskočilova 4, 14000 Praha 4
DENMARK 70 70 19 70 www.samsung.com/dk
ECUADOR 1-800-10-7267 www.samsung.com/latin
EL SALVADOR 800-6225 www.samsung.com/latin
ESTONIA 800-7267 www.samsung.ee
KAZAHSTAN 8-10-800-500-55-500 www.samsung.kz
KYRGYZSTAN
00-800-500-55-500
FINLAND 030-6227 515 www.samsung.com/fi
FRANCE 3260 SAMSUNG or
08 25 08 65 65 (€ 0,15/min)
www.samsung.com/fr
GERMANY 01805 - 121213
(€ 0,14/min)
www.samsung.de
GUATEMALA 1-800-299-0013 www.samsung.com/latin
HONG KONG 3698 4698 www.samsung.com/hk
HUNGARY 06-80-SAMSUNG (7267864) www.samsung.com/hu
INDIA 3030 8282
1800 110011
www.samsung.com/in/
INDONESIA 0800-112-8888 www.samsung.com/id
ITALIA 800-SAMSUNG(7267864)
800-048989
www.samsung.com/it
JAMAICA 1-800-234-7267 www.samsung.com/latin
JAPAN 0120-327-527 www.samsung.com/jp
LATVIA 800-7267 www.samsung.com/lv/
index.htm
LITHUANIA 8-800-77777 www.samsung.com/lt
LUXEMBURG 0035 (0)2 261 03 710 www.samsung.com/be
MALAYSIA 1800-88-9999 www.samsung.com/my
MEXICO 01-800-SAMSUNG (7267864) www.samsung.com/mx
NETHERLANDS
0900 20 200 88 (€ 0,10/min) www.samsung.com/nl
NEW ZEALAND
0800SAMSUNG(726-7864) www.samsung.com/nz
NORWAY 815-56 480 www.samsung.com/no
PANAMA 800-7267 www.samsung.com/latin
PHILIPPINES 1800-10-SAMSUNG
(7267864)
www.samsung.com/ph
POLAND 0 801 801 881
022-607-93-33
www.samsung.com/pl
PORTUGAL 80 8 200 128 www.samsung.com/pt
PUERTO RICO 1-800-682-3180 www.samsung.com/latin
REP.
DOMINICA
1-800-751-2676 www.samsung.com/latin
REPUBLIC OF
IRELAND
0818 717 100 www.samsung.com/uk
RUSSIA 8-800-555-55-55 www.samsung.ru
SINGAPORE 1800-SAMSUNG (7267864) www.samsung.com/sg
SLOVAKIA 0800-SAMSUNG (726786) www.samsung.com/sk
SOUTH
AFRICA
0860 726 7864 (SAMSUNG) www.samsung.com/za
SPAIN 902 10 11 30 www.samsung.com/es
SWEDEN 0771-400 200 www.samsung.com/se
SWITZERLAND 0800-7267864 www.samsung.com/ch/
TAIWAN 0800-329-999 www.samsung.com/tw
THAILAND 1800-29-3232
02-689-3232
www.samsung.com/th
TRINIDAD &
TOBAGO
1-800-7267-864 www.samsung.com/latin
TURKEY 444 77 11 www.samsung.com.tr
U.A.E 800-SAMSUNG (7267864) www.samsung.com/mea
U.K 0870 SAMSUNG (7267864) www.samsung.com/uk
U.S.A. 1-800-SAMSUNG (7267864) www.samsung.com
UKRAINE 8-800-502-0000 www.samsung.ua
UZBEKISTAN 8-800-120-0400 www.samsung.com.uz
VENEZUELA 0-800-100-5303 www.samsung.com/latin
VIETNAM 1 800 588 889 www.samsung.com/vn
Country Customer Care Center Web Site

ii
CONTENTS
1. Introduction
Special Features .................................................................................................................... 1.1
Understanding Component Locations ...................................... .................................................. 1.2
Front View ............................................................................................. .......................... 1.2
Rear View .............................................................. .......................................................... 1.2
Control Panel Func ti on s ..................................................................................................... 1.3
2. Getting Started
Unpacking ............................................................................................................................. 2.1
Selecting a Locatio n ................................................................................ ........ .................. 2.2
Installing the Toner C a r tridge ................................................................................ .................. 2.2
Loading Paper ....................................................................................................................... 2.3
Making Connecti ons ............................................................................................................... 2.4
Turning the Machine On ........................................................................................ ........ .......... 2.6
Installing Printer Softw ar e ....................................................................................................... 2.7
System Require ments ....................................................................................................... 2.7
Printer Driver Features ...................................................................................................... 2.8
Changing the Displ ay Language and Country ........................................... .................................. 2.8
Setting Language ............................................................................................................. 2.8
Setting Country .............................................................. ........ .......................................... 2.8
Setting the Machine ID
(Only for
SCX-4521F
) ......................................................................................... 2.9
Entering Characters Using the
Number Keyp ad ............................................. .................................................................. 2.9
Setting the Date and Time
(Only for
SCX-4521F
) ....................................................................................... 2.10
Changing the Cloc k M o de ......................................................................... ........................ 2.10
Setting the Paper Size and Type ............................................................. ................................ 2.10
Setting Sounds
(Only for
SCX-4521F
) ......................................... ... ... ... ... ................ 2.11
Speaker, Ringer, Key Sound, and Alarm Soun d ........................................... ........................ 2.11
Speaker Volume ............................. ................................................................................ 2.11
Using the Save Mo de s .................................................................. ........................................ 2.11
Toner Save Mo de .................... ........ ................................................................................ 2.11
Power Save Mode ........................................................... ................................................ 2.11
Setting the Dial Mode
(Only for
SCX-4521F
) ....................................................................................... 2.12
3. Paper Handling
Selecting Print Mater i als .......................................................................................................... 3.1
Paper Type, Inpu t Sources, and Capacities ......................................................... .................. 3.1
Guidelines for Pap er and Special Materials ........................................................................... 3.2
Loading Paper ....................................................................................................................... 3.3
Using the Tray ............................................................... .................................................. 3.3
Using the Manual Tray ............................................................................. .......................... 3.3
Verifying an Output Location ................................................................................................... 3.3
4. Copying
Loading Paper fo r C op y i n g ....................................................................................................... 4.1
Preparing a Document .......................................................... ........ .......................................... 4.1
Making Copies on th e Document Glass ............................................................ .......................... 4.2
Making Copies fro m the Automatic Docume n t Fee der .................................................................. 4.2
Setting Copy Options ............................................................ .................................................. 4.3
Darkness ......................................................................................................................... 4.3
Original Type ......................................................................................................... .......... 4.3
Reduced/Enlar ge d Copy ................................................................... .................................. 4.3
Number of Cop ie s ................................................................................... ........ .................. 4.3
Using Special Copy Fe atu r es .......................................................................... ........ .................. 4. 4
Clone Copying .................................................................................................................. 4.4

iii
Collation Copying .... ................................................................................ .......................... 4. 4
Auto Fit Copying ............................................................................................................... 4.4
ID Card Copying ..................................................... ........ .................................................. 4.5
2 Up or 4 Up Co py i n g ........................................................................................................ 4.5
Poster Copying ................................................................................................................. 4.5
Changing the Defau l t Settings ................................................................................................. 4.6
Setting the Time Ou t O ption .................................................................................................... 4.6
Setting the Favorite Cop y Option .............................................................................................. 4.6
5. Basic Printing
Printing a Docume n t ............................................................................................................... 5.1
Canceling a Print Job .............................................................................................................. 5.1
6. Scanning
Scanning Basics ..................................................................................................................... 6.1
Scanning From the Co n tr ol P an e l to an Application ..................................................................... 6.1
7. Faxing (Only for SCX-4521F)
Setting Up the Fax System
Changing the Fax S etu p o ptions ............................................................................. ........ .......... 7.1
Available Fax Setup O pti o n s .................................................................................................... 7.1
Sending a Fax
Loading a Document ..................................................................................... ........ .................. 7.3
Adjusting the Docu ment Resolution .......................................................................................... 7.4
Sending a Fax Automatically .......................................................... .......................................... 7.4
Sending a Fax Man u al ly ........................ ........ ........................................................................ .. 7.5
Redialing the Last Nu mber .................................................................................................... .. 7.5
Confirming Transm i s s ion ......................................................................................................... 7.5
Automatic Redialing .............................................................................. .................................. 7.5
Receiving a Fax
About Receiving Modes ......................................... .................................................................. 7.6
Loading Paper fo r R eceiving Faxes .......................................................................... .................. 7.6
Receiving Automatically in Fax Mode ....................................................... .................................. 7.6
Receiving Manu al ly in Tel Mode .............................................................. ........ .......................... 7.6
Receiving Automa tica lly in An s / Fax M ode .................................................................................. 7.6
Receiving Manu al ly Using an Extension Telepho n e .................................................................... .. 7.7
Receiving Faxes Us i n g th e D RPD Mode ............................................................ .......................... 7.7
Receiving Faxes in th e M emory ...................... .......................................................................... 7.7
Automatic Dialing
Speed Dialing ...................................................................... .................................................. 7.8
Storing a Number fo r Speed Dialing .................................................. ........ .......................... 7.8
Sending a Fax using a Speed Dial Number ................................. ........ .................................. 7.8
Group Dialing ........................................................................................................................ 7.8
Setting a Group Dia l N u mber ............................................................................................. 7.8
Editing Group Dial Numbers ..................... .......................................................................... 7.9
Sending a Fax Using Group Dialing
(Multi-address Transmission) ............................................................................................. 7.9
Searching for a Number in Memory .......................................................................................... 7.9
Searching Seque n tially th r o u g h th e Memory ......................................................................... 7.9
Searching with a Par ticu l ar Firs t Le tter .............. ................................................................ 7.10
Printing a Phoneb o o k Li st ..................................................................................................... . 7.10
Other Ways to Fax
Sending Broadc ast Fax es .............. ........................................................................................ 7.10
Sending a Delayed Fax ................................. ........ ................................................................ 7.11
Sending a Priority Fax ........................................................................................................ ... 7.11
Adding Documen ts To a Scheduled Fax ................................................................................... 7.12
Canceling a Sched u led Fax ............................................ ........ ................................................ 7.12

iv
Additional Features
Using Secure Rece i v ing Mode ................................ ................................................................ 7.13
Printing Reports ................................................................................................................... 7.13
Using Advanced Fax Se ttings ................................................................................................. 7.14
Changing Setting O p tion s ................................................................................................ 7.14
Advanced Fax Settin g Options .......................................................................................... 7.14
8. Maintenance
Clearing the Mem ory .................................................................................... .......................... 8.1
Setting the Machine to be Checke d by Ph o ne
(Only for
SCX-4521F
) ......................................................................................... 8.2
Cleaning Your Mac h i n e ............................................................................................................ 8.2
Cleaning the Outsid e ......................................................................................................... 8.2
Cleaning the Inside ......................................................................... ........ .......................... 8.2
Cleaning the Scan Un i t ...................................................................................................... 8.3
Maintaining the Ton e r Car tr id g e ............................................................................................... 8.3
Redistributing To n er ........................................................................................ ........ .......... 8.4
Replacing the Ton er Cartridge .......................................................... ........ .......................... 8.4
Setting the Notify Toner Option
(Only for
SCX-4521F
) .................... ...... .......... ......... .......... ......... .......... ...... ..... 8.4
Cleaning the Drum .......................................................................................... .................. 8.5
Ignoring the Toner Empty Message
(Only for
SCX-4521F
) .......................................... 8.5
Consumables and Replacement Parts ........................................................................................ 8.5
Replacing the ADF Rubber Pad ....................................................................................... .......... 8.6
9. Troubleshooting
Clearing Documen t J ams ......................................................................................................... 9.1
Input Misfeed ......................................................... .......................................................... 9.1
Exit Misfeed ..................................................................................................................... 9.2
Clearing Paper Jams ..................................................................................................... .......... 9.2
In the Tray .................... ................................................................................ .................. 9.2
In the Manual Tray ........................................................................................................... 9.2
In the Fuser Area or Ar ou n d th e Toner Cartridge ................................................................. .. 9.3
In the Paper Exit Area ....................................................................................................... 9.3
Tips for Avoiding P a p er J ams ............................................................................................ .. 9.4
Clearing LCD Error M e s s ages ................................................................................................... 9.4
Solving Other Probl ems ................................................ .......................................................... 9.6
Paper Feeding Pr oblems .................................................................................................... 9.6
Printing Problems ........................... ........ .......................................................................... 9.7
Printing Quality Pro bl ems ................................................................................................... 9.8
Copying Problems ........................................................................................................... 9.10
Scanning Problems ......................................................................................................... 9.11
Fax Problems
(Only for
SCX-4521F
) ...................... ............................................ 9.11
Common Linux Problems ....................................................................................................... 9.12
Common Macint o s h Pr oblems ................................................................................ ................ 9.13
Problems in Printe r S etu p Utility ....................................................................................... 9.13
10. Specifications
General Specificatio n s .................................................................. ........................................ 10.1
Scanner and Copier Specifications .................. ........ ................................................................ 10.2
Printer Specification s ............................................................................................................ 10.2
Facsimile Specifications
(Only for
SCX-4521F
)
.................................................................................................................. 10.3
Paper Specification s ............................................................................................................. 10.3
Overview ....................................................................................................................... 10.3
Supported Sizes of Paper ................................................................................................. 10.4
Guidelines for Us ing P aper ....................................................... ........ ................................ 10.4
Paper Specification s ........................................................................................................ 10.5
Paper Output C apacity .................................................................................................... 10.5
Paper Storage En v i ron ment ............................................................................................. 10.5
v
Important Precautions and Safety Information
When using this machine, these basic safety precautions should always be
followed to reduce risk of fire, electric sho c k and injury to people:
1. Read and understand all instructions.
2. Use common sense whenever operating electrical appliances.
3. Follow all warnings and instructions marked on the machine and in the
literature accompanying the machine.
4. If an operating instruction app ea rs to co n flict with safe ty i nfo rm atio n ,
heed the safety information. You may have misunderstood the operating
instruction. If you cannot resolve the conflict, contact your sales or
service representative for assistance.
5. Unplug the machin e fr om the AC wall socket and/or teleph one j ack
before cleaning. Do not use liquid or aerosol cleaners. Use only a damp
cloth for cleaning.
6. Do not place the machine on an unstable cart, stand or table. It may fall,
causing serious damage.
7. Your machine should never be placed on, near or over a radiator, heater,
air conditioner or ventilation duct.
8. Do not allow anything to rest on the power . Do not locate your machine
where the cords will be abused by persons walking on them.
9. Do not overload wall outlets and extension cords. This can diminish
performance, and may result in the risk of fire or electric shock.
10. Do not allow pets to chew on the AC power, telephone or PC interface
cords.
11. Never push objects of any kind into the machine through case or cabinet
openings. They may touch dangerous voltage points, creating a risk of
fire or shock. Never spill liquid of an y k ind o n to o r in to th e machine.
12. Your machine may have a heavy cover for optimal pressure on the
document for the best scanning and/or faxing (usually the flatbed-type
machine). In this case, replace the cover after placing document on the
scan glass, by holding and moving it down slowly until it seats on its
location.
13. To reduce the risk of electric shock, do not disassemble the machine.
Take it to a qualified service technician when repair work is required.
Opening or removing covers may expose you to dangerous voltages or
other risks. Incorrect reassembly could cause electric shock when the
unit is subsequently used.
14. Unplug the machine from the telephone jack, PC and AC wall outlet and
refer servicing to qualified service personnel under the following
conditions:
•When any part of the power cord, plug or connecting cable is damaged
or frayed.
•If liqui d has been sp illed into the machine.
•If the machine has been exposed to rain or water.
•If the machine does not operate properly after instructions have been
followed.
•If the machine has been dropped, or the cabinet appears damaged.
•If the machine exh i bi ts a s u d de n an d distinct change in performance.
15. Adjust only those controls covered by the operating instructions.
Improper adjustment of other controls may result in damage, and may
require extensive work by a qualified service technician to restore the
machine to normal operation.
16. Avoid using this machine during a lightning storm. There may be a
remote risk of electric shock from lightn ing. If p o ssible, u np l u g the AC
power and telephone cord for the duration of the lightning storm.
17. SAVE THESE INSTRUCTIONS.
18. Use only No.26 AWG or larger telephone line cord.
Laser Safety Statement
The printer is certified in the U.S. to conform to the requirements of DHHS
21 CFR, chapter 1 Subchapter J for Class I(1) laser products, and elsewhere
is certified as a Class I laser product conforming to the requirements of IEC
825.
Class I laser products are not considered to be hazardous. The laser system
and printer are designed so there is never any human access to laser
radiation above a Class I leve l during normal operation, user maintenance or
prescribed service condition.
WARNING
Never operate or ser vice the printer with the protec tive cover remo ved from
Laser/Scanner assembly. The reflected beam, although invisible, can
damage your eyes.
Ozone Safety
During normal operation, this machine produces ozone.
The ozone produced does not present a hazard to the
operator. However, it is advisable that the machine be
operated in a we ll ventilated area.
If you need additional information about ozone, please
request your nearest Samsung dealer.

vi
Mercury Safety
LAMP(S) INSIDE THIS PRODUCT CONTAIN MERCURY AND MUST
BE RECYCLED OR DISPOSED OF ACCORDING TO LOCAL, STATE
OR FEDERAL LAW S. For details see lamprecycle.org, eiae.org, or
call 1-800-Samsung
Power Saver
This machine contains advanced energy conservation
technology that reduces power consumption when it is
not in active use.
When the machine does not receive data for an
extended period of time, power consumption is
automatically lowered.
Recycling
Please recycle or dispose of the packaging material for this
product in an environmentally responsible manner.
Correct Disposal of This Product (Waste
Electrical & Electronic Equipment)
(Applicable in the European Union and other European
countries with separate collection systems)
This marking shown on the product or its literature, indicates
that it should not be disposed with other household wastes
at the end of its working life. To prevent possible harm to
the environment or human health from uncontrolled waste
disposal, please separate this from other types of wastes and
recycle it responsibly to promote the sustainable reuse of
material resources.
Household users should contact either the retailer where they purchased this
product, or their local government office, for details of where and how they
can take this item for environ m entally safe recycling.
Business users should contact their supplier and check the terms and
conditions of the purchase contract. This product should not be mixed with
other commercial wastes for disposal.
Radio Frequency Emissions
FCC Information to the User
This device complies with P a rt 15 o f th e FCC Rules. Operation is subject to
the following two conditions:
•This device may not cause harmful interference, and
•This device must accept any interference received, including
interference that may cause undesired operation.
This equipment has be en te ste d and found to comply with the limits for a
Class B digital device, pursuant to Part 15 of the FCC Rules. These limits are
designed to provide reasonable protection against harmful interference in a
residential installation. This equipment generates, uses and can radiate radio
frequency energy and, if not installed and used in accordance with the
instructions, may cause harmful interference to radio communications.
However, there is no guarantee that interference will not occur in a particular
installation. If this equipment does cau se h arm fu l inte r feren ce to radio or
television reception, which can be determined by turning the equipment off
and on, the user is encouraged to try to correct the interference by o ne o r
more of the following measures:
•Reorient or relocate the receiving antenn a.
•Increase the separation between the equipment and receiver.
•Connect the equipment into an outlet on a circuit different from that to
which the receiver is connected.
•Consult the dealer or experienced radio TV technician for help.
C
AUTION
:
Change or modifications not expressly approved by the
manufacturer responsible for compliance could void the user's authority to
operate the equipment.
Canadian Radio Interference Regulations
This digital apparatus do e s n o t exceed the Class B limits for radio noise
emissions from digital apparatus as set out in the interference-causing
equipment standard e n titled “Digital Apparatus”, ICES-003 of the Industry
and Science Canada.
Cet appareil numérique respecte les limites de bruits radioélectriques
applicables aux appareils numériques de Classe B prescrites dans la norme
sur le matériel brouilleur: “Appareils Numériques” , ICES-003 édictée par
l’Industrie et Sciences Canada.
Fax Branding
The Telephone Consumer Protection Act of 1991 makes it unlawful for any
person to use a computer or other electronic device to send any message via
a telephone facsimile machine unless such message clearly contains in a
margin at the top or bottom of each tra nsmitted page or on the first page of
the transmission the following information:
(1) the date and time of tr an smission
(2) identification of either business, business entity or individual sending the
message; and
(3) telephone number of either the sending machine, business, business
entity or individual.
The T elephone Company may ma ke changes in its communications facilities,
equipment operations or procedures where such action is reasonably
required in the operation of its business and is not inconsistent with the rules
and regulations in FCC Part 68. If such changes can be reasonably expected
to render any customer term inal eq u i pm ent incompatible with telephone
company communications facilities, or require modification or alteration of
such terminal equipment, or otherwise materially affect its use or
performance, the customer shall be given adequate notice in writing, to allow
the customer an opportunity to maintain uninterrupted service.

vii
Ringer Equivalence Number
The Ringer Equivalence Number and FCC Registration Number for this
machine may be found o n the lab el loca ted o n the bottom or rear of the
machine. In some instances you may need to provide these numbers to the
telephone company.
The Ringer Equivalence Number (REN) is a measure of the electrical load
placed on the telephone line, and is useful for determining whether you have
“overloaded” the line. Installing several types of equipment on the same
telepho ne line may re sult in p roble ms ma king an d rec eiving teleph one ca lls,
especially ringing when your line is called. The sum of all Ringer Equivalence
Numbers of the equipment on your telephone line should be less than five in
order to assure proper service from the telephone company. In some cases,
a sum of five may not be usable on your line. If any of your telephone
equipment is not operating properly, you should immediately remove it from
your telephone line, as it may cause harm to the telephone network.
WARNING:
FCC Regulations state that chan g e s or modifications to this equipment not
expressly approved by the manufacturer could void the user’s authority to
operate this eq uipment. In the event that termin al eq u ipment causes harm
to the telephone network, th e telephone company should no tify the customer
that service may be stopped. However, where prior notice is impractical, the
company may temporarily cease service, providing that they:
a) promptly notify the custome r.
b) give the customer an oppo r tun ity to co r rect th e e q uipment problem.
c) inform the customer of the right to bring a complaint to the Federal
Communication Commission pursuant to procedures set out in FCC Rules and
Regulations Subpart E of Part 68.
You should also know that:
• Your machine is not designed to be connected to a digital PBX system.
• If you intend to use a computer modem or fax modem on the same phone
line as your machine, you may experience transmission and reception
problems with all the equipment. It is recommended that no other
equipment, except for a regular telephone, share the line with your
machine.
• If your area experiences a high incidence of lightning or power surges, we
recommend that you install surge protectors for both the power and the
telephone lines. Surge protectors can be purchased from your dealer or
telephone and electronic specialty stores.
• When programming emergency numbers and/or making test calls to
emergency numbers, use a non-emergency number to advise the
emergency service dispatcher of your intentions. The dispatcher will give
you further instructions on how to actually test the emergency number.
• This machine may not be used on coin service or party lines.
• This machine provides magnetic coupling to hearing aids.
• You may safely conn ect this eq u ipment to the telephone network by
means of a standard modular jack, USOC RJ-11C.
Declaration of Conformity (European
Countries)
Approvals and Certifications
The CE marking applied to this product symbolizes Samsung
Electronics Co. , Ltd. Declaration of Conformity with the
following applicable 93/68/EEC Directives of the European
Union as of the dates indicated:
January 1, 1995
: Council Directive 73/23/EEC Approximation of the laws
of the member states related to low voltage equipment.
January 1, 1996
: Council Directive 89/336/EEC (92/31/EEC),
approximation of the laws of the Member State s related to electromagne tic
compatibility .
March 9, 1999
: Council Directive 1999/5/EC on radio equipment and
telecommunications termina l equipment and the mutual recognition o f their
conformity .
A full declaration, defining the relevant Directives and referenced standards
can be obtained from your Samsung Electronics Co., Ltd. representative.
EC Certification
Certification to 1999/5/EC Radio Equipment &
Telecommunications Terminal Equipment Directive (FAX)
This Samsung product has been self-certified by Samsung for pan-European
single terminal connection to the analogue public switched telephone
network (PSTN) in accordance with Directive 1999/5/EC. The product has
been designed to wo r k with the national PSTNs and compatib le PBXs of the
European countries:
In the event of problems, you should contact the Euro QA Lab of Samsung
Electronics Co., L td. in th e first instance .
The product has been tested against TBR21. To assist in the use and
applicat ion of termin al equipmen t which complies with th is standard, th e
European Telecommunication Standards Institute (ETSI) has issued an
advisory document (EG 201 121) which contains notes and additional
requirements to ensure network compatibility of TBR21 terminals. The
product has been designed against, and is fully compliant with, all of the
relevant advisory notes contained in this document.
Replacing the Fitted Plug (for UK Only)
I
MPORTANT
The mains lead for this machine is fitted with a standard (BS 1363) 13 amp
plug and has a 13 am p fu se . When you change or examine the fuse, you
must re-fit the correct 13 amp fuse. Y ou then need to replace the fuse cove r .
If you have lost the fuse cover, do not use the plug until you have another
fuse cover.
Please contact the people from you purchased the machine.
The 13 amp plug is the most widely used type in the UK and sh o uld b e
suitable. However , some buildings (mainly old ones) do not have normal 13
amp plug sockets. You ne ed to buy a suitable plug adaptor. Do not remove
the moulded plug.
viii
W
ARNING
If you cut off the moulded plug, get rid of it straight away.
You cannot rewire the plug and you may receive an electric
shock if you plug it into a socket.
I
MPORTANT WARNING
: You must earth this machine.
The wires in the main s lead have the following color code:
• Green and Yellow: Earth
•Blue: Neutral
•Brown: Live
If the wires in the mains lead do not match the colors marked in your plug,
do the following:
You must connect the green and yellow wire to the pin marked by the letter
“E” or by the safety ‘Earth symbo l ’ or color ed g reen and yellow or green.
You must connect the blue wire to the pin which is marked with the letter “N”
or colored black.
You must connect the brown wire to the pin which is marked with the letter
“L” or colored red.
You must have a 13 amp fuse in the plug, adaptor, or at the distribution
board.

ix
Differences Between British and American
English
British English American English
(Re)dialling (Re)dialing
Colour Color
Emphasise Emphasize
Recognise Recognize
Organise Organize
Authorise Authorize
Cancelling Canceling
Customise Customize
Socket Jack
Labelling Labeling
Grey Gray
Introduction
1.1
1 Introduction
Thank you for purchasing this Samsung multifunctional
product. Your machine provides printing, copying, scanning,
and faxing (only for SCX-4521F) functions!
This cha p t er includes:
• Special Features
• Understanding Component Locations
Special Features
Your new machine is equipped with special features that
improve the print quality. You can:
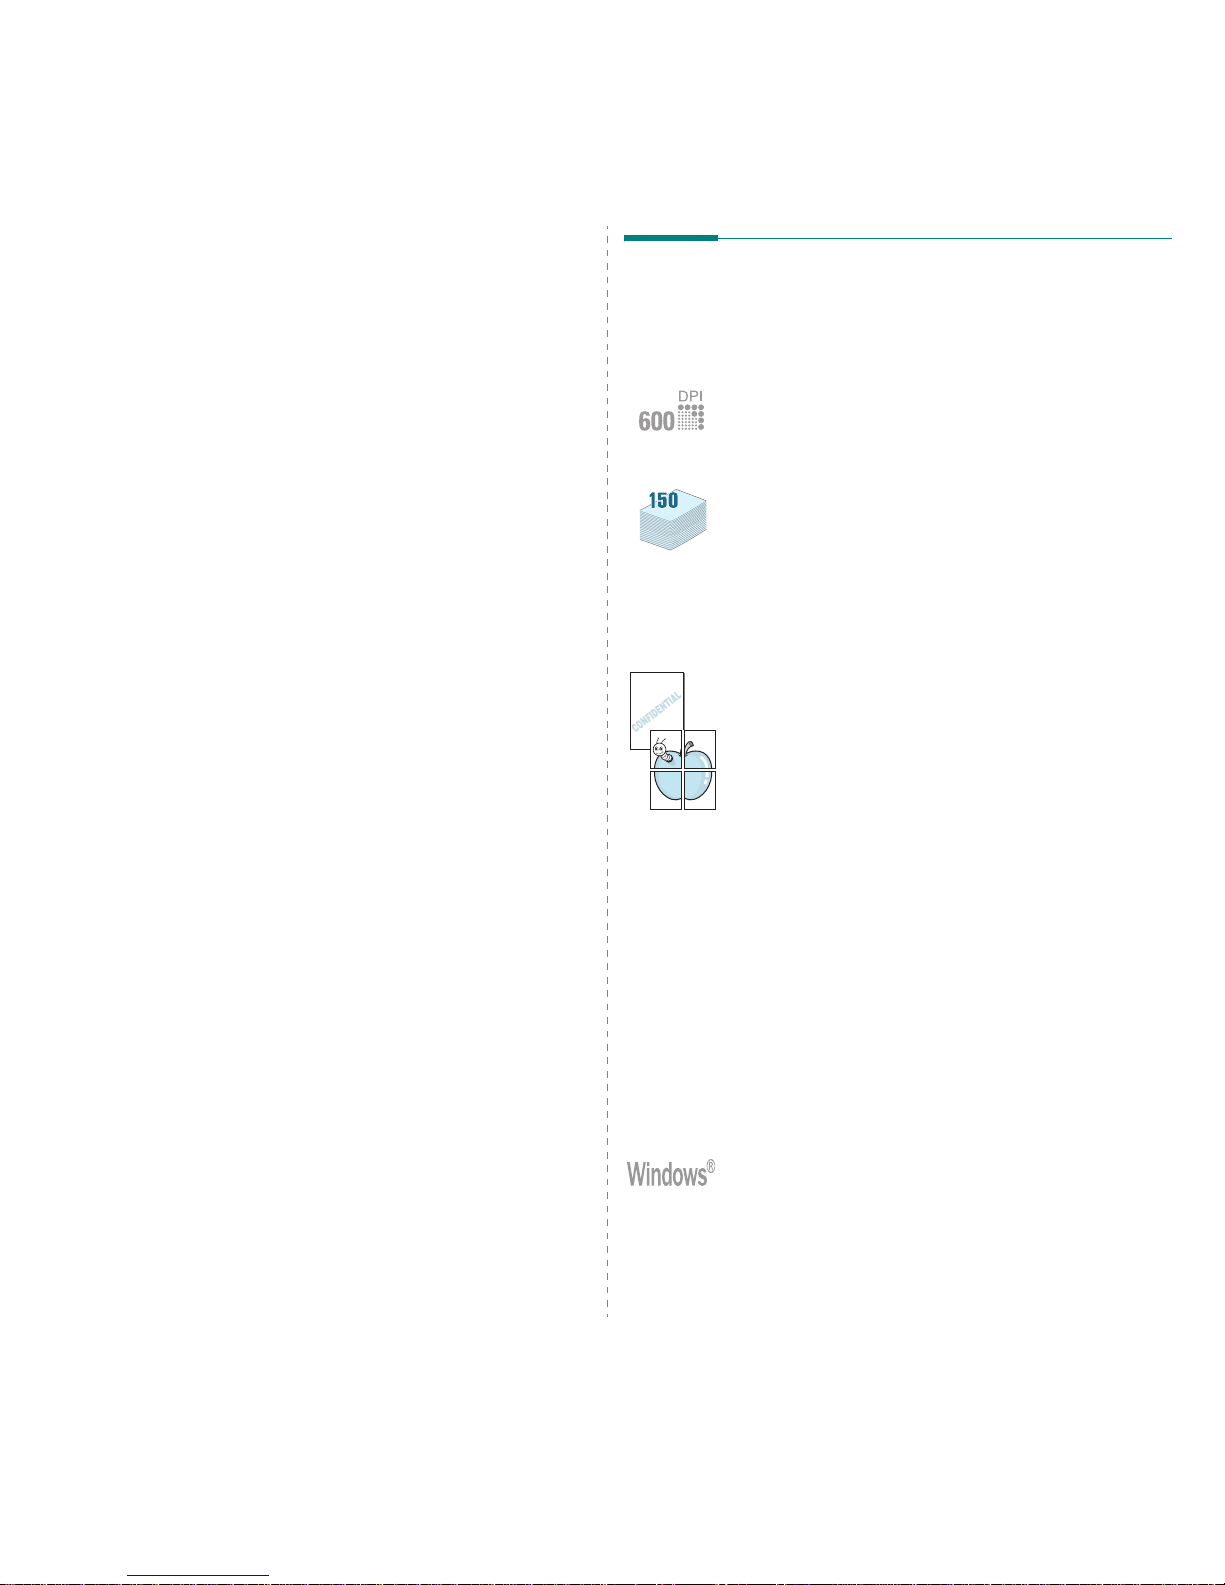
Print with excellent quality and high speed
•You can print up to
600 dots per inch
(dpi).
•Up to
20 ppm in A4 (20 ppm in Letter
).
Handle paper flexibly
•
Manual tray
supports one sheet of envelopes, labels,
transparencies, custom-sized materials, postcards and
heavy paper.
•
Standard 150-sheet tray
supports standard type and
size of paper. Also, standard tray supports one sheet of
special materials.
• 50-sheet output tray supports convenient access.
Create professional documents
•Print
Watermarks
. You can customize your documents
with words, such as “Confidential”. For details, see
Software User’s Guide
.
•Print
Posters
. The text and pictures of each page of your
document are magnified and printe d across the sheet of
paper and taped together to form a poster. For details,
see
Software User’s Guide
.
Save time and money
• Allows you to use the
Toner Save
mode to save the
toner . For details, see
Software User’s Guide
and “Toner
Save Mode” on page 2.11.
• You c an prin t mult iple pag es on on e sing le shee t of pap er
to save paper.
• You can use preprinted forms and letterhead on plain
paper.
• This machine automatically
conserves electricity
by
substantially reducing power consumption when not
printing.
Print in various environments
• You can print in
Windows 98/Me/NT 4.0/2000/XP
.
• Your machine is compatible with various
Linux
and
Macintosh
.
• Your machine comes with both the
USB
and
Parallel
interface.
Introduction
1.2
Understanding Component
Locations
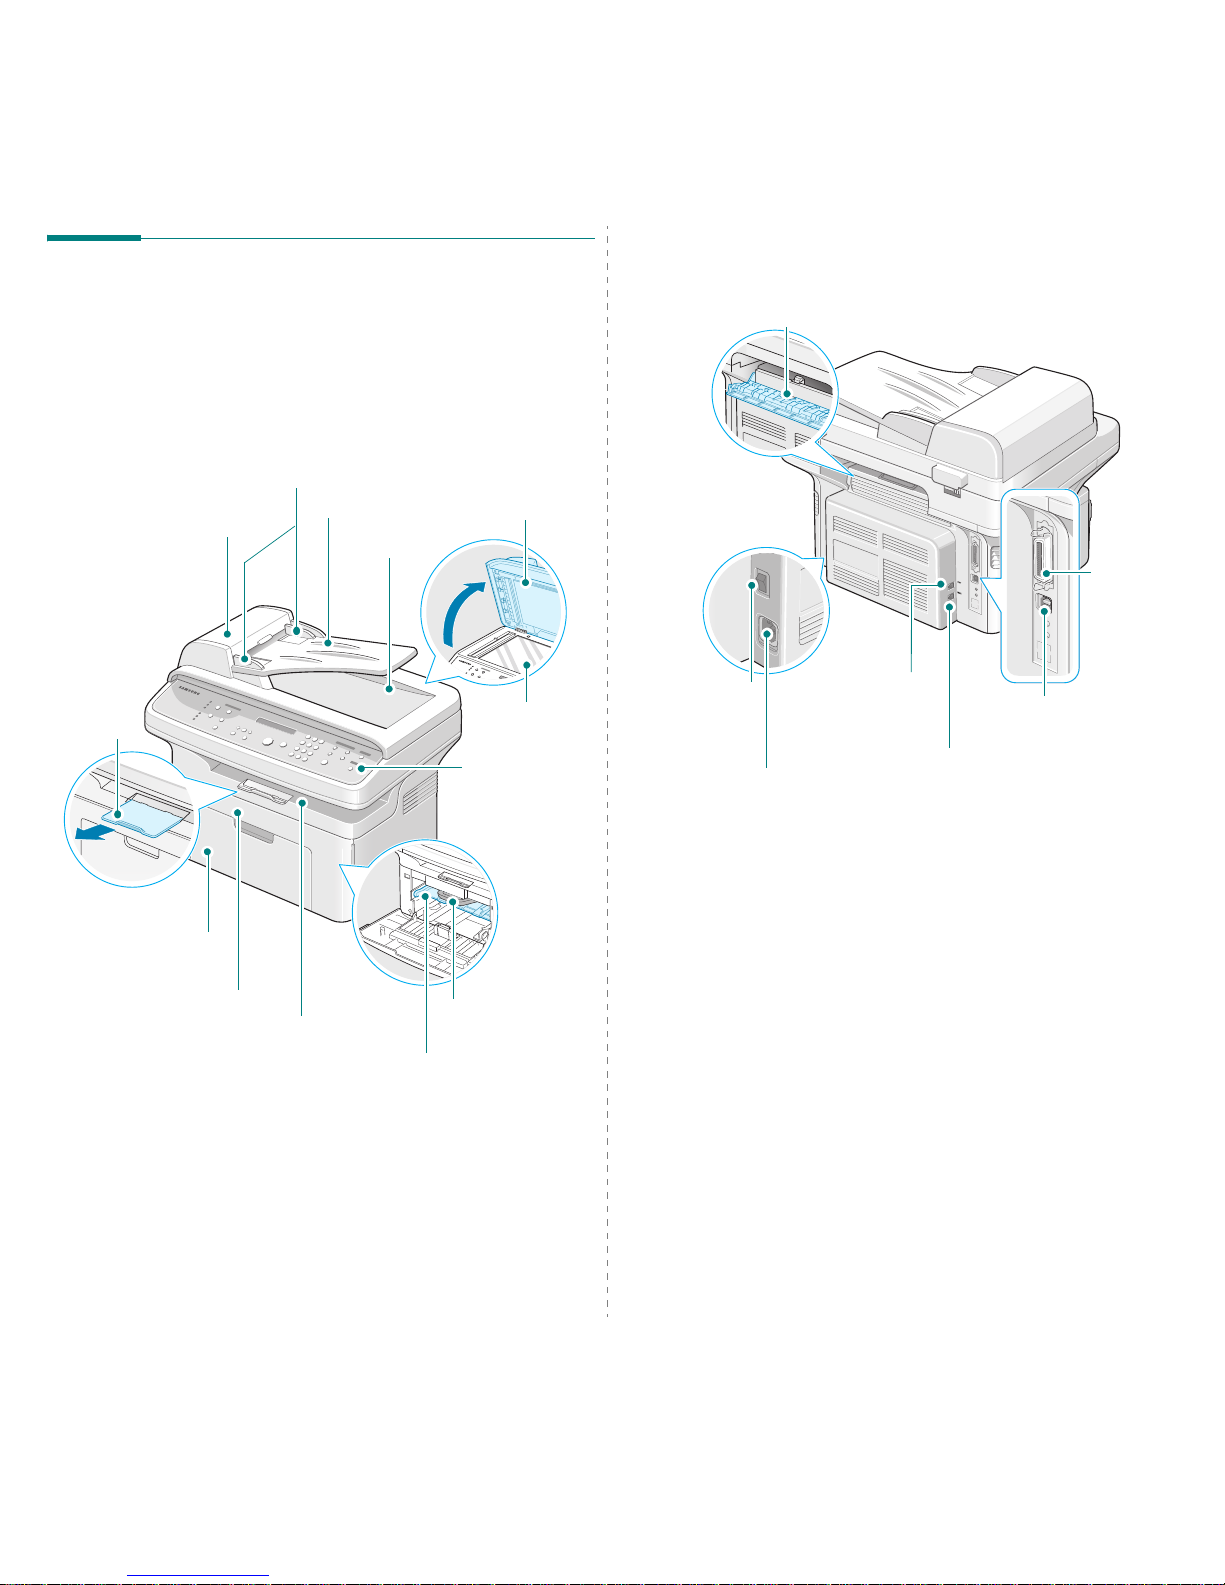
These are the main components of your machine:
Front View
Document
Guides
Document
Input Tray
Document
Cover
Document Glass
Automatic
Document Feeder
Control Panel
(SCX-4521F: see
page 1.3.
SCX-4321: see
page 1.3.)
Front Door
Output Tray
(Face Down)
Paper Input
Tray
Paper
Output
Extension
Document
Output Tray
Toner
Cartridge
Manual Tray
The figure above shows an SCX-4521F.
Rear View
Line Jack
(Only for SCX-4521F)
The figure above shows an SCX-4521F.
Rear Cover
Power
Switch
AC Power Cord
Connector
EXT. Jack*
(Only for
SCX-4521F)
USB
Connector
Parallel
Connector
*
If your country has a different telephone connection system,
this socket may be blocked.
Introduction
1.3
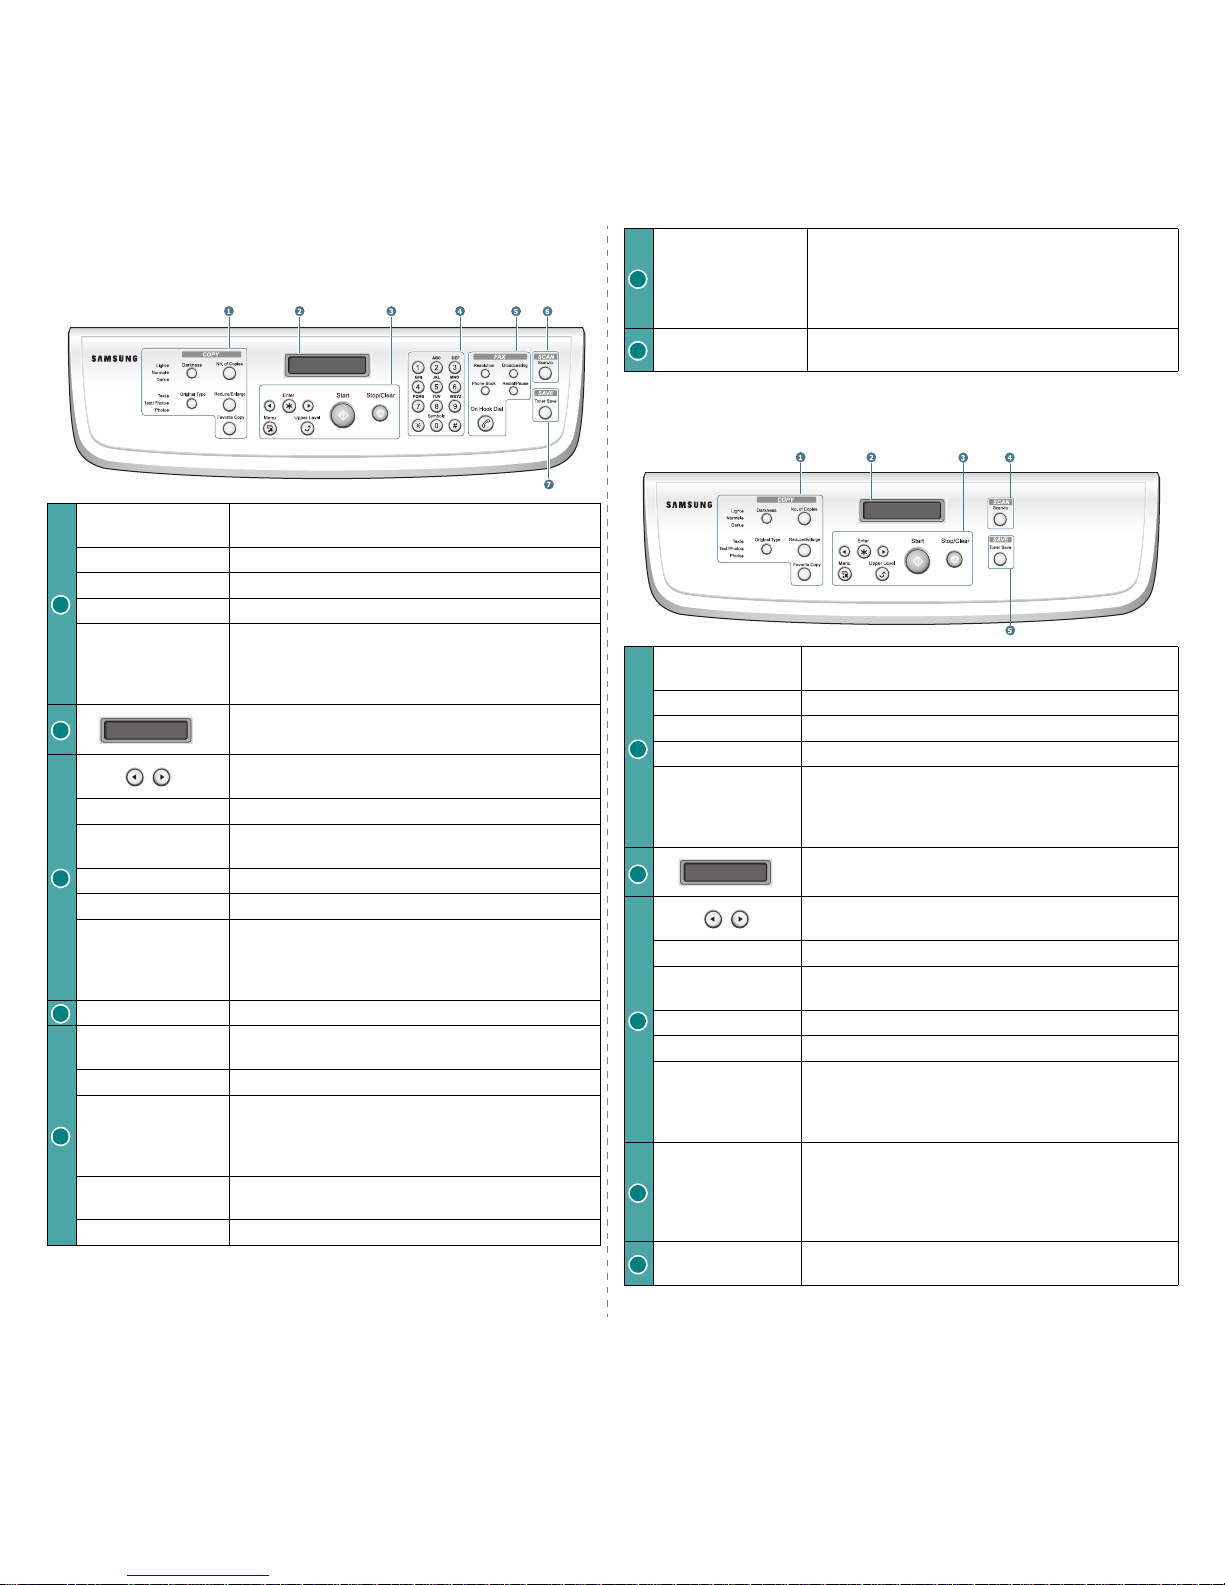
Control Panel Functions
SCX-4521F
Darkness
Adjusts the brightness of the documents for the
current copy job.
Original Type
Selects the document type for the current copy job.
No. of Copies
Selects the number of copies.
Reduce/Enlarge
Makes a copy smaller or larger than the original.
Favorite Copy
Allows you to use one of the special copy features,
such as Clone, Collation, Auto Fit, ID Card Copy, 2/4
Up (multiple pages on a sheet), and Poster copying
after assigning it.
Displays the current status and prompts during an
operation.
Uses to scroll through the available options for the
selected menu item.
Enter
Confirms the selection on the display.
Menu
Enters Menu mode and scrolls through the me nus
available.
Upper Level
Sends you back to the upper menu level.
Start
Starts a job.
Stop/Clear
Stops an ope ration at any time.
In Standby mode, clears/cancels the copy options,
such as the darkness, the document type setting,
the copy size, and the number of copies.
Number Keypad
Dials a number or enters alphanumeric characters.
Resolution
Adjusts the resolution of the documents for the
current fax job.
Broadcasting
Allows you to send a fax to multiple destinations.
Phone Book
Allows you to store frequently-dialed fax num bers as
one or two-digit speed dial or group dial numbers for
automatic dialing and edit the stored numbers. Also
allows you to print a Phonebook list.
Redial/Pause
In Standby mode, redials the last number or in Edit
mode, inserts a pause into a fax number.
On Hook Dial
Engages the telephone line.
1
2
3
4
5
SCX-4321
Scan-to
Allows you to access a list of your PC software
programs that an image can be scanned to. You
must create the scan list using the Samsung
software (Printer Settings Utility) provided with this
machine. For details, see
Software User’s Guide
.
Toner Save
Allows you to save on toner by using less toner to
print a document.
6
7
Darkness
Adjusts the brightness of the documents for the
current copy job.
Origin a l T ype
Selects the document type for the current copy job.
No. of Copies
Selects the number of copies.
Reduce/Enlarge
Makes a copy smaller or larger than the original.
Favorite Copy
Allows you to use one of the special copy features,
such as Clone, Collation, Auto Fit, ID Card Copy, 2/4
Up (multiple pages on a sheet), and Poster copying
after assigning it.
Displays the current status and prompts during an
operation.
Uses to scroll through the available options for the
selected menu item.
Enter
Confirms the selection on the display.
Menu
Enters Menu mode and scrolls through the menus
available.
Upper Level
Sends you back to the upper menu level.
Start
Starts a job.
Stop/Clear
Stops an operation at any time.
In Standby mode, clears/cancels the copy options,
such as the darkness, the document type setting, the
copy size, and the number of copies.
Scan-to
Allows you to access a list of your PC software
programs that an image can be scanned to. Y ou must
create the scan list using the Samsung software
(Printer Settings Utility) provided with this machine.
For details, see
Software User’s Guide
.
Toner Save
Allows you to save on toner by using less toner to
print a document.
1
2
3
4
5

Getting Started
2.1
2 Getting Started
This chapter gives you step-by-step instructions for setting up
your machine.
This cha p t er includes:
• Unpacking
• Installing the Toner Cartridge
• Loading Paper
•Making Connections
• Turning the Machine On
• Installing Printer Software
• Changing the Display Language and Country
• Setting the Machine ID (Only for SCX-4521F)
• Setting the Date and Time (Only for SCX-4521F)
• Setting the Paper Size and Type
• Setting Sounds (Only for SCX-452 1F)
•Using the Save Modes
• Setting the Dial Mode
(Only for
SCX-4521F
)
Unpacking
1
Remove the machine and all accessories from the packing
carton. Make sure that the machine has been packed with
the following items :
Starter Toner Cartridge
AC Power Cord
*
*.The appearance of the power cord and the telephone line cord
may differ depending on your country’s specifications.
CD-ROM
**
**.The CD-ROM contains the Samsung printer drivers, Scan
drivers, Printer Settings Utility, SmarThru software, the
User’s Guide, and the Adobe Acrobat Reader program.
Quick Install Guide
Telephone Line Cord*
(only for SCX-4521F)
TAM Lead
(only for SCX-4521F and UK)
Paper Cover
***
***.The paper cover is to prevent dust and moisture from
contaminating your paper loaded in the tray. When you need
to open the machine (for example, cleaning inside of the
machine, removing the jammed paper or installing the toner
cartridge), remove the paper cover from your machine.
N
OTES
:
• Components may differ from country to coun try.
• You should use the telephone line cord which is supplied
with your machine. If you are replacing it with another
vendor’s, it should be AWG #26 or larger telephone line
cord.
• Power cord must be plugged into a grounded power
socket.
Getting Started
2.2
2
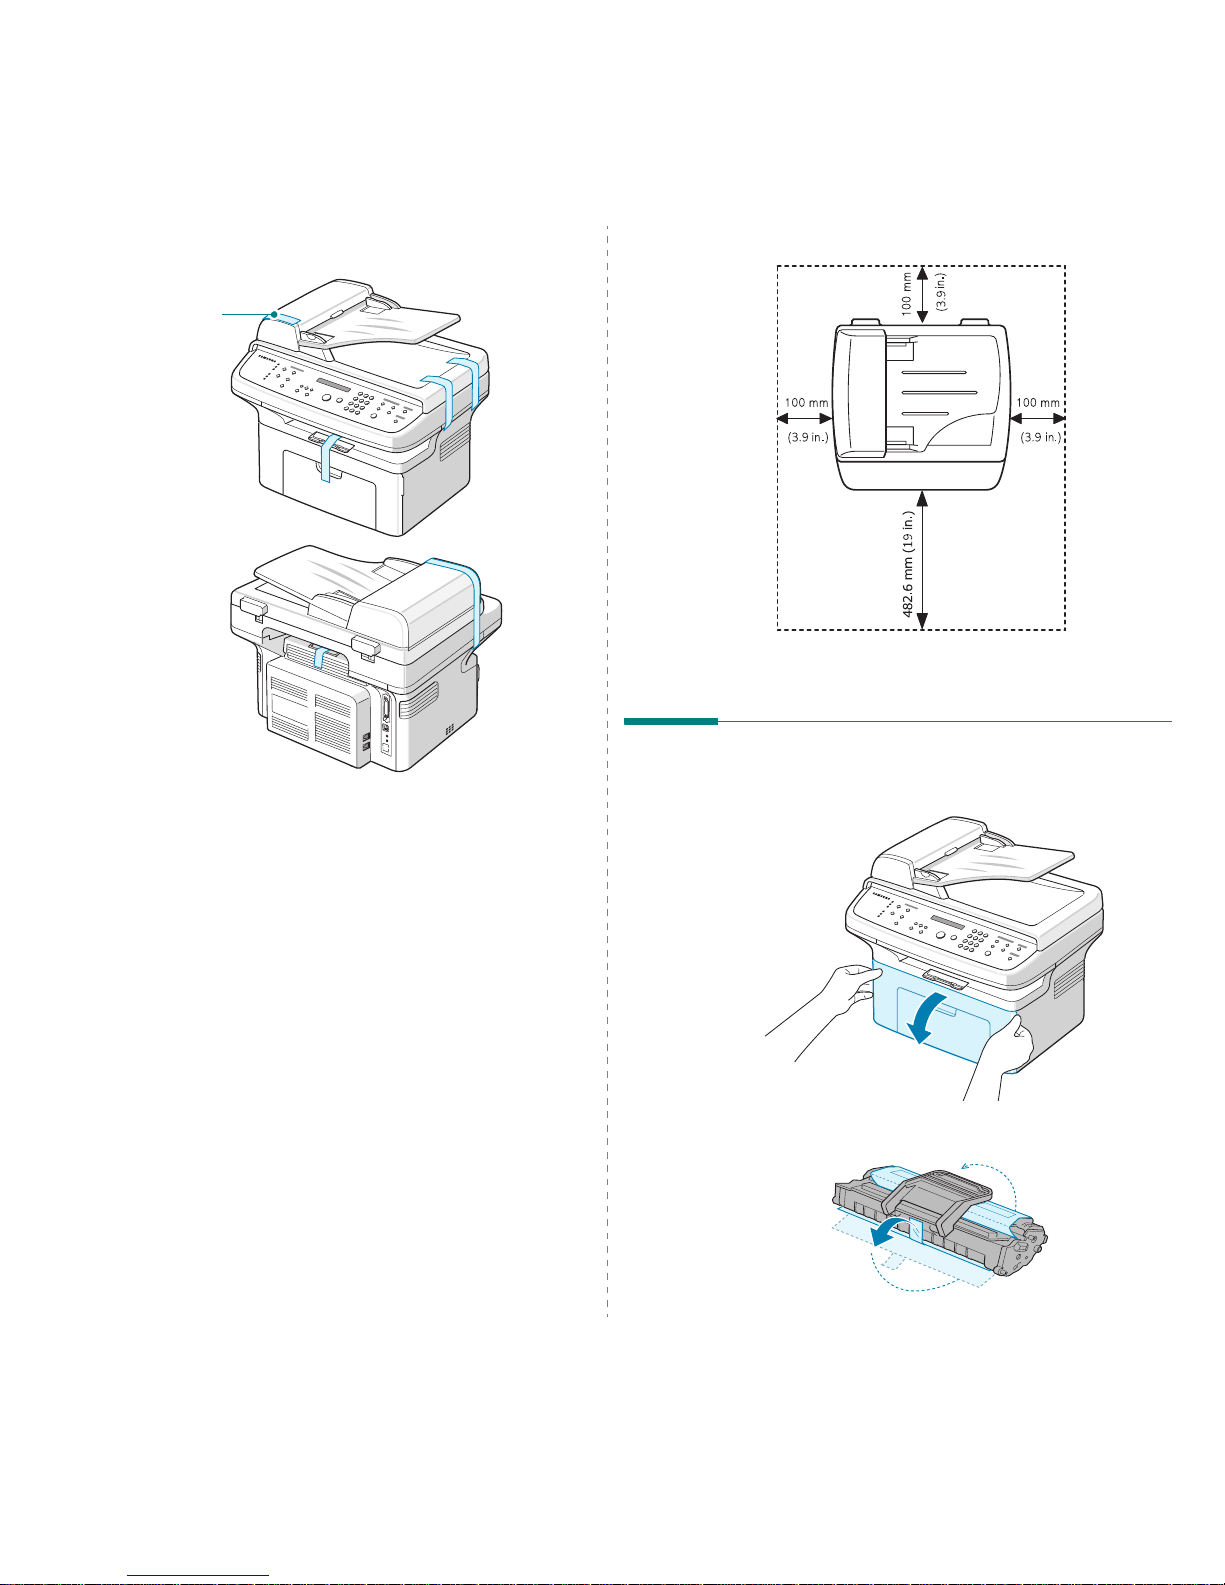
Remove the packing tape from the front, back, and sides
of the machine.
Selecting a Location
Select a level, stable place with adequate sp ace fo r air
circulation. Allow extra space for opening doors and trays.
The area should be well-ventilated and away from di rect
sunlight or sources of heat, cold, and humidity. Do not set the
machine close to the edge of your desk or table.
Clearance Sp ace
• Front: 19 in./482.6 mm (enough space so that the tray
and door can be opene d)
• Back: 3.9 in./100 mm (enough space for ventilation)
• Right: 3.9 in./100 mm (enough space for ventilation)
Tape
• Left: 3.9 in./100 mm (enough spac e f or ventilation)
Installing the Toner Cartridge
1
Open the front door.
2
Remove the toner cartridge from its bag and remove the
paper protecting the cartridge by pulling the packing tape.
Getting Started
2.3
3
Gently roll the cartridge 5 or 6 times to distribute the
toner.
Thoroughly rolling the cartridge will assure maximum
copies per cartridge.
N
OTE
: If toner gets on your clothing, wipe it off with a dry cloth
and wash clothing in cold water. Hot water sets toner into fabric.
C
AUTIONS
:
• To prevent damage, do not expose the toner cartridge to
light for more than a few minutes. Cover it with a piece of
paper, if left exposed for more than a few minutes.
• Do not touch the green underside of the toner cartridge. Use
the handle on the cartridge to avoid touching this area.
4
Unfold the toner cartridge handle and grasp it. Insert the
cartridge in the machine until it snaps into place.
N
OTE
: Carefully insert or pull out the toner cartridge not to
scratch against the printer.
5
Close the front door. Make sure that the door is securely
closed. If the cover is not firmly closed, printing errors
may occur when you print.
N
OTE
: When printing text at 5% coverage, you can expect a toner
cartridge life of approximately 3,000 pages. (1,000 pages for the
toner cartridge that is shipped with the machine.)
Loading Paper
The tray can hold a maximum of 150 sheets of 20 lb (
75 g/m2
bond) plain paper.
1
Grasp the tray a n d p ull it toward you to open. Pinch the
rear guide and pull it out to exten d th e tray.
Getting Started
2.4
2
Fan the ed g es o f the paper stack to separate the page s.
Then tap the stack on a flat surface to even it up.
3
Load paper
with the print side facing up
.
Make sure that all four corners are flat in the tray.
Pay attention not to overload paper. Paper overloading
may cause paper jams.
4
Pinch the rear guide to adjust for the paper length and
pinch the side guide to slide it to the e d ge of the paper.
N
OTES
:
• Do not push the paper side guide far eno u gh to cau s e th e
materials to warp.
• If you do not adjust the paper side guide, it may cause paper
jams.
5
If necessary, close the paper cover to keep th e paper
loaded in the tray from dust.
Making Connections
1
If you have SCX-4321:
Skip this step and proceed to step 2.
If you have SCX-4521F:
Plug one end of the supplied telephone line cord into the
LINE
jack on the machine and the other end into the wall
jack.
If you want to use your machine to receive both faxes and
voice calls, you will need to connect a telephone and/or
answering machine to your machine.
To the wall jack
Getting Started
2.5
Plug the cord of your extension phone or answering
machine into the
EXT.
jack.
UK users should plug the cord of the extension phone into
the supplied TAM lead and plug the cord of the TAM lead
into the
EXT.
jack on the back of your machine.
N
OTES
:
• Use the TAM lead and the telephone line cord supplied with
your machine.
• In the United Kingdom, if a three-wire type (SHUNT-wire,
older equipment) telephone or answering machine is
connected to the EXT. jack on the machine, the external
equipment will fail to ring when receiving an incoming call as
the machine is designed to o pe rate with the latest
technology. To prevent this incompatibility, use two-wire
(newer equipm en t) te le phones or answering mac h i n es .
To an extension phone or
answering machine
TAM lead
(For UK users only)
For German users only
For France users only
Getting Started
2.6
2
Connect a USB cable to the USB connector on your
machine. You need to buy a USB 1.1 compliant cable that
is within 3 m in length.
If you want to use a parallel printer cable, purchase only
an IEEE-1284 compliant parallel cable and connect it to
the parallel connector on your machine.
Push the metal clips down to fit inside the notche s o n the
cable plug.
N
OTES
:
• You only need to connect one of the cables mentioned
above. Do not use the parallel and the USB cables at the
same time.
• If you are using a USB cable, you must be running Windows
98/Me/2000/XP, Macintosh 10.3, or Linux.
To the USB port on your computer
To the parallel port on your computer
Turning the Machine On
1
Plug one end of the supplied three-pronged electrical cord
into the AC socket on the mach ine and the other e nd into a
properly grounded AC outlet.
2
Press the power switch to turn the machine on. “Warming
Up Please Wait” appears on the display indicating that the
machine is now on.
To view your display text in another language, see
“Changing the Display Language and Country” on
page 2.8.
C
AUTIONS
:
• The fusing area at the rear portion of the inside of yo u r
printer is hot when powered. Be careful not to be burned
when accessing this area.
• Do not disassemble the machine with power on. If you do,
you may receive an electric shock.
To the AC outlet

Getting Started
2.7
Installing Printer Software
You must install software using the supplied CDROM after you have set up your machine and
connected it to your computer. For details, see
Software User’s Guide
.
The CD-ROM provide s you with the following software:
Programs for Windows
T o use your machine as a printer and scanner in Windows, you
must install the MFP driver . Y o u can install selectively or all the
following components:
•
Printer driver
- Use this driver to take full advantage of
your printer’s features.
•
Scan driver
- TWAIN and Windows Image Acquisition
(WIA) driver are available for scanning documents on
your machine.
•
Printer Settings Utility- Use this program to create
phonebook entries and configure the destination of the scan
button. You can also update the firmware of the machine.
•
SmarThru
- It is the accompanying Windows-based
software for yo ur multifunctional machine. Al lows you to
edit a scanned image in many ways using a powerful
image editor and to send the image by e- mail. You can
also open another image editor program installed in your
Windows, like Adobe PhotoShop, from SmarThru.
For details, please refer to the onscreen help supplied on
the SmarThru program.
Macintosh Driver
You can print and scan in Macintosh using your machine.
Linux Driver
You can print and scan in Linux using your machine.
System Requirements
Your machine supports following operating system.
•Windows
98/Me/NT 4.0/2000/XP
- The following tabl e
shows Windows requirements.
N
OTE
: For Windows NT 4.0/2000/XP, the system
administrator should install the software.
•Macintosh 10.3 - See Software User’s Guide.
• Vario us Linux - See Software User’s Guide.
Item Requirements Recommended
CPU
Windows 98/Me/
NT 4.0/2000
Pentium II 400
MHz or higher
Pentium III 933
MHz
Windows XP
Pentium III 933
MHz or higher
Pentium IV 1 GHz
RAM
Windows 98/Me/
NT 4.0/2000
64 MB or higher 128 MB
Windows XP 128 MB or higher 256 MB
Free disk
space
Windows 98/Me/
NT 4.0/2000
300 MB or higher 1 GB
Windows XP 1 GB or higher 5 GB
Internet
Explorer
5.0 or higher 5.5

Getting Started
2.8
Printer Driver Features
Your printer drivers support the following standard features:
• Paper source selection
• Paper size, orientation and media type
• number of copies
The following table lists a general overview of features
supported by your printer drivers.
N
OTE
: For de t ails about ins t a lling softwa re and using it s
features, see
Software User’s Guide
.
Feature
Printer Driver
Win 98/Me/
NT4.0/2000/XP
Linux Macintosh
Toner Save Y Y N
Print qua lity option Y Y Y
Poster printing Y N N
Multiple pages per sheet
(N-up)
YY(2,4)Y
Fit to page printing Y Y N
Scale printing Y Y Y
Watermark Y N N
Overlay Y N N
Print order Y N N
Changing the Display Language
and Country
Setting Language
To change the language that displays on the control panel,
follow these steps:
1
Press
Menu
until “Machine Setup” appears on the top line
of the display.
2
Press the scroll button ( or ) until “Language” appears
on the bottom line of the d ispla y.
3
Press
Enter
. The current setting appears on the bottom
line of the display.
4
Press the scroll button ( or ) until the language you
want appears on the display.
5
Press
Enter
to save the selection.
6
To return to Standby mode, press
Stop/Clear
.
Setting Country
1
Press
Menu
until “Machine Setup” appears on the top line
of the display.
2
Press the scroll button ( or ) until “Select Country”
appears on the bottom line of the d ispla y.
3
Press
Enter
. The current setting appears on the bottom
line of the display.
4
Press the scroll button ( or ) until your country appears
on the display.
5
Press
Enter
to save the selection.
6
To return to Standby mode, press
Stop/Clear
.
N
OTE
: Changing the country clears the memory.
Getting Started
2.9
Setting the Machine ID
(Only for SCX-4521F)
In some countries, you are required by law to indicate your fax
number on any fax you send. The Machine ID, containing your
telephone number and name (or company name), will be
printed at the top of each page sent from your machine.
1
Press
Menu
until “Machine Setup” appears on the top line
of the display. The first available menu item, “Machine ID” ,
displays on the bottom line.
2
Press
Enter
. The display asks you to enter the fax number .
If there is a number already set, the number appears.
3
Enter your fax number using the number keypad.
N
OTE
: If you make a mistake while entering numbers, press
the button to delete the last digit.
4
Press
Enter
when the number on the display is correct.
The display asks you to enter an ID.
5
Enter your name or the company name using the number
keypad.
You can enter alphanumeric characters using the number
keypad, and include special symbols by pressing the
0
button.
For details on how to use the n u mb e r k e y pa d to e n ter
alphanumeric characters, see “Entering Characters Using
the Number Keypad” on page 2.9.
If you want to enter the same letter or number in
succession (e.g. SS, AA, 777), enter one digit, move the
cursor by pressing the
button and enter the ne x t dig it.
If you want to insert a space in the name, you can also
use the
button to move the cur so r to sk ip th e po sition.
6
Press
Enter
when the name on th e d isplay is correct.
7
To return to Standby mode, press
Stop/Clear
.
Entering Characters Using the
Number Keypad
As you perform various tasks, you need to enter names and
numbers. For example, when you set up your machine, you
enter your name (or your company’s name) and telephone
number. When you store one- or two-digit speed dial or group
dial numbers, you may also enter the corresponding names.
To enter alphanumeric characters:
1
When you are prompted to enter a letter,
locate the button labeled with th e
character you want. Press the button until
the correct letter appears on the display.
For example, to e nter th e le tter
O
,
press
6
, labeled w ith “MNO”.
Each time you press
6
, the display shows
a different letter,
M, N, O
, and finally 6.
You can enter special char acters, such as space, plus sign,
and etc.. For details, see “Keypad Letters and Numbers”
on page 2.9.
2
To enter additional letters, repeat step 1 .
If the next letter is printed on the sa me button, move the
cursor by pressing the
button and then press the button
labeled with the letter you want. The cursor will move to
the right and the next letter will appear o n the display.
You can enter a space b y pressing
1
twice.
3
When you finish entering letters, press
Enter
.
Keypad Letters and Numbers
Changing Numbers or Names
If you make a mistake while entering a number or name, press
the button to delete the last digit or character. Then enter the
correct number or character.
Inserting a Pause
With some telephone systems, you must dial an access code (9,
for example) and listen for a second d ial tone. In such cases,
you must insert a pause in the telephone number. You can
insert a pause while you are setting up speed dial numbers.
T o insert a pause, press
Redial/Pause
at the appropriate place
while entering the telephone number. A “
−
” appears on the
display at the corresponding location.
Key Assigned numbers, letters, or characters
1 1 Space
2
A B C 2
3
D E F 3
4
G H I 4
5
J K L 5
6 M N O 6
7 P Q R S 7
8
T U V 8
9
W X Y Z 9
0
+ - , . ‘ / * # & 0
Getting Started
2.10
Setting the Date and Time
(Only for SCX-4521F)
When you turn your machine on for the first time, the display
prompts you to enter the curren t date and time. After entering,
it will not appear anymore.
N
OTE
: When turning on the machine after turning it off for a
long time, you need to reset date an d time.
1
Press
Menu
until “Machine Setup” appears on the top line
of the display.
2
Press the scroll button ( or ) to display “Date & Time”
on the bottom line and p r ess
Enter
.
3
Enter the correct time and date using the number keyp ad.
Month = 01 ~ 12
Day = 01 ~ 31
Year = r eq u i res fo u r di gits
Hour = 01 ~ 12 (12- ho u r mode)
00 ~ 23 (24-hour mo d e)
Minute = 00 ~ 59
N
OTE
: The date format may differ from co u n try to co u ntr y.
You can also u se th e scroll butto n ( or ) to move the
cursor under the digit you want to correct and enter a new
number.
4
T o select “AM” or “PM” for 12-hour format, press the or
button or any number button.
When the cursor is not under the AM or PM indicator,
pressing the or button immediately mov es the
cursor to the indicator.
You can change the clock mode to 24-hour format (e.g.
01:00 PM as 13:00). For details, see “Changing the Clock
Mode” on pa ge 2.10.
5
Press
Enter
when the time and date o n th e d isplay is
correct.
6
To return to Standby mode, press
Stop/Clear
.
Changing the Clock Mode
You can set your machine to display the current time using
either a 12-hour or 24-hour format.
1
Press
Menu
until “Machine Setup” appears on the top line
of the display.
2
Press the scroll button ( or ) until you see “Clock Mode”
on the bottom line and p r ess
Enter
.
The clock mode currently set for the machine displays.
3
Press the scroll button ( or ) to select the other mode
and then press
Enter
to save the selection.
4
To return to Standby mode, press
Stop/Clear
.
Setting the Paper Size and Type
After loading paper in the tray, you n e ed to set the paper size
and type using the control panel buttons. These settings will
apply to copy and fax modes. For PC-printing, you need to
select the paper size and type in the application program you
use on your PC.
1
Press
Menu
.
The display shows “P aper Setting” on the top line of the
display.
2
Press the scroll button ( or ) to display “Pap er Si z e” on
the bottom line and press
Enter
to access the menu item.
3
Use the scroll button ( or ) to find the paper size you
are using and press
Enter
to save it.
4
Press the button to scroll to “Paper Type” and press
Enter
to access the menu item.
5
Use the scroll button ( or ) to find the paper typ e you
are using and press
Enter
to save it.
6
To return to Standby mode, press
Stop/Clear
.

Getting Started
2.11
Setting Sounds
(Only for
SCX-4521F
)
You can control the following sounds:
• Speaker: You can turn on or off the
sounds from the
telephone line through the speaker, such as the dial tone or
a fax tone
. With this option set to “Comm .” the s peak er is
on until the remote m achine answers.
• Ringer: You can adjust the ringer volume.
• Key Sound : With this option set to “On” a key tone
sounds each time a key is pressed.
• Alarm Sound: You can turn the alarm sound on or off.
With this option set to “On” an alarm tone sounds when
an error occurs or fax communication ends.
• You c a n a d just the volume level using the On Hook Dial
button.
Speaker, Ringer, Key So und, and Alarm Sound
1
Press
Menu
until “Sound/Volume” appears on the top line
of the display.
2
Press the scroll button ( or ) to scroll through the
options. Press
Enter
when you see the desired sound
option.
3
Press the scroll button ( or ) to display the desired
status or volume for the option y ou h a ve selected.
You will see the selection on th e bottom line of the display .
For the ringer volume, you can select “Off”, “Low”, “Med”,
and “High”. Setting “Off” means that the rin g er d oes n ot
sound. The machine works normally even if the ringer is
turned off.
4
Press
Enter
to save the selection. The next sound option
appears.
5
If necessary , repeat steps 2 through 4.
6
To return to Standby mode, press
Stop/Clear
.
Speaker Volume
1
Press
On Hook Dial
. A dial tone sounds from the speaker.
2
Press the scroll button ( or ) until you hear the volume
you want. The display shows the current volume level.
3
Press
On Hook Dial
to save the change and return to
Standby mode.
N
OTE
: You can adjust the speaker volume only wh en the
telephone line is connected.
Using the Save Modes
Toner Save Mode
T oner Save mode allows your machine to use less toner on each
page. Activating this mod e ex te n d s the life o f the to n e r
cartridge beyond what one would experience in the normal
mode, but it reduc e s p ri n t qu ality.
To turn the toner save mode o n o r off, press
Toner Save
.
• If the button backlight is on, the mode is active and the
machine uses less toner when printing a document.
• If the button backligh t is off, the mode is deactivated and
the machine prints with the normal quanti ty of to ne r.
N
OTE
: When PC-printing, you can also turn on or off the toner
save mode in the printer prop erties. For de tails, see
Software
User’s Guide
.
Power Save Mode
Power Save mode allows your machine to reduce power
consumption when it is not in actual use. You can turn this
mode on and select a leng th of tim e fo r which the machine
waits a fter a job is printed before i t switches to a redu ced pow er
state.
1
Press
Menu
until “Machine Setup” appears on top line of
the display.
2
Press the scroll button ( or ) until “Power Save” appears
on the bottom line. Press
Enter
.
3
Press the scroll button ( or ) to display “On” on the
bottom line and press
Enter
.
Selecting “Off” means that the power save mode is
deactivated.
4
Press the scroll button ( or ) until the time setting you
want appears.
The available options are 5, 10, 15, 30, and 45 (minutes).
5
Press
Enter
to save the selection.
6
To return to Standby mode, press
Stop/Clear
.

Getting Started
2.12
Setting the Dial Mode
(Only for SCX-4521F)
You can select the type of the telephone dial system where your
machine is connected.
N
OTE
: The Dial Mode setting may be unavailable depending
on your country.
1
Press
Menu
until “Machine Setup” appears on the top line
of the display.
2
Press the scroll button ( or ) until you see “Dial Mode”
on the bottom line and p r ess
Enter
.
3
Press the scroll button ( or ) to select the desired dial
mode.
Select “Tone” if your machine is connected to a tone dial
line.
Select “Pulse” if the machine is connected to a pulse dial
line.
4
Press
Enter
to save the selection.
5
To return to Standby Mode, press
Stop/Clear
.
Paper Handling
3.1
3 Paper Handling
This chapter introduces you to the basics of selecting print
materials and loading them into you r machine.
This cha p t er includes:
• Selecting Print Materials
• Loading Paper
• Verifying an Output Location
Selecting Print Materials
You can print on a variety of print materials, such as plain
paper , envelopes, labels, and transparencies. Always use print
materials that meet the guidelines for use w ith this machine.
See “Paper Specifications” on page 10.3. To get the best
possible print quality, use only high-quality copier-grade paper.
When you choose print materials, consider the following:
• Size: Y ou can use an y size paper th at fits easily w ithin the
paper adjusters of the tray.
• Weight: 16 ~ 24 lb (60 to 90 g/m
2
bond) for the tr ay w ith
multi-pages feeding, and 16 ~ 43 lb (60 to 165 g/m
2
bond) for the manual tray and tray with single page
feeding.
• Brightness: Some papers are whiter than others and
produce sharper, more vibrant images.
• Surface smoothness: The smoothness of the paper
affects how crisp the printing looks on the paper.
C
AUTION
: Using print materials that dose not conform to th e
specifications listed o n page 10.2 may cau s e problems that
may require service. This service is not covered by the
warranty or service agreements.
Paper Type, Input Sources, and
Capacities
Paper Type
*
*. If you experience excessive jamming, load one sheet at a time
through the tray or manual tray.
Input Tray/Capaci ty
**
**.Maximum capacity may differ depending on media weight,
thickness, and environmental conditions.
Tray Manual tray
Plain paper
150 1
Envelopes
11
Labels
11
Transparencies
11
Card stock
11

Paper Handling
3.2
Guidelines for Paper and Special
Materials
When selecting or loading paper , envelopes, or other special
material, keep these guidelines in mind:
• Always use paper and other materials that conform with
the specifications listed under “Paper Specifications” on
page 10.3.
• Attempting to print on damp, curled, wrinkled, or torn
paper can cause paper jams and poor print quality.
• Use only high quality copier gr ade paper for the best print
quality.
• Avoid paper with embossed lettering, perforations, or a
texture that is too smooth or too rough. Paper jams may
occur.
• Store paper in its ream wrapper until you are ready to
use. Place cartons on pallets or shelves, not on the floor.
Do not place heavy objects on top of the paper, whether
it is packaged or unpackaged. Keep it away from
moisture, or other conditions that can cause it to wrinkle
or curl.
• Store unused materials at temperatures between 15
o
C
and 30
o
C (59 oF to 86 oF). The relative humidity should
be between 10 % and 70 %.
• During storage, you should use a moisture-proof wrap,
such as a plastic container or bag, to prevent dust and
moisture from contaminating your paper.
• Load special paper types one s heet at a ti me throu gh th e
manual tray or the tray to avoid paper jams.
• Only use materials specifically recommended for use in
laser printers.
• To prevent special materials, such as transparencies and
label sheets fro m s tic ki ng to ge th er, remove them as the y
print out.
•For envelopes:
Use only well-constructed envelopes with sharp and well
creased folds.
Do not use envelopes with clasps and sn aps.
Do not use envelopes with windows, coated lining, self-
adhesive seals, or other synthetic materials.
Do not use damaged or poorly made envelopes.
Only use envelopes recommended for laser printers.
Before loading envelopes in the tray, m a k e su re that th e y
are undamaged and are not stuck together.
Do not feed stamped envelopes.
• For transparencies:
Place them on a flat surface after removing them from the
machine.
Do not leave them in th e tray for long periods of time.
Dust and dirt may accumulate on them, resulting in spotty
printing.
To avoid smudging caused by fingerprints, handle them
carefully.
To avoid fading, do not expose printed transparencies to
prolonged sunlight.
Only use transparencies recommended for use in laser
printers.
Ensure that transparencies are not wrinkled, curled, or
have any torn edges.
•For labels:
Verify that th eir adhe siv e material can tolerate a fusing
temperature of 200
o
C (392 o F) for 0.1 second.
Make sure that there is no exposed adhesive material
between them. Exposed areas can cause labels to peel off
during printing, which can cause paper jams. Exposed
adhesive can also cause damage to machine components.
Do not load a sheet of them through the machine more
than once. The adhesive backing is designed for one pass
through the machine.
Do not use labels that are sep arating from the backing
sheet or are wrinkled, bubbled or otherwise damaged.
Only use labels recommended for laser printers.
• For Card Stock or Custom-sized materials:
Postcards, 3.5 x 5.8 in. (89 x 148 mm) cards and other
custom-sized materials can be p rinted with this printer.
The minimum size is 3 x 5 in. (76 x 127 mm) and the
maximum size is 8.5 x 14 in. (216 x 356 mm)
Always insert the short-edge into the tray first. If you
want to print in landscape mode, make this selection
through your software. Inserting paper long-edge first
may cause a paper jam.
Do not print on media smaller than 3 in. (76 mm) wide or
5 in. (127 mm) long.
• For preprinted paper:
Letterheads must be printed w ith he at-resistant ink that
will not melt, vaporize, or release hazardous emissions
when subjected to the printer’s fusing temperature of
200 °C (392 °F) for 0.1 second.
Ink on letterheads must be non-flammable and should not
adversely affect any p rin te r roller s.
Forms and letterheads should be sealed in a moistureproof wrapping to prevent changes during storage.
Before you load preprinted paper as forms and
letterheads, verify that the ink on the paper is dry. During
the fusing process, wet ink can come off preprinted paper.
• Do not use
Carbonless
paper and
Tracing
paper. Use of
these types of paper could result in chemical smells and
could damage your machine.
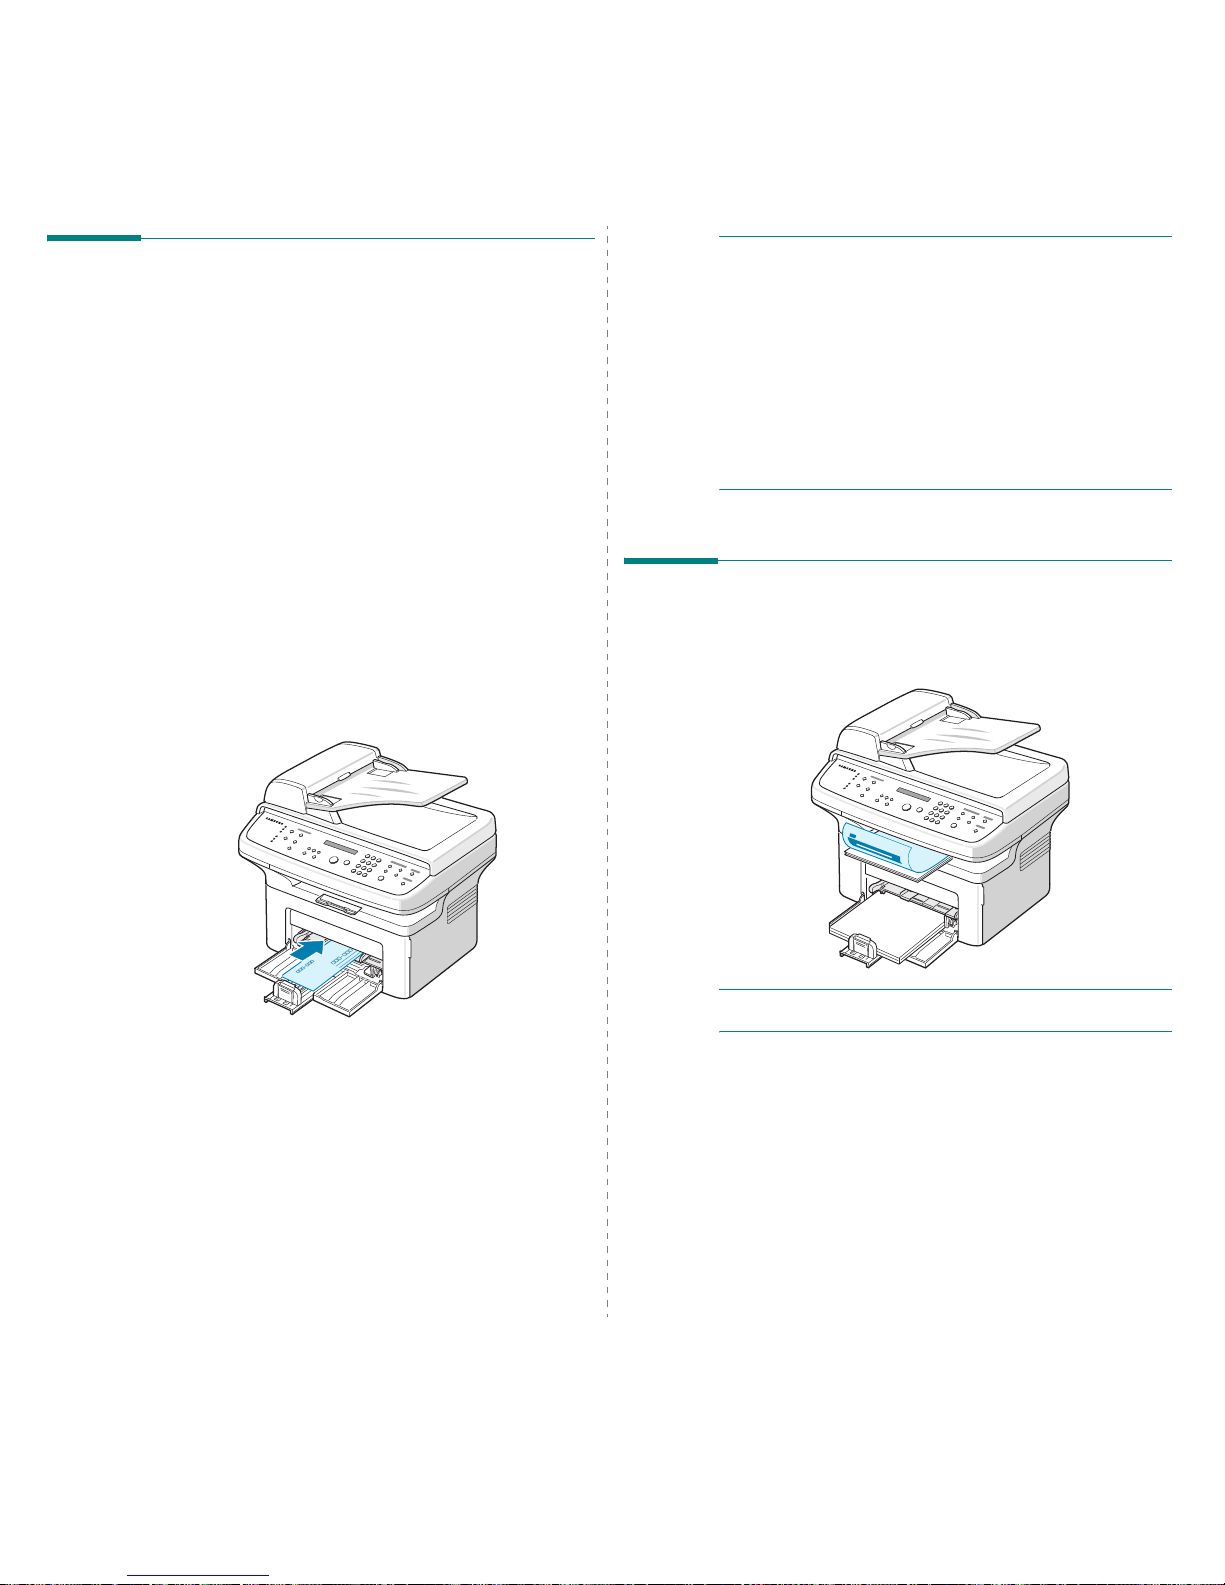
Paper Handling
3.3
Loading Paper
Proper paper loading helps prevent paper jams and ensure
trouble-free printing. Do not remove the paper in the tray while
a job is printing. Doing so may cause a paper jam. See “Paper
T ype, Input Sources, and Capacities” on page 3.1 for
acceptable paper size and capacity for the tray.
Using the Tray
The tray holds 150 sheets of paper.
Load a stack of paper into the tr ay and print. For details about
loading paper in the tray, see “Loading Paper” on page 2.3.
To use the s p ecial material like env elope, label and card,
remove the stack of plain paper and load one sheet of special
material into the tray.
Using the Manual Tray
When you print a document using your PC and want to check
the print quality after each page is printed, load the paper in
the manual tray a nd select
Manual Feed
for
Source
from the
softwar e application.
1
Load the print material in the tray
with the print side up
.
Push the print material firmly into the manual tr ay.
2
Adjust the paper guide against the p rint m ate rial witho u t
bending the material.
3
Select
Manual Feed
for
Source
from the software
application, and then select the correct paper size and
type. For details, see
Software User’s Guide
.
4
Operate printi n g.
5
The display shows “Add Paper & Press Start” then press
Start
on the machine to start feeding.
Printing is started.
6
If you have multiple pa ges to be p rinted, the d isplay sho ws
“Add Paper & Press Start” again. Load the next sheet and
press
Start
.
Repeat this step for every page to be printed.
N
OTES
:
• When you print more than 20 envelopes in succession, print
speed may be reduced.
• If you experience jams with card stock feeding, turn the
paper around and try again.
• Manually loading paper and pressing
Start
to start feeding is
only available with PC printing.
• Because the Manual Feed mode does not print jobs
automatically and continuously, incoming faxes are stored in
memory instead of printing immediately. (Only for SCX4521F)
• When you press
Stop/Clear
in the Manual Feed mode, the
print job in progress is canceled.
Verifying an Output Location
The machine has a paper output location which holds 50 sheets
of paper. The output tray collects printed paper face down, in
the order in which the sheets were pr inted .
N
OTE
: Pull the paper output exte nsion not to d rop the printed
paper.

Copying
4.1
4 Copying
This chapter gives you step-by-step instructions for copying
documents.
This cha p t er includes:
• Loading Paper for Copying
• Preparing a Document
• Making Copies on the Document Glass
• Making Copies from the Automatic Document Feeder
• Setting C o py Options
• Using Special Copy Features
• Changing the Default Settings
• Setting the Time Out Option
• Setting the Favorite Copy Option
Loading Paper for Copying
The instructions for loading print materials are the same
whether you are printing, faxing, or copying. For further details,
see “Loading Paper” on page 2.3 for loading paper in the tray.
N
OTE
: For copying, you can only use Letter-, A4-, Legal-,
Folio-, Executive-, B5-, A5-, or A6-sized p rint materia ls.
Preparing a Document
You can use the document g lass or the Automatic Docum ent
Feeder (ADF) to load an original document for copying,
scanning, and sending a fax. Using the ADF, you can load up to
30 documents (20 lb, 75 g/m
2
bond) for one job. You can, of
course, place only one sheet at a time on the document glass.
When you use the ADF:
• Do not load documents smal ler than 5.6 x 5.8 in. (142 x
148 mm) or larger than 8.5 x 14 in. (216 x 356 mm).
• Do not attempt to feed the following types of documents:
- carbon-paper or carbon-backed paper
- coated paper
- onion skin or thin paper
- wrinkled or creased paper
- curled or rolled paper
- torn paper
• Remove all staples and paper clips before loading
documents.
• Make sure any glue, ink, or correcti on fluid on the paper
is completely dry before loading documen ts.
• Do not load documents that include different sizes or
weights of paper.
• Do not load booklet, pamphlet, transparenc ies, or
documents having other unusual characteristics.
 Loading...