

Samsung SCH-U960ZSAVZW User Manual

PORTABLE All Digital
MOBILE PHONE
User Manual
Please read this manual before operating your
phone, and keep it for future reference.

Intellectual Property
All Intellectual Property, as defined below, owned by or which is otherwise the property of Samsung or its respective suppliers relating to
the SAMSUNG Phone, including but not limited to, accessories, parts, or software relating there to (the “Phone System”), is proprietary to
Samsung and protected under federal laws, state laws, and international treaty provisions. Intellectual Property includes, but is not limited
to, inventions (patentable or unpatentable), patents, trade secrets, copyrights, software, computer programs, and related documentation
and other works of authorship. You may not infringe or otherwise violate the rights secured by the Intellectual Property. Moreover, you
agree that you will not (and will not attempt to) modify, prepare derivative works of, reverse engineer, decompile, disassemble, or
otherwise attempt to create source code from the software. No title to or ownership in the Intellectual Property is transferred to you. All
applicable rights of the Intellectual Property shall remain with SAMSUNG and its suppliers.
Samsung Telecommunications America (STA), LLC
Headquarters: Customer Care Center:
1301 E. Lookout Drive 1000 Klein Rd.
Richardson, TX 75082 Plano, TX 75074
Toll Free Tel: 1.888.987.HELP (4357)
Internet Address:
©
2009 Samsung Telecommunications America, LLC is a registered trademark of Samsung Electronics America, Inc. and its related
entities.
Do you have questions about your Samsung Mobile Phone?
For 24 hour information and assistance, we offer a new FAQ/ARS System (Automated Response System) at:
www.samsungtelecom.com/support
http://www.samsungusa.com
U960_Rogue_English_UM_CG02_PM__071409_F8

GH68-22542A
Printed in U.S.A.
Open Source Software
Some software components of this product incorporate source code covered under GNU General Public License (GPL), GNU Lesser General
Public License (LGPL), OpenSSL License, BSD License and other open source licenses. To obtain the source code covered under the open
source licenses, please visit:
http://www.samsungnetwork.com/Home/opensource
.
Disclaimer of Warranties; Exclusion of Liability
EXCEPT AS SET FORTH IN THE EXPRESS WARRANTY CONTAINED ON THE WARRANTY PAGE ENCLOSED WITH THE PRODUCT, THE
PURCHASER TAKES THE PRODUCT "AS IS", AND SAMSUNG MAKES NO EXPRESS OR IMPLIED WARRANTY OF ANY KIND WHATSOEVER
WITH RESPECT TO THE PRODUCT, INCLUDING BUT NOT LIMITED TO THE MERCHANTABILITY OF THE PRODUCT OR ITS FITNESS FOR ANY
PARTICULAR PURPOSE OR USE; THE DESIGN, CONDITION OR QUALITY OF THE PRODUCT; THE PERFORMANCE OF THE PRODUCT; THE
WORKMANSHIP OF THE PRODUCT OR THE COMPONENTS CONTAINED THEREIN; OR COMPLIANCE OF THE PRODUCT WITH THE
REQUIREMENTS OF ANY LAW, RULE, SPECIFICATION OR CONTRACT PERTAINING THERETO. NOTHING CONTAINED IN THE INSTRUCTION
MANUAL SHALL BE CONSTRUED TO CREATE AN EXPRESS OR IMPLIED WARRANTY OF ANY KIND WHATSOEVER WITH RESPECT TO THE
PRODUCT. IN ADDITION, SAMSUNG SHALL NOT BE LIABLE FOR ANY DAMAGES OF ANY KIND RESULTING FROM THE PURCHASE OR USE OF
THE PRODUCT OR ARISING FROM THE BREACH OF THE EXPRESS WARRANTY, INCLUDING INCIDENTAL, SPECIAL OR CONSEQUENTIAL
DAMAGES, OR LOSS OF ANTICIPATED PROFITS OR BENEFITS.

Table of Contents
Section 1: Getting Started .............................................. 4
Understanding this User Manual . . . . . . . . . . . . . . . . . . . . . . . .4
Notes and Tips . . . . . . . . . . . . . . . . . . . . . . . . . . . . . . . . . . . . . 4
Using the Battery . . . . . . . . . . . . . . . . . . . . . . . . . . . . . . . . . . . 4
Inserting and Removing Your Memory Card
(purchased separately) . . . . . . . . . . . . . . . . . . . . . . . . . . . . . 9
Memory Card Formatting . . . . . . . . . . . . . . . . . . . . . . . . . . . . 11
Turning Your Phone On and Off . . . . . . . . . . . . . . . . . . . . . . . . 13
Setting Up Voicemail . . . . . . . . . . . . . . . . . . . . . . . . . . . . . . . . 13
Section 2: Understanding Your Phone ......................... 14
Features of Your Phone . . . . . . . . . . . . . . . . . . . . . . . . . . . . . . 14
Closed View of Your Phone . . . . . . . . . . . . . . . . . . . . . . . . . . .15
Back View of Your Phone . . . . . . . . . . . . . . . . . . . . . . . . . . . . 16
Side View of Your Phone . . . . . . . . . . . . . . . . . . . . . . . . . . 17
Open View of Your Phone . . . . . . . . . . . . . . . . . . . . . . . . . . . . 18
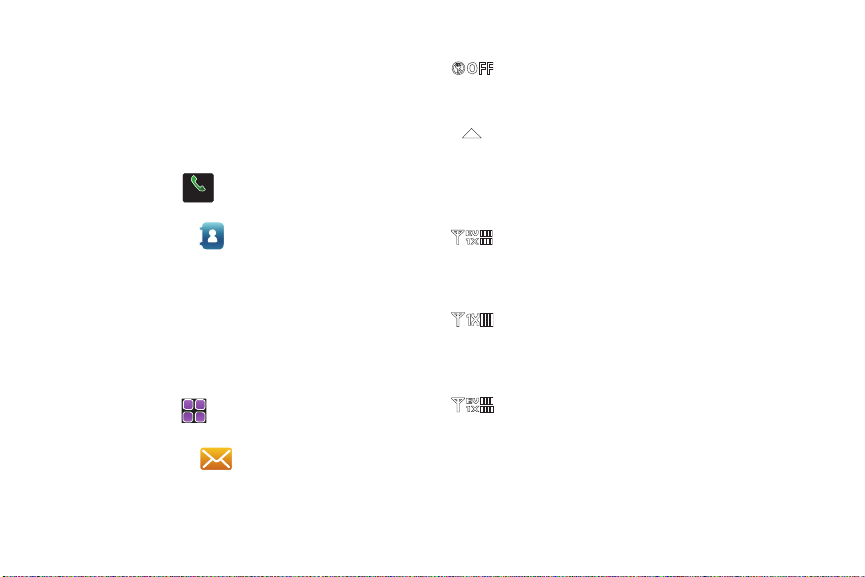
Event Status Bar Icons . . . . . . . . . . . . . . . . . . . . . . . . . . . . . . 22
Event Status Bar and Event Manager . . . . . . . . . . . . . . . . . . . 22
Care and Use of the Touch Screen . . . . . . . . . . . . . . . . . . . . . 24
Dialog Boxes . . . . . . . . . . . . . . . . . . . . . . . . . . . . . . . . . . . . . 25
Section 3: Touch Screen Navigation ............................ 26
Widgets . . . . . . . . . . . . . . . . . . . . . . . . . . . . . . . . . . . . . . . . . 29
Widget Bar Navigation . . . . . . . . . . . . . . . . . . . . . . . . . . . . . .32
Keyboard Navigation . . . . . . . . . . . . . . . . . . . . . . . . . . . . . . . 34
Menu Outline . . . . . . . . . . . . . . . . . . . . . . . . . . . . . . . . . . . . . 34
1
Section 4: Call Functions ............................................. 38
Making a Call . . . . . . . . . . . . . . . . . . . . . . . . . . . . . . . . . . . . . 38
Ending a Call . . . . . . . . . . . . . . . . . . . . . . . . . . . . . . . . . . . . . 38
Three-way Calling . . . . . . . . . . . . . . . . . . . . . . . . . . . . . . . . . 39
Answering a Call . . . . . . . . . . . . . . . . . . . . . . . . . . . . . . . . . . 40
Call In-Progress Options . . . . . . . . . . . . . . . . . . . . . . . . . . . . . 40
Recent Calls . . . . . . . . . . . . . . . . . . . . . . . . . . . . . . . . . . . . . . 41
Roaming . . . . . . . . . . . . . . . . . . . . . . . . . . . . . . . . . . . . . . . . 44
TTY . . . . . . . . . . . . . . . . . . . . . . . . . . . . . . . . . . . . . . . . . . . . 44
Voice Commands . . . . . . . . . . . . . . . . . . . . . . . . . . . . . . . . . . 45
Section 5: Understanding Your Contacts ....................51
Contacts Icons . . . . . . . . . . . . . . . . . . . . . . . . . . . . . . . . . . . . 51
Adding a Contact . . . . . . . . . . . . . . . . . . . . . . . . . . . . . . . . . . 52
Adding Pauses . . . . . . . . . . . . . . . . . . . . . . . . . . . . . . . . . . . . 55
Contact List . . . . . . . . . . . . . . . . . . . . . . . . . . . . . . . . . . . . . . 56
Editing an Existing Contact Entry . . . . . . . . . . . . . . . . . . . . . . 56
Deleting a Contact Entry . . . . . . . . . . . . . . . . . . . . . . . . . . . . . 57
Backup Assistant . . . . . . . . . . . . . . . . . . . . . . . . . . . . . . . . . . 57
Contact Groups . . . . . . . . . . . . . . . . . . . . . . . . . . . . . . . . . . . 57
Speed Dialing . . . . . . . . . . . . . . . . . . . . . . . . . . . . . . . . . . . . . 61
Favorites . . . . . . . . . . . . . . . . . . . . . . . . . . . . . . . . . . . . . . . . 62
Emergency Contacts . . . . . . . . . . . . . . . . . . . . . . . . . . . . . . . 63
My Name Card . . . . . . . . . . . . . . . . . . . . . . . . . . . . . . . . . . . . 64
Finding My Phone Number . . . . . . . . . . . . . . . . . . . . . . . . . . . 65

Section 6: Selecting Text Entry Modes ........................66
Entering Text Using the QWERTY Keyboard . . . . . . . . . . . . . . 66
Entering Text using Touch Screen Keypad . . . . . . . . . . . . . . . 69
Section 7: Messaging ................................................... 73
Types of Messages . . . . . . . . . . . . . . . . . . . . . . . . . . . . . . . . 73
Changing Message Settings . . . . . . . . . . . . . . . . . . . . . . . . . . 73
Creating and Sending Text Messages . . . . . . . . . . . . . . . . . . . 74
Creating and Sending Picture Messages . . . . . . . . . . . . . . . . 76
Creating and Sending Video Messages . . . . . . . . . . . . . . . . . . 78
Creating and Sending Voice Messages . . . . . . . . . . . . . . . . . . 79
Receiving New Messages . . . . . . . . . . . . . . . . . . . . . . . . . . . . 81
Quick Reply . . . . . . . . . . . . . . . . . . . . . . . . . . . . . . . . . . . . . . 85
Messages Folder . . . . . . . . . . . . . . . . . . . . . . . . . . . . . . . . . . 86
Voicemail . . . . . . . . . . . . . . . . . . . . . . . . . . . . . . . . . . . . . . . . 95
Visual Voice Mail . . . . . . . . . . . . . . . . . . . . . . . . . . . . . . . . . . 95
Mobile IM . . . . . . . . . . . . . . . . . . . . . . . . . . . . . . . . . . . . . . . . 96
Email . . . . . . . . . . . . . . . . . . . . . . . . . . . . . . . . . . . . . . . . . . . 97
Chat . . . . . . . . . . . . . . . . . . . . . . . . . . . . . . . . . . . . . . . . . . . . 98
Section 8: Changing Your Settings .............................. 99
My Verizon . . . . . . . . . . . . . . . . . . . . . . . . . . . . . . . . . . . . . . . 99
Tools . . . . . . . . . . . . . . . . . . . . . . . . . . . . . . . . . . . . . . . . . . . 99
Bluetooth Menu . . . . . . . . . . . . . . . . . . . . . . . . . . . . . . . . . . . 99
Sound Settings . . . . . . . . . . . . . . . . . . . . . . . . . . . . . . . . . . . 104
Display Settings . . . . . . . . . . . . . . . . . . . . . . . . . . . . . . . . . . 106
Touch Settings . . . . . . . . . . . . . . . . . . . . . . . . . . . . . . . . . . . 109
Phone Settings . . . . . . . . . . . . . . . . . . . . . . . . . . . . . . . . . . . 110
Call Settings . . . . . . . . . . . . . . . . . . . . . . . . . . . . . . . . . . . . 117
Memory . . . . . . . . . . . . . . . . . . . . . . . . . . . . . . . . . . . . . . . . 120
USB Mode . . . . . . . . . . . . . . . . . . . . . . . . . . . . . . . . . . . . . . 121
Phone Info . . . . . . . . . . . . . . . . . . . . . . . . . . . . . . . . . . . . . . 122
Set-Up Wizard . . . . . . . . . . . . . . . . . . . . . . . . . . . . . . . . . . . 122
Section 9: Media Center ............................................. 123
Media Center . . . . . . . . . . . . . . . . . . . . . . . . . . . . . . . . . . . . 123
Music & Tones . . . . . . . . . . . . . . . . . . . . . . . . . . . . . . . . . . . 123
Games . . . . . . . . . . . . . . . . . . . . . . . . . . . . . . . . . . . . . . . . . 127
Browser . . . . . . . . . . . . . . . . . . . . . . . . . . . . . . . . . . . . . . . . 127
Browse & Download . . . . . . . . . . . . . . . . . . . . . . . . . . . . . . 128
Extras . . . . . . . . . . . . . . . . . . . . . . . . . . . . . . . . . . . . . . . . . 128
Section 10: Music ...................................................... 129
Inserting and Removing the microSD card . . . . . . . . . . . . . . 129
Memory Card Formatting . . . . . . . . . . . . . . . . . . . . . . . . . . . 129
Music & Tones . . . . . . . . . . . . . . . . . . . . . . . . . . . . . . . . . . . 129
Section 11: Camera and Camcorder .......................... 135
Using the Camera . . . . . . . . . . . . . . . . . . . . . . . . . . . . . . . . 135
Using the Camcorder . . . . . . . . . . . . . . . . . . . . . . . . . . . . . . 143
Section 12: Tools ........................................................ 149
Voice Commands . . . . . . . . . . . . . . . . . . . . . . . . . . . . . . . . . 149
Calculator . . . . . . . . . . . . . . . . . . . . . . . . . . . . . . . . . . . . . . 149
Calendar . . . . . . . . . . . . . . . . . . . . . . . . . . . . . . . . . . . . . . . 151
Alarm Clock . . . . . . . . . . . . . . . . . . . . . . . . . . . . . . . . . . . . . 152
Stop Watch . . . . . . . . . . . . . . . . . . . . . . . . . . . . . . . . . . . . . 154
World Clock . . . . . . . . . . . . . . . . . . . . . . . . . . . . . . . . . . . . . 154
2

Notepad . . . . . . . . . . . . . . . . . . . . . . . . . . . . . . . . . . . . . . . . 155
Sketch Pad . . . . . . . . . . . . . . . . . . . . . . . . . . . . . . . . . . . . . . 156
Timer . . . . . . . . . . . . . . . . . . . . . . . . . . . . . . . . . . . . . . . . 157
USB Mass Storage . . . . . . . . . . . . . . . . . . . . . . . . . . . . . . . . 157
File Viewer . . . . . . . . . . . . . . . . . . . . . . . . . . . . . . . . . . . . . . 158
Section 13: Browser ................................................... 159
Accessing the Browser . . . . . . . . . . . . . . . . . . . . . . . . . . . . .159
Navigation Using the Browser . . . . . . . . . . . . . . . . . . . . . . . . 159
Accessing a URL Address . . . . . . . . . . . . . . . . . . . . . . . . . . . 164
Using Favorites . . . . . . . . . . . . . . . . . . . . . . . . . . . . . . . . . . . 164
Browser Settings . . . . . . . . . . . . . . . . . . . . . . . . . . . . . . . . .166
Using your History . . . . . . . . . . . . . . . . . . . . . . . . . . . . . . . . 166
About Browser . . . . . . . . . . . . . . . . . . . . . . . . . . . . . . . . . . . 167
RSS Feeds . . . . . . . . . . . . . . . . . . . . . . . . . . . . . . . . . . . . . . 167
Flash Content . . . . . . . . . . . . . . . . . . . . . . . . . . . . . . . . . . . .168
Section 14: Health and Safety Information ...............170
Health and Safety Information . . . . . . . . . . . . . . . . . . . . . . . . 170
Warning Regarding Display . . . . . . . . . . . . . . . . . . . . . . . . . . 171
Samsung Mobile Products and Recycling . . . . . . . . . . . . . . . 171
UL Certified Travel Adapter . . . . . . . . . . . . . . . . . . . . . . . . . . 171
Consumer Information on Wireless Phones . . . . . . . . . . . . . . 172
Road Safety . . . . . . . . . . . . . . . . . . . . . . . . . . . . . . . . . . . . . 177
Responsible Listening . . . . . . . . . . . . . . . . . . . . . . . . . . . . . . 179
Operating Environment . . . . . . . . . . . . . . . . . . . . . . . . . . . . . 181
Using Your Phone Near Other Electronic Devices . . . . . . . . . 181
FCC Hearing-Aid Compatibility (HAC) Regulations for Wireless
Devices . . . . . . . . . . . . . . . . . . . . . . . . . . . . . . . . . . . . . . 181
3
Potentially Explosive Environments . . . . . . . . . . . . . . . . . . . . 183
Emergency Calls . . . . . . . . . . . . . . . . . . . . . . . . . . . . . . . . . 184
FCC Notice and Cautions . . . . . . . . . . . . . . . . . . . . . . . . . . . 184
Other Important Safety Information . . . . . . . . . . . . . . . . . . . . 185
Product Performance . . . . . . . . . . . . . . . . . . . . . . . . . . . . . . 185
Availability of Various Features/Ring Tones . . . . . . . . . . . . . . 186
Battery Standby and Talk Time . . . . . . . . . . . . . . . . . . . . . . . 187
Battery Precautions . . . . . . . . . . . . . . . . . . . . . . . . . . . . . . . 187
Care and Maintenance . . . . . . . . . . . . . . . . . . . . . . . . . . . . . 188
Section 15: Warranty Information ............................. 190
Standard Limited Warranty . . . . . . . . . . . . . . . . . . . . . . . . . . 190
Index ............................................................................ 194

Section 1: Getting Started
Understanding this User Manual
The chapters of this manual generally follow the same order as
the menus and sub-menus in your Samsung Rogue™. A robust
index for quick reference to most features begins on page 194.
Also included is important safety information that you should
know before using your Rogue™. Most of this information is near
the back of the guide, beginning on page 170.
Notes and Tips
Throughout this guide are icons and text that are set apart from
the rest. These are intended to point out important information,
quick methods for activating features, to define terms, and more.
The definitions for these methods are as follows:
•
Notes
: Explain alternative options within the current feature, menu, or
sub-menu.
•
Tips
: Provide quick or innovative methods for performing functions
related to the subject at hand.
•
Important!
: Points out important information about the current feature
that could affect performance, or even damage your phone.
This section allows you to start using your Rogue™ after
activating your service, setting up your voicemail, contacting
customer support, or getting an understanding of how this
manual is put together.
Using the Battery
Note:
This phone comes packaged with a partially charged rechargeable
standard Li-Ion battery and wall charger.
You must fully charge the battery before using your phone for the first
time. A fully discharged battery requires up to 4 hours of charge time.
Important!:
Although the phone can be used while the battery is charging,
the battery must be fully charged before first use, otherwise you
could damage the battery.
Battery Indicator
The battery indicator in the upper-right corner of the display
indicates battery power level. Four bars indicate a full
charge, while an empty icon indicates an almost empty
battery. Two to three minutes before the battery becomes too low
to operate, a blinking empty battery icon appears and a tone
sounds. If you continue to operate the phone without charging, it
will shut down.
Getting Started 4
Using A Non-Supported Batter y
Samsung handsets do not accept the use of a non-supported
battery.
When using a non-supported battery, you will hear a series of
beeps and you will see a warning message that indicates:
“
NON-SUPPORTED BATTERY. SEE USER GUIDE
”
If you receive this warning, battery charging has been disabled.
Samsung charging accessories (i.e. travel adapter, and cigarette
lighter adapter) will only charge a Samsung-approved battery.
Note:
When using a non-supported battery the handset can only be used for
the duration of the life of the battery and cannot be recharged.
Important!:
Using a non-supported battery may cause damage to your
Rogue™. Use a Samsung supported battery only.
5
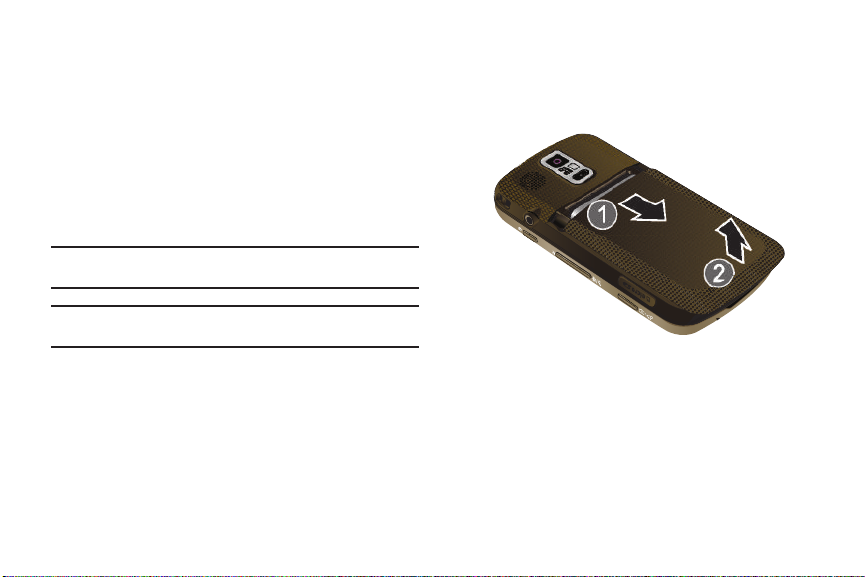
Installing the Battery
1. Press down at the top of the battery cover, and slide the
battery cover back and lift up to remove.

Insert the top end of the battery into the phone housing
2.
using the directional arrow printed on the battery. The gold
contacts at the battery end must align with contacts on the
phone. Push bottom end of the battery down until it snaps
into place.
Getting Started 6
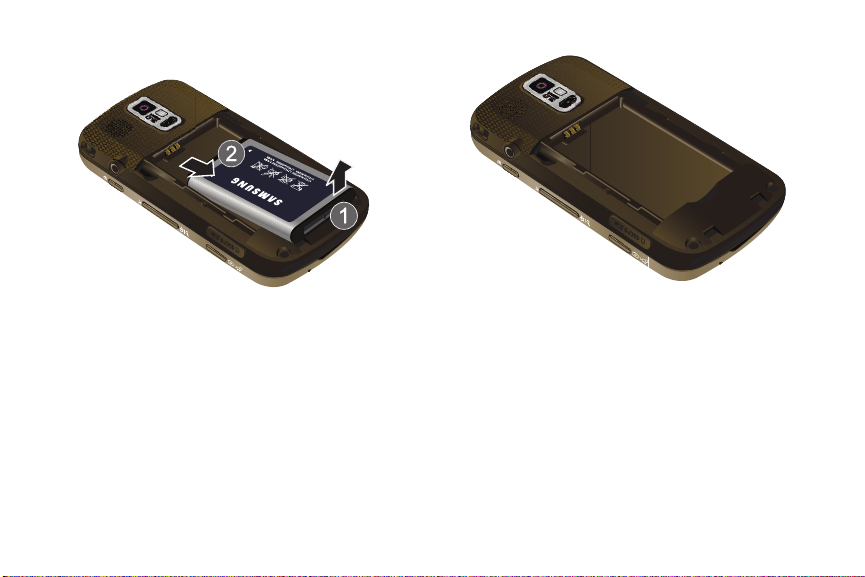
3.
Insert the top of the battery cover down into the
corresponding slots (positioned on each side of the cover).
Push down on the bottom of the battery cover and push it
up until it snaps into place.
7
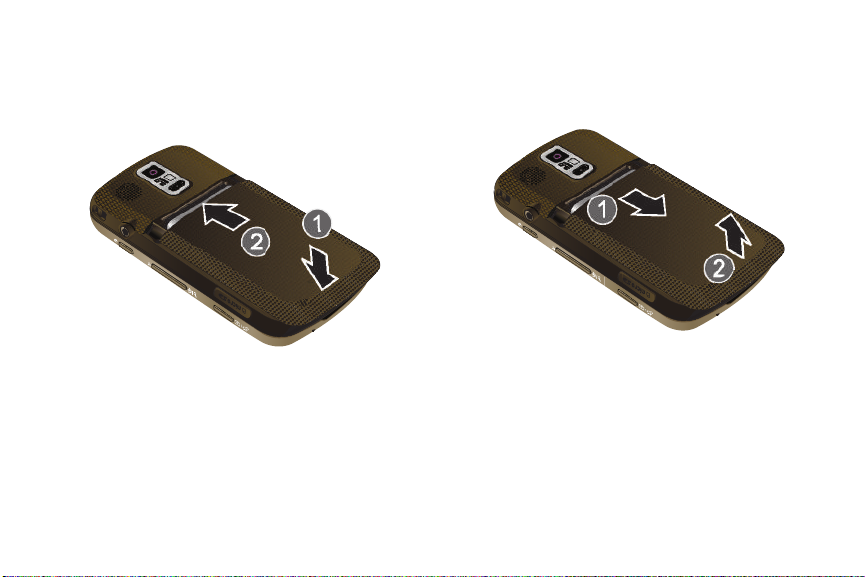
Removing the Battery
1. Push the top of the battery cover forward. Lift the bottom
of the battery cover to remove it.
Lift the battery from the bottom end and remove.
2.
Getting Started 8
3.
Insert the top of the battery cover down into the
corresponding slots (positioned on each side of the cover).
Push down on the bottom of the battery cover and push it
up until it snaps into place.
9
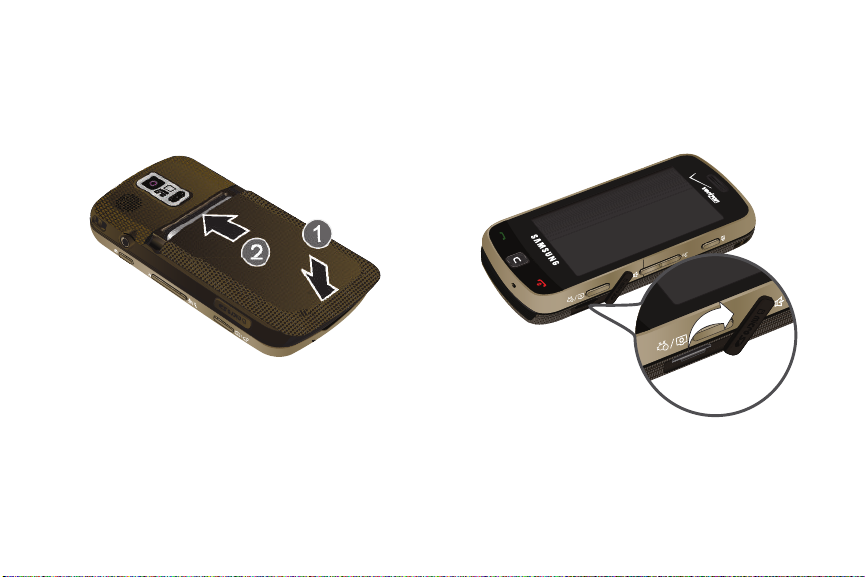
Inserting and Removing Your Memory Card
(purchased separately)
Installing the Memory Card
1. Pull the microSD card cover out and turn to expose the
card slot.
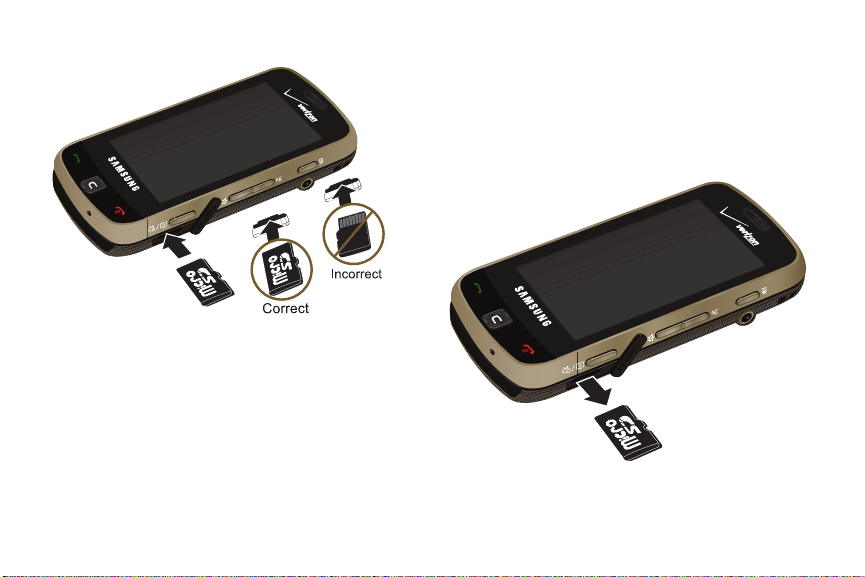
Push the microSD card into the slot until it locks into place.
2.
Removing the Memory Card
1. Pull the microSD card cover out and turn to expose the
card slot.
2. Push in on the memory card to release the lock and
remove memory card from the memory card slot.
Getting Started 10
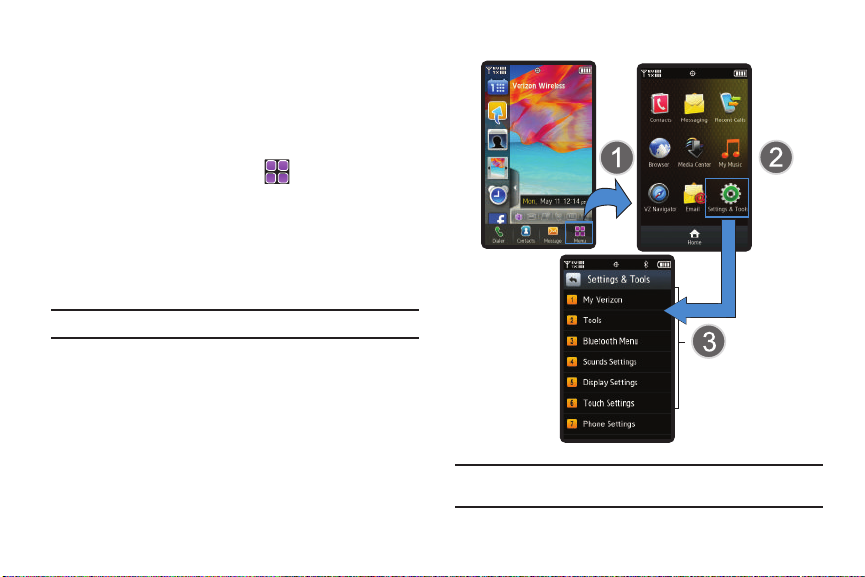
Memory Card Formatting
Formatting a microSD™ Card using your Rogue™
1. Insert the microSD™ memory card.
2. From the Home screen, touch
MENU
➔
Settings & Tools.
Scroll the screen up and touch
3.
9. Memory
➔ 3. Card
Memory ➔ 9. Format Card.
4. At the
Format card?
pop-up, touch
Yes
to continue, or No to
cancel the operation.
Formatting a microSD™ Card using your PC
For best playback of songs stored to the microSD™ memory
card, you should reformat your memory card with PC format
FAT32.
Note:
Any content currently stored on the microSD™ memory card will be
lost when this procedure is performed.
1. Insert the microSD™ memory card into an SD card
adapter.
2. Insert the SD card adapter into the SD card reader slot.
3. Plug the SD card reader into a USB port on your PC.
11
4. On your PC, go to your My Computer directory and
highlight the drive that represents the SD card reader.
5. Right click and select the Format option.
6. Under the File System option, select FAT32 and click the
Start button.
7. Your microSD™ memory card will be reformatted.
Note:
Your Rogue™ can support microSD™ memory cards with a capacity
of 16GB maximum.
8. Remove the microSD™ card from the SD card reader and
insert it back into your phone. The My Music directory will
automatically be created on the microSD™ memory card
the first time that you access V Cast Music l Rhapsody/My
Music/Sync Music from your phone.
Charging the Battery
Your Rogue™ is powered by a rechargeable standard Li-ion
battery. Only use Samsung-approved charging devices and
batteries. Samsung accessories are designed to maximize
battery life. Using other accessories may invalidate your warranty
and may cause damage.
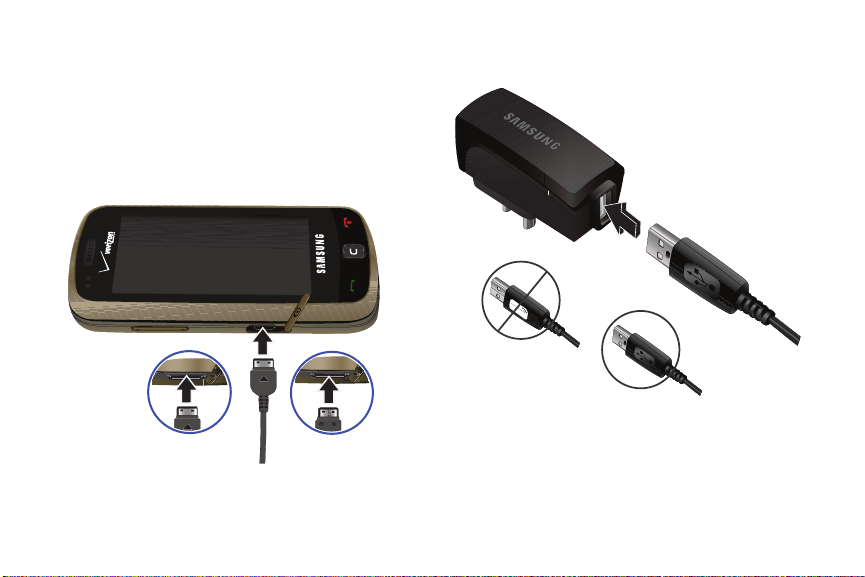
Wall Charger
Incorrect
Correct
The wall charger is a convenient, light-weight charger that
rapidly charges your Rogue™ from any 120/ 220 VAC outlet.
1. Turn the connector cover to access the charger port.
2. Insert the travel charger adapter end into the charging port
on the left side of the Rogue™.
3. Plug the wall/USB charger into a standard AC wall outlet.
DATA LINK CABLE
Incorrect
Correct
When the Rogue™ is completely charged (the battery icon
becomes still), unplug the adapter from the power outlet.
Getting Started 12
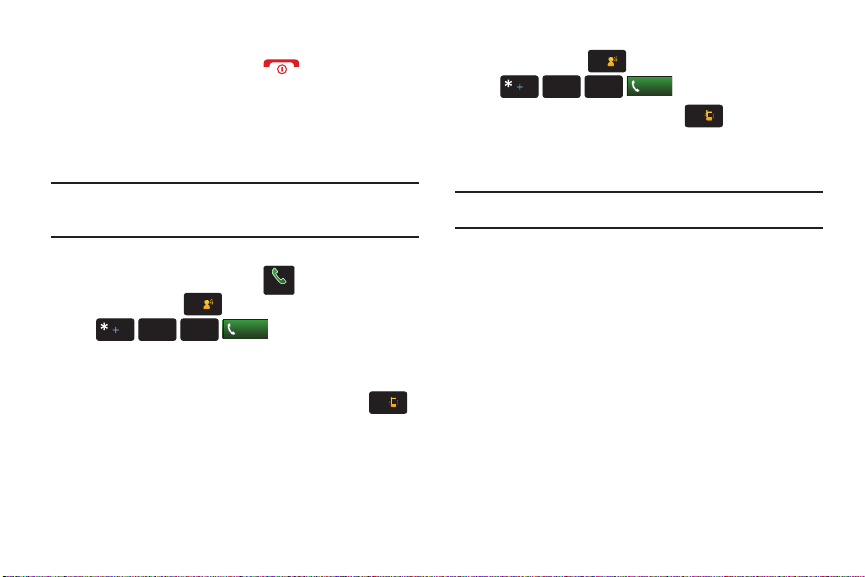
Turning Your Phone On and Off
DialerDialer
tuv
8
Call
#
䊳
Press and hold the
Power/End
key to turn the phone’s
power on or off.
Setting Up Voicemail
Voicemail allows callers to leave voice messages, which can be
retrieved any time.
Note:
Once your voicemail account has been set up, you can use the
voicemail selection 5 (under the Messaging menu) to view details of
voice messages in your voicemail box.
Voicemail Setup*
1. From the Home screen, touch
2. Touch and hold or touch
1
mno
Call
6
from the touch keypad or
QWERTY keyboard, or dial your wireless phone number
from any touch-tone phone.
3. When the recorded announcement begins, touch
to interrupt (if applicable).
4. An easy-to-follow setup tutorial will begin. Follow the
instructions to set up your new password and record a
greeting.
13
Dial Pad
Listening to Voicemail
1. Touch and hold or touch
2. Enter your password followed by key.
3. Follow the recorded prompts to listen to messages, change
1
mno
tuv
6
8
administrative options, and so on.
*Airtime and long distance charges apply. IN Calling minutes do not apply to
voicemail setup or retrievals.
.
#

Section 2: Understanding Your Phone
This section outlines key features of your phone. It also displays
the screen and the icons that are displayed when the phone is in
use.
Features of Your Phone
•
Full color WVGA (480 x 800) AMOLED (Active Matrix Organic LED)
Touch Screen with a slide-out QWERTY keyboard
•
High Speed Data (EVDO 1x - Rev A Capable Technology)
•
Global Positioning (GPS) Technology with VZ Navigator
•
V CAST Music with Rhapsody® and V CAST Video Capable
•
Personal Tools (Calculator, Calendar, Alarm Clock, Stop Watch, World
SM
Clock, and Notepad)
•
Full HTML Browser
•
Messaging Services (Standard and Enhanced TXT Messaging, Picture
Messaging, Video Messaging, Voice Messaging, Mobile and Corporate
Email, and Mobile Instant Messenger)
•
3.0 Megapixel Camera and Camcorder with Flash and Auto Focus
•
Advanced Speech Recognition with Dictation
•
Speakerphone
•
microSD™ Memory Card Slot (up to 16GB capacity)
•
Advanced photo features and functionalities (photo river, photo editor,
dynamic canvas, panoramic photos)
•
Video editor
•
Business card reader
•
File Viewer (Word, Excel, Powerpoint and PDF)
•
Bluetooth® 2.1 + EDR Wireless Technology **
Note:
**The Samsung Rogue™ supports the following Bluetooth profiles:
Headset, Handsfree, Bluetooth Stereo Support for Music , Phonebook Access,
Basic Printing, Basic Imaging, Object Pus h for vCard, File Transfer and Serial
Port. Go to www.verizonwireless.com/bluetoothchart. To view supported
profiles on your device:
Menu
➔
Settings
➔
Supported Profiles
Menu
➔
.
Settings & Tools
➔
Bluetooth
Understanding Your Phone 14
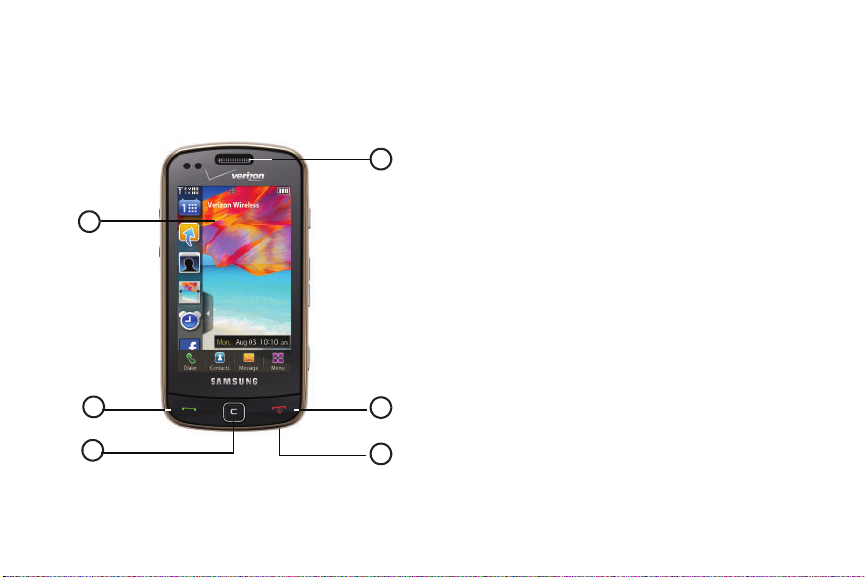
Closed View of Your Phone
1
2
3
6
5
4
Phone External Features
1.
Main LCD/Touch Screen
: Displays all the information
needed to operate your phone.
2.
Send key
: Press to answer an incoming call or to dial a
number. Press the key once to access the recent call log.
3.
Clear key
: Press to return to the previous menu or screen.
4.
Earpiece
: Allows you to hear the other caller.
5.
End/Power key
: Powers the phone On or Off. Press to end a
call or to return to the Home screen from any menu, submenu or options menu.
6.
Microphone
: Allows the other caller to hear you clearly
when you are speaking to them.
15

Back View of Your Phone
1
2
Phone External Features
1.
Speaker
: Music, ringtones and sounds are heard through
the speaker.
2.
Camera lens
: Allows you to take photos.
Understanding Your Phone 16
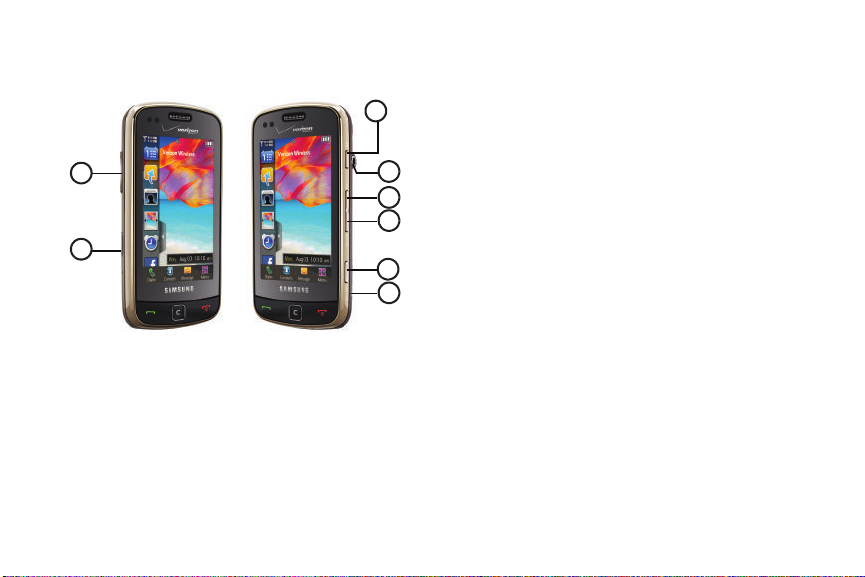
Side View of Your Phone
1
2
3
4
5
6
7
8
1.
Volume key
master volume or adjust the voice volume during a call. To
mute the ringer during an incoming call, press the volume
: From the Home screen you can adjust the
key up or down. Also, press and hold the key to activate
Sound Off mode/Normal mode.
17
2.
Power Port
: Used to plug in the charging adapter.
3.
Lock/Unlock key
: Locks/unlocks display with a short press
when power is On. Activates the backlight.
4.
3.5 mm Headset Jack
: Allows you to plug in your standard
music headphones (for listening to music only) or an
optional headset for safe and convenient conversations.
5.
Voice Recognition key
: Press to activate voice recognition
features.
6.
Speakerphone/Zoom key
: Press to activate speakerphone.
Press and hold to increase and decrease size of web
content.
7.
Camera/Camcorder key
: Press to activate the camera, or
press and hold to activate the camcorder.
8.
microSD™ Memory Card Slot
: Allows you to insert a
microSD™ memory card to add additional memory and
storage capacity.
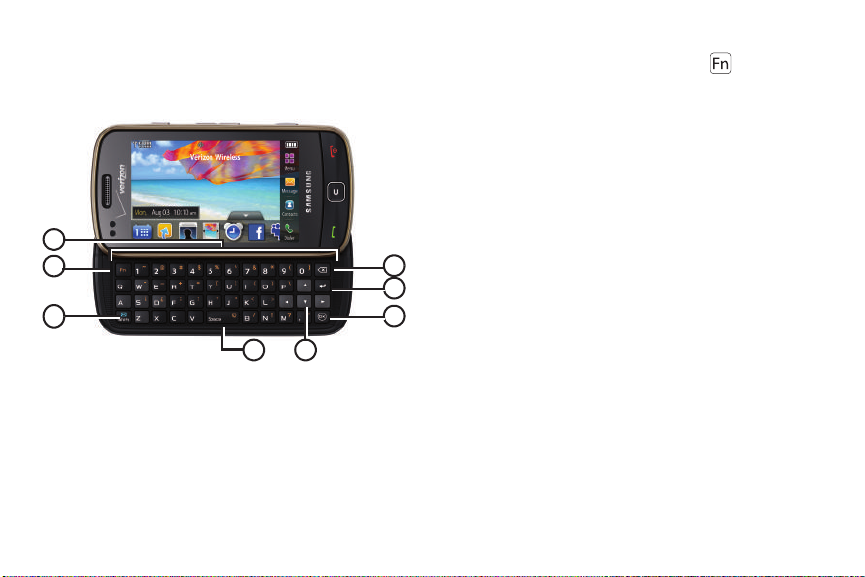
Open View of Your Phone
3
7
8
4
2
1
6
5
This touch screen phone also offers the convenience of a slideout QWERTY keyboard. To access the keyboard, rotate the phone
90 degrees to the left and slide the phone up.
When you slide the phone open, the display rotates from a
portrait viewing mode to a landscape viewing mode.
QWERTY Keyboard Features
1.
QWERTY keyboard:
keyboard layout.
Provides an alphanumeric character
2.
Fn key
: The Fn (
Function
) key, toggles to access the orange
symbols on the QWERTY keyboard. The icon will
appear on the top annunciator line of the display when
function is On. (For more information regarding the
annunciator line, see page 20.)
3.
Shift key
: Toggles the casing for alphabet characters
between mixed case, uppercase and lowercase. Case will
remain as selected until the Shift key is pressed again.
Except for “Abc” mode, which only capitalizes the first
character, then switches back to “abc”. From the Home
screen press to open the New Text Message screen.
4.
Space key
: Allows you to add spaces between words and
characters.
5.
Directional keys
: Allows you to navigate through the phone
menu options.
6.
OK key
: Press when navigating through a menu to accept
the highlighted choice, or perform an action in an
application.
Understanding Your Phone 18
7.
8
1
6
2
7
3
4
5
Enter key
: Press to perform the function highlighted in the
Home Screen Layout
menu or submenu. Press to enter spaces between lines of
text.
8.
Backspace key
: Deletes characters from the display when
you are in text entry mode.
19
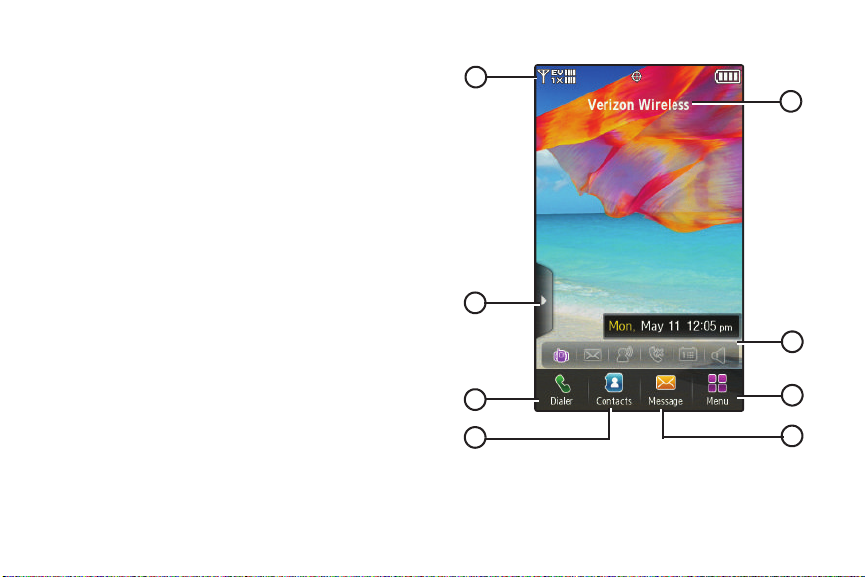
Understanding the Home Screen
Dialer
1. The
Annunciator Line
, which is the top line of your phone’s
display, shows icons that indicate network status, battery
power, signal strength, connection type and more.
2. The
Widget Bar Tab
displays the Widget Bar when touched.
The Widget Bar allows you to quickly access menu items.
3. The
Dialer
button allows you to access the touch
Dialer
keypad for dialing numbers.
4. The
Contacts
button allows you to access your
Contact list.
5. The ERI banner indicates the service provider.
6. The
Event Status Bar
illuminates the icons to indicate
recent events or status changes. Touch this bar to access
the
Event Manager
screen. See “Event Status Bar and
Event Manager” on page 22.
7. The
Menu
button allows you to access the
Menu
screen.
8. The
Message
button allows you to open the
Messaging menu.
Main
Annunciator icons
Airplane Mode
: Appears when Standalone Mode is on.
When on, all RF functions for your phone are disabled, and
you cannot use your phone to place or receive calls.
Roaming
: Your phone is outside your home area. While
roaming, another wireless provider may be handling your
call. The service rate for the call may be higher than those
made from within your home area. Please refer to Verizon
Wireless for roaming rates.
EV signal strength
: Appears when your phone is using the
EVDO protocol. Appears when your phone is on and
indicates the current signal strength. More bars indicate a
stronger signal.
1X signal streng
th: Indicates your phone is using the CDMA
1X protocol. Appears when your phone is on and indicates
the current signal strength. More bars indicate a stronger
signal.
EV1X signal strength
: The EVDO/1X protocol is capable of
high-speed broadband data (3G). Appears when your phone
is on and indicates the current signal strength. More bars
indicate a stronger signal.
Understanding Your Phone 20
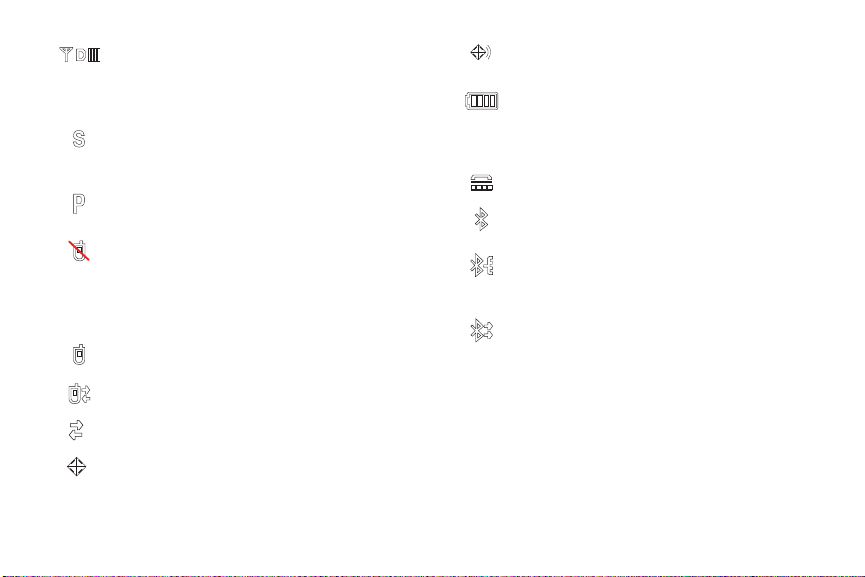
D signal strength
: Appears when your phone is receiving
digital data. Appears when your phone is on and indicates
the current signal strength. More bars indicate a stronger
signal.
SSL
: Indicates the secure socket layer is actively
transmitting your communications over the internet in an
encrypted format.
Voice Privacy
: Prevents eavesdropping over a CDMA traffic
channel.
No Service
: Your phone cannot find a signal because you’re
outside a service area. You cannot make or receive calls.
Wait for a signal or move to an open area to find a signal. This
indicator always appears when you first turn on your phone
and disappears once service is located.
Voice Call
: Indicates a call in progress.
Data Call
: Indicates a data call in progress.
Dormant
: Indicates no incoming or outgoing data.
E911
: Indicates Global Positioning Service (GPS) for 911 is
set to On for emergency calls only.
21
Location On
: Global Positioning Service is set to On for
location and 911 calls.
Battery Level
: More bars indicate a greater charge. When
the battery is low, an empty battery icon flashes and the
phone sounds an alert, which indicates your phone is about
to shut down.
TTY
: Indicates that TTY is enabled.
Bluetooth On
: Indicates that Bluetooth wireless technology
is turned on.
Bluetooth Connected
: Indicates Bluetooth wireless
technology is turned on and is paired with another
Bluetooth-enabled device.
Bluetooth Active
: Indicates that Bluetooth wireless
technology is connected to another device and receiving or
pushing data.

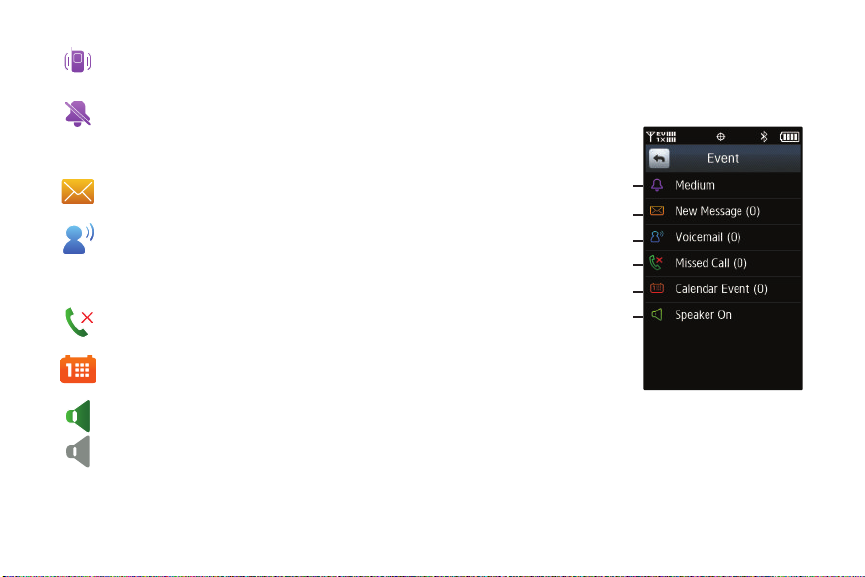
Event Status Bar Icons
Vibrate On
: Your phone vibrates upon receiving a call.
Speakerphone: Your phone switches to speakerphone
instead of earpiece.
Missed Calls: Your phone displays this icon when calls are
missed.
Message
: Indicates that Bluetooth wireless technology is
connected to another device and receiving or pushing da ta.
Calendar Appt: Your phone displays this icon when you
have a calendar event scheduled.
Voicemail
: You’ve received a voicemail message, page or
web alert message. You have one or more unread
voicemail messages in your voicemail box. (Only
applicable on the Verizon Wireless Network.)
Alarm On: Indicates that your phone has an alarm set.
All Sounds Off: The ringer is silenced for all alerts, incoming
calls, and incoming messages.
Alarm Only: Your phone will only ring when the set
alarm sounds.
Event Status Bar and Event Manager
The Event Status Bar is an area that displays in the Home screen
to inform you of calendar events, missed calls, or when new
messages have been sent to the phone.
The Event Status bar appears on the bottom of the Home screen
display.
If an icon is illuminated in color, it indicates a recent event for
that function. Touching on the bar opens the Event Manager
menu.
The following is a description of these onscreen notification
icons:
Volume
: The level of the ringer is set between Low and High
in five incremental stages: Low, Medium Low, Medium,
Medium High, and High.
Alarm Only
: Your phone will only ring when the set alarm
sounds.
Understanding Your Phone 22
Vibrate Only
Call Voicemail
Turn speaker on or off
Adjust master volume
View missed calls
View Inbox or new message
View calendar events
new message or voicemail, or when an alarm has been set.
All Sounds Off
alarms.
New Messages
new message.
Voicemail
voicemail message or there is one or more unread voicemail
messages in your voicemail box. (Only applicable on the
Verizon Wireless Network.)
Missed Calls
missed calls.
Calendar App
events scheduled within the next 24 hours.
Speakerphone On
through the speaker.
Speakerphone Off
earpiece.
23
: Your phone vibrates upon receiving a call, a
: All sounds have been disabled, including
: This icon is illuminated when you receive a
: This icon is illuminated when you receive a
: This icon is illuminated when you have
t: This icon is illuminated when you have any
: You can hear the other party in a call
: Youcan hear the other party through the
Event Manager Menu
The Event Manager menu offers easy access to common
functions. Touch the icons or text in the Event Manager menu to
perform the action shown in the illustration below.
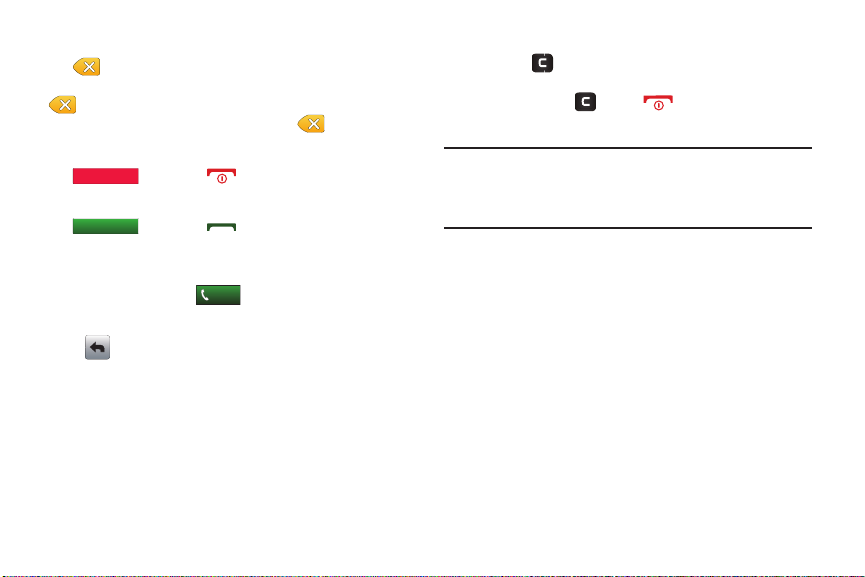
Backspace Button
EndEnd
AnswerAnswer
Call
The button erases or clears numbers, text, or symbols
within the text fields. If you enter an incorrect character, touch
to backspace (and delete) the character. To erase the
previous word in a sentence, touch and hold .
End Button
The button and is used to end a call.
Answer Button
The button and is used to activate or answer
calls.
Call Button
Enter a number and touch to make a call.
Return Button
Touch to exit from the current menu and return to the
previous screen.
Clear key
•
Press to exit from the current menu and return to the
previous screen.
•
Press and hold or press to return to the Home screen.
Care and Use of the Touch Screen
Warning!:
Your touch screen responds best to a light touch from the pad of
your finger or a non-metallic stylus. Using excessive force or a
metallic object when pressing on the touch screen may damage
the tempered glass surface and void the warranty. See “Warranty
Information” on page 190.
The precautions below should be followed when using the touch
screen.
•
Hands and fingers must be clean and dry. The touch screen is
sensitive. Do not use excess force when using the touch screen.
Sensitivity levels for the touch screen are adjustable. For more
information, refer to
•
Do not sit or place heavy objects on the touch screen as damage may
“Touch Settings”
on page 109.
occur. Do not drag or scratch the touch screen with any sharp objects.
•
Avoid extreme conditions (excess temperatures and humidity) when
the phone is in use. Keep chemicals away from your phone that may
damage or change the phone’s appearance and functionality.
•
Use a soft, clean, dry cloth to wipe the display and remove fingerprints.
Understanding Your Phone 24

Dialog Boxes
Dialog boxes prompt for action, inform you of status, or warn you
of situations such as low memory. Dialog boxes and their
definitions are outlined below.
•
Choice
-Example: “SAVE MESSAGE?”
•
Confirm
-Example: “ERASE ALL MESSAGES?”
•
Performing
•
Completed
•
Information
•
Error
•
Warning
25
-Example: “SENDING...” “CONNECTING...”
-Example: “MESSAGE SENT”
-Example: “NEW MESSAGE”
-Example: “SYSTEM ERROR!”
-Example: “BATTERY LOW,” “MEMORY FULL!”
Section 3: Touch Screen Navigation
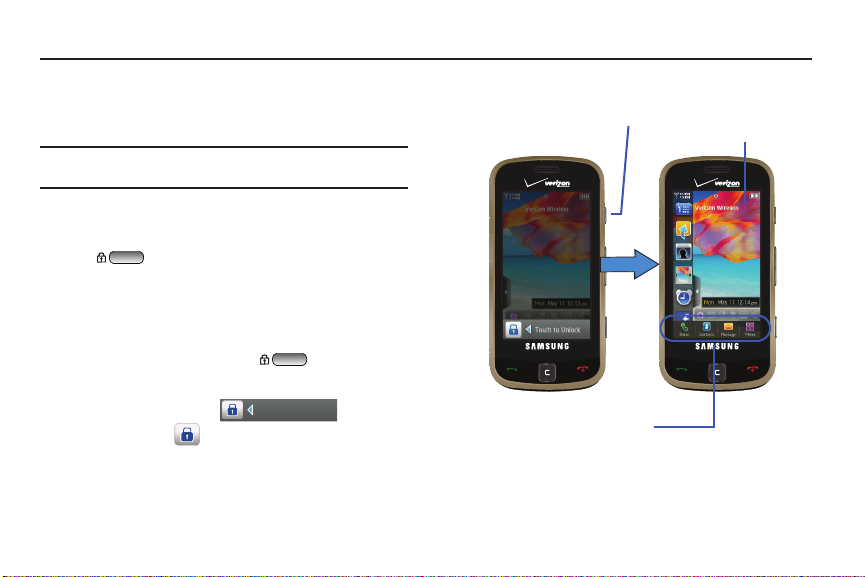
Touch to Unlock
Menu tabs
Lock/Unlock key
Home screen
This section explains the navigation between functions for your
Samsung Rogue™. It also includes an outline of all the available
menus associated with your phone.
Note:
Throughout the Rogue™ User Manual, instructions apply to
Screen Navigation
, except where noted.
Locking and Unlocking the Display
To lock the Rogue™,
䊳
Press (on the right side of the phone).
To unlock the Rogue™,
䊳
When the Rogue™ is locked, press any external key to
illuminate the display.
䊳
When the Rogue™ is locked, press (on the right side
of the phone) to unlock.
䊳
Also if the display is locked, displays.
Touch the
Lock icon
to unlock.
Tou ch
Because this is a touch screen phone, keeping the phone in Lock
mode may prevent the unintentional use of the Rogue™, and
prevent unnecessary battery drainage. However, Auto Lock can
be disabled under Touch Settings.
Touch Screen Navigation 26
Navigating through Menus
As you navigate through a menu, options display on the screen
as scrollable lists. The menu options buttons (located at the
bottom of most screens, provide access to additional screen
options).
To navigate a scrollable list:
1. From the Home screen, touch
2. Touch an onscreen option.
3. From the available list of options you can either:
•
Touch an onscreen entry to activate it.
•
Firmly press and slide your finger up or down the screen to scroll
MENU
.
through lists of menu items.
Note:
Tapping or touching individual entries on the list opens the list entry.
27
Note:
When scrolling through a list (see below) make sure not to touch or
press individual entries on the list as this will open the list entry.
 Loading...