

SAMSUNG SCH-U750 User Manual

PORTABLE All Digital
MOBILE PHONE
User Manual
Please read this manual before operating your
phone, and keep it for future reference.

Intellectual Property
All Intellectual Property, as defined below, owned by or which is otherwise the property of Samsung or its respective suppliers relating to
the SAMSUNG Phone, including but not limited to, accessories, parts, or software relating there to (the “Phone System”), is proprietary to
Samsung and protected under federal laws, state laws, and international treaty provisions. Intellectual Property includes, but is not limited
to, inventions (patentable or unpatentable), patents, trade secrets, copyrights, software, computer programs, and related documentation
and other works of authorship. You may not infringe or otherwise violate the rights secured by the Intellectual Property. Moreover, you
agree that you will not (and will not attempt to) modify, prepare derivative works of, reverse engineer, decompile, disassemble, or
otherwise attempt to create source code from the software. No title to or ownership in the Intellectual Property is transferred to you. All
applicable rights of the Intellectual Property shall remain with SAMSUNG and its suppliers.
Samsung Telecommunications America (STA), LLC
Headquarters: Customer Care Center:
1301 E. Lookout Drive 1000 Klein Rd.
Richardson, TX 75082 Plano, TX 75074
Toll Free Tel: 1.888.987.HELP (4357)
Internet Address:
©
2009 Samsung Telecommunications America, LLC is a registered trademark of Samsung Electronics America, Inc. and its related
entities.
Do you have questions about your Samsung Mobile Phone?
For 24 hour information and assistance, we offer a new FAQ/ARS System (Automated Response System) at:
www.samsungtelecom.com/support
http://www.samsungusa.com
U750_Alias 2_ English_CB19_PM_032409_F6

GH68-22369A
Printed in Korea
T9 Text Input is licensed by Tegic Communications and is covered by U.S. Pat. 5,818,437; U.S. Pat. 5,953,541; U.S. Pat. 6,011,554 and
other patents pending.
ACCESS® and NetFront™ are trademarks or registered trademarks of ACCESS Co., Ltd. in Japan and other countries.
The Bluetooth® word mark, figure mark (stylized “B Design”), and combination mark (Bluetooth word mark and “B Design”) are registered
trademarks and are wholly owned by the Bluetooth SIG.
microSD™ and the microSD logo are Trademarks of the SD Card Association.
Alias™ 2 is a trademark of Verizon Wireless.
Open Source Software
Some software components of this product incorporate source code covered under GNU General Public License (GPL), GNU Lesser General
Public License (LGPL), OpenSSL License, BSD License and other open source licenses. To obtain the source code covered under the open
source licenses, please visit:
http://www.samsungnetwork.com/Home/opensource
.

Disclaimer of Warranties; Exclusion of Liability
EXCEPT AS SET FORTH IN THE EXPRESS WARRANTY CONTAINED ON THE WARRANTY PAGE ENCLOSED WITH THE PRODUCT, THE
PURCHASER TAKES THE PRODUCT "AS IS", AND SAMSUNG MAKES NO EXPRESS OR IMPLIED WARRANTY OF ANY KIND WHATSOEVER
WITH RESPECT TO THE PRODUCT, INCLUDING BUT NOT LIMITED TO THE MERCHANTABILITY OF THE PRODUCT OR ITS FITNESS FOR ANY
PARTICULAR PURPOSE OR USE; THE DESIGN, CONDITION OR QUALITY OF THE PRODUCT; THE PERFORMANCE OF THE PRODUCT; THE
WORKMANSHIP OF THE PRODUCT OR THE COMPONENTS CONTAINED THEREIN; OR COMPLIANCE OF THE PRODUCT WITH THE
REQUIREMENTS OF ANY LAW, RULE, SPECIFICATION OR CONTRACT PERTAINING THERETO. NOTHING CONTAINED IN THE INSTRUCTION
MANUAL SHALL BE CONSTRUED TO CREATE AN EXPRESS OR IMPLIED WARRANTY OF ANY KIND WHATSOEVER WITH RESPECT TO THE
PRODUCT. IN ADDITION, SAMSUNG SHALL NOT BE LIABLE FOR ANY DAMAGES OF ANY KIND RESULTING FROM THE PURCHASE OR USE OF
THE PRODUCT OR ARISING FROM THE BREACH OF THE EXPRESS WARRANTY, INCLUDING INCIDENTAL, SPECIAL OR CONSEQUENTIAL
DAMAGES, OR LOSS OF ANTICIPATED PROFITS OR BENEFITS.

Table of Contents
Section 1: Getting Started ..............................................4
Understanding this User Manual . . . . . . . . . . . . . . . . . . . . . . . . 4
Notes and Tips . . . . . . . . . . . . . . . . . . . . . . . . . . . . . . . . . . . . . 4
Dialogue boxes . . . . . . . . . . . . . . . . . . . . . . . . . . . . . . . . . . . . 4
Using the Battery . . . . . . . . . . . . . . . . . . . . . . . . . . . . . . . . . . . 5
Turning Your Phone On and Off . . . . . . . . . . . . . . . . . . . . . . . . 9
Setting Up Voicemail . . . . . . . . . . . . . . . . . . . . . . . . . . . . . . . . 9
Inserting and Removing Your Memory Card . . . . . . . . . . . . . . 10
Memory Card Formatting . . . . . . . . . . . . . . . . . . . . . . . . . . . . 11
Section 2: Understanding Your Phone ......................... 12
Features of Your Phone . . . . . . . . . . . . . . . . . . . . . . . . . . . . . 12
Closed View of Your Phone . . . . . . . . . . . . . . . . . . . . . . . . . . . 12
Open View of Your Phone (Portrait Mode) . . . . . . . . . . . . . . . . 14
Keypads . . . . . . . . . . . . . . . . . . . . . . . . . . . . . . . . . . . . . . . . . 15
Command Keys . . . . . . . . . . . . . . . . . . . . . . . . . . . . . . . . . . . 16
Understanding the Home Screen . . . . . . . . . . . . . . . . . . . . . . 18
Section 3: Call Functions ............................................21
Making a Call . . . . . . . . . . . . . . . . . . . . . . . . . . . . . . . . . . . . . 21
Answering a Call . . . . . . . . . . . . . . . . . . . . . . . . . . . . . . . . . . 21
Call In-Progress Options . . . . . . . . . . . . . . . . . . . . . . . . . . . . . 21
Recent Calls . . . . . . . . . . . . . . . . . . . . . . . . . . . . . . . . . . . . . . 22
Contacts . . . . . . . . . . . . . . . . . . . . . . . . . . . . . . . . . . . . . . . . 25
Roaming . . . . . . . . . . . . . . . . . . . . . . . . . . . . . . . . . . . . . . . . 26
Voice Commands . . . . . . . . . . . . . . . . . . . . . . . . . . . . . . . . . . 26
Section 4: Menu Navigation ........................................ 34
Menu Navigation . . . . . . . . . . . . . . . . . . . . . . . . . . . . . . . . . . 34
Menu Outline . . . . . . . . . . . . . . . . . . . . . . . . . . . . . . . . . . . . . 36
Section 5: Understanding Your Contacts ....................42
Opening Contacts Menu . . . . . . . . . . . . . . . . . . . . . . . . . . . . 42
Contacts Icons . . . . . . . . . . . . . . . . . . . . . . . . . . . . . . . . . . . . 42
Adding a Contact . . . . . . . . . . . . . . . . . . . . . . . . . . . . . . . . . . 43
Adding Pauses . . . . . . . . . . . . . . . . . . . . . . . . . . . . . . . . . . . . 46
Contact Groups . . . . . . . . . . . . . . . . . . . . . . . . . . . . . . . . . . . 46
Finding a Contacts Entry . . . . . . . . . . . . . . . . . . . . . . . . . . . . 51
Editing an Existing Contact Entry . . . . . . . . . . . . . . . . . . . . . . 51
Deleting a Contact Entry . . . . . . . . . . . . . . . . . . . . . . . . . . . . 52
Speed Dialing . . . . . . . . . . . . . . . . . . . . . . . . . . . . . . . . . . . . 52
My Name Card . . . . . . . . . . . . . . . . . . . . . . . . . . . . . . . . . . . 53
Finding My Phone Number . . . . . . . . . . . . . . . . . . . . . . . . . . . 53
Emergency Contacts . . . . . . . . . . . . . . . . . . . . . . . . . . . . . . . 54
Section 6: Entering Text ............................................... 55
Entering Text in Landscape Mode . . . . . . . . . . . . . . . . . . . . . 55
Entering Text in Portrait Mode . . . . . . . . . . . . . . . . . . . . . . . . 55
Section 7: Messaging .................................................. 57
Types of Messages . . . . . . . . . . . . . . . . . . . . . . . . . . . . . . . . 57
Changing Message Settings . . . . . . . . . . . . . . . . . . . . . . . . . 57
Creating and Sending Text Messages . . . . . . . . . . . . . . . . . . 58
Creating and Sending Picture Messages . . . . . . . . . . . . . . . . 59
1

Creating and Sending Video Messages . . . . . . . . . . . . . . . . . .61
Creating and Sending Voice Messages . . . . . . . . . . . . . . . . . . 62
Receiving New Messages . . . . . . . . . . . . . . . . . . . . . . . . . . . . 64
Message Folders . . . . . . . . . . . . . . . . . . . . . . . . . . . . . . . . . .67
Voicemail . . . . . . . . . . . . . . . . . . . . . . . . . . . . . . . . . . . . . . . . 77
Visual Voice Mail . . . . . . . . . . . . . . . . . . . . . . . . . . . . . . . . . . . 78
Mobile IM . . . . . . . . . . . . . . . . . . . . . . . . . . . . . . . . . . . . . . . .78
Email . . . . . . . . . . . . . . . . . . . . . . . . . . . . . . . . . . . . . . . . . . . 79
Chat . . . . . . . . . . . . . . . . . . . . . . . . . . . . . . . . . . . . . . . . . . . . 80
Section 8: Changing Your Settings ............................. 81
My Verizon . . . . . . . . . . . . . . . . . . . . . . . . . . . . . . . . . . . . . . . 81
Tools . . . . . . . . . . . . . . . . . . . . . . . . . . . . . . . . . . . . . . . . . . . 81
Bluetooth Menu . . . . . . . . . . . . . . . . . . . . . . . . . . . . . . . . . . . 81
Sounds Settings . . . . . . . . . . . . . . . . . . . . . . . . . . . . . . . . . . . 85
Display Settings . . . . . . . . . . . . . . . . . . . . . . . . . . . . . . . . . . . 88
Phone Settings . . . . . . . . . . . . . . . . . . . . . . . . . . . . . . . . . . . .94
Call Settings . . . . . . . . . . . . . . . . . . . . . . . . . . . . . . . . . . . . . 102
TTY . . . . . . . . . . . . . . . . . . . . . . . . . . . . . . . . . . . . . . . . . . . . 103
Memory . . . . . . . . . . . . . . . . . . . . . . . . . . . . . . . . . . . . . . . . 105
USB Mode . . . . . . . . . . . . . . . . . . . . . . . . . . . . . . . . . . . . . . 106
Phone Info . . . . . . . . . . . . . . . . . . . . . . . . . . . . . . . . . . . . . . 107
Section 9: Media Center ............................................ 108
Media Center . . . . . . . . . . . . . . . . . . . . . . . . . . . . . . . . . . . . 108
Music & Tones . . . . . . . . . . . . . . . . . . . . . . . . . . . . . . . . . . . 108
Picture & Video . . . . . . . . . . . . . . . . . . . . . . . . . . . . . . . . . . . 110
Games . . . . . . . . . . . . . . . . . . . . . . . . . . . . . . . . . . . . . . . . . 115
Mobile Web . . . . . . . . . . . . . . . . . . . . . . . . . . . . . . . . . . . . .116
2
Browse & Download . . . . . . . . . . . . . . . . . . . . . . . . . . . . . . . 116
Extras . . . . . . . . . . . . . . . . . . . . . . . . . . . . . . . . . . . . . . . . . 117
Section 10: Music ...................................................... 118
Inserting and Removing the microSD card . . . . . . . . . . . . . . 118
Memory Card Formatting . . . . . . . . . . . . . . . . . . . . . . . . . . . 118
Music & Tones . . . . . . . . . . . . . . . . . . . . . . . . . . . . . . . . . . . 118
Section 11: Tools ........................................................ 124
Voice Commands . . . . . . . . . . . . . . . . . . . . . . . . . . . . . . . . . 124
Calculator . . . . . . . . . . . . . . . . . . . . . . . . . . . . . . . . . . . . . . 124
Calendar . . . . . . . . . . . . . . . . . . . . . . . . . . . . . . . . . . . . . . . 126
Alarm Clock . . . . . . . . . . . . . . . . . . . . . . . . . . . . . . . . . . . . . 128
Stop Watch . . . . . . . . . . . . . . . . . . . . . . . . . . . . . . . . . . . . . 129
World Clock . . . . . . . . . . . . . . . . . . . . . . . . . . . . . . . . . . . . . 130
Notepad . . . . . . . . . . . . . . . . . . . . . . . . . . . . . . . . . . . . . . . . 130
Section 12: Landscape Mode ..................................... 133
Opening Your Phone to a Landscape View . . . . . . . . . . . . . . 133
Making a Call . . . . . . . . . . . . . . . . . . . . . . . . . . . . . . . . . . . . 133
Answering a Call . . . . . . . . . . . . . . . . . . . . . . . . . . . . . . . . . 135
Creating and Sending Messages . . . . . . . . . . . . . . . . . . . . . 135
Email . . . . . . . . . . . . . . . . . . . . . . . . . . . . . . . . . . . . . . . . . . 136
Mobile IM . . . . . . . . . . . . . . . . . . . . . . . . . . . . . . . . . . . . . . . 137
Chat . . . . . . . . . . . . . . . . . . . . . . . . . . . . . . . . . . . . . . . . . . . 138
My Account . . . . . . . . . . . . . . . . . . . . . . . . . . . . . . . . . . . . . 138
Section 13: Mobile Web .............................................139
Mobile Web . . . . . . . . . . . . . . . . . . . . . . . . . . . . . . . . . . . . . 139
Launching Mobile Web . . . . . . . . . . . . . . . . . . . . . . . . . . . . . 139

Exit Mobile Web . . . . . . . . . . . . . . . . . . . . . . . . . . . . . . . . . . 139
Navigate the Web . . . . . . . . . . . . . . . . . . . . . . . . . . . . . . . . . 139
Mobile Web Soft Keys . . . . . . . . . . . . . . . . . . . . . . . . . . . . . 140
Links . . . . . . . . . . . . . . . . . . . . . . . . . . . . . . . . . . . . . . . . . . 141
Place a Call While Using Mobile Web . . . . . . . . . . . . . . . . . . 141
Section 14: Health and Safety Information ...............142
Health and Safety Information . . . . . . . . . . . . . . . . . . . . . . . 142
Samsung Mobile Products and Recycling . . . . . . . . . . . . . . . 143
UL Certified Travel Adapter . . . . . . . . . . . . . . . . . . . . . . . . . . 143
Consumer Information on Wireless Phones . . . . . . . . . . . . . . 144
Road Safety . . . . . . . . . . . . . . . . . . . . . . . . . . . . . . . . . . . . . 149
Responsible Listening . . . . . . . . . . . . . . . . . . . . . . . . . . . . . 151
Operating Environment . . . . . . . . . . . . . . . . . . . . . . . . . . . . . 153
Using Your Phone Near Other Electronic Devices . . . . . . . . . 153
FCC Hearing-Aid Compatibility (HAC) Regulations
for Wireless Devices . . . . . . . . . . . . . . . . . . . . . . . . . . . . . . . 154
Potentially Explosive Environments . . . . . . . . . . . . . . . . . . . . 155
Emergency Calls . . . . . . . . . . . . . . . . . . . . . . . . . . . . . . . . . 156
FCC Notice and Cautions . . . . . . . . . . . . . . . . . . . . . . . . . . . 157
Other Important Safety Information . . . . . . . . . . . . . . . . . . . 157
Product Performance . . . . . . . . . . . . . . . . . . . . . . . . . . . . . . 158
Availability of Various Features/Ring Tones . . . . . . . . . . . . . 158
Battery Standby and Talk Time . . . . . . . . . . . . . . . . . . . . . . 159
Battery Precautions . . . . . . . . . . . . . . . . . . . . . . . . . . . . . . . 159
Care and Maintenance . . . . . . . . . . . . . . . . . . . . . . . . . . . . . 160
Section 15: Warranty Information ............................. 162
Standard Limited Warranty . . . . . . . . . . . . . . . . . . . . . . . . . 162
End User License Agreement for Software . . . . . . . . . . . . . . 165
Index ............................................................................ 170
Note: The Home screen is where the phone is waiting for input from you. No menu
is displayed and the phone isn’t performi ng any action. It’s the starting po int
for all instructional steps.
3

Section 1: Getting Started
Understanding this User Manual
The chapters of this manual generally follow the same order as
the menus and sub-menus in your phone. A robust index for
quick reference to most features begins on page page 170.
Also included is important safety information that you should
know before using your phone. Most of this information is near
the back of the guide, beginning on page 142.
Notes and Tips
Throughout this guide are icons and text that are set apart from
the rest. These are intended to point out important information,
quick methods for activating features, to define terms, and more.
The definitions for these methods are as follows:
•
Notes
: Explain alternative options within the current feature, menu, or
sub-menu.
•
Tips
: Provide quick or innovative methods for performing functions
related to the subject at hand.
•
Important
: Points out important information about the current feature
that could affect performance, or even damage your phone.
4
This section allows you to start using your phone after activating
your service, setting up your voicemail, contacting customer
support, or getting an understanding of how this manual is put
together.
Dialogue boxes
Dialogue boxes prompt for action, inform you of status, or warn
of situations such as low memory. Dialogue boxes and their
definitions are outlined below.
•
Choice
-Example: “SAVE MESSAGE?”
•
Reconfirm
-Example: “ERASE ALL MESSAGES?”
•
Performing
•
Completed
•
Information
•
Error
•
Warning
-Example: “SENDING...” “CONNECTING...”
-Example: “MESSAGE SENT”
-Example: “NEW MESSAGE”
-Example: “SYSTEM ERROR!”
-Example: “BATTERY LOW,” “MEMORY FULL!”
Using the Battery
OK
Note:
This phone comes packaged with a partially charged rechargeable
standard Li-Ion battery and wall charger.
You must fully charge the battery before using your phone for the first
time. A fully discharged battery requires up to 4 hours of charge time.
Important!:
Although the phone can be used while the battery is charging,
the battery must be fully charged before first use, otherwise you
could damage the battery.
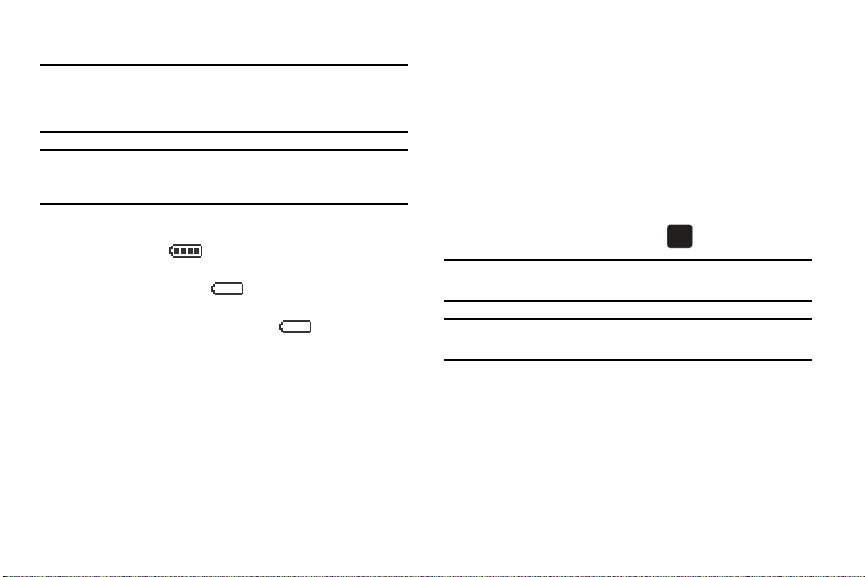
Battery Indicator
The battery indicator in the upper-right corner of the
display indicates battery power level. Four bars indicate a full
charge, while an empty icon indicates an almost empty
battery. Two to three minutes before the battery becomes too low
to operate, a blinking empty battery icon appears and a
tone sounds. If you continue to operate the phone without
charging, it shuts down.
Using A Non-Supported Battery
Samsung handsets do not support the use of a non-supported
battery.
When using a non-supported battery you will hear a series of
beeps and you will see a warning message that indicates “
SUPPORTED BATTERY. SEE USER MANUAL
” If you receive this
warning, battery charging has been disabled.
Samsung charging accessories (i.e. wall charger, and cigarette
lighter adapter) will only charge a Samsung approved battery.
To continue use of your handset press .
Note:
When using a non-supported battery the handset can only be used for
the duration of the life of the battery and cannot be recharged.
Important!:
Using a non-supported battery may cause damage to your
phone. Use a Samsung supported battery only.
OK
Getting Started 5
NON
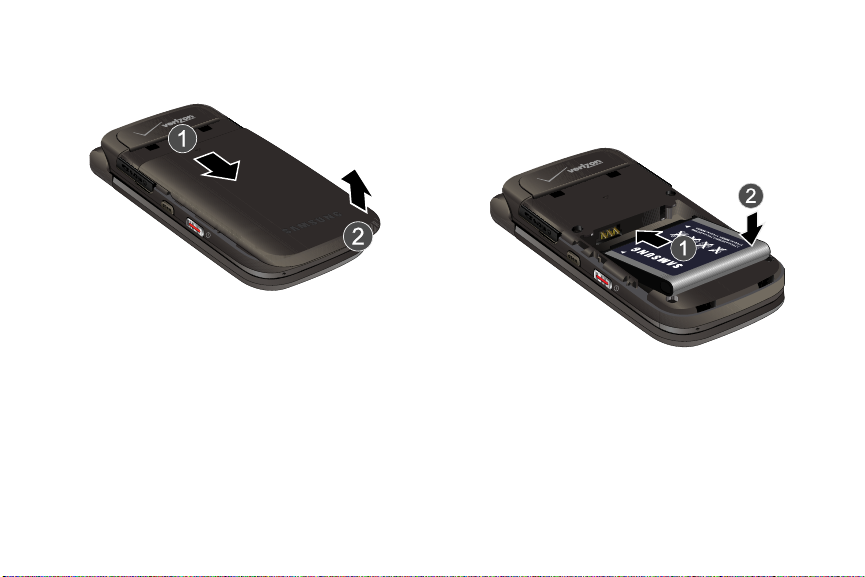
Installing the Battery
1. Press down at the top of the battery cover, and slide the
battery cover back and lift up to remove.
6
2. Insert the top end of the battery into the phone housing
using the directional arrow printed on the battery. The gold
contacts at the battery end must align with contacts on the
phone. Push bottom end of the battery down until it snaps
into place.
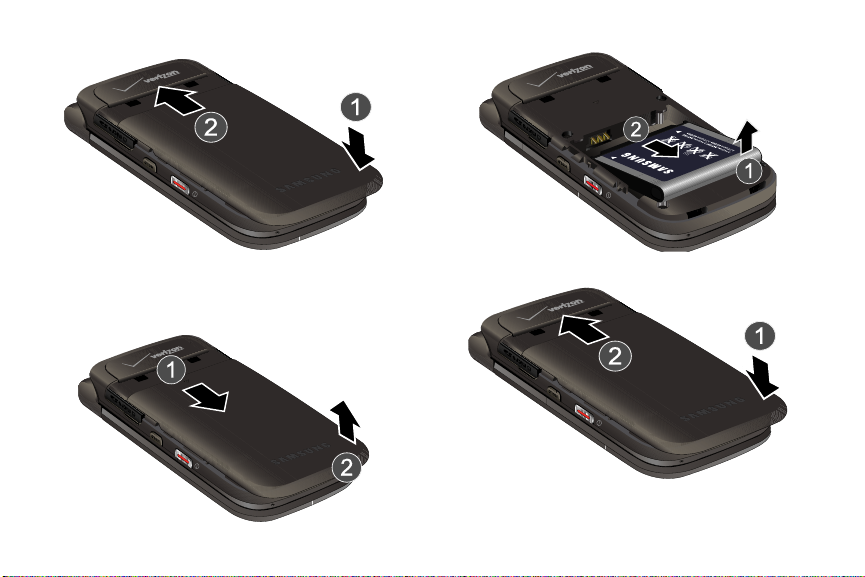
Slide the battery cover up until it snaps into place.
3.
2. Lift the battery from the bottom end and remove.
Removing the Batter y
1. Press down at the top of the battery cover, and slide the
battery cover back and lift up to remove.
3. Slide the battery cover up until it snaps into place.
Getting Started 7
+
Incorrect
Correct
Charging the Battery
Your phone is powered by a rechargeable standard Li-ion battery.
Only use Samsung-approved charging devices and batteries.
Samsung accessories are designed to maximize battery life.
Using other accessories may invalidate your warranty and may
cause damage.
Note:
The phone can be used while charging but will charge faster when
powered off.
8
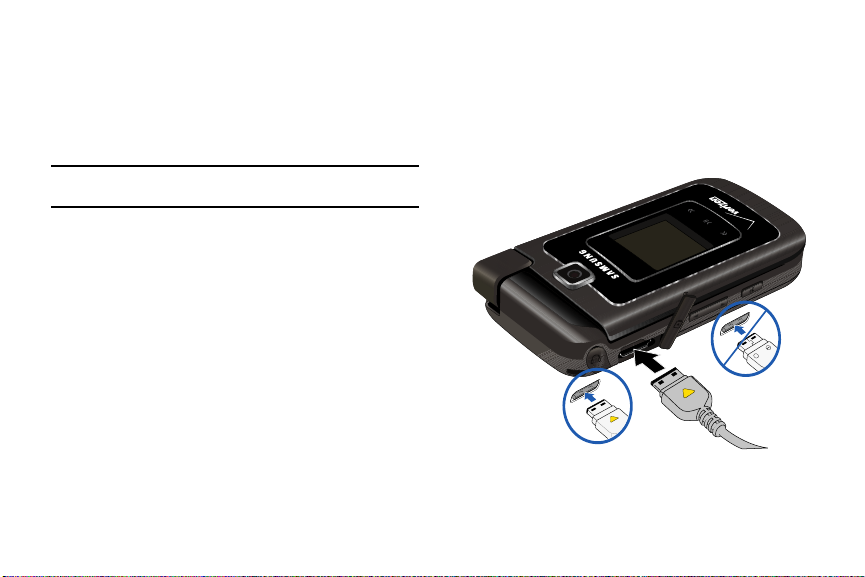
Wall Charger
The wall charger is a convenient, light-weight charger that
rapidly charges your phone from any 120/220 VAC outlet.
1. Pull the connector cover out and turn to expose the
connector. Insert the wall charger adapter end, with the
arrow up, into the connector.
Plug the wall charger into a standard AC wall outlet.
2.
When the phone is completely charged (the battery icon becomes
still), unplug the charger from the power outlet. Remove the
adapter end from the connector and replace the connector cover.
Turning Your Phone On and Off
Turning Your Phone On
1. Open the flip, then press and hold the
On/Off
button
on the right side of the phone.
Note:
As with any other radio-transmitting device, do not touch the internal
antenna as it affects call quality and may cause the phone to operate
at a higher power level than is necessary. The internal antenna is
located along the top on the back side of your phone.
2. Once the phone finds a signal, the time, date, and day
appear in the display.
3. You’re now ready to place and receive calls.
Note:
If the phone is outside the Verizon Wireless coverage area the roaming
icon appears in the top of the display.
Turning Your Phone Off
䊳
Open the flip, then press and hold the
On/Off
button
on the right side of the phone.
Setting Up Voicemail
Voicemail allows callers to leave voice messages.
Note:
Airtime and long distance charges apply. Mobile to Mobile minutes do
not apply to Voicemail setup or retrievals.
Voicemail Setup
1. Press the
2. When the recorded announcement begins, press to
Voicemail
key .
interrupt (if applicable). An easy-to-follow setup tutorial
will begin. Follow the instructions to set up your new
password and record a greeting.
Note:
Once your voicemail account has been set up, you can use the
voicemail selection 5 (under the Messaging menu) to view details of
voice messages in your voicemail box.
Getting Started 9
Listening to Voicemail
Incorrect
Correct
1. Press the
Voicemail
key .
2. You are then prompted to enter your password followed by
key. Follow recorded prompts to listen to messages,
change administrative options, etc.
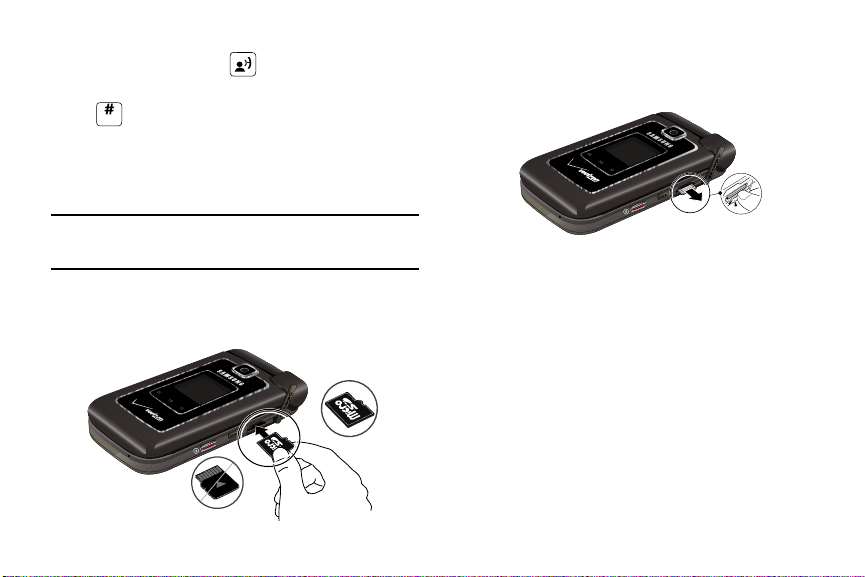
Inserting and Removing Your Memory Card
Inserting Your microSD™ Card
Note:
Your phone does not come with the microSD™ memory card, it must
be purchased as an accessory. See your service provider for more
information.
1. Lift memory card cover and insert the memory card, with
the contacts side down, into the memory card slot until it is
fully seated. Refer to the following illustration.
10
Removing Your Memory Card
1. Pull the microSD card cover out and turn to expose the
card slot.
2. Press in the microSD card to unlock and remove.
Memory Card Formatting
OK
OKOK
OKOK
OK
Formatting a microSD™ Card using your Alias™ 2
1. Open the flip in portrait mode and press
the Directional keys to highlight the
Settings & Tools menu and press .
2. Press Memory.
3. Press Card Memory.
4. Press the right soft key Options.
5. The Format Card option is highlighted. Press .
6. Highlight Yes and press to format microSD™ card.
OK
Formatting a microSD™ Card using your PC
For best playback of songs stored to the microSD™ memory
OK
MENU
. Press
card, reformat your memory card with PC format FAT32.
Note:
Any content currently stored on the microSD™ memory card will be
lost after this procedure is performed.
1. Insert the microSD™ memory card into an SD card
adapter (purchased separately).
2. Insert the SD card adapter into the SD card reader slot.
3. Plug the SD card reader into a USB port on your PC.
4. On your PC, go to your My Computer directory and
highlight the drive that represents the SD card reader.
5. Right click and select the Format option.
6. Under the File System option, select FAT32 and click the
Start button. Your microSD™ memory card will be
reformatted.
7. Remove the microSD™ card from the SD card reader and
insert it back into your phone. The My Music directory will
automatically be created on the microSD™ memory card.
Getting Started 11
Section 2: Understanding Your Phone
1
2
3
6
8
5
4
9
11
12
7
10
This section outlines key features of your phone as well as
screens and icons that display when the phone is in use.
Features of Your Phone
–
High Speed Data (EvDo 1x Technology)
–
Global Positioning (GPS) Technology for VZ Navigator
–
V CAST Music with Rhapsody
–
Personal Organizer (Calculator, Calendar, Alarm Clock, Stop Watch,
®
World Clock, Notepad, File Viewer)
–
Messaging Services (Standard and Enhanced TXT Messaging, Picture
Messaging, Video Messaging, Email Messaging, Voice Messaging,
Mobile Instant Messenger and Chat)
–
QWERTY keyboard for quick messaging
–
2.0 Megapixel Camera with Night Shot Mode
–
Advanced Speech Recognition
–
Speakerphone
–
Bluetooth® Wireless Technology **
**The Alias™ 2 supports the following Bluetooth profiles: Headset, Handsfree,
Stereo Bluetooth for music playback, Phonebook Access, Basic Printing, Basic
Imaging, Object Push for vCard and vCalendar and Serial Port.
The Alias™ 2 does not support all Bluetooth OBEX profiles. Go to
www.verizonwireless.com/bluetoothchart to check vehicle/accessor y compatibility.
12
SM
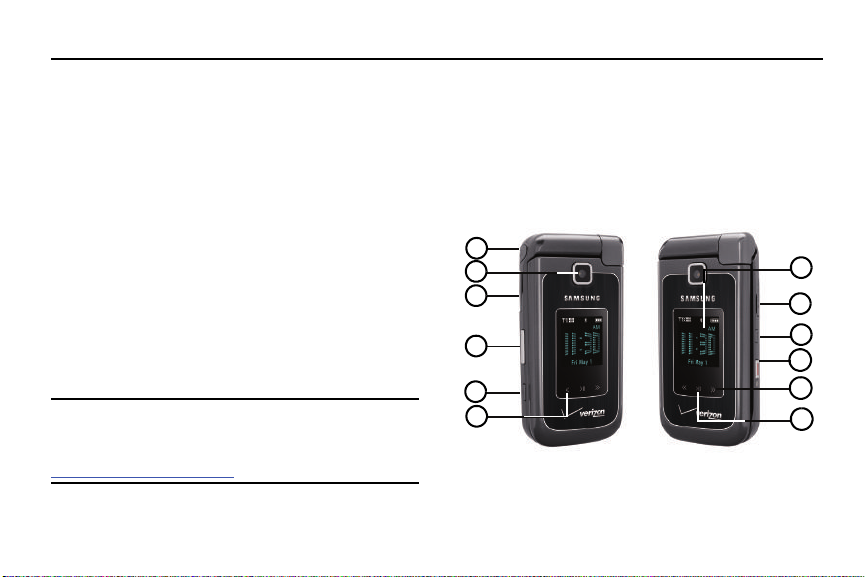
Closed View of Your Phone
The following illustration shows the main external features of
your phone. For explanation of features; see “Features (Closed
view)” on page 13.

Features (Closed view)
1.
Headset Jack
: Allows you to plug in an optional headset for
safe, convenient conversations.
2.
Camera Lens
3.
Power/Accessory Connector
: Allows you to take photos.
: The power/accessory
interface connector is used to plug in the charging
accessories and also connect any available accessory
cables to your phone.
4.
Volume Key
: Allows you to adjust the master volume or
adjust the voice volume during a call. To mute the ringer
during an incoming call, press the volume key up or down.
Also press and hold the key, to activate Sound Off mode/
Normal mode.
5.
Voice Commands Key
: Allows you to access Voice
Commands.
6.
Rewind Key: Touch and hold to rewind music. Touch to go
to a previous song.
7.
External LCD
: External LCD shows signal and battery
strength, time, day, and date. It also displays incoming
calls or messages.
8.
microSD™ Memory Card Slot
: Allows you to insert a
microSD™ memory card (purchased separately) to add
additional memory and storage capacity.
9.
Hold Key
: Allows you to lock/unlock the music keys (i.e.,
Rewind, Play/Pause, and Fast Forward) on the front of the
phone.
10.
On/Off button
11.
Fast Forward Key
: Allows you to turn handset on and off.
: Touch and hold to fast forward music.
Touch to go to a next song.
12.
Play/Pause Key
: Touch play or touch to pause music
playing.
Understanding Your Phone 13
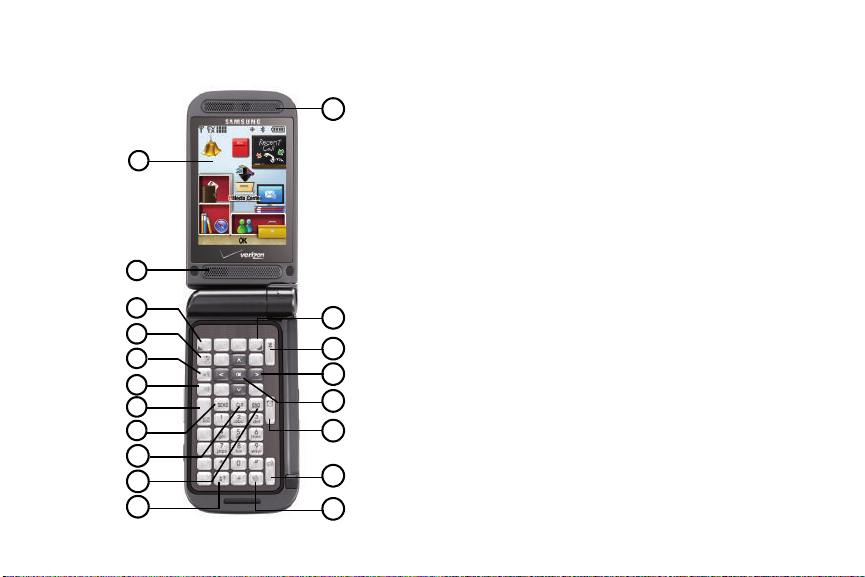
Open View of Your Phone
2
5
4
3
1
6
8
7
14
15
16
9
10
12
18
19
17
11
13
(Portrait Mode)
The following illustration shows the main features of the phone.
14
Features
1.
Internal LCD
: Displays all the information needed to operate
your phone.
2.
Speaker
: Music, Ringtones and Sounds are played through
the speaker.
3.
Left Soft Key
: This key is used to navigate through menus
and applications by selecting the choice indicated on the
lower left area of the display screen.
4.
Camera/Camcorder Key
: Press to activate the camera and
take photos. Press and hold to activate the camcorder and
take video.
5.
Voice Commands Key
6.
Speakerphone Key
: Press to access Voice Commands.
: Press and hold this key to enable/
disable the speakerphone option.
7.
Text Message Key
8.
Send Key
: Launches the New Txt Msg screen.
: Allows you to place or receive a call. From the
Home screen, press the key once to view All Calls log.
9.
Back/Clear Key
: Deletes characters from the display when
you are in text entry mode. Press to return to the previous
menu or screen when navigating features.
End Key
10.
: Ends a call. When you receive an incoming call,
press to send the call directly to voicemail.
11.
Voicemail/Visual Voice Mail Key
: Press to dial Voicemail or
open Visual Voice Mail (subscription required).
12.
Earpiece
: The earpiece allows you to hear the other caller.
13.
Right Soft Key
: This key is used to navigate through menus
and applications by selecting the choice indicated on the
lower right area of the display screen.
14.
Bluetooth
: Turn Bluetooth on or off.
15.
Directional Key
: This key allow you to scroll through the
phone menu options.
16.
OK Key
: Pressing when navigating through a menu accepts
the highlighted choice in a menu, or performs an action in
an application.
17.
Alarms
: Launches the Alarm Clock screen.
18.
Games
: Launches the Games screen.
19.
Vibration Key:
Press to activate vibration mode.
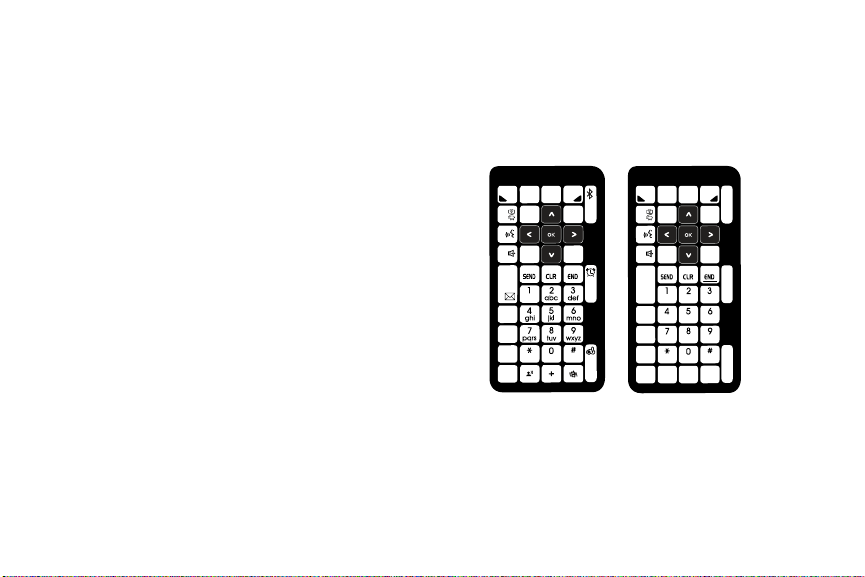
Keypads
Your phone can be opened either vertically or horizontally. The
keyboard changes depending upon whether the phone is in
portrait or landscape orientation.
Portrait Keypad - Numeric
Understanding Your Phone 15
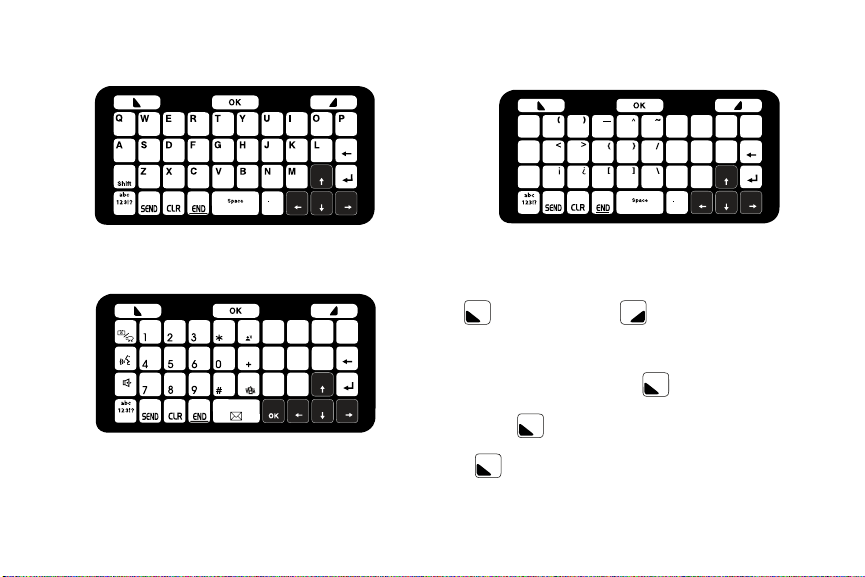
Landscape Keypad - QWERTY
Landscape Keypad - Symbols
Landscape Keypad - Numeric
16
Command Keys
Functions for the soft keys are defined by what appears above
each in the display. There are two soft keys, the left soft key
and the right soft key .
Left Soft Key
Some functions of the left soft key are as follows.
•
Press the
Message
(left) soft key to open the Messaging menu.
•
When the left soft key function is
soft key to view settings for the feature.
•
When the left soft key function is
to edit a Contact or Profile setting.
Settings
Edit
, press the
, press the
Edit
Settings (
(left) soft key
left)
Right Soft Key
Some functions of the right soft key are as follows.
•
Press the
Contacts
(right) soft key to open your Contacts list.
•
When the right soft key function is
Options
, press the
Options
soft key to view more options for the current menu.
Tex t E n t r y M o d e Key
This key is limited to Landscape mode:
In text fields, while in landscape mode press the
Tex t En t r y Mo d e
key to toggle between Abc,123!? and Symbols keypad.
Clear Key
The
CLR
key is used to erase or clear numbers, text, or
symbols from the display. You can also use to return to a
previous menu or to return to the Home screen from any menu.
•
If you enter an incorrect character, briefly press to backspace
(and delete) the character.
•
To erase the previous word in a sentence, press and hold .
•
To back up one menu level, briefly press .
•
Press and hold to return to the Home screen.
End Key
The
End
key is used to end a call or to return to the Home
screen from any menu or cancel the last input.
•
Press to disconnect a call.
(right)
•
Press to return to the Home screen from any menu, or to cancel
the last input.
•
Press to send an incoming call directly to Voicemail.
Send Key
The
Send
key is used to answer calls, dial calls, and to
recall the last number(s) dialed, received, or missed.
•
Press to answer calls.
•
Enter a number and press to make a call.
•
Press from the Home screen to display a list of all calls to and
from your phone.
•
Press twice from the Home screen to call the most recently
dialed, received, or missed number.
•
Press to pick up a waiting call. Press again to switch
back to the other call.
Directional Keys
Use the Directional keys (up, down, left, right) to browse
menus, sub-menus, and lists. Each key also acts as a shortcut to
launch applications. The Directional keys can be customized to
launch your favorite application. For more information, refer to
“Set Shortcut Keys” on page 95.
Understanding Your Phone 17
Camera Key
From the Home screen, press
Camera
key to activate the
camera. While in camera mode, press the Camera key to take a
photo.
Voice Commands Key
From the Home screen, press the
Voice Commands
key to
activate Voice Commands.
Speakerphone Key
With the flip open, press the
Speakerphone
key to switch
from using the earpiece to the speakerphone before or during a
call. Use the volume keys (located on the left side of your phone)
to adjust the volume. Press the
Speakerphone
key to enable
and disable the speakerphone option.
When answering a call, press and hold the Speakerphone key
. To end the call, press the End key . After the call has
ended the speakerphone function turns off automatically.
New Text Message Key
From the Home screen, press the
Text Message
key to
create a Text Message.
Bluetooth Key
Open the flip in portrait mode and press the
Bluetooth
key to
to turn Bluetooth On/Off on your device.
18
Alarm Clock Key
Open the flip in portrait mode and press the
Alarm Clock
key
to open the Alarm Clock menu.
Games Key
Open the flip in portrait mode and press the
Games
key to
open Games menu.
Vibration Mode Key
Open the flip in portrait mode and press the
Vibration Mode
key
to set your incoming call alert to vibrate.
Understanding the Home Screen
The top annunciator line
of your phone’s display
contain icons that indicate
network status, battery
power, signal strength,
connection type and
more.
The lower area of the
Home screen shows icons
that indicate feature and
function status.
The following list contains icons that may appear in your display.
Display icons
Airplane Mode
: Appears when Airplane Mode is on. When
on, all RF functions for your phone are disabled, and you
cannot use your phone to place or receive calls.
Roaming
: Your phone is outside your home area. While
roaming, another wireless provider may be handling your
call. The service rate for the call may be higher than those
made from within your home area. Please refer to Verizon
Wireless for roaming rates.
1X signal streng
th: Indicates your phone is using the CDMA
1X protocol. Appears when your phone is on and indicates
the current signal strength. More bars indicate a stronger
signal.
D signal strength
: Appears when your phone is receiving
digital data. Appears when your phone is on and indicates
the current signal strength. More bars indicate a stronger
signal.
SSL
: Indicates the secure socket layer is actively
transmitting your communications over the internet in an
encrypted format.
Voice Privacy
: Prevents eavesdropping over a CDMA traffic
channel.
No service
: Your phone cannot find a signal because you’re
outside a service area. You cannot make or receive calls.
Wait for a signal or move to an open area to find a signal. This
indicator always appears when you first turn on your phone
and disappears once service is located.
Voice Call
: Indicates a call in progress.
Data Call
: Indicates a data call in progress.
Dormant
: Indicates no incoming or outgoing data.
E911
: Indicates Global Positioning Service (GPS) for 911 is
set to On for emergency calls only.
Location On
: Global Positioning Service is set to On for
location and 911 calls.
Battery Level
: More bars indicate a greater charge. When
the battery is low, an empty battery icon flashes and the
phone sounds an alert, which indicates your phone is about
to shut down.
TTY
: Indicates that TTY is enabled.
Bluetooth On
: Indicates that Bluetooth wireless technology
is turned on.
Understanding Your Phone 19
Bluetooth Connected
: Indicates Bluetooth wireless
technology is turned on and is paired with another
Bluetooth-enabled device.
Bluetooth Active
: Indicates that Bluetooth wireless
technology is connected to another device and receiving or
pushing data.
Bottom Display Icons
All Sounds Off
: The ringer is silenced for all alerts, incoming
calls, and incoming messages.
Alarm Only
: Your phone will only ring when the set alarm
sounds.
Vibrate On
: Your phone vibrates upon receiving a call.
Calendar Appt:
Your phone displays this icon when you have
a calendar event scheduled.
Voicemail:
You’ve received a voicemail message, page or
web alert message. You have one or more unread voicemail
messages in your voicemail box. (Only applicable on the
Verizon Wireless Network.)
Alarm On
: Indicates that your phone has a set alarm.
Auto Answer
: Automatic answer is enabled. Your phone
automatically picks up calls after the designated time with
the stereo headset or when your Bluetooth headset or
Bluetooth hands-free car kit is connected.
Speakerphone
: Your phone switches to speakerphone
instead of earpiece.
Missed Calls
: Your phone displays this icon when calls are
missed.
New Msgs
: You’ve received a new text, page or web alert
message. You’re also notified of a new message by
animations and sound.
20
Section 3: Call Functions
OKOK
This section describes how to make or answer a call. It also
includes the features and functionality associated with making or
answering a call.
Making a Call
1. Open the flip in portrait mode and enter the number to call
using the numeric keypad and press .
Answering a Call
You can answer calls with either the flip open or closed.
To answer a call with the flip in the closed position; open the flip.
The call will be automatically answered.
To answer a call with the flip in the open position; press to
answer the call, or , or the right soft key Ignore to
send the call to voicemail, or left soft key Quiet to silence
the ringer.
Answering Call-Waiting Calls
When you receive a call while on a call:
•
Press to answer the new call.
•
When you press and answer the incoming call, the original
caller is placed on hold.
•
Press the key again to return to your original call.
Call In-Progress Options
Access numerous menus and features even while in a call.
Note:
If the call is disconnected while accessing the Call-In Progress Options,
the options disappear from the display and the phone eventually
returns to the Home screen.
1. While in a call, press the right soft key Options. The
following menu items appear in the display.
•New Message
• Contact List
• Recent Calls
• Bluetooth Menu
• Main Menu
•Notepad
• Whisper Mode
–
–
• Voice Privacy:
: Allows you to create a new text message.
: Opens Contact list to view your contacts.
: Displays recent received, missed and dialed calls.
: Displays the Bluetooth menu.
: Displays the Main menu.
: Opens the Notepad.
: Increases microphone to maximum volume level.
Press the Directional key to highlight a menu.
Press to open the highlighted menu or to activate the feature.
Prevents eavesdropping over a CDMA traffic
channel.
Call Functions 21
Note:
OKOK
OKOKOK
OKOK
During a call turn on Whisper Mode when speaking softly or when the
caller cannot hear your voice clearly. This mode is useful in meetings
or public places.
2. Press the left soft key Mute/Unmute to mute the call.
Press again to unmute the call.
Recent Calls
When you place, miss, or receive a call, a record of the call is
saved in Recent Calls, which is a listing of the different types of
calls you can either receive or make. These types of calls are:
•
Missed
: Displays any missed calls.
•
Received
: Displays any received calls that were answered.
•
Dialed
: Displays all outgoing calls made from your phone.
•
All
: Displays all missed, received, and outgoing calls made from your
phone.
•
View T imers
: Displays amount of time for: Last Call, All Calls, Received
Calls, Dialed Calls, Roaming Calls, Transmit Data, Received Data, Total
Data, Last Reset, Lifetime Calls, and Lifetime Data Counter.
Note:
The menu navigation instructions for this section uses the default
My Place
display theme,
1. Open the flip in portrait mode and press
22
Grid menu
layout.
MENU
Recent
2. Press the
Calls menu and press . Press the Directional
Directional key to highlight Recent
OK
Call
key up or down to highlight the call type that you want to
view and press .
3. Press the
Directional key up or down to view the
call.
Viewing Call History
Recent Calls retains information such as the duration, date and
time, and whether the call was received, dialed, or missed.
1. Open the flip in portrait mode and press .
2. Press the
Directional key down to highlight the
desired number.
3. Once the desired number is highlighted, press OPEN.
4. The following call information appear in the display:
• Call Type
: The title bar displays if the call is a missed, dialed, or
received.
•Name
: If the caller is in your Contacts list, their name is listed here
as well as the appropriate icon to indicate Mobile 1, Mobile 2,
.
Home, Work, or Fax. This option only appears if the caller is in your
Contacts list. If the caller is not in your Contacts list, “No Name”
appears.
• Number
OK
OKOK
OK
OKOK
: Displays the telephone number.
• Time and Date
•Duration
5. Press the right soft key Options to display the
: The time and date of the call.
: The duration of the calls made or received.
following options:
• Details: Displays when the contact is in your contact list. Details show
the contact information provided in the contact list.
• Save to Contacts
Note:
If
Save to Contacts
Contacts list.
•Erase
•Lock/Unlock
: Save the number to your Contacts list.
doesn't appear, that entry is already in your
: Deletes the call from Call History.
: Locks or unlocks the entry to prevent accidental
deletion.
•View Timers
6. Press the
option. Press to enter the highlighted option’s sub-
: Select to view the call timers for your phone.
Directional key down to highlight an
OK
menu.
Call History Icons
When you view Recent Calls, an icon to the left of the number
indicates the type of call.
Indicates a Missed call
Indicates a Dialed call
Indicates a Received call
Making Calls Using Call History
1. Open the flip in portrait mode and press . Press the
Directional key up or down until the desired number
is highlighted.
2. Press to call the highlighted number. Or, you can
press OPEN, then press to call the highlighted
number.
Creating or Updating Contacts Using Call Histor y
1. Open the flip in portrait mode and press then press
the Directional key up or down until the desired
number is highlighted. Press the right soft key
Options. Save to Contacts is highlighted. Press .
2. Press the
Directional key up or down to highlight
Add New Contact or Update Existing. Press .
Call Functions 23
OK
3.
OKOK
OKOK
OK
OK
OK
OK
OK
If you selected Add New Contact, the following types are
available.
•
Mobile 1
•
Mobile 2
•
Home
•
Work
•
Fax
4. If you selected
5. Press the
Update Existing
Directional key up or down to highlight the
, proceed to step 10.
desired entry type (Mobile 1, Mobile 2, Home, Work, or
Fax) then press .
6. Enter a name for the entry using the keypad. Press the left
soft key Abc if you wish to select a different method
of text entry, such as T9 Word, Abc, 123, and Symbols.
7. To assign a Speed Dial location, press the
Directional key up or down to highlight the number you
would like to assign to a Speed Dial location and press the
Highlight an unassigned location and press SET. A
confirmation message appears in the display, Ye s is
highlighted, press to add Contact to the speed dial
OK
location.
Note:
Voicemail is assigned to Speed Dial location 1. Location 411: directory
assistance, 611: customer service access, 911: emergency phone
number.
Note:
You can assign a speed dial location to each number associated with
the contact (Home, Work, Mobile 1, Mobile 2, and Fax.).
8. When you’re finished entering information for the entry,
OK
press SAVE. The entry is saved to your Contacts.
9. An CONTACT UPDATED or
CONTACT SAVED
with a selection list of entry types displays. Press the
Directional key up or down to highlight the desired type
then press . The number is added to the selected
OK
entry and saved to your Contacts.
10. For
Update Existing
OK
.
, highlight the desired contact and press
OK
pop-up screen
right soft key Options. Highlight Set Speed Dial and
press .
24
Press the Directional key to highlight the desired
OK
OKOK
OKOK
OKOK
OKOK
OKOK
OKOK
11.
entry type and press .
12. Press
SAVE
OK
to save the new entry.
Deleting Call History Entries
1. Open the flip in portrait mode and press then press
the Directional key up or down until the desired
number is highlighted. Press the right soft key
Options. A pop-up menu appears in the display.
2. Press the Directional key down to highlight Erase
and press . Select Ye s or No at the ERASE ENTRY?
pop-up screen.
3. Press .
Deleting All Call History Entries
1. Open the flip in portrait mode and press .
2. Press the right soft key Options. A pop-up menu
appears in the display.
3. Press the
Directional key down to highlight Erase All
and then press . Select Yes or No at the ERASE ALL?
pop-up screen and press .
Contacts
Making Calls Using Contacts
Contacts are entries that you create to store names, numbers,
and other information for people or groups of interest. If you’ve
already entered information into your Contacts list, you can recall
and dial the contact easily. For more information, refer to “Adding
a Contact” on page 43.
1. Open the flip in portrait mode and press the right soft key
Contacts. Press the Directional key up or down
until the contact that you want to call is highlighted then
press VIEW. Details for the contact appear in the
display.
Note:
To quickly locate a name, press (or multi-press) any key on the keypad
that corresponds to the first, second, and/or third letters of the
contact’s name.
2. If the entry contains more than one number, press the
Directional key up or down to highlight the desired
number.
3. Press to call the number.
Call Functions 25
Roaming
OK
OKOKOK
What is Roaming?
Your phone can roam on other compatible digital networks.
Roaming occurs when you travel outside a pre-designated
coverage area. The roaming icon displays when roaming is active
and extra charges may apply when making or receiving calls.
Note:
Some features may be unavailable while roaming.
Roaming Options
The following roaming options are available:
–
Home Only
- Your phone is available for normal operation only in the
designated coverage area.
–
Automatic-A
: The preferred “A” side carrier roaming list is used to
acquire service.
–
Automatic-B
: The preferred “B” side carrier roaming list is used to
acquire service.
Note:
Contact Verizon Wireless for information regarding preferred systems.
To change your Roaming option, follow these steps:
Note:
The menu navigation instructions for this section uses the default
My Place
display theme,
26
Grid menu
layout.
1. Open the flip in portrait mode and press
2. Press the
& Tools menu and press .
3. Press Phone Settings.
4. Press System Select.
5. Press the
Directional key to highlight Settings
OK
Directional key up or down to choose the
OK
MENU
.
setting you want, and press .
Voice Commands
Voice Commands is advanced speech recognition software that
can be used to access a variety of functions on your phone.
Voice Commands software automatically voice activates all
contacts for voice dialing and searching, no pre-recording or
training needed. Speak phone numbers naturally to dial, and use
voice commands to navigate phone menus.
Voice Commands Settings
You can adjust the settings and preferences by opening Voice
Commands menu. Using this menu, you can change the
following Voice Command features:
 Loading...