

Page 1
4G LTE SMARTPHONE
SCH-R950 Logo Here
This document is watermarked because certain important information in the
document has not yet been verified.This document has been sent to you as
a draft and for informational purposes only.The document should only be
used for internal purposes and may not be distributed outside of Samsung,
except to Samsung's carrier customer for testing purposes. Distributing
the document outside of Samsung, except to Samsung's carrier customer for
testing purposes could result in legal exposure to the company if the
preliminary, unverified information in the draft turns out to be inaccurate.
DRAFT - Internal Use Only
This device is capable of operating in 802.11a/n mode. For 802.11a/n devices operating in the frequency
range of 5.15 - 5.25 GHz, they are restricted to indoor operations to reduce any potential harmful
interference for Mobile Satellite Services (MSS) in the US. WIFI Access Points that are capable of
allowing your device to operate in 802.11a/n mode (5.15 - 5.25 GHz band) are optimized for indoor
use only. If your WIFI network is capable of operating in this mode, please restrict your WIFI use
User Manual
Please read this manual before operating your
phone, and keep it for future reference.
Page 2

Intellectual Property
DRAFT - Internal Use Only
All Intellectual Property, as defined below, owned by or which is otherwise the property of Samsung or its respective suppliers
relating to the SAMSUNG Phone, including but not limited to, accessories, parts, or software relating there to (the “Phone
System”), is proprietary to Samsung and protected under federal laws, state laws, and international treaty provisions. Intellectual
Property includes, but is not limited to, inventions (patentable or unpatentable), patents, trade secrets, copyrights, software,
computer programs, and related documentation and other works of authorship. You may not infringe or otherwise violate the
rights secured by the Intellectual Property. Moreover, you agree that you will not (and will not attempt to) modify, prepare
derivative works of, reverse engineer, decompile, disassemble, or otherwise attempt to create source code from the software. No
title to or ownership in the Intellectual Property is transferred to you. All applicable rights of the Intellectual Property shall remain
with SAMSUNG and its suppliers.
Open Source Software
Some software components of this product, including but not limited to 'PowerTOP' and 'e2fsprogs', incorporate source code
covered under GNU General Public License (GPL), GNU Lesser General Public License (LGPL), OpenSSL License, BSD License and
other open source licenses. To obtain the source code covered under the open source licenses, please visit:
http://opensource.samsung.com
.
Disclaimer of Warranties; Exclusion of Liability
EXCEPT AS SET FORTH IN THE EXPRESS WARRANTY CONTAINED ON THE WARRANTY PAGE ENCLOSED WITH THE PRODUCT, THE
PURCHASER TAKES THE PRODUCT "AS IS", AND SAMSUNG MAKES NO EXPRESS OR IMPLIED WARRANTY OF ANY KIND
WHATSOEVER WITH RESPECT TO THE PRODUCT, INCLUDING BUT NOT LIMITED TO THE MERCHANTABILITY OF THE PRODUCT OR
ITS FITNESS FOR ANY PARTICULAR PURPOSE OR USE; THE DESIGN, CONDITION OR QUALITY OF THE PRODUCT; THE
PERFORMANCE OF THE PRODUCT; THE WORKMANSHIP OF THE PRODUCT OR THE COMPONENTS CONTAINED THEREIN; OR
COMPLIANCE OF THE PRODUCT WITH THE REQUIREMENTS OF ANY LAW, RULE, SPECIFICATION OR CONTRACT PERTAINING
SCH-R950_UM_English_UCPLG1_CH_090412_D1
Page 3

THERETO. NOTHING CONTAINED IN THE INSTRUCTION MANUAL SHALL BE CONSTRUED TO CREATE AN EXPRESS OR IMPLIED
DRAFT - Internal Use Only
WARRANTY OF ANY KIND WHATSOEVER WITH RESPECT TO THE PRODUCT. IN ADDITION, SAMSUNG SHALL NOT BE LIABLE FOR
ANY DAMAGES OF ANY KIND RESULTING FROM THE PURCHASE OR USE OF THE PRODUCT OR ARISING FROM THE BREACH OF
THE EXPRESS WARRANTY, INCLUDING INCIDENTAL, SPECIAL OR CONSEQUENTIAL DAMAGES, OR LOSS OF ANTICIPATED PROFITS
OR BENEFITS.
SAMSUNG IS NOT LIABLE FOR PERFORMANCE ISSUES OR INCOMPATIBILITIES CAUSED BY YOUR EDITING OF REGISTRY SETTINGS,
OR YOUR MODIFICATION OF OPERATING SYSTEM SOFTWARE.
USING CUSTOM OPERATING SYSTEM SOFTWARE MAY CAUSE YOUR DEVICE AND APPLICATIONS TO WORK IMPROPERLY.
SAFE™ ("Samsung Approved For Enterprise") TO THE FULL EXTENT PERMITTED BY LAW SAMSUNG ELECTRONICS CO., LTD.,
SAMSUNG TELECOMMUNICATIONS AMERICA, LLC, AND THEIR AFFILIATES (COLLECTIVELY REFERRED TO HEREIN AS THE
"SAMSUNG ENTITIES") EXPRESSLY DISCLAIM ANY AND ALL WARRANTIES, EXPRESS OR IMPLIED, INCLUDING ANY WARRANTY OF
MERCHANTABILITY, FITNESS FOR A PARTICULAR PURPOSE, INTEROPERABILITY OR NON-INFRINGEMENT, WITH RESPECT TO
INFORMATION TECHNOLOGY SECURITY PROTECTION, SAFE™ APPROVED DEVICES AND SAFE™ APPROVED APPLICATIONS. IN NO
EVENT SHALL THE SAMSUNG ENTITIES BE LIABLE FOR ANY DIRECT, INDIRECT, INCIDENTAL, PUNITIVE, OR CONSEQUENTIAL
DAMAGES OF ANY KIND WHATSOEVER WITH RESPECT TO INFORMATION TECHNOLOGY SECURITY PROTECTION, SAFE™
APPROVED DEVICES OR SAFE™ APPROVED APPLICATIONS. In addition, information technology security protection will be affected
by features or functionality associated with, among other things the e-mail platform, master data management, and virtual private
network solutions selected by the software provider, solution provider or user. Choice of an e-mail, master data management,
and virtual private network solution is at the sole discretion of the software provider, solution provider or user and any associated
effect on information technology security protection is solely the responsibility of the software provider, solution provider or user.
For complete statement of limited warranty, please refer to
smartphone and Galaxy Tab™ devices are sold.
www.samsung.com/us/safe
, available on the web and where Samsung
Page 4

Samsung Telecommunications America (STA), LLC
DRAFT - Internal Use Only
Headquarters:
1301 E. Lookout Drive
Richardson, TX 75082
Tol l Free Te l:
Internet Address:
©2012 Samsung Telecommunications America, LLC. Samsung is a registered trademark of Samsung Electronics Co., Ltd.
Do you have questions about your Samsung Mobile Phone? For 24 hour information and assistance, we offer a new FAQ/ARS
System (Automated Response System) at:
Nuance®, VSuite™, T9® Text Input, and the Nuance logo are trademarks or registered trademarks of Nuance Communications,
Inc., or its affiliates in the United States and/or other countries.
The Bluetooth
registered trademarks and are wholly owned by the Bluetooth SIG.
microSD™ and the microSD logo are Trademarks of the SD Card Association.
Openwave
and are trademarks of SRS Labs, Inc. CS Headphone and WOW HD technologies are incorporated under license
from SRS Labs, Inc.
http://www.samsungusa.com
®
word mark, figure mark (stylized “B Design”), and combination mark (Bluetooth word mark and “B Design”) are
®
is a registered Trademark of Openwave, Inc.
Customer Care Center:
1000 Klein Rd.
Plano, TX 75074
1.888.987.HELP (4357)
http://www.samsung.com/us/support.
Page 5

TM
DRAFT - Internal Use Only
, DivX®, DivX Certified® and associated logos are trademarks of Rovi Corporation or its subsidiaries and are used under
license.
®
DivX Certified
ABOUT DIVX VIDEO: DivX
Certified
to play DivX® video up to HD 720p, including premium content.
®
®
device that plays DivX video. Visit
is a digital video format created by DivX, LLC, a subsidiary of Rovi Corporation. This is an official DivX
www.divx.com
for more information and software tools to convert your files into DivX
videos.
®
ABOUT DIVX VIDEO-ON-DEMAND: This DivX Certified
device must be registered in order to play purchased DivX Video-on-
Demand (VOD) movies. To obtain your registration code, locate the DivX VOD section in your device setup menu (tap
Settings > About device > Legal information > License settings > DivX® VOD > Register
vod.divx.com
for more information on
). Go to
how to complete your registration.
Google, the Google logo, Android, the Android logo, Google Play, Gmail, Google Mail, Google Maps, Google Music, Google Talk,
Picasa, YouTube and other marks are trademarks of Google Inc.
Wi-Fi is a registered trademark of the Wireless Fidelity Alliance, Inc.
Swype and the Swype logos are trademarks of Swype, Inc.
©
2010 Swype, Inc. All rights reserved.
Devices purchased for use on USCC's system are designed for use exclusively on 's system. You agree that you won't make any
modifications to the Equipment or programming to enable the Equipment to operate on any other system. A voice plan is
required on all voice-capable devices, unless specifically noted otherwise in the terms governing your agreement. Some devices
or plans may require you to subscribe to a data plan.
Your phone is designed to make it easy for you to access a wide variety of content. For your protection,
USCC wants you to be
aware that some applications that you enable may involve the location of your phone being shared. For applications available
through
USCC, USCC offers privacy controls that let you decide how an application may use the location of your phone and
other phones on your account. However,
USCC's privacy tools do not apply to applications available outside of USCC. Please
review the
Apps >
Page 6

terms and conditions and the associated privacy policy for each location-based service to learn how location information will be
DRAFT - Internal Use Only
used and protected.
Your phone may be used to access the Internet and to download, and/or purchase goods, applications, and services from USCC
or elsewhere from third parties.
controls may not be available for certain devices which bypass
USCC may collect certain types of information from your device when you use USCC services to provide customer support
and to improve its services. For more information on
USCC provides tools for you to control access to the Internet and certain Internet content. These
USCC controls.
USCC's Privacy Policy, visit
http://www.uscellular.com
.
Your phone features earSmart™, an intelligent voice processor that delivers a clear voice experience, allowing you to
™ in nearly any environment. earSmart technology uses the science of human hearing to distinguish sounds, identify your
heard
voice and suppress surrounding noise, for clear conversations just about anywhere.
How Does It Work?
•
The earSmart voice processor in your phone captures your voice and all the sounds around you.
•
Working like the human ear, it processes and distinguishes these sounds, isolates your voice conversation, and removes background noise from both ends of a call.
•
It also automatically equalizes and adjusts voice volume so you can hear and talk naturally, even in the noisiest places.
•
With earSmart technology, you can talk where you want, and have clear conversations for mobile calls, video chats, even speakerphone calls,
without worrying about surrounding noise.
hear and be
Page 7

Table of Contents
Section 1: Getting Started .............................6
Setting Up Your Phone . . . . . . . . . . . . . . . . . . . . .6
Charging a Battery . . . . . . . . . . . . . . . . . . . . . . . .9
Switching the Phone On or Off . . . . . . . . . . . . . .11
Locking and Unlocking the Touch Screen . . . . . .12
Setting up your Phone with Ready2Go . . . . . . . .12
Creating a Samsung Account . . . . . . . . . . . . . . .12
Creating a New Google Account . . . . . . . . . . . . .13
Retrieving your Google Account Password . . . . .13
Setting Up Your Voice Mail . . . . . . . . . . . . . . . . .13
Troubleshooting . . . . . . . . . . . . . . . . . . . . . . . . .14
Section 2: Understanding Your Phone ........15
Features of Your Phone . . . . . . . . . . . . . . . . . . .15
Front View of Your Phone . . . . . . . . . . . . . . . . . .16
Side Views of Your Phone . . . . . . . . . . . . . . . . .17
Rear View of Your Phone . . . . . . . . . . . . . . . . . .18
S Pen . . . . . . . . . . . . . . . . . . . . . . . . . . . . . . . . .19
Display Layout . . . . . . . . . . . . . . . . . . . . . . . . . .22
Menu Navigation . . . . . . . . . . . . . . . . . . . . . . . .31
Customizing Your Home Screen . . . . . . . . . . . . .36
DRAFT - Internal Use Only
DRAFT - Internal Use Only
Notification Bar . . . . . . . . . . . . . . . . . . . . . . . . 42
Memory Card . . . . . . . . . . . . . . . . . . . . . . . . . . 44
Section 3: Call Functions ............................46
Displaying Your Phone Number . . . . . . . . . . . . 46
Making a Call . . . . . . . . . . . . . . . . . . . . . . . . . . 46
Making Emergency Calls . . . . . . . . . . . . . . . . . 47
Making a Call Using Speed Dial . . . . . . . . . . . . 48
Making a Call from the Address Book . . . . . . . . 49
Answering a Call . . . . . . . . . . . . . . . . . . . . . . . 49
Dialing Options . . . . . . . . . . . . . . . . . . . . . . . . 50
Call Log . . . . . . . . . . . . . . . . . . . . . . . . . . . . . . 50
Call Duration . . . . . . . . . . . . . . . . . . . . . . . . . . 53
Options During a Call . . . . . . . . . . . . . . . . . . . . 53
Call Settings . . . . . . . . . . . . . . . . . . . . . . . . . . 57
Section 4: Entering Text ..............................64
Text Input Methods . . . . . . . . . . . . . . . . . . . . . 64
Entering Text Using the Samsung Keyboard . . . 64
Changing the Text Input Mode - Keypad . . . . . . 65
Using ABC Mode . . . . . . . . . . . . . . . . . . . . . . . 65
Using Symbol/Numeric Mode . . . . . . . . . . . . . . 66
1
Page 8

Predictive Text . . . . . . . . . . . . . . . . . . . . . . . . . 66
DRAFT - Internal Use Only
Samsung Keyboard Settings . . . . . . . . . . . . . . . 67
Using the Google Voice Typing Feature . . . . . . . 67
Section 5: Accounts and Contacts ............. 68
Accounts . . . . . . . . . . . . . . . . . . . . . . . . . . . . . . 68
Contacts . . . . . . . . . . . . . . . . . . . . . . . . . . . . . . 69
Section 6: Multimedia ................................. 79
Media Hub . . . . . . . . . . . . . . . . . . . . . . . . . . . . 79
Music Player . . . . . . . . . . . . . . . . . . . . . . . . . . . 81
Using Playlists . . . . . . . . . . . . . . . . . . . . . . . . . . 83
Google Play Music . . . . . . . . . . . . . . . . . . . . . . . 84
Video Player . . . . . . . . . . . . . . . . . . . . . . . . . . . 84
Play Movies . . . . . . . . . . . . . . . . . . . . . . . . . . . 85
Gallery . . . . . . . . . . . . . . . . . . . . . . . . . . . . . . . 86
Camera . . . . . . . . . . . . . . . . . . . . . . . . . . . . . . . 87
Using the Camera . . . . . . . . . . . . . . . . . . . . . . . 87
Camera Options . . . . . . . . . . . . . . . . . . . . . . . . 88
Using the Camcorder . . . . . . . . . . . . . . . . . . . . 91
Camcorder Options . . . . . . . . . . . . . . . . . . . . . . 92
Section 7: Messaging .................................95
Types of Messages . . . . . . . . . . . . . . . . . . . . . . 95
Creating and Sending Messages . . . . . . . . . . . . 95
2
Message Options . . . . . . . . . . . . . . . . . . . . . . . 96
Viewing New Received Messages . . . . . . . . . . . 98
Deleting Messages . . . . . . . . . . . . . . . . . . . . . . 99
Message Search . . . . . . . . . . . . . . . . . . . . . . . . 99
Messaging Settings . . . . . . . . . . . . . . . . . . . . . 100
Using Email . . . . . . . . . . . . . . . . . . . . . . . . . . . 101
Using Gmail . . . . . . . . . . . . . . . . . . . . . . . . . . . 103
Google Talk . . . . . . . . . . . . . . . . . . . . . . . . . . . 104
ChatON . . . . . . . . . . . . . . . . . . . . . . . . . . . . . .105
Section 8: Changing Your Settings ..........108
Accessing Settings . . . . . . . . . . . . . . . . . . . . . 108
Wi-Fi Settings . . . . . . . . . . . . . . . . . . . . . . . . . 108
Bluetooth settings . . . . . . . . . . . . . . . . . . . . . .109
Sharing and Transferring Files . . . . . . . . . . . . . 109
More Settings... . . . . . . . . . . . . . . . . . . . . . . . .112
Lock Screen Settings . . . . . . . . . . . . . . . . . . . 116
More Settings (Personalization) . . . . . . . . . . . .116
Data Usage . . . . . . . . . . . . . . . . . . . . . . . . . . . 118
More... Settings . . . . . . . . . . . . . . . . . . . . . . . .118
Sound Settings . . . . . . . . . . . . . . . . . . . . . . . . 124
Display Settings . . . . . . . . . . . . . . . . . . . . . . .127
Wallpaper . . . . . . . . . . . . . . . . . . . . . . . . . . . .127
Page 9

LED indicator . . . . . . . . . . . . . . . . . . . . . . . . . .128
DRAFT - Internal Use Only
Motion Settings . . . . . . . . . . . . . . . . . . . . . . . .128
Dormant Mode . . . . . . . . . . . . . . . . . . . . . . . . .130
Power Saving . . . . . . . . . . . . . . . . . . . . . . . . .130
Storage . . . . . . . . . . . . . . . . . . . . . . . . . . . . . .130
Battery . . . . . . . . . . . . . . . . . . . . . . . . . . . . . .131
Application Manager . . . . . . . . . . . . . . . . . . . .131
Accounts and Sync . . . . . . . . . . . . . . . . . . . . .133
Location Services . . . . . . . . . . . . . . . . . . . . . .133
Security Settings . . . . . . . . . . . . . . . . . . . . . . .134
Language and Input . . . . . . . . . . . . . . . . . . . . .138
Voice Settings . . . . . . . . . . . . . . . . . . . . . . . . .141
Back up and reset . . . . . . . . . . . . . . . . . . . . . .142
Pen Settings . . . . . . . . . . . . . . . . . . . . . . . . . .143
Accessory Settings . . . . . . . . . . . . . . . . . . . . .143
Date and Time . . . . . . . . . . . . . . . . . . . . . . . . .144
Accessibility . . . . . . . . . . . . . . . . . . . . . . . . . .144
Hearing options . . . . . . . . . . . . . . . . . . . . . . . .146
Developer Options . . . . . . . . . . . . . . . . . . . . . .146
Allow mock locations . . . . . . . . . . . . . . . . . . . .147
User interface . . . . . . . . . . . . . . . . . . . . . . . . .147
About Device . . . . . . . . . . . . . . . . . . . . . . . . . .148
Section 9: Connections .............................150
Internet . . . . . . . . . . . . . . . . . . . . . . . . . . . . . 150
Wi-Fi . . . . . . . . . . . . . . . . . . . . . . . . . . . . . . . 156
NFC . . . . . . . . . . . . . . . . . . . . . . . . . . . . . . . . 160
Bluetooth . . . . . . . . . . . . . . . . . . . . . . . . . . . . 160
PC Connections . . . . . . . . . . . . . . . . . . . . . . . 163
NFC . . . . . . . . . . . . . . . . . . . . . . . . . . . . . . . . 165
Section 10: Applications ...........................166
AllShare Play . . . . . . . . . . . . . . . . . . . . . . . . . 166
Calculator . . . . . . . . . . . . . . . . . . . . . . . . . . . 170
Calendar . . . . . . . . . . . . . . . . . . . . . . . . . . . . 170
Camera . . . . . . . . . . . . . . . . . . . . . . . . . . . . . 172
ChatON . . . . . . . . . . . . . . . . . . . . . . . . . . . . . 172
Chrome . . . . . . . . . . . . . . . . . . . . . . . . . . . . . 172
Clock . . . . . . . . . . . . . . . . . . . . . . . . . . . . . . . 172
Contacts . . . . . . . . . . . . . . . . . . . . . . . . . . . . 175
Downloads . . . . . . . . . . . . . . . . . . . . . . . . . . . 176
Email . . . . . . . . . . . . . . . . . . . . . . . . . . . . . . . 176
Gallery . . . . . . . . . . . . . . . . . . . . . . . . . . . . . . 176
Gmail . . . . . . . . . . . . . . . . . . . . . . . . . . . . . . . 176
Internet . . . . . . . . . . . . . . . . . . . . . . . . . . . . . 176
Kies air . . . . . . . . . . . . . . . . . . . . . . . . . . . . . 176
3
Page 10

Latitude . . . . . . . . . . . . . . . . . . . . . . . . . . . . . 177
DRAFT - Internal Use Only
Local . . . . . . . . . . . . . . . . . . . . . . . . . . . . . . . . 178
Maps . . . . . . . . . . . . . . . . . . . . . . . . . . . . . . . 179
Media Hub . . . . . . . . . . . . . . . . . . . . . . . . . . . 180
Messaging . . . . . . . . . . . . . . . . . . . . . . . . . . . 180
Music Player . . . . . . . . . . . . . . . . . . . . . . . . . . 180
My Files . . . . . . . . . . . . . . . . . . . . . . . . . . . . . 180
Navigation . . . . . . . . . . . . . . . . . . . . . . . . . . . . 181
Phone . . . . . . . . . . . . . . . . . . . . . . . . . . . . . . . 183
Play Books . . . . . . . . . . . . . . . . . . . . . . . . . . . 183
Play Movies . . . . . . . . . . . . . . . . . . . . . . . . . . 183
Play Music . . . . . . . . . . . . . . . . . . . . . . . . . . . 184
Play Store . . . . . . . . . . . . . . . . . . . . . . . . . . . . 184
Point& . . . . . . . . . . . . . . . . . . . . . . . . . . . . . . . 184
Polaris Office 4.0 . . . . . . . . . . . . . . . . . . . . . . 184
S Note . . . . . . . . . . . . . . . . . . . . . . . . . . . . . . . 185
S Suggest . . . . . . . . . . . . . . . . . . . . . . . . . . . . 186
S Voice . . . . . . . . . . . . . . . . . . . . . . . . . . . . . . 186
Samsung Apps . . . . . . . . . . . . . . . . . . . . . . . . 187
Search . . . . . . . . . . . . . . . . . . . . . . . . . . . . . . 187
Settings . . . . . . . . . . . . . . . . . . . . . . . . . . . . . 187
Talk . . . . . . . . . . . . . . . . . . . . . . . . . . . . . . . . 187
4
Video Player . . . . . . . . . . . . . . . . . . . . . . . . . . 187
Voice Recorder . . . . . . . . . . . . . . . . . . . . . . . . 187
YouTube . . . . . . . . . . . . . . . . . . . . . . . . . . . . . 188
Section 11: Health and Safety Information 190
Exposure to Radio Frequency (RF) Signals . . . . 190
Specific Absorption Rate (SAR) Certification
Information . . . . . . . . . . . . . . . . . . . . . . . . . 195
FCC Part 15 Information to User . . . . . . . . . . .196
Smart Practices While Driving . . . . . . . . . . . . .197
Battery Use and Safety . . . . . . . . . . . . . . . . . . 198
Samsung Mobile Products and Recycling . . . .200
UL Certified Travel Charger . . . . . . . . . . . . . . . 201
Display / Touch-Screen . . . . . . . . . . . . . . . . . . 201
GPS . . . . . . . . . . . . . . . . . . . . . . . . . . . . . . . . . 202
Emergency Calls . . . . . . . . . . . . . . . . . . . . . . .202
Care and Maintenance . . . . . . . . . . . . . . . . . .203
Responsible Listening . . . . . . . . . . . . . . . . . . .204
Operating Environment . . . . . . . . . . . . . . . . . .206
FCC Hearing Aid Compatibility (HAC)
Regulations for Wireless Devices . . . . . . . . .208
Restricting Children's Access to Your
Mobile Device . . . . . . . . . . . . . . . . . . . . . . .210
Page 11

FCC Notice and Cautions . . . . . . . . . . . . . . . . .210
DRAFT - Internal Use Only
DRAFT - Internal Use Only
Other Important Safety Information . . . . . . . . .211
Section 12: Warranty Information ............213
Standard Limited Warranty . . . . . . . . . . . . . . .213
End User License Agreement for Software . . . .218
Section 13: Samsung Product Registration 224
Index ........................................................ 225
5
Page 12
Section 1: Getting Started
USCC
Graphic Placement
USCC
Graphic Placement
DRAFT - Internal Use Only
This section explains how to start using your phone by first
configuring your hardware, activating your service, and then
setting up your voice mail.
Setting Up Your Phone
Prior to use it is necessary to install both the battery and SIM
into their corresponding internal compartments. The
microSD™ card slot is also located in this same internal
area.
1. Remove the back cover by inserting a fingernail into
the slot on the top of your phone (1).
6
2. Lift the cover up (2) and away from the phone (3).
Caution!
Do not bend or twist the back cover excessively.
Doing so may damage the cover.
Page 13
Installing the SIM Card
DRAFT - Internal Use Only
When you subscribe to a cellular network, you are provided
with a plug-in SIM card loaded with your subscription details,
such as your PIN, available optional services, and many
others features.
.
USCC
Graphic Placement
Important!
You can easily damage the plug-in SIM card
information and its contacts by scratching or
bending the card, so be careful when handling,
inserting, or removing the card. Keep all SIM cards
out of reach of small children.
Carefully slide the SIM card into the SIM card socket
(as shown) until the card locks into place.
•
Make sure that the card’s gold contacts face into the phone
and that the upper-left angled corner of the card is positioned
as shown
Note:
If the card is not inserted correctly, the phone will not
detect the SIM card. Re-orient the card back into the slot
if the SIM is not detected.
Getting Started 7
Page 14
Installing the Battery
DRAFT - Internal Use Only
1. Insert the battery into the opening on the back of the
phone, making sure the connectors align (1).
2. Gently press down to secure the battery (2).
USCC
Graphic Placement
Removing and Installing the Memory Card
You can use a microSD (SD) or microSDHC card to
expand available memory space if you desire. This secure
digital card enables you to exchange images, music, and
data between SD-compatible devices. This type of memory
card is designed for use with this mobile phone and other
devices.
8
Note:
Your phone has been tested to support up to a 64GB
memory card.
Installing the Memory Card
Push the microSD card into the slot until it clicks (as
shown).
•
Make sure the microSD’s gold contact pins face downward and
the card is securely inserted.
USCC
Graphic Placement
For more information on Memory Cards, see “Memory Card”
on page 44.
Page 15
Removing the Memory Card
DRAFT - Internal Use Only
1. Push on the memory card until it clicks and is released.
2. Grasp the memory card and remove it from the phone.
Installing the Back Cover
1. Place the battery cover onto the back of the phone (1)
and press down (2).
USCC
Graphic Placement
2. Press along the edge of the back cover (3) until you
have a secure seal.
USCC
Graphic Placement
Note:
Make sure the battery is properly installed before
switching on the phone.
Charging a Battery
Your device is powered by a rechargeable Li-ion battery. The
Travel Charger that is used to charge the battery, is included
with your device. Use only Samsung-approved batteries and
chargers.
Note:
You must fully charge the battery before using your
phone for the first time. A discharged battery recharges
fully in approximately 4 hours.
Getting Started 9
Page 16
Note:
USCC
Graphic Placement
DRAFT - Internal Use Only
Long backlight settings, searching for service, vibrate
mode, web browser use, and other variables may
reduce the battery’s talk and standby times.
Although you can use the phone while the battery is
charging, doing so will require additional charging time.
Using the Travel Charger
Important!
Verify that the handset battery is installed prior to
connection. If the battery is not properly installed
and the wall charger is connected, the handset
may power off and on continuously, preventing
proper operation.
10
1. Plug the flat end of the Travel Charger into the Power/
Accessory Interface connector and the other end into a
standard AC wall outlet.
2. When charging is finished, remove the flat end from
the interface connector jack on the phone.
Page 17
Warning!
USCC
Graphic Placement
DRAFT - Internal Use Only
If your handset has a touch screen display, please
note that a touch screen responds best to a light
touch from the pad of your finger. Using excessive
force or a metallic object when pressing on the touch
screen may damage the tempered glass surface and
void the warranty. For more information, refer to
“Standard Limited Warranty” on page 213.
Note:
Failure to unplug the wall charger before you remove the
battery, can cause damage to the phone.
Low Battery Indicator
When the battery is weak and only a few minutes of talk time
remain, the battery icon ( ) blinks and the device sounds a
warning tone at regular intervals. In this condition, your
phone conserves its remaining battery power, not by turning
off the backlight, but by entering the dimming mode. For a
quick check of your battery level, glance at the battery
charge indicator located in the upper-right corner of your
device’s display. Solid color ( ) indicates a full charge.
When the battery level becomes too low, the phone
automatically turns off.
Switching the Phone On or Off
1. Press and hold until the phone switches on.
2. Swipe your finger across the screen to unlock the
phone.
Note:
The display language is preset to English at the factory.
To change the language, use the Language menu. For
more information, refer to “Changing Your Settings” on
page 108.
3. To switch off the phone, press and hold , until
Device options
the
screen displays.
Getting Started 11
Page 18
Power off
4. Tap
5. At the
to switch off the phone.
Power off
prompt, tap OK.
Locking and Unlocking the Touch Screen
1. Press to lock the touch screen.
2. Press again to display the lock screen then
swipe your finger across the screen to unlock.
2. Touch
– or –
12
Get Started
to begin.
DRAFT - Internal Use Only
Creating a Samsung Account
An active Samsung account is required to begin accessing
applications such as ChatON and AllShare Play.
1. From the home screen, touch and hold the Notification
Bar until the pull-down displays, then drag down
vertically. For more information, refer to “Notification
Bar” on page 42.
2. Tap
3. Tap
4. Tap
5. Tap the
6. Tap
7. Tap
8. Enter the required information and tap
9. At the Welcome screen, tap
10. Follow the on-screen instructions to verify your email
Samsung account
Create new account
Terms and conditions
I accept all the terms above
Privacy policy
Agree
.
address and activate your account.
.
.
to read them and tap OK.
and read the policy and tap OK.
Next
checkbox.
.
Sign up
.
Page 19
Creating a New Google Account
DRAFT - Internal Use Only
In order to utilize your device to the fullest extent, you will
need to create a Google™ Account when you first use your
device. With a Google Account, Google applications will
always be in sync between your phone and computer.
If you did not create a new account during the setup
procedure when you first turned your phone on, follow these
steps:
1. From the Home screen, tap ➔
The
Add a Google Account
2. Ta p
New
to create a new Google account.
– or –
If you already have a Google account, tap
sign in and add the account to your phone.
3. Follow the on-screen instructions to add a Google
Account.
Note:
Once you have created a Google account, you only need
to sign in.
screen displays.
Gmail
Existing
Retrieving your Google Account Password
A Google account password is required for Google
applications. If you misplace or forget your Google Account
password, follow these instructions to retrieve it:
1. From your computer, use an Internet browser and
navigate to
.
to
2. Click on the
3. Tap the
4. Enter your Email address and click
5. Follow the password recovery procedure.
Setting Up Your Voice Mail
1. From the Home screen, tap , then tap .
2. Follow the tutorial to create a password, record a
greeting, and record your name.
Note:
These steps may be different depending on your
network.
http://google.com/accounts.
Can’t access your account?
I forgot my password
link.
radio button.
Continue
.
Getting Started 13
Page 20

Accessing Your Voice Mail
DRAFT - Internal Use Only
DRAFT - Internal Use Only
1. From the Home screen, tap , then tap .
You may be prompted to enter a password.
2. When connected, follow the voice prompts from the
voice mail center.
Accessing Your Voice Mail From Another Phone
1. Dial your wireless phone number.
2. When you hear your voicemail greeting, press the
asterisk key on the phone you are using.
3. Enter your password.
Troubleshooting
If your device has fatal errors, hangs up, or freezes, you may
need to reset the device to regain functionality.
If your device is frozen and unresponsive, press and
hold the Power/Lock Key for 8 to 10 seconds.
14
Page 21

Section 2: Understanding Your Phone
DRAFT - Internal Use Only
DRAFT - Internal Use Only
This section outlines some key features of your phone and
describes the screen and the icons that display when the phone
is in use. It also shows how to navigate through the phone and
provides information on using a memory card.
Features of Your Phone
Your phone is lightweight, easy-to-use and offers many
useful features. The following list outlines a few of the
features included in your phone.
•
4G LTE network with 1.5 gigahertz quad-core processor
•
Android v 4.1.1, Jelly Bean Platform
•
Touch screen provides quick response to a variety of in-phone
menus and options including applications and seven home
screens
•
Virtual (on-screen) QWERTY keyboard
•
Ready access to the Internet
•
Built-in Bluetooth and advanced Wi-Fi® technology
•
USB Tethering-capable
•
Mobile Hotspot Capability
•
Brilliant 5.5” HD SuperAMOLED plus display
•
8 Megapixel camera and camcorder with 2 Megapixel Front
Facing camera
•
GPS Navigation functionality provides real-time navigation
•
Up to 32 GB expandable memory slot
•
Corporate and Personal Email
•
Sync and update social network applications
•
Over 250,000 Apps available to download
•
Access to Movies and TV Shows with Samsung Media Hub
•
Full Integration of Google Mobile™ Services (Gmail, YouTube,
Google Maps, Google Voice Search)
•
Multiple Messaging Options: Text/Picture/Video Messaging, and
Instant Messaging with Google Talk™
•
DivX Certified® to play DivX® video up to HD 1080p, including
premium content
•
AllShare™ Play to share your media content across DLNA
certified devices
Understanding Your Phone 15
Page 22
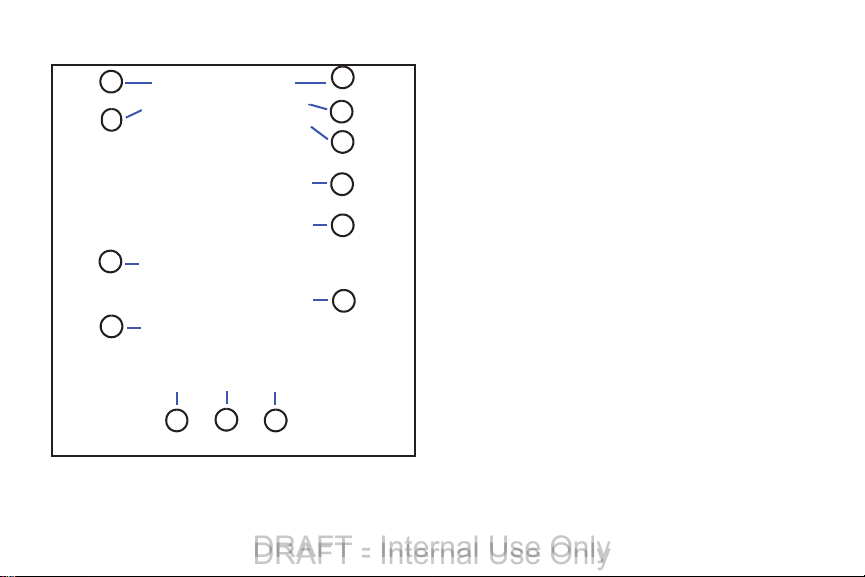
Front View of Your Phone
7
3
2
4
5
8
6
1
13
12
11
10
9
USCC
Graphic Placement
DRAFT - Internal Use Only
DRAFT - Internal Use Only
1.
Status light
fully charged, blue when powering up, and orange
when a notification has arrived.
2.
External speaker
3. Application icons: you can place shortcuts to your
favorite applications on the Home screen.
4. Primary shortcuts: allows quick access to important
features such as Phone, Contacts, Messaging, Internet,
and Apps. For more information, refer to “Primary
Shortcuts” on page 22.
5. Menu key: allows you to access sub-menus with
additional options for different features and
applications such as Home screen, Phone, Contacts,
Messaging, and Web.
6. Home key: allows you to return to the main Home
screen from any Home screen or menu. Press and hold
to display Task Manager. Quickly press twice to
activate the S Voice application.
7. Back key: allows you step backwards when navigating
a menu or web page.
: displays red when charging, green when
: allows you to hear the caller.
16
Page 23
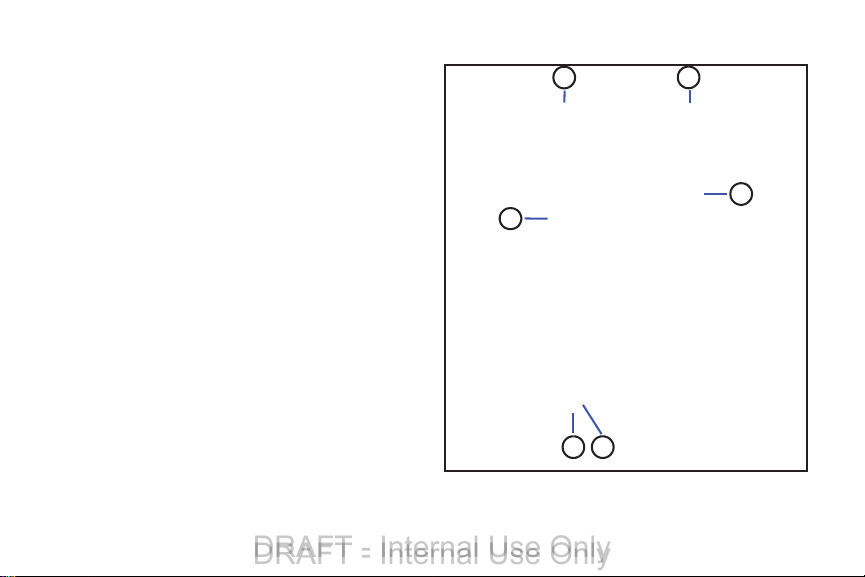
8.
5
1
2
43
6
USCC
Graphic Placement
DRAFT - Internal Use Only
DRAFT - Internal Use Only
Home screen indicator
presently displayed.
9. Google Quick Search bar: a shortcut to Google Search
that allows you to search for items on the internet.
10. AccuWeather screen: displays Time, Day, Date,
Temperature and weather conditions for your area.
11. Indicator icons: shows the information needed to
12.
13.
operate your phone, such as the received signal
strength, phone battery level, time, unread Emails,
missed calls, etc.
Front facing camera
yourself when you set the camera shooting mode to
Self shot.
Proximity and Light sensors
level to adjust keypad access. If the light path is
blocked, for example, when holding the phone close to
your ear, the touch screen will turn off.
: shows which Home screen is
: allows you to take pictures of
: uses the ambient light
Side Views of Your Phone
Understanding Your Phone 17
Page 24
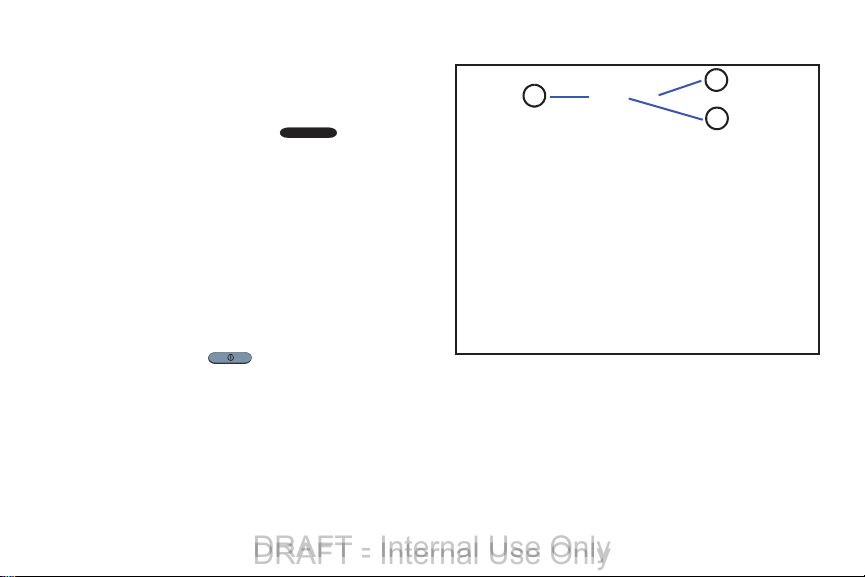
3.5mm Headset jack
2
3
1
USCC
Graphic Placement
DRAFT - Internal Use Only
DRAFT - Internal Use Only
1.
Volume keys
2.
while in standby mode or adjust the voice volume
during a call. When receiving an incoming call, briefly
press down either volume key (
ring tone. Adjusts text size when reading a message or
using the browser in the Apps folder.
3. Power/Accessory Interface connector: allows you to
connect a Travel Charger or other optional accessories
such as a USB/data cable or a hands-free headset for
convenient, hands-free conversations.
4.
Microphone
are speaking to them. It also used for the
Speakerphone.
5. Power/Lock key: ( ) lets you power your phone
on and off. Also allows you to lock or unlock the touch
screen. For more information on locking your phone,
see “Locking and Unlocking the Phone” on page 34.
6.
Microphone
recording.
18
: allows you to plug in headphones.
: allow you to adjust the ringer volume
) to mute the
: allows other callers to hear you when you
: used for noise cancellation and stereo
Rear View of Your Phone
1.
Flash
: is used to provide adequate light when taking
pictures in dark places.
External speaker
2.
Speakerphone is turned on.
3.
Camera lens
: allows you to hear when the
: is used to take pictures and shoot videos.
Page 25
S Pen
1
2
USCC
Graphic Placement
USCC
Graphic Placement
DRAFT - Internal Use Only
DRAFT - Internal Use Only
The S Pen is a stylus that assists you in performing different
functions. By using the Pen button, you can minimize having
to switch between touch and pen input.
Pen button
1.
functionality to the S Pen. For more information, refer
to “Using the S Pen” on page 20.
2.
Stylus tip
screen.
: by pressing the Pen button, you can add
: the tip of the S Pen is used for tapping the
Removing the S Pen from your Phone
The S Pen is stored in your phone to make it easier to keep
track of.
To remove the S Pen, follow these steps:
1. Use your fingernail or a sharp object to pull the end of
the S Pen out of the phone (1).
2. Pull the S Pen out of the phone (2).
Understanding Your Phone 19
Page 26
Using the S Pen
Press S Pen button
USCC
Graphic Placement
Press
S Pen
button
USCC
Graphic Placement
DRAFT - Internal Use Only
DRAFT - Internal Use Only
There are several different functions you can perform by
using the S Pen.
Back Button
To move to a previous screen, hold the S Pen button and
touch and drag the screen to the left. The previous screen
displays.
20
Menu Button
To display the menu from any screen, hold the S Pen button
and touch and drag the screen upward. The menu displays.
Page 27
Launch S Note
USCC
Graphic Placement
USCC
Graphic Placement
DRAFT - Internal Use Only
DRAFT - Internal Use Only
S Note is an application that you can launch from any screen
to take quick notes or jot down ideas. To open S Note, hold
the S Pen button and double-tap the screen. ???cross ref
here.
Screen Capture
To take a screen capture, hold the S Pen button and press
and hold the S Pen anywhere on the screen. Files are saved
My Files
➔
sdcard0
➔
in the
Screenshots
Understanding Your Phone 21
folder.
Page 28
Write on any Screen after Capture
USCC
Graphic Placement
DRAFT - Internal Use Only
DRAFT - Internal Use Only
To write on a screen capture, use the pen to draw or write.
Files are saved in the
IMG_Edited
folder.
My files ➔ sdcard0
➔
Screenshots
22
Display Layout
➔
Your display screen provides a wealth of information about
the phone’s status and options, as well as providing access
to application icons. For more information, refer to “Front
View of Your Phone” on page 16.
Primary Shortcuts
There are four non-movable Application Shortcuts that
display at the bottom of all Home screens. The default
shortcuts are:
•
•
•
•
•
You can change the Phone, Messaging, S Note, and Internet
application shortcuts to any icon that displays in the Apps
menu.
For more information, refer to “Adding and Removing
Primary Shortcuts” on page 37.
Phone
for dialing a number.
Messaging
S Note
Internet
Apps
for creating and viewing Messages.
for
creating notes using the keypad or S Pen
for surfing the Internet.
for accessing the applications on your phone.
.
Page 29
Indicator Icons
DRAFT - Internal Use Only
DRAFT - Internal Use Only
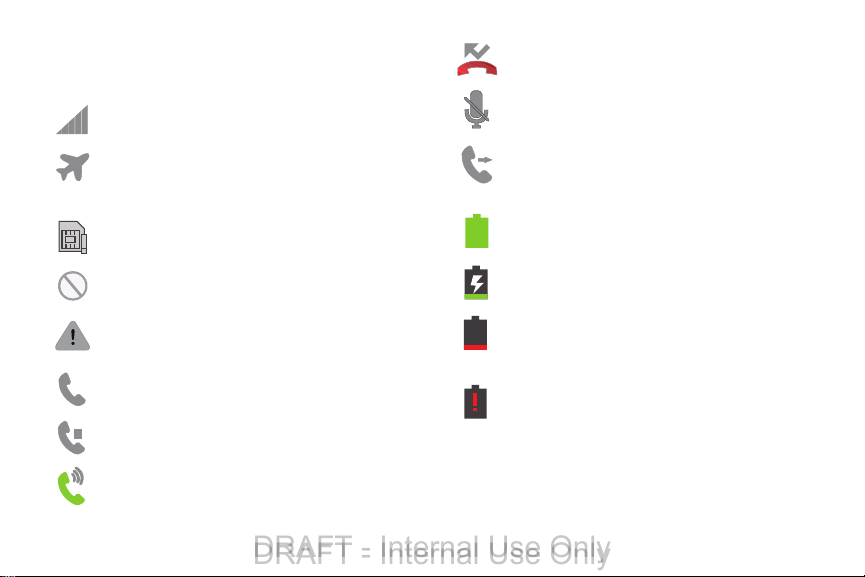
This list identifies the symbols you’ll see on your phone’s
display and Indicator area:
Displays your current signal strength. The greater
the number of bars, the stronger the signal.
Indicates that the Airplane Mode is active. You
cannot send or receive any calls or access online
information.
Displays when there is no SIM card in the phone.
Displays when there is no network available.
Displays when there is a system error or alert.
Displays when a call is in progress.
Displays when a call is on hold.
Displays when the speakerphone is on.
Displays when a call has been missed.
Displays when a call has been muted.
Displays when Call forwarding is set to Always
forward. For more information, refer to “Call
forwarding” on page 60.
Displays your battery charge level. Icon shown is
fully charged.
Displays when your battery is charging. Also
displays battery charge level.
Device Power Very Low – Shows your current
battery only has between 5 and 15 percent power
remaining.
Device Power Critical – Shows your current battery
only has less than 5 percent power remaining and
will immediately shutdown.
Understanding Your Phone 23
Page 30
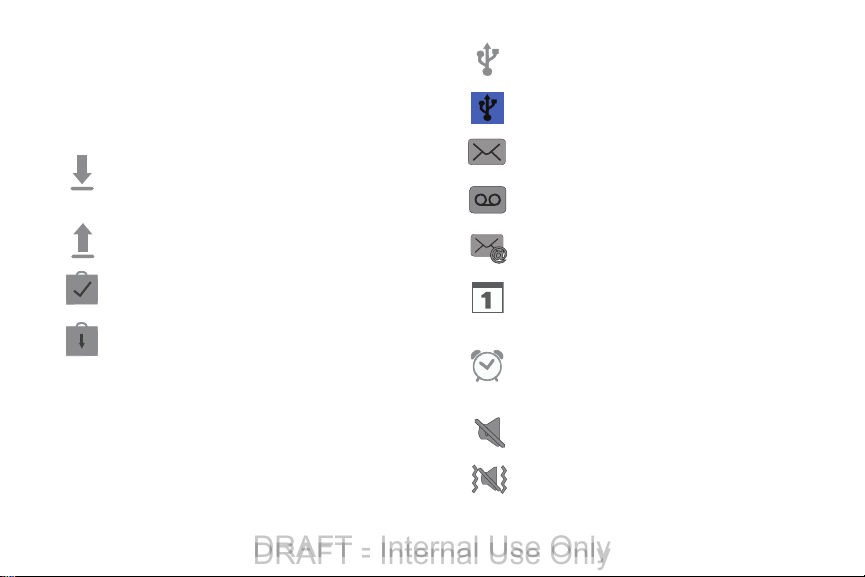
Displays when your connection to a 4G LTE network
DRAFT - Internal Use Only
DRAFT - Internal Use Only
is active.
Displays when your phone is communicating with
the 4G LTE network.
Displays when your phone is downloading or has
downloaded a file. It will blink green when it is
installing.
Displays when the an outbound file transfer is in
progress.
Displays when the phone is connected to a
computer via a supported USB cable connection.
Displays when the phone is tethered via a
supported USB cable connection.
Displays when a new text or multimedia message
is received.
Displays when a new voice mail is received.
Displays when Email is received.
Displays when a Play Store download has
completed.
Displays when updates are available for dow nload.
24
Displays when the time and date for a Calendar Event
has arrived. For more information, refer to
“Calendar” on page 170.
Displays when you set an alarm to ring at a specified
time. For more information, refer to “Alarm” on page
172.
Displays when the Sound profile is set to Mute.
Displays when the Sound profile is set to Vibrate.
Page 31
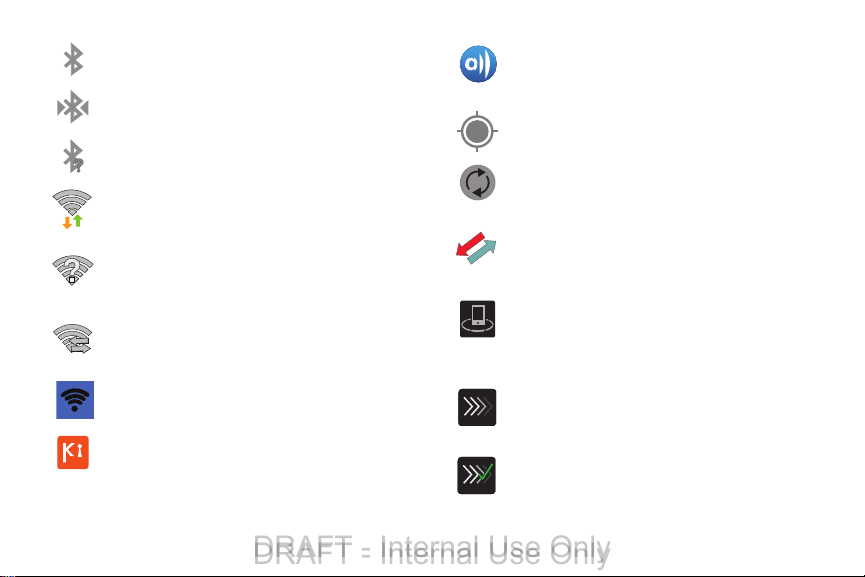
Displays when Bluetooth is activated.
DRAFT - Internal Use Only
DRAFT - Internal Use Only
Displays when a Bluetooth device has been paired
with the phone.
Displays briefly when Bluetooth is on but is not
connected to a Bluetooth device.
Displays when Wi-Fi is connected, active, and
communicating with a Wireless Access Point
(WAP).
Displays when Wi-Fi is active but there is a
communication issue with the target Wireless
Access Point (WAP).
Displays when Wi-Fi Direct is active and your phone
is connected to another device.
Displays when your phone as been configured as a
portable Wi-Fi hotspot.
Displays when your phone is connected to a PC
using Kies air.
Displays when your phone is connected to a Digital
Living Network Alliance (DLNA) certified device
using the AllShare Play application.
Displays when GPS is active and acquiring a signal.
Displays when data synchronization and
application sync is active and synchronization is in
progress for Gmail, Calendar, and Contacts.
Displays when your phone is connecting to the
Device Management server when you first turn on
your phone.
Displays when your device is connected to control
streaming media and is connected to a
Digital Living Network Alliance (DLNA) certified
device using the AllShare Play application.
Displays when a file is being uploaded or sync’d
between your device and an external Web storage
location.
Displays when the uploaded or transferred file was
successfully delivered.
Understanding Your Phone 25
Page 32
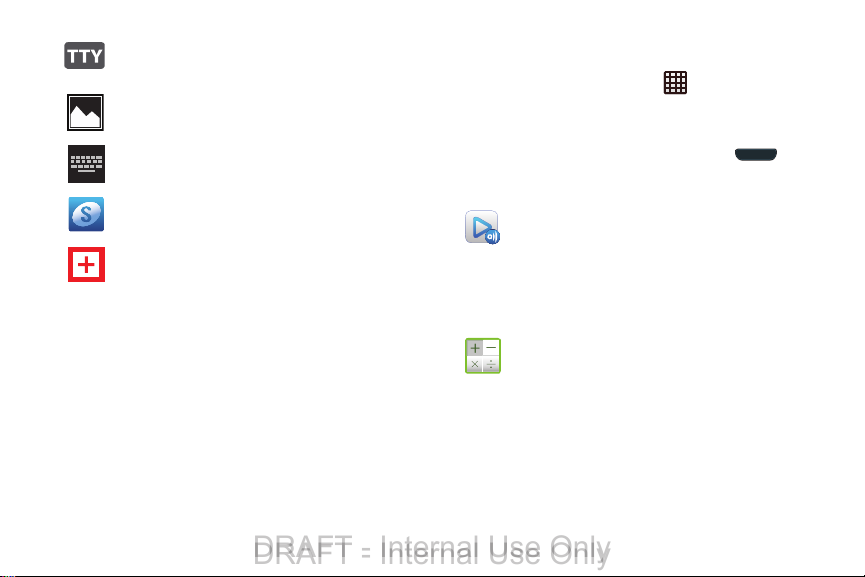
Displays when TTY device has been inserted.
DRAFT - Internal Use Only
DRAFT - Internal Use Only
Displays when a screen capture has been taken.
Displays when the keypad is active.
Displays when you have not yet set up a Samsung
Account.
Displays when an emergency call is taking place.
For more details on configuring your phone’s settings, see
“Changing Your Settings” on page 108.
Application Icons
The Apps menu provides quick access to the items you use
most frequently.
The following table contains a description of each
application. If the application is already described in another
section of this user manual, then a cross reference to that
particular section is provided.
26
For information on navigating through the Apps icons, see
“Navigating Through the Application Menus” on page 35.
1. From the Home screen, tap , then tap one of the
application icons.
2. Follow the on-screen instructions.
3. To return to the main Home screen, tap
The following applications are available:
AllShare Play
stream photos, music and videos from its memory to
other Digital Living Network Alliance (DLNA) certified
devices. Your phone can also play digital content
streamed from other DLNA certified devices. For more
information, refer to “AllShare Play” on page 166.
Calculator
a calculator. The calculator provides the basic
arithmetic functions; addition, subtraction,
multiplication, and division. You can also use this as a
scientific calculator. For more information, refer to
“Calculator” on page 170.
: AllShare Play allows your phone to
: Using this feature you can use the phone as
.
Page 33
Calendar
DRAFT - Internal Use Only
DRAFT - Internal Use Only
: With the Calendar application, you can
consult the calendar by day, week, month, year, create
events, and set an alarm to act as a reminder, if
necessary. For more information, refer to “Calendar”
on page 170.
Camera
: Use your 8.0 megapixel camera feature to
produce photos and videos. For more information, refer
to “Camera” on page 87.
ChatON
: With the ChatON application, you can interact
with friends and family with text, images, hand-written
notes and video shared instantly. You can also chat in
groups. For more information, refer to “ChatON” on
page 172.
Chrome
: The Google Chrome app allows you to use the
Google Chrome web browser on your phone. ???
Clock
: The Clock application allows you to access
alarms, view the World Clock, set a stopwatch, use a
timer, and setup a Desk Clock. For more information,
refer to “Clock” on page 172.
Contacts
: You can manage your daily contacts by
storing their name and number in your Address Book.
Address Book entries can be sorted by name, entry, or
group. For more information, refer to “Accounts and
Contacts” on page 68.
Downloads
manage all of your downloads from the Play Store and
the Browser. For more information, refer to
“Downloads” on page 176.
Email
using various email services. You can also receive text
message alerts when you receive an important email.
For more information, refer to “Using Email” on page
101.
Gallery
back videos. For photos, you can also perform basic
editing tasks, view a slideshow, set photos as
wallpaper or contact image, and share as a picture
message. For more information, refer to “Gallery” on
page 86.
: The Downloads application allows you to
: Email enables you to review and create email
: The Gallery is where you view photos and play
Understanding Your Phone 27
Page 34
Gmail
DRAFT - Internal Use Only
DRAFT - Internal Use Only
: Gmail is a web-based email service. Gmail is
configured when you first set up your phone.
Depending on your synchronization settings, Gmail
can automatically synchronize with your Gmail
account on the web. For more information, refer to
“Using Gmail” on page 103.
Internet
: Open the web browser to start surfing the
web. The browser is fully optimized and comes with
advanced functionality to enhance the Internet
browsing feature on your ph one. For more information,
refer to “Internet” on page 150.
Kies air
: Kies air allows you to sync your Windows PC
wirelessly with your phone provided they are both on
the same Wi-Fi network. You can view call logs, videos,
photos, bookmarks, IMs, and even send SMS
messages from your home computer. For more
information, refer to “Kies air” on page 164.
Latitude
: With Google Latitude, you can see the location
of all of your friends on a map or on a list. You can also
share or hide your location. For more inform ation, refer
to “Latitude” on page 177.
28
Local
: Local is an application that uses Google Maps
and your location to help you find Restaurants, Cafes,
Bars, Attractions, and more. You can also add your own
locations. For more information, refer to “Local” on
page 178.
Maps
: Depending on your location, you can view basic,
custom, and satellite maps and local business
information, including locations, contact information,
and driving directions. You can also post public
messages about a location an d track your friends. For
more information, refer to “Maps” on page 179.
Media Hub
: Samsung Media Hub is your one stop for the
hottest movie and TV content. You can rent or purchase
your favorite content and watch from the convenience
of anywhere. For more information, refer to “Media
Hub” on page 79.
Messaging
messages. For more information, refer to “Messaging”
on page 95.
: You can send and receive different types of
Page 35
Music Player
DRAFT - Internal Use Only
DRAFT - Internal Use Only
files that you have stored on your phone and memory
card. You can also create playlists. For more
information, refer to “Music Player” on page 81.
My Files
images, videos, bluetooth files, Android files, and other
memory card data in one convenient location. For more
information, refer to “My Files” on page 180.
Navigation
navigation system with voice guidance. You can type or
speak your destination. For more information, refer to
“Navigation” on page 181.
Phone
logs, and favorites. For more information, refer to “Call
Functions” on page 46.
Play Books
more than 3 million free e-books and hundreds of
thousands more to buy in the eBookstore. For more
information, refer to “Play Books” on page 183.
: Music Player allows you to play music
: My Files allows you to manage your sounds,
: Navigation is an internet-connected GPS
: Allows you to access the dialer keypad, call
: With Google Play Books, you can find
Play Movies
thousands of different movies and television shows.
You can watch instantly, or download your movie or
show for offline viewing at a later time. For more
information, refer to “Play Movies” on page 85.
Play Music: With the Music application, while online, you can
play music that you have added to your music file as well as
any music you copied from your PC. While offline, you can
listen to music you have copied from your PC.
information, refer to “Google Play Music” on page 84.
Play Store
downloadable applications and games to install on
your phone. For more information, refer to “Play Store”
on page 184.
Point&
: With Google Play Movies, you can rent
For more
: The Play Store provides access to
: Require information for this application. ???
Polaris Office 4.0
Office compatible office suite. This application
provides a central place for managing your
documents online or offline. For more information,
refer to “Polaris Office 4.0” on page 184.
: Polaris® Office 4.0 is a Microsoft
Understanding Your Phone 29
Page 36
S Note
DRAFT - Internal Use Only
DRAFT - Internal Use Only
: The S Note application allows you to create
notes using the keypad, the S Pen tool, or both. You can
add images, voice recordings, and text all in one place.
???
S Suggest
: This application recommends popular
applications when connected to a Wi-Fi network. All
recommended applications are guaranteed to be
compatible with your device. For more information,
refer to “S Suggest” on page 186.
S Voice
: With the S Voice application you can use your
voice to perform operations that you would normally
have to do by hand such as dialing a phone number,
texting a message, playing music, etc. For more
information, refer to “S Voice” on page 186.
Samsung Apps
Search
screen Internet search engine that is on the Google
Search Bar on your main Home screen. For more
information, see “Google Search Bar” on page 31.
30
: ???
: The Google Search application is the same on-
Settings
: This icon navigates to the sound and phone
settings for your phone. It includes such settings as:
display, security, memory, and any extra settings
associated with your phone. For more information,
refer to “Changing Your Settings” on page 108.
Tal k
: Google Talk is a free Windows and web-based
application for instant messaging offered by Google.
Conversation logs are automatically saved to a Chats
area in your Gmail account. This allows you to search
a chat log and store them in your Gmail accounts. For
more information, refer to “Google Talk” on page 104.
Video Player
files stored on your microSD card. For more
information, refer to “Video Player” on page 84.
Voice recorder
an audio file up to one minute long and then
immediately send it as a message. For more
information, refer to “Voice Recorder” on page 187.
YouTube
users can upload and share videos, and view them in
MPEG-4 format. For more information, refer to
“YouTube” on page 188.
: The Video Player application plays video
: The Voice recorder allows you to record
: YouTube is a video sharing website on which
Page 37
Tip:
DRAFT - Internal Use Only
DRAFT - Internal Use Only
To open applications quickly, add the icons of frequentlyused applications to the Home screen or to the folders you
created. For details, see “Customizing Your Home Screen”
on page 36.
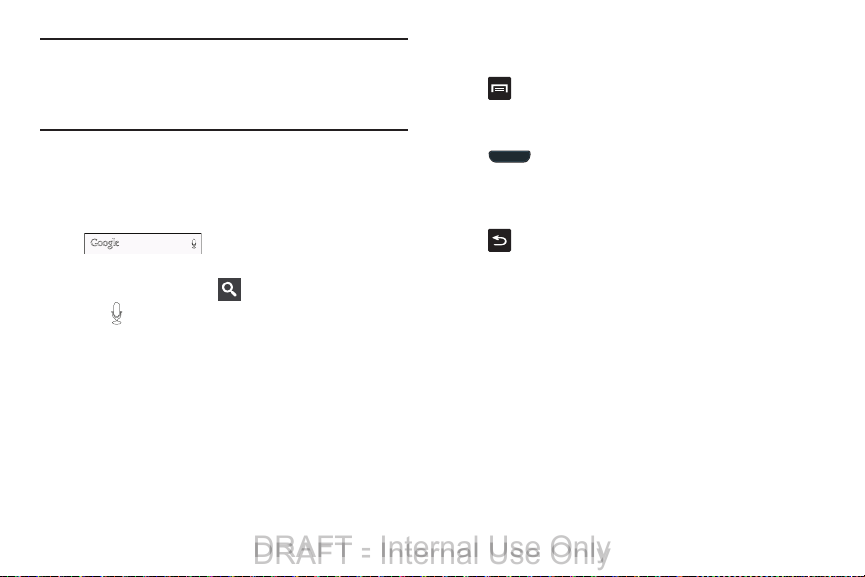
Google Search Bar
The Google Search Bar provides you an on-screen Internet
search engine powered by Google™.
1. From the main home screen, tap the Google Search bar
.
2. Use the on-screen keypad to enter the item you want
to search for, then tap .
3. Tap to use Google Voice Search. For more
information, refer to “S Voice” on page 186.
Menu Navigation
You can tailor the phone’s range of functions to fit your needs
using both menus and widgets. Menus, sub-menus, and
features can be accessed by scrolling through the available
on-screen menus. Your phone originally has five home
screens.
Command Keys
Menu Key
Press Menu
options for the current screen or feature.
Home Key
Press
and hold to display recently used apps and access the Task
manager.
Back Key
Press
step.
to display a context-sensitive menu of
Home
to display the main Home screen. Press
Back
to return to the previous screen, option or
Terms used in this user manual
Tap
Lightly touch items to select or launch them. For example:
•
Tap the on screen keyboard to enter characters or text.
•
Tap a menu item to select it.
•
Tap an application’s icon to launch the application.
Touch and Hold
Activate on-screen items by a touch and hold gesture. For
example:
•
Touch and hold a widget on the home screen to move it.
Understanding Your Phone 31
Page 38

•
DRAFT - Internal Use Only
DRAFT - Internal Use Only
Touch and hold on a field to display a pop-up menu of options.
Swipe and Palm Swipe
To swipe, lightly drag your finger vertically or horizontally
across the screen. Use swipe when:
•
Unlocking the screen
•
Scrolling through the Home screen or a menu
To palm swipe, swipe the side of your hand horizontally
across the screen. Use palm swipe when:
•
Capturing the screen
Panning
To pan, touch and hold a selected icon, then move the device
to the left or right to reposition it to another page. You must
first activate Motion on your device. Use panning to:
•
Move icons on your Home screens or Application Menus to
another page.
For more information, refer to “Power Saving” on page 130.
Tilt
To activate the tilt feature, press and hold two points on the
screen then tilt the device back and forth to reduce or
enlarge the screen. Use tilt to:
•
Reduce or enlarge the screen in the Gallery or Browser.
32
For more information, refer to “Power Saving” on page 130.
Tur n over
Turn your phone over so that the screen faces downward. For
example:
•
Mute incoming calls and playing sounds by turning your phone
over.
Using Gestures
By activating the various gesture features you can access a
variety of time saving functions.
To activate motion:
1. From the Home screen, press and then tap
Settings
➔
Motion
.
2. Tap the ON/OFF icon located at the top of
the screen to activate motion.
3. Tap the checkboxes located to the right of each motion
option to activate the motions you wish. A checkmark
displays to indicate activation.
The following is a description of the available gestures:
•
Quick glance
glance by reaching towards your device.
: Once enable, you can check key information at a
ON
Page 39

•
DRAFT - Internal Use Only
DRAFT - Internal Use Only
Direct call
: Once enabled, the device will dial the currently
displayed on-screen Contact entry as soon as you place the
device to your ear.
•
Smart alert
notified of you have missed any calls or messages.
•
Double tap to top
device to be taken to the top of the current on-screen list.
•
Tilt to zoom
content can be zoomed. In a single motion, touch and hold two
points on the display then tilt the tilt the device back and forth to
zoom in or out.
•
Pan to move icon
application shortcut icon or widget on the screen. Once it
detaches, move the device left or right to migrate it to a new
location.
•
Pan to browse images
on-screen image to pan around it. Move the device left or right to
pan vertically or up and down to pan horizontally around the large
on-screen image.
: Once enabled, pickup the device to be alerted and
: Once enabled, double tap the top of the
: Once enabled, you must be on a screen where
: Once enabled, touch and hold a desired
: Once enabled, touch and hold a desired
•
Shake to update
Bluetooth devices, rescan for Wi-Fi devices, Refresh a Web page,
etc.
•
Turn over to mute/pa use
and any playing sounds by turning the device display down on a
surface. This is the opposite of the Pickup to be Notified Gesture.
•
Palm swipe to capture
on-screen information swiping across the screen. In a single
motion, press the side of your hand on the screen and swipe form
left to right. The image is then copied to the clipboard.
•
Palm touch to mute/pause
on-screen video or mute any current sound by simply covering
the screen with your hand. Once you remove your hand from the
screen, the device goes back to normal by either continuing to
play the current video or unmuting the current sound.
For more information, refer to “Power Saving” on page 130.
: Once enabled, shake your device to rescan for
: Once enabled, mute incoming calls
: Once enabled, you can capture any
: Once enabled, you can pause any
Understanding Your Phone 33
Page 40
Locking and Unlocking the Phone
USCC
Graphic Placement
DRAFT - Internal Use Only
DRAFT - Internal Use Only
To unlock your phone:
1. Press the lock button located on the upper right
side of your phone.
2. The lock screen will display with
displayed at the bottom of the screen.
unlock
3. Swipe the touch screen in any direction.
4. The Home screen will display as shown above.
Note:
There are several additional ways you can lock your
screen. For more information, refer to “Lock Screen
Settings” on page 116.
Swipe screen to
Home Screen Overview
The main home screen is the starting point for many
applications and functions, and it allows you to add items
like application icons, shortcuts, folders, or Google widgets
to give you instant access to information and applications.
This is the default page and accessible from any menu by
pressing
34
.
Navigating Through the Home Screens
Your phone initially has five home screens. If you like, you
can place different applications on each of the home
screens.
From the main Home screen, sweep the screen with
your finger in either direction. The main Home Screen
is located in the middle with two Home screens on
each side.
Page 41
Navigating Through the Application Menus
USCC
Graphic Placement
DRAFT - Internal Use Only
DRAFT - Internal Use Only
Your phone initially has three Application Menus available.
Follow these steps to navigate through the Application
Menus:
1. At the Home screen, tap . The first Application
Menu displays.
2. Sweep the screen left or right to access the other two
menus.
3. Tap one of the application icons.
Note:
As you add applications, the number of Application
menus that you have available will increase.
Navigating Using Sub-Menus
Sub-menus are available when you are at any Home screen
or have selected a feature or application such as Phone,
Contacts, Messaging, or Internet.
To access a sub-menu:
1. Press
A sub-menu displays at the bottom of the phone
screen.
.
Understanding Your Phone 35
Page 42
2. Tap an option.
Sub-Menu items
USCC
Graphic Placement
DRAFT - Internal Use Only
DRAFT - Internal Use Only
Accessing Recently-Used Apps
1. Press and hold from any screen to open the
recently-used applications window.
2. Tap an icon to open the selected application.
– or –
Tap
Task manager
36
to go to the Task manager.
Customizing Your Home Screen
You can customize your Home screen by doing the following:
•
Creating Shortcuts
•
Adding and Removing Widgets on the Home Screen
•
Repositioning Widgets
•
Creating Folders
•
Changing the Wallpaper
•
Adding and Deleting Home Screens
Creating Shortcuts
Shortcuts are different than the current Home screen
Widgets that only launch an application. Shortcuts activate a
feature, action, or launch an application.
Note:
To move a shortcut from one screen to another, it must
first be deleted from its current screen. Navigate to the
new screen, then add the shortcut.
Adding a shortcut from the Apps Menu
1. Press to activate the main Home screen.
2. Navigate to the desired Home Page.
3. Tap to display your current applications.
Page 43
4. Scroll through the list and locate your desired
DRAFT - Internal Use Only
DRAFT - Internal Use Only
application.
5. Touch and hold the application icon. This creates an
immediate shortcut of the selected icon and closes the
Apps
tab.
6. While still holding the on-screen icon, position it on the
current page. Once complete, release the screen to
lock the new shortcut into its new position on the
current screen.
Adding a shortcut via the Add to Home screen
1. Press to activate the main Home screen.
2. Navigate to the desired Home Page.
3. Touch and hold on an empty area of the Home screen.
Add to Home screen
4. Ta p
Apps and widgets, Folder
5. Ta p
6. Press and hold a shortcut from the available list and
position it on the current screen.
Deleting a shortcut
1. Press to activate the main Home screen.
2. Touch and hold the desired shortcut. This unlocks it
from its location on the current screen.
.
, or
Page
.
3. Drag the icon over the Delete icon and release it.
As you place the shortcut into the Trash, both items
turn red.
Note:
This action does not delete the shortcut, it just removes
it from the current screen.
Adding and Removing Primary Shortcuts
You can change any of your primary shortcuts with the
exception of the
1. Press to activate the main Home screen.
2. Touch and hold the primary shortcut you want to
replace, then drag it to an empty space on any Home
screen.
3. Scroll through the Home screen to find the shortcut you
want to add as the new primary short cut.
4. Touch and hold the new shortcut, then drag it to the
empty space in the row of primary shortcuts.
The new primary shortcut will now display on all Home
screens.
Apps
shortcut.
Understanding Your Phone 37
Page 44
Adding and Removing Widgets
DRAFT - Internal Use Only
DRAFT - Internal Use Only
Widgets are self-contained applications that reside in either
your Widgets tab or on the main or extended Home screens.
Unlike a shortcut, the Widget displays as an on-screen
application.
Adding a Widget
1. Press to activate the main Home screen.
2. Navigate to the desired Home Page.
3. Touch and hold on an empty area of the screen.
Apps
4. Tap
5. Tap t he
6. Press and hold an available Widget to position it on the
Removing a Widget
1. Touch and hold a Widget until you can move it around
2. Drag the Widget over the Delete icon and release
38
.
Widgets
tab at the top of the screen.
current screen.
on the screen.
it.
As you place the Widget into the Trash, both items turn
red.
Note:
This action does not actually delete the Widget, it just
removes it from the current Home screen.
Moving Icons in the Apps Menu
1. Press to activate the main Home screen.
2. Tap to display your current applications.
Apps
3. Tap the
already selected.
4. Press
5. Tap
the option.
6. Press
7. Scroll through the list and locate the icon you wish to
move.
8. Touch and drag the icon to the position that you want.
To move to a different page, drag the icon to the edge
of the page until the page scrolls to the desired page.
9. Tap
10. Press to return to the Home screen.
tab at the top of the screen if it is not
and tap
View type
.
Customizable grid
and tap
Save
.
. A green circle displays next to
Edit
.
Page 45
Creating Application Folders
DRAFT - Internal Use Only
DRAFT - Internal Use Only
You can create application folders to hold similar applications
if you wish.
To create a folder follow these steps:
1. Press to activate the main Home screen.
2. Tap to display your current applications.
Apps
3. Tap t he
already selected.
4. Press
5. Touch and hold the first application that you would like
to move to a folder.
6. Drag the icon down to the
7. A folder displays in the original place of the application
icon with the application icon displayed on top of it.
8. Repeat steps 5 - 7 to add additional apps to the folder.
9. Drag the icon down to the
information on the application.
10. Ta p
tab at the top of the screen if it is not
and tap
Edit
.
Save
.
icon.
icon to view
Adding a New Page to the Application Menu???
You can add a new page to your application menu by
following these steps:
1. Press to activate the main Home screen.
2. Tap to display your current applications.
Apps
3. Tap the
already selected.
4. Press
5. Touch and hold the first application that you would like
to move to a new page.
6. Drag the icon down to the
The app displays on a new page.
tab at the top of the screen if it is not
and tap
Edit
.
icon.
Changing the Wallpaper
You can change the Wallpaper (background) of your home
screens by following these steps:
1. From any Home screen, touch and hold on an empty
area of the screen.
Home screen
The
2. Ta p
Set wallpaper for
3. Select the location where you would like to change the
wallpaper. Tap
lock screens
4. Tap one of the following options:
window displays.
.
Home screen, Lock screen
.
Understanding Your Phone 39
, or
Home and
Page 46

• Gallery
USCC
Graphic Placement
DRAFT - Internal Use Only
DRAFT - Internal Use Only
: select a wallpaper from photographs you have taken
with your camera.
• Live wallpapers
not available for the Lock screen option.
• Wallpapers
5. Select a wallpaper and tap
Cancel
: select an animated wallpaper. This option is
: select from many still-life wallpapers.
Set wallpaper, Done
.
Moving Home Screens
Your phone comes with seven Home screens. You can
arrange the screens in any order that you want.
To move a Home screen, follow these steps:
1. Press to activate the main Home screen.
2. Press
and tap
Edit page
.
40
3. Touch and hold the Home screen you want to move.
, or
4. Drag it to the location that you would like to place it.
In this example, the YP app screen is moved to the last
position.
When you move a Home screen, the other Home
screens will be re-ordered automatically.
Page 47
5. Press to return to the main Home screen.
USCC
Graphic Placement
USCC
Graphic Placement
DRAFT - Internal Use Only
DRAFT - Internal Use Only
Adding and Deleting Home Screens
You can delete Home screens and then add Home screens
later if you want.
To delete a Home screen, follow these steps:
1. Press to activate the main Home screen.
2. Press
3. Touch and hold the Home screen you want to delete.
and tap
Edit page
.
4. Drag it to the trash can located at the bottom of the
screen.
5. If there are items on the Home screen that you want to
delete, the
6. Ta p
tap
7. Press to return to the main Home screen.
Remove home screen page
OK
to delete the page and its contents, otherwise
Cancel
.
Understanding Your Phone 41
prompt displays.
Page 48
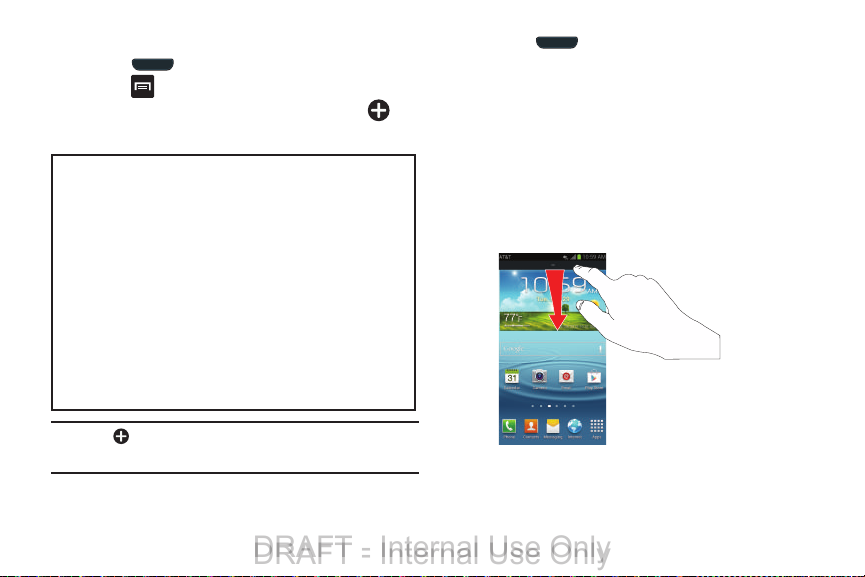
To add a Home screen, follow these steps:
USCC
Graphic Placement
DRAFT - Internal Use Only
DRAFT - Internal Use Only
1. Press to activate the main Home screen.
2. Press and tap
3. Touch and hold the Home screen that contains
drag it to the new location.
Edit page
.
Note:
The icon will only be displayed if a Home screen has
previously been deleted.
42
and
4. Press to return to the main Home screen.
You can now add items to your new Home screen.
Notification Bar
The Notification Bar includes a pull-down list to show
information about processes that are running, recent
notifications, and alerts. To display the Status indicator:
On the Home screen, touch and hold the Notification
Bar until the pull-down displays, then drag down
vertically.
Page 49
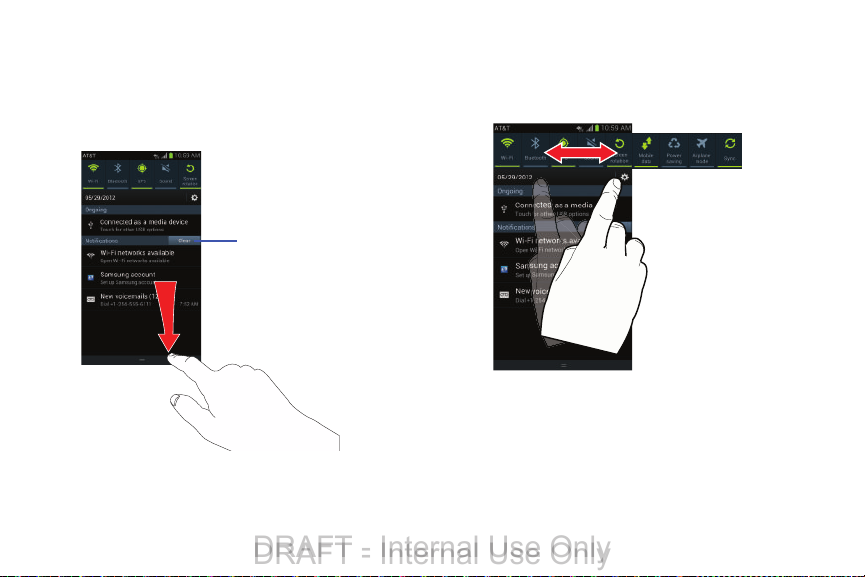
Clearing Notifications
Clear Button
DRAFT - Internal Use Only
DRAFT - Internal Use Only
To clear all notifications from the Notification panel:
1. From the Home screen, touch and hold the Notification
Bar until the pull-down displays, then drag down
vertically.
2. Tap t he
Clear
button.
The notifications are cleared and the panel closes.
Accessing Additional Panel Functions
In addition to notifications, this panel also provides quick and
ready access to separate device functions. These can be
quickly activated or deactivated by toggling them on or off.
The following functions can either be activated (green) or
deactivated (gray): Wi-Fi, Bluetooth, GPS, Sound, Screen
rotation, Mobile data, Power saving, Airplane mode, Driving
mode, and Sync.
Understanding Your Phone 43
Page 50

Memory Card
DRAFT - Internal Use Only
DRAFT - Internal Use Only
Your device lets you use a microSD (SD) or microSDHC
card to expand available memory space. This secure digital
card enables you to exchange images, music, and data
between SD-compatible devices. This section addresses the
features and options of your device’s SD functionality. The
device has a USB SD card mode.
Mounting the SD Card
To store additional photos, music, videos, and other
applications, you must mount (install) the SD card prior to
use. Mounting the SD card establishes a USB connection
with your computer.
1. Insert the SD card into the external, SD card slot. For
more information, refer to “Removing and Installing the
Memory Card” on page 8.
2. Your SD card is scanned to see the available
information on it.
44
Unmounting the SD card
Unmounting the SD card prevents corruption and damage to
the SD card while removing it from the slot.
Settings
1. From the Home screen, tap ➔
Storage
.
2. Scroll to the bottom of the display and tap
card
.
OK
3. Tap
.
For more information, refer to “Removing and Installing
the Memory Card” on page 8.
➔
Unmount SD
SD card Available Memory Status
To view the memory allocation for your external SD card:
Settings
1. From the Home screen, tap ➔
Storage
.
2. The available memory for Device and SD card displays
under the
Total space
and
Available space
➔
headings.
Page 51
Erasing Files from the SD card
DRAFT - Internal Use Only
DRAFT - Internal Use Only
You can erase files from the SD card using the phone.
1. Ensure the SD card is mounted. For more information,
refer to “Mounting the SD Card” on page 44.
1. From the Home screen, tap ➔
Storage
.
Format SD card
2. Ta p
3. At the
Warning!
4. Ta p
Format SD card
.
SD card
Performing the next step erases all data stored on
the SD card.
Delete all
.
confirmation prompt, tap
to format or press to cancel.
Settings
➔
Format
Understanding Your Phone 45
Page 52
Section 3: Call Functions
DRAFT - Internal Use Only
DRAFT - Internal Use Only
This section describes how to make or answer a call. It also
includes the features and functionality associated with
making or answering a call.
For more information, refer to “Sound Settings” on page
124.
Displaying Your Phone Number
Tap ➔
phone number displays in the
Settings ➔ About device ➔ Status
My phone number
Making a Call
1. From the Home screen, tap and use the on-screen
keypad to enter the number you wish to dial.
2. Tap
Note:
When you activate the
menu, the phone will automatically redial up to 10 times
when the person does not answer the call or is already
on the phone. For more information, refer to “Call
Settings” on page 57.
46
to make the call.
Auto redial
option in the Voice Call
. Your
field.
Making an International Call
1. From the Home screen, tap , then touch and hold
. The + character displays.
2. Use the on-screen keypad to enter the country code,
area code, and phone number.
•
If you make a mistake, tap until the desired numbers have
been deleted.
3. Tap to make the call.
Manual Pause Dialing
To manually call a number with pause(s) without storing it in
your Contacts list:
1. From the Home screen, tap
keypad to enter the phone number.
2. Press
3. Tap
Tip:
You can create pauses longer than three seconds by
entering multiple three second pauses.
to display the dialer sub-menu.
Add 3-sec pause
use the keypad to enter the additional numbers.
to add a three second pause, and
and use the on-screen
Page 53
4. Select
DRAFT - Internal Use Only
DRAFT - Internal Use Only
5. Ta p
For more information, refer to “Manual Pause Dialing” on
page 46.
Add wait
to add a wait. A wait will pause the
calling sequence until you enter a number or press a
key.
to make the call.
Correcting an Entered Number
Use the following steps to correct a mis-typed entry when
dialing.
After entering a number using the keypad:
•
If you make a mistake, tap to erase a single character.
•
Press and hold to erase the entire string of numbers.
Ending a Call
Tap t he key.
Dialing a Recent Number
All incoming, outgoing and missed calls are recorded in the
Call log. If the number or caller is listed in your Address
Book, the associated name also displayed.
1. From the Home screen, tap .
2. Tap t he Logs tab.
A list of recent calls displays.
3. Tap the desired Contact to enter the
to make a call.
tap
Details
page, then
Making Emergency Calls
If you do not have a SIM card installed the first time you turn
on the phone, the
displays and an animated tutorial shows you how to install
the SIM card.
Without a SIM card, you can only make an emergency call
with the phone; normal cell phone service is not available.
Making an Emergency Call without a SIM card
1. Ta p
an emergency call.
2. Enter 9-1-1 and tap . Complete your call. During
this type of call, you will have access to the Speaker
mode, Keypad, and End Call features.
3. Tap to exit this calling mode.
Insert SIM card to make calls
Emergency call
from the on-screen display to make
message
Call Functions 47
Page 54
Making an Emergency Call with a SIM card
DRAFT - Internal Use Only
DRAFT - Internal Use Only
The Emergency calling mode makes redialing an emergency
number a 1-tap process. Before you can resume normal
calling operations, you should first exit this mode.
1. From the Home screen, tap .
2. Enter the emergency number (ex: 911) and then tap
.
3. Complete your call. During this type of call, you will
have access to the Speaker mode, Keypad, and End
Call features.
•
After completing your emergency call, displays in the
Notification area until you exit the Emergency calling mode.
Note:
This mode can drain your battery power more rapidly
than a normal calling mode.
4. At the Emergency Callback screen:
•
Tap to callback 911 with a single tap.
•
Touch and slide to the right to exit this mode.
48
•
Touch and slide to the left return to the Home screen. This
allows you to access other applications while staying in this
mode.
Making a Call Using Speed Dial
You can assign a short cut number to a phone number in your
Contacts List for speed dialing.
Contacts
Select contact
.
to display
screen
1. From the Home screen, tap
your Contacts List.
2. Press to display the Contacts List sub-menu.
Speed dial setting
3. Tap
Speed dial setting
4. The
numbers 1 through 100. The number 1 is reserved for
Voicemail.
5. Tap an unused number and the
displays.
6. Select a contact to assign to the number. The selected
contact number will display in the speed dial number
box.
7. To remove a speed dial number or change the order,
press to display the Speed dial setting sub-menu.
8. Tap
Change order
.
screen displays showing the
or
Remove
Page 55
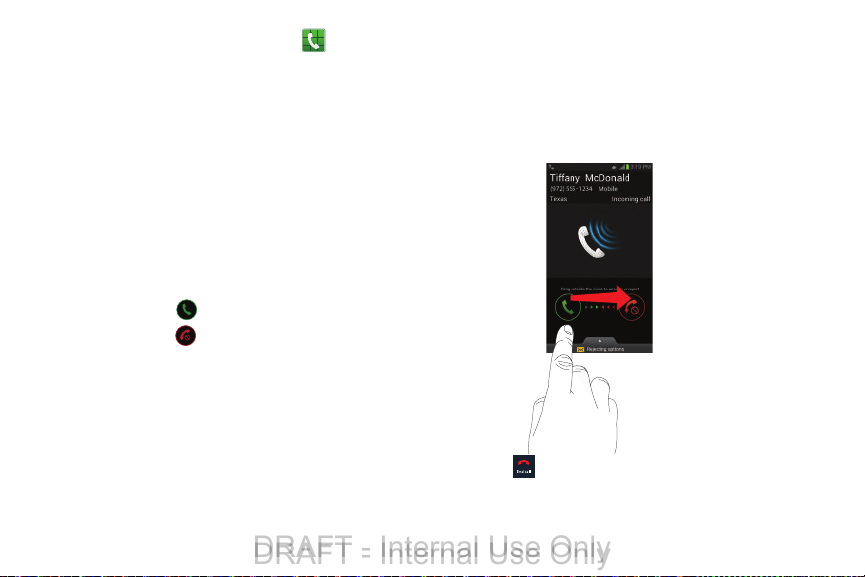
9. To make a call using Speed Dial, tap
DRAFT - Internal Use Only
DRAFT - Internal Use Only
and from the Dialer, touch and hold the speed dial
number.
➔
Making a Call from the Address Book
You can store phone numbers that you use regularly on the
SIM card or in the phone’s memory. These entries are
collectively called the Address Book.
Answering a Call
When a call is received the phone rings and displays the
caller’s phone number, or name if stored in the Address
Book.
1. At the incoming call screen:
•
Touch and drag
•
Touch and drag
send it to your voicemail.
•
Touch and drag the
tap a predefined text message to send to the caller.
• I’m driving • I’m in a meeting
• I’m at the cinema • Sorry, I’m busy. Call
• I’m in class
in any direction to answer the call.
in any direction to reject the call and
Reject call with message
tab upward and
back later.
Keypad
– or –
–
Tap
Create new message
– or –
–
Tap
Remind me later
be reminded.
2. Ta p to end the call.
to compose a new message.
and then set a time that you would like to
Call Functions 49
Page 56
Note:
DRAFT - Internal Use Only
DRAFT - Internal Use Only
You can answer a call while using the Address Book or
other menu feature. After ending the call, the phone
returns to the previously active function screen.
Dialing Options
From the Home screen and Application menus, you have the
option to access the Dialer and initiate a call by tapping
Keypad
➔
following tabs are located at the top of your screen:
•
Keypad
keypad.
•
Logs
•
Favorites
Favorites.
•
Contacts
contact to call.
After you begin to enter numbers, the
displays so you can save the Contact if needed.
50
. From the Dialer and the Contacts screen, the
: dials the current number entered using the on-screen
: displays a list of all dialed, received, and missed calls.
: displays your contacts that you have marked as
: takes you to your Address Book where you can select a
Add to Contacts
option
Call Log
The phone stores the numbers of the calls you’ve dialed,
received, or missed in the Call log. The Call log displays the
details of the call.
1. From the Home screen, tap .
2. Tap the Logs tab.
A list of recent calls displays. If the number or caller is
listed in your Address Book, the associated name
displays.
All calls made, received, and missed are listed. Types of calls
are identified by the following icons:
•
Incoming Calls
•
Outgoing Calls
•
Missed Calls
•
Rejected Calls
•
Auto Rejected Calls
:
:
:
:
:
Page 57
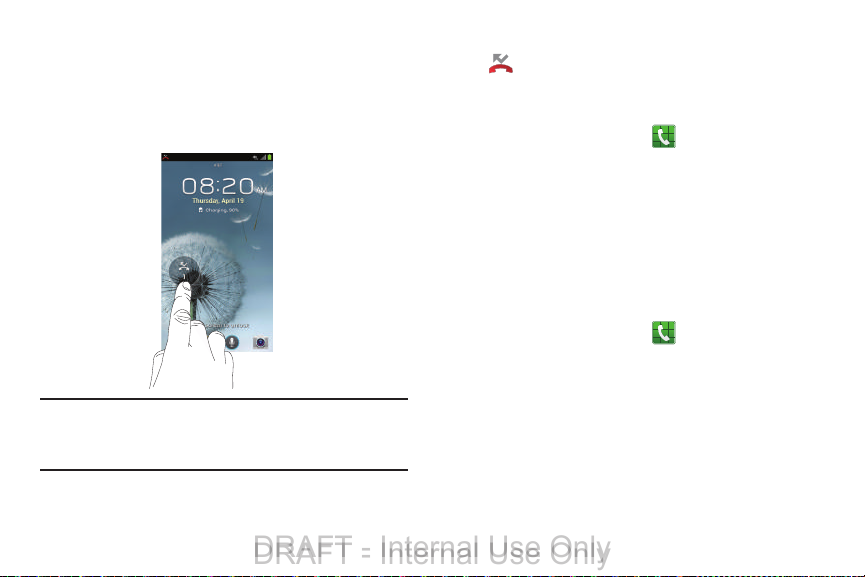
Viewing Missed Calls from the Lock Screen
DRAFT - Internal Use Only
DRAFT - Internal Use Only
The number of calls you have missed displays on the Home
screen.
1. Touch the missed call icon with the number of missed
calls on it and move it in any direction.
Note:
If there is a voicemail sent by the same number,
associated icons are displayed and can then be
selected.
2. The Call log displays. Missed calls are identified by the
icon next to the number
.
Calling Back a Missed Call
To call back a missed call number:
1. From the Home screen, tap ➔ Logs.
A list of recent calls displays. If the number or caller is
listed in your Address Book, the associated name
displays.
2. Swipe the desired missed call to the right to call.
– or –
Swipe the desired missed call to the left to message.
Saving a Recent Call to your Address Book
1. From the Home screen, tap ➔ Logs.
A list of recent calls displays.
2. Tap the call you want to save to your Address Book.
3. The call detail page displays. Tap
the call to your Address Book.
The Create contact screen displays.
– or –
Create contact
Call Functions 51
to add
Page 58
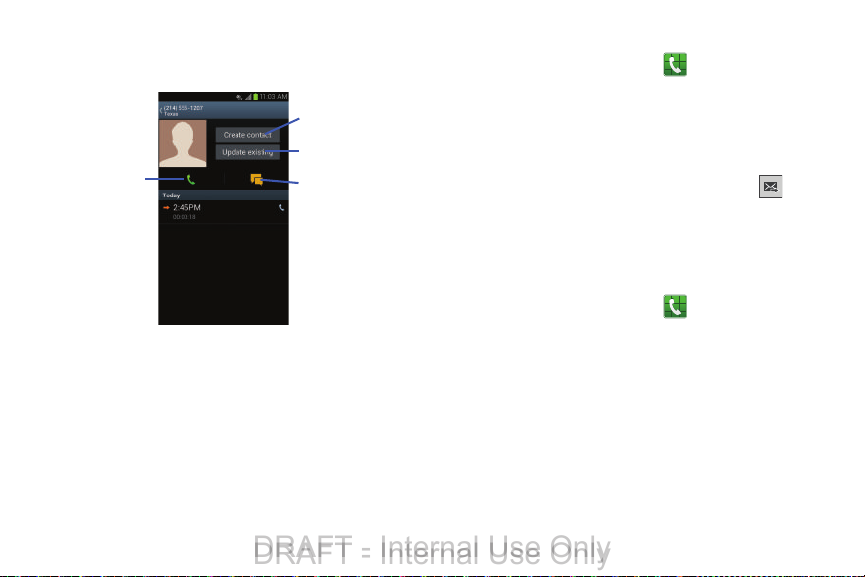
If you want to replace the number for an existing
Add as new
Call the number
Send a message
contact
Update an existing
contact
DRAFT - Internal Use Only
DRAFT - Internal Use Only
contact, tap
4. Enter information into the various fields using the
keypad.
5. Tap
For further details about the Address Book feature, see
“Adding Contacts” on page 69.
52
Update existing
Save
to save when you are finished.
.
Sending a Message to a Recent Call
1. From the Home screen, tap ➔ Logs.
A list of recent calls displays.
2. Swipe the entry you want to message to the left.
3. At the Message screen, tap the empty text field and
use the on-screen keypad to type in a message.
4. When you are done with your message, tap
send.
For more information, refer to “Creating and Sending
Messages” on page 95.
Deleting a Call from the Call Log
1. From the Home screen, tap ➔ Logs.
A list of recent calls displays.
2. Touch and hold the call you want to delete from the Call
log.
3. Tap Delete.
Delete
4. At the
The call is deleted from the Call log.
prompt, tap OK.
to
Page 59
Adding a Call to the Reject List
DRAFT - Internal Use Only
DRAFT - Internal Use Only
1. From the Home screen, tap ➔ Logs.
A list of recent calls displays.
2. Touch and hold the call you want to add to the Reject
List.
3. Ta p Add to reject list.
OK
4. At the Add to reject list prompt, tap
Future calls from this number will be rejected and sent
to your voicemail.
.
Call Duration
1. From the Home screen, tap ➔ Logs.
➔
2. Press
3. The following times are displayed for Voice and Data:
•Last call
• Dialed calls
• Received calls
received.
• All calls
received.
Call duration
: shows the length of time for the last call.
: shows the total length of time for all calls made.
: shows the total length of time for all calls
: shows the total length of time for all calls made and
.
4. You may reset these times to zero by pressing
then tapping
Reset
.
Options During a Call
Your phone provides a number of control functions that you
can use during a call.
Adjusting the Call Volume
During a call, to adjust the earpiece volume, use the
keys on the left side of the phone.
Press the Up volume key to increase the volume level
Down
and press the
volume level.
From the Home screen, you can also adjust the ringer volume
using these same keys.
volume key to decrease the
In-Call Options
During an active call there are several functions available by
tapping a corresponding on-screen button.
•
Hold: place the current active call on hold.
•
Add call
: displays the dialer so you can call another person.
•
Keypad
: displays the on-screen keypad, where you can
enter number using DTMF (Dual Tone Multi-Frequency).
•
End call
: terminates the call.
Call Functions 53
Volume
Page 60
•
Hold
DRAFT - Internal Use Only
DRAFT - Internal Use Only
Speaker
: routes the phone’s audio through either the speaker or
through the earpiece.
–
Tap
Speaker
to route the audio through the speaker. (You can
adjust the speaker volume using the volume keys.) A green line
displays under the Speaker button.
–
Tap
Speaker
again to use the phone’s earpiece (see
the Speakerphone During an Active Call”
green line displays when Speaker is not activated.
•
Mute/Unmute
–
Tap
displays under the Mute button.
–
Tap
disappear when Mute is not activated.
•
Headset
–
Tap
green line displays under the Headset button.
–
Tap
green line will disappear when the Headset is not activated.
•
Press for more options:
–
Contacts
–
Memo
54
turn the onboard microphone either on or off.
Mute
during a call to mute the microphone. A green line
Mute
again to unmute the microphone. The green line will
connects to a Bluetooth headset.
Headset
during a call to activate a Bluetooth headset. A
Headset
again to de-activate the Bluetooth headset. The
: allows you to go to your Contact list.
: allows you to jot down a memo during a call.
on page 56). The
“Using
–
Noise Suppression On/Off
Suppression feature when you are in a noisy area. Turn it Off
when not needed to conserve battery power.
–
In-call sound EQ
during an active call. Sometimes you might need the sound to
be softer, clearer, or optimized for one ear or the other.
: allows you to turn on the Noise
: assigns a sound equalizer preset for use
Placing a Call on Hold
You can place the current call on hold at any point during a
conversation. You can also make another call while you have
a call in progress if your network supports this service.
1. While on a call, tap
the current caller on hold.
2. You can later reactivate this call by tapping Unhold
Unhold
.
To make a new call while you have a call in progress
1. Tap
Hold
.
Add call
2. Tap
3. Enter the new number and tap
Once connected, the active call displays in a large box
at the top of your screen and the call on hold displays
in a smaller box in the middle of your screen.
to display the dialer.
Hold
Hold
. This action places
.
Page 61
Switching Between Calls
DRAFT - Internal Use Only
DRAFT - Internal Use Only
When you have an active call and a call on hold, you may
switch between the two calls, changing the one on hold to
active and placing the other on hold.
1. Ta p Swap.
The current call (caller #2) is placed on hold and the
previous call on hold (caller #1) is then reactivated so
that you can continue conversing with that person. The
active call displays in a green box.
2. Tap to end the currently active call.
To end a specific call
1. Ta p
Swap
until the call you want to end displays in a
green box.
2. Ta p
3. Tap to end the remaining call.
To answer a call while you have a call in progress
1. Tap and slide to the right to answer another call.
2. Ta p
to end the specific call.
Putting "Name/Number" on hold
on hold.
– or –
to put the first call
Ta p
Ending call with "Name/Number"
call.
3. To switch between the two calls, tap Swap.
•Swap
: Places the current call on hold and then activates the
previous call. The active call displays in a green box. Tap
again to switch back.
To end a call on hold
1. Ta p to disconnect the active call.
2. The call on hold will now become the active call. Tap
to end the call.
to end the first
Swap
3-Way Calling (Multi-Party Calling)
The 3-Way or Multi-Party feature allows you to answer a
series of incoming calls and place them on hold. If this
service is supported by the network, all calls can be joined
together. You are notified of an incoming call by a call waiting
tone.
Note:
The Merge option combines all of the calls you have
established with your phone (both active and on hold).
Swap places the current call on hold and then activates
the previous call.
Call Functions 55
Page 62
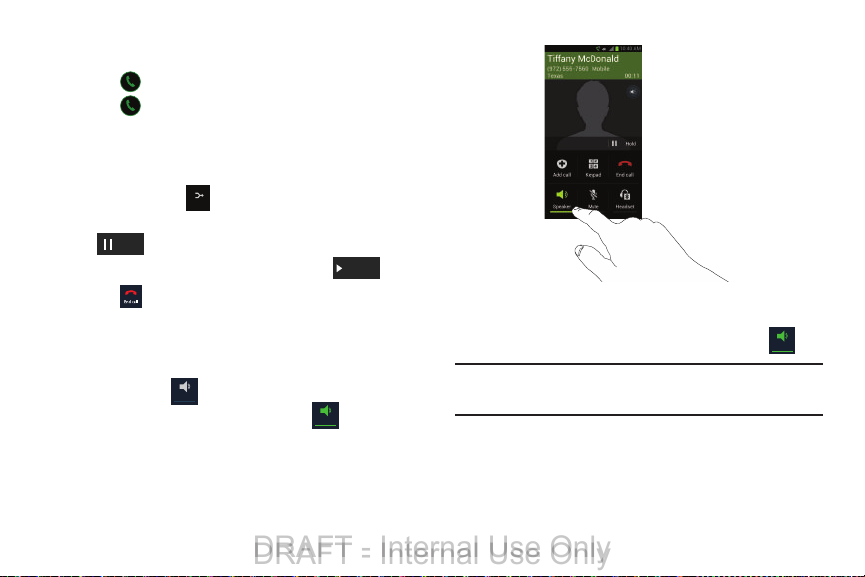
This feature joins all of the calls you have established with
Merge
Hold
Unhold
Speaker
Speaker
Speaker
DRAFT - Internal Use Only
DRAFT - Internal Use Only
your phone (both active and on hold) into a multi-party call.
1. Tap and slide to the right to answer the call.
2. Tap and slide to the right to answer the next call.
Putting "Number" on hold
3. Tap
to put the first call on
hold.
4. Join the first two callers into a single multi-party call by
tapping Merge .
5. To temporarily leave the conference call, tap
.
To rejoin the conference call tap
Unhold
6. Tap to end the call.
Using the Speakerphone During an Active Call
While in an active call, it is possible to enable the
speakerphone feature.
Speaker
1. Tap
The
Speaker
speakerphone is activated.
56
.
button now displays as and the
Hold
.
Volume
2. Use the
keys (located on the left side of your
phone) to adjust the volume.
3. To deactivate the speakerphone, tap
Important!
For more information, see “Responsible Listening”
Speaker
.
on page 204.
Page 63
Switching off the Microphone (Mute)
Mute
Mute
Mute
Headset
Headset
Headset
DRAFT - Internal Use Only
DRAFT - Internal Use Only
You can temporarily switch your phone’s microphone off, so
that the other person cannot hear you.
Example:
You wish to say something to person in the room,
but do not want the person on the phone to hear
you.
To mute your phone during a call
1. Ta p Mute .
Mute
button now displays as and Mute is
The
activated.
2. Ta p Mute
reactivate the microphone.
Bluetooth headset
1. Ta p Headset .
2. The phone will scan for your Bluetooth headset. When
found, connect to the headset.
Headset
The
Bluetooth headset is activated.
3. Ta p Headset to deactivate the Bluetooth headset
and reactivate the phone speaker.
to deactivate the Mute function and
button now displays as and the
Searching for a Number in Address Book
1. During the active call, press then tap
2. Tap the Address Book entry.
For further details about the Address Book feature.
Contacts
Call Waiting
The Call Waiting feature allows you to answer an incoming
call while you have a call in progress, if this service is
supported by the network, and you must first activate the
Call Waiting feature:
From the Home screen, tap ➔ ➔
➔
Additional settings ➔Call waiting
Call settings
.
You are notified of an incoming call by a call waiting
tone.
Call Settings
To access the Call settings menu:
From the Home screen, tap ➔ ➔
settings
.
Call Functions 57
Call
.
Page 64
Call rejection
DRAFT - Internal Use Only
DRAFT - Internal Use Only
1. From the Call settings screen, tap
OFF / ON
2. Tap t he
3. Tap
Auto reject mode
options:
• All numbers
• Auto reject numbers
4. Tap
Auto reject list
5. Tap to manually add numbers to the Reject list.
Unknown
6. Tap
not in your Contacts list.
icon to turn Auto reject mode on
.
ON
and tap one of the following
: to reject all calls.
: to reject all calls in your Reject list.
.
, to automatically reject all calls that are
Call rejection
Set reject messages
1. From the Home screen, tap ➔ ➔
➔
Set reject messages
2. Tap to manually add a reject message.
– or –
Tap one of the pre-written messages to display when
you want to reject the call. You can also edit the
message.
58
.
.
Call settings
Save
3. Tap
to save the reject message.
Ringtones and keypad tones
1. From the Home screen, tap ➔ ➔
➔
Ringtones and keypad tones
Device ringtone
2. Tap
Device vibration
3. Tap
OK
.
Incoming call vibration
4. Tap
vibrate when a call is incoming.
Keytones
5. Tap
keypad.
, select a ringtone, and tap OK.
, select a vibration type, and tap
to play a tone when you press the
.
to if you want your phone to
Reminder tone
1. From the Home screen, tap ➔ ➔
➔
Reminder tone
2. Tap a tone to hear it played.
3. Select a tone and tap
.
OK
.
Call alert
1. From the Home screen, tap ➔ ➔
➔
Call alert
.
Call settings
Call settings
Call settings
Page 65
2. Ta p
DRAFT - Internal Use Only
DRAFT - Internal Use Only
Call vibrations
when the called party answers the phone.
3. Ta p
Call status tones
call then tap
Alerts on call
4. Ta p
notifications during a call.
to enable your phone to vibrate
to set the sound settings during a
OK
.
to turn off alarm and message
Call answering/ending
1. From the Home screen, tap ➔ ➔
➔
Call answering/ending
2. The following options are available:
• Answering key
calls by pressing the Home key.
• The power key ends calls
call by pressing the power key without turning off the screen.
.
: Tap this option to be able to accept incoming
: This option will allow you to end a
Call settings
Auto screen off during calls
This option turns on the proximity sensor during calls so that
your phone will know to turn the screen off to save power.
From the Home screen, tap ➔ ➔
➔
settings
feature.
Auto screen off during calls
Call
to enable the
Accessory settings for call
1. From the Home screen, tap ➔ ➔
➔
Accessory settings for call
2. The following options are available:
• Automatic answering
answer and incoming call when a headset is detected.
• Automatic answering timer
the device automatically accepts the incoming call.
• Outgoing call conditions
the device is locked.
.
: configures the device to automatically
: configures the time delay before
: allows you to make calls even when
Call settings
My call sound
This option allows you to personalize the sounds you hear
during a call with and without earphones.
➔
1. From the Home screen, tap ➔
➔
My call sound
My call sound settings
2. Ta p
Personalize call sound
3. Ta p
on-screen instructions.
.
.
and follow the detailed
Call Functions 59
Call settings
Page 66
Use extra vol. for calls
DRAFT - Internal Use Only
DRAFT - Internal Use Only
This option allows you to see an extra volume button on the
screen during calls.
From the Home screen, tap ➔ ➔
settings
➔
Use extra vol. for calls
to enable the feature.
Increase volume in pocket
This option increases the ringtone volume when the device is
in a pocket or a bag. It uses the proximity sensor to detect its
location.
From the Home screen, tap ➔ ➔
➔
settings
feature.
Increase volume in pocket
to enable the
Call forwarding
1. From the Home screen, tap ➔ ➔
➔
Call forwarding
2. Tap one of the following options:
• Always forward
• Forward when busy
designated number instead of your voice mail number if you
are on another phone call.
60
➔
Voice call
.
: allows you to forward all voice calls.
allows you to forward voice calls to a
Call
Call
Call settings
• Forward when unanswered
to a designated number instead of your voicemail number
when there is no answer on your phone. You can also select
the amount of time that the phone delays before forwarding.
• Forward when unreachable
to a designated number instead of your voicemail number
when you are not in an area covered by your service provider or
when your phone is switched off.
: allows you to forward voice calls
: allows you to forward voice calls
Additional settings
1. From the Home screen, tap ➔ ➔
➔
Additional settings
2. Tap one of the following options:
•Caller ID
: allows you to choose how your Caller ID displays.
Select Network default, Hide number, or Show number.
• Call waiting
is trying to reach you during another call. Tap to activate.
• Auto redial
was either cut off or was unable to connect. Tap to activate.
•Noise reduction
from your side during calls.
.
: the network service informs you when someone
: automatically redials the last number if the call
: allows you to suppress background noise
Call settings
Page 67
• Fixed Dialing Numbers
DRAFT - Internal Use Only
DRAFT - Internal Use Only
a limited set of phone numbers.
• Auto area code
area code to all outbound calls. Slide the slider to the on
position.
: allows you to restrict outgoing calls to
: allows you to automatically prepend a specific
Using Fixed Dialing Numbers
Enabling FDN
1. From the Home screen, tap ➔ ➔
➔
Additional settings ➔ Fixed dialing numbers
Enable FDN
2. Ta p
3. At the prompt, enter your PIN2 code and tap
FDN is enabled.
4. To enable FDN after it has been disabled, tap
, enter your PIN2 code and tap OK.
FDN
Important!
Not all SIM cards use a PIN2 code. If your SIM card
does not, this menu does not display.
The PIN2 code is provided by your carrier. Entering
an incorrect PIN2 code could cause the phone to
lock. Contact customer service for assistance.
.
Call settings
.
OK
.
Disable
Changing the PIN2 Code
1. From the Home screen, tap ➔ ➔
➔
Additional settings ➔ Fixed dialing numbers
Change PIN2
2. Ta p
3. At the prompt, enter your old PIN2 code.
4. At the prompt, enter a new PIN2 code.
5. Confirm your PIN2 code.
Managing the FDN List
When this feature is enabled, you can make calls only to
phone numbers stored in the FDN list on the SIM card.
Note:
Before you can manage an FDN list a list must be
created.
1. From the Home screen, tap ➔
➔
Additional settings ➔ Fixed dialing numbers
FDN list
2. Ta p
3. A list of all existing FDN numbers displays.
.
.
Call Functions 61
Call settings
➔
Call settings
.
.
Page 68
Voicemail service
DRAFT - Internal Use Only
DRAFT - Internal Use Only
1. From the Home screen, tap ➔ ➔
➔
Voicemail Service
Voicemail service provided by your carrier is the
default.
My carrier
2. Tap
.
to remove the carrier Voicemail service.
Voicemail settings
You can view or modify your voicemail number from this
menu.
1. From the Home screen, tap ➔
➔
Voicemail settings
2. Tap the
3. Tap
Voice mail number
digits, and enter a new voicemail number using the
keypad, then tap
OK
.
.
field, backspace to erase the
OK
.
➔
Ringtone
1. From the Home screen, tap ➔ ➔
➔
Ringone
.
2. Tap a ringtone to hear it played.
OK
3. Select a ringtone and tap
62
.
Call settings
Call settings
Call settings
Vibrate
This option allows you to configure vibration settings.
➔
Never
Call settings
.
1. From the Home screen, tap ➔
➔
Vibrate
.
Always, Only in silent mode
2. Tap
, or
TTY Mode
A TTY (also known as a TDD or Text Telephone) is a
telecommunications device that allows people who are deaf,
hard of hearing, or who have speech or language disabilities,
to communicate by telephone.
Your phone is compatible with select TTY devices. Please
check with the manufacturer of your TTY device to ensure
that it is compatible with digital cell phones.
Your phone and TTY device will connect via a special cable
that plugs into your phone’s headset jack. If this cable was
not provided with your TTY device, contact your TTY device
manufacturer to purchase the connector cable.
➔
1. From the Home screen, tap ➔
➔
TTY mode
.
TTY Full, TTY HCO
2. Tap
displays to indicate selection. Tap
, or
TTY VCO
Call settings
. A green checkmark
TTY Off
to turn it off.
Page 69
Accounts
DRAFT - Internal Use Only
DRAFT - Internal Use Only
SIP (Session Initiation Protocol) is an Internet protocol used
for live communication sessions such as phone calls. This
menu will allow you to set up your SIP accounts for Internet
calling.
➔
1. From the Home screen, tap ➔
. ➔
Accounts
settings
Receive incoming calls
2. Ta p
while using internet call. This will use more battery
power.
3. Ta p
Add account
4. Enter the required information. Contact your SIP
account representative for the necessary information.
.
to allow calls to be received
.
Call
Use Internet calling
Your device can make calls over the Internet using VoIP
(Voice over Internet Protocol) using a SIP account.
➔
1. From the Home screen, tap ➔
➔
Use Internet calling
2. Tap one of the following options:
• For all calls when mobile network available
always use Internet calling when there is an available network.
• Only for Internet calls
when you specify directly.
• Ask for every call
make a call.
.
: the phone will only use Internet calling
: the phone will prompt you every time you
Call Functions 63
Call settings
: your phone will
Page 70
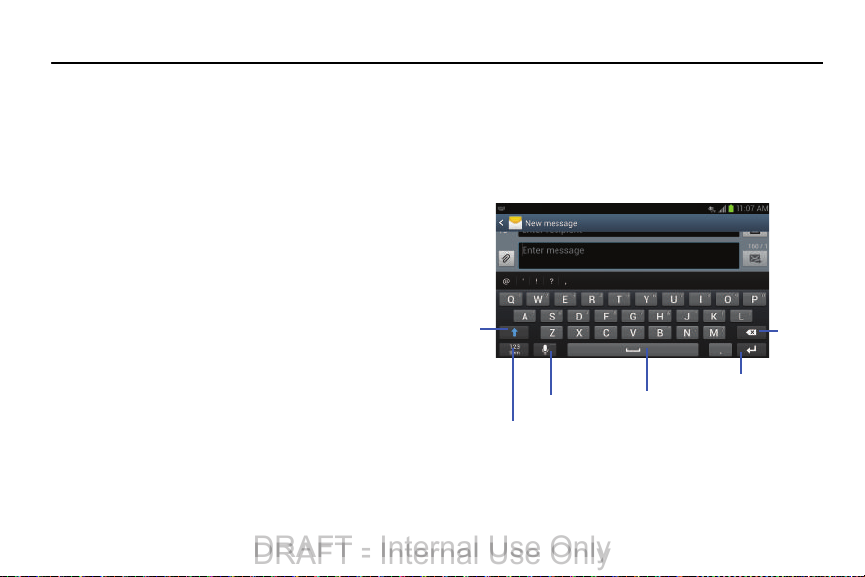
Section 4: Entering Text
New
Paragraph
Text Input Mode
Shift
Key
Delete
Key
Space Bar
Voice Typing
DRAFT - Internal Use Only
DRAFT - Internal Use Only
This section describes how to select the desired text input
method when entering characters into your phone. This
section also describes the predictive text entry system that
reduces the amount of key strokes associated with entering
text.
Your phone comes equipped with an orientation detector that
can tell if the phone is being held in an upright (Portrait) or
sideways (Landscape) orientation. This is useful when
entering text.
Text Input Methods
There are two text input methods available:
•
Samsung keyboard (default)
QWERTY keypad that can be used in both portrait and
landscape orientation.
•
Google Voice typing
To change the input method, see “Keyboards and Input
Methods” on page 138.
64
: Samsung’s on-screen
: allows you to enter text by speaking.
Entering Text Using the Samsung Keyboard
From a screen where you can enter text, rotate your phone
counterclockwise to a Landscape orientation. The on-screen
QWERTY keypad will display.
Page 71
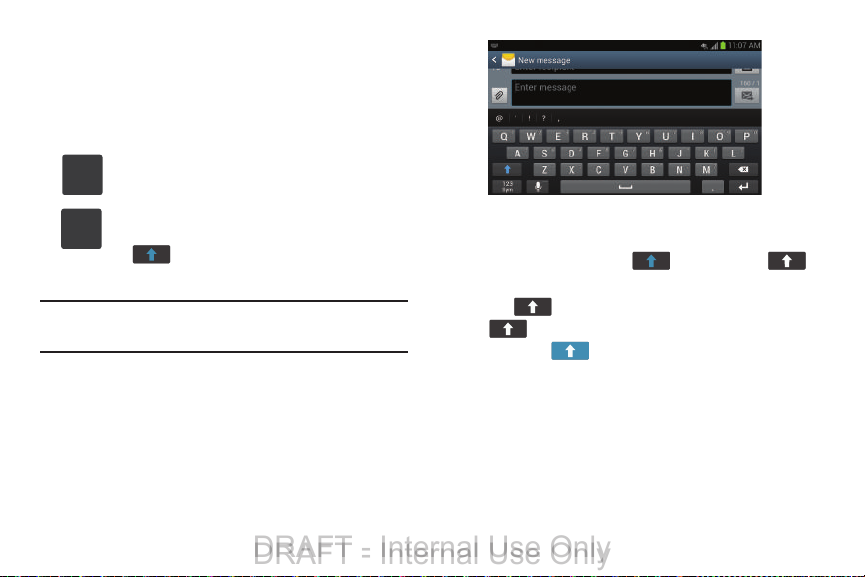
Changing the Text Input Mode - Keypad
123
Sym
ABC
DRAFT - Internal Use Only
DRAFT - Internal Use Only
There are two main keypad layout keys that change on the
keyboard display.
Sym
and
Abc
The available Text Input modes are:
.
Note:
Symbol/Numeric Mode
symbol, and emoticon keys.
ABC Mode
Can also be set to
) key.
(
When in
Abc
mode, the
Sym
mode, the
Abc/ABC/abc
: activates the default alphabet keys.
: activates the number,
Abc
or
abc
by using the shift
Sym
button displays. When in
button displays.
Using ABC Mode
1. If desired, rotate your phone counterclockwise to a
Landscape orientation.
2. When you tap the
screen displays:
Enter message
field, the following
3. Tap the desired alphabetic characters.
4. The screen initially opens in ABC mode. After typing the
first letter, the shift key ( ) will change to
and following letters will be lowercase.
5. Tap to input another upper-case letter or tap
twice to switch to ABC mode. The shift key will
change to in ABC mode. All following letters
will be uppercase until you tap the shift key again.
Entering Text 65
Page 72
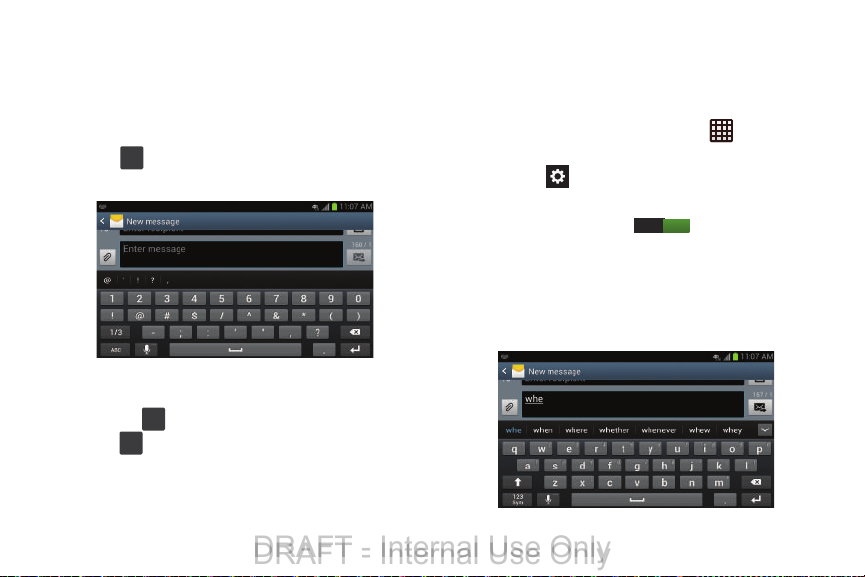
Using Symbol/Numeric Mode
123
Sym
1/3
ABC
DRAFT - Internal Use Only
DRAFT - Internal Use Only
Use Symbol/Numeric Mode to add numbers, symbols, or
emoticons.
1. Rotate your phone counterclockwise to a Landscape
orientation.
2. Tap
3. Tap the desired number, symbol, or emoticon
4. Tap t he
5. Tap to return to Abc mode.
66
at the bottom of the screen. The following
screen displays:
characters.
button to access additional symbols.
Predictive Text
By using the Predictive Text option, you can have next-letter
prediction and regional error correction, which compensates
for pressing the wrong keys on the QWERTY keyboard.
1. To turn Predictive Text on or off, tap ➔
More settings (System) ➔Language and input
2. Tap the
3. Tap the ON/OFF slider, located to the right of the
Predictive text
4. In the text portion of the message screen, begin typing
a word. A list of word options is displayed. Tap one of
the words to replace the word that has already been
typed or scroll the line of words to the left for more
word choices.
icon next to
field, to .
Samsung keyboard
ON
Settings
.
.
➔
Page 73
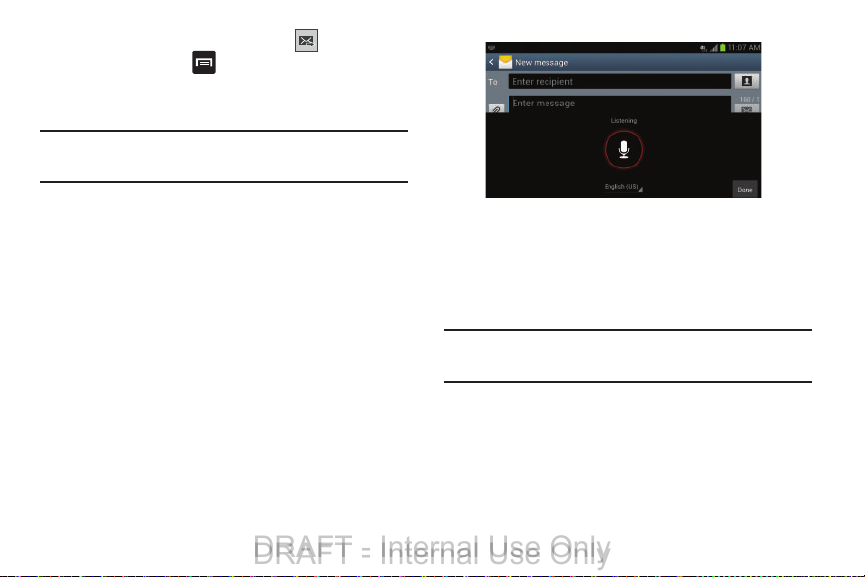
5. Continue typing your message. Tap to send the
DRAFT - Internal Use Only
DRAFT - Internal Use Only
message or press
information, refer to “Creating and Sending Messages”
on page 95.
Note:
You can also use Predictive Text mode in the portrait
orientation.
for more options. For more
Samsung Keyboard Settings
For information on how you can configure your Samsung
keyboard settings, see “Samsung Keyboard settings” on
page 139.
Using the Google Voice Typing Feature
You can use your voice to enter text using the Google Voice
typing feature.
1. From the keypad, touch the top of the screen and drag
it down to display your notification panel.
Choose input method
2. Ta p
Google voice typing
3. Ta p
.
.
4. At the
5. The text is displayed in the message as you are
6. Ta p
Note:
Listening
prompt, speak clearly and distinctly
into the microphone.
speaking.
Done
when you are finished.
The feature works best when you break your message
down into smaller segments.
Entering Text 67
Page 74
Section 5: Accounts and Contacts
DRAFT - Internal Use Only
DRAFT - Internal Use Only
Accounts
Your phone provides the ability to synchronize information,
from from a variety of accounts, including Email, Facebook,
Google, and your Samsung account. Depending on the
account, you can choose to synchronize your calendar,
contacts, and other types of content.
Contacts from your accounts display in your phone’s
Contacts.
With synchronization, you can ensure that information on
your phone is updated with any information that changes in
your accounts.
Controlling Synchronization
You can choose to have your phone automatically
synchronize with your accounts, or manually synchronize
each account when you want to check messages.
You may also choose to limit automatic or background
synchronization to extend battery life.
Menu
1. From the Home screen, touch
Settings
.
Personal
, touch
2. Under
68
Accounts and sync
, then touch
.
3. To control synchronization:
•
Touch
Accounts and sync
synchronization automatically, at any time.
•
Touch
Accounts and sync
synchronization.
With automatic synchronization disabled, you can manually
sync accounts with the
Tip:
You can also control synchronization from Notifications,
with the Sync toggle. Cross reference Notifications ???.
to allow
to disable automatic
Sync
option available in each account.
Setting Up Your Accounts
Set up and manage your accounts with the
sync
settings.
For information about setting up other, non-synchronized
email accounts, see “Configuring Email Accounts” on
page 82.
Tip:
For more information on setting up your email, contact
your Wireless Provider.
Accounts and
Page 75

Adding an account
DRAFT - Internal Use Only
DRAFT - Internal Use Only
1. From the Home screen, touch Menu
Settings
.
Personal
, touch
2. Under
Add account
3. Select an account provider, then follow the prompts to
enter your credentials and sign in.
4. The phone communicates with the provider’s server to
set up your account on the phone.
Managing accounts
1. From the Home screen, touch Menu
Settings
2. Under
3. Select an account, then touch a setting to enable or
disable synchronization. A check mark displays to
indicate activation.
.
.
Personal
Accounts and sync
, touch
Accounts and sync
, then touch
➔
, then touch
.
Contacts
To a cces s Cont acts:
From the Home screen, touch
Contact tips:
•
Swipe your finger left-to-right across a contact to make a call to
the contact.
•
Swipe right-to-left across a contact to create a message
addressed to the contact.
Adding Contacts
1. From the Home screen, touch
Add contact
+
•
If you have defined accounts (Google, Samsung, and so on),
the Save contact to pop-up displays:
•
If you have not defined any accounts, the
up displays. The following options are available:
–
OK
–
Add new account
device saves your contacts. The
displays. (For more information, refer to
Accounts”
.
: Saves your contacts in
: Lets you define an account to which your
on page 68..)
Accounts and Contacts 69
Contacts
Contacts
Save contact
“my device contacts”
Add new account
“Setting Up Your
.
➔
pop-
.
screen
Page 76

2. At the
DRAFT - Internal Use Only
DRAFT - Internal Use Only
3. Touch contact fields to enter information:
70
Save contact to
the contact (available options depend on accounts you
define to your device):
• Microsoft Exchange ActiveSync
account.
•Google
: Save to your Google account.
• Samsung
• Phone
•
•
•
•
: Save to your Samsung account.
: Save to “my device contacts”.
Tou c h
contact.
Tou c h
Name
enter
Name prefix, First name, Middle name, Last name,
Name suffix
Touch
Phone number
Label
button to choose a label, from
Work Fax, Home Fax, Pager, Other
another number, touch .
Touch
Email address
Label
button to choose a label, from
Custom
to create a new label. To add an address, touch .
prompt, select a save option for
: Save to your Corporate
Photo ID
to choose a picture to identify the
to enter a name for the contact. Touch to
.
to enter a phone number, then touch the
Mobile, Home, Work
, or
Custom
to enter an email address, then touch the
Home, Work, Other
. To add
, or
•
Touch
Address
to enter an email address, then touch the
Label
button to choose a label, from
Custom
to create a new label. To add an address, touch .
•
Touch next to
Label
the
Anniversary, Other
•
Touch
Groups
information about Groups, see
•
Touch
Ringtone
•
Touch
Vibration pattern
along with the ringtone when this contact calls or sends you a
message.
or
,
•
Touch
Add another field
Phonetic Name, Organization, IM, Notes, Nickname
Website
4. When you finish entering information, touch
Events
button to choose a label, from
, or
Custom
to assign the contact to a group. For more
to choose a ringtone for the contact.
to choose a vibration pattern to play
to add more fields, including
, or
Relationship
Home, Work, Other
to enter a special date, then touch
Birthday
to create a new label.
“Groups”
on page 75.
.
,
Save
, or
,
.
Page 77
Creating Contacts from Recent calls
DRAFT - Internal Use Only
DRAFT - Internal Use Only
Save a phone number from a recent call to create a new
contact, or update an existing contact.
For more information, see “Creating or Updating Contacts
Using Recent calls” on page 44.
Creating Contacts from the Phone Keypad
Enter a phone number with the Phone Keypad, then save it.
Phone
1. From the Home screen, touch
2. Touch the digits of the phone number on the
3. Touch
4. Continue entering contact information. For more
Tip:
Add to Contacts
the pop-up menu.
information, see “Adding Contacts” on page 69.
While entering a phone number, you can add waits or
pauses. Enter the number up to the pause or wait, then
touch Menu
to select
, then select
Add 2 sec pause
.
Create contact
or
Add wait
Keypad
from
Updating Contacts
Make changes to update an existing contact.
1. From the Home screen, touch
2. Touch a contact to view its information, then touch
Edit
.
– or –
Touch and hold a contact, then select
.
.
menu.
3. Continue entering contact information. For more
information, see “Adding Contacts” on page 69.
Updating Contacts from the Phone Keypad
Enter a phone number with the Phone Keypad, then save it.
1. From the Home screen, touch
2. Touch the digits of the phone number on the
3. To uch
4. Select a contact to update, then continue entering
Add to Contacts
from the pop-up menu.
contact information. For more information, see “Adding
Contacts” on page 69.
, then select
Accounts and Contacts 71
Contacts
.
Edit
from the
Phone
.
Keypad
Update existing
.
Page 78
Updating Contacts from Recent calls
DRAFT - Internal Use Only
DRAFT - Internal Use Only
Save a phone number from a recent call to create a new
contact, or update an existing contact.
For more information, see “Creating or Updating Contacts
Using Recent calls” on page 44.
Choosing Contacts to Display
1. From the Home screen, touch
Menu
2. Touch
•
Choose
•
Choose an account to only display contacts from that account.
•
Touch
•
Choose
account, or the phone.
, then touch
All contacts
Phone
Customized list
to show all contacts.
to show only show contacts saved to the phone.
to select contact types for each
Contacts
Contacts to display
Contacts Settings
1. From the Home screen, touch
Menu
2. Touch
•
Select
least one stored phone number.
•
Touch
•
Touch
72
, then touch
Only contacts with phones
List by
to sort contacts by first or last name.
Display contacts by
to list contacts by first or last name.
Contacts
Settings
:
to show contacts with at
•
Touch
Send contact
contacts by Bluetooth contacts. For more information about
sending contacts, see
page 74.
to set your preference for transferring
“Sending Namecards (vCards)”
on
Other Contacts Options
1. From the Home screen, touch
.
:
.
2. Touch a contact to display it, then touch
•History
: View calls and messages to and from this contact.
•Edit
: Modify contact information. For more information, see
“Updating Contacts”
•Delete
: Erase the contact record.
• Join contact/Separate contact
one. For information, see
• Mark as default
(such as IM or email address). Defaults are the contact method
used when creating a message or calling a contact. You can
also set a default by touching and holding on a contact field.
• Share namecard via
“Sending Namecards (vCards)”
see
on page 71.
“Joining Contacts”
: Set a default phone number or other field
: Send the namecard. For information,
Contacts
.
Menu
:
: Manage multiple contacts as
on page 73.
on page 74.
Page 79
• Add to reject list
DRAFT - Internal Use Only
DRAFT - Internal Use Only
from the contact are rejected automatically. To remove a
contact form the reject list, touch and hold on the contact in the
main contacts screen, then choose
• Print namecard
compatible Samsung Bluetooth-enabled printer.
: Mark the contact so that calls or messages
Remove from reject list
: Print the namecard via Bluetooth to a
My Local Profile
My local profile is your own contact record, listed under ME
in Contacts. You can send My local profile as a vCard via
Bluetooth or as an attachment.
Creating My Local Profile
1. From the Home screen, touch
ME
touch
Menu
Set up profile
in the contact fields.
, then touch
2. Under
3. Enter your information
information, refer to “Adding Contacts” on page 69..
Sending My Local Profile
You can send your profile as a vCard via Bluetooth to other
Bluetooth devices, or as an attachment.
1. From the Home screen, touch
2. Touch your profile to display your contact information.
3. Touch
Contacts
.
For more
Contacts
Share namecard via
4. Choose a sending method, then follow the prompts to
send the profile.
Joining Contacts
.
Your phone can synchronize with multiple accounts,
including Google, Corporate, and other providers, plus social
networking sites like Facebook. When you synchronize
contacts from these accounts with your phone, you may have
multiple contacts for one person.
Joining contact records allows you to see all the contact’s
numbers and addresses together. Joining also helps you
keep your contacts updated, because any changes to
.
.
.
information in the respective accounts is automatically
updated the next time you synchronize with the account.
Joining contacts
1. From the Home screen, touch
2. Touch a contact to display its information.
Menu
3. To uch
available contacts displays.
4. Select a contact to join to the displayed contact. The
joined contact displays.
, then touch
Accounts and Contacts 73
Contacts
Join contact
.
. A list of
Page 80
5. To join another contact, touch the
DRAFT - Internal Use Only
DRAFT - Internal Use Only
Joined contact screen displays.
Touch
Join another contact
displays.
Select a contact to join to the displayed contact. The
joined contact displays.
Separating contacts
1. From the Home screen, touch
2. Touch a contact to display its information.
3. Touch the
4. Touch to the right of a contact to remove it from
the selected joined contact.
Connection
field to display joined contacts.
Connection
. A list of available contacts
Contacts
Exporting and Importing Contacts
You can export your contact list to an installed memory card,
or import a list of contacts (previously exported) from a
memory card.
1. From the Home screen, touch
Menu
2. Touch
3. Select an option, then follow the prompts to complete
the operation:
74
, then touch
Contacts
Import/Export
field. The
.
.
.
• Import from USB storage
installed mass storage.
• Export to USB storage
storage.
• Import from SD card
installed memory card.
• Export to SD card
• Send namecard via
information, see
page 74.
: Copy contacts that are saved in
: Copy contacts to installed mass
: Copy contacts that are saved on an
: Copy contacts to an installed memory card.
: Share contacts as vCards. For more
“Sending Namecards (vCards)”
on
Sending Namecards (vCards)
You can send a contact namecard as a vCards via Bluetooth
to other Bluetooth devices, or as an attachment via Gmail or
Email.
Important!
Not all Bluetooth devices accept contacts, and not
all devices support transfers of multiple contacts.
Check the target device’s documentation.
1. From the Home screen, touch
Menu
2. Tou ch
namecard via
, then touch
.
Import/Export
Contacts
➔
.
Send
Page 81

3. Touch contacts to mark them for sending, or touch
DRAFT - Internal Use Only
DRAFT - Internal Use Only
Select all
to mark all contacts. A check mark displays
for marked contacts.
Done
4. Touch
then follow the prompts to send the namecard:
• Bluetooth
•Dropbox
•Email
•Gmail
• Messaging
• Wi-Fi Direct
. At the prompt, choose a sending method,
: For more information about sending via Bluetooth,
“Bluetooth”
see
“Dropbox”
: For more information about sending email, see
“Email”
: For more information about sending Gmail, see
“Composing and Sending Gmail”
“Creating and Sending Messages”
see
see see
on page 153.
: For more information about sending via Dropbox, see
on page 132.
on page 82.
on page 83.
: For more information about sending messages,
: For more information about using Wi-Fi Direct,
“Wi-Fi Direct”
on page 151.
on page 78.
Favorites
Mark contacts with a star to identify them as Favorites.
Favorites
Favorites display on the
Contacts
screens for fast dialing or messaging, and are
indicated by the .
Creating Favorites
1. From the Home screen, touch
2. Touch and hold on a contact, then select
from the pop-up menu.
favorites
– or –
Touch a contact to display it, then touch at the top
right of the screen, it changes color to .
tab in the
Phone
Contacts
Add to
and
.
Groups
Assign contacts to Groups to make searching for contacts
faster, or to quickly call or send messages to group
members. Your phone comes with pre-loaded groups you
can use to add your contacts.
Accounts and Contacts 75
Page 82
Adding a New Group
DRAFT - Internal Use Only
DRAFT - Internal Use Only
1. From the Home screen, touch
Groups
.
Menu
➔
2. Touch
•
Touch
Group name
•
Touch
Group ringtone
members of this group.
•
Touch
Vibration pattern
from members of this group.
•
Touch
Add member
3. Touch
Editing a Group
1. From the Home screen, touch
2. Touch a Group to display it.
3. Touch
76
Save
Groups
the group. For more information, see “Adding a New
Group” on page 76.
Create
to enter a Group Name.
to choose a ringtone for calls from
to choose a vibration to play for calls
to select members from Contacts.
to save the new group.
.
Menu
➔
Edit
, then update information for
Contacts
, then enter information:
Contacts
➔
➔
Deleting a Group
1. From the Home screen, touch
Groups
.
Menu
➔
2. Tou ch
3. Touch a Group to mark it for deletion, or touch
to mark all groups. A check mark displays to indicate
selection. You cannot delete pre-loaded groups.
4. Tou ch
Adding Contacts to a Group
1. From the Home screen, touch
2. Touch a Group to display it, then touch .
3. Touch contact(s) to mark them for addition, or touch
4. Tou ch
Delete
group members
Groups
Select all
to mark all contacts. A check mark displays to
indicate selection.
Done
Delete
, then choose
.
.
to add the selected contact(s).
.
Group only
Contacts
or
Group and
Contacts
➔
Select all
➔
Page 83
Removing Contacts from a Group
DRAFT - Internal Use Only
DRAFT - Internal Use Only
1. From the Home screen, touch
Groups
.
2. Touch a Group to display it.
Menu
➔
3. Touch
4. Touch contact(s) to mark them for removal, or touch
Select all
to mark all contacts. A check mark displays
to indicate selection.
5. Touch
Sending a Message to Group Members
Create a new text or email message, addressed to the
group’s members.
1. From the Home screen, touch
2. Touch and hold a Group, then touch
3. Touch contacts to mark them for the new message,
Done
Send email
then touch
Remove member
to remove the selected contact(s).
.
Done
.
Contacts
.
Contacts
Send message
➔
➔
Groups
or
4. The new message opens, with recipients marked
recipients marked. Create the message. For more
information, see “Creating and Sending Messages” on
page 78, or see “Composing and Sending Email” on
page 82.
Speed Dials
Speed dials are 1-, 2-, or 3-digit shortcuts (1 to 100) you
assign to contacts.
For more information about using speed dials to call, see
“Making Calls using Speed Dials” on page 40.
Note:
Some speed dials are reserved and cannot be assigned:
.
Speed dial 1 is reserved for Voicemail.
Speed dial 100 is reserved for Directory Assistance.
Assigning Speed Dials
1. From the Home screen, touch
Menu
2. To uch
3. A list of speed dials displays.Touch a speed dial, then
touch a contact to assign the speed dial to the contact.
, then touch
Speed dial setting
Accounts and Contacts 77
Contacts
.
.
Page 84

Removing or Reassigning a Speed Dial
DRAFT - Internal Use Only
DRAFT - Internal Use Only
1. From the Home screen, touch
Menu
2. Touch
3. Touch and hold an assigned Speed dial setting, the
following options pop-up:
• Replace
contact.
•Remove
78
, then touch
: Touch a new speed dial location to assign it to the
: Unassign the speed dial from the contact.
Contacts
Speed dial setting
.
.
Page 85
Section 6: Multimedia
DRAFT - Internal Use Only
DRAFT - Internal Use Only
This section explains how to use the multimedia features of
your phone, including Media Hub, Music Player, Google Play
Music, Video Player, Play Movies, Gallery, Camera, and
Camcorder.
Media Hub
Samsung Media Hub is your one stop for the hottest movie
and TV content. With hundreds of titles available at your
fingertips, entertaining yourself or your kids on the go has
never been easier. You can rent or purchase your favorite
content and watch from the convenience of anywhere.
Featuring the stunning viewing quality Samsung is known
for, Samsung Media Hub is your gateway to mobile video like
you've never experienced it before.
Note:
Media Hub usage is based on service availability.
Using Media Hub
1. From the Home screen, tap ➔
and lock screen
Samsung app to run.
2. At the warning prompt, tap
➔
Unknown sources
Settings ➔ Security
to allow the
OK
.
Home
3. Ta p
4. Read the
5. Ta p
6. At the Media Hub screen,
7. The following tabs are displayed at the top of the
➔ ➔
Terms and Conditions
agree to the Terms and Conditions
Accept
to continue or
The Media Hub screen displays.
recently added media that you can rent or purchase.
screen:
•Home
: displays the Media Hub main screen.
•Movies
: displays movies that are available for rent or purchase.
Scroll through the top navigation bar and select a movie
category. The movies of that type displays below.
• TV Shows
•My Media
: displays TV shows that are available for purchase.
Scroll through the top navigation bar and select a TV category.
The TV shows of that type displays below.
: allows you to view all of the media that you have
purchased or rented. Tap a media entry to view it.
Media Hub
screen and tap the
checkbox.
Decline
to exit.
What’s New
is displayed with
Multimedia 79
.
I
Page 86

8. Scroll through the media listings and tap on an item
DRAFT - Internal Use Only
DRAFT - Internal Use Only
you would like to purchase or rent.
9. At the Details screen, follow the on-screen instructions
to create a Samsung account and make a purchase.
10. The media will be stored in the My Media folder.
Media Hub Notices
•
Any media item (Media Content) may be rented or purchased after
you create an account in Media Hub.
•
Media Content that is downloaded may be viewed concurrently on
up to five (5) devices with Media Hub that are also registered to
the same account.
•
You may choose to remove a device from your account no more
than once every 90 days.
•
You may remove Media Content from a device as many times as
you’d like. You will have the ability to re-download the Media
Content at a later point in time subject to content re-download
availability and studio permissions.
•
You MUST be in network coverage to license Media Content you
have acquired through the Service.
•
You can use 3G, 4G, or Wi-Fi connectivity in order to download
Media Content.
80
•
Unlike purchased Media Content, rented Media Content will be
viewable on only 1 device in your account.
•
Media Content is downloaded and saved onto the SD card.
•
Your Media Content may pause/stop or not download in networks
where there is a weak signal.
•
You may begin watching downloaded Media Content as soon as a)
license acquisition has occurred and b) sufficient amount of the
Media Content has been buffered.
•
You must finish watching rented Media Content within 24
consecutive hours of the start of playback.
•
Stopping, pausing or restarting rented Media Content does not
extend the available viewing time.
•
In no event will rented Media Content be available for a period
of more than thirty (30) days (or shorter on a title-by-title basis)
after the Media Content has been rented (e.g., if you begin
viewing rented Media Content on the 29th day after the rental
transaction, but do not finish viewing the entire title, that rented
Media Content may not be available for the entire twenty-four
(24) consecutive hour period if such period would extend the
viewable time beyond the thirty (30) day rental window).
Page 87
•
DRAFT - Internal Use Only
DRAFT - Internal Use Only
You cannot play any media content downloaded from Media Hub
through any output on your mobile phone, including All Share.
Music Player
The Music Player is an application that can play music files.
The Music Player supports files with extensions AAC, AAC+,
eAAC+, MP3, WMA, 3GP, MP4, and M4A. Launching the
Music Player allows you to navigate through your music
library, play songs, and create playlists (music files bigger
than 300 KB are displayed).
Playing Music
1. Tap ➔
2. Tap a library category at the top of the screen (All,
Playlists, Albums, Artists, Music square, or Folders) to
view the available music files.
3. Scroll through the list of songs and tap an entry to
begin playback.
4. The following Music Player controls are available:
Music Player
Pause the song.
Start the song after being paused.
Press and hold to rewind the song. Tap to go to
previous song.
.
Press and hold to fast-forward the song. Tap to go
to next song.
Volume control.
Repeat one: repeats the currently playing song.
Repeat all: replays the current list when the list
ends.
Play All: plays the current song list once.
Shuffle On: the current list of songs are randomly
shuffled for playback.
Shuffle Off: songs play in order and are not
shuffled.
Provides access to the Music square.
Lists the current playlist songs.
Displays the current song in the player window.
Provides access to the SoundAlive feature.
Multimedia 81
Page 88
Music Player Options
DRAFT - Internal Use Only
DRAFT - Internal Use Only
To access additional options, follow these steps:
1. While in the Music Player, press
2. The follow options are available:
• Add to quick list
• Via Bluetooth
headset.
•Share music via
Bluetooth, Email, Gmail, Group Cast, Messaging, or Wi-Fi
Direct.
• Add to playlist:
selected playlist.
•Details
Biography, and other information.
•Set as:
ringtone, or Alarm tone.
• Settings
more information, refer to
page 82.
•End
: allows you to end the Music Player app.
82
: adds the current music file to the Quick list.
: scans for devices and pairs with a Bluetooth
: allows you to share your music by using
allows you to add the current music file to a
: allows you to view media info such as Artist, Title,
allows you to set a music file to Phone ringtone, Caller
: allows you to change your Music Player settings. For
“Music Player Settings”
.
on
Music Player Settings
The Music Player Settings menu allows you to set
preferences for the Music Player such as whether you want
the music to play in the background, sound effects, and how
the music menu displays.
1. From the Home screen, tap ➔
Settings
2. Press ➔
3. Select one of the following settings:
•SoundAlive
Rock, Jazz, Dance, Classic, etc.
•Play speed
• Music menu
•Lyrics
• Music auto off
: set the play speed anywhere between 0.5X and
2.0X using the slider.
you want to display. Choices are: Albums, Artists, Genres,
Music square, Folders, Composers, Years, Most played,
Recently played, or Recently added. Tap each item that you
want to display in the Music menu.
: when activated, the lyrics of the song are displayed if
available.
off after a set interval.
.
: set a type of equalization such as Normal, Pop,
: this menu allows you to select which categories
: when activated, music will automatically turn
Music Player
.
Page 89
Using Playlists
DRAFT - Internal Use Only
DRAFT - Internal Use Only
Playlists are used to assign songs to a list of preferred media
which can then be grouped into a list for later playback. You
can create these playlists either from the handset’s Music
Player options menu or from within a 3rd party music
application (such as Windows Media Player) and then
downloaded to the handset.
Creating a Playlist
1. From the Home screen, tap ➔
Playlists
2. Tap t he
3. Press ➔
4. Type a name for this playlist in the field and tap
tab.
Create playlist
Adding Music to a Playlist
To add files to the playlist:
1. From the Home screen, tap ➔
Playlists
Add music
tab.
.
Select all
2. Tap t he
3. Tap the playlist name in which to add music.
4. Ta p
5. Tap a music file, or tap
tracks to this playlist then tap
Music Player
.
Music Player
to add all the music
Done
.
OK
Removing Music from a Playlist
To remove music files from a playlist:
1. From the Home screen, tap ➔
Playlists
2. Tap the
3. Tap the playlist name in which to delete music.
4. Press ➔
5. Tap the checkbox to the left of each track you want to
.
remove from this playlist, or tap
the music tracks from this playlist, then tap
tab.
Remove
.
Music Player
Select all
to remove all
Remove
.
.
Editing a Playlist
.
Besides adding and removing music files in a playlist, you
can also rename the playlist.
To edit a playlist:
.
1. From the Home screen, tap ➔
Playlists
2. Ta p
3. Press ➔
4. Tap a playlist name to edit.
5. Enter a new name for the playlist then tap
For information on downloading music for your phone, see
“Google Play Music” on page 84.
.
Edit title
.
Music Player
OK
.
Multimedia 83
.
Page 90
Google Play Music
DRAFT - Internal Use Only
DRAFT - Internal Use Only
With Google Play Music, you can play music that you have
added to your music file as well as any music you copied
from your PC. While offline, you can listen to music you have
copied from your PC.
Next
.
Get free songs
Play Music
1. From the Home screen, tap ➔
2. At the Welcome screen, tap
3. At the
4. At the
5. Follow the on-screen instructions for getting your free
6. Tap a song to start playback.
7. From the main Play Music screen, you can tap any of
8. Tap for the following options:
84
Select an account
you would like to link to Google Play Music or tap
Account
.
Get free music
music.
All music on your device and external SD card is
displayed including Music folders that may contain
multiple songs.
the following tabs for a more detailed listing of songs:
Recent, Artists, Albums, Songs, Playlists, and Genres.
screen, tap an account that
screen, tap
or
.
Add
Skip
•Shuffle all
• Make available offline
• Offline music only
• Settings
•Help
Video Player
.
The Video Player application plays video files stored on your
microSD card.
1. Tap ➔
2. All videos that you have on your phone and memory
card displays. Tap the video that you want to play.
3. The video will begin to play.
4. The following video controls are available:
: allows you to play all of your music in a shuffled
order.
: allows you play your music without
being online or connected to the network.
: only allows you to play music offline.
: allows you to view Open source licenses and the
music version for the Play Music application.
: allows you to view a help file on the Google Support
website.
Video Player
Pause the video.
Start the video after being paused.
.
Page 91
Press and hold to rewind the video. Tap to
DRAFT - Internal Use Only
DRAFT - Internal Use Only
go to previous video.
Press and hold to fast-forward the video.
Tap to go to next video.
Volume control.
PIP (Picture In Picture) view. T
be played in a small window so you can use
your phone for other purposes while watching
the video. Double-tap screen to return to
previous size.
Original size view. T
its original size.
Full-screen in ratio view. T
enlarged as much as possible without
becoming distorted.
Full-screen view. T
which may cause some minor distortion.
he video will be played in
he entire screen is used,
he video will
he video is
Note:
The screen view icons are a three-way toggle. The icon
that is displayed, is the mode that displays after tapping
the icon.
For more information on downloading videos for your phone,
see “Media Hub” on page 79.
Play Movies
With Google Play Movies, you can rent thousands of different
movies. You can watch instantly, or download your movie for
offline viewing at a later time.
1. From the Home screen, tap ➔
2. Log on to your Google account if you have not already
done so.
3. Following the on-screen instructions for renting and
viewing movies.
4. Tap the
5. Tap the
6. Press for additional options.
MY RENTALS
rented.
PERSONAL VIDEOS
on your phone or memory card.
tab to view movies you have
Play Movies
tab to view movies you have
Multimedia 85
.
Page 92
Gallery
DRAFT - Internal Use Only
DRAFT - Internal Use Only
The Gallery is where you view photos and play back videos.
For photos, you can also perform basic editing tasks, view a
slideshow, set photos as wallpaper or contact image, and
share as a picture message.
1. Tap ➔
All of the Albums that hold your pictures and videos
displays with folder name and number of files.
2. Tap an Album and thumbnails of the contents displays.
Note:
If your device displays that the memory is full when you
access Gallery, delete some of the files by using
or other file management applications and try again. For
more information, refer to “My Files” on page 180.
Gallery
Viewing Pictures
1. Tap a thumbnail to view the picture.
Note:
If no control icons are displayed on the screen in
addition to the picture, tap anywhere on the screen to
display them.
86
.
My files
2. The following options are available at the top of the
screen:
• Slideshow
You can also select Slideshow settings to set Effects, Music,
and Speed.
•Share via
ChatON, Flipboard, Picasa, Google+, S Memo, Bluetooth, Wi-Fi
Direct, Messaging, Gmail, or Email.
• Delete
3. Press for additional options.
Viewing Videos
Note:
If no control icons are displayed on the screen in
addition to the picture, tap anywhere on the screen to
display them.
1. Tap a video to select it.
2. Tap to play the video.
3. Press for additional options.
For video player controls, see “Video Player” on
page 84.
: allows you to see your photos in a slideshow.
: allows you to share the picture via Group Cast,
: allows you to delete the picture.
Page 93
Camera
DRAFT - Internal Use Only
DRAFT - Internal Use Only
This section explains how to use the camera on your phone.
You can take photographs and shoot video by using the builtin camera functionality. Your 8 megapixel camera produces
photos in JPEG format.
Important!
Do not take photos of people without their
permission.
Do not take photos in places where cameras are
not allowed.
Do not take photos in places where you may
interfere with another person’s privacy.
Using the Camera
Taking Photos
Taking pictures with your device’s built-in camera is as
simple as choosing a subject, pointing the camera, then
pressing the camera key.
Note:
When taking a photo in direct sunlight or in bright
conditions, shadows may display on the photo.
1. From the main Home screen, tap ➔
to activate the camera mode.
2. Using the phone’s main display screen as a viewfinder,
adjust the image by aiming the camera at the subject.
3. Before you take a picture, use the
keys to zoom in or out. You can magnify the picture up
to x4 (400 percent).
– or –
Pinch the screen to zoom out or pinch outwards to
zoom in.
4. If desired, before taking the photo, you can tap
on-screen icons to access various camera options and
settings.
5. You can also tap the screen to move the focus to the
area you touch.
6. Press the Camera key ( ) until the shutter sounds.
(The picture is automatically stored to your designated
storage location. If no microSD is installed, all pictures
are stored on the Phone.) For more information, refer to
“Camera Options” on page 88.
Camera
Up
and
Down
Volume
Multimedia 87
Page 94
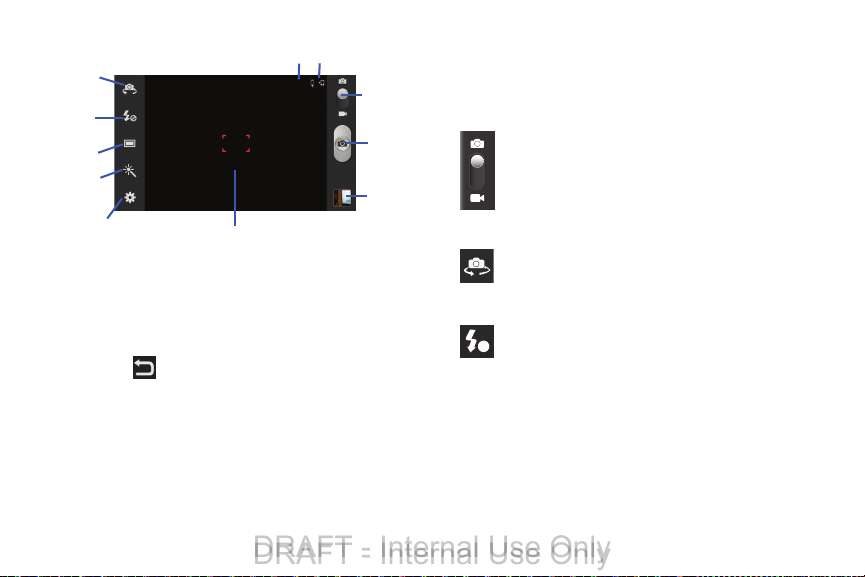
Camera Options
Display Image
Settings
Storage Location
Camera
Key
Image
Viewer
Mode
Front
Flash
Facing
Camera
Charger on
Mode
Shooting
Effects
A
DRAFT - Internal Use Only
DRAFT - Internal Use Only
Options are represented by icons across both sides of the
screen.
7. While viewing a picture, after you have taken it, pinch
the screen outwards to zoom in or pinch the screen
inwards to zoom out.
You can magnify the picture up to x4.
8. Press to return to the viewfinder.
88
Camera / Camcorder Mode
in various modes. Once you change the mode, the
corresponding indicator displays at the top left of the
display. Slide the button up for Camera, or down for
Camcorder.
Self-portrait
camera so you can take pictures of yourself or video
chat.
Flash
Auto flash.
: allows you to activate the front facing
: allows you to set the flash options to Off, On, or
: allows you to take a photo
Page 95
Shooting mode
DRAFT - Internal Use Only
DRAFT - Internal Use Only
one of the following:
•
Single shot
returning to the shooting mode.
•
Burst shot
captured in quick succession by pressing and
holding the shutter button.
•
HDR
mode to increase image detail.
•
Face detection
out.
•
Smile shot
subject. Once the camera detects the person’s
smile, it takes the picture.
•
Beauty
features.
•
Panorama
initial photo and then adding additional images to
itself. The guide box lets you view the area where
the second part of the panoramic picture should
display.
: allows you to set the shooting mode to
: takes a single photo and view it before
: allows several photographs to be
: takes pictures in HDR (High Dynamic Range)
: double tap on a face to zoom in or
: the camera focuses on the face of your
: adjusts the contrast to smooth facial
: takes a landscape photo by taking an
•
Cartoon
: gives your photo a cartoon look.
•
Share shot
pictures quickly with your friends.
•
Buddy photo share
pictures in your contacts to send your friends or
family pictures of themselves.
Effects
special effects to the photo. Options include: None,
Negative, Black and white, Sepia, Washed out, Cold
vintage, Warm vintage, Posterize, Solarize, Blue point,
Green point, and Red-yellow point.
Settings:
Edit shortcuts
settings that you use the most.
Self-portrait
can take pictures of yourself.
Flash
Auto flash.
Shooting mode
: uses Wi-Fi Direct to share your
: uses face recognition from
: allows you to change the color tone or apply
: allows you to set shortcut icons for the
: allows you to set the front camera so yo u
: allows you to set the flash options to Off, On, or
: allows you to set the shooting mode.
Multimedia 89
Page 96

Scene mode
DRAFT - Internal Use Only
DRAFT - Internal Use Only
best pictures possible. Options include None, Portrait,
Landscape, Night, Sports, Party/Indoor, Beach/Snow,
Sunset, Dawn, Fall Color, Firework, Text, Candlelight,
and Backlight. Helpful tips are shown for each scene
mode at the bottom of the display screen.
Settings: (continued)
Exposure value
level by moving the slider.
Focus mode
or Macro. Use Macro mode to take close-up pictures.
Timer
before taking a picture. Options include: Off, 2 sec, 5
sec, and 10 sec.
Effects
special effects to the photo. Options include: None,
Negative, Black and white, Sepia, Washed out, Cold
vintage, Warm vintage, Posterize, Solarize, Blue point,
Green point, and Red-yellow point.
90
: allows you to set the Scene to help take the
: allows you to adjust the brightness
: allows you to set this option to Auto focus
: allows you to set a timer for how long to wait
: allows you to change the color tone or apply
Resolution
8M (3264x2448), W6M (3264x1836),
3.2M (2048x1536), W2.4M (2048x1152),
W0.9M (1280x720), or 0.3M (640x480).
White balance
following choices: Auto, Daylight, Cloudy,
Incandescent, or Fluorescent.
ISO
your digital camera. Choose from Auto, 100, 200, 400,
or 800. Use a lower ISO number to make your camera
less sensitive to light, a higher ISO number to take
photos with less light, or Auto to let the camera
automatically adjust the ISO for each of your shots.
Metering
or meters the light source: Centre-weighted, Spot, or
Matrix.
Anti-Shake
of the subject of the photo or hand movement.
: allows you to set the image size to either:
: allows you to set this option to one of the
: ISO determines how sensitive the light meter is on
: allows you to set how the camera measures
: reduces image blur due to the movement
Page 97
Auto contrast
DRAFT - Internal Use Only
DRAFT - Internal Use Only
backlight circumstances where intensity of
illumination can vary excessively.
Guidelines
Image quality
Superfine, Fine, or Normal.
Settings: (continued)
GPS tag
as Geotagging). The location of where the picture is
taken is attached to the picture. (Only available in
Camera mode.) Before you can use the GPS tag
(Geotagging), from the Home screen tap ➔
Settings
Shutter sound
or Off.
Storage
location for images or videos as either Phone or
Memory card (if inserted).
Reset
settings to the default values.
: provides a clear image even under
: allows you to turn the guidelines On or Off.
: allows you to set the image quality to:
: allows you to turn GPS On or Off (also known
➔
Location services
: allows you to set the Shutter sound to On
: allows you to configure the default storage
: allows you to reset all camera or camcorder
and tap
Use GPS satellites
Image viewer
and the various viewing options for a selected picture.
Image viewer options are described in the following
section. The last picture you took, displays as a
thumbnail in the Image viewer icon.
: allows you to access the Image viewer
Viewing your Pictures
After you take a photo, you can access various options from
the Image Viewer. The Image Viewer uses your Gallery. For
more information, refer to “Gallery” on page 86.
Using the Camcorder
In addition to taking photos, the camera also doubles as a
camcorder that also allows you to record, view, and send
videos.
.
Note:
The camera may not be able to properly record videos to
a memory card with a slow transfer speed.
Multimedia 91
Page 98
Shooting Video
DRAFT - Internal Use Only
DRAFT - Internal Use Only
Tip:
When shooting video in direct sunlight or in bright
conditions, it is recommended that you provide your
subject with sufficient light by having the light source
behind you.
Camera
Up
and
to
Down
1. From the main Home screen, tap
activate the camera mode.
2. Touch and drag the Camera mode button down to
Camcorder Mode.
3. Using the phone’s main display screen as a viewfinder,
adjust the image by aiming the camcorder at the
subject.
4. Before you take a video, use the
keys to zoom in or out. You can magnify the video up to
x4 (400 percent).
– or –
Pinch the screen to zoom out or pinch outwards to
zoom in.
5. Tap the Video key ( ) to begin shooting video. The red
light will blink while recording.
92
Volume
6. You can tap the screen to move the focus to the area
you touch.
7. Tap to turn on auto focus. This will automatically
focus on the middle of the screen.
8. To capture an image from the video while recording,
tap . This feature is not available when the antishake feature is activated.
9. Tap the Video key ( ) again to stop the recording and
save the video file to your Camera folder.
10. Once the file has been saved, tap the image viewer,
then tap to play your video for review.
11. Press to return to the viewer.
Camcorder Options
Options are represented by icons across both sides of the
screen.
Camera / Camcorder Mode
in various modes. Once you change the mode, the
corresponding indicator displays at the top left of the
display. Slide the button up for Camera, or down for
Camcorder.
: allows you to take a photo
Page 99
Live Shooting
DRAFT - Internal Use Only
DRAFT - Internal Use Only
session in Camcorder mode. You can view the photo in
your image viewer or Gallery.
Self portrait
camera so you can take videos of yourself or video chat.
Flash
When you set the flash to On, it stays on continually
while you are taking a video.
Recording mode
to: Normal, which is limited only by available space on
the destination location and to Limit for MMS, which is
limited by MMS size restrictions.
Effects
special effects to the video. Options include: None,
Negative, Black and white, Sepia, Washed out, Cold
vintage, Warm vintage, Posterize, Solarize, Blue point,
Green point, and Red-yellow point.
: takes a photo during a video recording
: allows you to activate the front facing
: allows you to set the flash options to Off or On.
: allows you to set the recording mode
: allows you to change the color tone or apply
Settings:
Edit shortcuts
settings that you use the most.
Self-recording
you can take videos of yourself or video chat.
Flash
When you set the flash to On, it stays on continually
while you are taking a video.
Recording mode
to: Normal, which is limited only by available space on
the destination location or Limit for MMS, which is
limited by MMS size restrictions.
Exposure value
level by moving the slider.
: allows you to set shortcut icons for the
: allows you to set the front camera so
: allows you to set the flash options to Off or On.
: allows you to set the recording mode
: allows you to adjust the brightness
Multimedia 93
Page 100
Timer
DRAFT - Internal Use Only
DRAFT - Internal Use Only
: allows you to set a timer for how long to wait
before taking a video. Options include: Off, 2 sec, 5 sec,
and 10 sec.
Effects
: allows you to change the color tone or apply
special effects to the photo. Options include: None,
Negative, Black and white, Sepia, Washed out, Cold
vintage, Warm vintage, Posterize, Solarize, Blue point,
Green point, and Red-yellow point.
Resolution
1920x1080, 1280x720, 720x480, 640x480, or
320x240.
Settings: (continued)
White balance
following choices: Auto, Daylight, Cloudy,
Incandescent, or Fluorescent.
Anti-Shake
of the subject of the video or hand movement.
: allows you to set the image size to either:
: allows you to set this option to one of the
: reduces image blur due to the movement
Storage
: allows you to configure the default storage
location for images or videos as either Phone or
Memory card (if inserted).
Reset
: allows you to reset all camera or camcorder
settings to the default values.
Image viewer
and the various viewing options for a selected video.
Image viewer options are described in the following
section. The last video you took, displays as a
thumbnail in the Image viewer icon.
: allows you to access the Image viewer
Viewing your Videos
After you take a video, you can access various options from
the Image Viewer. The Image Viewer uses your Gallery and
the Video Player. For more information, refer to “Gallery” on
page 86. Also, see“Video Player” on page 84.
Guidelines
Video quality
Superfine, Fine, or Normal.
94
: allows you to turn the guidelines On or Off.
: allows you to set the image quality to:
 Loading...