

Page 1

SCH-n330 Series
All Digital
MOBILE PHONE
User Guide
Please read this manual before operating your
phone, and keep it for future reference.
YH09.05_CB_N330_092605_F1
Page 2

Intellectual Property
All Intellectual Property , as defin ed below , owned by or which is
otherwise the property of Samsung or its respecti ve suppliers
relating to the SAMSUNG Phone, including but not limited to,
accessories, parts, or software relating there to (the “Phone
System”), is proprietary to Samsung and protected under federal
laws, state laws, and international treaty provisions. Intellectual
Property includes, but is not limited to, inventions (patentable or
unpatentable), patents, trade secrets, copyrights, software,
computer programs, and related documentation and other
works of authorship. Y ou ma y not infringe or otherwise viol ate
the rights secured by the Intellectual Property. Moreover, you
agree that you will not (and will not attempt to) modify, prepare
derivative works of, reverse engineer, decompile, disassemble,
or otherwise attempt to create so urce code from the software. No
title to or ownership in the Intellectual Property is transferred to
you. All applicable rights of the Intellectual Property shall
remain with SAMSUNG and its suppliers.
Samsung Telecommunications America (STA),
Inc.
Headquarters: Customer Care Center:
1301 E. Lookout Drive 1601 E. Plano Parkway, Suite150
Richardson, TX 75082 Plano, TX 75074
Tel: 972.761.7000 Toll Free Tel: 1.888.987.HELP (4357)
Internet Address: http://www.samsungusa.com
©
2005 Samsung Telecommunications America, Inc. is a
registered trademark of Samsung Electr onics America, Inc. and
its related entities.
Licensed by Qualcomm Incorporated under one or mor e of the
following patents: U.S. Patent No. 4, 901, 30 7; 5, 056, 109; 5, 099,
204; 5, 101, 501; 5, 103, 459; 5, 107, 225; 5, 109, 390.
Page 3

GH68-07002A
Openwave® is a registered Trademark of Openwave, Inc.
RSA® is a registered Trademark RSA Security, Inc.
Disclaimer of Warranties; Exclusion of Liability
EXCEPT AS SET FORTH IN THE EXPRESS WARRANTY
CONT AINED ON T HE WARRANTY PAGE ENCLOSED WITH
THE PRODUCT , THE PURCHASER T AKES THE PRODUCT “AS
IS”, AND SAMSUNG MAKES NO EXPRESS OR IMPLIED
WARRANTY OF ANY KIND WHATSOEVER WITH RESPECT
TO THE PRODUCT, INCLUDING BUT NOT LIMITED TO THE
MERCHANTABILITY OF THE PRODUCT OR ITS FITNESS FOR
ANY PARTICULAR PURPOSE OR USE; THE DESIGN,
CONDITION OR QUALITY OF THE PRODUCT; THE
PERFORMANCE OF THE PRODUCT; THE WORKMANSHIP
OF THE PRODUCT OR THE COMPONENTS CONT AINED
THEREIN; OR COMPLIANCE OF THE PRODUCT WITH THE
REQUIREMENTS OF ANY LAW, RULE, SPECIFICATION OR
CONTRACT PERTAINING THERETO. NOTHING
CONTAINED IN THE INST RUCTION MANUAL SHALL BE
CONSTRUED TO CREATE AN EXPRESS OR IMPLIED
WARRANTY OF ANY KIND WHATSOEVER WITH RESPECT
TO THE PRODUCT . IN ADDITION, SAMSUNG SHALL NOT BE
LIABLE FOR ANY DAMAGES OF ANY KIND RESULTING
FROM THE PURCHASE OR USE OF THE PRODUCT OR
ARISING FROM THE BREACH OF THE EXPRESS WARRANTY,
INCLUDING INCIDENTAL, SPECIAL OR CONSEQUENTIAL
DAMAGES, OR LOSS OF ANTICIPATED PROFITS OR
BENEFITS.
Page 4

Page 5

Table of Contents
Section 1: Getting Started .................................9
Activating Your Phone ....................................................10
Setting Up Your Voice Mail .............................................12
Understanding this User Manual .....................................13
Section 2: Understanding Your Phone ............15
Features of Your Phone ..................................................16
Front View of Your Phone ...............................................17
Extending and Retracting the Pop-up Display .................19
Internal Antenna .............................................................20
Command Keys ..............................................................21
Understanding the Display Screen ..................................24
Battery ...........................................................................28
Section 3: Call Functions .................................31
Making a Call .................................................................32
International Calls ..........................................................32
Receiving a Call .............................................................33
Adjusting the Call Volume ...............................................34
Call Logs ........................................................................34
Phone Modes .................................................................39
Roaming ........................................................................42
Voice Dialing ..................................................................44
Section 4: Menu Navigation ............................51
Menu Navigation ............................................................52
Menu Outline .................................................................55
Section 5: Entering Text ..................................63
Changing the Text Entry Mode ........................................64
Using T9 Mode ...............................................................66
Entering Text in ABC Mode .............................................68
Entering Symbols ...........................................................69
Table of Contents 5
Table of Contents
Page 6

Entering Numbers ..........................................................70
Section 6: Understanding Your Contacts List .73
Your Contacts List ..........................................................74
Adding a New Contacts List Entry ...................................75
Finding a Contacts List Entry ..........................................81
Editing an Existing Contacts List Entry ............................84
Table of Contents
Deleting a Contacts List Entry .........................................90
Speed Dialing .................................................................91
Memory ..........................................................................94
Section 7: Messages ........................................95
Send Text Messages ......................................................96
Retrieving New Messages ..............................................99
Voice Mail ....................................................................100
Message Folders ..........................................................101
Messages Settings .......................................................106
Erase Messages ...........................................................107
Section 8: Axcess ..........................................109
Axcess Catalog .............................................................110
Settings ........................................................................111
Help .............................................................................112
Section 9: Mobile Web ...................................115
Mobile Web Operations .................................................116
Launch Mobile Web ......................................................116
Exit Mobile Web ............................................................116
Navigate the Web .........................................................117
Mobile Web Soft Keys ...................................................117
Using links ...................................................................117
How Mobile Web Keys Work .........................................118
Section 10: Gallery .........................................121
Gallery Menu ................................................................122
Menu Style ...................................................................123
6
Page 7

Animation ....................................................................123
Banner .........................................................................124
Volume/VibeTonz .........................................................125
Ringer Type ..................................................................126
Key Beep .....................................................................127
Alerts ...........................................................................128
Power On/Off ...............................................................129
Roam Ringer ................................................................130
Section 11: Tools ...........................................131
Today ...........................................................................132
Scheduler ....................................................................136
Jump To Date ..............................................................137
To Do List ....................................................................138
Memo Pad ...................................................................140
Alarm Clock .................................................................142
Count Down .................................................................144
World Time ..................................................................146
Calculator ....................................................................147
Voice Kit .......................................................................147
Section 12: Settings ......................................157
Location .......................................................................158
Network .......................................................................159
Data .............................................................................161
Security .......................................................................163
Others ..........................................................................171
Section 13: Phone Info ..................................177
Version .........................................................................178
Phone Number .............................................................178
Section 14: Health and Safety Information ...179
Health and Safety Information ......................................180
Consumer Information on Wireless Phones ...................182
Road Safety .................................................................192
Table of Contents 7
Table of Contents
Page 8

Operating Environment .................................................195
Using Your Phone Near Other Electronic Devices ..........195
Potentially Explosive Environments ...............................198
Emergency Calls ...........................................................199
FCC Notice and Cautions ..............................................200
Other Important Safety Information ...............................201
Table of Contents
Product Performance ....................................................202
Availability of Various Features/Ring Tones ...................203
Battery Standby and Talk Time .....................................204
Battery Precautions ......................................................204
Care and Maintenance ..................................................205
Section 15: Warranty Information .................207
Standard Limited Warranty ...........................................208
Index ...............................................................215
8
Page 9
Section 1: Getting Started
Topics Covered
• Activating your phone
• Setting Up Voice Mail
• Understanding this User Manual
This section allows you to start using your phone by
activating your service and phone, setting up your
voice mail, contacting customer support, or getting an
understanding of how this manual is put together.
Section 1
Section 1: Getting Started 9
Page 10

Activating Your Phone
Contact Alltel and follow their instructions for obtaining
service. We suggest that you read this guide to fully
understand the services your phone supports.
Important! You should fully charge the battery in your phone before first
use, otherwise you could damage the battery. For details, see "Charge the
battery" on page 29.
Turn your phone on
1. Open the pop-up display
on your phone (as shown)
Section 1
Note: As with any other radio-transmitting device, do not touch the
antenna area (top rear of your phone) as that affects receive signal strength
and call quality and may cause the phone to operate at a higher power
level than is necessary.
by simultaneously
pressing both pop-up
display buttons located on
each side of the phone.
2. Press and hold for
two or more seconds.
3. The phone begins
searching for a network signal.
4. Once the phone finds a signal, the Alltel name, the time,
date, and day appear in the display.
5. You’re now ready to place and receive calls.
10
Page 11

Activating Your Phone
If you are outside of the Alltel coverage or roaming are a,
the no signal ( ) and no service ( ) icons appear on
the top bar of the display.
Turn your phone off
1. Open the pop-up display on your phone by
simultaneously pressing both pop-up display buttons
located on each side of the phone.
2. Press and hold for two or more seconds. Your
phone powers off.
Note: If your phone is on and you press for less than a second, the
phone will not power off. This prevents your phone from being turned off
accidentally.
Section 1
Section 1: Getting Started 11
Page 12

Setting Up Your Voice Mail
V oice m ail allows callers to leave voice message s, which
can be retrieved any time.
Note: Once your voice mail account has been set up, you can use the Voice
Mail folder (under the Message menu) to view details of voice messages in
your voice mail box.
1. In idle mode, press and hold the Down key, press and
hold the key or dial your own mobile number to dial
voice mail.
2. Press to interrupt the greeting.
Section 1
3. Follow the prompts in the new user tutorial to setup your
mail box.
Listen to voice mail
1. In idle mode, press and hold the Down key, press and
hold the key or dial your own mobile number to dial
voice mail. After connecting, you will hear your voice
greeting.
2. Interrupt your greeting by pressing .
3. You are then prompted to enter your password.
12
Page 13

Understanding this User Manual
Understanding this User Manual
The sections of this manual generally follow the same
order as the menus and sub menus in your phone. A
robust index for quick reference to most features begins
on page 215.
Also included is important safety information that you
should know before using your phone. Most of this
information is near the back of the guide, beginning on
page 179.
Notes and tips
Throughout this guide are icons and text that ar e set apart
from the rest. These are intended to point out important
information, quick methods for activating features, to
define terms, and more. The definitions for these
methods are as follows:
• Notes: Explain alternative options within the current feature,
menu, or sub menu.
• Tips: Provide quick or innovative methods for performing
functions related to the subject at hand.
• Fast Facts: Are like snippets from a glossary. Fast facts
provide definitions in context and proximity to the menu or
feature in question.
• Important: Points out important information about the current
feature that could affect performance, or even damage your
phone.
Section 1
Section 1: Getting Started 13
Page 14

Section 1
14
Page 15

Section 2: Understanding Your Phone
Topics Covered
• Features of Your Phone
• Front View of Your Phone
• Extending and Retracting the Pop-up Display
• Internal Antenna
• Command Keys
• Understanding the Display Screen
• Battery
This section outlines some key features of your phone.
Y our phone’s display and the icons that will appear on it
when in use are also described.
Note: Some network-based features described in this user manual may
not be available in all coverage areas. For more information, contact your
wireless service provider.
Section 2
Section 2: Understanding Your Phone 15
Page 16

Features of Your Phone
• Domestic and international voice and text messaging service
(available on participating networks).
• High speed data (CDMA 2000 1x Technology)
• Global Positioning (GPS) Technology
• 128 x 160 pixel color Liquid Crystal display
• PIM functions (Scheduler, To Do List, etc.)
• TXT Messaging
• Voice Dial
• Speaker phone
• 32 Polyphonic Ring tones
• VibeTonz™ Technology
Section 2
16
Page 17
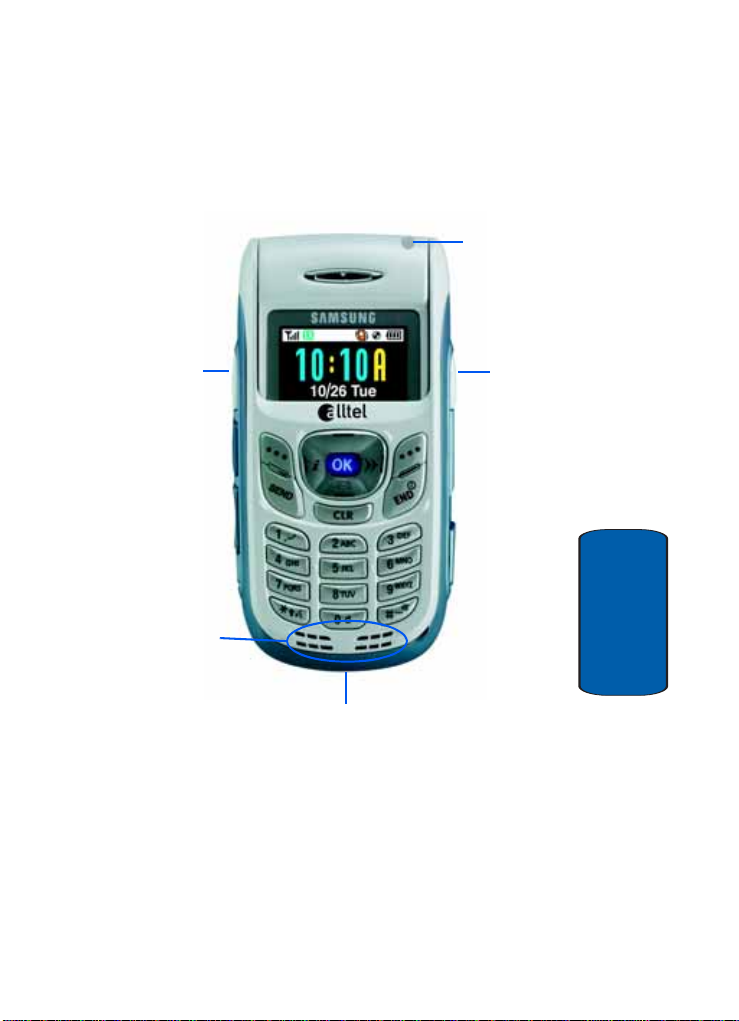
Front View of Your Phone
SCH-n330 closed view.
Front View of Your Phone
Service LED
Pop-up
Display
Button
Speaker
Charger/Accessory Connector
Section 2: Understanding Your Phone 17
Pop-up
Display
Button
Section 2
Page 18
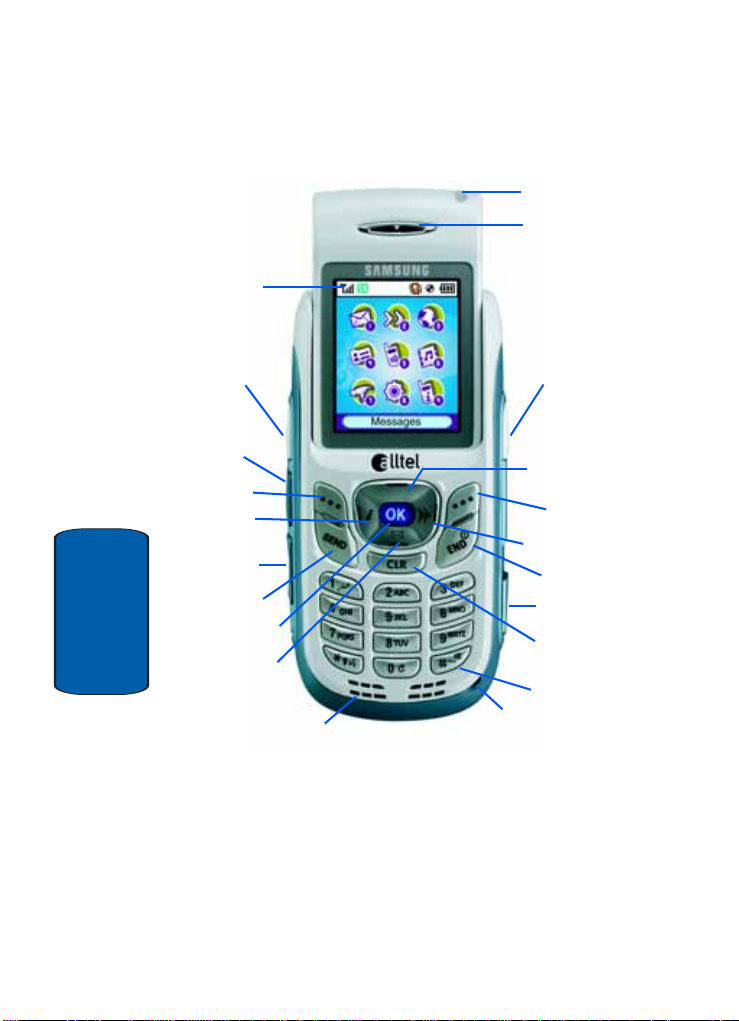
SCH-n330 open view.
Display
Service LED
Earpiece
Get In Web/
Left Key
Section 2
18
Pop-up
Display
Button
Speaker
Phone
Button
Left Soft
Key
Volume
Up/Down
Keys
Send Key
Messages/
Down Key
OK Key
Speaker
Pop-up
Display
Button
Up Key/
Shortcut
Key
Right Soft
Key
Axcess/Right
Key
End Key
Headset
Connector
CLR
(Clear) Key
Space/Silent
Mode Key
Microphone
Page 19
Extending and Retracting the Pop-up Display
Extending and Retracting the Pop-up Display
The SCH-n330’s unique pop-up display is designed to
provide maximum visual space in a compact phone, as
well as, to restrict unwanted dialed calls. With the pop-up
display retracted, the keypad is locked. This prevents
unwanted dialing of numbers and unwanted turning the
phone on and off.
Note: You must extend the pop-up display to turn the SCH-n330 on or off.
With the phone on and the pop-up display retract ed, all
incoming call, incoming message , alert, and alarm rings
or tones can still sound.
Tip: You can setup the SCH-n330 to allow you to answer incoming calls by
simply extending the pop-up display. See "Call Answer" on page 172.
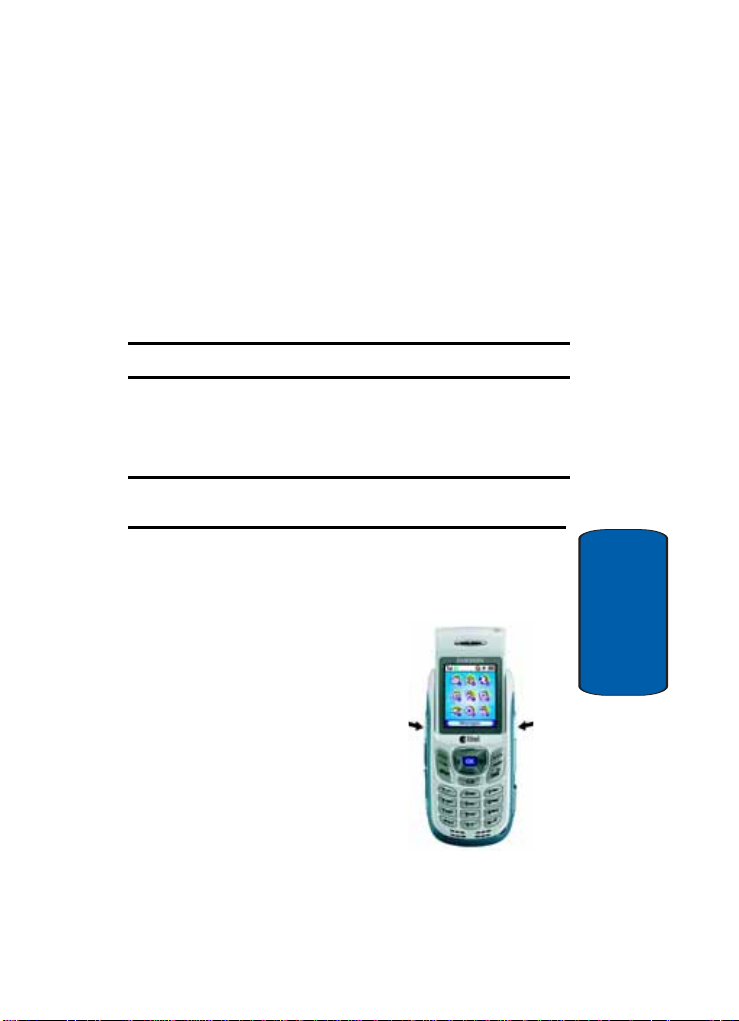
T o use your new SCH-n330 phone, follow the steps listed
below:
1. Hold your phone in an upright position.
2. To extend the display,
simultaneously press
both pop-up display
buttons located on each
side of the phone.
You can now turn the
phone on or off. See
‘‘Turn your phone on” on
page 10 and ‘‘Turn your
phone off” on page 11.
Section 2
Section 2: Understanding Your Phone 19
Page 20

3. Once the phone is on, you can use the keypad to make
and answer calls, to access the menu options of your
phone, and to personalize it to fit your needs.
4. To retract the display, gently push the top of the display
down until it locks in place.
Internal Antenna
A void touching the internal antenna area at the upper rear
of your phone while it is powered up. Contact with the
internal antenna area affects the quality of your calls and
may cause the phone to operate at a higher power level
than necessary.
Section 2
20
Page 21

Command Keys
Command Keys
Functions for the soft keys are defined by what appears
above each in the display . There ar e two soft keys, the left
soft key ( ) and the right soft key ( ).
Left soft key
Some functions of
the left soft key are
as follows.
• When the left soft
key function in
the display is
Menu, press the
Menu (left) soft
key ( ) to open
the menu list.
• When the left soft
key function is
Option, press the
Option (left) soft
key ( ) to view
options in some
features.
• When the left soft key function is Edit, press the Edit (left) soft
key ( ) to edit a Contacts entry or Profile setting.
Right soft key
Some functions of the right so f t ke y are as fo llows.
• When the right soft key function is Back, press the Back (right)
soft key ( ) to return to the previous menu.
• In idle mode, press the Contacts (right) soft key ( ) to open
your Contacts list.
Left
Soft
Key Function
Left
Soft
Key
Right
Soft
Key Function
Right
Soft
Key
Section 2
Section 2: Understanding Your Phone 21
Page 22

Clear key
The CLR key ( ) is used to erase or clear numbers, text,
or symbols from the display. You can also use to
return to a previous menu or to return to idle mode from
any menu.
1. If you enter an incorrect character, briefly press to
backspace (and delete) the character.
2. T o erase the previous word in a sentence, press and hold
.
3. To back up one menu level, briefly press .
4. To return to idle mode from any menu, press and hold
until you return to idle mode.
Volume key
The volume key is located on the left side of your phone.
Y ou can use the volume key to set the call ringer volume
in idle mode or earpiece volume while in a call. You can
also use the volume key to scroll through menus, sub
menus, and lists.
Section 2
22
Page 23

Command Keys
End key
1. Press and hold the End key ( ) to turn on your phone.
2. Press and hold to turn off your phone.
3. Briefly press once to disconnect a call, to return to
idle mode from any menu, or to cancel the last input.
Send key
The Send key ( ) is used to answer calls, dial calls, and
to recall the last number(s) dialed, re cei ved, or missed.
1. Press once to answer calls.
2. Enter a number and briefly press to make a call.
3. Briefly press in idle mode to display a list of recent
calls to and from your phone.
4. Press twice in idle mode to call the most recently
dialed number.
5. Press to pick up a waiting call. Press again to
switch back to the other call.
Navigation key
Use the directional keys on the navigation key to browse
menus, sub menus, and lists. Each key also acts as a
shortcut to launch applications. The up navigation key is
user-definable. Press when replying to prompts, and
jumping to highlighted links on the web.
Section 2
Section 2: Understanding Your Phone 23
Page 24

Understanding the Display Screen
The top line of the display is
reserved for icons that indicate
network status, battery power,
signal strength, and more. The
following icons are some that
appear in the display.
Display icons
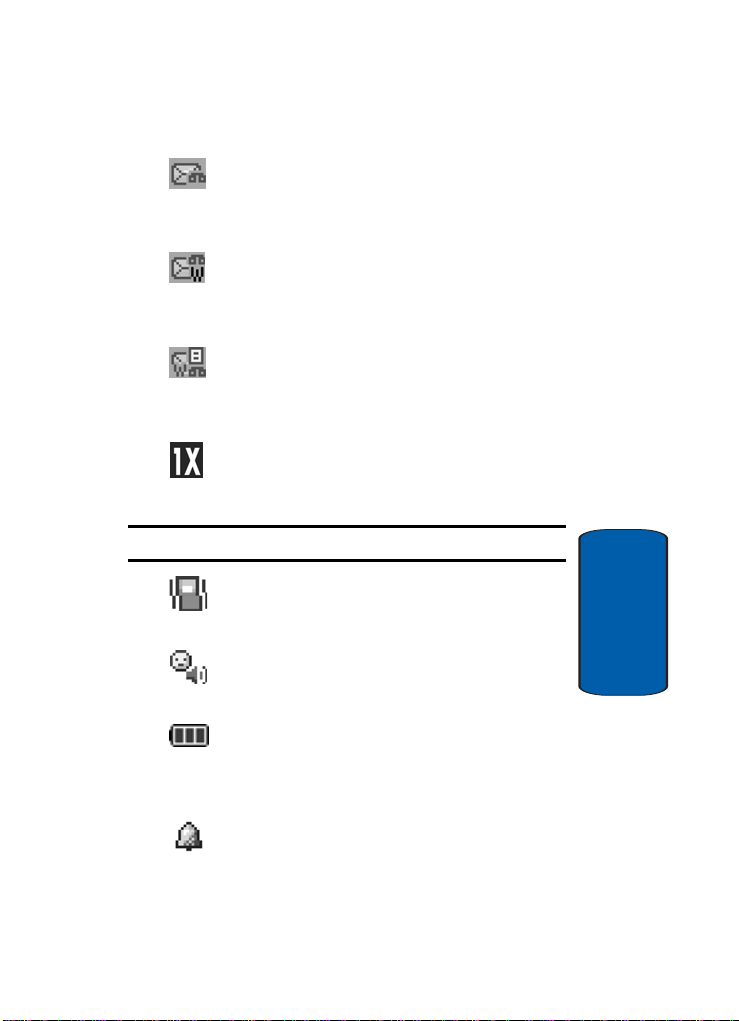
Signal strength: Always appears when your phone is
on and indicates the current signal strength. More lines
indicate a stronger signal.
No service indicator: Your phone cannot find a signal
because you’re outside a service area. You cannot make
or receive calls. Wait for a signal or mo ve to an open ar ea
to find a signal. This indicator always appears when you
first turn on your phone and disappears once service is
located.
Roaming indicator: Your phone is outside your home
area. While roaming, another wireless pr ovi d er ma y be
Section 2
handling your call. The service rate for the call may be
higher than those made from within your home area.
Please refer to Alltel for r oa ming rates.
In Use: Indicates a call in progress. When dialing a
number, this icon flashes until the call connects.
New Message: Y ou’ ve receiv ed a new text mes sage,
page, or web alert message. You’re also notified of a new
message by animations and sound. You have one or more
unheard voice mail messages in your voice mail box.
(Only applicable on Alltel Network.)
24
Page 25
Understanding the Display Screen
Voicemail message: Indicates that you’ve received a
new voice message. Y ou’re al so notified by a visual,
audible, and VibeTonz alert according to your assigned
preferences.
WAP push & voicemail message: Indicates that you’ve
received voice and WAP push messages. You’re also
notified by a visual, audible, and VibeTonz alert according
to your assigned preferences.
WAP push, TXT & voicemail message: Indicates that
you’ve received text, voice, and WAP push messages.
You’re also notified by a visual, audible, and VibeT onz alert
according to your assigned preferences.
1
X Protocol: Indicates your phone is using the 1X
protocol. The 1X protocol is capable of high-speed data
(3G).
Note: 1X protocol is available only in the Alltel network.
VibeTonz mode: Your phone vibrates and/or sounds a
tone (according to y o u r VibeTonz selection) upon
receiving a call.
Speakerphone on: Your phone is in speakerphone
mode. You can talk and listen to your call without holding
your phone next to you r ea r.
Battery strength: More black bars indicate a greater
charge. When the battery is low, an empty battery icon
flashes and the phone sounds an alert, which indicates
your phone is about to shut down.
Alarm clock: The alarm clock is set.
Section 2: Understanding Your Phone 25
Section 2
Page 26

Section 2
Ringer off: Your phones call ringer is turned off.
GPS (United States only): Global Positioning Service
(GPS) for 911 is set to On for emergency calls only .
GPS (United States Only): Global Positioning Service
is set to On for location and 911 calls.
Silent mode: The ringer is silenced for all alerts,
incoming calls, and incoming messages. The phone
alerts you to thes e by v ib ration and a flashing service
LED.
26
Page 27
Understanding the Display Screen
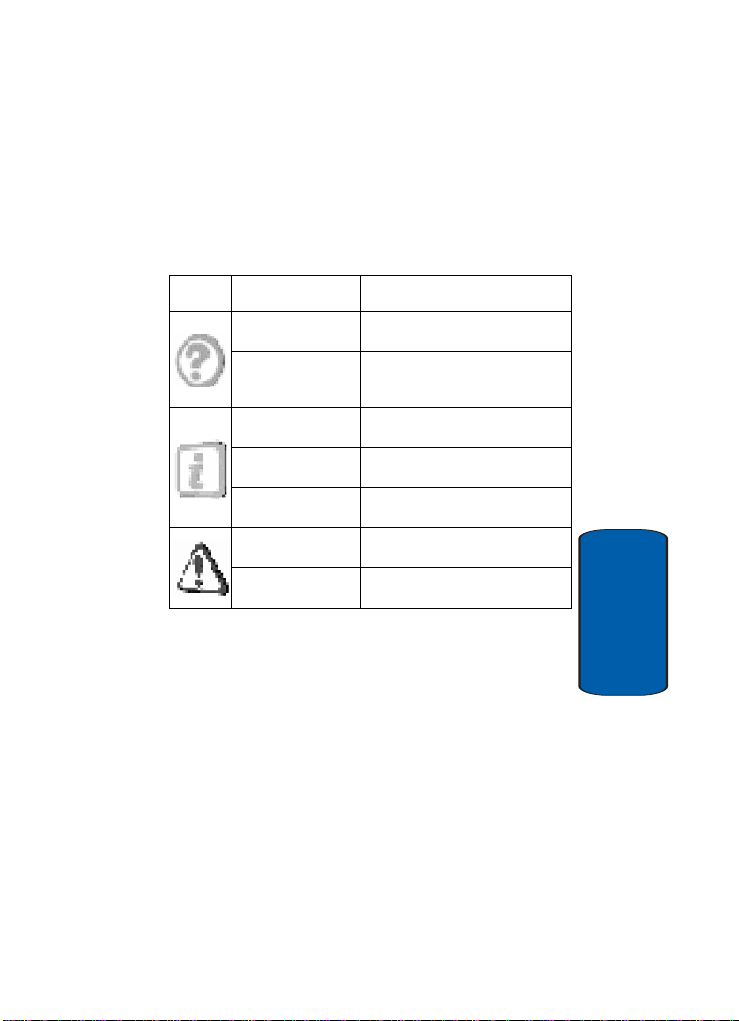
Dialogue boxes
Dialogue boxes prompt for action, inform you of status, or
warn of situations such as low memory. Dialogue boxes
and their definitions are outlined below.
ICON MESSA GE TYPE EXAMPLE
Choice
Reconfirm
Performing
Completed
Information
Error
Warning
Section 2: Understanding Your Phone 27
“Save message draft?”
Delete all received
messages?”
“Sending...” “Connecting...”
“Message sent successfully!”
“New Message”
“System Error!”
“Battery Low,” “Memory Full!”
Section 2
Page 28
Battery
Note: This phone comes packaged with a partially charged rechargeable
standard Li-Ion battery and travel adapter.
Important: Although the phone can be used while the battery is charging,
the battery must be fully charged before first use, otherwise you could
damage the battery.
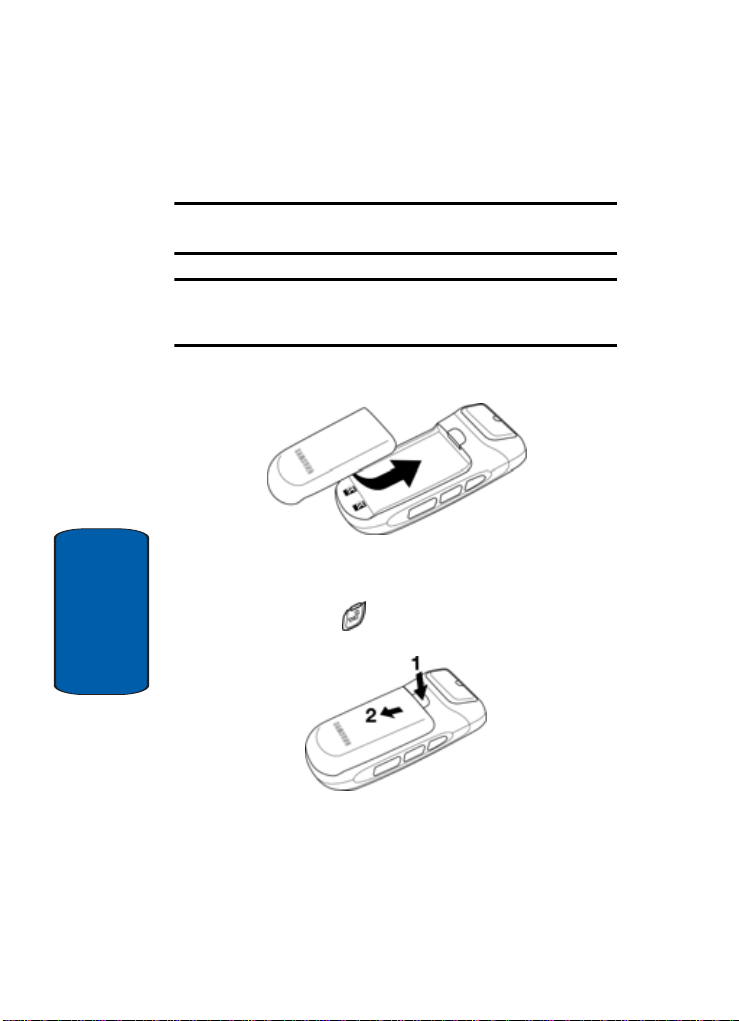
1. Place the battery so it rests in the slot in your phone just
below the battery release latch.
2. Gently slide the battery up until it snaps into place.
Remove the battery
1. Press and hold to turn off the phone (if on).
Section 2
2. Press down the battery release latch (1) and hold.
3. Slide the battery (2) down and lift it away from your
phone.
28
Page 29

Battery
Charge the battery
Y our phone is powered by a rechargeable standard Li-Ion
battery. Only use Samsung-approved charging devices
and batteries. Samsung accessories are designed to
maximize battery life.
Caution: Using other, non-Samsung accessories may invalidate your
warranty and may cause damage.
Use the travel adapter
The travel adapter is a
convenient, light-weight
charger that rapidly charges
your phone from any 120/220
VAC outlet.
1. Plug the large end of the travel adapter into a standard
120 or 220 VAC wall outlet.
2. Insert the smaller end of the adapter into the charger/
accessory connector at the bottom end of the phone.
Your phone begins charging and the battery image
appears in the display.
Section 2
Note: You can use your phone while charging, however, the battery
charges faster if the phone is turned off.
Section 2: Understanding Your Phone 29
Page 30

Battery indicator
The battery indicator ( ) in the upper-right corner of
the display indicates battery power level. Three bars
indicate a full charge, while an empty icon ( ) indicates
an almost empty battery.
T wo to three minutes before t he battery becomes too low
to operate, a blinking empty battery icon ( ) appears in
the display and a tone sounds.
If you continue to operate the phone without charging, it
shuts down.
Section 2
30
Page 31

Section 3: Call Functions
Topics Covered
• Making a Call
• International Calls
• Receiving a Call
• Adjusting the Call Volume
•Call Logs
• Phone Modes
•Roaming
• Voice Dialing
This section allows you to make or answer a call. It al so
includes the features and functionality associated with
making or answering a call.
Section 3: Call Functions 31
Section 3
Page 32

Making a Call
1. With your phone on, extend the pop-up display by
simultaneously pressing both pop-up display buttons
located on each side of the phone.
2. Enter the number you wish to call using the keypad.
3. Press to place the call.
Dialing emergency numbers
Y ou can dial any of the numbers 91 1, *911, or #91 1 to place
an emergency call.
International Calls
Call another country from the U.S.
1. In idle mode, enter the three-digit exit code (011) for the
United States.
2. Enter the country code for the country that you are
calling.
3. Enter the number that you wish to call, then press .
Notes:
1. Puerto Rico and Canada are on the North American dialing plan.
Making calls to Puerto Rico and Canada is similar to making calls
within the United States, no unique country codes are necessary.
2. For more information on International Dialing see Alltel.com.
Section 3
32
Page 33
Receiving a Call
Receiving a Call
When you receive a call, the phone displays one of the
following:
• If the caller can be identified, the caller’ s number (or name if it’s
in your Contacts list) appears in the display.
• If the caller can’t be identified, Call from unavailable #, Call
from restricted #, or no number appears in the display.
Y our phone continues to notify you of the call until one of
the following events occur:
• You press to answer the call.
• The calling party ends the call.
• The call is sent to voicemail.
Receive calls while using a feature
If you receive a call while browsing menus and su b
menus, or while using a feature, the caller’s number (or
name, if it’s in your Contacts list) appears in the display as
well as the options Silent and Ignore.
• Press the Ignore (left) soft key ( ) to send the call directly to
voicemail.
• Press the Answer (right) soft key ( ) to answer the call.
If the call goes unanswered, it will eventually be sent to
voicemail.
Note: If you answer the call, when you end it, your phone displays the idle
screen.
Section 3: Call Functions 33
Section 3
Page 34

Adjusting the Call Volume
■ In idle mode, repeatedly press the volume key ( ) up or down until
the desired Calls Level (Silent, 1 Beep, VibeTonz, Level 1-5,
Vib+Ring, or Vib&Ring) appears in the display. The volume key is
on the left side of phone, next to the SEND key ( ).
Call Logs
Use Recent Calls to view a list of recently dialed and
received calls. Use Calls to view separate lists of all
Outgoing, Incoming, and Missed calls for your phone.
Y ou can use either Recent Calls or Calls to view Call Timers
and to erase your call history.
Note: Functionality of Recent Calls and Calls is dependent upon availability
with the service provider’s network and whether or not Caller ID is enabled.
View Recent Calls
1. In idle mode, press . A list of recently dialed and
received calls appears in the display.
2. Use the navigation keys to select a particular call.
3. Press to view the selected call or press to dial
the selected number.
Section 3
34
Page 35

Call Logs
View Calls
1. In idle mode, press the Menu (left) soft key ( ), then
press (Calls).
2. Press the corresponding number on the keypad to view
call logs for the following call types:
• for Outgoing
• for Incoming
• for Missed
The selected list of logged calls appears in the display.
3. Use the navigation keys ( ) to select a particular call.
4. Press to view the selected call or press to dial
the selected number.
Calls and Recent Calls menu options
While viewing Calls or Recent Calls, you have options
such as saving recent call numbers to your Contacts list,
sending messages to logged call numbers, and
prepending (editing) numbers before saving.
1. In idle mode, press for Recent Calls and skip to
Step 3,
Or
Press the Menu (left) soft key ( ), then press for
Calls.
Section 3: Call Functions 35
Section 3
Page 36
2. From the Calls menu, press the corresponding number
on the keypad to view call logs for the following call
types:
• for Outgoing
• for Incoming
• for Missed
The selected list of logged calls appears in the display.
3. Use the navigation keys ( ) to highlight a particular
phone number.
4. Press to display the latest call information for that
number.
5. Press the Option (left) soft key ( ). A pop-up menu
appears in the display containing the following options:
• Talk: Dial the number.
• Save: Save the number as a new entry or save the number to
an existing entry in your Contacts list.
• Prepend: Display the number with the cursor before the first
digit.
Useful for entering a “1” or area code ahead of the displayed
phone number.
• Erase: Delete the number from your Calls list.
6. Use the navigation keys ( ) to highlight an option.
7. Press to perform the highlighted function.
8. Follow the prompts as necessary to complete the
function.
Section 3
36
Page 37
Call Logs
Erase Call Logs
Use Erase Logs to delete calls from any or all call logs.
1. In idle mode, press the Menu (left) soft key ( ), then
press (Calls), and press (Erase Logs).
2. Use the navigation keys to highlight the call log type that
you wish to delete, then press .
• for Outgoing
• for Incoming
• for Missed
• for All Calls
You’re prompted to confirm the erasure.
3. Use the navigation keys to highlight Yes to erase the
selected call log, or to highlight No to return to the Erase
Logs sub menu.
4. Press to perform your selected function.
Section 3: Call Functions 37
Section 3
Page 38
Call Timers
Use the Call Timer sub menu to view various timers fo r
calls made and received from y ou r phone. You can also
reset any of your call timers, with the exception of the
Lifetime timer.
Note: The Lifetime timer retains a log of all calls made since the purchase
of your phone and cannot be reset.
1. In idle mode, press the Menu (left) soft key ( ), then
press (Calls), (Call Timer). The following
menu items appear in the display.
• Last Call: View the duration of your last call.
• Total: View the duration of total outgoing and incoming calls.
• Lifetime: View the duration of all calls on your phone since
activation (Life Time time rs cannot be erased).
• Erase Total: Erase the Last Call and Total time rs.
2. Use the navigation keys to highlight the desired sub
menu.
3. Press to perform the function for the highlighted
option or to enter its sub menu and make changes as
desired.
Section 3
38
Page 39

Phone Modes
Phone Modes
Idle mode
Idle is the state of the phone once it has obtained service
from the network and is idle. The phone goes into idle:
• After you power the phone on.
• When you press after a call.
• Anytime you press while browsing your phone’s menus
and sub menus.
1. While in idle mode, enter a phone number, then press
to place a call.
2. Press to return to idle mode.
Text entry mode
Enter content using any of the four text entry modes.
1. At any text entry screen, press the Option (left) soft key
( ). A pop-up menu appears in the display with T9
WORD highlighted.
2. Use the navigation keys to display the optional text entry
modes of T9 WORD, ABC, Symbol, and 123.
3. Once the desired method of text entry appears, press
to use that mode of text entry in your message.
Section 3: Call Functions 39
Section 3
Page 40
Silent mode
Silence the tones your keypad makes whenever you press
a key using the Silent Mode feature.
Enter Silent mode
■ In idle mode, press and hold . Entering Silent Mode briefly
appears in the display and your phone returns to idle mode.
Exit silent mode
■ In idle mode, press and hold . Exit Silent Mode briefly
appears in the display and your phone returns to idle mode.
VibeTonz mode
•
In idle mode, repeatedly press the volume key ( ) down until
VibeTonz appears in the display, or press the volume key up
until Vib+Ring or Vib&Ring appears in the display. The volume
key is on the left side of phone, next to the SEND key ( ).
Note: The VibeTonz icon ( ) appears in the display whenever the phone
is in VibeTonz, Vib+Ring, or Vib&Ring mode.
Section 3
40
Page 41
Phone Modes
Speaker Mode
Speaker mode lets you conduct a call without holding the
phone to your head. Speaker mode also lets you include
other, nearby people in an active call.
Enter Speaker Mode
■ While you are in a call, press and hold the Speaker Phone key ( ).
The “Speaker Phone On” message and the speaker on icon ( )
appear in the display.
Note: You must be involved in an active call on your phone before you
attempt to enter Speaker Mode. If you press and hold from Idle Mode,
the “Cannot Enter Speaker mode” message appears in the display.
Exit Speaker Mode
■ While you are in a call and in Speaker Mode, press and hold .
The “Speaker Phone Off” message appears in the display, and the
speaker on icon ( ) disappears from the display.
Note: Your phone automatically exits Speaker Mode when you end a call.
Section 3: Call Functions 41
Section 3
Page 42

Roaming
What is Roaming
You can roam (travel outside your designated coverage
area) with your phone to other digital networks. The
roaming icon appears in the display when roaming is
active, and extra charges may apply when making or
receiving a call.
Note: Some features may be unavailable while roaming. Roaming also
consumes additional power from the battery, requiring more frequent
charging.
Roaming Options
Roam Option sets roaming preferences if you move out of
your home network. The following roaming options are
available:
• Home only—Your phone is available for normal operation only
within your designated coverage area.
• Automatic-A—The Preferred Roaming List (PRL) is used to
acquire service. If no preferred systems are found, any digital
“A” system is acquired.
• Automatic-B—The PRL is used to acquire service. If no
preferred systems are found, any digital “B” system is
acquired.
Note: Browse www.Alltel.com or contact Alltel for information regarding
Roaming and preferred systems.
Section 3
42
Page 43
Change Roaming option
To change your Roaming option, follow these steps:
1. In idle mode, press the Menu (left) soft key ( ), then
press (Settings), (Network), (Roam
Option).
2. Use the navigation key to highlight your roam option
preference, then press . Your settings are saved.
Note: This feature is only available on the Alltel network.
Roaming
Section 3: Call Functions 43
Section 3
Page 44

Voice Dialing
The SCH-n330 phone includes voice recognition-based
dialing technology. You can use your voice in a natural
manner to dial numbers, lookup contacts, record a voice
memo, and much more. Please review the following
content to learn more about this useful feature.
Note: Voice Dialing is a provided and controlled by the Voice Kit feature.
See "Voice Setup" on page 151 for more information.
Voice dialing commands
The Voice Dialing menu, which you can activate by
pressing and holding the key, contains the following
commands:
• Digit Dial—Dials any seven- or ten-digit North American phone
number.
• Name Dial—Dials a name, if stored in your Contacts list.
• Voice Memo—Lets you record a voice memo.
• Contacts—Displays your Contacts entries, if any exist.
• My phone#—Displays your phone number assigned by Alltel.
To access the Voice Dialing menu, do the following:
1. In idle mode, press and hold the key. The Voice
Dialing command menu appears in the display, and the
phone prompts, “Say a command.”
2. In a natural manner, say one of the following commands:
• Digit Dial
Section 3
• Name Dial
• Voice Memo
44
Page 45

Voice Dialing
• Contacts
• My phone#
The text of the command you spoke appears in the
display followed by a prompt.
3. Follow the prompts as necessary to complete the
function.
Digit Dial
Digit Dial lets you dial any valid seven-digit or ten-digit
phone number by speaking the number naturally,
without pausing between digits.
Digit Dial Tips
• Digit Dial works best in quieter environments.
• When pronouncing a number, speak at a normal speed, saying
each digit clearly. There is no need to pause between digits.
• Digit Dial recognizes the digits one, two, three, four, five, six,
seven, eight, nine, zero, and oh (zero). Your phone does not
recognize numbers such as “one eight hundred” for “1-800.”
Instead, say “one eight zero zero,” or “one eight oh oh.”
• Digit Dial recognizes only valid seven- or ten-digit North
American phone numbers, optionally preceded by the digit “1.”
Note: If you are experiencing frequent problems getting Digit Dial to
recognize you, try adapting it to your voice, which can greatly improve
accuracy. See "Set Digits—Adapt Digits" on page 152 more information.
Section 3: Call Functions 45
Section 3
Page 46

Using Digit Dial
1. In idle mode, press and hold the key. The Voice
Dialing command menu appears on the display, and the
phone prompts, “Say a command” followed by a single
beep.
2. Say “Digit Dial.”
The command Digit Dial appears in the display and the
phone prompts, “Number please” followed by a beep.
3. Say the number naturally and clearly.
• If the phone asks “Did you say” foll owed by the correct number ,
say “Yes.” The phone dials the number.
• If the phone asks “Did you say” followed by any incorrect
numbers, say “No.”
• If there are other choices, the phone pr ompts you with them
next.
4. Use the navigation keys to highlight a number from the
list, then press the SEND (left) soft key ( ) or press
to dial that number.
Note: If Digit Dial frequently does not recognize your speech, you may want
to adapt (or “train”) Digit Dial to better respond to your voice. After you
adapt Digit Dial, however, your phone is customized to your voice, and your
voice only. Others will not be able to use Digit Dial unless they reset the
phone to factory defaults. See "Set Digits—Adapt Digits" on page 152 for
more information.
Section 3
46
Page 47

Voice Dialing
Name Dial
Name Dial lets you dial any person in your Contacts list
by saying that person’s name. Name Dial automatically
voice activates every contact in your Contacts list without
the need to record or “train” names before using them.
Note: See "Add a New Contact Entry" on page 77 for information on
creating a Contacts list.
Place a call using Name Dial
1. In idle mode, press and hold the key. The Voice
Dialing command menu appears in the display, and the
phone prompts, “Say a command” followed by a single
beep.
2. Say “Name Dial.”
The command Name Dial appears on the display a nd the
phone prompts, “Name please” followed by a beep.
3. Say the name of the person you wish to call, exactly as it
is entered in your Contacts list.
• If Name Dial doesn’t recognize the name, your phone prompts
you to repeat the name.
• If Name Dial cannot f ind a match, your phone displays and
announces, “Sorry No Match Found.”
• If one or more names appear on the display along with a
prompt for you to confirm the name you want, say “Yes” or
“No” as appropriate.
4. You can also choose a name from the list by using the
navigation key to highlight the name and then press the
SEND (left) soft key ( ) or press to dial that
number.
Section 3: Call Functions 47
Section 3
Page 48

5. If the name you say or choose has more than one
associated number, the different locations (such as
“Home” or “Office”) appear on the display and your
phone prompts you, “At which location?” followed by a
beep.
6. Say the location that you wish to call. The phone dials
the number.
Voice Memo
V oice Memo allows you to quickly recor d a voice memo
for later playback.
Record a voice memo
1. In idle mode, press and hold the key. The Voice
Dialing command menu appears in the display, and the
phone prompts, “Say a command” followed by a single
beep.
2. Say “Voice Memo.”
Recording appears on the display and the phone
prompts, “Please record after the beep” followed by a
beep.
3. Wait for the beep, then start sp ea ki ng. As it i s re cord in g,
the phone displays the elapsed time.
4. Press the Stop (right) soft key ( ) when you’re finished
recording. A pop-up menu appears on the display with
Save highlighted.
Section 3
5. Press to save your voice memo and return to the idle
screen.
48
Page 49

Voice Dialing
Note: For more information about the Voice Memo feature, see "Voice
Memo" on page 147.
Contacts
Contacts allows you to view the information for a
Contacts list entry by saying that entry’s name.
Display a contact
1. In idle mode, press and hold the key. The Voice
Dialing command menu appears in the display, and the
phone prompts, “Say a command” followed by a single
beep.
2. Say “Contacts.”
Contacts appears on the display, and the phone prompts,
“Name Please” followed by a beep.
3. Say the name of the Contacts list entry you want to view
exactly as it is entered in your Contacts list.
• If your phone doesn’t reco gnize the name, it prompts you to
repeat the name. If your phone cannot find a match, it displays
and announces, “Sorry No Match Found.”
• When your phone recognizes a match, it repeats the name and
displays the information for the contact you requested.
Section 3: Call Functions 49
Section 3
Page 50

My phone number
My phone# allows you to view and hear your phone
number by saying a voice command.
Display your phone number
1. In idle mode, press and hold the key. The Voice
Dialing command menu appears in the display, and the
phone prompts, “Say a command” followed by a single
beep.
2. Say “My phone number.”
The phone displays and announces your phone number.
3. Press to exit.
Section 3
50
Page 51

Section 4: Menu Navigation
Topics Covered
• Menu Navigation
• Menu Outline
This section explains the menu navigation for your
phone. It also includes an outline of all the available
menus associated with your phone.
Section 4
Section 4: Menu Navigation 51
Page 52

Menu Navigation
Access menus using the navigation key in tandem with
the two soft keys ( ), or use a shortcut.
Section 4
1. In idle mode press the Menu (left) soft key ( ). The first
of several menus appear in the display.
2. Use the navigation keys to browse phone menus.
3. Press to enter the menu or sub menu presently
appearing in the display.
Return to the Previous Menu
1. Press the Back (right) soft key ( to return to the
previous menu.
2. If Back does not appear in the display, press to
return to the previous menu.
Navigate Using Shortcuts
You can also access menus and sub menus using menu
numbers. This method is often called a “shortcut.” To
shortcut to a menu or sub menu, press the Menu (left) soft
key ( ), then enter the menu and/or sub menu
number(s) for the feature in question. Use "Menu Outline"
on page 55, for looking up the menu shortcut number.
1. In idle mode, press the Menu (left) soft key ( ).
2. Press the number of the menu, sub menu, and so on to
arrive at the desired feature.
52
Page 53
Menu Navigation
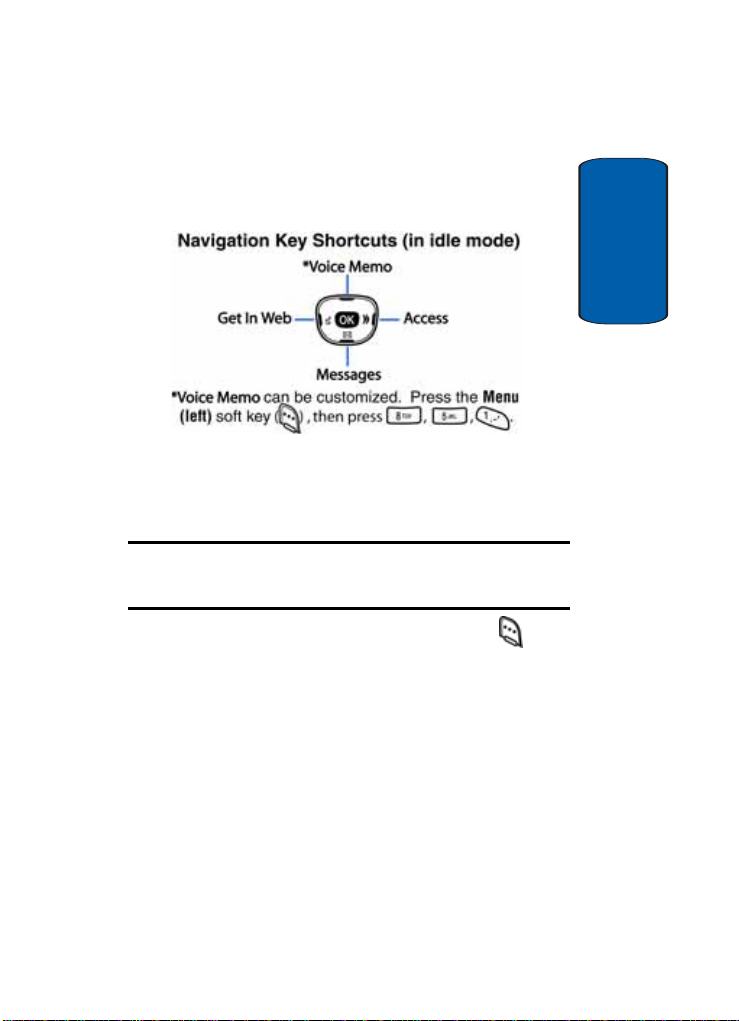
Navigation Key Shortcuts
In idle mode, press a navigation key (as illustrated below)
to launch its corresponding application.
The In-Use Option
Y ou can access numerous menus and features even while
in a call.
Note: If the call is disconnected while accessing the In-Use Option, the InUse Option disappears from the display and the phone eventually returns to
idle mode.
1. While in a call, press the Menu (left) soft key ( ). The
following In-Use menu items appear in the display.
• Calls: Displays your recent incoming, outgoing, and missed
calls.
• Contacts: Opens the Contacts list and lets you view contacts.
• Silent/Quit: Silences or restores keypad tones.
• Send Tel #: Sends your cell phone number as DTMF tones.
Useful for dealing with automated customer suppo rt systems.
• Send DTMF: Sends the number called as DTMF tones.
• Voice Privacy: Prevents recipients of your calls from seeing
your number on their display.
Section 4: Menu Navigation 53
Section 4
Page 54

Section 4
• Location: Changes the GPS setting to Location On or 911
.
Only
• Version: Lets you view t he software and hardware version
information for your phone.
2. If you press the Msg (right) soft key ( ) in while in a
call, the following Messages menu items appear in the
display:
• Send New Msg: Lets you compose and send a text
message.
• Voice Mail: Lets you view information about your received
voice mail messages.
• Inbox: Lets you view information about and review your
received text messages.
• Outbox: Lets you view sent text messages.
• Draft: Lets you view and send previously composed
messages that are not yet sent.
• Saved: Lets you view messages in the Save folder .
• Wap Push: Lets you view messages received through the
WAP browser.
• Msg Setting: Lets you change the message settings on your
phone
• Erase Msg: Lets you erase any o r all me ssages and
message information stored in your phone.
3. Use the navigation key to highlight a menu. Press to
open the highlighted menu or to activate the feature.
54
Page 55

Menu Outline
Menu Outline
Use the menu shortcuts on the following pages to quickly
access menus and sub menus. Press the Menu (left) soft
key ( ), then press the number to the right of the menu
to jump to that menu, sub menu, or feature. For example,
to jump to the Outbox sub menu, press the Menu (left)
soft key ( ), then press (Messages), (Outbox).
1 Messages
1.1 Send New Msg
1.2 Voice Mail
1.3 Inbox
1.4 Outbox
1.5 Draft
1.6 Saved
1.7 Wap Push
1.8 Msg Setting
1.8.1 Send Setting
1.8.1.1 SaveInOutbox
1.8.1.2 Callback #
1.8.1.3 Entry Mode
1.8.1.4 Insert Sign.
1.8.1.5 Delivery Ack
1.8.2 Msg. Alert
1.8.2.1 Vol./VibeTonz
1.8.2.2 Type
1.8.2.2.1 Voice Mail
1.8.2.2.2 Page
1.8.2.2.3 Text
1.8.2.2.4 Wap Push
Section 4: Menu Navigation 55
Section 4
Page 56

Section 4
1.8.2.3 Reminder
1.8.3 Auto Play
1.8.4 Auto View
1.8.5 Auto Erase
1.8.6 Block/Unblock
1.8.7 Quick Text
1.8.7.1 Yes
1.8.7.2 No
1.8.7.3 Call me
1.8.7.4 Need directions
1.8.7.5 Where are you?
1.8.7.6 Will call later
1.8.7.7 Busy
1.8.7.8 On my way
1.8.7.9 Will arrive 15 minutes
1.8.7.10 Thank you
1.8.7.11 Love you
1.8.8 Signature
1.8.9 Voice Mail #
1.9 Erase Msg
1.9.1 Voice
1.9.2 Inbox
1.9.3 Outbox
1.9.4 Draft
1.9.5 Saved
1.9.6 All Messages
2 Axcess
2.1 Axcess
56
Page 57

3 Mobile Web
3.1 Mobile Web
4 Contacts
4.1 Find
4.2 Add
4.2.1 Number
4.2.2 E-Mail
4.3 Rename Group
4.3.1 Friend
4.3.2 Family
4.3.3 Colleague
4.3.4 VIP
4.3.5 No Name
4.4 Memory
5Calls
5.1 Outgoing
5.2 Incoming
5.3 Missed
5.4 Erase Logs
5.4.1 Outgoing
5.4.2 Incoming
5.4.3 Missed
5.4.4 All Calls
5.5 Call Timer
5.5.1 Last Call
Menu Outline
Section 4
Section 4: Menu Navigation 57
Page 58

5.6 Data Counter
Section 4
6Gallery
6.1 Menu Style
6.2 Animation
6.3 Banner
6.4 Vol./VibeTonz
6.5 Ringer Type
58
5.5.2 Total
5.5.3 LifeTime
5.5.4 Erase Total
5.6.1 Transmit
5.6.2 Received
5.6.3 Total
5.6.4 Erase Total
6.2.1 Opening
6.2.1.1 Proloaded
6.2.1.2 My Image
6.2.2 Closing
6.2.2.1 Preloaded
6.2.2.2 My Image
6.2.3 Wallpaper
6.2.3.1 Preloaded
6.2.3.2 My Image
6.4.1 Calls
6.4.2 Alarm
6.5.1 Calls
6.5.1.1 Preloaded
6.5.1.2 My Melody
Page 59

6.5.2 Alarm
6.5.2.1 Preloaded
6.5.2.2 My Melody
6.5.3 Data
6.5.3.1 Preloaded
6.5.3.2 My Melody
6.5.4 Planner
6.5.4.1 Preloaded
6.5.4.2 My Melody
6.6 Key Beep
6.6.1 Volume
6.6.2 Tone Length
6.6.3 VibeTonz
6.7 Alerts
6.7.1 Minute Beep
6.7.2 Service
6.7.3 Connect
6.7.4 Disconnect
6.7.5 Fade
6.7.6 Roam
6.7.7 Privacy
6.8 Power On/Off
6.9 Roam Ringer
Menu Outline
Section 4
7 Tools
7.1 Today
7.2 Scheduler
7.3 Jump To Date
Section 4: Menu Navigation 59
Page 60

7.4 To Do List
7.5 Memo Pad
7.6 Alarm Clock
7.7 Count Down
Section 4
7.8 World Time
7.9 Calculator
7.10 Voice Kit
8 Settings
8.1 Location
8.2 Network
8.3 Data
8.4 Security
60
7.10.1 Voice Memo
7.10.1.1 Record
7.10.1.2 Review
7.10.1.3 Erase All
7.10.2 Voice Setup
7.10.2.1 Set Active
7.10.2.2 Set Digits
7.10.2.2.1 Adapt Digits
7.10.2.2.2 Reset Digits
8.2.1 Set NAM
8.2.2 Roam Option
8.3.1 Auto Detect
8.3.2 Baud Rate
8.4.1 Lock Phone
8.4.2 Change Lock
8.4.3 Emergency #
Page 61

8.4.4 Voice Privacy
8.4.5 Restriction
8.4.6 Erase Memory
8.4.7 Reset Phone
8.5 Others
8.5.1 Shortcut
8.5.2 Call Answer
8.5.3 C all End
8.5.4 Auto Retry
8.5.5 Language
8.5.6 Clock Set
8.5.7 Backlight
8.5.8 C ontrast
8.5.9 Auto Hyphen
8.5.10 Service LED
8.4.3.1 911
8.4.3.2 #911
8.4.3.3 *911
8.4.5.1 Outgoing
8.4.5.2 Incoming
8.4.5.3 Contacts
8.5.7.1 LCD
8.5.7.2 Keypad
8.5.7.3 Power save
Menu Outline
Section 4
9 Phone Info
9.1 Version
9.2 Phone Number
Section 4: Menu Navigation 61
Page 62

Section 4
62
Page 63

Section 5: Entering Text
Topics Covered
• Changing the Text Entry Mode
• Using T9 Mode
• Entering Text in ABC Mode
• Entering Symbols
• Entering Numbers
This section outlines how to select the desired text input
mode when entering characters into your phone (for
example: contact names and e-mail addresses, text
messages, and memos).
This section also describes how to use the T9 predictive
text entry system to reduce the number of key strokes
associated with entering text.
Section 5
Section 5: Entering Text 63
Page 64

Changing the Text Entry Mode
You can use the keys on your phone to enter text
composed of alphabetical characters, symbols, and
numbers. This is made possible by changing sets of
characters the keys enter or the method of entry. Each
character set or entry method (symbol, number, etc.) is
called a text entry mode. Your phone provides the
following four text entry modes:
• ABC—Alphabetical text entry mode. Options are:
• ABC—All capital letters
• Abc—Initial capital letters
Section 5
• abc—All lower case letters
• Symbol—Symbol entry mode. Enter symbols into your
message by pressing the corresponding number that appears
above each symbol in the display.
• 123—Number entry mode. Enter numbers by pressing the
corresponding key on the keypad.
• T9 Word—Predictive text mode. Press each key only once to
enter the letter of the word that you’re spelling.
Y our current mode of text entry (ABC, Symbol, 123, or T9
W ord) is indicated in the lower part of the display when
composing a text message.
64
Page 65

Changing the Text Entry Mode
Change text entry modes
1. While composing a text message, press the Option (left)
soft key ( ) to display a pop-up menu containing the
following options:
• T9 WORD / ABC / Symbol / 123
• Text Format
• Add Media
• Quick Text
ABC is highlighted.
2. Use the left or right navigation key to choose display the
text entry mode you want to use.
3. Press . The mode is changed.
Enter upper and lower case text
1. While composing a text message, press and hold the
key to change to successive Text Entry modes until
ABC appears, or
Press the Option (left) soft key ( ) to display a pop-up
menu containing the following options:
• T9 WORD / ABC / Symbol / 123
• Text Format
• Add Media
• Quick Text
Use the left and right navigation keys to show ABC Text
Entry mode and press .
Section 5
Section 5: Entering Text 65
Page 66
2. Press the briefly and repeatedly until the Text Mode
indicator shows the desired text case entry mode:
• ABC—All capital letters
• Abc—Initial capital letters
• abc—All lower case letters
3. Enter your text.
Using T9 Mode
The T9 Word predictive text entry mode lets you enter
words easily by pressing a minimum number of keys. As
you press each key , the phone selects a letter that makes up
Section 5
the word it thinks you are typing, based on a built-in
dictionary . As you press additional keys, the phone enters
letters and the word changes based on the keys you press.
Note: ABC mode is the factory-set default text entry mode for messages.
You can reset this default value to T9 mode, if you want. See "Messages
Settings" on page 106 for more information.
Text entry in T9 Word mode
1. When you are in T9 Word mode, start entering a word
using the through keys.
Note: Press each key only once for each letter.
As you type, a word will appear; however, it changes
with each key you press.
2. Enter the whole word before editing or deleting any
keystrokes.
66
Page 67
Using T9 Mode
3. If the word is correct, start entering the next word.
Otherwise, press the key repeatedly to display
alternate word choices for the keys you have pressed.
4. Complete each word with a space by pressing the
key.
Note: To enter words not found in the T9 mode, use the ABC text entry
mode. See "Entering Text in ABC Mode" on page 68.
For example, to enter a word using T9 predictive text,
follow these steps:
1. In idle mode, press the Menu (left) soft key ( ), then
press (Messages) and (Send New Msg) to
compose a new text message.
2. Enter the phone number of the recipient, then press .
The Messages text entry screen appears in the display.
3. If the text entry mode (lower right hand corner) is not
Word, then press the Option (left) soft key ( ). A popup menu containing the following options appears in the
display:
• T9 WORD / ABC / Symbol / 123
• Text Format
• Add Media
• Quick Text
ABC is highlighted.
Use the left and right navigation keys to display T9
WORD, then press .
Section 5: Entering Text 67
Section 5
T9
Page 68

4. Enter the word “Samsung” into your message by
pressing each of the following keys only once:
S A M S U N G
T9 Word recognizes the most commonly used word for
the numeric sequence 7267864 is “Samsung.”
If more than one word shares the same numeric
sequence, use the key to scroll through other
available words.
Entering Text in ABC Mode
Section 5
In ABC mode, you enter text characters by pressing the
key with the letter you want printed on it, such as the
key for the letter “H”.
• Press a key once to enter the first letter printed on that key,
such as press the key once to enter the letter “G”.
• Press the key repeatedly until the desired character appears in
the display, such as press the key twice to enter the letter
“H”.
• Pause briefly and the displayed character is accepted and
inserted into your message.
• Press the key once to enter a space.
Note: ABC mode is the factory-set default text entry mode for messages.
You can reset this default value to T9 mode, if you want. See "Messages
Settings" on page 106 for more information.
68
Page 69

Entering Symbols
Entering Symbols
Symbol mode enables you to enter symbols, such as @ or
%, into a text message.
1. In idle mode, press the Menu (left) soft key ( ), then
press (Messages) and (Send New Msg) to
compose a new text message.
2. Enter the phone number of the recipient, then press .
The Messages text entry screen appears in the display.
3. Press the Option (left) soft key ( ). A pop-up menu
containing the following options appears in the display:
• T9 WORD / ABC / Symbol / 123
• Text Format
• Add Media
• Quick Text
T9 WORD or ABC is highlighted.
4. Use the left and right navigation keys to display Symbol,
then press . The first of four screens of symbols
appear in the display.
5. Use the left and right navigation keys to page through the
other symbols, if necessary.
6. Press the key that corresponds to the symbol that you
want to enter. For example, press for an
exclamation point (!).
The symbol you selected appears in the text a nd the t ext
input mode automatically returns to T9 WORD or ABC.
7. Repeat steps 3 through 6 to insert as many symbols into
your message as needed.
Section 5
Section 5: Entering Text 69
Page 70

Entering Numbers
Y ou can use 123 text entry mode enter numbers into a text
message, memo, or e-mail address . Wh en you create a
new text message, the Send T o scre en appears first in the
display. This screen always appears in 123 mode.
1. In idle mode, press the Menu (left) soft key ( ), then
press (Messages) and (Send New Msg) to
compose a new text message. The Send To screen
appears in the display.
2. Enter the phone number of the recipient, then press .
The Messages text entry screen appears in the display.
Section 5
3. Press the Option (left) soft key ( ). A pop-up menu
containing the following options appears in the display:
• T9 WORD / ABC / Symbol / 123
• Text Format
• Add Media
• Quick T ext
T9 WORD or ABC is highlighted.
4. Use the left and right navigation keys to display 123,
then press . The text entry mode (shown in the lower
right hand corner) changes to 123.
5. Press the key(s) for the number(s) (1 through 0) you want
to insert in your message.
70
Page 71

To resume entering letters:
1. Press Option (left) soft key ( ). A pop-up menu
containing the following options appears in the display:
• T9 WORD / ABC / Symbol / 123
• Text Format
• Add Media
• Quick Text
2. T9 WORD or ABC is highlighted.
3. Use the left and right navigation keys to display T9
WORD or ABC, then press . The text entry mode
(shown in the lower right hand corner) changes to T9
WORD or ABC.
Entering Numbers
Section 5
Section 5: Entering Text 71
Page 72

Section 5
72
Page 73

Section 6: Understanding Your Contacts List
Topics Covered
• Your Contacts List
• Adding a New Contacts List Entry
• Finding a Contacts List Entry
• Editing an Existing Contacts List Entry
• Deleting a Contacts List Entry
• Speed Dialing
•Memory
This section provides explanations and procedures for
managing your daily contacts by storing their names and
numbers in your Contacts list. You can sort and search
through your Contacts list entries by entry name, entry
type, or group name.
Section 6: Understanding Your Contacts List 73
Section 6
Page 74

Your Contacts List
Y our Contacts list can store up to 500 numbers, with each
contact having up to five associated phone numbers, an email address, and a picture ID.
Each phone number can be up to 32 digits in length,
including hard pauses. Contact names can be up to 22
characters in length. You can also specify a memory
location for each entry , and you can restrict access to the
Contacts list to prevent unauthorized use.
Tip: One-Touch, Two-Touch, and Three-Touch Dialing allow you to call
numbers stored in your Contacts list faster. (See pa ge 92.)
Open Your Contacts List
1. In idle mode, press the Menu (left) soft key ( ), then
press for Contacts. The following Contacts sub
menus and options appear in the display:
• Find—Find a phone number By Name, By Entry, or By Group.
• Add—Add a number or e-mail to your Contacts.
Section 6
Note: You can also access your Contacts list from idle mode by pressing
the Contacts (right) soft key ( ). The Contacts Find screen appears in the
display.
• Rename Group—Rename one of your five groups.
• Memory—View available memory for dial entries.
2. Use the navigation keys to highlight the Contacts sub
menu or option of your choice, and press .
74
Page 75
Adding a New Contacts List Entry
Tip: You can also access a sub menu or menu option by pressing the
number key corresponds to the menu item number. For example, press
for Add.
Adding a New Contacts List Entry
Y ou can add Contact entries to your Contacts list by using
the Contacts menu, at the end of a call, by Direct Entry , and
by using the Call Logs,.
Contacts Menu Method
1. In idle mode, press the Menu (left) soft key ( ), then
press for Contacts and for Add. A pop-up
menu with the following Add options appears in the
display:
• Number
• E-mail
2. Use the navigation keys to highlight the desired option
and press . The Enter Number or Enter E-mail
screen appears in the display.
3. Enter the phone number or e-mail address for the entry,
then press . The Confirm menu with the following
options appears in the display:
• New Entry
• Find
Section 6
Section 6: Understanding Your Contacts List 75
Page 76
4. With New Entry highlighted, press . The Select Type
screen containing the following (number type) icons
appears in the display:
Home Office Mobile
Pager Fax
5. Use the navigation keys to highlight the number type that
matches your new entry and press . The Contact
information screen appears in the displa y with the Name
field highlighted.
6. Enter a name to associate with the new entry using the
keypad (see "Section 5: Entering Text" on page 63 for
more information), then press to save the entry.
Note: You can enter or select additional numbers and other information for
each Contact. See "Editing an Existing Contacts List Entry" on page 84 for
more information.
Section 6
76
Page 77
Adding a New Contacts List Entry
End of Call Method
Once you’ve finished a call (incoming or outgoing), you
can add the number of the caller to your Contacts list.
Note: If the call was incoming and Caller ID information was unavailable,
then the Store option is also unavailable.
1. After you press to end your call, the call time, length
of call, phone number, and name of the party (if
available) appear in the display.
2. Press the Save (right) soft key ( ). You’re prompted to
confirm this as a New Entry, or to Find a name in your
Contacts with which to associate the number.
3. Follow the instructions in the upcoming sections
depending on whether the number is a new entry or is
one you want to add to an existing Contact.
Add a New Contact Entry
1. With the New Entry option highlighted, press . The
following number types appear in the display:
Home Office Mobile
Pager Fax
Section 6
2. Use the navigation keys to highlight the number type that
matches your new entry and press . The Contact
information screen appears in the display wi th the Name
field highlighted.
Section 6: Understanding Your Contacts List 77
Page 78

3. Enter a name to associate with the new entry using the
keypad (see "Section 5: Entering Text" on page 63 for
more information), then press to save the entry.
Add to an Existing Contact Entry
1. Use the navigation keys to highlight t he Find option, then
press . The Find screen appears in the display with
the By Name sorting method selected an d your Cont acts
listed alphabetically by name.
2. Use the navigation keys to select the search method that
you want to use (By Name, By Entry, or By Group).
3. Enter information to find the entry, or use the navigation
keys to scroll the list and highlight the desired entry, then
press . The following number types appear in the
display:
Home Office Mobile
Pager Fax
Section 6
78
4. Use the navigation keys to highlight the number type that
matches the number you are adding, then press .
The Contacts screen appears in the display containing
information about the selected Contact, including the
new number.
5. Press again. The number is added to the existing
Contact entry.
Page 79

Adding a New Contacts List Entry
Direct Entry Method
Y ou can use this shortcut to quickly create a new Co ntact
entry.
1. Enter the number, as if placing a call.
2. Press the Save (right) soft key ( ).
3. Follow the screen prompts to enter or select other
Contact information.
Call Logs Method
Y ou can use call history log entries to create Contacts or to
add numbers to existing Contacts.
1. In idle mode, press the Menu (left) soft key ( ), then
press for Calls. The Calls menu appears in the
display.
2. From the Calls menu, press the corresponding number
on the keypad to view call logs for the following call
types:
• for Outgoing
• for Incoming
• for Missed
The selected list of logged calls appears in the display.
3. Use the navigation keys to highlight the number you
want to store in the Contacts list, then press .
The call information for the selected number appears in
the display.
Section 6
Section 6: Understanding Your Contacts List 79
Page 80

Section 6
4. Press the Option (left) soft key ( ) to display a pop-up
menu containing the following options:
• Talk
• Save
• Prepend
• Erase
5. Use the navigation keys to highlight the Save option,
then press .
6. Add the number as a New Entry (see "Add a New
Contact Entry" on page 77), or use Find to add the
number to a existing Contact (see "Add to an Existing
Contact Entry" on page 78).
80
Page 81

Finding a Contacts List Entry
Finding a Contacts List Entry
After you store an entry in your Contacts list, Find allows
you to locate that entry quickly by entry name, entry
number, or group name.
Open the Find screen
1. In idle mode, press the Contacts (right) soft key ( ).
The Find screen appears in the display with By Name
selected, your Contact entries sorted alphabetically, and
the top entry highlighted.
2. Use the left and right navigation keys to sel ect one of the
following methods to find the entry:
• By Name—Search the Contacts alphabetical ly by name.
• By Entry—Search the Contacts by entry nu mber.
• By Group—Search the Contacts by selecting from one of the
five available groups.
Find by Name
Use this option to find a stored Contact by entry name.
1. In the Find screen, use the left and r ight navigation keys
to select By Name.
2. Enter the Contact name as it appears in your Contacts
list. For example, if you saved the name as Amy Smith,
begin your search by pressing the key.
As you enter letters, the entry names and numbers of the
closest matches appear in the display.
3. When the desired Contact appears in the display,
highlight the entry using the navigation keys (if
necessary).
Section 6
Section 6: Understanding Your Contacts List 81
Page 82

4. T o dial the number a ssociated with the se lected Co ntact,
press the key.
5. To view the information for the selected Contact, press
.
Find by Entry
Use this option to find a stored Contact by its location
(entry) number.
1. In the Find screen, use the left and right navigation keys
to select By Entry.
2. Enter the number for your Contact.
As you enter numbers, the entry numbers and names of
the closest matches appear in the display.
3. Use the navigation keys to highlight the entry you want.
4. T o dial the number a ssociated with the se lected Co ntact,
press the key.
5. To view the information for the selected Contact, press
.
Find by Group
Section 6
This option lets you to find a Contact within a selected
group.
1. In the Find screen, use the left and right navigation keys
to select By Group.
2. Press the down navigation key briefly to highlight the
group name field.
82
Page 83

Finding a Contacts List Entry
3. Use the left and right navigation keys to view the group
that you want. As each group is selected, Contacts
assigned to the group appear in your phone’s screen.
4. Use the navigation keys to highlight the desired entry.
5. To dial the number associated with the selected Contact,
press the key.
6. To view the information for the selected Contact, press
.
Section 6
Section 6: Understanding Your Contacts List 83
Page 84

Editing an Existing Contacts List Entry
Once a Contact has been saved, it can be easily changed or
modified.
Edit Contact Numbers
1. In idle mode, press the Contacts (right) soft key ( ).
The Find screen appears in the display with By Name
selected, your Contact entries sorted alphabetically, and
the top entry highlighted.
2. Use the left and right navigation keys to select one of the
following methods to find the entry:
• By Name—Search the Contacts alphabetically by name.
• By Entry—Search the Contacts by entry number.
• By Group—Search the Contacts by selecting from one of the
five available groups.
3. Use the left and right navigation keys to display the
search method that you want to use (By Name, By
Entry, or By Group).
4. Enter information to find the Contact entry, or use the
Section 6
navigation keys to highlight the entry containing the
number that you want to edit.
5. Once the entry is highlighted, press .
The Contacts screen appears in the display containing
information about the selected Contact.
6. Use the navigation keys to highlight the number within
the entry that you want to edit.
84
Page 85

Editing an Existing Contacts List Entry
7. Press the Option (left) soft key ( ) to display a pop-up
menu containing the following options:
• Talk
• Edit
• Erase
8. Use the navigation keys to highlight the Edit option, then
press .
9. Press and hold the key to clear all numbers in the
highlighted field.
10.Use the navigation keys and press the key to delete
individual digits.
11.When you’re finished editing the Contact number(s),
press . Your changes are saved and a confirmation
message appears in the display.
Add Pauses to Contact Numbers
When you call automated systems (like banking
services), you are often required to enter a password or
account number. Instead of manually entering the
numbers each time, you can store the numbers in your
Contacts list along with special characters called pauses.
• P pause: A hard pause stops the calling sequence until you
enter additional numbers.
• T pause: A two-second pause stops the calling sequence and
then automatically sends the remaining digits.
Y ou can enter multiple T (two-second) pauses to extend
the length of a pause. For example, two consecutive T
pauses cause a total pause time of four seconds.
Section 6
Section 6: Understanding Your Contacts List 85
Page 86

Note: Keep in mind that pauses count as digits towards the 32-digit
maximum for Contact numbers.
T o store a pause in a Contact number , f ollow these steps:
1. In idle mode, enter the number you want to save as a
Contact (such as your bank’s teleservice number).
2. Press the Option (left) soft key ( ). The following pause
menu options appear in the display:
• P pause—a hard pause (awaits input from you).
• T pause—a two-second pa use.
P pause is highlighted.
3. Use the navigation keys to highlight the pause option of
your choice.
4. Press to add/insert the highlighted pause into your
number sequence.
5. When you’re finished entering the number and pauses,
press the Save (right) soft key ( ) to store the number
in your Contacts list (see "Add a New Contact Entry" on
Section 6
page 77 or see "Add to an Existing Contact Entry" on
page 78 for more information).
86
Page 87

Editing an Existing Contacts List Entry
Pause Dialing Within Contact Numbers
1. If you store a Contact number using T (two-second)
pause(s), simply Find the number in your Contacts list
and press .
2. If you store a number using P (hard) pause(s), Find the
number in your Contacts list and wait for the appropriate
prompt(s) from the number you are calling (credit card
number, bank account number, and so on).
3. Press to dial the remaining part of the saved
number.
Rename Groups
Use this option to rename a group in your Contacts list.
1. In idle mode, press the Menu (left) soft key ( ), then
press (for Contacts) and (for Rename
Group).
2. Use the navigation keys to highlight the group that you
want to rename, then press .
The Rename Group screen appears in the display
containing the current name of the group with a flashing
cursor at the end of the name.
3. Press the Option (left) soft key ( ) to display a pop-up
menu containing the following options:
• T9 WORD
• ABC
• Symbol
• 123
T9 WORD is highlighted.
Section 6
Section 6: Understanding Your Contacts List 87
Page 88

4. Use the navigation keys to choose the text entry mode
you want to use.
5. Press . The mode is changed.
6. Press the key to delete characters individually, or
press and hold the key to clear all characters in the
display.
7. Enter a new group name using the keypad, then press
.
Edit an E-mail Address
1. In idle mode, press the Contacts (right) soft key ( ).
The Find screen appears in the display with By Name
selected, your Contact entries sorted alphabetically, and
the top entry highlighted.
2. Use the left and right navigation keys to select one of the
following methods to find the entry:
• By Name—Search the Contacts alphabetically by name.
• By Entry—Search the Contacts by entry number.
• By Group—Search the Contacts by selecting from one of the
Section 6
five available groups.
3. Use the left and right navigation keys to display the
search method that you want to use (By Name, By
Entry, or By Group).
4. Enter information to find the Contact entry, or use the
navigation keys to highlight the entry containing the email address that you want to edit.
88
Page 89

Editing an Existing Contacts List Entry
5. Press the Option (left) soft key ( ) to display a pop-up
menu containing the following options:
• Edit
• Erase
• Add New
With Edit highlighted.
6. Press .
The Contacts screen appears in the display containing
information about the selected Contact.
7. Use the navigation keys to highlight the e-mail address
within the entry that you want to edit.
8. Use the keypad to edit the e-mail address.
9. Press the key twice to insert the @ symbol.
10.To add a domain type press the Option left soft key
( ). A pop-up menu containing the following options
appears in the display:
• 123 / T9 WORD / ABC / Symbol (with 123 highlighted)
• .com / .edu / .net ( with . com showing )
11.Use the up and down navigation keys to highlight .com.
12.Use the left and right navigation keys to highlight the
desired domain type (.com, .edu, .net), then press .
The selected domain type is added to the e-mail
address.
Section 6
Note: If the domain type is not .com, .edu, or .net, you must enter it using
your keypad.
13.Press to save your changes.
Section 6: Understanding Your Contacts List 89
Page 90

Deleting a Contacts List Entry
1. In idle mode, press the Contacts (right) soft key ( ).
The Find screen appears in the display with By Name
selected, your Contact entries sorted alphabetically, and
the top entry highlighted.
2. Use the left and right navigation keys to select one of the
following methods to find the entry to be deleted:
• By Name—Search the Contacts alphabetically by name.
• By Entry—Search the Contacts by entry number.
• By Group—Search the Contacts by selecting from one of the
five available groups.
3. Use the left and right navigation keys to display the
search method that you want to use (By Name, By
Entry, or By Group).
4. Enter information to find the Contact entry, or use the
navigation keys to highlight the entry that you want to
delete.
5. Press the Option (left) soft key ( ) to display a pop-up
Section 6
90
menu containing the following options:
• Edit
• Erase
• Add New
With Edit highlighted.
6. Use the navigation keys to highlight Erase, and press
.
The phone prompts you to confirm the erasure.
7. Use the navigation key to highlight Yes or No, then press
.
Page 91

Speed Dialing
Speed Dialing
Contact entries are assigned an entry numbers between 2
and 500. These entry numbers are assigned automatically
when you create Contact entries. Y ou ha ve the option to
change the automatically assigned entry number while
creating the entry or after you have created the entry.
Note: Entry number 1 is reserved for your voice mail.
The entry number for each Contact corresponds with a
same speed dial location. For example, Contact entry 10 is
also Speed dial location 10. Since a contact can have up to
5 different phone numbers stored in it, you must select
what phone number is dialed when speed dialing is used.
Selecting SpeedDial Phone Number
Unless you change it, the first phone number you enter or
select when creating a Contact is used f or speed dialing.
T o change the phone number dialed when you use speed
dialing, follow these steps:
1. In idle mode, press the Contacts (right) soft key ( ).
The Find screen appears in the display with By Name
selected, your Contact entries sorted alphabetically, and
the top entry highlighted.
2. Use the left and right navigation keys to sel ect one of the
following methods to find the entry to be changed:
• By Name—Search the Contacts alphabetical ly by name.
• By Entry—Search the Contacts by entry nu mber.
Section 6
Section 6: Understanding Your Contacts List 91
Page 92

• By Group—Search the Contacts by selecting from one of the
five available groups.
3. Use the left and right navigation keys to display the
search method that you want to use (By Name, By
Entry, or By Group).
4. Enter information to find the Contact entry, or use the
navigation keys to highlight the entry that you want to
change, then press .
The Contacts screen appears in the display containing
information about the selected Contact.
5. Use the navigation keys to highlight SpeedDial and
press the Edit (left) soft key ( ).
6. Use the navigation keys to select the icon associated
with the number you want dialed when SpeedDial is
used.
7. Press to save your changes.
Speed Dialing Options
Once you have stored phone numbers in your Contacts
Section 6
list, you can dial the numbers quickly by using one of the
SpeedDial options.
One-touch Dialing
Contacts memory locations 001 through 009 are special
One-Touch dialing locations. You can call the phone
numbers stored in memory locations 001 through 009 by
pressing and holding a single key.
For example, for location number 001 (V oice Mail), press
and hold until “Voice Mail” and the number appear
in the display and the number is dialed.
92
Page 93

Speed Dialing
Two-touch Dialing
Contacts memory locations 010 through 099 are special
Two-Touch dialing locations. You can call the phone
numbers stored in memory locations 010 through 099 by
pressing the first key and then pressing and holding the
second key.
For example, for location number 013, briefly press ,
then press and hold down until the associated
Contact name and number appear in the display and the
number is dialed.
Three-touch Dialing
Contacts memory locations 100 through 500 are special
Three-Touch dialing locations. You can call the phone
numbers stored in memory locations 100 through 500 by
pressing the first and second keys, and then pressing and
holding the third key.
For example, to dial location number 1 13, press , ,
then press and hold until the associated Contact
name and number appear in the display and the number
is dialed.
Section 6
Section 6: Understanding Your Contacts List 93
Page 94

Memory
The Memory menu option lets you view the amount of
memory you have used to store Contact entries, as well as
the memory remaining to store more Contact entries.
■ In idle mode, press the Menu (left) soft key ( ), then press
(for Contacts) and (for Memory). The amount of memory
used and remaining for Contacts is displayed.
Section 6
94
Page 95

Section 7: Messages
Topics Covered
• Send Text Messages
• Retrieving New Messages
•Voice Mail
• Message Folders
• Messages Settings
• Erase Messages
This section explains how to use your phone to send or
receive different types of messages. This section also
describes the features and functionality associated with
messaging.
Section 7: Messages 95
Section 7
Page 96
Send Text Messages
Y ou can use your SCH-n330 phone to send text messages
to, and receive text messages from, compatible phones
and other devices. You can use the various text entry
modes your phone provides to compose your messages.
See "Section 5: Entering Text" on page 63 for more
information about these text entry modes.
Note: A text message can contain a maximum of 160 characters. If you
must send a message that exceeds 160 characters, you must send more
than one message, which can incur additional cost.
To compose and send a new text message, do the
following:
1. In idle mode, press the Menu (left) soft key ( ), then
press (Messages) and (Send New Msg). The
Send To screen appears in the display.
2. Enter the phone number of the recipient, then press .
The Messages text entry screen appears in the display.
3. Enter the text for your message using the keypad.
T o change your current text entry mode and/or add some
previously saved text to your message, press the Option
(left) soft key ( ). A pop-up menu containing the
following options appears in the display:
• T9 WORD or ABC (highlighted)—Change the text entry mode.
See "Section 5: Entering T ext" on page 63 for information
about the text entry options your phone provides.
Section 7
• Text Format—Select text appeara nce options, such as Size,
Mode, Bold, and so on.
96
Page 97

Send Text Messages
• Add Media—Add previously saved picture and sound files to
your message.
• Quick Text—Add previously saved text, such as a salutation
or closing, to your message. See Step 4 i n this procedure for
information about creating Quick Text files.
4. Once you’re finished entering your message, press .
The New Message menu containing the following
options appears in the display:
• Edit Send To—Edit the recipient’s Send To number.
• Edit Text—Edit the content of your message. You also have
text input options and the option to add Quick Text to your
message.
• Send Options—Choose the Priority, Privacy, whether you
want to have a Delivery Acknowledgement, and insert a
Signature and/or Call Back #. See the following section,
"Message send options", for more information on these
settings.
• Save in Draft—Save the message to your Draft folder.
• Save Text—Save the text in your message as a Quick Text
file. Quick T ext files contain pre-composed text that can be
inserted into any message you choose.
5. To send your message, press the Send (left) soft key
().
Message send options
Y ou can set message priority, privacy , and other options
before you send a message.
1. After you’ve composed a message and pressed ,
you’re returned to the New Message menu.
Section 7
Section 7: Messages 97
Page 98

2. Use the navigation key to highlight Send Options, then
press . The Send Options menu containing the
following options appears in the display:
• Priority—Assign a priority to your message.
• Validity—Select the period of time you want the message to
be available to the recipient.
• Delivery Ack—Request that the message recipient
acknowledge that your message is received.
• Insert Sign.—Insert your pre-composed signature into the
message.
• Callback #—Insert a number into your message for the
recipient to call you back.
• Def. Delivery—Schedule message delivery for a particular
date and time.
3. Use the navigation keys to display the various Send
Options for each menu item.
4. When the send option you want is highlighted, press
to confirm the selection or to enter the option’s sub
menu.
Section 7
98
Page 99
Retrieving New Messages
Retrieving New Messages
When your phone receives a message in idle mode, a
ringer sounds (unless turned off), and New Message
appears in the display along with the closed envelope icon
( ). The date and time of the message also appear in the
display.
• Press the Ignore (left) soft key ( ) to return your phone to idle
mode. The message is saved to your inbox where you can view
it later.
• Press the View (right) soft key ( ) to open the message.
Press the Reply (right) soft key ( ) to open the Messages
(message composer) screen and respond to the message.
OR
• Press the Option (left) soft key ( ) to Forward, Erase, Save
Text, Save Msg, Save Contact, or Block Sender.
Receive messages during a call
When your phone receives a message during a call, New
Message appears in the display along with the closed
envelope icon ( ). You can view the message without
disconnecting your call.
• Press the Ignore (left) soft key ( ) to return your phone to idle
mode. The message is saved to your inbox where you can view
it later.
• Press the View (right) soft key ( ) to open the message.
Your call remains connected.
Section 7
Section 7: Messages 99
Page 100
Messages and lock mode
Y our phone still receiv es messages while in Lock Mode.
The time and date of the message appear in the, but you
cannot save or open the message until you unlock your
phone by doing the following:
1. Press the Unlock (left) soft key ( ). The Lock pop-up
appears in the display.
2. Enter the lock code. The Lock pop-up disappears and
you can now save or open the message.
Note: See "Lock Phone" on page 164 for more information about your
phone’s Lock Mode.
Voice Mail
All unanswered calls to your phone are sent to the voice
mail system, even if your phone is turned off. When your
phone is in idle mode and you receive a voice message,
New Message appears in the display along with the
closed envelope and he adset icon ( ).
Your service provider has assigned your voice mail
number to the key .
Check voice mail
1. Press and hold . Your phone dials the voice mail
system.
2. When you’re connected to the voice mail system, enter
Section 7
your password and press .
3. Follow the recorded prompts to listen to your voice mail.
100
 Loading...