

Samsung SCHA670, SCH-A670U, SCH-A670D, SCH-A670W, SCH-a670 Series User Manual

YH26.06_CB_a670_092605_F2
SCH-a670 Series
All Digital/Dual-Mode
MOBILE PHONE
User Guide
Please read this manual before operating your
phone, and keep it for future reference.

Intellectual Property
All Intellectual Proper ty , as defined below , owned by or which is
otherwise the property of Samsung or its respective suppliers
relating to the SAMSUNG Phone, incl uding but not li mited to,
accessories, parts, or software relating there to (the “Phone
System”), is proprietary to Samsung and protected under federal
laws, state laws, and international treaty provisions. Intellectual
Property includes, but is not limited to, inventions (patentable or
unpatentable), patents, trade secrets, copyrights, software,
computer programs, and related documentation and other
works of authorship. You may not infringe or otherwise violate
the rights secured by the Intellectual Property. Moreover, you
agree that you will not (and will not a ttempt to) modify , prepar e
derivative works of, revers e engineer, decompile, disassemble,
or otherwise attempt to cr eate source code from the software. No
title to or ownership in the Intellectual Property is transfer red to
you. All applicable rights of the Intellectual Property shall
remain with SAMSUNG and its suppliers.
Samsung Telecommunications America (ST A),
Inc.
Headquarters: Customer Care Center:
1301 E. Lookout Drive 1601 E. Plano Parkway, Suite150
Richardson, TX 75082 Plano, TX 75074
Tel: 972.761.7000 Toll Free Tel: 1.888.987.HELP (4357)
Internet Address: http://www.samsungusa.com
©
2005 Samsung Telecommunications America, Inc. is a
registere d trademark of Samsung Electronics America, Inc. an d
its related entities.

GH68-07736A
Openwave® is a registered Trademark of Openwave, Inc.
RSA® is a registered Trademark RSA Security, Inc.
Licensed by Qualcomm Incorporated under one or more of the
following patents: U.S. Patent No. 4, 901, 307; 5, 056, 109; 5, 099, 204;
5, 101, 501; 5, 103, 459; 5, 107, 225; 5, 109, 390.
Disclaimer of Warranties; Exclusion of Liability
EXCEPT AS SET FORTH IN THE EXPRESS WARRANTY
CONTAINED ON THE W A RRANTY PAGE ENCLOSED WITH
THE PRODUCT , THE PURCHASER T AKES THE PRODUCT “AS
IS”, AND SAMSUNG MAKES NO EXPRESS OR IMPLIED
WARRANTY OF ANY KIND WHATSOEVER WITH RESPECT
TO THE PRODUCT, INCLUDING BUT NOT LIMITED TO THE
MERCHANT ABILITY OF THE PRODUCT OR ITS FITNESS FOR
ANY PARTICULAR PURPOSE OR USE; THE DESIGN,
CONDITION OR QUALITY OF THE PRODUCT; THE
PERFORMANCE OF THE PRODUCT; THE WORKMANSHIP
OF THE PRODUCT OR THE COMPONENTS CONTAINED
THEREIN; OR COMPLIANCE OF THE PRODUCT WITH THE
REQUIREMENTS OF ANY LAW, RULE, SPECIFICATION OR
CONTRACT PERTAINING THERETO. NOTHING
CONTAINED IN THE INSTRUCTION MANUAL SHALL BE
CONSTRUED TO CREATE AN EXPRESS OR IMPLIED
WARRANTY OF ANY KIND WHATSOEVER WITH RESPECT
TO THE PRODUCT . IN ADDITION, SAMSUNG SHALL NOT BE
LIABLE FOR ANY DAMAGES OF ANY KIND RESULTING
FROM THE PURCHASE OR USE OF THE PRODUCT OR
ARISING FROM THE BREACH OF THE EXPRESS W ARRANTY ,
INCLUDING INCIDENTAL, SPECIAL OR CONSEQUENTIAL
DAMAGES, OR LOSS OF ANTICIPA TED PROFITS OR
BENEFITS.


Table of Contents 5
Table of Contents
Table of Contents
Section 1: Getting Started .................................9
Activating Your Phone ....................................................10
Setting Up Your Voice Mail .............................................12
Understanding This User Guide ......................................12
Section 2: Understanding Your Phone ............15
Features of Your Phone ..................................................16
Front View of Your Phone ...............................................17
Command Keys ..............................................................19
Understanding the Display ..............................................22
Battery ........................................................................... 24
Your Phone’s Modes ......................................................26
Section 3: Call Functions .................................31
Making a Call .................................................................32
Answering a Call ............................................................35
Calls ..............................................................................40
Voice Mail ......................................................................44
Voice Kit .........................................................................45
Section 4: Menu Navigation ............................53
Menu Navigation ............................................................54
Menu Shortcuts ..............................................................54
Navigation Key Shortcuts ...............................................55
Navigate Using a Shortcut ..............................................55
Menu Outline .................................................................56
Section 5: Entering Text ..................................63
Changing the Text Entry Mode ........................................64
Using T9® Mode ............................................................65
Entering Upper and Lower Case .....................................66
Entering Symbols ...........................................................67
Entering Numbers ..........................................................68

Table of Contents
6
Section 6: Understanding Your Contacts ........69
Contacts .........................................................................70
Adding a New Contacts Entry ..........................................71
Finding a Contacts Entry .................................................73
Renaming a Contacts Group ...........................................75
Editing an Existing Contacts Entry ...................................76
Saving a Number After a Call ..........................................83
Deleting a Contacts Entry ...............................................85
Finding My Phone Number .............................................85
Memory ..........................................................................86
Section 7: Messaging ......................................87
Types of Messages .........................................................88
Create and Send Text Messages .....................................88
Receive Text Messages ..................................................91
Send Picture Messages in Camera Mode ........................92
Send Picture Messages in Standby Mode .......................94
Message Folders ............................................................98
Message Settings .........................................................105
Erase Messages ...........................................................108
Section 8: easyedgeSM .................................... 109
Applications Shopping and Downloading ......................110
Changing Your easyedgeSM Settings .............................110
Using On-line Help ........................................................111
Section 9: Display ..........................................115
Display Settings ...........................................................116
Menu Style ...................................................................117
Animation .....................................................................117
Front Display ................................................................118
Banner .........................................................................119
Backlight ......................................................................120
Auto hyphen .................................................................121
Dial Digits .....................................................................121

Table of Contents 7
Table of Contents
Dial Screen ..................................................................122
Service LED .................................................................122
Section 10: Sounds ........................................125
Volume/Vibrate ............................................................. 126
Ringer Type ..................................................................126
Key Beep .....................................................................127
Alerts ...........................................................................128
Power On/Off ...............................................................129
Roam Ringer ................................................................129
Whisper Mode ..............................................................130
Section 11: Camera .......................................131
Taking Pictures ............................................................132
Saving Pictures ............................................................141
The Picture Gallery .......................................................141
Taking Videos ..............................................................143
The Video Gallery .........................................................144
Camera Settings ..........................................................145
Point, Click, and Send a Picture ....................................152
Section 12: Tools ...........................................153
Voice Kit .......................................................................154
Today ........................................................................... 161
Scheduler ....................................................................163
Jump To Date ..............................................................164
To Do List ....................................................................164
Memo Pad ...................................................................166
Count Down .................................................................168
Alarm Clock .................................................................170
World Time ..................................................................172
Calculator ....................................................................173
Section 13: Changing Your Settings .............175
Location Setting ...........................................................176
Network Settings ..........................................................176

Table of Contents
8
Security Settings ..........................................................178
Call Options ..................................................................185
Shortcut Setting ...........................................................188
Language Setting .........................................................189
Clock Set ......................................................................189
Version Information ......................................................190
Section 14: Health and Safety Information ...191
Health and Safety Information .......................................192
Consumer Information on Wireless Phones ...................194
Road Safety ..................................................................204
Operating Environment .................................................206
Using Your Phone Near Other Electronic Devices ..........207
Potentially Explosive Environments ...............................208
Emergency Calls ...........................................................209
FCC Notice and Cautions ..............................................210
Other Important Safety Information ...............................211
Product Performance ....................................................212
Availability of Various Features/Ring Tones ...................213
Battery Standby and Talk Time .....................................214
Battery Precautions ......................................................214
Care and Maintenance ..................................................216
Section 15: Warranty Information .................219
Standard Limited Warranty ...........................................220
Index ...............................................................227

Section 1: Getting Started 9
Section 1
Section 1: Getting Started
Topics Covered
• Activating Your Phone
• Setting Up Voice Mail
• Understanding This User Guide
The SCH-a670 offers a mixture of features such as a
high-resolution display, PIM (Personal Information
Manager) functions, a built-in digital camera with
flash and video capture capabilities, voice
recognition applications, and more. We ask that you
take time to read this guide and become familiar with
your phone’s many features.
This section walks you through starting to use your
phone by activating your service, setting up your
voice mail, contacting cu stomer support, and getting
an understanding of how this manual is put together.
10
Section 1
Activating Your Phone
Contact your wireless carrier and follow their
instructions for obtaining service, if necessary. We
suggest that you read this guide to fully understand the
services your phone supports.
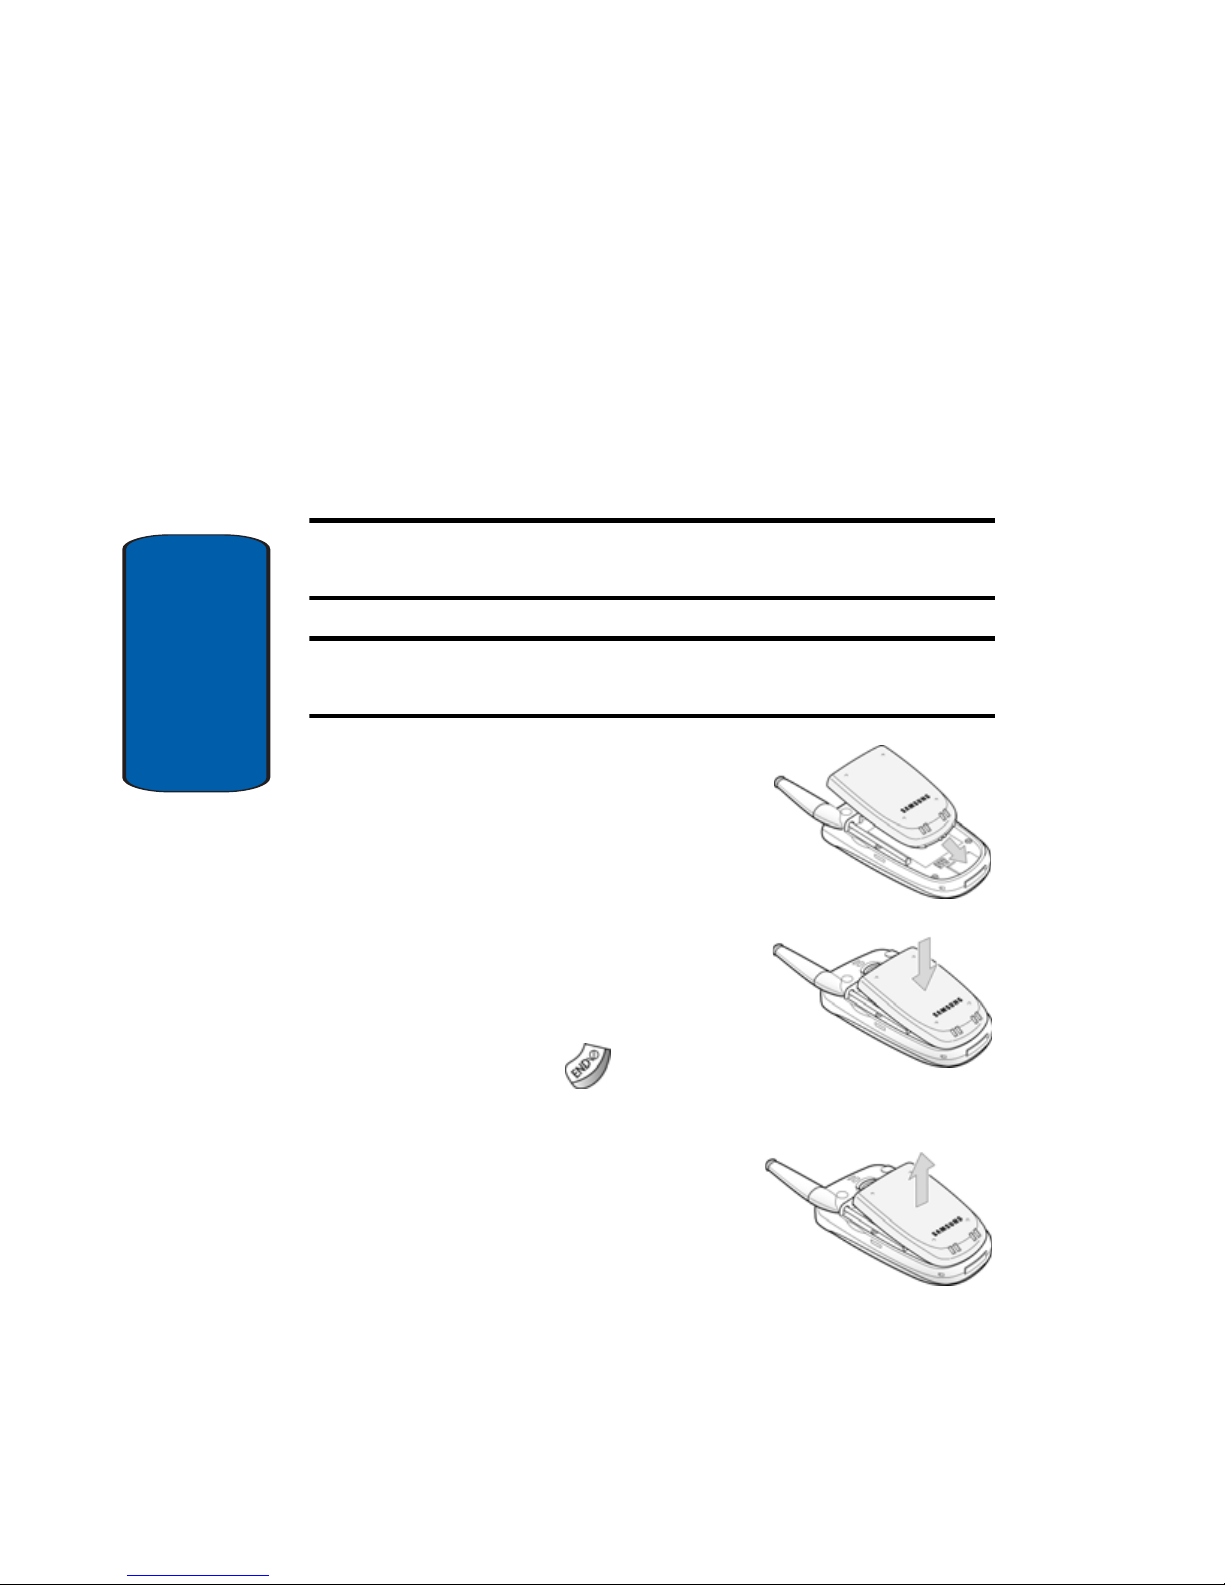
Install the Battery
Note: This phone comes packaged with a partially charged rechargeable
standard Li-Ion battery and travel charger.
Important! The phone can be used while the battery is charging, but must
be fully charged before first use, otherwise you could damage the battery.
1. Insert the bottom end of the
battery into the phone with the
label side down. Match the gold
contacts on the battery to those
on the phone.
2. Push the top end of the battery
down until it snaps into place.
Remove the Battery
1. Press and hold to turn off the
phone (if on).
2. Pull the battery release latch
toward the top of the phone. The
top of the battery should po p up .
3. Use your finger to lift the battery
(top end first) up and away from
the phone.

Section 1: Getting Started 11
Activating Your Phone
Section 1
Turning Your Phone On
1. Fully extend the antenna for the clearest reception, then
open the folder.
2. Press and hold
for two or more seconds. Your phone
powers up, and the phone searches for a network signal.
Note: As with any other radio-transmitting device, do not touch the
antenna as it affects call quality and may also cause the phone to operate
at a higher power level than is necessary.
䢇 Once the phone fi nds a signal, the time, date, and day appear
in the bottom of the display .
䢇 You’re now ready to place and receive calls.
If the phone is outside of your carrier’s coverage or
roaming area, the No Service indicator ( ) appears in
top of the display. If you cannot place or receive calls,
try later when service is available.
Turning Your Phone Off
■ Press and hold
for two or more seconds. Your phone powers
off.
Note: If your phone is on and you press for less than one second, the
phone will not power off. This prevents your phone from being turned off
accidentally.

12
Section 1
Setting Up Your Voice Mail
Before callers can leave voice mail messages, you’ll first
need to set up your account.
1. In standby mode, press and hold until your phone
dials the voice mailbox.
2. Once connected to voice mail, follow the recorded
prompts to personalize your password, greeting, and
mailbox options.
Note: Once you’re Voice Mail account has been set up, you can use the
Voice Mail folder (in the Message menu) to view details of messages in
your voice mailbox. See “Voice Mail” on page 98 for more information.
Understanding This User Guide
The sections of this guide are arranged in similar order
to the menus and sub menus in your phone. A robu st
index for quick reference to most features begins on
page 227.
Also included is important safety information that you
should know before using your phone. Most of this
information is near the back of the guide, beginning on
page 191.

Section 1: Getting Started 13
Understanding This User Guide
Section 1
Notes and Tips
Throughout this guide are icons and text that are set
apart from the rest. These are intended to point out
important information, quick methods for activating
features, to define terms, and more. The definitions for
these methods are as follows:
• Notes—Notes explain alternative options within the current
feature, menu, or sub menu.
• Tips—Tips provide quick or innovative methods for performing
functions related to the subject at hand.
• Fast Facts—Fast Facts are like snippets from a glossary. Fast
facts provide definitions in context and proximity to the menu
or feature in question.
• Important—Points out important information about the current
feature that could affect performance, or even damage your
phone.

14
Section 1

Section 2: Understanding Your Phone 15
Section 2
Section 2: Understanding Your Phone
Topics Covered
• Features of Your Phone
• Front View of Your Phone
• Command Keys
• Understanding the Display
• Battery
• Your Phone’s Modes
This section outlines some key features of your
phone. It also displays the screen and the icons that
will are displayed when the phone is in use.

16
Section 2
Features of Your Phone
• High-Resolution Color Display
• Video Capture
• High Speed Data (CDMA 2000 1X Technology)
• Global Positioning Service (GPS) Technology
• Personal Information Manager (Scheduler, To Do List)
• Short Message Service (SMS)
• Picture Messaging
• Voice Recognition Applications
• Built-In Digital Camera With Flash
• 16-Note Polyphonic Ringtones
Section 2: Understanding Your Phone 17
Front View of Your Phone
Section 2
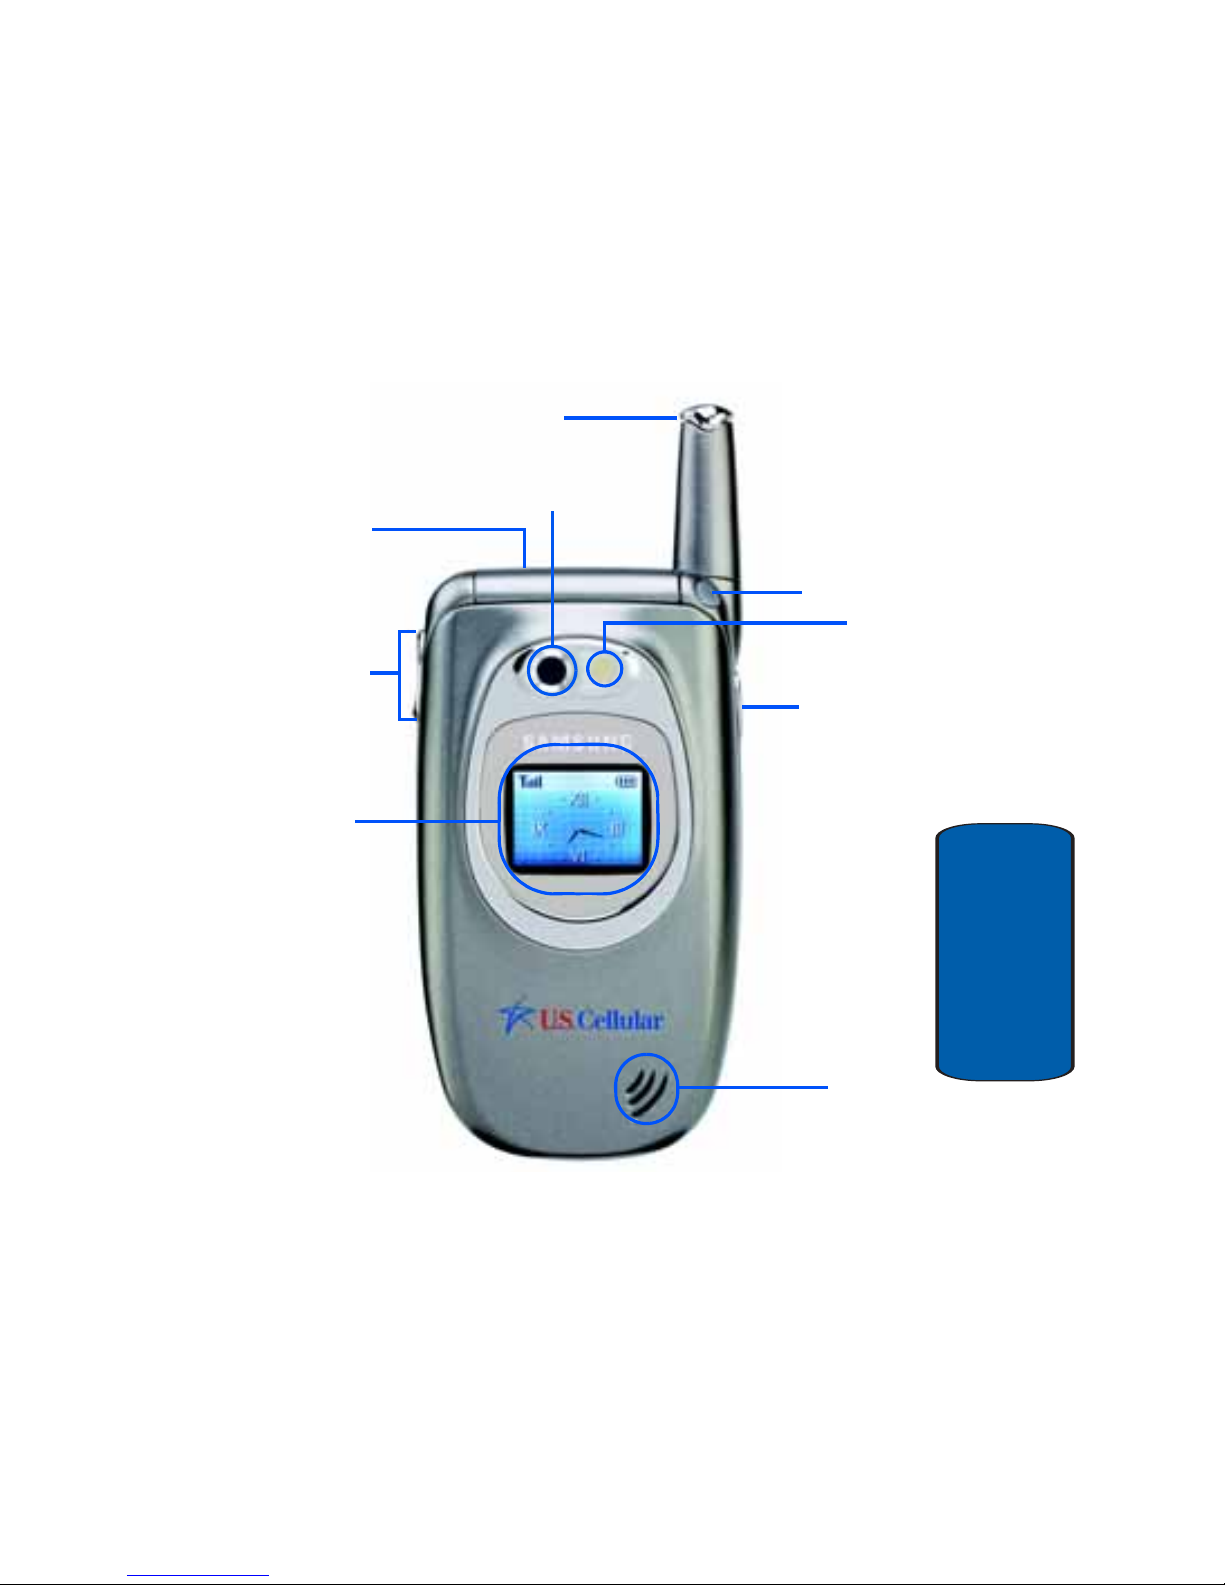
Front View of Your Phone
SCH-a670—Closed View
Antenna
Volume Key
Service
Headset
Connector
Speaker
Camera
Hot Key
Camera Lens
Flash
External
LCD
LED
18
Section 2
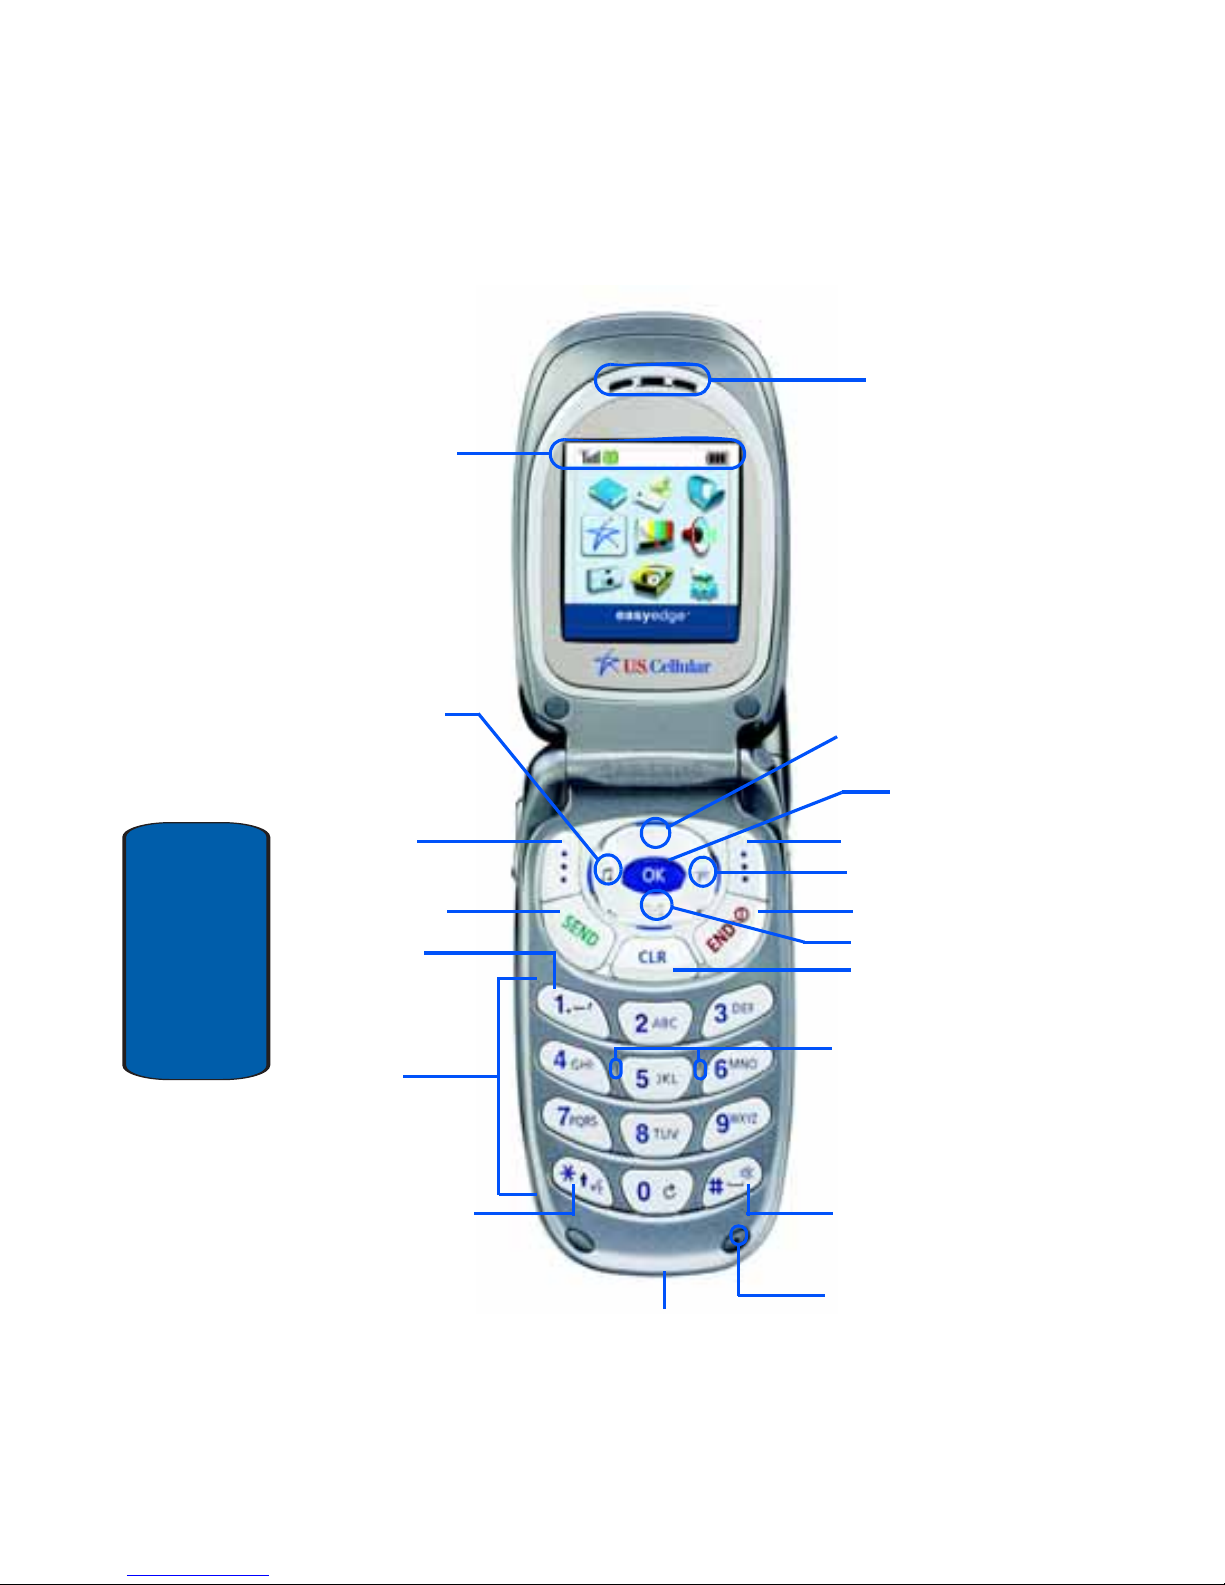
SCH-a670—Open View
Earpiece
Display
Right Soft Key
Left
SEND Key
END Key
OK Key
easyedgeSM
CLR Key
Messages
Sounds
Alpha-
Vo ice Signal
(press and hold)
Space/
Silent Mode
Voice Mail
(press and hold)
Microphone
Power/Accessory
Raised Nibs
For Keypad
Orientation
User-
Shortcut
Programmable
(press and hold)
Icons
Soft Key
Connector
Numeric
Keypad
Section 2: Understanding Your Phone 19
Command Keys
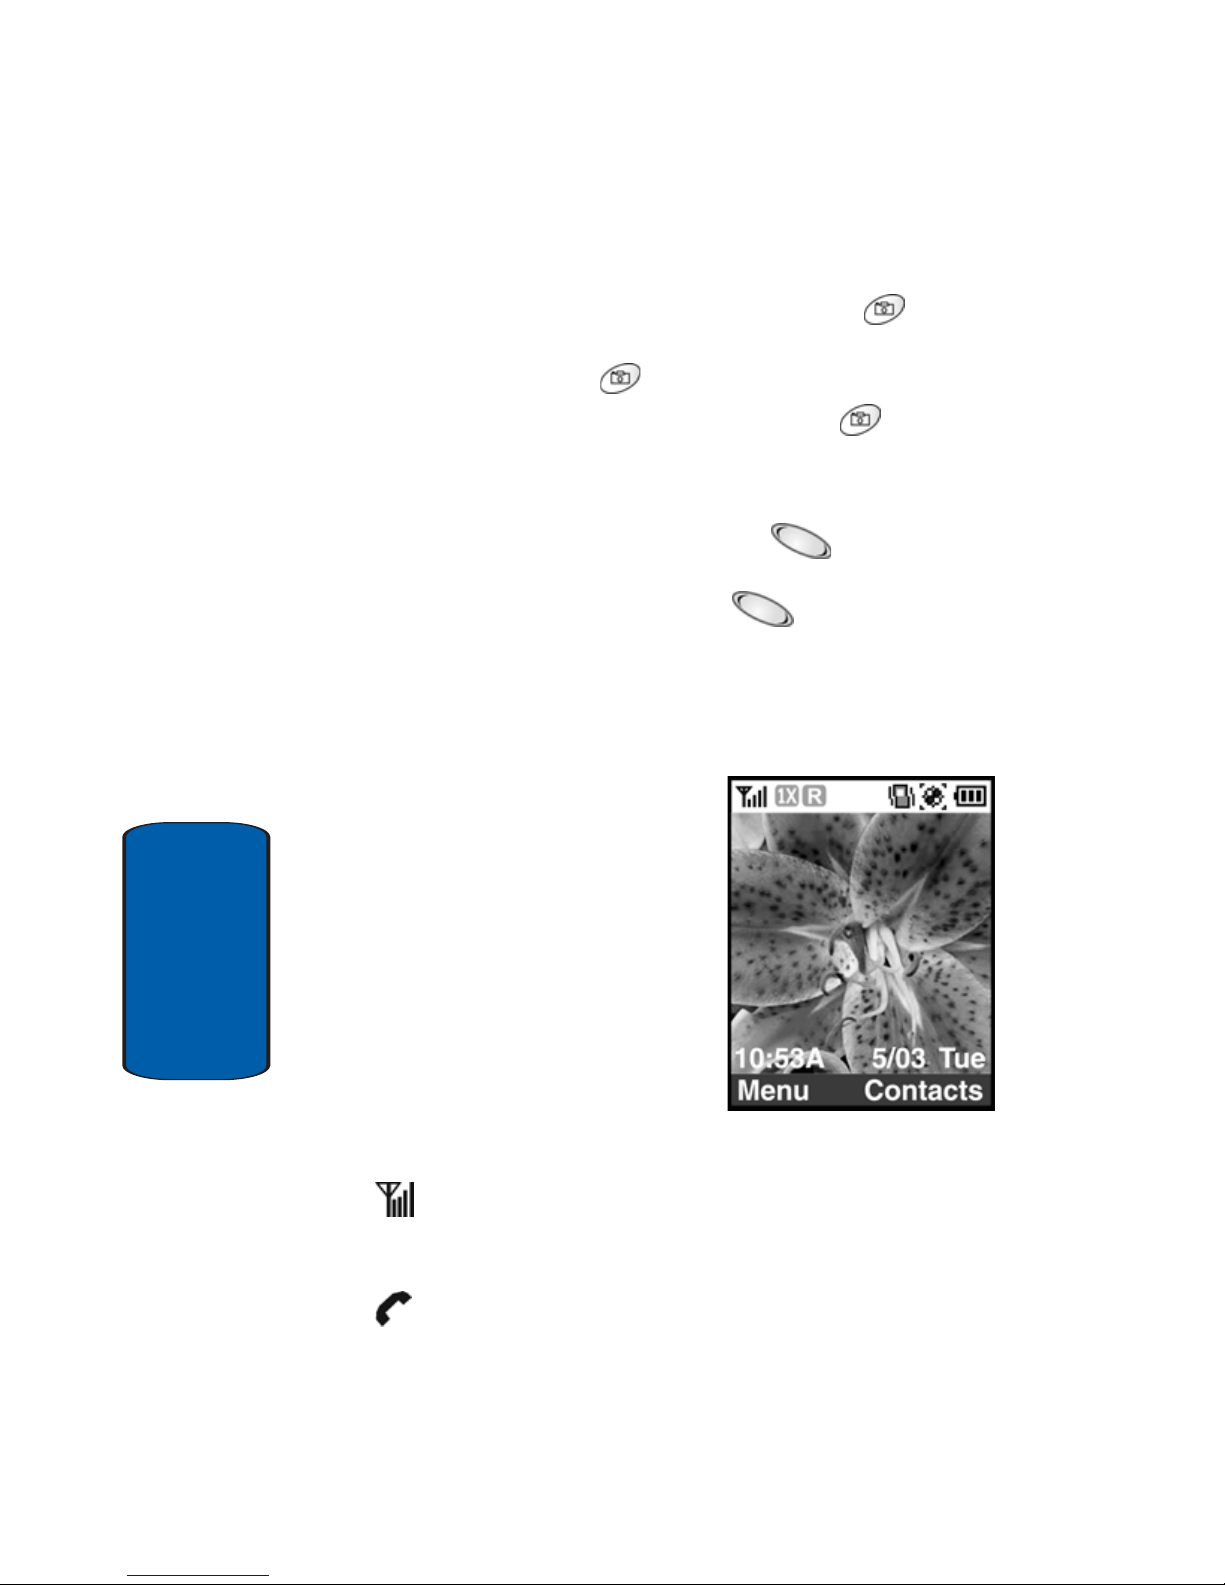
Section 2
Command Keys
Left Soft Key
Functions for the left soft key ( ) are defined by what
appears above it in the display. Some functions of the
left soft key are as follows.
• In standby mode, press the Menu (left) soft key ( ) to display
the first of several menus.
• Press the Option (left) soft key ( ) to view options in some
cases.
• Press the left soft key ( ) in response to prompts for browser
charges and other instances.
Right Soft Key
Functions for the right soft key ( ) are defined by what
appears above it in the display. Some, but not all
functions of the right soft key are as follows:
• In standby mode, press the Contacts (right) soft key ( ) to
enter the Contacts list.
• Press the Back (right) soft key ( ) to return to the previous
menu from a sub menu.
• Press the Back (right) soft key ( ) to return to the standby
mode from any main menu.
• In camer a mod e, pre ss th e Gallery (right) soft key ( ) to view
stored pictures.
20
Section 2
Navigation Keys
Use any of the four di rectional navigation keys to
browse menus, sub menus, and lists. With your phone
in standby mode, each of the four navigation keys also
acts as a shortcut to launch specific applications.
• Up—User programmable to provide a shortcut to one of your
phone’s many functions.
• Down—Accesses the Messages menu.
• Left—Accesses the Sounds menu.
• Right—Accesses the easyedge
SM
feature.
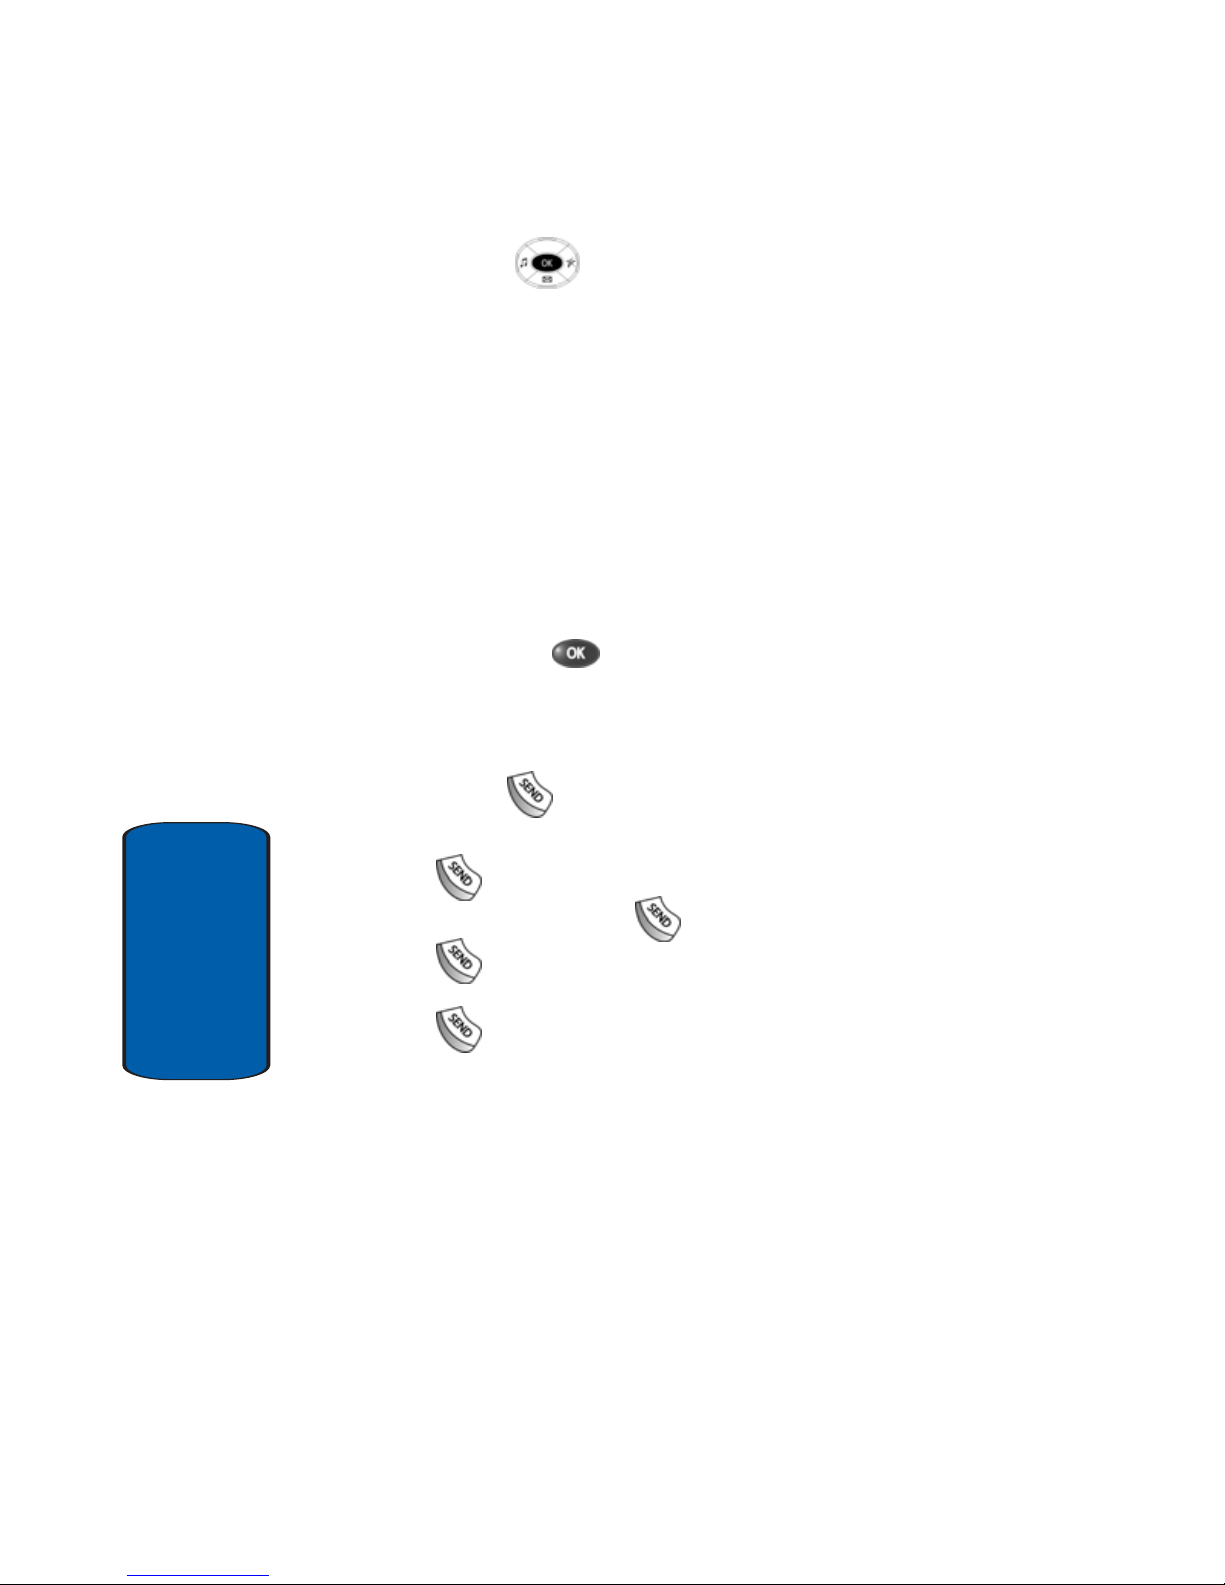
• OK—Use the OK ( ) key
for such things as replying to or
confirming prompts, and jumping to highlighted links on the
web.
SEND Key
The SEND key ( ) is used to answer calls, dial calls,
and to recall the last number dialed:
• Press once to answer calls.
• Enter a number and press once to connect a call.
• Press
once in standby mode to display the most recently
dialed number.
• Press twice in standby mode to call the most recently
dialed number.

Section 2: Understanding Your Phone 21
Command Keys
Section 2
Clear key
The CLR key ( ) is used to erase or clear letters,
numbers, or characters from the display. You can also
press to return to a previous menu or return to
standby mode from any menu.
• Press
to backspace and delete.
• To erase all digits or characters from the display screen, press
and hold .
• To back up one menu level, briefly press .
• To return to standby mode from any menu, press and hold
until you return to standby mode.
End Key
• Press and hold
to turn on your phone.
• Press and hold
to turn off your phone.
• Press
once to disconnect a call, to return to standby
mode, or to cancel any input.
Asterisk (*) Key
Press and hold to activate voice command mode.
Say certain voice commands t o make calls, r ecor d voice
memos, revi ew your Contacts, and review your
calendar and today’s schedule.
One (1) Key
In standby mode, press and hold to call your voice
mail box.
Pound (#) Key
Press and hold to silence or restore the tones your
keypad makes.
22
Section 2
Camera Key
•
In standby mode, press and hold the camera key ( ) on the
right side of the phone to activate the camera.
• Press the camera key ( )a second time to snap a picture.
• In standby mode, briefly press the camera key ( ) to display
camera sub menus.
Volume Keys
• In standby mode, press the volume key ( ) on the left side
of the phone up or down to select ring volume and/or ring type.
• During a call, press the volume key ( ) up or down to
adjust earpiece volume.
Understanding the Display
The top line of the display is
reserved for icons that indicate
such things as network status,
battery power, signal strength,
and connection type. Other
icons may appear elsewhere in
the display as well. The
following list includes some of
these icons, along with their
descriptions.
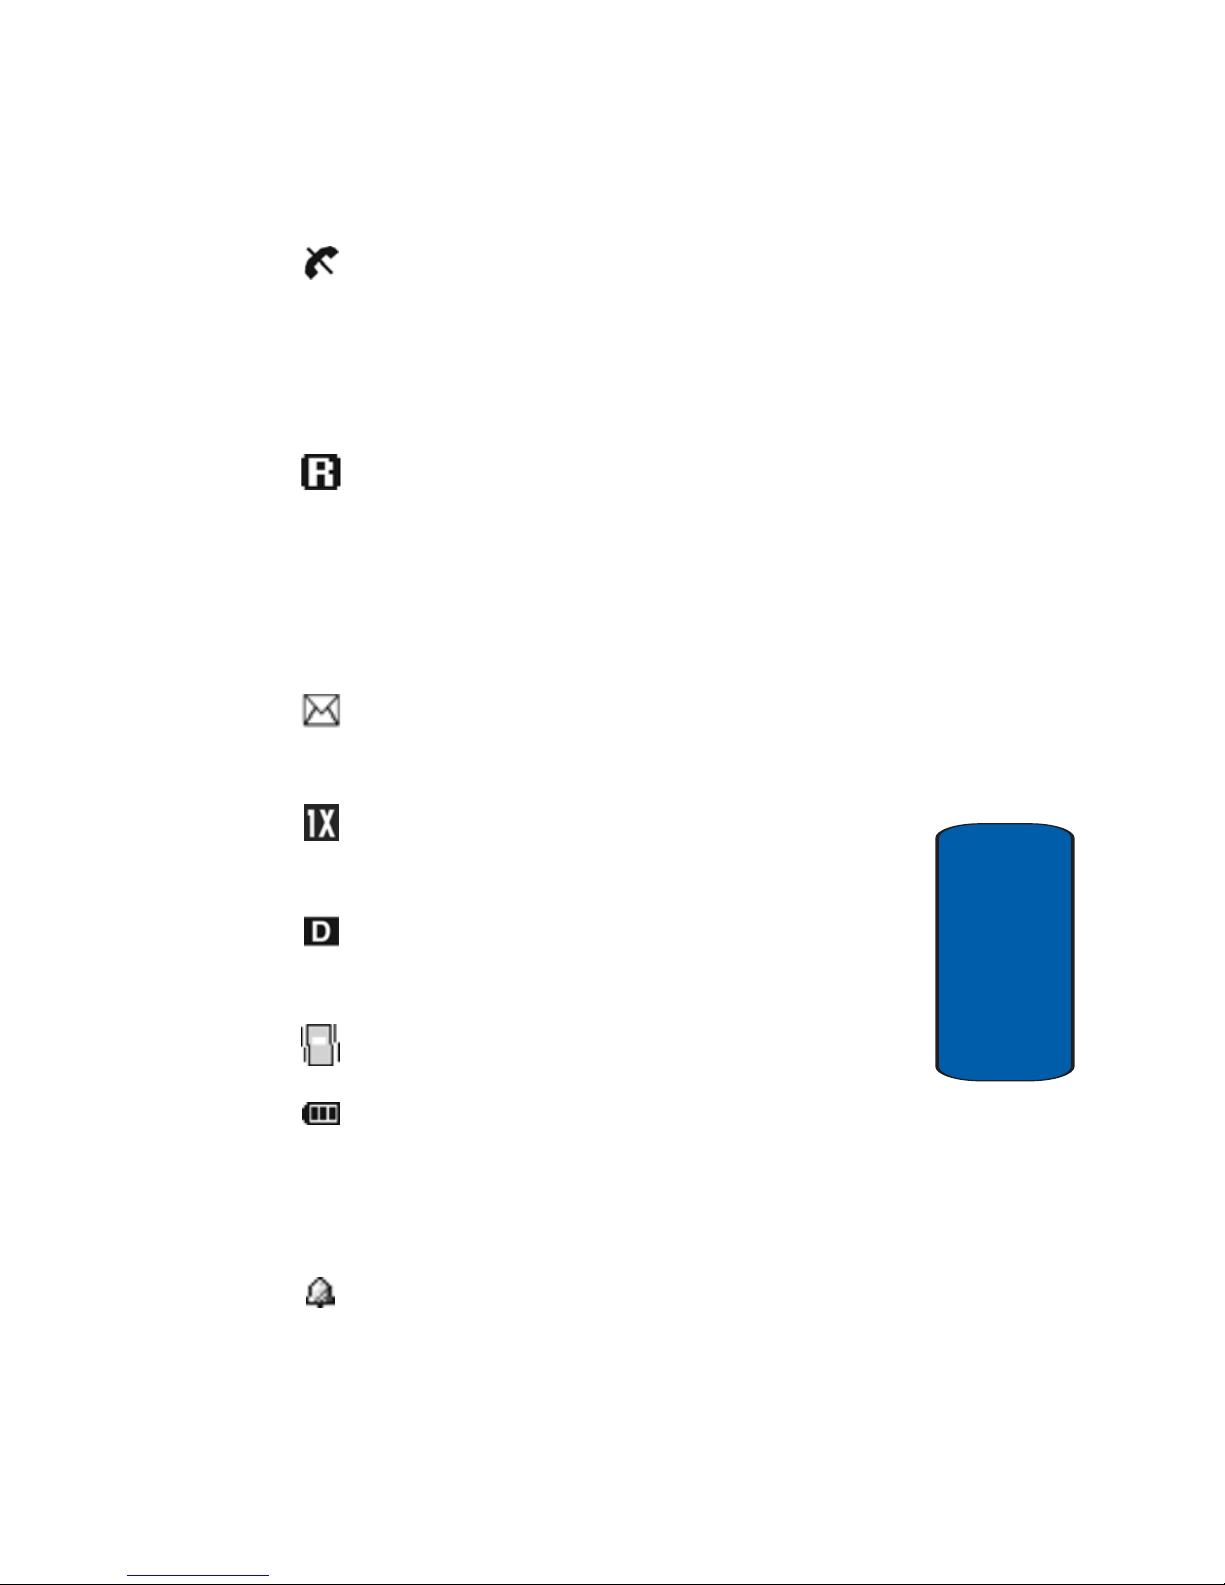
Display Screen Icons
Signal strength—Always appears when your phone is on
and indicates the current receive signal strength. More
lines indicate a stronger signal received from the network.
Service indicator—Indicates a call in progress. When
dialing a number , this icon flashes until the call connec ts.
Section 2: Understanding Your Phone 23
Understanding the Display
Section 2
No service indicator—Indicates your phone cannot
obtain service because you are outside a service area. You
cannot make or receive calls. Wait for a signal o r move into
an open area to try and find a signal. The no service
indicator always appears when you turn on your phone and
disappears once service is located.
Roam—Extended roaming indicator. Roaming occurs
when your phone is outside yo ur home area. While
roaming, a wireless system other than your wireless
provider’ s may be handling your call, so the service rate for
the call may be higher than for a call within your home area.
Please refer to information from you r w ireless provider on
roaming rates.
New Message—Indic ates that you have received a new
voice, text, page or web alert message. You are also notified
by visual and audible alerts.
1X Protocol—Indicates your phone is using the 1X data
protocol. The 1X protocol is capable of high-speed data
(3G).
IS95-2G Protocol—Indicates your phone is using the
IS95-2G protocol. Thi s protocol is not capable of high
speed data.
Vibrate mode —Indicates your phone is in vibrate mode
(ringer is silent).
Battery strength—Indicates the battery charge level. The
more black bars, the greater the char ge. When the battery
charge becomes very low, a flashing empty battery icon
displays and the phone sounds an audible alert, which
indicates your phone is about to shut down.
Alarm clock—The alarm clock is set.
24
Section 2
GPS (911 only)—Indicates that Global Positioning Service
(GPS) location is on only for 911 calls.
GPS—Indicates GPS location is on continuously.
Silent mode—Indicates your phone is in silent mode. The
ringer is silenced for all alerts, incoming calls, and incoming
messages. The phone alerts you of incoming calls, alerts, or
messages by vibration and a flashing Service LED.
Battery
Charging the Battery
Your phone is powered by a rechargeable standard LiIon battery. Only use Samsung-approved charging
devices and batteries. Samsung accessories are
designed to maximize battery life.
Caution! Using other accessories may invalidate your warranty and may
cause damage.
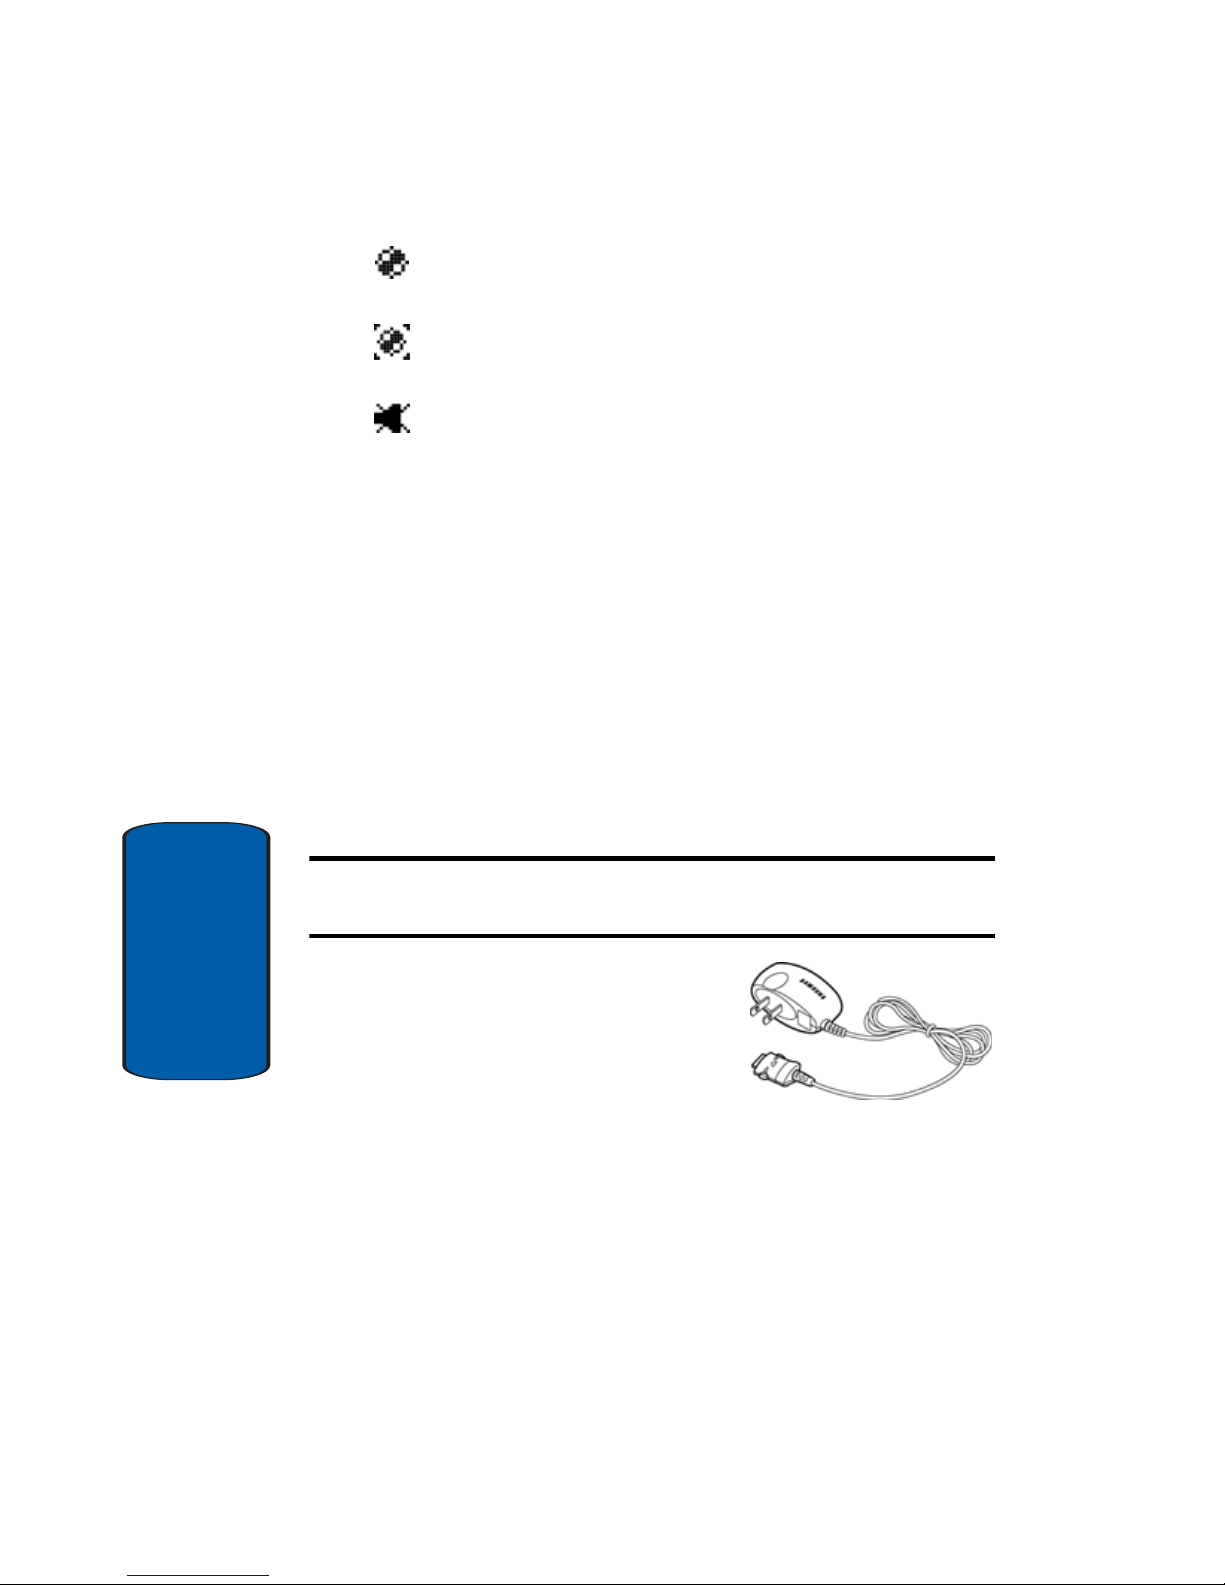
Using the Travel Charger
The travel charger is a
convenient, light-weight charger
that charges your phone from any
120/220 VAC outlet.
1. Plug the large end of the travel charger into a standard
120 or 220 VAC wall outlet.
2. Remove the small plastic plug from the chargeraccessory connector in the bottom of the phone.

Section 2: Understanding Your Phone 25
Battery
Section 2
3. Insert the smaller end of the
adapter , arrow side up, into the
charger-accessory connector
until it clicks into place.
Tip: You can use your phone while charging, however, the battery charges
faster if the phone is turned off.
Battery indicator
The battery indicator ( ) in the upper-right corner of
the display indicates power level. Monitor the battery
strength and ensur e your battery is adequately char ged.
• Three bars ( ) indicate a full charge.
• An empty battery icon ( ) indicates a near empty battery.
• The empty battery icon ( ) blinks and a tone sounds two to
three minutes before the battery is too low to operate the
phone.
If you continue to use the phone without charging the battery,
the phone shuts down.

26
Section 2
Power Save mode
Unless the Backlight-Power save setting for the Liquid
Crystal Display (LCD) has been changed, Power save is
set to Off and the backlight changes from bright to dim
after a minute of inactivity, and after another minute of
inactivity, turns off. With Power save set to On, the
backlight is always dim. After approximately one
minute of inactivity, Power save turns the backlight off.
To set Power save, do the following:
1. In standby mode, press the Menu (left) soft key ( ),
then press for Display, (for Backlight), and
for Power save. The following options appear in the
display:
䢇 Off
䢇 On
2. Use the navigation keys to highli ght On or Off, then press
the key.
Your Phone’s Modes
Call Answer Mode
You can select how you wish to answer a call.
1. In standby mode, press the Menu (left) soft key ( ),
then press (for Setup), (for Call Options), and
for Call Answer. The following call answer options
appear in the display:
䢇 Send Key—Only pressing answers a call.
䢇 Folder Open—Opening the phone’s fol der or pressing
answers a call.
䢇 Any Key—Pressing any key except answers a call.
Section 2: Understanding Your Phone 27
Your Phone’s Modes
Section 2
2. Use the navigation keys to highlight an option.
3. Press the key to select the method for answering
calls.
Input mode
Input mode determines how you enter text, numbers
and symbols. While at any text entry screen, press the
Option (left) soft key ( ), then choose the input mode
from the pop-up menu using the navigation keys.
Optional input modes are T9 Word, ABC, Symbol, 123,
and Canned Msg. (See “Section 5: Entering Text” on
page 63 for more information.)
Tip: You can also cycle between T9 Word, ABC, and 123 by repeatedly
pressing and holding .
Lock Mode
When the phone is in Lock Mode, restrictions are
placed on phone use. You can receive calls and
messages, but cannot place outgoing calls (except for
emergency numbers) until you unlock the phone. Lock
Mode also restricts access to menus and the volume
key. Unlock your phone by entering the lock code
when prompted. (See “Lock Phone” on page 178 for
more information.)
28
Section 2
Standby Mode
Standby mode is the state of the phone once it has
found service and is idle. The phone goes into standby
mode:
• After you power the phone on.
• When you press after a call or from within a menu.
In standby mode, you will see the time, day, and date as
well as all phone status icons.
1. While in standby mode, enter a phone number, and press
to place a call.
2. Press to return to standby mode.
Receive Messages in Standby Mode
You can receive messages in standby mode. An alert
tone sounds and a notification message appears in the
display when a new message arrives.
• Press the View (right) soft key ( ) to view now.
• Press the Ignore (left) soft key ( ) to view later.
Talk Mode
You can place and receive calls only when your phone
is on. While in a call your phone is in talk mode. Press
the Menu (left) soft key ( ) to display a list of menu
options. See “In-Use Menu” on page 39 for more
information.

Section 2: Understanding Your Phone 29
Your Phone’s Modes
Section 2
Enter/Exit Silent Mode
Silence the tones your keypad makes when you press a
key.
• In standby mode, press and hold . Entering Silent Mode
briefly appears in the display and your phone returns to standby
mode.
• While in Silent mode and standby mode, press and hold .
Exit Silent Mode briefly appears in the display and your phone
returns to standby mode.
Vibrate Mode
■ In standby mode, repeatedly press the volume key ( ) down
until Vibrate appears in the display.
The volume key is on the upper left side of phone, near the left soft
key ( ).
Adjust the Ringer
1. In standby mode, press the volume key ( ) on the
left side of the phone up or down. Options are:
2. When you are satisfied with the setting, press the
key. Your phone returns to standby mode.
Tip: You can also enter the Volume/Vibrate sub-menu by pressing the
Menu (left) soft key ( ), then pressing the , , and keys. Use
the volume key on the left side of your phone to adjust the ringer setting.
Note: The vibrate icon ( ) appears in the display when the phone is in
Vibrate or Vibrate+Ring mode.
䢇 Silent 䢇 Level 2
䢇 1-Beep 䢇 Level 3
䢇 Vibrate 䢇 Level 4
䢇 Vib+Ring 䢇 Level 5
䢇 Level 1

30
Section 2
Camera Mode
Camera mode lets you activate your phone’s camera to
take pictures and short videos. In Camera mode, you
can also enable or disable the flash and adjust the
resolution and appearance of your pictures and videos.
See “Section 11: Camera” on page 131 for more
information.
• Entering Camera Mode—In standby mode, press and hold the
Camera key ( ) on the upper right side of your phone, near
the right soft key ( ).
• Exiting Camera Mode—Press the End key ( ).
 Loading...