

Samsung SCH A610 User Manual

SCH-a610 Series
All Digital
TELEPHONE
User Guide
Please read this manual before operating your
phone, and keep it for future reference.

Intellectual Property
All Intellectual Property, as defined below, owned by or which is
otherwise the property of Samsung or its respective suppliers relating
to the SAMSUNG Phone, including but not limited to, accessories,
parts, or software relating thereto (the “Phone System”), is
proprietary to Samsung and protected under federal laws, state laws,
and international treaty provisions. Intellectual Property includes, but
is not limited to, inventions (patentable or unpatentable), patents,
trade secrets, copyrights, software, computer programs, and related
documentation and other works of authorship. You may not infringe
or otherwise violate the rights secured by the Intellectual Property.
Moreover, you agree that you will not (and will not attempt to) modify,
prepare derivative works of, reverse engineer, decompile,
disassemble, or otherwise attempt to create source code from the
software. No title to or ownership in the Intellectual Property is
transferred to you. All applicable rights of the Intellectual Property
shall remain with SAMSUNG and its suppliers.
Samsung Telecommunications America (STA), Inc.
Headquarters Customer Care Center
1301 East Lookout Dr. 1601 E. Plano Parkway, Suite 150
Richardson, TX 75082
Tel: 972.761.7000 Toll Free Tel: 1.888.987.HELP (4357)
Fax: 972.761.7001 Fax: 972.761.7001 and 972.761.7501
Internet Address: http://www.samsungusa.com
©2003 Samsung Telecommunications America. Samsung is a
registered trademark of Samsung Electronics America, Inc. and its
related entities.
Licensed by Qualcomm Incorporated under one or more of the
following patents: U.S. Patent No. 4, 901, 307; 5, 056, 109; 5, 099,
204; 5, 101, 501; 5, 103, 459; 5, 107, 225; 5, 109, 390.
Printed in South Korea
GH68-04359A
Rev. 4.0 (12-30-03)
®
Openwave
RSA
is a registered Trademark of Openwave, Inc.
®
is a registered Trademark RSA Security, Inc.
Plano, TX 75074

Disclaimer of Warranties;
Exclusion of Liability
EXCEPT AS SET FORTH IN THE EXPRESS WARRANTY
CONTAINED ON THE WARRANTY PAGE ENCLOSED WITH THE
PRODUCT, THE PURCHASER TAKES THE PRODUCT "AS IS",
AND SAMSUNG MAKES NO EXPRESS OR IMPLIED WARRANTY
OF ANY KIND WHATSOEVER WITH RESPECT TO THE
PRODUCT, INCLUDING BUT NOT LIMITED TO THE
MERCHANTABILITY OF THE PRODUCT OR ITS FITNESS FOR
ANY PARTICULAR PURPOSE OR USE; THE DESIGN,
CONDITION OR QUALITY OF THE PRODUCT; THE
PERFORMANCE OF THE PRODUCT; THE WORKMANSHIP OF
THE PRODUCT OR THE COMPONENTS CONTAINED THEREIN;
OR COMPLIANCE OF THE PRODUCT WITH THE
REQUIREMENTS OF ANY LAW, RULE, SPECIFICATION OR
CONTRACT PERTAINING THERETO. NOTHING CONTAINED IN
THE INSTRUCTION MANUAL SHALL BE CONSTRUED TO
CREATE AN EXPRESS OR IMPLIED WARRANTY OF ANY KIND
WHATSOEVER WITH RESPECT TO THE PRODUCT. IN
ADDITION, SAMSUNG SHALL NOT BE LIABLE FOR ANY
DAMAGES OF ANY KIND RESULTING FROM THE PURCHASE OR
USE OF THE PRODUCT OR ARISING FROM THE BREACH OF
THE EXPRESS WARRANTY, INCLUDING INCIDENTAL, SPECIAL
OR CONSEQUENTIAL DAMAGES, OR LOSS OF ANTICIPATED
PROFITS OR BENEFITS.


Contents
SCH-a610 closed view.......................................................................1
SCH-a610 open view..........................................................................2
Menu quick reference ........................................................................3
Navigation Key shortcuts....................................................... 3
Introduction ........................................................................................5
Key features of the SCH-a610............................................... 5
How to use this guide ............................................................ 5
Understand your phone.....................................................................6
Antenna ................................................................................. 6
Backlight features .................................................................. 6
Power save mode.................................................................. 7
Left soft key .......................................................................... 7
Right soft key ........................................................................ 8
Clear key ............................................................................... 8
End key ................................................................................. 8
Headset connector ................................................................ 9
Service LED .......................................................................... 9
Microphone.......................................................................... 10
Alpha-Numeric keypad ........................................................ 10
Speaker ............................................................................... 10
SEND key ........................................................................... 10
Navigation key ..................................................................... 10
Camera key ......................................................................... 11
Camera shutter key ............................................................. 11
Camera wheel .................................................................... 11
Get It Now............................................................................ 11
Your phone’s display ........................................................... 12
Install the battery ................................................................. 14
Remove the battery ............................................................. 15
Charge the battery............................................................... 15
Battery indicator................................................................... 16
Your phone’s modes .......................................................................17
Call Answer mode ............................................................... 17
Input mode........................................................................... 17
Lock mode........................................................................... 17
Standby mode ..................................................................... 18
Receive messages in standby mode................................... 18
Talk mode............................................................................ 18
i

Enter silent mode ................................................................ 19
Exit silent mode................................................................... 19
Vibrate mode....................................................................... 19
Adjust the ringer setting....................................................... 19
Get Started .......................................................................................20
Obtaining service for your phone ........................................ 20
Turn your phone on ............................................................. 20
Turn your phone off ............................................................. 20
Make and answer calls........................................................ 21
Voice Mail............................................................................ 24
Menus and sub menus ....................................................................25
Navigation Key shortcuts..................................................... 28
Menu navigation .................................................................. 29
Navigate using a shortcut.................................................... 30
In-Use menu........................................................................ 30
Mute the phone ................................................................... 31
The Camera ......................................................................................32
Rotate the camera............................................................... 32
Take pictures....................................................................... 32
Save pictures....................................................................... 34
Other Camera features........................................................ 34
Camera Settings.................................................................. 37
Point, click, and send a picture............................................ 42
Calls ..................................................................................................43
Outgoing calls...................................................................... 43
Incoming calls...................................................................... 44
Missed calls......................................................................... 44
Erase logs ........................................................................... 45
Review calls ........................................................................ 46
Call timer ............................................................................. 47
Call waiting.......................................................................... 47
Caller ID .............................................................................. 48
Call Block ............................................................................ 48
Three-way calling ................................................................ 48
Phone Book......................................................................................49
Open the Phone Book ......................................................... 49
Find ..................................................................................... 50
Rename group..................................................................... 53
Edit Phone Book numbers................................................... 54
Add pauses ......................................................................... 55
ii

Store pauses in a Phone Book entry ................................... 55
Pause dial from the Phone Book ......................................... 56
Manual pause calling........................................................... 56
Erase individual Phone Book entries................................... 57
Edit an existing e-mail address............................................ 57
Assign a speed dial location to a Phone Book entry ........... 58
Assign a speed dial type to a Phone Book entry ................. 59
Assign a picture to a Phone Book entry .............................. 60
Store numbers after a call ................................................... 60
Store numbers from call logs............................................... 62
Shortcuts to storing phone numbers.................................... 62
One-touch dialing ................................................................ 63
Two-touch dialing ................................................................ 63
Three-touch dialing.............................................................. 63
My phone #.......................................................................... 63
Messages..........................................................................................64
Text entry modes................................................................. 64
Send SMS text messages ................................................... 67
Receive text messages ....................................................... 70
Receive messages while in a call........................................ 70
Send pix messages in camera mode .................................. 71
Send pix messages in standby mode.................................. 73
Create a slide show ............................................................. 76
Receive pix messages......................................................... 79
Message folders .................................................................. 80
Web Alerts........................................................................... 87
Erase messages.................................................................. 87
Message settings................................................................. 88
Mobile Web by VZW with MSN® .....................................................90
Stored web content.............................................................. 90
Launch Mobile Web............................................................. 90
Exit Mobile Web................................................................... 91
Navigate the web................................................................. 91
Mobile Web soft keys .......................................................... 91
How Mobile Web keys work ................................................ 92
Links .................................................................................... 93
Place a call while using Mobile Web ................................... 93
Get It Now .........................................................................................94
Get It Now Options .............................................................. 95
iii

Disable or Remove an application....................................... 96
Planner..............................................................................................97
Open the planner................................................................. 97
Today .................................................................................. 97
Scheduler ............................................................................ 99
View an event...................................................................... 99
Jump to date...................................................................... 100
To Do List .......................................................................... 100
Memo pad ......................................................................... 101
Count Down....................................................................... 103
Alarm clock........................................................................ 105
World Time ........................................................................ 106
Calculator .......................................................................... 107
Voice Kit .........................................................................................108
Voice Kit commands.......................................................... 108
Digit Dial............................................................................ 108
Name Dial.......................................................................... 112
Quick Dial.......................................................................... 113
Use Quick Dial................................................................... 114
Phonebook ........................................................................ 115
Voice Memos..................................................................... 115
Review and Erase Memos ................................................ 117
Setup...............................................................................................118
Location............................................................................. 118
Display............................................................................... 119
Sounds .............................................................................. 122
Network ............................................................................. 125
Security ............................................................................. 126
Others................................................................................ 131
Version .............................................................................. 135
TTY/TDD..........................................................................................135
Usage guidelines:
All about performance and safety................................................136
Getting the Most Out of Your Reception ........................... 136
Maintaining Safe Use of and Access to Your Phone......... 138
Caring for the Battery ........................................................ 141
Acknowledging Special Precautions and FCC.................. 142
FDA Consumer Update ..................................................... 143
Owner's record .................................................................. 157
User Guide Proprietary Notice .......................................... 157
iv

Limited Warranty............................................................................158
Index ..................................................................................165
v

vi
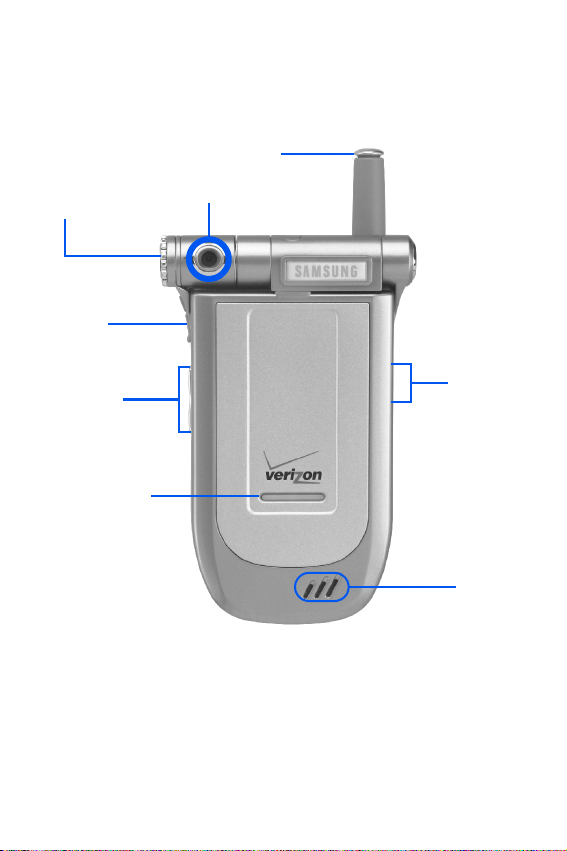
SCH-a610 closed view
C
Antenna
amera
Wheel
Headset
Connector
Volume Key
Service LED
Camera
Camera
Shutter
Key
Speaker
SCH-a610 closed view 1

SCH-a610 open view
y
Icons
Earpiece
Displa
Navigation
Key
Camera
Lens
Left
Soft Key
OK Key
Verizon
Mobile Web
SEND
Key
Message
Alpha-Numeric
Keypad
Voice Recognition
Shortcut
2
Power/Accessory Connector
Space/Silent Mode
Microphone
Microphone
Swivel
Flip
Camera
Button
Right
Soft Key
Get it
Now
END
Key
CLR
Key

✂
Menu quick reference
Cut out and use this page as a handy quick reference for
several useful features in your phone.
1) Camera 5) Get It Now 8) Voice Kit
1) Take a picture 1) Get It Now 1) Quick Dial
2) Gallery
3) Settings 1) Get In Web 3) Voice Setup
4) Help
2) Phone Book
1) Find 2) Scheduler 2) Display
2) Add 3) Jump To Date 3) Sounds
3) Rename Group 4) To Do List 4) Network
4) My Phone # 5) Memo Pad 5) Security
5) Memory 6) Count Down 6) Others
3) Calls
1) Outgoing 8) World Time
2) Incoming 9) Calculator
3) Missed
4) Erase Logs
5) Call Timer
4) Message
1) Send New Msg
2) Voice
3) Inbox
4) Outbox
5) Draft
6) Saved
7) WebAlert
8) Msg Setting
9) Erase Msg
6) Mobile Web
7) Planner 9) Setup
1) Today 1) Location
7) Alarm Clock 7) Version
Navigation Key shortcuts
In standby mode, press a navigation
key to launch its corresponding
application.
2) Voice Memo
✂
Menu quick reference 3
Quick Reference
Turn the phone on and off
• Press and hold to turn the phone off (if on) and on (if off).
Check voice mail
• In standby mode, press and hold , then follow the recorded prompts.
Enter/Exit silent mode
• In standby mode, press and hold . To exit, press and hold .
Set call ringer volume
• In standby mode, press the volume key on the left side of the phone.
• Press the volume key up or down to set call ringer volume as desired.
View recent calls
• In standby mode, press . Your recent calls appear in the display.
Change the wallpaper
• In standby mode, press the left soft key ( ) Menu, then press
• Select the source that you wish to browse for wallpaper, then press .
• Browse available choices using the navigation key, then press .
Save a number (quickly)
• In standby mode, enter the number you wish to save using the keypad.
• Press . With
• Select the number type using the navigation keys, then press
• Enter a name for the entry using the keypad, then press .
. A pop-up menu appears in the display.
New Entry highlighted, press again.
.
✂
View software/hardware information
• In standby mode, press the left soft key ( ) Menu, then press .
Mute/Unmute the phone
• While in a call, press the left soft key ( ) Menu, twice.
4
✂

Introduction
Congratulations on your purchase of the Samsung SCHa610 mobile phone. The SCH-a610 offers a rich blend of
features such as a large, high-resolution swivel display, PIM
(Personal Information Manager) functions, a built-in digital
camera with flash, voice activated applications, and more.
We ask that you take time to read this guide and become
familiar with this phone’s many features.
Key features of the SCH-a610
• Large, high-resolution color display
• High speed data (CDMA 2000 1X Technology)
• Global Positioning Technology (GPS)
• PIM functions (Scheduler, To Do List, etc.)
• Enhanced Message Service (EMS)
• Short Message Service (SMS)
• Pix Messaging
• Voice Recognition Applications
• Built-in digital camera with flash
• Swivel flip
• 16 Polyphonic Ringtones
How to use this guide
A robust index for reference begins on page 165. Also
included is important safety information that you should know
before using your phone; this information begins on
page 136.
If you still have questions, we’ll be happy to answer them.
Just call our Samsung Customer Care Center toll-free at
1.888.987.HELP (4357).
Introduction 5

Understand your phone
Antenna
Avoid touching the antenna while the phone is on. Contact
with the antenna affects call quality and may cause the phone
to operate at a higher power level than necessary.
Backlight features
Backlight features give you the flexibility to choose the
amount of time the display and backlight remain illuminated
after your last activity. Keep in mind that increasing these
settings reduces battery life.
Folder Open keeps the display or keypad backlight on as
long as the folder is open.
1.
In standby mode, press the left soft key ( ) Menu.
2. Press , , for Backlight. The following
backlight options appear in the display.
1 Lcd
2 Keypad
3 Power save
Use the navigation key to highlight Lcd or Keypad, then
3.
press .
4. Use the navigation key to highlight the amount of time
that you wish the keypad or display to remain illuminated
after a period of inactivity, then press .
6

Power save mode
Normally, the LCD backlight is at full brightness, dims after a
minute of inactivity, and then turns off. With
enabled, the backlight starts out dim, then turns off after 15
seconds of inactivity. To enable or disable
1. In standby mode, press the left soft key ( ) Menu.
2. Press , , for Backlight. The following
options appear in the display.
1 Lcd
2 Keypad
3 Power save
Use the navigation key to highlight Power save, then
3.
press .
4. Use the navigation key to highlight On or Off, then
press .
Off and On appear in the display.
Power save
Power save:
Left soft key
Functions for the left soft key ( ) are
defined by what appears above it in the
display. Some functions of the left soft key
are as follows.
• Press the left soft key ( ) Menu to enter the
main menu.
• Press the left soft key ( ) Option to view options in
some features.
• Press ( ) to acknowledge browser charges and
other prompts.
Understand your phone 7

Right soft key
Functions for the right soft key ( ) are
defined by what appears above it in the
display. Some functions of the right soft key
are as follows:
• Press the right soft key ( ) Back to
return to the standby mode from any main menu.
• Press the right soft key ( ) Back to return to the
previous menu from a sub menu.
• In standby mode, press the right soft key ( ) Contacts
to enter the
Contacts list.
• In camera mode, press the right soft key ( ) Gallery to
view stored pictures.
Clear key
The CLR key ( ) is used to erase or clear
numbers from the display. You can also use
to return to a previous menu or to return
to standby mode from any menu.
• If you enter an incorrect character, briefly press
backspace and delete.
• To erase all digits or characters from the display screen,
press and hold .
• To back up one menu level, briefly press .
• To return to standby mode from any menu, press and
hold until you return to standby mode.
to
End key
• Press and hold
your phone.
• Press and hold
your phone.
8
to turn on
to turn off

• Press
mode, or cancel any input.
once to disconnect a call, return to standby
Headset connector
The headset connector is the input jack for
the optional hands-free headset. The
headset includes an earbud and
microphone in a convenient, lightweight unit
so you can talk without using your hands.
• Before connecting the headset, gently
pry open the cover of the input jack on
the phone to expose the connector inside.
Service LED
The Service LED on the front flip has the
following functions.
• Flashes to indicate an incoming call
or message.
• Lights momentarily when you power
up the phone and flashes red when
the phone is in need of a charge.
• Green indicates you are in service in
your home coverage area.
Turn the Service LED on or off
1. In standby mode, press the left soft
key
Menu, then press , , . Off and On
appear in the display.
2. Use the navigation key to highlight your preference, then
press .
Understand your phone 9

Microphone
The microphone, located just beneath on the
keypad, is used for conversation, voice setup, and
recording voice memos.
Alpha-Numeric keypad
Use the alpha-numeric keypad to enter text, numbers, and
special characters.
Speaker
The speaker, located on the front of the flip,
plays sounds such as ring tones and alerts.
SEND key
The SEND key ( ) is used to answer calls,
dial calls, and to recall the last number dialed:
• Press once to answer calls.
• Enter a number and press once to connect a call.
• Press once in standby mode to display the most
recently dialed number.
• Press twice in standby mode to call the most
recently dialed number.
Navigation key
Use any of the four directional keys on the
navigation key to browse menus, sub menus,
and lists. When in standby mode, each key also acts as a
shortcut to launch a pre-assigned application. The up
navigation key is user definable. Use the
such things as replying to or confirming prompts, and jumping
to highlighted links on the web.
OK () key
for
10

Camera key
The camera key ( ) activates the built-in
digital camera.
• Press once to activate the camera.
• Press again to snap the picture.
Camera shutter key
• Press the camera shutter key (on
the right side of the phone) to
activate the camera.
• Press the camera shutter key a
second time to snap a picture.
• In standby mode, press and hold
the camera shutter key to display
the camera menu.
Camera wheel
The digital color camera is built in to the axis of
the flip and can rotate over 180°.
Get It Now
You can download games, ring tones, e-mail and more using
Get It Now. For information on airtime charges, contact
Verizon Wirele s s.
1. In standby mode, press the right navigation key ( ).
The shopping cart icon ( ) appears in the upper left
corner of the display.
2. Press . A message appears in the display informing
you that browsing and downloading apps uses airtime.
Understand your phone 11

3. Press (Start). Your phone takes a moment to
connect, then the following
the display.
Get it Now options appear in
• What’s New • Get Pix
• Get Games • Get Fun
• Get Tones • Get Mail
• Get Going • Enter Keywords
4. Use the navigation key to highlight the category of
your choice, then press .
5. Follow the instructions on the display.
Your phone’s display
The top line of the display is reserved
for icons that indicate network status,
battery power, signal strength,
connection type, and more. Following
is a list of these icons and
their descriptions.
Display screen icons
Signal strength: Always appears
when your phone is on and indicates the current signal
strength. More lines indicate higher signal strength.
Service indicator: Indicates a call in progress. When dialing
a number, this icon flashes until the call connects.
12

No service indicator: Indicates your phone cannot find a
signal because you’re outside a service area. You cannot
make or receive calls. Wait for a signal or move into an open
area to try and find a signal. The no service indicator always
appears when you turn on your phone and disappears once
service is located.
Roam: Extended roaming indicator. Roaming occurs when
you use your phone outside your home area. While roaming,
a wireless provider's system other than Verizon Wireless
handles your call, so the service rate for the call may be
higher than those made within your home area. Please refer
to information from Verizon Wireless on roaming rates.
New Message: Indicates that you’ve received a new voice,
text, page or web alert message. You’re also notified by a
visual and audible alert.
1X Protocol: Indicates your phone is using the 1X protocol.
The 1X protocol is capable of high-speed data (3G).
IS95-2G Protocol: Indicates your phone is using the IS95-
2G protocol. This protocol is not capable of high speed data.
Vibrate mode: Indicates your phone is in vibrate mode. Your
phone vibrates upon receiving an incoming call.
Battery strength: Indicates the battery charge level. The
more black bars, the greater the charge. When the battery
becomes very low, a flashing empty battery icon displays
and the phone sounds an audible alert, which indicates your
phone is about to shut down.
Alarm clock: The alarm clock is set.
Ringer silent: Indicates that your phones ringer is set
to silent.
GPS (911 only): This icon represents Global Positioning
Service (GPS) for 911.
GPS: Indicates GPS is on for location.
Understand your phone 13

Silent mode: Indicates your phone is in silent mode. ringer is
silenced for all alerts, incoming calls, and incoming
messages. The phone alerts you of incoming calls, alerts, or
messages by vibration and a flashing Service LED.
Flash in use: Indicates the camera flash is set to On.
Self Timer in use: Self Timer delays the camera shutter for
5 or 10 seconds after you press the camera shutter button or
when snapping a picture.
Multi Shot in use: Multi Shot snaps multiple pictures after
the camera shutter button is pressed. The number of pictures
snapped is dependant upon the resolution setting.
Swivel flip
The flip (or folder) on your phone
conveniently rotates clockwise up to 180°
so that you can screen callers, and even
take pictures with the flip closed.
• With the flip open, rotate the display
clockwise and close the flip. The
display screen automatically orients
itself to the new position.
Install the battery
This phone comes packaged with a partially charged
rechargeable standard Li-Ion battery and desktop charger.
Important! The phone can be used while the battery is charging, but must be fully charged before first use, otherwise you could damage the battery.
1.
Place the battery into the
provided slots on the underside
of the phone.
14

2. Gently slide the battery toward the top end of the phone
until you hear it click into place.
Remove the battery
1. Press and hold to turn off the phone (if on).
2. Press the battery release latch and slide the battery
toward the bottom end of the phone until it stops.
3. Lift the battery up and away
from the phone.
Charge the battery
Your phone is powered by a rechargeable standard Li-Ion
battery. Only use Samsung-approved charging devices and
batteries. Samsung accessories are designed to maximize
battery life. Using other accessories may invalidate your
warranty and may cause damage.
Use the desktop charger
The desktop charger operates from a 120/220 VAC wall
outlet. It also acts as a cradle to hold your phone in a
convenient, easy-to-use position while charging.
1. Plug the AC plug from the desktop charger into a
standard 120 VAC or 220 VAC wall outlet.
2. Slide your phone, bottom end first, into the desktop
charger. Your phone begins charging.
Tip: You can use your phone while charging.
Tip: The battery charges faster if the phone is turned off.
Understand your phone 15

Battery indicator
The battery indicator ( ) in the upper-right corner of the
display indicates battery power level. Three bars indicate a
full charge, while an empty battery icon ( ) indicates an
almost empty battery.
Low battery warning
Two to three minutes before the battery becomes too low to
operate, a blinking empty battery icon ( ) appears and a
tone sounds. If you continue to operate the phone without
charging, the phone shuts down. Be sure to monitor the
battery strength icon and ensure your battery is adequately
charged.
16

Your phone’s modes
Call Answer mode
You can select the how you wish to answer a call.
1. In standby mode, press the left soft key ( ) Menu, then
press , , . The following call answer options
appear in the display.
Send Key
Folder Open
Any Key
2.
Use the navigation key to highlight an option.
3. Press to select the method for answering calls.
Input mode
Use input mode to enter text, numbers and symbols into
various screens. While at any text entry screen, press left soft
key ( )
up menu using the navigation key. Optional modes are
Word
Lock mode
When you lock the phone using Lock Mode, restrictions are
placed on phone use. You can receive messages and calls,
but you cannot make outgoing calls (except for emergency
numbers) until you unlock the phone.
access to menus and the volume key. Unlock your phone by
following the prompts and entering the lock code.
Option, then choose the input mode from the pop-
, ABC, Symbol, and 123.
Tip: You can also cycle between T9 Word, ABC, and 123
modes by repeatedly pressing and holding
Lock Mode also restricts
.
T9
Your phone’s modes 17

Standby mode
Standby mode is the phone’s state once it has found service
and is idle. The phone goes into standby mode:
• After you power it on.
• When you press after a call.
In standby mode, you will see the time, day, and date as well
as all other icons.
1. While in standby mode, enter a phone number, and
press to place a call.
2. Press to return to standby mode.
Receive messages in standby mode
You can receive messages in standby mode. An alert tone
sounds and a notification message appears when a new
message arrives.
• Press the right soft key ( ) View to view the message,
or press the left soft key ( )
message later.
Ignore to view the
Talk mod e
You can only place and receive calls when your phone is on.
While in a call your phone is in talk mode. Press the left soft
key ( ) to display a list of
Use menu” on page 30 for more information.
In-Use menu options. See “In-
18

Enter silent mode
You can silence the tones your keypad makes whenever you
press a key.
• In standby mode, press and hold . Entering Silent
Mode
briefly appears in the display and your phone
returns to standby mode.
Exit silent mode
• In standby mode, press and hold . Exit Silent Mode
briefly appears in the display and your phone returns to
standby mode.
Vibrate mode
• In standby mode, repeatedly press the volume key ( )
down until
is on the left side of phone, next to the SEND
key ( ).
Vibrate appears in the display. The volume key
Adjust the ringer setting
1. In standby mode, repeatedly press the volume key ( )
on the left side of the phone up or down. Options are:
• Silent • Level 2
• 1-Beep • Level 3
• Vibrate • Level 4
• Vibrate+Ring • Level 5
• Level 1 •
2. Press once you’re satisfied with the setting. The
phone returns to standby mode.
You can also enter the Volume/Vibrate sub menu by
pressing the left soft key
, . Use the volume key to adjust the ringer setting.
The vibrate icon ( ) appears in the display when the phone
is in Vibrate or Vibrate+Ring mode.
() Menu, then , ,
Your phone’s modes 19

Get Started
Obtaining service for your phone
Contact Verizon Wireless and follow their instructions for
obtaining service, if necessary. We suggest that you read this
guide to fully understand the services your phone supports.
Turn your phone on
1. Fully extend the antenna for the clearest reception, then
open the flip.
2. Press and hold
As with any other radio-transmitting device, do not touch the
antenna as it affects call quality and may cause the phone to
operate at a higher power level than is necessary.
3. Verizon Wireless
your phone begins searching for a network signal.
4. Once the phone finds a signal, the time, date, and day
appear in the bottom of the display.
5. You’re now ready to place and receive calls.
If the phone is outside of your carrier’s coverage or roaming
area, appears in the top of the display. If you cannot place
or receive calls, try later when service is available.
Turn your phone off
• Press and hold
powers off.
If your phone is on and you press for less than one
second, the phone will not power off. This prevents your
phone from being turned off accidentally.
for two or more seconds.
momentarily appears in the display and
for two or more seconds. Your phone
20
 Loading...