

Samsung SCH-400 User Manual

SCH-400 SERIES OWNERS MANUAL
Series
SCH-400
OWNERS MANUAL
samsung telecommunications america, inc.
1130 east arapaho road
richardson, texas 75081
tel: 972-761-7000 •fax: 972-761-7001
tech support: 888-987-help (4357)
web site: www.samsungtelecom.com
GH68-00418A
ver. 1.1

SCH-400 Series
CDMA
DIGITAL PORTABLE
CELLULAR TELEPHONE
Owner’s Manual
Please read this manual before operating the phone,
and keep it for future reference.

Introduction Table of ContentsPrecautions
Introduction
Important Information
This manual is based on the production version of the
included portable cellular telephone. Software
changes may have occurred after this printing.
Safety Precautions
For more detailed safety information,see “Safety”on
page 62 through 64.
• Do not use your phone while driving;park the
vehicle first.
• Do not use your phone when near medical
equipment.
• Do not use your phone at any time while traveling
on board a plane.
• Do not use your phone where a blasting operation
is in progress.
• Do not use your phone at a refueling point.
FCC/IC Notice
This device complies with part 15 of the FCC rules.
Operation is subject to the following two conditions:
(1) This device may not cause harmful interference,
and (2) this device must accept any interference
received,including interference that may cause
undesired operation.
Getting Started
Features 6
Description of Your Phone 7
Screen Display 8
Active Flip 8
Key Functions 9
Status Indicators 10
Display Messages 11
Battery 11
Installing the Battery 11
Removing the Battery 11
Dual-Slot Desktop Charger 12
Charging the Battery 13
Battery Charge Indicator 14
Tips on Battery Life 14
Caring for the Battery 15
Battery Disposal and Recycling 15
Call Quality 16
Basic Operations
Basic Operations of Your Phone 17
Turning Your Phone On and Off 18
Modes of Operation 18
Placing Calls 19
Receiving Calls 20
The Menu
Menu Organization 22
Conversation Menu Options 22
Calls Options 26
Sounds Options 28
Display Options 33
Setup Options 35
2
3

Phone Book
Overview of the Phone Book 39
Storing Phone Numbers 40
Viewing Stored Entries 41
Displaying Your Phone Number 42
Dialing from the Phone Book 42
Editing Phone Book Entries 43
Erasing Phone Book Entries 44
Storing Secret Numbers 45
Digital Voice Dial
Digital Voice Dialing 46
Training the Phone 46
Checking Recorded Name 47
Digital Voice Dialing Setup Options 48
Using Digital Voice Dialing 49
Security Options
Electronic Devices 63
Aircraft 63
Blasting Areas 63
Other Dangerous Areas 64
Accessories
Batteries 65
Dual-Slot Desktop Charger 65
Cigarette Lighter Adapter 65
Travel Charger 65
Hands-Free Car Kit 65
Headset 65
Appendix A
Display Messages 67
Glossary of Terms 68
Security Menu 51
Lock Mode 52
Call Restriction 54
Priority Numbers 55
Other Options 56
Message Services
Short Message Services and Voicemail 58
Reviewing Messages 59
Safety
Compliance with Safety Standards 62
Driving 62
Index 71
List of Tables
Table 1. Phone and Battery Specifications 16
Table 2. Talk and Standby Times 16
Table 3. Main Menu Structure 24
Table 4. Memory Dialing Shortcuts 42
Table 5. Battery Charging Times 66
54

Getting Started
SEND
END
1.
'
2
ABC3DEF
4
5
JKL
GHI
6
MNO
7
8
TUV9WXYZ
0
OPER
PWR CLR OK MENU
PQRS
Getting Started
Features
Congratulations on the purchase of your SAMSUNG
Phone. Using the latest digital technology,the phone
operates in a similar manner to other wireless phones,
while providing superior audio quality.
The following options make your phone both fun and
easy to use:
• Active Flip (answers calls,hangs up,etc.)
• Phone Book Memory - 79 Locations
• Speed Dialing
• One and Two-touch Turbo Dialing
• Voice Dialing - 20 Locations
• Short Message Services (SMS) and Voicemail
• Ringer Mute During Incoming Call
• 9 Ring Tones,4 Melodies,Vibration Alert
• Call Logs - 9 Locations Each:Outgoing and
Incoming Calls
• Programmable Lock Code
• Pause Dialing
• Alarm
• Dynamic Character Display
6
Description of Your Phone
Function keys and other controls activate the features
of your phone. The following illustration identifies the
function keys,controls,and indicators:
1
16
2
15
3
4
5
6
7
8
14
13
6
12
11
9
10
(not actual size)
1) Lamp (LED)
2) Headset Jack
3) LCD Screen
4) Volume Control
5) SEND Key
6) Scroll Keys
7) Power Key
8) Clear Key
9) Microphone
10) Flip
11) OK (Store) Key
12) Menu Key
13) End Key
14) Messages Key
15) Earpiece
16) Antenna
7

Getting Started
R D
-
-
SEND
END
Screen Display
This phone features dynamic character sizing,which
enables the screen to display from 12 to 16 characters
per line. The five-line screen includes four text lines
and one icon line,which displays active options and
selected menu items.
During conversation,the screen displays the call timer
and the name and number of the other party,if
available. Active in-use options,such as Mute and Call
Waiting,also display during conversation.
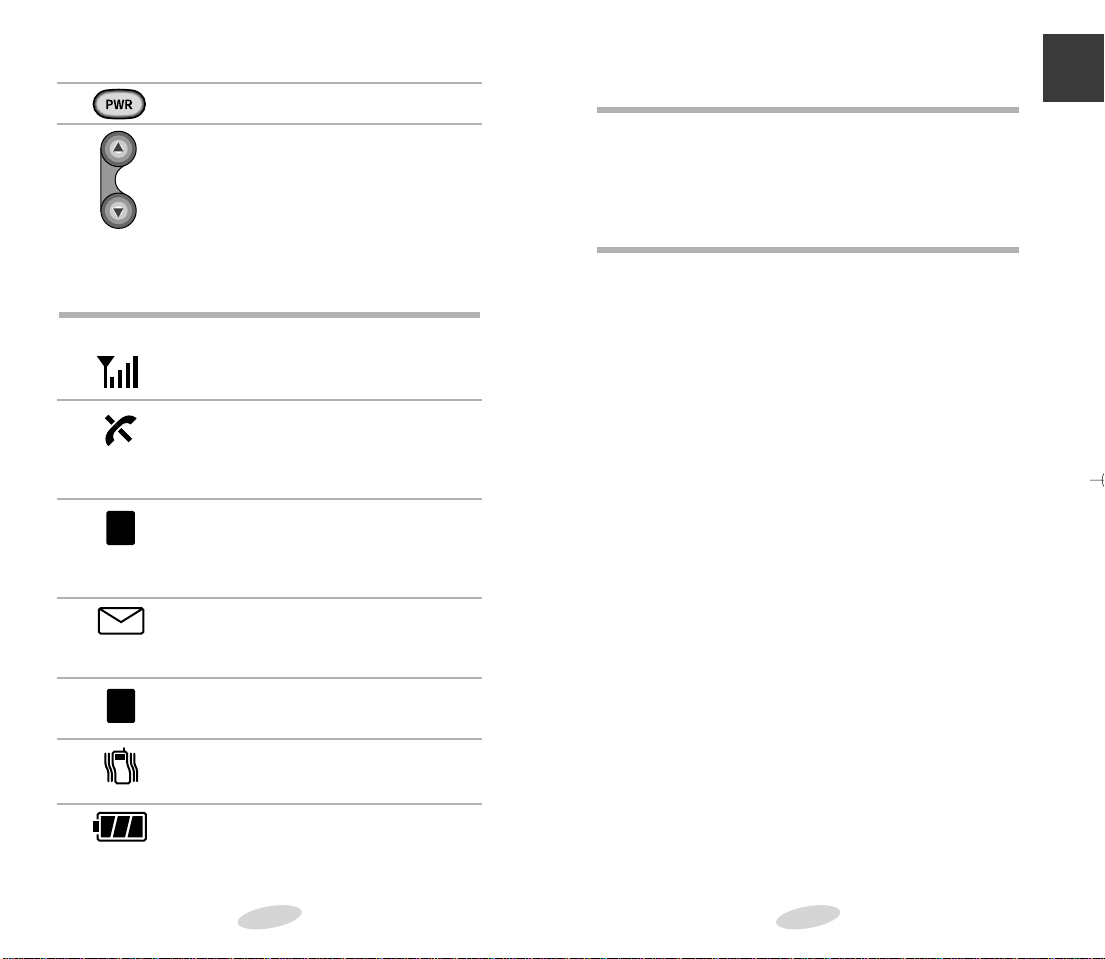
The following icons display at power-on:
Signal
Strength Roaming Digital
No Service
/In Use Message Vibrator On
Active Flip
The flip can control four functions of your phone.
The flip:
◆ answers an incoming call simply by opening it
◆ disconnects a call simply by closing it
◆ can be set to give you the digital voice dialing
prompt (see Digital Voice Dialing Setup Options on
page 48)
◆ tums on the backlight when opened (see Backlight
Control on page 33)
(not actual size)
8
Battery
Strength
Key Functions
Press SEND to:
• place a call after dialing the number,
• initiate Three-way calling,
• access Call Logs.
Press CLR to:
• erase one character at a time while entering names and numbers,
• go back one menu level at a time while
viewing menu options,
Press and hold CLR to:
• erase all displayed characters while entering names and numbers,
• return to Standby mode while viewing
menu options or dialing.
Press END to:
• end a call,
• exit the current menu and return to
Standby mode.
• mute the ringer during an incoming call.
Press MENU to:
• display the Main Menu,
• scroll forward through menus,
• enter a pause while entering numbers.
Press MESSAGES to access messages.
Press OK to:
• save menu option settings
• quickly store your dialled digits
• enter menus
• have one-button access to your phone
book (from Standby mode)
Press the arrow keys to scroll menu options.
Press and hold to:
•
initiate Voice Dialing when the flip is open.
Press and hold to:
•
switch between bell and vibrator setting.
9
Getting Started
R
D
Status Indicators
Press PWR to turn the phone on and off.
Press the Volume button to:
• adjust voice volume during
conversation.
• adjust ring volume in Standby mode,
• scroll Call Logs,Phone Book entries,
and menu options.
• mute the ringer during an incoming call.
Signal Strength
Indicates current signal strength.
No Service
Indicates that the phone is outside a
service area and cannot send or receive
calls.
Roaming
Displays when the phone is outside the
home service area but within the
network.
Message
Indicates a voicemail notification
(VMN),pa ge,or text message.
Digital
Indicates a Digital mode.
Vibrate
Indicates a Vibrate mode.
Display Messages
Messages appear on your display at various times. For
a listing and explanation these messages, refer to
Appendix A.
Battery
Your phone package includes a partially charged
rechargeable battery so that you can use the phone
immediately after it is activated.
Installing the Battery
To attach the battery to your phone:
1.Hold the batter y so that the metal contacts on the
base of the battery line up with the metal
contacts on the base of the phone.
2.Place the batter y on the back of the phone with
the top of the battery about a quarter of an inch
from the latch.
3.Gently slide the batter y toward the top of the
phone until it snaps into place.
Removing the Battery
Make sure to turn the power off before removing
the battery. Then press the battery release button
while sliding the battery out of position.
Battery Charge
Indicates the battery charge level.
10
11

Getting Started
Dual-Slot Desktop Charger
The Dual-Slot Desktop Charger contains:
• Front compartment for charging the battery while
attached to the phone
• Rear compartment for charging the battery alone
(not attached to the phone)
• A three colored light for each compartment that
indicates the status of the battery charge as follows:
• Red light to indicate that the battery is charging
• Green light to indicate that the battery is
fully charged
• A yellow light indicates that the batter y is
operating at a temperature that is too high or
too low, or that the batter y is misaligned in
the charger. If the light is yellow,check the
charger and battery.
Charging the Battery
To charge the battery using the Dual-Slot Desktop
Charger:
1.Plug the power cord of the charger into a wall outlet.
2.Select one of the following options:
• Insert the entire phone with battery attached into
the front compartment of the charger.
• Insert a single battery (alone, not attached to the
phone) into the rear compartment of the charger.
• A single battery in the rear compartment and a
phone with battery in the front compartment.
When two batteries are in the charger,the batteries
charge simultaneously.
Note: Use only the SAMSUNG-approved Dual-Slot
Desktop Charger with your phone by Samsung. Using
the wrong charger could damage the battery.
12
13

Getting Started
Battery Charge Indicator
The Battery Charge Indicator displays in the upper
right corner of the screen and indicates three levels of
charge. Three solid bars indicate a fully charged battery. When the battery charge level is low or empty,a
clear Battery Charge Indicator (no bars displayed)
flashes on the screen.
Tips on Battery Life
The operation time of the batteries may be shorter
than specified in the following cases:
• Battery standby time is affected by network
conditions.
• If your phone is out of a service area for an
extended time,it continues to search for service
and thus reduces battery standby time.
• Answering calls also consumes as much power as
required when making calls.
• Your Lithium Ion battery will gradually wear out
(like all batteries) and need to be replaced.
• If your battery life is shorten to half of the original
specified time,you should purchase a new one.
14
Caring for the Battery
Use only SAMSUNG-approved batteries,Desktop and
Travel chargers. These chargers maximize battery life
and performance. Using other batteries or chargers
may invalidate your warranty and may damage the
battery.
For proper battery care,please follow these guidelines:
• To avoid damage,charge the battery in
temperatures that range from 32˚F to 104˚F
(O˚C to 40˚C).
• Do not use the battery charger in direct sunlight
or in high humidity areas (such as a bathroom).
• Never dispose of the battery by incineration (fire).
• Keep the metal contacts at the battery base clean.
• Do not attempt to disassemble or short-circuit the
battery,as injuries or burns may result.
• Replace the battery when it no longer provides
acceptable performance.
• Do not store the battery in high-temperature
areas for a long time.
• Do not allow metal objects or liquids to contact or
short-circuit the battery terminals, as injuries or
burns may result.
Battery Disposal and Recycling
Please be aware of the following guidelines when
disposing of or recycling the battery:
• Do not dispose of the battery in a fire;the cell
may explode. Check the regulations in your area
for special disposal instructions.
• Do not open or puncture the battery;the released
electrolyte is corrosive and may cause damage to
the eyes and skin. This substance also can be
toxic if swallowed.
• Charge the battery in accordance with the
instructions specified in this manual.
15
Basic Operations
2
ABC
1.'1.'1.
'
SEND
END
SEND
SEND
Call Quality
For optimum call quality with your phone,please
follow these guidelines:
• Fully extend the antenna. While it may be possible
to place calls with the antenna retracted,the phone
operates best with the antenna fully extended.
• Hold the phone as you would hold any other
telephone handset. Speak directly into the
microphone,and position the antenna up and over
your shoulder while talking.
• Do not hold the antenna while using the phone,as
this may affect call quality.
Table 1: Phone and Battery Specifications
Phone Type: Dual Mode CDMA/AMPS 800MHz
Graphic LCD: 5 Lines (4 Text Lines,1 Icon Line)
Battery Type: Standard : 1000 mAh Lithium Ion
Extended : 1600 mAh Lithium Ion
Ultra-Extended :2700 mAh Lithium Ion
Phone with: Standard Battery Extended Battery
Dimensions (H✕W✕D): 114✕51✕24 mm 114✕51✕28 mm 114✕51✕40.5 mm
Weight: 140g/4.9 oz 157g/5.5 oz 184g/6.5 oz
Table 2: Talk and Standby Times
Mode Standard Battery Extended Battery Ultra-Extended
Talk CDMA up to 150 mins up to 270 mins up to 390 mins
Talk AMPS up to 65 mins up to 120 mins up to 180 mins
Standby CDMA up to 35 hours up to 55 hours up to 75 hours
Standby AMPS up to 8 hours up to 12 hours up to 19 hours
Note:Talk and Standby times are longer in CDMA mode.
* Your talk and standby times could vary substantially
and are related to network signal coverage. Coverage
will vary due to a number of circumstances:
• fringe areas with poor network coverage
• structural interference due to dense urban areas
• geographical obstacles such as mountains and
canyons
16
Ultra-Extended Battery
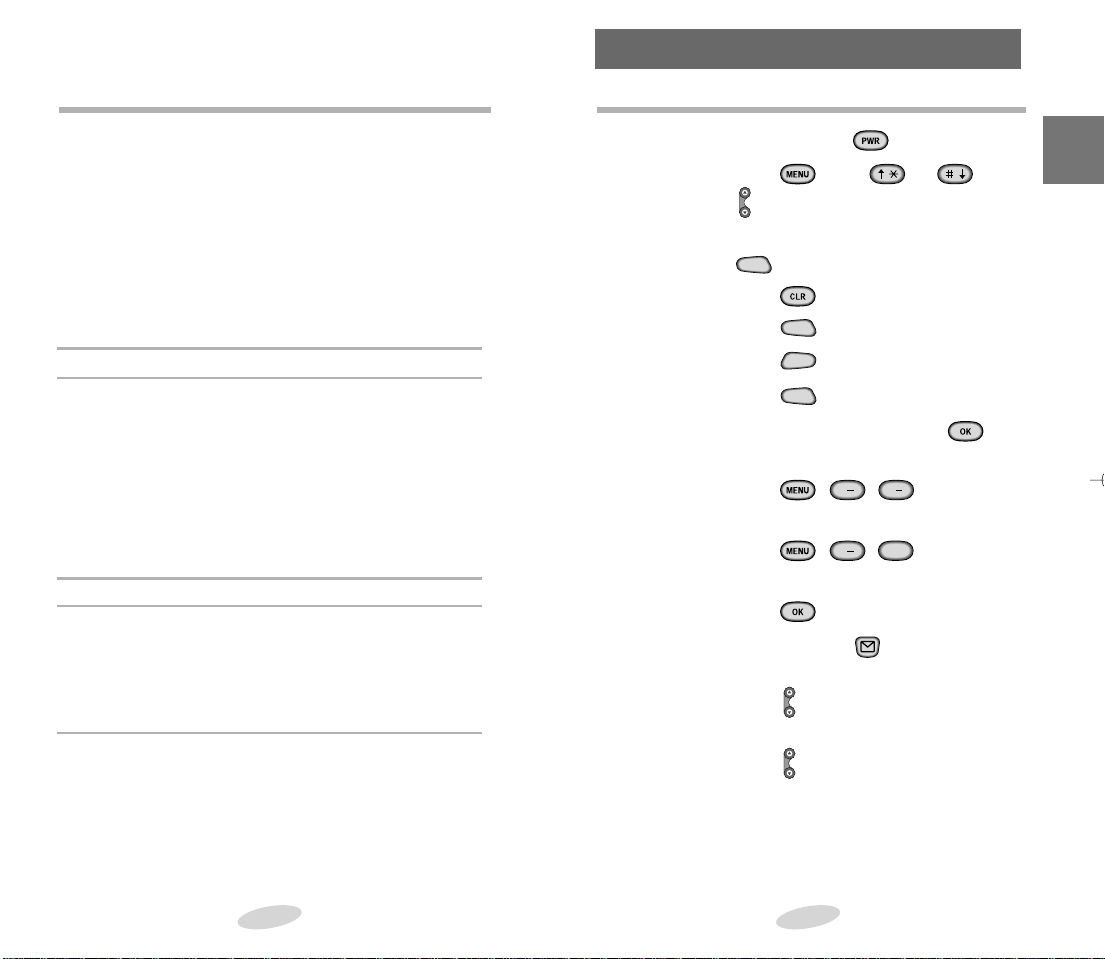
Basic Operations of Your Phone
Turn On/Off Press and hold .
Menu Scrolling Press ,then or ,or
.
Make Calls Enter the number,and then press
.
Correct Mistakes
Press .
Redial Call Press twice.
End Call Press ,or close the flip.
Answer Call Press ,or open the flip.
Save Numbers Enter phone number,press , and
then follow the screen prompts.
Outgoing Call Press , , ,to review
the last 9 outgoing calls.
Incoming Call Press , , ,to review
the last 9 incoming calls.
Name Search Press in Standby Mode.
One-touch Press and hold in Standby mode.
Voicemail
Adjust Ring Press in Standby mode.
Volume
Mute the Ringer
Press during an incoming call.
17
Basic Operations

SEND
3
DEF
SEND
Turning Your Phone On and Off
Turning On
To turn on your phone,press and hold .
The red light flashes, an alert sounds. The display
updates to reflect the following conditions:
• When the system locates ser vice, the greeting
message displays. You can now place and receive
calls.
• If the system cannot locate service,only the
greeting message displays. In this case,you cannot
place and receive calls.Turn off the phone,and
then try again later when ser vice is available.
• If your phone is locked,“Locked”displays. Press
,and enter the four-digit lock code to unlock
the phone.
Turning Off
To turn off your phone,press and hold .
When your power is off,nothing displays on the
screen.
Modes of Operation
Standby Mode
When your phone is on but no call is in progress,the
phone is in Standby Mode. The Main Menu and all its
options are accessed from Standby Mode.See Table 3
on page 24,for a structure of the Main Menu.
Conversation Mode
When a call is in progress,the phone is in conversation mode,and the Conver sation Mode menus can be
accessed by pressing . See pa ge 22 for a list of
these menu items.
18
Placing Calls
Basic Operations
Placing a Call
To place a call:
1.Press and hold to power on your phone. An
active screen display indicates that the phone is
on.(No dial tone sounds.)
2.Enter the phone number,up to 32 digits, by
pressing the digit keys. The phone number
displays on the screen.
3.Press . The phone places the call to the
entered phone number.
Priority Dialing
You can place calls to one of the seven priority numbers that are in your priority number list even if your
phone is locked,or outgoing calls are restricted.
Prepend Dialing
The prepend option enables you to add up to three
digits,such as area codes and network feature
activation codes,to a phone number of up to 10 digits.
You can prepend any existing entry in the Phone Book
or Call Logs.
To prepend existing phone numbers in the Phone
Book or Call Logs:
1. Access the phone number entr y.
2.When the phone number displays, press to
display options.
3.Press for prepend.
4.Enter the area code or feature code.
5.Press to call the number.
19

SEND
SEND
Pause Dialing
END
SEND
SEND
SEND
SEND
SEND
SEND
You can insert one or more pauses between the DTMF
tones. You can enter up to 32 digits,including the
pause.
1.Enter the phone number of the ser vice you wish to
access.
2.Press to insert a pause. The pause indication
“p”displays after the phone number.
3.Enter the number to be dialed in DTMF.
4.Press . When the service answers, the
announcement tells you to enter your number.
5.Press again to transmit DTMF number.
Note: If you insert more than one pause,press
after each pause to transmit the next series of numbers.
Correcting a Misdialed Number
To correct a misdialed number:
• Press to erase the digit, and then enter the
correct digit.
• Press and hold to erase the entire entr y,and
then enter the correct phone number.
Receiving Calls
Answering a Call
To answer an incoming call,press ,or open the
flip.
Ending a Call
To end a call,press ,or close the flip. The call time
displays,along with the name/number of the
other party (if available). The phone returns to Standby
mode automatically.
20
Call Waiting
Call Waiting enables you to receive a second call
during conversation. When a Call Waiting call comes
in,the incoming call aler t sounds, when set,and a text
notification displays.
Contact your service provider to activate Call Waiting.
To answer a Call Waiting call:
1.To answer the call,press
The phone
.
connects the calling party,and places the cur rent
party on hold.
2.Press again to switch between the two
parties.
Three-Way Calling
Three-Way Calling enables you to conduct conference
calls with two separate parties at the same time. You
are billed airtime for each outgoing call separately.
Contact your service provider to activate Three-Way
Calling.
To place a Three-Way Call:
1.Dur ing conversation, enter the phone number for
the third party,and then press again. The
phone places the other party on hold.
2.When the third party answers, press again to
connect with the original party.
Call Forwarding
This phone provides the option of forwarding
incoming calls to another phone number,even while
your phone is off. Activating Call Forwarding does not
affect outgoing calls made from this phone.
Contact your service provider to activate Call
Forwarding.
21
Basic Operations

The Menu
3
DEF2ABC
1.
'
SEND
7
PQRS
6
MNO6MNO5JKL
4
GHI
Menu Organization
Main Menu
The Main Menu is accessed from the Standby mode by pressing . The Main Menu contains 7 primar y options, many
of which contain sub-menus with more specific options.
Table 3 on page 24 contains a listing of the Main Menu and its
submenus.
Conversation Menu
The conversation menu is accessed when you are on a call by
pressing . The following options are available in
Conversation mode:
1.Calls
2.Phone Book
3.Mute/Unmute
4.Silent Key
5. Version
6.Send Tel #
6.Send Tel #
7.My phone #
SND.Send DTMF
Menu Navigation
To access a Main or Conversation mode menu option,press
,and then press the associated digit key to select the
desired option.
As an alternative to pressing the digit keys,press the scroll
keys ( ) to scan menu options.
,or
Pressing the scroll keys highlights each option in sequence.
Press to select the highlighted option.
Conversation Menu Options
Calls ()
The Call Logs store up to nine incoming calls and nine outgoing calls. Each log stores the name and phone number (if
available),as well as the date/time stamp. For details see Call
Options on page 26.
Phone Book () You can use the phone book features during conversation.
For details see Phone Book on page 40~45. Mute/Unmute ()
This feature allows you to mute the phone’s microphone,so
that the other party cannot hear you or other sounds on your
end.
22
Silent key ()
You can enter a number during conversation without transmitting the beep tones to the other party.
Version () You can view the software and hardware version of your
The Menu
phone during conversation. Send Tel # () When leaving a message on someone else’s pager,you may be
asked to enter your phone number. You can conveniently
transmit your number to the pager by pressing two keys
instead of the entire number.
1. When the pager memo asks you to enter your phone
number after calling the paging system,press .
2.Press on the keypad. The message SENDING DTMF
blinks,and the phone displays and dials your phone num-
ber automatically. My phone # () You can check your own phone number during conversation.
For details My phone #,see page 42.
Send DTMF
You can store personal numbers (such as ID codes,passwords,
credit card numbers,etc.) in memory. This enables you to
transmit them very quickly without having to input all the digits in each transaction. Begin by storing each of your credit
card numbers (or ID codes,etc.) in one of the phone’s memory locations in the same way you store a phone number in
memory. When making a business transaction by phone,the
service will ask you to enter the code. To do so,follow these
steps:
1.Press , then .
2.Select an entry where the appropriate number is stored.
The number displays on the screen.
3.Press to select an entry.
4.Press .
5.Press .
23
 Loading...