

Page 1
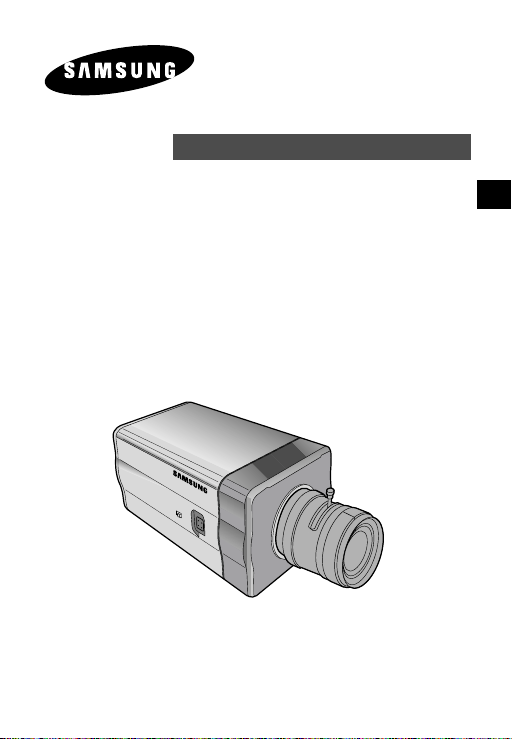
WDR DAY/NIGHTCOLOR CAMERA
E
SCC-B2305(P)/B2005P
User’s Manual
Es
D
F
I
Page 2
Important Safety Instructions
CAUTION
E
RISK OF ELECTRIC
SHOCK DO NOT OPEN
CAUTION: TO REDUCE THE
RISK OF ELECTRIC SHOCK,
DO NOT REMOVE REAR
COVER. NO USER
SERVICEABLE PARTS INSIDE.
REFER TO QUALIFIED
SERVICE PERSONNEL.
This symbol indicates
high voltage is present
inside. It is dangerous to
make any kind of contact
with any inside part of
this product.
This symbol alerts you
that important literature
concerning operation and
maintenance has been
included with this
product.
To prevent damage which may result in fire or electric shock hazard,
do not expose this appliance to rain or moisture.
This device complies with part 15 of the FCC Rules. Operation is
subject to the following two conditions.
1) This device may not cause harmful interference, and
2) This device must accept any interference that may cause undesired
operation.
CAUTION:
Danger of explosion if battery is incorrectly replaced.
Replace only with the same or equivalent type recommended by the
manufacturer.
Dispose of used batteries according to the manufacturer’s instructions.
2 3
1. Read these instructions.
2. Keep these instructions.
3. Heed all warnings.
4. Follow all instructions.
5. Do not use this apparatus near water.
6. Clean only with dry cloth.
7. Do not block any ventilation openings. Install in accordance
with the manufacturer’s instructions.
8. Do not install near any heat sources such as radiators, heat
registers, or other apparatus (including amplifiers) that produce
heat.
9. Do not defeat the safety purpose of the polarized or groundingtype plug. A polarized plug has two blades with one wider than
the other. A grounding type plug has two blades and a third
grounding prong. The wide blade or the third prong are
provided for your safety. If the provided plug does not fit into
your outlet, consult an electrician for replacement of the
obsolete outlet.
10. Protect the power cord from being from being walked on or
pinched particularly at plugs, convenience receptacles, and the
point where they exit from the apparatus.
11. Only use attachments/accessories specified by the
manufacturer.
12. Use only with cart, stand, tripod, bracket, or table specified by
the manufacturer, or sold with the apparatus. When a used,
caution when moving the cart/apparatus combination to avoid
injury from tip-over.
13. Unplug this apparatus. When a cart is used, use caution when
moving the cart/apparatus combination to avoid injury from tipover.
14. Refer all servicing to qualified service personnel. Servicing is
required when the apparatus has been damaged in any way,
such as power-supply cord or plug is damaged, liquid has been
spilled or objects have fallen into the apparatus, the apparatus
has been exposed to rain or moisture, does not operate
normally, or been dropped.
E
Page 3

Contents
Chapter 1 Introduction
Chapter 1 Introduction ........................................................ 5
E
Chapter 2 Special Features ............................................. 6
Chapter 3 Part Names and Functions ............................... 7
Chapter 4 Installation .......................................................... 12
Cautions for Installation and Use .......................13
Connecting Automatic Shutter Lens Connector
Fixing Lens and Adjusting Lens Selection Switch
Adjusting Back Focus ........................................ 16
Connecting Cables ............................................ 18
Chapter 5 Camera Set-Up ................................................. 20
Appendix Product Specification ........................................ 39
........... 14
....... 15
The WDR(Wide Dynamic Range)DAY/NIGHT camera shall be used to
express both dark and bright part distinctively in the screen with a dual
shutter. The conventional camera clips the screen white when a bright
object like a window occupies the screen while this camera is a technically
integrated state-of-the-art product to revive even a brighter part distinctively.
The DAY/NIGHT Camera operates in a color mode in an the illumination
over the standard value and otherwise in B/W mode by deleting the IR Cut
function, which contributes to the improvement of sensitivity so that it is
called a low illumination camera which is able to identify objects in a dark
area. Meanwhile, it has incorporated a Sense Up function owing to a low
speed shutter and a field accumulation method to improve its low
illumination feature prominently.
[WDR(Wide Dynamic Range)]
The WDR camera is a state of art to enlarge the screen profit
effectively, especially for taking photos of a window in a building. In
short it revives both the indoor and outdoor status as they are clearly.
[DAY/NIGHT]
It is a function of a color camera to delete the fiter with the IR Cut
function in an illumination below the standard value so that it has
a better sensitivity.
The DAY/NIGHT Camera is mostly used in dark places like basement
parking lots with a comparatively low illumination. In daytime, it provides a
color screen of high density with a horizontal resolution of 480, and, at
night, it utilizes the DAY/NIGHT function as well as the Sense Up function
to identify objects. In same cases, you may use this camera in relation to
the infrared ray emission equipment additionally.
E
4 5
Page 4
Chapter 2 Special Features
Chapter 3 Part Names and Functions
High Sensitivity
It has an up-to-date 1/3" Super-HAD P/S CCD for an image of high
sensitivity.
Function of WDR
The WDR camera is state-of-the-art to enlarge the screen profit effectively,
especially for taking photos of a window in a building. In short it revives
both the indoor and outdoor status as they are clearly.
Low Illumination Function
It has both a low illumination function and DAY/NIGHT function based on
digital signal technology in order to operate in the worst environment
without light.
Superior Back Light Adjustment Function
In case the object has a bright illumination or sunlight behind it, this camera
adjusts the image shaded by the back light for clear photographs.
Digital Power Supply Synchronization Method
The Full Digital Method Line Lock is realized in this camera, which adjusts
the vertical camera synchronization directly to improve controllability and
reliability of the camera.
High Resolution
It realizes high resolution resulting from full digital image processing
supported by a state-of-art digital signal technology.
Output Signal Setting
You may select the REVERSE (horizontally, vertically, or both) function of
the video output signal and the private, horizontal, and vertical profile.
6 7
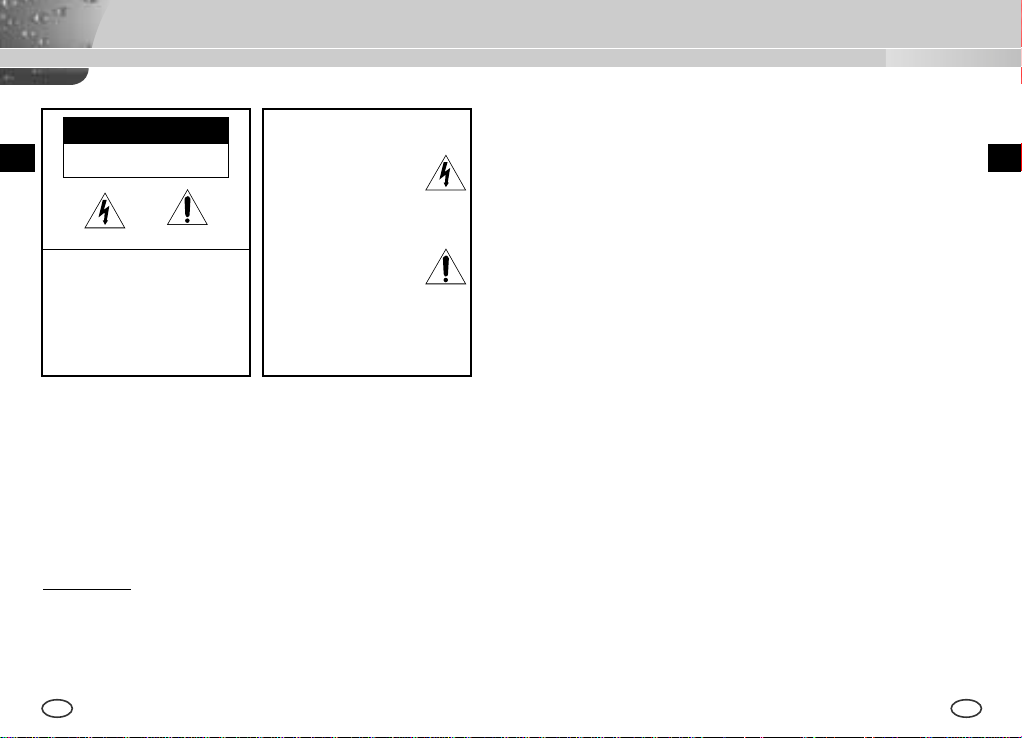
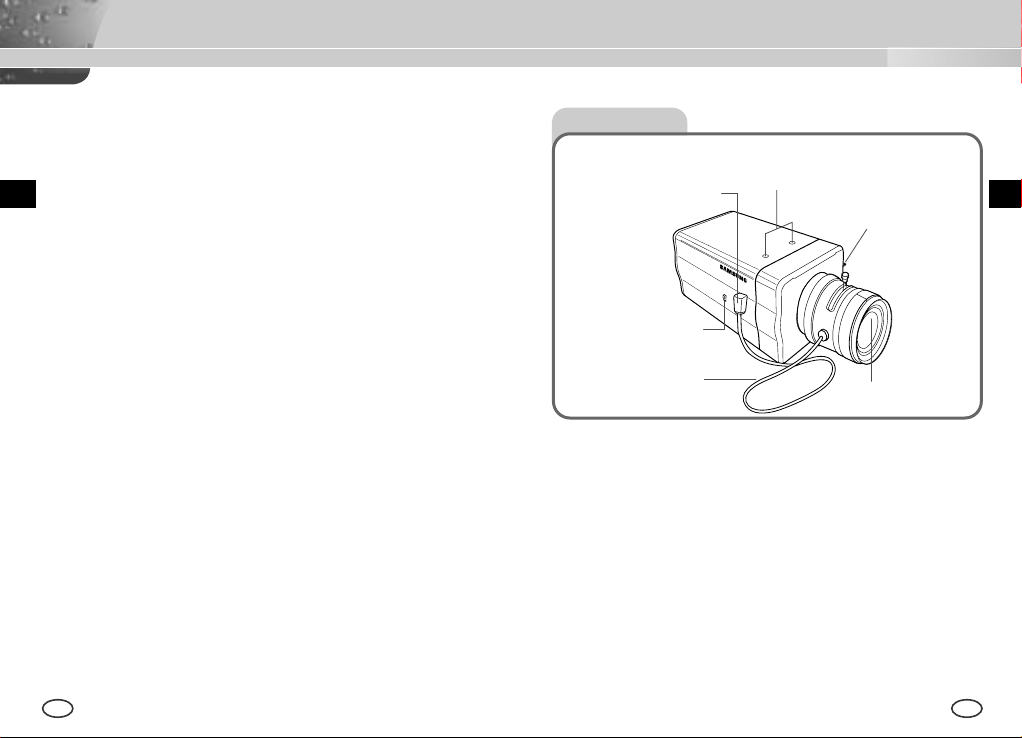
Side View
Mount Adapter Fixing
Auto Iris Lens
Connector
ALC Lens
Selection Switch
Automatic Shutter
Lens Control Cable
Mount Adapter Fixing Groove
This groove is used for screwing the mount adapter, a part of the bracket
where the camera will be installed.
Camera Lens(Option)
This lens is installed in the camera.
* A camera lens with a stained surface should be cleaned softly with a lens
tissue or ethanol painted cotton cloth.
Auto Iris Lens Connector
This connector provides the automatic shutter lens with power supply,
control signal, video signal, or DC signal necessary for the control of the
lens shutter
Groove
Back Focus
Control Bar
Camera Lens
EE
Page 5

Auto Iris Lens Control Cable
AC 220-240V
This cable transmits the control signal from the camera to control the lens
shutter.
Back Focus Control Bar
It controls the back focus.
ALC Lens Setting Switch
This switch sets the Auto Iris lens type for use.
DC : When you attach an Auto Iris lens requiring the DC control signal,
please put this switch in the DC position.
VIDEO : When you attach an Auto Iris lens requiring the video control
signal, please put this switch in the VIDEO position.
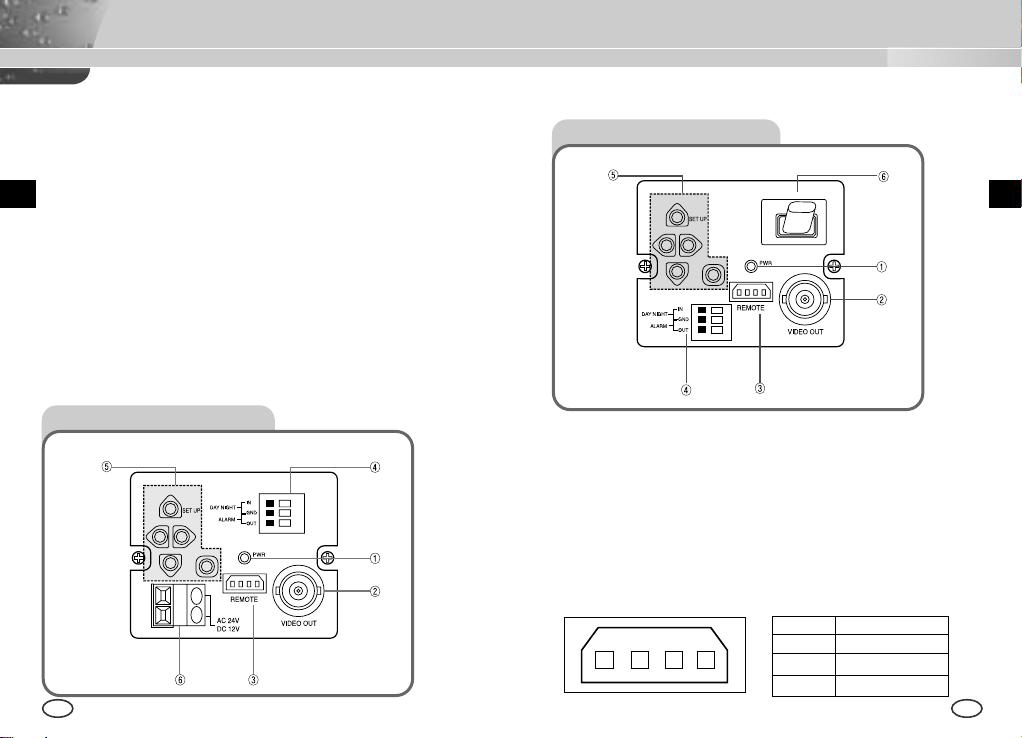
SCC-B2005P Rear View
EE
SCC-B2305(P) Rear View
① Power Display LED
When the camera is supplied with power, LED is on.
➁ Video Output Terminal
The monitor video input terminal is connected with this terminal through
which the camera video signal comes out.
8 9
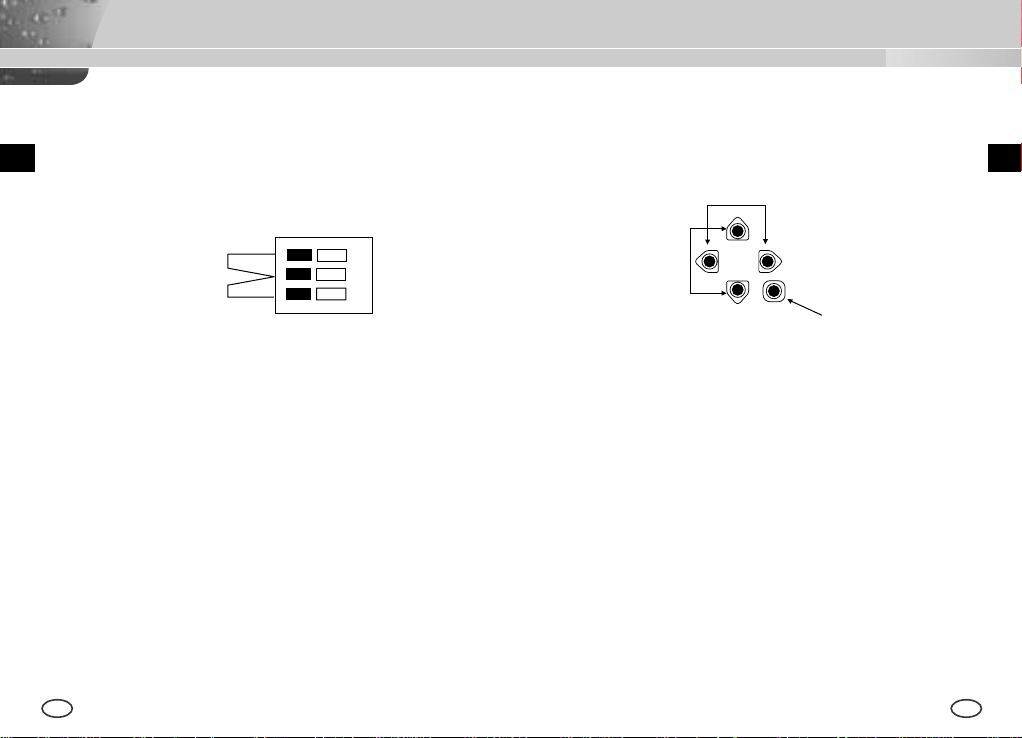
➂ Remote Input Terminal(RS-232)
This terminal is used for camera control at the production plant.
1 TXD
1 2
3 4
2 RXD
3+5V
4 GND
Page 6
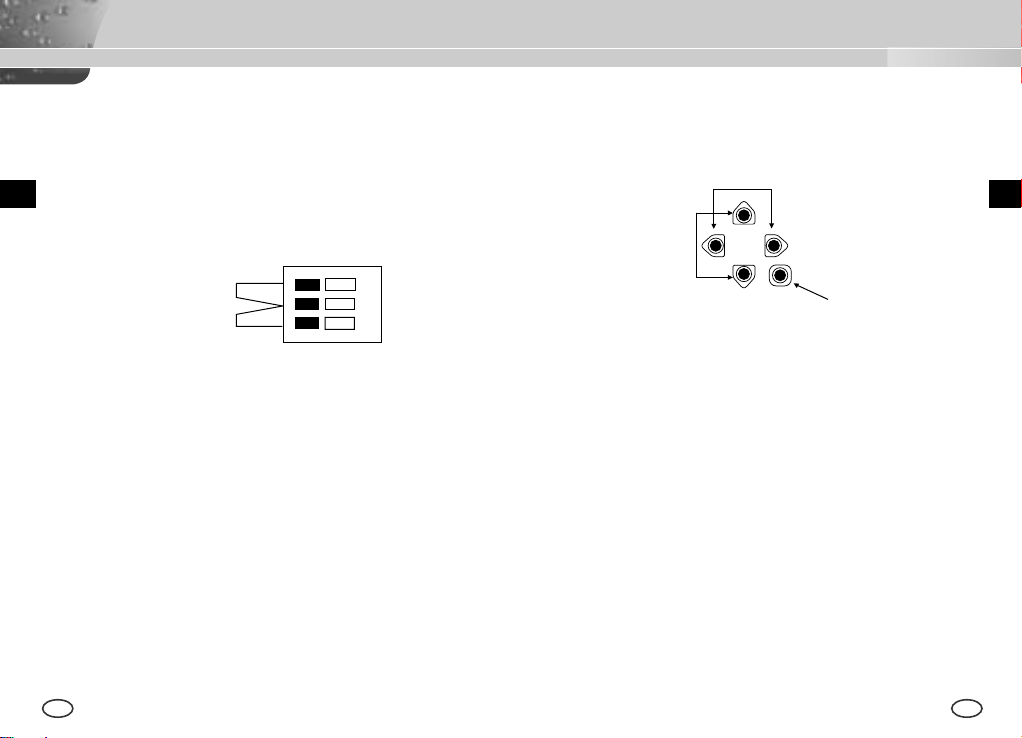
➃ DAY/NIGHT External Signal Input & Alarm Signal Output
This is a function to receive the external DAY/NIGHT signal from the
sensor(option) and convert the signal into BW. The MOTION DET
function generates an alarm signal when a movement is detected.
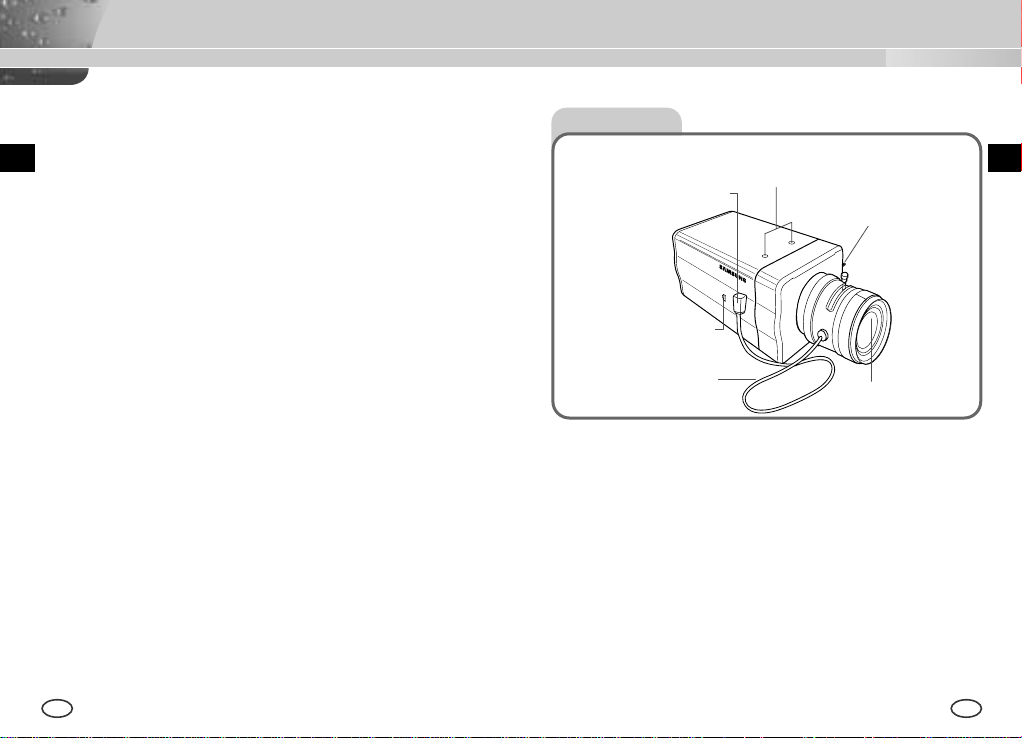
⑤ Camera Operation Switch(Setup Switch)
The function of the camera operation switch changes depending on
whether the camera is currently in the usual operation mode(No setup
menu is seen on the screen) or the setup menu mode.
EE
[LEFT/RIGHT] key
[ENTER] key
DAY/NIGHT IN
ALARM OUT
GND
①
➁
Connect an external sensor to the DAY/NIGHT terminal as shown in ① then
connect any external device such as a buzzer or lamp to the ALARM
terminal as shown in ➁.
The ALARM output terminal is an open collector with the following capacity:
DC 16V and 100mA.
OFF : Open contact
ON : Below 100mA
The DAY/NIGHT input terminal has the input of DC 5V pull-up and over
0.2mA.
[UP/DOWN] key
[UP/DOWN] key : These keys move up or down the cursor.
[LEFT/RIGHT] key : These keys move the cursor to the left or right or
identify the values sequentially which can be
assigned in each setup menu.
[ENTER] key : It is used to enter the Setup menu.(Press it about 2
seconds.)
It is used to enter a sub-menu of a setup menu by
clicking the setup menu or to set the current value.
➅ Power Connection Port
This port is connected to the power(adapter) cable.
OFF : Open contact
ON : Closed contact
10 11
Page 7
Chapter 4 Installation
This chapter describes what should be checked before installation, how to
set the installation environment, and what should be done during
installation. Then, it describes how to install the camera and connect the
E
cable in actual circumstances.
What should be done during installation and use
① Do not disassemble the camera on your own.
E
Before Installation
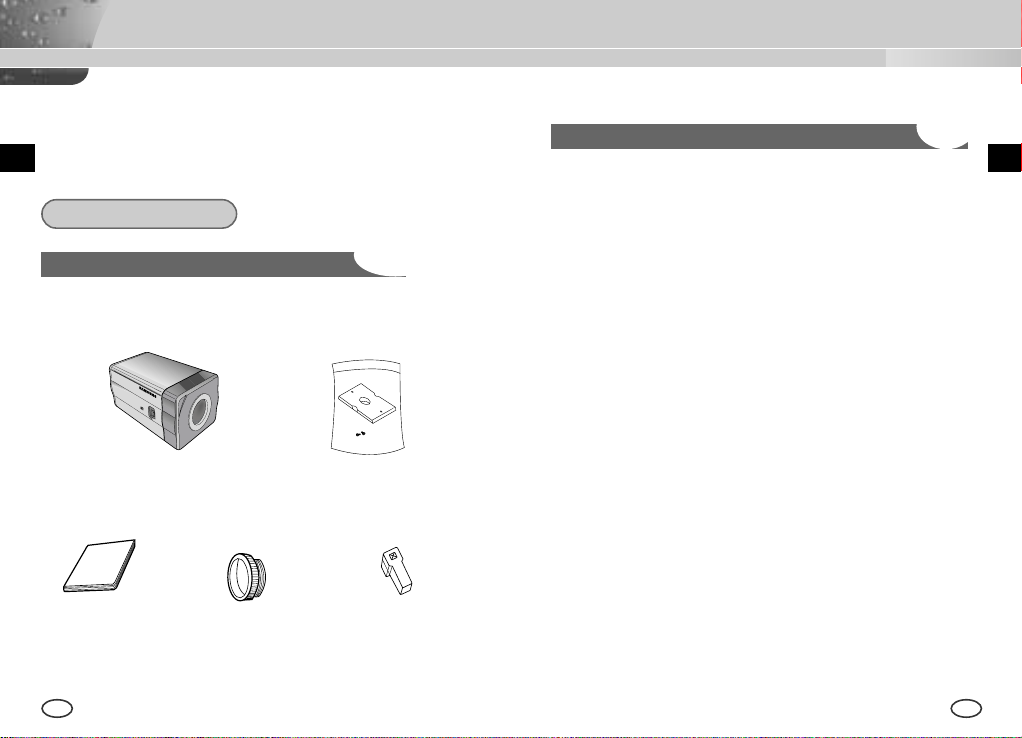
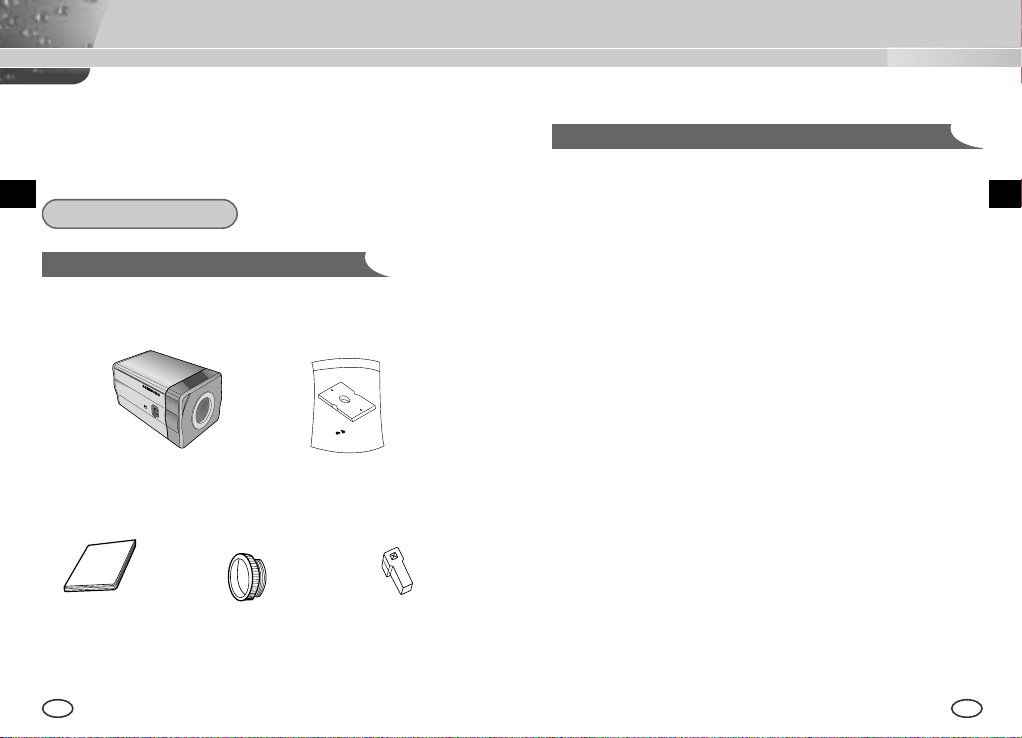
Checking the contents of the package
Be sure to check if the following items are included in the package.
Camera Camera Holder(Mount)
User's Manual
12 13
C Mount Adapter Auto Iris
Lens Connector
➁ Be careful when handling the camera at all times. Do not strike the
camera with your fists or shake it. The camera should be stored and
treated with care to avoid any damage.
➂ Do not put or operate the camera in rain or wet places.
➃ Do not scrub the camera body with rough sandpaper when it is stained.
Please use a dry cloth at all times.
⑤ Put the camera in a cool area free from direct light. Otherwise, the
camera may be damaged.
Page 8
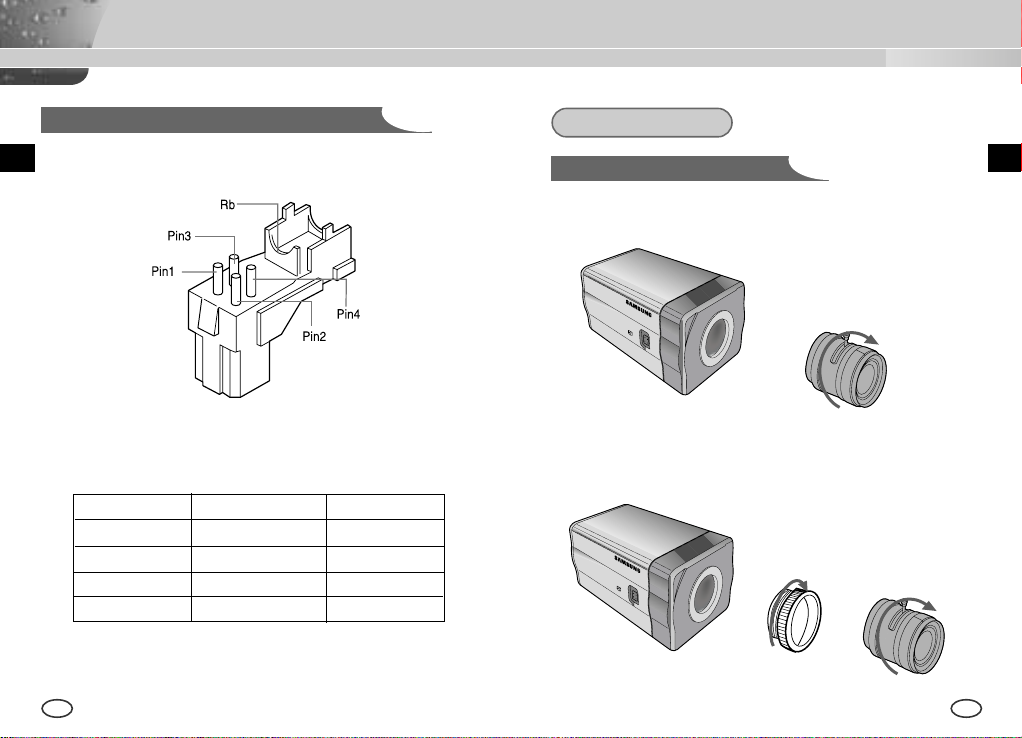
Connecting Auto Iris Lens Connector
Prepare the Auto Iris lens connector, a camera auxiliary, as follows :
Installation
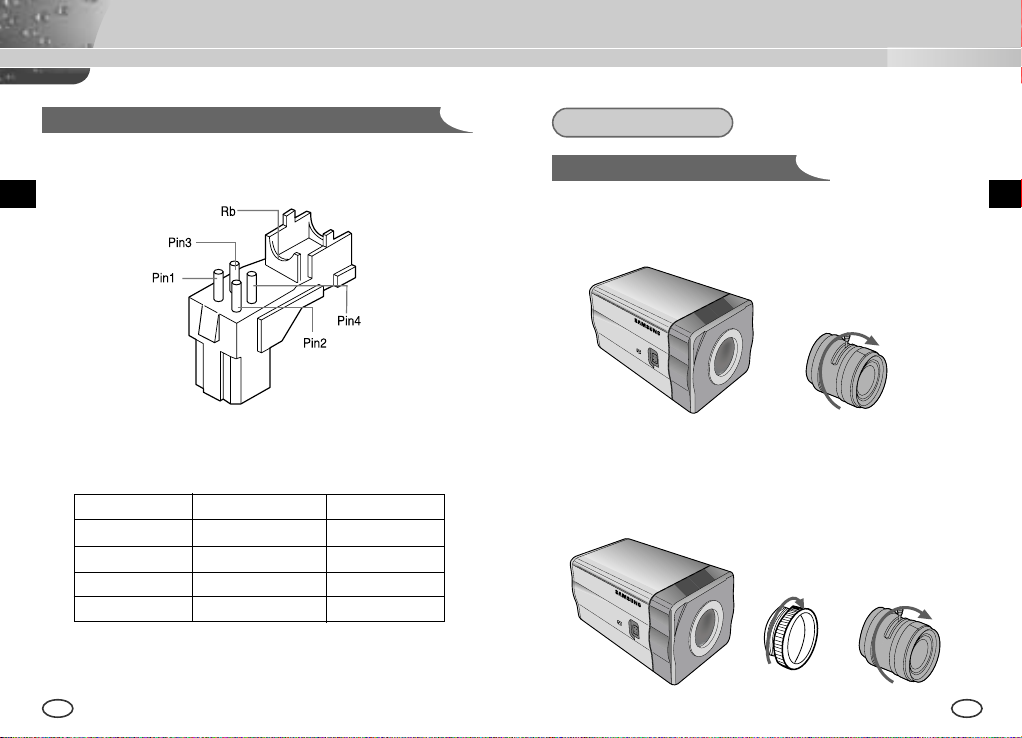
Lens Fixing
In case of CS lenses
Turn the CS lens clockwise until it is fixed as shown as follows.
CS lens
EE
Connect each uncovered shutter control cable wire to the Auto Iris lens
connector as follows.
Pin No. DC Control Type VIDEO Control Type
1 Damp(-) Power (+12V)
2 Damp(+) N/A
3 Drive(+) VIDEO Signal
4 Drive(-) GROUND
14 15
In case of C lenses
Turn the C-mount adapter clockwise to fix it. Then turn the C lens
clockwise until it is fixed as follows.
C lens
Page 9
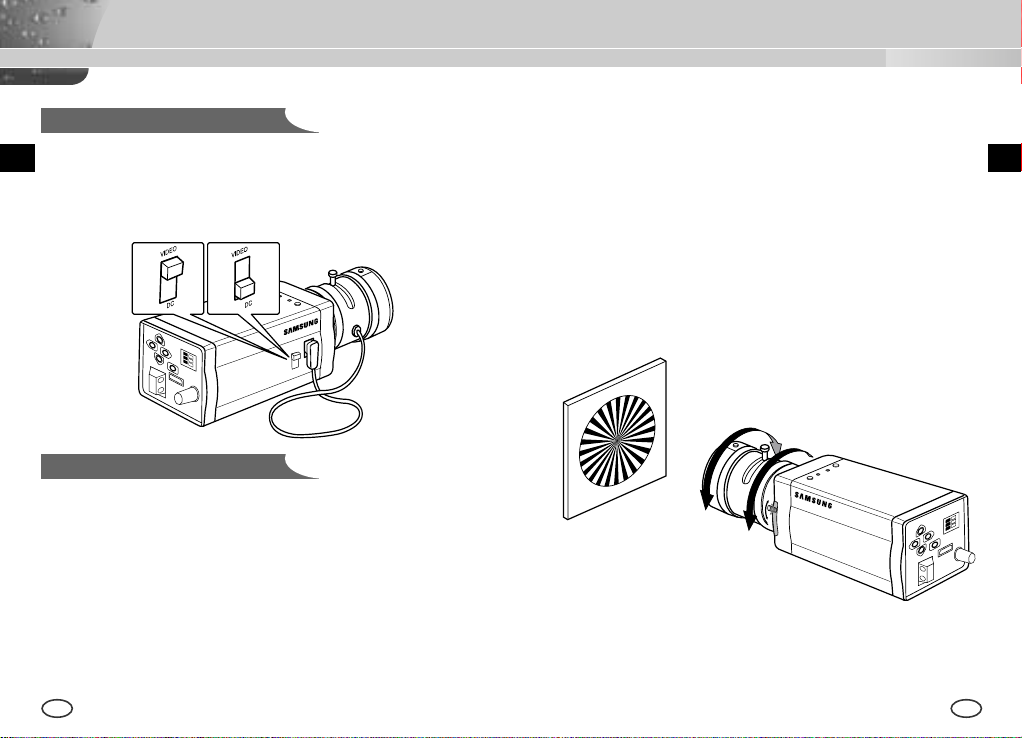
Setting Switch Control
You should change the position of the lens setting switch on the side of the
camera according to the lens type. Depending on whether you fixed the DC
control type Auto Iris lens or video control type automatic shutter lens, you
should put the switch in "DC" or "VIDEO" position respectively.
Lenses with zoom function
① Image an object with high resolution(letticed) at a distance of 3 to 5 m
and zoom in the lens as close to TELE as possible. Then adjust the lens
focus bar until the object is seen best.
➁ Zoom in the lens as close to WIDE as possible and adjust the BACK
FOCUS adjustment bar until the object is seen best.
➂ Repeat from ① to ➁ above 2 or 3 times until the focus on the ZOOM
TELE side is in line with that on the ZOOM WIDE side.
Back Focus Adjustment
The camera back focus is adjusted at the plant before delivery, but some
lenses are out of focus though the number differs in types. If it's the case,
you should make the back focus adjustment as follows. First, this is the
back focus adjustment procedure for fixed focus lenses.
Lenses without zoom function
① Image an object with high resolution(letticed) at more than 10m distance
and put the lens focus ring in the infinite(
➁ Rotate the BACK FOCUS control bar until the object is seen best.
➂ Tighten the BACK FOCUS control bar fixing screw.
16 17
) position.
∞
EE
Page 10
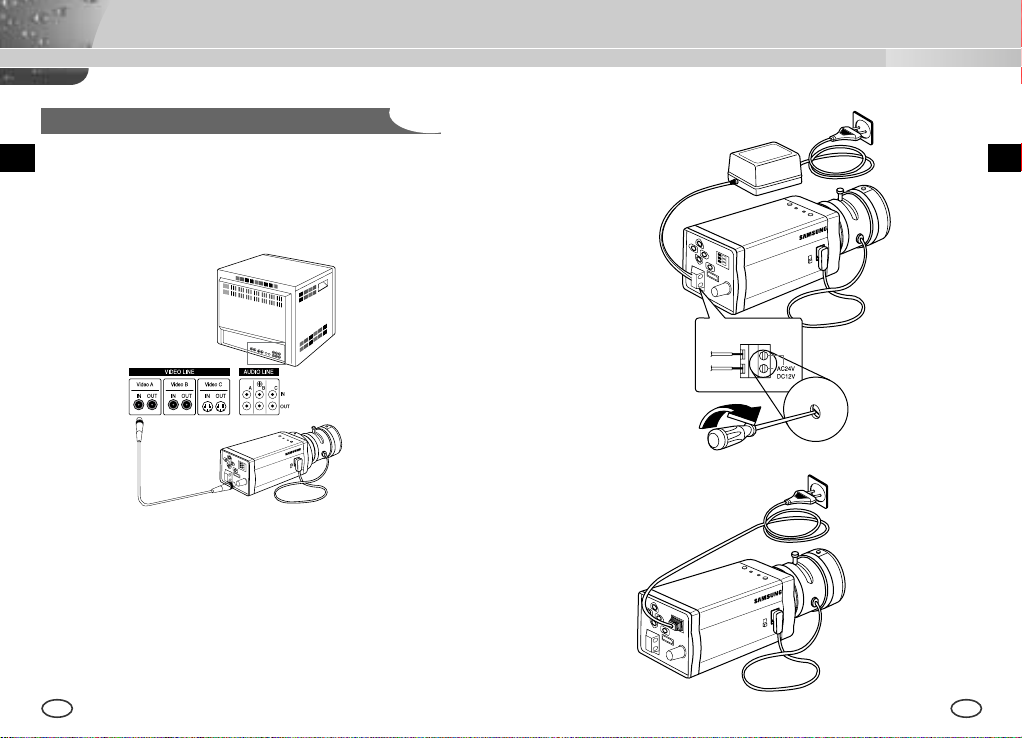
Connecting Cables and Checking Operation
1 First, connect the connector of the BNC cable to the Video Out terminal
2 Second, connect the other connector of the BNC cable to the Video In
terminal.
Video In Terminal of
Monitor Rear Surface
BNC cable
Video Out Terminal
3 Then, connect the power adapter. Connect a part of the power adapter
composed of 2 lines to the Camera Power In terminal with a flat-head
driver as follows.(GND : marked with a white line)
* Power source may be AC24V or DC12V irrespective of polarity
SCC-B2305(P)
EE
SCC-B2005P
18 19
Page 11
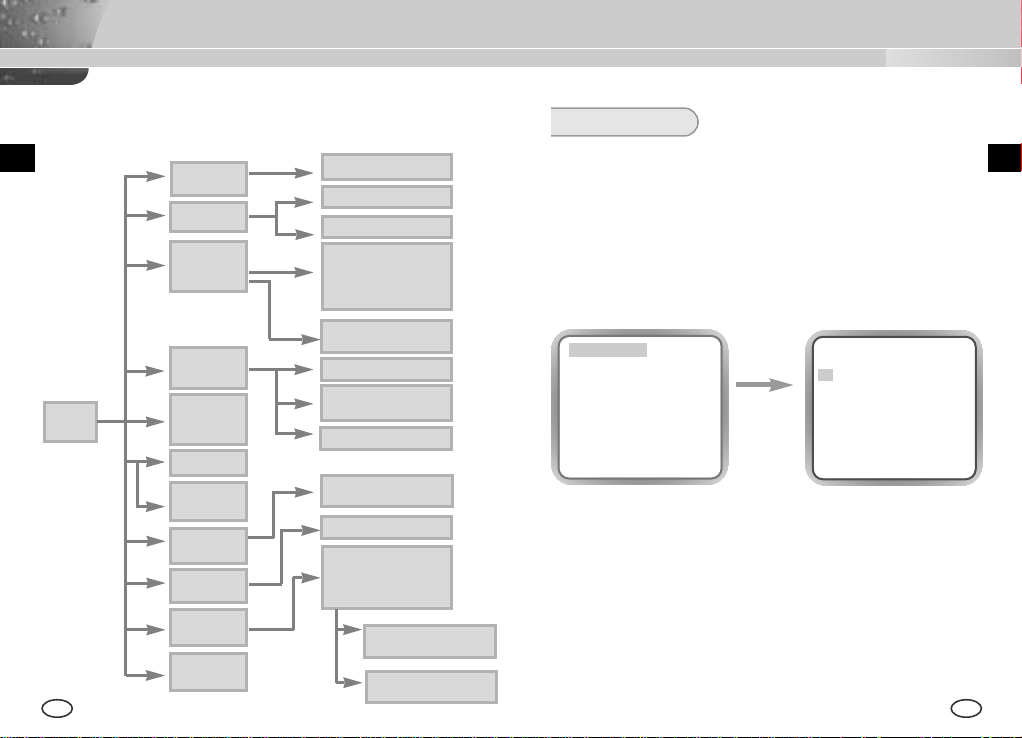
Chapter 5 Camera Set-Up
This chapter describes how to set up the camera. The first part
describes the whole set up menu and composition and the second part
describes the function of each menu.
E
CAMERA ID
ON.../OFF
IRIS
DC... /VIDEO/ELC...
BLC/WDR
OFF
/BLC...
/WDR...
ON...
DC...
ELC...
BLC...
WDR...
SETUP
MENU
COLOR/BW
COLOR/BW...
/AUTO.../EXT...
SHUTTER
OFF/ 1/100~1/10K
OFF/ AUTO
X2~X160
AGC
OFF/LOW/HIGH
MOTION
S.SLOW/SLOW/
NORM/FAST/F.FAST
WHITE BAL
ATW/AWC/MANU...
SYNC
INT/LINE...
SPECIAL
EXIT
QUIT/SAVE/PRESET
BW...
AUTO...
EXT...
MANU...
LINE...
...
SPECIAL...
20 21
CAMERA ID AND
LOCATION SETUP
DC IRIS SETUP
ELC LEVEL SETUP
BLC AREA SETUP
BOTTOM...TOP...
LEFT...RIGHT...
CENTER...
LEVEL SETUP
FLICKERLESS SETUP
BURST ON/OFF
BURST ON/OFF
LEVEL DURATION
BURST ON/OFF
3200K/5600K/USER
RED-BLUE SETUP
PHASE SETUP
BAUD RATE, REVERSE,
POSI/NEGA, DETAIL,
MOTION DET...,
PRIVACY..., LANGUAGE
MOTION
DET...
PRIVACY...
PRIVACYTYPE &
AREA SETUP
AREA SETUP
SENSITIVITY SETUP
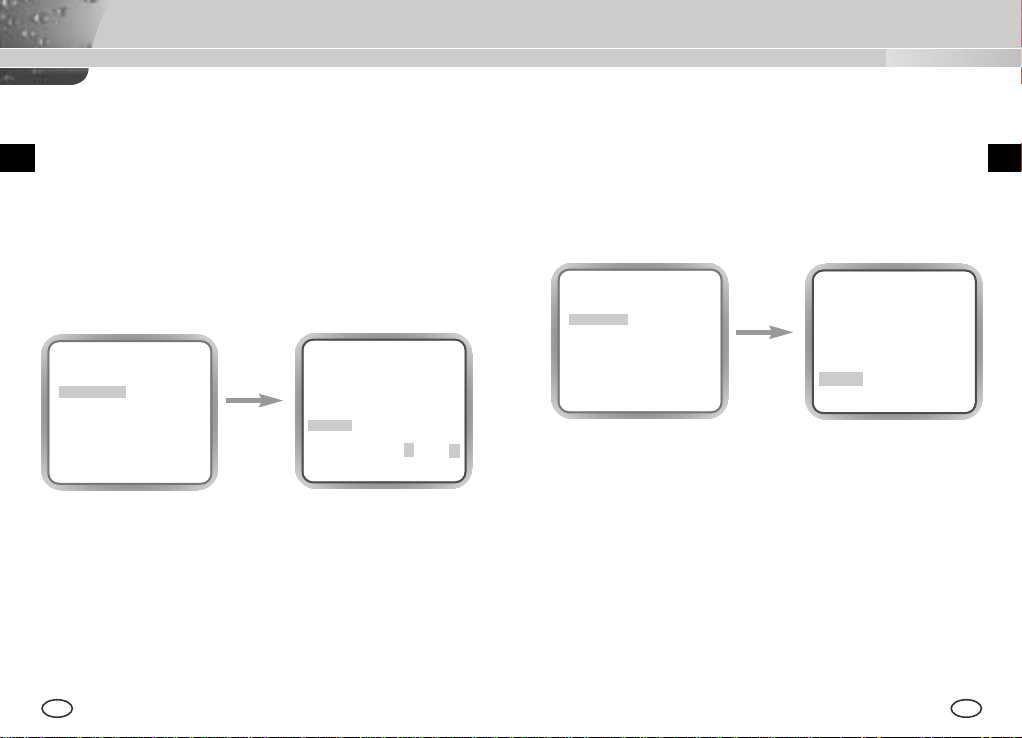
CAMERA ID
This CAMERA ID menu designates a CAMERA ID on the monitor screen
connected to the camera. If you turn on the CAMERA ID menu and press
the [ENTER] key, the sub-screen will appear to designate a CAMERA ID.
The CAMERA ID may be composed of letters, numbers, special texts, or a
combination of these up to 20 digits. The designated CAMERA ID can be
located at any place as desired by using the submenu
CAMERA ID ON...
IRIS DC...
BLC/WDR OFF
COLOR/BW COLOR
SHUTTER OFF
AGC OFF
WHITE BAL ATW
SYNC INT
SPECIAL ...
EXIT QUIT
press the
[ENTER] key
(CAMERA ID)
A B C D E F G H I J K L
M N O P Q R S T U V W
X Y Z 0 1 2 3 4 5 6 7 8 9
: ! - + * ( ) /
SP
❿❿➛➛
SP
LOCATION...
RET
....................
E
Page 12
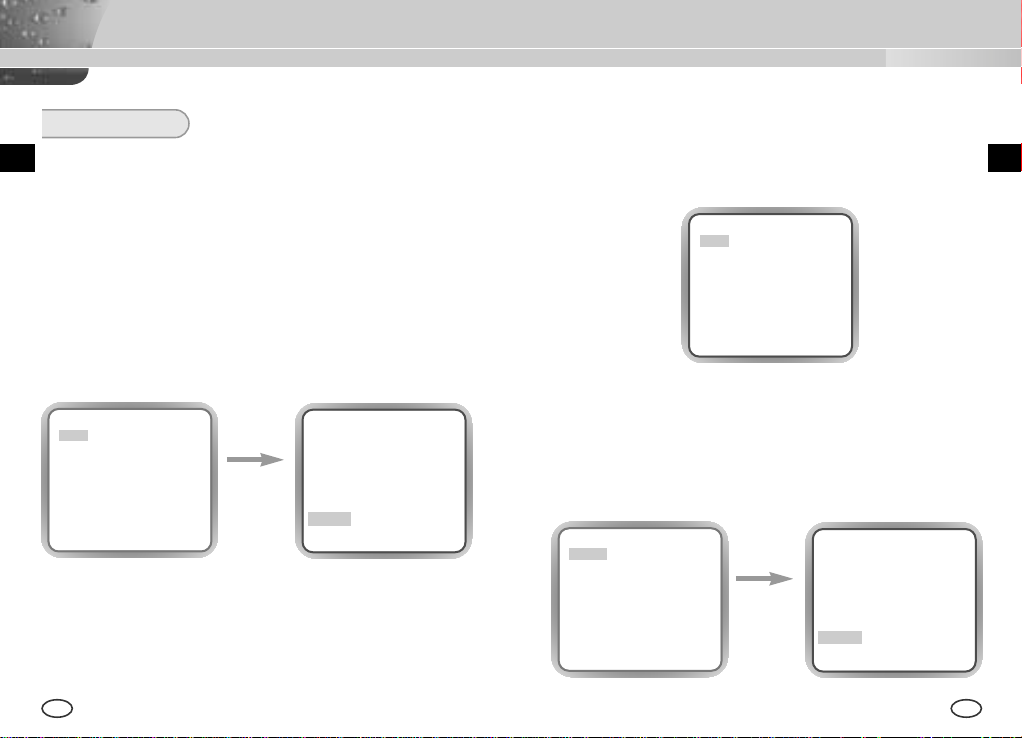
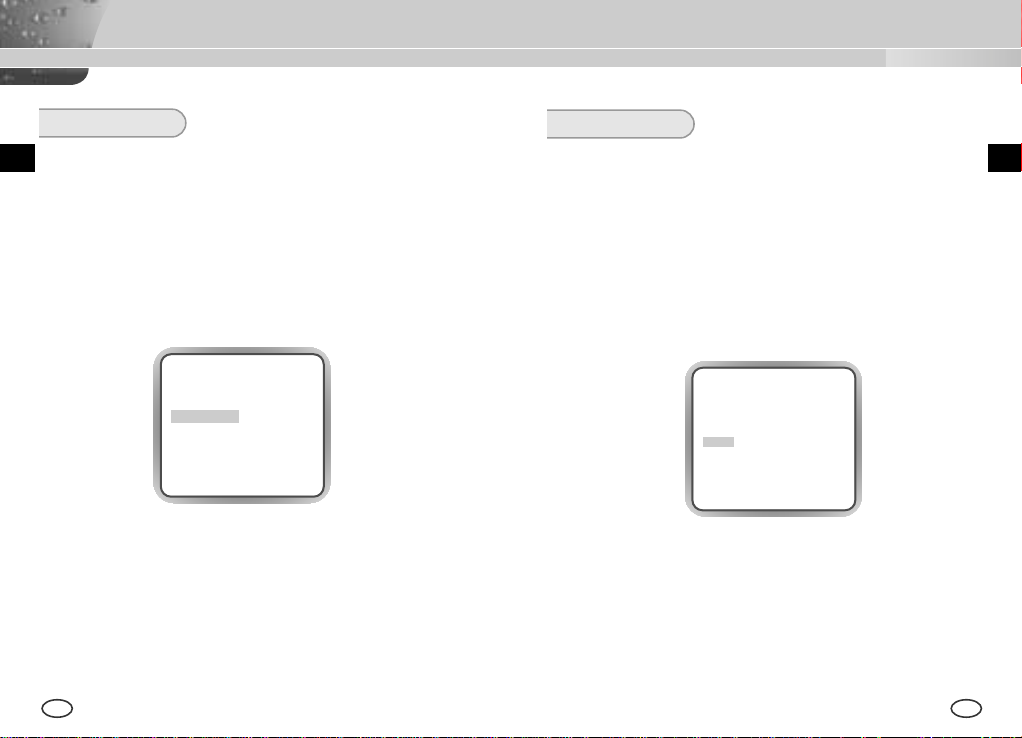
IRIS
This CAMERA has an IRIS function for automatic control of the brightness
level through the intensity of radiation. The ALC can select the DC IRIS
level, VIDEO IRIS, and ELC LEVEL.
❿ DC...
If you select the DC menu and press the [ENTER] key, the sub-screen
will appear to set the brightness level. Here, you are able to set the
brightness level by pressing the LEFT or RIGHT key in the LEVEL
menu. Level setting is available only by using the DC IRIS lens.
Then, you shall puts the ALC LENS selection switch on the side of the
camera in the “DC” position.
CAMERA ID ON...
IRIS DC...
BLC/WDR OFF
COLOR/BW COLOR
SHUTTER OFF
AGC OFF
WHITE BAL ATW
SYNC INT
SPECIAL ...
EXIT QUIT
press the
[ENTER] key
(IRIS/DC)
LEVEL (0) ----I---RET
❿ VIDEO
It is used while the VIDEO lens is in use. You shall use the variable
resistor attached to the IRIS LEVEL LENS for the control. Then put the
ALC LENS selection switch on the camera side in “VIDEO” position.
CAMERA ID OFF
IRIS VIDEO
BLC/WDR OFF
COLOR/BW COLOR
SHUTTER OFF
AGC OFF
WHITE BAL ATW
SYNC INT
SPECIAL ...
EXIT QUIT
❿ ELC...
This menu controls the High Speed Shutter Level within a limited range
in the event of too intensive radiation from outside while using the
Manual Lens. If you select the ELC in the IRIS menu and press the
[ENTER] key, the following subscreen will appear. Here, you are able to
set the level by pressing the LEFT or RIGHT key.
CAMERA ID ON...
IRIS ELC...
BLC/WDR OFF
COLOR/BW COLOR
SHUTTER OFF
AGC OFF
WHITE BAL ATW
SYNC INT
SPECIAL ...
EXIT QUIT
press the
[ENTER] key
(IRIS/ELC)
LEVEL (0) ----I---RET
EE
22 23
Page 13
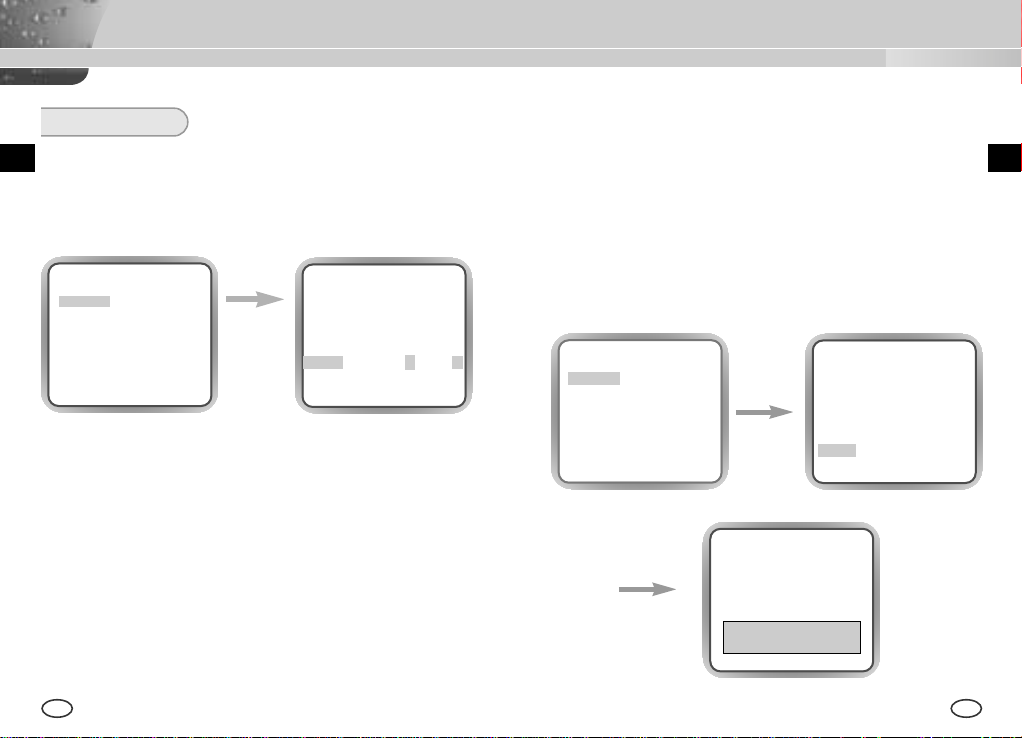
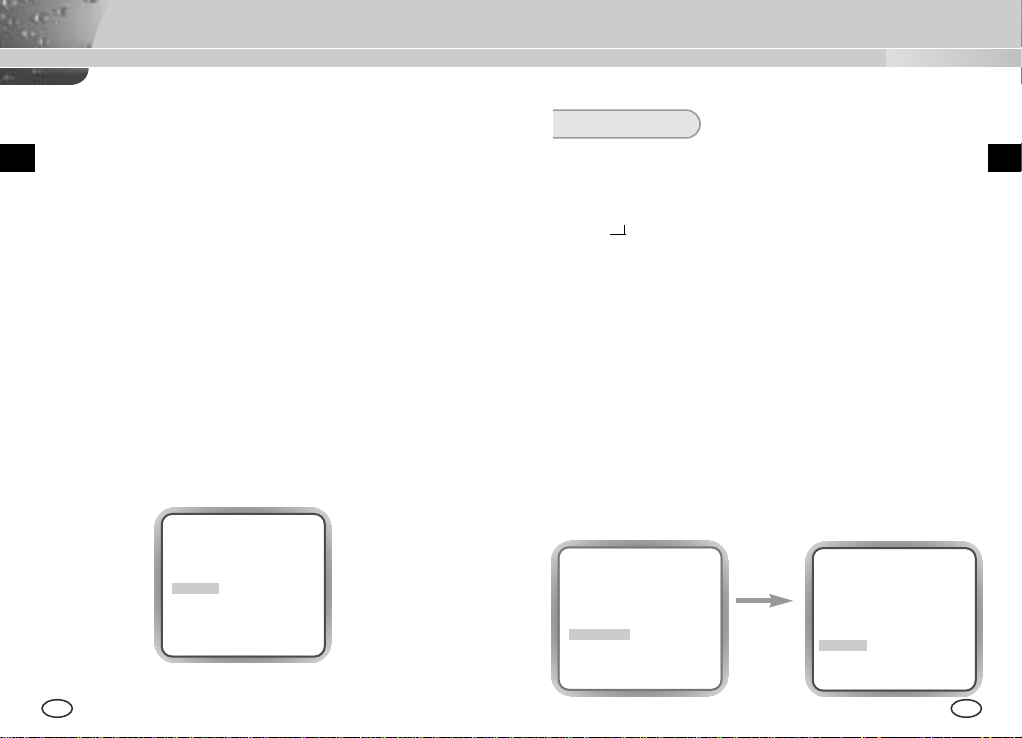
BLC/WDR
❿ WDR...
The WDR camera is state of the art to enlarge the screen profit effectively,
especially for taking photos of a window in a building. In short it revives both
the indoor and outdoor status as they are clearly.
CAMERA ID OFF
IRIS DC
BLC/WDR WDR...
COLOR/BW COLOR
SHUTTER OFF
AGC OFF
WHITE BAL ATW
SYNC INT
SPECIAL ...
EXIT QUIT
❖
The level of DC IRIS can be set at the time of WDR function setup.
press the
[ENTER] key
(WDR)
LEVEL L - - - I - - - H
FLICKERLESS OFF
RET
❿ BLC...
If you use an ordinary camera when there is an intense and concentrated
illumination behind an object, the back light will shade the image on the
monitor screen. The BLC function prevents such a back light effect to secure
a clear image under all illumination environments. Press the LEFT or RIGHT
key at OFF to set the USER function for a setting of the already set 5 areas
including BOTTOM..., TOP..., LEFT ..., RIGHT..., and CENTER. If you select
the BOTTOM... in the BLC menu and press the [ENTER] key, you will be able
to certify the already set BOTTOM area.
CAMERA ID ON...
IRIS ELC...
BLC/WDR BLC...
COLOR/BW COLOR
SHUTTER OFF
AGC OFF
WHITE BAL ATW
SYNC INT
SPECIAL ...
EXIT QUIT
press the
[ENTER] key
press the
[ENTER] key
(BLC)
AREA BOTTOM...
RET
EE
24 25
Page 14
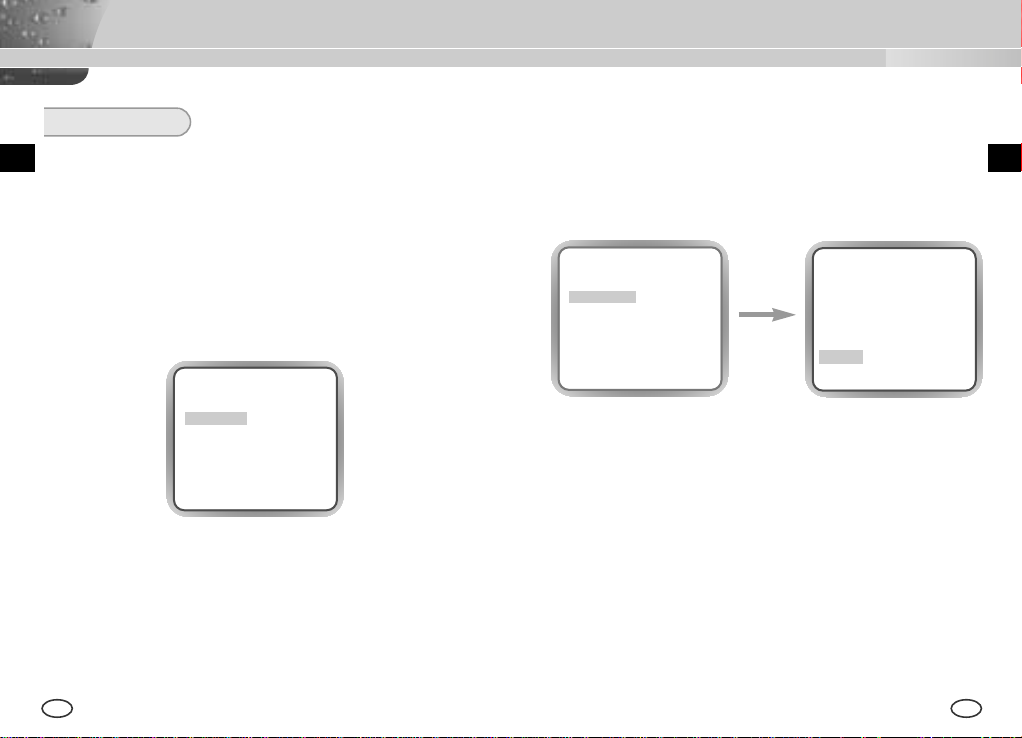
COLOR/BW
The COLOR/BW menu turns the IR(Infrared) Filter on or off. In low
illumination environments, the BW mode will turn off the IR Filter and the
sensitivity will be as high as that of BW cameras. Otherwise, the BW mode
will turn on the IR Filter and the sensitivity will return to normal to recover
the normal screen.
❿ COLOR
In this mode, the camera outputs the video image only in color.
CAMERA ID ON...
IRIS DC...
BLC/WDR OFF
COLOR/BW COLOR
SHUTTER OFF
AGC OFF
WHITE BAL ATW
SYNC INT
SPECIAL ...
EXIT QUIT
❿ BW...
This is the IR Filter OFF Mode in black and white.(high sensitivity like
BW cameras) If you select the BW... and press the [Enter] key, the BW
submenu screen will appear. You will be able to send out the BURST
signal by turning on or off in this menu.
CAMERA ID ON...
IRIS DC...
BLC/WDR OFF
COLOR/BW BW...
SHUTTER OFF
AGC OFF
WHITE BAL --SYNC INT
SPECIAL ...
EXIT QUIT
press the
[ENTER] key
(BW)
BURST ON
RET
EE
26 27
Page 15
❿ AUTO...
This menu automatically converts the COLOR Mode into the BW Mode
or vice versa depending on illumination. In low illumination
environments, it turns off the IR Filter to raise sensitivity, otherwise it
turns on the IR Filter to lower sensitivity.
If you select the AUTO menu and press the [Enter] key, the BW LEVEL
Control AUTO BW submenu will appear on the menu screen. You will be
able to send out the BURST signal by turning on or off in this menu, set
up the DURATION TIME for conversion, or set up the standard
brightness level for converting the COLOR mode into the BW mode.
CAMERA ID ON...
IRIS DC...
BLC/WDR OFF
COLOR/BW AUTO...
SHUTTER OFF
AGC -- WHITE BAL ATW
SYNC INT
SPECIAL ...
EXIT QUIT
press the
[ENTER] key
(AUTO BW)
BURST ON
LEVEL LOW
DURATION S -I-----L
RET
❿ EXT...
This menu automatically converts the COLOR Mode into the BW Mode
or vice versa depending on illumination with an external sensor. If you
select the EXIT menu and press the [Enter] key, the EXTERNAL BW
submenu will appear on the menu screen. You will be able to send out
the BURST signal by turning on or off in this menu.
CAMERA ID ON...
IRIS DC...
BLC/WDR OFF
COLOR/BW EXT...
SHUTTER OFF
AGC OFF
WHITE BAL ATW
SYNC INT
SPECIAL ...
EXIT QUIT
press the
[ENTER] key
(EXTERNAL BW)
BURST ON
RET
EE
28 29
Page 16
SHUTTER
AGC/MOTION
The SHUTTER menu sets up the high speed electronic shutter, AUTO
low speed shutter. The high speed electronic shutter covers 7 shutter
speeds from 1/100 to 1/10K seconds and is commonly used for imaging
fast moving objects. Both the low speed shutter cover 10 shutter speeds
from x2 to x160, which slows the shutter speed to make clearer and
brighter the screen images taken in dark illumination. If you want to slow
the shutter speed automatically depending on the degree of darkness by
sensing the intensity of radiation, please select the AUTO low speed.
❿ AGC
The AGC menu lightens the screen below the standard brightness
because of the object taken in dark illumination. Setting up the AGC
menu is available only in either High Speed Shutter mode or OFF mode.
If you press the LEFT or RIGHT key to reach the LOW or HIGH position,
the AGC function will start activating. LOW is used for the lower AGC
GAIN whereas HIGH is used for the higher AGC GAIN.
While the COLOR/BW menu is set to AUTO, the AGC menu is all --- and
the maximum AGC GAIN stays at HIGH.
CAMERA ID ON...
IRIS DC...
BLC/WDR OFF
COLOR/BW AUTO...
SHUTTER OFF
AGC -- WHITE BAL ATW
SYNC INT
SPECIAL ...
EXIT QUIT
CAMERA ID ON...
IRIS DC...
BLC/WDR OFF
COLOR/BW AUTO...
SHUTTER OFF
AGC -- WHITE BAL ATW
SYNC INT
SPECIAL ...
EXIT QUIT
If you keep pressing the LEFT or RIGHT key, the following speeds appear
in sequence.
OFF→AUTO X2 →AUTO X4 →AUTO X6 →AUTO X8 →AUTO X12 →AUTO X16 →AUTO
→
AUTO X40 →AUTO X80 →AUTO X160 →OFF→1/100(NTSC), 1/20(PAL) →1/250
X20
→
1/500 →1/1000 →1/2000 →1/4000 →1/10K →OFF
❖
While the IRIS mode is in ELC or the BLC/WDR mode is WDR, you may
use the following modes only.
OFF→AUTO X2 →AUTO X4 →AUTO X6→AUTO X8 →AUTO X12 →AUTO X16 →AUTO
→
AUTO X40 →AUTO X80 →AUTO X160 →OFF
X20
30 31
EE
Page 17
❿ MOTION
The MOTION function is available only in the AUTO mode with these 5
steps: S.SLOW, SLOW, NORM, FAST, F.FAST.
The S.SLOW minimizes the intensity of the AGC to monitor stable
objects in the dark
The SLOW keeps the intensity of AGC low to monitor objects with a
little movement in the dark.
The NORM standardizes the intensity of AGC to monitor moving
objects in the dark.
The FAST keeps the intensity of AGC high to monitor fast moving
objects in the dark.
The F.FAST maximize the intensity of AGC to monitor very fast
moving objects in the dark.
To activate the MOTION function, you should press the DOWN key to
move the cursor to the MOTION menu and press the LEFT or RIGHT
key while the SHUTTER menu is set to AUTO. Pressing the LEFT and
RIGHT key enables you to move to the SLOW mode and FAST mode
respectively
CAMERA ID ON...
IRIS DC...
BLC/WDR OFF
COLOR/BW AUTO...
SHUTTER AUTO X2
MOTION F.FAST
WHITE BAL ATW
SYNC INT
SPECIAL ...
EXIT QUIT
32 33
WHITE BAL
❿ ATW
If you select the ATW mode in the WHITE BAL menu, you will be able to
monitor the color temperature change by real time and set up the White
Balance to the real time color temperature automatically.
❿ AWC
❿ MANU...
❿
If you select the AWC mode in the WHITE BAL menu, you will be able to
set up the White Balance to the real time color temperature only once
which will be maintained thereafter. If you select the AWC mode in the
WHITE BAL menu, fix a screen that you want to image, and press the
[ENTER] key. Then the AWC function will start activating.
If you select the MANU.. mode in the WHITE BAL menu, you will be able
to set up the White Balance in consideration of the current illumination
manually. If you select the MANU... item and press the [ENTER] key, the
MANU... submenu will appear to select the White Balance. If you press
the LEFT or RIGHT key in the PRESET menu, you will be able to select
the 3200K, 5600K, or USER mode.
3200K : Set the color temperature to 3200°K
5600K : Set the color temperature to 5600°K.
USER : Use the RED and BLUE control bar to select a proper value
for setup.
CAMERA ID ON...
IRIS DC...
BLC/WDR OFF
COLOR/BW EXT...
SHUTTER OFF
AGC OFF
WHITE BAL MANU...
SYNC INT
SPECIAL ...
EXIT QUIT
press the
[ENTER] key
(AWB/MANU)
PRESET 3200K
RET
EE
Page 18

(AWB/MANU)
(AWB/MANU)
SPECIAL
You can control the BAUD RATE, REVERSE, POSI/NEGA, DETAIL, and
press the
PRESET 3200K
RET
[Left/Right]
key
PRESET OFF (USER)..
RED ( 00) ----I---BLUE ( 00) ----I---RET
SYNC
The INT mode is necessary for using the internal synchronization and
the LINE... mode is necessary for the operation of multi cameras
because it synchronizes the camera phase by using the external
signal(AC Signal). A little phase deviation for some sets may be aligned
by adjusting the PHASE. The SYNC function is available only with AC
power source. Put the cursor on the SYNC, press the LEFT/RIGHT key
to select the LINE... item, and press the [ENTER] key. Now, you will see
the submenu to adjust the PHASE. The PHASE ranges from -106H to
+106H(NTSC), -138H to +138H(PAL).
MOTION DET function by yourself in the SPECIAL menu. If your select the
SPECIAL menu and press the [ENTER] key, the SPECIAL submenu screen
will appear.
CAMERA ID ON...
IRIS DC...
BLC/WDR OFF
COLOR/BW EXT...
SHUTTER OFF
AGC OFF
WHITE BAL MANU...
SYNC INT
SPECIAL ...
EXIT QUIT
press the
[ENTER] key
(SPECIAL)
BAUD RATE 38400
REVERSE OFF
POSI/NEGA +
DETAIL (0)----I-MOTION DET OFF
PRIVACY ...
RET
❿ BAUD RATE : Sets the communication speed to 4800, 9600, 19200, or
38400bps for RS-232 communication.
❿ REVERSE : REVERSES THE SCREEN IN 3 MODES, LEFT/RIGHT,
UP/DOWN, OR LEFT/RIGHT/UP/DOWN.
❖ Note: Please reset the BLC, MOTION, PRIVACY area because they don’t change
by all means.
CAMERA ID ON...
IRIS DC...
BLC/WDR OFF
COLOR/BW EXT...
SHUTTER OFF
AGC OFF
WHITE BAL MANU...
SYNC LINE...
SPECIAL ...
EXIT QUIT
❖
When you use DC power source, the SYNC Menu is full --- and you can
press the
[ENTER] key
not use the SYNC function.
34 35
(LINE LOCK)
PHASE (-106) I-------RET
❿ POSI/NEGA: Outputs the video brightness signal normally or reversely.
The brightness level is high at inverted output.
❿ DETAIL : Adjusts the horizontal and vertical sharpness.
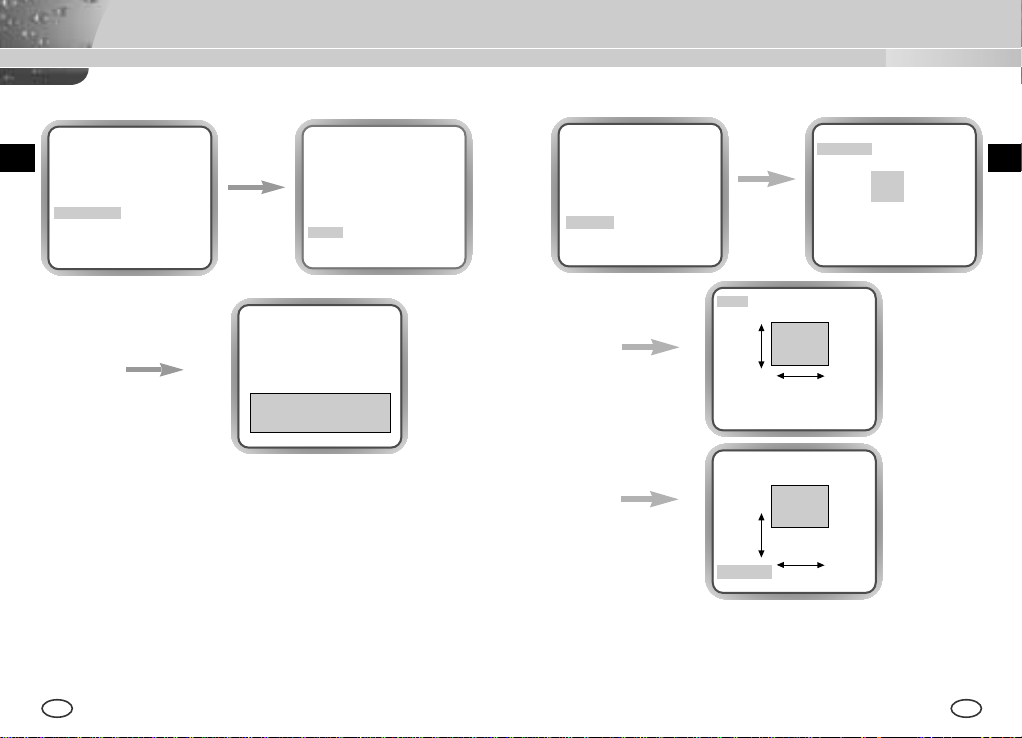
❿ MOTION DET : MOTION DET detects any movement of objects. if you
activate the MOTION DET function at the time when you expect nobody
to move, the function will detect the movement of an intruder Once
detected, the function outputs the ALARM signal. The MOTION DET
function detects any movement and selects the movement sensitivity
and the area to detect the movement. If you select the ON... mode and
press the [ENTER] key, the MOTION DET submenu screen will appear.
EE
Page 19
(SPECIAL)
BAUD RATE 38400
REVERSE OFF
POSI/NEGA +
DETAIL (0)----I-MOTION DET ON...
PRIVACY ...
RET
press the
[ENTER] key
(MOTION DET)
AREA BOTTOM...
SENSITIVITY L ---I---H
RET
(SPECIAL)
BAUD RATE 38400
REVERSE OFF
POSI/NEGA +
DETAIL (0)----I-MOTION DET ON...
PRIVACY ...
RET
SIZE
press the
[ENTER] key
(PRIVACY ZONE)
PRIVACY1 ON...
PRIVACY2 OFF
PRIVACY3 OFF
PRIVACY4 OFF
PRIVACY5 OFF
PRIVACY6 OFF
PRIVACY7 OFF
PRIVACY8 OFF
RET
EE
SIZE
LEFT/RIGHT
KEY
press the
[ENTER] key
press the
[ENTER] key
UP/DOWN
KEY
POSITION..
SIZE
The AREA is set in the same way with the AREA in the BLC menu while
designating one among ALL, CENTER, BOTTOM, TOP, LEFT, or RIGHT. If
you select BOTTOM and hit the ENTER key, the selected area will be
displayed in the screen.
The SENSITIVITY is used to setup the strength of the MOTION
DETECTION in 7 levels.
press the
[ENTER] key
UP/DOWN
KEY
POSITION..
POSITION
LEFT/RIGHT
KEY
❿ PRIVACY: This function is aiming at the protection of personal privacy,
selecting a screen part black not to be displayed in the screen.
This function permits the control of the strength level in 8 levels.
You may setup the size and location of the area.
36 37
Page 20
Product Specification
EXIT
The EXIT menu is used for the termination of the CAMERA SETUP menu.
❿ QUIT
Ignores any change and returns to the previously saved SETUP menu.
❿ SAVE
Saves all the changes to the menu until now.
❿ PRESET
Ignores any change and returns to the initial value of the CAMERA
SETUP menu which was set for the product shipment.
CAMERA ID OFF
IRIS DC...
BLC/WDR OFF
COLOR/BW AUTO...
SHUTTER AUTO X2
AGC F.FAST
WHITE BAL ATW
SYNC INT
SPECIAL ...
EXIT QUIT
SCC-B2305(P)/B2005P Special Features
ITEM DESCRIPTION
Definition
Power Source SCC-B2305(P) : AC 24V ± 10% (NTSC:60Hz ±
Power Consumption SCC-B2305(P) : Approx. 4.5W
Broadcasting System SCC-B2305:NTSC Standard Color System
Imaging Device 1/3 inch P/S CCD
Effective Pixel NTSC:
Scanning Method NTSC:525 Line, 2:1 Interlace
Line Frequency Horizontal(NTSC) : 15,734 Hz(INT) / 15,750 Hz(L/L)
Synchronization Method INT/Line Lock
Resolution 500/530 TV Lines (COLOR/BW)
S/N Ratio 52dB (AGC Off)
CCTV CAMERA (WDR & DAY/NIGHT)
0.1Hz, PAL:50Hz ± 0.1Hz), DC12V +10% ~ -5%
SCC-B2005P : AC220V ~ AC240V (50Hz
±0.1Hz)
SCC-B2005P : Approx. 5W
SCC-B2305P, SCC-B2005P:PALStandard
Color System
768(H) X 494(V)
PAL:
752(H) X 582(V)
PAL:625 Line, 2:1 Interlace
Horizontal(PAL) : 15,625 Hz(INT) / 15,625 Hz(L/L)
Vertical(NTSC) : 59.94 Hz(INT) / 60 Hz(L/L)
Vertical(PAL) : 50 Hz(INT) / 50 Hz(L/L)
EE
38 39
Page 21

ITEM DESCRIPTION
E
Minimum Scene Illumination COLOR :
Dynamic Range
0.3 Lux (F1.2) (0.002 Lux)
B/W :
0.06 Lux (F1.2) (0.0004 Lux)
NTSC:x64
PAL:x80
Day/Night COLOR/BW/AUTO/EXT
Color Temperature ATW/AWC/MANUAL MODE
(3200°K,5600°K,R/B Gain Adjustment)
Electronic Shutter Speed ALC:OFF~1/10K sec (7 steps)
ELC:Max 1/100K sec
Back Light Compensation
OFF/WDR/BLC
Sense Up OFF/AUTO X2~X160
Motion Detection OFF/ON (AREA/SENSITIVITY Setting)
Video Control POSI/NEGA, REVERSE(H, V, H/V ),
DETAIL, PRIVACY Setting
Signal Output Composite Video Out : 1.0 Vp-p 75 ohms/BNC
AI Lens VIDEO/DC
Lens Mount CS/C (Mount Adaptor)
Operating Temperature -10°C ~ +50°C
Operating Humidity ~90%
Physical Size 68(W) x 55(H) x 128.5(D) mm
Weight SCC-B2305(P) : Approx. 450g
SCC-B2005P : Approx. 550g
40
Page 22
WDR TAG/NACHTFARBE KAMERA
SCC-B2305(P)/B2005P
BEDIENUNGSANLEITUNG
D
Page 23
Sicherheitshinweise
Ziel dieser Informationen ist es, den ordnungsgemäßen Gebrauch dieses Geräts
sicherzustellen und dadurch Gefahren oder Sachbeschädigungen zu vermeiden.
Bitte befolgen Sie alle Anweisungen.
D
1. Achten Sie darauf, dass Sie nur den mitgelieferten Adapter verwenden. (Die
2. Beim Anschließen der Netz- und Signalkabel müssen zuvor die externen
3. Schließen Sie nicht mehrere Kameras an einen Adapter an. (Wird die Kapazität
4. Stecken Sie das Netzkabel fest in die Steckdose ein. (Ein loser Anschluss kann
5. Bei der Wand- oder Deckeninstallation bringen Sie die Kamera sicher und fest an.
6. Plazieren Sie keine leitfähigen Gegenstände (wie z. B. Schraubenzieher, Münzen
7. Die Kamera darf nicht an einem rußigen, staubigen oder feuchten Ort installiert
8. Beim Auftreten eines ungewöhnlichen Geruchs oder einer Rauchentwicklung, die
Warnung
Die Nichtbeachtung eines Warnhinweises kann zum Tode oder
zu schweren Verletzungen führen.
Verwendung eines anderen Adapters als des mitgelieferten kann Feuer, einen
Stromschlag oder die Beschädigung des Geräts verursachen.)
Anschlussbuchsen überprüft werden. Schließen Sie die Alarmsignalkabeladern an
die Alarmanschlüsse, den Netzadapter an die Netzsteckdose und den
Gleichstromadapter an den Gleichstromeingang an, und achten Sie dabei auf die
richrige Polarität. (Ein falscher Anschluss an das Stromnetz kann Feuer, einen
Stromschlag oder die Beschädigung des Geräts verursachen.)
überschritten, kann es zu einer anormalen Wärmeentwicklung oder Feuer
kommen.)
Feuer verursachen.)
(Fällt die Kamera herunter, kann es zur Verletzung von Personen kommen.)
und metallene Objekte) oder mit Wasser gefüllte Behälter auf der Kamera. (Das
kann zur Verletzung von Personen durch Feuer, Stromschlag oder
herunterfallende Gegenstände führen.)
werden. (Andernfalls besteht die Gefahr eines Brandes oder Stromschlags.)
vom Gerät ausgehen, ziehen Sie unverzüglich das Netzkabel aus der Steckdose
und wenden Sie sich an Ihr Kundendienstzentrum. (Die Fortsetzung des
Gebrauchs kann in diesem Fall zu Feuer oder einem elektrischen Schlag führen.)
9. Sollte das Gerät nicht störungfrei funktionieren, setzen Sie sich mit Ihrem Händler
oder dem nächsten Kundendienstzentrum in Verbindung. Das Gerät darf niemals
in keiner Weise zerlegt oder modifiziert werden. (Samsung übernimmt keine
Haftung für Probleme, die durch unbefugte Abänderungen oder einen
Reparaturversuch herbeigeführt sind.)
10. Beim Reinigen darf Wasser niemals direkt auf die Geräteteile gelangen.
(Andernfalls besteht die Gefahr eines Brandes oder Stromschlags.) Die
Oberfläche kann mit einem trockenen Tuch abgewischt werden. Verwenden Sie
für das Gerät keine Reinigungsmittel oder chemischen Reiniger, da sich durch
solche Mittel die Farbe ablösen und der Oberflächenüberzug beschädigt werden
kann.
Achtung
Die Nichtbeachtung eines mit Achtung gekennzeichneten
Hinweises kann zu Verletzungen und Sachschaden führen.
1. Lassen Sie keine Gegenstände auf das Gerät fallen, und setzen Sie es keinen
starken Stößen aus. Setzen Sie die Kamera keinen starken Vibrationen oder
magnetischen Störfeldern aus.
2. Die Kamera darf nicht an Orten mit hohen Temperaturen (über 50 °C) bzw. tiefen
Temperaturen (unter -10 °C) oder hoher Luftfeuchtigkeit installiert werden.
(Andernfalls besteht die Gefahr eines Brandes oder Stromschlags.)
3. Installieren Sie das Gerät nicht in der Nähe von Wärmequellen, wie z. B. einem
Heizgerät oder Heizkörper, und an Orten, an denen es direktem Sonnenlicht
ausgesetzt ist. (Hier besteht Feuergefahr.)
4. Wenn Sie die bereits installierte Kamera an einen anderen Ort verlegen wollen,
achten Sie darauf, die Kamera auszuschalten, bevor Sie sie abnehmen oder neu
installieren.
5. Die Installation sollte an einer gut belüfteten Stelle erfolgen.
6. Ziehen Sie bei einem Gewitter den Netzstecker. (Die Nichtbeachtung kann zu
Feuer oder einer Beschädigung des Geräts führen.)
D
2 3
Page 24

INHALTVERZEICHNIS
Kapitel 1 Übersicht
Kapitel 1 ÜBERSICHT ....................................................... 5
Kapitel 2 SPEZIALE MERKMALE .................................... 6
D
Kapitel 3 BEZEICHNUNG DER TEILE UND IHRE
FUNKTIONEN .................................................... 7
Kapitel 4 INSTALLATION ................................................... 12
Vorsichtmaßnahmen für die Installation und den
Gebrauch ............................................................. 13
Die WDR (DYNAMISCHE REICHWEITE) TAG/NACHT Kamera wird
verwenden, den dunklen und hellen beiden Teil unverwechselbar in dem
Bildschirm mit einem doppelten Verschluß auszudrücken.
Die konventionelle Kamera schneidet den Bildschirm weiß aus, wenn ein
heller Gegenstand wie das Fenster den Bildschirm einnimmt, während
diese Kamera ein technisch integrierter Produkt ist, damit belebt auch ein
hellen Teil unverwechselbar wieder.
Die TAG/NACHT Kamera ist eine niedrige Beleuchtung Kamera, die auch
im dunklen Bereich der Gegenstände identifiziert; die Kamera betreibt in
der Farbmode über den bestimmten Beleuchtung und andernfalls in der SW
Mode beseitigt die IR Cut Funktion.
Inzwischen, ist es eine Sense Up Funktion aufgenommen, mit Hilfe des
Langezeit Verschlußes und der Field Anhäufung Methode, um die Leistung
der niedrigen Beleuchtung Eigenschaft zu verbessern.
Verbindung des Automatischen Verschluß
Objektiv Anschlußes .......................................... 14
Einstellung des Objektivs und des Auswahl
Schalters .............................................................. 15
Einstellung des Rück-brennpunktes .................. 16
Anschluß der Kabel ............................................ 18
[WDR(Wide Dynamic Range)]
Die WDR Kamera ist ein Zustand der Kunst, den Bildschirm Profit
wirksam zu erweitern, besonders für die Fotos des Fensters in
einem Gebäude. Kurz, es belebt den Innenraum und Außenraum
Status wieder, sie klar zu machen.
[TAG/NACHT]
Es ist eine Funktion einer Farbkamera; diese Funktion unter
bestimmten Beleuchtung beseitigt den Filter, der eine IR Cut
Kapitel 5 Einstellung der Kamera ...................................... 20
Beilage Produkt Spezifikationen ...................................... 39
4 5
Funktion hat, um eine bessere Empfindlichkeit zu haben.
Die TAG/NACHT Kamera ist meistens an der dunklen Stelle, wie am
Untergeschoß-parkplatz benutzt werden. Am Tag, als Farbmode der hohen
Dichte mit einer horizontalen 480 Resolution wird es besorgt, und an der
Nacht die TAG/NACHT Funktion dazu die Sense Up Funktion wird es
nutzen, den Objekt zu identifizieren. Außerdem, könen Sie diese Kamera
zusätzlich in Bezug auf die Infrarot Emission Geräte benutzen.
D
Page 25
Kapitel 2 Speziale Merkmale
Kapitel 3 Teilnamen und Funktionen
Hohe Empfindlichkeit
Es hat ein neuesten 1/3Super-HAD P/S CCD für ein Bild der hohen
Empfindlichkeit.
Funktion der WDR
Die WDR Kamera ist ein Zustand der Kunst, den Bildschirm Profit wirksam
zu erweitern, besonders für die Fotos des Fensters in einem Gebäude.
Kurz, es belebt den Innenraum und Außenraum Status wieder, sie klar zu
machen.
Niedrige Beleuchtung Funktion
Es hat beide Funktionen; eine Illumination Funktion und TAG/NACHT
funktion auf Grund der Digitalsignal Technologie, um in der schlechten
Umgebung ohne Licht betreiben zu können.
Superior Gegenlicht Einstellung Funktion
Im Fall von einer hellen Beleuchtung oder Sonnenstrahlen hinter dem
Gegenstand kann das Bild, das wegen der Gegenlicht verdunkelt worden
war, deutlich aufgenommen werden.
Digital Stromquelle Synchronisation Methode
Mit dem Vollen Digital Methode Linie Schluß (Line Lock) kann man die
vertikale Synchronisation der Kamera direkt struern, so die Kontrollfähigkeit
und die Zuverläßigkeit der Kamera zu verbessern.
Hohe Resolution
Es verwirklicht eine hohe Resolution von vollen digitalen Bild-Entwickellung
mit der höchsten Digital Signal Technologie.
Ausgabe Signal Einstellung
Sie können die DETAIL oder REVERS (Waagrecht, Senkrecht oder beide)
Funktion des Video Ausgangs-signals und das PRIVAT, waagrechte und
senkrechte Profil auswählen
6 7
Seite Ansicht
Passepartout Adapter
Automatischer Verschluß
Objektiv Anschluß
ALC Objektiv
Auswahlschalter
Automatische Verschluß
Objektive Kontrollkabel
Passepartout Adapter Befestigungsrille
Diese Rille benutzt für die Befestigung des Adapters, ein Teil der Klammer
wo die Kamera installiert wird.
Automatische Verschluß Objektive (Option)
Dieses Objektiv ist in der Kamera installiert werden.
* Eine Objektiv der Oberfläche der Kamera muß mit einem Objektivpapier
oder in Äthan benetzten Baumwolltuch sanft reinigen werden.
Automatischer Verschluß Objektiv Anschluß
Dieser Anschluß versorgt das automatische Verschluß Objektiv mit dem
Strom-versorgung, Kontrollsignal, Videosignal oder DC Signal, nötwendig
für die Kontrolle des Objektiv-verschlußes.
Befestigungsrille
Gegen Brennpunkt (Back
Focus) Kontrollstab
Kamera Objektiv
DD
Page 26
Automatische Verschluß Objektiv Kontrollkabel
AC 220-240V
Diese Kabel senden das Kontrollsignal von der Kamera über, den Objektiv
Verschluß zu kontrollieren. Nun, auch im Menu müssen Sie DC/VIDEO mit
SCC-B2005P Vista Posteriore
der ausgewähten Taste, auswählen.
Gegen Brennpunkt (Back Focus) Kontrollstab
Es kontrolliert das Gegenbrennpunkt.
ALC Objektiv Auswahlschalter
Dieser Schalter stellt für die Verwendung des Auto Blende-blende
Verschluß Typs ein.
DC : Wenn Sie ein Auto Blende-blende Objektiv gebraucht mit dem DC
Kontrollsignal eingestellt haben, wählen Sie dieser Schalter zur DC Position.
VIDEO : Wenn Sie ein Auto Blende-blende Objektiv mit dem VIDEO
Kontrollsignal eingestellt haben, wählen Sie dieser Schalter zur VIDEO
Position.
SCC-B2305(P) Vista Posteriore
① Strom Anzeiger LED
Wenn die Kamera mit dem Strom geliefert ist, schaltet LED ein.
➁ Video Ausgabe Terminal
8 9
Der Monitor Video Input Terminal ist angeschloßen, mit diesem Terminal,
der durch diesen Terminal das Videosignal der Kamera senden.
➂ Fernbedienung Input Terminal (RS-232)
Dieser Terminal ist für die Kamera Kontrolle an der Produktion Fabrik.
1 TXD
1 2
3 4
2 RXD
3+5V
4 GND
DD
Page 27
➃ TAG/NACHT Außensignal Input ALARM Signal Ausgabe
Diese Funktion empfängt das außen TAG/NACHT Signal von dem
Außenlicht Sensor (Option) und zum SW umwandeln lassen.
Die BEWEGUNG DET Funktion führt zu einem ALARM Signal wenn
eine Bewegung wahrgenommen wird.
⑤ Kamera Betriebsschalter (Setup Schalter)
Diese Funkton des Kamera Betriebsschalters ist anhängig von der
Kamera ob sie zur Zeit in der üblichen Mode (kein Setup Menu ist auf
das Bild aufgezeigt) ist, oder in der Setup Menu Mode.
[LINK/RECHTS] Taste
[OBEN/UNTEN] Taste
DD
TAG/NACHT IN
ALARM OUT
GND
①
➁
In der Setup Menu Mode
[ENTER] Taste
[OBEN/UNTEN] Richtungstaste : Diese Tasten werden bei der Bewegung
des Sursors nach oben oder unten benutzt.
[LINKS/RECHTS] Richtungstaste : Diese Tasten werden bei der Bewegung
Ein Außensensor zum TAG/NACHTTerminal anschließen, wie Nummer ①
zeigt.
Die Äußerengeräte wie ein Summer oder eine Lampe zum ALARM Terminal
anschließen, wie Nummer ➁ zeigt.
Der ALARM Ausgabe Terminal ist ein offene Einnehmer mit dem folgenden
Fassungsvermögen ; DC 16V und 100 mA
AUS (OFF) : Offener Kontakt
EIN (ON) : Unter 100mA
Der TAG/NACHT Input Terminal hat ein Input DC 5V Pull-up, über 0.2mA.
des Cursors nach LINKS oder RECHTS benutzt, und auch bei der
Zuweisung in jedem Setup Menu, der Wert Reihenweise zu
identifizieren.
[ENTER] Taste : Es benutzt für die Ausführung des Setup Menus. (Über 2
Sekunden drücken.) Diese Taste wird benutzt zu dem Untermenubild
gewählt von dem Setupmenu auszuführen, oder der laufende Wert
einzustellen.
➅ Strom Anschluß Terminal
Dieses Terminal wird zum Strom (Adapter)-kabel angeschloßen.
AUS (OFF) : Offener Kontakt
EIN (ON) : Geschloßener KOntakt
10 11
Page 28
Kapitel 4 Installation
In diesem Kapitel wird erläutert, was vor der Installation der Kamera zu
beachten ist, wie man eine geeignete Installationsstelle auswählt und
welche Vorsichtsmaßnahmen bei der Installation zu treffen sind. Nun
können Sie die Kamera installieren und die Kabel anschließen.
D
Vor der Installation
Überprüfung des Inhalts in der Verpackung
Überprüfen Sie bitte, ob die folgende Zubehörteile im Lieferumfang
enthalten sind.
Vorsichtsmaßnahmen für die Installation und den Gebrauch
① Der Benutzer darf niemals selber die Kamera demontieren.
➁ Bei dem Umgehen der Kamera immer vorsichtig sein.
Die Kamera nicht mit der Faust schlagen oder schüttern.
Die Kamera muß mit Vorsicht lagert und behandelt werden, vom
Schaden zu vermeinden.
➂ Achten Sie darauf, daß die Kamera an einer regenfreien oder nicht
feuchten Lage installiert werden und an der naßen Lage nicht betreiben
lassen.
➃ Nicht schrubben die Kamera mit dem rauhen Sandpapier und beim
Reinigen benutzen Sie die Trockentücher.
D
Kamera Kamera Stütze
Manuale
d’utenteBedienungs
anleitung
12 13
C Passepartout
Adapter
(Passepartout)
Auto Blende Objektiv
Anschluß
⑤ Installieren Sie die Kamera an einem kühlen Ort und nicht in direkten
Sonnenlicht.
Page 29
Verbindung des Automatischen Verschluß Objektiv Anschlußes
Der Kamera, dazu der Automatische Verschluß Objektiv Anschluß wie folgt
vorbereiten:
Installation
Einstellung des Objektivs
CS Objektive Fall
Der CS Objektiv im Uhrzeigersinn drehen, bis es wie unten befestigt
wird.
CS Objektive
DD
Jede Abgezogene Verschluß Kontrollkabel Leitung zu dem automatischen
Verschluß Objektiv Anschluß wie folgt verbinden.
Stecknadel Nr. DC Kontrolltyp VIDEO Kontrolltyp
1 Damp(-) Strom (+12V)
2 Damp(+) N/A
3 Drive(+) VIDEO Signal
4 Drive(-) GROUND
14 15
C Objektive Fall
Der C Passepartout Adapter im Uhrzeigersinn drenen, um es zu
befestigen.
Dann drehen der C Objektiv im Uhrzeigersinn, bis es wie unten befestigt
wird.
C Objektive
Page 30

Einstellung des Auswahlschalters
Sie müßen die Position des Objektiv Einstellschlter neben der Kamera, je nach
dem Objektivtyp ändern.
Sie müßen der Schalter in der "DC" oder beziehungsweise "VIDEO" Position
drehen, ob der Einstellobjektiv DC Kontrolltyp automatische Verschlußobjektiv
ist oder der Video Kontrolltyp automatische Verschluß-objektiv ist.
Objektive mit Zoom Funktion
① Ein Gegenstand mit hocher Resolution (Gitterförmige Gegenstand)
einer Entfernung 3m bis 5m einbilden und der Zoom in dem Objektiv zu
TELE als möglich nahe einstellen. Dann drehen der Objektiv
Brennpunktring, bis der Gegenstand deutlicher sein wird.
➁ Der Zoom in dem Objektiv zu WIDE als möglich nahe einstellen und
dann drehen der RÜCK-BRENNPUNKT Einstellstab, bis der Gegenstand
deutlicher sein wird.
➂ Nummer ① bis ➁ und für 2 oder 3 male wiederholen, bis der Brennpunkt
auf der ZOOM TELE Seite mit denem auf der ZOOM WIDE Seite
deutlich passen wird.
Einstellung des Rück-brennpunktes (Back Focus)
Die Kamera Rück-brennpunkt ist in der Fabrik vor der Lieferung eingestellt,
aber einige Objektive sind aus dem Brennpunkt, je nach der Objektivtypen.
Wenn es so ist, müßen Sie der Rück-brennpunkt wie folgt einstellen.
Zuerst, es ist das Rück-brennpunkt Einstell-verfahren für die Fixierten
Brennpunkt Objektive.
Objektive ohne Zoom Funktion
① Ein Gegenstand mit hocher Resolution (Gitterförmige Gegenstand) über
als 10m Entfernung einbilden und der Objektiv Brennpunktring in der
Unendlichkeit ( ∞ ) Position legen.
➁ Der RÜCK-BRENNPUNKT Einstellring drehen, bis der Gegenstand
deutlicher sein wird.
➂ Die Fixierschraube des RÜCK-BRENNPUNKT Einstellrings einschrauben.
16 17
DD
Page 31

Anschluß der Kabel und Überprüfung des Betriebs
SCC-B2305(P)
1 Schließen Sie zuerst das eine Ende des BNC-Videokabels an den
Videoausgang (VIDEO OUT) an.
2 Schließen Sie als nächstens das andere Ende des BNC-Kabels an die
Videoeingangsbuchse des Monitors an.
VIDEO EIN TERMINAL
des Monitor-hinterteils
BNC KABEL
VIDEO AUS
TERMINAL
SCC-B2005P
3 Schließen Sie dann Netzadapter an. Verwenden Sie einen
Schlitzschraubenzieher, um das zweiadrige Ende des Netzadapters an
den Netzeingangsanschluß der Kamera wie folgt anzuschließen. (GND:
mit einer weißen Linie auf dem Kabel gekennzeichnet.)
* Die Stromquelle kann mit AC24V und DC12V ungeachteter Polatität
anschließen.
18 19
DD
Page 32

Kapitel 5 Aufbau der Kamera
Dieses Kapatel gibt einen Überblick über den Aufbau der Einstellmenu.
Zuerst das Totale Einstellmenu und der Aufbau und dann erläutert ihre
Funktionen.
KAMERA ID
D
SETUP
MENU
EIN.../AUS
IRIS
DC... /VIDEO/ELC...
BLC/WDR
AUS
BLC...
WDR...
FARBE/S/W
FARBE/S/W...
/AUTO.../EXT...
SHUTTER
AUS/ 1/100~1/10K
AUS/ AUTO
X2~X160
AGC
AUS/WENIG/HOCH
BEWEGUNG
S.LANGS/LANGS/
NORM/SCHN/S.SCHN
WEISSABGL
ATW/AWC/MANU...
SYNC
INT/LINIE...
SPEZIAL
...
AUSGANG
VERL/SICHERN/
PRESET
20 21
EIN...
DC...
ELC...
BLC...
WDR...
S/W...
AUTO...
EXT...
MANU...
LINIE...
SPEZIAL...
AKTIVITAET
KAMERA ID AND
LOCATION SETUP
DC BLENDE SETUP
ELC PEGEL SETUP
BLC BEREICH SETUP
UNTEL...OBEN...
LINKS...RECHTS...
MITTE...
PEGEL
SETUP
FLIMMERFREI SETUP
FARBTRAGER EIN/AUS
BURST EIN/AUS
PEGEL DURATION
FARBTRAGER EIN/AUS
3200K/5600K/BENUTZER
ROT, BLAU SETUP
PHASE SETUP
BAUD RATE, REVERS,
POSI/NEGA, DETAIL,
AKTIVITAET...
PRIVAT...
PRIVAT...
PRIVAT TYPE &
BEREICH SETUP
BEREICH SETUP
SENSITIVITY SETUP
KAMERA ID
Im Menu KAMERA ID können Sie eine Kennung für die Kamera festlegen,
die auf dem Bildschirm des mit der Kamera angeschloßene Monitors
erscheint. Wenn Sie im Einstellmenu KAMERA ID auf EIN stellen und
[ENTER] drücken, wird ein Untermenubildschirm eingeblendet, in dem Sie
der Kamera eine Kennung zuweisen können.
Dazu können Sie max. 20 alphamunerische Zeichen und einige
Sonderzeichen verwenden, die in KAMERA ID gezeigt werden.
Der gezeigte KAMERA ID können Sie im Untermenu POSITION an einer
bestimmten Stelle auf dem Monitor plazieren.
KAMERA ID EIN...
BLENDE DC...
BLC/WDR AUS
FARBE/S/W FARBE...
SHUTTER AUS
AGC WENIG
WEISSABGL ATW
SYNC INT
SPEZIAL ...
AUSGANG VERL
Die Taste
[ENTER]
drücken
(KAMERA ID)
A B C D E F G H I J K L
M N O P Q R S T U V W
X Y Z 0 1 2 3 4 5 6 7 8 9
: ! - + * ( ) /
SP
❿❿➛➛
SP
POSITION...
RUE
....................
D
Page 33

BLENDE
Diese KAMERA ist grundsätzlich je nach Intensität des einfallenden Lichts
die Fuktion gestruert werden und das Niveau des Lichts aufbauen. ALC
kann DC BLENDE Stufe , VIDEO BLENDE und ELC Stufe aufstellen.
❿ DC...
Wenn Sie die BLENDE auf DC einstellen und [ENTER] drücken, wird ein
Unterbildschirm, wo kann das Niveau des Lichts aufbauen, eingeblendet.
Der Punkt NIVEAU ermöglicht Ihnen die Lichtsniveau-einstellung mit
Hilfe der Tasten [LINKS, RECHTS].
Es ist möglich, die Lichtsniveau-einstellung nur bei der Verwendung der
DC BLENDE OBJEKTIV. Dann, können Sie der ALC OBJEKTIV Auswahl
Schalter auf der Seite der Kamera zur “DC” Position stellen.
❿ VIDEO
Es verwendet wenn das VIDEO Objektiv im Verwendungszustand ist.
Sie können den veränderbare Widerstand verwenden, der am BLENDE
STUFE OBJEKTIV für die Kontrolle befestigt ist.
Dann stellen Sie der ALC OBJEKTIV Auswahl Schalter auf die Seite der
Kamera in “VIDEO” Position ein.
KAMERA ID AUS
BLENDE VIDEO
BLC/WDR AUS
FARBE/S/W FARBE
SHUTTER AUS
AGC AUS
WEISSABGL ATW
SYNC INT
SPEZIAL ...
AUSGANG VERL
❿ ELC...
Wenn es zu viele Radiation gibt, dieses Menu kontrolliert automatisch
den hohen Schnelligkeit Verschluß Niveau bei der Verwendung des
manuellen Objektivs und mit dem bestimmten Einstellniveau erhalten
KAMERA ID EIN...
BLENDE DC...
BLC/WDR AUS
FARBE/S/W FARBE
SHUTTER AUS
AGC AUS
WEISSABGL ATW
SYNC INT
SPEZIAL ...
AUSGANG VERL
22 23
Die Taste
(BLENDE/DC)
[ENTER]
drücken
PEGEL (0) ----I---RUE
lassen.
Wenn Sie im Menu BLENDE der ELC... wählen und die Taste [ENTER]
drücken, wird das folgende Unterbild erscheinen.
Sie können die Taste [LINKS, RECHTS] pressen, um das Niveau
einzustellen.
KAMERA ID EIN...
BLENDE ELC...
BLC/WDR AUS
FARBE/S/W FARBE
SHUTTER AUS
AGC AUS
WEISSABGL ATW
SYNC INT
SPEZIAL ...
AUSGANG VERL
Die Taste
(BLENDE/ELC)
[ENTER]
drücken
PEGEL (0) ----I---RUE
DD
Page 34

BLC/WDR
❿ WDR...
Die WDR Kamera ist ein Zustand der Kunst, den Bildschirm Profit
wirksam zu erweitern, besonders für die Fotos des Fensters in einem
Gebäude. Kurz, es belebt den Innenraum und Außenraum Status
wieder, sie klar zu machen. Wenn Sie die Taste [ENTER] drücken,
können Sie die WDR STUFE einsetzen und auch die Funktion
FLIMMERFREI einsetzen.
KAMERA ID EIN
BLENDE DC...
BLC/WDR WDR...
FARBE/S/W FARBE
SHUTTER AUS
AGC AUS
WEISSABGL ATW
SYNC INT
SPEZIAL ...
AUSGANG VERL
Die Taste
[ENTER]
❖ Bei der Einsetzung der WDR Funktion , können Sie die DC IRIS STUFE
einsetzen.
(WDR)
PEGEL L ----I----H
drücken
FLIMMERFREI AUS
RUE
❿ BLC...
Wird bei einer normalen Kamera eine starke Lichtquelle benutzt, wie z.B.
ein Scheinwerfer, der das Objekt vom hinten beleuchtet, dann erscheint
esauf dem Monitor aufgrund des Gegenlichts dunkel. Zur Lösung des
Gegenlichtproblems kann die passende BLC Funktion so eingestellt
werden, daßbei allen Lichtverhältnissen klare Videobilder gelingen. Mit
Hilfe der Taste LINKS, RECHTS können Sie die 5 bereit eingestellte
Bereich UNTEN..., OBEN...,RECHTS..., LINKS..., MITTE...
Im Menu BLC, zB. beim UNTEN... die Taste ENTER drücken, dann
können Sie der eingestellte UNTEN Bereich bestätigen.
KAMERA ID EIN...
BLENDE ELC
BLC/WDR BLC...
FARBE/S/W FARBE
SHUTTER AUS
AGC AUS
WEISSABGL ATW
SYNC INT
SPEZIAL ...
AUSGANG VERL
Die Taste
[ENTER]
drücken
Die Taste
(BLC)
[ENTER]
BEREICH UNTEN...
drücken
RUE
DD
24 25
Page 35

FARBE/S/W
Das FARBE/S/W Menu hat eine Funktion, das IR(Infrarot) Filter ein-oder
ausschalten. In niedriger Beleuchtungsumgebung, die S/W Mode wird das
IR Filter ausschalten und die Empfindlichkeit wird hoch wie die S/W Kamera
sein. Andernfalls, die FARBE Mode wird das IR Filter einschalten und die
Empfindlichkeit wird niedriger mit dem zurückkerten normalen Bild.
❿ S/W...
Es ist die IR Filter AUS Mode in Schwarz und Weiss (hohe
empfindlichkeit wie S/W Kamera). Wenn Sie die S/W... wählen und die
Taste ENTER drücken, das S/W Untermenu erscheint werden.
Sie können einstellen, das FARB TRAGER Signal auszusenden drehend
auf EIN oder AUS.
DD
❿ FARBE...
In dieser Mode, geben die Kamera den Video Bild nur in Farbe aus.
KAMERA ID EIN...
BLENDE DC...
BLC/WDR AUS
FARBE/S/W FARBE
SHUTTER AUS
AGC AUS
WEISSABGL ATW
SYNC INT
SPEZIAL ...
AUSGANG VERL
26 27
KAMERA ID EIN...
BLENDE DC...
BLC/WDR AUS
FARBE/S/W S/W...
SHUTTER AUS
AGC AUS
WEISSABGL --SYNC INT
SPEZIAL ...
AUSGANG VERL
Die Taste
[ENTER]
drücken
(S/W)
FARBTRAGER
RUE
EIN
Page 36

❿ AUTO...
Dieses Menu umwandelt die FARBE mode in der S/W Mode
automatisch oder umgekehrt je nach der Beleuchtung. In der niedrigen
Beleuchtungsumgebung, die S/W Mode wird das IR Filter ausschalten
und die Empfindlichkeit wird hoch. Andernfalls, in der hohen
Beleuchtungsumgebung, die FARBE Mode wird das IR Filter einschalten
und die Empfindlichkeit wird niedriger.
Wenn Sie das AUTO wählen und die Taste [ENTER] drücken, das
AUTO/S/W Unterbild erscheint werden und dieses Bild reguliert das S/W
NIVEAU. Sie können das FARBTRAGER Signal drehend auf EIN oder
AUS aussenden, die ZEITRAUM für die Umwandlung einstellen oder
das Standard Beleuchtungsniveau für die Umwandlung die FARBE
Mode in der S/W Mode einstellen.
KAMERA ID EIN...
BLENDE DC...
BLC/WDR AUS
FARBE/S/W AUTO...
SHUTTER AUS
AGC --WEISSABGL ATW
SYNC INT
SPEZIAL ...
AUSGANG VERL
Die Taste
(AUTO S/W)
FARBTRAGER
[ENTER]
PEGEL WENIG
drücken
ZEITRAUM S --I------ L
RUE
EIN
❿ EXT...
Dieses Menu umwandelt die FARBE Mode in der S/W Mode
automatisch oder umgekehrt je nach der Beleuchtung mit dem äußeren
Sensor. Wenn Sie das EXT Menu wählen und die Taste [ENTER]
drücken, wird das EXTERN S/W Untermenu auf dem Menubild
erscheinen.
Sie können das FARBTRAGER Signal drehend auf EIN oder AUS in
diesem Menu aussenden.
KAMERA ID EIN...
BLENDE DC...
BLC/WDR AUS
FARBE/S/W EXT...
SHUTTER AUS
AGC AUS
WEISSABGL ATW
SYNC INT
SPEZIAL ...
AUSGANG VERL
Die Taste
(EXTERN S/W)
[ENTER]
drücken
FARBTRAGER EIN
RUE
DD
28 29
Page 37

SHUTTER
AGC/BEWEGUNG
Im Menu VERSCHLUß können Sie die Verschlußzeiten des elektronischen
Schnellverschlußes sowie von AUTO Langsamezeit Verschluß. Der elektronische
Schnellverschluß unterstützt 7 Verschlußzeiten von 1/100 Sekunden bis 1/10K
Sekunden, und im allgemeinen ist für das Bild des bewegenden Objekts benutzt.
Langsamezeit Verschluß beides unterstützen 10 Verschlußzeiten von x2 bis x160
und hat die Funktion, eine langsamere Verschlußzeit einzustellen, um ein klares und
helles Bild auf dem Monitor zu erhalten. Wählen Sie AUTO Langsamezeit Verschluß,
damit die Kamera die Lichtmenge ermittelt und je nach Grad der Dunkelheit eine
langsame Verschlußzeit automatisch einstellen möchten.
❿ AGC
Das Menu AGC hat die Funktion, das Bild klar zu sehen, wenn das
erhaltene Videobild unter einer bestimmten Helligkeit liegt, weil es bei
unzureichende Licht- verhältnissen aufgenommen wurde. Beim nur
Schnellverschluß oder AUS können Sie das Menu AGC einstellen. Mit
der Taste [LINKS, RECHTS] auf WENIG oder HOCH platzieren, dann
die AGC funktioniert. WENIG wird beim maximalen niedrigen AGC
NIVEAU, HOCH beim höhen AGC NIVEAU verwenden.
Wenn das Menu FARBE / S/W AUTO...ist, wird das Menu AGC als ---
KAMERA ID EIN...
BLENDE DC...
BLC/WDR AUS
FARBE/S/W AUTO...
SHUTTER AUS
AGC --WEISSABGL ATW
SYNC INT
SPEZIAL ...
AUSGANG VERL
Wenn Sie die Richtungstaste LINKS/RECHTS mehrmals drücken,
erscheinen die Verschlußzeiten in der nachstehenden Reihenfolge.
angezeigt und wird der maximalen AGC GAIN zu HOCH eingestellt.
KAMERA ID EIN...
BLENDE DC...
BLC/WDR AUS
FARBE/S/W AUTO...
SHUTTER AUS
AGC --WEISSABGL ATW
SYNC INT
SPEZIAL ...
AUSGANG VERL
OFF→AUTO X2 →AUTO X4 →AUTO X6 →AUTO X8 →AUTO X12 →AUTO X16 →AUTO
X20
→
AUTO X40 →AUTO X80 →AUTO X160 →OFF→1/100(NTSC), 1/20(PAL) →1/250
→
1/500 →1/1000 →1/2000 →1/4000 →1/10K →OFF
❖
Wenn die BLENDE auf ELC oder BLC/WDR ist. können Sie nur in
folgender Mode verwenden.
OFF→AUTO X2 →AUTO X4 →AUTO X6→AUTO X8 →AUTO X12 →AUTO X16 →AUTO
X20
→
AUTO X40 →AUTO X80 →AUTO X160 →OFF
30 31
DD
Page 38

❿ BEWEGUNG
Diese Option kann in der AUTO Mode benutzt werden;
Es stehen fünf Stufen, S.LANGS, LANGS, NORM, SCHN und S.SCHN
zur Auswahl.
Mit S.LANGS läßt sich die AGC-Verstärkung minimieren, um
unbewegliche Objekte an dunklen Orten überzuwachen.
Mit LANGS läßt sich die AGC-Verstärkung verringern, um wenig
bewegende Objekte an dunklen Orten überzuwachen.
Mit NORM läßt sich die AGC-Verstärkung auf Mitte einstellen, um
bewegende Objekte an dunklen Orten überzuwachen.
Mit SCHN läßt sich die AGC-Verstärkung vergrößern, um sich
schnell bewegende Objekte an dunklen Orten überzuwachen.
Mit S.SCHN läßt sich die AGC-Verstärkung vergrößern, um sich
schnell bewegende Objekte an dunklen Orten überzuwachen.
Ist Verschlußmenu im Einstellmenu AUTO eingestellt, positionieren Sie
den Cursor mit der Taste [UNTER] auf BEWEGUNG Menu und benutzen
die Tasten [LINKS, RECHTS], um die Funktion Bewegung auszuführen.
Bestätigen Sie die Taste [LINKS], um zu LANGS Mode zu gelangen, und
die Taste [RECHTS], um zu SCHN Mode zu gelangen.
KAMERA ID EIN...
BLENDE DC...
BLC/WDR AUS
FARBE/S/W AUTO...
SHUTTER AUTO X2
BEWEGUNG S.SCHN
WEISSABGL ATW
SYNC INT
SPEZIAL ...
AUSGANG VERL
WEISSABGL
❿ ATW
Wenn Sie WEISSABAL Menu auf ATW Mode einstellen, wacht die Kamera
kontinuierlich die Veränderung der Farbtemperatur über und passt den
Weissabgleich automatisch an die Farbtemperatur an.
❿
❿ AWC
Wenn Das WEISSABAL Menu auf AWC Mode einstellen, wird der Weissabgleich
einmal an die Farbtemperatur angepasst, und dieser Wert wird beibehalten.
Stellen Sie WEISSABAL Menu auf AWC ein und drücken Sie die Taste
[ENTER], dann wird die AWC Funktion ausgeführt.
❿ MANU...
Wenn Sie den WEISSABAL Menu zur MANU... Mode einstellen, können Sie je
nach der bestehende Beleuchtung Weissabgleich direkt ausführen.
Wenn Sie den Punkt MANUELL... auswählen und [ENTER] drücken, wird ein
MANUELL...-Untermenu eingeblendet, in dem Sie einen manuellen
Weissabgleich vornehmen können. Sie haben die Wahl unter 3200°K, 5600°K
oder BENUTZER -Mode, in dem Sie die T asten [LINKS] oder [RECHTS] im
PRESET-Menu drücken.
3200K : Die Farbtemperatur bei 3200°K einstellen.
5600K : Die Farbtemperatur bei 5600°K einstellen.
BENUTZER : Unter ROT und BLAU Steuerstab ein geeigneten Wert
KAMERA ID EIN...
BLENDE DC...
BLC/WDR AUS
FARBE/S/W EXT...
SHUTTER AUS
AGC AUS
WEISSABGL MANU...
SYNC INT
SPEZIAL ...
AUSGANG VERL
auszuwählen, dann die Farbtemperatur einstellen.
(AWB/MANU)
Die Taste
PRESET 3200K
[ENTER]
drücken
RUE
DD
32 33
Page 39

(AWB/MANU)
PRESET 3200K
RUE
RESCHTS]
verwenden
SYNC
Wählen Sie INT, wenn Sie die interne Synchronisation verwenden. LINIE...
ist für die Synchronisation der Kameraphasen erforderlich, um mehrere
Kameras mit Hilfe des externen Signals (AC Signal) zu betreiben.
Sie können PHASE einstellen, um jegliche Phasenabweichungen zwischen
den einzelnen KAMERA-Sets zu beseitigen.
Diese SYNCH Funktion können Sie bei AC Stromversorgung nutzen;
Positionieren Sie den Cursor auf LINIE..., mit der Taste [LINKS
LINIE. auswählen und [ENTER] drücken, dann erscheint der Bildschrim
eines Untermenus, in dem Sie die Phase-Einstellung anpassen können,
Sie können die Phase von -106H bis +106H einstellen(NTSC), von -138H
bis +138H(PAL).
KAMERA ID EIN...
BLENDE DC...
BLC/WDR AUS
FARBE/S/W EXT...
SHUTTER AUS
AGC AUS
WEISSABGL MANU...
SYNC LINIE...
SPEZIAL ...
AUSGANG VERL
Bei der DC Stromversorgung Verwendung, erscheint das SYNC Menu
zu ---und die SYNC funktion kann nicht benutzen.
34 35
Die Taste
[ENTER]
(AWB/MANU)
Die Taste
PRESET AUS(BENUTZER)
[LINKS/
ROT
BLAU
RUE
(LINIE LOCK)
drücken
PHASE (-106) I-------RUE
( 00) ----I---( 00) ----I----
/
RECHTS].
SPEZIAL
Im Menu SPEZIAL können Sie die Optionen BAUD RATE, REVERS,
POSI/NEGA, DETAIL, AKTIVITAET direkt steuern. Wenn Sie SPEZIAL
wählen und [ENTER] drücken, wird ein SPEZIAL -Untermenu eingeblendet.
KAMERA ID EIN...
BLENDE DC...
BLC/WDR AUS
FARBE/S/W EXT...
SHUTTER AUS
AGC AUS
WEISSABGL MANU...
SYNC INT
SPEZIAL ...
AUSGANG VERL
Die Taste
❿BAUD RATE : Bei der RS232, das Kommunikationstempo auf 4800,
9600, 19200, 38400 bps einstellen.
❿ REVERS : DER BILDSCHIRM IN 3 MODEN, LINKS/RECHTS, AUF/AB ODER
LINKS/RECHTS/AUF/AB UMKEHREN.
Anmerkung : Bitte stellen Sie der Bereich BLC, AKTIVITAET, PRIVATwieder
❖
ein, weil Sie selbst verständlich nicht ändern werden.
❿ POSI/NEGA : Das Video Helligkeitssignal normal oder umgekehrt
ausgeben.
❿ DETAIL: Die horizontale und vertikale Schärfe regulieren.
❿AKTIVITAET
Die AKTIVITAET funktion erkennt sich bewegende Objekte und
kann zur Erkennung von Eindringling bei Abwesenheit eingesetzt
werden. Bei der Bewegung wird das ALARM Signal melden.
Sie können die Bewegungsmelder-empfindlichkeit und den
Bewegungsmelderbereich einstellen. Wenn Sie EIN wählen und
[ENTER] drücken, wird das AKTIVITAET-Untermenubild eingeblendet.
(SPEZIAL)
BAUD RATE 38400
REVERS AUS
POSI/NEGA +
DETAIL (0)----I--
[ENTER]
AKTIVITAET AUS
PRIVAT ...
drücken
SPRACHE DEUTSCH
RUE
DD
Page 40

(SPEZIAL)
BAUD RATE 38400
REVERSE AUS
POSI/NEGA +
DETAIL (0)----I-AKTIVITAET EIN...
PRIVAT ...
SPRACHE DEUTSCH
RUE
Die Taste
[ENTER]
verwenden
Die Taste
verwenden
(AKTIVITAET)
[ENTER]
BEREICH UNTEN...
EMPF L ---I--- H
RUE
Der BEREICH ist in gleicher Weise mit dem BEREICH in dem BLC Menu
eingestellt worden. Sie sind in dem Bereich ALLE, MITTE, UNTEN, OBEN,
LINKS oder RECHTS bestimmt worden.
Wenn Sie UNTEN auswählen und die Taste ENTER drücken, wird der
ausgewälhte Bereich auf dem Bildschirm angezeigt.
EMPFINDLICHKEIT wird verwendet, die Stärke der AKTIVITAET in 7
Stufen einzustellen.
❿PRIVAT
Diese Funktion ist nach dem Schutz der persönlichen Privatsphäre
beabsichtigt, so zeigt den Teil des ausgewählten Bildschirms in schwarz
im Bildschirm nicht an. Diese Funktion erlaubt die Kontrolle der 8 Stärkestufen. Sie sollen die Größe und die Stelle des Bereichs aufstellen.
(SPEZIAL)
BAUD RATE 38400
REVERSE AUS
POSI/NEGA +
DETAIL (0)----I-AKTIVITAET EIN...
PRIVAT ...
SPRACHE DEUTSCH
RUE
Die Taste
[ENTER]
drücken
Die Taste
[ENTER]
drücken
Die Taste
verwenden
GROESSE
[OBEN/
UNTEN]
TASTE
POSITION
GROESSE
[OBEN/
UNTEN]
TASTE
POSITION
(
PRIVACY ZONE
PRIVAT 1 EIN...
PRIVAT2 AUS
PRIVAT3 AUS
PRIVAT4 AUS
PRIVAT5 AUS
PRIVAT6 AUS
[ENTER]
PRIVAT7 AUS
PRIVAT8 AUS
RUE
GROESSE
[LINK/RECHTS]
TASTE
POSITION
[LINK/RECHTS]
TASTE
)
❿ SPRACHE : Die folgende sprache stehen zur Auswhl: Englich, Deutsch,
Francais, Espanõl und Italiano.
DD
36 37
Page 41

Prodotto Specificazione
EXIT
Das AUSGANG Menu benutzt für die Beendigung des Kamera Aufbaumenus.
D
❿ VERL
Übergeht alle von Ihnen vorgenommenen Veränderungen und stellt das
vorherig gespeicherte Einstellmenu wieder her.
❿ SICHERN
Speichert die Einstellmenu, die bisher verändert worden sind.
❿ PRESET
Übergeht alle von Ihnen vorgenommenen Veränderungen und stellt die
wertseitigen KAMERA EINSTELLUNG Menu wieder her.
KAMERA ID AUS
BLENDE DC...
BLC/WDR AUS
FARBE/S/W AUTO...
SHUTTER AUTO X2
AGC S.SCHN
WEISSABGL ATW...
SYNC INT
SPEZIAL ...
AUSGANG VERL
SCC-B2305P/B2005P Charakteristische Merkmale
ARTIKEL BESCHREIBUNG
Definition CCTV Kamera (WDR&TAG/NACHT)
Spannungsquelle SCC-B2305(P) : AC 24V ± 10% (NTSC:60Hz ±
0.1Hz, PAL:50Hz ± 0.1Hz), DC12V +10% ~ -5%
SCC-B2005P : AC220V ~ AC240V (50Hz
±0.1Hz)
Leistungsaufnahme SCC-B2305(P) : Approx. 4.5W
SCC-B2005P : Approx. 5W
Fernsehnorm SCC-B2305:NTSC Standard Farbe System
SCC-B2305P, SCC-B2005P:PALStandard
Farbe
Bildaufnehmer 1/3 Inch P/S CCD
Effektive Pixel NTSC:
Abtastverfahren NTSC:525 Linien, 2:1 Zeilensprung
Zeilenfrequenz Horizontal(NTSC) : 15,734 Hz(INT) / 15,750 Hz(L/L)
Synchronisationsverfahren INT/LINIE LOCK
Auflösung 500/530 TV LINIEN (FARBE/S/W)
S/N Ratio 52dB (AGC OFF)
768(H) X 494(V)
PAL:
752(H) X 582(V)
PAL:625 Linien, 2:1 Zeilensprung
Horizontal(PAL) : 15,625 Hz(INT) / 15,625 Hz(L/L)
Vertical(NTSC) : 59.94 Hz(INT) / 60 Hz(L/L)
Vertical(PAL) : 50 Hz(INT) / 50 Hz(L/L)
D
38
39
Page 42

ARTIKEL BESCHREIBUNG
Min.Szenenbeleuchtung Farbe:
Dynamic Range
D
0.3 Lux (F1.2) (0.002 Lux)
S/W:
0.06 Lux (F1.2) (0.0004 Lux)
NTSC:x64
PAL:x80
TAG/NACHT
FARBE/S/W/AUTO/EXT
Elektronische Verschlusszeit ALC:OFF~1/10K sek (7 Stufen)
ELC:Max 1/100K sek
Elektronischer Verschluß AUS/, 1/100(NTSC), 1/120(PAL), 1/250, 1/500,
1/1k, 1/2k, 1/4k, 1/10k Sek.
Gegenlichtkompensation AUS/WDR/BLC
Restlichtbetrieb AUS/AUTO x2 ~ x160
Bewegungsmeldung
AUS/EIN(Einstellung von
BEREICH/EMPFINDLICHKEIT)
Videosteuerung
Einstellung von POSI/NEGA,REVERS
(H, V, H/V) DETAIL, PRIVAT
Signalausgang Composite Videoausgang : 1.0Vp-p 75 ohms/BNC
Objektiv VIDEO / DC
Objektiv Passepartout CS/C (Passepartout Adapter)
Temperatur bei Betrieb -10°C ~ +50°C
Luftfeuchtigkeit bei Betrieb - 90%
Abmessungen 68(W) x 55(H) x 128.5 (D)mm
Gewicht SCC-B2305(P) : Approx. 450g
SCC-B2005P : Approx. 550g
40
Page 43

CAMERA COULEUR WDR JOUR/NUIT
SCC-B2305(P)/B2005P
Manuel d’Utilisation
F
Page 44

Précautions de sécurité
L’objectif des précautions de sécurité est d’assurer l’utilisation correcte de
ce produit afin d’éloigner tout risque et tout dégât à la propriété. Assurezvous de bien observer toutes les précautions.
Avertissement
Ne pas tenir compte d’un avertissement risque de causer des
blessures graves, voire mortelles.
1. Assurez-vous d’utiliser uniquement l’adaptateur fourni avec le produit.
(L’utilisation d’un adaptateur autre que celui fourni peut endommager le
produit ou causer un incendie ou des décharges électriques.)
2. Avant de brancher le cordon d’alimentation et les câbles de signal, vérifiez
d’abord les bornes extérieures. Reliez les câbles des signaux d’alarme à
leur borne respective. Branchez l’adaptateur CA sur la prise CA et
l’adaptateur CC sur la prise CC tout en tenant compte de la bonne polarité.
(La connexion incorrecte à la source d’alimentation peut endommager le
produit ou causer un incendie ou des décharges électriques.)
3. Ne branchez jamais plus d’une caméra sur un seul adaptateur. (Le
dépassement de la capacité de charge risque de générer une chaleur
anormale au point de causer un incendie.)
4. Branchez le cordon d’alimentation sur la prise murale. Assurez-vous que la
connexion est solidement fixée. (Une mauvaise connexion peut constituer
le risque d’un incendie.)
5. Lorsque vous installez la caméra au mur ou au plafond, assurez-vous
qu’elle y soit fixée solidement et de faáon sécuritaire. (La chute de la
caméra peut causer des blessures corporelles.)
6. Ne placez jamais d’objets conducteurs (p. ex., un tournevis, des pièces de
monnaie, tout autre objet métallique) ni de contenants remplis d’eau sur la
caméra. (Cela pourrait présenter un risque de blessures corporelles en
raison d’un incendie, d’une décharge électrique ou de la chute d’un objet.)
7. N’installez pas la caméra dans un emplacement plein de suie, de poussière
ou d’humidité. Cela pourrait causer un incendie ou provoquer une
décharge électrique.
8. Si vous détectez une odeur étrange ou de la fumée qui sort du produit,
débranchez immédiatement le cordon d’alimentation et contactez le centre de
soutien technique. (Une sollicitation continue de l’appareil dans ces conditions
pourrait causer un incendie ou provoquer des décharges électriques.)
9. Si ce produit cesse de fonctionner correctement, communiquez avec votre
revendeur ou le centre d’entretien dans votre localité. Ne démontez ni ne
modifiez jamais ce produit. (Samsung n’est pas responsable des problèmes
techniques découlant d’une modification non autorisée ou d’une tentative de
réparation.)
10. Lorsque vous nettoyez le produit, veillez à ne pas vaporiser d’eau directement
sur les composants du produit. (Cela pourrait causer un incendie ou provoquer
une décharge électrique.) Nettoyez la surface au moyen d’un chiffon doux.
N’utilisez jamais de détersifs ni de nettoyants chimiques. Cela pourrait
provoquer une décoloration ou endommager le fini du produit.
Mise en garde
Ne pas tenir compte d’une mise en garde peut entraåner des
blessures cor porelles ou des dégâts à la propriété.
1. Ne laissez pas tomber d’objets sur le produit ni ne soumettez le produit à de
forts coups. Ne placez pas le produit dans un emplacement où il pourrait
subir de fortes vibrations ou des interférences magnétiques.
2. Ne placez pas le produit dans un emplacement où il fait très chaud (plus de
°C
/122°F), très froid (moins de ‘10°C/14°¯F) ou très humide. (Cela pourrait
50
causer un incendie ou provoquer une décharge électrique.)
3. Évitez un emplacement où le produit est exposé à des rayons directs du
soleil ou à une source de chaleur, telle qu’un radiateur ou un appareil de
chauffage. (Le non-respect de cette consigne pourrait présenter un risque
d’incendie.)
4. Si vous désirez déplacer le produit à la suite de son installation, assurez-vous
de couper le courant avant son déplacement et sa réinstallation.
5. Installez le produit dans une aire bien ventilée.
6. En cas d’orage, débranchez le cordon électrique de la prise murale. (Le nonrespect de cette consigne pourrait provoquer un incendie ou endommager le
produit.)
FF
2 3
Page 45

Sommaire
Chapitre 1 Introduction
Chapitre 1 Introduction ......................................................... 5
Chapitre 2 Caractéristiques .................................................. 6
Chapitre 3 Noms et Fonctions des Composants ................ 7
F
Chapitre 4 Installation .......................................................... 12
Précautions d’installation et d’utilisation ............ 13
Raccordement du connecteur de l’objectif à
diaphragme automatique ................................... 14
Fixation de l’objectif / Réglage du bouton de
sélection de l’objectif .......................................... 15
Focalisation ..........................................................16
La caméra JOUR/NUIT WDR (Wide Dynamic Range) peut afficher sur l’écran à la fois la
partie sombre et la partie lumineuse en utilisant un double obturateur. Contrairement à la
caméra conventionnelle qui affiche un écran blanc lorsqu’un objet tel qu’une fenêtre
occupe une partie de l’écran, cette caméra intègre une technologie ultramoderne
permettant un affichage performant de la partie lumineuse.
La caméra JOUR/NUIT est une caméra de surveillance qui fonctionne en mode couleur
jusqu’à une certaine luminosité et change en dessous de celle-ci son mode de
fonctionnement en noir et blanc en désactivant la fonction ‘IR Cut’. Cela contribue à
améliorer la sensibilité de la caméra en permettant l’identification des objets même en
zone sombre. Sa caractéristique en basse luminosité est hautement renforcée par la
fonction ‘Sense Up’ dû à l’obturateur à basse vitesse et au mode d’accumulation ‘Field’.
[WDR(Wide Dynamic Range)]
La caméra WDR intègre une technologie ultramoderne permettant
d’élargir la capacité de l’écran, ceci est particulièrement idéal pour
prendre des photos en intérieur avec des fenêtres. Ainsi, vous
pouvez réaliser en même temps des images d’intérieur et des
images d’extérieur.
Connexion du câble .......................................... 18
[Fonction JOUR/NUIT]
Chapitre 5 Configuration de la Caméra ............................... 20
En dessous d’une certaine luminosité, le filtre coupant les
infrarouges (IR Cut) est désactivé afin d’améliorer la sensibilité de
la caméra.
Annexe Spécifications Techniques .................................. 39
4 5
La caméra JOUR/NUIT est conçue pour une application en zone sombre comme
dans les parkings souterrains où la luminosité est en dessous d’un certain seuil. Elle
fonctionne en mode couleur en offrant une haute résolution horizontale de 480 lignes
dans la journée et elle peut capter des objets même dans la nuit en appliquant la
fonction JOUR/NUIT et la fonction ‘Sense Up’. Vous pouvez également utiliser cette
caméra avec l’émetteur d’infrarouge.
F
Page 46

Chapitre 2 Caractéristiques
Chapitre 3 Noms et Fonctions des Composants
Haute sensibilité
La technologie de pointe ‘1/3" Super-HAD P/S CCD’ permet d’obtenir des
images d’une haute sensibilité.
Fonction WDR
La caméra WDR intègre une technologie ultramoderne permettant d’élargir
la capacité de l’écran, ceci est particulièrement idéal pour prendre des
photos en intérieur avec des fenêtres. Ainsi, vous pouvez réaliser en même
temps des images d’intérieur et des images d’extérieur
Fonctionnement en basse luminosité
Le fonctionnement en basse luminosité basé sur la technologie du signal
numérique et la fonction JOUR/NUIT offre une possibilité de prise de vue
même sous de mauvaises conditions sans lumière.
Excellente correction du contre-jour
Malgré la présence d’un éclairage puissant ou d’un rayonnement solaire
derrière l’objet, cette caméra permet d’obtenir une prise de vue nette grâce
à la correction des images assombries par le contre-jour.
Mode de synchronisation numérique
Le mode de synchronisation numérique des fréquences trame et réseau est
intégré dans cette caméra pour un réglage direct de la synchronisation
verticale de la caméra, permettant un contrôle plus pratique et fiable.
Haute Résolution
La caméra offre une haute résolution grâce à une technologie ultramoderne
de traitement numérique des images.
Sélection du signal de sortie
Vous pouvez sélectionner la fonction REVERSE (horizontal, vertical,
horizontal/vertical), la fonction PRIVAT (Confidentialité) et le profil horizontal
ou vertical.
6 7
Vue de côté
Encoche pour la fixation
Connecteur de l’objectif à
diaphragme automatique
Bouton de sélection
de l’objectif ALC
Câble de contrôle de
l’objectif à diaphragme
automatique
Encoche pour la fixation sur le support d’installation
Utilisez cette encoche pour fixer la caméra avec des vis sur le support
d’installation constituant une partie de l’équerre sur laquelle la caméra sera
installée.
Objectif à diaphragme automatique (option)
Ceci est un objectif à fixer sur la caméra.
* Si la surface de l’objectif est sale, nettoyez-la délicatement avec un tissu
spécifique pour l’optique ou un tissu de coton humidifié à l’éthanol.
Connecteur de l’objectif à diaphragme automatique
Ce connecteur fournit au diaphragme de l’objectif l’alimentation, le signal de
contrôle, le signal vidéo ou le signal DC nécessaires à son contrôle.
sur le support d’installation
Barre de focalisation
Objectif
FF
Page 47

Câble de contrôle de l’objectif à diaphragme automatique
AC 220-240V
Ce câble transmet le signal de contrôle émis par la caméra pour contrôler
SCC-B2005P Vue arrière
le diaphragme de l’objectif. En este tiempo, tiene que seleccionar
DC/VIDEO en el menú como el interruptor seleccionado.
Barre de focalisation
Utilisez cette barre pour la focalisation.
Bouton de sélection de l’objectif ALC
Utilisez ce bouton pour sélectionner le type d’objectif à diaphragme
automatique souhaité.
DC : Positionnez ce bouton sur DC si vous avez installé un objectif à
diaphragme automatique nécessitant un signal de contrôle DC.
VIDEO : Positionnez ce bouton sur VIDEO si vous avez installé un objectif
à diaphragme automatique nécessitant un signal de contrôle VIDEO.
SCC-B2305(P) Vue arrière
① LED de l’alimentation
La LED s’allume lorsque l’alimentation fonctionne.
➁ Sortie vidéo
Cette sortie est reliée à l’entrée vidéo du moniteur et donne le signal
8 9
vidéo de la caméra.
➂ Entrée REMOTE (RS-232)
Cette entrée est utilisée pour le réglage de la caméra en usine.
1 TXD
1 2
3 4
2 RXD
3+5V
4 GND
FF
Page 48

➃ Entrée de signal externe JOUR/NUIT & sortie de signal d’alarme
C’est une fonction qui permet de recevoir le signal externe JOUR/NUIT
émis par un détecteur de luminosité externe (option) et de changer le
mode de fonctionnement en noir et blanc. Lorsque la fonction
‘MOUVEMENT DET’ est activée, le signal d’alarme est émis suite à une
détection de mouvement.
DAY/NIGHT IN
ALARM OUT
GND
①
➁
Reliez le détecteur externe au terminal JOUR/NUIT comme le montre la
figure ① , puis reliez l’équipement externe tel que sonnerie ou lampe au
terminal d’alarme comme le montre la figure ➁.
La sortie d’alarme est un collecteur ouvert de puissance : inférieur DC 16V
/ inférieur 100mA.
OFF : contact ouvert
ON : inférieur à 100mA
L’entrée JOUR/NUIT est de DC 5V pull-up et supérieur à 0,2mA.
OFF : contact ouvert
ON : contact fermé
⑤ Bouton de réglage de la caméra (Setup)
Les fonctions de contrôle de la caméra varient selon le mode utilisé :
mode standard (le menu Setup ne s’affiche pas sur l’écran) ou mode
Setup.
Touches
Touches
[Haut/Bas]
Touches [Haut/Bas] : Utilisez ces touches pour déplacer le curseur
[Gauche/Droite]
Touche [ENTER]
vers le haut ou le bas.
Touches [Gauche/Droite] : Utilisez ces touches pour déplacer le
curseur vers la gauche ou la droite, ou pour
afficher dans l’ordre les valeurs ajustables
de chaque menu Setup
Touche [ENTER] : Appuyez sur cette touche (pendant plus de 2
secondes) pour entrer dans le menu Setup.
Utilisez cette touche pour accéder au sous-menu
Setup ou pour sélectionner la valeur actuelle.
➅ Port d’alimentation secteur
Ce port est connecté au cordon (à la prise) d’alimentation.
FF
10 11
Page 49

Chapitre 4 Installation
Ce chapitre contient des informations relatives aux vérifications avant
l’installation de la caméra, au choix de sa mise en place et aux précautions
d’installation. Veuillez lire attentivement ces indications avant d’installer la
caméra et de connecter le câble
Précaution d’installation et d’utilisation
① La caméra de doit pas être démontée par l’utilisateur lui-même.
Avant l’installation
F
Lors du déballage, vérifiez le contenu du paquet :
Vérifiez que les éléments suivants sont inclus dans l’emballage.
Caméra Adaptateur (‘Mount’)
Manuel d’utilisation
12 13
Adaptateur ‘C Mount’ Connecteur de
l’objectif à diaphragme
automatique
➁ Veuillez toujours utiliser la caméra avec précaution. Evitez les chocs, les
secousses, un stockage sans soin et une mauvaise manipulation qui
peuvent endommager la caméra.
➂ N’installez pas la caméra sous la pluie ou dans des endroits humides.
➃ Utilisez un tissu sec pour le nettoyage. Ne frottez pas excessivement le
corps de la caméra avec des produits abrasifs.
⑤ Installez la caméra dans un endroit frais en évitant le rayonnement direct
du soleil car celui-ci peut endommager l’appareil.
F
Page 50

Raccordement du connecteur de l’objectif à
diaphragme automatique
Préparez le connecteur de l’objectif à diaphragme automatique fourni avec la
caméra.
Otez la protection des câbles de contrôle du diaphragme et reliez chaque
câble au connecteur de l’objectif du diaphragme automatique en vous
référant au tableau suivant :
Installation
Fixation de l’objectif
Lors de l’objectif CS :
Vissez l’objectif CS dans le sens des aiguilles d’une montre, comme
l’indique la figure ci-dessous.
l’objectif CS
Lors de l’objectif C :
Vissez d’abord le support d’installation dans le sens des aiguilles d’une
montre. Vissez ensuite l’objectif C dans le même sens, comme l’indique
la figure ci-dessous.
FF
N° de la clé Type de contrôle DC Type de contrôle VIDEO
1 Damp (-) Alimentation (+12V)
2 Damp (+) Non utilisé
3 Drive (+) Signal VIDEO
4 Drive (-) GROUND
14 15
l’objectif C
Page 51

Réglage du bouton de sélection de l’objectif
Vous devez régler le bouton de sélection de l’objectif situé sur le côté de la
caméra selon le type d’objectif. Positionnez le bouton sur « DC » si
l’objectif fixé est de type contrôle DC, et sur « VIDEO » si l’objectif fixé est
de type contrôle VIDEO.
Objectif avec fonction de zoom
① Prenez l’image d’un objet net (en forme de carreau) placé à une
distance de 3 à 5 m, puis réglez le zoom au maximum vers TELE.
Ensuite, réglez l’anneau de la focale jusqu’à ce que l’image de l’objet
soit la plus nette possible.
➁ Réglez le zoom au maximum vers WIDE et tournez la barre de
focalisation jusqu’à ce que l’image de l’objet soit la plus nette possible.
➂ Répétez ① ou ➁ fois les procédés 2 et 3 jusqu’à de que la focale sur le
côté ZOOM TELE et celle sur le côté ZOOM WIDE soient correctement
réglées.
Focalisation
La focale de la caméra est déjà réglée en sortie d’usine, mais cette
focalisation peut ne pas correspondre à certains types d’objectif. Dans ce
cas, réglez la focale selon les indications suivantes. Ceci est une méthode
pour le réglage d’un objectif à focale fixe.
Objectif sans fonction de zoom
① Prenez l’image d’un objet net (en forme de carreau) placé à une
distance de plus de 10 m et positionnez l’anneau de la focale de
l’objectif sur l’infini (∞).
➁ Tournez-le jusqu’à ce que l’image de l’objet soit la plus nette possible.
➂ Fixez l’anneau de réglage de la focale en serrant la vis.
16 17
FF
Page 52

Connexion du câble & Vérification du fonctionnement
1 Reliez d’abord un côté du connecteur du câble BNC à la sortie VIDEO
(VIDEO OUT).
2 Reliez l’autre côté du connecteur du câble BNC à l’entrée VIDEO du
moniteur.
Entrée Vidéo située
derrière le moniteur
Câble BNC
Sortie Vidéo
3 Ensuite, reliez le cordon d’alimentation comme le montre la figure ci-
dessous. Reliez un des 2 liges à l’entrée de l’alimentation de la caméra
avec un tournevis plat. (GND : indiqué par une ligne blanche)
* La source d’alimentation peut être AC 24V ou DC 12V sans respect de
polarité.
SCC-B2305(P)
FF
SCC-B2005P
18 19
Page 53

Chapitre 5 Configuration de la Caméra
Ce chapitre contient des informations relatives au menu Setup de la
caméra. Lisez d’abord les informations générales sur le menu Setup,
puis la fonction de chaque menu.
CAMERA ID AND
POSITION SETUP
DC IRIS SETUP
ELC
NIVEAU SETUP
CJOUR AREA SETUP
BAS.../HAUT.../
GAUCHE.../DROITE.../
CENTRE...
NIVEAU
SETUP
FLICKERLESS SETUP
S.PORTEUSE
ON/OFF
S.PORTEUSE
ON/OFF
NIVEAU DUREE
S.PORTEUSE
ROUGE, BLEU SETUP
ON/OFF
3200K/5600K/UTIL
PHASE SETUP
VITESSE, REVERS,
POSI/NEGA, DETAIL,
DET MOUVE...
PRIVEE...
PRIVEE...
PRIVEE TYPE &
ZONE SETUP
ZONE SETUP
SENSIBILITÉ SETUP
/WDR
ON...
DC...
ELC...
CJOUR...
CAMERA ID
ON.../OFF
IRIS
F
DC... /VIDEO/ELC...
CJOUR
OFF
/CJOUR...
/WDR...
WDR...
COULEUR/N&B
COULEUR.../N&B
.../AUTO.../EXT...
SETUP
MENU
SHUTTER
OFF/ 1/100~1/10K
OFF/ AUTO
X2~X160
OFF/BAS/HAUT
MOUVEMENT
T.LENT/LENT/
NORM/VITE/T.VITE
BAL BLANCS
BA/BM/MANU...
SYNC
INT/LIGNE...
SPECIAL
SORTIE
QUITTER/SAUVE
R/PRESET
20 21
CAG
...
N&B...
AUTO...
EXT...
MANU...
LIGNE...
SPECIAL...
DET MOUVE
CAMERA ID
Le menu d’identification de la caméra (CAMERA ID) permet de lui attribuer
un nom qui s’affichera sur le moniteur. Sélectionnez ON… dans le menu
CAMERA ID et appuyez sur la touche ENTER pour accéder au sous-menu
afin d’attribuer un nom à la caméra. Vous pouvez utiliser jusqu’à 20
caractères comprenant les lettres, les chiffres et quelques caractères
spéciaux. Le nom donné à la caméra (ID) peut être positionné à l’endroit
souhaité sur l’écran en utilisant le sous-menu POSITION...
CAMERA ID ON
IRIS DC...
CJOUR/WDR OFF
COULEUR/N&B COULEUR
SHUTTER OFF
CAG OFF
BAL BLANCS BA
SYNC INT
SPECIAL ...
SORTIE QUITTER
Appuyez sur
la touche
[ENTER]
(CAMERA ID)
A B C D E F G H I J K L
M N O P Q R S T U V W
X Y Z 0 1 2 3 4 5 6 7 8 9
: ! - + * ( ) /
SP
❿❿➛➛
SP
POSITION...
RET
....................
F
Page 54

IRIS
Cette caméra dispose d’une fonction de réglage automatique d’IRIS selon
la quantité de lumière. Vous pouvez régler le niveau de luminosité. Dans
l’option ALC, vous pouvez sélectionner le niveau de DC IRIS, de IRIS
VIDEO et de ELC.
❿ DC...
Dans le menu IRIS, sélectionnez DC… pour accéder au sous-menu qui
vous permettra de régler la luminosité, puis appuyez sur la touche
[ENTER]. Utilisez les touches [Gauche/Droite] pour régler la luminosité
dans le menu NIVEAU. Le réglage du niveau est disponible uniquement
avec l’objectif DC IRIS. Ensuite, réglez le bouton de sélection ALC LENS
sur le côté de la caméra sur la position ‘DC’.
CAMERA ID ON...
IRIS DC...
CJOUR/WDR OFF
COULEUR/N&B COULEUR
SHUTTER OFF
CAG OFF
BAL BLANCS BA
SYNC INT
SPECIAL ...
SORTIE QUITTER
Appuyez sur
la touche
(IRIS/DC)
[ENTER]
NIVEAU (00) ----I---RET
❿ VIDEO
Cette fonction est utilisée avec un objectif vidéo. Vous pouvez réglez le
niveau de l’iris avec une résistance variable attachée à l’objectif. Puis
réglez le bouton de sélection ALC LENS sur le coté de la caméra sur la
position ‘VIDEO’.
CAMERA ID OFF
IRIS VIIDEO
CJOUR/WDR OFF
COULEUR/N&B COULEUR
SHUTTER OFF
CAG OFF
BAL BLANCS BA
SYNC INT
SPECIAL ...
SORTIE QUITTER
❿ ELC...
Cette fonction permet le réglage automatique du niveau du diaphragme
à haute vitesse en utilisant l’objectif manuel, afin de préserver le niveau
réglé lorsque la luminosité externe est trop élevée. Sélectionnez ELC…
dans le menu IRIS puis appuyez sur la touche ENTER pour entrer dans
le sous-menu comme le montre la figure suivante. Utilisez les touches
[Gauche/Droite] pour régler ce niveau.
CAMERA ID ON...
IRIS ELC...
CJOUR/WDR OFF
COULEUR/N&B COULEUR
SHUTTER OFF
CAG OFF
BAL BLANCS BA
SYNC INT
SPECIAL ...
SORTIE QUITTER
Appuyez sur
(IRIS/ELC)
la touche
[ENTER]
NIVEAU (00) ----I---RET
FF
22 23
Page 55

CJOUR/WDR
❿ WDR...
La caméra WDR intègre une technologie ultramoderne permettant
d’élargir la capacité de l’écran, ceci est particulièrement idéal pour
prendre des photos en intérieur avec des fenêtres. Ainsi, vous pouvez
réaliser en même temps des images d’intérieur et des images
d’extérieur. Si aprociona la tecla [ENTER], se puede ajustar el NIVEAU
de WDR y además la función de ANTI-BATTEMENT.
CAMERA ID ON...
IRIS DC...
CJOUR/WDR WDR...
COULEUR/N&B COULEUR
SHUTTER OFF
CAG OFF
BAL BLANCS BA
SYNC INT
SPECIAL ...
SORTIE QUITTER
Appuyez sur
la touche
[ENTER]
Si vous sélectionnez la fonction WDR, vous pouvez régler le niveau
(LEVEL) de DC IRIS
(WDR)
NIVEAU L ----I----H
FLICKERLESS OFF
RET
❿ CJOUR...
Si vous utilisez une caméra normale en présence d’un éclairage intense
comme celui d’un spot derrière un objet, l’image de l’objet sur le
moniteur s’assombrie. Cette caméra dispose d’une fonction CJOUR pour
résoudre ce problème de contre-jour, permettant d’obtenir une image
nette sous n’importe quel éclairage. Dans le mode OFF, vous pouvez,
en utilisant les touches Gauche/Droite, sélectionner au choix 5 zones
préréglées (BAS…, HAUT…, GAUCHE…, DROITE…, CENTRE…).
Vous pouvez vérifier la zone correspondante en appuyant sur la touche
ENTER après la sélection (p. ex. BAS).
CAMERA ID ON...
IRIS ELC
CJOUR/WDR CJOUR...
COULEUR/N&B COULEUR
SHUTTER OFF
CAG OFF
BAL BLANCS BA
SYNC INT
SPECIAL ...
SORTIE QUITTER
Appuyez sur
la touche
[ENTER]
Appuyez sur
la touche
[ENTER]
(CJOUR)
ZONE BAS...
RET
FF
24 25
Page 56

COULEUR/N&B
C’est un menu pour activer ou désactiver le filtre IR (infrarouge). En basse
luminosité, le filtre IR est désactivé et la caméra fonctionne en mode N&B
(noir et blanc) en augmentant sa sensibilité jusqu’au niveau d’une caméra
noir et blanc. Par contre, en haute luminosité, le filtre IR est activé et la
caméra fonctionne en mode COULEUR (couleur) en diminuant sa
sensibilité.
❿ COULEUR
Sur ce mode, le débit d’images vidéo de la caméra sera uniquement en
mode couleur.
CAMERA ID ON...
IRIS DC...
CJOUR/WDR OFF
COULEUR/N&B COULEUR
SHUTTER OFF
CAG OFF
BAL BLANCS BA
SYNC INT
SPECIAL ...
SORTIE QUITTER
❿ N&B…
Ceci est un mode noir et blanc et le filtre IR est désactivé (avec la
sensibilité de caméra noir et blanc). Lorsque vous appuyez sur la touche
[ENTER] après avoir sélectionné N&B …, le sous-menu de N&B
s’affiche sur l’écran. Dans ce sous-menu, vous pouvez activer (ON) ou
désactiver (OFF) l’envoie du signal S.PORTEUSE.
CAMERA ID ON...
IRIS DC...
CJOUR/WDR OFF
COULEUR/N&B N&B...
SHUTTER OFF
CAG OFF
BAL BLANCS --SYNC INT
SPECIAL ...
SORTIE QUITTER
Appuyez sur
(N&B)
la touche
[ENTER]
S.PORTEUSE ON
RET
FF
26 27
Page 57

❿ AUTO...
Le mode bascule automatiquement du mode couleur au mode noir et
blanc selon la luminosité. En basse luminosité, le filtre IR est désactivé
et la caméra fonctionne en mode N&B (noir et blanc) en augmentant sa
sensibilité. En haute luminosité, le filtre IR est activé et la caméra
fonctionne en mode couleur en diminuant sa sensibilité.
Lorsque vous appuyez sur la touche [ENTER] après avoir sélectionné
AUTO, le sous-menu AUTO N&B apparaît. Vous pouvez activer ou
désactiver l’envoi du signal S.PORTEUSE et régler la DUREE ainsi que
le critère de luminosité pour la conversion du mode couleur en mode
noir et blanc.
CAMERA ID ON...
IRIS DC...
CJOUR/WDR OFF
COULEUR/N&B AUTO...
SHUTTER OFF
CAG --BAL BLANCS BA
SYNC INT
SPECIAL ...
SORTIE QUITTER
Appuyez sur
la touche
[ENTER]
(AUTO N&B)
S.PORTEUSE ON
NIVEAU
DUREE S-I-----L
RET
BAS
❿ EXT...
C’est un menu pour la conversion automatiquement du mode couleur en
mode noir et blanc selon la luminosité, à l’aide du détecteur externe.
Lorsque vous appuyez sur la touche [ENTER] après avoir sélectionné
SORTIE, le sous-menu EXTERNAL N&B apparaît sur l’écran. Vous
pouvez activer ou désactiver le signal S.PORTEUSE en sélectionnant
ON ou OFF dans ce menu.
CAMERA ID ON...
IRIS DC...
CJOUR/WDR OFF
COULEUR/N&B EXT...
SHUTTER OFF
CAG OFF
BAL BLANCS BA
SYNC INT
SPECIAL ...
SORTIE QUITTER
Appuyez sur
(EXTERNAL N&B)
la touche
[ENTER]
S.PORTEUSE ON
RET
FF
28 29
Page 58

SHUTTER
Le menu SHUTTER règle la vitesse du diaphragme électrique à haute
vitesse, celle du diaphragme AUTO à basse vitesse. Le diaphragme
électrique à haute vitesse couvre 7 vitesses de diaphragme allant de 1/100
à 1/10K de secondes et il est souvent utilisé pour la prise de vue des objets
mobiles. Le diaphragme AUTO à basse vitesse couvrent 10 vitesses de
diaphragme de x2 à x160, ralentissant sa vitesse afin de rendre plus nettes
et plus lumineuses les images prises en basse luminosité. Si vous
souhaitez ralentir automatiquement la vitesse du diaphragme selon la
luminosité par une détection d’intensité de la lumière, sélectionnez la basse
vitesse AUTO.
CAMERA ID ON...
IRIS DC...
CJOUR/WDR OFF
COULEUR/N&B AUTO...
SHUTTER OFF
CAG --BAL BLANCS BA
SYNC INT
SPECIAL ...
SORTIE QUITTER
Lorsque vous appuyez successivement sur les touches Gauche/Droite dans
le menu SHUTTER, les vitesses s’affichent dans l’ordre suivant.
OFF→AUTO X2 →AUTO X4 →AUTO X6 →AUTO X8 →AUTO X12 →AUTO X16 →AUTO
→
AUTO X40 →AUTO X80 →AUTO X160 →OFF→1/100(NTSC), 1/20(PAL) →1/250
X20
1/500 →1/1000 →1/2000 →1/4000 →1/10K →OFF
❖
Si le mode IRIS est réglé sur ELC ou CJOUR/WDR, vous ne pouvez
utiliser que les modes suivants.
OFF→AUTO X2 →AUTO X4 →AUTO X6→AUTO X8 →AUTO X12 →AUTO X16 →AUTO
→
AUTO X40 →AUTO X80 →AUTO X160 →OFF
X20
CAG/MOUVEMENT
❿ CAG
Le menu CAG éclaire l’écran présenté ci-dessous avec une luminosité
standard lorsque l’image a été prise en basse luminosité. Le réglage du
menu CAG est possible uniquement en mode High Speed Shutter ou
OFF. Lorsque vous sélectionnez BAS ou HAUT en utilisant les touches
Gauche/Droite, la fonction CAG est activée. Le mode BAS est utilisé
pour diminuer le GAIN CAG et le mode HAUT pour augmenter le GAIN
CAG.
Lorsque le menu COLOR/N&B est en mode AUTO…, le menu CAG
s’affiche comme --- et le gain CAG maximal se fixe sur Haut.
CAMERA ID ON...
IRIS DC...
CJOUR/WDR OFF
COULEUR/N&B AUTO...
SHUTTER OFF
CAG --BAL BLANCS BA
SYNC INT
SPECIAL ...
SORTIE QUITTER
→
FF
30 31
Page 59

❿ MOUVEMENT
La fonction MOUVEMENT est utilisable avec les diaphragmes AUTO.
Elle est constituée de 5 modes : T.LENT, LENT, NORM, VITE, T.VITE.
T.LENT est utilisé pour surveiller les objets immobiles en zone
sombre en minimisant le niveau AGC.
LENT est utilisé pour surveiller les objets n’ayant pas de mouvement
mportant en zone sombre en diminuant le niveau AGC.
NORM est utilisé pour surveiller les objets mobiles en zone sombre
en réglant sur une valeur moyenne le niveau AGC.
VITE est utilisé pour surveiller les objets ayant un mouvement rapide
en zone sombre en augmentant le niveau AGC.
T.VITE est utilisé pour surveiller les objets ayant un mouvement très
rapide en zone sombre en maximisant le niveau AGC.
Lorsque le menu SHUTTER est en mode AUTO, utilisez la touche Bas
pour déplacer le curseur sur le menu MOUVEMENT et les touches
Gauche/Droite pour activer la fonction MOUVEMENT. Appuyez sur la
touche Gauche pour avancer vers LENT et la touche Droite pour
avancer vers VITE.
CAMERA ID ON...
IRIS DC...
CJOUR/WDR OFF
COULEUR/N&B AUTO...
SHUTTER AUTO X2
MOUVEMENT T.VITE
BAL BLANCS BA
SYNC INT
SPECIAL ...
SORTIE QUITTER
32 33
BAL BLANCS
❿ BA
Si vous sélectionnez le mode BA dans le menu BAL BLANCS, Le
changement de la température de couleur sera détecté en temps réel et
la balance de blanc sera automatiquement réglée selon la température
de couleur.
❿
❿ BM
Si vous sélectionnez le mode BM dans le menu BAL BLANCS, la
balance de blanc sera réglée une seule fois selon la température de
couleur souhaitée, et cette valeur sera maintenue. Pour activer le mode
BM, sélectionnez BM dans le menu BAL BLANCS, fixez l’image que
vous souhaitez prendre et appuyez sur la touche [ENTER].
❿ MANU...
Si vous sélectionnez le mode MANU… dans le menu BAL BLANCS,
vous pouvez régler vous-même la balance de blanc selon l’éclairage
actuel. Sélectionnez MANU… puis appuyez sur la touche [ENTER\ pour
accéder au sous-menu qui permettra de sélectionner la balance de
blanc manuellement. Dans le menu PRESET, sélectionnez 3200K,
5600K ou UTIL en utilisant les touches [Gauche/Droite].
3200K : La température de couleur sera réglée à 3200°K.
5600K : La température de couleur sera réglée à 5600°K.
UTIL : Sélectionnez la température de couleur souhaitée sur la
CAMERA ID ON...
IRIS DC...
CJOUR/WDR OFF
COULEUR/N&B EXT...
SHUTTER OFF
MOUVEMENT OFF
BAL BLANCS MANU...
SYNC INT
SPECIAL ...
SORTIE QUITTER
barre de réglage ROUGE et BLEU.
(ABB/MANU)
Appuyez sur
la touche
[ENTER]
PRESET 3200K
RET
FF
Page 60

(ABB/MANU)
(ABB/MANU)
SPECIAL
Dans le menu SPECIAL, vous pouvez régler vous-même les fonctions
Appuyez sur la
touche
PRESET 3200K
RET
[Gauche/Droite]
PRESET OFF(UTIL)-ROUGE (00) ----I---BLEU (00) ----I---RET
SYNC
La fonction INT est utilisée pour la synchronisation interne. La fonction
LINE… synchronise des fréquences frame et réseau en utilisant le signal
AC, et elle est indispensable lors du fonctionnement de plusieurs caméras.
La déviation entre chaque caméra peut être éliminée par le réglage
PHASE. La fonction SYNC est disponible lorsque vous utilisez le courant
alternatif. Positionnez le curseur sur LIGNE, appuyez sur la touche
[Gauche/Droite] pour la sélection puis appuyez sur la touche [ENTER] pour
accéder au sous-menu. La phase est réglable de -106H à +106H(NTSC) de -138H á +138H.
CAMERA ID ON...
IRIS DC...
CJOUR/WDR OFF
COULEUR/N&B EXT...
SHUTTER OFF
AGC OFF
BAL BLANCS MANU...
SYNC LIGNE...
SPECIAL ...
SORTIE QUITTER
Appuyez sur
la touche
[ENTER]
(LIGNE BLOC)
PHASE (000) ----I---RET
VITESSE, D-ZOOM, PIP, MIRROR, POSI/NEGA, DETAILet DET MOUVE.
Appuyez sur la touche [ENTER] après avoir sélectionné le menu SPECIAL
pour accéder au sous-menu.
CAMERA ID ON...
IRIS DC...
CJOUR/WDR OFF
COULEUR/N&B EXT...
SHUTTER OFF
AGC OFF
BAL BLANCS MANU...
SYNC INT...
SPECIAL ...
SORTIE QUITTER
❿ VITESSE :
Lors de la communication RS-232, vous pouvez régler la
Appuyez sur
la touche
[ENTER]
(SPECIAL)
VITESSE 38400
REVERSE OFF
POSI/NEGA +
DETAIL (0)----I-DET MOUVE OFF
PRIVEE ...
LANGAGE FRANÇAIS
RET
vitesse de communication entre 4800, 9600, 19200, 38400 bps.
❿ REVERS : Utilisez cette fonction pour inverser l’écran selon 3 modes :
gauche/droite, haut/bas ou gauche/droite/haut/bas.
Note : Veuillez régler les fonctions BLS, MOTION, PRIVACY car elles ne
seront pas modifiées.
❿ POSI/NEGA : émet le signal de luminosité de la vidéo en mode normal
ou en mode inverse.
❿ DETAIL: Vous pouvez régler la netteté horizontale ou verticale.
❿ DET MOUVE
La fonction DET MOUVE contribue à la détection du mouvement de
l’objet. Lorsqu’il n’y a pas de circulation, activez la fonction DET MOUVE
pour détecter un mouvement suspect. Le signal ALARM sera émis lors
de la détection d’un mouvement. Vous pouvez sélectionner la sensibilité
de détection ainsi que la zone à surveiller par la fonction DET MOUVE.
Lorsque vous utilisez l’alimentation DC, la fonction SYNC n’est pas
disponible et le menu SYNC s’affiche comme ---.
34 35
Appuyez sur la touche ENTER après avoir sélectionné ON... pour
accéder au sous-menu DET MOUVE.
FF
Page 61

(SPECIAL)
VITESSE 38400
REVERSE OFF
POSI/NEGA +
DETAIL (0)----I-DET MOUVE ON
PRIVEE ...
LANGAGE FRANÇAIS
RET
Appuyez sur
les touches
[ENTER]
Appuyez sur
la touche
[ENTER]
(DET MOUVE)
ZONE BAS...
SENSIBILITE L---I---H
RET
La fonction AREA peut être réglée de la même manière que la fonction
AREA du menu BLC : TOUT, CENTRE, BAS, HAUT, GAUCHE ou
DROITE. Si vous sélectionnez BAS et appuyez sur la touche Entrée, la
zone sélectionnée s’affichera à l’écran.
La fonction SENSITIVITY (Sensibilité) est utilisée pour régler la fonction
MOTION DET (Détection de Mouvement) sur 7 niveaux.
❿ PRIVEE
Cette fonction est consacrée à la protection des données personnelles,
en affichant une partie de l’écran en noir pour qu’elle ne soit pas visible.
Vous pouvez régler cette fonction sur 8 niveaux et régler les dimensions
et la position de la zone.
(SPECIAL)
VITESSE 38400
REVERSE OFF
POSI/NEGA +
DETAIL (0)----I-DET MOUVE ON
PRIVEE ...
LANGAGE FRANÇAIS
RET
Appuyez sur
la touche
[ENTER]
Appuyez sur
la touche
[ENTER]
Appuyez sur
TAILLE
Touches
[Haut/Bas]
POSITION
TAILLE
Touches
[Haut/Bas]
POSITION
la touche
[ENTER]
(
PRIVACY ZONE
PRIVEE 1 ON...
PRIVEE 2 OFF
PRIVEE 3 OFF
PRIVEE 4 OFF
PRIVEE 5 OFF
PRIVEE 6 OFF
PRIVEE 7 OFF
PRIVEE 8 OFF
RET
TAILLE
❷
➛❿
Touches
[Gauche/Droite]
POSITION
❷
➛❿
Touches
[Gauche/Droite]
)
❿ LANGAGE : Vous pouvez sélectionner l’une des langues suivantes :
anglais, allemand, français, espagnol et Italien.
FF
36 37
Page 62
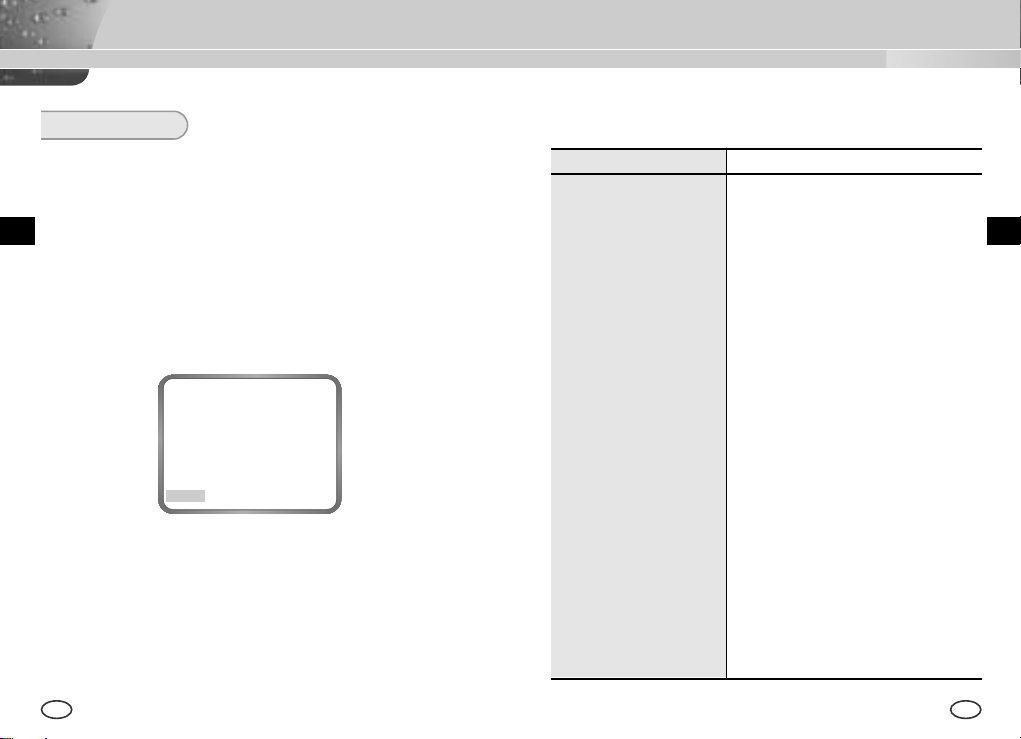
Spécifications Techniques
SORTIE
Utilisez ce menu pour fermer le menu CAMERA SETUP.
❿ QUITTER
Annule les modifications et retourne au menu SETUP précédent.
F
❿ SAUVER
Sauvegarde les modifications effectuées jusqu’à présent.
❿ PRESET
Annule les modifications et rétablit les paramètres par défaut du menu
CAMERA SETUP réglés en sortie d’usine.
CAMERA ID OFF
IRIS DC...
CJOUR/WDR OFF
COULEUR/N&B AUTO...
SHUTTER AUTO X2
CAG T.VITE
BAL BLANCS BA
SYNC INT
SPECIAL ...
SORTIE QUITTER
SCC-B2305P/B2005P
ARTICLE DESCRIPTION
Type de produit Caméra de surveillance (WDR&JOUR/NUIT)
Source d’alimentation SCC-B2305(P) : AC 24V ± 10% (NTSC:60Hz ±
0.1Hz, PAL:50Hz ± 0.1Hz), DC12V +10% ~ -5%
SCC-B2005P : AC220V ~ AC240V (50Hz
±0.1Hz)
Consommation d’électricité SCC-B2305(P) : Approx. 4.5W ,
SCC-B2005P : Approx. 5W
Système de diffusion SCC-B2305:Système couleur standard NTSC
SCC-B2305P, SCC-B2005P:Système couleur
standard PAL
Dispositif de prise de vue 1/3 inch P/S CCD
Nombre de pixels NTSC:
Mode de balayage
Fréquence de ligne
Mode de synchronisation INT / LIGNE BLOC
Résolution 500/530 TV Lignes (COULEUR/N&B)
Rapport S/B 52dB (CAG OFF)
768(H) X 494(V)
PAL:
752(H) X 582(V)
NTSC : 525 lignes, Rapport d’entrelacement 2:1
PAL: 625 lignes, Rapport d’entrelacement 2:1
Horizontal(NTSC) : 15,734 Hz(INT) / 15,750 Hz(L/B)
Horizontal
(PAL) : 15,625 Hz(INT) / 15,625 Hz(L/B)
Vertical
(NTSC) : 59,94 Hz(INT) / 60 Hz(L/B)
Vertical(PAL) : 50 Hz(INT) / 50 Hz(L/L)
F
38
39
Page 63

Article Description
Luminosité minimale Couleur :
Dynamic Range
0.3 Lux (F1.2) (0.002 Lux)
N&B :
0.06 Lux (F1.2) (0.0004 Lux)
NTSC:x64
PAL:x80
F
JOUR/NUIT COULEUR/N&B/AUTO/EXT
Température de couleur Mode BA/BM/Manuel (3200°K, 5600°K,
contrôle du gain R/B)
Vitesse d’obturation ALC:OFF~1/10K sec (7 étapes)
électronique
Correction du contre-jour
ELC:MAX 1/100K sec
OFF/WDR/CJOUR
Sense Up OFF/AUTO X2~X160
Détection de mouvement OFF/ON (RÉGLAGE DE ZONE/SENSIBILITE)
Contrôle vidéo POSI/NEGA, REVERS(H,V,H/V), réglage du
DETAIL, PRIVEE
Sortie Signal Sortie vidéo composite : 1.0 Vp-p 75 ohms/BNC
Objectif VIDEO/DC
Support d’objectif CS/C (Support de fixation)
Température de fonctionnement
Humidité de fonctionnement
-10°C +50°C
Inférieur à 90%
Dimensions 68(L) x 55(H) x 128.5(P) mm
Poids SCC-B2305(P) : Approx. 450g,
SCC-B2005P : Approx. 550g
40
Page 64

WDR CÁMARA DEL COLOR DE DIA/NOCHE
SCC-B2305(P)/B2005P
Manual del usuario
Es
Page 65

Medidas de seguridad
El propósito de esta información es garantizar el uso apropiado de este
producto con el fin de prevenir cualquier peligro o daño a la propiedad.
Sírvase tomar en cuenta todas las medidas de seguridad.
Advertencia
El ignorar este aviso de advertencia puede ocasionar una lesión
grave o la muerte.
1. Asegúrese de usar solamente el adaptador suministrado. (El usar un
adaptador diferente al suministrado puede ocasionar un incendio, un
choque eléctrico o un daño al producto.)
2. Cuando vaya a conectar la fuente de alimentación y los cables de las
señales, revise antes los terminales de conexión externa. Conecte los cables
de las señales de alarma a los terminales para las alarmas, el adaptador de
CA al receptáculo de entrada de CA y el adaptador de CC a la entrada de
CC, asegurándose de tener en cuenta las polaridades. (Una conexión
incorrecta de la fuente de alimentación puede ocasionar un incendio, un
choque eléctrico o un daño al producto.)
3. No conecte varias cámaras a un adaptador. (El exceder la capacidad puede
producir una generación anormal de calor o fuego.)
4. Enchufe firmemente el cable eléctrico en el receptáculo de corriente. (Una
conexión floja puede producir fuego.)
5. Al instalar la cámara en una pared o un techo, sujétela bien y con firmeza.
(Una cámara, al caer, puede causar daños corporales.)
6. No coloque objetos conductores (p.ej., destornilladores, monedas, u
objetos metálicos) o envases llenos de agua encima de la cámara. (El
hacerlo puede causar daños corporales debido a la posible ocurrencia de
fuego, choque eléctrico o la caída de los objetos.)
7. No la instale en un lugar tiznado, polvoriento o húmedo. (El hacerlo puede
ocasionar un incendio o un choque eléctrico.)
2 3
8. Si hubiera olores inusuales o humo que parecieran ser causados por el
producto, desconecte inmediatamente la fuente de alimentación y
comuníquese con el centro de servicios. (El continuar usando la cámara
en tales condiciones puede provocar un incendio o un choque eléctrico.)
9. Si este producto presenta una falla de operación, comuníquese con la
tienda en donde lo adquirió, o con el centro de servicios más cercano.
Nunca desarme ni modifique este producto de ninguna manera. (Samsung
no es responsable por los problemas causados por modificaciones no
autorizadas o por intentos de reparación.)
10. Al limpiarlo, no rocíe agua directamente en las piezas del producto. (Al
hacerlo puede provocar un fuego o un choque eléctrico.) Limpie la
superficie con un paño seco. Nunca use detergentes o limpiadores
químicos en el producto, ya que esto puede causar decoloración de la
superficie o causar un daño al acabado.
Precaución
El ignorar este aviso de precaución puede ocasionar una lesión
o daño a la propiedad.
1. No deje caer objetos en el producto ni lo golpee. Manténgalo alejado de
lugares sujetos a vibración excesiva o interferencia magnética.
2. No lo instale en un sitio sujeto a altas temperaturas( por encima de
500
°C
/122°F), bajas temperaturas (por debajo de -100°C/ 14°F), o alta
humedad. (El hacerlo puede causar un incendio o un choque eléctrico.)
3. Evite los sitios expuestos a la luz del sol o cercanos a fuentes de calor tales
como calentadores o radiadores. (El no observar esto puede ocasionar un
riesgo de fuego.)
4. Si usted quiere cambiar de ubicación el producto ya instalado, no olvide
apagarlo antes de moverlo o de reinstalarlo.
5. Instale en un sitio con buena ventilación.
6. Saque el enchufe del tomacorriente cuando haya una tormenta eléctrica.
(El no observar esto puede ocasionar un incendio o un daño al producto.)
EsEs
Page 66

CONTENIDOS
Capítulo 1 Introducción .......................................................... 5
Capítulo 2 Características Especiales ................................. 6
Capítulo 3 Nombres de piezas y funciones ......................... 7
Es
Capítulo 4 Instalación ............................................................ 12
Precauciones para la instalación y el uso ......... 13
Conexión el conector de lente de Automático
ordenador .............................................................14
Fijación de lente y Ajuste Switch de selección
de lente ................................................................ 15
Ajuste de Enfoque Posterior ............................... 16
Conexión de Cables ............................................ 18
WDR(Wide Dynamic Range) DIA/NOCHE la cámara debe ser utilizada para
expresar el oscuro y brillante distintamente en la pantalla con doble
obturador. La convencional cámara capta la pantalla blanca cuando el
objeto es brillante como la ventana, ocupa la pantalla mientras la cámara
es técnicamente integrada con el producto del estado de arte para
recuperar aun más brillo, distintamente. Cámara de DIA /NOCHE opera en
el modo de color en el valor de iluminación. y de otra manera en el modo
de B/W, suprimiendo la función de IR que se desarolla la sensibilidad. Por
eso se llama cámara de baja iluminación porque es podible identificar los
objetos aun en una area oscura. Mientras tanto, ésto es incoportado la
función de Sense Up a causa del obturador de baja velocidad y el método
de acumulación de esfera para mejorar sus caracteristicas de iluminación
distintamente.
[WDR(Ancho Campo Dinámico)]
Cámara de WDR es un estado de arte para aumentar la ganancia
de la pantalla, efectivamente, y especialmente es para sacar fotos
de ventanas en el edificio. Es decir ésto ofrece varios estados en
el interior y exterior claramente.
[DIA/NOCHE]
Capítulo 1. Introducción
Es una función de cámara de color para suprimir el filtero con la
Capítulo 5 Configuración de la cámara ............................... 20
función de IR en la condición de la iluminación debajo del valor
estándar por eso ésto tiene mayor sensibilidad.
Apéndice Especificaciones del producto ............................ 39
4 5
Cámara de DIA/NOCHE es casi siempre usada en un lugar oscuro como el
aparcamiento o el sótano que hay baja iluminación, comparativamente, en
el día, ofrece el color de alta densidad con horizontal resolución de 480. y
en la noche, puede usar la función de DIA/NOCHE, tanto como la función
de Sense Up para identificar los objetos. En el mismo caso, Puede usar
esta cámara con relación al équipo de emisión de rayo de infrarrojo.
adicionalmente
Es
Page 67

Capítulo 2 Características Especiales
Capítulo 3 Nombre de partes y Funciones
Alta Sensebilidad
Adapta el CCD de Super-HAD que tiene la última lente incorporada del
microchip, de alta sensibilidad.
Función de WDR
Cámara de WDR es un estado de arte que aumenta la ganancia de
pantalla efectivamente, especialmente, puede sacar una foto de la ventana
en un edificio. Es decir significa que puede obtener el estado en el interior
e incluso en el exterior, claramente.
Función de baja Iluminación
Éste tiene la función de baja iluminación y la función de DIA/NOCHE a
base de tecnología digital que da senal para operar en mal ambiente y sin
luz.
Función de Ajuste de Contraluz Superior
En el caso de que el objeto tenga iluminación brillante o exista luz solar
detrás del objeto, esta cámara ajusta la imagen dada sombra por contraluz
para una foto clara.
Método de Sincronización de Alimentación Digital
Linea de Bloqueo de Full método digital es realizado en esta cámara que
ajusta la sincronización vertical de la cámara directamente para mejorar la
habilidad de control y la fiabilidad de cámara.
Alta resolución
Ésto realiza una alta resolución gracias al procedimiento de full imagen
digital apoyada por la tecnología de senal digital de estado de arte.
Configuración de senal de salida
Puede seleccionar la función de REVERSE(horizontalmente, verticalmente,
o ambos) de la salida de video y privado, horizontal y vertical resena.
6 7
Vista Lateral
Montaje de Adaptador
A lente de Iris
Conector
Conmutador de la
Selección de Lentes ALC
Automático Obturador
Cable de control de lente
Montaje de adaptador ranura Fijada
Esta ranura es usada para el montaje del adaptador, una parte de soporte
en donde cámara sera instalada.
Lente de Cámara (Opción)
Este lente está instalado en la cámara.
* Lente de cámara con superficie estable debe ser limpiado suavemente
con el pano o pano de algodón en etanól.
Conector de lente auto iris
Este conector ofrece el lente de automático obturador con alimentación,
Senal de control, senal de video, o senal de DC que es necesaia para
controlar el obturador de las lentes.
fijación Ranura
Enfoque Posterior
Barra de Contol
Lente de Cámara
EsEs
Page 68

Cable de lente auto iris
AC 220-240V
Este cable transmite la senal de control desde la cámara para control el
obturador de lente.
Barra de control de Enfoque Posterior
Ésto controla el Enfoque Posterior
Configuración de ALC lente
Este switch configura el tipo de lente de Auto Iris para utilizar.
●
DC : Cuando se acerca el lente de Auto Iris se necesita la senal de DC control, Por
favor ponga este switch en la posición de DC.
●
VIDEO : Cuando se acerca a lente auto iris que se necesita la senal de control de
video, por favor ponga este switch en la posición de VIDEO.
SCC-B2305(P) Vista Posterior
SCC-B2005P Vista Lateral
① Mostrar Power LED
Cuando la cámara es proporciada con power, LED está encendida.
➁ Terminal de Video de Salida
El terminal de entrada del video monitor es conectado con este terminal
en donde la senal de cámara se ha salido.
➂ Terminal(RS-232) de Remoto Entrada
Este terminal es usado para el control de cámara en la producción de
fábrica.
1 TXD
1 2
3 4
2 RXD
3 +5V
4 GND
EsEs
8 9
Page 69

➃ Entrada de senal externa de DIA/NOCHE & Salida de senal de
Alarma
Es la función para recibir la senal externa de DIA/NOCHE desde el
sensor (opción) y convierte la senal a BW. MOVIMIENTO DET Función
genera una senal de alarma cuando el movimiento es detectado.
DAY/NIGHT IN
ALARM OUT
GND
①
➁
Conecte un sensor externo a la terminal de DIA/NOCHE como ① lo
demostrado abajo, luego conecte cualquier dispositivo externo tal como ➁
el timbre o lámpara a la terminal de ALARMA.
Terminal como lo demostrado abajo en el terminal de salida de ALARMA es
un conector que tiene la siguiente función DC 16V y 100mA.
OFF: Contacto abierto
ON: Debajo de 100mA
El terminal de entrada de DIA/NOCHE tiene la entrada de DC 5V pull-up y
más 0.2mA.
OFF: Contacto Abierto
ON : Contacto Cerrado
⑤ Switch de Opración de Cámara (Switch de configuración)
La función de Switch de operación de la cámara es cambiada según si
la cámara está en el usual modo de operación continuamente (No
configuración menu es vista en la pantalla) o el modo de configuración
menu.
[IZQUIERDA/DERECHA]
[ARRIBA/ABAJO]
[ARRIBA/ABAJO] key : Estas keys mueve el cursor arriba o abajo.
[IZQUIERDA/DERECHA] key : Estas keys mueven el cursor a la izquierda
key
key
[ENTER] key
o a la derecha o identifica los valores al fin que puede ser asignado en
cada menu de configuración.
[ENTER] key : Usado para entrar en el menu de configuración (Presionelo
unos 2 segundos). y es usado para entrar en el sub-menu del menu de
configuración por hacer click el menu de configuración o para configurar el
actual valor.
➅ Puerto de Conexión de energía
Esto puerto es conectado al Power Cable.
EsEs
10 11
Page 70

Capítulo 4 Instalación
Este capítulo descibe cuales deben ser comprobados antes de la
instalación, como configura en el ambiente de instalación, y cuales deben
ser hechos durante la instalación. Entonces, muestra el método de
instalación de la cámara y de conexión el cable en actual condición.
Qúe es importante durante la instalación y uso
① No desmontar la cámara usted mismo.
Antes de la instalación
Es
Chequeo de los contenidos del paquete
Aségurese de comprobar si el paquete contiene los siguientes.
Cámara Soporte de cámara
Manual del usuario
12 13
Adaptador de
C-Montaje
(Montaje)
Conectador de
Lente de Obturador
Automático
➁ Tenga mucho cuidado siempre que maneje la cámara, No golpear la
cámara con su puno ni sacudirlo. La cámara debe ser guardada y
manejada con mucho cuidado para evitar algún dano.
➂ No colocar u operar la cámara en la lluvia o en el lugar mojado.
➃ No fregar el equipo de camara con ningun papel aspero cuando tenga
alguna mancha. Por favor, siempre utilice un pano seco.
⑤ Coloque la camara en cualquier area fresca y el un lugar que no haya
luz directa. Si no, podra causar algun dano.
Es
Page 71

Conectando el conector de lente Auto Iris
Prepare el conector de lente de Auto Iris, auxilio de cámara, como lo siguiente :
Instalación
Fijación de lente
En el caso de lentes de CS
Gire lente de CS en el sentido de las agujas del reloj como lo siguiente.
EsEs
CS lents
Conecte cada cable de control descubierto de obturador al conector de
lente de Auto Iris como lo siguiente.
Pin No.
1 Damp (-) Power (+12V)
2 Damp (+) N/A
3 Drive (+) Senal de VIDEO
4 Drive (-) Ground
14 15
DC Tipo de Control VIDEO Tipo de Control
En el caso de lentes de C
Gire el adaptador de C-mountaje en el sentido de los agujas del reloj
para fijarlo. Luego gire el lente de C en el sentido de los agujas del reloj
hasta que sea fijada como está demostado abajo.
C lens
Page 72

Control de Switch de Configuración
Tiene que cambiar la posición de switch de configuración de lente en la parte lateral
de la cámara depende del tipo de lente. Depende su fijación de lente auto iris del
tipo de DC o el lente de automático obturador del tipo de video control, Tiene que
configurar el switch en la posición de DC o VIDEO respectivamente.
Ajuste del enfoque posterior
El enfoque posterior de la cámara es ajustado en la fábrica antes de su
distribución, pero algunos lentes no son enfocadoras a pesar de que el
numero es diferente, depende de los tipos. En este caso, seTiene que
ajustar enfoque posterior como lo siguiente. Primero, ésto está en el
procedimiento de ajuste de enfoque posterior para la fijada lente de
enfoque.
Función de lente sin zoom
Imagine un objeto de alta resolución(letticed) en la distancia(más de 10m) y
①
coloque el anillo de enfoque de lente en la infinita(∞) posición.
➁ Rodee la barra de control de ENFOQUE POSTERIOR hasta que el
objeto sea visto claramente.
➂ Apriete la barra de control de ENFOQUE POSTERIOR fijando el tornillo.
Función de lente con zoom
Imagine un objeto de alta resolución en la distancia de 3 a 5 m y zoom el lente
①
para que esté lo más cerca de TELE. Luego ajuste la barra del enfoque de lente
hasta que el objeto sea visto claramente.
➁
Zoom el lente para que esté lo más cerca de WIDE y ajuste la barra de
ENFOQUE POSTERIOR hasta que el objeto se vea claramente.
➂
Repita de ① a ➁ más de 2 o 3 veces hacia el enfoque en el ZOOM TELE side is
in line with that on the ZOOM WIDE side.
EsEs
16 17
Page 73

Concectando los cables y chequeo de operación
1 Primero, conecte el conector de BNC cable al terminal de video salida.
2 Segundo, conecte otro conector de BNC cable al terminal de video.
Video en Terminal de
Monitor trasera de superficie
BNC cable
Terminal de Video
Salida
3 Luego, conecte el power adaptador Conecte una parte del power
adaptador que es compuestos por 2 lineas a la cámara Power en
terminal con el destornillador plano como lo siguiente(GND : marcado
con linea blanca).
* La Fuente de corriente eléctrica puede ser AC24V o DC12V ignorando
la poralidad.
SCC-B2305(P)
EsEs
SCC-B2005P
18 19
Page 74

Capítulo 5 Configuración de Cámara
Este capítulo describe el método de configuración de cámara. La
Primera parte muestra el menu total y composición. La Segunda parte
muestra la función de cada menu.
ON...
DC...
ELC...
BLC...
Es
CAMARA ID
ON.../OFF
IRIS
DC... /VIDEO/ELC...
BLC/WDR
OFF
CLUZ...
WDR...
WDR...
SETUP
MENU
COLOR/BW
COLOR/BW..
/AUTO.../EXT...
OBTURADOR
OFF/ 1/100~1/10K
OFF/ AUTO
X2~X160
CAG
OFF/BAJO/
ALTO
MOVIMIENTO
S.SLOW/SLOW/
NORM/FAST/F.FAST
BAL BLANCO
BA./BM /MANU...
SYNC
INT/LÍNEA...
ESPECIAL
SALIDA
DEJAR/SAVE/PRE
SET
BW...
AUTO...
EXT...
MANU...
LÍNEA
...
SPECIAL...
DET MOVI
20 21
CAMERA ID Y
CONFIGURACION DE LOCALIDAD
DC DIAFRAGMA SETUP
ELC NIVEL SETUP
BLC ZONA SETUP
ABAJO...ARRIBA...
IZQUIERDA...DERECHA...
CENTRO...
NIVEL SETUP
FLICKERLESS SETUP
SATURACION ON/OFF
SATURACION ON/OFF
LEVEL DURATION
SATURACION ON/OFF
3200K/5600K/UTIL...
ROJO, AZUL SETUP
...
FASE SETUP
BAUD RATE, REVERSO,
POSI/NEGA, DETALLE,
DET MOVI...
PRIVADA...
PRIVADA...
PRIVADATYPE &
ZONA SETUP
ZONA SETUP
SENSITIVITY SETUP
CÁMARA ID
Este menu de CAMERA ID designa CAMERA ID en la pantalla del monitor
que es conectada a cámara. Si enciende el menu de CAMERA ID y
presiona [ENTER], el sub-pantalla aparecerá para designar el CAMERA ID.
El CAMERA ID puede ser compuesto con las letras, numeros, especiales
textos, o combinado de éstos hacia 20 digitales designado CAMERA ID
puede ser existe en cualquier lugares como quiere, utilizando el submenu.
CAMARA ID ON...
IRIS DC...
BLC/WDR OFF
COLOR/BW COLOR
OBTURADOR OFF
AGC OFF
BAL BLANCO ATW
SYNC INT
ESPECIAL ...
SALIDA PAUSA
Presione
[ENTER]
(CÁMARA ID)
A B C D E F G H I J K L
M N O P Q R S T U V W
X Y Z 0 1 2 3 4 5 6 7 8 9
: ! - + * ( ) /
SP
❿❿➛➛
SP
LOCALIDAD...
RET
...................
Es
Page 75

IRIS
La CAMARA tiene una función de IRIS para el control automático del nivel
de brillo por la intensidad de rayo. ALC puede seleccionar el nivel de DC
IRIS, VIDEO IRIS, y NIVEL DE IRIS.
❿ VIDEO
Usado mientras el lente de VIDEO es utilizada. Tiene que usar varios
registro que proporcia el LENTE DE IRIS NIVEL para el control. Luego,
ponga el switch de selección de ALC LENTE en la parte de cámara en
la posición de VIDEO.
❿ DC...
Si se selecciona el menu de DC y se presiona ENTER], la sub-pantalla
Apareserá para configurar el nivel de brillo. Ahora puede configurar el
nivel de brillo por presionar IZQUIERDA o DERECHA KEY en el menu de
NIVELConfiguración de nivel es dispoinible solo por utilizar el lente de DC
IRIS, pues tiene que poner el switch de selección de ALC LENTE en la
parte de cámara en la posición de DC.
CAMARA ID OFF
IRIS VIDEO
BLC/WDR OFF
COLOR/BW COLOR
OBTURADOR OFF
AGC OFF
BAL BLANCO ATW
SYNC INT
ESPECIAL ...
SALIDA PAUSA
❿ ELC...
CAMERA ID ON...
IRIS DC...
BLC/WDR OFF
COLOR/BW COLOR
OBTURADOR OFF
AGC OFF
BAL BLANCO ATW
SYNC INT
ESPECIAL ...
SALIDA PAUSA
22 23
Presione
[ENTER]
(IRIS/DC)
NIVEL
RET
(0) ----I----
Este menu controla NIVEL DE OBTURADOR DE ALTA VELOCIDAD
dento del campo limitado en el evento si hay rayo intensivo desde el
exterior mientras el uso de lente d Manual. Si selecciona ELC en el
menu de IRIS y presiona [ENTER], siguiente subpantalla Apareserá.
Ahora, Puede configurar el nivel por presionar IZQUIERDA o
DERECHA.
CAMARA ID ON...
IRIS ELC...
BLC/WDR OFF
COLOR/BW COLOR
OBTURADOR OFF
AGC OFF
BAL BLANCO ATW
SYNC INT
ESPECIAL ...
SALIDA PAUSA
Presione
[ENTER]
(IRIS/DC)
NIVEL (
RET
0
) ----I----
EsEs
Page 76

BLC/WDRCLUZ/WDR
❿ WDR...
La cámara de WDR es un estado de arte para aumentar la ganacia de
pantalla efectivamente, Especialmente puede sacar la foto de ventana
en el edificio. Es decir, se realiza el estado de interior y exterior
claramente.
CAMARA ID OFF
IRIS DC...
BLC/WDR WDR...
COLOR/BW COLOR
OBTURADOR OFF
AGC OFF
BAL BLANCO ATW
SYNC INT
ESPECIAL ...
SALIDA PAUSA
❖
El nivel de DC IRIS puede ser configurado en el momento de la
configuración de función de WDR.
(WDR)
Presione
NIVEL L ----I---- H
[ENTER]
PREVENCION DE PARPADEO
RET
OFF
❿ BLC...
Si usa cámara general cuando hay intensa y concentrada iluminación
detrás del objecto, la contraluz sombreará la imagen en la pantalla de
monitor. La función de BLC previene como el efecto de contraluz para
mantener la clara imagen en cualquier ambiente de iluminación.
Presione el key de IZQUIERDA o DERECHA en la condición de OFF
para configurar la función de USUARIO ya que está incluido 5 areas
FONDO..., TOP..., IZQUIERDA..., DERECHA..., y CENTRO. Si
selecciona FONDO... en el menu de BLC y presiona key de [ENTER],
Se podrá certificar el área de BOTTOM que ya está configurado.
CAMARA ID ON...
IRIS ELC
BLC/WDR CLUZ...
COLOR/BW COLOR
OBTURADOR OFF
AGC OFF
BAL BLANCO ATW
SINC INT
ESPECIAL ...
SALIDA PAUSA
presione
[ENTER]
(BLC)
presione
[ENTER]
AREA BOTTON...
RET
EsEs
24 25
Page 77

COLOR/BW
El menu de COLOR/BW enciende o apaga el Filtro de IR(Infrarrojo). En el
ambiente de baja iluminación, el modo de BW apagrá el filtro de IR y la
sensibilidad aumentará tan alto como las camaras de BW. De otra manera,
el modo de BW encenderá el filtro de IR y la sensibilidad volverá normal
para recuperar la pantalla normal.
❿ COLOR...
En este modo, Salida de video imagen de cámara está colorado.
CAMARA ID ON...
IRIS DC...
BLC/WDR OFF
COLOR/BW COLOR
OBTURADOR OFF
AGC OFF
BAL BLANCO ATW
SYNC INT
ESPECIAL ...
SALIDA PAUSA
❿ BW...
Este es el modo de filtro de IR en Negro y en Blanco.(Alta sensibilidad
como cámara de BW) Si selecciona BW...y presiona [Enter], el submenu
pantalla de BW Apareserá. Puede mandar EXPLOSIÓN Senal por
encender o apagar en este menu.
CAMARA ID ON...
IRIS DC...
BLC/WDR OFF
COLOR/BW BW...
OBTURADOR OFF
AGC OFF
BAL BLANCO --SYNC INT
ESPECIAL ...
SALIDA PAUSA
presione
[ENTER]
(BW)
EXPLOSIÓN
RET
ON
EsEs
26 27
Page 78

❿ AUTO...
Este menu convierte el modo de COLOR al modo de BW
automáticamente o en cambio, depende de la iluminación. En el
ambiente de baja iluminación, ésto apaga el Filtro de IR para aumentar
la sensibilidad, de otra manera ésto enciende el Filtro de IR para
disminuir la sesibilidad Si selecciona el menu de AUTO y presione
[Enter], el BW NIVEL. Control AUTO BW submenu Apareserá en la
pantalla de menu. Se podrá mandar la senal de EXPLOSIOIN por
encender o apagar en este menu, configure TIEMPO DE DURACION
para conversación, o configure el nivel de estándar brillo para convertir
el modo de COLOR al modo de BW.
CAMARA ID ON...
IRIS DC...
BLC/WDR OFF
COLOR/BW AUTO...
OBTURADOR OFF
AGC --BAL BLANCO ATW
SYNC INT
ESPECIAL ...
SALIDA PAUSA
(AUTO BW)
Presione
EXPLOSION
[ENTER]
NIVEL BAJO
DURACION S ----I---- L
RET
ON
❿ SALIDA...
Este menu convierte el modo de COLOR autómaticamente al modo de
BW o en cambio depende de la iluminación con sensor externo. Si
selecciona menu del EXIT y presiona [Enter], el submenu de EXTERNO
BW aparecerá en la pantalla de menu. Se podrá mandar la senal de
EXPLOSIÓN por encender o apagar en este menu.
CAMARA ID ON...
IRIS DC...
BLC/WDR OFF
COLOR/BW EXT...
OBTURADOR OFF
AGC OFF
BAL BLANCO AGC
SYNC INT
ESPECIAL ...
SALIDA PAUSA
Presione
[ENTER]
(EXTERNO BW)
EXPLOSION
RET
EsEs
ON
28 29
Page 79

OBTURADOR
El menu de OBURADOR configura el obturador de alta velocidad eléctronica, AUTO
baja la velocidad de obturador. El obturador de alta velocidad eléctronica ofrece 7
obturadores de velocidades desde 1/100 a 1/10K segundos y es usado
comunalmetne para capturar objetos en movimiento. Obturador de baja velocidad
ofrece 10 obturadores velocidaded desde x2 a x160, que baje la velocidad de
obturador para que haga la imagen clara y brillante en la oscura iluminación. Si
quiere bajar la velocidad del obturador autómaticamente depende de la cantidad de
obscuridad por percibir la intensidad de rayo, por favor seleccione la baja velocidad
de AUTO.
CAMARA ID ON...
IRIS DC...
BLC/WDR OFF
COLOR/BW AUTO...
OBTURADOR OFF
AGC --BAL BLANCO ATW
SYNC INT
ESPECIAL ...
SALIDA PAUSA
Si presiona el key de IZQUIERDA o DERECHA, siguiente velocidad
Apareserá en la secuencia.
OFF →AUTO X2 →AUTO X4 →AUTO X6 →AUTO X8 →AUTO X12 →AUTO X16 →AUTO
→
AUTO X40 →AUTO X80 →AUTO X160 →OFF →1/100(NTSC), 1/20(PAL) →1/250
X20
1/500 →1/1000 →1/2000 →1/4000 →1/10K →OFF
❖
Mientras que el modo de IRIS está en ELC o el modo de BLC/WDR está
WDR, solo podrá usar siguientes modos.
OFF →AUTO X2 →AUTO X4 →AUTO X6→AUTO X8 →AUTO X12 →AUTO X16 →AUTO
X20
→
AUTO X40 →AUTO X80 →AUTO X160 →OFF
AGC/ MOVIMIENTO
❿ AGC
El menu de AGC ilumina la pantalla menos del brillo estándar a causa
de objeto capturado en oscura iluminación. Configuraición de menu de
AGC Es disponible solo en el modo de obturador de alta velocidad o el
modo de OFF. Si presiona el key de IZQUIERDA o DERECHA para
llegar a BAJO o ALTAposición La función de AGC se iniciará activación.
BAJO es usado para más bajo AGC GANANCIA en cambio ALTAes
usado para más alta AGC GANANCIA. Mientras el menu de
COLOR/BW es configurado a AUTO, el menu de AGC es todo l --- y el
máximo AGC GANANCIA permanece ALTA.
CAMARA ID ON...
IRIS DC...
COLOR/BW OFF
COLOR/ByN AUTO...
OBTURADOR OFF
AGC --BAL BLANCO ATW
SYNC INT
ESPECIAL ...
→
SALIDA PAUSA
EsEs
30 31
Page 80

❿ MOVIMIENTO
La función de MOVIMIENTO es disponible solo en el modo de AUTO
mode con estos 5 pasos : M.LENTA, LENTA, NORM, RAPIDO,
M.RAPIDO.
L.LENTA reduce la intensidad de AGC para captar el objeto de
monitor en la obscuridad.
LENTA mantiene la intensidad de AGC bajamente para captar el
objeto de monitor con poco movimiento en la obscuridad.
NORM AJ estandariza la intensidad de AGC para captar el moviendo
objeto en la oscuriad.
RAPIDO mantiene la intensidad de AGC altamente para captar el
moviendo objeto rápidamente en la obscuridad.
M.RAPIDO reduce la intensidad de AGC para captar el objeto que
mueve muy rápidamente, en la obscuridad.
Para activar la función de MOVIMIENTO, tiene que presionar ARRIBA
para mover el cursor al menu de MOVIMIENTO y presionar IZQUIERDA
o DERECHA KEY mientras el menu de OBTURADOR está configurado
a AUTO. Si presiona IZQUIERDA y DERECHA, se podrá mover el modo
de LENTAy RAPIDO respectivamente.
BAL BLANCO
❿ ATW
Si selecciona el modo de ATW en el menu de BAL BLANCO, se podrá saber el
cambio de temperatura durante el tiempo actual y configurar BALANCE BLANCO
y ésto permanecerá continuamente.
❿ AWC
Si selecciona el modo de AWC en el menu de BAL BLANCO, ajuste la pantalla
que quiere mirar, y presione [ENTER]. Luego la función de AWC se iniciará
automaticamente.
❿ MANU...
Si selecciona el modo de MANU... en el modo de BAL BLANCO, se podrá
configurar BAL BLANCO relación con actual iluminación manualmente. Si
selecciona MANU... item y presiona [ENTER], el menu MANU... submenu
Apareserá para seleccionar BAL BLANCO. Si presiona IZQUIERDA o DERECHA
en el menu de PRESET, se podrá seleccionar el modo de 3200K, 5600K, o
USER.
3200K :Configurar la temperatura de color a 3200 °K
5600K :Configurar la temperatura de color a 5600 °K
UTIL : Usa la barra de control de ROJO y AZUL para seleccionar
el propiado valor para la configuración.
EsEs
CAMARA ID ON...
IRIS DC...
BLC/WDR OFF
COLOR/BW AUTO...
OBTURADOR AUTO X2
MOVIMIENTO
BAL BLANCO ATW
SYNC INT
ESPECIAL ...
SALIDA PAUSA
32 33
M.RAPI
CAMARA ID ON...
IRIS DC...
BLC/WDR OFF
COLOR/BW EXT...
OBTURADOR OFF
AGC OFF
BAL BLANCO MANU...
SYNC INT
ESPECIAL ...
SALIDA PAUSA
Presione
[ENTER]
(AWB/MANU)
PRESET 3200K
RET
Page 81

(AWB/MANU)
(AWB/MANU)
ESPECIAL
Puede controlar la función de RATIO DE BAUDIOS, CONTRARIO,
presione
[ENTER]
PRESET 3200K
RET
PRESET OFF(USUARIO)-ROJO (00) ----I---AZUL (00) ----I---RET
Es
SYNC
El modo de INT es necesario para el uso internal sincronización y LINEA...
modo es necesitado para la operación de multi cámara Porque ésto sincroniza
la fase de cámara por utilizar la externo senal (AC Senal). Poco desviasión de
fase para algúna configuración puede ser posicionado por ajustar la FASE La
función de SYNC es disponible solo con alimentación de AC. Coloque el cursor
en SYNC, presione IZQUIERDA /DERECHA Para seleccionar LINEA... item, y
presione [ENTER]. Ahora se podrá el submenu para ajustar FASE. La FASE
varia desde -106H a +106H(NTSC), -138H to +138H(PAL).
CAMARA ID ON...
IRIS DC...
BLC/WDR OFF
COLOR/BW EXT...
OBTURADOR OFF
AGC OFF
BAL BLANCO MANU...
SYNC INT
ESPECIAL ...
SALIDA PAUSA
(BLOQUEO DE LINEA)
presione
[ENTER]
FASE (-106) I-------RET
POSI/NEGA, DETALLA, Y MOVIMIENTO DET usted mismo en el menu de
ESPECIAL. Si selecciona el menu de ESPECIAL y presiona [ENTER], la
pantalla de submenu de ESPECIAL Apareserá.
CAMERA ID ON...
IRIS DC...
BLC/WDR OFF
COLOR/BW EXT...
OBTURADOR OFF
AGC OFF
BAL BLANCO MANU...
SYNC INT
ESPECIAL ...
SALIDA PAUSA
Presione
[ENTER]
(ESPECIAL)
RATIO DE BAUDIOS 38400
CONTRARIO OFF
POSI/NEGA +
DETALLA (0)----I-DET MOVIMIENTO OFF
PRIVADO
RET
❿ RATIO DE BAUDIOS : Configura la velocidad de unicación4800,9600
19200, o 38400bps para RS-232 comunicación.
❿ CONTRARIO : Invierte la pantalla en 3 MODOS, IZQUIERDA/
DERECHA, ARRIBA/ABAJO, O IZQUIERDA/DERECHA/ARRIBAABAJO.
Nota: Por favor configure el área de BLC, MOVIMIENTO, PRIVADO
porque ésos no cambian.
❿ POSI/NEGA : Imprime la Senal de brillo de video normalmente El nivel
de brillo es alto en la salida de invertido.
❿ DETALLE : Ajusta definición horizontal y vertical.
❿ MOVIMIENTO DET : MOVIMIENTO DET detecta cualquier movimiento
de los objetos. Si activa la función de MOVIMIENTO DET function en el
tiempo. aun cuando imagine que nada se esta moviendo, la función
detectará el movimiento del intruso. En el momento de que es detectado,
la función imprime la senal de ALARMAl. La función de MOVIMIENTO
DET detecta cualquier movimiento y selecciona la sensebilidad de
Cuando se usa alimentaciOn de DC el menu de SYNC está llena --- y
se no puede usar la función de SYNC.
movimiento y el area para detectar el movimiento. Si selecciona ON...
modo y Presiona [ENTER], la pantalla del submenu de MOVIMIENTO
DET Apareserá.
34 35
Es
...
Page 82

(ESPECIAL)
RATIO DE BAUDIOS 38400
CONTRARO OFF
POSI/NEGA +
DETALLA (0)----I-DET MOVI OFF
PRIVADA
IDIOMA ESPAÑOL
RET
...
(DET MOVI)
Presione
[ENTER]
AREA ABAJO...
SENSIBILIDAD L ----I---- H
RET
(ESPECIAL)
RATIO DE BAUDIOS 38400
CONTRARIO OFF
POSI/NEGA +
DETALLA (0)----I-MOVIMIENTO DET ON...
PRIVADA
PRIVADO ESPAÑOL
RET
...
(ZONA PRIVADA)
PRIVADO 1 ON...
PRIVADO 2 OFF
PRIVADO 3 OFF
PRIVADO 4 OFF
presione
PRIVADO 5 OFF
[ENTER]
PRIVADO 6 OFF
PRIVADO 7 OFF
PRIVADO 8 OFF
RET
EsEs
Presione
[ENTER]
El AREA es configurado de la misma manera con AREA en el menu de
presione
[ENTER]
DIMENSION
Tecla
[ARRIBA
❷
/ABAJO]
POSICIÓN
DIMENSION
➛❿
Tecla
[IZQUIERDA/
DERECHA]
BLC mientras una cosa designado entre TODO, CENTRO, FONDO, TOP,
IZQUIERDA, o DERECHA. si selecciona FONDO y presiona ENTER,
seleccionado área sera mostrado en la pantalla. La SENSIBILIDAD es
usado para configurar la intensidad de DETECCIÓN DE MOVIMIENTO en
7 niveles.
❿ PRIVADA
Esta función es ofrecida con el fin de la protección del personal privado, y es
presione
[ENTER]
DIMENSION
Tecla
[ARRIBA
❷
/ABAJO]
POSICIÓN
POSICIÓN
➛❿
Tecla
[IZQUIERDA/
DERECHA]
para que la parte negra no se muestre en la pantalla. Esta función ofrece control
de intensidad de nivel de 8 neveles. Puede configurar su Dimensión y localidad
de area.
36 37
❿IDIOMA : Usted puede elegir un de los idiomas siguientes : Inglés,
alemán, Francés, Español, e italiano.
Page 83

Especificaciones del producto
SALIDA
El menu de SALIDA es usado para la terminación del menu de
CAMARA CONFIGURACIÓN.
❿ PAUSA
Ignora cualquier cambio y vuelve al menu guardado de
CONFIGURACIÓN.
Es
ALMACENAMIENTO
❿
Guarda todos cambios el menu hasta ahora.
❿ PRESET
Ignora cualquier cambio y vuelve al inicial valor del menu de CAMARA
ONFIGURACION que fue configurado para distribución del producto.
CAMARA ID OFF
IRIS DC...
BLC/WDR OFF
COLOR/BW AUTO...
OBTURADOR AUTO X2
AGC M.RAPIDO
BAL BLANCO ATW
SYNC INT
ESPECIAL ...
SALIDA PAUSA
38
SCC-B2305(P)/B2005P Característica Especial
ITEM DESCRIPCION
Definición CAMARA DE CCTV (WDR & DIA /NOCHE)
Alimentación
Consumo de energía SCC-B2305(P) : Approx. 4.5W
Sistema de difusión
dispositivo de imagen 1/3 inch P/S CCD
Efectivo Pixel NTSC :
Método de Borrada NTSC : 525 Linea, 2:1 entrelazado
Frecuencia de Linea Horizontal(NTSC) : 15,734 Hz(INT) / 15,750 Hz(L/L)
Método de sincronización INT/LÍNEA BLOC
Resolución 500/530 Líneas de TV (COLOR/BW)
S/N Ratio 52dB (CAG OFF)
Iluminación de Mínima escena
SCC-B2305(P) : AC 24V ± 10% (NTSC : 60Hz ±
0.1Hz, PAL : 50Hz ± 0.1Hz), DC12V + 10% ~ -5%
SCC-B2005P : AC220V ~ AC240V (50Hz ±
0.1Hz)
SCC-B2005P : Approx. 5W
SCC-B2305 : NTSC el sistema de estándar color
SCC-B2305P, SCC-B2005P : PALEstándar
Sistema de Color
768(H) X 494(V)
752(H) X 582(V)
PAL :
PAL: 625 Linea, 2:1 entrelazado
Horizontal(PAL) : 15,625 Hz(INT) / 15,625 Hz(L/L)
Vertical(NTSC) : 59.94 Hz(INT) / 60 Hz(L/L)
Vertical(PAL) : 50 Hz(INT) / 50 Hz(L/L)
COLOR :
0.3 Lux (F1.2) (0.002 Lux)
B/W :
0.06 Lux (F1.2) (0.0004 Lux)
Es
39
Page 84

ITEM DESCRIPCIÓN
Dinámico Campo
NTSC : x64
PAL: x80
DIA/NOCHE COLOR/BW/AUTO/EXT
Temperatura de Color ATW/AWC/MANUAL MODE
(3200°K, 5600°K, R/B Ajuste de ganancia)
Velocidad del obturador ALC:OFF~1/10K seg (7 pasos)
Es
electrónico
Compensación de Contraluz
ELC:Max 1/100K seg
OFF/WDR/BLC
Sense Up OFF/AUTO X2 ~ X160
Compensación de Contraluz
OFF/ON(Configuración de AREA/SENSIBILIAD)
Control de Video POSI/NEGA, CONTRARIO(H, V, H/V),
Configuración de DETALLA, PRIVADO
Salida de Senal Compuesto Video Out : 1.0 Vp-p 75 ohms/BNC
Salida de video compuesto : 1.0 Vp-p 75
ohms/BNC
AI Lente VIDEO/DC
Lente Montaje CS/C(Montar Adaptador)
Temperatura de Operación
Humedad de Operación
-10°C ~ +50°C
~90%
Humedad de Operación 68(W) x 55(H) x 128.5(D) mm
Peso SCC-B2305(P) : unos x 450g
SCC-B2005P : unos x 550g
40
Page 85

MACCHINA FOTOGRAFICA COLORE WDR GIORNO/NOTTE
SCC-B2305(P)/B2005P
Manuale d’Utente
I
Page 86

Norme di sicurezza
Scopo di queste informazioni è garantire l’uso corretto del prodotto per
prevenire pericoli o danni alla proprietà. Attenersi a tutte le precauzioni.
Avvertenza
La mancata osservanza di questa indicazione può provocare
la morte o gravi lesioni.
1. Utilizzare esclusivamente l’adattatore in dotazione. (L’uso di un
adatattatore diverso da quello fornito può provocare incendi, scosse
elettriche o danni al prodotto.)
2. Quando si collegano i cavi dell’alimentatore e del segnale, controllare i
terminali dei collegamenti esterni prima di effettuare i collegamenti.
I
Collegare i cavi del segnale di allarme agli appositi terminali, l’adattatore
AC alla presa di ingresso della corrente AC, e l’adattatore DC all’ingresso
della corrente DC, rispettando le polarità corrette. (Un collegamento non
corretto dell’alimentatore può provocare incendi, scosse elettriche o danni
al prodotto.)
3. Non collegare più telecamere allo stesso adattatore. (Il superamento
della capacità può provocare una generazione anomala di calore oppure
incendi.)
4. Inserire il cavo di alimentazione nell’apposita presa. (Un collegamento
allentato può provocare incendi.)
5. Quando si installa la telecamera a soffitto oppure a parete, fissare bene
l’apparecchio. (Una telecamera instabile può cadere e provocare lesioni
personali.)
6. Non collocare oggetti con capacità conduttive (cacciaviti, monete e altri
oggetti metallici) oppure recipienti pieni d’acqua sopra la telecamera. (La
mancata osservanza di questa norma può provocare lesioni personali
dovute a incendi, scosse elettriche o alla caduta di oggetti.)
7. Non installare l’apparecchio in luoghi sporchi, polverosi o umidi. (In caso
contrario si possono provocare incendi o scosse elettriche.)
8. Se dall’apparecchio provengono odori insoliti oppure fumo, scollegare
immediatamente dall’alimentazione elettrica e rivolgersi al centro di
assistenza. (Se si continua a utilizzare l’apparecchio in tali condizioni si
possono provocare incendi o scosse elettriche.)
2 3
9. In caso di funzionamento difettoso dell’apparecchio, rivolgersi al
rivenditore presso cui è stato effettuato l’acquisto oppure al centro di
assistenza più vicino. Non smontare né modificare il prodotto. (Samsung
non è responsabile di problemi causati da modifiche non autorizzate o
da tentativi di riparazione.)
10. Durante la pulizia, non spruzzare acqua direttamente sui componenti
del prodotto. (In caso contrario si possono provocare incendi o scosse
elettriche.) Pulire la superficie con un panno asciutto. Non usare mai
detergenti o prodotti chimici per la pulizia del prodotto, in quanto questi
potrebbero provocare lo scolorimento della superficie e danneggiare il
rivestimento esterno.
Attenzione
La mancata osservanza di questa indicazione può provocare
lesioni o danni alla proprietà.
1. Non far cadere oggetti sopra il prodotto e non sottoporre quest’ultimo a
forti colpi. Il prodotto non va tenuto in un luogo soggetto a vibrazioni
eccessive o a interferenze magnetiche.
2. Non installare il prodotto in un luogo soggetto ad alte (superiori ai 50
gradi) o basse temperature (- 10 gradi), oppure ad elevata umidità. (In
caso contrario si possono provocare incendi o scosse elettriche.)
3. Evitare i luoghi esposti alla luce solare diretta e la vicinanza a sorgenti di
calore come caloriferi e radiatori. (La mancata osservanza di questa
norma può provocare incendi.)
4. Per spostare un apparecchio già installato, assicurarsi di averlo spento
prima di spostarlo e reinstallarlo.
5. Installare l’apparecchio in un luogo ben ventilato.
6. In caso di temporali, staccare la spina dalla presa elettrica. (La mancata
osservanza di questa norma può provocare incendi o danni al prodotto.)
I
Page 87

Contenuti
Capitolo 1 Introduzione
Capitolo 1 Introduction ......................................................... 5
Capitolo 2 Special Features ................................................ 6
Capitolo 3 Part Names and Functions ............................... 7
Capitolo 4 Installazione ........................................................ 12
I
Cauzione per l’Installazione e l’Uso .................. 13
Connettendo Otturatore Automatica Connettore
Lenti .................................................................... 14
Lenti Fissando e Aggiustando per l’Interruttore di
Selezione ............................................................ 15
Aggiustando Fuoco Posteriore ......................... 16
Connttendo Cavi ................................................18
Capitolo 5 Camera Set-up ................................................... 20
Il WDR(Wide Dynamic Range) GIORNO/NOTTE camera deve essere usato
per esprimere tutti tanto scuro quanto luminoso della parte distintivamente
nello schermo con un doppio shutter. La camera convenzionale del
morsetto lo schermo bianca quando un oggetto luminoso come un window
occupa lo schermo mentre questa camera è un stato –di-il arte prodotto
integrato tecnicalmente per rinvenire anche una parte più luminoso
distintivamente.
La camera Giorno/Notte opera nel modo colore nell’illuminazione sopra di
valore standard e altrimenti in modo B/W da cancellando la funzione IR
Cut, che fornire alla sensibilità miglioramenta. Questo è chiamato alla
camera d’illuminazione bassa che può identificare gli oggetti nell’aria scura.
Intanto ha incorporato la funzione di Senso UP. Acausa di una velocità
bassa dell’otturatore e un metodo d’accumulazione di campo per migliorarlo
d’illuminazione bassa per la caratteristica prominentemente.
[WDR(Wide Dynamic Range)]
La camera WDR è un stato di arte per allargare lo schermo del
profitto efficacemente, specialmente per facendo i foto di una
finestra in un edificio. Per farla breve questo rinvenire tanto
l’interno quanto l’esterno degli stati come loro sono chiaramente.
[GIORNO/NOTTE]
È una funzione della camera colore per cancellare il filtro con la
funzione il IR Cut nell’illuminazione sotto il valore standardo perciò
Appendice Prodotto Specificazione ..................................... 39
4 5
ha una sensitività migliore.
La camera Giorno/Notte è usato generalmente nei posti scuri come il
parcheggio seminterrato moltissimi con uno illuminazione basso
comportivamente. In ore diurne, fornire uno schermo colore di densità alta
con una risoluzione orizzontale di 48, e alla notte utilizzare. La funzione
Giorno/Notte cosi bene come il senso sopra di funzione agli oggetti
identificare. Nello stesso cosi, può usare questa camera in relazione al
infrarosso raggio emissione equipaggiamento.
I
Page 88

Capitolo 2 Caratteri Speciali
Capitolo 3 Nomi e Funzione dei componenti
Sensibilità Alta
Ha un up-to-date 1/3” Super-HAD P/S CCD per un imaggine di sensibilità
alta.
Funzione di WDR
La camera WDR è lo stato-di-l’arte per allargare lo schermo del profitto
efficacemente, specialemente per facendo i fotodi una finestra in un
edificio. Per farla breve questo rinvenire tanto l’interno quanto l’esterno
degli stati come loro sono chiaramente.
Funzione Illuminazione Debole
Hanno tutti e due della funzione di illuminazione debole e Giorno/Notte
funziona in base sul segno digitale tecnologia allo scopo to operare
nell’ambiente peggiore senza luce.
Funzione Adattamento Luce Retro Superiore
Nel caso gli oggetti ha un illuminazione chiaro o luce di sole indietro,
questa camera aggiusta l’imagine ombreggiato dalla luce per fotografare
chiaro.
Metodo Sincoronizazione Alimentazione Digitale
La serratura linea metodo digitale intera in questa camera, che aggiusta la
sincronizazione della camera verticale diretamente per improvare
controllabilemente e la camera dell’attendibilità.
Risoluzione Alta
Realizza la risoluzione alta risultando dall’immagine digitale intera di
trasformazione sostenutp dalla tecnologia migliore di segnale digitale.
Setting Segnale Output
Può selezionare la funzione di INVERSO(Orizzontalmente, verticalmente o
tutti due) dello segnale output del video e profilo del privato, orizzontale e
verticale.
6 7
Vista Fianco
Solco Fissando
Connectore Lente
Otturatore Automatica
Interrutore Setting
Lente ALC
Cavo Controllo Lente
Otturatore Automatica
Solco Fissando Adattore Supporto
Questo solco è usato per avvitando l’adattore supporto, una parte del
parente dove la camera sarà essere installato.
Lenti Otturatore Automatica (Opzionale)
Questo lente è installato nella camera.
* La lente della camera con una superficia macchiata dovrebbe essere
pulito leggeramente con un tessuto per lente o l’etnolo dipinto di tessuto
cottone.
Collegatore Lente Otturatore Automatica
Questo collegatore fornisce la lente otturatore automatica con
l’alimentazione, lo segnale controllo, segnale di video, o segnale
necessaria di DC per il controllo del lente otturatore.
Adattore Supporto
Bar Controllo
Fuoco Retro
Lente Cammera
II
Page 89

Cavo Controllo Lente Otturatore Automatica
AC 220-240V
Questo cavo trasmette lo segnale di controllo dalla camera per controllare
l’otturatore della lente. Adesso abche nel menu deve selezionare
DC/VIDEO come Interruttore selezionata.
Bar Controllo Fuoco Retro
Controllare il fuoco retro.
Interrutore Setting Lente ALC
Questo interrutore mette il tipo di lente Iris per usare.
DC: Quando attacare un lente Iris Auto richiedendo la segnale di controllo
DC, per favore mette questo interrutore nella posizione DC.
VIDEO:Quando attacca un lente Iris Auto richiedendo la segnale controllo
video, per favore mette questa interruttore nella posizione VIDEO.
SCC-B2305(P) Vista Posteriore
SCC-B2005P Vista Posteriore
① LED Display Potenza
Quando la camenra è fornita con la potenza, LED è on.
➁ Terminale Output Video
Il terminale input di monitor del video è collegato con questa terminale
attraverso che il video segnale della camera uscire.
➂ Terminale Input Remoto (RS-232)
Questa terminale è usato per il controllo della camera alla impianta di
produzione.
1 TXD
1 2
3 4
2 RXD
3+5V
4 GND
II
8 9
Page 90

➃ Input Segnale Esteriore E Output Segnale Allarme Giorno/Notte
Questo è una funzione per ricevere la segnale DAY/NIGHT esteriore dal
sensore(opzionale) E convertire la segnale nel BW. La funzione
MOVIMENTO DET genera un segnale allarme quando un movimento è
scoperto.
⑤ Interruttore Operazione Camera (Interruttore Setup)
La funzione dell’interruttore operazione della camera cambia non cè
dubbio se la camera è è attualmente nel modo d’operazione usuale. (Il
menu di No setup è visto sullo schermo) o il modo del menu di setup.
[LEFT/RIGHT] chiave
[UP/DOWN] chiave
DAY/NIGHT IN
ALARM OUT
GND
①
➁
[UP/DOWN] chiave : Questi chiavi muovere sopra o in giù del
[ENTER] chiave
cursore.
[LEFT/RIGHT] chiave : Questi chavi muovere il cursore alla sinistra o
destra o identificare il valore sequentemente che
Collegare un sensore esteriore al terminale Giorno/Notte come mostrando
in ① poi collegare qualche dispositivo esteriore per esempio un segnale
acustico o lampada al terminale ALARM come ha mostrato in ➁.
Il terminale output ALARM è un collezionista aprire con la capacità
[ENTER] chiave : Questo è usato per entrare il menu di Setup.
può essere assegnato in ogni menu setup.
(Premerlo sopra 2 secondi)
È usato per entrare un menu di setup di sottomenu da far scattando il menu di setup o per
mettere il valore corrente.
seguente : Sotto DC 16V e Sotto 100mA
OFF : Aprire il contatto
ON : Sotto 100mA
➅ Porto Collrgamento Potenza(Adattatore)
Questo porto è collegato al cavo della potenza(adattatore)
Il terminale input Giorno/Notte ha il input di DC 5V avvicina e sopra 0.2 mA.
OFF : Aprire il contatto
ON : Chiudere il contatto.
10 11
II
Page 91

Capitolo 4 Installazione
Questo capitolo descrive che cosa dovrebbe essere controllato prima
l’installazione, come mettere l’ambiente d’installazione, e che cosa
dovrebbe essere fatto mentre installazione. Poi, descrivere come per
installare la camera e collegare il cavo nelle circostanze reale.
Che cosa dovrebbe essere fatto mentre l’installazione e uso
① Non smontare la camera da solo.
Prima Installazione
Controllazione Gli Contenuti del Pacco
Non mancare di controllare se l’articolo seguente sono incluso nel pacco.
I
Camera Supporto
Manuale d’utente
12 13
Adattatore
supporto C
camera(Montatura)
Collegatore lente
otturatore automatico
➁ Attentare quando il trattamento della camera sempre. Non battere la
camera con vostro pugno o scrollarlo. La camera dovrebbe essere
depositato e trattato con cura per evitare altro danno.
➂ Non mettere o operare la camera in pioggia o in posto umidità.
➃ Non strofinare il corpo della camera con la carta vetrata ruvido quando è
macchiato. Per favore usare un tessuto asciugato sempre.
⑤ Mettere una camera nell’aria libera fresca dalla luce directta. Altrimenti,
la camera può essere danneggiato.
I
Page 92

Collegamento Lente Otturatore Automatico Collegatore
Preparare il connettore lente otturatore automatico, una camera ausiliaria,
come seguente:
INSTALLAZIONE
Fissaggio Lente
Nel caso di lenti CS
Girare il lenti CS in senso orario fino questo è fissato come è mostrato
come seguente.
lenti CS
Collegare ogni cavo di filo metalico d’otturatore rivelato al collegatore
otturatore automatico come seguente.
Numero Pin Tipo Controllo DC Tipo Controllo Video
1 Damp(-) Potenza (+12V)
2 Damp(+) N/A
3 Drive(+) Segnale Video
4 Drive(-) Ground
14 15
Nel caso di lenti C
Girare l’adattore C-supporto in senso orario per fissarlo. Poi girare il
lente C in senso orario fino è fissato come seguenti.
lenti C
II
Page 93

Controllo Interruttore montaggio
Dovrebbe cambiare la posizione dell’interruttore di montaggio per lente
sulle parte della camera secondo del tipo dilente.
Può contarci se ha fissato il tipo lente d’otturatore automatica di tipo del
controllo DC, deve mettere l’interruttore nel posizione ripettivamente “DC” o
“VIDEO”.
Lenti con funzione zoom
① Immaginare un oggetto con la risoluzione(letticed) alta a una distanza di
3 a 5m e zoom nel lente al più chiudere a TELE. Poi aggiustare il fuoco
del lente anello fino l’oggetto è visto migliore.
➁ Zoom nel lente al più vicinare a WIDE e aggiustare il BACK FOCUS
aggiustamente ilbar fino l’oggetto è visto migliore.
➂ Ripetere da (1) a (2) oltre 2 o 3 volte fino il fuoco sulla parte ZOOM
TELE è nella linea con sulla parte ZOOM WIDE.
Aggiustamento Fuoco Retro
La camera del fuoco retro è aggiustato alla pianta prima consegna, ma
qualche lenti sono fuori di fuoco attraverso il numero differisce in tipi. Se
questi è il caso, dovrebbe produrre il fuoco retro aggiustamento come
seguenti. Prima, questo è il fouco retro aggiustamento procedura per fuochi
fissati dei lenti
Lenti senza funzione zoom
① Immaginare un oggetto con la risoluzione(letticed) alta a più che la
distanza 10m e mette il fuoco di lente circondare nella posizione
infinita(∞).
➁ Ruotare il FUOCO RETRO aggiustamento circondare fino l’oggetti è
visto meglio.
➂ Ha Stringeto il FUOCO RETRO aggiustamento la vite anello fissando.
16 17
II
Page 94

Collegamento cavi e controllazione operazione
1 Prima, collegare il collegatore del cavo BNC al terminale Video Out.
2 Secondo, collegare il collegatore altro del cavo BNC al terminale Video
IN.
Morsetto di Video in dello
schermo posteriore.
CAVO BNC
MORSETTO
VIDEO OUT
3 Poi, collegare l’adattotore della potenza. Collegare una parte
dell’adattatore potenza composto delle line 2 al terminale Potenza In
Camera In con un dispositivo della testa-piatta come seguente. (GND:
marcato con una linea bianca)
* Il sorgente della potenza deve essere collegare noncurrante della
polità AC24V e DC 12V.
SCC-B2305(P)
II
SCC-B2005P
18 19
Page 95

Capitolo 5 Set-up Camera
Questo capitolo descrive come fare set-up la camera. La parte prima
descrive il menu di setup interna e il composizione e la parte secondo
descrive l’ogni menu del funzione.
I
ID CAMERA
ON.../OFF
IRIS
DC.../VIDEO/ELC...
BLC/WDR
OFF
BLC...
WDR...
ON...
ELC...
BLC...
WDR...
SETUP
MENU
COLORE/B/N
COLORE/B/N...
/AUTO.../EXT...
SHUTTER
OFF/ 1/100~1/10K
OFF/ AUTO
X2~X160
OFF/BASSO/ALTO
MOVIMENTO
M.LENTO/LENTO
/NORM/VELOC/
M.VELOC
BIL BIANCO
ATW/AWC/MANU...
SYNC
INT/LINE...
SPECIALE
EXIT
ESCI/SALVA/
PRESET
AGC
...
B/N...
EST...
MANU...
SPECIAL...
20 21
DC...
AUTO...
LINE...
ACTIVITY DET
ID CAMERAAND POSIZIONE
SETUP
DC IRIS SETUP
ELC
LIVELLO SETUP
BLC AREA SETUP
BASSO...ALTO...
SINISTRA...DESTRA...
CENTRO...
LIVELLO SETUP
FLICKERLESS SETUP
BURST ON/OFF
BURST ON/OFF
LIVELLO DURATION
BURST ON/OFF
3200K/5600K/UTIL
ROSSO, BLU SETUP
FASE SETUP
BAUD RATE, INVERSO,
POSI/NEGA DETTAGLIO,
ACTIVITY DET...
PRIVACY...
PRIVACY...
PRIVACYTYPE &
ZONA SETUP
ZONA SETUP
SENSITIVITY SETUP
ID CAMERA
Questo menu di ID CAMERA designa un ID CAMERA sullo schermo di
monitor collegato alla camenra. Se accende il menu ID CAMERA e premere
la chiave [ENTER], il sotto-schermo sarà apparire di designata un ID
CAMERA. Il ID CAMERA può essere composito di lettere, numeri, testi
speciali, o un combinazione di questa sopra ai digitali. Il ID CAMERA
designata può essere collocato al altro posto come desiderato da usando il
sottomenu.
ID CAMERA ON...
IRIS DC...
BLC/WDR OFF
COLORE/ B/N
SHUTTER OFF
AGC OFF
BIL BIANCO ATW
SYNC INT
SPECIALE ...
USCITA ESCI
COLORE
Se premere
la Chiave
(ID CAMERA)
A B C D E F G H I J K L
M N O P Q R S T U V W
X Y Z 0 1 2 3 4 5 6 7 8 9
SP
POSIZIONE...
[Enter]
RET
....................
: ! - + * ( ) /
❿❿➛➛
SP
I
Page 96

IRIS
Questa CAMERA ha una funzione IRIS per controllo automatico del livello
della luminosità attraverso il radiazione dell’intensità. Il ALC può selezionare
il livello DC IRIS, VIDEO IRIS e ELC LIVELLO.
❿ DC...
Se selezionare il menu DC e premere la chiave [ENTER], il sotto
schermo sarà apparire per mettere il livello della luminosità. Ecco può
mettere il livello della luminosità da premendo la chiave LEFT o RIGHT
nel menu LIVELLO. Il setting di Level è disponibile solo da usando il
lente DC IRIS. Poi, deve mette l’interruttore della selezione ALC LENS
sul lato della camera nella posizione “DC”.
ID CAMERA ON...
IRIS DC...
BLC/WDR OFF
COLORE/ B/N
SHUTTER OFF
AGC OFF
BIL BIANCO ATW
SYNC INT
SPECIALE ...
USCITA ESCI
COLORE
Se premere
la Chiave
(IRIS/DC)
[Enter]
LIVELLO (0) ----I---RET
❿ VIDEO
Questo è uasto i lenti VIDEO è in uso. Deve usare il registore variabile
attacato al IRIS LIVELLO LENS per il controllo. Poi mette l’interruttore
della selezione sulla camera del lato in posizione “VIDEO”.
ID CAMERA OFF
IRIS VIDEO
BLC/WDR OFF
COLORE/ B/N
SHUTTER OFF
AGC OFF
BIL BIANCO ATW
SYNC INT
SPECIALE ...
USCITA ESCI
COLORE
❿ ELC...
Questo menu controlla il Livello Otturatore Velocità Alta entro un raggio
limitato nel caso di troppo radizione d’intensività dal esterno metre
usando il lente Manuale. Se selezionare il ELC nel menu IRIS e premere
la chiave [ENTER], il sotto schermo seguente sarà apparire. Ecco può
mettere il livello da premendo la chiave LEFT o RIGHT.
ID CAMERA ON...
IRIS ELC...
BLC/WDR OFF
COLORE/ B/N
SHUTTER OFF
AGC OFF
BIL BIANCO ATW
SYNC INT
SPECIALE ...
USCITA ESCI
COLORE
Se premere
la Chiave
(IRIS/ELC)
[Enter]
LIVELLO (0) ----I---RET
II
22 23
Page 97

BLC/WDR
❿ WDR...
La camera WDR è stato dell’arte per allargare lo schermo profitto
efficacemente per facendo i foto di una finestra in un edificio. Per farla
breve questo rinvenire tanto l’interno quanto l’esterno degli stati come
loro sono chiaramente. Se preme Chiave [ENTER] può installare la
funzione FLICKERLESS ed installare il LIVELLO WDR.
ID CAMERA OFF
IRIS DC...
BLC/WDR WDR...
COLORE/ B/N
SHUTTER OFF
AGC OFF
BIL BIANCO ATW
SYNC INT
SPECIALE ...
USCITA ESCI
❖
Quando installa la funzione WDR, può installarare LIVELLO del DC
COLORE
Se premere
la Chiave
IRIS.
(WDR)
LIVELLO L ----I----H
[Enter]
FLICKERLESS OFF
RET
❿ BLC...
Se usare una camera ordinaria quando c’è un intenso e l’illuminazione
concentrato dietro un oggetto, la luce retro sarà l’ombra dell’immagine
sullo schermo del monitor. Il funzione BLC impedisce come un effetto
della luce retro per assicurare uno immagine chiaro sotto gli ambiento
dell’illuminazione d’intero. Con uso le chiave destra ed sinistra può
installare 5 campi già installato BASS…, ALTO…,DESTRA…
SINISTRA….CENTRP. Se selezionare il BASSO . nel menu BLC e
premere la chave [ENTER], sarà potere certificare l’area BASSO già è
messo.
ID CAMERA ON...
IRIS ELC
BLC/WDR BLC...
COLORE/ B/N
SHUTTER OFF
AGC OFF
BIL BIANCO ATW
SYNC INT
SPECIALE ...
USCITA ESCI
COLORE
Se premere
la Chiave
[Enter]
Se premere
la Chiave
[Enter]
(BLC)
ZONA BASSO...
RET
II
24 25
Page 98
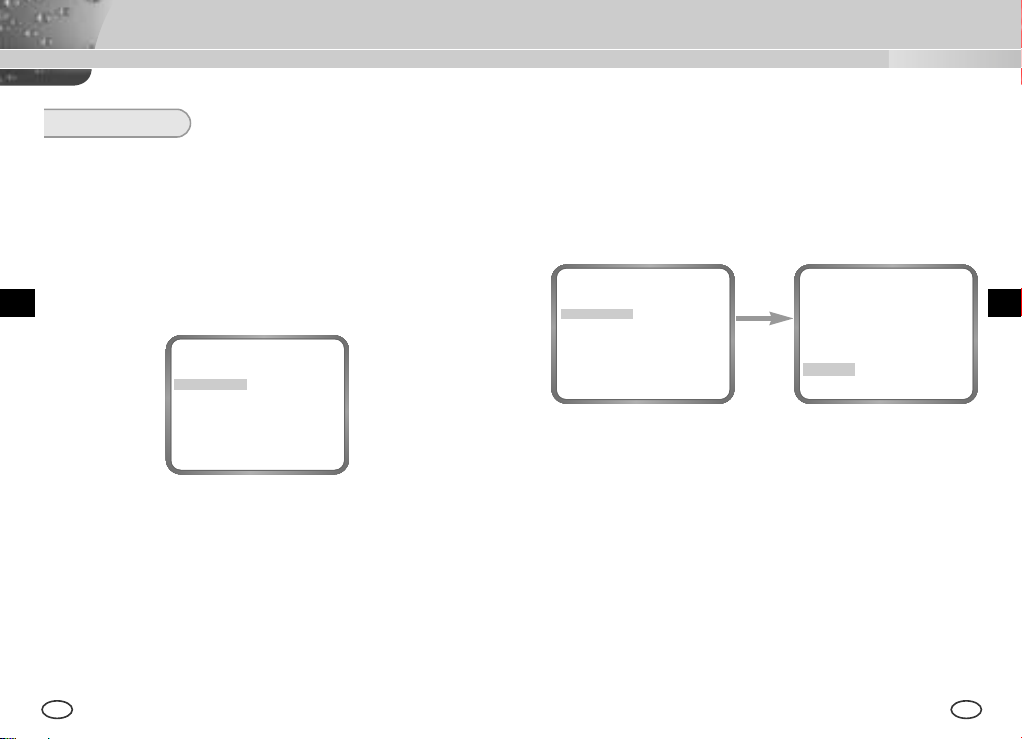
COLORE / B/N
Il menu COLORE/ByNgirare il Filtro IR(Infrarosso) on o off. Negli ambienti
dell’illuminazione debole, il modo B/N sarà spento il Filtro IR e la sensitività
sarà essere così alto come dellla camera B/N. Altrimenti, il modo B/N sarà
accendere il Filtro IR e la sensitività sarà ritornare al normale per ricoprire
lo schermo normale.
❿ COLORE
In questo modo, la camera output dell’imagine video solo in colore.
ID CAMERA ON...
IRIS DC...
BLC/WDR OFF
COLORE/ B/N
SHUTTER OFF
AGC OFF
BIL BIANCO ATW
SYNC INT
SPECIALE ...
USCITA ESCI
COLORE
❿ B/N...
Questo è il Filtro IR di Modo OFF in nero e bianco.(la sensività alta
piace la camera B/N) Se selezionare il B/N…e premere il chave [Enter],
lo schermo di sottomenu B/N sarà apparire. Deve potere a mandare la
segnale BURST da acceso o spento in questo menu.
ID CAMERA ON...
IRIS DC...
BLC/WDR OFF
COLORE/ B/N
SHUTTER OFF
AGC OFF
BIL BIANCO --SYNC INT
SPECIALE ...
USCITA ESCI
B/N...
Se premere
la Chiave
(B/N)
[Enter]
BURST ON
RET
II
26 27
Page 99

❿ AUTO...
Questo menu automaticamente convertire il Modo COLORE nel Modo
B/N o viceversa secondo l’illuminazione. Negli ambienti dell’illuminazione
devole, spengere il Filtro IR per alzare sensibilità, altrimenti accendere il
Filtro IR a bassare sensibilità.
Se selezionare il menu AUTO e premere la chiave [Enter], Il Controllo
B/N LEVEL del sottomenu AUTO B/N sarà apparire sullo schermo menu.
Sarà potere a mandare fuori la segnale BURST da accso o spento in
questo menu, setup il DURATATIME per conversione, o setup il livello di
luminosità standard per convertendo il modo COLORE nel modo B/N.
ID CAMERA ON...
IRIS DC...
BLC/WDR OFF
COLORE/ B/N
SHUTTER OFF
AGC --BIL BIANCO ATW
SYNC INT
SPECIALE ...
USCITA ESCI
AUTO...
Se premere
la Chiave
(AUTO B/N)
BURST ON
LIVELLO BASSO
[Enter]
DURATA S ----I---- L
RET
❿ EST...
Questo menu automaticamente convertire il Modo COLORE nel Modo
B/N o viceversa secondo l’illuminazione con un sensore esteriore. Se
selzionare il menu USCITAe premere la chiave [Enter], il sottomenu
EXTERNAL B/N sarà apparire sul menu di schermo. Sarà potere a
mandare fuori la segnale BURST da accendo o spento in questo menu.
ID CAMERA ON...
IRIS DC...
BLC/WDR OFF
COLORE/ B/N
SHUTTER OFF
AGC OFF
BIL BIANCO ATW
SYNC INT
SPECIALE ...
USCITA ESCI
EST...
Se premere
la Chiave
(ESTERNO B/N)
[Enter]
BURST ON
RET
II
28 29
Page 100

SHUTTER
Il menu SHUTTER setup la velocità alta elettronico della velocità d’otturatore, la
velocità d’otturatore della velocità devole AUTO. La velocità alta elettronica
d’otturatore coprire la velocità d’otturatore 7 da 1/100 a 1/10K secondi e è usato
solitamente per imaginando presto oggetti movimentando. Tutti due la velocità
devole d’otturatore e la velocità debole d’otturatore AUTO coprire 10 velocite
oda x2 a 160, che rallentare la velocità d’otturatore fare più pulito e più chiaro
l’immagine dello schermo che ha preso nell’illuminazione di buio. Se vuole
mostrare la velocià d’otturatore automaticamente secondo il grado dell’oscurità
da sondando la radiazione della intensità, per favore selezionare la velocità
debole AUTO.
AGC/MOVIMENTO
❿ AGC
Il menu AGC alleggerire lo schermo sotto la luminosità standard perche
l’oggetto preso nell’illuminazione scuro. Setting up il menu AGC è
disponibile solo nell’uno o l’altro modo High Speed Shutter o modo OFF.
Se premere la chiave LEFT o RIGHT per arrivare la posizione BASSO o
ALTO, la funzione AGC sarà cominciare attivamdo. BASSO è usato per
il AGC GAIN inferiore mentre ALTO è usato per il AGC GAIN superiore.
Quando il menu COLORE/B/Nè auto, l’articolo di menu AGC indica ---,
AGC GAUN Massimo fissa ALTO.
II
ID CAMERA ON...
IRIS DC...
BLC/WDR OFF
COLORE/ B/N
SHUTTER OFF
AGC --BIL BIANCO ATW
SYNC INT
SPECIALE ...
USCITA ESCI
AUTO...
ID CAMERA ON...
IRIS DC...
BLC/WDR OFF
COLORE/ B/N
SHUTTER OFF
AGC --BIL BIANCO ATW
SYNC INT
SPECIALE ...
USCITA ESCI
AUTO...
Se mantere di premendo la chiave LEFT o RIGHT, la velocità seguente
appare in sequenza.
OFF→AUTO X2 →AUTO X4 →AUTO X6 →AUTO X8 →AUTO X12 →AUTO X16 →AUTO
→
AUTO X40 →AUTO X80 →AUTO X160 →OFF→1/100(NTSC), 1/20(PAL) →1/250
X20
→
1/500 →1/1000 →1/2000 →1/4000 →1/10K →OFF
❖
Mentre il modo IRIS è in ELC o BLC/WDR, può usare solo i modi
seguente.
OFF→AUTO X2 →AUTO X4 →AUTO X6→AUTO X8 →AUTO X12 →AUTO X16
→
AUTO X20 →AUTO X40 →AUTO X80 →AUTO X160 →OFF
30 31
 Loading...