

Samsung SCC-5395 User Manual
Vari-focal Anti-Vandal Dome Camera
User’s Guide
ENG
SCC-B5394/5395
GER
FRE
SPA
ITA
TUR
3
Safety Precautions
CAUTION
RISK OF ELECTRIC
SHOCK DO NOT OPEN
CAUTION: TO REDUCE THE RISK OF
ELECTRIC SHOCK, DO NOT REMOVE REAR
COVER. NO USER SERVICEABLE PARTS
INSIDE. REFER TO QUALIFIED SERVICE
PERSONNEL.
This symbol indicates high voltage
is present inside. It is dangerous to
make any kind of contact with any
inside part of this product.
This symbol alerts you that important
literature concerning operation and
maintenance has been included with
this product.
To prevent damage which may result in fire
or electric shock hazard, do not expose this
appliance to rain or moisture.
WARNING
1. Be sure to use only the standard adapter
that is specified in the specification
sheet. Using any other adapter could
cause fire, electrical shock, or damage
to the product
2. Incorrectly connecting the power
supply or replacing battery may cause
explosion, fire, electric shock, or damage
to the product.
2
3.
Do not connect multiple cameras to a
single adapter. Exceeding the capacity may
cause abnormal heat generation or fire.
4. Securely plug the power cord into the
power receptacle. Insecure connection
may cause fire.
5. When installing the camera, fasten it
securely and firmly. A falling camera may
cause personal injury.
6. Do not place conductive objects (e.g.
screwdrivers, coins, metal things, etc.) or
containers filled with water on top of the
camera. Doing so may cause personal
injury due to fire, electric shock, or falling
objects.
7. Do not install the unit in humid, dusty, or
sooty locations. Doing so may cause fire
or electric shock.
8. If any unusual smells or smoke come
from the unit, stop using the product. In
such case, immediately disconnect the
power source and contact the service
center. Continued use in such a condition
may cause fire or electric shock.

ENG
3
9. If this product fails to operate normally,
contact the nearest service center. Never
disassemble or modify this product
in any way. (SAMSUNG is not liable
for problems caused by unauthorized
modifications or attempted repair.)
10. When cleaning, do not spray water
directly onto parts of the product. Doing
so may cause fire or electric shock.
CAUTION
1. Do not drop objects on the product or
apply strong shock to it. Keep away from
a location subject to excessive vibration
or magnetic interference.
2. If you want to relocate the already
installed product, be sure to turn off the
power and then move or reinstall it.
3. Remove the power plug from the
outlet when then there is a lightning.
Neglecting to do so may cause fire or
damage to the product.
4. Keep out of direct sunlight and heat
radiation sources. It may cause fire.
5. Install it in a place with good ventilation.
6. Avoid aiming the camera directly towards
extremely bright objects such as sun,
as this may damage the CCD image
sensor.
7. Apparatus shall not be exposed to
dripping or splashing and no objects
filled with liquids, such as vases, shall be
placed on the apparatus.
8. The Mains plug is used as a disconnect
device and shall stay readily operable at
any time.
FCC Statement
This device complies with part 15 of the FCC
Rules. Operation is subject to the following
two conditions:
1) This device may not cause harmful
interference, and
2) This device must accept any interference
received including interference that may
cause undesired operation.
Note
This equipment has been tested and found to
comply with the limits for a Class A digital device,
pursuant to part 15 of FCC Rules. These limits
are designed to provide reasonable protection
against harmful interference when the equipment
is operated in a commercial environment. This
equipment generates, uses, and can radiate
radio frequency energy and, if not installed
and used in accordance with the instruction
manual, may cause harmful interference to radio
communications. Operation of this equipment
in a residential area is likely to cause harmful
interference in which case the user will be
required to correct the interference at his own
expense.

5
Important Safety Instructions
1. Read these instructions.
2. Keep these instructions.
3. Heed all warnings.
4. Follow all instructions.
5. Do not use this apparatus near water.
6. Clean only with dry cloth.
7. Do not block any ventilation openings.
Install in accordance with the
manufacturer’s instructions.
8. Do not install near any heat sources
such as radiators, heat registers, or
other apparatus (including amplifiers)
that produce heat.
9. Do not defeat the safety purpose of
the polarized or grounding-type plug.
A polarized plug has two blades with
one wider than the other. A grounding
type plug has two blades and a third
grounding prong. The wide blade or the
third prong is provided for your safety.
If the provided plug does not fit into
your outlet, consult an electrician for
replacement of the obsolete outlet.
10. Protect the power cord from being
walked on or pinched particularly at
plugs, convenience receptacles, and the
point where they exit from the apparatus.
11. Only use attachments/accessories
specified by the manufacturer.
12. Use only with cart, stand, tripod, bracket,
or table specified by the manufacturer, or
sold with the apparatus.
4
13. Unplug this apparatus. When a cart is
used, use caution when moving the
cart/apparatus combination to avoid
injury from tip-over.
14. Refer all servicing to qualified service
personnel. Servicing is required when
the apparatus has been damaged in any
way, such as power-supply cord or plug
is damaged, liquid has been spilled or
objects have fallen into the apparatus,
the apparatus has been exposed to rain
or moisture, does not operate normally,
or been dropped.

ENG
5
Contents
Overview
Installation
Appendix A: Specifications for NTSC Standard
Appendix B: Specifications for PAL Standard
..............................................................................................
About this guide ............................................................................6
Product overview ...........................................................................6
Main features .................................................................................6
Components ...................................................................................7
Checking components in the package .......................................7
Components of your camera ......................................................8
..........................................................................................
Setting switches ............................................................................9
Setting function switches ............................................................9
Connecting cables and changing the settings ......................... 11
Installing camera .........................................................................12
Before installation .....................................................................12
About the installation holes ......................................................12
Installing on a pipe ...................................................................13
Installing the camera on the ceiling ..........................................15
Disassembling/assembling the Main body from the Case .......16
Adjusting the camera direction ..................................................17
.................
...............................
6
9
19
20

7
Overview
About this guide
❚
This user guide includes basic instructions for
the product. It is recommended that all users
read this guide before use.
This guide is divided as follows:
Chapter 1, “Overview,” introduces the user guide
and product related information. (This chapter)
Chapter 2, “Installation,” explains how to set and
install the product.
Appendix, “Specifications,” provides the
specifications of the product.
Product overview
❚
This anti-vandal dome camera provides
the superb monitoring features in bank and
business areas and it is a water-proof and
vibration-proof camera, which can strongly
endure an external impact. This vari-focal
camera provides the digital noise reduction
(DNR) and real-time CCD defect correction
features for implementing a clear image.
6
Main features
❚
Power: DC 12V/AC 24V
Special functions
Line lock (LL) control
Auto white balancing
Horizontal/vertical image reversing
Flickerless control
Low shutter speed control
Backlight compensation control
Automatic switching between color and black
& white modes
Equipped with vari-focal lens
Auto Iris function
Digital noise reduction (DNR)
Dynamic CCD defect compensation
ENG
7
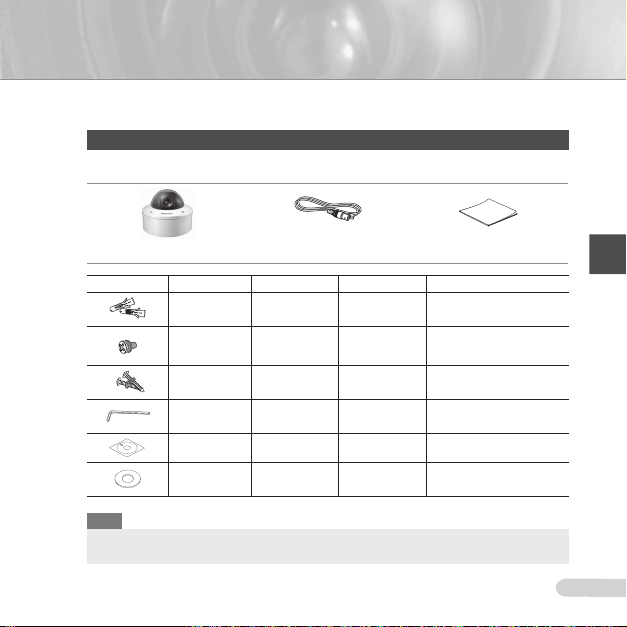
Components
❚
Checking components in the package
Please check your camera and accessories are included in the package. Those components
are as shown below:
Camera Test Monitor Cable User’s Guide
Image Part name Standard Quantity Usage
Plastic anchor HUD 5 4 (EA)
ASSY screw
machine
ASSY screw
tapping
L-Wrench TROX T-20 1
Template 1 Used for guiding the installation
Gasket-pipe hole T2.5 W56 1
BH M5 X L6.
(White+o-ring)
TH M4xL30 (Black+
o-ring)
Attach each piece to screw connection
holes for strengthening connection
Used for filling in the holes when
8
installing pipe and wall mount
Used when installing your camera
4
on the ceiling or wall
Used for assembling/
disassembling the Dome cover
Used to make a wiring hole when
installing the camera on the
ceiling or wall
Note
The test monitor cable is used to test the camera by connecting to a portable display. If you really want to
connect the camera to a monitoring display, use the BNC cable.
 Loading...