

Samsung SCB-6001 User Manual

HD-SDI CAMERA
User Manual
SCB-6001

HD-SDI Camera
User Manual
Copyright
©2013 Samsung Techwin Co., Ltd. All rights reserved.
Trademark
The name of thi s product is the reg istered tradema rk of Samsung Techwin C o., Ltd.
Other trad emarks mention ed in this manual are th e registered trad emark of their resp ective company.
Restriction
Samsung Techwi n Co., Ltd shall reser ve the copyrigh t of this document. U nder no circumst ances, this docu ment shall
be reproduced, distributed or changed, partially or wholly, without formal authorization of Samsung Techwin.
Disclaimer
Samsung Techwi n makes the best to ver ify the integri ty and correct ness of the conten ts in this document , but no
formal guar antee shall be provi ded. Use of this do cument and the subse quent results sha ll be entirely on the u ser’s own
responsib ility. Samsung Techwi n reserves the ri ght to change the con tents of this docum ent without prio r notice.
Warranty
If the produ ct does not opera te properly in norm al conditions, p lease let us know. S amsung Techwin will reso lve the
problem for f ree of charge. The wa rranty perio d is 3 years. However, the f ollowings are exclu ded:
• If the syste m behaves abnorma lly because you run a p rogram irreleva nt to the system oper ation.
• Deterior ated performan ce or natural worn -out in process o f time
Design and specifications are subject to change without prior notice.
is the regist ered logo of Samsun g Techwin Co., Ltd.

overview
IMPORTANT SAFETY INSTRUCTIONS
1. Read these instructions.
2. Keep these instructions.
3. Heed all warnings.
4. Follow all instructions.
5. Do not use this apparatus near water.
6. Clean only with dry cloth.
7. Do not block any ventilation openings, Install in accordance with the manufacturer’s
instructions.
8. Do not install near any heat sources such as radiators, heat registers, stoves, or other
apparatus (including amplifiers) that produce heat.
9. Do not defeat the safety purpose of the polarized or grounding-type plug. A polarized
plug has two blades with one wider than the other. A grounding type plug has two
blades and a third grounding prong. The wide blade or the third prong are provided for
your safety. If the provided plug does not fit into your outlet, consult an electrician for
replacement of the obsolete outlet.
10. Protect the power cord from being walked on or pinched particularly at plugs,
convenience receptacles, and the point where they exit from the apparatus.
11. Only use attachments/ accessories specified by the manufacturer.
12. Use only with the cart, stand, tripod, bracket, or table specified by
the manufacturer, or sold with the apparatus. When a cart is used,
use caution when moving the cart/apparatus combination to avoid
injury from tip-over.
13. Unplug this apparatus during lighting storms or when unused for
long periods of time.
14. Refer all servicing to qualified service personnel. Servicing is required when the
apparatus has been damaged in any way, such as power-supply cord or plug is
damaged, liquid has been spilled or objects have fallen into the apparatus, the apparatus
has been exposed to rain or moisture, does not operate normally, or has been dropped.
●
OVERVIEW
English _3

overview
WARNING
TO REDUCE THE RISK OF FIRE OR ELECTRIC SHOCK, DO NOT EXPOSE
THIS PRODUCT TO RAIN OR MOISTURE. DO NOT INSERT ANY METALLIC
OBJECT THROUGH THE VENTILATION GRILLS OR OTHER OPENNINGS
ON THE EQUIPMENT.
Apparatus shall not be exposed to dripping or splashing and that no objects
filled with liquids, such as vases, shall be placed on the apparatus.
CAUTION
CAUTION
RISK OF ELECTRIC SHOCK.
DO NOT OPEN
CAUTION
REFER SERVICING TO QUALIFIED SERVICE PERSONNEL.
: TO REDUCE THE RISK OF ELECTRIC SHOCK.
DO NOT REMOVE COVER (OR BACK).
NO USER SERVICEABLE PARTS INSIDE.
EXPLANATION OF GRAPHICAL SYMBOLS
The lightning flash with arrowhead symbol, within an
equilateral triangle, is intended to alert the user to the
presence of “dangerous voltage” within the product’s
enclosure that may be of sufficient magnitude to constitute a
risk of electric shock to persons.
The exclamation point within an equilateral triangle is intended
to alert the user to the presence of important operating
and maintenance (servicing) instructions in the literature
accompanying the product.
4_ overview

Class construction
An apparatus with CLASS construction shall be connected to a MAINS
socket outlet with a protective earthing connection.
Battery
Batteries(battery pack or batteries installed) shall not be exposed to excessive
heat such as sunshine, fire or the like.
Disconnection Device
Disconnect the main plug from the apparatus, if it’s defected. And please call
a repair man in your location.
When used outside of the U.S., it may be used HAR code with fittings of
an approved agency is employed.
CAUTION
These servicing instructions are for use by qualified service personnel only.
To reduce the risk of electric shock do not perform any servicing other than
that contained in the operating instructions unless you are qualified to do so.
Please use the input power with just one camera and other devices must not
be connected.
The BNC Out terminal of the product is provided for easier installation, and is
not recommended for monitoring purposes.
If you keep the BNC cable connected, a risk of lightening may cause damage
or malfunction to the product.
●
OVERVIEW
English _5

overview
Please read the following recommend safety precautions carefully.
yDo not place this apparatus on an uneven surface.
yDo not install on a surface where it is exposed to direct sunlight, near
heating equipment or heavy cold area.
yDo not place this apparatus near conductive material.
yDo not attempt to service this apparatus yourself.
yDo not place a glass of water on the product.
yDo not install near any magnetic sources.
yDo not block any ventilation openings.
yDo not place heavy items on the product.
yDo not expose the camera to radioactivity.
User’s Manual is a guidance book for how to use the products.
The meaning of the symbols are shown below.
yReference : In case of providing information for helping of product’s usages
yNotice : If there’s any possibility to occur any damages for the goods and
human caused by not following the instruction
Please read this manual for the safety before using of goods and keep it in
the safe place.
6_ overview

CONTENTS
OVERVIEW
3
INSTALLATION &
CONNECTION
13
OPERATING YOUR CAMERA
18
APPENDIX
35
3 Important Safety Instructions
8 Product Features
9 What’s Included
10 At a Glance
13 Mounting the Lens
15 Connecting with other Device
18 Menu Configuration
19 Menu Setup
35 Troubleshooting
36 Specification
38 Product Overview
●
OVERVIEW
English _7

overview
PRODUCT FEATURES
• Supports Full HD-SDI Video
By adopting a diagonal 6mm (1/3”) 2M pixel CMOS, the camera produces clear picture
quality.
• Excellent low-illumination image quality
By adopting high-sensitive colour CMOS, the camera provides clear image quality under a
severe low illumination condition of 0.017 Lux (with SENS-UP, 60x).
• SSNR3 (Samsung Super Noise Reduction) Function
The high-performance WN2 DSP chip effectively removes low-light gain noise and afterimage
to provide clear images even in dark environments.
•
Night (ICR)Day&
This camera has a function that automatically selects the mode that is appropriate for
daytime or night-time conditions. The COLOR mode operates in daytime conditions to
provide optimum colors, and B/W mode operates in night-time conditions to enhance the
definition of the image.
•
INTELLIGENCE
Once motion is detected, the camera sends an alert signal to the processing unit,
which, if used in conjunction with an optional alarm, can provide effective surveillance of
your property.
• SSDR (Samsung Super Dynamic Range)
For images with high contrast between bright and dark areas from difficult lighting conditions
such as backlighting, this camera selectively illuminates darker areas while retaining the same
light level for brighter areas to even out the overall brightness.
• Miscellaneous Functions
HLC(High Light Compensation), SENS-UP, FLIP (H/V-REV), D-ZOOM and PRIVACY
functions are provided.
• OSD
By providing multi-lingual user-friendly OSD (On-screen Display) menu, the camera provides
easy handling of the camera.
8_ overview
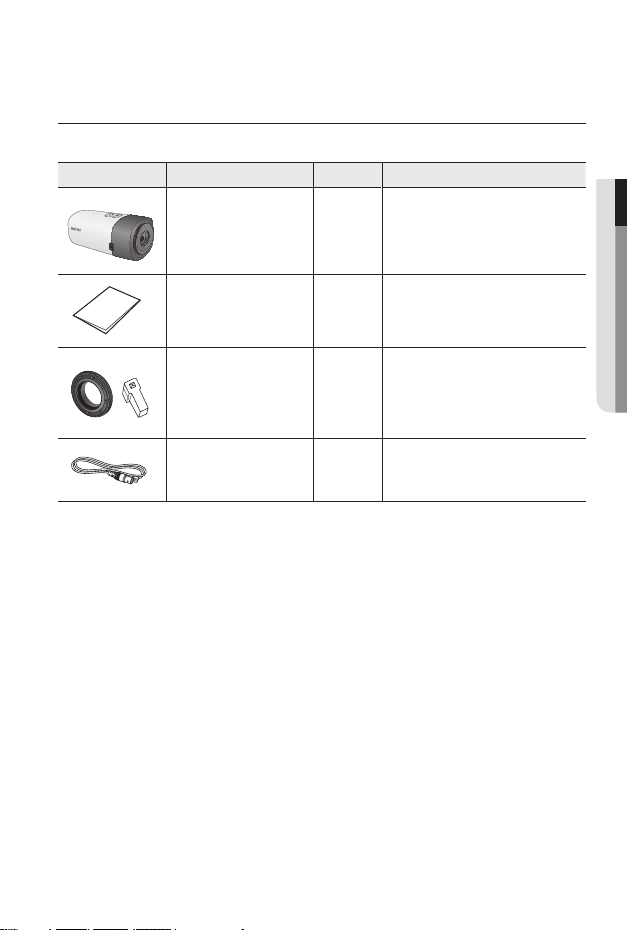
WHAT’S INCLUDED
Check if the main unit and all the following accessories are included in the product package.
Appearance Item Name Quantity Description
Camera
Quick Manual 1
1
●
OVERVIEW
C Mount Adapter
Auto Iris Lens Connector
Cable for the testing monitor 1
1
Used to install the camera lens
Used to test the camera connection to a
portable display device
English _9

overview
AT A GLANCE
Front Side
Item Description
Mounting Bracket
a
Screw Hole
Auto Iris Lens
b
(Optional)
Auto Iris Lens
c
Connector
a
b
c
Used to fix the camera on a bracket or mounting bracket.
The screw size : use this screw to fix the mounting
bracket .
1/4” -20UNC(20THREAD)
L : 4.5mm±0.2mm (ISO Standard), or
0.197” (ASA Standard)
Installed on the lens adaptor.
Used to supply power and output signal to control the iris of the lens.
`
M
10_ overview
Mounting Bracket is not included.
For more information to use mounting bracket, refer to the product’s documentation.
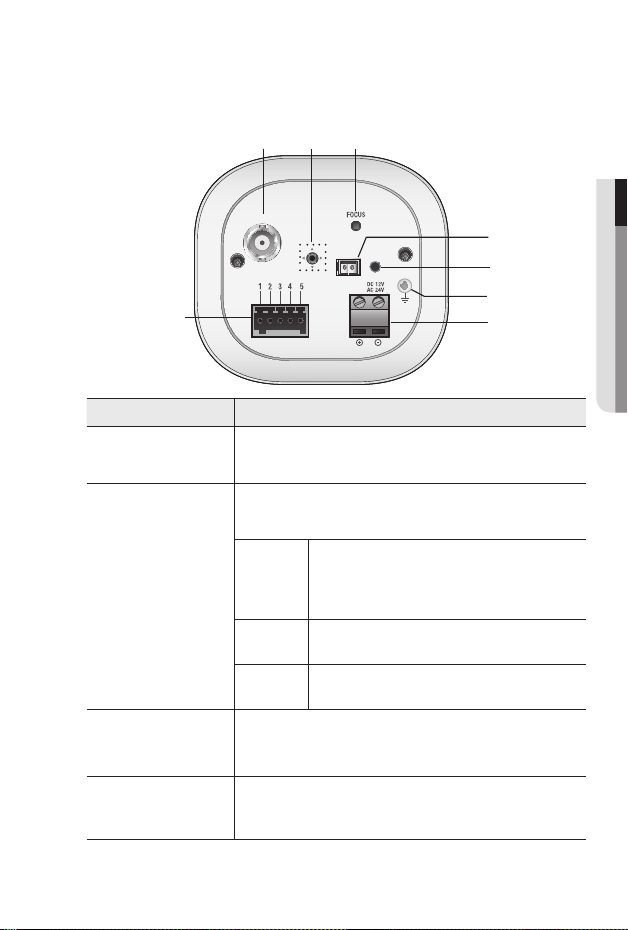
Rear Side
a b c
HD-SDI
VIDEO
POWER
1 : GND
2 : EXT_D/N
3 : MD_OUT
h
Item Description
4 : RS_485+
5 : RS_485-
d
e
f
g
●
OVERVIEW
HD-SDI Video Out
a
terminal
SETUP Switch
b
Focus Adjustment
c
Button
VIDEO
d
BNC terminal for HD-SDI video signal output.
The switch is used for setting and adjusting the camera’s functions and
properties.
Move this switch left or right to move the cursor or change
_/+
$/%
@
Press and hold this button more than 2 seconds to
adjustment to the default flange back position.
Short to press this button to fit the focus automatically.
Analogue video output terminal of Video.
Use a monitor cable for testing the camera with a portable display.
(for installation)
the value in the menu.
When menu is off, use this switch for adjusting focus.
Move this switch up or down to move the cursor in the
menu.
Press the switch to set the function in menu. To move to a submenu item in the menu, press this switch.
restores the focus
English _11

overview
Item Description
Power LED This lamp turns green when the proper power is applied to the camera.
e
GND Used for earth-grounding.
f
Power Port Used to plug the power cable.
g
I/O Port
h
1:GND Earth-grounding port for external signal.
2:EXT_D/N External signal input port for Day/Night mode setup.
3:MD_OUT Output port that signals when a motion is detected.
4:RS-485+ Signal port for RS-485 communication.
5:RS-485– Signal port for RS-485 communication.
12_ overview
 Loading...