

Page 1
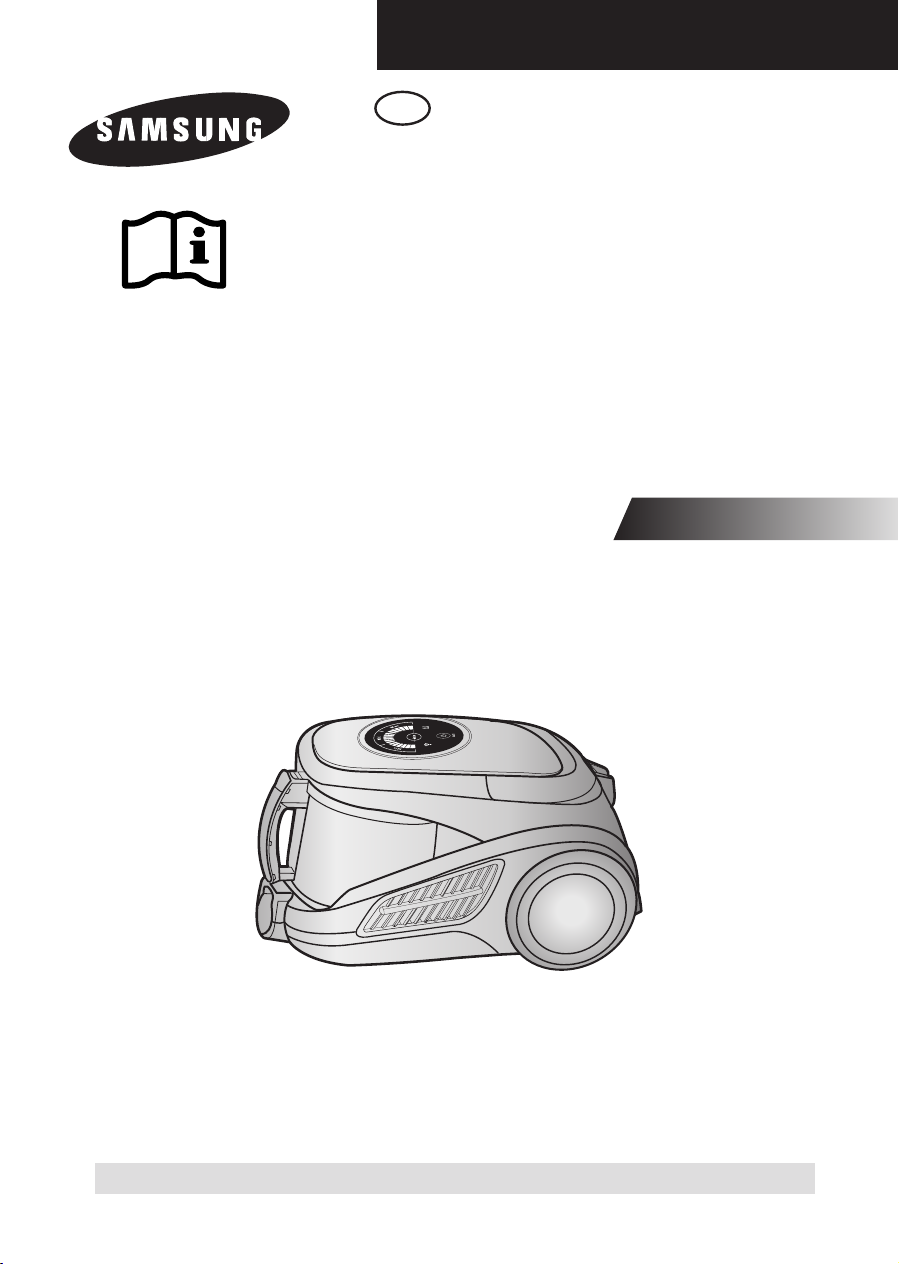
EN
Operating Instructions
VACUUM CLEANER
❈
Before operating this unit, please read the instructions carefully.
❈ Indoor use only.
Register your product at www.samsung.com/global/register
Page 2

IMPORTANT SAFEGUARDS
1. Read all instructions carefully. Before switching on, make sure that the voltage of your
electricity supply is the same as that indicated on the rating plate on the bottom of the
cleaner.
2. WARNING : Do not use the vacuum cleaner when rug or floor is wet.
Do not use to suck up water.
3. Close supervision is necessary when any appliance is used by or near children. Do not
allow the vacuum cleaner to be used as a toy. Do not allow the vacuum cleaner to run
unattended at any time. Use the vacuum cleaner only for its intended use as described in
these instructions.
4. Do not use the vacuum cleaner without a dust bin. Empty the dust bin before it is full in
order to maintain the best efficiency.
5. Do not use the vacuum cleaner to pick up matches, live ashes or cigarette butts. Keep
the vacuum cleaner away from stoves and other heat sources. Heat can deform and discolour the plastic parts of the unit.
6. Avoid picking up hard, sharp objects with the vacuum cleaner as they may damage the
cleaner parts. Do not stand on the hose assembly. Do not put weight on the hose. Do not
block the suction or the exhaust port.
7. Switch the vacuum cleaner off on the body of the machine before unplugging from the
electrical outlet. Disconnect the plug from the electrical outlet before changing the dust
bag or dust container. To avoid damage, please remove the plug by grasping the plug
itself, not by pulling on the cord.
8. This appliance is not intended for use by young persons or infirm persons without
supervision unless they are adequately supervised by a responsible person to ensure
that they can use the appliance safely.
Young children should be supervised to ensure that they do not play with the appliance.
9. The plug must be removed from the socket outlet before cleaning or maintaining the
appliance.
10. The use of an extension cord is not recommended.
11. If your vacuum cleaner is not operating correctly, switch off the power supply and consult
an authorized service agent.
12. If the supply cord is damaged, it must be replaced by the manufacturer or its service
agent or a similarly qualified person in order to avoid a hazard.
13. Don’t carry the vacuum cleaner by holding the hose.
Use the handle on the vacuum cleaner set.
14. Unplug the cleaner when not in use. Turn off the power switch before unplugging.
EN-1
Page 3
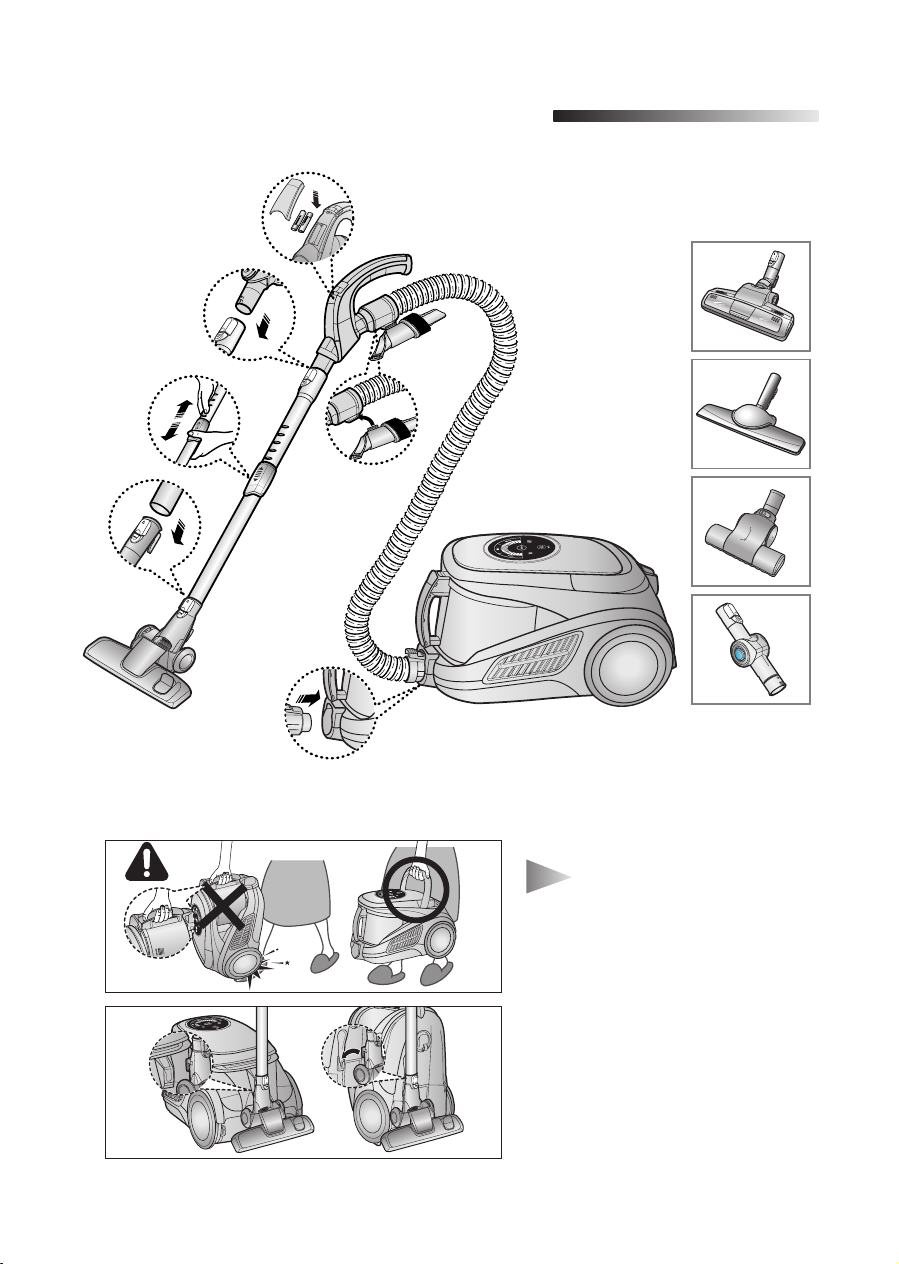
ASSEMBLING THE CLEANER
1
OPTION
Features may vary according to model. Refer to 5,6 page.
▼
CAUTION
Please do not press the button of
dust bin handle when carrying
machine.
For storage, park the floor nozzle.
EN-2
Page 4
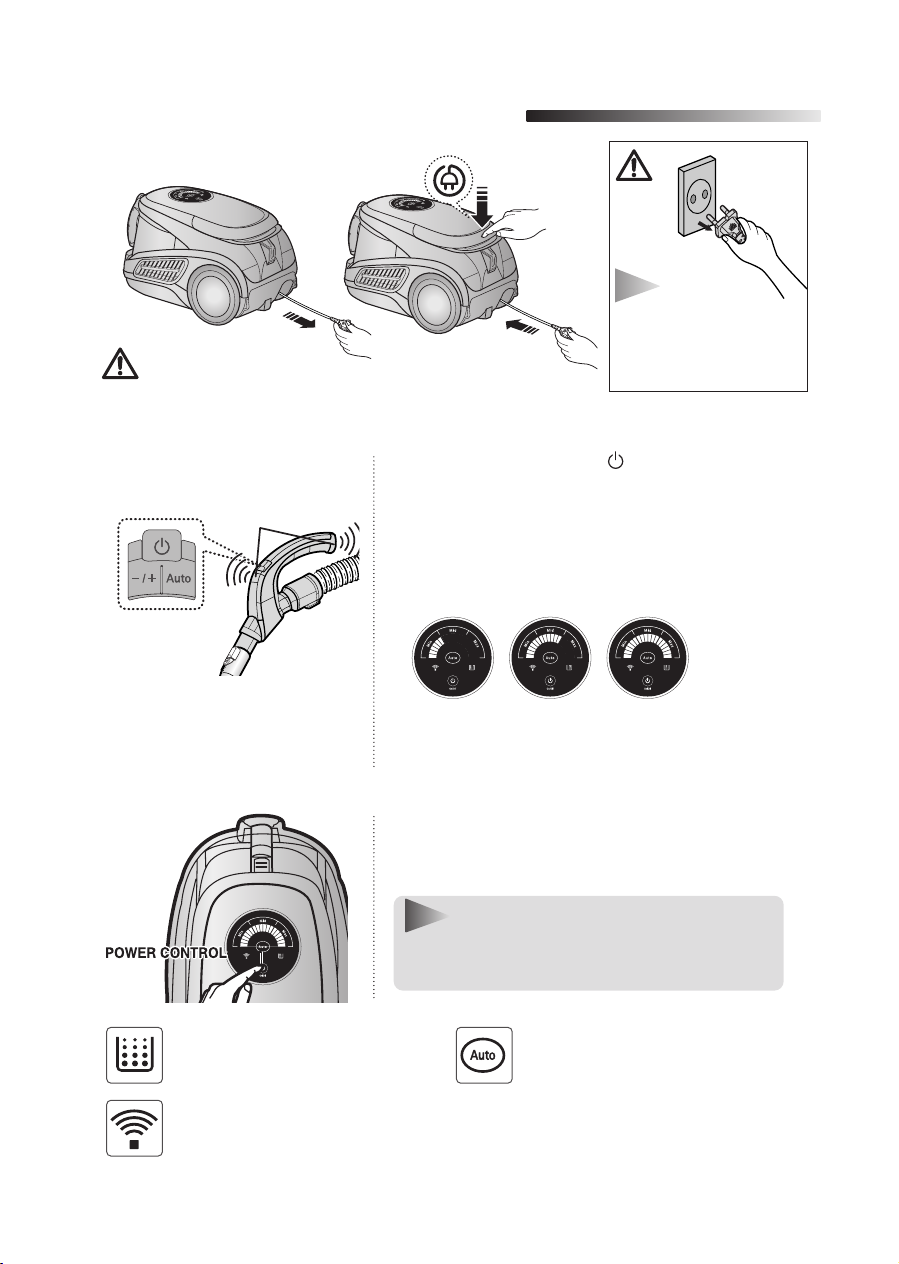
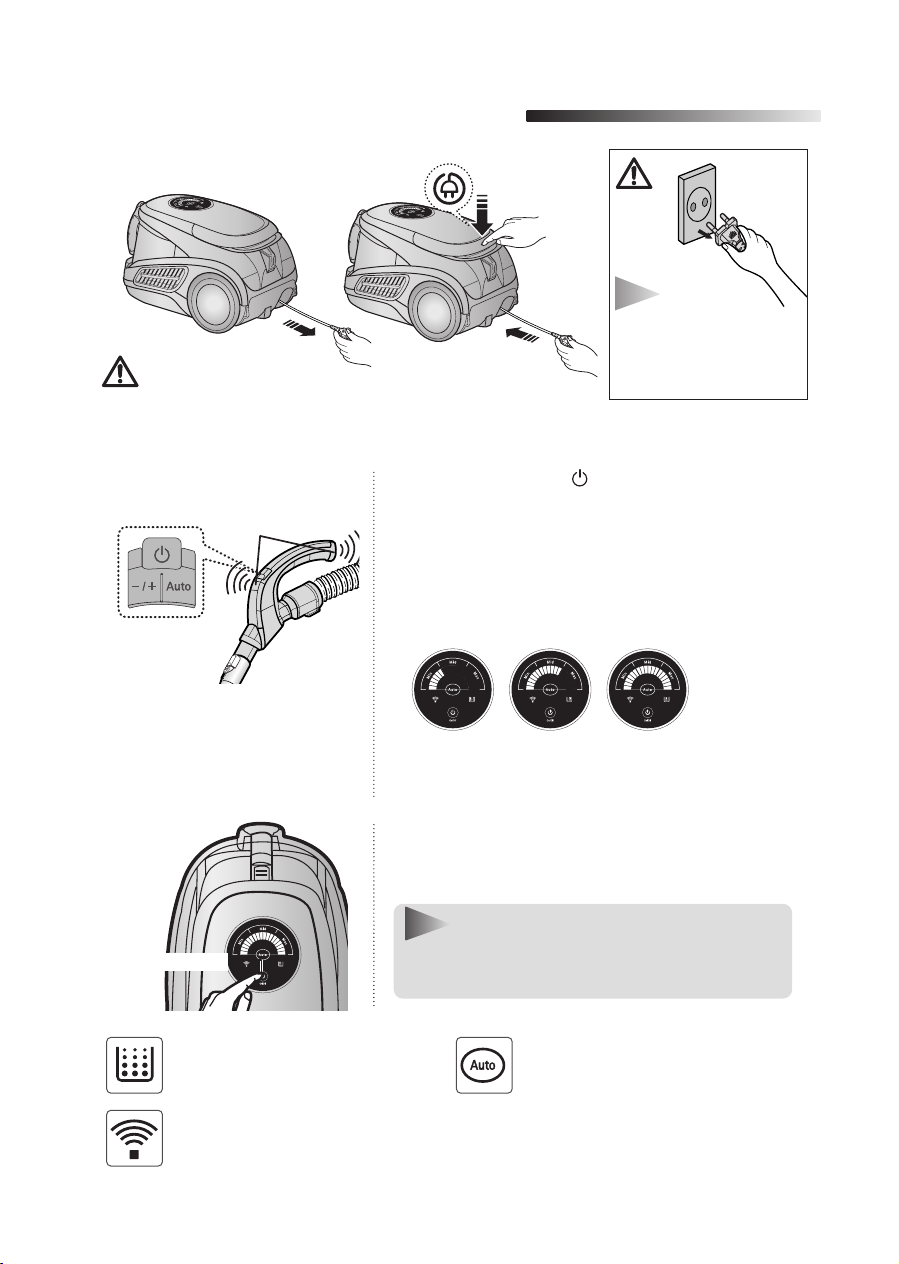
OPERATING THE CLEANER
2
2-1. POWER CORD
Please make sure your
cable is fully extended
before use.
2-2. POWER CONTROL (INFRARED CONTROL)
1. Vacuum cleaner ON/OFF ( )
- HOSE
SENDER
HANDLE CONTROL
[The cleaner is controlled by using
infrared signals.]
Press the ON/OFF button to operate the vacuum cleaner.
Press again to stop the vacuum cleaner.
2. Vacuum cleaner MODE ( -/+)
Press the MODE button repeatedly to select the correct
mode.
(ON) MIN → MID → MAX
3. Using Auto mode
Press the Auto button to operate the vacuum
cleaner automatically.
NOTE
When removing the
plug from the
electrical outlet, grasp
the plug, not the cord.
- BODY
Press the power control button repeatedly to select the
correct mode.
(ON(MAX) → OFF)
NOTE : If the remote handle control is not
The filter light is illuminated when the dust
pack requires checking or emptying.
An audio signal will also sound.
The IR light indicates the part that
receives the infra-red signal from the
handle control.
EN-3
working, the cleaner can be operated
using the control button on the body of
the machine.
This indicates that the automatic suction
mode is selected. The level of suction is
indicated by the LED display.
Page 5
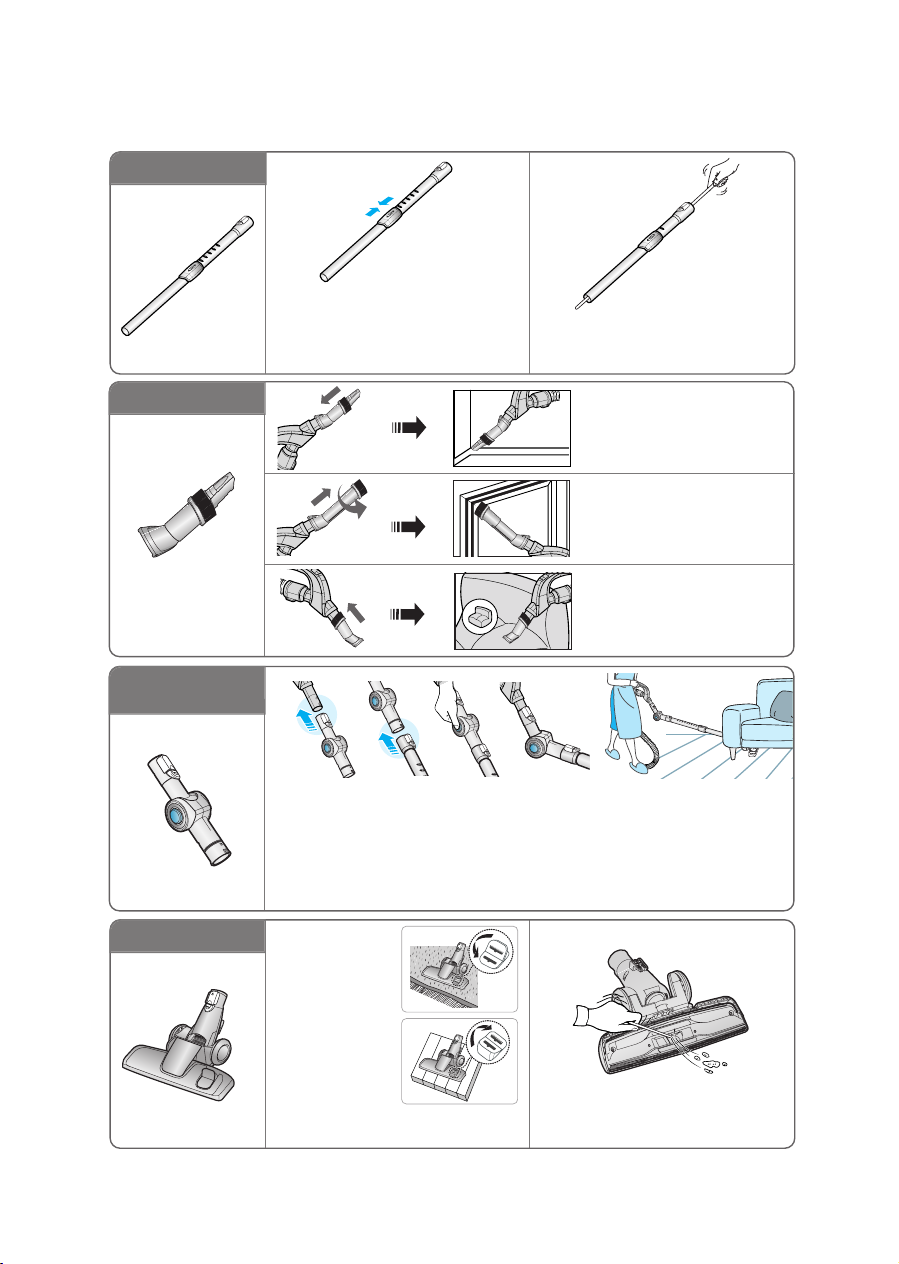
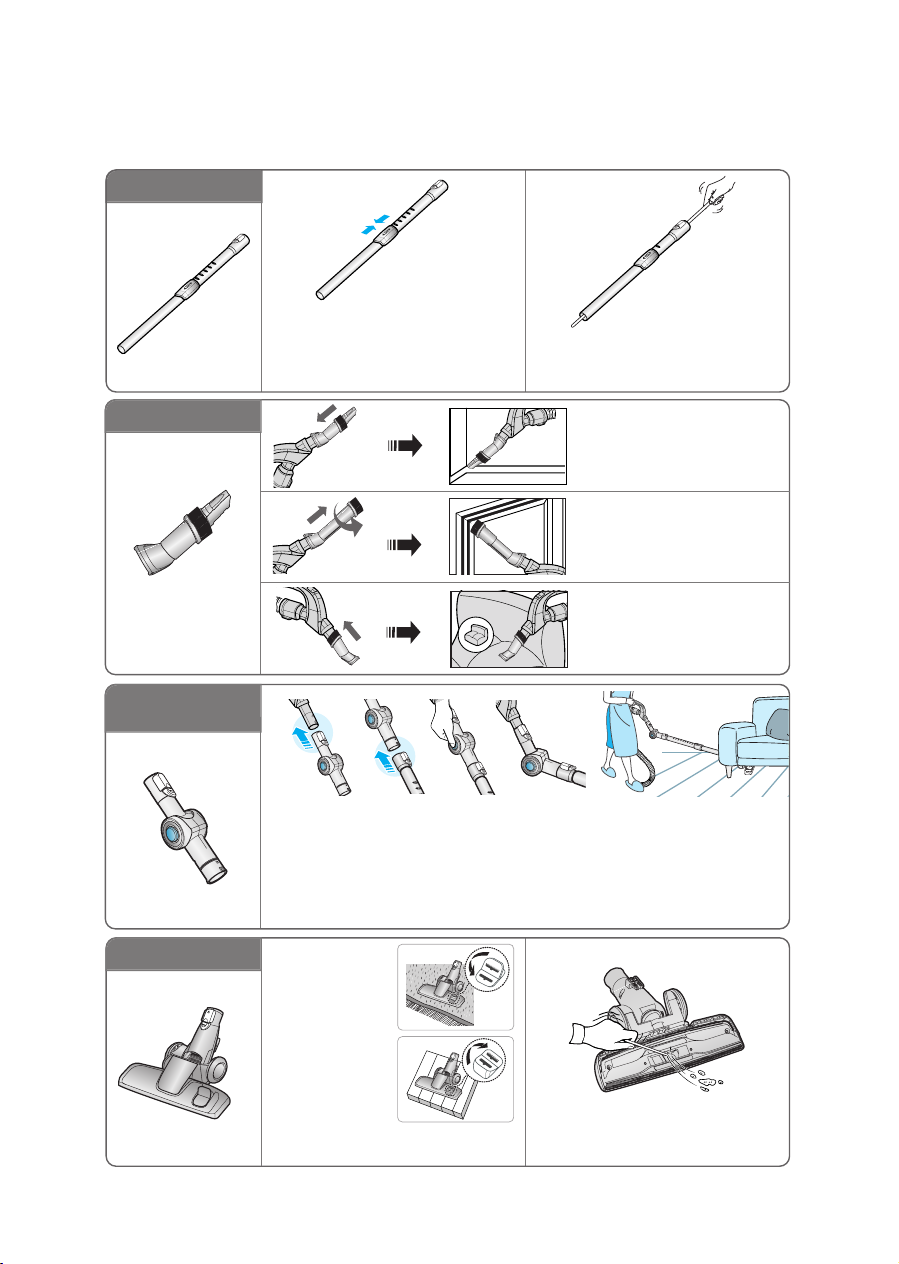
2-3. HOW TO USE AND MAINTAIN THE ACCESSORIES
Features may vary according to model.
▼
PIPE
Adjust the length of the telescopic
pipe by sliding the length control button located in the center of the telescopic pipe back and forth.
To check for blockages, separate the telescopic pipe and adjust to shorten. This allows
for easier removal of waste clogging the tube.
ACCESSORY
All in one Accessory
ELBOW EXTENDING TUBE
(OPTION)
OPTION
Push the accessory on to
the end of the hose handle.
Pull out and turn the dusting brush for cleaning delicate areas.
To use the upholstery tool,
push the accessory on to
the end of the hose handle
in the opposite direction.
1234 5
1. Connect the elbow extending tube to connecting part for hose knob and
telescopic pipe.
2. Fit the telescopic pipe to the lower part of the elbow extending tube.
3. Press the PUSH button.
4. With the PUSH button pressed, the elbow extending tube is folded.
5. Using the elbow extending tube allows hard to reach areas (e.g. under
furniture)to be cleaned without having to kneel down.
▲▲
▲
Carpet
Cleaning
▲
Floor
Cleaning
Adjust the inlet lever according to the
floor surface.
EN-4
Remove waste matter completely if
the inlet is blocked.
Page 6
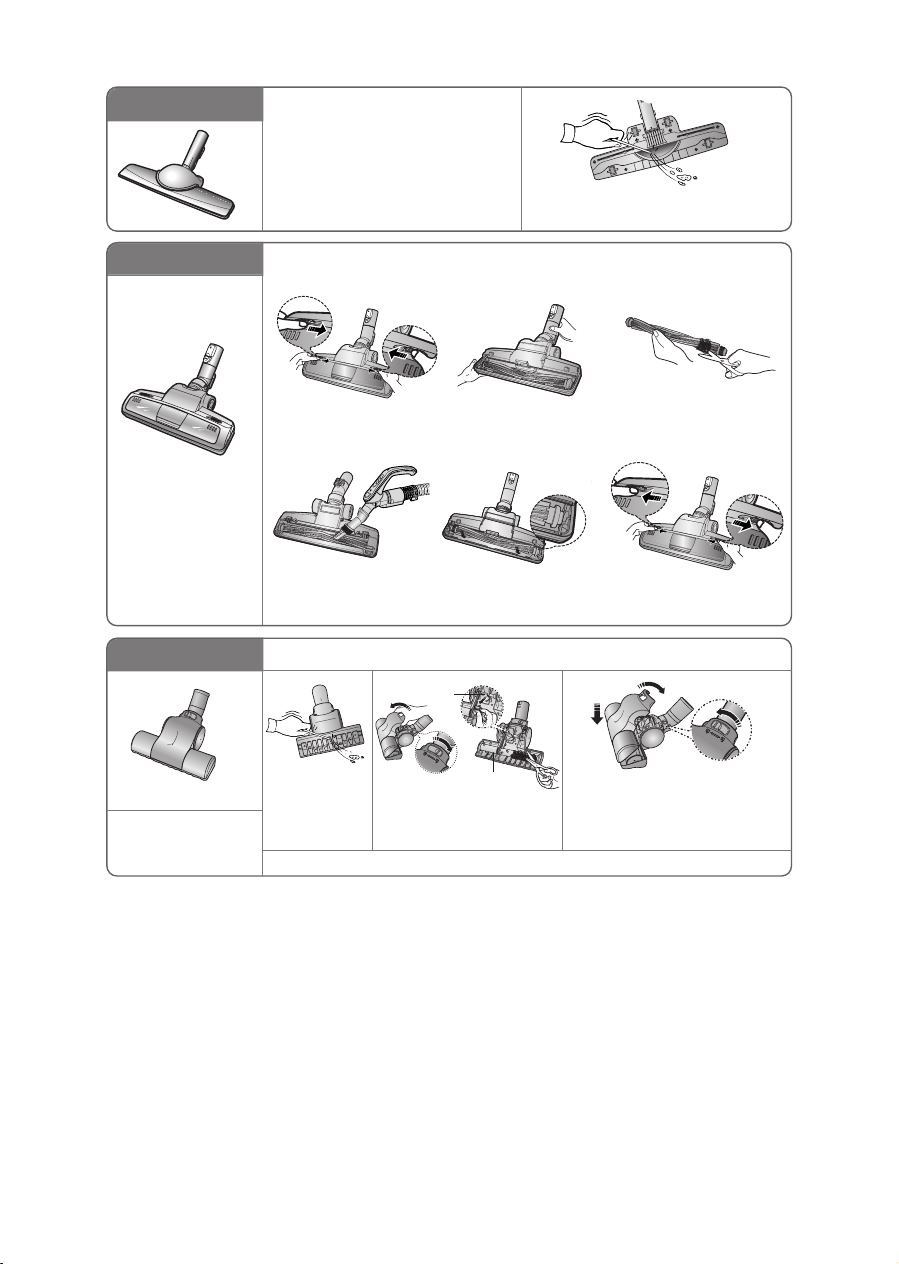
OPTION
Vacuum dust in wide area at once
Remove waste matter completely
if the inlet is blocked.
OPTION
For improved
pick-up of pet hair
and fibre on carpets
OPTION
Brush for blanket
For picking up pet hair
and fibre on upholstery
and bed linen.
Frequent vacuuming of hair or pet fur may cause a falling-off of the rotation due to
matters tangled around the drum. In this case, clean the drum with care.
1
Push the Open button of
the transparent screen
cover to separate the cover.
4
Remove dust inside the
brush housing using a
dry duster or crevice tool.
Clogs on turbine keeps brush from turning, and in this case, take care of it.
Remove waste
matter completely when
inlet is blocked.
Warning : Use for bedclothes only. Be cautious not to damage brush during unclogging.
Turn the lock button to
‘UNLOCK’, and remove
waste matter.
2 3
Remove the brushbar
from the transparent
screen.
5
Insert brushbar into
rotating belt and
assemble.
Turbine
Brush
Remove waste matter
such as dust and hair
tangled around the
brushbar using scissors.
6
Click the transparent
screen cover back into
place to reassemble.
To reassemble, align the cover to the
front of the main body and close. After
closing the cover, ensure that the lock
button is turned to the ‘LOCK’ position.
EN-5
Page 7
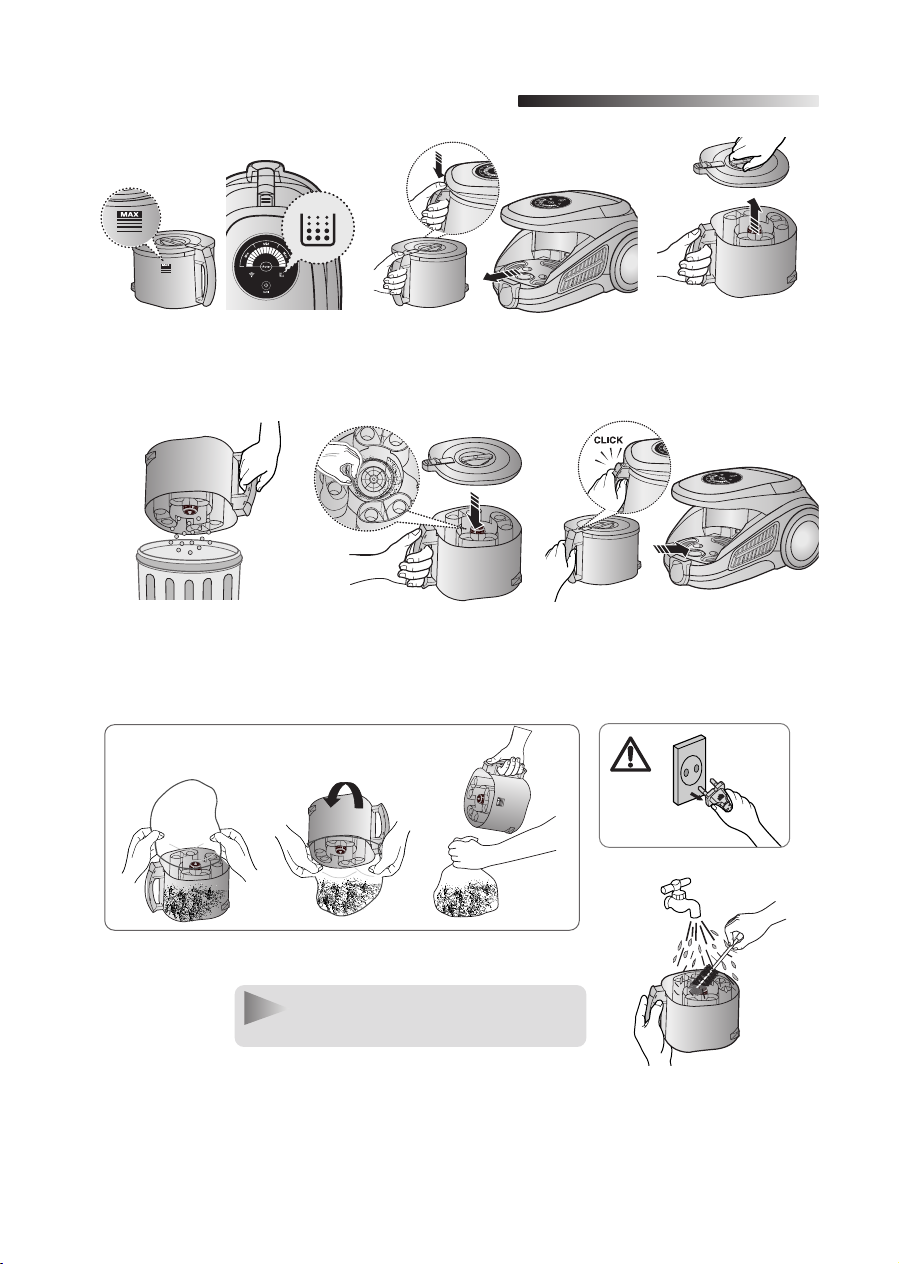
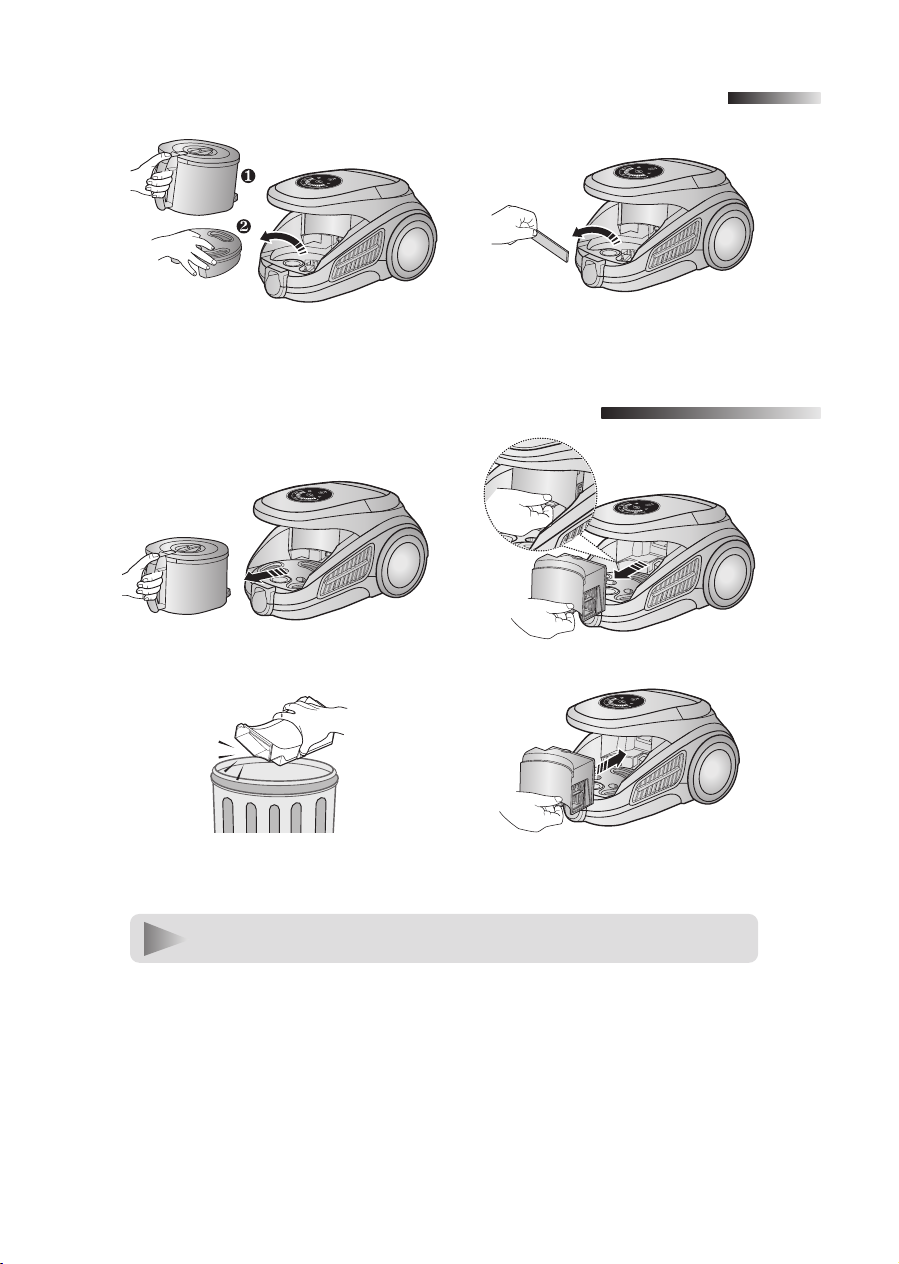
EMPTYING THE DUST BIN
3
1 2 3
Once dust reaches the DUST
FULL mark, empty the dust bin
4 5 6
Throw the dust away
in the bin.
- Empty into a plastic bag
(recommended for asthma/allergy sufferers)
After empting the DUST
BIN, remove the obstacles
like hair, fur on the cap of
the DUST BIN.
Take the dust bin out by
pressing the button.
Separate the dust
bin cover.
Before use, push the dust bin
into the main body of the vacuum cleaner until you hear
the "click" sound.
NOTE
You may rinse the dust bin with cold water.
EN-6
Page 8
CLEANING THE DUST PACK
4
4-1. WHEN TO CLEAN THE DUST PACK
- Please, check the dust bin and dust pack if suction is noticeably reduced
or the filter check indicator lamp turns on after empting the dust bin.
The lamp will illuminate to signal
when suction is reduced.
If the light comes on, please clean the
DUST BIN as shown.
4-2. CLEANING THE DUST BIN
1
Detach the DUST BIN.
2
After empting the DUST BIN,
remove the obstacles like hair, fur
on the cap of the DUST BIN.
NOTE :
Please, check the filter
check indicator lamp (4-3)
as shown in the following
illustrations if the lamp is
still illuminated even after
cleaning the dust bin.
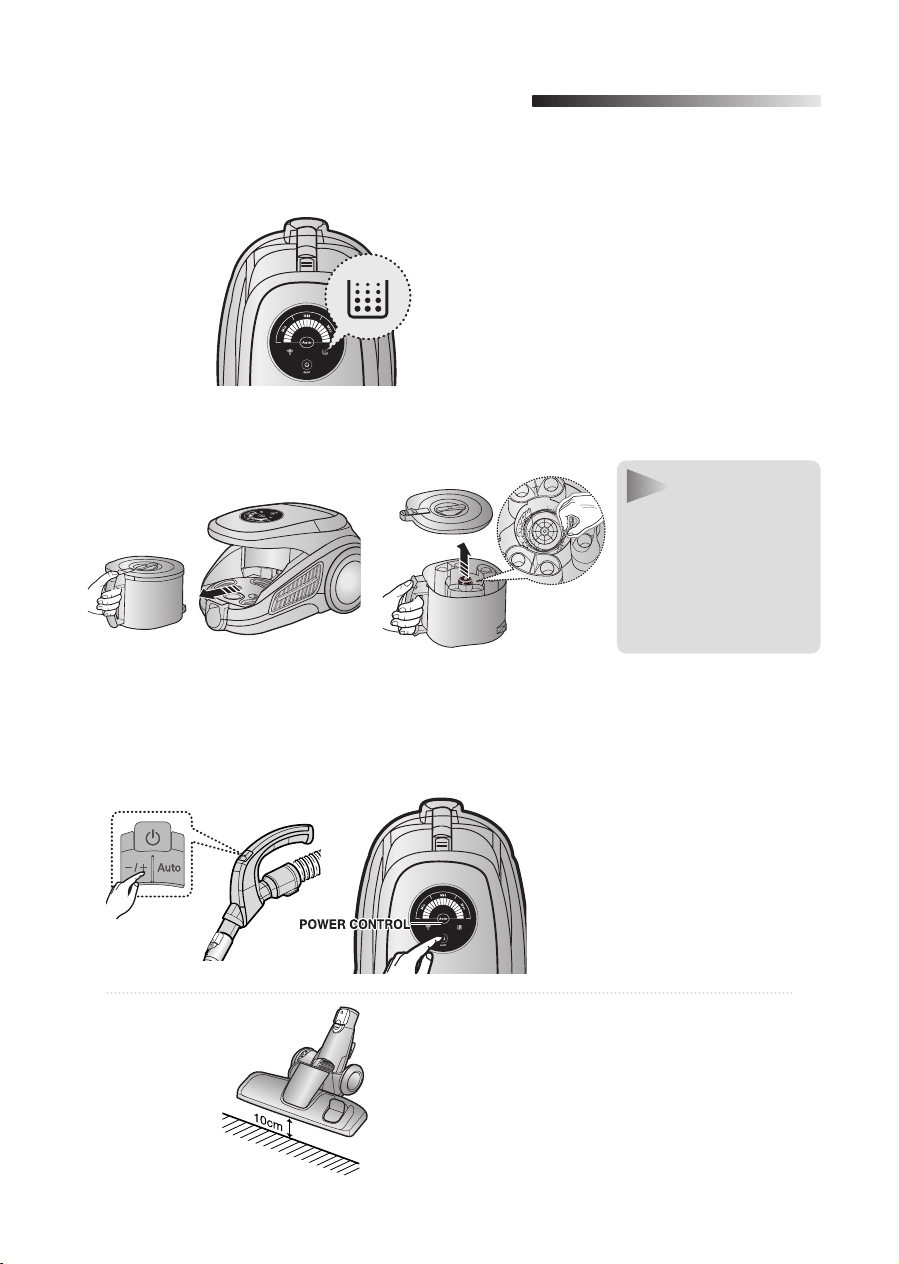
4-3. CHECKING THE FILTER CHECK INDICATOR LAMP
Turn the vacuum power to 'MAX'
HANDLE CONTROL
If the filter check indicator turns
red with the inlet floating 10cm
above flat floor, clean the DUST
PACK.
EN-7
Page 9
4-4. CLEANING THE DUST PACK
12
Remove the dust bin and dust
pack as shown.
Remove the fixed frame
of the dust pack cover.
3
Remove the sponge pad from
the dust pack.
4
Wash the sponge and the filter
of the dust pack with water.
Let the sponge and dust pack
dry in the shade for more than
12 hours.
7 8
65
Put the sponge into
the dust pack.
Before reassembly,
align the dust pack cover
and dust pack correctly.
NOTE :
Make sure the filter is completely dry before putting it back into the vacuum
cleaner. Allow 12 hours for it to dry.
Put the assembled dust pack
into the main body.
EN-8
Page 10
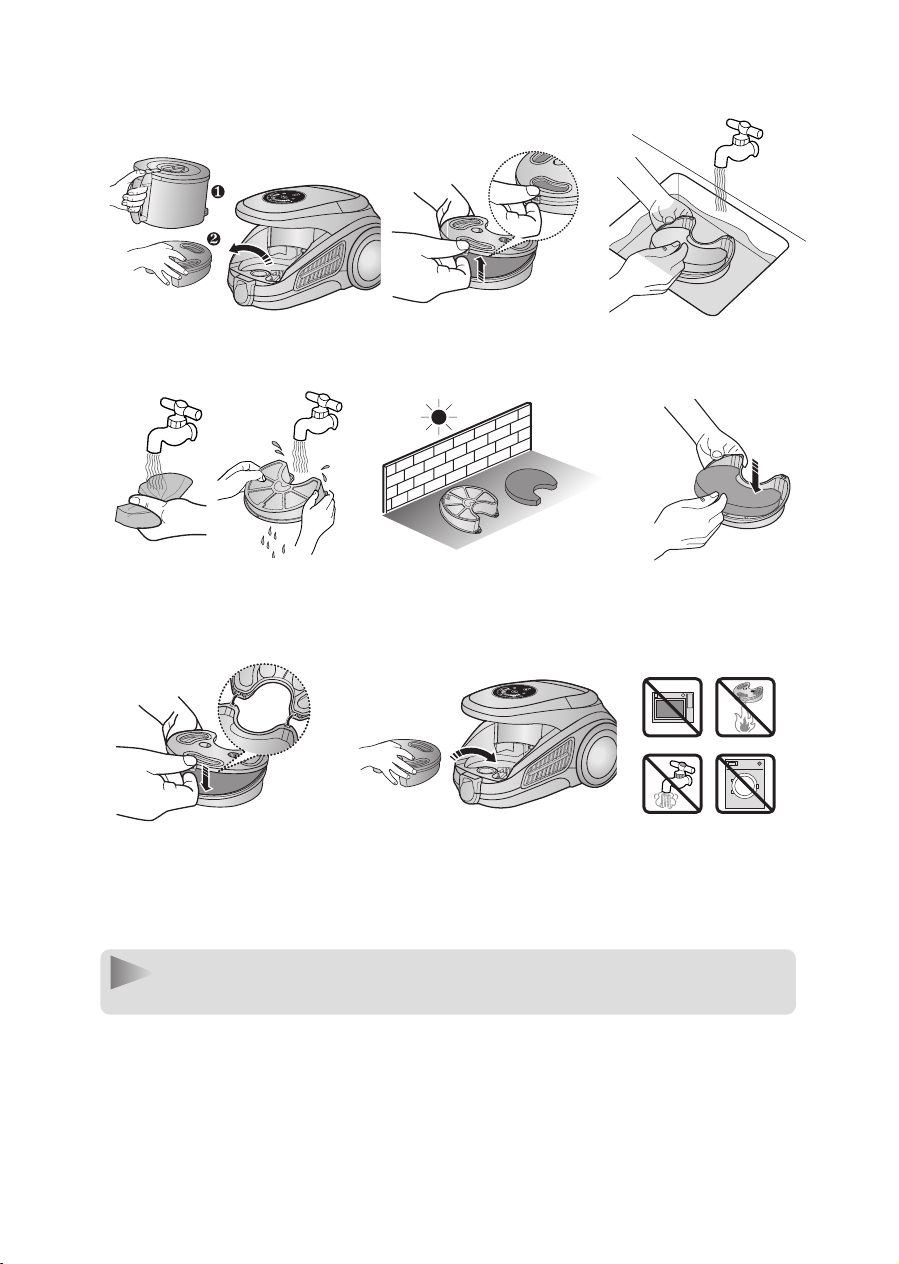
CLEANING THE MOTOR PROTECTION FILTER
5
Take out both the dust bin and the
dust pack.
CLEANING THE OUTLET FILTER
6
1
Remove the dust bin.
3
Dust the HEPA filter.
4
Remove the motor protection filter from
the vacuum cleaner. Shake and tap the
dust from it and put back in machine.
2
Put the HEPA filter into the main body
until you hear a ‘click’ sound.
Pull out the HEPA Filter as shown.
NOTE : Replacement filters are available at your local Samsung distributor.
EN-9
Page 11
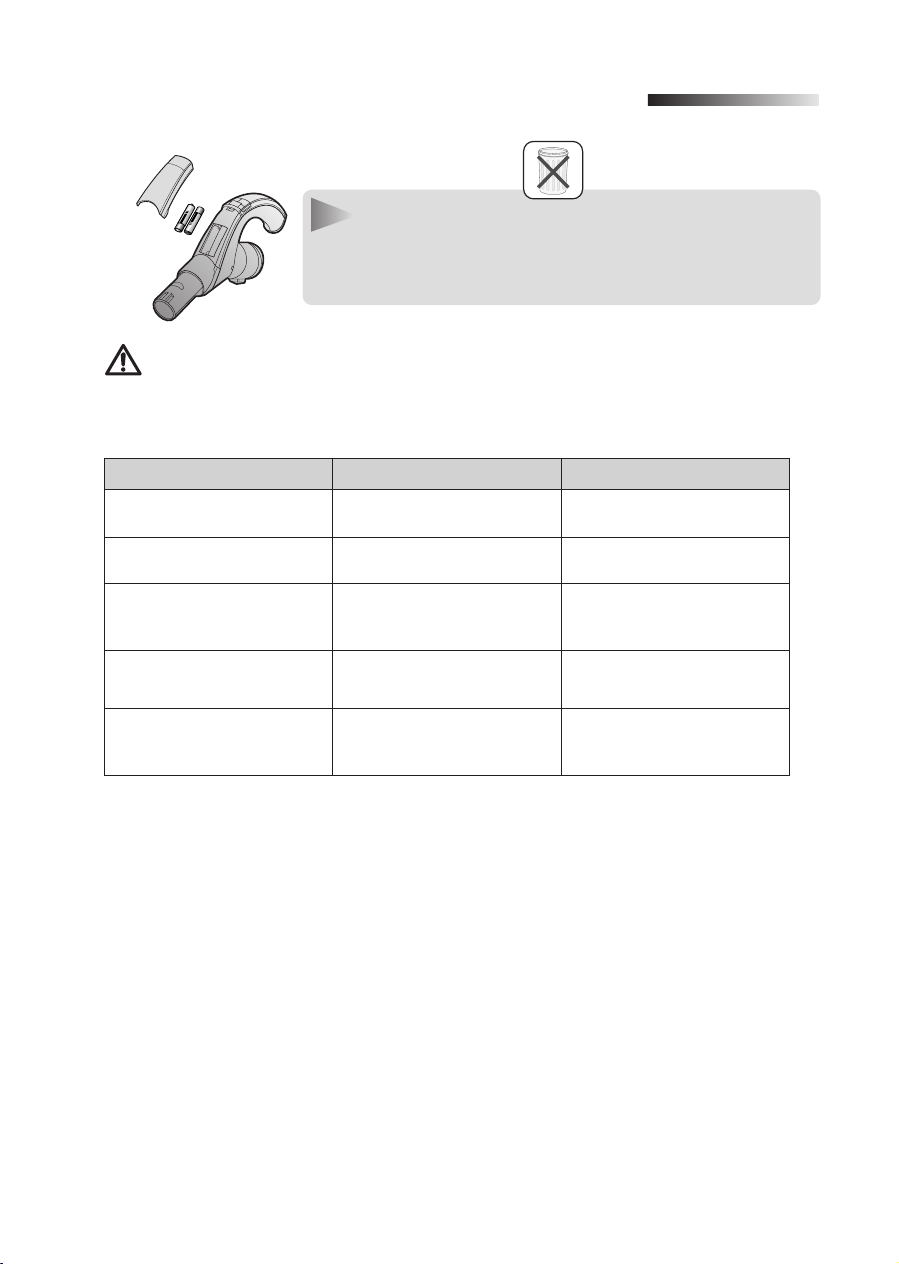
CHANGE THE BATTERY(OPTIONAL)
7
BATTERY TYPE : AAA Size
NOTE
1. When the vacuum cleaner does not work, replace the batteries.
If the problem persists, please contact our authorized dealer.
2. Use 2 batteries of size AAA.
WARNING
1. Never disassemble or recharge the batteries.
2. Never heat up the batteries or throw them into fire.
- IF YOU HAVE A PROBLEM
PROBLEM CAUSE REMEDY 0
Motor does not start.
Suction force is gradually
decreasing.
Cord does not rewind fully. Check that the cord is not
Vacuum cleaner does not
pick up dirt.
Low or decreasing suction
This Vacuum cleaner is approved the following.
EMC Directive : 89/336/EEC, 92/31/EEC and 93/68/EEC
Low Voltage Safety Directive : 73/23/EEC and 93/68/EEC
No power supply.
Thermal cut-out.
Nozzle, suction hose or tube
is blocked.
twisted or wound unevenly.
Crack or hole in hose.
Filter is full of dust.
Check cable, plug and socket.
Leave to cool.
Check for blockage and
remove it.
Pull the cord out 2-3m and
push the cord rewind button.
Check hose and replace if
required.
Please check filter and, if
necessary, clean as illustrated in the instructions.
3. Do not reverse (+),(-) poles.
4. Dispose of the batteries properly.
EN-10
Page 12
SV
Bruksanvisning
DAMMSUGARE
❈
Läs anvisningarna noga innan du börjar använda den här enheten.
❈
Endast för inomhusanvändning.
Vinn när du registrerar din produkt på www.samsung.com/global/register
Page 13

VIKTIGA SÄKERHETSFÖRESKRIFTER
1. Läs alla anvisningar noga. Innan du startar dammsugaren kontrollerar du att spänningen
i det eluttag du använder är samma som anges på märkplåten på dammsugarens
undersida.
2. VARNING : Använd inte dammsugaren om mattan eller golvet är blött.
Sug inte upp vatten.
3. Noggrann övervakning är nödvändig om apparaten används av eller i närheten av barn.
Låt inte barn leka med dammsugaren. Låt inte dammsugaren vara igång utan uppsikt.
Använd dammsugaren endast till det den är avsedd för, vilket beskrivs i dessa anvisningar.
4. Använd inte dammsugaren utan dammkammaren. Töm dammkammaren innan den är
full för att bibehålla bästa effekt.
5. Använd inte dammsugaren till att suga upp tändstickor, glödande aska eller cigarettfimpar. Håll dammsugaren borta från spisar och andra värmekällor.Värme kan deformera
och missfärga enhetens plastdetaljer.
6. Undvik att plocka upp hårda, vassa föremål med dammsugaren eftersom de kan skada
delar i den. Stå inte på dammsugarslangen. Ställ inga vikter på dammsugarslangen.
Blockera inte insugs- eller utblåsvägar
7. Stäng av dammsugaren med knappen på maskinen innan du kopplar bort den från eluttaget. Ta bort kontakten från eluttaget innan du byter dammpåse eller dammbehållare.
För att undvika skada ska du hålla i kontakten när du tar bort den från eluttaget. Dra inte
i sladden.
8. Denna apparat är inte avsedda att användas av barn eller svaga personer utan övervakning om de inte övervakas av någon annan ansvarig. Detta för att säkerställa att de
kan använda apparaten på ett säkert sätt.
Små barn ska övervakas för att säkerställa att de inte leker med apparaten.
9. Kontakten måste tas bort från eluttaget före rengöring eller underhåll av apparaten.
10. Du rekommenderas att inte använda en förlängningssladd.
11. Om dammsugaren inte fungerar på rätt sätt, stänger du av strömmen och kontaktar ett
auktoriserat serviceombud.
12. För att undvika risker måste skadade nätsladdar bytas ut av tillverkaren, dess serviceombud eller annan kvalificerad person.
13. Bär inte dammsugaren genom att hålla i dammsugarslangen.
Använd handtaget på dammsugaren.
14. Koppla bort dammsugaren från elnätet när den inte används. Stäng av strömbrytaren
innan du kopplar ur nätsladden.
SV-1
Page 14

SÄTTA IHOP DAMMSUGAREN
1
TILLBEHÖR
Funktioner kan variera beroende på modell. Se sidan 5 och 6.
▼
IAKTTAG FÖRSIKTIGHET
Tryck inte ner knappen på
dammkammarens handtag när
du bär maskinen.
Vid förvaring placerar du munstycket enligt bilden.
SV-2
Page 15
ANVÄNDA DAMMSUGAREN
2
2-1. NÄTKABEL
Kontrollera att kabeln är
helt utdragen före
användning.
2-2. STRÖMBRYTARE (INFRARÖD KONTROLL)
– DAMMSUGARSLANG
SÄNDARE
REGLAGE PÅ HANDTAG
[Dammsugaren kan manövreras med hjälp
av infraröda signaler.]
– HUVUDENHET
1. Dammsugare PÅ/AV( )
Tryck på PÅ/AV-knappen för att använda dammsugaren. Tryck igen på knappen för att stoppa dammsugaren.
2. Dammsugarläge MODE (-/+)
Tryck flera gånger på MODE-knappen för att ställa in
rätt läge. (PÅ) MIN → MID → MAX
3. Använda automatiskt läge.
Tryck på Auto-knappen för att reglera sugkraften
automatiskt.
OBS!
När du tar bort kontakten från eluttaget ska
du hålla i kontakten inte
i sladden.
STRÖMBRYTARE
Filterlampan tänds när dammpaketet
behöver kontrolleras eller tömmas.
Även en ljudsignal avges.
IR-lampan indikerar den del som tar
emot den infraröda signalen från
reglaget på handtaget.
Tryck flera gånger på strömbrytaren för att ställa in rätt
läge.
(PÅ(MAX)
→
AV)
OBS! : Om reglaget på handtaget inte funger-
ar, kan du manövrera dammsugaren
med hjälp av knapparna på huvudenheten.
Detta indikerar att automatiskt sugläge är
valt. Sugläget indikeras med en lampa.
SV-3
Page 16
2-3. HUR DU ANVÄNDER OCH UNDERHÅLLER TILLBEHÖREN
Funktioner kan variera beroende på modell.
▼
RÖR
Justera längden på teleskopröret
genom att skjuta knappen som du
justerar längden med i mitten
på teleskopröret bakåt och framåt.
TILLBEHÖR
Allt-i-ett-tillbehör
KNÄFÖRLÄNGNINGSRÖR
1234 5
(TILLVAL)
1. Anslut knäförlängningsröret till anslutningsdelen för slangen och
teleskopröret.
2. Passa in teleskopröret på den nedre delen av knäförlängningsröret.
3. Tryck på tryckknappen.
4. Med tryckknappen nedtryckt viks knäförlängningsröret.
5. Med hjälp av knäförlängningsröret kommer du åt områden (t ex under
möbler) som ska rengöras utan att du själv behöver gå ner på knä.
Dela teleskopröret och
korta ner det för att kontrollera om något blockerar det. Detta
gör det lättare att ta bort skräp som
blockerar i röret.
Skjut på tillbehöret på änden
av dammsugarslagens handtag.
Dra ut och vrid dammborsten
för att rengöra ömtåliga områden.
För att använda möbelverktyget, skjuter du på tillbehöret
på änden av dammsugarslangens handtag i motsatt riktning.
TILLBEHÖR
▲▲
▲
Mattrengöring
▲
Golvrengöring
Justera insugsspaken beroende på
typ av golvyta.
SV-4
Ta bort allt skräp om insuget är
blockerat.
Page 17

TILLBEHÖR
Damma med dammsugaren på stora
områden.
Ta bort allt skräp om insuget är
blockerat.
TILLBEHÖR
För att förbättra
upptagning av
djurhår och fibrer
och fibrer på mattor.
TILLBEHÖR
Om du ofta dammsuger upp hår från djur kan det börja ramla av från valsen
på grund av att material snärjs runt trumman.
I det här fallet rengör du varsamt valsen.
1
Tryck på öppningsknappen på det genomskinliga locket för att ta bort
locket.
4
Ta bort damm inuti
borsthöljet med hjälp av
en dammborste eller
smalt rörmunstycke.
Blockeringar i turbinen hindrar borsten från att vrida sig och det behöver då åtgärdas.
2 3
Ta bort borstvalsen från
höljet.
5 6
För in borstvalsen i den
roterande remmen och
montera den.
Turbin
Ta bort material som t ex
damm och hår som snott
sig runt borstvalsen med
hjälp av sax.
Sätt tillbaka det genomskinliga locket på dess
plats.
Borste för täcken
För att ta upp djurhår
och fibrer från möbeltyger och sänglinnen.
Ta bort allt
skräp när
insuget är
blockerat.
Varning
Vrid på låsknappen för att
låsa upp och ta bort skräp.
: Ska endast användas för sänglinne. Var försiktig så att du inte skadar borsten
när du tar bort skräp.
Borste
När du ska sätta ihop delarna placerar du locket på framsidan av huvuddelen och stänger det. När du har
stängt locket vrider du låsknappen för
att låsa fast locket.
SV-5
Page 18

TÖMMA DAMMKAMMAREN
3
1 2 3
Töm dammkammaren när
dammet har nått markeringen
DUST FULL.
4 5 6
Töm dammet i
soptunnan.
– Töm i en plastpåse
(rekommenderas för astmatiker och allergiker)
När du har tömt dammkammaren tar du bort hår, päls
och dylikt från dammkammarens övre del.
Ta bort dammkammaren genom
att trycka på knappen.
Ta bort locket på
dammkammaren.
Före användning trycker du tillbaka dammkammaren i dammsugarens huvudenhet tills du hör ett
klickande ljud.
OBS!
Du ska inte skölja dammkammaren med vatten.
SV-6
Page 19

RENGÖRA DAMMPAKETET
4
4-1. NÄR DU SKA RENGÖRA DAMMPAKETET
Kontrollera dammkammaren och dammpaketet om du upptäcker en märkbar försämring av sugkraften eller om kontrollampan för filter tänds efter
att du tömt dammkammaren.
Lampan tänds för att signalera att sugkraften
har minskat.
Om lampan tänds ska du rengöra
dammkammaren enligt dessa instruktioner
nedan.
4-2. RENGÖRA DAMMKAMMAREN
1
Ta bort dammkammaren När du har tömt dammkammaren
2
tar du bort hår, päls och dylikt
från dammkammarens övre del.
4-3. KONTROLLERA FILTERKONTROLLAMPAN
Ställ sugkraften på MAX
STRÖMBRYTARE
REGLAGE PÅ HANDTAG
Rengör dammpaketet om filterkontrollampan blir
röd när du håller insuget 10 cm ovanför ett plant
golv.
OBS!
Kontrollera filterkontrollampan (4-3) som visas i följande bild om lampan fortsätter att lysa även
efter att du rengjort
dammkammaren.
SV-7
Page 20

4-4. RENGÖRA DAMMPAKETET
12
Ta bort dammkammaren och
dammpaketet som visas.
Ta bort fästramen på
dammpaketets lock.
3
Ta bort dynan från dammpaketet.
4
Tvätta dammpaketets dyna och
filter med vatten.
Låt dynan och dammpaketet
torka i skugga i mer än 12 timmar.
7 8
65
Sätt tillbaka dynan
i dammpaketet.
Innan du sätter ihop igen
ser du till att damm-
paketet och locket är rätt
inpassade.
OBS!
Kontrollera att filtret är helt torrt innan du sätter tillbaka det i dammsugaren. Låt det
torka i 12 timmar.
Sätt tillbaka det ihopsatta
dammpaketet i dammsugaren.
SV-8
Page 21

RENGÖRA MOTORSKYDDSFILTRET
5
Ta ut både dammkammaren och
dammpaketet.
RENGÖRA UTBLÅSFILTRET
6
1
Ta bort dammkammaren.
3
Damma HEPA-filtret.
Ta bort motorskyddsfiltret från dammsugaren. Skaka och slå bort dammet från det
och sätt tillbaka det i dammsugaren.
2
Dra ut HEPA-filtret som visas.
4
Sätt tillbaka HEPA-filtret in i dammsugaren tills du hör ett klickande ljud.
OBS! Utbytesfilter finns att köpa hos din lokala Samsung-återförsäljare.
SV-9
Page 22

BYTA UT BATTERIET (TILLVAL)
7
BATTERITYP: AAA-storlek
OBS!
1. Byt ut batterierna när dammsugaren inte fungerar.
Om problemet kvarstår kontaktar du vår auktoriserade återförsäljare.
2. Använd två batterier storlek AAA.
1. Försök inte ta isär eller ladda batterierna.
VARNING
2. Värm aldrig batterier eller kasta in dem i eld.
3. Vänd inte (+) och (-) polerna fel.
4. Kasta förbrukade batterier i enlighet med gällande miljöskyddsföreskrifter.
- OM DU FÅR PROBLEM
PROBLEM ORSAK ÅTGÄRD
Motorn startar inte.
Sugeffekten minskar gradvis.
Sladden dras inte in helt. Kontrollera att sladden inte
Ingen strömtillförsel.
Upphettningsskyddet är aktiverat.
Munstycket, dammsugarslangen eller röret är blockerat.
är snodd eller ojämnt lindad.
Kontrollera sladden, kontakten
och uttaget. Låt dammsugaren svalna.
Undersök om något blockerar och ta bort det.
Dra ut sladden 2-3 m och
tryck på inlindningsknappen.
Dammsugaren suger inte
upp smuts.
Låg eller minskande sugeffekt.
Spricka eller hål i
dammsugarslangen.
Filtret är fullt av damm.
Undersök slangen och byt ut
den vid behov.
Kontrollera filtret och rengör
vid behov enligt anvisningarna.
Denna dammsugare är godkänd enligt följande.
EMC-direktiv: 89/336/EEC, 92/31/EEC och 93/68/EEC
Direktiv för säkerhet vid lågspänning: 73/23/EEC och 93/68/EEC
Om du har några frågor eller synpunkter om Samsungs produkter,
är du välkommen att kontakta Samsung Support.
08 585 367 87
www.samsung.com/se
SV-10
Page 23

DA
Betjeningsinstruktioner
STØVSUGER
❈
Du bedes venligst læse denne brugervejledning grundigt igennem,
førend du betjener enheden.
❈
Kun til indendørs brug.
Vind når du registrerer dit produkt på www.samsung.com/global/register
Page 24

VIGTIGE SIKKERHEDSFORANSTALTNINGER
1. Læs alle instruktioner grundigt igennem. Før du tænder for enheden, skal du sikre dig, at
du har samme elforsyning som vist på mærkepladen i bunden af støvsugeren.
2. ADVARSEL: Brug ikke støvsugeren på våde tæpper eller gulve.
Brug den ikke til at suge vand op med.
3. Børn skal være under nøje opsyn, når et hvilket som helst apparat anvendes af eller i
nærheden af børn.
Støvsugeren bør ikke bruges som legetøj. Lad ikke støvsugeren være i gang uden opsyn
på noget som helst tidspunkt. Brug kun støvsugeren til de formål, den er beregnet til,
som beskrevet i denne brugervejledning.
4. Brug ikke støvsugeren uden støvtank.
Tøm støvtanken før den er helt fyldt op, så du bibeholder den bedste ydeevne.
5. Brug ikke støvsugeren til opsamling af tændstikker, aske eller cigaretskod. Hold støvsugeren væk fra komfurer og andre varmekilder. Varme kan deformere og misfarve plastikdelene på enheden.
6. Undgå at opsamle hårde, skarpe genstande med støvsugeren, da de kan beskadige
enhedens dele. Stå ikke på slangesamlingen. Placér ikke noget tungt på slangen. Blokér
ikke indsugnings- eller udblæsningsåbningen.
7. Sluk for støvsugeren på selve enheden før du tager stikket ud af stikkontakten. Tag
stikket ud af stikkontakten før du skifter støvsugerpose eller støvtank. For at undgå skader skal du tage stikket ud ved at tage fat i selve stikket og ikke ved at trække i ledningen.
8. Denne enhed bør ikke anvendes af små børn eller svagelige personer uden opsyn, med
mindre de er under nøje opsyn af en ansvarlig person, der sikrer, at de kan anvende
enheden på sikker vis.
Små børn bør være under opsyn så man sikrer sig, at de ikke leger med enheden.
9. Stikket skal være taget ud af stikkontakten før rengøring eller vedligeholdelse af
enheden.
10. Brug af forlængerledning anbefales ikke.
11. Hvis støvsugeren ikke fungerer korrekt, skal du slukke for støvsugeren og kontakte et
autoriseret servicefirma.
12. Hvis strømkablet er beskadiget, skal det udskiftes af fabrikanten eller fabrikantens servicefirma eller af en lignende uddannet person, så man undgår en farlig situation.
13. Lad være med at bære støvsugeren i ledningen.
Brug håndtaget på støvsugeren.
14. Tag støvsugerenn stik ud, når den ikke bruges. Slå strømmen fra, før stikket trækkes ud.
DA-1
Page 25

SÅDAN SAMLER DU STØVSUGEREN
1
VALGMULIGHED
Funktionerne varierer muligvis afhængig af model. Se side 5,6.
▼
FORSIGTIG
Tryk ikke på knappen på støvtankens håndtag samtidig med, at
du bærer støvsugeren.
Ved opbevaring, parkér mundstykket til gulv.
DA-2
Page 26

SÅDAN BETJENER DU STØVSUGEREN
2
2-1. STRØMKABEL
Sørg for, at kablet er
trukket fuldt ud før brug.
2-2. STRØMKONTROL (INFRARØD KONTROL)
1. Støvsuger ON/OFF (tændt/slukket)
- SLANGE
SENDER
BETJENING PÅ HÅNDTAG
[Støvsugeren kontrolleres ved brug af
infrarøde signaler.]
Tryk på knappen ON/OFF for at betjene støvsugeren. Tryk på
knappen igen for at slukke for støvsugeren.
2. Støvsuger FUNKTION (-/+)
Tryk gentagne gange på knappen FUNKTION for at vælge
den korrekte funktion.
(ON) (TÆNDT) MIN → MID → MAX
3. Sådan bruger du Auto-funktion
Tryk på knappen Auto for at betjene støvsugeren automatisk.
BEMÆRK
Når du tager stikket ud
af stikkontakten, skal du
tage fat i stikket og ikke
i ledningen.
-ENHEDEN
STRØMKONTROL
Filterlampen lyser, når støvposen
skal kontrolleres eller tømmes.
Der høres også et lydsignal.
IR-lampen indikerer, når der modtages infrarødt signal fra betjeningen
på håndtaget.
Tryk gentagne gange på strømkontrolknappen for at
vælge den korrekte funktion.
(ON(MAX)
→
OFF)
BEMÆRK :
DA-3
Hvis fjernbetjeningen på håndtaget ikke fungerer, kan støvsugeren betjenes ved brug af kontrolknappen på selve støvsugeren.
Dette indikerer, at der er valgt automatisk sugefunktion. Indstillingen af sugeniveauet indikeres i LED displayet.
Page 27

2-3. SÅDAN ANVENDES OG VEDLIGEHOLDES TILBEHØRET
Funktionerne varierer muligvis afhængig af model.
▼
RØR
Du kan justere længden på teleskoprøret ved at skubbe kontrolknappen,
der er placeret midt på
teleskoprøret, frem og tilbage.
TILBEHØR
Alt i ét tilbehør
ALBUE-FORLÆNGERRØR
1234 5
(VALGMULIGHED)
1. Tilslut albue-forlængerrøret til tilslutningsdelen af slange og teleskoprør.
2. Sæt teleskoprøret sammen med den nederste del af albue-forlængerrøret.
3. Tryk på knappen PUSH (skub).
4. Når du har trykket på knappen PUSH, så bøjes albue-forlængerrøret.
5. Når du bruger albue-forlængerrøret, kan du nå svært tilgængelige steder
(fx under møbler), uden at du skal ned på knæ.
røret er tilstoppet skal du skille
For at kontrollere om
teleskoprøret ad og justere det, så det
bliver kortere. Herved er det lettere at
fjerne ophobet affald i røret.
Skub tilbehøret ned til
enden af rørets håndtag.
Træk støvbørsten ud og drej
den rundt ved rengøring af
svært tilgængelige steder.
Ved brug af mundstykket til
møbelstof skal tilbehøret
skubbes ned i enden af rørets
håndtag i modsat retning.
VALGMULIGHED
▲▲
▲
Rengøring af
tæpper
▲
Rengøring
af gulve
Justér indsugnings-reguleringsarmen,
så den passer med gulvets overflade.
DA-4
Fjern alt affald, hvis indsugningen er
tilstoppet.a
Page 28

VALGMULIGHED
Støvsugning af store områder på én
gang
Fjern alt affald, hvis indsugningen er
blokeret.
VALGMULIGHED
Forbedret opsamling af hår fra husdyr og tæppefibre
VALGMULIGHED
Hyppig støvsugning af hår eller pels på kæledyr kan forårsage mindre rotation, fordi hår og pels er sammenfiltret i tromlen. I dette tilfælde skal du
omhyggeligt rengøre tromlen.
1
Tryk på knappen Open
(åbn) på det gennemsigtige
skærmdæksel for at tage
dækslet af.
4
Støv indeni børstehuset
fjernes ved brug af en
tør støvekost eller et
mundstykke til sprækker.
Ved tilstopninger i turbinen kan børsten ikke dreje rundt, og hvis dette sker,
skal det afhjælpes.
2 3
Fjern børstestangen fra
den gennemsigtige
skærm.
5
Sæt børstestangen
ind i rotationsbæltet
og saml dem.
Turbine
Affald så som støv og
sammenfiltret hår rundt
om børstestangen fjernes
med en saks.
6
Det gennemsigtige skærmdæksel er sat tilbage
på plads, når du hører et
klik.
Børste til tæpper
Til opsamling af hår fra
kæledyr og fibre på
møbelstof og sengetøj.
Fjern alt affald,
hvis indsugningen er tilstoppet.
Advarsel: Bør kun anvendes til sengetøj. Pas på, at du ikke beskadiger
børsten, når du tager det tilstoppede materiale ud.
Drej låseknappen om på
'UNLOCK' (lås op) og fjern
affaldet.
Børste
Ved genmontering skal du rette
dækslet ind med forkanten af støvsugerens hoveddel og lukke. Efter
at du har lukket dækslet, skal du
sørge for, at låseknappen er drejet
om i position 'LOCK' (låst).
DA-5
Page 29

SÅDAN TØMMER DU STØVTANKEN
3
1 2 3
Støvtanken skal tømmes, når
støvet har nået mærket DUST
FULL (støv, fuld).
4 5 6
Hæld støvet ud i
affaldsspanden.
- Tøm ud i en plastikpose
(anbefales til astmatikere/allergikere)
Når du har tømt STØVTANKEN, skal du fjerne forhindringer så som hår og pels på
kapslen i STØVTANKEN.
Tryk på knappen og tag
støvtanken ud.
Tag støvtankens
dæksel af.
Før brug skal du skubbe støvtanken ind i støvsugerens
hoveddel, indtil du hører et
"klik".
BEMÆRK
Du kan rense støvtanken i koldt vand
DA-6
Page 30

RENGØRING AF FILTERPAKKEN
4
4-1. HVORNÅR SKAL DU RENGØRE FILTERPAKKEN?
Hvis sugeevnen reduceres betydeligt, skal du kontrollere støvtanken og filterpakken, for ellers vil indikatorlampen for kontrolfilteret lyse, efter at du
har tømt støvtanken.
Lampen lyser og signalerer, at sugeevnen er
reduceret.
Når lampen lyser, skal STØVBEHOLDEREN
rengøres som vist.
4-2. SÅDAN RENGØR DU STØVTANKEN
1
Tag STØVTANKEN af.
2
Når du har tømt STØVTANKEN, skal du fjerne forhindringer så som hår og pels på
kapslen i STØVTANKEN.
BEMÆRK
Hvis lampen stadig lyser,
efter at du har rengjort
støvtanken, skal du kontrollere indikatorlampen for
kontrolfilteret (4-3) som vist
på følgende illustrationer.
4-3. SÅDAN KONTROLLERER DU INDIKATORLAMPEN FOR
KONTROLFILTERET
Drej sugekraften om på 'MAX'
STRØMKONTROL
BETJENING PÅ HÅNDTAG
Hvis indikatorlampen for kontrolfilteret bliver rød, når
indsugningen sker 10 cm over fladt gulv, skal
FILTERPAKKEN rengøres.
DA-7
Page 31

4-4. SÅDAN RENGØR DU FILTERPAKKEN
12
Fjern støvtank og filterpakke som
vist.
Fjern fastgørelsesrammen på filterpakkens
dæksel.
3
Tag svampen ud af filterpakken.
4
Vask svamp og filteret i filterpakken med vand.
Lad svamp og filterpakke
tørre i skygge i mere end 12
timer.
7 8
65
Sæt svampen ind i
filterpakken.
Før genmontering skal
støvtank og filterpakke
rettes korrekt ind.
BEMÆRK :
Sørg for, at filteret er fuldstændig tørt, før du sætter det ind i støvsugeren igen.
Lad det tørre i 12 timer.
Sæt den samlede filterpakke
ind i støvsugerens hoveddel.
DA-8
Page 32

RENGØRING AF MOTORENS BESKYTTELSESFILTER
5
Tag både støvtank og filterpakke ud.
SÅDAN RENGØR DU UDBLÆSNINGSFILTERET
6
1
Tag støvtanken ud.
3
Støv HEPA filteret af.
4
Fjern motorens beskyttelsesfilter i støvsugeren. Ryst og slå støvet af det og sæt det
tilbage i enheden.
2
Træk HEPA filteret ud som vist.
Sæt HEPA filteret ind i hoveddelen,
indtil du hører et 'klik'.
BEMÆRK : Du kan få ekstra filtre hos din lokale Samsung forhandler.
DA-9
Page 33

UDSKIFTNING AF BATTERIER (VALGFRIT)
7
BATTERITYPE: AAA str.
BEMÆRK
1. Når støvsugeren ikke virker, skal batterierne skiftes ud.
Hvis problemet fortsætter, skal du kontakte en autoriseret
forhandler.
2. Brug 2 batterier størrelse AAA.
ADVARSEL
1. Adskil eller genoplad aldrig batterierne.
2. Varm aldrig batterierne op eller smid dem ind i ild.
- HVIS DER OPSTÅR ET PROBLEM
PROBLEM ÅRSAG AFHJÆLPNING
Motoren starter ikke.
Sugekraften mindskes gradvist.
Ledningen rulles ikke helt
op.
Støvsugeren suger ikke
snavs op.
Lav eller mindsket sugning
Denne støvsuger overholder følgende:
EMC-direktiver: 89/336/EØF, 92/31/EØF og 93/68/EØF
Lavspændingsdirektiver: 73/23/EØF og 93/68/E
Ingen strømforsyning.
Termisk afbrydelse.
Mundstykke, sugeslange
eller rør er tilstoppet.
Kontrollér, om ledningen er
snoet eller rullet ujævnt op.
Revne eller hul i slangen.
Filteret er fuldt af støv.
3. Vend ikke (+) og (-) polerne om.
4. Bortskaf batterierne på korrekt vis.
Kontrollér kabel, stik og
stikkontakt. Lad enheden afkøle.
Kontroller om der er tilstopninger og fjern dem.
Træk ledningen 2-3 m ud og
tryk på knappen til ledningsoprul.
Kontrollér slangen og skift
den ud, om nødvendigt.
Kontrollér filteret og rengør
det om nødvendigt som vist
på illustrationerne.
DA-10
Page 34

NO
Brukerhåndbok
STØVSUGER
❈
Du bør lese denne håndboken grundig før du tar apparatet i bruk.
❈
Kun for innendørs bruk.
Vinn når du registrerer ditt produkt på www.samsung.com/global/register
Page 35

VIKTIGE FORHOLDSREGLER
1. Les alle instruksjonene nøye. Før du slår på apparatet må du forsikre deg om at spenningen i strømforsyningen din er den samme som angitt på typeskiltet på bunnen av støvsugeren.
2. ADVARSEL : Ikke bruk støvsugeren hvis teppet eller gulvet er vått.
Ikke bruk produktet til å suge opp vann.
3. Du må følge nøye med når apparater brukes av eller i nærheten av barn.
Støvsugeren må ikke benyttes som en leke.
La aldri støvsugeren gå uten tilsyn. Bruk støvsugeren bare for sitt tiltenkte bruk, som
beskrevet i denne håndboken.
4. Ikke bruk støvsugeren uten montert støvbeholder. Tøm støvbeholderen innen den er full
slik at du opprettholder best mulig effekt.
5. Ikke bruk støvsugeren for å plukke opp fyrstikker, varm aske eller sigarettstumper.
Hold støvsugeren unna ovner og andre varmekilder. Varme kan deformere og misfarge
plastdeler på enheten.
6. Unngå å plukke opp harde, skarpe objekter med støvsugeren ettersom disse kan skade
deler i støvsugeren. Ikke stå på slangen eller tilbehøret. Ikke plasser tunge gjenstander
på slangen. Ikke blokker innsugs- eller utblåsingsporten.
7. Slå av støvsugeren med PÅ/AV-knappen på kabinettet innen du trekker strømstøpselet ut
av veggkontakten.Trekk ut strømstøpselet fra veggkontakten innen du skifter støvpose
eller støvbeholder. For å unngå skader skal du gripe tak i strømstøpselet for å trekke det
ut av veggkontakten. Ikke trekk i ledningen.
8. Dette apparatet er ikke beregnet for bruk av unge personer eller barn uten tilsyn. De må
eventuelt overvåkes på adekvat måte av en ansvarlig person for å sikre at apparatet
benyttes på en trygg og forsvarlig måte.
Små barn bør overvåkes for å sikre at de ikke leker med apparatet.
9. Strømstøpselet må trekkes ut av veggkontakten før apparatet rengjøres eller vedlikeholdes.
10. Bruk av skjøteledning anbefales ikke.
11. Dersom støvsugeren ikke fungerer korrekt, slår du av strømmen og kontakter et autorisert servicesenter.
12. Hvis strømledningen er skadet, skal den skiftes ut av produsent, forhandler eller autorisert elektriker for å unngå risiko.
13. Ikke bær støvsugeren ved å holde i slangen. Bruk håndtaket på støvsugeren.
14. Trekk strømstøpselet ut av veggkontakten når støvsugeren ikke er i bruk. Slå av strømmen før du trekker ut strømstøpselet.
NO-1
Page 36

MONTERE STØVSUGEREN
1
TILLEGGSUTSTYR
▼
Funksjoner og tilbehør kan variere avhengig av modell.
Referer til sidene 5 og 6.
FORSIKTIG
Unngå å trykke på knappen for
støvbeholderhåndtaket når du
bærer maskinen.
Ved lagring skal gulvmunnstykket
parkeres.
NO-2
Page 37

BRUKE STØVSUGEREN
2
2-1. STRØMLEDNING
Påse at ledningen er
trukket helt ut innen du slår
på støvsugeren.
2-2. EFFEKTKONTROLL (INFRARØD KONTROLL)
1. Støvsuger PÅ/AV( )
- SLANGE
SENDER
HÅNDTAK-KONTROLL
[Støvsugeren kontrolleres ved bruk av
infrarøde signaler.]
Trykk på PÅ/AV-knappen for å starte støvsugeren.
Trykk en gang til for å slå den av.
2. Støvsugerens MODUS (+/-)
Trykk gjentatte ganger på knappen MODE for å velge
korrekt modus.
(PÅ) MIN → MID → MAX
3. Bruke automodus
Trykk på Auto-knappen for å bruke støvsugeren i automodus.
MERK
Når du trekker strømstøpselet ut av veggkontakten skal du
gripe i støpselet, ikke i
ledningen.
- KABINETT
EFFEKTKONTROLL
Filterindikatoren lyser når det er nødvendig å sjekke eller tømme støvbeholderen. Det høres også et lydsignal.
IR-signalene indikerer hvilken del som
mottar de infrarøde signalene fra
håndtak-kontrollen.
Trykk gjentatte ganger på effektkontrollknappen for å
velge korrekt modus.
(PÅ (MAX)
→
AV)
MERK : Når du trekker strømstøpselet ut av
veggkontakten skal du gripe i støpselet, ikke i ledningen.
Dette indikerer at automatisk sugemodus er valgt.
Sugeeffektens nivå indikeres i LED-displayet.
NO-3
Page 38

2-3. SLIK BRUKER OG VEDLIKEHOLDER DU TILBEHØRET
Funksjoner og tilbehør kan variere avhengig av modell.
▼
RØR
Juster lengden på teleskoprøret ved å
skyve knappen for justering av lengden (befinner seg i senter av teleskoprøret) frem og tilbake.
TILBEHØR
Alt i ett-tilbehør
FORLENGER/ALBURØR
1234 5
(TILLEGGSUTSTYR)
1. Kople forlenger/alburøret til koplingselementet for slangeknapp og
teleskoprør.
2. Kople teleskoprøret på den nedre delen på forlenger/alburøret.
3. Trykk på PUSH-knappen.
4. Ved å trykke på PUSH-knappen foldes forlenger/alburøret.
5. Ved å benytte forlenger/alburøret blir det enklere støvsuge vanskelig
tilgjengelige områder (f.eks. under møbler) uten å måtte bøye deg.
For å sjekke etter blokkeringer må du
ta av teleskoprøret og stille det inn
kortest mulig. Dette gjør det enklere å
fjerne smuss som blokkerer røret.
Trykk tilbehøret på plass
på enden av håndtaket.
Trekk ut og vri støvbørsten
for rengjøring av ømtålige
områder.
For å bruke møbelmunnstykket trykkes tilbehøret
på plass på enden av håndtaket i motsatt retning.
TILLEGGSUTSTYR
▲▲
▲
Støvsuge
tepper
▲
Støvsuge
gulv
Juster hendelen på munnstykket i
samsvar med gulvets overflate.
NO-4
Fjern smusset fullstendig hvis
innsuget er blokkert.
Page 39

TILLEGGSUTSTYR
Støvsuger et større område om
gangen.
Fjern smusset fullstendig hvis
innsuget er blokkert.
TILLEGGSUTSTYR
For forbedret opptak
av dyrehår og fibrer
på tepper
TILLEGGSUTSTYR
Hyppig støvsuging av hår eller dyrepels kan føre til redusert rotasjon grunnet materie
som fester seg rundt sylinderen. I slike tilfeller må sylinderen rengjøres varsomt.
1
Trykk på knappen ’Open’
på det transparente skjermdekselet for å separere
dekselet.
4
Fjern støv innvendig i
børstehuset ved hjelp av
en tørr støvklut eller et
fugemunnstykke.
Tilstopping av turbinen hindrer børsten i å gå rundt. Sørg for å rengjøre den.
2 3
Fjern børsten fra den
transparente skjermen.
5 6
Før børsten i det
roterende beltet og
monter.
Turbin
Fjern smuss, slik som
støv og hår som har viklet
seg rundt børsten. Bruk
en saks til dette.
Klikk det transparente
skjermdekselet på plass.
Munnstykke for tepper
For å ta opp dyrehår
og fibrer fra møbel-
trekk og sengetøy.
Fjern smusset
fullstendig hvis
innsuget er
blokkert.
Advarsel : Kun til bruk for sengetøy. Vær varsom slik at børsten ikke skades ved
Vri låseknappen til posisjonen ‘UNLOCK’ og fjern
smusset.
fjerning av tilstopping.
Børste
For montering innrettes dekselet
til fronten av hovedkabinettet
og lukkes. Når du har lukket dekselet må du påse at låseknappen settes til posisjonen ‘LOCK’.
NO-5
Page 40

TØMME STØVBEHOLDEREN
3
1 2 3
Når støvet rekker opp til merket
DUST FULL må
støvbeholderen tømmes.
4 5 6
Tøm støvbeholderen
for støv.
- Tømmes i en plastpose
(anbefales for astmatikere/allergikere)
Når du har tømt STØVBEHOLDEREN, fjernes
hindringer slik som hår og
belegg på STØVBEHOLDERENS sokkel.
Ta ut støvbeholderen ved
å trykke på knappen.
Ta av dekselet på
støvbeholderen.
Før bruk trykkes støvbeholderen inn i støvsugerens
hovedkabinett inntil du hører
et "klikk".
MERK
Du kan skylle støvbeholderen med kaldt vann
NO-6
Page 41

RENGJØRE STØVENHETEN
4
4-1. NÅR DU SKAL RENGJØRE STØVENHETEN
Kontroller støvbeholderen og støvenheten hvis sugeeffekten blir merkbart
redusert eller hvis filterindikatorlampen tennes etter at du har tømt
støvbeholderen.
Lampen tennes som signal på at sugeeffekten er redusert.
Hvis lampen tennes må du rengjøre
STØVBEHOLDEREN slik som vist.
4-2. RENGJØRE STØVBEHOLDEREN
1
Ta ut støvbeholderen.
2
Når du har tømt STØVBEHOLDEREN, fjernes hindringer
slik som hår og belegg på
STØVBEHOLDERENS sokkel.
4-3. KONTROLLERE FILTERINDIKATORLAMPEN
Sett sugeeffekten til 'MAX'.
EFFEKTKONTROLL
HÅNDTAK-KONTROLL
Hvis filterindikatorlampen lyser rødt mens
innsuget på munnstykket befinner seg 10 cm
over gulvet, må STØVENHETEN rengjøres.
MERK :
Kontroller filterindikatorlampen (4-3) slik som vist i følgende illustrasjoner dersom
lampen fortsatt lyser, selv
etter at du har rengjort
støvbeholderen.
NO-7
Page 42

4-4. RENGJØRE STØVENHETEN
12
Ta ut støvbeholderen og rengjør
støvenheten som vist.
Fjern støvenhetens deksel fra rammen.
3
Fjern svampputen fra støvenheten.
4
Vask svampen og filteret i
støvenheten med vann.
La svampen og støvenheten
tørke på et skyggefullt
sted i mer enn 12 timer.
7 8
65
Sett svampen
tilbake i støvenheten.
Før montering rettes
støvenhetens deksel korrekt til støvenheten.
MERK :
MERK: Forsikre deg om at filteret er fullstendig tørt innen du setter det tilbake i
støvsugeren. La det tørke i 12 timer.
Sett den monterte støvenheten tilbake i
hovedkabinettet.
NO-8
Page 43

RENGJØRE FILTERET FOR BESKYTTELSE AV MOTOR
5
Ta ut både støvbeholderen og
støvenheten.
RENGJØRE UTBLÅSINGSFILTERET
6
1
Fjern støvbeholderen.
3
Fjern støvet fra HEPA-filteret.
4
Fjern filteret for beskyttelse av motoren fra
støvsugeren. Rist og bank vekk støvet og
sett filteret tilbake i maskinen.
2
Trekk ut HEPA-filteret som vist.
Før HEPA-filteret inn hovedkabinettet
igjen inntil du hører et ‘klikk’.
MERK: Reservefiltre er tilgjengelig hos din lokale Samsungforhandler.
NO-9
Page 44

SKIFTE BATTERIENE (TILLEGGSUTSTYR)
7
BATTERITYPE: AAA
MERK
1. Skift batteriene dersom støvsugeren ikke virker.
Dersom problemet vedvarer må du kontakte en autorisert
forhandler.
2. Bruk 2 batterier i størrelse AAA.
ADVARSEL
1. Forsøk aldri å lade opp batterier eller ta dem fra hverandre.
2. Utsett aldri batterier for varme og kast dem aldri på varmen.
3. Forsikre deg alltid om korrekt polaritet (+)/(-).
4. Brukte batterier skal avfallshåndteres på korrekt måte.
- HVIS DET OPPSTÅR ET PROBLEM
PROBLEM MULIG ÅRSAK LØSNING
Motoren starter ikke. Ingen strømforsyning.
Termobryter aktivert.
Sugeeffekten reduseres
langsomt.
Ledningen vindes ikke helt
opp.
Støvsugeren suger ikke opp
smuss.
Svak eller redusert sugeeffekt.
Denne støvsugeren er kompatibel med følgende:
EMC-direktivet: 89/336/EF, 92/31/EF og 93/68/EF
Lavspenningsdirektivet: 73/23/EF og 93/68/EF
Kontroller at ledningen ikke
er vridd eller rullet ujevnt
opp.
Check that the cord is not
twisted or wound unevenly.
Sprekk eller hull i slangen.
Filteret er fullt av støv.
Kontroller ledning, støpsel og
veggkontakt.
La maskinen avkjøles
Kontroller for blokkeringer
og fjern dem.
Trekk ledningen ut 2-3 meter
og trykk en gang til på
oppspolingsknappen
Kontroller slangen og skift
den om nødvendig ut.
Kontroller filteret og, om
nødvendig, rengjør det slik
som illustrert i instruksjonene.
NO-10
Page 45

FI
Käyttöohjeet
PÖLYNIMURI
❈
Ennen tuotteen käyttöä, lue nämä ohjeet huolellisesti.
❈
Vain käyttöön sisätiloissa.
Osallistu kilpailuun ja voita! Rekisteröi Samsung-tuotteesi osoitteessa www.samsung.com/global/register
Page 46

TÄRKEITÄ TURVAOHJEITA
1. Lue kaikki ohjeet huolellisesti. Ennen kuin kytket tuotteen toimintaan, tarkista, että kiinteistön sähköjännite on sama kuin pölynimurin pohjassa olevaan arvokilpeen merkitty
jännite.
2. VAROITUS: Älä käytä pölynimuria maton tai lattian ollessa märkä.
Älä käytä imuria veden imemiseen.
3. Tarkka valvonta on tarpeen, mikäli imuria käyttävät lapset tai sitä käytetään lasten
läheisyydessä. Älä anna lasten käyttää pölynimuria leikkikaluna. Älä koskaan anna
pölynimurin käydä ilman valvontaa. Käytä pölynimuria ainoastaan sen suunniteltuun käyttötarkoitukseen siten kuin näissä ohjeissa kuvataan.
4. Älä käytä pölynimuria ilman pölysäiliötä. Tyhjennä pölysäiliö ennen sen täyttymistä
kokonaan säilyttääksesi parhaan imutehon.
5. Älä käytä pölynimuria tulitikkujen, kuuman tuhkan tai kuumien savukkeen tumppien
keräämiseen pois.
Pidä pölynimuri erillään liedestä ja muista lämmönlähteistä. Lämpö saattaa aiheuttaa
muodonmuutoksia ja värimuutoksia laitteen muoviosiin.
6. Vältä kovien, terävien esineiden keräämistä pois imuroimalla, sillä ne saattavat vahingoittaa imurin osia.
Älä seiso imurin letkun päällä. Älä aseta painavia esineitä letkun päälle. Älä tuki imu- tai
poistoaukkoa.
7. Katkaise pölynimurin virta laitteen rungossa olevasta virtakytkimestä, ennen kuin irrotat
pistotulpan pistorasiasta. Irrota pistotulppa pistorasiasta enne pölypussin tai pölysäiliön
vaihtamista. Liitäntäkaapelin vahingoittumisen välttämiseksi, irrota pistotulppa pistorasiasta tarttumalla kiinni itse tulpasta, ei johdosta.
8. Tätä laitetta ei ole tarkoitettu lasten käyttöön ilman valvontaa, ellei heitä ohjata riittävästi
sen varmistamiseksi, että he pystyvät käyttämää laitetta turvallisesti.
Lapsia tulee valvoa sen varmistamiseksi, että he eivät leiki tällä laitteella.
9. Pistotulppa tulee irrottaa pistorasiasta ennen laitteen puhdistusta tai huoltoa.
10. Jatkojohdon käyttö ei ole suositeltavaa.
11. Mikäli pölynimuri ei toimi kunnolla, katkaise siitä virta, irrota pistotulppa pistorasiasta ja
ota yhteys valtuutettuun huoltoon.
12. Mikäli virtajohto on vahingoittunut, sen vaihtaminen tulee turvallisuussyistä jättää valmistajan tai valtuutetun huollon tehtäväksi.
13. Älä kanna pölynimuria letkusta. Pidä kiinni pölynimurin kädensijasta.
14. Irrota pistotulppa pistorasiasta, kun imuri ei ole käytössä. Katkaise virta imurin kytkimestä
ennen pistotulpan irrottamista.
FI-1
Page 47

PÖLYNIMURIN KOKOAMINEN
1
VALINNAISVARUSTE
Ominaisuudet saattavat vaihdella mallikohtaisesti. Katso sivut 5 ja 6.
▼
VAARA
Älä paina pölysäiliön kädensijassa olevaa painiketta kantaessasi
imuria.
Säilytystä varten, aseta lattiasuulake pitimeensä.
FI-2
Page 48

PÖLYNIMURIN KÄYTTÖ
2
2-1. VIRTAJOHTO
Varmista, että virtajohto
on kokonaan ulosvedettynä ennen käyttöä.
2-2. TEHON SÄÄTÖ (INFRAPUNAOHJAUS)
1. Pölynimuri ON/OFF (PÄÄLLE/POIS)
- LETKU
SENDER
KÄDENSIJASSA OLEVA OHJAIN
(Imuria ohjataan infrapunasignaalin avulla)
- RUNKO
Paina ON/OFF-painiketta käynnistääksesi pölynimurin.
Paina uudelleen pysäyttääksesi imurin.
2. Pölynimuri MODE (Tila) (+/-)
Paina MODE-painiketta toistuvasti valitaksesi sopivan toimintatilan.
(ON) MIN (Päällä, minimiteho) → MID (Keskiteho) → MAX
(Maksimiteho)
3. Automaattisen tilanvalinnan käyttö
Paina Auto-painiketta käyttääksesi pölynimuria automaattikäytöllä.
HUOMAUTUS
Irrottaessasi pistotulppaa pistorasiasta tartu
kiinni tulpasta, älä johdosta.
TEHON SÄÄTÖ
Suodattimen merkkivalo palaa, kun pölysäiliöyksikkö vaatii tarkistusta tai tyhjennystä.
Tällöin kuuluu myös äänisignaali.
IR-merkkivalo osoittaa kohdan, joka vastaanottaa kädensijan kaukosäätimestä
tulevan infrapunasignaalin.
Paina tehonsäätöpainiketta toistuvasti valitaksesi sopivan toimintatilan.
(ON(MAX)
→
OFF) (Päällä(Maksimi) →Pois)
HUOMAUTUS :
Mikäli kädensijan kaukosäädin ei toimi, imuria
voi käyttää laitteen rungossa olevan ohjauspainikkeen avulla.
Tämä osoittaa, että automaattinen imutehon säätö on käytössä. Imutehon taso
näytetään LEDmerkkivaloilla.
FI-3
Page 49

2-3. VARUSTEIDEN KÄYTTÖ JA HOITO
Ominaisuudet saattavat vaihdella mallikohtaisesti.
▼
LETKU
VARUSTE
Kaikki yhdessä -
varuste
NIVELJATKE
(VALINNAISVARUSTE)
Säädä teleskooppiputken pituutta
liu’uttamalla sen keskiosassa
sijaitsevaa pituuden säätöpainiketta
eteen- ja taaksepäin.
Tarkistaaksesi tukokset irrota
teleskooppiputki ja säädä se lyhyeksi.
Tämä helpottaa tukkeumien poistoa
putkesta.
Työnnä varuste paikalleen
letkun kädensijan päähän.
Vedä ulos ja käännä pölyharja herkkien kohteiden
puhdistusta varten.
Käyttääksesi verhoilun puhdistustyökalua työnnä lisälaite
toisinpäin letkun kädensijan
päähän.
1234 5
1. Kiinnitä niveljatke letkun pään ja teleskooppiputken väliin.
2. Kiinnitä teleskooppiputki niveljatkeen alaosaan.
3. Paina PUSH-painiketta.
4. Niveljatketta voidaan taivuttaa PUSH-painikkeen ollessa painettuna.
5. Niveljatkeen käyttö mahdollistaa vaikeasti luokse päästävien alueiden
(esimerkiksi huonekalujen alla) siivouksen tarvitsematta laskeutua
polvilleen.
VALINNAISVARUSTE
▲▲
▲
mattojen
imurointi
▲
lattian
imurointi
Aseta imutavan valitsin lattiapinnan
mukaisesti.
FI-4
Poista tukos kokonaan, jos imuaukko
tukkeutuu.
Page 50

VALINNAISVARUSTE
Pölyn imurointi kerralla leveältä alalta
Poista tukos kokonaan, jos imuaukko
tukkeutuu.
VALINNAISVARUSTE
Lemmikkieläinten
karvojen ja kuitujen
parempaan
irrotukseen matoista
VALINNAISVARUSTE
Usein tapahtuva hiusten tai lemmikkien karvojen imurointi voi aiheuttaa
pyörimisen hidastumista johtuen niiden takertumisesta rummun ympärille.
Puhdista silloin rumpu huolellisesti.
1
Paina läpinäkyvän
suojakannen Open
(Avaa) - painiketta ja
irrota kansi.
4
Poista pöly harjakotelon
sisältä käyttäen pölyharjaa tai rakosuutinta.
Tukokset turbiinissa estävät harjan pyörimistä, jolloin yksikkö on puhdistettava.
2 3
Poista harjatanko
läpinäkyvästä
suojakannesta.
5 6
Aseta harjatanko
pyörivään hihnaan ja
kokoa.
Turbiini
Poista roskat, esimerkiksi
harjatangon ympärille
takertuneet pöly ja hiukset, käyttäen saksia.
Napsauta läpinäkyvä
suojakansi takaisin
paikalleen.
Peittoharja
Lemmikkieläinten
karvojen ja kuitujen
irrottamiseen
verhoiluista ja
vuodevaatteista
Poista tukos
kokonaan, kun
imuaukko
tukkeutuu.
Varoitus : Käytä ainoastaan vuodevaatteille. Varo, ettet vahingoita harjaa
Käännä lukitusnuppi
UNLOCK (AUKI) -asentoon
ja poista tukos.
poistaessasi tukoksia.
Harja
Kokoa uudelleen linjaamalla kansi rungon etureunan kanssa ja sulkemalla
se. Suljettuasi kannen varmista, että
lukitusnuppi on käännetty LOCK
(LUKOSSA) - asentoon.
FI-5
Page 51

PÖLYSÄILIÖN TYHJENNYS
3
1 2 3
Tyhjennä pölysäiliö, kun pöly
saavuttaa DUST FULL
(PÖLYSÄILIÖ TÄYNNÄ) merkin.
4 5 6
Kaada pöly pois säiliöstä.
- Tyhjennä säiliö muovipussiin
(suositellaan astmasta/allergioista kärsiville)
Tyhjennettyäsi pölysäiliön
poista tukokset, esimerkiksi
hiukset tai karvat, pölysäiliön
kannesta.
Ota pölysäiliö pois
painamalla painiketta.
Irrota pölysäiliön
kansi.
Ennen imurin käyttöä, työnnä
pölysäiliö imurin rungon
sisään, kunnes kuulet napsahduksen.
HUOMAUTUS
Voit huuhdella pölysäiliön kylmällä vedellä.
FI-6
Page 52

PÖLYSUODATINYKSIKÖN PUHDISTUS
4
4-1. MILLOIN PÖLYSUODATINYKSIKKÖ PITÄÄ PUHDISTAA
Tarkista pölysäiliö ja pölysuodatinyksikkö, jos imuteho on huomattavasti
laskenut tai suodattimen tarkistusvalo syttyy pölysäiliön tyhjennyksen jälkeen.
Merkkivalo syttyy, kun imuteho on alentunut.
Jos merkkivalo syttyy, puhdista pölysäiliö
kuten tässä esitetään.
4-2. PÖLYSÄILIÖN PUHDISTUS
1
Irrota pölysäiliö Tyhjennettyäsi pölysäiliön poista
2
Tarkista suodattimen
merkkivalo (4-3) seuraavissa kuvissa esitetyllä tavalla, jos valo palaa vielä
pölysäiliön puhdistamisen
jälkeenkin.
tukokset, esimerkiksi hiukset tai
karvat, pölysäiliön kannesta.
4-3. SUODATTIMEN MERKKIVALON TARKISTAMINEN
Käännä imuteho MAX-asentoon.
TEHON SÄÄTÖ
KÄDENSIJASSA OLEVA OHJAIN
Jos suodattimen merkkivalo muuttuu punaiseksi
imuaukon ollessa 10 cm tasaisen lattian
yläpuolella, puhdista pölysäiliö.
OBS!
FI-7
Page 53

4-4. PÖLYSÄILIÖYKSIKÖN PUHDISTUS
12
Irrota pölysäiliö ja pölysuodatinyksikkö kuvan mukaisesti.
Irrota kiinteä reunus pölysuodatinyksikön kannesta.
3
Poista suodatinsieni pölysuodatinyksiköstä.
4
Pese pölysuodatinyksikön sieni
ja suodatin vedellä.
Anna sienen ja pölysuodatinyksikön kuivua varjoisassa
paikassa yli 12 tuntia.
7 8
65
Aseta sieni pölysuodatinyksikköön.
Ennen takaisin asennusta, linjaa pölysuodatinyksikön kansi
ja pölysuodatinyksikkö oikein
yhteen.
HUOMAUTUS:
Varmista, että suodatin on täysin kuiva ennen se panemista takaisin
pölynimuriin. Anna sen kuivua 12 tuntia.
Aseta koottu pölysuodatinyksikkö pölynimurin runkoon.
FI-8
Page 54

MOOTTORISUODATTIMEN PUHDISTUS
5
Poista pölysäiliö ja pölysuodatinyksikkö.
POISTOILMASUODATTIMEN PUHDISTUS
6
1
Poista pölysäiliö.
3
Puhdista HEPA-suodatin pölystä.
Poista moottorisuodatin pölynimurista.
Ravistele ja koputtele siitä pölyt pois ja aseta
se takaisin imuriin.
2
Poista HEPA-suodatin kuvan mukaisesti.
4
Aseta HEPA-suodatin takaisin imuriin siten, että kuuluu napsahdus.
HUOMAUTUS : Vaihtosuodattimia on saatavana paikallisella Samsung-
jälleenmyyjällä.
FI-9
Page 55

PARISTON VAIHTO (VALINNAINEN)
7
PARISTOTYYPPI: AAA-koko
HUOMAUTUS
1. Jos pölynimuri ei toimi, vaihda paristot.
Jos ongelma jatkuu, ota yhteyttä valtuutettuun jälleenmyyjään.
2. Käytä 2 kpl AAA-kokoa olevia paristoja.
1. Älä koskaan avaa tai lataa paristoja.
VAROITUS
2. Älä koskaan lämmitä tai heitä tuleen paristoja.
3. Älä käännä (+) ja (-) -napoja päinvastoin.
4. Hävitä paristot asianmukaisesti.
- MIKÄLI ONGELMIA ESIINTYY
ONGELMA SYY KORJAUS
Moottori ei käynnisty Ei sähköä. Lämpökatkaisu. Tarkista kaapeli, pistotulppa
ja pistorasia. Anna laitteen
jäähtyä.
Imuteho vähenee asteittain.
Virtajohto ei kelaa kokonaan takaisin.
Suutin, imuletku tai putki
on tukkeutunut.
Tarkista, että johto ei ole
kiertynyt tai kelautunut
epätasaisesti.
Tarkista ja avaa tukos.
Vedä virtajohtoa 2–3 m
ulospäin ja paina
takaisinkelauspainiketta.
Pölynimuri ei ime sisäänsä
likaa.
Matala ja heikkenevä
imuteho.
Murtuma tai reikä letkussa. Tarkista ja tarvittaessa vai-
hda letku.
Suodatin on täynnä pölyä. Tarkista ja tarvittaessa
puhdista näissä ohjeissa
esitetyllä tavalla.
Pölynimuri on hyväksytty seuraavien standardien mukaisesti.
EMC-direktiivi: 89/336/EEC, 92/31/EEC ja 93/68/EEC
Pienjännitedirektiivi: 73/23/EEC ja 93/68/EEC
FI-10
Page 56

DJ68-00368F REV(0.0)
 Loading...