

Samsung SH-152A, SC-152N, SC-152C User Manual [en, en]
1
Front View of the CD-ROM Drive
2
System Requirements
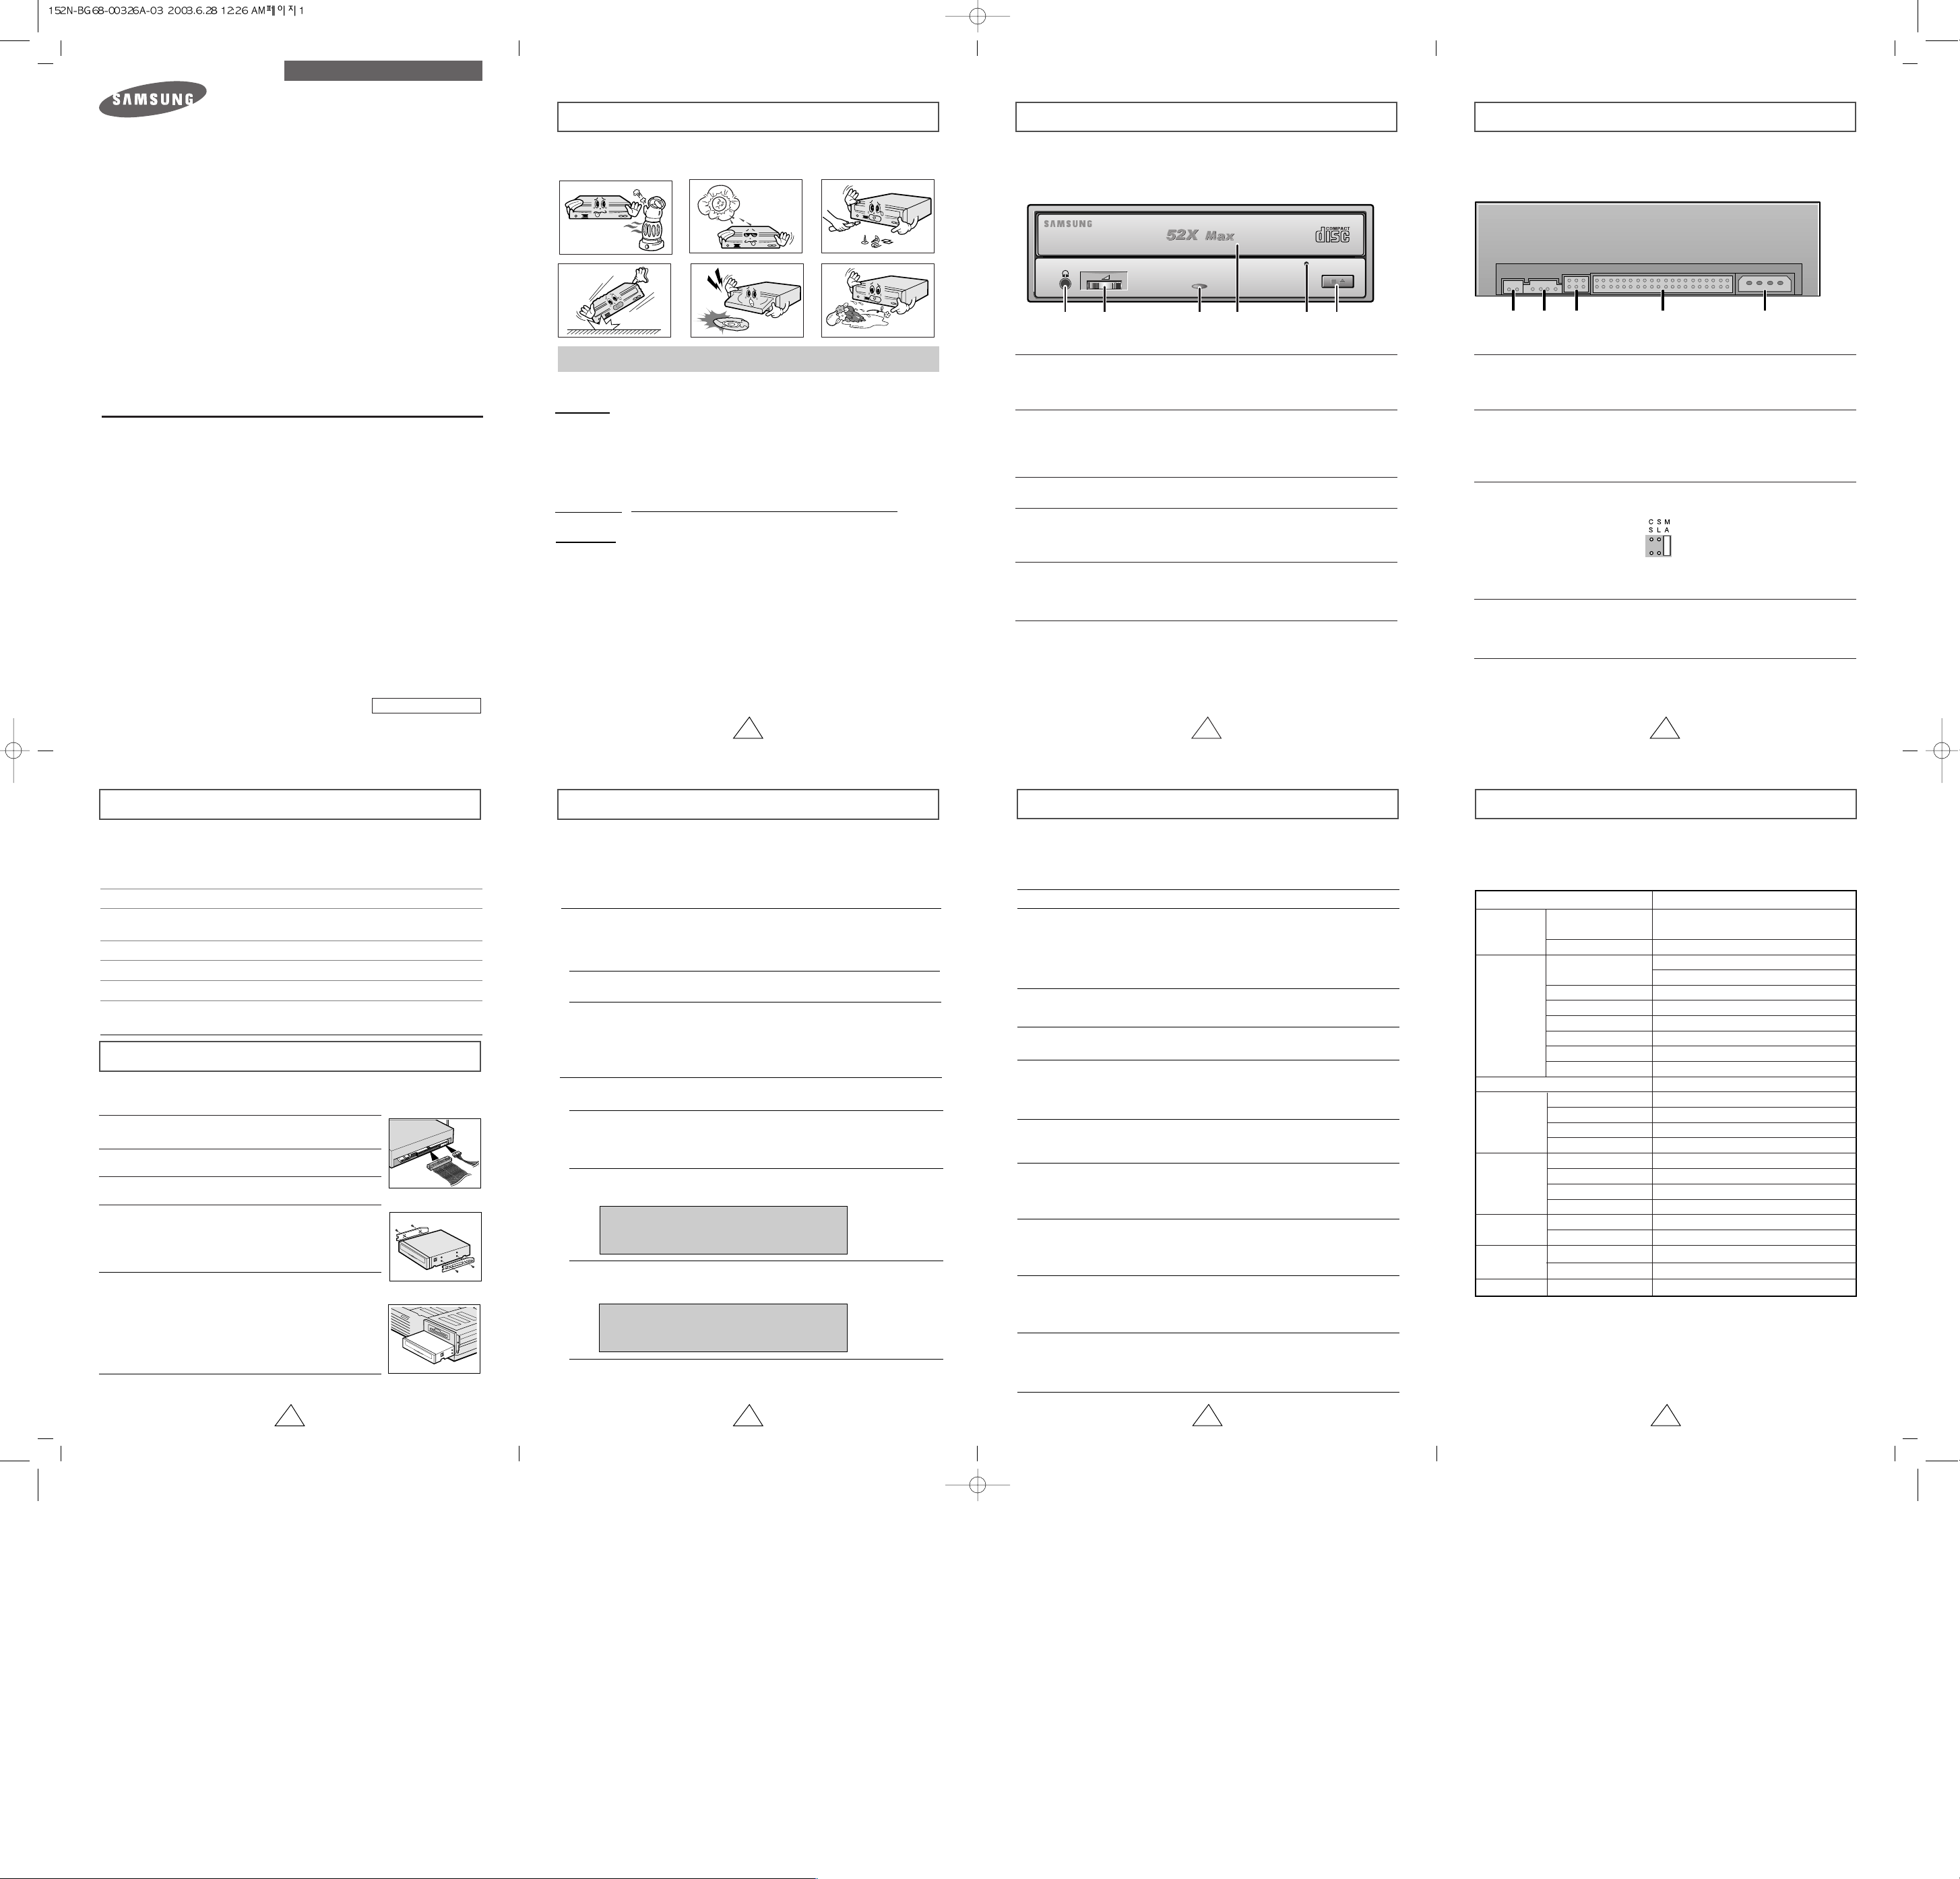
Rear View of the CD-ROM Drive
3
4 5
6 7
112
3
4
56
Headphone Connector
The sound output terminal enables you to plug stereo headphones into the drive.
It requires a 3.6 mm stereo mini-jack.
1123 4 5
Digital output terminal
You can connect a sound card or MPEG card which support Digital output
terminal to your drive using this two-pin terminal.
1
Turn OFF your computer. Remember to verify the
configuration jumper on the rear of the CD-ROM drive.
2
Remove the cover of your PC(main unit of the computer)
3
Remove the blank cover panel of the 5.25 inch unit in
which the CD-ROM drive is to be installed.
6
Put the cover back on your PC.
5
Install the CD-ROM drive into the unit and secure it with
mounting screws (recommended standard M3x6x4)
☛
◆
Depending on your PC model, you may need to
attach guide rails to the drive, so that the drive is
held firmly in place.
☛
◆
If you use screws that are longer than the
recommended standard, you may damage the
drive.
Before you install the CD-ROM drive, we strongly recommend that you make certain
that your set-up meets the system requirements listed below.
Installing the CD-ROM Drive
Install the CD-ROM drive in your computer horizontally, making sure that the Open/Close
button is on the right.
To install the drive, proceed as follows.
2
Sound output terminal
You can connect a sound card to your drive using this four-pin terminal.
☛ This function is not covered in detail in this guide. Refer to the documentation
supplied with your sound card.
3
Master/slave select terminal
Usually, this is a pre-set configuration as illustrated below.
☛ Verify that the setting is as illustrated. If it is not, simply remove the jumper
and place it in the correct position.
4
Interface terminal
This input/output interface terminal is used to connect the 40-pin flat cable from
the IDE interface to the CD-ROM drive.
5
Power terminal
The power terminal is a four-conductor male plug.
Eject Button
4
Disc compartment
The compartment opens and closes automatically when you press
the Eject button.
Emergency eject hole
If the compartment does not open when you press the Eject button, power off
the computer, insert a pin or unfolded paper clip in the hole and push firmlhy)
6
Eject Button
5
Emergency eject hole
If the compartment does not open when you press the Eject button, power off
the computer, insert a pin or unfolded paper clip in the hole and push firmlhy)
2
Headphone volume control
This headphone volume control adjusts the volume for your headphones. You can only
use the headphone jack and volume control when you have installed the required
software utilities. For example, the Microsoft Windows Media player can be used.
3
LED
4
Connect the CD-ROM drive to the IDE interface and power
cables Iocated inside your computer.
☛ Connectors are keyed so it is impossible to put them in
an incorrect position. Do not force the connectors, if they
do not seem to fit.
Item
Windows version
MS-DOS version
Disk space
Free expansion unit
Type of computer
Description
Windows 95/98/2000/ME/XP
Windows NT 4.0(or higher)
5.0(or higher)
100KB minimum
5.25 inch
IBM 486SX 20MHz (or higher) with an IDE
interface(or a 100% IBM-compatible computer)
CD-ROM DRIVE
SC-152
User's Guide - ENGLISH
Technical Specifications
Max. 7800KB/s
SC-152N
SECTIONS
DISC
DRIVE PER FORMANCE
FRONT
PANEL
REAR PANEL
OPERATING
ENVIRONMENT
GENERAL
RELIABILITY
ERROR RATE
Disc types supported
Disc diameter
Data transfer rate
Access time (1/3 stroke)
Data buffer capacity
Laser
Slide mechanism
Spindle motor
Load mechanism
Button
Indicator(LED)
Headphone output
Volume control
Required power
Interface connector
Audio output
Jumper block
Work area
Storage area
Dimensions (W x H x D)
Net weight
MTBF
CD-DA, CD-ROM Mode-1, CD-ROM XA Mode-2 Form-1, Form-2,
CD-Plus, CD-Extra, Photo-CD(Single, Multi-session),
Video CD ready, Enhanced CD, CD-I/Fmv, CD-R/RW
120mm or 80mm
PIO Mode - 4. DMA MW2, Ultra DMA(option)
75ms(typical)
128KB
Semiconductor Laser
Gear motor
Brushless motor
Tray, DC motor(Soft Eject)
Mode-1 : 1block / 10 bits, Mode-2 : 1 block/10 bits
Eject(Open/Close)
Busy
Stereo Mini - jack (Ø 3,6 mm) 0.60 ± 20% (Vrms) 33Ω
Dial type
+5V DC 1.3A, +12V DC 1.5A
ATAPI
Line out 0.70 ± 20%(Vrms), 47kΩ
Device configuration jumper
Temperature : 5~45 °C, Humidity : 8~80%
Temperature : -40~60 °C, Humidity : 5~90%
900g (set only)
125,000 POH(Duty 20%)
146mm(W) x 44.5mm(H) x 202(D)mm
SAMSUNG continually strives to improve its products.
Both the design specifications and these user instructions are thus subject to
change without notice.
12 9
BG68-00326A Ver : 03
Safety Precautions
The following diagrams illustrate the precautions to be taken when using
your CD-ROM drive.
Setting Up the Device Driver
It is not necessary to set up additional device driver for Window
95/98/2000/NT because it uses the device driver provided by the Window.
Solving Technical Problems
☛ Frictional sound detected during the operation of Spin-Up and Stop is made ABS
(Auto Balance System), not by malfunction.
◆
Automatic Setup
◆
Manual Setup
LAST DRIVE = Z
- - - - - - - - - - - - - - - - - - - - - - - - - - - - - - - - - - - -
- - - - - - - - - - - - - - - - - - - - - - - - - - - - - - - - - - - DEVICE = C :\SAMSUNG\SSCDROM.SYS /D : SSCD000 /V
- - - - - - - - - - - - - - - - - - - - - - - - - - - - - - - - - - - -
- - - - - - - - - - - - - - - - - - - - - - - - - - - - - - - - - - - C :\SAMSUNG\MSCDEX /D:SSCD000
1Insert the setup diskette in the diskette drive and change the directory to A:,
where A: is the diskette drive.
To do so, type A: after the C:\ prompt and press [Enter].
2Type CDSETUP and press [Enter].
3Reboot the computer.
1Make the C:\SAMSUNG directory.
2Copy the files from the diskette to the C:\SAMSUNG directory.
To do so, type COPY A:
*.*
C:\SAMSUNG after the C:\ prompt and press
[Enter].
3Edit the CONFIG.SYS file.
Add the DEVICE=C:\SAMSUNG\SSCDROM.SYS \D:SSCD000 /V entry.
4Edit the AUTOEXEC.BAT file.
Add the C:\SAMSUNG\MSCDEX /D:SSCD000 entry.
5Reboot the computer.
You must not use the drive in any manner other than that specified in this guide.
Avoid exposing your eyes or skin to direct or scattered radiation.
CAUTION
Do not attempt to repair the CD-ROM drive yourself. Contact
your dealer or local SAMSUNG representative for all repairs.
If you make any adjustments or perform any operations other
than those specified in this guide, you run the risk of exposure to
hazardous radiation.
WARRANTY
Please refer to the Samsung limited warranty statements.
Precautions
1.To reduce the risk of fire or electric shock, do not expose
this appliance to rain or moisture.
2. Always check each disc for cracks before using it. If there are
cracks on the surfaces, especially around the border of the
center hole, we recommend that you make a copy of the disc
immediately and then stop using it. If you continue using the
disc, it will probably develop more cracks and eventually cause
irreparable damage.
3. Do not use poor quality discs:
● From unknown sources
● Without any copyright
● Scratched or damaged in any way
Problem
Meaning / Solution
The CD-ROM drive is not
detected by the computer.
◆ Check that the power, audio and IDE cables are
correctly connected to the computer.
◆ Change the IDE cable and reconnect it to the computer.
Preferably, connect a second IDE cable to the CD-ROM
drive in master mode; see page 7 for further details.
◆ Check the position of the jumper in the master/slave
select terminal.
◆ Reinstall the device driver or update it with the latest
version by downloading it from the Samsung Web site.
◆ This case may occur when there is a Windows
installation problem; reinstall Windows.
◆ Check whether the audio cable is correctly connected
to the sound output terminal on the CD-ROM drive and
the sound card CD-IN terminal.
◆ Check that the sound card is operational.
◆ Adjust the volume control.
◆ Install the latest version of the device driver.
◆ Check whether the CD is of good quality and clean it,
if necessary.
◆ Check that the power cable is correctly connected.
◆ Power off and disconnect the PC. Insert a pin or
unfolded paper clip in the emergency hole and push
firmly until the disc compartment opens.
◆ Adjust the size of the replay screen.
◆ After checking the display resolution, adjust it, if
necessary.
◆ The computer may not recognize the disc if you start
playback too quickly after inserting the disc.
Open and close the disc compartment and try again.
◆ Clean the disc and try again.
◆ The interface mode of the sound card is AT-BUS.
You must therefore connect the CD-ROM drive to the
IDE port on the PC mother board, rather than to the
sound card, or install an IDE-compatible sound card.
After installing the CD-ROM
drive, the PC gets slower.
The CD-ROM drive is not
recognized by MS-DOS.
The CD-ROM drive is not
detected by Windows.
No sound is heard from an
audio CD.
A CD is not read or is read too
slowly.
The disc compartment will not
open.
When the MPEG software plays a
Video CD, the pictures are not regular
and the running speed is too slow.
The Disc is not in message is
displayed even though a disc
has been inserted.
The CD-ROM drive is not
detected after it is connected
to a sound card.
* The design of this product can be more or less changed according to its
characteristics.
FCC Compliance
This equipment has been tested and found to comply with the limits for a
Class B digital device, pursuant to Part 15 of the FCC rules.
These limits are designed to provide reasonable protection against harmful
interference in a residential installation.
This equipment generates, uses, and can radiate radio frequency energy and,
if not installed and used in accordance with the instructions, may cause
harmful interference to radio communications. However, there is no guarantee
that interference will not occur in a particular installation. If this equipment
does cause harmful interference to radio or television reception, which can be
deter-mined by turning the equipment off and on, the user is encouraged to
try to correct the interference by one or more of the following measures:
• Re-orient or relocate the receiving antenna.
• Increase the separation between the equipment and receiver.
• Connect the equipment into an outlet on a circuit different from that to
which the receiver is connected.
• Consult the dealer or an experienced radio/TV technician for help.
✱ Changes or modifications not expressly approved by the party responsible for compliance
could void the user’s authority to operate the equipment

1
Vorderseite des CD-ROM-Laufwerks
2
System Anforderungen
Rückseite des CD-ROM-Laufwerks
3
4 5 6 7
1
Kopfhöreranschluß
An diese Buchse können Sie einen Stereo-Kopfhörer mit 3,6 mm-Klinkenstecker
anschließen.
1223 4 5
Audio Ausgangsanschluß
ü
ber diesen 4poligen Steckverbinder kann das Laufwerk mit einer Sound-Karte
verbunden werden.
☛ Diese Funktion wird in der vorliegenden Anleitung nicht aüsfuhrlich
beschrieben. Sehen Sie in der Dokumentation für das Audio-Zubehörnach.
1
Den Computer ausschalten. Nicht vergessen, die Einstellung des
Konfigurations-Jumpers auf der Rückseite des CD-ROMLaufwerks zu überprüfen.
2
Die Abdeckung von der PC (Zentraleinheit des Computers)
abnehmen.
3
Die Blende für die 5,25-Zoll-Einheit, in der das CD-ROM-Laufwerk
installiert werden soll, entfernen.
6
Die Abdeckung wieder auf der PC anbringen.
5
Das CD-ROM-Laufwerk in die Einheit einbauen und mit den
Befestigungs-schrauben (empfohlen werden Standardschrauben M3x6x4)
befestigen.
☛ ◆ Je nach PC-Modell müssen eventuell Führungsschienen an dem
Laufwerk angebracht werden, damit das Laufwerk gut fixiert wird.
◆ Wenn Schrauben verwendet werden, die länger sind als die
empfohlene Standardgröße, kann das Laufwerk beschädigt
werden.
Bevor Sie das CD-ROM-Laufwerk einbauen, sollten Sie sich unbedingt
vergewissern, daß Ihr Computer die nachstehenden System-Anforderungen erfüllt.
Einbauen des CD-ROM-Laufwerks
Bauen Sie das CD-ROM-Laufwerk in horizontaler Lage in den Computer ein. Achten Sie
dabei darauf, daß sich die Taste Open/Close auf der rechten Seite befindet.
Zum Einbauen des Laufwerks ist folgendermaßen vorzugehen:
3
Jumper für Geräte-Konfiguration
Normalerweise sieht die vorgegebene Konfiguration wie folgt aus :
☛
ü
berprüfen Sie, daß die vorliegende Einstellung der abgebildeten Einstellung
entspricht. Wenn dies nicht der Fall ist, einfach den Jumper entfernen und in
die richtige Stellung bringen.
4
Interface-Kabelanschluß
Schliessen Sie das 40 polige Flachbandkabel von der IDE-Schnittstelle an
diesen Eingangs-/Ausgangs-Schnittstellen-Anschluß an.
5
Stromversorgungsanschluß
Der Stromversorgungsanschluß ist ein vieradriger Stecker.
1
Digitaler Audio-Anschluß
ü
ber diesen 2 poligen Steckverbinder können Sie eine Sound-Karte oder eine
MPEG-Karte mit digitalem Audio-Signal an das Laufwerk anschließen.
5
Notöffnung
Wenn sich die Schublade nach dem Drücken der Taste Open/Close nicht öffnet,
stecken Sie einen kleinen Metallstift (zum Beispiel von einer aufgebogenen
Büroklammer) in dieses Loch, um die Schublade zu öffnen und die CD zu entnehmen.
4
Disc-Schublade
Die Disc-Schublade öffnet und schließt sich automatisch, wenn eine CD
eingelegt oder entnommen wird die Taste Open/Close gedrückt wird.
☛ Beim Einlegen der CD in die Schublade ist darauf zu achten, daß die
beschriftete Seite der CD immer oben ist. Wenn keine CD eingelegt oder
entnommen wird, sollte die Schublade immer geschlossen bleiben.
6
Taste zum Öffnen/Schließen der Disc-Schublade
Wenn diese Taste gedrückt wird, wird die CD-ROM-Schublade geöffnet bzw.
geschlossen.
2
Lautstärkeregler
Mit diesem Regler wird die Lautstärke des Kopfhörers eingestellt.
☛ Der Kopfhörer-anschluß und die Lautstärkeregler sind nur funktions-
fähig, wenn die erforderlichen Software-Utilities installiert werden.
Sie können zum Beispiel den Microsoft Windows Media Player benutzen.
3
LED
4
Das IDE-Schnittstellenkabel und die Stromversorgungskabel im
Computer an das CD-ROM-Laufwerk anschließen.
◆
Die Steckverbinder sind so beschaffen, daß sie nur in einer
Stellung passen.
ü
ben Sie keine Kraft aus, wenn sie nicht zu
passen scheinen.
Betrifft...
Windows-Version
MS-DOS-Version
Freier Speicherplatz auf Festplatte
Freie Erweiterungseinheit
Art des Computers
Beschreibung
Windows 95 OSR2/98/2000/ME/XP
Windows NT 4.0 (oder höher)
ab Version 5,0
mindestens 100KB
5,25 Zoll
IBM 486SX 20MHz (oder mehr) mit
einer IDE-Schnittstelle (oder ein 100%
IBM-kompatibler Computer)
CD-ROM
LAUFWERK
SC-152
Bedienungsanleitung
Technische Daten
SC-152N
Betrifft...
CD
LeistungsDaten Laufwerk
Bedienfeld
Vorderseite
Rückseite
Umgebungsbedingungen
Allgemeines
Zuverlässigkeit
Fehlerrate
CD-Typen
CD-Durchmesser
Datentransfergeschwindigkeit
Zugriffszeit(1/3 Hub)
Datenpufferkapazität
Laser
Bewegungsmechanismus
Spindelmotor
Lademechanismus
Taste
LED-Anzeige
Kopfhörer-Anschluß
Lautstärkeregler
Leistungsaufnahme
Schnittstellen-Anschluß
Audio-Ausgang
Jumper-Block
Gerätebetrieb
Nettogewichtt
MTBF
Lagerung
Abmessungen (BxHxT)
CD-DA. CD-ROM Modus-1. CD-ROM XA Modus-2 Format 1 und 2,
CD-Plus. CD-Extra Photo-CD(Single-/Multi-session), Video CD
ready. Enhanced CD. CD-I/FMV, CD-R/RW
80 oder 120mm
PIO Modus-4, DMA MW2(option)
Max. 7800KB/s
75ms(typisch)
128KB
Halbleiter Laser
Getriebemotor
Stromrichtermotor
CD-Schublade; Gleichstrommotor (Soft Eject)
Modus 1 : 1 Block/1012Bits, Modus 2 : 1 Block/109 Bits
Herauskommen(Öffnen/Schließen) Spielen(Nächste)
leuchtet bei Betrieb
Stereo-Ministecker (Ø 3,6 mm) 0,60 ± 20%(Vrms) 33Ω
Drucktaste
+5V Gleichspannung 1,3A
+12V Gleichspannung 1,5A
ATAPI
Line out 0,70 ± 20%(Vrms), 47kΩ
Jumper für Geräte-Konfigurierung
Temperatur : 5 ~ 45 °C
Luftfeuchtigkeit :8 ~ 80% (nicht kondensierend)
Temperatur : -40 ~ 60 °C
Luftfeuchtigkeit : 5 ~ 90% (nicht kondensierend)
146mm(B) x 44,5mm(H) x 202mm(T)
900g
125.000 POH(Auslastung 20%)
Aufgrund der ständigen Weiterentwicklung unserer Geräte können technische
Daten und die vorliegende Bedienungsanleitung ohne vorherige Ankündigung
geändert werden
Sicherheitshinweise
Die folgenden Abbildungen veranschaulichen die Vorsichtsmaßnahmen, die bei der
Benutzung des CD-ROM-Laufwerks getroffen werden müsen.
Das Laufwerk darf auf keine andere Weise benutzt werden als in diesem Handbuch beschrieben.
Wasser und Feuchtigkeit vom Gerät fernhalten, da sonst Gefahr durch elektrische
Schläge besteht bzw. Geräteschäden auftreten können.
ACHTUNG
Versuchen Sie nicht, das CD-ROM-Laufwerk selbst zu reparieren.
Wenden Sie sich bei allen eventuellen Reparaturen an Ihren Händler
oder Ihre SAMSUNG-Vertretung vor Ort.
GARANTIE
Garantie-Reparaturen müssen von Samsung-Fachhändlern oder
Samsung-Vertragswerkstätten ausgeführt werden.
Vorsichtsmaßnahme
1. Vor dem Gebrauch sollte man auf den Diskettenriß achten.Wenn ein
Diskettenriß doch vorhanden ist(besonders am Rande des
Zentralloches), empfehlen wir dringend, eine Kopie aus der Disketten
zu machen. Wenn man trotz des Rißes weiterhin diese Diskette benutzt,
wird der Riß noch größer, und zum Schulß wird sie total beschädigt.
2. Bei der Benutzung der Diskette achten Sie auf das Spitzenprodukt.
Es gibt auch Produkte, welche illegal, gekratzt oder beschädigt
hergestellt werden.
Bei erster Funktion(SPIN-UP) und beim Anhalten(STOP) entsteht ein
Reibungsgeräusch. Es ist aus ABS(Auto Balance Systeme) und kein merkwürdiges
Geräusch.
Installieren der Treibersoftware
Bei WINDOWS 95/98/2000/NT ist der Vorrichtungstreiber von WINDOWS
angewendet worden und ist daher keinen anderen Vorrichtungstreiber
nötig.
Falls Probleme auftreten
☛ Bei der Anfangsfunktion(SPIN-UP) und beim Anhalten(STOP) entsteht ein
Reibungsgeräusch. Es ist aus ABS(Auto Balance Systeme) und kein
merkwürdiges Geräusc
◆
Automatische Installation
1
Die 3,5" SETUP Diskette ins FDD einführen und dann auf das A: Laufwerk
wechseln.
Wenn im Display [A:\] erscheint, [CDSETUP] eingeben und die
EINGABE Taste drücken. Die Treiber werden automatisch geladen.
● Das 3,5" FDD wird als A: Laufwerk betrachtet.
[C:\ A:] eingeben und EINGABE Taste drücken.
2
Nach der Installation den Computer neu starten.
3
◆
Manuelles Installieren
1
Einen neuen Ordner anlegen [C:\SAMSUNG].
[SSCDROM.SYS] in diesen Ordner kopieren.
● [C:\ COPY A:
*.*
C:\SAMSUNG] eingeben und dann EINGABE Taste drücken.
2
[CONFIG.SYS] Datei bearbeiten.
●
DEVICE=C:\SAMSUNG\SSCDROM.SYS /D:SSCD000 /V eingeben.
3
[AUTOEXEC.BAT] Datei bearbeiten.
● C:\SAMSUNG\MSCDEX /D:SSCD000 eingeben.
4
Neustarten des Computer.
5
LAST DRIVE = Z
- - - - - - - - - - - - - - - - - - - - - - - - - - - - - - - - - - - -
- - - - - - - - - - - - - - - - - - - - - - - - - - - - - - - - - - - DEVICE = C :\SAMSUNG\SSCDROM.SYS /D : SSCD000 /V
- - - - - - - - - - - - - - - - - - - - - - - - - - - - - - - - - - - C :\SAMSUNG\MSCDEX /D:SSCD000
- - - - - - - - - - - - - - - - - - - - - - - - - - - - - - - - - - - -
- - - - - - - - - - - - - - - - - - - - - - - - - - - - - - - - - - - -
Das CD-ROM Laufwerk wird
nicht erkannt.
Nach dem Einbau des CD-ROM
Laufwerkes verlangsamt sich
die Geschwindigkeit des PCs.
◆ Überprüfe das Strom-, Audio- und IDE Kabel.
◆ Versuche die Verbindungslage des IDE Kabels zu
ändern(möglichst mit zweiten IDE Masterkabel zu
verbinden).
◆ Bestätige den AnsprungsAnschluss von Master/Slave
Problem Ursache/Abhilfe
Das CD-ROM Laufwerk wird
unter DOS (nur Lesen möglich)
nicht erkannt.
◆ Den Einrichtungstreiber wieder neu einbauen lassen
oder eine neueste Version vom Samsung PC
installieren lassen.
Das CD-ROM Laufwerk wird unter
WINDOWS nicht erkannt.
◆ Wenn das WINDOWS Programm defekt ist,
kann ein Erkennungsproblem eintauchen.
Dann neu installieren.
Kein Ton beim Abspielen
einer CD
◆ Überprüfe den Audiokabelanschluss, ob er mit
Soundleistungskabelendverschluss vom CD-ROM
Laufwerk und mit dem CD-IN Kabelendverschluss
von Soundkarte richtig angeschlossen ist.
◆ Überprüfe die Funktionalität von Soundkarte
◆ Versuche die Lautstärke vom Soundregler zu prüfen.
Die CD wird nicht erkannt und
die Geschwindigkeit
verlangsamt sich.
◆ Installiere die neuesten Version dieses
Vorrichtungstreibers
◆ Überprüfe den CD Zustand und mach die CD sauber.
Anzeige " keine CD vorhanden"
trotz eingelegter Disc.
◆ Wenn die Starttaste zu schnell gedrückt wird,
kann der Computer die Disc nicht erkennen.
In diesem Fall öffnen und schließen der Schublade
und erneut versuchen.
◆ Reinigen der CD und erneut versuchen.
CD-RW Laufwerk wird
nach dem Anschluß an eine
Soundkarte nicht erkannt.
◆ Das ist möglich, weil die Soundkarte eine Schnittstelle
mit AT-BUS haben könnte. Schließen Sie das
CD-ROM Laufwerk am System IDE Interface an.
Die CD Schublade öffnet sich
nicht.
◆ Überprüfe die Elektrizitätsschnur und den Stromkabel,
ob sie richtig angeschlossen sind.
◆ Obwohl das Gerät angeschaltet ist, läßt sich der CD
Kasten nicht öffnen.
Dann versuche mit einer Klammer zu helfen.
Stecke die Klammer in die Notöffnung rein und öffne
den Kasten.
12
3
4
56
✱ Bei Aenderungen oder Modifikationen, die der Anwender ohne Bestaetigung
vorgenommen hat, verliert der Anwender das Recht den Produkt zu benutzen.
http:// www.samsungodd.com
www.samsungelectronics.com
 Loading...